

Page 1

Operating Instruc t ions
Manuel d’utilisation
Bedienungsanleitung
Instrucciones de funcionamiento
Istruzio ni d’uso
使用說明書
使用说明书
Инструкция по эксплуатации
Marine Case
Boîtier marin
型号
Model No.
DMW-MCTZ5
防水盒
Before connecting, operati ng or adjusting this product, please read the
instru ct io n s completely.
Avant de raccorder, régler ou utiliser l’appareil, il est recommandé de lire
attentivem ent le manuel d’utilisation.
Bitt e lesen Si e diese Bedienungs anleitung vor der I nb etrie bnahme de s
Gerätes vollständig durch.
Antes del uso, lea completamente estas instrucciones.
Leggere completamente queste istruzio ni prim a dell ’uso.
使用前,請完整閱讀本說明書。
Перед пользованием прочтите, пожалуйста, эту инструкцию полностью.
EPP
使用前,请完整阅读本说明书。
VQT1Q30-M
Page 2

Contents
Before Use . . . . . . . . . . . . . . . . . . . . . . . . . . . . . . . . . .3
Accessories. . . . . . . . . . . . . . . . . . . . . . . . . . . . . . . . . .5
Handling and Care . . . . . . . . . . . . . . . . . . . . . . . . . . . .6
Components . . . . . . . . . . . . . . . . . . . . . . . . . . . . . . . . .8
What is the O-ring?. . . . . . . . . . . . . . . . . . . . . . . . . . . .9
Preparation -Setting the O-ring- . . . . . . . . . . . . . . . . .10
Preparation -Checking the Case is Waterproof-. . . . .14
Preparation -Attaching the Digital Camera- . . . . . . . .15
Taking Pictures. . . . . . . . . . . . . . . . . . . . . . . . . . . . . .18
Tips for Taking Pictures in the Water . . . . . . . . . . . . .19
After Use. . . . . . . . . . . . . . . . . . . . . . . . . . . . . . . . . . .20
Cleaning and Storing . . . . . . . . . . . . . . . . . . . . . . . . .21
Caution for Use. . . . . . . . . . . . . . . . . . . . . . . . . . . . . .21
Specifications . . . . . . . . . . . . . . . . . . . . . . . . . . . . . . .23
2
VQT1Q30
Page 3

ENGLISH
Before Use
≥ This Marine Case is designed f or a Panasonic Digital Camera.
You can enjoy taking pictures underwater at depths up to 40 m/130 feet.
≥ In the case of water leakage due to insufficient care, P anasonic is in no
way liable for damage to any products (digital camera, batteries, card etc.)
inside this Case , photography costs or any other expenses.
≥ Panasonic also off ers no comp ensation fo r accidents resulting in injury or
damage to property.
≥ Read the operatin g inst ructions for your digital cam era.
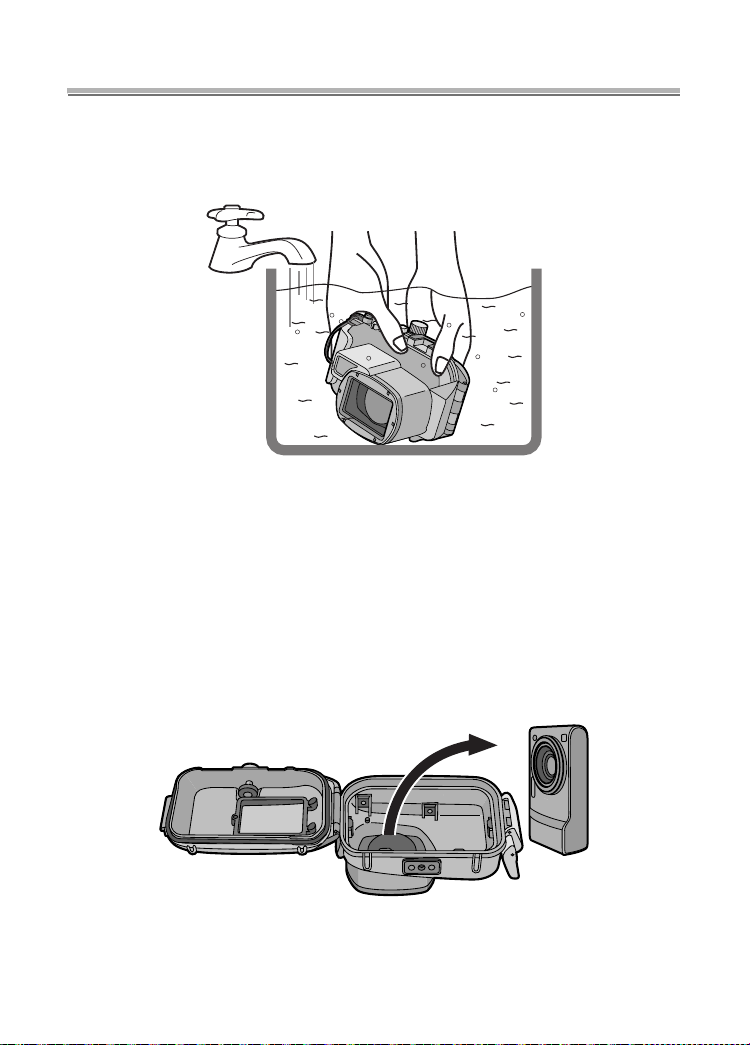
≥ Before attaching the digital camera, submerge the case in water for
about 3 minutes or more to check that there is no water leakage.
∫ About handling this Case
≥ Use un de r the follow i ng con ditions.
• Water depth: Up to 40 m/130 feet
to
• Ambient temperature: 0 °C
≥ Do not use the Case in w ate r ov er 40 ° C/1 04° F. The heat ma y da ma ge the Cas e or
cause water le akage.
≥ The Case is made of impact res istant polycarbonate however be careful when you
are using it. It can be easily scratched when taking pictures in rocky places etc. and
can be damaged by the impact if dropped etc. When travelling, pack the Case
carefully to prevent any direct impact if it is dropped etc. and do not leave the digital
camera in the Case. Only attach the digital camera to the case if you are
transporting it a short distance such as from the airport to the di ving spot. (You
cannot reuse the material the Case was packed in at the time of purchase to
transport it.)
≥ When boarding a plane, the change in atmospheric pressure ma y cause the inside
of the Case to expand causing damage to the Case. Remove the O-ring before
boarding a plane.
≥ Do not leave the digital camera in the Case for a long period of time in a car, a
ship, exposed to direct sunlight etc. The Case is an airtight device so the
temperature inside the Case will become very high and the digital camera may
stop operating properly. Do not let the temperature inside the Case become
too high.
40 °C/32 °F
to
104 °F
VQT1Q30
3
Page 4

Before Use (continued)
∫ Using the Case in high or low temperatures
≥ If you open or close the Case where it is humid or hot and then move to a place that
is cold or dive underwater, condensation may appear inside the Case, the glass
surface may become cloudy and the digital camera may be damaged.
≥ If you suddenly mov e the Ca se from a cold place or cold water to a warm place, the
glass surface may become cloudy. Wait until the Case becomes close to the air
temperature before taking pictures.
∫ About preparation
≥ Do not open o r c los e t h e Cas e wh er e i t ma y be spla sh ed b y wat e r or s an d may
get in it. We recommend opening or closing the Case indoors.
≥ Replace the battery, card etc. and attach the digital camera indoors where there is
little mois tu re.
≥ If you must open or close the Case at the diving spot to replace the battery or
the card, be sure to follow the steps below.
• Select a place wher e th e C as e w i ll no t be sp la sh ed by water and sand will not get
in it.
• Blow off any drops of water in the gap between the rear case and the front case
and on the buck le. Th orough ly wip e off a ny rem ainin g dro ps of wat er w ith a d ry
cloth.
• Thoroughly wipe off any drops of water on your body or hair.
• Be par ticul arly c arefu l abou t any water c oming from the sl eeves of yo ur the rmal
suit.
• Do not touch the digital camera if your hands are wet from sea water. Wet a towel
with fres h wate r and place it in a po lye ster bag befor eh an d. Use this to wel to w ip e
off any drops of water or sand on your hands or body.
≥ This Case does not absorb shock. If you place a heavy object on the Case or cause
shock to it, the digital camera may be damaged. Be careful when you are using the
case.
4
VQT1Q30
Page 5
Accessories
When you first open the package, check that the Case and all the
accessories are inc luded and that there has been no damage t o the
Case or any of the accessories during distrib ution or
transportation. If you find something unusual, consult your dealer
before using the Case.
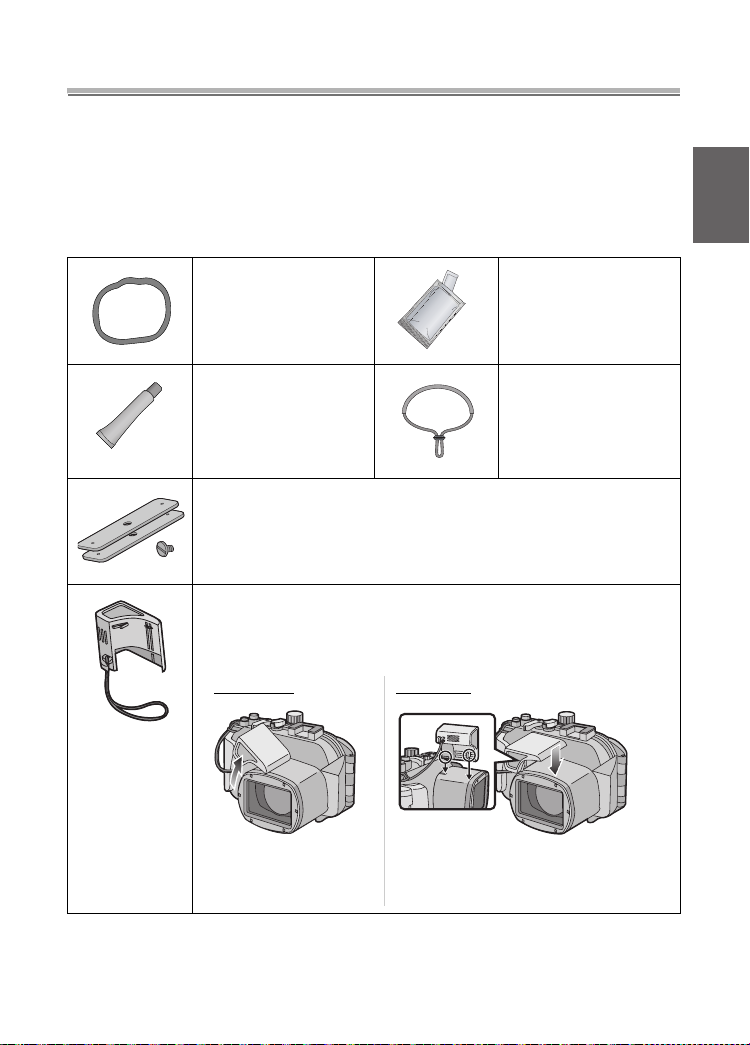
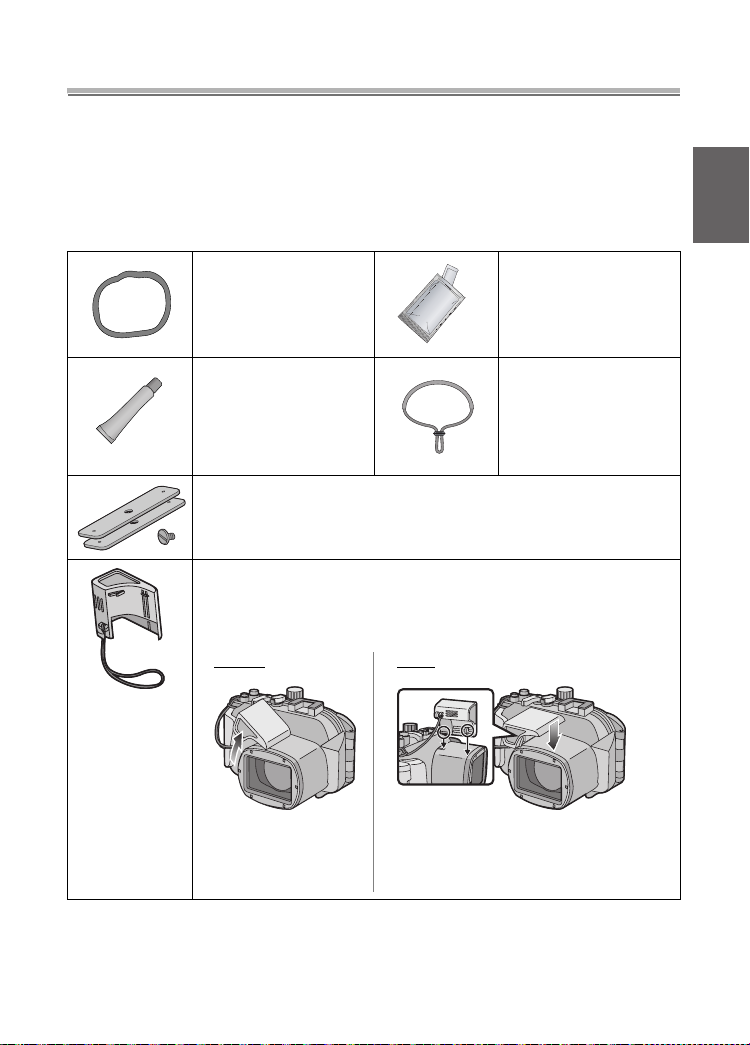
Do not use any accessories except those specified below.
O-ring
VMG1798
Grease (for O-ring )
VZG0372
Weight (2) , Weights attachm e nt screw
VXA8446
Diffuser
VYK2D90
Silica Gel (Desiccant)
(1 g /5 pieces)
VZG0371
Hand Strap
VFC4190
≥ Y ou can remove this diffuser when not using it
Removing Attaching
.
Align with the mark on the back of the
case and attach.
VQT1Q30
5
Page 6

Handling and Care
≥ Do not place the Case where it may fall.
• If the Case falls on your head or f oot, it will injure you and cause the Ca se to
malfunction.
≥ Never alter the Case.
• If water leaks into the digital camer a becaus e the Cas e was alt ered, th e digital
camer a may be damaged beyo nd repair.
• If you continue to use the digital camera after water has leaked into it, this may
cause a fire.
≥ Do not use the Case while scuba diving without proper trai ning.
• You should only operate the Case while scuba diving if you have been properly
trained and certified for this sport.
≥ Never place the Case, grease, silica gel or O-ring within the reach of
infants.
• If any part of an infant’s body is caught in the Case, it may cause an injury.
• Infants may accidentally swallow the grease, silica gel or O-ring.
• Consult a doctor immediately if you think an infant may have swallowed the
grease, silica gel or O- ring.
≥ Do not hang the strap around your neck underwater.
• It may become wound around your neck causing suffocation or other serious
injuries.
≥ Thoroughly wash off any grease on your hands.
• Do not allow the grease on your hands to come into contact with your mouth or
eyes.
≥ If water leaks into the case, stop using it immediately.
• This may cause an electric shock, burning or a fire.
• Consult your dealer.
≥ If anything abnormal occ urs whil e using the Case under wate r , please
follow all necessary procedures and gui delines for decompressing
when you ascend.
• If you ascend too quickly, you may get caisson disease.
≥ If smoke or abnormal heat, smells or sounds come from the Case,
stop using it immediately.
• These may cause an electric shock, burning or fire.
• Remove the digital camera from the Case and then immediately remove the
batter y from the dig ita l came ra.
• Consult your dealer.
≥ Be careful when opening the Case after water leakage.
• The leaked water may blow out or the rear case may flip.
6
VQT1Q30
Page 7

≥ Do not leave the Case where the temperatu re is high.
• The temper atu r e in si de th e Case becom es very high particula r l y whe n it is
exposed to direct sunlight on a beach, a ship etc. or when it is left in an airtight car
in the summer. The heat may damage the Case or its inner pa rts.
• If a digital camera is attached to the Case, it may also be damaged.
• If you use the attac hed digital camera when the temperature inside the Case is
very high, it may cause leakage, short-circuiting or insulation failure resulting in
fire or malfunction.
≥ Do not handle the digital camera or the battery with wet hands.
• This may cause an electric shock or ma lfunction.
∫ When taking pictures with the flash
≥ When taking pictures with t he flash, the corners of the picture may be vignetted or
the picture may not be lit evenly.
≥ When taking pictures with the flash, the available flash range is less unde rwater
than on land.
VQT1Q30
7
Page 8
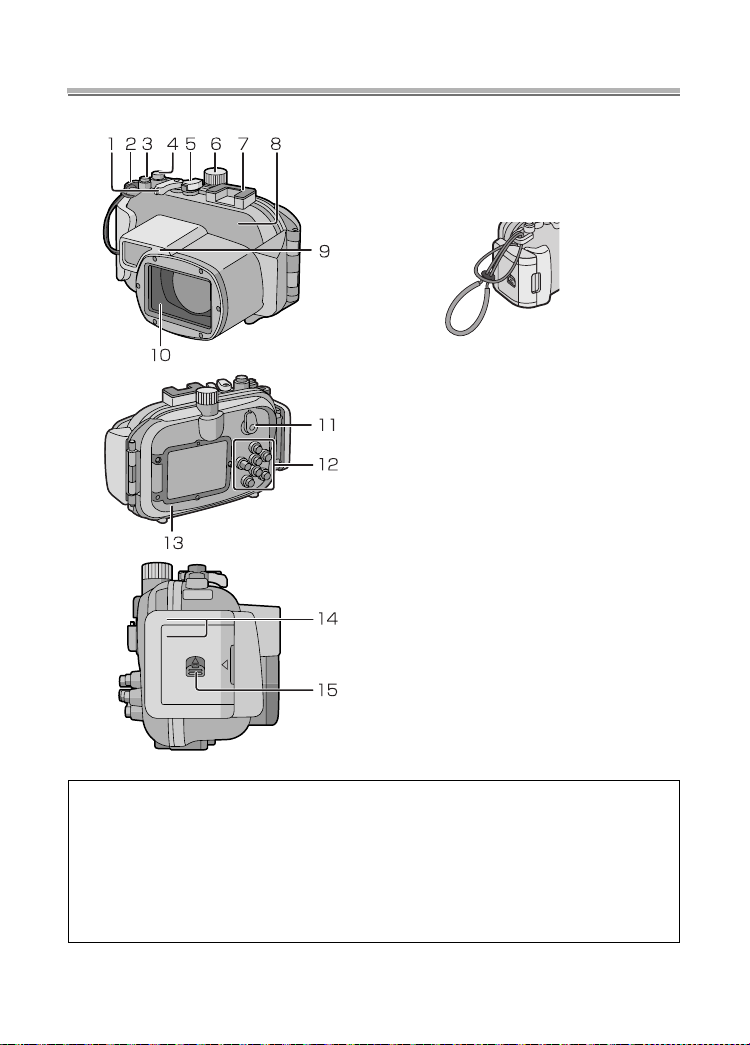
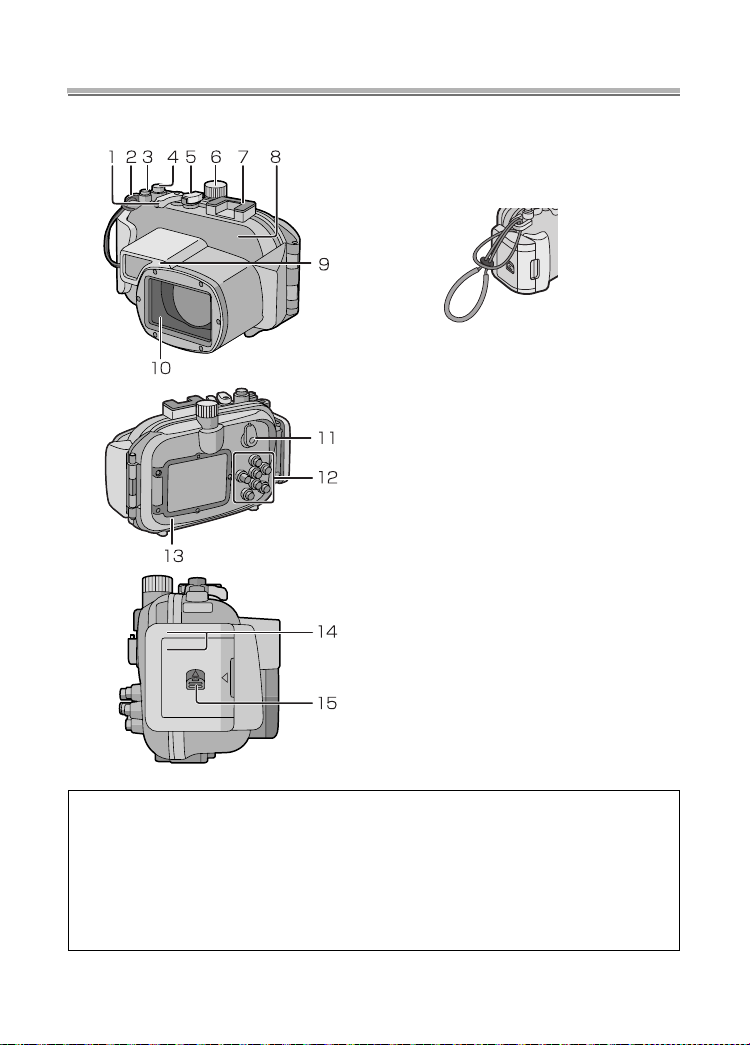
Components
1. Zoom Lever
2. Strap Eyel et
(for attac hing the supplied hand
strap and diffuser)
3. [E. Z OO M ] button
4. Shutter Button
5. Camera ON/OFF Switch
6. Mode dial
7. Mounting shoe for INON
Inc., external strobe
¢1
8. Front Case
9. Diffuser (supplied)
10. Front Glass
11. [REC]/[PLAYBACK] selector
switch
12. Button operation section
(Read the operat ing
instructions of the digital
camera for details about
each button operation.
¢2
)
13. Rear Case
14. Buckle
15. Lock Release Lever
¢1 This is a mounting shoe dedicated for an external strobe manufactured by
INON Inc.
Please refer to INON Inc. regarding compatible strobe.
http://www.inon.co.jp/INON_WORLD_body.html
¢2 Depending on the digital camera being used, the
button indications on the marine c ase may be slightly different. Follow the button indications on the digital camera for use.
8
VQT1Q30
Page 9
What is the O-ring?
≥ The O-ring is a waterproofing packing used for underwater cameras, watches and
diving equipment.
≥ The O-ring keeps the Case waterproof by sealing the gap between the rear case
and the front case.
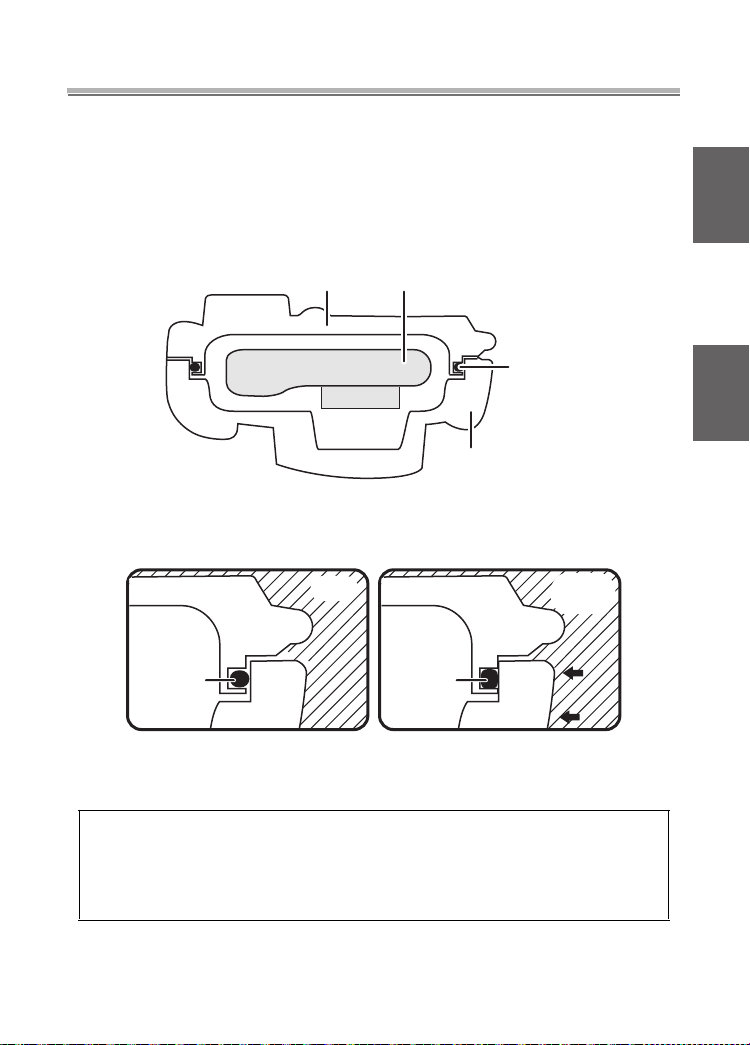
∫ How the O-r ing keeps the Case waterp roof
Rear Case
Digital Camera
O-ring
Front Case
The gum comes into contact with the sides of the Case making the
Case waterproof and stopping water from entering from th e gap.
Water
pressure
O-ring
Water
O-ring
When water pressu re acts on the O-ring, the surface of the O-ring
expands and the Case is sealed more tightly.
The O-ring prevents water leakage by coming into uniform
contact with the sides of the Case. Theref ore, good car e of the
O-ring is very important. Incorrect care of the O-ring may
cause water leakage.
VQT1Q30
9
Page 10
Preparation -Setting the O-ring-
Be sure to set the O-ring before attaching a digital camera.
Thoroughly wash and dry your hands befor e handling the O-ring. Place
the O-ring where there is no sand or dust.
1
Loosen the O-ring with your fingers to remove it.
≥ Loosen part of the O-ri ng with the tips of two fingers and then lift the loosened
part. Be careful not to scratch the O-ring with your fingernails.
O-ring
O-ring
∫
Note
≥ Do not use a pointed object to remove the O-ring. This may scratch the O-ring.
10
VQT1Q30
Page 11
2
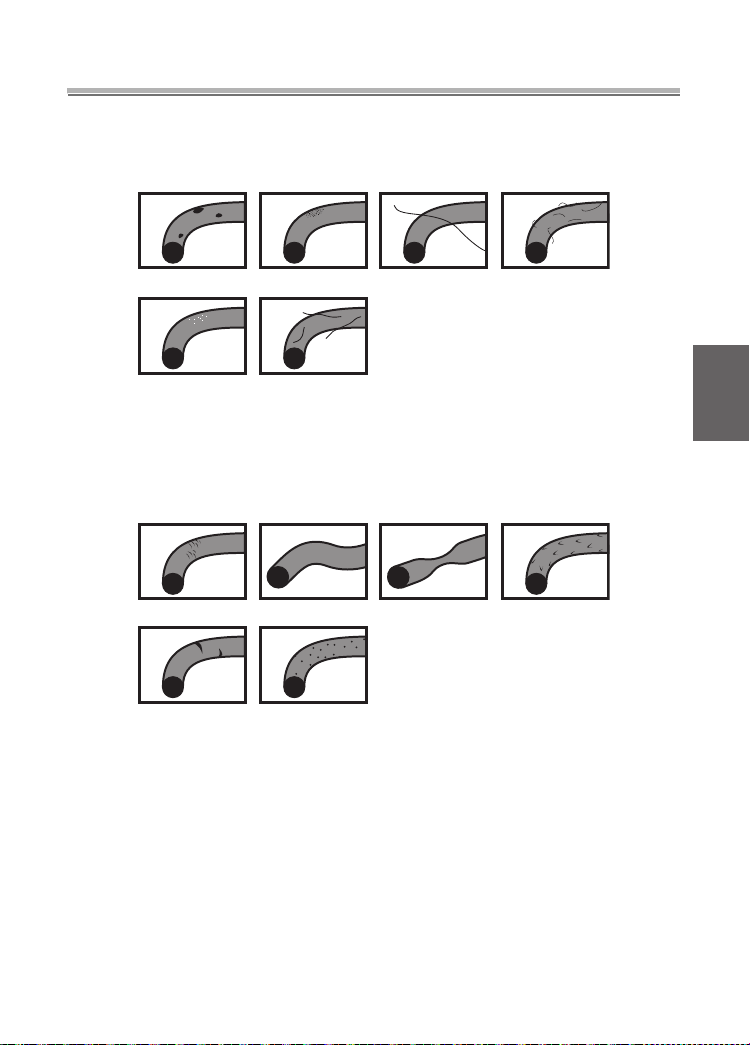
Check the O-ring.
≥ Check that there is no dirt, sand, hair, dust, salt crystals, lint or grease on the
O-ring. If you find any of these, remove them with a soft, dry cloth.
3Dirt
3Salt crystals 3Lint
3Sand
3
Hair
3Dust
≥ There may be dirt on the O-ring that you cannot see. Check if there is any dirt by
rubbing your finger over the O-ring.
≥ Be careful not to leave any fibers from the dry cloth on the O-ring when w iping it.
≥ Check that the O-ring is not ripped, twisted, squashed, frayed or scratched and
that there is no sand sticking to it. Replace the O-ring in these cases.
3Ripped 3Twisted
3Scratched 3Sand
3
Inspect the O-rin g groove.
3Squashed 3Frayed
≥ Grai ns of san d or ha r de ne d sa lt crysta ls may get in t o the O-ring groove.
Remove them carefully with an air spray or a cotton swab. If you use a cotton
swab, be careful not to leave any fibers from it in the O-ring groove.
11
VQT1Q30
Page 12
Preparation -Setting the O-ring- (continued)
4
Inspect the opposite side of the O-ring in the same way.
5
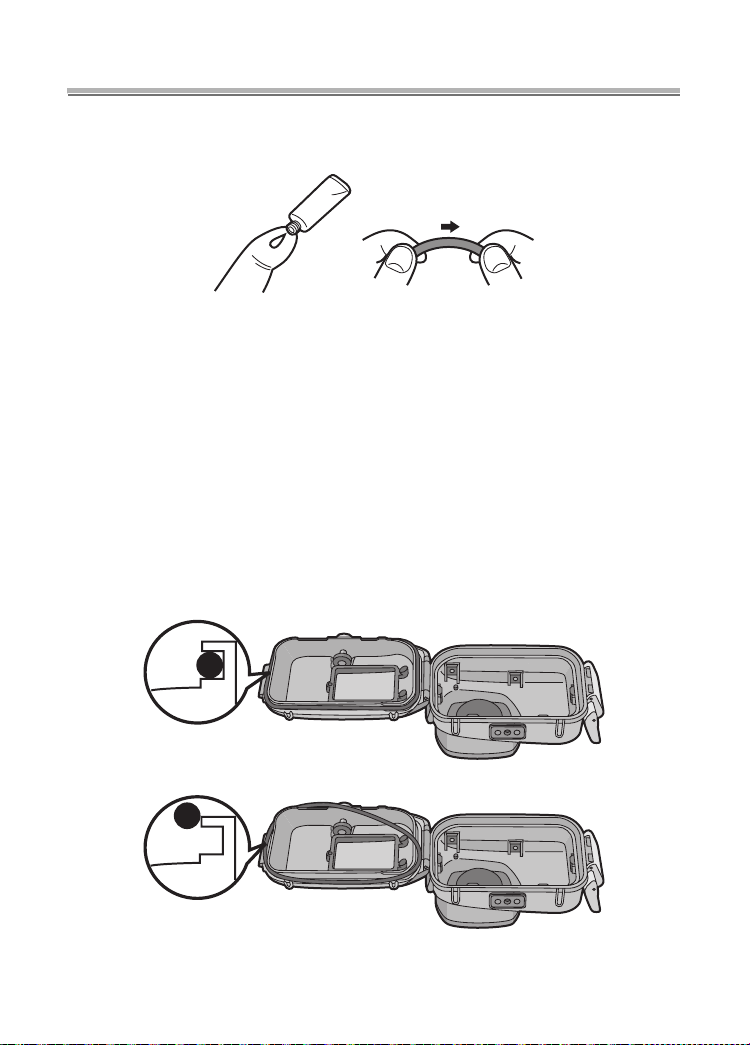
Apply the grease (supplied).
≥ Apply a rice-grain size of grease (supplied) evenly to the O-ring with the tip of
your finger.
≥ Dirt or dust will stick to the O- ring if you apply too much grease.
≥
Use only the specifie d grease. If you use other types o f grease, the
surface of the O-ring may be da maged causing wat er leakage.
≥ Do not apply t he gr ea se with paper or a cl ot h. Th e f ib ers f rom t he pape r or cloth
may stick to the O-ring.
6
Fit the O-ring evenl y int o the O-r ing groove.
Check the following:
≥ There is no dirt sticking to the O-ring.
≥ The O-ring has no t come out.
≥ The O-ring is n ot twist ed.
≥ The O-ring is not stretched too much.
CORRECT
12
VQT1Q30
INCORRECT
Page 13
7
Inspect the O-ring one last time.
Check the following one more time:
≥ There is no dirt sticking to the O-ring.
≥ The O-ring has no t come out.
≥ The O-ring is n ot twist ed.
≥ There are no scratches or squash ed parts on the O -ring.
Thoroughly wipe any grease off your hands with a dry cloth and then
wash your hands with water.
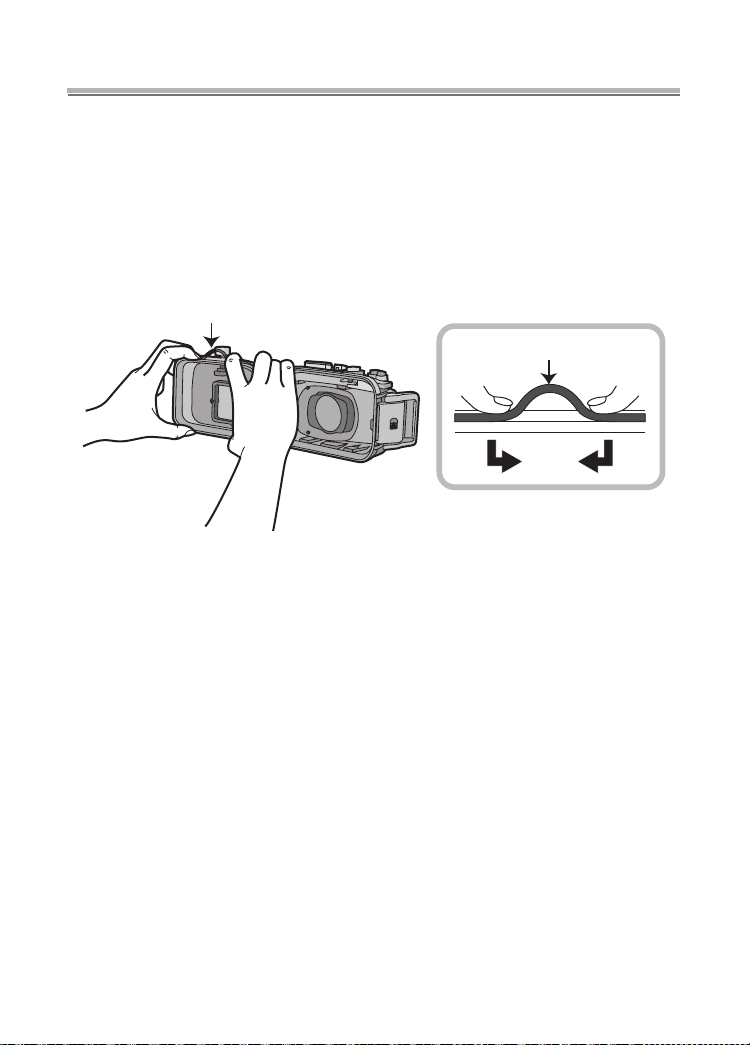
8
Close the buckle.
1
≥ Check that no foreign materials are sticking to the outer surface of the O-ring or
the buckle on the front case and then close the Case.
∫
Notes
≥ To keep the Case complet ely airtight, do not scratch the surface of the O-ring that
comes in to contact with the sides of th e Case.
≥ Never us e a n O-r in g tha t ha s be en sc r atc hed or d amage d b y di rt etc . Th is wil l c au se
water leakage.
≥ Each time you use the Case, r emov e the O-ring and check that there is no dirt,
sand, hair or other for eign materials in the O-ring groo ve and then apply a thin coat
of grease (supplied). If you apply too much grease, dirt and the dust may stick to the
O-ring causing water leakage.
≥ Be sure to bring a spare O-ring in case the O-ring that you ar e using becomes
damage d or scrat ched.
2
13
VQT1Q30
Page 14
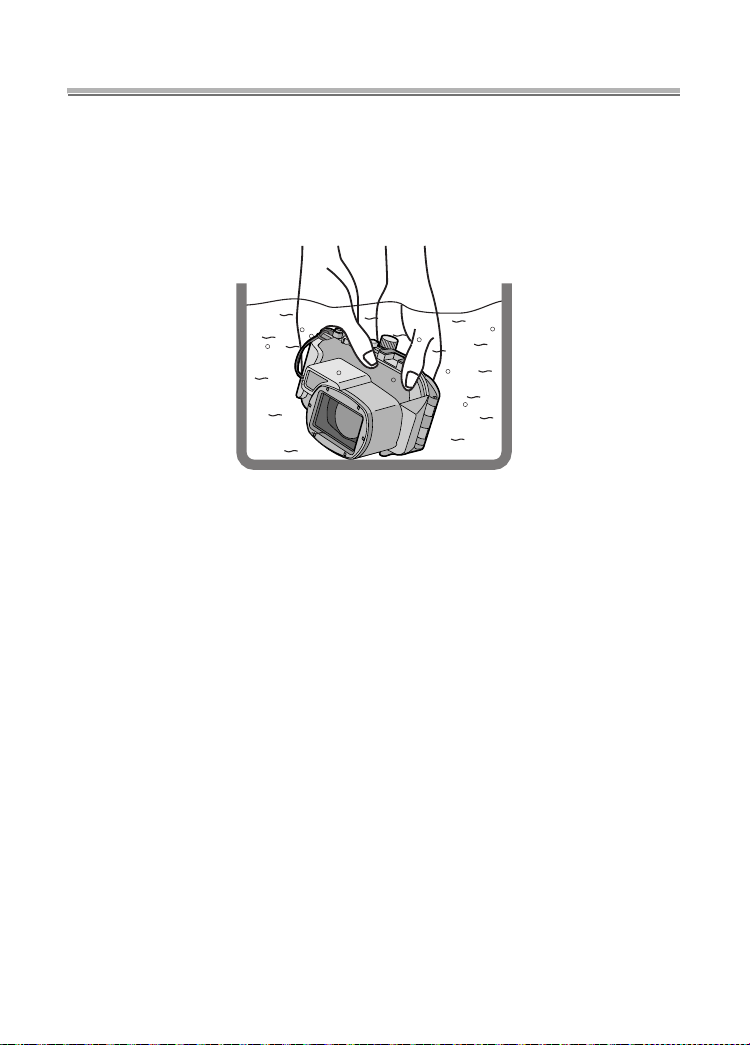
Preparation -Checking the Case is Waterproof-
After setting the O-ri ng, check that no water leaks into the Case by
submerging it in a water tank, bath tub etc. for more than about
3 minutes before attaching a digital camera.
≥ Do not use the Case in w ate r ove r 40 °C/104 °F. The heat ma y da ma ge the Case or
cause water le akage.
‘
Carry out the same test after attaching the digital camera to the Case. (P15)
∫
Notes
≥ If bubbles rise from the Case when it is submerged in water or there is water inside
the Case when you take it out the water, there is water leakage. In these cases,
consult your dealer.
≥ If water leaks into the Case while you are us ing it and the digital ca mera is
submerged in water, remove the bat tery immedi ately. Hydrogen gas can cause
burnin g or expl os io n if the r e is a fire nearby.
≥ If you dive quickly while holding the Case or throw the Case from a ship into the sea,
some water leakage may occur because of high pressure. This is not a malfunction
of the Case. Always dive slowly into the water.
≥ The Case is designed to be used at a depth of up to 40m/130feet. If you dive
deeper than 40m/130 feet, part of the Case may be damaged beyond repair.
≥ When closing the Case, be careful that no foreign mater ials g et caught between the
O-ring and the O-ring groove. Even one strand of ha ir or one grain of sand can
cause water le akage.
14
VQT1Q30
Page 15
Preparation -Attaching the Digital Camera-
Check that the ON/OFF Switch on the camera and the case is set to
[OFF], and [REC]/[PLAYBACK] selector switch is set to [
≥ Remove the strap fr o m the dig ita l came ra.
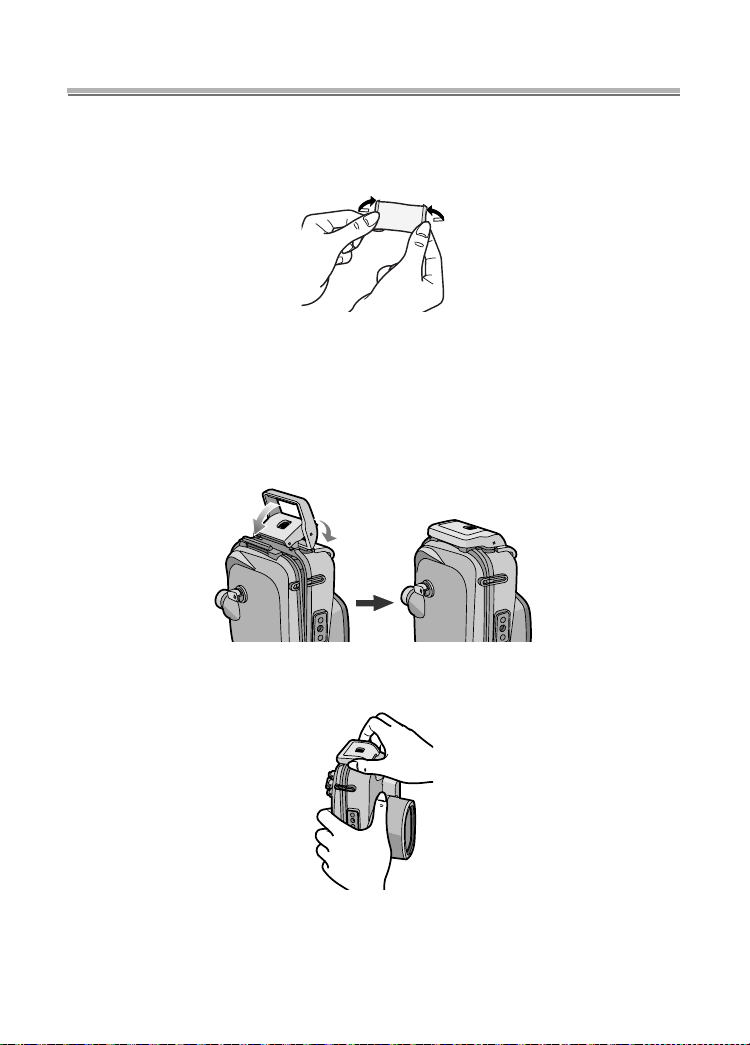
1
Push 2 up with your finger while sliding 1 to open the buckle.
!
].
1
2
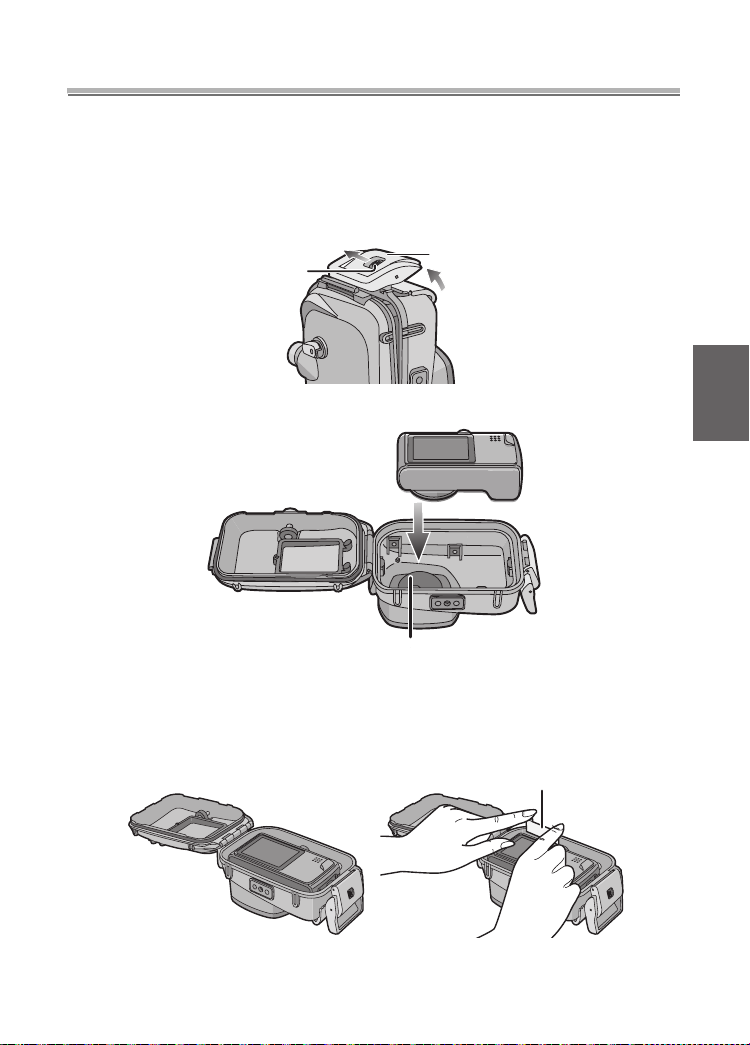
Attac h th e d igital camera to the Case.
≥ Be careful not to catch the shading ring 1.
3
Inser t the si li c a g e l (s up p lie d ).
≥ Always use new silica ge l.
2
1
Silica gel
15
VQT1Q30
Page 16
Preparation -Attaching the Digital Camera- (continued)
≥ When inserting the silica gel, bend it as shown in the illustration below
and then insert it as far as possible. If you close the Case with the silica
gel not fully inserted, the silica gel will get caught in the O-ring causing
water leakage.
≥ If the air temperature is high and the water temperature is low, condensation
may appear inside the Case. T o prevent condensation, make sure that the silica
gel (supplied) does not come into contact with the digital camera lens. To
prevent the Case fro m becoming fogged up, insert the si lica gel about
1 to 2 hours before using the Case.
4 Close the buckle.
1
Check that the buckle is clos ed fir m ly.
‘
Do not insert the strap etc. in the buckle
2
5 After you have attached the digital camera, check one more time that no
water leaks into the Case.
16
VQT1Q30
(P14)
Page 17
∫ Not es
≥
Check one more time that the O-ring is fitted evenly into the O-ring groove.
≥ Avoid opening or closing the Case where there is a lot of sand or dust and in humid
or wet places.
≥ If there is a sudden change in temperature, condensation may appear inside the
Case.
≥ If sunscreen or sun oil sticks to the Case, wash it off immediately with lukewarm
water to prevent reduced waterproo fness or discoloration.
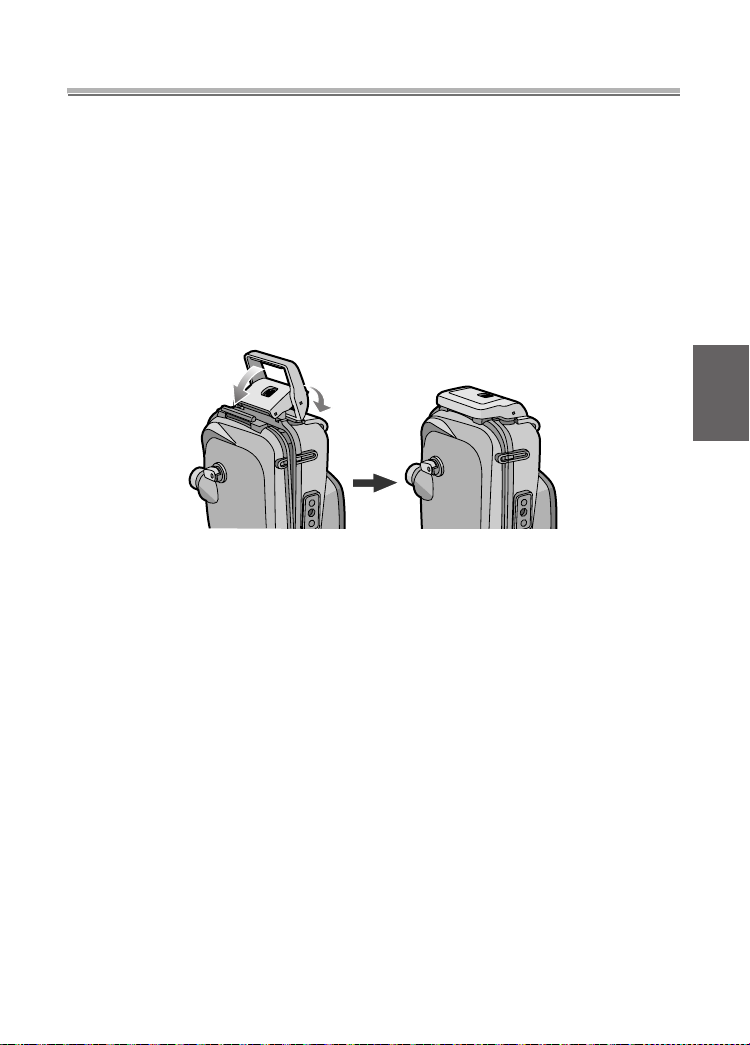
∫ A t ta ch i n g th e w ei g h ts
About using the weights
Attach the weights to adjust to the preferred buoyancy when using the marine c ase.
Use them as necessa ry.
Refer to the follow in g ab ou t buoyanc y un de rwa te r.
1 If you use the digi tal camera and th e marine case only:
They will float slowly in fresh water or seawater. (Plus buoyancy)
2 If you use the digital camera, the marine case and 1 weight:
They will float even more slowly in fresh water or seawater than
(Plus buoyancy)
1.
3 If you use the digital camera, the marine case and 2 weights:
They will sin k sl owly in fr es h wa ter or se awa te r. (Minus buoyanc y )
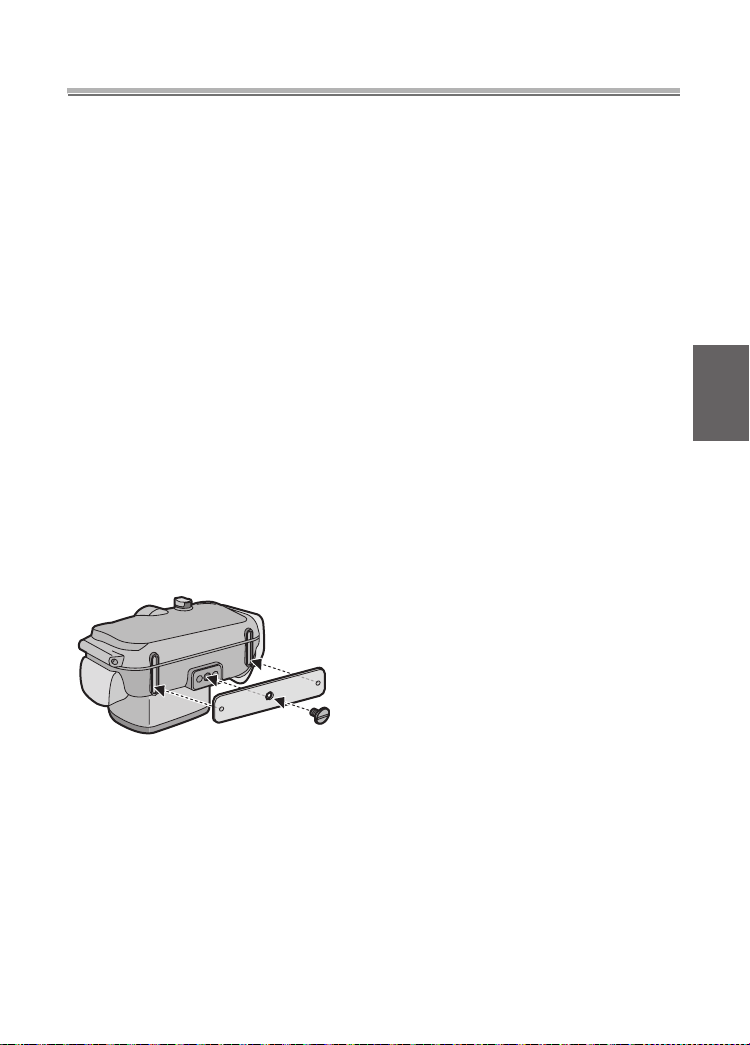
How to atta c h the w ei g h ts
If you use 1 weight, align the protruding part of
the weight with the tr ipo d rec e pta c le on the
marine case and then use the supplied screw
to attach it. If you use 2 weights, align the
projecting part of the second weight with the
indented part of the first weight so that the
weights do not overlap and t hen attach them
to the tripod receptacle.
∫ Not e
≥
To prevent rusting, detach the weights after use, wipe off any salt and then store
them.
17
VQT1Q30
Page 18
Taking Pictures
∫ Before taking pictures underwater
Check the foll owing before diving.
≥
Is there sufficient remaining battery power?
≥ Is there sufficient memory in the card?
≥ Is the O-ring fitted evenly into the O-ring groove?
≥ Have you chec ked that no water leaks into the Case?
≥ Is the buckle closed firmly?
∫ Taking pictures
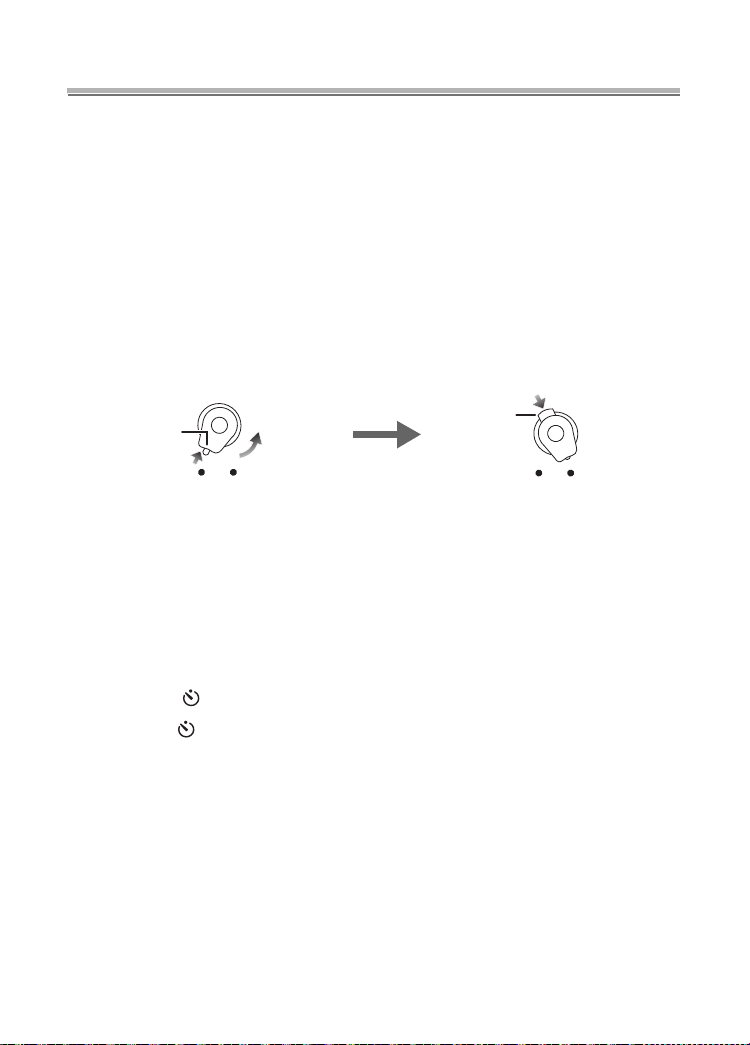
1 Turn the camera on.
Press 1 to release the lock
and then set to [ON].
1
OFF
ON
Press 2 to lock.
2
OFF
ON
2 Display the scene mode menu and then set [UNDERWATER].
≥
Read the operating instructions of the digital c amera f or details.
3 Aim the AF area on the LCD monitor at the subjec t y ou want to f ocus
on.
4 Press 2 ( /AF-L ) to focus .
•Press 2 (/AF-L) again to cancel.
5 Press the shutter button fully to take the pi cture.
∫ Not es
≥
Before attaching the camer a to the Case, we recom m end se tti ng the clock aga in .
(Read the operating instructions of the digital camera for details.)
≥ If there are any particles floating in front of the camera, it may focus on them instead
of the subject.
≥ If there are drops of water or dirt sticking to the front glass, you may not be able to
focus properly. Be sure to wipe the front glass before taking pictures.
18
VQT1Q30
Page 19

Tips for Taking Pictures in the Water
When the image is too bluish i n the water
1 Press 3 ( ) several times until [] appears.
2 Press 2 (AF-L)/1 ()
to adjust the whi te balance.
3 Press [MENU /SET] to fi n ish.
≥ You can also press the shutter button halfwa y to finish.
Select the best picture
Set the flash to [ ].
Using the auto bracket func tion (For models with an auto bracket function)
≥ Each time the shutter button is pressed, 3 pictures with different exposures are
automatically recorded. You can select the desired picture from the 3 pictures.
Use Burst mode
≥ When taking pictur es of a fast-mov ing subject (a fish etc.), you can select your
favourite picture after taking the pictures using burst mode.
∫
Note
≥ For more information, read the operating instructions of the digital camera.
19
VQT1Q30
Page 20
After Use
After you have finished taking pictures, follow the steps below.
1
Submerge the Case in fresh water for about 30 minutes or more
without removing the digital camera to remo ve any salt crystals etc.
≥
Press all the operatio n buttons etc. on the Case to wash away any
seawater. If the salt crystals are not removed from the buttons etc., they
will harden and the buttons will become unoperable.
≥
Do not w ash the C as e wi th fast -r un ni ng o r p res su ri zed wate r etc . as it m a y
cause water leakage.
2
Wipe the wat er w ith a dry c loth that has no salt crystals sticking to it
and then dry the Case completely.
≥ Do not dry the Case by exposing it to direct sunlight. This may
damage the Case or may has ten deteriorati on of the O-ring.
discolor
or
3
Open the rear of the case to remove the digital camera.
20
VQT1Q30
Page 21

4
Remove the O-ring from the Case and check that there is no rubbish
etc. in the O-ring groove.
5
Check that there are no scratches etc. on the O-ring while you are
applying the grease.
∫
Notes
Be careful when remo ving the digital camera fr om the Case so that it
does not get wet.
≥ Remove the camera with clean h ands. (Wash your hands with fresh water and then
thoroughly dry them.)
≥ Thoroughl y dry an y mo is tur e on y our b od y or hair. (Be particularl y ca ref ul ab ou t any
water coming from the sleeves of your thermal suit.)
≥ When the weather or the sea is particularly bad, select a place where the dig ital
camera will not get wet e.g. indoors or where there is a roof overhead.
Cleaning and Storing
Wash the outside of the Case with water.
1
≥ Wash the outside of the Case until it is clean. (P20)
≥ Be sure to close the Case and then wash the outside only with water.
≥ Wipe off any dirt inside the Case with a wet, soft cloth.
∫
Notes
≥ Do not wash the Case with high-pressure water as it may cause water leakage.
Remove the digital camera before washing the Case with water.
≥ Do not leave the digita l camera inside the Case when storing it.
≥ Store the Case in a cool, well-ventilated place.
Caution for Use
∫
Handling of the O-ring
≥
Do not use al c ohol, thinn e r or a chemical clean i ng age nt for clea ni n g th e O -
ring. Thus will cause damage to, or deterioration of, the O-ring.
≥
If you will not be using the Case for a long period of time, remove the O-ring
from the O-ring groove, apply a thin coat of grease (supplied), place it in a
clean polyester bag and then store it in a cool, dark place to prevent the
surface from being damaged. When yo u use the O-ring again, thoroughly
check that it is not scratched or split.
21
VQT1Q30
Page 22

Caution for Use (continued)
≥ Use only the specified grease. If you use other types of grease, the surface of
the O-ring may be damaged causing water leakage.
≥ The O-ring comes into contact with the sides of the C ase making the Cas e
waterproof. Do not knoc k, insert foreign materials (dirt, sa nd, hair etc.) or scratch
the O-ring or sides of the Case.
≥ Use the tips of your fingers to remove the O-ring. Do not use a pointed object as it
may scratch th e O -ring.
≥ After removing the O-ring from the rear case, wipe off any dirt, sand, hair or oth er
foreign materials on it. Also wipe the O- ring groove and the inner sides of the front
case which come into contact with the O-ring.
≥ Never us e a n O-r in g tha t ha s be en sc r atc hed or d amage d b y di rt etc . Th is wil l c au se
water leakage. Replace it with a new O-ring.
≥ After replacin g an O-ring, not using the Case for a long period of time, ope ning the
Case to attach a digital camera or to replace the battery etc., thoroughly check that
the O-ring is not scratched or spli t. Then, close the C ase and c heck that no water
leaks i nto i t b y su bmer gi ng it in a w at er t an k, ba th tu b e tc. f o r abo ut 3 min ut e s. ( P14 )
≥ O-rings are consumable products. Although the lifespan of O-rings will depend on
how well they are maintained, how often they are used and their storage conditions,
we recommend replacing them every year even if you cannot see any scratches.
∫ About maintenance
≥ Do not use the chemicals shown below for cleaning, rustproofing, defogging
or repair. Using them directly or indirectly (with a chemical spray etc.) on the
Case may cause it to crack under high pressure.
Prohibited chemicals Cautions
Volatile organic solvents/
Chemi cal cleans ers
Anti-corrosives
Anticlouding agents
Adhesives
≥ If grease sticks to the digital camera, wipe it off with a soft, dry cloth.
≥ When wiping the inside of the Case, only use a soft, dry cloth. Wipe the inside of the
front glass with a soft, dry cloth before and after use to keep the glass clear.
Do not clean the Case with volati le organic solvents
such as alcohol, gasoline or thinner or with chemical
clean ser s. Cl ean i t w ith fr es h wa ter or luk e w a rm wa ter.
Do not use anti-corrosi ves as the metal parts of the
Case are made from stainless steel or brass. Clean it
with fresh water.
Do not use commerc ially available anti clouding
agents. Be sure to use the silica gel indicated in these
operating instr u ct ion s.
Do not use adhesives for repair. If the C ase need s to
be repaired, co nsult y our dealer .
22
VQT1Q30
Page 23

∫ About storage and inspection after use
≥ Always take the digital camera out of the Case.
≥ Make sure that no dirt or dust is stuck to the O-ring.
≥ Thoroughl y dry the Ca se at ro om tem per at ure and then st ore it in a coo l, da rk pl ac e.
≥ We recommend that the Case b e inspected about 3 years after purchase. This
inspection in volves dismantling and cleaning the C ase, inspecting all the parts and
repairing them if necessary and checking the waterproofness of the Case using the
same hydrostatic test equipment that was used to check the waterproofness before
purchase. The c ustomer i s responsible for all transportation costs.
≥ Do not dismantle any parts or use any accessories not specified in these operating
instructions and do not al ter the Case. If the Case does not wo rk properly, consult
your deale r.
Specifications
Compatible model: DMC-TZ5/DMC-TZ15/DMC-TZ4/DMC-TZ11
Mass (Weight): Approx. 434g/15 1/4 oz
(As of March 2008
¢
)
Dimensions: App rox. 150 mm (W)k94 mm (H)k93 mm (D)
[5
15/16q (W)k3 3/4q (H)k3 11/16q (D)]
(excluding the projecting parts)
Material: Polycarbonate
Waterproof construction: O-ring seal ing
Water resistant depth: 40 m/130 feet
¢ Refer to the operating instructions, catalogue, websit e etc. of the digital
camera for the latest inf ormati on on m odels that can be used.
Panasonic Consumer Electronics Company,
Division of Panasonic Corporation of North America
One Panasonic Way, Secaucus, NJ 07094
Panasonic Puerto Rico, Inc.
Ave. 65 de Infantería, Km. 9.5, San Gabriel Industrial Park, Carolina, Puerto Rico 00985
Panasonic Canada Inc.
5770 Ambler Drive, Mississauga, Ontario, L4W 2T3
Panasonic Corporation 2008
VQT1Q30
23
Page 24

Table des ma tières
Avant utilisation. . . . . . . . . . . . . . . . . . . . . . . . . . . . . .25
Accessoires. . . . . . . . . . . . . . . . . . . . . . . . . . . . . . . . . 27
Manipulation et entretien. . . . . . . . . . . . . . . . . . . . . . .28
Composants . . . . . . . . . . . . . . . . . . . . . . . . . . . . . . . .30
Qu’est-ce qu’un joint torique?. . . . . . . . . . . . . . . . . . .31
Préparatifs -Mise en place du joint torique- . . . . . . . . 32
Préparatifs
Préparatifs -Mise en place de l’appareil photo
numérique- . . . . . . . . . . . . . . . . . . . . . . . . . . . . . . . .37
Prise de vues . . . . . . . . . . . . . . . . . . . . . . . . . . . . . . .40
Conseils pour la prise de vue dans l’eau . . . . . . . . . .41
Après utilisation. . . . . . . . . . . . . . . . . . . . . . . . . . . . . .42
Nettoyage et rangement . . . . . . . . . . . . . . . . . . . . . . .44
Remarques sur l’utilisation de l’appareil . . . . . . . . . . . 45
Spécifications . . . . . . . . . . . . . . . . . . . . . . . . . . . . . . .47
-Vérification de l’étanchéité du boîtier-
. . .36
24
VQT1Q30
Page 25

FRANÇAIS
Avant utilisation
≥ Ce boîtier marin est conçu pour un appareil photo numérique Panasonic.
Vous pou vez prendre des photos sous l’eau à une profondeur allant jusqu’à
40 m/13 0 pieds.
≥ Dans le cas d’une infiltration d’eau provoquée par un manque de précautions,
Panasoni c n’est resp o ns abl e en aucune man iè r e de s do m ma g e s su bi s par les
produi ts (ap p ar e il ph ot o num érique, batt eries, carte, etc.) pré s ents à l’intérieur du
boîtier, du coût des photographies ou de toute s autres dépenses.
≥ Panasonic n’offre aucune compensation pour les accidents provoquant des
blessures ou des dommages.
≥ Veuillez lire le manuel d’utilisation de l’appare il photo numérique.
≥ Avant d’installer l’appareil photo numérique, immergez le boîtier dans l’eau
pendant environ 3 minutes ou plus pour vérifier son étanchéité.
∫ Manipulation du boîtier
≥ Utilisez
≥ N’utilisez pas le boîtier dans une eau de plus de 40 °C/104 °F. La chaleur peut
≥ Le boîtier est f ait de polycarbonate rési stant au choc; toutefois faites attention en
≥ Lorsque vous embarquez dans un avion, le changement de pression
≥ Ne laissez pas l’appareil photo numérique dans le boîtier pendant un long
dans les conditions s uivantes:
• Profondeur de l’eau: jusqu’à 40 m/130 pieds
• Température ambiante: 0 °C à 40 °C/32 °F à 104 °F
l’endommager et causer des infiltrations d’eau.
l’utilisant. Il peut être facilement éraflé si vous prenez des photos dans des endroits
rocheux, etc. et peut êtr e endommagé par le choc s’il venait à tomber, et c. Pour
voyager en voiture, bateau, train ou avion, emballez soigneusement le boîtier afin
d’évit er les chocs en cas de chute, etc. et ne laissez pas l’apparei l photo dans le
boîtier. Installez l’appareil photo numérique dans le boîtier uniquement si vous le
transportez sur une courte dist ance comme de l’aéroport vers le point de plongée.
(Vous ne pouvez pas réut iliser le matériau av ec lequel le boîtier a été emballé au
moment de l’achat en vue du transport.)
atmosphérique peut causer une au gmentation de la pression à l’intérieur d u boîtier
qui risque de l’endommager. Retirez le joint torique avant d’embarquer dans un
avion.
moment dans une voiture, ou un bateau exposés directement aux rayons du
soleil, etc. Le boîtier est un appareil hermétique donc sa température
intérieure peut devenir très élevée et l’appareil photo numérique peut arrêter
de fonctionner correctement. Ne laissez pas la température intérieure du
boîtier devenir trop élevée.
25
VQT1Q30
Page 26

Avant utilisation (suite )
∫ Utilisation dans de hautes ou basses températures
≥
Si vous ouvr ez ou fe rmez le boîtier da ns un end roit cha ud et hum ide et puis que v ous le
déplacez vers un endroit froid ou que vous plongez sous l’eau, de la condensation peut
appa raître à l’in térieur d u boîtier, la surfa c e du verre peut s ’e mbuer et l’ap pareil photo
peut être endommagé.
≥ Si vous déplacez soudainement le boîtier d’un endroit où la température de l’air ou
de l’e au est froide vers un endroit où la température est chaude, la sur face du verr e
peut s’embuer. Attendez jusqu’à ce que la température du boîtier se rapproche de la
tempé rat u re am biante avant d e pre ndre des photos.
∫ Préparatifs
≥ N’ouvrez pas et ne fermez pas le boîtier dans un endroit où il pourrait être
éclaboussé par de l’eau ou dans un endroit où le sable pourrait y pénétrer.
Nous vous conseillons d’ouvrir et de fermer le boîtier à l’intérieur.
≥
Remplacez la batterie, la c a rte, etc. et in stallez l’a ppareil photo numérique à l’intérieur
dans un endroit peu humide .
≥ Si vous devez ouvrir ou fermer le boîtier au point de plongée pour remplacer
la batterie ou la carte, veillez à suivre les étapes suivantes.
• Choisiss ez un en droit où le boî tier ne sera pas éclab oussé par de l’e au et où le
sable ne pourra pas y pénétre r.
• Enlevez toutes les gouttes d’eau présentes entre le côté avant et le côté
boîtier et sur le loquet de verrouillage en soufflant. Enlevez complètement les
gouttes d’eau r estantes avec un chiffon sec.
• Essuyez complètement toutes les gouttes d’eau de votre corps ou vos cheveux.
• Soyez particulièrement attentif à l’eau qui a pénétré dans votre combinaison de
plongée par les manches.
• Ne touch ez pa s l’a ppar eil ph ot o num ériq ue si vos main s so nt mo uillé es d ’ea u de
mer. Mouill ez un e serv iett e avec de l’ eau dou ce et me ttez-l a à l’avanc e dan s un
sac en plastique. Utilisez cette serviette pour essuyer les gouttes d’eau et le sable
présents sur vos mains ou votre corps.
≥ Ce boîti er n’absorbe pas les chocs. Si vous placez un obje t lourd sur le boîtier ou si
vous le cognez, l’app areil photo peut être endommagé. Faites attention lorsque
vous utilisez le boîtier.
arriè re du
26
VQT1Q30
Page 27
Accessoires
Lorsque vous ouvrez l’emballage pour la première fois, vérifiez
bien qu’il contient l e boîtier et tous les accessoi res et que ceux-ci
n’ont pas été endommagés lors du transport. Si vous constatez
quelque chose d’anormal, consultez votre revendeur a vant
d’utiliser le boîtier.
N’utilisez aucun autre accessoire que ceux indiqués ci-dessous.
Joint torique
VMG1798
Tube de graisse (pour
joint torique)
VZG0372
Poids (2) , Vis de fixation des poids
VXA8446
Diffuseur
VYK2D90
Gel de silice
(dessiccatif)
(1 g/5 pièces)
VZG0371
Dragonne
VFC4190
≥ Vous pouvez retirer le diffuseur lorsque vous ne l’utilisez pas.
Retirez Fixez
Alignez-le avec les repères à l’arrière
du boîtier et fixez-l e.
27
VQT1Q30
Page 28

Manipu la tio n et en tr et ien
≥ Ne placez pas le boîtier dans un endroit où il pourrait tomber.
• Si le boîtier tombe sur votre tête ou votre pied, il vous blessera et pourra mal
fonctionner.
≥ Ne mo di fi e z ja m a is le boît ie r.
• Si de l’eau s’introduit dans l’appareil photo numérique parce que le boîtier est
abîmé, l'appareil peut être endommagé de façon irrémédiable.
• Si vous continuez d’utiliser l’appareil photo après que l’eau s’y soit infiltrée, il peut
prendre feu.
≥ N’utilisez pas le boîtier en plongée sous-marine sans un
entraînement adéquat.
• Vous ne devez uti lis er ce b oît ie r lor s d’une pl on gé e sous- m arine qu e si v ous a v ez
été correctement entraîné et êtes qualifié pour ce sport.
≥ Ne placez jamais le boîtier, la graisse, le gel de silice ou le joint
torique à la portée des enfants.
• Si un enfan t se coince une partie du corps dans ce boîti er, cela peut provoquer
une blessure.
• Les enfants peuvent accidentellement avaler la graisse, le gel de silice ou le joint
torique.
• Consultez i mmédi at em en t v otr e médeci n si v ou s pe ns ez que v ot r e enf a nt a av a lé
de la graisse, du gel de silice ou le joint torique.
≥ N’enroulez pas la bandoulière autour de votre cou lorsque vous êtes
sous l’eau.
• Cela peut vous blesser le cou et causer une suffocation ou d’autres blessures
sérieuses.
≥ Nettoyez toutes traces de graisse de vos mains.
• Ne mettez pas la graisse en contact avec vos yeux ou votre bouche.
≥ S’il y a des infiltrations d’ea u dans le boîtier, arrêtez immédi atement
de l’ut iliser.
• Ceci peut pr ovoq uer un choc électrique, une brûlure ou un incendie.
• Consultez votre revendeur.
≥ Si quelque chose d’anormal survient en utilisant le boît ier sous l’eau,
veuillez suivre to utes l es pr océdur es n écessa ires e t les consignes de
décompression lors de votre remontée.
• Si vous remontez trop rapidement, vous pouvez subir la ma ladie des caissons.
≥ Si de la fumée ou une chaleur , une odeur ou un bruit anormal
provient du boîtier, arrêtez de l’util iser immédiatement.
• Cela peut causer un choc électrique, une brûlure ou un incendie.
• Retirez l’appareil photo numérique du boîtier et puis retirez les batteries de
l’appareil photo.
• Consultez votre revendeur.
28
VQT1Q30
Page 29

≥ Faites attention en ouvrant le boîtier après une infiltration d’eau.
• L’ea u qui s’es t infiltrée pe ut éclabousser ou bien l’arrière du boîtier peut se
renverser.
≥ Ne laissez pas le boîtier dans un endroi t où la tempér ature est élevée.
• La température à l’intérieur du boîtier peut devenir très élevée surtout lorsqu’il est
exposé directement aux rayons du soleil sur une plage, en voyage, etc. ou
lorsqu’il es t laissé dans une voiture fermée en ple in été. La chaleur peut
endommager le boîtier ou ses él éments internes.
• Si un appareil photo numérique se trouve à l’intérieur du boîtier, celui-ci peut
également être endommagé.
• Si vous utilisez l’appareil photo numérique lorsque la tempér ature à l’intérieur du
boîtier est très élevée, cela peut causer des infiltrations, des courts-circuits ou
une pa nne d’is olation ayant pour résultat un feu ou un mauvais fonctionnement.
≥ Ne manipulez pas l’appareil photo numérique ou la batterie avec les
mains mouillées.
• Cela peut provo quer un choc électrique ou un mauvais fonctionnement.
∫ Prises de vues avec le flash
≥ Lorsque vous u tilisez le flash, les angles de l’image peuvent êtr e coupés ou l’image
peut ne pas apparaître illuminée de manière uniforme.
≥ En prenant des photos avec le fla sh, la porté e disponible de celui-ci es t plus faible
sous l’eau qu’en plein air.
29
VQT1Q30
Page 30
Composants
1. Lev ier de zoom
2. Œillet d e la dragonne
(pour fixer la dragonne et le
diffuseur fournis)
3. Touche de zoom facile
[E.ZOOM]
4. Déclencheur
5. Interrup t eur de marche/arrêt
6. Molette de sélection du
mode
7. Griff e porte-flash
stroboscopique externe de
INON Inct.
¢1
8. Couvercle avant
9. Diffuseur (fourni)
10. Vitre avant
11. Sélecteur [ENR. ]/[LECT.]
12. T ouches de fonctionnement
(Reportez-vous au m anuel
d’utilisation de l’appareil
photo num érique pou r plus
de détails s ur chaque touch e
de fonctionnem ent.
¢2
)
13. Couvercle arrière
14. Loquet de verrouillage
15. Levier de déverrouillage
¢1 Il s’agit d’une griffe porte- flash stroboscopique externe f abriqué par INON Inc.
Veuillez vous enqu érir auprè s de INON Inc . co nc ernant le flash
stroboscopique externe compatible.
http://www.inon.co.jp/INON_WORLD_body.html(en anglais seulement)
¢2 Les touches de fonctionnement du boîtier marin pe uvent différer légèr ement
de celles de l’appareil photo numérique utilisé. Lors de l’utilisation, consultez
les touches de fonctionnement de l’appareil photo numérique.
30
VQT1Q30
Page 31

Qu’est-ce qu’un joint torique?
≥ Un joint torique est une garniture étanche utilisée pour les appareils photo, montres
ou équi pements de plongée.
≥ Le joint torique r end le boîtier étanche en scellant l’espace entre sa partie avant e t
arrière.
∫ Comment le joint torique rend le boîtier étanche
Couver cl e ar r i è re
Le caou tc ho uc du joint tori qu e entre en contact avec les côtés du boîtier, le
rendant ainsi étanche et empêchant l’eau d’entrer par l’ouverture.
Eau
Joint
torique
Appareil photo numérique
Joint
torique
Couvercle avant
Pression
de l’eau
Joint
torique
Quand le joint torique est écrasé par la pression de l ’eau, sa surface
s’élargit et le boîtier est scellé plus herméti quement.
Le joint torique évit e les infiltrations d’eau en uniformisant le
contact des deux côtés du boîtier. Donc, le bon entretien du
joint torique est très important. Un mauvais entretien peut
causer des infilt rations d’eau.
31
VQT1Q30
Page 32

Préparatifs -Mise en place du joint torique-
Assurez-v ous de mettre le joint tori que en place avant d’i nstaller
l’appareil photo numérique.
Lavez et séch ez v o s mains avec soi n a v ant de mani pul er le j oint t orique.
Placez le joint torique dans un endroit sans sabl e ni poussière.
1
Desserrez le joint torique avec vo s do igt s pour l’ enlever.
≥ Desserrez une partie du joint torique du bout de vos deux doigts e t soulevez la
partie détachée. Faites attention de ne pas érafler le joint torique avec vos
ongles.
Joint torique
Joint torique
∫
Nota
≥ N’utilisez pas d’objet pointu pour retirer le joint torique. Ceci pourrait l’érafler.
32
VQT1Q30
Page 33

2
Vérifiez le jo in t to r iq u e .
≥ Vérifiez l’absence de saleté, sable, cheveux, poussière, cristaux de sel, fibre ou
graisse sur le joint torique. Si vous trouvez une de ces choses, retirez-la avec
un chiffon sec et doux.
3Saleté
3
Cristaux de sel
3Sable
3Fils de tissu
3Cheveux 3Poussière
≥ Sur le joint torique, il peut y avoir de la saleté que vous ne pouvez pas voir.
Vérifiez la présence de saletés en frottant votre doigt sur le joint torique.
≥ Lors du nettoyage du joint torique, f aites attenti on de ne pas laisser sur celui-ci
les fibres du linge sec et doux.
≥ Vérifiez que le joint torique ne soit ni déchiré, tordu, écrasé, effiloché ou éraflé et
qu’il n’y ait pas de sable collé dessus. Si c’est le cas, remplacez le joint torique.
3Fissures
3Rayures 3
3
Vérifiez la rainure du joint torique.
3Distorsions
Dépôts de sable
3Écrasements 3 Écaillements
≥ Des grains de sable ou des cristaux de sel durcis peuvent entrer dans la rainure
du join t torique. Retirez-les avec précaution avec un jet d’air ou un tampon de
coton. Si vous utilisez un tampon de coton, veillez à ne pas laisser de fibres
dans la r ainure du joint toriq ue.
33
VQT1Q30
Page 34

Préparatifs -Mise en place du joint torique- (suite)
4
Vér ifiez le côté opposé du joint torique de la mêm e manière.
5
Appliquez la graisse (fournie).
≥ Appliquez un iformém ent e t du bo ut d u d oi gt une qu an t ité de gr ai sse ( f ou rni e) d e
la dimension d’un grain de riz sur le joint torique.
≥
Si vous appl iquez trop d e gr aisse , de l a sale té ou de la po ussi ère col lera au joint torique .
≥
Utilisez uniquement la graisse indiquée. Si vous utilisez un autre type de graisse,
la surface du jo i n t tori que peut s’en domma ge r et causer des inf i l trat i o ns d’ eau .
≥ N’appliquez pas la graisse à l’aide d’un papier ou d’un chiffon. Des fibres
pourraient r ester collées au joint torique .
6
Placez le joint torique dans la rainure.
Vérifiez les choses suivantes:
≥ Qu’il n’y ait pas de saleté collée sur le joint torique.
≥ Que le joint torique ne sorte pas de son logement.
≥ Que le joint torique n’est pas tordu.
≥ Que le joint torique ne soit pas trop étiré.
Correct
34
VQT1Q30
Incorrect
Page 35

7
Vérifiez le joint torique une dernière fois.
Vérifiez les choses suiv antes encore une fois:
≥ Qu’il n’y ait pas de saleté collée sur le joint torique.
≥ Que le joint torique ne sorte pas de son logement.
≥ Que le joint torique n’est pas tordu.
≥ Il n’y a aucune érafl ure ou bossellement sur le joint tori que.
Essuyez avec soin tout e la graisse de vos mains a vec un chiffon sec
puis lavez-l es avec de l’eau.
8
Fermez le loquet.
1
≥ Vérifiez qu’aucune matière étrangère ne soit collée à la surface extérieure et au
loquet de verrouillage sur la partie avant du boîtier, puis fermez le boîtier.
∫
Nota
≥ Pour garder le boîtier complètement hermétique, n’éraflez pas la s urface du joint
torique qui entr e en con tac t avec le s cô té s du boîtier.
≥ N’utilisez jam ais un joint torique qui a été éraflé ou endommagé par de la saleté,
etc. Ceci causerait des infiltrations d’eau.
≥ Chaque fois que vous utilisez le boîtier, retirez le joint torique et vérifiez qu’il n’y ait
ni saleté, sable, cheveux ou autres matériaux étrangers dans la rainure, puis
appliquez une mince couche de graisse (fournie). Si vous appliquez trop de graisse,
la saleté et la poussière peuvent coller au joint torique et causer une infiltration
d’eau.
≥ Assurez-vous d’avoir un joint torique de rechange dans le cas où celui que vous
utilis ez soit endommagé ou éraflé.
2
35
VQT1Q30
Page 36

Préparatifs -Vér ification de l’é ta nchéité du boîtier-
Après la préparati on du joi nt torique, vérifiez l’a b sence d’infiltrations
d’eau dans le boîtier en l’immergeant dans un bassin d’eau, une
baignoire, etc. pendant environ 3 minutes avant d’installer l’appareil
photo numérique.
≥ N’utilisez pas le boîtier dans une eau de plus de 40 °C/104 °F. La chaleur peut
l’endommager et causer des infiltrations d’eau.
‘
Effectuez le même test après avoir mis en place l’appareil photo n umérique
dans le boîtier. (P37)
∫
Nota
≥ Si des bulles sont produites lorsque que le boîtier est i mmergé dans l’eau ou qu’il y
a de l’eau à l’intérieur de celui-ci lorsque vous le retirez de l’eau, cela signifie qu’il y
a une fuite. Dans de tels cas, consultez le détaillant.
≥ Si de l’eau s’ in f iltr e dans le bo ît i er pe nd ant qu e v o us l ’u til is ez et qu e l’a pp ar eil pho to
numérique se retrouve submergé, retirez immédiatement la bat terie. L’hydrogène
peut s’enflammer ou exploser si un feu se trou ve à proximité.
≥ Si vous pl onge z r a pide men t tout en t en ant le boî ti er ou si v ous la nc ez l e bo î tier d’ un
batea u dans la mer, une infiltration d’eau peut survenir en raison de la pr ession
élevée. Il ne s’agit pas d’un mauvais fonctionnement du boîtier. Plongez toujours
lentem e nt da ns l’ ea u .
≥ Le boît ier es t conçu p our êtr e util i sé à u ne pr ofonde ur a ll a nt j usq u’ à 40 m/130pieds.
Si vous plongez à une profondeur de plus de 40 m/130 pieds, une partie du boîtier
peut être endommagée de façon irrémédi able.
≥ En fermant le boîtier, assurez-vous qu’aucun matériau étranger ne se trouve entre
le joint torique et la rainure. Un simple cheveu ou grain de sable peut causer une
infiltration d’ea u.
36
VQT1Q30
Page 37

Préparatifs -Mise en place de l’appareil photo numérique-
Vér ifiez que l’interrupteur de mar che/arrêt de l’appareil photo et du
boîtier mari n sont rég lés sur [OFF] et q ue le sél ecteur [ ENR.]/ [LECT.] est
régl é s ur [
≥ Retirez la bandoulière de l’appareil photo numérique.
1
!
].
Appuyez sur 2 avec votre doi gt tout en fais ant gli sser 1 pour ouvrir
le loquet.
1
2
Installez l’appareil photo numérique dans le boîtier.
2
1
≥ Attention à ne pas heurter l’anneau de protection 1.
3
Insérez le gel de silice (fourni).
≥ Utilisez toujours du gel de silice neuf.
Gel de silice
37
VQT1Q30
Page 38

Préparatifs
≥ En introduisant le gel de silice, pliez-le comme montré sur l’illustration ci-
dessous et insérez-le aussi loin que possible. Si vous fermez le boîtier
alors que le gel de silice n’est pas totalement mis en place, celui-ci sera
pris dans le joint torique et causera une infiltration d’eau.
≥ Si la tempér ature de l’air est élevée et si celle de l’eau est basse, de la
conden sation peut apparaître à l’intér ieur du boîtier. Pour éviter cela, assurezvous que le gel de silice (fourni) n’entre pas en contact avec l’objectif de
l’appa reil photo. Pour évit er que le boîtie r ne s’embue, placez le gel de silice
envir on 1 à 2 he ures avant d’utiliser le boîtier.
-Mise en place de l’appareil photo numérique- (suite)
4 Fermez le loquet.
1
‘ Vérifiez
Ne coincez pas la courroie, etc. dans le loquet.
que le loquet est correctement fermé.
2
5 Après avoir installé l’appareil photo, vérifiez une fois de plus l’absence
d’infiltration d’eau dans le boîtier.
38
VQT1Q30
(P36)
Page 39

∫ Not a
≥
Vérifiez encore une fois la bonne mise en place du joint tor ique dans sa rainure.
≥ Évitez d’ouvrir ou de fe rmer le boîtier lors qu’il y a beaucoup de sable ou de
poussière et dans des endr oits humides ou mouillés.
≥ S’il y a un changement soudain de température, de la condensation peut apparaître
à l’intérieur du boîtier.
≥ Si de l’écran solaire ou de l’huile solaire co lle au boîtier, nettoyez-le immédi atement
avec de l’eau tiède afin d’éviter la décoloration et une étanchéité amoindrie.
∫ Fixation des poids
À propos de l’utilisation des poids
Fixez les poids pour régler la flottabilité préférée lors de l’utilisation du boîtier marin.
Utilisez-les selon le besoin .
Consultez les points suivants concernant la flottabilité sous l’eau.
1 Lors de l’utilisation de l’appareil photo numérique et du boîtier marin seulement:
Ils flottent l entement dans l’eau douce ou l’eau de mer. (flottabili té positive)
2 Lors de l’utilisation de l’appareil photo numérique, du boîtier marin et d’un poids:
Ils flottent encore plus lentement dans l’eau douce ou l’eau de mer. (flottabilité
positive)
3 Lors de l’utilisation de l’appareil photo numérique, du boîtier marin et de deux
poids:
Ils coulent lentement dans l’eau douce ou l’eau de mer. (flottabilité négative)
Méthode de fixation des poids
Lors de l’utilisation d’un poids, alignez la partie
en saillie du poids avec la prise de fixation de
trépied sur le boîtier marin puis utilisez la vis
fournie po ur le fixer. Si vous uti lis ez les deu x
poids, alig nez la partie en saillie du deuxième
poids avec la partie en creux du premier poids
afin qu’ils ne soi ent pas superposés puis fixezles à la pris e de fi xa tion de trépi ed .
∫ Remarques
≥
Afin d’empêcher la rouille, retirez les poids après leur utilisation, essuyez tout le sel
puis rangez-les.
39
VQT1Q30
Page 40

Prise de vues
∫ Avant de prendre des photos dans l'eau
Vér ifiez les choses suivantes avant de plonger.
≥
Reste-t-il suffisamment d’énergie dans la batterie?
≥ Y a-t-il suffisamment d’espace mémoire sur la carte?
≥ Est-ce que le joint t orique est correctement mis en place dans sa rainure?
≥ Avez-vous vérifié l’absence d’infiltration d’eau dans le boîtier?
≥ Le loquet est-il fermement verrouillé?
∫ Prise de vues
1 Allumez l’appareil photo.
Appuyez sur 1 pour dév errouil ler,
puis réglez sur [ON].
Appuyez sur 2 pour
verrouiller.
1
OFF
ON
2
OFF
ON
2 Affichez le menu du mode scène et sélect ionnez [SOUS-MARIN] .
≥
Pour plus de détails, lise z le manuel d’utilisation de l’appareil photo numérique.
3 Dirigez la zone MPA de l’écran AC L sur le sujet que vous désir ez
mettre au point.
4 Appuyez sur 2 ( /AF-L) pour faire la mise au point.
• Appuyez à nouveau sur 2 (/AF-L) pour annuler.
5 Appuyez à fond sur le déclencheur pour prendr e une photo.
∫ Not a
Av ant d e p la ce r l’ ap pa rei l ph oto n u mér ique d ans l e b oît ie r , n ou s v o us co nsei ll on s d e
≥
régler à nouveau l’hor lo ge.
(Pour plus de détails, lisez le manuel d’utilisation de l’appareil photo numérique.)
≥ S’il y a des particules qui flottent devant l’appareil photo, elles peuvent être mises
au point à la place du sujet.
≥ S’il y a de s gout t es d’ea u ou de la sal eté sur le v e r re a v a nt , v ou s po uv e z n e pa s êtr e
capable de faire correctement la mise au point. Essuyez le verre avant de prendre
des photos.
40
VQT1Q30
Page 41

Conseils pour la prise de vue dans l’eau
Lorsque l’image est trop bleuâtr e d ans l’ eau
1 Appuyez plusieurs fois sur 3 ( ) jusqu’à ce que [] apparaisse.
2 Appuyez sur 2 (/AF-L) /1 () pour régl er l’éq ui libre des blan cs.
3 Appu yez sur [M E NU /SET] pour f in ir.
≥ Vo us pouv ez égalem ent appuyer à mi-course sur le déclencheur pour finir.
Sélectionnez la me il le u re ima g e
Réglez le flash sur [ ].
Utilisation de la f onction de prise de vues en rafale avec réglag e automatique de
l’exposition (pour modèles munis de cette fonction)
≥ Chaque fois que le déclencheur es t appuyé, 3 phot os avec des expositions
différente s sont automatiqu ement enregist rées. Vous pouvez c hoisir la photo
désirée parmi les 3 qui ont été prises.
Utilisation du mode rafale
≥ Lors de prises de vues de sujet à mouvement rapide (un Clown orange, par
exemple) en mode rafale, vous pouvez sélectionner vot re photo préférée parmi
celles qui ont été prises.
∫
Nota
≥ Pour plus d’informations, lisez le manuel d’utilisation de l’appareil photo numérique.
41
VQT1Q30
Page 42

Après utilisa tio n
Après av oir fini de prendre des photos, suivez les étapes suivantes.
1
Immergez le boîtier dans de l’eau douce pendant en vir on 30 minutes
ou plus sans retirer l’appareil photo afin d’enlever tous les cristaux
de sel, etc.
≥
Appuyez sur toutes les touches de fonctionnement, etc. du boîtier afin
d’enlever toute l’eau de mer. Si les cristaux de sel ne sont pas retirés des
touches, etc., ceux-ci durciront et les touches deviendront inutilisables.
≥
Ne lavez pas le boîtier avec de l’eau à trop grand débit ou sous pression,
etc. car cela peut causer des infiltrations d’eau.
2
Essuyez l’ea u a vec un chi ffo n sec qui n’ est pas i mprégné de crist aux
de sel et séchez complètement le boîtier.
≥ Ne séchez pas le boîtier en l’exposant directement aux rayons du soleil. Ceci
peut
décolorer
joint toriq ue.
ou endommager l e boîtier ou bien accélérer la détérior ation du
42
VQT1Q30
Page 43

3
Ouvrez le couvercle arrière pour retirer l’appareil photo numérique.
4
Retirez le joint torique du boîtier et vérifiez qu’il n’y ait aucune
saleté, etc. dans la rai nure.
5
Vérifiez qu’il n’y ait aucune éraflure, etc. sur le joint torique pendant
que vous appliquez la graisse.
∫
Nota
Faites atte nti on en retirant l’appareil photo du boîtier que celui-ci ne se
mouille pas.
≥ Retirez l’appareil photo avec les mains propres. (Lavez vos mains avec de l’eau
douce et séchez-les avec soin.)
≥ Séchez com plètement toute trace d’humidité de votre corps et de vos cheveux.
(Soyez particulièrement attentif à l’eau qui a pénétrée dans votre combinaison de
plongé e par les manches.)
≥ Lorsque le temps ou la mer est particulièrement mauvais, choisissez un endroit où
l’appareil photo ne sera pas mouillé, par exemple à l’intérieur ou sous une toiture.
43
VQT1Q30
Page 44

Nettoyage et rangement
Lavez l’extérieur du boîtier avec de l’eau.
1
≥ Lavez l’ext érieur du boîtier jusqu’à ce qu’il soit propre. (P42)
≥ Veillez à fermer le boîtier et lavez l’extérieur uniquement avec de l’eau.
≥ Essuyez toutes traces de saleté à l’intérieur du boîtier avec un chiffon doux et
humide.
∫
Nota
≥ Ne lavez pas le boîtier avec de l’eau sous pression car cela peut provoquer des
infiltrati ons d’eau. Retirez l’appareil photo avant de laver le boî tier avec de l’eau.
≥ Ne laissez pas l’appareil photo numérique dans le boîtier lorsque vous le rangez.
≥ Rangez le boîtier dans un en droit frais , bien ventilé.
44
VQT1Q30
Page 45

Remarques sur l’utilisation de l’appareil
∫ Manipulation du joint torique
≥ N’utilisez pas d’alcool, de solvant ou de nettoyant chimique pour nettoyer le
joint torique. Ceci accélérera les dommages ou la détérioration du joint
torique.
≥ Si vous n’utilisez pas le boîtier pendant un long moment, retirez le joint
torique de la rainure, appliquez une mince couche de graisse (fournie),
placez-le dans un sac en polyester propre et placez-le dans un endroit frais et
sombre afin d’éviter que la surface ne soit endommagée. Lorsque vous
utilisez le joint torique à nouveau, vérifiez avec soin que celui-ci n’est ni
égratigné ni plié.
≥ Utilisez uniquement la graisse indiquée. Si vous utilisez d’autres types de
graisse, la surface du joint to rique peut en être abîmée et causer des
infiltrations d’eau.
≥ Le joint torique entre en contact avec les côtés du boîtier et le rend hermétique. Ne
cognez pas, n’introduisez aucun matériaux étrangers (saleté, sable, cheveux, etc.)
et n’éraflez pas le joint torique ou les cô tés du boîtier.
≥ Utilisez le bo ut de vo s do igt s po ur ret ire r le jo i nt to riqu e . N’u t il is ez pas d’o bjet po in tu
car cela peut érafler le joint torique .
≥ Après avoir retiré le joint torique de la partie arrière du boîtier, retirez-en toutes les
saletés, sable, cheveux ou autres matières étrangères. Essuyez également la
rainur e du jo in t to ri que et les parties int é rieures du co uvercle avant qui sont en
contac t avec le joint torique .
≥ Ne jamais utiliser un joint torique qui a été éraflé ou taché par de la saleté, etc. Ceci
causerait des infiltrations d’eau. Remplacez-le par un joint torique n euf.
≥ Après le remplacement du joint torique, la non-utilisation du boîtier pour une période
prolon gé e, l’o uverture du boîtier po ur in stallatio n de l’appareil photo, le
remplacement de la batterie, etc., vérifiez avec soin que le joint torique n’est ni
éraflé ni fendu. Puis, fermez le boîtier et vérifiez pour confi rmer l’ab s ence de toute
infiltration d’eau en l’ immergeant dans un bassin d’eau, une baignoire, etc. pendant
environ 3 minutes. (P36)
≥ Les joints toriques sont des produits consommables. Bien que la durée de vie des
joints toriques dépende de la manière dont ils sont entretenus, de la fr équence à
laquel le il s s on t u tili sé s e t d e le ur co nd iti on de r ang em en t, nous v ou s co nse il l ons de
les remplacer chaque année même si vous ne voyez aucune éraflure.
45
VQT1Q30
Page 46

Remarques sur l’utilisation de l’appareil (suite)
∫ Entretien
≥ N’utilisez pas les produits chimiques indiqués ci-dessous pour le nettoyage,
la protection antirouille, la protection antibuée ou la réparation. Leur usage
direct ou indirect (avec un vaporisateur chimique, etc.) sur le boîtier peut, à
haute pression, fissurer celui-ci.
Substan ce s chimiq ues Mises en garde
Solvants organiques
volatiles/Détergents
chimiques
Produits anticorrosifs
Produits antibuée
Adhésifs
≥ Si la graisse reste collée à l’appareil photo numérique, essuyez-la avec un linge
doux et sec.
≥ Pour essuyer l’int érieur du boîtier, utilisez uniquement un chiffon sec et doux.
Essuyez l’intérieur du verre avant avec ce chiffon, avant et après l’utilisation afin
qu’il reste propre.
Ne pas net toyer le boîtier au moyen de solvants
organiques volatiles comme l’alcool, le benzine ou
des diluants ou avec des détergents chimiques.
Nettoyez le boîtier avec de l’eau courante ou tiède.
Ne pas utiliser de produit s anticorrosifs car l es parties
en métal du boîti er sont en acier inoxydable ou en
laiton. Lavez-les à l’eau douce.
Ne pas utiliser de prod uits antibuée disponibles dans
le commerce. Veillez à utiliser le gel de silice indiqué
dans ce manuel d’utilisation.
Ne pas utiliser d’adhésifs pour la réparation. Si le
boîtier a besoin d’être réparé, con s ultez votre
revendeur.
46
VQT1Q30
Page 47

∫
À propos du rangement et de la vérification après
l’utilisation
≥
Retirez toujours l’appareil photo numérique du boîtier.
≥
Veillez à ce qu’aucune saleté ou poussière n’adhère au joint torique.
≥
Séchez bien le boîtier à température ambiante et le ranger dans un endroit frais à
l’abri de la lumière.
≥
Nous vous conseillons de faire vérifier le boîtier environ 3 ans après l’achat. Cette
vérification comprend le désassemblage et le nettoyage du boîtier, l’inspection de
tous ses éléments et leur réparation si nécessaire ainsi que la vérification de son
étanchéité en utilisant le même test hydrostatique que celui effectué avant l’achat.
Tous les frais de port sont à la charge du client.
≥
Ne désassemblez aucun élément, n’utilisez aucun accessoire qui ne serait pas
indiqué dans ce manuel d’utilisation et ne modifiez pas le boîtier. Si le boîtier ne
fonctionne pas correctement, consultez votre revendeur.
Spécifications
Modèles compatibles:
Poids:
Dimensions:
DMC-TZ5/DMC-TZ15/DMC-TZ4/DMC-TZ11(En
1/4
¢
)
oz
date de mars 2008
Envir on 434g/15
Environ 150 mm (L)k94 mm (H)k93 mm (P)
[5
15/16 po
(L)k3
3/4 po
(H)k3
11/16 po
(P)]
(parties en saillie non comprises)
Matière:
Structure étanche:
Polycarbonate
Fermetu r e j oint torique
Profondeur de
résistance à l’eau:
¢
Reportez-vous au manuel d’utilisation, au catalogue, au site Internet, etc.,
40 m/130 pieds
de l’appareil photo numérique pour les informations les plus récentes au
sujet des modèles qui peuvent être utilisés.
Panasonic Canada Inc.
5770 Ambler Drive,
Mississauga, Ontario
L4W 2T3
(905) 624-5010
www.panasonic.ca
Panasonic Corporation 2008
Imprimé au Japon
47
VQT1Q30
Page 48

Inhalt
Vor der Verwendung . . . . . . . . . . . . . . . . . . . . . . . . . . 49
Zubehör . . . . . . . . . . . . . . . . . . . . . . . . . . . . . . . . . . . . 51
Handhabung und Pflege . . . . . . . . . . . . . . . . . . . . . . . 52
Bauteile . . . . . . . . . . . . . . . . . . . . . . . . . . . . . . . . . . . . 54
Was ist der O-Ring? . . . . . . . . . . . . . . . . . . . . . . . . . . . 55
Vorbereitung -Einsetzen des O-Rings- . . . . . . . . . . . . 56
Vorbereitung -Kontrollieren, dass das
Gehäuse wasserdicht ist- . . . . . . . . . . 60
Vorbereitung -Anbringen der Digitalkamera- . . . . . . . 61
Aufnahme von Bildern . . . . . . . . . . . . . . . . . . . . . . . . . 64
Tipps zur Aufnahme von Bildern im Wasser . . . . . . . . 65
Nach Gebrauch . . . . . . . . . . . . . . . . . . . . . . . . . . . . . . 66
Reinigung und Aufbewahrung . . . . . . . . . . . . . . . . . . . 68
Vorsichtshinweise . . . . . . . . . . . . . . . . . . . . . . . . . . . . 69
Spezifikationen . . . . . . . . . . . . . . . . . . . . . . . . . . . . . . . 71
48
VQT1Q30
Page 49

DEUTSCH
Vor der V erwendung
≥ Dieses Unt erwas sergehäuse wurde für die Digitalkameras von P anasonic.
Sie können bis zu einer Wassertiefe von 40 m Spaß an Unterw asseraufnahmen
haben.
≥ Beim Eindringen von Wasser aufgrund Nachlässigkeit haftet Panasonic in keiner
Weis e für Schä den an jeglic hen im Geh äuse ent halte nen Pro dukt en (Dig ita lkame ra,
Batterien, Karte, etc.), Kosten für Fotografien oder sonstige Aufwendungen.
≥ Panasonic leistet außerdem keinen Schadenersatz für Unfälle, die zu Verletzungen
oder Sachschaden führe n.
≥ Lesen Sie dazu die Bedienungsanleitung zu Ihrer Digita lkamera.
≥ Bevor Sie die Digitalkamera anbringen, das Gehäuse ca. 3 Minuten oder
länger in Wasser tauchen, um zu überprüfen, ob kein Wasser eindringt.
∫ Zum Umgang mit diesem Gehäuse
≥ Ve rwendu ng unter den folgenden Bedingungen:
• Wassertiefe: Bis zu 40 m
• Umgebungstempe ra t ur: 0 oC bis 40 oC
≥ Das G eh äu se nicht in Wasser mi t einer Tempera tur über 40 °C verw en de n. Die
Wärme kann das Gehäuse beschädigen oder zum Ei ndringen von Wasser führen.
≥ Das Gehäuse besteht aus st oßfestem P olykarbonat. Seien Sie jedoch bei der
Benutzung v orsichtig, das es lei c ht zerkratzt, wenn Bi lder an felsigen Stellen, etc.
aufgenommen werden und kann durch Stöße wie durch Herunterfallen o.ä.
beschädigt werden. Bei Reisen im Auto, Schiff, Zug oder Flugzeug, das Gehäuse
gut verpacken, um jegliche direkte Stöße zu vermeiden, falls es herunterfallen sollte
und lassen Sie die Digit alkamera nicht im Gehäuse. Die Digitalkamera nur im
Gehäus e anbringen, wenn Sie di es e eine kurze Strecke lang, wi e z.B. vom
Flughafen zum Tauchort transportieren . (Das Verpac kungsmaterial aus dem Kauf
des Gehäuses kann nicht zum T ransportieren verwendet werden.)
≥ Beim Bestei gen ei nes Flug zeug s kann der Wec hsel des at mosph ärische n Druc k zur
Ausdeh n un g de s Ge häuse s f üh ren und da du rch z u B esc hädi gu ng en . En tf er nen Sie
den O-Ring, bevor Sie ein Flugze ug besteigen.
≥ Lassen Sie die Digitalkamera nicht längere Zeit in einem Auto, auf einem
Schiff oder direkter Sonneneinstrahlung ausgesetzt. Das Gehäuse ist eine
luftdichte Vorrichtung, daher wird die Temperatur darin sehr hoch und es
kann zu Funktionsstörungen der Digitalkamera kommen. Lassen Sie die
T emperatur im Gehäuse nich t zu hoch w erden.
49
VQT1Q30
Page 50

Vor der Verwendung (Fortsetzung)
∫ Verwendung des Gehäuses bei hohen oder
niedrigen Temperaturen
≥ Wenn Sie das Gehä use an feuchten oder heißen Orten öffnen und dann an einen
kühlen Ort oder unter Wasser bringen, kann e s im Innere n des Gehäu ses zu
Kondensation kommen, die G lasfläche sich trüben und die Di gitalkamera
beschädigt wer den.
≥ Wenn Sie da s G ehä us e plö t zl ic h v on e i nem ka lt en O rt od er ka l te m W a sse r an ei ne n
warmen Ort bringen, kann die Oberfläche sich trüben. Warten Sie mit dem
Aufnehmen von Bildern, bis sich das Gehäuse der Lufttemperatur angepasst hat.
∫ Zur Vorbereitung
≥ Öffnen oder schließen Sie das Gehäuse nicht, wo es Wasserspritzern
ausgesetzt ist oder Sand hineingeraten kann. Wir empfehlen das Öffnen oder
Schließen des G ehäuses in gesc hlossenen Räumen .
≥ Nehm en Si e da s E rs etz ender Batte r i e, de r Karte, et c. und das Anbr i ng en der
Digitalkamer a in gesc hlossenen Räumen vor, wo w enig Feuchtigkeit vorh anden is t.
≥ Wenn Sie das Gehäuse am Tauchort öffnen oder schließen müssen, um die
Batterie oder die Karte zu ersetzen, halten Sie unbedingt die unten
aufgeführten Schritte ein.
• Wählen Sie einen Ort, an dem kein Wasser auf das Gehäuse spritzen und kein
Sand in dieses gelangen kann.
• Entfernen Sie jegliche Wassertropfen im Zwischenraum zwischen vorderem und
hinterem Geräteteil und auf der Schnalle. Verbleibende Wassertropfen mit einem
trockenen Tuch sorg fältig abreiben.
• Sorgfäl tig jegliche Wassertropfen auf dem Körper und den Haaren tro ckenreiben.
• Achten Sie besonders auf Wasser aus den Ärmeln Ihres Taucheranzugs .
• Berühren Sie di e Di gi tal kam er a nich t, we nn I hre Hä nd e m it Sal zw ass er b ef eu ch te t
sind. Feuchten Sie zuvor ein Handtuch mit Süßwasser an und bringen Sie es in
einer Plastiktüte unter. Verwenden Sie dieses Handtuch, um jegliche
Wasser tr o pfen od er San d von H än de n un d Kör p er zu entfernen.
≥ Das Gehäuse ist nicht stoßfest. Wenn Sie einen schweren Gegen stand darauf
abstellen oder es Stöße erleidet, kann die Digitalkamera beschädigt werden. Seien
Sie bei der Verwendung des Gehäuses vorsichtig.
50
VQT1Q30
Page 51

Zubehör
Beim ersten Öff nen der Verpackung überprüfen, ob das Gehä use und
alle Zubehörteile enthal ten sind und dass keine V ersand- oder
T ransportschäden am Gehäuse oder an jeglichen Zubehörteilen
vorliegen. Bei Unregel m äßigkeiten wenden Sie sich v or der
Verwendung des Gehäuses an Ihren Händler.
Verwenden Sie keine anderen Zubehörteile al s die unten
aufgeführten.
O-Ring
VMG1798
Fett (für O-Ring)
VZG0372
Gewichte (2) , Schraube zum Befestigen der Gewichte
VXA8446
Diffusor
VYK2D90
≥
Sie können den Diffusor entfernen, wenn Sie ihn nicht verwenden.
Entfernen Anbringen
Mit der Kennzeichnung auf der Rüc kseite
des Gehäuses ausrich ten und anbring en.
Kieselgel
(Trockenmittel)
(1 g/5 Stück)
VZG0371
Handriemen
VFC4190
51
VQT1Q30
Page 52

Handhabung und Pflege
≥ Stellen Sie dieses Gehäuse nicht an ei nem instabilen Ort ab.
• Fällt das Gehäuse auf Kopf oder Füße, führt dies zu Verletzungen und zu
Funktionsstörungen des G ehäuses.
≥ Nehmen Sie keinerlei Veränderungen am Gehäuse v or.
• Wenn Wasser in d ie Digit alkamera eindringt, weil Änderungen am Gehäuse
vorgenommen wurden, kann die Digitalkamera irreparabel beschädigt werden.
• Wenn Sie die Digitalkamera weiter benutzen, nachdem in diese Wasser
einge drungen ist, kann dies einen Brand zur F olge haben.
≥ Verwenden Sie das Gehäus e ohne angeme ssene Einweisung nicht
beim Scuba-Tauchen.
• Sie sollten das Gehä us e n ur be im S cu ba- Tauchen ei nset z en , we nn Sie üb er ei ne
angemessene Ausbildung und einen Schein für diesen Sport verfügen.
≥ Das Gehäuse, das Fett, das Kieselgel und den O-Ring stets
außerhalb der Reichweite von Kindern aufbewahren.
• Geraten Körperteile von Kindern in das Gehäuse, kann dies zu Verletzungen
führen.
• Kinder können das Fett, das Kieselgel oder den O-Ring versehentlich
verschlucken.
• Suchen Sie umgehend den Arzt auf, wenn Sie annehmen, dass ein Kind Fett,
Kies elgel oder den O-R ing v erschluckt hat.
≥ Den Riemen unter Wasser nicht um den Hals hängen.
• Dieser könnte sich um den Hals winden und zu Ersticken oder schweren
Verletzungen führen.
≥ Die Hände sorgfältig von jeglichem Fett reinigen.
• Vermeiden Sie, dass Fett an Ihr en Händen in Kontakt mit Mund od er Aug en
gerät.
≥ Gerät Wasser in das Gehäuse, unter brechen Sie die V erwendung
umgehend.
• Dies kann sonst zu einem Stromschlag, Verbrennungen oder Brand führen.
• Verständigen Sie Ihren Händler.
≥ Bei unvorh ergesehenen Ereigni ssen während des Gebrauchs des
Gehäuses unter Was ser halten Sie sich beim Auft auchen bit te an alle
vorgeschriebenen Vorgehens w eisen und Richtlinie n zum
Druckausgleich.
• Wenn Sie zu schnell auftauchen, kann dies die Caissonkrankheit zur Folge
haben.
52
VQT1Q30
Page 53

≥ Wenn das Gehäuse Rauch oder anormal e Wärme, Gerüche oder
Geräusche erzeugt, unt erbrechen Sie die Verwendung unverzüglich.
• Diese können zu einem Stromschlag, Verbrennu ngen oder B rand führen.
• Entnehmen Sie die Digitalkamera aus dem Gehäuse und entfernen Sie dann
umgehend die Batterien.
• Verständigen Sie Ihren Händler.
≥ Beim Öffnen des Gehäuses nach dem Eintreten von Wasser
vorsichtig vorgehen.
• Das eingedru ngene Wasser kann herausgedrückt werden oder die
Gehäuserückseite abspringen.
≥ Lassen Sie das Gehäuse nicht an Orten mit hohen Temperaturen
zurück.
• Die Innentem pe r atu r des G ehäu se s e rre i cht beso nd ers ho he W erte , w e nn di es es
direkter Sonneneinstrahlung am Strand, auf einem Schiff, etc. ausgesetzt wird
oder wenn dieses im Sommer im geschlossenen Auto gelassen wird. Die Wärme
kann zu Beschädigung des Gehäuses oder seiner internen Teile führen .
• Wird eine Digitalkamera im Gehäuse angebracht, kann diese eb enso beschädigt
werden.
• Wenn Sie die dara n angebrachte Digitalkamera verwenden, w enn die
Innentemperatur des Gehäuses sehr hoch ist, kann dies zum Eindringen von
Wasser, Kurzschluss oder Ausfall der Isolierung und so zu Brand oder
Funktionsstörungen führen.
≥ Berühren Sie die Digitalkame ra oder die Batterie nicht mit f euchten
Händen.
• Dies kann zu Stromschlag oder Funktionsstörungen führen.
∫ Bei der Aufnahme von Bildern mit Blitzlicht
≥ Bei der Aufnahme von Bildern mit Blitzlicht können die Ecken des Bildes
vers chwommen sein oder das Bild kann nicht glei chmäßig ausgeleuchtet sein.
≥ Bei der Aufnah me von Bildern mit Blitzlicht ist der verfügbare Blitzlichtbereic h unter
Was s er gering er als auf dem Land.
53
VQT1Q30
Page 54

Bauteile
1. Zoom-Hebel
2. Riemenöse
(zum Anbringen de s in der
Lieferun g enthalten en
Handr ie m ens und des D iffusors)
3. Taste [E.ZOOM]
4. Auslösetaste
5. ON/OFF-Schalter
6. Modusschalter
7. Zubehörschuh für externes
Blitzgerä t von INON Inc.
8. Vorderes Gehäus e
9. Diffusor (beiliegend)
10. Vordere Glasscheibe
11. Auswahlschalter [REC]/
[WIEDERG.]
12. Funktionstastenbereich
(Lesen Sie die
Bedienungsanleitung zur
Digitalkamera fü r Details zu
jeder Tastenfunktion.
¢2
13. Hinteres Gehäuse
¢1
)
14. Schnalle
15. Sperrfreigabe-Schalter
¢1 Dieser Zubehörschuh ist für ein externes Blitzgerät von INON Inc.
vorgesehen.
Für Inf ormationen zu kompatiblen Blitzgeräten wenden Sie sich an INON Inc.
http://www.inon.co.jp/INON_WORLD_body.html
¢2 Je nach der verwendeten Digitalkamera können die Tastensymbole am
Unterwassergehäuse geringfügig voneinander abw eichen . Beachten Sie die
Tastensymbole an der Digitalkamera zum Gebrauch.
54
VQT1Q30
Page 55

Was ist der O-Ring?
≥ Der O-Ring ist eine wasserdichte Dichtung, die für Unterwasserkameras, Uhren und
Tauchausrüstungen verwend et wird.
≥ Der O-Ring erhält das Gehäuse wasserdicht, indem er den Zwischenraum
zwischen dem hinteren und vorderen Gehäuseteil abdichtet.
∫ Wie der O-Ring das Gehäuse wasserdicht erhält
Hinteres Gehäuse
Digital-Kamera
O-Ring
Vorderes Gehäuse
Das Gummi befindet sich in Kontakt mit den G ehäuseseiten, macht das
Gehäuse so wasserdicht und verhindert, dass über den Zwischenraum
Wasser ei ntritt.
Wasser
O-Ring O-Ring
Wasserdruck
Wird der O-Ring durch den Wasserdruck zusammengedrückt, dehnt
sich dessen Oberfläche aus und das Gehäuse wird so noch besser
abgedichtet.
Der O-Ring verhindert das Eindringen von Wasser durc h den
gleichmäßigen Kontakt mit den Gehäuseseiten. Daher ist die
korrekte Pflege des O-Ri ngs sehr wichtig. Fehler hafte Pflege
kann zum Eindringen von Wasser führen.
55
VQT1Q30
Page 56

Vorbereitung -E insetzen des O-Rings-
Setzen Sie vor dem Anbringen einer Digitalkamera unbedingt zuerst
den O-Ring ein.
Waschen und tro ck nen Sie Ihre Hän de v or der Handhabung des O-Rings
gründlich. Den O-Ring an eine m sand - und stau bfreien Ort einsetzen.
1
Den O-Ring zum Entfernen mit den Fingern lösen.
≥ Einen Teil des O-Ring s mi t z wei Fi nger sp i tze n lö se n un d dann de n ge lö sten Teil
anheben. Dara uf achten, dass keine Kratze r durch F ingernägel am O-Ring
entstehen.
O-Ring
O-Ring
∫
Hinweis
≥ Verwenden Sie keine spitzen Gegenstände zum Entfernen des O -Rings, da er
dadurc h beschädigt werden könnte.
56
VQT1Q30
Page 57

2
Prüfen des O-Rings.
≥ Kontrollieren Sie, dass kein Schmutz, Sand, keine Haare, Salzkristalle, Fusseln
oder altes Fett auf dem O -Ring v orhanden sind. Stellen Sie dies fest, diese mit
einem weichen, trockenen Tuch ent fernen.
3Schmutz
3Salzkristalle 3Fusseln
3Sand
3Haare
3Staub
≥ Es kann sich nicht erk ennbarer Schmutz auf dem O-Ring befinden.
Kontrolli eren Sie den O-Rin g auf Schmutz, in dem Sie mit dem Fing er darüber
fahren.
≥ Achten Sie darauf, dass nach dem Abreiben keine Fasern des trockenen Tuchs
auf dem O-R in g zurückbleiben.
≥ Kontrollieren, dass der O-Ring nicht gerissen, verdreht, gequetscht, rissig oder
zerkratzt ist und kein Sand daran haftet. In diesen Fällen den O-Ring ersetzen.
3Risse
3Kratzer 3
3
Die Nut des O-Rings überprüfen.
3Verdrehung
Staub,
anhaftender Sand
3Quetschung 3Abblättern
≥ Sandkörner oder hart gewordene Salzkristalle können in die Nut des O-Rings
gelangen. Diese vorsichtig durch Aufsp rühen von Luft oder mit einem
Baumwolltuch entfernen. Wenn Sie ein Baumw olltuch verwenden , achten Sie
darauf, dass dessen Fasern nicht in der Nut des O-Rings zurückbleiben.
57
VQT1Q30
Page 58

Vorbereitung -E insetzen des O-Rings- (Fortsetz ung)
4
Überprüfen Sie die gegenüberl iegende Seite des O-Rings auf
dieselbe W eise.
5
Tragen Sie das Fett auf (beiliegend).
≥ Tragen Sie eine reiskorngroße Fettmenge (beiliegend) gleichmäßig mit der
Finger k uppe auf den O- R ing auf.
≥ Schmutz oder Staub bleiben am O-Ri ng haften, wenn Sie zu viel Fett a uftragen.
≥
Verwenden Sie nur das angegebene Fett. Bei Verwendung anderer
Fettarte n ka nn die Ober flä che des O-Rings beschädigt we rden und zum
Eind ringen von Wasser führen.
≥ T ragen Sie das Fett nicht mit Papier oder Stoff auf. Die Papier- oder Stofffasern
können am O-Ri ng haften bleiben.
6
Den O-Ring gleichmäßig in seine Nut einsetzen.
Kontrollieren Sie Folgendes:
≥ Dass kein Schmutz am O-Ring haftet.
≥ Dass der O-Ring nicht heraustritt.
≥ Dass der O-Ring nicht verdreht ist.
≥ Dass der O-Ring nicht zu stark gedehnt ist.
Richtig
58
VQT1Q30
Falsch
Page 59

7
Letzte Überprüfung des O-Rings.
Über p rüfen Sie Folgen de s erneut:
≥ Dass kein Schmutz am O-Ring haftet.
≥ Dass der O-Ring nicht heraustritt.
≥ Dass der O-Ring nicht verdreht ist.
≥ Es sind keine Kratzer oder Quetschungen am O-Ring vorhanden.
Jegliches Fett mit einem trockenen Tuch sorgfältig von denn Händen
wischen und dann die Hände mit Wasser waschen.
8
Schließen Sie die Schnalle.
1
≥ Kontrollieren, ob kein Fremdmaterial an der Außenoberfläche des O-Rings oder
der Schnalle an der vorderen Gerätese ite haftet und da nn das Geh äuse
schließen.
∫
Hinweise
≥ Um das Gehäuse vollkommen luftdicht zu halten, Kratzer auf der Oberfläche des
O-Rings vermeiden, die mit den Gehäuseseiten in Kontakt kommt.
≥ Nie einen O -Ring verwenden, der durch Schmutz, etc. zerkra tzt oder beschädigt
wurde. Dies führt zum Eindringen von Wasser.
≥ Bei jeder V erwendung des G ehäuses den O-Ring entfernen und kontrollieren, dass
sich kein Schm utz, San d, Haare oder anderes Fremdmaterial in der Nutz des
O-Rings befindet und dann einen dünne S chicht Fett (beiliegend) auftragen. Wird
zu viel Fett aufgetr agen, können Schmutz und Staub am O-Ring haften bleiben und
zum Eindri ngen von Wasser führen.
≥ Nehmen Sie zur Sicherheit einen O-Ring als Ersatz mit, sollte der benutzte
beschädigt oder verkr atzt sein.
2
59
VQT1Q30
Page 60

Vorbereitung
-Kontrollieren, dass das Gehäuse wasserdicht ist-
Nach dem Einsetzen des O-Rings überprüfen, dass kei n W asser in das
Gehäuse eindringt, indem Sie es 3 Minuten lang in einen Wassertank,
eine Badewanne, etc. Eintauchen, bev or Sie die Digitalkamera
anbringen.
≥ Das G eh äu se nicht in Wasser mi t einer Tempera tur über 40 °C verw en de n. Die
Wärme kann das Gehäuse beschädigen oder zum Eindringen von Wasser führe n.
‘
Denselben Te st nach dem Anbringen der Digitalkamera im Gehäuse
durchführen. (P 61)
∫
Hinweise
≥ Steigen Blasen vom Gehäuse auf, wenn es unter Wasser getaucht ist oder befindet
sich Wasser im Gehäuse, wenn Sie es aus dem Wasser nehmen, ist es nicht
wasserdicht. Wenden Sie sich in diesem Fall an Ihren Händler .
≥ Gerät während der Verwendung Wasser in das Gehäuse und die Digitalkamera wird
ins Wasser getaucht, unverzüglich die Batterie entfernen. Wasserstoff kann zu
Brand oder Explosion führen, wenn sich offenes Feuer in der Nähe befindet.
≥ Wenn Sie schnell ins Wasser ta uchen, während Sie das Gehäuse halten ode r das
Gehäuse von einem Schiff ins Meer werfen, kann es durch den hohen Druck zum
Eindringen von Wasser kom men. Hierbei handelt es sich nicht um eine
Funktionsstörung des Gehäuses. Tauchen Sie stets langsam ins Wasser ein.
≥ Das Gehäuse ist darauf ausgelegt , auf einer Tiefe von bis zu 40 m verwen det zu
werden. Wenn Sie tiefer als 40 m tauchen, können Teile des Gehäuses irreparabel
beschädigt wer den.
≥ Beim Schließen des Gehäuses darauf achten, dass keinerlei Fremdmaterial
zwischen den O-Ring und die Nut des O-R ings gelangt. Auf eine Haarsträhne oder
ein Sandkorn kann zum Eindringen von Wasser führen.
60
VQT1Q30
Page 61

Vorbereitung -Anbringen der Digitalkamera-
Stellen Sie sicher, dass der ON/OFF-Schalter der Kamera auf [OFF] steht
und der Auswahlschalter [REC]/[WIEDERG.] auf [
≥ Den R iem e n von de r Di git alkamera en tfe r ne n.
1
Drücken Sie 2 mit dem Finger nach oben, während 1 zum Öffnen
der Schnalle verschoben wird.
!
] gestellt ist.
1
2
Die Digitalkamera am Gehäuse anbringen.
2
1
≥ Achten Sie darauf, den Sonnenschutzring 1 nicht zu entfernen.
3
Legen Sie das Kieselgel ein (beiliegend).
≥ Stets neues Kieselgel verwenden.
Kieselgel
61
VQT1Q30
Page 62

Vorbereitung -Anbringen der Digitalkamera- (Fortsetzung)
≥ Beim Einlegen des Kieselgels, dieses wie in der Abbildung unten biegen
und dann so weit wie möglich einschieben. Schließen Sie das Gehäuse
bei nicht vollständig eingeschobenem Kieselgel, gerät dieses in den
O-Ring und führt zum Eindringen v on Wasser.
≥ Bei hoher L uf t- un d ni ed ri ger Wassertemp eratur kan n im I nner e n d es Ge hä uses
Kondensation auftreten. Um Kondensation vorzubeugen, sicherstellen, dass
das Kieselgel (beiliegend) nicht mit dem Objektiv der Digitalkamera in Kontakt
kommt. Um ein Beschlagen des Gehäuses zu vermeiden, das Kieselgel ca.
1 bis 2 Stunden vor dem Verwenden des Gehäuses einlegen.
4 Schließen Sie die Schnalle.
1
Kontrollieren Sie, ob die Schnalle fest verschlossen ist.
‘
Nicht den Gurt usw. in die Schnalle einführen.
2
5 Nach dem Anbringen der Digital kamera ein weiteres Mal überprüf en,
ob kein Wasser in das Gehäuse eindringt. (P60)
62
VQT1Q30
Page 63

∫ Hi nweise
≥
Ein wei teres Mal überprüfen, ob d er O-Ring gleichmäßig in di e Nut des O-Rings
eingesetzt is t.
≥ Ve rmeiden Si e das Öffnen und Schließen des Gehäuses an Orten mit viel Sand
oder Staub oder feuchten oder nassen S tellen.
≥ Bei einem plötzlichen Temperaturwechsel kann Kondensation im I nneren des
Gehäuses auftreten.
≥ Gerät Sonnenschutzmittel oder –öl auf das Gehäuse, dies unverzüglich mit
lauwarmem Wa sser abw aschen, um einer verringerten W asserdichtigkeit oder
Entfärbun g vorz ubeugen.
∫ Anbringen der Gewichte
Benutzung der Gewic hte
Bringen Sie die Gewichte an, um den gewünschten Auftrieb bei Benutzung des
Unterwassergehäuses zu korrigieren. Verwenden Sie sie bei Bedarf.
Beachten Sie zum Auftrieb unter Wasser:
1 Wenn Sie nur die Digitalkamera und das Unterwassergehäuse benutzen,
dass diese geringfügig in Süß - od er Sal zw as s er schwimme n. (positi ver Auf tri eb)
2 Wenn Sie die Digitalkamera, das Unterwassergehäuse und 1 Gewicht benutzen,
dass diese noch geringfügiger in Süß- oder Salzwasser schwimmen, als bei
(positiver Auftrieb)
1.
3 Wenn Sie die Digitalkamera, das Unterwassergehäuse und 2 Gewichte benutzen,
dass diese geringfügig in Süß- oder Salzw asser sinken. ( negativer Auftrieb)
Anbringen der Gewichte
Richten Sie bei Benutzung 1 Gewichts dessen
vorstehenden Teil zum Stativanschluss des
Unterw asse rgehä uses aus und ver wen den Si e
dann die beiliegende Schraube zum
Befestigen. Richten Sie bei Benutzung von 2
Gewichten des vorstehenden Teil des zweiten
Gewichts zur Einkerbung des ersten Gewicht s
aus, s o dass sich die Gewichte nicht
überlappen, und bringen Sie am
Stativa ns c hl us s an .
∫ Hi nweis
≥
Entfernen Sie die Gewi chte nach dem Gebrauch, sä ubern Sie sie von Salz und
bewahren Sie sie dann auf, um die Ausbildung von Rost zu ver hindern.
63
VQT1Q30
Page 64

Aufnahme von Bildern
∫ Vor der Aufnahme von Bildern unter Wasser
Vor dem Tauchen Folgendes überprüfen.
≥
Verbleibt ausreichend Batterieleistung?
≥ Ist ausreichend Speicher auf der Kart e?
≥ Ist de r O-R in g gleichm äßig in die Nut de s O- R in gs eingesetz t?
≥ Haben Sie kontrolliert, dass kein Wasser in das Gehäuse eindringt?
≥ Ist die Schnalle fest verschlossen?
∫ Aufnahme von Bildern
1 Schalten Sie die Kamera ein.
Drücken Sie 1, um die Sperre freizugeben
und stellen Sie die Kamera auf [ON].
Drücken Sie 2 zur Verriegelung.
1
OFF
ON
2
OFF
ON
2 Das Szenenmodus-Menü einblenden und [UNTER WASSER]
einstellen.
≥
Lesen Sie wegen Details in der Bedienungsanleitung der Digitalkamera nach.
3 Den AF-Bereich auf dem LCD-Monitor auf das scharfzustellende
Objekt richten.
4 Drücken Sie 2 ( /AF-L) zum Scharfstellen.
• Drücken S ie erneut 2 (/AF-L) zum Löschen.
5 Die Auslösetaste ganz drücken, um das Bild aufzunehmen.
∫ Hi nweise
Vor dem A nbringen der Kam era am Geh äuse em pfehle n wir das erneute Einstellen der
≥
Uhr. (Lesen Sie wegen D etails in der Bedienungsanleitung der D igitalkam era nach.)
≥ Befinden sich schwebende Teilchen vor der Kamera, kann die Scharfeinstellung auf
diese anstatt auf das Objekt erfolgen.
≥ Befinden sich Wassertropfen oder Schmutz auf der vorderen Glasscheibe, kann die
Scharfeinstellung vielleicht nicht korrekt erfolgen. Achten Sie darauf, die vordere
Scheibe vor der Aufnahme abzureiben.
64
VQT1Q30
Page 65

Tipps zur Aufnahme von Bildern im Wasser
Das Bild ist im Wasser zu bläulich
1 Drücken Sie 3( ) mehrmals, bis [ ] erscheint.
2 Drücken Sie 2 (/AF-L)/1 ( ), um den Weißabgleich einzustellen.
3 Drück en Sie [MENU/SET], um zu beenden.
≥ Sie könne zum Beenden auch die Auslösetaste halb drücken.
Wählen Sie das beste Bild
Stellen Sie den Flash auf [ ].
Gebra uch der Auto Bracket-Funktion (bei Modellen mit Auto Bracket-Fun k tion)
≥ Bei jedem Dr ücke n der Au slösetaste werden automatisch 3 Bilder mit
vers chiedener Belic htung aufgenomme n. Sie können das gewünschte Bild
unter den 3 Bildern aussuchen.
Verwendung des Burst-Modus
≥ Beim Aufnehmen von Bildern eines sich schnell bewegenden Objektes (ein
Clownfisch, usw .), können Sie das von Ihnen bevorzugte Bild nach der
Aufnahme im Burst-Modus auswählen.
∫
Hinweis
≥ Für weitere Informationen siehe Bedienungsanleitung der Digitalkamera.
65
VQT1Q30
Page 66

Nach Gebrauch
Nach der Bildaufnahme die folgenden Schritte ausführen.
1
Das Gehäuse ca. 30 Minuten oder mehr in Süßwasser tauchen, ohne
die Digitalkamera zu entfernen, um jegliche Salzkristalle, etc . zu
entfernen.
≥
Alle Bedienknöpfe etc. auf dem Gehäuse drücken, um jegliches
Salzwasser zu entfernen. Werden die Salzkristalle nicht von den Knöpfen,
etc. Entfernt, werden diese hart und mit der Zeit unbenutzbar.
≥
Das Gehäuse nicht unter fließendem oder unter Druck stehendem Wasser,
o.ä. waschen, da dies zum Eindringen von Wasser führen kann.
2
Das Wasser mit einem trock enen Tuch abreiben, an dem keine
Salzkristalle haften und dann vollkommen trockenreiben.
≥ Das Gehäuse nicht durch dir ekte Sonneneinstrahlung trocknen. Dies kann das
Gehäus e entfärben od er be sc hädigen od er den Verschleiß de s O-Ri ng s
beschleunigen.
66
VQT1Q30
Page 67

3
Die Geräterückseite öffnen, um die Digitalkamera zu entfernen.
4
Den O-Ring aus dem Gehäuse entfernen und sicherstellen, dass
keine Rückstände, o.ä. in der Nut des O-Rings vorhanden sind.
5
Beim Auftragen des Fetts überprüf en, ob sich keine Kratzer, etc. auf
dem O-Ring befinden.
∫
Hinweise
Achten Sie beim Entfernen der Digitalkamera aus dem Gehäuse darauf,
dass diese nicht nass wird.
≥ Die Kamera mit sauberen Händen entfernen. (Hände mit Süßwasser waschen und
sorgfältig abtrocknen.)
≥ Trocknen Sie jegliche Feuchtigk eit auf Körper und Haar sorgfältig ab. (Achten Sie
insbesondere auf aus den Ärmeln des Taucheranzugs aust retend es Wasser. )
≥ Bei besonders schlechten Wetterbedingungen und hohen Wellen, eine Stelle
auswählen, an der di e Digitalkamer a nicht nass werden kann, z.B. in Innenräumen
oder an überdachten Plätzen.
67
VQT1Q30
Page 68

Reinigung und Aufbewahrung
Die Außenseite des Gehäuses mit Wasser abwaschen.
1
≥ Die Auße nseite des Gehäus es mit Wasser sauberwaschen. (P66)
≥ Vergewissern Sie si ch, dass das Gehäus e geschlossen ist und waschen Sie
dann di e Außen s eite nur mit Wasser.
≥ Jeglichen Schmut z im Inneren des Gehäuses mit einem nassen, weichen Tuch
abreiben.
∫
Hinweise
≥ Das Gehäuse nicht mit unter hohem Druck stehenden Wasser abwaschen, da dies
zum Eindringen von Wasser führ en kann. D ie Digi talkam era entfernen, bevor Sie
das Gehäuse mit Wasser reinigen.
≥ Lassen Si e die Digitalkamera zur Aufbewahru ng nicht im Gehäus e.
≥ Ve rwahren Sie das Gehäuse an einem kühlen, gut belüfteten Ort.
68
VQT1Q30
Page 69

Vorsichtshinweise
∫ Handhabung des O-Rings
≥ Verwenden Sie weder Alkohol, Verdünner, noch chemische Reinigungsmittel
zum Reinigen des O-Rings. Dies führt zu Beschädigungen oder einem
schnelleren Verschleiß des O- Rings.
≥ Wenn Sie das Gehäuse für länge re Zeit nicht verwenden, de n O-Ring aus
seiner Nut entfernen, eine dünne Schicht Fett (beiliegend) auftragen, in einem
sauberen Plastikbeutel unterbringen und dann an einem kühlen, dunklen Ort
lagern, um ein Beschädigen der Oberfläche zu verhindern. Wenn Sie den
O-Ring erneut benutzen, untersuchen Sie vorher, ob dieser keine Kratzer oder
Risse aufweist.
≥ Verwenden Sie nur das angegebene Fett. Bei Verwendung anderer Fettarten
kann die Oberfläche des O-Rings beschädigt werden und es kann zum
Eindring en von Wasser kommen.
≥ Der O-Ring kommt mit den Geräteseiten in Kontakt und macht das Gehäuse
wasserdicht. Nicht gegen den O-Ring oder die Geräteseiten stoßen,
Fremdmateri alien hineingeraten lassen (S chmutz, Sand, Haar, etc.) oder den
O-Ring oder die Seiten des Gehäuses verkratzen.
≥ Verwenden Sie die Fingerspitzen, um den O-Ring zu entfernen. Verwenden Sie
keine sp itze n G eg enstände, da di es e den O -R in g ver k ratzen könnten .
≥ Nach dem Entfernen des O-Ri ngs aus der Geräterückseite je glichen Schmutz,
Sand, H aare oder andere Fremdm aterialien darauf abreiben. Ebenso die Nut des
O-Rings und die Innenseiten der Vorderseite des Gehäuses abreiben, die mit dem
O-Ring in Kontakt kommen.
≥ Nie einen O -Ri ng v er w en den , de r d urc h S ch mu tz, o . ä. b esc hä di gt w urd e . Dies ka nn
zum Eindringen von Wasser führ en. Durch einen neuen O-R ing ersetzen.
≥ Nach dem Ers etzen eines O-R ings, längerem Nichtgebrauch des Gehäu s es oder
Öffnen des Gehäuses zum Anbringen einer Digitalkamera, Ersetzen der Batterie,
etc. Sorg f ä lti g ü berp rüf e n, ob de r O-R ing ni ch t z erkr a tzt ode r ge ri ssen i st . Da nn das
Gehäuse schließen und kontrollieren, dass kein Wasser eindringt, wenn Sie es ca.
drei Minuten in einen Wassertank, eine Badewanne o.ä. eintauchen. (P60 )
≥ O-Ring sind Verbrauchsmaterialien. Obwohl die Lebens dauer von O-Ri ngen davon
abhängt, wie gut sie ge wartet und wie oft sie benutzt werden und von ihr en
Lagerbedingungen, empfehlen wir, diese einmal im Jahr zu ersetzen, auch wenn
Sie keine K rat zer erkennen kön ne n .
69
VQT1Q30
Page 70

Vorsichtshinweise (Fortsetzung)
∫ Zur Wartu ng
≥ Verwenden Sie keine der unten gezeigten Chemikalien zum Reinigen, als
Rostschutz, zum Entfernen des Beschlags oder für Reparaturen. Durch deren
direkte oder indirekte Verwendung (in einem chemischen Spray o.ä.) kann das
Gehäuse unter hohem Druck Risse bekommen.
Verbotene Chemikalien Vorsichtsmaßnahmen
Flüchtige organische
Lösungsmittel/
Chemische
Reinigungsmittel
Korrosionsschutzmittel
Mittel zum Schutz gegen
T rübung
Klebstoffe
≥ Haftet Fett an der Digitalkamera, reiben Sie es mit einem weichen, trockenen Tuch
ab.
≥ Zum Abreiben der Innenseite des Gehäuses nur ein weiches, t rockenes Tuch
verwenden. Die Inne nseite der vorderen Glasscheibe vor und nach dem Gebrau ch
mit einem weichen, trockenen Tuch abreiben, um das Glas sauber zu halten.
Reinigen Sie das Geh äu se nich t mit flüchtigen
organischen Lösungsmitteln wie Alkohol, Be nzin oder
V erdünne r bzw . chem ischen Reinigun gsmitteln. R einigen
Sie es mit Süßwasser oder lauwarmem Wasser.
V erw enden Sie keine K o rrosionsschutzmittel, da die
Metallteile an diesem Gehäuse aus ro stfreiem S tahl od er
Messing bes tehe n. R einig en Sie diese m it Süßw a s ser .
Verwend en S ie kei ne h and elsü b lichen Wirkstoffe gegen
Trübung von Glas. Verwenden Sie unbedingt das in dieser
Bedienungsanleitung angegebene Kieselgel.
Verwenden Sie keine Klebstoffe zum Reparieren. Ist
eine Reparatur des Gehäuses erforderlich,
verständigen Sie Ihren Händler.
70
VQT1Q30
Page 71

∫ Zur Aufbewahrung und Inspektion nach der Benutzung
≥ Die Digitalkamera stets aus dem Gehäuse nehmen.
≥ Vergewissern Sie si ch, dass kein Schmutz oder Staub am O-Ring haftet.
≥ Trocknen Sie das Gehäuse bei Raumtemperatur un d verwahren Sie es dann an
einem kü hlen, dunklen Ort.
≥ Wir empfehlen eine Inspektion des Gehäuses ca. 3 Jahre na ch Erwerb. Diese
Inspektion umfasst da s Zerlegen und Reini gen des Gehäuses, Inspizieren aller
Teile und deren Reparatur, wenn erforderlich und die Überprüfung der
Wasserdichtigkeit des Gehäuses unter Verwendung derselben hydrostatischen
Testausrüstung, die vor dem Kauf ei ngesetzt wurde. Alle Transportk osten sind vom
Kunden zu tragen.
≥ Keinerlei Teile zerlegen und kein Zubehör verwenden, das nicht in der
Bedienungsanleitung aufgeführt ist und keine Verän derungen am Gehäus e
anbringen. Bei Funktionsstörungen des Ge häuses v erständigen Sie Ihren Händler.
Spezifikationen
Kompatibles Modell: DMC-TZ5/DMC-TZ15/DMC-TZ4/DMC-
TZ11 (gültig ab März 2008
¢
)
Gewicht: Ca. 434 g
Abmessungen : Ca. 150 mm (W)k94 mm (H)k93 mm (D)
(ohne hervorstehenden Teil)
Material: Polykarbonat
Wasserdicht gebaut: O-Ring-Dichtung
Wasserdicht bis: 40 m
¢ Für die neuesten Informationen zu den verwendbaren Modellen, siehe in
der Bedienungsanleitung, im Katalog, auf der Internetseite, usw. zur
Digitalkamera.
VQT1Q30
71
Page 72

Indice
Antes del uso . . . . . . . . . . . . . . . . . . . . . . . . . . . . . . . . 73
Accesorios . . . . . . . . . . . . . . . . . . . . . . . . . . . . . . . . . . 75
Manejo y Cuidado. . . . . . . . . . . . . . . . . . . . . . . . . . . . . 76
Componentes . . . . . . . . . . . . . . . . . . . . . . . . . . . . . . . . 78
¿Qué es el anillo tórico?. . . . . . . . . . . . . . . . . . . . . . . . 79
Preparación -Ajuste del anillo tórico-. . . . . . . . . . . . . . 80
Preparación -Control de lo impermeable
del estuche-. . . . . . . . . . . . . . . . . . . . . . 84
Preparación -Unión de la cámara digital- . . . . . . . . . . 85
Sacar imágenes . . . . . . . . . . . . . . . . . . . . . . . . . . . . . . 88
Consejos para sacar imágenes en el agua. . . . . . . . . . 89
Después del uso. . . . . . . . . . . . . . . . . . . . . . . . . . . . . . 89
Limpieza y almacenamiento . . . . . . . . . . . . . . . . . . . . . 91
Precauciones para el uso . . . . . . . . . . . . . . . . . . . . . . . 91
Especificaciones. . . . . . . . . . . . . . . . . . . . . . . . . . . . . . 93
72
VQT1Q30
Page 73

ESPAÑOL
Antes del uso
≥ Este estuche marino ha sido diseñado para las cámaras digitales de Panasonic.
Puede gozar de la toma de imágenes submarinas a una profundidad hasta 40 m.
≥ En el caso de infiltración debida a escaso cuidado, Panasonic no se responsabiliza
por los daños padecidos por cualquier producto (cámara digital, baterías, tarjeta,
etc.) que quepa en este estuche, los costes fotográficos o cualquier otros gastos.
≥ Panasonic no proporciona ninguna compensación por accidentes que condujesen a
heridas o daños a la propiedad.
≥ Lea las instrucciones de funcionamiento de su cámara digital.
≥ Antes de unir la cámara digital, sumerja el estuche en el agua durante
3 minutos o más para comprobar que no haya infiltración de agua.
∫ Acerca del manejo del estu ch e
≥ Utilice teniendo en cuenta las siguientes condiciones.
• Profundida d del agu a: H as ta 40 m
• Temperatura ambiente: 0 oC a 40 oC
≥ No use el estuche en agua por en cima de los 40 °C. El calor puede dañar el
estuch e o causar infiltración de agua.
≥ El estuche está hecho de policarbon ato resi stente al impacto, sin embargo ponga
cuidado cuando lo va a usar. Él puede arañarse fácilmente cuando toma imágenes
en luga res con escollos etc. y pued e dañarse por el impacto debido a caída etc.
Cuando viaja en coche, buque, avión embale con esmero el estuche para evitar un
impact o directo en el caso de que se caiga y no deje la cámara digital d entro del
estuche. Sólo una la cámara digital al estuche cuando la lleva por cortas distancias
como la del aeropuerto al lugar del buceo (para transportarlo, no puede volver a
usar el material con el que fue embalado al momento de la compra).
≥ Cuando se embarca en un avión, el camb io de presión atmosférica podría hacer
expandir el interior del estuche causándole daño. Quite el anillo tórico antes de
embarc arse en un avión.
≥ No deje la cámara digital en el estuche por largos períodos de tiempo dentro
de un coche, un buque, o bien expuesto a la luz directa del sol etc. El estuche
es un dispositivo estanco al aire así que la temperatura dentro del estuche va
a subir mucho y la cámara podría dejar de funcionar correctamente. No deje
que la temperatura dent ro del estuche aumente demasiado.
73
VQT1Q30
Page 74

Antes del uso (continuación)
∫ Uso del estuche a altas o bajas temperaturas
≥ Si abre o cierra el estuche donde haya humedad o calor y luego va a un lugar frío o
bien va a bucear, podría tener lugar condensación dentro del estuche, ponerse
empañada la supe rficie del cristal y dañar s e la cámara digital.
≥ Si de repente desplaza el estuche de un lugar, o agua, frío a uno caliente, podría
empañarse la superficie del cris tal. Esp ere hasta que el est uche se acerque a la
temperatura del aire antes de tomar la s imágen es.
∫ Acerca de la preparación
≥ No abra el estuche ni lo cierre donde puede rociarse por el agua o done pueda
entra arena en él. Le reco mendamos que lo abra o lo cierra en casa.
≥ Reemplace la batería, la tarjeta etc. y una la cámara digital en casa donde haya
poca hu me da d.
≥ Si tiene q ue abrir o cerrar el estuche en lug ares de b uceo para reemplazar la
batería o la tarjeta, tenga cuidado de seguir los pasos siguientes.
• Elija un lugar do nde el e stu che no p ue da ser rociado co n agua o en t rar arena en
su interior.
• Quite so pl an do cu alquier gota de ag ua en el esp ac io e ntr e la parte delante ra y la
trasera del estuche y en la hebilla. Saque enteramente las gotas que quedan de
agua con un trap o seco.
• Seque enter amente cualquier gota d e agua de s u cuerpo o pelo.
• Ponga cuidado en el agua que pueda ca er de las mangas de su traje térmico.
• No toque l a cámara dig ital si sus manos es tán mojad as de agua del mar. Moje
una toal la con ag ua fres ca y la co loque e n una bol sa de pol iéste r de antem ano.
Emplee esta toalla para sacar las gotas d e agua o arena de su mano o cuerpo.
≥ Este estuche no absorbe los golpes. Si coloca un objeto pesado encima del
estuche o lo golpee, la cámara digital podría dañarse. Ponga cuidado cuando usa el
estuche.
74
VQT1Q30
Page 75

Accesorios
Cuando antes abre el paquete, asegúrese de que estén incluidos
tanto el estuche como todos los accesorios y de que ambos no
hayan padecido daño alguno durante la distribución o el transporte.
En el caso de que encontrase algo insólito, llame a su comerciante
antes de utilizar el est uche.
No utilice ningún accesorio salvo los detallados a continuación.
Anillo tórico
VMG1798
Grasa (para el anillo
tórico)
VZG0372
Pesos (2) , Tornillo de unió n de los pesos
VXA8446
Difusor
VYK2D90
Silica ge l (D es e ca nte )
(1 g/5 piezas)
VZG0371
Correa de mano
VFC4190
≥ Puede quitar este difusor cuando no lo utiliza.
Remoción Unión
Alinee la marc a de la parte tr ase ra
del estuche y únalo.
75
VQT1Q30
Page 76

Manejo y Cuidado
≥ No coloque el estuche donde pueda caerse.
• Por si se c ae el estuche en su cabeza o pie, él herirá a uste d y causará al
estuche un funcionamiento defectuoso.
≥ Nunca modifique el estuche.
• Si se filtra agua dentro de la cámara debido a que el estuche fue modificado, la
cámara digital podría dañarse sin posibilidad de ser reparada.
• Si sigue utilizando la cámara digital después de filtrarse agua en ella, eso podría
hacerl a inc endiar.
≥ No utilice el estuche para el buceo sin adecuado adiestram iento.
• El estuche tendría que ser hecho funcionar en el buceo sólo si us ted tiene
adecuado entrenamiento y certificación para este deporte.
≥ Nunca deje el estuche, la grasa, el sili cagel o el anillo tórico al
alcance de los niños.
• Si el estuche agarra una cualquier parte del cuerpo del niño puede causarle heridas.
• Los niños po drían por c asualidad tragarse la grasa, el silicagel e el anillo tórico.
• Llame de inmediato a un médico por si duda que el niño pueda haberse tragado
la grasa, el silicagel o el anillo tórico.
≥ No cuelgue la correa alrededor de su cuello cuando está sumergido
en el agua.
• Ésta podría envolverse a lre de do r de s u c ue ll o c aus ándo le so f oca ci ón u o tr a s eria
herida.
≥ Limpie toda grasa de sus manos.
• Con sus manos untadas de grasa no frote su boca ni sus ojos.
≥ Por si se filtra agua en el estuche, deje de usarlo de inmediato.
• Eso puede causar una descarga eléctrica, una quemadura o un incendio.
• Llame a su com erc ia nte.
≥ Si ocurre algo anómalo mientras que est á utilizando el estuche
sumergido en el agua, cuando sube siga todos los necesarios
procedimientos y líneas de guía para la descompresión.
• Si sube demasiado rápido, puede contraer la enfermedad del buzo.
≥ Si del estuche sale humo o calor anómalo, olor o sonido, déjelo de
usarlo de inmediato.
• Eso puede causar una descarga eléctrica, una quemadura o un incendio.
• Saque la cámar a digital fuer a del es tuche y, de inmediat o, quite la batería de la
cámara digital.
• Llame a su com erc ia nte.
≥ Ponga cuidado cuando abre el estuche después de una infilt ración
de agua.
• El agua penetrada podría hacerlo reventar o podría volcar el estuche trasero.
76
VQT1Q30
Page 77

≥ No deje el estuche donde hay una lata temperatura.
• La temperat ura dentro del estuche aumenta mucho sobre todo cuando éste est á
expuesto a la luz directa del sol en una playa, un buque etc. o bien cuando se
deja e n un coche s in aire durante el verano. El calor puede dañar el estuche o
sus piez as interna s.
• Si al estuche está unida una cámara digital, también ésta podría salir dañada.
• Si utiliza la cámara digital unida cuando la temperatura dentro del estuche es
demasi ado al ta , ést e po dría ca usar un a i nfi lt ra ci ón , un c orto cir cu it o o un a falt a de
aislamiento y de eso hacer originar un incendio o un funcionamiento defectuoso.
≥ No maneje la cámara digital o la batería con las manos mojadas.
• Eso podría causar una descarga eléctrica o un funcionamiento defectuoso.
∫ Cuando se sacan imágenes con el flash
≥ Cuando toma imágenes usando el flash, lo que sale de las imágenes podría
resultar viñeteado o bien la imagen podría no alumbrarse uniformemente.
≥ Cuando toma imágenes con el flash, el rango disponible de éste último es menos
debajo de la supe rficie del agua que estando en ti erra.
77
VQT1Q30
Page 78

Componentes
1. Pal anca del zoom
2. Ojal de la correa
(para unir la correa de mano
suministrada y el difusor)
3. Botón [E.ZOOM]
4. Botón del obturador
5. Inte r r u pt o r O N /O F F
6. Disco del modo
7. Zapata de montaje para
INON Inc ., str o be externo
¢1
8. Estuche delantero
9. Difusor (suministrada)
10. Cristal delantero
11. Interruptor selector [REC]/
[REPR.]
12. Sección de funcionamiento
de botones
(Lea las instrucciones de
funcionamient o de la cámara
digital para los detalles
acerca de cada botón de
funcionamiento.
¢2
)
13. Estuche trasero
14. Hebilla
15. Palanca para soltar el bloqueo
¢1 Ésta es una zapat a de montaj e dedi cada al strobe e xte rno fab ricado por INON
Inc.
Pregunte a INON Inc. sobre el strobe compatible.
http://www.inon.co.jp/INON_WORLD_body.html
¢2 Según la cámara digital que se está usando, las
indica ciones de botones en el estu che marino pueden ser un poco difer entes.
Para el uso si ga las instruccion es de botones en la cámara digital.
78
VQT1Q30
Page 79

¿Qué es el anillo tórico?
≥ El anillo tórico es una junta hermética utilizada para cámar as, reloj submarinos y
otros dispositivos de buc eo.
≥ El anillo tórico mantiene lo impermeable del estuche cerrando la holgura entre su
parte tra sera y la delantera.
∫ Cómo el anillo tórico mantiene lo impermeable del estuche
Estuche trasero
Cámara digital
Anillo tórico
Estuche
delantero
La goma toca ambos lados del estuche volviéndol o impermeable e
impidiendo al agua infiltrarse a tra vés de la holgura.
Presión
de agua
Anillo
tórico
Agua
Anillo
tórico
Cuando el anillo tórico está prensado por la presión del agua, la
superficie del mismo anillo se expande yendo a proporcionar al
estuche un cierre más fuerte.
El anillo tórico impide la infiltración del agua por su contacto
uniforme con los lados del estuche. Por lo tanto, es muy
importante poner mucho cuidado en dicho anillo. Un cuidado
inadecuado del anillo tórico podría causar infiltraciones de agua.
79
VQT1Q30
Page 80

Preparación -Ajuste del anillo tórico-
T enga cuidado de poner el anill o tórico antes de uni r una cámara digital.
Limpie a fondo y seque sus manos antes de manejar el anillo tórico.
Coloque dicho anillo en un lugar donde no haya aren a ni pol vo.
1
Afloje el anillo tóric o con sus dedos para quitarlo.
≥ Afloje part e del anillo tórico con la punta de do s dedos, luego levante la parte
aflojada. Tenga cuidado de no arañar dicho anillo con las uñas.
Anillo tórico
Anillo tórico
∫
Nota
≥ No utilice un objeto puntiagudo para qu itar el anillo t órico ya que eso podría
arañarlo.
80
VQT1Q30
Page 81

2
Controle el anillo tórico.
≥ Compruebe que en el anillo tórico no haya s uciedad, arena, pelo, polvo,
cristales de sal, hilas o grasa vieja. En el caso de que los encontrase, sáquelos
con un trapo bla nco y seco.
3Suciedad
3Sal 3Hilas
3Arena
3Pelo
3
Polvo
≥ Podría haber su ciedad en el anillo tóric o que no puede verse. Co mpruebe si
hay su ciedad fr otando con su dedo encima del anillo tó rico.
≥ T enga cuidado de no dejar fibras del trapo seco en el anillo tórico cuando lo va
a limpiar.
≥ Compruebe que el anillo no esté desgarrado, torcido, apretado , deshilachado o
arañado y que no tenga arena pegada encima. E n estos c asos reemplace el
anillo tórico.
3Hendedura
3Arañazo 3Arena pegada
3
Controle la ranur a del an il lo tó rico.
3Distorsión
3Aplastamiento 3Peladura
≥ Granos de arena o cristales de sal endurecidos pueden entrar en la ranura del
anill o tórico. Sáquelos con un chorro de aire o un estropajo de algodón. Si usa
un est ropajo de algodón, t enga cuidado de no dejar ninguna de sus fi bras en la
ranura de dich o anillo.
81
VQT1Q30
Page 82

Preparación -Ajuste del anillo tórico- (continuación)
4
Controle el lado opuesto del anillo tórico de la misma manera.
5
Aplique la grasa (suministrada).
≥ Con la punta de su dedo aplique uniformemente en el anillo tórico grasa
(suministrada) que tenga un tamaño de un grano de arroz.
≥ Suciedad o polvo se pegarán al anillo tórico por si aplica demasiada grasa.
≥
Sólo utilice la grasa e specificada. S i usa gr asa de otro género, puede
dañarse la superficie del anillo tórico causando infiltración de agua.
≥ No aplique la grasa usando papel o un trapo ya que las fibras de éstos podrían
pegars e al anillo tórico.
6
Ponga el anillo tórico de manera unif orm e dentro de la respectiva
ranura.
Compr u eb e lo siguiente:
≥ No haya suciedad pegada al anillo tórico.
≥ El anillo tóri co no salga.
≥ El anillo tórico no esté torcido.
≥ El anillo tórico no esté extendido demasiado.
OK
82
VQT1Q30
INCORRECTO
Page 83

7
Controle el anillo tó ri c o u n a ú lt im a vez.
Compr u eb e lo siguient e una vez más:
≥ No haya suciedad pegada al anillo tórico.
≥ El anillo tóri co no salga.
≥ El anillo tórico no esté torcido.
≥ No haya ningún arañazo ni partes apretadas en el anillo tórico.
Saque a fondo toda grasa de sus manos con un trapo seco luego
límpielas con agua.
8
Cierre la hebilla.
1
≥ Compruebe que ningún mat erial extra ño esté pegado a la superfi cie ex terna del
anillo tórico y de la hebilla en el estuche delante ro luego ciérrelo.
∫
Notas
≥ Para mantener el estuche enterament e estanc o al aire, no arañe la superficie del
anill o tórico que va a tocar los lad os del estuche.
≥ Nunca utilice un anillo tórico que haya sido arañado o dañado por la suciedad etc.
Eso causará in filtración de agua.
≥ Cada vez que utiliza el estuche, quite el anillo tórico y compruebe que no haya
suciedad, arena, pelo u otro material extraño en la ranura del anillo tórico y, luego,
apliq ue una ligera capa de grasa (suministra da). Si aplica demasiada grasa,
podrían pegarse a dicho anillo suciedad y polvo causando infiltración de agua.
≥ Tenga cuidado d e llevar consigo un anillo tórico de repuesto e n el caso de que se
dañas e o arañ as e el que está usand o.
2
83
VQT1Q30
Page 84

Preparación -Control de lo impermeab le del es t uche-
Después de coloc ar el anillo tórico, compruebe que no haya infiltración
de agua dentro del est uche sumergiendo éste úl timo en un tanque de
agua, una bañera etc. durante alrededor de 3 minutos antes de unirlo a
la cámar a dig i ta l.
≥ No use el estuche en agua por en cima de los 40 °C. El calor puede dañar el
estuch e o causar infiltración de agua.
‘
Realice la misma prueba después de unir la cámara digital al estuche. (P85)
∫
Notas
≥ Compruebe que ningún material extraño esté pegado a la superficie externa del
anillo tórico y de la hebilla en el estuche delantero luego ciérrelo.
≥ Si el agua se filtra en el estuche mientras que está usándolo y la cámara digital está
sumergida en el agua, quite de inmediato la batería. El gas de hidrógeno podría
incen di ars e o causar una expl os ió n por si hay un fuego cer c a .
≥ Si bucea rápidamente mientras que mantiene el estuche o tira éste desde un buque
a la mar, podría ocurrir infiltración de agua debido a la alta presión. Eso no es un
funcionamiento defectuoso, sin embargo siempre b ucee lentamente.
≥ El estuche está diseñado para que pueda ser usado a una profundidad hasta 40 m.
Por si bucea a una profundi dad mayor de 40m, parte del estuche podría dañarse
irreparablemente.
≥ Cuando cierra el estuche, ponga cuidado e n que no sea agarra do ningún material
extraño entre el anillo tórico y su ranura incluso un pequeño pelo o grano de arena
podría causar infiltración de agua.
84
VQT1Q30
Page 85

Preparación -Unión de la cám a ra di gi t al-
Compruebe que el interruptor ON/OFF de la cámara y el estuc he esté
ajustado en [OFF] y el interruptor selector [REC]/[REPR.] esté ajustado
en [
!
].
≥ Quite la correa de la cámara digital.
1
Empuje hacia arriba 2 con su dedo, mientras hace deslizar 1 para
abrir la he b illa.
1
2
Una la cámara digital al estuche.
1
≥ T enga cuidado de no agarrar la espira de sombra 1.
3
Inser t e e l si li ca g e l (s u m i n is tr a do ) .
≥ Siempre utilice silicagel nuevo.
2
Silicagel
85
VQT1Q30
Page 86

Preparación -Unión de la cám ara di gi t al- ( continuación)
≥ Cuand o ins er ta el sil ica ge l, dóbl elo com o se muestr a en la figur a ab ajo ,
luego in sértelo lo más all á que sea posible. Si cierra el estuche con el
silicagel no insertado enteramente, éste será agarrado en el anillo tórico
causando infilt ra ci ón de agu a.
≥ Si la temperatura del aire es alta y la del agua es baja, puede tener lugar
conden sación dentro d el estuche. Para impedir la condensaci ón, asegúrese de
que el si licagel (suministra do) no vaya a tocar el objetivo de la cámara di gital.
Para evitar que se forme neblina en el estuche, inserte el silicagel cerca de 1 a
2 horas antes de utilizar el estuche.
4 Cierre la hebilla.
1
‘
Compruebe que la hebilla esté cerrada firmemente.
No inserte la correa etc. en la hebilla.
2
5 Después de unir la cámara digi tal, compruebe una vez más que no
haya inf i ltració n de agua en el es t u ch e. (P8 4)
86
VQT1Q30
Page 87

∫ Not as
≥
Compruebe una o más ve ces que el anillo tórico esté aplicado de mane ra uniforme
dentro de su ranura.
≥ Evit e abrir o cerrar el es tu ch e donde haya mucha arena o polvo o en luga r es
húmedos o mojados.
≥ Si ocurre un repente cambio de temperatura, puede tener lugar condensación
dentro del estuche.
≥ Si un protector o aceite solar se peg a al estuche, sáquelo de inmediato con agua
tibia para evitar que se reduzca lo impermeable suyo o se descolore.
∫ Unión de los pesos
Acerca del uso de los pesos
Cuando usa el estuche marino, una los pesos hasta lograr la flotabilidad deseada.
Úselos como necesita.
Se refiera a lo siguiente por lo que respecta a la flotabilidad submarina.
1 Si sólo utiliza la cámara digital y el estuche marino:
Ellos flotan lentamente en el agua dulc e o el agua del mar (Más flotabilidad).
2 Si sólo utiliza la cámara digital, el estuche marino y 1 peso:
Ellos flotan aún más lentamente en la agua dulce o el agua del mar que
flotabilidad).
1 (Más
3 Si sólo utiliza la cámara digital, el estuche marino y 2 pesos:
Ellos se hunden lentamente en la agua dulce o el agua del mar (Menos
flotabilidad).
Cómo unir los pesos
Si utiliza 1 peso, alinee la parte saliente del
peso con el receptáculo en el estuche marino,
luego utilice el tornillo suministrado para
unirlo. Si utiliza 2 pesos, alinee la parte
saliente del segundo peso con la parte
dentada del primero de manera que los pesos
no se sobrepongan, luego los una al
receptáculo del trípode.
∫ Not a
≥
Para evitar el herrumbre, quite los pesos tras el uso, les saque todo indicio de sal y
almacénelos.
87
VQT1Q30
Page 88

Sacar imágenes
∫ Antes de sacar imágenes estando sumergidos en el a gua
Compruebe lo siguiente antes de bucear.
≥
¿Queda bastante carga en la batería?
≥ ¿Queda bastante memoria en la tarjeta?
≥ ¿El anillo tórico es tá aplicado de manera uniforme dentro de su ranura?
≥ ¿Ha com p r ob ad o que no haya infiltr ac ió n de agua en el estuch e?
≥ ¿La hebil la está cerrada firmemente?
∫ Sacar imágenes
1 Encienda la cámara.
Pulse 1 para soltar el bloqueo,
luego ajusta a [ON].
Pulse 2 para bloquear.
1
OFF
ON
2
OFF
ON
2 Visualice el menú del modo de escen a y luego aj uste a
[SUBMARINO].
≥
Lea las instrucciones de fu ncionamiento de la cámara digital para más detalles.
3 Dirija el área AF en el monitor LCD haci a el suj eto que quiere
enfocar.
4 Pulse 2 ( / A F -L ) p ar a en fo car.
• Vuelva a pulsar 2 (/AF-L) para cancelar.
5 Pulse a tope el botón del obturador para tomar la imagen.
∫ Not as
Antes de unir la cámara al estuche, le recomendamos que ajuste de nuevo el reloj.
≥
(Lea las instrucciones de funcionamiento de la cámara digit al para más detalles.)
≥ Si hay algunas partículas flotantes delante de la cámara, puede enfocar éstas en
lugar del sujeto.
≥ Si hay gotas de agua o suciedad pegadas en el cristal delantero, podría no ser
posib le enfocar correctamente. Tenga cuidado de li m piar el cristal antes de tomar
las imágenes.
88
VQT1Q30
Page 89

Consejos para sacar imágenes en el agua
Cuando la imagen es demasiado azulada en el agua
1 Puls e muc h as vece s 3 ( ) hasta que aparezca [ ].
2 Pulse 2 (/AF-L)/1 () para ajustar el balance del blanco.
3 Pulse [MENU/SET] para terminar.
≥ Para terminar puede también pulsar a mit ad el botón del obturador.
Elija la mejor imagen
Ajuste el flash a [ ].
Uso de la función del bracketing automático (Para modelos que tienen dicha función)
≥
Cada vez que pulsa el botón del obturador, se graban automáticamente
3 imágenes con diferente exposición. Entre las 3 puede elegir la imagen deseada.
Use el modo de ráfaga
≥ Cuando toma imágenes de un sujeto que se mueve rápido (un pez payaso etc.),
puede se leccionar su imagen favorita después de tomas las imá genes con el
modo de ráfaga.
∫
Nota
≥ Para más información, lea las instrucciones de funcionamiento sobre la cámara
digital.
Después del uso
Después de terminar la toma de las imagines, siga los pasos a continuación.
1
Sumerja el estuche en agua fresca durante 30 minu tos o más sin
quitar la cámara digital para sacar los cristales de sal etc.
89
VQT1Q30
Page 90

Después del uso (continuación)
≥ Pulse todos los botones operacionales etc. en el estuche para sacar toda
agua del mar. En el caso de que de los botones no se saquen los cristales
de sal etc., éstos se endu recerán y los botones dej arán de ser operables.
≥ No limpie el estuche con agua de chorro rápido o presurizada etc. ya que
eso podría causar infiltración de agua.
2 Saque el agua con un trapo seco que no tenga cristales de sal
pegados en él y, luego, seque enteramente el estuche.
≥
No seque el estuche exponiéndolo a la luz directa del sol. Eso podría hacer
decolorar o dañar el estuche o acelerar el deterioro del anillo tórico .
3 Abra la parte trasera del estuche para quitar la cámar a d igi tal.
4 Quite el anillo tóri co del est uche y compr uebe que no ha ya suc ied ad
etc. en su ranura.
5 Compruebe que no hay a ara ñazos etc. en el anill o tórico mie ntras v a
aplicando la grasa.
∫ Not as
T enga cuidado cuando va a quitar la cámara di git al del estuche de
manera que no se moje.
≥
Quite la cámara con las mano s limpias. (Lave sus manos con agua fresca y las
seque en teramente.)
≥ Seque cualquier humedad de su cuerpo o pelo. (Ponga especial cuidado en el agua
que sale de las mangas de su traje térmico.)
≥ Cuando el tiempo o el mar es muy malo, elija un lugar donde la cámara digital no se
moje como, por el ejemplo, en casa o donde haya un techo encima.
90
VQT1Q30
Page 91

Limpieza y alm ace n am ien to
Lave la parte externa del estuche con agua.
1
≥ Lave la parte e xterna del estuche hasta que esté limpia. (P89)
≥ T enga cuidado de cerrar el estuche y luego l ave s olo con agua su parte
externa.
≥ Saque toda suciedad dentro del estuche con un trapo mo jado y blando.
∫
Notas
≥ No lave el estuche con agua a alta presión ya que eso podría causar infiltra ción de
agua. Quite la c ámara digital antes de lavar el estuche con agua .
≥ No deje la cámara digital en el interior del estuche cuando vaya a almacenarla.
≥ Almacene el estuche en un lugar frío y bien ventilado.
Precauciones para el uso
∫
Manejo del anillo tórico
≥
No utilice alcohol, diluyente o un agente químico para limpiar el anillo tórico.
Eso causará daño o deterioro al anillo tórico.
≥
Si no utiliza el estuche durante un largo período de tiempo, quite el anillo
tórico de su ranura, le aplique una ligera capa de grasa (suministrada), lo
meta en una bolsa limpia de poliéster y, luego, lo almacene en un lugar frío y
oscuro para evitar dañar su superficie. Cuando vuelve a usar lo, comp ruebe
con esmero que no esté arañado ni roto.
≥
Sólo utilice la grasa especificada. Si usa grasa de otro género, puede dañarse
la superficie del anillo tórico causando infiltración de agua.
≥ El anillo tórico toca los lados del estuche volviendo éste último impermeab le. No
golpee, haga entrar material extraño (suciedad, arena o pelo etc.) ni arañe el anillo
tórico ni los lados del estuche.
≥ Use las puntas de sus dedos para quitar el anillo tórico. No utilice objetos
puntiagudos ya que eso podría arañar el anillo tórico.
≥ Después de quitar el anillo tórico de la parte trasera del estuche, le saque toda
suciedad, arena, pelo u otro material extraño. Limpie también la ranura del anillo
tórico y los lados internos de la parte delantera del estuche que toca el anillo tórico.
≥ Nunca utilice un anillo tórico que haya sido arañado o dañado por la suciedad etc.
Eso causará infiltración de agua. Reemplácelo con uno nuevo.
91
VQT1Q30
Page 92

Precauciones para el uso (continuación)
≥ Después de reemplazar el anillo tórico, no usar el estuche durante un largo período
de tiem po o abrir e l estuche para unir la cámara, reemplace la batería etc.,
compruebe a fondo que el anillo tórico no esté arañado ni roto. Luego cierre el
estuch e y compruebe que no ha ya in filtr ación de agua en él sumergié ndolo en un
tanque de agua, bañera etc. durante más o menos 3 minutos. (P84)
≥ Los anillo tóricos son productos consumibles. Sin embargo su duración dependerá
del cómo se manten drán, del cuánto se utilizan y de sus condiciones de
almacenamiento, le recomendamos reemplazarlos cada año aunque no vea ningún
arañazo.
∫ Acerca del manten imient o
≥ No utilice los productos químicos a continuación para la limpieza,
antioxidante, antiempañante o reparación. Lo de usarlos directa o
indirectamente (por aspersión química etc.) en el estuche puede producir
grietas si sujeto a alta presión.
Productos
químicos
prohibidos
Disolventes
orgánicos volátiles/
Agentes químic os
para limp ieza
Anticorrosivos
Agentes
antiempañantes
Adhesivos
No limpi e el e st uc he con di so lv ent e s o rgá ni cos volátiles como el
alcohol , la gasolina o un diluyente y agen tes químicos para
limpie za. Límpielo con agua fría o tibia.
No utilice anticorrosivos ya que las partes metálica están
hechas de acero inoxidable o bronce. Límpielo con agua fresca.
No utilice agentes antiempañantes a la venta. Tenga cuidado de
usar el silicagel indicado en esta s instrucc iones de
funcionamiento.
No utili ce adhes iv o s pa ra r epa r ar. En el ca so de q ue s u es tuch e
necesitase ser reparado, llame a su comerciante.
≥ Si la grasa se pega a la cámara digital, sáquela con un trapo blando y seco.
≥ Cuando limpia el interior del estuche, sólo hágalo utilizando un trapo blando y seco.
Limpie el interi or del cris tal delantero con un trap o blando y seco an tes y después
del uso para que el crista l se mantenga claro.
Cuidado
92
VQT1Q30
Page 93

∫ Acerca del almacenamiento y de la inspección
después del uso
≥ Siempre tenga la cámara digital fuera del estuche.
≥ Ponga cuidado en que no haya suciedad ni polvo pegados en el anil lo tórico.
≥ Seque a fondo el estuche a temperatura ambiente, luego almacénelo en un sitio frío
y oscuro.
≥ Le recomend amo s qu e i ns pec cion e el es tu che de sp ué s de 3 años des de la com pra
Esta inspección conlle va el desmontaje y la limpieza del estuche, comprobando
todas las piezas y reparándolas si fuese necesario y controlando lo impermeable
del est uche usando el mismo equipo de ensayo hidrostático que fue usa do para
controlar lo impermeable antes de la compra. Todos los costes de transporte están
a cargo del cliente.
≥ No desmonte ninguna pieza ni utilice accesorio alguno que no esté especificado en
estas instrucciones de mantenimiento ni modifique el estu che. Si e l estuche no
funci ona correc tamente, llame a su comer c iante.
Especificaciones
Modelo compatible: DMC-TZ5/DMC-TZ15/DMC-TZ4/DMC-TZ11
(A partir de marzo de 2008
¢
)
Peso: Aproximadam ente 434 g
Dimensiones: Aproximadamente
150 mm (W)k94 mm (H)k93 mm (D)
(excluyendo las partes salient es)
Material: Policarbonato
Sistema impermeable: Cier re de anillo tó rico
Profundidad de
resistencia al agua: 40 m
¢ Se refiera a las instruccion es de funcionamien to, cat álogo , sitio web etc. de
la cámara digital para la última información sobre los modelos que puede
usar.
93
VQT1Q30
Page 94

Indice
Prima dell’uso. . . . . . . . . . . . . . . . . . . . . . . . . . . . . . . . . . . . .95
Accessori . . . . . . . . . . . . . . . . . . . . . . . . . . . . . . . . . . . . . . . .97
Manipolazione e cura. . . . . . . . . . . . . . . . . . . . . . . . . . . . . . .98
Componenti . . . . . . . . . . . . . . . . . . . . . . . . . . . . . . . . . . . . .100
Cosa é un O-ring? . . . . . . . . . . . . . . . . . . . . . . . . . . . . . . . .1 01
Preparazione -Preparazione dell’O-ring- . . . . . . . . . . . . . . .102
Preparazione -Controllo dell’impermeabilità
della custodia- . . . . . . . . . . . . . . . . . . . . . . .1 06
Prepa razio ne -Inser imento della f ot ocamera digitale -. . . . .107
Ripresa di immagini . . . . . . . . . . . . . . . . . . . . . . . . . . . . . . .110
Consigli per la ripresa di immagini in acqua. . . . . . . . . . . . .111
Dopo l’uso . . . . . . . . . . . . . . . . . . . . . . . . . . . . . . . . . . . . . .112
Pulizia e custodia . . . . . . . . . . . . . . . . . . . . . . . . . . . . . . . . .114
Precauzioni per l’uso . . . . . . . . . . . . . . . . . . . . . . . . . . . . . .115
Specifiche. . . . . . . . . . . . . . . . . . . . . . . . . . . . . . . . . . . . . . .117
94
VQT1Q30
Page 95

ITALIANO
Prima dell’uso
≥ Questa Custodia Mar ina può essere utilizzata con le fotocamere digit ali Panasoni c.
Consente di riprendere immagini sott’acqua a profondità fino a 40 m.
≥ In caso di infiltr azioni d’acqua dovute a negligenza da parte dell’utente , Panasonic
non può essere ritenuta responsabile dei danni ai prodotti (f otocamera digitale,
batterie, scheda ecc.) inseriti nella custodia, dei costi fotografici o di ogni altra
spesa.
≥ Panas onic non offre inoltre alcu n risarcimento in c aso di incidenti che causino
lesioni alle persone o danni alla proprietà.
≥ Leg ge re il ma nuale di istruzioni de ll a fotoc am er a digi t a le.
≥ Prima di inserire la fotocamera digitale, immergere la custodia in acqua per
3 o più minuti , allo scopo di controllare che non vi siano infiltrazioni d’acqua.
∫ Trattamento della custodia
≥ Utilizzo nelle seguenti condizioni.
• Profondità dell’acqua: fino a 40 m
• Temperatura ambiente: 0 oC a 40 oC
≥ Non utilizzare la custodia in acqua a temper atura superiore a 40 °C. Il calore può
danneggiare la custodia o causare infiltrazioni.
≥ La custodia è in policarbonato res istente agli urti, ma fare comunque attenzione
quando la si utilizza. Si graffia fa cilmente, specialmente in ambi enti rocciosi, e può
danneggiarsi in caso di urti violenti o cadute. Quando si viaggia in auto, nave, treno
o aereo, imballare attentamente la custodia per evitar e urti diretti in caso di caduta,
e non las c iare la fotoc amera digitale nella cu stodia. Inserire la fo tocamera digit ale
nella c ustodia solo se la distanza da coprir e è breve, ad esempio quando si va
dall’aeroporto al luogo di immersione. (Non è possibile riutilizzare per il trasporto
l’imballaggio originale della custodia.)
≥ Quando ci si trova a bordo di un aereo, il cambiamento della pressione atmosferica
può causare l’es pansione della parte interna della custodia, danneggiandola.
Rimuovere l’O-ring prima di imbarcarsi su un aereo.
≥ Non lasciare per lungo tempo la fotocamera digitale nella custodia all’interno
di un’auto o di una nave, esposta alla luce solare diretta, ecc. La custodia è a
tenuta ermetica, per cui la temperatura al suo interno può raggiungere livelli
molto elevati, e la fotocamera digitale può cessare di funzionare
correttamente. Non lasciare che la temperatura all’interno della custodia
diventi troppo elevata.
95
VQT1Q30
Page 96

Prima dell’uso (continua)
∫ Utilizzo della custodia in condizioni di bassa o alta
temperatura
≥ Se si apre o si chiude la custodia in un ambiente umido o caldo e poi si passa in un
posto fre dd o o ci si imm er ge s ott ’a cq ua, al l’ int ern o dell a cu st odia può f ormar si dell a
conden sa, la superficie del ve tro può ap pannarsi e la fotocamera digit ale può
essere danneggiata.
≥ Se si porta repentinamente la custodia da un luogo in cui la temperatura dell’aria o
dell’acqua è bassa a un ambiente riscaldato, la superficie del vetro può appannarsi.
Attendere che l a temperatura della custodia si avvicini a quella dell’ambiente prima
di riprendere le immagini.
∫ Preparazione
≥ Non aprire o chiudere la custodia dove spruzzi d’acqua potrebbero colpirla o
la sabbia rischia di penetrare al suo interno. Si consiglia di aprire o chiudere
la custodia all’interno.
≥ Quando si sostituisce la batteria, la scheda, ecc. e si inserisce la fotocamera nella
custodia, eseguire l’operazione al coperto, e in condizioni di scarsa umidità.
≥ Se si deve aprire o chiudere la custodia nella zona dell’immersione per
sostituire la batteria o la scheda, attenersi alla seguente procedura.
• Scegliere un punto in cui la custodia non possa essere raggiunta da spruzzi
d’ac qu a, e in cui la sabbia no n po ss a penetrare al su o intern o.
• Eliminare le eventuali go cce d’a cqua dall’intercapedine t ra la copertura anteriore
e quella posteriore, e dalla fibbia. Quindi rimuovere attentamente eventuali gocce
d’acqua residue con un pann o asciutto.
• Eliminare attentamente eve ntuali gocce d’acqua dal corpo e dai capelli.
• Fare particolare attenzione all’acqua presente nelle maniche della muta termica.
• Non toccare la fotocamer a digitale con le mani bagnate di acqua di mare.
Inumid ire prima un asciu gamano in acqua do lce e metterlo in una busta di
poliestere. Utilizzare tale asciugamano per rimuov ere l’acqua o la sabbia d alle
mani o dal corpo.
≥ La custod ia no n è in gr ad o d i a mmorti zzar e g li urt i. S e si coll oc a u n o gget t o p esant e
sulla cu stodia o la si urta, la fotocamera digitale può danneggiarsi. Fare attenzione
quando s i utilizza la custodia.
96
VQT1Q30
Page 97

Accessori
Quando si apre la con fezio ne per la prima vol ta, cont rol lare c he si ano
presenti la custodia e tut ti gli accessori, e che non abbiano subito
danni durante la distri buzione o il trasporto.
Se si riscontra qualc he anomalia, contattare il rivenditore prima di
utilizzare la custodia.
Non utilizzare acc essori diversi da quell i sot to indicati.
O-ring
VMG1798
Grasso (per O-ring)
VZG0372
Pesi (2) , Vite di installazione dei pesi
VXA8446
Diffusore
VYK2D90
Silica Gel (Essiccante)
(1 g/5 pezzi)
VZG0371
Cinturino
VFC4190
≥ È possibil e rimuovere il diffusore quando non lo si utilizza.
Rimozione Installazione
Allineare con il segno sul retro
della custodia e installare.
97
VQT1Q30
Page 98

Manipolazione e cura
≥ Non collocare la custodia in punti inst abili.
• Se la custodia dovesse cadere su un piede o sulla testa, potrebbe ferire l’utente.
Inoltre potrebbe non funzionare più in modo corretto.
≥ Non modificare mai la custodia.
• Se dell’acqua dovesse penetrare nella fotocamera digitale a causa di una modifica
alla custodia, la fot ocamera può essere dannegg iata in modo irreparabile .
• Se si continu a ad ut ili zz ar e la fo t oca mer a di gi tal e do po che l’a cqu a è pe ne tr at a al
suo interno, può svilupparsi un incendio.
≥ Non utilizzare la cu stod ia per immer sioni con r espiratore se no n si ha
una preparazione adeguata.
• Utilizzare la cu stod ia d ura nt e im mers io ni co n re sp ira t ore so lo se si d isp on e di un a
preparazione adegua ta e di una certificazione per questo s port.
≥ Tenere la custodia, il grasso, il silica gel o l’O-ring al di fuori della
portata dei bambini.
• Se un bambino dovesse restare con una parte del corpo intrappolata nella
custodia, rischia di ferirsi.
• I bambini possono inghiotti re accidentalme nte il gr asso, il silica gel o l’O-ring.
• Consultare immediatamente un medico se si ritiene che un bambino p ossa av er
inghi ottito il grasso, il silica gel o l’O-ring.
≥ Non appendere la cinghia al collo sott’acqua.
• Infatti potrebbe avvolgersi intorno al collo, causando soffocamento o serie lesioni.
≥ Lavare via accuratamente ogni traccia di grass o dall e man i.
• Non strofinare gli occhi o la bocca con le mani sporche di grasso.
≥ Se l’acqua dovesse penetrare nella custodia, smettere immediatamente
di utilizzarla.
• In caso contrario si rischia di prender e la scossa o di ustionarsi, oppur e può verificars i
un incendio.
• Consultar e il rivenditore.
≥ Se si verifica qualche anomalia mentre si utilizza la custodia sott’acqua,
seguire tutte le procedure necessarie e le istruzioni per la decompressione
durante la risalita.
• Se si risale troppo rapidamente, si rischia un’embolia gassosa.
≥ Se si verificano eventi quali fuoriuscita di fumo, surriscaldamento,
emissione di odori o suoni strani, cessare immediatamente di utilizzare
la custodia.
• In caso contr ario si ri sc hi a di prender e la sc os s a o di us t io na r s i, oppure può
verificarsi un incendio.
• Rimuov ere la f otocamera digitale dall a custodia, quindi rimuovere immedi atamente la
batteria dalla fot ocamera digi tale .
• Consultar e il rivenditore.
98
VQT1Q30
Page 99

≥ Fare attenzione quando si apre la custodia dopo una infiltrazione di acqua.
• L’ac qua che si era infiltrat a può fuori uscire, o la copertura post eriore p uò
capovolgersi.
≥ Non lasciare la custodia esposta a temperature elevate.
• La temperatura i nterna ra ggiunge valo ri molto elevati in particolare quando la
custodia è esp osta alla luce solare diretta su una spiaggia, su una nave, ecc., o
quando viene lasciata in una macchina chiusa in estate. Il calore può
danneggiare la custodia o le parti interne.
• Se nella custo dia era inser i ta una fotocame ra dig ita le, an ch e qu es t a può ess ere
danneggiata.
• Se si utilizza la fotocamera digitale inserita nella custodia quando la temperatura
interna è molto elevata, possono verificarsi perdite, cortocircuiti o perdite di
isolamento, e la fotocamera può incendiarsi o guastarsi.
≥ Non maneggiare la fotocamera digitale o la batteria con le mani
bagnate.
• In caso contrario di rischia di prend ere la scossa, o di danneggiare l’ apparecchio.
∫ Quando si riprendono immagini con il flash
≥ Quando si ripr e ndon o i mma gi ni c on il f lash , gl i an go li d ell’ i mma gine po ss ono e sser e
soggetti all’effetto vignetta, o la luminosità dell’immagine può non essere uniforme.
≥ Quando si riprendono immagini con il flash, la distanza utile del flash è inferiore in
acqua che sulla terraferma.
99
VQT1Q30
Page 100

Componenti
1. Lev a dello zoom
2. Occhiello ci nghia
(Per l’installazione del cinghino
e del diffusore in dotazione)
3. Pulsante [E.ZOOM]
4. Pulsante di scatto otturatore
5. Interruttore ON/OFF
6. Selettore modalità di
funzionamento
7. Connettore per flash
stroboscopico esterno di
INON Inc .
¢1
8. Copertura anteriore
9. Diffusore (in dot azione)
10. Vetro anteriore
11. Selettore [REC]/[RIPR.]
12. Funzionamento dei pulsanti
(P er ulte riori inf ormazioni sul
funzionamento di ciascun
pulsante le ggere l e istruzio ni
per l’uso della fotocamer a
digitale.
¢2
)
13. Copertura posteriore
14. Fibbia
15. Leva di sblocco chiusura
¢1 Si tratta di un connettore dedicato ad un flash stroboscopico esterno prodotto
da INON Inc.
Contat t are INON Inc. riguardo ai flash strobo s co pici compa ti bi li.
http://www.inon.co.jp/INON_WORLD_body.html
¢2 Per alcuni modelli di fotocamera digitale, le indicazioni dei pulsanti sulla cust o-
dia suba cquea possono essere leggermente diverse. Per l’utilizz o seguire le
indica zioni dei pulsanti sulla fotocamera digitale.
100
VQT1Q30
 Loading...