

Operating Instructions
Bedienungsanleitung
Mode d’emploi
Instrucciones de funcionamiento
Istruzioni d’uso
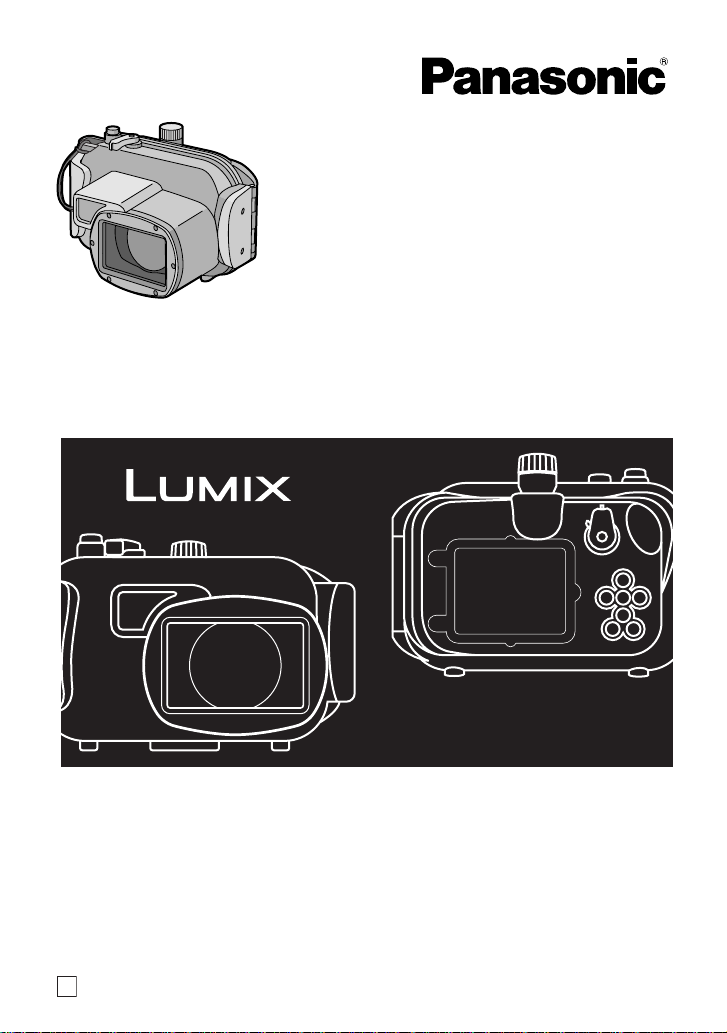
Marine Case
Model No. DMW-MCTZ3
Before use, please read these i nstructions completely.
Bitte lesen Sie diese Bedienungsanleitung vor der Inb etriebnahme des
Gerätes vollständig durch.
Lire intégralement ces instructions avant d’utiliser l’appareil.
Antes del uso, lea completamente estas instrucciones.
Leggere completamente queste istruzioni prima dell’uso.
E
VQT1F26

Contents
Before Use . . . . . . . . . . . . . . . . . . . . . . . . . . . . . . . . . . . . . . 3
Accessories . . . . . . . . . . . . . . . . . . . . . . . . . . . . . . . . . . . . . 5
Handling and Care . . . . . . . . . . . . . . . . . . . . . . . . . . . . . . . . 6
Components. . . . . . . . . . . . . . . . . . . . . . . . . . . . . . . . . . . . . 8
What is the O-ring? . . . . . . . . . . . . . . . . . . . . . . . . . . . . . . . 9
Preparation -Setting the O-ring-. . . . . . . . . . . . . . . . . . . . . 10
Preparation -Checking the Case is Waterproof - . . . . . . . . 14
Preparation -Attaching the Digit al Camera- . . . . . . . . . . . . 15
Taking Pictures . . . . . . . . . . . . . . . . . . . . . . . . . . . . . . . . . 18
Tips for Taking Pictures in the Wat e r. . . . . . . . . . . . . . . . . 19
After Use . . . . . . . . . . . . . . . . . . . . . . . . . . . . . . . . . . . . . . 20
Cleaning and Storing . . . . . . . . . . . . . . . . . . . . . . . . . . . . . 21
Caution for Use . . . . . . . . . . . . . . . . . . . . . . . . . . . . . . . . . 21
Specifications. . . . . . . . . . . . . . . . . . . . . . . . . . . . . . . . . . . 23
Sales and Support Information
Customer Care Centre
• For customers within the UK:
08705 357357
• For customers within the Republic of
Ireland: 01 289 8333
• Visit our website for product information
• E-mail: customer.care@panasonic.co.uk
Direct Sales at Panasonic UK
• Or der accessory and consumable items
for your product with ease and
confidence by phoning our Customer
Care Centre Monday– Thursda y
9.00 a.m.– 5.30 p.m., Friday 9.30 a.m.–
5.30 p.m.
(Excluding public holidays)
• Or go on line through our Internet
Accessory ordering application at
www.panasonic.co.uk.
• Most major credit and debit cards
accepted.
• All enquiries transactions and distribution
facilities are provided directly by
Panasonic UK Ltd.
• It couldn’t be simpler!
• Also available through our Internet is
direct shopping for a wide range of
finished products, take a browse on our
website for further details.
Interested in purchasing an extended
guarantee?
Please call 0870 240 6284 or visit our
website www.panasonic.co.uk/guarantee
.
2
VQT1F26

ENGLISH
Before Use
≥ This Marine Case is designed for Panasonic Digital Camera.
You can enjoy taking pictures underwater at depths up to 40 m.
≥ In the case of water leakage due to insufficient care, Matsushita is in no way liable
for damage to any products (digital camera, batteries, card etc.) inside this Case,
photography costs or any other expenses.
≥ Matsushita also offers no compensation for accidents resulting in injury or damage
to property.
≥ Read the operating instructions for your digital camera.
≥ Before attaching the digital camera, submerge the case in water for about
3 minutes or more to check that there is no water leakage.
∫ About handling this Case
≥ Use under the following conditions.
• Water depth: Up to 40 m
• Amb ient temperatu re: 0 °C
≥ Do not use the Case in water over 40 °C. The heat may damage the Case or cause
water leakage.
≥ The Case is made of impact resistant polycarbonate however be careful when you
are using it. It can be easily scratched when taking pictures in rocky places etc. and
can be damaged by the impact if dropped etc. When travelling, pack the Case
carefully to prevent any direct impact if it is dropped etc. and do not leave the digital
camera in the Case. Only attach the digital camera to the case if you are
transporting it a short distance such as from the airport to the diving spot. (You
cannot reuse the material the Case was packed in at the time of purchase to
transport it.)
≥ When boarding a plane, the change in atmospheric pressure may cause the inside
of the Case to expand causing damage to the Case. Remove the O-ring before
boarding a plane.
≥ Do not leave the digital camera in the Case for a long p eriod of time in a car, a
ship, exposed to direct sunlight etc. The Case is an airtight device so the
temperature inside the Case will become very high and the digital camera may
stop operating properly. Do not let the temperature inside the Case become
too high.
to
40 °C
VQT1F26
3

Before Use (continued)
∫ Using the Case in high or low temperatures
≥ If you open or close the Case where it is humid or hot and then move to a place that
is cold or dive underwater, condensation may appear inside the Case, the glass
surface may become cloudy and the digital camera may be damaged.
≥ If you suddenly move the Case from a cold place or cold water to a warm place, the
glass surface may become cloudy. Wait until the Case becomes close to the air
temperature before taking pictures.
∫ About preparation
≥ Do not open or close the Case where it may be splashed by water or sand may
get in it. We recommend opening or closing the Case indoors.
≥ Replace the battery, card etc. and attach the digital camera indoors where there is
little moisture.
≥ If you must open or close the Case at the diving spot to replace the battery or
the card, be sure to follow the steps below.
• Select a p lace where the Case w ill not be splashed by water and sand will not get
in it.
• Blow off any drops of water in the gap between the rear case and the front case
and on the buckle. Thoroughly wipe off any remaining drops of water with a dry
cloth.
• Tho roughly wipe off any drops of water on your body or hair.
• Be par ticularly careful about any water coming from the sleeves of your thermal
suit.
• Do not touch the digital camera if your hands are wet from sea water. Wet a towel
with fresh water and place it in a polyester bag beforehand. Use this towel to wipe
off any drops of water or sand on your hands or body.
≥ This Case does not absorb shock. If you place a heavy object on the Case or cause
shock to it, the digital camera may be damaged. Be careful when you are using the
case.
4
VQT1F26
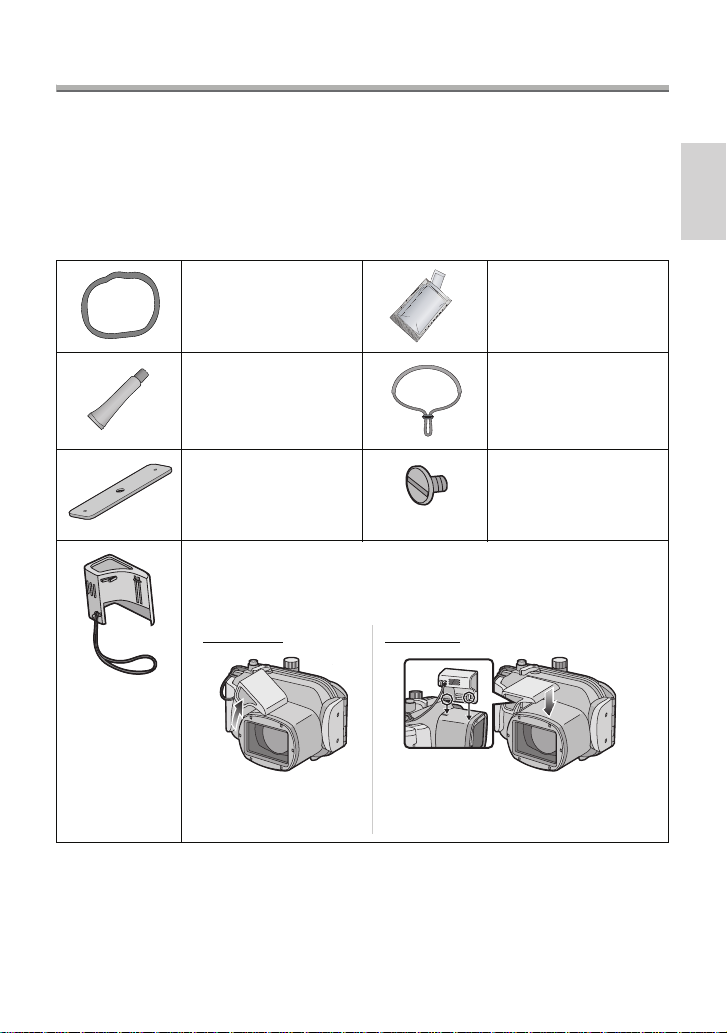
Accessories
When you first open the package, check that the Case and all the
accessories are inc l uded an d that th ere has be en no d ama ge to the
Case or any of the accessories during distribution or
transportation. If you find something unusual, consult your dealer
before using the Case.
Do not use any accessories except those specified below.
O-ring
VMG1798
Grease (for O-ring)
VZG0372
Weights (2)
VMP8844
Diffuser
VYK2D90
Silica Gel (Desiccant)
(1 g /5 pieces)
VZG0371
Hand Strap
VFC4190
Weights attachment
screw
VHD1930
≥ You can remove this diffuser when not using it.
Removing Attaching
Attach as shown in the diagram.
VQT1F26
5

Handling and Care
≥ Do not place the Case where it may fall.
• If the Case falls on your head or foot, it will injure you and cause the Case to
malfunction.
≥ Never alter the Case.
• If water leaks into the digital camera because the Case was altered, the digital
camera may be damaged beyond repair.
• If you continue to use the digital camera after water has leaked into it, this may
cause a fire.
≥ Do not use the Case while scuba diving without proper training.
• You should only operate the Case while scuba diving if you have been properly
trained and certified for this sport.
≥ Never place the Case, grease, silica gel or O-ring within the reach of
infants.
• If any part of an infant’s body is caught in the Case, it may cause an injury.
• Infants may accidentally swallow the grease, silica gel or O-ring.
• Consult a doctor immediately if you think an infant may have swallowed the
grease, silica gel or O-ring.
≥ Do not hang the strap around your neck underwater.
• It may become wound around your neck causing suffocation or other serious
injuries.
≥ Thoroughly wash off any grease on your hands.
• Do not allow the grease on your hands to come into contact with your mouth or
eyes.
≥ If water leaks into the case, stop using it immediately.
• This may cause an electric shock, burning or a fire.
• Consult your dealer.
≥ If anything abnormal occur s wh ile usin g the Cas e underw ater, please
follow all necessary procedures and guidelines for decompressing
when you ascend.
• If you ascend too quickly, you may get caisson disease.
≥ If smoke or abnormal heat, smells or sounds come from the Case,
stop using it immediately.
• These may cause an electric shock, burning or fire.
• Remove the digital camera from the Case and then immediately remove the
battery from the digital camera.
• Consult your dealer.
≥ Be careful when opening the Case after water leakage.
• The leaked water may blow out or the rear case may flip.
6
VQT1F26

≥ Do not leave the Case where the temperature is high.
• The temperature inside the Case becomes very high particularly when it is
exposed to direct sunlight on a beach, a ship etc. or when it is left in an airtight car
in the summer. The heat may damage the Case or its inner parts.
• If a digital camera is attached to the Case, it may also be damaged.
• If you use the attached digital camera when the temperature inside the Case is
very high, it may cause leakage, short-circuiting or insulation failure resulting in
fire or malfunction.
≥ Do not handle the digital camera or the battery with wet hands.
• This may cause an electric shock or malfunction.
∫ When taking pictures with the flash
≥ When taking pictures with the flash, the corners of the picture may be vignetted or
the picture may not be lit evenly.
≥ When taking pictures with the flash, the available flash range is less underwater
than on land.
VQT1F26
7

Components
12 3 4 5
7
1. Zoom Lever
2. Strap Eyelet
(for attaching the supplied hand
strap and diffuser)
6
3. Shutter Button
4. Mode Dial
5. Front Case
6. Diffuser (supplied)
7. Front Glass
8
9
10
11
12
13141516
17
8. Camera ON/OFF Switch
9. 3/Exposure Compensation/
Auto Bracket/White Balance
Fine Adjustment/Bac kli ght
Compensation In Simple
Mode Button
10. 1/Flash Setting Button
11. [MENU/SET] Button
12. [FUNC]/Delete button
13. 4/[REV] Button
14. [DISPLAY/LCD MODE] Button
15. 2/Self-timer Button/AF Lock
16. Rear Case
17. Buckle
18. Lock Release Leve r
8
VQT1F26
18
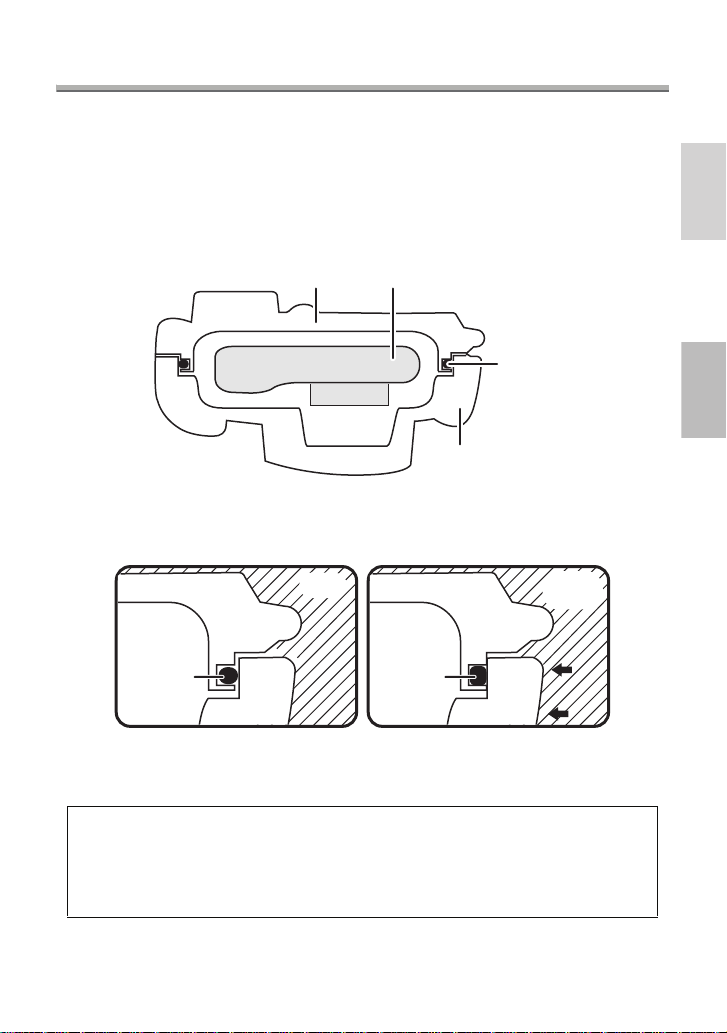
What is the O-ring?
≥ The O-ring is a waterproofing packing used for underwater cameras, watches and
diving equipment.
≥ The O-ring keeps the Case waterproof by sealing the gap between the rear case
and the front case.
∫ How the O-ring keeps the Case waterproof
Rear Case
Digital Camera
O-ring
Front Case
The gum comes into contact with the sides of the Case making the
Case waterproof and stopping water from entering from the gap.
Water
pressure
O-ring
Water
O-ring
When the O-ring is crushed by water pressure, the surface of
the O-ring expands and the Case is sealed more tightly.
The O-ring prevents water leakage by coming into uniform
contact with the sides of the Case. Theref ore, good care of the
O-ring is very important. Incorrect care of the O-ring may
cause water leakage.
VQT1F26
9
Preparation
Be sure to set the O-ring before attaching a digital camera.
Thoroughly wash and dry your hands before handling the O-ring. Place
the O-ring where there is no sand or dust.
1
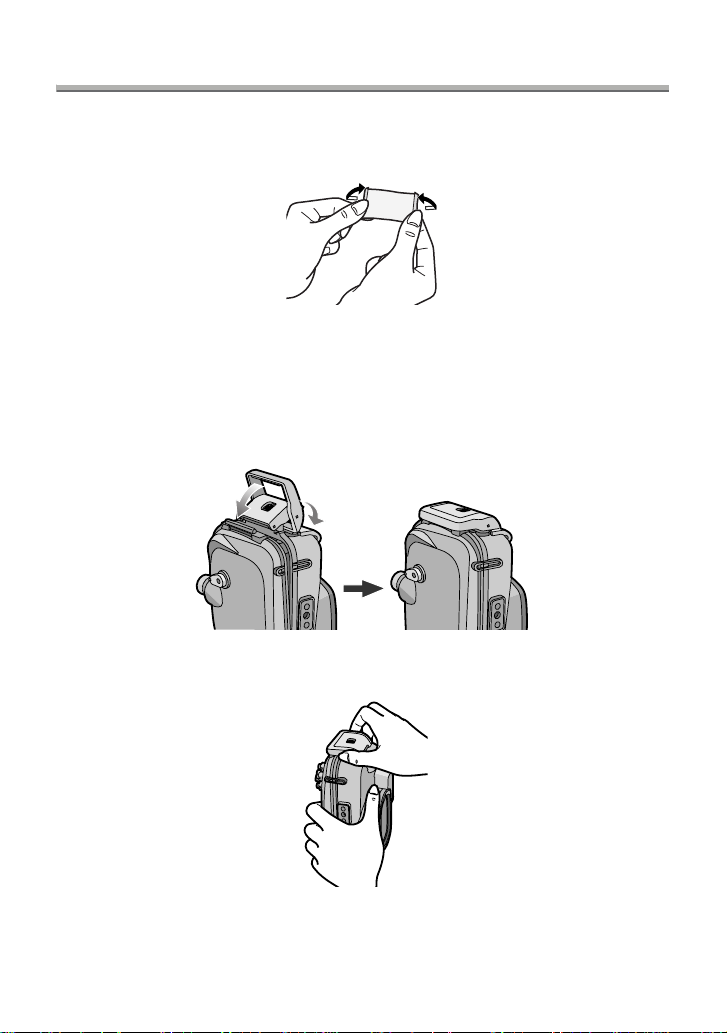
Loosen the O-ring with your fingers to remove it.
≥
Loosen part of the O-ring with the tips of two fingers and then lift the loosened
part. Be careful not to scratch the O-ring with your fingernails.
∫ Note
Do not use a pointed object to remove the O-ring. This may scratch the O-ring.
≥
-Setting the O-ring-
O-ring
O-ring
10
VQT1F26
2
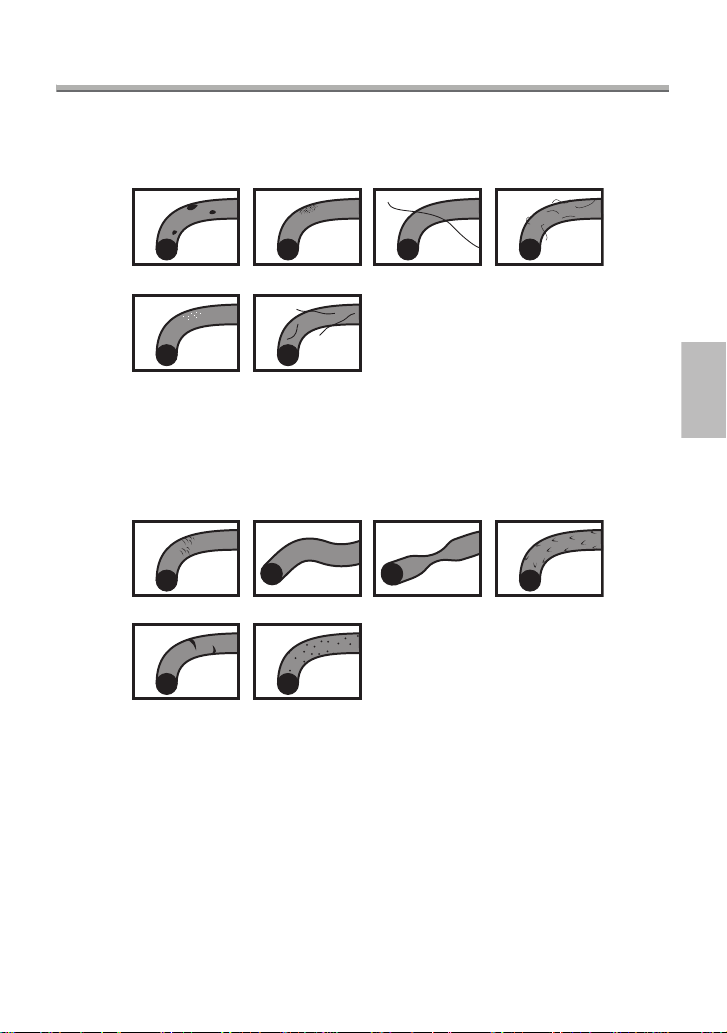
Check the O-ring.
≥ Check that there is no dirt, sand, hair, dust, salt crystals, lint or old grease on
the O-ring. If you find any of these, remove them with a soft, dry cloth.
3Dirt
3Salt crystals 3Lint
3Sand
3
Hair
3Dust
≥ There may be dirt on the O-ring that you cannot see. Check if there is any dirt by
rubbing your finger over the O-ring.
≥ Be careful not to leave any fibers from the dry cloth on the O-ring when wiping it.
≥ Check that the O-ring is not ripped, twisted, squashed, frayed or scratched and
that there is no sand sticking to it. Replace the O-ring in these cases.
3Ripped
3Scratched 3Sand sticking
3
Inspect the O-ring groove.
3Twisted
3Squashed 3Frayed
≥ Grains of sand or hardened salt crystals may get into the O-ring groove.
Remove them carefully with an air spray or a cotton swab. If you use a cotton
swab, be careful not to leave any fibers from it in the O-ring groove.
11
VQT1F26
Preparation -Setting the O-ring- (continued)
4
Inspect the opposite side of the O-ring in the same way.
5
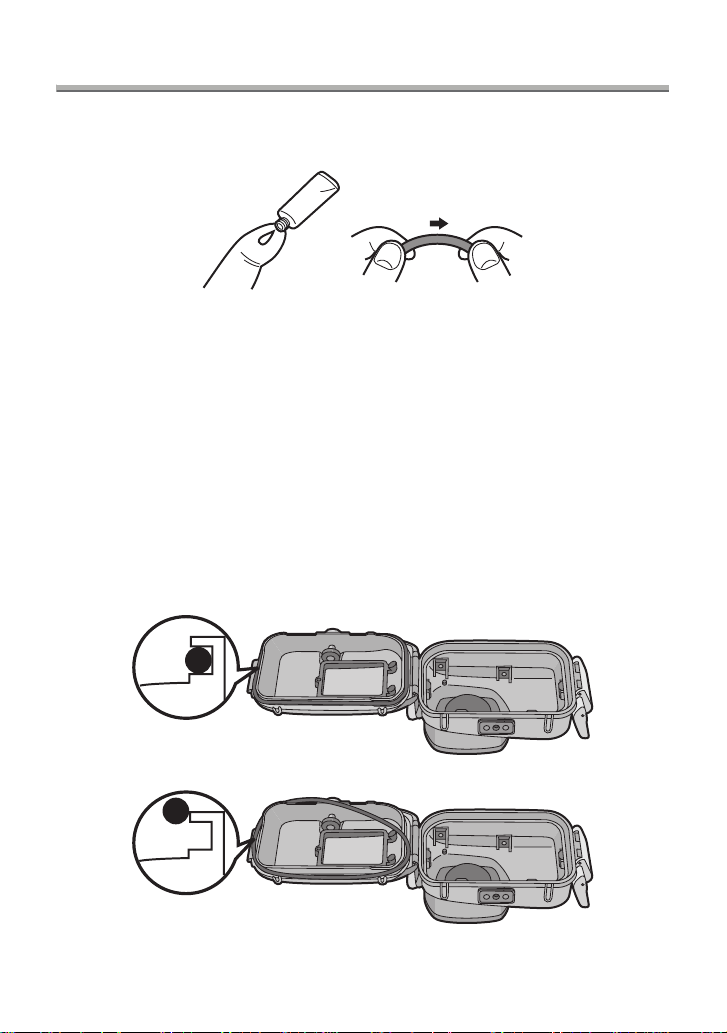
Apply the grease (supplied).
≥ Apply a rice-grain size of grease (supplied) evenly to the O-ring with the tip of
your finger.
≥ Dirt or dust will stick to the O-ring if you apply too much grease.
≥
Use only the specified grease. If you use other types of grease, the
surface of the O-ring may be damaged causing water leakage.
≥ Do not apply the grease with paper or a cloth. The fibers from the paper or cloth
may stick to the O-ring.
6
Fit the O-ring evenly into the O-ring groove.
Check the following:
≥ There is no dirt sticking to the O-ring.
≥ The O-ring has not come out.
≥ The O-ring is not twisted.
≥ The O-ring is not stretched too much.
CORRECT
12
VQT1F26
INCORRECT
7
Inspect the O-ring one last time.
Check the following one more time:
≥ There is no dirt sticking to the O-ring.
≥ The O-ring has not come out.
≥ The O-ring is not twisted.
≥ There are no scratches or squashed parts on the O-ring.
Thoroughly wipe any grease off your hands with a dry cloth and then
wash your hands with water.
8
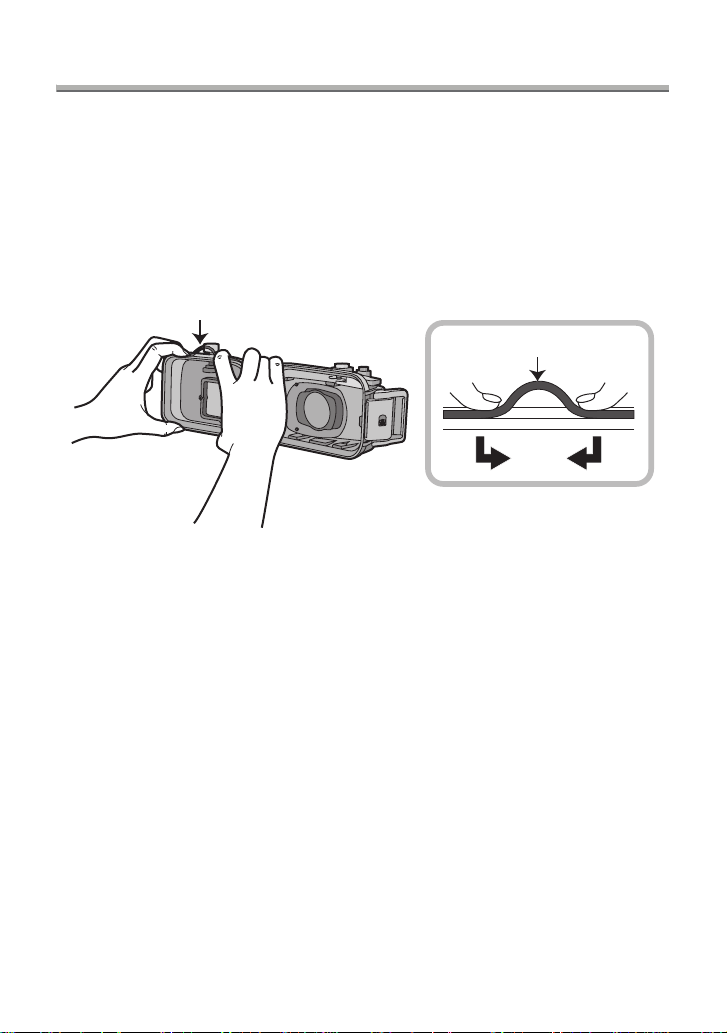
Close the buckle.
1
≥ Check that no foreign materials are sticking to the outer surface of the O-ring and
the buckle on the front case and then close the Case.
∫
Notes
≥ To keep the Case completely airt ight, do not scratch the surface of the O-ring that
comes into contact with the sides of the Case.
≥ Never use an O-ring that has been scratched or damaged by dirt etc. This will cause
water leakage.
≥ Each time you use the Case, remove the O-ring and check that there is no dirt,
sand, hair or other foreign materials in the O-ring groove and then apply a thin coat
of grease (supplied). If you apply too much grease, dirt and the dust may stick to the
O-ring causing water leakage.
≥ Be sure to bring a spare O-ring in case the O-ring that you are using becomes
damaged or scratched.
2
13
VQT1F26
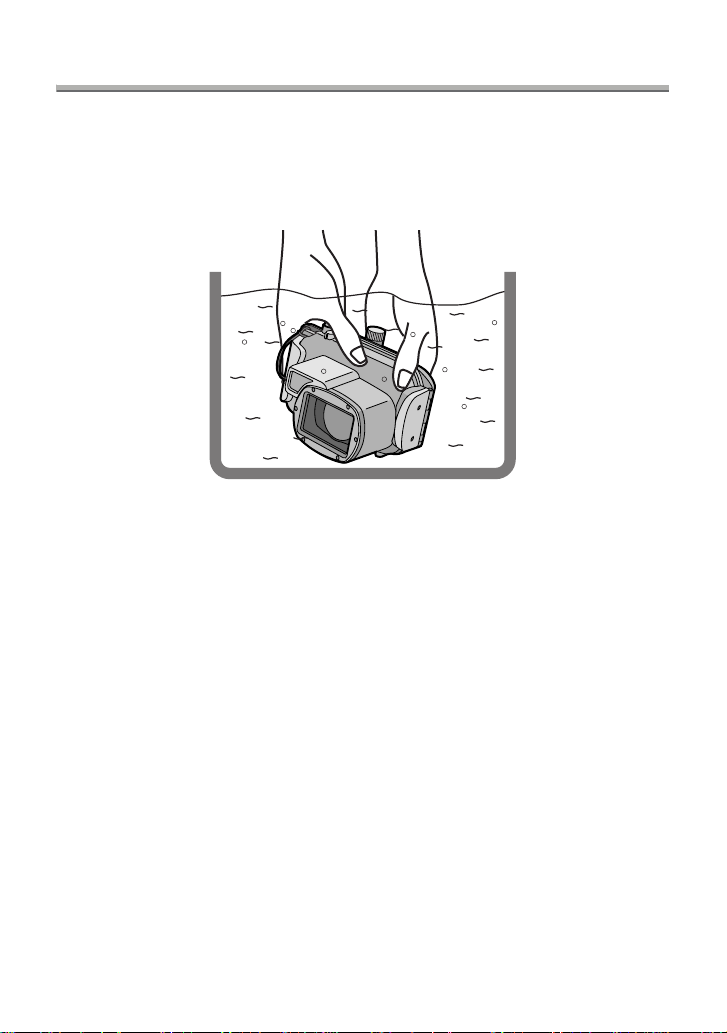
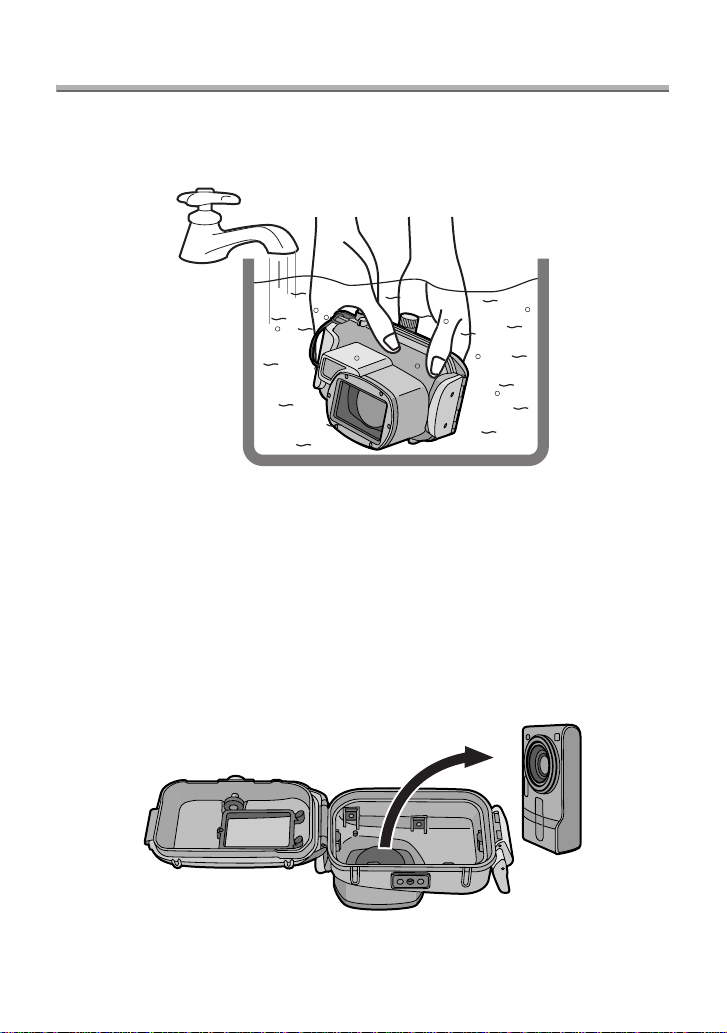
Preparation -Checking the Case is Waterproof-
After setting the O-ring, check that no water leaks into the Case by
submerging it in a water tank, bath tub etc. for more than about
3 minutes before attaching a digital camera.
≥ Do not use the Case in water over 40 °C. The heat may damage the Case or cause
water leakage.
‘
Carry out the same test after attaching the digital camera to the Case. (P15)
∫
Notes
≥ If bubbles rise from the Case when it is submerged in water or there is water inside
the Case when you take it out the water, there is water leakage. In these cases,
consult your dealer.
≥ If water leaks into the Case while you are using it and the digital camera is
submerged in water, remove the battery immediately. Hydrogen gas can cause
burning or explosion if there is a fire nearby.
≥ If you dive quickly while holding the Case or throw the Case from a ship into the sea,
some water leakage may occur because of high pressure. This is not a malfunction
of the Case. Always dive slowly into the water.
≥ The Case is designed to be used at a depth of up to 40 m. If you dive deeper than
40 m, part of the Case may be damaged beyond repair.
≥ When closing the Case, be careful that no foreign materials get caught between the
O-ring and the O-ring groove. Even one strand of hair or one grain of sand can
cause water leakage.
14
VQT1F26
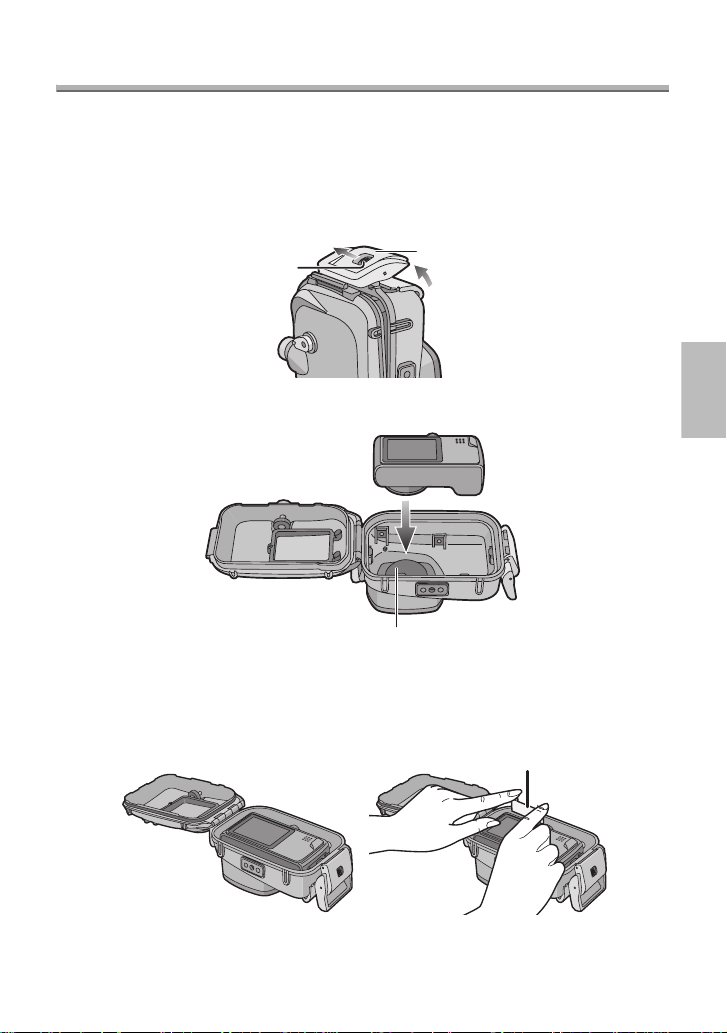
Preparation -Attaching the Digital Camera-
Check that th e ON/OFF Switch on the camera and the case is set to
[OFF].
≥ Remove the strap from the digital camera.
1
Push 2 up with your finger while sliding 1 to open the buckle.
1
2
Attach the digital camera to the Case.
≥ Be careful not to catch the shading ring 1.
3
Insert the silica gel (supplied).
≥ Always use new silica gel.
2
1
Silica gel
15
VQT1F26
Preparation -Attaching the Digital Camera- (continued)
≥ When inserting the silica gel, bend it as shown in the illustration below
and then insert it as far as possible. If you close the Case with the silica
gel not fully inserted, the silica gel will get caught in the O-ring causing
water leakage.
≥ If the air temperature is high and the water temperature is low, condensation
may appear inside the Case. To prevent condensation, make sure that the silica
gel (supplied) does not come into contact with the digital camera lens. To
prevent the Case from becoming fogged up, insert the silica gel about 1 to
2 hours before using the Case.
4 Close the buckle.
1
‘
Check that the buckle is closed firmly.
Do not insert the strap etc. in the buckle.
2
5 After you have attached the digital camera, check one more time that
no water leaks into the Case. (P14)
16
VQT1F26
∫ Notes
≥
Check one more time that the O-ring is fitted evenly into the O-ring groove.
≥ Avoid opening or closing the Case where there is a lot of sand or dust and in humid
or wet places.
≥
If there is a sudden change in temperature, condensation may appear inside the Case.
≥ If sunscreen or sun oil sticks to the Case, wash it off immediately with lukewarm
water to prevent reduced waterproofness or discolouration.
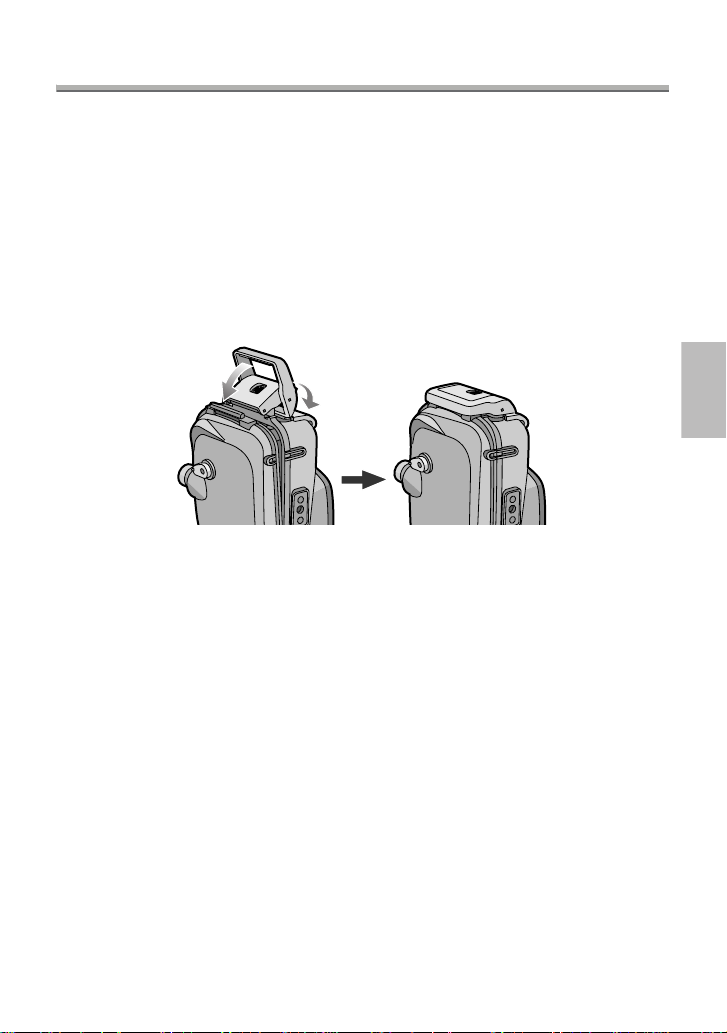
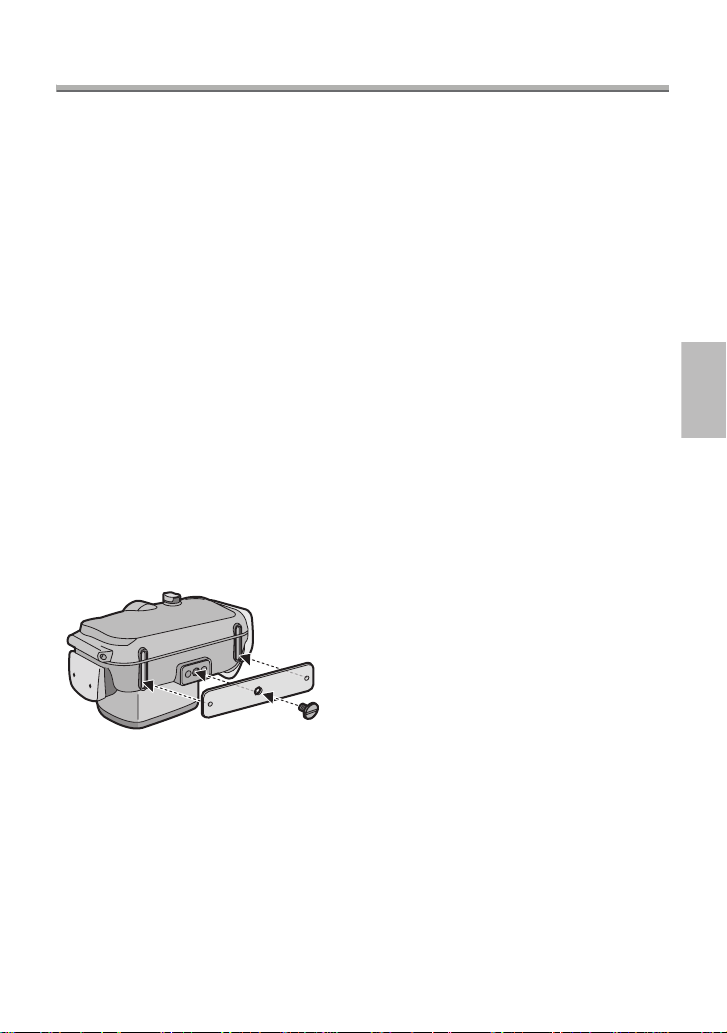
∫ Attaching the weights
About using the weights
Attach the weights to adjust to the preferred buoyancy when using the marine case.
Use them as necessary.
Refer to the following about buoyancy underwater.
1 I f you use the digital camera and the marine case only:
They will float slowly in fresh water or seawater. (Plus buoyancy)
2 I f you use the digital camera, the marine case and 1 weight:
They will float even more slowly in fresh water or seawater than
(Plus buoyancy)
1.
3 I f you use the digital camera, the marine case and 2 weights:
They will sink slowly in fresh water or seawater. (Minus buoyancy)
How to attach the weights
If you use 1 weight, align t he protruding p art of
the weight with the tripod receptacle on the
marine case and then use the supplied screw
to attach it. If you use 2 weights, align the
projecting part of the second weight with the
indented part of the first weight so that the
weights do not overlap and then attach them
to the tripod receptacle.
∫ Note
To prevent rusting, detach the weights after use, wipe off any salt and then store
≥
them.
17
VQT1F26
Taking Pictures
∫ Before taking pictures underwater
Check the following before diving.
≥
Is there sufficient remaining battery power?
≥ Is there sufficient memory in the card?
≥ Is the O-ring fitted evenly into the O-ring groove?
≥ Have you checked that no water leaks into the Case?
≥ Is the buckle closed firmly?
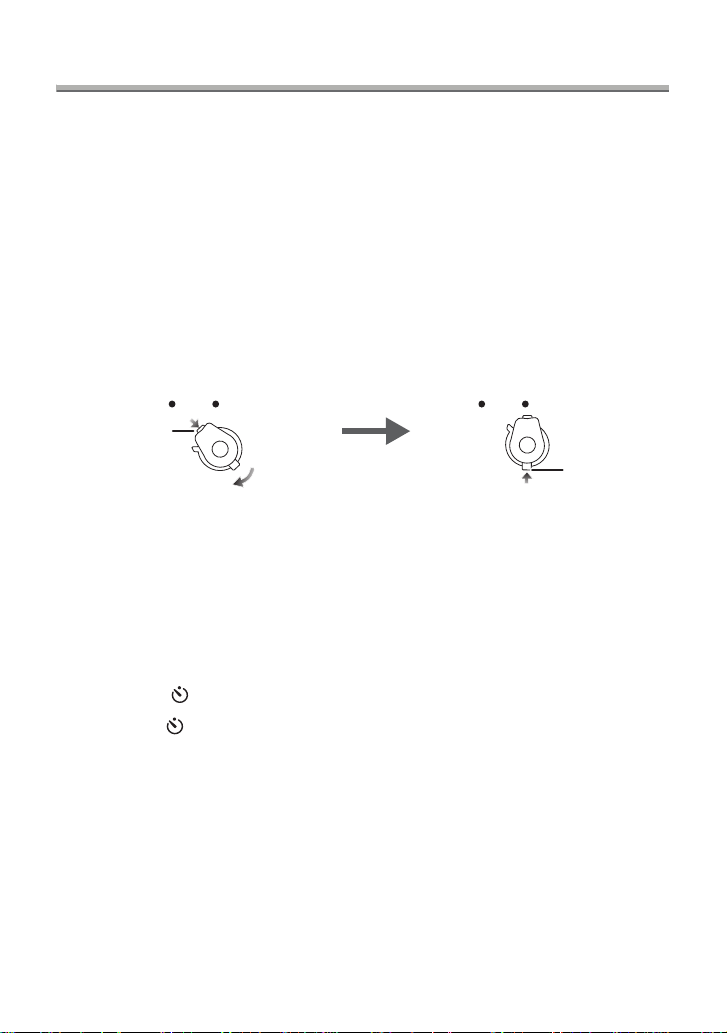
∫ Taking pictures
1 Tu rn the camera on.
Press 1 to release the lock
and then set to [ON].
ONOFF
Press 2 to lock.
ONOFF
1
2
2 Display the scene mode menu and then set [UNDERWATER].
≥
Read the operating instructions of the digital camera for details.
3 Aim the AF area on the LCD monitor at the subject y ou want to f ocus
on.
4 Press 2 ( ) to focus.
•Press 2 () again to cancel.
5 Press the shutter button fully to take the picture.
∫ Notes
≥
Before attaching the camera to the Case, we recommend setting the clock again.
(Read the operating instructions of the digital camera for details.)
≥ If there are any particles floating in front of the camera, it may focus on them instead
of the subject.
≥ If there are drops of water or dirt sticking to the front glass, you may not be able to
focus properly. Be sure to wipe the front glass before taking pictures.
18
VQT1F26

Tips for Taking Pictures in the Water
When the image is too bluish in the water
1 Press 3 ( ) several times until [] appears.
2 Press 2 ()/1 ()
to adjust the white balance.
3 Press [MENU/SET] to finish.
≥ You can also press the shutter button halfway to finish.
Select the best picture
Set the flash to [ ].
Using the auto bracket function (For models with an auto bracket function)
≥ Each time the shutter button is pressed, 3 pictures with different exposures are
automatically recorded. You can select the desired picture from the 3 pictures.
Use Burst mode
≥ When taking pictures of a fast-moving subject (a clownfish etc.), you can select
your favourite picture after taking the pictures using burst mode.
∫
Note
≥ For more information, read the operating instructions of the digital camera.
19
VQT1F26
After Use
After finishing taking pictures, follow the steps below.
1
Submerge the Case in fresh water for about 30 minutes or more
without removing the digital camera to remove any salt crystals etc.
≥
Press all the operation buttons etc. on the Case to wash away any
seawater. If the salt crystals are not removed from the buttons etc., they
will harden an d the buttons will become unope r a ble.
≥
Do not wash the Case with fast-running or pressurized water etc. as it may
cause water leakage.
2
Wipe the water with a dry cloth that has no salt crystals sti ck ing to it
and then dry the Case completely.
≥ Do not dry the Case by exposing it to direct sunlight. This may
damage the Case or may hasten deterioration of the O-ring.
discolour
or
3
Open the rear case to remove the digital camera.
20
VQT1F26

4
Remove the O-ring from the Case and check that there is no debris,
etc. in the O-ring groove.
5
Check that there are no scratches etc. on the O-ring while you are
applying the grease.
∫
Notes
Be careful when removing the digital camera from the Case so that it
does not get wet.
≥ Remove the camera with clean hands. (Wash your hands with fresh wat er and then
thoroughly dry them.)
≥ Thoroughly dry any moisture on your body or hair. (Be particularly careful about any
water coming from the sleeves of your thermal suit.)
≥ When the weather or the sea is particularly bad, select a place where the digital
camera will not get wet e.g. indoors or where there is a roof overhead.
Cleaning and Storing
1
Wash the outside of the Case with water.
≥ Wash the outside of the Case until it is clean. (P20)
≥ Be sure to close the Case and then wash the outside with only water.
≥ Wipe off any dirt inside the Case with a wet, soft cloth.
∫
Notes
≥ Do not wash the Case with pressurized water as it may cause water leakage.
Remove the digital camera before washing the Case with water.
≥ Do not leave the digital camera inside the Case when storing it.
≥ Store the Case in a cool, well-ventilated place.
Caution for Use
∫
Handling of the O-ring
≥
Do not use alcohol, thinner or a chemical cleaning agent for cleaning the
O-ring. This will cause damage to, or deterioration of, the O-ring.
≥
If you will not be using the Case for a long period of time, remove the O-ring
from the O-ring groove, apply a thin coat of grease (supplied), place it in a
clean polyester bag and then store it in a cool, dark place to prevent the
surface from being damaged. When you use the O-ring again, thoroughly
check that it is not scratched or split.
21
VQT1F26

Caution for Use (continued)
≥ Use only the specified grease. If you use other types of grease, the surface of
the O-ring may be damaged causing water leakage.
≥ The O-ring comes into contact with the sides of the Case making the Case
waterproof. Do not knock, insert foreign materials (dirt, sand, hair etc.) or scratch
the O-ring or sides of the Case.
≥ Use the tips of your fingers to remove the O-ring. Do not use a pointed object as it
may scratch the O-ring.
≥ After removing the O-ring from the rear case, wipe off any dirt, sand, hair or other
foreign materials on it. Also wipe the O-ring groove and the inner sides of the front
case which come into contact with the O-ring.
≥ Never use an O-ring that has been scratched or damaged by dirt etc. This will cause
water leakage. Replace it with a new O-ring.
≥ After replacing an O-ring, not using the Case for a long period of time or opening the
Case to attach a digital camera, replace the battery etc., thoroughly check that the
O-ring is not scratched or split. Then, close the Case and check that no water leaks
into it by submerging it in a water tank, bath tub etc. for about 3 minutes. (P14)
≥ O-rings are consumable products. Although the lifespan of O-rings will depend on
how well they are maintained, how often they are used and their storage conditions,
we recommend replacing them every year even if you cannot see any scratches.
∫ About maintenance
≥ Do not use the chemicals shown below for cleaning, rustproofing, defogging
or repair. Using them directly or indirectly (with a chemical spray etc.) on the
Case may cause it to crack under high pressure.
Prohibited chemicals Cautions
Volati le organic solvents/
Chemical cleansers
Anti-corrosives
Anticlouding agents
Adhesives
≥ If grease sticks to the digital camera, wipe it off with a soft, dry cloth.
≥ When wiping the inside of the Case, only use a soft, dry cloth. Wipe the inside of the
front glass with a soft, dry cloth before and after use to keep the glass clear.
Do not clean the Case with volatile organic solvents
such as alcohol, gasoline or thinner or with chemical
cleansers. Clean it with fresh water or lukew arm water.
Do not use anti-corrosives as the metal parts of the
Case are made from stainless steel or brass. Clean it
with fresh water.
Do not use commercially available anticlouding
agents. Be sure to use the silica gel indicated in these
operating instructions.
Do not use adhesives for repair. If the Case needs to
be repaired, consult your dealer.
22
VQT1F26

∫ About storage and inspection after use
≥ Always take the digital camera out of the Case.
≥ Make sure that no dirt or dust is stuck to the O-ring.
≥ Thoroughly dry the Case at room temperature and then store it in a cool, dark place.
≥ We recommend that the Case be inspected about 3 years after purchase. This
inspection involves dismantling and cleaning the Case, inspecting all the parts and
repairing them if necessary and checking the waterproofness of the Case using the
same hydrostatic test equipment that was used to check the waterproofness before
purchase. The customer is responsible for all transportation costs.
≥ Do not dismantle any parts or use any accessories not specified in these operating
instructions and do not alter the Case. If the Case does not work properly, consult
your dealer.
Specifications
Compatible model: DMC-TZ2/DMC-TZ3 (As of March 2007*)
Mass: Approx. 430 g
Dimensions: Approx. 155 mm (W)k94 mm (H)k93 mm (D)
Material: Polycarbonate
Waterproof construction: O-ring sealing
Water resistant depth: 40 m
* Refer to the operating instructions, catalogue, website etc. of the digital
camera for the latest information on models that can be used.
(excluding the projecting parts)
23
VQT1F26

Inhalt
Vor der Verwendung . . . . . . . . . . . . . . . . . . . . . . . . . . 25
Zubehör . . . . . . . . . . . . . . . . . . . . . . . . . . . . . . . . . . . . 27
Handhabung und Pflege . . . . . . . . . . . . . . . . . . . . . . . 28
Bauteile . . . . . . . . . . . . . . . . . . . . . . . . . . . . . . . . . . . . 30
Was ist der O-Ring? . . . . . . . . . . . . . . . . . . . . . . . . . . . 31
Vorbereitung -Einsetzen des O-Rings- . . . . . . . . . . . . 32
Vorbereitung -Kontrollieren, dass das
Gehäuse wasserdicht ist- . . . . . . . . . . 36
Vorbereitung -Anbringen der Digitalkamera- . . . . . . . 37
Aufnahme von Bildern . . . . . . . . . . . . . . . . . . . . . . . . . 40
Tipps zur Aufnahme von Bildern im Wasser . . . . . . . . 41
Nach Gebrauch . . . . . . . . . . . . . . . . . . . . . . . . . . . . . . 42
Reinigung und Aufbewahrung . . . . . . . . . . . . . . . . . . . 44
Vorsichtshinweise . . . . . . . . . . . . . . . . . . . . . . . . . . . . 45
Spezifikationen . . . . . . . . . . . . . . . . . . . . . . . . . . . . . . . 47
24
VQT1F26

DEUTSCH
Vor der Verwendung
≥ Dieses Unterwassergehäuse wurde für die Digitalkameras von Panasonic.
Sie können bis zu einer Wassertiefe von 40 m Spaß an Unterwasseraufnahmen
haben.
≥ Beim Eindringen von Wasser aufgrund Nachlässigkeit haftet Matsushita in keiner
Weise für Schäden an jeglichen im Gehäuse enthaltenen Produkten (Digitalkamera,
Batterien, Karte, etc.), Kosten für Fotografien oder sonstige Aufwendungen.
≥ Matsushita leistet außerdem keinen Schadenersatz für Unfälle, die zu V erletzungen
oder Sachschaden führen.
≥ Lesen Sie dazu die Bedienungsanleitung zu Ihrer Digitalkamera.
≥ Bevor Sie die Digitalkamera anbringen, das Gehäuse ca. 3 Minuten oder
länger in Wasser tauchen, um zu überprüfen, ob kein Wasser eindringt.
∫ Zum Umgang mit diesem Gehäuse
≥ Verwendung unter den folgenden Bedingungen:
• Wassertiefe: Bis zu 40 m
• Umgebungstemperatur: 0 oC bis 40 oC
≥ Das Gehäuse nicht in Wasser mit einer Temperatur über 40 °C verwenden. Die
Wärme kann das Gehäuse beschädigen oder zum Eindringen von Wasser führen.
≥ Das Gehäuse besteht aus stoßfestem Polykarbonat. Seien Sie jedoch bei der
Benutzung vorsichtig, das es leicht zerkratzt, wenn Bilder an felsigen Stellen, etc.
aufgenommen werden und kann durch Stöße wie durch Herunterfallen o.ä.
beschädigt werden. Bei Reisen im Auto, Schiff, Zug oder Flugzeug, das Gehäuse
gut verpacken, um jegliche direkte Stöße zu vermeiden, falls es herunterfallen sollte
und lassen Sie die Digitalkamera nicht im Gehäuse. Die Digitalkamera nur im
Gehäuse anbringen, wenn Sie diese eine kurze Strecke lang, wie z.B. vom
Flughafen zum Tauchort transportieren. (Das Verpackungsmaterial aus dem Kauf
des Gehäuses kann nicht zum Transportieren verwendet werden.)
≥ Beim Besteigen eines Flugzeugs kann der Wechsel des atmosphärischen Druck zur
Ausdehnung des Gehäuses führen und dadurch zu Beschädigungen. Entfernen Sie
den O-Ring, bevor Sie ein Flugzeug besteigen.
≥ Lassen Sie die Digitalkamera nicht längere Zeit in einem Auto, auf einem
Schiff oder direkter Sonneneinstrahlung ausgesetzt. Das Gehäuse ist eine
luftdichte Vorrichtung, daher wird die Temperatur darin sehr hoch und es
kann zu Funktionsstörungen der Digitalkamera kommen. Lassen Sie die
Temperatur im Gehäuse nicht zu hoch werden.
25
VQT1F26

Vor der Verwendung (Fortsetzung)
∫ Verwendung des Gehäuses bei hohen oder
niedrigen Temperaturen
≥ Wenn Sie das Gehäuse an feuchten oder heißen Orten öffnen und dann an einen
kühlen Ort oder unter Wasser bringen, kann es im Inneren des Gehäuses zu
Kondensation kommen, die Glasfläche sich trüben und die Digitalkamera
beschädigt werden.
≥ Wenn Sie das Gehäuse plötzlich von einem kalten Ort oder kaltem Wasser an einen
warmen Ort bringen, kann die Oberfläche sich trüben. Warten Sie mit dem
Aufnehmen von Bildern, bis sich das Gehäuse der Lufttemperatur angepasst hat.
∫ Zur Vorbereitung
≥ Öffnen oder schließen Sie das Gehäuse nicht, wo es Wasserspritzern
ausgesetzt ist oder Sand hineingeraten kann. Wir empfehlen das Öffnen oder
Schließen des Gehäuses in geschlossenen Räumen.
≥ Nehmen Sie das Ersetzender Batterie, der Karte, etc. und das Anbringen der
Digitalkamera in geschlossenen Räumen vor, wo wenig Feuchtigkeit vorhanden ist.
≥ Wenn Sie das Gehäuse am Tau chor t öffnen oder schließen müssen, um die
Batterie oder die Karte zu ersetzen, halten Sie unbedingt die unten
aufgeführten Schritte ein.
• W ählen Sie einen Or t , an dem kein Wasser auf das Gehäuse spritzen und kein
Sand in dieses gelangen kann.
• Entfernen Sie jegliche Wassertropfen im Zwischenraum zwischen vorderem und
hinterem Geräteteil und auf der Schnalle. Verbleibende Wassertropfen mit einem
trockenen Tuch sorgfältig abreiben.
• Sorgfältig jegliche Wassertropfen auf dem Körper und den Haaren trockenreiben.
• Ach ten Sie besonders auf Wasser aus den Ärmeln Ihres Taucheranzugs.
• Berühren Sie die Digitalkamera nicht, wenn Ihre Hände mit Salzwasser befeuchtet
sind. Feuchten Sie zuvor ein Handtuch mit Süßwasser an und bringen Sie es in
einer Plastiktüte unter. Verwenden Sie dieses Handtuch, um jegliche
Wassertropfen oder Sand von Händen und Körper zu entfernen.
≥ Das Gehäuse ist nicht stoßfest. Wenn Sie einen schweren Gegenstand darauf
abstellen oder es Stöße erleidet, kann die Digitalkamera beschädigt werden. Seien
Sie bei der Verwendung des Gehäuses vorsichtig.
26
VQT1F26

Zubehör
Beim ersten Öffnen der Verpackung überprüfen, ob das Gehäuse und
alle Zubehörteile enthalten sind und dass keine Versand- oder
Transportschäden am Gehäuse oder an jeglichen Zubehörteilen
vorliegen. Bei Unregelmäßigkeiten wenden Sie sich vor der
Verwendung des Gehäuses an Ihren Händler.
Verwenden Sie keine anderen Zubehörteile als die unten
aufgeführten.
O-Ring
VMG1798
Fett (für O-Ring)
VZG0372
Gewichte (2)
VMP8844
Diffusor
VYK2D90
≥
Sie können den Diffusor entfernen, wenn Sie ihn nicht verwenden.
Entfernen Anbringen
Bringen Sie die Gewichte wie in der
Zeichnung gezeigt an.
Kieselgel
(Trockenmittel)
(1 g/5 Stück)
VZG0371
Handriemen
VFC4190
Schraube zum
Befestigen der
Gewichte
VHD1930
27
VQT1F26

Handhabung und Pflege
≥ Stellen Sie dieses Gehäuse nicht an einem instabilen Ort ab.
• Fällt das Gehäuse auf Kopf oder Füße, führt dies zu Verletzungen und zu
Funktionsstörungen des Gehäuses.
≥ Nehmen Sie keinerlei Veränderungen am Gehäuse vor.
• Wenn Wasser in die Digitalkamera eindringt, weil Änderungen am Gehäuse
vorgenommen wurden, kann die Digitalkamera irreparabel beschädigt werden.
• Wenn Sie die Digitalkamera weiter benutzen, nachdem in diese Wasser
eingedrungen ist, kann dies einen Brand zur Folge haben.
≥ Verwenden Sie das Gehäuse ohne angemessene Einweisung nicht
beim Scuba-Tauchen.
• Sie sollten das Gehäuse nur beim Scuba-T auchen einsetz en, wenn Sie über eine
angemessene Ausbildung und einen Schein für diesen Sport verfügen.
≥ Das Gehäuse, das Fett, das Kieselgel und den O-Ring stets
außerhalb der Reichweite von Kindern aufbewahren.
• Geraten Körperteile von Kindern in das Gehäuse, kann dies zu Verletzungen
führen.
• Kinder können das Fett, das Kieselgel oder den O-Ring versehentlich
verschlucken.
• Suchen Sie umgehend den Arzt auf, wenn Sie annehmen, dass ein Kind Fett,
Kieselgel oder den O-Ring verschluckt hat.
≥ Den Riemen unter Wasser nicht um den Hals hängen.
• Dieser könnte sich um den Hals winden und zu Ersticken oder schweren
Verletzungen führen.
≥ Die Hände sorgfältig von jeglichem Fett reinigen.
• Vermeiden Sie, dass Fett an Ihren Händen in Kontakt mit Mund oder Augen
gerät.
≥ Gerät Wasser in das Gehäuse, unterbrechen Sie die Verwendung
umgehend.
• Dies kann sonst zu einem Stromschlag, Verbrennungen oder Brand führen.
• V erständigen Sie Ihren Händler .
≥ Bei unvorhergesehenen Ereignissen während des Gebrauchs des
Gehäuses unter Wasser ha lten Sie sic h beim Auftauchen bitte an alle
vorgeschriebenen Vorgehensweisen und Richtlinien zum
Druckausgleich.
• Wenn Sie zu schnell auftauchen, kann dies die Caissonkrankheit zur Folge
haben.
28
VQT1F26

≥ Wenn das Gehäuse Rauch oder anormale Wärme, Gerüche oder
Geräusche erzeugt, unterbrechen Sie die Verwendung unverzüglich.
• Diese können zu einem Stromschlag, Verbrennungen oder Brand führen.
• Entnehmen Sie die Digitalkamera aus dem Gehäuse und entfernen Sie dann
umgehend die Batterien.
• V erständigen Sie Ihren Händler .
≥ Beim Öffnen des Gehäuses nach dem Eintreten von Wasser
vorsichtig vorgehen.
• Das eingedrungene Wasser kann herausgedrückt werden oder die
Gehäuserückseite abspringen.
≥ Lassen Sie das Gehäuse nicht an Orten mit hohen Temperaturen
zurück.
• Die Innentemperatur des Gehäuses erreicht besonders hohe Werte, wenn dieses
direkter Sonneneinstrahlung am Strand, auf einem Schiff, etc. ausgesetzt wird
oder wenn dieses im Sommer im geschlossenen Auto gelassen wird. Die Wärme
kann zu Beschädigung des Gehäuses oder seiner internen Teile führen.
• Wird eine Digitalkamera im Gehäuse angebracht, kann diese ebenso beschädigt
werden.
• Wenn Sie die daran angebrachte Digitalkamera ver wenden, wenn die
Innentemperatur des Gehäuses sehr hoch ist, kann dies zum Eindringen von
Wasser, Kurzschluss oder Ausfall der Isolierung und so zu Brand oder
Funktionsstörungen führen.
≥ Berühren Sie die Digitalkamera oder die Batterie nicht mit feuchten
Händen.
• Dies kann zu Stromschlag oder Funktionsstörungen führen.
∫ Bei der Aufnahme von Bildern mit Blitzlicht
≥ Bei der Aufnahme von Bildern mit Blitzlicht können die Ecken des Bildes
verschwommen sein oder das Bild kann nicht gleichmäßig ausgeleuchtet sein.
≥ Bei der Aufnahme von Bildern mit Blitzlicht ist der verfügbare Blitzlichtbereich unter
Wasser geringer als auf dem Land.
29
VQT1F26
Bauteile
12 3 4 5
7
1. Zoom-Hebel
2. Riemenöse
(zum Anbringen des in der
Lieferung enthaltenen
Handriemens und des Diffusors)
6
3. Auslösetaste
4. Modusschalter
5. Vorderes Gehäuse
6. Diffusor (beiliegend)
7. Vordere Glasscheibe
8
9
10
11
12
13141516
17
8. ON/OFF-Schalter
9. 3/Belichtungsausgleich/
Auto Bracket/WeißausgleichFeineinstellung/GegenlichtAusgleich im Einfach-Modus
Taste
10. 1/Blitzlicht-Modus-Taste
11. [MENU/SET]-Taste
12. [FUNC]/Lösch-Taste
13. 4/[REV]-Taste
14. [DISPLAY/LCD MODE]Taste
15. 2/Selbstauslöser-Taste/
AF-Sperre
16. Hinteres Gehäuse
30
VQT1F26
18
17. Schnalle
18. Sperrfreigabe-Schalter
 Loading...