

Page 1
Operating Instructions
Marine Case
Model No.
DMW-MCTZ3
Before connecting, operating or
adjusting this product, please read
the instructions completely.
For USA assistance, please call: 1-800-272-7033 or send e-mail to : digitalstillcam@us.panasonic.com
For Canadian assistance, please call: 1-800-99-LUMIX (1-800-995-8649) or
send e-mail to: lumixconcierge@ca.panasonic.com
PP
VQT1F25
Page 2

Contents
Before Use . . . . . . . . . . . . . . . . . . . . . . . . . . . . . . . . . . 3
Accessories. . . . . . . . . . . . . . . . . . . . . . . . . . . . . . . . . . 5
Handling and Care . . . . . . . . . . . . . . . . . . . . . . . . . . . . 6
Components . . . . . . . . . . . . . . . . . . . . . . . . . . . . . . . . . 8
What is the O-ring?. . . . . . . . . . . . . . . . . . . . . . . . . . . . 9
Preparation -Setting the O-ring- . . . . . . . . . . . . . . . . . 10
Preparation -Checking the Case is Waterproof- . . . . . 14
Preparation -Attaching the Digital Camera- . . . . . . . . 15
Taking Pictures . . . . . . . . . . . . . . . . . . . . . . . . . . . . . . 18
Tips for Taking Pictures in the Water . . . . . . . . . . . . . 19
After Use. . . . . . . . . . . . . . . . . . . . . . . . . . . . . . . . . . . 20
Cleaning and Storing . . . . . . . . . . . . . . . . . . . . . . . . . 21
Caution for Use. . . . . . . . . . . . . . . . . . . . . . . . . . . . . . 21
Specifications . . . . . . . . . . . . . . . . . . . . . . . . . . . . . . . 23
Limited Warranty. . . . . . . . . . . . . . . . . . . . . . . . . . . . . 24
Spanish Quick Use Guide/
Guía rápida en español. . . . . . . . . . . . . . . . . . . . . . . . 28
2
VQT1F25
Page 3

Before Use
≥ This Marine Case is designed for Panasonic Digital Camera.
You can enjoy taking pictures underwater at depths up to 40 m/130 feet.
≥ In the case of water leakage due to insufficient care, Matsushita is in no
way liable for damage to any products (digital camera, batteries, card etc.)
inside this Case, photography costs or any other expenses.
≥ Matsushita also offers no compensation for accidents resulting in injury or
damage to property.
≥ Read the operating instructions for your digital camera.
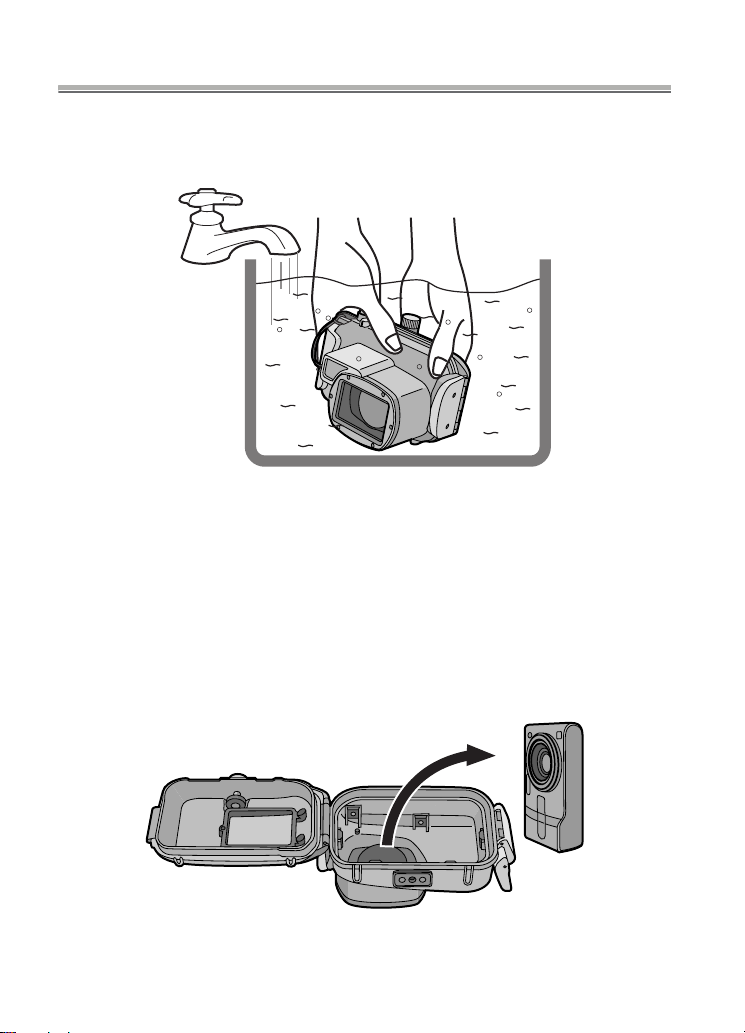
≥ Before attaching the digital camera, submerge the case in water for
about 3 minutes or more to check that there is no water leakage.
∫ About handling this Case
≥ Use under the following conditions.
• Water depth: Up to 40 m/130 feet
• Ambient temperature: 0 °C
≥ Do not use the Case in water over 40 °C/104 °F. The heat may damage the Case or
cause water leakage.
≥ The Case is made of impact resistant polycarbonate however be careful when you
are using it. It can be easily scratched when taking pictures in rocky places etc. and
can be damaged by the impact if dropped etc. When travelling, pack the Case
carefully to prevent any direct impact if it is dropped etc. and do not leave the digital
camera in the Case. Only attach the digital camera to the case if you are
transporting it a short distance such as from the airport to the diving spot. (You
cannot reuse the material the Case was packed in at the time of purchase to
transport it.)
≥ When boarding a plane, the change in atmospheric pressure may cause the inside
of the Case to expand causing damage to the Case. Remove the O-ring before
boarding a plane.
≥ Do not leave the digital camera in the Case for a long period of time in a car, a
ship, exposed to direct sunlight etc. The Case is an airtight device so the
temperature inside the Case will become very high and the digital camera may
stop operating properly. Do not let the temperature inside the Case become
too high.
to
40 °C/32 °F
to
104 °F
VQT1F25
3
Page 4

Before Use (continued)
∫ Using the Case in high or low temperatures
≥ If you open or close the Case where it is humid or hot and then move to a place that
is cold or dive underwater, condensation may appear inside the Case, the glass
surface may become cloudy and the digital camera may be damaged.
≥ If you suddenly move the Case from a cold place or cold water to a warm place, the
glass surface may become cloudy. Wait until the Case becomes close to the air
temperature before taking pictures.
∫ About preparation
≥ Do not open or close the Case where it may be splashed by water or sand may
get in it. We recommend opening or closing the Case indoors.
≥ Replace the battery, card etc. and attach the digital camera indoors where there is
little moisture.
≥ If you must open or close the Case at the diving spot to replace the battery or
the card, be sure to follow the steps below.
• Select a place where the Case will not be splashed by water and sand will not get
in it.
• Blow off any drops of water in the gap between the rear case and the front case
and on the buckle. Thoroughly wipe off any remaining drops of water with a dry
cloth.
• Thoroughly wipe off any drops of water on your body or hair.
• Be particularly careful about any water coming from the sleeves of your thermal
suit.
• Do not touch the digital camera if your hands are wet from sea water. Wet a towel
with fresh water and place it in a polyester bag beforehand. Use this towel to wipe
off any drops of water or sand on your hands or body.
≥ This Case does not absorb shock. If you place a heavy object on the Case or cause
shock to it, the digital camera may be damaged. Be careful when you are using the
case.
4
VQT1F25
Page 5
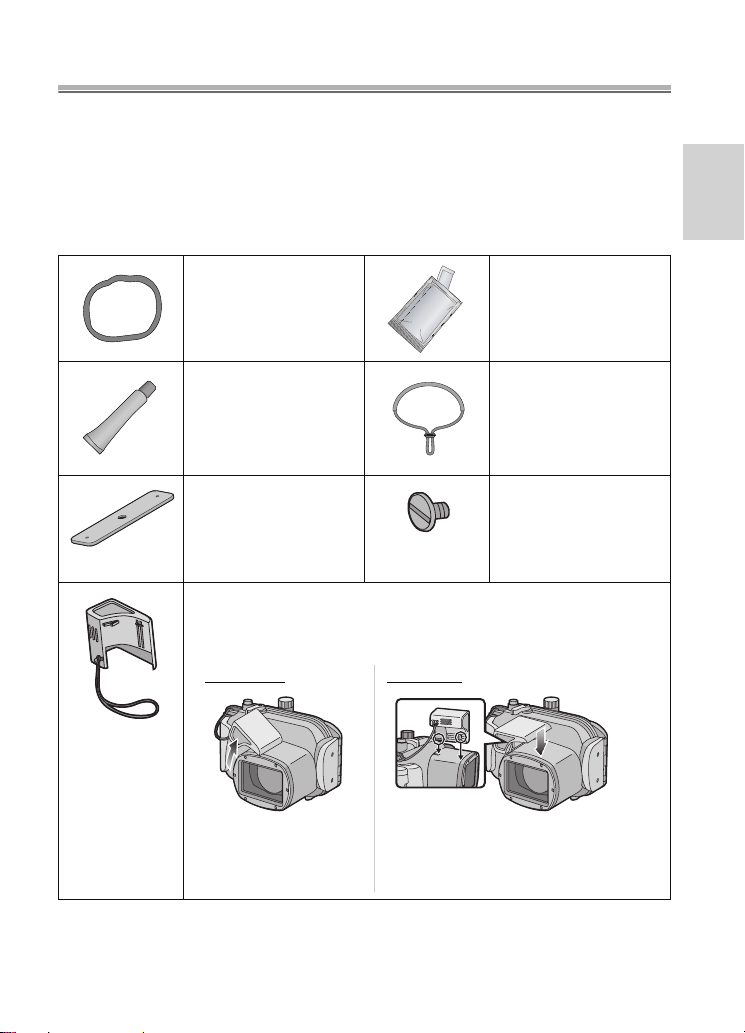
Accessories
When you first open the package, check that the Case and all the
accessories are included and that there has been no damage to the
Case or any of the accessories during distribution or
transportation. If you find something unusual, consult your dealer
before using the Case.
Do not use any accessories except those specified below.
O-ring
VMG1798
Grease (for O-ring)
VZG0372
Weight (2)
VMP8844
Diffuser
VYK2D90
Silica Gel (Desiccant)
(1 g /5 pieces)
VZG0371
Hand Strap
VFC4190
Weights attachment
screw
VHD1930
≥ You can remove this diffuser when not using it
Removing Attaching
.
Attach as shown in the diagram.
5
VQT1F25
Page 6

Handling and Care
≥ Do not place the Case where it may fall.
• If the Case falls on your head or foot, it will injure you and cause the Case to
malfunction.
≥ Never alter the Case.
• If water leaks into the digital camera because the Case was altered, the digital
camera may be damaged beyond repair.
• If you continue to use the digital camera after water has leaked into it, this may
cause a fire.
≥ Do not use the Case while scuba diving without proper training.
• You should only operate the Case while scuba diving if you have been properly
trained and certified for this sport.
≥ Never place the Case, grease, silica gel or O-ring within the reach of
infants.
• If any part of an infant’s body is caught in the Case, it may cause an injury.
• Infants may accidentally swallow the grease, silica gel or O-ring.
• Consult a doctor immediately if you think an infant may have swallowed the
grease, silica gel or O-ring.
≥ Do not hang the strap around your neck underwater.
• It may become wound around your neck causing suffocation or other serious
injuries.
≥ Thoroughly wash off any grease on your hands.
• Do not allow the grease on your hands to come into contact with your mouth or
eyes.
≥ If water leaks into the case, stop using it immediately.
• This may cause an electric shock, burning or a fire.
• Consult your dealer.
≥ If anything abnormal occurs while using the Case underwater, please
follow all necessary procedures and guidelines for decompressing
when you ascend.
• If you ascend too quickly, you may get caisson disease.
≥ If smoke or abnormal heat, smells or sounds come from the Case,
stop using it immediately.
• These may cause an electric shock, burning or fire.
• Remove the digital camera from the Case and then immediately remove the
battery from the digital camera.
• Consult your dealer.
≥ Be careful when opening the Case after water leakage.
• The leaked water may blow out or the rear case may flip.
6
VQT1F25
Page 7

≥ Do not leave the Case where the temperature is high.
• The temperature inside the Case becomes very high particularly when it is
exposed to direct sunlight on a beach, a ship etc. or when it is left in an airtight car
in the summer. The heat may damage the Case or its inner parts.
• If a digital camera is attached to the Case, it may also be damaged.
• If you use the attached digital camera when the temperature inside the Case is
very high, it may cause leakage, short-circuiting or insulation failure resulting in
fire or malfunction.
≥ Do not handle the digital camera or the battery with wet hands.
• This may cause an electric shock or malfunction.
∫ When taking pictures with the flash
≥ When taking pictures with the flash, the corners of the picture may be vignetted or
the picture may not be lit evenly.
≥ When taking pictures with the flash, the available flash range is less underwater
than on land.
VQT1F25
7
Page 8
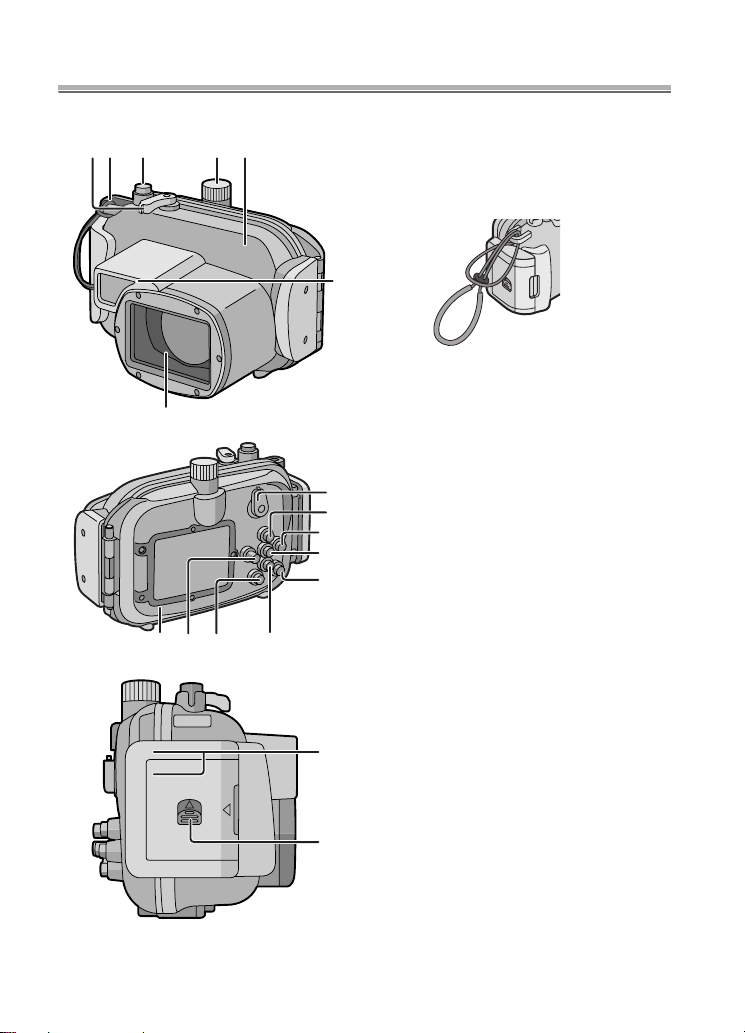
Components
12 3 4 5
7
1. Zoom Lever
2. Strap Eyelet
(for attaching the supplied hand
strap and diffuser)
6
3. Shutter Button
4. Mode Dial
5. Front Case
6. Diffuser (supplied)
7. Front Glass
8
9
10
11
12
13141516
17
8. Camera ON/OFF Switch
9. 3/Exposure Compensation/
Auto Bracket/White Balance
Fine Adjustment/Backlight
Compensation In Simple
Mode Button
10. 1/Flash Setting Button
11. [MENU/SET] Button
12. [FUNC]/Delete Button
13. 4/[REV] Button
14. [DISPLAY/LCD MODE]
Button
15. 2/Self-timer Button/AF Lock
16. Rear Case
17. Buckle
18. Lock Release Lever
8
VQT1F25
18
Page 9
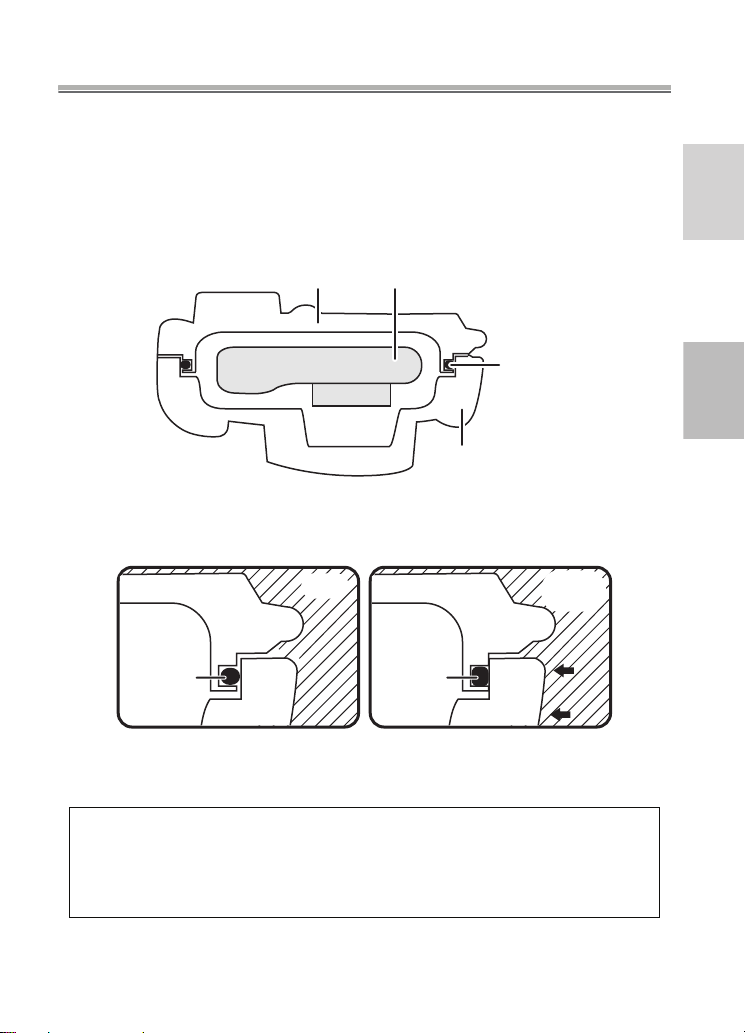
What is the O-ring?
≥ The O-ring is a waterproofing packing used for underwater cameras, watches and
diving equipment.
≥ The O-ring keeps the Case waterproof by sealing the gap between the rear case
and the front case.
∫ How the O-ring keeps the Case waterproof
Rear Case
Digital Camera
O-ring
Front Case
The gum comes into contact with the sides of the Case making the
Case waterproof and stopping water from entering from the gap.
Water
pressure
O-ring
Water
O-ring
When water pressure acts on the O-ring, the surface of the O-ring
expands and the Case is sealed more tightly.
The O-ring prevents water leakage by coming into uniform
contact with the sides of the Case. Therefore, good care of the
O-ring is very important. Incorrect care of the O-ring may
cause water leakage.
VQT1F25
9
Page 10
Preparation
Be sure to set the O-ring before attaching a digital camera.
Thoroughly wash and dry your hands before handling the O-ring. Place
the O-ring where there is no sand or dust.
1
Loosen the O-ring with your fingers to remove it.
≥
Loosen part of the O-ring with the tips of two fingers and then lift the loosened
part. Be careful not to scratch the O-ring with your fingernails.
∫ Note
Do not use a pointed object to remove the O-ring. This may scratch the O-ring.
≥
-Setting the O-ring-
O-ring
O-ring
10
VQT1F25
Page 11
2
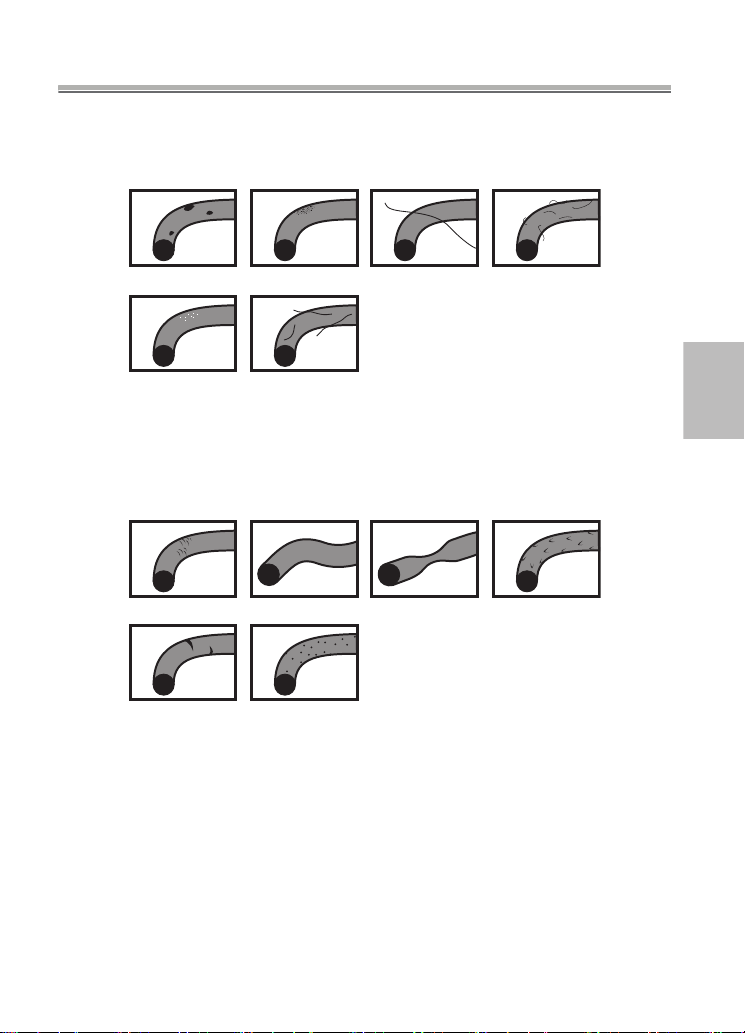
Check the O-ring.
≥ Check that there is no dirt, sand, hair, dust, salt crystals, lint or grease on the
O-ring. If you find any of these, remove them with a soft, dry cloth.
3Dirt
3Salt crystals 3Lint
3Sand
3
Hair
3Dust
≥ There may be dirt on the O-ring that you cannot see. Check if there is any dirt by
rubbing your finger over the O-ring.
≥ Be careful not to leave any fibers from the dry cloth on the O-ring when wiping it.
≥ Check that the O-ring is not ripped, twisted, squashed, frayed or scratched and
that there is no sand sticking to it. Replace the O-ring in these cases.
3Ripped
3Scratched 3Sand sticking
3
Inspect the O-ring groove.
3Twisted
3Squashed 3Frayed
≥ Grains of sand or hardened salt crystals may get into the O-ring groove.
Remove them carefully with an air spray or a cotton swab. If you use a cotton
swab, be careful not to leave any fibers from it in the O-ring groove.
11
VQT1F25
Page 12
Preparation -Setting the O-ring- (continued)
4
Inspect the opposite side of the O-ring in the same way.
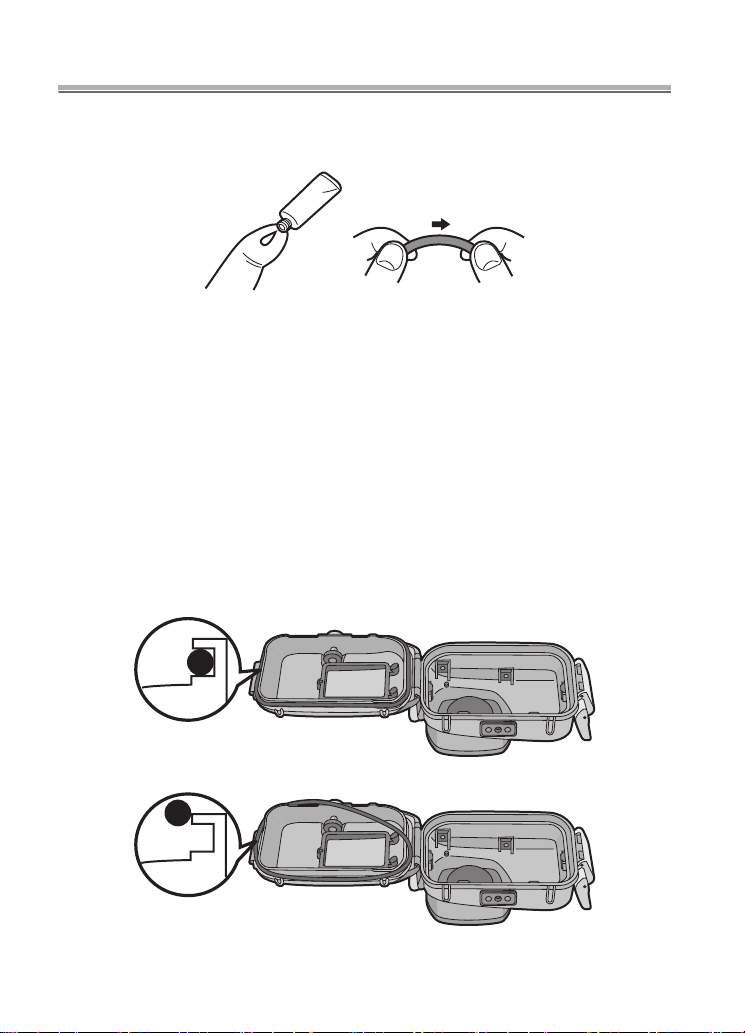
5
Apply the grease (supplied).
≥ Apply a rice-grain size of grease (supplied) evenly to the O-ring with the tip of
your finger.
≥ Dirt or dust will stick to the O-ring if you apply too much grease.
≥
Use only the specified grease. If you use other types of grease, the
surface of the O-ring may be damaged causing water leakage.
≥ Do not apply the grease with paper or a cloth. The fibers from the paper or cloth
may stick to the O-ring.
6
Fit the O-ring evenly into the O-ring groove.
Check the following:
≥ There is no dirt sticking to the O-ring.
≥ The O-ring has not come out.
≥ The O-ring is not twisted.
≥ The O-ring is not stretched too much.
CORRECT
12
VQT1F25
INCORRECT
Page 13
7
Inspect the O-ring one last time.
Check the following one more time:
≥ There is no dirt sticking to the O-ring.
≥ The O-ring has not come out.
≥ The O-ring is not twisted.
≥ There are no scratches or squashed parts on the O-ring.
Thoroughly wipe any grease off your hands with a dry cloth and then
wash your hands with water.
8
Close the buckle.
1
≥ Check that no foreign materials are sticking to the outer surface of the O-ring and
the buckle on the front case and then close the Case.
∫
Notes
≥ To keep the Case completely airtight, do not scratch the surface of the O-ring that
comes into contact with the sides of the Case.
≥ Never use an O-ring that has been scratched or damaged by dirt etc. This will cause
water leakage.
≥ Each time you use the Case, remove the O-ring and check that there is no dirt,
sand, hair or other foreign materials in the O-ring groove and then apply a thin coat
of grease (supplied). If you apply too much grease, dirt and the dust may stick to the
O-ring causing water leakage.
≥ Be sure to bring a spare O-ring in case the O-ring that you are using becomes
damaged or scratched.
2
13
VQT1F25
Page 14
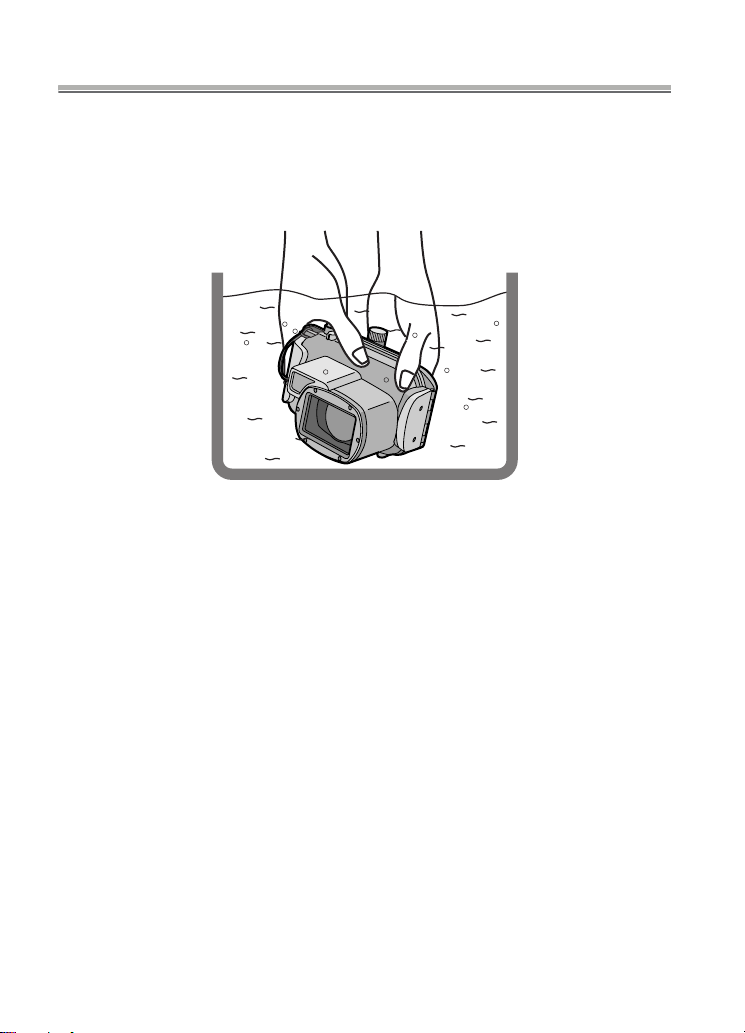
Preparation -Checking the Case is Waterproof-
After setting the O-ring, check that no water leaks into the Case by
submerging it in a water tank, bath tub etc. for more than about
3 minutes before attaching a digital camera.
≥ Do not use the Case in water over 40 °C/104 °F. The heat may damage the Case or
cause water leakage.
‘
Carry out the same test after attaching the digital camera to the Case. (P15)
∫
Notes
≥ If bubbles rise from the Case when it is submerged in water or there is water inside
the Case when you take it out the water, there is water leakage. In these cases,
consult your dealer.
≥ If water leaks into the Case while you are using it and the digital camera is
submerged in water, remove the battery immediately. Hydrogen gas can cause
burning or explosion if there is a fire nearby.
≥ If you dive quickly while holding the Case or throw the Case from a ship into the sea,
some water leakage may occur because of high pressure. This is not a malfunction
of the Case. Always dive slowly into the water.
≥ The Case is designed to be used at a depth of up to 40 m/130 feet. If you dive
deeper than 40 m/130 feet, part of the Case may be damaged beyond repair.
≥ When closing the Case, be careful that no foreign materials get caught between the
O-ring and the O-ring groove. Even one strand of hair or one grain of sand can
cause water leakage.
14
VQT1F25
Page 15
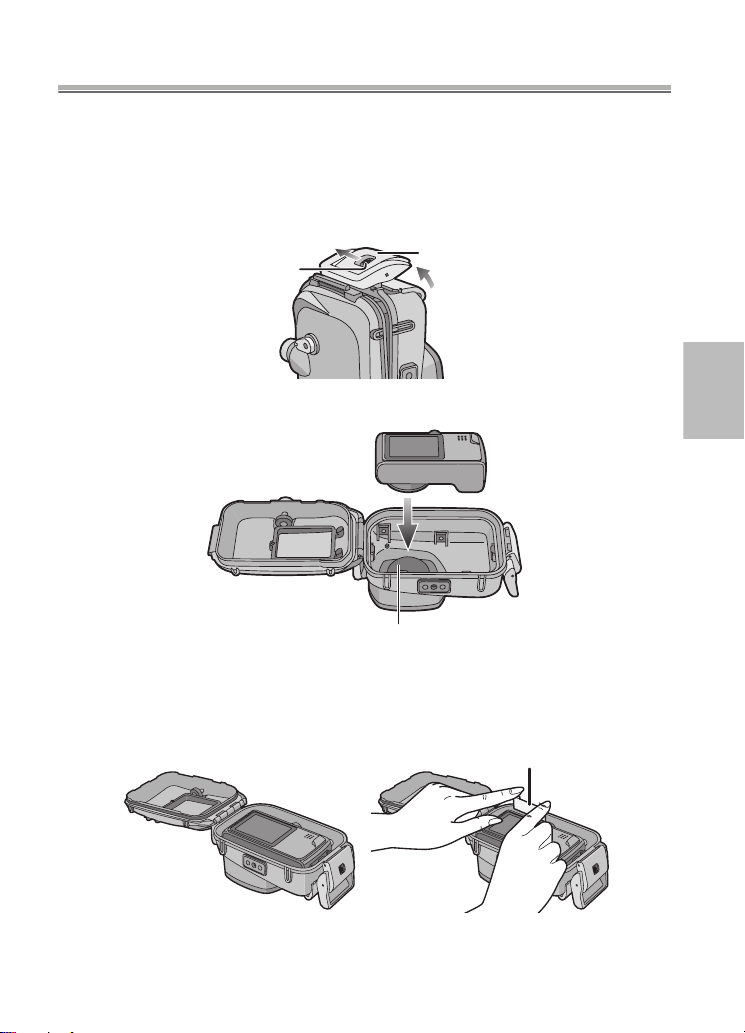
Preparation -Attaching the Digital Camera-
Check that the ON/OFF Switch on the camera and the case is set to
[OFF].
≥ Remove the strap from the digital camera.
1
Push 2 up with your finger while sliding 1 to open the buckle.
1
2
Attach the digital camera to the Case.
≥ Be careful not to catch the shading ring 1.
3
Insert the silica gel (supplied).
≥ Always use new silica gel.
2
1
Silica gel
15
VQT1F25
Page 16
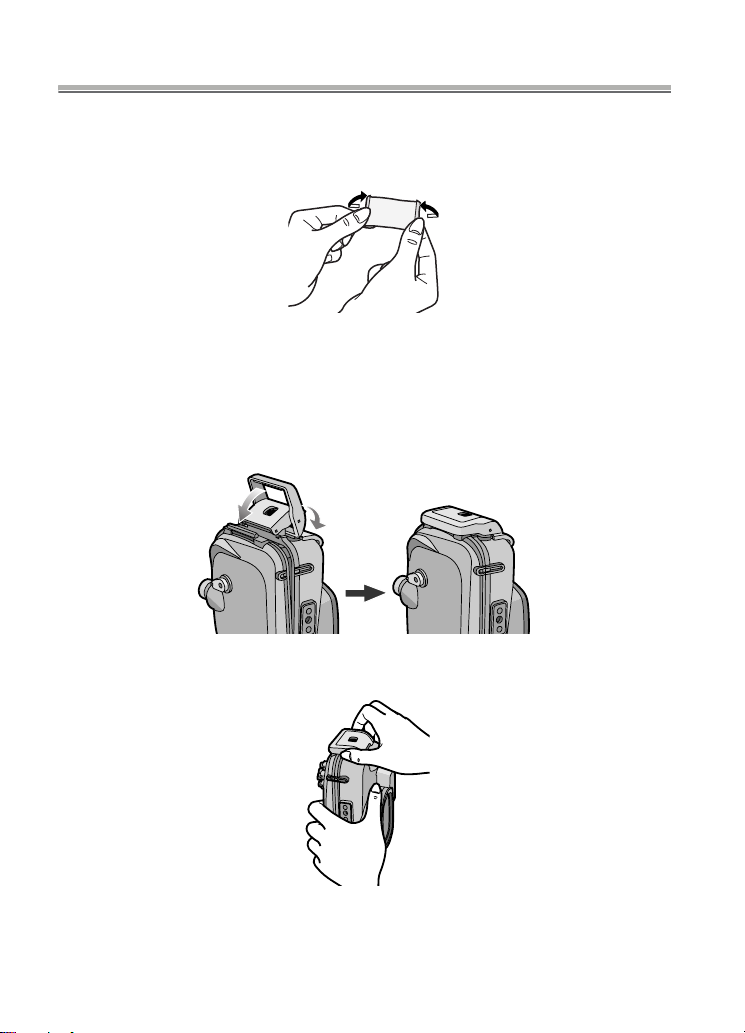
Preparation -Attaching the Digital Camera- (continued)
≥ When inserting the silica gel, bend it as shown in the illustration below
and then insert it as far as possible. If you close the Case with the silica
gel not fully inserted, the silica gel will get caught in the O-ring causing
water leakage.
≥ If the air temperature is high and the water temperature is low, condensation
may appear inside the Case. To prevent condensation, make sure that the silica
gel (supplied) does not come into contact with the digital camera lens. To
prevent the Case from becoming fogged up, insert the silica gel about
1 to 2 hours before using the Case.
4 Close the buckle.
1
‘ Check that the buckle is closed firmly.
Do not insert the strap etc. in the buckle.
2
5 After you have attached the digital camera, check one more time that no
water leaks into the Case.
16
VQT1F25
(P14)
Page 17
∫ Notes
Check one more time that the O-ring is fitted evenly into the O-ring groove.
≥
≥ Avoid opening or closing the Case where there is a lot of sand or dust and in humid
or wet places.
≥ If there is a sudden change in temperature, condensation may appear inside the
Case.
≥ If sunscreen or sun oil sticks to the Case, wash it off immediately with lukewarm
water to prevent reduced waterproofness or discoloration.
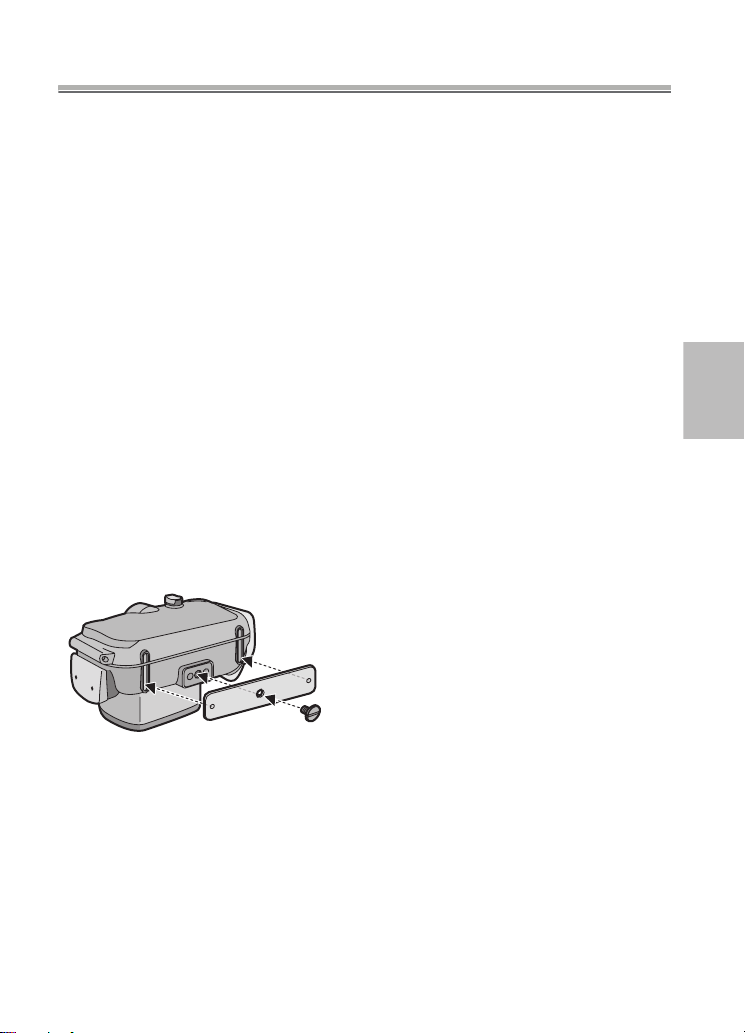
∫ Attaching the weights
About using the weights
Attach the weights to adjust to the preferred buoyancy when using the marine case.
Use them as necessary.
Refer to the following about buoyancy underwater.
1 If you use the digital camera and the marine case only:
They will float slowly in fresh water or seawater. (Plus buoyancy)
2 If you use the digital camera, the marine case and 1 weight:
They will float even more slowly in fresh water or seawater than
(Plus buoyancy)
1.
3 If you use the digital camera, the marine case and 2 weights:
They will sink slowly in fresh water or seawater. (Minus buoyancy)
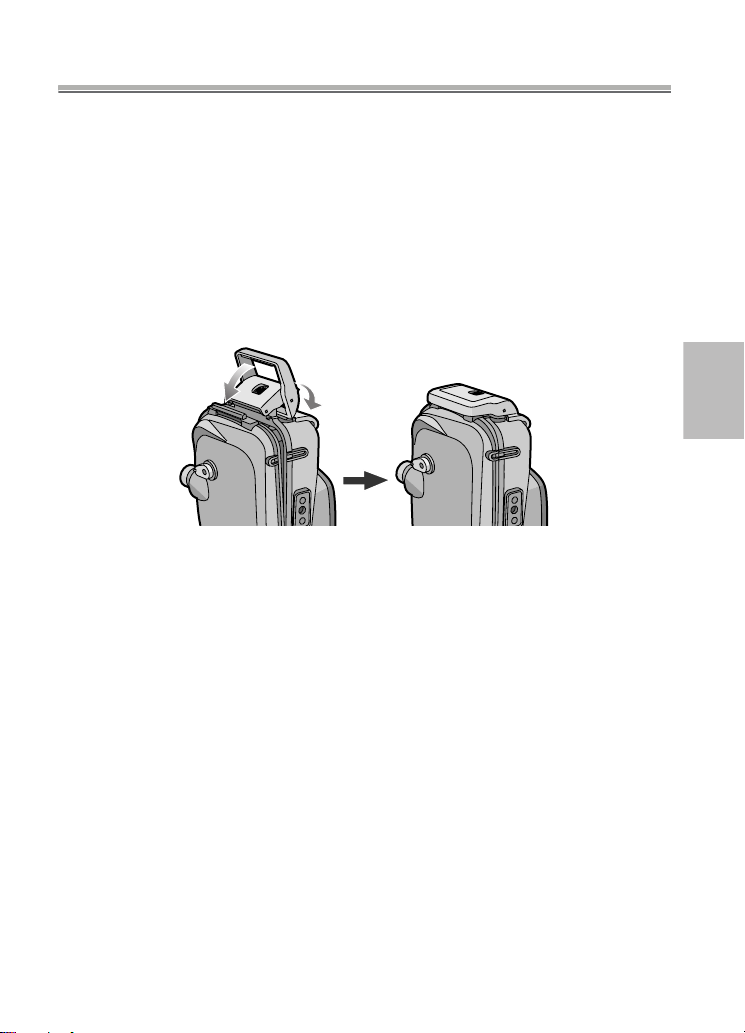
How to attach the weights
If you use 1 weight, align the protruding part of
the weight with the tripod receptacle on the
marine case and then use the supplied screw
to attach it. If you use 2 weights, align the
projecting part of the second weight with the
indented part of the first weight so that the
weights do not overlap and then attach them
to the tripod receptacle.
∫ Note
To prevent rusting, detach the weights after use, wipe off any salt and then store
≥
them.
17
VQT1F25
Page 18

Taking Pictures
∫ Before taking pictures underwater
Check the following before diving.
≥
Is there sufficient remaining battery power?
≥ Is there sufficient memory in the card?
≥ Is the O-ring fitted evenly into the O-ring groove?
≥ Have you checked that no water leaks into the Case?
≥ Is the buckle closed firmly?
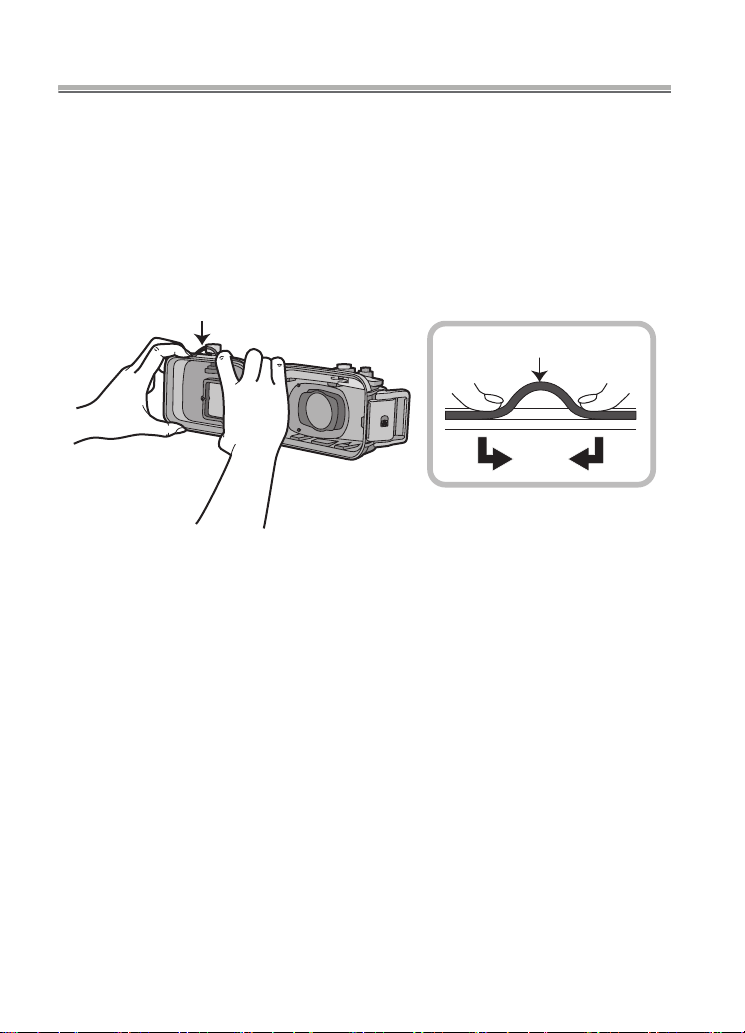
∫ Taking pictures
1 Turn the camera on.
Press 1 to release the lock
and then set to [ON].
ONOFF
Press 2 to lock.
ONOFF
1
2
2 Display the scene mode menu and then set [UNDERWATER].
≥
Read the operating instructions of the digital camera for details.
3 Aim the AF area on the LCD monitor at the subject you want to focus
on.
4 Press 2 ( ) to focus.
•Press 2 () again to cancel.
5 Press the shutter button fully to take the picture.
∫ Notes
≥
Before attaching the camera to the Case, we recommend setting the clock again.
(Read the operating instructions of the digital camera for details.)
≥ If there are any particles floating in front of the camera, it may focus on them instead
of the subject.
≥ If there are drops of water or dirt sticking to the front glass, you may not be able to
focus properly. Be sure to wipe the front glass before taking pictures.
18
VQT1F25
Page 19

Tips for Taking Pictures in the Water
When the image is too bluish in the water
1 Press 3 ( ) several times until [] appears.
2 Press 2 ()/1 ()
to adjust the white balance.
3 Press [MENU/SET] to finish.
≥ You can also press the shutter button halfway to finish.
Select the best picture
Set the flash to [ ].
Using the auto bracket function (For models with an auto bracket function)
≥ Each time the shutter button is pressed, 3 pictures with different exposures are
automatically recorded. You can select the desired picture from the 3 pictures.
Use Burst mode
≥ When taking pictures of a fast-moving subject (a fish etc.), you can select your
favourite picture after taking the pictures using burst mode.
∫
Note
≥ For more information, read the operating instructions of the digital camera.
19
VQT1F25
Page 20
After Use
After finishing taking pictures, follow the steps below.
1
Submerge the Case in fresh water for about 30 minutes or more
without removing the digital camera to remove any salt crystals etc.
≥
Press all the operation buttons etc. on the Case to wash away any
seawater. If the salt crystals are not removed from the buttons etc., they
will harden and the buttons will become unoperable.
≥
Do not wash the Case with fast-running or pressurized water etc. as it may
cause water leakage.
2
Wipe the water with a dry cloth that has no salt crystals sticking to it
and then dry the Case completely.
≥ Do not dry the Case by exposing it to direct sunlight. This may
damage the Case or may hasten deterioration of the O-ring.
discolor
or
3
Open the rear case to remove the digital camera.
20
VQT1F25
Page 21

4
Remove the O-ring from the Case and check that there is no debris,
etc. in the O-ring groove.
5
Check that there are no scratches etc. on the O-ring while you are
applying the grease.
∫
Notes
Be careful when removing the digital camera from the Case so that it
does not get wet.
≥ Remove the camera with clean hands. (Wash your hands with fresh water and then
thoroughly dry them.)
≥ Thoroughly dry any moisture on your body or hair. (Be particularly careful about any
water coming from the sleeves of your thermal suit.)
≥ When the weather or the sea is particularly bad, select a place where the digital
camera will not get wet e.g. indoors or where there is a roof overhead.
Cleaning and Storing
Wash the outside of the Case with water.
1
≥ Wash the outside of the Case until it is clean. (P20)
≥ Be sure to close the Case and then wash the outside with only water.
≥ Wipe off any dirt inside the Case with a wet, soft cloth.
∫
Notes
≥ Do not wash the Case with pressurized water as it may cause water leakage.
Remove the digital camera before washing the Case with water.
≥ Do not leave the digital camera inside the Case when storing it.
≥ Store the Case in a cool, well-ventilated place.
Caution for Use
∫
Handling of the O-ring
≥
Do not use alcohol, thinner or a chemical cleaning agent for cleaning the Oring. This will cause damage to, or deterioration of, the O-ring.
≥
If you will not be using the Case for a long period of time, remove the O-ring
from the O-ring groove, apply a thin coat of grease (supplied), place it in a
clean polyester bag and then store it in a cool, dark place to prevent the
surface from being damaged. When you use the O-ring again, thoroughly
check that it is not scratched or split.
21
VQT1F25
Page 22

Caution for Use (continued)
≥ Use only the specified grease. If you use other types of grease, the surface of
the O-ring may be damaged causing water leakage.
≥ The O-ring comes into contact with the sides of the Case making the Case
waterproof. Do not knock, insert foreign materials (dirt, sand, hair etc.) or scratch
the O-ring or sides of the Case.
≥ Use the tips of your fingers to remove the O-ring. Do not use a pointed object as it
may scratch the O-ring.
≥ After removing the O-ring from the rear case, wipe off any dirt, sand, hair or other
foreign materials on it. Also wipe the O-ring groove and the inner sides of the front
case which come into contact with the O-ring.
≥ Never use an O-ring that has been scratched or damaged by dirt etc. This will cause
water leakage. Replace it with a new O-ring.
≥ After replacing an O-ring, not using the Case for a long period of time, opening the
Case to attach a digital camera or to replace the battery etc., thoroughly check that
the O-ring is not scratched or split. Then, close the Case and check that no water
leaks into it by submerging it in a water tank, bath tub etc. for about 3 minutes. (P14)
≥ O-rings are consumable products. Although the lifespan of O-rings will depend on
how well they are maintained, how often they are used and their storage conditions,
we recommend replacing them every year even if you cannot see any scratches.
∫ About maintenance
≥ Do not use the chemicals shown below for cleaning, rustproofing, defogging
or repair. Using them directly or indirectly (with a chemical spray etc.) on the
Case may cause it to crack under high pressure.
Prohibited chemicals Cautions
Volatile organic solvents/
Chemical cleansers
Anti-corrosives
Anticlouding agents
Adhesives
≥ If grease sticks to the digital camera, wipe it off with a soft, dry cloth.
≥ When wiping the inside of the Case, only use a soft, dry cloth. Wipe the inside of the
front glass with a soft, dry cloth before and after use to keep the glass clear.
Do not clean the Case with volatile organic solvents
such as alcohol, gasoline or thinner or with chemical
cleansers. Clean it with fresh water or lukewarm water.
Do not use anti-corrosives as the metal parts of the
Case are made from stainless steel or brass. Clean it
with fresh water.
Do not use commercially available anticlouding
agents. Be sure to use the silica gel indicated in these
operating instructions.
Do not use adhesives for repair. If the Case needs to
be repaired, consult your dealer.
22
VQT1F25
Page 23

∫ About storage and inspection after use
≥ Always take the digital camera out of the Case.
≥ Make sure that no dirt or dust is stuck to the O-ring.
≥ Thoroughly dry the Case at room temperature and then store it in a cool, dark place.
≥ We recommend that the Case be inspected about 3 years after purchase. This
inspection involves dismantling and cleaning the Case, inspecting all the parts and
repairing them if necessary and checking the waterproofness of the Case using the
same hydrostatic test equipment that was used to check the waterproofness before
purchase. The customer is responsible for all transportation costs.
≥ Do not dismantle any parts or use any accessories not specified in these operating
instructions and do not alter the Case. If the Case does not work properly, consult
your dealer.
Specifications
Compatible model: DMC-TZ2/DMC-TZ3 (As of March 2007*)
Mass: Approx. 430 g/15.2 oz
Dimensions: Approx. 155 mm (W)k94 mm (H)k93 mm (D)
1/8q (W)k3 3/4q (H)k3 5/8q (D)]
[6
Material: Polycarbonate
Waterproof construction: O-ring sealing
Water resistant depth: 40 m/130 feet
* Refer to the operating instructions, catalogue, website etc. of the digital
camera for the latest information on models that can be used.
(excluding the projecting parts)
23
VQT1F25
Page 24

Limited Warranty
FOR U.S.A.
PANASONIC CONSUMER
ELECTRONICS COMPANY, DIVISION
OF PANASONIC CORPORATION OF
NORTH AMERICA
One Panasonic Way,
Secaucus, New Jersey 07094
Digital Still Camera ACCESSORIES LIMITED WARRANTY
Limited Warranty Coverage
If your product does not work properly because of a defect in materials or
workmanship, Panasonic Consumer Electronics Company or Panasonic Puerto Rico,
Inc. (collectively referred to as “the warrantor”) will, for the length of the period indicated
on the chart below, which starts with the date of original purchase (“warranty period”),
at its option either (a) repair your product with new or refurbished parts, or (b) replace it
with a new or a refurbished product. The decision to repair or replace will be made by
the warrantor.
For ninety (90) days — AC Adaptors, Auto flashes, Conversion Lenses, Filters,
Lens Adaptors, Marine Cases
For ten (10) days— Batteries (Non-rechargeable batteries are not warranted.)
You must Mail-In your product during the warranty period. This warranty only applies to
products purchased and serviced in the United States or Puerto Rico. This warranty is
extended only to the original purchaser of a new product which was not sold “as is”.
Mail-In Service
For assistance in obtaining service in the United States please contact:
Panasonic Service and Technology Company Panasonic Plus Department
20421 84th Avenue South
Kent, WA 98032
Phone: 1-800-833-9626
Fax: 1-800-237-9080
If repair is needed during the warranty period the purchaser will be required to furnish a
sales receipt/proof of purchase indicating date of purchase.
Also, purchaser will be responsible for shipping the unit to the above address.
For assistance in Puerto Rico call Panasonic Puerto Rico, Inc. (787)-750-4300 or fax
(787)-768-2910.
PANASONIC PUERTO RICO, INC.
Ave. 65 de infantería, Km. 9.5,
San Gabriel Industrial Park,
Carolina, Puerto Rico 00985
24
VQT1F25
Page 25

Limited Warranty Limits And Exclusions
This warranty ONLY COVERS failures due to defects in materials or workmanship, and
DOES NOT COVER normal wear and tear or cosmetic damage. The warranty ALSO
DOES NOT COVER damages which occurred in shipment, or failures which are
caused by products not supplied by the warrantor, or failures which result from
accidents, misuse, abuse, neglect, mishandling, misapplication, alteration, faulty
installation, set-up adjustments, misadjustment of consumer controls, improper
maintenance, power line surge, lightning damage, modification, or commercial use
(such as in a hotel, office, restaurant, or other business), rental use of the product,
service by anyone other than a Factory Servicenter or other Authorized Servicer, or
damage that is attributable to acts of God.
THERE ARE NO EXPRESS WARRANTIES EXCEPT AS LISTED UNDER “LIMITED
WARRANTY COVERAGE”. THE WARRANTOR IS NOT LIABLE FOR INCIDENTAL
OR CONSEQUENTIAL DAMAGES RESULTING FROM THE USE OF THIS
PRODUCT, OR ARISING OUT OF ANY BREACH OF THIS WARRANTY.
(As examples, this excludes damages for lost time, travel to and from the
servicer, or loss of, or failure to obtain, images, data or other camera memory
content. The items listed are not exclusive, but are for illustration only.)
EXPRESS AND IMPLIED WARRANTIES, INCLUDING THE WARRANTY OF
MERCHANTABILITY, ARE LIMITED TO THE PERIOD OF THE LIMITED WARRANTY.
Some states do not allow the exclusion or limitation of incidental or consequential
damages, or limitations on how long an implied warranty lasts, so the exclusions may
not apply to you.
This warranty gives you specific legal rights and you may also have others rights which
vary from state to state. If a problem with this product develops during or after the
warranty period, you may contact your dealer or Servicenter. If the problem is not
handled to your satisfaction, then write to the warrantor’s Consumer Affairs Department
at the addresses listed for the warrantor.
PARTS AND SERVICE WHICH ARE NOT COVERED BY THIS LIMITED WARRANTY
ARE YOUR RESPONSIBILITY.
ALL
25
VQT1F25
Page 26

Limited Warranty (continued)
FOR CANADA
Panasonic Canada Inc.
5770 Ambler Drive, Mississauga, Ontario L4W 2T3
PANASONIC PRODUCT – LIMITED WARRANTY
Panasonic Canada Inc. warrants this product to be free from defects in material and
workmanship and agrees to remedy any such defect for a period as stated below from
the date of original purchase.
Digital Camera One (1) year, parts and labour
Digital Photo Peripherals One (1) year, parts and labour
Digital Camera Accessories Ninety (90) days, parts and labour
LIMITATIONS AND EXCLUSIONS
This warranty does not apply to products purchased outside Canada or to any product
which has been improperly installed, subjected to usage for which the product was not
designed, misused or abused, damaged during shipping, or which has been altered or
repaired in any way that affects the reliability or detracts from the performance, nor
does it cover any product which is used commercially. Dry cell batteries, printer ink
cartridge and paper are also excluded from coverage under this warranty.
This warranty is extended to the original end user purchaser only. A purchase receipt
or other proof of date of original purchase is required before warranty service is
performed.
THIS EXPRESS, LIMITED WARRANTY IS IN LIEU OF ALL OTHER WARRANTIES,
EXPRESS OR IMPLIED, INCLUDING ANY IMPLIED WARRANTIES OF
MERCHANTABILITY AND FITNESS FOR A PARTICULAR PURPOSE.
IN NO EVENT WILL PANASONIC CANADA INC. BE LIABLE FOR ANY SPECIAL,
INDIRECT OR CONSEQUENTIAL DAMAGES.
In certain instances, some jurisdictions do not allow the exclusion or limitation of
incidental or consequential damages, or the exclusion of implied warranties, so the
above limitations and exclusions may not be applicable.
26
VQT1F25
Page 27

WARRANTY SERVICE/PRODUCT REPAIRS
For product operation repairs and information assistance, please contact:
Our Customer Care Centre: 1-800 #: 1-800-99-LUMIX (1-800-995-8649)
Fax #: (905) 238-2360
Lumix Email link: lumixconcierge@ca.panasonic.com
Email link: “Customer support” on www.panasonic.ca
27
VQT1F25
Page 28

Spanish Quick Use Guide/Guía rápida en español
Antes del uso (P3)
≥
Este estuche marino ha sido diseñado
para las cámaras digitales de
Panasonic. Puede gozar de la toma de
imágenes submarinas a una
profundidad hasta 40 m/130 pies.
≥ En el caso de infiltración debida a
escaso cuidado, Matsushita no se
responsabiliza por los daños
padecidos por cualquier producto que
quepa en este estuche (cámara digital,
baterías, tarjeta, etc.), los costes
fotográficos o cualquier otros gastos.
≥ Matsushita no proporciona ninguna
compensación por accidentes que
condujesen a heridas o daños a la
propiedad.
≥ Lea las instrucciones de
funcionamiento de su cámara digital.
≥ Antes de unir la cámara digital,
sumerja el estuche en el agua
durante 3 minutos o más para
comprobar que no haya infiltración
de agua.
∫ Acerca del manejo del estuche
≥
Utilice teniendo en cuenta las
siguientes condiciones.
• Profundidad del agua: Hasta 40 m/
130 pies
• Temperatura ambiente: 0 oC a
40 oC/32 °F a 104 °F
≥ No use el estuche en agua por encima
de los 40 °C/104 °F. El calor puede
dañar el estuche o causar infiltración
de agua.
≥ El estuche está hecho de
policarbonato resistente al impacto, sin
embargo ponga cuidado cuando lo va
a usar. Él puede arañarse fácilmente
cuando toma imágenes en lugares con
escollos etc. y puede dañarse por el
impacto debido a caída etc. Cuando
viaja en coche, buque, avión embale
con esmero el estuche para evitar un
impacto directo en el caso de que se
caiga y no deje la cámara digital dentro
del estuche. Sólo una la cámara digital
al estuche cuando la lleva por cortas
distancias como la del aeropuerto al
lugar del buceo. (Para transportarlo, no
puede volver a usar el material con el
que fue embalado al momento de la
compra)
≥ Cuando se embarca en un avión, el
cambio de presión atmosférica podría
hacer expandir el interior del estuche
causándole daño. Quite el anillo tórico
antes de embarcarse en un avión.
≥ No deje la cámara digital en el
estuche por largos períodos de
tiempo dentro de un coche, un
buque, o bien expuesto a la luz
directa del sol etc. El estuche es un
dispositivo estanco al aire así que la
temperatura dentro del estuche va a
subir mucho y la cámara podría
dejar de funcionar correctamente.
No deje que la temperatura dentro
del estuche aumente demasiado.
∫ Uso del estuche a altas o bajas
temperaturas
≥ Si abre o cierra el estuche donde haya
humedad o calor y luego va a un lugar
frío o bien va a bucear, podría tener
lugar condensación dentro del
estuche, ponerse empañada la
superficie del cristal y dañarse la
cámara digital.
28
VQT1F25
Page 29

≥ Si de repente desplaza el estuche de
un lugar, o agua, frío a uno caliente,
podría empañarse la superficie del
cristal. Espere hasta que el estuche se
acerque a la temperatura del aire
antes de tomar las imágenes.
∫ Acerca de la preparación
No abra el estuche ni lo cierre
≥
donde puede rociarse por el agua o
done pueda entra arena en él. Le
recomendamos que lo abra o lo
cierra en casa.
≥ Reemplace la batería, la tarjeta etc. y
una la cámara digital en casa donde
haya poca humedad.
≥ Si tiene que abrir o cerrar el estuche
en lugares de buceo para
reemplazar la batería o la tarjeta,
tenga cuidado de seguir los pasos
siguientes.
• Elija un lugar donde el estuche no
pueda ser rociado con agua o entrar
arena en su interior.
• Quite soplando cualquier gota de
agua en el espacio entre la parte
delantera y la trasera del estuche y
en la hebilla. Saque enteramente las
gotas que quedan de agua con un
trapo seco.
• Seque enteramente cualquier gota
de agua de su cuerpo o pelo.
• Ponga cuidado en el agua que pueda
caer de las mangas de su traje
térmico.
• No toque la cámara digital si sus
manos están mojadas de agua del
mar. Moje una toalla con agua fresca
y la coloque en una bolsa de
poliéster de antemano. Emplee esta
toalla para sacar las gotas de agua o
arena de su mano o cuerpo.
≥ Este estuche no absorbe los golpes. Si
coloca un objeto pesado encima del
estuche o lo golpee, la cámara digital
podría dañarse. Ponga cuidado
cuando usa el estuche.
Manejo y Cuidado (P6)
≥ No coloque el estuche donde pueda
caerse.
• Por si se cae el estuche en su
cabeza o pie, él herirá a usted y
causará al estuche un
funcionamiento defectuoso.
≥ Nunca modifique el estuche.
• Si se filtra agua dentro de la cámara
debido a que el estuche fue
modificado, la cámara digital podría
dañarse sin posibilidad de ser
reparada.
• Si sigue utilizando la cámara digital
después de filtrarse agua en ella, eso
podría hacerla incendiar.
≥ No utilice el estuche para el buceo
sin adecuado adiestramiento.
• El estuche tendría que ser hecho
funcionar en el buceo sólo si usted
tiene adecuado entrenamiento y
certificación para este deporte.
≥ Nunca deje el estuche, la grasa, el
silicagel o el anillo tórico al alcance
de los niños.
• Si el estuche agarra una cualquier parte
del cuerpo del niño puede causarle
heridas.
• Los niños podrían por casualidad
tragarse la grasa, el silicagel e el
anillo tórico.
• Llame de inmediato a un médico por
si duda que el niño pueda haberse
tragado la grasa, el silicagel o el
anillo tórico.
29
VQT1F25
Page 30

Guía rápida en español
(continuación)
≥ No cuelgue la correa alrededor de
su cuello cuando está sumergido en
el agua.
• Ésta podría envolverse alrededor de
su cuello causándole sofocación u
otra seria herida.
≥ Limpie toda grasa de sus manos.
• Con sus manos untadas de grasa no
frote su boca ni sus ojos.
≥ Por si se filtra agua en el estuche,
deje de usarlo de inmediato.
• Eso puede causar una descarga
eléctrica, una quemadura o un
incendio.
• Llame a su comerciante.
≥ Si ocurre algo anómalo mientras
que está utilizando el estuche
sumergido en el agua, cuando sube
siga todos los necesarios
procedimientos y líneas de guía
para la descompresión.
• Si sube demasiado rápido, puede
contraer la enfermedad del buzo.
≥ Si del estuche sale humo o calor
anómalo, olor o sonido, déjelo de
usarlo de inmediato.
• Eso puede causar una descarga
eléctrica, una quemadura o un
incendio.
• Saque la cámara digital fuera del
estuche y, de inmediato, quite la
batería de la cámara digital.
• Llame a su comerciante.
≥ Ponga cuidado cuando abre el
estuche después de una infiltración
de agua.
• El agua penetrada podría hacerlo
reventar o podría volcar el estuche
trasero.
≥ No deje el estuche donde hay una
lata temperatura.
• La temperatura dentro del estuche
aumenta mucho sobre todo cuando
éste está expuesto a la luz directa
del sol en una playa, un buque etc. o
bien cuando se deja en un coche sin
aire durante el verano. El calor puede
dañar el estuche o sus piezas
internas.
• Si al estuche está unida una cámara
digital, también ésta podría salir
dañada.
• Si utiliza la cámara digital unida
cuando la temperatura dentro del
estuche es demasiado alta, éste
podría causar una infiltración, un
cortocircuito o una falta de
aislamiento y de eso hacer originar
un incendio o un funcionamiento
defectuoso.
≥ No maneje la cámara digital o la
batería con las manos mojadas.
• Eso podría causar una descarga
eléctrica o un funcionamiento
defectuoso.
∫ Cuando se sacan imágenes
con el flash
Cuando toma imágenes usando el
≥
flash, lo que sale de las imágenes
podría resultar viñeteado o bien la
imagen podría no alumbrarse
uniformemente.
30
VQT1F25
Page 31

≥ Cuando toma imágenes con el flash, el
rango disponible de éste último es
menos debajo de la superficie del
agua que estando en tierra.
¿Qué es el anillo tórico? (P9)
≥
El anillo tórico es una junta hermética
utilizada para cámaras, reloj
submarinos y otros dispositivos de
buceo.
≥ El anillo tórico mantiene lo
impermeable del estuche cerrando la
holgura entre su parte trasera y la
delantera.
∫
Cómo el anillo tórico mantiene
lo impermeable del estuche
≥ La goma toca ambos lados del
estuche volviéndolo impermeable e
impidiendo al agua infiltrarse a través
de la holgura.
≥ Cuando el anillo tórico está prensado
por la presión del agua, la superficie
del mismo anillo se expande yendo a
proporcionar al estuche un cierre más
fuerte.
El anillo tórico impide la infiltración
del agua por su contacto uniforme
con los lados del estuche. Por lo
tanto, es muy importante poner
mucho cuidado en dicho anillo. Un
cuidado inadecuado del anillo tórico
podría causar infiltraciones de agua.
Preparación
-Ajuste del anillo tórico- (P10)
≥
Tenga cuidado de poner el anillo
tórico antes de unir una cámara
digital.
≥
Limpie a fondo y seque sus manos
antes de manejar el anillo tórico.
Coloque dicho anillo en un lugar
donde no haya arena ni polvo.
1
Afloje el anillo tórico con sus
dedos para quitarlo.
• Afloje parte del anillo tórico con la
punta de dos dedos, luego levante la
parte aflojada. Tenga cuidado de no
arañar dicho anillo con las uñas.
∫
Nota
≥ No utilice un objeto puntiagudo para
quitar el anillo tórico ya que eso podría
arañarlo.
2
Controle el anillo tórico.
• Compruebe que en el anillo tórico no
haya suciedad, arena, pelo, polvo,
cristales de sal, hilas o grasa vieja.
En el caso de que los encontrase,
sáquelos con un trapo blanco y seco.
• Podría haber suciedad en el anillo
tórico que no puede verse.
Compruebe si hay suciedad frotando
con su dedo encima del anillo tórico.
• Tenga cuidado de no dejar fibras del
trapo seco en el anillo tórico cuando
lo va a limpiar.
• Compruebe que el anillo no esté
desgarrado, torcido, apretado,
deshilachado o arañado y que no
tenga arena pegada encima. En
estos casos reemplace el anillo
tórico.
31
VQT1F25
Page 32

Guía rápida en español
(continuación)
Controle la ranura del anillo
3
tórico.
• Granos de arena o cristales de sal
endurecidos pueden entrar en la
ranura del anillo tórico. Sáquelos con
un chorro de aire o un estropajo de
algodón. Si usa un estropajo de
algodón, tenga cuidado de no dejar
ninguna de sus fibras en la ranura de
dicho anillo.
4
Controle el lado opuesto del
anillo tórico de la misma
manera.
5
Aplique la grasa
(suministrada).
• Con la punta de su dedo aplique
uniformemente en el anillo tórico
grasa (suministrada) que tenga un
tamaño de un grano de arroz.
• Suciedad o polvo se pegarán al anillo
tórico por si aplica demasiada grasa.
• Sólo utilice la grasa especificada.
Si usa grasa de otro género, puede
dañarse la superficie del anillo
tórico causando infiltración de
agua.
• No aplique la grasa usando papel o
un trapo ya que las fibras de éstos
podrían pegarse al anillo tórico.
6
Ponga el anillo tórico de
manera uniforme dentro de la
respectiva ranura.
Compruebe lo siguiente:
• No haya suciedad pegada al anillo
tórico.
• El anillo tórico no salga.
• El anillo tórico no esté torcido.
• El anillo tórico no esté extendido
demasiado.
7
Controle el anillo tórico una
última vez.
Compruebe lo siguiente una vez más:
• No haya suciedad pegada al anillo
tórico.
• El anillo tórico no salga.
• El anillo tórico no esté torcido.
• El anillo tórico no esté extendido
demasiado.
≥
Saque a fondo toda grasa de sus
manos con un trapo seco luego
límpielas con agua.
8
Cierre la hebilla.
• Compruebe que ningún material
extraño esté pegado a la superficie
externa del anillo tórico y de la
hebilla en el estuche delantero luego
ciérrelo.
∫
Notas
≥ Para mantener el estuche enteramente
estanco al aire, no arañe la superficie
del anillo tórico que va a tocar los
lados del estuche.
≥ Nunca utilice un anillo tórico que haya
sido arañado o dañado por la suciedad
etc. Eso causará infiltración de agua.
≥ Cada vez que utiliza el estuche, quite
el anillo tórico y compruebe que no
haya suciedad, arena, pelo u otro
material extraño en la ranura del anillo
tórico y, luego, aplique una ligera capa
de grasa (suministrada). Si aplica
demasiada grasa, podrían pegarse a
dicho anillo suciedad y polvo causando
infiltración de agua.
32
VQT1F25
Page 33

≥ Tenga cuidado de llevar consigo un
anillo tórico de repuesto en el caso de
que se dañase o arañase el que está
usando.
Preparación -Control de lo
impermeable del estuche- (P14)
≥
Después de colocar el anillo tórico,
compruebe que no haya infiltración
de agua dentro del estuche
sumergiendo éste último en un
tanque de agua, una bañera etc.
durante alrededor de 3 minutos
antes de unirlo a la cámara digital.
≥ No use el estuche en agua por encima
de los 40 °C/104 °F. El calor puede
dañar el estuche o causar infiltración
de agua.
‘
Realice la misma prueba después
de unir la cámara digital al estuche.
∫
Notas
≥ Compruebe que ningún material
extraño esté pegado a la superficie
externa del anillo tórico y de la hebilla
en el estuche delantero luego ciérrelo.
≥ Si el agua se filtra en el estuche
mientras que está usándolo y la
cámara digital está sumergida en el
agua, quite de inmediato la batería. El
gas de hidrógeno podría incendiarse o
causar una explosión por si hay un
fuego cerca.
≥ Si bucea rápidamente mientras que
mantiene el estuche o tira éste desde
un buque a la mar, podría ocurrir
infiltración de agua debido a la alta
presión. Eso no es un funcionamiento
defectuoso, sin embargo siempre
bucee lentamente.
≥ El estuche está diseñado para que
pueda ser usado a una profundidad
hasta 40 m/130 pies. Por si bucea a
una profundidad mayor de
40 m/130 pies, parte del estuche
podría dañarse irreparablemente.
≥ Cuando cierra el estuche, ponga
cuidado en que no sea agarrado
ningún material extraño entre el anillo
tórico y su ranura incluso un pequeño
pelo o grano de arena podría causar
infiltración de agua.
33
VQT1F25
Page 34

Guía rápida en español
(continuación)
Preparación -Unión de la
cámara digital-
≥ Compruebe que el interruptor ON/
OFF de la cámara y el estuche
marino esté en [OFF].
≥ Quite la correa de la cámara digital.
1
Empuje hacia arriba 2 con su
dedo, mientras hace deslizar
1 para abrir la hebilla.
2
Una la cámara digital al
estuche.
• Tenga cuidado de no agarrar la
espira de sombra 1.
3
Inserte el silicagel
(suministrado).
• Siempre utilice silicagel nuevo.
1
(P15)
2
1
Silicagel
• Cuando inserta el silicagel,
dóblelo como se muestra en la
figura abajo, luego insértelo lo
más allá que sea posible. Si cierra
el estuche con el silicagel no
insertado enteramente, éste será
agarrado en el anillo tórico
causando infiltración de agua.
• Si la temperatura del aire es alta y la
del agua es baja, puede tener lugar
condensación dentro del estuche.
Para impedir la condensación,
asegúrese de que el silicagel
(suministrado) no vaya a tocar el
objetivo de la cámara digital. Para
evitar que se forme neblina en el
estuche, inserte el silicagel cerca de
1 a 2 horas antes de utilizar el
estuche.
4
Cierre la hebilla.
1
2
‘ Compruebe que la hebilla esté
cerrada firmemente.
No inserte la correa etc. en la
hebilla.
5
Después de unir la cámara
digital, compruebe una vez
más que no haya infiltración de
agua en el estuche.
34
VQT1F25
Page 35

∫ Notas
≥
Compruebe una o más veces que el
anillo tórico esté aplicado de manera
uniforme dentro de su ranura.
≥ Evite abrir o cerrar el estuche donde
haya mucha arena o polvo o en
lugares húmedos o mojados.
≥ Si ocurre un repente cambio de
temperatura, puede tener lugar
condensación dentro del estuche.
∫ Si un protector o aceite solar se pega
al estuche, sáquelo de inmediato con
agua tibia para evitar que se reduzca
lo impermeable suyo o se descolore.
∫ Unión de los pesos
Acerca del uso de los pesos
Cuando usa el estuche marino, una los
pesos hasta lograr la flotabilidad deseada.
Úselos como necesita.
Se refiera a lo siguiente por lo que
respecta a la flotabilidad submarina.
1 Si sólo utiliza la cámara digital y el
estuche marino:
Ellos flotan lentamente en el agua
dulce o el agua del mar (Más
flotabilidad).
2 Si sólo utiliza la cámara digital, el
estuche marino y 1 peso:
Ellos flotan aún más lentamente en la
agua dulce o el agua del mar que
(Más flotabilidad).
1
3 Si sólo utiliza la cámara digital, el
estuche marino y 2 pesos:
Ellos se hunden lentamente en la
agua dulce o el agua del mar (Menos
flotabilidad).
Cómo unir los pesos
Si utiliza 1 peso, alinee la parte saliente
del peso con el receptáculo en el estuche
marino, luego utilice el tornillo
suministrado para unirlo. Si utiliza 2
pesos, alinee la parte saliente del
segundo peso con la parte dentada del
primero de manera que los pesos no se
sobrepongan, luego los una al
receptáculo del trípode.
∫ Nota
Para evitar el herrumbre, quite los
≥
pesos tras el uso, les saque todo
indicio de sal y almacénelos.
35
VQT1F25
Page 36

Panasonic Consumer Electronics Company,
Division of Panasonic Corporation of North America
One Panasonic Way, Secaucus, NJ 07094
Panasonic Puerto Rico, Inc.
Ave. 65 de Infantería, Km. 9.5, San Gabriel Industrial Park, Carolina, Puerto Rico 00985
Panasonic Canada Inc.
5770 Ambler Drive, Mississauga, Ontario, L4W 2T3
C 2007 Matsushita Electric Industrial Co., Ltd.
P
Page 37

K
Imprimé au Japon
C 2007 Matsushita Electric Industrial Co., Ltd.
www.panasonic.ca
(905) 624-5010
L4W 2T3
Mississauga, Ontario
5770 Ambler Drive,
Panasonic Canada Inc.
Page 38

27
VQT1F25
www.panasonic.ca
lumixconcierge@ca.panasonic.com
1-800-99-LUMIX (1-800-995-8649)
Lien courriel : « Support à la clientèle » à
Lien courriel Lumix :
N° de télécopieur : (905) 238-2360
notre service à la clientèle au : Ligne sans frais :
veuillez contacter
Pour la réparation ou pour obtenir de l’aide sur le fonctionnement de l’appareil,
RÉPARATION SOUS GARANTIE/RÉPARATION DE PRODUITS
Page 39

VQT1F25
26
limitations stipulées ci-dessus peuvent ne pas être applicables.
indirects ou consécutifs, ou les exclusions de garanties implicites. Dans de tels cas, les
Certaines juridictions ne reconnaissent pas les exclusions ou limitations de dommages
DOMMAGE DIRECT, INDIRECT OU CONSÉCUTIF.
PANASONIC N’AURA D’OBLIGATION EN AUCUNE CIRCONSTANCE POUR TOUT
PARTICULIER.
DU CARACTÈRE ADÉQUAT POUR LA COMMERCIALISATION ET UN USAGE
GARANTIE, EXPRESSE OU IMPLICITE, INCLUANT LES GARANTIES IMPLICITES
CETTE GARANTIE LIMITÉE ET EXPRESSE REMPLACE TOUTE AUTRE
garantie.
de la date d’achat original sera exigée pour toute réparation sous le couvert de cette
Cette garantie est octroyée à l’utilisateur original seulement. La facture ou autre preuve
garantie.
piles sèches, les cartouches d’encre et le papier ne sont pas couverts sous cette
conçu ou utilisé à des fins commerciales, cette garantie devient nulle et sans effet. Les
l’appareil a été altéré ou transformé de façon à modifier l’usage pour lequel il a été
ainsi que ceux découlant d’un accident en transit ou de manipulation. De plus, si
les dommages résultant d’une installation incorrecte, d’un usage abusif ou impropre
Cette garantie n’est valide que pour les appareils achetés au Canada et ne couvre pas
LIMITATIONS ET EXCLUSIONS
Quatre-vingt-dix (90) jours, pièces et main-d’oeuvre
Un (1) an, pièces et main-d’oeuvre
photo numériques
Accessoires pour appareils
photographie numérique
Périphériques pour
Appareil photo numérique Un (1) an, pièces et main-d’oeuvre
dessous et commençant à partir de la date d’achat original.
le cas échéant, de remédier à toute défectuosité pendant la période indiquée ciPanasonic Canada Inc. garantit cet appareil contre tout vice de fabrication et accepte,
Certificat de garantie limitée Panasonic
5770 Ambler Drive, Mississauga, Ontario L4W 2T3
Panasonic Canada Inc.
Garantie
Page 40

25
VQT1F25
sujet des modèles qui peuvent être utilisés.
de l’appareil photo numérique pour les informations les plus récentes au
* Reportez-vous au manuel d’utilisation, au catalogue, au site Internet, etc.,
résistance à l’eau: 40 m/130 pieds
Profondeur de
Structure étanche: Fermeture joint torique
Matière: Polycarbonate
(parties en saillie non comprises)
[6
(H)k93 mm (P)
1/8 po (L)k3 3/4 po (H)k3 5/8 po (P)]
Dimensions: Environ 155 mm (L)k94 mm
Poids: Environ 430 g/15,2 oz
Modèle compatible: DMC-TZ2/DMC-TZ3 (À compter de mars 2007*)
Spécifications
fonctionne pas correctement, consultez votre revendeur.
indiqué dans ce manuel d’utilisation et ne modifiez pas le boîtier. Si le boîtier ne
≥ Ne désassemblez aucun élément, n’utilisez aucun accessoire qui ne serait pas
Tous les frais de port sont à la charge du client.
étanchéité en utilisant le même test hydrostatique que celui effectué avant l’achat.
tous ses éléments et leur réparation si nécessaire ainsi que la vérification de son
vérification comprend le désassemblage et le nettoyage du boîtier, l’inspection de
≥ Nous vous conseillons de faire vérifier le boîtier environ 3 ans après l’achat. Cette
l’abri de la lumière.
≥ Séchez bien ce boîtier à température ambiante et le ranger dans un endroit frais à
≥
Veillez à ce qu’aucune saleté ou poussière n’adhère au joint torique.
≥ Retirez toujours l’appareil photo numérique du boîtier.
l’utilisation
∫ À propos du rangement et de la vérification après
Page 41

VQT1F25
24
qu’il reste propre.
Essuyez l’intérieur du verre avant avec ce chiffon, avant et après l’utilisation afin
≥ Pour essuyer l’intérieur du boîtier, utilisez uniquement un chiffon sec et doux.
doux et sec.
≥ Si la graisse reste collée à l’appareil photo numérique, essuyez-la avec un linge
revendeur.
boîtier a besoin d’être réparé, consultez votre
Ne pas utiliser d’adhésifs pour la réparation. Si le
dans ce manuel d’utilisation.
le commerce. Veillez à utiliser le gel de silice indiqué
Ne pas utiliser de produits antibuée disponibles dans
laiton. Lavez-les à l’eau douce.
en métal du boîtier sont en acier inoxydable ou en
Ne pas utiliser de produits anticorrosifs car les parties
Nettoyez le boîtier avec de l’eau courante ou tiède.
des diluants ou avec des détergents chimiques.
organiques volatiles comme l’alcool, le benzine ou
Ne pas nettoyer le boîtier au moyen de solvants
Adhésifs
Produits antibuée
Produits anticorrosifs
chimiques
volatiles/Détergents
Solvants organiques
Substances chimiques Mises en garde
haute pression, fissurer celui-ci.
direct ou indirect (avec un vaporisateur chimique, etc.) sur le boîtier peut, à
la protection antirouille, la protection antibuée ou la réparation. Leur usage
≥ N’utilisez pas les produits chimiques indiqués ci-dessous pour le nettoyage,
∫ Entretien
Remarques sur l’utilisation de l’appareil (suite)
Page 42

23
VQT1F25
les remplacer chaque année même si vous ne voyez aucune éraflure.
laquelle ils sont utilisés et de leur condition de rangement, nous vous conseillons de
joints toriques dépende de la manière dont ils sont entretenus, de la fréquence à
≥ Les joints toriques sont des produits consommables. Bien que la durée de vie des
3 minutes. (P14)
en l’immergeant dans un bassin d’eau, une baignoire, etc. pendant environ
éraflé ni fendu. Puis, fermez le boîtier et vérifiez l’absence de toute infiltration d’eau
remplacement de la batterie, etc., vérifiez avec soin que le joint torique n’est ni
prolongée, l’ouverture du boîtier pour installation de l’appareil photo, le
≥ Après remplacement du joint torique, la non-utilisation du boîtier pour une période
causerait des infiltrations d’eau. Remplacez-le par un joint torique neuf.
≥ Ne jamais utiliser un joint torique qui a été éraflé ou taché par de la saleté, etc. Ceci
contact avec le joint torique.
rainure du joint torique et les parties intérieures du couvercle avant qui sont en
saletés, sable, cheveux ou autres matières étrangères. Essuyez également la
≥ Après avoir retiré le joint torique de la partie arrière du boîtier, retirez-en toutes les
car cela peut érafler le joint torique.
≥ Utilisez le bout de vos doigts pour retirer le joint torique. N’utilisez pas d’objet pointu
et n’éraflez pas le joint torique ou les côtés du boîtier.
cognez pas, n’introduisez aucun matériaux étrangers (saleté, sable, cheveux, etc.)
≥ Le joint torique entre en contact avec les côtés du boîtier et le rend hermétique. Ne
infiltrations d’eau.
graisse, la surface du joint torique peut en être abîmée et causer des
≥ Utilisez uniquement la graisse indiquée. Si vous utilisez d’autres types de
égratigné ni plié.
utilisez le joint torique à nouveau, vérifiez avec soin que celui-ci n’est ni
sombre afin d’éviter que la surface ne soit endommagée. Lorsque vous
placez-le dans un sac en polyester propre et placez-le dans un endroit frais et
torique de la rainure, appliquez une mince couche de graisse (fournie),
≥ Si vous n’utilisez pas le boîtier pendant un long moment, retirez le joint
torique.
joint torique. Ceci accélérera les dommages ou la détérioration du joint
≥ N’utilisez pas d’alcool, de solvant ou de nettoyant chimique pour nettoyer le
∫ Manipulation du joint torique
Remarques sur l’utilisation de l’appareil
Page 43

VQT1F25
22
≥ Rangez ce boîtier dans un endroit frais, bien ventilé.
≥ Ne laissez pas l’appareil photo numérique dans le boîtier lorsque vous le rangez.
infiltrations d’eau. Retirez l’appareil photo avant de laver le boîtier avec de l’eau.
≥ Ne lavez pas le boîtier avec de l’eau sous pression car cela peut provoquer des
∫
Remarques
humide.
≥ Essuyez toutes traces de saleté à l’intérieur du boîtier avec un chiffon doux et
≥ Veillez à fermer le boîtier et lavez l’extérieur uniquement avec de l’eau.
≥ Lavez l’extérieur du boîtier jusqu’à ce qu’il soit propre. (P20)
1
Lavez l’extérieur du boîtier avec de l’eau.
Nettoyage et rangement
Page 44

21
VQT1F25
l’appareil photo ne sera pas mouillé, par exemple à l’intérieur ou sous une toiture.
≥ Lorsque le temps ou la mer est particulièrement mauvais, choisissez un endroit où
plongée par les manches.)
(Soyez particulièrement attentif à l’eau qui a pénétrée dans votre combinaison de
≥ Séchez complètement toute trace d’humidité de votre corps et de vos cheveux.
douce et séchez-les avec soin.)
≥ Retirez l’appareil photo avec les mains propres. (Lavez vos mains avec de l’eau
mouille pas.
Faites attention en retirant l’appareil photo du boîtier que celui-ci ne se
∫
Remarques
que vous appliquez la graisse.
5
Vérifiez qu’il n’y ait aucune éraflure, etc. sur le joint torique pendant
saleté, etc. dans la rainure.
4
Retirez le joint torique du boîtier et vérifiez qu’il n’y ait aucune
3
Ouvrez le couvercle arrière pour retirer l’appareil photo numérique.
Page 45

VQT1F25
20
joint torique.
ou endommager le boîtier ou bien accélérer la détérioration du
décolorer
peut
≥ Ne séchez pas le boîtier en l’exposant directement aux rayons du soleil. Ceci
de sel et séchez complètement le boîtier.
2
Essuyez l’eau avec un chiffon sec qui n’est pas imprégné de cristaux
etc. car cela peut causer des infiltrations d’eau.
≥
Ne lavez pas le boîtier avec de l’eau à trop grand débit ou sous pression,
touches, etc., ceux-ci durciront et les touches deviendront inutilisables.
d’enlever toute l’eau de mer. Si les cristaux de sel ne sont pas retirés des
≥
Appuyez sur toutes les touches de fonctionnement, etc. du boîtier afin
de sel, etc.
ou plus sans retirer l’appareil photo afin d’enlever tous les cristaux
1
Immergez le boîtier dans de l’eau douce pendant environ 30 minutes
Après avoir fini de prendre des photos, suivez les étapes suivantes.
Après utilisation
Page 46

19
VQT1F25
≥ Pour plus d’informations, lire le manuel d’utilisation de l’appareil photo numérique.
∫
Remarque
celles qui ont été prises.
exemple) en mode rafale, vous pouvez sélectionner votre photo préférée parmi
≥ Lors de prises de vues de sujet à mouvement rapide (un clown orange, par
Utilisation du mode rafale
désirée parmi les 3 qui ont été prises.
différentes sont automatiquement enregistrées. Vous pouvez choisir la photo
≥ Chaque fois que le déclencheur est appuyé, 3 photos avec des expositions
l’exposition (pour modèles munis de cette fonction)
Utilisation de la fonction de prise de vues en rafale avec réglage automatique de
Réglez le flash sur [ ].
Sélectionnez la meilleure image
≥ Vous pouvez également appuyer à mi-course sur le déclencheur pour finir.
3 Appuyez sur [MENU/SET] pour finir.
2 Appuyez sur 2 () /1 () pour régler l’équilibre des blancs.
1 Appuyez plusieurs fois sur 3 ( ) jusqu’à ce que [] apparaisse.
Lorsque l’image est trop bleuâtre dans l’eau
Conseils pour la prise de vue dans l’eau
Page 47

2
VQT1F25
18
prendre des photos.
capable de faire correctement la mise au point. Essuyez le verre avant, avant de
≥ S’il y a des gouttes d’eau ou de la saleté sur le verre avant, vous pouvez ne pas être
au point à la place du sujet.
≥ S’il y a des particules qui flottent devant l’appareil photo, elles peuvent être mises
(Pour plus de détails, lisez le manuel d’utilisation de l’appareil photo numérique.)
régler à nouveau l’horloge.
≥
Avant de placer l’appareil photo numérique dans le boîtier, nous vous conseillons de
∫ Remarques
5 Appuyez à fond sur le déclencheur pour prendre une photo.
• Appuyez à nouveau sur 2 () pour annuler.
4 Appuyez sur 2 ( ) pour faire la mise au point.
mettre au point.
3 Dirigez la zone MPA de l’écran ACL sur le sujet que vous désirez
≥
Pour plus de détails, lisez le manuel d’utilisation de l’appareil photo numérique.
mode.
2 Affichez le menu du mode scène et sélectionnez [SOUS-MARIN]
ONOFF
1
ONOFF
verrouiller.
Appuyez sur 2 pour
puis réglez sur [ON].
Appuyez sur 1 pour déverrouiller,
1 Allumez l’appareil photo.
∫ Prise de vues
≥ Le loquet est-il fermement verrouillé?
≥ Avez-vous vérifié l’absence d’infiltration d’eau dans le boîtier?
≥ Est-ce que le joint torique est correctement mis en place dans sa rainure?
≥ Y a-t-il suffisamment d’espace mémoire sur la carte?
Reste-t-il suffisamment d’énergie dans la batterie?
≥
Vérifiez les choses suivantes avant de plonger.
∫ Avant de prendre des photos sous-marines
Prise de vues
Page 48

17
VQT1F25
rangez-les.
Afin d’empêcher la rouille, retirez les poids après leur utilisation, essuyez tout le sel puis
≥
∫ Remarques
les à la prise de fixation de trépied.
afin qu’ils ne soient pas superposés puis fixezpoids avec la partie en creux du premier poids
poids, alignez la partie en saillie du deuxième
fournie pour le fixer. Si vous utilisez les deux
trépied sur le boîtier marin puis utilisez la vis
en saillie du poids avec la prise de fixation de
Lors de l’utilisation d’un poids, alignez la partie
Méthode de fixation des poids
Ils coulent lentement dans l’eau douce ou l’eau de mer. (flottabilité négative)
poids:
3 Lors de l’utilisation de l’appareil photo numérique, du boîtier marin et de deux
positive)
Ils flottent encore plus lentement dans l’eau douce ou l’eau de mer.(flottabilité
2 Lors de l’utilisation de l’appareil photo numérique, du boîtier marin et d’un poids:
Ils flottent lentement dans l’eau douce ou l’eau de mer. (flottabilité positive)
1 Lors de l’utilisation de l’appareil photo numérique et du boîtier marin seulement:
Consultez les points suivants concernant la flottabilité sous l’eau.
Utilisez-les selon le besoin.
Fixez les poids pour régler la flottabilité préférée lors de l’utilisation du boîtier marin.
À propos de l’utilisation des poids
∫ Fixation des poids
avec de l’eau tiède afin d’éviter la décoloration et de réduire l’étanchéité.
≥ Si de l’écran solaire ou de l’huile solaire colle au boîtier, nettoyez-le immédiatement
à l’intérieur du boîtier.
≥ S’il y a un changement soudain de température, de la condensation peut apparaître
poussière et dans des endroits humides ou mouillés.
≥ Évitez d’ouvrir ou de fermer le boîtier lorsqu’il y a beaucoup de sable ou de
Vérifiez encore une fois la bonne mise en place du joint torique dans sa rainure.
≥
∫ Remarques
Page 49

VQT1F25
16
(P14)
d’infiltration d’eau dans le boîtier.
5 Après avoir installé l’appareil photo, vérifiez une fois de plus l’absence
Ne pas coincer la courroie etc. dans le loquet.
2
que le loquet est correctement fermé.
1
‘ Vérifiez
4 Fermez le loquet.
environ 1 à 2 heures avant d’utiliser le boîtier.
l’appareil photo. Pour éviter que le boîtier ne s’embue, placez le gel de silice
vous que le gel de silice (fourni) n’entre pas en contact avec l’objectif de
condensation peut apparaître à l’intérieur du boîtier. Pour éviter cela, assurez-
≥ Si la température de l’air est élevée et si la température de l’eau est basse, de la
pris dans le joint torique et causera une infiltration d’eau.
alors que le gel de silice n’est pas totalement mis en place, celui-ci sera
dessous et introduisez-le aussi loin que possible. Si vous fermez le boîtier
≥ En introduisant le gel de silice, pliez-le comme montré sur l’illustration ci-
-Mise en place de l’appareil photo numérique - (suite)
Préparatifs
Page 50

15
VQT1F25
Gel de silice
≥ Utilisez toujours du gel de silice neuf.
3
Insérez le gel de silice (fournie).
≥ Attention à ne pas heurter l’anneau de protection 1.
1
2
Installez l’appareil photo numérique dans le boîtier.
2
1
pour ouvrir
1
le loquet.
1
Appuyez sur 2 avec votre doigt tout en faisant glisser
≥ Retirez la bandoulière de l’appareil photo numérique.
boîtier marin sont placés sur [OFF].
Vérifiez que l’interrupteur de marche/arrêt de l’appareil photo et du
Préparatifs -Mise en place de l’appareil photo numérique -
Page 51

VQT1F25
14
infiltration d’eau.
le joint torique et la rainure. Un simple cheveu ou grain de sable peut causer une
≥ En fermant le boîtier, assurez-vous qu’aucun matériau étranger ne se trouve entre
peut être endommagée de façon irrémédiable.
Si vous plongez à une profondeur de plus de 40 m/130 pieds, une partie du boîtier
≥ Le boîtier est conçu pour être utilisé à une profondeur allant jusqu’à 40 m/130 pieds.
lentement dans l’eau.
élevée. Il ne s’agit pas d’un mauvais fonctionnement du boîtier. Plongez toujours
bateau dans la mer, une infiltration d’eau peut survenir en raison de la pression
≥ Si vous plongez rapidement tout en tenant le boîtier ou si vous lancez le boîtier d’un
peut s’enflammer ou exploser si un feu se trouve à proximité.
numérique se retrouve submergé, retirez immédiatement la batterie. L’hydrogène
≥ Si de l’eau s’infiltre dans le boîtier pendant que vous l’utilisez et que l’appareil photo
une fuite. Dans de tels cas, consultez le détaillant.
de l’eau à l’intérieur de celui-ci lorsque vous le retirez de l’eau, cela signifie qu’il a
≥ Si des bulles sont produites lorsque que le boîtier est immergé dans l’eau ou qu’il a
∫
Remarques
dans le boîtier. (P15)
‘
Effectuez le même test après avoir mis en place l’appareil photo numérique
l’endommager et causer des infiltrations d’eau.
≥ N’utilisez pas le boîtier dans une eau de plus de 40 °C/104 °F. La chaleur peut
photo numérique.
baignoire, etc. pendant environ 3 minutes avant d’installer l’appareil
d’eau dans le boîtier en l’immergeant dans un bassin d’eau, une
Après la préparation du joint torique, vérifiez l’absence d’infiltrations
Préparatifs -Vérification de l’étanchéité du boîtier-
Page 52

13
VQT1F25
utilisez soit endommagé ou éraflé.
≥ Assurez-vous d’avoir un joint torique de rechange dans le cas où celui que vous
d’eau.
la saleté et la poussière peuvent coller au joint torique et causer une infiltration
appliquez une mince couche de graisse (fournie). Si vous appliquez trop de graisse,
ni saleté, sable, cheveux ou autres matériaux étrangers dans la rainure, puis
≥ Chaque fois que vous utilisez le boîtier, retirez le joint torique et vérifiez qu’il n’y ait
etc. Ceci causerait des infiltrations d’eau.
≥ N’utilisez jamais un joint torique qui a été éraflé ou endommagé par de la saleté,
torique qui entre en contact avec les côtés du boîtier.
≥ Pour garder le boîtier complètement hermétique, n’éraflez pas la surface du joint
∫
Remarques
loquet de verrouillage sur la partie avant du boîtier, puis fermez le boîtier.
≥ Vérifiez qu’aucune matière étrangère ne soit collée à la surface extérieure et au
2
1
8
Fermez le loquet.
puis lavez-les avec de l’eau.
Essuyez avec soin toute la graisse de vos mains avec un chiffon sec
≥ Il n’y a aucune éraflure ou bossellement sur le joint torique.
≥ Que le joint torique n’est pas tordu.
≥ Que le joint torique ne sorte pas de son logement.
≥ Qu’il n’y ait pas de saleté collée sur le joint torique.
Vérifiez les choses suivantes encore une fois:
7
Vérifiez le joint torique une dernière fois.
Page 53

VQT1F25
12
Incorrect
Correct
≥ Que le joint torique ne soit pas trop étiré.
≥ Que le joint torique n’est pas tordu.
≥ Que le joint torique ne sorte pas de son logement.
≥ Qu’il n’y ait pas de saleté collée sur le joint torique.
Vérifiez les choses suivantes:
6
Placez le joint torique dans la rainure.
pourraient rester collées au joint torique.
≥ N’appliquez pas la graisse à l’aide d’un papier ou d’un chiffon. Des fibres
la surface du joint torique peut s’endommager et causer des infiltrations d’eau.
≥
Utilisez uniquement la graisse indiquée. Si vous utilisez un autre type de graisse,
≥
Si vous appliquez trop de graisse, de la saleté ou de la poussière collera au joint torique.
la dimension d’un grain de riz sur le joint torique.
≥ Appliquez uniformément et du bout du doigt une quantité de graisse (fournie) de
5
Appliquez la graisse (fournie).
4
Vérifiez le côté opposé du joint torique de la même manière.
Préparatifs -Mise en place du joint torique- (suite)
Page 54

11
VQT1F25
dans la rainure du joint torique.
coton. Si vous utilisez un tampon de coton, veillez à ne pas laisser de fibres
du joint torique. Retirez-les avec précaution avec un jet d’air ou un tampon de
≥ Des grains de sable ou des cristaux de sel durcis peuvent entrer dans la rainure
3
Vérifiez la rainure du joint torique.
Dépôts de sable
3Écrasements 3Écaillements
3Distorsions
3Rayures 3
3Fissures
torique.
et qu’il n’y ait pas de sable collé dessus. Si c’est le cas, remplacez le joint
≥ Vérifiez que le joint torique ne soit ni déchiré, tordu, écrasé, effiloché ou éraflé
les fibres du linge sec et doux.
≥ Lors du nettoyage du joint torique, faites attention de ne pas laisser sur celui-ci
Vérifiez la présence de saletés en frottant votre doigt sur le joint torique.
≥ Sur le joint torique, il peut y avoir de la saleté que vous ne pouvez pas voir.
3
3Fils de tissu
3Poussière
3Cheveux
3Sable
Cristaux de sel
3Saleté
un chiffon sec et doux.
graisse sur le joint torique. Si vous trouvez une de ces choses, retirez-la avec
≥ Vérifiez l’absence de saleté, sable, cheveux, poussière, cristaux de sel, fibre ou
2
Vérifiez le joint torique.
Page 55

VQT1F25
10
≥ N’utilisez pas d’objet pointu pour retirer le joint torique. Ceci pourrait l’érafler.
∫
Remarque
Joint torique
Joint torique
ongles.
partie détachée. Faites attention de ne pas érafler le joint torique avec vos
≥ Desserrez une partie du joint torique du bout de vos deux doigts et soulevez la
1
Desserrez le joint torique avec vos doigts pour l’enlever.
Placez le joint torique dans un endroit sans sable ni poussière.
Lavez et séchez vos mains avec soin avant de manipuler le joint torique.
l’appareil photo numérique.
Assurez-vous de mettre le joint torique en place avant d’installer
Préparatifs -Mise en place du joint torique-
Page 56

VQT1F25
9
causer des infiltrations d’eau.
joint torique est très important. Un mauvais entretien peut
contact des deux côtés du boîtier. Donc, le bon entretien du
Le joint torique évite les infiltrations d’eau en uniformisant le
s’élargit et le boîtier est scellé plus hermétiquement.
Quand le joint torique est écrasé par la pression de l’eau, sa surface
torique
Joint
de l’eau
Pression
Eau
torique
Joint
ainsi étanche et empêchant l’eau d’entrer par l’ouverture.
Le caoutchouc entre en contact avec les côtés du boîtier le rendant
Couvercle avant
torique
Joint
Appareil photo numérique
Couvercle arrière
∫ Comment le joint torique rend-t-il le boîtier étanche
arrière.
≥ Le joint torique rend le boîtier étanche en scellant l’espace entre sa partie avant et
ou équipements de plongée.
≥ Un joint torique est une garniture étanche utilisée pour les appareils photo, montres
Qu’est-ce qu’un joint torique?
Page 57

VQT1F25
8
18. Levier de déverrouillage
17. Loquet de verrouillage
16. Couvercle arrière
automatique
Verrouillage de mise au point
mise au point automatique/
15. 2/Touche de verrouillage de
ACL [DISPLAY/LCD MODE]
14. Touche de l’affichage/mode
(prévisualisation)
13. Touche 4/[REV]
Touche d’effacement
12. Touche de fonction [FUNC]/
(affichage/réglage du menu)
11. Touche [MENU/SET]
10. Touche 1/du mode flash
contre-jour en mode simple
blancs/Compensation du
Réglage fin de l’équilibre des
automatique de l’exposition/
en rafale avec réglage
l’exposition/Prises de vues
9. Touche 3/compensation de
8. Interrupteur de marche/arrêt
7. Vitre avant
6. Diffuseur (fourni)
5. Couvercle avant
mode
4. Molette de sélection du
3. Déclencheur
18
17
13141516
12
11
10
9
8
7
6
diffuseur fournis)
(pour fixer la courroie et le
2. Œillet de la courroie
1. Levier de zoom
12 3 4 5
Composants
Page 58

VQT1F25
7
sous l’eau qu’en plein air.
≥ En prenant des photos avec le flash, la portée disponible de celui-ci est plus faible
peut ne pas apparaître illuminée de manière uniforme.
≥ Lorsque vous utilisez le flash, les angles de l’image peuvent être coupés ou l’image
∫ Prises de vues avec le flash
• Cela peut provoquer un choc électrique ou un mauvais fonctionnement.
mains mouillées.
≥ Ne manipulez pas l’appareil photo numérique ou la batterie avec les
une panne d’isolation ayant pour résultat un feu ou un mauvais fonctionnement.
boîtier est très élevée, cela peut causer des infiltrations, des courts-circuits ou
• Si vous utilisez l’appareil photo numérique lorsque la température à l’intérieur du
également être endommagé.
• Si un appareil photo numérique se trouve à l’intérieur du boîtier, celui-ci peut
endommager le boîtier ou ses éléments internes.
lorsqu’il est laissé dans une voiture fermée en plein été. La chaleur peut
exposé directement aux rayons du soleil sur une plage, en voyage, etc. ou
• La température à l’intérieur du boîtier peut devenir très élevée surtout lorsqu’il est
≥ Ne laissez pas le boîtier dans un endroit où la température est élevée.
• L’eau qui s’est infiltrée peut sortir ou bien l’arrière du boîtier peut se renverser.
≥ Faites attention en ouvrant le boîtier après une infiltration d’eau.
Page 59

VQT1F25
6
• Consultez votre revendeur.
l’appareil photo.
• Retirez l’appareil photo numérique du boîtier et puis retirez les batteries de
• Cela peut causer un choc électrique, une brûlure ou un incendie.
provient du boîtier, arrêtez de l’utiliser immédiatement.
≥ Si de la fumée ou une chaleur, une odeur ou un bruit anormal
• Si vous remontez trop rapidement, vous pouvez subir la maladie des caissons.
décompression lors de votre remontée.
veuillez suivre toutes les procédures nécessaires et les consignes de
≥ Si quelque chose d’anormal survient en utilisant le boîtier sous l’eau,
• Consultez votre revendeur.
• Ceci peut provoquer un choc électrique, une brûlure ou un incendie.
de l’utiliser.
≥ S’il y a des infiltrations d’eau dans le boîtier, arrêtez immédiatement
• Ne mettez pas la graisse en contact avec vos yeux ou votre bouche.
≥ Nettoyez toutes traces de graisse de vos mains.
sérieuses.
• Cela peut vous blesser le cou et causer une suffocation ou d’autres blessures
sous l’eau.
≥ N’enroulez pas la bandoulière autour de votre cou lorsque vous êtes
de la graisse, du gel de silice ou le joint torique.
• Consultez immédiatement votre médecin si vous pensez que votre enfant a avalé
torique.
• Les enfants peuvent accidentellement avaler la graisse, le gel de silice ou le joint
une blessure.
• Si un enfant se coince une partie du corps dans ce boîtier, cela peut provoquer
torique à la portée des enfants.
≥ Ne placez jamais le boîtier, la graisse, le gel de silice ou le joint
été correctement entraîné et êtes qualifié pour ce sport.
• Vous ne devez utiliser ce boîtier lors d’une plongée sous-marine que si vous avez
entraînement adéquat.
≥ N’utilisez pas le boîtier en plongée sous-marine sans un
causer un incendie.
• Si vous continuez d’utiliser l’appareil photo après que l’eau s’y soit infiltrée, il peut
abîmé, celui-ci peut être endommagé de façon irrémédiable.
• Si de l’eau s’introduit dans l’appareil photo numérique parce que le boîtier est
≥ Ne modifiez jamais le boîtier.
fonctionner.
• Si le boîtier tombe sur votre tête ou votre pied, il vous blessera et pourra mal
≥ Ne placez pas le boîtier dans un endroit où il pourrait tomber.
Manipulation et entretien
Page 60

VQT1F25
5
Fixez-le selon I’illustration.
VHD1930
poids
Vis de fixation des
VFC4190
Courroie
VZG0371
(1 g/5 pièces)
(dessiccatif)
Gel de silice
Fixez
Retirez
≥ Vous pouvez retirer le diffuseur lorsque vous ne l’utiliser pas.
VYK2D90
Diffuseur
VMP8844
Poids (2)
VZG0372
joint torique)
Tube de graisse (pour
VMG1798
Joint torique
dessous.
N’utilisez aucuns autres accessoires que ceux indiqués cid’utiliser le boîtier.
quelque chose d’anormal, consultez votre revendeur avant
n’ont pas été endommagés lors du transport. Si vous constatez
bien qu’il contient le boîtier et tous les accessoires et que ceux-ci
Lorsque vous ouvrez l’emballage pour la première fois, vérifiez
Accessoires
Page 61

VQT1F25
4
vous utilisez le boîtier.
vous le cognez, l’appareil photo peut être endommagé. Faites attention lorsque
≥ Ce boîtier n’absorbe pas les chocs. Si vous placez un objet lourd sur le boîtier ou si
présents sur vos mains ou votre corps.
sac en plastique. Utilisez cette serviette pour essuyer les gouttes d’eau et le sable
mer. Mouillez une serviette avec de l’eau douce et mettez-la à l’avance dans un
• Ne touchez pas l’appareil photo numérique si vos mains sont mouillées d’eau de
plongée par les manches.
• Soyez particulièrement attentif à l’eau qui a pénétré dans votre combinaison de
• Essuyez complètement toutes les gouttes d’eau de votre corps ou vos cheveux.
d’eau restantes avec un chiffon sec.
et sur le loquet de verrouillage en soufflant. Enlevez complètement les gouttes
• Enlevez toutes les gouttes d’eau présentes entre le côté avant et arrière du boîtier
sable ne pourra pas y pénétrer.
• Choisissez un endroit où le boîtier ne sera pas éclaboussé par de l’eau et où le
la batterie ou la carte, veillez à suivre les étapes suivantes.
≥ Si vous devez ouvrir ou fermer le boîtier au point de plongée pour remplacer
dans un endroit peu humide.
≥
Remplacez la batterie, la carte, etc. et installez l’appareil photo numérique à l’intérieur
vous conseillons d’ouvrir et de fermer le boîtier à l’intérieur.
éclaboussé par de l’eau ou dans un endroit où le sable pourrait y entrer. Nous
≥ N’ouvrez pas et ne fermez pas le boîtier dans un endroit où il pourrait être
∫ Préparatifs
température ambiante avant de prendre des photos.
peut s’embuer. Attendez jusqu’à ce que la température du boîtier soit proche de la
de l’eau est froide vers un endroit où la température est chaude, la surface du verre
≥ Si vous déplacez soudainement le boîtier d’un endroit où la température de l’air ou
peut être endommagé.
apparaître à l’intérieur du boîtier, la surface du verre peut s’embuer et l’appareil photo
déplacez vers un endroit froid ou que vous plongez sous l’eau, de la condensation peut
≥
Si vous ouvrez ou fermez le boîtier dans un endroit chaud et humide et puis que vous le
température
∫ Utilisation du boîtier à haute ou à basse
Avant utilisation (suite)
Page 62

VQT1F25
3
boîtier devenir trop élevée.
de fonctionner correctement. Ne laissez pas la température intérieure du
intérieure peut devenir très élevée et l’appareil photo numérique peut arrêter
soleil, etc. Le boîtier est un appareil hermétique donc sa température
moment dans une voiture, un bateau, exposés directement aux rayons du
≥ Ne laissez pas l’appareil photo numérique dans le boîtier pendant un long
l’endommager. Retirez le joint torique avant d’embarquer dans un avion.
atmosphérique peut causer une poussée à l’intérieur du boîtier qui risque de
≥ Lorsque vous embarquez dans un avion, le changement de pression
moment de l’achat en vue du transport.)
(Vous ne pouvez pas réutiliser le matériau avec lequel le boîtier a été emballé au
transportez sur une courte distance comme de l’aéroport vers le point de plongée.
boîtier. Installez l’appareil photo numérique dans le boîtier uniquement si vous le
d’éviter les chocs en cas de chute, etc. et ne laissez pas l’appareil photo dans le
voyager en voiture, bateau, train ou avion, emballez soigneusement le boîtier afin
rocheux, etc. et peut être endommagé par le choc s’il venait à tomber, etc. Pour
l’utilisant. Il peut être facilement éraflé si vous prenez des photos dans des endroits
≥ Le boîtier est fait de polycarbonate résistant au choc; toutefois faites attention en
l’endommager et causer des infiltrations d’eau.
≥ N’utilisez pas le boîtier dans une eau de plus de 40 °C/104 °F. La chaleur peut
• Température ambiante: 0 °C à 40 °C/32 °F à 104 °F
• Profondeur de l’eau: jusqu’à 40 m/130 pieds
≥
Utilisation dans les conditions suivantes:
∫ Manipulation du boîtier
pendant environ 3 minutes ou plus pour vérifier son étanchéité.
≥ Avant d’installer l’appareil photo numérique, immergez le boîtier dans l’eau
≥ Veuillez lire le manuel d’utilisation de l’appareil photo numérique.
blessures ou des dommages.
≥ Matsushita n’offre aucune compensation pour les accidents provoquant des
boîtier, du coût des photographies ou de toutes autres dépenses.
produits (appareil photo numérique, batteries, carte, etc.) présents à l’intérieur du
Matsushita n’est responsable en aucune manière des dommages subis par les
≥ Dans le cas d’une infiltration d’eau provoquée par un manque de précautions,
40 m/130 pieds.
Vous pouvez prendre des photos sous l’eau à une profondeur allant jusqu’à
≥ Ce boîtier marin est conçu pour l’appareil photo numérique Panasonic.
Avant utilisation
Page 63

VQT1F25
2
Garantie . . . . . . . . . . . . . . . . . . . . . . . . . . . . . . . . . . . 26
Spécifications . . . . . . . . . . . . . . . . . . . . . . . . . . . . . . . 25
Remarques sur l’utilisation de l’appareil . . . . . . . . . . . 23
Nettoyage et rangement . . . . . . . . . . . . . . . . . . . . . . . 22
Après utilisation. . . . . . . . . . . . . . . . . . . . . . . . . . . . . . 20
Conseils pour la prise de vue dans l’eau . . . . . . . . . . 19
Prise de vues . . . . . . . . . . . . . . . . . . . . . . . . . . . . . . . 18
numérique -. . . . . . . . . . . . . . . . . . . . . . . . . . . . . . . . 15
Préparatifs -Mise en place de l’appareil photo
. . . 14
-Vérification de l’étanchéité du boîtier-
Préparatifs
Préparatifs -Mise en place du joint torique- . . . . . . . . 10
Qu’est-ce qu’un joint torique? . . . . . . . . . . . . . . . . . . . . 9
Composants . . . . . . . . . . . . . . . . . . . . . . . . . . . . . . . . . 8
Manipulation et entretien. . . . . . . . . . . . . . . . . . . . . . . . 6
Accessoires. . . . . . . . . . . . . . . . . . . . . . . . . . . . . . . . . . 5
Avant utilisation. . . . . . . . . . . . . . . . . . . . . . . . . . . . . . . 3
Table des matières
Page 64

envoyez un courriel à : lumixconcierge@ca.panasonic.com
Pour de I’aide, composez le 1-800-99-LUMIX (1-800-995-8649) ou
PP
S0207Kd0
VQT1F25
attentivement le manuel d’utilisation.
l’appareil, il est recommandé de lire
Avant de raccorder, régler ou utiliser
DMW-MCTZ3
N° de modèle
Boîtier marin
Manuel d’utilisation
 Loading...