

Page 1
Operating Instructions
Bedienungsanleitung
Manuel d’utilisation
Instrucciones de funcionamiento
Istruzioni d’uso
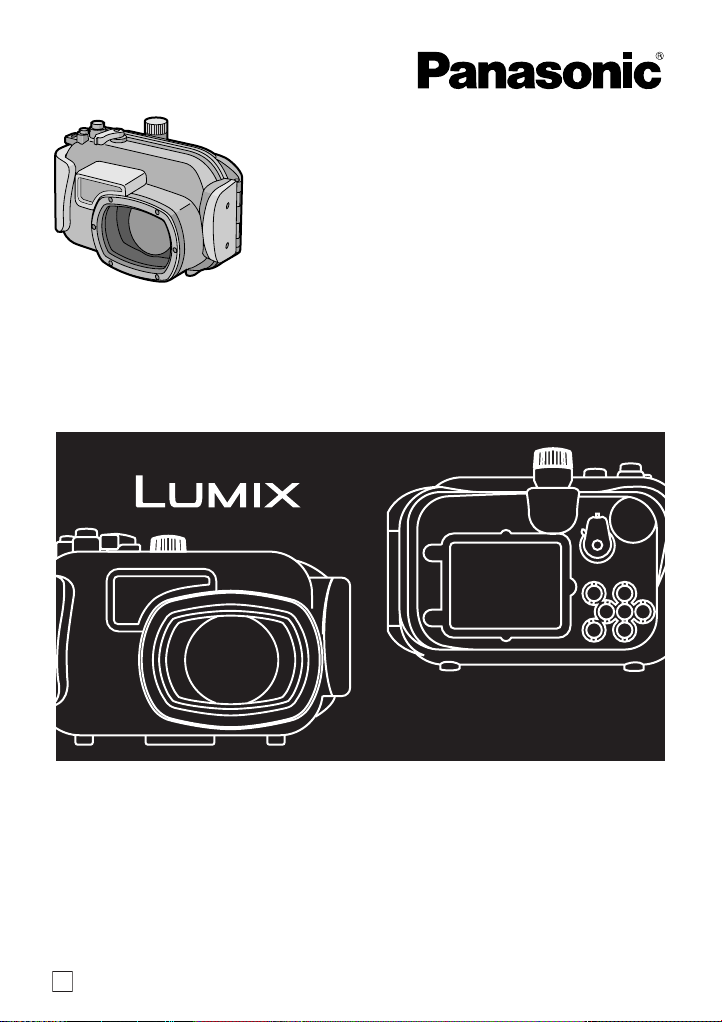
Marine Case
Model No. DMW-MCTZ1
Before use, please read these instructions completely.
Bitte lesen Sie diese Bedienungsanleitung vor der Inb etriebnahme des
Gerätes vollständig durch.
Avant l’utilisation, veuillez lire entièrement ces instructions.
Antes del uso, lea detenidamente, por favor, estas instrucciones .
Prima dell’uso, leggere completamente queste istruzioni.
E
VQT0X68
Page 2

Contents
Before Use . . . . . . . . . . . . . . . . . . . . . . . . . . . . . . . . . .3
Accessories. . . . . . . . . . . . . . . . . . . . . . . . . . . . . . . . . . 5
Handling and Care . . . . . . . . . . . . . . . . . . . . . . . . . . . .6
Components . . . . . . . . . . . . . . . . . . . . . . . . . . . . . . . . .8
What is the O-ring?. . . . . . . . . . . . . . . . . . . . . . . . . . . .9
Preparation -Setting the O-ring- . . . . . . . . . . . . . . . . . 10
Preparation -Checking the Case is Waterproof-. . . . . 14
Preparation -Attaching the Digital Camera- . . . . . . . .1 5
Taking Pictures. . . . . . . . . . . . . . . . . . . . . . . . . . . . . .18
Tips for Taking Pictures in the Water . . . . . . . . . . . . . 19
After Use. . . . . . . . . . . . . . . . . . . . . . . . . . . . . . . . . . .20
Cleaning and Storing . . . . . . . . . . . . . . . . . . . . . . . . .21
Caution for Use. . . . . . . . . . . . . . . . . . . . . . . . . . . . . . 21
Specifications . . . . . . . . . . . . . . . . . . . . . . . . . . . . . . . 23
Sales and Support Information
Customer Care Centre
• For customers within the UK:
08705 357357
• For customers within the Republic of
Ireland: 01 289 8333
• Visit our website for product information
• E-mail: customer.care@panasonic.co.uk
Technical Support for AV Software
• For UK, ROI: 08701 505610
Direct Sales at Panasonic UK
• Order accessory and consumable items
for your product with ease and
confidence by phoning our Customer
Care Centre Monday– Thursday
9.00 a.m.–5.30 p.m., Friday 9.30 a.m.–
5.30 p.m.
(Excluding public holidays)
• Or go on line through our Intern et
Accessory ordering application at
www.panasonic.co.uk.
• Most major credit and debit cards
accepted.
• All enquiries transactions and distribution
facilities are provided directly by
Panasonic UK Ltd.
• I t couldn’t be simpler!
• A lso available through our Internet is
direct shopping for a wide range of
finished products, take a browse on our
website for further details.
Interested in purchasing an extended
guarantee?
Please call 0870 240 6284 or visit our
website www.panasonic.co.uk/guarantee
.
2
VQT0X68
Page 3

ENGLISH
Before Use
≥ This Case is designed only for Panasonic Digital Camera DMC-TZ1.
You can enjoy taking pictures underwater at depths up to 40 m.
≥ In the case of water leakage due to insufficient care, Matsushita is in no way liable
for damage to any products (digital camera, batteries, card etc.) inside this Case,
photography costs or any other expenses.
≥ Matsushita also offers no compensation for accidents resulting in injury or damage
to property.
≥ Read the operating instructions for your digital camera.
≥ Before attaching the digital camera, submerge the case in water for about
3 minutes or more to check that there is no water leakage.
∫ About handling this Case
≥ Use under the following conditions.
• Water depth: Up to 40 m
• Ambient temperature: 0 °C
≥ Do not use the Case in water over 40 °C. The heat may damage the Case or cause
water leakage.
≥ The Case is made of impact resistant polycarbonate however be careful when you
are using it. It can be easily scratched when taking pictures in rocky places etc. and
can be damaged by the impact if dropped etc. When travelling, pack the Case
carefully to prevent any direct impact if it is dropped etc. and do not leave the digital
camera in the Case. Only attach the digital camera to the case if you are
transporting it a short distance such as from the airport to the diving spot. (You
cannot reuse the material the Case was packed in at the time of purchase to
transport it.)
≥ When boarding a plane, the change in atmospheric pressure may cause the inside
of the Case to expand causing damage to the Case. Remove the O-ring before
boarding a plane.
≥ Do not leave the digital camera in the Case for a long p eriod of time in a car, a
ship, exposed to direct sunlight etc. The Case is an airtight device so the
temperature inside the Case will become very high and the digital camera may
stop operating properly. Do not let the temperature inside the Case become
too high.
to
40 °C
VQT0X68
3
Page 4

Before Use (continued)
∫ Using the Case in high or low temperatures
≥ If you open or close the Case where it is humid or hot and then move to a place that
is cold or dive underwater, condensation may appear inside the Case, the glass
surface may become cloudy and the digital camera may be damaged.
≥ If you suddenly move the Case from a cold place or cold water to a warm place, the
glass surface may become cloudy. Wait until the Case becomes close to the air
temperature before taking pictures.
∫ About preparation
≥ Do not open or close the Case where it may be splashed by water or sand may
get in it. We recommend opening or closing the Case indoors.
≥ Replace the battery, card etc. and attach the digital camera indoors where there is
little moisture.
≥ If you must open or close the Case at the diving spot to replace the battery or
the card, be sure to follow the steps below.
• Select a place where the Case w ill not be splashed by water and sand will not get
in it.
• Blow off any drops of water in the gap between the rear case and the front case
and on the buckle. Thoroughly wipe off any remaining drops of water with a dry
cloth.
• Thoroughly wipe off any drops of water on your body or hair.
• Be par ticularly careful about any water coming from the sleeves of your thermal
suit.
• Do not touch the digital camera if your hands are wet from sea water. Wet a towel
with fresh water and place it in a polyester bag beforehand. Use this towel to wipe
off any drops of water or sand on your hands or body.
≥ This Case does not absorb shock. If you place a heavy object on the Case or cause
shock to it, the digital camera may be damaged. Be careful when you are using the
case.
4
VQT0X68
Page 5
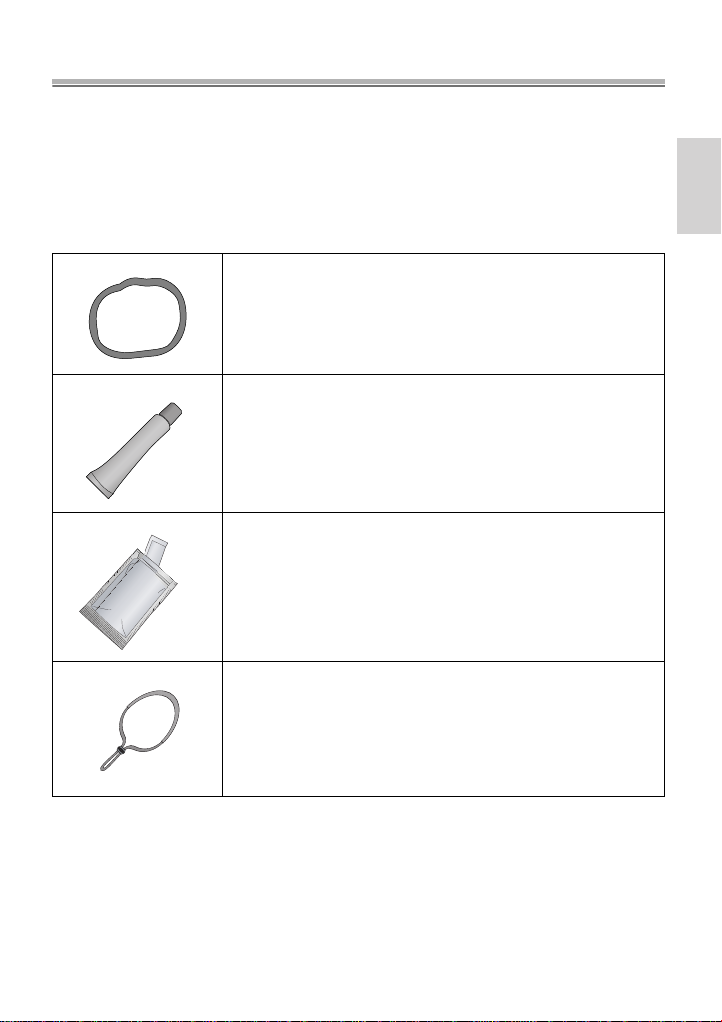
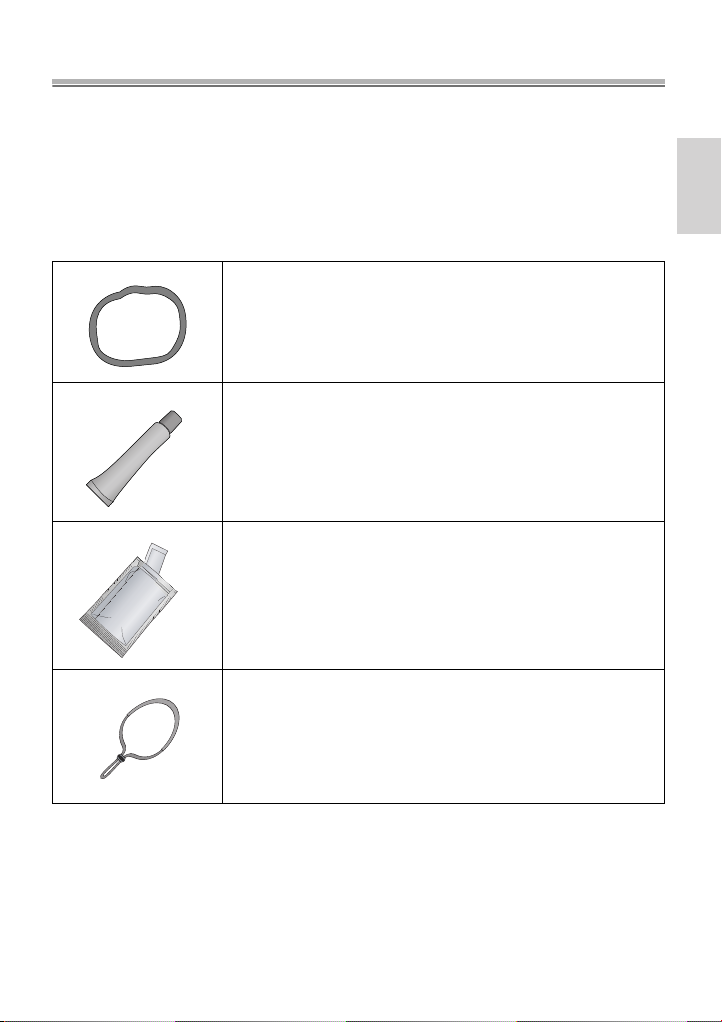
Accessories
When you first open the package, check that the Case and all the
accessories are inc l uded an d that th ere has be en no d ama ge to the
Case or any of the accessories during distribution or
transportation. If you find something unusual, consult your dealer
before using the Case.
Do not use any accessories except those specified below.
O-ring
VMG1743
Grease (for O-ring)
VZG0372
Silica Gel (Desiccant)
(1 g/5 pieces)
VZG0371
Hand Strap
VFC4190
5
VQT0X68
Page 6

Handling and Care
≥ Do not place the Case where it may fall.
• If the Case falls on your head or foot, it will injure you and cause the Case to
malfunction.
≥ Never alter the Case.
• If water leaks into the digital camera because the Case was altered, the digital
camera may be damaged beyond repair.
• If you continue to use the digital camera after water has leaked into it, this may
cause a fire.
≥ Do not use the Case while scuba diving without proper training.
• You should only operate the Case while scuba diving if you have been properly
trained and certified for this sport.
≥ Never place the Case, grease, silica gel or O-ring within the reach of
infants.
• If any part of an infant’s body is caught in the Case, it may cause an injury.
• Infants may accidentally swallow the grease, silica gel or O-ring.
• Consult a doctor immediately if you think an infant may have swallowed the
grease, silica gel or O-ring.
≥ Do not hang the strap around your neck underwater.
• I t may become wound around your neck causing suffocation or other serious
injuries.
≥ Thoroughly wash any grease on your hands.
• Do not allow the grease on your hands to come into contact with your mouth or
eyes.
≥ If water leaks into the case, stop using it immediately.
• This may cause an electric shock, burning or a fire.
• Consult your dealer.
≥ If anything abnormal occur s wh ile usin g the Cas e underw ater, please
follow all necessary procedures and guidelines for decompressing
when you ascend.
• If you ascend too quickly, you may get caisson disease.
≥ If smoke or abnormal heat, smells or sounds come from the Case,
stop using it immediately.
• T hese may cause an electric shock, burning or fire.
• Rem ove the digital camera from the Case and then immediately remove the
battery from the digital camera.
• Consult your dealer.
≥ Be careful when opening the Case after water leakage.
• The leaked water may blow out or the rear case may flip.
6
VQT0X68
Page 7

≥ Do not leave the Case where the temperature is high.
• The tem perature inside the Case becomes very high par ticular l y when it is
exposed to direct sunlight on a beach, a ship etc. or when it is left in an airtight car
in the summer. The heat may damage the Case or its inner parts.
• If a digital camera is attached to the Case, it may also be damaged.
• If you use the attached digital camera when the temperature inside the Case is
very high, it may cause leakage, short-circuiting or insulation failure resulting in
fire or malfunction.
≥ Do not handle the digital camera or the battery with wet hands.
• T his may cause an electric shock or malfunction.
∫ When taking pictures with the flash
≥ When taking pictures with the flash, the corners of the picture may be vignetted or
the picture may not be lit evenly.
≥ When taking pictures with the flash, the available flash range is less underwater
than on land.
VQT0X68
7
Page 8
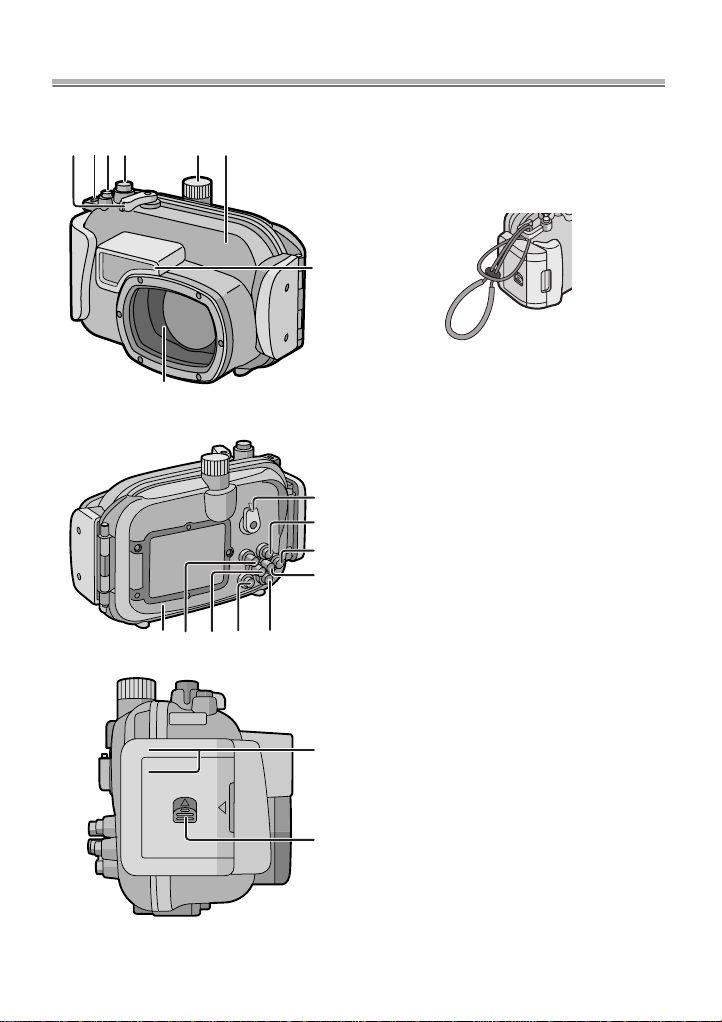
Components
1 32 4 5 6
8
17 13
1516
14
1. Zoom Lever
2. Strap Eyelet
(for attaching the supplied hand
strap)
7
3. Optical Image Stabilizer
Button
4. Shutter Button
5. Mode Dial
6. Front Case
7. Diffuser
9
• You cannot remove this .
8. Front Glass
10
11
12
18
9. Camera ON/OFF Switch
10. 3/Exposure Compensation/
Auto Bracket/White Balance
Fine Adjustment Button
11. 1/Flash Setting Button
12. MENU/SET Button
13. 4/REV Button
14. Delete/Single/Burst Mode
Button
15. 2/Self-timer Button
16. DISPLAY/LCD MODE Butto n
17. Rear Case
8
VQT0X68
18. Buckle
19. Lock Release Button
19
Page 9
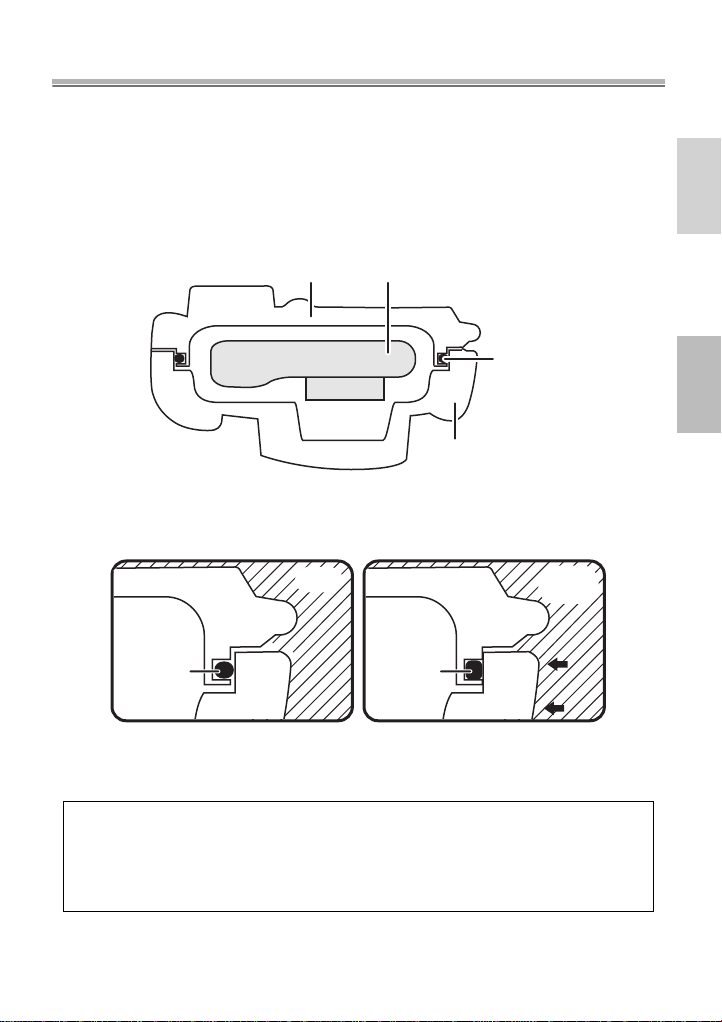
What is the O-ring?
≥ The O-ring is a waterproofing packing used for underwater cameras, watches and
diving equipment.
≥ The O-ring keeps the Case waterproof by sealing the gap between the rear case
and the front case.
∫ How the O-ring keeps the Case waterproof
Rear Case
Digital Camera
O-ring
Front Case
The gum comes into contact with the sides of the Case making the
Case waterproof and stopping water from entering from the gap.
Water
pressure
O-ring
Water
O-ring
When the O-ring is crushed by water pressure, the surface of
the O-ring expands and the Case is sealed more tightly.
The O-ring prevents water leakage by coming into uniform
contact with the sides of the Case. Theref ore, good care of the
O-ring is very important. Incorrect care of the O-ring may
cause water leakage.
VQT0X68
9
Page 10

Preparation -Setting the O-ring-
Be sure to set the O-ring before attaching a digital camera.
Thoroughly wash and dry your hands before handling the O-ring. Place
the O-ring where there is no sand or dust.
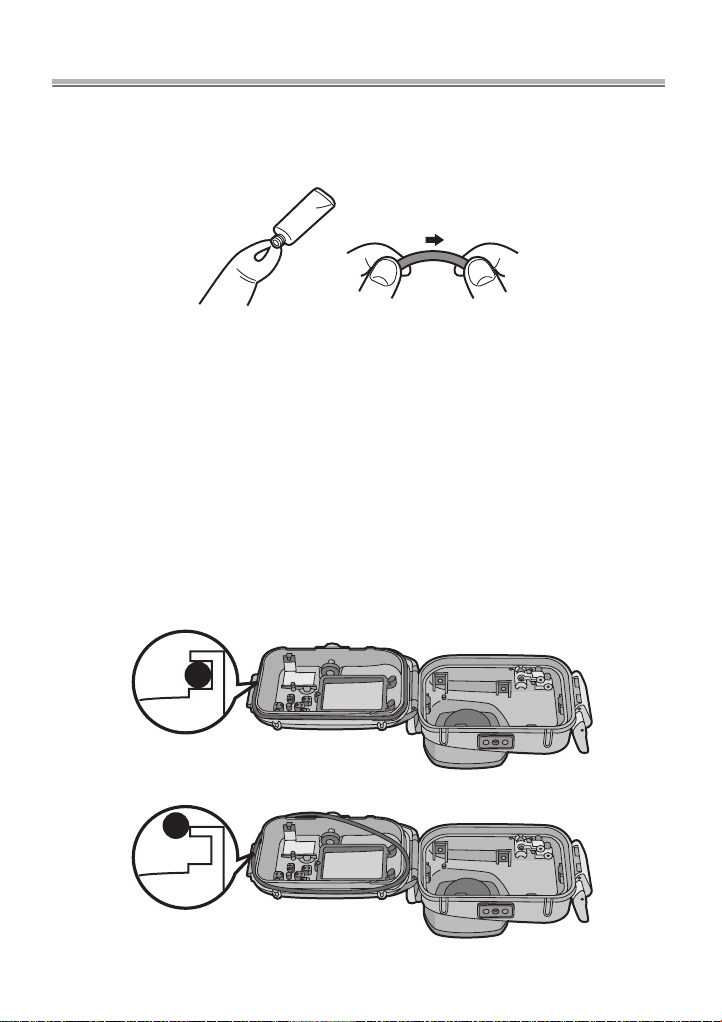
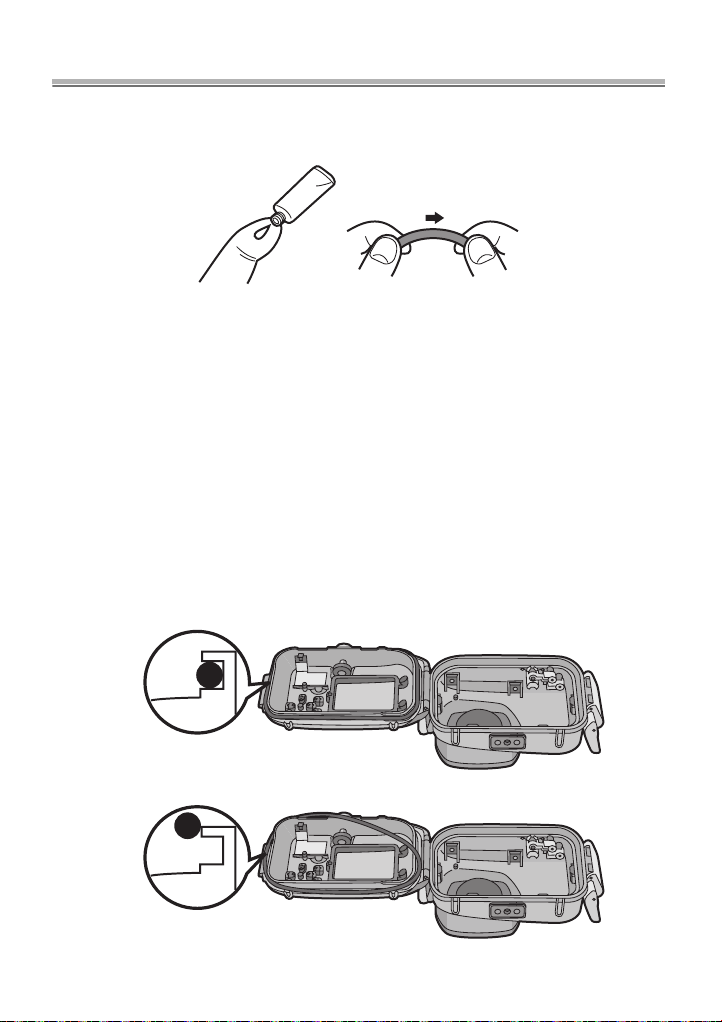
1
Loosen the O-ring with your fingers to remove it.
≥ Loosen part of the O-ring with the tips of two fingers and then lift the loosened
part. Be careful not to scratch the O-ring with your fingernails.
O-ring
O-ring
∫
Note
≥ Do not use a pointed object to remove the O-ring. This may scratch the O-ring.
10
VQT0X68
Page 11
2
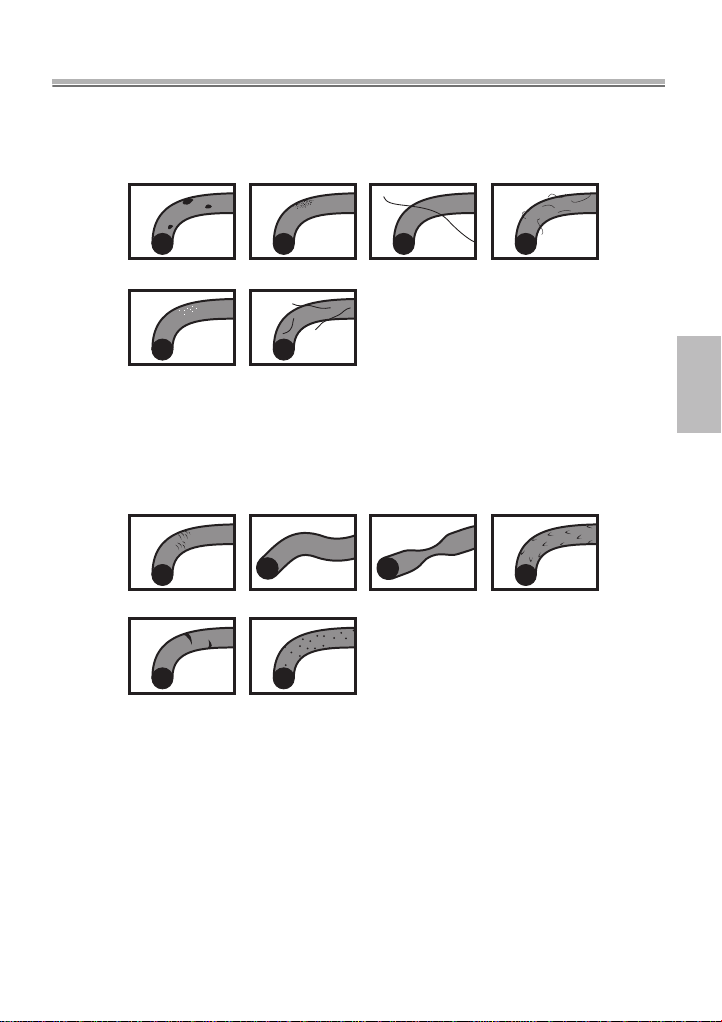
Check the O-ring.
≥ Check that there is no dirt, sand, hair, dust, salt crystals, lint or old grease on
the O-ring. If you find any of these, remove them with a soft, dry cloth.
3Dirt
3Salt crystals 3Lint
3Sand
3
Hair
3Dust
≥ There may be dirt on the O-ring that you cannot see. Check if there is any dirt by
rubbing your finger over the O-ring.
≥ Be careful not to leave any fibers from the dry cloth on the O-ring when wiping it.
≥ Check that the O-ring is not ripped, twisted, squashed, frayed or scratched and
that there is no sand sticking to it. Replace the O-ring in these cases.
3Ripped
3Scratched 3Sand sticking
3
Inspect the O-ring groove.
3Twisted
3Squashed 3Frayed
≥ Grains of sand or hardened salt crystals may get into the O-ring groove.
Remove them carefully with an air spray or a cotton swab. If you use a cotton
swab, be careful not to leave any fibers from it in the O-ring groove.
11
VQT0X68
Page 12
Preparation -Setting the O-ring- (continued)
4
Inspect the opposite side of the O-ring in the same way.
5
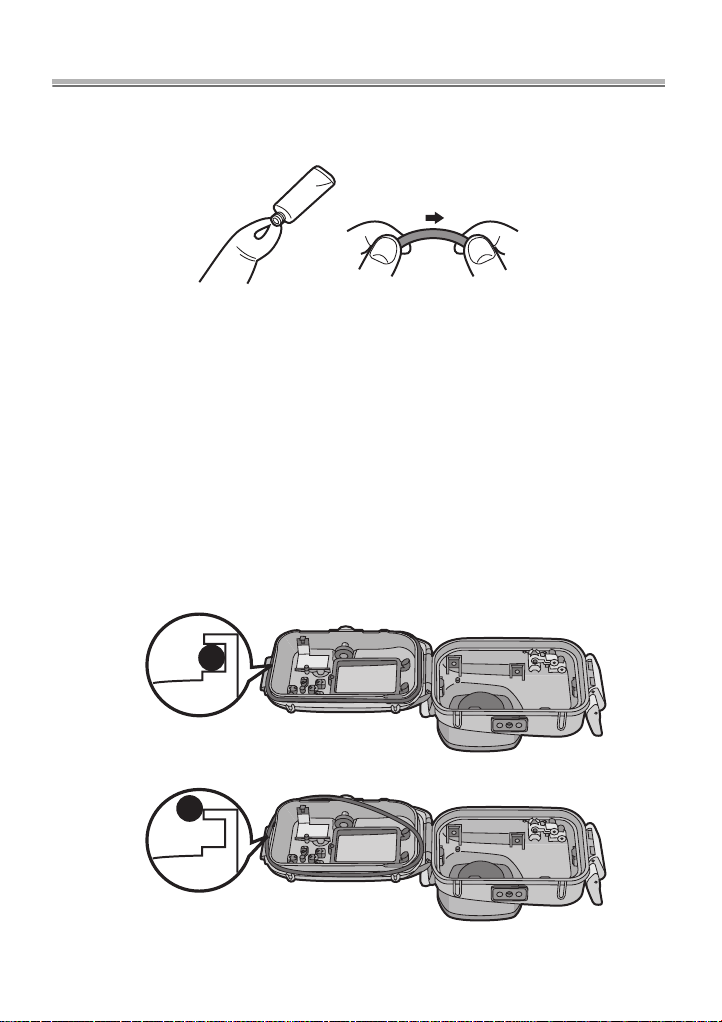
Apply the grease (supplied).
≥ Apply a rice-grain size of grease (supplied) evenly to the O-ring with the tip of
your finger.
≥ Dirt or dust will stick to the O-ring if you apply too much grease.
≥
Use only the specified grease. If you use other types of grease, the
surface of the O-ring may be damaged causing water leakage.
≥ Do not apply the grease with paper or a cloth. The fibers from the paper or cloth
may stick to the O-ring.
6
Fit the O-ring evenly into the O-ring groove.
Check the following:
≥ There is no dirt sticking to the O-ring.
≥ The O-ring has not come out.
≥ The O-ring is not twisted.
≥ The O-ring is not stretched too much.
CORRECT
12
VQT0X68
INCORRECT
Page 13

7
Inspect the O-ring one last time.
Check the following one more time:
≥ There is no dirt sticking to the O-ring.
≥ The O-ring has not come out.
≥ The O-ring is not twisted.
≥ There are no scratches or squashed parts on the O-ring.
Thoroughly wipe any grease off your hands with a dry cloth and then
wash your hands with water.
8
Close the buckle.
1
≥ Check that no foreign materials are sticking to the outer surface of the O-ring and
the buckle on the front case and then close the Case.
∫
Notes
≥ To keep the Case completely airt ight, do not scratch the surface of the O-ring that
comes into contact with the sides of the Case.
≥ Never use an O-ring that has been scratched or damaged by dirt etc. This will cause
water leakage.
≥ Each time you use the Case, remove the O-ring and check that there is no dirt,
sand, hair or other foreign materials in the O-ring groove and then apply a thin coat
of grease (supplied). If you apply too much grease, dirt and the dust may stick to the
O-ring causing water leakage.
≥ Be sure to bring a spare O-ring in case the O-ring that you are using becomes
damaged or scratched.
2
13
VQT0X68
Page 14
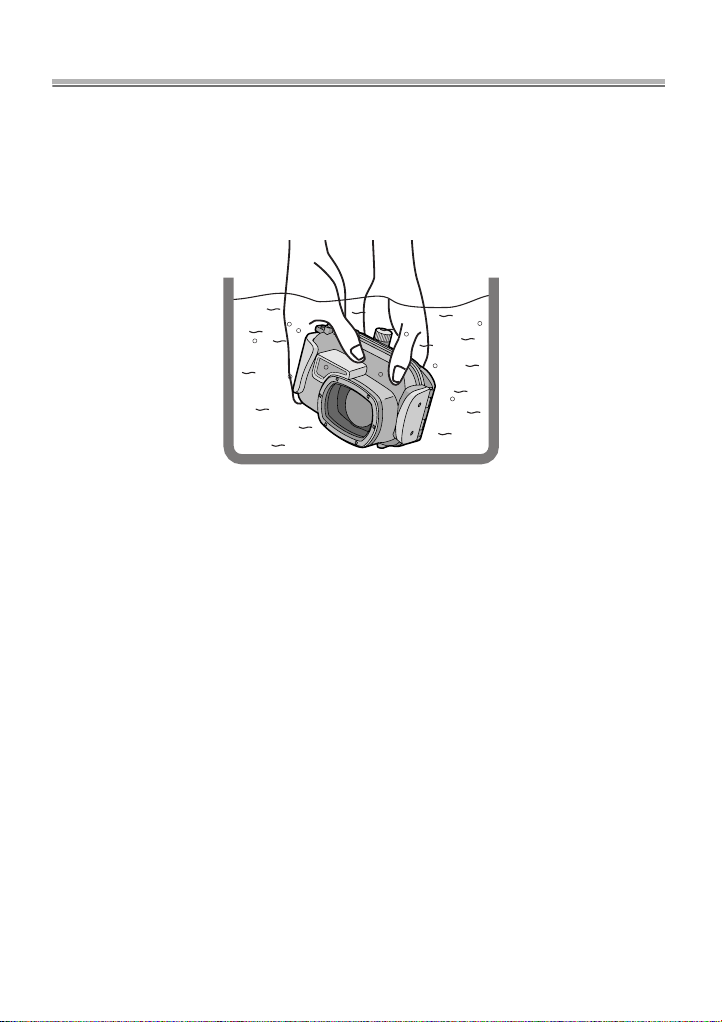
Preparation -Checking the Case is Waterproof-
After setting the O-ring, check that no water leaks into the Case by
submerging it in a water tank, bath tub etc. for more than about
3 minutes before attaching a digital camera.
≥ Do not use the Case in water over 40 °C. The heat may damage the Case or cause
water leakage.
‘
Carry out the same test after attaching the digital camera to the Case. (P15)
∫
Notes
≥ If bubbles rise from the Case when it is submerged in water or there is water inside
the Case when you take it out the water, there is water leakage. In these cases,
consult your dealer.
≥ If water leaks into the Case while you are using it and the digital camera is
submerged in water, remove the battery immediately. Hydrogen gas can cause
burning or explosion if there is a fire nearby.
≥ If you dive quickly while holding the Case or throw the Case from a ship into the sea,
some water leakage may occur because of high pressure. This is not a malfunction
of the Case. Always dive slowly into the water.
≥ The Case is designed to be used at a depth of up to 40 m. If you dive deeper than
40 m, part of the Case may be damaged beyond repair.
≥ When closing the Case, be careful that no foreign materials get caught between the
O-ring and the O-ring groove. Even one strand of hair or one grain of sand can
cause water leakage.
14
VQT0X68
Page 15

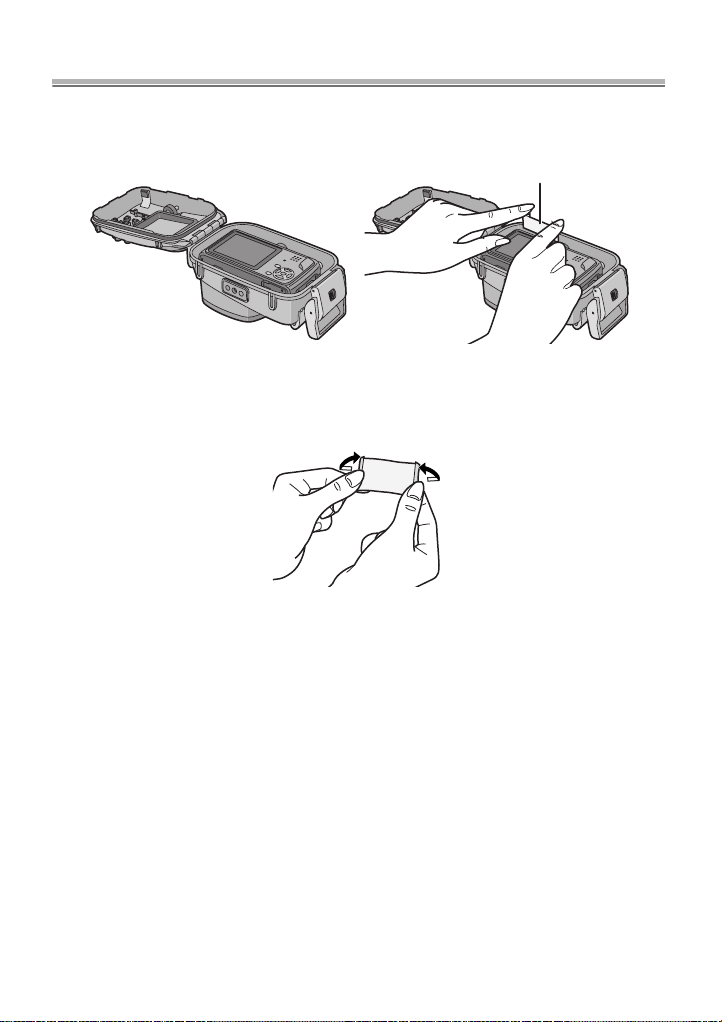
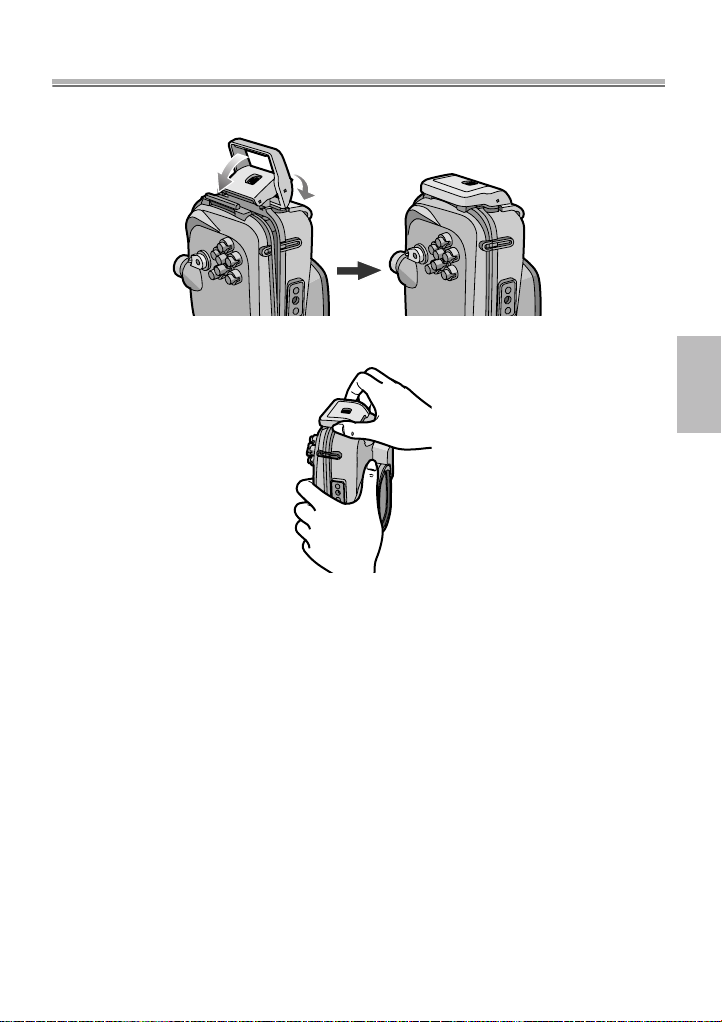
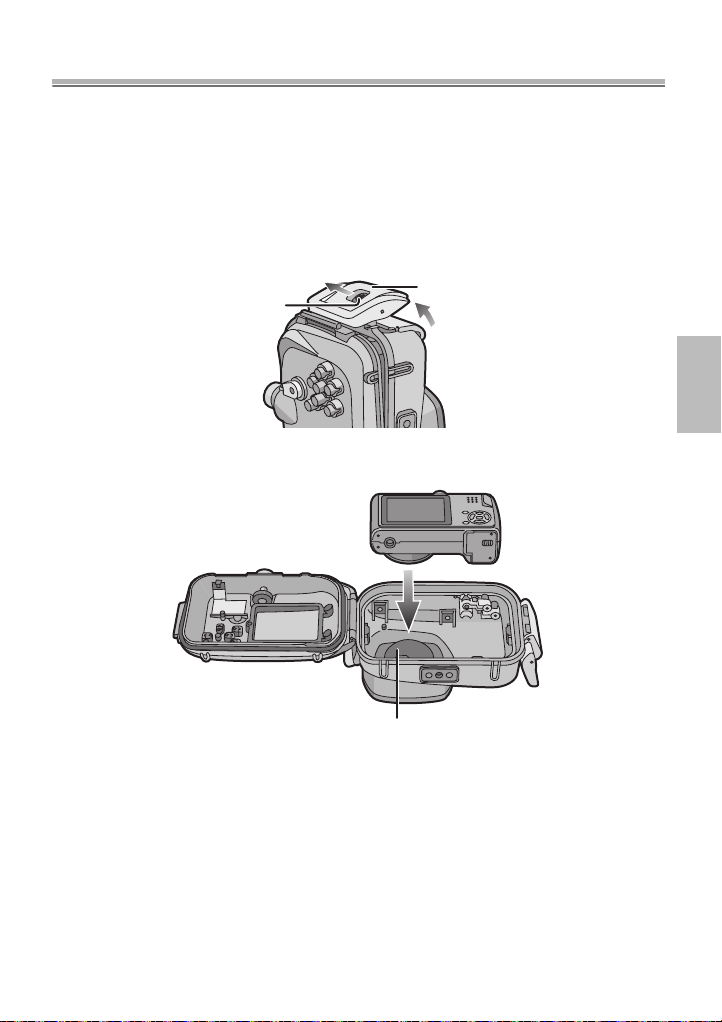
Preparation -Attaching the Digital Camera-
Check that th e ON/OFF Switch on the camera and the case is set to
[OFF].
≥ Remove the strap and the lens cap from the digital camera.
1
Push 2 up with your finger while sliding 1 to open the buckle.
1
2
Attach the digital camera to the Case.
≥ Be careful not to catch the shading ring 1.
2
1
15
VQT0X68
Page 16
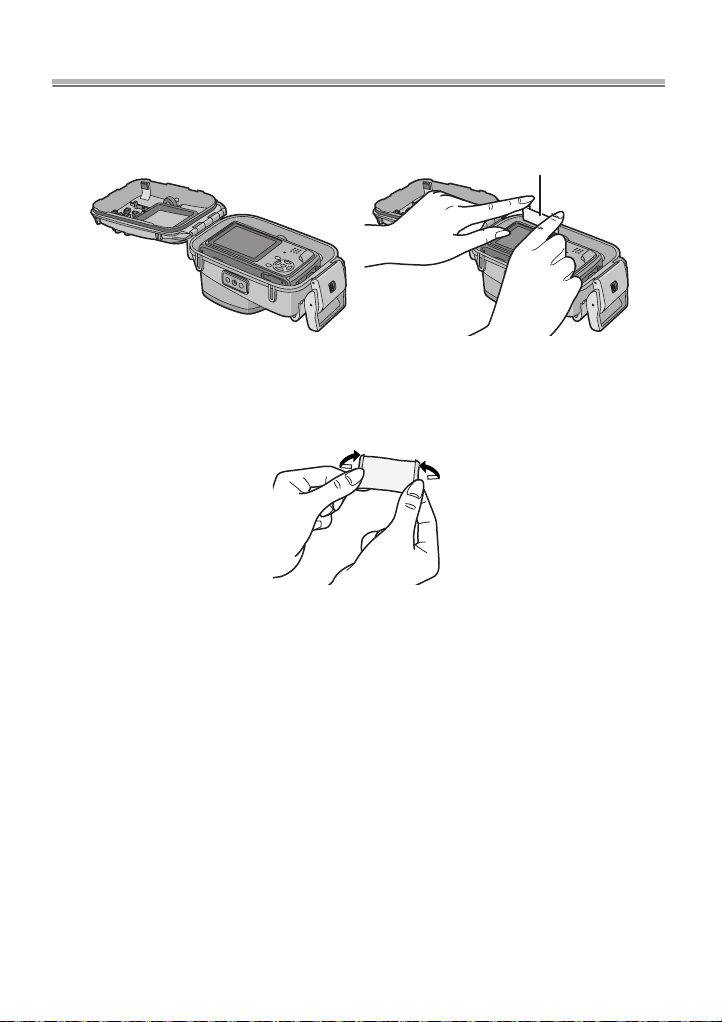
Preparation -Attaching the Digital Camera- (continued)
3
Insert the silica gel (supplied).
≥ Always use new silica gel.
Silica gel
≥
When inserting the silica gel, bend it as shown in the illustration below
and then insert it as far as possible. If you close the Case with the silica
gel not fully inserted, the silica gel will get caught in the O-ring causing
water leakage.
≥ If the air temperature is high and the water temperature is low, condensation
may appear inside the Case. To prevent condensation, make sure that the silica
gel (supplied) does not come into contact with the digital camera lens. To
prevent the Case from becoming fogged up, insert the silica gel about 1 to
2 hours before using the Case.
16
VQT0X68
Page 17
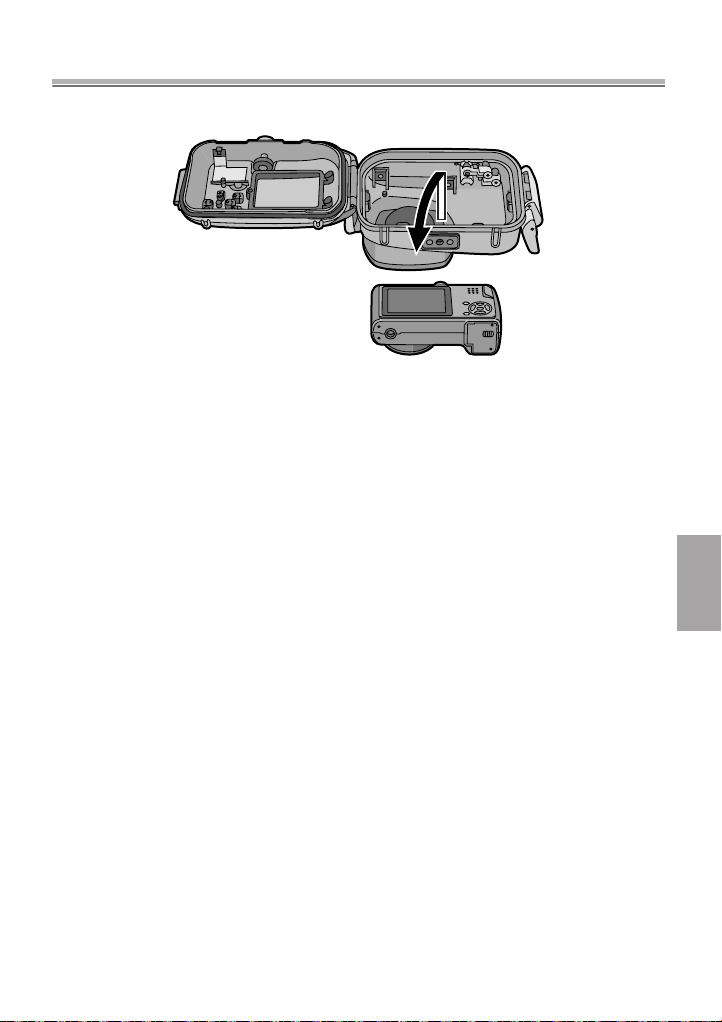
4
Close the buckle.
1
‘
Check that the buckle is closed firmly.
5
After you have attached the digital camera, check one more time that no
water leaks into the Case.
∫
Notes
≥ Check one more time that the O-ring is fitted evenly into the O-ring groove.
≥ Avoid opening or closing the Case where there is a lot of sand or dust and in humid
or wet places.
≥ If there is a sudden change in temperature, condensation may appear inside the
Case.
≥ If sunscreen or sun oil sticks to the Case, wash it off immediately with lukewarm
water to prevent reduced waterproofness or discolouration.
2
(P14)
17
VQT0X68
Page 18
Taking Pictures
∫ Before taking pictures underwater
Check the following before diving.
≥
Is there sufficient remaining battery power?
≥ Is there sufficient memory in the card?
≥ Is the O-ring fitted evenly into the O-ring groove?
≥ Have you checked that no water leaks into the Case?
≥ Is the buckle closed firmly?
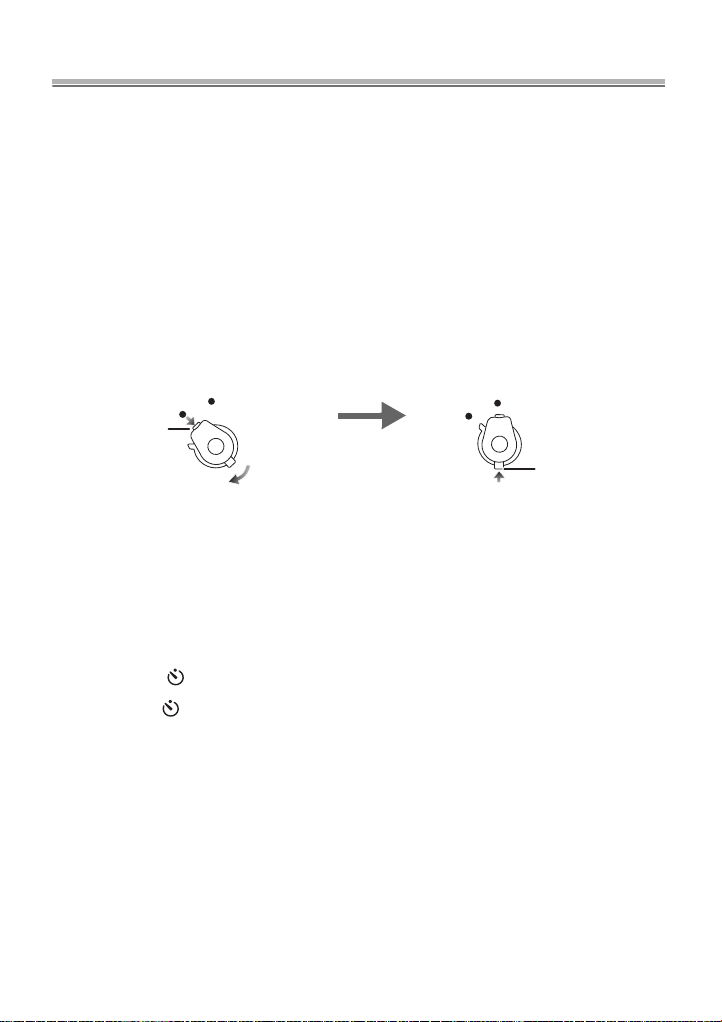
∫ Taking pictures
1 Tu rn the camera on.
Press 1 to release the lock
and then set to [ON].
ON
OFF
Press 2 to lock.
ON
OFF
1
2
2 Display the scene mode menu and then set [UNDERWATER].
≥
Read the operating instructions of the digital camera for details.
3 Aim the AF area on the LCD monitor at the subject y ou want to f ocus
on.
4 Press 2 ( ) to focus.
•Press 2 () again to cancel.
5 Press the shutter button fully to take the picture.
∫ Notes
≥
Before attaching the camera to the Case, we recommend setting the clock again.
(Read the operating instructions of the digital camera for details.)
≥ If there are any particles floating in front of the camera, it may focus on them instead
of the subject.
≥ If there are drops of water or dirt sticking to the front glass, you may not be able to
focus properly. Be sure to wipe the front glass before taking pictures.
18
VQT0X68
Page 19

Tips for Taking Pictures in the Water
When the image is too bluish in the water
1 Press 3 ( ) several times until [] appears.
2 Press 2 ()/1 ()
to adjust the white balance.
3 Press [MENU /SET] to finish.
≥ You can also press the shutter button halfway to finish.
Select the best picture
Set the flash to [ ].
Use auto bracket
≥ Each time the shutter button is pressed, 3 pictures with different exposures are
automatically recorded. You can select the desired picture from the 3 pictures.
Use Burst mode
≥ Each time the shutter button is pressed in Burst mode, more than one picture of
a fast moving subject etc. is recorded. You can select the desired picture from
the recorded pictures.
∫
Note
≥ For more information, read the operating instructions of the digital camera.
19
VQT0X68
Page 20
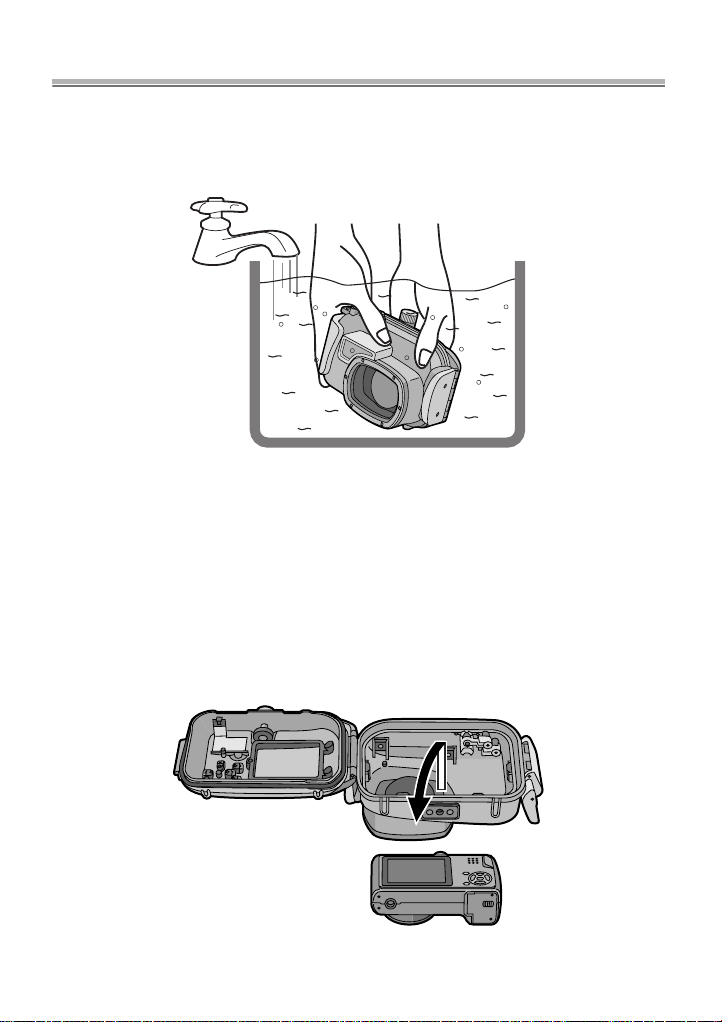
After Use
After finishing taking pictures, follow the steps below.
1
Submerge the Case in fresh water for about 30 minutes or more
without removing the digital camera to remove any salt crystals etc.
≥
Press all the operation buttons etc. on the Case to wash away any
seawater. If the salt crystals are not removed from the buttons etc., they
will harden an d the buttons wil l become unop e r a bl e.
≥
Do not wash the Case with fast-running or pressurized water etc. as it may
cause water leakage.
2
Wipe the water with a dry cloth that has no salt crystals sti ck ing to it
and then dry the Case completely.
≥ Do not dry the Case by exposing it to direct sunlight. This may
damage the Case or may hasten deterioration of the O-ring.
discolour
or
3
Open the rear case to remove the digital camera.
20
VQT0X68
Page 21

4
Remove the O-ring from the Case and check that there is no rubbish
etc. in the O-ring groove.
5
Check that there are no scratches etc. on the O-ring while you are
applying the grease.
∫
Notes
Be careful when removing the digital camera from the Case so that it
does not get wet.
≥ Remove the camera with clean hands. (Wash your hands with fresh wat er and then
thoroughly dry them.)
≥ Thoroughly dry any moisture on your body or hair. (Be particularly careful about any
water coming from the sleeves of your thermal suit.)
≥ When the weather or the sea is particularly bad, select a place where the digital
camera will not get wet e.g. indoors or where there is a roof overhead.
Cleaning and Storing
1
Wash the outside of the Case with water.
≥ Wash the outside of the Case until it is clean. (P20)
≥ Be sure to close the Case and then wash the outside only with water.
≥ Wipe off any dirt inside the Case with a wet, soft cloth.
∫
Notes
≥ Do not wash the Case with high-pressure water as it may cause water leakage.
Remove the digital camera before washing the Case with water.
≥ Do not leave the digital camera inside the Case when storing it.
≥ Store the Case in a cool, well-ventilated place.
Caution for Use
∫
Handling of the O-ring
≥
Do not use alcohol, thinner or a chemical cleaning agent for cleaning the
O-ring. Thus will hasten damage to, or deterioration of, the O-ring.
≥
If you will not be using the Case for a long period of time, remove the O-ring
from the O-ring groove, apply a thin coat of grease (supplied), place it in a
clean polyester bag and then store it in a cool, dark place to prevent the
surface from being damaged. When you use the O-ring again, thoroughly
check that it is not scratched or split.
21
VQT0X68
Page 22

Caution for Use (continued)
≥ Use only the specified grease. If you use other types of grease, the surface of
the O-ring may be damaged causing water leakage.
≥ The O-ring comes into contact with the sides of the Case making the Case
waterproof. Do not knock, insert foreign materials (dirt, sand, hair etc.) or scratch
the O-ring or sides of the Case.
≥ Use the tips of your fingers to remove the O-ring. Do not use a pointed object as it
may scratch the O-ring.
≥ After removing the O-ring from the rear case, wipe off any dirt, sand, hair or other
foreign materials on it. Also wipe the O-ring groove and the inner sides of the front
case which come into contact with the O-ring.
≥ Never use an O-ring that has been scratched or damaged by dirt etc. This will cause
water leakage. Replace it with a new O-ring.
≥ After replacing an O-ring, not using the Case for a long period of time or opening the
Case to attach a digital camera, replace the battery etc., thoroughly check that the
O-ring is not scratched or split. Then, close the Case and check that no water leaks
into it by submerging it in a water tank, bath tub etc. for about 3 minutes. (P14)
≥ O-rings are consumable products. Although the lifespan of O-rings will depend on
how well they are maintained, how often they are used and their storage conditions,
we recommend replacing them every year even if you cannot see any scratches.
∫ About maintenance
≥ Do not use the chemicals shown below for cleaning, rustproofing, defogging
or repair. Using them directly or indirectly (with a chemical spray etc.) on the
Case may cause it to crack under high pressure.
Prohibited chemicals Cautions
Volati le organic solvents/
Chemical cleansers
Anti-corrosives
Anticlouding agents
Adhesives
≥ If grease sticks to the digital camera, wipe it off with a soft, dry cloth.
≥ When wiping the inside of the Case, only use a soft, dry cloth. Wipe the inside of the
front glass with a soft, dry cloth before and after use to keep the glass clear.
Do not clean the Case with volatile organic solvents
such as alcohol, gasoline or thinner or with chemical
cleansers. Clean it with fresh water or lukew arm water.
Do not use anti-corrosives as the metal parts of the
Case are made from stainless steel or brass. Clean it
with fresh water.
Do not use commercially available anticlouding
agents. Be sure to use the silica gel indicated in these
operating instructions.
Do not use adhesives for repair. If the Case needs to
be repaired, consult your dealer.
22
VQT0X68
Page 23

∫ About storage and inspecti on after use
≥ Always take the digital camera out of the Case.
≥ Make sure that no dirt or dust sticks to the O-ring.
≥ Thoroughly dry the Case at room temperature and then store it in a cool, dark place.
≥ We recommend that the Case is inspected about 3 years after purchase. This
inspection involves dismantling and cleaning the Case, inspecting all the parts and
repairing them if necessary and checking the waterproofness of the Case using the
same hydrostatic test equipment that was used to check the waterproofness before
purchase. The customer is responsible for all transportation costs.
≥ Do not dismantle any parts or use any accessories not specified in these operating
instructions and do not alter the Case. If the Case does not work properly, consult
your dealer.
Specifications
Compatible model: DMC-TZ1
Mass: Approx. 383 g
Dimensions: Approx. 154 mm (W)k91 mm (H)k79 mm (D)
Material: Polycarbonate
Waterproof construction: O-ring sealing
Water resistant depth: 40 m
(excluding the projection part)
23
VQT0X68
Page 24

Inhalt
Vor der Verwendung . . . . . . . . . . . . . . . . . . . . . . . . . . 25
Zubehör . . . . . . . . . . . . . . . . . . . . . . . . . . . . . . . . . . . . 27
Handhabung und Pflege . . . . . . . . . . . . . . . . . . . . . . . 28
Bauteile . . . . . . . . . . . . . . . . . . . . . . . . . . . . . . . . . . . . 30
Was ist der O-Ring? . . . . . . . . . . . . . . . . . . . . . . . . . . . 31
Vorbereitung -Einsetzen des O-Rings- . . . . . . . . . . . . 32
Vorbereitung -Kontrollieren, dass das
Gehäuse wasserdicht ist- . . . . . . . . . . 36
Vorbereitung -Anbringen der Digitalkamera- . . . . . . . 37
Aufnahme von Bildern . . . . . . . . . . . . . . . . . . . . . . . . . 40
Tipps zur Aufnahme von Bildern im Wasser . . . . . . . . 41
Nach Gebrauch . . . . . . . . . . . . . . . . . . . . . . . . . . . . . . 42
Reinigung und Aufbewahrung . . . . . . . . . . . . . . . . . . . 44
Vorsichtshinweise . . . . . . . . . . . . . . . . . . . . . . . . . . . . 45
Spezifikationen . . . . . . . . . . . . . . . . . . . . . . . . . . . . . . . 47
24
VQT0X68
Page 25

DEUTSCH
Vor der Verwendung
≥ Dieses Gehäuse ist für die Digitalkamera DMC-TZ1 von Panasonic bestimmt.
Sie können bis zu einer Wassertiefe von 40 m Spaß an Unterwasseraufnahmen
haben.
≥ Beim Eindringen von Wasser aufgrund Nachlässigkeit haftet Matsushita in keiner
Weise für Schäden an jeglichen im Gehäuse enthaltenen Produkten (Digitalkamera,
Batterien, Karte, etc.), Kosten für Fotografien oder sonstige Aufwendungen.
≥ Matsushita leistet außerdem keinen Schadenersatz für Unfälle, die zu V erletzungen
oder Sachschaden führen.
≥ Lesen Sie dazu die Bedienungsanleitung zu Ihrer Digitalkamera.
≥ Bevor Sie die Digitalkamera anbringen, das Gehäuse ca. Drei Minuten oder
länger in Wasser tauchen, um zu überprüfen, ob kein Wasser eindringt.
∫ Zum Umgang mit diesem Gehäuse
≥ Verwendung unter den folgenden Bedingungen:
• Wassertiefe: Bis zu 40 m
• Um g e bungstemper a tur: 0 oC bis 40 oC
≥ Das Gehäuse nicht in Wasser mit einer Temperatur über 40 °C verwenden. Die
Wärme kann das Gehäuse beschädigen oder zum Eindringen von Wasser führen.
≥ Das Gehäuse besteht aus stoßfestem Polykarbonat. Seien Sie jedoch bei der
Benutzung vorsichtig, das es leicht zerkratzt, wenn Bilder an felsigen Stellen, etc.
aufgenommen werden und kann durch Stöße wie durch Herunterfallen o.ä.
beschädigt werden. Bei Reisen im Auto, Schiff, Zug oder Flugzeug, das Gehäuse
gut verpacken, um jegliche direkte Stöße zu vermeiden, falls es herunterfallen sollte
und lassen Sie die Digitalkamera nicht im Gehäuse. Die Digitalkamera nur im
Gehäuse anbringen, wenn Sie diese eine kurze Strecke lang, wie z.B. vom
Flughafen zum Tauchort transportieren. (Das Verpackungsmaterial aus dem Kauf
des Gehäuses kann nicht zum Transportieren verwendet werden.)
≥ Beim Besteigen eines Flugzeugs kann der Wechsel des atmosphärischen Druck zur
Ausdehnung des Gehäuses führen und dadurch zu Beschädigungen. Entfernen Sie
den O-Ring, bevor Sie ein Flugzeug besteigen.
≥ Lassen Sie die Digitalkamera nicht längere Zeit in einem Auto, auf einem
Schiff oder direkter Sonneneinstrahlung ausgesetzt. Das Gehäuse ist eine
luftdichte Vorrichtung, daher wird die Temperatur darin sehr hoch und es
kann zu Funktionsstörungen der Digitalkamera kommen. Lassen Sie die
Temperatur im Gehäuse nicht zu hoch werden.
25
VQT0X68
Page 26

Vor der Verwendung (Fortsetzung)
∫ Verwendung des Gehäuses bei hohen oder
niedrigen Temperaturen
≥ Wenn Sie das Gehäuse an feuchten oder heißen Orten öffnen und dann an einen
kühlen Ort oder unter Wasser bringen, kann es im Inneren des Gehäuses zu
Kondensation kommen, die Glasfläche sich trüben und die Digitalkamera
beschädigt werden.
≥ Wenn Sie das Gehäuse plötzlich von einem kalten Ort oder kaltem Wasser an einen
warmen Ort bringen, kann die Oberfläche sich trüben. Warten Sie mit dem
Aufnehmen von Bildern, bis sich das Gehäuse der Lufttemperatur angepasst hat.
∫ Zur Vorbereitung
≥ Öffnen oder schließen Sie das Gehäuse nicht, wo es Wasserspritzern
ausgesetzt ist oder Sand hineingeraten kann. Wir empfehlen das Öffnen oder
Schließen des Gehäuses in geschlossenen Räumen.
≥ Nehmen Sie das Ersetzender Batterie, der Karte, etc. und das Anbringen der
Digitalkamera in geschlossenen Räumen vor, wo wenig Feuchtigkeit vorhanden ist.
≥ Wenn Sie das Gehäuse am Tau chor t öffnen oder schließen müssen, um die
Batterie oder die Karte zu ersetzen, halten Sie unbedingt die unten
aufgeführten Schritte ein.
• Wählen Sie einen Ort , an dem kein Wasser auf das Gehäuse spritzen und kein
Sand in dieses gelangen kann.
• Entfernen Sie jegliche Wassertropfen im Zwischenraum zwischen vorderem und
hinterem Geräteteil und auf der Schnalle. Verbleibende Wassertropfen mit einem
trockenen Tuch sorgfältig abreiben.
• Sorgfältig jegliche Wassertropfen auf dem Körper und den Haaren trockenreiben.
• Achten Sie besonders auf Wasser aus den Ärmeln Ihres Taucheranzugs.
• Berühren Sie die Digitalkamera nicht, wenn Ihre Hände mit Salzwasser befeuchtet
sind. Feuchten Sie zuvor ein Handtuch mit Süßwasser an und bringen Sie es in
einer Plastiktüte unter. Verwenden Sie dieses Handtuch, um jegliche
Wassertropfen oder Sand von Händen und Körper zu entfernen.
≥ Das Gehäuse ist nicht stoßfest. Wenn Sie einen schweren Gegenstand darauf
abstellen oder es Stöße erleidet, kann die Digitalkamera beschädigt werden. Seien
Sie bei der Verwendung des Gehäuses vorsichtig.
26
VQT0X68
Page 27
Zubehör
Beim ersten Öffnen der Verpackung überprüfen, ob das Gehäuse und
alle Zubehörteile enthalten sind und dass keine Versand- oder
Transportschäden am Gehäuse oder an jeglichen Zubehörteilen
vorliegen.
Bei Unregelmäßigke iten wenden Sie sich vor der Verwendung des
Gehäuses an Ihren Händler.
Verwenden Sie keine anderen Zubehörteile als die unten aufgeführten.
O-Ring
VMG1743
Fett (für O-Ring)
VZG0372
Kieselgel (Trockenmittel)
(1 g/5 Stück)
VZG0371
Handriemen
VFC4190
27
VQT0X68
Page 28

Handhabung und Pflege
≥ Stellen Sie dieses Gehäuse nicht an einem instabilen Ort ab.
• Fällt das Gehäuse auf Kopf oder Füße, führt dies zu Verletzungen und zu
Funktionsstörungen des Gehäuses.
≥ Nehmen Sie keinerlei Veränderungen am Gehäuse vor.
• Wenn Wasser in die Digitalkamera eindringt, weil Änderungen am Gehäuse
vorgenommen wurden, kann die Digitalkamera irreparabel beschädigt werden.
• Wenn Sie die Digitalkamera weiter benutzen, nachdem in diese Wasser
eingedrungen ist, kann dies einen Brand zur Folge haben.
≥ Verwenden Sie das Gehäuse ohne angemessene Einweisung nicht
beim Scuba-Tauchen.
• Sie sollten das Gehäuse nur beim Scuba-Tauchen einsetzen, wenn Sie über eine
angemessene Ausbildung und einen Schein für diesen Sport verfügen.
≥ Das Gehäuse, das Fett, das Kieselgel und den O-Ring stets
außerhalb der Reichweite von Kindern aufbewahren.
• Geraten Körperteile von Kindern in das Gehäuse, kann dies zu Verletzungen
führen.
• Kinder können das Fett, das Kieselgel oder den O-Ring versehentlich
verschlucken.
• S uchen Sie umgehend den Arz t auf, wenn Sie annehmen, dass ein Kind Fett,
Kieselgel oder den O-Ring verschluckt hat.
≥ Den Riemen unter Wasser nicht um den Hals hängen.
• Dies er könnte sich um den Hals winden und zu Ersticken oder schweren
Verletzungen führen.
≥ Die Hände sorgfältig von jeglichem Fett reinigen.
• Vermeiden Sie, dass Fett an Ihren Händen in Kontakt mit Mund oder Augen
gerät.
≥ Gerät Wasser in das Gehäuse, unterbrechen Sie die Verwendung
umgehend.
• Dies kann sonst zu einem Stroms chlag, Verbrennungen oder Brand führen.
• Verständigen Sie Ihren Händler.
≥ Bei unvorhergesehenen Ereignissen während des Gebrauchs des
Gehäuses unter Wasser ha lten Sie sic h beim Auftauchen bitte an alle
vorgeschriebenen Vorgehensweisen und Richtlinien zum
Druckausgleich.
• Wenn Sie zu schnell auftauchen, kann dies die Caissonkrankheit zur Folge
haben.
28
VQT0X68
Page 29

≥ Wenn das Gehäuse Rauch oder anormale Wärme, Gerüche oder
Geräusche erzeugt, unterbrechen Sie die Verwendung unverzüglich.
• Diese können zu einem Stromschlag, Verbrennungen oder Brand führen.
• E ntnehmen Sie die Digitalkamera aus dem Gehäuse und entfernen Sie dann
umgehend die Batterien.
• Verständigen Sie Ihren Händler.
≥ Beim Öffnen des Gehäuses nach dem Eintreten von Wasser
vorsichtig vorgehen.
• Das eingedrungene Wasser kann herausgedrückt werden oder die
Gehäuserückseite abspringen.
≥ Lassen Sie das Gehäuse nicht an Orten mit hohen Temperaturen
zurück.
• Die Innentemperatur des Gehäuses erreicht besonders hohe Werte, wenn dieses
direkter Sonneneinstrahlung am Strand, auf einem Schiff, etc. ausgesetzt wird
oder wenn dieses im Sommer im geschlossenen Auto gelassen wird. Die Wärme
kann zu Beschädigung des Gehäuses oder seiner internen Teile führen.
• Wird eine Digitalkamera im Gehäuse angebracht, kann diese ebenso beschädigt
werden.
• Wenn Sie die daran angebrachte Digitalkamera verwenden, wenn die
Innentemperatur des Gehäuses sehr hoch ist, kann dies zum Eindringen von
Wasser, Kurzschluss oder Ausfall der Isolierung und so zu Brand oder
Funktionsstörungen führen.
≥ Berühren Sie die Digitalkamera oder die Batterie nicht mit feuchten
Händen.
• Dies kann zu Strom schlag oder Funktions stör ungen führen.
∫ Bei der Aufnahme von Bildern mit Blitzlicht
≥ Bei der Aufnahme von Bildern mit Blitzlicht können die Ecken des Bildes
verschwommen sein oder das Bild kann nicht gleichmäßig ausgeleuchtet sein.
≥ Bei der Aufnahme von Bildern mit Blitzlicht ist der verfügbare Blitzlichtbereich unter
Wasser geringer als auf dem Land.
29
VQT0X68
Page 30

Bauteile
1 32 4 5 6
8
17 13
1516
14
1. Zoom-Hebel
2. Riemenöse
(zum Anbringen des in der
Lieferung enthaltenen
Handriemens)
7
3. Optischer Bildstabilisator
Taste
4. Auslösetaste
5. Modusschalter
6. Vorderes Gehäuse
7. Diffusor
9
10
11
12
18
• K ann nicht entfernt werden.
8. Vordere Glasscheibe
9. ON/OFF-Schalter
10. 3/Belichtungsausgleich/
Autobracket/Weißabgleich
Feineinstellung-Taste
11. 1/Blitzlicht-Modus-Taste
12. MENU/SET-Taste
13. 4/REV-Taste
14. Lösch/Einzel-/BurstmodusTaste
15. 2/Selbstauslöser-Taste
16. DISPLAY/LCD-MODUS
Taste
17. Hinteres Gehäuse
30
VQT0X68
18. Schnalle
19
19. Sperrfreigabetaste
Page 31

Was ist der O-Ring?
≥ Der O-Ring ist eine wasserdichte Dichtung, die für Unterwasserkameras, Uhren und
Tauchausrüs tungen verwendet wird.
≥ Der O-Ring erhält das Gehäuse wasserdicht, indem er den Zwischenraum
zwischen dem hinteren und vorderen Gehäuseteil abdichtet.
∫ Wie der O-Ring das Gehäuse wasserdicht erhält
Digital-KameraHinteres Gehäuse
O-Ring
Vorderes Gehäuse
Das Gummi befindet sich in Kontakt mit den Gehäuseseiten, macht das
Gehäuse so wasserdicht und verhindert, dass über den Zwischenraum
Wasser eintritt.
Wasser
O-Ring O-Ring
Wasserdruck
Wird der O-Ring durch den Wasserdruck zusammengedrückt, dehnt
sich dessen Oberfläche aus und das Gehäuse wird so noch besser
abgedichtet.
Der O-Ring verhindert das Eindringen von Wasser durch den
gleichmäßigen Kontakt mit den Gehäuseseiten. Daher ist die
korrekte Pflege des O-Rings sehr wichtig. Fehlerhaft e Pflege
kann zum Eindringen von Wasser führen.
31
VQT0X68
Page 32

Vorbereitung -Einsetzen des O-Rings-
Setzen Sie vor dem Anbringen einer Digitalkamera unbedingt zuerst
den O-Ring ein.
Waschen und tr oc knen Sie Ihre Hände v or der Handhabun g des O-Rings
gründlich. Den O-Ring an einem sand- und staubfreien Ort einsetzen.
1
Den O-Ring zum Entfernen mit den Fingern lösen.
≥ Einen Teil des O-Rings mit zwei Fingerspitzen lösen und dann den gelösten Teil
anheben. Darauf achten, dass keine Kratzer durch Fingernägel am O-Ring
entstehen.
O-Ring
O-Ring
∫
Hinweis
≥ Verwenden Sie keine spitzen Gegenstände zum Entfernen des O-Rings, da er
dadurch beschädigt werden könnte.
32
VQT0X68
Page 33

2
Prüfen des O-Rings.
≥ Kontrollieren Sie, dass kein Schmutz, Sand, keine Haare, Salzkristalle, Fusseln
oder altes Fett auf dem O-Ring vorhanden sind. Stellen Sie dies fest, diese mit
einem weichen, trockenen Tuch entfernen.
3Schmutz
3Salzkristalle 3Fusseln
3Sand
3Haare
3Staub
≥ Es kann sich nicht erkennbarer Schmutz auf dem O-Ring befinden.
Kontrollieren Sie den O-Ring auf Schmutz, indem Sie mit dem Finger darüber
fahren.
≥ Achten Sie darauf, dass nach dem Abreiben keine Fasern des trockenen Tuchs
auf dem O-Ring zurückbleiben.
≥ Kontrollieren, dass der O-Ring nicht gerissen, verdreht, gequetscht, rissig oder
zerkratzt ist und kein Sand daran haftet. In diesen Fällen den O-Ring ersetzen.
3Risse
3Kratzer 3
3
Die Nut des O-Rings überprüfen.
3Verdrehung
Staub,
anhaftender Sand
3Quetschung 3Abblättern
≥ Sandkörner oder hart gewordene Salzkristalle können in die Nut des O-Rings
gelangen. Diese vorsichtig durch Aufsprühen von Luft oder mit einem
Baumwolltuch entfernen. Wenn Sie ein Baumwolltuch verwenden, achten Sie
darauf, dass dessen Fasern nicht in der Nut des O-Rings zurückbleiben.
33
VQT0X68
Page 34
Vorbereitung -Einsetzen des O-Rings- (Fortsetzung)
4
Überprüfen Sie die gegenüberliegende Seite des O-Rings auf
dieselbe Weise.
5
Tragen Sie das Fett auf (beiliegend).
≥ Tragen Sie eine reiskorngroße Fettmenge (beiliegend) gleichmäßig mit der
Fingerkuppe auf den O-Ring auf.
≥ Schmutz oder Staub bleiben am O-Ring haften, wenn Sie zu viel Fett auftragen.
≥
Verwenden Sie nur das angegebene Fett. Be i Verwendung anderer
Fettarten kann die Oberfläche des O-Rings beschädigt werden und zum
Eindringen von Wasser führen.
≥ Tragen Sie das Fett nicht mit Papier oder Stoff auf. Die Papier- oder Stofffasern
können am O-Ring haften bleiben.
6
Den O-Ring gleichmäßig in seine Nut einsetzen.
Kontrollieren Sie Folgendes:
≥ Dass kein Schmutz am O-Ring haftet.
≥ Dass der O-Ring nicht heraustritt.
≥ Dass der O-Ring nicht verdreht ist.
≥ Dass der O-Ring nicht zu stark gedehnt ist.
Richtig
34
VQT0X68
Falsch
Page 35

7
Letzte Überprüfung des O-Rings.
Überprüfen Sie Folgendes erneut:
≥ Dass kein Schmutz am O-Ring haftet.
≥ Dass der O-Ring nicht heraustritt.
≥ Dass der O-Ring nicht verdreht ist.
≥ Es sind keine Kratzer oder Quetschungen am O-Ring vorhanden.
Jegliches Fett mit einem trockenen Tuch sorgfältig von denn Händen
wischen und dann die Hände mit Wasser waschen.
8
Schließen Sie die Schnalle.
1
≥ Kontrollieren, ob kein Fremdmaterial an der Außenoberfläche des O-Rings oder
der Schnalle an der vorderen Geräteseite haftet und dann das Gehäuse
schließen.
∫
Hinweise
≥ Um das Gehäuse vollkommen luftdicht zu halten, Kratzer auf der Oberfläche des
O-Rings vermeiden, die mit den Gehäuseseiten in Kontakt kommt.
≥ Nie einen O-Ring verwenden, der durch Schmutz, etc. zerkratzt oder beschädigt
wurde. Dies führt zum Eindringen von Wasser.
≥ Bei jeder Verwendung des Gehäuses den O-Ring entfernen und kontrollieren, dass
sich kein Schmutz, Sand, Haare oder anderes Fremdmaterial in der Nutz des
O-Rings befindet und dann einen dünne Schicht Fett (beiliegend) auftragen. Wird
zu viel Fett aufgetragen, können Schmutz und Staub am O-Ring haften bleiben und
zum Eindringen von Wasser führen.
≥ Nehmen Sie zur Sicherheit einen O-Ring als Ersatz mit, sollte der benutzte
beschädigt oder verkratzt sein.
2
35
VQT0X68
Page 36

Vorbereitung
-Kontro lliere n, das s das Gehäuse wasserdicht ist-
Nach dem Einsetzen des O-Rings überprüfen, dass kein Wasser in das
Gehäuse eindringt, indem Sie es 3 Minuten lang in einen Wassertank,
eine Badewanne, etc. Eintauchen, bevor Sie die Digitalkamera
anbringen.
≥ Das Gehäuse nicht in Wasser mit einer Temperatur über 40 °C verwenden. Die
Wärme kann das Gehäuse beschädigen oder zum Eindringen von Wasser führen.
‘
Denselben Test nach dem Anbringen der Digitalkamera im Gehäuse
durchführen. (P37)
∫
Hinweise
≥ Steigen Blasen vom Gehäuse auf, wenn es unter Wasser getaucht ist oder befindet
sich Wasser im Gehäuse, wenn Sie es aus dem Wasser nehmen, ist es nicht
wasserdicht. Wenden Sie sich in diesem Fall an Ihren Händler.
≥ Gerät während der Verwendung W asser in das Gehäuse und die Digitalkamera wird
ins Wasser getaucht, unverzüglich die Batterie entfernen. Wasserstoff kann zu
Brand oder Explosion führen, wenn sich offenes Feuer in der Nähe befindet.
≥ Wenn Sie schnell ins Wasser tauchen, während Sie das Gehäuse halten oder das
Gehäuse von einem Schiff ins Meer werfen, kann es durch den hohen Druck zum
Eindringen von Wasser kommen. Hierbei handelt es sich nicht um eine
Funktionsstörung des Gehäuses. Tauchen Sie stets langsam ins Wasser ein.
≥ Das Gehäuse ist darauf ausgelegt, auf einer Tiefe von bis zu 40 m verwendet zu
werden. Wenn Sie tiefer als 40 m tauchen, können Teile des Gehäuses irreparabel
beschädigt werden.
≥ Beim Schließen des Gehäuses darauf achten, dass keinerlei Fremdmaterial
zwischen den O-Ring und die Nut des O-Rings gelangt. Auf eine Haarsträhne oder
ein Sandkorn kann zum Eindringen von Wasser führen.
36
VQT0X68
Page 37
Vorbereitung -Anbringen der Digitalkamera-
Kontrollieren, dass der ON/OFF-Schalter auf der Kamera und dem
Gehäuse auf [OFF] gestellt ist.
≥ Den Riemen und den Objektivdeckel von der Digitalkamera entfernen.
1
Drücken Sie 2 mit dem Finger nach oben, während 1 zum Öffnen
der Schnalle verschoben wird.
1
2
2
Die Digitalkamera am Gehäuse anbringen.
1
≥ Achten Sie darauf, den Sonnenschutzring 1 nicht zu entfernen.
37
VQT0X68
Page 38
Vorbereitung -Anbringen der Digitalkamera- (Fortsetzung)
3
Legen Sie das Kieselgel ein (beiliegend).
≥ Stets neues Kieselgel verwenden.
Kieselgel
≥
Beim Einlegen des Kieselgels, dieses wie in der Abbildung unten biegen
und dann so weit wie möglich einschieben. Schließen Sie das Gehäuse
bei nicht vollständig eingeschobenem Kieselgel, gerät dieses in den
O-Ring und führt zum Eindringen von Wasser.
≥ Bei hoher Luft- und niedriger Wassertemperatur kann im Inneren des Gehäuses
Kondensation auftreten. Um Kondensation vorzubeugen, sicherstellen, dass
das Kieselgel (beiliegend) nicht mit dem Objektiv der Digitalkamera in Kontakt
kommt. Um ein Beschlagen des Gehäuses zu vermeiden, das Kieselgel ca.
1 bis 2 Stunden vor dem Verwenden des Gehäuses einlegen.
38
VQT0X68
Page 39

4
Schließen Sie die Schnalle.
1
‘
Kontrollieren Sie, ob die Schnalle fest verschlossen ist.
5
Nach dem Anbringen der Digitalkamera ein weite res Mal überprüfen,
ob kein Wasser in das Gehäuse eindringt. (P36)
∫
Hinweise
≥ Ein weiteres Mal überprüfen, ob der O-Ring gleichmäßig in die Nut des O-Rings
eingesetzt ist.
≥ Vermeiden Sie das Öffnen und Schließen des Gehäuses an Orten mit viel Sand
oder Staub oder feuchten oder nassen Stellen.
≥ Bei einem plötzlichen T emper aturwechsel kann Kondensatio n im Inneren des
Gehäuses auftreten.
≥ Gerät Sonnenschutzmittel oder –öl auf das Gehäuse, dies unverzüglich mit
lauwarmem Wasser abwaschen, um einer verringerten Wasserdichtigkeit oder
Entfärbung vorzubeugen.
2
39
VQT0X68
Page 40

Aufnahme von Bildern
∫ Vor der Aufnahme von Bildern unter Wasser
Vor dem Tauchen Folgendes überprüfen.
≥
Verbleibt ausreichend Batterieleistung?
≥ Ist ausreichend Speicher auf der Karte?
≥ Ist der O-Ring gleichmäßig in die Nut des O-Rings eingesetzt?
≥ Haben Sie kontrolliert, dass kein Wasser in das Gehäuse eindringt?
≥ Ist die Schnalle fest verschlossen?
∫ Aufnahme von Bildern
1 Schalten Sie die Kamera ein.
Drücken Sie 1, um die Sperre freizugeben
und stellen Sie die Kamera auf [ON].
ON
OFF
1
Drücken Sie 2 zur Verriegelung.
ON
OFF
2
2 Das Szenenmodus-Menü einblenden und [UNTER WASSER]
einstellen.
≥ Lesen Sie wegen Details in der Bedienungsanleitung der Digitalkamera nach.
3 Den AF-Bereich auf dem LCD-Monitor auf das scharfzustellende
Objekt richten.
4 Drücken Sie 2 () zum Scharfstellen.
• Drücken Sie erneut 2 () zum Löschen.
5 Die Auslösetaste ganz drücken, um das Bild aufzunehmen.
∫ Hinweise
Vor dem Anbringen der Kamera am Gehäuse empfehlen wir das erneute Einstellen der
≥
Uhr. (Lesen Sie wegen Details in der Bedienungsanleitung der Digitalkamera nach.)
≥ Befinden sich schwebende Teilchen vor der Kamera, kann die Scharfeinstellung auf
diese anstatt auf das Objekt erfolgen.
≥ Befinden sich Wassertropfen oder Schmutz auf der vorderen Glasscheibe, kann die
Scharfeinstellung vielleicht nicht korrekt erfolgen. Achten Sie darauf, die vordere
Scheibe vor der Aufnahme abzureiben.
40
VQT0X68
Page 41

Tipps zur Aufnahme von Bildern im Wasser
Das Bild ist im Wasser zu bläulich
1 Drücken Sie 3( ) mehrmals, bis [ ] erscheint.
2 Drücken Sie 2 ()/1 ( ), um den Weißabgleich einzustellen.
3 Drücken Sie [MENU/SET], um zu beenden.
≥ Sie könne zum Beenden auch die Auslösetaste halb drücken.
Wählen Sie das beste Bild
Stellen Sie den Flash auf [ ].
Verwendung von Auto-Bracket
≥ Bei jedem Drücken der Auslösetaste werden automatisch drei Bilder mit
verschiedener Belichtung aufgenommen. Sie können das gewünschte Bild
unter den drei Bildern aussuchen.
Verwendung des Burst-Modus
≥ Bei jedem Drücken der Auslösetaste im Burst-Modus wird mehr als ein Bild
eines sich schnell bewegenden Objekts aufgenommen. Sie können das
gewünschte Bild aus den aufgenommenen Bildern auswählen.
∫
Hinweis
≥ Für weitere Informationen siehe Bedienungsanleitung der Digitalkamera.
41
VQT0X68
Page 42

Nach Gebrauch
Nach der Bildaufnahme die folgenden Schritte ausführen.
1
Das Gehäuse ca. 30 Minuten od er mehr in Süßwass er tauche n, ohne
die Digitalkamera zu entfernen, um jegliche Salzkristalle, etc. zu
entfernen.
≥
Alle Bedienknöpfe etc. auf dem Gehäuse drücken, um jegliches
Salzwasser zu entfernen. Werden die Salzkristalle nicht von den Knöpfen,
etc. Entfernt, werden diese hart und mit der Zeit unbenutzbar.
≥
Das Gehäuse nicht unter fließendem oder unter Druck stehendem Wasser ,
o.ä. waschen, da dies zum Eindringen von Wasser führen kann.
2
Das Wasser mit einem trockenen Tuch abreiben, an dem keine
Salzkristalle haften und dann vollkommen trockenreiben.
≥ Das Gehäuse nicht durch direkte Sonneneinstrahlung trocknen. Dies kann das
Gehäuse entfärben oder beschädigen oder den Verschleiß des O-Rings
beschleunigen.
42
VQT0X68
Page 43
3
Die Geräterückseite öffnen, um die Digitalkamera zu entfernen.
4
Den O-Ring aus dem Gehäuse entfernen und sicherstellen, dass
keine Rückstände, o.ä. in der Nut des O-Rings vorhanden sind.
5
Beim Auftragen des Fetts überprüfen, ob sich keine Kratzer, etc. auf
dem O-Ring befinden.
∫
Hinweise
Achten Sie beim Entfernen der Digitalkamera aus dem Gehäuse darauf,
dass diese nicht nass wird.
≥ Die Kamera mit sauberen Händen entfernen. (Hände mit Süßwasser waschen und
sorgfältig abtrocknen.)
≥ Trocknen Sie jegliche Feuchtigkeit auf Körper und Haar sorgfältig ab. (Achten Sie
insbesondere auf aus den Ärmeln des Taucheranzugs austretendes Wasser.)
≥ Bei besonders schlechten Wetterbedingungen und hohen Wellen, eine Stelle
auswählen, an der die Digitalkamera nicht nass werden kann, z.B. in Innenräumen
oder an überdachten Plätzen.
43
VQT0X68
Page 44

Reinigung und Aufbewahrung
Die Außenseite des Gehäuses mit Wasser abwaschen.
1
≥ Die Außenseite des Gehäuses mit Wasser sauberwaschen. (P42)
≥ Vergewissern Sie sich, dass das Gehäuse geschlossen ist und waschen Sie
dann die Außenseite nur mit Wasser.
≥ Jeglichen Schmutz im Inneren des Gehäuses mit einem nassen, weichen Tuch
abreiben.
∫
Hinweise
≥ Das Gehäuse nicht mit unter hohem Druck stehenden Wasser abwaschen, da dies
zum Eindringen von Wasser führen kann. Die Digitalkamera entfernen, bevor Sie
das Gehäuse mit Wasser reinigen.
≥ Lassen Sie die Digitalkamera zur Aufbewahrung nicht im Gehäuse.
≥ Verwahren Sie das Gehäuse an einem kühlen, gut belüfteten Ort.
44
VQT0X68
Page 45

Vorsichtshinweise
∫ Handhabung des O-Rings
≥ Verwenden Sie weder Alkohol, Verdünner, noch chemische Reinigungsmittel
zum Reinigen des O-Rings. Dies führt zu Besc hä digungen oder einem
schnelleren Verschleiß des O-Rings.
≥ Wenn Sie das Gehäuse für lä nge r e Ze it nicht verwenden, den O-Ring a us
seiner Nut entferne n , ei ne d ünne Sc hic ht F ett ( b eili egend) auf tra gen, in e ine m
sauberen Plastikbeutel unterbringen und dann an einem kühlen, dunklen Ort
lagern, um ein Beschädigen der Oberfläche zu verhindern. Wenn Sie den
O-Ring erneut benutzen, untersuchen Sie vorher, ob dieser keine Kratzer oder
Risse aufweist.
≥ Verwenden Sie nur das angegebene Fett. Bei Verwendung anderer Fettarten
kann die Oberfläche des O-Rings beschädigt werden und es kann zum
Eindringen von Wasser kommen.
≥ Der O-Ring kommt mit den Geräteseiten in Kontakt und macht das Gehäuse
wasserdicht. Nicht gegen den O-Ring oder die Geräteseiten stoßen,
Fremdmaterialien hineingeraten lassen (Schmutz, Sand, Haar, etc.) oder den
O-Ring oder die Seiten des Gehäuses verkratzen.
≥ Verwenden Sie die Fingerspitzen, um den O-Ring zu entfernen. Verwenden Sie
keine spitzen Gegenstände, da diese den O-Ring verkratzen könnten.
≥ Nach dem Entfernen des O-Rings aus der Geräterückseite jeglichen Schmutz,
Sand, Haare oder andere Fremdmaterialien darauf abreiben. Ebenso die Nut des
O-Rings und die Innenseiten der Vorderseite des Gehäuses abreiben, die mit dem
O-Ring in Kontakt kommen.
≥ Nie einen O-Ring verwenden, der durch Schmutz, o.ä. beschädigt wurde. Dies kann
zum Eindringen von Wasser führen. Durch einen neuen O-Ring ersetzen.
≥ Nach dem Ersetzen eines O-Rings, längerem Nichtgebrauch des Gehäuses oder
Öffnen des Gehäuses zum Anbringen einer Digitalkamera, Ersetzen der Batterie,
etc. Sorgfältig überprüfen, ob der O-Ring nicht zerkratzt oder gerissen ist. Dann das
Gehäuse schließen und kontrollieren, dass kein Wasser eindringt, wenn Sie es ca.
drei Minuten in einen Wassertank, eine Badewanne o.ä. eintauchen. (P36)
≥ O-Ring sind Verbrauchsmaterialien. Obwohl die Lebensdauer von O-Ringen dav on
abhängt, wie gut sie gewartet und wie oft sie benutzt werden und von ihren
Lagerbedingungen, empfehlen wir, diese einmal im Jahr zu ersetzen, auch wenn
Sie keine Kratzer erkennen können.
45
VQT0X68
Page 46

Vorsichtshinweise (Fortsetzung)
∫ Zur Wartung
≥ Verwenden Sie keine der unten gezeigten Chemikalien zum Reinigen, als
Rostschutz, zum Entfernen des Beschlags oder für Reparaturen. Durch deren
direkte oder indirekte Verwendung (in einem chemischen Spray o.ä.) kann das
Gehäuse unter hohem Druck Risse bekommen.
Verbotene Chemikalien Vorsichtsmaßnahmen
Flüchtige organische
Lösungsmittel/
Chemische
Reinigungsmittel
Korrosionsschutzmittel
Mittel zum Schutz gegen
Trübung
Klebstoffe
≥ Haftet Fett an der Digitalkamera, reiben Sie es mit einem weichen, trockenen Tuch
ab.
≥ Zum Abreiben der Innenseite des Gehäuses nur ein weiches, trockenes Tuch
verwenden. Die Innenseite der vorderen Glasscheibe vor und nach dem Gebrauch
mit einem weichen, trockenen Tuch abreiben, um das Glas sauber zu halten.
Reinigen Sie das Gehäuse nicht mit flüchtigen
organischen Lösungsmitteln wie Alkohol, Benzin oder
Verdünner bzw . chemischen Reinigungsmitteln. Reinigen
Sie es mit Süßwasser oder lauwarmem Wasser.
Verwenden Sie keine Korrosionsschutzmittel, da die
Metallteile an diesem Gehäuse aus rostfreiem Stahl oder
Messing bestehen. Reinigen Sie diese mit Süßwasser.
Verwenden Sie keine handelsüblichen Wirkstoffe gegen
Trü bung von Glas. Verwenden Sie unbedingt das in dieser
Bedienungsanleitung angegebene Kieselgel.
Verwenden Sie keine Klebstoffe zum Reparieren. Ist
eine Reparatur des Gehäuses erforderlich,
verständigen Sie Ihren Händler.
46
VQT0X68
Page 47

∫ Zur Aufbewahrung und Inspektion nach der Benutzung
≥ Die Digitalkamera stets aus dem Gehäuse nehmen.
≥ Vergewi ssern Sie sich, dass kein Schmutz oder Staub am O-Ring haftet.
≥ Trocknen Sie das Gehäuse bei Raumtemperatur und verwahren Sie es dann an
einem kühlen, dunklen Ort.
≥ Wir empfehlen eine Inspektion des Gehäuses ca. 3 Jahre nach Erwerb. Diese
Inspektion umfasst das Zerlegen und Reinigen des Gehäuses, Inspizieren aller
Teile und deren Reparatur, wenn erforderlich und die Überprüfung der
Wasserdichtigkeit des Gehäuses unter Verwendung derselben hydrostatischen
Tes tausrüst ung, die vor dem Kauf eingesetzt wurde. Alle Transportkosten sind vom
Kunden zu tragen.
≥ Keinerlei Teile zerlegen und kein Zubehör verwenden, das nicht in der
Bedienungsanleitung aufgeführt ist und keine Veränderungen am Gehäuse
anbringen. Bei Funktionsstörungen des Gehäuses verständigen Sie Ihren Händler.
Spezifikationen
Kompatibles Modell: DMC-TZ1
Gewicht: Ca. 383 g
Abmessungen : Ca. 154 mm (W)k91 mm (H) k79 mm (D)
Material: Polykarbonat
Wasserdicht gebaut: O-Ring-Dichtung
Wasserdicht bis: 40 m
(ohne hervorstehenden Teil)
47
VQT0X68
Page 48

Table des matières
Avant utilisation. . . . . . . . . . . . . . . . . . . . . . . . . . . . . .49
Accessoires. . . . . . . . . . . . . . . . . . . . . . . . . . . . . . . . . 51
Manipulation et entretien. . . . . . . . . . . . . . . . . . . . . . .52
Composants . . . . . . . . . . . . . . . . . . . . . . . . . . . . . . . . 54
Qu’est-ce qu’un joint torique?. . . . . . . . . . . . . . . . . . . 55
Préparation -Préparation du joint torique-. . . . . . . . . . 56
Préparation
-Vérification de l’étanchéité du boîtier- . . . . . . . . . . . 60
Préparation
-Mise en place de l’appare il pho to nu mé ri q ue - . . . . 61
Prise de vues . . . . . . . . . . . . . . . . . . . . . . . . . . . . . . .64
Conseil pour la prise de vue dans l’eau . . . . . . . . . . .65
Après l’utilisation. . . . . . . . . . . . . . . . . . . . . . . . . . . . .66
Nettoyage et rangement . . . . . . . . . . . . . . . . . . . . . . .6 8
Remarques sur l’utilisation de l’appar eil . . . . . . . . . . .69
Spécifications . . . . . . . . . . . . . . . . . . . . . . . . . . . . . . . 71
48
VQT0X68
Page 49

FRANÇAIS
Avant utilisation
≥
Ce boîtier est uniquement conçu pour l’appareil photo numérique DMC-TZ1 Panasonic.
Vous pouvez prendre des photos sous l’eau à une profondeur allant jusqu’à
40 m.
≥
Dans le cas d’une infiltration d’eau provoquée par un manque de précautions,
Matsushita n’est responsable en aucune manière des dommages subis par les produits
(appareil photo numérique, batteries, carte, etc.) présents à l’intérieur du boîtier, du coût
des photographies ou de toutes autres dépenses.
≥
Matsushita n’offre aucune compensation pour les accidents provoquant des blessures
ou des dégats matériels.
≥
Veuillez lire le manuel d’utilisation de l’appareil photo numérique.
≥ Avant d’installer l’appareil photo numérique, immergez le boîtier dans l’eau
pendant environ 3 minutes ou plus pour vérifier son étanchéité.
∫ Manipulation du boîtier
≥
Utilisation dans les conditions suivantes:
• Profondeur de l’eau: jusqu’à 40 m
• Température ambiante: 0 °C à 40 °C
≥
N’utilisez pas le boîtier dans une eau de plus de 40 °C. La chaleur peut l’endommager et
causer des infiltrations d’eau.
≥
Le boîtier est fait de polycarbonate résistant au choc toutefois faites attention en
l’utilisant. Il peut être facilement éraflé si vous prenez des photos dans des endroits
rocheux, etc. et peut être endommagé par le choc s’il venait à tomber, etc. Pour voyager
en voiture, bateau, train ou avion, emballez soigneusement le boîtier afin d’éviter les
chocs en cas de chute, etc. et ne laissez pas l’appareil photo dans le boîtier. Installez
l’appareil photo numérique dans le boîtier uniquement si vous le transportez sur une
courte distance comme de l’aéroport vers le point de plongée. (Vous ne pouvez pas
réutiliser le matériau avec lequel le boîtier a été emballé au moment de l’achat en vue du
transport.)
≥
Lorsque vous embarquez dans un avion, le changement de pression atmosphérique
peut causer une poussée à l’intérieur du boîtier qui risque de l’endommager. Retirez le
joint torique avant d’embarquer dans un avion.
≥ Ne laissez pas l’appareil photo numérique dans le boîtier pendant un long
moment dans une voiture, un bateau, exposés directement aux rayons du
soleil, etc. Le boîtier est un appareil hermétique donc sa température
intérieure peut devenir très élevée et l’appareil photo numérique peut arrêter
de fonctionner correctement. Ne laissez pas la température intérieure du
boîtier devenir trop élevée.
49
VQT0X68
Page 50

Avant utilisation (suite)
∫ Utilisation du boîtier à haute ou à basse
température
≥
Si vous ouvrez ou fermez le boîtier dans un endroit chaud et humide et puis que vous le
déplacez vers un endroit froid ou que vous plongez sous l’eau, de la condensation peut
apparaître à l’intérieur du boîtier, la surface du verre peut s’embuer et l’appareil photo
peut être endommagé.
≥ Si vous déplacez soudainement le boîtier d’un endroit où la température de l’air ou
de l’eau est froide vers un endroit où la température est chaude, la surface du verre
peut s’embuer. Attendez jusqu’à ce que la température du boîtier soit proche de la
température ambiante avant de prendre des photos.
∫ Préparation
≥ N’ouvrez pas et ne fermez pas le boîtier dans un endroit où il pourrait être
éclaboussé par de l’eau ou dans un endroit où le sable pourrait y entrer . Nous
vous conseillons d’ouvrir et de fermer le boîtier à l’intérieur.
≥
Remplacez la batterie, la carte, etc. et installez l’appareil photo numérique à l’intérieur
dans un endroit peu humide.
≥ Si vous devez ouv r ir ou fermer le boîtier au point de plongée pour remplacer
la batterie ou la carte, veillez à suivre les étapes suivantes.
• Choisissez un endroit où le boîtier ne sera pas éclaboussé par de l’eau et où le
sable ne pourra pas y pénétrer.
• Enlevez toutes les gouttes d’eau présentes entre le côté avant et arrière du boîtier
et dans la dans le loquet de verrouillage en soufflant. Enlevez complètement les
gouttes d’eau restantes avec un chiffon sec.
• Essuyez complètement toutes les gouttes d’eau de votre corps ou vos cheveux.
• Soyez particulièrement attentif à l’eau qui a pénétré dans votre combinaison de
plongée par les manches.
• Ne touchez pas l’appareil photo numér ique si vos mains sont mouillées d’eau de
mer. Mouillez une serviette avec de l’eau douce et mettez-la à l’avance dans un
sac en plastique. Utilisez cette serviette pour essuyer les gouttes d’eau et le sable
présents sur vos mains ou votre corps.
≥ Ce boîtier n’absorbe pas les chocs. Si vous placez un objet lourd sur le boîtier ou si
vous le cognez, l’appareil photo peut être endommagé. Faites attention lorsque
vous utilisez le boîtier.
50
VQT0X68
Page 51

Accessoires
Lorsque vous ouvrez l’emballage pour la première fois, vérifiez
bien qu’il contient le boîtier et tous les accessoires et que ceux-ci
n’ont pas été endommagés lors du transport. Si vous constatez
quelque chose d’anormal, consultez votre revendeur avant
d’utiliser le boîtier.
N’utilisez aucuns autres accessoires que ceux indiqués cidessous.
Joint tor ique
VMG1743
Tube de graisse (pour joint torique)
VZG0372
Gel de silice (dessiccatif)
(1 g/5 pièces)
VZG0371
Courroie
VFC4190
51
VQT0X68
Page 52

Manipulation et entretien
≥ Ne placez pas le boîtier dans un endroit où il pourrait tomber.
• Si le boîtier tombe sur votre tête ou votre pied, il vous blessera et pourra mal
fonctionner.
≥ Ne modifiez jamais le boîtier.
• S i de l’eau s’introduit dans l’appareil photo numérique parce que le boîtier est
abîmé, celui-ci peut être endommagé de façon irrémédiable.
• Si vous continuez d’utiliser l’appareil photo après que l’eau s’y soit infiltrée, il peut
prendre feu.
≥ N’utilisez pas le boîtier en plongée sous-marine sans un
entraînement adéquat.
• Vous ne devez utiliser ce boîtier lors d’une plongée sous-marine que si v ous a v ez
été correctement entraîné et êtes qualifié pour ce sport.
≥ Ne placez jamais le boîtier, la graisse, le gel de silice ou le joint
torique à la portée des enfants.
• S i un enfant se coince une partie du corps dans ce boîtier, cela peut provoquer
une blessure.
• Les enfants peuvent accidentellement avaler la graisse, le gel de silice ou le joint
torique.
• Consultez immédiatement votre médecin si vous pensez que votre enfant a avalé
de la graisse, du gel de silice ou le joint torique.
≥ N’enroulez pas la bandoulière autour de votre cou lorsque vous êtes
sous l’eau.
• Cela peut vous blesser le cou et causer une suffocation ou d’autres blessures
sérieuses.
≥ Nettoyez toutes traces de graisse de vos mains.
• Ne m ettez pas la graisse en contact avec vos yeux ou votre bouche.
≥ S’il y a des infiltrations d’eau dans le boîtier, arrêtez immédiatement
de l’utiliser.
• Ceci peut provoquer un choc électrique, une brûlure ou un incendie.
• Consultez votre revendeur.
≥ Si quelque chose d’anormal su rvient en utilisan t le boîtier sous l’ea u,
veuillez suivre toutes les pr océdures nécessaires et les consignes de
décompression lors de votre remontée.
• S i vous remontez trop rapidement, vous pouvez subir la maladie des caissons.
≥ Si de la fumée ou une chaleur, une odeur ou un bruit anormal
provient du boîtier, arrêtez de l’utiliser immédiatement.
• Cela peut causer un choc électrique, une brûlure ou un incendie.
• Ret irez l’appareil photo numérique du boîtier et puis retirez les batteries de
l’appareil photo.
• Consultez votre revendeur.
52
VQT0X68
Page 53

≥ Faites attention en ouvrant le boîtier après une infiltration d’eau.
• L’eau qui s’est infiltrée peut sortir ou bien l’arrière du boîtier peut se renverser.
≥ Ne laissez pas le boîtier dans un endr oit où la temp érature est él evée.
• La température à l’intérieur du boîtier peut dev enir très élevée surtout lorsqu’il est
exposé directement aux rayons du soleil sur une plage, en voyage, etc. ou
lorsqu’il est laissé dans une voiture fermée en plein été. La chaleur peut
endommager le boîtier ou ses éléments internes.
• Si un appareil photo numérique se trouve à l’intérieur du boîtier, celui-ci peut
également être endommagé.
• S i vous utilisez l’appareil photo numérique lorsque la température à l’intérieur du
boîtier est très élevée, cela peut causer des infiltrations, des courts-circuits ou
une panne d’isolation ayant pour résultat un feu ou un mauvais fonctionnement.
≥ Ne manipulez pas l’appareil photo numérique ou la batterie avec les
mains mouillées.
• Cela peut provoquer un choc électrique ou un mauvais fonctionnement.
∫ Prises de vues avec le flash
≥ Lorsque vous utilisez le flash, les angles de l’image peuvent être coupés ou l’image
peut ne pas apparaître illuminée de manière uniforme.
≥ En prenant des photos avec le flash, la portée disponible de celui-ci est plus faible
sous l’eau qu’en plein air.
53
VQT0X68
Page 54

Composants
1 32 4 5 6
8
17 13
1516
14
1. Levier de zoom
2. Œillet de la courroie
(pour fixer la poignée fournie)
7
3. Touche du stabilisateur
optique de l’image
4. Déclencheur
5. Molette de sélection du
mode
6. Couvercle avant
7. Diffuseur
•Vous ne pouvez retirer cette
9
10
11
12
18
19
pièce.
8. Vitre avant
9. Interrupteur marche/arrêt
10. Touche 3/Compensa tion de
l’exposi tion/Prise de vues en
rafale avec réglage
automatique de l’exposition/
Réglage fin de l’équil ibre des
blancs
11. Touche 1/du mode flash
12. Touche MENU/SET
13. Touche 4/REV
14. Touche d’effacement/mode
simple/prise de vues en
rafale
15. 2/T ouche de ve rrouillage de
mise au point automatique
16. Touche MODE AFFICHEUR/
ACL
17. Couvercle arrière
18. Loquet de verrouillage
19. Touche de déverrouillage
54
VQT0X68
Page 55

Qu’est-ce qu’un joint torique?
≥ Un joint torique est une garniture étanche utilisée pour les appareils photo, montres
ou équipements de plongée.
≥ Le joint torique rend le boîtier étanche en scellant l’espace entre sa partie avant et
arrière.
∫ Comment le joint torique rend-t-il le boîtier étanche
appareil photo numériqueCouvercle arrière
Joint
torique
Couvercle avant
Le caoutchouc entre en contact avec les côtés du boîtier le rendant
ainsi étanche et empêchant l’eau d’entrer par l’ouverture.
Pression
de l’eau
Joint
torique
Eau
Joint
torique
Quand le joint torique est écrasé par la pression de l’eau, sa surface
s’élargit et le boîtier est scellé plus hermétiquement.
Le joint torique évite les infiltrations d’eau en uniformisant le
contact des deux côtés du boîtier. Donc, le bon entretien du
joint torique est très important. Un mauvais entretien peut
causer des infiltrations d’eau.
VQT0X68
55
Page 56

Préparation -Préparation du joint torique-
Assurez-vous de préparer le joint torique avant d’installer l’appareil
photo numérique.
Lavez et séchez v os mains a vec so in av ant de m anipuler le joint torique.
Placez le joint torique dans un endroit sans sable ni poussière.
1
Desserrez le joint torique avec vos doigts pour l’enlever.
≥ Desserrez une partie du joint torique du bout de vos deux doigts et soulevez la
partie détachée. Faites attention de ne pas érafler le joint torique avec vos
ongles.
Joint tori q u e
Joint torique
∫
Remarque
≥ N’utilisez pas d’objet pointu pour retirer le joint torique. Ceci pourrait l’érafler.
56
VQT0X68
Page 57

2
Vérifiez le joint torique.
≥ Vérifiez l’absence de saleté, sable, cheveu, poussière, cristaux de sel, fibre ou
graisse sur le joint torique. Si vous trouvez une de ces choses, retirez-la avec
un chiffon sec et doux.
3Saleté
3
Cristaux de sel
3Sable
3Fils de tissu
3Cheveux
3Poussière
≥ Sur le joint torique, il peut y avoir de la saleté que vous ne pouvez pas voir.
Vérifiez la présence de saletés en frottant votre doigt sur le joint torique.
≥ Lors du nettoyage du joint torique, faites attention de ne pas laisser sur celui-ci
les fibres du linge sec et doux.
≥ Vérifiez que le joint torique ne soit ni déchiré, tordu, écrasé, effiloché ou érafler
et qu’il n’y ait pas de sable collé dessus. Si c’est le cas, remplacez le joint
torique.
3Fissures
3Rayures 3
3
Vérifiez la rainure du joint torique.
3Distorsions
Dépôts de sable
3Écrasements 3Écaillements
≥ Des grains de sable ou des cristaux de sel durcis peuvent entrer dans la r ain ure
du joint torique. Retirez-les avec précaution avec un jet d’air ou un tampon de
coton. Si vous utilisez un tampon de coton, veillez à ne pas laisser de fibres
dans la rainure du joint torique.
57
VQT0X68
Page 58
Préparation -Préparation du joint torique- (suite)
4
Vérifiez le côté opposé du joint torique de la même manière.
5
Appliquez la graisse (fournie).
≥ Appliquez uniformément et du bout du doigt une quantité de graisse (fournie) de
la dimension d’un grain de riz sur le joint torique.
≥ Si vous appliquez trop de graisse, de la saleté ou de la poussière collera au joint
torique.
≥
Utilisez uniquement la graisse indiquée. Si vous utilisez un autre type de
graisse, la surface du joint torique peut s’endommager et causer des
infiltrati o ns d’eau.
≥ N’appliquez pas la graisse à l’aide d’un papier ou d’un chiffon. Des fibres
pourraient rester collées au joint torique.
6
Placez le joint torique dans la rainure.
Vérifiez les choses suivantes:
≥ Qu’il n’y ait pas de saleté collée sur le joint torique.
≥ Que le joint torique ne sor te pas de son logement.
≥ Que le joint torique n’est pas tordu.
≥ Que le joint torique ne soit pas trop étiré.
Correct
58
VQT0X68
Incorrect
Page 59

7
Contrôlez le joint torique une dernière fois.
Vérifiez les choses suivantes encore une fois:
≥ Qu’il n’y ait pas de saleté collée sur le joint torique.
≥ Que le joint torique ne sor te pas de son logement.
≥ Que le joint torique n’est pas tordu.
≥ Que le joint torique ne soit pas trop étiré.
Essuyez avec soin toute la graisse de vos mains avec un chiffon sec
puis lavez-les avec de l’eau.
8
Fermez le loquet.
1
≥ Vérifiez qu’aucuns matériaux étrangers ne soient collés à la surface extérieur et
au loquet de verrouillage sur la partie avant du boîtier, puis fermez le boîtier.
∫
Remarques
≥ Pour garder le boîtier complètement hermétique, n’éraflez pas la surface du joint
torique qui entre en contact avec les côtés du boîtier.
≥ N’utilisez jamais un joint torique qui a été éraflé ou endommagé par de la saleté,
etc. Ceci causerait des infiltrations d’eau.
≥ Chaque fois que vous utilisez le boîtier, retirez le joint torique et vérifiez qu’il n’y ait
ni saleté, sable, cheveux ou autres matériaux étrangers dans la rainure, puis
appliquez une mince couche de graisse (fournie). Si vous appliquez trop de graisse,
la saleté et la poussière peuvent collées au joint torique et causer une infiltration
d’eau.
≥ Assurez-vous d’avoir un joint torique de rechange dans le cas où celui que vous
utilisez soit endommagé ou éraflé.
2
59
VQT0X68
Page 60

Préparation -Vérification de l’étanchéité du boîtier-
Après la préparation du joint torique, vérifiez l’absence d’infiltrations
d’eau dans le boîtier en l’immergeant dans un bassin d’eau, une
baignoire, etc. pendant environ 3 minutes ava nt d’ insta ller l’app ar eil
photo numérique.
≥ N’utilisez pas le boîtier dans une eau de plus de 40 °C. La chaleur peut
l’endommager et causer des infiltrations d’eau.
‘
Effectuez le même test après avoir mis en place l’appareil photo numérique
dans le boîtier. (P61)
∫
Remarques
≥ Si des bulles sont produites lorsque que le boîtier est immergé dans l’eau ou qu’il a
de l’eau à l’intérieur de celui-ci lorsque vous le retirez de l’eau, cela signifie qu’il a
une fuite. Dans de tels cas, consultez le détaillant.
≥ Si de l’eau s’infiltre dans le boîtier pendant que vous l’utilisez et que l’appareil photo
numérique se retrouve submergé, retirez immédiatement la batterie. L’hydrogène
peut s’enflammer ou exploser si un feu se trouve à proximité.
≥ Si vous plongez rapidement tout en tenant le boîtier ou si vous l ancez le boîtier d’un
bateau dans la mer, une infiltration d’eau peut survenir en raison de la pression
élevée. Il ne s’agit pas d’un mauvais fonctionnement du boîtier. Plongez toujours
lentement dans l’eau.
≥ Le boîtier est conçu pour être utilisé à une profondeur allant jusqu’à 40 m. Si vous
plongez à une profondeur de plus de 40 m, une partie du boîtier peut être
endommagée de façon irrémédiable.
≥ En fermant le boîtier, assurez-vous qu’aucun matériau étranger ne se trouve entre
le joint torique et la rainure. Un simple cheveu ou grain de sable peut causer une
infiltration d’eau.
60
VQT0X68
Page 61

Préparation -Mise en place de l’appareil photo numérique -
Vérifiez que l’interrupteur marche/arrêt de l’appareil photo et du boîtier
marin sont placés sur [OFF].
≥ Retirez la courroie et le capuchon d’objectif de l’appareil photo numérique.
1
Appuyez sur 2 avec votre do igt tout en faisant gliss er 1 pour ouvrir
le loquet.
1
2
2
Installez l’appareil photo numérique dans le boîtier.
1
≥ Attention à ne pas heurter l’anneau de protection 1.
61
VQT0X68
Page 62
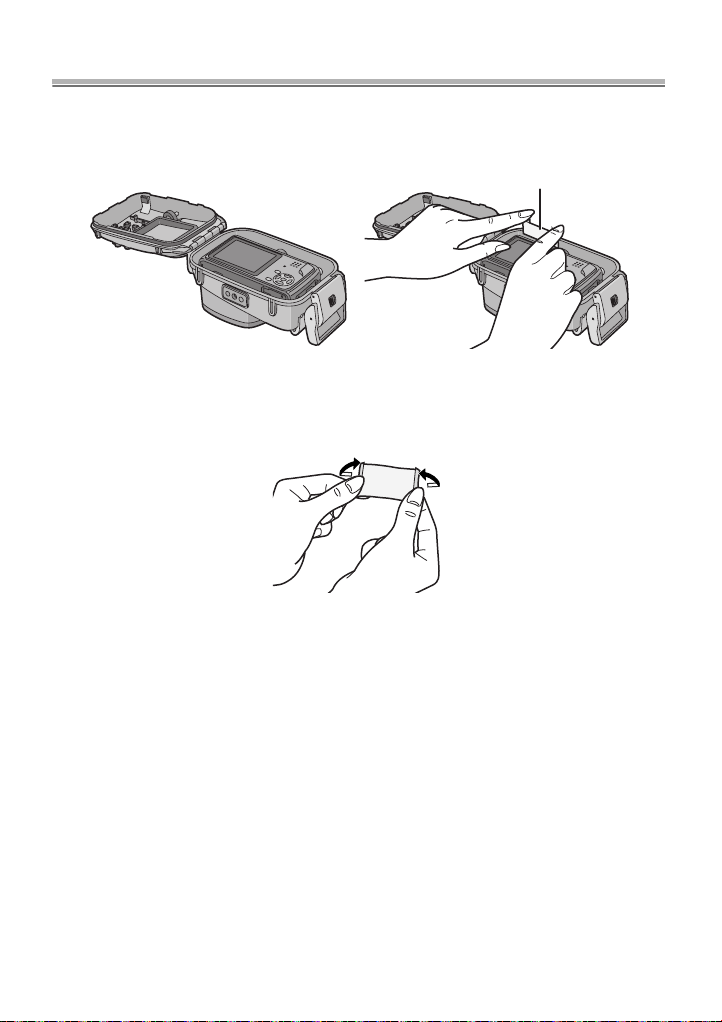
Préparation -
3
Insérez le gel de silice (fournie).
≥ Utilisez toujours du gel de silice neuf.
Mise en place de l’appare il photo n umérique - (suite)
Gel de silice
≥
En introduisant le gel de silice, pliez-le comme montré sur l’illustration cidessous et introduisez-le aussi loin que possible. Si vous fermez le boîtier
alors que le gel de silice n’est pas totalement mis en place, celui-ci sera
pris dans le joint torique et causera une infiltration d’eau.
≥ Si la température de l’air est élevée et si la température de l’eau est basse, de la
condensation peut apparaître à l’intérieur du boîtier. Pour éviter cela, assurezvous que le gel de silice (fourni) n’entre pas en contact avec l’objectif de
l’appareil photo. Pour éviter que le boîtier ne s’embue, placez le gel de silice
environ 1 à 2 heures avant d’utiliser le boîtier.
62
VQT0X68
Page 63

4
Fermez le loquet.
1
‘
Vérifiez
5
Après avoir installé l’appareil phot o, vérifiez une fois de plus l’absence
d’infiltratio n d’e a u dans le boîtier.
∫
Remarques
≥ Vérifiez encore une fois la bonne mise en place du joint torique dans sa rainure.
≥ Évitez d’ouvrir ou de fermer le boîtier lorsqu’il y a beaucoup de sable ou de
poussière et dans des endroits humides ou mouillés.
≥ S’il y a un changement soudain de température, de la condensation peut apparaître
à l’intérieur du boîtier.
≥ Si de l’écran solaire ou de l’huile solaire colle au boîtier, nettoyez-le immédiatement
avec de l’eau tiède afin d’éviter la décoloration et de réduire l’étanchéité.
que le loquet est correctement fermé.
2
(P60)
63
VQT0X68
Page 64

Prise de vues
∫ Avant de prendre des photos sous-marine
Vérifiez les choses s uivantes avant de p longer.
≥
Reste-t-il suffisamment d’énergie dans la batterie?
≥ Y a-t-il suffisamment d’espace mémoire sur la carte?
≥ Est-ce que le joint torique est correctement mis en place dans sa rainure?
≥ Avez-vous vérifié l’absence d’infiltration d’eau dans le boîtier?
≥ Le loquet est-il fermement verrouillé?
∫ Prise de vues
1 Allumez l’appareil photo.
Appuyez sur
puis réglez sur
1
1
pour déverrouiller
[ON].
ON
OFF
Appuyez sur 2 pour
verrouiller.
ON
OFF
2
2 Affichez le menu du mode scène et sélectionnez [SOUS-MARINE]
mode.
≥ Pour plus de détails, lisez le manuel d’utilisation de l’appareil photo numérique.
3 Dirigez la zone MPA de l’écran ACL sur le sujet que vous désirez
mettre au point.
4 Appuyez sur 2 ( ) pour faire la mise au point.
• Appuyez à nouveau sur 2 () pour annuler.
5 Appuyez à fond sur le déclencheur pour prendre une photo.
∫ Remarques
Avant de ranger le boîtier, nous vous conseillons de régler à nouveau l’horloge.
≥
(Pour plus de détails, lisez le manuel d’utilisation de l’appareil photo numérique.)
≥ S’il y a des particules qui flottent devant l’appareil photo, elles peuvent être mises
au point à la place du sujet.
≥ S’il y a des gouttes d’eau ou de la saleté sur le verre avant, vous pouvez ne pas être
capable de faire correctement la mise au point. Essuyez le verre avant, avant de
prendre des photos.
64
VQT0X68
Page 65

Conseil pour la prise de vue dans l’eau
Lorsque l’image et trop bleuâtre dans l’eau
1 Appuyez plusieurs fois sur 3 ( ) jusqu’à ce que [] apparaisse.
2 Appuyez sur 2 () /1 () pour régler l’équilibre des blancs.
3 Appuyez sur [MENU/SET] pour finir.
≥ Vous pouvez également appuyer à mi-course sur le déclencheur pour finir.
Sélectionnez la meilleure image
Réglez le flash sur [ ].
Utilisez la fonction de prise de vues en rafale avec réglage automatique de l’exposition
≥ Chaque fois que le déclencheur est appuyé, 3 photos avec des expositions
différentes sont automatiquement enregistrées. Vous pouvez choisir la photo
désirée parmi les 3 qui ont été prises.
Utilisez le mode rafale
≥ Chaque fois que le déclencheur est appuyé en mode rafale, plus d’une photo
d’un sujet se déplaçant rapidement, etc. sont enregistrées. Vous pouvez choisir
la photo désirée parmi celles enregistrées.
∫
Remarque
≥ Pour plus d’informations, lire le manuel d’utilisation de l’appareil photo numérique.
65
VQT0X68
Page 66

Après l’utilisat ion
Après avoir fini de prendre des photos, suivez les étapes suivantes.
1
Immergez le boîtier dans de l’ea u douce pen dant environ 30 minutes
ou plus sans retirer l’appareil photo afin d’enlever tous les cristaux
de sel, etc.
≥
Appuyez sur toutes les touches de fonctionneme nt, etc. du boîtier afin
d’enlever toute l’eau de mer. Si les cristaux de sel ne sont pas retirés des
touches, etc., elles durciront et deviendront inutilisables.
≥
Ne lavez pas le boîtier avec de l’eau à trop grand débit ou sous pression,
etc. car cela peut causer des infiltrations d’eau.
2
Essuyez l’eau avec un chiff on sec qui n’est pas im prégné de cristau x
de sel et séchez complètement le boîtier.
≥ Ne séchez pas le boîtier en l’exposant directement aux rayons du soleil. Ceci
peut décolorer ou endommager le boîtier ou bien accélérer la détérioration du
joint torique.
66
VQT0X68
Page 67

3
Ouvrez le couvercle arrière pour retirer l’appareil photo numérique.
4
Retirez le joint torique du boîtier et vérifiez qu’il n’y ait aucune
saleté, etc. dans la rainure.
5
Vérifiez qu’il n’y ait aucune éraflur e, etc. sur le joint toriq ue pend ant
que vous appliquez la graisse.
∫
Remarques
Faites attention en retirant l’appareil photo du boîtier que celui-ci ne se
mouille pas.
≥ Retirez l’appareil photo avec les mains propres. (Lavez vos mains avec de l’eau
douce et séchez-les avec soin.)
≥ Séchez complètement toute trace d’humidité de votre corps et de vos cheveux.
(Soyez particulièrement attentif à l’eau qui a pénétrée dans votre combinaison de
plongée par les manches.)
≥ Lorsque le temps ou la mer est particulièrement mauvais, choisissez un endroit où
l’appareil photo ne sera pas mouillé ex. à l’intérieur ou sous une toiture.
67
VQT0X68
Page 68

Nettoyage et rangement
Lavez l’extérieur du boîtier avec de l’eau.
1
≥ Lavez l’extérieur du boîtier jusqu’à ce qu’il soit propre. (P66)
≥ Veillez à fermer le boîtier et lavez l’extérieur uniquement avec de l’eau.
≥ Essuyez toutes traces de saleté à l’intérieur du boîtier avec un chiffon doux et
humide.
∫
Remarques
≥ Ne lavez pas le boîtier avec de l’eau sous pression car cela peut provoquer des
infiltrations d’eau. Retirez l’appareil photo avant de laver le boîtier avec de l’eau.
≥ Ne laissez pas l’appareil photo numérique dans le boîtier lorsque vous le rangez.
≥ Rangez ce boîtier dans un endroit frais, bien ventilé.
68
VQT0X68
Page 69

Remarques sur l’utilisation de l’appareil
∫ Manipulation du joint torique
≥ N’utilisez pas d’alcool, de solvant ou de nettoyant chimique pour nettoyer le
joint torique. Ceci accélérera les dommages ou la détérioration du joint
torique.
≥ Si vous n’utilisez pas le boîtier pendant un long moment, retirez le joint
torique de la rainure, appliquez une mince couche de graisse (fournie),
placez-le dans un sac en polyester propre et placez-le dans un endroit frais, et
sombre afin d’éviter que la surface ne soit endommagée. Lorsque vous
utilisez le joint torique à nouveau, vérifiez avec soin que celui-ci n’est ni
égratigné ni plié.
≥ Utilisez uniquement la graisse indiquée. Si vous utilisez d’autres types de
graisse, la surface du joint torique peut en être abîmée et causer des
infiltrations d’eau.
≥ Le joint torique entre en contact avec les côtés du boîtier et le rend hermétique. Ne
cognez pas, n’introduisez aucun matériaux étrangers (saleté, sable, cheveux, etc.)
et n’éraflez pas le joint torique ou les côtés du boîtier.
≥ Utilisez le bout de vos doigts pour retirer le joint torique. N’utilisez pas d’objet pointu
car cela peut érafler le joint torique.
≥ Après avoir retiré le joint torique de la partie arrière du boîtier, retirez-en toutes les
saletés, sable, cheveux ou autres matériaux étrangers. Essuyez également la
rainure du joint torique et l’intérieur du côtés av ant du boît ier qui est en contact a v ec
le joint torique.
≥ Ne jamais utiliser un joint torique qui a été éraflé ou taché par de la saleté, etc. Ceci
causerait des infiltrations d’eau. Remplacez-le par un joint torique neuf.
≥ Après avoir remplacé le joint torique, après une longue période d’inutilisation du
boîtier ou en l’ouvrant pour installer l’appareil photo, remplacez la batterie etc.,
vérifiez avec soin que le joint torique n’est ni éraflé ni fendu. Puis, fermez le boîtier
et vérifiez l’absence de toute infiltration d’eau en l’immergeant dans un bassin
d’eau, une baignoire, etc. pendant environ 3 minutes. (P60)
≥ Les joints toriques sont des produits consommables. Bien que la durée de vie des
joints toriques dépende de la manière dont ils sont entretenus, de la fréquence à
laquelle ils sont utilisés et de leur condition de rangement, nous vous conseillons de
les remplacer chaque année même si vous ne voyez aucune éraflure.
69
VQT0X68
Page 70

Remarques sur l’utilisation de l’appareil (suite)
∫ Entretien
≥ N’utilisez pas les produits chimiques indiqués ci-dessous pour le nettoyage,
la protection antirouille, la protection antibuée ou la réparation. Leur usage
direct ou indirect (avec un vaporisateur chimique, etc.) sur le boîtier peut, à
haute pression, fissurer celui-ci.
Substances chimiques Mises en garde
Solvants organiques
volatiles/Détergents
chimiques
Produits anticorrosifs
Produits antibuée
Adhésifs
≥ Si la graisse reste collée à l’appareil photo numérique, essuyez-la avec un linge
doux et sec.
≥ Pour essuyer l’intérieur du boîtier, utilisez uniquement un chiffon sec et doux.
Essuyez l’intérieur du verre, avant et après l’utilisation afin qu’il reste propre.
Ne pas nettoyer le boîtier au moyen de solvants
organiques volatiles comme l’alcool, le benzine ou
des diluants ou avec des détergents chimiques.
Nettoyez le boîtier av ec de l’eau courante ou tiède.
Ne pas utiliser de produits anticorrosifs car les parties
en métal du boîtier sont en acier inoxydable ou en
laiton. Lavez-les à l’eau douce.
Ne pas utiliser de produits antibuée disponibles dans
le commerce. Veillez à utiliser le gel de silice indiqué
dans ce manuel d’utilisation.
Ne pas utiliser d’adhésifs pour la réparation. Si le
boîtier a besoin d’être réparé, consultez votre
revendeur.
70
VQT0X68
Page 71

∫ À propos du rangement et de la vérification après
l’utilisation
≥ Toujours retirer l’appareil photo numérique du boîtier.
≥ Veillez à ce qu’aucune saleté ou poussière n’adhère au joint torique.
≥ Séchez bien ce boîtier à température ambiante et le ranger dans un endroit frais à
l’abri de la lumière.
≥ Nous vous conseillons de faire vérifier le boîtier environ 3 ans après l’achat. Cette
vérification comprend le désassemblage et le nettoyage du boîtier, l’inspection de
tous ses éléments et leur réparation si nécessaire ainsi que la vérification de son
étanchéité en utilisant le même test hydrostatique que celui effectué avant l’achat.
Tous les frais de port sont à la charge du client.
≥ Ne désassemblez aucuns éléments, n’utilisez aucun accessoire qui ne serait pas
indiqué dans ce manuel d’utilisation et ne modifiez pas le boîtier. Si le boîtier ne
fonctionne pas correctement, consultez votre revendeur.
Spécifications
Modèle compatible: DMC-TZ1
Poids: Environ 383 g
Dimensions: Environ 154 mm (L)k91 mm (H)k79 mm (P)
Matière: Polycarbonate
Structure étanche: Fermeture joint torique
Profondeur de
résistance à l’eau: 40 m
(parties en saillie non comprises)
71
VQT0X68
Page 72

Indice
Antes del uso . . . . . . . . . . . . . . . . . . . . . . . . . . . . . . . . 73
Accesorios . . . . . . . . . . . . . . . . . . . . . . . . . . . . . . . . . . 75
Manejo y Cuidado. . . . . . . . . . . . . . . . . . . . . . . . . . . . . 76
Componentes . . . . . . . . . . . . . . . . . . . . . . . . . . . . . . . . 78
¿Qué es el anillo tórico?. . . . . . . . . . . . . . . . . . . . . . . . 79
Preparación -Ajuste del anillo tórico-. . . . . . . . . . . . . . 80
Preparación -Control de lo imperm eable
del estuche-. . . . . . . . . . . . . . . . . . . . . . 84
Preparación -Unión de la cámara digital- . . . . . . . . . . 85
Sacar imágenes . . . . . . . . . . . . . . . . . . . . . . . . . . . . . . 88
Consejos para sacar imágenes en el agua. . . . . . . . . . 89
Después del uso. . . . . . . . . . . . . . . . . . . . . . . . . . . . . . 89
Limpieza y almacenamiento . . . . . . . . . . . . . . . . . . . . . 91
Precauciones para el uso. . . . . . . . . . . . . . . . . . . . . . . 91
Especificaciones. . . . . . . . . . . . . . . . . . . . . . . . . . . . . . 93
72
VQT0X68
Page 73

ESPAÑOL
Antes del uso
≥ Este estuche ha sido diseñado sólo par a la cámar a di gi tal de P ana soni c DMC-TZ1.
Puede gozar de la toma de imágenes submarinas a un a profu ndi dad hast a 40 m.
≥ En el caso de infiltración debida a escaso cuidado, Matsushita no se responsabiliza
por los daños padecidos por cualquier producto (cámara digital, baterías, tarjeta,
etc.) que quepa en este estuche, los costes fotográficos o cualquier otros gastos.
≥ Matsushita no proporciona ninguna compensación por accidentes que condujesen
a heridas o daños a la propiedad.
≥ Lea las instrucciones de funcionamiento de su cámara digital.
≥ Antes de unir la cámara digital, sumerja el estuche en el agua durante
3 minutos o más para comprobar que no haya infiltración de agua.
∫ Acerca del manejo del estuche
≥ Utilice teniendo en cuenta las siguientes condiciones.
• Profundidad del agua: Hasta 40 m
• Temperatura ambiente: 0 oC a 40 oC
≥ No use el estuche en agua por encima de los 40 °C. El calor puede dañar el
estuche o causar infiltración de agua.
≥ El estuche está hecho de policarbonato resistente al impacto, sin embargo ponga
cuidado cuando lo va a usar. Él puede arañarse fácilmente cuando toma imágenes
en lugares con escollos etc. y puede dañarse por el impacto debido a caída etc.
Cuando viaja en coche, buque, avión embale con esmero el estuche para evitar un
impacto directo en el caso de que se caiga y no deje la cámara digital dentro del
estuche. Sólo una la cámara digital al estuche cuando la lle va por cortas distancias
como la del aeropuerto al lugar del buceo (para transportarlo, no puede volver a
usar el material con el que fue embalado al momento de la compra).
≥ Cuando se embarca en un avión, el cambio de presión atmosférica podría hacer
expandir el interior del estuche causándole daño. Quite el anillo tórico antes de
embarcarse en un avión.
≥ No deje la cámara digital en el estuche por largos períodos de tiempo dentro
de un coche, un buque, o bi en e x puest o a la lu z di rec ta de l sol etc. El est uc he
es un dispositivo estanco al aire así que la temperatura dentro del estuche va
a subir mucho y la cámara podr ía de jar de funcionar correctam en te. No deje
que la temperatura dentro del estuche aumente demasiado.
73
VQT0X68
Page 74

Antes del u so (continuación)
∫ Uso del estuche a altas o bajas temperaturas
≥ Si abre o cierra el estuche donde haya humedad o calor y luego va a un lugar frío o
bien va a bucear, podría tener lugar condensación dentro del estuche, ponerse
empañada la superficie del cristal y dañarse la cámara digital.
≥ Si de repente desplaza el estuche de un lugar, o agua, frío a uno caliente, podría
empañarse la superficie del cristal. Espere hasta que el estuche se acerque a la
temperatura del aire antes de tomar las imágenes.
∫ Acerca de la pr eparación
≥ No abra el estuch e ni lo cierre d onde pue de r ocia rse por el a gua o don e pued a
entra arena en él. Le recomendamos que lo abra o lo cierra en casa.
≥ Reemplace la batería, la tarjeta etc. y una la cámara digital en casa donde haya
poca humedad.
≥ Si tiene que abrir o cerrar el estuche en lugares de buceo para reemplazar la
batería o la tarjeta, tenga cuidado de seguir los pasos siguientes.
• Elija un lugar donde el estuche no pueda ser rociado con agua o entrar arena en
su interior.
• Quite soplando cualquier gota de agua en el espacio entre la parte delantera y la
trasera del estuche y en la hebilla. Saque enteramente las gotas que quedan de
agua con un trapo seco.
• Seque enteramente cualquier gota de agua de su cuerpo o pelo.
• Ponga cuidado en el agua que pueda caer de las mangas de su traje térmico.
• No toque la cámara digital si sus manos están mojadas de agua del mar. Moje
una toalla con agua fresca y la coloque en una bo lsa de poliéster de antemano.
Emplee esta toalla para sacar las gotas de agua o arena de su mano o cuerpo.
≥ Este estuche no absorbe los golpes. Si coloca un objeto pesado encima del
estuche o lo golpee, la cámara digital podría dañarse. Ponga cuidado cuando usa el
estuche.
74
VQT0X68
Page 75
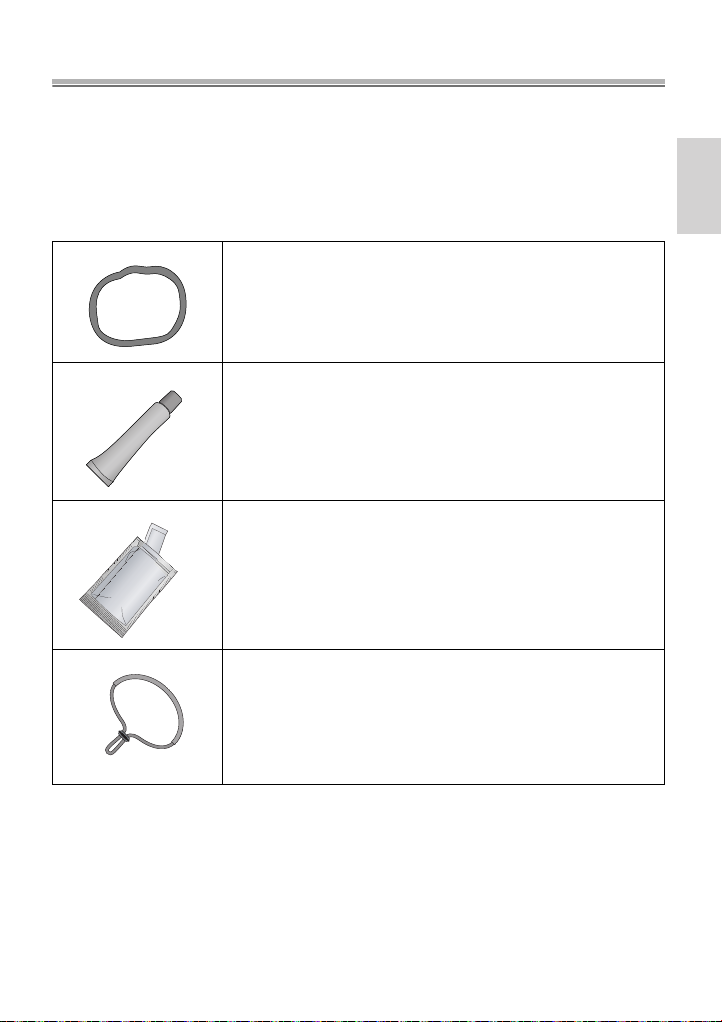
Accesorios
Cuando antes abre el paquete, asegúrese de que estén incluidos
tanto el estuche como todos los accesorios y de que ambos no
hayan padecido daño alguno durante la distribución o el transporte.
En el caso de que encontrase algo insólito, llame a su comerciante
antes de utilizar el estuche.
No utilice ningún accesorio salvo los detallados a continuación.
Anillo tórico
VMG1743
Grasa (para el anillo tórico)
VZG0372
Silicagel (Desecante)
(1 g/5 piezas)
VZG0371
Correa de mano
VFC4190
75
VQT0X68
Page 76

Manejo y Cuidado
≥ No coloque el estuche donde pueda caerse.
• Por si se cae el estuche en su cabeza o pie, él herirá a usted y causará al
estuche un funcionamiento defectuoso.
≥ Nunca modifique el estuche.
• S i se filtra agua dentro de la cámara debido a que el estuche fue modificado, la
cámara digital podría dañarse sin posibilidad de ser reparada.
• Si sigue utilizando la cámara digital después de filtrarse agua en ella, eso podría
hacerla incendiar.
≥ No utilice el estuche para el buceo sin adecuado adiestramiento.
• E l estuche tendría que ser hecho funcionar en el buceo sólo si usted tiene
adecuado entrenamiento y certificación para este deporte.
≥ Nunca deje el estuche, la grasa, el silicagel o el anillo tórico al
alcance de los niños.
• Si el estuche agarra una cualquier parte del cuerpo del niño puede causarle heridas.
• Los niños podrían por casualidad tragarse la grasa, el silicagel e el anillo tórico.
• Llam e de inmediato a un médico por si duda que el niño pueda haberse tragado
la grasa, el silicagel o el anillo tórico.
≥ No cuelgue la correa alrededor de su cuello cuando está sumergido
en el agua.
• Ésta podría envolverse alrededor de su cuello causándole sofocación u otra seria
herida.
≥ Limpie toda grasa de sus manos.
• Con sus manos untadas de grasa no frote su boca ni sus ojos.
≥ Por si se filtra agua en el estuche, deje de usarlo de inmediato.
• E so puede causar una descar ga eléctrica, una quemadura o un incendio.
• Llam e a su comerciant e.
≥ Si ocurre algo anómalo mientras que está utilizando el estuche
sumergido en el agua, cuando sube siga todos los necesarios
procedimientos y líneas de guía para la descompresión.
• Si sube demasiado rápido, puede contraer la enfermedad del buzo.
≥ Si del estuche sale humo o calor anómalo, olor o sonido, déjelo de
usarlo de inmediato.
• E so puede causar una descar ga eléctrica, una quemadura o un incendio.
• Saque la cámara digital fuera del estuche y, de inmediato, quite la batería de la
cámara digital.
• Llam e a su comerciant e.
≥ Ponga cuidado cuando abre el estuche después de una infiltración
de agua.
• El agua penetrada podría hacerlo reventar o podría volcar el estuche trasero.
76
VQT0X68
Page 77

≥ No deje el estuche donde hay una lata temperatura.
• La temperatura dentro del estuche aumenta mucho sobre todo cuando éste está
expuesto a la luz directa del sol en una playa, un buque etc. o bien cuando se
deja en un coche sin aire durante el verano. El calor puede dañar el estuche o
sus piezas internas.
• Si al estuche está unida una cámara digital, también ésta podría salir dañada.
• Si utiliza la cámara digital unida cuando la temperatura dentro del estuche es
demasiado alta, éste podría causar una infiltración, un cortocircuito o una falta de
aislamiento y de eso hacer originar un incendio o un funcionamiento defectuoso.
≥ No maneje la cámara digital o la batería con las manos mojadas.
• E so podrí a causar una descarga eléctrica o un funcionamiento defectuoso.
∫ Cuando se sacan imágenes con el flash
≥ Cuando toma imágenes usando el flash, lo que sale de las imágenes podría
resultar viñeteado o bien la imagen podría no alumbrarse uniformemente.
≥ Cuando toma imágenes con el flash, el rango disponible de éste último es menos
debajo de la superficie del agua que estando en tierra.
77
VQT0X68
Page 78

Componentes
1 32 4 5 6
8
17 13
1516
14
1. Palan ca del z oom
2. Ojal de la correa
(para unir la correa de mano
suministrada)
7
3. Botón del estabiliza dor
óptico de la imagen
4. Botón del obturador
5. Disco del modo
6. Estuche delantero
7. Difusor
• No puede quitarlo.
9
10
11
12
18
8. Cristal delantero
9. Interruptor ON/OFF
10. 3/Botón de compensación a
la exposición/Bracketing
automático/Ajuste fino del
balance del blanco
11. 1/Botón del MODO FLASH
12. Botón MENU/SET
13. 4/Botón REV
14. Botón del modo Borrar/
único/de ráfaga
15. 2/Botón del autodisparador
16. Botón del modo DISPLAY/
LCD
17. Estuche trasero
78
VQT0X68
18. Hebilla
19
19. Botón para soltar el bloqueo
Page 79

¿Qué es el anillo tórico?
≥ El anillo tórico es una junta hermética utilizada para cámaras, reloj submarinos y
otros dispositivos de buceo.
≥ El anillo tórico mantiene lo impermeable del estuche cerrando la holgura entre su
parte trasera y la delantera.
∫ Cómo el anillo tórico mantiene lo impermeable del estuche
Estuche trase r o
Cámara digital
Anillo tórico
Estuche
delantero
La goma toca ambos lados del estuche volviéndolo impermeable e
impidiendo al agua infiltrarse a través de la holgura.
Presión
de agua
Anillo
tórico
Agua
Anillo
tórico
Cuando el anillo tórico está prensado por la presión del agua, la
superficie del mismo anillo se expande yendo a proporcionar al
estuche un cierre más fuerte.
El anillo tórico impide la infiltración del agua por su co ntac to
uniforme con los lado s de l estuc he. Por lo tanto, es muy
importante poner mu c ho cuida do en dic ho anillo. Un cu idad o
inadecuado del anillo tórico podría causar infiltraciones de agua.
79
VQT0X68
Page 80

Preparación -Ajuste del anillo tórico-
Teng a cuida do de po ner el an illo tórico antes d e unir un a cáma ra digital .
Limpie a fondo y seque sus manos antes de manejar el anillo tórico.
Coloque dicho anillo en un lugar donde no haya arena ni polvo.
1
Afloje el anillo tórico con sus dedos para quitarlo.
≥ Afloje parte del anillo tórico con la punta de dos dedos, luego levante la parte
aflojada. Tenga cuidado de no arañar dicho anillo con las uñas.
Anillo tórico
Anillo tórico
∫
Nota
≥ No utilice un objeto puntiagudo para quitar el anillo tórico ya que eso podría
arañarlo.
80
VQT0X68
Page 81

2
Controle el anillo tórico.
≥ Compruebe que en el anillo tórico no haya suciedad, arena, pelo, polvo,
cristales de sal, hilas o grasa vieja. En el caso de que los encontrase, sáquelos
con un trapo blanco y seco.
3Suciedad
3Sal 3Hilas
3Arena
3Pelo
3
Polvo
≥ Podría haber suciedad en el anillo tórico que no puede verse. Compruebe si
hay suciedad frotando con su dedo encima del anillo tórico.
≥ Tenga cuidado de no dejar fibras del trapo seco en el anillo tórico cuando lo va
a limpiar.
≥ Compruebe que el anillo no esté desgarrado, torcido, apretado , deshilachado o
arañado y que no tenga arena pegada encima. En estos casos reemplace el
anillo tórico.
3Hendedura
3Arañazo 3Arena pegada
3
Controle la ranura del anillo tórico.
3Distorsión
3Aplastamiento 3Peladura
≥ Granos de arena o cristales de sal endurecidos pueden entrar en la ranura del
anillo tórico. Sáquelos con un chorro de aire o un estropajo de algodón. Si usa
un estropajo de algodón, tenga cuidado de no dejar ninguna de sus fibras en la
ranura de dicho anillo.
81
VQT0X68
Page 82

Preparación -Ajuste del anillo tórico- (continuación)
4
Controle el lado opuesto del anillo tórico de la misma manera.
5
Aplique la grasa (suministrada).
≥ Con la punta de su dedo aplique uniformemente en el anillo tórico grasa
(suministrada) que tenga un tamaño de un grano de arroz.
≥ Suciedad o polvo se pegarán al anillo tórico por si aplica demasiada grasa.
≥
Sólo utilice la grasa especificada. Si usa grasa de otro género, puede
dañarse la superficie del anillo tórico causando infiltración de agua.
≥ No aplique la grasa usando papel o un trapo ya que las fibras de éstos podrían
pegarse al anillo tórico.
6
Ponga el anillo tórico de manera uniforme dentro de la respectiva
ranura.
Compruebe lo siguiente:
≥ No haya suciedad pegada al anillo tórico.
≥ El anillo tórico no salga.
≥ El anillo tórico no esté torcido.
≥ El anillo tórico no esté extendido demasiado.
OK
82
VQT0X68
INCORRECTO
Page 83
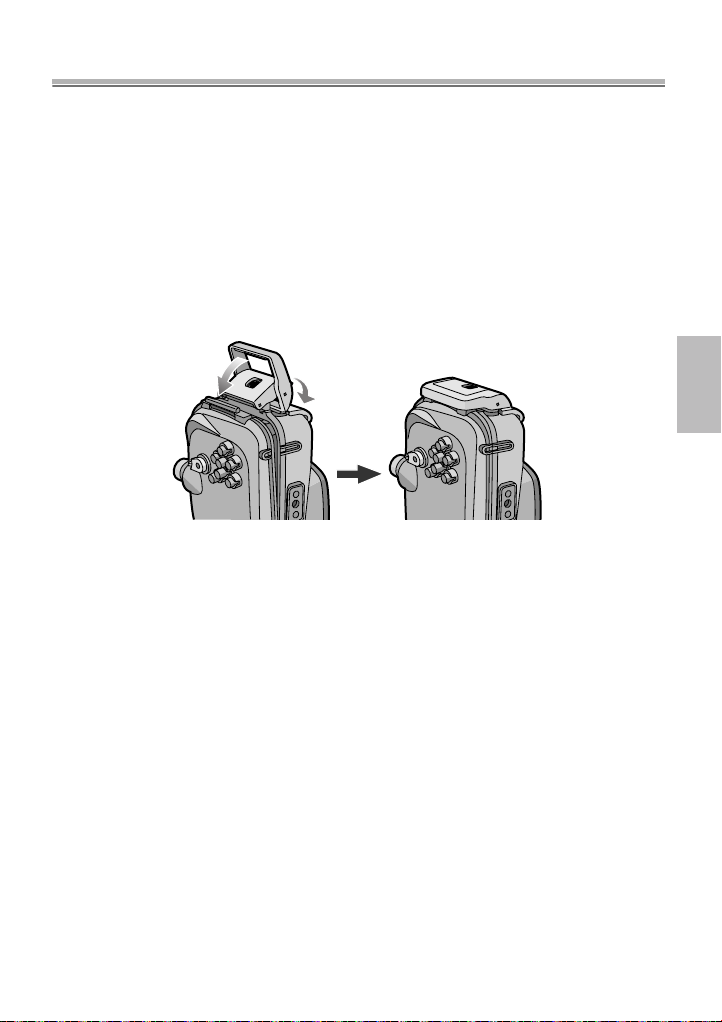
7
Controle el anillo tórico una última vez.
Compruebe lo siguiente una vez más:
≥ No haya suciedad pegada al anillo tórico.
≥ El anillo tórico no salga.
≥ El anillo tórico no esté torcido.
≥ No haya ningún arañazo ni partes apretadas en el anillo tórico.
Saque a fondo toda grasa de sus manos con un trapo seco luego
límpielas con agua.
8
Cierre la hebilla.
1
≥ Compr uebe que ningún material extraño esté pegado a la superficie externa del
anillo tórico y de la hebilla en el estuche delantero luego ciérrelo.
∫
Notas
≥ Para mantener el estuche enteramente estanco al aire, no arañe la superficie del
anillo tórico que va a tocar los lados del estuche.
≥ Nunca utilice un anillo tórico que haya sido arañado o dañado por la suciedad etc.
Eso causará infiltración de agua.
≥ Cada vez que utiliza el estuche, quite el anillo tórico y compruebe que no haya
suciedad, arena, pelo u otro material extraño en la ranura del anillo tórico y, luego,
aplique una ligera capa de grasa (suministrada). Si aplica demasiada grasa,
podrían pegarse a dicho anillo suciedad y polvo causando infiltración de agua.
≥ Tenga cuidado de llevar consigo un anillo tórico de repuesto en el caso de que se
dañase o arañase el que está usando.
2
83
VQT0X68
Page 84

Preparación -Control de lo impermeable del estuche-
Después de colocar el anill o tóric o, co mprue be q ue no haya infiltración
de agua dentro del estuche sumergiendo éste último en un tanque de
agua, una bañera etc. durante alrededor de 3 minutos antes de unirlo a
la cámara digital.
≥ No use el estuche en agua por encima de los 40 °C. El calor puede dañar el
estuche o causar infiltración de agua.
‘
Realice la misma prueba después de unir la cámara digital al estuche. (P85)
∫
Notas
≥ Compruebe que ningún material extraño esté pegado a la superficie externa del
anillo tórico y de la hebilla en el estuche delantero luego ciérrelo.
≥ Si el agua se filtra en el estuche mientras que está usándolo y la cámara digital está
sumergida en el agua, quite de inmediato la batería. El gas de hidrógeno podría
incendiarse o causar una explosión por si hay un fuego cerca.
≥ Si bucea rápidamente mientras que mantiene el estuche o tira éste desde un buque
a la mar, podría ocurrir infiltración de agua debido a la alta presión. Eso no es un
funcionamiento defectuoso, sin embargo siempre bucee lentamente.
≥ El estuche está diseñado para que pueda ser usado a una profundidad hasta 40 m.
Por si bucea a una profundidad mayor de 40 m, parte del estuche podría dañarse
irreparablemente.
≥ Cuando cierra el estuche, ponga cuidado en que no sea agarrado ningún material
extraño entre el anillo tórico y su ranura incluso un pequeño pelo o grano de arena
podría causar infiltración de agua.
84
VQT0X68
Page 85

Preparación -Unión de la cámara digital-
Compruebe que el inte rruptor O N/OFF de la cá mara y el e stuch e marino
esté en [OFF].
≥ Quite la correa y la tapa del objetivo de la cámara digital.
1
Empuje hacia arriba 2 con su dedo, mientras hace deslizar 1 para
abrir la hebilla.
1
2
Una la cámara digital al estuche.
2
1
≥ Tenga cuidado de no agarrar la espira de sombra 1.
85
VQT0X68
Page 86

Preparación -Unión de la cámara digital- (continuación)
3
Inserte el silicagel (suministrado).
≥ Siempre utilice silicagel nuevo .
Silicagel
≥
Cuando inserta el silicagel, dóblelo como se muestra en la figura abajo,
luego insértelo lo más allá que sea posible. Si cierra el estuche con el
silicagel no insertado enteramente, éste será agarrado en el anillo tórico
causando infiltra c ión de agua.
≥ Si la temperatura del aire es alta y la del agua es baja, puede tener lugar
condensación dentro del estuche. Para impedir la condensación, asegúrese de
que el silicagel (suministrado) no vaya a tocar el objetivo de la cámara digital.
Para evitar que se forme neblina en el estuche, inserte el silicagel cerca de 1 a
2 horas antes de utilizar el estuche.
86
VQT0X68
Page 87

4
Cierre la hebilla.
1
‘
Compruebe que la hebilla esté cerrada firmemente.
5
Después de unir la cámara digital, compruebe una vez más que no
haya infiltración de agua en el estuche. (P84)
∫
Notas
≥ Compruebe una o más veces que el anillo tórico esté aplicado de manera uniforme
dentro de su ranura.
≥ Evite abrir o cerrar el estuche donde haya mucha arena o polvo o en lugares
húmedos o mojados.
≥ Si ocurre un repente cambio de temperatura, puede tener lugar condensación
dentro del estuche.
≥ Si un protector o aceite solar se pega al estuche, sáquelo de inmediato con agua
tibia para evitar que se reduzca lo impermeable suyo o se descolore.
2
87
VQT0X68
Page 88
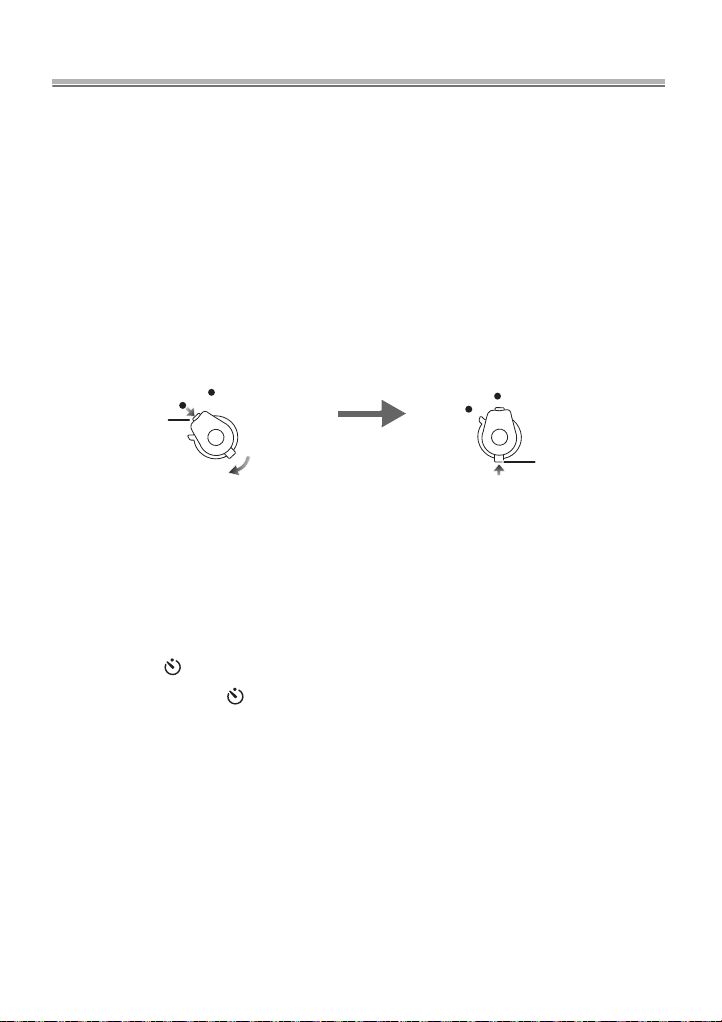
Sacar imágenes
∫ Antes de sacar imágenes estando sumergidos en el agua
Compruebe lo siguiente antes de bucear.
≥
¿Queda bastante carga en la batería?
≥ ¿Queda bastante memoria en la tarjeta?
≥ ¿El anillo tórico está aplicado de manera uniforme dentro de su ranura?
≥ ¿Ha comprobado que no haya infiltración de agua en el estuche?
≥ ¿La hebilla está cerrada firmemente?
∫ Sacar imágenes
1 Encienda la cámara.
Pulse 1 para soltar el bloqueo,
luego ajusta a [ON].
ON
OFF
1
Pulse 2 para bloquear.
ON
OFF
2
2 Visualice el menú del modo de escena y luego ajuste a
[SUBMARINO].
Lea las instrucciones de funcionamiento de la cámara digital para más detalles.
≥
3 Dirija el área AF en el monitor LCD hacia el sujeto que quiere
enfocar.
4 Pulse 2 ( ) para enfocar.
• Vuelva a pulsar 2 () para cancelar.
5 Pulse a tope el botón del obturador para tomar la imagen.
∫ Notas
Antes de unir la cámara al estuche, le recomendamos que ajuste de nuevo el reloj.
≥
(Lea las instrucciones de funcionamiento de la cámara digital para más detalles.)
≥ Si hay algunas partículas flotantes delante de la cámara, puede enfocar éstas en
lugar del sujeto.
≥ Si hay gotas de agua o suciedad pegadas en el cristal delantero, podría no ser
posible enfocar correctamente. Tenga cuidado de limpiar el cristal antes de tomar
las imágenes.
88
VQT0X68
Page 89
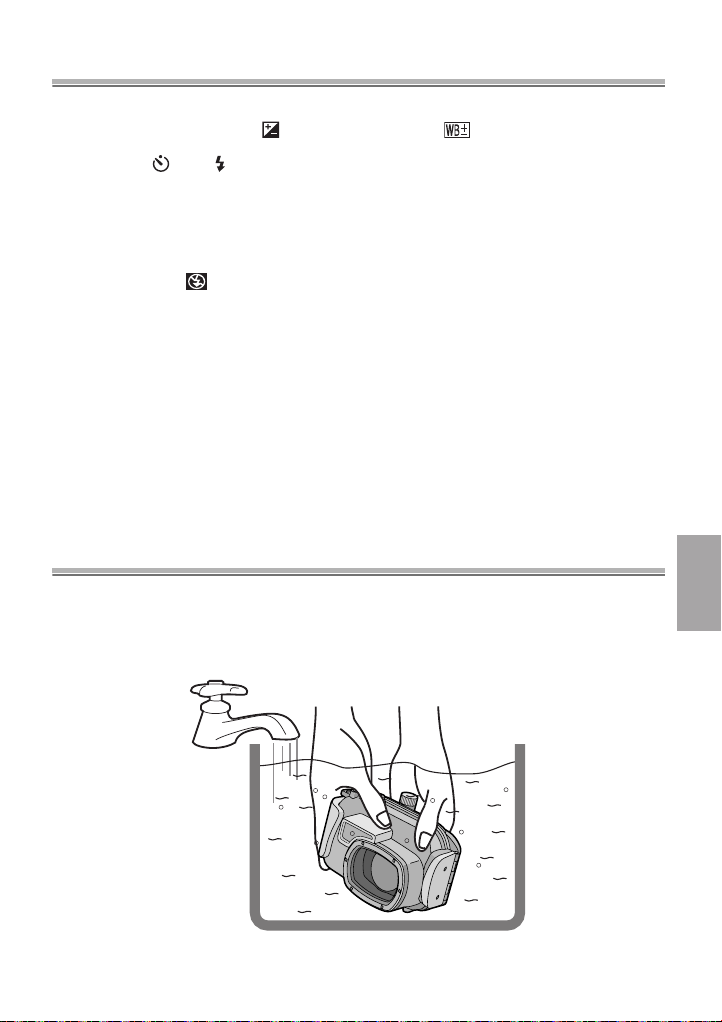
Consejos para sacar imágenes en el agua
Cuando la imagen es demasiado azulada en el agua
1 Pulse muchas veces 3 ( ) hasta que aparezca [ ].
2 Pulse 2 () /1 () para ajustar el balance del blanco.
3 Pulse [MENU/SET] para terminar.
≥ Para terminar puede también pulsar a mitad el botón del obturador.
Elija la mejor imagen
Ajuste el flash a [ ].
Use el bracketing automático
≥
Cada vez que pulsa el botón del obturador, se graban automáticamente
3 im ágenes con diferente exposición. Entre las 3 puede elegir la imagen deseada.
Use el modo de ráfaga
≥ Cada vez que pulsa el botón del obturador en el modo de ráfaga, se va a grabar
más de una imagen de un sujeto que se mueve rápido. Entre las imágenes
grabadas puede elegir la imagen deseada.
∫
Nota
≥ Para más información, lea las instrucciones de funcionamiento sobre la cámara
digital.
Después del uso
Después de terminar la toma de las imagines, siga los pasos a continuación.
1
Sumerja el estuche en agua fresca durante 30 minutos o más sin
quitar la cámara digital para sacar los cristales de sal etc.
89
VQT0X68
Page 90

Después del uso (continuación)
≥ Pulse todos los botones operacionales etc. en el estuche para sacar toda
agua del mar. En el caso de que de los botones no se saquen los cristales
de sal etc., éstos se endurecerán y los botones dejarán de ser operables.
≥ No limpie el estuche con a gua de c horro rápido o presurizada etc. ya que
eso podría causar infiltración de agua.
2 Saque el agua con un trapo seco que no tenga cristales de sal
pegados en él y, luego, seque enteramente el estuche.
≥
No seque el estuche exponiéndolo a la luz directa del sol. Eso podría hacer
decolorar o dañar el estuche o acelerar el deterioro del anillo tórico.
3 Abra la parte trasera del estuche para quitar la cámara digital.
4 Quite el anillo tórico del estuche y comprue be que no hay a su ciedad
etc. en su ranura.
5 Compruebe que no ha y a a rañazos etc. e n el an illo tórico mientra s v a
aplicando la grasa.
∫ Notas
Tenga cuidado cuando va a quitar la cámara digital del estuche de
manera que no se moje.
Quite la cámara con las manos limpias. (Lave sus manos con agua fresca y las
≥
seque enteramente.)
≥ Seque cualquier humedad de su cuerpo o pelo. (Ponga especial cuidado en el agua
que sale de las mangas de su traje térmico.)
≥ Cuando el tiempo o el mar es muy malo, elija un lugar donde la cámara digital no se
moje como, por el ejemplo, en casa o donde haya un techo encima.
90
VQT0X68
Page 91

Limpieza y almacenamiento
Lave la parte externa del estuche con agua.
1
≥ Lave la parte externa del estuche hasta que esté limpia. (P89)
≥ Tenga cuidado de cerrar el estuche y luego lave solo con agua su parte
externa.
≥ Saque toda suciedad dentro del estuche con un trapo mojado y blando.
∫
Notas
≥ No lave el estuche con agua a alta presión ya que eso podría causar infiltración de
agua. Quite la cámara digital antes de lavar el estuche con agua.
≥ No deje la cámara digital en el interior del estuche cuando vaya a almacenarla.
≥ Almacene el estuche en un lugar frío y bien ventilado.
Precauciones para el uso
∫
Manejo del anillo tórico
≥
No utilice alcohol, diluyente o un agente químico para limpiar el anillo tórico.
Eso causará daño o deterioro al anillo tórico.
≥
Si no utiliza el estuche durante un largo período de tiempo, quite el anillo
tórico de su ranura, le aplique una ligera capa de grasa (suministrada), lo
meta en una bolsa limpia de poliéster y, luego, lo almacene en un lugar frío y
oscuro para evitar dañar su superficie. Cuando vuelve a usarlo, compruebe
con esmero que no esté arañado ni roto.
≥
Sólo utilice la grasa especificada. Si usa grasa de otro género, puede dañarse
la superficie del anillo tórico causando infiltración de agua.
≥ El anillo tórico toca los lados del estuche volviendo éste último impermeable. No
golpee, haga entrar material extraño (suciedad, arena o pelo etc.) ni arañe el anillo
tórico ni los lados del estuche.
≥ Use las puntas de sus dedos para quitar el anillo tórico. No utilice objetos
puntiagudos ya que eso podría arañar el anillo tórico.
≥ Después de quitar el anillo tórico de la parte trasera del estuche, le saque toda
suciedad, arena, pelo u otro material extraño. Limpie también la ranura del anillo
tórico y los lados internos de la parte delantera del estuche que toca el anillo tórico.
≥ Nunca utilice un anillo tórico que haya sido arañado o dañado por la suciedad etc.
Eso causará infiltración de agua. Reemplácelo con uno nuevo.
91
VQT0X68
Page 92

Precauciones para el uso (continuación)
≥ Después de reemplazar el anillo tórico, no usar el estuche durante un largo período
de tiempo o abrir el estuche para unir la cámara, reemplace la batería etc.,
compruebe a fondo que el anillo tórico no esté arañado ni roto. Luego cierre el
estuche y compruebe que no haya infiltración de agua en él sumergiéndolo en un
tanque de agua, bañera etc. durante más o menos 3 minutos. (P84)
≥ Los anillo tóricos son productos consumibles. Sin embargo su duración dependerá
del cómo se mantendrán, del cuánto se utilizan y de sus condiciones de
almacenamiento, le recomendamos reemplazarlos cada año aunque no vea ningún
arañazo.
∫ Acerca del mantenimiento
≥ No utilice los productos químicos a continuación para la limpieza,
antioxidante, antiempañante o reparación. Lo de usarlos directa o
indirectamente (por aspersión química etc.) en el estuche puede producir
grietas si sujeto a alta presión.
Productos
químicos
prohibidos
Disolventes
orgánicos volátiles/
Agentes químicos
para limpieza
Anticorrosivos
Agentes
antiempañantes
Adhesivos
No limpie el estuche con disolventes orgánicos volátiles como el
alcohol, la gasolina o un diluyente y agentes químicos para
limpieza. Límpielo con agua fría o tibia.
No utilice anticorrosivos ya que las partes metálica están
hechas de acero inoxidable o bronce. Límpielo con agua fresca.
No utilice agentes antiempañantes a la venta. T enga cuidado de
usar el silicagel indicado en estas instrucciones de
funcionamiento.
No utilice adhesivos para reparar . En el caso de que su estuche
necesitase ser reparado, llame a su comerciante.
≥ Si la grasa se pega a la cámara digital, sáquela con un trapo blando y seco.
≥ Cuando limpia el interior del estuche, sólo hágalo utilizando un trapo blando y seco .
Limpie el interior del cristal delantero con un trapo blando y seco antes y después
del uso para que el cristal se mantenga claro.
Cuidado
92
VQT0X68
Page 93

∫ Acerca del almacenamiento y de la inspección
después del uso
≥ Siempre tenga la cámara digital fuera del estuche.
≥ Ponga cuidado en que no haya suciedad ni polvo pegados en el anillo tórico.
≥ Seque a fondo el estuche a temperatura ambiente, luego almacénelo en un sitio frío
y oscuro.
≥ Le recomendamos que inspeccione el estuche después de 3 años desde la compra
Esta inspección conlleva el desmontaje y la limpieza del estuche, comprobando
todas las piezas y reparándolas si fuese necesario y controlando lo impermeable
del estuche usando el mismo equipo de ensayo hidrostático que fue usado para
controlar lo impermeable antes de la compra. Todos los costes de transporte están
a cargo del cliente.
≥ No desmonte ninguna pieza ni utilice accesorio alguno que no esté especificado en
estas instrucciones de mantenimiento ni modifique el estuche. Si el estuche no
funciona correctamente, llame a su comerciante.
Especificaciones
Modelo compatible: DMC-TZ1
Peso: Aproximadamente 383 g
Dimensiones: Aproximadamente
Material: Policarbonato
Sistema impermeable: Cierre de anillo tórico
Profundidad de
resistencia al agua: 40 m
154 mm (W)k91 mm (H)k79 mm (D)
(excluyendo las partes salientes)
93
VQT0X68
Page 94

Indice
Prima dell’uso. . . . . . . . . . . . . . . . . . . . . . . . . . . . . . . . . . . . .95
Accessori . . . . . . . . . . . . . . . . . . . . . . . . . . . . . . . . . . . . . . . .97
Manipolazione e cura . . . . . . . . . . . . . . . . . . . . . . . . . . . . . . .98
Componenti . . . . . . . . . . . . . . . . . . . . . . . . . . . . . . . . . . . . .100
Cosa é un O-ring? . . . . . . . . . . . . . . . . . . . . . . . . . . . . . . . .101
Preparazione -Preparazione dell ’O-ring-. . . . . . . . . . . . . . .102
Preparazione -Controllo dell’impermeabilità
della custodia- . . . . . . . . . . . . . . . . . . . . . . .106
Preparazione -Inserimento della fotocamera digitale-. . . . .107
Ripresa di immagini . . . . . . . . . . . . . . . . . . . . . . . . . . . . . . .110
Consigli per la ripresa di immagini in acqua. . . . . . . . . . . . .111
Dopo l’uso . . . . . . . . . . . . . . . . . . . . . . . . . . . . . . . . . . . . . .112
Pulizia e custodia . . . . . . . . . . . . . . . . . . . . . . . . . . . . . . . . .114
Precauzioni per l’uso . . . . . . . . . . . . . . . . . . . . . . . . . . . . . .115
Specifiche. . . . . . . . . . . . . . . . . . . . . . . . . . . . . . . . . . . . . . .117
94
VQT0X68
Page 95

ITALIANO
Prima dell’uso
≥ Questa custodia può essere utilizzata solo per la fotocamera digitale Panasonic
DMC-TZ1.
Consente di riprendere immagini sott’acqua a profondità fino a 40 m.
≥ In caso di infiltrazioni d’acqua dovute a negligenza da parte dell’utente, Matsushita
non può essere ritenuta responsabile dei danni ai prodotti (fotocamera digitale,
batterie, scheda ecc.) inseriti nella custodia, dei costi fotografici o di ogni altra
spesa.
≥ Matsushita non offre inoltre alcun risarcimento in caso di incidenti che causino
lesioni alle persone o danni alla proprietà.
≥ Leggere il manuale di istruzioni della fotocamera digitale.
≥ Prima di inserire la fotocamera digitale, immergere la custodia in acqua per
3 o più minuti , allo scopo di controllare che non vi siano infiltrazioni d’acqua.
∫ Trattamento della custodia
≥ Utilizzo nelle seguenti condizioni.
• Profondità dell’acqua: fino a 40 m
• Temperatura ambiente: 0 oC a 40 oC
≥ Non utilizzare la custodia in acqua a temperatura superiore a 40 °C. Il calore può
danneggiare la custodia o causare infiltrazioni.
≥ La custodia è in policarbonato resistente agli urti, ma fare comunque attenzione
quando la si utilizza. Si graffia facilmente, specialmente in ambienti rocciosi, e può
danneggiarsi in caso di urti violenti o cadute. Quando si viaggia in auto, nave, treno
o aereo, imballare attentamente la custodia per evitare urti diretti in caso di caduta,
e non lasciare la fotocamera digitale nella custodia. Inserire la fotocamera digitale
nella custodia solo se la distanza da coprire è breve, ad esempio quando si va
dall’aeroporto al luogo di immersione. (Non è possibile riutilizzare per il trasporto
l’imballaggio originale della custodia.)
≥ Quando ci si trova a bordo di un aereo, il cambiamento della pressione atmosferica
può causare l’espansione della parte interna della custodia, danneggiandola.
Rimuovere l’O-ring prima di imbarcarsi su un aereo.
≥ Non lasciare per lungo tempo la fotocamera digitale nella custodia all’interno
di un’auto o di una nave, esposta alla luce solare diretta, ecc. La custodia è a
tenuta ermetica, per cu i la tem peratura al suo interno può raggiungere livelli
molto elevati, e la fotocamera digitale può cessare di funzionare
correttamente. Non lasciare che la temperatura all’interno della custodia
diventi troppo elevata.
95
VQT0X68
Page 96

Prima dell’uso (continua)
∫ Utilizzo della custodia in condizioni di bassa o alta
temperatura
≥ Se si apre o si chiude la custodia in un ambiente umido o caldo e poi si passa in un
posto freddo o ci si immerge sott’acqua, all’interno della custodia può formarsi della
condensa, la superficie del vetro può appannarsi e la fotocamera digitale può
essere danneggiata.
≥ Se si porta repentinamente la custodia da un luogo in cui la temperatura dell’aria o
dell’acqua è bassa a un ambiente riscaldato, la superficie del vetro può appannarsi.
Attendere che la temperatura della custodia si avvicini a quella dell’ambiente prima
di riprendere le immagini.
∫ Preparazione
≥ Non aprire o chiudere la custodia dove spruzzi d’acqua potrebbero colpirla o
la sabbia rischia di penetrare al suo interno. Si consiglia di aprire o chiudere
la custodia all’interno.
≥ Quando si sostituisce la batteria, la scheda, ecc. e si inserisce la fotocamera nella
custodia, eseguire l’operazione al coperto, e in condizioni di scarsa umidità.
≥ Se si deve aprire o chiudere la custodia nella zona dell’immersione per
sostituire la batteria o la scheda, attenersi alla seguente procedura.
• Scegliere un punto in cui la custodia non possa essere raggiunta da spruzzi
d’acqua, e in cui la sabbia non possa penetrare al suo interno.
• Eliminare le eventuali gocce d’acqua dall’intercapedine tra la copertura anteriore
e quella posteriore, e dalla fibbia. Quindi rimuovere att entamente ev entuali gocce
d’acqua residue con un panno asciutto.
• Eliminare attentamente eventuali gocce d’acqua dal corpo e dai capelli.
• Fare particolare attenzione all’acqua presente nelle maniche della muta termica.
• Non toccare la fotocamera digitale con le mani bagnate di acqua di mare.
Inumidire prima un asciugamano in acqua dolce e metterlo in una busta di
poliestere. Utilizzare tale asciugamano per rimuovere l’acqua o la sabbia dalle
mani o dal corpo.
≥ La custodia non è in grado di ammortizzare gli urti. Se si colloca un oggetto pesante
sulla custodia o la si urta, la fotocamera digitale può danneggiarsi. Fare attenzione
quando si utilizza la custodia.
96
VQT0X68
Page 97

Accessori
Quando si apre la confezione per la prima volta, controllare che siano
presenti la custodia e tutti gl i accessori, e che non a bbiano subito dann i
durante la distribuzione o il trasporto.
Se si riscontra qualche anomalia, contattare il rivenditore prima di
utilizzare la custodia.
Non utilizzare accessori diversi da quelli sotto indicati.
O-ring
VMG1743
Grasso (per O-ring)
VZG0372
Silica Gel (Essiccante)
(1 g/5 pezzi)
VZG0371
Cinturino
VFC4190
97
VQT0X68
Page 98

Manipolazione e cura
≥ Non collocare la custodia in punti instabili.
• Se la custodia dovesse cadere su un piede o sulla testa, potrebbe ferire l’utente.
Inoltre potrebbe non funzionare più in modo corretto.
≥ Non modificare mai la custodia.
• Se dell’acqua dov esse pene tra re nel la f oto camer a digi tale a causa di una modif ica
alla custodia, la f otocamer a può essere dan neg gia ta in mod o irr epara bil e.
• Se si continua ad utilizzare la fotocamera digitale dopo che l’acqua è penetrata al
suo interno, può svilupparsi un incendio.
≥ Non utilizzare la custo dia per imm ersioni con respirato re se non si ha
una preparazione adeguata.
• Utilizzare la custodia durante immersioni con respiratore solo se si dispone di una
preparazione adeguata e di una certificazione per questo sport.
≥ Tenere la custodia, il grasso, il silica gel o l’O-ring al di fuori della
portata dei bambini.
• S e un bambino dovesse restare con una parte del cor po intrappolata nella
custodia, rischia di ferirsi.
• I bambini possono inghiottire accidentalmente il grasso, il silica gel o l’O-ring.
• Consultare immediatamente un medico se si ritiene che un bambino possa aver
inghiottito il grasso, il silica gel o l’O-ring.
≥ Non appendere la cinghia al collo sott’acqua.
• Infatti potrebbe avvolgersi intorno al collo, causando soffocamento o serie lesioni.
≥ Lavare via accuratamente ogni traccia di grasso dalle mani.
• Non strofinare gli occhi o la bocca con le mani sporche di grasso.
≥ Se l’acqua dovesse penetrare nella custodia, smettere immediatamente
di utilizzarl a.
• In caso contrario si rischia di prender e la scossa o di ust ionarsi, o ppure può v erificarsi
un incendio.
• Consultare il rivenditore.
≥ Se si verifica qualche anomalia me ntre si utiliz za la custo dia sott’acqu a,
seguire tutte le pr ocedure nece ssarie e le istruzioni per la decom pressione
durante la risalita.
• S e si risale troppo rapidamente, si rischia un’embolia gassosa.
≥ Se si verificano eventi quali fuoriuscita di fumo, surriscaldamento,
emissione di odori o suoni strani, cessare immediatamente di utilizzare
la custodia.
• In caso contrario si rischia di prendere la scossa o di ustionarsi, oppure può
verificarsi un incendio.
• Rimuover e la f otocamera di gitale dalla cu stodia, qui ndi rimuov ere immedi atamente la
batteria dalla fo tocamer a di git ale .
• Consultare il rivenditore.
98
VQT0X68
Page 99

≥ Fare attenzione quando si apre la custodia dopo una infiltrazione di
acqua.
• L’acqua che si era infiltrata può fuoriuscire, o la copertura posteriore può
capovolgersi.
≥ Non lasciare la custodia esposta a temperature elevate.
• La temperatura interna raggiunge valori molto elevati in particolare quando la
custodia è esposta alla luce solare diretta su una spiaggia, su una nave, ecc., o
quando viene lasciata in una macchina chiusa in estate. Il calore può
danneggiare la custodia o le parti interne.
• S e nella custodia era inserita una fotocamera digitale, anche questa può essere
danneggiata.
• S e si utilizza la fotocamera digitale inserita nella custodia quando la temperatura
interna è molto elevata, possono verificarsi perdite, cortocircuiti o perdite di
isolamento, e la fotocamera può incendiarsi o guastarsi.
≥ Non maneggiare la fotocamera digitale o la batteria con le mani
bagnate.
• In caso contrario di rischia di prendere la scossa, o di danneggiare l’apparecchio.
∫ Quando si riprendono immagini con il flash
≥ Quando si riprendono immagini con il flash, gli angoli dell’immagine possono essere
soggetti all’effetto vignetta, o la luminosità dell’immagine può non essere uniforme.
≥ Quando si riprendono immagini con il flash, la distanza utile del flash è inferiore in
acqua che sulla terraferma.
99
VQT0X68
Page 100

Componenti
1 32 4 5 6
8
17 13
1516
14
1. Leva dello zoom
2. Occhiello cinghia
(Per l’installazione del cinghino
in dotazione)
7
3. Pulsante Stabilizz atore ottico
d’immagine
4. Pulsante di scatto otturatore
5. Selettore modalità di
funzionamento
6. Copertura ante riore
7. Diffusore
9
10
11
12
18
19
• Non è possibile rimuoverlo.
8. Vetro anteriore
9. Interruttore ON/OFF
10. 3/Pulsante Compensazione
dell’esposizione/Bracketing
automatico/Regola zione fi ne
del bilanciamento del bianco
11. 1/Pulsante modalità flash
12. Pulsante MENU/SET
13. 4/Pulsante REV
14. Pulsante Eliminazione/
Modalità scatto singolo/
Modalità scatto a raffica
15. 2/Pulsante Autoscatto
16. Pulsante DISPLAY/LCD
MODE
17. Copertura posteriore
18. Fibbia
19. Tasto di sblocco chiusura
100
VQT0X68
 Loading...