

Page 1
Operating Instructions
Bedienungsanleitung
Manuel d’utilisation
Instrucciones de funcionamiento
Flash
Model No. DMW-FL500
Before use, please read these instructions completely.
Bitte lesen Sie diese Bedienungsanleitung vor der Inbetriebnahme
des Gerätes vollständig durch.
Avant l’utilisation, veuillez lire entièrement ces instructions.
Antes del uso, lea detenidamente, por favor, estas instrucciones.
E
VQT0Z62
Page 2

Contents
Information for Your Safety ..................................................................................................................... 3
Precautions......................................................................................................................................... 4
Supplied accessories.............................................................................................................................. 4
Names of the Components..................................................................................................................... 5
Displays Appearing on the Display Panel............................................................................................... 6
Concerning the batteries ........................................................................................................................ 7
Inserting and Removing the Unit’s Batteries (optional)......................................................................... 10
Checking the Flash’s Remaining Battery Charge ................................................................................. 11
Mounting the Unit onto the Digital Camera, and Removing it............................................................... 12
Taking Pictures using a Digital Camera with Communication Functions.............................................. 13
How to select the flash mode............................................................................................................ 13
[TTL AUTO] ...................................................................................................................................... 14
[AUTO] ............................................................................................................................................. 15
[MANUAL] ........................................................................................................................................ 16
[FP TTL AUTO] ................................................................................................................................ 17
[FP MANUAL] .................................................................................................................................. 18
Taking Pictures using a Digital Camera without Communication Functions ......................................... 20
How to select the flash mode............................................................................................................ 20
[AUTO] ............................................................................................................................................. 21
[MANUAL] ........................................................................................................................................ 23
Other Applications ................................................................................................................................ 24
Taking pictures with bounce lighting ................................................................................................. 24
Taking pictures at close range .......................................................................................................... 25
Selecting the lighting angle manually................................................................................................ 25
How to use the Wide Panel............................................................................................................... 26
Many choices for different flash photography applications................................................................ 27
Functions.............................................................................................................................................. 28
Concerning Continuous Firing .............................................................................................................. 30
Table of Guide Numbers (GN).............................................................................................................. 31
Troubleshooting .................................................................................................................................... 33
Cautions for Use................................................................................................................................... 35
Specifications........................................................................................................................................ 37
2
VQT0Z62
Page 3

Information for Your
Safety
≥ This flash is designed to be used with digital
cameras made by Panasonic.
It is compatible with DMC-L1K (with
communication functions: P13 to 19 ),
DMC-FZ30 etc. (without communication
functions: P20 to 23 ). (as of July 2006)
≥ The explanations in these operating
instructions describe DMC-L1K as an example.
≥ Four Thirds
WARNING
TO REDUCE THE RISK OF FIRE OR
SHOCK HAZARD AND ANNOYING
INTERFERENCE, USE ONLY THE
RECOMMENDED ACCESSORIES AND DO
NOT EXPOSE THIS EQUIPMENT TO RAIN,
MOISTURE, DRIPPING OR SPLASHING.
DO NOT REMOVE THE COVER (OR BACK);
THERE ARE NO USER SERVICEABLE
PARTS INSIDE. REFER SERVICING TO
QUALIFIED SERVICE PERSONNEL.
TM
is a trademark.
ENGLISH
-If you see this symbol-
Information on Disposal for Users of Waste
Electrical & Electronic Equipment (private
households)
This symbol on the products
and/or accompanying
documents means that used
electrical and electronic
products should not be
mixed with general
household waste.
For proper treatment,
recovery and recycling,
please take these products
to designated collection points, where they will
be accepted on a free of charge basis.
Alternatively, in some countries you may be
able to return your products to your local retailer
upon the purchase of an equivalent new
product.
Disposing of this product correctly will help to
save valuable resources and prevent any
potential negative effects on human health and
the environment which could otherwise arise
from inappropriate waste handling. Please
contact your local authority for further details of
your nearest designated collection point.
Penalties may be applicable for incorrect
disposal of this waste, in accordance with
national legislation.
For business users in the European Union
If you wish to discard electrical and electronic
equipment, please contact your dealer or
supplier for further information.
Information on Disposal in other Countries
outside the European Union
This symbol is only valid in the European
Union.
If you wish to discard this product, please contact
your local authorities or dealer and ask for the
correct method of disposal.
VQT0Z62
3
Page 4
Precautions
∫ Concerning the unit’s handling
Do not subject the unit to strong vibration or
≥
≥ Before carrying the unit around with you,
≥ Sand and dirt may cause the unit to
≥ When taking photos on rainy days or on a
≥ The unit is not waterproof. If rain or drops of
≥ Read the operating instructions for your digital
Doing so may cause not only the unit to
impact.
malfunction but also the flash head to break.
ensure that the wide panel is properly
retracted. (P26)
malfunction. When using the unit in an
environment such as a beach, take steps to
protect it from sand and dirt.
beach, take care to keep the unit dry.
water splash onto the unit, wipe off the
water with a dry cloth. If the unit does not
operate normally, consult the dealer or your
nearest servicentre.
camera.
∫ When the unit is not going to be used for a
prolonged period
≥ Be absolutely sure to remove the batteries from
the unit.
≥ If the batteries are left inside the unit, a faint
current will flow continuously, even when the
unit’s power is off, gradually discharging the
batteries. (For details on nickel metal hydride
batteries, refer to P9.)
≥ Store the batteries in a cool, moisture-free
location where the temperature is kept as
constant as possible.
(Recommended temperature range:
15 °C to 25 °C;
recommended humidity range: 40% to 60%)
If you plan to store the unit and/or its batteries
≥
inside a closet or cupboard, it is recommended
that you put a desiccant (silica gel) in with them.
Supplied accessories
[Inspection to be performed when you unpack
the unit]
When removing the unit from its packing box,
check that the main unit and its supplied
accessories are present, and also check their
external appearance and functions to verify that
they have not sustained any damage during
distribution and transportation.
If you discover any trouble, contact your vendor
before using the product.
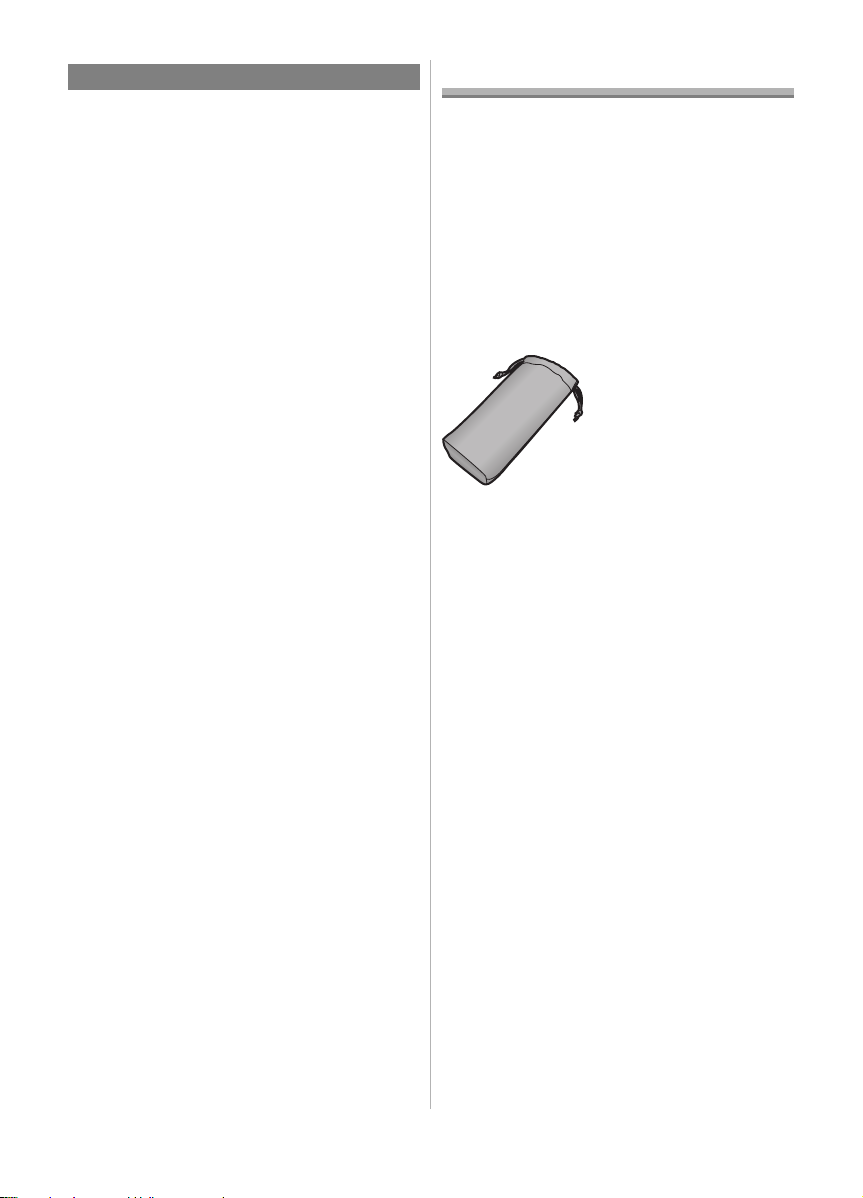
For this flash, use only the flash case shown
below.
Flash case
VFC4216
≥ The batteries are optional.
4
VQT0Z62
Page 5
Names of the
8
Components
12
6
7
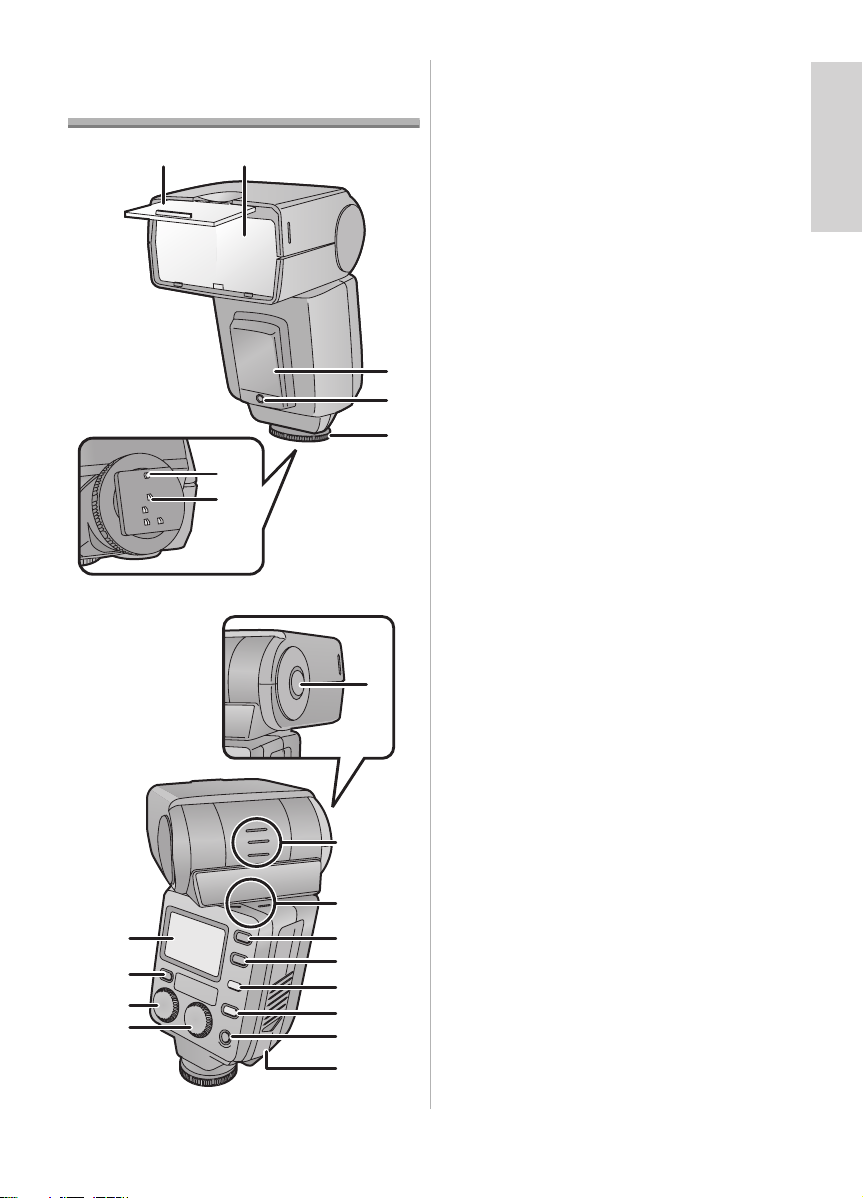
1 Wide panel (P26)
2 Flash head
3 AF assist lamp (P29)
≥ In dark locations where it is difficult to
bring the subject into focus, you can direct
light onto the subject to facilitate focusing.
(The AF assist works only when this flash
is used in combination with Panasonic’s
“Four Thirds
camera: it will not work with other
cameras.)
4 Flash sensor
5 Lock ring (P12)
6 Lock pin (P12)
7 Terminal area (P12)
3
8 Bounce unlock button (P12, 24 )
4
9 Bounce up/down angle display (P24)
10 Bounce left/right angle display (P24)
5
11 [MODE] button (P13, 20 , 28 )
12 [ZOOM] button (P21, 23 , 25 , 26 )
13 [AUTO CHECK] lamp (P11, 14 , 21 )
14 [TEST/CHARGE] button (P11, 13 20 )
15 [POWER] button (P11, 13 20 28 )
16 Battery cover (P10)
17 [F] dial (P19, 21 , 28 )
18 [GN/ISO] dial (P16, 21 , 23 , 28 )
19 [LIGHT] button (P28)
≥ The display panel will light for about
15 seconds. It can also be lighted by
operating a digital camera with
communication functions.
20 Display panel (P6)
TM
” digital single-lens reflex
20
19
18
17
9
10
11
12
13
14
15
16
5
VQT0Z62
Page 6
Displays Appearing on the Display Panel
1 2 3
13
12
11
10
98 7
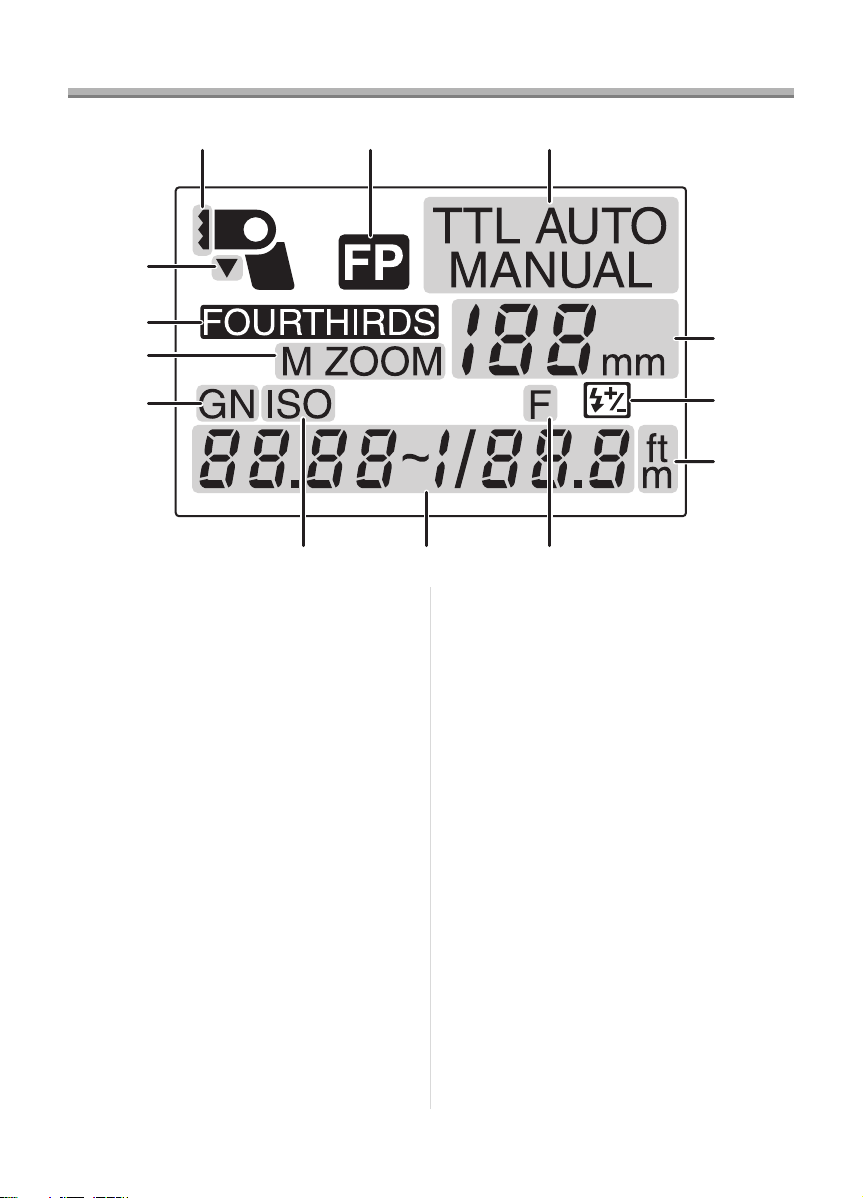
1 Wide panel display (P26)
2 FP firing (P17, 18 )
3 Flash mode (P13, 20 )
4 Zoom value (P25)
5 Flash intensity adjustment (P19)
6 Distance display (P29)
7 Aperture
8 Setting displays
(guide number, ISO sensitivity, aperture,
flash working range, correct distance, flash
intensity adjustment)
9 ISO sensitivity
10 Guide number (GN) (P31)
4
5
6
11 ZOOM mode (P25)
12 Lighting angle display (P29)
≥ [FOUR THIRDS]:
The lighting angle is displayed by the
focal length of the “Four Thirds” digital
camera format lens.
≥ [135]:
The lighting angle is converted into the
focal length of the 135 camera (35 mm
film conversion) and displayed.
13 Close-up flash (P25)
6
VQT0Z62
Page 7
Concerning the batteries
∫ Types of batteries that can be used
AA Alkaline dry batteries (LR6)
AA Rechargeable nickel metal hydride batteries
(Ni-MH)
≥ The use of batteries made by Panasonic is
recommended.
≥ The performance of the batteries used may
significantly differ depending on which battery
brand is used, how long the batteries have
been stored since they were manufactured and
how they have been stored.
≥ The performance of the batteries decreases
temporarily at low temperatures (below 10 °C),
but will be restored when the temperature
returns to room temperature.
≥ Malfunctioning may occur under certain
ambient temperatures and operating
conditions. However, this is not indicative of
trouble.
≥ In order to ensure that the batteries will function
for as long as possible, it is recommended that
you turn off the unit’s power during the intervals
between taking photos. If the unit is to be used
for prolonged periods, the use of rechargeable
nickel metal hydride batteries is recommended.
≥ Once spent, batteries may recover their
performance when left standing for a while, but
they will quickly become unusable again. For
this reason, always make a point of replacing
spent batteries with fresh ones.
∫ Types of batteries with which operation is
not guaranteed
AA Ni-Cd batteries
AA Nickel-manganese batteries (ZR6)
AA Lithium batteries (FR6)
AA Manganese batteries (R6)
AA Oxyride (oxy-nickel-hydroxide) dry batteries
(LR6)
CR-V3 Lithium battery packs
≥ Panasonic offers no guarantees that the unit
will operate properly when any of the batteries
listed above are used. Furthermore, use of
these batteries may result in electrolyte
leakage, power-on failures and other trouble.
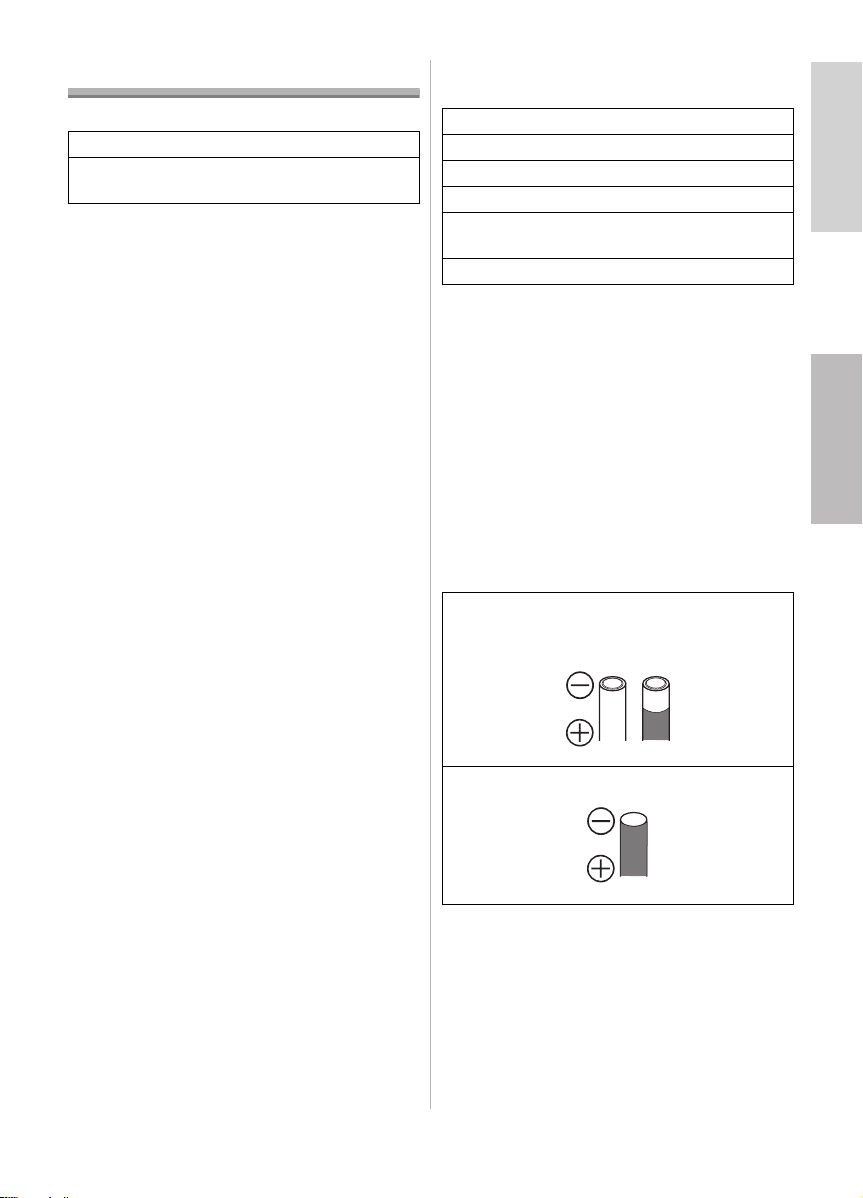
∫ Batteries with shapes that cannot be used
≥ Installing batteries with non-regular shapes in
the unit may cause electrolyte leakage, heat
generation and even rupturing of the batteries
themselves.
≥ Some batteries sold on the market have part or
all of their jackets missing: Under no
circumstances should such batteries be used.
(Refer to the figure below.)
≥ Batteries (bare batteries) with no external
jackets or batteries with parts of their jackets
missing
≥ Batteries whose - electrode is flat
7
VQT0Z62
Page 8

∫ Handling the batteries
Mishandling of batteries may cause electrolyte
leakage, heat generation and even rupturing of
the batteries themselves. Heed with the following
cautions.
≥ Do not expose batteries to water or seawater
or allow their terminal areas to become wet.
≥ Do not remove their external jackets or
damage them in any way.
≥ Do not drop the batteries, knock them into
other objects or subject them to any other
kind of strong impact.
≥ Stop using the batteries as soon as you
notice any electrolyte leakage, deformation,
discolouration or any other such trouble.
≥ Do not store batteries in locations where the
temperature and/or humidity levels are high.
≥ Keep batteries out of the reach of infants and
small children.
≥ When replacing the batteries, replace all four
batteries with fresh batteries of the same
type.
≥ Remove the batteries from the unit when you
do not intend to use the unit for a prolonged
period.
≥ Batteries may be hot immediately after the
unit has been used. Before removing them
from the unit, turn off the unit’s power and
wait until the temperature of the batteries has
dropped.
≥ At low temperatures (under 10 °C), the
performance of batteries will deteriorate and
the number of flashes fired by the unit will be
sharply reduced. The operating duration of
batteries tends to be shorter particularly
when alkaline dry batteries are used so warm
them in your pocket before use. When
warming batteries in your pocket, avoid direct
contact with cigarette lighters and other metal
objects as well as with pocket/body warmers.
≥ The number of flashes fired by the unit may
also be sharply reduced if the + and electrodes of the batteries are exposed to oils
from the skin or other forms of dirt. Before
installing the batteries, wipe the + and electrodes carefully using a soft, dry cloth.
If electrolytes should leak from the batteries,
wipe away all traces of the electrolyte in the
battery compartment, and then insert fresh
batteries or fully charged nickel metal hydride
batteries.
If you should get electrolyte on your hands or
clothes, rinse it off thoroughly with water. If you
should get electrolyte in your eyes, you risk
losing your sight. In such a case, do not rub your
eyes but immediately wash them with clean
water, and then seek medical advice.
8
VQT0Z62
Page 9

∫ Rechargeable nickel metal hydride
batteries
Nickel metal hydride batteries can be made ready
for use by recharging them using a dedicated
charger. However, mishandling may cause
electrolyte leakage, heat generation, the ignition
of flames and even rupturing of the batteries
themselves. Heed the following precautions.
≥ It may not be possible to properly recharge
batteries with dirty + and - electrodes. Use
a soft, dry cloth to carefully wipe the + and electrodes as well as the terminal areas of the
charger.
≥ Either when they are purchased or when they
have not been used for a prolonged period,
nickel metal hydride batteries may not have a
sufficient charge. This is due to their
characteristics and is not indicative of trouble.
Their regular performance will be restored
after they have been charged a number of
times.
≥ It is recommended that the batteries be
recharged only after their existing charge has
been used up. If they are repeatedly charged
without their existing charge first having been
used up, it may be difficult for them to sustain
their capacity. (A phenomenon referred to as
the memory effect.)
≥ If the memory effect has occurred, use up the
existing charge in the batteries until the unit
cannot fire and then recharge them fully a
number of times. This will restore their
capacity.
≥ When nickel metal hydride batteries are not
being used, their capacity will diminish due to
the effects of natural discharging.
≥ Do not continuously charge nickel metal
hydride batteries which already have a
charge.
≥ Do not remove their external jackets or
damage them in any way.
≥ Read the instructions accompanying the
charger used when recharging the batteries.
Nickel metal hydride batteries have a specific
service life. As they are increasingly used or as
time goes by, their capacity will diminish gradually.
When the length of time during which the unit can
be used has dropped drastically, the batteries
may have reached the end of their service life.
Obtain fresh batteries.
≥ The length of the service life of batteries differs
depending on their storage method, operating
conditions and the environment in which they
are used.
∫ When the unit is not going to be used for a
prolonged period
≥ If the batteries are left inside the unit, a faint
current will flow continuously, even when the
unit’s power is off, gradually discharging the
batteries. If they are left like this, they may
overdischarge and may become unusable even
when recharged.
≥ When storing the batteries for a prolonged
period, it is recommended that they be charged
once a year and that after their remaining
charge has been used up, they be removed
from the unit and stored again.
∫ Service life of batteries
Number of flashes
(number of full flashes in MANUAL mode at
intervals of 30 seconds)
Batteries used Number of flashes
Alkaline dry batteries
(LR6)
Nickel metal hydride
batteries (Ni-MH)
Photo taking conditions
≥ Temperature: 23 °C
Flash interval
Batteries used Flash interval
Alkaline dry batteries
(LR6)
Nickel metal hydride
batteries (Ni-MH)
≥ The number of flashes and flash interval differ
slightly depending on the storage status of the
batteries and the operating conditions.
At least 120 flashes
At least 140 flashes
Approx. 6 s
Approx. 4 s
VQT0Z62
9
Page 10
Inserting and Removing
the Unit’s Batteries
(optional)
≥ Check that the unit’s power is off.
≥ Use alkaline dry batteries or rechargeable
nickel metal hydride batteries.
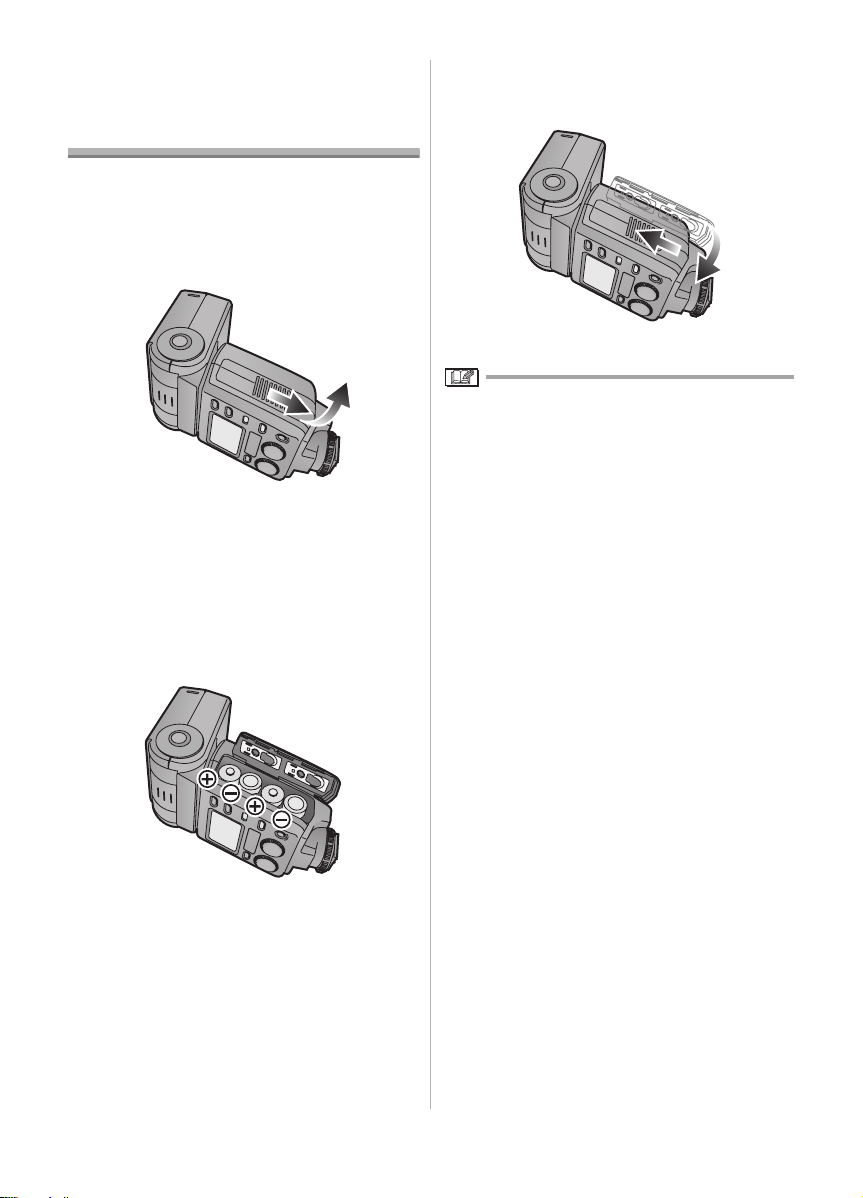
1 Slide the battery cover to open it.
≥ There is tape adhered to the battery cover
the first time that you use the unit. Peel it
off.
2 When inserting the batteries,
ensure that the + and - poles of
the batteries are aligned
correctly.
3 Close the battery cover by sliding
it back firmly as far as it will go.
≥ After using the unit, take out the batteries.
10
VQT0Z62
Page 11
Checking the Flash’s
Remaining Battery Charge
≥ Install the batteries and then turn on the unit
and check the battery remaining power.
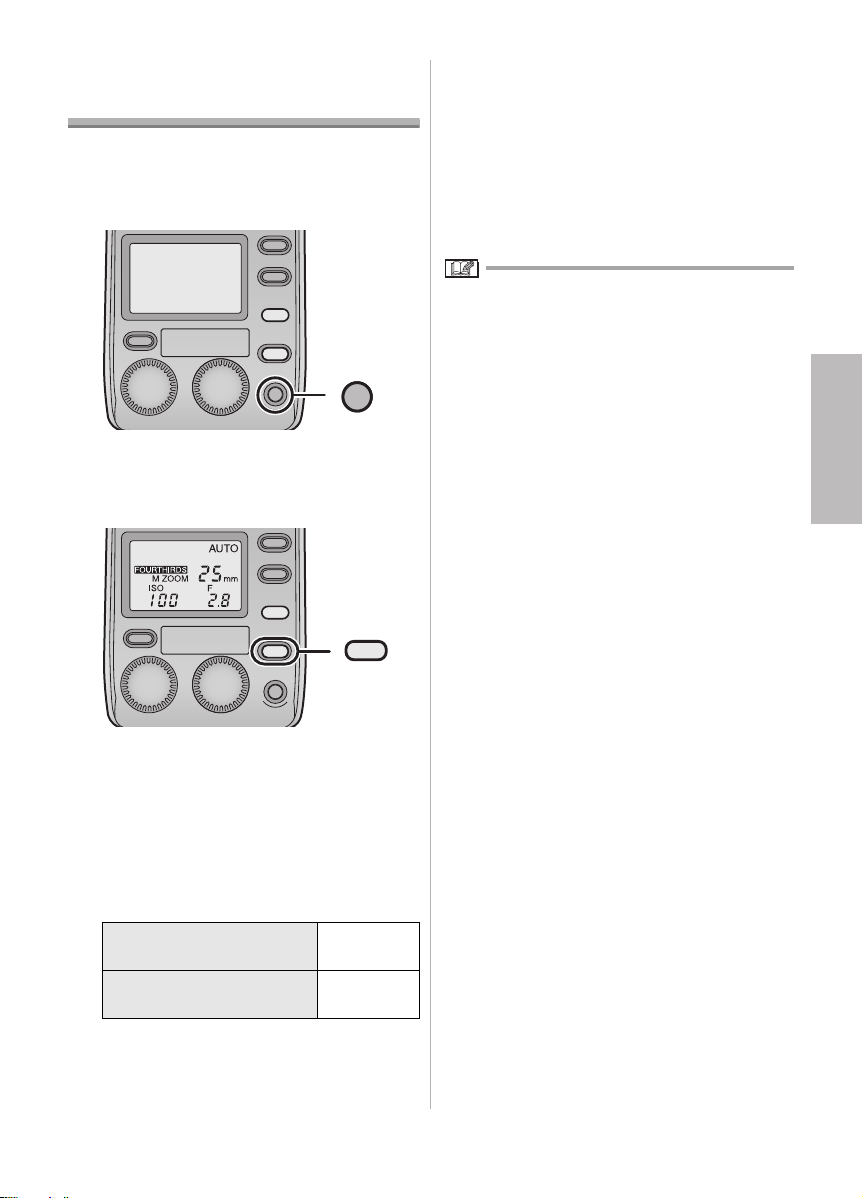
1 Push the [POWER] button.
POWERPOWER
≥ Charging now starts.
2 Check that the [TEST/CHARGE]
button lights.
TEST/
CHARGE
≥ If the [TEST/CHARGE] button and [AUTO
CHECK] lamp both flash at the same
time, it means that the batteries are
almost completely worn out and should
be replaced with fresh batteries as soon
as possible.
3 Push the [POWER] button to turn
off the unit’s power.
≥ When the [TEST/CHARGE] button is pushed,
the unit may fire.
≥ Turn off the power in the following situations:
≥ When mounting the unit onto, or disengaging
it from, the digital camera
≥ When you do not want the unit to fire
≥ When you are not going to use the unit
≥ After the batteries have been fully
charged, the [TEST/CHARGE] button
lights.
≥ If it takes as long for the [TEST/CHARGE]
button to light as the period indicated in
the table below, it means that the
batteries are nearly worn out. Replace
them with fresh batteries as soon as
possible.
Alkaline batteries More than
30 s
Rechargeable nickel metal
hydride batteries
More than
10 s
11
VQT0Z62
Page 12
Mounting the Unit onto
the Digital Camera, and
Removing it
≥ Check that the power of the digital camera and
unit is off. (Mounting the unit onto, or
disengaging it from, the camera while the
power is on may cause trouble and is not
recommended.)
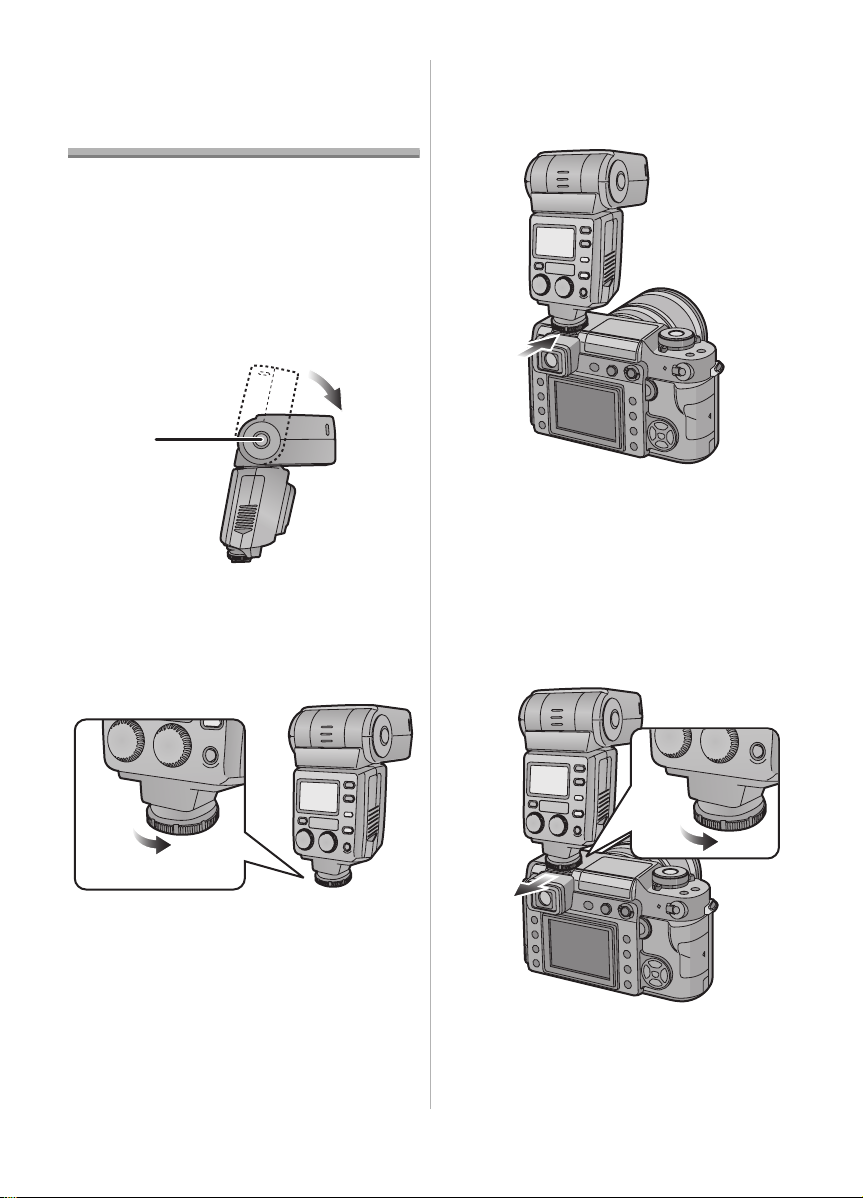
∫ Mounting the unit
1 Secure the flash head at the
horizontal front position.
A
3 Slide the unit firmly toward the
back of the hot shoe until a
clicking sound is heard.
4 Turn the lock ring in the
[2LOCK] direction until it stops
turning.
A: Bounce unlock button
≥ If the flash head is at the lock position,
rotate it while pushing the bounce unlock
button.
2 Loosen the lock ring.
≥ If the lock pin is protruding, turn the lock
ring in the opposite direction from
[2LOCK] and retract the pin.
≥ Do not apply more force than is
necessary to the lock ring.
≥ Do not touch the terminal areas with your
fingers, metal objects, etc.
≥ Do not mount the unit onto the digital
camera while the lock pin is protruding.
Otherwise you may damage the unit.
12
VQT0Z62
∫ Removing the unit
Completely loosen the lock ring,
and slide the unit off from the hot
shoe.
Page 13
Taking Pictures using a
Digital Camera with
Communication
Functions
How to select the flash mode
≥ For details on each flash mode, turn to P14 to
18 .
1 Turn on the power of the digital
camera.
2 Push the [POWER] button on the
unit.
POWER
≥ The [TEST/CHARGE] button lights after
the batteries have been fully charged.
3 Push the shutter button of the
digital camera halfway down.
≥ The ISO sensitivity, aperture, shutter
speed and other photo taking information
are sent between the digital camera and
the unit.
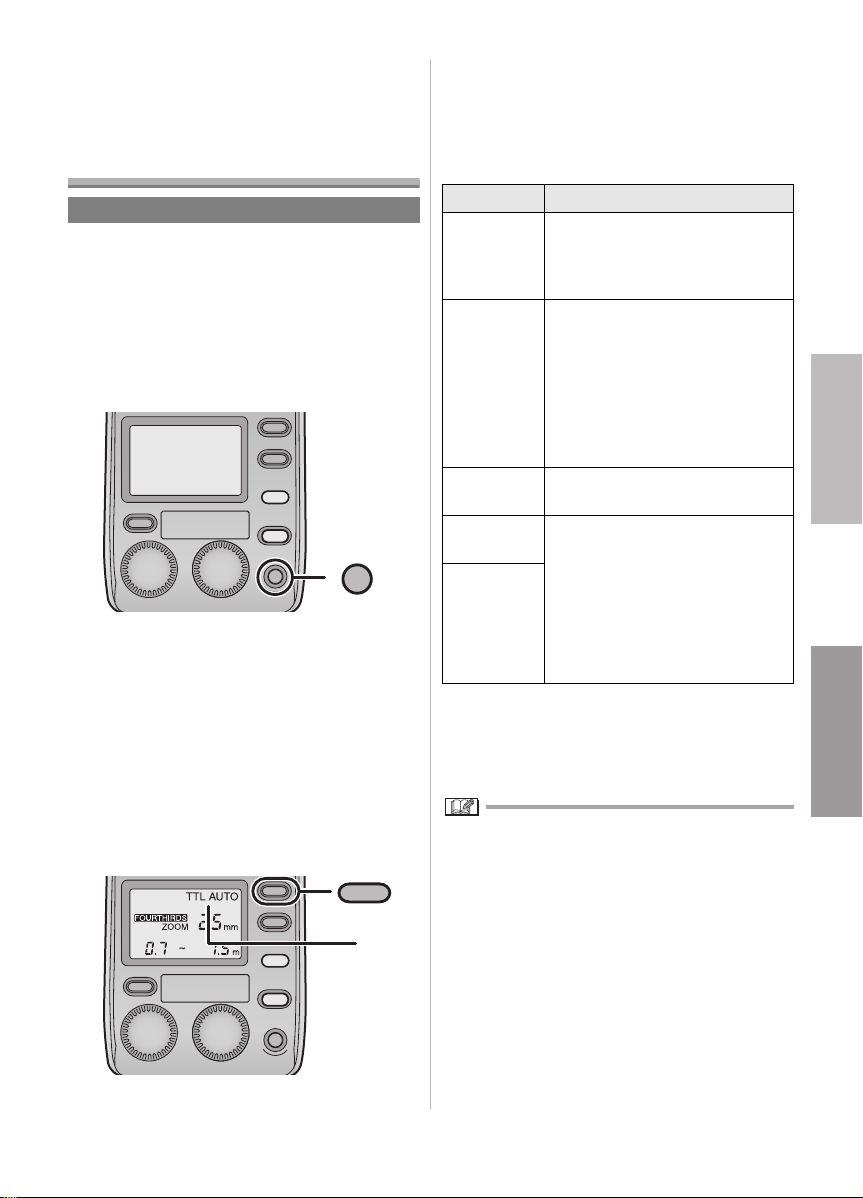
4 Push the [MODE] button, and
select the flash mode.
MODE
A
≥ The flash mode is shown on the display
panel.
≥ The mode is changed each time the
[MODE] button is pushed.
∫ Concerning the flash modes
Item Details of settings
[TTL AUTO] After measuring the appropriate
[AUTO] The unit senses the light by its
[MANUAL] The unit fires at the guide number
[FP TTL
AUTO]
[FP
MANUAL]
¢ The guide number (GN) is a value which
indicates the light quantity of a flash unit. The
higher the value, the greater the quantity of
light emitted by the unit.
≥ It may not be possible to use some of these
modes depending on the photo taking modes
which are supported by the digital camera.
≥ It is not possible to select a mode which cannot
be used.
flash intensity by discharging a
pre-flash, the unit fires again for
photo taking. (P14)
flash sensor in accordance with
the aperture of the lens, and it
adjusts the flash intensity. (P15)
≥ This mode can be used only for
digital camera models with
communication functions which
support the [AUTO] mode.
¢
which has been set. (P16)
(GN)
This mode enables flash photo
taking even at the high shutter
speeds of the digital camera by
FP firing (repeatedly firing the
flash at high speed). (P17)
The unit initiates FP firing at the
flash intensity set in the [FP
MANUAL] mode. (P18)
A: Flash mode
13
VQT0Z62
Page 14
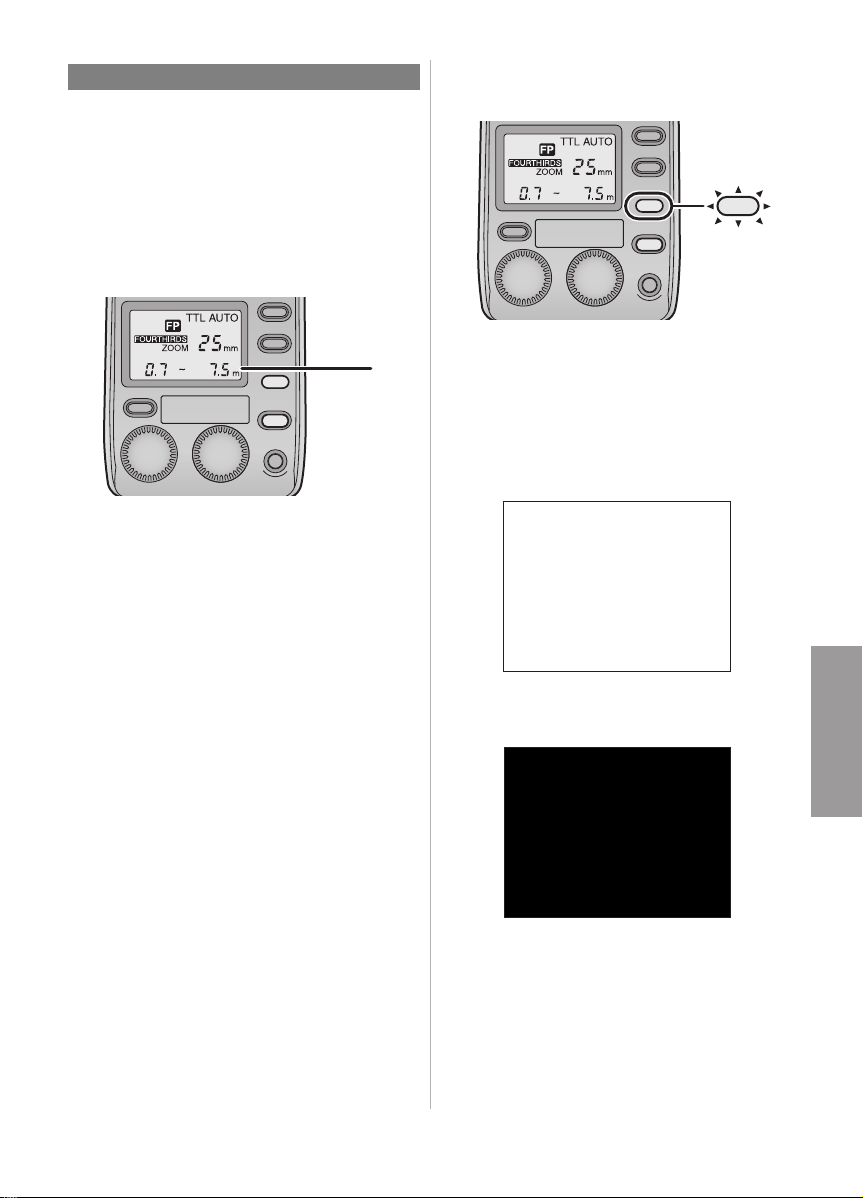
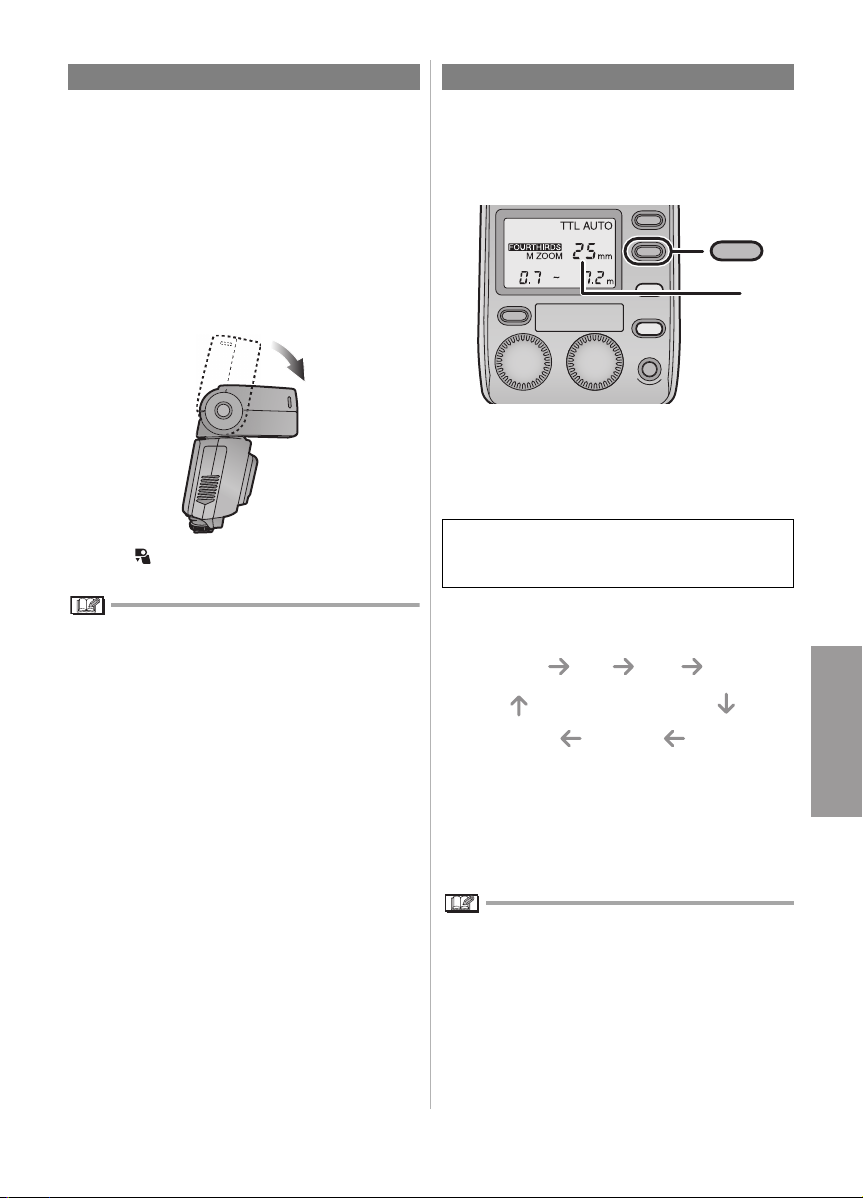
[TTL AUTO]
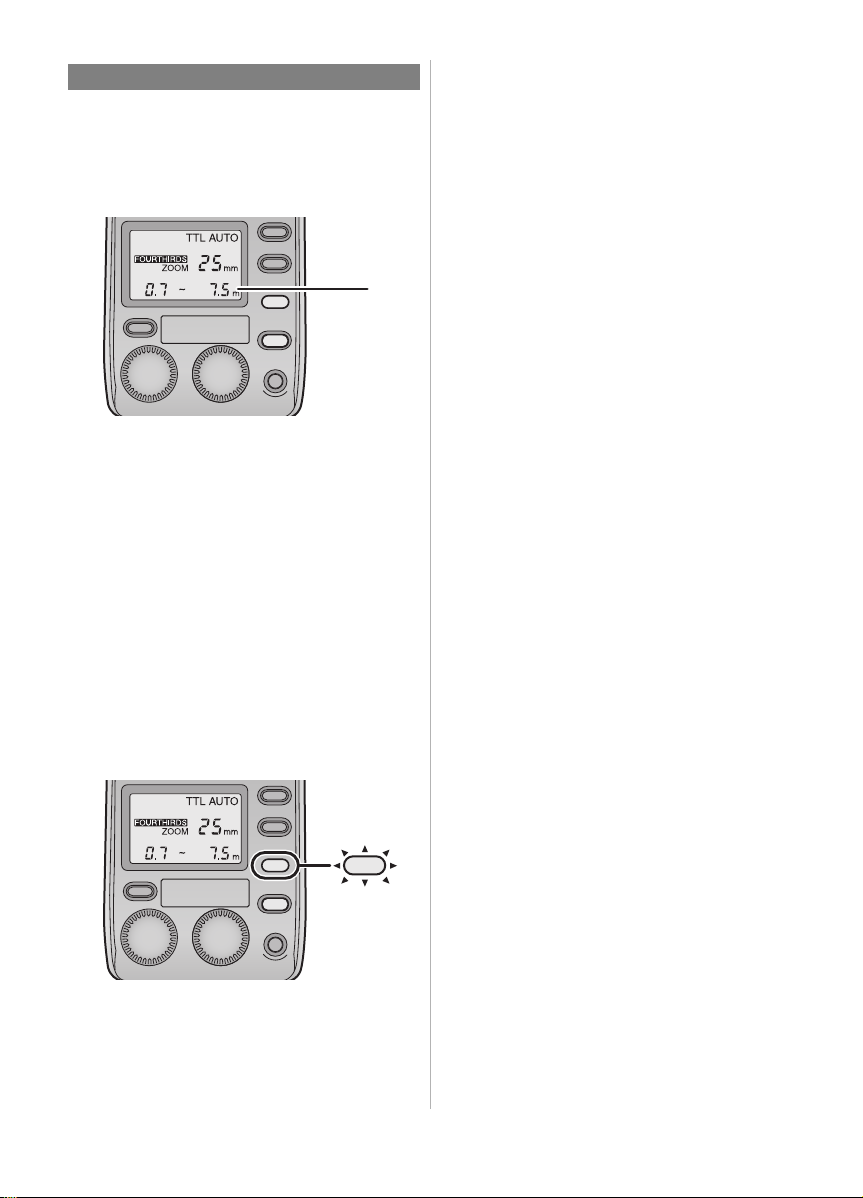
Push the [MODE] button, and select the flash
mode. (P13)
≥ The flash working range is shown on the
display panel in line with the settings of the
digital camera.
A
A: Flash working range
1 Check that the distance to the
subject is within the flash
working range.
≥ If the subject is outside the range, adjust
the aperture of the lens or change the
distance to the subject.
≥ The flash working range changes
depending on the type and settings (ISO
sensitivity, aperture and focal length) of
the digital camera used.
2 Push the shutter button all the
way down, and take the picture.
3 Check that the [AUTO CHECK]
lamp is flashing.
≥ If the [AUTO CHECK] lamp continues to
flash for about 5 seconds, it means that
the unit has fired successfully.
14
VQT0Z62
AUTO
CHECK
Page 15
[AUTO]
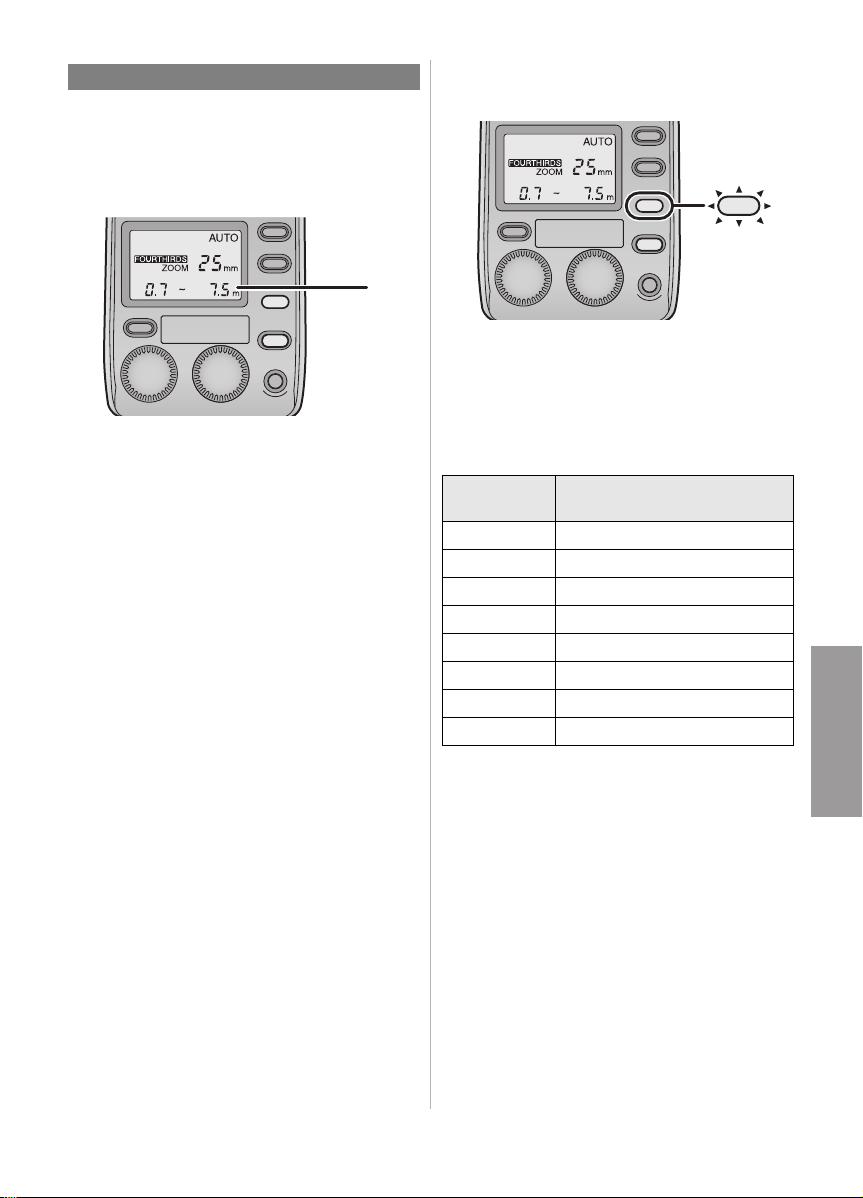
Push the [MODE] button, and select the flash
mode. (P13)
≥ The flash working range is shown on the
display panel in line with the settings of the
digital camera.
A
3 Check that the [AUTO CHECK]
lamp is flashing.
AUTO
CHECK
≥ If the [AUTO CHECK] lamp continues to
flash for about 5 seconds, it means that
the unit has fired successfully.
A: Flash working range
≥ If the settings on the digital camera (ISO
sensitivity and aperture) are outside the
combinations of the ISO sensitivity and
aperture which can be adjusted, the flash
working range is not displayed and the
user is warned by the flashing of [ISO]
and [F] on the display. In a case like this,
change the digital camera settings.
1 Check that the distance to the
subject is within the flash
working range.
≥ If the subject is outside the range, adjust
the aperture of the lens or change the
distance to the subject.
≥ The flash working range changes
depending on the type and settings (ISO
sensitivity, aperture and focal length) of
the digital camera used.
2 Push the shutter button all the
way down, and take the picture.
∫ Combinations of the ISO sensitivity and
aperture which can be adjusted in the
[AUTO] mode
ISO
sensitivity
3200 F8 to F32
1600 F5.6 to F32
800 F4 to F32
400 F2.8 to F32
200 F2 to F32
100 F1.4 to F22
50 F1.4 to F16
25 F1.4 to F11
Aperture
15
VQT0Z62
Page 16
[MANUAL]
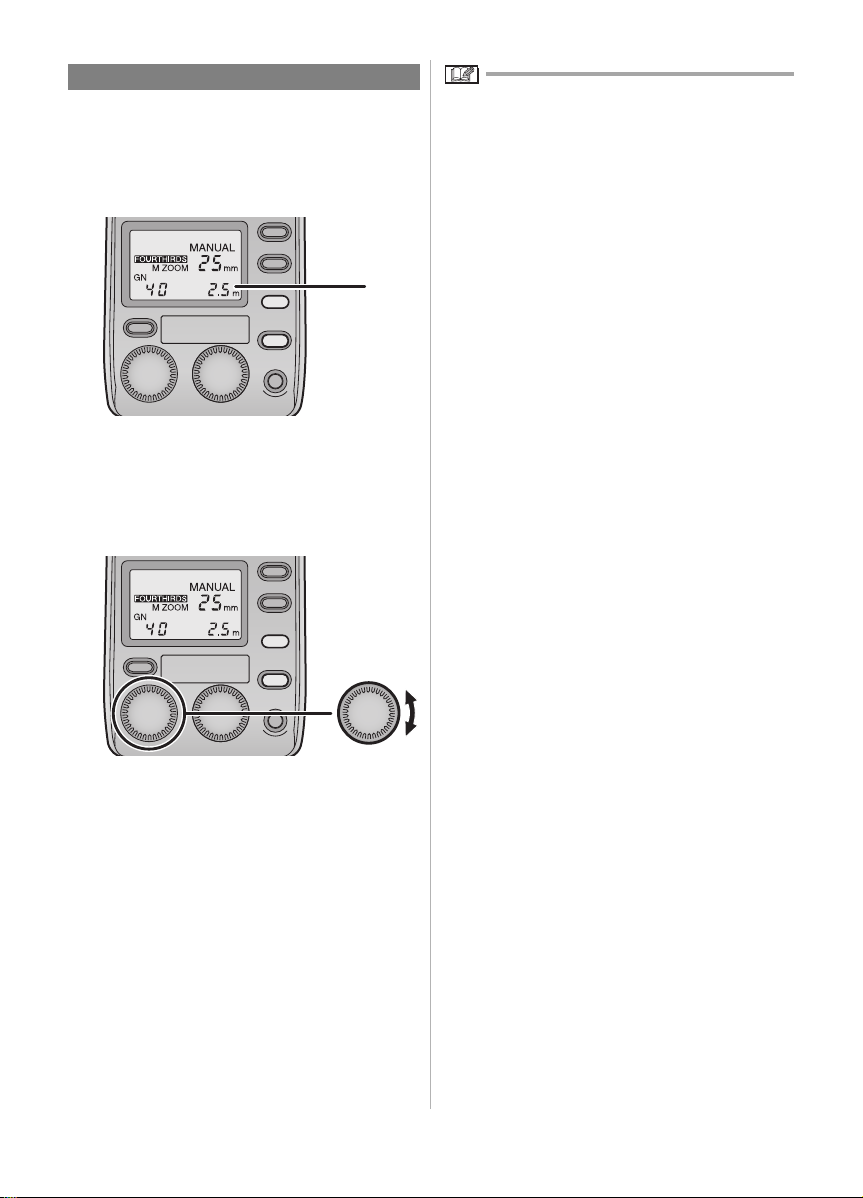
Push the [MODE] button, and select the flash
mode. (P13)
≥ The optimum camera to subject distance and
guide number (GN) matching the digital camera
settings are shown on the display panel.
A
A: Optimum camera to subject distance
1 Turn the [GN/ISO] dial and set the
guide number (GN) so that the
camera to subject distance is set
to the distance the subject.
≥ If the ISO sensitivity is [100], the optimum
camera to subject distance can be calculated
by dividing the guide number (GN) by the
aperture. (P31)
GN/ISO
≥ The [F] dial can also be used for this
setting.
≥ If the optimum camera to subject distance
is closer than 0.6 m (or 0.5 m for close-up
photos), the lighting range of the flash will
shift. In this case, the user is warned by
the flashing of the number on the display.
≥ The optimum camera to subject distance
changes depending on the digital camera
settings (ISO sensitivity, aperture, focal
length and shutter speed).
2 Push the shutter button all the
way down, and take the photo.
16
VQT0Z62
Page 17
[FP TTL AUTO]
Push the [MODE] button, and select the flash
mode. (P13)
≥ This mode enables flash photo taking even at
the high shutter speeds of the digital camera by
FP firing (repeatedly firing the flash at high
speed).
≥ The flash working range is shown on the
display panel in line with the settings of the
digital camera.
A
A: Flash working range
1 Check that the distance to the
subject is within the flash
working range.
≥ If the subject is outside the range, adjust
the aperture of the lens or change the
distance to the subject.
≥ The flash working range changes
depending on the type and settings (ISO
sensitivity, aperture and focal length) of
the digital camera used. The range is
narrower than in the [TTL AUTO] mode.
2 Push the shutter button all the
way down, and take the photo.
3 Check that the [AUTO CHECK]
lamp is flashing.
AUTO
CHECK
≥ If the [AUTO CHECK] lamp continues to
flash for about 5 seconds, it means that
the unit has fired successfully.
The following kinds of photos can be taken
using high shutter speeds.
≥ Photo taking with the shadows softened by
backlight photography
≥ Portrait photos taken outdoors with an open
aperture and with the background defocused
17
VQT0Z62
Page 18

[FP MANUAL]
Push the [MODE] button, and select the flash
mode. (P13)
≥ The optimum camera to subject distance and
guide number (GN) matching the digital camera
settings are shown on the display panel.
A
A: Optimum camera to subject distance
1 Turn the [GN/ISO] dial and set the
guide number (GN) so that the
camera to subject distance is set
to the distance to the subject.
GN/ISO
≥ The [F] dial can also be used for this
setting.
≥ If the optimum camera to subject distance
is closer than 0.6 m (or 0.5 m for close-up
photos), the lighting range of the flash will
shift. In this case, the user is warned by
the flashing of the number on the display.
≥ The optimum camera to subject distance
changes depending on the digital camera
settings (ISO sensitivity, aperture, focal
length and shutter speed).
2 Push the shutter button all the
way down, and take the photo.
18
VQT0Z62
Page 19
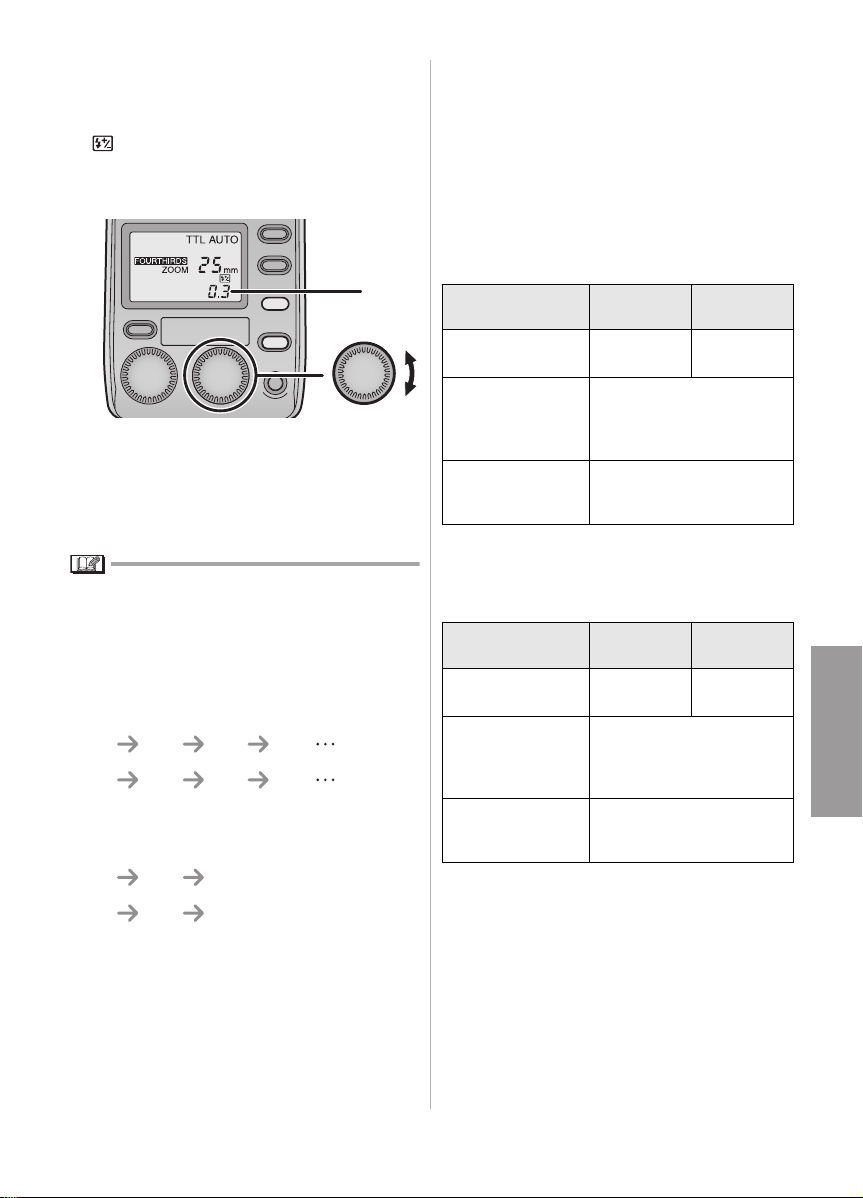
∫ Adjusting the flash intensity
The flash intensity can be adjusted in steps.
Set the flash intensity adjustment to [ON] before
adjusting the flash intensity. (P29)
≥ [ ] appears on the display panel.
1 Turn the [F] dial, and set the flash
intensity adjustment value.
A
F
A: Flash intensity adjustment value
≥ The flash intensity adjustment value is
always displayed except when it is [0]. If
the flash intensity adjustment value is [0],
the flash working range is not displayed.
The flash intensity adjustment range and the
actual flash intensity may differ depending on
the flash mode.
≥ Flash intensity adjustment range
≥ If [TTL AUTO], [AUTO] or [FP TTL AUTO] is
selected, the flash intensity can be adjusted
over a range of d3.0 steps.
0 +0.3 +0.7 +1.0 +3.0
0
-
0.3
-
0.7
-
1.0-3.0
≥ If [MANUAL] or [FP MANUAL] is selected,
the flash intensity can be adjusted over a
range of d0.7 steps.
0 +0.3 +0.7
≥ The actual flash intensity may vary when the
flash intensity adjustment value has been set
on both the digital camera and the unit.
≥ If [TTL AUTO], [AUTO] or [FP TTL AUTO] is
selected, the unit fires at the adjustment
value obtained by adding together the
adjustment values set on the digital camera
and the unit. (The value set on the unit only
is displayed as the flash intensity adjustment
value.)
[Example]
Unit
Adjustment value
setting
Unit’s flash
intensity
adjustment value
display
Actual
adjustment value
used for firing
≥ If [MANUAL] or [FP MANUAL] is selected,
the unit fires at the adjustment value set on
the unit only.
[Example]
Adjustment value
setting
Unit’s flash
intensity
adjustment value
display
Actual
adjustment value
used for firing
+0.3
(+2/3 EV)
Unit
+0.3
(+1/3 EV)
Digital
camera
+0.3
(+1/3 EV)
+0.3
+0.6
Digital
camera
+0.3
(+1/3 EV)
+0.3
+0.3
0
-
0.3
-
0.7
19
VQT0Z62
Page 20
Taking Pictures using a
Digital Camera without
Communication
Functions
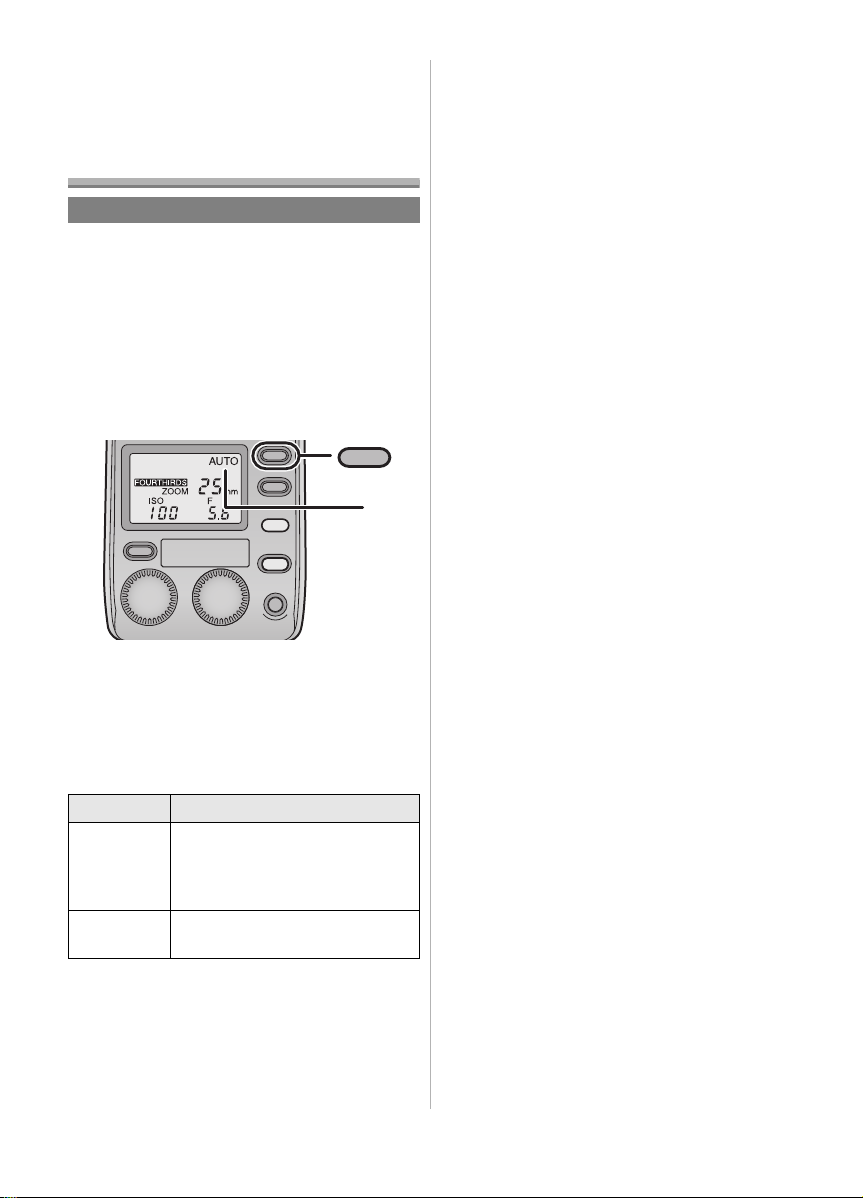
How to select the flash mode
≥ For details on each flash mode, turn to P21 to
23 .
1 Push the [POWER] button on the
unit.
≥ The [TEST/CHARGE] button lights after
the batteries have been fully charged.
2 Push the [MODE] button to select
the flash mode.
MODE
A
A: Flash mode
≥ The flash mode is shown on the display
panel.
≥ The mode is changed each time the
[MODE] button is pushed.
∫ Concerning the flash modes
Item Details of settings
[AUTO] The unit senses the light by its
[MANUAL] The unit fires at the guide number
¢ The guide number (GN) is a value which
indicates the light quantity of a flash unit. The
higher the value, the greater the quantity of
light emitted by the unit.
flash sensor in accordance with
the aperture of the lens, and it
adjusts the flash intensity. (P21)
¢
(GN)
which has been set. (P23)
20
VQT0Z62
Page 21
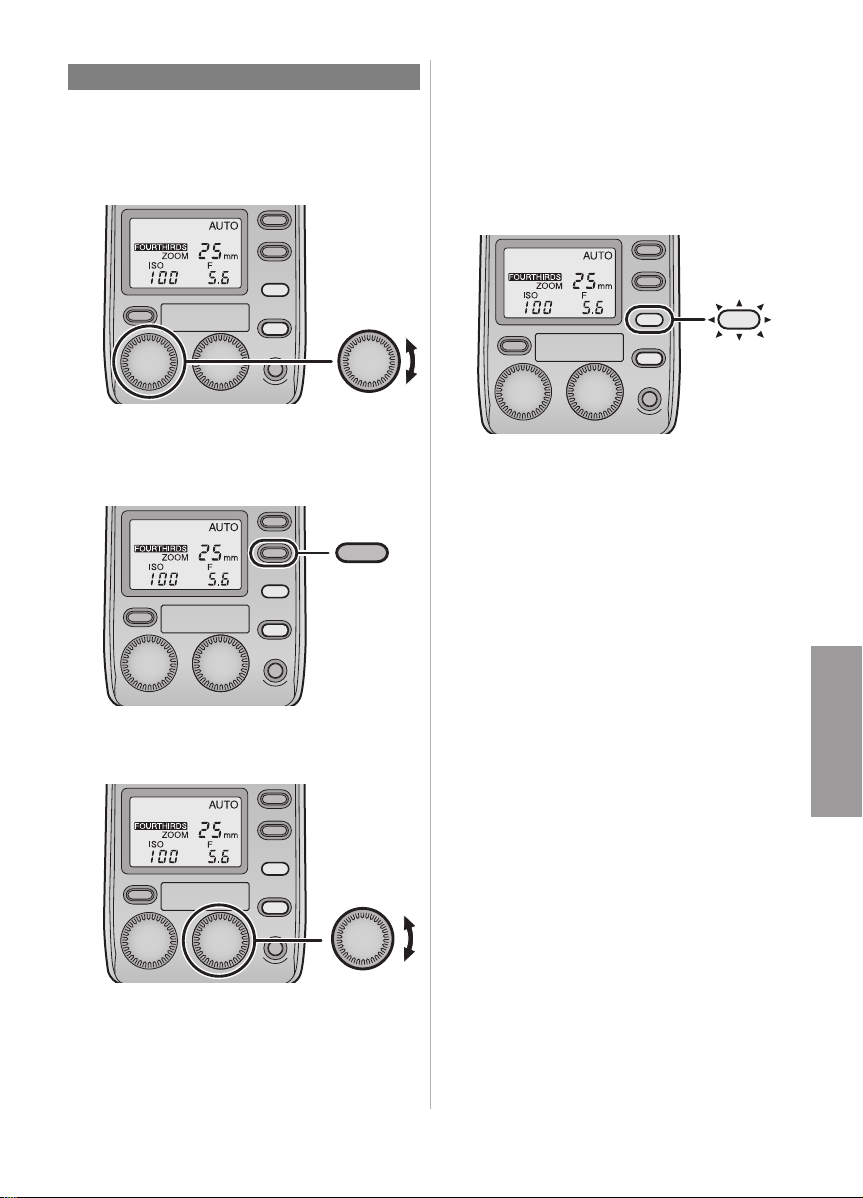
[AUTO]
Push the [MODE] button, and select the flash
mode. (P20)
1 Turn the [GN/ISO] dial to set the
ISO sensitivity.
GN/ISO
2 Push the [ZOOM] button to set
the zoom value to the focal
length of the lens.
ZOOM
4 Push the shutter button all the
way down, and take the photo.
5 Check that the [AUTO CHECK]
lamp is flashing.
≥ If the [AUTO CHECK] lamp continues to
flash for about 5 seconds, it means that
the unit has fired successfully.
AUTO
CHECK
3 Turn the [F] dial and set it to the
aperture of the lens.
F
≥ If the combination of the ISO sensitivity
and aperture are outside the usable
range, a warning is given in the form of
the flashing ISO sensitivity and aperture
displays. In a case like this, change the
ISO sensitivity and aperture.
21
VQT0Z62
Page 22
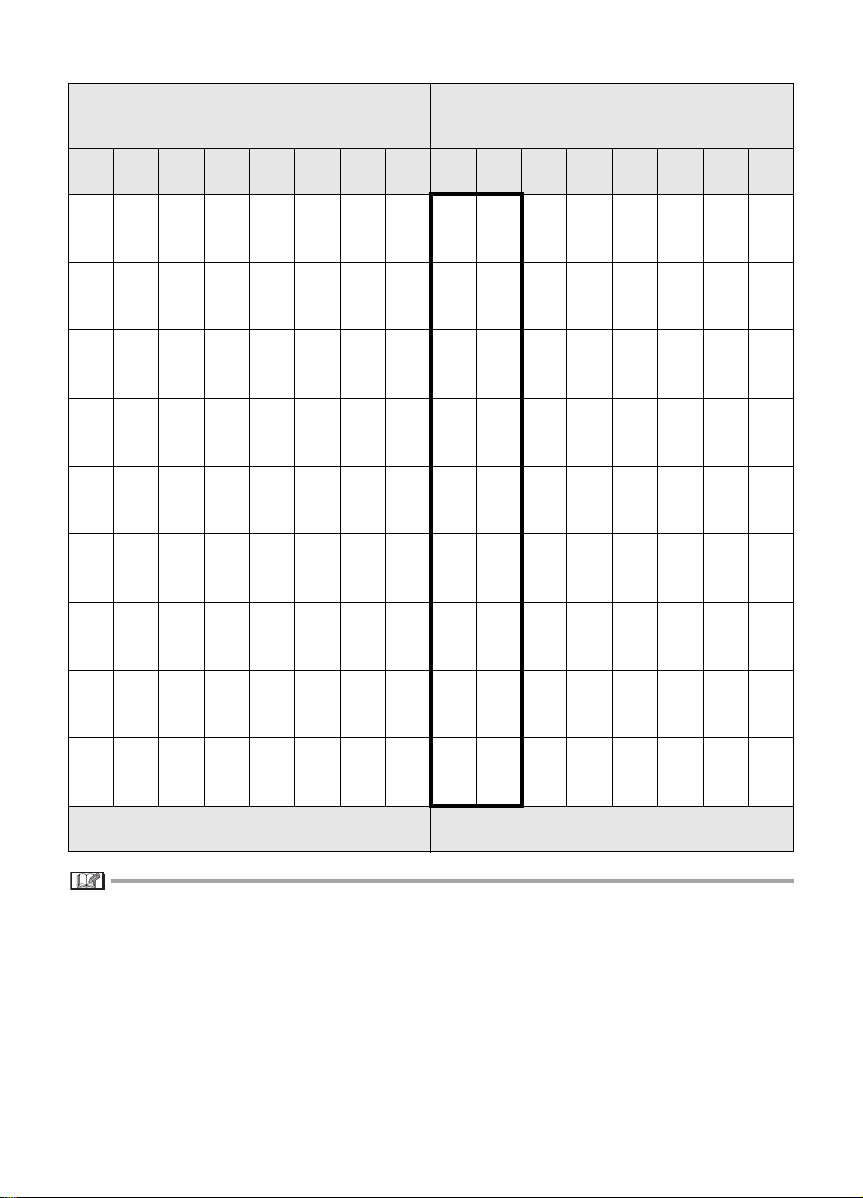
∫ Flash working range in [AUTO] mode
ISO sensitivity
3200 1600
F8 F5.6 F4 F2.8 F2 F1.4
F11F8F5.6F4F2.8F2F1.4
F16 F11 F8 F5.6 F4 F2.8 F2 F1.4
F22F16F11 F8F5.6F4F2.8F2
F32 F22 F16 F11 F8 F5.6 F4 F2.8
` F32 F22 F16 F11 F8 F5.6 F4
``F32 F22 F16 F11 F8 F5.6
```F32 F22 F16 F11 F8
````F32 F22 F16 F11
800 400 200 100 50 25
``
`
Aperture values that can be set
Lighting angle
Focal length (mm)
(35 mm film conversion)
8
(16)10(20)12(24)14(28)17(35)25(50)35(70)42(85)
1.1
1.2
1.7
1.9
2.2
2.5
2.8
[
12.8
0.8
[
9.0
0.5
[
6.4
0.5
[
4.5
0.5
[
3.2
0.5
[
2.2
0.5
[
1.6
0.5
[
1.1
0.5
[
0.7
[
14.2
0.9
[
10.0
0.6
[
7.1
0.5
[
5.0
0.5
[
3.5
0.5
[
2.5
0.5
[
1.8
0.5
[
1.2
0.5
[
0.8
[
20.0
1.2
[
14.0
0.8
[
10.0
0.6
[
7.0
0.5
[
5.0
0.5
[
3.5
0.5
[
2.5
0.5
[
1.7
0.5
[
1.2
[
21.4
1.3
[
15.0
0.9
[
10.7
0.6
[
7.5
0.5
[
5.3
0.5
[
3.7
0.5
[
2.7
0.5
[
1.8
0.5
[
1.3
[
25.7
1.6
[
18.0
1.1
[
12.8
0.8
[
9.0
0.5
[
6.4
0.5
[
4.5
0.5
[
3.2
0.5
[
2.2
0.5
[
1.5
[
28.5
1.7
[
20.0
1.2
[
14.2
0.8
[
10.0
0.6
[
7.1
0.5
[
5.0
0.5
[
3.6
0.5
[
2.5
0.5
[
1.7
[
32.1
2.0
[
22.5
1.4
[
16.0
1.0
[
11.2
0.7
[
8.0
0.5
[
5.6
0.5
[
4.0
0.5
[
2.8
0.5
[
1.9
3.1
[
35.7
2.2
[
25.0
1.5
[
17.8
1.1
[
12.5
0.7
[
8.9
0.5
[
6.2
0.5
[
4.5
0.5
[
3.1
0.5
[
2.2
Working range when taking pictures in [AUTO]
(m)
≥ The areas framed by the bold lines indicate the flash working range when the wide panel is used.
(P26)
≥ When the flash head is facing toward the front, the number displayed at the near-distance side is
0.6 m or more, and when it is pointed downward, it is 0.5 m or more.
≥ The flash intensity can be adjusted in 1/3 steps by varying the ISO sensitivity and aperture from the
digital camera settings.
22
VQT0Z62
Page 23

[MANUAL]
Push the [MODE] button, and select the flash
mode. (P20)
≥ The guide number (GN) and light quantity ratio
appear on the display panel.
A
A: Light quantity ratio
≥ The “light quantity ratio” is the ratio of the
flash intensity to the full flash.
1 Push the [ZOOM] button to set
the zoom value to the focal
length of the lens.
3 Push the shutter button all the
way down, and take the photo.
∫ How to determine the aperture and guide
number
When the camera to subject distance and
aperture have been decided upon
≥ The following formula is used to obtain the
guide number (GN), which is then set in the
unit.
“Aperture (F)” k “Camera to subject distance (m)”
m “ISO sensitivity coefficient”
When the aperture is to be set
≥ The following formula is used to obtain the
aperture, which is then set in the digital
camera.
“Guide number (GN)” k “ISO sensitivity
coefficient” m “Camera to subject distance (m)”
How to obtain the optimum camera to subject
distance
“Guide number (GN)” k “ISO sensitivity
coefficient” m “Aperture (F)”
ZOOM
2 Turn the [GN/ISO] dial, and set
the guide number (GN).
GN/ISO
≥ The [F] dial can also be used for this
setting.
ISO sensitivity coefficient
ISO
sensitivity
3200 5.6
1600 4.0
800 2.8
400 2.0
200 1.4
100 1.0
50 0.71
25 0.5
≥ For a list of guide numbers (GN), turn to P31.
Compensation coefficient
VQT0Z62
23
Page 24
Other Applications
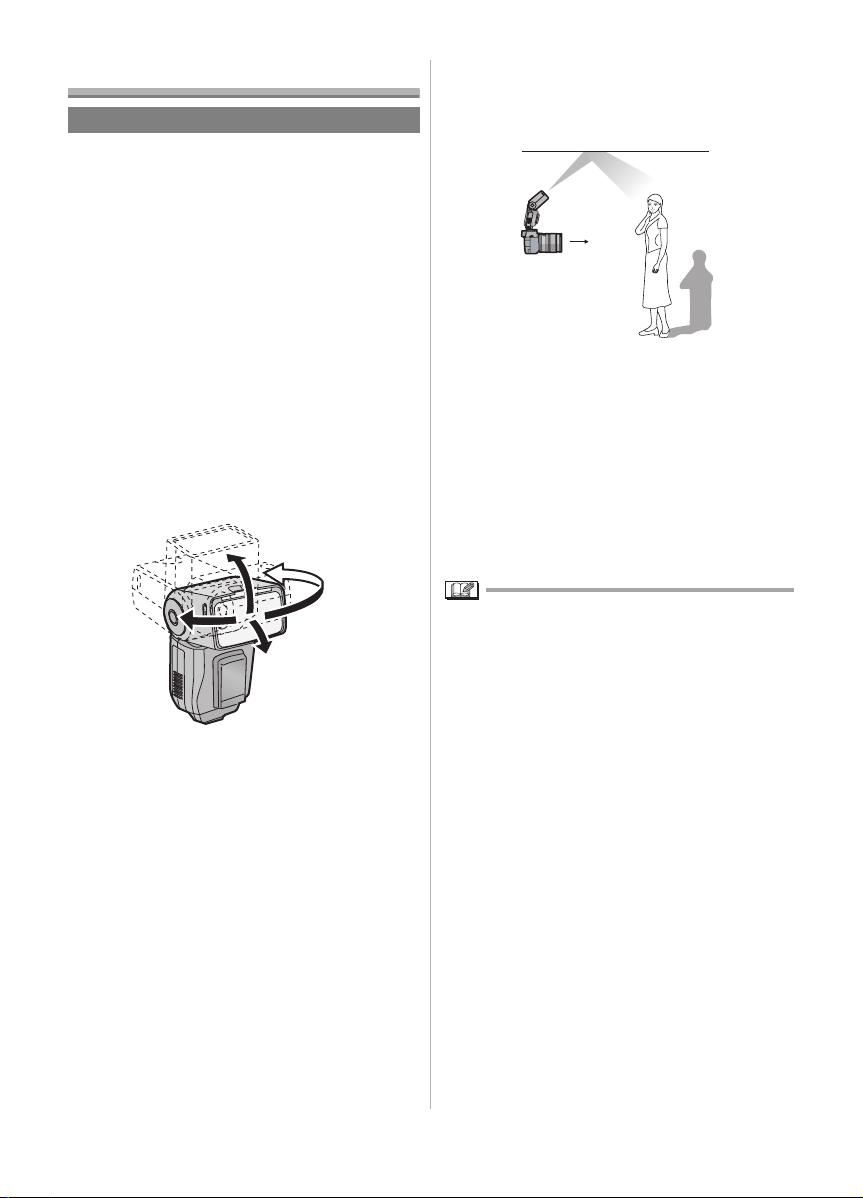
Taking pictures with bounce lighting
≥ Bounce light photography is a technique which
uses the reflected light from a ceiling or a wall
onto which the light emitted from a flash unit
has been directed.
≥ If the flash is aimed directly at the front of the
subject when the portrait of a person is to be
taken, for instance, strong shadows may form
or the person’s skin and other areas may
appear whitish and indistinct.
≥ However, if the bounce light technique is used
at times like this, the strong shadows can be
minimized and the subject captured naturally.
1 While holding down the bounce
unlock button, turn the flash
head so that it is pointing in the
desired direction.
90°
2 Point the flash at the ceiling or
other reflective surface, and take
the photo.
≥ The flash working range and optimum
camera to subject distance do not appear
on the display panel.
≥ When the lighting angle is set to [ZOOM]
(auto), the zoom value appears on the
display panel as [--] and 25 mm [135
camera (35 mm film conversion): 50 mm]
is set.
≥ The lighting angle can be changed
manually. (P25)
90°
7°
≥ At the locked position, change the
direction while holding down the bounce
unlock button.
24
VQT0Z62
180°
≥ When the [TEST/CHARGE] button is pushed,
the [AUTO CHECK] lamp lights, and whether or
not the firing is appropriate can be verified.
(This is possible only when [AUTO] is
established as the flash mode.)
≥ If the surface (such as the ceiling or walls) off
which the light from the flash is to be reflected
is coloured, this may affect the photo images.
Choose a surface which is white or off-white as
the reflecting surface.
Page 25
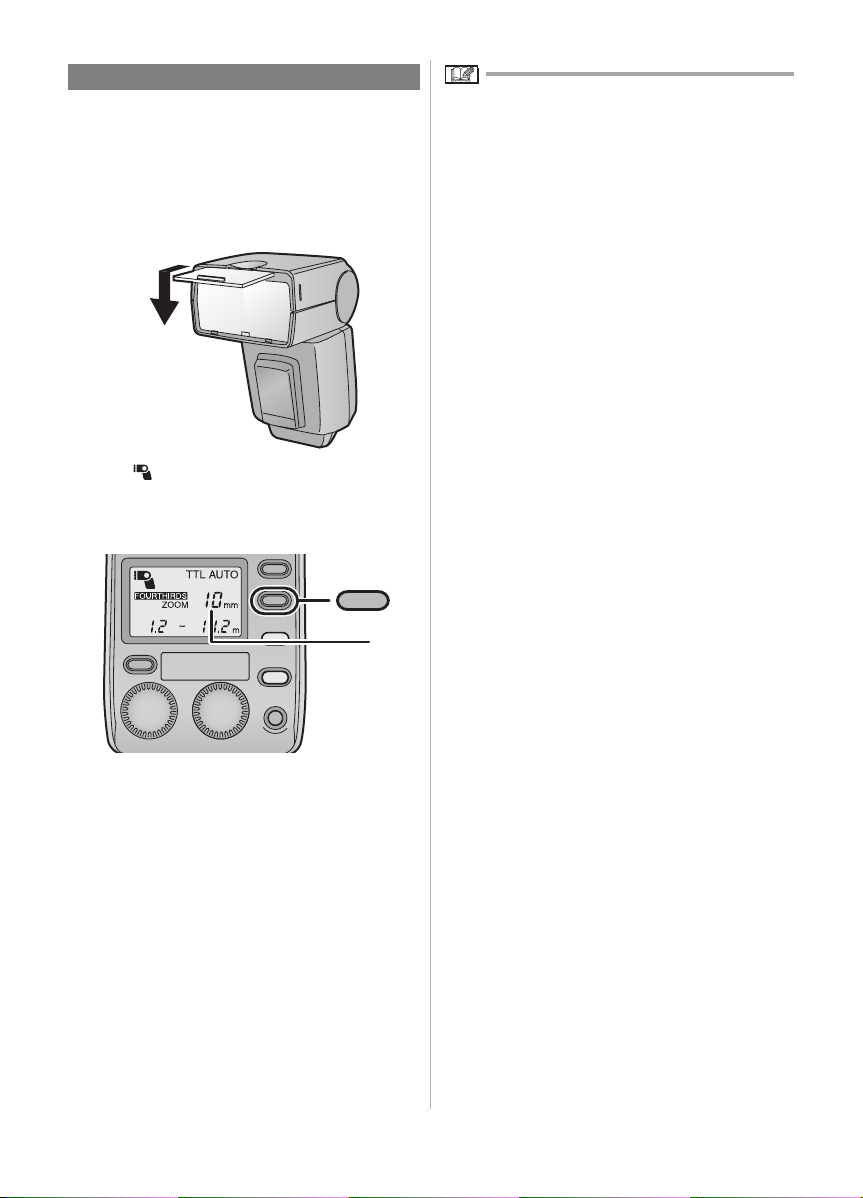
Taking pictures at close range Selecting the lighting angle manually
≥ When the camera to subject distance is 0.5 m
to 1.5 m, the light emitted from the flash will be
skewed. For this reason, while holding down
the bounce unlock button, point the flash head
downward (7 degrees), and then take the
picture.
≥ The lighting angle can be adjusted manually.
Push the [ZOOM] button, and
select the lighting angle.
ZOOM
Point the flash head down as far
as it will go (7 degrees
downward).
A: Lighting angle
≥ [M ZOOM] appears on the display panel.
Any of the following ZOOM settings can be
selected:
12 mm, 14 mm, 17 mm, 25 mm, 35 mm, 42 mm
≥ [ ] appears on the display panel.
≥ Vignetting may be caused by the light from the
flash when the lens has a long overall length or
a large diameter. Take a test photo first, and
then take the picture.
≥ Use the flash in this way only for close-up
photos. If you keep the flash head pointed
down during regular photo taking, the light
emitted from the flash at the top of the screen
will be insufficient.
[With a 135 camera (35 mm film conversion):
24 mm, 28 mm, 35 mm, 50 mm, 70 mm, 85 mm]
Each time the [ZOOM] button is pushed, the
settings are selected in the following sequence:
AUTO
ZOOM
42
(85)
≥ [AUTO ZOOM] can be used only when a digital
camera with communication functions is used.
≥ When the wide panel is used,
any of the following settings can be selected:
[AUTO ZOOM], [10 (20)] or [8 (16)].
12
(24)
35
(70)
14
(28)
17
(35)
25
(50)
A
≥ When a value higher than the focal length of
the lens used is selected, the edges of the
images will darken.
VQT0Z62
25
Page 26
How to use the Wide Panel
≥ Use the built-in wide panel for flash
photography when the focal length of the lens is
wider than 12 mm.
≥ Set wide panel switching to [ON]. (P29)
1 Pull out the wide panel and then
push it down.
≥ [ ] appears on the display panel.
2 Push the [ZOOM] button, and
select the lighting angle.
ZOOM
A
≥ The angle cannot be displayed for a digital
camera which does not have communication
functions.
When using the wide panel, the guide number
≥
(GN) is reduced. This means that the working
range is reduced when taking photos in the [TTL
AUTO], [AUTO] or [FP TTL AUTO] mode and that
the optimum camera to subject distance is
reduced when taking photos in the [MANUAL] or
[FP MANUAL] range.
≥ After taking the photos, retract the wide panel.
≥ Do not push the wide panel upward. Otherwise
it may be damaged.
A: Lighting angle
≥ 8 mm or 10 mm
[16 mm or 20 mm for a 135 camera
(35 mm film conversion)] can be selected.
26
VQT0Z62
Page 27

Many choices for different flash
photography applications
≥ Many different flash photography applications
can be chosen by the digital camera settings.
≥ It may not be possible to use some functions
depending on the functions and shape of the
digital camera used.
≥ For further details, refer to the operating
instructions of your digital camera.
≥ Select [TTL AUTO] or [FP TTL AUTO] as the
flash mode.
Red-eye reduction flash
≥ The light emitted by the flash reduces red eye
where the eyes of the subjects appear red.
Slow synchronization
2nd curtain synchronization
≥ When taking slow-shutter shots of moving
subjects, the flash is activated just before the
shutter closes.
Light sources emanating from behind the
subject are captured to achieve a dynamic
feeling.
≥ Light from the unit can be emitted using the
slow shutter.
This enables shots of people to be taken clearly
against the backdrop of night scenes.
27
VQT0Z62
Page 28
Functions
≥ You can set each function in advance.
1 Push the [POWER] button.
2 Press the [MODE] button for 2 or
more seconds to switch to the
function settings.
MODE
3 Turn the [GN/ISO] dial to select
the menu item.
∫ Returning the function settings to the
default status (status at the time of
purchase)
When the [MODE] button and [LIGHT] button are
pushed together for two or more seconds, all the
settings except for the distance display (m/ft) are
returned to their defaults.
MODE
LIGHT
≥ The setting for the distance display (m/ft)
remains unchanged.
GN/ISO
4 Turn the [F] dial to select the
setting.
F
5 Push the [MODE] button to exit
the settings.
28
VQT0Z62
Page 29
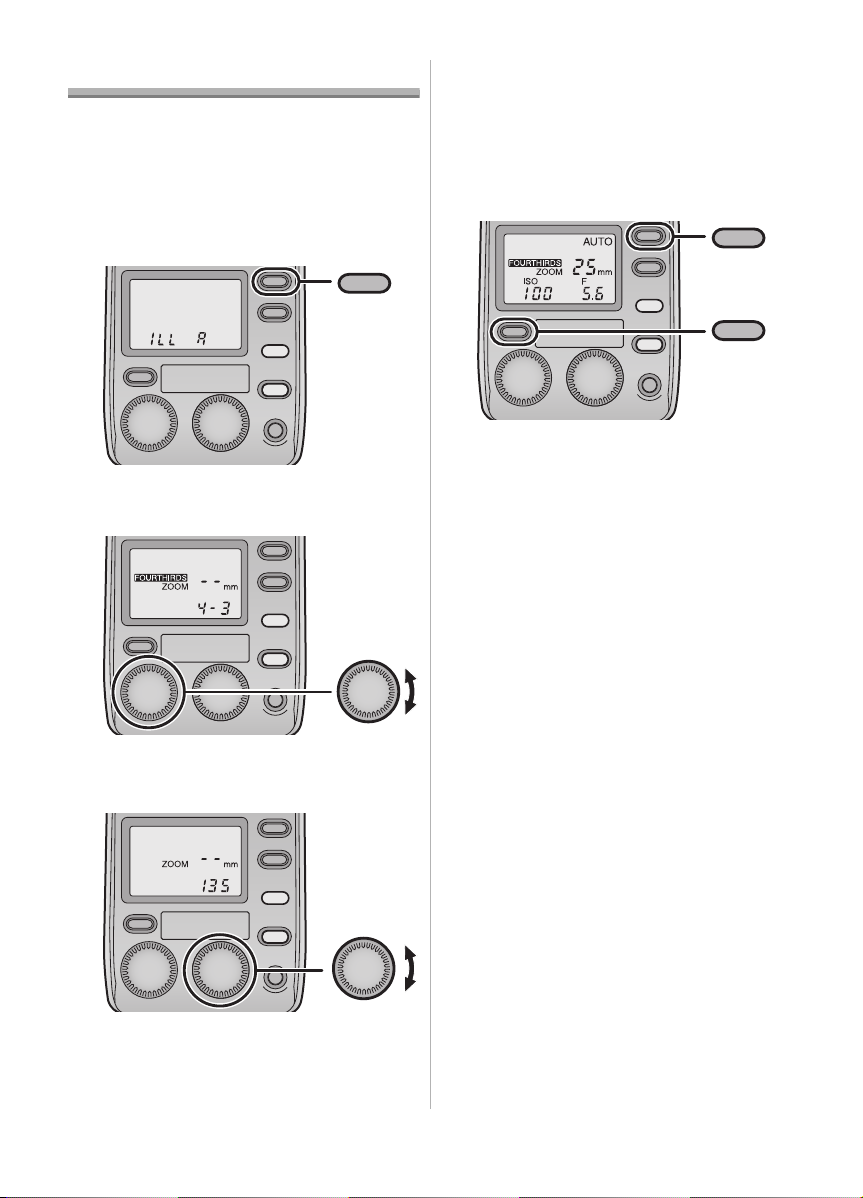
Press the [MODE] button for 2 or more seconds to switch to the function settings. (P28)
Item Setting
AF assist
lamp
≥ AF assist will not work with digital cameras which are not part of Panasonic’s “Four Thirds” system.
Lighting
angle
≥ 135 camera: This is a synonym for a 35 mm film camera format.
A: The AF assist lamp lights, and focusing is facilitated.
OFF: The AF assist lamp does not light.
4-3: The lighting angle is indicated by the focal length of the lens
for the format used with the “Four Thirds” digital camera.
135: The lighting angle is converted into the focal length of a
35 mm film camera.
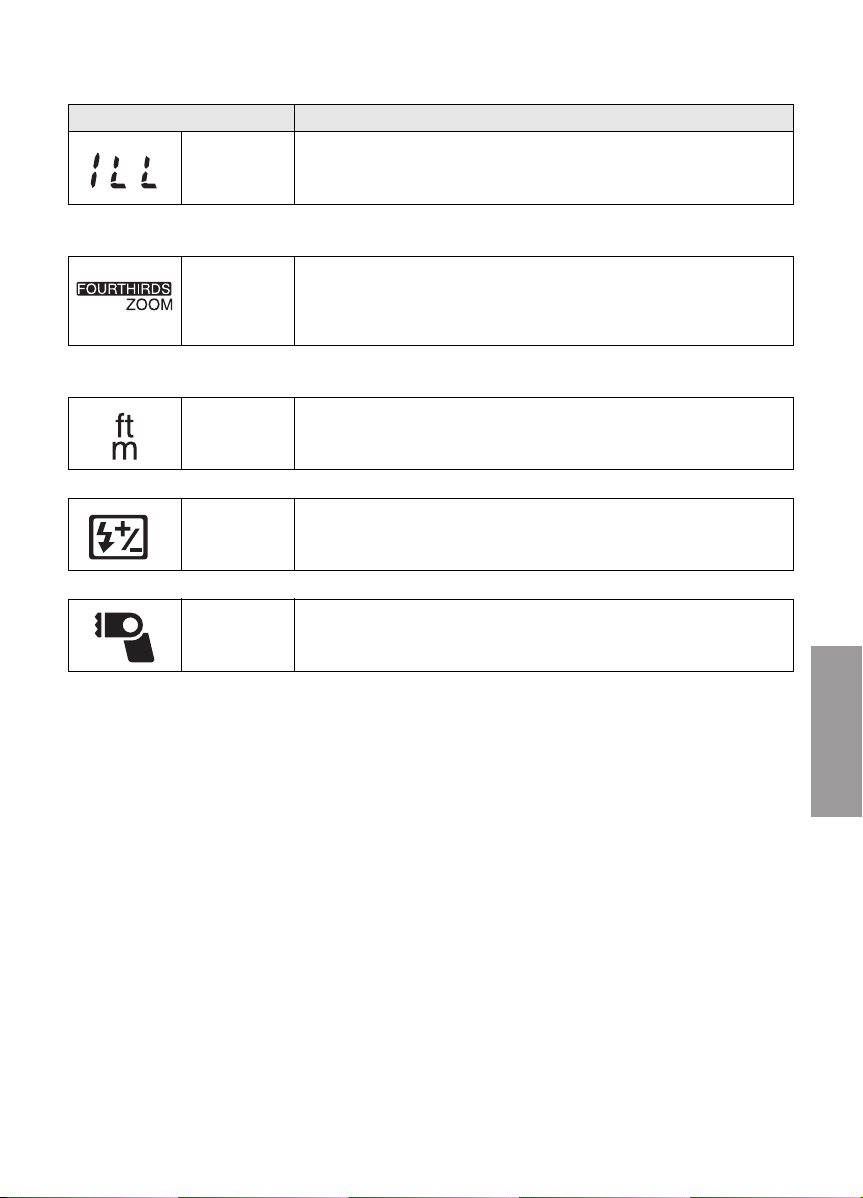
Distance
display
Flash
intensity
adjustment
Wide panel
switching
ft: Distances are indicated in feet.
m: Distances are indicated in meters.
ON: The flash intensity is adjusted.
OFF: The flash intensity is not adjusted.
ON: The wide panel takes effect. The unit recognizes that the
wide panel is extended.
OFF: The wide panel has no effect.
29
VQT0Z62
Page 30

Concerning Continuous
Firing
When the flash is fired continuously, its flash head
becomes hot, and this may possibly lead to
deterioration or malfunction of the unit. Keep
continuous firing within the number of times given
below, and then allow the unit to rest for at least
10 minutes.
Restriction on number of flashes during
continuous firing
Flash
intensity
1/1
(FULL)
1/2 0.5 s 20
1/4 0.3 s 40
1/8 to 1/128 0.2 s or less 80
Flash interval
1 s 10
Restriction
on number of
flashes
Continuous firing is synchronized up to the
number of frames listed below. If the restriction on
the number of flashes during continuous firing is
exceeded, allow the unit to rest for at least
10 minutes.
Number of frames for which continuous firing
is possible (serial photography speed:
8 frames per second)
Light quantity No. of frames
1/4 2
1/8 5
1/16 10
1/32 16
1/64 30
1/128 40
30
VQT0Z62
Page 31

Table of Guide Numbers (GN)
[TTL AUTO]/[AUTO]
FOUR THIRDS 8 10 12 14 17 25 35 42
Lighting angle
(mm)
[TTL AUTO]/[AUTO]
[MANUAL]
Lighting angle
(mm)
[MANUAL]
[FP TTL AUTO]
Lighting angle
(mm)
Shutter speed
When a 135 (35 mm
film conversion)
16 20 24 28 35 50 70 85
camera is used
Full flash 18 20 28 30 36 40 45 50
FOUR THIRDS 8 10 12 14 17 25 35 42
When a 135 (35 mm
film conversion)
16 20 24 28 35 50 70 85
camera is used
1/1 18 20 28 30 36 40 45 50
1/2 13 14 20 21 26 28 32 35
1/4 9.010141518202325
1/8 6.47.19.91113141618
1/16 4.55.07.07.59.0 10 11 13
1/32 3.23.54.95.36.47.18.08.8
1/64 2.32.53.53.84.55.05.66.3
1/128 1.61.82.52.73.23.54.04.4
FOUR THIRDS 8 10 12 14 17 25 35 42
When a 135 (35 mm
film conversion)
16 20 24 28 35 50 70 85
camera is used
1/125 13 14 20 21 26 28 32 35
1/160 11 13 18 19 23 25 28 32
1/200 10 11 16 17 20 23 25 28
1/250 9.010141518202325
1/320 8.0 8.9 13 13 16 18 20 22
1/400 7.1 7.9 11 12 14 16 18 20
1/500 6.47.19.91113141618
1/640 5.7 6.3 8.8 9.4 11 13 14 16
1/800 5.0 5.6 7.9 8.4 10 11 13 14
1/1000 4.55.07.07.59.0 10 11 13
1/1250 4.04.46.26.78.08.9 10 11
1/1600 3.64.05.65.97.27.98.99.9
1/2000 3.23.55.05.36.47.18.08.9
1/2500 2.83.14.44.75.76.37.17.9
1/3200 2.52.83.94.25.15.66.37.0
1/4000 2.22.53.53.74.55.05.66.3
1/5000 2.02.23.13.34.04.55.05.6
1/6400 1.82.02.83.03.64.04.55.0
1/8000 1.61.82.52.73.23.54.04.4
31
VQT0Z62
Page 32

[FP MANUAL]
≥ Listed below are the guide numbers (GN) for 1/1 (FULL) flashes.
FOUR THIRDS 8 10 12 14 17 25 35 42
Lighting angle
(mm)
Shutter speed
When a 135 (35 mm
film conversion)
camera is used
1/125 13 14 20 21 26 28 32 35
1/160 11 13 18 19 23 25 28 32
1/200 10 11 16 17 20 23 25 28
1/250 9.010141518202325
1/320 8.0 8.9 13 13 16 18 20 22
1/400 7.1 7.9 11 12 14 16 18 20
1/500 6.47.19.91113141618
1/640 5.7 6.3 8.8 9.4 11 13 14 16
1/800 5.0 5.6 7.9 8.4 10 11 13 14
1/1000 4.5 5.0 7.0 7.5 9.0 10 11 13
1/1250 4.0 4.4 6.2 6.7 8.0 8.9 10 11
1/1600 3.6 4.0 5.6 5.9 7.2 7.9 8.9 9.9
1/2000 3.2 3.5 5.0 5.3 6.4 7.1 8.0 8.9
1/2500 2.8 3.1 4.4 4.7 5.7 6.3 7.1 7.9
1/3200 2.5 2.8 3.9 4.2 5.1 5.6 6.3 7.0
1/4000 2.2 2.5 3.5 3.7 4.5 5.0 5.6 6.3
1/5000 2.0 2.2 3.1 3.3 4.0 4.5 5.0 5.6
1/6400 1.8 2.0 2.8 3.0 3.6 4.0 4.5 5.0
1/8000 1.6 1.8 2.5 2.7 3.2 3.5 4.0 4.4
16 20 24 28 35 50 70 85
≥ In the [FP MANUAL] mode, the following formula can be used to obtain the guide numbers (GN)
when any setting except 1/1 is used for the light quantity.
How to obtain the guide number when the light quantity setting is other than 1/1
≥ Guide number (GN) = Guide number for 1/1 k light quantity ratio coefficient
Light quantity ratio coefficient
Light quantity ratio 1/1 1/2 1/4 1/8 1/16
Light quantity ratio
coefficient
≥ The tables show the values when the ISO sensitivity is [100].
1.0 0.71 0.5 0.35 0.25
32
VQT0Z62
Page 33

Troubleshooting
∫ Q&A for the unit
Question (Q) Answer (A)
The unit becomes hot. When the unit is fired continuously immediately after the [TEST/
I can’t install the unit on my
digital camera.
I can’t select the flash
modes even by pushing the
[MODE] button.
The colouring of the images
differs from what I see.
The flash working range
does not appear on the
display panel.
The display panel is
extinguished even though
the unit’s power is on.
The flash’s power does not
go off even though I turned
off the power of my digital
camera which comes with
communication functions.
I can’t switch to the lighting
angle.
CHARGE] button has lighted, the batteries will generate heat, but this
does not pose any problems in terms of performance or quality. In
cases like this, wait until the flash head and batteries cool off before
resuming use.
Is the lock pin protruding?
You cannot install the unit on your digital camera if this pin is
protruding.
≥ Turn the lock ring in the opposite direction from [2LOCK] until it
stops and retract the pin before proceeding to install the unit on the
digital camera.
When connecting the unit to some digital camera models capable of
communication, you can select the flash’s mode only from the digital
camera.
Adjust the white balance of the digital camera. (Setting to the [AUTO]
mode is recommended.)
The flash working range is not displayed in the following cases:
≥ When the lens has been detached
≥ When bounce light photography is performed
≥ When the light intensity is adjusted
≥ When the ISO sensitivity or aperture setting is outside the range
Is the digital camera’s power-saving function working?
The flash is coupled to the digital camera so that when the digital
camera’s power-saving function is working, the flash’s display panel
will be extinguished.
≥ Push the digital camera’s shutter button halfway down to release
the function.
When the power of a digital camera with communication functions is
switched off, the flash is set to the power-saving mode. When the
power of the digital camera is turned back on, the flash’s power is also
turned on.
When the flash’s power is to be turned off, turn off its power first.
When the flash is used in combination with a digital camera without
communication functions, it is automatically set to the power-saving
mode when no operations have been performed for about 60 minutes.
Has the wide panel been damaged?
≥ If the wide panel is damaged while it is extended, you will no longer
be able to use the [ZOOM] button. In this case, you can use the
[ZOOM] button if you set wide panel switching to [OFF].
33
VQT0Z62
Page 34

∫ Q&A for the panel display
Question (Q) Answer (A)
[ISO] and [F] are flashing or
the numbers for the ISO
sensitivity and aperture are
flashing.
The optimum camera to
subject distance is flashing.
[ ] and the lighting angle
are flashing.
[ ] does not go off. The flash head has been set to point downward (7 degrees). Do not
[ ] does not go off. The wide panel is extended.
This means that the ISO sensitivity and aperture of the digital camera
are outside the flash working range of the flash.
Change the ISO sensitivity and aperture of the digital camera.
The flash is too close to the subject.
If the subject is too close, the lighting range of the flash will shift so
take photos at a distance further than 0.6 m (or 0.5 m for close-up
photos).
Extend the wide panel.
use this setting unless you are taking close-ups.
≥ The guide number (GN) is reduced.
Pay attention to the camera to subject distance.
34
VQT0Z62
Page 35

Cautions for Use
∫ Concerning the unit
≥ Avoid bringing the unit into close proximity with
objects. Its heat and light may cause
deformation or discolouration.
≥ When taking photos outside the flash working
range, the proper exposure will not be
achieved, and images which are whitish or too
dark may be taken.
≥ At high shutter speeds, the effects obtained by
the unit may not be sufficient.
Keep the unit away from insecticide sprays
and other volatile substances.
≥ If the unit is exposed to these sprays or
substances, its external case may deteriorate
and/or its paint may peel off.
≥ Do not leave the unit in contact with any items
made of rubber or PVC for prolonged periods of
time.
Do not use benzine, paint thinners, alcohol or
other such solvents to maintain the unit.
≥ Remove the batteries before proceeding with
maintenance.
≥ Use of solvents may cause a deterioration in
the unit’s external case and/or the paint to peel
off.
≥ Wipe away dust and fingerprints using a soft,
dry cloth.
≥ Do not use kitchen detergents or chemical
cleaning cloths.
≥ If rain or drops of water splash onto the unit,
wipe off the water with a dry cloth.
≥ Under no circumstances should the unit be
stored in any of the following locations since
doing so may cause trouble in operation or
malfunctioning.
≥ In direct sunlight or on a beach in summer
≥ In locations with high temperatures and
humidity levels or where the changes in
temperature and humidity are acute
≥ In locations with high concentrations of sand,
dust or dirt
≥ Where there is fire
≥ Near heaters, air conditioners or humidifiers
≥ Where water may make the unit wet
≥ Where there is vibration
≥ Inside a vehicle
≥ Multiple-light shots cannot be taken by using
the flash in combination with other flash units.
≥ Do not drop the unit, knock it into other objects
or subject it to any other kind of strong impact
or shock.
≥ When the unit is not going to be used for a
prolonged period, mold and other problems
may cause failure of the unit. It is
recommended that you check the unit’s
operation prior to use.
≥ Do not touch the unit’s electrical contacts.
Doing so can cause failure of the unit.
≥ To safeguard the flash head from overheating
and deterioration, stop using the unit after
10 continuous firings at the full flash intensity,
and allow the unit to rest for at least 10 minutes
to ensure that the flash head cools off.
Do not carry the unit when it is still attached to
the camera body.
35
VQT0Z62
Page 36

∫ Concerning the batteries
Be sure to remove the batteries when you will
not be using the camera for a long period of
time.
≥ If the temperature is too high or low, the
terminals may rust causing a malfunction.
If you drop the batteries accidentally, check to
see if the body of the batteries or the terminals
are damaged.
≥ Inserting a damaged battery in the camera will
damage the camera.
Bring charged spare batteries when going out.
≥ Be aware that the operating time of the
batteries becomes shorter in low temperature
conditions such as at a ski resort.
Dispose of unusable batteries.
≥ Batteries have a limited life.
≥ Do not throw batteries into fire because they
may cause an explosion.
Do not allow battery terminals to come into
contact with metal objects (such as necklaces,
hairpins, etc.).
≥ This can cause short circuiting or heat
generation and you may be badly burned if you
touch the batteries.
Do not attempt to recharge dry batteries.
Do not throw batteries into a fire or expose to
excessive heat such as sunshine.
36
VQT0Z62
Page 37

Specifications
Power requirements:
Batteries
recommended for
use
Charging time
(from full flash until
the [TEST/CHARGE]
button lights)
Firing period Approx. 1/20000 s to 1/500 s
No. of flashes
(with full flash)
Flash modes TTL AUTO/AUTO/MANUAL/FP TTL AUTO/FP MANUAL
Bounce angle Upward: 0 to 90 degrees, downward: 0 to 7 degrees,
Power-saving mode
AF assist lamp Only for combinations with digital camera having communication capability
Guide number Automatically selected
Lighting angle Automatically selected
Dimensions Approx. 79.4 mm (W)k141.1 mm (H)k107.1 mm (D)
Mass Approx. 375 g (main unit)
Operating
temperature
Operating humidity 10% to 80% (no condensation)
DC 6.0 V
AA Alkaline dry batteries (LR6) k 4/
AA Rechargeable nickel metal hydride batteries (Ni-MH)k 4
Max. 7 s: AA Alkaline dry batteries
Max. 5 s: AA Rechargeable nickel metal hydride
(Varies depending on the flash intensity; FP firing excluded.)
120 flashes or more: AA Alkaline dry batteries
140 flashes or more: AA Rechargeable nickel metal hydride
(Differs depending on the photo taking conditions.)
toward the right: 0 to 90 degrees, toward the left: 0 to 180 degrees
Coupled to power-saving mode of a digital camera having communication
capability
approximate distance enabling automatic lighting at low-brightness levels:
0.7m to 7m
(Differs depending on the digital camera and type of lens used)
50: At 42 mm setting
28: At 12 mm setting
18/20 selected: When the wide panel is used
At 12 mm setting:
At 42 mm setting:
Using wide panel:
¢ When “FOUR THIRDS” applies as the ZOOM display
(excluding the projecting parts)
Approx. 455 g (including batteries)
0°C to 40°C
batteries
batteries
(85 mm when a 135 camera is used)
(24 mm when a 135 camera is used)
61 degrees up/down, 78 degrees left/right
(View angle of 12 mm lens covered)
21 degrees up/down, 28 degrees left/right
(View angle of 42 mm lens covered)
83 degrees up/down, 101 degrees left/right
(View angle of 8 mm lens covered)
¢
¢
¢
37
VQT0Z62
Page 38

Inhalt
Informationen für Ihre Sicherheit .......................................................................................................... 39
Vermeidung von Störungen .............................................................................................................. 40
Beiliegendes Zubehör........................................................................................................................... 40
Bezeichnung der Bauteile..................................................................................................................... 41
Im Anzeigefeld erscheinende Anzeigen................................................................................................ 42
Zum Thema Batterien........................................................................................................................... 43
Einsetzen und Entfernen der Batterien im Gerät (optional).................................................................. 46
Kontrolle des Restladestands der Batterien im Gerät........................................................................... 47
Montage des Gerätes an der Digitalkamera und Entfernen von dieser................................................ 48
Fotografieren unter Verwendung einer Digitalkamera mit Datenaustausch-Funktionen....................... 49
Auswahl des Blitzlicht-Modus............................................................................................................ 49
[TTL AUTO] ...................................................................................................................................... 50
[AUTO] ............................................................................................................................................. 51
[MANUAL] ........................................................................................................................................ 52
[FP TTL AUTO] ................................................................................................................................ 53
[FP MANUAL] .................................................................................................................................. 54
Fotografieren unter Verwendung einer Digitalkamera ohne Datenaustausch-Funktionen.................... 56
Auswahl des Blitzlicht-Modus............................................................................................................ 56
[AUTO] ............................................................................................................................................. 57
[MANUAL] ........................................................................................................................................ 59
Weitere Anwendungen.......................................................................................................................... 60
Fotografieren bei Reflexbeleuchtung ................................................................................................ 60
Fotografieren aus geringer Entfernung ............................................................................................ 61
Manuelle Auswahl des Beleuchtungswinkels .................................................................................... 61
Gebrauch des Wide Panel ................................................................................................................ 62
Auswahl vieler verschiedener Fotoanwendungen mit Blitzlicht......................................................... 63
Funktionen............................................................................................................................................ 64
Zum Thema Dauerauslösung ............................................................................................................... 66
Tabelle der Leitzahlen (GN) .................................................................................................................. 67
Störungssuche...................................................................................................................................... 69
Hinweise zur Benutzung ....................................................................................................................... 71
Technische Daten ................................................................................................................................. 73
38
VQT0Z62
Page 39

Informationen für Ihre
Sicherheit
≥ Dieses Blitzlicht wurde zum Einsatz mit
Digitalkameras von Panasonic entworfen.
Es ist kompatibel zu DMC-L1K (mit
Datenaustausch-funktionen: P49 bis 54 ),
DMC-FZ30 usw. (ohne
Datenaustausch-funktionen: P56 bis 59 ).
(Stand: Juli 2006)
≥ Die Erläuterungen in dieser
Bedienungsanleitung beziehen sich als ein
Beispiel auf DMC-L1K.
≥ Four Thirds
WARNUNG
VERWENDEN SIE ZUR REDUZIERUNG
DER GEFAHR EINES BRANDES ODER
STROMSCHLAGES SOWIE STÖRENDER
INTERFERENZEN NUR DAS EMPFOHLENE
ZUBEHÖR UND SETZEN SIE DIESES
GERÄT WEDER REGEN, FEUCHTIGKEIT,
NOCH TROPFEN ODER SPRITZERN AUS.
ENTFERNEN SIE NICHT DEN DECKEL
(ODER DIE RÜCKWAND). IM
GERÄTEINNEREN BEFINDEN SICH KEINE
TEILE, DIE VOM ANWENDER GEWARTET
WERDEN KÖNNEN. WENDEN SIE SICH
FÜR REPARATURARBEITEN BITTE AN
FACHPERSONAL.
TM
ist ein Warenzeichen.
DEUTSCH
-Bedeutung des nachstehend abgebildeten
Symbols-
Benutzerinformationen zur Entsorgung von
elektrischen und elektronischen Geräten
(private Haushalte)
Entsprechend der
grundlegenden
Firmengrundsätzen der
Panasonic-Gruppe wurde ihr
Produkt aus hochwertigen
Materialien und
Komponenten entwickelt und
hergestellt, die recycelbar
und wieder verwendbar sind.
Dieses Symbol auf
Produkten und/oder begleitenden Dokumenten
bedeutet, dass elektrische und elektronische
Produkte am Ende ihrer Lebensdauer vom
Hausmüll getrennt entsorgt werden müssen.
Bringen Sie bitte diese Produkte für die
Behandlung, Rohstoffrückgewinnung und
Recycling zu den eingerichteten kommunalen
Sammelstellen bzw. Wertstoffsammelhöfen, die
diese Geräte kostenlos entgegennehmen.
Die ordnungsgemäße Entsorgung dieses
Produkts dient dem Umweltschutz und
verhindert mögliche schädliche Auswirkungen
auf Mensch und Umwelt, die sich aus einer
unsachgemäßen Handhabung der Geräte am
Ende Ihrer Lebensdauer ergeben könnten.
Genauere Informationen zur nächstgelegenen
Sammelstelle bzw. Recyclinghof erhalten Sie
bei Ihrer Gemeindeverwaltung.
Für Geschäftskunden in der Europäischen
Union
Bitte treten Sie mit Ihrem Händler oder
Lieferanten in Kontakt, wenn Sie elektrische und
elektronische Geräte entsorgen möchten. Er
hält weitere Informationen für sie bereit.
Informationen zur Entsorgung in Ländern
außerhalb der Europäischen Union
Dieses Symbol ist nur in der Europäischen
Union gültig.
39
VQT0Z62
Page 40

Vermeidung von Störungen
∫ Hinsichtlich des Umgangs mit dem Gerät
≥ Setzen Sie das Gerät keinen starken
Erschütterungen oder Stößen aus. Dadurch
werden nicht nur Funktionsstörungen am Gerät
hervorgerufen, sondern auch der Blitzlichtkopf
beschädigt.
≥ Prüfen Sie vor dem Transport des Gerätes, ob
das Wide Panel richtig eingefahren wurde.
(P62)
≥ Sand und Schmutz können
Funktionsstörungen am Gerät hervorrufen.
Schützen Sie das Gerät deshalb davor,
wenn Sie es in einer Umgebung, wie am
Strand, benutzen.
≥ Achten Sie beim Fotografieren an Regentagen
oder in einer Umgebung, wie am Strand,
darauf, das Gerät trocken zu halten.
≥ Das Gerät ist nicht wasserdicht. Wischen
Sie, sollten Regen oder Wassertropfen auf
das Gerät spritzen, das Wasser mit einem
trockenen Tuch ab. Setzen Sie sich mit
Ihrem Händler oder dem nächstgelegenen
Service-Center in Verbindung, sollte das
Gerät nicht normal funktionieren.
≥ Lesen Sie dazu die Bedienungsanleitung zu
Ihrer Digitalkamera.
∫ Wenn das Gerät über einen längeren
Zeitraum nicht benutzt wird
≥ Entfernen Sie unbedingt die Batterien aus dem
Gerät.
≥ Bleiben die Batterien im Gerät fließt, auch
wenn das Gerät ausgeschaltet ist, ständig ein
schwacher Strom, wodurch die Batterien
entladen werden. (Für Details zu NickelMetallhydrid-Batterien siehe auf P45.)
≥ Bewahren Sie die Batterien an einem kühlen,
von Feuchtigkeit freien Ort auf, an dem die
Temperatur so konstant wie möglich gehalten
wird.
(Empfohlener Temperaturbereich:
15 °C bis 25 °C;
empfohlener Feuchtigkeitsbereich:
40% bis 60%)
≥ Sollten Sie das Gerät und / oder seine
Batterien in einem Schrank aufbewahren
wollen, wird empfohlen, diesen ein
Trockenmittel (Silikat-Gel) beizufügen.
Beiliegendes Zubehör
[Kontrollen, die beim Entfernen der
Verpackung des Geräts vorzunehmen sind]
Prüfen Sie beim Entnehmen des Gerätes aus
seinem Karton, ob das Hauptgerät und sein
beiliegendes Zubehör vorhanden sind.
Kontrollieren Sie deren äußeres Aussehen und
ihre Funktionsweise, um zu prüfen, dass es
während des Vertriebs und Transports nicht zu
Beschädigungen gekommen ist.
Setzen Sie sich, sollten Sie Störungen feststellen,
vor dem Gebrauch des Gerätes mit Ihrem
Händler in Verbindung.
Verwenden Sie für dieses Blitzlicht nur die
unten gezeigte Blitzlichthülle.
Blitzlichthülle
VFC4216
≥ Die Batterien sind optional.
40
VQT0Z62
Page 41

Bezeichnung der Bauteile
8
12
6
7
9
1 Wide Panel (P62)
2 Blitzlichtkopf
3 AF-Hilfsstrahl (P65)
≥ In dunkler Umgebung, wo es schwierig
ist, das Objekt scharf zu stellen, können
Sie einen Lichtstrahl auf das Objekt
richten, um das Scharfstellen zu
erleichtern.
(Der AF-Hilfslampe funktioniert nur, wenn
dieses Blitzlicht mit einer digitalen
Spiegelreflexkamera “Four Thirds
Panasonic benutzt wird: mit anderen
Kameras funktioniert es nicht.)
4 Blitzlichtsensor
3
5 Arretierring (P48)
6 Arretierstift (P48)
4
7 Kontaktbereich (P48)
5
8 Reflex-Entriegelungstaste (P48, 60 )
9 Reflex-Winkelanzeige nach oben/unten
(P60)
10 Reflex-Winkelanzeige nach links/rechts
(P60)
11 [MODE]-Taste (P49, 56 , 64 )
12 [ZOOM]-Taste (P57, 59 , 61 , 62 )
13 [AUTO CHECK]-Leuchte (P47, 50 , 57 )
14 [TEST/CHARGE]-Taste (P47, 49 , 56 )
15 [POWER]-Taste (P47, 49 , 56 , 64 )
16 Batteriedeckel (P46)
17 [F]-Schalter (P55, 57 , 64 )
18 [GN/ISO]-Schalter (P52, 57 ,59 , 64 )
19 [LIGHT]-Taste (P64)
≥ Das Anzeigefeld leuchtet für etwa 15 s
auf. Zudem kann es durch den Betrieb
einer Digitalkamera mit DatenaustauschFunktionen zum Aufleuchten gebracht
werden.
20 Anzeigefeld (P42)
TM
” von
20
19
18
17
10
11
12
13
14
15
16
41
VQT0Z62
Page 42

Im Anzeigefeld erscheinende Anzeigen
1 2 3
13
12
11
10
98 7
1 Wide Panel-Anzeige (P62)
2 FP-Aktivierung (P53, 54 )
3 Blitzlicht-Modus (P49, 56 )
4 Zoom-Wert (P61)
5 Einstellung der Blitzlichtintensität (P55)
6 Fuß-/Meter-Anzeige (P65)
7 Blendenöffnung
8 Einrichten der Anzeigen
(Leitzahl, ISO-Empfindlichkeit,
Blendenöffnung, Blitzlichtarbeitsentfernung,
richtige Entfernung, Einstellung der
Blitzlichtintensität)
9 ISO-Empfindlichkeit
10 Leitzahl (GN) (P67)
4
5
6
11 ZOOM-Modus (P61)
12 Beleuchtungswinkel-Anzeige (P65)
≥ [FOUR THIRDS]:
Der Beleuchtungswinkel ergibt sich aus
der Brennweite des “Four Thirds”
Digitalkameraobjektivs.
≥ [135]:
Der Beleuchtungswinkel wird in die
Brennweite der Kamera 135 (35 mm-Film
Umwandlung) umgewandelt und
angezeigt.
13 Aufklapp-Blitzlicht (P61)
42
VQT0Z62
Page 43

Zum Thema Batterien
∫ Verwendbare Batteriearten
AA Alkaline-Trockenbatterien (LR6)
AA Wiederaufladbare Nickel-Metallhydrid-
Batterien (Ni-MH)
≥ Es wird zur Verwendung von Batterien von
Panasonic geraten.
≥ Die Leistung der verwendeten Batterien kann
deutlich in Abhängigkeit davon variieren,
welche Batteriemarke verwendet wird, wie
lange die Batterien seit ihrer Herstellung
gelagert wurden und wie sie aufbewahrt
wurden.
≥ Die Leistung der Batterien verringert sich
vorübergehend bei niedrigen Temperaturen
(unter 10 °C), kehrt jedoch zurück, wenn die
Temperatur Raumtemperatur erreicht.
≥ Bei bestimmten Umgebungstemperaturen und
Betriebsbedingungen kann es zu
Funktionsstörungen kommen. Jedoch handelt
es sich dabei nicht um Defekte.
≥ Um zu gewährleisten, dass die Batterien so
lange wie möglich funktionieren, wird
empfohlen, das Gerät in den Zeiträumen
zwischen dem Aufnehmen von Fotos
auszuschalten. Wenn das Gerät über einen
längeren Zeitraum genutzt werden soll, wird
zum Einsatz von wiederaufladbaren NickelMetallhydrid-Batterien geraten.
≥ Nach dem Ausschalten gewinnen die Batterien
unter Umständen etwas von ihrer Leistung
zurück, wenn sie eine gewisse Zeit ausruhen,
jedoch werden sie dann schnell wieder
unbenutzbar. Denken Sie aus diesem Grund
immer daran, verbrauchte Batterien durch neue
zu ersetzen.
∫ Batteriearten, mit denen der Betrieb nicht
gewährleistet ist
AA Ni-Cd-Batterien
AA Nickel-Mangan-Batterien (ZR6)
AA Lithium-Batterien (FR6)
AA Mangan-Batterien (R6)
AA Oxyride-Trockenbatterien
(Oxy-Nickel-Hydroxid) (LR6)
CR-V3 Lithium-Akkus
≥ Panasonic garantiert beim Einsatz beliebiger
der oben aufgeführten Batterien, nicht für den
richtigen Betrieb des Gerätes. Außerdem kann
die Verwendung dieser Batterien zum
Auslaufen von Elektrolyt, Störungen beim
Einschalten und anderen Defekten führen.
∫ Batterien mit Formen, die nicht verwendbar
sind
≥ Das Einsetzen von Batterien mit
ungewöhnlichen Formen im Gerät kann zum
Auslaufen von Elektrolyt, zum Entstehen von
Wärme und auch zum Reißen dieser Batterien
führen.
≥ Bei einigen auf dem Markt erhältlichen
Batterien fehlt ein Teil oder die gesamte Hülle.
Solche Batterien dürfen keinesfalls benutzt
werden. (Siehe in der nachstehenden
Abbildung.)
≥ Batterien (blanke Batterien) ohne äußere
Hülle oder Batterien, bei denen ein Teil ihrer
Hülle fehlt
≥ Batterien mit - flacher Elektrode
43
VQT0Z62
Page 44

∫ Umgang mit den Batterien
Ein falscher Umgang mit den Batterien kann zum
Auslaufen von Elektrolyt, zum Entstehen von
Wärme und auch zum Reißen der Batterien
führen. Beachten Sie die folgenden
Vorsichtsmaßnahmen.
Setzen Sie die Batterien weder Wasser noch
≥
Meerwasser aus und verhindern Sie, dass ihre
Kontaktbereiche feucht werden.
≥
Entfernen bzw. beschädigen Sie nicht die äußere
Hülle der Batterien.
≥
Lassen Sie die Batterien nicht fallen, schlagen Sie
sie nicht auf andere Gegenstände oder setzen Sie
sie keinen anderen starken Erschütterungen aus.
≥
Verwenden Sie die Batterien nicht länger, sobald
Sie ein Auslaufen von Elektrolyt, Verformungen,
Verfärbungen oder andere derartige Defekte
feststellen.
≥
Bewahren Sie die Batterien nicht an Orten auf, an
denen hohe Temperatur und/oder Feuchtigkeit
herrscht.
≥
Halten Sie die Batterien aus der Reichweite von
Kindern und Babys fern.
≥
Ersetzen Sie beim Austausch der Batterien alle
vier Batterien durch neue des gleichen Typs.
≥
Entfernen Sie die Batterien aus dem Gerät, wenn
Sie das Gerät über einen längeren Zeitraum nicht
benutzen.
≥
Die Batterien sind unter Umständen kurz nach
dem Gebrauch des Gerätes heiß. Schalten Sie
deshalb die Stromversorgung des Gerätes ab und
warten Sie vor dem Entnehmen der Batterien aus
dem Gerät ab, bis ihre Temperatur gesunken ist.
≥
Bei niedrigen Temperaturen (unter 10 °C)
verringert sich die Leistung der Batterien und
reduziert sich die Anzahl der vom Gerät
ausgelösten Blitze deutlich. Die Betriebsdauer der
Batterien verkürzt sich besonders, wenn AlkalineTrockenbatterien verwendet werden. Wärmen Sie
die Batterien deshalb vor dem Gebrauch in Ihrer
Tasche an. Vermeiden Sie dabei aber einen
direkten Kontakt mit Feuerzeugen, anderen
Gegenständen aus Metall bzw. Taschen-/
Körperwärmern.
≥
Die Anzahl der vom Gerät ausgelösten Blitze kann
sich zudem deutlich verringern, wenn die
Batterieelektroden
Ausscheidungen der Haut oder anderen Arten von
Schmutz ausgesetzt sind. Wischen Sie vor dem
Einsetzen der Batterien die Elektroden
vorsichtig mit einem weichen, trockenen Tuch ab.
+
und - öligen
+
und -
Sollte Elektrolyt aus den Batterien auslaufen,
müssen alle Spuren des Elektrolyts im
Batteriefach entfernt und dann neue Batterien
bzw. vollkommen aufgeladene NickelMetallhydrid-Batterien eingelegt werden.
Sollte Elektrolyt auf Ihre Hände oder Kleidung
gelangen, muss dieses sorgfältig mit Wasser
abgespült werden. Falls Elektrolyt in Ihre Augen
gelangt, besteht die Gefahr, dass Sie Ihr
Augenlicht verlieren. Reiben Sie in diesem Fall
nicht die Augen sondern spülen Sie sie mit
sauberem Wasser und suchen Sie einen Arzt
auf.
44
VQT0Z62
Page 45

∫ Wiederaufladbare Nickel-Metallhydrid-
Batterien
Nickel-Metallhydrid-Batterien können durch
Wiederaufladen mit einem entsprechenden
Ladegerät wieder gebrauchsfähig gemacht werden.
Jedoch kann ein unsachgemäßer Gebrauch zum
Auslaufen von Elektrolyt, Entstehen von Wärme,
Entzündung von Flammen sowie auch zum Reißen
der Batterien führen. Beachten Sie deshalb die
folgenden Vorsichtsmaßnahmen.
Unter Umständen ist es nicht möglich, die
≥
Batterien richtig aufzuladen, wenn die Elektroden
+
und - verschmutzt sind. Verwenden Sie ein
weiches, trockenes Tuch, um die Elektroden
und
-
sowie die Anschlusskontakte des
Ladegerätes vorsichtig abzuwischen.
≥
Sowohl beim Kauf oder bei Nichtnutzung über
einen längeren Zeitraum weisen NickelMetallhydrid-Batterien unter Umständen keine
ausreichende Ladung auf. Grund dafür sind ihre
Eigenschaften, was jedoch kein Anzeichen für
einen Defekt ist. Ihre ordnungsgemäße Leistung
wird wieder hergestellt, nachdem sie mehrfach
aufgeladen wurden.
≥
Es ist empfehlenswert, die Batterien erst
aufzuladen, wenn ihre vorhandene Ladung
verbraucht wurde. Werden sie wiederholt
aufgeladen, ohne dass ihre vorhandene Ladung
zuvor verbraucht wurde, behalten sie unter
Umständen nur schwer ihre Leistung bei. (Diese
Erscheinung wird als Speichereffekt bezeichnet.)
≥
Verbrauchen Sie, wenn es zum Auftreten des
Speichereffekts gekommen ist, die vorhandene
Ladung der Batterien bis das Auslösen nicht
mehr möglich ist. Laden Sie die Batterien dann
mehrfach vollständig auf. Dadurch erlangen die
Batterien ihre Leistung wieder.
≥
Wenn Nickel-Metallhydrid-Batterien nicht benutzt
werden, verringert sich ihre Leistung auf Grund
einer natürlichen Entladung.
≥
Laden Sie Nickel-Metallhydrid-Batterien nicht
ständig auf, wenn diese bereits geladen sind.
≥
Entfernen bzw. beschädigen Sie nicht die äußere
Hülle der Batterien.
≥
Lesen Sie die dem zum Aufladen der Batterien
verwendeten Ladegerät beiliegende Anleitung.
+
benutzt werden kann, deutlich verringert, haben die
Batterien unter Umständen das Ende ihrer Betriebszeit
erreicht. Erwerben Sie dann neue Batterien.
≥ Die Länge der Lebensdauer der Batterien ist in
Abhängigkeit von ihrer Aufbewahrungsart, den
Betriebsbedingungen und der Umgebung, in
der sie benutzt werden, unterschiedlich.
∫ Wenn das Gerät über einen längeren
Zeitraum nicht benutzt wird
≥ Bleiben die Batterien im Gerät fließt ständig ein
schwacher Strom, d.h. auch, wenn die
Stromversorgung des Gerätes ausgeschaltet
ist. Dadurch entladen sich die Batterien
schrittweise, wobei es zu einer zu starken
Entladung kommen kann und die Batterien
auch nach einem Aufladen nicht mehr
brauchbar sind.
≥ Beim Aufbewahren der Batterien über einen
längeren Zeitraum wird empfohlen, sie
zumindest einmal pro Jahr aufzuladen,
nachdem ihre Restladung verbraucht wurde,
sie aus dem Gerät entfernt und erneut gelagert
wurden.
∫ Lebensdauer der Batterien
Blitzanzahl
(Vollblitzanzahl im Modus MANUAL in
Abständen von 30 Sekunden)
Gebrauchte Batterien Blitzanzahl
AlkalineTrockenbatterien (LR6)
Nickel-MetallhydridBatterien (Ni-MH)
Fotografierbedingungen
≥ Temperatur: 23 °C
Blitzintervall
Gebrauchte Batterien Blitzintervall
AlkalineTrockenbatterien (LR6)
Nickel-MetallhydridBatterien (Ni-MH)
Mindestens 120 Blitze
Mindestens 140 Blitze
Etwa 6 s
Etwa 4 s
Nickel-Metallhydrid-Batterien haben eine bestimmte
Lebensdauer. Bei zunehmender Nutzung oder
vergehender Zeit verringert sich ihre Leistung
schrittweise. Hat sich die Zeitdauer, die das Gerät
≥ Die Blitzanzahl und das Blitzintervall variieren
geringfügig je nach dem Aufbewahrungsstatus
der Batterien und den Betriebsbedingungen.
45
VQT0Z62
Page 46

Einsetzen und Entfernen
der Batterien im Gerät
(optional)
≥ Prüfen Sie, ob die Stromversorgung des
Gerätes ausgeschaltet ist.
≥ Verwenden Sie Alkaline-Trockenbatterien oder
wiederaufladbare Nickel-MetallhydridBatterien.
1 Verschieben Sie den
Batteriefachdeckel, um diesen zu
öffnen.
≥ Ziehen Sie bei erstmaligem Gebrauch
des Gerätes das Klebeband am
Batteriefachdeckel ab.
2 Prüfen Sie beim Einlegen der
Batterien, ob die Batteriepole +
und - korrekt ausgerichtet sind.
3 Schließen Sie den
Batteriefachdeckel, indem Sie ihn so
weit wie möglich zurückschieben.
≥ Nehmen Sie die Batterien nach dem Gebrauch
des Gerätes heraus.
46
VQT0Z62
Page 47

Kontrolle des
Restladestands der
Batterien im Gerät
≥ Setzen Sie die Batterien ein, schalten Sie das
Gerät ein und prüfen Sie dann die Restleistung
der Batterien.
1 Drücken Sie die [POWER]-Taste.
POWERPOWER
≥ Jetzt beginnt der Ladevorgang.
2 Prüfen Sie, ob die [TEST/
CHARGE]-Taste aufleuchtet.
≥ Blinken die [TEST/CHARGE]-Taste und
die [AUTO CHECK]-Kontrollleuchte
gleichzeitig, bedeutet dies, das die
Batterien fast vollständig abgenutzt sind,
so dass sie so bald wie möglich durch
neue Batterien ersetzt werden müssen.
3 Drücken Sie die [POWER]-Taste,
um die Stromversorgung des
Gerätes abzuschalten.
≥ Beim Drücken der [TEST/CHARGE]-Taste wird
das Gerät unter Umständen ausgelöst.
≥ Schalten Sie die Stromversorgung in folgenden
Situationen aus:
≥ Beim Anbringen an oder Entfernen von der
Digitalkamera
≥ Wenn das Gerät nicht ausgelöst werden soll
≥ Wenn Sie das Gerät nicht benutzen
TEST/
CHARGE
≥ Nachdem die Batterien vollständig
aufgeladen wurden, leuchtet die
[TEST/CHARGE]-Taste.
≥ Leuchtet die [TEST/CHARGE]-Taste so
lange, wie in der unten stehenden Tabelle
angegeben, bedeutet dies, dass die
Batterien fast abgenutzt sind. Ersetzen
Sie sie so bald wie möglich durch neue
Batterien.
Alkaline-Batterien Über 30 s
Wiederaufladbare Nickel-
Metallhydrid-Batterien
Über 10 s
47
VQT0Z62
Page 48

Montage des Gerätes an
der Digitalkamera und
Entfernen von dieser
≥
Prüfen Sie, ob die Stromversorgung von
Digitalkamera und Gerät ausgeschaltet sind. (Das
Montieren an oder das Entfernen des Gerätes von
der Kamera, während die Stromversorgung
eingeschaltet ist, kann Störungen hervorrufen.)
∫ Montieren des Gerätes
1 Bringen Sie den Blitzlichtkopf
waagerecht auf der Vorderseite an.
A
≥ Montieren Sie das Gerät nicht an der
Digitalkamera, wenn der Arretierstift
herausragt. Anderenfalls kann es zu
Störungen kommen.
3 Schieben Sie das Gerät bis ganz
zur Hinterseite des Kontakts bis
ein Klicken zu hören ist.
A: Reflex-Entriegelungstaste
≥ Drehen Sie den Blitzlichtkopf nach dem
Einrasten und drücken Sie dabei die
Reflex-Entriegelungstaste.
2 Lösen Sie den Arretierring.
≥ Drehen Sie, wenn der Arretierstift
herausragt, den Arretierring in die
entgegengesetzte Richtung zu [2LOCK]
und fahren Sie den Stift ein.
≥ Üben Sie nicht mehr Kraft als nötig auf
den Arretierring aus.
≥ Berühren Sie die Anschlusskontakte nicht
mit Ihren Fingern, Gegenständen aus
Metall, usw.
48
VQT0Z62
4 Drehen Sie den Arretierring in die
Richtung [2LOCK], bis er sich
nicht weiter drehen lässt.
∫ Entfernen des Gerätes
Lockern Sie den Arretierring
vollständig und schieben Sie das
Gerät aus dem Kontakt.
Page 49

Fotografieren unter
Verwendung einer
Digitalkamera mit
Datenaustausch-Funktionen
Auswahl des Blitzlicht-Modus
≥ Für Details zu jedem Blitzlicht-Modus siehe auf
P50 bis 54 .
1 Schalten Sie die Stromversorgung
der Digitalkamera ein.
2 Drücken Sie die [POWER]-Taste
am Gerät.
POWER
≥ Die [TEST/CHARGE]-Taste leuchtet auf,
nachdem die Batterien vollständig
aufgeladen wurden.
3 Drücken Sie die Auslösetaste der
Digitalkamera halb nach unten.
≥
Die ISO-Empfindlichkeit, Blendenöffnung,
Verschlusszeit sowie andere Daten zum
Fotografieren werden zwischen der
Digitalkamera und dem Gerät ausgetauscht.
4 Drücken Sie die [MODE]-Taste und
wählen Sie den Blitzlicht-Modus.
MODE
A
≥ Der Blitzlicht-Modus wird auf dem
Anzeigefeld angezeigt.
≥ Bei jedem Drücken der [MODE]-Taste
ändert sich der Modus.
∫ Zum Thema der Blitzlicht-Modi
Option Einstellungsdetails
[TTL AUTO] Nach dem Messen der richtigen
[AUTO] Das Gerät misst die
[MANUAL] Das Gerät wird bei der
[FP TTL
AUTO]
[FP
MANUAL]
¢ Die Leitzahl (GN) ist ein Wert, der die
Lichtmenge eines Blitzlichtgerätes angibt. Je
höher dieser Wert ist, um so größer ist die vom
Gerät ausgestrahlte Lichtmenge.
Blitzlichtintensität durch Auslösen
eines Vorblitzes wird das Gerät
erneut zum Aufnehmen des
Fotos ausgelöst. (P50)
Lichtverhältnisse mit seinem
Blitzlichtsensor entsprechend der
Blendenöffnung und regelt die
Blitzlichtintensität. (P51)
≥ Dieser Modus kann nur bei
Digitalkameramodellen mit
Datenaustauschfunktionen
benutzt werden, die den
[AUTO] Modus unterstützen.
eingerichteten Leitzahl (GN)
ausgelöst. (P52)
Dieser Modus ermöglicht ein
Fotografieren auch bei längeren
Verschlusszeiten der
Digitalkamera durch das
FP-Auslösen (wiederholtes
Auslösen des Blitzlichts mit hoher
Geschwindigkeit). (P53)
Das Gerät beginnt mit der
FP-Auslösung bei der im
[FP MANUAL]-Modus
eingerichteten Blitzlichtintensität.
(P54)
¢
A: Blitzlicht-Modus
≥ Unter Umständen ist es je nach den von der
Digitalkamera unterstützten Fotografier-Modi
nicht möglich, einige dieser Modi zu benutzen.
≥ Ein Modus, der nicht benutzbar ist, kann nicht
gewählt werden.
49
VQT0Z62
Page 50

[TTL AUTO]
Drücken Sie die [MODE]-Taste und wählen Sie
den Blitzlicht-Modus. (P49)
≥ Die Blitzlichtarbeitsentfernung wird auf dem
Anzeigefeld zusammen mit den Einstellungen
der Digitalkamera angezeigt.
A
A: Blitzlichtarbeitsentfernung
1 Prüfen Sie, ob die Entfernung
zum Objekt innerhalb der
Blitzlichtarbeitsentfernung liegt.
≥ Korrigieren Sie die Blendenöffnung oder
ändern Sie die Entfernung zum Objekt,
wenn sich das Objekt außerhalb dieses
Bereichs befindet.
≥ Die Blitzlichtarbeitsentfernung ändert sich
in Abhängigkeit vom Typ und den
Einstellungen (ISO-Empfindlichkeit,
Blendenöffnung und Brennweite) der
verwendeten Digitalkamera.
2 Drücken Sie die Auslösetaste
vollständig und nehmen Sie das
Bild auf.
3 Prüfen Sie, ob die [AUTO
CHECK]-Kontrollleuchte blinkt.
AUTO
CHECK
≥ Blinkt die [AUTO CHECK]-Kontrollleuchte
mehr als 5 sekunden, bedeutet dies, dass
das Gerät erfolgreich ausgelöst wurde.
50
VQT0Z62
Page 51

[AUTO]
Drücken Sie die [MODE]-Taste und wählen Sie
den Blitzlicht-Modus. (P49)
≥ Die Blitzlichtarbeitsentfernung wird auf dem
Anzeigefeld zusammen mit den Einstellungen
der Digitalkamera angezeigt.
A
3 Prüfen Sie, ob die [AUTO
CHECK]-Kontrollleuchte blinkt.
AUTO
CHECK
≥ Blinkt die [AUTO CHECK]-Kontrollleuchte
mehr als 5 sekunden, bedeutet dies, dass
das Gerät erfolgreich ausgelöst wurde.
A: Blitzlichtarbeitsentfernung
≥ Liegen die Einstellungen an der
Digitalkamera (ISO-Empfindlichkeit und
Blendenöffnung) außerhalb der
einstellbaren Kombinationen für ISOEmpfindlichkeit und Blendenöffnung, wird
der Blitzlichtarbeitsbereich nicht
angezeigt und der Anwender durch das
Blinken von [ISO] und [F] auf dem Display
gewarnt. Ändern Sie in diesem Fall die
Einstellungen der Digitalkamera.
1 Prüfen Sie, ob die Entfernung
zum Objekt innerhalb des
Blitzlichtarbeitsbereichs liegt.
≥ Korrigieren Sie die Blendenöffnung oder
ändern Sie die Entfernung zum Objekt,
wenn sich das Objekt außerhalb dieses
Bereichs befindet.
≥ Die Blitzlichtarbeitsentfernung ändert sich
in Abhängigkeit vom Typ und den
Einstellungen (ISO-Empfindlichkeit,
Blendenöffnung und Brennweite) der
verwendeten Digitalkamera.
2 Drücken Sie die Auslösetaste
vollständig und nehmen Sie das
Bild auf.
∫ Kombinationen von ISO-Empfindlichkeit
und Blendenöffnung, die im [AUTO]-Modus
eingerichtet werden können
ISO-
Empfindlichkeit
3200 F8 bis F32
1600 F5.6 bis F32
800 F4 bis F32
400 F2.8 bis F32
200 F2 bis F32
100 F1.4 bis F22
50 F1.4 bis F16
25 F1.4 bis F11
Blendenöffnung
51
VQT0Z62
Page 52

[MANUAL]
Drücken Sie die [MODE]-Taste und wählen Sie
den Blitzlicht-Modus. (P49)
≥ Die optimale Entfernung zwischen Kamera und
Objekt sowie die Leitzahl (GN) entsprechend
den Einstellungen der Digitalkamera werden
auf dem Anzeigefeld angezeigt.
≥ Die optimale Entfernung zwischen
Kamera und Objekt ändert sich je nach
den Einstellungen der Digitalkamera
(ISO-Empfindlichkeit, Blendenöffnung,
Brennweite und Verschlusszeit).
2 Drücken Sie die Auslösetaste
vollständig und nehmen Sie das
Foto auf.
A
A: Optimale Entfernung zwischen Kamera
und Objekt
1 Drehen Sie am [GN/ISO]-Schalter
und stellen Sie die Leitzahl (GN)
ein, so dass die Entfernung
zwischen Kamera und Objekt auf
die Entfernung zum Objekt
eingerichtet wird.
GN/ISO
≥ Auch der [F]-Schalter kann für diese
Einstellung benutzt werden.
≥ Ist die optimale Entfernung zwischen
Kamera und Objekt geringer als 0,6 m
(bzw. 0,5 m bei Nahaufnahmen),
verändert sich der Beleuchtungsbereich
des Blitzlichts. In diesem Fall wird der
Anwender durch das Blinken der Ziffer
auf der Anzeige gewarnt.
≥ Beträgt die ISO-Empfindlichkeit [100] kann die
optimale Entfernung zwischen Kamera und
Objekt durch Dividieren der Leitzahl (GN) durch
die Blendenöffnung berechnet werden. (P67)
52
VQT0Z62
Page 53

[FP TTL AUTO]
Drücken Sie die [MODE]-Taste und wählen Sie
den Blitzlicht-Modus. (P49)
≥ Dieser Modus ermöglicht ein Fotografieren
auch bei längeren Verschlusszeiten der
Digitalkamera durch das FP-Auslösen
(wiederholtes Auslösen des Blitzlichts mit
hoher Geschwindigkeit).
≥ Die Blitzlichtarbeitsentfernung wird auf dem
Anzeigefeld zusammen mit den Einstellungen
der Digitalkamera angezeigt.
A
A: Blitzlichtarbeitsentfernung
1 Prüfen Sie, ob die Entfernung
zum Objekt innerhalb der
Blitzlichtarbeitsentfernung liegt.
≥ Korrigieren Sie die Blendenöffnung oder
ändern Sie die Entfernung zum Objekt,
wenn sich das Objekt außerhalb dieses
Bereichs befindet.
≥ Die Blitzlichtarbeitsentfernung ändert sich
in Abhängigkeit vom Typ und den
Einstellungen (ISO-Empfindlichkeit,
Blendenöffnung und Brennweite) der
verwendeten Digitalkamera. Der Bereich
ist kleiner als im [TTL AUTO]-Modus.
2 Drücken Sie die Auslösetaste
vollständig und nehmen Sie das
Foto auf.
3 Prüfen Sie, ob die [AUTO
CHECK]-Kontrollleuchte blinkt.
AUTO
CHECK
≥ Blinkt die [AUTO CHECK]-Kontrollleuchte
mehr als 5 sekunden, bedeutet dies, dass
das Gerät erfolgreich ausgelöst wurde.
Die folgenden Fotoarten können mit längeren
Verschlusszeiten aufgenommen werden.
≥ Fotografieren bei durch
Hintergrundbeleuchtung weich gemachten
Reflexen.
≥ Im Freien aufgenommene Portraitfotos bei
großer Blendenöffnung und unscharfem
Hintergrund
53
VQT0Z62
Page 54

[FP MANUAL]
Drücken Sie die [MODE]-Taste und wählen Sie
den Blitzlicht-Modus. (P49)
≥ Die optimale Entfernung zwischen Kamera und
Objekt sowie die Leitzahl (GN) entsprechend
den Einstellungen der Digitalkamera werden
auf dem Anzeigefeld angezeigt.
A
A: Optimale Entfernung zwischen Kamera
und Objekt
1 Drehen Sie am [GN/ISO]-Schalter
und stellen Sie die Leitzahl (GN)
ein, so dass die Entfernung
zwischen Kamera und Objekt auf
die Entfernung zum Objekt
eingerichtet wird.
2 Drücken Sie die Auslösetaste
vollständig und nehmen Sie das
Foto auf.
≥ Auch der [F]-Schalter kann für diese
Einstellung benutzt werden.
≥ Ist die optimale Entfernung zwischen
Kamera und Objekt geringer als 0,6 m
(bzw. 0,5 m bei Nahaufnahmen),
verändert sich der Beleuchtungsbereich
des Blitzlichts. In diesem Fall wird der
Anwender durch das Blinken der Ziffer
auf der Anzeige gewarnt.
≥ Die optimale Entfernung zwischen
Kamera und Objekt ändert sich je nach
den Einstellungen der Digitalkamera
(ISO-Empfindlichkeit, Blendenöffnung,
Brennweite und Verschlusszeit).
54
VQT0Z62
GN/ISO
Page 55

∫ Einstellen der Blitzlichtintensität
Die Blitzlichtintensität kann stufenweise
eingestellt werden.
Richten Sie die Einstellung für die
Blitzlichtintensität vor deren Regelung auf [ON]
ein. (P65)
≥ [ ] erscheint auf dem Anzeigefeld.
1 Drehen Sie am [F]-Schalter und
richten Sie den Korrekturwert für
die Blitzlichtintensität ein.
A
F
A: Korrekturwert der Blitzlichtintensität
≥ Der Korrekturwert der Blitzlichtintensität
wird immer angezeigt, ausgenommen er
lautet [0]. Ist der Korrekturwert der
Blitzlichtintensität [0] wird der
Blitzlichtarbeitsbereich nicht angezeigt.
Der Einstellbereich für die Blitzlichtintensität
und die eigentliche Blitzlichtintensität können
je nach dem Blitzlicht-Modus variieren.
≥ Einstellbereich der Blitzlichtintensität
≥ Bei Auswahl von [TTL AUTO], [AUTO] oder
[FP TTL AUTO] kann die Blitzlichtintensität in
einem Bereich von d3.0 Stufen eingestellt
werden.
0 +0.3 +0.7 +1.0 +3.0
0
-
0.3
-
0.7
-
1.0-3.0
≥ Bei Auswahl von [MANUAL] oder [FP
MANUAL] kann die Blitzlichtintensität in
einem Bereich von d0.7 Stufen eingestellt
werden.
≥ Die eigentliche Blitzlichtintensität wird erzielt,
wenn der Korrekturwert für die
Blitzlichtintensität sowohl an der Digitalkamera
als am Gerät eingestellt wurde.
≥ Bei Auswahl von [TTL AUTO], [AUTO] oder
[FP TTL AUTO] wird das Gerät mit dem
durch Addieren der an der Digitalkamera und
dem Gerät eingestellten Werte erzielten
Korrekturwert ausgelöst. (Nur der am Gerät
eingestellte Wert wird als Korrekturwert für
die Blitzlichtintensität angezeigt.)
[Beispiel]
Gerät
Einrichten des
Korrekturwertes
Anzeige des
Korrekturwertes
für die
Blitzlichtintensität
des Gerätes
Zum Auslösen
verwendeter
Korrekturistwert
≥ Bei Auswahl von [MANUAL] oder [FP
MANUAL] wird das Gerät nur bei dem hier
eingestellten Korrekturwert ausgelöst.
[Beispiel]
Einrichten des
Korrekturwertes
Anzeige des
Korrekturwertes
für die
Blitzlichtintensität
des Gerätes
Zum Auslösen
verwendeter
Korrekturistwert
+0.3
Gerät
+0.3
Digitalkamera
+0.3
(+1/3 EV)
+0.3
+0.6
(+2/3 EV)
Digitalkamera
+0.3
(+1/3 EV)
+0.3
+0.3
(+1/3 EV)
0 +0.3 +0.7
0
-
0.3
-
0.7
55
VQT0Z62
Page 56

Fotografieren unter
Verwendung einer
Digitalkamera ohne
DatenaustauschFunktionen
Auswahl des Blitzlicht-Modus
≥ Für Details zu jedem Blitzlicht-Modus siehe auf
P57 bis 59 .
1 Drücken Sie die [POWER]-Taste
am Gerät.
≥ Die [TEST/CHARGE]-Taste leuchtet auf,
nachdem die Batterien vollständig
aufgeladen wurden.
2 Drücken Sie die [MODE]-Taste,
um den Blitzlicht-Modus
auszuwählen.
MODE
A
¢ Die Leitzahl (GN) ist ein Wert, der die
Lichtmenge eines Blitzlichtgerätes angibt. Je
höher dieser Wert ist, um so größer ist die vom
Gerät ausgestrahlte Lichtmenge.
A: Blitzlicht-Modus
≥ Der Blitzlicht-Modus wird auf dem
Anzeigefeld angezeigt.
≥ Bei jedem Drücken der [MODE]-Taste
ändert sich der Modus.
∫ Zum Thema der Blitzlicht-Modi
Option Einstellungsdetails
[AUTO] Das Gerät misst die
Lichtverhältnisse mit seinem
Blitzlichtsensor entsprechend der
Blendenöffnung und regelt die
Blitzlichtintensität. (P57)
[MANUAL] Das Gerät wird bei der
eingerichteten Leitzahl (GN)
ausgelöst. (P59)
56
VQT0Z62
¢
Page 57

[AUTO]
Drücken Sie die [MODE]-Taste und wählen Sie
den Blitzlicht-Modus. (P56)
1 Drehen Sie den [GN/ISO]-
Schalter, um die ISOEmpfindlichkeit einzurichten.
GN/ISO
2 Drücken Sie die [ZOOM]-Taste,
um den Zoom-Wert auf die
Brennweite des Objektivs
einzurichten.
ZOOM
≥ Liegt die Kombination aus ISO-
Empfindlichkeit und Blendenöffnung
außerhalb des nutzbaren Bereichs, wird
durch das Blinken der Anzeigen für ISOEmpfindlichkeit und Blendenöffnung eine
Warnung gegeben. Ändern Sie in diesem
Fall die ISO-Empfindlichkeit und
Blendenöffnung.
4 Drücken Sie die Auslösetaste
vollständig und nehmen Sie das
Foto auf.
5 Prüfen Sie, ob die [AUTO
CHECK]-Kontrollleuchte blinkt.
≥ Blinkt die [AUTO CHECK]-Kontrollleuchte
mehr als 5 sekunden nachdem die
Auslösetaste betätigt wurde, bedeutet
dies, dass das Gerät erfolgreich
ausgelöst wurde.
AUTO
CHECK
3 Drehen Sie am [F]-Schalter und
richten Sie ihn auf die
Blendenöffnung des Objektivs
ein.
F
57
VQT0Z62
Page 58

∫ Blitzlichtarbeitsentfernung im [AUTO]-Modus
ISO-Empfindlichkeit
3200 1600
F8 F5.6 F4 F2.8 F2 F1.4
F11F8F5.6F4F2.8F2F1.4
F16 F11 F8 F5.6 F4 F2.8 F2 F1.4
F22F16F11 F8F5.6F4F2.8F2
F32 F22 F16 F11 F8 F5.6 F4 F2.8
` F32 F22 F16 F11 F8 F5.6 F4
``F32 F22 F16 F11 F8 F5.6
```F32 F22 F16 F11 F8
````F32 F22 F16 F11
800 400 200 100 50 25
``
`
Einstellbare Öffnungswerte
Beleuchtungswinkel
Brennweite (mm)
(35 mm-Film Umwandlung)
8
(16)10(20)12(24)14(28)17(35)25(50)35(70)42(85)
1,1
1,2
1,7
1,9
2,2
2,5
2,8
[
12,8
0,8
[
9,0
0,5
[
6,4
0,5
[
4,5
0,5
[
3,2
0,5
[
2,2
0,5
[
1,6
0,5
[
1,1
0,5
[
0,7
[
14,2
0,9
[
10,0
0,6
[
7,1
0,5
[
5,0
0,5
[
3,5
0,5
[
2,5
0,5
[
1,8
0,5
[
1,2
0,5
[
0,8
[
20,0
1,2
[
14,0
0,8
[
10,0
0,6
[
7,0
0,5
[
5,0
0,5
[
3,5
0,5
[
2,5
0,5
[
1,7
0,5
[
1,2
[
21,4
1,3
[
15,0
0,9
[
10,7
0,6
[
7,5
0,5
[
5,3
0,5
[
3,7
0,5
[
2,7
0,5
[
1,8
0,5
[
1,3
[
25,7
1,6
[
18,0
1,1
[
12,8
0,8
[
9,0
0,5
[
6,4
0,5
[
4,5
0,5
[
3,2
0,5
[
2,2
0,5
[
1,5
[
28,5
1,7
[
20,0
1,2
[
14,2
0,8
[
10,0
0,6
[
7,1
0,5
[
5,0
0,5
[
3,6
0,5
[
2,5
0,5
[
1,7
[
32,1
2,0
[
22,5
1,4
[
16,0
1,0
[
11,2
0,7
[
8,0
0,5
[
5,6
0,5
[
4,0
0,5
[
2,8
0,5
[
1,9
3,1
[
35,7
2,2
[
25,0
1,5
[
17,8
1,1
[
12,5
0,7
[
8,9
0,5
[
6,2
0,5
[
4,5
0,5
[
3,1
0,5
[
2,2
Arbeitsentfernung beim Aufnehmen von Bildern
mit [AUTO] (m)
≥ Die durch fettgedruckte Linien eingerahmten Bereiche geben die Blitzlichtarbeitsentfernungen bei
Verwendung des Wide Panel an. (P62)
≥ Ist der Blitzlichtkopf nach vorn gerichtet, beträgt die auf der Seite Nähe – Entfernung angezeigte
Ziffer 0,6 m oder mehr, nach unten gerichtet, lautet diese 0,5 m oder mehr.
≥ Die Blitzlichtintensität kann in 1/3 Stufen durch Ändern und Einrichten von ISO-Empfindlichkeit und
Blendenöffnung unter den Einstellungen der Digitalkamera eingestellt werden.
58
VQT0Z62
Page 59

[MANUAL]
Drücken Sie die [MODE]-Taste und wählen Sie
den Blitzlicht-Modus. (P56)
Die Leitzahl (GN) und das Lichtmengenverhältnis
≥
erscheinen auf dem Anzeigefeld.
A
3 Drücken Sie die Auslösetaste
vollständig und nehmen Sie das
Foto auf.
∫ Festlegen von Blendenöffnung und
Leitzahl
Wenn die Entfernung zwischen Kamera und
Objekt sowie die Blendenöffnung festgelegt
wurden
≥ Die folgende Formel wird benutzt, um die
Leitzahl (GN) zu ermitteln, die dann am Gerät
eingerichtet wird.
“Blendenöffnung (F)” k “Entfernung zwischen
Kamera und Objekt (m)” m “Koeffizient der ISOEmpfindlichkeit”
A: Lichtmengenverhältnis
≥ Das “Lichtmengenverhältnis” ist das
Verhältnis zwischen der Blitzlichtintensität
zum vollen Blitzlicht.
1 Drücken Sie die [ZOOM]-Taste, um
den Zoom-Wert auf die Brennweite
des Objektivs einzurichten.
ZOOM
2 Drehen Sie den [GN/ISO]-
Schalter und richten Sie die
Leitzahl (GN) ein.
GN/ISO
Wenn die Blendenöffnung eingerichtet werden
muss
≥ Die folgende Formel wird benutzt, um die
Blendenöffnung zu ermitteln, die dann an der
Digitalkamera eingerichtet wird.
“Leitzahl (GN)” k “Koeffizient der ISOEmpfindlichkeit” m “Entfernung zwischen Kamera
und Objekt (m)”
Erzielung der optimalen Entfernung zwischen
Kamera und Objekt
“Leitzahl (GN)” k “Koeffizient der ISOEmpfindlichkeit” m “Blendenöffnung (F)”
Koeffizient der ISO-Empfindlichkeit
ISO-
Empfindlichkeit
3200 5,6
1600 4,0
800 2,8
400 2,0
200 1,4
100 1,0
50 0,71
25 0,5
≥ Für eine Aufstellung von Leitzahlen (GN) siehe
auf P67.
Ausgleichskoeffizient
≥ Auch der [F]-Schalter kann für diese
Einstellung benutzt werden.
59
VQT0Z62
Page 60

Weitere Anwendungen
Fotografieren bei Reflexbeleuchtung
≥ Das Fotografieren bei Reflexbeleuchtung ist
eine Technik, bei der das von einer Decke oder
Wand reflektierte Licht genutzt wird, auf die das
von einem Blitzlichtgerät ausgestrahlte Licht
gerichtet wurde.
≥ Ist das Blitzlicht direkt auf die Vorderseite des
Objektes gerichtet, wenn das Portrait einer
Person aufgenommen wird, können sich zum
Beispiel starke Schatten bilden bzw. die Haut
dieser Person oder andere Bereiche
erscheinen weißlich und undeutlich.
≥ Wird jedoch in diesen Fällen die
Reflexlichttechnik benutzt, lassen sich die
starken Schatten minimieren und das Objekt
natürlich aufnehmen.
1 Drehen Sie, während Sie die
Reflex-Entriegelungstaste
gedrückt halten, den
Blitzlichtkopf, so dass er in die
gewünschte Richtung zeigt.
90°
2 Richten Sie das Blitzlicht auf die
Decke oder eine andere
reflektierende Oberfläche und
nehmen Sie das Foto auf.
≥ Die Blitzlichtarbeitsentfernung und die
optimale Entfernung zwischen Kamera
und Objekt erscheinen nicht auf dem
Anzeigefeld.
≥ Beim Einrichten des Beleuchtungswinkels
auf [ZOOM] (Auto), erscheint der ZoomWert auf dem Anzeigefeld als [--] und es
wird 25 mm [Kamera 135 (35 mm-Film
Umwandlung): 50 mm] eingestellt.
≥ Der Beleuchtungswinkel kann manuell
geändert werden. (P61)
180°
90°
7°
≥ Ändern Sie die Richtung in der arretierten
Position, indem Sie die ReflexEntriegelungstaste gedrückt halten.
60
VQT0Z62
≥ Beim Drücken der [TEST/CHARGE]-Taste
blinkt die [AUTO CHECK]-Kontrollleuchte und
es kann geprüft werden, ob die Auslösung
richtig erfolgt oder nicht. (Dies ist nur möglich,
wenn [AUTO] als Blitzlicht-Modus eingerichtet
ist.)
≥ Ist die Oberfläche (wie die Decke oder die
Wände), von der das Licht des Blitzlichts
reflektiert werden soll, gefärbt, kann dies
Einfluss auf die Fotos haben. Wählen Sie eine
weiße oder ähnliche Oberfläche als
reflektierende Oberfläche.
Page 61

Fotografieren aus geringer Entfernung Manuelle Auswahl des
≥ Beträgt die Entfernung zwischen Kamera und
Objekt 0,5 m bis 1,5 m, wird das vom Blitzlicht
ausgestrahlte Licht verdreht. Richten Sie aus
diesem Grund den Blitzlichtkopf während Sie
die Reflex-Entriegelungstaste gedrückt halten
nach unten (7 Grad).
Richten Sie den Blitzlichtkopf so
Beleuchtungswinkels
≥ Der Beleuchtungswinkel kann manuell
eingestellt werden.
Drücken Sie die [ZOOM]-Taste
und wählen Sie den
Beleuchtungswinkel.
weit wie möglich nach unten
(7 Grad nach unten).
A: Beleuchtungswinkel
≥
[M ZOOM] erscheint auf dem Anzeigefeld.
ZOOM
A
≥ [ ] erscheint auf dem Anzeigefeld.
≥ Durch das Licht des Blitzlichts kann ein
Vignetteneffekt hervorgerufen werden, wenn
das Objektiv eine große Gesamtlänge oder
einen großen Durchmesser besitzt. Nehmen
Sie vor dem Gebrauch zuerst ein Testfoto auf.
≥ Verwenden Sie das Blitzlicht auf diese Weise
nur für Nahaufnahmen. Wenn Sie den
Blitzlichtkopf während des normalen
Aufnehmens von Fotos nach unten gerichtet
halten, ist das vom Blitzlicht oben am
Bildschirm ausgestrahlte Licht ungenügend.
Es kann eine beliebige der folgenden ZOOMEinstellungen gewählt werden:
12 mm, 14 mm, 17 mm, 25 mm, 35 mm, 42 mm
[bei einer Kamera 135 (35 mm-Film Umwandlung):
24 mm, 28 mm, 35 mm, 50 mm, 70 mm, 85 mm]
Bei jedem Betätigen der [ZOOM]-Taste werden
die Einstellungen in der folgenden Reihenfolge
gewählt:
AUTO
ZOOM
42
(85)
≥ [AUTO ZOOM] kann nur bei einer
Digitalkamera mit Datenaustauschfunktionen
benutzt werden.
≥ Bei Verwendung des Wide Panel
kann eine beliebige der folgenden
Einstellungen gewählt werden: [AUTO ZOOM],
[10 (20)] oder [8 (16)].
≥ Bei Wahl eines größeren Wertes als der
Brennweite des verwendeten Objektivs
verdunkeln sich die Ränder der Bilder.
12
(24)
35
(70)
14
(28)
17
(35)
25
(50)
61
VQT0Z62
Page 62

Gebrauch des Wide Panel
≥ Verwenden Sie das eingebaute Wide Panel für
Blitzlichtaufnahmen, wenn die Brennweite des
Objektivs mehr als 12 mm beträgt.
≥ Richten Sie die Wide Panel-Einstellung auf
[ON] ein. (P65)
1 Ziehen Sie das Wide Panel
heraus und drücken Sie es nach
unten.
≥ [ ] erscheint auf dem Anzeigefeld.
2 Drücken Sie die [ZOOM]-Taste
und wählen Sie den
Beleuchtungswinkel.
ZOOM
≥ Der Winkel kann bei einer Digitalkamera ohne
Datenaustauschfunktionen nicht angezeigt
werden.
Bei Verwendung des Wide Panel verringert sich
≥
die Leitzahl (GN). Das heißt, dass die
Arbeitsentfernung beim Aufnehmen von Fotos im
[TTL AUTO]-, [AUTO]- oder [FP TTL AUTO]-
Modus geringer ist sowie dass die optimale
Entfernung zwischen Kamera und Objekt beim
Aufnehmen von Fotos im Bereich [MANUAL] oder
[FP MANUAL] geringer ist.
≥ Fahren Sie nach dem Fotografieren das Wide
Panel wieder ein.
≥ Drücken Sie das Wide Panel nicht nach oben,
da es anderenfalls beschädigt werden kann.
A: Beleuchtungswinkel
≥ 8 mm oder 10 mm
[16 mm oder 20 mm bei einer Kamera
(35 mm-Film Umwandlung)
135
gewählt werden.
62
VQT0Z62
A
] können
Page 63

Auswahl vieler verschiedener
Fotoanwendungen mit Blitzlicht
≥ Viele verschiedene Fotoanwendungen mit
Blitzlicht lassen sich durch die Einstellungen
der Digitalkamera wählen.
≥ Unter Umständen ist es je nach den
Funktionen und der Form der verwendeten
Digitalkamera nicht möglich, einige Funktionen
zu nutzen.
≥ Für weitere Details siehe in der
Bedienungsanleitung zu Ihrer Digitalkamera.
≥ Wählen Sie [TTL AUTO] oder [FP TTL AUTO]
als Blitzlicht-Modus.
Blitzlicht zur Reduzierung des Rote-AugenEffekts
≥ Das vom Blitzlicht ausgestrahlte Licht
verringert den Rote-Augen-Effekt, wobei die
Augen des Objektes rot erscheinen.
Hintere Vorhang-Synchronisation
≥ Beim Erstellen von Aufnahmen mit langer
Verschlusszeit von sich bewegenden Objekten,
wird das Blitzlicht kurz vor dem Ende der
Verschlusszeit ausgelöst.
Lichtquellen hinter dem Objekt werden erfasst,
um einen Eindruck von Dynamik zu vermitteln.
Langsame Synchronisation
≥ Bei Verwendung langer Verschlusszeiten kann
Licht vom Gerät ausgestrahlt werden.
Dadurch lassen sich Personen vor einem
nächtlichen Hintergrund klar aufnehmen.
63
VQT0Z62
Page 64

Funktionen
≥ Sie können alle Funktionen vorab einstellen.
5 Drücken Sie die [MODE]-Taste,
um die Einstellungen zu
beenden.
1 Drücken Sie die [POWER]-Taste.
2 Drücken Sie die [MODE]-Taste für
mindestens 2 Sekunden, um zu
den Funktionseinstellungen zu
schalten.
MODE
3 Drehen Sie den [GN/ISO]-
Schalter, um die Menüoption zu
wählen.
GN/ISO
∫ Rücksetzen der Funktionseinstellungen
auf die Grundeinstellung (wie zum
Zeitpunkt des Kaufs)
Werden die [MODE]- und die [LIGHT]-Taste
gleichzeitig für mindestens zwei Sekunden
gedrückt, werden alle Einstellungen außer der
Entfernungsanzeige (m/ft) auf ihre
Grundeinstellung zurückgesetzt.
MODE
LIGHT
≥ Die Einstellung für die
Entfernungsanzeige (m/ft) bleibt
unverändert.
4 Drehen Sie den [F]-Schalter, um
die Einstellung zu wählen.
64
VQT0Z62
F
Page 65

Drücken Sie die [MODE]-Taste für mindestens 2 Sekunden, um zu den Funktionseinstellungen zu
schalten. (P64)
Option Einstellung
AFHilfsstrahl
≥ Die AF-Hilfslampe funktioniert nicht bei Digitalkameras, die nicht zum “Four Thirds”-System von
Panasonic gehören.
A: Die AF-Hilfslampe leuchtet auf, wodurch das Scharfstellen
erleichtert wird.
OFF: Die AF-Hilfsfunktion ist nicht aktiv.
4-3: Der Beleuchtungswinkel wird durch die Brennweite des
Beleuchtungswinkel
≥ 135 Kamera: Dies ist ein Synonym für ein 35 mm Film-Kameraformat.
Entfernungs
anzeige
Einstellung
der Blitzlichtintensität
Wide
PanelUmschaltung
135: Der Beleuchtungswinkel wird in die Brennweite der 35 mm
ft: Die Entfernungen werden in engl. Fuß angegeben.
m: Die Entfernungen werden in Metern angegeben.
ON: Die Blitzlichtintensität ist eingestellt.
OFF: Die Blitzlichtintensität ist nicht eingestellt.
ON: Das Wide Panel wird wirksam. Das Gerät erkennt, dass
OFF: Das Wide Panel ist nicht wirksam.
Objektivs für das mit der Digitalkamera “Four Thirds”
genutzte Format angezeigt.
Film-Kamera umgewandelt.
das Wide Panel ausgefahren wurde.
65
VQT0Z62
Page 66

Zum Thema
Dauerauslösung
Beim fortlaufenden Auslösen des Blitzlichts wird
der Blitzlichtkopf heiß, was möglicherweise zu
einer Abnutzung oder Funktionsstörungen des
Gerätes führen kann. Beschränken Sie die
Dauerauslösung auf die unten angegebene
Anzahl und lassen Sie das Gerät dann
mindestens 10 minuten ausruhen.
Beschränkung der Blitzanzahl während der
Dauerauslösung
Blitzlichtintensität
1/1
(VOLL)
1/2 0,5 s 20
1/4 0,3 s 40
1/8 bis 1/128
Blitzintervall
1 s 10
0,2 s oder
weniger
Beschrän-
kung der
Blitzanzahl
80
Die Dauerauslösung wird auf die unten
angegebene Vollbildanzahl synchronisiert.
Lassen Sie das Gerät, wenn die Beschränkung
der Blitzanzahl während der Dauerauslösung
überschritten wird, mindestens 10 minuten
ausruhen.
Anzahl der Vollbilder, für die eine
Dauerauslösung möglich ist (serienmäßige
Fotografiergeschwindigkeit: 8 Vollbilder pro
Sekunde)
Lichtmenge Vollbildanzahl
1/4 2
1/8 5
1/16 10
1/32 16
1/64 30
1/128 40
66
VQT0Z62
Page 67

Tabelle der Leitzahlen (GN)
[TTL AUTO]/[AUTO]
FOUR THIRDS 8 10 12 14 17 25 35 42
Beleuchtungs-
winkel (mm)
[TTL AUTO]/[AUTO]
[MANUAL]
Beleuchtungs-
winkel (mm)
[MANUAL]
[FP TTL AUTO]
Beleuchtungs-
winkel (mm)
Verschlusszeit
Bei Verwendung
einer Kamera 135
(35 mm-Film
Umwandlung)
16 20 24 28 35 50 70 85
Voll bl it z 18 20 28 30 36 40 45 50
FOUR THIRDS 8 10 12 14 17 25 35 42
Bei Verwendung
einer Kamera 135
(35 mm-Film
Umwandlung)
1/1 18 20 28 30 36 40 45 50
1/2 13 14 20 21 26 28 32 35
1/4 9,010141518202325
1/8 6,47,19,91113141618
1/16 4,55,07,07,59,0 10 11 13
1/32 3,23,54,95,36,47,18,08,8
1/64 2,32,53,53,84,55,05,66,3
1/128 1,61,82,52,73,23,54,04,4
16 20 24 28 35 50 70 85
FOUR THIRDS 8 10 12 14 17 25 35 42
Bei Verwendung
einer Kamera 135
(35 mm-Film
Umwandlung)
1/125 13 14 20 21 26 28 32 35
1/160 11 13 18 19 23 25 28 32
1/200 10 11 16 17 20 23 25 28
1/250 9,010141518202325
1/320 8,0 8,9 13 13 16 18 20 22
1/400 7,1 7,9 11 12 14 16 18 20
1/500 6,47,19,91113141618
1/640 5,7 6,3 8,8 9,4 11 13 14 16
1/800 5,0 5,6 7,9 8,4 10 11 13 14
1/1000 4,55,07,07,59,010 11 13
1/1250 4,04,46,26,78,08,9 10 11
1/1600 3,64,05,65,97,27,98,99,9
1/2000 3,23,55,05,36,47,18,08,9
1/2500 2,83,14,44,75,76,37,17,9
1/3200 2,52,83,94,25,15,66,37,0
1/4000 2,22,53,53,74,55,05,66,3
1/5000 2,02,23,13,34,04,55,05,6
1/6400 1,82,02,83,03,64,04,55,0
1/8000 1,61,82,52,73,23,54,04,4
16 20 24 28 35 50 70 85
67
VQT0Z62
Page 68

[FP MANUAL]
≥ Unten werden die Leitzahlen (GN) für 1/1 (VOLL) Blitze aufgeführt.
FOUR THIRDS 8 10 12 14 17 25 35 42
Beleuchtungs-
winkel (mm)
Bei Verwendung
einer Kamera 135
(35 mm-Film
Umwandlung)
16 20 24 28 35 50 70 85
1/125 13 14 20 21 26 28 32 35
1/160 11 13 18 19 23 25 28 32
1/200 10 11 16 17 20 23 25 28
1/250 9,010141518202325
1/320 8,0 8,9 13 13 16 18 20 22
1/400 7,1 7,9 11 12 14 16 18 20
1/500 6,47,19,91113141618
1/640 5,7 6,3 8,8 9,4 11 13 14 16
1/800 5,0 5,6 7,9 8,4 10 11 13 14
Verschlusszeit
1/1000 4,5 5,0 7,0 7,5 9,0 10 11 13
1/1250 4,0 4,4 6,2 6,7 8,0 8,9 10 11
1/1600 3,6 4,0 5,6 5,9 7,2 7,9 8,9 9,9
1/2000 3,2 3,5 5,0 5,3 6,4 7,1 8,0 8,9
1/2500 2,8 3,1 4,4 4,7 5,7 6,3 7,1 7,9
1/3200 2,5 2,8 3,9 4,2 5,1 5,6 6,3 7,0
1/4000 2,2 2,5 3,5 3,7 4,5 5,0 5,6 6,3
1/5000 2,0 2,2 3,1 3,3 4,0 4,5 5,0 5,6
1/6400 1,8 2,0 2,8 3,0 3,6 4,0 4,5 5,0
1/8000 1,6 1,8 2,5 2,7 3,2 3,5 4,0 4,4
≥ Im [FP MANUAL]-Modus kann die folgende Formel zur Ermittlung der Leitzahlen (GN) benutzt
werden, wenn eine beliebige Einstellung außer 1/1 für die Lichtmenge verwendet wird.
Ermittlung der Leitzahl, wenn eine andere Einstellung für die Lichtmenge als 1/1 erfolgt
≥ Leitzahl (GN) = Leitzahl für 1/1 k Koeffizient des Lichtmengenverhältnisses
Koeffizient des Lichtmengenverhältnisses
Lichtmengen-
verhältnis
1/1 1/2 1/4 1/8 1/16
Koeffizient des
Lichtmengen-
1,0 0,71 0,5 0,35 0,25
verhältnisses
≥ Die Tabelle zeigt die Werte bei einer ISO-Empfindlichkeit von [100].
68
VQT0Z62
Page 69

Störungssuche
∫ Fragen und Antworten zum Gerät
Frage (F) Antwort (A)
Das Gerät wird heiß.
Ich kann das Gerät nicht an
meiner Digitalkamera
installieren.
Ich kann den BlitzlichtModus auch bei Drücken
der [MODE]-Taste nicht
wählen.
Die Färbung der Bilder
weicht von dem ab, was ich
sehe.
Die
Blitzlichtarbeitsentfernung
erscheint nicht auf dem
Anzeigefeld.
Das Anzeigefeld verlischt,
obwohl die
Stromversorgung des
Gerätes eingeschaltet ist.
Die Stromversorgung des
Blitzlichts schaltet sich
auch dann nicht aus, wenn
ich die Stromversorgung
meiner Digitalkamera mit
Datenaustauschfunktionen
ausschalte.
Ich kann nicht zum
Beleuchtungswinkel
umschalten.
Wird das Gerät fortlaufend unmittelbar nach dem Aufleuchten der
[TEST/CHARGE]-Taste ausgelöst, erzeugen die Batterien Wärme.
Dies ruft jedoch keine Probleme hinsichtlich der Leistung oder Qualität
hervor. Warten Sie in diesen Fällen vor einem erneuten Gebrauch ab,
bis sich der Blitzlichtkopf und die Batterien abgekühlt haben.
Ragt der Arretierstift heraus?
Sie können das Gerät nicht an Ihrer Digitalkamera anbringen, wenn
dieser Stift herausragt.
≥ Drehen Sie den Arretierring in der entgegengesetzten Richtung zu
[2LOCK] bis er stoppt und fahren Sie den Stift vor dem Anbringen
des Gerätes an der Digitalkamera ein.
Beim Anschließen einiger Modelle von Digitalkameras an das Gerät,
die zum Datenaustausch in der Lage sind, können Sie den BlitzlichtModus nur an der Digitalkamera wählen.
Korrigieren Sie den Weißabgleich der Digitalkamera. (Es wird zur
Einstellung des [AUTO]-Modus geraten.)
Die Blitzlichtarbeitsentfernung wird in folgenden Fällen nicht angezeigt:
≥ Wenn das Objektiv entfernt wurde
≥ Wenn eine Reflexlicht-Fotografie aufgenommen wird
≥ Wenn die Lichtintensität eingestellt ist
≥ Wenn die Einstellungen für ISO-Empfindlichkeit oder
Blendenöffnung außerhalb des möglichen Bereichs liegen
Ist die Stromsparfunktion der Digitalkamera aktiv?
Das Blitzlicht ist mit der Digitalkamera verbunden, so dass bei
Aktivierung der Stromsparfunktion der Digitalkamera das Anzeigefeld
des Blitzlichts verlischt.
≥ Drücken Sie die Auslösetaste der Digitalkamera halb, um die
Funktion zu deaktivieren.
Wenn die Stromversorgung einer Digitalkamera mit
Datenaustauschfunktionen ausgeschaltet wird, schaltet das Blitzlicht auf
den Stromspar-Modus. Beim erneuten Einschalten der Stromversorgung
der Digitalkamera wird auch die des Blitzlichtes aktiviert.
Schalten Sie, wenn die Stromversorgung des Blitzlichts
ausgeschaltet werden soll, zuerst dessen Stromversorgung aus und
dann die der Digitalkamera.
Wenn das Blitzlicht mit einer Digitalkamera ohne
Datenaustauschfunktionen benutzt wird, erfolgt eine automatische
Einstellung des Stromspar-Modus, wenn über etwa 60 minuten keine
Arbeitsgänge ausgeführt werden.
Wurde das Wide Panel beschädigt?
≥ Wurde das Wide Panel beim Ausfahren beschädigt, ist es nicht
mehr möglich, die [ZOOM]-Taste zu verwenden. In diesem Fall
können Sie die [ZOOM]-Taste verwenden, wenn Sie die Einstellung
für das Wide Panel auf [OFF] einrichten.
69
VQT0Z62
Page 70

∫ Fragen und Antworten zum Anzeigefeld
Frage (F) Antwort (A)
[ISO] und [F] blinken oder
die Ziffern für ISOEmpfindlichkeit und
Blendenöffnung blinken.
Die Anzeige der optimalen
Entfernung zwischen
Kamera und Objekt blinkt.
[ ] und die Anzeige des
Beleuchtungswinkels
blinken.
[ ] schaltet sich nicht
aus.
[ ] schaltet sich nicht
aus.
Das bedeutet, dass ISO-Empfindlichkeit und Blendenöffnung der
Digitalkamera außerhalb der Blitzlichtarbeitsentfernung des Blitzlichts
liegen.
Ändern Sie die ISO-Empfindlichkeit und Blendenöffnung der
Digitalkamera.
Das Blitzlicht befindet sich zu nahe am Objekt.
Befindet sich das Objekt zu nahe, verschiebt sich der
Beleuchtungsbereich des Blitzlichts. Nehmen Sie deshalb Fotos in
einer Entfernung von mehr als 0,6 m (oder 0,5 m bei Nahaufnahmen)
auf.
Fahren Sie das Wide Panel aus.
Der Blitzlichtkopf wurde nach unten gerichtet (7 Grad). Verwenden
Sie diese Einstellung nur für Nahaufnahmen.
Das Wide Panel ist ausgefahren.
≥ Die Leitzahl (GN) ist verringert.
Achten Sie auf die Entfernung zwischen Kamera und Objekt.
70
VQT0Z62
Page 71

Hinweise zur Benutzung
∫ Zum Gerät
≥ Vermeiden Sie es, das Gerät in die
unmittelbare Nähe von Gegenständen zu
bringen. Seine Wärme und sein Licht können
Verformungen und Verfärbungen hervorrufen.
≥ Beim Aufnehmen von Fotos außerhalb der
Blitzlichtarbeitsentfernung wird die richtige
Belichtung nicht erzielt und es werden
weißliche oder zu dunkle Bilder aufgenommen.
≥ Bei kurzen Verschlusszeiten sind die durch das
Gerät erzielten Wirkungen unter Umständen
nicht ausreichend.
Halten Sie das Gerät von Insektensprays und
anderen flüchtigen Substanzen fern.
≥ Wird das Gerät solchen Sprays oder
Substanzen ausgesetzt, kann seine äußere
Hülle beschädigt werden und/oder kann seine
Farbe abblättern.
≥ Bringen Sie das Gerät nicht über längere
Zeiträume mit Gegenständen aus Gummi oder
PVC in Kontakt.
Verwenden Sie kein Benzin, Farbverdünner,
Alkohol oder andere derartige Lösungsmittel
zum Säubern des Gerätes.
≥ Entfernen Sie die Batterien vor
Instandhaltungsarbeiten.
≥ Der Einsatz von Lösungsmitteln kann zu einer
Beschädigung des Gerätegehäuses und/oder
einem Abblättern der Farbe führen.
≥ Wischen Sie Staub oder Fingerabdrücke mit
einem weichen, trockenen Tuch ab.
≥ Verwenden Sie keine Haushaltsreiniger oder
chemische Reinigungstücher.
≥ Wischen Sie, sollten Regen oder
Wassertropfen auf das Gerät spritzen, das
Wasser mit einem trockenen Tuch ab.
≥ Keinesfalls darf das Gerät unter den folgenden
Bedingungen benutzt oder aufbewahrt werden,
da dies zu Defekten oder Funktionsstörungen
führen kann.
≥ Bei direktem Sonnenlicht oder im Sommer
an der Küste
≥ An Orten mit hohen Temperaturen und hoher
Feuchtigkeit, bzw. wo starke Änderungen bei
Temperatur und Feuchtigkeit erfolgen
≥ An Orten mit hoher Konzentration von Sand,
Staub oder Schmutz
≥ Bei einem Brand
≥ In der Nähe von Heizkörpern, Klimaanlagen
oder Luftbefeuchtern
≥ Wo Wasser das Gerät benässen kann
≥ Wo Erschütterungen vorhanden sind
≥ In einem Fahrzeug
≥ Mehrfache Lichtauslösungen dürfen nicht
erzeugt werden, indem das Blitzlicht
zusammen mit anderen Blitzlichtgeräten
verwendet wird.
≥ Lassen Sie das Gerät nicht fallen, schlagen Sie
es nicht auf andere Gegenstände oder setzen
Sie es keinen anderen starken
Erschütterungen oder Stößen aus.
≥ Wird das Gerät über einen längeren Zeitraum
nicht benutzt, können Schimmel und andere
Probleme zu Defekten am Gerät führen. Es
wird empfohlen, die Funktionsfähigkeit des
Gerätes vor dem Gebrauch zu prüfen.
≥ Berühren Sie nicht die elektrischen Kontakte
des Gerätes. Dadurch kann es zu einem Defekt
am Gerät kommen.
≥ Stellen Sie den Gebrauch des Gerätes, um den
Blitzlichtkopf vor Überhitzung und
Beschädigung zu schützen, nach
10 Dauerauslösungen bei voller
Blitzlichtintensität ein und lassen Sie das Gerät
mindestens 10 minuten ausruhen, damit sich
der Blitzlichtkopf abkühlen kann.
Tragen Sie das Gerät nicht, während es noch
an der Kamera angebracht ist.
71
VQT0Z62
Page 72

∫ Zum Thema Batterien
Achten Sie darauf, die Batterien zu entfernen,
wenn Sie die Kamera für längere Zeit nicht
benutzen.
≥ Ist die Temperatur zu hoch oder niedrig,
können die Kontakte rosten und
Funktionsstörungen verursachen.
Überprüfen Sie, sollten die Batterien aus
Versehen zu Boden fallen, ob das Gehäuse
und die Kontakte nicht beschädigt wurden.
≥ Das Einlegen einer schadhaften Batterie in die
Kamera kann diese beschädigen.
Tragen Sie aufgeladene Ersatzbatterien bei
sich, wenn Sie das Haus verlassen.
≥ Achten Sie darauf, dass sich die Betriebszeit
der Batterie bei niedrigen Temperaturen, wie
auf Skipisten, verkürzt.
Entsorgung unbrauchbarer Batterien.
≥ Batterien haben eine begrenzte Lebensdauer.
≥ Werfen Sie Batterien nicht ins Feuer, sie
könnten explodieren.
Lassen Sie die Batteriekontakte nicht mit
Metallgegenständen in Kontakt kommen
(wie Halsketten, Haarnadeln, usw.).
≥ Dies kann Kurzschlüsse oder
Wärmeerzeugung verursachen und beim
Berühren der Batterien zu schweren
Verbrennungen führen.
Versuchen Sie nicht, Trockenbatterien wieder
aufzuladen.
Werfen Sie die Batterien nicht ins Feuer oder
setzen Sie sie keiner starken Hitze, wie
Sonnenschein, aus.
72
VQT0Z62
Page 73

Technische Daten
Anforderungen an die
DC 6,0 V
Stromversorgung:
Zum Gebrauch
empfohlene Batterien
Aufladedauer
(ab dem Vollblitz bis die
[TEST/CHARGE]-Taste
aufleuchtet)
Auslösedauer Etwa 1/20000 s bis 1/500 s
Blitzanzahl
(mit Vollblitz)
Blitzlicht-Modi TTL AUTO/AUTO/MANUAL/FP TTL AUTO/FP MANUAL
Reflexwinkel Nach oben: 0 bis 90 Grad, nach unten: 0 bis 7 Grad,
Stromspar-Modus
AF-Hilfsstrahl Nur bei Kombinationen mit einer Digitalkamera mit Datenaustauschfunktion
Leitzahl
AA Alkaline-Trockenbatterien (LR6) k 4/
AA Wiederaufladbare Nickel-Metallhydrid-Batterien (Ni-MH) k 4
Max. 7 s : AA Alkaline-Trockenbatterien
Max. 5 s : AA Wiederaufladbare Nickel-Metallhydrid-
(Variiert je nach der Blitzlichtintensität; ausgenommen FP-Auslösung.)
120 Blitze: AA Alkaline-Trockenbatterien
140 Blitze:
(Variiert je nach den Aufnahmebedingungen.)
nach rechts: 0 bis 90 Grad, nach links: 0 bis 180 Grad
Mit dem Stromspar-Modus einer Digitalkamera mit Datenaustauschfunktion
gekoppelt
etwaige Entfernung zur automatischen Auslösung bei geringer Helligkeit: 0,7 m bis 7 m
(Variiert je nach der Digitalkamera und dem verwendeten Objektivtyp)
Batterien
AA Wiederaufladbare Nickel-Metallhydrid-Batterien
Automatisch gewählt
50: Bei der Einstellung von 42 mm (85 mm
bei Verwendung einer Kamera 135)
28: Bei der Einstellung von 12 mm (24 mm
bei Verwendung einer Kamera 135)
18/20 gewählt: Bei Verwendung des Wide Panel
Beleuchtungswinkel Automatisch gewählt
Bei der Einstellung von 12 mm: 61 Grad nach oben/unten, 78 Grad nach
links/rechts (Blickwinkel von 12 mm Objektiv
abgedeckt)
¢
Bei der Einstellung von 42 mm: 21 Grad nach oben/unten, 28 Grad nach
Verwendung des Wide Panel: 83 Grad nach oben/unten, 101 Grad nach
¢ Wenn “FOUR THIRDS” als ZOOM-Anzeige aktiv ist
Abmessungen
Gewicht Etwa 375 g (Hauptgerät)
Zulässige relative
Temperatur
Zulässige relative
Feuchtigkeit
Etwa 79,4 mm (B) k141,1 mm (H) k107,1 mm (T) (ohne hervorstehende Teile)
Etwa 455 g (einschließlich Batterien)
0 °C bis 40 °C
10% bis 80% (ohne Kondensation)
links/rechts (Blickwinkel von 42 mm Objektiv
abgedeckt)
links/rechts (Blickwinkel von 8 mm Objektiv
abgedeckt)
¢
¢
73
VQT0Z62
Page 74

Table des matières
Précautions à prendre .......................................................................................................................... 75
Précautions....................................................................................................................................... 76
Accessoires fournis............................................................................................................................... 76
Noms des composants......................................................................................................................... 77
Affichages apparaissant sur le panneau d’affichage ............................................................................ 78
À propos des piles ................................................................................................................................ 79
Insertion et retrait des piles de l’élément (vendues séparément) ......................................................... 82
Vérification de la charge restante des piles dans l’élément.................................................................. 83
Montage et retrait de l’élément d’un appareil photo numérique............................................................ 84
Prises de vues en utilisant un appareil photo numérique avec fonctions de communication ............... 85
Comment sélectionner le mode flash................................................................................................ 85
[TTL AUTO] ...................................................................................................................................... 86
[AUTO] ............................................................................................................................................. 87
[MANUAL] ........................................................................................................................................ 88
[FP TTL AUTO] ................................................................................................................................ 89
[FP MANUAL] .................................................................................................................................. 90
Prises de vues en utilisant un appareil photo numérique sans fonctions de communication............... 92
Comment sélectionner le mode flash................................................................................................ 92
[AUTO] ............................................................................................................................................. 93
[MANUAL] ........................................................................................................................................ 95
Autres applications ............................................................................................................................... 96
Prises de vues avec une lumière indirecte ....................................................................................... 96
Prises de vues en gros plan.............................................................................................................. 97
Sélection manuelle de l’angle d’éclairage......................................................................................... 97
Comment utiliser le diffuseur grand-angulaire .................................................................................. 98
Choix de plusieurs différentes applications de photographie au flash .............................................. 99
Fonctions............................................................................................................................................ 100
À propos du déclenchement continu .................................................................................................. 102
Tableau des nombres-guides (GN) ..................................................................................................... 103
En cas de problème............................................................................................................................ 105
Précautions d’utilisation...................................................................................................................... 107
Spécifications...................................................................................................................................... 109
74
VQT0Z62
Page 75

Précautions à prendre
≥ Ce flash est conçu pour être utilisé avec les
appareils photo numériques fabriqués par
Panasonic.
Il est compatible avec le modèle DMC-L1K
(avec fonctions de communication: de la P85 à
la 91 ), le modèle DMC-FZ30, etc. (sans
fonctions de communication: de la P92 à la
95 ). (en date de juillet 2006)
≥ Le modèle DMC-L1K est utilisé à titre
d’exemple dans ce manuel d’utilisation.
≥ Four Thirds
AVERTISSEMENT
AFIN DE RÉDUIRE LES RISQUES
D’INCENDIE OU D’ÉLECTROCUTION ET
LES PERTURBATIONS INDÉSIRABLES,
N’UTILISEZ QUE LES ACCESSOIRES
RECOMMANDÉS ET N’EXPOSEZ PAS CET
APPAREIL À LA PLUIE, À L’HUMIDITÉ OU
À DES ÉCLABOUSSURES. NE PAS
ENLEVER LE BOÎTIER (OU LE DOS) DE
L’APPAREIL; CELUI-CI NE CONTIENT
AUCUNE PIÈCE SUSCEPTIBLE D’ÊTRE
RÉPARÉE PAR L’UTILISATEUR. POUR LES
RÉPARATIONS, VEUILLEZ VOUS
ADRESSER À UN PERSONNEL QUALIFIÉ.
TM
est une marque de commerce.
FRANÇAIS
-Si vous voyez ce symbole-
Informations relatives à l’évacuation des
déchets, destinées aux utilisateurs
d’appareils électriques et électroniques
(appareils ménagers domestiques)
Lorsque ce symbole figure
sur les produits et/ou les
documents qui les
accompagnent, cela signifie
que les appareils électriques
et électroniques ne doivent
pas être jetés avec les
ordures ménagères.
Pour que ces produits
subissent un traitement, une
récupération et un recyclage appropriés,
envoyez-les dans les points de collecte
désignés, où ils peuvent être déposés
gratuitement. Dans certains pays, il est possible
de renvoyer les produits au revendeur local en
cas d’achat d’un produit équivalent.
En éliminant correctement ce produit, vous
contribuerez à la conservation des ressources
vitales et à la prévention des éventuels effets
négatifs sur l’environnement et la santé
humaine qui pourraient survenir dans le cas
contraire.
Afin de connaître le point de collecte le plus
proche, veuillez contacter vos autorités locales.
Des sanctions peuvent être appliquées en cas
d’élimination incorrecte de ces déchets,
conformément à la législation nationale.
Utilisateurs professionnels de l’Union
européenne
Pour en savoir plus sur l’élimination des
appareils électriques et électroniques,
contactez votre revendeur ou fournisseur.
Informations sur l’évacuation des déchets
dans les pays ne faisant pas partie de
l’Union européenne
Ce symbole n’est reconnu que dans l’Union
européenne.
Pour vous débarrasser de ce produit, veuillez
contacter les autorités locales ou votre
revendeur afin de connaître la procédure
d’élimination à suivre.
VQT0Z62
75
Page 76

Précautions
∫ À propos de la manipulation de l’élément
≥ Ne soumettez pas l’élément à de fortes
vibrations ou à des chocs. Cela pourrait
entraîner un mauvais fonctionnement ou
encore briser la tête du flash.
≥ Avant de transporter l’élément avec vous,
assurez-vous que le diffuseur grand-angulaire
est correctement rétracté. (P98)
Le sable et la saleté peuvent causer le mauvais
≥
fonctionnement de l’élément. Si vous utilisez
l’élément à la plage, prenez des mesures pour
le protéger du sable et de la saleté.
≥
Pour prendre des photos un jour de pluie ou à la
plage, prenez soin de garder l’élément au sec.
≥ L’élément n’est pas étanche. Si des gouttes
de pluie ou d’eau l’éclaboussent, essuyez
l’eau avec un chiffon sec. Si l’élément ne
fonctionne plus correctement, consultez le
revendeur ou votre service après-vente le
plus proche.
≥ Veuillez lire le manuel d’utilisation de l’appareil
photo numérique.
∫ Si l’élément n’est pas utilisé durant une
période prolongée
≥ Soyez absolument sûr de retirer les piles de
l’appareil.
Si les piles sont laissées dans l’appareil, un
≥
faible courant s’écoulera de façon continue,
même si l’appareil est éteint, déchargeant petit à
petit les piles. (Pour plus de détails sur les piles
au nickel-métal-hydrure, reportez-vous à la
P81.)
≥ Rangez les piles dans un endroit frais, sans
humidité et avec une température la plus
constante possible.
(La limite de température recommandée est de:
15 °C à 25 °C;
la limite d’humidité recommandée est de:
40% à 60%)
≥ Si vous prévoyez de ranger cet appareil et/ou
ses piles dans un placard ou une armoire, il est
recommandé de placer un déshydratant (gel de
silice) avec eux.
Accessoires fournis
[La vérification doit être effectuée lorsque
vous sortez l’appareil de l’emballage]
En retirant l’appareil de son emballage, vérifiez la
présence de l’appareil principal et de tous ses
accessoires, et vérifiez également l’apparence
externe ainsi que leur fonction afin de vérifier
qu’ils n’ont subi aucun dommage lors du transport
ou de la livraison.
Si vous découvrez un problème, contactez votre
vendeur avant d’utiliser le produit.
Pour ce flash, utilisez uniquement l’étui
montré ci-dessous.
Étui de transport pour le flash
VFC4216
≥ Les piles sont vendues séparément.
76
VQT0Z62
Page 77

Noms des composants
8
12
6
7
9
10
1 Diffuseur grand-angulaire (P98)
2 Tête du flash
3 Lampe d’assistance pour la mise au point
automatique (P101)
≥ Dans des endroits sombres où il est
difficile de mettre au point un sujet, vous
pouvez éclairer directement le sujet afin
de faciliter la mise au point.
(L’assistance pour la mise au point
automatique fonctionne uniquement
lorsque ce flash est utilisé en association
avec l’appareil photo reflex numérique à
objectif unique (SLR) “Four Thirds
3
4
5
Panasonic: il ne fonctionne pas avec
d’autres appareils photo.)
4 Capteur du flash
5 Anneau de verrouillage (P84)
6 Broche de verrouillage (P84)
7 Borne (P84)
8 Touche d’orientation du réflecteur (P84, 96 )
9 Indices d’angle de réflexion vertical (P96)
10 Indices d’angle de réflexion horizontal (P96)
11 Touche de mode [MODE] (P85, 92 , 100 )
12 Touche de zoom [ZOOM] (P93, 95 , 97 , 98 )
13 Voyant d’auto-vérification [AUTO CHECK]
(P83, 86 , 93 )
14 Touche d’essai/charge [TEST/CHARGE]
(P83, 85 , 92 )
15 Interrupteur [POWER] (P83, 85 , 92 , 100 )
16 Couvercle du logement des piles (P82)
17 Molette du nombre d’ouverture [F]
(P91, 93 , 100 )
18 Molette du nombre-guide/ISO [GN/ISO]
(P88, 93 , 95 , 100 )
19 Touche d’éclairage [LIGHT] (P100)
≥ Le panneau d’affichage s’allumera durant
15 secondes environ. Il peut également
être allumé en utilisant un appareil photo
avec fonctions de communication.
20 Panneau d’affichage (P78)
TM
” de
20
19
18
17
11
12
13
14
15
16
77
VQT0Z62
Page 78

Affichages apparaissant sur le panneau d’affichage
1 2 3
13
12
11
10
98 7
1 Affichage diffuseur grand-angulaire (P98)
2 Déclenchement FP (P89, 90 )
3 Mode flash (P85, 92 )
4 Valeur du zoom (P97)
5 Réglage de l’intensité du flash (P91)
6 Affichage distance (P101)
7 Ouverture
8 Affichage des réglages
(nombre-guide, sensibilité ISO, ouverture,
distance de fonctionnement du flash,
distance correcte, réglage de l’intensité du
flash)
9 Sensibilité ISO
10 Nombre-guide (GN) (P103)
4
5
6
11 Mode de ZOOM (P97)
12 Affichage angle d’éclairage (P101)
≥ [FOUR THIRDS]:
L’angle d’éclairage est affiché par la
longueur focale du format de l’objectif de
l’appareil photo numérique “Four Thirds”.
≥ [135]:
L’angle d’éclairage est converti à la
longueur focale d’un appareil photo 135
(conversion film 35 mm) et affiché.
13 Prise de vue en gros-plan avec flash (P97)
78
VQT0Z62
Page 79

À propos des piles
∫ À propos des types de pile qui peuvent être
utilisés
Piles alcalines AA (LR6)
Piles rechargeables au nickel-métal-hydrure AA
(Ni-MH)
≥ L’utilisation de piles fabriquées par Panasonic
est recommandée.
≥ La performance des piles utilisées peut différer
de façon significative selon la marque utilisée,
leur temps d’existence depuis leur fabrication et
la manière dont elles ont été entretenues.
≥ La performance des piles diminue
temporairement à basse température (sous
10 °C), mais celle-ci est récupérée lorsque la
température redevient normale.
≥ De mauvais fonctionnements peuvent survenir
sous certaines températures et conditions
d’utilisation. Cependant, ce n’est pas le signe
de problème.
≥ De manière à être sûr que les piles
fonctionneront le plus longtemps possible, nous
vous conseillons d’éteindre l’appareil entre les
prises de vues. Si l’appareil est utilisé durant de
longues périodes, l’usage des piles
rechargeables au nickel-métal-hydrure est
recommandé.
≥ Une fois épuisées, les piles peuvent retrouver
leur efficacité en les laissant de coté pendant
un moment, mais elles deviendront de nouveau
rapidement inutilisables. Pour cette raison,
remplacez les piles épuisées par des neuves.
∫ À propos des types de pile avec lequels le
fonctionnement n’est pas garanti
Piles Ni-Cd AA
Piles au nickel-manganèse AA (ZR6)
Piles au lithium AA (FR6)
Piles au manganèse AA (R6)
Piles Oxyride (oxy-nickel-hydroxide) AA (LR6)
Blocs-batteries au lithium CR-V3
≥ Panasonic n’offre aucune garantie quant au
bon fonctionnement de l’élément en utilisant les
piles listées ci-dessus. De plus, l’utilisation de
ces piles peut causer des fuites d’électrolyte,
des pannes et d’autres problèmes.
∫ À propos des piles ayant des formes qui ne
peuvent pas être utilisées
≥ L’installation de piles ayant une forme non
régulière dans l’appareil peut causer des fuites
d’électrolyte, générer de la chaleur et même
causer la rupture des piles.
≥ Certaines piles vendues sur le marché n’ont
aucun revêtement ou seulement une partie de
celui-ci: N’utilisez ce genre de pile sous aucun
prétexte. (Reportez-vous au dessin
ci-dessous.)
≥ Piles n’ayant aucun revêtement ou piles avec
une partie seulement du revêtement
≥ Piles dont le pôle - est plat
79
VQT0Z62
Page 80

∫ Manipulation des piles
Une mauvaise manipulation des piles peut causer
des fuites d’électrolyte, générer de la chaleur et
même causer la rupture des piles. Suivez les
précautions suivantes.
≥ N’exposez pas les piles à de l’eau ou de l’eau
de mer et ne permettez pas que les pôles
deviennent humides.
≥ Ne retirez pas leur revêtement externe ou ne
les endommagez en aucune façon.
≥ Ne faites pas tomber les piles, ne les cognez
pas à d’autres objets ou ne les soumettez à
aucun autre type de choc.
≥ Arrêtez d’utiliser les piles dès les premiers
signes de fuite d’électrolyte, de déformation,
de décoloration ou de n’importe quel autre
type de problème.
≥ Ne rangez pas les piles dans des endroits où
la température et/ou l’humidité sont trop
élevées.
≥ Gardez les piles hors de la portée des
enfants.
≥
Lors du remplacement des piles, remplacez
toutes les quatre piles par des piles neuves
de même type.
≥ Retirez les piles de l’appareil si vous avez
l’intention de ne plus utiliser l’appareil durant
un long moment.
≥ Les piles peuvent être chaudes
immédiatement après l’utilisation de
l’élément. Avant de les retirer de l’élément,
éteignez celui-ci et attendez que la
température baisse.
≥ À basse température (sous 10 °C), la
performance des piles sera amoindrie et le
nombre de flash déclenché par l’appareil sera
fortement réduit. La durée de fonctionnement
des piles diminue particulièrement si des
piles alcalines sont utilisées. Par conséquent,
réchauffez-les dans votre poche avant de les
utiliser. En réchauffant les piles dans votre
poche, évitez le contact direct avec un briquet
et autres objets en métal tels qu’un
réchauffeur de poche.
≥ Le nombre de flash déclenché par l’appareil
peut être fortement réduit si les pôles + et des piles sont exposés au sébum ou autres
formes de saletés. Avant d’installer les piles,
essuyez les pôles + et - avec attention en
utilisant un chiffon sec et doux.
Si l’électrolyte devait s’écouler des piles,
essuyez-en toutes les traces dans le
compartiment des piles, puis insérez des piles
neuves ou des piles au nickel-métal-hydrure
complètement chargées.
Si vous avez de l’électrolyte sur vos mains ou
vos vêtements, rincez-le complètement avec de
l’eau. Si vous avez de l’électrolyte dans les
yeux, vous risquez de perdre la vue. Dans un tel
cas, ne frottez pas vos yeux mais nettoyez-les
immédiatement avec de l’eau claire, et
consultez votre médecin.
80
VQT0Z62
Page 81

∫ Piles rechargeables au nickel-métal-
hydrure
Les piles au nickel-métal-hydrure sont prêtes à
l’usage une fois chargées à l’aide d’un chargeur
dédié. Cependant, une mauvaise manipulation
des piles peut causer des fuites d’électrolyte,
dégager de la chaleur, générer des flammes et
même causer la rupture des piles. Suivez les
précautions suivantes.
≥
Il peut ne pas être possible de charger des
piles qui ont de la saleté sur les pôles
Utilisez un chiffon doux et sec et essuyez avec
attention les pôles
contacts du chargeur.
≥ Lorsqu’elles sont achetées ou lorsqu’elles ne
sont pas utilisées durant un long moment, les
piles au nickel-métal-hydrure peuvent ne pas
avoir une charge suffisante. Ceci est dû à leur
caractéristique et n’est le signe d’aucun
problème. Leur performance normale sera
restaurée après qu’elles auront été chargées
un certain nombre de fois.
≥
Nous vous conseillons de charger les piles
uniquement lorsque leur charge existante a
été complètement utilisée. Si elles sont
chargées de façon répétée sans que leur
charge existante soit d’abord complètement
utilisée, il peut être difficile pour elles de
conserver leur capacité. (Un phénomène
appelé effet mémoire.)
≥ Si l’effet mémoire est survenu, utilisez la
charge existante dans les piles jusqu’à ce
que l’élément ne puisse plus se déclencher,
puis rechargez-les complètement un certain
nombre de fois. Cela restaurera leur capacité.
≥ Lorsque les piles au nickel-métal-hydrure ne
sont pas utilisées, leur capacité diminue à
cause d’un déchargement naturel.
≥ Ne continuez pas à charger des piles au
nickel-métal-hydrure qui sont déjà chargées.
≥ Ne retirez pas leur revêtement externe ou ne
les endommagez en aucune façon.
≥ Lisez les instructions qui accompagnent le
chargeur utilisé pour recharger les piles.
Les piles au nickel-métal-hydrure ont une durée
de vie spécifique. Au fur et à mesure qu’elles sont
utilisées ou que le temps s’écoule, leur capacité
diminuera graduellement. Si la durée pendant
laquelle l’appareil peut être utilisé a
considérablement baissé, les piles peuvent avoir
+
et - ainsi que les
+
et -.
atteint la fin de leur durée de vie. Procurez-vous
des piles neuves.
≥ La durée de vie des piles diffère selon leur
méthode de rangement, leurs conditions
d’utilisation et l’environnement dans lequel
elles sont utilisées.
∫ Si l’élément n’est pas utilisé durant une
période prolongée
≥ Si les piles sont laissées dans l’appareil, un
faible courant s’écoulera de façon continue,
même si l’appareil est éteint, déchargeant petit
à petit les piles. Si elles sont laissées ainsi,
elles peuvent se décharger de façon excessive
et devenir inutilisable même après avoir été
chargées.
≥ Si vous rangez les piles pendant une longue
période, nous vous conseillons de les charger
une fois par an et une fois leur charge épuisée,
de les retirer de l’appareil et de les ranger de
nouveau.
∫ Durée de vie des piles
Nombre de flash
(Nombre de flash en pleine puissance en
mode MANUAL à intervalles de 30 secondes)
Piles utilisées Nombre de flash
Piles alcalines AA (LR6)
Piles au nickel-métal-
hydrure (Ni-MH)
Conditions de prise de vues
≥ Température: 23 °C
Intervalle du flash
Piles utilisées Intervalle du flash
Piles alcalines AA (LR6)
Piles au nickel-métal-
hydrure (Ni-MH)
≥ Le nombre de flash et les intervalles diffèrent
légèrement selon l’état de rangement des piles
et les conditions d’utilisation.
Au moins 120 flashes
Au moins 140 flashes
Environ 6 s
Environ 4 s
81
VQT0Z62
Page 82

Insertion et retrait des
piles de l’élément
(vendues séparément)
≥ Vérifiez que l’élément est éteint.
≥ Utilisez des piles alcalines ou des piles
rechargeables au nickel-métal-hydrure.
1 Faites glisser le couvercle du
logement des piles pour l’ouvrir.
≥ Lors de la première utilisation de
l’élément, décollez la bande qui adhère
au couvercle du logement des piles.
2 En insérant les piles, assurez-
vous que les pôles + et - sont
correctement alignés.
3 Fermez le couvercle du logement
des piles en le faisant glisser
fermement dans le sens de la
flèche aussi loin que possible.
≥ Après avoir utilisé l’appareil, retirez les piles.
82
VQT0Z62
Page 83

Vérification de la charge
restante des piles dans
l’élément
≥ Installez les piles, allumez cet élément et
vérifiez la charge restante des piles.
1 Appuyez sur la touche [POWER].
POWERPOWER
≥ La charge démarre.
2 Vérifiez que la touche [TEST/
CHARGE] s’allume.
TEST/
CHARGE
≥ Si la touche [TEST/CHARGE] et le voyant
[AUTO CHECK] clignotent tous les deux
en même temps, cela signifie que les
piles sont presque complètement hors
d’usage et qu’elles doivent être
remplacées le plus rapidement possible
par des piles neuves.
3 Appuyez sur la touche [POWER]
pour éteindre l’élément.
≥ Lorsque la touche [TEST/CHARGE] est
appuyée, l’élément peut se déclencher.
≥ Éteindre l’élément dans les situations
suivantes:
≥ En montant l’élément sur, ou en le retirant
de, l’appareil photo numérique
≥ Lorsque vous ne désirez pas que l’élément
se déclenche
≥ Lorsque vous n’allez pas utiliser l’élément
≥ Une fois les piles complètement
chargées, la touche [TEST/CHARGE]
s’allume.
≥ Si cela prend autant de temps pour la
touche [TEST/CHARGE] de s’allumer
que le temps indiqué dans le tableau cidessous, cela signifie que les piles sont
presque hors d’usage. Remplacez-les le
plus rapidement possible par des piles
neuves.
Piles alcalines Plus de 30 s
Piles rechargeables au
nickel-métal-hydrure
Plus de 10 s
83
VQT0Z62
Page 84

Montage et retrait de
l’élément d’un appareil
photo numérique
≥ Vérifiez que l’élément et l’appareil photo
numérique sont éteints. (Monter l’élément sur,
ou le retirer de, l’appareil photo tandis que
celui-ci est allumé peut provoquer des
problèmes et n’est pas recommandé.)
∫ Montage de l’élément
1 Assurez-vous que la tête du flash
est en position avant et
horizontale.
A
≥ Ne montez pas l’élément sur l’appareil
photo numérique si la broche de
verrouillage dépasse. Ceci pourrait
endommager l’élément.
3 Faites glisser fermement
l’élément vers l’arrière de la griffe
porte-accessoires jusqu’à ce
qu’un clic se fasse entendre.
A: Touche d’orientation du réflecteur
≥ Si la tête du flash est sur la position
verrouillée, tournez-la tout en appuyant
sur la touche d’orientation du réflecteur.
2 Desserrez l’anneau de verrouillage.
≥ Si la broche de verrouillage dépasse,
tournez l’anneau de verrouillage dans le
sens opposé à [2LOCK] et rétractez la
broche.
≥ N’employez pas plus de force que
nécessaire sur l’anneau de verrouillage.
≥ Ne touchez pas les bornes avec vos
doigts, objets en métal, etc.
84
VQT0Z62
4 Tournez l’anneau de verrouillage
dans la direction [2LOCK]
jusqu’à ce qu’il arrête de tourner.
∫ Retrait de l’élément
Desserrez complètement l’anneau
de verrouillage et retirez l’élément
de la griffe porte-accessoires.
Page 85

Prises de vues en utilisant
un appareil photo
numérique avec fonctions
de communication
Comment sélectionner le mode flash
≥ Pour plus de détails sur chaque mode flash,
reportez-vous aux pages 86 à 90 .
1 Allumez l’appareil photo numérique.
2 Appuyez sur la touche [POWER]
de l’appareil.
POWER
≥ La touche [TEST/CHARGE] s’allume une
fois les piles complètement chargées.
3 Appuyez à mi-course sur le
déclencheur de l’appareil photo
numérique.
≥ Les informations sur la sensibilité ISO,
l’ouverture, la vitesse d’obturation et les
autres informations relatives aux prises
de vues sont transmises entre l’appareil
photo numérique et l’élément.
4 Appuyez sur la touche [MODE],
et sélectionnez le mode flash.
MODE
≥ Le mode flash apparaît sur le panneau
d’affichage.
≥ Le mode est changé chaque fois que la
touche [MODE] est appuyée.
∫ À propos des modes flash
Mode Détails des réglages
[TTL AUTO] Après avoir mesuré l’intensité du
[AUTO] L’élément détecte la lumière à
[MANUAL] L’unité se déclenche selon le
[FP TTL
AUTO]
[FP
MANUAL]
¢ Le nombre-guide (GN) est une valeur qui
indique la quantité de lumière d’un flash. Plus
haute est la valeur, plus grande est la quantité
de lumière émise par l’appareil.
flash appropriée en déchargeant
un pré-flash, l’unité se déclenche
une nouvelle fois pour prendre
une photo. (P86)
travers son capteur en accord
avec l’ouverture de l’objectif, et il
règle l’intensité du flash. (P87)
≥ Ce mode peut uniquement être
utilisé sur des modèles
d’appareil photo numérique
avec fonctions de
communication qui prennent
en charge le mode [AUTO].
nombre-guide (GN)
choisi. (P88)
Ce mode permet de prendre des
photos avec flash même à
grande vitesse d’obturation de
l’appareil photo numérique avec
le déclenchement FP
(déclenchement répété du flash à
grande vitesse). (P89)
L’appareil commence le
déclenchement FP à l’intensité
du flash réglé dans le mode [FP
MANUAL]. (P90)
¢
qui a été
A: Mode flash
A
≥ Il peut ne pas être possible d’utiliser certains de
ces modes selon les modes de prises de vues
qui sont pris en charge par l’appareil photo
numérique.
≥ Il est impossible de sélectionner un mode qui
ne peut pas être utilisé.
85
VQT0Z62
Page 86

[TTL AUTO]
Appuyez sur la touche [MODE], et sélectionnez le
mode flash. (P85)
≥ La distance de fonctionnement du flash est
montrée sur le panneau d’affichage à la suite
des réglages de l’appareil photo numérique.
A
A: Distance de fonctionnement du flash
1 Vérifiez que la distance entre
l’appareil et le sujet est comprise
dans la portée utile du flash.
≥ Si le sujet est hors de portée, réglez
l’ouverture de l’objectif ou changez la
distance du sujet.
≥ La distance de fonctionnement du flash
change selon le type et les réglages
(sensibilité ISO, ouverture et longueur
focale) de l’appareil photo numérique
utilisé.
2 Appuyez à fond sur le
déclencheur et prenez la photo.
3 Vérifiez que le voyant [AUTO
CHECK] est en train de clignoter.
≥ Si le voyant [AUTO CHECK] clignote
pendant environ 5 secondes, cela signifie
que l’élément s’est déclenché avec
succès.
86
VQT0Z62
AUTO
CHECK
Page 87

[AUTO]
Appuyez sur la touche [MODE], et sélectionnez le
mode flash. (P85)
≥ La distance de fonctionnement du flash est
montrée sur le panneau d’affichage à la suite
des réglages de l’appareil photo numérique.
A
3 Vérifiez que le voyant [AUTO
CHECK] est en train de clignoter.
AUTO
CHECK
≥ Si le voyant [AUTO CHECK] clignote
pendant environ 5 secondes, cela signifie
que l’élément s’est déclenché avec
succès.
A: Distance de fonctionnement du flash
≥ Si les réglages de l’appareil photo
numérique (sensibilité ISO et ouverture)
sont au-delà des combinaisons de
sensibilité ISO et d’ouverture qui peuvent
être réglées, la distance de
fonctionnement du flash n’est pas
affichée et l’utilisateur est prévenu par le
clignotement des indications [ISO] et [F]
sur l’écran. Dans un cas comme celui-ci,
changez les réglages de l’appareil photo
numérique.
1 Vérifiez que la distance entre
l’appareil et le sujet est comprise
dans la distance de
fonctionnement du flash.
≥ Si le sujet est hors de portée, réglez
l’ouverture de l’objectif ou changez la
distance entre l’appareil et le sujet.
≥ La distance de fonctionnement du flash
change selon le type et les réglages
(sensibilité ISO, ouverture et longueur
focale) de l’appareil photo numérique
utilisé.
2 Appuyez à fond sur le
déclencheur et prenez la photo.
∫ Combinaisons de la sensibilité ISO et de
l’ouverture qui peuvent être réglées en
mode [AUTO]
Sensibilité
ISO
3200 F8 à F32
1600 F5.6 à F32
800 F4 à F32
400 F2.8 à F32
200 F2 à F32
100 F1.4 à F22
50 F1.4àF16
25 F1.4àF11
Ouverture
87
VQT0Z62
Page 88

[MANUAL]
Appuyez sur la touche [MODE], et sélectionnez le
mode flash. (P85)
≥ La distance optimale entre l’appareil photo et le
sujet et le nombre-guide (GN) correspondant
aux réglages de l’appareil photo numérique
apparaissent sur le panneau d’affichage.
A
A: Distance optimale entre l’appareil photo
et le sujet
1 Tournez la molette [GN/ISO] et
sélectionnez le nombre-guide
(GN) de façon à ce que la
distance entre l’appareil photo et
le sujet soit réglée sur la distance
du sujet.
2 Appuyez à fond sur le
déclencheur et prenez la photo.
≥ Si la sensibilité ISO est de [100], la distance
optimale entre l’appareil photo et le sujet peut
être calculée en divisant le nombre-guide (GN)
par l’ouverture. (P103)
≥ La molette [F] peut également être
utilisée pour ce réglage.
≥ Si la distance optimale entre l’appareil
photo et le sujet est moins de 0,6 m (ou
0,5 m pour des photos en gros plan), la
portée de la luminosité du flash changera.
Dans ce cas, l’utilisateur est averti par le
clignotement du numéro sur l’affichage.
≥ La distance optimale entre l’appareil
photo et le sujet change selon les
réglages de l’appareil photo numérique
(sensibilité ISO, ouverture, longueur
focale et vitesse d’obturation).
88
VQT0Z62
GN/ISO
Page 89

[FP TTL AUTO]
Appuyez sur la touche [MODE], et sélectionnez le
mode flash. (P85)
≥ Ce mode permet de prendre des photos avec
flash même à grande vitesse d’obturation de
l’appareil photo numérique avec le
déclenchement FP (déclenchement répété du
flash à grande vitesse).
≥ La distance de fonctionnement du flash est
montrée sur le panneau d’affichage à la suite
des réglages de l’appareil photo numérique.
A
A: Distance de fonctionnement du flash
1 Vérifiez que la distance entre
l’appareil et le sujet est comprise
dans la portée utile du flash.
≥ Si le sujet est hors de portée, réglez
l’ouverture de l’objectif ou changez la
distance entre l’appareil et le sujet.
≥ La distance de fonctionnement du flash
change selon le type et les réglages
(sensibilité ISO, ouverture et longueur
focale) de l’appareil photo numérique
utilisé. La portée est plus courte que dans
le mode [TTL AUTO].
2 Appuyez à fond sur le
déclencheur et prenez la photo.
3 Vérifiez que le voyant [AUTO
CHECK] est en train de clignoter.
AUTO
CHECK
≥ Si le voyant [AUTO CHECK] clignote
pendant environ 5 secondes, cela signifie
que l’élément s’est déclenché avec
succès.
Les genres de photo suivants peuvent être
pris en utilisant de grandes vitesses
d’obturation.
≥ Photo prise avec les ombres adoucies par la
fonction contre-jour
≥ Portrait pris à l’extérieur avec une ouverture
ouverte et avec l’arrière-plan défocalisé
89
VQT0Z62
Page 90

[FP MANUAL]
Appuyez sur la touche [MODE], et sélectionnez le
mode flash. (P85)
≥ La distance optimale entre l’appareil photo et le
sujet et le nombre-guide (GN) correspondant
aux réglages de l’appareil photo numérique
apparaissent sur le panneau d’affichage.
A
A: Distance optimale entre l’appareil photo
et le sujet
1 Tournez la molette [GN/ISO] et
sélectionnez le nombre-guide
(GN) de façon à ce que la
distance entre l’appareil photo et
le sujet soit réglée sur la distance
du sujet.
2 Appuyez à fond sur le
déclencheur et prenez la photo.
≥ La molette [F] peut également être
utilisée pour ce réglage.
≥ Si la distance optimale entre l’appareil
photo et le sujet est moins de 0,6 m (ou
0,5 m pour les photos en gros plan), la
portée de la luminosité du flash changera.
Dans ce cas, l’utilisateur est averti par le
clignotement du numéro sur l’affichage.
≥ La distance optimale entre l’appareil
photo et le sujet change selon les
réglages de l’appareil photo numérique
(sensibilité ISO, ouverture, longueur
focale et vitesse d’obturation).
90
VQT0Z62
GN/ISO
Page 91

∫ Réglage de l’intensité du flash
L’intensité du flash peut être réglée par niveau.
Réglez l’intensité du flash sur [ON] avant d’en
régler l’intensité. (P101)
≥ [ ] apparaît sur le panneau d’affichage.
1 Tournez la molette [F] et
sélectionnez la valeur de réglage
de l’intensité du flash.
A
F
A: Valeur de réglage de l’intensité du flash
≥ La valeur du réglage de l’intensité du
flash est toujours affichée sauf lorsqu’elle
est égale à [0]. Si la valeur du réglage de
l’intensité du flash est [0], la portée de
fonctionnement du flash n’est pas
affichée.
La limite de réglage de l’intensité du flash et
l’intensité réelle peuvent être différentes selon
le mode flash.
≥ Limite de réglage de l’intensité du flash
≥ Si [TTL AUTO], [AUTO] ou [FP TTL AUTO]
est sélectionné, l’intensité du flash peut être
réglée sur une portée de d3.0 étapes.
0 +0.3 +0.7 +1.0 +3.0
0
-
0.3
-
0.7
-
1.0-3.0
≥ Si [MANUAL] ou [FP MANUAL] est
sélectionné, l’intensité du flash peut être
réglée sur une portée de d0.7 étapes.
0 +0.3 +0.7
0
-
0.3
-
0.7
≥ L’intensité réelle du flash peut varier lorsque la
valeur de réglage de l’intensité du flash a été
sélectionnée sur l’appareil photo numérique
ainsi que sur l’élément.
≥ Si [TTL AUTO], [AUTO] ou [FP TTL AUTO]
est sélectionné, l’élément se déclenche à la
valeur de réglage obtenue en additionnant
les valeurs de réglage sélectionnées sur
l’appareil photo numérique et sur l’élément.
(Seule la valeur sélectionnée sur l’élément
est affichée comme valeur de réglage de
l’intensité du flash.)
[Exemple]
Élément
Configuration de
la valeur de
réglage
Affichage de la
valeur de réglage
de l’intensité du
flash de l’élément
Valeur de réglage
réelle utilisée
pour le
déclenchement
≥ Si [MANUAL] ou [FP MANUAL] est
sélectionné, l’élément se déclenche à la
valeur de réglage sélectionnée sur l’élément
uniquement.
[Exemple]
Configuration de
la valeur de
réglage
Affichage de la
valeur de réglage
de l’intensité du
flash de l’élément
Valeur de réglage
réelle utilisée
pour le
déclenchement
+0.3
Élément
+0.3
Appareil
photo
numérique
+0.3
(+1/3 EV)
+0.3
+0.6
(+2/3 EV)
Appareil
photo
numérique
+0.3
(+1/3 EV)
+0.3
+0.3
(+1/3 EV)
91
VQT0Z62
Page 92

Prises de vues en utilisant
un appareil photo
numérique sans fonctions
de communication
Comment sélectionner le mode flash
≥ Pour plus de détails sur chaque mode flash,
reportez-vous aux pages 93 à 95 .
1 Appuyez sur la touche [POWER]
de l’appareil.
≥ La touche [TEST/CHARGE] s’allume une
fois les piles complètement chargées.
2 Appuyez sur la touche [MODE]
pour sélectionner le mode flash.
MODE
A
A: Mode flash
≥ Le mode flash apparaît sur le panneau
d’affichage.
≥ Le mode est changé chaque fois que la
touche [MODE] est appuyée.
∫ À propos des modes flash
Mode Détails des réglages
[AUTO] L’appareil détecte la lumière à
[MANUAL] L’unité se déclenche selon le
¢ Le nombre-guide (GN) est une valeur qui
indique la quantité de lumière d’un flash. Plus
haute est la valeur, plus grande est la quantité
de lumière émise par l’appareil.
travers son capteur en accord
avec l’ouverture de l’objectif, et il
règle l’intensité du flash. (P93)
nombre-guide (GN)
choisi. (P95)
¢
qui a été
92
VQT0Z62
Page 93

[AUTO]
Appuyez sur la touche [MODE], et sélectionnez le
mode flash. (P92)
1 Tournez la molette [GN/ISO] pour
régler la sensibilité ISO.
GN/ISO
2 Appuyez sur la touche [ZOOM]
pour régler la valeur de zoom à la
longueur focale de l’objectif.
ZOOM
pour avertir l’utilisateur. Dans un tel cas,
changez la sensibilité ISO et l’ouverture.
4 Appuyez à fond sur le
déclencheur et prenez la photo.
5 Vérifiez que le voyant [AUTO
CHECK] est en train de clignoter.
≥ Si le voyant [AUTO CHECK] clignote
pendant environ 5 secondes, cela signifie
que l’élément s’est déclenché avec
succès.
AUTO
CHECK
3 Tournez la molette [F] et réglez-la
selon l’ouverture de l’objectif.
F
≥ Si la combinaison de la sensibilité ISO et
de l’ouverture sont en dehors de la
gamme utilisable, l’affichage de la
sensibilité ISO et de l’ouverture clignotent
93
VQT0Z62
Page 94

∫ Distance de fonctionnement du flash en mode [AUTO]
Sensibilité ISO
3200 1600
F8 F5.6 F4 F2.8 F2 F1.4
800 400 200 100 50 25
``
F11F8F5.6F4F2.8F2F1.4
F16 F11 F8 F5.6 F4 F2.8 F2 F1.4
F22F16F11 F8F5.6F4F2.8F2
F32 F22 F16 F11 F8 F5.6 F4 F2.8
` F32 F22 F16 F11 F8 F5.6 F4
``F32 F22 F16 F11 F8 F5.6
```F32 F22 F16 F11 F8
````F32 F22 F16 F11
Valeurs d’ouverture qui peuvent étre réglées
8
(16)10(20)12(24)14(28)17(35)25(50)35(70)42(85)
1,1
[
12,8
14,2
0,8
[
`
9,0
10,0
0,5
[
6,4
0,5
[
4,5
0,5
[
3,2
0,5
[
2,2
0,5
[
1,6
0,5
[
1,1
0,5
[
0,7
Distance de fonctionnement en prenant des
Angle d’éclairage
Longueur focale (mm)
(conversion film 35 mm)
1,2
1,7
[
20,0
1,2
[
14,0
0,8
[
10,0
0,6
[
7,0
0,5
[
5,0
0,5
[
3,5
0,5
[
2,5
0,5
[
1,7
0,5
[
1,2
1,9
[
21,4
1,3
[
15,0
0,9
[
10,7
0,6
[
7,5
0,5
[
5,3
0,5
[
3,7
0,5
[
2,7
0,5
[
1,8
0,5
[
1,3
25,7
18,0
12,8
[
0,9
[
0,6
[
7,1
0,5
[
5,0
0,5
[
3,5
0,5
[
2,5
0,5
[
1,8
0,5
[
1,2
0,5
[
0,8
photos en [AUTO] (m)
2,2
1,6
1,1
0,8
9,0
0,5
6,4
0,5
4,5
0,5
3,2
0,5
2,2
0,5
1,5
2,5
2,8
[
[
28,5
1,7
[
[
20,0
1,2
[
[
14,2
0,8
[
[
10,0
0,6
[
[
7,1
0,5
[
[
5,0
0,5
[
[
3,6
0,5
[
[
2,5
0,5
[
[
1,7
[
32,1
2,0
[
22,5
1,4
[
16,0
1,0
[
11,2
0,7
[
8,0
0,5
[
5,6
0,5
[
4,0
0,5
[
2,8
0,5
[
1,9
3,1
[
35,7
2,2
[
25,0
1,5
[
17,8
1,1
[
12,5
0,7
[
8,9
0,5
[
6,2
0,5
[
4,5
0,5
[
3,1
0,5
[
2,2
≥ Les zones encadrées en gras indiquent les distances de fonctionnement du flash lorsque le diffuseur
grand-angulaire est utilisé. (P98)
≥ Lorsque la tête du flash est dirigée vers l’avant, le nombre affiché sur le coté de la distance proche
est de 0,6 m ou plus, et lorsqu’elle est dirigée vers le bas, elle est de 0,5 m ou plus.
≥ L’intensité du flash peut être réglée par pas de 1/3 en variant la sensibilité ISO et l’ouverture des
réglages de l’appareil photo numérique, et en les sélectionnant.
94
VQT0Z62
Page 95

[MANUAL]
Appuyez sur la touche [MODE], et sélectionnez le
mode flash. (P92)
Le nombre-guide (GN) et le taux de quantité de
≥
lumière apparaissent sur le panneau d’affichage.
A
A: Taux de quantité de lumière
≥ Le “taux de quantité de lumière” est le
taux de l’intensité du flash en pleine
puissance.
1 Appuyez sur la touche [ZOOM]
pour régler la valeur de zoom à la
longueur focale de l’objectif.
ZOOM
2 Tournez la molette [GN/ISO] et
réglez le nombre-guide (GN).
3 Appuyez à fond sur le
déclencheur et prenez la photo.
∫ Comment déterminer l’ouverture et le
nombre-guide
Lorsque la distance entre l’appareil photo et le
sujet et l’ouverture ont été décidé
≥ La formule suivante est utilisée pour obtenir le
nombre-guide (GN), qui est ensuite réglé sur
l’élément.
“Ouverture (F)” k “Distance entre appareil photo
et sujet (m)” m “Coefficient de sensibilité ISO”
Lorsque l’ouverture doit être définie
≥ La formule suivante est utilisée pour obtenir
l’ouverture, qui est ensuite réglée sur l’appareil
photo numérique.
“Nombre-guide (GN)” k “Coefficient de sensibilité
ISO” m “Distance entre appareil photo et sujet
(m)”
Comment obtenir la distance optimale entre
l’appareil photo et le sujet
“Nombre-guide (GN)” k “Coefficient de sensibilité
ISO” m “Ouverture (F)”
Coefficient de sensibilité ISO
Sensibilité
ISO
3200 5,6
1600 4,0
800 2,8
400 2,0
200 1,4
100 1,0
50 0,71
25 0,5
≥ Pour avoir une liste de nombres-guides (GN),
reportez-vous à la P103.
Coefficient de correction
≥ La molette [F] peut également être
utilisée pour ce réglage.
GN/ISO
95
VQT0Z62
Page 96

Autres applications
Prises de vues avec une lumière
indirecte
≥ La photographie à lumière indirecte est une
technique qui utilise la lumière réfléchie par un
plafond ou un mur à partir d’un flash qui l’a
émise.
≥ Si le flash est dirigé directement en avant du
sujet lorsqu’un portrait doit être effectué, par
exemple, de grandes ombres peuvent se
former ou bien la peau de la personne ou
d’autres zones peuvent devenir blanchâtres ou
floues.
≥ Cependant, si la technique de la lumière
indirecte est utilisée dans le même cas, les
fortes ombres peuvent être minimisées et le
sujet capté de façon naturelle.
1 Tout en maintenant enfoncée la
touche d’orientation du
réflecteur, tournez la tête du flash
vers la direction désirée.
90°
180°
90°
7°
≥ En position verrouillée, changez la
direction en maintenant enfoncée la
touche d’orientation du réflecteur.
2 Dirigez le flash vers le plafond ou
une autre surface réfléchissante
et prenez la photo.
≥ La distance de fonctionnement du flash
ainsi que la distance optimale entre
l’appareil photo et le sujet n’apparaissent
pas sur le panneau d’affichage.
≥ Lorsque l’angle d’éclairage est réglé sur
[ZOOM] (auto), la valeur du zoom [--]
apparaît sur le panneau d’affichage et
25 mm [appareil photo 135 (conversion
film 35 mm): 50 mm] est sélectionné.
≥ L’angle d’éclairage peut être changé
manuellement. (P97)
≥ Lorsque la touche [TEST/CHARGE] est
appuyée, le voyant [AUTO CHECK] s’allume, et
le déclenchement approprié peut être vérifié.
(Ceci est possible uniquement lorsque [AUTO]
est établi en tant que mode flash.)
≥ Si la surface (comme un plafond ou des murs)
sur laquelle la lumière du flash est réfléchie est
colorée, cela peut affecter les photos.
Choisissez une surface blanche ou blanc-cassé
comme surface de réflexion.
96
VQT0Z62
Page 97

Prises de vues en gros plan
≥ Lorsque la distance entre l’appareil photo et le
sujet est de 0,5 m à 1,5 m, la lumière émise par
le flash sera faussée. Pour cette raison, tout en
maintenant enfoncée la touche d’orientation du
réflecteur, dirigez la tête du flash vers le bas
(7 degrés), puis prenez une photo.
Sélection manuelle de l’angle d’éclairage
≥ L’angle d’éclairage peut être réglé
manuellement.
Appuyez sur la touche [ZOOM] et
sélectionnez l’angle d’éclairage.
Pointez la tête du flash vers le
bas aussi loin que possible
(7 degrés vers le bas).
≥ [ ] apparaît sur le panneau d’affichage.
≥ Le vignettage peut être causé par la lumière du
flash lorsque l’objectif est long ou a un large
diamètre. Prenez d’abord une photo d’essai,
puis prenez une photo.
≥ Utilisez le flash de cette façon uniquement pour
les photos en gros plan. Si vous laissez la tête
du flash dirigée vers le bas pendant une prise
de vue normale, la lumière émise par le flash
en haut de l’écran sera insuffisante.
ZOOM
A
A: Angle d’éclairage
≥ [M ZOOM] apparaît sur le panneau
d’affichage.
Tous les réglages ZOOM suivants peuvent
être sélectionnés:
12 mm, 14 mm, 17 mm, 25 mm, 35 mm, 42 mm
Chaque fois que la touche [ZOOM] est appuyée,
les réglages sont sélectionnés dans l’ordre
suivant:
≥ [AUTO ZOOM] peut être utilisé uniquement
≥ Lorsque le diffuseur grand-angulaire est utilisé,
[Avec un appareil photo 135
(conversion film 35 mm): 24 mm, 28 mm,
35 mm, 50 mm, 70 mm, 85 mm]
AUTO
ZOOM
42
(85)
lorsqu’un appareil photo numérique avec
fonctions de communication est utilisé.
tous les réglages suivants peuvent être
sélectionnés: [AUTO ZOOM], [10 (20)] ou
[8 (16)].
12
(24)
35
(70)
14
(28)
17
(35)
25
(50)
≥ Lorsqu’une valeur plus grande que la longueur
focale de l’objectif est utilisée, les bords de
l’image seront assombris.
97
VQT0Z62
Page 98

Comment utiliser le diffuseur grandangulaire
≥ Utilisez le diffuseur grand-angulaire incorporé
du flash lorsque la longueur focale de l’objectif
est plus large que 12 mm.
≥ Réglez le commutateur du diffuseur grand-
angulaire sur [ON]. (P101)
1 Sortez le diffuseur grand-angulaire
et appuyez le vers le bas.
≥ [ ] apparaît sur le panneau d’affichage.
2 Appuyez sur la touche [ZOOM] et
sélectionnez l’angle d’éclairage.
ZOOM
≥ L’angle ne peut pas être affiché avec un
appareil photo numérique qui n’a pas les
fonctions de communication.
≥ En utilisant le diffuseur grand-angulaire, le
nombre-guide (GN) est réduit. Cela signifie que
la distance de fonctionnement est réduite en
prenant des photos en mode [TTL AUTO],
[AUTO] ou [FP TTL AUTO] et que la distance
optimale entre l’appareil photo et le sujet est
réduite en prenant des photos en mode
[MANUAL] ou [FP MANUAL].
≥ Après les prises de vues, rétractez le diffuseur
grand-angulaire.
≥ Ne pivotez pas le diffuseur grand-angulaire
vers le haut. Cela pourrait l’endommager.
A: Angle d’éclairage
≥ 8 mm ou 10 mm
[16 mm ou 20 mm pour un appareil photo
135 (conversion film 35 mm)] peuvent
être sélectionnés.
98
VQT0Z62
A
Page 99

Choix de plusieurs différentes
applications de photographie au flash
≥ Plusieurs différentes applications de flash
photographiques peuvent être choisies avec les
réglages de l’appareil photo numérique.
≥ Il peut ne pas être possible d’utiliser certaines
fonctions selon la forme et les fonctions de
l’appareil photo numérique utilisé.
≥ Pour d’autres détails, référez-vous au manuel
d’utilisation de votre appareil photo numérique.
≥ Sélectionnez [TTL AUTO] ou [FP TTL AUTO]
comme mode flash.
Flash réduction yeux rouges
≥ La lumière émise par le flash réduit le
phénomène yeux rouges des sujets.
Synchronisation lente
Synchronisation avec l’arrière-plan
(rideau arrière)
≥ En prenant des vues à obturation lente de
sujets en mouvement, le flash est activé juste
avant la fermeture de l’obturateur.
Les sources de lumière émanant de derrière le
sujet sont capturées en donnant une
impression de mouvement.
≥ La lumière de l’élément peut être émise en
utilisant l’obturation lente.
Ceci permet une prise de vue claire de
personnes ressortant sur un arrière plan de
scène nocturne.
99
VQT0Z62
Page 100

Fonctions
≥ Vous pouvez sélectionner chaque fonction à
l’avance.
1 Appuyez sur la touche [POWER].
2 Appuyez sur la touche [MODE]
pendant 2 secondes ou plus pour
commuter vers les réglages des
fonctions.
MODE
3 Tournez la molette [GN/ISO] pour
sélectionner un élément du
menu.
5 Appuyez sur la touche [MODE]
pour sortir des réglages.
∫ Réinitialisation des réglages par défaut des
fonctions (état au moment de l’achat)
Lorsque la touche [MODE] et la touche [LIGHT]
sont appuyées ensemble pendant 2 secondes ou
plus, tous les réglages sauf celui de l’affichage de
la distance (m/ft) sont réinitialisés.
MODE
LIGHT
≥ Le réglage de l’affichage de la distance
(m/ft) reste inchangé.
4 Tournez la molette [F] pour
sélectionner le réglage.
100
VQT0Z62
GN/ISO
F
 Loading...