

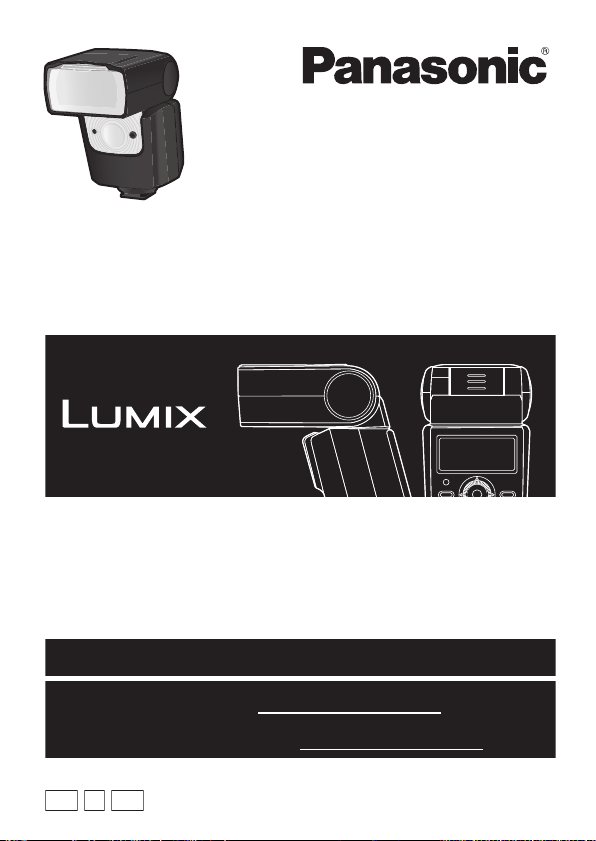
Panasonic DMW-FL360L User Manual
GK
E
Operating Instructions
PP
For USA and Puerto Rico assistance, please call: 1-800-211-PANA(7262) or,
contact us via the web at: http://www.panasonic.com/contactinfo
For Canadian assistance, please call: 1-800-99-LUMIX (1-800-995-8649) or
send e-mail to: lumixconcierge@ca.panasonic.com
Pour de I’aide, composez le 1-800-99-LUMIX (1-800-995-8649) ou
envoyez un courriel à : lumixconcierge@ca.panasonic.com
Manuel d’utilisation
使用说明书
FLASH
Model No.
Modèle
DMW-FL360L
型号
闪光灯
Please read these instructions carefully before using this
Il est recommandé de lire attentivement ce m anuel a vant d’utiliser
l’appareil et de le conserver pour consultation ultérieure.
product, and save this manual for future use.
请于使用前仔细阅读操作使用说明书 , 并妥善保管。
VQT4Q07
F1012CT0

Operating Instructions
FLASH
Thank you for purchasing Panasonic product.
Please read these instructions carefully before using this product, and save this
manual for future use.
Contents
Information fo r You r Saf et y..............2
Precautions......................................6
Supplied Accessories ......................6
Names of Parts................................7
Control Panel...................................7
Continuous Firing.............................7
Preparing a Battery
(optional)..........................................8
Loading Batteries.............................8
Attaching to the Camera..................8
Turning on the Flash....... ................. 8
Shooting ..........................................9
Flash Mode....................................10
Button Function s...................... ... ...11
Information for Your Safety
CAUTION!
To reduce the risk of fire, electric shock or product damage,
• Do not install or place this unit in a bookcase, built-in cabinet or in another
confined space. Ensure this unit is well ventilated.
Wireless Flash Settings................. 12
Placing Wireless Flash Units.........12
Fixing the Irradiation Angle...........13
Using the Wide Panel.................... 13
Using the Catch Light Plat e...........13
Other Settings ............................... 13
Custom Settings............................14
Camera without Communication
Functions ...................................... 15
Slave Mode ................................... 16
Cautions for Use ........................... 16
Specifications................................ 16
Limited Warranty (ONLY FOR
U.S.A. AND PUERTO R ICO)........18
Limited Warranty
(ONLY FOR CANADA) ............. ... . 21
2
VQT4Q07 (ENG)

ENGLISH
IMPORTANT SAFETY
INSTRUCTIONS
When using your photographic equipment, basic safety
precautions should always be followed , including the following:
≥ Read and understand all instructions before using.
≥ Close supervision is necessary when any appliance is
used by or near children. Do not leave appliance
unattended while in use.
≥
Care must be t aken as burns can occur from touching hot
parts.
≥ Do not operate if the appliance has been dropped or
damaged - until it has been examined by qualified
service personnel.
≥ Let appliance cool completely before putting away.
≥
To reduce the risk of electric shock, do not immerse this
appliance in water or other liquids.
≥ To reduce the risk of electric shock, do not disassemble
this appliance, but take it to qualified service personnel
when service or repair work is required. Incorrect
reassembly can cause electric shock when the
appliance is used subsequently.
≥ The use of an accessory attachment not recommended
by the manufacturer may cause a risk of fire, electric
shock, or injury to persons.
SAVE THESE
INSTRUCTIONS
(ENG) VQT4Q07
3

∫ About the batteries
CAUTION
•Danger of explosion if battery is incorrectly replaced. Replace only with
the type recommended by the manufacturer .
•When disposing the batteries, please contact your local authorities or
dealer and ask for the correct method of disposal.
•Do not heat or expose to flame.
•Do not leave the battery(ies) in a car exposed to direct sunlight for a long
period of time with doors and windows closed.
•If rechargeable batteries are to be used, then rechargeab le batteries
manufactured by Panasonic are recommended.
THE FOLLOWING APPLIES ONLY IN THE U.S.A.
FCC Note:
This equipment has been tested and found to comply with the limits for a Class
B digital device, pursuant to Part 15 of the FCC Rules.
These limits are designe d to provide reason able protec tion agains t har mful
interference in a residential installation. This equipment generates, uses
and can radiate radio frequency energy and, if not installed an d used in
accordance with the instruction s, may cause harmful interference to radio
communications. However, there is no guarantee that interference will not
occur in a particular installation. If this equipment does ca use harmful
interference to radio or television reception, which can be determined by
turning the equipment off and on, the user is enco u raged to try to correct
the interference by one or more of the following measures:
≥ Reorient or relocate the receiving antenna.
≥ Increase the separation between the equipment and receiver.
≥ Connect the equipment into an outlet on a circuit different from that to
which the receiver is connected.
≥ Consult the dealer or an experienced radio/TV technician for help.
Any unauthorized changes or modifications to this equipment would void
the user’s authority to operate this device.
This device complies with Pa rt 15 of the FCC Rul es. Ope ration is subject to
the following two conditions: (1) This device may not cause ha rmful
interference, and (2) this device mus t accept any interference received,
including interference that may cause undesired operation.
Responsible Party:
Panasonic Corporation of North Ame r ica
One Panasonic Way
Secaucus, NJ 07094
Support Contact:
Panasonic Consumer Marketing Company of North America
Telephone No.: 1-800-211-PANA (7262)
4
VQT4Q07 (ENG)
THE FOLLOWING APPLIES ONLY IN CANADA.
This Class B digital apparatus complies with Canadian ICES-003.
-If you see this symbolInformation on Disposal for Users of Waste Electrical & Electron ic
Equipment (private households)
Penalties may be applicable for incorrect disposal of this waste, in
accordance with national legislation.
For business users in the Europ ean Union
If you wish to discard electrical and electronic equipment, please contact your
dealer or supplier for further information.
Information on Disposal in other Countries outside the European
Union
This symbol is only valid in the European Union.
If you wish to discard this product, please contact your local authorities or
dealer and ask for the correct method of disposal.
This symbol on the products and /or accompanying
documents means that used electrical and
electronic products should not be mixed with
general household waste.
For proper treatment, rec overy and recycling,
please take these products to designated collection
points, where they will be accepted on a free of
charge basis. Alternatively, in some countries you
may be able to return your produc ts to your local
retailer upon the purchase of an equivalent new
product.
Disposing of this product correctly will help to save
valuable resources and prevent any potential
negative effects on human health and the
environment which could otherwise arise from
inappropriate waste handling. Please contact your
local authority for further details of your nearest
designated collection point.
(ENG) VQT4Q07
5
Precautions
VFC4916 VFB0243
12
≥ This is the external flash for the Panasonic digital cameras (mentioned as flash in
the following). When this flash is used together with a digital camera that
supports wireless mode, shooting with a wireless flash becomes possible.
Available functions vary depending on the digital camera used. As for the
corresponding digital cameras, please visit our web site.
http://panasonic.jp/support/global/cs/dsc/
(This Site is English only.)
∫ Handling the unit
≥ Do not subject the un it to strong vibration or impact. Doing so may not only
cause the unit to malfunction but also cause the flash head to break.
≥ Sand and dirt may cause the unit to malfunction. When using the unit in an
environment such as a beach, take steps to protect it from sand and dirt.
≥ This unit is neither dust-proof nor splash-proof. If by any chance water
droplets, etc. are splashed on the unit, wipe them off with a dry cloth. If the
unit fails to function correctly, consult your dealer or Panasonic.
≥ Read the operating instructions for your digital camera.
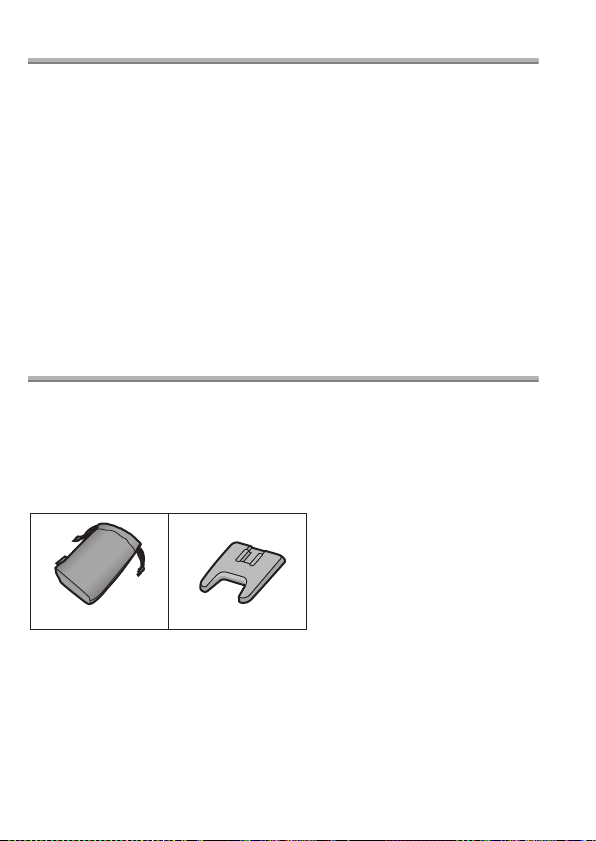
Supplied Accessories
[Inspection to be performed when you unpack the unit]
When removing the unit from its packing box, check that the main unit and the
supplied accessories are there and also check their external appearance and
functions to verify that they have not sustained any damage during distribution and
transportation.
If you discover any trouble, contact your vendor before using the product.
Product numbers correct as of October 2012. These may be subject to change.
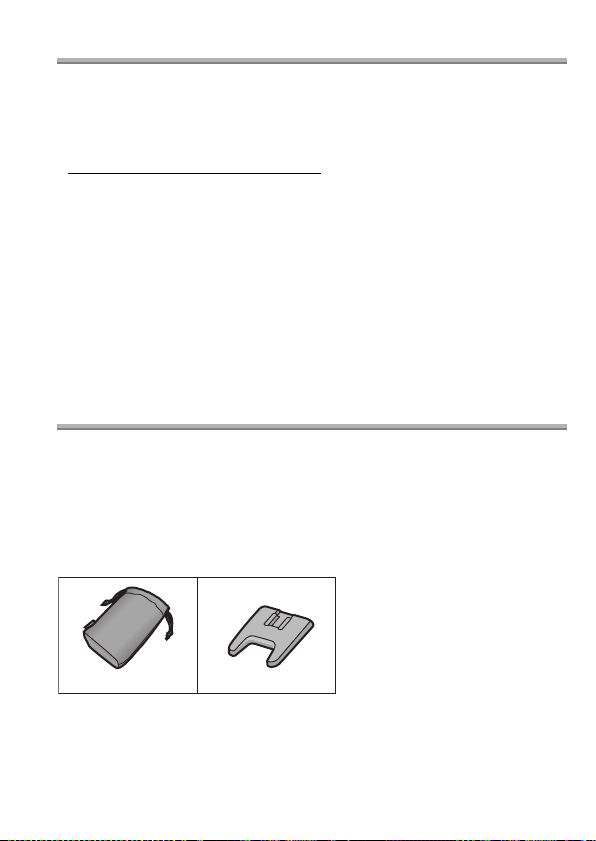
1 Flash case
2 Flash stand
≥ The batteries are optional.
6
VQT4Q07 (ENG)
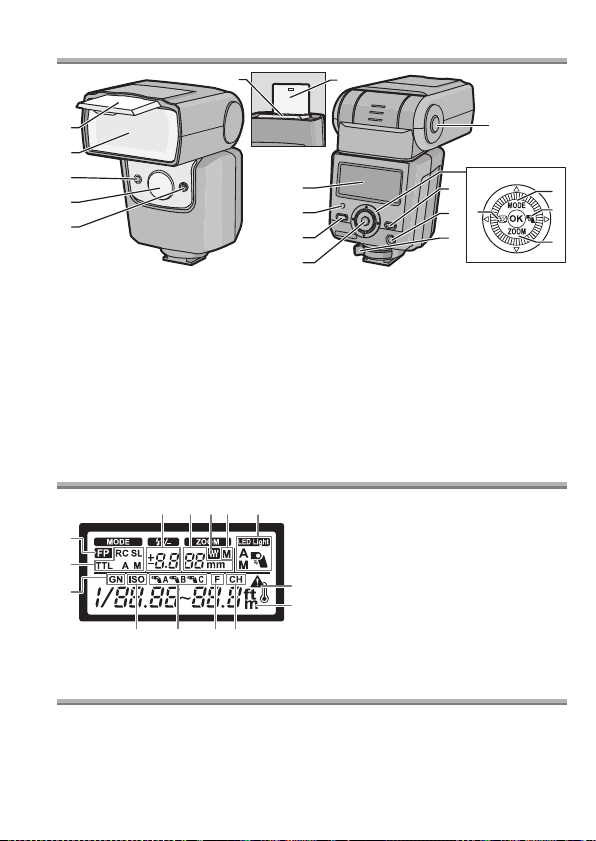
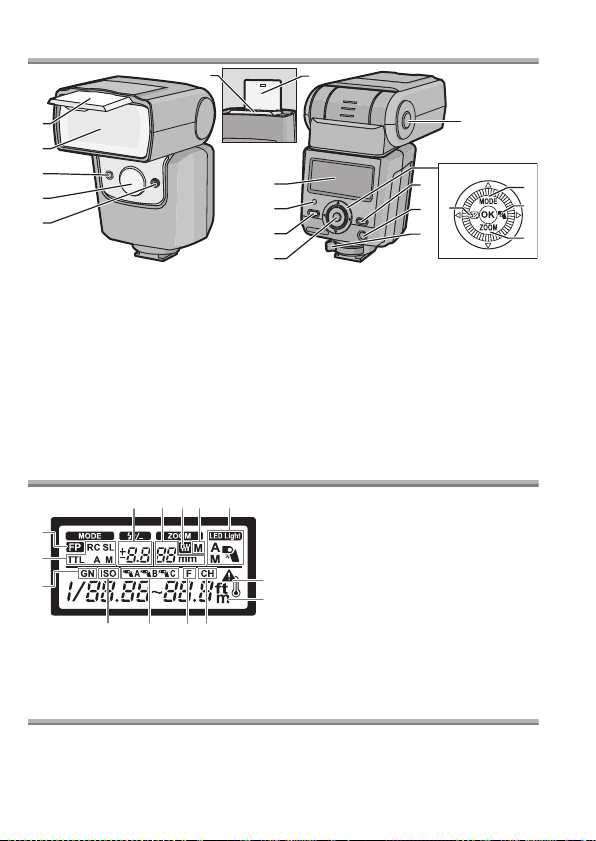
Names of Parts
b
d
a
c
1 Wide panel
2 Flash head
3 Wireless sensor
4 AF assist lamp/LED light
5 Flash sensor
6 Catch light plate
7 Control panel
8 [AUTO CHECK] lamp
9 [TEST/CHARGE] button/lamp
: [OK] button
; Bounce unlock button
< [BACK LIGHT] button
= [ON/OFF] button
> Lock lever
? Dial
a (2): Flash intensity adjustment button
b (3): [MODE] button
c (1): LED light button
d (4): [ZOOM] button
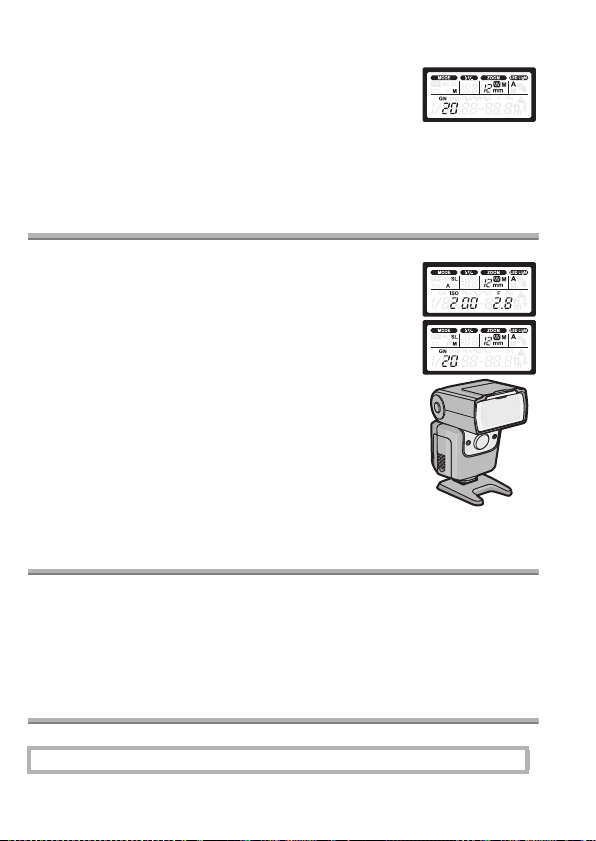
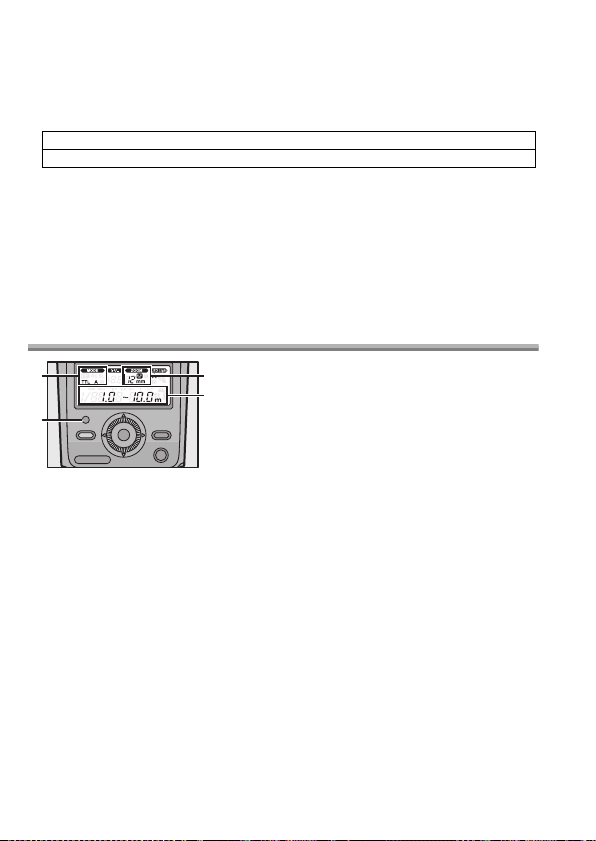
Control Panel
Continuous Firing
The flash may become hot when fired many times in succession, resulting in
damage or malfunction. The flash should be fired no more than 10 times in
succession at intervals of 2.5 seconds, after which it should be left unused for at
least 10 minutes.
1 FP firing
2 Flash mode
3 Guide number
(GN)
4 Flash inte nsity
adjustment
5 ZOOM value
6 FOUR THIRDS
7 Zoom mode
8 LED light
9 ISO sensitivity
: RC mode group
; Aperture (F)
< RC mode
channel
= Temperature
warning
> Distance units
(ENG) VQT4Q07
7
Preparing a Battery (optional)
Choose from the below batteries:
≥ LR6/AA Alkaline dry batteries (x 4)
≥ HR6/AA Rechargeable nickel metal hydride batteries (Ni-MH) (x 4)
R6/AA Manganese dry batteries cannot be used.
The use of batteries made by Panasonic is recommended.
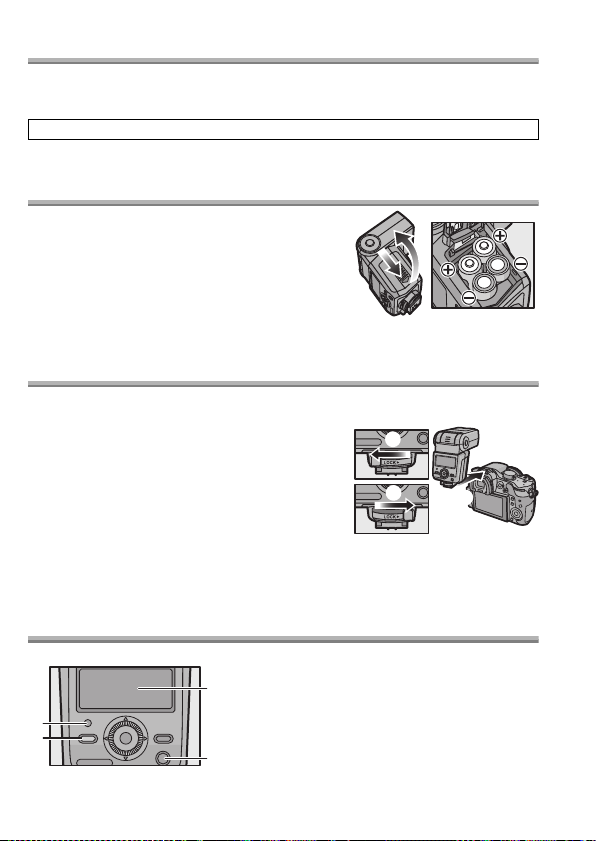
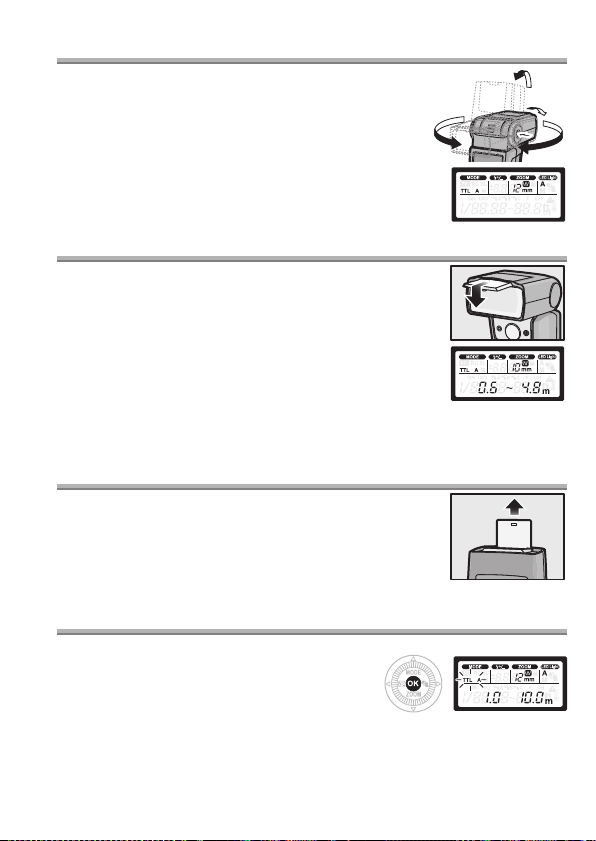
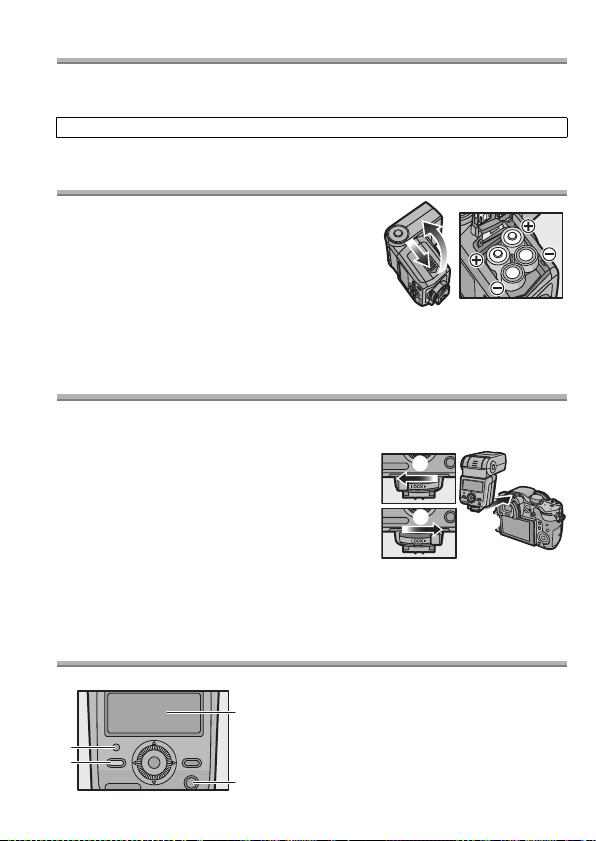
Loading Batteries
≥ Use alkaline dry batteries or rechargeable nickel
metal hydride batteries.
1 Slide the battery cover to open it.
2 Insert the batteries with correct [r]/
[s] polarity.
3 Close the battery cover by sliding it
back firmly as far as it will go.
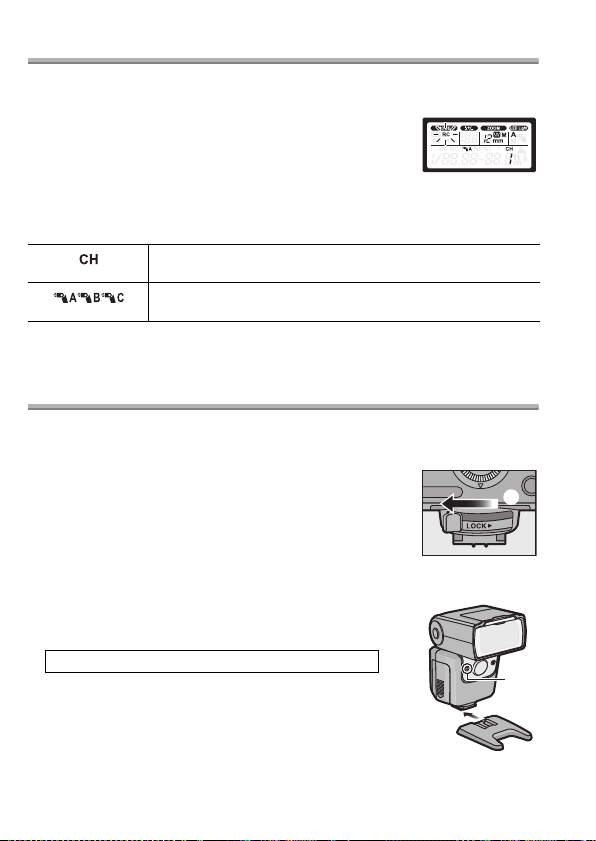
Attaching to the Camera
Confirm that both the camera and flash are off. Attaching or removing the flash
while either the flash or the camera is on may result in malfunction.
1 Slide the lock lev er i n th e di rection
opposite to that indicated by the
[LOCK 1] icon (1).
2 Slide the flash into the hot shoe until
it clicks securely into pl ac e (2).
3 Slide the lock lever to the [LOCK 1]
position (3).
≥ To remove the flash, slide the lock lever in the direction opposite to the [LOCK1]
arrow and slide it from the shoe.
Turning on the Flash
Attach a flash to the camera, and then turn the camera on.
1 [AUTO CHECK] lamp
2 [TEST/CHARGE] lamp
3 Control panel
4 [ON/OFF] button
8
VQT4Q07 (ENG)
Press the [O N/OFF] button.
≥ The control panel display will turn on.
T o turn the flash off, press the [ON/OFF] button again.
≥
≥ Replace the batteries if the [TEST/CHARGE] lamp does not light after:
30 seconds (Alkaline dry batteries)
10 seconds (Rechargeable nickel metal hydride batteries)
≥ If the [TEST/CHARGE] lamp and [AUTO CHECK] lamp blink simultaneously,
batteries are running low. Replace the batteries. Using a considerably
exhausted battery may result in malfunction.
≥ The flash will enter sleep mode whenever the camera enters sleep mode.
≥ If no operations are performed for approximately 60 minutes, the flash will turn off
automatically. Press the [ON/OFF] button to turn it on.
≥ Oscillating sound may be output while charging the flash, but this is not
malfunction.
Shooting
1 Flash mode
2 Lighting an gle
Displayed according to the focal length of the
lens.
3 [AUTO CHECK] lamp
4 Light working range
1 Use camera controls to choose the flash mode.
See the camera operating instructions for details.
2 Choose a flash mode.
“Flash Mode” (P10)
• The camera and flash will exchange shooting information and the flash working
range will be displayed in the control panel.
3 Press the shutter button halfway.
• Flash range varies with camera settings (ISO sensitivity, aperture, and lens
focal length).
4 Press the shutter button the rest of the w ay down to take the
picture.
The unit emits light in proper exposure if [AUTO CHECK] lamp flashes for
approximately 5 seconds.
≥ When using a flash, flash light may be blocked by the lens body, lens hood, etc.
≥ Use the wide panel to prevent overexposure at ranges of less than 1 m (3.3 feet)
(P13).
(ENG) VQT4Q07
9
Flash Mode
Choose a flash mode according to your subject and shooting
conditions.
1 Press the [MODE] (3) button.
2 Rotate the dial to select a flash mode .
• While [MANUAL] or [FP MANUAL] is selected, pressing [MODE] (3) button
allows you to set the guide number. Press the [MODE] (3) again to turn back.
3 Press the [OK] button.
Control panel display Control operation
The flash light intensity is controlled automatica lly
[ TTL AUTO]
[ AUTO]
Blinks:
Out of flash working range
[ MANUAL] In this mode, the flash is emitted according to the
[ RC]
[ FP TTL AUTO] FP firing. This mode allows you to use flash
[ FP MANUAL]
according to the camera’s setup. The flash will be
adjusted based on the bri ghtn e ss taken through the
camera’s lens. U sually use this mode with a camera
with communication cap ability.
The flash will be adjusted based on the brig htn ess
captured by flash sensor on the flash. If the camera
has communication capability, this mode can be
used only when the camera is an AUTO-compatible
model.
guide number setting. The flash displays the
optimal range, which is calculated based on the
guide number and camera settings.
Wireless control is available with Panasonic digital
cameras that support wireless mode. (P12)
photography even at shutter speeds faster than the
flash synchronization speed of the camera.
≥ Maximum output is reduced, resulting in a smaller
flash working range. Flash working range also
diminishes with shutter speed.
[FP TTL AUTO]: Flash level is set automatically.
[FP MANUAL]: The flash fires at the selected guide
number. The flash displays the optimal range,
which is calculated based on the guide number and
camera settings.
10
VQT4Q07 (ENG)
Control panel display Control operation
[ SL AUTO] The flash can be fired remotely in sync with any
[ SL MANUAL]
flash fired by other units.
[SL AUTO]: Flash level is set automatically.
[SL MANUAL]: The flash fires at the selected guide
number.
Button Functions
Button Function Use
[ZOOM]
Adjust flash level by up to w5 EV.
This value is combined with
[]
adjustments to flash
compensation made using the
camera.
Adjust the lighting angle manually.
[M] appears in the display.
1 Press [ ] (2) or [ZOOM]
(4).
2 Rotate the dial to select the
value, and then press the
[OK] button.
1 Before shooting, set the
LED light to [M].
“Other Settings” (P13)
2 Press [ ] (1) to turn the
LED light on. Press [ ] (1)
again to turn the LED light
[]
[
TEST/
CHARGE
[BACK
LIGHT]
Manually turn the LED light on or
off.
T o fire a test flash, press the [TEST/CHARGE] button while the [TEST/
CHARGE] lamp is lit.
]
The control panel backlight lights for about 15 seconds.
off. To view the LED
brightness setting, press
and hold [ ] (1) for 2
seconds while the LED light
is on.
≥ The flash and batteries may
become warm if you keep the
LED light on, but this is not a
malfunction.
(ENG) VQT4Q07
11
Wireless Flash Settings
Wireless control is available with Panasonic digital cameras that support wireless
mode. See the operating instructions of the digital camera for operation of the
digital camera during wireless flash shooting.
1 Set the camera to wireless mode.
2 Set the flash to [RC ] mode.
“Flash Mode” (P10)
• When [RC] is selected, pressing [MODE] (3) button
allows you to set a channel. Press the [MODE] (3) button again to turn back.
3 Use the flash to select the channel and group.
“Other Settings” (P13)
Channel
Group
The Firing mo de, the flas h adj ust ment , an d the ma nua l f lash adjus tm ent can be s et
for each group by operating the camera.
Set the camera and flash to the same channel.
The camera can adjust flash settings separately for up to 3
groups; choose the group to which the flash bel ongs.
Placing Wireless Flash Units
Since the communication is performed with the flash emission of the camera, the
flash positioning range varies with the camera. Refer to the camera operating
instructions for details about the flash positioning range.
1 Attach the supplied stand.
• Slide the lock lever in the direction opposite to that
indicated by the [LOCK 1] icon (1) and slide the flash
onto the stand until it clicks securely into place (2).
• Slide the lock lever to the [LOCK 1] position to latch the
flash in place.
• To remove the flash, slide the latch in the direction opposite to the [LOCK 1]
arrow and slide it from the stand.
2 Position the flash with the wireless sensor
(A) facing the camera.
Take a test shot after positioning.
≥ We recommend using a single group of up to three remote
flash units.
≥ Flash may not fire due to the angle or distance between the
camera and the object.
12
VQT4Q07 (ENG)
Fixing the Irradiation Angle
Point the flash head at a wall or ceiling for bounce flash
photography. The area illuminated at ranges of 0.5 m
(1.6 feet) to 1.0 m (3.3 feet) will not be correct; point the
flash down.
Pressing the bounce unlock button, turn the
light-emitting section up/down and left/right.
Using the Wide Panel
Use the built-in wide panel for flash photography when the
focal length of the lens is wider than 12 mm.
Slide out the wide panel and place it on the flash
head.
≥ The estimated range display changes when the wide panel
is used.
≥ The lighting angle can be set to 10 mm and 8 mm only.
≥ Do not tilt the wide panel up.
≥ The ZOOM display will blink if the lens has a focal length of
12 mm or more.
Using the Catch Light Plate
Reflecting the flash light allows you to shoot with the catch
light effect, which reflects light in the models eyes.
Slide out the catch light plate.
Point the flash directly upward with the plate toward the
subject.
Other Settings
The following options can be selected in the control panel.
1 Press the [OK] button.
An item will blink in the control panel.
2 Press 3/4/2/1 to highlight items.
3 Rotate the dial to select the setting ,
and then press [OK] button.
180º
90º
7º
180º
(ENG) VQT4Q07
13
Option Description
MODE (flash mode) P10
(flash intensity adjustment) P11
ZOOM (lighting angle) P11
Choose whether the LED lights automatically
or manually.
(LED light)
GN (guide number) Adjust flash level.
ISO sensitivity Adjust ISO sensitivity.
Group Choose a group for [RC] mode. (P12)
Aperture Adjust aperture.
Channel Choose a channel for [RC] mode. (P12)
[A]: Lights automatically as required.
[M]: Lights when the LED light button is
pressed.
None: Does not light.
Custom Settings
Customize settings for improved ease of use.
1 Press and hold the [OK] butt on fo r more than 2 seceonds.
The flash will enter custom settings mode.
2 Press 3/4 to highlight items.
3 Rotate the dial to change the highlight ed i tem.
4 Press and hold the [OK] button for more than 2 seconds to
end the settings.
Control panel Option Description
AF assist
lamp
LED
brightness
Slave
flash
Flash
cable
Zoom
display
[A]: Controlled by camera.
[OFF]: Does not light.
[1/1] to [1/16]: Adjust LED brightness.
[ON]: Flash control display shows slave mode.
[OFF]: Flash control display does not show
slave mode.
[ON]: Flash cable not used.
[OFF]: Flash cable used.
Display values for FOUR THIRDS lenses.
[]:
None: Display 35 mm film camera equivalent
values.
14
VQT4Q07 (ENG)
Control panel Option Description
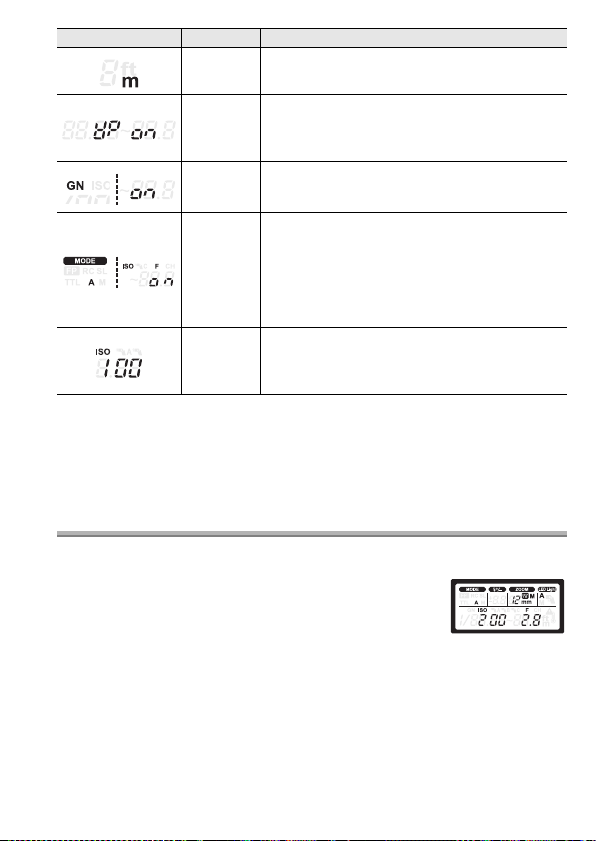
Distance
units
Wide
panel
detection
Guide
number
display
Auto light
sensing
Auto ISO
display
[m]: Distances displayed in meters.
[ft]: Distances displayed in feet.
[ON]: Flash detects position of wide panel.
Lighting angle adjusted automatically.
[OFF]: Flash does not detect wide panel
position.
[ON]: Flash output is shown as a guide number.
[OFF]: Flash output is shown as a relative value.
[ON]: The ISO sensitivity and the aperture are
adjusted to match the camera.
[OFF]: The ISO sensitivity and the aperture of
the flash can be adjusted with the dial.
≥ This can only be used for digital cameras with
communication functions. (Only when the flash
mode is set to [AUTO] or [SL AUTO] mode.)
[25] to [3200]: Display the ISO sensitivity when
[AUTO] is selected as the flash mode for
cameras that can not communicate with the
flash unit.
∫ Returning the custom settings to the defau lt settin g
Press and hold the [OK] button and [BACK LIGHT] button together for more
than 2 seconds
The control panel will blink once when settings are reset.
Display of the distance unit does not return to the default setting.
Camera without Communication Functions
∫ AUTO
Set aperture and ISO sensitivity to the values select ed wi th the cam era .
1 Set the flash mode to [AUTO].
“Flash Mode” (P10)
• When [AUTO] is selected, pressing [MODE] (3) button
allows you to set the aperture. Press the [MODE] (3)
button again to turn back.
2 Match the zoom position to the focal length of the lens.
“[ZOOM]” (P11)
3 Adjust aperture and ISO sensitivity.
“Other Settings” (P13)
If the selected values are out of the flash working range, [ISO] and [F] will blink in
the display. The [AUTO CHECK] lamp blinks for about 5 seconds after the shutter
is released to show that the flash has fired successfully.
(ENG) VQT4Q07
15
∫ MANUAL
Choose the guide number.
1 Set the flash mode to [MANUAL].
“Flash Mode” (P10)
2 Match the zoom position to the focal length
of the lens.
“[ZOOM]” (P11)
3 Set the guide number.
“Other Settings” (P13)
Slave Mode
The flash can be fired remotely in sync with any flash fired by other units.
1 Set the flash mode to [SL AUTO] or [SL
MANUAL].
“Flash Mode” (P10)
Adjust other flash settings as for [AUTO] or [MANUAL] mode.
“Camera without Communication Functions” (P15)
2 Position the flash.
Flash positioning method is same as the wireless mode.
“Placing Wireless Flash Units” (P12)
Refer to the camera operating instructions for details about
the flash positioning range.
• Set the flash mode of the camera to the manual which
does not fire the pre-flash. If the camera fires the preflash, the external flash synchronizes with the pre-flash of
the camera, and cannot fire the flash light properly.
• The flash may fire in response to flash units used by other
photographers.
Cautions for Use
∫ About the unit
Do not carry the unit when it is still attached to the camera body.
∫ About the batteries
Be sure to remove the batteries when you will not be using the unit for a long
period of time.
Specifications
Specifications are subject to change without notice.
Power requirements:
16
VQT4Q07 (ENG)
DC 6.0 V

Batteries
recommended for use
Charging time
(from full flash until
the [TEST/CHARGE]
LR6/AA
Alkaline dry batteries k 4/
HR6/AA Rechargeable nickel metal hydride batteries
(Ni-MH)
k 4
Approx. 2.0sec.: LR6/AA Alkaline dry batteries
Approx. 1.5 sec.: HR6/AA Rechargeable nickel metal
hydride batteries
lamp lights)
Firing period Approx. 1/20000 sec. to 1/500 sec.
(Varies depending on the flash intensity; FP firing
excluded.)
No. of flashes
(with full flash)
Approx. 250 flashes:
Approx. 350flashes: HR6/AA Rechargeable nickel
metal hydride batter ies (min. 1900 mAh type)
LR6/AA
Alkaline dry batteries
(Differs depending on the photo taking conditions.)
AF assist l amp Effective distance: approximately 1 m (3.3 feet) to 5 m
(16 feet)
(Differs depending on the digital camera and type of
lens used)
Flash modes TTL AUTO/AUTO/MANUAL/FP TTL AUTO/
FP MANUAL/SL AUTO/SL MANUAL/RC
Guide number 36 (ISO100), 12 (ISO100: When the wide panel is used)
Lighting angle Covers the angle of view of 12 to 42 mm lenses (35 mm
film camera equivalent: 24 to 85 mm)
(With wide panel: 8 mm lens, 35 mm film camera
equivalent: 16 mm)
Dimensions
Approx. 62.0 mm (W)k104.0 mm (H)k98.0 mm (D)
q
(W)k4.095q (H)k3.858q(D)]
[2.441
(excluding the projecting parts)
Mass (weight) Approx. 376 g/0.829 lb (including batteries)
Approx. 257 g/0.567 lb (main unit)
Operating temperature 0 °C to 40 °C (32 °F to 104 °F)
Operating humidity 10%RH to 80%RH (no condensat ion)
For the U.S.A.
Panasonic Consumer Marketing Company of North America,
Division of Panasonic Corporation of North America
One Panasonic Way, Secaucus, NJ 07094
For CANADA
Panasonic Canada Inc.
5770 Ambler Drive, Mississauga, Ontario L4W 2T3
www.panasonic.ca
Printed in China
(ENG) VQT4Q07
17

Limited Warranty (ONLY FOR U.S.A. AND PUERTO RICO)
Panasonic C onsumer Marketing Company of North America,
Division of Pana sonic Corporation of North America
One Panasonic Way, Secaucus, New Jersey 07094
Panasonic Products Limited Warranty
Limited Warranty Coverage (For USA and Puerto Rico Only)
If your product does not work properly because of a defect in materials or
workmanship, Panasonic Consumer Marketing Company of North America
(referred to as “the warrantor”) will, for the length of the period indicated on the
chart below, which starts with the date of original purchase (“warranty period”), at
its option either (a) repair your product with new or refurbished parts, (b) replace it
with a new or a refurbished equivalent value product, or (c) refund your purchase
price. The decision to repair, replace or refund will be made by the warrantor.
Product or Part Name Parts Labor
Digital Camera Accessories 90 Days 90 Days
Batteries (Non-rechargeable batteries are
not warranted.)
During the “Labor” warranty period there will be no charge for labor. During the
“Parts” warranty period, there will be no charge for parts. This Limited Warranty
excludes both parts and labor for non-rechargeable batteries, antennas, and
cosmetic parts (cabinet). This warranty only applies to products purchased and
serviced in the United States or Puerto Rico. This warranty is extended only to the
original purchaser of a new product which was not sold “as is”.
Mail-In Service
For assistance in the U.S.A. and Puerto Rico in obtaining repairs, please ship the
product prepaid to:
Panasonic Exchange Center
4900 George McVay Drive
Suite B
McAllen, TX 78503
@us.panasonic.com
panacare
Online Repair Request
To submit a new repair request and for quick repair status visit our Web Site at
www.panasonic.com/repair
18
VQT4Q07 (ENG)
.
10 Days Not Applicable

When shipping the unit, carefully pack, include all supplied a cces so ries lis ted i n t he
Owner’s Manual, and send it prepaid, adequately insured and packed well in a
carton box. When shipping Lithium Ion batteries please visit our Web Site at
www.panasonic.com/BatteryHandling
most up to date information. Include a letter detailing the complaint, a return
address and provide a daytime phone number where you can be reached. A valid
registered receipt is required under the Limited Warranty.
IF REPAIR IS NEEDED DURING THE WARRANTY PERIOD, THE PURCHASER
WILL BE REQUIRED TO FURNISH A SALES RECEIPT/PROOF OF PURCHASE
INDICATING DATE OF PURCHASE, AMOUNT PAID AND PLACE OF
PURCHASE. CUSTOMER WILL BE CHARGED FOR THE REPAIR OF ANY
UNIT RECEIVED WITHOUT SUCH PROOF OF PURCHASE.
Limited Warranty Limits And Exclusions
This warranty ONLY COVER S failures due to defects in materials or workman ship, and
DOES NOT COVER normal wear and tear or cosmetic damage . The warranty ALSO
DOES NOT COVER damages which oc curre d in shipment, or failures which are
caused by products not supplied by the warrantor, or failures which result from
accidents, misuse, abuse, neglect, mishandling, misapplication, alteration, faulty
installation, set-up adjustments, misadjustment of consume r controls, imprope r
maintenance, power line surge, lightning damage, modification, introduction of sand,
humidity or liquids, commercial use such as hotel, office, restaurant, or other business
or rental use of the product, or service by anyone other than a Factory Service Center
or other Authorized Servicer, or damage that is attributable to acts of God.
THERE ARE NO EXPRESS WARRA NTIES EXCEPT AS LISTED UNDER
“LIMITED WARRANTY COVERAGE”.
THE WARRANTOR IS NOT LIABLE FOR INCIDENTAL OR CONSEQUENTIAL
DAMAGES RESULTING FROM THE USE OF THIS PRODUCT, OR ARISING
OUT OF ANY BREACH OF THIS WARRANTY.
(As examples, this excludes damages for lost time, travel to and from the servicer,
loss of or damage to media or images, data or other memory or recorded content.
The items listed are not exclusive, but for illustration only.)
ALL EXPRESS AND IMPLIED WARRANTIES, INCLUDING THE WARRANTY OF
MERCHANTABILITY, ARE LIMITED TO THE PERIOD OF THE LIMITED WARRANTY.
Some states do not allow the exclusion or limitation of incidental or consequential
damages, or limitations on how long an implied warranty lasts, so the exclusions
may not apply to you.
This warranty gives you specific legal rights and you may also have other rights
which vary from state to state. If a problem with this product develops during or
after the warranty period, you may contact your dealer or Service Center. If the
problem is not handled to your satisfaction, then write to the warrantor’s Consumer
Affairs Department at the addresses listed for the warrantor.
PARTS AND SERVICE, WHICH ARE NOT COVERED BY THIS LIMITED
WARRANTY, ARE YOUR RESPONSIBILITY.
as Panasonic is committed to providing the
(ENG) VQT4Q07
19

Customer Services Directory (United States and Puerto Rico)
Obtain Product Information and Operating Assistance; locate your nearest
Dealer or Service Center; purchase Parts and Accessories; or make
Customer Servi ce and Literature requests by visiting our Web Site at:
http://www.panasonic.com/help
or, contact us via the web at:
http://www.panasonic.com/contactinfo
You may also contact us directly at:
1-800-211-PANA (7262)
Monday-Friday 9am-9pm, Saturday-Sunday 10am-7pm EST
For hearing or speech impaired TTY users, TTY: 1-877-833-8855
Accessory Purchases (United States and Puerto Rico)
Purchase Parts, Accessories and Instruction Books online for all Panasonic
Products by visiting our Web Site at:
http://www.pstc.panasonic.com
Or, send your request by E-mail to:
npcparts@us.panasonic.com
You may also contact us directly at:
1-800-332-5368 (Phone) 1-800-237-9080 (Fax Only)
(Monday-Friday 9am-9pm EST)
Panasonic National Parts Center
20421 84th Ave S., Kent, WA 98032
(We accept Visa, MasterCard, Discover Card, American Express)
For hearing or speech impaired TTY users, TTY: 1-866-605-1277
As of October 2012
20
VQT4Q07 (ENG)

Limited Warranty (ONLY F O R CANA D A)
5770 Ambler Drive, Mississauga, Ontario L4W 2T3
PANASONIC PRODUCT – LIMITED WARRANTY
Panasonic Canada Inc. warrants this product to be free from defects in
material and workmanship und er normal us e and for a p eriod as stat ed below
from the date of original purc hase agrees t o, at its op tion either (a) re pair you r
product with new or refurbished parts, (b) replace it with a new or a
refurbished equivalent value product , or (c) refund yo ur purc has e pric e. The
decision to repair, replace or refund will be made by Panasonic Canada Inc.
Digital Camera One (1) year, parts and labour
Digital Camera Peripherals One (1) year, parts and labour
Digital Camera Accessories Ninety (90) days, parts and labour
This warranty is given only to the original purchaser, or the person for
whom it was purchased as a gift, of a Panasonic brand product mentioned
above sold by an authorized Panasonic dealer in Canada and purchased
and used in Canada, which product was not sold “as is”, and which
product was delivered to you in new condition in the original packaging.
IN ORDER TO BE ELIGIBLE TO RECEIVE WARRANTY SERVICE
HEREUNDER, A PURCHASE RECEIPT OR OTHER PROOF OF DATE
OF ORIGINAL PURCHASE, SHOWING AMOUNT PAID AND PLACE
OF PURCHASE IS REQUIRED
LIMITATIONS AND EXCLUSIONS
This warranty ONLY COVERS failures due to defects in materials or
workmanship, and DOES NOT COVER normal wear and tear or
cosmetic damage. The warranty ALSO DOES NOT COVER damages
which occurred in shipment, or failures which are caused by products
not supplied by Panasonic Canada Inc., or failures which result from
accidents, misuse, abuse, neglect, mishandling, misapplication,
alteration, faulty installation, set-up adjustments, misadjustment of
consumer controls, improper maintenance, improper batteries, power
line surge, lightning damage, modification, introduction of sand, humidity
or liquids, commercial use such as hotel, office, restaurant, or other
business or rental use of the product, or service by anyone other than a
Authorized Servicer, or damage that is attributable to acts of God.
Panasonic Canada Inc.
(ENG) VQT4Q07
21

Dry cell batteries, printer ink cartridge and paper are also excluded from
coverage under this warranty.
Rechargeable batteries are warranted for ninety (90) days from date of
original purchase.
THIS EXPRESS, LIMITED WARRANTY IS IN LIEU OF ALL OTHER
WARRANTIES, EXPRESS OR IMPLIED, INCLUDING ANY IMPLIED
WARRANTIES OF MERCHANTABILITY AND FITNESS FOR A
PAR TICULAR PURPOSE. IN NO EVENT WILL PANASONIC CANADA
INC. BE LIABLE FOR ANY SPECIAL, INDIRECT OR
CONSEQUENTIAL DAMAGES RESULTING FROM THE USE OF THIS
PRODUCT OR ARISING OUT OF ANY BREACH OF ANY EXPRESS
OR IMPLIED WARRANTY. (As examples, this warranty excludes
damages for lost time, travel to and from the Authorized Servicer, loss of
or damage to media or images, data or other memory or recorded
content. This list of items is not exhaustive, but for illustration only.)
In certain instances, some jurisdictions do not allow the exclusion or
limitation of incidental or consequential damages, or the exclusion of
implied warranties, so the above limitations and exclusions may not be
applicable. This warranty gives you specific legal rights and you may
have other rights which vary depending on your province or territory.
WARRANTY SERVICE
For product operati on a nd information assistance, please contact:
Our Customer Care Centre:
Telephone: 1-800-99-LUMIX
Fax # : (905) 238-2360
Email link: lumixconcierge@ca.panasonic.com
For defective product exchange within the warranty period, please
contact the original Dealer or our Customer Care Centre.
(1-800-995-8649)
22
VQT4Q07 (ENG)

Manuel d’utilisation
FRANÇAIS
FLASH
Merci d’avoir arrêté votre choix sur un produit Panasonic.
Il est recommandé de lire attentivement ce manuel avant d’utiliser l’appareil et de
le conserver pour consultation ultérieure.
Table des matières
Précautions à prendre................... 23
Précautions................................... 27
Accessoires fournis....................... 27
Noms des composants ................. 28
Panneau de commande................ 28
Déclenchement continu ................ 28
Choix des piles (vendues
séparément).................................. 29
Mise en place des piles................. 29
Mise en place du flash .................. 29
Mise en marche du flash............... 29
Prises de vues . ... .......................... 30
Modes du flash ...... .. ... ................. . 31
Fonctionnement des touches........ 32
Paramétrages pour liaison s ans
fil du flash...................................... 33
Établissement de flashs avec
liaison sans fil................................33
Réglage de l’angle de
rayonnement.................................34
Utilisation du diffuseur à
grand-angulaire.............................34
Utilisation de la plaque reflet.........34
Autres paramétrages.....................34
Paramétrages personnalisés.........35
Appareil photo sans fonctions de
communication ..............................37
Mode asservi.................................38
Précautions d’utilisation.................38
Spécifications ................................39
Garantie limitée.............................40
Précautions à prendre
ATTENTION!
Afin d’éviter tout risque d’incendie, d e c ho c élec trique ou de dommage à
l’appareil :
• N’installez pas ou ne placez pas cet appareil dans une bibliothèque, une armoire ou
tout autre espace confiné. Assurez-vous que la ventilation de l’appareil est adéquate.
(FRE) VQT4Q07
23

IMPORTANTES MESURES
DE SÉCURITÉ
Lors de l’utilisation de votre équip ement photographique, il
convient d’observe r certaines précautions de base, notamment :
≥ Lisez attentivement toutes les instructions.
≥ Ne laissez jamais un enfant utiliser l’équipement sans
surveillance et faites preuve de la plus grande prudence
lorsque l’équipement est utilisé à proximité d’enfants. Ne
laissez jamais l’équipement sans surveillance.
≥ Évitez de toucher les parties chaudes de l’appareil afin
de prévenir des brûlures.
≥ N’utilisez pas l’appareil s’il a été échappé ou subi un
choc violent; faites-le examiner par un technicien qualifié
avant de l’utiliser.
≥ Laissez l’appareil refroidir avant de le ranger.
≥
Afin de réduire le risque de chocs électriques, n’immergez
pas l’appareil et ne l’exposez pas à des liquides.
≥ Afin de prévenir les risques de chocs électriques, ne
démontez pas l’appareil. Confiez toute réparation à un
technicien qualifié. Un remontage impropre peut
entraîner un risque de chocs électriques.
≥ L’uti lisation d’un accessoire autre que ceux
recommandés par le fabricant peut entraîner des risques
d’incendie, de chocs électriques ou de blessures.
CONSERVEZ CE MANUEL
24
VQT4Q07 (FRE)

∫ À propos des piles
ATTENTION
• Danger d’explosion si la pile n’est pas remplacée correctement. Remplacez-la
uniquement par une pile du type recommandé par le fabricant.
• Suivez les instructions des autorités locales ou celles du détaillant pour jeter les
piles usées.
• N’exposez pas la pile à la chaleur et tenez-la éloignée de toute flamme.
• Ne laissez pas la ou les piles dans un véhicule exposé au soleil avec vitres et portes
fermées pendant une longue période de temps.
• Lors de l’utilisation de piles rechargeables, nous recommandons d’utiliser des piles
rechargeables fabriquées par Panasonic.
CE QUI SUIT NE S’APPLIQUE QU’AU CANADA.
Cet appareil numérique de la classe B est conforme à la norme
NMB-003 du Canada.
(FRE) VQT4Q07
25

-Si ce symbole apparaîtInformations relatives à l’évacuation des déchets, destinées aux
utilisateurs d’appareils électriques et électroniques (appareils
ménagers domestique s )
Lorsque ce symbole figure sur les produits et/ou les
documents qui les accompagnent, cela signifie que
les appareils électriques et électroniques ne
doivent pas être jetés avec les ordures ménagères.
Pour que ces produits subissent un traitement, une
récupération et un recyclage appropriés, envoyezles dans les points de collecte désignés, où ils
peuvent être déposés gratuitement. Dans certains
pays, il est possible de renvoyer les produits au
équivalent.
En éliminant correctement ce produit, vous contribuerez à la
conservation des ressources vitales et à la prévention des éventuels
effets négatifs sur l’environnement et la santé humaine qui pourraient
survenir dans le cas contraire.
Afin de connaître le point de collecte le plus proche, veuillez contacter
vos autorités locales.
Des sanctions peuvent être appliquées en cas d’élimination incorrecte
de ces déchets, conformément à la législation nationale.
Utilisateurs professionnels de l’Union européenne
Pour en savoir plus sur l’élimination des appareils électriques et
électroniques, contactez votre revendeur ou fournisseur.
Informations sur l’évacuation des déchets dans les pays ne
faisant pas partie de l’Union européenne
Ce symbole n’est reconnu que dans l’Union européenne.
Pour vous débarrasser de ce produit, veuillez contacter les autorités
locales ou votre revendeur afin de connaître la procédure
d’élimination à suivre.
revendeur local en cas d’achat d’un produit
26
VQT4Q07 (FRE)
Précautions
VFC4916 VFB0243
12
≥ Cet appareil est le flash externe conçu pour les appareils photo numériques
Panasonic (désigné par le terme flash dans le présent manuel). Lorsque ce flash
est utilisé de pair avec un appareil photo numérique prenant en charge une
connexion sans fil, il est possible de commander le flash à distance. Les
fonctionnalités disponibles varient selon le modèle d’appareil photo utilisé. Pour
la liste des appareils photo compatibles, reportez-vous à notre site Web.
http://panasonic.jp/support/global/cs/dsc/
(en anglais seulement.)
∫ À propos de la manipulation de l’élément
≥ Ne soumettez p as l’élément à de fortes vibrations ou à des chocs. Cela
pourrait entraîner un mauvais fonctionnement ou encore briser la tête du flash.
≥ Le sable et la saleté peuvent causer le mauvais fonctionnement de
l’élément. Si vous utilisez l’élément à la plage, prenez des mesures pour le
protéger du sable et de la saleté.
≥ Cet appareil n’est étanche ni à la poussière ni aux éclaboussures. Dans
l’éventualité où de l’eau, etc. serait éclaboussé sur l’appareil, essuyez-le
avec un linge sec. Si le fonctionnement l’appareil semble anormal,
communiquez avec le revendeur ou avec Panasonic.
≥ Veuillez lire également le manuel d’utilisation de votre appareil photo numérique.
Accessoires fournis
[Inspection à faire lors du désemballage]
En retirant l’appareil de son emballage, vérifiez la présence de l’appareil principal
et de tous ses accessoires, et vérifiez également l’apparence externe ainsi que leur
fonction afin de vous assurer qu’ils n’ont subi aucun dommage lors du transport ou
de la livraison.
Si vous découvrez un problème, contactez votre vendeur avant d’utiliser le produit.
Les numéros de modèle sont à jour en date d’octobre 2012. Ils sont sujets à
changements.
1 Étui de transport pour le
flash
2 Support du flash
≥ Les piles sont vendues
séparément.
(FRE) VQT4Q07
27
Noms des composants
b
d
a
c
1 Diffuseur grand-angulaire
2 Tête du flash
3 Capteur de signal de liaison sans fil
4 Lampe d’assistance pour la mise au
point automatique/Voyant à diode
5 Capteur du flash
6 Plaque reflet
7 Panneau de commande
8 Voyant d’auto-vérification [AUTO
CHECK]
9 Touche/voyant d’essai/charge [TEST/
CHARGE]
: Touche [OK]
; Touche d’orientation du réflecteur
< Touche de rétroéclairage
= Interrupteur [ON/OFF]
> Levier de verrouillage
? Molette
a (2) : Touche de réglage de l’intensité
du flash
b (3) : Touche de mode [MODE]
c (1) : Touche de la lampe à DEL
d (4) : Touche de zoom [ZOOM]
Panneau de commande
1 Déclenchement
FP
2 Mode flash
3 Nombre-guide
(GN)
4 Réglage de
l’intensité du
flash
5 Valeur du ZOOM
6 QUATRE TIERS
7 Mode ZOOM
8 Voyant à diode
Déclenchement continu
Il se peut que le flash devienne chaud après plusieurs déclenchements successifs,
ce qui pourrait provoquer un mauvais fonctionnement. Le flash ne doit pas être
déclenché plus de 10 fois en succession à des intervalles de 2,5 secondes, après
quoi il devrait ne pas être utilisé pendant au moins 10 minutes.
28
VQT4Q07 (FRE)
9 Sensibilité ISO
: Groupe de mode
de commande à
distance
; Ouverture (F)
< Canal du mode
de commande à
distance
= Avertisseur de
surchauffe
> Unités de
mesure de la
distance
Choix des piles (vendues séparément)
Vous pouvez utiliser les types de piles suivants :
≥ Piles alcalines sèches, LR6/AA (x 4)
≥ Piles rechargeables HR6/AA au nickel-métal-hydrure (Ni-MH) (x 4)
Il n’est possible d’utiliser des piles R6/AA au mang an ès e.
L’utilisation de piles fabriquées par Panasonic est recommandée.
Mise en place des piles
≥ Utilisez des piles alcalines ou des piles
rechargeables au nickel-métal-hydrure.
1 Faites gli sser le couver cle du
logement des piles pour l’ouvrir.
2 Mettez les piles en place en prenant
soin de respecter la polarité [r]/[s].
3 Fermez le couvercle du logement
des piles en le faisant glisse r fe rm ement dans le sens de la
flèche aussi loin q ue possible.
Mise en place du flash
Vérifiez que l’appareil photo et le flash sont hors marche. La mise en place ou le
retrait du flash alors que l’appareil photo ou le flash est en marche peut provoquer
des problèmes de fonctionnement.
1 Glissez le levier de verrouillage dans la
direction opposée à celle de l’icône de
verrouillage [LOCK
1
] (1).
2 Glissez le flash dans la griffe porte-
accessoires jusqu’à ce qu’il se bloque
en position (
2
).
3 Glissez le levier de verrouillage vers la
position [LOCK
≥ Pour retirer le flash, gli ssez le levier de verr ou illa ge dan s la directi on oppos ée à
celle de la flèche [LOCK1] et retirez le flash de la griffe porte-accessoires.
1
] (3).
Mise en marche du flash
Mettez le flash en place sur l’appareil photo, puis mettez celui-ci en marche.
1 Voyant d’auto-vérification [AUTO CHECK]
2 Voyant d’essai/charge [TEST/CHARGE]
3 Panneau de commande
4 Interrupteur [ON/OFF]
(FRE) VQT4Q07
29
Appuyez sur l’interrupteur [ON/OFF].
≥ L’affichage du panneau de commande est activé.
≥ Pour mettre le flash hors marche, appuyez de nouveau sur l’interrupteur [ON/
OFF].
≥ Remplacez les piles dans le cas où le voyant d’essai/charge [TEST/CHARGE] ne
s’allumerait pas après :
30 secondes (avec des piles alcalines)
10 secondes (avec des piles au nickel-métal-hydrure)
≥ Les voyants [TEST/CHARGE] et [AUTO CHECK] qui clignotent simultanément
indiquent que les piles sont faibles. Remplacez les piles. L’utilisation d’une pile
faible peut entraîner des problèmes de fonctionnement.
≥ Lorsque l’appareil photo passe en mode de veille, le flash fait de même.
≥
Après un délai d’inactivité d’environ 60 minutes, le flash est automatiquement mis
hors marche. Appuyez sur l’interrupteur [ON/OFF] pour le reme ttre en marche.
≥ Un son oscillant peut être entendu durant la recharge du flash; cela n’est le signe
d’aucune anomalie.
Prises de vues
1 Mode flash
2 Angle d’écl airage
Affiché en fonction de la longueur focale de
l’objectif.
3 Voyant d’auto-vérification [AUTO CHECK]
4 Distance de fonctionnement du fl ash
1 Choisissez le mode du fla sh au moyen des command es de
l’appareil photo.
Reportez-vous au manuel d’utilisation de l’appareil photo pour plus de détails.
2 Sélectionnez un mode de flash.
“Modes du flash” (P31)
• L’appareil photo et le flash s’échangent des informations sur la prise de vue et
la portée du flash est affichée sur le panneau de commande.
3 Appuyez sur le déclencheur à mi-course.
• La portée du flash varie selon les paramétrages de l’appareil photo (sensibilité
ISO, ouverture et longueur focale de l’objectif).
4 Appuyez sur le déclencheur à fond pour effectuer la prise de
vue.
L’élément se déclenche avec l’exposition appropriée lorsque le voyant [AUTO
CHECK] clignote pendant environ 5 secondes.
≥ Lors de l’utilisation du flash, prenez garde à ce que la lumière du flash ne soit pas
bloquée par l’objectif, le parasoleil, etc.
≥
Utilisez le diffuseur pour pré venir la surexpo sition à des distanc es inférieures à 1m
(3,3 pieds) (P34).
30
VQT4Q07 (FRE)
 Loading...