

PANASONIC DMW-FL220 User Manual
E
Operating Instructions
Flash
Model No. DMW-FL220
Before use, please read these instructions completely.
VQT1U62-1

Contents
Information for Your Safety ............................................................ 2
Precautions................................................................................ 4
Supplied accessories..................................................................... 4
Names of the Components ............................................................ 5
About the batteries......................................................................... 5
Inserting and Removing the Unit’s Batteries (optional).................. 9
Checking the Flash’s Remaining Battery Charge ........................ 10
Mounting the Unit onto the Digital Camera, and Removing it.......11
Taking Pictures ............................................................................ 12
How to select the flash mode................................................... 12
[TTL AUTO] ............................................................................ 12
[MANUAL] ............................................................................... 14
Many choices for different flash photography applications.......... 15
Continuous Firing......................................................................... 15
Troubleshooting ........................................................................... 16
Cautions for Use .......................................................................... 17
Specifications............................................................................... 19
Information for Your Safety
≥ This flash is designed to be used with digital cameras made by
Panasonic. It is compatible with the DMC-LX3
etc. (as of December 2008)
≥ The digital camera illustrations in these operating instructions
show DMC-G1K as an example.
¢1 This flash light supports firmware of ver. 1.1 or higher.
¢1
or DMC-G1K
WARNING:
TO REDUCE THE RISK OF FIRE, ELECTRIC SHOCK OR
PRODUCT DAMAGE,
• DO NOT EXPOSE THIS APPARATUS TO RAIN,
MOISTURE, DRIPPING OR SPLASHING AND THAT NO
OBJECTS FILLED WITH LIQUIDS, SUCH AS VASES,
SHALL BE PLACED ON THE APPARATUS.
• USE ONLY THE RECOMMENDED ACCESSORIES.
• DO NOT REMOVE THE COVER (OR BACK); THERE ARE
NO USER SERVICEABLE PARTS INSIDE. REFER
SERVICING TO QUALIFIED SERVICE PERSONNEL.
THIS UNIT IS INTENDED FOR USE IN TROPICAL
CLIMATES.
2
VQT1U62

-If you see this symbol-
ENGLISH
Information on Disposal for Users of Waste Electrical & Electronic Equipment (private households)
Information on Disposal in other Countries outside the European Union
This symbol is only valid in the European Union.
If you wish to discard this product, please contact your local authorities or dealer and ask for the correct method of disposal.
This symbol on the products and/or accompanying documents means that used electrical and electronic
products should not be mixed with general household waste.
For proper treatment, recovery and recycling, please take these products to designated collection points, where
they will be accepted on a free of charge basis. Alternatively, in some countries you may be able to return your
products to your local retailer upon the purchase of an equivalent new product.
Disposing of this product correctly will help to save valuable resources and prevent any potential negative
effects on human health and the environment which could otherwise arise from inappropriate waste handling.
Please contact your local authority for further details of your nearest designated collection point.
Penalties may be applicable for incorrect disposal of this waste, in accordance with national legislation.
For business users in the European Union
If you wish to discard electrical and electronic equipment, please contact your dealer or supplier for further information.
∫ About the batteries
CAUTION
Danger of explosion if battery is incorrectly replaced. Replace only with the same or equivalent type recommended by the
manufacturer. Dispose of used batteries according to the manufacturer’s instructions.
≥ Do not heat or expose to flame.
≥ Do not leave the battery(ies) in an automobile exposed to direct sunlight for a long period of time with doors and windows closed.
≥ If rechargeable batteries are to be used, rechargeable batteries manufactured by Panasonic are recommended.
VQT1U62
3
Precautions
∫ Handling the unit
≥
Do not subject the unit to strong vibration or impact.
so may not only cause the unit to malfunction but also cause the
flash head to break.
Doing
≥ Sand and dirt may cause the unit to malfunction. When
using the unit in an environment such as a beach, take
steps to protect it from sand and dirt.
≥ When taking photos on rainy days or on a beach, take care to
keep the unit dry.
≥ The unit is not waterproof. If rain or drops of water splash
onto the unit, wipe off the water with a dry cloth. If the unit
does not operate normally, consult the dealer or your
nearest servicenter.
≥ To safeguard the flash head from overheating and deterioration,
stop using the unit after 10 continuous firings at the full flash
intensity, and allow the unit to rest for at least 10 minutes to
ensure that the flash head cools off.
≥ Read the operating instructions for your digital camera.
∫ When the unit is not going to be used for a prolonged
period
≥ Be absolutely sure to remove the batteries from the unit.
≥ If the batteries are left inside the unit, a faint current will flow
continuously, even when the unit’s power is off, gradually
discharging the batteries. (For details on nickel metal hydride
batteries, refer to P7.)
≥ Store the batteries in a cool, moisture-free location where the
temperature is kept as constant as possible.
(Recommended temperature range: 15 °C to 25 °C;
recommended humidity range: 40% to 60%)
≥
If you plan to store the unit and/or its batteries inside a closet or
cupboard, it is recommended that you put a desiccant (silica gel)
in with them.
Supplied accessories
[Inspection to be performed when you unpack the unit]
When removing the unit from its packing box, check that the main
unit and its supplied accessory is there and also check their
external appearance and functions to verify that they have not
sustained any damage during distribution and transportation.
If you discover any trouble, contact your vendor before using the
product.
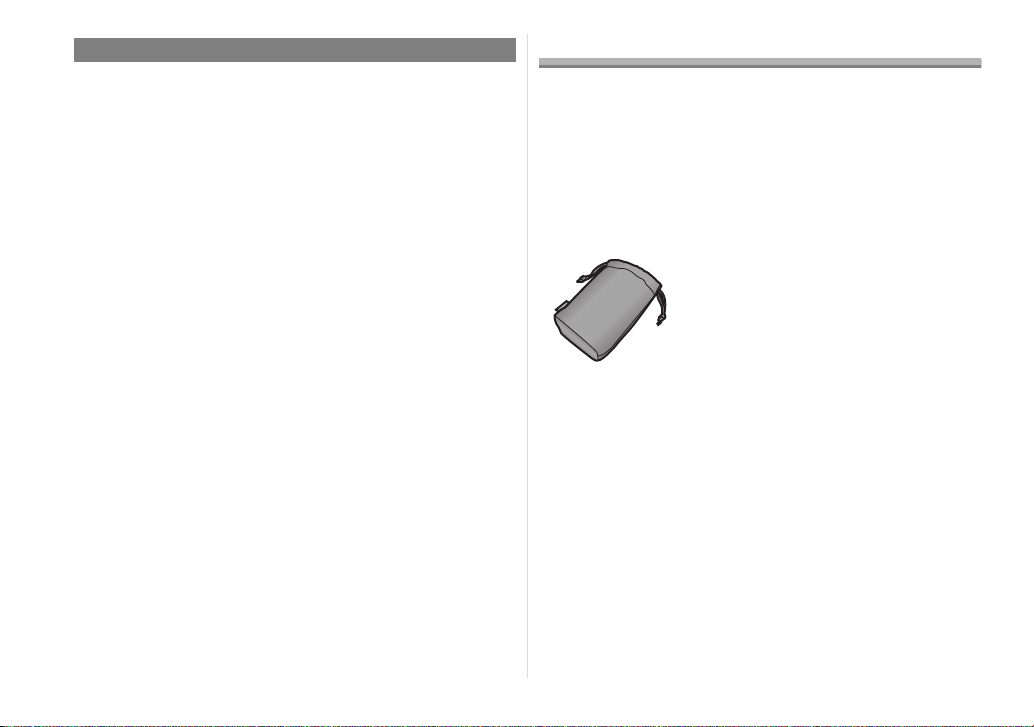
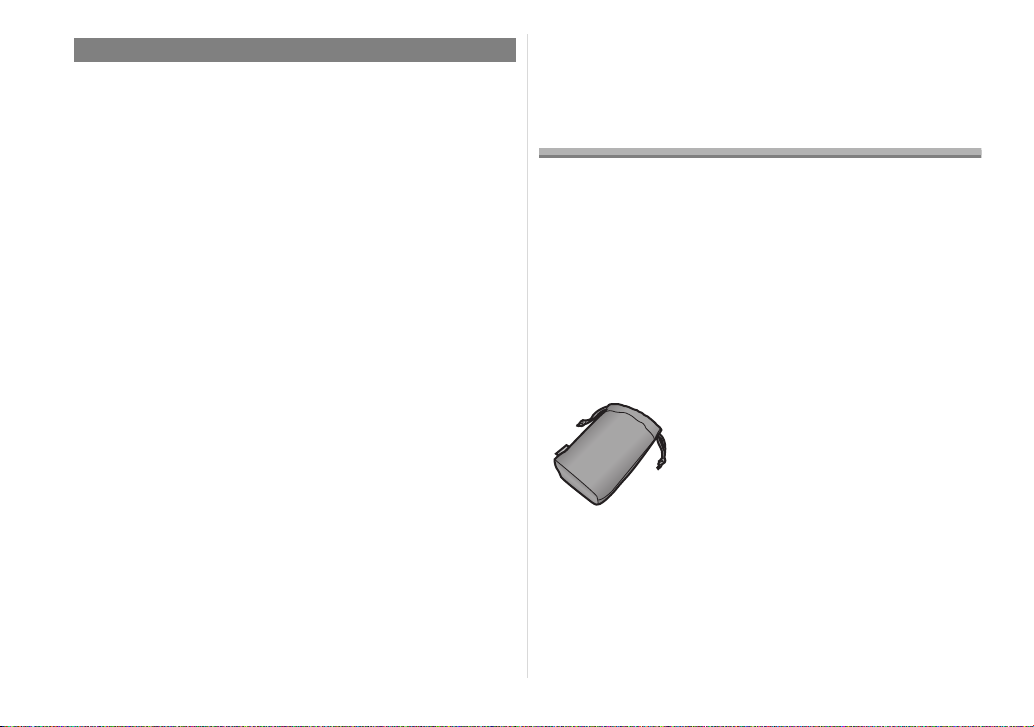
For this flash, use only the flash case shown below.
Flash case
VFC4353
≥ The batteries are optional.
4
VQT1U62

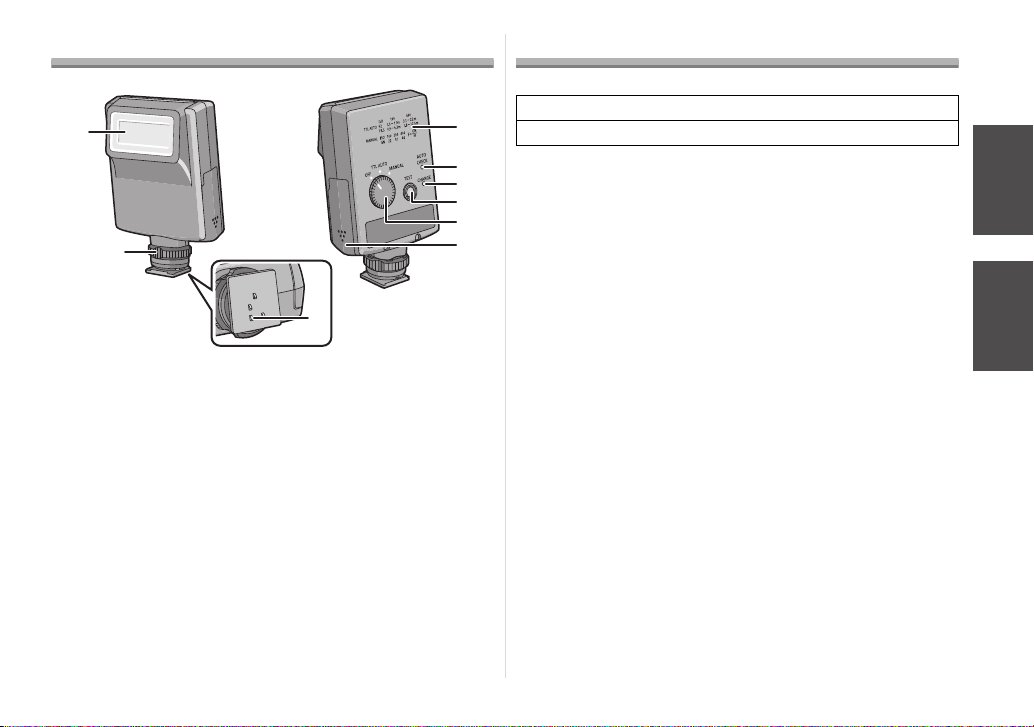
Names of the Components
1
2
3
1 Flash head
2 Lock ring (P11)
3 Terminal area (P11)
4 Exposure list
5 [AUTO CHECK] lamp (P10, 12)
6 [CHARGE] lamp (P10, 12)
7 [TEST] button (P10)
8 Mode dial (Power/Mode select) (P10, 12)
9 Battery cover (P9)
About the batteries
∫ Types of batteries that can be used
4
5
6
7
8
9
AA Alkaline dry batteries (LR6)
AA Rechargeable nickel metal hydride batteries (Ni-MH)
≥ The use of batteries made by Panasonic is recommended.
≥ The performance of the batteries used may significantly differ
depending on which battery brand is used, how long the
batteries have been stored since they were manufactured and
how they have been stored.
≥ The performance of the batteries decreases temporarily at low
temperatures (below 10 °C), but will be restored when the
temperature returns to room temperature.
≥ Malfunctioning may occur under certain ambient temperatures
and operating conditions. However, this is not indicative of
trouble.
≥ In order to ensure that the batteries will function for as long as
possible, it is recommended that you turn off the unit’s power
during the intervals between taking photos. If the unit is to be
used for prolonged periods, the use of rechargeable nickel metal
hydride batteries is recommended.
≥ Once depleted, batteries may recover their performance when
left standing for a while, but they will quickly become unusable
again. For this reason, always make a point of replacing
depleted batteries with fresh ones.
VQT1U62
5
∫ Types of batteries with which operation is not guaranteed
AA Ni-Cd batteries
AA Nickel-manganese batteries (ZR6)
AA Lithium batteries (FR6)
AA Manganese dry batteries (R6)
AA Oxyride (oxy-nickel-hydroxide) dry batteries
≥ Panasonic offers no guarantees that the unit will operate
properly when any of the batteries listed above are used.
Furthermore, use of these batteries may result in electrolyte
leakage, power failure, risk of explosion etc.
∫ Batteries with shapes that cannot be used
≥ Installing batteries with irregular shapes in the unit may cause
electrolyte leakage, heat generation and even rupturing of the
batteries themselves.
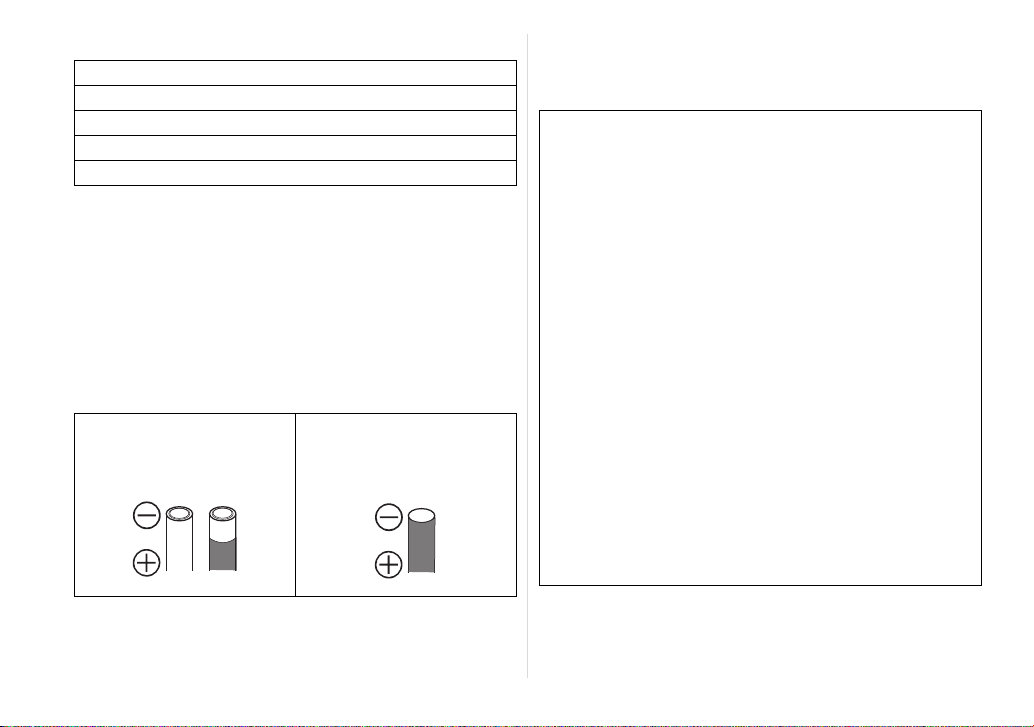
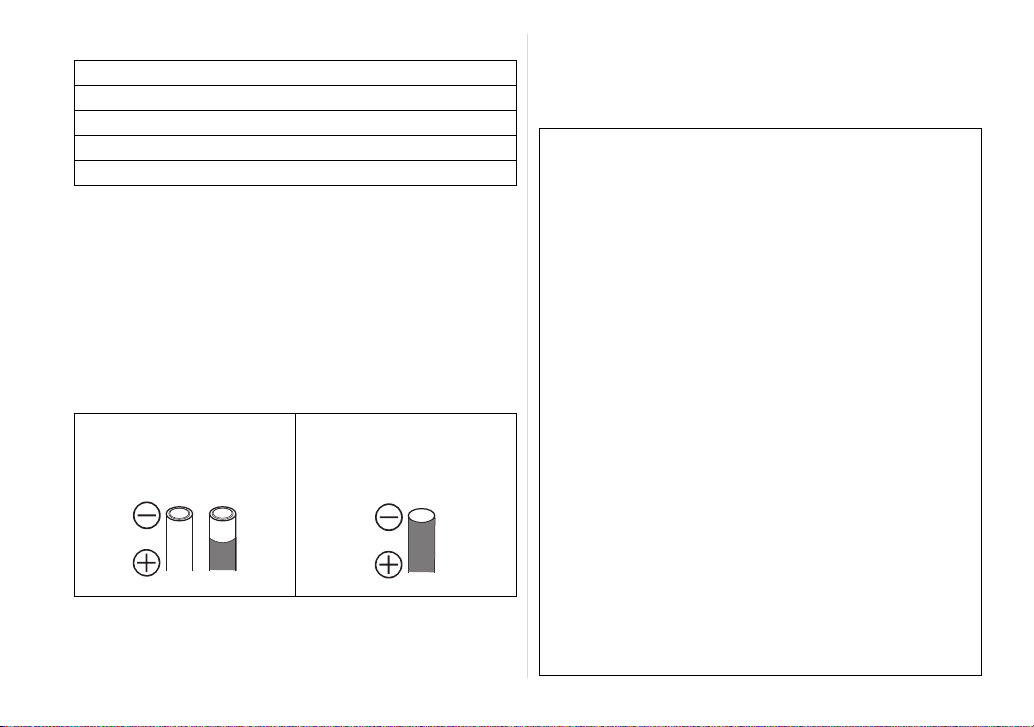
≥ Some batteries sold on the market have part or all of their
jackets missing: Under no circumstances should such batteries
be used. (Refer to the figure below.)
≥ Batteries (bare batteries) with
no external jackets or
batteries with parts of their
jackets missing
≥ Batteries whose - electrode
is flat
∫ Handling the batteries
Mishandling of batteries may cause electrolyte leakage, heat
generation and even rupturing of the batteries themselves. Note
the following cautions.
≥ Do not expose batteries to water or seawater or allow their
terminal areas to become wet.
≥ Do not remove their external jackets or damage them in any
way.
≥ Do not drop the batteries, knock them into other objects or
subject them to any other kind of strong impact.
≥ Stop using the batteries as soon as you notice any electrolyte
leakage, deformation, discolouration or any other such trouble.
≥ Do not store batteries in locations where the temperature and/
or humidity levels are high.
≥ Keep batteries out of the reach of infants and small children.
≥ Always use 2 new batteries of the same type when replacing
batteries.
≥ Remove the batteries from the unit when you do not intend to
use the unit for a prolonged period.
≥ Batteries may be hot immediately after the unit has been used.
Before removing them from the unit, turn off the unit’s power
and wait until the temperature of the batteries has dropped.
≥ At low temperatures (under 10 °C), the performance of
batteries will deteriorate and the number of flashes fired by the
unit will be sharply reduced. The operating duration of batteries
tends to be shorter particularly when alkaline dry batteries are
used so warm them in your pocket before use. When warming
batteries in your pocket, avoid direct contact with cigarette
lighters and other metal objects as well as with pocket/body
warmers.
6
VQT1U62

≥ The number of flashes fired by the unit may also be sharply
reduced if the
exposed to oils from the skin or other forms of dirt. Before
installing the batteries, wipe the
using a soft, dry cloth.
If electrolytes should leak from the batteries, wipe away all traces
of the electrolyte in the battery compartment, and then insert
fresh batteries or fully charged nickel metal hydride batteries.
If you should get electrolyte on your hands or clothes, rinse it off
thoroughly with water. If you should get electrolyte in your eyes,
you risk losing your sight. In such a case, do not rub your eyes
but immediately wash them with clean water, and then seek
medical advice.
+ and - electrodes of the batteries are
+ and - electrodes carefully
≥ It is recommended that the batteries be recharged only after
their existing charge has been used up. If they are repeatedly
charged without their existing charge first having been used up,
it may be difficult for them to sustain their capacity. (A
phenomenon referred to as the memory effect.)
≥ If the memory effect has occurred, use up the existing charge
in the batteries until the unit cannot fire and then recharge them
fully a number of times. This will restore their capacity.
≥ When nickel metal hydride batteries are not being used, their
capacity will diminish due to the effects of natural discharging.
≥ Do not continuously charge nickel metal hydride batteries
which already have a charge.
≥ Do not remove their external jackets or damage them in any
way.
≥ Read the instructions accompanying the charger used when
recharging the batteries.
∫ Rechargeable nickel metal hydride batteries
Nickel metal hydride batteries can be made ready for use by
recharging them using a dedicated charger. However, mishandling
may cause electrolyte leakage, heat generation, the ignition of
flames and even rupturing of the batteries themselves. Heed the
following precautions.
≥ It may not be possible to properly recharge batteries with dirty
+ and - electrodes. Use a soft, dry cloth to carefully wipe the
+ and - electrodes as well as the terminal areas of the
charger.
≥ Either when they are purchased or when they have not been
used for a prolonged period, nickel metal hydride batteries
may not have a sufficient charge. This is due to their
characteristics and is not indicative of trouble. Their regular
performance will be restored after they have been charged a
number of times.
Nickel metal hydride batteries have a specific service life. As they
are increasingly used or as time goes by, their capacity will
diminish gradually. When the length of time during which the unit
can be used has dropped drastically, the batteries may have
reached the end of their service life. Obtain fresh batteries.
≥ The length of the service life of batteries differs depending on
their storage method, operating conditions and the environment
in which they are used.
∫ When the unit is not going to be used for a prolonged
period
≥ If the batteries are left inside the unit, a faint current will flow
continuously, even when the unit’s power is off, gradually
discharging the batteries. If they are left like this, they may
overdischarge and may become unusable even when
recharged.
VQT1U62
7

≥ When storing the batteries for a prolonged period, it is
recommended that they be charged once a year and that after
their remaining charge has been used up, they be removed from
the unit and stored again.
∫ Service life of batteries
Number of flashes
(number of full flashes in MANUAL mode at intervals of
30 seconds)
Batteries used Number of flashes
Alkaline dry batteries (LR6) Approx. 140 flashes
Nickel metal hydride batteries
(Ni-MH)
Photo taking conditions
≥ Temperature: 23 °C
≥ The number of flashes differs slightly depending on the storage
status of the batteries and the operating conditions.
Approx. 230 flashes
(min. 2400 mAh type)
8
VQT1U62
Inserting and Removing the Unit’s
Batteries (optional)
≥ Check that the unit’s power is off. (Make sure the mode dial is
set to [OFF].)
≥ Use alkaline dry batteries or rechargeable nickel metal hydride
batteries.
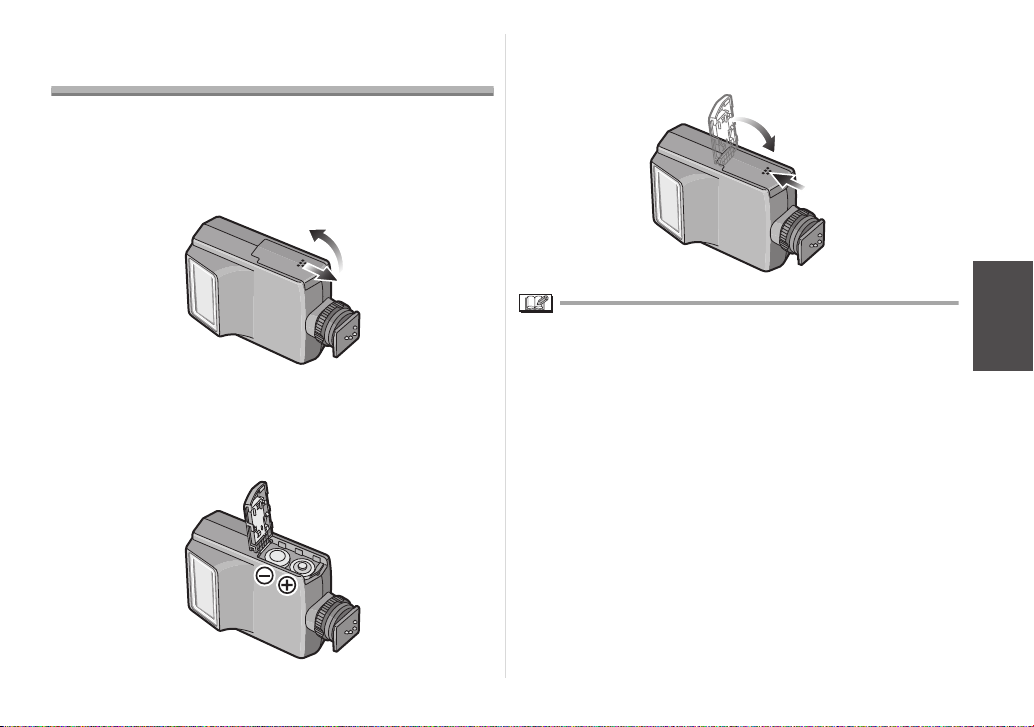
1 Slide the battery cover to open it.
≥ There is tape adhered to the battery cover the first time that you
use the unit. Peel it off.
2 When inserting the batteries, ensure that the +
and - poles of the batteries are aligned correctly.
3 Close the battery cover by sliding it back firmly as
far as it will go.
≥ After using the unit, take out the batteries.
VQT1U62
9
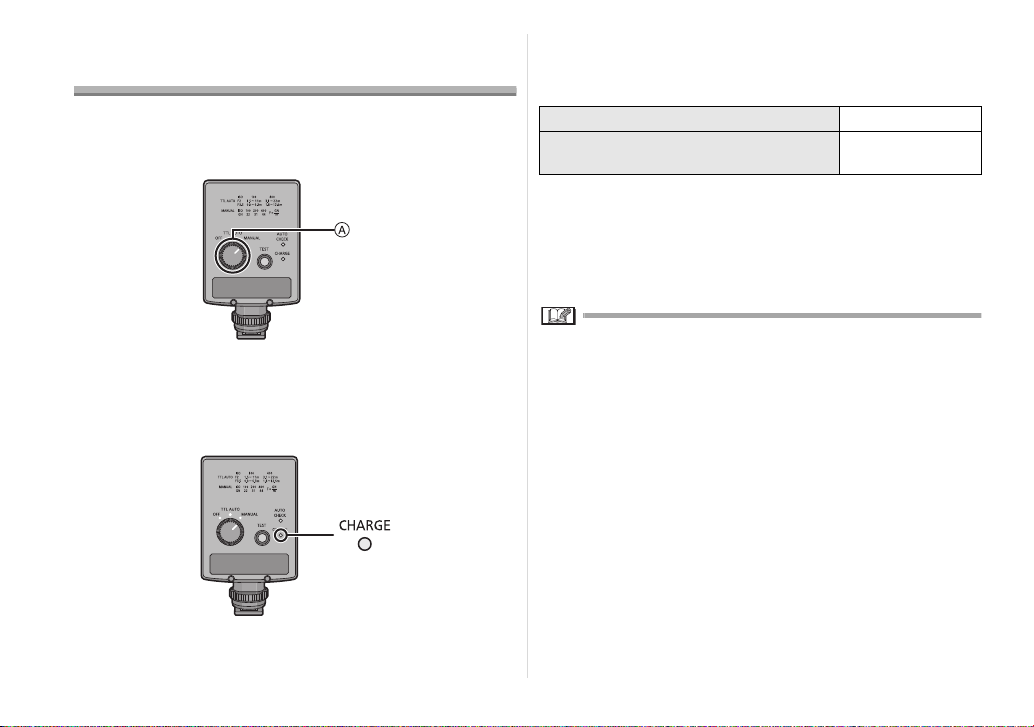
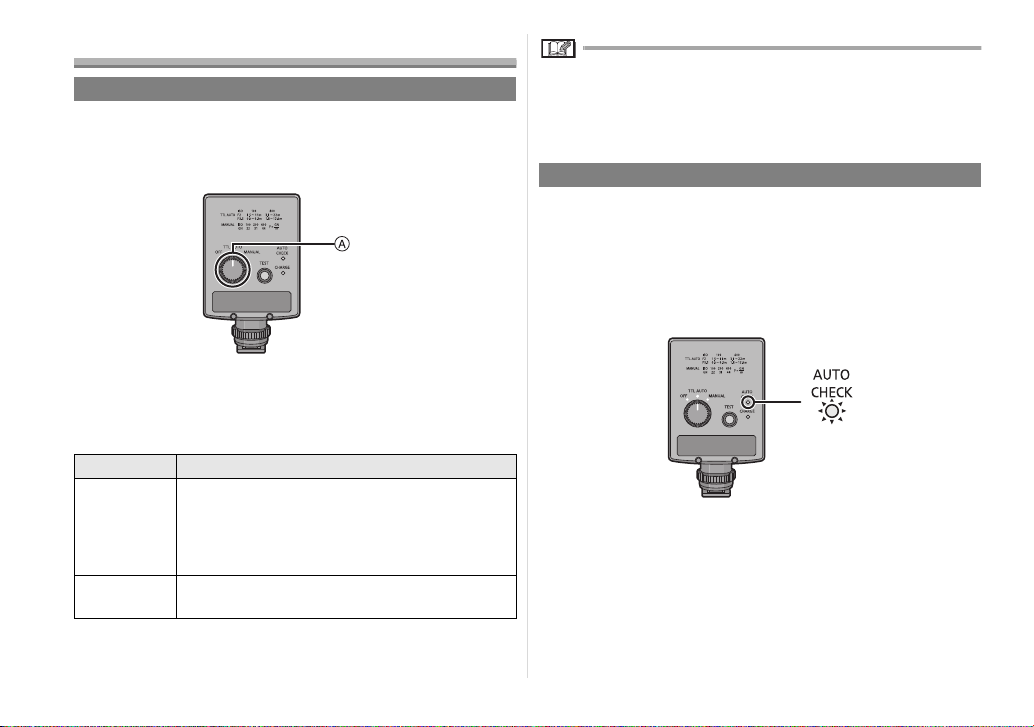
Checking the Flash’s Remaining
Battery Charge
Insert the batteries and then turn on the unit and check the battery
remaining power.
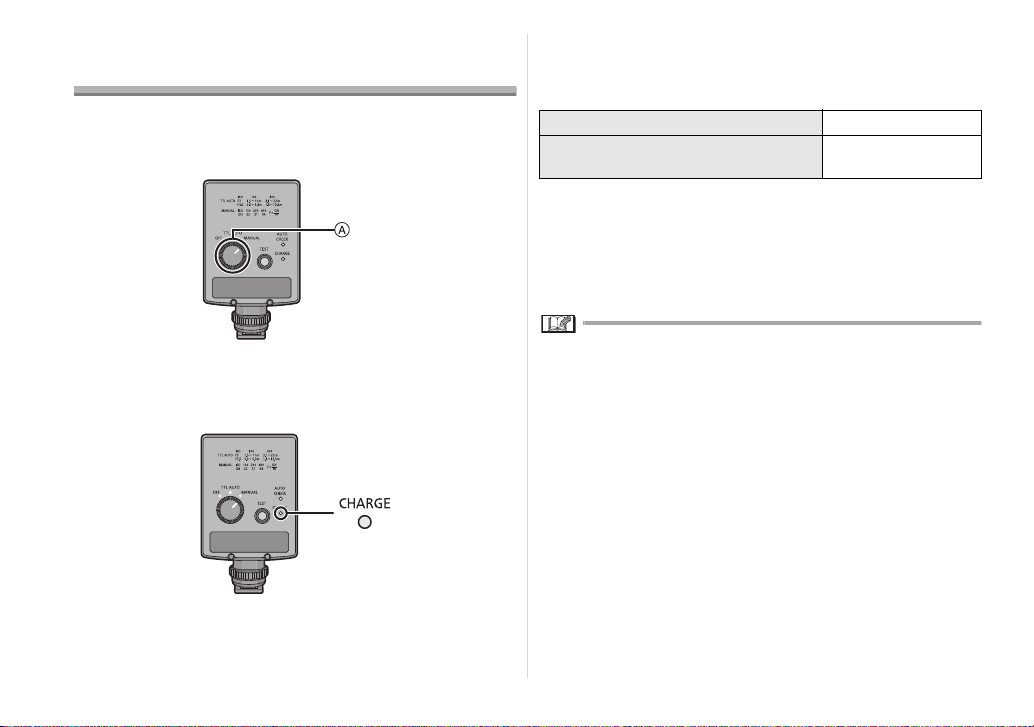
1 Set the mode dial to [MANUAL].
≥ If it takes as long for the [CHARGE] lamp to light as the period
indicated in the table below, it means that the batteries are
nearly worn out. Replace them with fresh batteries as soon as
possible.
Alkaline dry batteries More than 30 s
Rechargeable nickel metal hydride
batteries
≥ If the [CHARGE] lamp and [AUTO CHECK] lamp both flash at
the same time, it means that the batteries are almost completely
worn out and should be replaced with fresh batteries as soon as
possible.
More than 10 s
3 Set the mode dial to [OFF] to turn off the unit’s
power.
A Mode dial
≥ Charging now starts.
2 Check that the [CHARGE] lamp lights.
≥ The [CHARGE] lamp lights after the flash has been fully
charged.
10
VQT1U62
≥ When you set the dial to [TTL AUTO], [CHARGE] lamp will keep
blinking until flash recognises the digital camera.
≥ When the [TEST] button is pressed, the unit may fire.
≥ Turn off the power in the following situations:
≥ When mounting the unit onto, or disengaging it from, the
digital camera
≥ When you do not want the unit to fire
≥ When you are not going to use the unit
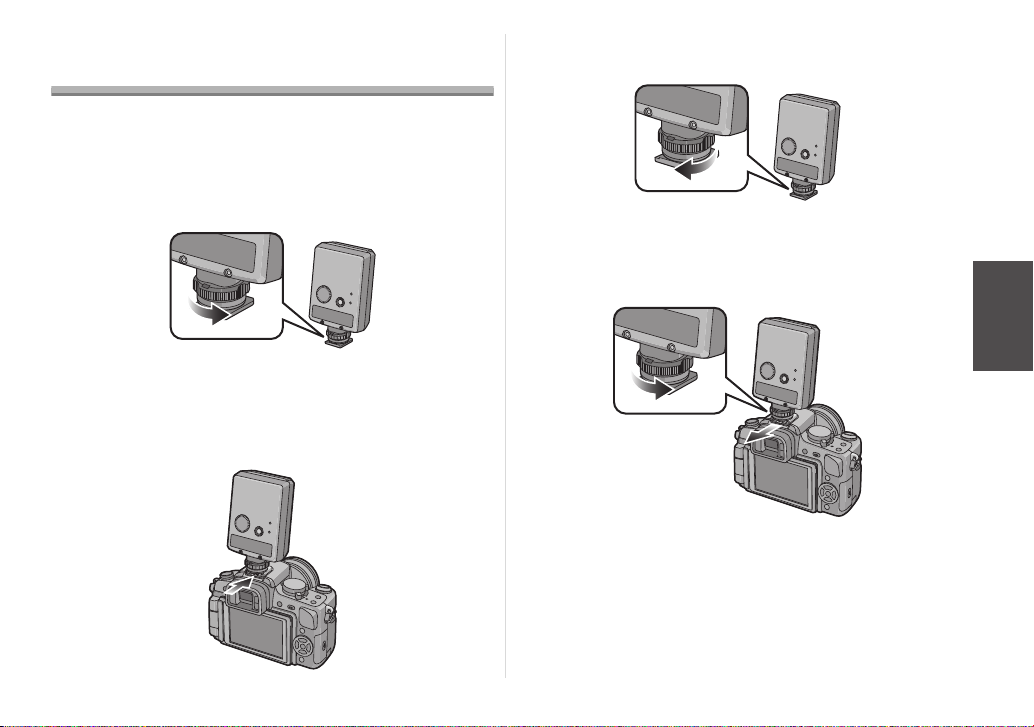
Mounting the Unit onto the Digital
Camera, and Removing it
≥ Check that the power of the digital camera and unit is off.
(Mounting the unit onto, or disengaging it from, the camera while
the power is on may cause trouble and is not recommended.)
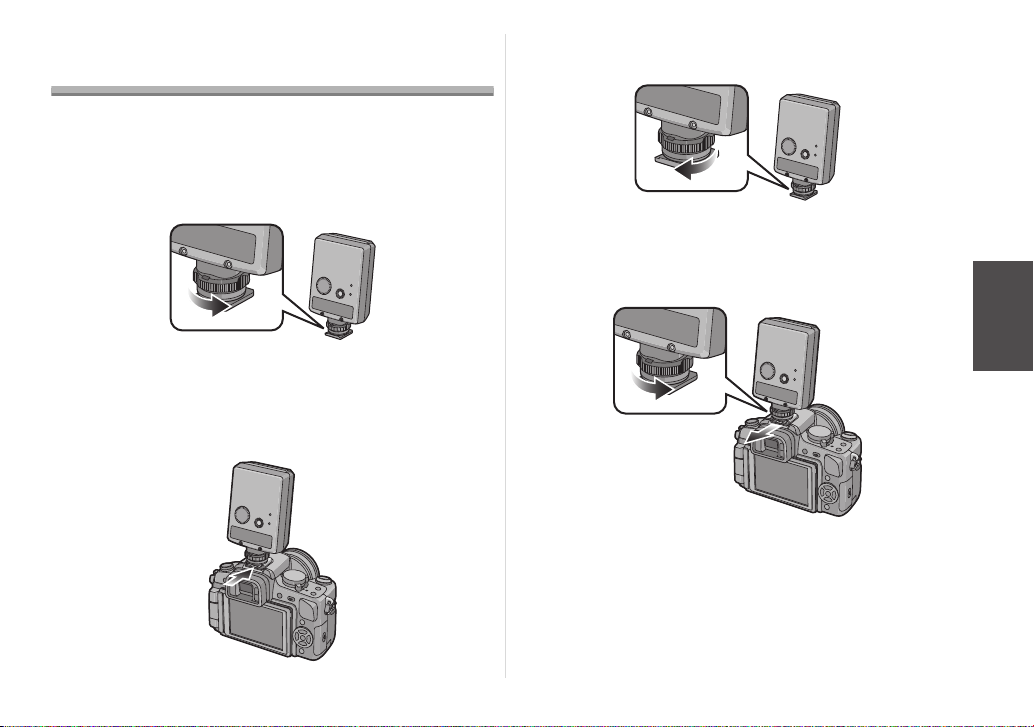
∫ Mounting the unit
1 Loosen the lock ring.
≥ Do not apply more force than is necessary to the lock ring.
≥ Do not touch the terminal areas with your fingers, metal objects,
etc.
2 Slide the unit into the hot shoe of the digital
camera, ensuring that it is fully inserted.
3 Rotate the lock ring in the direction of the arrow
until it stops.
∫ Removing the unit
Completely loosen the lock ring, and slide the unit
off from the hot shoe.
VQT1U62
11
Taking Pictures
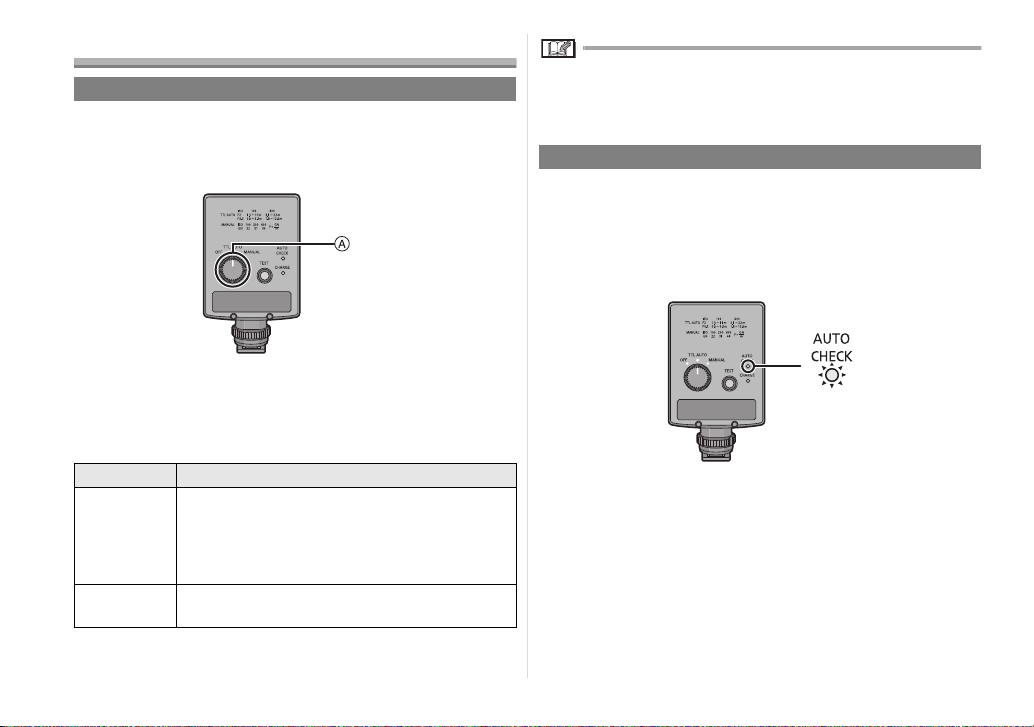
How to select the flash mode
1 Turn on the power of the digital camera.
2 Turn the mode dial on the unit to select the flash
mode.
A Mode dial
≥ The [CHARGE] lamp lights after the flash has been fully
charged.
∫ About the flash modes
Item Details of settings
After measuring the appropriate flash intensity by
[TTL AUTO]
[MANUAL]
¢ The guide number (GN) is a value which indicates the light
quantity of a flash.
12
VQT1U62
discharging a pre-flash, the unit fires again for
photo taking.
≥ [CHARGE] lamp will keep blinking until flash
recognises the digital camera.
The unit emits light in Guide Number (GN)
·m).
(ISO100
≥ Please set flash mode to [MANUAL] for digital cameras without
a communication function, and use an optimum camera to
subject distance (P14) as a guide.
[TTL AUTO]
Refer to P13 about the flash working range.
1 Press the shutter button all the way down, and
take the picture.
2 Check that the [AUTO CHECK] lamp is flashing.
≥ The unit emits light in proper exposure if [AUTO CHECK] lamp
flashes for approximately 5 seconds. If it does not flash, check
the settings on the unit and the digital camera.
3 Set the mode dial to [OFF] to turn off this unit
after taking the picture.
¢
22

∫ Flash working range (m)
ISO
sensitivity
80 2.0 to 14.0 1.4 to 9.8 1.0 to 7.0 0.8 to 5.6 0.7 to 4.9 0.7 to 3.5 0.7 to 2.4 0.7 to 1.8 0.7 to 1.2 0.7 to 0.9
100 2.2 to 15.7 1.5 to 11.0 1.1 to 7.9 0.9 to 6.3 0.8 to 5.5 0.7 to 3.9 0.7 to 2.8 0.7 to 2.0 0.7 to 1.4 0.7 to 1.0
200 3.1 to 22.0 2.2 to 15.4 1.5 to 11.0 1.2 to 8.8 1.1 to 7.7 0.8 to 5.5 0.7 to 3.9 0.7 to 2.8 0.7 to 1.9 0.7 to 1.4
400 4.4 to 31.4 3.1 to 22.0 2.2 to 15.7 1.8 to 12.6 1.5 to 11.0 1.1 to 7.9 0.8 to 5.5 0.7 to 4.0 0.7 to 2.8 0.7 to 2.0
800 6.2 to 44.0 4.3 to 30.8 3.1 to 22.0 2.5 to 17.6 2.2 to 15.4 1.5 to 11.0 1.1 to 7.7 0.8 to 5.6 0.7 to 3.9 0.7 to 2.8
1600 8.8 to 62.9 6.2 to 44.0 4.4 to 31.4 3.5 to 25.1 3.1 to 22.0 2.2 to 15.7 1.5 to 11.0 1.1 to 8.0 0.8 to 5.5 0.7 to 4.0
3200
6400
1.4 2 2.8 3.5 4 5.6 8 11 16 22
12.3 to
88.0
17.6 to
125.7
8.6 to 61.6 6.2 to 44.0 4.9 to 35.2 4.3 to 30.8 3.1 to 22.0 2.2 to 15.4 1.6 to 11.2 1.1 to 7.7 0.8 to 5.6
12.3 to
88.0
8.8 to 62.9 7.0 to 50.3 6.2 to 44.0 4.4 to 31.4 3.1 to 22.0 2.2 to 16.0 1.5 to 11.0 1.1 to 8.0
≥ The flash working range changes depending on the type and settings (ISO sensitivity, aperture and focal length) of the digital camera
used.
Aperture value (F)
VQT1U62
13

[MANUAL]
1 Press the shutter button all the way down, and
take the picture.
2 Set the mode dial to [OFF] to turn off this unit
after taking the picture.
∫ How to determine the aperture and the optimum camera to
subject distance
Guide number (GN) for this unit is 22 (ISO100
When the aperture is to be set
≥ The following formula is used to obtain the aperture, which is
then set in the digital camera.
“Guide number (GN)”
k “ISO sensitivity coefficient
to subject distance (m)”
How to obtain the optimum camera to subject distance
“Guide number (GN)”
k “ISO sensitivity coefficient
(F)”
¢ ISO sensitivity coefficient
ISO
sensitivity
80 0.89 800 2.8
100 1.0 1600 4.0
200 1.4 3200 5.6
400 2.0 6400 8.0
Compensation
coefficient
ISO
sensitivity
·m).
¢
” m “Camera
¢
” m “Aperture
Compensation
coefficient
∫ Optimum camera to subject distance (m)
ISO
sensitivity
100 15.7 11.0 7.9 6.3 5.5 3.9 2.8 2.0 1.4 1.0
200 22.0 15.4 11.0 8.8 7.7 5.5 3.9 2.8 1.9 1.4
400 31.4 22.0 15.7 12.6 11.0 7.9 5.5 4.0 2.8 2.0
800 44.0 30.8 22.0 17.6 15.4 11.0 7.7 5.6 3.9 2.8
1600 62.9 44.0 31.4 25.1 22.0 15.7 11.0 8.0 5.5 4.0
3200 88.0 61.6 44.0 35.2 30.8 22.0 15.4 11.2 7.7 5.6
6400
1.4 2 2.8 3.5 4 5.6 8 11 16 22
80 14.0 9.8 7.0 5.6 4.9 3.5 2.4 1.8 1.2 0.9
125.7
88.0 62.9 50.3 44.0 31.4 22.0 16.0 11.0 8.0
≥ The optimum camera to subject distance is an estimate.
Aperture value (F)
14
VQT1U62

Many choices for different flash
photography applications
Many different flash photography applications can be chosen by
the digital camera settings. Refer to the operating instructions of
your digital camera.
≥ It may not be possible to use some functions depending on the
functions and shape of the digital camera used.
≥ Select [TTL AUTO] as the flash mode.
Red-eye reduction flash
≥ The light emitted by the flash
reduces red eye where the eyes of
the subjects appear red.
Slow synchronization
≥ Light from the unit can be emitted
using the slow shutter.
This enables shots of people to be
taken clearly against the backdrop of
night scenes.
2nd curtain synchronization
≥
When taking slow-shutter shots of
moving subjects, the flash is activated
just before the shutter closes.
Light sources emanating from behind
the subject are captured to achieve a
dynamic feeling.
Continuous Firing
When the flash is fired continuously, its flash head becomes hot,
and this may possibly lead to deterioration or malfunction of the
unit. Keep continuous light emission to a maximum of 10 times
before resting the unit for at least 10 minutes.
VQT1U62
15

Troubleshooting
∫ Q&A for the unit
The unit becomes hot.
This unit will generate heat when light is continuously emitted right
after the [CHARGE] lamp lights up. However, the performance and
quality of this unit will not be affected as long as continuous light
emission does not exceed 10 times.
In cases like this, wait until the flash head and batteries cool off
before resuming use.
You can’t install the unit on your digital camera.
Did you loosen the lock ring? (P11)
The unit cannot be attached to a digital camera unless the lock ring
is loosened.
The flash is not activated.
≥ Is [CHARGE] lamp lit up?
≥ Light may not be emitted if the flash is attached incorrectly.
[CHARGE] lamp is lit up but light is not emitted by pressing
[TEST] button.
The unit is waiting for communication with the digital camera.
In this case, switch the mode dial of this unit once. If you are using
a digital camera with a communication function, turn on the digital
camera again.
The colouring of the images differs from what I see.
Adjust the white balance of the digital camera.
The recorded picture is too bright or dark.
≥ Is there a subject within the flash working range? Adjust the
flash light amount, aperture, and ISO sensitivity etc. of the digital
camera according to the distance to the subject.
≥ Check the mode dial on this unit.
The flash’s power does not go off even though I turned off the
power of my digital camera which comes with communication
functions.
Power is not connected with the digital camera.
Turn off this unit by setting the mode dial to [OFF].
16
VQT1U62

Cautions for Use
∫ About the unit
≥ Do not look directly at the flash at close range when it is
activated.
≥ Avoid bringing the unit into close proximity with objects. Its heat
and light may cause deformation or discolouration.
≥ When taking photos outside the flash working range, the proper
exposure will not be achieved, and images which are whitish or
too dark may be taken.
≥ At high shutter speeds, the effects obtained by the unit may not
be sufficient.
Keep the unit away from insecticide sprays and other volatile
substances.
≥ If the unit is exposed to these sprays or substances, its external
case may deteriorate and/or its paint may peel off.
≥ Do not leave the unit in contact with any items made of rubber or
PVC for prolonged periods of time.
Do not carry the unit when it is still attached to the camera
body.
≥ Under no circumstances should the unit be stored in any of the
following locations since doing so may cause trouble in
operation or malfunctioning.
≥ In direct sunlight or on a beach in summer
≥ In locations with high temperatures and humidity levels or
where the changes in temperature and humidity are acute
≥ In locations with high concentrations of sand, dust or dirt
≥ Where there is fire
≥ Near heaters, air conditioners or humidifiers
≥ Where water may make the unit wet
≥ Where there is vibration
≥ Inside a vehicle
≥ Multiple-light shots cannot be taken by using the flash in
combination with other flash units.
≥ Do not drop the unit, knock it into other objects or subject it to
any other kind of strong impact or shock.
≥ When the unit is not going to be used for a prolonged period,
mold and other problems may cause failure of the unit. It is
recommended that you check the unit’s operation prior to use.
≥ Do not touch the unit’s electrical contacts. Doing so can cause
failure of the unit.
≥ To safeguard the flash head from overheating and deterioration,
stop using the unit after 10 continuous firings at the full flash
intensity, and allow the unit to rest for at least 10 minutes to
ensure that the flash head cools off.
∫ Cleaning
Before cleaning the unit, remove the batteries. Then wipe the
unit with a dry soft cloth.
≥ When the unit is soiled badly, it can be cleaned by wiping the dirt
off with a wrung wet cloth, and then with a dry cloth.
≥ Do not use solvents such as benzine, thinner, alcohol, kitchen
detergents, etc., to clean the unit, since it may deteriorate the
external case or the coating may peel off.
≥ When using a chemical cloth, be sure to follow the
accompanying instructions.
∫ About the batteries
Be sure to remove the batteries when you will not be using the
unit for a long period of time.
≥ If the temperature is too high or low, the terminals may rust
causing a malfunction.
If you drop the batteries accidentally, check to see if the body
of the batteries or the terminals are damaged.
≥ Inserting a damaged battery in the unit will damage the unit.
VQT1U62
17

Bring charged spare batteries when going out.
≥ Be aware that the operating time of the batteries becomes
shorter in low temperature conditions such as at a ski resort.
Dispose of unusable batteries.
≥ Batteries have a limited life.
≥ Do not throw batteries into fire because they may cause an
explosion.
Do not allow battery terminals to come into contact with metal
objects (such as necklaces, hairpins, etc.).
≥ This can cause short circuiting or heat generation and you may
be badly burned if you touch the batteries.
Do not attempt to recharge dry batteries.
Do not throw batteries into a fire or expose to excessive heat
such as sunlight.
18
VQT1U62

Specifications
Power
requirements:
DC 3.0 V
Operating
temperature
Operating
humidity
0 °C to 40 °C
10% to 80% (no condensation)
Batteries
recommended
for use
Charging time
(from full flash
until the
[CHARGE] lamp
lights)
Firing period Approx. 1/20000 s to 1/500 s
No. of flashes
(with full flash)
Flash modes TTL AUTO/MANUAL
Guide number Automatically selected: When [TTL AUTO]
Lighting angle 60 degrees up/down, 78 degrees left/right
Dimensions Approx. 61.0 mm (W)k97.7 mm (H)k
Mass Approx. 111 g (main unit)
AA Alkaline dry batteries (LR6)
AA Rechargeable nickel metal hydride
batteries (Ni-MH)
Approx. 5.5 s: AA Alkaline dry batteries
Approx. 5.0 s: AA Rechargeable nickel metal
hydride batteries
(Varies depending on the flash intensity.)
Approx. 140 flashes: AA Alkaline dry batteries
Approx. 230 flashes: AA Rechargeable nickel
metal hydride batteries (min. 2400 mAh type)
(Differs depending on the photo taking
conditions.)
mode is set
22 (ISO100
View angle of 24 mm lens covered
(35 mm film camera equivalent)
46.1 mm (D) (excluding the projecting parts)
Approx. 157 g (including batteries)
k 2
·m): When [MANUAL] mode is set
k 2/
VQT1U62
19

Inhalt
Informationen für Ihre Sicherheit ................................................. 20
Vermeidung von Störungen ..................................................... 22
Beiliegendes Zubehör.................................................................. 22
Bezeichnung der Bauteile ............................................................ 23
Zum Thema Batterien .................................................................. 23
Einsetzen und Entfernen der Batterien im Gerät (optional) ......... 27
Kontrolle des Restladestands der Batterien im Gerät.................. 28
Montage des Gerätes an der Digitalkamera und Entfernen von
dieser ........................................................................................... 29
Aufnehmen von Bildern ............................................................... 30
Auswahl des Blitzlicht-Modus .................................................. 30
[TTL AUTO] ............................................................................ 30
[MANUAL] ............................................................................... 32
Auswahl vieler verschiedener Fotoanwendungen mit Blitzlicht... 33
Kontinuierliche Blitzauslösung ..................................................... 33
Störungssuche ............................................................................. 34
Hinweise zur Benutzung .............................................................. 35
Technische Daten ........................................................................ 37
Informationen für Ihre Sicherheit
≥ Dieses Blitzlicht wurde zum Einsatz mit Digitalkameras von
Panasonic entworfen. Kompatibel mit DMC-LX3
DMC-G1K etc. (Stand Dezember 2008)
≥ Die Erläuterungen zur Digitalkamera in dieser
Bedienungsanleitung beziehen sich als ein Beispiel auf
DMC-G1K.
¢1 Dieser Blitz unterstützt die Firmware Ver. 1.1 oder höher.
¢1
oder
WARNUNG:
ZUR REDUZIERUNG DER GEFAHR VON BRAND,
ELEKTRISCHEM SCHLAG UND BESCHÄDIGUNG:
• DIESES GERÄT SORGFÄLTIG VOR NÄSSE,
FEUCHTIGKEIT, SPRITZ- UND TROPFWASSER ZU
SCHÜTZEN; BLUMENVASEN UND ANDERE MIT
FLÜSSIGKEITEN GEFÜLLTE BEHÄLTER DÜRFEN NICHT
AUF DIESES GERÄT GESTELLT WERDEN.
• AUSSCHLIESSLICH DAS EMPFOHLENE ZUBEHÖR
VERWENDEN.
• AUF KEINEN FALL DIE ABDECKUNG (ODER
RÜCKWAND) ABSCHRAUBEN; IM GERÄTEINNEREN
BEFINDEN SICH KEINE TEILE; DIE VOM BENUTZER
GEWARTET WERDEN KÖNNEN. REPARATURARBEITEN
SIND GRUNDSÄTZLICH DEM
KUNDENDIENSTPERSONAL ZU ÜBERLASSEN.
DIESES GERÄT IST FÜR DEN EINSATZ IN TROPISCHEN
KLIMZONEN BESTIMMT.
20
VQT1U62

-Bedeutung des nachstehend abgebildeten Symbols-
DEUTSCH
Benutzerinformationen zur Entsorgung von elektrischen und elektronischen Geräten (private Haushalte)
Entsprechend der grundlegenden Firmengrundsätzen der Panasonic-Gruppe wurde ihr Produkt aus
hochwertigen Materialien und Komponenten entwickelt und hergestellt, die recycelbar und wieder
verwendbar sind.
Dieses Symbol auf Produkten und/oder begleitenden Dokumenten bedeutet, dass elektrische und
elektronische Produkte am Ende ihrer Lebensdauer vom Hausmüll getrennt entsorgt werden müssen.
Bringen Sie bitte diese Produkte für die Behandlung, Rohstoffrückgewinnung und Recycling zu den
eingerichteten kommunalen Sammelstellen bzw. Wertstoffsammelhöfen, die diese Geräte kostenlos
entgegennehmen.
Die ordnungsgemäße Entsorgung dieses Produkts dient dem Umweltschutz und verhindert mögliche
schädliche Auswirkungen auf Mensch und Umwelt, die sich aus einer unsachgemäßen Handhabung der
Geräte am Ende Ihrer Lebensdauer ergeben könnten.
Genauere Informationen zur nächstgelegenen Sammelstelle bzw. Recyclinghof erhalten Sie bei Ihrer
Gemeindeverwaltung.
Für Geschäftskunden in der Europäischen Union
Bitte treten Sie mit Ihrem Händler oder Lieferanten in Kontakt, wenn Sie elektrische und elektronische Geräte entsorgen
möchten. Er hält weitere Informationen für sie bereit.
Informationen zur Entsorgung in Ländern außerhalb der Europäischen Union
Dieses Symbol ist nur in der Europäischen Union gültig.
∫ Zu den Batterien
ACHTUNG
Explosionsgefahr bei falschem Anbringen der Batterie. Ersetzen Sie nur mit einem äquivalentem vom Hersteller empfohlenem Typ.
Behandeln Sie gebrauchte Batterien nach den Anweisungen des Herstellers.
≥ Der Akku darf weder Hitze noch offenem Feuer ausgesetzt werden.
≥ Lassen Sie Akkus nie für längere Zeit bei direkter Sonneneinstrahlung in einem geschlossenen Auto liegen.
≥ Sollen wieder aufladbare Batterien verwendet werden, werden von Panasonic hergestellte wieder aufladbare Batterien emfpohlen.
VQT1U62
21
Vermeidung von Störungen
∫ Hinsichtlich des Umgangs mit dem Gerät
≥ Setzen Sie das Gerät keinen starken Erschütterungen oder
Stößen aus. Dadurch werden nicht nur Funktionsstörungen am
Gerät hervorgerufen, sondern auch der Blitzlichtkopf
beschädigt.
≥ Sand und Schmutz können Funktionsstörungen am Gerät
hervorrufen. Schützen Sie das Gerät deshalb davor, wenn
Sie es in einer Umgebung, wie am Strand, benutzen.
≥ Achten Sie beim Fotografieren an Regentagen oder in einer
Umgebung, wie am Strand, darauf, das Gerät trocken zu halten.
≥ Das Gerät ist nicht wasserdicht. Wischen Sie, sollten Regen
oder Wassertropfen auf das Gerät spritzen, das Wasser mit
einem trockenen Tuch ab. Setzen Sie sich mit Ihrem Händler
oder dem nächstgelegenen Service-Center in Verbindung,
sollte das Gerät nicht normal funktionieren.
≥ Stellen Sie den Gebrauch des Gerätes, um den Blitzlichtkopf vor
Überhitzung und Beschädigung zu schützen, nach
10 Dauerauslösungen bei voller Blitzlichtintensität ein und
lassen Sie das Gerät mindestens 10 minuten ausruhen, damit
sich der Blitzlichtkopf abkühlen kann.
≥ Lesen Sie dazu die Bedienungsanleitung zu Ihrer Digitalkamera.
∫
Wenn das Gerät über einen längeren Zeitraum nicht benutzt wird
≥ Entfernen Sie unbedingt die Batterien aus dem Gerät.
≥ Bleiben die Batterien im Gerät fließt, auch wenn das Gerät
ausgeschaltet ist, ständig ein schwacher Strom, wodurch die
Batterien entladen werden. (Für Details zu Nickel-MetallhydridBatterien siehe auf P25.)
≥ Bewahren Sie die Batterien an einem kühlen, von Feuchtigkeit
freien Ort auf, an dem die Temperatur so konstant wie möglich
gehalten wird.
(Empfohlener Temperaturbereich: 15 °C bis 25 °C;
empfohlener Feuchtigkeitsbereich: 40% bis 60%)
≥ Sollten Sie das Gerät und / oder seine Batterien in einem
Schrank aufbewahren wollen, wird empfohlen, diesen ein
Trockenmittel (Silikat-Gel) beizufügen.
Beiliegendes Zubehör
[Kontrollen, die beim Entfernen der Verpackung des Geräts
vorzunehmen sind]
Prüfen Sie beim Entnehmen des Gerätes aus seinem Karton, ob
das Hauptgerät und sein beiliegendes Zubehör vorhanden sind.
Kontrollieren Sie deren äußeres Aussehen und ihre
Funktionsweise, um zu prüfen, dass es während des Vertriebs und
Transports nicht zu Beschädigungen gekommen ist.
Setzen Sie sich, sollten Sie Störungen feststellen, vor dem
Gebrauch des Gerätes mit Ihrem Händler in Verbindung.
Verwenden Sie für dieses Blitzlicht nur die unten gezeigte
Blitzlichthülle.
Blitzlichthülle
VFC4353
≥ Die Batterien sind optional.
22
VQT1U62
Bezeichnung der Bauteile
1
2
3
1 Blitzlichtkopf
2 Arretierring (P29)
3 Kontaktbereich (P29)
4 Belichtungsliste
5 [AUTO CHECK]-Leuchte (P28, 30)
6 [CHARGE]-Leuchte (P28, 30)
7 [TEST]-Taste (P28)
8 Moduswähler (Ein/Modusauswahl) (P28, 30)
9 Batteriedeckel (P27)
Zum Thema Batterien
∫ Verwendbare Batteriearten
4
5
6
7
8
9
AA Alkaline-Trockenbatterien (LR6)
AA Wiederaufladbare Nickel-Metallhydrid-Batterien (Ni-MH)
≥ Es wird zur Verwendung von Batterien von Panasonic geraten.
≥ Die Leistung der verwendeten Batterien kann deutlich in
Abhängigkeit davon variieren, welche Batteriemarke verwendet
wird, wie lange die Batterien seit ihrer Herstellung gelagert
wurden und wie sie aufbewahrt wurden.
≥ Die Leistung der Batterien verringert sich vorübergehend bei
niedrigen Temperaturen (unter 10 °C), kehrt jedoch zurück,
wenn die Temperatur Raumtemperatur erreicht.
≥ Bei bestimmten Umgebungstemperaturen und
Betriebsbedingungen kann es zu Funktionsstörungen kommen.
Jedoch handelt es sich dabei nicht um Defekte.
≥ Um zu gewährleisten, dass die Batterien so lange wie möglich
funktionieren, wird empfohlen, das Gerät in den Zeiträumen
zwischen dem Aufnehmen von Fotos auszuschalten. Wenn das
Gerät über einen längeren Zeitraum genutzt werden soll, wird
zum Einsatz von wiederaufladbaren Nickel-MetallhydridBatterien geraten.
≥ Nach dem Ausschalten gewinnen die Batterien unter
Umständen etwas von ihrer Leistung zurück, wenn sie eine
gewisse Zeit ausruhen, jedoch werden sie dann schnell wieder
unbenutzbar. Denken Sie aus diesem Grund immer daran,
verbrauchte Batterien durch neue zu ersetzen.
VQT1U62
23
∫ Batteriearten, mit denen der Betrieb nicht gewährleistet ist
AA Ni-Cd-Batterien
AA Nickel-Mangan-Batterien (ZR6)
AA Lithium-Batterien (FR6)
AA Mangan-Trockenbatterien (R6)
AA Oxyride-Trockenbatterien (Oxy-Nickel-Hydroxid)
≥ Panasonic garantiert beim Einsatz beliebiger der oben
aufgeführten Batterien, nicht für den richtigen Betrieb des
Gerätes. Außerdem kann die Verwendung dieser Batterien zu
Elektrolytlecks, Stromausfall, Explosionsrisiko, etc. führen.
∫ Batterien mit Formen, die nicht verwendbar sind
≥ Das Einsetzen von Batterien mit ungewöhnlichen Formen im
Gerät kann zum Auslaufen von Elektrolyt, zum Entstehen von
Wärme und auch zum Reißen dieser Batterien führen.
≥ Bei einigen auf dem Markt erhältlichen Batterien fehlt ein Teil
oder die gesamte Hülle. Solche Batterien dürfen keinesfalls
benutzt werden. (Siehe in der nachstehenden Abbildung.)
≥ Batterien (blanke Batterien)
ohne äußere Hülle oder
Batterien, bei denen ein Teil
ihrer Hülle fehlt
24
VQT1U62
≥ Batterien mit - flacher
Elektrode
∫ Umgang mit den Batterien
Ein falscher Umgang mit den Batterien kann zum Auslaufen von
Elektrolyt, zum Entstehen von Wärme und auch zum Reißen der
Batterien führen. Beachten Sie die folgenden
Vorsichtsmaßnahmen.
≥ Setzen Sie die Batterien weder Wasser noch Meerwasser aus
und verhindern Sie, dass ihre Kontaktbereiche feucht werden.
≥ Entfernen bzw. beschädigen Sie nicht die äußere Hülle der
Batterien.
≥ Lassen Sie die Batterien nicht fallen, schlagen Sie sie nicht auf
andere Gegenstände oder setzen Sie sie keinen anderen
starken Erschütterungen aus.
≥ Verwenden Sie die Batterien nicht länger, sobald Sie ein
Auslaufen von Elektrolyt, Verformungen, Verfärbungen oder
andere derartige Defekte feststellen.
≥ Bewahren Sie die Batterien nicht an Orten auf, an denen hohe
Temperatur und/oder Feuchtigkeit herrscht.
≥ Halten Sie die Batterien aus der Reichweite von Kindern und
Babys fern.
≥ Beim Auswechseln der Batterien, stets 2 neue Batterien
desselben Typs verwenden.
≥ Entfernen Sie die Batterien aus dem Gerät, wenn Sie das
Gerät über einen längeren Zeitraum nicht benutzen.
≥ Die Batterien sind unter Umständen kurz nach dem Gebrauch
des Gerätes heiß. Schalten Sie deshalb die Stromversorgung
des Gerätes ab und warten Sie vor dem Entnehmen der
Batterien aus dem Gerät ab, bis ihre Temperatur gesunken ist.
≥
Bei niedrigen Temperaturen (unter 10 °C) verringert sich die
Leistung der Batterien und reduziert sich die Anzahl der vom
Gerät ausgelösten Blitze deutlich. Die Betriebsdauer der
Batterien verkürzt sich besonders, wenn AlkalineTrockenbatterien verwendet werden. Wärmen Sie die Batterien
deshalb vor dem Gebrauch in Ihrer Tasche an. Vermeiden Sie
dabei aber einen direkten Kontakt mit Feuerzeugen, anderen
Gegenständen aus Metall bzw. Taschen-/Körperwärmern.

≥
Die Anzahl der vom Gerät ausgelösten Blitze kann sich zudem
deutlich verringern, wenn die Batterieelektroden
öligen Ausscheidungen der Haut oder anderen Arten von
Schmutz ausgesetzt sind. Wischen Sie vor dem Einsetzen der
Batterien die Elektroden
weichen, trockenen Tuch ab.
Sollte Elektrolyt aus den Batterien auslaufen, müssen alle
Spuren des Elektrolyts im Batteriefach entfernt und dann neue
Batterien bzw. vollkommen aufgeladene Nickel-MetallhydridBatterien eingelegt werden.
Sollte Elektrolyt auf Ihre Hände oder Kleidung gelangen, muss
dieses sorgfältig mit Wasser abgespült werden. Falls Elektrolyt in
Ihre Augen gelangt, besteht die Gefahr, dass Sie Ihr Augenlicht
verlieren. Reiben Sie in diesem Fall nicht die Augen sondern
spülen Sie sie mit sauberem Wasser und suchen Sie einen Arzt
auf.
+
und - vorsichtig mit einem
+
und -
∫ Wiederaufladbare Nickel-Metallhydrid-Batterien
Nickel-Metallhydrid-Batterien können durch Wiederaufladen mit
einem entsprechenden Ladegerät wieder gebrauchsfähig gemacht
werden. Jedoch kann ein unsachgemäßer Gebrauch zum
Auslaufen von Elektrolyt, Entstehen von Wärme, Entzündung von
Flammen sowie auch zum Reißen der Batterien führen. Beachten
Sie deshalb die folgenden Vorsichtsmaßnahmen.
≥ Unter Umständen ist es nicht möglich, die Batterien richtig
aufzuladen, wenn die Elektroden
Verwenden Sie ein weiches, trockenes Tuch, um die
Elektroden
Ladegerätes vorsichtig abzuwischen.
+ und - sowie die Anschlusskontakte des
+ und - verschmutzt sind.
≥ Sowohl beim Kauf oder bei Nichtnutzung über einen längeren
Zeitraum weisen Nickel-Metallhydrid-Batterien unter
Umständen keine ausreichende Ladung auf. Grund dafür sind
ihre Eigenschaften, was jedoch kein Anzeichen für einen
Defekt ist. Ihre ordnungsgemäße Leistung wird wieder
hergestellt, nachdem sie mehrfach aufgeladen wurden.
≥ Es ist empfehlenswert, die Batterien erst aufzuladen, wenn
ihre vorhandene Ladung verbraucht wurde. Werden sie
wiederholt aufgeladen, ohne dass ihre vorhandene Ladung
zuvor verbraucht wurde, behalten sie unter Umständen nur
schwer ihre Leistung bei. (Diese Erscheinung wird als
Speichereffekt bezeichnet.)
≥ Verbrauchen Sie, wenn es zum Auftreten des Speichereffekts
gekommen ist, die vorhandene Ladung der Batterien bis das
Auslösen nicht mehr möglich ist. Laden Sie die Batterien dann
mehrfach vollständig auf. Dadurch erlangen die Batterien ihre
Leistung wieder.
≥ Wenn Nickel-Metallhydrid-Batterien nicht benutzt werden,
verringert sich ihre Leistung auf Grund einer natürlichen
Entladung.
≥ Laden Sie Nickel-Metallhydrid-Batterien nicht ständig auf,
wenn diese bereits geladen sind.
≥ Entfernen bzw. beschädigen Sie nicht die äußere Hülle der
Batterien.
≥ Lesen Sie die dem zum Aufladen der Batterien verwendeten
Ladegerät beiliegende Anleitung.
Nickel-Metallhydrid-Batterien haben eine bestimmte Lebensdauer.
Bei zunehmender Nutzung oder vergehender Zeit verringert sich
ihre Leistung schrittweise. Hat sich die Zeitdauer, die das Gerät
benutzt werden kann, deutlich verringert, haben die Batterien unter
Umständen das Ende ihrer Betriebszeit erreicht. Erwerben Sie
dann neue Batterien.
VQT1U62
25

≥ Die Länge der Lebensdauer der Batterien ist in Abhängigkeit
von ihrer Aufbewahrungsart, den Betriebsbedingungen und der
Umgebung, in der sie benutzt werden, unterschiedlich.
∫ Wenn das Gerät über einen längeren Zeitraum nicht benutzt
wird
≥ Bleiben die Batterien im Gerät fließt ständig ein schwacher
Strom, d.h. auch, wenn die Stromversorgung des Gerätes
ausgeschaltet ist. Dadurch entladen sich die Batterien
schrittweise, wobei es zu einer zu starken Entladung kommen
kann und die Batterien auch nach einem Aufladen nicht mehr
brauchbar sind.
≥ Beim Aufbewahren der Batterien über einen längeren Zeitraum
wird empfohlen, sie zumindest einmal pro Jahr aufzuladen,
nachdem ihre Restladung verbraucht wurde, sie aus dem Gerät
entfernt und erneut gelagert wurden.
∫ Lebensdauer der Batterien
Blitzanzahl
(Vollblitzanzahl im Modus MANUAL in Abständen von
30 Sekunden)
Gebrauchte Batterien Blitzanzahl
Alkaline-Trockenbatterien (LR6)
Nickel-Metallhydrid-Batterien
(Ni-MH)
Fotografierbedingungen
≥ Temperatur: 23 °C
≥ Die Blitzanzahl variiert geringfügig je nach dem
Aufbewahrungsstatus der Batterien und den
Betriebsbedingungen.
Etwa 140 Blitze
Etwa 230 Blitze
(min. 2400 mAh-Typ)
26
VQT1U62

Einsetzen und Entfernen der Batterien
im Gerät (optional)
≥
Prüfen Sie, ob die Stromversorgung des Gerätes ausgeschaltet ist.
(Stellen Sie sicher, dass der Moduswähler auf [OFF] gestellt ist.)
≥ Verwenden Sie Alkaline-Trockenbatterien oder
wiederaufladbare Nickel-Metallhydrid-Batterien.
1 Verschieben Sie den Batteriefachdeckel, um
diesen zu öffnen.
≥ Ziehen Sie bei erstmaligem Gebrauch des Gerätes das
Klebeband am Batteriefachdeckel ab.
2 Prüfen Sie beim Einlegen der Batterien, ob die
Batteriepole + und - korrekt ausgerichtet sind.
3 Schließen Sie den Batteriefachdeckel, indem Sie
ihn so weit wie möglich zurückschieben.
≥ Nehmen Sie die Batterien nach dem Gebrauch des Gerätes
heraus.
VQT1U62
27
Kontrolle des Restladestands der
Batterien im Gerät
Setzen Sie die Batterien ein, schalten Sie das Gerät ein und prüfen
Sie dann die Restleistung der Batterien.
1 Stellen Sie den Moduswähler auf [MANUAL].
A Moduswähler
≥ Jetzt beginnt der Ladevorgang.
2 Überprüfen Sie, ob die [CHARGE]-Leuchte
aufleuchtet.
≥ Dauert es bis zum Aufleuchten der [CHARGE]-Leuchte so lange
wie in der unten stehenden Tabelle angegeben, bedeutet dies,
dass die Batterien fast entladen sind. Ersetzen Sie sie so bald
wie möglich durch neue Batterien.
Alkaline-Trockenbatterien Über 30 s
Wiederaufladbare Nickel-Metallhydrid-
Batterien
≥ Blinken die [CHARGE]-Leuchte und die [AUTO CHECK]-
Kontrollleuchte gleichzeitig, bedeutet dies, das die Batterien fast
vollständig entladen sind und so bald wie möglich durch neue
Batterien ersetzt werden sollten.
Über 10 s
3 Den Moduswähler auf [OFF] stellen und dann die
Stromversorgung des Geräts ausschalten.
≥ Wenn Sie den Wähler auf [TTL AUTO] stellen, blinkt die
[CHARGE]-Leuchte weiter, bis der Blitz die Digitalkamera
erkennt.
≥ Beim Drücken der [TEST]-Taste wird das Gerät unter
Umständen ausgelöst.
≥ Schalten Sie die Stromversorgung in folgenden Situationen aus:
≥
Beim Anbringen an oder Entfernen von der Digitalkamera
≥ Wenn das Gerät nicht ausgelöst werden soll
≥ Wenn Sie das Gerät nicht benutzen
≥ Wenn der Blitz vollständig geladen ist, leuchtet die [CHARGE]-
Leuchte.
28
VQT1U62
Montage des Gerätes an der
Digitalkamera und Entfernen von dieser
≥
Prüfen Sie, ob die Stromversorgung von Digitalkamera und Gerät
ausgeschaltet sind. (Das Montieren an oder das Entfernen des
Gerätes von der Kamera, während die Stromversorgung
eingeschaltet ist, kann Störungen hervorrufen.)
∫ Montieren des Gerätes
1 Lösen Sie den Arretierring.
≥ Üben Sie nicht mehr Kraft als nötig auf den Arretierring aus.
≥ Berühren Sie die Anschlusskontakte nicht mit Ihren Fingern,
Gegenständen aus Metall, usw.
2 Das Gerät in den Blitzlichtschuh schieben und
sicherstellen, dass es korrekt eingesetzt ist.
3 Den Arretierring bis zum Anschlag in
Pfeilrichtung drehen.
∫ Entfernen des Gerätes
Lockern Sie den Arretierring vollständig und
schieben Sie das Gerät aus dem Kontakt.
VQT1U62
29
Aufnehmen von Bildern
Auswahl des Blitzlicht-Modus
1 Schalten Sie die Stromversorgung der Digitalkamera ein.
2 Den Moduswähler auf dem Gerät drehen, um den
Blitzmodus auszuwählen.
A Moduswähler
≥ Wenn der Blitz vollständig geladen ist, leuchtet die [CHARGE]-
Leuchte.
∫ Zum Thema der Blitzlicht-Modi
Option Einstellungsdetails
Nach dem Messen der richtigen Blitzlichtintensität
[TTL AUTO]
[MANUAL]
¢ Die Leitzahl (GN) ist ein Wert, der die Lichtmenge eines
Blitzlichtgerätes angibt.
durch Auslösen eines Vorblitzes wird das Gerät
erneut zum Aufnehmen des Fotos ausgelöst.
≥ blinkt die [CHARGE]-Taste weiter, bis der Blitz
die Digitalkamera erkennt.
Das Gerät emittiert Licht in Leitzahl (GN)
·m).
(ISO100
¢
22
≥ Bitte den Blitzmodus für Digitalkameras mit
Kommunikationsfunktion auf [MANUAL] stellen und einen
optimalen Abstand der Kamera zum Objekt (P32) als Richtwert
verwenden.
[TTL AUTO]
Beziehen Sie sich hinsichtlich des Einsatzbereichs des Blitzes auf
P31.
1 Drücken Sie die Auslösetaste vollständig und
nehmen Sie das Bild auf.
2 Prüfen Sie, ob die [AUTO CHECK]-Leuchte blinkt.
≥ Das Gerät sendet Licht bei korrekter Beleuchtung aus, wenn die
[AUTO CHECK]-Leuchte ca. 5 Sekunden lang blinkt. Ist dies
nicht der Fall, die Einstellungen auf dem Gerät und der
Digitalkamera kontrollieren.
3 Den Moduswähler auf [OFF] stellen, um das Gerät
nach der Aufnahme des Bildes auszuschalten.
30
VQT1U62
 Loading...