

Page 1
Operating Instructions
If you have any questions, visit:
USA : http://shop.panasonic.com/support
Canada : www.panasonic.ca/english/support
Pour toute assistance supplémentaire, visiter :
www.panasonic.ca/french/support
Manuel d’utilisation
使用说明书
取扱説明書
FLASH
闪光灯
フラッシュライト
Model No.
Modèle
型号
品番
DMW-FL200L
Please read these instructions carefully before using
this product, and save this manual for future use.
Il est recommandé de lire attentivement ce manuel
avant d’utiliser l’appareil et de le conserver pour
consultation ultérieure.
请于使用前仔细阅读操作使用说明书,并将说
明书妥善保管,以备将来使用。
このたびは、パナソニック製品をお買い上げいただき、
まことにありがとうございます。
≥
取扱説明書をよくお読みのうえ、正しく安全にお使
いください。
≥
ご使用前に「安全上のご注意」(3 〜 5ページ)を必
ずお読みください。
≥ 保証書(裏表紙)は「お買い上げ日・販売店名」などの
記入を確かめ、取扱説明書とともに大切に保管して
ください。
保証書付き
SQT1378
F0416CT0
Page 2
Operating Instructions
FLASH
Thank you for purchasing Panasonic product.
Please read these instructions carefully before using this
product, and save this manual for future use.
Contents
Information for Your Safety .......................................... 2
Precautions .................................................................. 5
Supplied Accessories................................................... 6
Names of Parts ............................................................ 6
Continuous Firing......................................................... 7
Preparing a Battery (optional)...................................... 7
Loading Batteries......................................................... 7
Attaching to the Camera ..............................................7
Turning on the Flash .................................................... 8
Shooting....................................................................... 8
Flash Mode .................................................................. 9
Turning on the LED Light ........................................... 10
Wireless Flash Settings ............................................. 10
Placing Wireless Flash Units ..................................... 11
Fixing the Irradiation Angle ........................................11
Using the Wide Panel ................................................ 11
Slave Mode ................................................................ 12
Cautions for Use ........................................................12
Specifications............................................................. 13
Limited Warranty (ONLY FOR U.S.A.)....................... 14
Limited Warranty (ONLY FOR CANADA) .................. 16
2
SQT1378
Information for Your Safety
WARNING:
To reduce the risk of fire, electric shock or product
damage,
• Do not expose this unit to rain, moisture, dripping or
splashing.
• Do not place objects filled with liquids, such as vases,
on this unit.
• Use only the recommended accessories.
• Do not remove covers.
• Do not repair this unit by yourself. Refer servicing to
qualified service personnel.
CAUTION!
To reduce the risk of fire, electric shock or product
damage,
• Do not install or place this unit in a bookcase, built-in
cabinet or in another confined space. Ensure this unit
is well ventilated.
Page 3

IMPORTANT
SAFETY
INSTRUCTIONS
When using your photographic equipment,
basic safety precautions should always be
followed, including the following:
≥ Read and understand all instructions
before using.
≥ Close supervision is necessary when
any appliance is used by or near
children. Do not leave appliance
unattended while in use.
≥
Care must be taken as burns can occur from
touching hot parts.
≥ Do not operate if the appliance has been
dropped or damaged - until it has been
examined by qualified service
personnel.
≥ Let appliance cool completely before
putting away.
≥
To reduce the risk of electric shock, do not
immerse this appliance in water or other
liquids.
≥ To reduce the risk of electric shock, do
not disassemble this appliance, but take
it to qualified service personnel when
service or repair work is required.
Incorrect reassembly can cause electric
shock when the appliance is used
subsequently.
≥ The use of an accessory attachment not
recommended by the manufacturer may
cause a risk of fire, electric shock, or
injury to persons.
SAVE THESE
INSTRUCTIONS
SQT1378
3
English
Page 4

∫ About the batteries
CAUTION
• Danger of explosion if battery is incorrectly
replaced. Replace only with the type
recommended by the manufacturer.
• When disposing of the batteries, please contact
your local authorities or dealer and ask for the
correct method of disposal.
• Do not heat or expose to flame.
• Do not leave the battery(ies) in a car exposed to direct
sunlight for a long period of time with doors and
windows closed.
• If rechargeable batteries are to be used, then
rechargeable batteries manufactured by Panasonic
are recommended.
4
SQT1378
THE FOLLOWING APPLIES ONLY IN THE U.S.A.
FCC Note:
This equipment has been tested and found to comply with the
limits for a Class B digital device, pursuant to Part 15 of the
FCC Rules.
These limits are designed to provide reasonable protection
against harmful interference in a residential installation. This
equipment generates, uses, and can radiate radio frequency
energy and, if not installed and used in accordance with the
instructions, may cause harmful interference to radio
communications. However, there is no guarantee that
interference will not occur in a particular installation. If this
equipment does cause harmful interference to radio or
television reception, which can be determined by turning the
equipment off and on, the user is encouraged to try to correct
the interference by one or more of the following measures:
≥ Reorient or relocate the receiving antenna.
≥ Increase the separation between the equipment and
receiver.
≥ Connect the equipment into an outlet on a circuit different
from that to which the receiver is connected.
≥ Consult the dealer or an experienced radio/TV technician
for help.
Any unauthorized changes or modifications to this equipment
would void the user’s authority to operate this device.
This device complies with Part 15 of the FCC Rules.
Operation is subject to the following two conditions: (1) This
device may not cause harmful interference, and (2) this device
must accept any interference received, including interference
that may cause undesired operation.
Responsible Party:
Panasonic Corporation of North America
Two Riverfront Plaza, Newark, NJ 07102-5490
Support Contact: http://shop.panasonic.com/support
Page 5
THE FOLLOWING APPLIES ONLY IN CANADA.
CAN ICES-3(B)/NMB-3(B)
-If you see this symbol-
Disposal of Old Equipment
Only for European Union and countries with
recycling systems
This symbol on the products, packaging, and/
or accompanying documents means that used
electrical and electronic products must not be
mixed with general household waste.
of old products, please take them to applicable collection
points in accordance with your national legislation.
By disposing of them correctly, you will help to save
valuable resources and prevent any potential negative
effects on human health and the environment.
For more information about collection and recycling,
please contact your local municipality.
Penalties may be applicable for incorrect disposal of this
waste, in accordance with national legislation.
For proper treatment, recovery and recycling
Precautions
≥ This is the external flash for the Panasonic digital
cameras (mentioned as flash in the following). When this
flash is used together with a digital camera that supports
wireless mode, shooting with a wireless flash becomes
possible. Available functions vary depending on the digital
camera used. As for the corresponding digital cameras,
please visit our web site.
http://panasonic.jp/support/global/cs/dsc/ (This Site is
English only.)
∫ Handling the unit
≥ Do not subject the unit to strong vibration or impact.
Doing so may not only cause the unit to malfunction but
also cause the flash head to break.
≥ Sand and dirt may cause the unit to malfunction.
When using the unit in an environment such as a
beach, take steps to protect it from sand and dirt.
≥ This unit is neither dust-proof nor splash-proof. If by
any chance water droplets, etc. are splashed on the
unit, wipe them off with a dry cloth. If the unit fails to
function correctly, consult your dealer or Panasonic.
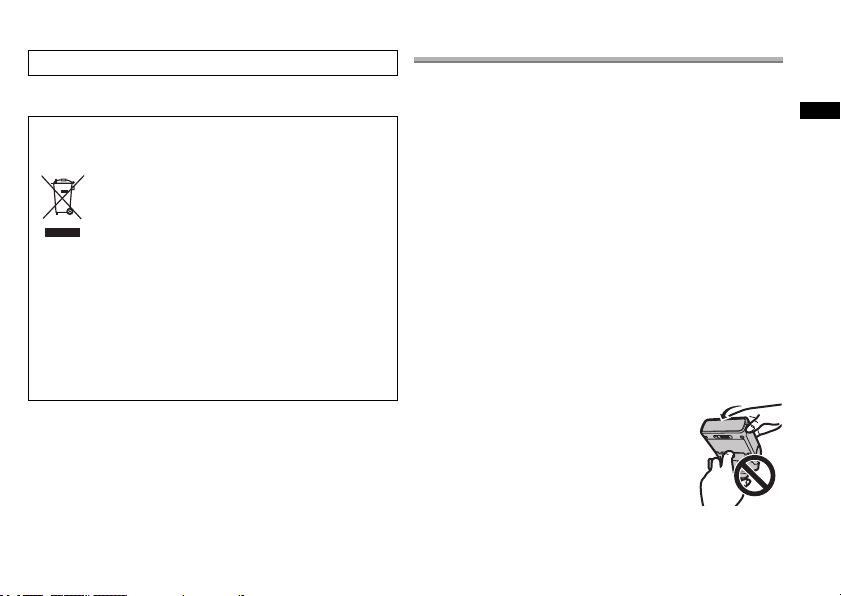
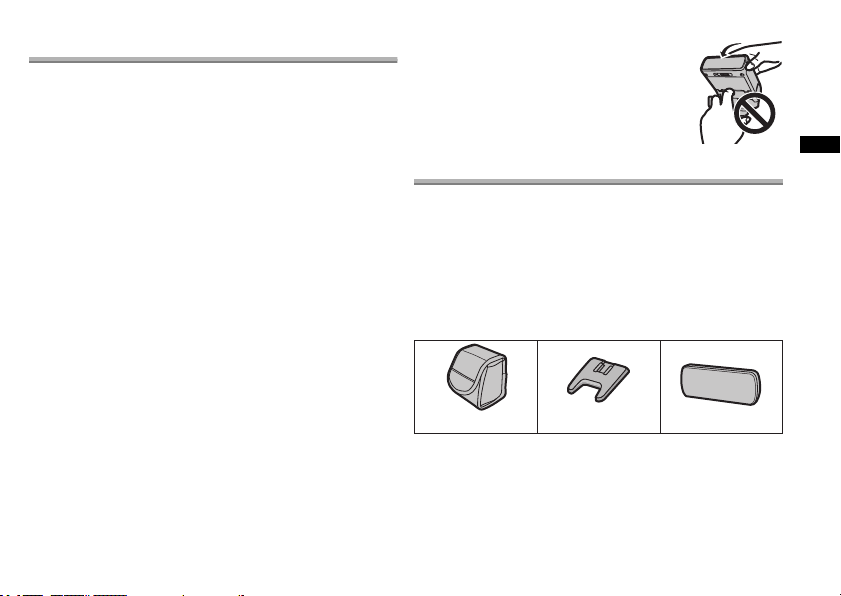
≥ Be careful not to catch your finger, etc. in
the unit when adjusting the angle of the
flash head.
≥ Read the operating instructions for your
digital camera.
English
SQT1378
5
Page 6
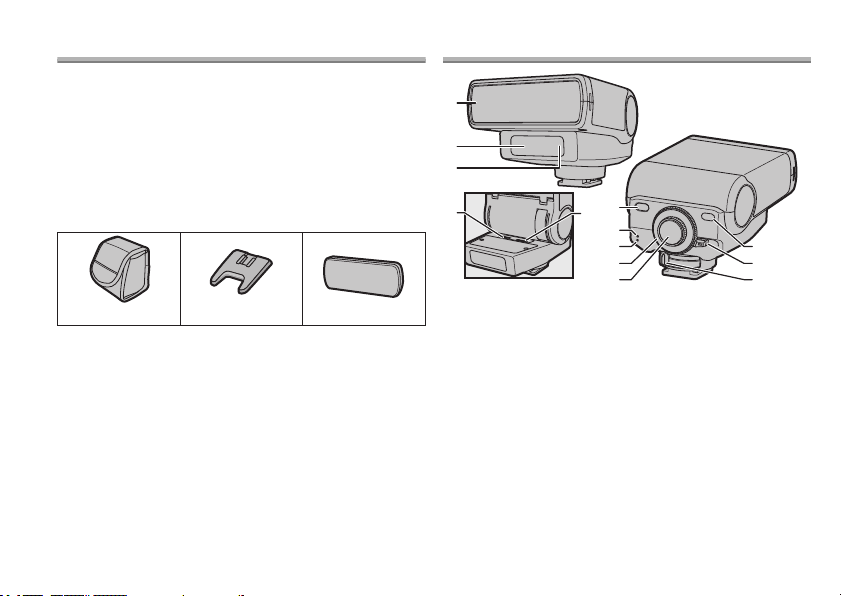
Supplied Accessories
SFC0373 VFB0243 SFB0010
123
[Inspection to be performed when you unpack the unit]
When removing the unit from its packing box, check that the
main unit and the supplied accessories are there and also
check their external appearance and functions to verify that
they have not sustained any damage during distribution and
transportation.
If you discover any trouble, contact your vendor before
using the product.
Product numbers correct as of April 2016. These may be
subject to change.
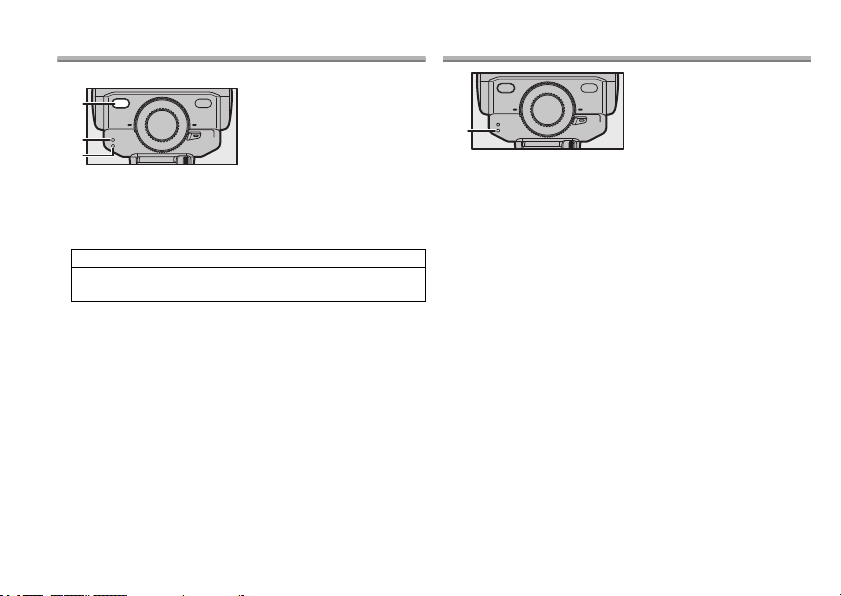
Names of Parts
1 Flash case
2 Flash stand
3 Wide panel
≥ The batteries are optional.
6
SQT1378
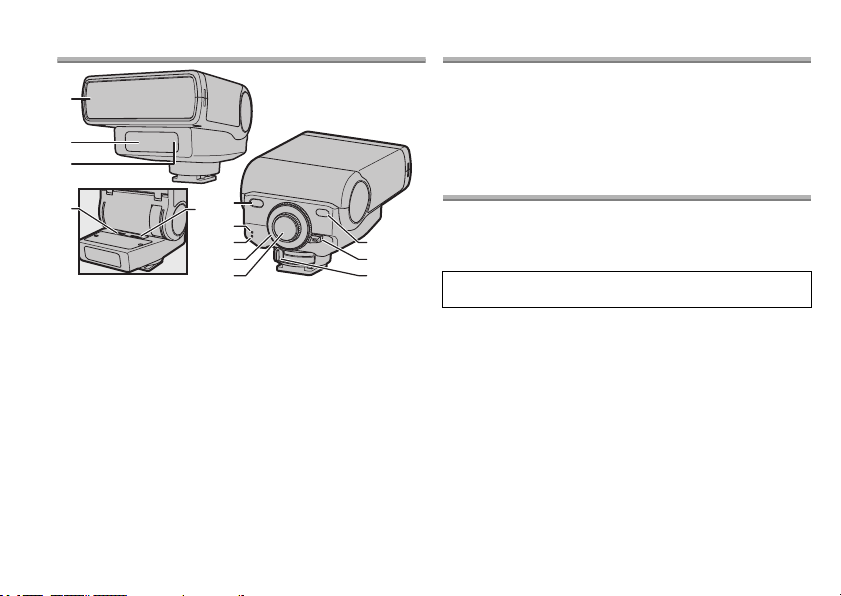
1 Flash head
2 AF assist lamp/LED light
3 Wireless sensor
4 [GR] (Group) switch
5 [CH] (Channel) switch
6 [ON/OFF] button
7 [CHARGE] lamp
8 [AUTO CHECK] lamp
9 Flash exposure
compensation/output
control dial
: LED light output control
dial
; [TEST] button
< Mode lever
= Lock lever
Page 7
Continuous Firing
The flash may become hot when fired many times in
succession, resulting in damage or malfunction. The flash
should be fired no more than 10 times in succession at
intervals of 2.5 seconds, after which it should be left unused
for at least 10 minutes.
Preparing a Battery (optional)
Choose from the below batteries:
≥ LR6/AA Alkaline dry batteries (k 2)
≥ HR6/AA Rechargeable nickel metal hydride batteries
(Ni-MH) (k 2)
R6/AA Manganese dry batteries cannot be used.
The use of batteries made by Panasonic is recommended.
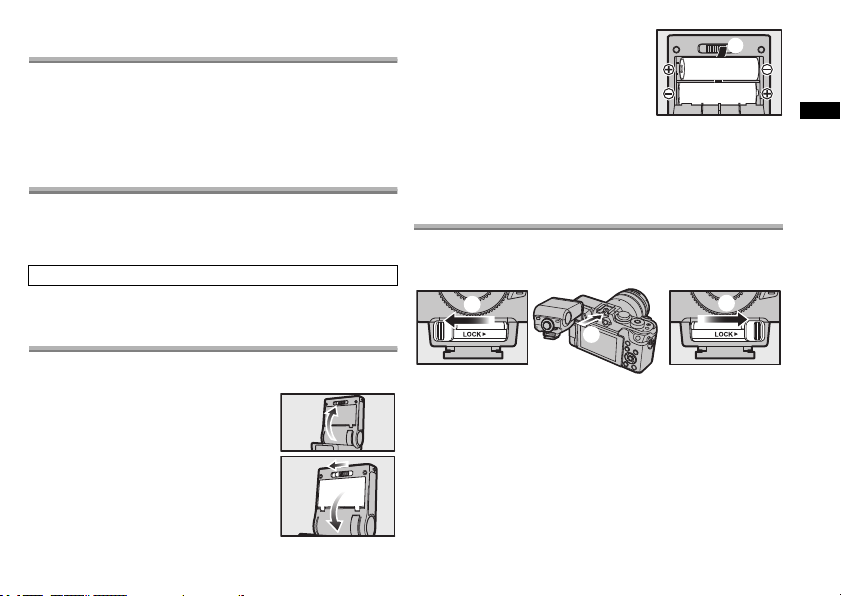
Loading Batteries
≥ Use alkaline dry batteries or rechargeable nickel metal
hydride batteries.
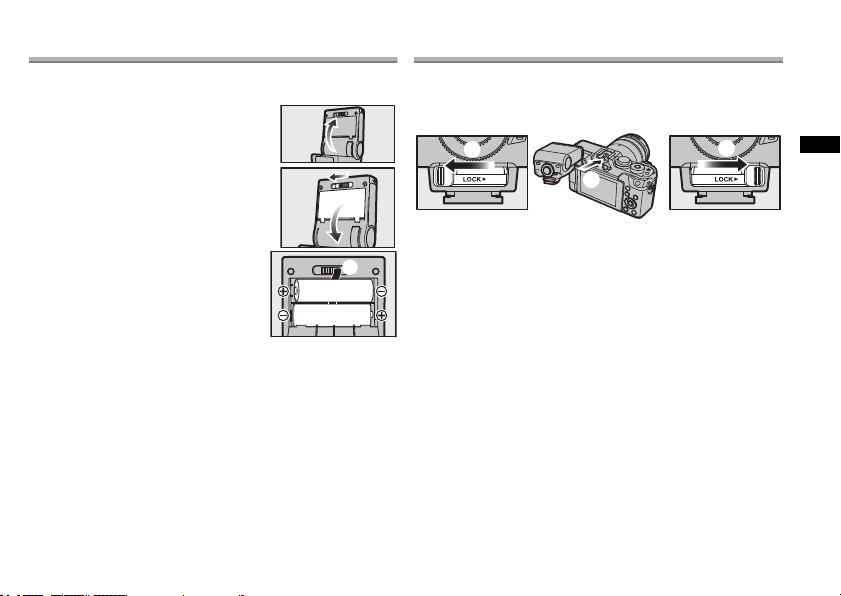
1 Rotate the flash head.
2 Slide the lever in the
direction of [2 OPEN] to
open the battery cover.
3 Insert the batteries over
the ribbon (A) with correct
[r]/[s] polarity.
• You can easily take out the
batteries by pulling the ribbon.
4 Close the battery cover
until it clicks into place.
• Close the battery cover so that the ribbon does not stick
out.
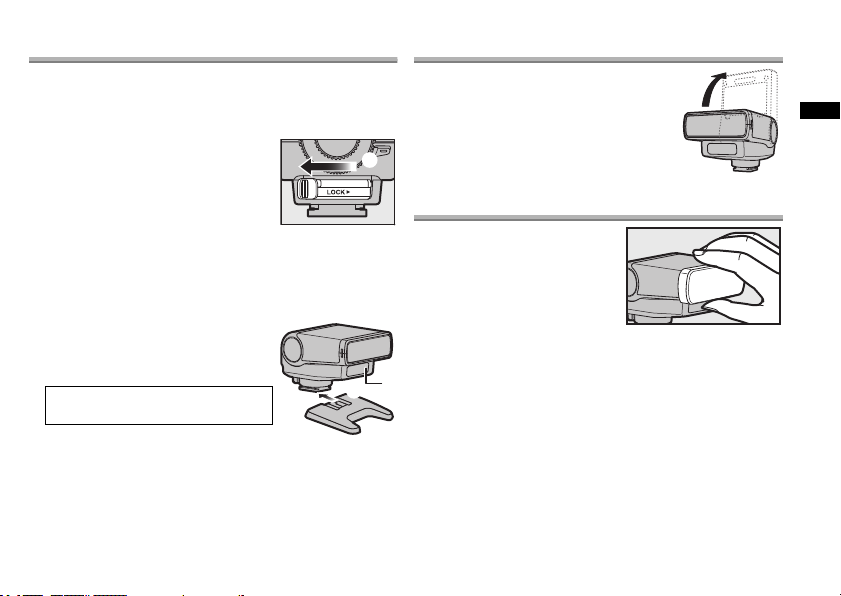
Attaching to the Camera
Confirm that both the camera and flash are off. Attaching or
removing the flash while either the flash or the camera is on
may result in malfunction.
1 Slide the lock lever in the direction
opposite to that indicated by the [LOCK 1]
icon (1).
2 Slide the flash into the hot shoe until it
clicks securely into place (2).
3 Slide the lock lever to the [LOCK 1]
position (3).
≥ To remove the flash, slide the lock lever in the direction
opposite to the [LOCK1] arrow and slide it from the shoe.
SQT1378
7
English
Page 8
Turning on the Flash
Attach a flash to the camera, and then turn the camera on.
1
[ON/OFF] button
2
[CHARGE] lamp
3
[AUTO CHECK] lamp
Press the [ON/OFF] button.
≥ To turn the flash off, press the [ON/OFF] button again.
≥ Replace the batteries if the [CHARGE] lamp does not light
after:
30 seconds (Alkaline dry batteries)
10 seconds (Rechargeable nickel metal hydride
batteries)
≥ If the [CHARGE] lamp and [AUTO CHECK] lamp blink
simultaneously, batteries are running low. Replace the
batteries. Using a considerably exhausted battery may
result in malfunction.
≥ The flash will enter sleep mode whenever the camera
enters sleep mode.
≥ If no operations are performed for approximately 20
minutes, the flash will turn off automatically. Press the
[ON/OFF] button to turn it on.
≥ Oscillating sound may be output while charging the flash,
but this is not malfunction.
8
SQT1378
Shooting
1
[AUTO CHECK] lamp
1 Use camera controls to choose the flash
mode.
See the camera operating instructions for details.
2 Choose a flash mode.
“Flash Mode” (P9)
3 Press the shutter button halfway.
4 Press the shutter button the rest of the way
down to take the picture.
The unit emits light in proper exposure if [AUTO CHECK]
lamp flashes for approximately 5 seconds.
≥ When using a flash, flash light may be blocked by the lens
body, lens hood, etc.
≥ Use the wide panel to prevent overexposure at ranges of
less than 1 m (3.3 feet) (P11).
Page 9
∫ Firing a test flash
1
[CHARGE] lamp
2
[TEST] button
Press the [TEST] button while the [CHARGE] lamp is lit to
fire a test flash.
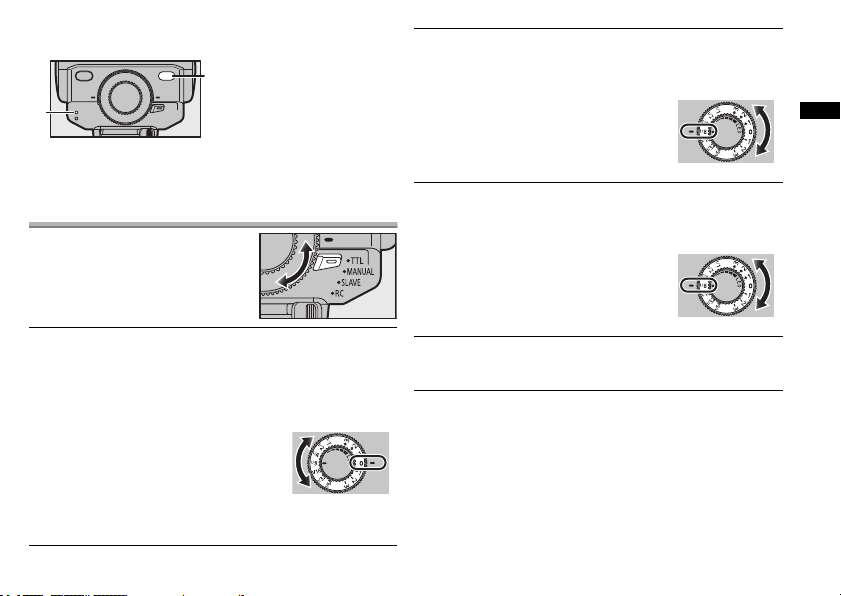
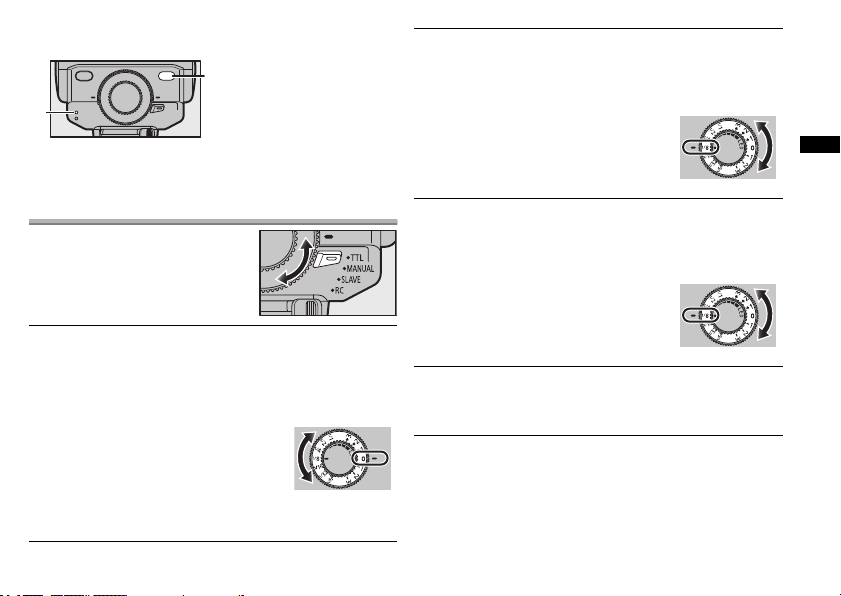
Flash Mode
Choose a flash mode according to
your subject and shooting
conditions.
Set the mode lever to the
appropriate position.
[TTL] (TTL AUTO)
The flash light intensity is controlled automatically
according to the camera’s setup. The flash will be adjusted
based on the brightness taken through the camera’s lens.
Usually use this mode with a camera with communication
capability.
Rotate the flash exposure
compensation/output control dial to
adjust the flash output.
≥ You can make an adjustment by
selecting a value between j3 EV
and i3EV.
≥ Select [0] when not making an adjustment.
[MANUAL]
The flash is fired at the intensity that you set.
Select this mode when using a camera without
communication capability.
Rotate the flash exposure
compensation/output control dial to set
the flash output.
≥ You can set a value between [1/1]
(full flash) and [1/64].
[SLAVE] (SL MANUAL)
The flash can be fired remotely in sync with any flash fired
by other units.
The flash is fired at the intensity that you set.
Rotate the flash exposure
compensation/output control dial to set
the flash output.
≥ You can set a value between [1/1]
(full flash) and [1/64].
[RC]
Wireless control is available with Panasonic digital
cameras that support wireless mode. (P10)
SQT1378
English
9
Page 10
Turning on the LED Light
Rotate the LED light output
control dial.
Rotating in the direction of 1:
Decreases the amount of light or turns
off the LED light.
≥ When you rotate the dial until it stops, the LED light turns
off.
Rotating in the direction of 2:
Increases the amount of light.
≥ The flash and batteries may become warm if you keep the
LED light on, but this is not a malfunction.
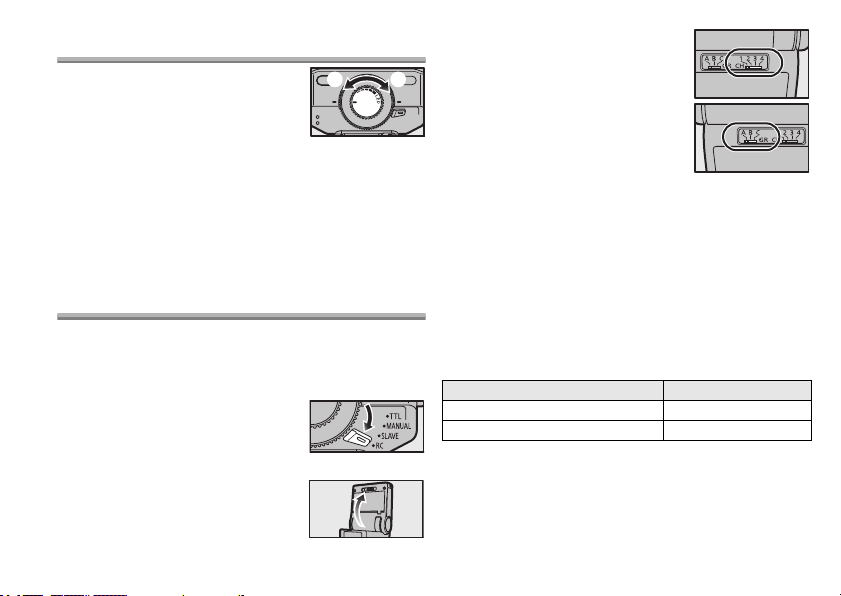
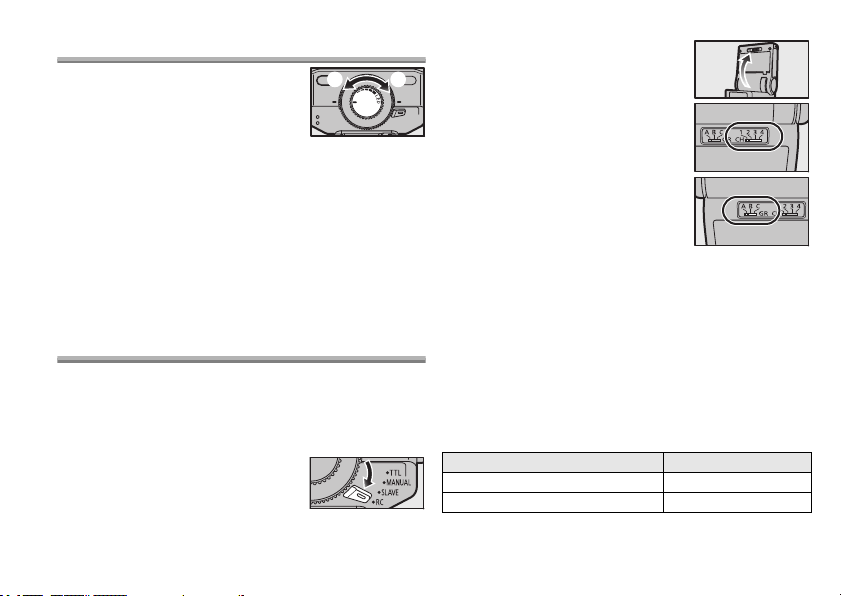
Wireless Flash Settings
Wireless control is available with Panasonic digital cameras
that support wireless mode. See the operating instructions
of the digital camera for operation of the digital camera
during wireless flash shooting.
1 Set the camera to wireless
mode.
2 Set the flash to [RC] mode.
“Flash Mode” (P9)
3 Rotate the flash head.
10
SQT1378
4 Set the channel with the
[CH] switch.
• Set the camera and flash to the
same channel.
5 Set the group with the [GR]
switch.
• The camera can adjust flash
settings separately for up to 3
groups; choose the group to which
the flash belongs.
≥ If it is difficult to slide the switch, use the tip of a ball point
pen or similar tool to slide it.
≥ After setting the channel and group, return the flash head
to its original angle.
The Firing mode, the flash adjustment, and the manual
flash adjustment can be set for each group by operating the
camera.
≥ The flash will operate as follows when you set the camera
to a setting not supported by the flash:
Camera Flash
[Firing Mode]: [AUTO] Does not fire.
[Wireless FP]: [ON] Fires as normal.
Page 11
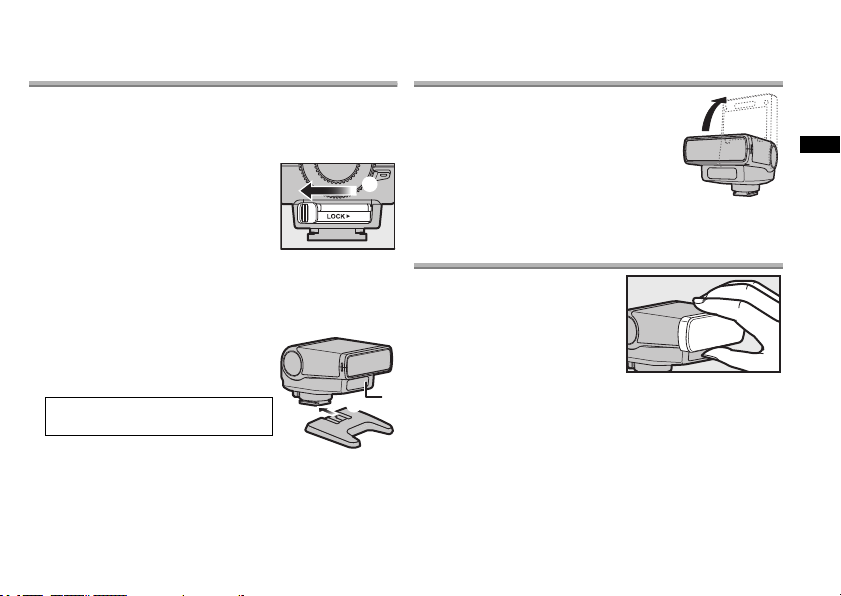
Placing Wireless Flash Units
Since the communication is performed with the flash
emission of the camera, the flash positioning range varies
with the camera. Refer to the camera operating instructions
for details about the flash positioning range.
1 Attach the supplied stand.
• Slide the lock lever in the direction
opposite to that indicated by the
[LOCK 1] icon (1) and slide the
flash onto the stand until it clicks
securely into place (2).
• Slide the lock lever to the [LOCK 1] position to latch
the flash in place.
• To remove the flash, slide the latch in the direction
opposite to the [LOCK 1] arrow and slide it from the
stand.
2 Position the flash with the
wireless sensor (A) facing
the camera.
Take a test shot after
positioning.
≥ We recommend using a single group
of up to three remote flash units.
≥ Flash may not fire due to the angle
or distance between the camera and
the object.
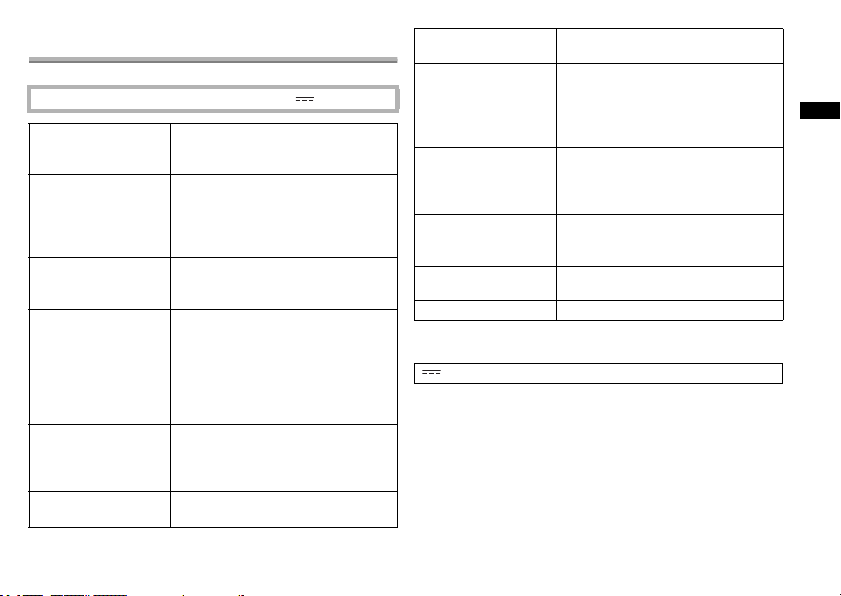
Fixing the Irradiation Angle
Point the flash head at a wall or ceiling
for bounce flash photography.
Rotate the flash head.
90º
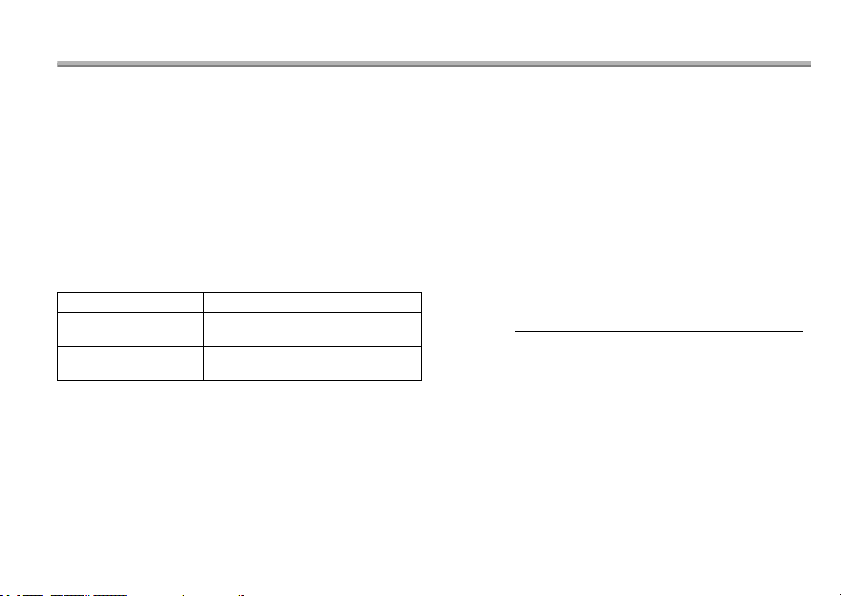
Using the Wide Panel
Use the supplied wide panel for
flash photography when the
focal length of the lens is wider
than 12 mm.
Attach the wide panel to
the flash.
≥ The lighting angle will be the same as the angle of view of
a lens with a focal distance of 7 mm.
SQT1378
11
English
Page 12

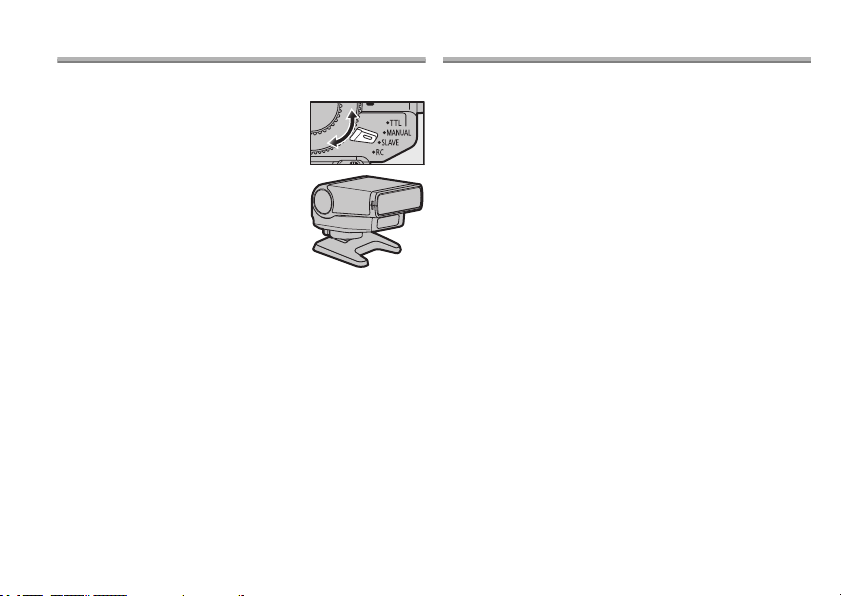
Slave Mode
The flash can be fired remotely in sync with any flash fired
by other units.
1 Set the flash mode to
[SLAVE].
“Flash Mode” (P9)
2 Position the flash.
Flash positioning method is same
as the wireless mode.
“Placing Wireless Flash Units”
(P11)
Refer to the camera operating
instructions for details about the
flash positioning range.
• Set the flash mode of the camera to the manual which
does not fire the pre-flash. If the camera fires the preflash, the external flash synchronizes with the pre-flash
of the camera, and cannot fire the flash light properly.
• The flash may fire in response to flash units used by
other photographers.
12
SQT1378
Cautions for Use
∫ About the unit
Do not carry the unit when it is still attached to the
camera body.
We recommend that you place the unit in the flash case
when carrying it.
≥ Place the unit in the flash case with the flash head side
up.
∫ About the batteries
Be sure to remove the batteries when you will not be
using the unit for a long period of time.
Page 13
Specifications
For the U.S.A.
Panasonic Corporation of North America
Two Riverfront Plaza, Newark, NJ 07102-5490
http://shop.panasonic.com
For CANADA
Panasonic Canada Inc.
5770 Ambler Drive, Mississauga, Ontario L4W 2T3
www.panasonic.com
Printed in China
Specifications are subject to change without notice.
Power requirements:
Batteries
recommended for
use
Charging time
(from full flash until
the [CHARGE] lamp
lights)
Firing period Approx. 1/10000 sec. to 1/250 sec.
No. of flashes
(with full flash)
AF assist lamp
Flash modes TTL AUTO/MANUAL/
DC 3.0 V (3.0 V )
Alkaline dry batteries k 2/
LR6/AA
HR6/AA Rechargeable nickel metal
hydride batteries (Ni-MH)
Approx. 5 sec.: LR6/AA Alkaline
dry batteries
Approx. 3 sec.: HR6/AA
Rechargeable nickel metal hydride
batteries
(Varies depending on the flash
intensity)
Approx. 120 flashes:
Alkaline dry batteries
Approx. 200 flashes: HR6/AA
Rechargeable nickel metal hydride
batteries (min. 2400 mAh type)
(Differs depending on the photo
taking conditions.)
Effective distance: approximately 1 m
(3.3 feet) to 5 m (16 feet)
(Differs depending on the digital
camera and type of lens used)
SL MANUAL/RC
LR6/AA
k 2
Guide number 20 (ISO100), 14 (ISO100: When
Lighting angle Covers the angle of view of 12 mm
Dimensions
Mass (weight) Approx. 230 g/0.507 lb (including
Operating
temperature
Operating humidity
The symbols on this product (including the accessories)
represent the following:
DC
the wide panel is used)
lens (35 mm film camera
equivalent: 24 mm)
(With wide panel: 7 mm lens, 35 mm
film camera equivalent: 14 mm)
Approx. 61.0 mm (W)k52.5 mm
(H)
k
82.0 mm (D)
q
(W)k2.067q (H)k3.228q(D)]
[2.402
(excluding the projecting parts)
batteries)
Approx. 180 g/0.397 lb (main unit)
0 °C to 40 °C (32 °F to 104 °F)
10%RH to 80%RH (no condensation)
SQT1378
English
13
Page 14

Limited Warranty
(ONLY FOR U.S.A.)
Panasonic Products Limited Warranty
Limited Warranty Coverage (For USA Only)
If your product does not work properly because of a defect
in materials or workmanship, Panasonic Corporation of
North America (referred to as “the warrantor”) will, for the
length of the period indicated on the chart below, which
starts with the date of original purchase (“warranty period”),
at its option either (a) repair your product with new or
refurbished parts, (b) replace it with a new or a refurbished
equivalent value product, or (c) refund your purchase price.
The decision to repair, replace or refund will be made by the
warrantor.
Product or Part Name Parts Labor
Digital Camera Peripherals 1 Year 1 Year
Digital Camera Accessories 90 Days 90 Days
Rechargeable Batteries 1 Year 1 Year
During the “Labor” warranty period there will be no charge
for labor. During the “Parts” warranty period, there will be no
charge for parts. This Limited Warranty excludes both parts
and labor for non-rechargeable batteries, antennas, and
cosmetic parts (cabinet). This warranty only applies to
products purchased and serviced in the United States. This
warranty is extended only to the original purchaser of a new
product which was not sold “as is”.
14
SQT1378
Mail-In Service
Online Repair Request
To submit a new repair request and for quick repair status
visit our Web Site at http://shop.panasonic.com/support
When shipping the unit, carefully pack, include all supplied
accessories listed in the Owner’s Manual, and send it
prepaid, adequately insured and packed well in a carton
box. When shipping Lithium Ion batteries please visit our
Web Site at
http://shop.panasonic.com/support
committed to providing the most up to date information.
Include a letter detailing the complaint, a return address and
provide a daytime phone number where you can be
reached. A valid registered receipt is required under the
Limited Warranty.
IF REPAIR IS NEEDED DURING THE WARRANTY
PERIOD, THE PURCHASER WILL BE REQUIRED TO
FURNISH A SALES RECEIPT/PROOF OF PURCHASE
INDICATING DATE OF PURCHASE, AMOUNT PAID AND
PLACE OF PURCHASE. CUSTOMER WILL BE
CHARGED FOR THE REPAIR OF ANY UNIT RECEIVED
WITHOUT SUCH PROOF OF PURCHASE.
Limited Warranty Limits and Exclusions
This warranty ONLY COVERS failures due to defects in
materials or workmanship, and DOES NOT COVER normal
wear and tear or cosmetic damage. The warranty ALSO
DOES NOT COVER damages which occurred in shipment,
or failures which are caused by products not supplied by the
warrantor, or failures which result from accidents, misuse,
abuse, neglect, mishandling, misapplication, alteration,
faulty installation, set-up adjustments, misadjustment of
--Online Repair Request
.
as Panasonic is
Page 15

consumer controls, improper maintenance, power line
surge, lightning damage, modification, introduction of sand,
humidity or liquids, commercial use such as hotel, office,
restaurant, or other business or rental use of the product, or
service by anyone other than a Factory Service Center or
other Authorized Servicer, or damage that is attributable to
acts of God.
THERE ARE NO EXPRESS WARRANTIES EXCEPT AS
LISTED UNDER “LIMITED WARRANTY COVERAGE”.
THE WARRANTOR IS NOT LIABLE FOR INCIDENTAL
OR CONSEQUENTIAL DAMAGES RESULTING FROM
THE USE OF THIS PRODUCT, OR ARISING OUT OF ANY
BREACH OF THIS WARRANTY.
(As examples, this excludes damages for lost time, travel to
and from the servicer, loss of or damage to media or
images, data or other memory or recorded content. The
items listed are not exclusive, but for illustration only.)
ALL EXPRESS AND IMPLIED WARRANTIES,
INCLUDING THE WARRANTY OF MERCHANTABILITY,
ARE LIMITED TO THE PERIOD OF THE LIMITED
WARRANTY.
Some states do not allow the exclusion or limitation of
incidental or consequential damages, or limitations on how
long an implied warranty lasts, so the exclusions may not
apply to you.
This warranty gives you specific legal rights and you may
also have other rights which vary from state to state. If a
problem with this product develops during or after the
warranty period, you may contact your dealer or Service
Center. If the problem is not handled to your satisfaction,
then write to:
Consumer Affairs Department
Panasonic Corporation of North America
661 Independence Pkwy
Chesapeake, VA 23320
PARTS AND SERVICE, WHICH ARE NOT COVERED BY
THIS LIMITED WARRANTY, ARE YOUR RESPONSIBILITY.
As of March 2016
SQT1378
English
15
Page 16
Limited Warranty (ONLY FOR CANADA)
5770 Ambler Drive, Mississauga, Ontario L4W 2T3
Panasonic Canada Inc.
PANASONIC PRODUCT – LIMITED WARRANTY
Panasonic Canada Inc. warrants this product to be free
from defects in material and workmanship under normal use
and for a period as stated below from the date of original
purchase agrees to, at its option either (a) repair your
product with new or refurbished parts, (b) replace it with a
new or a refurbished equivalent value product, or (c) refund
your purchase price. The decision to repair, replace or
refund will be made by Panasonic Canada Inc.
Digital Camera One (1) year, parts and labour
Digital Camera
Peripherals
Digital Camera
Accessories
16
SQT1378
One (1) year, parts and labour
Ninety (90) days, parts and
labour
This warranty is given only to the original purchaser, or the
person for whom it was purchased as a gift, of a Panasonic
brand product mentioned above sold by an authorized
Panasonic dealer in Canada and purchased and used in
Canada, which product was not sold “as is”, and which
product was delivered to you in new condition in the original
packaging.
IN ORDER TO BE ELIGIBLE TO RECEIVE WARRANTY
SERVICE HEREUNDER, A PURCHASE RECEIPT OR
OTHER PROOF OF DATE OF ORIGINAL PURCHASE,
SHOWING AMOUNT PAID AND PLACE OF PURCHASE
IS REQUIRED
Page 17

LIMITATIONS AND EXCLUSIONS
This warranty ONLY COVERS failures due to defects in
materials or workmanship, and DOES NOT COVER normal
wear and tear or cosmetic damage. The warranty ALSO
DOES NOT COVER damages which occurred in shipment,
or failures which are caused by products not supplied by
Panasonic Canada Inc., or failures which result from
accidents, misuse, abuse, neglect, mishandling,
misapplication, alteration, faulty installation, set-up
adjustments, misadjustment of consumer controls, improper
maintenance, improper batteries, power line surge, lightning
damage, modification, introduction of sand, humidity or
liquids, commercial use such as hotel, office, restaurant, or
other business or rental use of the product, or service by
anyone other than a Authorized Servicer, or damage that is
attributable to acts of God.
Dry cell batteries, printer ink cartridge and paper are also
excluded from coverage under this warranty.
Rechargeable batteries are warranted for ninety (90) days
from date of original purchase.
THIS EXPRESS, LIMITED WARRANTY IS IN LIEU OF ALL
OTHER WARRANTIES, EXPRESS OR IMPLIED,
INCLUDING ANY IMPLIED WARRANTIES OF
MERCHANTABILITY AND FITNESS FOR A PARTICULAR
PURPOSE. IN NO EVENT WILL PANASONIC CANADA
INC. BE LIABLE FOR ANY SPECIAL, INDIRECT OR
CONSEQUENTIAL DAMAGES RESULTING FROM THE
USE OF THIS PRODUCT OR ARISING OUT OF ANY
BREACH OF ANY EXPRESS OR IMPLIED WARRANTY.
(As examples, this warranty excludes damages for lost
time, travel to and from the Authorized Servicer, loss of or
damage to media or images, data or other memory or
recorded content. This list of items is not exhaustive, but for
illustration only.)
In certain instances, some jurisdictions do not allow the
exclusion or limitation of incidental or consequential
damages, or the exclusion of implied warranties, so the
above limitations and exclusions may not be applicable.
This warranty gives you specific legal rights and you may
have other rights which vary depending on your province or
territory.
WARRANTY SERVICE
For product operation, repairs and information
assistance, please visit our Support page:
www.panasonic.ca/english/support
English
SQT1378
17
Page 18
Manuel d’utilisation
FLASH
Merci d’avoir arrêté votre choix sur un produit Panasonic.
Il est recommandé de lire attentivement ce manuel avant
d’utiliser l’appareil et de le conserver pour consultation
ultérieure.
Table des matières
Précautions à prendre.................................................. 2
Précautions .................................................................. 5
Accessoires fournis...................................................... 5
Noms des composants ................................................ 6
Déclenchement continu ............................................... 6
Choix des piles (vendues séparément)........................6
Mise en place des piles................................................ 7
Mise en place du flash .................................................7
Mise en marche du flash.............................................. 8
Prises de vues .............................................................8
Modes du flash ............................................................ 9
Mise en marche de la lampe à DEL........................... 10
Paramétrages pour liaison sans fil du flash ...............10
Établissement de flashs avec liaison sans fil.............11
Réglage de l’angle de rayonnement..........................11
Utilisation du diffuseur à grand-angulaire ..................11
Mode asservi.............................................................. 12
Précautions d’utilisation .............................................12
Spécifications.............................................................13
Garantie limitée.......................................................... 14
2
SQT1378
Précautions à prendre
AVERTISSEMENT :
Pour réduire les risques d’incendie, de choc
électrique ou de dommages à l’appareil :
• N’exposez pas cet appareil à la pluie, à l’humidité, à
l’égouttement ou aux éclaboussements.
• Ne placez sur l’appareil aucun objet rempli de liquide,
tel un vase.
• Utilisez exclusivement les accessoires recommandés.
• Ne retirez pas les couvercles.
• Ne réparez pas l’appareil vous-même. Confiez toute
réparation à un technicien de service qualifié.
ATTENTION!
Afin d’éviter tout risque d’incendie, de choc électrique ou de
dommage à l’appareil :
• N’installez pas ou ne placez pas cet appareil dans une
bibliothèque, une armoire ou tout autre espace confiné.
Assurez-vous que la ventilation de l’appareil est adéquate.
Page 19

IMPORTANTES
MESURES DE
SÉCURITÉ
Lors de l’utilisation de votre équipement
photographique, il convient d’observer
certaines précautions de base, notamment :
≥ Lisez attentivement toutes les
instructions.
≥ Ne laissez jamais un enfant utiliser
l’équipement sans surveillance et faites
preuve de la plus grande prudence
lorsque l’équipement est utilisé à
proximité d’enfants. Ne laissez jamais
l’équipement sans surveillance.
≥ Évitez de toucher les parties chaudes de
l’appareil afin de prévenir des brûlures.
≥ N’utilisez pas l’appareil s’il a été
échappé ou subi un choc violent; faitesle examiner par un technicien qualifié
avant de l’utiliser.
≥ Laissez l’appareil refroidir avant de le
ranger.
≥
Afin de réduire le risque de chocs
électriques, n’immergez pas l’appareil et
ne l’exposez pas à des liquides.
≥ Afin de prévenir les risques de chocs
électriques, ne démontez pas l’appareil.
Confiez toute réparation à un technicien
qualifié. Un remontage impropre peut
entraîner un risque de chocs
électriques.
≥ L’utilisation d’un accessoire autre que
ceux recommandés par le fabricant peut
entraîner des risques d’incendie, de
chocs électriques ou de blessures.
CONSERVEZ CE
MANUEL
SQT1378
FRANÇAIS
3
Page 20
∫ À propos des piles
ATT ENT ION
• Danger d’explosion si la pile n’est pas remplacée
correctement. Remplacez-la uniquement par une pile du
type recommandé par le fabricant.
• Suivez les instructions des autorités locales ou celles du
détaillant pour jeter les piles usées.
• N’exposez pas la pile à la chaleur et tenez-la éloignée de toute
flamme.
• Ne laissez pas la ou les piles dans un véhicule exposé au soleil
avec vitres et portes fermées pendant une longue période de
temps.
• Lors de l’utilisation de piles rechargeables, nous
recommandons d’utiliser des piles rechargeables fabriquées
par Panasonic.
CE QUI SUIT NE S’APPLIQUE QU’AU CANADA.
CAN ICES-3(B)/NMB-3(B)
4
SQT1378
-Si ce symbole apparaît-
L’élimination des équipements usagés
Applicable uniquement dans les pays membres de
l’Union européenne et les pays disposant de
systèmes de recyclage.
ménagères.
Afin de permettre le traitement, la valorisation et le
recyclage adéquats des appareils usagés, veuillez les
porter à l’un des points de collecte prévus, conformément
à la législation nationale en vigueur.
En les éliminant conformément à la réglementation en
vigueur, vous contribuez à éviter le gaspillage de
ressources précieuses ainsi qu’à protéger la santé
humaine et l’environnement.
Pour de plus amples renseignements sur la collecte et le
recyclage, veuillez vous renseigner auprès des
collectivités locales.
Le non-respect de la réglementation relative à
l’élimination des déchets est passible d’une peine
d’amende.
Apposé sur le produit lui-même, sur son
emballage, ou figurant dans la documentation
qui l’accompagne, ce pictogramme indique
que appareils électriques et électroniques
usagés, doivent être séparées des ordures
Page 21
Précautions
SFC0373 VFB0243 SFB0010
123
≥ Cet appareil est le flash externe conçu pour les appareils
photo numériques Panasonic (désigné par le terme
flash dans le présent manuel). Lorsque ce flash est utilisé
de pair avec un appareil photo numérique prenant en
charge une connexion sans fil, il est possible de
commander le flash à distance. Les fonctionnalités
disponibles varient selon le modèle d’appareil photo
utilisé. Pour la liste des appareils photo compatibles,
reportez-vous à notre site Web.
http://panasonic.jp/support/global/cs/dsc/ (en anglais
seulement.)
∫ À propos de la manipulation de l’élément
≥ Ne soumettez pas l’élément à de fortes vibrations ou
à des chocs. Cela pourrait entraîner un mauvais
fonctionnement ou encore briser la tête du flash.
≥ Le sable et la saleté peuvent causer le mauvais
fonctionnement de l’élément. Si vous utilisez
l’élément à la plage, prenez des mesures pour le
protéger du sable et de la saleté.
≥ Cet appareil n’est étanche ni à la poussière ni aux
éclaboussures. Dans l’éventualité où de l’eau, etc.
serait éclaboussé sur l’appareil, essuyez-le avec un
linge sec. Si le fonctionnement l’appareil semble
anormal, communiquez avec le revendeur ou avec
Panasonic.
≥ Faites attention de ne pas vous coincer le
doigt, etc. dans l’appareil lorsque vous
réglez l’angle de la tête du flash.
≥ Veuillez lire également le manuel
d’utilisation de votre appareil photo
numérique.
Accessoires fournis
[Inspection à faire lors du désemballage]
En retirant l’appareil de son emballage, vérifiez la présence de
l’appareil principal et de tous ses accessoires, et vérifiez également
l’apparence externe ainsi que leur fonction afin de vous assurer
qu’ils n’ont subi aucun dommage lors du transport ou de la livraison.
Si vous découvrez un problème, contactez votre vendeur
avant d’utiliser le produit.
Les numéros de produits sont exacts en date d’avril 2016.
Ces numéros sont sujets à des modifications.
1 Étui de transport pour le flash
2 Support du flash
3 Diffuseur grand-angulaire
≥ Les piles sont vendues séparément.
FRANÇAIS
SQT1378
5
Page 22
Noms des composants Déclenchement continu
Il se peut que le flash devienne chaud après plusieurs
déclenchements successifs, ce qui pourrait provoquer un
mauvais fonctionnement. Le flash ne doit pas être
déclenché plus de 10 fois en succession à des intervalles
de 2,5 secondes, après quoi il devrait ne pas être utilisé
pendant au moins 10 minutes.
Choix des piles (vendues séparément)
1 Tête du flash
2 Lampe d’assistance MPA/
lampe à DEL
3 Capteur sans fil
4 Commutateur [GR]
(Groupe)
5 Commutateur [CH]
(Canal)
6 Interrupteur [ON/OFF]
7
Voyant de charge [CHARGE]
8 Voyant d’auto-vérification
[AUTO CHECK]
6
SQT1378
9 Molette de commande de
la compensation
d’exposition/sortie du
flash
: Molette de commande de
sortie de la lampe à DEL
; Touche d’essai [TEST]
< Sélecteur de mode
= Levier de verrouillage
Vous pouvez utiliser les types de piles suivants :
≥ Piles alcalines sèches, LR6/AA (
≥ Piles rechargeables HR6/AA au nickel-métal-hydrure
(Ni-MH) (
k
2)
Il n’est possible d’utiliser des piles R6/AA au
manganèse.
L’utilisation de piles fabriquées par Panasonic est
recommandée.
k
2)
Page 23
Mise en place des piles
≥ Utilisez des piles alcalines ou des piles rechargeables au
nickel-métal-hydrure.
1 Relevez la tête du flash.
2 Faites glisser le levier dans
la direction [2 OPEN] pour
ouvrir le couvercle du
logement des piles.
3 Insérez les piles par-
dessus le ruban (A) en
respectant le sens de la
polarité [r]/[s].
• Vous pouvez facilement retirer
les piles en tirant sur le ruban.
4 Fermez le couvercle du logement des piles
avec un déclic.
• Fermez le couvercle du logement des piles sans
coincer le ruban.
Mise en place du flash
Vérifiez que l’appareil photo et le flash sont hors marche. La
mise en place ou le retrait du flash alors que l’appareil photo
ou le flash est en marche peut provoquer des problèmes de
fonctionnement.
1 Glissez le levier de verrouillage dans la
direction opposée à celle de l’icône de
verrouillage [LOCK
1
] (1).
2 Glissez le flash dans la griffe porte-
accessoires jusqu’à ce qu’il se bloque en
position (
2
).
3 Glissez le levier de verrouillage vers la
position [LOCK
≥ Pour retirer le flash, glissez le levier de verrouillage dans
la direction opposée à celle de la flèche [LOCK1] et
retirez le flash de la griffe porte-accessoires.
1
] (3).
FRANÇAIS
SQT1378
7
Page 24

Mise en marche du flash
Mettez le flash en place sur l’appareil photo, puis mettez celui-ci
en marche.
1 Interrupteur [ON/OFF]
2 Voyant de charge
[CHARGE]
3 Voyant d’auto-vérification
[AUTO CHECK]
Appuyez sur l’interrupteur [ON/OFF].
≥ Pour mettre le flash hors marche, appuyez de nouveau sur
l’interrupteur [ON/OFF].
≥ Remplacez les piles dans le cas où le voyant de charge
[CHARGE] ne s’allumerait pas après :
30 secondes (avec des piles alcalines)
10 secondes (avec des piles au nickel-métal-hydrure)
≥ Les voyants [CHARGE] et [AUTO CHECK] qui clignotent
simultanément indiquent que les piles sont faibles. Remplacez
les piles. L’utilisation d’une pile faible peut entraîner des
problèmes de fonctionnement.
≥ Lorsque l’appareil photo passe en mode de veille, le flash fait
de même.
≥ Après un délai d’inactivité d’environ 20 minutes, le flash est
automatiquement mis hors marche. Appuyez sur l’interrupteur
[ON/OFF] pour le remettre en marche.
≥
Un son oscillant peut être entendu durant la recharge du flash; cela n’est
le signe d’aucune anomalie.
8
SQT1378
Prises de vues
1 Voyant d’auto-vérification
[AUTO CHECK]
1 Choisissez le mode du flash au moyen des commandes
de l’appareil photo.
Reportez-vous au manuel d’utilisation de l’appareil photo pour plus
de détails.
2 Sélectionnez un mode de flash.
“Modes du flash” (P9)
3 Appuyez sur le déclencheur à mi-course.
4 Appuyez sur le déclencheur à fond pour effectuer la
prise de vue.
L’élément se déclenche avec l’exposition appropriée lorsque le
voyant [AUTO CHECK] clignote pendant environ 5 secondes.
≥
Lors de l’utilisation du flash, prenez garde à ce que la lumière du flash
ne soit pas bloquée par l’objectif, le parasoleil, etc.
≥
Utilisez le diffuseur pour prévenir la surexposition à des distances
inférieures à 1 m (3,3 pieds) (P11).
Page 25
∫ Déclenchement d’un essai du flash
1
Voyant de charge [CHARGE]
2
Touche d'essai [TEST]
Appuyez sur la touche [TEST] alors que le voyant
[CHARGE] est allumé pour déclencher un essai du flash.
Modes du flash
Sélectionnez un mode de flash en
fonction du sujet et des conditions
de prise de vues.
Réglez le sélecteur de mode
à la position appropriée.
[TTL] (TTL AUTO)
L’intensité du flash est automatiquement réglée en fonction
du paramétrage de l’appareil photo. L’intensité du flash est
réglée en fonction de la lumière mesurée par l’objectif. Il est
recommandé d’utiliser ce mode avec un appareil photo doté
d’une capacité de communication.
Faites tourner la molette de commande
de la compensation d’exposition/sortie
du flash pour régler la sortie du flash.
≥ Vous pouvez effectuer un réglage en
sélectionnant une valeur située entre
j3 EV et i3EV.
≥ Sélectionnez [0] pour ne pas effectuer de réglage.
[MANUAL]
Le flash se déclenche avec l’intensité que vous avez
définie.
Sélectionnez ce mode en utilisant un appareil photo sans
capacité de communication.
Faites tourner la molette de commande
de la compensation d’exposition/sortie
du flash pour définir la sortie du flash.
≥
Vous pouvez sélectionner une valeur
située entre [1/1] (plein flash) et [1/64].
[SLAVE] (SL MANUAL)
Le déclenchement du flash peut être synchronisé avec celui
de tout flash déclenché sur d’autres appareils.
Le flash se déclenche avec l’intensité que vous avez
définie.
Faites tourner la molette de commande
de la compensation d’exposition/sortie
du flash pour définir la sortie du flash.
≥
Vous pouvez sélectionner une valeur
située entre [1/1] (plein flash) et [1/64].
[RC]
La commande à distance par liaison sans fil est possible avec
les appareils photo numériques Panasonic prenant en charge
une liaison sans fil. (P10)
SQT1378
FRANÇAIS
9
Page 26
Mise en marche de la lampe à DEL
Faites tourner la molette de
commande de sortie de la
lampe à DEL.
En faisant tourner vers 1 :
Diminue la quantité de lumière ou désactive la lampe à DEL.
≥ Si vous tournez la molette jusqu’au bout, la lampe à DEL
s’éteint.
En faisant tourner vers 2 :
Augmente la quantité de lumière.
≥ Le flash et les piles peuvent chauffer si vous laissez la
lampe à DEL allumée, mais il ne s’agit pas d’un
dysfonctionnement.
Paramétrages pour liaison sans
fil du flash
Le pilotage sans fil est possible avec les appareils photo
numériques de Panasonic prenant en charge le mode de liaison
sans fil. Reportez-vous au manuel de l’appareil photo pour de
plus amples informations sur son fonctionnement lors de prises
de vues sans fil.
1 Activez le mode sans fil
sur l’appareil photo.
2 Activez le mode [RC] du
flash.
“Modes du flash” (P9)
10
SQT1378
3 Relevez la tête du flash.
4 Sélectionnez le canal à
l’aide du commutateur [CH].
• Réglez l’appareil photo et le flash
sur le même canal.
5 Sélectionnez le groupe à
l’aide du commutateur [GR].
• L’appareil photo peut régler les
paramètres flash séparément
pour 3 groupes; choisissez le
groupe auquel le flash appartient.
≥
S’il est difficile de faire glisser le commutateur, utilisez la pointe
d’un stylo bille ou quelque chose de similaire pour y parvenir.
≥ Après avoir défini le canal et le groupe, replacez la tête du
flash dans son angle d’origine.
Il est possible d’établir sur l’appareil photo le mode de
déclenchement du flash, le réglage du flash et le réglage
manuel du flash.
≥
Si vous avez réglé l’appareil photo sur un paramètre qui n’est
pas pris en charge par le flash, ce dernier fonctionnera ainsi :
Appareil photo Flash
[Mode de déclenchement] : [AUTO]
[Plan focal sans fil] : [OUI]
Ne se déclenche pas.
Se déclenche normalement.
Page 27
Établissement de flashs avec
liaison sans fil
Du fait que la communication est établie avec l’émission du
flash de l’appareil photo, la plage des positions du flash
varie selon les appareils photo. Reportez-vous au manuel
de l’appareil photo pour de plus amples informations sur la
plage des positions du flash.
1 Fixez le support fourni.
• Glissez le levier de verrouillage dans le
sens opposé de la direction indiquée
par l’icône [LOCK
flash sur le support jusqu’à ce qu’il se
bloque en position (
• Glissez le levier de verrouillage
dans la position [LOCK 1] pour le bloquer en position.
• Pour retirer le flash, glissez le levier de verrouillage
dans la direction opposée à celle de la flèche
[LOCK 1], puis retirez le flash du support.
1
] (1) et glissez le
2
).
2 Orientez le flash de manière
que son capteur de signal (
A
)
soit face à l’appareil photo.
Faites une prise de vue d’essai
après avoir orienté le flash.
≥ Il est recommandé d’utiliser un
groupe ne comptant pas plus de
3 flashs pilotés à distance.
≥
Il est possible que le flash ne se déclenche
pas en raison de l’angle ou de la distance
entre le sujet et l’appareil photo.
Réglage de l’angle de
rayonnement
Orientez la tête du flash vers le plafond
ou un mur pour un éclairage indirect.
Relevez la tête du flash.
90º
Utilisation du diffuseur à grandangulaire
Utilisez le diffuseur grand-angle
fourni avec le flash si la
longueur focale de l’objectif est
de plus de 12 mm.
Installez le diffuseur
grand-angle sur le flash.
≥ L’angle d’éclairage sera le même que l’angle de vue d’un
objectif ayant une distance focale de 7 mm.
SQT1378
FRANÇAIS
11
Page 28
Mode asservi
Le déclenchement du flash peut être synchronisé avec celui
de tout flash déclenché sur d’autres appareils.
1 Réglez le mode de flash
sur [SLAVE].
“Modes du flash” (P9)
2 Orientez le flash.
Les modalités d’orientation du flash
sont les mêmes que dans le mode
de liaison sans fil.
“Établissement de flashs avec
liaison sans fil” (P11)
Reportez-vous au manuel de
l’appareil photo pour de plus
amples informations sur la plage
des positions du flash.
• Réglez le flash dans le mode manuel par lequel aucun préflash n’est déclenché. Si un pré-flash est déclenché par
l’appareil photo, le flash externe est alors synchronisé avec
ce pré-flash et ne peut se déclencher de manière
appropriée.
• Il se pourrait que le flash se déclenche en réaction à
d’autres flashes utilisés par d’autres photographes.
12
SQT1378
Précautions d’utilisation
∫ À propos de l’élément
Ne transportez pas l’élément s’il est encore fixé sur
l’appareil photo.
Nous vous conseillons de placer l’élément dans l’étui
de transport pour le flash pour le transporter.
≥ Placez l’élément dans l’étui de transport pour le flash avec
la tête du flash vers le haut.
∫ À propos des piles
Si vous ne devez pas utiliser l’élément pendant une
longue période, assurez-vous d’enlever les piles.
Page 29

Spécifications
Pour le Canada
Panasonic Canada Inc.
5770 Ambler Drive, Mississauga, Ontario L4W 2T3
www.panasonic.com
Imprimé en Chine
Les spécifications sont sous réserve de modifications.
Alimentation requise:
Piles
recommandées
Tem ps de
chargement
(de plein flash jusqu’à
ce que le voyant
[CHARGE] s’allume)
Durée de
déclenchement
Nombre de flashs
(plein flash)
Lampe d’assistance
pour la mise au
point automatique
Modes de flash TTL AUTO/MANUAL/
3,0 V c.c. (3,0 V )
Piles alcalines LR6/AA
Piles rechargeables au nickelmétal-hydrure
HR6/AA (Ni-MH)
Environ 5 s : Piles alcalines LR6/
AA
Environ 3
au nickel-métal-hydrure HR6/AA
Environ 1/10000 s à 1/250 s
(Change en fonction de l’intensité
du flash)
Environ 120 flashs : avec piles
alcalines LR6/AA
Environ 200 flashs : avec piles
rechargeables au nickel-métal-hydrure
HR6/AA (Type min. 2400 mAh)
(Diffère selon les conditions de
prise de vues.)
Portée : environ 1 m (3,3 pieds) à
5 m (16 pieds)
(Diffère selon le type d’appareil photo
numérique et d’objectif utilisés)
SL MANUAL/RC
k 2
s : Piles rechargeables
Nombre-guide
Angle d’éclairage Couvre l’angle de vue d’un objectif
k
2/
Dimensions
Poids
Température de
fonctionnement
Humidité relative de
fonctionnement
Les symboles présents sur ce produit (y compris sur les
accessoires) signifient ceci :
CC
20 (ISO 100), 14 (ISO 100: Lorsque
le diffuseur est utilisé)
de 12 mm (équivalent à une
pellicule 35 mm : 24 mm)
(Avec le diffuseur grand-angle :
objectif de 7 mm, équivalent à une
pellicule 35 mm : 14 mm)
Environ 61,0 mm (L)k52,5 mm
k
82,0 mm (P)
(H)
[2,402 po (L)k2,067 po (H)k3,228 po (P)]
(parties saillantes excluses)
Environ 230g/0,507 lb (piles incluses)
Environ 180g/0,397 lb (unité principale)
0 °C à 40 °C (32 °F à 104 °F)
10 % à 80 % (pas de
condensation)
FRANÇAIS
SQT1378
13
Page 30
Garantie limitée
POUR LE CANADA
5770, Ambler Drive, Mississauga (Ontario) L4W 2T3
PRODUIT PANASONIC – GARANTIE LIMITÉE
Panasonic Canada Inc. garantit que ce produit est exempt
de défauts de matériaux et de main-d’œuvre dans un
contexte d’utilisation normale pendant la période indiquée
ci-après à compter de la date d’achat original et, dans
l’éventualité d’une défectuosité, accepte, à sa discrétion, de
(a) réparer le produit avec des pièces neuves ou remises à
neuf, (b) remplacer le produit par un produit neuf ou remis à
neuf d’une valeur équivalente ou (c) rembourser le prix
d’achat. La décision de réparer, remplacer ou rembourser
appartient à Panasonic Canada Inc.
Appareils photo
numériques
Périphériques pour
appareils photo
numériques
Accessoires d’appareils
photo numériques
14
SQT1378
Un (1) an, pièces et maind’œuvre
Un (1) an, pièces et maind’œuvre
Quatre-vingt-dix (90)
jours, pièces et maind’œuvre
Panasonic Canada Inc.
La présente garantie n’est fournie qu’à l’acheteur original
d’un des produits de marque Panasonic indiqués plus haut,
ou à la personne l’ayant reçu en cadeau, vendu par un
détaillant Panasonic agréé au Canada et utilisé au Canada.
Le produit ne doit pas avoir été « vendu tel quel » et doit
avoir été livré à l’état neuf dans son emballage d’origine.
POUR ÊTRE ADMISSIBLE AUX SERVICES AU TITRE DE
LA PRÉSENTE GARANTIE, LA PRÉSENTATION D’UN
REÇU D’ACHAT OU DE TOUTE AUTRE PIÈCE
JUSTIFICATIVE DE LA DATE D’ACHAT ORIGINAL,
INDIQUANT LE MONTANT PAYÉ ET LE LIEU DE
L’ACHAT, EST REQUISE.
Page 31

RESTRICTIONS ET EXCLUSIONS
La présente garantie COUVRE SEULEMENT les
défaillances attribuables à un défaut des matériaux ou à un
vice de fabrication et NE COUVRE PAS l’usure normale ni
les dommages esthétiques. La présente garantie NE
COUVRE PAS NON PLUS les dommages subis pendant le
transport, les défaillances causées par des produits non
fournis par Panasonic Canada Inc. ni celles résultant d’un
accident, d’un usage abusif ou impropre, de négligence,
d’une manutention inadéquate, d’une mauvaise application,
d’une altération, d’une installation ou de réglages
impropres, d’un mauvais réglage des contrôles de
l’utilisateur, d’un mauvais entretien, de piles inadéquates,
d’une surtension temporaire, de la foudre, d’une
modification, de la pénétration de sable, de liquides ou
d’humidité, d’une utilisation commerciale (dans un hôtel, un
bureau, un restaurant ou tout autre usage par affaires ou en
location), d’une réparation effectuée par une entité autre
qu’un centre de service Panasonic agréé ou encore d’une
catastrophe naturelle.
Les piles sèches, les cartouches d’encre et le papier sont
également exclus de la présente garantie.
Les piles rechargeables sont couvertes par une garantie de
quatre-vingt-dix (90) jours à compter de la date d’achat
original.
CETTE GARANTIE LIMITÉE ET EXPRESSE REMPLACE
TOUTE AUTRE GARANTIE, EXPRESSE OU IMPLICITE,
INCLUANT LES GARANTIES IMPLICITES DU
CARACTÈRE ADÉQUAT POUR LA
COMMERCIALISATION ET UN USAGE PARTICULIER.
PANASONIC CANADA INC. N’AURA D’OBLIGATION EN
AUCUNE CIRCONSTANCE POUR TOUT DOMMAGE
DIRECT, INDIRECT OU CONSÉCUTIF RÉSULTANT DE
L’UTILISATION DE CE PRODUIT OU DÉCOULANT DE
TOUTE DÉROGATION À UNE GARANTIE EXPRESSE OU
IMPLICITE.
(À titre d’exemples, cette garantie exclut les dommages
relatifs à une perte de temps, le transport jusqu’à et depuis
un centre de service agréé, la perte ou la détérioration de
supports ou d’images, de données ou de tout autre contenu
en mémoire ou enregistré. Cette liste n’est pas exhaustive
et n’est fournie qu’à des fins explicatives.)
Certaines juridictions ne reconnaissent pas les exclusions
ou limitations de dommages indirects ou consécutifs, ou les
exclusions de garanties implicites. Dans de tels cas, les
limitations stipulées ci-dessus peuvent ne pas être
applicables. La présente garantie vous confère des droits
précis; vous pourriez aussi avoir d’autres droits pouvant
varier selon votre province ou territoire de résidence.
SERVICE SOUS GARANTIE
Pour tout renseignement sur les produits, réparation ou
assistance technique, veuillez visiter notre page Soutien :
www.panasonic.ca/french/support
SQT1378
15
FRANÇAIS
Page 32

Bedienungsanleitung
BLITZ
Vielen Dank für Ihren Kauf dieses Panasonic-Produkts.
Bitte lesen Sie diese Anleitung vor der Inbetriebnahme
dieses Produkts aufmerksam durch, und bewahren Sie
dieses Handbuch für spätere Bezugnahme griffbereit auf.
Inhalt
Informationen für Ihre Sicherheit.................................. 2
Vorsichtsmaßnahmen .................................................. 4
Mitgeliefertes Zubehör .................................................4
Bezeichnungen der Bauteile........................................ 5
Dauerauslösung...........................................................5
Vorbereitung eines Akkus (Sonderzubehör)................5
Aufladen der Akkus...................................................... 5
Anbringen an der Kamera............................................6
Einschalten des Blitzlichts............................................ 6
Aufnahme .................................................................... 7
Blitzmodus ...................................................................7
Einschalten des LED-Lichts ......................................... 8
Einstellungen für Wireless-Blitzlicht .............................8
Positionieren von Wireless-Blitzlicht-Geräten..............9
Festlegung des Strahlungswinkels ............................ 10
Gebrauch des Wide Panel .........................................10
Slave-Modus .............................................................. 10
Vorsichtsmaßnahmen ................................................10
Spezifikationen .......................................................... 11
2
SQT1378
Informationen für Ihre
Sicherheit
WARNUNG:
Um die Gefahr eines Brandes, eines Stromschlages
oder einer Beschädigung des Produktes zu
reduzieren,
• Setzen Sie dieses Gerät weder Regen, noch
Feuchtigkeit, Tropfen oder Spritzern aus.
• Stellen Sie keine mit Flüssigkeiten gefüllten Gefäße,
wie Vasen, auf dieses Gerät.
• Verwenden Sie nur das empfohlene Zubehör.
• Entfernen Sie die Abdeckungen nicht.
• Reparieren Sie das Gerät nicht selbst. Wenden Sie sich
für Reparaturarbeiten bitte an das Fachpersonal.
WARNUNG!
Um die Gefahr eines Brandes, eines Stromschlages
oder einer Beschädigung des Produktes zu
reduzieren,
• Installieren oder positionieren Sie dieses Gerät nicht
in einem Bücherregal, Einbauschrank oder einem
sonstigen engen Raum. Stellen Sie eine gute
Belüftung des Gerätes sicher.
Page 33

∫ Informationen zu den Batterien
ACHTUNG
• Explosionsgefahr bei falschem Anbringen der Batterie.
Ersetzen Sie die Batterie nur durch den vom Hersteller
empfohlenen Typ.
• Wenden Sie sich zur Entsorgung der Batterien an die
lokalen Behörden oder erfragen Sie die richtige
Vorgehensweise zur Entsorgung.
• Der Akku darf weder Hitze noch offenem Feuer ausgesetzt
werden.
• Lassen Sie den/die Akku/s nie längere Zeit in einem Auto mit
geschlossenen Türen und Fenstern zurück, das direkter
Sonneneinstrahlung ausgesetzt ist.
• Werden wiederaufladbare Batterien verwendet, wird zu den
von Panasonic hergestellten geraten.
-Bedeutung des nachstehend abgebildeten
Symbols-
Entsorgung von Altgeräten
Nur für die Europäische Union und Länder mit
Recyclingsystemen
Bitte führen Sie alte Produkte zur Behandlung,
Aufarbeitung bzw. zum Recycling gemäß den gesetzlichen
Bestimmungen den zuständigen Sammelpunkten zu.
Indem Sie diese Produkte ordnungsgemäß entsorgen,
helfen Sie dabei, wertvolle Ressourcen zu schützen und
eventuelle negative Auswirkungen auf die menschliche
Gesundheit und die Umwelt zu vermeiden.
Für mehr Informationen zu Sammlung und Recycling,
wenden Sie sich bitte an Ihren örtlichen
Abfallentsorgungsdienstleister.
Gemäß Landesvorschriften können wegen nicht
ordnungsgemäßer Entsorgung dieses Abfalls Strafgelder
verhängt werden.
Dieses Symbol, auf den Produkten, der
Verpackung und/oder den Begleitdokumenten,
bedeutet, dass gebrauchte elektrische und
elektronische Produkte nicht in den allgemeinen
Hausmüll gegeben werden dürfen.
DEUTSCH
SQT1378
3
Page 34

Vorsichtsmaßnahmen
SFC0373 VFB0243 SFB0010
123
≥
Dies ist ein externes Blitzlicht für Digital-Kameras von Panasonic (im
Weiteren als Blitzlicht bezeichnet). Wird das Blitzlicht mit einer
Digital-Kamera verwendet, die den Wireless-Betrieb unterstützt,
wird das Aufnehmen mit einem Wireless-Blitzlicht möglich. Die
möglichen Funktionen sind von der verwendeten Digital-Kamera
abhängig. Für die entsprechenden Digital-Kameras siehe auf
unserer Internetseite.
http://panasonic.jp/support/global/cs/dsc/ (Diese Seite ist nur in
englischer Sprache verfügbar.)
∫ Handhabung des Geräts
≥ Setzen Sie das Gerät keinen starken Erschütterungen
oder Stößen aus. Dies kann zu Funktionsstörungen am
Gerät führen aber auch zu einer Beschädigung des
Blitzlichts.
≥ Sand und Schmutz können Funktionsstörungen am
Gerät hervorrufen. Schützen Sie das Gerät deshalb
davor, wenn Sie es in einer Umgebung, wie am
Strand, benutzen.
≥ Das Gerät ist weder staub- noch spritzwasserdicht.
Wischen Sie, sollten zufällig Wassertropfen o.ä. auf
das Gerät gespritzt werden, diese mit einem
trockenen Tuch ab. Wenden Sie sich, wenn das Gerät
nicht richtig funktioniert, an Ihren Händler oder an
Panasonic.
≥ Seien Sie vorsichtig, dass Sie Ihren
Finger etc. nicht im Gerät einklemmen,
wenn Sie den Winkel des Blitzkopfes
einstellen.
≥ Lesen Sie in der Bedienungsanleitung zu
Ihrer Digital-Kamera nach.
4
SQT1378
Mitgeliefertes Zubehör
[Kontrollen, die beim Entfernen der Verpackung des
Geräts vorzunehmen sind]
Prüfen Sie beim Entnehmen des Gerätes aus seinem
Karton, ob das Hauptgerät und das mitgelieferte Zubehör
vorhanden sind. Kontrollieren Sie deren äußeres Aussehen
und ihre Funktionsweise, um zu prüfen, dass es während
des Vertriebs und Transports nicht zu Beschädigungen
gekommen ist.
Setzen Sie sich, sollten Sie Störungen feststellen, vor dem
Gebrauch des Gerätes mit Ihrem Händler in Verbindung.
Die Produktnummern beziehen sich auf den Stand von April
2016. Änderungen sind vorbehalten.
1 Blitzlichthülle
2 Blitzlichtständer
3 Wide Panel
≥ Die Akkus gehören zum Sonderzubehör.
Page 35

Bezeichnungen der Bauteile
1 Blitzlichtkopf
2 AF-Hilfslicht/LED-Licht
3 Wireless-Sensor
4 [GR] (Gruppe)-Schalter
5 [CH] (Kanal)-Schalter
6 [ON/OFF]-Taste
7 [CHARGE]-Lampe
8 [AUTO CHECK]-Lampe
9 Blitzlicht-
Belichtungsausgleich/
Ausgabesteuerrad
: LED-Licht-
Ausgabesteuerrad
; [TEST]-Taste
< Modushebel
= Sperrhebel
Dauerauslösung
Das Blitzlicht wird unter Umständen bei mehrmals nacheinander
erfolgender Auslösung heiß, wodurch es zu Schäden oder
Funktionsstörungen kommen kann. Das Blitzlicht darf nicht mehr als
10 mal nacheinander in Abständen von 2,5 s ausgelöst werden.
Nach dieser Zeit muss es mindestens 10 min unbenutzt bleiben.
Vorbereitung eines Akkus (Sonderzubehör)
Wählen Sie unter den nachstehenden Akkus:
≥ LR6/AA Alkaline-Trockenbatterien (2 Stck.)
≥
HR6/AA Wiederaufladbare Nickel-Metallhydrid-Batterien (Ni-MH) (2 Stck.)
R6/AA Mangan-Trockenbatterien können nicht verwendet werden.
Es wird zur Verwendung von Akkus aus Herstellung von
Panasonic geraten.
Aufladen der Akkus
≥ Verwenden Sie Alkaline-Trockenbatterien oder
wiederaufladbare Nickel-Metallhydrid-Batterien.
1 Drehen Sie den
Blitzlichtkopf.
2 Schieben Sie den Hebel in
Richtung [2 OPEN], um
die Abdeckung des
Batteriefachs zu öffnen.
3 Setzen Sie die Batterien
über dem Band (A) ein.
Achten Sie dabei auf die
korrekte [r]/[s]-Polarität.
• Sie können die Batterien unkompliziert
entnehmen, indem Sie am Band ziehen.
4 Schließen Sie die Abdeckung des Batteriefachs,
sodass sie mit einem Klicken einrastet.
• Schließen Sie die Batterieabdeckung so, dass das
Band nicht herausragt.
SQT1378
5
DEUTSCH
Page 36

Anbringen an der Kamera
Prüfen Sie, ob sowohl die Kamera als auch das Blitzlicht
ausgeschaltet sind. Ein Anbringen oder Entfernen des
Blitzlichts, wenn entweder das Blitzlicht oder die Kamera
eingeschaltet sind, kann zu Funktionsstörungen führen.
1 Verschieben Sie den Sperrhebel in der
entgegengesetzten Richtung, als der vom
Symbol [LOCK 1] angegebenen (1).
2 Schieben Sie das Blitzlicht in den
Zubehörschuh, so dass es fest einrastet (
3 Verschieben Sie den Sperrhebel in die
Position [LOCK 1] (3).
≥ Schieben Sie den Sperrhebel in die entgegengesetzte
Richtung als der vom Pfeil [LOCK1] angegebenen, um
das Blitzlicht zu entfernen und aus dem Zubehörschuh zu
schieben.
Einschalten des Blitzlichts
Bringen Sie ein Blitzlicht an der Kamera an und schalten Sie die
Kamera dann ein.
1 [ON/OFF]-Taste
2 [CHARGE]-Lampe
3 [AUTO CHECK]-Lampe
Betätigen Sie die [ON/OFF]-Taste.
≥ Betätigen Sie die [ON/OFF]-Taste erneut, um das
Blitzlicht auszuschalten.
≥
Wechseln Sie die Batterien aus, wenn die [CHARGE]-Lampe nicht
mehr leuchtet nach:
30 Sekunden (Alkaline-Trockenbatterien)
2
10 Sekunden (Wiederaufladbare Nickel-Metallhydrid-Batterien)
).
≥ Blinken die [CHARGE]- und die [AUTO CHECK]-Lampe
gleichzeitig, gehen die Batterien zur Neige. Wechseln Sie die
Batterien aus. Die Verwendung einer beinahe verbrauchten
Batterie kann zu Funktionsstörungen führen.
≥ Das Blitzlicht schaltet in den Ruhe-Modus, wenn die Kamera in
diesen wechselt.
≥ Werden über etwa 20 Minuten keine Vorgänge ausgeführt,
schaltet sich das Blitzlicht automatisch aus. Betätigen Sie die
[ON/OFF]-Taste, um es wieder einzuschalten.
≥ Während des Aufladens des Blitzlichts ist unter Umständen ein
schwingender Ton zu vernehmen, wobei es sich aber nicht um
eine Funktionsstörung handelt.
6
SQT1378
Page 37

Aufnahme
1 [AUTO CHECK]-Lampe
∫ Ausführen eines Testblitzes
1
2
[CHARGE]-Lampe
[TEST]-Taste
1 Verwenden Sie die Bedienelemente der
Kamera, um den Blitzmodus zu wählen.
Siehe in der Bedienungsanleitung zur Kamera für
Details.
2 Wählen Sie einen Blitzmodus.
“Blitzmodus” (P7)
3 Drücken Sie den Auslöser halb herunter.
4 Drücken Sie den Auslöser jetzt vollständig,
um das Bild aufzunehmen.
Das Gerät gibt Licht für die richtige Belichtung ab, wenn
die [AUTO CHECK]-Lampe für etwa 5 s blinkt.
≥ Bei Verwendung eines Blitzlichts wird das Licht unter
Umständen durch das Objektivgehäuse, die
Gegenlichtblende, usw. aufgehalten.
≥ Verwenden Sie das Wide Panel, um eine Überbelichtung
in Bereichen von weniger als 1 m zu verhindern (P10).
Drücken Sie die [TEST]-Taste, während die [CHARGE]Lampe leuchtet, um einen Testblitz auszuführen.
Blitzmodus
Wählen Sie entsprechend Ihrem
Objekt und den
Aufnahmebedingungen einen
Blitzmodus.
Bringen Sie den Modushebel
in die entsprechende Position.
[TTL] (TTL AUTO)
Die Blitzlichtintensität wird automatisch entsprechend der Konfiguration
der Kamera gesteuert. Das Blitzlicht wird je nach der vom Objektiv der
Kamera erfassten Helligkeit eingestellt. Verwenden Sie diesem Modus
bei einer Kamera mit Kommunikationsfunktion.
Drehen Sie den BlitzlichtBelichtungsausgleich/das Ausgabesteuerrad,
um die Blitzlichtstärke anzupassen.
≥ Sie können eine Anpassung
vornehmen, indem Sie einen Wert
zwischen j3 EV und i3 EV auswählen.
≥ Wählen Sie [0] aus, wenn Sie keine Anpassung
vornehmen möchten.
SQT1378
DEUTSCH
7
Page 38

[MANUAL]
Die Blitzlichtstärke entspricht dem Wert, den Sie
eingestellt haben.
Wählen Sie diesem Modus aus, wenn Sie eine Kamera
ohne Kommunikationsfunktion verwenden.
Drehen Sie den BlitzlichtBelichtungsausgleich/das
Ausgabesteuerrad, um die
Blitzlichtstärke einzustellen.
≥ Sie können einen Wert zwischen [1/1]
(volle Blitzlichtstärke) und [1/64] auswählen.
[SLAVE] (SL MANUAL)
Das Blitzlicht kann ferngesteuert synchron zu einem
beliebigem Blitzlicht ausgelöst werden, das von anderen
Geräten erzeugt wird.
Die Blitzlichtstärke entspricht dem Wert, den Sie
eingestellt haben.
Drehen Sie den BlitzlichtBelichtungsausgleich/das
Ausgabesteuerrad, um die
Blitzlichtstärke einzustellen.
≥ Sie können einen Wert zwischen [1/1]
(volle Blitzlichtstärke) und [1/64] auswählen.
[RC]
Die Wireless-Steuerung ist bei Digital-Kameras von
Panasonic erhältlich, die den Wireless-Modus
unterstützen. (P8)
8
SQT1378
Einschalten des LED-Lichts
Drehen Sie das LED-LichtAusgabesteuerrad.
Drehen in Richtung 1:
Die Lichtmenge wird verringert bzw.
das LED-Licht wird ausgeschaltet.
≥ Wenn Sie das Rad bis zum Stopp drehen, wird das LED-
Licht ausgeschaltet.
Drehen in Richtung 2:
Die Lichtmenge wird erhöht.
≥ Das Blitzlicht und die Batterien erwärmen sich
möglicherweise, wenn das LED-Licht eingeschaltet ist.
Dabei handelt es sich nicht um eine Fehlfunktion.
Einstellungen für WirelessBlitzlicht
Die Wireless-Steuerung ist bei Digital-Kameras von
Panasonic erhältlich, die den Wireless-Modus unterstützen.
Siehe in der Bedienungsanleitung zur Digital-Kamera für
den Betrieb der Digital-Kamera bei der Wireless-BlitzlichtAufnahme.
1 Richten Sie die Kamera auf
den Wireless-Modus ein.
2 Richten Sie das Blitzlicht
auf den [RC]-Modus ein.
“Blitzmodus” (P7)
Page 39

3 Drehen Sie den
Blitzlichtkopf.
4 Wählen Sie den Kanal mit
dem [CH]-Schalter aus.
• Wählen Sie für Kamera und
Blitzlicht den gleichen Kanal aus.
5 Wählen Sie die Gruppe mit
dem [GR]-Schalter aus.
• Die Kamera kann separate
Blitzlicht-Einstellungen für bis zu 3
Gruppen vornehmen. Wählen Sie
die Gruppe aus, zu der das Blitzlicht gehört.
≥ Wenn Sie beim Verschieben des Schalters
Schwierigkeiten haben, verwenden Sie die Spitze eines
Kugelschreibers oder ein ähnliches Werkzeug.
≥ Nach dem Einstellen von Kanal und Gruppe bringen Sie
den Blitzlichtkopf in die ursprüngliche Position zurück.
Der Auslöse-Modus, die Blitzlicht-Einstellung und die
manuelle Blitzlicht-Einstellung können durch Betätigen der
Kamera für jede Gruppe eingestellt werden.
≥
Wenn Sie für die Kamera eine Einstellung auswählen, die vom
Blitzlicht nicht unterstützt wird, funktioniert das Blitzlicht wie folgt:
Kamera Blitzlicht
[Blitzlicht-Steuerung]: [AUTO] Kein Blitzlicht.
[Drahtlos-FP]: [ON] Normales Blitzlicht.
Positionieren von WirelessBlitzlicht-Geräten
Da der Datenaustausch mit der Auslösung des Blitzlichts durch die
Kamera erfolgt, variiert der Positionierbereich des Blitzlichts mit
der Kamera. Siehe in der Bedienungsanleitung zur Kamera für
Details zum Positionierbereich des Blitzlichts.
1 Bringen Sie den
mitgelieferten Ständer an.
• Schieben Sie den Sperrhebel in
die entgegengesetzte Richtung zu
der vom Symbol [LOCK 1] (1)
angezeigten und schieben Sie
das Blitzlicht auf den Ständer, bis
es fest einrastet (2).
• Verschieben Sie den Sperrhebel in die Position [LOCK 1],
um das Blitzlicht zu arretieren.
• Schieben Sie den Sperrhebel in die entgegengesetzte
Richtung als der vom Pfeil [LOCK
Blitzlicht zu entfernen und vom Ständer zu schieben.
2 Ordnen Sie das Blitzlicht so
an, dass der Wireless-Sensor
(
A
) zur Kamera gerichtet ist.
Führen Sie nach dem
Positionieren eine
Testaufnahme aus.
≥ Wir raten, eine einzelne Gruppe von
bis zu drei entfernten BlitzlichtGeräten zu verwenden.
≥ Das Blitzlicht wird auf Grund des Winkels oder der
Entfernung zwischen der Kamera und dem Objekt unter
Umständen nicht ausgelöst.
1
] angegebenen, um das
SQT1378
9
DEUTSCH
Page 40

Festlegung des
90º
Strahlungswinkels
Richten Sie den Blitzlicht-Kopf auf eine
Wand oder Decke, um eine Aufnahme
mit Reflexbeleuchtung anzufertigen.
Drehen Sie den Blitzlichtkopf.
Gebrauch des Wide Panel
Verwenden Sie bei
Blitzlichtaufnahmen das
mitgelieferte Wide Panel, wenn
die Brennweite des Objektivs
mehr als 12 mm beträgt.
Bringen Sie das Wide
Panel am Blitzlicht an.
≥ Der Beleuchtungswinkel entspricht dem Bildwinkel eines
Objektivs mit einer Brennweite von 7 mm.
Slave-Modus
Das Blitzlicht kann ferngesteuert synchron zu einem
beliebigem Blitzlicht ausgelöst werden, das von anderen
Geräten erzeugt wird.
10
SQT1378
1 Stellen Sie den Blitzmodus
auf [SLAVE] ein.
“Blitzmodus” (P7)
2 Positionieren Sie das Blitzlicht.
Die Vorgehensweise zum
Positionieren des Blitzlichts ist die
gleiche, wie im Wireless-Modus.
“Positionieren von WirelessBlitzlicht-Geräten” (P9)
Siehe in der Bedienungsanleitung
zur Kamera für Details zum
Positionierbereich des Blitzlichts.
• Richten Sie den Blitzmodus der Kamera
auf Manuell ein, d.h. ohne Auslösung des Vorblitzes. Löst die Kamera
den Vorblitz aus, synchronisiert sich das externe Blitzlicht mit dem
Vorblitz der Kamera und kann das Blitzlicht nicht richtig auslösen.
• Das Blitzlicht wird unter Umständen als Reaktion auf
Blitzlichtgeräte ausgelöst, die von anderen
Fotographen benutzt werden.
Vorsichtsmaßnahmen
∫ Zum Gerät
Tragen Sie das Gerät nicht, während es noch an der
Kamera angebracht ist.
Es wird empfohlen, das Gerät in der Blitzlichthülle
aufzubewahren, wenn es transportiert wird.
≥ Platzieren Sie das Gerät mit der Blitzlichtkopf-Seite nach
oben in der Blitzlichthülle.
∫ Informationen zu den Akkus
Entfernen Sie unbedingt die Akkus, wenn Sie das Gerät
für längere Zeit nicht benutzen.
Page 41

Spezifikationen
Die Spezifikationen können ohne Ankündigung geändert
werden.
Anforderungen an die
Stromversorgung:
Empfohlene Akkus LR6/AA Alkaline-Trockenbatterien
Ladedauer
(ab dem Vollblitz bis
die [CHARGE]Lampe aufleuchtet)
Auslösedauer Ca. 1/10000 s bis 1/250 s
Blitzanzahl
(mit Vollblitz)
AF-Hilfslicht Effektive Entfernung: ca. 1 m bis
Gleichspannung 3,0 V (3,0 V )
k 2/
HR6/AA
Wiederaufladbare Nickel-
Metallhydrid-Batterien (Ni-MH)
Ca. 5 s:
LR6/AA
Trockenbatterien
Ca. 3 s:
Nickel-Metallhydrid-Batterien
(Variiert je nach Blitzlichtintensität)
Ca. 120 Blitze:
Trockenbatterien
Ca. 200 Blitze:
Wiederaufladbare NickelMetallhydrid-Batterien (Typ zu min.
2400 mAh)
(variiert je nach den
Aufnahmebedingungen.)
5m
(Ist von der verwendeten DigitalKamera und der Objektivart
abhängig)
Alkaline-
HR6/AA
Wiederaufladbare
LR6/AA
HR6/AA
k 2
Alkaline-
Blitzmodus TTL AUTO/MANUAL/
Leitzahl 20 (ISO100), 14 (ISO100: Bei
Beleuchtungswinkel
Abmessungen Ca. 61,0 mm (B)k52,5 mm
Masse Ca. 230 g (einschließlich Akkus)
Betriebstemperatur 0°C bis 40°C
Betriebsluftfeuchtigkeit
Die Symbole auf diesem Produkt (einschließlich Zubehör)
haben die folgenden Bedeutungen:
Gleichstrom
SL MANUAL/RC
Verwendung des Wide Panel)
Deckt den Bildwinkel von 12 mm-
Objektiven ab (KleinbildÄquivalent: 24 mm)
(Mit Wide Panel: 7 mm-Objektiv,
Kleinbild-Äquivalent: 14 mm)
(H)k82,0 mm (T)
(ausgenommen hervorstehender
Teile)
Ca. 180 g (Hauptgerät)
10%RH bis 80%RH (ohne
Kondensation)
SQT1378
DEUTSCH
11
Page 42

Instrucciones de funcionamiento
FLASH
Gracias por comprar un producto Panasonic.
Lea cuidadosamente estas instrucciones antes de usar este
producto, y guarde este manual para usarlo en el futuro.
Contenidos
Información para su seguridad .................................... 2
Precauciones ............................................................... 5
Accesorios suministrados ............................................6
Nombres de las piezas ................................................ 6
Disparo continuo.......................................................... 7
Preparación de la batería (opcional)............................7
Carga de las baterías................................................... 7
Colocación de la cámara ............................................. 7
Encendido del flash ..................................................... 8
Toma............................................................................ 8
Modo de flash ..............................................................9
Encender la luz LED ..................................................10
Ajustes del flash inalámbrico ..................................... 10
Colocación de las unidades flash inalámbricas.........11
Arreglo del ángulo de irradiación ...............................11
Uso del panel de gran angular...................................11
Modo de esclavo........................................................ 12
Precauciones para el uso .......................................... 12
Especificaciones ........................................................13
2
SQT1378
Información para su seguridad
ADVERTENCIA:
Para reducir el riesgo de incendios, de descargas
eléctricas o de daños en el producto,
• No exponga esta unidad a la lluvia, humedad, goteo o
salpicaduras.
• No coloque objetos llenos con líquido, como floreros,
sobre esta unidad.
• Utilice solamente los accesorios recomendados.
• No retire las cubiertas.
• No repare esta unidad usted mismo. Llévesela al personal
de reparación calificado.
¡ADVERTENCIA!
Para reducir el riesgo de incendios, de descargas
eléctricas o de daños en el producto,
• No instale ni ubique esta unidad en una biblioteca,
gabinete integrado ni en otro espacio confinado.
Asegúrese de que esta unidad esté bien ventilada.
Page 43

INSTRUCCIONES
DE SEGURIDAD
IMPORTANTES
Al usar el equipo fotográfico, siempre se
deben seguir precauciones básicas de
seguridad, incluidas las siguientes:
≥ Lea y entienda todas las instrucciones
antes del uso.
≥ Se necesita supervisión cuando el
aparato es usado por niños o se usa
cerca de ellos. No deje el aparato sin
supervisión durante el uso.
≥
Se debe tener cuidado ya que pueden
ocurrir quemaduras al tocar la piezas
calientes.
≥ No opere si el aparato se cayó o dañó
hasta que haya sido revisado por el
personal de reparación calificado.
≥ Deje que el aparato se enfríe por
completo antes de alejarlo.
≥
Para reducir el riesgo de descarga
eléctrica, no sumerja este aparato en agua
o en otros líquidos.
≥ Para reducir el riesgo de descarga
eléctrica, no desarme este aparato,
llévelo al personal de reparación
calificado cuando se necesita
reparación o mantenimiento. El
rearmado incorrecto puede causar una
descarga eléctrica al volver a usarlo.
≥ El uso de un accesorio no recomendado
por el fabricante puede provocar riesgo
de incendio, descarga eléctrica o
lesiones a personas.
GUARDE ESTAS
INSTRUCCIONES
SQT1378
3
ESPAÑOL
Page 44

∫ Acerca de las baterías
AVIS O
• Existe un riesgo de explosión si la batería se
reemplaza incorrectamente. Reemplace solamente
con el tipo recomendado por el fabricante.
• Al desechar las baterías, comuníquese con sus
autoridades locales o con el distribuidor y pregunte
sobre el método correcto de eliminación.
• No las caliente ni las exponga en llamas.
• No deje la batería(s) en un automóvil expuesto a la luz
solar directa durante un período largo de tiempo con
las puertas y las ventanas cerradas.
• Si se van a usar las baterías recargables, se
recomiendan las baterías recargables fabricadas por
Panasonic.
4
SQT1378
LO SIGUIENTE SÓLO SE APLICA EN LOS EE. UU.
Notas FCC:
Se ensayó este equipo y se comprobó que está de
conformidad con los límites de un dispositivo digital de la
clase B, de acuerdo con la Parte 15 de las Reglas FCC.
Estos límites se han ideado para proporcionar una razonable
protección contra las interferencias dañinas en una
instalación residencial. Este equipo genera, utiliza y puede
radiar energía de frecuencia radio y, por si no se instala y se
utiliza de acuerdo con las instrucciones, puede ocasionar
interferencia dañina a las comunicaciones radio. Aunque no
hay garantía de que no pueda tener lugar interferencia en
especiales instalaciones. Si este equipo causa interferencia a
la recepción de radio o televisión que pueden determinarse
apagando y encendiendo el equipo, se anima al usuario
intentar corregir la interferencia tomando una de las medidas
a continuación:
≥ Vuelva a orientar o a colocar la antena receptora.
≥ Aumente la separación entre el equipo y el receptor.
≥ Conecte el equipo a una toma de un circuito diferente del
que está conectado el receptor.
≥ Llame al concesionario o un técnico experto de radio y
televisión para ayuda.
Todo cambio o modificación a este equipo sin autorizar
invalidará el título del usuario para hacer funcionar este
dispositivo.
Este dispositivo cumple con la Parte 15 de las Reglas FCC. El
funcionamiento está sujeto a las dos condiciones a
continuación: (1) Este dispositivo podría no causar
interferencia dañina y (2) este dispositivo tiene que aceptar
toda la interferencia recibida, incluyendo la que puede causar
un funcionamiento no deseado.
Parte responsable:
Panasonic Corporation of North America
Two Riverfront Plaza, Newark, NJ 07102-5490
Contacto para atención: http://shop.panasonic.com/support
Page 45

-Si ve este símbolo-
Eliminación de Aparatos Viejos
Solamente para la Unión Europea y países con
sistemas de reciclado.
Para el adecuado tratamiento, recuperación y reciclaje
de los productos viejos llévelos a los puntos de recogida
de acuerdo con su legislación nacional.
Si los elimina correctamente ayudará a preservar
valuosos recursos y evitará potenciales efectos
negativos sobre la salud de las personas y sobre el
medio ambiente.
Para más información sobre la recogida u reciclaje, por
favor contacte con su ayuntamiento.
Puede haber sanciones por una incorrecta eliminación
de este residuo, de acuerdo con la legislación nacional.
.
Este símbolo en los productos, su embalaje o
en los documentos que los acompañen
significa que los productos eléctricos y
electrónicos usadas no deben mezclarse con
los residuos domésticos.
Precauciones
≥ Este es el flash externo para las cámaras digitales
Panasonic (se menciona como flash en lo siguiente).
Cuando el flash se usa junto con una cámara digital que
admite el modo inalámbrico, se puede realizar una toma
con el flash inalámbrico. Las funciones disponibles
pueden variar según la cámara digital usada. Para las
correspondientes cámaras digitales, visite nuestro sitio
web.
http://panasonic.jp/support/global/cs/dsc/ (Este sitio está
en inglés solamente.)
∫ Manipulación de la unidad
≥ No someta la unidad a una vibración o impacto fuerte.
Hacerlo puede hacer que la unidad falle y que el cabezal
del flash se quiebre.
≥ La arena y la suciedad pueden causar una falla de la
unidad. Cuando usa la unidad en un ambiente como
una playa, tome las medidas necesarias para
protegerla de la arena y la suciedad.
≥ Esta unidad no es resistente al polvo ni resistente a
salpicaduras. Si por algún motivo, gotas de agua, etc.
salpican la unidad, límpielas con un paño seco. Si la
unidad no funciona correctamente, consulte a su
distribuidor o a Panasonic.
≥ Tenga cuidado de no pillarse los dedos,
etc., en la unidad cuando ajuste el ángulo
del cabezal del flash.
≥ Lea las instrucciones de funcionamiento
sobre la cámara digital.
ESPAÑOL
SQT1378
5
Page 46

Accesorios suministrados
SFC0373 VFB0243 SFB0010
123
[Se debe realizar una inspección al desembalar la
unidad]
Al sacar la unidad de su caja de embalaje, revise que la unidad
principal y sus accesorios suministrados estén presentes y
también revise la apariencia y las funciones para verificar que
no se hayan dañado durante la distribución y el transporte.
Si descubre algún problema, comuníquese con su proveedor
antes de usar el producto.
Números de productos correctos a partir de abril de 2016.
Pueden estar sujetos a cambio.
Nombres de las piezas
1 Carcasa del flash
2 Pedestal del flash
3 Panel de gran angular
≥ Las baterías son un accesorio opcional.
6
SQT1378
1 Cabezal del flash
2 Lámpara de ayuda AF/luz
LED
3 Sensor inalámbrico
4 Interruptor [GR] (Grupo)
5 Interruptor [CH] (Canal)
6 Botón [ON/OFF]
7 Lámpara [CHARGE]
8 Lámpara [AUTO CHECK]
9 Compensación de la
exposición del flash/disco
de control de salida
: Disco de control de salida
de luz LED
; Botón [TEST]
< Palanca de modo
= Palanca de bloqueo
Page 47

Disparo continuo
El flash se puede calentar cuando se dispara muchas veces
seguidas, lo cual puede causar daño o fallas. El flash se
debe disparar no más de 10 veces seguidas a intervalos de
2,5 segundos, luego de lo cual se debe dejar sin usar
durante al menos 10 minutos.
Preparación de la batería (opcional)
Elija entre las siguientes baterías:
≥ Baterías alcalinas secas LR6/AA (
≥ Baterías de hidruro metálico de níquel HR6/AA
recargables (Ni-MH) (
No se pueden usar las baterías secas de manganeso R6/AA.
Se recomienda el uso de baterías fabricadas por Panasonic.
k
2)
k
2)
Carga de las baterías
≥ Use baterías secas alcalinas o baterías de hidruro
metálico de níquel recargables.
1 Gire el cabezal del flash.
2 Desplace la palanca en la
dirección de [2 OPEN]
para abrir la tapa de las
baterías.
3 Inserte las baterías sobre
la cinta (A) con la
polaridad correcta [r]/[s].
• Puede sacar fácilmente las
baterías tirando de la cinta.
4 Cierre la tapa de las
baterías hasta que haga clic.
• Cierre la tapa de la batería de modo que la cinta no
sobresalga.
Colocación de la cámara
Confirme que tanto la cámara como el flash estén
apagados. Colocar o sacar el flash mientras el flash o la
cámara están encendidos puede crear una falla.
1 Deslice la palanca de bloqueo en la
dirección opuesta a la indicada por el icono
[LOCK 1] (1).
2 Deslice el flash en la zapata caliente hasta que
haga clic de forma segura en el lugar (
3 Deslice la palanca de bloqueo hacia la
posición [LOCK 1] (3).
≥
Para sacar el flash, deslice la palanca de bloqueo en la dirección
opuesta a la flecha [LOCK
1
] y deslícela desde la zapata.
2
).
SQT1378
7
ESPAÑOL
Page 48

Encendido del flash
Coloque el flash en la cámara y luego encienda la cámara.
1 Botón [ON/OFF]
2 Lámpara [CHARGE]
3
Lámpara [AUTO CHECK]
Presione el botón [ON/OFF].
≥
Para apagar el flash, presione de nuevo el botón [ON/OFF].
≥
Sustituya las baterías si la lámpara [CHARGE] no se
enciende después de:
30 segundos (baterías secas alcalinas)
10 segundos (baterías de hidruro metálico de níquel
recargables)
≥ Si la lámpara [CHARGE] y la lámpara [AUTO CHECK]
parpadean simultáneamente, las baterías tienen poca
carga. Sustituya las baterías. Usar una batería con
considerablemente poca carga puede causar una
falla.
≥
El flash entrará en el modo de espera cuando la cámara entre
en el modo de espera.
≥ Si no se realiza una operación durante aproximadamente
20 minutos, el flash se apagará automáticamente.
Presione el botón [ON/OFF] para encenderlo.
≥ Se puede escuchar un sonido de oscilación mientras se
carga el flash, pero esto no es una falla.
8
SQT1378
Toma
1
Lámpara [AUTO CHECK]
1 Use los controles de la cámara para elegir
el modo del flash.
Vea las instrucciones de funcionamiento de la cámara
para obtener más información.
2 Elija un modo de flash.
“Modo de flash” (P9)
3 Pulse el botón del obturador hasta la mitad.
4 Presione el botón del obturador el resto del
trayecto hacia abajo para tomar la imagen.
La unidad emite una luz en la exposición correcta si la
lámpara [AUTO CHECK] parpadea durante
aproximadamente 5 segundos.
≥ Cuando se usa el flash, la luz del flash se puede bloquear
con el cuerpo de la lente, la visera de la lente, etc.
≥ Use el panel de gran angular para evitar la sobrexposición
a rangos de menos de 1 m (3,3 pies) (P11).
Page 49

∫ Disparo de un flash de prueba
1
Lámpara [CHARGE]
2
Botón [TEST]
Pulse el botón [TEST] mientras la lámpara [CHARGE] está
encendida para disparar un flash de prueba.
Modo de flash
Elija el modo del flash de acuerdo
con las condiciones de toma y el
sujeto.
Ajuste la palanca del modo
en la posición apropiada.
[TTL] (TTL AUTO)
La intensidad de la luz del flash se controla automáticamente
según la configuración de la cámara. El flash se ajustará
basándose en el brillo tomado por la lente de la cámara.
Generalmente, use este modo con una cámara con
capacidad de comunicación.
Gire el disco de control de
compensación de la exposición/salida
del flash para ajustar la salida del flash.
≥ Puede realizar un ajuste
seleccionando un valor entre j3 EV
y i3EV.
≥ Seleccione [0] cuando no realice ningún ajuste.
[MANUAL]
El flash se dispara con la intensidad que haya
establecido.
Seleccione este modo cuando use una cámara sin
capacidad de comunicación.
Gire el disco de control de
compensación de la exposición/salida
del flash para establecer la salida del
flash.
≥ Puede establecer un valor entre [1/1]
(flash completo) y [1/64].
[SLAVE] (SL MANUAL)
El flash se puede disparar de forma remota en
sincronización con el flash disparado desde otras
unidades.
El flash se dispara con la intensidad que haya
establecido.
Gire el disco de control de
compensación de la exposición/salida
del flash para establecer la salida del
flash.
≥ Puede establecer un valor entre [1/1]
(flash completo) y [1/64].
[RC]
El control inalámbrico está disponible con las cámara
digitales Panasonic que admiten el modo inalámbrico.
(P10)
SQT1378
ESPAÑOL
9
Page 50

Encender la luz LED
Gire el disco de control de
salida de la luz LED.
Girar en la dirección de 1:
Disminuye la cantidad de luz o apaga
la luz LED.
≥ Cuando gira el disco hasta que se detiene, la luz LED se
apaga.
Girar en la dirección de 2:
Aumenta la cantidad de luz.
≥
El flash y las baterías pueden calentarse si mantiene la luz LED
encendida, pero no se trata de un funcionamiento defectuoso.
Ajustes del flash inalámbrico
El control inalámbrico está disponible con cámaras digitales Panasonic
que admiten el modo inalámbrico. Vea las instrucciones de
funcionamiento de la cámara digital para conocer el funcionamiento de
la cámara digital durante la toma del flash inalámbrico.
1 Fije la cámara en el modo
inalámbrico.
2 Fije el flash en el modo [RC].
“Modo de flash” (P9)
3 Gire el cabezal del flash.
10
SQT1378
4 Establezca el canal con el
interruptor [CH].
• Fije la cámara y el flash al mismo
canal.
5 Establezca el grupo con el
interruptor [GR].
• La cámara puede realizar los
ajustes del flash de forma
separada para hasta 3 grupos,
elija el grupo al que pertenece el flash.
≥ Si es difícil deslizar el interruptor, use la punta de
bolígrafo o una herramienta similar para hacerlo.
≥ Después de establecer el canal y el grupo, devuelva el
cabezal del flash a su ángulo original.
El modo de disparo, el ajuste del flash y el ajuste manual
del flash se pueden fijar para cada grupo al hacer funcionar
la cámara.
≥ El flash funcionará como se describe cuando establezca
la cámara en un ajuste no admitido por el flash:
Cámara Flash
[Modo disparo]: [AUTO] No dispara.
[FP inalámbrico]: [ON] Dispara normal.
Page 51

Colocación de las unidades
flash inalámbricas
Como se realiza la comunicación con la emisión de flash de
la cámara, el rango de posicionamiento del flash varía
según la cámara. Consulte las instrucciones de
funcionamiento de la cámara para obtener más detalles
sobre el rango de posicionamiento del flash.
1 Coloque el pedestal suministrado.
• Deslice la palanca de bloqueo en
la dirección opuesta a la indicada
por el icono [LOCK 1] (1) y
deslice el flash en el pedestal
hasta que haga clic de manera
segura en el lugar (2).
• Deslice la palanca de bloqueo hacia la posición [LOCK 1]
para asegurar el flash en el lugar.
• Para sacar el flash, deslice el pestillo en la dirección
opuesta a la flecha [LOCK
2 Coloque el flash con un
sensor inalámbrico (A)
mirando hacia la cámara.
Realice una toma de prueba
luego de ubicar.
≥
Recomendamos usar un solo grupo de
hasta tres unidades de flash remotas.
≥ El flash puede no disparar debido al
ángulo o distancia entre la cámara y
el objeto.
1
] y deslícelo desde el pedestal.
Arreglo del ángulo de irradiación
Apunte el cabezal del flash hacia la
pared o techo para una fotografía con
rebote del flash.
Gire el cabezal del flash.
90º
Uso del panel de gran angular
Use el panel de gran angular
suministrado para fotografía
con flash cuando la longitud
focal de la lente sea de más de
12 mm de ancho.
Coloque el panel de gran
angular en el flash.
≥ El ángulo de iluminación será el mismo que el ángulo de
visión de una lente con una distancia focal de 7 mm.
SQT1378
ESPAÑOL
11
Page 52

Modo de esclavo
El flash se puede disparar de forma remota en
sincronización con el flash disparado desde otras unidades.
1 Ajuste el modo de flash a
[SLAVE].
“Modo de flash” (P9)
2 Ubique el flash.
El método de posicionamiento del
flash es el mismo que en el modo
inalámbrico.
“Colocación de las unidades flash
inalámbricas” (P11)
Consulte las instrucciones de
funcionamiento de la cámara para
conocer detalles sobre el rango de
posicionamiento del flash.
• Fije el modo del flash de la cámara a manual el cual no
dispara el flash previo. Si la cámara dispara el flash previo,
el flash externo se sincroniza con el flash previo de la
cámara y no puede disparar la luz del flash correctamente.
• El flash puede disparar en respuesta a las unidades de flash
usadas por otros fotógrafos.
12
SQT1378
Precauciones para el uso
∫ Acerca de la unidad
No traslade la unidad cuando todavía está colocado en
el cuerpo de la cámara.
Recomendamos que coloque la unidad en la carcasa
del flash al transportarla.
≥ Coloque la unidad en la carcasa del flash con el cabezal
del flash hacia arriba.
∫ Acerca de las baterías
Asegúrese de sacar las baterías cuando no va a usar la
unidad durante un período de tiempo prolongado.
Page 53

Especificaciones
Las especificaciones están sujetas a cambio sin previo aviso.
Requerimientos de energía:
Baterías
recomendadas para
el uso
Tiempo de carga
(desde el flash
completo hasta que la
lámpara [CHARGE]
se ilumina)
Período de disparo
Cantidad de
disparos del flash
(con flash completo)
Lámpara de ayuda AFDistancia eficaz: aproximadamente
Modos de flash TTL AUTO/MANUAL/
CC 3,0 V (3,0 V )
Baterías alcalinas secas LR6/AA k 2/
Baterías de hidruro metálico de níquel
recargables HR6/AA (Ni-MH)
Aproximadamente 5 segundos:
baterías alcalinas secas
Aproximadamente 3 segundos:
baterías de hidruro metálico de
níquel recargables H
Aproximadamente 1/
a 1/250 segundos
(Varía dependiendo de la
intensidad del flash)
Aproximadamente 120 disparos
del flash:
baterías
LR6/AA
Aproximadamente 200 disparos
del flash: baterías de hidruro
metálico de níquel recargables
H
R6/AA
(mín. 2400 mAh)
(Difiere según las condiciones de la
fotografía.)
1 m (3,3 pies) a 5 m (16 pies)
(Difiere según la cámara digital y el
tipo de lente usada)
SL MANUAL/RC
k
2
LR6/AA
R6/AA
10000
segundos
alcalinas secas
Número de guía 20 (ISO100), 14 (ISO100: cuando
Ángulo de
iluminación
Dimensiones Aproximadamente 61,0 mm
Masa
Temperatura de
funcionamiento
Humedad de
funcionamiento
Los símbolos en este producto (incluidos los accesorios)
representan lo siguiente:
CC
Para Estados Unidos
Panasonic Corporation of North America
Two Riverfront Plaza, Newark, NJ 07102-5490
http://shop.panasonic.com
se usa el panel de gran angular)
Cubre el ángulo de visión de una lente
de 12 mm (equivalente a una cámara
de película de 35 mm: 24 mm)
(Con el panel de gran angular: lente
de 7 mm, equivalente a una cámara
de película de 35 mm: 14 mm)
(Ancho)k52,5 mm (Alto)k82,0 mm
(Profundidad)
[2,402q (Ancho)k2,067q
(Alto)k3,228q (Profundidad)]
(sin incluir las piezas salientes)
Aproximadamente 230g/0,507 lb
(incluidas las baterías)
Aproximadamente 180 g/0,397 lb
(unidad principal)
0 °C a 40 °C (32 °F a 104 °F)
10%RH a 80%RH (sin
condensación)
Impreso en China
ESPAÑOL
SQT1378
13
Page 54

Istruzioni d’uso
FLASH
Grazie per aver acquistato un prodotto Panasonic.
Leggere attentamente queste istruzioni prima di utilizzare il
presente prodotto, e conservare questo manuale per usi
futuri.
Indice
Informazioni per la sua sicurezza ................................2
Precauzioni .................................................................. 4
Accessori in dotazione................................................. 4
Nome dei componenti..................................................5
Scatto continuo ............................................................ 5
Preparazione della batteria (opzionale).......................5
Caricamento delle batterie ........................................... 5
Installazione sulla fotocamera...................................... 6
Accensione del flash.................................................... 6
Scatto........................................................................... 7
Modalità del flash......................................................... 7
Accensione della luce LED ..........................................8
Impostazioni del flash wireless .................................... 8
Posizionamento di flash wireless.................................9
Fissaggio dell'angolo di irradiazione..........................10
Utilizzo del diffusore grandangolare...........................10
Modalità Servo........................................................... 10
Precauzioni per l’uso.................................................. 10
Specifiche ..................................................................11
2
SQT1378
Informazioni per la sua
sicurezza
ATTENZIONE:
Per ridurre il rischio di incendi, folgorazioni o danni
al prodotto,
• Non esporre questa unità a pioggia, umidità, gocce o
spruzzi d’acqua.
• Non collocare su questa unità oggetti contenenti
liquidi, ad esempio vasi.
• Utilizzare solo gli accessori consigliati.
• Non rimuovere le coperture.
• Non riparare l’unità autonomamente. Per la
manutenzione rivolgersi a personale qualificato.
ATTENZIONE!
Per ridurre il rischio di incendi, folgorazioni o danni
al prodotto,
• Non installare o posizionare questa unità in librerie,
armadietti o altri spazi confinati. Accertarsi che l’unità
sia ben ventilata.
Page 55

∫ Le batterie
PRECAUZIONE
• Se la batteria viene sostituita in modo non corretto esiste il
pericolo di esplosione. Sostituire solo con il tipo
raccomandato dal produttore.
• Quando si smaltiscono le batterie, contattare le autorità
locali o il rivenditore e chiedere informazioni sul metodo
corretto di smaltimento.
• Non scaldare e non esporre alla fiamma.
• Non lasciare la batteria/le batterie per molto tempo in
un’automobile, esposte alla luce solare diretta e con le portiere
e i finestrini chiusi.
• Se si utilizzano batterie ricaricabili, si consigliano batterie
ricaricabili prodotte da Panasonic.
-Se vedete questo simbolo-
Smaltimento di vecchie apparecchiature
Solo per Unione Europea e Nazioni con sistemi di
raccolta e smaltimento
riciclaggio di vecchi prodotti vi invitiamo a portarli negli
appositi punti di raccolta secondo la legislazione vigente
nel vostro paese.
Con uno smaltimento corretto, contribuirete a salvare
importanti risorse e ad evitare i potenziali effetti negativi
sulla salute umana e sull’ambiente.
Per ulteriori informazioni su raccolta e riciclaggio, vi
invitiamo a contattare il vostro comune.
Lo smaltimento non corretto di questi rifiuti potrebbe
comportare sanzioni in accordo con la legislazione
nazionale.
Questo simbolo sui prodotti, sull’imballaggio e/o
sulle documentazioni o manuali accompagnanti
i prodotti indica che i prodotti elettrici, elettronici
non devono essere buttati nei rifiuti domestici
generici.
Per un trattamento adeguato, recupero e
ITALIANO
SQT1378
3
Page 56

Precauzioni
SFC0373 VFB0243 SFB0010
123
≥ Questo è il flash esterno per fotocamere digitali
Panasonic (in seguito chiamato flash). Quando si utilizza
questo flash con una fotocamera digitale che supporta la
modalità wireless, è possibile scattare con un flash
wireless. Le funzioni disponibili cambiano a seconda della
fotocamera digitale utilizzata. Per le fotocamere digitali
corrispondenti, visitare il nostro sito web.
http://panasonic.jp/support/global/cs/dsc/ (Questo sito è
solo in inglese.)
∫ Utilizzo dell’unità
≥
Non sottoporre l'unità a forti vibrazioni o impatti.
Così facendo si possono causare non solo dei malfunzionamenti
nell'unità ma anche la rottura della testa del flash.
≥
Sabbia e polvere possono provocare il
malfunzionamento dell'unità. Quando si utilizza l'unità
in ambienti quali una spiaggia, prendere le precauzioni
necessarie a proteggerla dalla sabbia e dalla polvere.
≥ Questa unità non è impermeabile né alla polvere né
agli schizzi. Qualora l'unità venisse raggiunta da
goccioline d'acqua, rimuovere queste ultime con un
panno asciutto. Qualora l'unità non funzionasse
correttamente, consultare il proprio rivenditore o
Panasonic.
≥ Fare attenzione che le dita non
rimangano impigliate nell’unità quando si
regola l’angolo della testa del flash.
≥ Consultare le istruzioni per l’uso della
fotocamera digitale.
4
SQT1378
Accessori in dotazione
[Controllo da effettuare al momento del disimballo
dell'unità]
Quando si rimuove l'unità dalla scatola di imballaggio,
controllare che siano presenti l'unità principale e i relativi
accessori in dotazione; controllarne inoltre l'aspetto esterno
e la funzionalità, per verificare che non abbiano subito
danni durante la distribuzione e il trasporto.
Qualora si riscontrino problemi, contattare il rivenditore
prima di utilizzare il prodotto.
I codici dei prodotti sono aggiornati ad aprile 2016. È
possibile che subiscano delle modifiche.
1 Custodia del flash
2 Supporto del flash
3 Diffusore grandangolare
≥ Le batterie sono opzionali.
Page 57

Nome dei componenti
1 Testa del flash
2
Luce di ausilio AF/luce LED
3 Sensore wireless
4 Selettore [GR] (Gruppo)
5 Selettore [CH] (Canale)
6 Pulsante [ON/OFF]
7 Spia [CHARGE]
8 Spia [AUTO CHECK]
9 Selettore di controllo
compensazione
esposizione/controllo
intensità flash
:
Selettore di controllo
dell'intensità della luce LED
; Pulsante [TEST]
< Leva modalità
= Leva di bloccaggio
Scatto continuo
È possibile che il flash si surriscaldi quando viene utilizzato a lungo in
successione, provocando danni o malfunzionamenti. Il flash dovrebbe essere
utilizzato non più di 10 volte in successione ad intervalli di 2,5 secondi, dopo i
quali dovrebbe essere lasciato inutilizzato per almeno 10 minuti.
Preparazione della batteria (opzionale)
Scegliere tra le seguenti batterie:
≥ Batterie secche alcaline LR6/AA (
≥
Batterie al nichel-idruro metallico ricaricabili HR6/AA (Ni-MH) (k 2)
Non è possibile utilizzare batterie secche al manganese R6/AA.
Si consiglia l'utilizzo di batterie prodotte da Panasonic.
k 2)
Caricamento delle batterie
≥ Utilizzare batterie secche alcaline o batterie al nichel-
idruro metallico ricaricabili.
1 Ruotare la testa del flash.
2 Far scorrere la leva nella
direzione di [2 OPEN] per
aprire lo sportello della
batteria.
3 Inserire le batterie sul
nastro (A) con la polarità
corretta [r]/[s].
• È possibile rimuovere facilmente
le batterie tirando il nastro.
4 Chiudere lo sportello della
batteria finché non scatta in posizione.
• Chiudere il coperchio della batteria in modo che il
nastro non fuoriesca.
SQT1378
5
ITALIANO
Page 58

Installazione sulla fotocamera
Controllare che sia la fotocamera sia il flash siano spenti.
Installare o rimuovere il flash mentre il flash o la fotocamera
sono accesi può causare un malfunzionamento.
1 Far scorrere la leva di bloccaggio nella
direzione opposta a quella indicata
dall'icona [LOCK 1] (1).
2 Far scorrere il flash nell'apposito adattatore
finché non scatta completamente nella
corretta posizione (2).
3 Far scorrere la leva di bloccaggio in
posizione [LOCK 1] (3).
≥ Per rimuovere il flash, far scorrere la leva di bloccaggio
nella direzione opposta a quella indicata dalla freccia su
[LOCK1].
6
SQT1378
Accensione del flash
Installare il flash sulla fotocamera e quindi accendere la
fotocamera.
Premere il pulsante [ON/OFF].
≥
Per spegnere il flash, premere di nuovo il pulsante [ON/OFF].
≥ Sostituire le batterie se la spia [CHARGE] non si accende
dopo:
30 secondi (Batterie secche alcaline)
10 secondi (Batterie al nichel-idruro metallico ricaricabili)
≥ Se la spia [CHARGE] e la spia [AUTO CHECK]
lampeggiano contemporaneamente, significa che le
batterie si stanno esaurendo. Sostituire le batterie.
L’utilizzo di batterie considerevolmente esaurite può
provocare malfunzionamenti.
≥
Il flash entra in modalità Sleep ogni volta che la fotocamera
entra in modalità Sleep.
≥
Se non si eseguono operazioni per circa 20 minuti, il flash si
spegnerà automaticamente. Premere il pulsante [ON/OFF]
per riaccenderlo.
≥ È possibile che venga emesso un suono oscillante
durante la ricarica del flash, ma non si tratta di un
malfunzionamento.
1 Pulsante [ON/OFF]
2 Spia [CHARGE]
3 Spia [AUTO CHECK]
Page 59

Scatto
1 Spia [AUTO CHECK]
1 Utilizzare i controlli della fotocamera per
scegliere la modalità del flash.
Per maggiori dettagli, vedere le istruzioni per l’uso della
fotocamera.
2 Scegliere una modalità del flash.
“Modalità del flash” (P7)
3 Premere parzialmente il pulsante di scatto
dell’otturatore.
4 Premere il pulsante di scatto dell’otturatore
fino in fondo per riprendere l’immagine.
L’unità emette una luce con un’intensità tale da ottenere
un'esposizione corretta se la spia [AUTO CHECK]
lampeggia per circa 5 secondi.
≥ Quando si utilizza un flash, è possibile che la luce del
flash venga bloccata dal corpo dell'obiettivo, dal paraluce,
ecc.
≥ Utilizzare il diffusore grandangolare per evitare una
sovraesposizione a distanze inferiori a 1 m (P10).
∫ Scatto di prova del flash
1
Spia [CH ARGE]
2
Pulsante [TEST]
Premere il pulsante [TEST] mentre la spia [CHARGE] è
accesa per effettuare uno scatto di prova del flash.
Modalità del flash
Scegliere una modalità del flash in
base alle condizioni del soggetto e
di scatto.
Posizionare la leva della modalità
nella posizione appropriata.
[TTL] (TTL AUTO)
L'intensità della luce del flash viene controllata
automaticamente a seconda delle impostazioni della
fotocamera. Il flash viene regolato a seconda della
luminosità che passa attraverso l'obiettivo della
fotocamera. Utilizzare questa modalità con una fotocamera
con funzionalità di comunicazione.
Ruotare il selettore di compensazione
dell'esposizione/controllo dell'intensità
del flash per regolare l'intensità del flash.
≥ È possibile effettuare una
regolazione selezionando un valore
compreso tra j3EV e i3EV.
≥ Selezionare [0] per non effettuare regolazioni.
SQT1378
ITALIANO
7
Page 60

[MANUAL]
Il flash si attiva con l'intensità impostata.
Selezionare questa modalità quando si usa una
fotocamera senza funzionalità di comunicazione.
Ruotare il selettore di compensazione
dell'esposizione/controllo dell'intensità
del flash per impostare l'intensità del
flash.
≥ È possibile selezionare un valore
compreso tra [1/1] (intensità massima) e [1/64].
[SLAVE] (SL MANUAL)
È possibile attivare il flash a distanza in sincrono con
qualsiasi flash attivato da altre unità.
Il flash si attiva con l'intensità impostata.
Ruotare il selettore di compensazione
dell'esposizione/controllo dell'intensità
del flash per impostare l'intensità del
flash.
≥ È possibile selezionare un valore
compreso tra [1/1] (intensità massima) e [1/64].
[RC]
Il controllo wireless è disponibile per fotocamere digitali
Panasonic che supportano la modalità wireless. (P8)
8
SQT1378
Accensione della luce LED
Ruotare il selettore di
controllo dell'intensità della
luce LED.
Ruotando in direzione di 1:
Si riduce la quantità di luce o si disattiva la luce LED.
≥ Quando si ruota il selettore sino all'arresto, la luce LED si
spegne.
Ruotando in direzione di 2:
Si aumenta la quantità di luce.
≥ Il flash e le batterie possono diventare caldi se si tiene
accesa la luce LED, ma non si tratta di un
malfunzionamento.
Impostazioni del flash wireless
Il controllo wireless è disponibile su fotocamere digitali
Panasonic che supportano la modalità wireless. Vedere le
istruzioni per l'uso della fotocamera digitale per l'utilizzo della
fotocamera digitale durante lo scatto con flash wireless.
1 Impostare la fotocamera in
modalità wireless.
2 Impostare il flash sulla
modalità [RC].
“Modalità del flash” (P7)
Page 61

3 Ruotare la testa del flash.
4 Impostare il canale con il
selettore [CH].
• Impostare la fotocamera e il flash
sullo stesso canale.
5 Impostare il gruppo con il
selettore [GR].
• La fotocamera è in grado di
regolare le impostazioni del flash
sino a 3 gruppi separatamente;
scegliere il gruppo a cui appartiene il flash.
≥
Se risulta difficile fare scorrere il selettore, usare la punta di
una penna a sfera o uno strumento simile per farla scorrere.
≥ Dopo aver impostato il canale ed il gruppo, riportare la
testa del flash al suo angolo originale.
La modalità di scatto, la regolazione del flash e la
regolazione manuale del flash possono essere impostate
per ogni gruppo utilizzando la fotocamera.
≥ Il flash funzionerà come segue quando si imposta la
fotocamera con un'impostazione non supportata dal flash:
Fotocamera Flash
[Modalità Lampo]: [AUTO] Non scatta.
[FP wireless]: [ON] Scatta come normale.
Posizionamento di flash wireless
Dal momento che la comunicazione avviene con
l'emissione del flash della fotocamera, la distanza utile di
posizionamento del flash varia a seconda della fotocamera.
Per maggiori dettagli sulla distanza utile di posizionamento
del flash vedere le istruzioni per l'uso della fotocamera.
1 Installazione del supporto
in dotazione.
• Far scorrere la leva di bloccaggio
nella direzione opposta a quella
indicata dall'icona [LOCK 1] (1)
e far scorrere il flash nel supporto
finché non scatta completamente
nella corretta posizione (2).
• Far scorrere la leva di bloccaggio verso la posizione
[LOCK
1
• Per rimuovere il flash, far scorrere il meccanismo a
2 Posizionamento del flash
con il sensore wireless (
rivolto verso la fotocamera.
Dopo averlo posizionato,
eseguire uno scatto di prova.
≥ Si consiglia di utilizzare un singolo
gruppo composto al massimo da tre
flash remoti.
≥ È possibile che il flash non scatti a causa dell'angolo o
della distanza tra la fotocamera e l'oggetto.
] per far scattare il flash nella corretta posizione.
scatto nella direzione opposta a quella indicata dalla
freccia su [LOCK 1] ed estrarre il flash dal supporto.
A
)
SQT1378
9
ITALIANO
Page 62

Fissaggio dell’angolo di
90º
irradiazione
Puntare la testa del flash verso un muro
o soffitto per fotografie con flash di
rimbalzo.
Ruotare la testa del flash.
Utilizzo del diffusore
grandangolare
Utilizzare il diffusore
grandangolare in dotazione per
fotografie con il flash quando la
lunghezza focale dell'obiettivo è
inferiore a 12 mm.
Installare il diffusore
grandangolare sul flash.
≥ L'angolo di illuminazione sarà lo stesso dell'angolo di
visualizzazione di un obiettivo con una distanza focale di
7mm.
Modalità Servo
È possibile attivare il flash a distanza in sincrono con
qualsiasi flash attivato da altre unità.
10
SQT1378
1 Impostare la modalità del
flash su [SLAVE].
“Modalità del flash” (P7)
2 Posizionare il flash.
Il metodo di posizionamento del flash
è lo stesso della modalità wireless.
“Posizionamento di flash wireless”
(P9)
Per maggiori dettagli sulla distanza utile
di posizionamento del flash, vedere le
istruzioni per l’uso della fotocamera.
• Impostare la modalità del flash della
fotocamera su manuale in modo che non scatti il pre-flash.
Se la fotocamera scatta il pre-flash, il flash esterno si
sincronizza con il pre-flash della fotocamera e non emette
la luce del flash in modo corretto.
• È possibile che il flash scatti in risposta a flash utilizzati
da altri fotografi.
Precauzioni per l’uso
∫ Informazioni sull’unità
Non trasportare l'unità quando è ancora installata sul
corpo della fotocamera.
Raccomandiamo di posizionare l'unità nel contenitore
del flash per il trasporto.
≥ Posizionare l'unità nel contenitore del flash con la testa
del flash verso l'alto.
∫ Le batterie
Ricordarsi di rimuovere le batterie quando si prevede di
non utilizzare l'unità per un lungo periodo di tempo.
Page 63

Specifiche
È possibile che le specifiche subiscano delle modifiche
senza preavviso.
Requisiti di
alimentazione:
Batterie consigliate
Tem po di
caricamento
(da flash carico fino a
che si accende la
spia [CHARGE])
Tempo di scatto Circa da 1/10000 sec. a 1/250 sec.
N. di flash
(con flash carico)
CC 3,0 V (3,0 V )
Batterie secche alcaline LR6/AA k 2/
Batterie al nichel-idruro metallico
ricaricabili
Circa 5 sec.: Batterie secche
alcaline
Circa 3 sec.: Batterie al nichelidruro metallico ricaricabili
(Varia a seconda dell'intensità del
flash)
Circa 120 flash:
alcaline
Circa 200 flash: Batterie al nichelidruro metallico ricaricabili
(min. 2400 mAh)
(Differisce a seconda delle
condizioni di ripresa delle
fotografie.)
HR6/
LR6/AA
LR6/AA
AA (Ni-MH)k 2
HR6/
Batterie secche
HR6/
AA
AA
Luce di ausilio AF
Modalità del flash TTL AUTO/MANUAL/
Numero guida
Angolo di
illuminazione
Dimensioni
Massa Circa 230 g (batterie incluse)
Temperatura
operativa
Umidità operativa 10%RH a 80%RH (senza
I simboli su questo prodotto (compresi gli accessori)
rappresentano quanto segue:
CC
Distanza effettiva: circa da 1 m a 5 m
(Differisce a seconda della
fotocamera digitale e del tipo di
obiettivo utilizzato)
SL MANUAL/RC
20 (ISO100), 14 (ISO100: Quando
si utilizza il diffusore grandangolare)
Copre l'angolo di visualizzazione di
un obiettivo da 12 mm (equivalente
per fotocamera con pellicola
35 mm: 24 mm)
(Con diffusore grandangolare: obiettivo
da 7 mm, equivalente per fotocamera
con pellicola 35 mm: 14 mm)
Circa 61,0 mm (L)k52,5 mm
k
82,0 mm (P)
(A)
(escluse le parti sporgenti)
Circa 180 g (unità principale)
0°C a 40°C
condensa)
ITALIANO
SQT1378
11
Page 64

使用說明書
閃光燈
感謝您購買 Panasonic 產品。
使用本產品前請仔細閱讀這些說明,並保留本說明書供日後
使用。
目錄
安全注意事項 ................................... 2
注意事項 ....................................... 3
提供的附件 ..................................... 4
部件名稱 ....................................... 4
連續閃光 ....................................... 5
準備電池 (可選件)............................. 5
裝入電池 ....................................... 5
安裝到相機上 ................................... 5
開啟閃光燈 ..................................... 6
拍攝 ........................................... 6
閃光模式 ....................................... 7
點亮 LED 燈 .................................... 8
無線閃光設定 ................................... 8
放置無線閃光燈裝置 ............................. 9
固定發光角度 ................................... 9
使用廣角擴散片 ................................. 9
從動模式 ...................................... 10
使用時的注意事項 .............................. 10
規格 .......................................... 11
2
SQT1378
安全注意事項
警告:
為了降低起火、電擊或產品損壞的危險,
• 請勿讓本機遭受雨淋、受 潮、滴上或濺上水。
• 請勿將花瓶等盛滿液體的物品置於本機上。
• 請僅使用推薦的附件。
• 請勿卸下蓋子。
• 請勿自行維修本機。 請向有資格的維修人員請求維修。
注意!
為了降低起火、電擊或產品損壞的危險,
• 請勿將本機安裝或置於書櫃、壁櫥或其他密閉的空間裡。 請
確保本機通風良好。
Page 65

∫ 關於電池
注意
• 如果電池更換得不正確,會有發生爆炸的危險。 請僅用製造
商建議使用的類型的電池進行更換。
• 廢棄電池時,請與當地機構或經銷商聯繫,詢問正確的廢棄
方法。
• 請勿將電池加熱或接觸明火。
• 請勿將電池長時間放置在門窗緊閉受陽光直射的汽車內。
• 如果要使用可充電電池,建議使用Panasonic生產的可充電電池。
(對於台灣)
操作部中文表示對照表
注意事項
≥ 這是
Panasonic
光燈)。
可以用無線閃光進行拍攝。
用的功能也會有所不同。
的網站。
http://panasonic.jp/support/global/cs/dsc/
網站。)
∫ 本機的使用
≥ 請勿使本機受到強烈震動或撞擊。否則,不但可能會導致
本機出現故障,還可能會導致閃光燈頭破損。
≥ 沙子和污垢可能會導致本機出現故障。 在海灘等環境下使
用本機時,請採取措施防止沙子和污垢。
≥ 本機既不防塵也不防濺。 如果萬一水滴等濺到本機上,請 用
乾布將其擦去。 如果本機不能正常工作,請向經銷商或
Panasonic 諮詢。
≥ 調整閃光燈頭的角度時,請注意不要讓本
機夾到手指等。
≥ 請閱讀數位相機的使用說明書。
數位相機的外置閃光燈(在下文中被稱為閃
本閃光燈與支持無線模式的數位相機一起使用時,
根據所使用的數位相機不同,可
關於對應的數位相機,請訪問我們
(本網站為英文
中文 (繁體 )
SQT1378
3
Page 66

提供的附件
SFC0373 VFB0243 SFB0010
123
[ 打開包裝取出本機時要進行的確認 ]
從其包裝盒中取出本機時,請確認是否包含主機及提供的附
件,還要確認其外觀和功能,以確保它們在配送和運輸過程中
沒有受到任何損壞。
如果發現任何問題,請在使用本產品前與經銷商聯繫。
產品號碼截至 2016 年 4 月為準。此後可能會有變更。
部件名稱
1 閃光燈包
2 閃光燈座
3 廣角擴散片
≥ 電池為可選件。
4
SQT1378
1 閃光燈頭
2 AF 輔助燈 /LED 燈
3 無線感測器
4 [GR](群組)開關
5 [CH](頻道)開關
6 [ON/OFF] 按鈕
7 [CHARGE] 燈
8 [AUTO CHECK] 燈
9
閃光曝光補償/輸出控制轉盤
: LED 燈輸出控制轉盤
; [TEST] 按鈕
< 模式開關
= 鎖定開關
Page 67

連續閃光
連續多次閃光時閃光燈可能會變熱,導致損壞或故障。 閃光燈
應該以 2.5 秒的間隔連續閃光不超過 10 次,之後應該放置至
少 10 分鐘不使用。
準備電池(可選件)
從以下電池中選擇:
≥ LR6/AA 鹼性乾電池 (
≥ HR6/AA 可充電鎳氫電池 (Ni-MH) (
不能使用 R6/AA 錳乾電池。
建議使用 Panasonic 生產的電池。
k
2)
k
2)
裝入電池
≥ 請使用鹼性乾電池或可充電鎳氫電池。
1 轉動閃光燈頭。
2 朝 [2 OPEN] 指示的方向滑
動開關打開電池蓋。
3 以正確的 [r]/[s] 極性在絲
帶 (A) 上面插入電池。
•
通過拉絲帶,可以輕鬆地取出電池。
4 關閉電池蓋直到發出喀噠聲
到位為止。
•
請關閉電池蓋使得絲帶不會伸出來。
安裝到相機上
確認相機和閃光燈是否都關閉。 在閃光燈或相機開著時安裝或取下
閃光燈,可能會導致故障。
1 朝與 [LOCK 1] 圖示指示的方向相反的方向滑
動鎖定開關 (1)。
2 將閃光燈滑動到熱靴中,直到發出喀噠聲牢牢
地到位為止 (2)。
3 將鎖定開關滑動到 [LOCK 1] 位置 (3)。
≥
要取下閃光燈,朝與
關,將其從熱靴中滑出。
[LOCK1]
箭頭相反的方向滑動鎖定開
中文 (繁體 )
SQT1378
5
Page 68

開啟閃光燈
將閃光燈安裝到相機上,然後開啟相機。
1 [ON/OFF] 按鈕
2 [CHARGE] 燈
3 [AUTO CHECK] 燈
按 [ON/OFF] 按鈕。
≥
要關閉閃光燈,請再次按
≥ 如果在以下時間之後 [CHARGE] 燈不點亮,請更換電池:
30 秒(鹼性乾電池)
10 秒(可充電鎳氫電池)
≥ 如果 [CHARGE] 燈和 [AUTO CHECK] 燈同時閃爍,電池電
量低。 請更換電池。 使用電量耗盡的電池可能會導致故
障。
≥ 只要相機進入休眠模式,閃光燈也會進入休眠模式。
≥ 如果約 20 分沒有進行任何操作,閃光燈會自動關閉。 按
[ON/OFF] 按鈕會開啟。
≥ 給閃光燈充電時可能會輸出振動聲,但這並非故障。
6
SQT1378
[ON/OFF]
按鈕。
拍攝
1 [AUTO CHECK] 燈
1 使用相機的操作選擇閃光模式。
有關詳情,請參閱相機的使用說明書。
2 選擇閃光模式。
“ 閃光模式 ” (P7)
3 半按快門按鈕。
4 將快門按鈕繼續按下去拍攝圖片。
如果 [AUTO CHECK] 燈閃爍約 5 秒,本機會以適當的曝
光發光。
≥ 使用閃光燈時,閃光燈的光可能會被鏡頭機身、鏡頭遮光
罩等遮住。
≥
在
1 m (P9)
以下的範圍內,使用廣角擴散片會防止曝光過度。
Page 69

∫ 進行測試閃光
1
[CHARGE]
2
[TEST]
要進行測試閃光,在
[CHARGE]
燈點亮過程中按
閃光模式
根據被攝物體和拍攝條件選擇閃光
模式。
將模式開關設定到適當的位置。
[TTL] (TTL AUTO)
根據相機的設定自動控制閃光燈的光強度。
的鏡頭拍攝的亮度調整閃光燈。
常使用本模式。
轉動閃光曝光補償 / 輸出控制轉盤調整
閃光燈發光量。
≥ 可以通過選擇 j3EV和i3EV之間的
值來進行調整。
≥ 不進行調整時,請選擇 [0]。
用有通訊能力的相機時,通
燈
按鈕
[TEST]
按鈕。
會基於通過相機
[MANUAL]
閃光燈會以設定的強度閃光。
使用沒有通訊能力的相機時選擇本模式。
轉動閃光曝光補償 / 輸出控制轉盤設定
閃光燈發光量。
≥ 可以設定 [1/1] (完全閃光)和 [1/64]
之間的值。
[SLAVE] (SL MANUAL)
可以通過無線使其與其他閃光燈的光同步閃光。
閃光燈會以設定的強度閃光。
轉動閃光曝光補償 / 輸出控制轉盤設定
閃光燈發光量。
≥ 可以設定 [1/1] (完全閃光)和 [1/64]
之間的值。
[RC]
用支持無線模式的 Panasonic 數位相機時,無線控制可用。
(P8)
中文 (繁體 )
SQT1378
7
Page 70

點亮 LED 燈
轉動 LED 燈輸出控制轉盤。
朝 1 指示的方向轉動:
減少光量或者熄滅 LED 燈。
≥ 轉動轉盤直到停止時,LED 燈會熄
滅。
朝 2 指示的方向轉動:
增加光量。
≥ 如果讓 LED 燈一直開著,閃光燈和電池可能會變熱,但這
並非故障。
無線閃光設定
用支持無線模式的 Panasonic 數位相機時,無線控制可用。
有關無線閃光拍攝過程中的數位相機的操作,請參閱數位相
機的使用說明書。
1 將相機設定為無線模式。
2 將閃光燈設定為 [RC] 模式。
“ 閃光模式 ” (P7)
3 轉動閃光燈頭。
8
SQT1378
4 用 [CH] 開關設定頻道。
• 將相機和閃光燈設定為相同的頻
道。
5 用 [GR] 開關設定群組。
• 相機可以為最多 3 群組分別調整閃
光設定;選擇閃光燈所屬的群組。
≥ 如果難以滑動開關,請使用圓珠筆或
類似工具的前端進行滑動。
≥ 設定頻道和群組後,請將閃光燈頭返回到其原來的角度。
通過操作相機,可以為各群組設定閃光模式、閃光調整和手動
閃光調整。
≥
將相機設定為閃光燈不支持的設定時,閃光燈會如下工作:
相機 閃光燈
[閃燈模式]: [AUTO] 不閃光。
[無線 FP]: [ON] 像通常那樣閃光。
Page 71

放置無線閃光燈裝置
90º
由於通過相機的閃光燈的光進行通訊,因此根據相機不同,閃
光燈放置範圍也會有所不同。 有關閃光燈放置範圍的詳情,請
參閱相機的使用說明書。
1 安裝提供的座。
• 朝與 [LOCK 1] 圖示指示的方向相
反的方向滑動鎖定開關 (1),然後
將閃光燈滑動到座上直到發出喀噠
聲牢牢地到位為止 (2)。
• 將鎖定開關滑動到 [LOCK 1] 位置
將閃光燈鎖住。
• 要取下閃光燈,朝與[LOCK 1 ]箭頭相反的方向滑動鎖,將
其從座中滑出。
2 將無線感測器 (A) 朝向相機
來放置閃光燈。
放置後,請進行測試拍攝。
≥ 建議1群組使用最多3個遙控閃光燈裝
置。
≥ 由於相機與被攝物體之間的角度或距
離,閃光燈可能不閃光。
固定發光角度
可以將閃光燈頭朝向牆壁或天花板彈起
拍攝。
轉動閃光燈頭。
使用廣角擴散片
鏡頭的焦距從 12 mm 起在廣角
側閃光燈拍攝時,請使用提供的
廣角擴散片。
將廣角擴散片安裝到閃光
燈上。
≥ 照射角會與焦距 7mm的鏡頭的視角相同。
SQT1378
中文 (繁體 )
9
Page 72

從動模式
可以通過無線使其與其他閃光燈的光同步閃光。
1 將閃光模式設定為 [SLAVE]。
“ 閃光模式 ” (P7)
2 放置閃光燈。
閃光燈放置方法與無線模式的相同。
“ 放置無線閃光燈裝置 ” (P9)
有關閃光燈放置範圍的詳情,請 參 閱
相機的使用說明書。
• 將相機的閃光模式設定為不會預閃
的手動。 如果相機預閃,外置閃光
燈會與相機的預閃同步,無法使閃
光燈正確閃光。
• 閃光燈可能會對其他攝影者所使用的閃光燈裝置作出閃
光反應。
10
SQT1378
使用時的注意事項
∫ 關於本機
請勿在本機仍安裝在相機機身上的狀態下攜帶本機。
攜帶時,建議將本機放置在閃光燈包中。
≥ 請在閃光燈頭側朝上的狀態下將本機放置在閃光燈包中。
∫ 關於電池
長時間不使用本機時,請務必取出電池。
Page 73

規格
規格如有變更,恕不另行通知。
電源要求:
推薦使用的電池
充電時間
(從完全閃光到
[CHARGE] 燈點亮)
閃光期間 約 1/10000 秒至 1/250 秒
閃光次數
(完全閃光)
AF 輔助燈 有效距離: 約 1m至 5m
閃光模式
閃光指數 20 (ISO100)、14 (ISO100: 使用廣
照明角度 覆蓋 12 mm 鏡頭的視角(相當於
DC 3.0 V (3.0 V )
LR6/AA
鹼性乾電池k 2/
HR6/AA
可充電鎳氫電池
約 5 秒: LR6/AA 鹼性乾電池
約 3 秒: HR6/AA 可充電鎳氫電池
(根據閃光強度改變)
約 120 次閃光:
約 200 次閃光: HR6/AA 可充電鎳
氫電池
(最小 2400 mAh 類型)
(根據照片拍攝條件而有所不同。)
(根據數位相機和所使用的鏡頭的
類型而有所不同)
TTL AUTO/MANUAL/
SL MANUAL/RC
角擴散片時 )
35 mm 菲林相機: 24 mm)
(用廣角擴散片: 7 mm 鏡頭,相當
於 35 mm 菲林相機: 14 mm)
(Ni-MH)k 2
LR6/AA 鹼性乾電池
尺寸
重量 約 230 g(包括電池)
工作溫度 0°C至 40 °C
工作濕度 10%RH 至 80%RH(無水汽凝結)
本產品(包括附件)上的符號表示以下:
DC
約
61.0 mm
82.0 mm
(寬)k52.5 mm
(深)
k
(不包括突出部分)
約 180 g(主機)
(高)
中文 (繁體 )
SQT1378
11
Page 74

使用说明书
闪光灯
感谢您购买 Panasonic 产品。
请于使用前仔细阅读操作使用说明书,并将说
明书妥善保管,以备将来使用。
目录
安全注意事项 .......................... 2
注意事项 .............................. 3
提供的附件 ............................ 4
部件名称 .............................. 4
连续闪光 .............................. 5
准备电池 (可选件).................... 5
装入电池 .............................. 5
安装到相机上 .......................... 5
开启闪光灯 ............................ 6
拍摄 .................................. 6
闪光模式 .............................. 7
点亮 LED 灯 ........................... 8
无线闪光设置 .......................... 8
放置无线闪光灯装置 .................... 9
固定发光角度 .......................... 9
使用广角扩散片 ........................ 9
2
SQT1378
从动模式 ............................. 10
使用时的注意事项 ..................... 10
规格 ................................. 11
安全注意事项
警告 :
为了减少火灾、触电或产品损坏的危险,
•请勿让本机遭受雨淋、受潮、滴上或溅上
水。
•请勿将花瓶等盛满液体的物品置于本机上。
•请仅使用推荐的附件。
•请勿卸下盖子。
•请勿自行维修本机。 请向有资格的维修人
员请求维修。
注意!
为了减少火灾、触电或产品损坏的危险,
•请勿将本机安装或置于书柜、壁橱或其他
密闭的空间里。 请确保本机通风良好。
Page 75

∫ 关于电池
注意
•如果电池更换得不正确,会有发生爆炸的
危险。 请仅用制造商建议使用的类型的电
池进行更换。
•废弃电池时,请与当地机构或经销商联系,
询问正确的废弃方法。
•请勿将电池加热或接触明火。
•请勿将电池长时间放置在门窗紧闭受阳光直
射的汽车内。
•如果要使用可充电电池,建议使用 Panasonic
生产的可充电电池。
注意事项
≥ 这是 Panasonic 数码相机的外置闪光灯 (在
下文中被称为闪光灯)。 本闪光灯与支持无线
模式的数码相机一起使用时,可以用无线闪
光进行拍摄。 根据所使用的数码相机不同,
可用的功能也会有所不同。 关于对应的数码
相机,请访问我们的网站。
http://panasonic.jp/support/global/cs/dsc/
(本网站为英文网站。)
本机的使用
∫
≥
请勿使本机受到强烈震动或撞击。否则,不但可能
会导致本机出现故障,还可能会导致闪光灯头破损。
≥
沙子和污垢可能会导致本机出现故障。 在海滩等
环境下使用本机时,请采取措施防止沙子和污垢。
≥
本机既不防尘也不防溅。 如果万一水滴等溅
到本机上,请用干布将其擦去。
正常工作,请向经销商或
≥ 调整闪光灯头的角度时,请注意
不要让本机夹到手指等。
≥ 请阅读数码相机的使用说明书。
如果本机不能
Panasonic
咨询。
中文 (简体)
SQT1378
3
Page 76

提供的附件
SFC0373 VFB0243 SFB0010
123
[ 打开包装取出本机时要进行的确认 ]
从其包装盒中取出本机时,请确认是否包含主机
及提供的附件,还要确认其外观和功能,以确保
它们在配送和运输过程中没有受到任何损坏。
如果发现任何问题,请在使用本产品前与经销
商联系。
产品号码截至 2016 年 4 月为准。此后可能会
有变更。
部件名称
闪光灯包
1
2 闪光灯座
原产地 : 日本
广角扩散片
3
≥ 部分附件使用了中国以外原产地的产品。
≥ 电池为可选件。
4
SQT1378
1闪光灯头
2AF 辅助灯 /LED 灯
3无线传感器
4[GR](组)开关
5[CH](通道)开关
6[ON/OFF] 按钮
9闪光曝光补偿 / 输出
控制转盘
:LED灯输出控制转盘
;[TEST] 按钮
<模式开关
=锁定开关
7[CHARGE] 灯
8[AUTO CHECK] 灯
Page 77

连续闪光
连续多次闪光时闪光灯可能会变热,导致损坏或
闪光灯应该以
故障。
过
10
次,之后应该放置至少10分钟不使用。
2.5
秒的间隔连续闪光不超
准备电池(可选件)
从以下电池中选择 :
≥ LR6/AA 碱性干电池 (k 2)
≥ HR6/AA 可充电镍氢电池 (Ni-MH) (k 2)
不能使用 R6/AA 锰干电池。
建议使用 Panasonic 生产的电池。
装入电池
≥ 请使用碱性干电池或可充电镍氢电池。
1 转动闪光灯头。
2朝[2 OPEN]
向滑动开关打开电池盖。
指示的方
3
以正确的[r
(A)
丝带
•通过拉丝带,可以轻松地
取出电池。
]/[s]
极性在
上面插入电池。
4 关闭电池盖直到发出喀
哒声到位为止。
•请关闭电池盖使得丝带不会伸出来。
安装到相机上
确认相机和闪光灯是否都关闭。 在闪光灯或相
机开着时安装或取下闪光灯,可能会导致故障。
1 朝与 [LOCK 1] 图标指示的方向相反
的方向滑动锁定开关 (1)。
2 将闪光灯滑动到热靴中,直到发出喀
哒声牢牢地到位为止 (2)。
3 将锁定开关滑动到 [LOCK 1] 位置
(3)。
≥ 要取下闪光灯,朝与 [LOCK1] 箭头相反的方
向滑动锁定开关,将其从热靴中滑出。
SQT1378
5
中文 (简体)
Page 78

开启闪光灯
将闪光灯安装到相机上,然后开启相机。
1[ON/OFF] 按钮
2[CHARGE] 灯
3[AUTO CHECK] 灯
按 [ON/OFF] 按钮。
≥ 要关闭闪光灯,请再次按 [ON/OFF] 按钮。
≥ 如果在以下时间之后 [CHARGE]灯不点亮,请
更换电池 :
30 秒(碱性干电池)
10 秒(可充电镍氢电池)
≥ 如果 [CHARGE] 灯和 [AUTO CHECK] 灯同时
闪烁,电池电量低。 请更换电池。 使用电量
耗尽的电池可能会导致故障。
≥ 只要相机进入睡眠模式,闪光灯也会进入睡
眠模式。
≥ 如果约 20 分没有进行任何操作,闪光灯会自
动关闭。按 [ON/OFF] 按钮会开启。
≥ 给闪光灯充电时可能会输出振动声,但这并
非故障。
6
SQT1378
拍摄
1[AUTO CHECK] 灯
1 使用相机的操作选择闪光模式。
有关详情,请参阅相机的使用说明书。
2 选择闪光模式。
“ 闪光模式 ” (P7)
3 半按快门按钮。
4 将快门按钮继续按下去拍摄图像。
如果 [AUTO CHECK] 灯闪烁约 5 秒,本机会
以适当的曝光发光。
≥ 使用闪光灯时,闪光灯的光可能会被镜头机
身、镜头遮光罩等遮住。
≥ 在 1 m (P9) 以下的范围内,使用广角扩散片会
防止曝光过度。
Page 79

∫ 进行测试闪光
1[CHARGE] 灯
2[TEST] 按钮
要进行测试闪光,在
[CHARGE]
灯点亮过程中按
闪光模式
根据被摄物体和拍摄条件选
择闪光模式。
将模式开关设置到适当
的位置。
[TTL] (TTL AUTO)
根据相机的设置自动控制闪光灯的光强度。 会
基于通过相机的镜头拍摄的亮度调整闪光灯。
用有通信能力的相机时,通常使用本模式。
转动闪光曝光补偿 / 输出控制
转盘调整闪光灯发光量。
≥ 可以通过选择 j3EV和
i3EV之间的值来进行调整。
≥ 不进行调整时,请选择 [0]。
[TEST]
按钮。
[MANUAL]
闪光灯会以设置的强度闪光。
使用没有通信能力的相机时选择本模式。
转动闪光曝光补偿 / 输出控制
转盘设置闪光灯发光量。
≥ 可以设置 [1/1] (完全闪光)
和 [1/64] 之间的值。
[SLAVE] (SL MANUAL)
可以通过无线使其与其他闪光灯的光同步闪光。
闪光灯会以设置的强度闪光。
转动闪光曝光补偿 / 输出控制
转盘设置闪光灯发光量。
≥ 可以设置 [1/1] (完全闪光)
和 [1/64] 之间的值。
[RC]
用支持无线模式的 Panasonic 数码相机时,
无线控制可用。 (P8)
SQT1378
中文 (简体)
7
Page 80

点亮 LED 灯
转动
LED
灯输出控制转盘。
朝 1 指示的方向转动 :
减少光量或者熄灭 LED 灯。
≥ 转动转盘直到停止时, LED
灯会熄灭。
朝 2 指示的方向转动 :
增加光量。
≥ 如果让 LED 灯一直开着,闪光灯和电池可能
会变热,但这并非故障。
无线闪光设置
用支持无线模式的 Panasonic 数码相机时,无
线控制可用。 有关无线闪光拍摄过程中的数码
相机的操作,请参阅数码相机的使用说明书。
1
将相机设置为无线模式。
2
将闪光灯设置为
“ 闪光模式 ” (P7)
8
SQT1378
[RC]
模式。
3 转动闪光灯头。
4 用 [CH] 开关设置通道。
•将相机和闪光灯设置为相
同的通道。
5 用 [GR] 开关设置组。
•
相机可以为最多3组分别调整闪
光设置;选择闪光灯所属的组。
≥ 如果难以滑动开关,请使用
圆珠笔或类似工具的前端进行滑动。
≥
设置通道和组后,请将闪光灯头返回到其原来的角度。
通过操作相机,可以为各组设置闪灯模式、闪
光调整和手动闪光调整。
≥ 将相机设置为闪光灯不支持的设置时,闪光
灯会如下工作 :
相机 闪光灯
[闪灯模式]: [AUTO] 不闪光。
[无线 FP]: [ON] 像通常那样闪光。
Page 81

放置无线闪光灯装置
由于通过相机的闪光灯的光进行通信,因此根
据相机不同,闪光灯放置范围也会有所不同。
有关闪光灯放置范围的详情,请参阅相机的使
用说明书。
1 安装提供的座。
•朝与 [LOCK 1] 图标指示的
方向相反的方向滑动锁定
开关 (1),然后将闪光灯滑
动到座上直到发出喀哒声
牢牢地到位为止 (2)。
•将锁定开关滑动到 [LOCK 1] 位置将闪光灯
锁住。
•要取下闪光灯,朝与 [LOCK 1] 箭头相反的
方向滑动锁,将其从座中滑
出。
2 将无线传感器 (A) 朝向
相机来放置闪光灯。
放置后,请进行测试拍摄。
≥ 建议 1 组使用最多 3 个遥控闪
光灯装置。
≥ 由于相机与被摄物体之间的
角度或距离,闪光灯可能不
闪光。
固定发光角度
可以将闪光灯头朝向墙壁或天
花板弹起拍摄。
转动闪光灯头。
90º
使用广角扩散片
镜头的焦距从 12 mm 起
在广角侧闪光灯拍摄时,
请使用提供的广角扩散
片。
将广角扩散片安装到
闪光灯上。
≥ 照射角会与焦距 7mm的镜头的视角相同。
SQT1378
中文 (简体)
9
Page 82

从动模式
可以通过无线使其与其他闪光灯的光同步闪
光。
1 将闪光模式设置为
[SLAVE]。
“ 闪光模式 ” (P7)
2 放置闪光灯。
闪光灯放置方法与无线模式
的相同。
“ 放置无线闪光灯装置 ” (P9)
有关闪光灯放置范围的详
情,请参阅相机的使用说明
书。
•将相机的闪光模式设置为不会预闪的手动。
如果相机预闪,外置闪光灯会与相机的预闪
同步,无法使闪光灯正确闪光。
•闪光灯可能会对其他摄影者所使用的闪光灯
装置作出闪光反应。
10
SQT1378
使用时的注意事项
∫ 关于本机
请勿在本机仍安装在相机机身上的状态下携带
本机。
携带时,建议将本机放置在闪光灯包中。
≥ 请在闪光灯头侧朝上的状态下将本机放置在
闪光灯包中。
关于电池
∫
长时间不使用本机时,请务必取出电池。
Page 83

规格
规格如有变更,恕不另行通知。
电源要求 :
推荐使用的电池 LR6/AA 碱性干电池 k 2/
充电时间
(从完全闪光到
[CHARGE] 灯点
亮)
闪光期间 约 1/10000 秒至 1/250 秒
闪光次数
(完全闪光)
AF 辅助灯 有效距离 : 约 1m至 5m
DC 3.0 V (3.0 V )
HR6/AA 可充电镍氢电池
(Ni-MH)k 2
约 5 秒 : LR6/AA 碱性干电
池
约 3 秒 : HR6/AA 可充电镍
氢电池
(根据闪光强度改变)
约 120 次闪光 :
性干电池
约 200 次闪光 : HR6/AA 可
充电镍氢电池(最小
2400 mAh 类型)
(根据照片拍摄条件而有所不同。)
(根据数码相机和所使用的
镜头的类型而有所不同)
LR6/AA
闪光模式
闪光指数 20 (ISO100)、14 (ISO100:
照明角度 覆盖 12 mm 镜头的视角
尺寸
重量 约 230 g(包括电池)
碱
工作温度 0°C至 40 °C
工作湿度
本产品(包括附件)上的符号表示以下 :
DC
TTL AUTO/MANUAL/
SL MANUAL/RC
使用广角扩散片时 )
(相当于 35 mm 胶片相机 :
24 mm)
(用广角扩散片 : 7 mm 镜
头,相当于 35 mm 胶片相
机 : 14 mm)
约
61.0 mm
(高)k82.0 mm
(不包括突出部分)
约 180 g(主机)
10%RH至80%RH
(宽)k52.5 mm
(深)
(无水汽凝结)
SQT1378
11
中文 (简体)
Page 84

产品中有害物质的名称及含量
有害物质
部件名称
外壳、构造
印刷基板组件
闪光灯座
广角扩散片
铅
(Pb)汞(Hg)镉(Cd)
○○○ ○ ○ ○
×○○ ○ ○ ○
○○○ ○ ○ ○
○○○ ○ ○ ○
六价铬
(Cr(Ⅵ))
多溴联苯
(PBB)
多溴二苯醚
(PBDE)
本表格依据 SJ/T11364 的规定编制。
○ :表示该有害物质在该部件所有均质材料中的含量均在 GB/T26572 规定的限量要求以下。
× :表示该有害物质至少在该部件的某一均质材料中的含量超出 GB/T26572 规定的限量要求。
对于表示“×”的情况,属于欧盟 RoHS 指令的豁免项目。
12
SQT1378
Page 85

2016ᒤ4ᴸ㹼
൘ѝഭঠࡧ
Web Site: http://www.panasonic.com
中文 (简体)
SQT1378
13
Page 86

사용설명서
플래시
Panasonic 제품을 구입해 주셔서 감사합니다 .
이 제품을 사용하기 전에 이 지침을 주의 깊게 읽어보시고 이
설명서를 나중에 사용할 수 있도록 잘 보관하십시오 .
목차
안전을 위한 정보................................................ 2
주의사항 .......................................................... 3
부속품 ............................................................. 4
부품명 ............................................................. 4
연속 발광 ......................................................... 5
배터리 준비하기 ( 옵션 ) ..............................................5
배터리 장착하기 ................................................ 5
카메라에 부착하기 ............................................. 5
플래시 켜기 ...................................................... 6
촬영하기 .......................................................... 6
플래시 모드 ...................................................... 7
LED 조명 켜기................................................... 8
무선 플래시 설정................................................ 8
무선 플래시 기기 설치......................................... 9
발광 각도 조절하기............................................. 9
와이드 패널 사용하기.......................................... 9
종속 모드 ........................................................10
사용상의 주의 ..................................................10
사양 ...............................................................11
2
SQT1378
안전을 위한 정보
경고 :
화재 위험이나 감전, 제품의 손상을 방지하려면 ,
• 기기를 비, 습기 , 물이 떨어지거나 튀는 곳에 두지 마십시오.
• 기기 위에 꽃병과 같이 액체가 들어있는 물건을 두지 마십시
오 .
• 권장 부속품만 사용하십시오 .
• 커버를 제거하지 마십시오 .
• 기기를 직접 수리하지 마십시오 . 서비스는 자격을 갖춘 서비
스 직원에게 의뢰하십시오 .
주의 !
화재 위험이나 감전, 제품의 손상을 방지하려면
• 기기를 책장, 붙박이 수납장 또는 다른 좁은 공간에
설치하거나 두지 마십시오 . 반드시 통풍이 잘 되는
곳에 두십시오 .
,
Page 87

∫ 배터리에 관하여
주의
•
배터리를 잘못 교체하면 폭발할 위험이 있습니다. 제조업체
권장하는 유형의 배터리만 사용하여 교체하십시오
에서
.
• 배터리를 폐기처분할 경우에는 사용하는 지역의 공
공기관이나 판매점에 문의하여 적절한 폐기처분 방
법을 문의하시기 바랍니다 .
• 가열하거나 화염에 노출시키지 마십시오.
• 문과 창문이 닫힌 차량 내에서 배터리를 오랫동안 직사
광선에 노출시키지 마십시오 .
• 충전식 배터리를 사용 시에는 Panasonic 제조 충전식
배터리를 사용하는 것이 좋습니다 .
기종별 사용자 안내문
B 급기기
(
가정용 방송
통신기자재
이 기기는 가정용(B급) 전자파적합기기로
서
주로
)
가정에서 사용하는 것을 목적으로
하며, 모든 지역에서 사용할 수 있습니다
.
∫ MSIP 제품정보
기기의명칭 ( 모델명 ): 플래시
전국서비스대표번호 : 1588-8452 ( 파나소닉 )
제조자 : 파나소닉 주식회사
제조국가 : 중국
인증받은자의상호 : 파나소닉코리아 ( 주 )
(DMW-FL200L)
주의사항
≥ 이 것은 Panasonic 디지털 카메라용 외장플래시입니다 ( 이
후에는 플래시로 표기 ). 본 플래시를 무선 모드가 지원되
는 디지털 카메라와 함께 사용하면 무선 플래시로 촬영하
는 것이 가능합니다 . 사용 가능한 기능들은 사용하는 디지
털 카메라에 따라 다릅니다 . 대응되는 디지털 카메라에 관
하여는 저희 웹사이트를 방문해 주시기 바랍니다 .
http://panasonic.jp/support/global/cs/dsc/
( 본 사이트는 영어로만 되어 있습니다 .)
∫ 기기 취급법
≥ 기기에 강한 진동이나 충격을 주지 마십시오 . 기기가 오작
동을 일으킬 뿐만 아니라 플래시 헤드가 부서질 수도 있습
니다 .
≥ 모래나 흙은 기기 오작동을 일으킬 수 있습니다. 기기를 해
변과 같은 곳에서 사용할 경우에는 모래나 흙으로부터 보
호하는 조치를 취하십시오 .
≥ 본 기기는 방진 기능이나 물튀김 방지 기능이 없습니다. 만
약 물방울 등이 기기에 떨어지면 마른 천으로 닦아내
오 . 기기가 제대로 작동되지 않으면 대리점이나
Panasonic 에 문의하십시오 .
≥ 플래시 헤드 각도를 조절할 때 기기에 손
이 끼이지 않도록 조심하십시오 .
≥ 사용자의 디지털 카메라 사용설명서를 읽
으십시오 .
십시
한국어
SQT1378
3
Page 88

부속품
SFC0373 VFB0243 SFB0010
123
[ 기기 포장을 풀 때 하는 검사 ]
기기를 포장 박스에서 뺄 때는 메인 기기 및 부속품이 있는지
확인하고 외관 및 기능을 확인하여 유통 및 운송 중에 손상을
받지 않았는지 확인하십시오 .
문제가 발견되면 제품을 사용하기 전에 판매점에 연락하십
시오 .
제품번호는 2016 년 4 월 현재 기준입니다 . 변경될 수 있습
니다 .
1 플래시 케이스
2 플래시 스탠드
3 와이드 패널
≥ 배터리는 옵션입니다 .
4
SQT1378
부품명
1 플래시 헤드
2 AF 보조 램프 /LED 조명
3 무선 센서
4 [GR] ( 그룹 ) 스위치
5 [CH] ( 채널 ) 스위치
6 [ON/OFF] 버튼
7 [CHARGE] 램프
8 [AUTO CHECK] 램프
9 플래시 노출 보정 / 출력 조
절 다이얼
: LED 조명 출력 조절 다이
얼
; [TEST] 버튼
< 모드 레버
= 잠금 레버
Page 89

연속 발광
플래시가 연속으로 여러 번 켜지면 열이 발생할 수 있으며 손
상이나 오작동을 일으킬 수 있습니다 . 플래시는 적어도 10
분 동안 사용하지 않은 채로 둔 후 2.5 초 간격으로 연속으로
10 번 이상 켜지지 말아야 합니다 .
배터리 준비하기(옵션
아래의 배터리 중에서 선택하십시오 :
≥ LR6/AA 알카라인 건전지 (
≥ HR6/AA 충전식 니켈금속수소화합물 전지 (Ni-MH) (
R6/AA 망간 건전지는 사용할 수 없습니다 .
Panasonic 제조 배터리 사용을 권 장합니다 .
k
2)
)
k
2)
배터리 장착하기
≥ 알카라인 건전지나 충전식 니켈금속수소화합물 전지를 사
용하십시오 .
1 플래시 헤드를 돌리십시오 .
2
레버를 [2
돌려 배터리 커버를 여십시오
OPEN]
방향으로
.
3 정확한 [r]/[s] 극성이 되도
록 배터리들을 리본(A) 위로
넣으십시오 .
• 리본을 당기면 배터리들을 쉽게
꺼낼 수 있습니다 .
4 딸깍하고 맞게 끼워질 때까
지 배터리 커버를 닫으십시오 .
• 리본이 튀어나오지 않도록 배터리 커버를 닫으십시오 .
카메라에 부착하기
카메라와 플래시가 모두 꺼져 있는지 확인하십시오 . 플래시
또는 카메라가 켜져 있는 동안 플래시를 장착하거나 탈착하
면 오작동을 일으킬 수 있습니다 .
1 잠금 레버를 [LOCK 1] 아이콘 (1) 에 표기된
반대 방향으로 미십시오 .
2 플래시를 핫슈 안에 밀어 넣어 딸깍 소리가 날
때까지 미십시오 (2).
3 잠금 레버를 [LOCK 1] 위치 (3) 로 미십시오 .
≥ 플래시를 빼려면 잠금 레버를 [LOCK1] 화살표와 반대 방
향으로 밀어 슈에서 미십시오 .
한국어
SQT1378
5
Page 90

플래시 켜기
플래시를 카메라에 부착한 후 카메라를 켜십시오 .
1 [ON/OFF] 버튼
2 [CHARGE] 램프
3 [AUTO CHECK] 램프
[ON/OFF] 버튼을 누르십시오 .
≥
플래시를 끄려면
≥ [CHARGE] 램프에 불이 켜지 지 않으면 배터리를 교체하십
시오 :
30 초 후 ( 알카라인 건전지 )
10 초 후 ( 충전식 니켈금속수소화합물 전지 )
≥ [CHARGE] 램프 및 [AUTO CHECK] 램프가 동시에 깜박이
면 배터리 전원이 약해진 것입니다 . 배터리를 교체하십시
오 . 상당히 소모된 배터리를 사용하면 오작동을 일으킬 수
있습니다 .
≥ 카메라가 대기 모드로 들어갈 때마다 플래시가 대기 모드
로 들어갑니다 .
≥ 약 20 분 동안 아무 조작도 하지 않으면 플래시가 자동으로
꺼집니다 . [ON/OFF] 버튼 을 눌러 켜
시 충전 중에는 진동음이 들릴 수 있으나 오작동이 아
≥ 플래
닙니다 .
6
SQT1378
[ON/OFF]
버튼을 다시 누르십시오
십시오 .
촬영하기
1 [AUTO CHECK] 램프
1 카메라 조작을 이용하여 플래시 모드를 선택하
.
십시오 .
자세한 사항은 카메라 사용설명서를 참조하십시오 .
2 플래시 모드를 선택하십시오 .
“ 플래시 모드 ” (P7)
3 셔터 버튼을 반쯤 누르십시오 .
4 나머지 셔터 버튼을 완전히 눌러 사진을 촬영하
십시오 .
[AUTO CHECK] 램프가 약 5 초 동안 반짝이면 기기가 적
절한 노출로 빛을 방출합니다 .
≥ 플래시 사용 시 플래시 불빛이 렌즈 본체 , 렌즈 후드 등에
의해 가려질 수 있습니다 .
≥ 와이드 패널을 사용하면 1 m (P9) 이하 범위에서 과노출을
방지할 수 있습니다 .
Page 91

∫ 테스트 플래시 터뜨리기
1 [CHARGE] 램프
2 [TEST] 버튼
테스트 플래시를 터뜨리려면 [CHARGE] 램프가 켜져 있는
동안 [TEST] 버튼을 누르십시오 .
플래시 모드
피사체 및 촬영 조건에 따라 플래시
모드를 선택하십시오 .
모드 레버를 알맞은 위치로
설정하십시오 .
[TTL] (TTL AUTO)
플래시 조명 밝기는 카메라 설정에 따라 자동으로 조절됩
니다 . 플래시는 카메라 렌즈를 통해 촬영되는 밝기를 기본
으로 조절됩니다 . 본 모드는 일반적으로 통신 기능이 있는
카메라로 사용하십시오 .
플래시 노출 보정 / 출력 조절 다이얼을
돌려 플래시 출력을 조절하십시오 .
≥j3EV와 i3 EV 사이의 값을 선택하
여 조절을 할 수 있습니다 .
≥ 조절을 하지 않을 경우에는 [0] 을 선
택하
십시오 .
[MANUAL]
플래시가 사용자가 설정한 강도로 터집니다 .
통신 기능이 없는 카메라를 사용할 경우에 본 모드를 선택
하십시오 .
플래시 노출 보정 / 출력 조절 다이얼을
돌려 플래시 출력을 설정하십시오 .
≥ [1/1] (풀 플래시)과 [1/64] 사이의 값을
설정할 수 있습니다 .
[SLAVE] (SL MANUAL)
다른 기기에서 나오는 플래시와 함께 원격으로 플래시가
터집니다 .
플래시가 사용자가 설정한 강도로 터집니다 .
플래시 노출 보정 / 출력 조절 다이
돌려 플래시 출력을 설정하십시오 .
≥ [1/1] (풀 플래시)과 [1/64] 사이의 값을
설정할 수 있습니다 .
[RC]
무선 모드를 지원하는 Panasonic 디지털 카메라로 무선 조
절이 가능합니다 . (P8)
얼을
한국어
SQT1378
7
Page 92

LED 조명 켜기
LED 조명 출력 조절 다이얼을
돌리십시오 .
1 방향으로 돌리기 :
빛의 양이 줄어들거나 LED 조명이 꺼
집니다 .
≥ 다이얼이 멈출 때까지 돌리면 LED 조명이 꺼집니다 .
2 방향으로 돌리기 :
빛의 양이 늘어납니다 .
≥ LED 조명을 켜둔 상태로 두면 플래시와 배터리에 열이 발
생할 수 있으나 오작동이 아닙니다 .
무선 플래시 설정
무선 모드를 지원하는 Panasonic 디지털 카메라로 무선 조
절이 가능합니다 . 무선 플래시 촬영 중 디지털 카메라 조작
에 관하여는 디지털 카메라의 사용설명서를 참조하십시오 .
1 카메라를 무선 모드로 설정하
십시오 .
2 플래시를 [RC] 모드로 설정하
십시오 .
“ 플래시 모드 ” (P7)
3 플래시 헤드를 돌리십시오 .
8
SQT1378
4 [CH] 스위치로 채널을 설정하
십시오 .
• 카메라와 플래시를 같은 채널로 설
정하십시오 .
5[GR] 스위치로 그룹을 설정하
십시오 .
• 카메라가 플래시 설정을 최대 3 개
의 그룹으로 제각각 조절 가능합니
다 ; 플래시가 속하는 그룹을 선택
하십시오 .
≥ 스위치를 미는 것이 어려 우면 볼펜의 끝 등과 같은 도구를
사용하여 미십시오 .
≥ 채널과 그룹을 설정 한 후 플래시 헤드를 원래의 각도로 되
돌리십시오 .
카메라를 조작하여 각각의 그룹에 대해 발광 모드 , 플래시
조절 및 수동 플래시 조절을 설정할 수 있습니
에 의해 지원되지 않는 설정으로 카메 라를 설정할
≥ 플래시
경우에는 플래시가 다음과 같이 작동됩니다 :
카메라 플래시
[조명 모드]: [AUTO] 터지지 않습니다 .
[무선 FP]: [ON] 일반으로 터집니다 .
다 .
Page 93

무선 플래시 기기 설치
플래시 터짐과 함께 통신이 되기 때문에 플래시 설치 범위는
카메라에 따라 다릅니다 . 플래시 설치 범위에 관한 자세한
사항은 카메라 사용설명서를 참조하십시오 .
1
부속 스탠드를 장착하십시오
• 잠금 레버를 [LOCK 1] 아이콘과
반대 방향 (1) 으로 밀고 플래시를
딸깍 소리가 날 때까지 스탠드로
밀어 자리를 잘 잡도록 하십시오
(2).
• 잠금 레버를 [LOCK 1] 위치로 밀어 플래시가 제자리에
걸리도록 하십시오 .
• 플래시를 빼려면 걸쇠를 [LOCK1] 화살표와 반대 방향
으로 밀어 스탠드에서 미십시오 .
2 무선 센서 (A) 가 카메라를 향
하도록 하여 플래시를 설치하
십시오 .
설치 후 테스트 촬영을 하십시오 .
≥ 최대 3 개까지 원격 플래시 기기를 하
나의 그룹으로 사용하는 것이 좋습니
다 .
≥ 각도나 카메라와 피사체 사이의 거리
로 인해 플래시가 터지지 않을 수 있
습니다 .
.
발광 각도 조절하기
플래시 헤드가 벽이나 천정을 향하도록
하여 바운스 촬영을 합니다 .
플래시 헤드를 돌리십시오 .
와이드 패널 사용하기
렌즈의 초점 거리가 12 mm보다
와이드 쪽일 때 플래시 촬영할
경우에는 부속 와이드 패널을 사
용하십시오 .
와이드 패널을 플래시에 부
착하십시오 .
≥ 조명 각도가 초점 거리
7 mm의 렌즈
90º
시야각과 같게 됩니다
SQT1378
한국어
.
9
Page 94

종속 모드
다른 기기에서 나오는 플래시와 함께 원격으로 플래시가 터
집니다 .
1 플래시 모드를 [SLAVE] 로 설
정하십시오 .
“ 플래시 모드 ” (P7)
2 플래시를 설치하십시오 .
플래시 설치 방법은 무선 모드와 같
습니다 .
“ 무선 플래시 기기 설치 ” (P9)
플래시 설치 범위에 관한 자세한 사
항은 카메라 사용설명서를 참조하
십시오 .
•
카메라의 플래시 모드를 1차 플래
시가
터지지 않는 수동으로 설정하십시오. 카메라에서
차 플래시가 터지면 외장플래시가 카메라의 1차 플래시
와
동기화되어 플래시 불빛이 적절히 터지지 않습니다
• 다른 사진기의 플래시 기기에 반응하여 플래시가 터질
수 있습니다 .
10
SQT1378
사용상의 주의
∫ 기기에 관하여
기기가 카메라 본체에 부착되어 있을 때 기기를 휴대하지 마
십시오 .
휴대 시에는 기기를 플래시 케이스 안에 두는 것이 좋습니다
≥ 기기를 플래시 헤드 쪽을 위로 하여 플래시 케이스 안에 보
관하십시오 .
∫ 배터리에 관하여
기기를 오랫동안 사용하지 않을 경우에는 반드시 배터리를
빼십시오 .
1
.
.
Page 95

사양
Panasonic Korea Ltd.
사양은 예고없이 변경될 수 있습니다 .
필요 전원
권장 배터리
충전시간
( 풀 플래시에서
[CHARGE] 램프에 불
이 켜질 때까지 )
발광 시간 약 1/10000 초에서 1/250 초
플래시 횟수
( 풀 플래시로 )
AF 보조램프 유효 거리 : 약 1 m 에서 5 m
플래시 모드
가이드 번호 20 (ISO100), 14 (ISO100: 와이드
:
DC 3.0 V (3.0 V )
LR6/AA
알카라인 건전지 k
HR6/AA 충전식 니켈금속수소화합
물 전지 (Ni-MH)
약 5 초 : LR6/AA 알카라인 건전지
약 3 초 : HR6/AA 충전식 니켈금속
수소화합물 전지
( 플래시 강도에 따라 달라집니다 )
약 120 회 :
지
약 200 회 : HR6/AA 충전식 니켈 금
속수소화합물 전지 (min. 2400 mAh
타입 )
( 사진 촬영 조건에 따라 다릅니다 .)
( 사용하는 디지털 카메라 및 렌즈
유형에 따라 다름 )
TTL AUTO/MANUAL/
SL MANUAL/RC
패널 사용 시 )
k 2
LR6/AA
알카라인 건전
발광 각도 12 mm 시야각을 커버합니다
치수
2/
중량 약 230 g ( 배터리 포함 )
작동 가능한 온도 0°C에서 40 °C
작동 가능한 습도 10%RH 에서 80%RH ( 응결 없음 )
본 제품 ( 액세서리 포함 ) 의 심볼은 다음을 나타냅니다 :
DC
(35 mm 필름 카메라 환산 : 24 mm)
( 와이드 패널 시 : 7 mm 렌즈 ,
35 mm 필름 카메라 환산 : 14 mm)
약
61.0 mm (W)k52.5 mm
k
82.0 mm (D)
(H)
돌출 부위 제외
(
약 180 g ( 메인 기기 )
)
SQT1378
한국어
11
Page 96

Инструкция по эксплуатации
ВСПЫШКА
Благодарим за приобретение продукции Panasonic.
Перед использованием этого изделия, пожалуйста,
внимательно прочитайте данные инструкции и сохраните
это руководство для дальнейшего использования.
Оглавление
Информация для вашей безопасности .................... 2
Предостережения ...................................................... 3
Дополнительные принадлежности, которые
поставляются в комплекте ........................................4
Названия частей ........................................................ 4
Непрерывное срабатывание .....................................5
Подготовка аккумулятора (поставляется отдельно)
Установка аккумуляторов ..........................................5
Прикрепление к фотокамере ....................................5
Включение вспышки................................................... 6
Съемка ........................................................................6
Режим вспышки .......................................................... 7
Включение светодиодной лампочки......................... 8
Настройки беспроводного управления вспышкой
Размещение беспроводных вспышек....................... 9
Определение угла освещения
Использование широкоугольной панели ................. 9
Режим ведомой вспышки ........................................ 10
Предосторожности при использовании .................. 10
Технические характеристики...................................11
2
SQT1378
.....................................9
.... 5
...... 8
Информация для вашей
безопасности
ПРЕДУПРЕЖДЕНИЕ:
Для снижения риска пожара, удара
электрическим током или повреждения изделия:
• Берегите это устройство от воздействия дождя,
влажности, капель и брызг.
• Не ставьте на это устройство емкости с водой,
например вазы.
• Используйте только рекомендуемое
дополнительное оборудование.
• Не снимайте крышки.
• Не чините устройство самостоятельно. Доверьте
обслуживание квалифицированному персоналу.
ПРЕДОСТЕРЕЖЕНИЕ!
Для снижения риска пожара, удара
электрическим током или повреждения изделия:
• Не следует устанавливать или размещать данный
аппарат в книжном шкафу, встроенном шкафу или
другом замкнутом пространстве. Обеспечьте
хорошую вентиляцию данного устройства.
Page 97

∫ Информация об аккумуляторах
ПРЕДУПРЕЖДЕНИЕ
• В случае неправильной замены элемента
питания существует опасность взрыва.
Используйте для замены исключительно
рекомендованный изготовителем тип элемента
питания.
• При утилизации элементов питания запросите в
местных органах власти или у продавца
информацию по правильному способу
утилизации.
• Не нагревайте и не подвергайте воздействию огня.
• Не оставляйте аккумулятор(ы) на длительное
время в автомобиле с закрытыми окнами и
дверями на солнце.
• В случае использования перезаряжаемых
аккумуляторов рекомендуются перезаряжаемые
аккумуляторы производства Panasonic.
Предостережения
≥
Это внешняя вспышка для цифровых фотокамер Panasonic
(в дальнейшем именуемая вспышкой). Использование
данной вспышки вместе с цифровой фотокамерой, которая
поддерживает беспроводной режим, дает возможность
съемки с беспроводным управлением вспышкой. Доступные
функции могут отличаться в зависимости от используемой
цифровой фотокамеры. Информацию о соответствующих
цифровых фотокамерах см. на нашем веб-сайте.
http://panasonic.jp/support/global/cs/dsc/ (Сайт только на
английском языке.)
∫ Обращение с устройством
≥ Не подвергайте устройство воздействию сильной
вибрации и избегайте ударов. Иначе это может вызвать
не только неисправность устройства, но и разрушение
головки вспышки.
≥ Попадание песка и грязи может вызвать
неисправность устройства. При использовании
устройства в таких местах, как пляж, принимайте
меры для его защиты от песка и грязи.
≥ Данное устройство не является ни
пыленепроницаемым, ни брызгозащищенным. Если
на устройство случайно попадут капли воды, вытрите
их сухой тканью. Если устройство перестанет
правильно функционировать, обратитесь к своему
поставщику или в компанию Panasonic.
≥ Следите за тем, чтобы не прищемить
палец и т. п. данным устройством,
регулируя угол головки вспышки.
≥ Прочитайте инструкцию по эксплуатации
цифровой фотокамеры.
РУССКИЙ ЯЗЫК
SQT1378
3
Page 98

Дополнительные
SFC0373 VFB0243 SFB0010
123
принадлежности, которые
поставляются в комплекте
[При распаковке устройства следует произвести
осмотр]
При извлечении устройства из упаковочной коробки убедитесь,
что там находятся основное устройство и поставляемые в
комплекте дополнительные принадлежности, а также проверьте
их внешний вид и функционирование, чтобы убедиться, что они
не получили повреждений во время доставки и перевозки.
Если вы обнаружили какие-либо проблемы, обратитесь к
своему поставщику, прежде чем использовать данное
изделие.
Номера изделий верны по состоянию на апрель 2016 г. Они
могут изменяться.
1 Чехол для вспышки
2 Подставка для вспышки
3 Широкоугольная панель
≥
Аккумуляторы поставляются отдельно.
4
SQT1378
Названия частей
1 Головка вспышки
2 Вспомогательная
лампочка АФ/
светодиодная лампочка
3 Датчик беспроводного
управления
4 Переключатель [GR]
(Группа)
5 Переключатель [CH]
(Канал)
6 Кнопка [ON/OFF]
7 Индикатор [CHARGE]
8 Индикатор [AUTO
CHECK]
9 Диск управления
компенсацией
экспозиции/мощностью
вспышки
: Диск управления
мощностью
светодиодной лампочки
; Кнопка [TEST]
< Рычажок режимов
= Блокирующий рычажок
Page 99

Непрерывное срабатывание
Вспышка может сильно нагреваться при срабатывании много
раз подряд, что может привести к повреждению или
неисправности. Вспышка должна срабатывать не более 10 раз
подряд с интервалом в 2,5 секунды, после чего ее нельзя
использовать как минимум 10 минут.
Подготовка аккумулятора
(поставляется отдельно)
Выбирайте следующие аккумуляторы:
≥ Щелочные сухие аккумуляторы типа LR6/AA (k 2)
≥ Перезаряжаемые никель-металл-гидридные аккумуляторы
типа HR6/AA (Ni-MH) (k 2)
Марганцевые сухие аккумуляторы типа R6/AA
использовать нельзя.
Рекомендуется использовать аккумуляторы
производства Panasonic.
Установка аккумуляторов
≥
Используйте щелочные сухие акк умуляторы или перезаряжаемые
никель-металл-гидридные аккумуляторы.
1 Поверните головку
вспышки.
2 Сдвиньте рычажок в
направлении [
чтобы открыть крышку
отсека для аккумуляторов.
2
OPEN],
3 Вставьте аккумуляторы над
A
ленточкой (
правильную полярность [
• Аккумуляторы можно легко
вынуть, потянув за ленточку.
), соблюдая
r
]/[s].
4 Закройте крышку отсека
для аккумуляторов, так чтобы она стала на
место со щелчком.
• Закройте крышку отсека для аккумуляторов, так чтобы
ленточка не высовывалась.
Прикрепление к фотокамере
Убедитесь, что фотокамера и вспышка выключены. Если
вспышка прикрепляется или снимается, когда вспышка или
фотокамера включена, это может привести к неисправности.
1 Сдвиньте блокирующий рычажок в направлении,
противоположном указанному на значке [LOCK
2 Плотно вставьте вспышку в колодку для
принадлежностей, сдвигая ее до щелчка (2).
3 Сдвиньте блокирующий рычажок в
положение [LOCK 1] (3).
≥
Чтобы снять вспышку, сдвиньте блокирующий рычажок в
направлении, противоположном указанному стрелкой
1
], и выньте вспышку из колодки для принадлежностей.
[LOCK
1
SQT1378
] (1).
РУССКИЙ ЯЗЫК
5
Page 100

Включение вспышки
Прикрепите вспышку к фотокамере, а затем включите фотокамеру.
1 Кнопка [ON/OFF]
2 Индикатор [CHARGE]
3
Индикатор [AUTO CHECK]
Нажмите кнопку [ON/OFF].
≥ Чтобы выключить вспышку, еще раз нажмите кнопку
[ON/OFF].
≥ Смените аккумуляторы, если индикатор [CHARGE] не
загорается спустя:
30 секунд (щелочные сухие аккумуляторы)
10 секунд (перезаряжаемые никель-металлгидридные аккумуляторы)
≥ Если индикатор [CHARGE] и индикатор [AUTO
CHECK] мигают одновременно, у аккумуляторов
низкий заряд. Смените аккумуляторы.
Использование сильно разряженного
аккумулятора может привести к неисправности.
≥ Каждый раз при переходе фотокамеры в режим сна
вспышка также переходит в режим сна.
≥ Если в течение приблизительно 20 секунд не
выполняется никаких операций, вспышка
автоматически выключается. Чтобы снова включить
вспышку, нажмите кнопку [ON/OFF].
≥ Во время зарядки вспышки может слышаться
дрожащий звук, но это не является признаком
неисправности.
6
SQT1378
Съемка
1
Индикатор [AUTO CHECK]
1 Чтобы выбрать режим вспышки,
используйте элементы управления
фотокамеры.
Подробную информацию см. в инструкции по
эксплуатации фотокамеры.
2 Выберите режим вспышки.
“Режим вспышки” (P7)
3 Нажмите кнопку затвора наполовину.
4 Чтобы сделать снимок, нажмите кнопку
затвора до конца.
Вспышка излучает свет при правильной экспозиции,
если индикатор [AUTO CHECK] мигает
приблизительно 5 секунд.
≥ При съемке со вспышкой корпус объектива, бленда
объектива и т. п. могут загораживать свет от вспышки.
≥ Используйте широкоугольную панель, чтобы избежать
избыточной экспозиции при съемке на расстоянии
менее 1 м (P9).
 Loading...