


Owner’s Manual
for advanced features
Digital Camera
Model No. DMC-ZS10
Before connecting, operating or adjusting this product,
please read the instructions completely.
VQT3G90

Contents
Before use
Before use ..............................................5
About GPS ....................................................7
Standard Accessories ...........................8
Names of parts.......................................9
Preparations
Charging battery ..................................10
Guidelines for number of recordable
pictures and operating time .........................11
Inserting and removing the card
(optional)/the battery ...........................12
Using the AC adaptor (optional) and DC
coupler (optional) instead of the battery ......13
Picture save destination
(cards and built-in memory) ........................14
Remaining battery and memory capacity ....15
Recording capacity guidelines
(pictures/recording time) .............................15
How to operate the camera.................16
Touch operations .........................................17
Setting the clock ..................................18
To change time setting ................................19
Basics
Sequence of operations ......................20
Taking pictures with your own settings
[Program AE] Mode .............................22
How to adjust focus ............................23
Touching the screen and recording
(Touch Shutter function) .....................24
Touching the screen and adjusting the
focus and exposure
(Touch AF/AE function) .......................25
Taking pictures with automatic settings
[Intelligent Auto] Mode ........................ 26
Automatic Scene Detection .........................26
About flash ..................................................27
About Happy colors .....................................27
[Motion Deblur] ............................................27
[iHandheld Nite Shot] ..................................27
AF Tracking .................................................28
[Intelligent Auto] Mode restrictions ..............29
Taking motion pictures ....................... 30
Viewing your pictures
[Normal Play] .......................................32
Viewing motion pictures ..............................33
Zooming in and viewing “Playback Zoom”
Viewing a list of pictures “Multi Playback” ...34
Viewing pictures by their recording date
“Calendar Playback” ....................................35
...34
Deleting pictures .................................36
To delete multiple (up to 100)/
To delete all pictures ...................................37
Setting the menu .................................38
Menu type ...................................................40
Using Quick menu .......................................41
Using the [Setup] menu ......................42
[Clock Set] ...................................................42
[Auto Clock Set] ..........................................42
[World Time] ................................................42
[Travel Date] ................................................42
[Beep] ..........................................................42
[Volume] ......................................................43
[Cust.Set Mem.] ..........................................43
[LCD Mode] .................................................43
[Guide Line] .................................................43
[Histogram] ..................................................44
[Rec Area] ...................................................44
[Zoom Resume] ...........................................44
[Economy] ...................................................45
[Auto Review] ..............................................45
[No.Reset] ...................................................46
[Reset] .........................................................46
[USB Mode] .................................................46
[Output] .......................................................47
[VIERA Link] ................................................47
[3D Playback] ..............................................47
[Rotate Disp.] ..............................................48
[Version Disp.] .............................................48
[Format] .......................................................48
[Calibration] .................................................49
[Language] ..................................................49
[Demo Mode] ...............................................49
2 VQT3G90 VQT3G90 3

Application (Record)
Taking pictures with zoom ..................50
Using the zoom by performing touch
operations ...................................................50
Zoom types and use ....................................51
Taking pictures with flash ...................52
Taking close-up pictures ....................54
[Macro Zoom] ..............................................54
Focus range ................................................55
Taking pictures with self-timer ........... 56
Taking pictures with Exposure
Compensation ...................................... 57
Recording while exposure is changed
automatically ([Auto Bracket]) .....................57
Determine aperture and shutter speed
and record ........................................... 58
[Aperture-Priority] Mode ..............................58
[Shutter-Priority] Mode ................................58
[Manual Exposure] Mode ............................59
Register your own settings and record
[Custom] Mode ....................................60
[Cust.Set Mem.] ..........................................60
[Custom] ......................................................60
Taking pictures according to the scene
[Scene Mode] .......................................61
[My Scene Mode] ........................................62
[Portrait] .......................................................62
[Soft Skin] ....................................................62
[Transform] ..................................................62
[Self Portrait] ...............................................63
[Scenery] .....................................................63
[Panorama Assist] .......................................63
[Sports] ........................................................64
[Night Portrait] .............................................64
[Night Scenery] ............................................64
[Handheld Night Shot] .................................64
[Food] ..........................................................64
[Party] ..........................................................65
[Candle Light] ..............................................65
[Baby] ..........................................................65
[Pet] .............................................................65
[Sunset] .......................................................66
[High Sens.] .................................................66
[Flash Burst] ................................................66
[Starry Sky] ..................................................66
[Fireworks] ...................................................67
[Beach] ........................................................67
[Snow] .........................................................67
[Aerial Photo] ...............................................67
[Pin Hole] .....................................................67
[Film Grain] ..................................................67
[High Dynamic] ............................................67
[Photo Frame] .............................................68
[Underwater] ................................................68
[High Speed Movie] .....................................68
Recording 3D still pictures
[3D Photo Mode] .................................. 69
Burst function ...................................... 70
Recording with the Face Recognition
function [Face Recog.] ........................72
Registering face pictures ............................73
Editing or deleting information about
registered persons .....................................74
Recording the place of recording
with GPS ...............................................75
Using GPS ..................................................76
Executing positioning immediately and
updating your current location .....................78
Changing the recorded place name
information ..................................................79
Registering your current location as a
landmark .....................................................80
Changing the display of location name
information ..................................................81
Using GPS to set the clock ........................81
Useful features for travel ....................82
[Travel Date] ................................................82
[World Time] ...............................................83
Entering Text ........................................ 84

Contents (Continued)
Using the [Rec] menu .......................... 85
[Aspect Ratio] ..............................................85
[Picture Size] ...............................................85
[Quality] .......................................................86
[Sensitivity] ..................................................86
[White Balance] ...........................................87
[AF Mode] ....................................................89
[Quick AF] ....................................................90
[Face Recog.] ..............................................91
[Metering Mode] ..........................................91
[i.Exposure] .................................................91
[Min. Shtr Speed] ........................................92
[i.Resolution] ...............................................92
[Digital Zoom] ..............................................92
[Burst] ..........................................................93
[Color Mode] ................................................93
[AF Assist Lamp] .........................................93
[Red-Eye Removal] .....................................94
[Stabilizer] ...................................................94
[Date Stamp] ...............................................95
[Clock Set] ...................................................95
Using the [Motion Picture] menu .......96
[Rec Mode] ..................................................96
[Rec Quality] ................................................97
[Active Mode] ..............................................98
[Continuous AF] ...........................................98
[Wind Cut] ...................................................98
Recording still pictures while a
motion picture is being recorded ....... 99
Application (View)
Editing motion pictures ....................100
Capturing still pictures from motion
pictures ......................................................100
Splitting up motion pictures .......................100
Playing back still pictures recorded
using the burst function ...................101
Different playback methods
[Playback Mode] ................................102
[Slide Show] ..............................................102
[Filtering Play] ...........................................104
[Calendar] ..................................................104
Using the [Playback] menu...............105
[Upload Set] ..............................................105
[Title Edit] ..................................................106
[Place-Name Edit] .....................................107
[Text Stamp] ..............................................108
[Video Divide] ............................................109
[Resize] .....................................................110
[Cropping] ..................................................111
[Favorite] ...................................................112
[Print Set] ..................................................113
[Protect] .....................................................114
[Face Rec Edit] ..........................................114
[Copy] ........................................................115
Connecting with other devices
Viewing on TV screen .......................116
Viewing on a TV with HDMI Socket ..........117
VIERA Link (HDMI) (HDAVI Control™) ..... 118
Viewing 3D still pictures ............................119
Keep the recorded still pictures and
motion pictures .................................. 121
Copy by inserting the SD card into the
recorder .....................................................121
Dubbing playback pictures via AV cables
Use “PHOTOfunSTUDIO” to copy to
your computer ..........................................122
Keeping the 3D still pictures ......................122
...121
Using with your PC ............................ 123
Copying still pictures and motion
pictures .....................................................124
Uploading pictures to image-sharing
websites ....................................................126
Printing ...............................................127
Printing multiple pictures ...........................128
Print with date and text ..............................128
Making print settings on the camera .........129
Others
List of LCD monitor displays ............ 130
Message displays .............................. 132
Q&A Troubleshooting ......................134
Usage cautions and notes ................ 141
User License Agreement for Location
Name Data ................................................145
4 VQT3G90 VQT3G90 5

Before use
■
Camera handling
Keep the camera away from excessive vibration, force,
or pressure.
Avoid using the camera under the following conditions,
●
which may damage the lens, LCD monitor, or camera
body. This may also cause the camera to malfunction or
prevent recording.
• Dropping or hitting the camera against a hard surface
• Sitting down with the camera in your pants pocket or
forcing it into a full bag
• Adding accessories to the camera strap
• Pushing with excessive force on the lens or LCD monitor
The camera is not dust resistant, splash resistant, or
waterproof.
Avoid using the camera in places with excessive dust
or sand, or where water can come into contact with the
camera.
Avoid using the camera under the following conditions,
●
which present a risk that sand, water, or foreign material
may enter the camera through the lens or openings around
buttons. Be especially careful, because these conditions
may damage the camera and such damage may not be
repairable.
• In extremely dusty or sandy places
• In the rain or by the shore, where the camera may be
exposed to water
■
Condensation (lens clouding)
Condensation may occur when the camera is exposed to
●
sudden changes of temperature or humidity. Avoid these
conditions, which may make the lens dirty, cause mold, or
damage the camera.
If condensation does occur, turn off the camera and wait
●
about two hours before using it. Once the camera adjusts
to the surrounding temperature, clouded lenses will clear
naturally.

Before use (Continued)
■
Always take a test shot first
Before important events when you will use the camera (at weddings, for example),
always take a test shot to make sure that pictures and sound record correctly.
■
No compensation for missed shots
We cannot compensate for missed shots if technical problems with the camera or card
prevent recording.
■
Carefully observe copyright laws
Unauthorized use of recordings which contain works with copyright for purposes other
than personal use is prohibited under copyright law. Recording of certain material may
be restricted even for the purpose of personal use.
■
Also refer to “Usage cautions and notes” (→141)
6 VQT3G90 VQT3G90 7

About GPS
■
About the camera’s location name information
Before using the camera, read “User License Agreement for Location Name Data”. (→145)
■
When [GPS Setting] is [ON], the GPS function works even if the camera’s power
is off.
• Electromagnetic waves from the camera can affect instruments and meters. During
airplane takeoff and landing or in other restricted area, set [GPS Setting] to [OFF] or
, then turn the camera’s power off. (→76)
• When [GPS Setting] is [ON], power will drain from the battery even if the camera’s
power is OFF.
■
Recording location information
• The names of recording locations and landmarks (such as buildings) are current as of
December 2010. These will not be updated.
• Depending on the country or area, limited location name and landmark information
may be available.
■
Positioning
• Positioning will take time in environments where it is difficult to receive the signals
from the GPS satellites. (→75)
• Even if GPS reception is good, it will take approximately 2 to 3 minutes
to successfully execute positioning under the following conditions; when
positioning is executed for the first time, or when positioning is executed after
the camera is turned off with the [GPS Setting] set to
again or when [GPS Setting] is set to [OFF].
• Because the positions of the GPS satellites are constantly changing, depending on
the recording location and conditions, it may not be possible to position such satellites
accurately, or positioning discrepancy may occur.
■
When using in another country
• GPS may not work in China or in the border regions of countries neighboring China.
(Current as of December 2010)
• Some countries or regions may regulate the use of GPS or related technology.
Because this camera has a GPS function, before taking it into another country, check
with the embassy or your travel agency whether there are any restrictions on bringing
cameras with a GPS function.
and then turned on

Standard Accessories
Check that all the accessories are supplied before using the camera.
The accessories and their shape will differ depending on the country or area where the
●
camera was purchased.
For details on the accessories, refer to Basic Owner’s Manual.
Battery Pack is indicated as battery pack or battery in the text.
●
Battery Charger is indicated as battery charger or charger in the text.
●
Please dispose of all packaging appropriately.
●
Keep small parts in a safe place out of the reach of children.
●
■
Optional accessories
• Cards are optional. You can record or play back pictures on the built-in memory
when you are not using a card. (→14)
• If any accessories are lost, customers in the USA and Puerto Rico should contact
Panasonic’s parts department at 1-800-833-9626 and customers in Canada should
contact 1-800-99-LUMIX (1-800-995-8649) for further information about obtaining
replacement parts.
8 VQT3G90 VQT3G90 9

Names of parts
Mode dial
Flash
Self-timer indicator (→56)/AF Assist Lamp (→93)
Lens barrel
Lens
(→52)
(→5, 143)
GPS status indicator
(→78)
GPS antenna (→75)
Speaker (→43)
Microphone (→21)
LCD monitor (→43, 130)
REC/PLAY switch (→20)
[EXPOSURE] button (→58)
Cursor button
[DISP.] button
[Q.MENU]/[
/ ] button
Tripod receptacle
(→143)
Zoom lever
Motion picture button
Camera ON/OFF switch
Shutter button
We recommend
using the supplied
hand strap to
avoid dropping
the camera.
HDMI socket
(→117, 118)
[AV OUT/DIGITAL] socket
(→116, 121, 127)
Card/Battery door (→12)
Release lever (→12)
DC coupler cover (→13)
The illustrations and screens in this manual may differ from the actual product.
●
How to operate the camera (→16)
●

Charging battery
Charging light
([CHARGE])
On: Charging in progress
(approx. 130 min. if fully
depleted)
Off: Charging complete
If light is flashing:
• Charging may take longer
than normal if battery
temperature is too high or
too low (charging may not be
completed).
• Battery/charger connector is
dirty. Clean with a dry cloth.
Always charge before first use! (battery shipped uncharged)
■
About batteries that you can use with this unit
It has been found that counterfeit battery packs which look very similar to the genuine
products are made available to purchase in some markets. Some of these battery
packs are not adequately protected with internal protection to meet the requirements
of appropriate safety standards. There is a possibility that these battery packs may
lead to fire or explosion. Please be advised that we are not liable for any accident or
failure occurring as a result of use of a counterfeit battery pack. To ensure that safe
products are used we recommend that a genuine Panasonic battery pack is used.
• Use the dedicated charger and battery.
• The camera has a function for distinguishing batteries which can be used
safely. The dedicated battery supports this function. The only batteries
suitable for use with this unit are genuine Panasonic products and batteries
manufactured by other companies and certified by Panasonic. (Batteries which
do not support this function cannot be used). Panasonic cannot in any way
guarantee the quality, performance or safety of batteries which have been
manufactured by other companies and are not genuine Panasonic products.
Insert the battery terminals and attach the battery
to the charger
Connect the charger to the electrical outlet
Plug-in type
●
Battery
Inlet type
●
• The AC
cable does
10 VQT3G90 VQT3G90 11
Charger
(model-specific)
Charge the battery with the charger indoors
●
(10 °C - 30 °C (50 °F to 86 °F)).
Detach the battery after charging is
completed
The battery charger is in the standby condition when the AC power is supplied.
●
The primary circuit is always “live” as long as the battery charger is connected to
an electrical outlet.
not fit
entirely into
the AC input
terminal. A gap will remain.

Guidelines for number of recordable pictures and operating time
The number of recordable pictures or available operating time may vary according to
surrounding environment and usage conditions. Figures may be reduced if flash, zoom,
or other functions are used frequently, or in colder climates.
■
Recording still pictures
Number of recordable pictures Approx. 260 pictures
Recording time Approx. 130 min
Recording conditions by CIPA standard
●
• CIPA is an abbreviation of [Camera & Imaging
Products Association].
• [Program AE] Mode
• [GPS Setting] is set to [OFF]
• Temperature: 23 °C (73.4 °F)/Humidity:
50 %RH when LCD monitor is on.
• Using a Panasonic SD Memory Card
(32 MB).
• Using the supplied battery.
• Starting recording 30 seconds after the
camera is turned on. (When the Optical
Image Stabilizer function is set to [ON].)
• Recording once every 30 seconds with full
flash every second recording.
• Rotating the zoom lever from Tele to Wide or
vice versa in every recording.
• Turning the camera off every 10 recordings
and leaving it until the temperature of the
battery decreases.
Number reduced if intervals are longer – e.g. to approx. one quarter for 2-minute
intervals under the above conditions.
■
Recording motion pictures
[Rec Quality]
Available recording time
Actual available recording time
Recording conditions
●
• Temperature 23 °C (73.4 °F), humidity 50 %RH
• [GPS Setting] is set to [OFF]
1
∗
An AVCHD motion picture can be recorded continuously for up to 29 minutes 59 seconds when
[GFS] or [FSH] is set.
A maximum of approx. 2 GB of continuous motion picture can be recorded in [Motion JPEG]
format. (Even if there is more than 2 GB of available space on the card, the available recording
time will be calculated for a maximum of 2 GB.)
2
∗
The time you can actually record when repeatedly turning the power on and off, starting and
stopping recording and using zoom.
■
Viewing pictures
Playback time About 210 minutes
1
∗
2
∗
[AVCHD] [FSH] [Motion JPEG] [HD]
About 70 minutes About 85 minutes
About 35 minutes About 40 minutes
By CIPA standard

Inserting and removing the card (optional)/ the battery
Lever
Set the camera ON/OFF switch to OFF
Slide to the [OPEN] position
and open the lid
Do not
touch
terminal
Completely insert battery
and card
• Battery: Insert all the way firmly until a
locking sound is heard, and check
that the lever is hooked over the
battery.
Charged battery (check orientation)
Card (check orientation: terminals face
LCD)
■
To remove
• To remove battery: • To remove card:
move lever in
direction of arrow.
Lever press down in
• Memory card: Push in until it clicks.
Close lid
Slide to the [LOCK] position.
center.
Release lever
[OPEN] [LOCK]
Always use genuine Panasonic batteries.
●
If you use other batteries, we cannot guarantee the quality of this product.
●
Remove battery from camera after use.
●
• Keep the battery in a plastic bag, making sure that it is kept away from metallic
objects (such as clips) when carrying or storing the battery.
To remove the card or battery, turn the camera off and wait until the LUMIX indicator
●
on the LCD monitor goes off. (Failure to wait may cause the camera to malfunction and
may damage the card or recorded data.)
Keep the Memory Card out of reach of children to prevent swallowing.
●
The unusable battery should be discarded in accordance with battery recycling laws.
●
Call the RBRC hotline at 1-800-822-8837 for information.
12 VQT3G90 VQT3G90 13

Using the AC adaptor (optional) and DC coupler (optional)
instead of the battery
By using the AC adaptor (optional) and DC coupler (optional), you can record and play
back without worrying about the remaining battery charge.
The optional DC coupler can only be used with the designated Panasonic AC adaptor.
Insert DC coupler instead of
battery (→12)
DC IN socket
DC coupler
Open DC coupler cover
• If difficult to open, with the card/
battery door open, press the DC
coupler cover from the inside to open
it.
Plug AC adaptor into power
outlet
DC coupler
cover
AC adaptor
Always use a genuine Panasonic AC adaptor (optional).
●
Use the AC adaptor and DC coupler specifically for this camera. Using other adaptors
●
or couplers could cause camera failure.
It may not be possible to install camera on a tripod or unipod when the DC coupler is
●
connected, depending on the type of tripod or unipod.
When the AC adaptor is connected, always remove the AC adaptor when opening the
●
card/battery door.
Remove the AC adaptor and DC coupler when not in use and close the DC coupler
●
cover.
Also read the AC adaptor and DC coupler operating instructions.
●
Align the marks to
connect
Connect AC adaptor to DC IN
socket of DC coupler

Inserting and removing the card (optional)/
Remaining battery (only when using battery)
(flashes red)
If the battery mark flashes red, recharge or replace battery.
the battery (Continued)
Picture save destination (cards and built-in memory)
■
Built-in memory (approx. 18 MB)
Pictures may be copied between cards and the built-in memory. (→115)
●
The access time for the built-in memory may be longer than the access time for a card.
●
■
Compatible memory cards (optional)
The following SD standard-based cards (Panasonic brand recommended)
Type of Card Capacity Notes
SD Memory Cards 8 MB – 2 GB
SDHC Memory Cards 4 GB – 32 GB
SDXC Memory Cards 48 GB, 64 GB
∗
SD speed class refers to a specification for sustained write speeds. Confirm the SD speed by
checking the card label or other card related materials.
(Example)
• Using a card of SD speed “Class 4”
recommended for recording motion pictures in
[AVCHD].
Using a card of SD speed “Class 6”
recommended for recording motion pictures in
“MOTION JPEG”.
• Can be used with devices compatible with the
respective formats.
• Before using SDXC Memory Cards, check that
your computer and other devices support this type
of card.
http://panasonic.net/avc/sdcard/information/SDXC.html
• Only the cards listed on the left with the given
capacities are supported.
∗
or above is
∗
or above is
Please reformat the card with this camera if it has already been
●
formatted with a computer or another device. (→48)
If the write-protect switch is set to “LOCK”, the card cannot be used
●
to record or delete pictures, and it cannot be formatted.
It is recommended that you copy important pictures to your
●
computer (as electromagnetic waves, static electricity, or faults may
cause data to be damaged).
Latest information:
●
http://panasonic.jp/support/global/cs/dsc/ (This Site is English only.)
14 VQT3G90 VQT3G90 15
Switch (LOCK)

Remaining battery and memory capacity
Remaining battery (only when using battery)
(flashes red)
If the battery mark flashes red, recharge or replace battery.
Estimated remaining pictures or recording time capacity (press [DISP.]
Displayed when no card is inserted (pictures will be saved to built-in memory)
button to switch display)
When in operation
(Card) or (Built-in memory) are illuminated red.
While the light remains lit, an operation is taking place, such as picture writing, reading, deletion or
formatting. While the light is lit, do not turn off the power or remove battery, card, AC adaptor (optional)
or DC coupler (optional), as this can cause data loss or damage. Do not subject the camera to
vibrations, impact, or static electricity. Should any of these cause camera operation to be terminated,
attempt to perform the operation again.
Recording capacity guidelines (pictures/recording time)
The number of pictures you can take and the recording time vary in proportion to card
capacity (and depending on recording conditions and type of card).
If you make Web upload settings, the recording picture capacity and the recording time
●
capacity of the card may be reduced. (→105)
■
Recording picture capacity (still pictures)
[Picture Size] Built-in memory 2 GB 4 GB 16 GB
14M 2 330 670 2740
5M 5 650 1300 5300
0.3M 99 10050 19940 81340
• When the number of recordable pictures exceeds 99,999, “+99999” is displayed.
■
Recording time capacity (motion pictures)
When the [AVCHD] recording mode is used
• An AVCHD motion picture can be recorded continuously for up to 29 minutes 59 seconds when
[GFS] or [FSH] is set. The time displayed in the table is the total time.
When the [Motion JPEG] recording mode is used
[Rec Quality] Built-in memory 2 GB 4 GB 16 GB
HD – 7 min 40 s 15 min 40 s 1 h 6 min
VGA – 20 min 41 min 2 h 51 min
QVGA 32 s 55 min 30 s 1 h 53 min 7 h 55 min
• A maximum of approx. 2 GB of continuous motion picture can be recorded in [Motion JPEG]
format. (Even if there is more than 2 GB of available space on the card, the available recording
time will be calculated for a maximum of 2 GB.)
The time displayed in the table is the total time.
Built-in memory 2 GB 4 GB 16 GB
– 14 min 29 min 2 h 4 min

How to operate the camera
Mode dial
Use this to select the recording mode.
Shutter button
Use this to focus and record still pictures.
Zoom lever
Operate this when zooming in on a distant subject
to record it larger.
Motion picture button
Record motion pictures.
Camera ON/OFF switch
Use this to turn the camera’s power on and off.
REC/PLAY switch
Use this to select the recording mode or playback
mode.
[EXPOSURE] button
Operate this when setting the shutter speed or
aperture value. (Only in the
Cursor button
Use these for menu operations and for calling up
the recording functions listed below.
▲: Exposure Compensation, Auto Bracket etc.
▼: Macro Mode etc.
◄: Self-timer
►: Flash
• In this manual, the button that is used is
indicated by▲▼◄►.
mode)
[MENU/SET]
Use this to display the menus, enter the settings,
etc.
[Q.MENU]/[ / ] button
In the recording mode: Quick menu is displayed.
In the playback mode: Pictures are deleted.
During menu operations: The previous screen is
restored.
[DISP.] button
Use this to change display.
Touch Panel
You can operate the camera using the touch panel
on the LCD screen. (→17)
16 VQT3G90 VQT3G90 17

Touch operations
This camera’s touch panel senses pressure that is applied to the screen.
To “touch” is to press the touch panel and
Touch
then pull the finger back again.
To “drag” is to touch and slide your finger
across the touch panel surface.
Drag
Touching is used to select icons or pictures,
among other actions.
• Touch an icon near its center. If multiple
icons are touched simultaneously, the
camera may not operate normally.
If the type of sheet to protect LCD screens that are available on the market is to be
●
used, observe the precautions that are contained with the sheet. (Some types of
protective sheets may impair the screen’s visual recognition and ease of operation.)
If the camera is used with a protective sheet available on the market attached to
●
its screen or if the screen is not very responsive, touch the screen with a little more
pressure.
If your hand is pressed against the touch panel when holding the camera, the touch
●
panel will not work properly.
Do not press on the LCD monitor with hard pointed tips, such as ball point pens.
●
Do not press the touch panel with your fingernails.
●
Clean the LCD monitor with a soft dry cloth if there are fingerprints or other kinds of dirt
●
on it.
For details of the icons that appear on the touch panel, refer to “List of LCD monitor
●
displays” (→130).
■
Stylus pen
The stylus pen (supplied) comes in handy when doing the kinds of jobs that require
close or careful operation and your fingertips are too large to perform the operations
easily.
• Do not use a pen other than the pen supplied.
• Keep the stylus pen out of the reach of infants and small children.
• Do not place the stylus pen on the LCD monitor when storing. LCD monitor may
break when the stylus pen is pressed strongly against the LCD monitor.
Dragging (sliding your finger across the screen)
is used to scroll the pictures or change the
range of the pictures displayed.

Setting the clock
Set REC/PLAY switch to
REC/PLAY switch
before turning on the power.
Turn on the power
The power is turned on.
If the language select screen is not
displayed, proceed to step .
Press [MENU/SET] while the
message is displayed
Press ▲▼ to select the language,
and press [MENU/SET]
• The [Please set the clock] message
appears. (This message does not appear in
Playback Mode.)
Press [MENU/SET]
Press ◄► to select the items
(year, month, day, hour, minute,
display order or time display
format), and press ▲▼ to set
• To cancel → Press [ / ] button.
Press [MENU/SET]
Press [MENU/SET]
• To return to the previous screen,
press [ / ] button.
18 VQT3G90 VQT3G90 19

(The clock is not set when the camera is shipped.)
Press ◄ to select [Yes] and press [MENU/SET] if automatically
correcting time of day using the GPS function
• To manually set date and time → select [No].
When [Please set the home area] is displayed, press [MENU/
SET]
Press ◄► to set your home area and press [MENU/SET]
City or area
name Current time
Difference from GMT (Greenwich Mean Time)
The current time and home area are set.
• [GPS Setting] turns [ON].
To change time setting
When resetting date and time, select [Clock Set] from the [Setup] menu.
• Clock settings will be saved for approx. 3 months even after battery is removed,
provided a fully-charged battery was installed in the camera for 24 hours beforehand.
Select [Clock Set] from the [Rec] menu or [Setup] menu (→42)
Set the date and time (Perform steps - . (→18))
Failure to set the date and time will cause the date/time to be improperly printed when
●
printing pictures at a digital photo center or when using [Date Stamp] or [Text Stamp].
After the time has been set, the date can be printed correctly even if the date is not
●
displayed on the camera screen.

Sequence of operations
Turn on the power
1
Set to
2
Set to the desired Recording Mode
Align the mode dial correctly to
the mode that you want to use.
[Intelligent Auto] Mode T ake pictures with automatic settings. (→26)
[Program AE] Mode
3
[Aperture-Priority] Mode
[Shutter-Priority] Mode
[Manual Exposure] Mode
[Custom] Mode
[3D Photo Mode] Record 3D still pictures. (→69)
[Scene Mode] Take pictures according to scene. (→61)
[My Scene Mode]
→
Record pictures with your own settings.
(→22)
Determine aperture, then record pictures.
(→58)
Determine shutter speed, then record
pictures. (→58)
Determine aperture and shutter speed,
then record pictures. (→59)
Record pictures using pre-registered
settings. (→60)
Take pictures in frequently-used Scene
Modes. (→62)
20 VQT3G90 VQT3G90 21

Aim the camera and shoot
■
Taking still pictures
Press the shutter button halfway to focus
Press and hold the shutter button to take the
picture
■
Recording motion pictures
Press the motion picture button to start
recording
Press the motion picture button again to
4
finish recording
■
Holding the camera
AF Assist Lamp
Flash
We recommend using the supplied hand strap to avoid dropping the camera.
●
Set to
5
Motion picture
button
Microphone
Shutter button
• Stand with your arms close to your body and
with your legs apart.
• Do not touch the lens.
• Do not block the microphone when recording
motion pictures.
• Do not block the flash or the lamp. Do not look
at it from close range.
• Make sure that the camera does not move at
the moment the shutter button is pressed.
6
View pictures (→32)
Turn off the power
7
Scrolling to the next picture: Drag your finger
across the screen from right to left.
Returning to the previous picture: Drag your
finger across the screen from left to right.

T aking pictures with your own settings
[Program AE] Mode
Recording Mode:
Using the [Rec] menu to change settings and set up your own recording environment.
Set to ([Program AE] Mode)
Take a picture
Press halfway
(press lightly to focus)
■
Changing recording information display
Press the [DISP.] button.
If a warning is displayed about jitter, use [Stabilizer], a
●
tripod, or [Selftimer].
If aperture and shutter speed are shown in red, you do
●
not have appropriate exposure. You should either use
the flash, change [Sensitivity] settings or set [Min. Shtr
Speed] to a slower speed.
Press fully
(press the button all the
way to record)
Jitter alert
display
Aperture value Shutter speed
22 VQT3G90 VQT3G90 23

How to adjust focus
Useful when subject is not in center of picture.
First adjust focus according to subject
Align the AF area
with the subject
Hold down halfway
Return to desired composition
Press fully
AF area
Focus display
( When focus is aligned: illuminated
When focus is not aligned: flashing)
AF area
( When focus is aligned: green
When focus is not aligned: red)
Subjects/environments which may
●
make focusing difficult:
• Fast-moving or extremely bright
objects, or objects with no color
contrast.
• Taking pictures through glass or
near objects emitting light. In dark,
or with significant jitter.
• When too close to object or when
taking pictures of both distant and
close objects together in the same
picture.
The focus display flashes and beep sounds when focus is not
●
aligned.
Use the focus range displayed in red as a reference.
Even if the focus display is lit, the camera may be unable to bring
the subject into focus if it is out of range.
AF area is displayed larger in the following cases:
●
• When using Digital Zoom
• When focus is difficult to align for a subject in a dark scene
Focus display
Focus range

T ouching the screen and recording
(Touch Shutter function)
Recording Mode:
This function enables you to focus and record still pictures simply by touching the
subjects that appear on the screen.
Touch on the screen
• The icon changes to , and you can now
proceed with touch shutter recording.
Touch the subject you want to
record
• The subject is recorded when the auto focus
moves to the place that you touch and when
the subject is brought into focus.
• To release the touch shutter function
→ Touch
.
Motion pictures cannot be recorded.
●
The touch shutter function will not work along the edges of the screen.
●
Please note that the touch shutter will function even if you inadvertently touch the touch
●
panel.
When [Metering Mode] is set to (Spot), the exposure is adjusted to the place where
●
you touched the screen.
The setting of the touch shutter function will be stored even if the power switch is turned
●
to off.
24 VQT3G90 VQT3G90 25

T ouching the screen and adjusting the focus and exposure (Touch AF/AE function)
Recording Mode:
This function enables the focus and exposure to be set when you touch the subject
displayed on the screen.
Touch the place where you want
to set the focus and exposure
• When [AF Mode] is set to (Face
Detection), the Face Detection function
continues to operate, but the focus is
adjusted to the place where you touched.
• When [AF Mode] is set to (AF Tracking),
the camera locks onto the subject, and it
automatically continues to focus on the
subject and adjusts the exposure of the
subject as the subject moves.
Press the shutter button halfway
to bring the subject into focus,
and then press the button fully to
record the subject
• To release the touch AF/AE function
→ Touch .
The touch AF/AE function may fail to work under some recording conditions such as
●
when the subject is too small or the recording location is too dark.
The touch AF/AE function will not work along the edges of the screen.
●
During [Intelligent Auto] Mode, the camera will determine the touched subject to be the
●
optimal scene.

T aking pictures with automatic settings
[Intelligent Auto] Mode
Recording Mode:
Optimum settings are made automatically from information such as “face”, “movement”,
“brightness”, and “distance” just by pointing the camera at the subject, meaning that clear
pictures can be taken without the need to make settings manually.
Set to ([Intelligent Auto] Mode)
Take a picture
Press halfway
(press lightly to focus)
Press fully
(press the button all the
way to record)
Automatic Scene Detection
Camera reads scene when pointed at subject, and makes optimum settings automatically.
The icon of scene detected
Recognizes people
Recognizes babies
Recognizes landscapes
Recognizes night scenes and people in them (Only when is selected)
Recognizes night scenes
Recognizes night scenes without a tripod.
Recognizes close-ups
Recognizes sunsets
Reads subject movement to avoid blurring when scene does not correspond to any of the
above.
1
∗
When babies (under 3 years) that are registered with the Face Recognition function are recognized
2
∗
We recommend using a tripod and the self-timer.
3
∗
When [iHandheld Nite Shot] is [ON]
Depending on recording conditions, different scene types may be determined for the
●
same subject.
If desired scene type is not selected, we recommend manually selecting the appropriate
●
Recording Mode.
When , or is detected, Face Detection is activated, and the focus and
●
exposure are adjusted for the recognized faces.
1
∗
2
∗
3
∗
26 VQT3G90 VQT3G90 27

About flash
Press ► to select or .
When is selected, the optimum flash is selected automatically depending on
●
conditions. (→52)
When or is selected, the shutter speed is reduced.
●
About Happy colors
If [Color Mode] (→93) is set to [Happy], both still and motion pictures are clearer, with more
vivid coloring.
[Motion Deblur]
The camera automatically sets the optimum shutter speed in accordance with the
movements of the subject to minimize the blur of the subject.
■
Settings
Press [MENU/SET]
Press ▲▼◄► to select [Rec] menu and press [MENU/SET]
Press ▲▼ to select [Motion Deblur] and press [MENU/SET]
Press ▲▼ to select [ON] and press [MENU/SET]
When [Motion Deblur] is set to [ON], appears on the screen.
●
The subject may be recorded in a picture size smaller than the number of pixels that
●
has been set.
[iHandheld Nite Shot]
If a night scene is detected automatically while the camera is handheld, the camera can
record the still picture with less jitter and less noise by combining a burst of pictures.
■
Settings
Press [MENU/SET]
Press ▲▼◄► to select [Rec] menu and press [MENU/SET]
Press ▲▼ to select [iHandheld Nite Shot] and press [MENU/SET]
Press ▲▼ to select [ON] and press [MENU/SET]
The recordable area becomes slightly narrower.
■
Recording
Press the shutter button halfway
Press the shutter button fully
Do not move the camera while any messages are displayed on the screen.
When the camera is fixed in place on a tripod or by other means, [iHandheld Nite Shot]
●
will not be identified.

T aking pictures with automatic settings
[Intelligent Auto] Mode (Continued)
Recording Mode:
AF Tracking
This function enables the camera to continue to focus on the subject and adjust the
exposure of the subject even when the subject is moving.
■
With cursor button operations
Press ▲ to set [AF Mode] to AF Tracking
• To cancel AF Tracking → Press ▲ again.
Align the AF Tracking frame with the subject, and then press
▼ to lock
• To cancel AF Lock → Press ▼.
AF Tracking frame
AF Lock successful: Yellow
AF Lock failed: Red (flash)
■
With touch panel operations
Perform these operations with the touch shutter function (→ 24) released.
Touch the subject
• When switching to lock on to another subject → Touch the other subject.
• To release AF tracking → Touch .
The optimal scene for the AF locked subject is automatically identified.
●
Face Recognition will be inactive while using AF Tracking.
●
Under certain recording conditions, such as when the subject is small or when it is dark,
●
[AF Tracking] may not operate correctly.
28 VQT3G90 VQT3G90 29

[Intelligent Auto] Mode restrictions
Only menu items which are displayed in the [Intelligent Auto] Mode can be set.
●
The settings selected in the [Program AE] or other modes are reflected for not
●
displayed menu items on the [Setup] menu.
The settings for the following items are different from other recording modes:
●
[Picture Size] and [Color Mode] on the [Rec] menu, [Burst], and [Beep] on the [Setup]
menu
The settings for the following functions are fixed:
●
• [Auto Review]: [2 SEC.]
• [Guide Line]:
• [Quality]: (Fine)
• [Stabilizer]: [ON]
• [AF Assist Lamp]: [ON]
• [Metering Mode]: (Multiple)
• [i.Resolution]: [i.ZOOM]
• [Active Mode]: [ON]
∗
(23-area-focusing) when face cannot be recognized
The following functions cannot be used:
●
[Histogram], [Exposure], [Auto Bracket], [WB Adjust.], [Digital Zoom], [Min. Shtr Speed]
• [Sleep Mode]: [5 MIN.]
• [White Balance]: [AWB]
• [Sensitivity]:
• [AF Mode]: (Face Detection)
• [Quick AF]: [ON]
• [i.Exposure]: [STANDARD]
• [Red-Eye Removal]: [ON]
• [Continuous AF]: [ON]
∗

Taking motion pictures
Recording Mode:
Enables motion pictures to be recorded with (stereo) audio.
Press motion picture button to
start recording
[Rec Mode] (→96)/[Rec Quality] (→97)
Elapsed recording time Remaining recording
Immediately release the motion picture
●
button after pressing it.
You can also use zoom while recording
●
motion pictures.
• The zoom speed will be slower than
normal.
• When using zoom while recording motion
pictures, it may take some time to focus.
Still pictures can be taken during motion
●
picture recording. (→99)
time (approx.)
Press the motion picture button
again to end recording
30 VQT3G90 VQT3G90 31

■
Recording motion pictures in
Records a motion picture at your preferred settings.
• Aperture and shutter speed are automatically set.
■
Recording motion pictures in
The camera automatically detects the scene to record motion pictures with optimal settings.
When scene does not
correspond to any on the right.
• In mode, focus and exposure will be set according to the face detected.
• will be selected for nightscapes and other dark scenes.
• If the camera does not select your desired Scene Mode, choosing an appropriate
mode manually is recommended.
• The following menu options in the [Motion Picture] menu can be set:
• [Rec Mode] • [Rec Quality]
■
Motion picture recording in other recording modes
For details, refer to the pages relating to the respective recording modes. (However, a
motion picture cannot be recorded in [3D Photo Mode] mode)
An AVCHD motion picture can be recorded continuously for up to 29 minutes 59
●
seconds when [GFS] or [FSH] is set.
If [Rec Quality] is set to [GFS] or [FSH], and if the surrounding temperature
●
is high, or motion picture is recorded continuously, is displayed, and the
recording may be stopped halfway through.
If data is repeatedly recorded and deleted, the total available recording time on the SD
●
card may be reduced. To restore the original capacity, use the camera to format the
SD card. Be sure to save all important data to your computer or other media before
formatting, as all data saved to the card will be erased.
The Optical Image Stabilizer functions regardless of the settings before a motion picture
●
is recorded.
The following functions are not available:
●
AF tracking, Extended Optical Zoom, flash, [Face Recog.], [Rotate Disp.] for pictures
taken vertically.
For certain memory cards, recording may end while in progress.
●
The screen can become narrower in motion pictures compared to still pictures. Also, if
●
the Aspect Ratio is different for still pictures and motion pictures, the angle of view will
change when starting to record a motion picture. The recordable area is displayed by
setting [Rec Area] (→44) to [ON].
If Extended Optical Zoom was used before pressing the motion picture button, these
●
settings will be cleared, and the recordable area will be larger.
Depending on the environment when recording motion pictures, the screen may
●
turn black for an instant or noise may be recorded because of static electricity,
electromagnetic waves, etc.
When recording motion pictures using an AC adaptor, if you unplug the AC adaptor or
●
a power outage occurs, power to the camera is cut, and the motion picture in progress
will not be recorded.
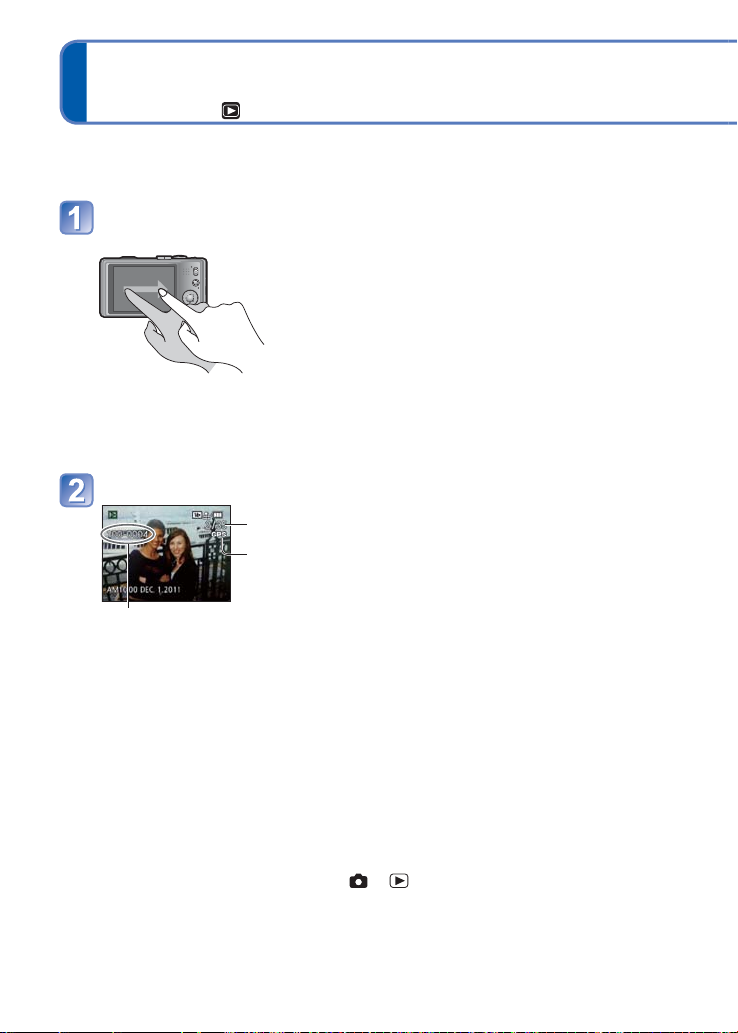
Viewing your pictures [Normal Play]
Playback Mode:
When a card is in the camera, pictures are played back from the card, and without a card,
pictures are played back from the built-in memory.
Drag your finger across the screen, and select the picture to
be played back
Scrolling to the next picture: Drag your finger across the
screen from right to left.
Returning to the previous picture: Drag your finger across
the screen from left to right.
• If you keep your finger touching the left or right edge of
the screen after scrolling the pictures, the pictures will
continue to be scrolled.
(The pictures are displayed in a reduced size.)
• The pictures can also be scrolled by pressing the ◄ ► cursor button. When the
buttons are held down, the pictures can be scrolled quickly forward or backward.
View pictures
Picture number/Total pictures
Location name information and latitude & longitude information are
provided
Folder/File number
■
Changing recording information display
Press the [DISP.] button.
Some pictures edited on a computer may not be able to be viewed on this camera.
●
If the REC/PLAY switch is moved from to while the power is on, the lens barrel
●
will be retracted after approx. 15 seconds.
This camera is compliant with the unified DCF (Design rule for Camera File system)
●
standard formulated by the Japan Electronics and Information Technology Industries
Association (JEITA), and with Exif (Exchangeable image file format). Files that are not
DCF-compliant cannot be played back.
32 VQT3G90 VQT3G90 33

Viewing motion pictures
Select a picture with the motion picture icon, and press ▲
Playback now starts.
Motion picture recording time
When playback starts, the elapsed playback time is displayed in
the top right of the screen.
Example: After 10 minutes and 30 seconds: [10m30s]
Motion picture icon (differs depending on the recording mode and picture quality setting)
■
Operations during motion picture playback
▲: Pause/play
▼: Stop
◄: Fast rewind (2 steps)
Single-frame rewind (while paused)
►: Fast forward (2 steps)
Single-frame forward (while paused)
• If ▲ is pressed during fast forward or rewind, it will return to normal playback speed.
• Volume can be adjusted with zoom lever.
It may not be possible to play back properly the motion pictures recorded using other
●
cameras.
Some information will not be displayed for motion pictures recorded in [AVCHD] .
●
Motion pictures can be viewed on your computer using “PHOTOfunSTUDIO” on the
●
supplied CD-ROM or “QuickTime”.

Viewing your pictures [Normal Play] (Continued)
Playback Mode:
Zooming in and viewing “Playback Zoom”
Touch the area that you want to magnify
Each time you touch, the magnification increases through four levels after 1x, 2x,
4x, 8x, and 16x. (The picture quality displayed becomes successively lower.)
• The area can also be magnified by turning the zoom lever toward T.
Drag your finger over the screen to move the position of the
area magnified
Current zoom position
Return to the original size (1x)
Reducing the display magnification rate
• The magnification rate can also be reduced by turning the zoom lever toward W.
• The position of the area magnified can also be moved by operating the cursor
button.
Playback zoom cannot be used during motion picture playback.
●
Viewing a list of pictures “Multi Playback”
Set to multiple screen display
Picture no./Total no.
Slide bar (drag this to change display)
• When the zoom lever is repetitively turned to W, the display method changes from
a 12-picture screen to a 30-picture screen, and to Calendar Playback. (Turn the
zoom lever toward to T to return.)
• When a picture is touched on the 12-picture or 30-picture screen, the picture
touched is displayed on the 1-picture screen (full-screen).
34 VQT3G90 VQT3G90 35

Viewing pictures by their recording date “Calendar Playback”
Turn the zoom lever toward W several times
Touch the recording date to be displayed, and touch [Set] to
enter the date
Select the month
The pictures recorded on the selected date appear on the 12-picture screen.
• The recording date can also be selected by using the cursor button, and press
[MENU/SET].
Only months when pictures were taken are shown on the calendar screen. Pictures
●
taken without clock settings are displayed with the date January 1st, 2011.
Pictures displayed with [!] cannot be played back.
●
Pictures taken with destination settings made in [World Time] are displayed in the
●
calendar screen using the appropriate date for the destination’s time zone.

Deleting pictures
Playback Mode:
Pictures will be deleted from the card if the card is inserted, or from the built-in memory if
the card is not inserted. (Deleted pictures cannot be recovered.)
Press to delete displayed picture
• A confirmation screen is displayed. Select [Yes]
with cursor button and then press [MENU/SET].
[DISP.] button
Do not turn off the power during deletion.
●
Use a sufficiently charged battery or an AC adaptor (optional) and DC coupler (optional).
●
Pictures cannot be deleted in the following cases:
●
• Protected pictures
• Card switch is in “LOCK” position.
• Pictures not of DCF standard (→32)
36 VQT3G90 VQT3G90 37

To delete multiple (up to 100)/To delete all pictures
A burst group is handled as one picture. (All the pictures in the selected burst group are
deleted.)
(after step
)
Use cursor button to select [Delete Multi]/[Delete All] and
press [MENU/SET]
[Delete Multi]
●
Use cursor button to select picture and press [DISP.] button
• To cancel → Press [DISP.] button again.
• To execute → Press [MENU/SET].
Picture selected
• You can select [All Delete Except ] in [Delete All] if there are pictures that have
been set as [Favorite] (→112).
• A confirmation screen is displayed. Select [Yes] with cursor button and then press
[MENU/SET].
• May take time depending on number of pictures deleted.

Setting the menu
Displaying the menu screen
Press [MENU/SET]
The menu selection screen is displayed.
Selecting the menu type
Select [Rec] menu and press [MENU/SET]
• The menu type can also be selected by touch
operations.
Select the item
Press ▲▼ to select [AF Mode] and press
[MENU/SET]
: Pages
The pages can also be selected with the zoom lever.
Changing the settings
Press ▲▼ to select a setting, and then
press [MENU/SET]
The selected setting is set.
• To cancel → Press [ / ] button.
: Settings
: Selected setting
Exiting the menu screen
Press [ / ] button several times
The menu closes and the monitor returns to the previous screen.
■
About the menu screen
Buttons used in menu operations
: [MENU/SET]
: Cursor button
: [ / ] button
Menu screen configuration
: Menu description
: Menu items
: Operation guide
■
Menu operation flow
38 VQT3G90 VQT3G90 39

Refer to the procedure example below when operating menus.
Press [MENU/SET]
The menu selection screen is displayed.
Select [Rec] menu and press [MENU/SET]
• The menu type can also be selected by touch
operations.
Press ▲▼ to select [AF Mode] and press
[MENU/SET]
: Pages
The pages can also be selected with the zoom lever.
Press ▲▼ to select a setting, and then
press [MENU/SET]
The selected setting is set.
• To cancel → Press [ / ] button.
: Settings
: Selected setting
Press [ / ] button several times
The menu closes and the monitor returns to the previous screen.
Example: Changing [AF Mode] in the [Rec] menu in [Program AE] Mode
The operation screen examples in this manual may differ from the actual screen display
●
or some parts of the screen display are omitted.
The menu types and items that are displayed vary according to the mode.
●
The setting methods vary depending on the menu item.
●
In Recording Mode, the menu screen can also be exited by pressing the shutter button
●
halfway.

Setting the menu (Continued)
Menu type
[Rec] menu (REC/PLAY switch: )
Changing picture preferences (→85)
• Displays settings such as White Balance, Sensitivity, Aspect Ratio, and Picture
Size.
[Motion Picture] menu (REC/PLAY switch: )
Recording motion pictures using your own settings (→96)
• You can select the picture quality, data format (recording mode) and other settings.
[GPS] menu (REC/PLAY switch: )
Using the GPS function (→75)
• You can select the GPS setting, location name display and other settings.
[Setup] menu (REC/PLAY switch: )
Making the camera more convenient to use (→42)
• Displays settings for ease of use such as adjusting the clock and changing the
beep sounds.
[Playback Mode] menu (REC/PLAY switch: )
Viewing recorded pictures (→102)
• Choose a playback mode to see Slide Shows or to narrow down the pictures for
display, etc.
[Playback] menu (REC/PLAY switch: )
Using your pictures (→105)
• Enables you to specify picture protection, resizing, and other settings for pictures
you have taken.
The following menu is also displayed depending on the recording mode.
●
• In the Scene Mode: Scene menu (→61)
• In the custom mode: Custom menu (→60)
40 VQT3G90 VQT3G90 41

Using Quick menu
During recording, you can easily call some of the menu items and set them.
Press [Q.MENU] button ([ / ] button)
Press ◄► to select a menu item
Press ▲▼ to select the settings
Press [MENU/SET]
The menu items and setting items that are displayed differ depending on the recording
●
mode.

Using the [Setup] menu
[Clock Set], [Economy] and [Auto Review] are important for clock setting and
battery life. Please check these before use.
Item Settings, notes
[Clock Set]
(→18)
[Auto Clock Set]
Setting the clock
automatically using GPS.
(→81)
[World Time]
Set the local time at
travel destination. (→83)
[Travel Date]
Record the number of
days elapsed in your
travels. (→82)
[Beep]
Change or mute the
beep/shutter sounds.
Set time, date, and display format.
[ON]/[OFF]
[Destination]: Set the local time at travel destination.
[Home]: Set date and time at home area.
[Travel Setup]
[SET] (Register departure and return dates)/[OFF]
[Location]
[SET] (Input name of location)/[OFF]
[Beep Level]
/ / : Low/High/Mute
[Beep Tone]
/ / : Change beep tone.
[Shutter Vol.]
/ / : Low/High/Mute
[Shutter Tone]
/ / : Change shutter tone.
42 VQT3G90 VQT3G90 43

For details about the setting procedure in the [Setup] menu (→38)
Item Settings, notes
[Volume]
Adjust volume of sound
from speakers (7 levels).
[Cust.Set Mem.]
Register settings on
current camera. (→60)
[LCD Mode]
Make LCD monitor easier
to see.
[Guide Line]
Select recording
information display and
types of guidelines.
[0] / [1] / [2] / [3] / [4] / [5] / [6]
• Cannot be used to adjust TV speaker volume when
connected to TV.
[C1] / [C2] / [C3]
[Auto Power LCD]:
The brightness is adjusted automatically depending on
how bright it is around the camera.
[Power LCD]:
Makes screen brighter than normal (for outdoor use).
[OFF]
• [Auto Power LCD] does not work in Playback Mode.
• [Power LCD] returns to ordinary brightness if there is no
operation for 30 seconds when recording. (Press any
button to make brighter again.)
• Because the picture shown on the LCD monitor screen
emphasizes brightness, some subjects may look different
than their actual appearance, but this will not affect the
recorded picture.
• Setting [LCD Mode] will reduce the number of pictures
that can be recorded and recording time.
[Rec. Info.]
[ON] (Display recording information with guide lines.)
[OFF]
[Pattern]
/ : Change the patterns of guide lines.
• When [Intelligent Auto] Mode has been selected, only
is displayed. Also recording information and guidelines
cannot be displayed simultaneously.

Using the [Setup] menu (Continued)
Item Settings, notes
[Histogram]
Check brightness in
picture on graph.
[ Rec Area]
Enables verification of
the recordable area for
a motion picture before
recording.
[Zoom Resume]
Remember the zoom
position when turning the
power off.
[ON]/[OFF]
A peak in the center
represents correct
brightness (correct
exposure). This can be
used as a reference for
exposure correction, etc.
• Histogram from time of recording is different to Histogram
in playback and displayed in orange, when recording with
flash or in dark locations. Also, Histogram may differ from
Histograms made with image editing software.
• Not displayed during ([Intelligent Auto] Mode), [Photo
Frame] or Playback Zoom.
[ON]/[OFF]
• Recordable area displayed for motion pictures should be
interpreted as a Guideline.
• When using Extended Optical Zoom, the recordable area
may not always be displayed for certain zoom ratios.
• This setting cannot be used with [Intelligent Auto] Mode.
[ON]/[OFF]
• Cannot be set when using [Self Portrait] Scene Mode.
(Example)
Dark ← OK → Bright
44 VQT3G90 VQT3G90 45

For details about the setting procedure in the [Setup] menu (→38)
Item Settings, notes
[Economy]
Turn off the power or
make the LCD monitor
go dark while not using
the camera to minimize
battery consumption.
[Auto Review]
Automatically display
still pictures immediately
after taking them.
[Sleep Mode]
[2 MIN.]/[5 MIN.]/[10 MIN.]/[OFF]:
Automatically shut off power while not in use.
• To restore → Press the shutter button halfway, or turn on
the power again.
• Cannot be used in the following cases:
When using AC adaptor (optional) and DC coupler
(optional), when connected to computer/printer, during
motion picture recording/playback, during Slide Shows,
during automatic demo playback
• Settings fixed to [5 MIN.] in [Intelligent Auto] Mode.
[LCD Power Save]
[ON]/[OFF]:
The LCD monitor goes dark to minimize power
consumption.
• Reduces the picture quality of the LCD monitor display
during recording to minimize battery consumption
(except for the Digital Zoom area). Note, however, that
there is no effect on the recorded picture.
• The setting in [LCD Mode] is prioritized over the setting
in [LCD Power Save] for the brightness of the LCD
monitor.
[1 SEC.]/[2 SEC.]
[HOLD]: Auto review screen remains until a button (other
than the [DISP.] button) is pressed
[OFF]
• Fixed to [2 SEC.] in [Intelligent Auto] Mode.
• In [Panorama Assist], [Handheld Night Shot], [Flash
Burst], and [Photo Frame] Scene Modes, or in [Auto
Bracket], and [Burst] Mode, Auto Review performed
regardless of setting.
• Motion pictures cannot be automatically reviewed.

Using the [Setup] menu (Continued)
Item Settings, notes
[No.Reset]
Reset picture file
numbers.
[Reset]
Reset to the default
settings.
[USB Mode]
Select communication
method for when
connecting camera to a
computer or printer with
USB connection cable.
• The folder number is updated and the file number starts
from 0001.
• A folder number between 100 and 999 can be assigned.
Numbers cannot be reset once folder number reaches
999. In this case, save all necessary pictures to your
computer, and format the built-in memory/card (→48).
• To reset folder number to 100:
First, format the built-in memory or card, and reset the
file numbers using [No.Reset]. Then, select [Yes] on the
folder number reset screen.
[Reset Rec. settings?]
[Reset setup parameters?]
• Information registered in [Face Recog.] is reset if
recording settings are reset.
• Resetting the setup parameters will also reset the
following.
Age in years/months and names in [Baby] and [Pet]
Scene Modes, [GPS] menu
• Folder numbers and clock settings will not be reset.
• Camera movement may be audible as the lens function
is reset. This is not a fault.
[Select on connection]:
Select [PC] or [PictBridge (PTP)] each time you connect to
a computer or PictBridge-compatible printer.
[PictBridge (PTP)]: Select when connecting to a
PictBridge-compatible printer.
[PC]: Select when connecting to a computer.
46 VQT3G90 VQT3G90 47

For details about the setting procedure in the [Setup] menu (→38)
Item Settings, notes
[Output]
Change the settings
to be used when the
camera is connected to a
TV or other device.
[VIERA Link]
Enable automatic linking
with other VIERA Linkcompatible devices, and
operability with a VIERA
remote control when
connecting via an HDMI
mini cable (optional)
(→116).
[3D Playback]
Set how 3D still picture is
output.
[TV Aspect] (Operates when AV cable is connected.)
/
[ON]: Operations may be performed via the remote
control of the VIERA Link-compatible device.
(Not all operations will be available.)
Operability of the camera’s own buttons will be
limited.
[OFF]: Operations must be performed via the camera’s
own buttons.
[3D]/[2D]
• If you want to play back a picture in 2D (conventional
picture) on a 3D television, set to [2D].
• This item of the menu functions when an HDMI mini
cable (optional) is connected.
• For the procedure for playing back a 3D still picture (→119).

Using the [Setup] menu (Continued)
Item Settings, notes
[Rotate Disp.]
Automatically rotate
portrait still pictures.
[Version Disp.]
Check the version of the
camera firmware.
[Format]
Use when [Built-In
Memory Error] or
[Memory Card Error]
appears, or when
formatting the built-in
memory or card.
When a card/built-in
memory is formatted,
the data cannot be
restored. Check the
content of the card/
built-in memory
carefully before
formatting.
: Rotate Display is turned on.
: Rotate Display is turned on for TV output only.
[OFF]
• [Rotate Disp.] cannot be used with motion pictures.
• Some pictures taken facing up or facing down may not
be rotated automatically.
• Pictures cannot be rotated during Multi Playback.
• Will only be displayed rotated on computer if in Exifcompatible (→32) environment (OS, software).
Current version is displayed.
• This requires a sufficiently charged battery, or an AC
adaptor (optional) and DC coupler (optional). When
formatting the built-in memory, remove the cards.
(Only inserted card will be formatted if present; built-in
memory will be formatted if no card is inserted.)
• Always format cards with this camera.
• All protected pictures and other picture data will be
deleted.
• Do not turn off power or perform other operations during
formatting.
• Formatting the built-in memory may take several
minutes.
• Consult the dealer or your nearest Service Center if
format cannot be successfully completed.
48 VQT3G90 VQT3G90 49

For details about the setting procedure in the [Setup] menu (→38)
Item Settings, notes
[Calibration]
Perform these
adjustments if something
different from what
was touched has been
selected or if the camera
did not respond when it
Press [MENU/SET].
Touch [+] which is displayed on the screen (in 5 places)
in sequence using the stylus pen (supplied).
Press [MENU/SET].
• If the proper positions were not touched, the touch
panel adjustments will not be performed. Touch the [+]
places again.
was touched.
[Language]
Set the language displayed on the screen.
Change display
language.
[Demo Mode]
View demonstration of
functions.
[Stabilizer Demo.]
Extent of jitter is shown on graph (estimate)
Extent of jitter
Extent of jitter after correction
• During demo screen display, the Optical Image Stabilizer
switches ON and OFF every time [MENU/SET] is
pressed.
• Cannot display during Playback Mode.
[Auto Demo]: View introductory Slide Show
[ON]/[OFF]
• [Auto Demo] cannot be displayed on external devices
such as TVs.

Taking pictures with zoom
Recording Mode:
You can zoom in up to 16 times with “Optical Zoom”, and up to 33.8 times with “Extended
Optical Zoom” (pictures only) with lower picture quality. To zoom further, you can use
[i.ZOOM] or [Digital Zoom].
Zoom In/Out
Capture a
wider area
(wide-angle)
• The zoom speed can be set to one of 2 levels using the angle at which the zoom
lever is turned.
1
∗
Enlarge
the subject
(telephoto)
Zoom bar
Using the zoom by performing touch operations
Touch
The zoom lever appears on the screen.
Touch the T or W edge of the zoom lever on the screen
Fast zooming all the way to the T end
1
Fast zooming
∗
Focus range
Zoom ratio
2
∗1,∗
2
Fast zooming all the way to the W end
Slow zooming
1
∗
The zoom speed does not change during motion picture recording.
2
∗
When or is touched again while zooming, zooming will stop.
Adjust the focus after adjusting the zoom.
●
Do not touch the lens barrel during zooming.
●
The zoom ratio and the zoom bar displayed on the screen are estimates.
●
The camera may make a rattling noise and vibrate when the zoom lever is operated -
●
this is not a fault.
∗1,∗
50 VQT3G90 VQT3G90 51

Zoom types and use
The zoom ratio changes when the number of recording pixels is changed.
■
Optical Zoom
Zooming in up to 16 times is possible if pictures without have been selected by
[Picture Size] on the [Rec] menu. (→85)
■
Extended Optical Zoom
Zooming in up to 33.8 times is possible when pictures with have been selected by
[Picture Size] on the [Rec] menu. (→85) EZ is short for “Extended Optical Zoom.”
Extended Optical Zoom cannot be used in the following cases:
●
• [Intelligent Auto] Mode (when [Motion Deblur] is [ON])
• [Macro Zoom] • Motion picture • When the [Burst] setting is set to or
• [Transform], [High Sens.], [Flash Burst], [Pin Hole], [Photo Frame] and [High Speed
Movie] Scene Modes
To increase the zoom ratio further, the following zoom can be used in combination.
■
i.Zoom
The camera uses super resolution technology to increase the zoom ratio. Using super
resolution technology, the zoom ratio can be increased up to about 1.3 times higher
than the original zoom ratio with almost no deterioration of picture quality. (→92)
When [i.Resolution] is set to [i.ZOOM], super resolution technology is applied to the
●
picture.
The i.Zoom functions in the following cases.
●
• [Intelligent Auto] Mode (except when [Motion Deblur] is [ON])
• Scene Modes (except for [Handheld Night Shot], [High Sens.], [Flash Burst], [Pin
Hole])
The [i.ZOOM] does not function when [Burst] is set (when or is set).
●
■
Digital Zoom
Zoom 4 times further than Optical/Extended Optical Zoom. Note that, with Digital Zoom,
enlarging will decrease picture quality. Set the [Digital Zoom] in the [Rec] menu to [ON].
(→92)
Digital Zoom cannot be used in the following modes:
●
• [Intelligent Auto] Mode • When the [Burst] setting is set to or
• Scene Modes ([Transform], [Handheld Night Shot], [High Sens.], [Flash Burst], [Pin
Hole], [Film Grain], [Photo Frame] and [High Speed Movie])

Taking pictures with flash
Recording Mode:
Press ► to display [Flash]
Use cursor button to select the desired type and press [MENU/
SET]
[Auto]
• Automatically judges whether or not to flash
[Auto/Red-Eye]
• Automatically judges whether or not to flash
(reduce red-eye)
[Forced Flash On]
• Always flash
[Forced On/Red-Eye]
• Always flash (reduce red-eye)
[Slow Sync./Red-Eye]
• Automatically judges whether or not to flash
(reduce red-eye; slow shutter speed to take
brighter pictures)
[Forced Flash Off]
• Never flash
1
∗
Two flashes will be emitted. Do not move until after the second flash. Interval between flashes varies
according to brightness of subject.
If [Red-Eye Removal] on the [Rec] menu is [ON], the
is automatically detected and still picture data is corrected. (Only when [AF Mode] is
Detection))
■
Available types in each mode (○: Available, –: Not available, : Default setting)
∗
○
–
–
––– – – – –
–
○○○ ○ ○○○○○–○○○
2
∗
Set to , , or depending on the subject and brightness.
Type, operations Uses
1
∗
1
∗
1
∗
2
○○ ○ ○
○○ ○
○○ ○ ○
○
–– –○–
–
– – – –––––
–
Normal use
Taking pictures of subjects in dark
places
Taking pictures with backlight or
under bright lighting (e.g. fluorescent)
Taking pictures of subjects against a
nightscape (tripod recommended)
Places where flash use is prohibited
appears with the flash icon, red-eye
○
○
(Face
–––––
––
○○
○○
○○–○
––––
––○–
○
○
• The flash cannot be used when recording motion pictures or 3D still pictures, Scene
Modes , , , , , , , or .
52 VQT3G90 VQT3G90 53

■
The available flash range when [Sensitivity] setting is [AUTO]
Max. W Approx. 0.6 m-5.0 m (1.97 feet-16.4 feet)
Max. T Approx. 1.0 m-2.8 m (3.28 feet-9.18 feet)
Shutter speeds are as follows:
●
• , , , : 1/60
• , : 1
3
∗
Varies according to [Min. Shtr Speed] setting.
4
∗
When [Min. Shtr Speed] is set to [AUTO], and a jitter is detected when [Stabilizer] is turned to
[ON], the maximum speed is 1/4 second. Also varies according to [Intelligent Auto] Mode and
Scene Modes, etc.
The effect of red-eye reduction varies depending on the subject and is affected by
●
factors such as distance to the subject, whether the subject is looking at the camera
during preliminary flash, and so on. In some cases, the effect of red-eye reduction may
be negligible.
Do not put your hands over the light-emitting area of the flash (→9) or look at it
●
from close range (a few centimeters away).
Do not use the flash at close distances to other subjects (heat/light may damage
subject).
Flash settings may be changed when changing Recording Mode.
●
Scene Mode flash settings are restored to default when Scene Mode is changed.
●
Edges of picture may become slightly dark if using flash at short distances without
●
using zoom (close to max. W). This may be remedied by using a little zoom.
No pictures may be taken if these marks (e.g. ) are flashing (flash is charging).
●
Insufficient light may prevent appropriate exposure or White Balance.
●
Flash charging may take time if battery is low, or if using flash repeatedly.
●
4
∗3,∗
- 1/4000th
3
∗
- 1/4000th

Taking close-up pictures
Recording Mode:
When you want to enlarge the subject, setting to [AF Macro] ( ) enables you to take
pictures at an even closer distance than the normal focus range (up to 3 cm (0.10 feet) for
max. W).
Press ▼ to display [Macro Mode]
Use cursor button to select [AF Macro] and press [MENU/SET]
■
Taking close-up pictures without standing
close to subject (
“Tele macro” operates automatically when zoom
ratios are close to the maximum T setting. The focus
can be aligned for distances as close as 1 m (3.28
feet). ( changes to )
display
[Macro Zoom]
To take even larger images of the subject, setting to [Macro Zoom] enables the subject to
appear even larger than when using [AF Macro].
Press ▼ to display [Macro Mode]
Use cursor button to select [Macro Zoom] and press [MENU/
SET]
“Tele macro” function)
Adjust the Digital Zoom magnification with the zoom lever
The zoom position is fixed at the Wide
Return Enlarge
In [Macro Zoom], higher magnification results in lower picture quality.
●
When [Macro Zoom] is set, Extended Optical Zoom or [i.ZOOM] does not work.
●
[Macro Zoom] cannot be set in [3D Photo Mode].
●
When [AF Tracking] is set, zoom macro is canceled.
●
end.
Focus range is 3 cm (0.10 feet) -
Digital Zoom magnification (1 x to 3 x)
∞
.
54 VQT3G90 VQT3G90 55

Focus range
When a subject is too close to the camera, the picture may not be properly focused. The
shortest recording distance differs depending on the zoom ratio and the setting in macro
recording mode.
1
During optical zooming
Zoom ratio (guideline)
1× 3 cm (0.10 feet) 50 cm (1.64 feet)
2× 10 cm (0.33 feet) 50 cm (1.64 feet)
3× 20 cm (0.66 feet) 50 cm (1.64 feet)
4× 40 cm (1.32 feet) 50 cm (1.64 feet)
5× 1 m (3.28 feet) 1 m (3.28 feet)
6× 1.5 m (4.92 feet) 1.5 m (4.92 feet)
7× - 11× 2 m (6.57 feet) 2 m (6.57 feet)
12× - 15× 1.5 m (4.92 feet) 2 m (6.57 feet)
16× 1 m (3.28 feet) 2 m (6.57 feet)
1
∗
The shortest recording distance is the distance from the lens front to the subject. This distance
changes gradually depending on the zoom position.
2
∗
The shortest recording distance is identical under the following settings.
• [Intelligent Auto] Mode
• [Food], [Candle Light], [Baby], [Pet], [High Sens.], [Flash Burst], [Pin Hole], [Film Grain], [High
Dynamic], [Underwater], [High Speed Movie] in Scene Mode
3
∗
The shortest recording distance is identical under the following settings.
• [Portrait], [Soft Skin], [Transform], [Panorama Assist], [Sports], [Party], [Sunset], [Starry Sky],
[Beach], [Snow], [Photo Frame] in Scene Mode
Ranges for focus alignment differ for Scene Modes.
●
Shortest recording distance
[Macro Mode]
2
∗
∗
[Macro Mode]
OFF
3
∗
It may take some time until distant subjects come into focus.
●
Using a tripod and [Selftimer] is recommended. Also, when recording a subject that is
●
close to the camera, setting [Flash] to [Forced Flash Off] is recommended.
Moving the camera after aligning the focus is likely to result in poorly focused pictures
●
if subject is close to the camera, due to the margin for focus alignment being severely
reduced.
Resolution may be reduced around the edges of the picture.
●

Taking pictures with self-timer
Recording Mode:
We recommend using a tripod. This is also effective for correcting jitter when pressing the
shutter button, by setting the self-timer to 2 seconds.
Press ◄ to display [Selftimer]
Use cursor button to select time duration and press [MENU/
SET]
Take a picture
Press the shutter button fully to start recording after the preset time.
Self-timer indicator
(Flashes for set duration)
• To cancel while in operation → Press [MENU/SET]
Focus will be automatically adjusted immediately before recording if shutter button is
●
pressed fully here.
After Self-timer indicator stops flashing, it may then be lit for AF Assist Lamp.
●
This function cannot be used in the [Underwater] Scene Mode, or when recording
●
motion pictures.
[10sec.] cannot be chosen in Scene Mode [Self Portrait].
●
56 VQT3G90 VQT3G90 57

T aking pictures with Exposure Compensation
Corrects exposure when adequate exposure cannot be obtained (if difference between
brightness of object and background, etc.).
■
Recording Mode:
Press ▲ to display [Exposure]
Use cursor button to select a value and press [MENU/SET]
• If the picture is too dark, adjust the exposure
to the “+” direction.
• If the picture is too bright, adjust the exposure
to the “-” direction.
• After exposure adjustment, the adjustment
value ( for example) is displayed in the
bottom-left corner of the screen.
• The Exposure Compensation value you set
is retained even after the camera is turned off.
Depending on the brightness, this may not be possible in some cases.
●
Exposure Compensation cannot be used with the [Starry Sky] Scene Mode.
●
Recording while exposure is changed automatically ([Auto Bracket])
Records 3 pictures in continuous succession while exposure is changed automatically.
After exposure adjustment, the adjustment value is set as the standard.
■
Recording Mode:
Press ▲ several times to display [Auto Bracket]
Use cursor button to select a value and press [MENU/SET]
• The first still picture is recorded without
compensation, the second still picture is
recorded with exposure adjusted in the
Value displayed
after Exposure
Compensation
set
Cannot be used with flash.
●
When [Auto Bracket] is set, [Burst] is canceled.
●
Cannot be set in [Transform], [Panorama Assist], [Handheld Night Shot], [Flash
●
Burst], [Starry Sky], [Pin Hole], [Film Grain], and [Photo Frame] Scene Modes or when
recording motion pictures.
“-” direction, and the third still picture is
recorded with exposure adjusted in the
“+” direction.
• Canceled when the power is turned off.

Determine aperture and shutter speed and record
Recording Mode:
[Aperture-Priority] Mode
When recording, you can control the range of focus (depth of field) to meet your recording
purposes.
Shutter speed is automatically adjusted to be appropriate for the set aperture value.
Set mode dial to ([Aperture-Priority] Mode)
Press [EXPOSURE] button and use cursor button to determine
aperture value
• When the aperture value is increased, the
range of depth in focus expands, and the
picture shows up clearly from the position
of the camera to the background.
• When the aperture value is reduced, the
Aperture value
Press [EXPOSURE] button
[Shutter-Priority] Mode
When recording, you can control the shutter speed to meet your recording purposes.
Aperture is automatically adjusted to be appropriate for the set shutter speed.
range of depth in focus shrinks, and the
background can get blurry.
Set mode dial to ([Shutter-Priority] Mode)
Press [EXPOSURE] button and use cursor button to determine
shutter speed
• At faster shutter speeds, movements by
the subject show as if they are still.
• At slower shutter speeds, subjects that
are moving show as jittery.
Shutter speed
Press [EXPOSURE] button
58 VQT3G90 VQT3G90 59

[Manual Exposure] Mode
This mode of recording lets you set any aperture value and shutter speed when exposure
adjustment prevents you from recording at the desired exposure (brightness/darkness).
Also, long-exposure recording of up to 60 seconds is possible.
Set mode dial to ([Manual Exposure] Mode)
• Manual exposure assist is displayed.
Press [EXPOSURE] button and use cursor button to determine
aperture value and shutter speed
Aperture value/shutter speed
Press [EXPOSURE] button
■
Manual exposure assist (estimate)
If the shutter button is pressed halfway, manual exposure assist is displayed.
Shows pictures with standard brightness.
Shows brighter pictures. For standard brightness, either use a faster
shutter speed or increase aperture value.
Shows darker pictures. For standard brightness, either use a slower
shutter speed or reduce aperture value.
■
Recording motion pictures in
• Aperture and shutter speed are automatically set.
When the picture is too bright or too dark or there is incorrect exposure, the numbers
●
for the aperture value and shutter speed are shown in red.
LCD monitor brightness may vary from the actual still picture recorded.
●

Register your own settings and record
[Custom] Mode
Recording Mode:
Registering your preferred Recording Mode, [Rec] menu settings, etc. to [Cust.Set Mem.]
and setting the mode dial to allows you to switch quickly to those settings.
[Cust.Set Mem.]
Up to 3 current camera settings can be registered.
■
Recording Mode:
Select the Recording Mode you wish to register and set the
[Rec] menu, [Setup] menu, etc.
Select [Cust.Set Mem.] from the [Setup] menu (→43)
Use cursor button to select custom set for registration and
press [MENU/SET]
Self-timer is not stored in custom set.
●
The following [Setup] menus are stored in custom set.
●
• [Guide Line] • [Histogram] • [Rec Area] • [Zoom Resume] • [Auto Review]
[Custom]
Settings registered in [Cust.Set Mem.] can be quickly called up by setting the mode dial
to .
Set mode dial to (Custom Mode)
Use cursor button to select custom set and press [MENU/SET]
■
Recording motion pictures in
Records motion pictures in registered Recording Mode.
Even if [Rec] menu, etc. is changed in [Custom], the content of the custom set does not
●
change. When changing registration content, reset in [Cust.Set Mem.].
60 VQT3G90 VQT3G90 61

T aking pictures according to the scene
[Scene Mode]
Recording Mode:
Using [Scene Mode] enables you to take pictures with optimum settings (exposure,
coloring, etc.) for given scenes.
Set mode dial to
Use cursor button to select the scene and press [MENU/SET]
(When the scene menu is not displayed →38)
■
Recording motion pictures in
Records a motion picture at the optimum settings for the selected scene.
• Some scenes are switched to the following scenes:
Selected scene Scenes for motion picture
[Baby] Portrait motion picture
[Night Portrait], [Night Scenery], [Handheld Night Shot],
[Starry Sky]
[Panorama Assist], [Sports], [Pet], [Flash Burst], [Fireworks],
[Photo Frame]
Low light motion picture
Normal motion picture
Selecting a Scene Mode inappropriate for the actual scene may affect the coloring of
●
your picture.
Following [Rec] menu settings will be automatically adjusted and cannot be selected
●
manually.
[Sensitivity], [Metering Mode], [i.Exposure], [Min. Shtr Speed], [i.Resolution],
[Color Mode]

T aking pictures according to the scene
[Scene Mode] (Continued)
Recording Mode:
[My Scene Mode]
You can register a commonly used Scene Mode in on the mode dial.
After the settings are made, pictures can be taken in the preset Scene Mode by simply
setting the mode dial to
Set mode dial to /
Use cursor button to select the scene and press [MENU/SET]
(If scene menu is not displayed →38)
■
Changing registered Scene Modes
Perform the registration operation again.
■
Recording motion pictures in
Records motion pictures in registered Recording Mode.
and
●
Both represent the same function. Frequently-used scenes can be preset to each
position so that you can quickly and easily switch to the desired Scene Mode.
If recording settings are reset by [Reset] in the [Setup] menu, the preset Scene Modes
●
are cleared.
Improves the skin tone of subjects for a healthier appearance in bright
daylight conditions.
[Portrait]
Smoothes skin colors in bright, outdoor daylight conditions (portraits from
[Soft Skin]
[Transform]
chest upwards).
Changes the appearance of the subject by stretching the length or width,
and at the same time, improves the skin appearances.
.
Tips
• The closer the zoom is positioned to the T (telephoto) edge and the closer the
camera is brought to the subject, the greater the effect will be.
Tips
• The closer the zoom is positioned to the T (telephoto) edge and the closer the
camera is brought to the subject, the greater the effect will be.
Select the Transform level.
Notes
• [Picture Size] will be fixed according to the [Aspect Ratio] setting, as detailed
below.
: 3 M : 2.5 M : 2 M
62 VQT3G90 VQT3G90 63

How to select a scene (→61)
Using flash in Scene Modes (→52)
Take pictures of yourself.
[Self Portrait]
[Scenery]
[Panorama Assist]
Tips
• Press shutter button halfway → self-timer indicator illuminates → press
shutter button fully
(if self-timer indicator flashes, focus is not correctly aligned)
• Use of the 2-second self-timer is recommended when the shutter speed is
slow or jitter occurs easily.
Takes clear pictures of wide, distant subjects.
Use the supplied software to join multiple pictures into a single panorama
picture.
Use cursor button to select the recording direction, and press [MENU/SET] to
set.
Special panorama guidelines will be displayed.
Take the picture.
Select [Next], and press [MENU/SET] to set.
• Alternatively, press the shutter button halfway.
• You can take pictures again by selecting [Retake].
Change the composition and take the picture so that a part of the picture
overlaps with the previous picture.
Section of picture that was taken last time
After you finish taking pictures, select [Exit], and press [MENU/SET] to set.
Tips
• Use a tripod.
• When it is dark, use the self-timer to record pictures.
Notes
• The focus, zoom, Exposure Compensation, White Balance, shutter speed,
and ISO Sensitivity are all fixed at the setting for the first picture.
• Shutter speed may slow down up to 8 seconds.
• After recording, the shutter may stay closed (up to 8 seconds) to process the
signal. This is not a malfunction.
• Panorama picture stitching cannot be performed by this camera. Use the
software on the supplied CD-ROM “PHOTOfunSTUDIO” to make the pictures
you record into a panorama still picture with your computer.
• To take more pictures, select [Next] and repeat steps
and .

T aking pictures according to the scene
[Scene Mode] (Continued)
Recording Mode:
Takes pictures of scenes with fast movement, e.g. sports.
[Sports]
[Night Portrait]
[Night Scenery]
[Handheld Night Shot]
[Food]
Tips
• Stand at least 5 m (16.4 feet) away.
Notes
• Shutter speed may slow down up to 1 second.
Takes pictures of people and nightscapes with close to actual brightness.
Tips
• Use flash.
• Subject should not move.
• Tripod, self-timer recommended.
Notes
• Shutter speed may slow down up to 8 seconds.
• After recording, the shutter may stay closed (up to 8 seconds) to process the
signal. This is not a malfunction.
Takes clear pictures of night scenes.
Tips
• Tripod, self-timer recommended.
Notes
• Shutter speed may slow down up to 8 seconds.
• After recording, the shutter may stay closed (up to 8 seconds) to process the
signal. This is not a malfunction.
Takes clear pictures of night scenes without a tripod.
Tips
• Stand at least 5 m (16.4 feet) away.
• After the shutter button has been pressed, do not move the camera during the
burst operation.
Notes
• Since a burst of still pictures are combined after they have been recorded, it
will be a few moments before you will be able to record another picture.
Takes natural-looking pictures of food.
64 VQT3G90 VQT3G90 65

How to select a scene (→61)
Using flash in Scene Modes (→52)
Brighten subjects and background in pictures of indoor events, such as
weddings.
[Party]
[Candle Light]
[Baby]
[Pet]
Tips
• Stand approx. 1.5 m (4.92 feet) away.
• Zoom: Wide (W side)
• Use flash.
• Tripod, self-timer recommended.
Brings out the atmosphere of a candlelit room.
Tips
• Do not use flash.
• Tripod, self-timer recommended.
Notes
• Shutter speed may slow down up to 1 second.
Uses weak flash to bring out skin colors.
• To record age and name
([Baby1] and [Baby2] can be set separately.)
Select [Age] or [Name] with cursor button, press [MENU/SET], select [SET],
and press [MENU/SET].
Set the birthday and name.
Age: Set birthday with cursor button, and press [MENU/SET].
Name: (See “Entering Text”: (→84))
Use cursor button to select [Exit] and press [MENU/SET]
Tips
• Make sure [Age] and [Name] are [ON] before taking a picture.
Notes
• Age display format depends on [Language] setting.
• Shutter speed may slow down up to 1 second.
• [Age] and [Name] print setting can be made on your computer using the
supplied CD-ROM “PHOTOfunSTUDIO”. Text may also be stamped onto the
still picture using [Text Stamp].
Records pet’s age and name when taking pictures.
• Refer to [Baby] for other tips and notes.

T aking pictures according to the scene
[Scene Mode] (Continued)
Recording Mode:
[Sunset]
[High Sens.]
[Flash Burst]
[Starry Sky]
Takes clear pictures of scenes such as sunsets.
Prevents blurring of subject in dark, indoor conditions.
Select the aspect ratio and the picture size with cursor button and press [MENU/
SET].
Enables continuous recording in dim locations.
Use cursor button to select the picture size and aspect ratio, and press
[MENU/SET] to set.
Take pictures (Hold shutter button).
Still pictures are taken continuously while the shutter button is held down.
Number of continuous shots: Max. 5
Notes
• When [Selftimer] is set, 5 pictures are taken.
• The focus, zoom, Exposure Compensation, shutter speed, and ISO Sensitivity
are all fixed at the setting for the first picture.
Takes clear pictures of starry skies or dark subjects.
• Shutter speed settings
Select with cursor button and press [MENU/SET].
Press shutter button.
Tips
• Always use a tripod.
• Self-timer recommended.
• Do not move the camera until the countdown has ended.
(Countdown for processing is redisplayed afterwards)
66 VQT3G90 VQT3G90 67
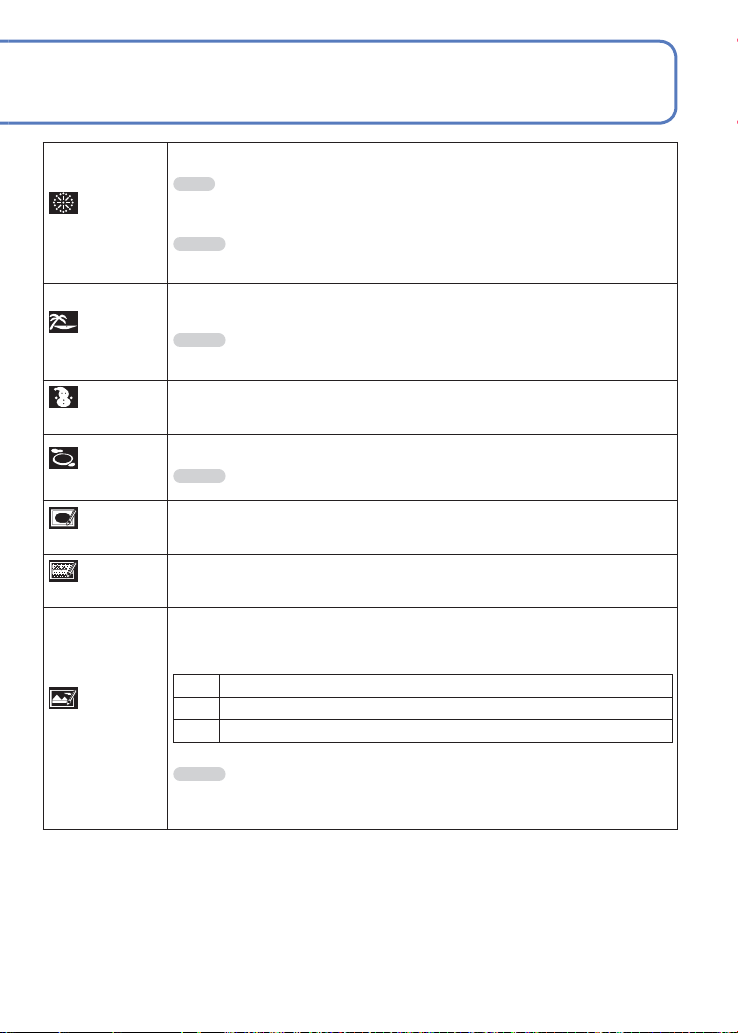
How to select a scene (→61)
Using flash in Scene Modes (→52)
Takes clear pictures of fireworks in the night sky.
Tips
[Fireworks]
[Beach]
• Stand at least 10 m (32.8 feet) away.
• Tripod recommended.
Notes
• Shutter speed is fixed to 1/4 or 2 seconds. (Setting of shutter speed changes
if exposure compensation is operated)
Brings out the clear blues of the sky and the sea without darkening
subject.
Notes
• Do not touch camera with wet hands.
• Beware of sand and sea water.
Brings out the natural color of snow in ski slope and mountain scenes.
[Snow]
[Aerial Photo]
Takes pictures of the view from aircraft windows.
Notes
• Turn the camera off when taking off or landing.
Darkens the area around the screen for a retro effect.
[Pin Hole]
Produces black and white pictures with a grainy texture.
[Film Grain]
Reduces over- and underexposure when recording into the light and in
night scenes.
Use cursor button to select the effect and press [MENU/SET].
[High Dynamic]
STD. Natural coloring effect
ART An impressionistic effect emphasizing contrast and color
B&W Monochrome effect
Notes
• Shutter speed may slow down up to 8 seconds.
• After recording, the shutter may stay closed (up to 8 seconds) to process the
signal. This is not a malfunction.

T aking pictures according to the scene
[Scene Mode] (Continued)
Recording Mode:
A frame is superimposed over the image.
Use cursor button to select the frame, and then press [MENU/SET].
[Photo Frame]
Notes
• The recording pixel level is 2 M (
• Guide lines cannot be displayed.
Achieve natural colors under water.
Tips
• For fast moving subjects, align with the AF area and press ◄ (AF Lock).
(Press ◄ again to release.)
[AF Lock]
(focus fixed)
).
[Underwater]
[High Speed Movie]
AF area
• If the zoom is operated after AF Lock is set, the AF Lock setting will be
canceled and must be set again.
• AF Lock cannot be set if [AF Mode] is set to
• Adjust the coloring with “White Balance fine adjustment” (→87).
Notes
• Always use marine case (optional).
• Positioning is not possible underwater, because the GPS signals cannot reach
the camera.
Records rapid movements at a high speed of 220 fps.
Press the motion picture button to start recording
Press the motion picture button again to finish recording
• Motion picture recording can also be started or finished by pressing the
shutter button.
• During playback, the movements of a subject that cannot be seen by the
naked eye can be made recognizable by playing back the motion pictures
using slow motion.
Notes
• High-speed motion pictures cannot be recorded in the built-in memory.
• They are recorded in [QVGA] of [Motion JPEG] motion pictures. (up to 2 GB,
about 7 minutes 20 seconds at one recording.)
• No sound is recorded.
• Still pictures cannot be recorded while high-speed motion pictures are being
recorded.
• The settings for the focus, zoom, exposure and White Balance are fixed to the
settings specified when recording was started.
• The Optical Image Stabilizer does not work.
• The [AF Mode] is set to
• Flickering or horizontal stripes may appear while recording under fluorescent
lighting.
(1-area-focusing).
.
68 VQT3G90 VQT3G90 69
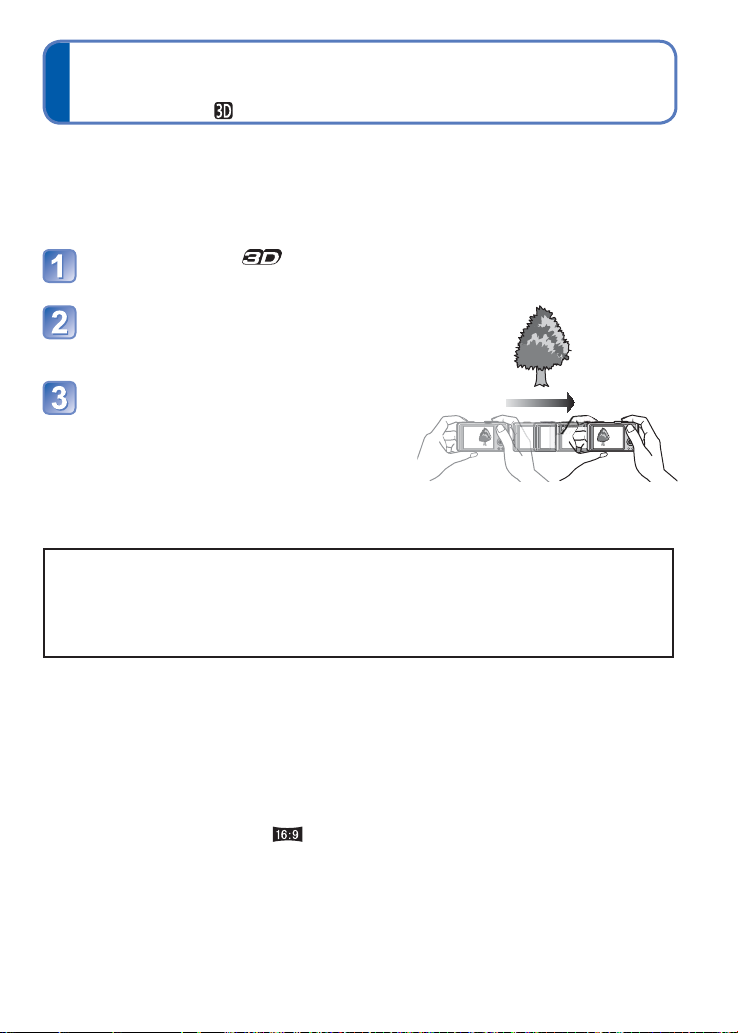
Recording 3D still pictures [3D Photo Mode]
Recording Mode:
The camera continuously records multiple still pictures while being moved horizontally,
and combines them into a 3D still picture. (The pictures are played back on the camera
as 2D still pictures.)
To view 3D still pictures, you need a 3D-capable TV. For details on how to play back 3D
still pictures (→119).
Set mode dial to
• The instructions on how to record pictures is displayed.
Record a picture so that the
subject comes on the right side
of the center
Slide this camera horizontally
level from left to right while
recording
• A guide is displayed while recording.
• By using the guide as a reference, slide the
camera by approximately 10 cm (0.33 feet)
in about 4 seconds.
Tips for recording pictures
• Record a stationary subject.
• Record a picture outdoors or in other bright locations.
• Press the shutter button halfway to fix the focus and the exposure, press the shutter
button fully, and then slide the camera.
3D still pictures cannot be recorded by holding this camera vertically.
●
3D still pictures are recorded in MPO format (3D).
●
The zoom position is fixed to the W end.
●
The picture size is fixed to 2M .
●
ISO Sensitivity is automatically adjusted. However, ISO Sensitivity is increased to
●
increase the shutter speed.
Motion pictures cannot be recorded.
●
When any of the recording conditions as listed below exists, the 3D effect may not be
●
available even if a picture is recorded in 3D, or image may be distorted:
• When the subject is too dark or its brightness changes
• When the subject is moving
• When pictures are recorded under water

Burst function
Recording Mode:
A burst of still pictures can be recorded while the shutter button is pressed fully.
Select [Burst] from the [Rec] menu
Use cursor button to select the burst setting, and press
[MENU/SET]
Setting Speed Description
• The burst speed is adjusted automatically in
Approx. 2 - 10
pictures/sec.
Approx. 2
pictures/sec.
Approx. 5
pictures/sec.
Approx. 10
pictures/sec.
40 pictures/sec.
60 pictures/sec.
[OFF] — The burst function is released. —
accordance with the movements of people, pets
or other subjects. ([Intelligent Burst mode])
• This setting can be selected only in the
[Intelligent Auto] Mode.
• The subject is brought into focus as far as this
is allowed by the burst speed. The pictures are
taken with the burst function while the exposure
and White Balance are being adjusted.
(However, when the burst function is operating
during motion picture recording, the focus is
fixed to the first picture.)
• The burst speed may be reduced under certain
recording conditions.
• Focus, exposure and White Balance are fixed in
the first picture.
• Focus, exposure and White Balance are fixed in
the first picture.
• Number of recording pixels that can be set
[Aspect Ratio] [Picture Size]
4:3 5M, 3M, 0.3M
3:2 4.5M, 2.5M, 0.3M
16:9 3.5M, 2M, 0.2M
1:1 3.5M, 2.5M, 0.2M
• Focus, exposure and White Balance are fixed in
the first picture.
• The recordable range is reduced.
• Number of recording pixels that can be set
[Aspect Ratio] [Picture Size]
4:3 2.5M, 0.3M
3:2 3M, 0.3M
16:9 3.5M, 0.2M
1:1 2M, 0.2M
No. of
pictures
100
100
15
50
60
70 VQT3G90 VQT3G90 71

Pictures taken with the or setting are recorded together as a group (burst
●
group). (→99)
Depending on changes in the brightness of the subject, the second and subsequent
●
pictures may be recorded brighter or darker when using the burst function at the ,
or setting.
Burst speed may be reduced if shutter speed is reduced in darker locations.
●
The pictures taken using the burst function at the or setting may be distorted if
●
the subjects were moving or the camera was moved.
[Auto Bracket] is released.
●
The flash is set to [Forced Flash Off].
●
Settings will be stored even if power is turned off.
●
Burst is not available in the Scene Modes [Panorama Assist], [Handheld Night Shot],
●
[Flash Burst], [Starry Sky], [Fireworks], [Pin Hole], and [Photo Frame].
When [Selftimer] is set, 3 pictures are taken.
●
It may take a while to store still pictures that were taken using the burst function.
●

Recording with the Face Recognition function
[Face Recog.]
Recording Mode:
■
How the Face Recognition function works
During recording
(When [AF Mode] is (Face Detection))
• The camera recognizes a registered face and adjusts focus and
exposure.
• When registered faces that have set names are recognized, the
names are displayed (up to 3 people).
During playback
• The name and age are displayed (if information is registered).
• During recording, the names that have been set for the recognized faces are displayed (up to 3
people).
• Only pictures of the selected registered people are played back ([Category Selection]).
■
Recording tips when registering face pictures
• Make sure the subject’s eyes are open and mouth closed; have the subject face the camera
directly, and make sure the outline of the face, the eyes and eyebrows are not hidden by hair.
• Make sure there are no heavy shadows on the face. (During registration, the flash is not used).
■
If the camera seems to have difficulty recognizing faces when recording
• Register additional pictures of the same person’s face, indoors and outdoors or with different
expressions or angles.
• Register additional pictures at the place you are recording.
• If a registered person is no longer recognized, re-register that person.
When Burst is performed, recording information relating to Face Recognition is put only
●
on the first picture.
If you press the shutter button halfway, then point the camera at a different subject and
●
record, recording information for a different person may be put on the picture.
Face Recognition does not work in the following cases:
●
Motion picture recording, Scene Modes [Transform], [Panorama Assist], [Night
Scenery], [Handheld Night Shot], [Food], [Flash Burst], [Starry Sky], [Fireworks], [Aerial
Photo], [Film Grain], [Underwater]
Face Recognition searches for faces similar to those registered, but there is no
●
guarantee it will always recognize these faces. In some cases, the camera cannot
recognize or incorrectly recognizes even registered people depending on their
expression or the environment.
Even if Face Recognition information is registered, pictures recorded when the name is
●
[OFF] are not categorized for Face Recognition in [Category Selection].
Even if Face Recognition information is changed, Face Recognition information
●
for previously recorded pictures is not changed.
For example, if a name is changed, pictures recorded before the change are not
categorized for Face Recognition in [Category Selection].
T o change name information for pictures already recorded, perform a [REPLACE] (→114)
●
in [Face Rec Edit].
72 VQT3G90 VQT3G90 73

Default [Face Recog.] setting is [OFF].
When the face pictures are registered, the setting will be [ON] automatically.
Registering face pictures
Up to 6 people’s face pictures can be registered along with such information as name and
birth date.
You can facilitate Face Recognition by the way you register faces: for example, register
multiple face pictures of the same person (up to 3 pictures in one registration).
Select [Face Recog.] from the [Rec] menu (→38)
Select [MEMORY] with cursor button and then press [MENU/
SET]
Select [New] with cursor button and then press [MENU/SET]
• If 6 people are already registered, first delete a registered person. (→74)
Record the face picture
Align the face with the guide and record.
Select [Yes] with cursor button and then press [MENU/SET].
• If re-recording, select [No]
• Faces of subjects other than people (e.g. pets) cannot be registered.
• When [DISP.] button is pressed, an explanation is displayed.
Use cursor button to select the item for editing and press
[MENU/SET]
[Name]
[Age] Set the birth date.
[Focus Icon] Change the icon that is displayed when the subject is in focus.
[Add Images] Up to 3 face pictures of the person can be registered.
Select [SET] with cursor button and then press [MENU/SET]
Enter the name (text input procedure: →84)
Select [SET] with cursor button and then press [MENU/SET]
Use ◄► to select year, month and day, set with ▲▼, and press [MENU/SET]
Select the focus icon with cursor button and then press [MENU/SET]
Select an unregistered frame and press [MENU/SET]
• When a registered face picture is selected with cursor button a screen to
confirm deletion is displayed. Select [Yes] to delete the face picture. (If
only one picture is registered, it cannot be deleted.)
Record the picture (Step above.)
Press [ / ] button

Recording with the Face Recognition function
What is GPS?
GPS is an abbreviation for Global Positioning System, which enables people to find
their locations using GPS satellites.
Receiving signals that contain orbit information and time information from multiple
satellites to calculate one’s current location is referred to as “Positioning”.
This camera can perform positioning when it receives signals from three or more GPS
satellites.
To ensure successful positioning
●
When using the GPS, we recommend holding the camera still for a while with the
GPS antenna facing upward in an outdoor location where you can see the entire
sky.
●
In the following types of locations, it may not be possible to correctly receive the
signals from the GPS satellites. In such cases, positioning may not be possible, or
significant positioning discrepancy may occur.
• Indoors • Underground or underwater (when using a marine case) • In forests
• When in a moving vehicle, such as a car or train • Near buildings or in valleys
• Near high-voltage power lines • In tunnels • Near 1.5 GHz mobile phones, etc.
●
Do not cover the GPS antenna with your hands or anything else.
●
If you are carrying the camera during positioning, do not carry it in a metal carrier or
similar container. Positioning cannot be performed when the camera is covered by a
material such as metal.
[Face Recog.] (Continued)
Recording Mode:
■
To set the Face Recognition function to [OFF]
Select [Face Recog.] from the [Rec] menu
Select [OFF] with cursor button and then press [MENU/SET]
Editing or deleting information about registered persons
Information about registered people can be edited or deleted.
Select the person or persons to be edited or deleted in step
(→73) and press [MENU/SET]
Use cursor button to select the item and press [MENU/SET]
[Info Edit] Edit name or other registered information. (→73)
[Priority] Set priority order for focus and exposure.
[Delete] Delete information and face pictures of registered persons.
Select the registration order with cursor button and then press [MENU/
SET]
74 VQT3G90 VQT3G90 75

Recording the place of recording with GPS
What is GPS?
GPS is an abbreviation for Global Positioning System, which enables people to find
their locations using GPS satellites.
Receiving signals that contain orbit information and time information from multiple
satellites to calculate one’s current location is referred to as “Positioning”.
This camera can perform positioning when it receives signals from three or more GPS
satellites.
To ensure successful positioning
●
When using the GPS, we recommend holding the camera still for a while with the
GPS antenna facing upward in an outdoor location where you can see the entire
sky.
●
In the following types of locations, it may not be possible to correctly receive the
signals from the GPS satellites. In such cases, positioning may not be possible, or
significant positioning discrepancy may occur.
• Indoors • Underground or underwater (when using a marine case) • In forests
• When in a moving vehicle, such as a car or train • Near buildings or in valleys
• Near high-voltage power lines • In tunnels • Near 1.5 GHz mobile phones, etc.
●
Do not cover the GPS antenna with your hands or anything else.
●
If you are carrying the camera during positioning, do not carry it in a metal carrier or
similar container. Positioning cannot be performed when the camera is covered by a
material such as metal.
Recording Mode:
Before use, read “About GPS” (→7) and “User License Agreement for Location Name
Data” (→145).

Recording the place of recording with GPS
(Continued)
Recording Mode:
Using GPS
Select [GPS Setting] from the [GPS] menu (→38)
Use cursor button to select [ON] or and press [MENU/SET]
• To cancel, select [OFF]
[GPS Setting] Description
[ON] Even when the camera’s power is turned off, positioning is executed
[INFO] You can check the current reception status. (→78)
■
Using in locations such as airplanes or hospitals
When [GPS Setting] is set to [ON], the GPS function operates even when the camera's
power is off.
Electromagnetic waves from the camera can affect instruments and meters. During
airplane takeoff and landing or in other restricted area, set [GPS Setting] to [OFF] or ,
then turn the camera’s power off.
• If the GPS status indicator lights up periodically while the camera’s power is off, [GPS
Setting] is set to [ON].
periodically.
Positioning is executed only while the camera’s power is on. (It is not
executed while the camera’s power is off.)
76 VQT3G90 VQT3G90 77

For [GPS] menu setting procedures (→38)
■
When [GPS Setting] is set to [ON] or
In Recording Mode, an icon that indicates the positioning status is displayed on the
LCD monitor.
When positioning is executed successfully, your current location is stored in the
camera’s memory, and the location name information appears on the screen.
Icon Time elapsed after successful positioning
In last 5 minutes
From 5 minutes to 1 hour ago
From 1 hour to 2 hours ago
More than 2 hours ago
Location name information
Even if GPS reception is good, it will take approximately 2 to 3 minutes
●
to successfully execute positioning under the following conditions; when
positioning is executed for the first time, or when positioning is executed after
the camera is turned off with the [GPS Setting] set to and then turned on
again or when [GPS Setting] is set to [OFF].
The information of the current location stored in the camera’s memory is deleted at
●
the following times. (The information recorded on the pictures during recording is not
deleted.)
• When [GPS Setting] is set to [OFF]
• When [GPS Setting] is set to
• When the setup settings are reset with [Reset]
■
Information recorded on pictures
If the positioning is executed successfully, the following information is recorded on the
●
still picture or the motion picture you recorded (except when [Rec Quality] is set to
[FSH] or [SH]).
• Latitude/longitude
• Location name information (Country/region, province/state, city/borough/county, town/village,
landmark)
appears when the picture is played back.
●
■
Location name information
The location name information consists of location names and landmarks that are
●
found via a search of the camera’s database based on the latitude and longitude
that were acquired in positioning, and the most appropriate items are displayed
(Sometimes the nearest items are not displayed.)
• If there are no location names or landmarks “---” is displayed even if positioning is successful.
Even when “---” is displayed, in some cases location name information can be selected in [GPS
Area Select] (→79).
• In some cases, the landmark that you are looking for may not have been registered. Location
name information, such as landmarks, is current as of December 2010. (Landmark types →149)
The location name information (location name or landmark name) may be different
●
from the official name.
and then the camera’s power is turned off
Positioning failed

Recording the place of recording with GPS
(Continued)
Recording Mode:
Executing positioning immediately and updating your current location
If there is a discrepancy in the displayed information such as the location name or if
positioning has failed, move to a place where the signals from the GPS satellite can be
received more easily, and update the positioning.
Select [Repositioning] from the [GPS] menu
Positioning starts.
The GPS status indicator lights during positioning.
GPS status indicator
• When you select [GPS] or in the [GPS Setting] displayed in the Quick menu
(→41) and close the Quick menu, positioning will be executed.
■
Concerning the positioning intervals
Even if you do not manually update positioning, positioning is attempted automatically
immediately after the power has been turned on and at a fixed intervals after that
unless [GPS Setting] is [OFF].
When [GPS Setting] is [ON], positioning is tried at fixed time intervals even when the
power is off.
However, positioning is canceled under the following conditions.
• When the battery power is low and has appeared.
• When the power has not been turned on for a certain length of time.
■
To display the GPS reception status
Select [GPS Setting] from the [GPS] menu.
Use the cursor button to select [INFO] and press [MENU/SET].
• You can start positioning by pressing [MENU/SET] again.
GPS reception status display
●
: Received GPS time
: Number of GPS satellite signals received
: Latitude
Longitude
78 VQT3G90 VQT3G90 79

For [GPS] menu setting procedures (→38)
Changing the recorded place name information
If there are other candidate locations for the positioning results, you can change the
information to nearby place names or landmarks.
• When other place name information can be selected,
name information.
appears in front of the place
Select [GPS Area Select] from the [GPS] menu
Use cursor button to select the item to change and press
[MENU/SET]
Use cursor button to select the place name or landmark from
the displayed candidates, and then press [MENU/SET]
■
If you do not wish to record place names and landmarks
In step , select [Delete all place-names] and place names and landmarks will not be
recorded.
Or, in step , if you select [Yes] when a message asking whether to delete place
names and landmarks lower than the selected place name, information of the place
name will not be recorded (e.g., [City/Town/Village] and [Landmark] when [County/
Township] is deleted).
• However, longitude and latitude will be recorded. If you do not wish to record them,
turn [GPS Setting] to [OFF].
• To return place names and landmarks set to not be recorded to the original setting
(i.e., to record the place names and landmarks), perform [GPS Area Select] again.
In large public parks or similar locations, landmarks may not be displayed, or
●
incorrect landmarks may be displayed. If you cannot select the desired landmark in
[GPS Area Select], perform [My Landmark] (→80) before recording or [Place-Name
Edit] (→107) after recording.

Recording the place of recording with GPS
(Continued)
Recording Mode:
Registering your current location as a landmark
You can register a personal location that has not been registered in the camera as a
landmark. The registered landmark can be displayed or recorded on the pictures. (Up to
50 landmarks)
First, move to the location that is to be registered, and operate the GPS where positioning
can be executed.
Select [My Landmark] from the [GPS] menu
Use cursor button to select [None] and press [MENU/SET]
Use cursor button to select [Yes] and press [MENU/SET]
Positioning starts.
Press [MENU/SET]
• When positioning has failed
→ Move to a location where positioning can be executed, then select [Yes] using
cursor button and press [MENU/SET].
Input the landmark name (Character input method →84)
■
Editing or deleting registered landmarks
Select the landmark which was registered in step above, and press [MENU/SET].
Select an item and press [MENU/SET].
[Edit] This corrects the landmark name.
[Delete] This deletes the registered landmark.
80 VQT3G90 VQT3G90 81

For [GPS] menu setting procedures (→38)
Changing the display of location name information
The screen display of location name information found by positioning can be changed.
Select [Area Info. Set] from the [GPS] menu
Use cursor button to select the item for changing display and
press [MENU/SET]
Use cursor button to turn items to be displayed [ON] and
items not to be displayed [OFF], and then press [MENU/SET]
Using GPS to set the clock
Using the date and time information in the GPS signal, the camera can automatically
update its [Clock Set]. Also, after moving from your home area to one in a different time
zone, the time is changed to the local time automatically when positioning is successful.
Select [Auto Clock Set] from the [Setup] menu
Use cursor button to select [ON] and press [MENU/SET]
Perform the operations from step in “Setting the clock”
(first time only) (→19)
When [Auto Clock Set] is turned to [ON], [World Time] is set to [Destination].
●
Time and date corrected by [Auto Clock Set] is not as accurate as radio clocks. If the
●
time and date are not properly corrected, reset with [Clock Set].

Useful features for travel
[Travel Date]
If you set your travel schedule and record pictures, which day of your trip the picture was
recorded will be recorded.
■
Recording Mode: ∗
∗
Recording only. (Cannot set.)
Select [Travel Date] from the [Setup] menu
Use cursor button to select [Travel Setup] and press [MENU/
SET]
Use cursor button to select [SET] and press [MENU/SET]
Use cursor button to select the departure date and press
[MENU/SET]
Use cursor button to select the return date and press [MENU/
SET]
■
To record [Location]
Record your destination.
Once the [Travel Setup] is set, you can set the location.
Select [Location] in step above
Use cursor button to select [SET] and press [MENU/SET]
Enter your location (Entering text →84)
The travel date is calculated from the set departure date and the date set in the
●
camera’s clock. When destination is set in [World Time], days elapsed are calculated
based on local destination time.
When [Travel Setup] is set to [OFF], the number of days elapsed is not recorded. It is
●
not displayed even if [Travel Setup] is set to [SET] after recording.
If settings are made before the departure date, the number of days to departure are
●
displayed in orange with a minus sign (but not recorded).
When [Travel Date] is displayed in white with a minus sign, the [Home] date is one day
●
ahead of the [Destination] date due to the difference in time zones (this is recorded).
[Location] is recorded separately from the location name information which is recorded
●
on the pictures by the GPS function.
To print [Location] or the number of days that have passed, either use [Text Stamp] or
●
print using the software on the supplied CD-ROM “PHOTOfunSTUDIO”.
[Travel Setup] and [Location] cannot be set for AVCHD motion pictures.
●
82 VQT3G90 VQT3G90 83

For [Setup] menu setting procedures (→38)
[World Time]
Set the recording date and time with the local time at your destination.
■
Recording Mode:
Select [World Time] from the [Setup] menu
• Message will be displayed when setting for the first time. In this case, press
[MENU/SET] and skip to step .
Use cursor button to select [Home] or [Destination] and press
[MENU/SET]
Use cursor button to select area and press [MENU/SET]
Current time at selected
destination
Difference with home time
When [Destination] has been selected
■
To set summer time
Press ▲ in step . (Press again to release the setting)
• When summer time is set, the current time is advanced by 1 hour. If the setting is
canceled, the time automatically returns to the current time.
If you cannot find your destination in the area displayed on the screen, set based on
●
difference with home time.
is displayed on the screen for pictures recorded at the destination when they are
●
played back.
When [Auto Clock Set] is set to [ON], only the summer time setting of [Destination] can
●
be changed.
City/area name

Entering Text
Use the cursor button to enter names with the Face Recognition function and in Scene
Modes [Baby] and [Pet], or to register locations in [Travel Date] etc.
Use cursor button to select characters
Press [MENU/SET] several times until the desired character is
displayed
Text is inserted at the cursor position.
• To change the character type
→ Select , and press [MENU/SET].
Cursor position
■
Editing text
Use cursor button to move the cursor to text to edit.
• You can also use the zoom lever to reposition the cursor.
Use cursor button to select [Delete], and then press [MENU/SET].
Use cursor button to select the correct text, and then press [MENU/SET].
When you are finished entering text, use cursor button to
select [Set] and press [MENU/SET]
A maximum of 30 characters can be entered. (Maximum of 9 characters for [Face
●
Recog.] names)
84 VQT3G90 VQT3G90 85

Using the [Rec] menu
For [Rec] menu setting procedures (→38)
[Aspect Ratio]
Aspect ratio of still picture can be changed according to printing or playback format.
■
Recording Mode:
■
Settings: / / /
Edges may be cut off when printing – be sure to check in advance.
●
[Picture Size]
Set the size (number of pixels) of still pictures. Number of pictures which can be recorded
depends on this setting and on [Quality].
■
Recording Mode:
■
Settings:
Picture Size ([Aspect Ratio]: )
14 M
4320×3240 3648×2736 3072×2304 2560×1920 2048×1536 640×480
12.5 M
4320×2880 3648×2432 3072×2048 2560×1712 2048×1360 640×424
10.5 M
4320×2432 3648×2056 3072×1728 2560×1440 1920×1080 640×360
10.5 M
3232×3232 2736×2736 2304×2304 1920×1920 1536×1536 480×480
∗
This setting is not available in ([Intelligent Auto] Mode).
Mosaic effect may appear depending on subject and recording conditions.
●
10 M
9 M
7.5 M
7.5 M
∗
Picture Size ([Aspect Ratio]: )
∗
Picture Size ([Aspect Ratio]: )
∗
Picture Size ([Aspect Ratio]: )
∗
Setting guide
Larger picture size Smaller picture size
Crisper picture Coarser picture
Lower recording
capacity
∗
7 M
∗
6 M
∗
5.5 M
∗
5.5 M
Higher recording
capacity
5 M
4.5 M
3.5 M
3.5 M
∗
3 M
∗
2.5 M
∗
2 M
∗
2.5 M
0.3 M
∗
∗
∗
0.3 M
0.2 M
0.2 M
∗
∗
∗

Using the [Rec] menu (Continued)
[Quality]
Set quality of picture.
■
Recording Mode:
■
Settings: High quality, priority to picture quality
The setting is fixed to in the following Scene Modes:
●
[Transform], [High Sens.], and [Flash Burst]
Set ISO Sensitivity (sensitivity to lighting) manually.
We recommend higher settings to take clear pictures in darker locations.
■
Recording Mode:
■
Settings: [AUTO] / [Intelligent ISO] / [100] / [200] / [400] / [800] / [1600]
Setting guide
Location
(recommended)
Shutter speed Slow Fast
Interference Low High
Subject blur High Low
[AUTO] is automatically set in a range up to 400 (1000 when flash is used) based on
●
subject brightness.
[Intelligent ISO] is automatically set in a range up to 1600 based on subject
●
movement and brightness.
Standard quality, priority to the number of pictures
[Sensitivity]
[Sensitivity] [100] [1600]
Bright
(outdoors)
Dark
86 VQT3G90 VQT3G90 87

For [Rec] menu setting procedures (→38)
[White Balance]
Adjust coloring to suit light source if colors otherwise appear unnatural.
■
Recording Mode:
■
Settings: [AWB] (automatic) / (outdoor, clear sky) / (outdoor, cloudy sky) /
When [AWB] (Automatic White Balance) is set, the coloring is adjusted in accordance
●
with the light source. However, if the scene is too bright or too dark or if other extreme
conditions apply, the pictures may appear reddish or bluish. The White Balance may
not operate correctly if there is a multiple number of light sources.
We recommend setting to [AWB] or when under fluorescent lighting.
●
White Balance setting is fixed to [AWB] in the following Scene Modes:
●
[Scenery], [Night Portrait], [Night Scenery], [Handheld Night Shot], [Food], [Party],
[Candle Light], [Sunset], [Flash Burst], [Starry Sky], [Fireworks], [Beach], [Snow], [Aerial
Photo], [Film Grain] and [Underwater]
■
White Balance fine adjustment (excluding [AWB])
White Balance settings can be individually fine tuned if colors still do not appear as
anticipated.
Select the white balance to be fine-tuned, and press the [DISP.] button to display the
[WB Adjust.] screen.
Adjust with ► if reds are strong, adjust with ◄ if blues are strong.
Press [MENU/SET].
• Settings are remembered even if power is turned off.
• Settings remain applied when using flash.
• Even though the [AWB] setting is fixed in [Underwater] Scene Mode, fine adjustments
may still be made.
• Fine adjustments cannot be made when [Color Mode] (→93) is set to [B/W], [SEPIA],
[COOL], or [WARM].
(outdoor, shade) / (Incandescent lighting) /
(uses value set in ) / (set manually)

Using the [Rec] menu (Continued)
■
Setting White Balance manually ( )
Select and press [MENU/SET].
Point the camera towards a white object (e.g. paper) and press [MENU/SET].
White Balance is set to
• Making this setting will reset White Balance fine adjustment.
• Even if the camera’s power is OFF, the set White Balance is remembered.
• It may not be possible to set the correct White Balance if subjects are too bright or too
dark. In this case, adjust the brightness and try to set the White Balance again.
■
[AWB] operational range:
10000K
9000K
8000K
7000K
6000K
5000K
4000K
3000K
2000K
1000K
Blue sky
Cloudy sky (rain)
Shade
Sunlight
White fluorescent lighting
Incandescent lighting
Sunset/sunrise
Candlelight
.
88 VQT3G90 VQT3G90 89

For [Rec] menu setting procedures (→38)
[AF Mode]
Method of aligning focus can be changed according to position and number of subjects.
■
Recording Mode:
■
Settings: / / / /
Taking front-on
pictures of people
(Face Detection)
Automatically locking
the focus on a
moving subject
(AF Tracking)
Subject not centered
in picture (AF area not
displayed until focused)
(23-area-focusing)
Determined position
for focus
(1-area-focusing)
(Spot-focusing)
Recognizes faces (up to 15 people) and adjusts exposure and focus
accordingly.
AF area
Yellow : When the shutter button is pressed halfway, the frame turns
green when the camera is focused.
White : Displayed when more than one face is detected. Other faces
that are the same distance away as faces within the yellow
AF area are also focused.
Touch the subject
• Perform these operations with the touch shutter function (→24)
released.
AF Tracking frame
When the subject is recognized, the AF Tracking frame changes
from white to yellow, and the subject is automatically kept in focus.
If AF Lock fails, a red frame flashes.
• To release AF tracking → Touch
• Focus (same as macro recording) (→55)
Focuses on up to 23 points in each AF area.
1-area-focusing: Focuses on AF area in center of picture.
Spot-focusing: Focuses on smaller, limited area.
(Recommended when focus is difficult to align)
.

Using the [Rec] menu (Continued)
Focus is fixed to (1-area-focusing) in the following cases:
●
[Starry Sky], [Fireworks], [High Speed Movie] Scene Modes
Use (1-area-focusing) if focus is difficult to align with (Spot-focusing).
●
Cannot set to “Face Detection” in the following cases:
●
[Panorama Assist], [Night Scenery], [Handheld Night Shot], [Food], [Aerial Photo],
[Underwater] Scene Modes
If the camera misinterprets a non-human subject as a face in the “Face Detection”
●
setting, switch to another setting.
If conditions prevent the face from being recognized, such as when the movement of
●
the subject is too rapid, the [AF Mode] setting switches to (23-area-focusing).
Under certain recording conditions, such as when the subject is small or dark, AF
●
Tracking may not operate correctly.
When AF Tracking does not work, focus will be on (23-area-focusing).
●
Cannot set to in the following cases.
●
• [Panorama Assist], [Starry Sky], [Fireworks], [Pin Hole], [Film Grain], [High Dynamic]
or [High Speed Movie] Scene Modes
• [B/W], [SEPIA], [COOL], and [WARM] in [Color Mode]
While recording motion pictures and the setting is other than (Face Detection), focus
●
will be on (1-area-focusing).
[Quick AF]
The focus is automatically adjusted when camera blurring is small even when the shutter
button is not pressed. (Increases battery consumption)
■
Recording Mode:
■
Settings: [ON]/[OFF]
Focus alignment may take time if zoom is suddenly changed from max. W to max. T, or
●
if suddenly moving closer to subject.
Press shutter button halfway if focus is difficult to align.
●
The function will turn [OFF] in the following cases.
●
In Scene Modes [Night Portrait], [Night Scenery], [Handheld Night Shot], [Starry Sky],
[Fireworks] or [High Speed Movie]
[Quick AF] will not work while AF Tracking is operating.
●
90 VQT3G90 VQT3G90 91

For [Rec] menu setting procedures (→38)
[Face Recog.]
For details (→72).
[Metering Mode]
You can change the position for measuring brightness when correcting exposure.
■
Recording Mode:
■
Settings:
Brightness measurement position Conditions
Multiple
Center
weighted
Spot
Whole screen
Center and surrounding area Subject in center
Center and close surrounding area Great difference between
Normal usage (produces balanced
pictures)
brightness of subject and
background
(e.g. person in spotlight on stage,
backlighting)
[i.Exposure]
Automatically adjusts contrast and exposure to give more lifelike colors when there is
significant contrast between background and subject.
■
Recording Mode:
■
Settings: [LOW]/[STANDARD]/[HIGH]/[OFF]
[LOW], [STANDARD] and [HIGH] indicate the maximum range of correction.
●
When [i.Exposure] works, the color of changes.
●
Even if [Sensitivity] is set to [100], when [i.Exposure] is activated, pictures may be taken
●
at a higher ISO Sensitivity than the setting.

Using the [Rec] menu (Continued)
[Min. Shtr Speed]
Sets shutter speed to minimum. We recommend using slower shutter speeds to take
brighter pictures in dark locations.
■
Recording Mode:
■
Settings: [AUTO] [1/250] [1/125] [1/60] [1/30] [1/15] [1/8] [1/4] [1/2] [1]
Slower shutter speeds allow for brighter pictures but increase risk of jitter, so we
●
recommend using a tripod and the self-timer.
As still pictures may become dark when using faster values such as [1/250], we
●
recommend that still pictures are taken in bright locations ( flashes red when shutter
button is pressed halfway if still picture will be dark).
displayed on screen for settings other than [AUTO].
●
[i.Resolution]
Super resolution technology can be used to record still pictures with sharper outlines and
clearer resolution. Also, when [i.ZOOM] is set, the zoom ratio can be increased to about
1.3 with almost no deterioration of picture quality.
■
Recording Mode:
■
Settings: [ON]/[i.ZOOM]/[OFF]
About i.ZOOM (→51)
●
The setting is fixed to [i.ZOOM] in [Intelligent Auto] Mode (except when [Motion Deblur]
●
or [iHandheld Nite Shot] is set to [ON]).
The setting is fixed to [ON] in [Handheld Night Shot] and [High Sens.] Scene Modes,
●
[OFF] in [Flash Burst] and [Pin Hole] Scene Modes, and [i.ZOOM] in other Scene
Modes.
[Digital Zoom]
Multiplies effect of Optical Zoom or Extended Optical Zoom by up to 4 times.
■
Recording Mode:
■
Settings: [ON]/[OFF]
This is fixed to [ON] when [Macro Zoom] is set.
●
92 VQT3G90 VQT3G90 93

For [Rec] menu setting procedures (→38)
[Burst]
For details (→70).
[Color Mode]
Set color effects.
■
Recording Mode:
■
Settings: [STANDARD]/[NATURAL] (softer)/[VIVID] (sharper)/[B/W]/
Set to [NATURAL] if there is excessive noise in the picture when recording in the dark.
●
In [Intelligent Auto] Mode, only [STANDARD], [Happy], [B/W] or [SEPIA] can be set
●
(these are set separately from other modes).
[SEPIA]/[COOL] (more blue)/[WARM] (more red)/
[Happy] ([Intelligent Auto] Mode only)
[AF Assist Lamp]
Illuminates lamp when dark to facilitate focus alignment.
■
Recording Mode:
■
Settings: [ON] : Lamp illuminated with halfway press of shutter
The AF Assist Lamp has an effective distance of 1.5 m (4.92 feet).
●
• Do not block the lamp with your fingers or look at it from close
range.
The setting is fixed to [OFF] in the following Scene Modes:
●
[Self Portrait], [Scenery], [Night Scenery], [Handheld Night Shot],
[Sunset], [Fireworks], [Aerial Photo], [Underwater] and [High Speed
Movie] Scene Modes
button ( and larger AF area displayed)
[OFF] : Lamp off (taking pictures of animals in dark, etc.)
AF Assist Lamp

Using the [Rec] menu (Continued)
[Red-Eye Removal]
Automatically detects red-eye and corrects still picture data when recording with flash
red-eye reduction (
■
Recording Mode:
■
Settings: [ON]/[OFF]
This setting will work only when [AF Mode] is (Face Detection).
●
Depending on the circumstance, it may not be possible to correct red-eye.
●
When the function setting is [ON], a appears with the flash icon.
●
Automatically detects and prevents jitter.
■
Recording Mode:
■
Settings: [ON]/[OFF]
Setting fixed to [ON] during recording motion pictures, and in [Self Portrait] and
●
[Handheld Night Shot] Scene Modes.
In the [Starry Sky], [High Speed Movie] Scene Mode and [3D Photo Mode], the setting
●
is fixed to [OFF].
Cases where Optical Image Stabilizer may be ineffective:
●
Heavy jitter, high zoom ratio (also in the Digital Zoom range), fast-moving objects,
indoors or in dark locations (due to low shutter speed)
).
[Stabilizer]
94 VQT3G90 VQT3G90 95

For [Rec] menu setting procedures (→38)
[Date Stamp]
Still pictures can be taken with the recording date and time stamped on the still picture.
■
Recording Mode:
■
Settings: [W/O TIME]/[WITH TIME]/[OFF]
Date stamps on still pictures cannot be erased.
●
The date cannot be stamped when [Auto Bracket] or [Burst] is set, in [3D Photo Mode],
●
when recording a motion picture, or when [Panorama Assist] or [Flash Burst] Scene
Mode is set.
Do not request date printing in store or make date printing on printer for still pictures
●
with date stamps. (Date printing may be overlapping.)
[Clock Set]
Set the clock. Same function as that in [Setup] menu.

Using the [Motion Picture] menu
[Rec Mode]
Sets the data format of the motion picture that is recorded.
■
Recording Mode:
■
Settings:
Recording format Effect
• This is a data format suitable for playback on high-definition
TVs.
[AVCHD]
[Motion JPEG]
Even when devices are compatible with motion pictures recorded with this camera,
●
the playback may have poor picture or sound quality, or playback may not be possible.
Also, the recording information may not be displayed properly. In this case, use this
unit.
For details on AVCHD compatible devices, refer to the support sites below.
http://panasonic.jp/support/global/cs/dsc/
(This Site is English only.)
• The motion pictures on the card can be played back straight
away by inserting the card into a device that supports AVCHD.
For details, consult the instructions of the device used and find
out what the device supports.
• This data format is suited for playing back motion pictures on a
computer and other such devices.
96 VQT3G90 VQT3G90 97

For [Motion Picture] menu setting procedures (→38)
[Rec Quality]
Sets the picture quality of the motion picture that is recorded.
■
Recording Mode:
■
Settings:
[AVCHD] in [Rec Mode]
Setting Resolution
[GFS]
[FSH]
[GS]
[SH]
[Motion JPEG] in [Rec Mode]
Setting Resolution
[HD] 1280×720
[VGA] 640×480
[QVGA] 320×240
∗
The bit rate is the amount of data per unit time. A higher value translates into a higher image
quality.
About [GFS] and [FSH]
●
• The number of frames is set to 60i (60 fps for the sensor output).
About [GS] and [SH]
●
• The number of frames is set to 60p (60 fps for the sensor output).
The location information that was acquired in positioning is not recorded on motion
●
pictures recorded in [FSH] or [SH].
[QVGA] only can be recorded to the built-in memory.
●
To play back AVCHD motion pictures recorded with this unit on Panasonic Blu-ray Disc
●
Players (DMP-BD30/DMP-BD31/DMP-BD50) it is necessary to update the firmware of
the Blu-ray Disc Player.
You can download the latest firmware version from the following website.
http://panasonic.net/support/
1920×1080
1280×720
Number of frames per
∗
Bit rate
(average)
Approx. 17 Mbps 16:9
second
30 fps
Aspect ratio
Aspect ratio
16:9
4:3

Using the [Motion Picture] menu (Continued)
[Active Mode]
This mode provides image stabilization for major jittering that occurs when recording
motion pictures while walking.
• A stronger correction effect can be obtained when recording with the zoom set to the W
end.
■
Recording Mode:
■
Settings: [ON]/[OFF]
The setting is fixed to [OFF] when [Rec Mode] is set to [Motion JPEG].
●
[Continuous AF]
Either allow the focus to be constantly adjusted during motion picture recording, or fix the
focus position at the start of recording.
■
Recording Mode:
■
Settings: [ON]
The setting is fixed to [OFF] in the following Scene Modes:
●
[Starry Sky] and [Fireworks] Scene Modes
Reduces recording of wind sounds (wind noise) when recording in a strong wind.
■
Recording Mode:
■
Settings: [ON]/[OFF]
When [Wind Cut] is set to [ON], lower sounds will be eliminated and the sound quality
●
will differ from that of normal recordings.
[OFF]: Fix focus position at the start of motion picture recording.
[Wind Cut]
98 VQT3G90 VQT3G90 99

Recording still pictures while a motion picture is being recorded
Recording Mode:
Still pictures can be recorded even while a motion picture is being recorded.
Press the shutter button fully during the motion picture
recording
Still pictures with an aspect ratio of and 3.5 mega pixels are recorded. (Max.
40 pictures)
Motion picture recording continues unchanged.
• The clicking sound made when the shutter button is operated may be recorded.
• When still pictures are recorded during zooming, the zooming may stop.
■
Burst function
When the burst function has been set in advance, a burst of still pictures can be
recorded during motion picture recording.
• When or is selected as the burst setting, the still pictures are automatically
recorded at the setting.
• Even at the or setting, the focus is fixed at the first picture.
If the touch shutter function has been set, still pictures will be recorded if the touch
●
panel has been touched inadvertently during motion picture recording.
The camera will refocus if the shutter button is pressed halfway during motion picture
●
recording or if still pictures are recorded using the touch shutter function. This refocus
movement is recorded even during motion picture recording. When priority is to be
given to the motion picture videos, press the shutter button fully, and record the still
pictures. Still pictures can also be created after motion picture recording. (→100)
When the shutter button is pressed halfway, the picture size and the number of
●
recordable pictures are displayed.
Still pictures cannot be recorded at the following cases:
●
• When [Rec Quality] is set to [VGA] or [QVGA]
• When recording [High Speed Movie]
The flash is set to [Forced Flash Off].
●
Since the electronic shutter is used for recording, the pictures recorded may be
●
distorted.

Editing motion pictures
Playback Mode:
Capturing still pictures from motion pictures
Save a scene from a motion picture as a still picture.
Display the picture that you want to capture as a still picture
by pausing a motion picture during playback
Press [MENU/SET]
[Rec Quality] of the original motion picture [Picture Size] [Aspect Ratio]
[GFS] [FSH] [GS] [SH] [HD] 2M 16:9
[VGA] [QVGA] 0.3M 4:3
The picture quality becomes slightly lower because of the [Rec Quality] setting of the
●
original motion picture.
It may not be possible to capture still pictures from motion pictures that were recorded
●
with a different camera.
Splitting up motion pictures
A single motion picture can be split into 2 parts. This is convenient when you want to keep
just the necessary scenes, or if you wish to delete unnecessary scenes to increase free
space on your card, such as when traveling.
Select [Video Divide] from [Playback] menu (→38)
Select the motion picture to split with cursor button and then
press [MENU/SET]
Play back the motion picture and pause at the place to split
Press ▼ to decide the point to split the motion picture
• Confirmation screen is displayed. If you select [Yes], the operation is executed.
• The original motion picture that was split does not remain.
(There will only be the 2 motion pictures that were created after the split.)
During splitting, do not turn off the camera’s power or remove the card or battery. If you
●
do so, the motion picture may be deleted.
Splitting a Motion JPEG motion picture will cause the order of pictures to change. It is
●
recommended to display with [Calendar] (Calendar Playback) or [Filtering Play].
Splitting an AVCHD motion picture will not cause the order of pictures to change.
●
It may not be possible to split motion pictures that were recorded with a different
●
camera.
100 VQT3G90 VQT3G90 101
 Loading...