

Page 1

Recording images (advanced)
Taking Pictures with the Sports Mode
When you take photos of outdoor sports, this
mode allows you to capture a still action photo
1
2
1600
• [AUTO] setting in [W.BALANCE] works best when recording outdoors in the
daytime. When using indoors, the colour balance can change. You can change the
white balance setting. (P60)
• Sport Mode sets the camera to use a high shutter speed. It works best when used
in very brightly illuminated situations. To enhance this feature, try following the
action with the camera.
easily. Please note that this mode is suitable
to take photos of the subject from distances of
more than 5 m and in daylight situations.
1 Set the mode dial to Sports mode [ ].
2 Take a picture.
51
Page 2
Recording images (advanced)
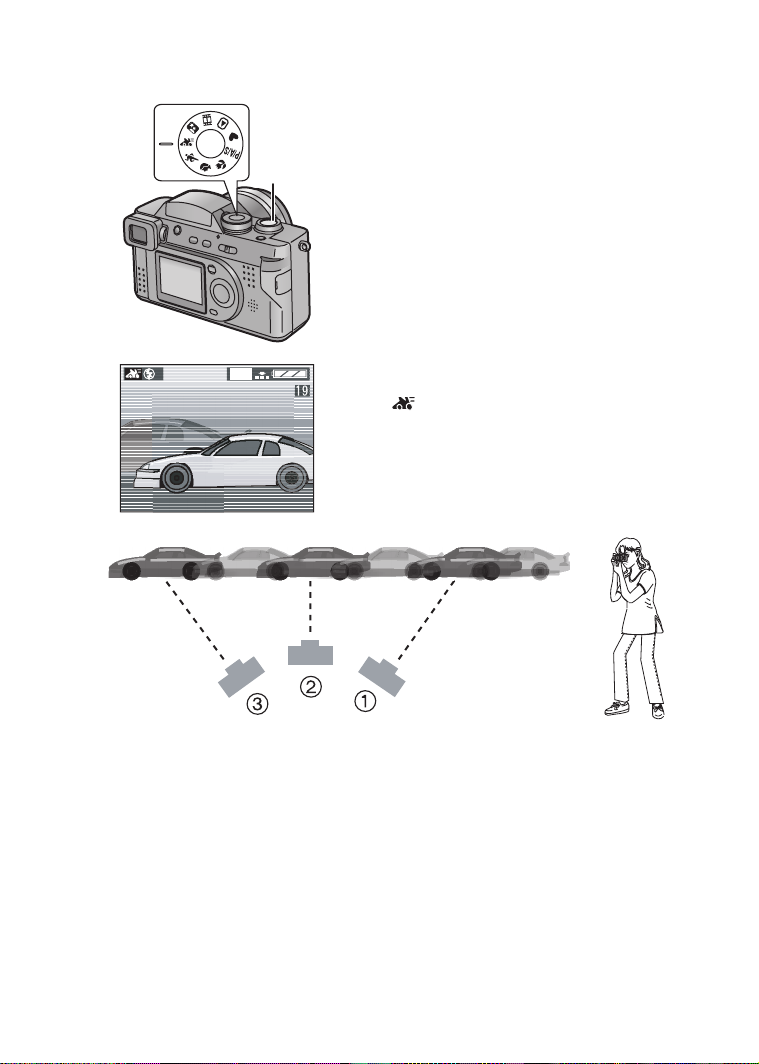
Taking Pictures with the Panning Mode
Panning is a technique of moving the camera
1
2
while tracking a subject in motion.
Using a slower shutter speed when tracking a
subject, you can sharply photograph a subject
in motion while blurring the background.
In the very bright summer daylight, if the
shutter speed can not be set slower enough
to blur the background, please use the
ND filter (DMW-LND55, optional). (P65)
Please try to use the prefocus technique to
reduce the time for focusing while shooting a
fast moving subject. (P41)
1600
1 Set the mode dial to Panning mode
[].
2 Take a picture.
1 Move the camera smoothly while tracking a subject in motion.
2 Press the shutter button while moving the camera.
3 Keep moving the camera continuously.
It is difficult to adjust the focus when the subject comes in to the shot. Adjust the
focus in advance at the point where the photo is to be taken.
• Set the AF trigger to [FOCUS] and you can fix the focus even if you press the
shutter button halfway. (P41)
• [AUTO] setting in [W.BALANCE] works best when recording outdoors in the
daytime. When using indoors, the colour balance can change. You can change the
white balance setting. (P60)
• The stabilizer function is effective only when taking a picture horizontally moving
the camera from side to side.
52
Page 3

Recording images (advanced)
Taking Pictures with the Night Portrait
Mode
The Night Portrait mode combines the
electronic flash with a “slow shutter” mode.
1
3
2
This unique feature allows you to photograph
close subjects against the natural night
background. Since the shutter speed is slow,
we highly recommend using a tripod to steady
the camera.
The subject should be positioned within the
available flash range. (When setting to
ISO100, about 30 cm – 2.1 m)
We recommend you to set the zoom lever
towards W.
1600
1 Press [ OPEN] button to open the
flash.
2 Set the mode dial to Night portrait
mode [ ].
3 Take a picture.
ª
When taking picture of only a
landscape at night
• You can obtain a good picture of a
nightscape (including no other subjects) by
closing the flash.
• The shutter speed is about 8 seconds.
• Be sure to close the flash when you do not use the flash.
• Flash setting is fixed to Slow sync./Red-eye reduction [ ].
• White balance is set to [AUTO] in the default position. You can change the setting.
(P60)
• The shutter may be kept closed (Max: about 8 seconds) after taking a picture with
slow shutter speed, but it is not a malfunction.
• When taking a picture in a dark place, the noise may appear. To avoid the noise,
we recommend you to set the picture adjustment to [NATURAL]. (P59)
53
Page 4
Recording images (advanced)
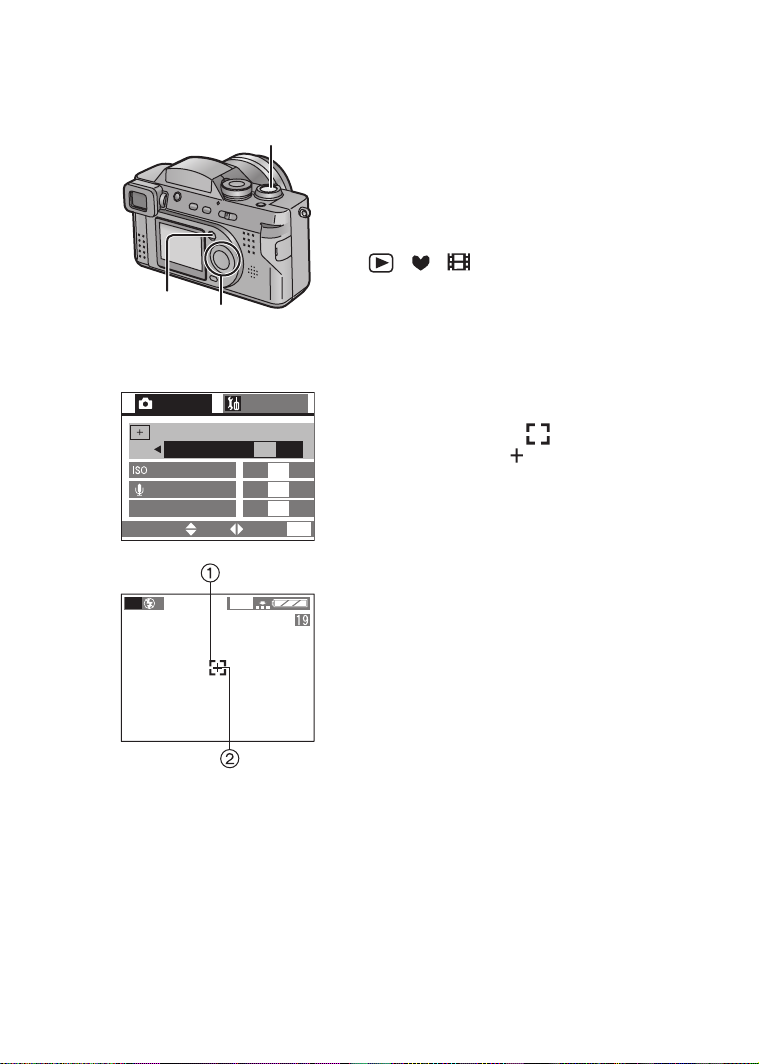
Taking Pictures with the Spot Mode
When this mode is selected, both the focus
6
and the exposure will be adjusted to spot on a
limited area. This is suitable when you take
pictures in delicate light conditions and intend
to take a picture of a specific area.
[Preparation]
• Set the mode dial to any position except
[ ]/[ ]/[ ]. (P27)
1,4
2,3
1 Press the [MENU] button.
2 Press 3/4 to select [SPOT MODE].
3 Press 1 to set to [ON].
2,3
REC
SPOT MODE
SENSITIVITY
AUDIO REC.
C-AF
CONT.AF
SELECT
2
SETUP
/
4
OFF ON
SET
EXIT
AUTO
OFF
OFF
MENU
4 Press the [MENU] button.
• The menu will disappear.
• The spot AF area 1 and spot
metering target 2 appear.
5 Centre the subject in the spot AF
area.
6 Take a picture.
4
P
• When the subject is dark, the focus may not be adjusted properly.
• Surroundings become dark or whitish depending on the subject to set to
appropriate exposure in the spot AF area.
• If the subject is out of the spot AF area, use the AF/AE lock. (P57)
1600
54
Page 5

Recording images (advanced)
Compensating the Exposure
In some situations the illumination of the
background and your subject may differ. Auto
exposure systems may not always calculate
the proper exposure correctly. This is a
normal situation. This feature allows you to
manually compensate the exposure.
[Preparation]
• Set the mode dial to any position except
[ ]/[ ]/[ ]. (P27)
1 Press 3 until [ EXPOSURE] is
selected.
2 Press 2/1 to compensate the
exposure.
• You can compensate from j2 EV to
i2 EV with 1/3 EV step.
(EV is an abbreviation of Exposure
Value, and it is the amount of light
given to the CCD by the aperture value
and the shutter speed)
3 Press the 4/[REVIEW/SET] button.
• The adjustment display will disappear.
• The exposure compensation indication
1 will appear.
4 Take a picture.
2
SELECT
3
P
4
1,2,3
EXPOSURE
EXIT
1600
1
+
/
3
• Depending on brightness of the subject, the range for which it is possible to
compensate the exposure will be limited.
55
Page 6

Recording images (advanced)
Taking Pictures with Auto (AE) Bracket
Pressing the shutter button once, the camera
will automatically take 3 pictures changing
exposure according to the set exposure
compensation value.
[Preparation]
• Set the mode dial to any position except
[ ]/[ ]/[ ]. (P27)
1 Press 3 until [ AUTO BRACKET]
is selected.
2 Press 1, then press 2/1 to set the
exposure compensation range.
•OFF
• n1/3EV
• n2/3EV
• n1EV
3 Press the 4/[REVIEW/SET] button.
• The adjustment display will disappear.
• The auto bracket indication 1 appears.
4 Take a picture.
2
SELECT
4
1,2,3
AUTO BRACKET
EXIT
3
P
• Once you take a picture, auto bracket will be cancelled automatically.
• When flash fires, you can take only 1 picture. Auto bracket setting cannot be
cancelled.
• The digital zoom magnification is limited to 2 times.
• When setting auto bracket, you cannot take a still picture with audio.
• When setting auto bracket and the burst mode simultaneously, auto bracket will be
performed.
• Depending on the brightness of the subject, the range for which it is possible to
compensate the exposure pictures using auto bracket will be limited.
1600
56
Page 7

Recording images (advanced)
Using the AF/AE Lock
If the subject is out of the AF area and you
press the shutter button, the subject’s focus is
not adjusted. After locking focus and
1,2
1
P
1600
F2.8 1/25
exposure (AF/AE lock), you can take a clear
picture with adjusted focus.
AF: Auto focus
AE: Auto exposure
[Preparation]
• Set the mode dial to any position except
[]. (P27)
1 Aim the camera at the subject on
which you want to adjust the focus to
enter the AF area 2 on the LCD
monitor/Viewfinder and then keep
pressing the shutter button halfway
(AF/AE lock).
• When the focus is adjusted, the focus
indication 1 [¥] appears.
2 Move the camera keeping the chosen
composition and press the shutter
button all the way.
2
P
1600
• Before pressing the shutter button, you can
set the AF/AE lock again and again.
57
Page 8

Recording images (advanced)
Using the Colour Effect
This function makes it possible to use colour
effect on pictures, such as bluish, reddish,
and black and white.
[Preparation]
• Set the mode dial to any position except
[ ]/[ ]/[ ]. (P27)
1 Press the [MENU] button.
2 Press 3/4 to select [COL.EFFECT].
3 Press 2/1 to select [OFF], [COOL],
1,4
2,3
REC
AF
AF TRIGGER
D.ZOOM
COL.EFFECT
PICT.ADJ.
SELECT
4
P
COOL
2,3
3
/
COOL WARM
OFF
4
SET
SETUP
1600
OFF
B/W
STANDARD
MENU
EXIT
[WARM] or [B/W].
• [COOL]: The picture becomes bluish.
• [WARM]: The picture becomes reddish.
• [B/W]: The picture becomes black
4 Press the [MENU] button.
• The menu will disappear.
•The indication [//] 1
will appear.
• When using the colour effect mode, you
cannot adjust the white balance.
and white.
COOL WARM
B/W
58
Page 9

Recording images (advanced)
Adjusting the Colour Tone or the Contrast
(Picture Adjustment)
This function enables you to adjust the colour
tone or the contrast.
[Preparation]
• Set the mode dial to any position except
[ ]/[ ]/[ ]. (P27)
1 Press the [MENU] button.
1,4
2,3
REC
AF
AF TRIGGER
D.ZOOM
COL.EFFECT
PICT.ADJ.
SELECT
2,3
3
SETUP
/
4
OFF
OFF
NATURAL STANDARD
EXIT
MENU
SET
2 Press 3/4 to select [PICT.ADJ.].
3 Press 2/1 to select [NATURAL],
[STANDARD] or [VIVID].
• [NATURAL]: The picture becomes soft.
• [VIVID]: The picture becomes
sharp.
4 Press the [MENU] button.
• The menu will disappear.
• When taking a picture in a dark place, the noise may appear. To avoid the noise,
we recommend you to set the picture adjustment to [NATURAL].
59
Page 10

Recording images (advanced)
Setting the White Balance
Auto White Balance is designed to
automatically adjust the camera to produce
natural flesh tones. In most situations it works
fine. In some situations where several
different types of lighting are present,
enhanced performance can be achieved by
setting the white balance manually.
[Preparation]
• Set the mode dial to any position except
[ ]/[ ]/[ ]. (P27)
1,4
2,3
1 Press the [MENU] button.
2 Press 3/4 to select [W.BALANCE].
3 Press 2/1 to select the mode.
2,3
REC
W.BALANCE
AE
AE MODE
PICT.SIZE
QUALITY
SELECT
AUTO
1
/
4
SET
SETUP
1600
EXIT
P
MENU
• [AUTO]: if the auto white balance is set
• [ ] (Daylight):
for recording outdoors on a bright day
• [ ] (Cloudy):
for recording under cloudy and shady
sky
• [ ] (Halogen):
for recording under halogen lighting
• [ ] (White set):
for manual setting (Read the following
page where the manual setting is
explained in detail)
4 Press the [MENU] button.
• The menu will disappear.
• In simple mode [ ] or motion image mode [ ], the white balance is fixed to
[AUTO].
• The setting of the white balance is applied to the other recording modes.
• When taking a picture with the flash, the white balance will be automatically
adjusted (only when in [AUTO], halogen mode [ ]), but the white balance may
not be properly adjusted when the flash light is insufficient.
60
Page 11

5
1,6
2,3,4
2,3
1
/
4
SET
SETUP
EXIT
REC
W.BALANCE
AUTO
AE
AE MODE
PICT.SIZE
QUALITY
SELECT
4
WHITE SET
AIM THE CAMERA AT
A WHITE SURFACE AND
PRESS THE SHUTTER
CANCEL
CANCEL
Recording images (advanced)
ª To set manually (White set)
Here the white set mode of white balance is
explained.
[Preparation]
• Set the mode dial to any position except
[ ]/[ ]/[ ]. (P27)
1 Press the [MENU] button.
2 Press 3/4 to select [W.BALANCE].
3 Press 1 to set to white set [ ].
Only when setting the white balance again
4 Press 1.
5 Aim the camera at a white paper 1 or
P
1600
MENU
6 Press the [MENU] button.
• When taking a picture with the flash after
setting the white balance manually, the
white balance may not be properly adjusted.
We recommend to set the white balance to
MENU
[AUTO] when using the flash.
• The message “AIM THE CAMERA AT
A WHITE SURFACE AND PRESS THE
SHUTTER” is displayed.
similar objects so that it completely
fills the frame to white on the screen
and press the shutter button all the
way.
• White balance is set.
• The menu will disappear.
61
Page 12

Recording images (advanced)
Finely Adjusting the White Balance
If you cannot acquire the desirable hue with
4
[W.BALANCE] because of different light
sources, etc., adjust the fine white balance as
follows.
[Preparation]
• Set the mode dial to any position except
[ ]/[ ]/[ ]. (P27)
• Set the white balance to [ ]/[ ]/[ ]/
[].
2
RED BLUE
SELECT
1,2,3
WB ADJUST.
EXIT
1 Press 3 until [ WB ADJUST.] is
selected.
2 Adjust the white balance with 2/1.
1 [BLUE]: Press when the hue is
reddish.
2 [RED]: Press when the hue is
bluish.
3 Press the 4/[REVIEW/SET] button.
• The adjustment display will disappear.
• The colour of the white balance icon is
turned into red or blue.
4 Take a picture.
• When you set the white balance by the
white set mode [ ], the adjustment level
is set to 0.
• You can set the value independently for
each of the modes in [W.BALANCE].
• When using the colour effect mode, you
cannot adjust the white balance.
62
Page 13

Recording images (advanced)
Setting ISO Sensitivity
ISO sensitivity is a value that corresponds to
the sensitivity to light. The higher it is, the
better the camera performs in dark places.
[Preparation]
• Set the mode dial to any position except
[ ]/[ ]/[ ]. (P27)
1 Press the [MENU] button.
2 Press 3/4 to select [SENSITIVITY].
1,4
2,3
2
REC
SPOT MODE
SENSITIVITY
AUTO
AUDIO REC.
C-AF
CONT.AF
SELECT SET
2,3
SETUP
/
4
OFF
50 100 200 400
OFF
OFF
MENU
EXIT
3 Press 2/1 to select the sensitivity.
• [AUTO]: From ISO50 to 400 (From
• [50]: ISO50
• [100]: ISO100
• [200]: ISO200
• [400]: ISO400
4 Press the [MENU] button.
• The menu will disappear.
ISO100 to 200 when using the
flash)
The ISO sensitivity is
automatically adjusted. If your
picture is still too dark, please
use the flash.
• In motion image mode [ ] or simple mode [ ], ISO sensitivity is fixed to
[AUTO].
• When you take a picture in high ISO sensitivity, the picture noise appears and the
picture quality deteriorates.
63
Page 14

Recording images (advanced)
Taking Pictures with Burst Mode
By continuously pressing the shutter button, it
is possible to record in burst mode.
Number of recordable
2
Burst speed
pictures
4 frames/
H
second
1
[Preparation]
• Set the mode dial to any position except
2 frames/
L
second
[ ]/[ ]. (P27)
Max
4 frames
Max
4 frames
1 Press [ ].
• Every time you press it, what is
displayed changes as shown below.
LH
: High speed
H
: Low speed
L
When these indicators are not displayed,
burst mode is cancelled.
2 Press the shutter button halfway to
lock the focus, then press it fully to
take pictures in sequence.
• It is possible to record 4 frames in 1 second
in burst mode, at a shutter speed higher
than 1/60th, but the flash does not fire
simultaneously.
• If the flash fires, it is possible to record only
1frame.
• In simple mode [ ], the shutter speed is
fixed to the low speed.
• You cannot take still pictures with audio in
the burst mode.
• When setting auto bracket and the burst
mode simultaneously, auto bracket will be
performed.
Max
7 frames
Max
7 frames
OFF
64
Page 15

Recording images (advanced)
Using the MC Protector/ND Filter
The MC protector (DMW-LMC55; optional)
neither affects the colours nor the amount of
1
2
3
light, so it can always be left attached to
protect the Digital Camera’s lens.
The ND filter (DMW-LND55; optional)
reduces the amount of light to approximately
1/8th without affecting the colour balance.
[Preparation]
• Check that the camera switch is set to [OFF]
and the lens barrel is fully retracted.
• Close the flash. (P39)
1 Remove the lens ring.
2 Attach the lens hood adapter 1.
3 Install the MC protector 2 or the ND
filter 3.
• The lens hood 4 and lens cap 5 can be
attached when installing the MC protector or
ND filter.
• When taking pictures with the flash using
the MC protector/ND filter, the vignetting
effect may occur.
• Do not use the conversion lens.
If it is used with the supplied lens hood
adapter, it may break.
65
Page 16

Playback
Playback
Playing Back Still Pictures
1 Set the mode dial to playback [ ].
1
2
• The last recorded picture is played
back.
2 Press 2 to play back the previous
picture.
Press 1 to play back the following
picture.
• Every time you press 2/1, the
previous (next) picture is played back.
• The picture following the last one is the
first picture.
ª Fast forwarding/Fast rewinding
1600
10:00 11.
• This camera is based on the DCF standards (Design rule for Camera File system)
which were established by JEITA (Japan Electronics and Information Technology
Industries Association).
• The file format that can be played back with this camera is JPEG. (Some JPEG
pictures may not be compatible with this camera.)
• When playing back still pictures that have been recorded with other equipment, the
quality of pictures may be deteriorated and pictures may not be able to be played
back.
• When changing the folder name or file name on PC, the pictures may not be able
to be played back.
• When playing back a file out of standard, the folder/file number is indicated by [-]
and the screen may become black.
AUG
.2003
During playback, continue pressing 2/1.
1: Fast forward
2: Fast rewind
• The file number increases/decreases. When
releasing 2/1, the picture corresponding to
the current file number is displayed.
66
Page 17

Playback
Playing Back Still Pictures with Audio
1 Set the mode dial to playback [ ].
1,
1
2,6
2
PLAY AUDIO
2,3
3,4,5
1600
2 Press 2/1 to select the file with
audio icon [ ] 2.
3 Press the 4/[REVIEW/SET] button to
play back the audio.
• You can hear audio from the speaker
1.
ª To adjust the sound volume A
1
Set the mode dial to playback [ ].
2
Press the [MENU] button.
3
Press 1 to select the [SETUP] menu.
4
Press 3/4 to select [VOLUME].
5
Press 2/1 to adjust the sound
volume.
6
Press the [MENU] button.
• The menu will disappear.
10:00 11.
PLAY
MONITOR
VOLUME
BEEP
POWER SAVE
SELECT SET
AUG
.2003
SETUP
2MIN.
EXIT
1
/
2
MENU
67
Page 18

Playback
9 Images Multi Playback
It is possible to display 9 images at once.
1
1 2 3
4 5 6
7 8 9
SELECT
10
13 14
WT
2
CANCEL
11 12
[Preparation]
• Set the mode dial to playback [ ]. (P27)
1 During playback, rotate the zoom
lever towards [ ].
• Multi playback (9 frames) starts.
2 Press 3/4/2/1 to select images.
• To return to the normal indication,
rotate the zoom lever towards [ ].
The image with the file number
coloured in yellow is displayed.
SELECT
CANCEL
68
Page 19

Playback
Using the Playback Zoom
During playback it is possible to enlarge
pictures. (2 times/4 times/8 times/16 times)
WT
1
[Preparation]
• Set the mode dial to playback [ ]. (P27)
1 During playback, rotate the zoom
lever towards [ ].
• The more the zoom lever rotates
towards [ ], the more the zoom
magnification ratio increases.
• The more the zoom lever rotates
towards [ ], the more the zoom
magnification ratio decreases.
• Use 3/4/2/1 to change the area to
be enlarged.
ª To delete a picture during the
playback zoom
Press the [ ] button.
When this message is displayed “DELETE
CANCEL
• The more the zoom magnification increases, the more the picture quality
deteriorates.
• The playback zoom may not operate if pictures have been recorded with other
equipment.
DELETE
THIS PICTURE?”, press 2 to select [YES],
and press the 4/[REVIEW/SET] button.
(P71)
69
Page 20

Playback
Playing Back Motion Images
[Preparation]
• Set the mode dial to playback [ ]. (P27)
1 Press 2/1 to select the file with the
motion image icon [ ] 1.
2 Press the 4/[REVIEW/SET] button to
play back the motion image.
• By pressing 4, motion image playback
will stop.
• The icon 2 is corresponding to the 3/4/2/
1 button.
ª Fast forwarding/Fast rewinding
During motion image playback, continue
pressing 2/1.
1: Fast forward
2: Fast rewind
• When releasing the button, it turns to
normal motion image playback.
ª To pause
Press 3 during motion image playback.
•Press 3 again to cancel pause.
1
PLAY MOTION
IMAGE
10:00 11.
2
10S REMAIN
1,2
AUG
.2003
• To adjust the sound volume. (P67)
2
• The playback zoom cannot be used during playing back motion images.
• When playing back motion images that have been recorded with other equipment,
the quality of images may be deteriorated and images may not be able to be
played back.
• The file format that can be played back with this camera is QuickTime Motion
JPEG.
• It could happen that the Motion JPEG file recorded by PC or other equipments
cannot be played back with this camera.
• When using a high capacity Memory Card, it is possible that fast rewinding may be
slower.
70
Page 21

Editing
Deleting Images
Editing
Images recorded on the card can be deleted.
Once deleted, images cannot be recovered.
[Preparation]
• Set the mode dial to playback [ ]. (P27)
• When an image is protected, it cannot be
deleted. Cancel the protect setting. (P76)
2
1,3,4
2,3
DELETE SINGLE
DELETE THIS PICTURE?
YES NO
SELECT
SET
MULTI/ALL
[Delete single image]
1 Press 2/1 to select the image to be
deleted.
2 Press [ ].
3 Press 2 to select [YES].
4 Press the 4/[REVIEW/SET] button.
• The selected image is deleted.
71
Page 22

1,5
2,3,4,6,7
1
2,3,4
2,
2
MULTI/ALL DELETE
MULTI DELETE
ALL DELETE
SELECT SET CANCEL
3,4
MULTI DELETE
7 89
Editing
[Delete multi images]
It is possible to delete up to 50 images all at
once.
1 Press [ ] twice.
2 Select [MULTI DELETE] and then
press 1.
3 Press 2/1 to select the images to be
deleted.
4 Press the 4/[REVIEW/SET] button.
• The selected images are displayed with
[ ]. Pressing the 4/[REVIEW/SET]
button again, the setting is cancelled.
• The indication [ ] blinks red if the
selected image is protected. Cancel the
protect setting. (P76)
5 Press [ ].
6 When this message is displayed
“DELETE THE PICTURES YOU
MARKED?”, press 2 to select [YES].
7 Press the 4/[REVIEW/SET] button.
• The selected multi images are deleted
all at once.
10
SELECT
MARK/UNMARK
11
DELETE
EXIT
6
MULTI DELETE
DELETE THE PICTURES
YOU MARKED?
YES NO
SELECT
3,4
ALL DELETE
DELETE ALL PICTURES?
YES NO
SELECT
SELECT
SET
SET
MENU
[Delete all images]
Once deleted, images cannot be recovered.
1
Press [ ] twice.
2
Press 4 to select [ALL DELETE] and
then press 1.
3
When this message is displayed
“DELETE ALL PICTURES?”, press 2
to select [YES].
4
Press the 4/[REVIEW/SET] button.
• Images that are protected (P76) or out
of DCF standards (P66) are not
deleted.
• Do not turn the camera switch off or remove
the card during deleting.
• When the remaining power is low, use the
AC adapter.
72
Page 23

Editing
Writing the Print Information in the
Card (DPOF Setting)
It is possible to write print information (DPOF
data) on the card with the images that you
want to print and the number of sheets.
DPOF is an abbreviation of Digital Print Order
Format. With the DPOF corresponding
system, you can add print information to the
images on the Memory Card.
[Preparation]
1,6
2,3,4,5
2,3
PLAY
PROTECT
DPOF PRINT
SLIDE SHOW
AUDIO DUB.
RESIZE
SELECT
4
DPOF SET THIS
1
/
2
SET
SETUP
SINGLE
MULTI
CANCEL
INDEX
EXIT
MENU
• Set the mode dial to playback [ ]. (P27)
[Single copy setting]
1 Press the [MENU] button.
2 Press 3/4 to select [DPOF PRINT]
and then press 1.
3 Select [SINGLE] and then press 1.
4 Press 2/1 to select 1 image.
5 Press 3/4 to select the number of
sheets.
• The number of sheets can be set from
1 to 999.
6 Press the [MENU] button twice.
• The menu will disappear.
COUNT
SELECT EXIT
5
DPOF SET THIS
COUNT
SELECT EXIT
[To cancel]
Set the number of sheets to 0 in step 5 of the
[Single copy setting].
MENU
1
MENU
73
Page 24

1,6
2,3,4,5
2,3
1
/
2
SET
SETUP
SINGLE
MULTI
CANCEL
INDEX
EXIT
PLAY
PROTECT
DPOF PRINT
SLIDE SHOW
AUDIO DUB.
RESIZE
SELECT
4
DPOF SET MULTI
7 89
10
COUNT
SELECT EXIT
11
5
DPOF SET MULTI
7 89
10
COUNT
SELECT EXIT
11
Editing
[Multi copy setting]
1 Press the [MENU] button.
2 Press 3/4 to select [DPOF PRINT]
and then press 1.
3 Press 3/4 to select [MULTI] and then
press 1.
4 Press 2/1 to select the image.
5 Press 3/4 to select the number of
sheets to be printed.
• The number of sheets can be set from
1 to 999.
• Copy setting 1 is displayed (white).
6 Repeat steps 4 and 5, and at the end
press the [MENU] button twice.
• The DPOF setting of multi images is
set at once.
• The menu will disappear.
MENU
[To cancel]
Set the number of sheets to 0 in step 5 of the
[Multi copy setting].
• If the file is not based on the DCF standard,
the DPOF setting cannot be set.
MENU
3
MENU
DCF is abbreviation of [Design rule for
Camera File system], stipulated by JEITA
[Japan Electronics and Information
Technology Industries Association].
• When using the DPOF feature, this camera
will overwrite any previous DPOF settings
made by other products.
• When this message is displayed “MEMORY
CARD FULL”, delete unnecessary files, and
then set the DPOF print setting again.
74
Page 25

1,6
2,3,4,5
1,6
2,3,4,5
2,32,3
1
PLAY
/
2
PROTECT
DPOF PRINT
SLIDE SHOW
AUDIO DUB.
RESIZE
SELECT
SET
4
CANCEL ALL DPOF
CANCEL ALL DPOF
PRINT SETTINGS?
YES NO
SELECT
4
DPOF INDEX
SET INDEX PRINT?
YES NO
SELECT
SETUP
SINGLE
MULTI
CANCEL
INDEX
EXIT
SET
SET
MENU
Editing
[To cancel all settings]
1 Press the [MENU] button.
2 Press 3/4 to select [DPOF PRINT]
and then press 1.
3 Press 3/4 to select [CANCEL] and
then press 1.
4 When this message is displayed
“CANCEL ALL DPOF PRINT
SETTINGS?”, press 2 to select [YES].
5 Press the 4/[REVIEW/SET] button.
• All DPOF settings are cancelled.
6 Press the [MENU] button.
• The menu will disappear.
[Index setting/to cancel]
1
Press the [MENU] button.
2
Press 3/4 to select [DPOF PRINT]
and then press 1.
3
Press 4 to select [INDEX] and then
press 1.
4
When this message is displayed “SET
INDEX PRINT?”, press 2 to select
[YES].
• When the index is already set, the
message “SET/CANCEL INDEX
PRINT?” is displayed.
Press 2/1 to select [SET], [CANCEL]
or [NO].
5
Press the 4/[REVIEW/SET] button.
• All images are set/cancelled.
6
Press the [MENU] button.
• The menu will disappear.
DPOF INDEX
SET/CANCEL INDEX
PRINT?
SET CANCEL NO
SELECT
SET
75
Page 26

Editing
Protecting Images on the Card
It is possible to protect the important images
recorded on the card from accidental erasure.
[Preparation]
• Set the mode dial to playback [ ]. (P27)
[Single setting/to cancel]
1,6
2,3,4,5
2,3
PLAY
PROTECT
DPOF PRINT
SLIDE SHOW
AUDIO DUB.
RESIZE
SELECT
4,5
PROTECT THIS
SELECT
SET/CANCEL
1
/
2
SET
SETUP
SINGLE
MULTI
CANCEL
EXIT
EXIT
1 Press the [MENU] button.
2 Press 3/4 to select [PROTECT] and
then press 1.
3 Select [SINGLE] and then press 1.
4 Press 2/1 to select 1 image.
5 Press the 4/[REVIEW/SET] button.
• The protect icon 1 appears.
• By pressing the 4/[REVIEW/SET]
button again, the protection is
cancelled and the icon will disappear.
MENU
6 Press the [MENU] button twice.
• The menu will disappear.
[Multi setting/To cancel all settings]
1
The method is the same as in “Writing
the Print Information in the Card
(DPOF Setting)”. (P73~P75)
MENU
• Formatting the card will erase all the data on the card, even if you protect the
images in this procedure.
• When trying to delete a protected file, these messages are displayed “THIS
PICTURE IS PROTECTED” or “PROTECTED PICTURES REMAIN
UNDELETED”. If you want to delete this file, cancel the protect setting first.
• The protect setting may not be effective in other products.
• Sliding the SD Memory Card Write-Protect switch to [LOCK] prevents the picture
from deletion even if the protection is not set.
• The audio dubbing cannot be used with protected images.
• While this feature will protect the photos from accidental erasure, formatting
the card will permanently delete all data.
76
Page 27

Tec hn ica l use
Technical use
Playing Back with Slide Show
(Automatic Playback)
All pictures selected in the card can be played
back one-by-one automatically.
[Preparation]
• Set the mode dial to playback [ ]. (P27)
1 Press the [MENU] button.
2 Press 3/4 to select [SLIDE SHOW]
1
2,3,4,5
2,3
1
PLAY
/
2
PROTECT
DPOF PRINT
SLIDE SHOW
AUDIO DUB.
RESIZE
SELECT
SET
4
START
DURATION
AUDIO
SELECT
SET
5
ALL SLIDE SHOW
START SLIDE SHOW
STOP
SETUP
ALL
DPOF
MENU
EXIT
1SEC.
OFF
EXIT
MENU
MENU
and then press 1.
3 Press 3/4 to select [ALL]/[DPOF]
and then press 1.
•[ALL]:
for playing back all pictures
•[DPOF]:
for playing back the DPOF set pictures
4 Press 3/4/2/1 for setting below.
• [DURATION]:
it can be set among 1, 2, 3 and
5 seconds.
• [AUDIO]:
it can be set to [ON] or [OFF]. By
setting it to [ON], it is possible to play
back the still pictures with audio in
Slide Show.
• [DPOF SET] (Only when setting to
[DPOF]):
You can select the pictures you want to
set to the Slide Show.
• [CANCEL ALL] (Only when setting to
[DPOF]):
You can cancel the Slide Show setting.
5 Select [START] and then press 1.
• The Slide Show starts.
• By pressing the [MENU] button, it
stops.
77
Page 28

Technical use
• In motion image playback, Slide Show is not available.
• The DPOF setting of Slide Show will not be applied to the DPOF printing.
• When setting [AUDIO] to [ON], the still picture with audio is played back for
5 seconds (audio recording)/Max 10 seconds (audio dubbing).
• When editing with the supplied software [SD Viewer for DSC] recorded on the
CD-ROM, you can play back in SD Slide Show with this camera. (P100)
• Images that are set DPOF with the supplied software [SD Viewer for DSC]
recorded on the CD-ROM cannot be played back in DPOF Slide Show with this
camera. Set DPOF Slide Show on this camera.
• When using the DPOF feature, this camera will overwrite any previous DPOF
settings made by other products.
78
Page 29

Technical use
.
Adding Audio to Recorded Pictures
(Audio Dubbing)
It is possible to add a 10-second narration to
a recorded picture.
[Preparation]
• Set the mode dial to playback [ ]. (P27)
1 Press the [MENU] button.
2 Press 3/4 to select [AUDIO DUB.]
and then press 1.
1,6
2,3,4,5
2
1
PLAY
PROTECT
DPOF PRINT
SLIDE SHOW
AUDIO DUB.
RESIZE
SELECT SET
3,4
AUDIO
DUB
SELECT
START
SETUP
/
2
MENU
EXIT
1600
MENU
EXIT
3 Press 2/1 to select the picture.
4 Press the 4/[REVIEW/SET] button to
start audio recording. (1 Microphone)
• When audio has already been
recorded, after the audio dubbing the
original audio is overwritten.
• When audio has already been
recorded, this message is displayed
“OVERWRITE AUDIO DATA?”. Then
press 2 to select [YES], and press the
4/[REVIEW/SET] button to start audio
recording.
5 Press the 4/[REVIEW/SET] button to
stop audio recording.
• Even if you do not press the
4/[REVIEW/SET] button, after about
10 seconds the audio recording stops
automatically.
6 Press the [MENU] button twice.
• The menu will disappear.
• Adding audio will use additional memory.
Using this feature will result in fewer images
that can be recorded on the card.
• The audio dubbing cannot be used with
motion images.
• The audio dubbing cannot be used with
protected images.
79
Page 30

Technical use
Resizing Recorded Pictures
It is possible to change the recorded picture
size. This function is useful if you want to
reduce the volume of the picture for attaching
to an e-mail or uploading on web-site.
[Preparation]
• Set the mode dial to playback [ ]. (P27)
1,8
2,3,4,5,6,7
PLAY
2
PROTECT
DPOF PRINT
SLIDE SHOW
AUDIO DUB.
RESIZE
SELECT SET
RESIZE
3
SELECT
SET
RESIZE
4
1600
1280
SELECT
RESIZE
6
DELETE ORIGINAL
PICTURE?
1
/
2
1600
1600
RESIZE
YES NO
SETUP
EXIT
EXIT
EXIT
1 Press the [MENU] button.
2 Press 3/4 to select [RESIZE] and
then press 1.
3 Press 2/1 to select the picture, and
then press 4.
4 Press 2/1 to select the size.
• [1280]: 1280k960
• [640]: 640k480
5 Press the 4/[REVIEW/SET] button to
MENU
set the size.
6 When this message is displayed
“DELETE ORIGINAL PICTURE?”,
press 2/1 to select [YES] or [NO].
7 Press the 4/[REVIEW/SET] button.
8 Press the [MENU] button twice.
MENU
MENU
• The menu will disappear.
• It is not possible to resize pictures in a size
lower than/equal to [640k480] or with an
aspect ratio that is not 4:3.
• It may not be possible to resize the pictures
recorded with other equipments.
• It is not possible to resize the motion image/
still picture with audio.
SELECT
SET
80
Page 31

Technical use
Trimming Recorded Pictures
WT
4
1,9
2,3,5,7,8
2
2
PLAY
/
2
TRIMMING
FORMAT
SELECT
SET
3
TRIMMING
SELECT
SET
4,5,6
TRIMMING
ZOOM
TRIM:SHUTTER
7
TRIMMING
DELETE ORIGINAL
PICTURE?
YES NO
SELECT
SETUP
1600
1600
6
EXIT
EXIT
EXIT
SET
MENU
MENU
It is possible to cut off the unnecessary parts
of the picture (trimming), and enlarge the
remaining parts of the picture.
[Preparation]
• Set the mode dial to playback [ ]. (P27)
1 Press the [MENU] button.
2 Press 3/4 to select [TRIMMING] and
then press 1.
3 Press 2/1 to select the picture, and
then press 4.
4 Rotate the zoom lever towards [ ] to
make subjects closer, and towards
[ ] to make subjects wider.
5 Press 3/4/2/1 to shift pictures.
6 Press the shutter button to set.
7 When this message is displayed
“DELETE ORIGINAL PICTURE?”,
press 2/1 to select [YES] or [NO].
8 Press the 4/[REVIEW/SET] button.
9 Press the [MENU] button twice.
• The menu will disappear.
• Trimming images will use additional memory
if the original image is saved.
• It is not possible to resize pictures in a size
MENU
lower than [640k480] or with an aspect ratio
that is not 4:3.
• You cannot operate trimming on pictures
recorded with other equipment.
• Trimming is not possible for the motion
image/still picture with audio.
• The picture size of the trimmed pictures may
become smaller than that of the original one
depending on the cut size.
• The picture quality of the trimmed picture
will be lower than that of the original one.
81
Page 32

Technical use
Formatting the Card
Usually, it is not necessary to format the card
(initializing). Format the card when this
message is displayed “MEMORY CARD
ERROR”.
[Preparation]
• Set the mode dial to playback [ ]. (P27)
1 Press the [MENU] button.
2 Press 3/4 to select [FORMAT] and
2
1
2,3,4
2
PLAY
/
2
TRIMMING
FORMAT
SETUP
3 When this message is displayed
4 Press the 4/[REVIEW/SET] button.
then press 1.
“DELETE ALL DATA ON THE
MEMORY CARD?”, press 2 to select
[YES].
• The card is formatted.
• After formatting, recorded images and
any other data cannot be recovered.
SELECT
SET
EXIT
MENU
3
FORMAT
DELETE ALL DATA
ON THE MEMORY CARD?
YES NO
SELECT
• When the battery power is low, use the AC adapter.
• When the card is formatted by PC or other equipment, format the card on the
camera again.
• If the card cannot be formatted, consult your dealer.
SET
82
Page 33

Technical use
Adjusting the LCD Monitor/Viewfinder
Brightness
You can adjust the brightness of the LCD
monitor or Viewfinder.
[Preparation]
• Set the mode dial to any position except
[ ]. (P27)
• Press the [DISPLAY] button to select the
display of LCD monitor 1 or Viewfinder 2.
(P25)
1 Press the [MENU] button.
2 Press 1 to open the [SETUP] menu.
3 Press 3/4 to select [MONITOR]/
1
/
2
[FINDER].
4 Press 2/1 to adjust the brightness.
5 Press the [MENU] button.
• The menu will disappear.
MENU
• Adjust the LCD Monitor or Viewfinder
brightness for easier viewing in bright or
dark condition. This will not affect the
brightness of the pictures being recorded or
1
/
2
played back.
3,4
1,5
2,3,4
REC
MONITOR
AUTO REVIEW
BEEP
POWER SAVE
SELECT
REC
FINDER
SET
SETUP
OFF
OFF
EXIT
SETUP
AUTO REVIEW
BEEP
POWER SAVE
SELECT
SET
OFF
OFF
EXIT
MENU
83
Page 34

Technical use
Using the Auto Review
Recording with the auto review set to [1SEC.]/
[3SEC.], the recorded picture is automatically
displayed on the LCD monitor/Viewfinder for
about 1 or 3 seconds.
[Preparation]
• Set the mode dial to any position except
[ ]/[ ]. (P27)
1,5
2,3,4
1 Press the [MENU] button.
2 Press 1 to open the [SETUP] menu.
3 Press 3/4 to select [AUTO REVIEW].
3,4
OFF 3SEC.1SEC.
SET
SETUP
2MIN.
EXIT
MENU
REC
MONITOR
AUTO REVIEW
BEEP
POWER SAVE
SELECT
• Press the shutter button halfway to cancel the review.
• Even when setting the auto review to [1SEC.]/[3SEC.], this function is not available
in motion image mode [ ].
• When recording in burst mode, auto bracket, still picture with audio modes, the
recorded picture is automatically displayed.
• In simple mode [ ], the auto review setting becomes [ON] (2 seconds) or [OFF].
4 Press 2/1 to select [1SEC.] or
1
/
2
[3SEC.].
5 Press the [MENU] button.
• The menu will disappear.
84
Page 35

Technical use
Setting up the Beep Sound
It is possible to set up the level of beep sound
(high or low) or turn it off.
1 Press the [MENU] button.
2 Press 1 to open the [SETUP] menu.
• In simple mode, skip this step.
3 Press 3/4 to select [BEEP].
1,5
3,4
REC
MONITOR
AUTO REVIEW
BEEP
2,3,4
SETUP
OFF
4 Press 2/1 to adjust the beep sound
volume.
5 Press the [MENU] button.
• The menu will disappear.
1
/
2
• In simple mode [ ], beep sound can only
be set to [ON] or [OFF].
POWER SAVE
SELECT
SET
2MIN.
EXIT
MENU
85
Page 36

Technical use
Setting up the Power Save Mode
In this mode, if the camera is not operated for
a set length of time, it is automatically turned
off.
1 Press the [MENU] button.
2 Press 1 to open the [SETUP] menu.
3 Press 3/4 to select [POWER SAVE].
1,5
3,4
REC
MONITOR
AUTO REVIEW
BEEP
POWER SAVE
SELECT
2,3,4
2MIN.
SETUP
5MIN. 10MIN.
SET
EXIT
OFF
OFF
MENU
4 Press 2/1 to choose the desired time
setting in minutes.
•[2MIN.]
•[5MIN.]
• [10MIN.]
• [OFF]: the camera is not turned off
1
/
2
5 Press the [MENU] button.
• The menu will disappear.
automatically.
• If you want to cancel the power save mode, turn the camera on again, use the
[ON]/[OFF] switch or press the shutter briefly.
• When using the AC adapter/connecting to a PC/recording the motion image/
playing back the motion image/during Slide Show, the power save mode is not
available.
• In simple mode [ ], the power save is fixed to [2MIN.].
86
Page 37

Technical use
Resetting the File Number
As file numbers are recorded sequentially,
use this function if you want it to start your
new recording from 0001 when using a
partially recorded card.
[Preparation]
• Set the mode dial to any position except
1,6
2,3,4,5
3
REC
NO.RESET
RESET
CLOCK SET
LANGUAGE
SELECT
4
NO.RESET
RESET FILE NO.
IN THE CAMERA?
YES NO
SET
SETUP
ENG
EXIT
2
/
2
MENU
[ ]/[ ]. (P27)
1 Press the [MENU] button.
2 Press 1 to open the [SETUP] menu.
3 Press 3/4 to select [NO.RESET] and
then press 1.
4 When this message is displayed
“RESET FILE NO. IN THE CAMERA?”,
press 2 to select [YES].
5 Press the 4/[REVIEW/SET] button.
6 Press the [MENU] button.
• The menu will disappear.
SELECT
SET
87
Page 38

Technical use
Reset the Settings
1,8
2,3,4,5,6,7
3
2
SETUP
ENG
EXIT
/
2
MENU
REC
NO.RESET
RESET
CLOCK SET
LANGUAGE
SELECT
SET
4
RESET
RESET REC. SETTINGS?
YES NO
Use this function to reset the settings to the
factory presets.
[Preparation]
• Set the mode dial to any position except
[ ]/[ ]. (P27)
1 Press the [MENU] button.
2 Press 1 to open the [SETUP] menu.
3 Press 3/4 to select [RESET] and
then press 1.
4 When this message is displayed
“RESET REC. SETTINGS?”, press 2
to select [YES].
5 Press the 4/[REVIEW/SET] button.
• The message “REC. SETTING RESET
COMPLETED” is displayed for about
2 seconds.
6 When this message is displayed
“RESET SETUP PARAMETERS?”,
press 2 to select [YES].
7 Press the 4/[REVIEW/SET] button.
• The clock setting is not reset.
8 Press the [MENU] button.
• The menu will disappear.
SELECT
6
RESET SETUP
PARAMETERS?
YES NO
SELECT
SET
RESET
SET
88
Page 39

Technical use
Playing Back Images with a TV Monitor
By connecting the camera to a television via the supplied A/V cable 1, it is possible
to view the playback of the recorded images on the TV.
A/V
OUT
USB
2
1
[Preparation]
• Turn the camera and the television off.
1 Connect the A/V cable 1 to the A/V OUT socket of the camera.
2 Connect the A/V cable to the video in and the audio in sockets of the TV.
• Yellow: to the video in socket
• White: to the audio in socket
3 Turn the television on and select external input.
4 Turn the camera on and then set the mode dial to playback [ ].
• The image is displayed on the television.
ª Viewing images in other countries
When setting [VIDEO OUT] on the menu, you can view images on the TV in other
countries (regions) which use the NTSC or PAL TV system.
• When connecting to a TV, we recommend that you use the AC adapter as the
power source. (P16)
• Use the supplied A/V cable only.
• Only when the mode dial is set to playback [ ], the images will be displayed on
the TV. In any of the recording modes there is no output from the A/V OUT socket.
• Read the TV operating instructions too.
89
Page 40

Technical use
Connecting to a PC
[Preparation]
• If your PC uses Microsoft Windows
from the CD that is included. If you are using a newer Microsoft operating system
such as Windows Me, Windows 2000, or Windows XP (Home Edition/
Professional), no USB driver needs to be installed. Your PC should recognize the
camera automatically.
A/V
OUT
USB
1 Insert the Memory Card into the camera, and turn the camera switch to
[ON].
2 Connect the camera to a PC via the supplied USB
connection cable 1.
[Windows]
The drive is shown on the [My Computer] folder.
• If it is the first time you are connecting the camera to a PC, the required driver
is installed automatically in order to let the camera be recognized by the
Windows Plug and Play, then it is shown on the [My Computer] folder.
[Macintosh]
The drive is shown on the screen.
• When connecting to a PC, we recommend that you use the AC adapter as the
power source. (P16)
• If the remaining battery power becomes low during communication, the power
indicator blinks and the alarm beeps. In this case, stop the communication. Then
turn the camera switch to [OFF] and charge the battery.
• When connecting to a PC, pictures and sounds are not output from the A/V OUT
socket.
• For further information (software installation), read the supplied operating
instructions for PC connection.
®
98 or 98SE, a USB driver must be installed
ACCESS
90
Page 41

Technical use
USB DIRECT-PRINT
By connecting the camera to a printer equipped with USB DIRECT-PRINT function
via the supplied USB connection cable, it is possible to print directly.
(Please ask the manufacturer of the printer for suitable models.)
A/V
OUT
USB
1 Insert the Memory Card into the camera, and turn the camera switch to
[ON].
2 Turn on a printer.
3 Connect the camera to a printer via the supplied USB connection cable
1.
• When connecting to a printer, we recommend that you use the AC adapter as the
power source. (P16)
• Read the printer operating instructions too.
• Disconnect the USB connection cable and DC cable after printing.
91
Page 42

Technical use
D
D
T
D
D
T
USB DIRECT-PRINT (Single Picture)
[Preparation]
• Connect the camera to a printer. (P91)
1
DIRECT PRINT
SINGLE
PICTURE
SELECT
DPOF
PICTURE
2
DIRECT PRINT
IRECT PRIN
PLEASE SELECT
THE PICTURE TO PRINT
SELECT
1600
PRINT
3,4
DIRECT PRINT
PLS CHECK THE PRINTER
START PRINTING?
COUNT 1
YES NO
PRINTSET
SELECT
5
DIRECT PRINT
IRECT PRIN
1600
SET
SET
1 Only when DPOF is already set, press
2 to select [SINGLE PICTURE], and
then press the 4/[REVIEW/SET]
button.
• The message “PLEASE SELECT THE
PICTURE TO PRINT” is displayed for
2 seconds.
• When DPOF is not set, this screen is
skipped.
2 Press 2/1 to select the picture to be
printed, and then press the 4/
[REVIEW/SET] button.
3 Press 3, and press 2/1 to set the
number of sheets, and then press the
4/[REVIEW/SET] button.
• The message “PLS CHECK THE
PRINTER START PRINTING?” is
displayed.
4 Press 2 to select [YES].
5 Press the 4/[REVIEW/SET] button.
• Printing starts.
• Press the [MENU] button to abort printing at
any time.
NOW PRINTING
REMAIN 8
CANCEL
MENU
92
Page 43

Technical use
D
D
T
USB DIRECT-PRINT (DPOF Picture)
[Preparation]
• Connect the camera to a printer. (P91)
• Write the print information in the card
1
DIRECT PRINT
SINGLE
PICTURE
SELECT
DPOF
PICTURE
2,3
DIRECT PRINT
PLS CHECK THE PRINTER
START PRINTING?
SET
(DPOF setting). (P73)
1 Press 1 to select [DPOF PICTURE].
• Press the [MENU] button, and you can
change the DPOF setting. (P73)
2 Press the 4/[REVIEW/SET] button.
• The message “PLS CHECK THE
PRINTER START PRINTING?” is
displayed.
3 Press 2 to select [YES].
4 Press the 4/[REVIEW/SET] button.
• Printing starts.
YES NO
SELECT
4
DIRECT PRINT
IRECT PRIN
NOW PRINTING
REMAIN 8
SET
1600
CANCEL
• Press the [MENU] button to abort printing at
any time.
• When the number of total images become
more than 255, the number of remaining
images will be displayed as “----”.
MENU
93
Page 44

After Use
3
1
OFF≥≥ON
Technical use
If the camera will not be used for a long time,
follow the steps below before storage. We
recommend the use of an optional soft case
to protect the camera.
1 Turn the camera switch to [OFF]. (P19)
• Close the flash. (P39)
2 Eject the card. (P17)
3 Remove the battery. (P14)
4 Remove the lens hood.
5 Remove the lens hood adapter.
6 Attach the lens ring.
7 Attach the lens cap. (P24)
4
5
• If you will not be using the camera for a long
time, remove the battery. (When you insert
the battery again, set the date/time)
6
7
94
Page 45

Others
The Menu Items
1
SETUP
/
4
AUTO
P
1600
1
2
3
4
REC
W.BALANCE
AE
AE MODE
PICT.SIZE
QUALITY
Others
REC mode menu
1 W.BALANCE (P60)
2 AE MODE (P31, P47, P48)
3 PICT.SIZE (P45)
4 QUALITY (P46)
5
6
7
8
9
10
11
12
13
14
15
16
17
SELECT
REC
SPOT MODE
SENSITIVITY
AUDIO REC.
C-AF
CONT.AF
SELECT
REC
AF TRIGGER
D.ZOOM
COL.EFFECT
PICT.ADJ.
SELECT
REC
STABILIZER
SELECT
REC
MONITOR
AUTO REVIEW
BEEP
POWER SAVE
SET
EXIT
2
SETUP
/
4
OFF ON
SET
EXIT
3
SETUP
/
4
SHUTTER
STANDARD
SET
EXIT
4
SETUP
/
4
OFF ON
SET
EXIT
SETUP
AUTO
OFF
OFF
OFF
OFF
OFF
2MIN.
MENU
5 SPOT MODE (P54)
6 SENSITIVITY (P63)
7 AUDIO REC. (P44)
8 CONT.AF (P42)
MENU
9 AF TRIGGER (P41)
10 D.ZOOM (P37)
11 COL.EFFECT (P58)
12 PICT.ADJ. (P59)
MENU
13 STABILIZER (P40)
MENU
14 MONITOR/FINDER (P83)
1
/
2
15 AUTO REVIEW (P84)
16 BEEP (P85)
17 POWER SAVE (P86)
SELECT
SET
EXIT
MENU
95
Page 46

REC
W.BALANC
NO.RESET
18
AE
AE MODE
RESET
19
PICT.SIZE
CLOCK SET
20
LANGUAGE
QUALITY
21
SELECT
22
23
24
25
26
27
28
29
PICT.MODE
ENLARGE
AUTO REVIEW
BEEP
CLOCK SET
SELECT SET EXIT
1
PLAY
PROTECT
DPOF PRINT
SLIDE SHOW
AUDIO DUB.
RESIZE
SELECT
2
PLAY
TRIMMING
FORMAT
SET
SET
4"k6"/10k15cm
/
2
SET
/
2
SETUP
SETUP
ENG
EXIT
EXIT
ON
ON
SETUP
EXIT
SETUP
Others
18 NO.RESET (P87)
2
/
2
19 RESET (P88)
20 CLOCK SET (P30)
21 LANGUAGE
MENU
MENU
Simple mode menu
• For items without number, refer to those with
the same name.
22 PICT.MODE (P33)
MENU
Playback mode menu
• For items without number, refer to those with
the same name.
23 PROTECT (P76)
24 DPOF PRINT (P73)
25 SLIDE SHOW (P77)
26 AUDIO DUB. (P79)
MENU
27 RESIZE (P80)
28 TRIMMING (P81)
29 FORMAT (P82)
30
31
SELECT
PLAY
MONITOR
VOLUME
BEEP
POWER SAVE
SELECT
PLAY
CLOCK SET
LANGUAGE
VIDEO OUT
SELECT
SET
SET
SET
EXIT
SETUP
EXIT
SETUP
ENG
EXIT
OFF
MENU
1
/
2
30 VOLUME (P67)
MENU
2
/
2
31 VIDEO OUT (P89)
MENU
96
Page 47

Cautions for Use
ª Cautions for Use
Keep the digital camera away
from magnetized equipment
(such as a microwave oven, TV,
video game equipment, etc.).
• If you use the digital camera on or
near a TV, images and sounds may be
disturbed due to electromagnetic wave
radiation.
• Do not use the digital camera near a
cell phone because doing so may
cause noise to adversely affect the
images and sounds.
• Recorded data may be damaged, or
images may be distorted by strong
magnetic fields created by speakers or
large motors.
• Electromagnetic wave radiation
generated by a microprocessor may
adversely affect the digital camera,
causing the disturbance of images and
sounds.
• If the digital camera is affected by
magnetically charged equipment and
does not function properly, turn the
camera off and detach the battery or
AC adapter and then connect the
battery or AC adapter again.
Thereafter, turn the camera on.
Do not use the digital camera
near radio transmitters or
high-voltage lines.
• If you record near radio transmitters or
high-voltage lines, recorded images or
sounds may be adversely affected.
Do not spray insecticides or
volatile chemicals onto the
digital camera.
• If the digital camera is sprayed with
such chemicals, the camera body may
be deformed and the surface finish
may peel off.
Others
• Do not keep rubber or plastic products
in contact with the digital camera for a
long period of time.
When you use the digital camera
on a beach or similar place, do
not let sand or fine dust get into
the camera.
• Sand or dust may damage the digital
camera or card. (Care should be taken
when inserting and removing the card)
When you use your digital
camera on a rainy or snowy day
or on a beach, make sure that no
water enters the digital camera.
• Water may cause the digital camera or
card to malfunction. (Irreparable
damage may occur)
• If sea water splashes onto the digital
camera, wet a soft cloth with tap
water, wring it well, and use it to wipe
the camera body carefully. Then, wipe
it again thoroughly with a soft dry
cloth.
Do not use the digital camera for
surveillance purpose or other
business use.
• If you use the digital camera for a long
period of time, the internal
temperature increases and,
consequently, this may cause
malfunction.
• The digital camera is not intended for
business use.
97
Page 48

Do not use benzine, thinner or
alcohol for cleaning the digital
camera.
• The camera body may be deformed
and the surface finish may peel off.
• Before cleaning the camera, detach
the battery or pull out the AC adapter
from the electrical outlet.
• Wipe the digital camera with a soft, dry
cloth. To remove stubborn stains, wipe
with a cloth that is soaked in a
detergent diluted with water and
afterward finish wiping with a dry cloth.
• For storing or transporting the digital
camera, place it in a bag or case lined
with soft pads to prevent the coating
on the camera body from being worn.
After use, be sure to take the
card out, and detach the battery
or pull out the AC adapter from
the electrical outlet.
• If the battery is left on the digital
camera for a long time, the voltage
drops excessively, and the battery will
not function even after it is recharged.
ª Optimal Use of the Battery
The battery is a rechargeable lithium ion
battery. Its ability to generate power is
based upon the chemical reaction that
takes place inside it. This reaction is
susceptible to the surrounding
temperature and humidity, and, if the
temperature is too high or too low, the
operating time of the battery becomes
shorter.
Others
Be sure to detach the battery
after use.
Be sure to detach the battery from the
digital camera. (If it is left attached to
the digital camera, a minute amount of
current is consumed even when the
digital camera power is off) If the battery
is left attached to the digital camera for
a long time, discharge takes place. The
battery may become unusable after it is
charged.
Dispose of an unusable battery.
• The battery has a limited life.
• Do not throw the battery into fire
because it may cause an explosion.
Always keep the terminals of the
battery clean.
Prevent the terminals from getting
clogged with dirt, dust, or other
substances.
If you drop the battery accidentally,
check to see if the battery body and
terminals are deformed. Attaching a
deformed battery to the digital camera
may damage the camera.
98
Page 49

ª Condensation
When condensation has taken
place:
Set the camera switch to [OFF]
and leave the digital camera in
this condition for about 1 hour.
When the camera becomes close
to the ambient temperature, the
fog disappears naturally.
ª Cautions for Storage
Before storing the digital camera, take
the card out and detach the battery.
Store all the components in a dry place
with a relatively stable temperature.
(Recommended temperature:
15oC to 25oC,
Recommended humidity: 40% to 60%)
Digital camera
• Wrap it with a soft cloth to prevent dust
from getting into the camera.
• Do not leave the camera in places that
expose it to high temperature.
Battery
• Do not leave the camera and the
battery at the place where the
temperature is too high, such as inside
the car during the midsummer.
• Extremely high or low temperatures
will shorten the life of the battery.
• If the battery is kept in smoky or dusty
places, the terminal may rust and
cause malfunctions.
• Do not allow the battery terminals to
come in contact with metal objects
(such as necklaces, hairpins, etc.).
This can result in a short circuit or heat
generation and, if you touch the
battery in this condition, you may be
badly burned.
Others
• Store the battery in a completely
discharged state. To store the battery
for a long period of time, we
recommend you charge it once every
year and store it again after you
completely use up the charged
capacity.
Card
• When the card is being read, do not
remove the card, turn off the camera,
or subject it to vibration or impact.
• Do not leave the card in places where
there is high temperature or direct
sunlight, or where electromagnetic
waves or static electricity are easily
generated.
• Do not bend or drop the card. The
card or the recorded content may be
damaged.
• After use, be sure to remove the card
from the digital camera.
• Do not touch the terminals on the back
of the card with your fingers. Do not
allow dirt, dust or water to enter it.
AC adapter
• If the battery is warm, charging takes a
longer time than normal.
• If you use the AC adapter near a radio,
radio reception may be disturbed.
Keep the AC adapter 100 cm or more
away from radio.
• When the AC adapter is in use, it may
generate whirring sounds. However,
this is normal.
• After use, be sure to disconnect the
AC mains lead. (If it is left connected,
a minute amount of current is
consumed)
• Keep the electrodes of the AC adapter
and battery always clean.
99
Page 50

ª LCD Monitor/Viewfinder/Lens
Ring
LCD monitor
• In a place with drastic temperature
changes, condensation may form on
the LCD monitor. Wipe it with soft dry
cloth.
• If the digital camera is extremely cold
when you turn the camera on, the
image on the LCD monitor is slightly
darker than usual at first. However, as
the internal temperature increases, it
goes back to the normal brightness.
Extremely high precision technology
is employed to produce the LCD
monitor screen featuring a total of
approximately 114,000 pixels. The
result is more than 99.99% effective
pixels with a mere 0.01% of the
pixels inactive or always lit. However,
this is not a malfunction and does
not affect the recorded picture.
Viewfinder
• Do not direct the Viewfinder or lens to
the sun. Internal components may be
seriously damaged.
Extremely high precision technology
is employed to produce the
Viewfinder screen featuring a total of
approximately 114,000 pixels. The
result is more than 99.99% effective
pixels with a mere 0.01% of the
pixels inactive or always lit. However,
this is not a malfunction and does
not affect the recorded picture.
Others
Lens ring
• If you push the zoom lever toward W
during recording with the filter or
conversion lens attached to the digital
camera, 4 corners of the image may
become dark (vignetting). For details,
refer to the operating instructions of
your accessories.
• Be sure to keep the lens ring attached
to the digital camera so as to shut out
unnecessary light.
ª SD Slide Show
If setting the SD Slide Show with the
[SD Viewer for DSC] which is in the
supplied CD-ROM, when playing back,
the message “START SD SLIDE
SHOW?” is displayed. Select [YES] and
press the 4/[REVIEW/SET] button to
start the SD Slide Show. Select [NO]
and press the 4/[REVIEW/SET] button
to start normal playback.
ª Folder Composition
When the Memory Card where data are
recorded is inserted into a PC, the
folders shown below will be displayed.
SD Memory
Card
• In the 100_PANA folder it is possible to
record up to 999 images.
• In the MISC folder it is possible to
record the files that have been set with
DPOF settings.
DCIM
100_PANA
EXPORT
MISC
100
Page 51

Others
Warning Indications
[NO MEMORY CARD]
Insert the Memory Card.
[THIS MEMORY CARD IS
PROTECTED]
Cancel the Memory Card lock.
[NO VALID IMAGE TO PLAY]
Carry out playback after recording or
after inserting the Memory Card with a
recorded image.
[MEMORY CARD FULL]/
[NOT ENOUGH MEMORY IN THE
CARD]
Insert a new Memory Card or delete the
useless data.
[REMOVE LENS CAP AND
PRESS BUTTON]
Remove the lens cap and then press
the 4/[REVIEW/SET] button.
[THIS PICTURE IS PROTECTED]
After cancelling the protect setting, you
can delete or overwrite the image.
[THIS PICTURE CAN’T BE
DELETED]/ [SOME PICTURES
CAN’T BE DELETED]
If the image is not based on the DCF
standard, it is not possible to be deleted.
[NO ADDITIONAL DELETE
SELECTIONS CAN BE MADE]
You have exceeded the number of
images that can be set at once with
multi delete setting.
[CAN’T BE SET ON THIS
PICTURE]/ [CAN’T BE SET ON
SOME PICTURES]
If the image is not based on the DCF
standard, it is not possible to set the
DPOF.
[MEMORY CARD ERROR]
Failed access to Memory Card.
Insert the card again.
[READ ERROR]
Data reading error.
Play it back again.
[WRITE ERROR]
Data writing error.
Turn the camera [OFF] and remove the
card. Then insert the card and turn the
camera back [ON]. Be sure camera is
[OFF] before removing or inserting the
card to avoid damaging the card.
[PLEASE SET THE CLOCK]
This message is displayed when you
use the camera for the first time or you
do not use the camera for a long time.
Set the clock again.
[MEMORY CARD ERROR
FORMAT THIS CARD?]
The format of this card cannot be
recognized by the camera. Format this
again with the camera.
[MODE DIAL IS NOT IN THE
PROPER POSITION]
This message is displayed when you
turn on the camera with the mode dial in
the wrong position.
Rotate the mode dial to the proper
position.
101
Page 52

Troubleshooting
1: The camera does not turn on.
1-1: Are the battery and the AC
adapter correctly connected?
Check the connection.
1-2: Is the battery sufficiently charged?
Use a battery that has been
sufficiently charged.
2: As the camera is turned on, it
turns off immediately.
2: Is the battery charge insufficient to
operate the camera? Charge the
battery or replace it with charged
one.
3: The lens and the Viewfinder are
fogged.
3: Has condensation occurred?
Carrying the digital camera from a
cold place to a warm place could
cause condensation on the
camera. Wait until condensation
disappears.
4: The image cannot be recorded.
4-1: Is the Memory Card inside?
4-2: Is the mode dial correctly set?
Check it.
4-3: There is no memory capacity left
on the card. Before recording,
delete some images.
Others
6: The LCD monitor/Viewfinder is
too bright or dark.
6: Adjust the brightness of the LCD
monitor/Viewfinder.
7: Flash does not fire.
7: Is the flash closed? Press the
[ OPEN] button to open the
flash.
8: The display or images on the
LCD monitor/Viewfinder are not
focused.
8: Set the mode dial to the mode
corresponding to the distance to
the subject.
9: The image cannot playback.
9-1: Is the Card inside?
9-2: There is no image in the Card.
9-3: The mode dial is not set to
playback [ ].
5: The image is not displayed on
the LCD monitor.
5: Is the the image displayed on the
Viewfinder? Press the [DISPLAY]
button to switch to LCD monitor
display.
102
Page 53

10: The image is not displayed on
the television.
10-1: Is the camera correctly connected
with the TV? Check it.
10-2: Set the TV to video input mode.
11: When connecting to PC, images
cannot be transferred.
11-1: Check that the camera is correctly
connected to the PC.
11-2: Is the camera correctly recognized
by the PC?
12: The clock setting is reset.
12-1: If you do not use the camera for a
long time, the clock setting may be
reset. When the message
[PLEASE SET THE CLOCK]
appears, set the clock again.
12-2: When you take a picture before
setting the clock, [0:00 0. 0. 0] is
recorded.
13: This camera chatters when it is
shaken.
13: This is the sound coming from the
lens. When you turn the camera
[ON], the sound is stopped. This is
not a malfunction.
14: Some pixels are inactive or
always lit on the LCD monitor.
14: This is not a malfunction. These
pixels do not affect the recorded
images.
Others
103
Page 54

Others
Specifications
Digital Camera Information for your safety
Power Source: DC 8.4 V
Power Consumption: 2.6 W (When recording with LCD Monitor)
Camera Effective pixels 2,000,000 pixels
Image sensor 1/3.2 inch CCD, total pixel number 2,110,000 pixels
Lens Optical 12a zoom, fl4.6 – 55.2 mm (35 mm film
Digital zoom Single: 3a, Burst: 2a
Focus TTL Auto/Macro
Focus range 30 cm (Wide)/120 cm (Tele) – 
Shutter system Electronic shutteriMechanical shutter
Burst recording 4 frames/second, Max 7 frames (standard)/
Motion image recording 320a240 pixels (10 frames/second with audio)
ISO sensitivity AUTO/50/100/200/400
Shutter speed 8 –1/2,000th
White balance AUTO/Daylight/Cloudy/Halogen/White set
Exposure (AE) Programme AE/Aperture-priority AE (A)/
Metering mode Multi/Spot (Spot mode)
LCD monitor 1.5 inch low-temperature polycrystalline TFT LCD
Viewfinder Colour electrical Viewfinder (114,000 pixels)
Flash Built-in pop up flash
Microphone Monaural
Speaker Monaural
Recording media SD Memory Card/MultiMediaCard
Recording size 1600k1200 pixels, 1280k960 pixels,
Quality Fine/Standard
2.4 W (When recording with Viewfinder)
2.4 W (When playing back with LCD monitor)
2.2 W (When playing back with Viewfinder)
Primary colour filter
camera equivalent: 35 – 420 mm)/F2.8
Spot AF (Spot mode)
Macro/Simple/Aperture-priority AE/Shutter-priority
AE: 5 cm (Wide)/120 cm (Tele) – 
4 frames (fine)
Motion image mode: 1/30th – 1/2,000th
Shutter-priority AE (S)
Exposure compensation (1/3 EV Step, j2–i2 EV)
(114,000 pixels) (field of view ratio 100%)
(field of view ratio 100%) (with dioptor adjustment)
(j4 i4 dioptor)
flash range: (ISO100)
approx. 30 cm – 2.1 m (Wide)/
approx. 120 cm – 2.1 m (Tele)
AUTO, AUTO/Red-eye reduction, Forced ON,
Slow sync./Red-eye reduction, Forced OFF
640k480 pixels (Still picture)
320k240 pixels (Motion image)
104
Page 55

Others
Recording file format
Still Picture JPEG (Design rule for Camera File system, based on
Exif 2.2 standard), DPOF corresponding
Still picture with audio JPEG (Design rule for Camera File system, based on
Exif 2.2 standard)i640k480 pixels
QuickTime (still picture with audio)
Motion image QuickTime Motion JPEG (motion image with audio)
Interface
Digital USB
Analog video/audio NTSC/PAL Composite/Audio line output (monaural)
Terminal
USB 5 pin Mini USB
Analog video/audio φ 2.5 mm jack
DC IN EIAJ type 3 jack
Dimensions (WkHkD) 114k70.3k83.3 mm (excluding the projection part)
Weight Approx. 318 g (excluding Memory Card and battery)
Approx. 350 g (with Memory Card and battery)
Operating Temperature 0oC–40oC
Operating Humidity 10% – 80%
Battery Charger/AC Adapter
(Panasonic DE-928B) Information for your safety
Input 110 – 240 V 50/60 Hz, 0.29 A
Output DIGITAL CAMERA 8.4 V 1.2 A
CHARGE 8.4 V 0.65 A
Battery Pack (lithium-ion)
(Panasonic CGA-S002E) Information for your safety
Voltage/capacity 7.2 V, 680 mAh
105
Page 56

Memo
106
Page 57

107
Page 58

B
VQT0E71
F0803Sm0 (700A)
C
Matsushita Electric Industrial Co., Ltd.
Web Site: http://www.panasonic.co.jp/global/
 Loading...