

Panasonic DMCFZ150K User Manual
Owner’s Manual
for advanced features
Digital Camera
Model No. DMC-FZ150
Before connecting, operating or adjusting this product,
please read the instructions completely.
VQT3S75

Contents
Before Use
Care of the camera ...................................5
Standard Accessories ...............................6
Names and Functions of Components......7
Preparation
Attaching the Lens Cap/
Shoulder Strap........................................12
Attaching the Lens Hood.........................14
Charging the Battery...............................15
• Charging ...........................................15
• Approximate operating time and
number of recordable pictures..........17
Inserting and Removing the Card
(optional)/the Ba ttery.............................. .19
About the Built-in Memory/the Card........20
• Approximate number of recordable
pictures and available recording
time...................................................22
Setting Date/Time (Clock Set).................23
• Changing the clock setting................24
Basic
Selecting the R e c o rd i n g Mo d e .............. ..2 5
Tips for taking good pictures...................27
• Preventing jitter (camera shake).......27
Taking Pictures with Your Favorite
Settings (Program AE Mode) ..................28
• Program Shift....................................29
Focusing..................................................30
Taking Pictures Using the Automatic
Function (Intelligent Auto Mode).............32
Recording Motion Pictur e s......................35
• Recording still pictures while
recording motion pict u res.................38
Playing Back Pictures
([NORMAL PLAY])................ ..................39
• Selecting a picture.............................40
• Displaying Multiple Screens
(Multi Playback)....................... .........40
• Using the Playback Zoom .................41
Playing Back Motion Pictures..................42
• Creating Still Pictures from a
Motion Picture...................................43
Deleting Pictures.....................................44
• To delete a single picture..................44
• To delete multiple pictures
(up to 100) or all the pictures............45
Setting the Menu.....................................46
• Setting menu items ...........................48
• Using the Quick Menu.......................49
About the Setup Menu.............................50
Recording
About the LCD Monitor/Viewfinder..........62
Taking Pictures with the Zoom................64
• Using the Optical Zoom/
Using the Extended Optical Zoom (EZ)/
Using the Intelligent Zoom/
Using the Digital Zoom......................64
Taking Pictures using the Flash ..............67
• Switching to the appropriate
flash setting............... ........................67
• Adjust the flash output.......................71
Taking Close-up Pictures............... .........72
Taking Pictures with Manual Focus.........73
Taking Pictures with the Self-Timer.........75
Compensating the Exposure...................76
Taking Pictures Using Auto Bracket........77
Taking Pictures Using Burst Mode..........78
Setting the Light Sensitivity.....................80
Taking Pictures by Specifying
the Aperture/Shutter Speed.....................82
• Aperture-Priority AE..........................82
• Shutter-Priority AE ............................82
• Manual Exposure Mode ....................83
Taking Pictures with different image
effects (Creative Control Mode) ..............84
- 2 -

Taking Expressive Portraits and
Landscape Pictures
(Advanced Scene Mode).........................86
• [PORTRAIT]......................................86
• [SCENERY].......................................87
• [SPORTS].........................................87
• [CLOSE-UP]......................................87
• [NIGHT PORTRAIT]..........................88
Taking Pictures that Match the Scene
Being Recorded (Scene Mode) ...............89
• [PANORAMA ASSIST]......................90
• [PARTY]............................................90
• [CANDLE LIGHT] ..............................91
• [BABY1]/[BABY2] ..............................91
• [PET].................................................92
• [SUNSET] .........................................92
• [HIGH SENS.]...................................92
• [FLASH BURST]...............................92
• [PANNING]........................................93
• [STARRY SKY].................................94
• [FIREWORKS]..................................94
• [BEACH]............................................95
• [SNOW].............................................95
• [AERIAL PHOTO] .............................95
• [PHOTO FRAME]..............................96
• [HIGH SPEED VIDEO]......................96
• [3D PHOTO MODE]..........................97
Recording Motion Picture with Manual
Settings (Creative Video Mode)..............98
Taking Pictures in Custom Mode..........100
• Registering Personal Menu Settings
(Registering custom settings) .........100
Taking a Picture with Face Recognition
Function................................................102
• Face Settings..................................103
• Setting Auto Registration/
Sensitivity........................................105
Entering Text.........................................107
Using the [REC] Mode Menu.................108
• [PHOTO STYLE].................. ........... 1 0 8
• [ASPECT RATIO]............................109
• [PICTURE SIZE] .............................110
• [QUALITY].......................................111
• [SENSITIVIT Y ] ... .. .............. .............111
• [ISO LIMIT SET ].............................. 1 1 2
• [ISO INCREMENTS] .......................112
• [WHITE BALANCE].........................113
• [FACE RECOG.] .............................116
• [AF MODE] ......................................117
• [QUICK AF].....................................120
• [AF/AE LOCK].................................121
• [METERING MODE] ............... .. .. .. ..122
• [I.DYNAMIC]
(Intelligent dynamic range control)
• [MIN. SHTR SPEED].......................123
• [I.RESOLUTION].............. .. .............124
• [DIGITAL ZOOM] ............................124
• [STABILIZER]..................................125
• [AF AS SIST LA MP]................... .. ....126
• [FLASH]...........................................126
• [FLASH SYNC HRO]......... .. .............126
• [RED-EYE REMOVAL]....................127
• [CONVERSION]..............................127
• [CLOCK SET]..................................127
Using the [MOTION PICTURE]
Mode Menu ........ ...................................128
• [REC MODE]...................................128
• [REC QUALITY]..............................129
• [EXPOSURE MODE] ......................130
• [CONTINUOUS AF] . .. ............. .. ......130
• [WIND CUT]....................................131
• [ZOOM MIC] ....................................131
.....123
- 3 -

Playback/Editing
Playing Back Burst Pictures..................132
Editing Burst Pictures................... .........134
Various methods to play back...............135
• [SLIDE SHOW] ...............................136
• [MODE PLAY] .................................139
• [CATEGORY PLAY]........................139
• [FAVORITE PLAY]..........................139
Using the [PLAYBACK] Mode Menu.....140
• [CALENDAR]..................................140
• [UPLOAD SET]...............................141
• [TITLE EDIT]...................................142
• [VIDEO DIVIDE]..............................143
• [TEXT STAMP]...............................144
• [RESIZE] .........................................146
• [CROPPING]...................................147
• [LEVELING]....................................148
• [ROTATE DISP.].............................149
• [FAVORITE]....................................150
• [PRINT SET]...................................151
• [PROTECT].....................................153
• [FACE REC EDIT]...........................154
• [COPY]............................................155
Connecting to other equipment
Printing the Pictures..............................169
• Selecting a single picture and
printing it.........................................170
• Selecting multiple pictures and
printing them...................................170
• Print Settings...................................171
Others
Optional accessories.............................174
Screen Display......................................180
Cautions for Use................................. ...183
Message Display...................................189
Troubleshooting.....................................192
Playing Back Pictures on a TV
Screen...................................................156
• Using VIERA Link (HDMI)...............158
Playing back 3D pictures.......................160
Saving the Recorded Still Pictures and
Motion Pictures .....................................162
• Copy by inserting the SD card into
the recorder................ ....................162
• Copy the playback image using
an AV cable ... .. .. ............. .............. ..1 6 3
• Copying to a PC using
“PHOTOfunSTUDIO” ......................164
Connecting to a PC...............................165
• Acquiring of still pictures and
[MP4] motion pictures (other than
[AVCHD] moti o n pic t u r e s )......... .. ....166
• Uploading the images to
sharing sites....................................168
- 4 -
Before Use
Before Use
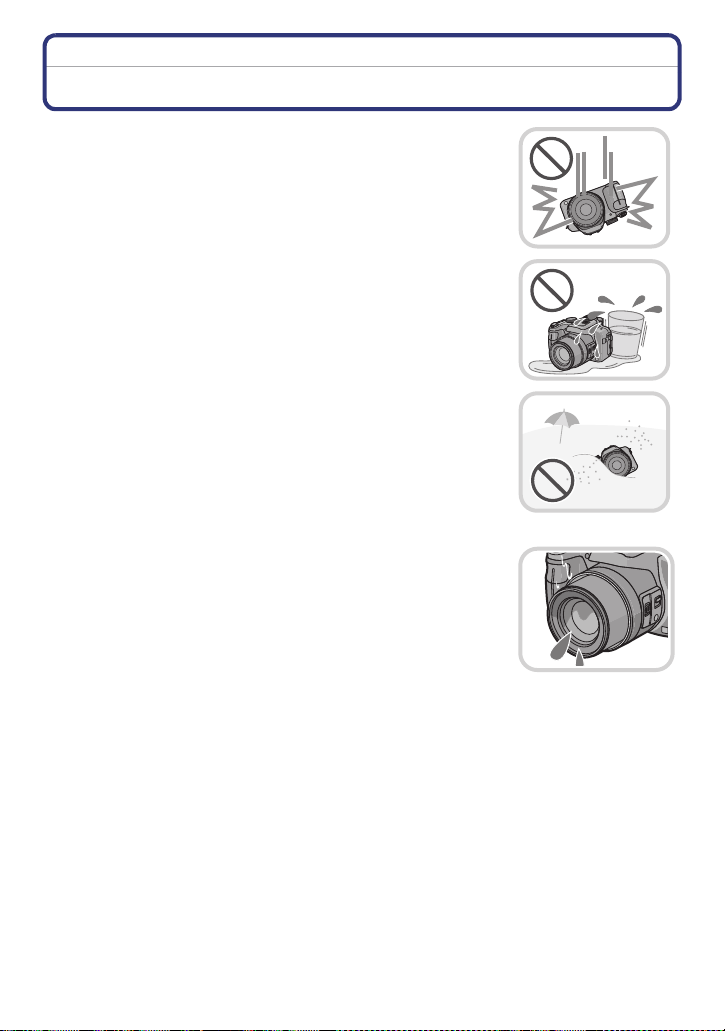
Care of the camera
Do not subject to strong vibration, shock, or pressure.
The lens, LCD monitor, or external case may be damaged if used in
•
following conditions.
It may also malfunction or image may not be recorded.
–Droppin g or hitting the camera.
–Pressi ng hard on the lens or the LCD monitor.
•When carrying or using the playback feature, en sure that the
lens is in the stored position.
•There are times when rattling sounds or vibrations will come
from the camera, but these are due to the motion of the
aperture, the zoom and the motor and do not indicate a defect.
This camera is not dust/d r ip/water proof.
Avoid using the camera at location with a lot of dust, water,
sand, etc.
•
Liquids, sand and other foreign material may get into the space
around the lens, buttons, etc. Be particularly careful since it may
not just cause malfunctions, but it may become unrepairable.
–Places with a lot of sand or dust.
–Places where water can come into contact with this unit such as
when using it on a rainy day or on a beach.
∫ About Condensation (When the lens or viewfinder is
fogged up)
Condensa ti on occurs when the ambient temperature or humidity
•
changes. Be careful of condensation since it causes lens stains,
fungus and camera malfunction.
•If condensation occurs, turn the camera off and leave it for about
2 hours. The fog will disappear naturally when the tempe rature of
the camera becomes close to the ambient temperature.
- 5 -

Before Use
Standard Accessories
Check that all the accessories are supplied before using the camera.
•
The accessories and their sha pe will dif fe r de pending o n t he cou ntry or ar ea where t he camera
was purchased.
For details on the accessorie s, refer to Basic Owner’s Manual.
•Battery Pack is indicated as battery pack or battery in the text.
•Battery Charg er is indicated as battery char g er or charger in the text.
•SD Memory Card, SDHC Memory Card and SDXC Memory Car d are indicated as card in the
text.
•The card is optional.
You can record or play back pictures on the built-in memory when you are not using a
card.
•If any accessories are lost, customers in the USA and Puerto Rico should contact Panas onic’s
parts departme nt at 1-800- 833-9626 and cus tomers in Canada shou ld contac t 1-800-99- LUMIX
(1-800-995-8649) for further information about obtaining replacement pa rts.
- 6 -
Before Use
12 3
8
45 6
7
9
10
11
12
13
1415
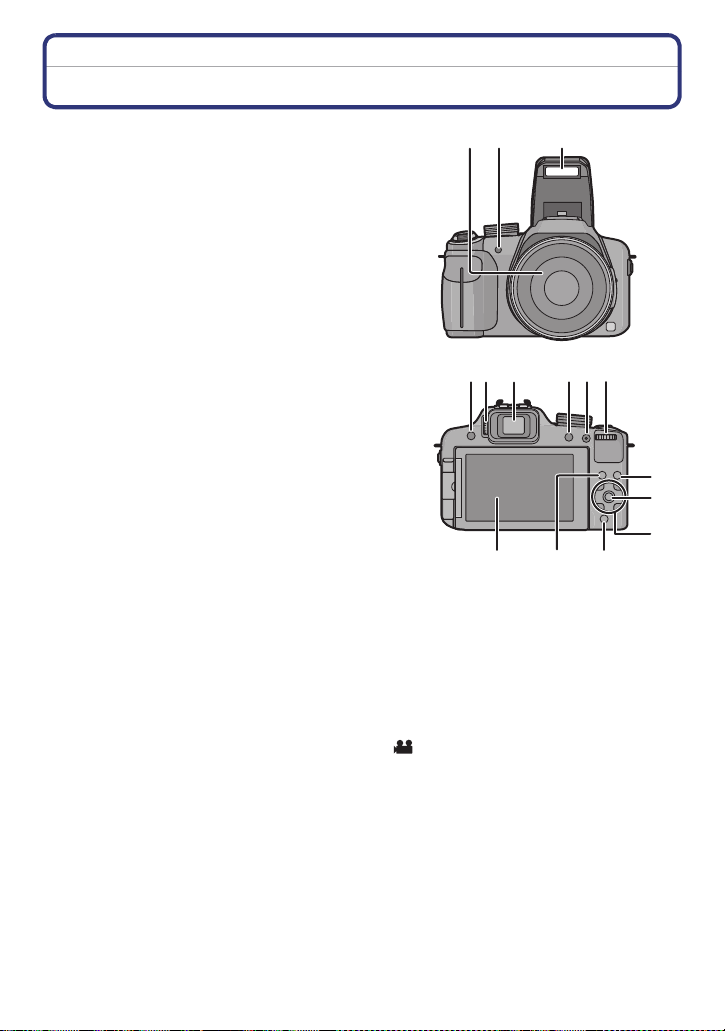
Names and Functions of Components
1 Lens (P5, 184)
2 Self-timer indicator (P75)
AF Assist Lamp (P126)
3Flash (P67)
4 Flash open button (P67)
5 Diopter adjustment dial (P10)
6 Viewfinder (P10, 180)
7 [EVF/LCD] button (P10)
8 [AF/AE LOCK] button (P119, 121)
9 Rear dial (P11)
10 Playback button (P39)
11 [MENU/SET] button (P11, 48)
12 Cursor buttons (P11)
3/ Exposure compensation (P76)/
Auto Bracket (P77)/Flash output adjustment (P71)
2/ Self-timer button (P75)
1/ISO (P80)
4/ Function button (P52)
The following menus can be assigned.
[PHOTO STYLE]/[ASPECT RATIO]/[QUALITY]/[METERING MODE]/[WHITE
BALANCE]/[I.DYNAMIC]/[GUIDE LINE]/[ REC AREA]/[REMAINING DISP.]
13 [Q.MENU] button (P49)/Delete button (P44)
14 [DISPLAY] button (P62)
15 LCD monitor (P62, 180)
- 7 -
Before Use
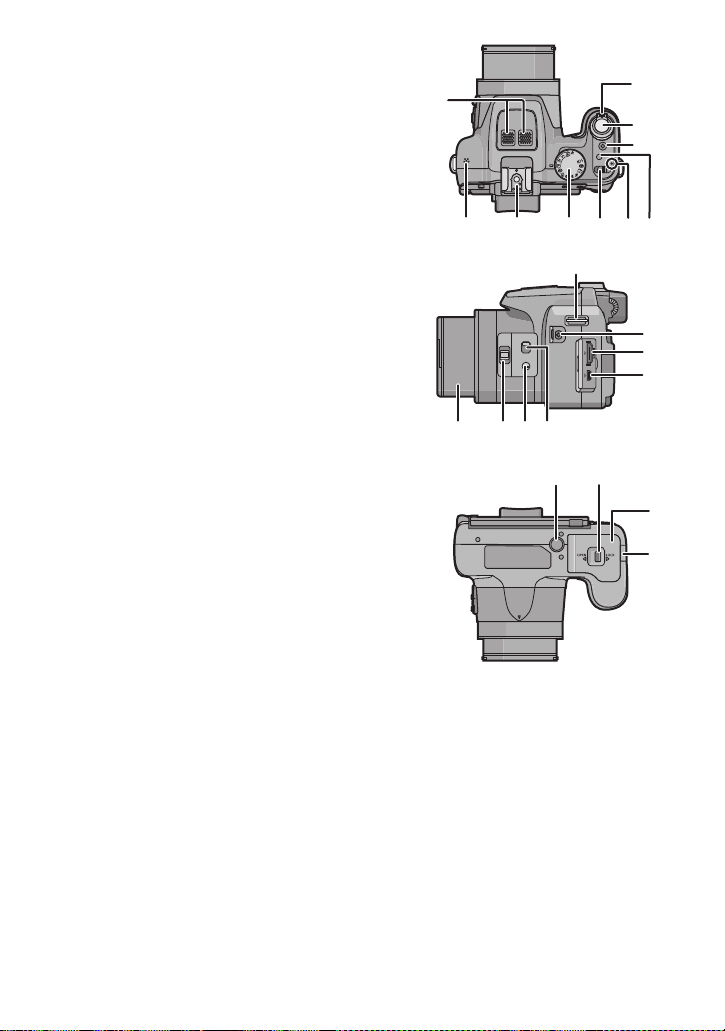
16 Stereo microphone
17 Zoom lever (P64)
18 Shutter button (P28, 32)
19 Motion picture button (P35)
20 Burst Mode button (P78)
21 Power lamp (P23)
22 Camera ON/OFF switch (P23)
23 Mode dial (P25)
24 Hot Shoe (P176, 178)
25 Speaker (P52)
•
Do not cover the speaker with your fingers.
26 Shoulder strap eyelet (P13)
27 [MIC/REMOTE] socket (P178)
28 [HDMI] socket (P156)
29 [AV OUT/DIGITAL] socket (P156, 163, 166,
169)
30 Focus selector switch (P72, 73)
31 [FOCUS] button (P32, 74, 120)
32 Side lever (P64, 73)
33 Lens barrel
34 Tripod receptacle (P188)
35 Release lever (P19)
36 Card/Battery door (P19)
37 DC coupler cover
•
When using an AC adaptor, ensure that the
Panasonic DC coupler (For shop display
purpose only) and AC adaptor (optional) are
used. (P179)
16
25
33 3132 30
24
M
CUST
23 22
26
MIC
REMOTE
AV OUT/DIGITAL
34 35
AV OUT/DIGITAL
21
17
18
19
20
27
28
29
36
37
- 8 -
Before Use
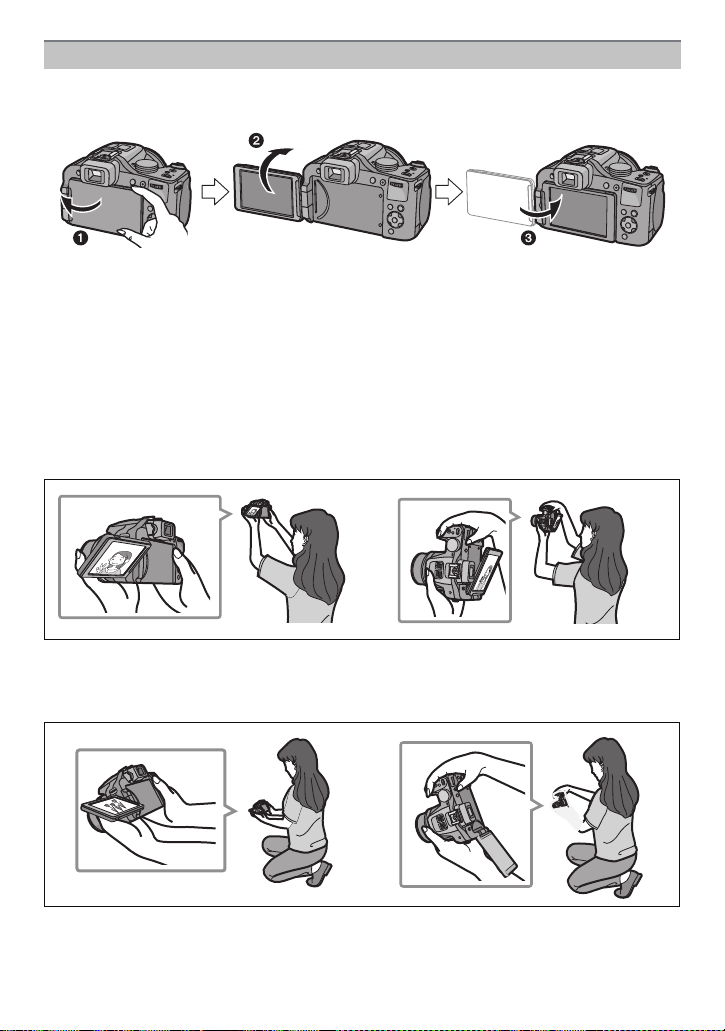
LCD Monitor
At the time when this camera is purchased, the LCD monitor is stowed in the camera body.
Bring out the LCD monitor as shown below.
1 Open the LCD monitor. (Maximum 180 o)
2 It can be rotated 180 o forwards.
3 Return the monitor to its original position.
•
Only rotate the LCD monitor after opening it wide enough, and be careful not to use
excessive force as it may b e damaged.
The LCD monitor can be rotated to suit your needs. This is convenient as it allows you to
take pictures from various angles by adjusting the LCD monitor.
•
Do not cover the AF Assist Lamp with your fin gers or other objects.
∫ Taking pictures at a high angle
•
This is convenient when there is someone in front of you and you cannot get close to the
subject.
•It can only be rotated 90 o towards you.
∫ Taking pictures at a low angle
•
This is convenient when taking pictures of flowers etc. that are in a low position.
•It can be rotated 180 o forward.
- 9 -
Before Use
Note
Be careful as this unit may get scratched if you rotate the LCD monitor without opening
•
the LCD monitor fully.
•Check that the term inal door i s clo sed wh en ro t ati ng t he L CD mon itor. The termina l door
may get damaged or LCD monitor may get scratched if you rotate the LCD monitor with
the terminal door opened.
•When not using the LCD monitor it is recommended that you close it with th e screen facing
inwards to prevent dirt and scratches.
•Note that op erating noise may be recorded when recording a motion picture with the LCD
monitor rotated.
Viewfinder
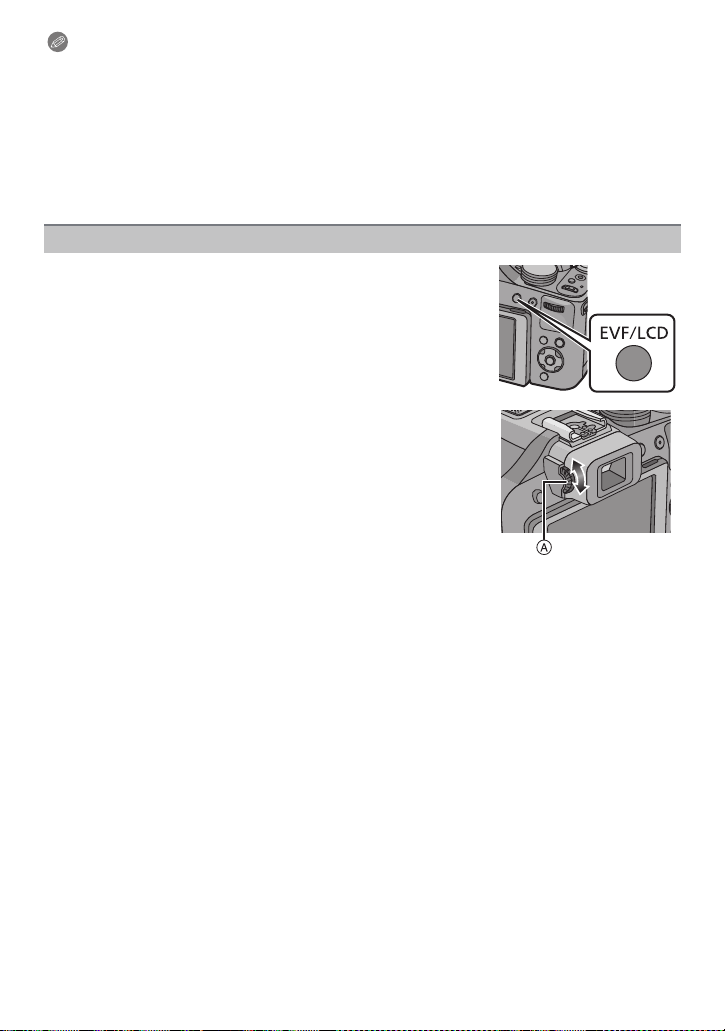
∫ Switching the LCD monitor/Viewfinder
Press [EVF/LCD].
•
Y ou can switch between LCD monitor display and Viewfinder
display.
•Switching via the [EVF/LCD] button will be maintained even
when the power of the digital camera is turned [OFF].
∫ Diopter adjustment
Adjust the diopter to suit your vision so that you can see the
Viewfinder clearly.
Look at the display on the Viewfinder and rotate the
diopter adjustment dial to where the screen is clearest.
A Diopter adjustment dial
- 10 -
Before Use
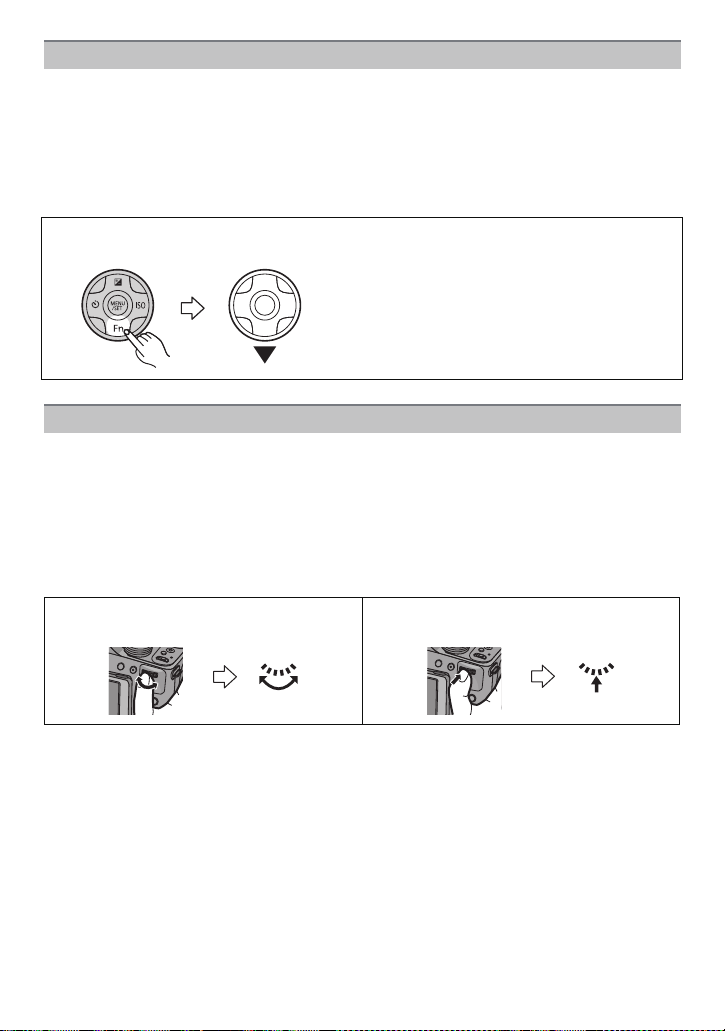
Cursor buttons/[MENU/SET] button
This document expresses the up, down, left, and right of the cursor button as follows, or as
3/4/2/1.
Cursor butto n:
Selection of items or setting of values etc., is performed.
[MENU/SET] b utton:
Confirmation of sett ing contents, et c ., is performed.
e.g.: When you press the 4 (down) button
or Press 4
Rear Dial
There are 2 ways to operate the rear dial, rotating left or right, and deciding by pressing.
Rotating:
Selection of items or setting of values is performed during the various settings.
Pressing:
Operations that are the same as [MENU/SET] button, such as determine settings,
etc., are performed during the various settings.
•
Rear dial is described as follows in this Owner’s Manual.
e.g.: Rotating left or right e.g.: Pressing the rear dial
- 11 -
Preparation
Preparation
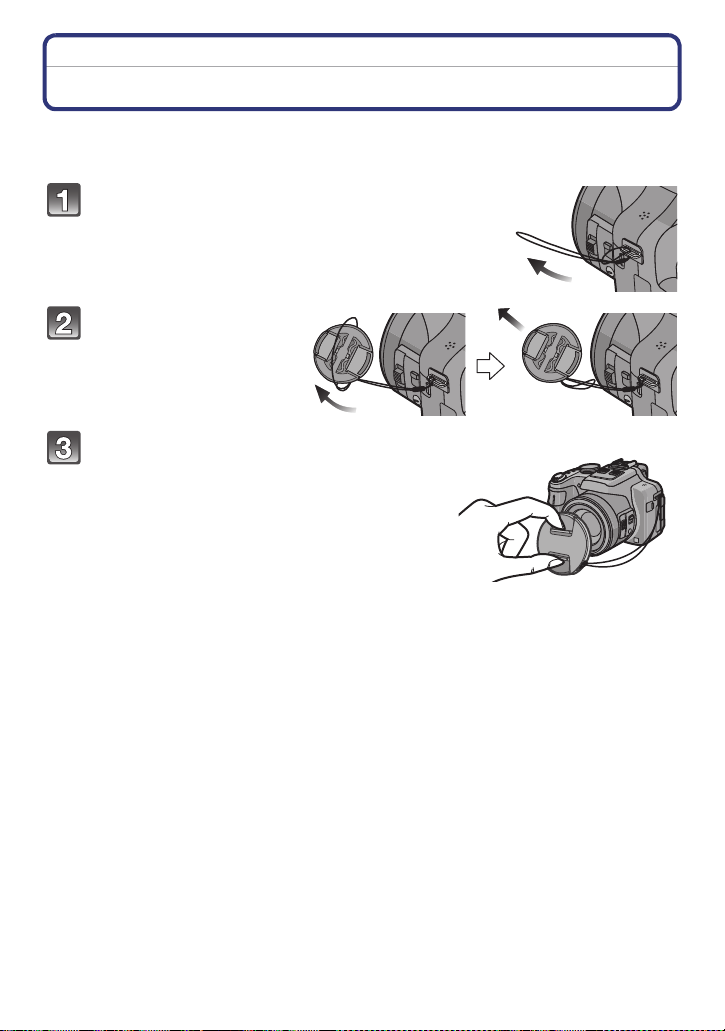
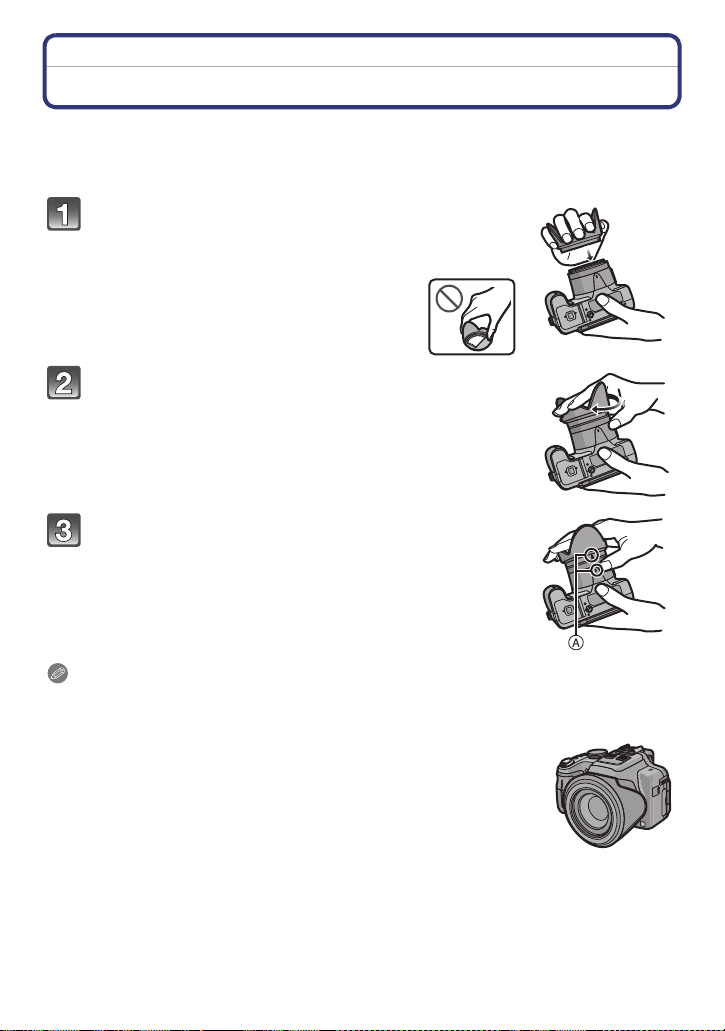
Attaching the Lens Cap/Shoulder Strap
∫ Attaching the Lens Cap
•
When you turn the camera off or c arry th e camera , at tac h the lens cap t o protec t the s urfac e of
the lens.
Pass the string through the hole on the
camera.
Pass the same string
through the hole on the
lens cap.
Attach the lens cap.
• Do not hang or swing around this unit.
• Make sure to detach the lens cap when turning the
power [ON].
• Be careful not to lose the lens cap.
• Be careful that the le ns cap st ring do es not b ecome
entangled with the shoulder strap.
- 12 -

Preparation
∫ Attaching the Shoulder Strap
•
We recommend attaching the shoulder strap when us in g the camera to prevent it from
dropping.
Pass the shoulder strap through the hole at the
shoulder strap eyelet.
Pass the shoulder strap through the stopper
and fasten the shoulder strap.
A Pull the shoulder strap 2 cm (0.07feet) or more.
• Attach the shoulder stra p to the other side of the camera
being careful not to twist i t.
- 13 -
Preparation
Attaching the Lens Hood
In bright sunlight or backlight, the lens hood will minimize lens flare and ghosting. The lens
hood cuts off excess lighting and improves the picture quality.
•
Check that the camera is turned off.
•Close the fl ash.
Insert the lens hood into the lens with the short
side aligned with the bottom of the main unit.
• Do not hold the lens hood in a way that twists or bends it.
Rotate the lens hood in the direction of the arrow.
You will feel some stiffness just before the mark,
but continue to rotate the lens hood to A where
the marks align.
(The lens hood will stop with a “click”.)
• Check that the lens hood is firmly attached and that it does not
appear in the picture.
Note
When taking pictures wit h flas h with t he le ns hoo d att a ched, th e lower port io n of th e pho to may
•
turn dark (vignetting effect) and the control of the flash may be disabled because the photo
flash may be obscured by the lens hood. We recommend detaching the lens hood.
•When temporar ily detaching and carrying the lens hood, attach the lens
hood to the lens in the reverse direct ion. Return it to the normal direction
when taking pictures.
- 14 -
Preparation
90°
Charging the Battery
∫ About batteries that you can use with this unit
It has been found that counterfeit battery packs which look very similar to the
genuine product are made available to purchase in some markets. Some of these
battery packs are not adequately protected with internal protection to meet the
requirements of appropriate safety standards. There is a possibility that these
battery packs may lead to fire or explosion. Please be advised that we are not
liable for any accident or failure occurring as a result of use of a counterfeit
battery pack. To ensure that safe products are used we would recommend that a
genuine Panasonic battery pack is used.
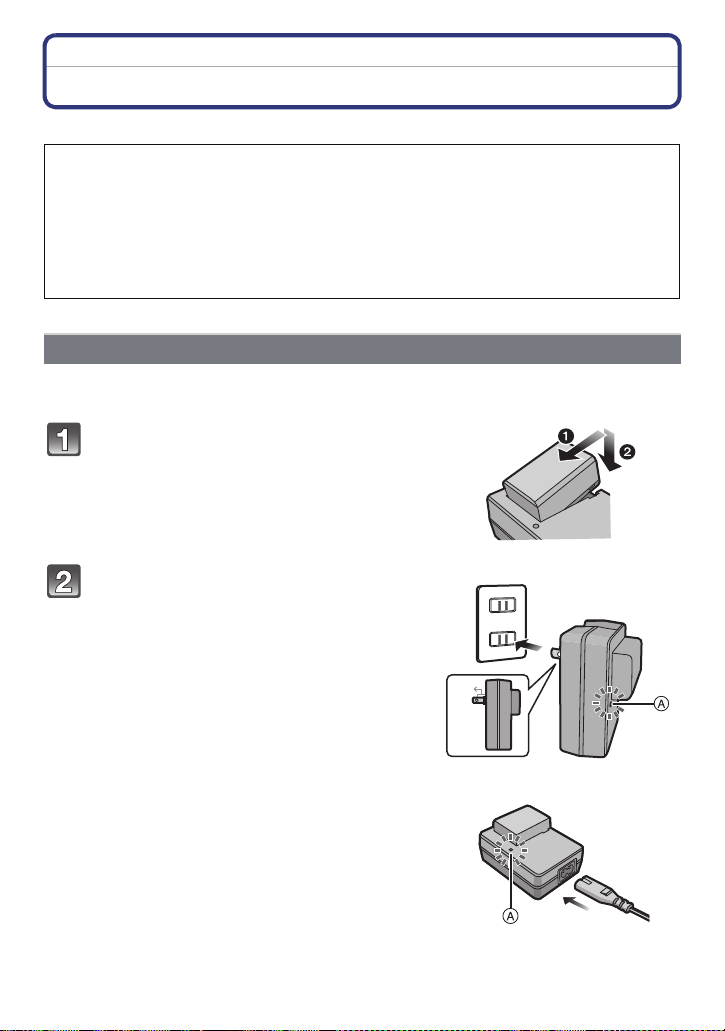
Use the dedicated charger and batter y.
•
Charging
•The battery is not charged when the camera is shipped. Charge the battery before use.
•Charge the battery with the charger indoors.
Attach the battery paying attention to
the direction of the battery.
plug-in type
Connect the charger to the electrical
outlet.
• The [CHARGE] indicator A lights up and
charging begins.
inlet type
- 15 -

Preparation
∫ About the [CHARGE] indicator
The [CHARGE] indicator turns on:
The [CHARGE] indicator is turned on during charging.
The [CHARGE] indicator turns off:
The [CHARGE] indicator will turn off once the charging has completed without any
problem. (Disconnect the charger from the electrical sock et and detach the battery after
charging is completed.)
•
When the [CHARGE] indicator flashes
–The battery temperature is too high or too lo w. It is reco mmend ed to c har ge the ba tt ery aga in
in an ambient temperature of between 10 oC and 30 oC (50 oF and 86 oF).
–The terminals of the charger or the battery are dirty. In this case, wipe them with a dry cloth.
∫ Charging time
Charging time Approx. 155 min
The indicated charging ti me is for when the battery has been discharged completely.
•
The charging time may vary depending on how the battery has been used. The charging
time for the battery in hot/cold environments or a battery that has not been used for long
time may be longer than normal.
∫ Battery indication
The battery indication is displayed on the screen.
The indication turns red an d blinks if the remaining battery power is exhausted. (The power
•
lamp also blin k s) R ech arge the batt ery o r re p l ace it with a fully ch a r ge d battery.
Note
•
Do not leave any metal items (such as clips) near th e co ntact areas of the power plug.
Otherwise, a fire and/or electric shocks may be caused by short-circuiting or the
resulting heat generated.
•The battery bec omes warm after using it and during and after charging. The camera also
becomes warm during use. This is not a malfunction.
•The battery can be rec harged even when it still has some charge left, but it is not
recommended that the battery ch arge be frequently topped up while the battery is fully
charged. (Since characterist ic swelling may occur.)
- 16 -

Preparation
Approximate operating time and number of recordable pictures
∫ Recording still pictures (When using the LCD monitor)
Number of recordable
pictures
Recording time Approx. 205 min
Recording conditions by CIPA standard
•
CIPA is an abbreviation of [Camera & Imaging Products Association].
•Temperature: 23 oC (73.4 oF)/Humidity: 50%RH when LCD monitor is on.
•Using a Panasonic SD Memory Card (32 MB).
•Using the supplied battery.
•Starting recording 30seconds after the camera is turned on. (When the Optical Image
Stabilizer function is set to [ON].)
•Recording once every 30 seconds with full flash every second recording.
•Rotating the zoom lever from Tele to Wide or vice versa in every recording.
•Turning the camera off every 10reco rdings and leaving it until the temper ature of the battery
decreases.
The number of recordable pictures varies depending on the recording interval time.
If the recording interval time becomes longer, the number of recordable pictures
decreases. [For example, if you were to take one picture every two minutes, then the
number of pictures would be reduced to approximately one-quarter of the number
of pictures given above (based upon one picture taken every 30 seconds).]
Approx. 410 pictures
(By CIP A standard in Program AE
Mode)
- 17 -

Preparation
∫ Recording motion pictures (When using the LCD monitor)
(Recording with picture quality set
Recordable time Approx. 110 min Approx. 140 min
Actual recordable time Approx. 60 min Approx. 75 min
These times are for an ambient temperature of 23 oC (73.4 oF) and a humidity of 50%RH.
•
Please be aware that these times are approximate.
•Actual reco rdable time is the time available for recording when repeating actions such as
switching the power supply [ON] /[OFF], starting/s topping recording, zoom operation etc.
[AVCHD]
to [PSH] (P129))
(Recording with pict ure quality set
[MP4]
to [FHD] (P129))
•Maximum time to record motion pictures continuously with [MP4] is 29 minutes 59 seconds or
up to 4 GB.
The maximum available recording time continuously is displayed on the screen.
∫ Playback (When usi ng the LCD monitor)
Playback time Approx. 330 min
Note
The operating times and number of recordable pictures will differ according to the
•
environment and the operating conditions.
For example, in the following cases, the operating times shorten and the number of recordable
pictures is reduced.
–In low-temperature environments, such as on ski slopes.
–When using [LCDMODE].
–When ope rations such as flash and zoom are used repeatedly.
•When the operating time of the camera becomes extremely short even after properly charging
the battery, the life of the battery may have expired. Buy a new battery.
- 18 -
Preparation
B
Inserting and Removing the Card (optional)/the Battery
•Turn the power switch to [OFF] and con firm that the lens barrel is retracted.
•We recommend using a Panasonic card.
Slide the release lever in the direction of
the arrow and open the card/battery
door.
• Always use genuine Panasonic batteries.
• If you use other batteries, we cannot guarantee
the quality of this product.
Battery: Being careful about the battery
orientation, insert all the way until you
hear a locking sound a nd then check t hat
it is locked by lever A.
Pull the lever A in the direction of the
arrow to remove the battery.
Card: Push it securely all the way until
you hear a “click” while being careful
about the direction in which you insert it.
T o remove the car d, push the card unti l it
clicks, then pull the card out upright.
B:Do not touch the connection terminals of the
card.
1:Close the card/battery door.
2:Slide the release lever in the direction
of the arrow.
Note
Remove the battery aft er use. (The batte ry will be exha usted if le ft fo r a long peri od of ti me af ter
•
being charged.)
•Remove the card or battery after turning off the power, with the power lamp completel y t urned
off and the lens barrel ret ra cted completely. ( The camera may not fu nctio n pro perl y, or the card
or recorded contents may be damaged.)
•When using an AC adaptor (optional) instead of the battery, refer to P179.
- 19 -
Preparation
About the Built-in Memory/the Card
The following operations can be performed using this unit.
•
When a card has not been inserted:
Pictures can be recorded in the built-in memory and played back.
•When a card has been inserted:
Pictures can be recorded on the card and played back.
•When using the built-in memory
>ð (access indication
k
•When using the card
† (access indication
¢ The access indication is displayed in red when pictures are being recorded on
the built-in memory (or the card).
Built-in Memory
•You can copy the recorded pi ctures to a card. (P155)
•Memory size: Approx. 70 MB
•The access time for the built-in memory may be longer tha n the access time for a card.
Card
The following cards which conform to the SD video standard can be used with this unit.
(These cards are indicated as card in the text.)
SD Memory Card
(8 MB to 2 GB)
SDHC Memory Card
(4 GB to 32 GB)
SDXC Memory Card
(48 GB, 64 GB)
¢
)
¢
)
Remarks
•Use a card with SD Sp eed Class
higher when recording motion pictures.
•SDHC Memory Card can be used with SDHC Memory Card
or SDXC Memory Card compatible equipment.
¢
with “Class 4” or
•SDXC Memory Card can only be used with SDXC Memory
Card compatible equipment .
•Check that the PC and ot her equipment are compat ible when
using the SDXC Memory Cards.
http://panasonic.net/avc/sdcard/information/SDXC.html
•Only the ca rds with capacity listed left can be used.
¢ SD Speed Class is the speed standard regarding continuous writing. Check via the lab el on
the card, etc.
e.g.:
•Please confirm the latest information on the following website.
http://panasonic.jp/support/global/cs/dsc/
(This Site is English only.)
- 20 -

Preparation
Note
Do not turn this unit off, remove its battery or card, or disconnect the AC adaptor
•
(optional) when the access indication is lit (when pictures are being written, read or
deleted, or the built-in memory or the card is being formatted). Furthermore, do not
subject the camera to vibrat ion, impact or static electricity.
The card or the data on the card may be damaged, and this unit may no longer operate
normally.
If operation fails due to vibration, impact or static electricity, perform the operation
again.
•Write-Protect switch A provided (When this switch is set to the [LO C K] position,
no further data writing, dele tion o r format ting is possibl e. The ability t o wri te, delet e
and format data is restored when the switch is returned to its original position.)
•The data on the built-in memory or the card may be da maged or lost due to
electromagnetic waves, static electricity or breakdown of the came ra or the card.
We recommend storing important data on a PC etc.
•Do not format the c ard on your PC or other equipment. Format it on the camera
only to ensure proper operat ion. (P60)
•Keep the Memory Card out of reach of children to prev ent swallowing.
- 21 -
Preparation
A
B
Approximate number of recordable pictures and available recordin g time
∫ About the display of the number of recordable pictures and available recording
time
Switching between the display of numb er of recordable pictures and available rec ording time
•
can be performed in the [REMAINI NGDISP.] (P55) in the [SETUP] me nu.
A Number of recordable pictures
B Available recording time
∫ Number of recordable pictures
•
[i99999] is displayed if there are more than 100,000 pictures remaining.
•Aspect ratio [X], Quality [A]
[PICTURE SIZE]
12M 15 380 6260 12670
5M (EZ) 26 650 10620 21490
0.3M (EZ) 400 10050 162960 247150
∫ Available recording time (when recording motion pictures)
•
“h” is an abbreviation for hour, “m” for minute and “s” for second.
•[AVCHD]
[REC QUALITY]
PSH j 8m00s 2h31m00s 5h07m00s
FSH j 14m00s 4h09m00s 8h26m00s
SH j 14m00s 4h09m00s 8h26m00s
•[MP4]
[REC QUALITY]
FHD j 11m40s 3h22m35s 6h50m29s
HD j 22m17s 6h26m46s 13h03m40s
VGA 1m49s 49m02s 14h11m14s 28h44m42s
Note
The number of recordable pictures and the available recording time are an approximation.
•
(These vary depending on the recording conditions and the type of card.)
•The number of rec ordable pictures and the availab l e recording time varies depending on the
subjects.
•Number of recordable pictures/available recordin g time for the card may decrease when
[UPLOAD SET] is performed.
•Maximum time to record motion pictures continuously with [MP4] is 29 minutes 59 seconds or
up to 4 GB.
The maximum available recording time continuously is displayed on the screen.
Built-in Memor y
(Approx. 70 MB)
Built-in Memor y
(Approx. 70 MB)
Built-in Memor y
(Approx. 70 MB)
2GB 32 GB 64 GB
2GB 32 GB 64 GB
2GB 32 GB 64 GB
- 22 -
Preparation
Setting Date/Time (Clock Set)
•The clock is not set when the camera is shipped.
Turn the camera on.
• The power lamp 1 lights when you turn this unit on .
• If the language select screen is no t displayed,
proceed to step
Press [MENU/SET].
Press 3/4 to select the language, and press [MENU/SET].
Press [MENU/SET].
Press 2/1 to select the items (year,
month, day, hour, minute, display
sequence or time display format), and
press 3/4 to set.
A: Time at the home area
B: Time at the travel destination
•
You can cancel without setting the clock by pressing
[‚].
4.
Press [MENU/SET] to set.
Press [MENU/SET].
- 23 -

Preparation
Changing the clock setting
Select [CLOCK SET] in the [REC] or [SETUP] menu, and press 1. (P48)
It can be changed in steps 5 and 6 to set the clock.
•
•The clock setting is maintained for 3 months using the built-in clock battery even
without the battery. (Leave the charged battery in the unit for 24 hours to charge the
built-in battery.)
Note
•
If the clock is not set, the correct date cannot be printed when you stamp the date on the
pictures with [TEXT STAMP] or order a photo studio to print the pictures.
•If the cloc k i s set, the c orr ect dat e can be printed ev e n if t he date is not disp lay ed on th e s cree n
of the camera.
- 24 -
Basic
CUST
M
CUST
M
Basic
Selecting the Recording Mode
Switching the mode by rotating the mode
dial.
Align a desir e d m ode with part A.
•
Rotate the mode dial slowl y and surely to adjust
to each mode.
∫ Basic
Program AE Mode (P28)
The subjects are recorded using your own settings.
Intelligent Auto Mode (P32)
The subjects are recorded using settings automatically selected by the camera.
- 25 -
Basic
∫ Advanced
Aperture-Priority AE Mode (P82)
The shutter speed is automatically determined by the aperture value you set.
Shutter-Priority AE Mode (P82)
The aperture value is automatically determined by the shutter speed you set.
Manual Exposure Mode (P83)
The exposure is adjusted by the aperture value and the shutter speed which are
manually adjusted.
Creative Video Mode (P98)
Record motion picture with manual settings.
Custom Mode (P100)
Use this mode to take pictures with previously registered settings.
Scene Mode (P89)
This allows you to take pictures that match the scene being recorded.
Creative Control Mode (P84)
Record while checking the image effect.
∫ Advanced Scene Mode
Portrait Mode (P86)
Use this mode to take pictures of people.
Scenery Mode (P87)
Use this mode to take pictures of scenery.
Sports Mode (P87)
Use this mode to take pictures of sporting events, etc.
Close-up Mode (P87)
Use this mode to take pictures of a close-by subject.
Night Portrait Mode (P88)
Use this mode to take pictures of night scenes and people against night time scenery.
- 26 -
Basic
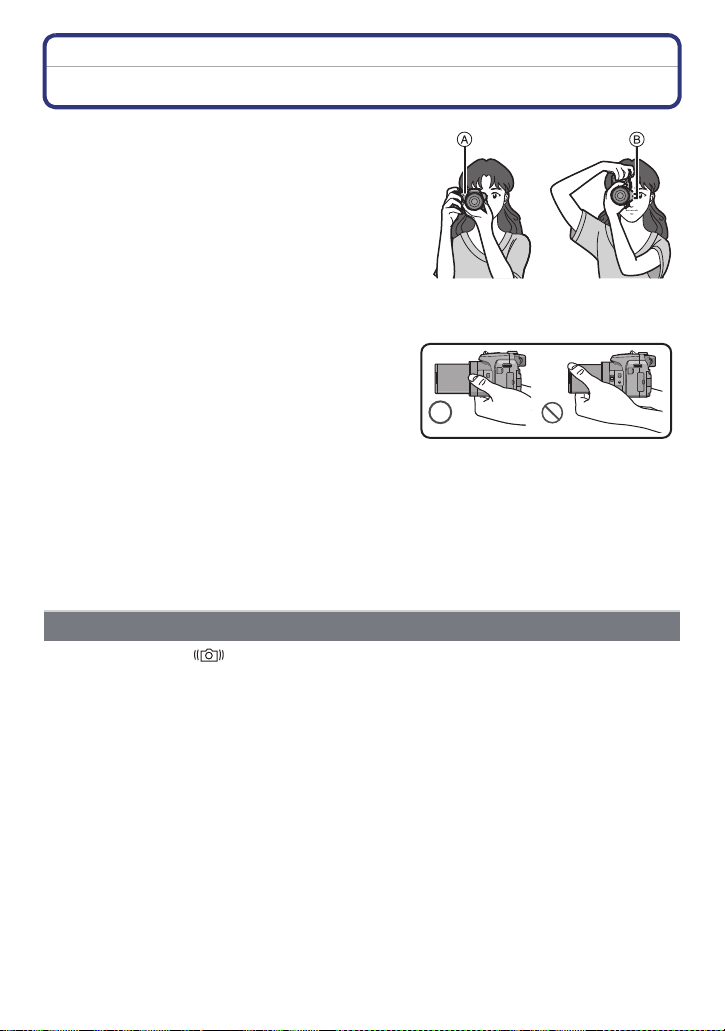
Tips for taking good pictures
Hold the camera gently with both hands,
keep your arms still at yo ur side and st and
with your feet slightly apart.
•Be careful not to put your fingers on the flash, AF
Assist Lamp A, microphone B, speaker or lens
etc.
•Be careful not to move the camera when you press
the shutter button.
•When taking pictures, make sure your footing is
stable and there is no danger of colliding with another
person, an object etc.
•Do not hold the len s barrel as you take pictures.
There is a risk that your finger will be trapped as the
lens retracts.
∫ Direction Detection Function ([ROTATE DISP.])
Pictures recorded with the camera held vertically are played back vertically (rotated). (Only
when [ROTATE DISP.] (P149) is set to [ON])
When the camera is held vertically and tilted up and down to record pictures, the Direct i on
•
Detection function may not work correctly.
•Motion pictures taken with the camera held ve rtically are not displayed vertically.
•You cannot record 3D pictures in vertical orientation.
MIC
REMOTE
AV OUT/DIGITAL
MIC
REMOTE
AV OUT/DIGITAL
Preventing jitter (camera shake)
When the jitter alert [ ] appears, use [STABILIZER] (P125), a tripod, the Self-Timer
(P75) or the remote shutter (DMW-RSL1; optional)
Shutter speed will be slower particularly in the following cases. Keep the ca mera still from the
•
moment the shutter button is pressed until the picture appears on the screen. We recommend
using a tripod .
(P178).
–Slow sync./Red-Eye Reduction
–In [HIGHDYNAMIC] in Creative Control Mode
–In [NIGHTPORTRAIT] and [NIGHT SCENERY] in [NIGHT PORTRAIT]
–In [PANORAMA AS S IS T], [PARTY], [CAND L E LIGHT], [STARRY SKY], or [FIREWORKS] in
Scene Mode
–When th e shutter speed is slowed in [MIN. SH TR SPEED]
- 27 -
Basic
CUST
M
D
A B C
Applicable modes:
Taking Pictures with Y our Favorite Settings
(Program AE Mode)
The camera automatically sets the shutter speed and the aperture value according to the
brightness of the subject.
You can take pictures with greater freedom by changing various settings in [REC] menu.
Set the mode dial to [ ].
• Set the focus selector switch to [AF].
Aim the AF area at the point you want to focus on.
Press the shutter button halfway to focus.
A Aperture value
B Shutter speed
C ISO sensitivity
• The focus indication D (green) lights when the
subject is focused.
• The maximum close-up distance (t he shortest
distance at which the subjec t can be taken) differs
depending on the zoom magnification. Please check
with the focus range display on the screen. (P30)
• Aperture value and shutter speed is disp layed in red
when correct exposure is n ot achieved . (Exc ept when
using a flash)
Press the shutter button fully (push it in
further), and take the picture.
- 28 -
Basic
A
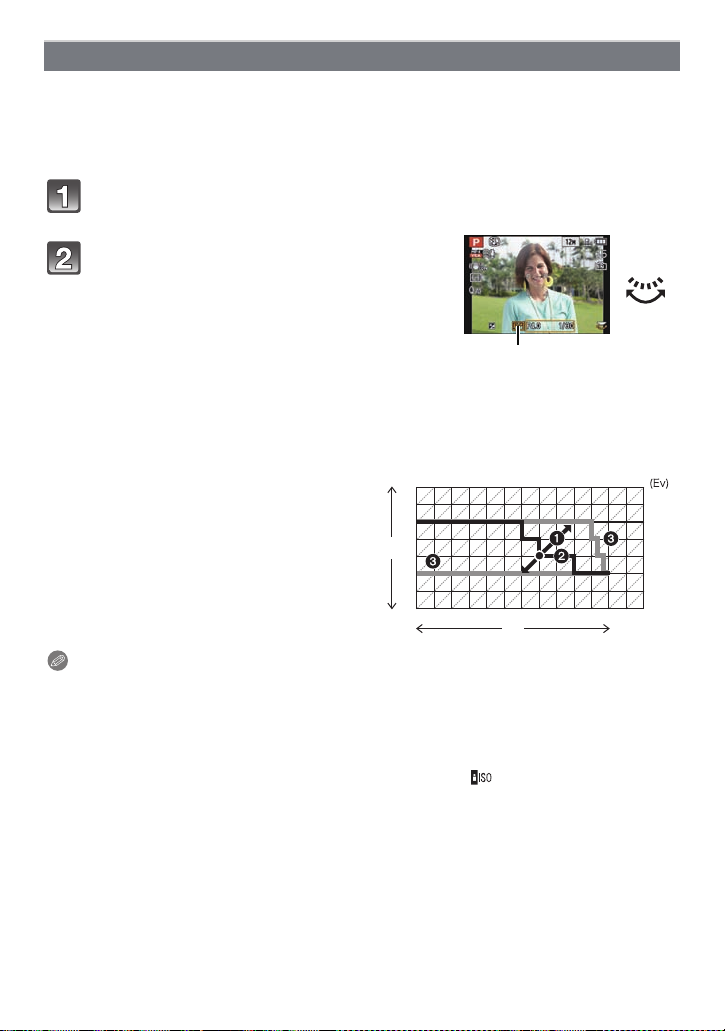
Program Shift
In Program AE Mode, you can change the preset aperture value and shutter speed without
changing the exposure. This is called Program Shift.
You can make the background more blurred by decreasing the aperture value or record a
moving subject more dynamically by slowing the shutter speed when taking a picture in
Program AE Mode.
Press the shutter button halfway and display the aperture value and
shutter sp eed value on the screen.
While the values are displayed (about
10 seconds), perform the Program Shift by
rotating the rear dial.
• It will switch between Program Shift operation and
Exposure Compensation operation (P76) ev er y tim e
the rear dial is pressed while the values are
displayed.
• The Program Shift indication A appears on t he screen when Program Shift is activate d.
• Program Shift is canceled if th e camera is turned off or the rear dial is rotated until the
Program Shift indication disappears.
∫ Example of Progra m Sh ift
(A): Aperture value
(B): Shutter speed
1 Program Shift amount
2 Program Shift line chart
3 Program Shift limit
1 2 3 4 5 6 7 8 9 10 11 12 13
2
2.8
4
(A)
5.6
8
11
1 1
1
1
1
1
1
1
/
/
/
/
2
4
8
15
1
/
/
/
30
60
125
(B)
1
/
/
250
500
14
1
1
/
/
1000
2000
Note
EV is an abbreviation of [Exposure Value], a unit indicating the amount of exposure. The EV
•
changes with the aperture value or the shutter speed.
•Program Shif t is canceled and the camera returns to nor mal Program AE Mode if more than
10 seconds pass after Program Shift is activated. However, the Program Shift setting is
memorized.
•Depending on the brightness of the subject , Program Shift may not be activated.
•Program Shift is available in all ISO sensitivity settings except [ ].
- 29 -
Basic
B
A
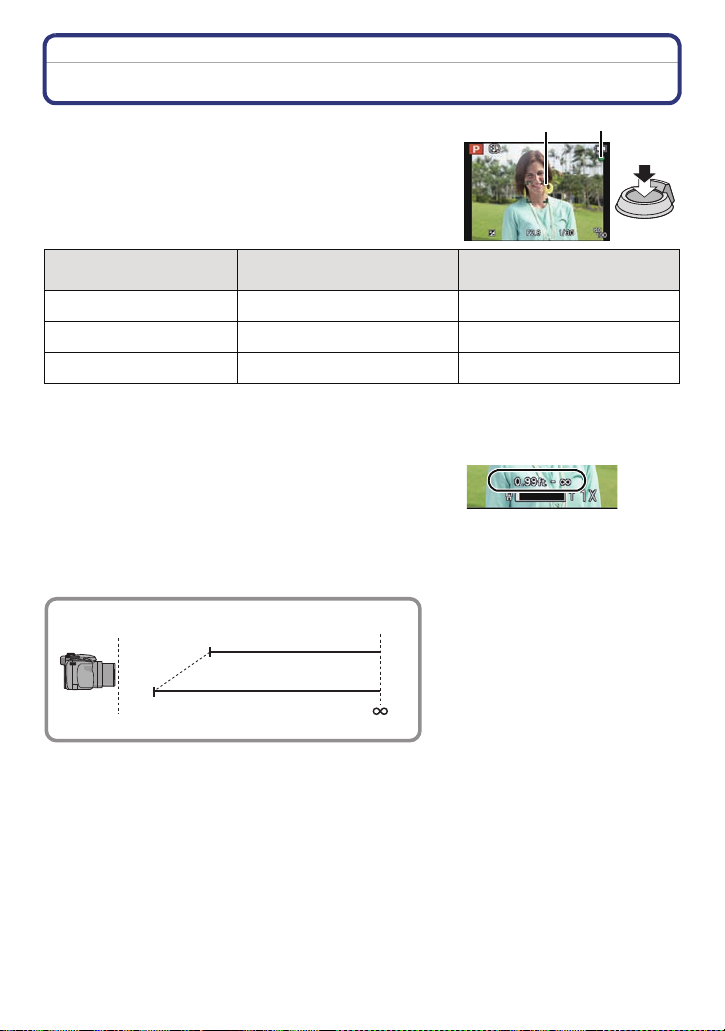
Focusing
Aim the AF area at the subject, and then press
the shutter button halfway.
Focus
Focus indi ca t i on A On Blinks
AF area B White>Green White>Red
Sound Beeps 2 times Beeps 4 times
When the subject is focused When the subject is not
focused
•AF area is displ ayed larger during the digital zoom or when it is dark.
∫ About focus range
The focus range is displayed when operating the
zoom.
•
The focus range is displayed in red when it is not focused
after pressing the shutter button halfway.
The focus range may change gradually depending on the zoom position.
e.g.: Range of focus du r ing the Program AE Mode
T
W
2 m (6.57 feet)
30 cm (0.99 feet)
- 30 -
 Loading...