

Page 1
Digital Camera
Operating Instructions
Model No.DMC-FZ10PP
Before use, please read these
instructions completely.
For USA assistance, please call: 1-800-272-7033 or send e-mail to : digitalstillcam@panasonic.com
For Canadian assistance, please call: 1-800-561-5505 or visit us at www.panasonic.ca
VQT0F85-2
Page 2

Safety
Dear Customer,
We would like to take this opportunity to
thank you for purchasing this Panasonic
Digital Camera. Please read these
Operating Instructions carefully and
keep them handy for future reference.
Information for Your Safety
WARNING
TO REDUCE THE RISK OF FIRE
OR SHOCK HAZARD AND
ANNOYING INTERFERENCE, USE
ONLY THE RECOMMENDED
ACCESSORIES AND DO NOT
EXPOSE THIS EQUIPMENT TO
RAIN OR MOISTURE. DO NOT
REMOVE THE COVER (OR BACK);
THERE ARE NO USER
SERVICEABLE PARTS INSIDE.
REFER SERVICING TO QUALIFIED
SERVICE PERSONNEL.
Notice:
This product has parts that contain a
small amount of mercury. It also
contains lead in some components.
Disposal of these materials may be
regulated in your community due to
environmental considerations. For
disposal or recycling information
please contact your local authorities,
or the Electronics Industries
Alliance: <http://www.eiae.org.>
Safety
Carefully observe copyright laws.
Recording of pre-recorded tapes or
discs or other published or
broadcast material for purposes
other than your own private use may
infringe copyright laws. Even for the
purpose of private use, recording of
certain material may be restricted.
• Please note that the actual controls
and components, menu items, etc. of
your Digital Camera may look
somewhat different from those shown
in the illustrations in these Operating
Instructions.
• SD Logo is a trademark.
• Other names, company names, and
product names printed in these
instructions are trademarks or
registered trademarks of the
companies concerned.
THE SOCKET OUTLET SHALL BE
INSTALLED NEAR THE
EQUIPMENT AND SHALL BE
EASILY ACCESSIBLE.
CAUTION
Danger of explosion if battery is
incorrectly replaced. Replace only
with the same or equivalent type
recommended by the manufacturer.
Dispose of used batteries according
to the manufacturer’s instructions.
RBRC
Li-ion
A lithium ion/polymer battery that is recyclable powers the
product you have purchased. Please call 1-800-8-BATTERY
TM
for information on how to recycle this battery.
2
Page 3
Safety
FCC Note: (U.S. only)
This equipment has been tested and
found to comply with the limits for a
Class B digital device, pursuant to
Part 15 of the FCC Rules. These
limits are designed to provide
reasonable protection against
harmful interference in a residential
installation. This equipment
generates, uses, and can radiate
radio frequency energy and, if not
installed and used in accordance
with the instructions, may cause
harmful interference to radio
communications. However, there is
no guarantee that interference will
not occur in a particular installation.
If this equipment does cause harmful
interference to radio or television
reception, which can be determined
by turning the equipment off and on,
the user is encouraged to try to
correct the interference by one or
more of the following measures:
• Reorient or relocate the receiving
antenna.
• Increase the separation between
the equipment and receiver.
• Connect the equipment into an
outlet on a circuit different from that
to which the receiver is connected.
• Consult the dealer or an
experienced radio/TV technician
for help.
FCC Caution: To assure continued
compliance, follow the
attached installation
instructions and use
only shielded interface
cables with ferrite core
when connecting to
computer or peripheral
devices.
Any changes or modifications not
expressly approved by the party
responsible for compliance could
void the user’s authority to operate
this equipment.
Trade Name: Panasonic
Model No.: DMC-FZ10
Responsible party: Matsushita Electric
Corporation of
America
One Panasonic
Way, Secaucus, NJ
07094
Support Contact: Panasonic
Consumer
Electronics
Company
1-800-272-7033
This device complies with Part 15 of
the FCC Rules. Operation is subject
to the following two conditions: (1)
This device may not cause harmful
interference, and (2) this device must
accept any interference received,
including interference that may
cause undesired operation.
This Class B digital apparatus
complies with Canadian ICES-003
Extremely high precision technology
is employed to produce the LCD
monitor/Viewfinder screen. The
result is more than 99.99% effective
pixels with a mere 0.01% of the
pixels inactive or always lit. However,
this is not a malfunction and does
not affect the recorded pictures.
3
Page 4

Contents
Safety
Information for Your Safety ................. 2
Preparation
Standard Accessories ......................... 6
Names of the Components ................. 8
Quick Guide ...................................... 10
Charging the Battery......................... 12
About the Battery .............................. 13
Inserting the Battery.......................... 14
Removing the Battery........................ 15
Using the AC Adaptor ....................... 16
About the Card.................................. 17
Inserting the Card.............................. 18
Removing the Card........................... 19
Attaching the Strap............................ 20
Attaching the Lens Hood/
Lens Cap ....................................... 21
Setting the Date/Time (Clock Set)..... 22
Setup Menu....................................... 24
Using the LCD Monitor/Viewfinder .... 27
About the Histogram ......................... 29
The Mode Dial................................... 30
Recording pictures (basic)
Taking Pictures ................................. 31
Checking the Recorded Picture
(Review) ........................................ 36
Using the Optical Zoom..................... 37
Taking Pictures using the Built-in
Flash.............................................. 38
Compensating the Exposure............. 41
Taking Pictures using Auto
Bracket .......................................... 42
Taking Pictures with the Self-timer.... 43
Taking Pictures using Burst Mode .... 44
Playback (basic)
Playing Back Pictures ....................... 45
9 Pictures Multi Playback.................. 46
Using the Playback Zoom ................. 47
Deleting Pictures............................... 48
Recording pictures
(advanced)
About the EXPOSURE Button........... 51
Taking Pictures with Aperture-priority
AE.................................................. 52
Taking Pictures with Shutter-priority
AE.................................................. 53
Taking Pictures with Manual
Exposure........................................ 54
Aperture Value and Shutter Speed ... 56
Taking Pictures using Macro
Mode.............................................. 57
Taking Pictures using Portrait
Mode.............................................. 58
Taking Pictures using Sports
Mode.............................................. 59
Taking Pictures using Panning
Mode.............................................. 60
Taking Pictures using Night Portrait
Mode.............................................. 62
Recording Motion Images ................. 63
Taking Pictures with Manual
Focus............................................. 65
Setting the White Balance................. 67
Setting the White Balance manually
(White set) .....................................69
Finely Adjusting the White
Balance.......................................... 70
Changing the Picture Size................. 71
Changing the Quality......................... 72
Taking Pictures using Spot Mode...... 73
Setting ISO Sensitivity....................... 74
Taking Pictures with Audio................ 75
Using the Continuous AF ..................76
Using the Digital Zoom ......................77
Using the Color Effect ....................... 78
Adjusting the Quality of the Picture
(Picture Adjustment) ...................... 79
Using the Optical Image Stabilizer .... 80
Creating Flip Animation..................... 81
Using the External Flash ................... 84
Using the Conversion Lens ............... 86
4
Page 5

Playback (advanced)
Playing Back Pictures with Audio ...... 88
Playing Back Motion Images ............. 89
Rotating the Picture........................... 90
Setting the Picture to be Printed and
the Number of Prints
(DPOF Print Setting)...................... 91
Preventing Accidental Erasure of
the Picture ..................................... 96
Playing Back with Slide Show........... 98
Adding Audio to Recorded Pictures
(Audio Dubbing)........................... 100
Resizing the Pictures ...................... 101
Trimming the Pictures..................... 103
Formatting the Card........................ 105
Playing Back Pictures with a TV
Screen ......................................... 106
Before Connecting with USB
Connection Cable ........................ 107
Connecting to a PC
(Mass Storage) ............................ 109
Connecting to a PC (PTP)............... 110
Connecting to a Printer ................... 112
Using a Printer (PictBridge)............. 113
Using a Printer
(USB Direct-Print)........................ 115
Others
Using the MC Protector/ND Filter.... 117
After Use ......................................... 118
Screen Display ................................ 119
The Menu Items .............................. 121
Cautions for Use.............................. 123
Approximate number of recordable
pictures and the size.................... 126
Message Display............................. 127
Troubleshooting............................... 128
Specifications.................................. 130
Digital Camera Accessory
System......................................... 132
Digital Camera Accessory Order
Form (For USA Customers)......... 133
Request for Service Notice
(For USA Only)............................ 134
Limited Warranty (For USA Only).... 135
Customer Services Directory
(For USA Only)............................ 137
Index................................................ 138
Spanish Quick Use Guide/
Guía española de uso rápido....... 140
5
Page 6
Preparation
Preparation
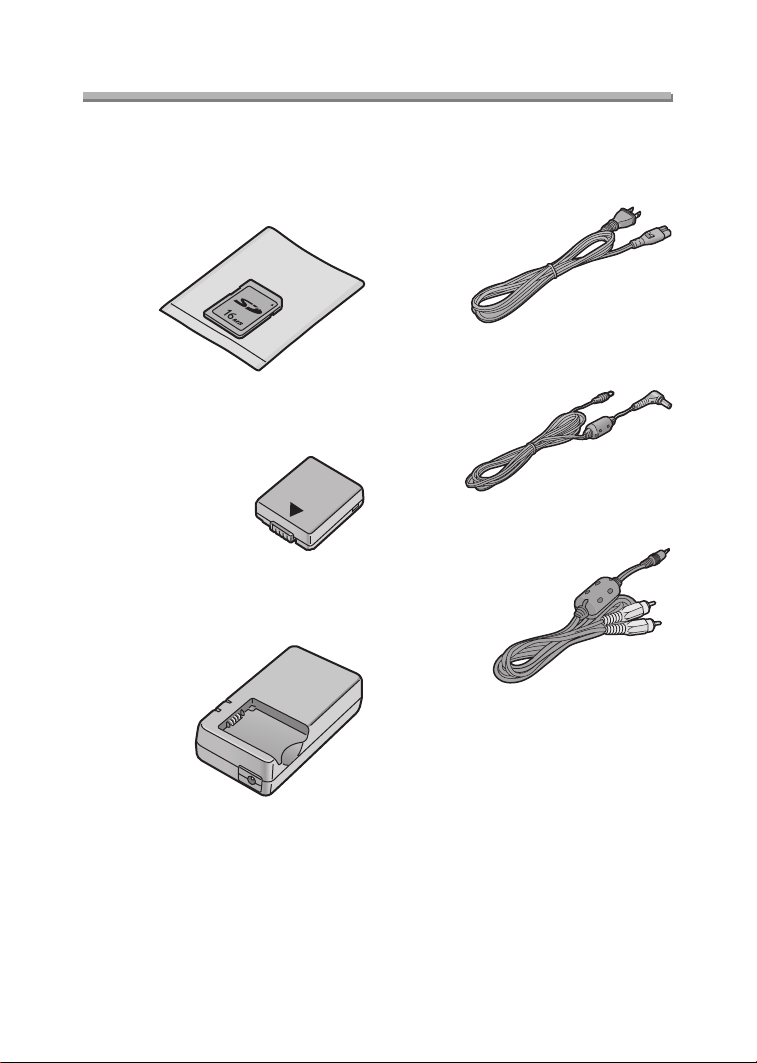
Standard Accessories
Before using your camera, check the contents.
∫ SD Memory Card (16 MB)
RP-SD016B
(In the text, it is indicated as “Card”)
∫ Battery Pack
CGA-S002A
(In the text, it is indicated as “Battery”)
∫ Battery Charger/AC Adaptor
DE-928A
(In the text, it is indicated as
“AC Adaptor”)
∫ AC Ca ble
K2CA2EA00002
∫ DC Cable
K2GH2DB00003
∫ A/V Cable
K1V204C10001
6
Page 7
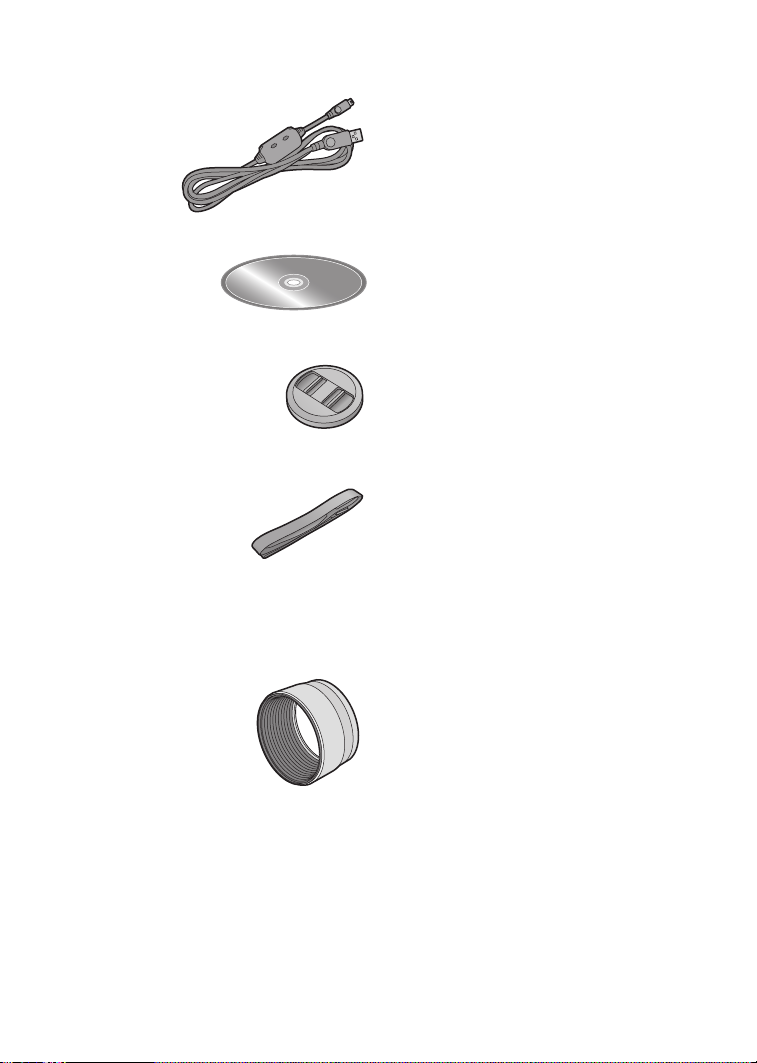
∫ USB Connection Cable
K1HA05CD0004
∫ CD-ROM
∫ Lens Cap
VYK0W96
∫ Strap
VFC4036
∫ Lens Hood
(72 mm threading for MC protector
and ND filter)
VYQ2793 (Silver)
VYQ2824 (Black)
Preparation
7
Page 8
Preparation
Preparation
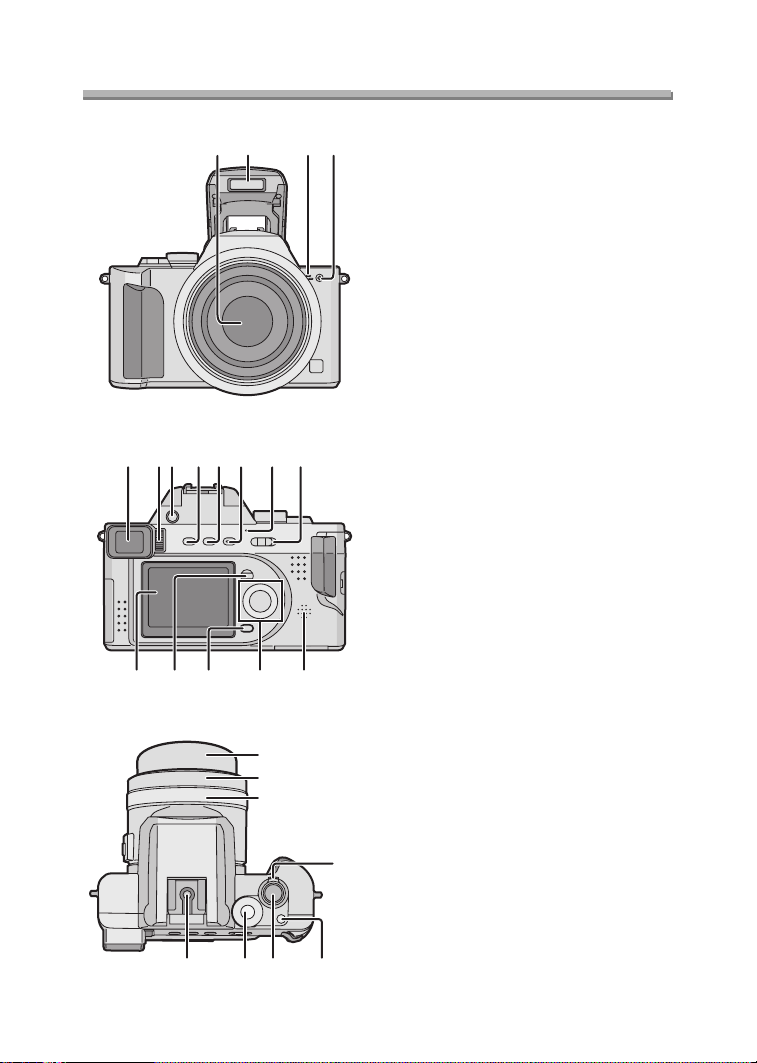
Names of the Components
13
14 15 16
1 2 34
8
109567
11 12
17
1 Lens
2Flash
3 Microphone (P63, 75)
4 Self-timer Indicator (P43)
5 Viewfinder (P27)
6 Diopter Adjustment Dial (P28)
7 Flash Open Button (P38)
8 [EVF/LCD] Button (P27)
9 [DISPLAY] Button (P27)
10 [EXPOSURE] Button
(P35, 51, 52, 53, 54)
11 Power Indicator (P32)
12 Camera Switch (P11)
13 LCD Monitor (P27, 119)
14 [MENU] Button (P24)
15 Delete Button (P48)
16 Cursor buttons
2/Self-timer Button (P43)
4/REVIEW/SET Button (P36)
1/Flash Mode Button (P38)
3/Exposure Compensation (P41)/
Auto Bracket (P42)/White Balance
Fine Adjustment (P70)/Flash Output
Adjustment (P40) Button
17 Speaker (P88)
18
19
20
2322 24 25
18 Lens Barrel (P33)
19 Lens Ring (P21)
20 MF Ring (P65)
21 Zoom Lever (P37, 77)
22 Hot Shoe (P84)
23 Mode Dial (P30)
21
24 Shutter Button (P31)
25 Single/Burst Mode Button (P44)
8
Page 9

7
8
9
30
31
32
26
Preparation
26 Focus Switch (P65)
27 [A/V OUT] Socket (P106)
28 [USB] Socket (5pin)
(P109, 110, 112)
29 Terminal Door
2
2
2
30 Strap Eyelet (P20)
31 [DC IN] Socket (P16)
32 [DC IN] Terminal Door (P16)
33 Card/Battery Door (P14, 18)
34 Card/Battery Door Open Lever
(P14, 18)
35 Tripod Receptacle
33 34 35
2
3
4
5
ª Battery Charger/AC Adaptor
1
(P12, 16)
1[AC INT] Terminal
2 [POWER] Indicator
3 [CHARGE] Indicator
4 Battery Attachment Part
5 [DC OUT] Terminal
9
Page 10
Preparation
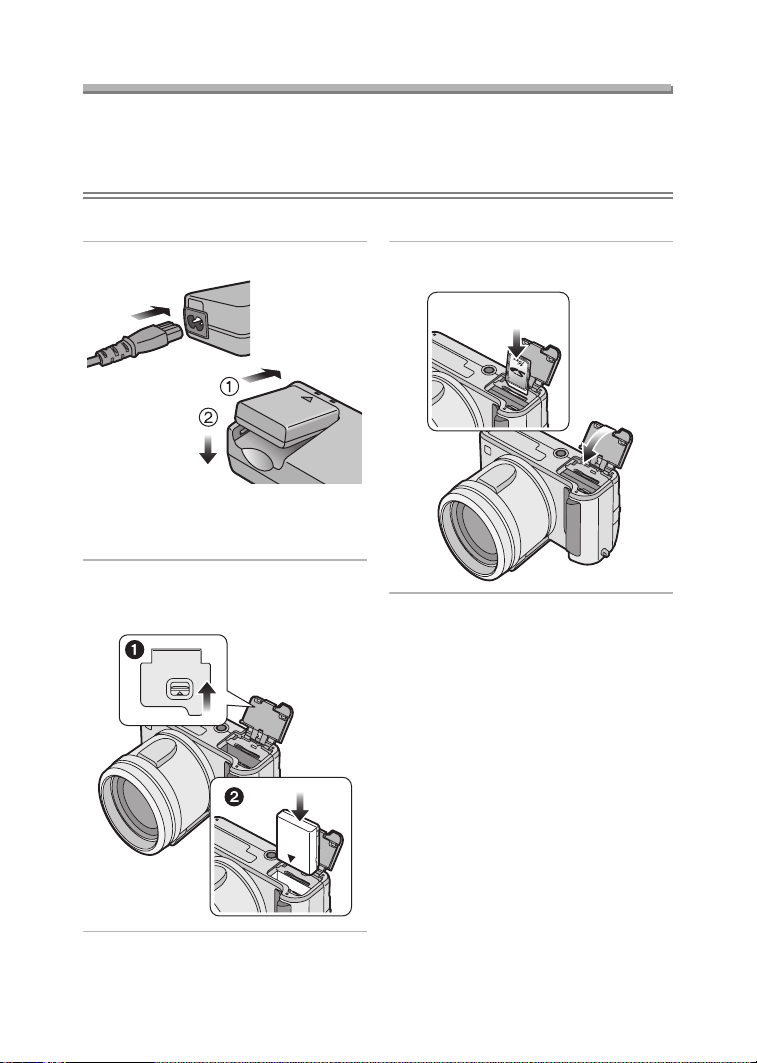
Quick Guide
• Charge the battery before using.
• Prepare the Camera/AC cable/Battery/AC adaptor/Card.
• Check that the camera is turned off and that the lens is retracted.
• Close the flash. (P38)
ª Preparation
1 Charge the battery. (P12)
• The battery cannot be charged
when the DC cable is connected to
the AC adaptor.
2 1 Slide the lever to open the
card/battery door.
2 Insert the battery. (P14)
MEMORY CARD/
BATTERY
OPEN
3 1 Insert the card. (P18)
2 Close the card/battery door.
1
2
10
Page 11
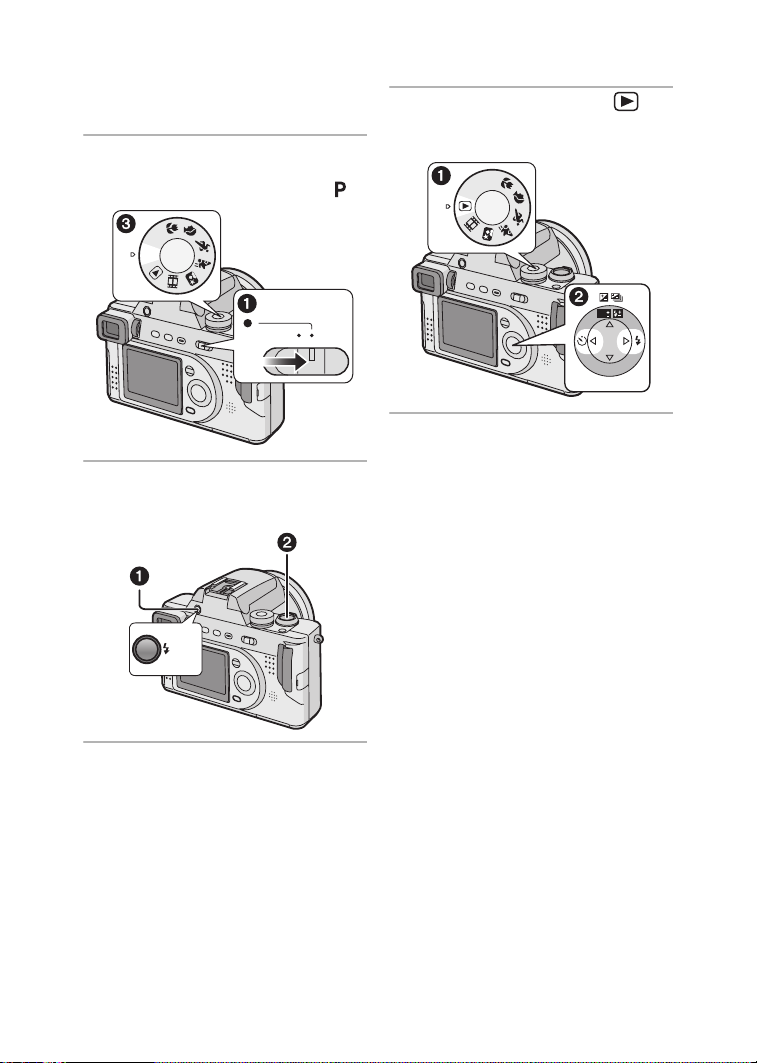
ª Recording
• Remove the lens cap.
• Be careful not to lose the lens cap.
4 1 Turn the camera on.
2 Set the clock. (P22)
3 Select Program AE mode [ ].
A/S/M
P
OFF ON
5 1 Open the flash.
(When using the flash) (P38)
2 Take a picture. (P31)
Preparation
ª Playback
6 1 Select Playback mode [ ].
2 Select the picture you want to
view. (P45)
A
/S/M
P
WB
R
E
W
V
E
I
SET
OPEN
11
Page 12
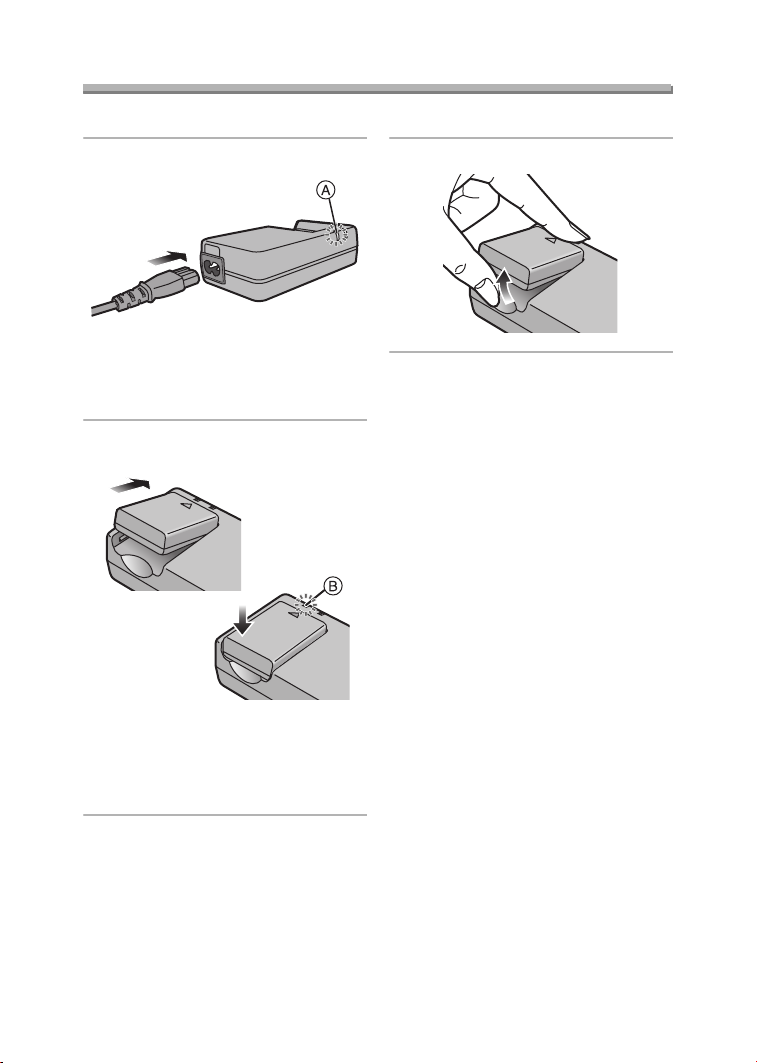
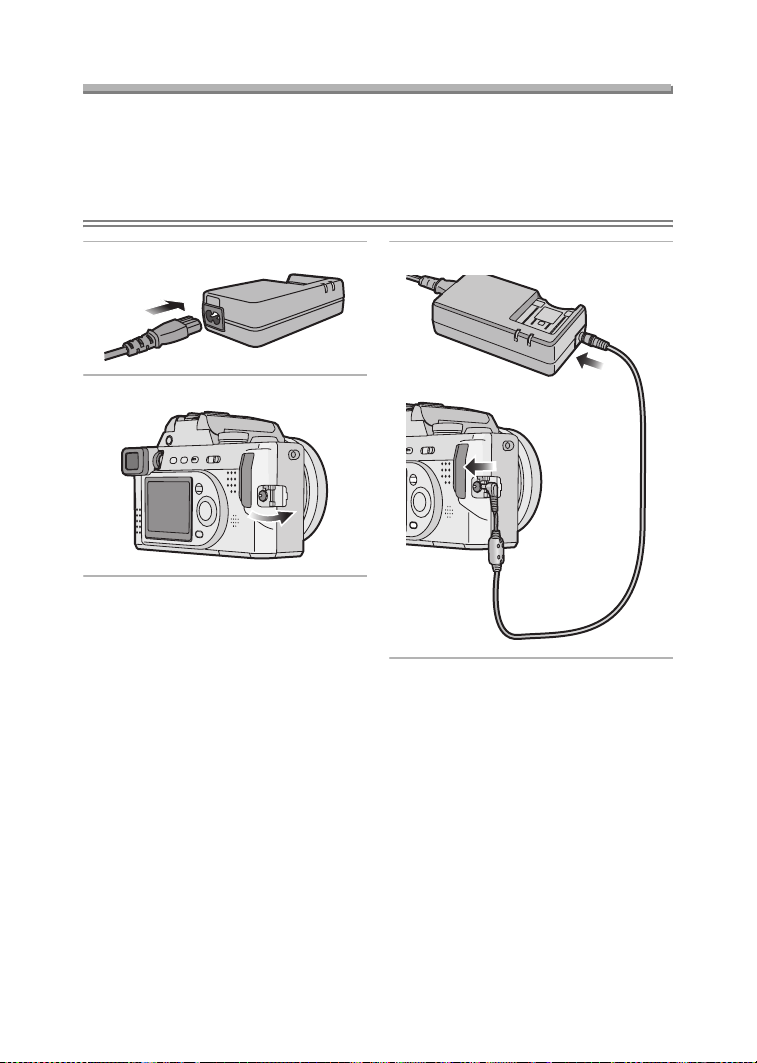
Charging the Battery
Charge the battery before using.
Preparation
1 Connect the AC cable.
• The [POWER] Indicator A lights.
• The battery cannot be charged
when the DC cable is connected to
the AC adaptor.
2 Attach the battery to the AC
adaptor.
• When the [CHARGE] Indicator B
lights, charging starts.
• When the [CHARGE] Indicator B
turns off (in about 90 minutes),
charging is finished.
3 Detach the battery.
¬
Suggestions/Tips
• After use, be sure to disconnect the
AC cable.
• The battery becomes warm after use/
charge or during charge. The camera
also becomes warm during use.
However, it is not a malfunction.
• The battery and AC adaptor are
designed only for this camera. Do
not use them with any other
equipment.
• Do not disassemble or alter the AC
adaptor.
¬
12
Page 13

Preparation
About the Battery
ª Battery indication
The remaining battery power appears on the screen.
(This does not appear when using AC adaptor)
> > >
(Blinks in red): Recharge or replace the battery.
ª Charging time and available recording time
Measured under the following conditions:
• Temperature: 77°F (25°C)/Humidity: 60
• Recording once every 30 seconds, flash every other record.
• Using the battery (supplied) and 16 MB SD Memory Card (supplied) [Picture
size: 2304k1728/Quality: Fine (When deleting all pictures after full use)]
%
Charging time
Supplied battery Approx. 90 min.
The recording time (recordable number) and playback time depend on the condition.
ª Charging environment and charging error
• Charge the battery under temperature of 50°F– 95°F (10°C – 35°C).
(The battery should also be the same temperature.)
• When charging starts, the [CHARGE] Indicator lights.
If the charging error occurs, the [CHARGE] Indicator blinks at about 1 second
cycles.
In this case, disconnect the AC adaptor from the electrical outlet, remove the
battery and ensure both room and battery temperature are not too low or high and
then charge it again.
If the problem persists, consult the dealer or your nearest servicenter.
Continuous recording/playback time
(recordable number)
Recording with LCD monitor
Approx. 100 min.
(equal to 200 still pictures)
Recording with Viewfinder
Approx. 120 min.
(equal to 240 still pictures)
Playback with LCD monitor
Approx. 180 min.
13
Page 14
Preparation
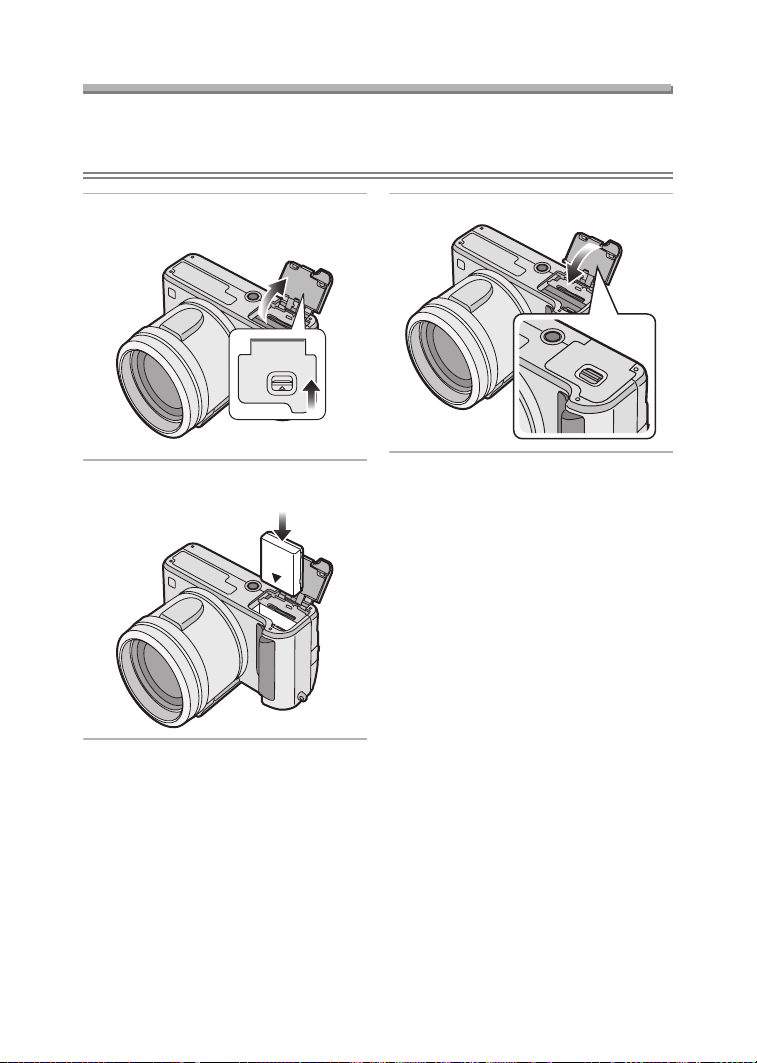
Inserting the Battery
Preparation
• Check that the camera is turned off and that the lens is retracted.
• Close the flash.
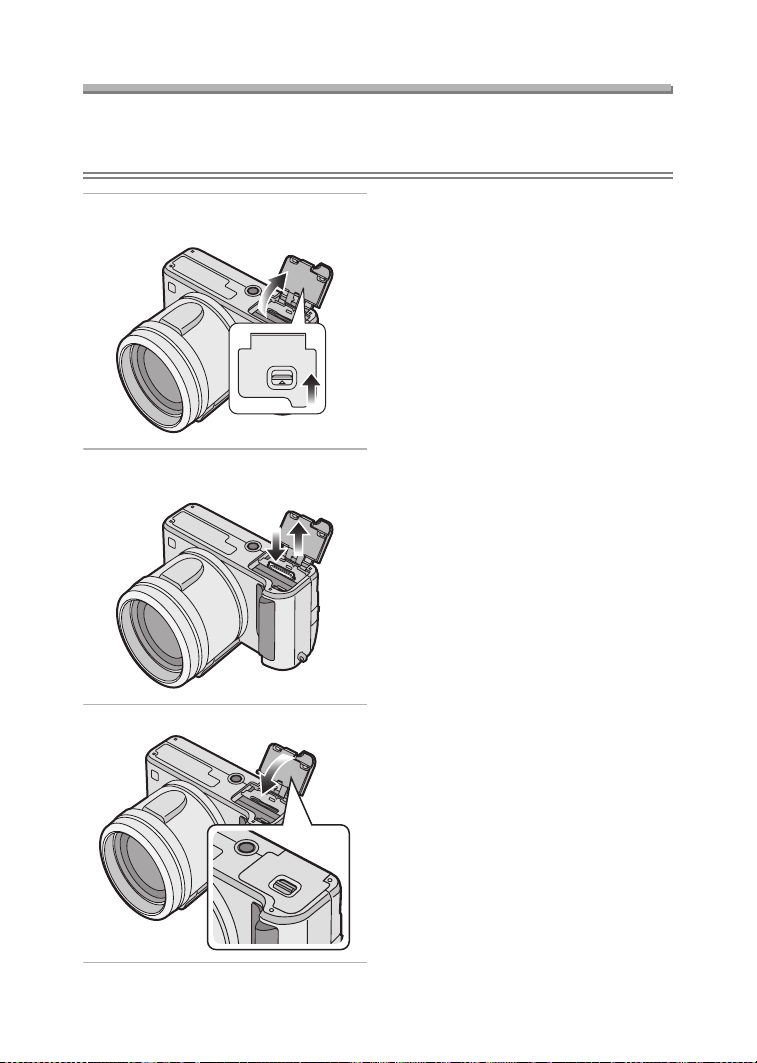
1 Slide the lever to open the card/
battery door.
MEMORY CARD/
BATTERY
OPEN
2 Insert the charged battery until it
clicks.
3 Close the card/battery door.
14
Page 15
Preparation
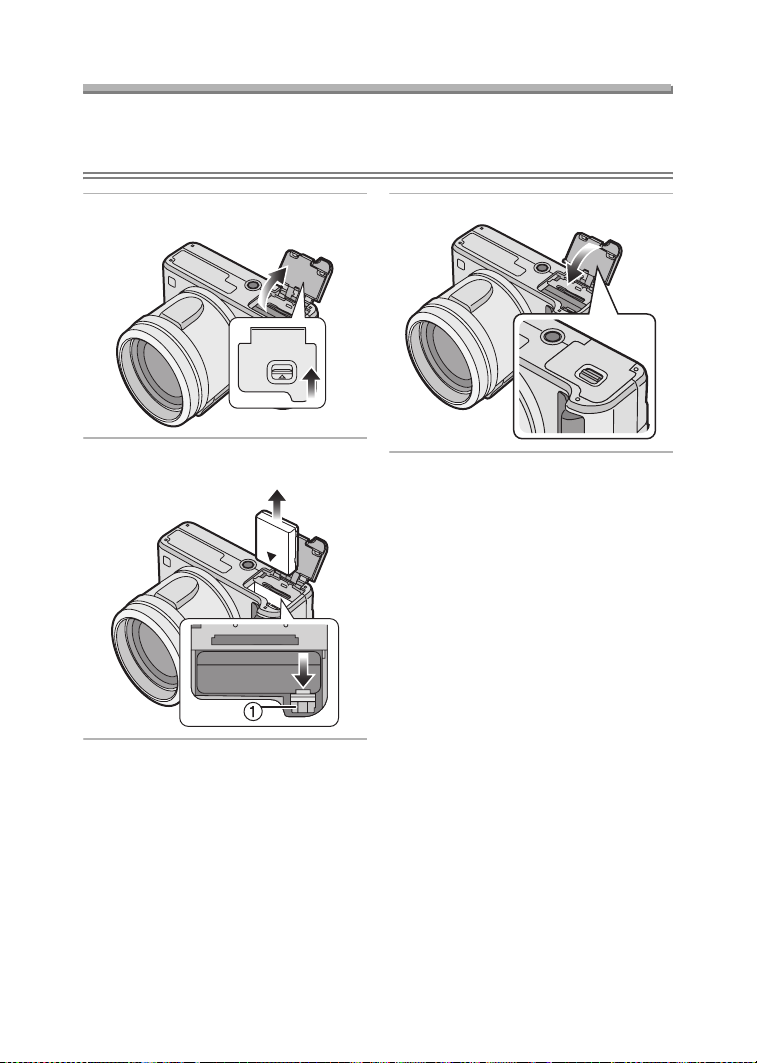
Removing the Battery
Preparation
• Check that the camera is turned off and that the lens is retracted.
• Close the flash.
1 Slide the lever to open the card/
battery door.
MEMORY CARD/
BATTERY
OPEN
2 Slide the lock 1 to remove the
battery.
3 Close the card/battery door.
¬
Suggestions/Tips
• If you will not use the camera for a
long time, remove the battery.
• After the fully charged battery has
been inserted for more than 24 hours,
the clock setting is stored (in the
camera) for max. 3 months after the
battery was removed, in accordance
with the elapsed time after the battery
is inserted. (The time may be shorter if
the battery is not charged sufficiently.)
If more than 3 months has passed, the
clock setting will be lost. In this case,
set the clock again. (P22)
• Do not open the card/battery door
during the access to the card.
• The supplied battery is designed
only for this camera. Do not use it
with any other equipment.
¬
15
Page 16
Preparation
Using the AC Adaptor
You can use the camera without worrying about battery discharge by connecting to
an AC adaptor.
Preparation
• Check that the camera is turned off and that the lens is retracted.
• Close the flash.
1 Connect the AC cable.
2 Open the [DC IN] terminal door.
3 Connect the DC cable.
¬
Suggestions/Tips
• Use the supplied DC cable.
If you use other DC cables, it may
cause a malfunction.
• The camera becomes warm during
use. This is not a malfunction.
• Disconnect the AC adaptor and DC
cable when the camera is not in use.
• The battery cannot be charged in the
camera even if the AC adaptor is
connected.
¬
16
Page 17
About the Card
Preparation
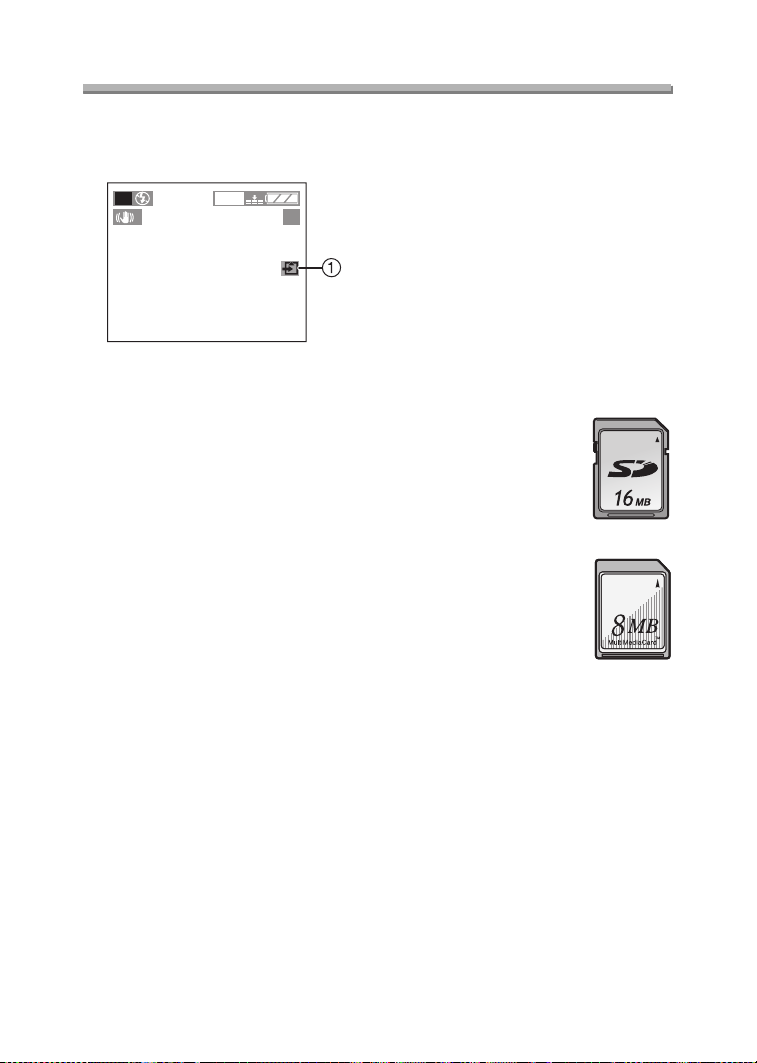
ª Access to the card
While the card is accessed, the card
access indication 1 lights.
P
1
2304
19
When the card access indication 1
lights, do not:
• turn the camera off.
• remove the battery or the card.
• disconnect the DC cable if you use the
AC adaptor.
The card and the card contents may be
damaged and the camera may not
operate normally.
It is possible that data stored on the
card can be damaged due to accidental
erasure, static electricity, electrical noise
or a defective card. We recommend
storing precious data to your PC’s hard
drive. (P109, 110)
ª SD Memory Card (supplied) and
MultiMediaCard (optional)
The SD Memory Card and
MultiMediaCard are small, lightweight,
removable external memory cards. The
reading/ writing speed of an SD Memory
Card is fast. The SD Memory Card is
equipped with a Write-Protect switch
that can inhibit writing and formatting a
card. (When the switch is slid to the
[LOCK] side, it is not possible to write or
delete data on the card and format it.
When the switch is unlocked, these
functions become available.)
SD Memory Card
MultiMediaCard
Suggestions/Tips
¬
¬
• The reading/writing speed of a
MultiMediaCard is slower than an SD
Memory Card. When a
MultiMediaCard is used, the
performance of certain features may
be slightly slower than advertised.
• After recording motion images using
the MultiMediaCard, the card access
indication may appear for a while, but
this is not a malfunction.
• Keep the Memory Card out of reach of
children to prevent swallowing.
17
Page 18

Preparation
Inserting the Card
Preparation
• Check that the camera is turned off and that the lens is retracted.
• Close the flash.
1 Slide the lever to open the card/
battery door.
MEMORY CARD/
BATTERY
OPEN
2 Insert the card with the label
facing the front of the camera until
it clicks.
• Insert the card, pressing gently
until it locks in place. If the card will
not insert freely, it may be reversed.
Do not force the card.
• Do not touch the connection
terminals on the back side of the
card.
3 Close the card/battery door.
18
Page 19
Preparation
Removing the Card
Preparation
• Check that the camera is turned off and that the lens is retracted.
• Close the flash.
¬
1 Slide the lever to open the card/
battery door.
MEMORY CARD/
BATTERY
OPEN
2 Push the card until it clicks, then
pull the card out upright.
Suggestions/Tips
• The card may be damaged if it is
removed while the camera is on.
• If the card/battery door cannot be
completely closed, remove the card
and insert it again.
• If the card cannot be fully inserted,
check the direction of the card.
• We recommend using Panasonic’s SD
Memory Card. (Use only the genuine
card.)
• The card may be damaged if it is not
fully inserted.
¬
3 Close the card/battery door.
19
Page 20
Attaching the Strap
Preparation
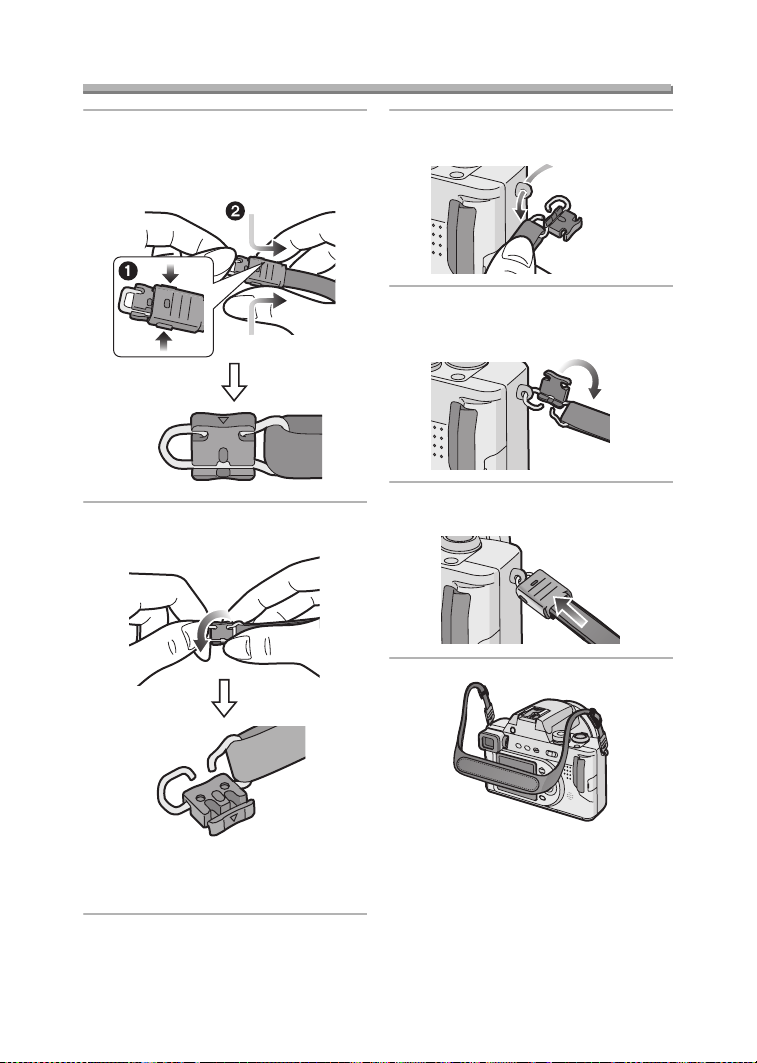
1 1 Pressing both sides of the
cover,
2 Pull out the black strap holder
completely.
2 Detach the black strap holder from
the metal fitting.
3 Pass the metal fitting through the
eyelet of the camera.
4 Rotate the black strap holder in
the opposite direction until it
clicks.
5 Slide the cover until it is attached
firmly.
• When the black strap holder is
completely detached, attach it
again as above.
• Attach the strap to the other side of the
camera being careful not to twist it.
• Attach the strap so that you can see
“Panasonic” logo.
• Check that the strap is firmly attached
to the camera.
20
Page 21
Preparation
Attaching the Lens Hood/Lens Cap
Preparation
• Check that the camera is turned off and that the lens is retracted.
• Close the flash.
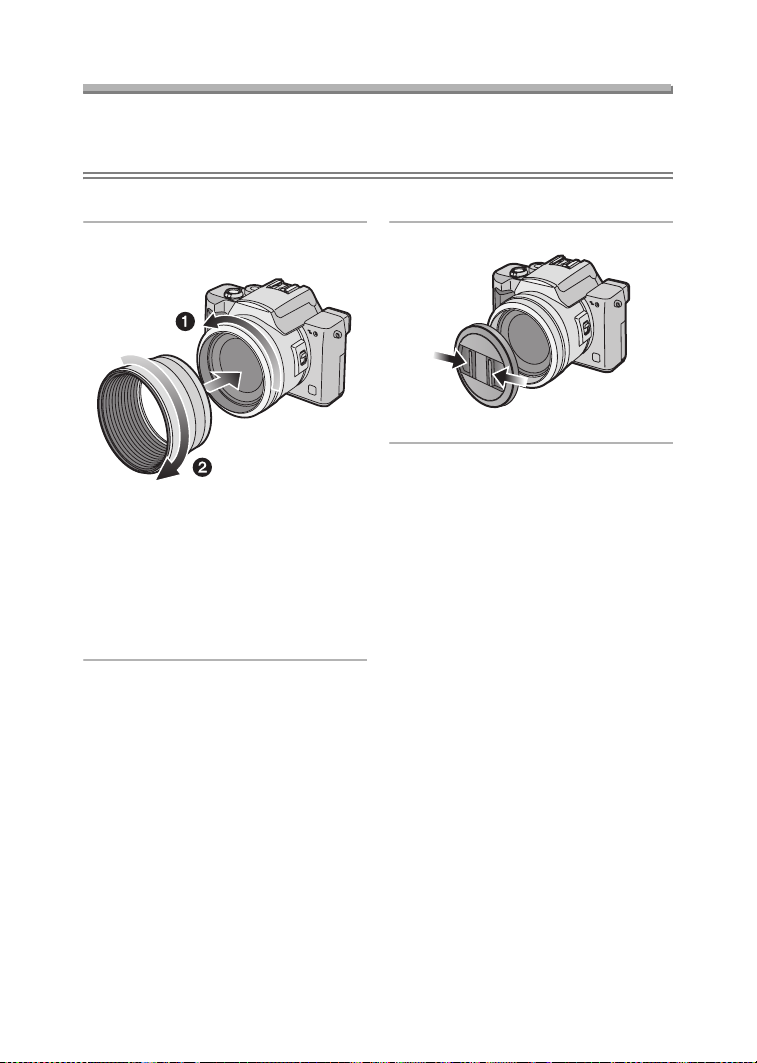
ª Lens Hood
1 1 Detach the lens ring.
2 Attach the lens hood.
• In bright sunlight or when there is
backlight, the lens hood will
minimize lens flare and ghosting.
• The lens hood cuts off excess
lighting and improves the picture
quality.
• When detaching the lens hood,
refer to P118.
ª When attaching the lens hood
• When taking pictures with flash, photo
flash is interrupted by the lens hood
and the bottom of the screen becomes
dark. (vignetting effect)
• When taking pictures with flash, we
recommend detaching the lens hood.
ª Lens Cap
1 Attach the lens cap.
• Be careful not to lose the lens cap.
ª When attaching the lens cap
• When you turn the camera off, carry
the camera or play back the pictures,
attach the lens cap to protect the
surface of the lens.
• Detach the lens cap before turning on
the camera in the recording mode.
• Consult the dealer or your nearest
servicenter if you lose the supplied
accessories. (You can purchase the
accessories separately.)
21
Page 22
Preparation
Setting the Date/Time (Clock Set)
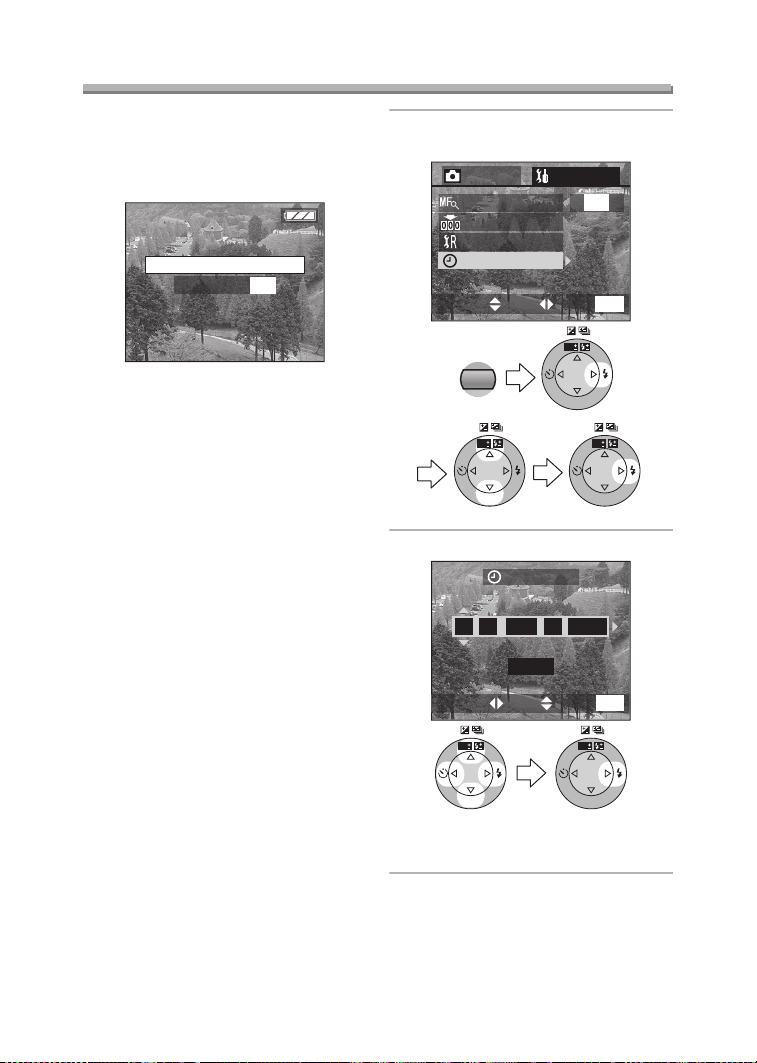
ª Initial setting
The clock is not set when the camera is
shipped. When you turn the camera on,
the clock setting screen appears.
PLEASE SET THE CLOCK
CLOCK SET
MENU
When pressing the [MENU] button, the
screen shown in step 2 appears. Set the
clock on it.
1 Select [CLOCK SET] from the
[SETUP] menu. (P24)
2
/
SETUP
REC
MF ASSIST
3
ON
NO.RESET
RESET
CLOCK SET
MENU
EXITSETSELECT
MENU
WB
R
E
W
V
E
I
SET
WB
R
E
W
V
E
I
SET
WB
R
E
W
V
E
I
SET
2 Set date and time.
CLOCK SET
DEC 11 2003
10 00
:
..
M/D/Y
WB
R
E
W
V
E
I
SET
• 2/1: Select the desired item.
• 3/4: Set date and time.
22
MENU
EXITSETSELECT
WB
R
E
W
V
E
I
SET
Page 23

Preparation
3 Select [M/D/Y], [D/M/Y] or [Y/M/D].
CLOCK SET
10:001
DEC
.1 1.2003
M/D/Y
MENU
EXITSETSELECT
WB
R
E
W
V
E
I
SET
• Close the menu by pressing the
[MENU] button 2 times after
finishing the setting.
• Check if the clock setting is correct,
after turning the camera off and on.
ª Date Printing
• You can set the date printing in DPOF
print setting on this camera. (P95)
• Using the supplied software, [SD
Viewer for DSC], it is possible to have
the date imprinted on the picture. For
details, please read the supplied
operating instructions for PC
connection.
• When you ask photo studios for
printing, be sure to order the printing
of the date. For further information,
ask a photo studio. Depending on the
studio, it may not be printed.
Suggestions/Tips
¬
¬
• You can set the year from 2003 to
2099. The 24-hour system is used.
• After the fully charged battery has
been inserted for more than 24 hours,
the clock setting is stored (in the
camera) for max. 3 months after the
battery was removed, in accordance
with the elapsed time after the battery
is inserted. (The time may be shorter if
the battery is not charged sufficiently.)
If more than 3 months has passed, the
clock setting will be lost. In this case,
set the clock again.
23
Page 24
Setup Menu
Preparation
1 Turn the camera on.
OFF ON
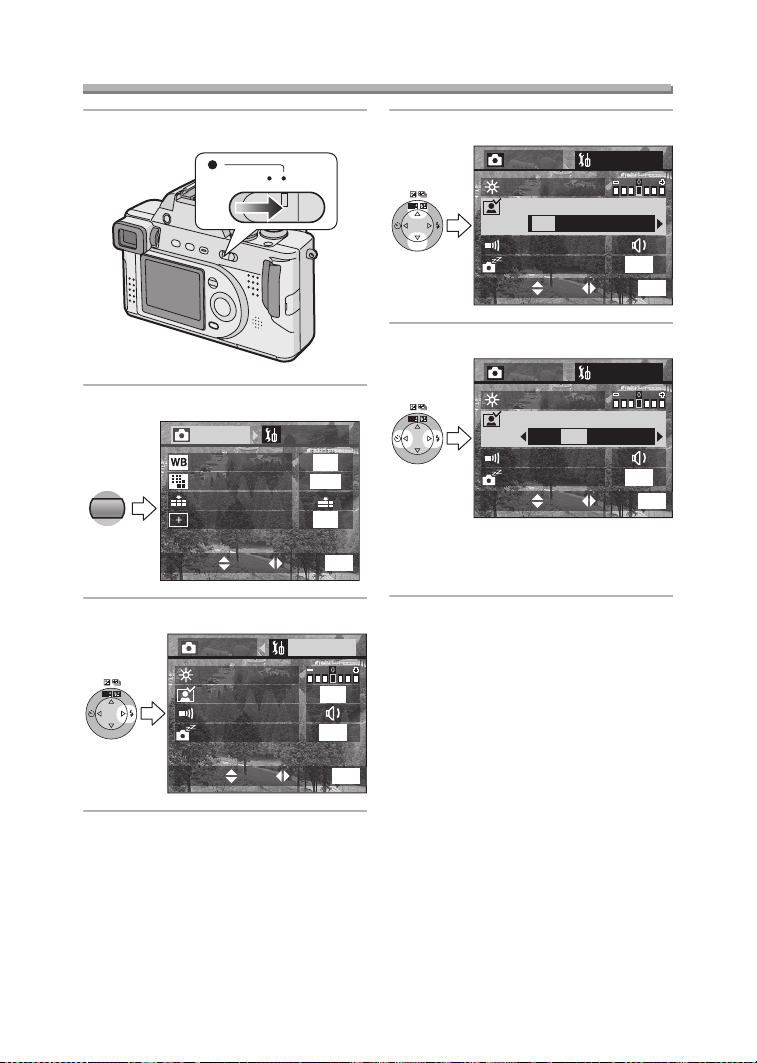
2 Press the [MENU] button.
1
/
REC
4
SETUP
W.BALANCE
MENU
PICT.SIZE
QUALITY
SPOT MODE
3 Select the [SETUP] Menu.
REC SETUP
WB
R
E
W
V
E
I
SET
MONITOR
AUTO REVIEW
BEEP
POWER SAVE
4 Select the desired item.
REC SETUP
WB
R
E
W
V
E
I
SET
MONITOR
AUTO REVIEW
OFF 1SEC. 3SEC. ZOOM
BEEP
POWER SAVE
1/
3
2MIN.
MENU
EXITSETSELECT
5 Set the desired value.
REC SETUP
MONITOR
AUTO REVIEW
OFF 1SEC. 3SEC. ZOOM
BEEP
POWER SAVE
AUTO
2304
OFF
WB
R
E
W
V
E
I
SET
• Close the menu by pressing the
MENU
EXITSETSELECT
1
/
3
OFF
2MIN.
[MENU] button after finishing the
setting.
1/
3
2MIN.
MENU
EXITSETSELECT
MENU
EXITSETSELECT
24
Page 25

Preparation
You can control the following items on [SETUP] Menu.
Menu Functions
MONITOR/
FINDER
Adjust the brightness of the LCD monitor (when pictures
appear on the LCD monitor) or Viewfinder (when pictures
appear on the Viewfinder) in 7 steps.
AUTO
REVIEW°
1
• [OFF]: The recorded picture does not automatically
appear.
• [1SEC.]: The recorded picture automatically appears
on the screen for about 1 second.
• [3SEC.]: The recorded picture automatically appears
on the screen for about 3 seconds.
• [ZOOM]: The recorded picture automatically appears
on the screen for about 1 second. Then it is
enlarged 4 times and appears for about
1 second. This mode is useful to confirm the
focus.
• In Motion image mode [ ], auto review function is not
activated.
• When using burst mode or auto bracket, the auto review
function works while recording the data into the card
regardless of the setting on the auto review function.
(The picture is not enlarged.)
• When using pictures with audio, the auto review
function works while recording the audio or the data into
the card regardless of the setting on the auto review
function. (The picture is not enlarged.)
BEEP • [ ]: The operational sound turns high.
• [ ]: The operational sound turns low.
• [ ]: The operational sound turns off.
POWER SAVE • [2MIN.]/[5MIN.]/[10MIN.]:
The camera is automatically turned off if it has
not been used for a predetermined amount of
time.
(Press the shutter button or turn the camera off
and on to cancel the power save mode.)
• [OFF]: The camera is not automatically turned off.
• When using the AC adaptor/connecting to a PC or
printer/recording motion images/playing back motion
images/during Slide Show, the power save mode is not
activated.
1
°
Recording mode only
25
Page 26
Preparation
Menu Functions
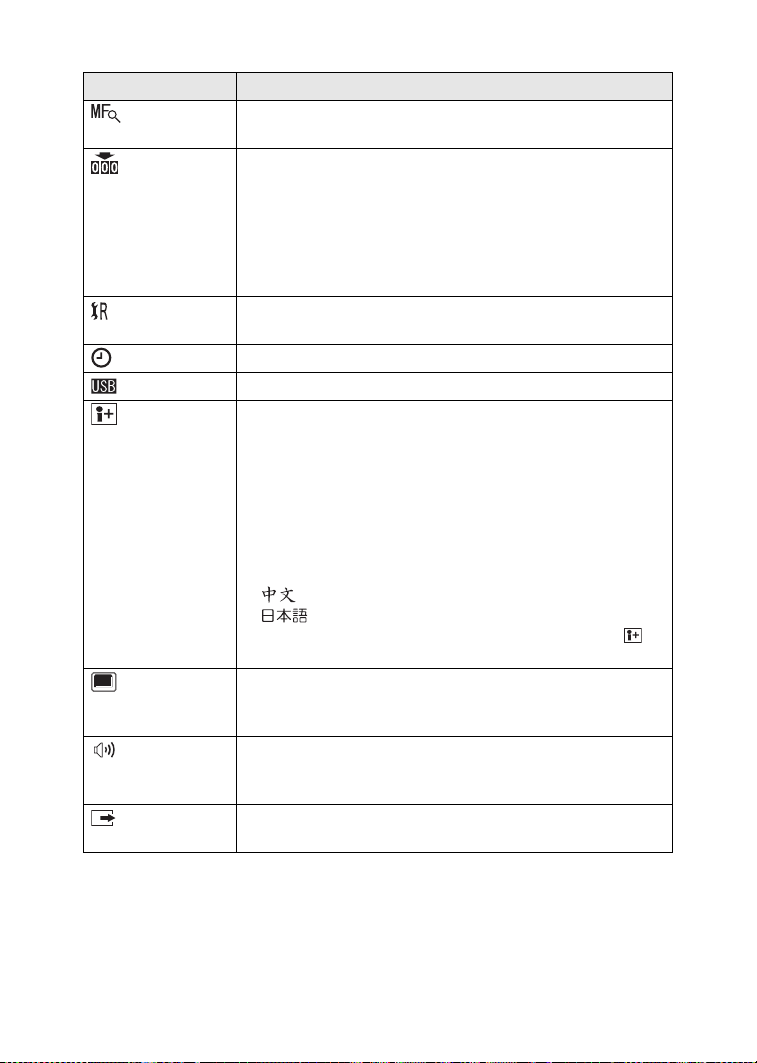
1
MF ASSIST°
In manual focus, assistance screen appears on the center
of the screen to facilitate focusing on the subject. (P65)
NO.RESET°
1
Set this when you want to start the file number of the picture
from 0001 on the next recording. (The folder number is
updated, and the file number starts from 0001.)
• The folder number can be assigned from 100 to 999.
When the folder number reaches to 999, it cannot be
reset. We recommend formatting the card after saving the
data on a PC or other.
RESET°
1
The camera is reset to the initial settings. However, the
folder number and the clock settings are not changed.
CLOCK SET Change the date and time. (P22)
USB MODE Set before connecting to a PC or a printer. (P107)
LANGUAGE Set to the language on the menu screen from the following
7 languages.
Set to the desired language with 2/1 and determine it with
4.
• [ENGLISH]: The menu screen in English
• [DEUTSCH]: The menu screen in German
• [FRANÇAIS]: The menu screen in French
• [ESPAÑOL]: The menu screen in Spanish
• [ITALIANO]: The menu screen in Italian
• [ ]: The menu screen in Chinese (Simplified)
• [ ]: The menu screen in Japanese
• When you set to other language by mistake, select [ ]
from the menu icons to set the desired language.
PLAY ON
2
LCD°
When Viewfinder is selected in the recording mode, the
picture automatically appears on the LCD monitor in review
or playback. (P28)
2
VOLUME°
The volume of speakers can be adjusted in 7 steps.
• When you connect the camera to a TV, the volume of the
speakers of the TV is not changed.
VIDEO OUT°
2
• [NTSC]: Video output is set to NTSC system.
• [PAL]: Video output is set to PAL system. (P106)
°1 Recording mode only °2 Playback mode only
26
Page 27
Preparation
Using the LCD Monitor/Viewfinder
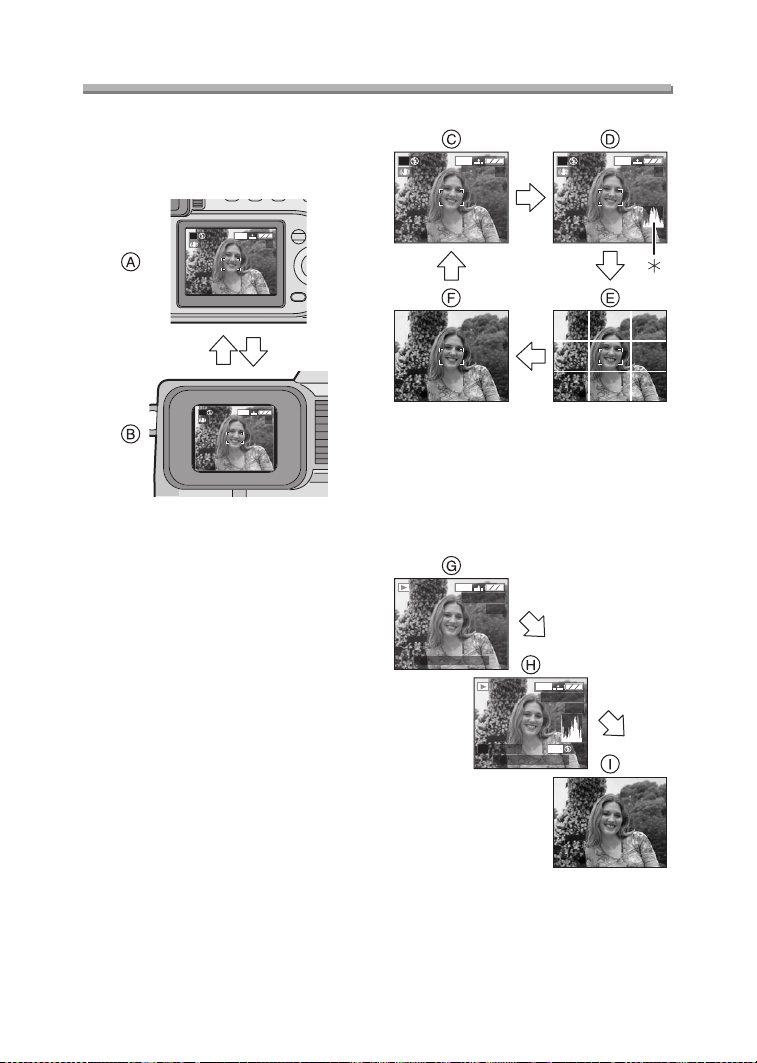
ª Switching the screen to be turned
on
Press the [EVF/LCD] button to switch to
the screen you would like to turn on.
2304
P
1
P
19
2304
1
19
A LCD monitor (LCD)
B Viewfinder (EVF)
• When the LCD monitor turns on, the
Viewfinder turns off. (and vice versa)
ª Selecting the screen to be used
Press the [DISPLAY] button to switch to
the screen to be used.
• When the menu screen appears,
during multi playback or during
playback zoom, the [DISPLAY] button
is not activated.
In recording mode
2304
P
1
19
2304
P
1
C Display
D Display with histogram
E Nondisplay (Recording guide line)
F Nondisplay
¢Histogram
In playback mode
2304
100_0001
1/19
10:00 DEC. 1.2003
2304
100_0001
1/19
ISO100
P
F2.8 1/25
10:00 DEC. 1.2003
AUTO
19
G Display
H Display with recording information
and histogram
I Nondisplay
27
Page 28
Preparation
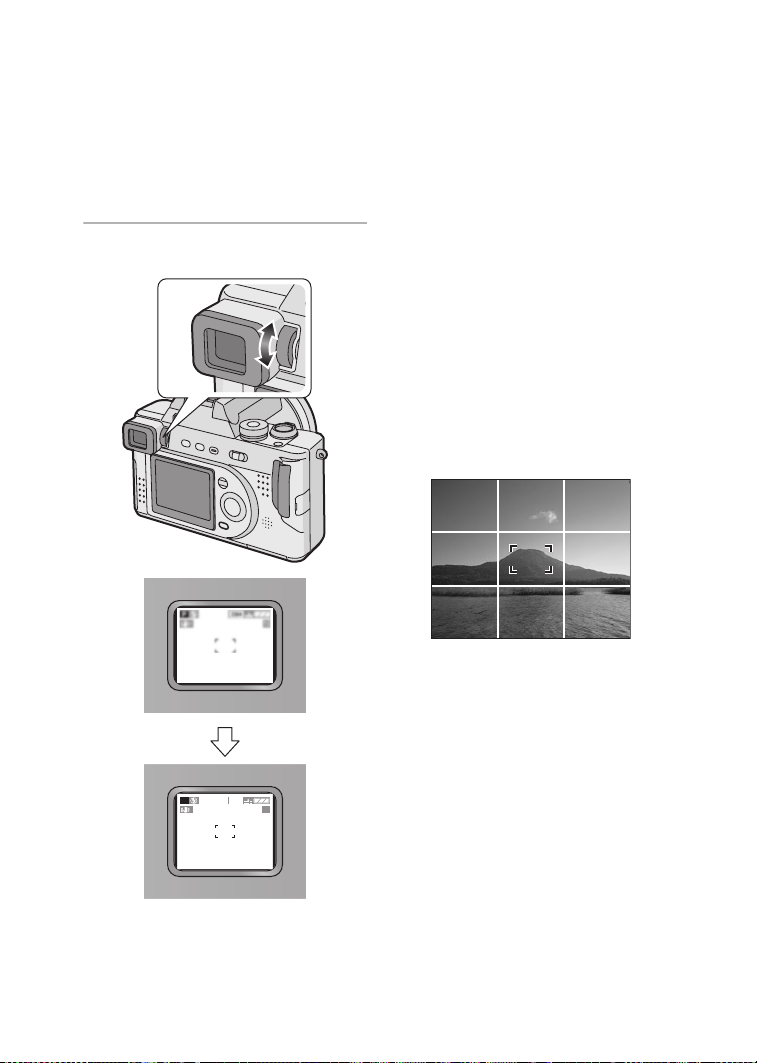
ª Diopter adjustment
This feature is useful for users who wear
corrective lenses and prefer to use the
Viewfinder.
Preparation
• Press the [EVF/LCD] button to display
the Viewfinder.
1 Adjust the diopter, rotating the
diopter adjustment dial.
ª Monitor priority
When setting [PLAY ON LCD] to [ON]
on the [SETUP] menu (P26), the LCD
monitor is turned on in the following
cases.
You can save the time to switch the
display to the LCD monitor even when
using the Viewfinder in recording.
• When the recording mode is switched
to playback mode.
• When reviewing pictures (P36)
• When turning the camera on in
playback mode.
ª Recording guide line
You can achieve balanced pictures by
aligning the subject on the cross point of
the horizontal and vertical guidelines.
You can also take pictures easily by
adjusting the horizon to the guide line.
You can take pictures with
well-designed composition by watching
the size and the balance of subjects.
2304
P
1
19
28
Page 29
Preparation
About the Histogram
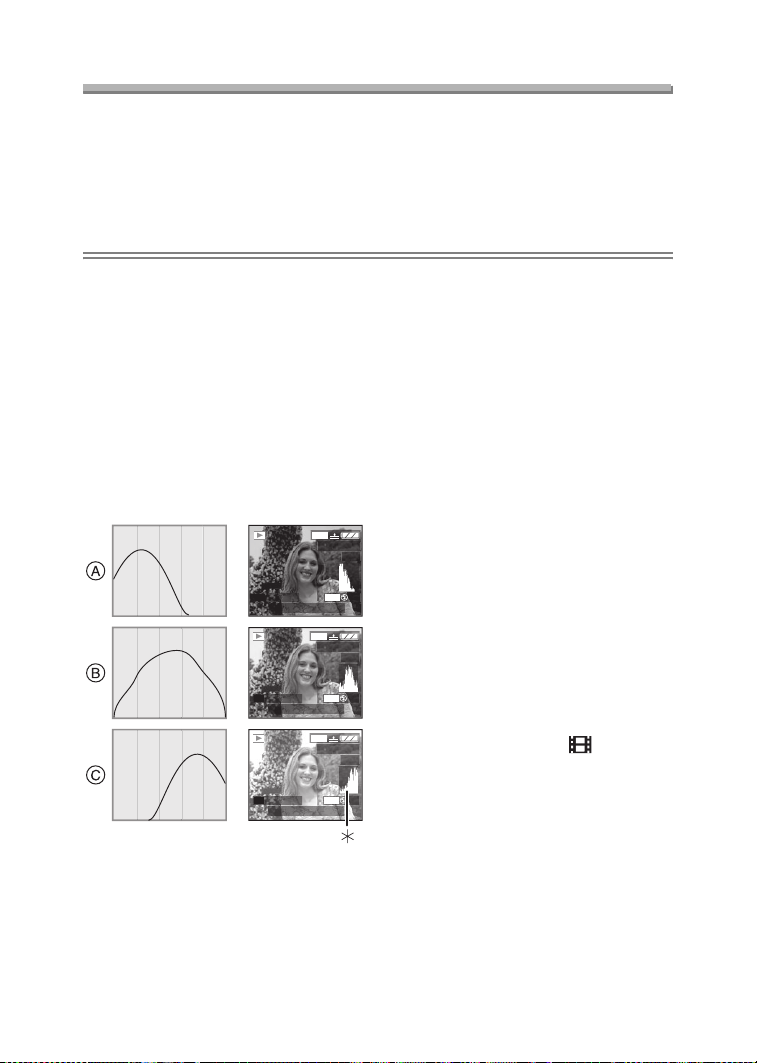
• A histogram is a graph that displays brightness along the horizontal axis (black to
white) and the number of pixels at each brightness level on the vertical axis.
• It allows the camera user to easily check the way a picture is being exposed.
• It is very useful if manual adjustments of the lens aperture and shutter speed are
available, especially in those situations where automatic exposure may be difficult
due to uneven lighting. Using the histogram feature will allow you to get the best
performance from the camera.
• When the values are concentrated to
the left as A, the picture is under
exposed.
• When the values in the histogram are
distributed as B, the exposure is
adequate and the brightness is
well-balanced.
• When the values are concentrated to
the right as C, the picture is over
exposed.
ª Example of histogram
2304
100_0001
1/19
P
F2.8 1/50
P
F2.8 1/100
P
F2.8 1/200
ISO100
10:00 DEC. 1.2003
2304
100_0001
ISO100
10:00 DEC. 1.2003
2304
100_0001
ISO100
10:00 DEC. 1.2003
1/19
AUTO
1/19
AUTO
A Under Exposed
B Properly Exposed
C Over Exposed
¢Histogram
Suggestions/Tips
¬
¬
• When the brightness of the picture
and the histogram do not match
each other, the histogram turns
yellow.
• The histogram turns yellow in the
following cases.
– When the flash is activated
– When the flash is closed
1. Aperture-priority AE/
Shutter-priority AE:
When the brightness of the
screen is not correct or when the
exposure is not adequately
adjusted
AUTO
2. Manual exposure:
When the shutter speed is slower
than 1/13th
3. In modes other than the above:
When the brightness of the
screen is not correct in dark
places
• The histogram does not appear when
in Motion image mode [ ], during
multi playback and playback zoom.
• The histogram in recording and
playback may not match each other.
• The histogram in this camera does not
agree with the one displayed in image
editing software on PC, etc.
• The histogram in the recording mode
is an approximation.
29
Page 30
Preparation
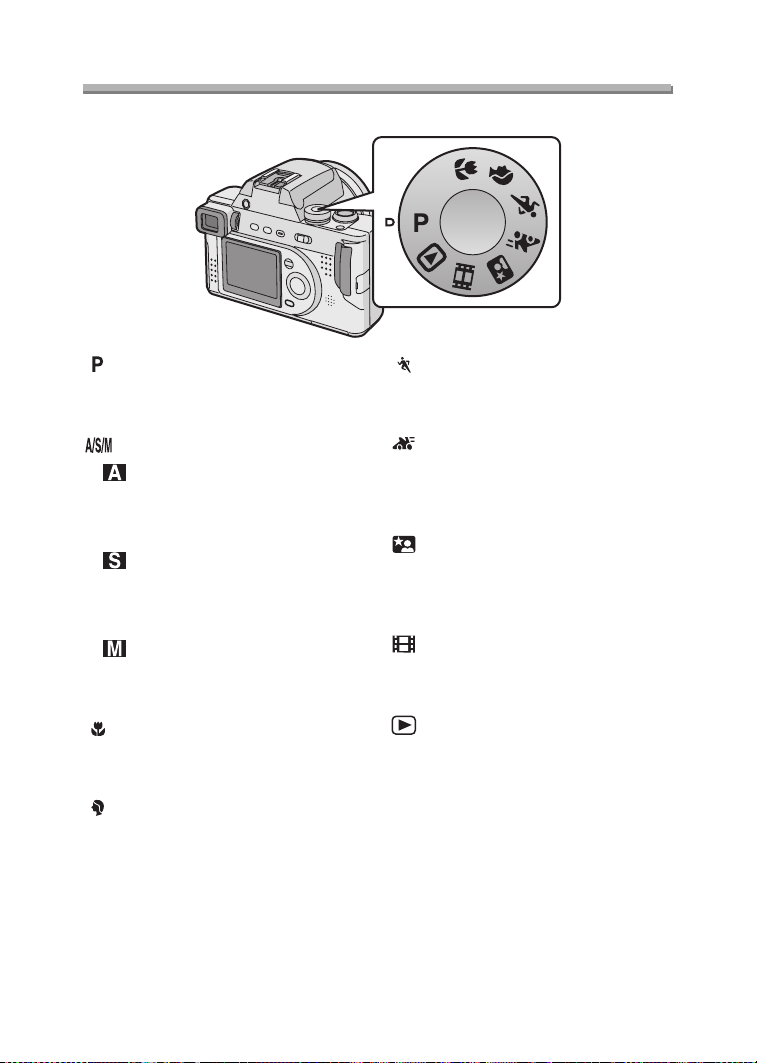
The Mode Dial
Select the desired mode turning the mode dial.
A/S/M
: Program AE mode (P31)
The aperture value and the shutter
speed are automatically adjusted.
: A/S/M mode (P52–54)
: Aperture-priority AE (P52)
The shutter speed is adjusted
automatically according to the
aperture value you set.
: Shutter-priority AE (P53)
The aperture value is adjusted
automatically according to the shutter
speed you set.
: Manual exposure (P54)
The aperture value and the shutter
speed are manually adjusted.
: Macro mode (P57)
This allows you to get closer to the
subject up to 0.16 feet (5 cm) (Wide).
: Portrait mode (P58)
This allows you to easily achieve the
depth of focus effect. The subject
stands out in front of an unfocused
background.
: Sports mode (P59)
This allows you to record still action
pictures of outdoor sports easily.
: Panning mode (P60)
This allows you to record a subject in
motion sharply while blurring the
background.
: Night portrait mode (P62)
This allows you to record the subject
clearly in front of beautiful night
illumination scenery.
: Motion image mode (P63)
This allows you to record motion
images.
: Playback mode (P45)
This allows you to play back recorded
pictures.
30
Page 31

Recording pictures (basic)
Recording pictures (basic)
Taking Pictures
Preparation
• Insert the charged battery (P14) or connect the AC adaptor (P16).
• Insert the card. (P18)
• Remove the lens cap.
1 1 Turn the camera on.
2 Select Program AE mode [ ].
3 Slide the focus switch to [AF].
A/S/M
P
FOCUS
AF
MF
OFF ON
2 Aim the AF area 1 to the point
you want to focus.
P
1
2304
19
3 Focus on the subject to take the
picture.
P
1
• A: Press the shutter button
halfway to focus.
• B: Press the shutter button fully to
take the picture.
• The focus indication 2 lights and
then the aperture value 3 and the
shutter speed 4 appear.
• When the focus indication is
blinking, the subject is not focused.
Press the shutter button halfway
and focus on the subject again.
2304
19
1/25F2.8
31
Page 32

Recording pictures (basic)
ª Posture to take good pictures
To take pictures without blurring:
• Hold the camera gently with both
hands, keep arms stationary at your
side and stand with your feet slightly
apart.
• Check that the camera is not shaken
when pressing the shutter button
halfway.
• After pressing the shutter button, keep
the camera stationary until the picture
appears on the screen.
• In the following cases, keep the
camera stationary for a long time.
– Slow sync./Red-eye reduction
[ ] (P38)
– In Night portrait mode [ ] (P62)
– When you set the shutter speed
slower (P35, 53, 54)
When recording with LCD Monitor
When recording with Viewfinder
Position of feet
• Hold the camera firmly with your right
hand.
• Put your left hand on the lens ring to
keep the camera stationary.
• Do not cover the microphone with your
finger or other objects.
• Do not touch the lens barrel.
ª Power indicator
OFF ON
Lighting:
• When turning the camera on
Blinking:
• When the card/battery door is open
• When the card is not inserted
• When there is no remaining capacity
on the card
• When the card is locked in the
recording mode
• When the remaining battery power is
low (blinking slowly)
ª Focusing
• The focus range is 0.98 feet
(30 cm) – ¶ (Wide), 6.56 feet (2 m) – 
(Tele).
• If you press the shutter button fully
without prefocusing, pictures may be
blurry or unfocused.
• When the subject is focused, the
camera beeps 2 times. If not, it beeps
4times.
• If the camera will not focus after a few
tries, turn it off and on and try again.
• Refer to P25 if you want to turn the
operational sound off.
32
Page 33

Recording pictures (basic)
• In the following cases, the camera
cannot focus on subjects properly in
Program AE mode.
– When including both near and
distant subjects in a scene
– When there is dirt on the glass
between the lens and the subject
– When there are illuminated or
glittering objects around the subject
– When taking a picture in a dark place
– When the subject moves fast
– When the scene is poor in contrast
– When jitter occurs
– When recording a very bright subject
We recommend taking pictures using
manual focus (P65), prefocus (P66) or
AF/AE lock.
• Even if the focus indication appears
and the subject is focused, it is
canceled when you release the shutter
button. Press the shutter button
halfway again.
ª Exposure
• If the exposure is not adequate, the
indication of the aperture value and
the shutter speed on the screen turns
red. (However, the aperture value and
the shutter speed do not turn red when
the flash is activated.)
• The brightness of the screen may
differ from that of recorded pictures. In
particular, when taking pictures in dark
places with slow shutter, the subject
looks dark on the screen, but the
actual picture is bright.
• When most of the subjects in the
screen are bright (e.g. blue sky on a
clear day, snowy field, etc.), the
recorded pictures may become dark.
In this case, compensate the
exposure. (P41)
ª Jitter (camera shake)
• When jitter could occur, the jitter alert
1 appears.
P
1
2304
19
1/8F2.8
• When the jitter alert appears, we
recommend using a tripod. If you
cannot use a tripod, be careful of how
you hold the camera. (P32)
• Be careful of jittering when pressing
the shutter button.
ª Care for the camera
• Check to make sure there is no stain
or dirt on the lens.
• Do not touch the lens directly.
• Do not cause impact to the lens or
lens barrel.
• When turning the camera on in the
recording mode, the lens barrel comes
out. Check to make sure there are no
obstacles in front of the lens.
• Take care not to touch or stain the
surface of the lens. When the lens
becomes dirty or dust attaches to the
lens, check if the lens is retracted, use
a commercial blower brush to remove
dust or dirt and wipe the lens with a
dry, soft cloth. If you use solvents such
as benzine, alcohol or thinner, the
camera may be discolored or broken.
• When using the camera in a sandy or
dusty place, be careful not to let dirt,
grit or seawater come into the camera.
33
Page 34

Recording pictures (basic)
¬
Suggestions/Tips
¬
• When brightness has changed due
to the zoom or the movement of the
camera, the lens may click and the
picture on the screen may be
drastically changed. However, the
pictures are not affected.
The sound is caused by automatic
adjustment of the aperture. It is not
a malfunction.
• When pressing the shutter button
halfway, the screen may become
dark or bright for a moment; this is
not a malfunction. This is caused
by adjusting the aperture value.
• If the camera is shaken while the
camera is turned off, you may hear
some internal mechanical
movement. This is not a
malfunction.
• We recommend setting the clock
again before taking pictures. (P22)
• When the time for power save is set
(P25), the camera is automatically
turned off if you do not operate within
the set time. When operating the
camera again, press the shutter button
or turn the camera off and on.
ª AF/AE Lock (AF: Auto focus/
AE: Auto exposure)
P
1
2304
19
When recording a picture of people with
a composition as the above picture, you
cannot focus on the subject because it
is out of AF area in usual operation.
In this case,
1. Aim the AF area to the subject.
2. Press the shutter button halfway to fix
the focus and the exposure.
• When the subject is focused, the
focus indication lights.
3. Keeping the focus and the exposure
fixed, move the camera as you want
to compose the picture.
4. Press the shutter button fully.
• You can repeatedly retry AF/AE lock
before pressing the shutter button.
P
1
2304
19
34
1/25F2.8
P
1
2304
19
1/25F2.8
Page 35

Recording pictures (basic)
ª Program shift
In Program AE mode, you can change
the preset aperture value and the
shutter speed under the same
exposure. This is called Program shift.
By this function, you can make the
background more blurred (by
decreasing the aperture value) or record
the subject in motion clearer (by setting
to slow shutter speed) in Program AE
mode.
• Press the shutter button halfway and
then press the [EXPOSURE] button
while the aperture value and the
shutter speed appear (for
10 seconds). Then press 2/1 to
activate the Program shift.
P
1
PROGRAM SHIFT
2304
19
1/60F2.8
EXPOSURE
P
1
PROGRAM SHIFT
2304
19
1/30F4.0
WB
2 3 4 5 6 7 8 9 10 11 12 13 14
2
2.8
4
(A)
5.6
8
11
0 1
1
1
1
1
1
1
1
1
1
/
/
/
/
/
/
2
4
8
/
15
30
60
125
(B)
1
/
/
/
/
250
500
1000
2000
(A): Aperture value
(B): Shutter speed
Suggestions/Tips
¬
¬
• Program shift can be set in Macro
mode (P57) too.
• If the exposure is not adequate when
pressing the shutter button halfway,
the shutter speed turns red.
• When Program shift can be set, you
cannot switch the flash mode or set
the self-timer. Press the [EXPOSURE]
button to cancel. (P51)
• When 10 or more seconds have
passed after the Program shift
becomes effective, the status to
activate the Program shift is canceled
and returned to the Program AE
mode. However, the setting on the
Program shift is memorized.
• Program shift is canceled when
turning the camera off.
• The Program shift may not be
activated depending on the brightness
of the subject.
R
E
W
V
E
I
SET
• When the Program shift is activated,
the Program shift indication 1
appears on the screen.
35
Page 36

Recording pictures (basic)
Checking the Recorded Picture (Review)
Preparation
• In Motion image mode [ ], review function is not activated.
1 Press 4.
REVIEW1
X
DELETE4
X
EXIT
WB
R
E
W
V
E
I
SET
• The last recorded picture appear
for about 10 seconds.
• Press the shutter button halfway or
4 to cancel the review.
• You can check the previous or
following picture with 2/1.
• When the recorded pictures are too
bright or dim, compensate the
exposure. (P41)
2 Enlarge and shift the picture.
REVIEW4
X
DELETE
8X
1
X
WB
TW
R
E
W
V
E
I
SET
•:1k>4k>8k
•:8k>4k>1k
ª Deleting the recorded picture
during the review
DELETE SINGLE
DELETE THIS PICTURE?
YES NO
SELECT
SET
WB
MULTI/ALL
WB
R
E
W
V
E
I
SET
• Once deleted, pictures cannot be
recovered.
• Multi pictures or all pictures can be
deleted. Read P49 or P50 to operate
them.
36
R
E
W
V
E
I
SET
Page 37

Recording pictures (basic)
Using the Optical Zoom
You can make people and subjects appear closer with the 12 times optical zoom,
and landscapes can be recorded in wide angle.
Preparation
• Set the mode dial except for [ ]. (P30)
1k
6k
12k
ª To make subjects appear further
away (Wide)
P
1
2304
19
W
T 1X
TW
ª To make subjects appear closer
(Tele)
P
1
¬
Suggestions/Tips
2304
19
W
T 12X
TW
¬
• The picture may be slightly distorted
according to the lens. The distortion
will increase as you make subjects
wider and closer.
• When using the zoom lens at high
magnification, the quality of the picture
can be enhanced if a tripod is used. At
high magnification, even small
movements can cause a slight
decrease in picture sharpness.
• The indicated zoom magnification is
an approximation.
37
Page 38

Recording pictures (basic)
Taking Pictures using the Built-in Flash
Preparation
• Set the mode dial except for [ ]/[ ]. (P30)
ª To open the flash
Press the [ OPEN] button.
OPEN
ª To close the flash
Press the flash until it clicks.
• Be sure to close the flash when not in
use.
ª Switching the flash setting
WB
R
E
W
V
E
I
SET
:AUTO
The flash is automatically activated
according to the recording condition.
: AUTO/Red-eye reduction
The flash is automatically activated
according to the recording condition.
It reduces the red-eye phenomenon
(eyes of the subject appear red in
photo flash) by lighting the flash
before the actual recording of the
picture.
Use this when you take pictures of
people in low lighting conditions.
: Forced ON
The flash is activated every time a
picture is recorded forcibly.
Use this when your subject is back-lit
or under fluorescent light.
: Slow sync./Red-eye reduction
When you take a picture with a dark
background landscape, it makes the
shutter speed slow when the flash is
activated, so that the dark
background landscape will become
bright. Simultaneously it reduces the
red-eye phenomenon.
Use this when taking pictures of
people with the dark background.
: Forced OFF
When you do not open the flash, this
mode is set. Even in dark places, the
flash is not activated.
Use this when taking pictures in
places where use of the flash is not
allowed.
38
Page 39

Recording pictures (basic)
ª Available flash settings
PASM
ª The available flash range to take pictures
ISO sensitivity Available flash range
ISO AUTO 1.31 feet (40 cm)– 13.1 feet (4 m)
ISO100 1.31 feet (40 cm) – 6.56 feet (2 m)
ISO200 1.97 feet (60 cm) – 9.18 feet (2.8 m)
ISO400 2.62 feet (80 cm) – 13.1 feet (4 m)
• The available flash range is an approximation.
• Refer to P32 for the focus range.
ª Shutter speed for each flash mode
Flash mode Shutter speed
: AUTO 1/60 – 1/2000
: AUTO/Red-eye reduction 1/60 –1/2000
: Forced ON 1/60 – 1/2000
: Slow sync./
Red-eye reduction
: Forced OFF
• Refer to P56 for the A/S/M modes.
1 – 1/2000
1/4 – 1/2000
8 – 1/2000
(in Night portrait mode [ ])
39
Page 40

Recording pictures (basic)
ª Adjusting flash output
Adjust the flash output when the subject
is small or reflection ratio is extremely
high or low.
1 Press 3 until [ FLASH]
appears on the screen to set the
flash output.
FLASH
EXITSELECT
WB
R
E
W
V
E
I
SET
WB
R
E
W
V
E
I
SET
• You can adjust this from j2EV to
i2 EV in steps of 1/3 EV.
• The determined flash output is
memorized even if the camera is
turned off.
¬
Suggestions/Tips
¬
• In Night portrait mode [ ], flash
setting is fixed to Slow sync./Red-eye
reduction [ ].
• In Motion image mode [ ] or when
the flash is closed, flash setting is fixed
to the Forced OFF [ ].
• When using the flash in ISO AUTO
setting, the ISO sensitivity is
automatically adjusted from ISO50 to
ISO400. To avoid noises, decrease the
ISO sensitivity.
• Do not stare at the photo flash from
close proximity when using the
flash.
• If you bring the flash too close to
the subjects, they may be distorted
or discolored by its heat and
lighting.
WB
R
E
W
V
E
I
SET
• Do not cover the photo flash with
your fingers or any other items.
• If the subject is too close when using
the flash, the picture may be over
exposed.
• When the jitter alert appears, we
recommend using the flash.
• When you set to burst mode or auto
bracket, only 1 picture is recorded for
every flash activated.
• The flash icon turns red when
activating the flash and pressing the
shutter button halfway.
• When the flash is being charged, the
flash icon blinks red, and you cannot
take a picture even when you press
the shutter button fully.
• When taking a picture with the
flash, we recommend removing the
lens hood. In some cases it may not
allow the scene to be illuminated
properly.
• When taking a picture with the flash,
the white balance will be automatically
adjusted [except for [ ] (Daylight)
WB
and [ ] (Flash)], but the white
balance may not be properly adjusted
when the photo flash is insufficient.
• When the shutter speed is fast, the
flash effect may not be sufficient.
• To avoid noises, we recommend
setting each item on [PICT.ADJ.] to
[LOW]. (P79)
• Refer to P74 for the ISO sensitivity.
• Refer to P84 for the external flash.
40
Page 41

Recording pictures (basic)
Compensating the Exposure
Use this function when you cannot achieve appropriate exposure due to the
difference of brightness between the subject and the background.
Preparation
• Set the mode dial except for [ ]/[ ]. (P30)
¬
1 Press 3 until [ EXPOSURE]
appears on the screen to
compensate the exposure.
EXPOSURE
EXITSELECT
WB
R
E
W
V
E
I
SET
WB
R
E
W
V
E
I
SET
• You can compensate from j2EV
to i2 EV in steps of 1/3 EV.
WB
R
E
V
I
SET
Suggestions/Tips
• EV is an abbreviation of Exposure
Value, and it is the amount of light
given to the CCD by the aperture
value and the shutter speed.
• The compensation range of the
exposure will be limited depending on
the brightness of the subject.
• The exposure compensation value
appears on the lower left of the
screen.
• The exposure value is memorized
even if the camera is turned off.
• You cannot compensate the exposure
in manual exposure.
W
E
¬
41
Page 42

Recording pictures (basic)
Taking Pictures using Auto Bracket
In this mode, 3 pictures are automatically recorded by each press of the shutter
button according to the compensation range of the exposure.
You can select the desired exposure among the 3 types of pictures.
[Preparation]
• Set the mode dial except for [ ]/[ ]. (P30)
¬
1 Press 3 until
[ AUTO BRACKET] appears
on the screen to set the
compensation range of the
exposure.
AUTO BRACKET
EXITSELECT
WB
R
E
W
V
E
I
SET
WB
R
E
W
V
E
I
SET
• You can select the exposure from
j1EV to i1 EV in steps of 1/3 EV.
• When you do not use auto bracket,
select [OFF].
WB
R
E
W
V
E
I
SET
WB
R
E
W
V
E
I
SET
Suggestions/Tips
• When setting the auto bracket, the
auto bracket icon appears on the lower
left of the screen.
• Once you take a picture, auto bracket
will be canceled automatically.
• When taking pictures using auto
bracket after the exposure
compensation, the pictures are based
on the compensated exposure.
When the exposure is compensated,
the compensated exposure value
appears on the lower left of the
screen.
• When the flash is activated, you can
take only 1 picture. Auto bracket
setting cannot be canceled.
• When setting auto bracket, you cannot
take a picture with audio.
• When setting auto bracket and the
burst mode simultaneously, auto
bracket will be performed.
• The exposure may not be
compensated with auto bracket
depending on the brightness of the
subject.
¬
42
Page 43

Recording pictures (basic)
Taking Pictures with the Self-timer
Preparation
• Set the mode dial except for [ ]/[ ]. (P30)
1 Switch the self-timer setting.
P
1
: Self-timer set to 10 seconds
: Self-timer set to 2 seconds
No display (canceled)
2304
19
WB
R
E
W
V
E
I
SET
;
;
2 Focus on the subject to take the
picture.
P
1
• If you press the [MENU] button
when the self-timer is set, the
self-timer setting is canceled.
¬
Suggestions/Tips
• When using a tripod or other cases,
setting the self-timer to 2 seconds is
convenient to stabilize the jitter caused
by pressing the shutter button.
• The self-timer
indicator 1 blinks
and the shutter is
activated after
10 seconds (or
2 seconds).
• When pressing the button fully at a
stroke, the subject is automatically
focused just before recording pictures.
(When setting the manual focus, the
focus is fixed.)
• When setting the self-timer in the burst
mode, you can take only 1 picture.
• We recommend using a tripod when
setting the self-timer.
2304
CANCEL
¬
19
MENU
43
Page 44

Recording pictures (basic)
Taking Pictures using Burst Mode
Preparation
• Set the mode dial except for [ ]/[ ]. (P30)
¬
1 Switch the burst mode setting.
P
1
H
2304
19
Suggestions/Tips
ª Number of pictures recorded in
burst mode
Burst
speed
¬
Number of recordable
pictures
: High speed
H
;
: Low speed
L
;
No display (canceled)
2 Take pictures.
• Keep pressing the shutter button
fully to activate the burst mode.
H
L
4 frames/
second
2 frames/
second
max.
5 frames
max.
5 frames
max.
7 frames
max.
7 frames
• It is possible to record 4 frames in
1 second in burst mode at a shutter
speed higher than 1/60th.
• If the flash is activated, you can record
only 1 frame.
• You cannot take pictures with audio in
the burst mode.
• When setting auto bracket and the
burst mode simultaneously, auto
bracket will be performed.
• Burst mode will not perform as
described if a MultiMediaCard is used
in place of an SD Memory Card. The
reading/writing speed of a
MultiMediaCard is slower than that of
an SD Memory Card.
44
Page 45

Playback (basic)
Playback (basic)
Playing Back Pictures
Preparation
• Set the mode dial to [ ]. (P30)
1 Select the picture.
2304
100_0001
1/19
10:00 DEC. 1.2003
WB
R
E
W
V
E
I
SET
• Press 2 to play back the previous
picture.
• Press 1 to play back the next
picture.
• The picture following the last one is
the first picture.
ª Fast forwarding/Fast rewinding
When you keep pressing 2/1 during
playback, the file number and the page
number are updated. If you release 2/
1 when the number of the desired
picture appears, you can play back the
picture.
1: Fast forward
2: Fast rewind
• The number of files forwarded/
rewound at a time depends on how
long you hold down 2/1.
• The longer you hold down 2/1, the
more pictures you can forward/rewind
at a time.
• The setting of the number of files
forwarded/rewound at a time varies
depending on the total number of the
recorded pictures.
• When releasing 2/1, the number of
file forwarded begins from 1.
• While forwarding or rewinding a large
number of pictures by holding down
2/1, once release 2/1 before
reaching the picture to be played back,
then press 2/1 to forward/rewind
pictures until the desired picture
appears.
• In review playback in the recording
mode or multi playback, the picture
can only be forwarded or rewound one
by one.
Suggestions/Tips
¬
¬
• This camera is based on the DCF
standards (Design rule for Camera
File system) which were established
by the Japan Electronics and
Information Technology Industries
Association (JEITA).
• When changing the folder name or file
name on PC, the pictures may not be
played back.
• The file format that can be played back
with this camera is JPEG. (There are
also pictures that cannot be played
back in JPEG format.)
• When playing back pictures that have
been recorded with other equipment,
the picture quality may be deteriorated
and pictures may not be played back.
• When playing back a file out of
standard, the folder/file number is
indicated by [—] and the screen may
turn black.
• The interference fringe may appear on
the screen depending on the subject.
This is called moire. This is not a
malfunction.
45
Page 46

Playback (basic)
9 Pictures Multi Playback
Preparation
• Set the mode dial to [ ]. (P30)
1 Switch to multi screen. 2 Select the pictures.
2304
100_0001
1/19
1 2 3
4
65
10:00 DEC. 1.2003
TW
1 2 3
4
7
SELECT CANCEL
7
98
SELECT CANCEL
WB
R
E
W
V
E
I
SET
10 11 12
65
98
SELECT CANCEL
ª To return to the normal playback
Rotate the zoom lever towards [ ].
TW
• The picture with the number colored in
yellow appears.
46
Page 47

Playback (basic)
Using the Playback Zoom
Preparation
• Set the mode dial to [ ]. (P30)
1 Enlarge the picture.
2X
4X
DELETECANCEL
TW
•:1k>2k>4k>8k>16k
•:16k>8k>4k>2k>1k
2 Shift the picture.
2X
4X
DELETECANCEL
WB
ª To delete a picture during the
playback zoom
Press the [ ] button.
When the confirmation screen appears,
press 2 to select [YES], and press 4.
(P48)
Suggestions/Tips
¬
¬
• The more the picture is enlarged, the
more its quality deteriorates.
• The playback zoom may not operate if
pictures have been recorded with
other equipment.
R
E
W
V
E
I
SET
47
Page 48

Deleting Pictures
Preparation
• Set the mode dial to [ ]. (P30)
ª To delete single picture
1 Select the picture to be deleted.
2304
100_0001
1/19
10:00 DEC. 1.2003
WB
R
E
W
V
E
I
SET
• Press 2 to play back the previous
picture.
• Press 1 to play back the next
picture.
2 Delete the picture.
DELETE SINGLE
Playback (basic)
DELETE THIS PICTURE?
YES NO
SELECT
SET
WB
R
E
V
SET
MULTI/ALL
W
E
I
WB
R
E
W
V
E
I
SET
48
Page 49

ª To delete multi pictures
Playback (basic)
1 Select [MULTI DELETE].
MULTI/ALL DELETE
MULTI DELETE
ALL DELETE
SETSELECT
CANCEL
WB
R
E
W
V
E
2 times
I
SET
2 Select the pictures to be deleted.
MULTI DELETE
7
10 11 12
SELECT
MARK/UNMARK
WB
R
E
W
V
E
I
SET
• The selected pictures appear with
[ ]. When 4 is pressed again, the
setting is canceled.
• The icon [ ] blinks red if the
selected picture cannot be deleted.
Cancel the protect setting. (P96)
8
DELETE
EXIT
R
WB
E
V
SET
9
MENU
W
E
I
3 Delete the pictures.
MULTI DELETE
DELETE THE PICTURES
YOU MARKED?
YES NO
WB
R
E
W
V
E
I
• It is possible to delete up to
50 pictures all at once.
SET
SETSELECT
WB
R
E
W
V
E
I
SET
49
Page 50

ª To delete all pictures
1 Select [ALL DELETE].
MULTI/ALL DELETE
MULTI DELETE
ALL DELETE
SETSELECT
CANCEL
WB
Playback (basic)
WB
¬
Suggestions/Tips
¬
• Once deleted, pictures cannot be
recovered. Please double-check
before deleting pictures.
• Pictures that are protected (P96) or
not of DCF standards (P45) are not
deleted.
• Do not turn off the camera while
deleting.
• When the remaining battery power
(P13) is low, use the AC adaptor.
R
E
W
V
E
2 times
I
SET
2 Delete all of the pictures.
ALL DELETE
DELETE ALL PICTURES?
YES NO
SETSELECT
WB
R
E
W
V
E
I
SET
WB
R
E
R
E
W
V
E
I
SET
W
V
E
I
SET
50
Page 51

Recording pictures (advanced)
Recording pictures (advanced)
About the EXPOSURE Button
ª How to use the [EXPOSURE] button
When pressing the [EXPOSURE] button in Program AE mode [ ], Macro mode
[ ] and A/S/M mode [ ], the operation of the cursor button changes as follows.
Normal Exposure setting mode
Program AE mode/
Macro mode
A/S/M mode
WB
R
E
W
V
E
I
SET
EXPOSURE
1/30F4.0
1 Exposure compensation,
etc.
2 Self-timer
3 Review
4 Flash
5 Program shift setting
6 Close the aperture
7 Set faster shutter speed
8 Open the aperture
9 Set slower shutter speed
• Refer to P35 for the Program shift.
WB
R
E
W
V
E
I
SET
PROGRAM SHIFT
1/30F4.0
WB
R
E
W
V
E
I
SET
F4.0 1/30
Recording mode Cursor button
Program AE
Macro mode
Aperture-priority
AE
Shutter-priority
AE
Manual
Exposure
Set the Program shift
with 2/1.
Set the aperture value
with 3/4.
(2/1 is not available.)
Set the shutter speed
with 2/1.
(3/4 is not available.)
Set the aperture value
with 3/4 and set the
shutter speed with 2/1.
51
Page 52

Recording pictures (advanced)
Taking Pictures with Aperture-priority AE
When you want the background to be in sharp focus, set the aperture value to a
higher number. The higher the aperture value, the smaller the aperture opening will
be. For a soft focus background, set the aperture number to a lower number which
corresponds to a larger aperture opening.
Preparation
• Set the mode dial to [ ]. (P30)
¬
1 Select [AE MODE] and set it to [A].
1
/
REC
4
SETUP
W.BALANCE
AE
AE MODE
PICT.SIZE
A M
AUTO
S
2304
QUALITY
MENU
EXIT
SETSELECT
MENU
WB
R
E
W
V
E
I
SET
WB
R
E
W
V
E
I
SET
• Close the menu by pressing the
[MENU] button after finishing the
setting.
2 Set the aperture value and take
the picture.
ISO100
A
1
2304
19
Suggestions/Tips
• Refer to P56 for the available range of
the aperture value and the shutter
speed.
• The focus range is 0.16 feet (5 cm)– 
(Wide) and 6.56 feet (2 m)– ¶ (Tele).
• If the subject is too bright, set to larger
aperture value, if too dim, set to
smaller aperture value.
• The brightness of the screen may
differ from that of the actual pictures.
Check it using review function or
setting to the playback mode.
• The ISO sensitivity cannot be set to
[AUTO].
• When the exposure is not adequate, of
the aperture and the shutter speed
values on the screen turn red.
¬
EXPOSURE
F2.8
WB
R
E
V
SET
W
E
I
52
Page 53

Recording pictures (advanced)
Taking Pictures with Shutter-priority AE
When you want to take a sharp picture of a fast moving subject, set to faster shutter
speed. When you want to create a trail effect, set to slower shutter speed.
Preparation
• Set the mode dial to [ ]. (P30)
¬
1 Select [AE MODE] and set it to [S].
1
/
REC
4
SETUP
W.BALANCE
AE
AE MODE
PICT.SIZE
AM
AUTO
S
2304
QUALITY
MENU
EXIT
SETSELECT
MENU
WB
R
E
W
V
E
I
SET
WB
R
E
W
V
E
I
SET
• Close the menu by pressing the
[MENU] button after finishing the
setting.
2 Set the shutter speed and take the
picture.
ISO100
S
1
2304
19
Suggestions/Tips
• Refer to P56 for the available range of
the aperture value and the shutter
speed.
• The focus range is between 0.16 feet
(5 cm) – ¶ (Wide) and 6.56 feet
(2 m) –¶ (Tele).
• The brightness of the screen may
differ from that of the actual pictures.
Check it using review function or
setting to the playback mode.
• You cannot set the following items in
Shutter-priority AE.
– Slow sync./Red-eye reduction
[ ] (P38)
– [AUTO] in ISO sensitivity (P74)
• When the exposure is not adequate,
the aperture value and the shutter
speed on the screen turn red.
• When the shutter speed is slow, we
recommend using a tripod.
¬
EXPOSURE
1/30
WB
R
E
W
V
E
I
SET
53
Page 54

Recording pictures (advanced)
Taking Pictures with Manual Exposure
Decide the exposure by setting the aperture value and the shutter speed manually.
Preparation
• Set the mode dial to A/S/M mode [ ]. (P30)
1 Select [AE MODE] and set it to [M].
1
/
REC
4
SETUP
W.BALANCE
AE
AE MODE
PICT.SIZE
A M
AUTO
S
2304
QUALITY
MENU
EXIT
SETSELECT
MENU
WB
R
E
W
V
E
I
SET
WB
R
E
W
V
E
I
SET
• Close the menu by pressing the
[MENU] button after finishing the
setting.
2 Set the aperture value and the
shutter speed.
ISO100
M
1
2304
19
F2.8 1/30
3 Press the shutter button halfway.
ISO100
M
1
2304
19
1/125F4.0
• Indication for the condition of
exposure 1 (manual exposure
assistance) appears for about
10 seconds.
• When the exposure is not
adequate, set the aperture value
and the shutter speed again.
4 Take the picture.
ISO100
M
1
2304
19
EXPOSURE
• 3/4: Aperture value
• 2/1: Shutter speed
WB
R
E
W
V
E
I
SET
1/125F5.6
54
Page 55

Recording pictures (advanced)
ª Manual Exposure Assistance
The exposure is
adequate.
Set to faster
shutter speed or
larger aperture
value.
Set to slower
shutter speed or
smaller aperture
value.
• The manual exposure assistance is an
approximation. We recommend taking
pictures and then checking them using
the review function.
Suggestions/Tips
¬
¬
• Refer to P56 for the available range of
the aperture value and the shutter
speed.
• The focus range is 0.16 feet (5 cm) –
(Wide) and 6.56 feet (2 m) – ¶ (Tele).
• If the exposure is not adequate, the
aperture value and the shutter speed
turn red when pressing the shutter
button halfway.
• You cannot set the following items in
manual exposure.
– Slow sync./Red-eye reduction
[ ] (P38)
– [AUTO] in ISO sensitivity (P74)
– Exposure compensation (P41)
55
Page 56

Recording pictures (advanced)
Aperture Value and Shutter Speed
ª Aperture-priority AE
Available Aperture value (Per 1/3 EV) Shutter Speed (Sec.)
F8.0 1 – 1/2000
F7.3 F6.5 F5.6 1 – 1/1600
F5.2 F4.6 F4.0 1 – 1/1300
F3.7 F3.3 F2.8 1 – 1/1000
ª Shutter-priority AE
Available Shutter Speed (Sec.) (Per 1/3 EV) Aperture value
8654
3.22.521.6
1.3 1 1/1.3 1/1.6
1/2 1/2.5 1/3.2 1/4
1/5 1/6 1/8 1/10
1/13 1/15 1/20 1/25
1/30 1/40 1/50 1/60
1/80 1/100 1/125 1/160
1/200 1/250 1/320 1/400
1/500 1/640 1/800 1/1000
1/1300 F4.0 –F8.0
1/1600 F5.6 –F8.0
1/2000 F8.0
F2.8–F8.0
ª Manual exposure
Available Aperture value (Per 1/3 EV) Available Shutter Speed (Sec.) (Per 1/3 EV)
F2.8 – F8.0 8 – 1/1000
F4.0 – F8.0 8 – 1/1300
F5.6 – F8.0 8 – 1/1600
F8.0 8– 1/2000
56
Page 57

Recording pictures (advanced)
Taking Pictures using Macro Mode
This mode allows you to take pictures closely focusing on the subject. (E.g. When
taking pictures of flowers.)
You can take pictures with the lens at a distance of 0.16 feet (5 cm) (Wide) from the
subject.
Preparation
• Set the mode dial to [ ]. (P30)
• Normal
6.56 feet
(2 m)
0.98 feet
(30 cm)
• Macro mode [ ]
6.56 feet
(2 m)
0.16 feet
(5 cm)
1
2304
19
¬
Suggestions/Tips
¬
• In Macro mode, we recommend using
a tripod.
• When the camera lens is at a distance
over the available range from the
subject, the subject may not be
focused even if the focus indication
lights.
• You can also set the Program shift.
(P35)
• The available flash range is about
1.31 feet (40 cm)– 13.1 feet (4 m).
(When setting to ISO AUTO)
57
Page 58

Recording pictures (advanced)
Taking Pictures using Portrait Mode
This mode allows you to make the subject stand out from the unfocused background
and adjust the exposure and the hue.
Preparation
• Set the mode dial to [ ]. (P30)
ª Technique for Portrait mode
To make this mode more effective,
rotate the zoom lever to Tele as far as
possible to be close to the subject, and
then select the background which is far
from the camera.
1
2304
19
¬
Suggestions/Tips
• This mode is suitable for outdoors in
the daytime.
• [AUTO] setting in white balance works
best when recording outdoors in the
daytime. When using indoors, the hue
may change.
• You can change the white balance
setting. (P67)
• When you want to change the
exposure or the hue, compensate the
exposure of adjust the picture quality.
¬
58
Page 59

Recording pictures (advanced)
Taking Pictures using Sports Mode
This mode allows you to take pictures of a fast moving subject. (E.g. When taking
pictures of outdoor sports.)
Preparation
• Set the mode dial to [ ]. (P30)
ª Technique for Sports mode
To record actions of the subject as if it
were still, the shutter speed becomes
faster than usual. This mode is more
effective when taking pictures on a clear
day.
1
2304
19
¬
Suggestions/Tips
• This mode is suitable for outdoors in
the daytime, keeping 16.4 feet (5 m) or
more away from the subject.
• [AUTO] setting in white balance works
best when recording outdoors in the
daytime. When using indoors, the hue
may change.
• You can change the white balance
setting. (P67)
¬
59
Page 60

Recording pictures (advanced)
Taking Pictures using Panning Mode
The Panning Mode allows you to follow the motion of a moving subject. This special
effect allows the subject to be in sharp focus while the background will show some
motion blur.
Preparation
• Set the mode dial to [ ]. (P30)
• Set to burst mode. (P44)
• Prefocus on the subject. (P66)
ª Technique for Panning mode
To achieve good pictures in panning
mode, pick a horizontal plane –and then
pan as you fire shots.
1 Move the camera smoothly while
tracking a subject in motion.
2 Press the shutter button while
moving the camera.
3 Keep moving the camera
continuously.
• Be careful of the following:
– Use the Viewfinder. (P27)
– Select the subject with quick
motion.
– Be as close to the subject as
possible.
– Prefocus to the point where the
subject will come. (P66)
– Use this mode with burst mode
(P44). Select the best picture from
the pictures taken.
2304
1
19
60
Page 61

Recording pictures (advanced)
¬
Suggestions/Tips
¬
• In panning mode, the shutter speed
becomes slower than usual to achieve
the panning effect. As a result, jitter
can easily occur.
• Panning function does not work well in
the following situations.
– Very bright scenes such as daytime
in summer. We recommend using an
ND filter (DMW-LND72, optional).
(P117)
– When the shutter speed is faster
than 1/100th.
– When the subject moves slowly and
the tracking speed is too slow. (The
background cannot be recorded
dynamically.)
• [AUTO] setting in white balance works
best when recording outdoors in the
daytime. When using indoors, the hue
may change.
• You can change the white balance
setting. (P67)
61
Page 62

Recording pictures (advanced)
Taking Pictures using Night Portrait Mode
Night Portrait Mode allows you to take pictures against a nighttime landscape. By
using the flash and a slow shutter speed, the picture will show the subject and the
background brighter than they appear in real life.
Preparation
• Set the mode dial to [ ]. (P30)
1
ª Technique for Night portrait mode
• Open the flash. (P38)
• Since the shutter speed becomes slow
(max. about 1 sec.), we recommend
using a tripod.
• Keep the subject still for about
1 second after taking a picture.
• The subject should be positioned
within the available flash range
[1.31 feet (40 cm)– 6.56 feet (2 m)].
(Fixed to ISO100)
• We recommend rotating the zoom
lever to Wide.
• The focus range is 3.28 feet (1 m)– ¶.
2304
19
ª When taking picture of only a
landscape at night
• Without the flash, the shutter speed
will be about 8 seconds at maximum.
The shutter speed is suitable for taking
pictures of nightscapes only.
• The focus range is 16.4 feet (5 m) – ¶.
Suggestions/Tips
¬
• Be sure to close the flash when you do
not use the flash.
• Flash setting is fixed to Slow sync./
Red-eye reduction [ ].
• You can change the white balance
setting. (P67)
• The shutter may be kept closed
(max. about 8 seconds) after taking a
picture with slow shutter speed, but it
is not a malfunction.
• When you take pictures in dark places,
noises may become visible.
To avoid noises, we recommend
setting each item on [PICT.ADJ.] to
[LOW]. (P79)
¬
62
Page 63

Recording pictures (advanced)
Recording Motion Images
You can record motion images with audio.
Preparation
• Set the mode dial to [ ]. (P30)
1 Select [MOTION RATE].
1
/
REC
2
SETUP
MOTION RATE
30fps 10fps
CAF
CONT.AF
D.ZOOM
STABILIZER
MENU
WB
R
E
W
V
E
I
SET
• [30fps]:
The motion of recorded image is
smooth, but the file size is large.
• [10fps]:
The file size is smaller so you can
record motion images for a longer
time.
• fps (frame per second); This
means the number of frames used
in 1 second.
• Close the menu by pressing the
[MENU] button after finishing the
setting.
OFF
OFF
MODE1
EXITSETSELECT
MENU
R
2 Press the shutter button halfway.
1
WB
• When the subject is focused, the
E
W
V
E
I
SET
focus indication 1 lights.
3 Press the shutter button fully to
start the recording.
1
• The audio
recording starts
simultaneously
from the built-in
microphone 2
of the camera.
• By pressing the shutter button fully
again, the recording stops.
• If the memory of the card becomes
full during recording, the recording
stops automatically.
35S
35S
63
Page 64

ª Available recording time
Recording pictures (advanced)
SD Memory
Card Capacity
Motion rate
10fps 30fps
16 MB 75 seconds 25 seconds
32 MB 160 seconds 55 seconds
64 MB 350 seconds 120 seconds
128 MB 720 seconds 240 seconds
256 MB 1450 seconds 480 seconds
512 MB 2950 seconds 1020 seconds
• The remaining recording time appears on the screen.
(It is an approximation.)
• The recordable time is an approximation.
Suggestions/Tips
¬
¬
• The picture size is fixed to 320k240 pixels.
• The motion images cannot be recorded without audio.
• If using the MultiMediaCard, after recording motion images, the card access
indication may appear for a while, but this is not a malfunction.
• After recording starts, the auto focus/zoom/aperture values are fixed (with the first
frame).
• Recording could suddenly stop depending on the type of the card when recording
motion images.
• When the motion images recorded with this camera is played back on other
equipment, the quality of pictures and sounds may be deteriorated or they may not
be played back.
• The motion images recorded with setting [MOTION RATE] to [30fps] cannot be
played on the camera which does not support [30fps] of motion rate.
• The review function cannot be used.
• The stabilizer function can be set to only [MODE1].
64
Page 65

Recording pictures (advanced)
FOCUS
AF
MF
Taking Pictures with Manual Focus
Use this function when you want to fix the focus.
Preparation
• Set the mode dial except for [ ]. (P30)
1 Select [MF ASSIST] from the
[SETUP] menu (in the recording
mode) (P26) and set it to [ON].
2
REC SETUP
MF ASSIST
OFF ON
NO.RESET
RESET
CLOCK SET
MENU
WB
R
E
W
V
E
I
SET
• Close the menu by pressing the
[MENU] button after finishing the
setting.
/
MENU
EXITSETSELECT
WB
R
E
W
V
E
I
SET
WB
R
E
W
V
E
I
SET
2 Slide the focus switch to [MF] and
rotate the MF ring 1 to focus on
the subject.
3
•AF: Auto focus
• MF: Manual focus
• 4: One shot AF
3 The MF assistance appears on the
center of the screen.
P
1
MF
• You can also set [MF ASSIST] to
[OFF] on the [SETUP] menu (in the
recording mode).
• When you stop rotating the MF
ring, the MF assistance disappears
about 2 seconds after.
2304
19
65
Page 66

Recording pictures (advanced)
FOCUS
AF
MF
ª Technique for Manual focus
The subject is focused.
ª Prefocus
This is a technique to focus on the point
to take pictures in advance when it is
difficult to focus on the subject with auto
focus due to its quick motion. (E.g.
Panning mode [ ]) (P60)
This function is suitable when the
distance between the camera and the
subject is certain.
The subject is unfocused.
1 Rotate the MF ring slowly. If the
subject is focused, rotate it a little
more.
2 Finely focus on the subject while
rotating the MF ring in the reverse
direction.
ª One shot AF
You can focus on the subject with auto
focus by sliding down the focus switch to
[4] in MF mode.
This is convenient for prefocus.
Suggestions/Tips
¬
¬
• You can also record with manual focus
in Motion image mode [ ]. When
starting the recording, the focus is
fixed.
• When you focus on the subject in
Wide, the focus may not be adequate
in Tele. In this case, focus on the
subject again.
• When you zoom in the subject after
focusing in Tele, the focus may
fluctuate. Focus on the subject again.
• When setting the manual focus, you
cannot set the continuous AF.
• The MF assistance only appears in
optical zoom range.
66
Page 67

Recording pictures (advanced)
Setting the White Balance
In certain situations, the color white may appear slightly reddish or bluish. This can
occur when shooting under early or late day sunlight, on a cloudy day, or under
halogen lighting. By using the manual White Balance feature you can achieve a
more accurate reproduction of the color white.
Preparation
• Set the mode dial except for [ ]/[ ]. (P30)
1 Select [W.BALANCE] and set the
desirable mode.
1
/
REC
4
SETUP
W.BALANCE
AUTO
PICT.SIZE
QUALITY
SPOT MODE
MENU
WB
R
E
W
V
E
I
SET
•[AUTO]:
for setting the white balance
automatically (auto white balance)
•[ ] (Daylight):
for recording outdoors on a bright
day
• [ ] (Cloudy):
for recording under a cloudy and
shady sky
• [ ] (Halogen):
for recording under halogen lighting
WB
•[ ] (Flash):
for taking a picture with photo flash
only
• [ ] (White set):
for manual setting (Read the
following page where the manual
setting is explained in detail.)
WB
2304
OFF
MENU
EXITSETSELECT
WB
R
E
W
V
E
I
SET
• Close the menu by pressing the
[MENU] button after finishing the
setting.
67
Page 68

Recording pictures (advanced)
Use of auto white balance adjustment in
inappropriate lighting conditions may
result in reddish or bluish pictures.
Where the subject is surrounded by
many light sources, auto white balance
adjustment may not operate properly.
In this case, set the white balance to the
mode except [AUTO] manually.
1 The range that is controlled by the
auto white balance adjustment mode
of this camera
2 Blue sky
3 Cloudy sky (Rain)
4 TV screen
5 Sunlight
6 White fluorescent light
7 Incandescent light bulb
8 Sunrise and sunset
9 Candlelight
2)
3)
4)
1)
5)
6)
7)
8)
9)
KlKelvin Color Temperature
68
Page 69

Recording pictures (advanced)
Setting the White Balance manually (White set)
Preparation
• Set the mode dial except for [ ]/[ ]. (P30)
¬
1 Select [W.BALANCE] and set to
[].
1
/
REC
4
SETUP
W.BALANCE
PICT.SIZE
WB
2304
QUALITY
OFF
MENU
EXITSETSELECT
WB
R
E
W
V
E
I
SET
MENU
SPOT MODE
WB
R
E
W
V
E
I
SET
2 (Only when setting the white
balance again) Press 1.
3 Aim the camera at a sheet of white
paper 1 or similar object so that it
completely fills the frame to white
on the screen and press the
shutter button fully.
Suggestions/Tips
• When setting the white balance to the
mode except for [AUTO], you can
finely adjust the white balance. (P70)
• The setting of the white balance is
applied to the other recording modes.
• In Motion image mode [ ], the white
balance is fixed to [AUTO].
• When taking a picture with the flash,
the white balance will be automatically
adjusted [except for [ ] (Daylight)
WB
and [ ] (Flash)], but the white
balance may not be properly adjusted
when the photo flash is insufficient.
¬
• Close the menu by pressing the
[MENU] button after finishing the
setting.
69
Page 70

Recording pictures (advanced)
Finely Adjusting the White Balance
If you cannot acquire the desirable hue with white balance because of too many
different light sources, etc., adjust the fine white balance as follows.
Preparation
• Set the mode dial except for [ ]/[ ]. (P30)
• Set the white balance to [ ]/[ ]/[ ]/[ ]/[ ]. (P67)
WB
1 Press 3 until [ WB ADJUST.]
appears.
WB ADJUST.
RED BLUE
EXITSELECT
WB
R
E
W
V
E
I
SET
2 Adjust the white balance.
WB ADJUST.
RED BLUE
EXITSELECT
WB
R
E
W
V
E
I
SET
• 1 [BLUE]: Press when the hue is
• 2 [RED]: Press when the hue is
• Close the function by pressing 4
after finishing the adjustment.
¬
Suggestions/Tips
• The white balance icon turns red or
blue.
• You can set the value independently
for each of the modes in white
balance.
• When you set the white balance using
the White set [ ], the adjustment
level is set to “0”.
• The adjusted picture will be close,
though may not be identical to the
actual picture.
reddish.
bluish.
¬
70
Page 71

Recording pictures (advanced)
Changing the Picture Size
Preparation
• Set the mode dial except for [ ]/[ ]. (P30)
¬
1 Select [PICT.SIZE] and set the
picture size.
1
/
REC
4
SETUP
W.BALANCE
PICT.SIZE
2304 1280
1600 640
QUALITY
SPOT MODE
MENU
WB
R
E
W
V
E
I
SET
• [2304]: 2304k1728 pixels
• [1600]: 1600k1200 pixels
• [1280]: 1280k960 pixels
• [640]: 640k480 pixels
• [HDTV]: 1920k1080 pixels
• Close the menu by pressing the
[MENU] button after finishing the
setting.
AUTO
OFF
MENU
EXITSETSELECT
WB
R
E
V
SET
W
E
I
Suggestions/Tips
• In Motion image mode [ ], the
picture size is fixed to 320k240 pixels.
• The smaller the picture size
(640k480) you select, the more
pictures you can store on the card. In
addition, a small file size allows you to
attach the picture to an e-mail or post
it on a web site more easily.
• If you select a larger picture size
(2304k1728), the printed picture will
be clearer, especially with larger sized
prints.
• If you playback pictures recorded
using [HDTV] mode on a
High-Definition TV, (HDTV has 16:9
aspect) the picture quality will be
higher. An SD Memory Card can be
played on TVs with an SD Memory
Card slot.
¬
71
Page 72

Recording pictures (advanced)
Changing the Quality
“Quality” refers to the amount each image is compressed. Lower compression
results in superior picture quality. Higher compression allows you to store more
images on your SD Memory card.
Preparation
• Set the mode dial except for [ ]/[ ]. (P30)
¬
1 Select [QUALITY] and set the
quality.
1
/
REC
4
SETUP
W.BALANCE
PICT.SIZE
QUALITY
SPOT MODE
AUTO
2304
OFF
MENU
EXITSETSELECT
Suggestions/Tips
• It may happen that pictures appear like
a mosaic depending on the subject or
the recording condition.
• The number of recordable pictures
depends on the subject.
• The number of remaining frames may
not correspond with recorded frames.
• Refer to P126 for the number of
recordable pictures.
¬
MENU
WB
R
E
W
V
E
I
SET
• : Fine (Low compression)
It gives priority to picture quality to
record high quality pictures.
• : Standard
(High compression)
It gives priority to the number of
recordable pictures and records
standard quality pictures.
• Close the menu by pressing the
[MENU] button after finishing the
setting.
WB
R
E
W
V
E
I
SET
72
Page 73

Recording pictures (advanced)
Taking Pictures using Spot Mode
When using Spot mode, the size of the area used to calculate the focus and
exposure is decreased. It is useful when you may be shooting through a group of
people and want to designate where in the group the camera will calculate the
exposure.
Preparation
• Set the mode dial except for [ ]/[ ]. (P30)
1 Select [SPOT MODE] and set it to
[ON].
1
/
REC
4
SETUP
W.BALANCE
PICT.SIZE
AUTO
2304
QUALITY
SPOT MODE
OFF ON
MENU
EXITSETSELECT
MENU
WB
R
E
W
V
E
I
SET
WB
R
E
W
V
E
I
SET
• Close the menu by pressing the
[MENU] button after finishing the
setting.
2 Aim the spot AF area to the
subject and press the shutter
button halfway for the AF/AE lock.
P
1
2304
19
3 Move the camera to compose the
picture fixing the focus on the
subject and take the picture.
P
1
• You can set suitable AF/AE in more
limited areas.
¬
Suggestions/Tips
• When the subject is dark, it may not be
focused properly.
• Background may become dark or
whitish depending on the subject
because the exposure is set
appropriately in the spot AF area.
2304
19
1/25F2.8
¬
1/25F2.8
• The spot AF area 1 and spot
metering target 2 appear.
73
Page 74

Recording pictures (advanced)
Setting ISO Sensitivity
The ISO setting sets the cameras sensitivity to light. The ISO setting can be
increased when you need to take pictures in places where a flash may not be
allowed. The overall picture quality will decrease slightly as the ISO setting is
increased.
ISO sensitivity 50 400
Use in bright places
(E.g. outdoors)
Use in dark places Not suitable Suitable
Shutter speed Slow Fast
Noises Less Increase
Preparation
• Set the mode dial except for [ ]. (P30)
1 Select [SENSITIVITY] and set the
ISO sensitivity.
2
/
REC
4
SENSITIVITY
AUTO
AUDIO REC.
CAF
CONT.AF
D.ZOOM
Suitable Not suitable
SETUP
100 200 40050
OFF
OFF
OFF
MENU
EXITSETSELECT
¬
Suggestions/Tips
¬
• In Motion image mode [ ], ISO
sensitivity is fixed to [AUTO].
• To avoid noises, we recommend
decreasing the ISO sensitivity or
setting each item on [PICT.ADJ.] to
[LOW]. (P79)
• In A/S/M mode [ ], the ISO
sensitivity cannot be set to [AUTO].
MENU
WB
R
E
W
V
E
I
SET
• When setting to [AUTO], the ISO
sensitivity is automatically adjusted
from ISO50 to ISO200 according to
the brightness. (From ISO50 to
ISO400 when using the flash)
• Close the menu by pressing the
[MENU] button after finishing the
setting.
WB
R
E
W
V
E
I
SET
74
Page 75

Recording pictures (advanced)
Taking Pictures with Audio
Preparation
• Set the mode dial except for [ ]/[ ]. (P30)
¬
1 Select
[
AUDIO REC.] and set it to
[ON].
2
/
REC
4
SETUP
SENSITIVITY
AUTO
AUDIO REC.
OFF ON
CAF
CONT.AF
D.ZOOM
OFF
OFF
EXITSETSELECT
MENU
WB
R
E
W
V
E
I
SET
• Close the menu by pressing the
[MENU] button after finishing the
setting.
2 Take the picture.
MENU
R
WB
E
W
V
E
I
SET
Suggestions/Tips
• It is not necessary to keep pressing
the shutter button.
• Audio is recorded
from the built-in
microphone 1 of
the camera.
• When setting to
auto bracket/burst
mode, it is not possible to take pictures
with audio.
• When audio is recorded with each
picture the total number of pictures
that can be stored on each card will be
slightly decreased.
¬
P
1
2304
19
1/25F2.8
• 5 seconds after, the audio
recording is stopped automatically.
• If you press the [MENU] button
during the audio recording, it will be
canceled. The audio cannot be
recorded.
75
Page 76

Recording pictures (advanced)
Using the Continuous AF
This function allows you to reduce the time required for focusing when pressing the
shutter button halfway.
Preparation
• Set the mode dial except for [ ]. (P30)
¬
1 Select [CONT.AF] and set it to
[ON].
2
/
REC
4
SETUP
AUTO
OFF
OFF
MENU
EXITSETSELECT
WB
R
E
V
SET
MENU
SENSITIVITY
AUDIO REC.
CAF
CONT.AF
D.ZOOM
R
OFF ON
WB
E
W
V
E
I
SET
• Close the menu by pressing the
[MENU] button after finishing the
setting.
2 Take the picture.
Suggestions/Tips
• When setting the manual focus, you
cannot use the continuous AF.
• The battery is depleted more quickly
using continuous AF.
• It may take time to focus on the
subject after rotating the zoom lever
from Wide to Tele or suddenly
changing the subject from distant one
to nearby one.
• Press the shutter button halfway again
when it is difficult to focus on the
subject.
• When pressing the shutter button
W
E
I
halfway, the motion on the screen may
be paused. This is not a malfunction.
¬
P
C_AF
1
2304
19
1/25F2.8
76
Page 77

Recording pictures (advanced)
Using the Digital Zoom
Preparation
• Set the mode dial except for [ ]. (P30)
ª Entering the digital zoom range
When you rotate the zoom lever to the
extreme Tele position the on screen
zoom indication may momentarily
pause. This is not a malfunction.
You can enter the digital zoom range to
continuously rotate the zoom lever to
Tele or to release the zoom lever once
and then rotate it to Tele again.
1 Select
[
D.ZOOM] and set it to [ON].
2
/
REC
4
SETUP
SENSITIVITY
AUDIO REC.
CAF
CONT.AF
AUTO
OFF
OFF
D.ZOOM
OFF ON
MENU
EXITSETSELECT
MENU
WB
R
E
W
V
E
I
SET
• Close the menu by pressing the
[MENU] button after finishing the
setting.
• When rotating the zoom lever with
setting the [D.ZOOM] to [ON], the
digital zoom indication appears.
(P119)
W
W
T
T
1 Optical zoom
2 Digital zoom
Suggestions/Tips
¬
¬
• It is possible to further magnify a
subject already magnified 12 times
with the optical zoom by 3 more times
with the digital zoom, thereby reaching
a maximum of 36 times.
• When using the digital zoom the
picture quality becomes deteriorated.
• In the digital zoom range, the stabilizer
WB
function may not be effective.
• We recommend to use a tripod in the
digital zoom range.
R
E
V
E
I
SET
• The indicated zoom magnification is
W
an approximation.
77
Page 78

Recording pictures (advanced)
Using the Color Effect
You can use 3 types of color effects depending on the image of the picture.
Preparation
• Set the mode dial except for [ ]/[ ]. (P30)
1 Select [COL.EFFECT] and set the
color.
3
/
REC
4
SETUP
COL.EFFECT
OFF
COOL WA RM B/W
PICT.ADJ.
STABILIZER
FLIP ANIM.
MENU
WB
R
E
W
V
E
I
SET
• [COOL]: The picture becomes
bluish.
• [WARM]: The picture becomes
reddish.
• [B/W]: The picture becomes
black and white.
• Close the menu by pressing the
[MENU] button after finishing the
setting.
EXITSETSELECT
MODE1
MENU
WB
R
E
W
V
E
I
SET
2 Take the picture.
P
COOL
¬
Suggestions/Tips
• [COOL] is effective when you want to
add cold atmosphere to the picture,
and [WARM] is effective when you
want to express comfortable warmth in
the scene.
2304
1
19
1/25F2.8
¬
78
Page 79

Recording pictures (advanced)
Adjusting the Quality of the Picture (Picture Adjustment)
Preparation
• Set the mode dial except for [ ]/[ ]. (P30)
1 Select [PICT.ADJ.]
REC
COL.EFFECT
.
3
/
4
SETUP
OFF
PICT.ADJ.
STABILIZER
MODE1
FLIP ANIM.
MENU
EXITSETSELECT
MENU
WB
R
E
W
V
E
I
SET
2 Select [CONTRAST],
[SHARPNESS] and [SATURATION]
respectively.
PICT.ADJ.
CONTRAST
LOW HIGHSTD.
SHARPNESS
SATURATION
WB
STD.
STD.
MENU
EXITSETSELECT
• [CONTRAST]:
HIGH: Increases the difference
between the brightness and
the darkness in the picture.
LOW: Decreases the difference
between the brightness and
the darkness in the picture.
• [SHARPNESS]:
HIGH: The picture is sharply
defined.
WB
LOW: The picture is softly
focused.
• [SATURATION]:
R
E
W
V
E
I
SET
HIGH: The colors in the picture
becomes vivid.
LOW: The colors in the picture
become natural.
• Close the menu by pressing the
[MENU] button 2 times after
finishing the setting.
¬
Suggestions/Tips
¬
• When you take pictures in dark places,
noises may become visible.
To avoid noises, we recommend
setting each item on [PICT.ADJ.] to
[LOW].
R
E
W
V
E
I
SET
79
Page 80

Recording pictures (advanced)
Using the Optical Image Stabilizer
Preparation
• Set the mode dial except for [ ]. (P30)
¬
1 Select [STABILIZER] and set it.
3
/
REC
4
SETUP
COL.EFFECT
PICT.ADJ.
STABILIZER
OFF
FLIP ANIM.
MENU
• [OFF]:
WB
R
E
W
V
E
I
SET
OFF
When image stabilization is not
desired or when using a tripod.
•[MODE1]:
1
The stabilizer operates
continuously and can assist during
photocomposition.
•[MODE2]:
2
The stabilizer function is in standby
and activates at the moment the
shutter captures the image. This
mode offers a greater degree of
stabilization.
• Close the menu by pressing the
[MENU] button after finishing the
setting.
OFF
MODE2MODE1
MENU
EXITSETSELECT
WB
R
E
V
SET
W
E
I
Suggestions/Tips
• In [MODE2], the optical image
stabilizer icon turns yellow soon after
you turn the camera on to keep the
stabilizer function activated.
• While the optical image stabilizer icon
is displayed in yellow and if the
camera receives a strong shock, the
icon may be displayed in yellow for
longer time than usual.
• While the optical image stabilizer icon
is displayed in yellow, the stabilizer
function may not work sufficiently.
• While the optical image stabilizer icon
is displayed in yellow, the pictures on
screen also be stabilized. (as same as
in [MODE1])
• The stabilizer function may not work
sufficiently in the following cases.
– When too much jitter occurs
– In digital zoom range
– When taking pictures while following
subjects in motion.
– When the shutter speed is extremely
slow due to nightscape or other
reasons.
• Refer to P33 for information on jitter.
¬
80
Page 81

Recording pictures (advanced)
Creating Flip Animation
You can create motion image files by arranging pictures taken frame-by-frame.
Preparation
• Set the mode dial except for [ ]/[ ]. (P30)
Example:
When capturing images of the subject in
sequence moving it little by little and
aligning the images, the subject looks
as if it were moving.
ª Capturing images
1 Select [FLIP ANIM.].
3
/
REC
4
SETUP
COL.EFFECT
OFF
PICT.ADJ.
STABILIZER
MODE1
FLIP ANIM.
EXITSETSELECT
MENU
WB
R
E
W
V
E
I
SET
2 Select [IMAGE CAPTURE].
FLIP ANIM.
IMAGE CAPTURE
CREATE MOTION IMAGE
DELETE STILL IMAGES
EXITSETSELECT
WB
MENU
MENU
WB
R
E
W
V
E
I
SET
81
R
E
W
V
E
I
SET
Page 82

Recording pictures (advanced)
3 Capture images for flip animation.
P
1
320
REMAIN
EXIT
8
92
MENU
ª Creating motion images
5 Select [CREATE MOTION IMAGE].
FLIP ANIM.
IMAGE CAPTURE
CREATE MOTION IMAGE
DELETE STILL IMAGES
MENU
EXITSETSELECT
• You can take up to 100 pictures.
4 Check the image.
REVIEW
SELECT EXIT DELETE
• You can check the previous or
following image with 2/1.
• Delete unnecessary images with
[ ] button.
320
WB
R
E
W
V
E
I
SET
1/8
MENU
WB
R
E
W
V
E
I
SET
WB
R
E
W
V
E
I
SET
6 Select [FRAME RATE] and set the
number of frames.
CREATE MOTION IMAGE
FRAME RATE
CREATE MOTION IMAGE
• [5fps]:
5 frames/sec.
• [10fps]:
10 frames/sec. (The motion images
become smoother.)
5fps 10fps
EXITSETSELECT
WB
R
E
W
V
E
I
SET
MENU
82
Page 83

Recording pictures (advanced)
7 Select [CREATE MOTION IMAGE]
and create a flip animation.
CREATE MOTION IMAGE
FRAME RATE
CREATE MOTION IMAGE
WB
R
E
W
V
E
I
SET
• The file number appears for about
1 second after creating a flip
animation.
• Including the created images, the
flip animation is counted as
1 animation image.
• Close the menu by pressing the
[MENU] button 3 times after
finishing the setting.
5fps
MENU
EXITSETSELECT
WB
R
E
W
V
E
I
SET
ª Playing back a created flip
animation
Follow the same procedure as you play
back motion images. (P89)
ª Deleting all of still images used
for flip animation
When selecting [DELETE STILL
IMAGES] in flip animation screen, a
confirmation screen appears. Select
[YES] and then press 4.
Suggestions/Tips
¬
¬
• Flip animations are created as motion
image files. (Extension: .MOV)
• The number of pixel is 320k240.
• You cannot use pictures with audio,
burst mode and auto bracket.
• The images in each frame do not
appear in normal review. (P36)
• Flip animations may not be played by
other equipment.
• The flip animations recorded with
setting [FRAME RATE] to [5fps]
cannot be played on the camera which
does not support [5fps] of motion rate.
• Audio cannot be recorded on flip
animations. However, you may hear
noises when playing with other
equipment without a mute function.
• The number of recordable images is
an approximation.
83
Page 84

Recording pictures (advanced)
Using the External Flash
After installing the optional flash, DMW-FL28, the effective range will be increased
when compared to the camera’s built in flash.
Preparation
• Set the mode dial except for [ ]/[ ]. (P30)
1 Attach the external flash to the hot
shoe 1 and turn the camera on.
• Tighten the lock screw 2 of the
external flash firmly.
2 Select [PRESET] or [MANUAL]
and turn the external flash on.
4
/
REC
4
SETUP
EXT.FLASH
PRESET MANUAL
CONVERSION
MENU
WB
R
E
W
V
E
I
SET
• Close the menu by pressing the
[MENU] button after finishing the
setting.
ª Switch the external flash setting
WB
R
E
V
SET
Icon Setting
or
or
External flash Forced
ON
External flash Forced
OFF
OFF
MENU
EXITSETSELECT
WB
R
E
V
E
I
SET
W
E
I
W
84
Page 85

Recording pictures (advanced)
ª About PRESET/MANUAL on the
external flash
• When setting to [PRESET] and
attaching the external flash, the
aperture value and the ISO sensitivity
are respectively set to [F2.8] and
[ISO100] on the camera regardless of
the recording mode. Set the external
flash to [AUTO] and set the same
value as the settings on the camera.
• We recommend setting to [PRESET]
for normal use.
• When setting to [MANUAL], you can
set the aperture value, the shutter
speed and the ISO sensitivity on the
camera even if the external flash is
attached.
• When setting to [MANUAL], set to the
Aperture-priority AE or the manual
exposure on the camera and then set
the same aperture value and the ISO
sensitivity on the external flash. (The
external flash cannot control the light
adequately due to the change in
aperture value on Shutter-priority AE
and Program AE.)
Suggestions/Tips
¬
¬
• Some commercial external flashes
have synchro terminals with
high-voltage or reversed polarity.
Using such external flashes may
cause a malfunction or the camera
may not operate normally.
Be sure to use Panasonic’s external
flash (DMW-FL28).
• If using other external flash units,
please make sure the flash is
designed for use with a digital camera
and the trigger voltage is based on
ISO 10330 (less than 24 volts).
• The available flash range is 32.8 feet
(10 m) in DMW-FL28. (When setting to
ISO100)
• When attaching the external flash, the
shutter speed becomes 1/60th to
1/250th in normal mode, 1 to 1/250th
in Night portrait mode [ ].
• External flash mode is selected when
attaching the external flash to the
camera even if the external flash is
turned off. When you are not using the
external flash, detach it or set it to
Forced OFF.
• When attaching the external flash, the
built-in flash cannot be activated.
• When attaching the external flash, the
camera becomes unstable to be put.
• Detach the external flash when
carrying the camera.
• When attaching the external flash, do
not hold only the external flash
because it may drop off the camera.
• When using the external flash and
setting the white balance to [ ]
WB
(Flash), finely adjust the white
balance. (P70)
• If you take pictures close to the subject
in Wide, the vignetting effect may
appear on the bottom of the recorded
picture.
• Read the operating instructions of the
external flash for details.
85
Page 86

Recording pictures (advanced)
Using the Conversion Lens
The tele conversion lens (DMW-LTZ10, optional) allows you to record pictures
zooming in much more (1.5 times). The wide conversion lens (DMW-LWZ10,
optional) allows you take pictures with wider range of focus than usual (0.8 times).
Preparation
• Set the mode dial except for [ ]. (P30)
• Check that the camera is turned off and that the lens is retracted.
1 Remove the lens cap and the lens
ring.
2 Attach the tele conversion lens 1
or wide conversion lens 2.
• Rotate the lens slowly and
carefully.
3 Turn the camera on and select
[CONVERSION].
4
/
REC
4
SETUP
EXT.FLASH
PRESET
CONVERSION
EXITSETSELECT
MENU
WB
R
E
W
V
E
I
SET
4 Set to [WIDE] or [TELE].
CONVERSION
OFF TELEWIDE
SETSELECT
WB
R
E
W
V
E
I
SET
•[OFF]:
When you do not attach the
conversion lens.
•[WIDE]:
When you attach the wide
conversion lens.
86
WB
R
E
V
SET
MENU
E
I
WB
R
E
W
V
E
I
SET
W
Page 87

Recording pictures (advanced)
•[TELE]:
When you attach the tele
conversion lens.
• Close the menu by pressing the
[MENU] button after finishing the
setting.
ª Recordable range when using the
conversion lens
When using the tele conversion lens:
• Normal: 15.1 feet (4.6 m)– 
• Macro mode [ ]:
15.1 feet (4.6 m)– 
When using the wide conversion lens:
• Normal: 0.56 feet (17 cm)– 
• Macro mode [ ]: 0.03 feet (1 cm) –
Tele conversion lens
Indication 6
Actual
magnification
35 mm film
camera
equivalent
Indication 1
Actual magnification 0.8k 1.6k
35 mm film camera
equivalent
k 12k 36k
k 18k 54k
9
315 mm 630 mm 1890 mm
Wide conversion lens
k 2k
28 mm 56 mm
Suggestions/Tips
¬
¬
• Check if the lens cap is removed
before attaching the conversion lens.
• When using the conversion lens:
– The built-in flash cannot be
activated.
– If you use a tripod, use the tripod
adaptor supplied with the
conversion lens, and then fix the
tripod to the tripod adaptor.
– If you set [CONVERSION] to
[OFF], the performance of the
conversion lens cannot be
brought out enough.
• When using the tele conversion
lens:
– We recommend using a tripod.
– The stabilizer function may not work
sufficiently.
– The focus indication may light due to
the jitter even if the subject is not
focused.
– The time required for focusing may
become longer than usual.
• Read the operating instructions of the
conversion lens for details.
• When using the tele conversion lens,
the available zoom range is limited to
6 times or more. Digital zoom is
available.
• When using the wide conversion lens,
the available zoom range is limited
between 1 times and 2 times. Digital
zoom is not available.
87
Page 88

Playback (advanced)
Playback (advanced)
Playing Back Pictures with Audio
Preparation
• Set the mode dial to [ ]. (P30)
¬
1 Select the picture with audio icon
.
[]
2304
100_0001
PLAY AUDIO
1/19
10:00 DEC. 1.2003
WB
R
E
W
V
E
I
SET
2 Play back the audio.
2304
100_0001
PLAY AUDIO
1/19
Suggestions/Tips
• The picture with audio cannot be
resized (P101) or trimmed (P103).
¬
10:00 DEC. 1.2003
WB
R
E
W
V
E
I
SET
• You can hear audio from the
speaker.
• To adjust the sound volume, refer
to P26.
88
Page 89

Playback (advanced)
Playing Back Motion Images
Preparation
• Set the mode dial to [ ]. (P30)
1 Select the picture with the motion
image icon [ ].
100_0001
PLAY MOTION
1/19
IMAGE
10:00 DEC. 1.2003
WB
R
E
W
V
E
I
SET
2 Play back the motion images.
10S REMAIN
WB
R
E
W
V
E
I
SET
• Motion image playback stops and
the normal playback is restored by
pressing 4.
• The icon 1 is corresponding to the
3/4/2/1.
ª Fast forwarding/Fast rewinding
During motion image playback, continue
pressing 2/1.
1: Fast forward
2: Fast rewind
• When releasing the button, it turns to
normal motion image playback.
ª To p aus e
Press 3 during motion image playback.
• Press 3 again to cancel pause.
• To adjust the sound volume, refer to
P26.
Suggestions/Tips
¬
¬
• You cannot use the zoom function
while playing back or pausing motion
images.
• The file format that can be played back
with this camera is QuickTime Motion
JPEG.
• Some QuickTime Motion JPEG files
recorded by a PC or other equipment
may not be played back with this
camera.
• When playing back motion images that
have been recorded with other
equipment, the quality of images may
be deteriorated or the images may not
be able to be played back.
• When using a high capacity card, it is
possible that fast rewinding may be
slower than usual.
89
Page 90

Playback (advanced)
Rotating the Picture
You can rotate the recorded pictures in increments of 90°.
This is a convenient function to play back pictures on TV.
Preparation
• Set the mode dial to [ ]. (P30)
1 Select [ROTATE].
1
/
PLAY
2
SETUP
ROTATE
PROTECT
DPOF PRINT
SLIDE SHOW
AUDIO DUB.
MENU
EXITSETSELECT
MENU
WB
R
E
W
V
E
I
SET
WB
R
E
W
V
E
I
SET
2 Select the direction to rotate the
picture.
ROTATE
CANCEL
WB
MENU
SETSELECT
WB
• Close the menu by pressing the
[MENU] button after finishing the
setting.
ª Example
When rotating clockwise ( )
Original
Picture
¬
Suggestions/Tips
¬
• Still pictures can only be rotated in
normal playback. When playing back
rotated pictures in zoom playback or
multi playback, pictures appear in
original angle.
• Rotated pictures appear on a PC only
when an OS or a software compatible
with Exif is installed in the PC.
• Exif is the file format for still pictures,
to which can be added recording
information and other, established by
JEITA [Japan Electronics and
Information Technology Industries
Association].
R
E
W
V
E
I
SET
R
E
V
I
SET
• [ ]: The picture rotates
counter-clockwise in
increments of 90°.
• [ ]: The picture rotates
clockwise in increments of
90°.
W
E
90
Page 91

Playback (advanced)
Setting the Picture to be Printed and the Number of Prints (DPOF Print Setting)
DPOF (Digital Print Order Format) is a system that allows the user to select which
pictures are to be printed on compatible photo printers. DPOF also allows the user
to set how many copies of each picture will be printed. Many commercial photo
printing services now use DPOF. For more information please visit:
http://www.panasonic.co.jp/avc/video/dpof/dpof_110/white_e.htm
Preparation
• Set the mode dial to [ ]. (P30)
ª Single setting/cancel
1 Select [DPOF PRINT].
1
/
PLAY
2
SETUP
ROTATE
PROTECT
DPOF PRINT
SLIDE SHOW
AUDIO DUB.
MENU
WB
R
E
W
V
E
I
SET
2 Select [SINGLE].
1
/
PLAY
2
SETUP
ROTATE
PROTECT
DPOF PRINT
SLIDE SHOW
AUDIO DUB.
WB
R
E
W
V
E
I
SET
MENU
EXITSETSELECT
SINGLE
MULTI
CANCEL
INDEX
MENU
EXITSETSELECT
3 Select the picture and set the
number of prints.
DPOF SET THIS
1
COUNT DATE
WB
R
E
W
V
E
I
SET
WB
R
E
W
V
E
I
SET
• The number of prints can be set
from 0 to 999.
• The number of prints icon [ ]
appears.
• When the number of prints is set to
“0”, DPOF print setting is canceled.
• Close the menu by pressing the
[MENU] button 2 times after
finishing the setting.
001
100_0001
1/19
DISPLAY
MENU
EXITSELECT
WB
R
E
W
V
E
I
SET
1
91
Page 92

ª Multi setting/cancel
Playback (advanced)
1 Select [DPOF PRINT].
1
/
PLAY
2
SETUP
ROTATE
PROTECT
DPOF PRINT
SLIDE SHOW
AUDIO DUB.
MENU
WB
R
E
W
V
E
I
SET
2 Select [MULTI].
1
/
PLAY
2
SETUP
ROTATE
PROTECT
DPOF PRINT
SLIDE SHOW
AUDIO DUB.
WB
R
E
W
V
E
I
SET
MENU
EXITSETSELECT
SINGLE
MULTI
CANCEL
INDEX
MENU
EXITSETSELECT
WB
R
E
W
V
E
I
SET
3 Select the pictures and set the
number of prints.
DPOF SET MULTI
7
10 11 12
COUNT DATE
WB
R
E
W
V
E
I
SET
• The number of prints can be set
from 0 to 999.
• The number of prints icon [ ]
appears.
• Repeat step 3.
• When the number of prints is set to
“0”, DPOF print setting is canceled.
• Close the menu by pressing the
[MENU] button 2 times after
finishing the setting.
001
WB
R
E
W
V
E
I
SET
1
8
9
DISPLAY
MENU
EXITSELECT
WB
R
E
W
V
E
I
SET
1
92
Page 93

ª To cancel all settings
Playback (advanced)
1 Select [DPOF PRINT].
1
/
PLAY
2
SETUP
ROTATE
PROTECT
DPOF PRINT
SLIDE SHOW
AUDIO DUB.
MENU
2 Select [CANCEL]
WB
R
E
V
E
I
SET
1
/
PLAY
2
ROTATE
PROTECT
DPOF PRINT
SLIDE SHOW
AUDIO DUB.
WB
R
E
W
V
E
I
SET
W
.
SETUP
MENU
EXITSETSELECT
SINGLE
MULTI
CANCEL
INDEX
MENU
EXITSETSELECT
WB
R
E
W
V
E
I
SET
3 Select [YES] to cancel all settings.
CANCEL ALL DPOF
CANCEL ALL DPOF
PRINT SETTINGS?
YES NO
SETSELECT
WB
R
E
W
V
E
I
SET
WB
R
E
W
V
E
I
SET
WB
R
E
W
V
E
I
SET
• Close the menu by pressing the
[MENU] button after canceling the
setting.
93
Page 94

ª Index setting/cancel
Playback (advanced)
1 Select [DPOF PRINT].
1
/
PLAY
2
SETUP
ROTATE
PROTECT
DPOF PRINT
SLIDE SHOW
AUDIO DUB.
MENU
2 Select [INDEX]
WB
R
E
V
E
I
SET
1
/
PLAY
2
ROTATE
PROTECT
DPOF PRINT
SLIDE SHOW
AUDIO DUB.
WB
R
E
W
V
E
I
SET
W
.
SETUP
MENU
EXITSETSELECT
SINGLE
MULTI
CANCEL
INDEX
MENU
EXITSETSELECT
WB
R
E
W
V
E
I
SET
3 Select [YES] to index setting.
DPOF INDEX
SET INDEX PRINT?
YES NO
SETSELECT
WB
R
E
W
V
E
I
SET
WB
R
E
W
V
E
I
SET
WB
R
E
W
V
E
I
SET
• Close the menu by pressing the
[MENU] button after finishing the
setting.
94
Page 95

Playback (advanced)
ª When the index is already set
DPOF INDEX
SET/CANCEL INDEX
PRINT?
SET CANCEL NO
SETSELECT
WB
R
E
W
V
E
I
SET
WB
R
E
W
V
E
I
SET
• Close the menu by pressing the
[MENU] button after finishing the
setting.
ª To print the date
You can set/cancel the printing with the
recorded date each press of the
[DISPLAY] button when setting the
number of prints.
DPOF SET THIS
1
DATE
100_0001
1/19
Suggestions/Tips
¬
¬
• DPOF print setting is a convenient
function when you print pictures with
printers supporting DPOF printing.
• DPOF is the abbreviation for Digital
Print Order Format. This feature
allows you to designate which pictures
will be printed.
• The setting of DPOF print will not be
applied to the DPOF setting of
Slide Show.
• If the file is not based on the DCF
standard, the DPOF print setting
cannot be set. DCF is an abbreviation
of [Design rule for Camera File
system], stipulated by JEITA [Japan
Electronics and Information
Technology Industries Association].
• When setting the DPOF print, this
camera will overwrite any previous
DPOF print settings made by other
equipment.
DATE
DATE
EXITSELECT
DISPLAY
MENU
COUNT
001
• The date print icon [ ] appears.
• When you ask photo studios for
printing, be sure to order the printing
of the date. For further information,
ask a photo studio. Depending on the
studio, it may not be printed.
95
Page 96

Playback (advanced)
Preventing Accidental Erasure of the Picture
Preparation
• Set the mode dial to [ ]. (P30)
ª Single setting/cancel
1 Select [PROTECT].
1
/
PLAY
2
ROTATE
PROTECT
DPOF PRINT
SLIDE SHOW
AUDIO DUB.
MENU
WB
R
E
W
V
E
I
SET
2 Select [SINGLE].
1
/
PLAY
2
ROTATE
PROTECT
DPOF PRINT
SLIDE SHOW
AUDIO DUB.
SETUP
EXITSETSELECT
SETUP
SINGLE
MULTI
CANCEL
EXITSETSELECT
MENU
R
MENU
WB
E
V
E
I
SET
3 Select the picture and set/cancel
the protection.
PROTECT THIS
SELECT
WB
W
R
E
W
V
E
I
SET
•[SET]:
The protect icon [ ] appears.
• [CANCEL]:
The protect icon [ ] disappears.
• Close the menu by pressing the
[MENU] button 2 times after
finishing the setting.
100_0001
1/19
MENU
EXITSET/CANCEL
WB
R
E
W
V
E
I
SET
WB
R
E
W
V
E
I
SET
96
Page 97

Playback (advanced)
ª Multi setting/To cancel all settings
Perform the same operation as in
[Setting the Picture to be Printed and
the Number of Prints (DPOF Print
Setting)]. (P91– 93)
Suggestions/Tips
¬
¬
• While this feature protects the pictures
from accidental erasure, formatting the
card will permanently delete all data.
(P105)
• If you want to delete protected
pictures, cancel the protect setting
first.
• The protect setting may not be
effective in other equipment.
• Sliding the SD Memory Card
Write-Protect switch to [LOCK]
prevents the picture from deletion
even if the protection is not set.
• The audio dubbing cannot be used
with protected pictures. (P100)
97
Page 98

Playback (advanced)
Playing Back with Slide Show
Preparation
• Set the mode dial to [ ]. (P30)
1 Select [SLIDE SHOW].
1
/
PLAY
2
SETUP
ROTATE
PROTECT
DPOF PRINT
SLIDE SHOW
AUDIO DUB.
MENU
EXITSETSELECT
MENU
WB
R
E
W
V
E
I
SET
WB
R
E
W
V
E
I
SET
2 Select the type of pictures to play
back.
1
/
PLAY
2
SETUP
ROTATE
PROTECT
DPOF PRINT
SLIDE SHOW
AUDIO DUB.
WB
R
E
W
V
E
I
SET
• [ALL]:
for playing back all pictures
•[DPOF]:
for playing back the pictures
DPOF Slide Show is set
ALL
DPOF
EXITSETSELECT
WB
R
E
V
SET
MENU
W
E
I
3 Select the following items.
START
DURATION
1SEC. 3SEC.2SEC. 5SEC.
AUDIO
WB
R
E
SET
• [DURATION]:
It can be set among 1, 2, 3 and
5 seconds.
• [AUDIO]:
By setting it to [ON], the audio of
the pictures with audio can be
played back during Slide Show.
• [DPOF SET] (Only when setting to
[DPOF]):
You can select the pictures you
want to set to the Slide Show.
• [CANCEL ALL] (Only when setting
to [DPOF]):
You can cancel the
DPOF Slide Show setting.
OFF
MENU
EXITSETSELECT
W
V
E
I
98
Page 99

4 Select [START].
START
DURATION
AUDIO
WB
Playback (advanced)
Suggestions/Tips
¬
¬
• When setting the DPOF Slide Show,
DPOF icon 1 appears on the picture
in green.
1SEC.
OFF
• When setting the DPOF Slide Show to
the picture with DPOF printing, both of
DPOF icon 1 and the number of
prints appear on the picture in green.
MENU
EXITSETSELECT
• When only the DPOF printing is set on
the picture, the DPOF icon 1 and the
WB
number of prints appear in white.
R
E
W
V
E
I
SET
R
E
W
V
E
I
SET
5 By pressing the [MENU] button,
the Slide Show stops.
ª SD Slide Show
If setting the SD Slide Show with the
[SD Viewer for DSC] which is in the
supplied CD-ROM, when playing back,
the confirmation screen appears. Select
[YES] and press 4 to start the SD
Slide Show. Select [NO] and press 4 to
start normal playback.
DPOF SET THIS
100_0001
1/19
SELECT
MENU
EXITSET/CANCEL
• In motion image playback, Slide Show
is not available.
• The DPOF setting of Slide Show will
not be applied to the DPOF printing.
• DPOF Slide Show cannot be
performed without the DPOF setting of
Slide Show.
• DPOF setting with the [SD Viewer for
DSC] in the supplied CD-ROM is only
for printing. Please set DPOF Slide
Show with this camera to play back
pictures in DPOF Slide Show.
• When setting the DPOF Slide Show,
this camera will overwrite any previous
DPOF settings made by other
equipment.
99
Page 100

Playback (advanced)
Adding Audio to Recorded Pictures (Audio Dubbing)
Preparation
• Set the mode dial to [ ]. (P30)
1 Select [AUDIO DUB.].
1
/
PLAY
2
SETUP
ROTATE
PROTECT
DPOF PRINT
SLIDE SHOW
AUDIO DUB.
MENU
EXITSETSELECT
MENU
WB
R
E
W
V
E
I
SET
WB
R
E
W
V
E
I
SET
2 Select the picture and start audio
recording.
AUDIO
DUB.
SELECT
WB
2304
100_0001
1/19
MENU
EXITSTART
WB
• The audio dubbing cannot be used
with motion images or protected
pictures.
3 Stop audio recording.
WB
R
E
W
V
E
I
SET
2304
100_0001
1/19
STOP
AUDIO
DUB.
• Even if you do not press 4, after
about 10 seconds the audio
recording stops automatically.
• Close the menu by pressing the
[MENU] button 2 times after
finishing the setting.
R
E
W
V
E
I
SET
R
E
W
V
E
I
SET
• When audio has already been
recorded, the confirmation screen
appears. Press 2 to select [YES],
and press 4 to start audio
recording. (The original audio is
overwritten.)
100
 Loading...