

Page 1
Operating Instructions
Digital Camera
Model No. DMC-FX37
Before connecting, operating or adjusting this product,
please read the instructions completely.
PC
VQT1R87
For USA assistance, please call: 1-800-211-PANA(7262) or, contact us via the web at: http://www.panasonic.com/contactinfo
For Canadian assistance, please call: 1-800-99-LUMIX (1-800-995-8649) or
send e-mail to: lumixconcierge@ca.panasonic.com
P
Page 2
Before Use
Before Use
Dear Customer,
Thank you for choosing Panasonic!
You have purchased one of the most s ophisticated and reliable products on the market
today. Used properly, we’re sure it will bring y ou and your family years of enjoyment.
Please take time to fill in the information on the below.
The serial number is on the tag located on the underside of your Camera. Be sure to
retain this manual as your convenient Camera information source.
Model No.
Serial No.
RBRC
Li-ion
A lithium ion battery that is recyclable powers the product you have
purchased. Please call 1-800-8-BATTERY for information on how to
TM
recycle this battery.
Information for Your Safety
WARNING:
TO REDUCE THE RISK OF FIRE, ELECTRIC SHOCK OR PRODUCT DAMAGE,
•DO NOT EXPOSE THIS APPARATUS TO RAIN, MOISTURE, DRIPPING OR
SPLASHING AND THAT NO OBJECTS FILLED WITH LIQUIDS, SUCH AS VASES,
SHALL BE PLACED ON THE APPARATUS.
•USE ONLY THE RECOMMENDED ACCESSORIES.
•DO NOT REMOVE THE COVER (OR BACK); THERE ARE NO USER
SERVICEABLE P ARTS INSIDE. REFER SERVICING TO QUALIFIED SERVICE
PERSONNEL.
Carefully obs erv e co pyri ght laws.
Recording of pre-recorded tapes or discs or other published or broadcast material
for purposes other than your own private use may infringe copyright laws. Even for
the purpose of private use, recording of certain material may be restricted.
•
Please note that the actual controls and components, menu items, etc. of your Digital
Camera may look somewhat differ ent from tho se shown in th e illustrations in th ese
Operating Instructions.
•SDHC Logo is a t rademark .
•Microsoft product screen shot(s) reprinted with permission from Microsoft Corporation.
•Other names, company names, and product names printed in these instructions are
trademarks or registered trademarks of the co m pani es concer ned.
2
VQT1R87
Page 3

Before Use
THE SOCKET OUTLET SHALL BE INSTALLED NEAR THE EQUIPMENT AND
SHALL BE EASILY ACCESSIBLE.
CAUTION
Danger of explosion if batte ry is incorrectly replaced. Replace only with the same or
equivalent type recommended by the manufacturer. Dispose of used batteries
according to the manufacturer’s instructions.
Warning
Risk of fire, explosion and burns. Do not disassemble, heat above 60 xC (140 oF) or
incinerate.
Product I de n tif i ca ti on Mar k in g is loc ate d on the botto m of units.
THE FOLLOWING APPLIES ONLY IN CANADA.
This Class B digital apparatus complies with Canadian ICES-003.
THE FOLLOWING APPLIES ONLY IN THE U.S.A.
FCC Note:
This eq uipment has been tested and found t o compl y with the limits for a Class B digital
device, pursuant to Part 15 of the FCC Rules. These limits are designed to provide
reasonable protection against harmful interference in a residential installation. This
equipment generates, uses, and can radiate radio frequency energy and, if not installed
and used in accordance with the instructions, may cause harmful interference to radio
communi cations. However, there is no guaran tee that interference will not o c cur in a
particular installation. If this equipment does cause harmful interference to radio or
television reception, which can be determined by turning the equipment off and on, the
user is encouraged to try to correct the interference by one or more of the following
measures:
•
Reorient or relocate th e receiving antenna.
•Increase the separation between the equipment and receiver.
•Connect the equipment in to an outlet on a ci rcuit differe nt from that to w hi ch the receiv er is
connected.
•Consult th e dealer or an experience d radio/TV tec hnician for hel p.
FCC Caution:To assure continued compliance, follow the attached installation
instructions and use only shielded interface cables with ferrite core when
connec ting to computer or peripheral devi ces.
Any changes or modi fications not ex pressly approved by the party responsible for
complia nce could void the user’s authori ty to oper ate this equipment.
VQT1R87
3
Page 4
Before Use
Declaration of Conformity
Trade Name: Panas on ic
Model No.: DMC-FX37
Responsible party: Panasonic Corporation of North America One Panasonic Way,
Secauc us , N J 07 09 4
Support Contact: Panasonic Consumer Electr onics Company 1-800-211-PANA (7262)
This device complies with Part 15 of the FCC Rules. Operation is subject to the
following two conditions: (1) This device may not cause harmful interference, and (2)
this device mu st accept any interference received, including interference that may
cause un de si r ed ope r at io n.
-If you see this symbolInformation on Disposal in other Countries outside the European Union
This s y mbol is only vali d in the European Union.
If you wish to discard this product, please contact your local
authorities or deal er and ask for the correct me thod of disposal.
∫ About the battery pack
CAUTION
Battery pack (Lithium ion battery pack)
•
Use the spe ci f i ed unit to recharge the ba tt ery pack.
•Do not use t he battery pack with equipment other than the specified unit.
•Do not get dirt, sand, li qui ds, or othe r fo reign matt er on the termi nals.
•Do not touc h the plug termi nals (i and j) with metal objects.
•Do not disassemble, rem odel, heat or throw int o fire.
If any electrolyte sho uld come into contact with your hands or clothes, wash it off
thoroughly with water.
If any electrolyte sho uld come into contact with your eyes, neve r rub the eyes. Rinse
eyes thoroughly with water, and then consult a doctor.
Do not heat or ex pose to flame.
•
•Do not leave the battery(ies) in an automobile exposed to direct sunlight for a long per i od of
time with doors and windows closed.
VQT1R87
4
Page 5
Before Use
∫ About the battery charger
CAUTION!
DO NOT INSTALL OR PLACE THIS UNIT IN A BOOKCASE, BUILT-IN CABINET OR
IN ANOTHER CONFINED SPACE. ENSURE THE UNIT IS WELL VENTILATED. TO
PREVENT RISK OF ELECTRIC SHOCK OR FIRE HAZARD DUE TO OVERHEATING,
ENSURE THAT CURTAINS AND ANY OTHER MATERIALS DO NOT OBSTRUCT
THE VENTILATION VENTS.
Battery charger
This battery charger operates on AC between 110 V and 240 V.
But
•
In the U.S.A. and Canada, the battery charge r m ust be conne ct ed to a 120 V AC power
supply on ly.
•When connec ting to an AC supply outsid e of the U.S.A. or Canada, us e a pl ug adaptor t o
suit the AC outlet co nfiguration.
∫ Care of the camera
Do not strongly shake or bump the camera by dropping it etc.
•
This uni t may malfunct i on, recording pictures ma y no longer be possible or
the lens or the LCD monitor may be damaged.
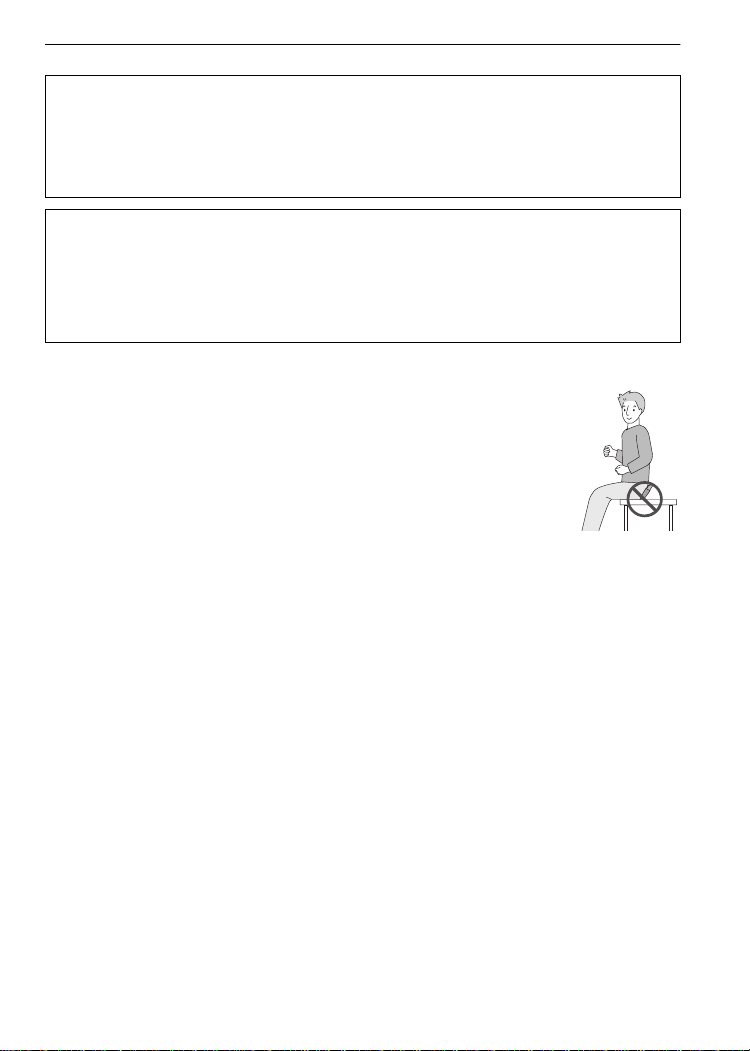
•We strongly recommend you do not leave the camera in your pants pocket
when you si t down or force fu l l y i nsert it into a ful l or tight bag et c.
Damage t o the LCD mon i to r or personal in j ury may resul t.
•Be particul arly careful i n the fo llowing p la ces as they may cause this
unit to malfunction.
–Places with a lot of sand or dust.
–Places where water can come into contact with this unit such as when using
it on a rainy day or on a beach.
•Do not touch the lens or the sockets with dirty hands. Also, be careful not to allow
liquids, sand and other foreign matter to get into the space around the lens, buttons etc.
•If water or seawater splashes on the camera, use a dry cloth to wipe the camera body
carefully.
∫ About Condensation (When the lens is fogged up)
•
Conden sation occu rs when the ambi ent temperature or humi dity chang es. Be careful of
condensation since it causes lens stains, fungus and camera malfunction.
•If condensation occurs, turn the camera off and leave it for about 2 hours. The fog will
disappear natura l ly when the temperature of the camera bec omes close to the ambien t
temperature.
∫ Read together with the “Cautions for Use”. (P98)
VQT1R87
5
Page 6

Contents
Before Use
Information for Your Safety....................... 2
Quick Guide.............................................. 8
Standard Accessories............................... 9
Names of the Compo ne nts ..... ................10
Playing back Pictures
([NORMAL PLAY])..................................31
• Displaying Multiple Screens
(Multi Playb a ck)................................ 32
• Using the Playback Zoom................. 32
• Switching the [PLAYBACK] mode ....32
Deleting Pictures.....................................33
• To delete a single picture..................33
• To delete multiple pictures
(up to 50) or all the pictures.............. 33
Preparation
Charging the Battery............................... 12
About the B a ttery (charg in g/numb e r of
recordabl e pictu res ) ........ .... .... ... ............. 13
Inserting and Removing the Card
(optional )/th e Bat tery .............. ... .... .... .....14
About the Built-in Memory/the Card........ 15
Setting Date/Time (Clock Set) ................ 16
• Changing the clock setting ...............17
Setting the Menu.....................................17
• Setting menu items........................... 18
• Using the quick menu.......................19
About the Setup Menu............................ 20
Selecting the [REC] Mode ......................24
Basic
Taking pictures using
the automatic function
(ñ: Intelligent Auto Mode)...................... 25
• Scene detection................................ 26
• AF Tracking Function ....................... 26
• About the flash..................................27
• Settings in Intelligent auto mode ...... 27
Taking pictures with your favorite
settings (·: Normal picture mode)......... 28
• Focusing........................................... 28
• When the subject is not in focus
(such as when it is not in the center
of the comp ositio n of the pic t u re
you want to take).......... .... ... ............. 29
• Preventing jitter (camera shake)....... 29
• Direction detection function ..............29
Taking Pictures with the Zoom ...............30
• Using the Optical Zoom/
Using the Extended optical zoom
(EZ)/Using the Digital Zoom ............. 30
Advanced (Recording pictures)
About the LCD Monitor ........................... 35
Taking Pictures using
the Built-in Fla sh ........ .... ... .... ..................37
• Switching to the appropriate flash
setting............................................... 37
Taking Close-up Pictures........................ 40
Taking Pictures with the Self-timer .........41
Compensating the Exposure ..................42
Taking Pictures using Auto Bracket........43
Taking pictures that match
the scen e be in g r ec orded
(¿: Scene mode) ............. .... .... .............. 44
• * [PORTRAIT]................................ 44
• + [SOFT SKIN]............................... 45
• [TRANSFORM] ........................... 45
• 0 [SELF PORTRAIT]...................... 45
• , [SCENERY] ................................ 46
• - [SPORTS]................................... 46
• . [NIGHT PORTRAIT] ...................46
• / [NIGHT SCENERY] ....................46
• 1 [FOOD] ....................................... 46
• 2 [PARTY]......................................47
• 3 [CANDLE LIGHT]........................ 47
• : [BABY1]/; [BABY2]..................47
• í [PET]........................................... 48
• ï [SUNSET]................................... 48
• 9 [HIGH SENS.].... ... .... .... .... .......... 48
• ô [HI-SPEED BURST].................... 49
• [FLASH BURST] ......................... 49
• 5 [STARRY SKY]...........................50
• 4 [FIREWORKS] ............................ 50
• 6 [BEACH] ..................................... 50
• 8 [SNOW].......................................51
• 7 [AERIAL PHOTO] .......................51
• [PIN HOLE]................................. 51
• [FILM GRAIN] ............................. 52
• < [UNDERWATER]........................ 52
6
VQT1R87
Page 7
Motion Picture Mode...............................53
Useful Functions at
Travel Destinations................................. 55
• Recording which Day of
the Vacation You Take the Picture... 55
• Recording Dates/Times at
Overse as Travel Destinations
(World Time)..................................... 56
Using the [REC] Mod e Menu .................. 5 8
• @ [PICTURE SIZE]...........................58
• A [QUALITY ]..... ..............................5 9
• ? [ASPECT RATIO] .......................59
• [INTELLIGENT ISO]....................59
• > [SENSITIVITY]............................ 60
• = [WHITE BALANCE] ....................60
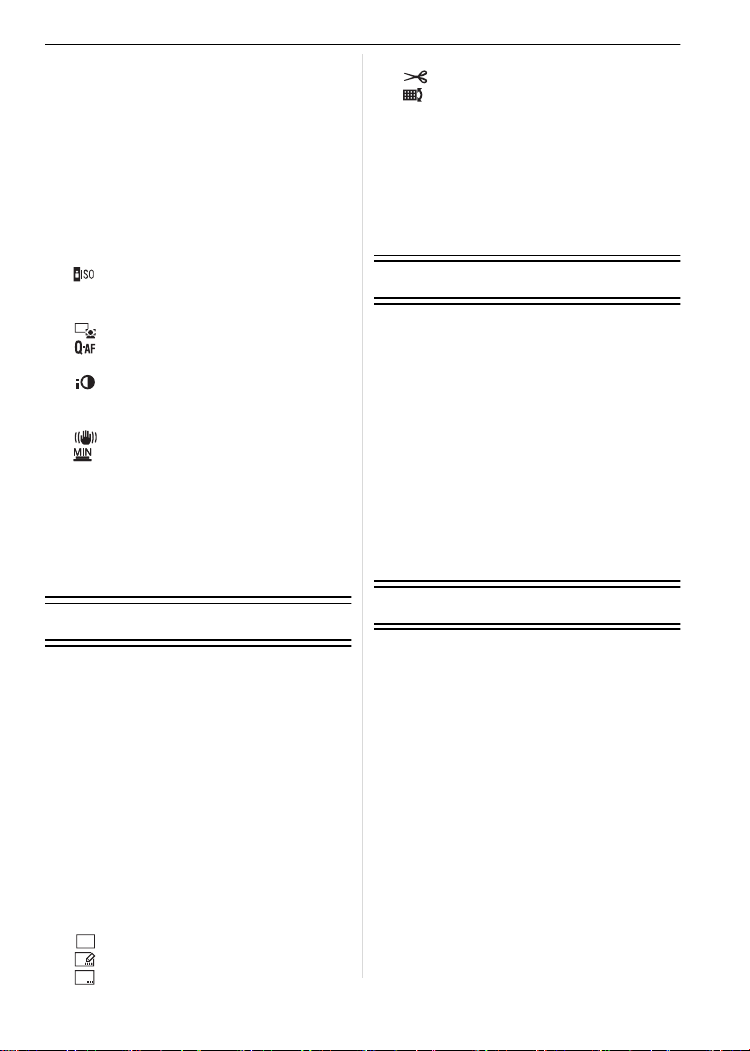
AF
• [AF MODE] ................................62
• [QUICK AF]................................63
• ˜ [BURST]...................................... 63
• [I.EXPOSURE]............................ 64
• ) [DIGITAL ZOOM] ........................64
• H [COLOR MODE] .......................... 65
• [STABILIZER] ............................65
• [MIN. SHTR SPEED] .................. 65
• B [AUDIO REC.] ...............................66
• F [AF ASSIST LAMP]................... 66
• U [CLOCK SET]...............................66
Taking and viewing clipboard pictures
(¨: Clipboard mode) ..............................67
• Taking clipboard pictures..................67
• Viewing clipboard pictures ................68
Advanced (Playback)
Playing Back Pictures in Sequence
(Slide Show) ...........................................70
Selecting Pictures and
Playing them Back
([CATEGORY PLAY]/
[FAVORITE PLAY]) ..... .... .... .... ............... 72
• [CATEGORY PLAY] ......................... 72
• [FAVORITE PLAY]............................73
Playing Back Motion Pi ctures/
Pictures with Audio .................................73
• Motion pictures .................................73
• Pictures with audio............................ 74
Creating still pictures from
a motion picture ......................................74
Using the [PLAYBACK] mode menu....... 75
• [CALENDAR].............................75
CAL
• [TITLE EDIT].............................. 76
• [TEXT STAMP] ..........................77
• Q [RESIZE].....................................79
• [TRIMMING]...............................80
• [LEVELING] ................................81
• ? [ASPECT CONV.].......................82
• N [ROTATE]/
M [ROTATE DISP.].........................83
• Ü [FAVORITE].................................83
• O [DPOF PRINT].............................84
• P [PROTECT].................................85
• B [AUDIO DUB.] ...............................86
• S [COPY] ......................................87
Connecting to other equipment
Connecting to a PC.................................88
Printing the Pictures................................90
• Selec ting a single picture and
printing it...........................................91
• Selec ting multiple pictures and
printing them.....................................91
• Print Settings ....................................92
Playing Back Pictures on a TV Screen...94
• Playing back pictures using
the AV cable (supplied) ....................94
• Playing back pictures on a TV
with an SD Memory Card slot...........94
• Playing back on the TV
with component socket.....................95
Others
Screen Display........................................96
Cautions for Use .....................................98
Message Display .................................. 101
Functions that cannot be set or
will not work under some conditions ..... 103
Troubleshooting ....................................105
Number of Recordable Pictures and
Available Recording Time.....................112
Specifications........................................115
Digital Camera Accessory System........118
Digital Camera Accessory Order Form
(For USA Customers) ...........................119
Request for Service Notice
(For USA Only) ..................................... 120
Limited Warranty (For USA Only)......... 121
Customer Services Dire ctory
(For USA Only) ..................................... 123
Précautions à prendre
(pour le Canada )......... .... .... ..................124
Index .....................................................126
VQT1R87
7
Page 8
Before Use
1
2
3
4
Before Use
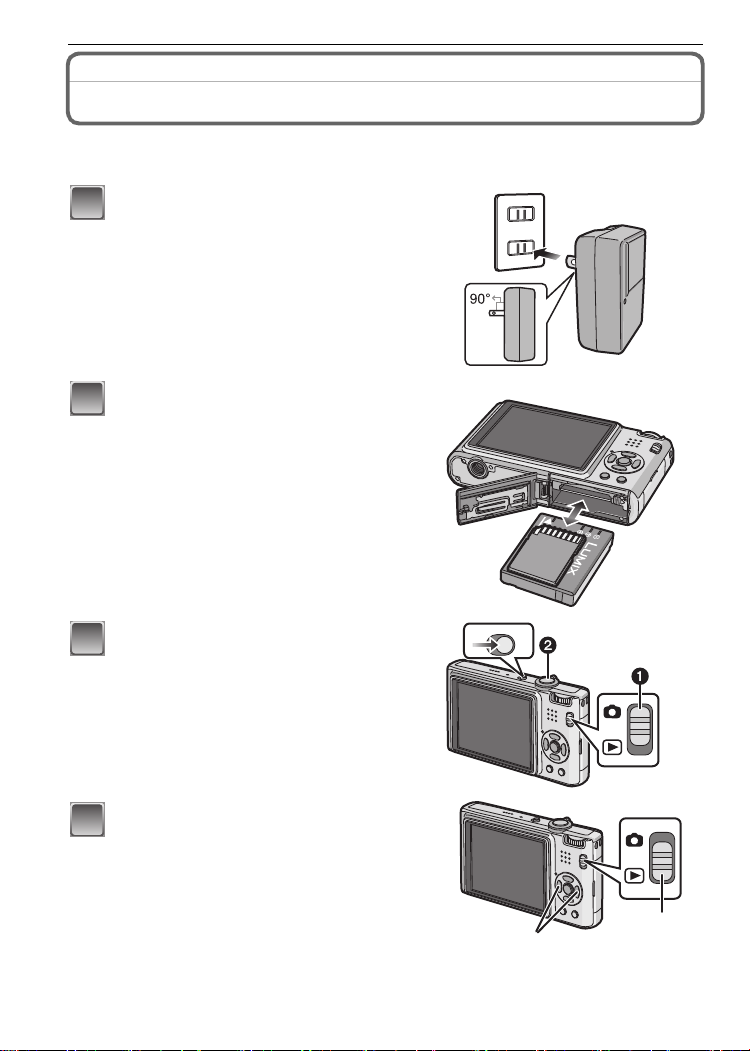
Quick Guide
This is an overview of how to record and play back pictures with the camera. For each
step, be sure to refer to the pages in di cate d in bra ckets .
Charge the battery. (P12)
• The battery is not charged when the
camera is shipped. Charge the battery
before use.
Insert the battery and the card.
(P14)
• When you do not use the card, you can
record or play back pictures on the
built-i n memory. (P15) Refer to P15
when you use a card.
Turn the camera on to take
pictures.
1 Slide the [REC]/[PLAYBACK] selector
switch to [!].
2 P res s the shutter button to tak e
pict ures. (P25)
Play back the pictures.
1 Slide the [REC]/[PLAYBACK] selector
switch to [(].
2 Select the picture you want to view.
(P31)
VQT1R87
8
ONOFF
Page 9
Standard Accessories
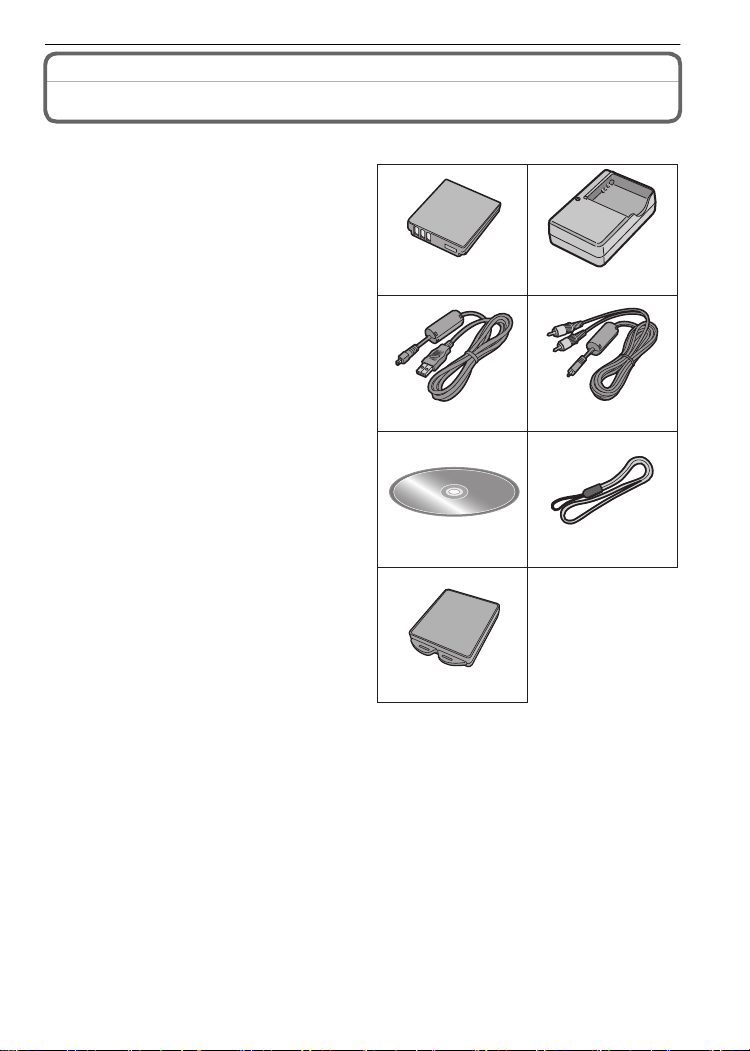
Check that all the accessories are included before using the camera.
1 Battery Pack
(Indicated as battery in the text)
Charge the battery before use.
2 Battery Charger
(Indicated as charger in the text)
3 USB Connection Cable
4AV Cable
5 CD-ROM
•
Software:
Use it to install the software to your PC.
6Strap
7 Battery Carrying Case
•
SD Memory Card, SDHC Memory Card and
MultiMediaCard are indicated as card in the
text.
•The card is optional.
You can record or play back pictures on the
built-in memory when you are not using a
card.
•For information ab out optional ac cessories ,
refer to the
System
•If any accessor i es are lost, customer s in th e
USA shoul d contact Pana sonic’s parts
department at 1 800 833-9626 and customers
in Canada should contact 1 800 99-LUMIX
(1-800-995-8649) for further information about
obtaining replacement parts.
“Digital Camer a Accessory
”. (P118)
12
DMW-BCE10PP
3
K1HA08CD0019
56
7
Before Use
DE-A39B
4
K1HA08CD0020
VFC4297
VYQ3914
VQT1R87
9
Page 10
Before Use
104 9
5786
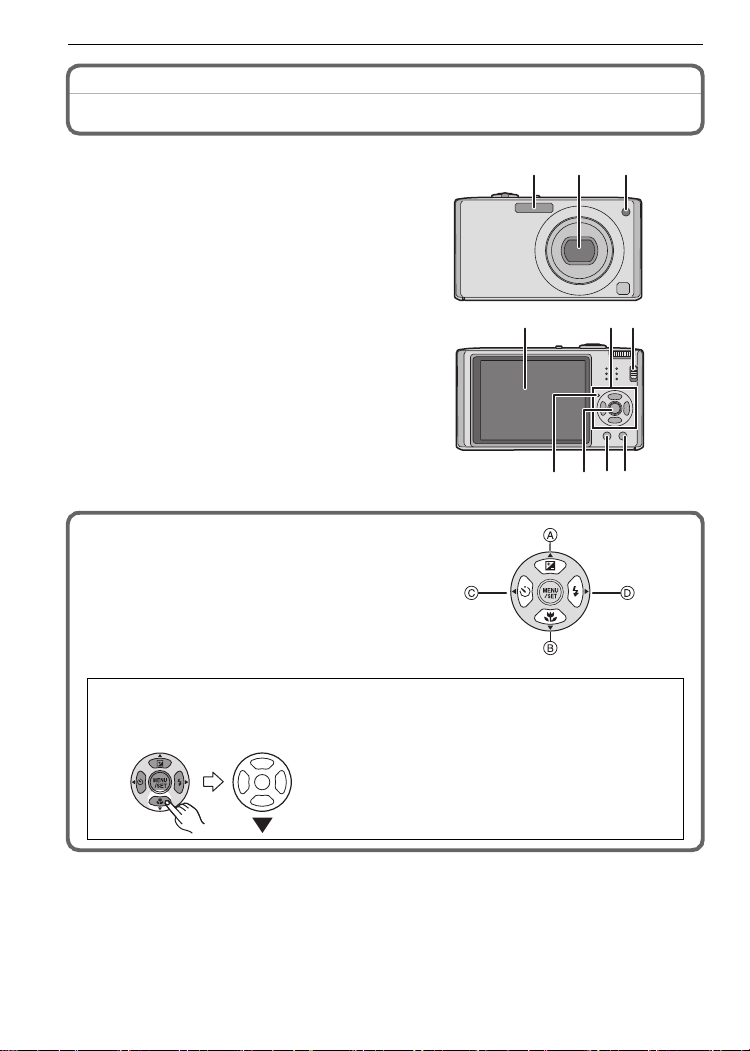
Names of the Components
1Flash (P37)
2Lens (P5, 99)
3 Se lf-timer indic a tor (P41)
AF assist lamp (P66)
4 LCD monitor (P35, 96)
5 Status indicat or (P 14, 21 , 25)
6 [M E NU /SET] but to n (P 16 )
7 [DISPLAY] button (P35)
8 [Q.MENU] (P19)/Delete (P33) button
9 [REC]/[PLAYBACK] selector switch
(P17)
10 Cursor buttons
A: 3/Exposure compensation (P42)/
Auto bracket (P43)/White balance
fine adju st m e nt (P6 1)
B: 4/ Macro mode (P40)
AF Tracking (P26, 63)
C: 2/Self-timer button (P41)
D: 1/Flash setting button (P37)
In these operating instructions, the c ursor buttons are described as shown in the
figure below or described with 3/4/2/1.
e.g.: When you press the 4 (down) button
123
10
or Press 4
VQT1R87
Page 11
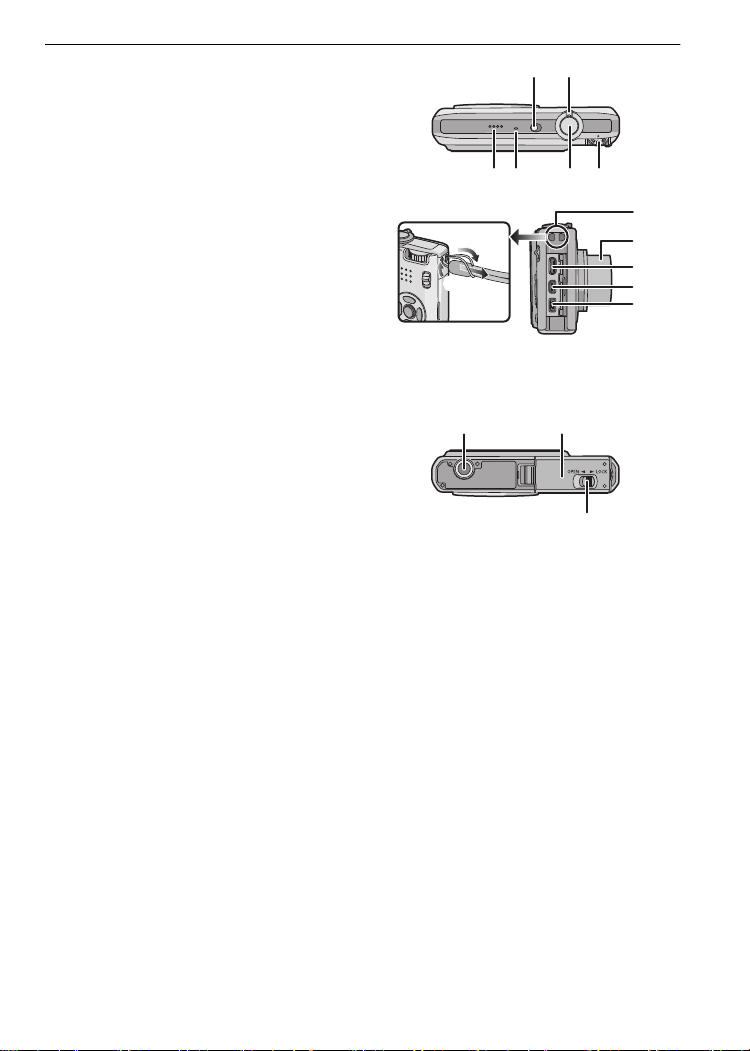
11 Camera ON/OFF switch (P16)
12 Zoom lever (P30)
13 Speaker (P73)
14 Microphone (P53, 66, 86)
15 Shutter button (P25, 53)
16 Mode dial (P24)
111312
14 15 16
17 Strap eyelet
•
Be sure to attach the strap when usi ng
the camera to ensure that you will not
drop it .
18 Lens barrel
19 [COMPONENTOUT] socket (P95)
20 [AV OUT/DI GITAL] socket (P88, 90, 94)
21 [DC IN] socket (P88, 90)
•
Always use a genuine Panasonic A C
adapto r (DM W-A C5PP; opti onal).
• This camera cannot charge the battery even when the AC adaptor (DMW-A C5PP;
optiona l ) is connected to it.
22 Tripod receptacle
When yo u use a tripod, ma k e su r e t he
•
tripod is s table when the c am e ra is
attached to it.
23 Card/Battery door (P14)
24 Release lever (P14)
22 23
Before Use
17
18
19
20
21
24
VQT1R87
11
Page 12

Preparation
1
2
3
Preparation
Charging the Battery
•Use the dedicated charger and battery.
•The battery is not charged wh en the camer a is shipped. Ch arge the battery before use.
•Charge the battery wit h t he charger i ndoors.
•Charge the bat tery in a temperature be tween 10 oC to 35oC (50 oF to 95 oF). (The battery
temperature should also be the same. )
Attach the battery with
attention to the direction of the
battery.
Connect the charger to the
electrical outlet.
• Charging starts when the [CHARGE]
indicator A lights green.
• Charging is complete wh en t h e
[CHARGE] in dicator A tur n s off (a fter
approx. 120 min maximum).
Detach the batter y after
charging is completed.
㧥㧜°
∫ When the [CHARGE] indicator flashes
•
The battery temperature is excessively high or low. The charging time will be longer than
normal. Also, charging may not be completed.
•The termin als of the charger or the bat tery are dirty. In this cas e, wipe them with a dry cloth.
Note
After chargi ng i s complet ed, be sure to disconnect the power supply device fr om the electrical
•
outlet.
•The battery becomes war m aft er using it and during and after charging. T he c amera also
becomes wa rm during use . Thi s is not a malfunction.
•The battery w i l l b e exhausted if l eft for a l ong period of tim e af ter being charged.
•The battery can be recharged even when it still has some charge left, but it is not
recommended that the battery charge be frequently topped up while the battery is fu l l y
charged. (The battery has characteristics that will reduce its operating duration and cause the
battery to swel l up .)
•When the operating time of t he camera becomes extre m el y short even after properly ch arging
the battery, the life of the battery m ay have expired. Buy a new battery.
•Do not leave an y metal items (s u ch as clips) near th e co n tact areas of the p o wer plug.
Otherwise, a fire and/or electric shocks may be caused by short-circuiting or the
resulting heat generated.
VQT1R87
12
Page 13
Preparation
About the Battery (charging/number o f recordable pictures)
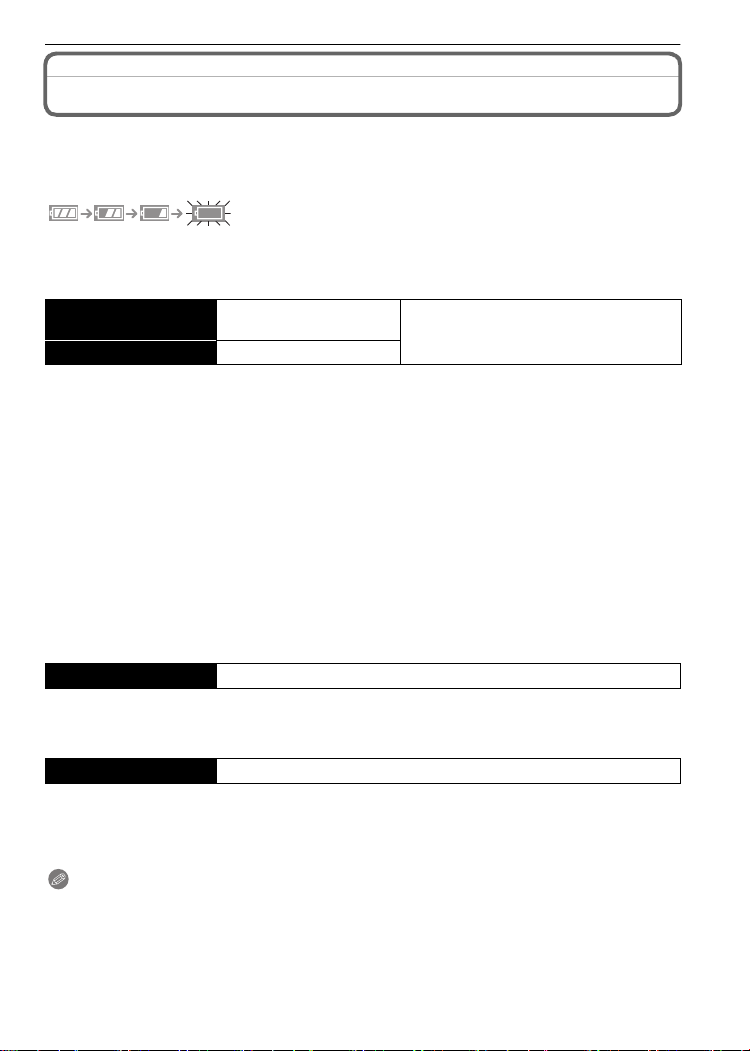
∫ Battery indication
The battery indication is displayed on the LCD monitor.
[It does not appear when you use the came ra with the AC adapto r (DMW-AC 5 PP;
optiona l) co nn ec t e d. ]
•
The indic at i on turns red and bl i nks if the re m ai ni ng battery power is exhausted. (Th e st at us
indicator blinks when the LCD monitor turns off.) Recharge the battery or replace it with a fully
charged battery.
∫ The bat tery life
Number of recordable
pictures
Recording time Approx. 150 min
Recording conditions by CIPA standard
•
CIPA is an abbreviation of [Camera & Imaging Pro ducts Associ ation].
•Temperature: 23 oC (73.4 oF)/Humidity: 50% when LCD monitor is on.
•Using a Panasonic SD Me m o ry Card (32 MB).
•Using the supplied ba tt ery.
•Starting recording 30 seconds after the camera is turned on. (When the optical image stabilizer
function is set to [AU TO].)
•Recording once every 30 seconds with full flash every second recording.
•Rotating the zoom le ver from T ele to Wide or vice versa in ever y recording.
•Turning the ca mera off every 10 recordings and leaving it until the temperature of the batt ery
decreases.
¢ The number of recordable pic tures decre ases in Auto Power LCD mode and Power LC D
mode.
(P20)
The number of recordable pictures varies depending on the recording interval time.
If the recording interval time becomes longer, the number of recordable pictures
decreases. [e.g. Whe n recording once every 2 minutes, the number of recordable
pictures decreases to about 77.]
Approx. 310 pictures
By CIPA standard in normal picture mode
¢
Playback t ime Approx. 400 min
The number of recordable pictures and playback time will vary depending on the
operating conditions and storing condition of the battery.
∫ Charging
Charging time Approx. 120 min maximum
Charging time and number of recordable pictures with the optional battery pack
(DMW-BCE10PP) are the same as above.
The charging time will vary slightly depending on the status of the battery and the
conditions in the charging environment.
When the charging has been completed successfully, the [CHARGE] indicator turns off.
Note
•
The battery may swell and its operating time may be come shorter as t he number of tim es it is
charged increases. For long term battery use, we recommend you do not frequently charge the
battery bef ore it is exhausted.
•The perf orm ance of the bat tery may temporarily deteriorate and the operating time may
become s horter in low temperature conditions (e.g. skiing/ snowboarding).
VQT1R87
13
Page 14
Preparation
1
2
3
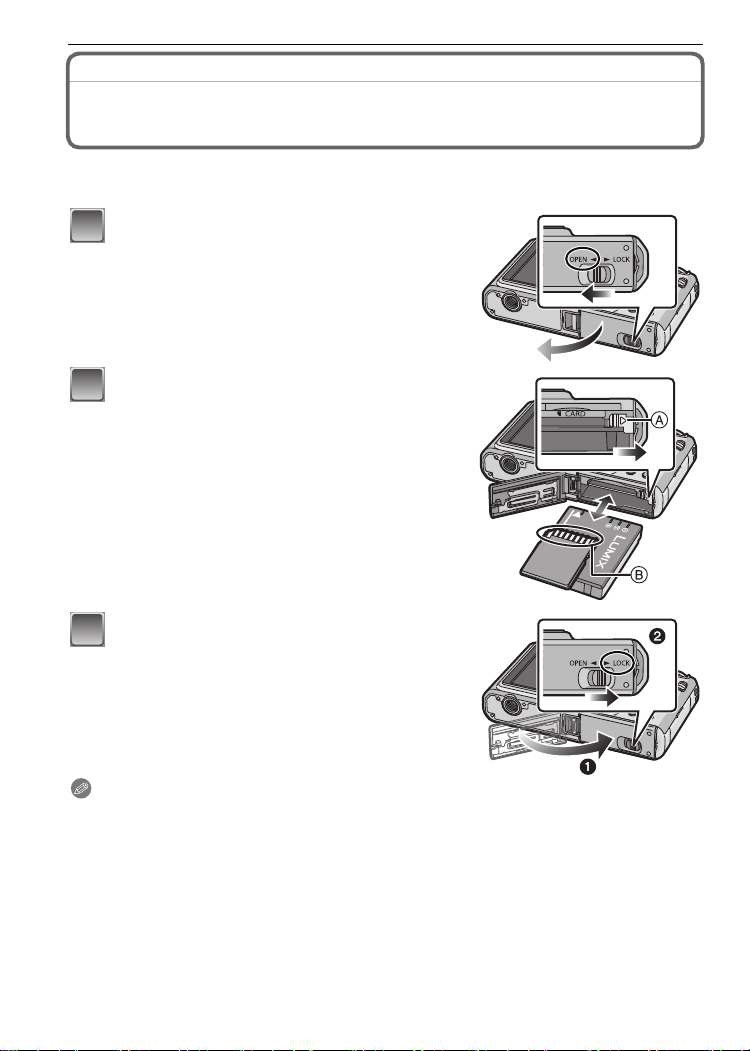
Inserting and Removing the Card (optional)/the Battery
•Check that this unit is turned off.
•We recommend using a Panasonic card.
Slide the release lever in t he direction of
the arrow and open t he card/battery door.
• Always use genuine Panasonic batteries
(DMW-BCE10PP).
• If you use other batteries, we cannot guarantee
the quality of this product.
Battery: Insert it f ully being car efu l about
the direction you insert it. Pull the lever
A in the direct ion of the arr ow to r emove
the battery.
Card: Push it fully until it clicks being
careful about the direct ion you insert it.
T o remove the card, pus h the card unti l it
clicks, then pull the car d out upright.
B:Do not touch the connection terminals of the
card.
•
The card may be damaged i f it is not fully inserted.
1:Close the card/battery door.
2:Slide the release lever in the direction
of the arrow.
• If the card/battery door cannot be completely
closed, remove the card, check its direction and
then insert it again.
Note
Remove the battery after use. Store the removed battery in the battery carrying case (supplied).
•
•Do not remove the battery until the LCD monitor and the status indicator (green) turn off as the
settings on the camera may not be stored properl y.
•The supplied battery is designed only for the camer a. Do not use it with any other equi pment.
•Before removing the card or batt er y, turn the c a m era off, and wa i t until the status indicat or has
gone off compl et el y. (Othe rwise, this uni t may no longer operate normally and th e card itself
may be damaged or the recorded pictures may be lost.)
VQT1R87
14
Page 15
Preparation
About the Built-in Memory/the Card
The following operations can be performed using this unit.
When a car d h as n o t been insert ed : Pictures can be record ed i n
•
the built-in memory and played back.
•When a card has been inserted: Pictures ca n be rec o r ded o n the
card and pl ayed back.
•Clipboard pictures (P67) are store d on the built-i n memory even if a
card is inserted.
•When using the built-in memory
k
>ð (access indication
•When using the card
† (access ind i cation
¢ The access indication lights red when pictures are being recorded on the built-in memory (or
the card).
•Memory size: Approx. 50 MB
•Recordable motion pictures: QVGA (320k240 p ixels) only
•The built-i n memory ca n be used as a temp orary storage device when the card be i ng used
becomes full.
•You can copy the recorded pictures to a card. (P87)
•The acce ss time for the bui l t-in memory may be long er than the acce ss time for a c ard.
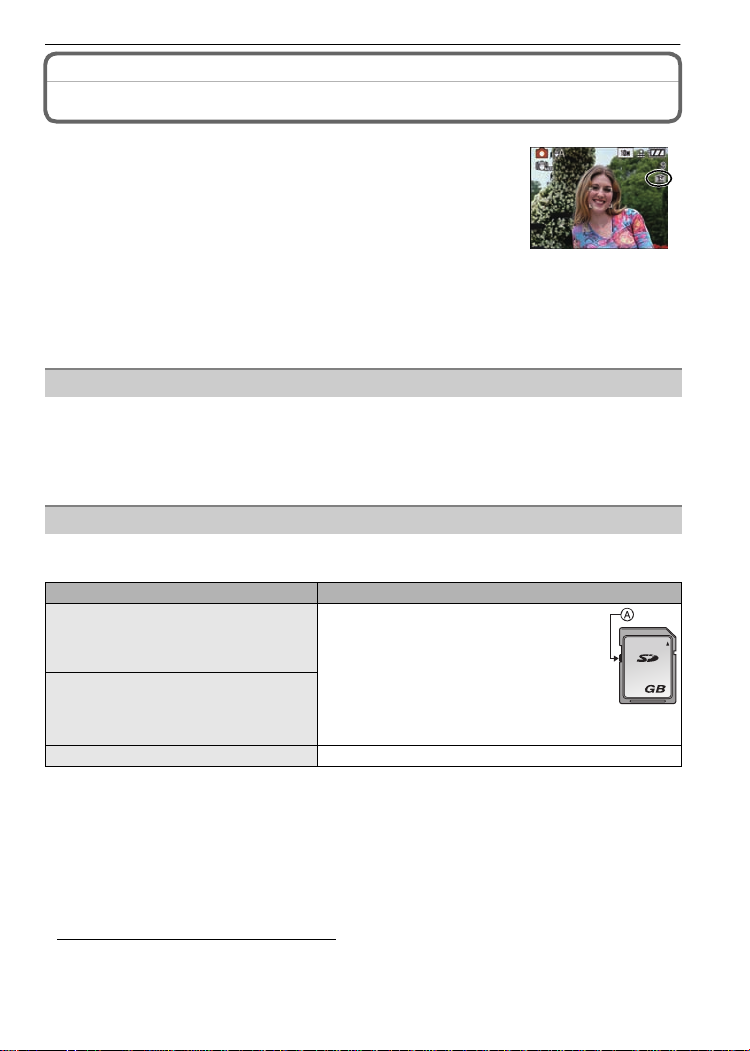
The following types of cards can be used with this unit.
(These cards are indicated as card in the text.)
Type of card Characteristics
SD Memory Card (8 MB to 2 GB)
(Formatt ed using the FAT12 or FAT16
format in compliance with th e SD
standard)
SDHC Memory Card (4 GB, 8 GB,
16 GB, 32 GB)
(Formatt ed using the FAT32 format in
compliance with th e S D st andard)
MultiMediaC ard •Still pictures on l y.
¢ The SDHC Memory Card is a memory card standard decided by the SD Association in 2006
for high ca paci ty memory cards more than 2 GB.
¢ You can us e an SDHC Mem ory Card in equi pment that is compatibl e wi th SDHC Me m o ry
Cards however you cannot use an SDHC Memory Card in equipment that is only compatible
with SD Memory Cards . (A l ways read the operating i nstructi ons for the equ ip m ent being
used.)
•You can only use cards wi th SDHC log o (i ndicatin g compliance with the SD sta ndard) if using
cards with 4 GB or more capa city.
•Please confirm the latest information on the following website.
http://panasonic.co.jp/pavc/global/cs
(This Sit e i s English only.)
¢
¢
)
¢
)
Built-in Memory
Card
•Fast recordi ng and wr iti ng speed
•Write-Protect switch A provided (When
this switch is set to the [LOCK] position,
no further data writing, deletion or
formatting is possible. The ability to
wri te, delete an d format data is restor ed
when the switch is retur ned to its
original po si t i on.)
2
VQT1R87
15
Page 16
Preparation
1
/SET
MENU
2
3
4
Note
Do not turn th i s u n it off, remove its battery o r c ard o r disconnect the AC adaptor
•
(DMW-AC5PP; optional) when the access indication is lit [when pictures are being read
or deleted or the built-in memory or the card is being formatted (P23)]. Furthermore , do
not subject the camera to vibration or impact. The card or the data on the card may be
damaged, and this unit may no longer operate normally.
•The data on the bui l t-in memory or the card ma y be damaged or lost due to elec tromagnetic
waves, static electricity or break down of the cam era or the card . We recommen d st oring
important data on a PC etc.
•Do not forma t the card on your PC or ot her equipment . Format it on the camera only to ensure
prop er operatio n. (P23)
•Keep the Me m ory Card out of reach of children to prev ent swallowi ng.
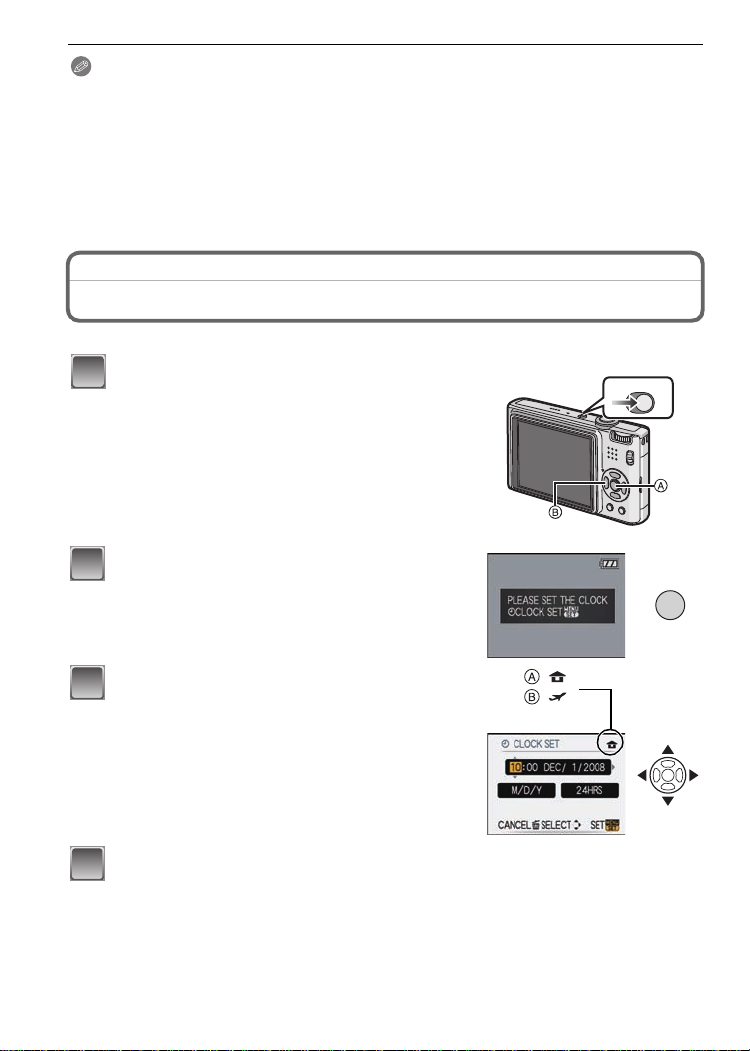
Setting Date/Time (Clock Set)
•The clock is not set when the camera is shipped.
Turn the camera on.
• The [PLEASE SET THE CLOCK] message appears.
(This message does not appea r in [PLAYBACK]
mode.)
A [MENU/S ET] bu tton
B Curs or buttons
Press [MENU/SET].
ONOFF
16
Press 2/1 to selec t the ite ms (year, month,
day , hour, minute, display sequence or time
:
:
display format), and press 3/4 to set.
A: Time at the home area
B: Time at the travel destination (P56)
‚: Cancel without setting the clock.
•
Select either [2 4HRS] or [A M/PM] for the time d i splay
format.
• AM/PM is displayed when [AM/PM] is selected.
Press [MENU/SET] to set.
• After completing the clock settings, turn the camera off. Then turn th e camera back on,
switch to recording mode, and check that the display re flects the settings that were
performed.
• When [MENU/SET] has been pressed to complete the settings without the clock having
been set, set the clock correctly by following the
below.
VQT1R87
“Changing the clock setting” procedure
Page 17
Preparation
Changing the clock setting
Select [CLOCK SET] in the [REC] or [SETUP] menu, and press 1. (P18)
It can be changed in step s 3 and 4 to set the clock.
•
•The clock setting is maintained for 3 months using the built-in clock battery even
without the battery. (Leave the charged battery in the unit for 24 hours to charge the
built-in battery.)
Note
The clock is displayed when [DISPL AY] is p ressed several times during recording.
•
•You can set the year from 2000 to 2099.
•If the clock is not set, th e correct date c annot be printed when you sta m p th e date on the
pictu res with [TEXT S TAMP] (P77 ) or order a pho to studi o to pr i nt the pi ct ures.
•If the clock is set, the correct date can be printed even if the date is not displayed on the screen
of the camera.
Setting the Menu
The camera comes with menus that allow you to set the settings for taking pictures and
playi ng them back just as you like and menus that enable you to have more fun with the
camera and use it more easily.
In particular, the [SETUP] menu contains some important settings relating to the camera’s
clock and power. Check the settings of this menu before proceeding to use the camera.
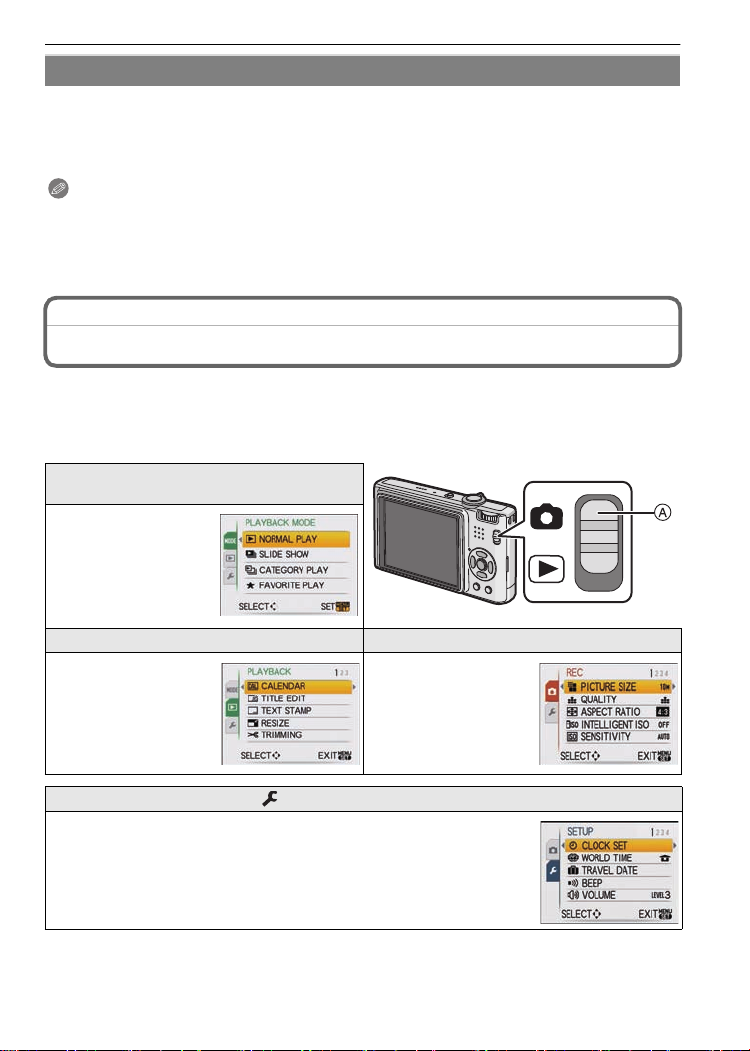
[MODE] playback mode menu
(P31, 70 to73)
•This menu lets you
select the s et ting of
the playback methods
such as playback or
slide show of only the
pictures se t as
[FAVORITE].
( [PLAYBACK] mode menu (P75 to 87) ! [REC] mo d e m e n u (P 58 to 66)
•This menu lets you
make the ro tat i on,
protection, trimming
or DPOF settings, etc.
of recorded pictures.
A [REC]/[PLAYBACK] selector switch
•This me nu lets you
set the co loring,
sensitivity, aspect
ratio, number of pixels
and other aspects of
the pictures you are
recording.
[SETUP] menu (P20 to 23)
•This menu let s y ou perform the clock settings, selec t the operating
beep tone set tings and set other setti ngs which make i t easier for you
to operate t he c am era.
•The [SETUP ] menu can be set fr om ei ther the [RE C MODE] or
[PLAYBACK MODE].
VQT1R87
17
Page 18
Preparation
1
2
3
4
/SET
MENU
1
2
3
∫ Functio ns tha t cann ot be se t or will not wor k und er som e condit ion s
Due to the camera’s specifications, it may not be possible to set some of the functions or
some functions may not work in some of the conditions under which the camera is used.
For details, refer to P103.
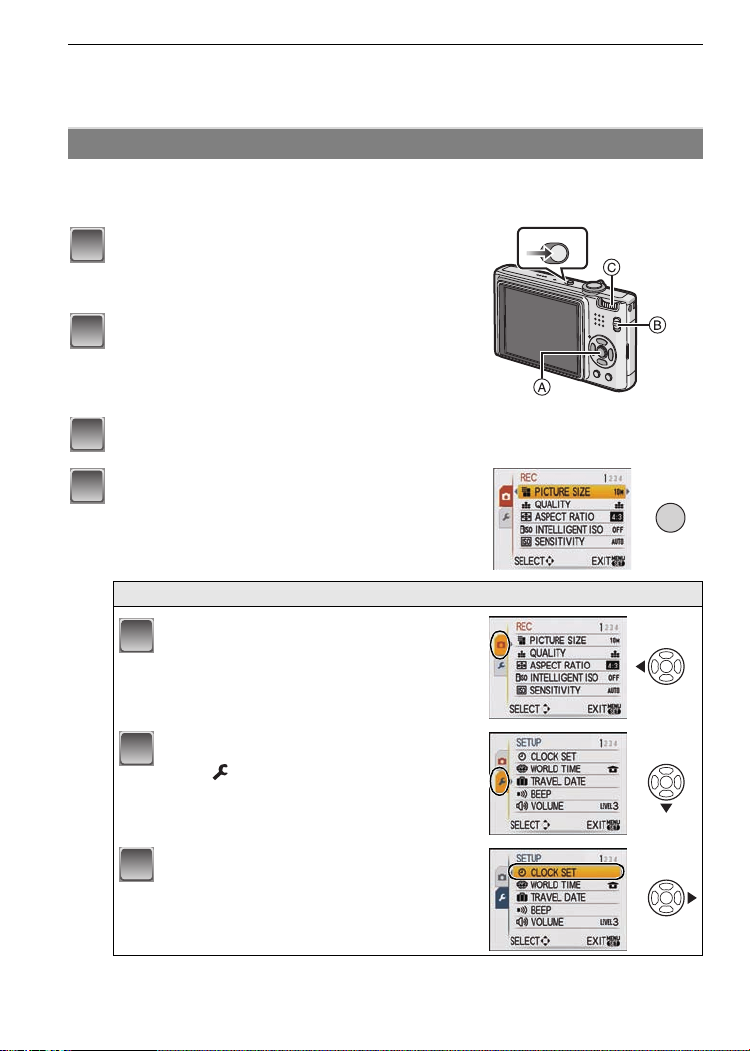
Setting menu items
This section describes how to select the normal picture mode settings, and the same
setting can be used for the [PLAYBACK] menu and [SETUP] menu as well.
Example: Setting [AF MODE] from [
T urn the camera on.
A [MENU/S ET] bu tton
B [REC]/[PLAYBACK] selector switch
C Mode dial
Slide the [REC]/[PLAYBACK] selector
switch to [!].
• When selecting the [PLAYBACK] m ode menu
settings, se t the [ REC]/[ PLAYBACK] selector swit ch to
[(], and proceed to step
Set the mode dial to [·].
Pres s [ME N U / S E T ] to di s pl a y th e me nu .
• You can switch menu screens from any menu item by
rotatin g th e zoom l ever.
Ø] to [š] in the normal picture mode
ONOFF
4.
Switching to the [SETUP] menu
18
Press 2.
Press 4 to select the [SETUP] menu
icon [ ].
Press 1.
• Select a menu item next and set it.
VQT1R87
Page 19
Preparation
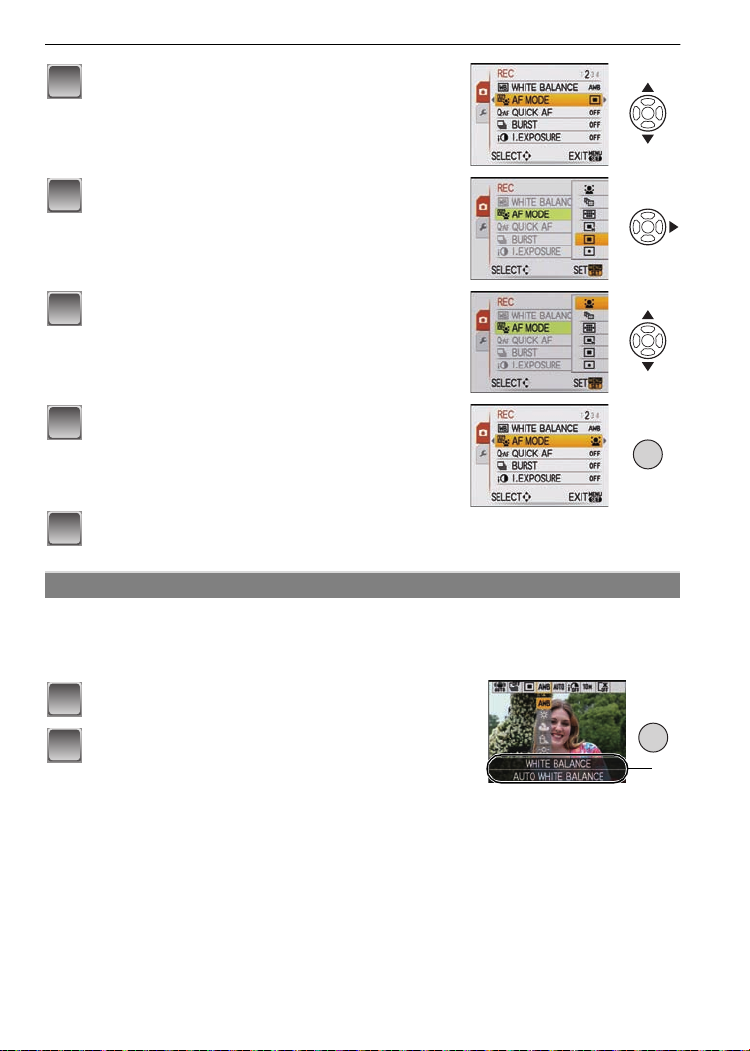
5
6
7
8
/SET
MENU
9
1
2
A
Press 3/4 to select [AF MODE].
• Select t he item at the ve ry bottom, an d press 4 to
move to the second screen.
Press 1.
• Depending on the item, its setting may not appear or it
may be di s p l ayed in a diff er ent way.
Press 3/4 to select [š].
Press [MENU/SET] to set.
Press [MENU/SET] to close the menu.
Using the quick menu
By using the quick menu, some of the menu settings can be easily found.
Some of the menu items cannot be set by t he modes.
•
•When [DISPLAY] is pressed while [STABILIZER] (P65) is selected, [JITTER, SUBJ. MOVE
DEMO.] c an be displayed.
Press and hold [Q.MENU] when recording.
Press 3
the setting and then press [MENU/SET] to
close the menu.
A The items to be set and the settings are displ ayed.
/4/2/1 to select the m enu item and
Q.MENU
VQT1R87
19
Page 20
Preparation
Perform these settings i f you need to.
About the Setup Menu
[CLOCK SET], [ECONOMY] and [AUTO REVIEW] are important items. Check their
settings befo re usin g the m .
In the Intelli gent auto mode, o nly [CLOCKSET], [WORL D TIME], [TRA VEL DATE ], [BEE P] and
•
[LANGUAGE ] can be set.
For details on how to select the [SETUP] menu settings, refer to P18.
U [CLOCK SET] Setting Date/Time.
•
Refer to P 16 for details.
Set the time in your home area and travel destination.
[WORLD TI ME]
•Refer to P 56 for details.
— [TRAVEL DATE]
•Refer to P 55 for details.
r [BEEP]
“ [DESTINATION]:
Travel destination area
– [HOME]:
Your home area
Set the departure date and the return date of the vacation.
[TRAVEL SETUP]
[OFF]/[SET]
[LOCATION]
[OFF]/[SET]
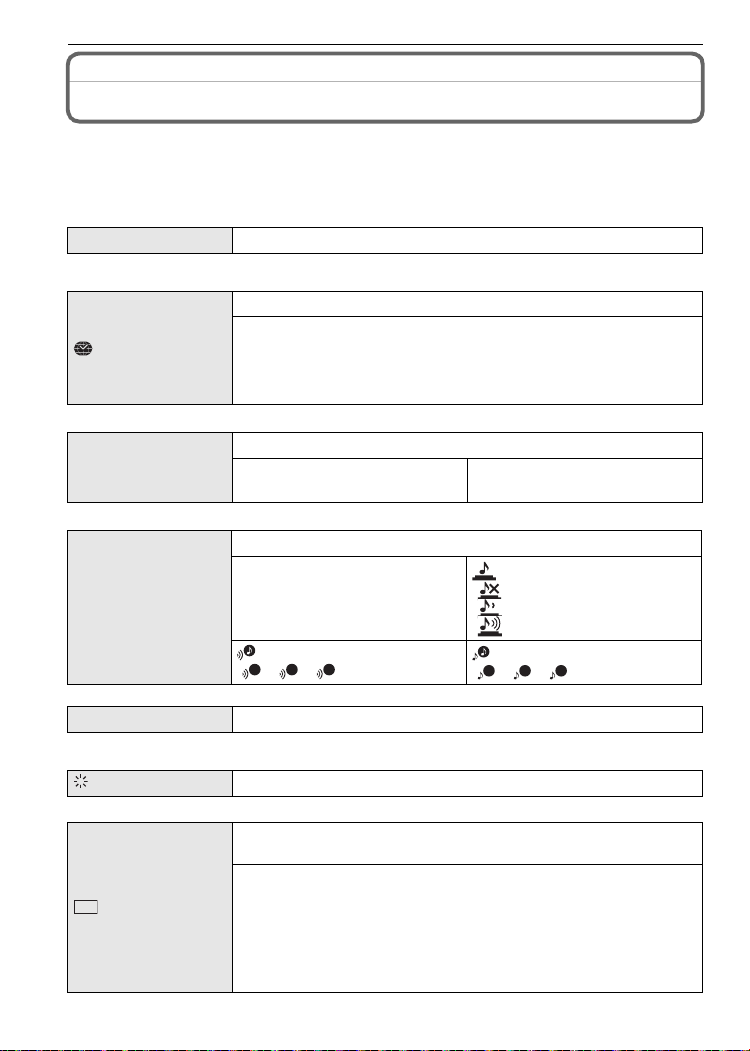
This allows you to set the beep and shutter sound.
r [BEEP LEVEL]:
[s] (Muted)
[t] (Low)
[u] (High)
[BEEP TONE]:
1 2 3
[]/[]/[]
[SHUTTER VOL.]:
[] (Muted)
[] (Low)
[ ] (High)
[SHUTTER TONE]:
1 2 3
[]/[]/[]
u [VOLUME ] Adjust the volume of the speaker to any of 7 levels.
•When you connect the camera to a TV, the volume of the TV speakers does not change .
[MONITOR] Adjust the brightness of the LCD monitor in 7 steps.
These menu settings make it easier to see the LCD monitor when
you are in bright places.
[OFF]
[LCD MODE]
LCD
„ [AUTO POWER LCD]:
The brightness is adjusted automatically depending on how bright
it is around the camera.
… [POWER LCD]:
The LCD monitor becomes brighter and easier to see even when
taking pictures out doors.
VQT1R87
20
Page 21
Preparation
•The brightness of the pictures displayed on the LCD monitor is increased so some subjects
may appear differentl y from actua l i ty on the LCD moni tor. However, this does not affect the
recorded pictures.
•The LCD monitor autom atically returns to norm al brightness after 30 seconds wh en recordi ng
in Power LCD mode. Pre ss any button to m ake the LCD monitor brig ht again.
•If the screen is difficult to s ee because of sunlight etc. shining on it, use your hand or another
object to block the light.
•The number of recordable pictures decreases in Auto Power LCD mode and Power LCD mode.
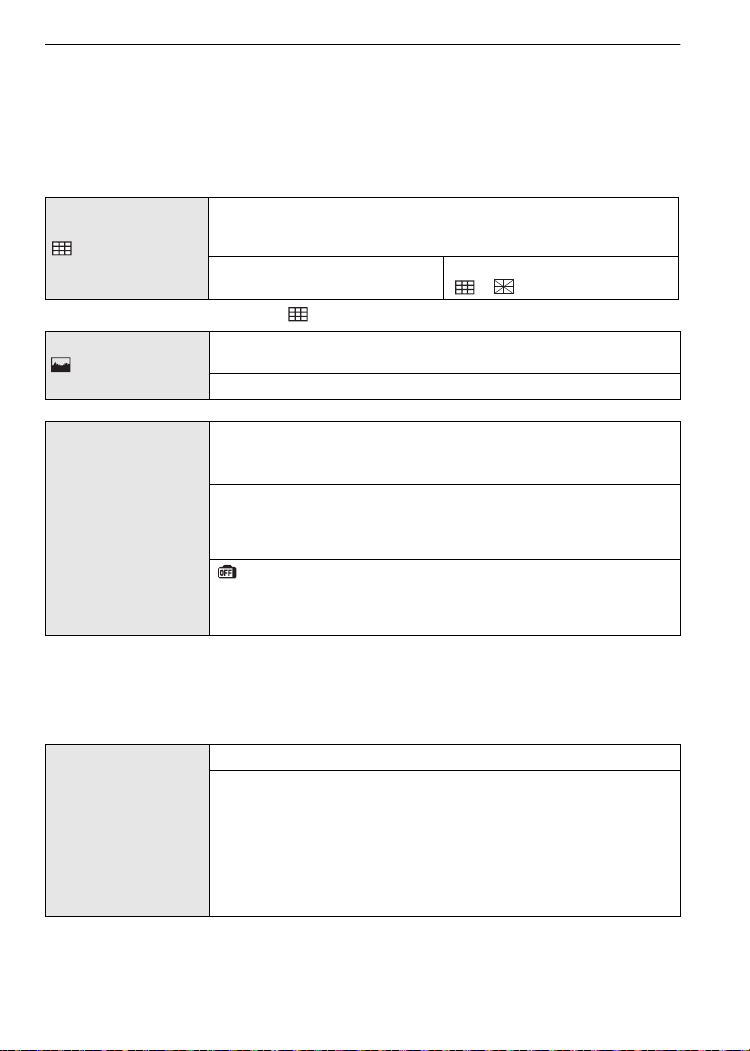
Set the pattern of the guide lines displayed when taking pictures.
You can also set whether or not to have the recording information
[GUIDE LINE]
displayed when the guide lines are displayed. (P35)
[REC. INFO.]:
[OFF]/[ON]
[PATTERN]:
[]/[]
•The [PATTERN] set ting is fixed t o [ ] i n the Intelligent auto mode and the clipboard mode.
This allows you to set either to display or not display the
[HISTOGRAM]
histogram. (P36)
[OFF]/[ON]
You can conserve the battery life by setting these menus.
Also, it will turn off the LCD monitor automatically when not in use
to prevent discharge of the battery.
p [POWER SAVE]:
q [EC ONOMY]
The camera is au tomat i ca lly t urn ed of f if t he cam er a has not b een
used for the time selected on the setting.
[OFF]/[2MIN.]/[5MIN.]/[10MIN.]
[AUTO LCD OFF]:
The LCD monitor is automatically turned off if the camera has not
been used for the time selected on the setting.
[OFF]/[15SEC.]/[30SEC.]
•Press the shutter butt on halfway or turn the camera off and on to can cel [POWER SAVE].
•[POWER SAVE] is set t o [5MIN.] in the Inte l ligent auto mo de and the clipboard mode.
•[POWER SAVE] is fixed to [2MIN.] when [AUTO LC D OFF] is set to [15SEC.] or [30SEC.].
•The status indicator l i ghts while the LCD monito r i s t urned off. Pres s any button to turn on the
LCD monitor again.
•[AUTO LCD OF F] does not work while ope rating menu or playback zoom.
Set the length of time that the picture is displayed after taking it.
[OFF]
[1SEC.]
o [AUTO REVIEW]
[2SEC.]
[HOLD]: The pictures are displayed until one any of the buttons
is pressed.
[ZOOM]: The picture is displayed for 1 second and then
•The auto review functi on i s activated regardles s of its setting w hen using auto bracket (P4 3),
[HI-SPEED BURST] (P49) and [FLASH BURST] (P49) in scene mod e, burst mode (P63) and
when recording still pictures with audio (P66). (The pictures cannot be enlarged.)
•In Intelligent auto mode, the auto review function is fixed to [2SEC.].
enlarge d 4 k and displayed for 1 more second.
VQT1R87
21
Page 22

Preparation
v [NO.RESET]
•The folder number is upd at ed and the file num ber starts fro m 0001. (P89)
•A folder num ber between 10 0 and 999 can be as signed.
When the folder number reaches 999, the number cannot be reset. We recommend formatting
the card (P2 3) after sa ving the data on a PC or elsewhere.
•To reset the folder number to 100, format the built-in memory or the card first and then use this
function to reset the file number.
A reset screen for the folder n umber will then appear. Select [YES] to reset the folder number.
w [RESET]
•When the [RESET] setting is selected during recording, the operation that resets the lens is
also performed at the same time. You will hear the sound of the lens operating but this is
normal and not indicative of malfunctioning.
•When [SETU P ] menu setting s are reset, th e following se tt i ngs are also res et. In additi on,
[ROTATE DISP.] (P83) is set to [ON], and [FAVORITE] (P83) is set to [OFF] in [PLAYBACK]
mode menu.
–The birthday and name settings for [BABY1]/[BABY2] (P47) and [PET] (P48) in sc ene mode.
–The settin gs of [TRAVEL DATE] (P55) ( depart u re da te, return d a te, lo cation)
–The [WORLD TIME] (P56) setting.
•The folder nu mber and the cl ock setting are not changed.
Reset the f il e num b er of the nex t r ec ord ing to 0001 .
The [REC] or [SETUP] menu settings are reset to the initial
settings.
Select th e USB co mmu ni cati on syst em af t er or be for e conn ec ti ng
the camera to your PC or your printer with the USB connection
cable (supplied).
y [SELECT ON CONNECTION]:
x [USB MODE]
Select either [PC] or [PictBridge(PTP)] if you connected the
camera to a PC or a printer supporting PictBridge.
{ [PictBridge(PTP)]:
Set after or before connecting to a printer supporting PictBridge.
z [PC]:
Set after or before co nnecting to a PC.
•When [PC] is selected, the c am era is connected via the “US B M ass Storage” comm unication
system.
•When [Pict Br i dge(PTP)] is selected, the camera is connected via the “PTP (Pictur e Tran sf er
Protocol)” communic ation system .
Set to match the color television system in each country.
| [VIDEO OUT]*
(Playb ack mode only)
[NTSC]: Video output is set to NTSC system.
[PAL]: Video output is set to PAL system.
•This will work when the AV cable is connected.
¢ PAL vi deo out is not avai l able on the ver si on DMC-FX37P sold in the U.S.
Set to match the type of TV.
(Playb ack mode only)
[TVASPECT]
[W]: When connecting to a 16:9 sc r e en TV.
[X]: When connecting to a 4:3 screen TV.
•This will work when the AV cable is connected.
VQT1R87
22
Page 23
} [SCENE MENU]
A
B
Preparation
Set the screen that will appear when a scene mode has been
selected.
[OFF]: The recording screen in the currently selected scene
mode ap pe ars .
[AUTO]: The [SCENE MODE] menu screen appears.
[FORMAT]
•Use a batt ery with suffi ci ent battery power or the AC adaptor (D M W-A C5PP; optional) whe n
formatting. Do not turn the camera off during formatting.
•If a card has been inserted, only the card is formatted. To format the bu ilt-in memory, remove
the card.
•If the card has been formatted on a PC or other equipment, for m at it on the camera again.
•It may take lo nger to format the built-in memory than the card.
•If the buil t -i n m emory or the card cannot be formatte d, consult your nearest Service Center.
For USA assistance, please call:
1-800-211-PANA(7262) or, contact us via the web at:
http://www.panasonic.com/contactinfo
The built-in memory or card is formatted. Formatting irretrievably
deletes all the data so check the data carefully before formatting.
For Canadian assistance, please call:
1-800-99-LUMIX (1-800-995-8649) or
send e-mail to: lumixconcierge@ca.panasonic.com
Set th e lan gu age disp la ye d on the scree n .
~ [LANGUAGE]
•If you set a diff erent language by mistake , se l ect [~] from the menu i cons to set the desired
language.
[DEMO MODE]
DEMO
[ENGLISH]/[DEUTSCH]/[FRANÇAIS]/[ESPAÑOL]/[ITALIANO]/
[繁體中文]
¢ No t av ai l able on the version DMC -F X 37P sold in the U.S.
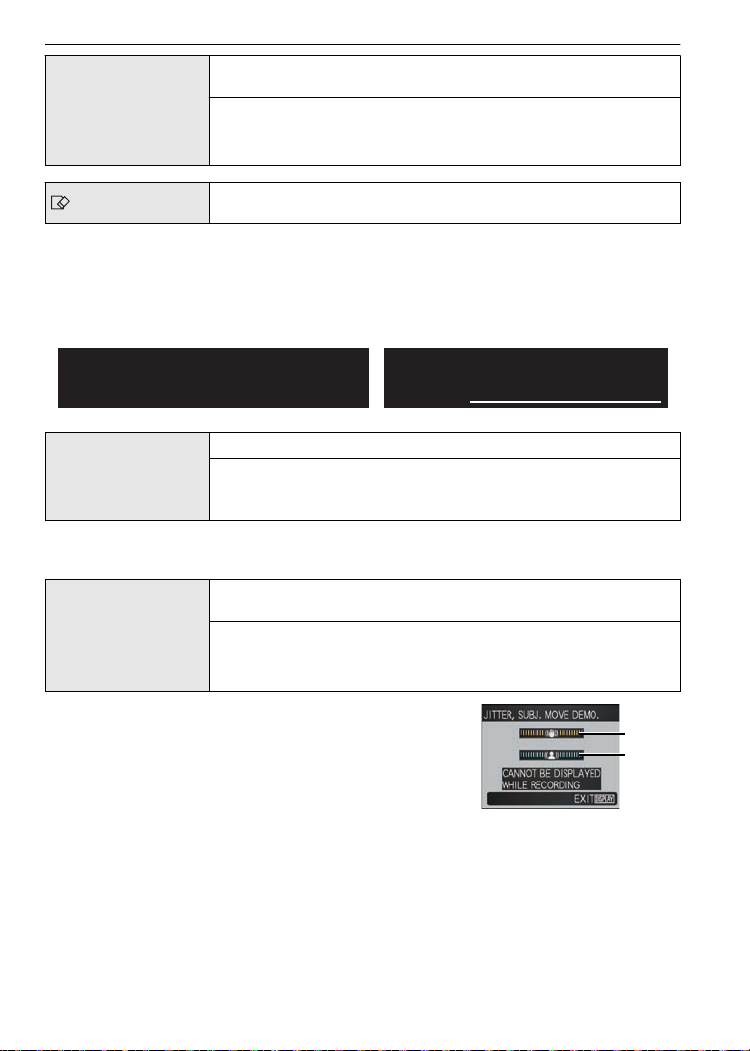
Select this to display [JITTER, SUBJ. MOVE DEMO.] or the
camera’s features.
¢
/[¢]
[JITTER, SUBJ. MOVE DEMO.]
[AUTO DEMO]: The camera’s features are displayed as a
slide show.
A Jitter detecti on dem onstration
B Movement detection demonstration
•In playback mode, [JITTER, SUBJ . MOVE DEMO.] cannot be
displayed.
•Press [DISPLAY] to close [JITTER, SU BJ. MOVE DEMO.].
Press [MENU/SET] to close [AUTO DEMO].
•[JITTER, SUBJ. MO VE DE M O.] is an approximati on.
•[AUTO DEMO] has no TV output capability.
VQT1R87
23
Page 24

Preparation
1
2
3
Mode switching
Selecting the [REC] Mode
When the [REC] mode is selected, the camera can be set to the Intelligent auto mode in
which the optimal settings are established in line with the subje c t to be recorded and the
recording condition s, or to the scene mode which enables you to take pictures that match
the scene being recorded.
T urn the camera on.
A [REC]/[PLAYBACK] selector switch
B Mode dial
ONOFF
Slide the [REC]/[PLAYBACK] selector
switch to [!].
Switching the mode by rotating the mode
dial.
Align a desired mode with part C.
•
Rotate the mode dial slowly and surely to adjust to each mode. (The part where
there is no mode will not turn.)
SCN
∫ List of [REC] modes
¦ Intelligent auto mode (P25)
The subjects are recorded using settings automatically selected by the camera.
!
Normal picture m ode (P28)
The subjects are recorded using your own settin gs.
Û Scene mo d e (P44)
This allows you to take pictures that match the scene being recorded.
$ Motion pic t ure mode (P53)
This mode allows you to record motion pictures with audio.
ì
Clipboard mode (P67)
Record as a memo.
24
VQT1R87
Page 25
Basic
ONOFF
1
2
3
4
5
[REC] mode: ñ
Basic
Taking pictures using the automatic function
(ñ: Intelligent Auto Mode)
The camera will set the most appropriate settings to match the subject and the recording
conditions so we recommend this mode for beginners or those who want to leav e the
settings to the camera and take pictures easily.
•The following funct i ons are activat ed automatically.
–Scene detection/[STABIL IZ ER ]/[INTELLI GENTISO]/Face detection/[QUICK AF]/
[I.EXPOSURE]/ Digital Red-eye Correction/Backlight Compensation
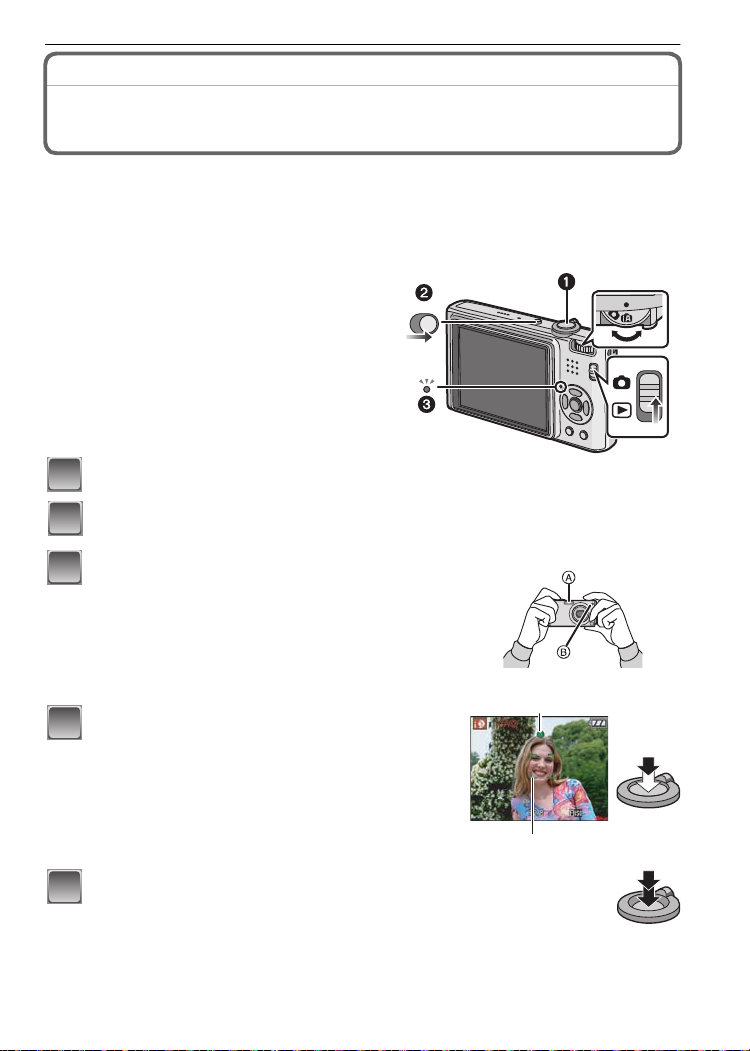
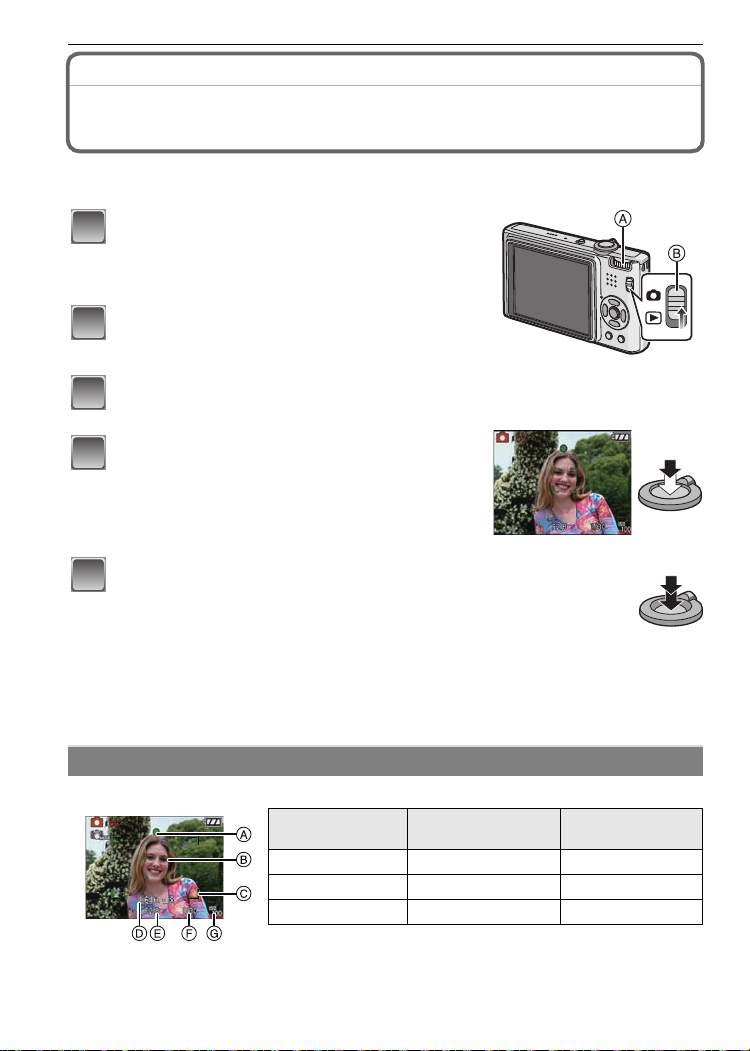
•The status in di cator 3 lights w hen you turn thi s
unit on 2. (It turns off after about 1 second.)
(1: Shutter button)
Slide the [REC]/[PLAYBACK] selector switch to [!].
Set the mo de d ia l to [ñ].
Hold this uni t gently with both hands, keep
your arms still at your side and stand w ith
your feet sl ightly apart.
A Flash
B AF assist lamp
Press the shutter button halfway to focus.
• The focus indication 1 (green) lights when the subject
is focused.
• The AF area 2 is displayed around the subject’s face
by the face detection function. In other cases, it is
displayed at t he point on the su bj ect which is in f ocus.
• The focus range is 5 cm (0.17 feet) (Wide)/1 m
(3.28 feet) (Tele) to ¶.
Press the shutter button fully (push it in
further), and take the picture.
•
The access indication (P15) lights red when pictures are
being rec o rd ed on t h e bu ilt-in m em o ry (o r the c a rd ).
VQT1R87
25
Page 26
Basic
∫ W he n taking pict ure s usi ng the flash (P37)
∫ W he n taking pict ure s usi ng the zoom (P30)
Note
•
Be careful not to move th e camera when you press the shutter bu tt on.
•Do not cover the flash or the AF assist lamp with your fingers or other objects.
•Do not t o uch the front of t he lens.
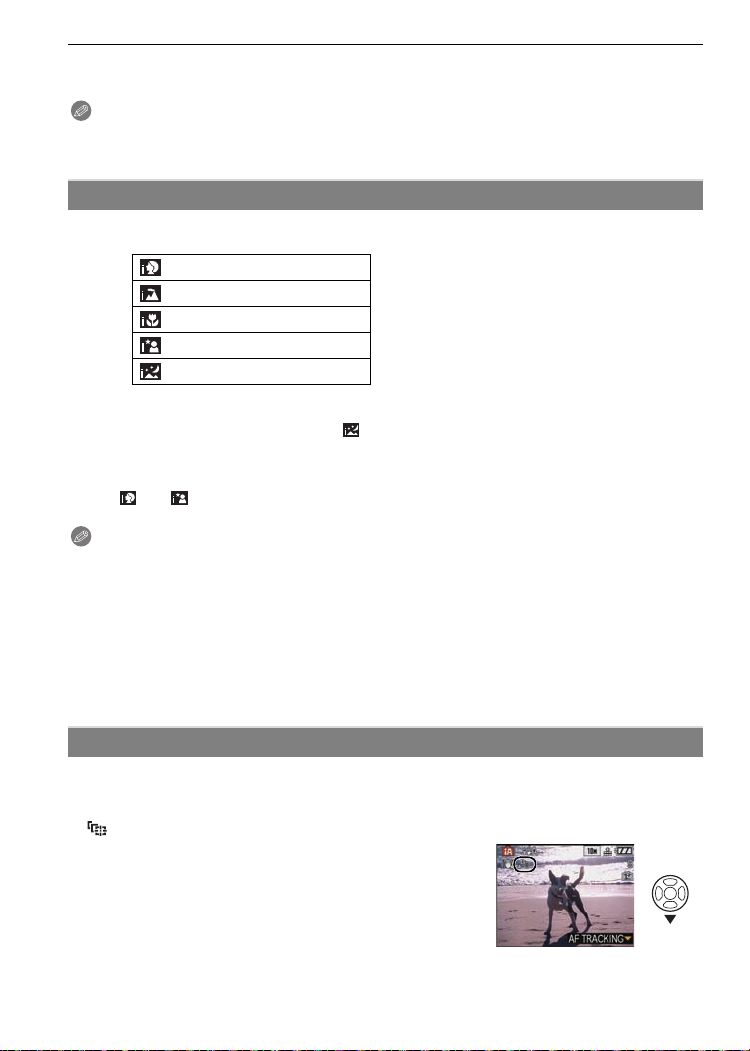
Scene detection
When the camera identifies the optimum scene, the icon of the scene concerned is
displ ayed in blue for 2 se conds, after which its color changes to the usual red.
>
¦
[i-PORTRAIT]
[i-SCENERY]
[i-MACRO]
•
[i-NIGHT PORTRAIT]
[i-NIGHT SCENERY]
[¦] is set if none of the scenes are applicab l e, and the standard settings are set.
•
•If a tripod is used, for instance, and the camera has judged that camera shake is minimal when
the scene mode has been identified as [ ], the shutter speed will be set to a maximum of
8 seconds.Take care not to mo ve the camera while taking pi ct ures.
•An optimum scene for the specified subject will be chosen when s et to AF tracking (P63).
Only wh en [‡] is selected
Only wh en [Œ] is selected
•
∫ Face detection
When [ ] or [ ] is selecte d, the ca mera aut o mati cal l y de tect s a pers on’s face, and it wil l
adjust the focus and exposure (P 62).
Note
Due to condi tion s such as the ones bel ow, a different scene ma y be identified for the same su bject .
•
–Subject conditions: When the face is bright or dark/The size of the subject/The distance to the
subjec t/T he contrast of the subject When the subject is moving/When zoom is used
–
Recording conditions: Sunset, Sunrise/Under low brightness conditions/When the camera is shaken
•To take pictures in an intended scene, it is recommended that you take pictures in the
appropriat e recordi ng m ode.
∫ The Backlight Compensation
Backlight refers to when light comes from the back of a subject.
In this case, the subject will become dark, so this function compensates the backlight by
brightening the whole of the picture automatically.
AF Tracking Function
It is possible to set the focus to the specified subject. Focus will keep following the subject
automatically even if it moves. Refer to P63 for details.
Set the [AF TRACKING] in the [REC] mode menu to [ON ].
•
([ ] is displayed on the screen.)
Bring the subject to the AF tracking frame, and
press 4 to lock the subject.
•AF tracking frame will turn yellow.
•An optimum scene for the specified subject will be chosen.
•Press 4 again to release.
26
VQT1R87
Page 27
Basic
About the flash
•When [‡] is selected, [ ], [ ] or [ ] i s s et depending on the type of su bj ect and
brightness.
•When [ ] or [ ] i s se t, digit al red-eye corr ection (P38) is enable d, an d the flash is
activated twice.
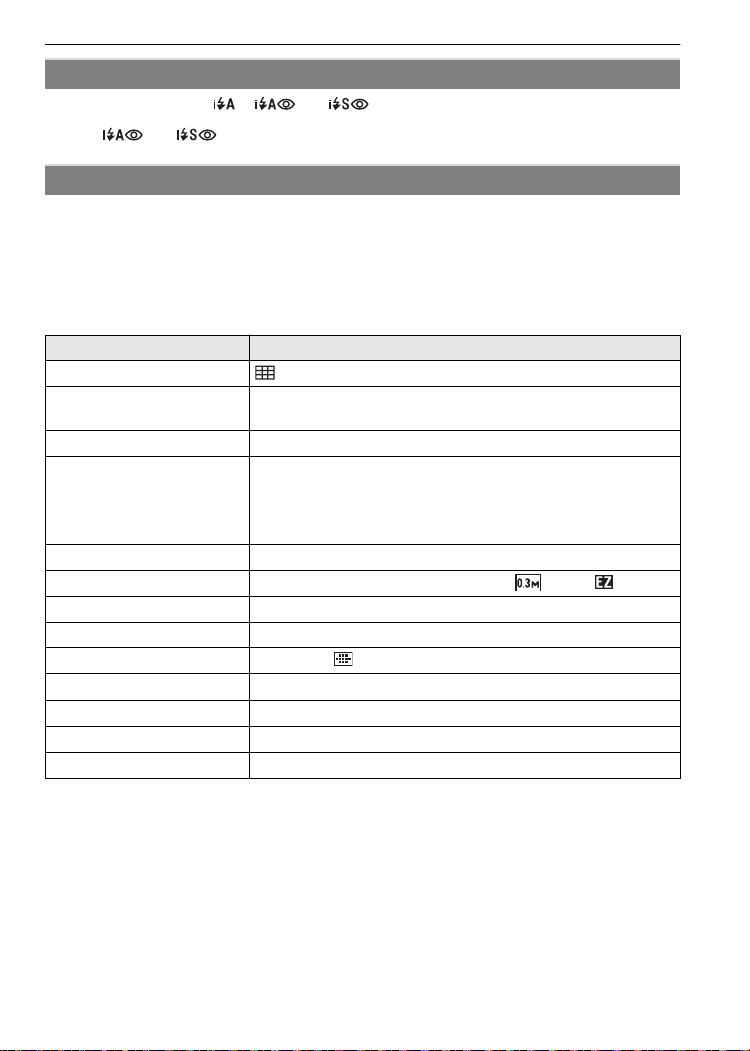
Settings in Intelligent auto mode
•Only the following functions can be set in this mode.
[REC] mod e menu
–[PICTURE SIZE]
[AF TRACKING]
¢ The set tings which can be selected are differen t f rom when other [REC] modes are used.
[SETUP] menu
–[CLOCK SET]/[WO RLD TIME]/[TRAVEL DATE]/[BEEP]/[LANGUAGE]
•The settings of the foll owing items are f i xed.
[GUIDE LINE] (P21) ([REC. INFO.]: [OFF])
[ECONOMY]
([POWER SAVE]) (P21)
[AUTO REVIEW] (P21) [2SEC.]
Focus range The focus range becomes the same as macro mode.
Self-timer (P41) 10 seconds
[QUALITY] (P59) A (Set to [›] when picture size is [ ] (0.3M ))
[INTELLIGENT ISO] (P59)
[WHITE BALANCE] (P60) [AWB]
[AF MODE] (P62) š (Set to [ ] when a face cannot be detected)
[QUICK AF] (P63) [ON]
[I.EXPOSURE] (P64) [ON]
[STABILIZER] (P65) [AUTO]
[AF ASSIST LAMP] (P66) [ON]
•The following funct i ons cannot be use d.
–[EXPOSURE]/[AUTO BRACKET]/White bala nc e fin e adju stme n t/[DIGITAL ZOOM]/
[AUDIO REC.]/[MIN. SHTR SPEED]/[HISTOGRAM]
•The other item s on the [SETU P ] menu can be set in a mode such as the no rm al pi cture mode.
What is set will be reflected in the Intelligent auto mode.
¢
(P58)/[ASPECT RATIO] (P59)/[BURST] (P63)/[COLOR MODE]¢ (P65)/
Item Settings
[5MIN.]
[5 cm (0.17 feet) (Wide)/1 m (3.28 feet) (Tele) to ¶] (P40)
The maximum close-up distance (the shortest distance at
•
which the subject can be taken) differs depending on the zoom
magnification.
ISOMAX
800
VQT1R87
27
Page 28
Basic
123
4
5
[REC] mode: ·
Taking pictures with your favorite settings
(·: Normal picture mode)
Many more menu items can be set and you can take pictures with greater freedom than
when you take pictures in the Intelligent auto mode (P25).
Slide the [REC]/[PLAYBACK] selector
switch to [!].
A Mode dial
B [REC]/[PL AYBACK] selector switch
Set the mode dial to [·].
• To change the setting while taking pictures, refer to
“Using the [R EC] Mode Menu” (P58).
Aim the AF area at the point you want to
focus on.
Press the shutter button halfway to f ocus.
• The focus i ndi cation (green) lights when the subject is
focused.
• The focus range is 50 cm (1.64 feet) (Wide)/1 m
(3.28 feet) (Tele)
• If picture s are to be taken at an even closer range,
refer to
“Ta ki ng Close-up Pictures ” (P40).
Press the halfway pressed shutter button
fully to take a picture.
• The access indicati on l i ghts (P15) red when pic tures
are being recorded on t he built-in m em ory (or the
card).
∫ To adjust the exposure and take pictures at times when the image appears too
dark ( P4 2 )
∫ To adjust the colors and take pictures at times when the image appears too red
(P60)
to ¶.
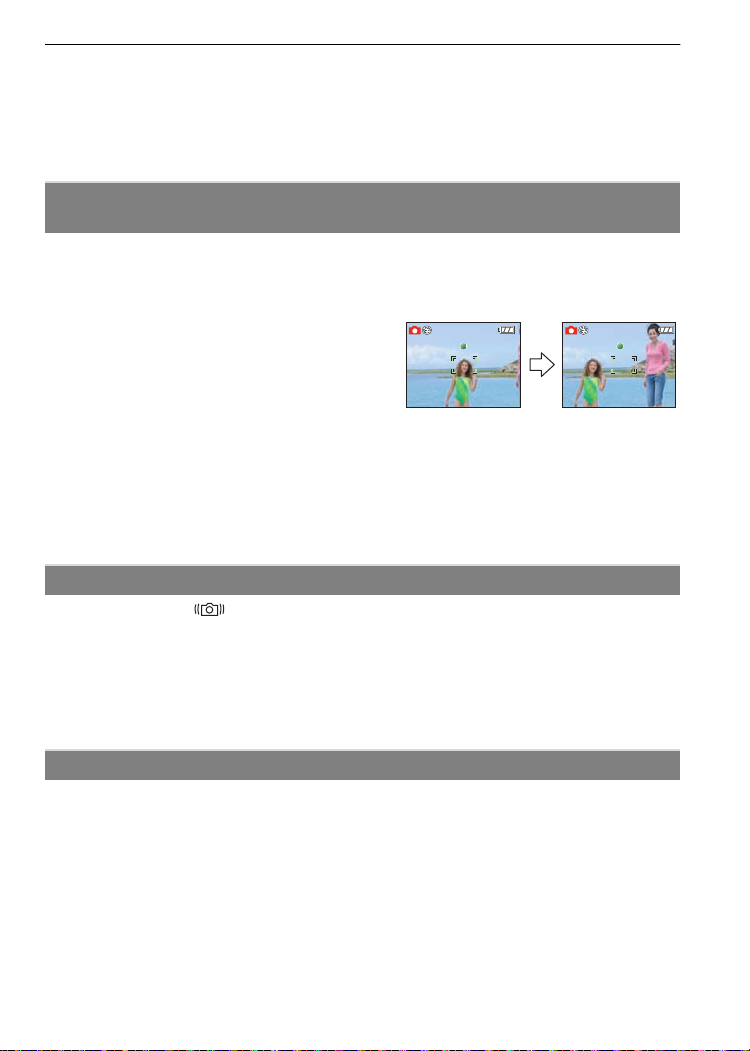
Focusing
Aim the AF area at the subject, and then press the shutter button halfway.
When the subj ect is
focused
A Focu s indi cation
B AF are a (normal)
28
Focus
Focus indication On Blinks
AF area White>Green White>Red
Sound Beeps 2 times Beeps 4 times
VQT1R87
When the subject
is not focused
Page 29
Basic
1/125
F2.8
ISO
100
1/125
F2.8
ISO
100
C AF are a (when using the digital zoo m or when it is dar k)
D Focus range
E Aperture value
F Shutter speed
G ISO sensitivity
¢ If correct exposure cannot be achieved, it will be displayed in red.
¢
¢
(However, it will not be displayed in red when the flash is used.)
When the subject is not in focus (such as when it is not in the center of
the composition of the picture you want to take)
1 Aim the AF area at the subject, and then press the shutter button halfway to fix the
focus and exposure.
2 Press and hold the shutter button halfway while moving the camera as you
compose the picture.
You can repeatedly retry the actions in step 1
•
before pressing the shutter button fully.
We recommend that you use the face
detection function when taking pictures of
people. (P62)
F2.8
1/125
1/125F2.8
ISO
ISO
100
100
F2.8
1/125
1/125F2.8
ISO
ISO
100
100
∫ Subje cts and recording condition s
which are difficult to focus
•
Fast-moving subjects, extremely bright subjects or subjects without contrast
•When the recordabl e range disp la y has appeare d i n red.
•When rec ording subj ects through wi ndows or near shiny objects
•When it is dark or when jitter occurs
•When the camera is too close to the subj ect or when tak in g a pi cture of both distant and near
subjects
Preventing jitter (camera shake)
When the jitter alert [ ] appears, use [STABILIZER] (P65), a tripod or the self-timer
(P41).
•Shutter speed will be slower particularly in the following cases. Keep the camera still from the
moment the shutter button is pre ss ed until the pi ct ure appears on the screen. We recomme nd
using a tri pod.
–Slow sync./Red-eye reduction
–In [NIGHT PORTRAIT], [NIGHTSCENERY], [PARTY], [CAND LE LIGHT], [STARRYSKY] or
[FIREWORKS] in scene mode (P44)
–When the shutter speed is slo we d in [MIN. SHTR SPEE D]
Direction detection functi on
Pictur es re cord ed wi th the ca mer a he l d v ert ic al ly are pl ay ed back ve rti ca ll y ( ro tat e d). ( Onl y
when [ROTAT E DISP.] (P83) is set to [ON])
•Pictures may not be dis pl ayed vertic al l y if they were tak en with the ca m era aimed up or down.
•Motion pi ctures taken wi th the camera held vertically are no t displayed vertically.
VQT1R87
29
Page 30
Basic
[REC] mode: ñ·¿n¨
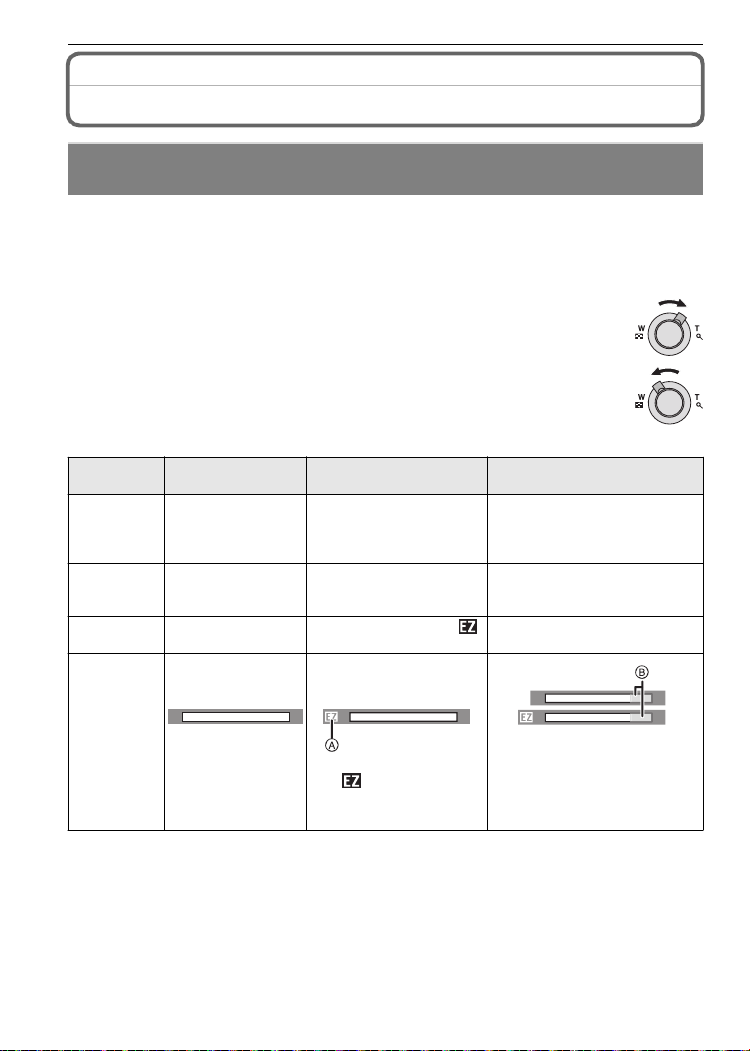
Taking Pictures with the Zoom
Using the Optical Zoom/Using the Extended optical zoom (EZ)/Usi ng
the Digital Zoom
You can zoom-in to make people and objects appear closer or zoom-out to record
landscapes in wide angle. To make subjects appear even closer [maximum of 8.9k], do
not set the picture size to the highest setting for each aspect ratio (X/Y/W).
Even higher levels of magnification are possi ble when [DIGITAL ZOOM] is set to [ON] in
[REC] menu.
T o make subjects appear closer use (Tele)
Rotate the zoom lever towards Tele.
T o make subjects appear further away use (Wide)
Rotate the zoom lever towards Wide.
∫ Types of zooms
Feature Optical zoom
Maximum
magnification
Picture
quality
5k 8.9k
No deteri oration No deterioratio n
Conditions None
Extended optical zoom
(EZ)
¢1
[PICTURE SIZE] with
(P58) is selected.
Digital zoom
20k [including optical zoom
5k]
35.6k [including ext ended
optical zoom 8.9k]
The higher the magnifi cation
level, the greater the
deterioration.
[DIGITAL ZOOM] (P64) on the
[REC] menu is set to [ON].
W
Screen
display
•
When using the zoom function, an estimate of the focus range will appear in conjunction
with the zo o m display b ar. (Exa mple: 0.5 m (1.64 ft.) –¶)
¢1 Th e magni fic at i on le ve l differs depending on [PICTU RESIZE] and [ASPEC TRA T IO] se tting.
W
T
A
[ ] is displayed.
T
W
W
B The digital zoom range is
displayed.
The AF area becomes larger
when the shutter butt on is
pressed halfway in the digital
zoom range
¢2
.
¢2 The on-screen z oom i ndication m ay m omentarily st op m oving when you rotate the zo om
lever to the ex treme Tele position. You can enter the digi tal zoom range by continuously
rotating the zoom lever to Tele or releasing the zoom lever once and then rotating it to Tele
again.
VQT1R87
30
T
T
Page 31

Basic
1
2
A
B
∫ Extended optical zoom mechanism
When you set the picture size to [ ] (3 million pixels), the 10M (10.1 million pixels) CCD
area is cropped to the center 3M (3 million pixels) area, allowing a picture with a higher
zoom effect.
Note
The digital zoom cannot be set when õ or ¨ has been sel ected.
•
•The indicated zoom magnification is an approximation.
•“EZ” is an abbreviation of “Extended optical Zoom”.
•The optical zoom is set to Wide (1k) when the c a m era is turned on.
•If you use the zoom functi on after focus i ng on the subjec t, f ocus on the subj ect again.
•The lens barrel extends or retract s ac cording to the zoom position. Take care not to interrupt
the motio n of the lens barrel while th e zoom lever is rota ted.
•When usin g the digital zo om , [STABILIZER] may n ot be eff ective.
•When usin g the digital zo om , we recomm end using a tripod and the self-timer (P41) for taking
pictures.
[PLAYBACK] mode: ¸
Playing back Pictures ([NORMAL PLAY])
Slide the [REC]/[PLAYBACK] selector
switch A
• Normal playb ack is set automatically in the
follo wing ca ses.
–When the mode was switched from the [ RE C]
–When the camera was tu rned on while the
• When the m ode dial is set to [ ¨], clipboard will
be displaye d. Refer to “Viewing clipboard
pictures
back the clipboard.
Press 2/1 to select the pi cture.
to [(].
to [PLAYBACK].
[REC]/[PLAYBACK] selecto r switch was at
[(].
” (P68) for informatio n about playing
2: Play back the previou s picture
1: Play back the next picture
• Speed of pictu re forwardin g/rewinding changes depending on the playback sta tu s.
∫ Fast forwarding/Fast rewinding
Press an d hol d 2/1 during playback.
2: Fast rew i nd
1: Fast forward
•
The file number A and the picture nu m ber B only
change one by one. Release 2/1 when the number of
the desi red picture appears to pla y back the pic tu re.
•If you ke ep pres sing 2/1, the nu m ber of picture s f orwarded/ rewound increases.
VQT1R87
31
Page 32

Basic
A
A
/SET
MENU
Displaying Multiple Screens (Multi Playback)
Rotate the zoom lever towards [L] (W).
1screen>12 screens>30 screens>Calendar screen
display (P75)
A Nu mb er of the selected picture and the total number of
recorded pictures
•Rotate the zoom lever towards [Z] (T) to return to the
previous screen.
•Pictures are not rotated for display.
∫ To return to normal playback
1 Press 3/4/2/1 to select a picture.
•
An icon will be displayed depending on the recorded picture and the settings.
2 Press [MENU/SET].
•
The picture that was selected will appear.
Using the Pl ayback Zoom
Rotate the zoom lever towards [Z] (T).
1k>2k>4k>8k>16k
When you rotate the zoom lever towards [L ] (W) afte r
•
enlarging the picture, the magnification becomes lower.
•When you change the magnification, the zoom position
indication A appears for about 1 second, and the position of
the enlarged section can be moved by pressing 3/4/2/1.
•
The more a picture is enlarged, the more its quality deteriorates.
•When you move the position to be displayed, the zoom
position indication appears for about 1 s eco nd.
Note
This camera complies with the DCF standard “Design rule for Camera File system” established
•
by JEITA “Japan Electronics and Information Technolo gy Industries Association” and with Exif
“Exchangeable Image File Format”. Files which do not comply with the DCF standard cannot be
played back.
•
The lens barrel retract s abo ut 15 seconds after switching from [REC] mode to [PLAYBACK] mode.
•If you want to save the enlarged picture, use the trimming function. (P80)
•The playback zoom may not operate if pictures have been recorded with other equipment .
Switching the [PLAYBACK] mode
1
Press [MENU/SET] during playback.
2 Press 1.
3 Press 3/4 to select the item and then press
[MENU/SET].
[NORMAL PLAY] (P31)
All the pictures are played back.
[SLIDE SHOW] (P70)
The pictures are played back in sequence.
[CATEGORY PLAY] (P72)
The pictures grouped together in categories are played back.
[FAVORITE PLAY] (P73)
Your favorite pictures are played back.
¢ [FAVORITE PLAY] is not displayed when [FAVORITE] has not been set.
VQT1R87
32
¢
Page 33

[PLAYBACK] mode: ¸
1
2
1
2
3
4
5
Deleting Pictures
Once deleted, pictures cannot be recovered.
Pictures on the built-in memory or the card, which is being played back will be deleted.
•
T o delete a single picture
Select the pi cture to be deleted, and then
press [‚].
A [ DISPL AY] b utton
B [
‚] button
Press 2 to select [YES] and then press
[MENU/SET].
To delete multiple pictures (up to 50) or all the pictures
Press [‚].
MENU
/SET
Basic
Press 3/4 to select [DELETE MULTI] or [DELETE ALL] and then
press [MENU/SET].
• [DELETE ALL] > step 5.
Press 3/4/2/1 to select the picture, and
then press [DISPLAY] to set. (Repeat this
step.)
• [ ] appears on the selected pictures. If [DIS PLAY] is
pressed again, the setting is canceled.
Press [MENU/SET].
Press 3 to select [YES] and then press [MENU/SET] to set.
DISPLAY
VQT1R87
33
Page 34

Basic
∫ When [DELETE ALL] has been selected with the [FAVORITE] (P83) setting
The selection screen is displayed again. Select [DELETE ALL] or
[ALL DE LETE EXCEPT Ü], press 3 to select [YES] and delete the pictures.
([ALL DELETE EXCEPTÜ] cannot be selected if no pictures have been set as
[FAVORITE].)
Note
•
Do not turn the camera off while deleting (while [‚] is displayed). Use a battery with a sufficient
power or the A C adaptor (DMW- AC 5PP; optional).
•If you press [MENU/SET] while deleting pictures using [DELETE MULTI], [DELETE ALL] or
[ALL DELETE EXCEPT Ü], the deleting will stop halfway.
•Depending on the number of pictures to be deleted, it may take some time to delete them.
•If pictures do not conform t o the DCF standard or are protected (P85), they will not be deleted
even if [DELETE ALL] or [ALL DELETE EXCEPTÜ] is selected.
34
VQT1R87
Page 35

Advanced (Recording pictures)
9
AUTO
About the LCD Monitor
Press [DISPLAY] to change.
A LCD monitor
B [DISPLAY] button
•When the m enu screen app ears, the [DI S PLAY] button is not
activated. During playback z oom (P32), wh i l e pl aying back motion
pictures (P73) and during a slide sho w (P 70), yo u can only select
“Normal display F” or “No display H”.
In recording mode
C Normal displa y
D No display
E No display (Recordi ng
guide line)
In playback mode
F Normal displa y
G Displ ay with recording
information
H No display
¢1, 2
¢
¢
1
AUTO
AUTO
1
9
Advanced (Recording pictures)
¢1 If the [HISTOGRAM] in [SETUP] menu is set to [ON], histogram will be displayed.
¢2 Set the pattern of the guide lines displayed by setting [GUIDE LINE] in [SETUP] menu. You
can also set whether or not to have the recording information displayed when the guide lines
are display ed.
Note
In [NIGHT PORTRAIT], [NIGHT SCENERY], [STARRY SKY] and [FIREWORKS] in scene
•
mode, the guide line is gray. (P44)
∫ Recording guide line
When you align the subject on the horizontal
and vertical guide lines or the cross point of
these lines, you can take pictures with
well-designed composition by viewing the size,
the slope and the balance of the subject.
A []:This is used when dividing the entire screen int o 3k3 for taking pic tu res with a
B []:This is used when you want to posi tion the subject at the exact center of the
well-bal anced composition.
screen.
VQT1R87
35
Page 36

Advanced (Recording pictures)
∫ About the Histogram
A histogram is a graph that displays brightness along the horizontal axis (black to white)
and the number of pixels at each brightness level on the ver tical axis.
It allows you to easily check a picture’s exposure.
1 Dark area, mid-tone, and bright area are balanced out evenly, making it suitable to take
a picture.
2 The picture will become underexposed with more dark area. The pictures with mostly
dark area, such as night scenery, will also have a histogram like this.
3 The picture will become overexposed with more bright area. The pictures with mostly
white area will also have a histogram like t his.
Examples of hist ogra m
1 Properly Exposed
2 Under Exposed
3 Overexposed
¢ Histogram
Note
•
When you take pictures with the flash or in dark places, the histogram is displayed in
orange because the recorded picture and the histogram do not match each other.
•The histogr am i s an approxim ation in reco rding mode.
•The histogr am of a picture may not match in recording mod e and playback mode.
•The histogram displayed in this camera does not match histograms displayed by picture editing
software used i n P Cs etc.
36
VQT1R87
Page 37

Advanced (Recording pictures)
1
2
3
[REC] mode: 񷿨
Taking Pictures using the Built-in Flash
A Photo flash
Do not cover it with your fingers or other objects.
Switching to the appropriate flash setting
Set the flash t o match the recording.
Press 1 [‰].
Press 3/4 to select a mode.
• You can also press 1 [‰] to select.
• For information about flash settings that can be selected, refer to
“Available flash settings by recording mode”. (P38)
Press [MENU/SET].
• You can also press the s hutter butto n hal fway to fini sh.
• The menu screen disappears after about 5 seconds. At this tim e, the selected item is
automatical l y set.
Item Description of settings
‡: AUTO
:
AUTO/Red-eye
reduction
‰: Forced flash ON
Force d O N/R ed- eye
reduction
Slow sync./Red-eye
reduction
Œ:
¢ The flash is activated twice. The subject should not move until the second flash is
¢
:
¢
:
¢
Forced flash OFF
activated. Interval until the second flash depends on the brightness of the subject.
The flash is automatically activated when the recording conditions make
it necessary.
The flash is automatically activated when the recording conditions make
it necessary.
It is activa ted once befo re the actual recording to reduce the re d-eye
phenomenon (eyes of the subject appearing red in the picture) and then
activated again for th e actual recor di ng.
•Use this when you take pictures of peop l e i n l ow l i ghting condi tions.
The flash is activated every time regardless of the recording conditions.
•Use this when your subject is back-lit or under fluorescent light.
•The flash setting is set to [ ] only when you set [PARTY] or
[CANDLE LIGHT] in scene mode. (P44)
If you take a picture with a dark background landscape, this feature will
slow the shut ter speed when the flas h i s ac tivated so that the dark
background landscape will become bright. Simultaneously it reduces the
red-eye phenomenon.
•Use this when you take pictures of people in front of a dark
background.
The flash is not activated in any recording conditions.
•Use this when you take pictures in places wh ere the use o f the
flash is not permitted.
VQT1R87
37
Page 38

Advanced (Recording pictures)
∫ About the di gital red-eye cor rection
When the flash is used with the Red-eye reduction ([ ], [ ], [ ]) selected, it will
automatic ally detect and correc t t he r ed-eye in the image dat a.
¢ It may not be able to correct the red-eye depending on the recording conditions. It may also correct
objects ot he r tha n red -e y e.
∫ Available flash set tings by recording mod e
The avail able flash settings depend on the recording mode.
(±: Available, —: Not available, ¥: Scene mode initial setting)
‡ ‰ Œ ‡ ‰ Œ
¢
ñ ±
·
* ±¥±
+ ±¥±
0 ±¥±
,
- ¥
.
/
1 ±
2
3
: ±¥±
; ±¥±
¢ When [‡] is selected, [ ], [ ] or [ ] is set dependi ng on the type of subject and
brightness.
•The flash setting may change if the recording mode is changed. Set the flash setting again if necessary.
•The flash setting is memorized even if the camera is turned off. However, the scene mode flash setting is
reset to the initial setting when the scene mode is changed.
∫ The available flash range to take pictures
•The available fl ash range is an approximation.
ISO sensitivity
————
±
±±±
——
——
±¥±
—————
—
———¥—
—————
—
———
———
AUTO 60 cm (1.97 feet) to 6.0 m (19.7 feet) 1.0m (3.28 feet) to 2.8 m (9.18 feet)
ISO100 60 cm (1.97 feet) to 1.9 m (6.23 feet) 1.0 m (3.28 feet)
ISO200 60 cm (1.97 feet) to 2.7 m (8.85 feet) 1.0 m (3.28 feet) to 1.2 m (3.94 feet)
ISO400 60 cm (1.97 feet) to 3.8 m (12.5 feet) 1.0 m (3.28 feet) to 1.8 m (5.91 feet)
ISO800 80 cm (2.62 feet) to 5.4 m (17.7 feet) 1.0 m (3.28 feet) to 2.5 m (8.20 feet)
ISO1600 1.15 m (3.77 feet) to 7.7 m (25.3 feet) 1.0m (3.28 feet) to 3.6m (11.8 feet)
——
——
±
——
±
——
¥±± ¥
±±¥ < ±
——
——
± í ±
—
± ï
± 9 ±
± ô
±
± 5
¥ 4
± 6
± 8 ¥
¥ 7
¥¥—±
± n
± ¨ ±
Available flash range
Wide Tele
—
±
—————
—
±
—————
——¥———
—————
—
—
——¥——
—————
—————
———
—
±
—
±
—
±
—
±
——
——
——
——
——
——
——
¥
¥
¥
¥
¥
¥
±
±
¥
±
±
¥
±
±
38
VQT1R87
Page 39

Advanced (Recording pictures)
•In [HIGH SENS.] (P48) in scene mode, the ISO sensitivity automatically switches to between [ISO1600]
and [ISO6400] and the available flash range also di ffers.
Wide: Approx. 1.15 m (3.77 feet) to approx. 15.4 m (50.5 feet)
Tele: Approx. 1.0 m (3.28 feet) to approx . 7.3 m (24.0 feet)
•In [FLASH BURST] (P49) in scene mode, the ISO sensitivity automatically switches to between
[ISO10 0] and [ISO3200] and the available flash range also differ s.
Wide: Approx. 60 cm (1.97 feet) to approx . 4 .0 m (13.1 feet)
Tele: Approx. 1.0 m (3.28 feet) to approx . 1.9 m (6.23fee t)
∫ Shutter speed for each flash setting
Flash setting Shutter spe ed (Sec.) Flash setting Shutter speed (Sec.)
‡
‰
1/30
¢1
to 1/2000t h
Œ
¢1
1
to 1/2 0 0 0th
1 or 1/4th to 1/2000th
1¢1 to 1/2 0 0 0th
1 or 1/4th to 1/2000th
¢2
¢2, 3
¢1 It may vary dependi ng on the [MIN. SHTR SPEED ] se tt i ng (P65).
¢2 When Intelligent ISO is set (P59)
¢3 [SPORTS], [BABY1]/[BABY2] and [PET] in scene mode (P44)
•¢2, 3: The shutter speed becomes a maximum of 1second in the following cases.
–When the optical image stabilizer is set to [OFF].
–When the camera has determined that there is little jitter when the optical image stabilizer is
set to [MODE1], [MODE2] or [AUTO].
•In Intelligent auto mode, shutter speed changes depending on the identified scene.
•There will be differences in the above shutter speeds in the scene modes.
–[NIGHT PORTRAIT] /[ NI G HT SCENERY]: 8 or 1/8th of a second to 1/ 2000th of a second
–[CANDLE LIGHT]: 1 or 1/8th of a second to 1/2000 t h of a second
–[FLASH BURST]: 1/30 th of a second to 1/2000th of a sec ond
–[STARRY SKY]: 15 seconds, 30 seconds, 60seconds
–[FIREWORKS]: 1/4th of a second, 2 seconds
–All other scene modes: 1/8th of a second to 1/2000th of a second
¢4 The maximum shu tt er speed is selected when the am ount of jitte r i s mi ni m al while
¢4
¢4
¢4
[STABILIZER] is set or when [STABILIZER] is set to [OFF].
Note
If you bring the flash too close to an obj ect , the object m ay be distorted or discolo red by the
•
heat or lighting from t he f l ash.
•When you tak e a pi cture beyond the avail abl e flash range, the exposu re m ay not be adjusted
proper ly and the pictu re m ay become bright or dark.
•When the flash is being charged, the flash icon bl in ks red, and you cannot take a pic tu re even
when you press the shutter button fully.
•The white balance ma y not be proper l y adjusted if t he flash level is i nsufficient for the subject.
•When the shutter speed is fast, the fl as h effect may not be sufficien t.
•It may take time to charge the flash if you repeat taking a picture. Take a picture after the
access indication disappears.
•The red-eye reducti on effect differ s between peo pl e. Also, if the subj ect was far away from the
camera or was not looking at the firs t fl ash, the effec t may not be evide nt.
VQT1R87
39
Page 40

Advanced (Recording pictures)
1
2
[REC] mode: ·n
Taking Close-up Pictures
This mode allows you to take close-up pictures of a subject, e.g. w hen taking pictures of
flowers. You can take pictures of a subject as close as 5 cm (0.17 feet) from the lens by
rotating the zoom lever upmost to Wide (1k).
Press 4 [#].
• In macro mod e, [ ] is displa yed. To cancel,
press 4 again.
T ake the pictures.
∫ Focus range
¢ The focus range changes in steps.
T
W
Note
We recommend using a tripod and the self- timer.
•
•We recommend setting the flash to [Œ] when you take pictures at clo se range.
•If the distance between the camera and the subject is beyond the focus range of the cam era,
the picture may not be prop erl y focused even if the focus i ndi cation ligh ts .
•When a subjec t is close to the camera, the effective f ocus range is significant l y narrowed.
Therefore, if the distance between the camera and the subject is changed after focusing on the
subject, it may become diff i cult to focus on it again.
•Macro mode gives priority to a subject close to the camera. Therefore, if the distance between
the camera and the subject i s more than 1 m (3.28 feet) it takes longer to focus on it in macro
mode than nor m al pi cture mode.
•When you take pictures at close range, the resolution of the periphery of the picture may
decrease sli ghtly. This is not a malfunction.
1 m (3.28 feet)
5 cm (0.17 feet)
40
VQT1R87
Page 41

Advanced (Recording pictures)
1
2
3
4
[REC] mode: 񷿨
Taking Pictures with the Self-timer
Press 2 [ë].
Press 3/4 to select a mode.
• You can also press 2 [ë] to select.
Press [MENU/SET].
• You can also press the s hutter butto n hal fway to fini sh.
• The menu screen disappears after about 5 seconds. At this tim e, the selected item is
automatical l y set.
Press the shutter button halfway to focus
and then press it fully to take the picture.
• The self-timer indicator A bl i nks and the shut ter is
activated after 10 seconds (or 2 seconds).
• If you press [MENU/SET] while the self-timer is set, the
self-timer setting is canceled.
Note
When usin g a tripod etc. , set ting the self-timer to 2 seconds is a c onvenient way to avoid the
•
jitter c aus ed by pressing the shutter button.
•When you press the shutter button once fully, the subject is auto matically focuse d just before
recording. In dark places, the self-timer indicator will blink and then may turn on brightly
operati ng as an AF assis t lamp (P66) to al l ow the camera t o focus on the subject.
•We recomme nd using a tripod when r ecording wit h t he self-timer.
•The number of pictures which can be taken in [BURST] is fixed to 3.
•The num ber of picture s w hi ch can be taken in [FLASH BURST] in scene m ode is fixed to 5.
•Self-timer cannot be set to 2 seconds in Intelligent auto mode.
•Self-timer cannot be set to 10 seconds in [SELF PORTRAIT] in scene mode or clipboard mode.
•Self-ti m er cannot be used while in [HI-SPEED BURST] or [UNDERWATER] in scene m ode.
VQT1R87
41
Page 42

Advanced (Recording pictures)
1
2
[REC] mode: ·¿n¨
Compensating the Exposure
Use this function when you cannot achiev e appropriate exposure due to the differenc e in
brightness between the subject and the background. Look at the following examples.
Under exposed
Properly
exposed
Overexposed
Compensate the exposure
towards positive.
Compensate the exposure
toward s ne gative .
Press 3 [È] unti l [E XPOSURE] appears,
compensate the exposure with 2/1.
• Select [0EV] to re turn to the origina l exposure.
Press [MENU/SET] to finish.
• You can also pr e s s t h e s h utter button hal fway to finish.
Note
•
EV is an abbrev i ation of [Exposure Value]. It refers to the amount of light given to th e CCD by
the aperture value and th e shutter speed.
•The exposu re compensation value appears on the lo wer left of the screen.
•The set exposure value i s m em orized even if the camera is turned off .
•The compensation range of the exposure will be limited depending on the brightness of the
subject.
42
VQT1R87
Page 43

Advanced (Recording pictures)
1
2
[REC] mode: ·¿
Taking Pictures using Auto Bracket
In this mode, 3 pictures are automatically recorded in the selected exposure
compensation range each time the shutter button is pressed. Y ou can select the picture
with the desired exposure from the 3 pic tures with different exposures.
With auto b rac ket d1 EV
1st picture 2nd picture 3rd picture
d0EV j1 EV i1 EV
Press 3 [È] until [AUTO BRACKET] appears, set
the compensation range of the exposure with 2/1.
• When you do not use aut o bracket, se le ct [OFF] (0).
Press [MENU/SET] to finish.
• You can also press the s hutter butto n hal fway to fini sh.
Note
•
When se tti ng auto brack et, [ ] appears on the screen.
•When taking pi ctures usi ng auto brac ket aft er setting the exposure compensation range, th e
pictures taken are based on the selec ted exposure compensation range.
When the exposure is c om pensated, the exposure compensation value appears on the lower
left of the screen.
•The auto bracket setti ng i s c anceled if you t urn the camera off or [POWER SAVE] is activated.
•When auto bracket is set , the auto review functio n i s ac tivated regardless of the auto review
setting. (T he picture is not enlarged.) You cannot set the aut o review func tion in the [SET UP]
menu.
•The expos ure may not be c om pensated w i th auto bracket depending on the brightnes s of the
subject.
•[Œ] is set for th e flash when auto b r acket is set .
•Burst is canceled when auto bracket is set.
VQT1R87
43
Page 44

Advanced (Recording pictures)
1
2
3
4
[REC] mode: ¿
Taking pictures that match the scene being
recorded
When you select a scene mode to match the subject and recording situation, the camera
sets the optimal exposure and hue to obtain the desired picture.
Slide the [REC]/[PLAYBACK] selector switch to [!].
Set the mode dial to [¿].
Press 3/4/2/1 to select the scene mode.
• You can switch menu screens from any menu item by rotating
the zoom lev er.
Press [MENU/SET] to set.
• The menu scr een is switch ed to the recordi ng screen in th e
selected scene mode.
∫ About the information
•
If you press [D ISPLAY] when selecti ng a scene mode i n s tep 3,
explanati ons about eac h sc ene mode are displ ayed. (If yo u press
[DISPLAY] again, the screen returns to the sce ne m ode menu.)
Note
To change the scene mode, press [MENU/SET] and then press 1, and return to step 3 above.
•
•Refer to P 39 for informa tion about th e shutter speed.
•The scene mode flash sett i ng i s reset to the initial setting when the s cene mode is changed.
•When you take a picture with a scene mode that is not adequate for the purpose, the hue of the
picture may differ from the actual scene.
•The followi ng items cannot be set in scene mo de because the camera automatically adj usts
them to the optimal setting.
–[INTELLIGENTISO]/[SENSITIVITY]/[I.EXPOSURE]/[COLOR MODE]/[MIN. SHTR SPEED ]
•[I.EXPOSURE] is activated automatically in the following scene modes.
–[PORTRAIT]/[SOF T SKIN]/[TRANSFORM]/[SELF PORTRAIT]/[SCENERY]/[SPORTS]/
[NIGHT PORTRAIT]/[PARTY]/[CANDLE LIGHT]/[BABY1]/[BABY2]/[SUNSET]/[HIGH SENS.]
When taking pictures of people outdoors during the daytime, this mode allows you to
improve the appearance of the persons concerned and make their skin tones look
healthier.
∫ Technique for Portrait mode
T o make this mode more effective:
1 Rotate the zoom lever as far as possible to Tele.
2 Move close to the subject to make this mode more effective.
Note
•
The initial setting for [AF MODE] is [š].
VQT1R87
44
(¿: Scene mode)
* [PORTRAIT]
Page 45

Advanced (Recording pictures)
+ [SOFT SKIN]
When taking pictures of people outdoors during the daytime, this mode enables the texture
of their skin to appear even softer than with [PORTRAIT]. (It is effective when taking
pictures of peop le from t h e che s t up.)
∫ Technique for Soft skin mode
To make this mode more effective:
1 Rotate the zoom lever as far as possible to Tele.
2 Move close to the subject to make this mode more effective.
Note
•
If a part of the background etc. is a color close to skin color, this part is also smoothed.
•This mode may not be effective when there is insufficient brightness.
•The initial setting for [AF MODE] is [š].
[TRANSFORM]
Subject can be recorded either slim or str etched, and at th e same time, skin can be
recorded smoothly.
1
Press 3/4 to select the setting, and then press [MENU/SET].
• It can be set from the qui ck m enu (P19).
2 Take pictures.
Note
[SOFT SKIN] is activated when recording. It becomes harder to detect the
•
[SOFT SKIN] when the level of [SLIM HIGH] or [STRETCH HIGH] is selected.
•[QUALITY] is automatically fixed to [›].
•You can take pictures suitable for 4qk6q/10k15 cm printing.
•The initial setting for [AF MODE] is [š].
•It cannot be used without notify i ng t he copyright owner, except for personal use.
0 [SELF PORTRAIT]
Select this to take pictures of yourself.
∫ Technique for Self portrait mode
Press the shutter button halfway to focus. The self-timer indicator
•
lights up when you are br ought into focus. Making sure you hold
the camera still, press the shutter button fully to take the picture.
•
The subject is not focused when the self-timer indicator is blinking.
Make sure to press the shutter button halfway again to focus.
•The recorded pictu re automati cally appea rs on the LCD monitor
for reviewing.
•If the picture is blurry due to the slow shutter speed, we
recommend using the 2 second se lf-timer.
Note
•
The focus range is about 30 cm (0.99 f eet) to 70 cm (2.29 feet) (Wide).
•You can take a picture of y ourself with audio (P66). If y ou do this, the self-timer in di cator will
light up whil e recording th e au dio.
•The zoom m agnification is automatically move d to Wide (1k).
•
The self-timer can only be set to off or 2 seconds. If it is set to 2 seconds, this setting will remain until
the camera is turned off, the scene mode is changed or [REC] mode or [PLAYBACK] mode is selected.
•The stabilizer function mode is fixed to [MODE2]. (P65)
•The initial setting for [AF MODE] is [š].
VQT1R87
45
Page 46

Advanced (Recording pictures)
, [SCENERY]
This allows you to take pictures of a wide landscape.
Note
The focus range is 5 m (16.4 feet) to ¶.
•
- [SPORTS]
Set her e when you want to take pict ures of sports s cenes or other fast-moving events.
Note
This mode is suitable for takin g pi ctures of sub j ects at distance s of 5 m (16.4 feet) or more.
•
•[INTELLIGENT ISO] is activated, and maximum IS O s ensitivity level becom es [ I SO800].
. [NIGHT PORTRAIT]
This allows you to take pictures of a person and the background with near real-life
brightness.
∫ Technique for Night portrait mode
•
Use the flash. (You ca n set to [ ].)
•Sinc e t h e s hutter speed becomes slow e r, we recommend using a tripod and the sel f-timer for
taking pictures.
•Ask the subj ect not to move while taking a picture.
•We recommend rotating the zoom lever to Wide (1k) an d being about 1. 5 m (4.92 feet) from
the subject when taking a pict ure.
Note
The focus range is 0.8 m (2.62 feet) (Wide)/1.2 m (3.94 feet) (Tele) to 5 m (16.4 feet).
•
•The shutter m ay remain c lo sed (max. abo ut 8 sec.) after taki ng the picture because of signal
processing. This is not a m al f unction.
•Noise may bec om e visible when you take pi ct ures in dark pl aces.
•The initial setting for [AF MODE] is [š].
/ [NIGHT SCENERY]
This allows you to take v ivid pictures of the nightscape.
∫ Technique for Night scenery mode
•
When the camera is set to [STABILIZER] and there is very little jitter, or if [STABILIZER] is set
to [OFF], shu tt er speed ma y s lo w down up to 8 seconds. We recommend using the tripod and
the self-tim er for taking pi ct ure.
Note
The focus range is 5 m (16.4 feet) to ¶.
•
•The shutter m ay remain c lo sed (max. abo ut 8 sec.) after taki ng the picture because of signal
processing. This is not a m al f unction.
•Noise may bec om e visible when you take pi ct ures in dark pl aces.
1 [FOOD]
This mode allows you to t ake pictures of food wit h a natural hue without being affected by
the ambi en t lig ht in r es tau r an ts etc.
Note
The focus range becom es t he same as mac ro mode. [5 cm (0.17 feet) (Wide)/1 m (3.28 feet)
•
(Tele) to ¶]
VQT1R87
46
Page 47

Advanced (Recording pictures)
2 [PARTY]
Select this when you want to take pictures at a wedding reception, an indoor party etc.
This allows you to take pictures of people and the background with near r eal-life
brightness.
∫ Technique for Party mode
•
Use the fl ash. (You can set to [ ] or [ ].)
•We recommend using a tripod and the self-timer for taking pict ures.
•We recommend rotating the zoom lever to Wide (1k) and being about 1.5 m (4.92 feet) from
the subject when taking pictures.
Note
The initial setting for [AF MODE] is [š].
•
3 [CANDLE LIGHT]
This mode allows you to take pictures with a candle-lit atmosphere.
∫ Te chnique for Candle light mode
•
This is mo re effective whe n tak i ng pictures w i thout using the f l ash.
•We recommend using a tripod and the self-timer for taking pict ures.
Note
The focus range becomes the same as macro mod e. [5 cm (0.17 feet) (Wide)/1 m (3.28 fe et)
•
(Tele) to ¶]
•The initial setting for [AF MODE] is [š].
: [BABY1]/; [BABY2]
This takes pictures of a baby with a healthy complexion. When you use the flash, the light
from it is weaker than usual.
It is possible to set different birthdays and names for [BABY1] and [BABY2]. You can
select to have these appear at the time of playback, or have them stamped on the
recorded image using [TEXT STAMP] (P77).
∫ Birthday/Name setting
1 Press 3/4 to select [AGE] or [NAME] and then press 1.
2 Press 3/4 to select [SET] and then press [MENU/SET].
3 Enter the birthday or name.
Birthday:
2/1: Select the items (year/month/day).
3/4:Setting.
[MENU/SET]: Exit.
Name: For details on how to enter characters, read the [TITLE EDIT] section on P76.
•
When the birthday or na me is set , [AG E] or [NAME] i s auto m at ica l ly se t to [ON].
• If [ON ] is selected when the birthd ay or name has not been regist ered, the s et ting screen
appears automatical l y.
4 Press [MENU/SET] to finish.
∫ To cancel [AGE] and [NAM E]
Select the [OFF] setting in step
Note
The age and name can be printed out using the “PHOTOfunSTUDIO-viewer-” bundled software
•
on the CD-ROM (suppl i ed).
•If [AGE] or [NAME] is set to [OFF] eve n when the bir th day or name has been set, the age or
name will not be displayed. Before taking pictures, set [AGE] or [N AME] to [ON].
2 of the “Birthday/Name setting” procedure.
VQT1R87
47
Page 48

Advanced (Recording pictures)
•The focus range becom es t he same as mac ro mode. [5 cm (0.17 feet) (Wide)/1 m (3.28 feet)
(Tele) to ¶]
•[INTELLIGENT ISO] is activated, and maximum IS O s ensitivity level becom es [ I SO400].
•If the camera is turne d on with [BABY1]/[BABY2] set, the age and name are displayed at the
lower left of the screen for ab out 5 seconds, along wit h the current date and time.
•If the age is not properly d ispl ayed, che ck the clock and bi rthday settings.
•The birthday setting a nd name setting can be reset with [RESET].
•The initial setting for [AF MODE] is [š].
í [PET]
Select this wh en you want to take pictu res of a pet such as a dog or a cat.
Y ou ca n se t your p et’ s b irt hd ay and nam e. You can sel ec t to h ave thes e ap pe ar at t he time
of play back, or have them stamped on the recorded image using [TEXT STAMP] (P77).
For information about [AGE] or [NAME], refer to [BABY1]/[BABY2] on P47.
Note
The initial setting for the AF assist lamp is [OFF].
•
•[INTELLIGENT ISO] is activated, and maximum IS O s ensitivity level becom es [ I SO800].
•The initial setting for [AF MODE] is [ ].
•The focus range becom es t he same as mac ro mode. [5 cm (0.17 feet) (Wide)/1 m (3.28 feet)
(Tele) to ¶]
•Refer to [BABY1]/[BABY2] for other information about this mode.
ï [SUNSET]
Select this when you want to take pictures of sunset view. This allows you to take vivid
pictures of the red color of the sun.
9 [HIGH SENS.]
This mode minimizes the jitter of the subjects, and enables you to take pictures of these
subjects in dimly lit rooms. (Select this for high-sensitivity processing. The sensitivity
automati call y swi tc he s to betwee n [ISO1 600 ] and [ISO 64 00].)
∫ P i ctu r e siz e and aspec t ra ti o
Press 3/4 to select the picture size and aspect ratio and then
press [ M ENU/SET] to set.
3M (4:3), 2.5M (3:2) or 2M (16:9) is selected as the pi cture size.
•
Note
[QUALITY] i s auto matically fixed to [›].
•
•You can take pictures suita bl e for 4qk6q/10k15 cm printing.
•The focus range becom es t he same as mac ro mode. [5 cm (0.17 feet) (Wide)/1 m (3.28 feet)
(Tele) to ¶]
VQT1R87
48
Page 49

Advanced (Recording pictures)
ô [HI-SPEED BURST]
This is a convenient mode for shooting rapid movement or a decisive moment.
∫ Picture si ze and aspect ratio
1 Press 3/4 to select the picture size and aspect ratio and
then press [MENU/SET] to set.
3M (4:3), 2.5M (3:2) or 2M (16:9) is selected as the picture si ze.
•
2 Take pictures.
•
Still pictures are t aken continuously while the shutter button is
pressed f ul l y.
Maximum Burst speed approx. 6 pictures/ se co nd
Number of recordable
pictures
•The burs t sp eed changes according to the recording cond iti ons.
•The number of burst recording pictures are limited by the picture-taking conditions and the type
and/or sta tus of the card u sed.
•The num ber of burst recording pic tu res increase immediately after form atting.
approx. 15 (built-in mem o ry)/approx. 15 to 100¢ (card)
¢ the maximum is 100.
Note
[QUALITY] is automatically fixed to [›].
•
•You can take pictures suitable for 4qk6q/10k15 cm printing.
•The shutter speed bec om es 1/8th of a se cond to 1/2000t h of a second.
•The focus range becomes the same as macro mod e. [5 cm (0.17 feet) (Wide)/1 m (3.28 fe et)
(Tele) to ¶]
•The focus, zoom, exposure, white balance, shutter speed and ISO sensitivity are fixed to the
settings for the first pi cture.
•The ISO sensitivity aut om atically swi t ches to between [ISO500] and [ISO800] . However, the
ISO sensi tivity is incre ased to make th e shutter speed high-speed.
[FLASH BURST]
Still pictures are taken continuously with flash. It is convenient to take continuous still
pictures in dark plac es .
∫ Picture si ze and aspect ratio
1 Press 3/4 to select the picture size and aspect ratio and
then press [MENU/SET] to set.
3M (4:3), 2.5M (3:2) or 2M (16:9) is selected as the picture si ze.
•
2 Take pictures.
•
Still pictures are t aken continuously while the shutter button is
pressed f ul l y.
Number of recordable
pictures
max. 5 pictures
Note
[QUALITY] is automatically fixed to [›].
•
•You can take pictures suitable for 4qk6q/10k15 cm printing.
•The focus range becomes the same as macro mod e. [5 cm (0.17 feet) (Wide)/1 m (3.28 fe et)
(Tele) to ¶]
•The focus, zoom, expos ure, shutter speed, ISO sen si t i vity, and flash level ar e fix ed to the
settings for the first pi cture.
•[INTELL I G E NT ISO] is acti vated, and ma xim um ISO sensi tivity level bec om es [ISO3200].
•See the Note on P39 when usi ng the flash.
VQT1R87
49
Page 50

Advanced (Recording pictures)
5 [STARRY SKY]
This allows you to take vivid pictures of a starry sky or a dark subject.
∫ Setting the shutter speed
Select a shutter spee d of [15 SEC.], [30 SEC.] or [60 SEC.].
1 Press 3/4 to select the number of seconds and then press
[MENU/SET].
It is also pos sible to change the number of seconds using the
•
quick menu. (P19)
2 Take pictures.
•
Press the shutter butt on f ul l y t o di splay the coun tdo wn screen. Do
not move the camera aft er this scree n i s displayed. When
countdown f inis he s, [PLEASE WAIT...] is displaye d for th e sam e
length o f t ime as the set sh utter speed for signal proce ss i ng.
• Press [MENU/S E T ] t o st op taking the pict ure while the countdown
screen is di splayed.
∫ Technique for Starry sky mode
•
The shutter opens for 15 , 30 or 60 seconds. Be sure to us e a t ri pod. We also recommend
taking pictures with the sel f -timer.
Note
The optical image stabilizer function is fixed to [OFF].
•
•ISO sensiti vit y is fixed to [ISO100].
4 [FIREWORKS]
This mode allows you to take beautiful pictures of fireworks expl oding in the night sky.
∫ Technique for Fireworks mode
•
Sinc e t h e s hutter speed becomes slow e r, we recommend using a tripod.
Note
This mode is most effective when the subject is 10 m (32.8 feet) or more away.
•
•The shutter speed beco m es the followi ng.
–When [OFF] is set on the optical image stabilizer function: Fixed to 2 seconds
–When [AUTO], [MODE1] or [MODE2] is set on the optical image stabilizer function: 1/4th of a
second or 2 seconds (The shutter speed becomes 2 seconds only when the camera has
determ in ed that there i s li ttle jitter such as when usi ng a tripod etc.)
–You can change the sh ut ter speed by compensating the expos ure.
•The AF area is not displayed.
•ISO sensiti vit y is fixed to [ISO100].
6 [BEACH]
This allows you to take even more vivid pictures of the blue color of the sea, sky etc. It also
prevents under exposure of people under strong sunlight.
Note
The initial setting for [AF MODE] is [š].
•
•Do not touch the cam era with we t hand s.
•Sand or seawater will cause the camera to malfunction. Make sure that sand or seawater does
not get into th e l ens or the term i nal s .
•Problems caused by sand or seawater are not covered by the product warranty.
50
VQT1R87
Page 51

Advanced (Recording pictures)
8 [SNOW]
This allows you to take pictures that show the snow as white as possible at a ski resort or
a snow-covered mountain.
7 [AERIAL PHOTO]
This mode allows you to take pictures through an airplane window.
∫ Technique for Aerial photo mode
•
We recommend using this technique if it is difficult to focus when taking pictures o f clouds etc.
Aim the camera at something with high contrast, press the shutter button halfway to fix the
focus and then aim the cam era at the sub j ect and press th e shutter bu tton fully to take the
picture.
Note
The focu s range is 5 m (16.4 feet) to ¶.
•
•Turn the camera off when taking off or landing.
•When using the camera, follow all instructions from the cabin crew.
•Be caref ul about the refl ection from the window.
[PIN HOLE]
Picture is taken dark er and with soft focu s aroun d the subje cts.
∫ Picture si ze and aspect ratio
Press 3/4 to select the pict ure size and aspect ratio and then
press [MENU/SET] to set.
•
3M (4:3), 2.5M (3:2) or 2M (16:9) is selected as the pi cture size.
Note
[QUALITY ] is automatically fixed to [›].
•
•You can take pictures suita bl e for 4qk6q/10k15 cm printing.
•The focus range becomes the same as macro mode. [5 cm (0.17 feet)
(Wide)/1 m (3.28 feet) (Tele) to ¶]
•Face detect i on m ay not operate normal ly i n t he dark areas around the
edges of the screen.
VQT1R87
51
Page 52

Advanced (Recording pictures)
A
[FILM GRAIN]
Picture is taken with a grainy texture as though blasted with sand.
∫ Pictu r e siz e and aspec t ra ti o
Press 3/4 to select the picture size and aspect ratio and then
press [MENU/SET] to set.
•
3M (4:3), 2. 5M (3:2) or 2M (1 6: 9) i s selected as the picture size.
Note
[QUALITY] is automatically fixed to [›].
•
•You can take pictures suitable for 4qk6q/10k15 cm printing.
•ISO sensitivity is fixed to [ISO1600].
•T he focus range becomes th e same as macr o m ode. [5 cm (0.17 feet)
(Wide)/1 m (3.28 feet) (Tele) to ¶]
< [UNDERW ATER]
Use the marine case (DMW-M CFX35; optional ). This allows you to take pictures with a
natural color.
Fixing the focus underwater (AF Lock)
You can fix the focus before taking a pi cture with AF lock. This is useful if you want to take
pictures of a fast moving subject etc.
1 Aim the AF area at the subject.
2 Press 2 to fix the focus.
•
The AF lock icon A appears when the subject is focused.
• Press 2 again to cancel AF lock.
• When you rotate the zoom lever, the AF lock is canceled. In this
case, focus on the subj ect and fix the fo cus again.
• You ca nnot set to AF lock when [AF MODE] is set to [ ].
White balance fine adjustment
You can adjust the hue to match the water de pth and the weather.
1 Press 3 [È] three times to display [WB ADJUST. ].
2 Press 2/1 to adjust the white balance.
2 [RED]: Press when the hue is bluish.
1 [BLUE]: Press when th e hue is reddish.
•
Select [ 0] if you do not want to finely adjust the whi te balance.
3 Press [MENU/SET] to close the men u.
•
If you adjust the white balance, [ ] appears on the screen in red or blue.
Note
The focus range becom es t he same as mac ro mode. [5 cm (0.17 feet) (Wide)/1 m (3.28 feet)
•
(Tele) to ¶]
VQT1R87
52
AWB
Page 53

Advanced (Recording pictures)
1
2
3
4
1
2
[REC] mode: n
Advanced (Recording pictures)
Motion Picture Mode
Slide the [REC]/[PLAYBACK] selector switch to [!].
Set the mo de d ia l to [n].
Press the shutter button halfway to focus
and then press it fully to start recording.
A Audio reco rdi ng
• The available recording time B is displayed on the top
right and the elapsed recording time C is displayed on
the bottom right of the screen.
• After pressing the shutter button fully, release it straight
away. If the button is held down, the sound will not be
recorde d for a few seconds when recording starts.
• When the subject is focused, the fo cus indication
lights.
• The focu s and zoom are fixed to the s e t t i n g when
recording starts (the fi rst frame).
• The audio is also recorded simultaneously from the
built-in microphone on this unit. (M otion pictures
cannot be rec orded without audio.)
Press the shutter button fully to stop recording.
• If the bu ilt -i n memory or the card becomes full in the m i ddl e of recording, the ca m era
stops recording automatically.
Changing the settings for the picture quality
•When yo u set the picture quality to [ ], [ ], or [ ], we recomm end using a hi gh-speed
card wit h “10MB/s” or greater displ ayed on the package.
Press [MENU/SET].
Press 3/4 to select [PICTUR E M OD E] a nd then press
1
.
VQT1R87
53
Page 54

Advanced (Recording pictures)
3
4
Press 3/4 to select the item and then press [MENU/SET].
Item Pict u r e si ze fps Aspect ratio
¢
¢
¢
10
• fps “frames pe r second”; This refers to the number of f rames used i n 1 second.
• You can record smoother motion pictures with “30 fps”.
• You can record longer m otion pictures with “10 fps” although t he pi cture quali t y i s lower.
• [ ] can be enjoyed on the TV as high qualit y motion picture by using th e component
cable (DMW-HDC2; optional). Refer to “Playing back on the TV with component socket”
(P95) for details .
• The file size with [ ] is small so it is suitable for e-mails.
¢Cannot be recorded i n the built-i n m em ory.
1280k720 pixels 30
848k48 0 pi xels 30
640k48 0 pi xels 30
320k24 0 pi xels
30
16:9
4:3
Press [MENU/SET] to close the menu.
• You can also press the shutter button halfway to close the menu.
Note
Refer to P 114 for inform ation about the available record in g time.
•
•The availa bl e recording tim e display ed on the scree n m ay not decrease regular l y.
•Depending on the type o f the card, the card access in di cation may appear for a while after
reco rding motion pi c tures. This is no t a m al function.
•Motion pictures can be recorded continuously up to 2 GB. The maximum available recording
time for up to 2 GB only is displayed on the screen.
•When motion pictures r ecorded with the camera are played bac k on other equipment, the
quality of the picture and sound may dete ri orate and it may not be possi ble to play them back.
Also the recording information may not be displayed correctly.
•LUMIX mode l s sold after August 2008 have i m proved sound quality, so motion picture can not
be played bac k on previous mo del s.
•In motion pic ture mode, the fo llowing func tions cannot be used.
–[š] and [ ] in [AF MODE]/Direction detection function/[AUTO] and [MODE2] on the optical
image stab i liz er function
•This unit does not suppo rt recording mo tion pictures on MultiMediaCards.
54
VQT1R87
Page 55

Advanced (Recording pictures)
1
2
3
4
5
[REC] mode: ñ·¿n
Useful Functions at Travel Destinations
Recording which Day of the Vacation You Take the Picture
For details on the [SETUP] menu settings, refer to P18.
If you se t the d ep art u re da t e or t he lo cati o n of t he vac ati on in adv an ce, t he nu mber of days
that have passed since the departure date (which day of the vacation it is) is recorded
when you take the picture. You can display the number of days that have passed wh en
playi ng back the pictures and sta m p it on the recorded pictures with [TEXT STAMP] (P77 ).
•
The number of days that have passed sin ce the departure date can be pr i nt ed out using the
“PHOTOfunSTUDIO -viewer-” bundled softw are on the CD-R OM (supplied ).
•Select [CLOCK SET] to set the current d ate and time in ad vance. (P16)
Select [TRAVEL DATE] fr om the [SETUP] menu, and
then press 1.
Press 3 to select [TRAVEL SETUP] and then press
1.
Press 4 to select [SET] and then pres s [MENU/
SET].
Press 3/4/2/1 to set the departure date (year/
month/day), and then press [MENU/SET].
Press 3/4/2/1 to set the return date (year/month/
day), and then press [MENU/SET].
• If you do not want to set the return date, press [MENU/SET] while
the date bar is displaye d .
VQT1R87
55
Page 56

Advanced (Recording pictures)
678
9
10
Press 4 to select [LOCATION] and then press 1.
Press 4 to select [SET] and then press [MENU/
SET].
Enter the location.
• For details on how to ente r characters, read the [TITLE EDIT] s ection on P76.
Press [MENU/SET] twice to close the menu.
T ake a p ict ure.
• The number of days that have passed since the depart ure date is displayed for about
5 seconds if this unit is turned on etc. after setting the travel date or when the travel date
is set.
• When the travel date is set, [—] appears on the lo wer right of th e sc reen.
∫ Canceling th e travel date
The travel date is automatically canceled if the current date is after the return date. If you
want to cancel the travel date before the end of the vacation, select [OFF] on the screen
shown in step
[OFF] in step
Note
The travel date i s ca l culated using th e date in the clock sett i ng and the departure date you set.
•
If you set [WORL D TIME] (P56) to the travel des tination, th e travel date is ca l culated using t he
date in the clock setting and the travel des tination set ting.
•The travel da te setting is me m ori zed even if t he camera is turned off.
•If [TRAVEL DATE] is set to [OFF], the number of days that have pas sed since the departure
date will not be recorded eve n i f y ou set the trave l date or the return date. Even if
[TRAVEL D ATE] is set t o [SET] after taking the pictures, which da y of the vacation you took
them is not dis played.
•If you set a depart ure date and t hen take a pictu re on a date befo re t hi s departure date, [-]
(minus) is di splayed in or ange and the day of the vacation tha t you took the pic ture is not
recorded.
•If th e travel da t e i s di splayed as [ -] (minus) i n white, there is a ti m e difference that involves dat e
change between the [HOME] and [DESTINATION]. (It will be recorded)
•The text set as [LOCATION] can be edited later with [TITLE EDIT].
•The names for [BABY1] /[BABY2] and [PET] will not be recorded when [LOCATION] is set.
•[LOCATION] cannot be recorde d when taking mo tion pictures .
3 or 7 and then press [MENU/SET] twice. If the [TRAVEL SETUP] is set to
3, [LOCATION] will be also set to [OFF].
Recording Dates/T imes at Overseas Travel Destinations (W orld Time)
For details on the [SETUP] menu settings, refer to P18.
You can display the local times at the travel destinations and record them on the pictures
you take.
•
Select [CLOCK SET] to set the cu rr ent date and time in advance. (P 16)
VQT1R87
56
Page 57

Selec t [WORLD TIME] from the [S E T UP ] menu,
1
2
3
A
B
4
C
5
E
D
6
and then press 1.
• When first using the camera after purchasing it, the [PLEASE
SET THE HOM E AR EA] mes sage appears. Press [M ENU/
SET], and set the home area on the screen in st ep
Press 4 to select [HOME], and then press
[MENU/SET].
Press 2/1 to select the home area, and the n
press [MENU/SET].
A C urrent time
B Time difference fro m G M T (Greenwich M ean Time)
• If daylight saving time [ ] is used at the home area, press
3. Press 3 again to return to the original time.
• The day light saving tim e setting for the home are a does not
advance the current time. Ad vance the clo ck setting by on e
hour.
Press 3 to select [DESTINATION] and then
press [ME NU/SET] to set.
C D epending on the set ting, the time at the travel des t i nation
area or the home area is dis pl ayed.
3.
Advanced (Recording pictures)
Press 2/1 to select the area the travel
destination is in and then press [MENU/SET] to
set.
D C urrent time of the destinati on area
E Time difference
• If daylight saving time [ ] is used at the travel destination,
press 3. (The time advances by one hour.) Press 3 again to
return to the original time.
Press [MENU/SET] to close the menu.
Note
Return the setting to [ HOME] when t h e vacation is finished by performi ng steps 1, 2 and 3.
•
•If [HOME ] is already set, change only the tr avel destina t i o n, and use.
•If you cannot find the travel destination in the areas displayed on the screen, set by the time
difference from the home area.
•The travel destination icon [“] appears when playi ng back pict ures taken at the travel
destination.
VQT1R87
57
Page 58

Advanced (Recording pictures)
Using the [REC] Mode Menu
@ [PICTURE SIZE]
For details on [REC] mode menu settings, refer to P18.
Set the number of pixels. The higher the numbers of pixels, the finer the detail of the
pictu res will appear even when they ar e printed onto large sheets.
Applicab le modes :
∫ When the aspect ratio is [X].
¢ This item cannot be set in the Intelligent auto mode.
(10M) 3648k2736 pixels
(7M )
(5M ) 2560k1920 pixels
(3M ) 2048k1536 pixels
(2M )
(0.3M ) 640k480 pixels
∫ When the aspect ratio is [Y].
(9M) 3648k2432 pixels
(6M )
(4.5M ) 2560k1712 pixels
(2.5M ) 2048k1360 pixels
∫ When the aspect ratio is [W].
(7.5M) 3648k2056 pixels
(5.5M )
(3.5M ) 2560k1440 pixels
(2M ) 1920k1080 pixels
¢
¢
¢
¢
ñ·¿
3072k2304 pixels
1600k1200 pixels
3072k2048 pixels
3072k1728 pixels
Note
“EZ” is an abb reviation of “E xtended optical Zoom”.
•
•A digital picture is made of numerous dots called pixels. The
higher the nu m bers of pixels , t he finer the picture will be
when it is printed on a large piece of paper or displayed on a
PC monitor.
A Many pixels (Fine)
B Few pixels (Rough)
¢ T hese pictur es are examples to show the effect.
•If you change the aspect rat i o, set the pictu re size again.
•The extend ed optical zoom does not wor k in [TRANS FO RM ], [HIGH SENS.],
[HI-SPEEDBURST], [FLASH BURST], [PIN HOLE] or [FILM GRAIN] in scene mode so the
picture size f or [ ] is not displayed.
•Pictures may appear mosaic dependi ng on the subje ct and the recor di ng conditions.
•Refer to P 112 for inform ation about the number of recorda bl e pi ctures.
VQT1R87
58
Page 59

Advanced (Recording pictures)
A [QUALITY]
For details on [REC] mode menu settings, refer to P18.
Set the compression rate at which the pictures are to be stored.
Appli cable modes:
·¿
[A]: Fine (when giving priority to the picture quality)
[›]: Standa rd (when using the standard picture qu ality and increasing the number of
pictures to be reco r de d w ith ou t ch an ging the nu mb er of pixels )
Note
Refer to P112 for information about the number of recordable pictures.
•
? [ASPECT RATIO]
For details on [REC] mode menu settings, refer to P18.
This allows you to select the aspect ratio of the pictures to suit printing or the playback
method.
Appli cable modes:
[X]: [ASPECT RATIO] of a 4:3 TV
[Y]: [ASPECT RATIO] of a 35 mm film cam era
[W]: [ASPECT RATIO] of a high -definition T V, etc.
ñ·¿
[X][Y][W]
Note
The ends o f t he recorded pi ctures may be cut at printi ng so check before printing. (P110)
•
[INTELLIGENT I S O]
For details on [REC] mode menu settings, refer to P18.
The camera automatically sets the optimum ISO sensitivity and shutter speed to suit the
movement of the subject and brightness of the scene to minimize the jitter of the subject.
Appli cable modes:
ISOMAX
[OFF]/[ ]/[ ]/[ ]
•
•The higher the value set for the ISO sensitivity, the more the jitter is reduced but the greater the
400
The upper lim i t of t he ISO sensitiv i ty can be set.
amount of picture noise.
Note
•
Depend i ng on the brightness and ho w f ast the subject is m oving, jitter may not be avoided.
•Movement s m ay not be detect ed when a movi ng subject is small, when a mo ving subject is at
the edge of the screen or when a subjec t has moved at the very mome nt when the shutter
button was presse d fu l l y.
•To avoid picture noise, we recommend decreas i ng m aximum ISO sensitivity level or sett i ng
[COLOR MODE] to [NAT URAL ]. (P65)
ISOMAX
800
·
ISOMAX
1600
VQT1R87
59
Page 60

Advanced (Recording pictures)
> [SENSITIVITY]
For details on [REC] mode menu settings, refer to P18.
This allows the sensitivity to light (ISO sensitivity) to be set. Setting to a higher figure
enables pictures to be taken even in dark places without the resulting pictures coming out
dark.
Applicab le modes :
·
[AUTO]/[100]/[200]/[400]/[800]/[1600]
ISO sensitivity
Recordi ng l ocation
(recommended)
Shutter speed Slow Fast
Noise Less Increased
When it is light (outdoors) When it is dark
100 1600
Note
•
When settin g to [AU TO], the ISO sensi tivit y is auto mati cally adjus ted to a max imum of [IS O400]
according to the brightness. (It can be adjusted to a maximum of [ISO1000] when using the
flash.)
•The setting i s not availabl e when [INTELLIGENT ISO] is being us ed. ([ ] i s displayed.)
•To avoid picture noise, we rec om m end that you ei t her reduce th e m aximum ISO sensitivity
level or set [COLOR MODE] to [NATURAL], and then take pictures. (P65)
= [WHITE BALANCE]
For details on [REC] mode menu settings, refer to P18.
In sunlight, under incandescent lights or in other such conditions where the color of white
takes on a reddish or bluish tinge, this item adjusts to the color of white which is closest to
what is seen by the eye in accordance with the light source.
Applicab le modes :
·¿n
[AWB]: Automati c adjustment
[V]: When taking pictures outdoors under a clear sky
[Ð]: When taking pictures outdoors under a cloudy sky
[î]: When taking pictures outdoors in the shade
[Ñ]: When taking pictures under incandescent lights
[Ò]: Value set by using [Ó]
[Ó]: Set manually
Note
The optimal white balance will differ depending on the type of halogen lighting being recorded
•
under so use [AWB] or [Ó].
•The white balance setti ng is memori zed even if the cam era is turned off. (However, the w hi t e
balance se tt i ng for a scene mo de returns to [AWB] when the scene mode is changed.)
VQT1R87
60
Page 61

Advanced (Recording pictures)
∫ Setting the white balance manually
1 Select [Ó] and then press [MENU/SET].
2 Aim the ca mera at a sheet of wh ite paper etc. so that the
frame in the center is filled by the white object only and then
press [M EN U/ SET].
∫ Finely adjus ting the white balance [ ]
You can finely adjust the white balance when you cannot acquire the desired hue by
setting th e whi t e ba la nc e.
Set the whi te balance to [V]/[Ð]/[î]/[Ñ]/[Ò].
•
1 Press 3 [È] several times until [WB A DJUST.] appears
and then press
2 [RED]: Press when the hue is bluish.
1 [BLUE ]: Press when the hue is reddish.
• Sele ct [0 ] t o return to the original whi te balance.
2/1 to adjust the white balance.
2 Press [MENU/SET] to finish.
•
You can also press the shutter button halfway to fini sh.
• The white balan ce icon on the screen turns red or blue.
• You can finely adjust the white bal ance independently fo r each white balance item .
• The white balance fine adjustment setti ng is reflecte d i n the picture when using the f l ash.
• The whit e ba l ance fine adj u s tm ent setting is memorize d even if the camer a is t urned off.
• The whit e ba l ance fine adj u s tm ent level in [Ò] r eturns to [0] when you r e set the whit e
balance using [Ó].
• In the [ UNDERWATER] in scene mode , t he white bala nce is fixed at [AWB] , but it can be
finely adjusted.
∫ Auto wh ite balance
Depending on the conditions prevailing when pictures are taken, the pi ctures may take on
a reddish or bluish tinge. Furthermore, when a multiple number of light sources are being
used or there is nothing with a color close to white, auto white balanc e may not function
properly. In a case like this, set the white balance to a mode other than [AWB].
1 Auto white balance will work within this range.
2Blue sky
3 C lo udy sky (Rain)
4 Shade
5 TV screen
6 Sunlight
7 White fluorescent light
8 Incandescent light bulb
9 Sunrise and sunset
10 Candlelight
KlKelvin color Temperature
1)
2)
3)
4)
5)
6)
7)
8)
9)
10)
VQT1R87
61
Page 62

Advanced (Recording pictures)
AF
[AF MODE]
For details on [REC] mode menu settings, refer to P18.
This allows the focusing method that suits the positions and number of the subjects to be selected.
Applicab le modes : ·¿n
[š]: Face detection
[]: AF Tracking
[]:11-area-focusing
[ƒ]: 1-area-focusing
(High speed)
[Ø]: 1-area-focusing
The camera automatically detects the person’s face. The
focus and exposure can then be adjusted to fit that face no
matter what portion of the picture it is in. (max. 15 areas)
Focus can be adjusted to a specified subject. Focus will keep
on following the subject even if it moves. (Dynamic tracking)
The camer a focu ses on any o f 1 1focus areas. Th is is effective
when the subject is not in the center of the screen.
The camera quickly focuses on the subject in the AF area on
the center of the screen.
The camera focuses on the su bject in the AF area on the
center of the screen.
[Ù]: Spot-focusing The camera focuses on a limited narrow area in the screen.
Note
The camera is focusing on all the AF areas when multiple AF areas (max. 11 areas) light at the
•
same time in [ ]. If y ou want to determine the focus position to take pictures, switch the AF
mode to [ƒ], [Ø] or [Ù].
•If the AF mode is set to [ ], the AF area is not displayed until the picture is brought into focus.
•Switch the AF mode to [ ƒ] or [Ø] if it is difficult to focus u sing [Ù].
•The camera may detect the subjects other than a person as the face. In this case, switch the
AF mode to any m odes other th an [š] and then take a pi ct ure.
•The AF mode cannot be set in [FI RE WORKS] in sc ene mode.
•It is not possible to set [š] in the following cases .
–In [NIGHT SCENERY], [FOOD], [STARRY SKY], [AERIAL PHOTO] and [UNDERWATER] in
scene mode.
–In motion picture mode.
∫ About [š]
The following AF area frames are displayed when the camera
detects the faces.
Yellow:
When the shutter button is pressed halfway, the frame turns green
when the came ra is focus ed .
White:
Displayed when more than one face is detected. Other faces that are the same distance
away as faces within the yellow AF areas are also focused.
•
Under certain picture-t aki ng conditions includ i ng the followi ng cases, the facial recog ni tion
function may fail to work, making it impossible to detect faces. [AF MODE] is switched to [ ].
–Whe n the face is not facing the camera
–When th e fa ce is at an angle
–When th e fa ce is extremely bright or dark
–When th ere is little co ntrast on the f aces
–When th e fa cial features are hidden be hi nd sunglasse s, etc.
–When th e fa ce appears small on the screen
–When there is rapid movement
–When th e su bj ect is other than a human be i ng
–Whe n the camera is shaki n g
–When digital zoom is used
62
VQT1R87
Page 63

Advanced (Recording pictures)
∫ About [ƒ]
•
You can focus on the sub j ect more quickly than in other AF modes.
•The picture may stop moving for a moment before being brought into focus when you press the
shutter but ton halfway. This is not a m al function.
∫ Setting up [ ] (AF Tracking)
1 Bring the subject to the AF tracking
frame, and press 4 to lock the subject
•
AF tracking frame will continuously focus on
the subject 's m ovement once the subjec t is
recognized.
• AF tracking is turned off when 4 is pres se d
again.
Before locking Locked
2 Take the picture
Note
•
Dynamic trac kin g fu nc tio n may fail to loc k, lo se the subject in AF tracking, or track diffe re n t
subjec t de pending on th e recording condition s su ch as the ones below.
–When the subject is t oo small
–When the record i ng l ocation is too dark
–When the subject is m oving too fast
–When the background has the s am e or similar col or to the subj ect.
–When jitter is occurring
–When usin g t h e z o om
•If it fails t o lo ck , AF area will fl ash in red, and disappear. Press 4 ag ai n.
•AF Tracking w i l l not operate wh en the subject i s not specifie d, the subject is lost, or has fa i l ed
to be tracked. The picture will be taken with [Ø] in [AF MODE] in that case.
•[QUICK AF] will not operate during AF tracking.
•It is not possible to set [ ] in [STARRY SKY], [FIREWORKS], [PIN HOLE], [FILM GRAIN], or
in the motion pictur e mode.
•It is not possible to set [ ] in [B/W], [SEPIA], [COOL], or [WARM] in [COLORMODE].
•The focus range becomes the same as macro mod e. [5 cm (0.17 feet) (Wide)/1 m (3.28 fe et)
(Tele) to ¶]
[QUICK AF]
For details on [REC] mode menu settings, refer to P18.
As long as the camera is held steady, the camera will automatically adjust the focus and
focus adjustment will then be quicker when the shutter is pressed. This is useful at times
when, for instance, you do not want to miss a picture-taking opportun ity.
Appli cable modes:
[OFF]/[ON]
Note
• Wh en [ON] is set, [ ] i s displayed on t he screen.
•It does not operate duri ng AF tracki ng.
·¿
˜ [BURST]
For details on [REC] mode menu settings, refer to P18.
Pictur es are taken continuou s ly while the shutter button is pressed.
Select the ones you really like from among the pictures you have taken.
Appli cable modes:
ñ·¿
VQT1R87
63
Page 64

Advanced (Recording pictures)
Burst speed (pictures/
second)
[OFF] ˜ ò
—2.5
¢
approx. 2
Number of
recordable pictures
¢ The burst speed is constant regardless of the transfer speed of the card.
•The burst s peed values given above ap ply when the shutter speed is 1/60 or faster and when the
flash is not activate d.
A —max. 3
—max. 5
›
Depends o n the r emaini ng
capacity of the built - in
memory/card.
Note
•When the burst mode setting is set to Unlimited
–The burst speed becomes sl ower halfway. The exact timing of this depends on the type of
card, the pict ure size and the quality.
–You can take pictures until the capaci ty of th e bui lt -in memory or the card is ful l.
•The focus is fixed when the first picture is taken.
•When the burst speed is set to [˜], t he exposure and white balance are fixed at the settings used
for the first pictu re fo r the subs e que nt pict ure s as well . Whe n the bur st s pee d is set to [ò], they
are adjusted each time you take a pi c ture.
•When the self-timer is used, the nu m ber of recordable pictures in burst mode is fixed to 3.
•If you ar e following a moving subject while taking pictures in a place ( landscape) indoors, o utdoors
etc. wher e there is a large differ enc e between th e light and shade, it may tak e time until the
exposur e is s table. If burst is used at this time, the exposure m ay not become optimal.
•The burst s peed (pictures/secon d) m ay become slower dependi ng on the recording environment
such as in dark places, if th e ISO sen si ti vity is hi g h etc .
•Burst mo de is not canceled when the camera is switched off.
•
If you take pictures in burst mode with the built-in memory, it will take time to write the picture data.
•[Œ] is set for the flash when burst is set.
•Auto bracket is canceled when burst is set.
[I.EXPOSURE]
For details on [REC] mode menu settings, refer to P18.
Contrast and exposure will be adjusted automatically when there is a big difference in
brightness between the background and subject, to bring the image close to how you see.
Applicable modes:
[OFF]/[ON]
Note
• When [ON] is set, [ ] is displayed on t he s c r een.
•Even when the [SENSITIVITY] is set to [ISO100], [SENSITIVITY] may be set higher than [ISO100]
if the picture is taken with [I.EXPOSURE] set to valid.
•Compensation effect may not be ac hieved depending on the c onditions.
•[ ] in the screen turns to yellow when [I.EXPOSURE] is in effect.
·
) [DIGITAL ZOOM]
For details on [REC] mode menu settings, refer to P18.
This can enlarge subjects even more than the optical zoom or extended optical zoom.
Applicable modes:
[OFF]/[ON]
Note
•Refer to P30 for details.
•If camera shake (jitter) is a problem during zooming, it is recommended that [STABILIZER] be set
to [AUTO] or [MODE 1].
VQT1R87
64
·¿n
Page 65

Advanced (Recording pictures)
H [COLOR MODE]
For details on [REC] mode menu settings, refer to P18.
Using these modes, the pictures can be made sharper or softer, the colors of the pictures
can be turned into sepia colors or other color effects can be achieved.
Appli cable modes:
[STANDARD]: Thi s is the sta nd ard sett in g.
[NATURAL]: The pictur e becomes softer.
[VIVID]: The picture becomes sharper.
[B/W]: The picture becomes black and white.
[SEPIA]: The picture becomes sepia.
[COOL]: The picture becomes bluish.
[WARM]: The picture becomes reddish.
Note
When you tak e pi ctures in dar k places, nois e m ay become visible. To avoid noise, we
•
recommend se tting to [NATURAL].
•You cannot set [COOL] or [WARM] in Intelligent auto mode. Also, you cannot set [NATURAL] or
[VIVID] in motion picture mode.
•Different color mode s c an be set in differ ent [REC] modes.
ñ·n
[STABILIZER]
For details on [REC] mode menu settings, refer to P18.
Using one of these modes, jitter during picture taking is detected, and the camera
automatically compensates the jitter, enabling jitter-free images to be taken.
Appli cable modes:
[OFF]
[AUTO]: The optimum jitter compensation is selected depending on the condition.
[MODE1]: Jitter is always compensated during [REC] mode.
[MODE2]: The jitter is compensated for when the shutter button is pressed.
Note
The stabilizer function may not be effective in the following cases.
•
–When there is a lot of jitter.
–When the zoom magnification is high.
–In digital zo om range.
–When taking pi ctures wh i l e following a m oving subje ct .
–When the shutter speed becomes slower to take pictures indoors or in dark places.
Be caref ul of camera jit ter when you pr ess the shutt er button.
•The setting is fixed to [MODE2] with [SELF PORTRAIT] in scene mode and to [OFF] in
[STA RR YSKY] in scene mode.
•In motion pi ct ure mode, [AUT O] or [MODE2 ] c annot be set.
·¿n
[MIN. SHTR SPEED]
For details on [REC] mode menu settings, refer to P18.
Y ou can take a picture brightly in dark places by setting [MIN. SHTR SPEED] slower. Also,
you can set it faster to reduce the blur of the subject.
VQT1R87
65
Page 66

Advanced (Recording pictures)
Applicable modes: ·
[1/250], [1/125], [1/60], [1/30], [1/15], [1/8], [1/4], [1/2], [1]
Minimum shutter speed setting 1/250– 1–
Brightness Darker Brighter
Jitter Less More
Note
•This should usual ly be se t to [1/8] to take pict ures. (When you select a mi nimu m shutt er speed oth er
than [1/8], [ ] appears on the screen.)
•Setting [MIN. SHTR SPEED] to slower speed might increase the chance of jitter, so we recommend
using a tripod and the self-timer for taking pictures.
•Setting [MIN. SHTR SPEED] to faster speed might make the picture darker, so we recommend
recording the picture in well-lit area. If correct exposure cannot be achieved, [ ] will flash in red
when the shutter button is pressed halfway.
B [AUDIO REC.]
For details on [REC] mode menu settings, refer to P18.
Audio can be recorded simultaneously with the image. You can record the conversation during
the shooting or the situation as a memo.
Applicable modes:
[OFF]: Audio will not be recorded.
[ON]: [B] is displayed on the screen.
Audio will be recorde d a s so on as t he image is recorded.
(It will stop in 5 seconds)
·¿
•If you press [MENU/SET] during audio recording, the audio recording is canceled.
Note
•The sound is set separately from [AUDIO REC.] (P67) in the clipboard mode.
•Audio is recorded from the built-in microphone on the camera.
•Audio recorded with this unit may not playback on other equipment.
F [AF ASSIST LAMP]
For details on [REC] mode menu settings, refer to P18.
Illuminating the su b ject makes it easier for the camera to focus when recording in low light
conditions that make focusing difficu lt.
Applicable modes:
[OFF]: The AF assist lamp does not turn on.
[ON]
: When taking pictures in dark places, the AF assist lamp lights while the shutter
button is pressed halfway. (Larger AF areas are now displayed.)
·¿n
Note
•The effective range of the AF assist lamp is 1.5 m (4.92 feet).
•When you do not want to use the AF assist lamp A (e.g. when taking pictures of
animals in dark places), set the [AF ASSIST LAMP] to [OFF]. In this case, it will
become more difficult to focus on the subject.
U [CLOCK SET]
For details on [REC] mode menu settings, refer to P18.
To set the year, month, day and time.
It functions in exactly the same way as [CLOCK SET] in the [SETUP] menu.
VQT1R87
66
Page 67

Advanced (Recording pictures)
1
2
3
1
Mode dial: ¨
Taking and viewing clipboard pictures
(¨: Clipboard mode)
This s etting is useful when taking pictures of timetables, route maps or other information
inst ead of taking notes. Regardless of whether a card is present or not, the data is
stored in the dedicate d cli pbo ar d folder of the bui lt -in mem ory so it can be
differentiated from the regular taken pictures and made available for immediate viewing.
Clipboard pictures can be recorded, played back and deleted only when the mode dial is
set to [¨].
T aking clipboard pictures
Slide the [REC]/[PLAYBACK] selector switch to [!].
Set the mo de d ia l to [¨].
T ake the pictures.
• Number of recordabl e pictures when using t he built-in m em ory solely for cli pboard
pictures
Picture size 2M 1M
Number of recordable pictures 97 146
–If the built-in memory contains pictures recorded in an other record i ng m o de, fewer
pictures can be recor ded than the figures given above.
Clipboard rec or din g me nu
The menu screen appears when [MENU/SET] is pressed during clipboard picture
recording.
Press 3/4 to select the menu item and then press
1.
Item Description of setting
[PICTURE SIZE]
[AUDIO REC.]
[LCD MODE]
[CLOCK SET] Used to set the clock.
Used to change the picture size.
2M : initial setting (Prefer quality)
1M : prefer quantity
Used to record sound (5 seconds) toge ther with the pictures.
¢This setting is not reflec te d in [AUD I O REC.] (P66) in th e [REC]
mode menu.
This has same function as the [LCD MODE] in the [SETUP] menu.
(P20)
VQT1R87
67
Page 68

Advanced (Recording pictures)
2
3
1
2
3
1
2
A
Press 3/4 to select the setting and then press [MENU/SET].
Press [MENU/SET] to close the menu.
Viewing clipboard pictures
Slide the [REC]/[PLAYBACK] selector switch to [(].
Set the mode dial to [¨].
Press 2/1 to move the picture.
2: Play back the previous picture.
1: Play back the next picture.
• When the zoom lever is turned to [L] (W), a screen showing 12 pictures appears. To
return to the full-screen display, turn the zoom lever to [Z] (T).
∫ Deleting clipboard pictures
The steps taken are the same as for normal deletion. Refer to P33.
When a picture with a zoom mark is deleted, it will no longer be possible to view the picture
•
prior to zoo m i ng ei ther.
•Zoomed pic tu res can also be de l eted.
Enlarging clipboard pictures and storing them in the memory (zoom marks)
This function is useful for enlarging parts of maps, for instance, and storing them in the
memory. For details on how to enlarge pictures, refer to “Using t he Playback Zoom” on
P32.
Select the posi tion to record by zoom lever and 3/4/2/1.
Press [MENU/SET].
• The zo om m ark [ ] A now appears on the picture stored in th e
memory.
• To change the zo om magnification or position, repeat the steps
above.
• To exit the zoom m ark setting, return the zo om m agnificati on to
[L] (W) (1k).
∫ Viewing pictures stored in th e memory
1 Press 2/1 to display the picture with the zoom mark [ ].
2 Rotate the zoom lever to [Z] (T).
VQT1R87
68
Page 69

Advanced (Recording pictures)
Clipboard playback menu
When [MENU/SET] is pressed during clipb oard playback, t he menu
screen appears. (The steps taken are the same as for the “Clipboard
recording menu” (P67).)
Item Description of setting
[CANCEL
MARK]
Used to release the zoom position.
1 Press 2/1 to select a clipboard pictures with zoom mark [ ].
2 Press [MENU/SET] to cancel.
Used to add sound after the clipboard pictures are record ed.
[AUDIO DUB.]
1 Press 2/1 to select the picture.
2 Press [MENU/SET] to start/stop recording.
Used to copy clipboard pictures onto a card one at a time.
[COPY]
¢Zoom marks are not copied.
1 Press 2/1 to select the picture and then press [MENU/SET].
2 Press 3 to select [YES] and then press [MENU/SET].
[LCD MODE]
•Follo wing functions are fixed.
[GUIDE LINE]
([REC. INFO.])
[GUIDE LINE] ([ PATTERN]) [SENSIT IVITY] [AUTO]
[ECONOMY]
([POWER SAVE])
[ECONOMY]
([AUTO LCD OFF])
[SELFTIMER] 2 seconds [AFASSIST LAMP] [ON]
[QUALITY] ›
•In the clipboard mode , t he following functions ca nnot be used.
–[AUTO BRACKET]/W hi t e balance fi ne adjustme nt /[ INTELLIG ENT ISO]/[QUICK AF] /
[BURST]/[I.EXPOSURE]/[DIGITAL ZOOM]/[COLOR MODE]/[MIN. SHTR SPEED]/
[HISTOGRAM ]/[ SLI DESHOW]/[CATEGORY PLA Y]/ [FAVORITE PLAY]
•The [STABILIZER ] (P65) setting in [REC] mod e is al so reflect ed i n clipboard mo de.
•Other items in the [SETUP] menu can be set in the normal picture mode, etc. Setting will be
reflected to the clipb oard mode.
Note
Please bear copyrights and other such matters in mind. (P2)
•
•The [PLAYBACK] mode menu (P75 ) function cannot be used.
•When the pi ctures recorded in ano ther recording mode have been rotated (P83) and copied
(P87) as clipboard pictures, the pictures prior to rotation will be shown.
•You cannot print while playing clipboard. (Clipboard image copie d t o card can be printed.)
This has sa m e fu nction as the [LC D MODE] in the [SETUP] men u. (P20)
Settings During Clipboard
Item
Description
of settings
[OFF] [ASPECT RATIO] X
5 minutes [WHITE BALA NCE] [AWB]
[OFF] [AF MODE] Ø
Item
Description
of settings
VQT1R87
69
Page 70

Advanced (Playback)
1
2
3
4
5
6
5
[PLAYBACK] mode: ¸
Advanced (Playback)
Playing Back Pictures in Sequence (Slide Show)
You can play back the pictures you have taken in synchronisation with music, and you can
do this in sequence while leaving a fixed interval between each of the pictures.
Furthermore, you can play back the pictures grouped together by category or play back
only those pictures you have set as favorites as a slide show.
This playback method is recommended when you have connected the camera to a TV set
to view the pictures you ha ve taken.
Slide the [REC]/[PLAYBACK] selector switch to
[(], and then press [MENU/SET].
• Set the mode di al to anything except [¨].
Press 1.
Press 3/4 to select [SLIDE SHOW], and then press [MENU/SET].
Press 3/4 to select the item and then press
[MENU/SET].
• [FAVORITE] can be selected only when [FAVORITE] on the
[PLAYBACK] menu (P83) is at [ON ] and there are pictures
already set as favorites.
When [ALL] or [FAVORITE] has been selected in step 4
Press 3 to select [START] and then press [MENU/
SET].
Press 4 to finish the slide show.
• Normal pl ayback resum es after the sl i d e show fi ni shes.
When [CATEGORY SELECTION] has been selected in step 4
Press 3/4/2/1 to select the category to play back
and then press [MENU/SET] to set.
• For deta ils on categories, refer to P72.
VQT1R87
70
Page 71

Advanced (Playback)
6
7
Press 3 to select [START] and then press [MENU/
SET].
Press 4 to finish the slide show.
• Normal pl ayback re sumes after the slide show fini shes.
∫ Operations performed during slide show
The cursor displayed du ring playback is the same as 3/4/2/1.
The men u sc reen is resto red when [‚] is press e d.
•
A Play/Pause
B Stop
C Back to previous pi ct ure
D Ahead to next pictur e
¢ The se operations can be performed only in t he pause mode.
E Reduc e volume level
F Increase volume l ev el
∫ Chan ging the slide show settings
You can change the settings for slide show playback by selecting
[EFFECT] or [SETUP] on the slide show menu screen.
[EFFECT]
This allows you to se le ct the scre e n eff e cts o r mus ic effects w hen
switching from one picture to the next.
[NATURAL], [SLOW], [SWING], [URBAN], [OFF], [AUTO]
•
When [URB AN] has been selected, th e pi cture may appear in blac k and white as a s cr een
effect.
•[AUTO] can be used only when [CATEGORY SELECTION] has been selected. The pictures
are playe d back with th e recommende d eff ects in each category.
[SETUP]
[DURAT ION] or [REPEAT] can be set.
Item Settings
[DURATION] 1SEC./2SEC./3SEC./5SEC.
[REPEAT] ON/OFF
[MUSIC]/[AUDIO] ON/OFF
•
[DURATION] can be set only when [OFF] has been select ed as the [EF FECT] setti ng.
•[AUDIO] will be displayed only when the [EFFECT] is set to [OFF]. Audio will be played along
with the still picture with audio by setting t he [AUDIO] to [ON].
Note
•
Motion pictures cannot be played back as a slide show.
•It is not possible to add new music effec ts.
¢
¢
VQT1R87
71
Page 72

Advanced (Playback)
1
2
3
[PLAYBACK] mode: ¸
Selecting Pictures and Playing them Back
([CATEGORY PLAY]/[FAVORITE PLAY])
[CATEG ORY PLAY]
This mode allows you to search images by scene mode or other categories (such as
[PORTRAIT], [SCENERY] or [NIGHT SCENERY]) and sort the pictures into each of the
categories. You can then play back the pictures in each category.
Perform step s 1 and 2 on page 70.
Press 3/4 to select [CATEGORY PLAY], and then press [MENU/SET].
Press 3/4/2/1 to select the category and then
press [MENU/SET] to set.
• If a picture is foun d in a cate gory, the category icon t urn s blu e.
• It may take time to search the picture files if there are a lot on the
card or the built-in memory.
• If you press [ ‚] while searching, the searching will stop halfway.
• Pict u res are sorted into the categ o r i e s shown below.
[CATEGORY]
*
,
.
Recording information
e.g. scene modes
[PORTRAIT],
[i-PORTRAIT],
[SOFT SKIN],
[TRANSFORM],
[SELF PORTRAIT],
[NIGHT PORTRAIT],
[i-NIGHT PORTRAIT],
[BABY1]/[BABY2]
[SCENERY],
[i-SCE NER Y] , [SUN SET] ,
[AERIAL PHOTO]
[NIGHT PORTRAIT],
[i-NIGHT PORTRAIT],
[NIGHT SCENERY],
[i-NIGHT SCENERY],
[STARRY SKY]
[CATEGORY]
Î [BABY1]/[BABY2]
í [PET]
1 [FOOD]
< [UNDERWATER]
Í [MOTION PICTURE]
Recording information
e.g. scene modes
[SPORTS], [PARTY],
[CANDLE LIGHT],
[FIREWORKS], [BEAC H],
[SNOW],
[AERIAL PHOTO]
[TRAVEL DATE]
¢
72
¢The travel dates of im ages in the clipboard folder are not categorized.
Still pictures created from a motion picture cannot be played back from the motion
•
pictures category in category playback.
VQT1R87
Page 73

Advanced (Playback)
1
2
A
BC
[FAVORITE PLAY]
You can play back the pictures you have set as [F AVORITE] (P8 3) (Only when
[FAVORITE] is set to [ON] and there are pictures which have been set to [FAVORITE]).
Perform steps 1 and 2 on page 70.
Press 3/4 to select [FAVORITE PLAY], and then press [MENU/SET ].
Note
Yo u can use only [ROTATE], [ROTATE DISP.], [DPOF PRINT], [PROTECT] or [AUDIO DUB.]
•
in the [PLAYBACK] menu.
[PLAYBACK] mode: ¸
Playing Back Motion Pictures/Pictures with Audio
Motion pictur es
Press 2/1 to select a picture with a motion picture
icon (such as [ ]), and then press 3 to play back.
A The motion picture recording time
B Motion picture icon
C Motion picture playback icon
•After play back starts, the el apse d pl ayback time is displayed on the
upper right of the scr een.
For example, 8 minutes and 30 seconds is disp l ayed as [8m30s ].
∫ Operations performed during motion picture playback
The cursor displayed du ring playback is the same as 3/4/2/1.
A Play/Pause
B Stop
C Fast rewind, Frame-by-frame rewind
D Fast forward, Frame-by-frame forward
¢ The se operations can be performed only in t he pause mode.
¢
¢
E Reduc e volume level
F Increase volume l ev el
VQT1R87
73
Page 74

Advanced (Playback)
A
1
A
2
Pictures with audio
Press 2/1 to select a picture with the audio icon [ ]
and then press 3 to play back.
A Audio icon
•Refer to [AUDIO REC.] (P66) and [AU DI ODUB.] (P86) for
information about how to create still pictures with audio.
Note
•
Sound can be heard through the speaker. Refer to [VOLUME] (P20) for information about how
to adj u st the volu me in the [SET UP] me nu.
•The file form at that can be played back with this camera is QuickTime Mo tion JPEG.
•Please note t hat the bundle d software incl udes QuickTime to pl ay back motion pi ct ure files
created with the camera on the PC.
•Some Quick Time Mo tion JPEG fil es recorded by a PC or other equi pm ent may not play back
on the camera.
•If you play bac k motion pictures that have been recor ded with other equipment, the pictu re
quality may deteriorat e or the pictures may not play back.
•Pictures w ith audio rec orded with oth er equipment may not playback on thi s unit.
•When using a high capacity card, it is possi bl e that fast re wi nding may be slower tha n usual.
[PLAYBACK] mode: ¸
Creating still pictures from a motion picture
You can create a si ngle still picture (with 1 screen or 9 screens) from a recorded motion
picture. This is effective in moving scenes when you want to look carefully at the
movement of a sports person etc.
Press 3 to pause motion pic ture playback.
• T o save the displayed image as 1 picture > go to step 3
• To save the motion picture as 1 pi cture with 9 sc reens > go to
step 2
Press [MENU/SET] to display the 9 screens
playback screen.
A: 30 frames: Display image every 1/30 second as picture
To advance frame-by-frame
3/4: Advance every 3 frames
2/1: Advance every 1 frames
Change the number of frame rate per second
Turn the zoom lever toward [L] (W)
Quality F rame rate pe r second
VQT1R87
74
///
T o end 9 screen disp lay
Pres s [MENU/ SET]
30>15>10>5
10>5
Page 75

Advanced (Playback)
3
4
1
2
3
Press the shutter button.
Press 3 to select [YES] and then press [MENU/SET].
Picture size
Item 1picture 9pictures
/
/
•[QUALITY] is fixed to [›].
Note
•You may not be able to save still pictures from a motion picture taken on other equipment.
[PLAYBACK] mode:
2M 2M
0.3M 2M
0.3M 1M
¸
Using the [PLAYBACK] mode menu
You can use various functions in playback mode to rotate pictures, set protection for them etc.
•With [TEXT STAMP], [RESIZE], [TRIMMING], [LEVELING] or [ASPECT CONV.], a new edited
pictur e is c re at e d. A ne w picture canno t b e cr ea te d if there is n o f ree s p ac e on t he bu ilt - i n me mo ry o r
the card so we recommend checking that there is free space and then editing the picture.
[CALENDAR]
CAL
You can display pictures by recording date.
Select [CALENDAR] on the [PLAYBACK] mode menu. (P18)
• You can also rotate the zoom lever several times towards [L] (W) to display the ca lend ar
screen. (P32)
Press 3/4/2/1 to select the date to be played back.
3/4: Select the month
2/1: Select the date
• If there were no pictures recorded during a month, the month is not
displayed.
Press [MENU/SET] to display the pictures that were
recorded on the selected date.
• Pre ss [ ‚] to return to the calendar screen.
VQT1R87
75
Page 76

Advanced (Playback)
4
123
4
5
Press 3/4/2/1 to select a picture and then press [MENU/SET].
• The picture that was selected will appear.
Note
The record in g date of the pic t ure selected in the playback screen becomes the date selected
•
when the cal endar scree n i s f i rst displayed.
•If there are multiple pictures with the same recording date, the first picture recorded on that day
is displayed.
•You can display the calendar between January 200 0 and Decemb er 2099.
•If the date is n ot set i n the camera, the record i ng date is set as January 1st, 2008.
•If you take pictu res after setting the travel destination in [WORLD TIME], the pict ures are
displayed by th e dates at the tr avel destinat i on in calenda r pl ayback.
[TITLE EDIT]
You can add text (comments) to pictures. After text has been registered, it can be included in
prints using [TEXT STAM P] (P77). (Only alphabetic characters and symbols can be entered.)
Select [TITLE EDIT] on the [PLAYBACK] mode menu. (P18)
Press 3/4 to select [SINGLE] or [MULTI] and then
press [MENU/SET].
76
Select the picture, and then press
[SINGLE] [MULTI]
[MENU/S ET] to set.
• [’] is displ ayed for pictures that have
already be en recorded with text in
[BABY1]/[BABY2] or [PET] name settings
in scene mode, [LOCATION] in travel date
or [TITLE EDIT].
[MULTI] setting
Press [DISPLAY] to set (repeat), and
then press [MENU/SET] to set.
• The setting i s canceled when [DISP LAY] is pres sed again.
Press 2/1 to
select the picture.
Press 3/4/2/1 to
select th e pictures.
Press 3/4/2/1 to select text and then press
[MENU/S E T ] to register.
• Press [DISPLAY] to switch text between [A] (capitals), [a] (small
case) and [& / 1] (special characte rs and numbers).
• The cursor at the entry pos i t i on can be moved to the left with
[L], and to the right with [Z].
• To enter a blank, move the cursor to [SP ACE] or to delete an
enter ed char acter, mov e t he cursor to [DEL E T E ], and pr ess [MENU/SET].
• To stop editi ng at any time during text entr y, press [‚].
• A maximum of 30 characters can be ent ered.
Press 3/4/2/1 to move the cursor to [EXIT] and then press [MENU/
SET] to end text input.
VQT1R87
Page 77

Advanced (Playback)
6
1
2
3
Press [‚] to return to the menu screen.
¢The menu screen is auto m atically re stored when [MULTI] is selecte d.
• Press [MENU/SET] to close the menu.
∫ Delete the title
[SINGLE] setting
¢
1 In step 4 when [SINGLE] (P76) is selected, delete all the t exts, select [EXIT], and
press [M EN U/ SET].
2 Press [ ‚].
3 Press [MENU/SET] to close the menu.
[MULTI] setting
1 In step 4, delete all the texts, select [EXIT], and press [MENU/SET].
2 Press [MENU/SET] to close the menu.
Note
Text can be scrolled if a ll of th e registered text does not fit on the screen.
•
•The name setting of [BABY1]/[BABY2] or [PET] in scene mode or [LOCATION] in travel date
can also be registered by using the oper ation in steps
•The name setting of [B ABY1 ]/[BABY2] or [PET] in scene mode, [LO CATION] in travel date and
[TITLE E DIT] cannot be registered at the same tim e.
•You can print out texts (comments) using the “PHOTOfunSTUD IO-viewer-” bundled software
on the CD-ROM (suppl i ed).
•You can set up to 50 pictures at one tim e wi th [MULTI].
•You cannot use title s edit for pict ures taken with ot her equipment.
4 and following.
[TEXT STAMP]
You can stamp the recording date/time, age, travel date or title onto the recorded pictures.
It is suitable for regular size printing. (Pictures with a picture size larger than [ ] will be
resized when stamping the date etc. on them.)
Select [TEXT STAMP] on the [PLAYBACK] mode menu. (P18)
Press 3/4 to select [SINGLE] or [MULTI] and then
press [MENU/SET].
Select the pi cture, and then press
[SINGLE] [MULTI]
[MENU/S ET] to set.
• [‘] appears on screen if the pi ct ure is
stamped wit h text.
[MULTI] setting
Press [DISPLAY] to set (repeat), and
then press [MENU/SET] to set.
The setting is canceled when [DISPLAY]
•
is pressed again.
Press 2/1 to
select the picture.
Press 3/4/2/1 to
select the pictures.
VQT1R87
77
Page 78

Advanced (Playback)
4
5
6
7
Press 3/4/2/1 to select [SHOOTING DATE], [AGE], [TRAVEL DA TE]
or [TITLE] and then press [MENU/SET] to set each it em.
[SHOOTING DATE]
[W/OTIME]: Stamp the year, month and date.
[WITHTIME]: St amp the year, month, day, hour and minutes.
[AGE] (P47)
If this is set to [ON], [AGE] is stamped on the pictures.
[TRAVEL DATE]
If this is set to [ON], [TRAVEL DATE] is stamped on the pictures.
[TITLE]
Text is printed together w ith the image for pictures that have already been recorded
with text in [BABY1]/[BABY2] or [PET] name settings in scene mode, [LOCATION]
in travel date or [TITLE EDIT].
Press [MENU/SET].
• If you set [TEXT STAMP] for a picture with a picture size larger than [ ], the picture
size will b ecome smaller as shown below.
Aspect ratio settin g Pict u r e size
X
Y
W
• The pictur e becomes sli ght l y rougher.
//>
// >
// >
Press 3 to select [YES] and then press [MENU/SET].
• The message [SAVE NEW PICTUR ES?] appears if the pict ure
was recorded with a pi ct ure size [ ] or less.
Press [‚] to return to the menu screen.
¢
The menu screen is automatically restored when [MULTI] is selected.
• Press [MENU /SET] to clos e t he menu.
Note
When you print pictures stamped with text, the date will be printed over the stamped text if you
•
specify printing of the date at t h e photo shop or on t h e printer .
•You can set up to 50 pictures at one time in [MU LTI].
•
Depe nd in g o n th e pri nte r b ei ng used, some cha racters may be cut at print ing. Check before print ing.
•When text is stamped onto the [ ] pictures, it is difficult to read it.
•Te xt and dates can not be stamped on the pi ct ures taken wi th other equipment.
¢
78
VQT1R87
Page 79

Advanced (Playback)
1
234
5
Q [RESIZE] Reducing the picture size (number of pixels)
We recommend resizing to [ ] if you want to attach a picture to an e-mail or use it on a
website. (Pictures set to the minimum number of pixels for [ASPECT RATIO] cannot be
further reduced in size.)
Select [RESIZE] on the [PLAYBACK] mode menu. (P18)
Press 3/4 to select [SINGLE] or [MULTI] and then
press [MENU/SET].
Select the pi cture and size.
[SINGLE] setting
[SINGLE]
1 Press 2/1 to select the picture, and
then press [MENU/SET].
2 Press 2/1 to select the size
press [M EN U/ SET].
¢ Only th e si zes to which th e pi ctures can be
resiz e d i s disp layed.
[MULTI] setting
¢
, and then
[MULTI]
1 Press 3/4 to select the size, and then
press [M EN U/ SET].
•
When [DISPLAY] is pressed, an ex pl anation
of resizi ng i s displayed.
2 Press 3/4/2/1 to select the picture,
and then press [DISPLAY].
Repeat this step for each picture , and press
•
[MENU/SET] to set.
Press 3 to select [YES] and then press [MENU/
SET].
Press [‚] to return to the menu screen.
¢The menu screen is auto m atically re stored when [MULTI] is
selected.
• Press [MENU/SET] to close the menu.
Note
You can set up to 50 pictur es at one time in [MULTI].
•
•The picture quality of the resized picture will deteriorate.
•It may not be possible to resize pictures recorded with other equipment.
¢
VQT1R87
79
Page 80

Advanced (Playback)
1
2
3
456
[TRIMMING]
You can enlarge and then clip the important part of the recorded picture.
Select [TRIMMING] on the [PLAYBACK] mode menu. (P18)
Press 2/1 to select the picture, and then press
[MENU/SET].
Use the zoom lever and press
3/4/2/1 to select the parts
to be trimmed.
Zoom lever (T): Enlargement
Zoom lever (W): Reduction
3/4/2/1: Move
Press [MENU/SET].
Press 3 to select [YES] and then press [MENU/
SET].
Press [‚] to return to the menu screen.
• Press [MENU /SET] to clos e t he menu.
Note
Depending on the cut size, the picture size of the trim m ed picture may become sm al l er than
•
that of the origi nal picture.
•The picture quality of the trimmed picture will deteriorate.
•It may not be pos sible to trim pi ct ures record ed with other equipment .
Reduction Enlargement
()
Move the position
()
80
VQT1R87
Page 81

Advanced (Playback)
1
2
3
4
5
[LEVELING]
Minute tilting of the image can be adjusted.
Select [LEVELING] on the [PLAYBACK] mode menu. (P18)
Press 2/1 to select the picture, and then press
[MENU/SET].
Press 2/1 to adjust the tilting, and pre ss [MENU/
SET].
1: clockwise
2: counter/clockwise
•
Up to 2 o can be adjust ed.
Press 3 to select [YES] and then press [MENU/
SET].
Press [‚] to return to the menu screen.
• Press [MENU/SET] to close the menu.
Note
Quality of image may become coarse when levell i ng i s performed.
•
•Recorded pixels may decrease compared to original image when levelling is performed.
•Levelling may not be performed on images recorded with other equipment.
VQT1R87
81
Page 82

Advanced (Playback)
1
2
3
4
5
6
? [ASPECT CONV .]
You can convert pictures taken with a [W] aspect ratio to a [Y] or a [X] aspect ratio.
Select [ASPECT CONV.] on the [PLAYBACK] mode menu. (P18)
Press 3/4 to select [Y] or [X] and then press
[MENU/SET].
Press 2/1 to select a picture taken with [W]
aspect ratio, and then press [MENU/SET].
Press 2/1 to determine the horizontal position,
and press [MENU/SET] to set.
• Use 3/4 to set the fram e position for pictures ro tat ed verticall y.
Press 3 to select [YES] an d then pres s [M ENU/SE T].
Press [‚] to return to the menu screen.
• Press [MENU /SET] to clos e t he menu.
Note
•
After convert i ng the aspec t r atio, the pict ure size may become larger than that of the original
picture.
•You may not be able to convert pictures tak en on other equipment.
VQT1R87
82
Page 83

Advanced (Playback)
1
2
3
4
1
2
3
N [ROTATE]/M [ROTATE DISP.]
This mode allows you to au tomatically display pictures vertically if th ey were recorded
holding the camera vertically or rotate pictures manually in 90o steps.
Rotate (The picture is rotated manually)
Select [ROTATE] on the [PLAYBACK] mode menu. (P18)
• The [ROTATE] function is disabled when [ROTATE DISP.] is set
to [OFF].
Press 2/1 to select the picture and then press
[MENU/SET].
• Motion pictures and protected pi ctures cannot be rotated.
Press 3/4 to select the direction to rotate the
picture and then press [MENU/SET].
: The picture rotates clockwise in steps of 90o.
: The picture rotates counter-clockwise in steps of 90o.
Press [‚] to return to the menu screen.
• Press [MENU/SET] to close the menu.
Rota te display (The p icture is automatically rot ated and displayed)
Select [ROTATE DISP.] on the [PLAYBACK] mode menu. (P18)
Press 4 to select [ON] and then press [MENU/SET] .
• The pictures are displayed without being rotated when you select
[OFF].
• Refer to P31 for information about how to pl ay back pictures.
Press [MENU/SET] to close the menu.
Note
When you play back pictures on a PC, they cannot be displayed in the rotated direction unless
•
the OS or software is compatible with Exif. Exif is a file format for still pictures which allows
recording information etc. to be added. It was established by “JEITA (Japan Electronics and
Information Technology Industri es Association)”.
•It may not be possible to rotate pictures that hav e been recorded with other equipment.
Ü [FA VORITE]
You can do the following if a mark has been added to pictures and they have been set as favorites.
•Play back only the pictures set as favorites. ([FA V ORITE PLAY])
•Play back the pictures set as favorite s only as a slide show.
•Delete all the pictu res not set as favorites . ([A LLDELETE EXCEPTÜ])
VQT1R87
83
Page 84

Advanced (Playback)
1
2
3
4
1
2
Select [F AVORITE] on the [PLAYBACK] mode menu. (P18)
Press 4 to select [ON] and then press [MENU/SET].
• You cannot set pictures as favorites if [FAVORITE] is set to
[OFF]. Also [Ü] will not appear when [FAVORITE] is set to [OFF]
even if it wa s previously set to [ON] .
Press [MENU/SET] to close the menu.
Press 2/1 to select the picture and then press 4.
• Repeat the above procedure.
• If 4 is pressed agai n, the favorite setting is ca nceled.
∫ Canceling all the [FAVORITE] settings
1 Select [CANCEL] on the screen shown in step 2 and then press [MENU/SET].
2 Press 3 to select [YES] and then press [MENU/SET].
3 Press [MENU/SET] to close the men u.
•
You cannot select [CANC EL] if not even one picture ha s been set as a fav orite.
Note
•
You can set up to 999 pictures as favo ri tes.
•When print in g pi ctures at a pho to printing st ore, [ALL DELETE EXCEPTÜ] (P33) is useful so
only the pictures you wan t t o be printed rem ain on the card.
•You may not be able to set pictures taken with other equipment as favorites.
•You can perform, check and cancel th e settings of i m ages as favori t es using the
“PHOTOfunSTUDIO-viewer-” bundled soft ware on the CD-ROM (supplied).
O [DPOF PRINT]
DPOF “Digital Print Order Format” is a system that allows the user to select which pictures
to print, how many copies of each picture to print and whether or not to print the recording
date on the pictures when using a DPOF compatible photo printer or photo printing store.
For details, ask at your photo printing store.
When you want to use a photo printing store to print pictures recorded on the built-in
memory, copy them to a card (P87) and then set the DPOF setting.
For more information visit:
http://panasonic.jp/dc/dpof_110/white_e.htm
Select [DPOF PRINT] on the [PLAYBACK] mode menu. (P18)
Press 3/4 to select [SINGLE] or [MULTI] and then
press [MENU/SET].
VQT1R87
84
Page 85

Select the picture, and th en press
3
4
5
1
2
[MENU/SET].
Advanced (Playback)
[SINGLE] [MULTI]
Press 2/1 to
select the picture.
Press 3/4/2/1
to select the
pictures.
Press 3/4 to set the number of prints, and then press [MENU/SET] to set.
• When [MULTI] has been selected, repeat steps 3 and 4 for each picture. (It is not
possible t o us e the same setti ng for a multip l e num ber of pict ures.)
Press [‚] to return to the menu screen.
• Press [MENU/SET] to close the menu.
∫ Canceling all the [DPOF PRINT] settings
1 Select [CANCEL] on the screen shown in step 2 and then press [MENU/SET].
2 Press 3 to select [YES] and then press [MENU/SET].
3 Press [MENU/SET] to close the menu.
You cannot select [C AN CE L] if not even one picture has been set for DP OF pri nting.
•
∫ To print the date
After setting the number of prints, set/cancel printing with the recording date by pressing
[DISPLAY].
When yo u go t o a photo printing store fo r di gital printing, be sure to order the print i ng of the
•
date addi tionally if required.
•Depending on the photo printing store or the printer, the date may not be printed even if you set
to print the date. For further information, as k at your photo pr i nting store or refer to the
operati ng i nstructions for the pr i nt er.
•The date cannot be print ed on pictures sta m ped with text.
Note
The number of prints can be set from 0 to 999.
•
•With a printer supporting PictBridge, the date print settings of the printer may take precedence
so check if this is the case.
•It may not be pos s i b le to use the DPOF print settin gs with othe r equipment . In this case, cancel
all the settings, and reset the settings.
•If the file is not based on the DCF st an d ar d , the DPO F prin t set ti n g cann o t be set.
P [PROTECT]
You can set protection for pictures you do not want to be deleted by mistake.
Select [PROTECT] on the [PLAYBACK] mode menu. (P18)
Press 3/4 to select [SINGLE] or [MULTI] and then
press [MENU/SET].
VQT1R87
85
Page 86

Advanced (Playback)
3
4
1
2
3
4
[SINGLE] [MULTI]
Select the picture, and then press
[MENU/SET].
When [MULTI] has been selected
•
Repeat these steps for each picture.
• The settings are can celed when [MENU/
SET] is pres s ed again.
Press 2/1 to
select the picture.
Press 3/4/2/1
to select the
pictures.
Press [‚] to return to the menu screen.
• Press [MENU /SET] to clos e t he menu.
∫ Canceling all the [PROTECT] settings
1 Select [CANCEL] on the screen shown in step 2 and then press [MENU/SET].
2 Press 3 to select [YES] and then press [MENU/SET].
3 Press [MENU/SET] to close the men u.
•
If you press [MENU/SET] while canceling protection, the canceling will stop halfway.
Note
•
The protect s etting may not be eff ective on other equipment.
•Even if you pro tect pictures i n the built-in me m ory or a card, the y will be deleted if the built-in
memory or the card is formatted.
•Even if you do no t protect pi ct ures on an SD Memory Card or an SDHC Memory Card, they
cannot be deleted when the card’s Write-Protect switch is set to [LOCK].
B [AUDIO DUB.]
You can add the audio after taking a picture.
Select [AUDIO DUB.] on the [PLAYBACK] mode menu. (P18)
Press 2/1 to select the picture and then press
[MENU/SET] to start audio recording.
• The message [OVERWRI T E AUDIO DATA?] screen appea rs
when audio has already been recorded. Press 3 to select [YES]
and then press [MENU/S E T ] to start audio recording. (T he
original audio is overwritten.)
• Audio is rec orded from the built-in microphone on the camera.
• If you press [ ‚], the au dio dubbing is canceled.
Press [MENU/SET] to stop recording.
• It will automatically stop after recording about 10 seconds without
pressing [MENU/SET].
Press [‚] to return to the menu screen.
• Press [MENU /SET] to clos e t he menu.
Note
Audio dubb in g m ay not work properly on pic tures reco rded by other equi pment.
•
VQT1R87
86
Page 87

Advanced (Playback)
1
2
3
4
5
S [COPY]
You can copy data of pictures you have shot from the built-in memory onto a card, from a
card into the built- in memory or from a card into the dedicated clipboard folder.
Select [COPY] on the [PLAYBACK] mode menu. (P18)
Press 3/4 to select the copy destination and then
press [MENU/SET].
: All the picture data in the built-in memory are copied
onto the card at one time. > step
: One picture at a time is copied from the card to the
built-in memory. > step
: The images are copi ed from the card t o the dedicated
clipbo ard folder (built-in memory) one at a time.
(Motio n pic tures ca nn ot be cop ie d. ) > Step
When copyi ng clipboar d pi ct ures onto a card, select
–
[COPY] on th e cli pboard pla yback menu. (P69)
3.
4.
3.
Press 2/1 to select the picture and then press [MENU/SET].
Press 3 to select [YES], and then press [MENU/
SET].
• If you press [MENU/SET] while copying pictures from the built-in
memory to the card, the copying will stop halfway.
• Do not turn the camer a off at a ny p oint during the c opying
process.
Press [‚] to return to the menu screen.
• Press [MENU/SET] to close the menu.
• If you copy from the built-in memory to a card, all the pictures are copied and then the
screen automatical l y returns to th e pl ayback screen.
Note
If you cop y picture data from the built-i n memory to a card which does not have sufficient free
•
space, the pi cture data will only be copi ed halfway. We recommend using a card w hi ch has
more fre e space than the bui l t-in memory (about 50 MB).
•If a picture exists with the same name (folder number/file number) as the picture to be copied in
the copy destination when [ ] is selected, a new folder is created and the picture is copied.
If a picture exists with the same name (folder number/file number) as the picture to be copied in
the copy destinatio n when [ ] is selected, that pi ct ure is not cop ie d. (P101)
•It may take time to copy the pictu re data .
•Only pict ures recorded with a Pan asonic digit al camera (LUM IX ) will be copied.
(Even if t he pi ctures we re recorded w i th a Panason ic digi tal camera , y ou may not be abl e to
copy them if they were edited with a PC.)
•DPOF settings on the original picture data will not be copied. S et the DPOF settings again afte r
copyin g is finished.
VQT1R87
87
Page 88

Connecting to other equipment
1
2
Connecting to other equipm ent
Connecting to a PC
You can acquire r ecorded pictures to a PC by connecting the camera and the PC.
You can easily print out or mail the pictures you have imported. Use of the
•
“PHOTOfunSTUDIO-viewer-” bundled soft ware on the CD -ROM (suppl i ed) is a convenient
way of doing this.
•Read the separate operati ng instruct i ons for the supplied software for more informati on about
the software i n the CD-ROM (supplied) and how to ins tall it.
Preparations:
Turn on the camera and the PC.
Remove the card before using the pictures in the built-in memory.
Connect the camera to a PC via the USB connection cabl e A
(supplied).
• Do not use any ot her USB connec tion cable s ex cept the suppli ed one.
Use of cables other than the supplied U SB connectio n cable may cau se malfunctio n.
OUT
COMPONENT
DIGITAL
AV OUT/
DC IN
A USB connection cable (suppl i ed)
•Check the directions of th e connecto rs, and plug the m st rai ght in or un pl ug them straight out.
(Otherwi se t he connectors may be bent out of shape whi ch will cause trouble.)
B Align the marks, and insert.
C AC adaptor (DMW -A C5PP; optio nal)
•Use a batter y with sufficie nt battery power or the AC adaptor (DMW-AC5PP; optional ). If the
remai ning batter y po wer becomes low while the camera and th e P C are communic ating, the
status indicator blinks and the alarm beeps.
Refer to
“Disconnecting the USB co nnection cable sa fely” (P89) before disconnecting the USB
connection cable. Otherwise, data may be destroyed.
Press 3/4 to select [PC], and then pre ss [MENU/
SET].
• If [USB MODE] (P22) is set to [PC] in the [SETUP] menu in
advance, the camera will be automatically c onnected to the PC
without displaying the [USB MODE] selection screen. Since there
is no need to set this each time you connec t to the PC, it is
convenient.
• When the cam era has been c onnected t o the PC with
[USB MODE] set to [PictBridge(PTP)], a message may appear
on the P C’s screen. S el e c t [Cancel] to close the screen, an d
disconn ect the camer a fr om the PC. Then set [U SB M ODE] to
[PC] again.
VQT1R87
88
USB MODE
PLEASE SELECT
THE USB MODE
PictBridge(PTP)
PC
SELECT
SET
MENU
Page 89

Connecting to other equipment
3
4
5
Double-click on [Removab le Di sk] i n [My Computer].
• When using a Macintosh, the drive is displayed on the desktop. (“LUMIX”, “NO_NAME”
or “Untitl ed” is display ed.)
Double-click [DCIM] folder.
Using a drag-and-drop operation, move the pictures you want to
acquire or the folder stor ing t hose pictures to any different folder on
the PC.
∫ Disconnecting the USB connection cable safely
•
Proceed with the har dware removal using “Saf el y Remove Hardware” on the task tray of the
PC. If the icon is not displayed, check that [ACCESS] is not displayed on the LCD monitor o f
the dig i tal camera before removing the hardwar e.
Note
Turn the camer a off before conn ecting or disconnecting the AC adaptor (DMW-AC5P P ;
•
optional).
•Before inserting or removing a card, turn the camera off and disconnec t the USB connection
cable. Otherwise, data may be destroyed.
•With the Mac OS X v10.2 or an earlie r operatin g sy st em , set the Write-Protect switch of the
SDHC me m ory card to the [ LOCK] positi on when importing pictures from an SDHC memory
card.
•If the camera is connec t ed i n clipboard mode, the built-in memory data is displayed even if a
card is inserted.
∫ Viewing the contents of the built-in memory or card using the PC (folder
composition)
1 Folder number
2 File number
3 JPG: Pictures
MOV: Motion pictures
MISC: DPOF print
Favorite
PRIVATE1:
(Built in memory only)
Clipboard pict ur e s
VQT1R87
89
Page 90

Connecting to other equipment
1
A new fo lder is created when pictures are taken in the f ollowing situations.
After [NO.R ESET] (P22) i n the [SETU P] menu has bee n exec ut ed
•
•When a card containing a folder with the same folder number has been inserted (Such as when
pictures were taken usin g another make of camera)
•When there i s a picture with fil e number 999 in side the folder
∫ Connection in the PTP mode (WindowsR XP, Windows VistaR and Mac OS X only)
Set [USB MODE] to [PictBridge(PTP)].
Data can now be read only from the card into the PC.
When there are 1000 or mor e pi ctures on a card, the pictures may not be imported in th e PTP
•
mode.
Printing the Pictures
If you conn ec t the came r a to a pr int e r supp or ti ng Pict Bri dg e, yo u can sel ec t the pi ctur es to
be printed out and instruct that printing be started on the camera’s LCD monitor.
Preparations:
Turn on the camera and the printer.
Remove the card before printing the pictures in the built-in memory.
Perform the print quality and other settings at the printer before pri nting the pictures.
Set the mode dial to anything except [¨].
Connect the camera to a printer via t he USB connection cable A
(supplied).
OUT
COMPONENT
DIGITAL
AV OUT/
A USB connection cable (suppl i ed)
•Check the directions of th e connecto rs, and plug the m st rai ght in or un pl ug them straight out.
(Otherwi se t he connectors may be bent out of shape whi ch will cause trouble.)
B Align the marks, and insert.
C AC adaptor (DMW -A C5PP; optio nal)
•Use a batter y with a sufficie nt batt ery power or the AC adaptor (DMW- AC 5 P P; opti onal). If the
remaining battery power becom es low while the camera and the printer are connected, the
status indica tor blinks and the alarm bee ps. If th i s happens dur i ng printing, st op printing at
once. If not printing, disconnect the USB connection cable.
•When the cam era is connec ted to the printer, the cable disconnect prohibit i con [å] appears.
Do not disconnect the USB cable while [å] is displayed.
VQT1R87
90
DC IN
Page 91

Connecting to other equipment
2
1
1/9
100
_
0001
2
1
2
Press 3/4 to select [PictBridge(PTP)], and then
press [MENU/SET].
USB MODE
PLEASE SELECT
THE USB MODE
PictBridge(PTP)
PC
SELECT
SET
MENU
Note
Do not use any other USB connection cables except the supplie d one.
•
Use of cables other than the supplied USB connection cable may cause malfunction.
•Turn the camer a off before conn ecting or disconnecting the AC adaptor (DMW-AC5P P ;
optional).
•Before inserting or removing a c ard, turn the camera off, an d di s connect the USB connect i on
cable.
•You cannot switch bet ween the built-in memory and the card whi l e t he camera is connected to
the printer. Disconnect the USB connection cable, insert (or remove) the card and then connect
the USB connection c abl e to the print er again.
•The pictures recorded in clipboard mode, copy them onto a card (P69), and then print them out.
Selecting a single pictu re and pri nting it
Press 2/1 to select the picture and then press
[MENU/SET].
• The mess age disapp ears in about 2 seconds.
Press 3 to select [PRINT START] and then press
[MENU/SET].
• Refer to P92 for th e items which can be set be fore st art ing to print
the pictures .
• Press [M ENU/SET] to cancel printin g halfway .
• Disco nnect the USB connection cable after pri nting.
Selecting multiple pic tures and printing them
Press 3.
Press 3/4 to select an item and then press [MENU/
SET].
• If the pri nt check scree n has appeared, select [YES], and print
the pictures .
PictBridge
SELECT
MULTI PRINT
CANCEL
CANCEL
100_0001
100
100_0001
PLEASE SELECT
THE PICTURE TO PRINT
PRINT
SINGLE SELECT
PRINT START
PRINT WITH DATE
NUM. OF PRINTS
PAPER SIZE
PAGE LAYOUT
SELECT
PictBridge
MULTI SELECT
SELECT ALL
DPOF PICTURE
FAVORITE
SELECT
VQT1R87
0001
SET
SET
OFF
1/9
1/9
1/9
MENU
1
MENU
MENU
91
Page 92

Connecting to other equipment
3
Item Description of settings
Multi ple picture s are printed at one time.
[MULTI SELECT]
•Press 3/4/2/1 to select the pictures, and then When [DISPLAY] is
pressed, [
pressed again, the setting is canceled.)
•After the pictures have been selected, press [MENU/SET].
é] appears on the pictures to be printed. (When [DISPLAY] is
[SELECTALL] Prints all the stored pi c tures.
[DPOF PICTURE] Prints the pictur es set in [DPOF PRINT] only. (P84)
[FAVORITE]
¢
Prints the pictures set as favorites only. (P83)
¢ On l y when [FAVORITE] is at [ON] and when there are pictures set as favorites. (P83)
Press 3 to select [PRINT START] and then press
[MENU/SET].
• Refer to “Print Settings” for the items which can be set before
starting to print the pictures.
• Press [MENU/SET] to cancel printing.
• Disconnect the USB connection ca bl e after printing.
MULTI SELECT
PRINT START
PRINT WITH DATE
NUM. OF PRINTS
PAPER SIZE
PAGE LAYOUT
CANCEL
SELECT
Print Settings
Select and set the items both on the screen in step 2 of the
“Selecting a single picture and printing it” and in step
3 of the
“Selecting multiple pictures and printing them” procedures.
•
When you wa nt to print pictur es in a paper size or a layout whi c h i s not
supported by th e camera, s et [PAPER SIZE] or [PAG E LAYOU T] to [{]
and then set the paper size or the layout on the printer. (For details,
refer to the operating instructions of the printer.)
•When [DPOF PICTURE] has been selected, the [PRINT WITH DATE]
and [NUM. OF PRINTS] items are not displayed.
MULTI SELECT
PRINT START
PRINT WITH DATE
NUM. OF PRINTS
PAPER SIZE
PAGE LAYOUT
CANCEL
SELECT
SET
EXIT
OFF
OFF
1
MENU
MENU
1
MENU
[PRINT WITH DATE]
Item Description of settings
[OFF] Date is not printe d.
[ON] Date is printed.
•If the printe r does not sup port date prin ting, the dat e cannot be printed on the picture.
•Since the printer’s settings may tak e precedenc e over the print wi th date setting, check th e
printer’s print with date setting as well.
Note
When asking the photo shop to print the pictures
•By stamping th e date using [TE X T STAMP] (P7 7) or setti ng date printing at the time of t he
[DPOF PRINT] (P84 ) setting before going to a photo shop, the dates can be pri nted at the
photo shop.
[NUM. OF PRINTS]
You can set the number of prints up to 999.
VQT1R87
92
Page 93

Connecting to other equipment
[PAPER SIZE]
Item Description of settings
{ Set t i ngs on the prin ter are prioritized.
[L/3.5qk5q]
[2L/5qk 7q] 127 mmk178 mm
[POSTCARD] 100 mmk148 mm
[16:9] 101.6 mmk180.6 mm
[A4] 210 mmk297 mm
[A3] 297 m mk42 0 mm
[10k15cm] 100 mmk15 0 m m
[4qk6q] 101.6 mmk152.4 mm
[8qk10q ] 203.2 mmk254mm
[LETTER] 216 mmk279.4 mm
[CARD SIZ E] 54 mmk85.6 mm
89
mmk
127
mm
•Paper sizes not supported by the printer will not be displayed.
[PAGE LAYOUT] (Layouts for printing that can be set with this unit)
Item Description of settings
{ Settings on the prin ter are prioritized.
á 1 picture with no fra me on 1 page
â 1 picture with a frame on 1 page
ã 2 pictures on 1 page
ä 4 pictures on 1 page
•An item cannot be select ed if the print er does not sup port the page layout.
∫ Layout print ing
When printing a picture several times on 1 sheet of paper
For example, if you want to print the same picture 4 times on 1 sheet of paper, set
[PAGE LAYOUT] to [ä] and then set [NUM. OF PRINTS] to 4 for the picture that you
want to print.
When printing different pictures on 1 sheet of paper
For example, if you want to print 4 different pictures on 1 sheet of paper, set
[PAGE LAYOUT] to [ä] and then set [NUM. OF PRINTS] to 1 for each of the 4 pictures.
Note
•
The camera is receivi ng an error me ssage from th e printer when the [¥] indication lights
orange duri ng printing. After finis hi ng printin g, make sure t here are no probl ems with the
printer.
•If the number of prints is hi gh, the pictu res may be printed severa l tim es. In this cas e, the
remaini ng number of pri nt s i ndicated may differ from the number set.
VQT1R87
93
Page 94

Connecting to other equipment
1
2
3
4
[PLAYBACK] mode: ¸
Playing Back Pictures on a TV Screen
Playing back pictures using the AV cable (supplied)
Preparations:
Set the [TV ASPECT ]. ( P22 )
Turn this unit and the TV off.
OUT
1 Yellow: to the vi de o input socket
2 White: to the audio input socket
A Align the marks, and insert.
B AV cable (supplied)
•Check the directions of th e connecto rs, and plug the m st rai ght in or un pl ug them straight out.
(Otherwi se t he connectors may be bent out of shape whi ch will cause trouble.)
Connect the AV cable B (suppli ed) to the video input and the audio
input sockets on the TV.
Connect the AV cable to the [AV OUT] socket on the camera.
COMPONENT
DIGITAL
AV OUT/
DC IN
T urn the TV on and select external input.
T urn the camera on.
Note
Depending on the [ASPEC TRA TIO ], black bands may be displayed on the top and bottom or
•
the left and right of the pictures.
•Do not use any other AV cables except the supplie d one.
•Read the operating ins tructions for the TV.
•When you play back a pictur e verticall y, it may be blurry.
•You can view pictures on TVs i n other countri es (regio ns) whi ch use the NT SC or PAL system
when you set [VIDEO OUT] in the [SETUP] menu.(PAL video out is not availabl e on the
version DMC-FX37P sold in the U.S.)
•Even if you set [VIDEO OUT] to [PAL], the output signal will still be NTSC in the recording
mode.(PAL video out is not available on the version DMC-FX37P sold in the U .S . )
Playing back pictures on a TV with an SD Memory Card slo t
Still pictures recorded on an SD Memory Card ca n be played back on a TV with an SD
Memory Car d slot.
VQT1R87
94
Page 95

Connecting to other equipment
1
234
Note
•Depending on the TV model, pictures may not be displayed on the full screen.
•Motion pictures cannot be played back. To play back motion pictures, connect the camera to the
TV with the AV cable (supplied).
•You c annot play back pictures on SDHC cards if the TV does not support these cards.
•You m ay not be able to play back MultiMediaCards.
Playing back on the TV with component socket
Y ou can enjoy high quality pictures and motion pictures on the TV by connecting the camera
with the TV using component cable (DMW-HDC2: optional).
Component output is output as 1080i. Connect with a TV compatible with the 1080i.
Preparations: Turn th is unit and the TV off.
Y/G
PB/B
R
/R
P
#WFKQ .)
#WFKQ 4&
L
AUDIO
1 Component Plugs: Connect the plugs to the component video input sockets on the TV
2 Audio Pin Plugs: to the audio input socket
3 TV with component socket
A Align the marks, and insert.
B Component cable (DMW-HDC2: optional)
•Check the directions of the connec tors, and plug them straight in or unplug them straight out.
(Otherwise the connectors may be bent out of shape which will cause trouble.)
R
with same color. (Indication on the TV might be different.)
OUT
COMPONENT
DIGITAL
AV OUT/
DC IN
Connect the component cable B (DMW-HDC2; option al) to the
component input and the audio input sockets on the TV.
Connect the component cable to the [COMPONENT OUT] socket on
the came ra.
Turn on the TV and switch to component input.
Turn the camera on.
• Play back the pictur es. (Except clipboard)
Note
•Depending on the [ASPECT RA TI O] , bands may be displayed on the top and bottom or the left
and right of the pictur es.
•
Do not use any other cables except a genuine Panasonic component cable (DMW-HDC2; optional).
•Audio will be output as monaural.
•When you play back a picture vertically, it may be blurry.
•Image is not displayed on the LCD monitor when the component cable is connected.
•
There are some playbac k menus that cannot be used while the component cable is connected.
•When pictures are displayed, they may not be displayed properly depending on the ty pe of TV.
•Read the operating instructions for the TV.
(P105)
VQT1R87
95
Page 96

Others
Others
Screen Display
∫ In recording
Recording in normal picture mode [!] (Initial setting)
1 Recording mode
2 Flash mo de (P37)
3 AF are a ( P28 )
4 Focus (P28)
5 Picture size (P58)
6 Quality (P59)
7 Ba tte r y indi ca tio n (P 1 3)
8 Number of recordable pictures (P112)
9 Built-in memory (P15)
: Card (P15) (dis played only during
recording)
10 Recording state
11 ISO sensit iv ity ( P 60 )
12 Shutt er sp eed (P28)
13 Aperture value (P28)
14 Optical image stabilizer (P65)/ : Jitter alert (P29)
∫ In recording (after settings)
15 AF Trackin g ( P 63 )
: Macro mode (P40)
16 White balance (P60)
17 ISO sensit iv ity ( P 60 )
maximum ISO sensit ivity level (P59)
18 Color mode (P65)
19 Picture mode (P53)
20 Available recording time (P53):
21 Spot AF area (P62)
22 Name
¢
1
(P47)
23 Histogram (P36)
24 Travel date (P55)
25 Elapsed recording time (P53)
:
AF TRACKING
: Intelligent ISO (P 59 )
AF tracking operation (P26, 63)
26 Current date and time/“: Travel destination setting
W
W
27 Minimum shutter speed
28 Age
¢1
Location
(P47)
¢2
(P55)
: Zoom/E xtended Optical Zoom (P30)/Digital zoom (P30, 6 3)
T
1X
29 Exposure compensation (P42)
30 Po wer LCD (P20)
„: Auto Power LCD (P20)
31 Intelligent Expo sure (P6 4)
32 Burst (P63)/ : Au to bracke t (P43)/B: Audio recording (P66)
33 Quick AF (P63) /
: AF Lock (P52)/ : AF assist lamp (P66)
34 Number of days that have passed since the travel date (P55)
35 Self-t im er mode (P 41)
VQT1R87
96
R8m30
s
¢2
(P56)
Page 97

Others
¢1 This is displayed for abou t 5 second s when this unit is turned on in [BABY1]/[BABY2] or
[PET] in scene mode.
¢2 This is displayed for about 5 seconds when the camera is turned on, aft er setting the c l ock
and after switching from playback mode to recording mode.
∫ In playback
1 Playback mode (P31)
2 Protected picture (P85)
3 Favorit es (P83)
: Zoom mark (P68)
4 Stamped wi th text ind ic a tio n (P77 )
5 P ic t u r e si ze (P58)
Motion picture icon (P73)
6 Q ua lity (P59)
7 Battery indication (P13)
8 Folder/File number (P89)
Built-in memory (P 15)
Elapsed pl ayback time (P73) :
8m30
s
9 P ic tu r e nu mb er / Total pictures
10 Motion picture recording time (P73):
8m30
s
11 Histogram (P36)
12 Exposu re compen s at ion ( P42)
13 Recordin g informa tio n (P 3 5)
14 Favorites settings (P83)
15 Recorded date and time/Travel destination setting (P56)/Name (P 47)/Location (P 55)/
Title (P76)
16 Age (P47)
17 Number of days that have passed since the travel date (P55)
18 Power LCD (P20)
19 Number of DPOF prints (P84)
20 Audio play back (P73)
: Motion picture playback (P73)
Cable disconnection warning icon (P90)
VQT1R87
97
Page 98

Others
Cautions for Use
Optimal use of the camera
Take care not to drop or knock the unit or put a lot of pressure on it.
Ta ke care not to knock or drop the bag/case that you inse rted the camer a i n as the shock may
•
cause dama ge to the camer a, lens or LCD m oni t or.
•Do not attach any other items to the wrist strap that’s inc l uded with your camera. While being
stored, that item can rest against the LCD monitor an d damage it.
•Do not use a paper bag as it can ea sil y rip causing t he camera to fall and be damaged.
•We strongly recommend y ou purchase a go od camera ba g/case from your local dea l er t o
protect your camera.
Keep the camera as far away as possible from electromagnetic equipment (such as
microwave ovens, TVs, video games etc.).
•
If you use the camera on top of or near a TV, the pictures and sound on th e camera may be
disrupted by electromagnetic wave radiation.
•Do not use the camera near cell phone s because doing so may result in noise ad versely
affecting the pi ctures and sound.
•Recorded data may be dama ged, or pictur es may be disto rted, by stron g m agnetic fiel ds
created by s peakers or large motors.
•Electromagnetic wave radiation generated by microprocessors m ay adversely aff ect the
camera, dis turbing the pictures an d sound.
•If the camera is adversely affected by elec t rom agnetic equipment and stops functio ni ng
properly, turn the camera off and remove the battery or disconnect AC adaptor (DMW-AC5PP;
optional). Then reinsert the battery or reconnect AC adaptor and turn the camera on.
Do not use the camera near radio transmitters or high-voltage lines.
If you record near radio transmitters or high-voltage lines, the recorded pictures and sound may
•
be adversel y affected.
Always use the supplied cords and cables. If you use optional acce ssories, use the
cords and the cables supplied with them.
Do not extend the cords or the cables.
Do not spray the camera with insecticides or volatile chemicals.
•
If the camera is sprayed with such chemicals, the body of the camera may be damaged and the
surface finish may peel off .
•Do not keep rubber or pla st i c products in contact with the c amera for a long period of t ime.
Cleaning
Before cleaning the camera, remove the battery or disconnect the power plug from
the outlet. Then wipe the camera with a dry soft cloth.
•When t he came ra is soi le d ba dly, it can be cle an ed by wip in g th e di rt off wit h a w rung wet
clot h, and then with a dr y cloth.
•Do not use solvents such as benzine, thinner, alcohol, kitchen detergents, etc., to clean
the camera, since it may deteriorate the external case or the coating may peel off.
•When using a chemical cloth, be sure to follow the accompanying instructions.
About the LCD monitor
•
Do not press the LCD monitor with excessive for ce. Uneven c ol ors may appear on the LCD
monitor and it may malfunction.
VQT1R87
98
Page 99

Others
•If the camera is cold when you turn it on, the picture on the LCD monitor will be slightly darker
than usual at first. However, the picture will return to normal brightness when the internal
temperature of the camera increases.
Extremely high precision technology is employed to produce the LCD monitor screen.
However, there may be some dark or bright spots (red, blue or green) on the screen.
This is not a malfunction. The LCD monitor screen has more than 99.99% effective
pixels with a mere 0.01% of the pixels inactive or always lit. The spots will not be
recorded on pictures on the built-in memory or a card.
About the Lens
•Do not press the lens with excessiv e f orce.
•Do not leave the camera with the lens facing the sun as rays of light from the sun ma y ca use it
to malfun ct i on. Also, be car eful when p la cing the camera outside or near a window.
Battery
The battery is a rechargeable lithium ion battery. Its ability to generate power comes
from the chemical reaction that takes place inside it. This reaction is susceptible to
the surrounding temperature and humidity. If the temperature is too high or too low,
the operating time of the battery will become shorter.
Always remove the battery after use.
•
St or e the removed batter y i n t he battery car rying case (supplied).
If you drop the battery accidentally, check to see if the
body of the battery and the terminals are damaged.
•
Inserting a damaged battery in the camera will damage the
camera.
Bring charged spare batteries when going out.
Be aware that the operating time of the battery becomes shorter in
•
low temperature co ndi tions suc h as at a ski reso rt .
•When yo u tr avel, do not forget to bring t he battery charger (supplied) so that you can char ge
the battery in the country that you are traveling in.
Dispose of unusable battery.
The battery has a limite d l i fe.
•
•Do not throw the battery into fire because it ma y ca use an explosi on.
•The unusable battery should be discarded in accordance with battery recycling laws. Call the
RBRC hot l i ne at 1-800-822-8837 fo r i nformatio n.
Do not allow battery terminals to come into contact with metal objects (such as
necklaces, hairpins etc.).
•
This can c ause short circuiting or heat generation and you may be badly burned i f y ou touch a
battery.
Charger
•If you use the battery charger near a radio, the radio reception may be disturbed.
•Keep the c harger 1 m (3.28 feet) or more away from ra di os.
•The char ger may gener at e whirring sounds when it i s being used. Thi s is not a malfunction.
•After use, be sure to disconnect the power supply device from the electrical outlet. (A very
small amount of curren t is consumed if it is left connect ed.)
•Keep the t erm i nals of the c harger and bat tery clean.
VQT1R87
99
Page 100

Others
Card
Do not leave the card where the temperature is high, where electromagnetic waves
or static electricity are easily generated or exposed to direct sunlight.
Do not bend or drop the card.
•
The card may be damaged or th e recorded content may be damaged or de l eted.
•Put the card i n th e card case or the storage ba g aft er use and when st ori ng or carry i ng t he
card.
•Do not allow dirt, dust or water to get into the terminals on the back of the card and do not touch
the terminals with your fingers.
When not using the camera for a long period of time
•Store the battery in a cool and dry p l ace with a relatively stable tempera tu re: [Recommended
temperature:15 oC to 25 oC (59oF to 77 oF), Recomme nded humidity: 40% to 60%]
•Always remo v e t he battery and the card fro m the camera.
•If the battery is left inser ted in the camera, it will discharge even if the camera is turned off. If
the battery continues to be left in the camera, it will discharge excessively and may become
unusable ev en if charged.
•When st o r i n g the battery for a long period of time , we recommend charging it once a year.
Remove th e battery from the camera and store it aga i n aft er it has compl etely discharged.
•We recommend storing the camera with a desiccant (silica gel) when you keep it in a closet or
a cabinet.
About the picture data
•Recorded data may be dama ged or lost if the cam era breaks down due to inappropria te
handling. Panasonic will not be liable for any damage suffered due to loss of r ecorded data.
About tripo ds
•When you use a t ri pod, make sur e the tripod is stabl e when this unit is attached t o i t.
•You may not be able to remove the card or the battery when using a tripod.
•Make sure that the screw on the tripod is not at an ang l e when attach in g or detaching t he
camera. You may damage the screw on the camera if you use excessive force when turning it.
Also, the camera body an d the rating la bel m ay be damaged or scratched if the camera is
attach ed to o tightly to the tri p o d.
•Read the operating ins tr uctions for the tripod caref ul l y.
100
VQT1R87
 Loading...