

Page 1
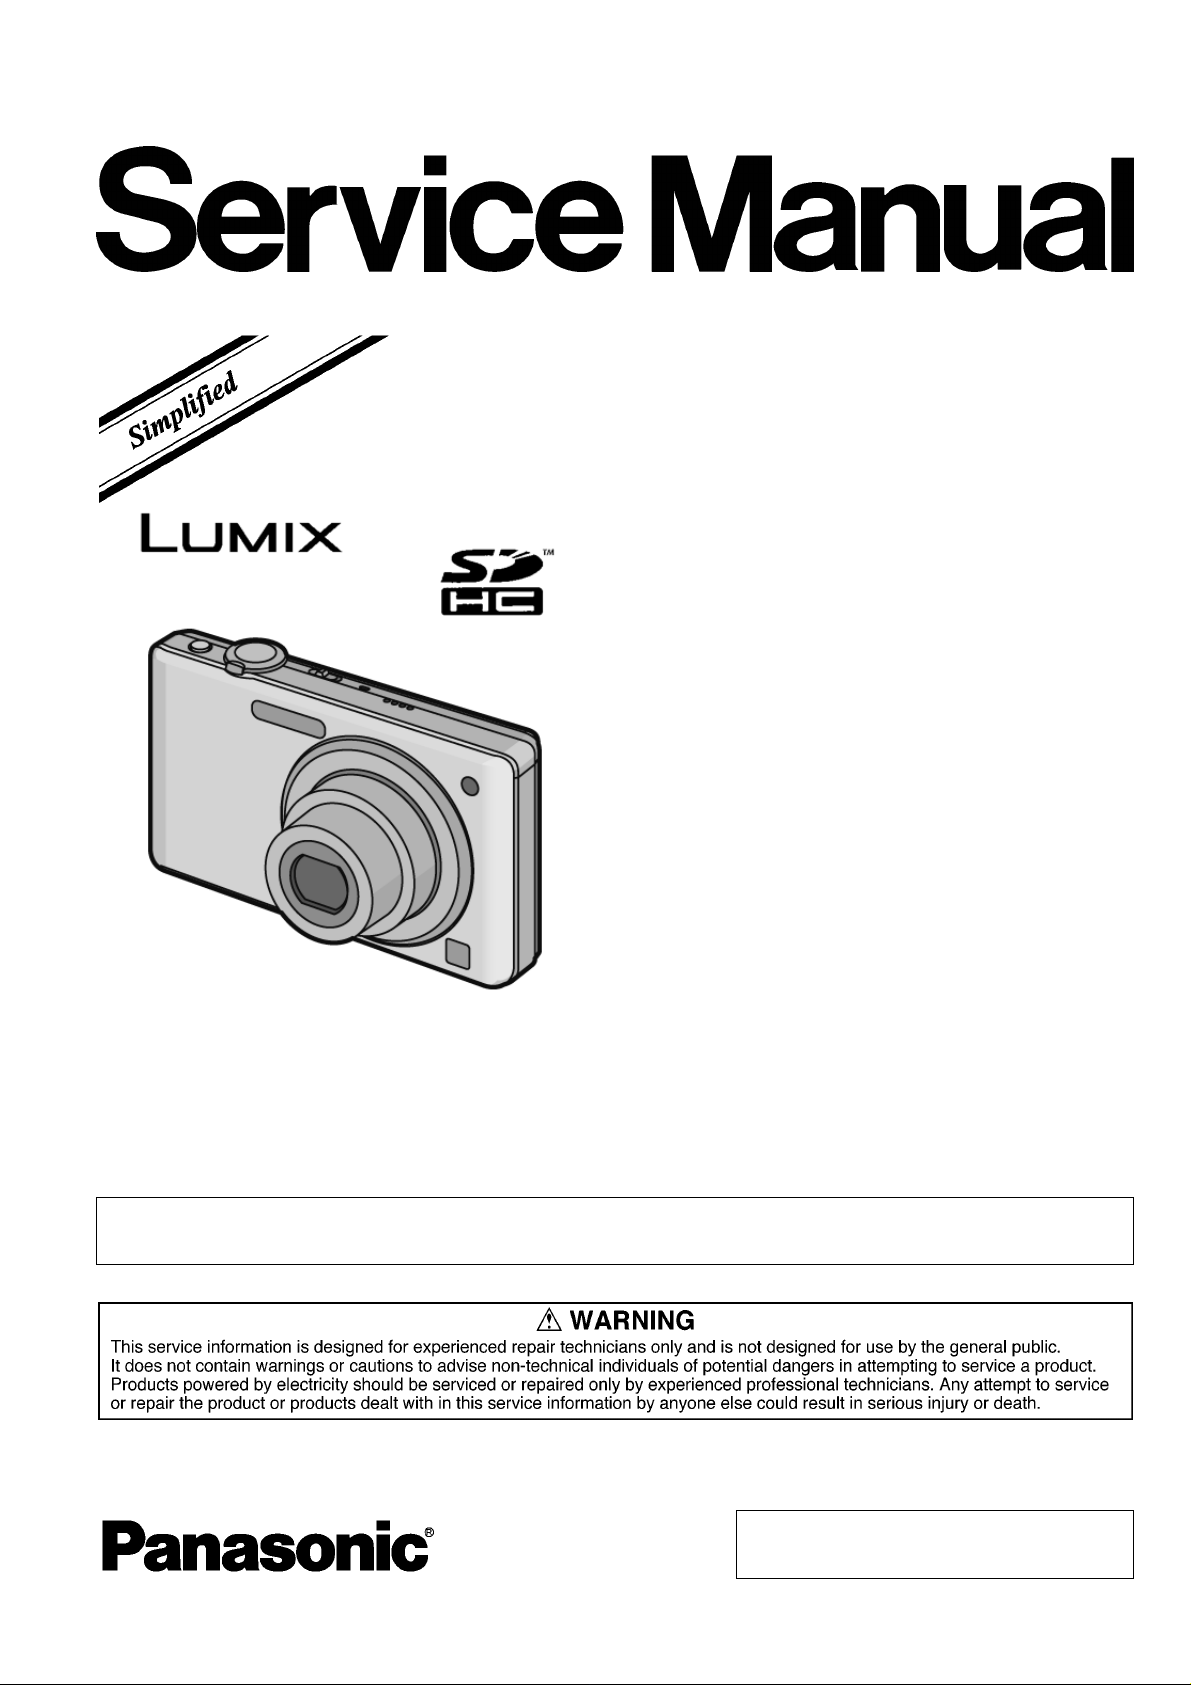
ORDER NO. DSC0906054AE
Digital Camera
Model No. DMC-FS12P
DMC-FS12PC
DMC-FS12PR
DMC-FS12PU
DMC-FS12EB
DMC-FS12EE
DMC-FS12EG
B26
DMC-FS12EP
DMC-FS12GC
DMC-FS12GJ
DMC-FS12GK
DMC-FS12GN
DMC-FS12GT
Vol.1
Colour
(S)-------Silver Type (except GT)
(K)-------Black Type (except GT)
(P)-------Pink Type (except EG/GN)
(A)-------Blue Type (only P/PC/PU/EP/GC/GN)
(G)-------Green Type (only P/PC/PU)
Please use this manual together with the service manual for
Model No.DMC-FS7P/PC/PR/PU/EB/EE/EF/EG/EP/GC/GD/GJ/GK/GN/GT Vol.1 Order No.DSC0902005CE
© Panasonic Corporation 2009 Unauthorized copying and distribution is a violation of law.
Page 2
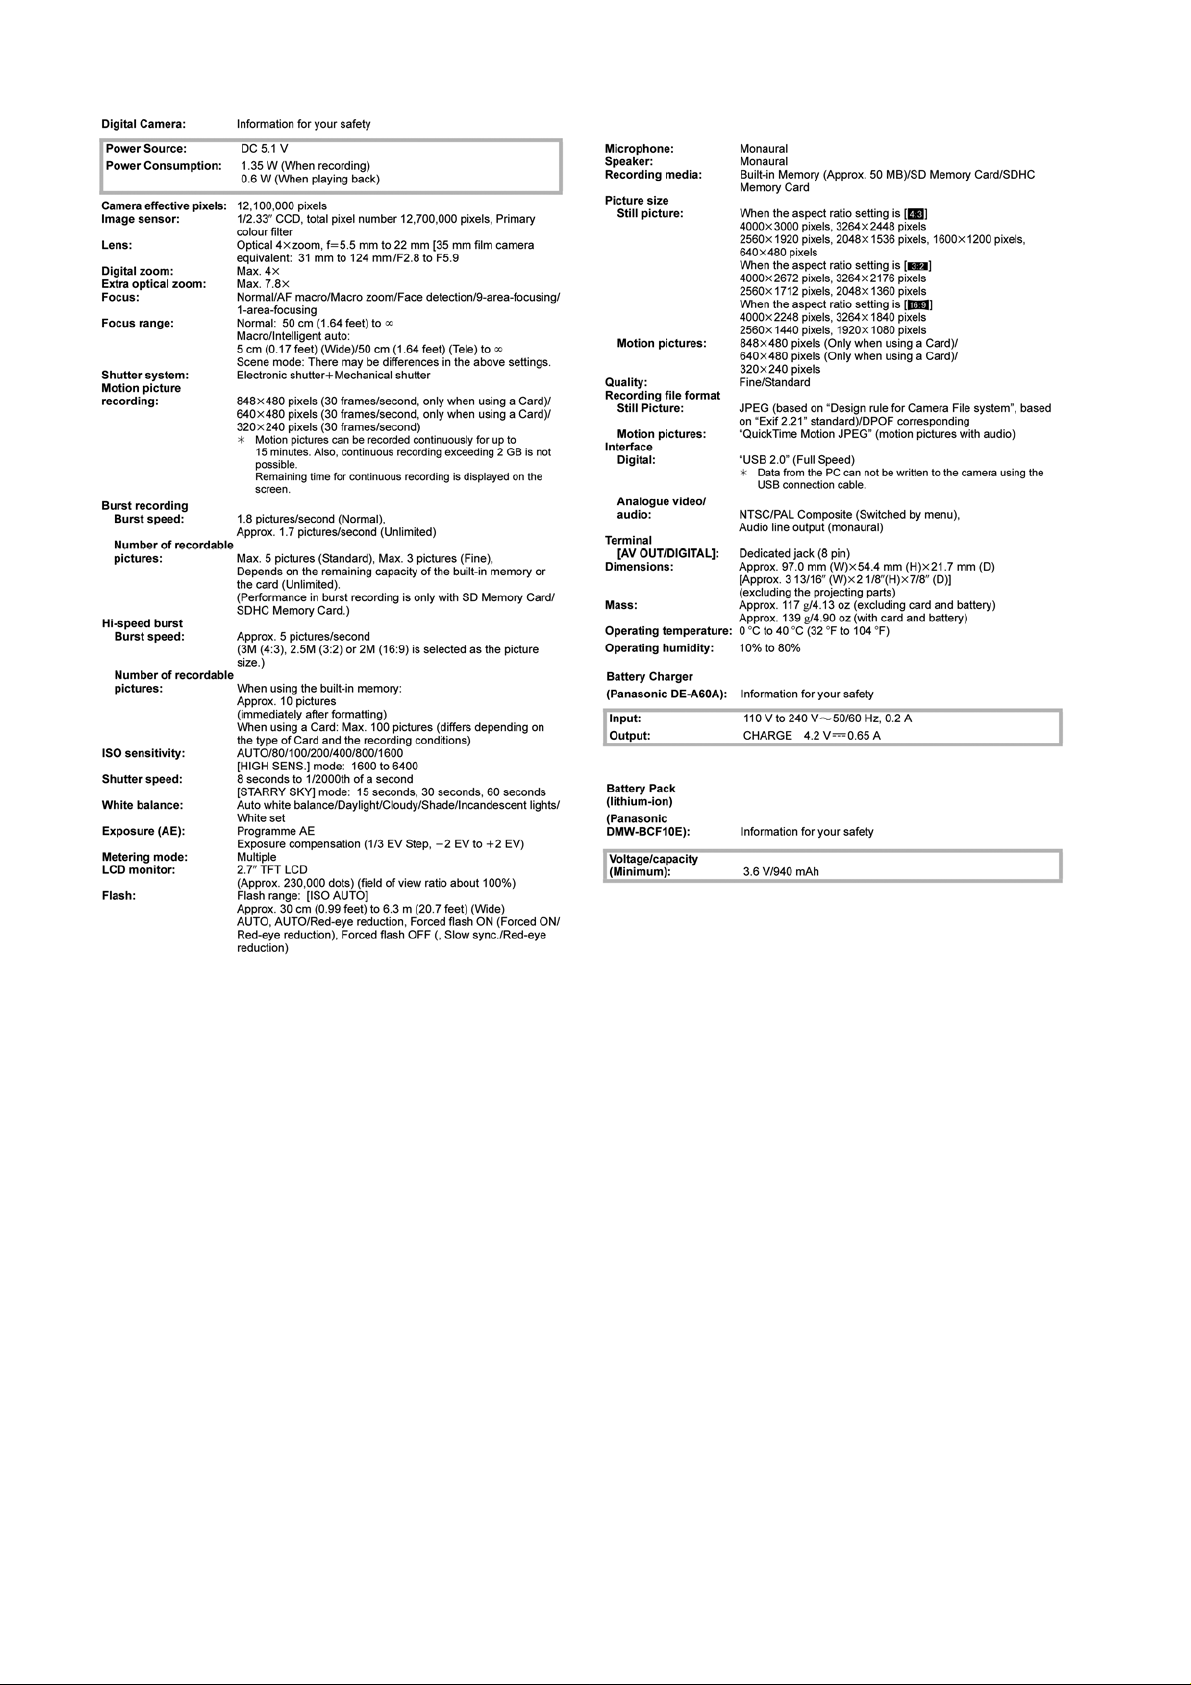
TABLE OF CONTENTS
1 SERVICE NAVIGA TION------------------------------------------3
1.1. INTRODUCTION-------------------------------------------3
1.2. Important Notice 1:(Other than U.S.A. and
Canadian Market)------------------------------------------3
1.3. About the Lens Unit ---------------------------------------3
2 INITIAL SETTINGS------------------------------------------------4
3 Disassembly and Assembly Instructions-----------------7
3.1. Disassembly and Assembly Instructions-------------7
3.2. Assembly Procedure for the Lens ---------------------9
3.3. Removal of the CCD Unit ------------------------------ 11
3.4. Removal of the Focus Motor Unit--------------------12
3.5. The Applyment of Grease Method-------------------12
4DIAGRAMS--------------------------------------------------------13
4.1. Overall Block Diagram----------------------------------13
4.2. Flash Top Schematic Diagram------------------------14
4.3. CCD Flex Schematic Diagram------------------------1 5
4.4. CCD Flex P.C.B.------------------------------------------16
5 REPLACEMENT PARTS LIST -------------------------------17
5.1. Electrical Parts Section---------------------------------17
5.2. Frame and Casing Section ----------------------------18
PAGE PAGE
5.3. Packing Parts and Accessories Section (1)------ 20
5.4. Packing and Accessories Section (2) -------------- 22
2
Page 3

1 SERVICE NAVIGATION
1.1. INTRODUCTION
This Service Manual contains technical information which will help service personnel to understand and service the Digital Camera
Digital Camera; DMC-FS12 series
The Digital Camera DMC-FS12 series have been developed based on DMC-FS7 series.
Since this Service Manual does not cover the same part which is already described in the Service Manual for DMC-FS7 series,
when servicing, refer to the descriptions in the Service Manual for ;
DMC-FS7P/PC/PR/PU/EB/EE/EF/EG/EP/GC/GD/GJ/GK/GN/GT: Order No.DSC0902005CE (Service Manual Vol. 1).
1.2. Important Notice 1:(Other than U.S.A. and Canadian Market)
When a part replacement is required for repairing MAIN PCB , replace as an assembled parts.
The following category is/are recycle module part. please send it/them to Central Repair Center.
MAIN PCB : VEP56074F
1.3. About the Lens Unit
Although this service manual (for DMC-FS12) is designed based on service manual for DMC-FS7,
the lens unit for DMC-FS12 is only one type.
Therefore, it is able to replace the defective part only.
(Unnecessary to distinguish the lens type. No limitation of the replacement part item described in service manual for FS7.)
Refer to the “Disassembly and Assembly Instructions” and “Exploded views” in details.
3
Page 4
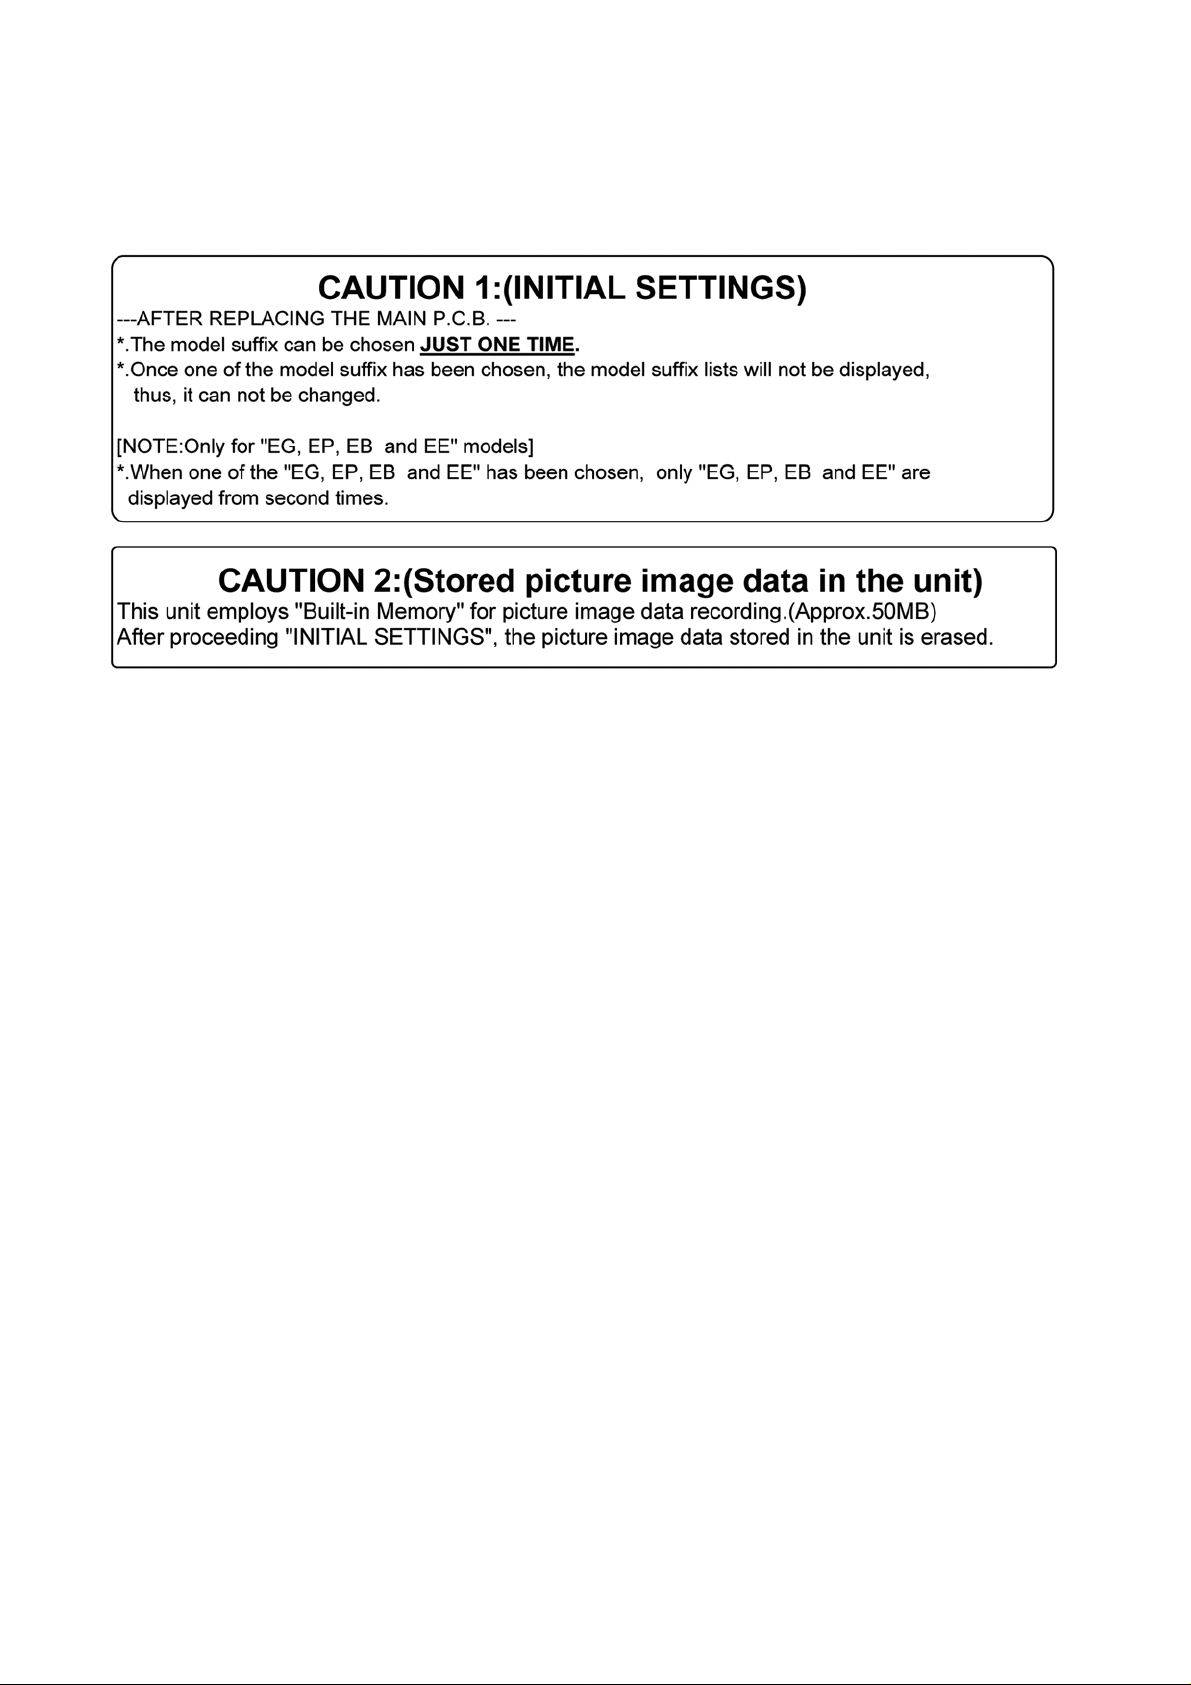
2 INITIAL SETTINGS
After replacing the MAIN PCB, be sure to perform the initial settings after achieving the adjustment by ordering the following
procedure in accordance with model suffix of the unit.
1. IMPORTANT NOTICE:
Before proceeding Initial settings, be sure to read the following CAUTIONS.
2. PROCEDURES:
• Precautions: Read the above “CAUTION 1” and “CAUTION 2”, carefully.
• Preparation:
1. Attach the Battery or AC Adaptor with a DC coupler to the unit.
2. Set the recording mode to the [NORMAL PICTURE] mode.
(Press the [MODE] button and select the [NORMAL PICTURE] by pressing the “[ UP ] and [DOWN] of Cursor buttons”,
then press the [MENU/SET] button.)
NOTE:
If the unit is other than [NORMAL PICTURE] mode, it does not display the initial settings menu.
• Step 1. The temporary cancellation of “INITIAL SETTINGS”:
Set the [REC]/[PLAYBACK] selector switch to “[ REC ] (Camera mark)”.
While keep pressing “[ UP ] of Cursor button” and [ iA ] button simultaneously, turn the Power on.
• Step 2. The cancellation of “INITIAL SETTINGS”:
Set the [REC]/[PLAYBACK] selector switch to “[ PLAYBACK ]”.
Press “[ UP ] of Cursor button” and [ iA ] button simultaneously, then turn the Power off.
• Step 3. Turn the Power on:
Set the [REC]/[PLAYBACK] selector switch to “[ REC ] (Camera mark)”, and then turn the Power on.
• Step 4. Display the INITIAL SETTING:
NOTE:
If the unit is other than [NORMAL PICTURE] mode, it does not display the initial settings menu.
While keep pressing [ MENU/SET ] and “[ RIGHT ] of Cursor buttons” simultaneously, turn the Power off.
The “INITIAL SETTINGS” menu is displayed.
There are two kinds of “INITIAL SETTINGS” menu form as follows:
4
Page 5
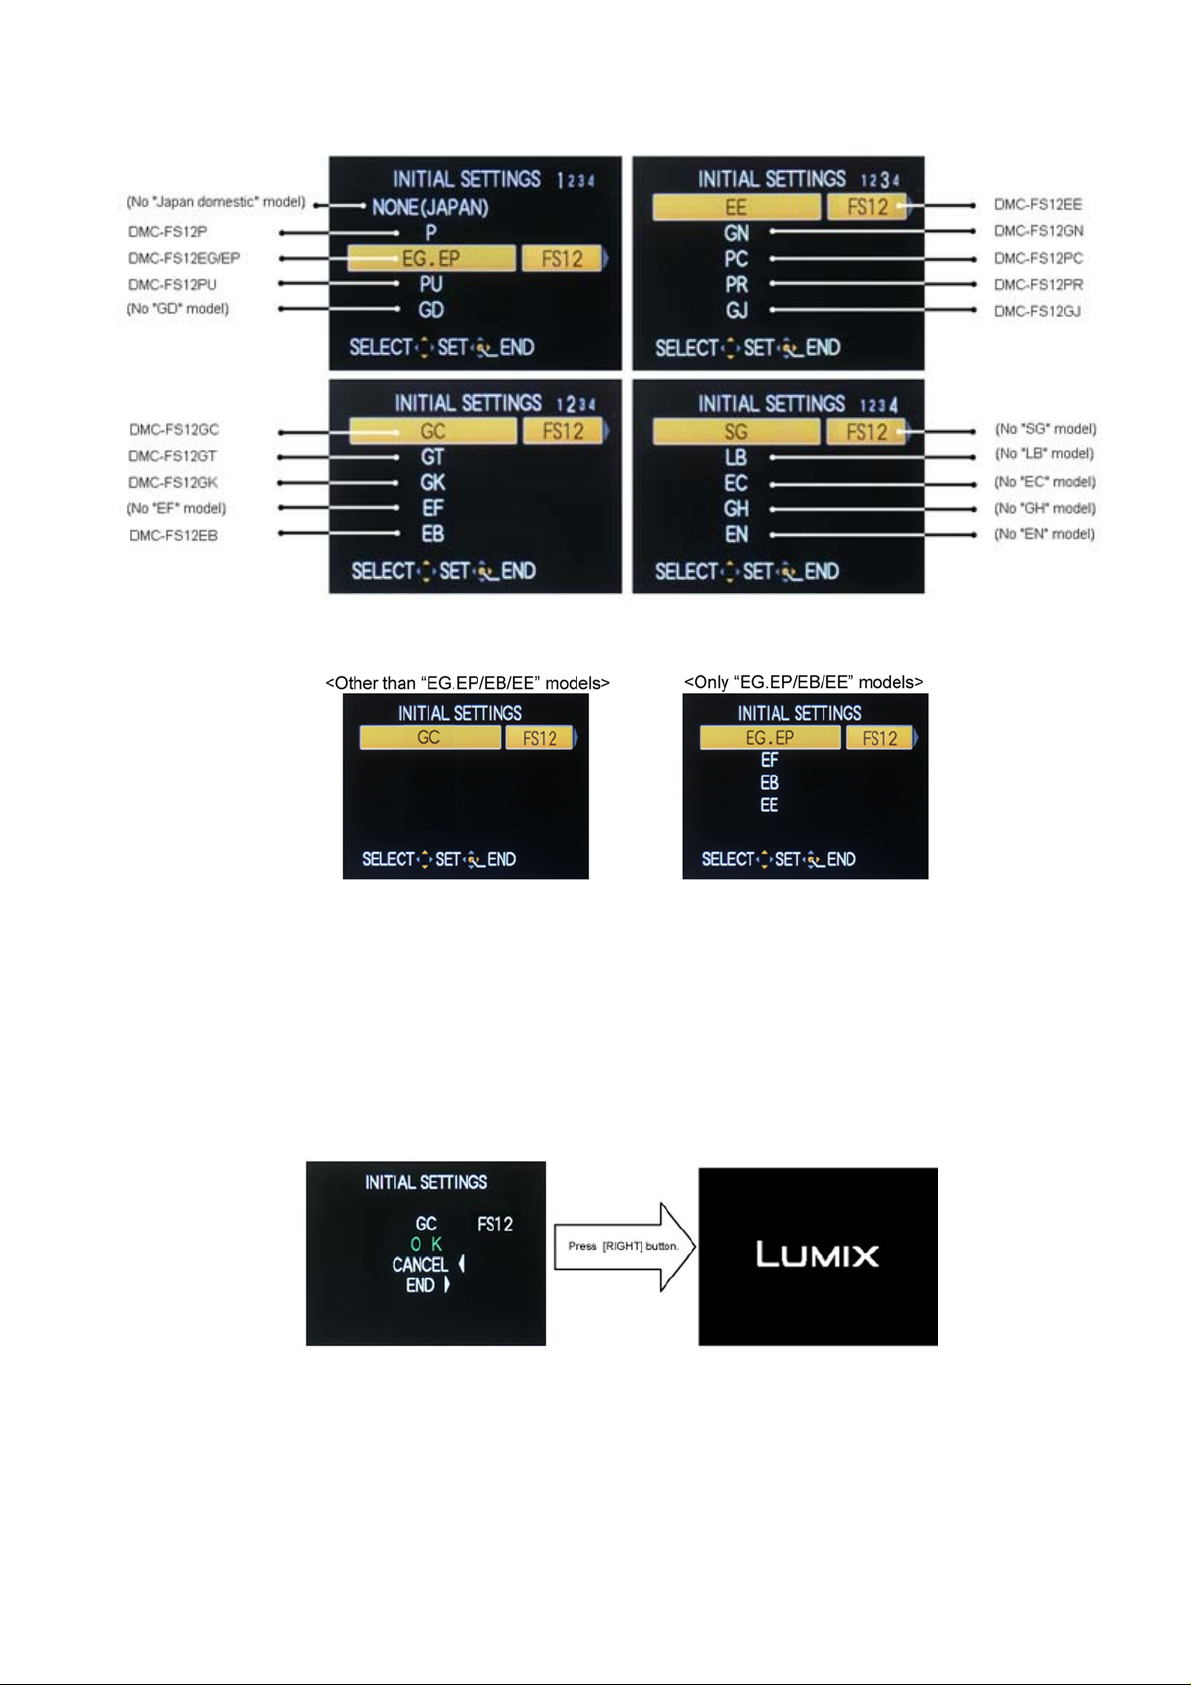
[CASE 1. After replacing MAIN P.C.B.]
When MAIN P.C.B. has just been replaced, all of the model suffix is displayed as follows. (Four pages in total)
[CASE 2. Other than “After replacing MAIN P.C.B.”]
• Step 5. Chose the model suffix in “INITIAL SETTINGS”: (Refer to “CAUTION 1”)
[Caution: After replacing MAIN P.C.B.]
The model suffix can been chosen, JUST ONE TIME.
Once one of the model suffix have been chosen, the model suffix lists will not be displayed, thus, it can be changed.
Therefore, select the area carefully.
Select the area with pressing “[ UP ] / [ DOWN ] of Cursor buttons”.
• Step 6. Set the model suffix in “INITIAL SETTINGS”:
Press the “[ RIGHT ] of Cursor buttons”.
The only set area is displayed, and then press the “[ RIGHT ] of Cursor buttons” after confirmation.
(The unit is powered off automatically.)
5
Page 6

• Step 7. CONFIRMATION:
Confirm the display of “PLEASE SET THE CLOCK” in concernd language when the unit is turned on again.
When the unit is connected to PC with USB cable, it is detected as removable media.
1) As for your reference, major default setting condition is as shown in the following table.
• Default setting (After “INITIAL SETTINGS”)
MODEL VIDEO OUTPUT LANGUAGE DATE REMARKS
a) DMC-FS12P NTSC English Month/Date/Year
b) DMC-FS12EG PAL English Date/Month/Year
c) DMC-FS12EP PAL English Date/Month/Year
d) DMC-FS12PU NTSC English Month/Date/Year
e) DMC-FS12GC PAL English Date/Month/Year
f) DMC-FS12GT NTSC Chinese (traditional) Year/Month/Date
g) DMC-FS12GK PAL Chinese (Simplified) Year/Month/Date
h) DMC-FS12EB PAL English Date/Month/Year
i) DMC-FS12EE PAL Russian Date/Month/Year
j) DMC-FS12GN PAL English Date/Month/Year
k) DMC-FS12PC NTSC English Month/Date/Year
l) DMC-FS12PR PAL English Date/Month/Year
m) DMC-FS12GJ PAL Thai Date/Month/Year
6
Page 7
3 Disassembly and Assembly Instructions
3.1. Disassembly and Assembly
Instructions
NOTE: When Disassembling and Assembling for the Lens
1. To minimize the possibility of the CCD being dirt, perform
disassemble and/or assemble under the condition of the
CCD is being mounted.
Disassembling procedures for the CCD unit, refer to item
3.3.
2. Take care that the dust and dirt are not entered into the
lens.
In case of the dust is putted on the lens, blow off them by
airbrush.
3. Do not touch the surface of lens.
4. Use lens cleaning KIT (BK)(VFK1900BK).
5. Apply the grease (RFKZ0472/VFK1850) to the point
where is shown to “Grease apply” in the figure.
When the grease is applied, use a toothpick and apply
thinly.
6. When repair the fixed frame, drive frame and direct
frame, must be unit exchange.
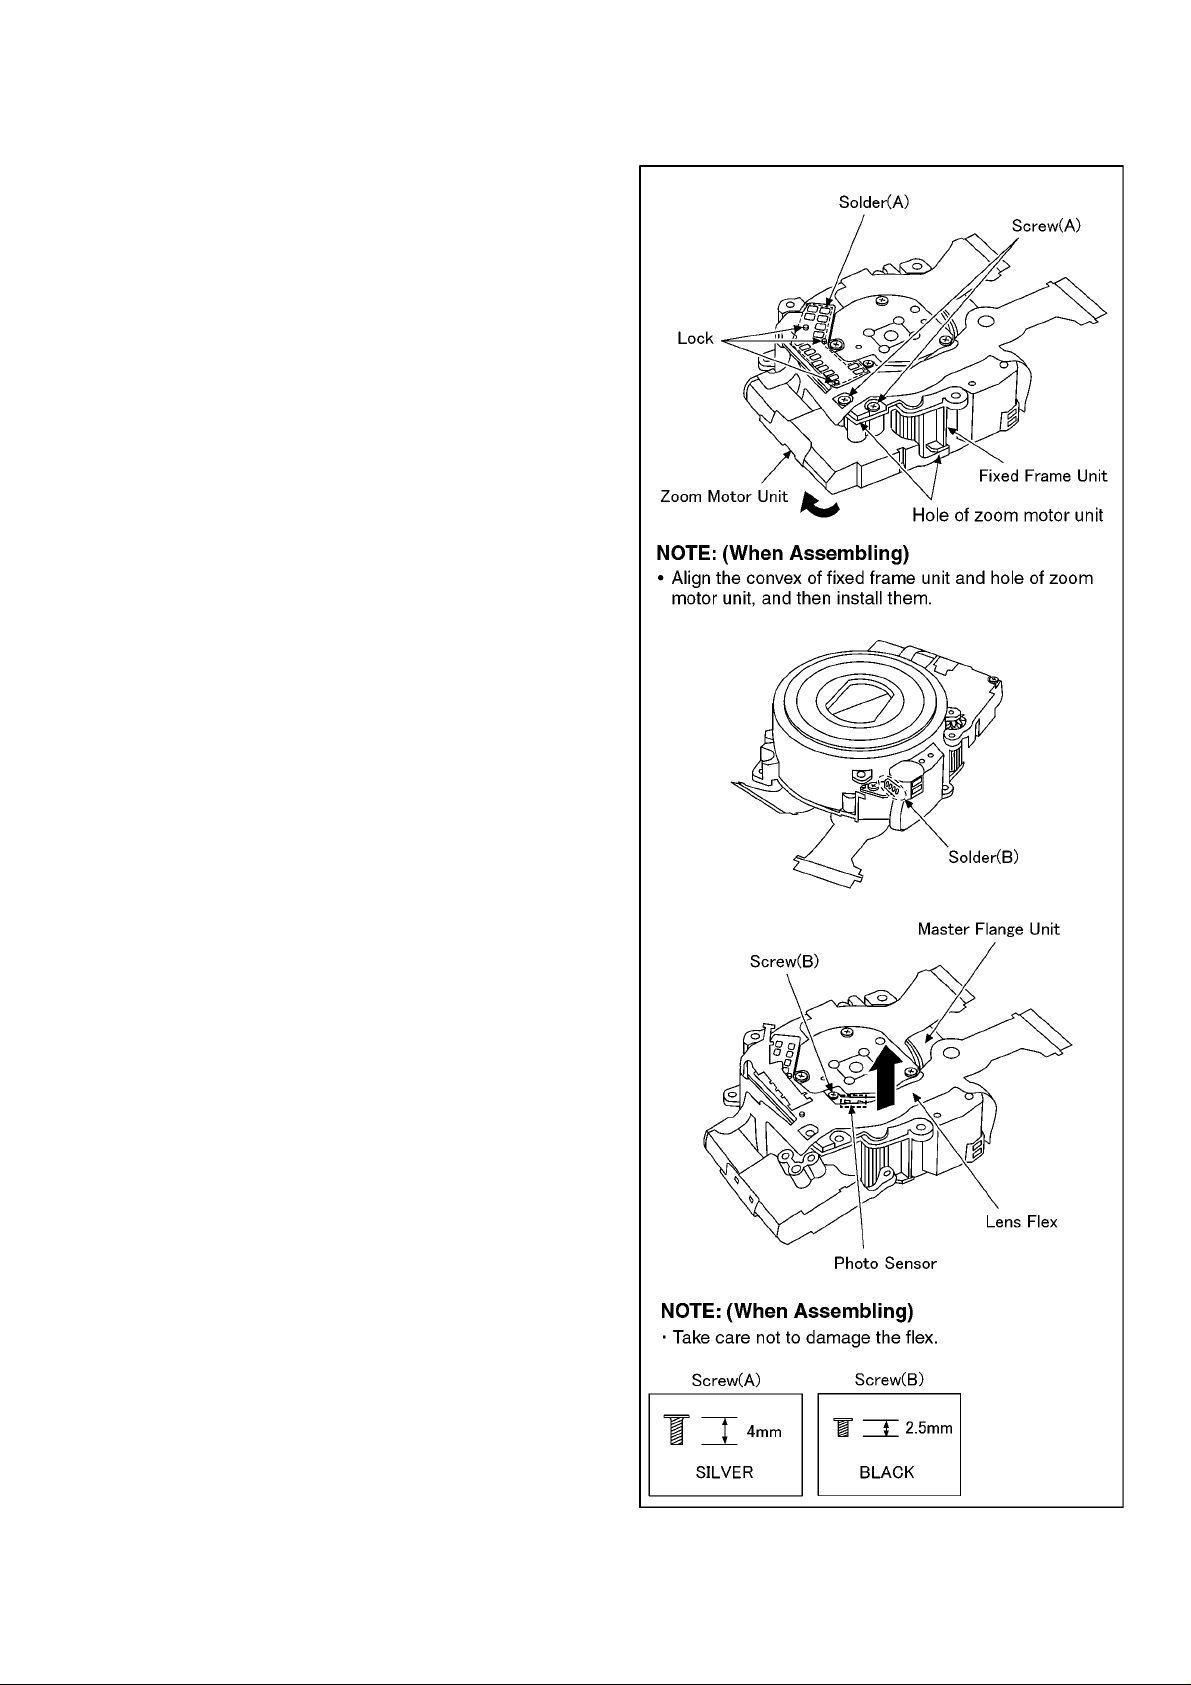
3.1.1. Removal of the Zoom Motor Unit
and Lens Flex P.C.B. Unit
1. Remove the 1 solder (A).
2. Remove the 3 locks.
3. Unscrew the 2 screws (A).
4. Remove the zoom motor unit to the indicated by arrow.
5. Remove the 1 solder (B).
6. Unscrew the 1 screw (B).
7. Remove the lens flex to the indicated by arrow.
7
Page 8

3.1.2. Removal of the Master Flange Unit 3.1.3. Removal of the 1st Lens Frame/2nd
Lens Frame Move Unit
3.1.4. Removal of the 2nd Lens Frame
Move Unit
8
Page 9

3.1.5. Removal of the Drive/Direct Frame
Unit
3.2. Assembly Procedure for the
Lens
3.2.1. Phase alignment of the Direct
Frame and Drive Frame Unit
3.2.2. Phase alignment of the Drive/Direct
Unit and Fixed Frame Unit
9
Page 10

3.2.3. Assembly for the 1st Lens Frame
Unit and Fixed/Drive/Direct Frame
Unit
3.2.4. Assembly for the 2nd Lens Frame
Move Unit and Fixed/Drive/Direct
Frame/1st Lens Frame Unit
10
Page 11

3.2.5. Assembly for the Master Flange
Unit and Fixed/Drive/Direct Frame/
1st Lens Frame/2nd Lens Frame
Move Unit
3.3. Removal of the CCD Unit
To prevent the CCD unit from catching the dust and dirt,
do not remove the CCD unit except for replacing.
11
Page 12

3.4. Removal of the Focus Motor
3.5. The Applyment of Grease
Unit
Method
The grease apply point of lens unit are as follows.
Apply grease additionally in the specified position if necessary.
When the grease is applied, use a toothpick and apply thinly.
• Lead screw
- Grease: VFK1850 (Furoyl type)
- Amount of apply: 2 - 4 mg
• Guide pole/Fasten groove of nut
- Grease: RFKZ0472
- Amount of apply: 2 - 4 mg
12
Page 13

4 DIAGRAMS
4.1. Overall Block Diagram
OVERALL BLOCK DIAGRAM
(33mm ~ 132mm)
CCD
1/2.33" 12 MEGA PIX
IC3001
CCD SIGNAL
CDS, AGC,
PROCESSOR
A/D, TG,
CCD DRIVER
X6001
(24MHz)
ZOOM
OIS UNIT
FLASH
REAR OPERATION UNIT
SHUTTER
FOCUSIRIS
IC9101
SYSTEM IC
MOTOR DRIVE,
OIS DRIVE&
PRE PROCESS
IC7101
GYRO
SENSOR X/Y
IC8001
IGBT DRIVER
X9101
(32.768kHz)
IC9101
SYSTEM IC
IC3002
REGLATOR
IC6002
SDRAM/256Mbit
NAND FLASH ROM/512Mbit
IC6001
VENUS4
CAMERA PROCESS
J-PEG COMP/EX PANDS
MEDIA I/F
USB I/F
MAIN MICROPROCESSOR
OIS CONTROL
LENS DRIVE
LCD DRIVE
SD
CARD
IC9101
SYSTEM IC
MICROPHONE AMP
SPEAKER CONTROL
VIDEO OUT
IC1210
REGLATOR
COLOR LCD
PANEL
2.7" PANEL
230k dots
MICROPHONE
SPEAKER
AV OUT / DIGITAL
TERMINAL
TOP OPERATION UNIT
13
IC1001
POWER
(POWER SUPPLY)
IC6004
FeRAM
BATTERY
DMC-FS12 OVERALL BLOCK DIAGRAM
Page 14

4.2. Flash Top Schematic Diagram
G
F
E
,DRAZAHERIFTSNIAGANOITCETORPDEUNITNOCROF:NOITUAC
.ESUFV23A5.1EPYTEMASEHTHTIWYLNOECALPER
V23A5.1
V23A5.1
,DRAZAHERIFTSNIAGANOITCETORPDEUNITNOCROF:NOITUAC
V23A52.1
TNOCNOITCETORPENURUOP:NOITNETTA
.ESUFV23A52.1EPYTEMASEHTHTIWYLNOECALPER
SEUQSIRSELEUNI
.V23A52.1EPYTEMÉMEDELBISUFSEDEUQRESILITU'NEIDNECNI'D
V23A52.1
NOCNOITCETORPENURUOP:NOITNETTA
SEUQSIRSELEUNIT
.V23A5.1EPYTEMÉMEDELBISUFSEDEUQRESILITU'NEIDNECNI'D
D
C
B
Variation Category
P8002
DMC-FS6/FS7/FS15
FS8/FS62/FS12
K4ZZ04000051
DMC-FS25
K4ZZ04000052
A
poThsalF
margaiDcitamehcS
01987654321
14
Page 15

4.3. CCD Flex Schematic Diagram
*
)
(
'
&
%
$
&&' )OH[
6FKHPDWLF 'LDJUDP
15
Page 16

4.4. CCD Flex P.C.B.
*
)
(
&RPSRQHQW 6LGH
'
&
%
)RLO 6LGH
$
&&' )OH[ 3&%
16
Page 17

5 REPLACEMENT PARTS LIST
5.1. Electrical Parts Section
COMPARISON CHART:
The following table shows difference between DMC-FS7 series and DMC-FS12 series.
Ref No. Original Part No. New Part No. Part Name & Description Pcs Remarks
DMC-FS7 series DMC-FS12 series
C3101 ----- F1H1C105A097 C.CAPACITOR CH 16V 1U 1 [SPC]
Q3101 ----- UP05C8B00L TRANSISTOR 1 [SPC] E.S.D.
R3101 ----- ERJ2GEJ470 M.RESISTOR CH 1/16W 47 1 [SPC]
R3102 ----- ERJ2GEJ182 M.RESISTOR CH 1/16W 18 1 [SPC]
R3107 ----- ERJ2GEJ132 M.RESISTOR CH 1/16W 1.3K 1 [SPC]
R3108 ----- ERJ2GEJ220 M.RESISTOR CH 1/16W 22 1 [SPC]
TH3101 ----- D4CC11030026 THERMISTORS 1 [SPC]
17
Page 18

5.2. Frame and Casing Section
COMPARISON CHART:
The following table shows difference between DMC-FS7 series and DMC-FS12 series.
Ref No. Original Part No. New Part No. Part Name & Description Pcs Remarks
DMC-FS7 series DMC-FS12 series
1 VEP56074B VEP56074F MAIN P.C.B. 1 (RTL) E.S.D.
7 VYK2Y41 VYK3J43 FRONT CASE UNIT 1 (-S)
7 VYK2Y45 VYK3J44 FRONT CASE UNIT 1 (-K)
7 VYK2Y50 VYK3J45 FRONT CASE UNIT 1 (-A)
7 VYK2Y47 VYK3J46 FRONT CASE UNIT 1 (-P)
7 VYK2Y53 VYK3J47 FRONT CASE UNIT 1 (-G)
9 VYK2Y42 VYK3J64 REAR CASE UNIT 1 (-S)
9 VYK2Y46 VYK3J65 REAR CASE UNIT 1 (-K)
9-2 VGU0D72 VGU0D72 CORSOR BUTTON 1 (-S,-A,-P,-G)
VGU0E98 CORSOR BUTTON 1 (-K)
24 VEP58076C VEP58076F FLASH TOP P.C.B. 1 (RTL) E.S.D.
27 VYK3H28 VYK3L29 TOP ORNAMENT UNIT 1
28 VGU0C05 VGU0C05 REC/PLAYBACK SELECTOR KNOB 1 (-S,-A,-P,-G)
VGU0E99 REC/PLAYBACK SELECTOR KNOB 1 (-K)
100 VXW1000 VXW1059 LENS UNIT(W/O CCD) 1 [SPC]
101 VDL2317 VDL2046 OPTICAL FILTER 1 [SPC]
102 VEK0N42 VEK0P39 CCD UNIT 1 [SPC]
103 VMX3707 VMX3707 CCD CUSHION 1 [SPC]
104 VXP3085 ----- 1ST LENS FRAME UNIT (For YM-Type and CX-Type) --- [SPC]
104 VXP3136 ----- 1ST LENS FRAME UNIT (For CP-Type) --- [SPC]
104 ----- VXP3073 1ST LENS FRAME UNIT 1 [SPC]
105 L6DA8BEC0003 ----- ZOOM MOTOR --- [SPC]
105 ----- VXP3117 DRIVE/DIRECT FRAME UNIT 1 [SPC]
106 B3NBA0000011 ----- PHOTO SENSOR --- [SPC]
107 B3NBA0000011 ----- PHOTO SENSOR --- [SPC]
107 ----- VXP3119 FIXED FRAME UNIT 1 [SPC]
109 ----- L6DA8BEC0003 ZOOM MOTOR 1 [SPC]
110 ----- VXP3114 2ND LENS FRAME UNIT 1 [SPC]
113 ----- VXP3256 MASTER FLANGE UNIT 1 [SPC]
113-1 ----- L6HA64NC0013 FOCUS MOTOR UNIT 1 [SPC]
113-2 ----- VMB4173 FOCUS SPRING 1 [SPC]
113-3 ----- VXP3121 3RD LENS FRAME UNIT 1 [SPC]
114 ----- VEK0L88 LENS FPC UNIT 1 [SPC]
114-1 ----- B3NAA0000132 PHOTO SENSOR 1 [SPC]
114-2 ----- B3NBA0000011 PHOTO SENSOR 1 [SPC]
114-3 ----- B3NBA0000011 PHOTO SENSOR 1 [SPC]
115 ----- VZT0815 BARRIER 1 [SPC]
B108 ----- VHD2020 SCREW 1 [SPC]
B109 ----- XQN14+CJ4FN SCREW 1 [SPC]
18
Page 19

Frame and Casing Section
19
Page 20

5.3. Packing Parts and Accessories Section (1)
Ref.No. Part No. Part Name & Description Pcs Remarks
200 VPF1302 CAMERA BAG 1 P,PC,PU
201 DE-A59BA/SX BATTERY CHARGER 1 P,PC,PU
202 ----- BATTERY 1 P,PC,PU
204 K1HA08AD0001 USB CABLE W/PLUG 1 P,PC,PU
205 K1HA08CD0027 AV CABLE W/PLUG 1 PU
206 VFC4297-B HAND STRAP 1 P,PC,PU
207 VFF0512-S CD-ROM (SOFTWARE/INSTRUCTION BOOK) 1 [SPC] P,PC,PU See “Notes”
208 VGQ0D56 BATTERY PROTECTION CASE 1 P,PC,PU
210 VPF1100 BAG, POLYETHYLENE 1 P,PC,PU
214 VPK3909 PACKING CASE 1 PS,PCS
214 VPK3933 PACKING CASE 1 PUP
214 VPK3937 PACKING CASE 1 PUA
214 VPK3940 PACKING CASE 1 PUG
214 VPK3939 PACKING CASE 1 PG,PCG
214 VPK3936 PACKING CASE 1 PA,PCA
214 VPK3932 PACKING CASE 1 PP,PCP
214 VPK3910 PACKING CASE 1 PUS
214 VPK3913 PACKING CASE 1 PK,PCK
214 VPK3914 PACKING CASE 1 PUK
215 VPN6649 CUSHION 1 P,PC,PU
225 VQT2D42 SIMPLIFIED O/I (ENGLISH/SPANISH) 1 P
225 VQT2D44 SIMPLIFIED O/I (SPANISH/PORTUGUESE) 1 PU
225 VQT2D43 SIMPLIFIED O/I (ENGLISH/CANADIAN FRENCH) 1 PC
226 VQT2B62 O/I SOFTWARE (SPANISH/PORTUGUESE) 1 PU,PR
226 VQT2D88 O/I SOFTWARE (ENGLISH/CANADIAN FRENCH) 1 P,PC
229 VQL1L48-6A ORERATING LABEL 1 PC
20
Page 21

Packing Parts and Accessories Section (1)
21
Page 22

5.4. Packing and Accessories Section (2)
Ref.No. Part No. Part Name & Description Pcs Remarks
300 VPF1302 CAMERA BAG 1 EXCEPT P,PC,PU
301 DE-A60AA/SX BATTERY CHARGER 1 EG,EP,EB,GN
301 DE-A60BB/SX BATTERY CHARGER 1 EE,GC,GJ,GK
301 DE-A60DA/SX BATTERY CHARGER 1 PR
301 DE-A60CA/SX BATTERY CHARGER 1 GT
302 ----- BATTERY 1 EXCEPT P,PC,PU
304 K1HA08AD0001 USB CABLE W/PLUG 1 EXCEPT P,PC,PU
305 K1HA08CD0027 AV CABLE W/PLUG 1 PR,GC,GJ,GT,GK
306 VFC4297-B HAND STRAP 1 EXCEPT P,PC,PU
307 VFF0484-S CD-ROM (SOFTWARE) 1 EG,EP,EE,GJ,GT [SPC] See “Notes”
307 VFF0512-S CD-ROM (SOFTWARE/INSTRUCTION BOOK) 1 PR,EB,GC,GN [SPC] See “Notes”
307 VFF0485-S CD-ROM (SOFTWARE) 1 GK [SPC] See “Notes”
308 VGQ0D56 BATTERY PROTECTION CASE 1 EXCEPT P,PC,PU
310 VPF1100 BAG, POLYETHYLENE 1 EXCEPT P,PC,PU
314 VPK3911 PACKING CASE 1 PRK,EGK,EPK,EBK,EEK,GCK,GJK,GNK
314 VPK3935 PACKING CASE 1 GKP
314 VPK3938 PACKING CASE 1 EPA,GCA,GNA
314 VPK3934 PACKING CASE 1 PRP,EPP,EBP,EEP,GCP,GJP,GTP
314 VPK3912 PACKING CASE 1 GKS
314 VPK3915 PACKING CASE 1 PRK,EGK,EPK,EBK,EEK,GCK,GJK,GNK
314 VPK3916 PACKING CASE 1 GKK
315 VPN6663 CUSHION 1 EXCEPT P,PC,PU
318 VQL1G34-6A OPERATING LABEL 1 GT
319 K2CT39A00002 AC CORD W/PLUG 1 EB,GC
320 K2CP2YY00001 AC CORD W/PLUG 1 GJ
320 K2CQ29A00002 AC CORD W/PLUG 1 EG,EP,EE,GC
321 K2CJ29A00002 AC CORD W/PLUG 1 GN
322 K2CA2CA00027 AC CORD W/PLUG 1 GT
322 K2CA2YY00070 AC CORD W/PLUG 1 GK
323 K2CJ29A00003 AC CORD W/PLUG 1 PR
324 VFF0515-C CD-ROM (INSTRUCTION BOOK) 1 [SPC]EG,EP See “Notes”
324 VFF0516-C CD-ROM (INSTRUCTION BOOK) 1 [SPC]EE See “Notes”
325 VQT2D45 SIMPLIFIED O/I (SPANISH) 1 PR
325 VQT2D55 SIMPLIFIED O/I (ENGLISH) 1 EB
325 VQT2D62 SIMPLIFIED O/I (ENGLISH) 1 GN
325 VQT2D61 INSTRUCTION BOOK (CHINESE(SIMPLIFIED)) 1 GK
325 VQT2D60 INSTRUCTION BOOK (CHINESE(TRADITIONAL)) 1 GT
325 VQT2D59 INSTRUCTION BOOK (TA) 1 GJ
325 VQT2D58 SIMPLIFIED O/I (ARABIC/PERSIAN) 1 GC
325 VQT2D56 SIMPLIFIED O/I (RUSSIAN/UKRAINIAN) 1 EE
325 VQT2D54 SIMPLIFIED O/I (HUNGARIAN/FINNISH) 1 EP
325 VQT2D46 SIMPLIFIED O/I (GERMAN/FRENCH) 1 EG
325 VQT2D48 SIMPLIFIED O/I (SPANISH/PORTUGUESE) 1 EG
325 VQT2D50 SIMPLIFIED O/I (SWEDISH/DANISH) 1 EP
325 VQT2D52 SIMPLIFIED O/I (POLISH/CZECH) 1 EP
325 VQT2D47 SIMPLIFIED O/I (ITALIAN/DUTCH) 1 EG
326 VQT2G19 O/I SOFTWARE (SPANISH/PORTUGUESE) 1 PU,PR
326 VQT2B69 O/I SOFTWARE (CHINESE(SIMPLIFIED)) 1 GK
326 VQT2D57 O/I SOFTWARE
(ENGLISH/CHINESE(TRADITIONAL)/ARABIC/PERSIAN)
326 VQT2D90 O/I SOFTWARE (CHINESE(TRADITIONAL)) 1 GT
326 VQT2D89 O/I SOFTWARE (ENGLISH) 1 EB,GN
326 VQT2C95 O/I SOFTWARE (TA) 1 GJ
326 VQT2G20 O/I SOFTWARE
(ENGLISH/CHINESE(TRADITIONAL)/ARABIC/PERSIAN)
326 VQT2B63 O/I SOFTWARE
(GERMAN/FRENCH/ITALIAN/DUTCH/SPANISH/PORTU-
GUESE)
326 VQT2B64 O/I SOFTWARE
(FINNISH/SWEDISH/DANISH/POLISH/CZECH/HUNGARIAN)
326 VQT2B67 O/I SOFTWARE (RUSSIAN/UKRAINIAN) 1 EE
1GC
1GC
1EG
1 EP
22
Page 23

Packing Parts and Accessories Section (2)
23
 Loading...