

Page 1
GC GMGH GAGF
Basic Operating Instructions
Digital Camera
Model No. DMC-FH25
DMC-FH5
DMC-FH2
Before use, please read these instructions completely.
More detailed instructions on the
operation of this camera are
contained in “Operating
Instructions for advanced features
(PDF format)” in the supplied CD-ROM. Install it
on your PC to read it.
VQT3D43
Page 2

Dear Customer,
We would like to take this opportunity to thank you for purchasing this
Panasonic Digital Camera. Please read these Operating Instructions
carefully and keep them handy for future reference. Please note that the
actual controls and components, menu items, etc. of your Digital Camera
may look somewhat different from those shown in the illustrations in these
Operating Instructions.
Carefully observe copyright laws.
•
Recording of pre-recorded t apes or discs or other published or broadcast
material for purposes other than your own private use may infringe copyright
laws. Even for the purpose of private use, recording of certain material may be
restricted.
Information for Your Safety
WARNING:
TO REDUCE THE RISK OF FIRE, ELECTRIC SHOCK OR PRODUCT
DAMAGE,
•
DO NOT EXPOSE THIS APPARATUS TO RAIN, MOISTURE, DRIPPING
OR SPLASHING AND THAT NO OBJECTS FILLED WITH LIQUIDS, SUCH
AS VASES, SHALL BE PLACED ON THE APPARATUS.
•USE ONLY THE RECOMMENDED ACCESSORIES.
•DO NOT REMOVE THE COVER (OR BACK); THERE ARE NO USER
SERVICEABLE PARTS INSIDE. REFER SERVICING TO QUALIFIED
SERVICE PERSONNEL.
THE SOCKET OUTLET SH ALL BE INSTALLED NEAR TH E
EQUIPMENT AND SHALL BE EASILY ACCESSIBLE.
∫ Product identification marking
Product Location
Digital camera Bottom
Battery charger Bottom
2
VQT3D43 (ENG)
Page 3

∫ About the battery pack
CAUTION
Danger of explosion if battery is incorrectly replaced. Replace only with
the same or equivalent type recommended by the manufacturer. Dispose
of used batteries according to the manufacturer’s instructions.
Do not heat or expose to flame.
•
•Do not leav e the battery(ies) in an automobile exposed to direct sunlight for a
long period of time with doors and windows closed.
Warning
Risk of fire, explosion and burns. Do not disassemble, heat above 60xC
or incinerate.
∫ About the battery charger
CAUTION!
•
DO NOT INSTALL OR PLACE THIS UNIT IN A BOOKCASE, BUILT -IN
CABINET OR IN ANOTHER CONFINED SPACE. ENSURE THE UNIT IS
WELL VENTILA T ED. T O PREV ENT RISK OF ELECTRI C SHOCK OR FIRE
HAZARD DUE TO OVERHEATING, ENSURE THAT CURTAINS AND ANY
OTHER MATERIALS DO NOT OBSTRUCT THE VENTILATION VENTS.
•DO NOT OBSTRUCT THE UNIT’S VENTILATION OPENINGS WITH
NEWSPAPERS, TABLECLOTHS, CURTAINS, AND SIMILAR ITEMS.
•DO NOT PLACE SOURCES OF NAKED FLAMES, SUCH AS LIGHTED
CANDLES, ON THE UNIT.
•DISPOSE OF BA TTERIES IN AN ENVIRONMENTALLY FRIENDLY
MANNER.
The battery charger is in the standby condition when the AC power supply cord
•
is connected. The primary circuit is alway s “live” as long as the power cord is
connected to an electri cal outlet.
(ENG) VQT3D43
3
Page 4

∫ Cautions for Use
Fuse cover
Figure A Figure B
Figure A Figure B
Fuse
(5 ampere)
Fuse
(5 ampere)
•
Do not use any other AV cables except the supplied one.
•Do not use any other USB connection cables except the supplied one.
Keep this unit as far away as possible from electromagnetic equipment
(such as microwave ovens, TVs, video games etc.).
•If you use this unit on top of or near a TV, the pic tures and/or sound on this unit
may be disrupted by electromagnetic wave radiation.
•Do not use this unit near cell phones because do ing so may result in noise
adversely affecting the pictures and/or sound.
•Recorde d data may be damaged, or pictures may be distorted, by strong
magnetic fields created by speakers or large motors.
•Electromagnetic wave radiation generated by microprocessors may adv ersely
affect this unit, dis turbing the pictures and/or sound.
•If this unit is adversely affec ted by electromagnetic equip m ent and stops
functioning properly, turn this unit off and remove the battery or disconnect AC
adaptor (DMW-AC5G; opti onal). Then reinsert the battery or reconnect AC
adaptor and turn this unit on.
Do not use this unit near radio transmitters or high-voltage lines.
•If you record near radio transmitters or high-voltage lines, the recorded pictures
and/or sound may be adversely affected.
∫ How to replace the Fuse
The location of the fuse differ according to the type of AC cable (figures A
and B).
Confirm the AC cable fitted and follow the instructions below.
Illustrations may differ from actual AC cable.
1 Open the fuse cover
with a screwdriver.
2 Replace the fuse and
close or attach the fuse
cover.
4
VQT3D43 (ENG)
Page 5

-If you see this symbolInformation on Dispos a l in other Countries out s ide
the European Union
This symbol is only valid in the European Union.
If you wish to discard this product, please contact your
local authorities or dealer and ask for the correct
method of disposal.
(ENG) VQT3D43
5
Page 6

Contents
Information for Your Safety...........................................................................2
Standard Accessories ...................................................................................7
Names of the Components ...........................................................................9
Charging the Battery...................................................................................12
• Charging...............................................................................................12
• Approximate operating time and number of recordable pictures ..........13
About the Built-in Memory/the Card............................................................14
Inserting and Removing the Card (optional)/the Battery.............................15
Setting Date/Time (Clock Set).....................................................................17
• Changing the Clock Setting ..................................................................17
Selecting the [Rec] Mode ............................................................................18
Taking pictures using the automatic function
(
ñ: Intelligent Auto Mode).........................................................................19
• Scene Detection....................................................................................20
Motion Picture Mode................ ......................... ..........................................21
Playing Back Pictures ([Normal Play]) ........................................................ 22
Deleting Pictures.........................................................................................22
Setting the Menu......................................................................................... 23
Reading the Operating Instructions (PDF format).......................................24
Specifications..............................................................................................26
∫ About illustrations in these operating instructions
The procedure is described for (DMC-FH25) as an example.
6
VQT3D43 (ENG)
Page 7

Standard Accessories
Check that all the accessories are supplied before using t he camera.
Product numbers correc t as of January 2011. These may be sub j ect to change.
1 Battery Pack
(Indicated as battery pack or battery in the text)
Charge the battery before use.
2 Battery Charger
(Indicated as battery charger or charger in the text)
3AC Cable
A Hong Kong Special Administrative Region of China and Sa udi Arabia
B Areas Other than Hong Kong Special Admi nis trat ive Reg ion o f China and
Saudi Arabia
4 USB Connection Cable
5AV Cable
6 CD-ROM
• Software:
Use it to install the software to your PC.
• Operating Instructions
7 Hand Strap
¢ When purchasing a spare ba ttery , please purchase an optional battery
(DMW-BCK7E).
•SD Memory Card, SDHC Memory Card and SDXC Memory Card are indicated
as card in the text.
•The card is optional.
You can record or play back pictures on the built-in memory when you are
not using a card.
•Consult the dealer or your nearest Service Centre if you lose the supplied
accessories. (You can purchase the accessories separately.)
¢
(ENG) VQT3D43
7
Page 8

4
VFC4297
3
12
5
6
7
NCA-YN101H DE-A92B
: (DMC-FH25GC) (DMC-FH5GC) (DMC-FH2GC)
K2CT39A00002
(DMC-FH25GH) (DMC-FH2GH) (DMC-FH5GM)
(DMC-FH25GF) (DMC-FH5GF) (DMC-FH2GF)
(DMC-FH25GA) (DMC-FH5GA) (DMC-FH2GA)
VFF0729
(DMC-FH25GC) (DMC-FH5GC) (DMC-FH2GC)
(DMC-FH25GH) (DMC-FH25GF) (DMC-FH25GA)
K1HY08YY0019
(DMC-FH25GC) (DMC-FH5GC) (DMC-FH2GC)
(DMC-FH25GH) (DMC-FH25GF) (DMC-FH25GA)
K1HY08YY0020
: (DMC-FH25GF) (DMC-FH5GF) (DMC-FH2GF)
(DMC-FH25GH) (DMC-FH2GH) (DMC-FH5GM)
K2CT3YY00034
(DMC-FH2GH) (DMC-FH5GM) (DMC-FH5GF)
(DMC-FH2GF) (DMC-FH5GA) (DMC-FH2GA)
K1HY08YY0015
(DMC-FH2GH) (DMC-FH5GM) (DMC-FH5GF)
(DMC-FH2GF) (DMC-FH5GA) (DMC-FH2GA)
K1HY08YY0016
(DMC-FH25GC) (DMC-FH5GC) (DMC-FH2GC)
VFF0794
(DMC-FH25GA) (DMC-FH5GA) (DMC-FH2GA)
K2CQ2YY00082
8
VQT3D43 (ENG)
Page 9
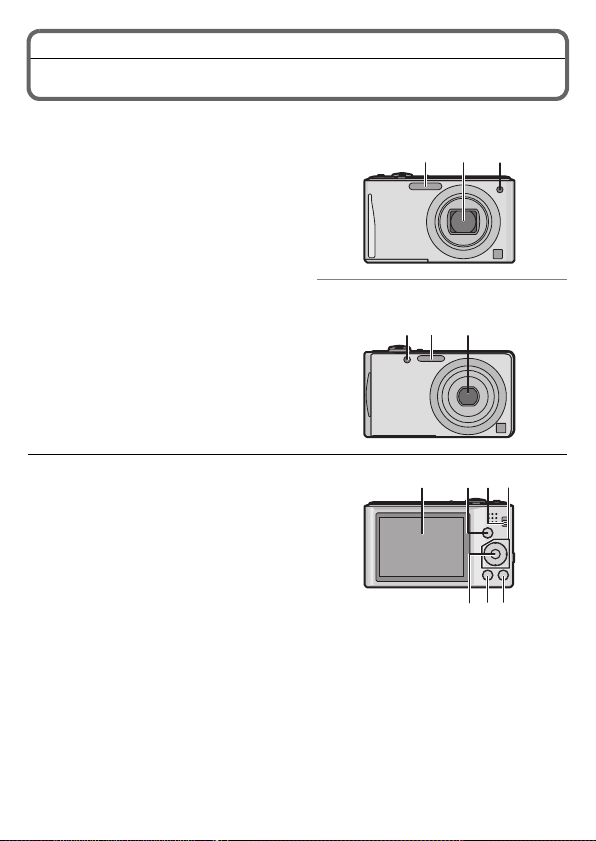
Names of the Components
1 2 3
(DMC-FH25)
1 23
(DMC-FH5) (DMC-FH2)
4
109
57
8
6
1Flash
2Lens
3 Self-timer indicator
AF Assist Lamp
4 LCD monitor
5 [MENU/SET] button
6 [DISP.] button
7 [Q.MENU]/Delete/Cancel button
8 [MODE] button
9 [Rec]/[Playback] selector switch
(ENG) VQT3D43
9
Page 10

10 Cursor buttons
3
A: 3/Exposure compensation
B: 4/Macro Mode
AF Tracking
C: 2/Self-timer
D: 1/Flash setting
In these operating instructions, the cursor buttons are described as
shown in the figure below or described with 3/4/2/1.
e.g.: When you press the 4 (down) button
or Press 4
11 Strap eyelet
• Be sure to attach the stra p wh en
using the camer a t o ens u r e tha t
you will not drop it.
12 Lens barrel
13 [AV OUT/DIGITAL] socket
10
VQT3D43 (ENG)
11
12
1
Page 11

14 Camera ON/OFF switch
15
1617 18 19
14
(DMC-FH25)
14 15
17 18
(DMC-FH5) (DMC-FH2)
ヮユヮヰンヺチヤモンュチバ
ャモヵヵユンヺ
21
22
20
ヮユヮヰンヺチヤモンュチバチャモヵヵユンヺ
ヰヱユワ ロヰヤレ
21
2322
20
16
15 Zoom lever
16 Speaker
• Do not cover the speaker with
your fingers.
17 Microphone
18 Shutter button
19 (DMC-FH25)
[E.ZOOM] button
20 Tripod receptacle
21 Card/Battery door
22 DC coupler cover
• When using an AC adaptor,
ensure that the Panasonic DC
coupler (DMW-DCC10; optional)
and AC adaptor (DMW-AC5G;
optional) are used.
• Always use a genuine Panasonic
AC adaptor (DMW-AC5G;
optional).
• When using an AC adaptor, use
the AC cable suppl ied with th e AC
adaptor.
• It is recommended to use a fully
charged battery or AC adaptor
(DMW-AC5G; optional) and DC
coupler (DMW-DCC10; optional)
when recording motion pictures.
• If while recording motion pictures
using the AC adaptor and the
power supply is cut off due to a
power outage or if th e AC a daptor
is disconnected etc., th e motion
picture being recorded will not be
recorded.
(DMC-FH5) (DMC-FH2)
23
Release lever
(ENG) VQT3D43
11
Page 12

Charging the Battery
∫ About batteries that you can use with this unit
Supplied battery or dedicated optional batteries (DMW-BCK7E) can be used
with this unit.
It has been found that counterfeit battery packs which look very similar to
the genuine product are made available to purchase in some markets. Some
of these battery packs are not adequately protected with internal protection
to meet the requirements of appropriate safety standards. There is a
possibility that these battery packs may lead to fire or explosion. Please be
advised that we are not liable for any accident or failure occurring as a result
of use of a counterfeit battery pack. To ensure that safe products are used
we would recommend that a genuine Panasonic battery pack is used.
•Use the dedic ated charger and battery.
Charging
•The batt ery is not char ged when th e camera is shi pped. Charg e the battery
before use.
•Charge the battery with the charger indoors.
Attach the battery paying
attention to the direction of the
battery.
Connect the AC cable.
• Disconnect the charger fro m the
electrical socket and d et ach the b atte ry
after charging is completed.
∫ About the [CHARGE] indicator
The [CHARGE] indicator turns on:
The [CHARGE] indicator A is turned on during charging.
The [CHARGE] indicator turns off:
The [CHARGE] indicator A will turn off once the charging has completed without
any problem.
•When the [CHARGE] indicator flashes
–The battery temperature is too high or too low. It is recommended to charge
the battery again in an ambient temperature of between 10 oC to 30 oC.
–The terminals of the charger or the battery are dirty. In this c ase, wipe them
with a dry cloth.
12
VQT3D43 (ENG)
Page 13

∫ Charging time
Supplied battery Optional battery
Charging time Appro x . 115 min Approx. 120 m in
Approximate operating time and number of recordable pict ures
(DMC-FH25)
Supplied battery Optional battery
Capacity of the batter y 660 mAh 680 mAh
Number of recordable
pictures
Recording time Approx. 125 min Approx. 127 min
(DMC-FH5)
Capacity of the batter y 660 mAh 680 mAh
Number of recordable
pictures
Recording time Approx. 130 min Approx. 132 min
(DMC-FH2)
Capacity of the batter y 660 mAh 680 mAh
Number of recordable
pictures
Recording time Approx. 135 min Approx. 137 min
Recording conditions by CIPA standard
•CIPA is an abbreviation of [Camera & Imaging Products Association].
•Normal Picture Mode
•Temperature: 23 oC/Humidity: 50%RH when LCD monitor is on.
•Using a Pan asonic SD Memory Card (32 MB).
•Starting recording 30 seconds after the camera is turned on. (When the Optical
Image Stabilizer fu nction is set to [ON].)
•Recording once every 30seconds with full flash every second recording.
•Rota ting the zoom lever from Tele to Wi de or vice versa in every recording.
•Turning the camera off every 10 recordings and leaving it until the temperature
of the battery decreases.
Playback time Approx. 200 min Approx. 205 min
Approx. 250 pictures Approx. 255 pictures
Supplied battery Optional battery
Approx. 260 pictures Approx. 265 pictures
Supplied battery Optional battery
Approx. 270 pictures Approx. 275 pictures
Supplied battery Optional battery
(ENG) VQT3D43
13
Page 14

About the Built-in Memory/the Card
Built-in Memory
•Memory size: Approx. 70 MB
•The access time for the built-in memory may be longer than the access time for
a card.
Card
The following cards which conform to the SD video standard can be used with this unit.
(These cards are indicated as card in the text.)
Type of card which
can be used with
this unit
SD Memory Card
(8 MB to 2 GB)
SDHC Memory Card
(4 GB to 32 GB)
SDXC Memory Card
(48 GB, 64 GB)
•Use a card with SD Speed Class
higher when recording motion pictures.
•SDHC Memory Card can be used with SDHC Memory
Card or SDXC Memory Card compatible equipment.
•SDXC Memory Card can only be used with SDXC
Memory Card compatible equipment.
•Check that the PC and other equipment ar e compatible
when using the SDXC Memory Cards.
http://panasonic.net/avc/sdcard/information/SDXC.htm l
•Only the cards with capacity listed left can be used.
¢ SD Speed Class is the speed standard regarding continuous writing. Check
via the label on the card, etc.
e.g.:
•Please confirm the late st information on the following website.
http://panasonic.jp/support/global/cs/dsc/
(This Site is English only.)
Note
Keep the Memory Card out of reach of children to prevent swallowing.
•
Remarks
¢
with “Class 6” or
14
VQT3D43 (ENG)
Page 15

Inserting and Removing the Card (optional)/the Battery
•Check that this unit is turned off.
•We recommend using a Panasonic card.
(DMC-FH25)
Slide the card/battery door to
open it.
• Always use genuine Panasonic
batteries (NCA-YN101H; supplied or
DMW-BCK7E; optional).
• If you use other batteries, we cannot
guarantee the quality of this product.
Battery: Being careful about the
battery orientation, insert all the
ユンヺ ヤモンュ
ヮユヮヰンヺチヤモンュチバ
ャモヵヵユンヺ
way until you hear a locking
sound and then check that it is
locked by lever A. Pull the lever
A in the direction of the arrow to
remove the battery.
Card: Push it securely all the way
until you hear a “click” while being careful about the
direction in which you insert it. To remove the card, push
the card until it clicks, then pull the card out upright.
B: Do not touch the connection terminals of the card.
1:Close the card/battery door.
2:Firmly slide the card/battery
door to the end until you h ear a
locking sound.
(ENG) VQT3D43
15
Page 16

(DMC-FH5) (DMC-FH2)
Slide the release lever in the
direction of the arrow and open
ユヮヰンヺチヤモンュチバチャモヵヵユンヺ
ヰヱユワ ロヰヤレ
the card/battery door.
• Always use genuine Panasonic
batteries (NCA-YN101H; supplied or
DMW-BCK7E; optional).
• If you use other batteries, we cannot
guarantee the quality of this product.
Battery: Being careful about the
battery orientation, insert all the
ヵユンヺ ヤモンュ
way until you hear a locking
sound and then check that it is
locked by lever A. Pull the lever
A in the direction of the arrow to
remove the battery.
Card: Push it securely all the way
until you hear a “click” while being careful about the
direction in which you insert it. To remove the card, push
the card until it clicks, then pull the card out upright.
B: Do not touch the connection terminals of the card.
1:Close the card/battery door.
ヮヰンヺチヤモンュチバチャモヵヵユンヺ
ヰヱユワ ロヰヤレ
2:Slide the release lever in the
direction of the arrow.
16
VQT3D43 (ENG)
Page 17

Setting Date/Time (Clock Set)
•The clock is not set when the camera is shipped.
Slide the [Rec]/[Playback]
selector switch to [!] and then
turn the camera on.
Press [MENU/SET].
Press 3/4 to select the language, and press
[MENU/SET].
Press [MENU/SET].
Press 2/1 to select the items (year,
month, day, hour, minu te, display
sequence or time display format),
and press 3/4 to set.
• You can cancel without setti n g the clock by press i ng [ ].
Press [MENU/SET] to set.
Press [MENU/SET].
Changing the Clock Setting
Select [Clock Set] in the [Rec] or [Setup] menu, and press [MENU/SET].
•It can be changed in steps 5 and 6 to set the clock.
(ENG) VQT3D43
17
Page 18

Selecting the [Rec] Mode
Slide the [Rec]/[Playback]
selector switch to [!].
Press [MODE].
Press 3/4/2/1 to select the
mode.
Press [MENU/SET].
∫ List of [Rec] Modes
¦ Intelligent Auto Mode
The subjects are recorded using settings automatically selected by the camera.
! Normal Picture Mode
The subjects are recorded using your own settings.
My Scene Mode
Pictures are taken using previously registered recording scenes.
Û Scene Mode
This allows you to take pictures that match the scene being recorded.
$ Motion Picture Mode
This mode allows you to record motion pictures with audio.
18
VQT3D43 (ENG)
Page 19

[Rec] Mode: ñ
1
2
Taking pictures using the automatic
function (ñ: Intelligent Auto Mode)
The camera will set the most appropriate settings to match the su bject and the
recording conditions so we recommen d this mode for beginners or those who
want to leave the settings to the camera and take pictures easily.
Slide the [Rec]/[Playback]
selector switch to [!], and
then press [MODE].
Press 3/4/2/1 to select [Intelligent Auto], and then
press [MENU/SET].
Press the shutter button halfway to
focus.
• The focus indication 1 (green) lights when
the subject is focused.
• The AF area 2 is displayed around the
subject’s face by the Face Detection function.
In other cases, it is displayed at the point on
the subject which is in focus.
Press the shutter button fully (push
it in further), and take the picture.
(ENG) VQT3D43
19
Page 20

Scene Detection
When the camera identifies the optimum scene, the ic on of the scene concerned
is displayed in blue for 2 seconds, after which its colour changes to the usual red.
¦
> [i-Portrait]
[i-Scenery]
[i-Macro]
[i-Night Portrait]
[i-Night Scenery]
[i-Sunset]
•
[¦] is set if none of the scenes are applicable, and the standard settings are set.
•When [ ] or [ ] is selected, the camera automatic ally detec ts a person’ s fac e,
and it will adjust the focus and exposure. (Face Detection)
•Only when [ ] is selected
20
VQT3D43 (ENG)
Page 21

[Rec] Mode: n
A
B
Motion Picture Mode
Slide the [Rec]/[Playback]
selector switch to [!], and
then press [MODE].
Press 3/4/2/1 to select [Motion Picture], and then
press [MENU/SET].
Press the shutter button halfway
to focus and then press it fully to
start recording.
A Available recording time
B Elapsed recording time
• The focus and zoom are fixed to the
setting when recording starts (the first
frame).
Press the shutter button fully to stop recording.
Note
Motion pictures can be recorde d continuously up to 2 GB.
•
The maximum available recording time for up to 2 GB only is displayed on the
screen.
(ENG) VQT3D43
21
Page 22

[Playback] Mode: ¸
Playing Back Pictures ([Normal Play])
Slide the [Rec]/[Playback]
selector switch to [(].
Press 2 or 1.
• After selecting th e motion picture, press
3 to start playback.
[Playback] Mode: ¸
Deleting Pictures
Once deleted, pictures cannot be recovered.
•Pictures on the built-in memory or the card that are being played back will be
deleted.
Select the picture to be deleted, and
then press [ ].
•Confirmation scree n is di splayed.
Picture is deleted by selecting [Yes].
22
VQT3D43 (ENG)
Page 23

Setting the Menu
Press [MENU/SET].
Press 2/1 to select menu and then
press [MENU/SET].
Press 3/4 to select the menu item and
then press [MENU/SET].
• Screen at right is an example of se lecting
[AF Mode] in [Rec] mode Menu.
Press 3/4 to select the s etti ng a nd th en
press [MENU/SET].
• Depending on the menu item, its setting may not
appear or it may be displayed in a different way.
• Screen at right is an example to set the [AF Mode]
Ø] (1-area-focusing) to [š] (Face
from [
Detection).
∫ Close the menu
Press [ ] several times or press the shutter button halfway.
(ENG) VQT3D43
23
Page 24

Reading the Operating Instructions (PDF format)
More detailed instructions on the operation of this camera are
contained in “Operating Instructions for Advanced Features
(PDF format)” in the supplied CD-ROM. Install it on your PC to
read it.
∫ For Windows
Turn the PC on and insert the CD-ROM containing the
Operating Instructions (supplied).
Click the [Operating
Instructions].
Select the desired language
and then click [Operating
Instructions] to install.
A To return to the install menu .
Double click the “Operating
Instructions” shortcut icon on
the desktop.
24
VQT3D43 (ENG)
Page 25

∫ When the Operating Instructions (PDF format) will not open
You will need Adobe Acrobat Reader 5.0 or later or Adobe Reader 7.0 or later to
browse or print the Operating Instructions (PDF format).
Insert the CD-ROM containing the Operating Instructions (supplied), click B and
then follow the messages on the screen to install.
(Compatible OS: Windows 2000 SP4/Windows XP SP3/Windows Vi sta SP2/
Windows 7)
•You can do wn load and install a version of Adobe Reader that you can use with
your OS from the following Web Site.
http://get.adobe.com/reader/otherversions
∫ To uninstall the Operating Instructions (PDF format)
Delete the PDF file from the “Program Files\Panasonic\Lumix\” folder .
•When the contents in the Program Files folder cannot be displayed, clic k the
[Show the contents of this folder] to display them.
∫ For Macintos h
Turn the PC on and insert the CD-ROM containing the
Operating Instructions (supplied).
Open the “Manual” folder in the CD-ROM and then copy
the PDF file with the desired language inside the folder.
Double click the PDF file to open it.
(ENG) VQT3D43
25
Page 26

Specifications
Digital Camera:
Information fo r your saf ety
Power Source: DC 5.1 V
Power
Consumption: 1.1 W (When recording)
0.7 W (When playing back)
Camera effective
pixels
Image senso r (DMC-FH25) (DMC-FH5)
Lens (DMC-FH25)
Digital zoom Max. 4k
Extra
optical zoom (DMC-FH25)
26
VQT3D43 (ENG)
(DMC-FH25) (DMC-FH5)
16,100,000 pixels
(DMC-FH2)
14,100,000 pixels
1/2.33q CCD, total pixel number 16,600,000 pixels,
Primary colour filter
(DMC-FH2)
1/2.33q CCD, total pixel number 14,500,000 pixels,
Primary colour filter
Optical 8kzoom, fl5 mm to 40 mm (35 mm film camera
equivalent: 28 mm to 224 mm)/F3.3 (Wide) to F5.9
(Tele)
(DMC-FH5) (DMC-FH2)
Optical 4kzoom, fl5 mm to 20 mm (35 mm film camera
equivalent: 28 mm to 112 mm)/F3.1 (Wide) to F6.5
(Tele)
Max. 18k (When set to 3,000,000 pixels [3M] or less)
(DMC-FH5)
Max. 9k (When set to 3,000,000 pixels [3M] or less)
(DMC-FH2)
Max. 8.4k (When set to 3,000,000 pixels [3M] or less)
Page 27

Focus range Normal (DMC-FH25)
50 cm (Wide)/2 m (Tele) to 
(DMC-FH5) (DMC-FH2)
50 cm (Wide)/1 m (Tele) to 
Macro/
Intelligent auto/
Motion picture
Scene Mode There may be differences in the above
Shutter system
Burst recording
Burst speed (DMC-FH25)
Number of
recordable
pictures
Hi-speed burst
Burst speed (DMC-FH25)
Number of
recordable
pictures
Shutter speed 8 seconds to 1/1600th of a second
Exposure (AE)
Metering mode Multiple
LCD monitor 2.7q TFT LCD (4:3)
Electronic shutte riMechanical shutter
Approx. 1.7 pictures/second
(DMC-FH5) (DMC-FH2)
Approx. 2.0 pictures/second
Depends on the remaining capaci ty of the built-in
memory/card.
Approx. 4 pictures/second
(DMC-FH5) (DMC-FH2)
Approx. 6 pictures/second
[3M (4:3), 2.5M (3:2) or 2M (16:9) is selected as the
picture size.]
When using the built-in memory:
Approx. 15 pictures (immediately after formatting)
When using a Card: Max. 100 pictures (differs
depending on the type of Card and the recording
conditions)
[Starry Sky] Mode: 15 seconds, 30 seconds, 60 seconds
Programme AE
Exposure compensation (1/3 EV Step, j2EV to i2EV)
(Approx. 230,000 dots) (field of view ratio about 100%)
5 cm (Wide)/1 m (Tele) to 
settings.
(ENG) VQT3D43
27
Page 28

Flash range (DMC-FH25)
Microphone Monaural
Speaker Monaural
Recording media Built-in Memory (Approx.70 MB)/SD Memory Card/
Recording file
format
Still Picture JPEG (based on “Design rule for Camera File system”,
Motion pictures “QuickTime Motion JPEG” (motion pictures with audio)
Interface
Digital “USB 2.0” (High Speed)
Analogue video/
audio
Terminal
[AV OUT/
DIGITAL]
Dimensions
(excluding the
projecting parts)
Mass (DMC-FH25)
Operating
temperature
Operating humidity 10%RH to 80%RH
Approx. 60 cm to 5.8 m (Wide, [ ] is set)
(DMC-FH5) (DMC-FH2)
Approx. 40 cm to 3.3 m (Wide, [ ] is set)
SDHC Memory Card/SDXC Memory Card
based on “Exif 2.3” standard)/DPOF corresponding
NTSC/P AL Composite (Switched by menu),
Audio line output (monaura l )
Dedicated jack (8 pin)
(DMC-FH25)
Approx. 99.2 mm (W)k56.5 mm (H)k27.8 mm (D)
(DMC-FH5) (DMC-FH2)
Approx. 94.3 mm (W)k53.5 mm (H)k18.8 mm (D)
Approx. 152 g (with card and battery)
Approx. 135 g (excluding card and battery)
(DMC-FH5)
Approx. 121 g (with card and battery)
Approx. 104 g (excluding card and battery)
(DMC-FH2)
Approx. 118 g (with card and battery)
Approx. 101 g (excluding card and battery)
0 oC to 40 oC
28
VQT3D43 (ENG)
Page 29

Battery Charger (Panasonic DE-A92B):
Information fo r your saf ety
Input: AC 110 V to 240 V, 50 /60 Hz, 0.2 A
Output: DC 4.2 V, 0.43 A
Battery Pack (lithium-ion) (Panasonic NCA-YN101H):
Information fo r your saf ety
Voltage/capacity: 3.6 V/660 mAh
(ENG) VQT3D43
29
Page 30

• SDXC Logo is a trademark of SD-3C, LLC.
Panasonic Corporation
Web Site: http://panasonic.net
Panasonic Corporation 2011
• QuickT ime and the QuickTime logo are trademarks or
registered trademar ks of Apple Inc., used under li cense
therefrom.
• This product uses “DynaFont” from DynaComware
Corporation. DynaFont is a registered trademark of
DynaComware Taiwan Inc.
• Other names, company names, and product names printed in these
instructions are trademarks or registered trademarks of the companies
concerned.
 Loading...