

Panasonic Lumix DMC-FH27, DMC-FH27K, DMC-FH27S, Lumix DMC-FS37 Operating Instructions Manual
Operating Instructions
for advanced features
Digital Camera
Model No. DMC-FH27
Before use, please read t hese instructio ns completely.
VQT3E12

Contents
Before Use
Care of the camera ...................................4
Standard Accessories ...............................5
Names of the Components .......................6
How to Use the Touch Panel ....................8
Preparation
Charging the Battery................................. 9
• Charging .............................................9
• Approximate operating time and
number of recordable pictures..........11
Inserting and Removing the Card
(optional)/the Battery...............................13
About the Built-in Memory/the Card........ 15
• Approximate number of
recordable pictures and
available recording time....................17
Setting Date/Time (Clock Set).................18
• Changing the Clock Setting ..............19
Basic
Selecting the [Rec] Mode........................ 20
Taking pictures using the automatic
function (Intelligent Auto Mode) .............. 21
• Tips for taking good pictures.............22
• Changing the settings .......................22
• Scene Detection . ...............................23
Taking pictures with your favourite
settings (Normal Picture Mode)...............24
• Preventing jitter (camera shake).......24
Focusing..................................................25
Taking pictures using the Touch Shutter
function....................................................27
Playing Back Pictures
([Normal Play])........................................28
Motion Pictu re Mode...............................30
Playing Back Motion Pictures..................31
Deletin g Pi ctures................ .. ...................32
• To delete a single picture..................32
• To delete multiple pictures (up to 50)
or all the pictures..............................33
Setting the Menu.....................................34
• Setting menu items...........................34
About the Setup Menu ............................36
Recording
About the LCD Monitor............................41
Taking Pictures with Focus and
Exposure Set on Subject
(Touch AF/AE).........................................42
Taking Pictures with the Zoom................43
• Using the Optical Zoom/
Using the Extra Optical Zoom (EZ)/
Using the Intelligent zoom/
Using the Digital Zoom......................43
• Using the Easy Zoom........................45
• Zooming with touch operation...........47
Shortcut setting .......................................48
Taking pictures that match
the scene being recorded
(Scene Mode)..........................................49
• Selecting Scene Mode for
each recording (Scene Mode)...........49
• Registering frequently used
Scene Modes (My Scene Mode).......50
• [Portrait].............................................51
• [Soft Skin]..........................................51
• [Transform]........................................51
• [Self Portrait] .....................................52
• [Scenery]...........................................52
• [Panora m a Ass i st]...... .. ......... .. ..........53
• [Sports]..............................................54
• [Night Portrait]...................................54
• [Night Scenery ]..................................54
• [Food]................................................55
• [Party]................................................55
• [Candle Light]....................................55
• [Baby1]/[Baby2]...... .......... .. ......... .. ....56
• [Pet]...................................................57
• [Sunset].............................................57
• [High Sens.].......................................57
• [Hi-Speed B urst ]................................58
• [Flash Burst]......................................59
• [Starry Sky]........................................59
• [Fireworks] .........................................60
• [Beach]..............................................60
• [Snow]...............................................60
• [Aerial Photo].....................................60
• [Pin Hole]...........................................61
• [Film Grain]........................................61
• [High Dynamic]........... .......... . .......... ..61
• [Photo Frame] ...................................62
- 2 -

Useful Functions at
Travel Destin a tio n s.................................63
• Recording which Day of the Vacation
and the Location of the Vacation
([Travel Date]) ...................................63
• Recording Dates/Times at
Overseas Travel Destinations
([World Time])...................................65
Using the [Rec] Mode Menu....................66
• [Flash]...............................................66
• [Selftimer]..........................................69
• [Picture Size].....................................70
• [Rec Quality] .....................................71
• [Sensitivity]........................................72
• [White Balance].................................73
• [AF Mode] .........................................75
• [Macro Mode]....................................77
• [Exposure].........................................78
• [i.Exposure]............ .. ......... .. .......... .. ..79
• [i.Reso l u ti o n ] .. .......... .. ......... .. .......... ..79
• [Digital Zoom]....................................79
• [Burst]................................................80
• [Color Mode] .....................................81
• [AF Assist Lamp]............................... 82
• [Red-Eye Removal]........................... 82
• [Stabilizer].........................................83
• [Date Stamp].....................................83
• [Clock Set].........................................83
Entering Text........................................... 84
Connecting to other equipment
Connecting to a PC ...............................101
• Using “PHOTOfunSTUDIO” to
copy to a PC ......... ..........................104
• Uploading the images to
sharing sites....................................104
Printing the Pictures..................... .........105
• Selecting a single picture and
printing it.........................................106
• Selecting multiple pictures and
printing them...................................106
• Print Settings...................................107
Playing Back Pictures on
a TV Screen...................... ........... .........110
• Playing back pictures using
the AV cable (supplied)...................110
• Playing back pictures on a TV with
an SD Memory Card slot.................111
Others
Screen Display......................................112
Cautions for Use....................................115
Message Display...................................120
Troubleshooting.....................................122
Playback/Editing
Various methods to play back.................85
• [Slide Show] ................. .. ......... .. ........8 6
• [Filtering Play] ...................................88
• [Calendar] ......................................... 89
Using the [Playback] Mode Menu ...........90
• [Upload Set]......................................90
• [Text Stamp]......................................92
• [Resize].............................................94
• [Cropping] .........................................95
• [Favorite]...........................................96
• [Print Set]..........................................97
• [Protect].............................................99
• [Copy]..............................................100
- 3 -
Before Use
Before Use
Care of the camera
Do not subject to strong vibration, shock, or pressure.
The lens, LCD mon itor, or exte rnal c ase may be da maged if used in
•
following conditions.
It may also malfunct i on or image may not be recorded.
–Drop or hit the camera.
–Sit down with the camera in your trousers pocket or forc efully
insert it into a full or tight bag, etc.
–Attach any items such as ac cess ories t o the s trap at t ac hed to t he
camera.
–Press hard on the lens or the LCD monitor.
This camera is not dus t/drip/water pr oof .
Avoid using the camera at location with a lot of dust, water,
sand, etc.
•
Liquids, sand and other foreign material may get into the space
around the lens, buttons, etc. Be particularly careful since it may
not just cause malfunctions, but it may become unrepairable.
–Places with a lot of sand or dust.
–Places where water can come into contact with this unit such as
when using it on a rainy day or on a beach.
∫ About Condensation (When the lens or the LCD monitor
is fogged up)
Condensation occurs when the ambient temperature or hu midity
•
changes. Be careful of condensation since it causes lens or LCD
monitor stains, fungus and camera malfunc tion.
•If condensation occurs, tur n the camera off and leave it for about
2 hours. The fog will disappear naturally when the temperature of
the camera becomes close to the ambient temperature.
- 4 -

Before Use
Standard Accessories
Check that all the accessories are supplied before using the camera.
•
The accessories and their s ha pe will dif fer de pend ing o n the c ount ry or ar ea wh ere the camera
was purchased.
For details on the accessories, refer to Basic Oper ating Instructions.
•Battery Pack is indicated as battery pack or battery in the text.
•Battery Charger is indicated as battery ch arger or charger in the text.
•SD Memory Card, SDHC Memory Card and SDXC Memory Card are indicated as card in the
text.
•The card is optional.
You can record or play back pictures on the built-in memory when you are not using a
card.
•Consult the dealer or your nearest Service Centre if you lose the supplied accessories. (You
can purchase th e accessories separately.)
- 5 -
Before Use
1 2 3
6
7
5
Names of the Components
1Flash (P66)
2 Lens (P4, 116)
3 Self-timer indicator (P69)
AF Assist Lamp (P82)
4 Touch panel/LCD monitor (P8, 41, 112)
5 Strap eyelet
Be sure to attach the strap when using
•
the camera to ensure that you will not
drop it.
6 Lens barrel
7 [AV OUT/DIGITAL] socket (P101, 105,
110)
4
- 6 -

Before Use
ヮユヮヰンヺチヤモンュチバ
ャモヵヵユンヺ
15
16
14
8 Camera ON/OFF switch (P18)
9 Zoom lever (P43)
10 Speaker (P36)
11 Microphone
12 Shutter button (P21, 24, 30)
13 [E.ZOOM] button (P45)
14 Tripod receptacle
15 Card/Battery door (P13, 14)
16 DC coupler cover (P14)
When using an AC adaptor, ensure that
•
the Panasonic DC coupler (optional) and
AC adaptor (optional) are used. For
connection details, refer to P14.
9
8
10 1 1 12 13
- 7 -
Before Use
How to Use the Touch Panel
This touch panel is a type that detects pressure.
Touch the screen
To touch and release the touch panel.
Drag
A movement without releasing the touch
panel.
Use this to perform tasks such as selecting
icons or images displayed on the touch
panel.
•
It may not operate properly when multiple
icons are touched simultaneously, s o try to
touch the centre of the icon.
This is used when performing tasks such as
moving to the next image by dragging
horizontally, or changing the range of the
displayed image.
This can also be used to perform tasks such
as switching the screen by operating the
slide bar.
Note
•
If you use a commercially available liquid crystal protecti on sheet,
please follow the instructions that ac company the sheet. (Some
liquid crystal protection sheets may impair visibility or operability.)
•Apply a little extra pressure when touching if you have a
commercially available p rotectio n sheet a ffi xed or if yo u feel it is no t
responding well.
•Touch panel will not operate properly when the hand holding this
unit is pressing on the touch panel.
•Do not press using anything with a sharp tip or anything hard, except for the supplied sty lus
pen.
•Do not operate with your fingernails .
•Wipe the LCD monitor with dry soft cloth when it gets dirty with finger prints and others.
•Do not scratch or press the LCD monitor too hard.
•For information about the icons displayed on the touch panel, refer to “Screen Display” on
P112.
∫ About the Styl us pe n
It is easier to use the stylus pen (supplied) for detailed
operation or if it is hard to operate with your fingers.
Do not place it where small children c an reach.
•
•Do not place the stylus pen on the LCD monitor when storing.
LCD monitor may break when the sty l us pen is pressed
strongly against the LCD monitor .
- 8 -
Preparation
Preparation
Charging the Battery
∫ About batteries that you can use with this unit
Supplied batt e ry or dedicated opti ona l batteries can be used with this unit.
Refer to Basic Operating Instructions about the accessory number of the available optional
batteries in your area.
It has been found that counterfeit battery packs which look very similar to the
genuine product are made available to purchase in some markets. Some of these
battery packs are not adequately protected with internal protection to meet the
requirements of appropriate safety standards. There is a possibility that these
battery packs may lead to fire or explosion. Please be advised that we are not
liable for any accident or failure occurring as a result of use of a counterfeit
battery pack. To ensure that safe products are u sed we would recommend that a
genuine Panasonic battery pack is used.
•
Use the dedicated charger and battery.
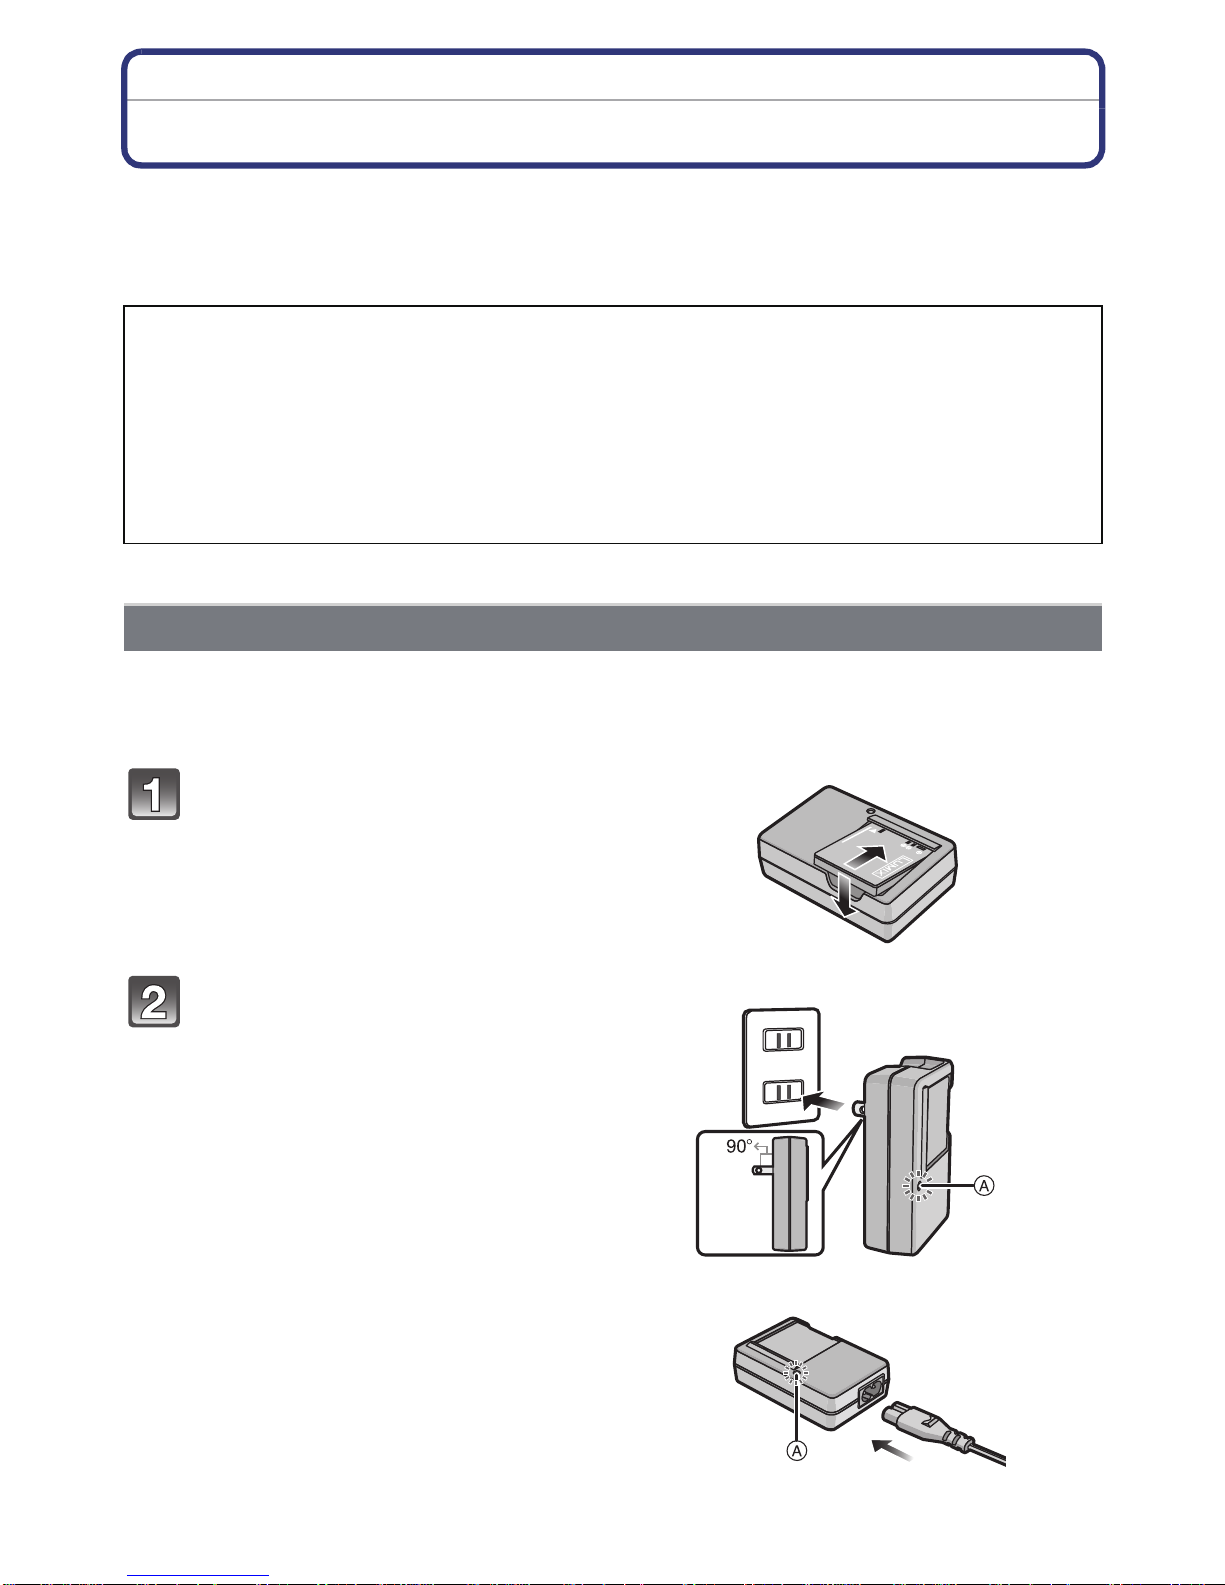
Charging
•The battery is not charged when the camera is shipped. Charge the battery before use.
•Charge the battery with the charger indoors.
Attach the battery paying
attention to the direction of the
battery.
plug-in type
Connect the charger to the
electrical outlet.
• Disconnect the charger from the
electrical socket and detac h the batte ry
after charging is completed.
inlet type
- 9 -

Preparation
∫ About the [CHARGE] indicator
The [CHARGE] indicator turns on:
The [CHARGE] indicator
A is turned on during charging.
The [CHARGE] indicator turns off:
The [CHARGE] indicator
A will turn off once the charging has completed without any
problem.
•
When the [CHARGE] indicator flashes
–The battery temper ature is t oo hi gh or too lo w. It is reco mmend ed to c har ge the ba tt ery aga in
in an ambient temperature of between 10 oC to 30 oC (50 oF to 86 oF).
–The terminals of the charg er or the battery are dirty. In this case, wipe them with a dry cloth.
∫ Charging time
Supplied battery Optional battery
Charging time Approx. 115 min Approx. 120 m in
•
The indicated charging time is for when the battery has been dischar ged completely.
The charging time may vary depending on how the battery has been used. The charging
time for the battery in hot/cold environments or a battery that has not been use d for a
long time may be longer than normal.
Note
Do not leave any metal items (such as clips) near the contact areas of the power plug.
•
Otherwise, a fire and/or electric shocks may be caused by short-circuiting or the
resulting heat generated.
•The battery becomes warm after using and during and after charg i ng. The camera also
becomes warm during use. This is not a malfunction.
•The battery can be recharged even when it still ha s some c harge left, but it is not
recommended that the battery charge be freque ntly topped up while the battery is fully
charged. (Since characteristic swelling may occur.)
- 10 -

Preparation
Approximate operating time and number of recordable pictures
∫ Battery indication
The battery indication is displayed on the LCD monitor.
The indication turns red and blinks if the remaining battery power is exhaust ed. Recharge the
•
battery or replace it with a fully charged batter y.
Supplied battery Optional battery
Capacity of the battery 660 mAh 680 mAh
Number of recordable
pictures
Recording time Approx. 125 min Approx. 127 min
Approx. 250 pictures Approx. 255 pictures
Recording conditions by CIPA standard
•
CIPA is an abbreviation of [Camera & Imaging Products Association].
•Normal Picture Mode
•Temperature: 23oC (73.4 oF)/Humidity: 50%RH when LCD monitor is on.
•Using a Panasonic SD Memory Card (32 MB).
•Starting recording 30 seconds after the came ra is turned on. (When the Opt i cal Image
Stabilize r function is set to [ON].)
•Recording once every 30 seconds with full flash every second recording.
•Rotating the zoom lever from Tele to Wide or vice versa in every recording.
•Turning the camera off every 10 recordings and leaving it un til the temperature of the battery
decreases.
The number of recordable pictures varies depending on the recording interval time.
If the recording interval time becomes longer, the number of recordable pictures
decreases. [For example, if you were to take one picture every two minutes, then the
number of pictures would be reduced to approximately one-quarter of the number
of pictures given above (based upon one picture taken every 30 seconds).]
- 11 -

Preparation
Supplied battery Optional battery
Playback time Approx. 200 min Approx. 205 min
Note
The operating times and number of recordable pictures will differ according to the
•
environment and the operating conditions.
For example, i n the following cases, the operating times shorten and the number of recordable
pictures is reduced.
–In low-temperature environments, such as on ski slopes.
–When using [LCD Mode].
–When operations such as flas h and zoom are used repeate dly.
•When the operating time of the camera becomes extremely short even after prope rly charging
the battery, the life of the battery may have expired. Buy a new battery.
- 12 -
Preparation
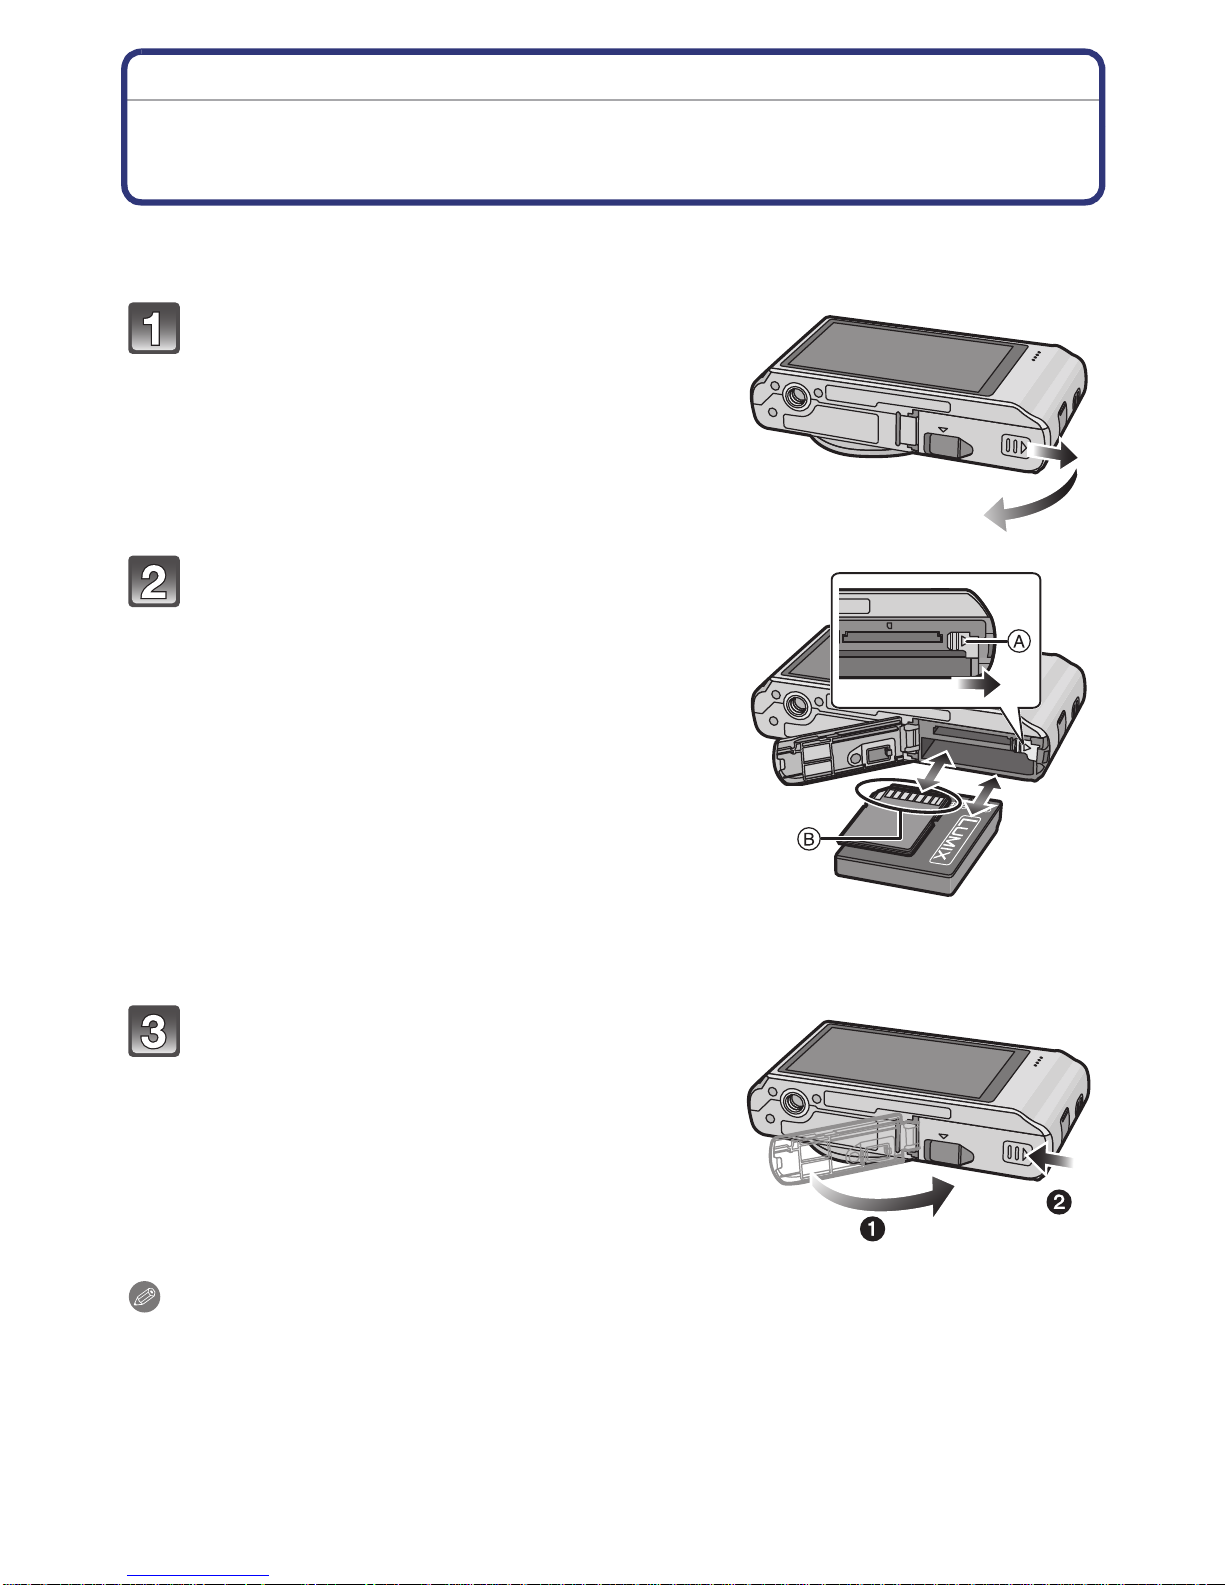
Inserting and Removing the Card (optional)/the
Battery
•Check that this unit is turned off.
•We recommend using a Panasonic card.
Slide the card/battery door to open it.
• Always use genuine Panasonic batteries.
• If you use other batteries, we cannot
guarantee the quality of this product.
Battery: Being care ful abou t the battery
orientation, insert all the way until you
hear a locking sound and then check
that it is locked by lever A. Pull the
lever A in the direction of the arrow to
remove the battery.
Card: Push it securely all the way until
you hear a “click” while being careful
about the direction in which you insert
it. To remove the card, push the card
until it clicks, then pull the card out
upright.
B:Do not touch the connection terminals of the card.
1:Close the card/battery door.
2:Firmly slide the card/battery door to
the end until you hear a locking
sound.
Note
Remove the battery after use.
•
•The battery will be exhausted if left for a long period of ti me after being charged.
•Turn the camera off and wait for the “LUMIX” display on the LCD monitor to clear before
removing the c ar d or batt er y. (Otherwise, this unit may no lo nger op erate nor mally a nd th e ca rd
itself ma y be damaged or th e r ec o r d ed pi c t ur es may be los t .)
- 13 -

Preparation
Using an AC adapt or ( optio nal) and a D C coupl er (o ption al) inst ead of the batt er y
The AC Adaptor (optional) can only be used with
the designated Panasonic DC Coupler (optional).
The AC adaptor (optional) cannot be us e d by
itself.
1 Open the card/battery door.
2 Insert the DC coupler, being careful of the
direction.
3 Open the DC coupler cover A.
•
Push open the coupler cover from the interior.
4 Close the card/battery door .
•
Ensure that the card/battery door is closed.
5 Plug the AC adaptor into an electrical outlet.
6 Connect the AC adaptor B to the [DC IN] socket
C of the DC coupler.
D Align the marks and insert.
•Ensure that only the AC ada ptor a nd DC co upler for t his
camera are used. Using any other equipment may
cause damage.
Note
Always use a genuine Panasonic AC adaptor (optional).
•
•When using an AC adaptor, use the AC cable supplied with the AC adaptor.
•Some tripods cannot be attached when the DC coupler is connected.
•Make sure to unplug the AC adaptor when y ou open the card/battery door.
•If the AC adaptor and DC coupler are not necessary, then remove them from the digital
camera. Also, please keep the DC coupler cover closed.
•Also read the operating instructions for the AC adaptor and DC coupler .
- 14 -

Preparation
About the Built-in Memory/the Card
The following operations can be performed using this unit.
•
When a card has not been inserted: Pictures can be recorded on
the built-in memory and played back.
•When a card has been inserted: Pictures can be recorded on the
card and played back.
•When using the built-in memory
>ð (access indication
k
•When using the card
† (access indication
¢ The access indication lights red when pictures are being recorded
on the built-in memory (or the card).
¢
•You can copy the recorded pictures to a card. (P100)
•Memory size: Approx. 70 MB
•The access time for the built-in memory may be l onger than the access time for a card.
¢
)
)
Built-in Memory
- 15 -
Preparation
2
A
Card
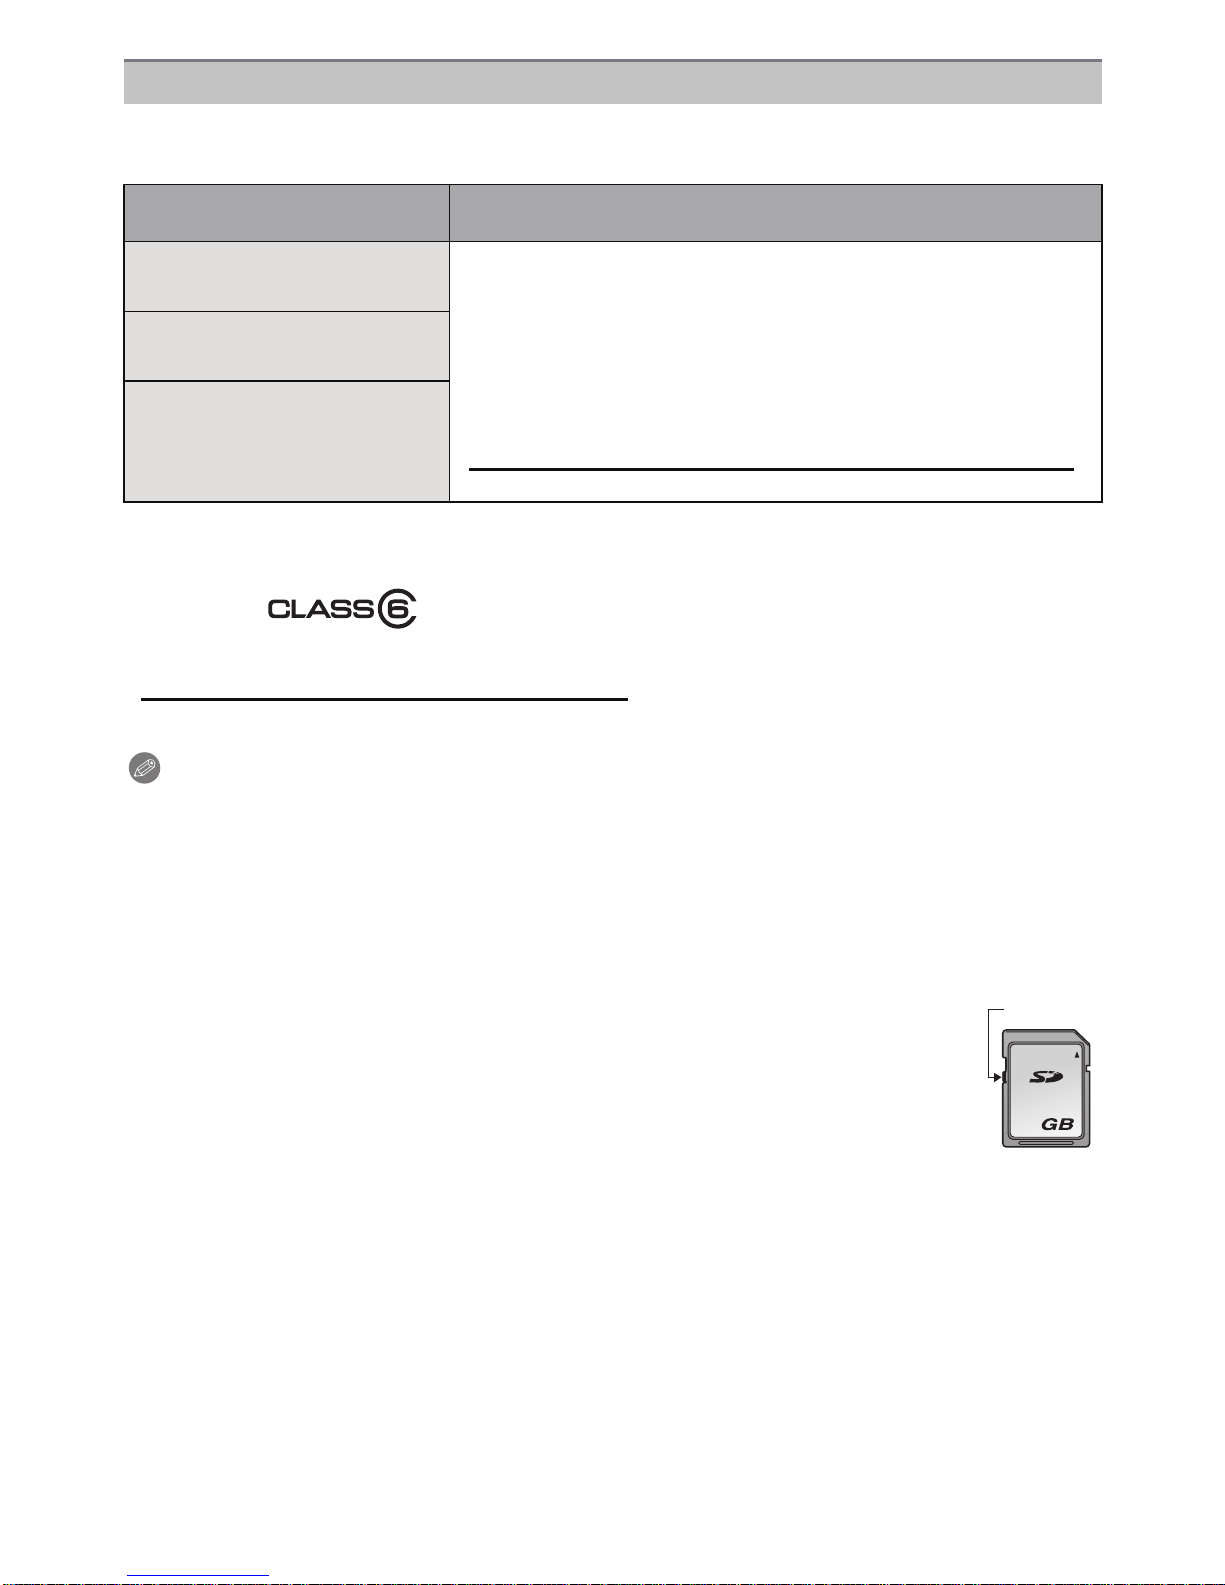
The following cards which conform to the SD video standard can be used with this unit.
(These cards are indicated as card in the tex t.)
Type of card which can be
used with th is unit
SD Memory Card
(8 MB to 2 GB)
•Use a card with SD Speed Class
higher when recording motion pictures.
Remarks
¢
with “Class 6” or
•SDHC Memory Card can be used with SDHC Memory Card
SDHC Memory Card
(4 GB to 32 GB)
or SDXC Memory Card compatible equipment.
•SDXC Memory Card can only be used with SDXC Memory
Card compatible equipment.
•Check that the PC and other equip ment are c ompa tib le when
SDXC Memory Card
(48 GB, 64 GB)
using the SDXC Memory Card s.
http://panasonic.net/avc/sdcard/information/SDXC.html
•Only the cards with capacity listed left can be used.
¢ SD Speed Class is the speed standard regarding continuous writing. Check via the label on
the card, etc.
e.g.:
•Please confirm the latest informatio n on the following website.
http://panasonic.jp/support/global/cs/dsc/
(This Site is English only.)
Note
Do not turn this unit off, remove its battery or card, or disconnect the AC adaptor
•
(optional) when the access indication is lit (when pictures are being written, read or
deleted, or the built-in memory or the card is being formatted). Furthermore, do not
subject the camera to vibration, impact or static electricity.
The card or the data on the card may be damaged, and this unit may no longer operate
normally.
If operation fails due to vibration, impact or static electricity, perform the operation
again.
•Write-Protect switch A provided (When this switch is set to the [LOCK] pos i tion,
no further dat a writing , dele tion o r formatt ing is possibl e. The a bility t o write , delete
and format data is restored when the switch is retu rned to its original position.)
•The data on the built-in memor y or t he card may be damaged or lost due to
electromagnetic waves, static electricit y or breakdown of the camera or the card.
We recommend sto ring important data on a PC etc.
•Do not format the card on your PC or other equipment. Format it on the camera
only to ensure proper operation. (P39)
•Keep the Memory Card out of reach of children to prevent swallowing.
- 16 -

Preparation
A
B
Approximate number of recordable pictures and
available recording time
∫ About the display of the number of recordable pictures and available recording
time
A Number of recordable pictures
B Available recording time
when taking still
pictures
when recording
motion pictures
∫ Number of recordable pictures
•
[i99999] is displayed if there are more than 100,000 pictures remaining.
Picture size
16M (4:3) 11 300 600 2450
5M (4:3) 26 650 1300 5300
0.3M (4:3) 410 10050 19940 81340
Built-in Memory
(Approx. 70 MB)
2GB 4GB 16 GB
∫ Available recording time (when recording motion pictures)
Recording
quality setting
HD j 10 min 10 s 20 min 30 s 1 h 23 min
VGA j 21 min 40 s 43 min 10 s 2 h 56 min
QVGA 2min 30s 1h 2min 2h 4min 8h 28min
Built-in Memory
(Approx. 70 MB)
2GB 4GB 16 GB
•
The number of recordable pictures and the available recording time are an appr oximation.
(These vary depending on the recording conditions an d the type of card.)
•The number of recordable pictures and the available recording time varies depending on the
subjects.
•Number of recordable pictures/available recording time for the card may decrease when
[Upload Set] is performed.
•Motion pictures can be recorded continuously up to 2 GB.
The maximum available recording time for up to 2 GB only is displayed on the screen.
- 17 -

Preparation
Setting Date/Time (Clock Set)
•The clock is not set when the camera is shipped.
Turn the camera on.
• If the language select scree n is not displ ayed, pro ceed
to step
Touch [Language Set].
4.
Select the language, and then touch [Set].
Touch [Clock Set].
Touch the items you wish to set (Year/
Month/Day/Hours/Minutes), and set using
[3]/[4].
A: Time at the home area
B: Time at the travel destination
•
Y ou can continue to swit ch th e sett ings by continuo usly
touching [3]/[4].
• Touch [ ] to cancel the date and time settings
without setting a date and time.
To set the display order and the time display
format.
Touch [Style] to dis play the settings screen for settin g
•
display order/time display format.
Touch [Set] to set.
Touch [Set] in the confirmation screen.
- 18 -

Preparation
Changing the Clock Setting
Select [Clock Set] in the [Rec] or [Setup] menu. (P34)
It can be changed in steps 5 and 6 to set the clock.
•
•The clock setting is maintained for 3 months using the built-in clock battery even
without the battery. (Leave the charged battery in the unit for 24 hours to charge the
built-in battery.)
Note
•
If the clock is not set, the correct date cannot be printed when you order a photo studio to print
the picture, or when you stamp the date on the pictures with [Date S tamp] or [Text Stamp].
•If the clock is set, the c orr ect date c an be prin ted eve n if the da te is n ot disp layed on th e sc ree n
of the camera.
- 19 -
Basic
Basic
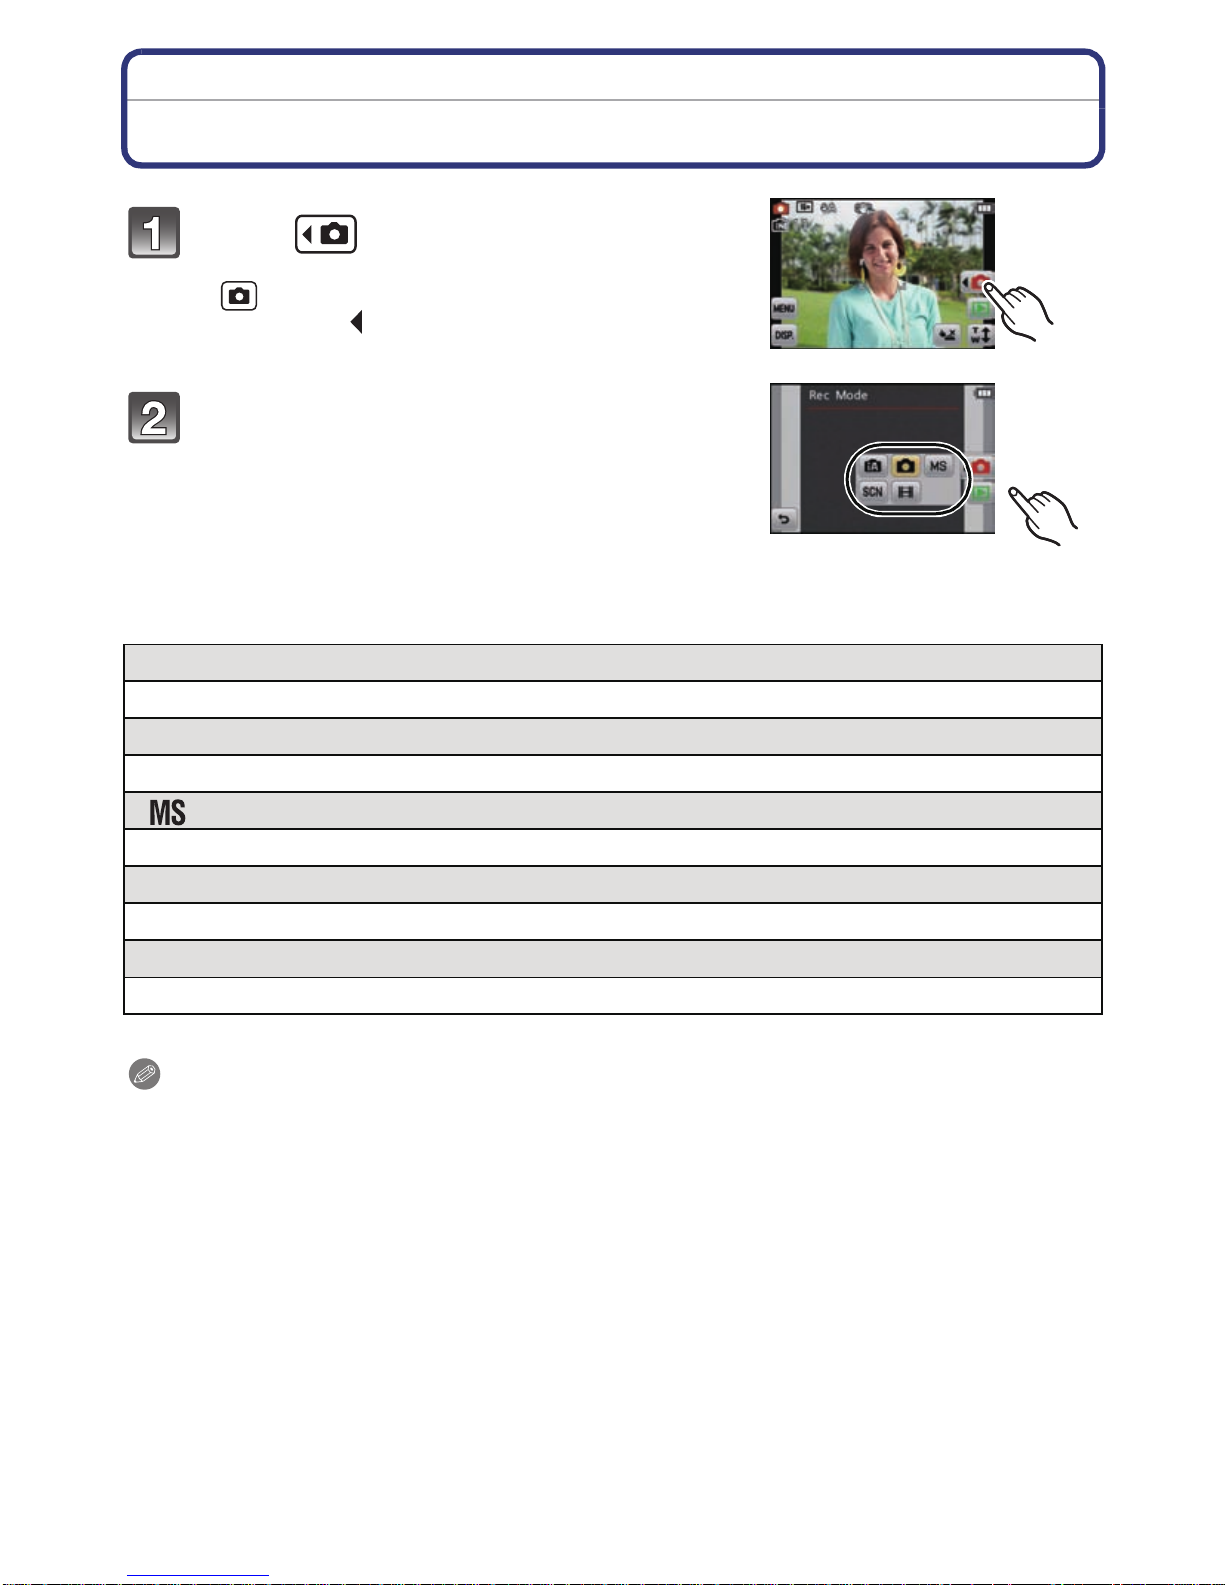
Selecting the [Rec] Mode
Touch [ ].
• When operating from the [Playback] Mode, touch
[ ] to switch to [Rec] Mode. Once it is switched to
[Rec] Mode, [ ] is displayed next to the ic on, so touch
it again.
Touch the mode icon.
∫ List of [Rec] Modes
¦
Intelligent Auto Mode (P21)
The subjects are recorded using settings automatically selected by the camera.
!
Normal Picture Mode (P24)
The subjects are recorded using your own settings.
My Scene Mode (P50)
Pictures are taken using previously registered recording scenes.
Û
Scene Mode (P49)
This allows you to take pictures that match the scene being recorded.
$
Motion Picture Mode (P30)
This mode allows you to record motion pictures with audio.
Note
•
When the mode has been switched from [Playback] Mode to [Rec] Mode, the previously set
[Rec] Mode will be set.
- 20 -
Basic
1 2
[Rec] Mode: ñ
Taking pictures using the automatic function
(Intelligent Auto Mode)
The camera will set the most appropriate settings to match the subject and the recording
conditions so we recommend this mode for beginners or those who want to leave the
settings to the camera and take pictures easily.
•
The following functions are activated aut omatically.
–Scene Detection/[Stabili zer]/Face Detection/Motion Detection/[i .Exposure]/
Backlight Compensation/[Red-Eye Removal]/[i.Resolution]/[i.ZOOM]/Auto White Balance/
[AF Assist Lamp]
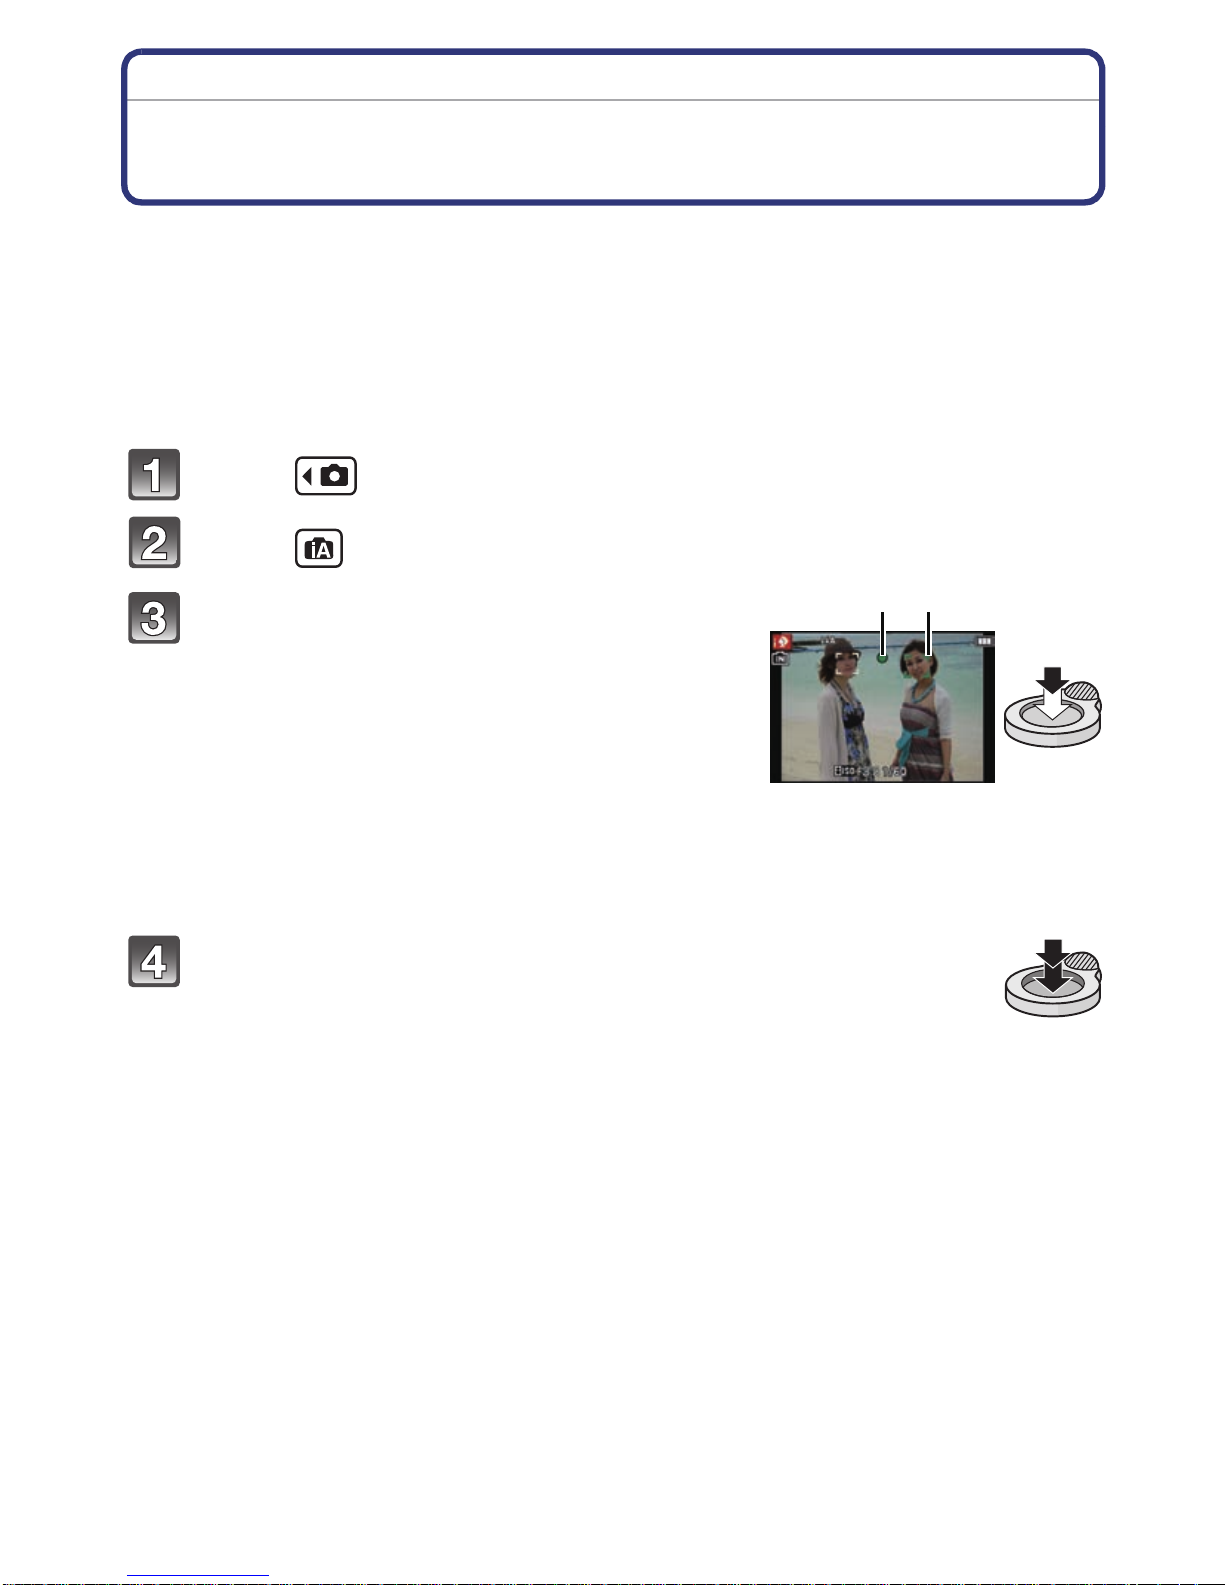
Touch [ ].
Touch [ ].
Press the shutter button halfway to focus.
• The focus indication 1 (green) lights when t he subject
is focused.
• The AF area 2 is displayed around the subject’s face
by the Face Detection function. In other cases, it is
displayed at the point on the subject which is in focus.
• The maximum close-up distance (t he shortest
distance at which the subject can be taken ) differs
depending on the zoom magnification. Please check
with the focus ran ge display on the screen. (P25)
• When the subject is touched, AF tracking function
works. For details, refer to P76.
Press the shutter button fully (push it in
further), and take the picture.
- 21 -
Basic
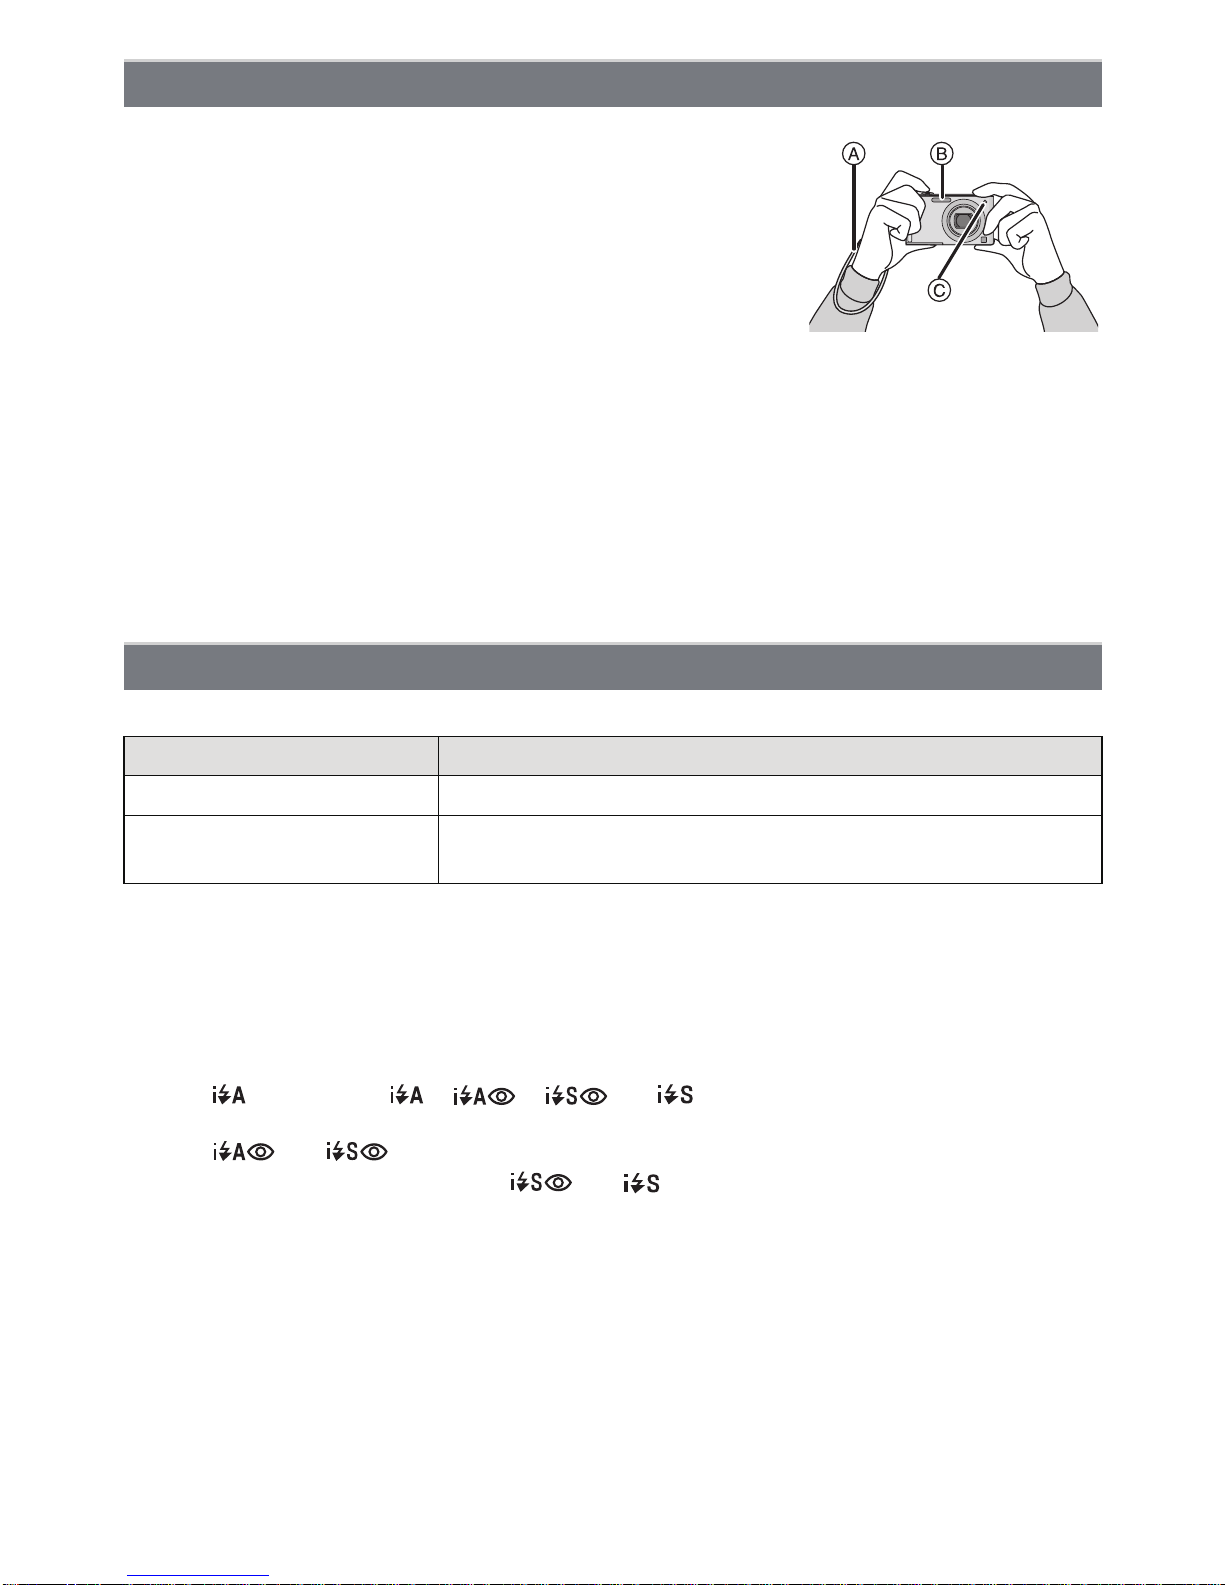
Tips for taking good pictures
•Be sure to attach the strap when using the camera to
ensure that you will not drop it.
•Hold the camera gently with both hands, keep your arms still at
your side and stand with your feet slightly apart.
•Be careful not to move the camera when you press the shutter
button.
•Do not cover the flash or the AF Assist Lamp with your fingers
or other objects.
•Do not touch the front of the l ens.
A Strap
B Flash
C AF assist lamp
∫ Direction Detection Function
Pictures recorded with the camera held vertically are played back vertically (rotated). (Only
when [Rotate Disp.] (P39) is set)
•The Direction Detection function may not operate correctly if recording is performed with the
camera aimed up or down.
•Motion pictures taken with the camera held vertically are not displayed vertically.
Changing the settings
Following menus can be set with the Intelligent Auto Mode.
Menu Item
[Rec] [Flash]¢/[Selftimer]/[Picture Size]¢/[Burst]/[Color Mo de]
[Setup] [Clock S et]/[World Time]/[Beep]¢/[Language]/
[Stabilizer Demo.]
For the setting method of the menu, refer to P34.
•
¢ Settings may be different from other [Rec] Modes.
•Menus specific to Intelligent Auto Mode
–Colour setting of [Happy] is available in [Color Mode]. It is possible to automatically take a
picture with a higher leve l of brilliance for the colour brightness and vividness.
∫ About the flash
When [ ] is selected, [ ], [ ], [ ] or [ ] is set depe nding on the ty pe of subject
•
and brightness.
•When [ ] or [ ] is set, Digital Red-Eye Correction is enabled.
•Shutter speed will be slower during [ ] or [ ].
¢
- 22 -
Basic
Scene Detection
When the camera identifies the optimum scene, the icon of the scene concerned is
displayed in blue for 2 seconds, after which its colour changes to the usual red.
¦ > [i-Portrait]
[i-Scenery]
[i-Macro]
•
[i-Night Portrait]
[i-Night Scenery]
[i-Sunset]
•
[¦] is set if none of the sce nes are applicable, and the standard settings are set .
•When [ ] or [ ] is selected, the camera automatically detects a pers on’s face, and it will
adjust the fo cus and exposure. (Face Detection)
•If a tripod is used, for inst ance, and th e camera has jud ged t hat c amer a shake is minimal when
the Scene Mode has been identified as [ ], the shutter speed will be set to a maximum of
8 seconds. Take car e not to move the camera while tak i ng pictures.
Only when [ ] is selected
Note
Due to conditions suc h as the ones below, a different scene may be identified for the same
•
subject.
–Subject conditions: When the face is bright or dark, the size of the subject, the colour of the
subject, the distance to the subject, the contrast of the subject , when the subject is moving
–Recording conditions: Sunset, su nrise, under low brightness condit ions, when the camera is
shaken, when zoom is used
•For the best results, it is recommended that you take pictures in the appropriate Recording
Mode.
•The Backlight Compensation
–Backlight refers to when light comes from the back of a subject. In this case, the subject will
become dark, so this function compens ates the backlight by brightening the whole of the
picture automatically.
- 23 -
Basic
AB
C
[Rec] Mode: ·
Taking pictures with your favourite settings
(Normal Picture Mode)
The camera automatically sets the shutter speed and the aperture value according to the
brightness of the subject.
You can take pictures with greater freedom by changing various settings in the [Rec]
menu.
Touch [ ].
Touch [ ].
Aim the AF area at the point you want to focus on.
Press the shutter button halfway to focus
and then press it fully t o take the picture.
A ISO sensitivity
B Aperture value
C Shutter speed
• Aperture value and shutter speed is disp layed in red
when correct exposure is not achieved. (Exclude
when using a flash)
Preventing jitter (camera shake)
When the jitter alert [ ] appears, use [Stabilizer] (P83), a tripod or the Self-timer (P69).
•
Shutter speed will be slower particularly in the following cases. Keep the camera still from the
moment the shutte r button is pressed until the picture appears on the screen. We recommend
using a tr ipod.
–In [Panorama Assist], [Night Portrait], [Night Scenery], [Party], [Candle Light], [StarrySky],
[Fireworks] or [High Dynamic] in Scene Mode
- 24 -
Basic
A
B
T
W
5 cm (0.17 feet)
1 m (3.28 feet)
Focusing
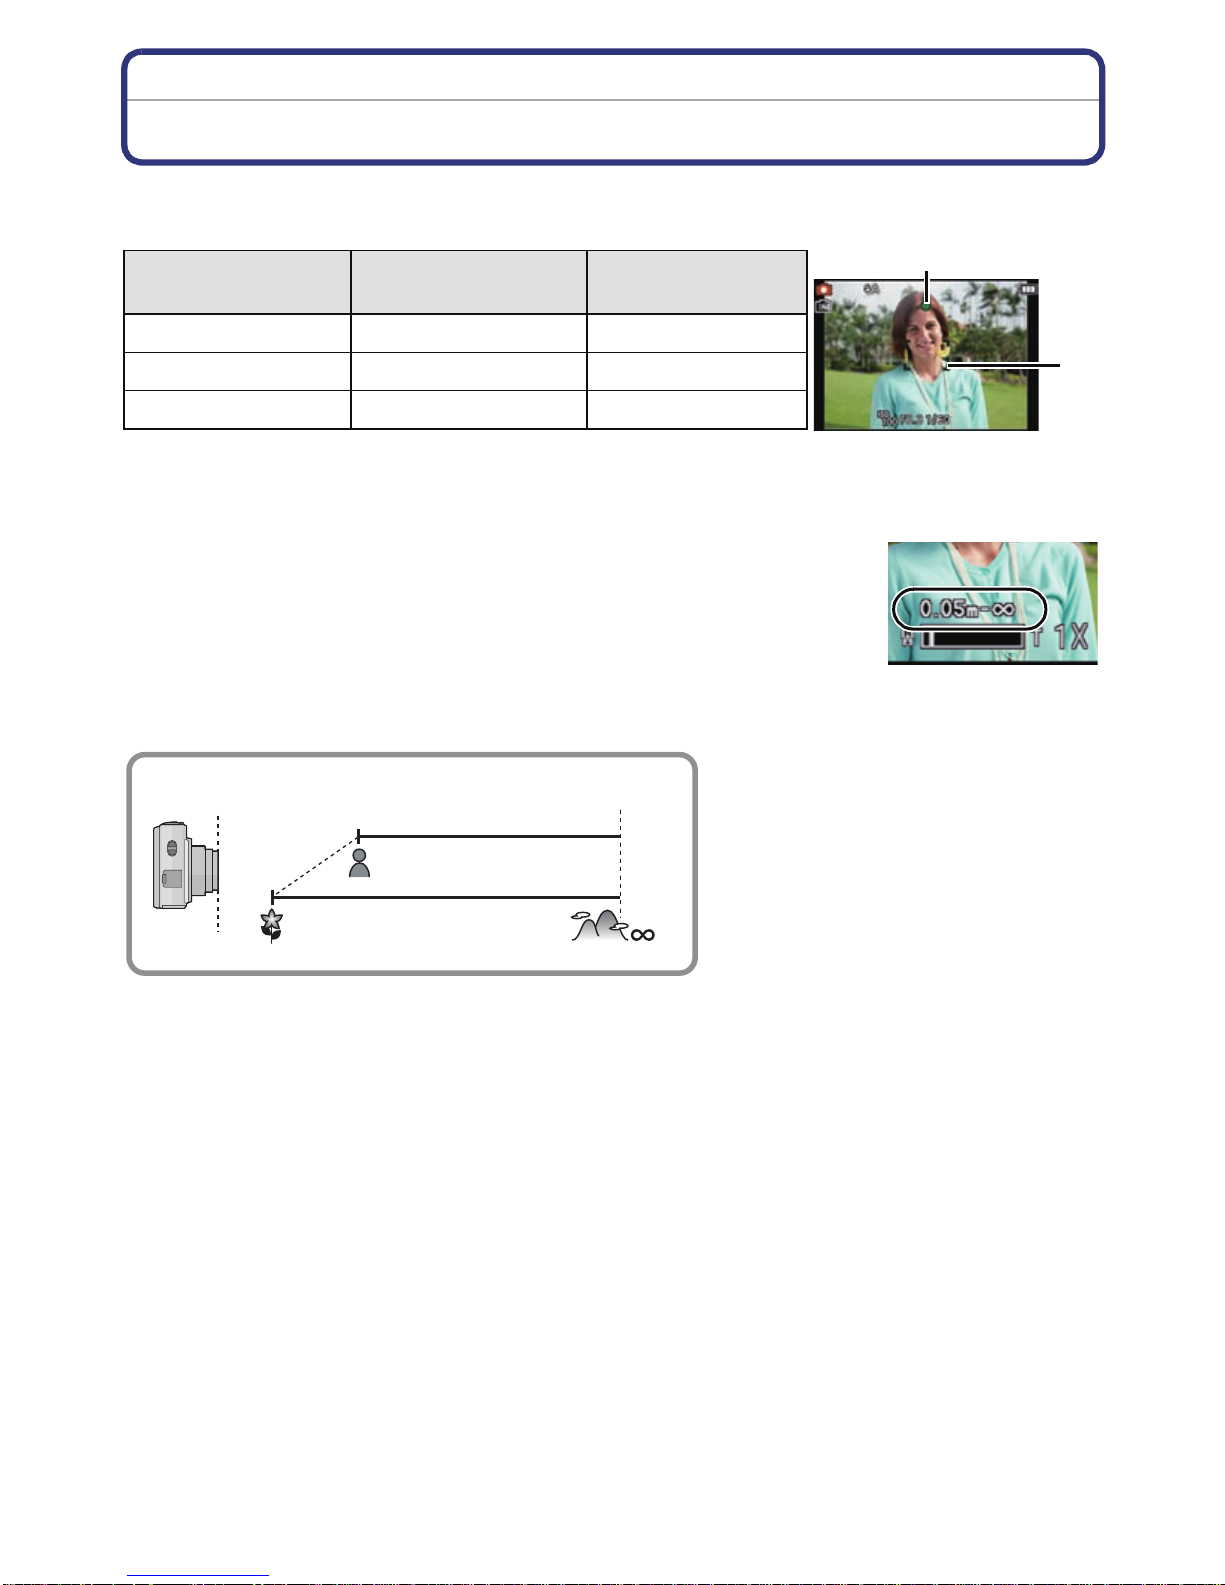
Aim the AF area at the subject, and then press the shutter button halfway.
Focus
Focu s ind ication A On Blinks
AF area B White>Green White>Red
Sound Beeps 2 times Beeps 4 times
•
AF area is displayed larger during the digital zoom or when it is dark.
When the subject is
focused
When the subject
is not focused
∫ About focus range
The focus range is displayed when operating the zoom.
•
The focus range is displ ayed in red when it is not focu sed af ter press ing
the shutter button halfway.
The focus range may change gradually depending on the zoom
position.
e.g.: Range of focus during the Intelligent Auto Mode
- 25 -

Basic
∫ When the subject is not in focus (such as when it is not in the centre of the
composition of the picture you want to take)
1 Aim the AF area at the subject,
and then press the shutter
button halfwa y to fix the focus
and exposure.
2 Press and hold the shutter
button hal fway while moving the
camera as you compose the picture.
You can repeatedly retry the actions in s tep 1 before pressing the shutter button fully.
•
∫ Subject and recording conditions which are difficult to focus in
•
Fast-moving subjects, extremely bright subjects or subjects without contrast
•When recording subjects through windows or near shiny objects
•When it is dark or when jitter occurs
•When the camera is too close to the subject or when taking a picture of both distant and near
subjects
- 26 -
Basic
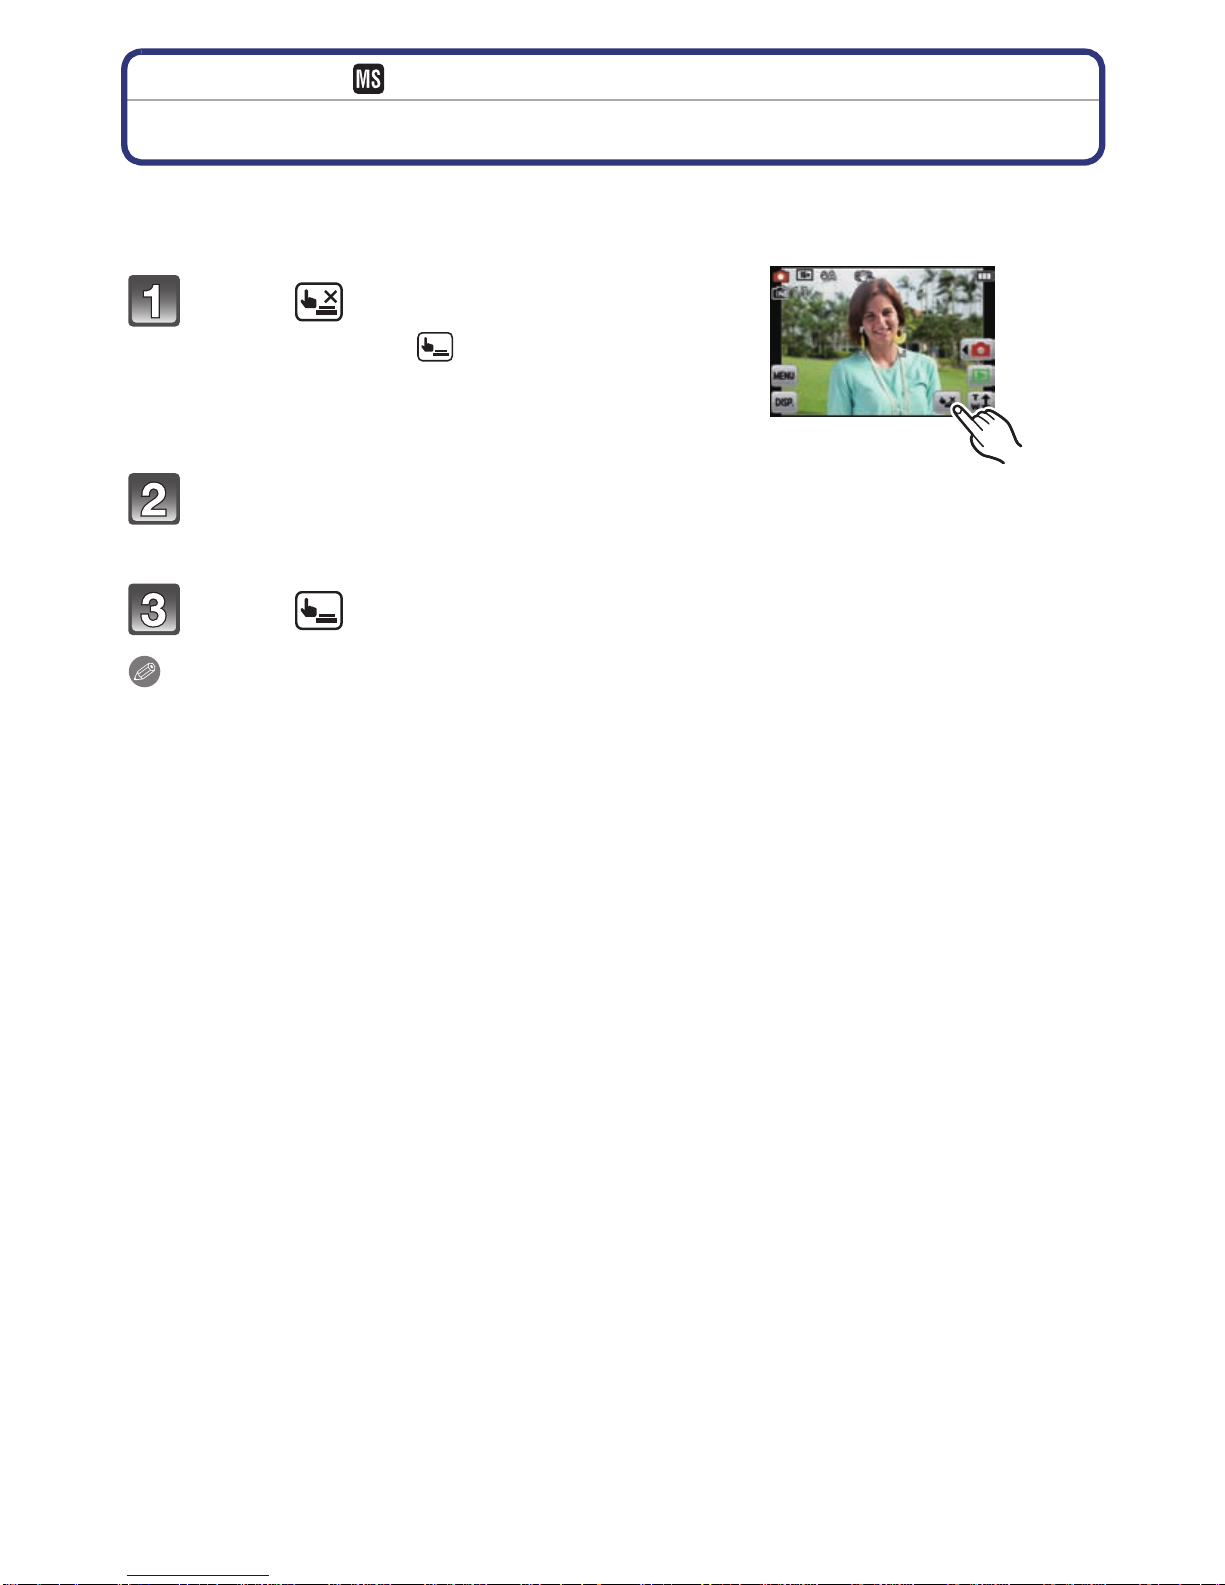
[Rec] Mode: ñ· ¿
Taking pictures using the Touch Shutter function
Just by touching the subject to focus, it will focus on the subject and take the picture
automatically.
Touch [ ].
• Icon will change to [ ], and taking a picture with
the Touch Shutter function becomes possible.
Touch the subject you wish to focus on, and then take a picture.
• AF area with same function as [Ø] in AF Mode is displayed at the position you tou ch ,
and a picture is taken when it is focused. (I t cannot be set to edge of the screen)
Touch [ ] to cancel the Touch Shutter function.
Note
Touch operation is not possible at th e top right of the LCD monitor even if image is displayed.
•
•The Touch Shutter setting is memorised even if the camera is turned off.
- 27 -

Basic
A B
[Playback] Mode: ¸
Playing Back Pictures ([Normal Play])
Touch [ ].
•The display switches to normal playback.
Note
This camera complies with the DCF standard “Design rule for Camera File system” established
•
by JEITA “Japan Electronics and Inf ormation Technology Industries Association” and with Exif
“Exchangeable Image File Format”. Files which do not comply with the DCF standard cannot
be played back.
•Pictures recorded with other camera may not be able to playback on this unit.
•The lens barrel retracts about 15 seconds after switching from [Rec] Mod e to [Playback] Mode.
Selecting a picture
Drag (P8) the screen horizontally.
–Forward: drag from right to left
–Rewind: drag from left to right
A File number
B Picture number
•Speed of picture forwarding/rewinding changes depending
on the playback status.
•You can forward or rewind pictures cont inuously by keeping
your finger on the left or right sides of the screen after
forwa r di n g /r ewinding a pi c t ur e .
(Pictures are displayed reduced in size.)
- 28 -
Basic
A
A
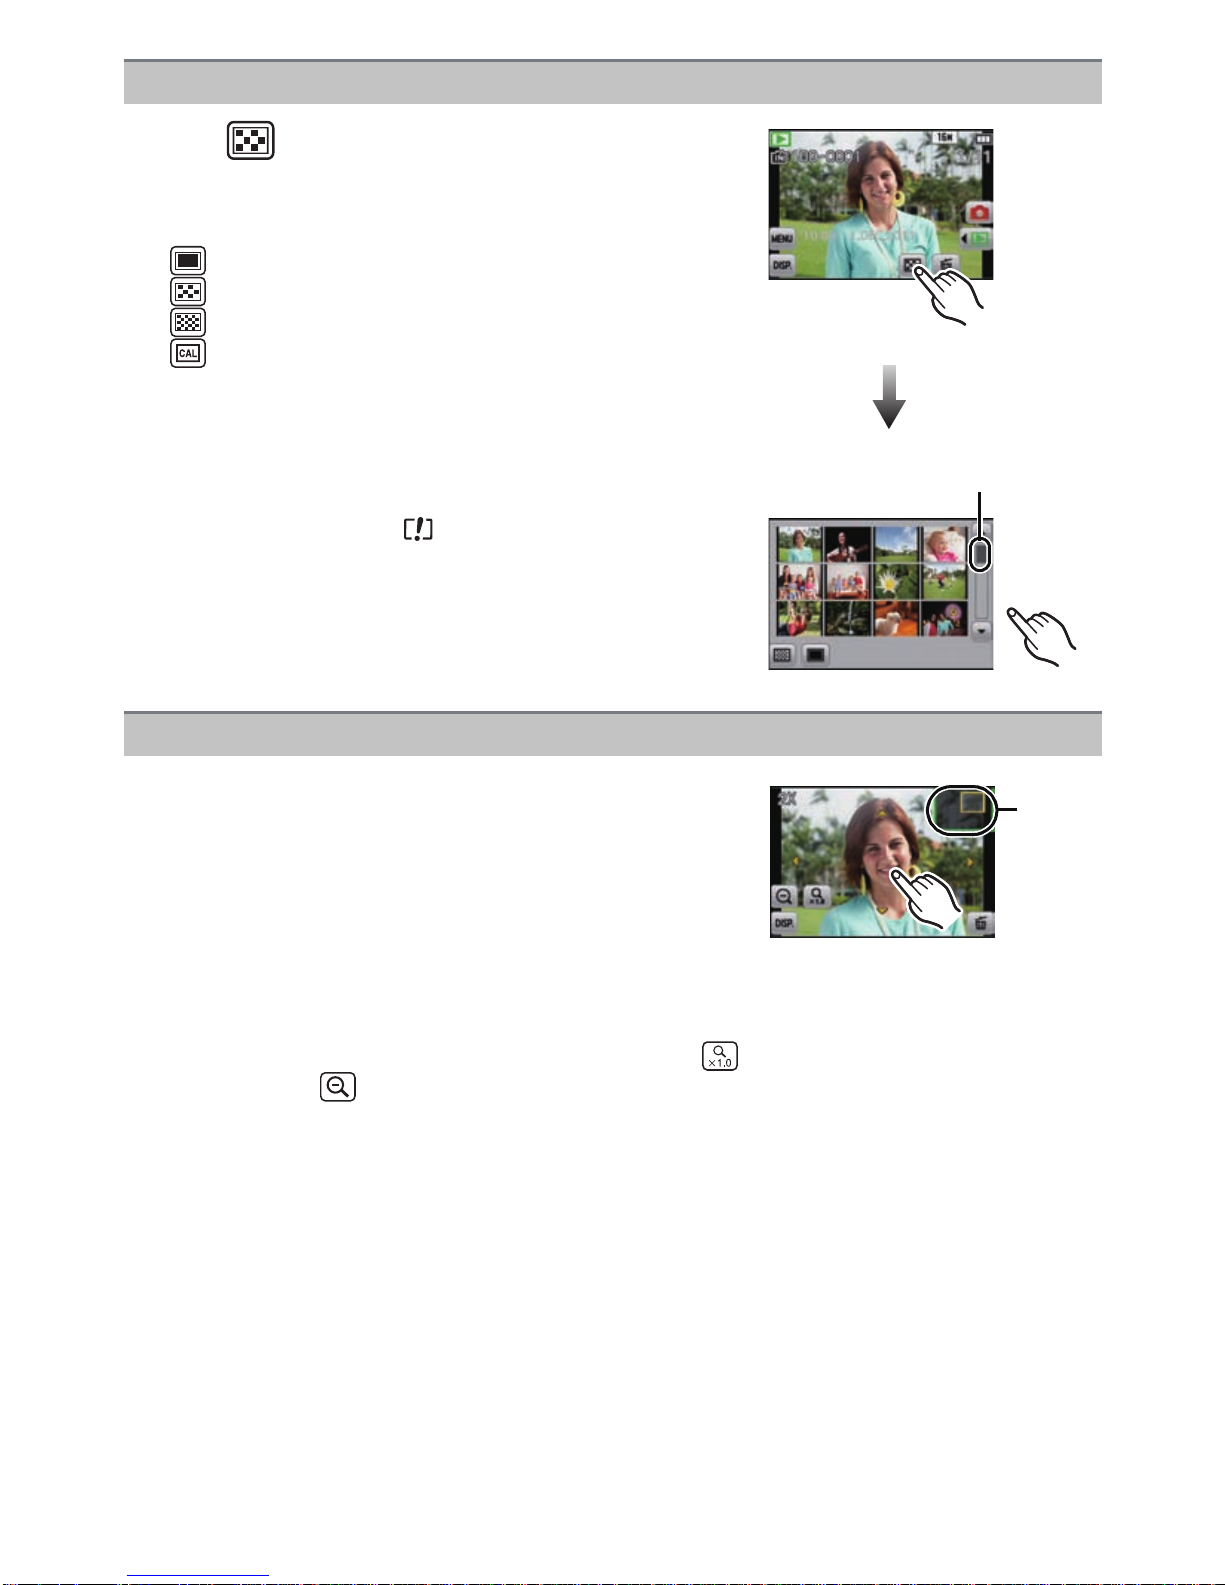
Displaying Multiple Screens (Multi Playback)
Touch [ ].
A Slide bar
•It is possible to switch the playback screen by touching the
following icons.
–[ ]: 1 screen
–[ ]: 12 screens
–[ ]: 30 screens
–[ ]: Calendar screen display
•Switch the screen by touching [3]/[4] if these are displayed
on the slide bar.
•The screen can be switched by dragging the slide bar up or
down (P8).
•The screen can be switched gradually by dragging the
screen up or down (P8).
•Pictures displayed using [ ] cannot be played back.
Using the Playback Zoom
Firmly touch the part to enlarge.
1k>2k>4k>8k>16k
•
You can also enlarge/reduce the picture by rotate the zoom
lever.
•When you change the magnification, the zoom position
indication A appears for about 1 second.
•The more a picture is enlarged, the more its quality
deteriorates.
•You can move the enlarged part by dragging (P8) the screen.
•Picture will return to the original size (1k) by to uching [ ].
•When you touch [ ], the magnification becomes lower .
- 29 -
Basic
A
B
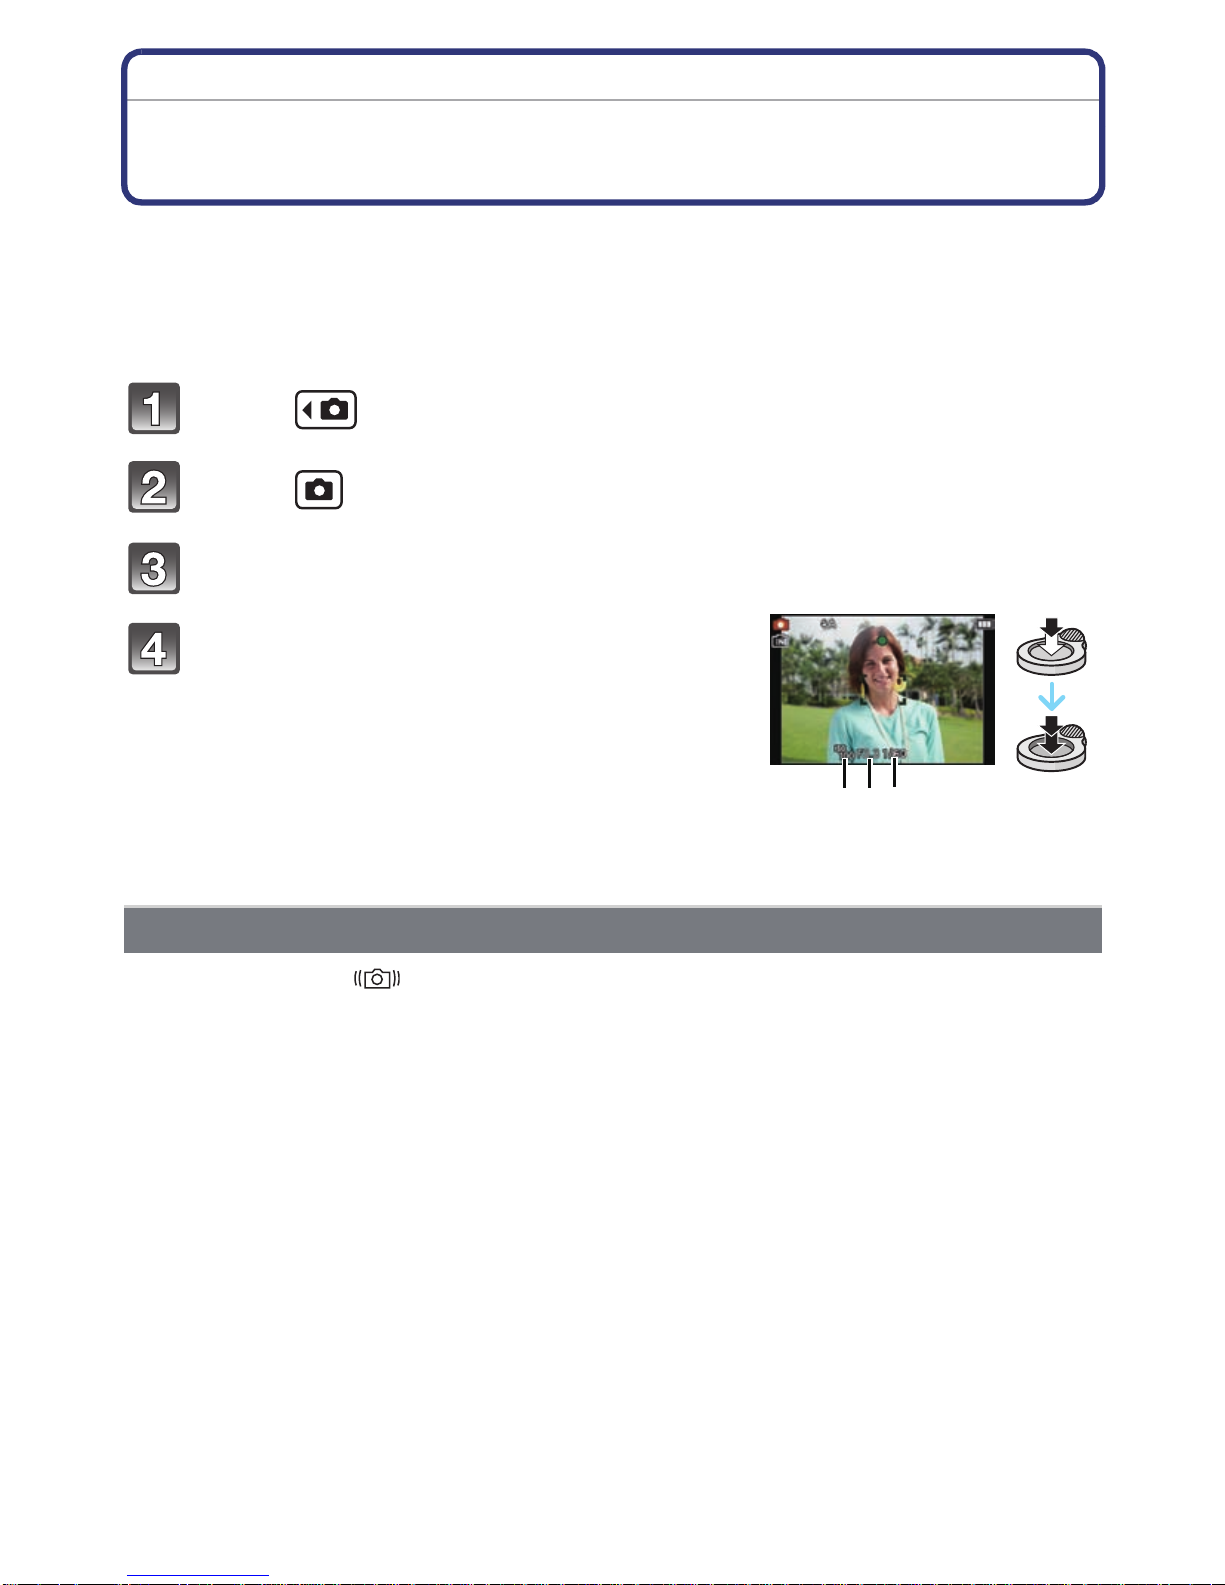
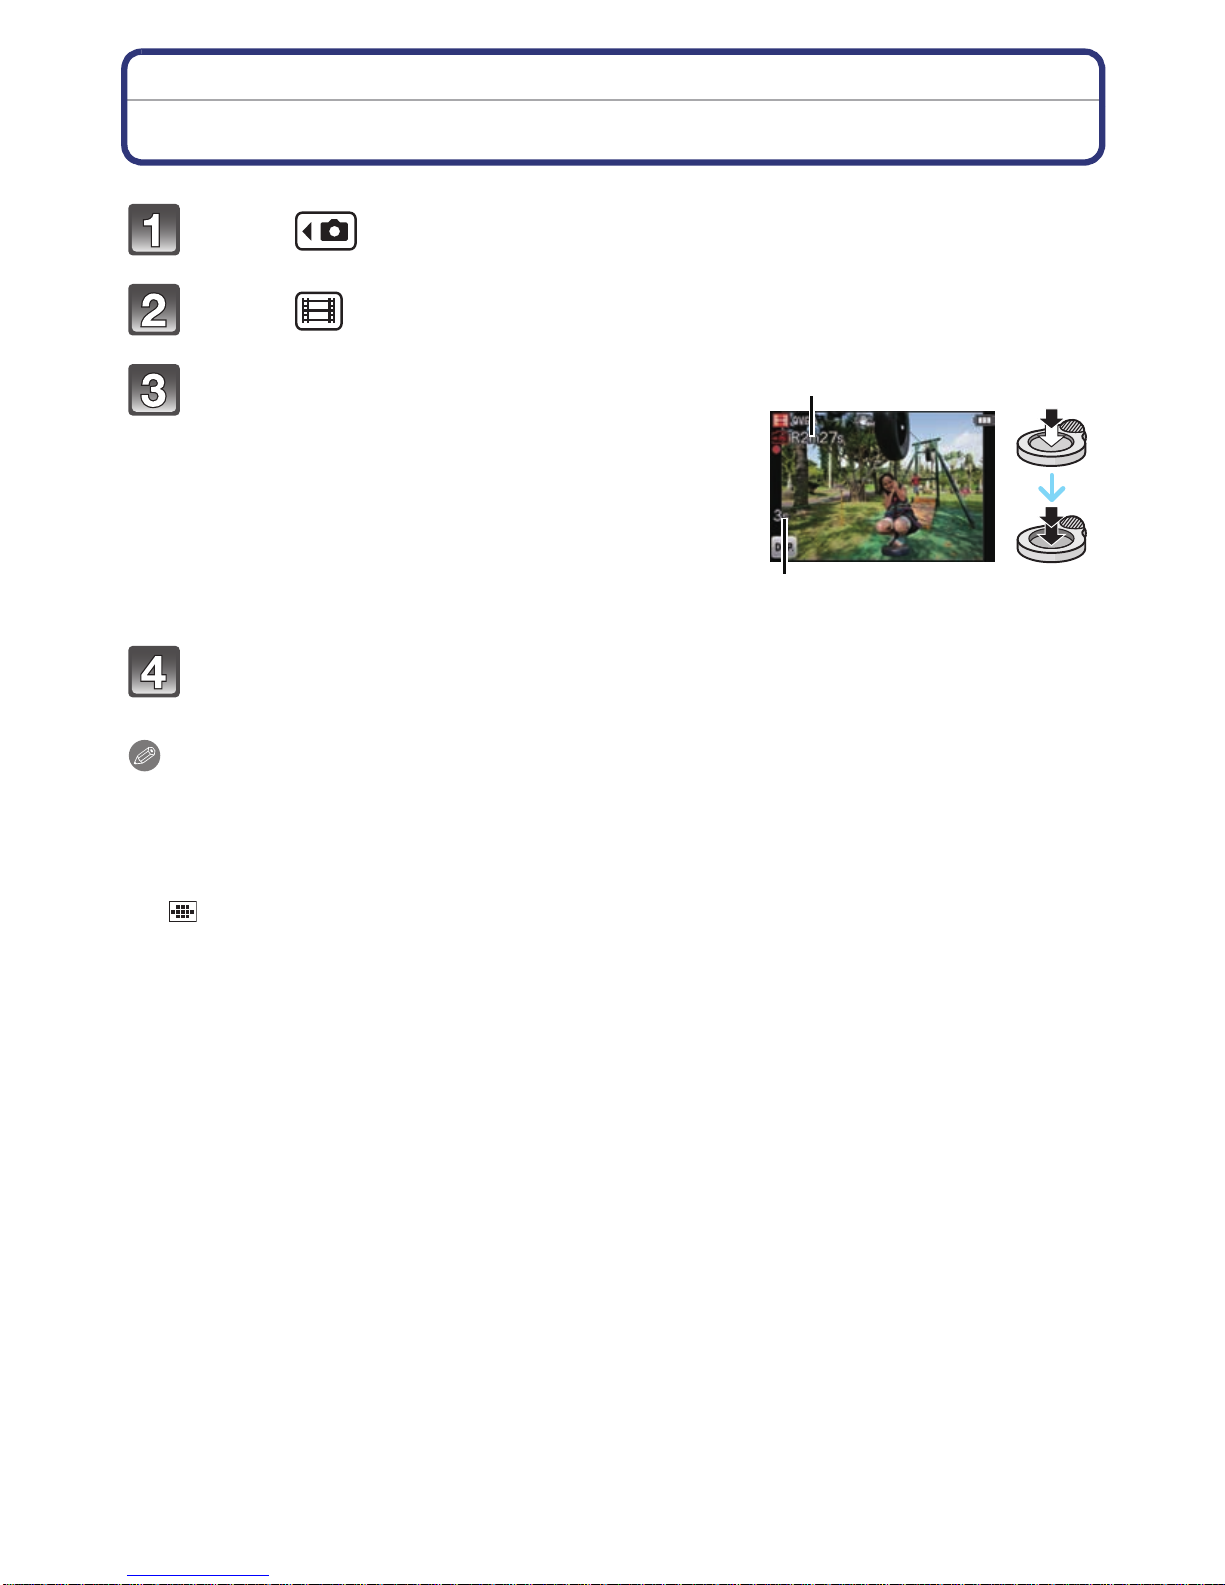
[Rec] Mode: n
Motion Picture Mode
Touch [ ].
Touch [ ].
Press the shutter button halfway to
focus and then press it fully to start
recording.
A Available recording time
B Elapsed recording ti me
• After pressing the shutter button fully, release it
straight away.
• The focus and zoom are fixed to th e sett ing when
recording starts (the first frame).
Press the shutter button fully to stop recording.
Note
Use a card with SD Speed Class with “Class 6” or higher when recording motion pictures.
•
•The available recording time displayed on the screen may not decrease regularly.
•Depending on the type of the card, the card access indication may appear for a while after
record i n g m ot i on pi c t ur e s . T h i s is no t a m al function .
•Following functions operate automatically in the Motion Picture Mode.
–[ ] in [AF Mode]/[Stabilizer]
•[Digital Zoom] or [AF Assist Lamp] cannot be setup in the Motion Picture Mode. Settings from
other [Rec] mode are used.
•When motion pictures recorded with the camera are played back on othe r equipment,
the quality of the picture and sound may deteriorate and it may not be possible to play
them back. Also the recording information may not b e di sp layed correctly.
•It is recommended to use a fully charged ba ttery or AC adaptor (optional) and DC coupler
(optional) when rec ording motion pictures.
•If while recording motion pi ctur es using the AC ad aptor a nd t he p ower su pply is cut off due to a
power outage or if th e AC adaptor is disconnected etc., the motion picture being recorded will
not be recorded.
•Sound of operation may be recorded when button or other operations are performed during
motion picture recording.
- 30 -
 Loading...