

Panasonic Diga DMR-E65 Operating Instructions Manual
Operating Instructions
DVD Video Recorder
Model No. DMR-E65
GN
Region number supported by
this unit
Region numbers are allocated to DVD players
and software according to where they are sold.
≥The region number of this unit is “4”.
≥The unit will play DVDs marked with labels
containing “4” or “ALL”.
Example:
2
2
3
2 ALL
4 ALL
3
5
4
Dear customer
Thank you for purchasing this product. For optimum
performance and safety, please read these
instructions carefully.
Before connecting, operating or adjusting this
product, please read these instructions completely.
Please keep this manual for future reference.
RQT7450-L
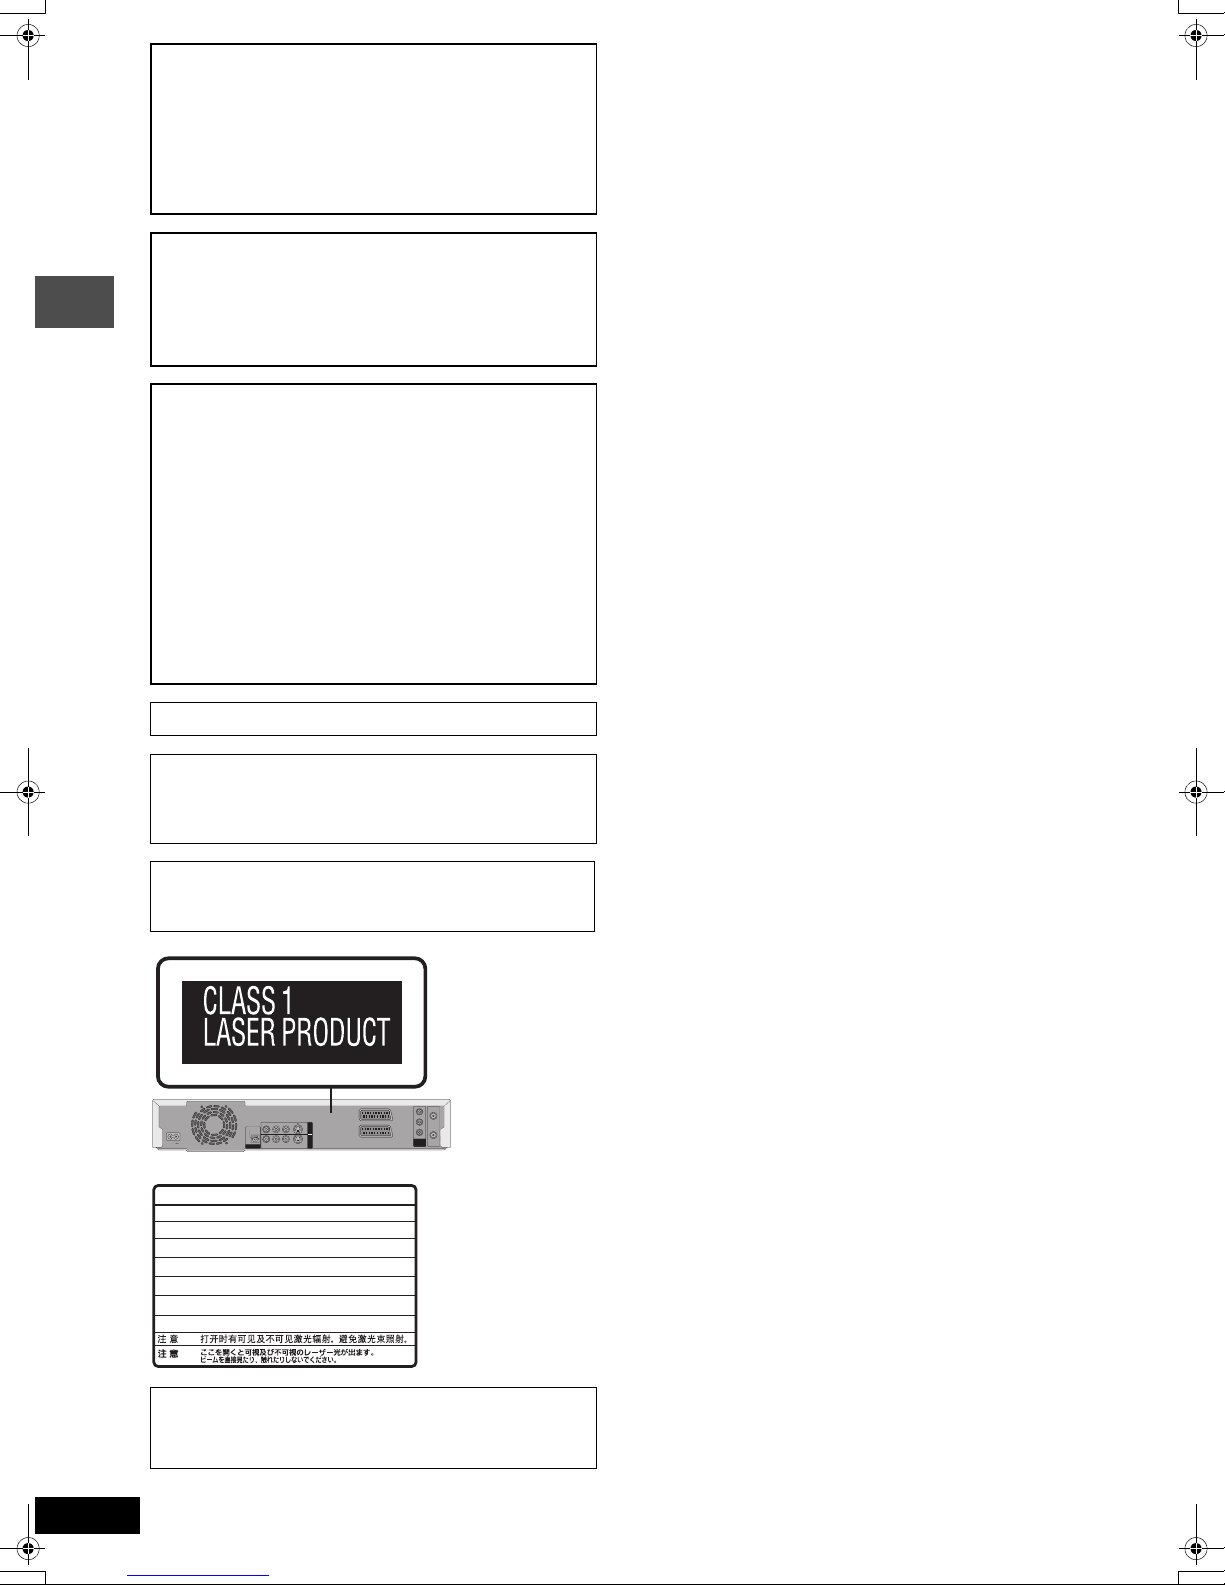
CAUTION!
THIS PRODUCT UTILIZES A LASER.
USE OF CONTROLS OR ADJUSTMENTS OR
PERFORMANCE OF PROCEDURES OTHER THAN THOSE
SPECIFIED HEREIN MAY RESULT IN HAZARDOUS
RADIATION EXPOSURE.
DO NOT OPEN COVERS AND DO NOT REPAIR YOURSELF.
REFER SERVICING TO QUALIFIED PERSONNEL.
WARNING:
TO REDUCE THE RISK OF FIRE, ELECTRIC SHOCK OR
PRODUCT DAMAGE, DO NOT EXPOSE THIS APPARATUS
TO RAIN, MOISTURE, DRIPPING OR SPLASHING AND THAT
NO OBJECTS FILLED WITH LIQUIDS, SUCH AS VASES,
SHALL BE PLACED ON THE APPARATUS.
CAUTION!
≥DO NOT INSTALL OR PLACE THIS UNIT IN A BOOKCASE,
BUILT-IN CABINET OR IN ANOTHER CONFINED SPACE.
Getting started
ENSURE THE UNIT IS WELL VENTILATED. TO PREVENT
RISK OF ELECTRIC SHOCK OR FIRE HAZARD DUE TO
OVERHEATING, ENSURE THAT CURTAINS AND ANY
OTHER MATERIALS DO NOT OBSTRUCT THE
VENTILATION VENTS.
≥DO NOT OBSTRUCT THE UNIT’S VENTILATION OPENINGS
WITH NEWSPAPERS, TABLECLOTHS, CURTAINS, AND
SIMILAR ITEMS.
≥DO NOT PLACE SOURCES OF NAKED FLAMES, SUCH AS
LIGHTED CANDLES, ON THE UNIT.
≥DISPOSE OF BATTERIES IN AN ENVIRONMENTALLY
FRIENDLY MANNER.
THIS UNIT IS INTENDED FOR USE IN MODERATE CLIMATES.
This product may receive radio interference caused by mobile
telephones during use. If such interference is apparent, please
increase separation between the product and the mobile
telephone.
The socket outlet shall be installed near the equipment and
easily accessible or the mains plug or an appliance coupler shall
remain readily operable.
Y
RF IN
(FDA 21 CFR)
(IEC60825-1)
RQLS0233
COMPONENT
VIDEO OUT
(NTSC:480P/480I,
PAL:576P/576I)
PB
PR
RF OUT
(Inside of product)
VIDEO
R - AUDIO - L
S-VIDEO
AC IN
DANGER
CAUTION
ATTENTION
ADVARSEL
VARO !
VARNING
ADVARSEL
VORSICHT
OPTICAL
DIGITAL AUDIO OUT
(PCM/BITSTREAM)
-
VISIBLE AND INVISIBLE LASER RADIATION WHEN OPEN.
AVOID DIRECT EXPOSURE TO BEAM.
-
VISIBLE AND INVISIBLE LASER RADIATION WHEN OPEN.
AVOID EXPOSURE TO BEAM.
-
RAYONNEMENT LASER VISIBLE ET INVISIBLE EN CAS D’OUVERTURE.
EXPOSITION DANGEREUSE AU FAISCEAU.
-
SYNLIG OG USYNLIG LASERSTRÅLING VED ÅBNING.
UNDGÅ UDSÆTTELSE FOR STRÅLING.
-
AVATTAESSA OLET ALTTIINA NÄKYVÄÄ JA NÄKYMÄTÖN
LASERSÄTEILYLLE. ÄLÄ KATSO SÄTEESEEN.
-
SYNLIG OCH OSYNLIG LASERSTRÅLNING NÄR DENNA DEL
ÄR ÖPPNAD. BETRAKTA EJ STRÅLEN.
-
SYNLIG OG USYNLIG LASERSTRÅLING NÅR DEKSEL ÅPNES.
UNNGÅ EKSPONERING FOR STRÅLEN.
-
SICHTBARE UND UNSICHTBARE LASERSTRAHLUNG, WENN ABDECKUNG
GEÖFFNET. NICHT DEM STRAHL AUSSETZEN.
-
-
OUT
AV4 IN
VIDEO
R - AUDIO - L
S-VIDEO
AV1 (TV)
AV2 (DECODER/EXT)
Keep the small memory cards such as the SD
Memory Card out of reach of children. If
swallowed, seek medical advice immediately.
RQT7450
2
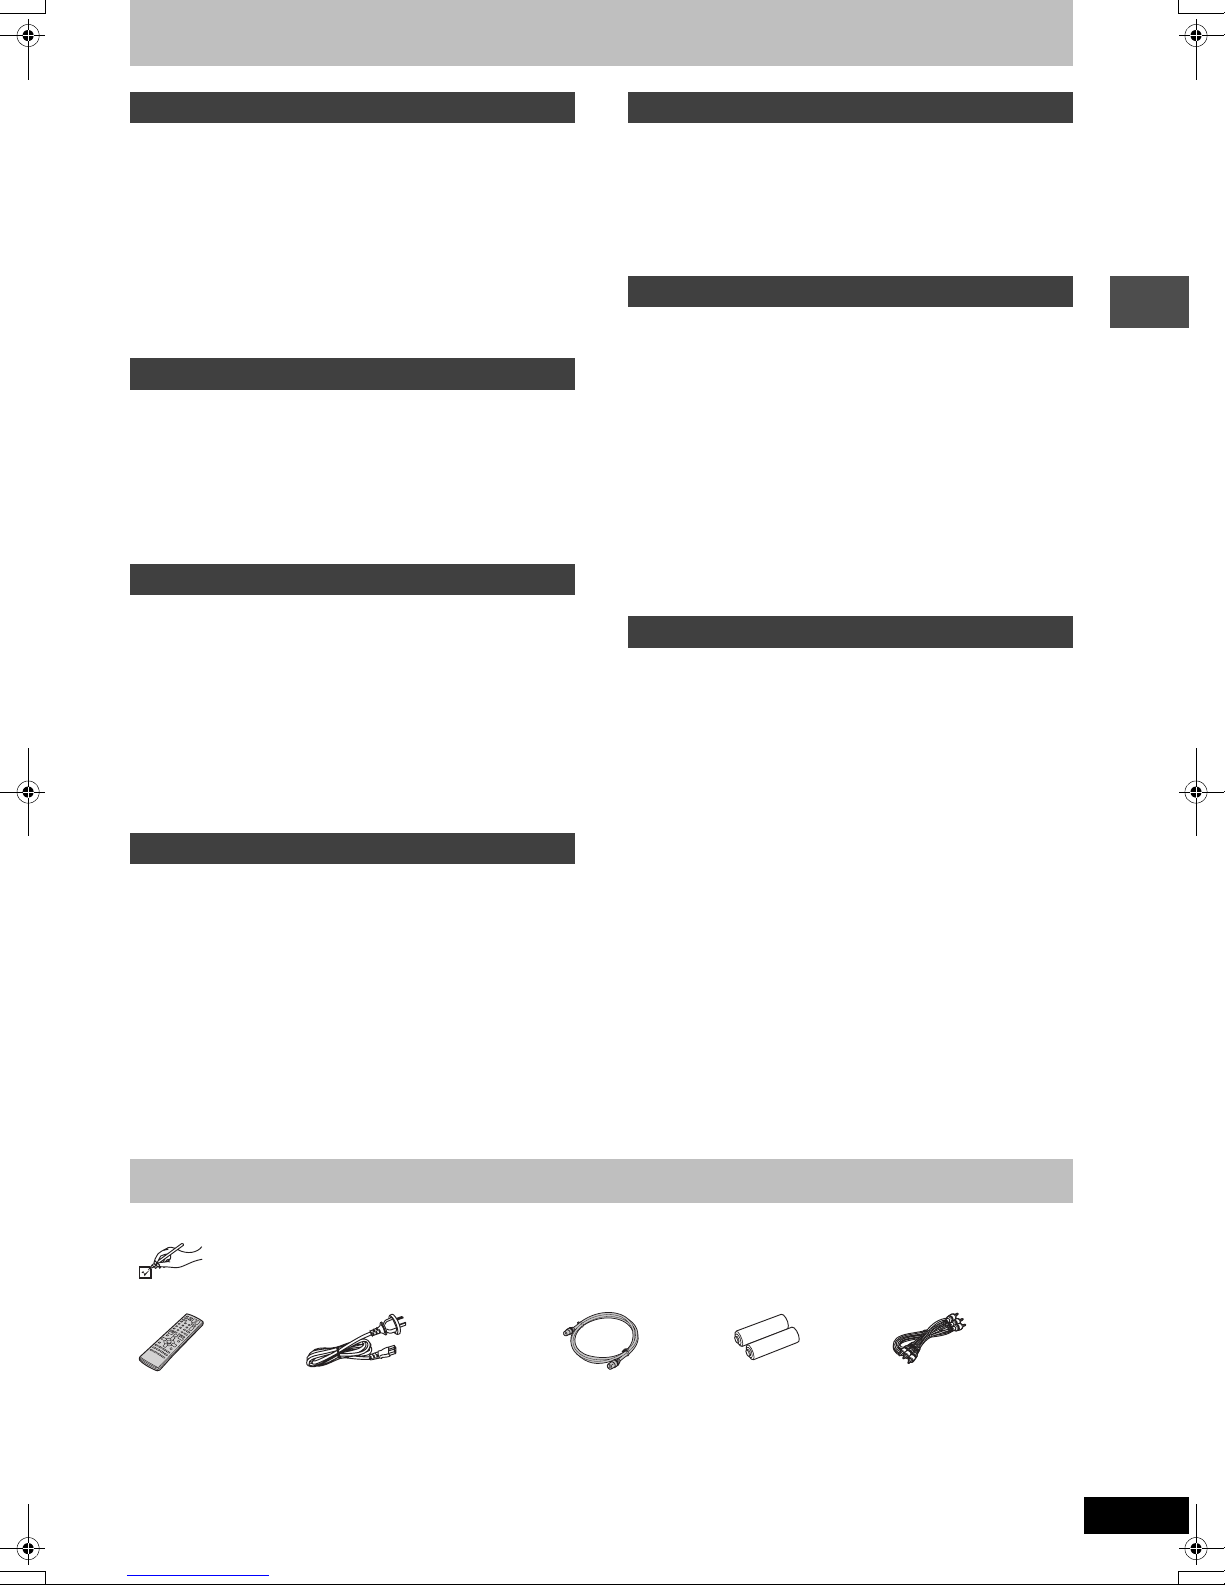
Table of contents
Getting started
Accessories . . . . . . . . . . . . . . . . . . . . . . . . . . . . . . . 3
Useful features . . . . . . . . . . . . . . . . . . . . . . . . . . . . . 4
The remote control. . . . . . . . . . . . . . . . . . . . . . . . . . 4
Control reference guide. . . . . . . . . . . . . . . . . . . . . . 5
STEP 1
STEP 2
STEP 3
Connection . . . . . . . . . . . . . . . . . . . . . . . . . 6
Channel reception settings. . . . . . . . . . . . 9
Set up to match your television
and remote control. . . . . . . . . . . . . . . . . . . . . . . . 10
To enjoy progressive video. . . . . . . . . . . . . . . . . . . . . . . . . . . . 10
Disc and card information . . . . . . . . . . . . . . . . . . . 12
Recording
Recording television programmes . . . . . . . . . . . . 14
Recording modes and approximate recording times . . . . . . . . 15
Playing while you are recording . . . . . . . . . . . . . . . . . . . . . . . . 15
Flexible Recording. . . . . . . . . . . . . . . . . . . . . . . . . . . . . . . . . . 16
Timer recording . . . . . . . . . . . . . . . . . . . . . . . . . . . 17
Using G-CODE® system to make timer recordings . . . . . . . . . . 17
Manually programming timer recordings . . . . . . . . . . . . . . . . . 18
Check, change or delete a programme . . . . . . . . . . . . . . . . . . 19
Playing back
Playing recorded video contents/Playing play-
only discs . . . . . . . . . . . . . . . . . . . . . . . . . . . . . . . 20
Operations during play. . . . . . . . . . . . . . . . . . . . . . . . . . . . . . . 21
Editing operations during play . . . . . . . . . . . . . . . . . . . . . . . . . 22
Changing audio . . . . . . . . . . . . . . . . . . . . . . . . . . . . . . . . . . . . 22
Using menus to play MP3 . . . . . . . . . . . . . . . . . . . 23
Playing still pictures . . . . . . . . . . . . . . . . . . . . . . . 24
Useful functions during still picture play. . . . . . . . . . . . . . . . . . 25
Using on-screen menus and Status messages. . 26
On-screen menus . . . . . . . . . . . . . . . . . . . . . . . . . . . . . . . . . . 26
Status messages . . . . . . . . . . . . . . . . . . . . . . . . . . . . . . . . . . . 27
Transfer (Dubbing)
Recording from a video cassette recorder . . . . . 33
Manual recording . . . . . . . . . . . . . . . . . . . . . . . . . . . . . . . . . . . 33
DV automatic recording (DV AUTO REC). . . . . . . . . . . . . . . . . 33
Transferring (dubbing) still pictures . . . . . . . . . . 34
Transferring (dubbing) using the transferring (dubbing) list . . . 34
Transferring (dubbing) all the still pictures of a card onto a
DVD-RAM—COPY ALL PICTURES . . . . . . . . . . . . . . . . . . . 35
Convenient functions
FUNCTIONS window . . . . . . . . . . . . . . . . . . . . . . . 35
Disc and card management . . . . . . . . . . . . . . . . . 36
Setting the protection . . . . . . . . . . . . . . . . . . . . . . . . . . . . . . . . 36
Providing a disc with a name . . . . . . . . . . . . . . . . . . . . . . . . . . 36
Erasing all titles and play lists—Erase all titles. . . . . . . . . . . . . 36
Erasing all the contents of a disc or card—Format . . . . . . . . . . 37
Enabling DVD-R to be played on other equipment—Finalize . . 37
Entering text . . . . . . . . . . . . . . . . . . . . . . . . . . . . . 38
Changing the unit’s settings . . . . . . . . . . . . . . . . 39
Common procedures . . . . . . . . . . . . . . . . . . . . . . . . . . . . . . . . 39
Summary of settings. . . . . . . . . . . . . . . . . . . . . . . . . . . . . . . . . 39
Tuning . . . . . . . . . . . . . . . . . . . . . . . . . . . . . . . . . . . . . . . . . . . . 42
TV System . . . . . . . . . . . . . . . . . . . . . . . . . . . . . . . . . . . . . . . . 43
Clock settings . . . . . . . . . . . . . . . . . . . . . . . . . . . . . . . . . . . . . . 43
Child Lock . . . . . . . . . . . . . . . . . . . . . . . . . . . . . . . 44
Reference
Maintenance/Disc and card handling . . . . . . . . . 44
Specifications . . . . . . . . . . . . . . . . . . . . . . . . . . . . 45
Safety precautions . . . . . . . . . . . . . . . . . . . . . . . . 45
Glossary. . . . . . . . . . . . . . . . . . . . . . . . . . . . . . . . . 46
Frequently asked questions. . . . . . . . . . . . . . . . . 47
Error messages . . . . . . . . . . . . . . . . . . . . . . . . . . . 48
Troubleshooting guide . . . . . . . . . . . . . . . . . . . . . 49
Index. . . . . . . . . . . . . . . . . . . . . . . . . . . . . Back cover
Getting started
Editing
Editing titles/chapters . . . . . . . . . . . . . . . . . . . . . . 28
Editing titles/chapters and playing chapters. . . . . . . . . . . . . . . 28
Title operations . . . . . . . . . . . . . . . . . . . . . . . . . . . . . . . . . . . . 29
Chapter operations . . . . . . . . . . . . . . . . . . . . . . . . . . . . . . . . . 29
Creating, editing and playing play lists . . . . . . . . 30
Creating play lists. . . . . . . . . . . . . . . . . . . . . . . . . . . . . . . . . . . 30
Editing and playing play lists/chapters . . . . . . . . . . . . . . . . . . . 31
Play list operations. . . . . . . . . . . . . . . . . . . . . . . . . . . . . . . . . . 31
Chapter operations . . . . . . . . . . . . . . . . . . . . . . . . . . . . . . . . . 31
Editing still pictures. . . . . . . . . . . . . . . . . . . . . . . . 32
Picture and folder operation. . . . . . . . . . . . . . . . . . . . . . . . . . . 32
Accessories
Please check and identify the supplied accessories.
∏∏ ∏ ∏∏
1 Remote control
(EUR7721KE0)
1 AC mains lead
≥For use with this unit only. Do not
use it with other equipment.
1 RF coaxial cable 2 Batteries
for remote control
1 Audio/video cable
RQT7450
3
Useful features
R6/LR6, AA, UM-3
This DVD Video recorder records high quality images to rapid random access capable DVD-RAM media. This has resulted in
many new features that out perform older tape formats. The following information summarizes a few of these features.
Instant recording
You no longer need to search for empty disc space. By
pressing the recording button, the unit finds available
recording space and begins recording right away. There is no
need to worry about overwriting already recorded content.
SD/PC card slots, DV input terminal
This unit is equipped with interfaces that allow networking
with digital equipment.
≥The SD/PC card slots of this unit let you transfer (dub)
digital camera photographs from a card to DVD-RAM for
easy storage without using a computer.
≥The DV automatic recording function of this unit lets you
easily transfer (dub) digital images to the DVD-RAM by
connecting only a single DV cable.
Getting started
Instant play
There is no need to rewind or search forward. Direct
Navigator guides you to the beginning of the recorded video
immediately.
The remote control
Chasing playback
There is no need to wait until
recording is complete. Without
stopping recording, you can play the
video currently being recorded from
its beginning.
Simultaneous Recording
and Playback
While recording, you can play
another video programme that was
recorded previously.
Time Slip
During play and also while recording,
you can jump to the scene you wish
to view by specifying the skip time.
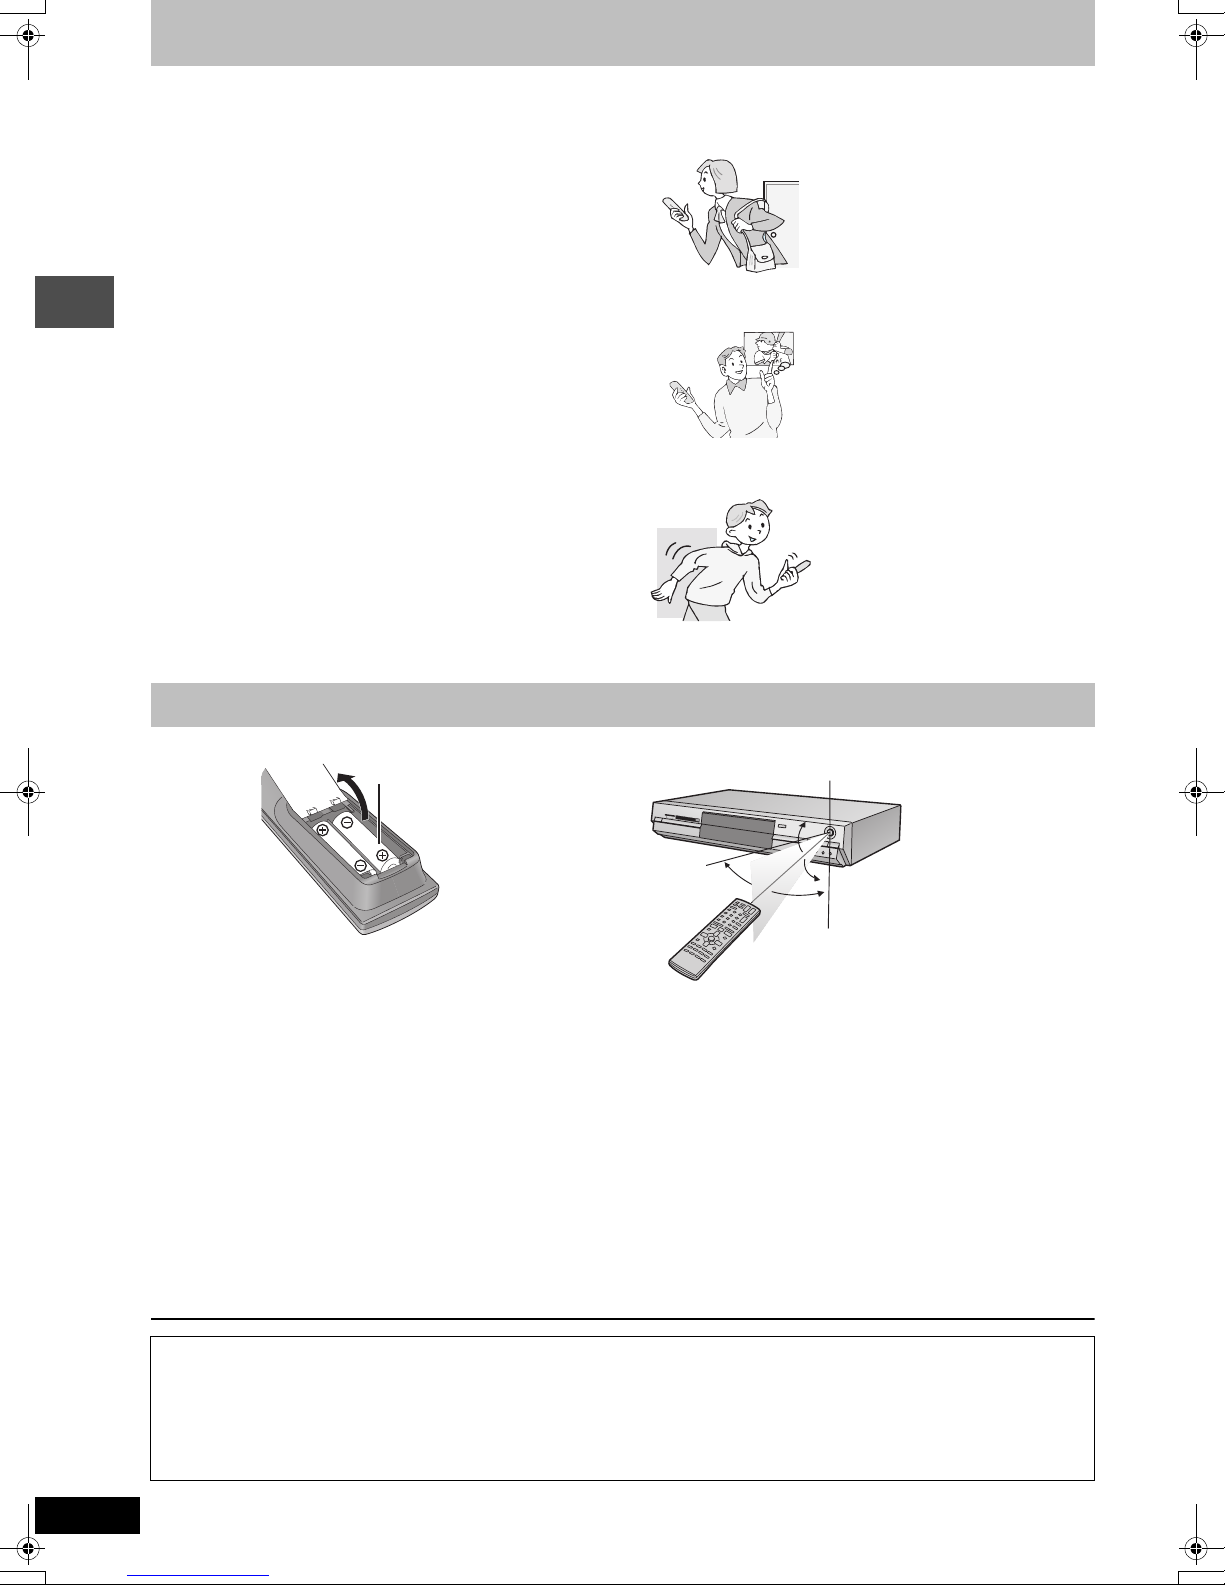
∫ Batteries
≥Insert so the poles (i and j) match those in the remote control.
≥Do not use rechargeable type batteries.
≥Do not mix old and new batteries.
≥Do not use different types at the same time.
≥Do not heat or expose to flame.
≥Do not take apart or short circuit.
≥Do not attempt to recharge alkaline or manganese batteries.
≥Do not use batteries if the covering has been peeled off.
Mishandling of batteries can cause electrolyte leakage which can
damage items the fluid contacts and may cause a fire.
Remove if the remote control is not going to be used for a long
period of time. Store in a cool, dark place.
[Note]
If you cannot operate the unit or television using the remote control
after changing the batteries, please re-enter the codes (➡ page 11).
∫ Use
Remote control signal sensor
20˚
30˚
20˚
30˚
7 m directly in front of the unit
The manufacturer accepts no responsibility and offers no compensation for loss of recorded or edited material due to a problem
with the unit or recordable media, and accepts no responsibility and offers no compensation for any subsequent damage caused by
such loss.
Examples of causes of such losses are
≥A disc recorded and edited with this unit is played in a DVD recorder or computer disc drive manufactured by another company.
≥A disc used as described above and then played again in this unit.
≥A disc recorded and edited with a DVD recorder or computer disc drive manufactured by another company is played in this unit.
RQT7450
4
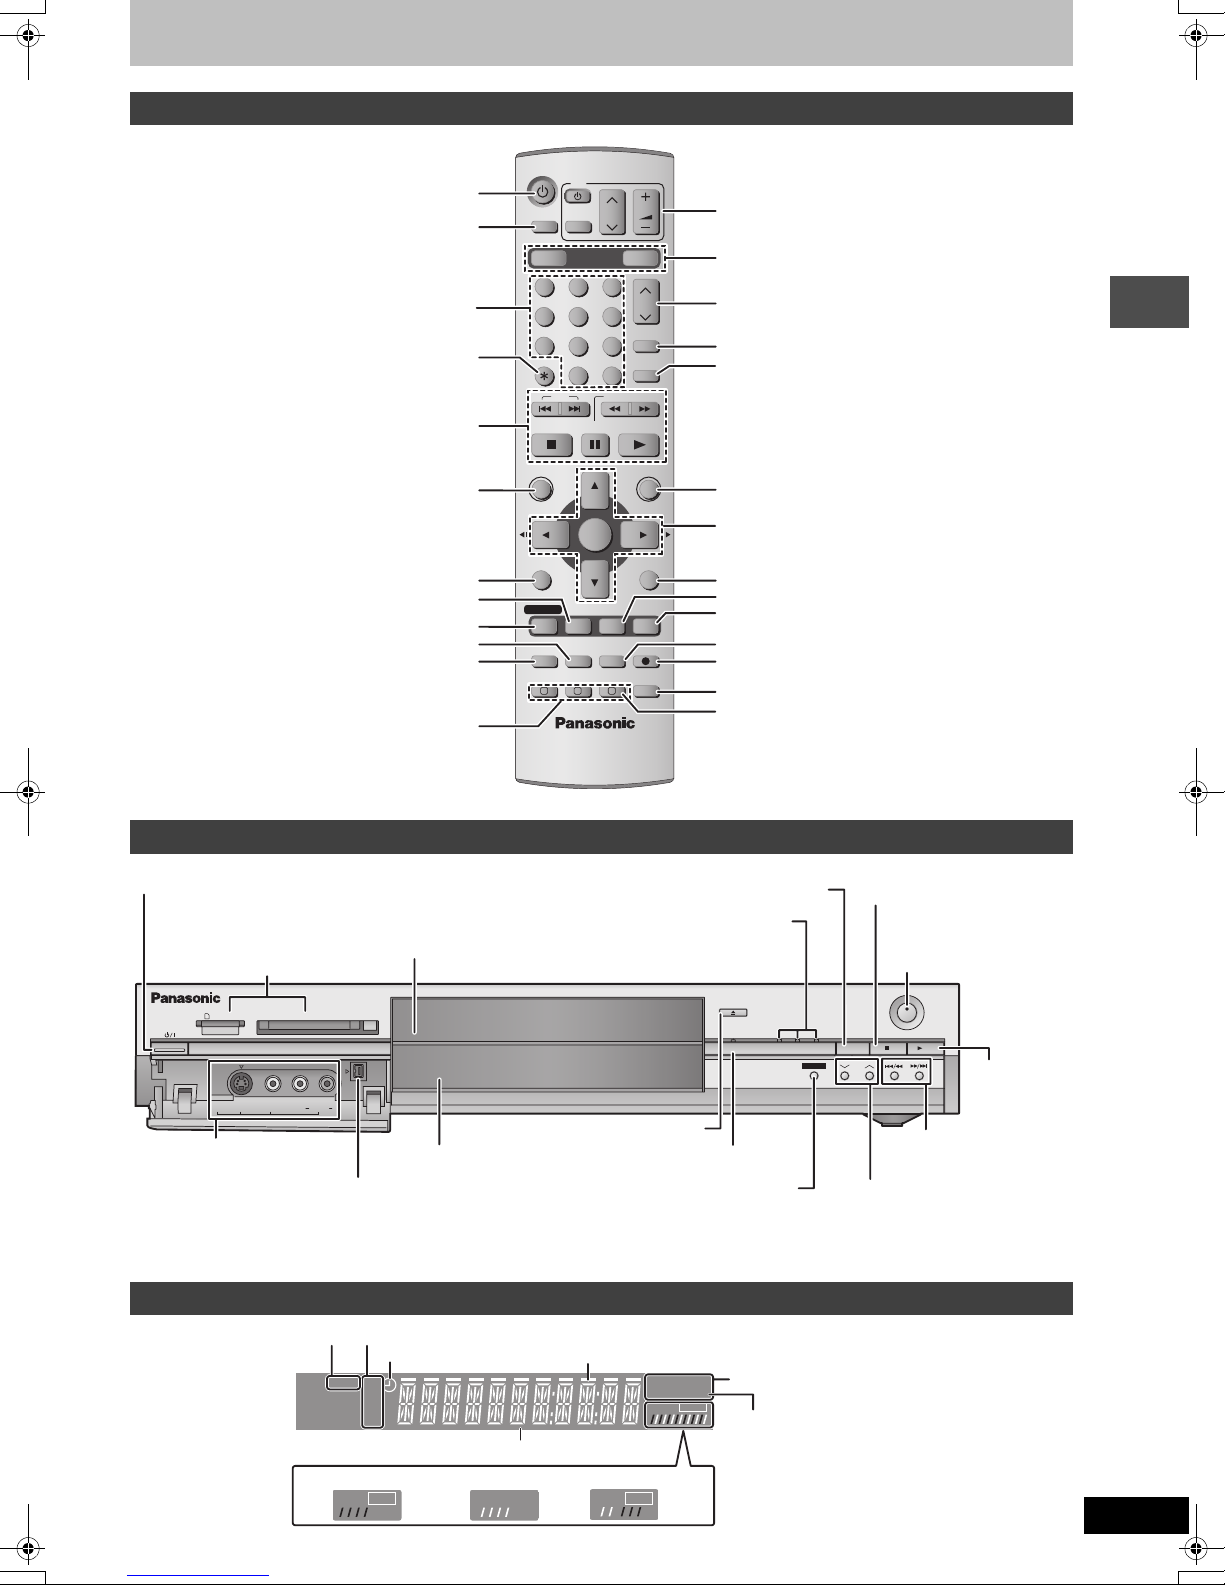
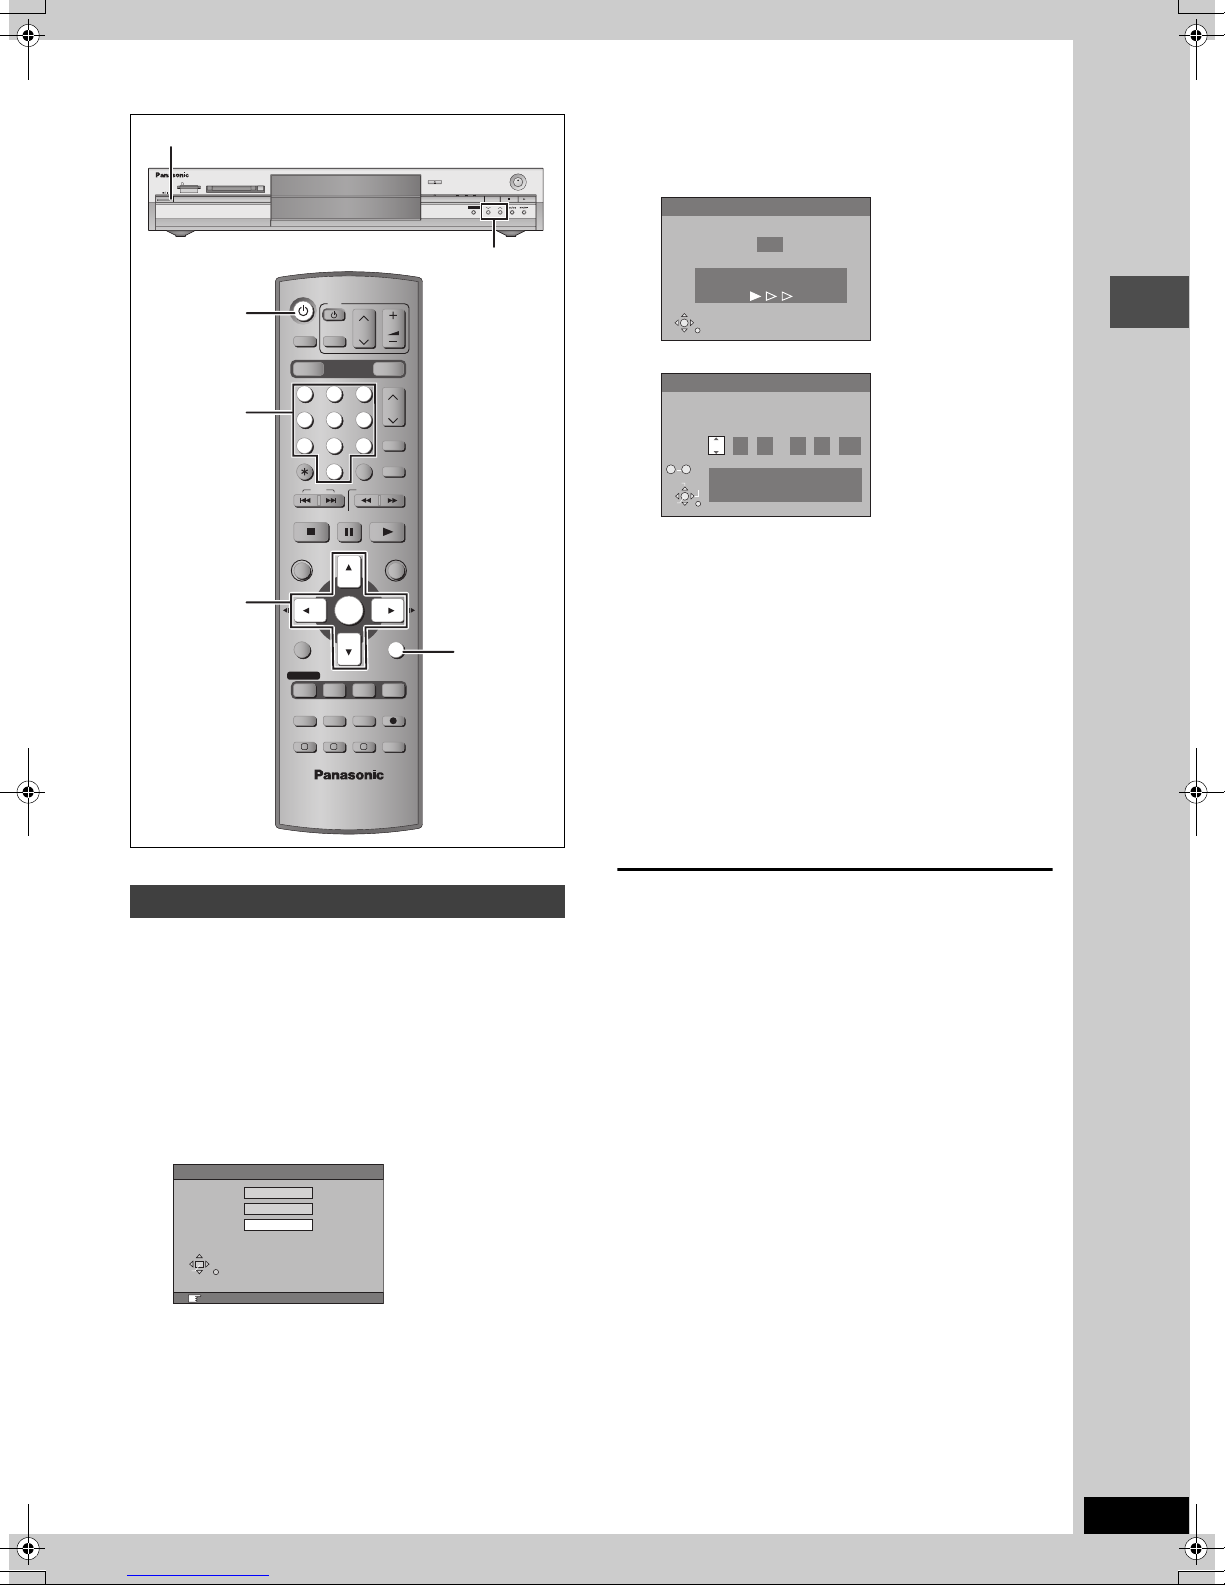
Control reference guide
REC
PLAY
PLAY
REC
Remote control
Turn the unit on (➡ page 9)
Input select (AV3, AV4 or DV) (➡page 33)
Select channels and title numbers etc./
Enter numbers
Basic operations for recording and play
Cancel
DVD
TV
INPUT SELECT
AV
DRIVE SELECT
DVD
123
456
7809
CANCEL
SKIP
STOP
PAU S E
VOLUME
CH
SD/PC
CH
G-Code
MANUAL SKIP
-/--
SLOW/SEARCH
PLAY/x1.3
Television operations (➡page 11)
Select drive (DVD, SD or PC)
(➡ page 14, 20, 25)
Channel select (➡ page 14)
CODE screen (➡ page 17)
Show GSkip 30 seconds forward (➡page 21)
Show Top menu/Direct navigator (➡ page 20, 28)
Show sub menu (➡ page 28)
Show on-screen menu (➡ page 26)
Show timer recording programme screen
(➡ page 18)
Erase items (➡ page 22)
Programme recording standby/release
(➡ page 17, 18)
Manual tuning operation (➡ page 42)
Main unit
Standby/on switch (Í/I) (➡ page 9)
Press to switch the unit from on to standby mode or vice
versa. In standby mode, the unit is still consuming a small
amount of power.
SD/PC card slots (➡ page 24)
SD CARD PC CARD EJECT
AV3
S-VIDEO IN VIDEO IN AUDIO IN DV IN
L/MONO
Connection for camcorder
etc. (➡ page 33)
Connection for digital
video (DV) camcorder
(➡ page 33)
Rear panel terminals (➡ page 7, 8)
Disc tray (➡page 14, 20)
R
Display (➡below)
ENTER
REC MODEERASE
CHAPTER
STATUS
CREATE
FUNCTIONS
RETURN
TIME SLIP
REC
AUDI O
DIRECT NAVIGATOR
TOP MENU
SUB MENU
PROG/CHECK
TIMER
F
A B C
DISPLAY
Select drive (➡ page 14, 20, 25)
Lights when the DVD, SD or
PC drive is selected
Open/close disc tray (➡page 14, 20)
Time Slip indicator (➡ page 15)
Skip the specified time/Display the television
image as a picture-in-picture (➡ page 15, 21)
Show FUNCTIONS window (➡page 35)
Selection/Enter, Frame-by-frame (➡ page 9, 21)
Return to previous screen
Show status messages (➡ page 27)
Skip the specified time/Display the television image
as a picture-in-picture (➡ page 15, 21)
Change recording mode (➡ page 14)
Start recording (➡ page 14)
Select audio (➡ page 22)
Create chapter (➡ page 22)
Stop (➡ page 14, 21)
Remote control signal sensor/
Start recording (➡ page 14)
OPEN/CLOSE
TIME SLIP
SD PCDVD
DRIVE SELECT
TIME SLIP
REC
CH
/x1.3
Start play
(➡ page 20)
Skip/Slow/Search
(➡ page 21)
Channel select
(➡ page 14)
Getting started
The unit’s display
Card indicator
Recording mode
Timer recording indicator
SD PC
XP
SP
LP
EP
Recording
Transferring (dubbing) in progress indicator
Main display section
Playback
DVD
R-AM
VCD
.MIX
REC
PLAY
Recording/Playback
Disc type
D.MIX (multi-channel DVD-Audio only)
When lit: down-mixed audio is played.
When off: the disc prevents down-mixing
so only the two front channels
can be played.
RQT7450
5
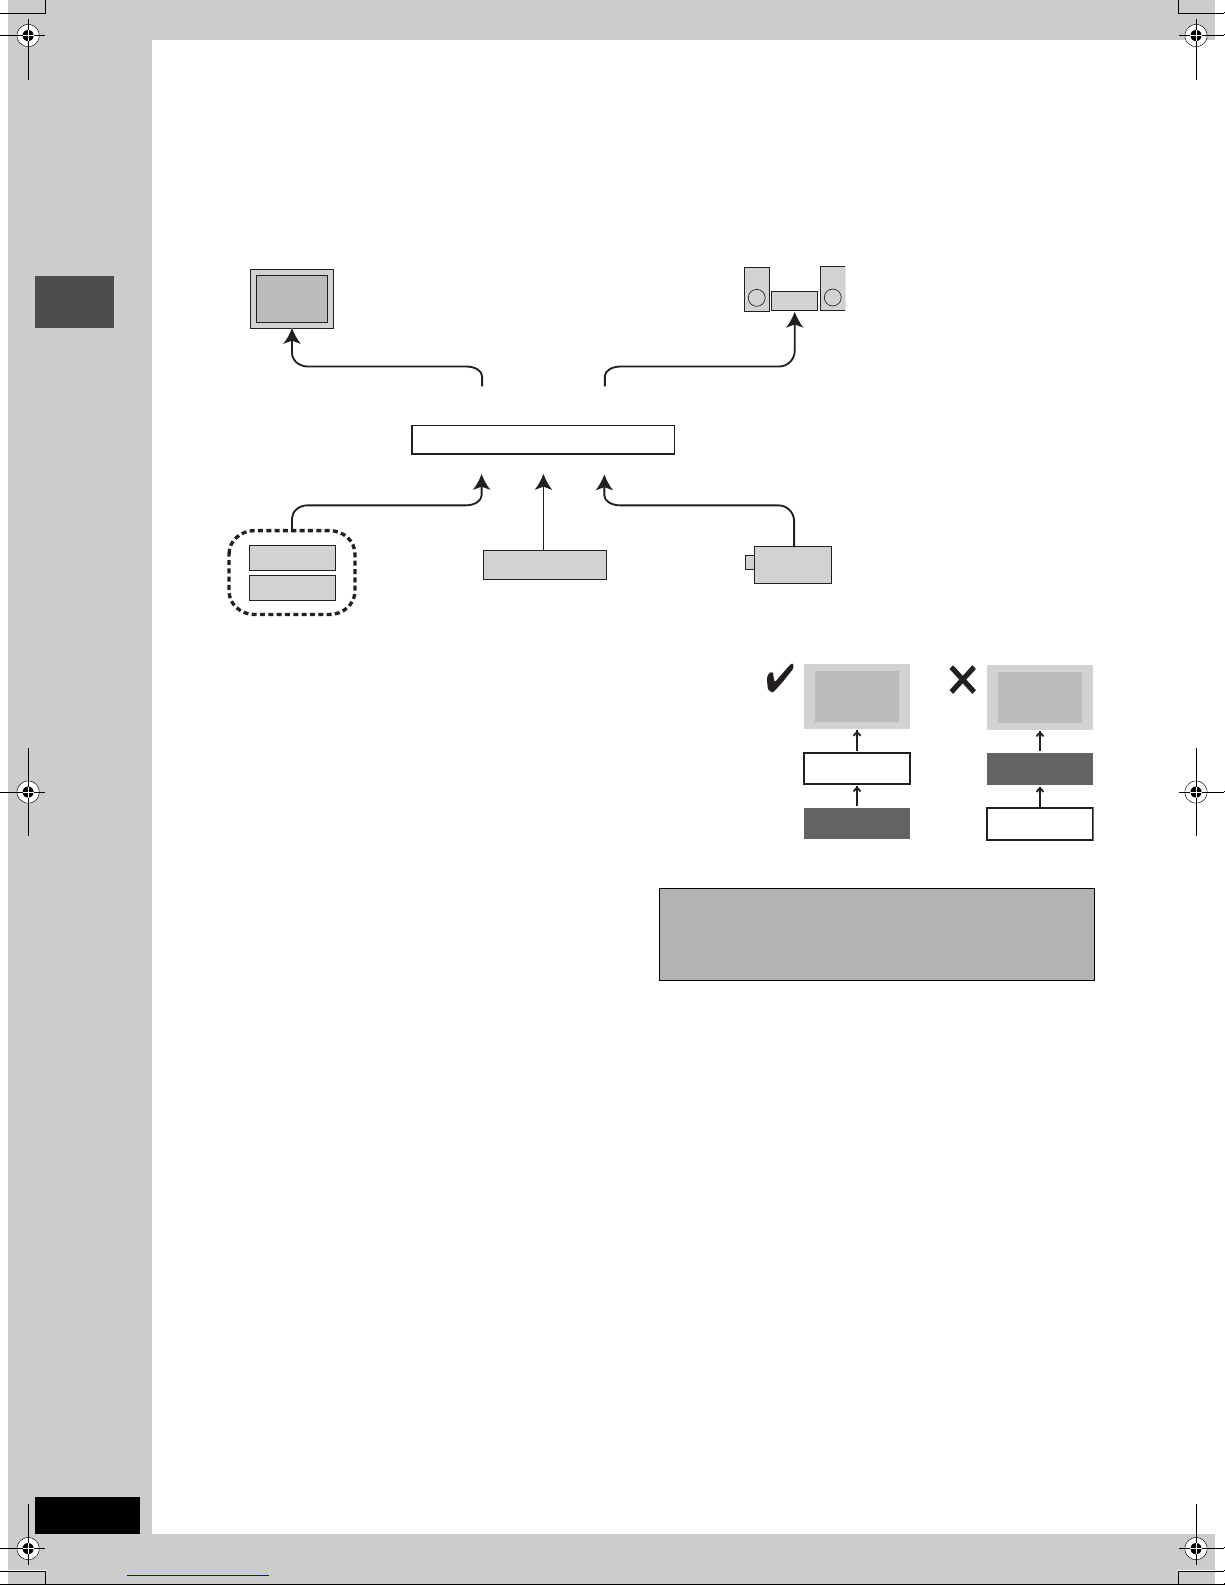
STEP
≥The equipment connections described are examples.
≥Before connection, turn off all equipment and read the appropriate operating instructions.
≥Peripheral equipment and optional cables sold separately unless otherwise indicated.
1
Connection
∫ Examples of equipment you can connect to this unit’s terminals
Television
From AUDIO/VIDEO OUT or
COMPONENT VIDEO OUT terminals
This unit
Getting started
Other equipment
To AV4 input terminals (rear)
Video cassette recorder
From AUDIO OUT terminals or
DIGITAL AUDIO OUT terminal
To AV3 or DV input terminals (front) (➡ page 33)
Amplifier
Camcorder
∫ Do not connect the unit through a video cassette recorder
Video signals fed through video cassette recorders will be affected by copyright protection
systems and the picture will not be shown correctly on the television.
≥When connecting to a television with a built in VCR, connect to the input terminals on
the television side, not the VCR side.
Television
This unit
VCR
Television
VCR
This unit
∫ When the unit is not to be used for a long time
To save power, unplug it from the household mains socket. This
unit consumes a small amount of power, even when it is turned off
(approx. 3 W).
Before moving the unit, ensure the disc tray is
empty.
Failure to do so will risk severely damaging the disc and
the unit.
RQT7450
6
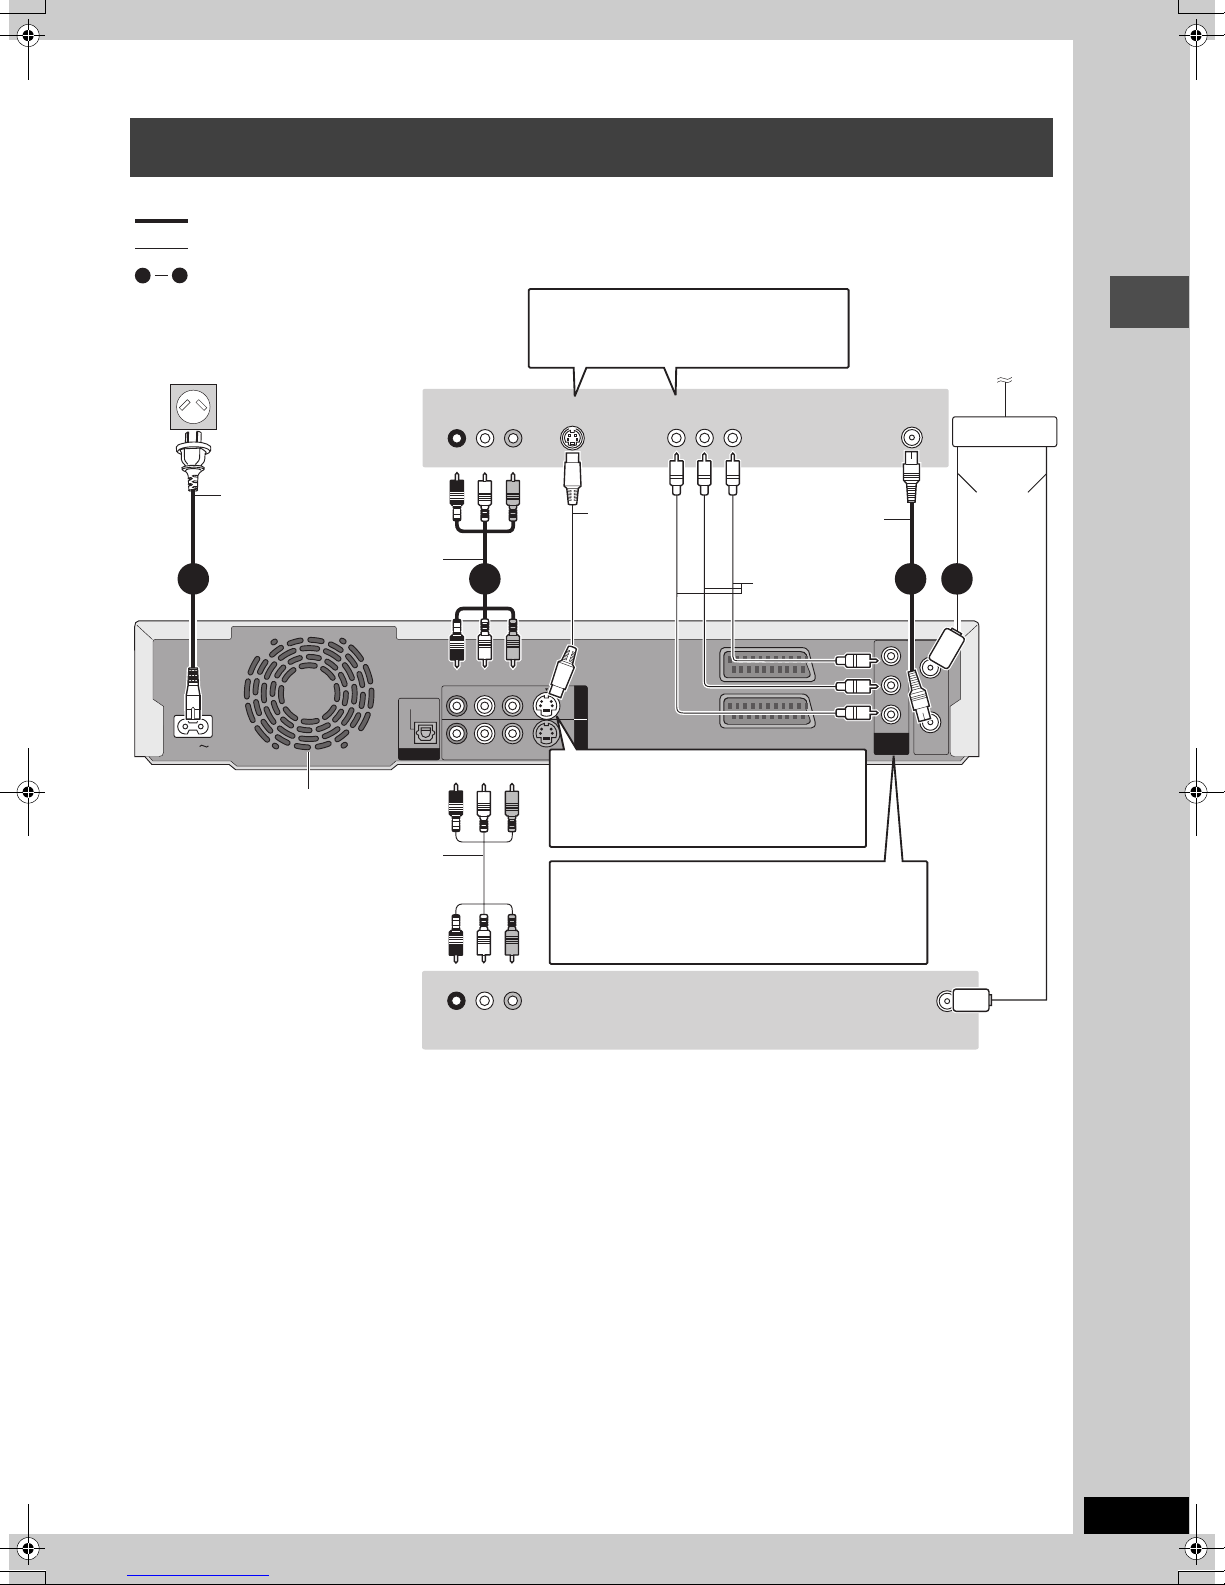
Connecting a television with AUDIO/VIDEO, S-VIDEO or COMPONENT VIDEO
terminals and VCR
indicates included accessories.
indicates accessories not included.
are required connections. Connect in the numbered order.
4
1
When making this connection, ensure you
connect the audio cables to the corresponding
To household mains socket
(AC 220–240 V, 50 Hz)
AC mains lead
Connect only after all other
connections are complete.
4
AC IN
This unit’s rear panel
Cooling fan
Audio/Video cable
OPTICAL
DIGITAL AUDIO OUT
(PCM/BITSTREAM)
Television’s
rear panel
AUDI O IN
R L
Red White Yellow
Red White Yellow
R - AUDIO - L
R - AUDIO - L
Red White Yellow
audio input terminals on the television.
VIDEO IN
S-VIDEO IN
COMPONENT
VIDEO IN
S-Video
cable
VIDEO
S-VIDEO
OUT
AV4 I N
VIDEO
S-VIDEO
S-VIDEO OUT terminal
The S-VIDEO OUT terminal achieves a more
vivid picture than the VIDEO OUT terminal.
(Actual results depend on the television.)
RF coaxial cable
Video cable
AV1 (TV)
AV2 (DECODER/EXT)
VHF/UHF
RF IN
COMPONENT
VIDEO OUT
(NTSC:480P/480I,
PAL:576P/576I)
2 13
Y
PB
PR
To the aerial
Splitter
Getting started
Aerial
cable
RF IN
RF OUT
Audio/Video cable
COMPONENT VIDEO OUT terminal
These terminals can be used for either interlace or
progressive output and provide a purer picture than the
S-VIDEO OUT terminal (➡below).
≥Connect to terminals of the same colour.
Use a splitter if
you also want
to connect the
aerial to your
VCR.
Red White Yellow
VCR’s rear panel
R L
AUDIO OUT VIDEO OUT
VHF/UHF
RF IN
∫ Component video output
Component signal outputs the colour difference signals (PB/PR) and luminance signal (Y) separately in order to achieve high fidelity in
reproducing colours. If the television is compatible with progressive output, a high quality picture can be output because this unit’s component
video output terminal outputs a progressive output signal (➡page 46).
For progressive output (➡page 10)
∫ Connecting to a television with 21-pin Scart
terminal
You can also connect with the AV1 terminal on this unit using the
21-pin Scart cable.
If your television is equipped with RGB input capability, by
connecting with a fully wired 21-pin Scart cable you can see video
using RGB output on this unit.
To output in RGB select “RGB (without component)” from “AV1
Output” in the SETUP menu (➡ page 41).
RGB refers to the three primary colours of light, red (R), green (G),
and blue (B) and also the method of producing video that uses
them. By dividing the video signal into the three colours for
transmission, noise is reduced for even higher quality images.
∫ Connecting to a VCR with 21-pin Scart terminal
You can also connect with the AV2 terminal on this unit using the
21-pin Scart cable.
To input in RGB select “RGB (Not NTSC)” from “AV2 Input” in the
SETUP menu (➡ page 41).
RQT7450
7
STEP
R - AUDIO -
R - AUDIO -
OPTICAL
DIGITAL AUDIO OUT
(PCM/BITSTREAM)
AC IN
R - AUDIO - L
VIDEO
S-VIDEO
R - AUDIO - L
VIDEO
S-VIDEO
OPTICAL
OUT
AV4 I N
DIGITAL AUDIO OUT
(PCM/BITSTREAM)
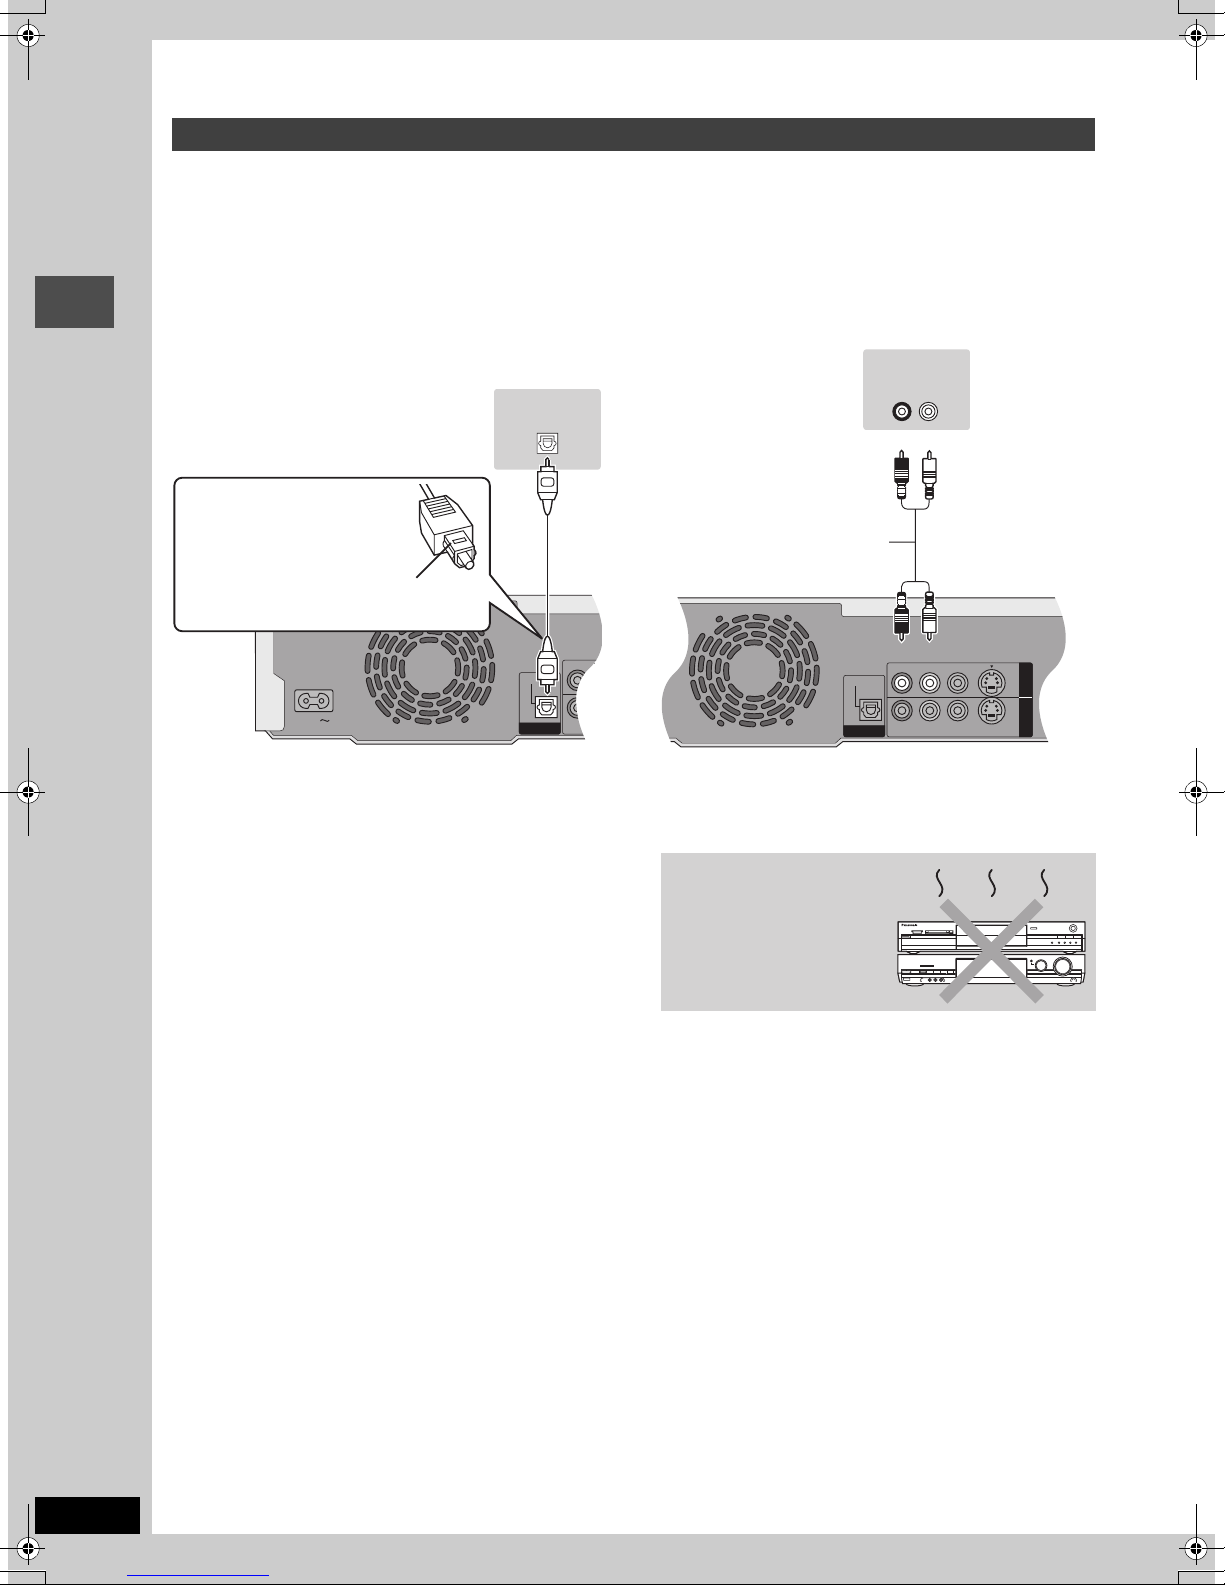
1
Connection
Connecting an amplifier or system component
∫ To enjoy multi-channel surround sound on
DVD-Video
Connect an amplifier with Dolby Digital, DTS and MPEG decoders
using an optical digital audio cable and change the settings in
“Digital Audio Output” (➡page 41) after tuning is completed
(➡ page 9).
≥You cannot use DTS Digital Surround decoders not suited to
DVD.
≥Even if using this connection, output will be only 2 channels when
playing DVD-Audio.
∫ Connection to a stereo amplifier
Amplifier’s rear panel
Amplifier’s rear panel
AUDIO IN
R L
OPTICAL IN
Red White
Getting started
Optical digital audio cable
Do not bend this cable sharply.
Audio cable
Insert fully, with this side facing up.
Red White
This unit’s rear panel
This unit’s rear panel
Do not place the unit on
amplifiers or equipment
that may become hot.
The heat can damage the unit.
RQT7450
8
STEP
2Channel reception settings
Í/ l
SD CARD PC CARD EJECT
Í DVD
Numbered
buttons
3,4,2,1
ENTER
DVD
TV
INPUT SELECT
AV
DRIVE SELECT
DVD
123
456
7809
CANCEL
SKIP
STOP
DIRECT NAVIGATOR
TOP MENU
SUB MENU
PROG/CHECK
DISPLAY
TIMER
F
A B C
CH
-/--
SLOW/SEARCH
PAU SE
ENTER
STATUS
REC MODEERASE
CREATE
CHAPTER
VOLUME
SD/PC
CH
G-Code
MANUAL SKIP
PLAY/x1.3
FUNCTIONS
RETURN
TIME SLIP
REC
AUDIO
OPEN/CLOSE
TIME SLIP
SD PCDVD
DRIVE SELECT
TIME SLIP
CH
X CH W
RETURN
3 Press [3, 4] to select the country
REC
/x1.3
and press [ENTER].
Auto-Setup starts. This takes about 5 minutes.
Auto-Setup
128
Auto-Setup in progress, please wait.
RETURN: to abort
RETURN
Auto-Setup is complete when you see the clock setting menu.
Clock
Time Date
0 : 00 : 00
1
. 1
.
No.
0 9
Please set clock manually.
CHANGE
SELECT
ENTER: store RETURN: leave
ENTER
RETURN
2004
Getting started
4 Press [2, 1] to select the item you
want to change.
This is a 24-hour clock.
The items change as follows:
Hour!#Minute!#Second!#Day!#Month!#Year
^--------------------------------------------------------------------------------------J
Reset the clock regularly to maintain accuracy (➡ page 43).
(Monthly accuracy +/– 15 seconds.)
5 Press [3, 4] to change the setting.
You can also use the numbered buttons for setting.
6 Press [ENTER] when you have
finished the settings.
The clock starts and the television displays the channel
being received.
Auto-Setup
When connecting to a television with the
corresponding terminal (➡page 7).
This unit’s Auto-Setup function automatically tunes all available TV
stations.
1 Turn on the television and select the
appropriate AV input to suit the
connections to this unit.
2 Press [Í DVD] to turn the unit on.
The country setting menu appears on the television.
Country
Australia
New Zealand
Others
SELECT
ENTER
RETURN
RETURN : leave ENTER : access
To stop partway
Press [RETURN].
∫ To confirm that stations have been tuned
correctly (➡ page 42)
∫ To restart Auto-Setup (➡page 43)
You can also use the following method to restart Auto-Setup.
When the unit is on and stopped
Press and hold [X CH] and [CH W] on the main unit until the
Country setting screen appears.
≥All the settings except for the ratings level, ratings password and
time settings return to the factory preset. The timer recording
programmes are also cancelled.
RQT7450
9

STEP
3
Set up to match your television and remote control
DVD
TV
VOLUME
INPUT SELECT
DVD
Numbered
buttons
CANCEL
DIRECT NAVIGATOR
TOP MENU
3,4,2,1
Getting started
ENTER
SUB MENU
CH
AV
DRIVE SELECT
123
456
7809
-/--
SKIP
SLOW/SEARCH
STOP
PAU SE
PLAY/x1.3
ENTER
SD/PC
CH
G-Code
MANUAL SKIP
FUNCTIONS
RETURN
TV operation
buttons
FUNCTIONS
RETURN
PROG/CHECK
DISPLAY
STATUS
TIME SLIP
TIMER
REC MODEERASE
CREATE
CHAPTER
REC
AUDIO
F
A B C
3 Press [3, 4] to select “Connection”
and press [1].
4 Press [3, 4] to select “TV Aspect”
and press [ENTER].
5 Press [3, 4] to select the TV aspect
and press [ENTER].
SETUP
Tun in g
Others
Disc
Picture
Sound
Display
Connection
≥16:9: 16:9 widescreen television
≥4:3: 4:3 aspect television
[RAM] Titles are recorded as they appear on screen.
[DVD-V] Video recorded for a widescreen is played as Pan
≥Letterbox: 4:3 aspect television
Widescreen picture is shown in the letterbox style
(➡ page 46).
TV Aspect
16:9 WIDE TV
16:9
4:3 TV
4:3
Letterbox
SELECT
ENTER
RETURN
& Scan (unless prohibited by the producer of the
disc) (➡ page 46).
To enjoy progressive video
You can enjoy progressive video by connecting this unit’s
COMPONENT VIDEO OUT terminals to an LCD/plasma television
or LCD projector compatible with progressive scan (➡ page 46).
Selecting television type and aspect
Choose the setting to suit your television and preference.
1 While stopped
Press [FUNCTIONS].
1 While stopped
Press [FUNCTIONS].
FUNCTIONS
DVD
Playback
Recording
Dubbing
Edit
Setting
ENTER
RETURN
SD/PC
TIMER RECORDING
DUBBING
SETUP
No Disc
2 Press [3, 4, 2, 1] to select
“SETUP” and press [ENTER].
SETUP
Manual
Auto-Setup Restart
Tuning
Others
Disc
Picture
Sound
Display
Connection
TAB
SELECT
RETURN
2 Press [3, 4, 2, 1] to select
“SETUP” and press [ENTER].
3 Press [3, 4] to select “Connection”
and press [1].
4 Press [3, 4] to select “Progressive”
and press [ENTER].
5 Press [3, 4] to select “On” and
press [ENTER].
Output becomes progressive.
[Note]
≥When connected to a regular television (CRT: Cathode ray tube)
or a multi system television using PAL mode, even if it is
progressive compatible, progressive output can cause some
flickering. Turn off “Progressive” if this occurs (➡page 27).
≥There is no output from the COMPONENT VIDEO OUT terminals
if “AV1 Output” in the SETUP menu is set to “RGB (without
component)”. Set this item to either “Video (with component)” or
“S-Video (with component)” (➡ page 41).
≥If the unit is connected to the television through VIDEO OUT, S-
VIDEO OUT or AV1 terminal, output will be interlace irrespective
of the settings.
To exit the screen
Press [RETURN] several times.
To return to the previous screen
Press [RETURN].
RQT7450
10
Television operation
SETUP
Disc
Tun in g
Remote Control
Others
Press “±” and “ENTER” together
for more than 2 seconds on the remote
control.
You can configure the remote control TV operation buttons to turn
the television on/off, change the television input mode, select the
television channel and change the television volume.
Point the remote control at the television
While pressing [Í TV], enter the code
with the numbered buttons.
e.g., 01: [0] ➡ [1]
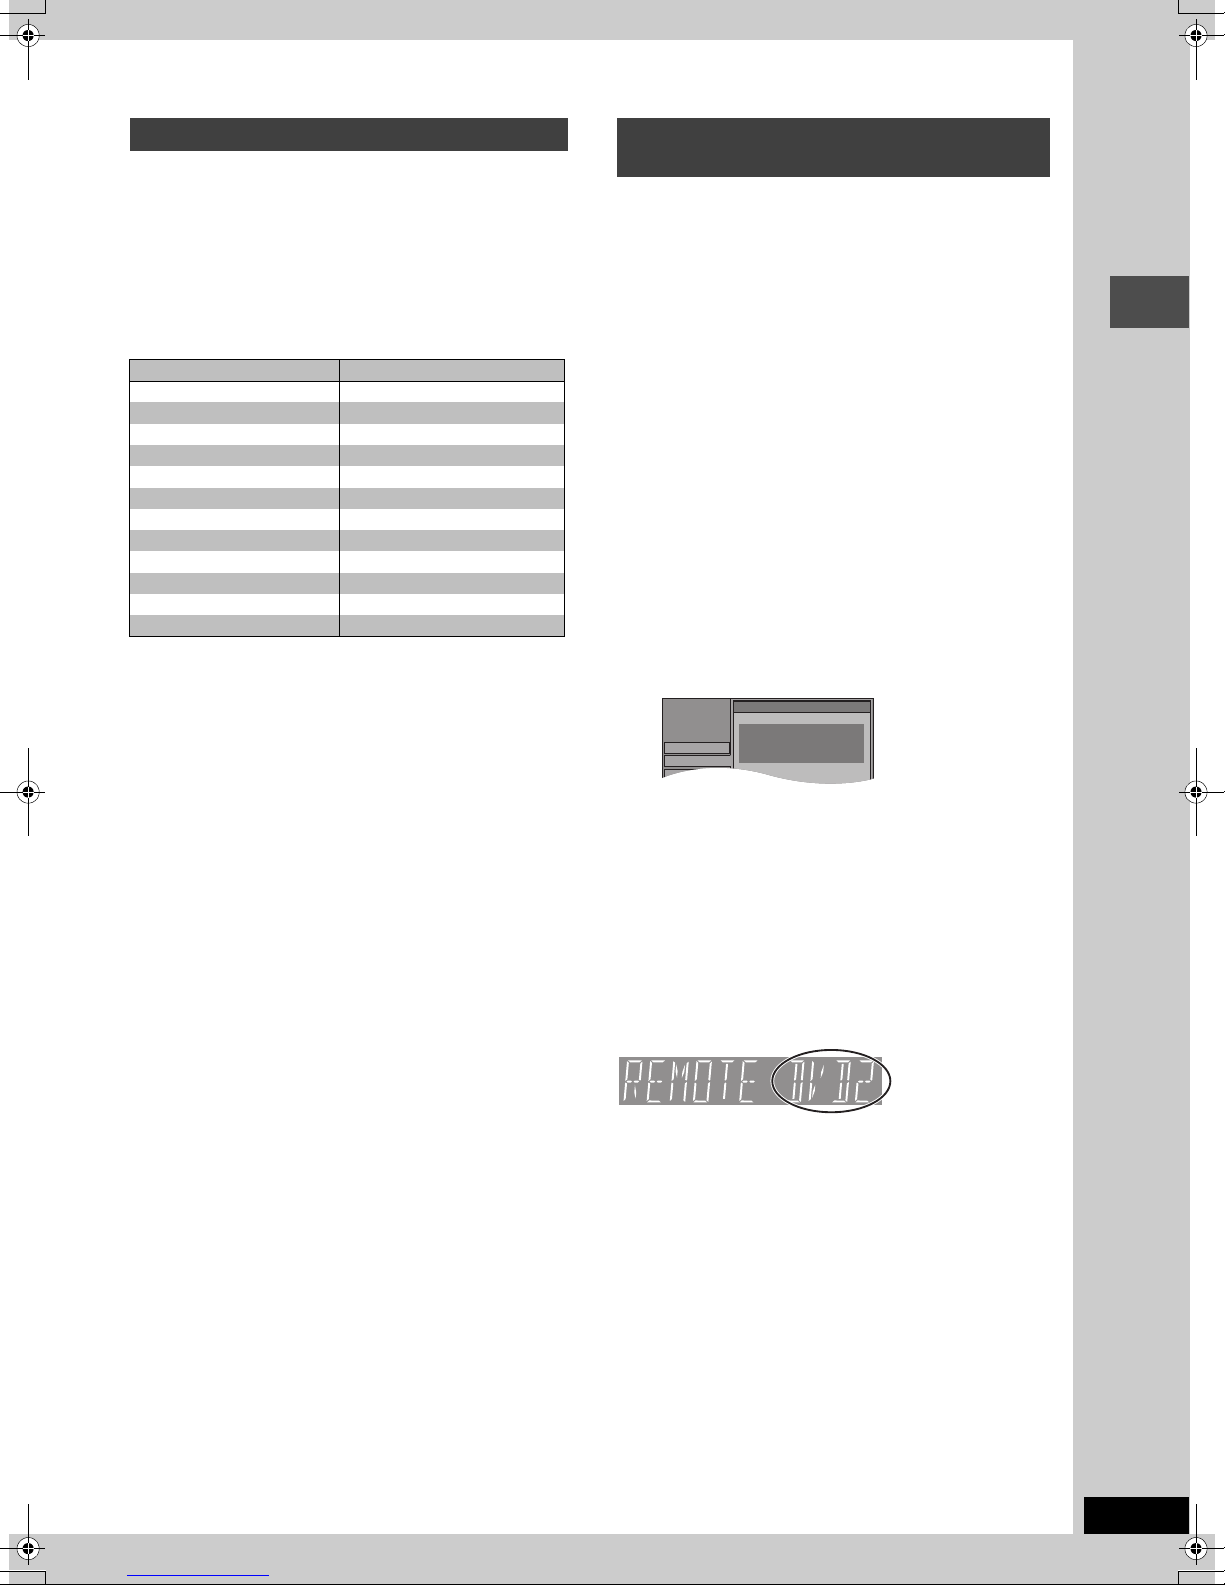
Manufacturer and Code No.
Brand Code
Panasonic/National 01, 02, 03, 04
GOLDSTAR/LG 15, 16
HITACHI 08
JVC 07
MITSUBISHI 09, 10
NEC 13
PHILIPS 12
SAMSUNG 12, 17, 18
SANYO 14, 19
SHARP 11
SONY 05
TOSHIBA 06
Test by turning on the television and changing channels. Repeat
the procedure until you find the code that allows correct operation.
≥If your television brand is not listed or if the code listed for your
television does not allow control of your television, this remote
control is not compatible with your television.
When other Panasonic products
respond to this remote control
If other Panasonic products are placed close together, change the
remote control code on the main unit and the remote control (the
two must match).
Under normal circumstances use the factory set code “DVD 1”.
1 While stopped
Press [FUNCTIONS].
2 Press [3, 4, 2, 1] to select
“SETUP” and press [ENTER].
3 Press [3, 4] to select “Others” and
press [1].
4 Press [3, 4] to select “Remote
Control” and press [ENTER].
5 Press [3, 4] to select the code
(“DVD 1”, “DVD 2” or “DVD 3”) and
press [ENTER].
Getting started
6 To change the code on the remote control
While pressing [ENTER], press and
hold the numbered button ([1], [2] or
[3]) for more than 2 seconds.
7 Press [ENTER].
∫ When the following indicator appears on the
unit’s display
The unit’s remote
control code
Change the code on the remote control to match the main unit’s
(➡ step 6).
[Note]
Executing “Shipping Condition” in the SETUP menu returns the
main unit code to “DVD 1”. Change the remote control code to 1
(➡ step 6).
RQT7450
11

Disc and card information
Discs you can use for recording and play (12 cm/8 cm)
Disc type Logo Instructions
Re-writable discs
≥You can record up to 16 hours [in EP (8Hour) mode on double-sided disc. You cannot
record or play continuously on two sides] (➡ page 15, Recording modes and
DVD-RAM
≥4.7 GB/9.4 GB, 12 cm
≥2.8 GB, 8 cm
Indicated in these instructions with
[RAM]
DVD-R
≥4.7 GB, 12 cm
≥1.4 GB, 8 cm
Getting started
[DVD-R]
≥We recommend using Panasonic discs. DVD-R from other manufacturers may not be recorded or played due to the condition of the recording.
≥This unit cannot record to discs containing both PAL and NTSC signals. Play of discs recorded with both PAL and NTSC on another unit is not
guaranteed.
Which should I use, DVD-RAM or DVD-R?
The following chart indicates the differences. Select based upon
what you require.
(Y: Possible, t: Impossible) DVD-RAM DVD-R
Re-writable Yt
Edit Y§1
Play on other players
Recording both M 1 and M 2 of
bilingual broadcast
Recording broadcasts that allow
one copy
Recording 16:9 aspect picture Y§6
§2
Y
Y
§5
Y
approximate recording times).
≥You can view the title being recorded from the beginning (Chasing playback, Time Slip)
(➡ page 15).
≥Scratch and dust resistant cartridge discs and large capacity double sided discs (9.4 GB)
are commercially available.
≥You can record digital broadcasts that allow “One time only recording” when using CPRM
(Content Protection for Recordable Media) compatible discs (➡ page 46).
≥This unit is compatible with 1k–3k recording speed discs.
≥
You can play and transfer (dub) still pictures taken on a digital camera etc. (➡page 24, 34).
One time recording discs (recordable until the disc is full)
≥You can record up to 8 hours [in EP (8Hour) mode] (➡ page 15, Recording modes and
approximate recording times).
≥By finalizing the disc, you can play it in a DVD player as DVD-Video (Play only)
(➡ page 37, 46).
≥You cannot record digital broadcasts that allow “One time only recording”.
≥This unit is compatible with 1k–4k recording speed discs.
§ 1 You can erase, enter name and change thumbnail. Available
space does not increase after erasing.
§ 2 Only on DVD-RAM compatible players.
§ 3 After finalizing the disc (➡page 37, 46).
§ 4 Only one is recorded (➡ page 41, Bilingual Audio Selection).
§ 5CPRM (➡ page 46) compatible discs only.
§ 6 The picture is recorded in 4:3 aspect.
§3
Y
§4
t
t
RQT7450
12
Play-only discs (12 cm/8 cm)
Disc type Logo Instructions
DVD-Audio
[DVD-A]
DVD-Video
[DVD-V]
Video CD
[VCD]
Audio CD
[CD]
—
High fidelity music discs
≥Played on this unit in 2
channels.
High quality movie and music
discs
Recorded music and video
(including CD-R/RW)
Recorded music and audio
(including CD-R/RW)
CD-R and CD-RW with music
recorded in MP3 (➡ page 23)
≥This unit plays CD-R/CD-RW discs (audio recording discs) which
have been recorded under one of the following standards: CD-DA,
MP3 and Video CD. Close the session or finalize the disc after
recording.
Play may be impossible on some CD-R or CD-RW discs due to the
condition of the recording.
≥The producer of the material can control how discs are played. So
you may not always be able to control play as described in these
operating instructions. Read the disc’s instructions carefully.
Discs that cannot be played
≥2.6 and 5.2 GB DVD-RAM, 12 cm
≥3.95 and 4.7 GB DVD-R for Authoring
≥Unfinalized DVD-R recorded on other equipment (➡ page 46,
Finalize)
≥DVD-Video with a region number other than “4” or “ALL”
≥DVD -RO M ≥DV D-R W ≥iR ≥iRW
≥CD-ROM ≥CDV ≥CD-G ≥Photo CD
≥CVD ≥SVCD ≥SACD ≥MV-Disc
≥PD ≥Divx Video Disc, etc.
Cards useable on this unit
Type Instructions
SD Memory Card
MultiMediaCard
SD Memory Card
MultiMediaCard
CompactFlash
SmartMedia
EMORYSTICK
M
xD-Picture Card
Microdrive
ATA Flash PC Card
Mobile hard disk
You can insert directly into the
SD card slot.
[SD]
You can insert into the PC
card slot using an adaptor
(TYPE II PC card adaptor).
[PC]
You can insert directly into the
PC card slot.
§
[PC]
≥You can play and transfer (dub) still pictures taken on a digital camera etc.
(➡ page 24, 34).
≥You can set the DPOF (Digital Print Order Format) for automatic printing on your
home printer or at a photo developing store (➡ page 32, 46).
≥Compatible with: FAT 12 or FAT 16
≥We recommend using a Panasonic SD card.
≥You cannot use SD cards that exceed 2 GB.
≥We recommend using this unit to format a card before recording (➡page 37, 46).
≥You may not be able to use the card if formatted on a computer.
§
Content saved on SD media storage (SV-PT1).
You can only play the recorded still pictures and transfer (dub) the data onto other
cards or DVD-RAM.
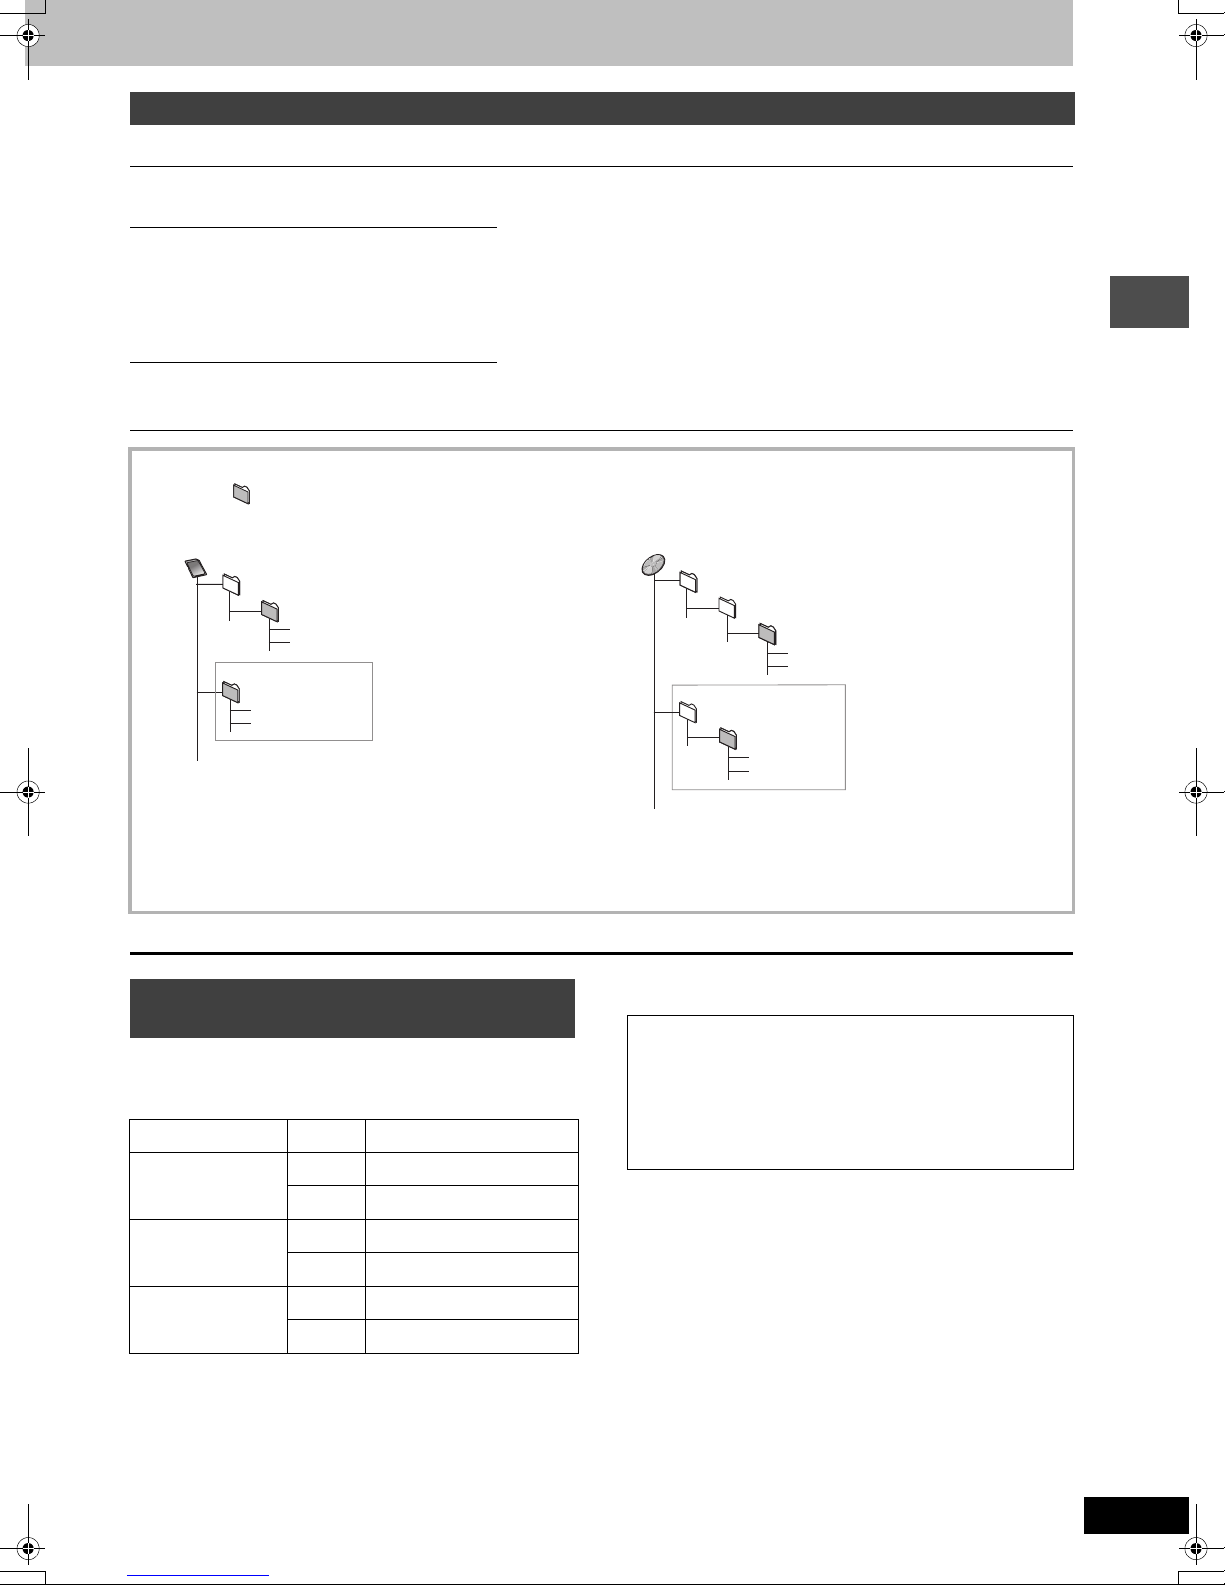
Structure of folders displayed by this unit
The following can be displayed on this unit.
¢¢¢: Numbers XXX: Letters
Card
(Higher folder)
DCIM
¢¢¢XXXXX
XXXX
¢¢¢¢
.JPG
¢¢¢¢
.JPG
.TIF
.TIF
§
XXXX
IM¢¢CDPF or IMEXPORT
XXXX
¢¢¢¢
¢¢¢¢
XXXX
§
Folders can be created on other equipment. However, these folders cannot be selected as a transferring (dubbing) destination.
DVD-RAM
JPEG
DCIM
DCIM¢¢¢
¢¢¢XXXXX
¢¢¢XXXXX
XXXX
XXXX
(Higher folder)
XXXX
¢¢¢¢
¢¢¢¢
XXXX
¢¢¢¢
.JPG
¢¢¢¢
.TIF
.JPG
.TIF
§
≥The folder cannot be displayed if the numbers are all “0” (e.g., DCIM000 etc).
≥If a folder name or filename has been input using other equipment, the name may not be displayed properly or you may not be able to play or
edit the data.
Types of disc for the type of connected
TV
When you use the discs recorded either PAL or NTSC, refer to this
table.
(Y: Possible, t: Impossible)
TV type Disc Yes/No
Multi-system TV
NTSC TV
PAL T V
§1
If you select “NTSC” in “TV System” (➡ page 43), the picture may
be clearer.
§2
Select “NTSC” in “TV System” (➡ page 43).
§3
If your television is not equipped to handle PAL 525/60 signals
the picture will not be shown correctly.
PA L Y
NTSC
PA L t
NTSC
PA L Y
NTSC
§3
Y
§1
Y
§2
Y
(PAL60)
Accessory discs
DVD-RAM
9.4 GB, double-sided, type 4 cartridge:
4.7 GB, single-sided, type 2 cartridge:
4.7 GB, single-sided, non-cartridge:
DVD-R
4.7 GB, single-sided, non-cartridge: LM-RF120LE
LM-AD240LE
LM-AB120LE
LM-AF120LE
Getting started
RQT7450
13
Recording television programmes
Time Slip indicator
215
SD CARD PC CARD EJECT
OPEN/CLOSE
TIME SLIP
DVD indicator
TIME SLIP
DVD
TV
VOLUME
INPUT SELECT
INPUT SELECT
DVD
Numbered
buttons
CANCEL
Recording
CH
AV
DRIVE SELECT
123
456
7809
-/--
SKIP
SLOW/SEARCH
STOP
PAU SE
PLAY/x1.3
SD/PC
CH
G-Code
MANUAL SKIP
∫
DISPLAY
ENTER
STATUS
FUNCTIONS
RETURN
TIME SLIP
DIRECT
NAVIGATOR
3,4,2,1
ENTER
DIRECT NAVIGATOR
TOP MENU
SUB MENU
PROG/CHECK
STATUS
TIMER
REC MODEERASE
F TIMER
F
A B C
CREATE
CHAPTER
REC
AUDIO
4
[RAM] [DVD-R]
≥You can record up to 99 titles on one disc.
≥
It is not possible to record continuously from one side of a double sided
disc to the other. You will need to eject the disc and turn it over.
≥When using 8 cm DVD-RAM, remove the disc from the cartridge.
≥It is not possible to record CPRM (➡page 46) protected material
onto DVD-R or 2.8 GB DVD-RAM discs.
≥It is not possible to record to a card.
REC
SD PCDVD
DRIVE SELECT
TIME SLIP
CH
∫1
3
1
3
;
1
FUNCTIONS
RETURN
TIME SLIP
5
AUDIO
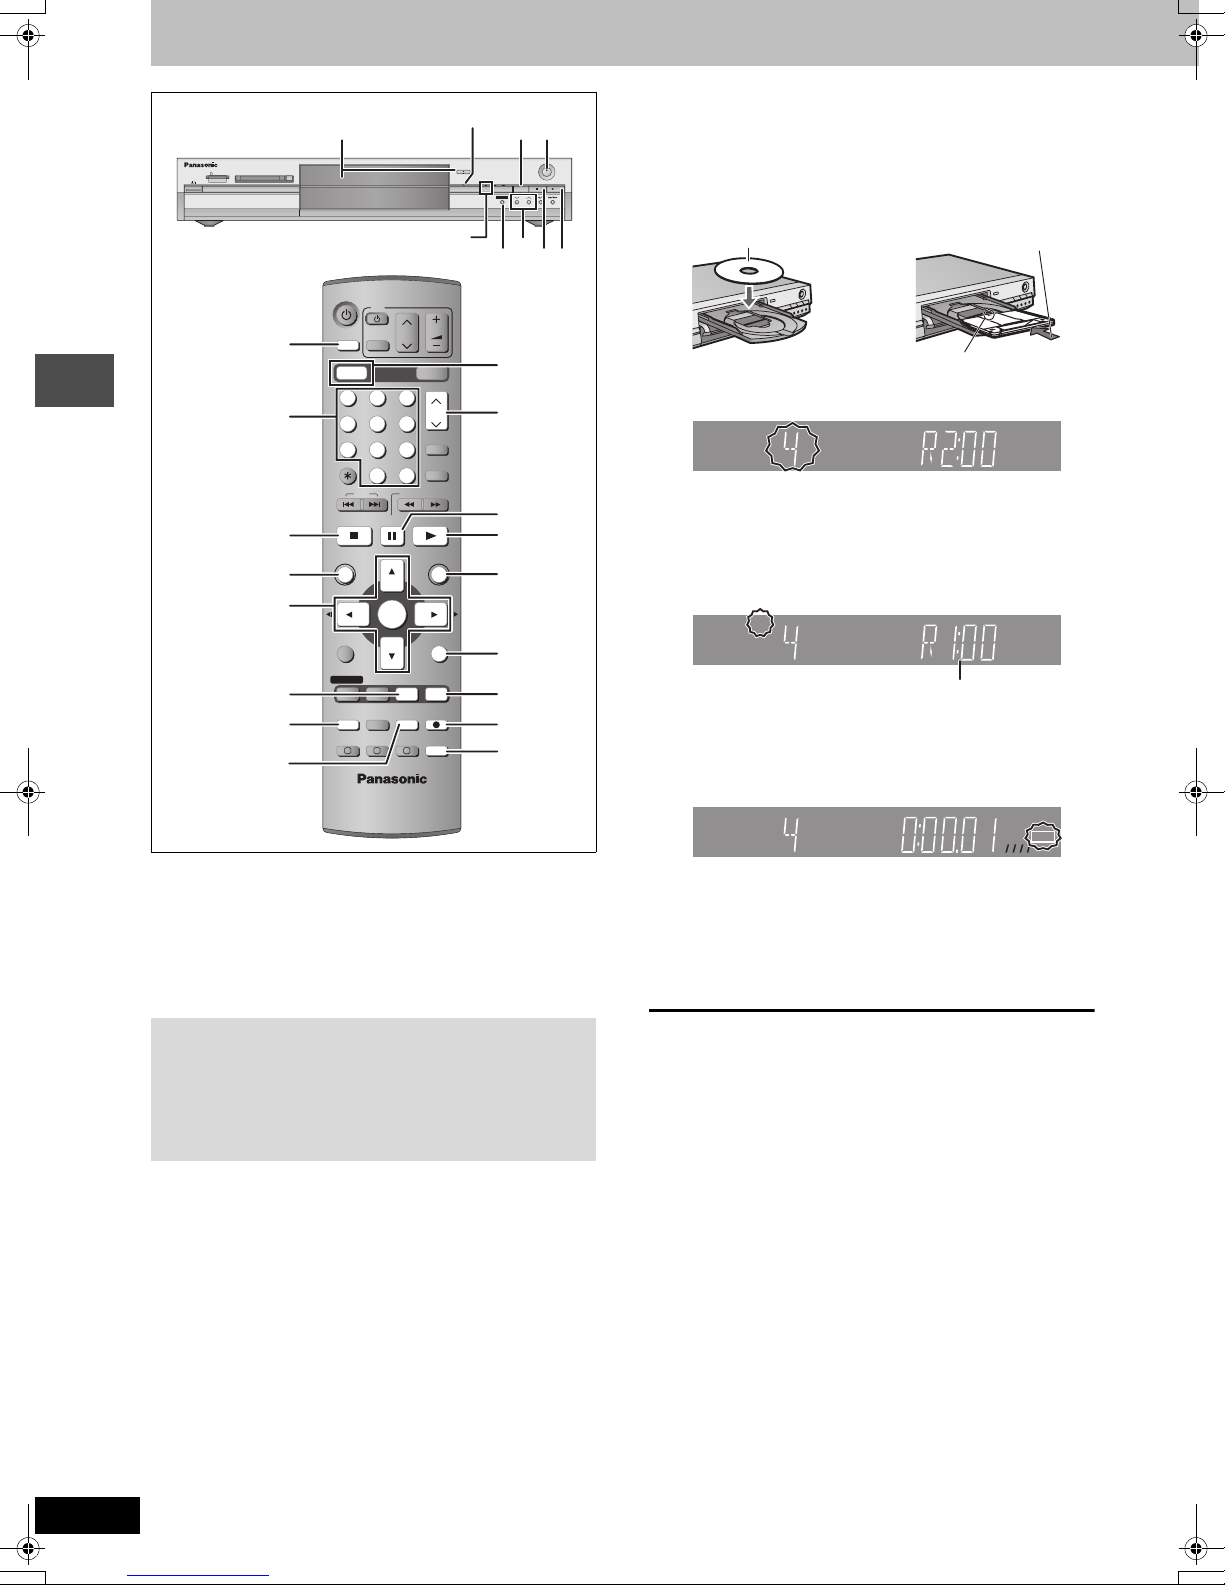
1 Press [DVD] to select the DVD drive.
The DVD indicator lights up on the unit.
2 Press [< OPEN/CLOSE] on the main
/x1.3
unit to open the tray and insert a disc.
≥Press the button again to close the tray.
Insert label-up.
Insert fully so it clicks into place.
Insert with the arrow facing in.
3 Press [WXCH] to select the channel.
DVD
SP
R-AM
To select with the numbered buttons:
e.g., 5: [0] ➡ [5]
15: [-/--] ➡ [1] ➡ [5]
4 Press [REC MODE] to select the
recording mode (XP, SP, LP or EP).
DVD
XP
Remaining time on the disc
≥To record sound using LPCM (XP mode only):
Set the “Audio Mode for XP Recording” to “LPCM” in the
SETUP menu (➡ page 41).
R-AM
5 Press [¥ REC] to start recording.
DVD
XP
Recording will take place on open space on disc. Data will not
be overwritten.
≥You cannot change the channel or recording mode during
recording.
≥[RAM] You can change the audio being received by pressing
[AUDIO] during recording. (Does not affect the recording of
audio.)
R-AM
REC
When recording to DVD-R
≥When recording bilingual broadcasts, only the audio selected in
“Bilingual Audio Selection” (➡page 41) is recorded (“M 1” or
“M 2”).
≥In order to play a DVD-R recorded using this unit on
another playback source, the disc must first be finalized
(➡ page 37).
RQT7450
14
∫ To stop recording
Press [∫].
From the start to the end of the recording is called one title.
[DVD-R]
It takes about 30 seconds for the unit to complete recording
management information after recording finishes.
∫ To pause recording
Press [;].
Press again to restart recording.
(Title is not split into separate titles.)
∫ To specify a time to stop recording—One Touch
Recording
During recording
Press [¥ REC] on the main unit to select the recording
time.
Each time you press the button:
30 (min.) ""# 60 (min.) ""# 90 (min.) ""# 120 (min.)
^" Counter (cancel) ,"" 240 (min.) ,"" 180 (min.) ,}
≥This does not work during timer recordings (➡ page 17) or while
using Flexible Recording (➡ page 16).
To stop recording partway
Press [∫].
Recording modes and approximate
recording times
Depending on the content being recorded, the recording times may
become shorter than indicated.
DVD-RAM
Mode
XP (High quality) 121
SP (Normal) 242
LP (Long play) 484
EP (Extra long play)
Single-sided
(4.7 GB)
8 (6
Double-sided
(9.4 GB)
§
) 16 (12§)8 (6
XP
SP
LP
EP (6 Hour)
Picture quality
§
EP (8 Hour)
Recording time
§
When “Recording time in EP mode” is set to “EP (6Hour)” in the
SETUP menu.
The sound quality is better when using “EP (6Hour)” than when
using “EP (8Hour)”.
(Unit: hour)
DVD-R
(4.7 GB)
§
)
Playing while you are recording
While recording to DVD-RAM you can view the title being recorded
from the beginning as well as play a recorded title.
[RAM]
Playing from the beginning of the title you are
recording—Chasing playback
Press [1](PLAY).
Time Slip indicator on the main unit lights.
Playing a title previously recorded while recording—
Simultaneous rec and play
1 Press [DIRECT NAVIGATOR].
2 Press [3, 4, 2, 1] to select a title
and press [ENTER].
Time Slip indicator on the main unit lights.
To exit the DIRECT NAVIGATOR screen
Press [DIRECT NAVIGATOR].
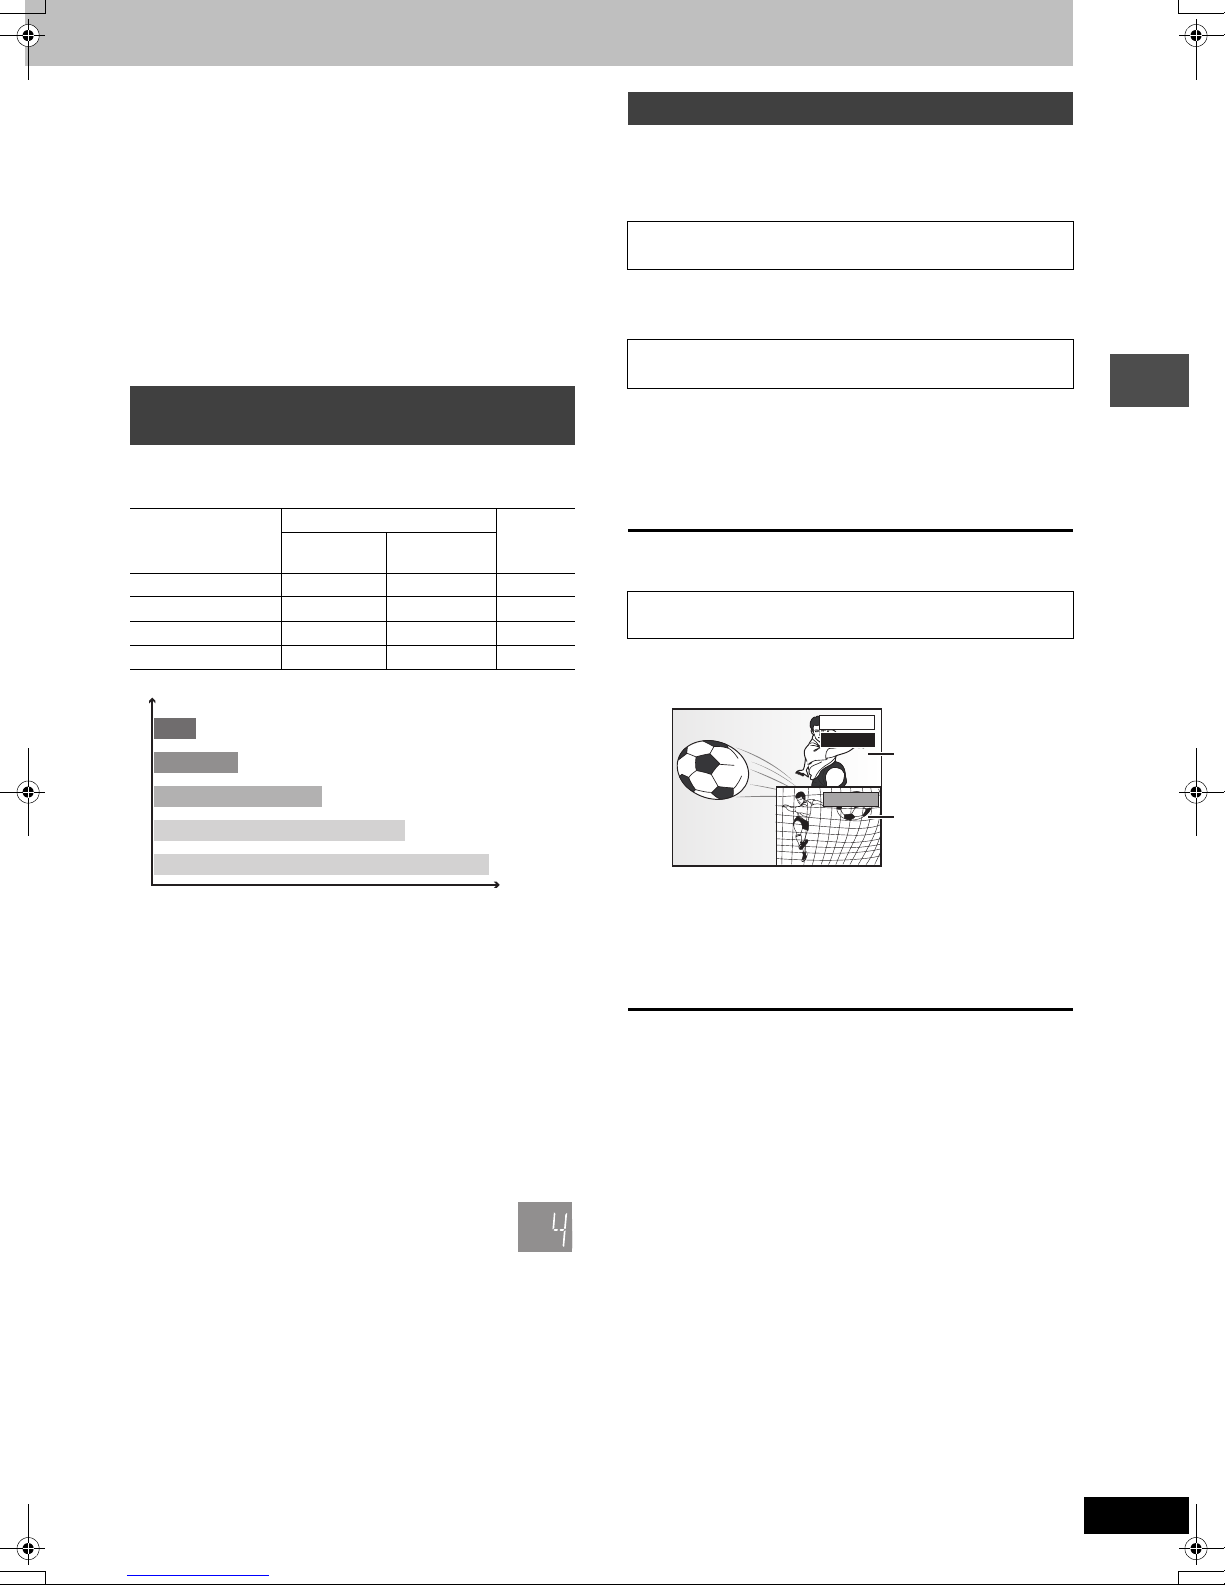
Reviewing the recorded images while recording—
Time Slip
1 Press [TIME SLIP].
Time Slip indicator on the main unit lights.
PLAY
0 min
REC
≥You will hear the playback audio.
Play starts from 30
seconds previous.
The image currently being
recorded
2 Press [3, 4] to select the time and
press [ENTER].
≥Press [TIME SLIP] to show the play images in full. Press
again to show the play and recording images.
Recording
[Note]
When recording to DVD-RAM using “EP (8Hour)” mode, play may
not be possible on DVD players that are compatible with DVD-RAM.
In this case use “EP (6Hour)” mode.
FR (Flexible Recording Mode)
The unit automatically selects a recording rate between XP and EP
(8Hour) that will enable the recordings to fit in the remaining disc
space with the best possible recording quality.
≥You can set when programming timer recordings.
≥All the recording modes from XP to EP appear in the
display.
XP
SP
LP
EP
∫ To stop play
Press [∫].
∫ To stop recording
2 seconds after play stops
Press [∫].
∫ To stop timer recording
Press [F TIMER].
≥You can also press and hold [∫] on the main unit for more than 3
seconds to stop recording.
RQT7450
15

Recording television programmes
Refer to the control reference on page 14.
[RAM] [DVD-R]
Flexible Recording
The unit sets the best possible picture quality that fits the recording
within the remaining disc space. The recording mode becomes FR
mode.
e.g.,
Recorded
Programme to be recorded
Preparation
Recording
Select the channel to record.
Remain
45 minutes in
SP mode
60 minutes
1 While stopped
Press [FUNCTIONS].
2 Press [3, 4, 2, 1] to select
“FLEXIBLE REC” and press [ENTER].
FLEXIBLE REC
Recording in FR mode
Maximum rec. time
Set rec. time
3 Hour 00 Min.
3 Hour 00 Min.
Start Cancel
SELECT
RETURN
3 Press [2, 1] to select “Hour” and
“Min.” and press [3, 4] to set the
recording time.
≥You can also set the recording time with the numbered
buttons.
4 When you want to start recording
Press [3, 4, 2, 1] to select “Start”
and press [ENTER].
Recording starts.
Perfectly fit!
Recording rate
between SP and LP
To exit the screen without recording
Press [RETURN].
To stop recording partway
Press [∫].
To show the remaining time
Press [STATUS].
RQT7450
Remaining
time
16
DVD-RAM
REC 59
ARD
L R
 Loading...