

Page 1

Settings and Printing
Maintenance and Specifications
Maintenance and Specifications
Replaceable Components . . . . . . . . . . . . . . . . . . . . . . . . . . . . . . . 3
Cleaning the Printer . . . . . . . . . . . . . . . . . . . . . . . . . . . . . . . . . . . . 5
External . . . . . . . . . . . . . . . . . . . . . . . . . . . . . . . . . . . . . . . . . . . . . . . 5
Internal . . . . . . . . . . . . . . . . . . . . . . . . . . . . . . . . . . . . . . . . . . . . . . . 5
Clearing a Jam . . . . . . . . . . . . . . . . . . . . . . . . . . . . . . . . . . . . . . .10
Media Tray Empty or Misfeed . . . . . . . . . . . . . . . . . . . . . . . . . . . . . 11
Jam at A . . . . . . . . . . . . . . . . . . . . . . . . . . . . . . . . . . . . . . . . . . . . . 13
Jam at B . . . . . . . . . . . . . . . . . . . . . . . . . . . . . . . . . . . . . . . . . . . . . 15
Jam at C . . . . . . . . . . . . . . . . . . . . . . . . . . . . . . . . . . . . . . . . . . . . . 18
Jam at D . . . . . . . . . . . . . . . . . . . . . . . . . . . . . . . . . . . . . . . . . . . . . 20
Jam at E . . . . . . . . . . . . . . . . . . . . . . . . . . . . . . . . . . . . . . . . . . . . . 21
Troubleshooting . . . . . . . . . . . . . . . . . . . . . . . . . . . . . . . . . . . . . . 23
Cleaning the Photosensitive Drum . . . . . . . . . . . . . . . . . . . . . . . . . 31
Error Indication . . . . . . . . . . . . . . . . . . . . . . . . . . . . . . . . . . . . . . . 35
Repacking Instructions . . . . . . . . . . . . . . . . . . . . . . . . . . . . . . . . 36
Repacking . . . . . . . . . . . . . . . . . . . . . . . . . . . . . . . . . . . . . . . . . . . . 36
Specifications . . . . . . . . . . . . . . . . . . . . . . . . . . . . . . . . . . . . . . . . 41
Printer . . . . . . . . . . . . . . . . . . . . . . . . . . . . . . . . . . . . . . . . . . . . . . . 41
Media . . . . . . . . . . . . . . . . . . . . . . . . . . . . . . . . . . . . . . . . . . . . . . . 43
Bi-directional Parallel Interface . . . . . . . . . . . . . . . . . . . . . . . . . . . . 49
USB (Universal Serial Bus) Interface . . . . . . . . . . . . . . . . . . . . . . . 51
1
Page 2

Settings and Printing
• Microsoft, Windows and Windows NT are either registered trademarks or trademarks of
Microsoft Corporation in the United States and/or other countries.
• Avery and all other related brands and product names are trademarks of Avery Dennison
Corporation.
• 3M and 3M logo are trademarks or registered trademarks of 3M.
• All other acknowledgements are trademarks or registered trademarks of their respective
holders.
Maintenance and Specifications
Maintenance and Specifications
2
Page 3

Settings and Printing
Maintenance and Specifications
Maintenance and Specifications
3
Replaceable Components
Replaceable Components
■
Supplies
When print is faded or indicators show the following status, the replacement of a supply is
needed.
Indicators
Printer
components
Toner cartridge
For U.S.A :
KX-PDP7
For other countries:
KX-PDP8
Drum unit
For all countries:
KX-PDM7
ERROR
TONER/
DRUM UNIT
Low Toner
Change the toner cartridge soon.
Toner Empty
Replace the toner cartridge now.
Change Drum Unit
Change the drum unit soon.
Drum Unit Worn out
Replace the drum unit now.
Drum Unit Worn out
and Toner Empty
Replace the drum unit and toner
cartridge now.
Message of printer
status display
Average life
—
4,000 pages
20,000 pages
✱1, ✱2
—
n
: Indicator is turned off.
: Indicator is lit.
, : Indicator is blinking (with an interval of 1 second).
*1 Refer to the next page.
*2 The toner cartridge provided with the printer is a starter kit toner car tridge, which
has less toner. (The page life expectancy is 2,000 pages.)
Page 4

Settings and Printing
Maintenance and Specifications
Maintenance and Specifications
Replaceable Components
*1Average life is based on an average of 5% coverage of the printable area and standard
density when the recommended media is used (refer to Example: 5% coverage). The life of
a toner cartridge is varied depending on the coverage, temperature, humidity or media etc.
So the average life cannot be assured. Continuously printing 10% coverage of the printable
area will reduce the life of the toner to about half as compared to printing 5% coverage.
Example (5% coverage)
Personal Image Editing System
Feature:
Congratulations on your purchase of the XX-XXXX, the three-in-one solution to today's office
needs. This amasing little desktop unit can be used as a : Printer, Scanner, Copier.
Printer Specification
Printing Method:
Print Speed:
Resolution:
Paper Feed:
Paper Outout:
Software Emulation:
Paper Size/Weight:
Memory Capacity:
Dimensions:
Mass {Weight}:
Consumables:
Noise Level:
CPU:
Other Specification
Operating Environment:
Storing Environment:
Feature:
Congratulations on your purchase of the XX-XXXX, the three-in-one solution to today's office
needs. This amasing little desktop unit can be used as a : Printer, Scanner, Copier.
❈ Application Soft : Text Bridge, Card Scan
Model No. XX-XXXX
Semiconductor Laser Electro-Photography
X ppm maximum (A4 size paper, text mode, 5 % image area)
600 dpi X 600 dpi
1 Multi-purpose manual feed up to 250 sheets of paper [75 g/m
Face-down paper ejection (up to 150 sheets) [75 g/m2 (20 lbs.)]
GDI + Soft XXXX
Letter, Legal, A4, Envelope, Executive, OHP, Label
2 MB
399 (W) X 390 (D) X 254 (H) mm (15.7" X 15.4" X 10")
Approx. 10 Kg {22 lbs.}
Starter toner cartridge : 20,000 pages average
Toner cartridge: 4,000 pages average
Drum unit: 20,000 pages average
Printing: 48 dBA
Stadby: 27 dBA
Intel 80C51 compatible
10 to 32.5˚C [50 to 90.5˚F] 20 to 80% RH
0 to 35˚C [32 to 95˚F] 20 to 80% RH
2
(20 lbs.)]
4
Page 5
Settings and Printing
Maintenance and Specifications
Maintenance and Specifications
Cleaning the Printer
Cleaning the Printer
Periodic cleaning of the printer is recommended. The frequency of cleaning is dependent
upon the environment in which the printer is used.
You should clean the printer:
•at least once a month.
•when you replace the toner cartridge.
•when print quality has deteriorated.
CAUTION
•Do not use benzene, thinner, aerosol cleaners, or any abrasive powder.
External
5
1
2
Turn the power OFF.
Clean all the covers with a soft cloth. Use any mild commercial cleaner.
Internal
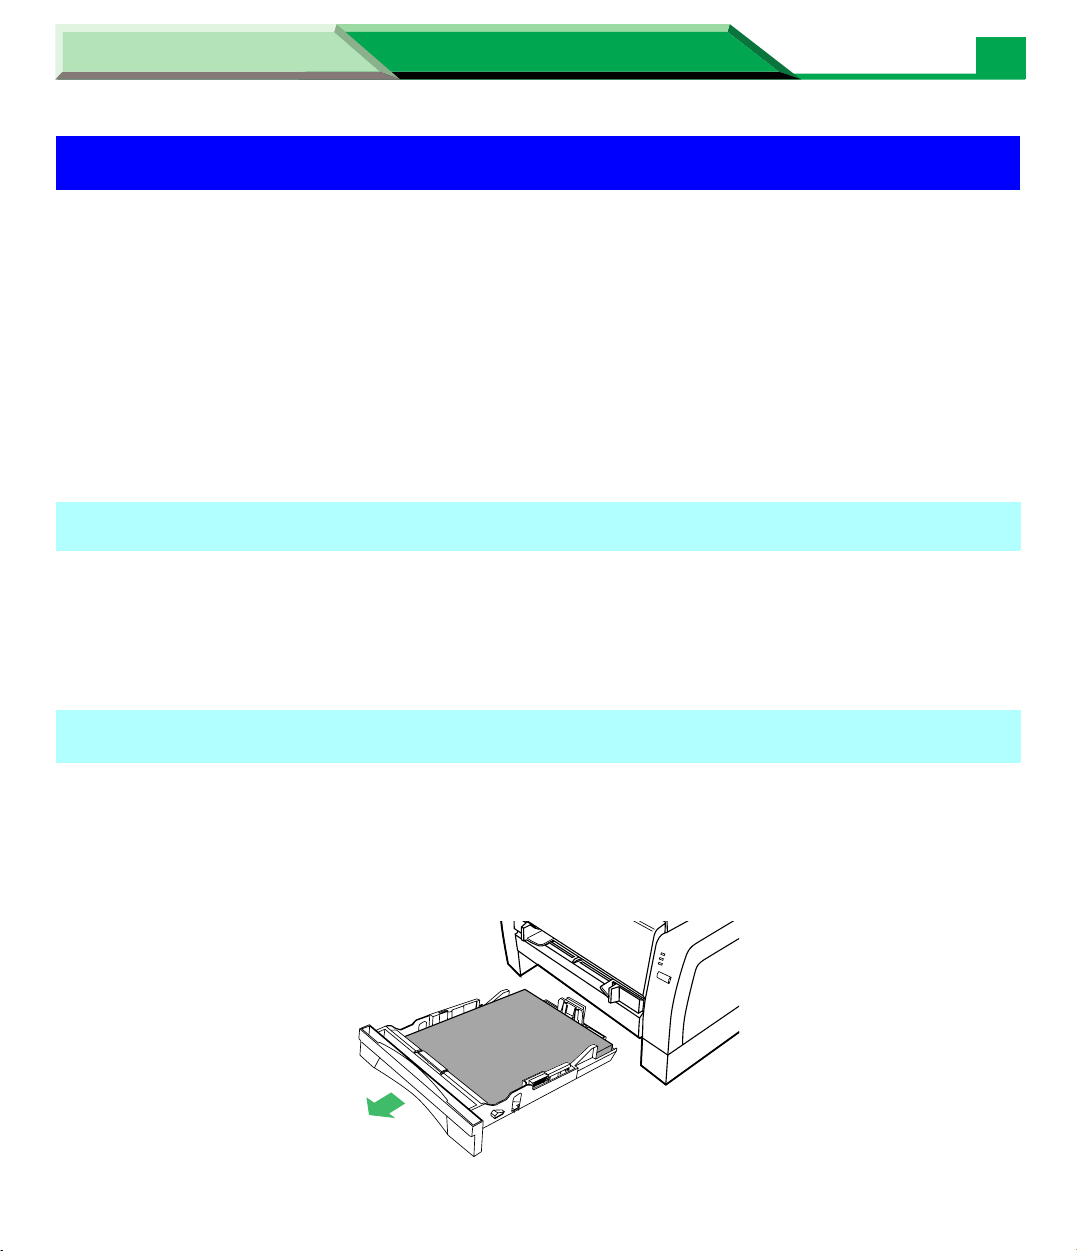
1
2
Turn the power off and remove the power cord for your safety.
Remove the media tray out of the printer.
Page 6
Settings and Printing
Maintenance and Specifications
Maintenance and Specifications
6
Cleaning the Printer
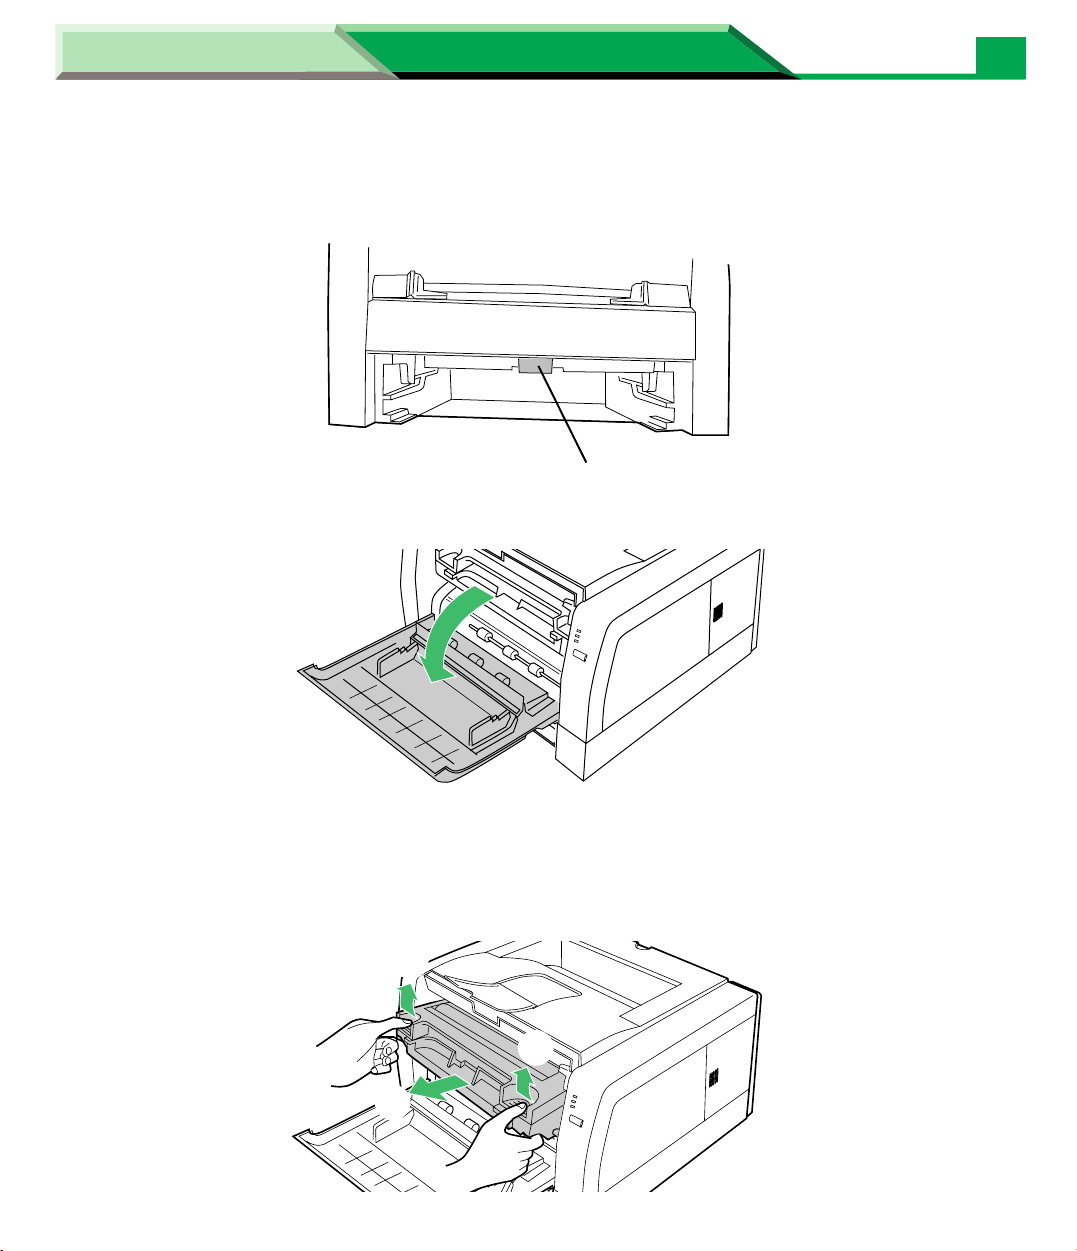
3
4
While rotating the pick up roller, wipe it with a soft cloth that has been
moistened with a mild commercial cleaner.
Pick up roller
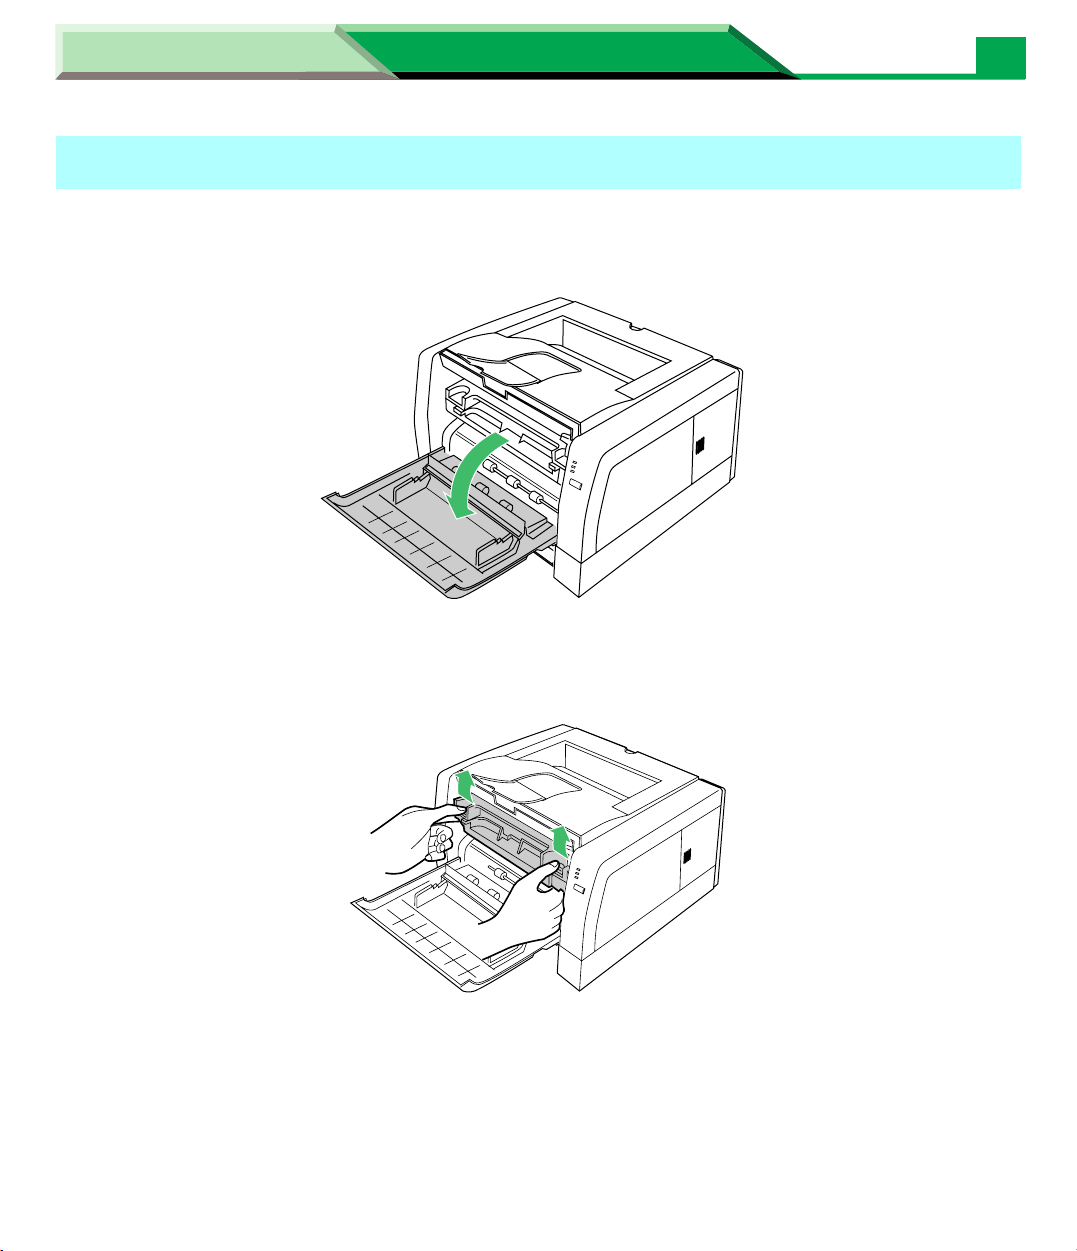
Open the front cover.
5
Lift the drum unit up ( # ) and slide it out of the printer ( $ ).
• To avoid possible toner spillage, it is recommended to place the drum unit on a
newspaper or drop cloth.
#
#
$
Page 7
Settings and Printing
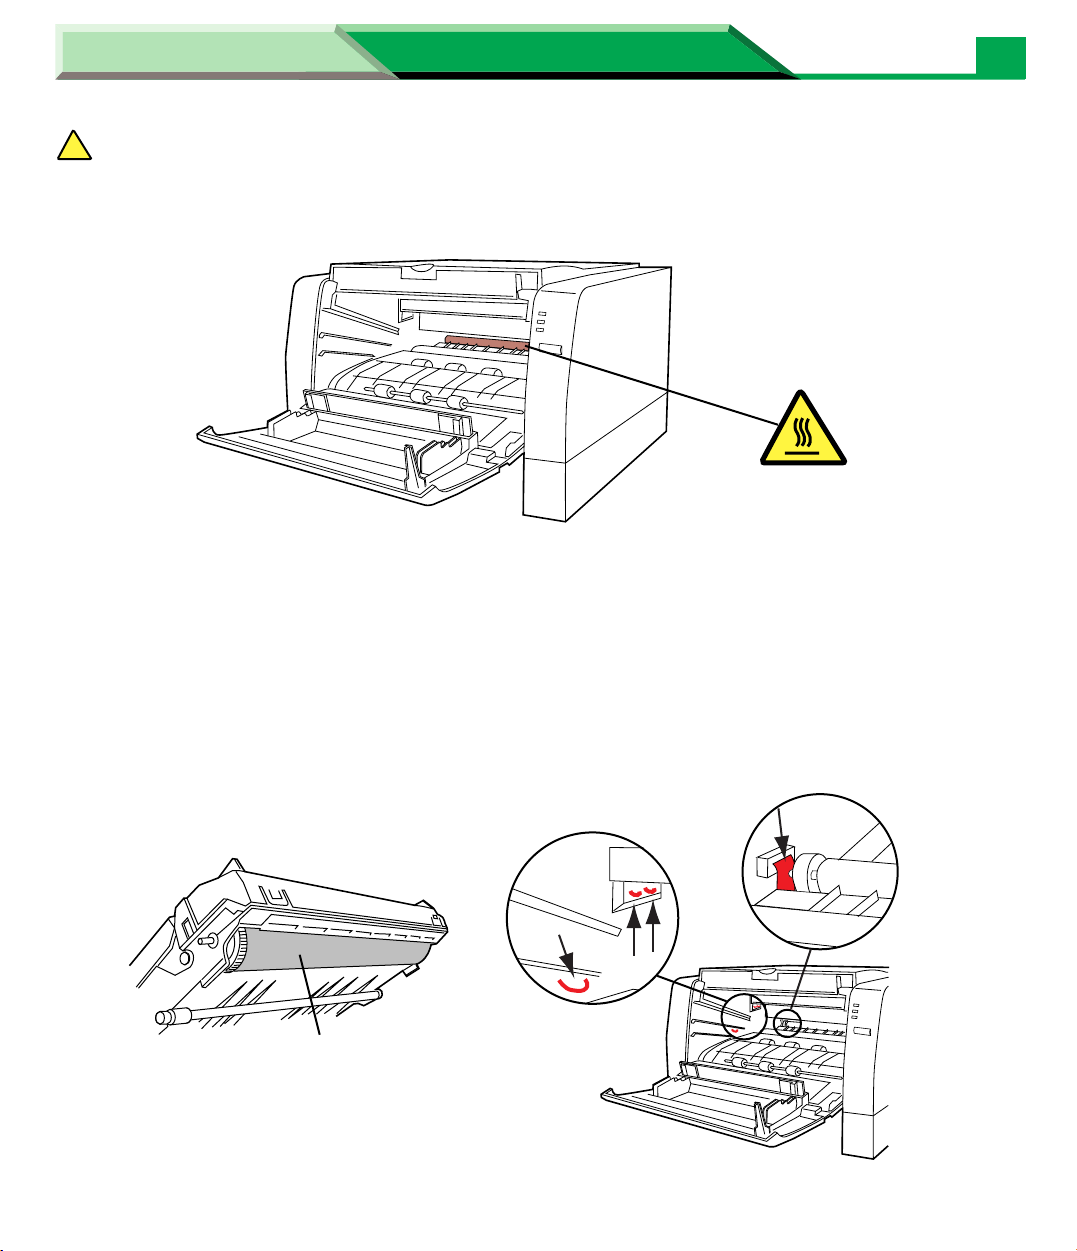
SAFETY CAUTION
!
•It is very hot inside the printer; to avoid personal injury, do not touch the components
illustrated below.
Maintenance and Specifications
Maintenance and Specifications
Cleaning the Printer
CAUTION:
HOT SURFACE
CAUTION
•To prevent any damage to the drum unit, observe the following precautions.
— Do not touch the black drum surface illustrated below.
— Do not expose the drum unit to light for more than 5 minutes.
— Do not expose the drum unit to direct sunlight.
— Do not keep the drum unit near dust or dirt.
— Do not place the drum unit in a high humid area.
•Do not touch electrodes illustrated below to prevent static electricity damage to the printer.
7
Black drum
Electrodes (shown in red)
Page 8

Settings and Printing
Maintenance and Specifications
Maintenance and Specifications
8
Cleaning the Printer
6
Wipe rollers (A) and (B), and paper chute with a soft cloth that has been
moistened with a mild commercial cleaner.
•Be sure to remove the paper dust.
(B)
Paper chute
Sheet: Not to damage
(A)
NOTE
•Front rollers (A) can be rotated half. Inner rollers (B) can be rotated to the direction of the
arrow. Be sure not to damage the sheets in front of the inner rollers (B).
7
Turn the sponge up and carefully wipe the laser unit cover glass with a
dry lint-free cloth.
Laser unit cover glass:
Not to touch with hand
CAUTION
To avoid a damage to the printer,
•Do not use rubbing alcohol to wipe the laser unit cover glass.
•Do not touch the laser unit cover glass by hand.
Page 9
Settings and Printing
Maintenance and Specifications
Maintenance and Specifications
9
Cleaning the Printer
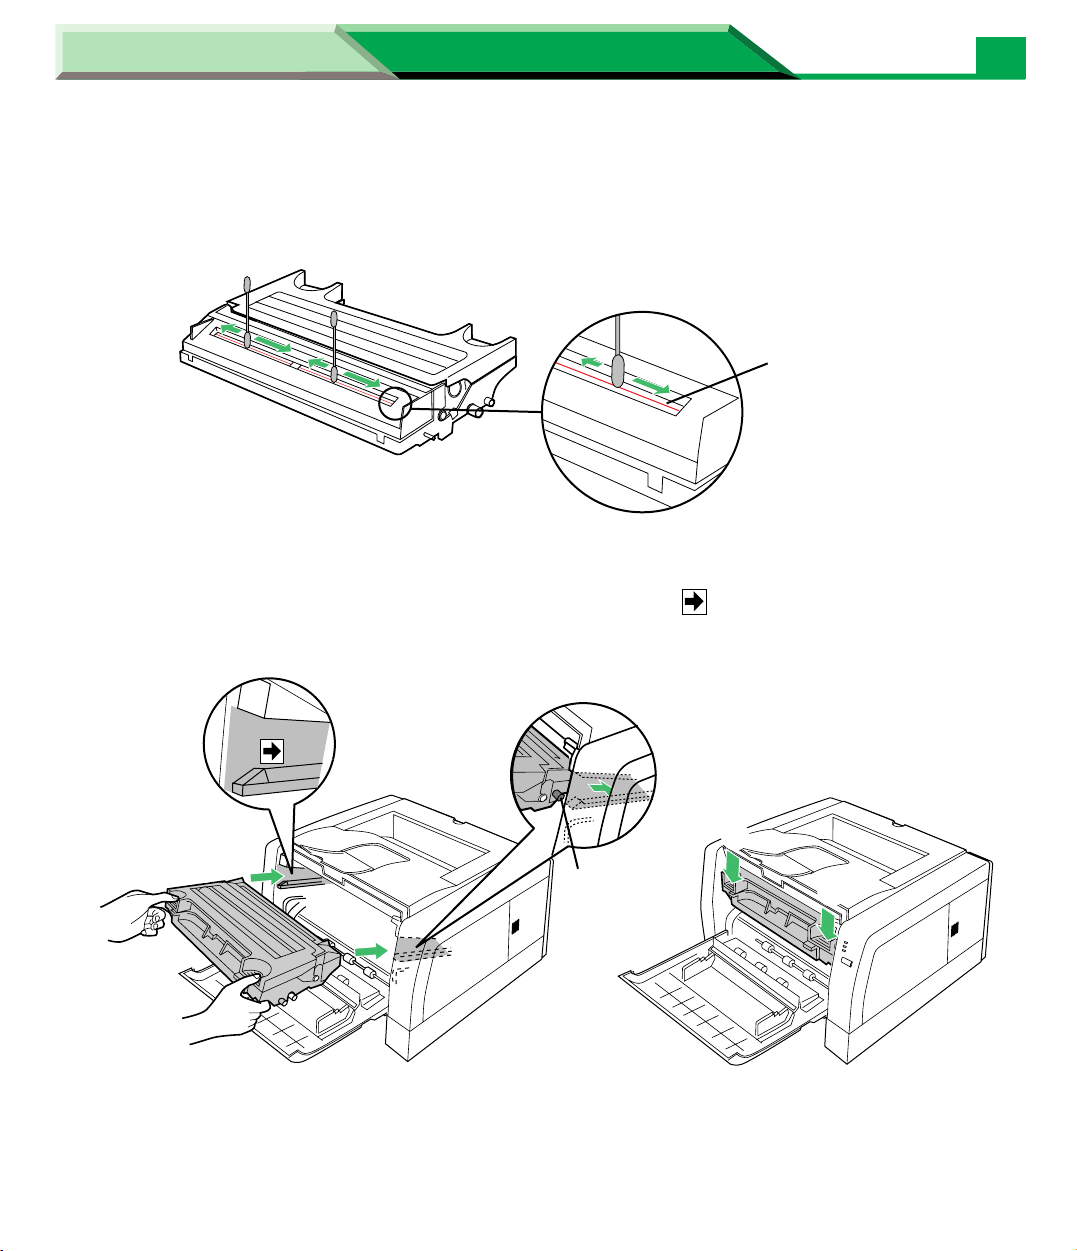
8
9
Carefully wipe the corona wire of the drum unit by sliding a dry cotton
swab from end to end a few times.
corona wire
Firmly inser t the drum unit in the slot of the printer ( # ) [insert the side
pins of the drum unit into the groove (label )]. Push down ( $ ).
10
$
#
Side pin
Close the front cover and replace the media tray into the printer.
$
Page 10
Settings and Printing
Maintenance and Specifications
Maintenance and Specifications
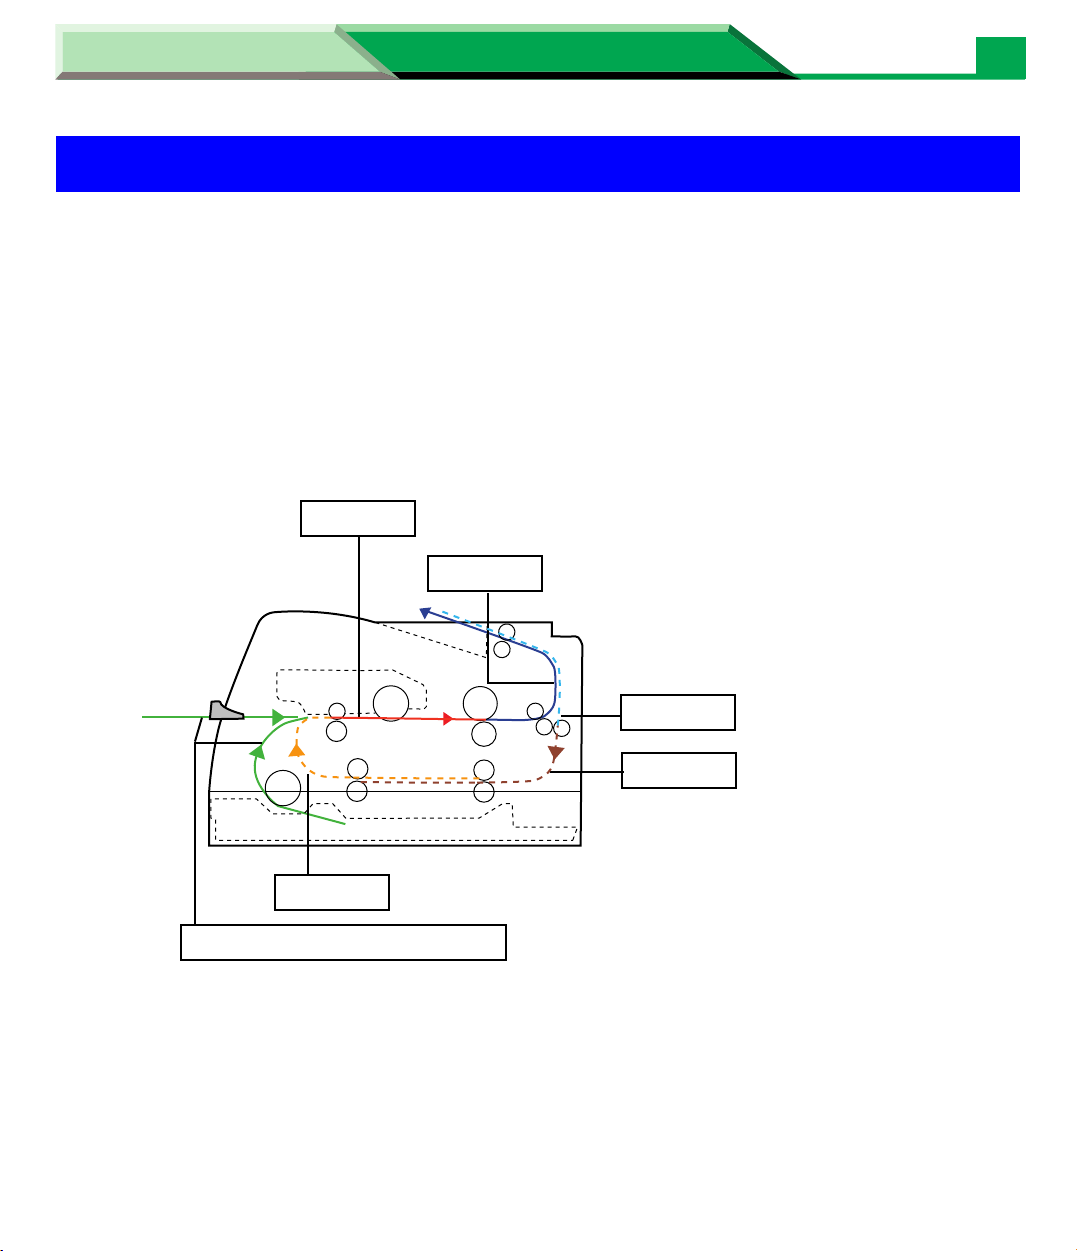
Clearing a Jam
Clearing a Jam
If the printer has frequent media jams, make sure that you follow these guidelines:
•Always use high-quality paper and transparencies. see “Media” on page 43.
2
• Make sure that you load thick paper [106 – 165 g/m
manual feed.
If a media jam occurs, the printer status display reports “Media Tray Empty or Misfeed” or “J am
at <Location>”. The <Locations> are the various sensors throughout the paper path, listed as
A through E.
Jam at A (see page 13)
Jam at B (see page 15)
(29 – 44 lbs.)] or labels only in the
10
Jam at D (see page 20)
Jam at E (see page 21)
Jam at C (see page 18)
Media Tray Empty or Misfeed (see page 11)
Page 11
Settings and Printing
Maintenance and Specifications
Maintenance and Specifications
Clearing a Jam
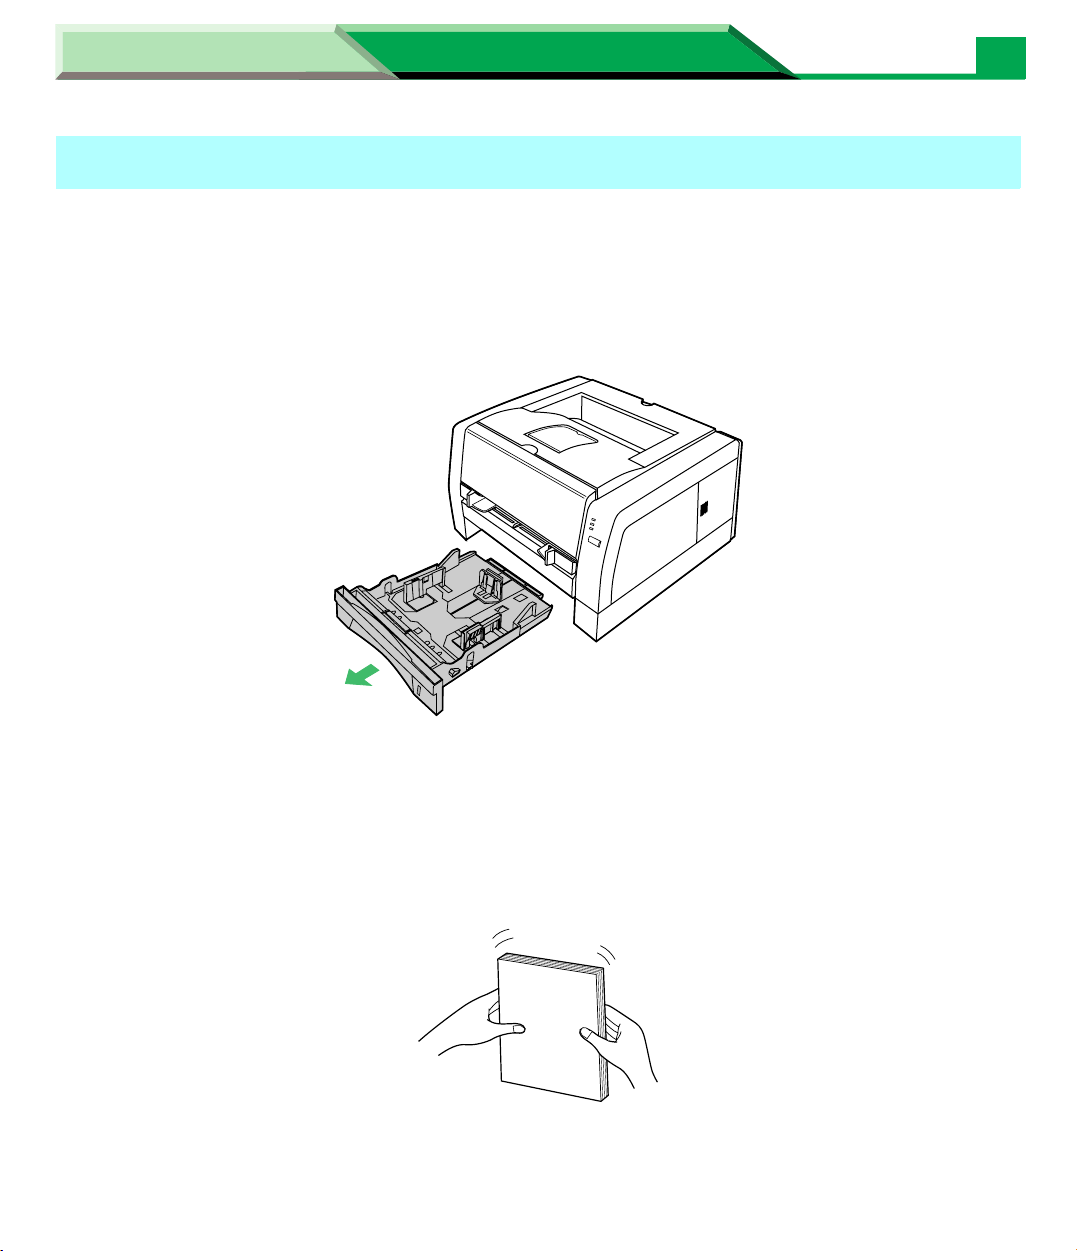
Media Tray Empty or Misfeed
When media is not in the media tray or media feed error has occurred, load the media in the
media tray or clear the media feed error as follows:
11
1
2
Pull the media tray out of the printer.
Tap the media stack on a level surface to avoid media jams or skewed
printing.
•If a media feed error has occurred, remove the media stack from the media tray and
tap it.
Page 12
Settings and Printing
Maintenance and Specifications
Maintenance and Specifications
12
Clearing a Jam
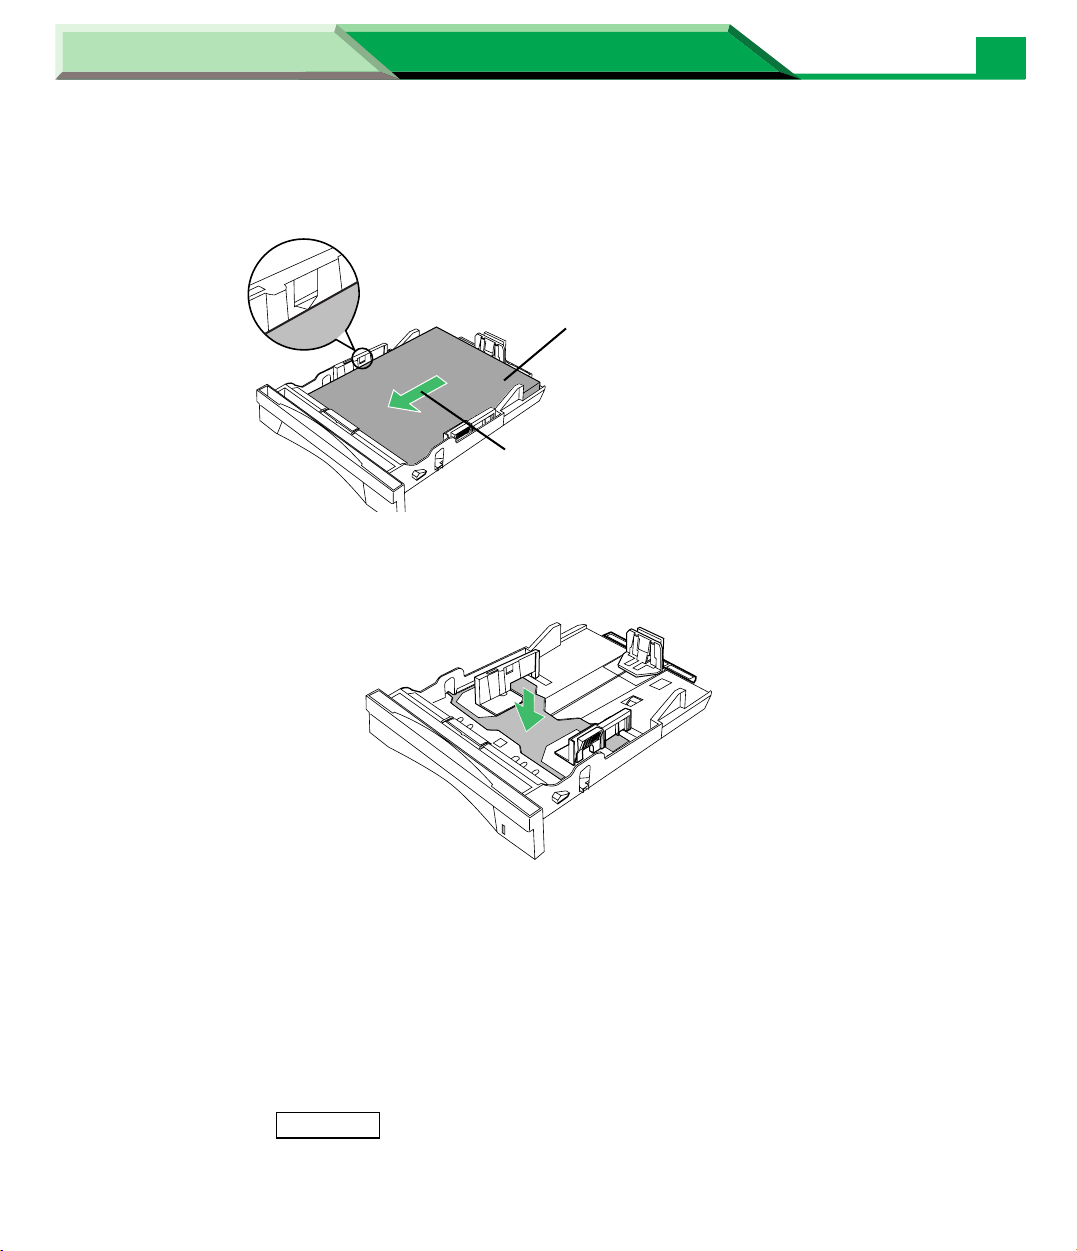
3
NOTE
•If the metal plate is in the up position by accident, the media tray cannot be inserted into the
Place the media with the print side down.
•Be sure that the media does not exceed the limit mark.
Print side down
Paper feeds in direction
of arrow.
printer. Before loading the media, push down the metal plate until it clicks, locking it in place.
4
CAUTION
Be sure to hold the media tray with both hands so you do not drop it especially when it is fully
loaded.
5
Replace the media tray into the printer.
Press the
or click
CONTINUE
Resume
button for less than 5 seconds on the printer panel
on the printer status display to clear the error status,
and continue/start printing.
Page 13

Settings and Printing
Jam at A
Maintenance and Specifications
Maintenance and Specifications
13
Clearing a Jam
1
2
Open the front cover.
Lift the drum unit up.
Page 14
Settings and Printing
Maintenance and Specifications
Maintenance and Specifications
14
Clearing a Jam
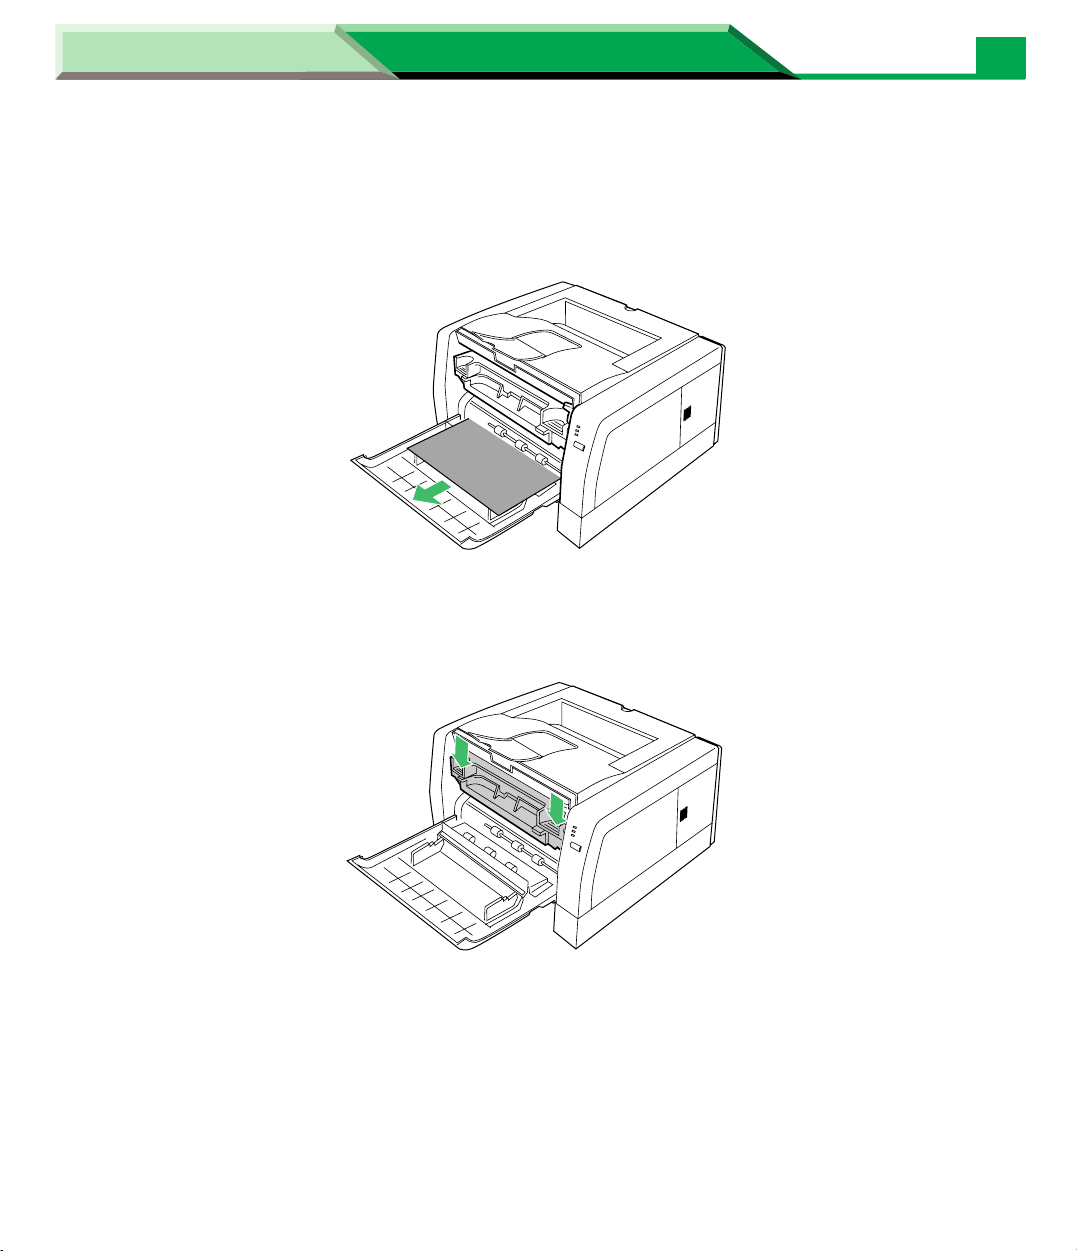
3
4
Grasp both sides of the jammed media and
printer.
Push the drum unit down.
slowly
pull it out of the
5
Close the front cover.
Page 15
Settings and Printing
Jam at B
Maintenance and Specifications
Maintenance and Specifications
15
Clearing a Jam
1
2
Open the front cover.
Lift the drum unit up.
Page 16
Settings and Printing
Maintenance and Specifications
Maintenance and Specifications
16
Clearing a Jam
3
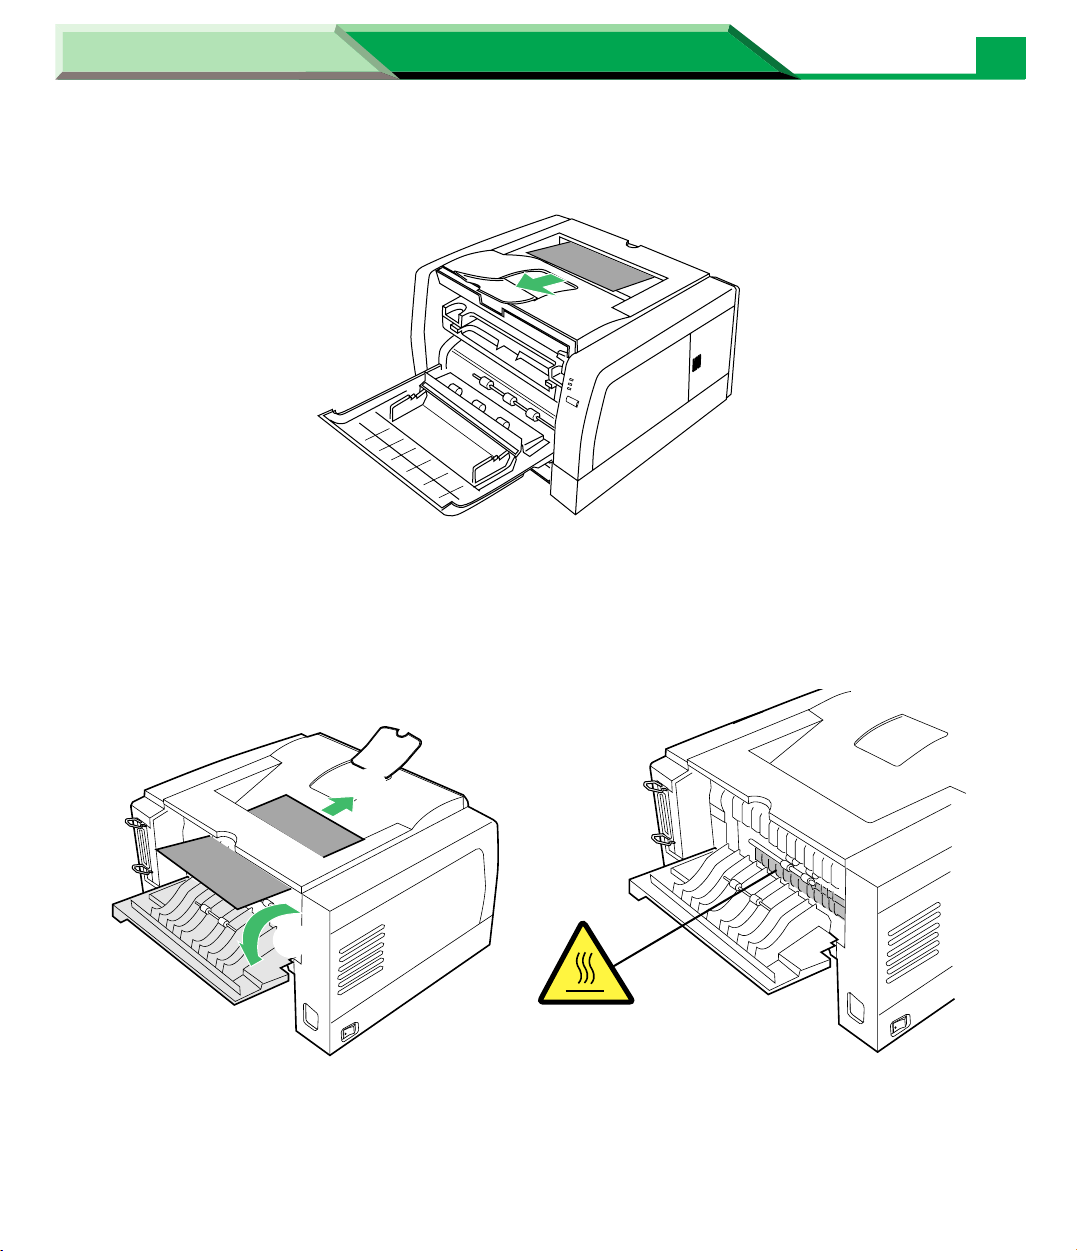
Remove the jammed media from the output tray.
- Or -
Open the rear cover of the printer ( #) and remove the jammed media
( $).
#
$
CAUTION HOT SURFACE
Page 17

Settings and Printing
Maintenance and Specifications
Maintenance and Specifications
17
Clearing a Jam
4
5
Push the drum unit down.
Close the front cover.
Page 18

Settings and Printing
Jam at C
Maintenance and Specifications
Maintenance and Specifications
18
Clearing a Jam
1
1
2
Perform the jam recovery steps for Jam at A (see page 13).
- Or -
Pull the media tray out of the printer.
Slowly pull the jammed media ($) out of the printer while pushing the
center tab (#) of the jam release pan down.
#
Rear side of
Printer
$
Page 19

Settings and Printing
Maintenance and Specifications
Maintenance and Specifications
19
Clearing a Jam
3
4
Replace the media tray into the printer.
Open and close the front cover to clear the error indication.
$
#
Page 20

Settings and Printing
Jam at D
Maintenance and Specifications
Maintenance and Specifications
20
Clearing a Jam
1
2
Open the rear cover of the printer ( # ) and grasp both sides of the
jammed media and slowly pull it out of the printer ( $ ).
$
#
CAUTION HOT SURFACE
Open and close the front cover to clear the error indication.
#
$
Page 21

Settings and Printing
Jam at E
Maintenance and Specifications
Maintenance and Specifications
21
Clearing a Jam
1
1
2
Perform the jam recovery steps for Jam at D (see page 20).
- Or -
Pull the media tray out of the printer.
Slowly pull the jammed media ($) out of the printer while pushing the
center tab (#) of the jam release pan down.
#
Rear side of
Printer
$
Page 22

Settings and Printing
Maintenance and Specifications
Maintenance and Specifications
22
Clearing a Jam
3
4
Replace the media tray into the printer.
Open and close the front cover to clear the error indication.
$
#
Page 23

Settings and Printing
Troubleshooting
Trouble Possible Cause Corrective Action
Maintenance and Specifications
Maintenance and Specifications
23
Troubleshooting
The background of the
images is printed in
gray.
ABCD--------
-----------------
--------
Faded image is printed
at the different position
from the original.
ABCD--------
-----------------
--------
ABCD--------
-----------------
--------
The toner cartridge has
reached the end of useful life.
The drum unit has reached the
end of useful life.
Incorrect type of media is used. Check the media usable or not
Your printer is in extremely high
humidity .
Printer driver is not set
correctly for paper.
The toner cartridge has
reached the end of useful life.
Your printer is in extremely high
or low humidity.
Print density is high. Display the Printer Console
Replace the toner cartridge.
Replace the drum unit.
(see “Media” on page 43).
Check the environment (see
“Specifications” on page 41).
Set the media type setting of
the printer driver correctly (see
page 22 in “Settings and
Printing”).
Replace the toner cartridge.
Check the environment (see
“Specifications” on page 41)
window and set the density
( ) to the lighter level (see
“Using the Printer Console
Window” on page 41 in
“Settings and Printing”).
Page 24

Settings and Printing
Trouble Possible Cause Corrective Action
Maintenance and Specifications
Maintenance and Specifications
24
Troubleshooting
Toner spots appear on
the page.
ABCD--------
-----------------
--------
The entire page prints
in black.
A white or black spots
appear in intervals of
94 mm.
Toner spots put on the
photosensitive drum.
Clean the toner spots with soft
cloth (refer to “Cleaning the
Photosensitive Drum” on page
31).
The drum unit is damaged. Replace the drum unit.
The corona wire in the drum
unit is dirty.
Clean the corona wire in the
drum unit (see “Cleaning the
Printer” on page 5).
The drum unit is damaged. Replace the drum unit.
Paste/Glue of a label or dust is
attached to the photosensitive
drum of the drum unit.
Wipe the photosensitive drum
of the drum unit (see “Cleaning
the Photosensitive Drum” on
page 31).
94 mm
94 mm
The photosensitive drum of the
drum unit is dirty or scratched.
Replace the drum unit.
Page 25

Settings and Printing
Trouble Possible Cause Corrective Action
Maintenance and Specifications
Maintenance and Specifications
25
Troubleshooting
Horizontal lines appear
in intervals of 94 mm.
94 mm
94 mm
White and horizontal
lines appear on the
page.
ABCD--------
-----------------
--------
A small dust is bitten in the
gear of the photosensitive
drum.
Remove the dust from the gear
(see “Cleaning the
Photosensitive Drum” on page
31).
Dust
The drum unit is damaged. Replace the drum unit.
The toner cartridge is
Replace the toner cartridge.
damaged.
The toner cartridge is stored for
a long period.
Print several blank pages until
the lines disappear.
(Try shaking to loosen toner.)
Try shaking to loosen toner.
Page 26

Settings and Printing
Trouble Possible Cause Corrective Action
Maintenance and Specifications
Maintenance and Specifications
26
Troubleshooting
A black and vertical
line appears on the
page.
ABCD--------
-----------------
--------
A white vertical line
appears on the page.
ABCD--------
-----------------
--------
Corona wire of the drum unit is
dirty.
The toner cartridge is
damaged.
The drum unit is damaged. Replace the drum unit.
The fuser unit is damaged. Display the Printer Console
The laser unit cover is dirty. Clean the laser unit cover (see
A small matter is mixed with the
roller of the toner cartridge.
Clean the corona wire in the
drum unit (see “Cleaning the
Printer” on page 5).
Replace the toner cartridge.
window and click icon ( )
to print a cleaning data (see
“Using the Printer Console
Window” on page 41 in
“Settings and Printing”).
If it is not recovered, call for
service to replace the fuser
unit.
“Cleaning the Printer” on page
5).
Replace the toner cartridge.
Page 27

Settings and Printing
Trouble Possible Cause Corrective Action
Maintenance and Specifications
Maintenance and Specifications
27
Troubleshooting
The printer prints
aslant.
ABCD--------
-----------------
--------
The print out media is
wrinkled.
The media is not installed
correctly.
Too much media is loaded in
the media tray.
Incorrect type of media is used. Check the media usable or not
The media is not installed
correctly.
The media is moist. Use fresh paper.
Incorrect type of media is used. Check the media usable or not
Install media correctly in the
media tray.
Adjust media guides correctly.
Decrease the media stack so
that the height of media does
not exceed the limit mark.
(see “About Media” on page 8
in “Settings and Printing”),
(see “Media” on page 43).
Install media correctly in the
media tray.
Adjust media guides correctly.
(see “About Media” on page 8
in “Settings and Printing”),
(see “Media” on page 43).
The back of the printed
page appears dirty.
The transfer roller or fuser unit
is contaminated after clearing a
jam.
The toner cartridge has
reached the end of useful life.
Incorrect type of media is used. Use a correct media (see
Display the Printer Console
window and click icon ( )
to print a cleaning data (see
“Using the Printer Console
Window” on page 41 in
“Settings and Printing”).
Replace the toner cartridge.
“About Media” on page 8 in
“Settings and Printing”),
(see “Media” on page 43).
Page 28

Settings and Printing
Trouble Possible Cause Corrective Action
Maintenance and Specifications
Maintenance and Specifications
28
Troubleshooting
Frequent mediapicking errors occur.
Image is cut. Image size is bigger than print
The length media guide of the
media tray is not set correctly.
The media is not set correctly
in the media tray.
Pick up roller is dirty. Clean the pick up roller (see
area.
Check the length media guide
is set to the groove indicating
the media size.
Check the loaded media is not
curled.
Check the media is not set on
the media height stopper (A) of
the length media guide.
A
“Cleaning the Printer” on page
5).
Adjust the image within the
print area. 4.2 mm (0.17″) is
required for the top, bottom
and sides margins.
Page 29

Settings and Printing
■ If you can’t make a print
Trouble Possible Corrective Action
Maintenance and Specifications
Maintenance and Specifications
29
Troubleshooting
Printer not
operating.
The printer does not
print correctly.
The printer may not be
plugged into an AC outlet or
turned on.
The interface cable(s) may
not be connected properly.
The printer driver is not set
correctly.
Appropriate driver may not
be installed or correct printer
may not be selected.
Make sure that you plugged in the
printer and turned it on.
Make sure that you connected the
interface cable(s) properly (see “Bi-
directional Parallel Interface” on
page 49), [see “USB (Universal
Serial Bus) Interface” on page 51].
Ensure the correct printer port is
selected in the printer driver for
cable used (see “Setting the Printer
Driver” on page 22 in “Settings and
Printing”).
If the communication link between
your computer and the printer is
working but the printer ejects a
blank page when printing from your
application or through Windows,
make sure that the appropriate
driver is installed and that you have
selected the printer correctly.
The setting for
printing is not
effective.
Some applications may not
allow you to change the
settings through the printer
driver’s setting window.
Change the application’s settings.
Page 30

Settings and Printing
Maintenance and Specifications
Maintenance and Specifications
Troubleshooting
■ If the print out is ragged
If the print out is ragged because of the curl of paper as illustrated below, slide the media tray
out of the printer and turn over the paper stack, then insert the media tray.
30
■ If you cannot install the printer driver in Microsoft® Windows NT®
operating system Version 4.0
The printer driver cannot be installed with Add Printer Wizard in Windows NT 4.0. Install the
printer driver with Setup.exe (see “Installing the Printer Software” in the Setup Guide).
■ Number of lines are changed in 2up or 4up printing using
Microsoft® Excell spreadsheet
Adjust the height of the cell size of the spreadsheet.
■ Printer Status Display alerts when printing many files
When printing many files, “Power Off or Cable Problem or Printer Busy” may be displayed on
the Printer Status Display. Wait for a while. The printing will be automatically resumed.
Page 31

Settings and Printing
Maintenance and Specifications
Maintenance and Specifications
Troubleshooting
Cleaning the Photosensitive Drum
If the paste or glue of a label is attached to the photosensitive drum of the drum unit, clean it
following the steps below.
31
1
2
3
Open the front cover of the printer.
Lift the drum unit up ( # ) and slide it out of the printer ( $ ).
#
#
$
While pushing the drum unit as illustrated below ( # ), lift the toner
cartridge up ( $ ).
#
$
Page 32

Settings and Printing
Maintenance and Specifications
Maintenance and Specifications
32
Troubleshooting
4
5
Remove the toner cartridge from the drum unit.
If a paste/glue of a label is attached, find the portion that it is attached
while rotating the gear of the photosensitive drum in the direction of the
arrow.
•The paste will be attached the portion that white or black spots of the print appear.
Paste
Gear
CAUTION
To prevent any damage to the drum unit, observe the following precautions.
•Do not rotate the photosensitive drum in the opposite direction of the above illustration,
otherwise the drum unit may be damaged.
•Do not touch the black drum surface.
•Do not expose the drum unit to light for more than 5 minutes.
•Do not expose the drum unit to direct sunlight.
•Do not keep the drum unit near dust or dirt.
•Do not place the drum unit in a high humidity area.
Page 33

Settings and Printing
Maintenance and Specifications
Maintenance and Specifications
33
Troubleshooting
6
Wipe the photosensitive drum with a dry cotton swab or remove the small
dust in the gears of the photosensitive drum.
Dust
CAUTION
• Do not use a shar p-pointed something like a ball-point pen to prevent the damage to the
drum unit when removing the paste.
7
Insert the side pins of the toner car tridge into the slots of the drum unit
(#). Push the toner cartridge in the drum unit ($).
$
#
Side pin
$
Page 34

Settings and Printing
Maintenance and Specifications
Maintenance and Specifications
34
Troubleshooting
8
Firmly inser t the drum unit in the slot of the printer ( # ) [inser t the side
pins of the drum unit into the groove (label )]. Push down ( $ ).
$
#
Side pin
$
9
Close the front cover.
Page 35

Settings and Printing
Error Indication
Maintenance and Specifications
Maintenance and Specifications
35
Error Indication
Indicators
1
*
READY
ERROR
TONER/
DRUM UNIT
READY
ERROR
TONER/
DRUM UNIT
READY
ERROR
TONER/
DRUM UNIT
Possible Cause
Front cover is open.
Media tray is empty.
Printer failed to feed a media
from media tray.
Media jam has occurred.
RAM overflow or overrun has
occurred.
Internal error has occurred.
Toner is low.
Drum unit is wearing out.
Recovery
Close the front cover.
Load media in the media tray
and press the CONTINUE
button (less than 5 seconds).
Remove the jammed media, then
open the front cover and close it.
Press the CONTINUE button
(less than 5 seconds).
Turn the power off for a few
secondes then on again. If the
error continues, call for service.
Replace the toner cartridge soon.
Replace the drum unit soon.
READY
ERROR
TONER/
DRUM UNIT
Drum unit is not installed.
Toner is empty.
Drum unit is worn out.
Drum unit is worn out and toner
is empty.
Install the drum unit.
Replace the toner cartridge now.
Replace the drum unit now.
Replace the toner cartridge and
drum unit now.
, : Indicator is lit. , : Indicator is blinking fast (with an interval of 1 second).
: Indicator is turned off.
1
*
The indication varies depending on the printer status.
Page 36

Settings and Printing
Maintenance and Specifications
Maintenance and Specifications
Repacking Instructions
Repacking Instructions
Repacking
It is highly recommended that you keep the original carton and ALL packing materials.
Should you need to transport or ship your printer, please follow these instructions.
SAFETY CAUTION
The printer weighs about 10 kg {22 lbs.}.
NOTE
•Should you need to send your printer for service, consult your reseller first or Panasonic.
•Please use the original carton and all of the original packing materials.
•Do not ship printer with drum unit installed.
•Improper repacking of the printer may result in a service charge to remove spilled toner.
• Since the printer uses dry toner, extreme care must be taken when handling. The printer
should be handled in the upright (vertical) position.
36
Material required:
•Original cartons and packing materials
•Newspaper or drop cloth
•Shipping tape and scissors
1
2
Turn off the printer; remove the power cord and all interface cables.
Open the front cover.
Page 37

Settings and Printing
Maintenance and Specifications
Maintenance and Specifications
37
Repacking Instructions
3
Lift the drum unit up ( # ) and slide it out of the printer ( $ ).
•To avoid possible toner spillage, it is recommended to place the drum unit on a newspaper, drop cloth or best to place back in original (Black) shipping bag.
#
#
$
CAUTION
•To prevent any damage to the drum unit, observe the following precautions.
— Do not touch the black drum surface illustrated below.
— Do not expose the drum unit to light for more than 5 minutes.
— Do not expose the drum unit to direct sunlight.
— Do not keep the drum unit near dust or dirt.
— Do not place the drum unit in a high humid area.
Black drum
Page 38

Settings and Printing
Maintenance and Specifications
Maintenance and Specifications
38
Repacking Instructions
4
5
While pushing the drum unit as illustrated below ( # ), lift the toner
cartridge up ( $ ).
$
#
Replace the shipping cover on the toner cartridge.
Page 39

Settings and Printing
Maintenance and Specifications
Maintenance and Specifications
39
Repacking Instructions
6
7
Insert the toner car tridge into a plastic bag and cer tainly seal the end of
the bag tightly.
#
%
Wrap the drum unit with the protective sheet to protect the drum surface.
$
8
9
Insert the drum unit into a plastic bag and seal the end of the bag tightly.
Close the front cover.
Page 40

Settings and Printing
Maintenance and Specifications
Maintenance and Specifications
40
Repacking Instructions
10
NOTE
• If a toner vacuum is available, it is the best tool for cleaning spilled toner. Do not use a
11
Wipe off any loose toner in and around the printer.
standard office vacuum; the toner will not be retained by typical vacuum dust collectors.
Repack the printer.
Drum unit
Toner cartridge
AC cord
Page 41

Settings and Printing
Maintenance and Specifications
Maintenance and Specifications
Specifications
Specifications
Printer
Printing Method:
Semiconductor Laser
Print Speed:
14 ppm (pages per minute) maximum (A4 size plain paper, simplex printing, 5% image area)
1
ppm maximum (Letter size plain paper, simplex printing, 5% image area)
15*
1
Maximum print speed is 14.6 ppm.
*
First Print:
15 seconds
Resolution:
600 x 600 dpi (dots per inch)
41
Paper Feed:
Media tray (universal cassette): up to 250 sheets of paper [75 g/m
Manual feed: 1 sheet
Paper Output:
2
Up to 150 sheets of paper [75 g/m
Power Source:
Refer to the nameplate on the rear of the unit
Memory:
2 MB
Interface:
Bi-directional parallel, USB
Warm Up Time
Less than 25 seconds [at 22°C (71.6°F), 50% RH]
Operating Environment:
10 to 32.5°C (50 to 90.5°F), 20 to 80% RH
Storage Environment:
0 to 35°C (32 to 95°F), 10 to 80% RH
(20 lbs.)]
2
(20 lbs.)]
Page 42

Settings and Printing
Maintenance and Specifications
Maintenance and Specifications
Specifications
Dimensions:
399 (W) X 390.5 (D) X 254 (H) mm (15.7″ X 15.4″ X 10″)
Mass {Weight}:
Approx. 10 kg {22 lbs.}
Consumables / Life:
Starter toner cartridge (provided with printer); 2,000 pages average*
Toner cartridge; 4,000 pages average*
Drum unit; 20,000 pages average*
1
1
1
*1 Average life at 5 % image area with repetitive printing of 10 pages (Letter / A4 size, single-
sided printing, default density).
5% image area means that the black area within the printing area is 5%. Printing 10%
image area continuously will reduce the life of the toner to about half as compared to
printing 5% image area. The Toner Saving mode allows you to save toner (see “Quality Tab”
on page 31 in “Settings and Printing”).
42
Power Consumption:
Printing*
2
(average): 310 W or less
Standby (average): 70 W or less
Power saving (When the fan stops.): 5.5 W or less
Meets E
NERGY STAR
® power conservation requirements.
*2Maximum print speed, duplex printing
Noise Level:
Printing: 49 dBA
Standby: 37dBA
CPU:
Intel 80C51 compatible
Page 43

Settings and Printing
Maintenance and Specifications
Maintenance and Specifications
Specifications
Media
■ Paper Specifications
This printer is designed to work well with most types of paper. However, differences in paper
may have significant effects on the quality of the print or the reliability of paper handling. It is
strongly recommended that you always test paper before purchasing it to make sure it
provides desirable performance. The following guidelines will be helpful.
Basic Weight:
60 to 105 g/m
Thickness:
3.7 to 7.5 mils (1 mil=1/1000″ )
Moisture Content:
4% to 6%
Smoothness:
100 to 300 Sheffield
2
(16 to 28 lbs.)
43
Acid Content:
5.5 PH minimum
Fusing Compatibility:
Must not scorch, melt, offset material, or release hazardous emissions when heated to 200°C
(392°F) for 0.1 second
Cutting Dimensions:
±0.0313 inch of nominal, corners 90°±4°
Grain:
Long grain
Cut Edge Conditions:
Cut with sharp blades, no paper dust
Ash Content:
Not to exceed 10%
Curl:
No allowable curl toward the side to be printed
Packing:
Polylaminated moisture proof ream wrap
Page 44

Settings and Printing
Maintenance and Specifications
Maintenance and Specifications
NOTE
•Please store your paper according to the recommendations of the manufacturer.
■ Paper and Envelope Sizes
The following paper and envelope sizes are supported by the printer.
Medium Name Dimension
Paper Letter 216 x 279 mm (8.5″ x 11″)
A4 210 x 297 mm (8.27″ x 11.7″)
Legal 216 x 356 mm (8.5″ x 14″)
B5 176 x 250 mm (6.92″ x 9.84″)
Executive 184 x 267 mm (7.25″ X 10.5″)
44
Specifications
1
A5*
1
A6*
Envelope*
1
Duplex printing cannot be performed with A5, A6 size paper or envelope.
*
1
Envelope #9 98 x 225 mm (3.87″ x 8.87″)
Envelope #10 105 x 241 mm (4.12″ x 9.5″)
International DL 110 x 220 mm (4.33″ x 8.66″)
International C5 162 x 229 mm (6.38″ x 9.01″)
Monarch 98 x 191 mm (3.87″ x 7.5″)
148.5 x 210 mm (5.85″ x 8.27″)
105 x 148.5 mm (4.13″ x 5.85″)
Page 45

Settings and Printing
Maintenance and Specifications
Maintenance and Specifications
Specifications
■ Types of Paper to Avoid
•Extremely smooth or shiny paper or paper that is highly textured
•Coated papers
•Acid paper
• Letterhead imprinted with low temperature or thermography. These materials may transfer
onto the fusing roller and cause damage. Any pre-printed paper should use inks compatible
with 200°C (392°F) for 0.1 second.
•Damaged or wrinkled paper, or paper with irregularities such as tabs, staples, etc.
•Multipart forms or carbonless paper
•Paper with a cotton and/or fiber content over 25%
•Ink jet media (paper, transparency, etc.) (It may transfer onto the fuser unit’s roller and
cause damage.)
■ Transparencies and Labels
You may also print on labels and transparencies that are made for the printer. Panasonic has
tested and found that the following work satisfactorily.
45
OHP transparencies 3M CG3300
Labels AVERY 5160, AVERY 5161, AVERY 5162, AVERY 5163,
AVERY 5660, AVERY 5661, AVERY 5662, AVERY 5663
Avery L7159, Avery L7160, Avery L7161, Avery L7162,
Avery L7163, Avery L7164
•To avoid damaging the printer, do not use ink jet transparency.
• Transparencies and adhesive material of labels should be stable at 205°C (400°F), the
printer’s maximum temperature.
•Re-using transparencies that have been fed through the printer once (for example, after jams
or if the transparency is ejected without being printed) can reduce the life of the consumables
and paper path components.
•When using transparencies, if the print quality is poor, print on the other side.
Page 46

Settings and Printing
Maintenance and Specifications
Maintenance and Specifications
Specifications
NOTE
• With any label stock, the labels must completely cover the backing material (see figure
below).
NOYES
46
Labels cover the entire
backing material
The backing material is exposed.
■ Envelope Specifications
It is recommended that you purchase only high quality envelopes with diagonal seams, as
shown in the diagram below:
High quality envelopes have the following characteristics:
•A thin, sharply creased leading edge
•Paper weight of 90 g/m
•Flat, free of curls, wrinkles, nicks, etc.
NOTE
•Wrinkle may occur in some case, even if high quality envelopes are used.
2
(24 lbs.)
Page 47

Settings and Printing
Maintenance and Specifications
Maintenance and Specifications
Specifications
It is not recommended that you use envelopes with any of the following characteristics (using
these may result in paper jams):
•Irregularly shaped envelopes
•Envelopes with curls, wrinkles, nicks, twists, dog-ears or other damage
•Envelopes with side seam construction
•Highly textured envelopes, or with extremely shiny surfaces
•Envelopes that seal by removing a peel-off strip
•Envelopes with more than one flap to be sealed
•Self-adhesive envelopes
•Envelopes that are baggy or not sharply creased
•Embossed envelopes
•Envelopes that have previously been printed with a laser printer
•Envelopes that have been previously printed inside
47
Curl
Side seam
construction
Twist
Peel-off strip
Multiple flaps
WaveDog-ears
Self adhesive
Bent-edge
Page 48

Settings and Printing
Do not attempt to print on any of the following types of envelopes. These may cause damage
to your printer.
•Envelopes with clasps, snaps or tie strings (see Figure 1)
•Envelopes with transparent windows (see Figure 2)
• Envelopes that will melt, discolour, scorch, offset or release hazardous emissions when
exposed to 200°C (392°F) for 0.1 second
•Envelopes that use encapsulated types of adhesive that do not require moistening but rely
on pressure to seal them
Maintenance and Specifications
Maintenance and Specifications
Specifications
48
Figure 1
Always test a sample of the envelopes you are thinking of buying. Confirm that the envelope
performs acceptably.
For best printing results
•Avoid printing in high humidity i.e., above 70%.
High humidity may cause the envelope to curl and pick up excess toner.
High humidity may also cause the envelope to seal.
• Envelope storage is very important. Store them away from moisture and humid air, where
they can lay flat and their edges won’t be bent or damaged. The humidity should not exceed
70% RH.
Figure 2
Page 49

Settings and Printing
Maintenance and Specifications
Maintenance and Specifications
Bi-directional Parallel Interface
Connector type:36PIN Anphenole connector
Cable: use a shielded cable 2 meters (6.6 feet) or less in length
Pin configuration
Pin Signal
1 nStrobe
2 Data 1
3 Data 2
4 Data 3
5 Data 4
6 Data 5
7 Data 6
8 Data 7
9 Data 8
10 nAck
11 Busy
12 PError
13 Select
14 nAutoFd
15 NC
16 GND
17 FG
18 Vcc
Pin Signal
19 GND
20 GND
21 GND
22 GND
23 GND
24 GND
25 GND
26 GND
27 GND
28 GND
29 GND
30 GND
31 ninit
32 nFault
33 GND
34 NC
35 NC
36 nSelectIn
49
Specifications
Parallel Interface connector (printer side)
18
36
1
19
Page 50

Settings and Printing
Maintenance and Specifications
Maintenance and Specifications
Specifications
CAUTION
•If the cable is connected to PC via printer buffer or selector, the printer may not print.
•A print server cannot be used for printing.
NOTE
•Be sure to use only a shielded cable. The printer will not operate properly if any of the pins
are not connected.
50
Page 51

Settings and Printing
Maintenance and Specifications
Maintenance and Specifications
USB (Universal Serial Bus) Interface
Cable: use a shielded cable 5 m (16.4 feet) or less in length.
Pin configuration
Signal pin Signal
51
Specifications
1V
2 -Data
3 + Data
4 Ground
USB Interface connector (printer side)
BUS
12
3
4
NOTE
• Be sure to use a full-speed shielded cable which the Data + and Data – cables are the
twisted pair.
•When using KX-P7100 printer and other USB devices simultaneously, we cannot guarantee
normal printing.
 Loading...