

Page 1
AIR CONDITIONER INSTALLATION
AIR CONDITIONER INSTALLATION
INSTALACIÓN DEL ACONDICIONADOR DE AIRE
INSTALACIÓN DEL ACONDICIONADOR DE AIRE
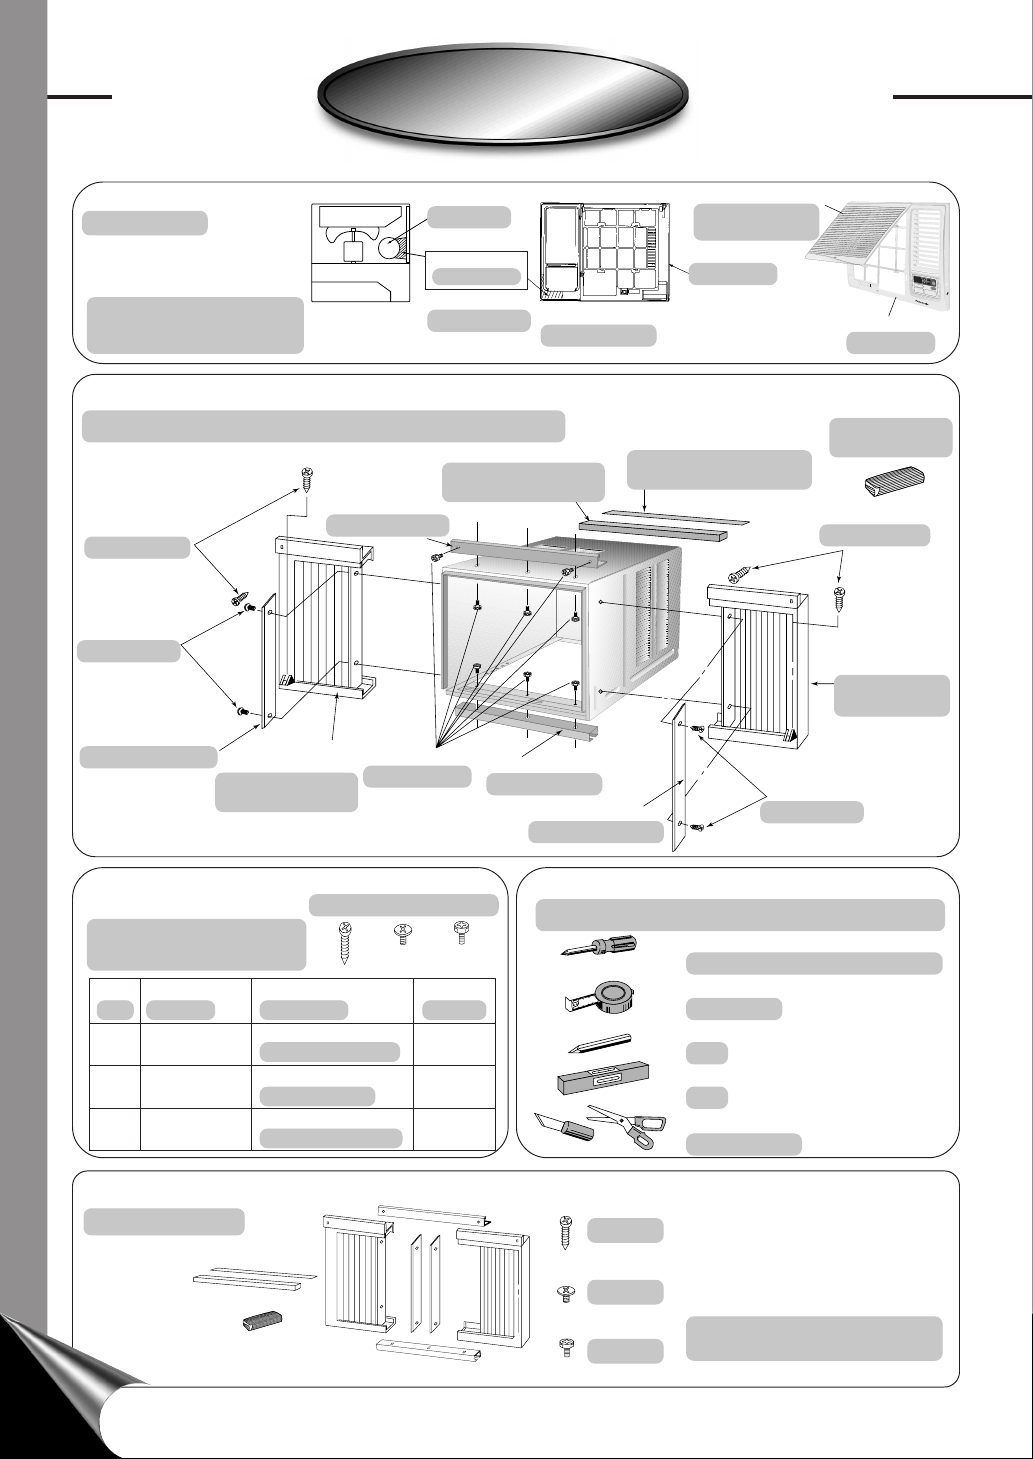
CAUTION
CUIDADO
Please remove the shipping blocks
fixed to the compressor and front
grille before installation.
Por favor remueva los tacos de envío
fijados en el compresor y la rejilla
Compressor
Compresor
REMOVE
REMUEVA
Shipping blocks
Tacos de envío
frontal antes de la instalacíon.
INSTALLATION BOX CONTENTS
CONTENIDO DE LA CAJA DE INSTALACIÓN
Window sash foam seal
Espuma de sellado de la
hoja móvil de la ventana
Bottom bracket
Soporte inferior
Type A screws
Tornillos tipo A
Type B screws
Tornillos tipo B
Panel retainer
Retenedor del panel
Left side
expandable panel
Lado izquierdo del
panel extensible
Top bracket
Soporte superior
Type C screws
Tornillos tipo C
BACK VIEW
VISTA TRASERA
Window sash sealing ribbon
Cinta de sellado de la hoja
Panel retainer
Retenedor del panel
Front intake grille
Rejilla frontal de la
toma de aire
Front grille
Rejilla frontal
móvil de la ventana
Tornillos tipo B
(1,8 oz) (Masilla)
Type A screws
Tornillos tipo A
expandable panel
Lado derecho del
panel extensible
Type B screws
F
T
E
M
P
/
T
I
M
E
h
r
C
O
O
L
F
A
N
M
O
D
E
HIGH
MED
FAN SPEED
LOW
Front grille
Rejilla frontal
Sealer 50 g
(1.8 oz) (Putty)
Sellador 50 g
Right side
T
IM
E
R
O
P
E
R
A
T
IO
N
R
S
E
T
O
S
FF/O
E
T
/
N
C
A
N
C
E
L
E
C
O
N
O
M
Y
Wireless
R
e
m
o
t
e
C
o
n
tr
o
l
SCREWS
FURNISHED
TORNILLOS
SUMININSTRADOS
Type Part no. Remarks Qty.
Tipo Parte no. Comentario Cantidad
CWH55207A
A
CWH55330
B
CWH55222A
C
ACCESSORIES
ACCESORIOS
Type A Type B Type C
Tipo A Tipo B Tipo C
Wood Screw
Tornillo para madera
Tapping Screw
Tornillo de rosca
Machine Screw
Tornillo para metales
SUGGESTED TOOL LIST
LISTA DE HERRAMIENTAS SUGERIDAS
Medium sized screwdriver (#2 Phillips)
Destornillador mediano (Phillips No. 2)
Tape Measure
Cinta métrica
6
4
8
(6 pcs)
(6 piezas)
Pencil
Lápiz
Level
Nivel
Knife or Scissors
Cuchilla o tijeras
(4 pcs)
(4 piezas)
(8 pcs)
(8 piezas)
6
6
Note : Check that none of the
accessories are missing.
Nota : Compruebe que no falte
ninguno de los accesorios.
Page 2
SELECT THE BEST LOCATION
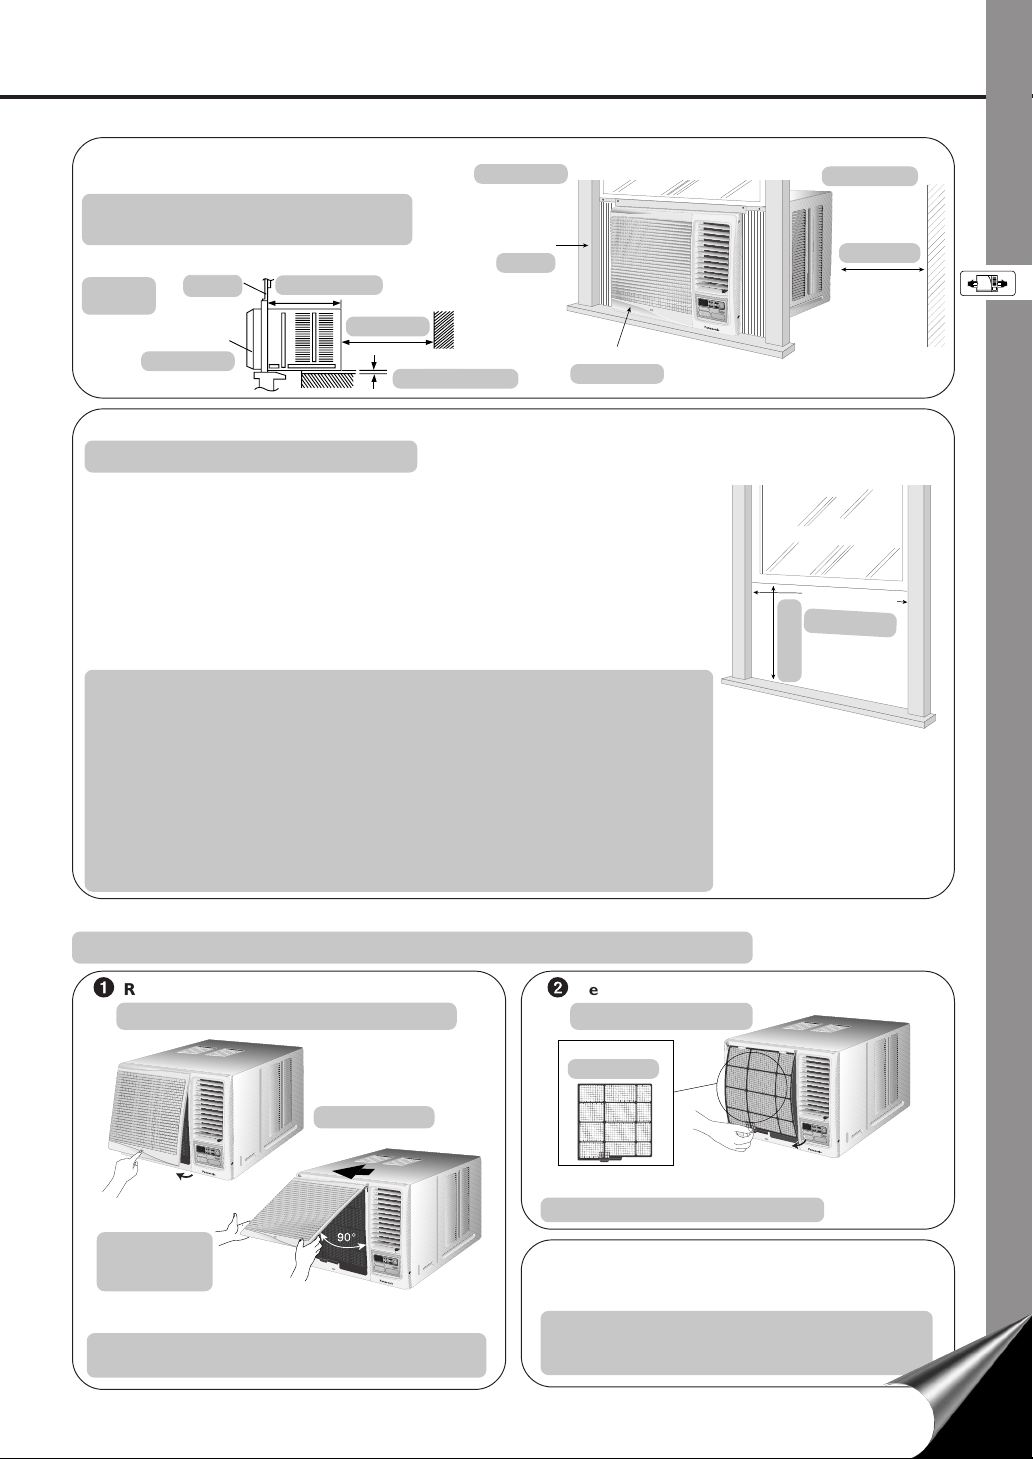
(Single or Double hung window)
Indoor side
Lado interior
ELIJA LA MEJOR UBICACIÓN
(Ventana de guillotina simple o doble)
11
/
SIDE VIEW
VISTA
LATERAL
Window
Ventana
Front grille
Rejilla frontal
18–
18–
11
inches
16
/16 pulgadas
12 inches
12 pulgadas
More than 4 inches
Más de 4 pulgadas
Window
Ventana
Front grille
Rejilla frontal
WINDOW REQUIREMENTS
REQUISITOS DE LA VENTANA
• Hot sun rays hitting the outside surface of the cabinet will create considerable heat
load. If the outside of the cabinet is exposed to direct sunlight, consider building an
awning to shade the cabinet while providing ample area for the heated air to be exhausted
from the condenser (both sides) and the top.
This unit is designed for installation in standard double hung windows. However, it
may also be installed in a sliding window using the optional installation kit (ME-68S
and CZ-MW4-P) available through your local dealer or parts distributor.
NOTE: The unit may also be installed “through the wall”. You should, however,
observe standard carpentry practices and frame the opening without violating
local ordinances.
• Los rayos solares que tocan la superficie exterior de la caja crearán una considerable
carga de calor. Si la parte que da al exterior de la caja está bajo la luz directa del sol,
considere el construir un toldo para dar sombra pero dejando espacio suficiente para
que el aire caliente pueda ser expulsado del condensador (en ambos lados) y parte
superior.
Este aparato está diseñado para ser instalado en ventanas levadizas dobles. Sin em-
bargo, se pueda instalar también en una ventana de corredora utilizando los avíos de
instalación optativos (ME-68S y CZ-MW4-P) que están disponibles por medio de su
comerciante local o distribuidor de partes.
NOTA: Esta unidad tambíen se puede instalar a través de la pared. En este caso, se
deberán realizar trabajos de carpintería y construir una estructura en la abertura
deacuerdo con los reglamentos locales.
Outdoor side
Lado exterior
12 inches
12 pulgadas
F
T
IM
E
R
O
P
E
T
R
E
A
M
T
IO
P
/T
N
IM
E
R
hr
S
E
T
O
F
S
F
E
/O
T
/
N
C
A
N
C
E
CO
L
OL
FAN
M
O
DE
HIG
E
C
H
O
N
O
M
Y
M
ED
FAN SPEED
LO
W
Wireless
Remote Control
21
(min)
4
/
1
14 -
21-
21-
(minimo)
4
/
1
14 -
21
/
32
/
32
to 35-
a 35-
7
/
16
7
/
16
PREPARATION OF AIR CONDITIONER CHASSIS
PREPARACIÓN DEL CHASIS DEL ACONDICIONADOR DE AIRE
1
Remove the front intake grille
Quite la rejilla frontal de la toma de aire
Push and release.
Presione y suelte.
CLO
SE VENT O
PEN
F
TIMER
OPERATION
TEMP/TIMER
h
r
SET
SET/
OFF/ON
CANCEL
C
O
O
L
F
M
A
N
O
D
E
H
IG
H
E
C
O
N
O
M
Y
M
E
D
F
A
N
S
P
E
E
D
L
O
W
Wireless
Remote Control
Lift up to about
90° and remove.
Levante hasta
más o menos 90˚
y quite.
C
LO
SE VEN
T O
PEN
F
TIMER
OPERATION
TEMP/TIMER
h
r
SET
SET/
OFF/ON
CANCEL
C
O
O
L
F
M
A
N
O
D
E
H
IG
H
E
C
O
N
O
M
Y
M
E
D
F
A
N
S
P
E
E
D
L
O
W
W
ireless
Rem
ote Control
Slide the front intake grille slightly to the left to unhook
the tabs.
Deslice la rejilla frontal de toma de aire un poco a la
izquierda para descolgar las lengüetas.
2
Remove the air filter
Quite el filtro de aire
Air filter
Filtro de aire
Tilt up and pull out the air filter by the holder.
Incline y saque el filtro por el soporte.
NOTE: It is much easier, and also safer, to install the
empty cabinet into a window first and we
suggest that you follow this procedure.
NOTA: Es mucho más fácil y también más seguro
instalar primero la caja vacía en la ventana.
Nosotros sugerimos, que lo haga así.
CLOSE VENT OPEN
F
T
IM
E
R
O
T
P
E
E
M
R
P
A
T
/T
IO
IM
N
E
hr
R
S
E
T
SET/
OFF/ON
CANCEL
COOL
FAN
M
ODE
HIGH
E
C
O
N
O
M
Y
M
ED
FAN SPEED
LOW
Wireless
R
e
m
o
te
C
o
n
tro
l
7
7
Page 3
OFF/ON
OPERATION
TEM
P/TIM
ER
C
O
O
L
F
A
N
H
IG
H
M
E
D
L
O
W
MODE
F
A
N
S
P
E
E
D
SET
TIMER
SET/
CANCEL
hr
F
ECONOMY
Wireless
Remote Control
AIR CONDITIONER INSTALLATION
O
FF
/O
N
OPERATION
T
E
M
P
/T
IM
E
R
C
O
O
L
FA
N
H
IG
H
M
E
D
L
O
W
MODE
F
A
N
S
P
E
E
D
S
E
T
TIMER
S
E
T
/
C
A
N
C
E
L
hr
F
E
C
O
N
O
M
Y
Wireless
R
e
m
o
te
C
o
n
t
r
o
l
AIR CONDITIONER INSTALLATION
INSTALACIÓN DEL ACONDICIONADOR DE AIRE
INSTALACIÓN DEL ACONDICIONADOR DE AIRE
3
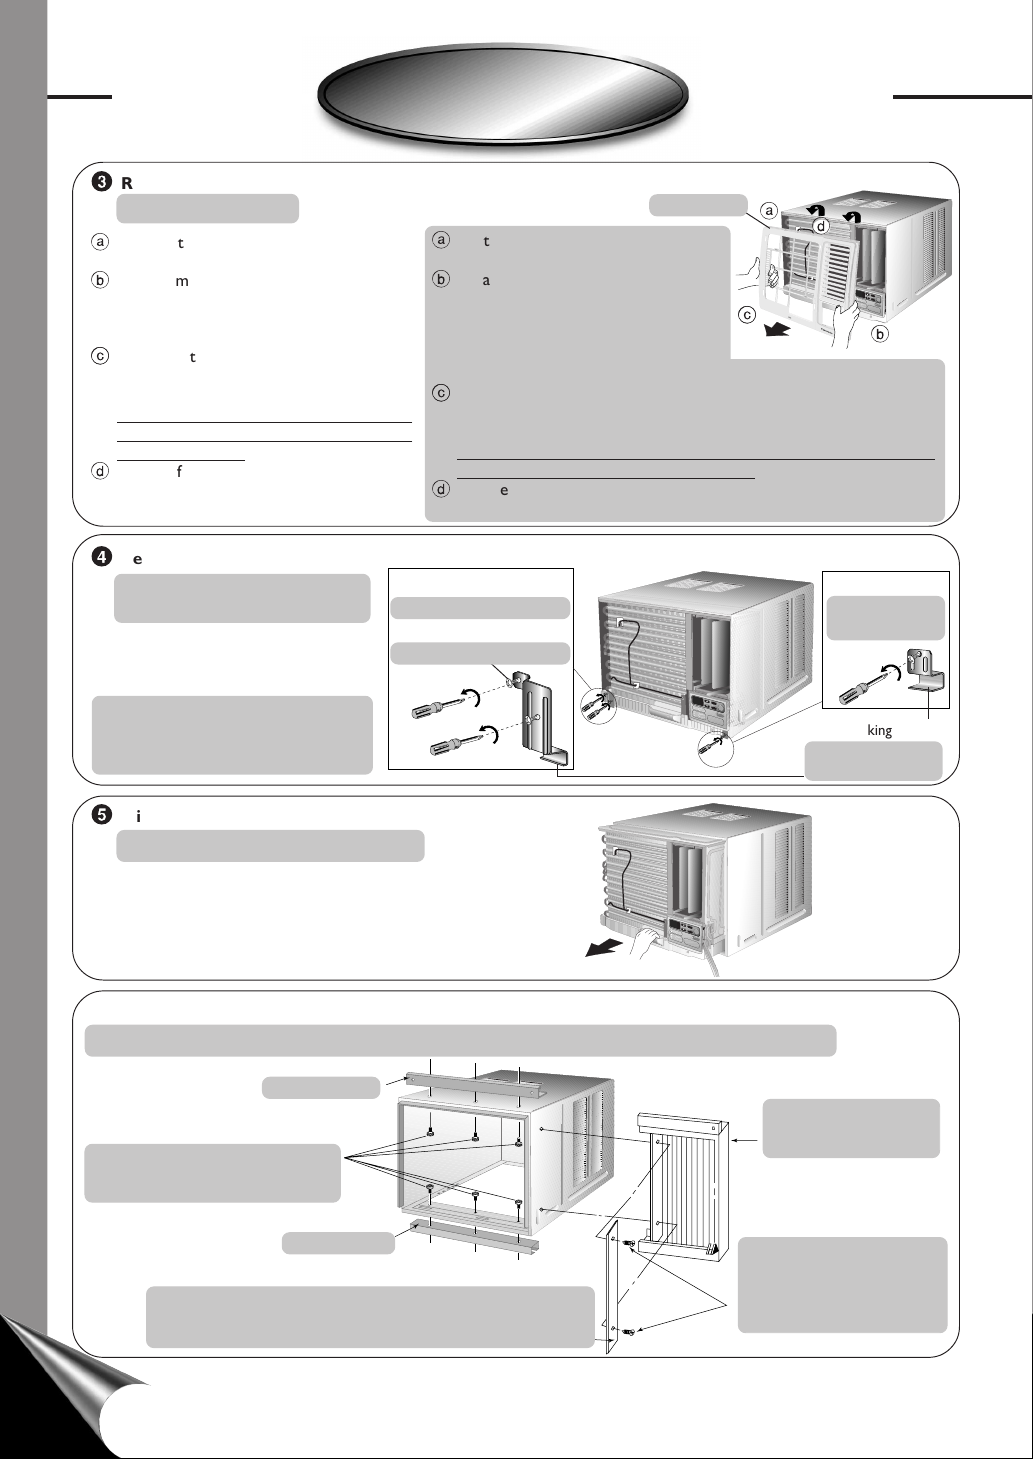
Remove the front grille
Quite la rejilla frontal
a
Remove the adhesive tape from all sides of
the front grille.
b
At bottom right side of the front grille, press
inward on cabinet near the power cord, and
pull the grille outward to the right until right
tab releases.
c
At the bottom left side, push inward on
cabinet and pull the grille outward to the
left to release the left tab.
Do not pull the bottom edge toward you
more than 3 inches to prevent the two top
tabs from damage.
d
Slide the front grille upwards to free the two
top tabs from slots at the top of the cabinet.
4
Remove the chassis locking brackets
Quite los soportes que cierran
el chasis
Unscrew and remove the chassis locking
brackets (1 chassis grounding screw and
2 screws). Keep for later use.
Desatornille y quite los soportes que
cierran el chasis (1 tornillos del chasis
a tierra y dos tornillos). Guardelos para
futuro uso.
a
Quite las cintas adhesivas de los lados
de la rejilla frontal.
b
En la parte inferior derecha de la rejilla
frontal, presione hacia dentro en el
mueble al lado del cordón de
alimentación y tire de la rejilla hacia fuera,
hacia la derecha, hasta desenganchar la
lengüeta derecha.
c
En el lado inferior izquierdo, presione hacia dentro en el mueble y tire
de la rejilla hacia fuera, hacia la izquierda, para desenganchar la lengüeta
izquierda.
No tire del borde inferior, hacia usted, más de 3 pulgadas para impedir
que las dos lengüetas superiores se dañen.
d
Deslice la rejilla frontal hacia arriba para liberar las dos lengüetas
superiores de las ranuras en la parte superior del mueble.
Counter clockwise.
En sentido contrario al reloj.
Chassis grounding screw
Tornillos del chasis a tierra
Front grille
Rejilla frontal
F
TIMER
TEMP/TIMER
hr
O
P
E
R
A
T
IO
N
SET
C
S
O
E
O
T
/
L
OFF/ON
C
A
N
C
E
L
F
A
N
M
O
D
E
H
IG
H
M
E
D
ECONOMY
FAN SPEED
L
O
W
Wireless
R
e
m
o
te
C
o
n
tro
l
c
a
d
Counter clockwise.
contrario al reloj.
Chassis locking brackets
Soportes que cierran
el chasis
b
En sentido
5
Slide the chassis out from the cabinet
Deslice el chasis hacia afuera del caja
HOW TO ASSEMBLE THE EXPANDABLE PANELS (LEFT & RIGHT)
COMO ARMAR LOS PANELES EXPANSIBLES (IZQUIERDO Y DERECHO)
Top bracket
Soporte superior
Attach the top and bottom bracket to
the cabinet using screw type C (6 pcs).
Fije los retención superior e interior a
el caja utilizando tornillos tipo C
(6 piezas).
Bottom bracket
Panel retainer
Soporte inferior
(The panel retainers are packed in the folds of the expansion panels.)
Retenedor del panel
(Las placas de retención del panel están empacadas en los pliegues de
los paneles expansibles.)
8
Insert expandable panels into
the top and bottom brackets.
Inserte los paneles
expansibles en los soportes
de arriba abajo.
Attach a panel retainer on the first
fold of each expansion panel and
secure panel retainers to cabinet
using screw type B (2 each).
Inserte la placa de retención del
panel dentro del primer pliegue de
cada uno de los paneles expansibles
y retenedor del panel al caja usando
los tornillos tipo B (2 cada uno).
Page 4
CABINET INSTALLATION
INSTALACION DEL CAJA
1
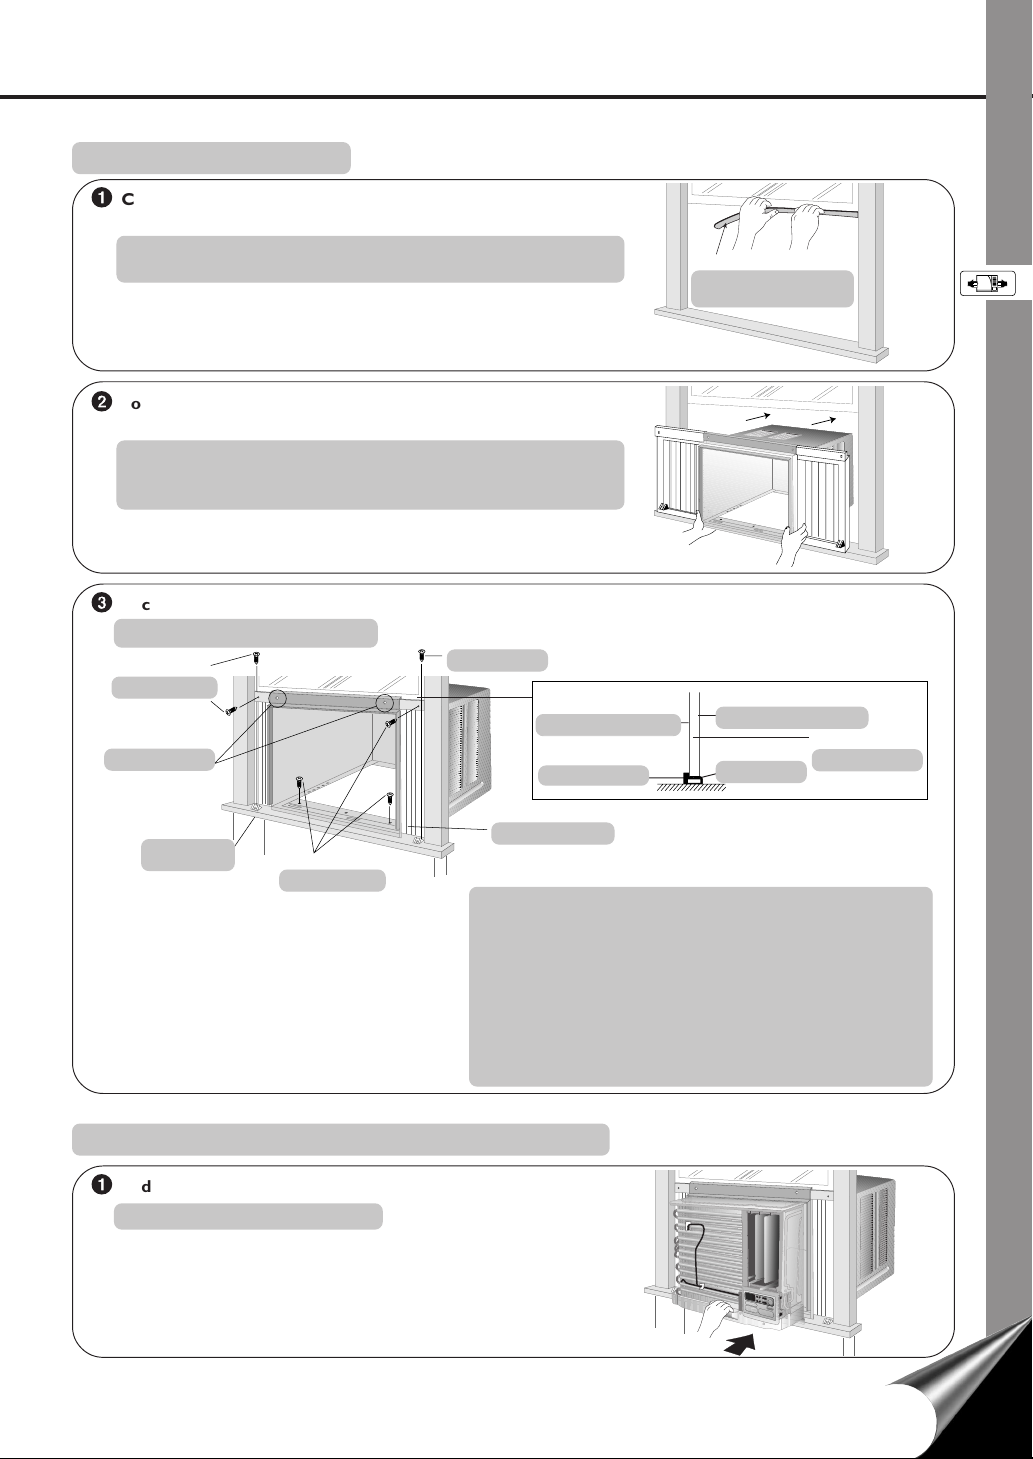
Cut the “Sealing Ribbon” to the proper length, and attach it
along the bottom edge of the bottom window sash.
Corte la cinta de sellar del largo apropiado y colóquela a lo
largo de la parte inferior de la ventana de guillotina.
2
To prevent condensation water from dripping inside, the cabinet
should be installed level or very slightly tilted to the outside.
Para prevenir que el agua de condensación gotee dentro, el
caja debe ser instalada al nivel o con una muy ligera inclinación
desde adentro hacia fuera.
3
Secure the cabinet using screws.
Fije la caja usando los tornillos.
Type A screws
Tornillos tipo A
Type C screws
Tornillos tipo C
Type A screw
Tornillo tipo A
Inside of sash
Interior de la hoja móvil
Top bracket
Soporte superior
Window sash sealing ribbon
Cinta de sellado de la hoja
móvil
Outside of sash
Exterior de la hoja móvil
Sealing ribbon
Cinta de sellar
Window sash
Hoja de la ventana
Window sill
Alféizar de la
ventana
Type A screws
Panel extensible
Tornillos tipo A
Expandable panel
• Expand the expandable panel fully into the grooves of the
window frame, secure the expandable panel, left, right and
top mounting frames to the bottom of the window sash
using 6 type A screws and 2 type C screws.
• Secure the cabinet using 2 type A wood screws.
• Cut the window sash foam seal to the proper size and
seal the opening between the top of the inside window
sash and the outside window sash.
Note : If a gap exists between the unit and window sash,
you may use “Sealer” supplied with the installation
kit for a better seal.
• Expande el panel extenible completamente dentro del marco de la
ventana, asegúrelo a la parte inferior de la hoja de la ventana por la
izquierda, a la derecha y por la parte superior, usando 6 tornillos tipo
A y 2 tornillos del tipo C.
• Fije la caja usando 2 tornillos para madera tipo A.
• Corte la cinta para sellar de la hoja de la ventana del tamafío correcto
y selle la abertura entre la parte superior del interior y del exterior
de la hoja de la ventana.
Nota : Si existiera un espacio entre la unidad y la hoja de la ventana,
puede usar el sellador que está dentro del paquete de instalación,
para obtener un mejor sellado.
CHASSIS INSTALLATION INTO THE CABINET
INSTALACIÓN DEL CHASIS DENTRO DE LA CAJA
1
Slide the chassis into the cabinet
Deslica el chasis dentro del caja
F
TIM
ER
T
E
M
O
P
P
/T
E
h
IM
R
r
A
E
T
R
IO
N
S
E
T
S
E
T
/
COOL
OFF/ON
C
A
N
C
E
L
FAN
M
O
D
E
HIGH
E
C
MED
O
N
O
M
Y
FAN SPEED
LOW
Wireless
R
em
ote C
ontrol
9
Page 5
AIR CONDITIONER INSTALLATION
AIR CONDITIONER INSTALLATION
INSTALACIÓN DEL ACONDICIONADOR DE AIRE
INSTALACIÓN DEL ACONDICIONADOR DE AIRE
2
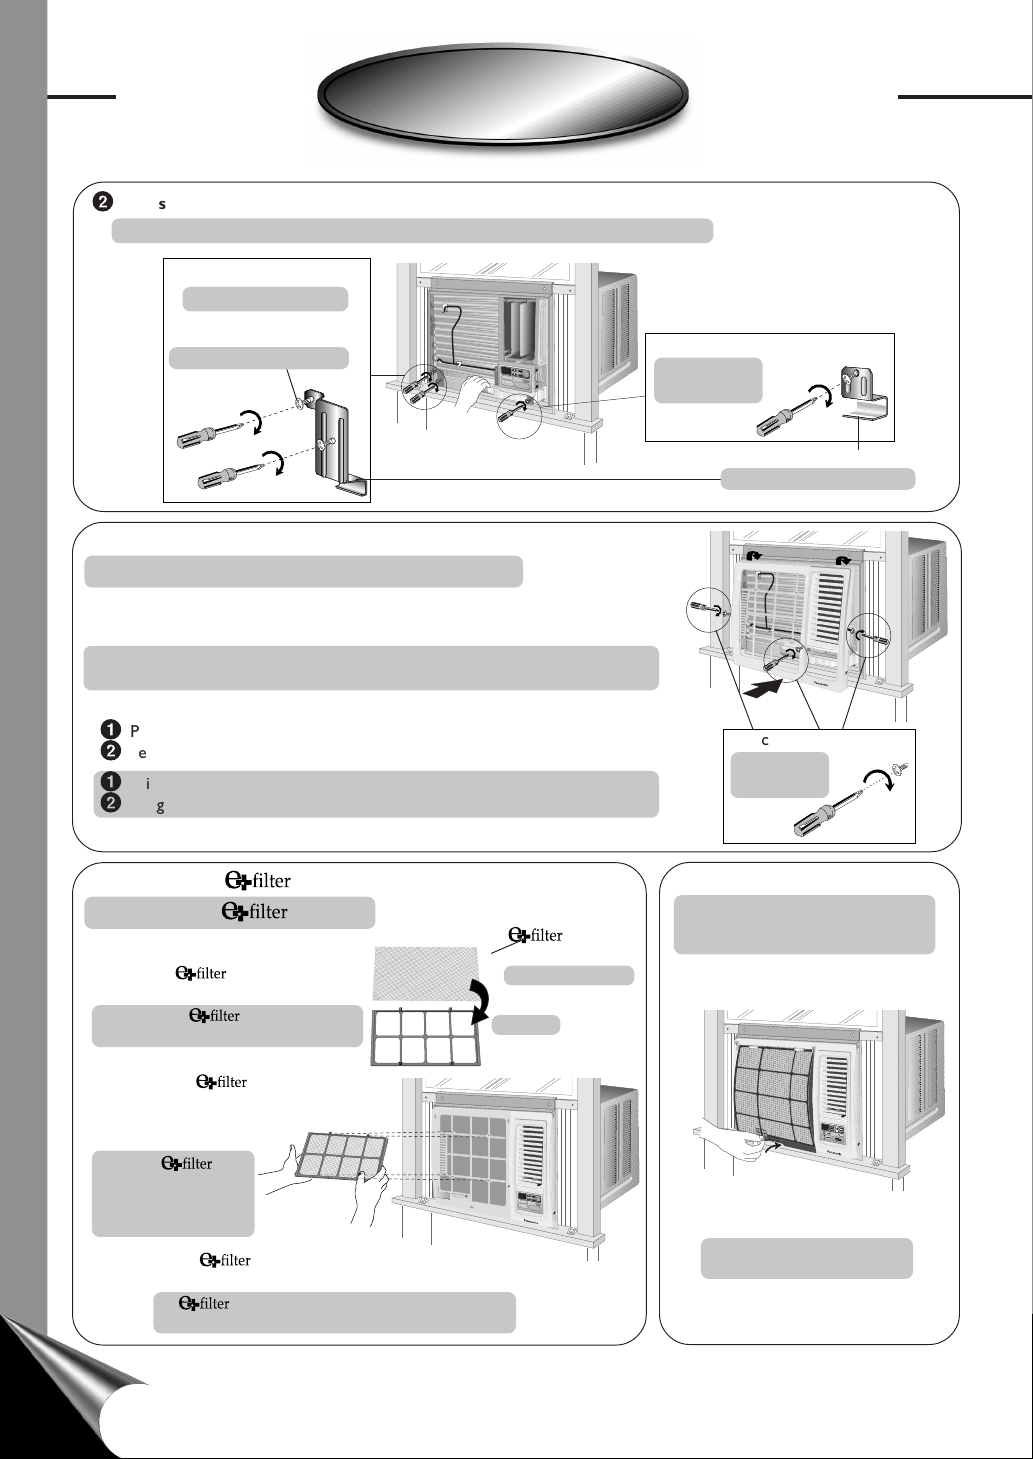
Reinstall the chassis locking brackets and retighten the screws
Reinstale las ménsulas de retención del chasis y apriete bien los tornillos
Clockwise
En el sentido del reloj
Chassis grounding screw
Tornillos del chasis a tierra
F
TIMER
O
PERATION
T
E
M
P
/T
IM
E
R
hr
S
E
T
SET/
O
F
F
/O
N
CANCEL
COOL
FAN
M
O
D
E
HIGH
EC
O
NO
M
Y
MED
FAN SPEED
LOW
W
ireless
R
e
m
o
te
C
o
n
tro
l
INSTALLATION OF THE FRONT GRILLE
INSTALACIÓN DE LA REJILLA FRONTAL
Depending upon the location of the AC outlet, route the AC cord to either the
left or right side while installing the front grille.
Dependiendo de la ubicación de la toma de CA, dirija el cable hacia la derecha o
izquierda mientras instala la rejilla frontal.
1
Place the front grille on the cabinet first.
2
Secure the front grille to the main chassis using the screws provided.
1
Primero, ponga la rejilla frontal en la caja.
2
Asegure la rejilla frontal a el chasis haciendo uso de los tornillos provistos.
INSERT THE
INSERTE EL FILTRO
Attach the (part no. CZ-SF6P)
to the frame.
Adjuntar el
filtro (serie no.
CZ-SF6P) a el marco.
(part no. CZ-SF6P)
(serie no. CZ-SF6P)
To frame
Al marco
Clockwise
En el sentido
del reloj
Chassis locking brackets
Soportes que cierran el chasis
F
TIM
E
R
OPERATION
T
E
M
P
/T
IM
E
R
hr
S
E
T
S
E
O
T
/
F
F
/O
N
C
A
N
C
E
L
C
O
O
L
M
F
A
O
N
D
E
ECONOMY
H
IG
H
M
E
D
FAN SPEED
L
O
W
Wireless
R
em
ote
C
on
trol
Clockwise
En el sentido
del reloj
INSERT THE AIR FILTER
INSERTE EL FILTRO DE
AIRE
10
Slot in the
and the frame (part no.
CZ-SFW6P) to the
front grille.
El ranura
filtro
y el marco (serie no.
CZ-SFW6P) a la rejilla
frontal.
The and the frame can be obtained
separately from your nearest servicenter.
El
filtro y el marco puede ser obtenido en
su servicentro más cercano por separado.
F
T
IM
E
R
O
PERATION
T
E
M
P
/
T
I
M
E
R
h
r
S
E
T
S
E
T
OFF/ON
/
C
A
N
C
E
L
C
O
O
L
F
M
A
N
O
D
E
H
IG
E
H
C
O
N
O
M
Y
M
E
D
F
A
N
S
P
E
E
D
L
O
W
W
ireless
Remote Control
Attach the air filter to
the intake grille.
Adjuntar el filtro de aire a la
rejilla frontal.
 Loading...