

Page 1
Panasonic
Color Television
Operating Instructions
CT-20SX11
CT-F2111
CT-F2111X
CT-F2121L
For assistance, please call: 1-800-211-PANA (7262) or
send e-mail to: [email protected] (USA only)
TQB2AA0407 10607
PRINTED IN USA
Page 2

W A RN ING
/v \
WARNING^ To reduce the risk of electric shock do not remove cover or back.
No user-serviceable parts inside. Refer servicing to qualified service personnel.
RISK OF ELECTRIC SHOCK
DO NOT OPEN
A
/• \
The lightmng ftash with arrow
head within a triangle is
Intended to tell the user that
A
WARNING: To prevent fire or shock hazard, do not expose this appliance
parts inside the product are a
risk of electric shock to persons.
to rain or moisture.
A
The exclamation point within a
triangle is intended to tell the
user that important operating
and servicing instructions are in
the papers with the appliance.
Page 3

Table of Contents____________________________________________
Table of Contents
Feature Chart................................................................3
Congratulations
Customer Record
Care and Cleaning......................................................................4
Specifications..............................................................................4
Installation
Television Location.....................................................................5
Optional Cable Connections.......................................................6
AC Power Supply Cord...............................................................6
Cable / Antenna Connection.......................................................6
.................................................................
Optional Equipment Connections
VCR Connection.........................................................................7
Cable Box Connection................................................................8
VCR and Cable Box Connection
Amplifier Connection {To Audio Amp)
Main Menu..................................................................11
Action Button............................................................................11
CH / VOL Button......................................................................11
Remote Control Buttons
Remote Control Guide.............................................................11
Main Menu Feature Chart..........................................12
.........................................................
.......................................................................
..............................
................................................
.....................................
..........................................................
4
4
5
7
9
10
11
Special Features
Menu Languages......................................................................14
Timer.........................................................................................14
Sleep Timer..............................................................................14
Program Timer
CH CAP (Channel Caption)......................................................15
Lock..........................................................................................16
Troubleshooting Chart....
Read these instructions completely before operating TV.
Contents are subject to change without notice or obligation.
Copyright 2001 by Matsushita Electric Corporation of America. Atl rights reserved.
Unauthorized copying and distribution is a violation of law.
...................................................
.........................................................................
14
..........................................
14
17
Page 4
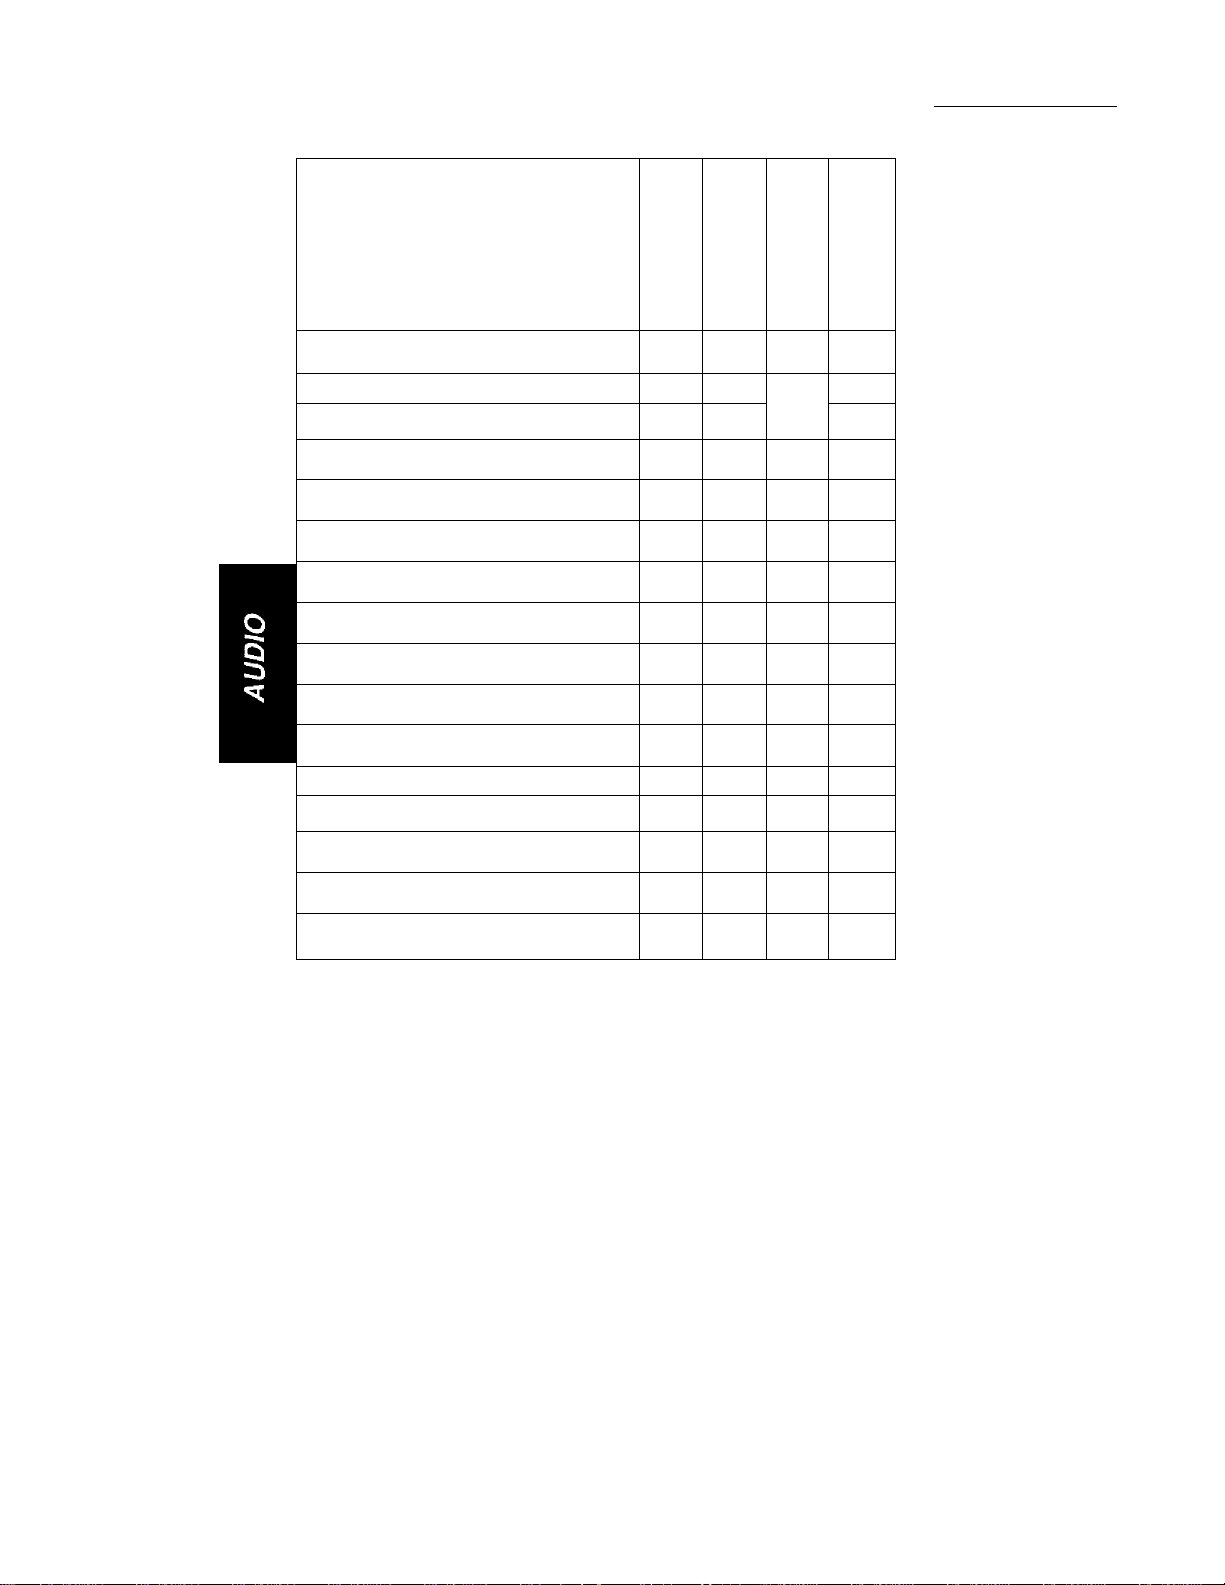
Feature Chart
Feature Chart
MODELS
FEATURES
MENU LANGUAGE
ENG/SPAN/FR
V-CHIP CAPABILITY
75 OHM INPUT n
VIDEO NORM
AUDIO NORM
STEREO
Al SOUND □ □ □ □
BASS/BALANCEfTREBLE □
SURROUND
T- *
is
O
□ □
□ □
□
□
□ □
Y
e
hi
o
□
□
n
□
Y^
CVI
Si
hi
hi
O
□
□
a
□
□ □
□
□
□ □ n □
e
O
□
□
o
n
□
□
A/VIN
(REAR/FRONT)
AUDIO OUT
S-VHS INPUT
HEADPHONE JACK □ □
2 2
(2/1) (2/1) (2/1)
□ □
n o
2
a
a
□
2
(2/1)
□
O
□
Page 5
Congratulations
Congratulations
Your new Panasonic Tau television is designed to provide state-of-the-art picture
quality and features an innovative PureFlat™ picture tube. The new gray or silver
cabinet with compact, elegant styling is designed to give you many years of
enjoyment. It was thoroughly tested and tuned at the factory for best performance.
Customer Record
The model and serial number of this product are located on the back of the TV. You
should note the model and serial number in the space provided and retain as a
permanent record of your purchase. This will aid in identification in the event of theft or
loss. Product registraton for U S. customers is available at:
Panasonic.
Care and Cleaning
Screen (Turn TV Off)
□ Use a mild soap solution or window cleaner with a soft clean cloth DO NOT USE
□ Avoid excessive moisture and wipe dry
Note: Do not spray any type of cleanin g fluid directly o n the screen
www.prodreg.com/
Model
Number
Serial
Number
ABRASIVE CLEANERS
Cabinet and Remote Control
□ For cabinets and remote control, use a soft cloth dampened with water or a mild detergent
solution Avoid excessive moisture and wipe dry.
O Do not use benzene, thinner or other petroleum based products.
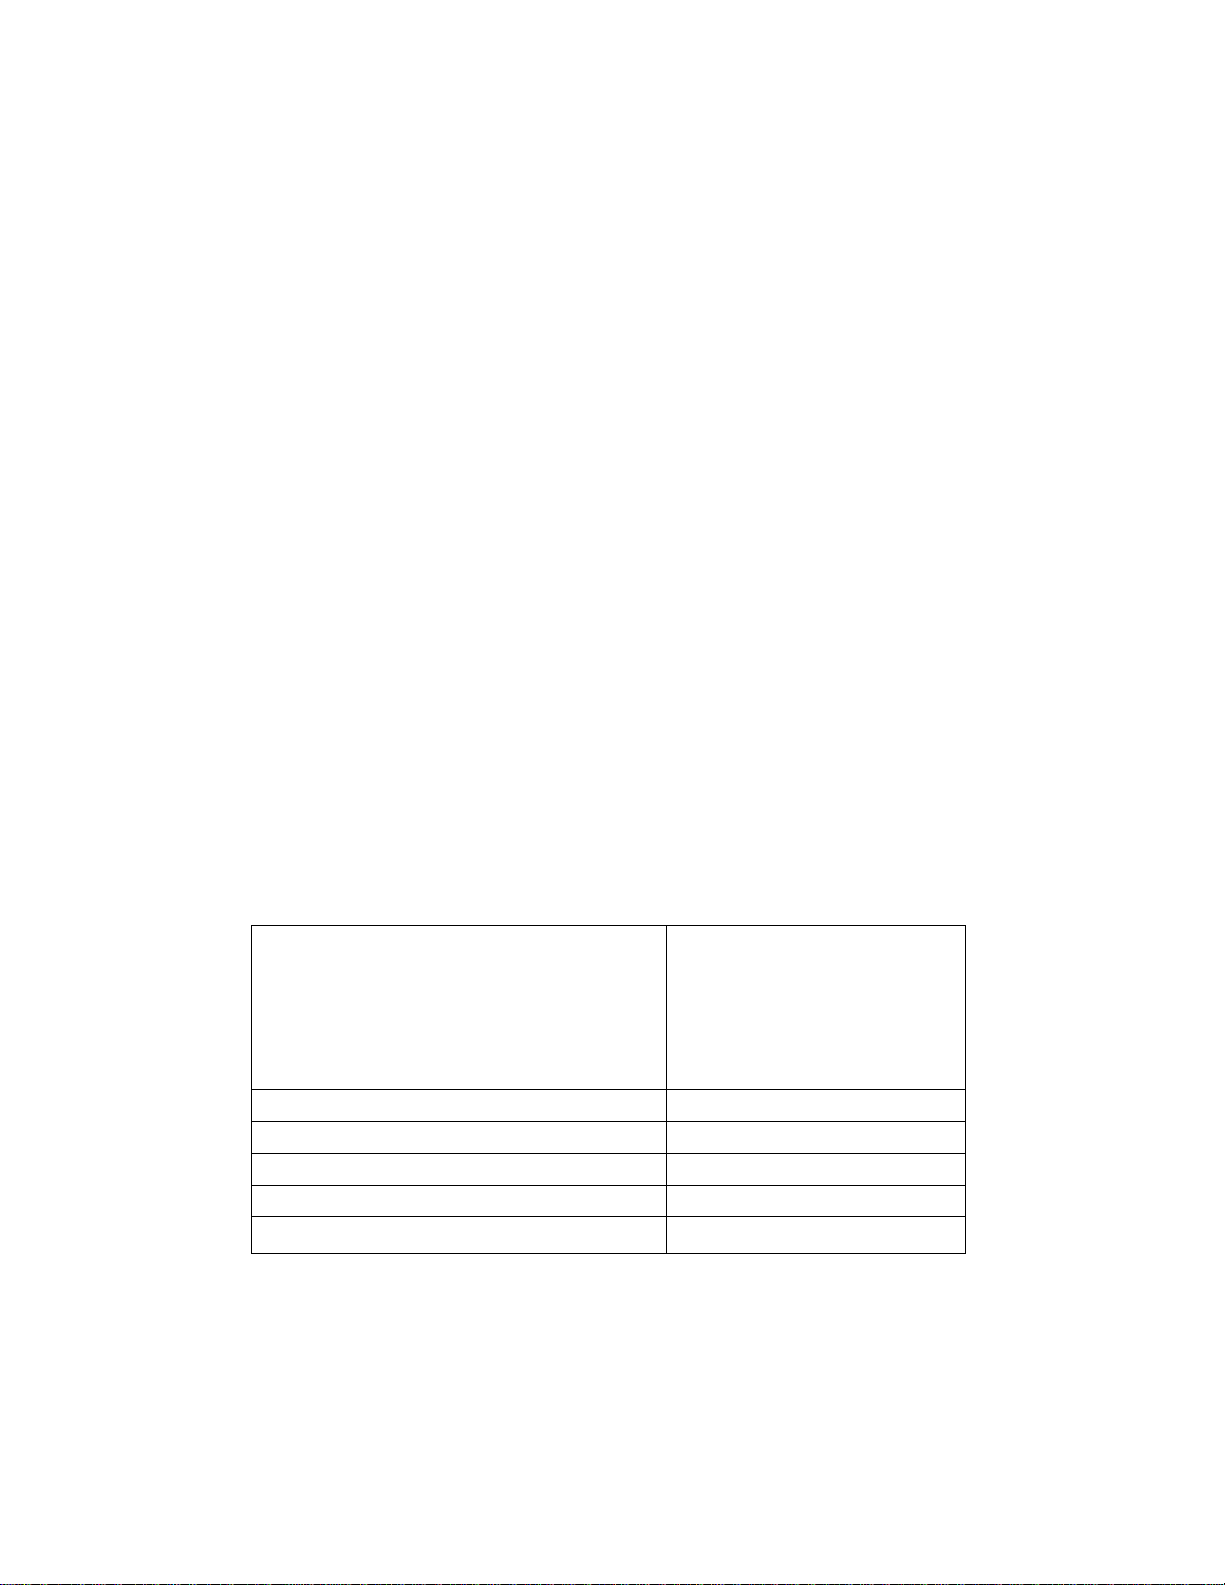
Specifications
Power Source
CT-20SX11 (1.4A)
CT-F2111 (1.4A)
CT-F2111X (1.4A)
CT-F2121L (1.4A)
Channel Capability -181
Video Input Jacks
Audio input Jacks
Audio Output Jacks
S-Video Input Jacks
Specifications are subject to change without notice or obligation.
1 Vp-p, 75 Ohm, Phono Jack Type
120V AC. 60Hz
127V AC, 60Hz
Auto (110Vca-220Vca), 50/60Hz
VHF-12, UHF-56, Cable-113
500mV RMS 47K Ohm
0-2 OV RMS 4 7K Ohm
S-Video (Y-C) Connector
Page 6

Installation
Television Location
This unit is intended to be used with an optional stand or entertainment center.
Consult your dealer for available options.
□
□
□
□
CAUTION: Use this television receiver only with the cart, stand, tripod,
bracket, or table specified by the manufacturer, or sold with the apparatus. When
a cart is used, use caution when moving the cart/apparatus combination to avoid
injury from tip-over. In order to avoid injury to children, never place your
television receiver on a piece of furniture that is capable of being tilted by a child
leaning on it, pulling on it, standing on it, or climbing on it.
Installation
Avoid excessive sunlight or bright lights, including reflections.
Keep away from excessive heat or moisture. Inadequate ventilation may cause internal
component failure.
Fluorescent lighting may reduce remote control transmitting range.
Keep away from magnetic equipment, including motors, fans and external speakers.
Page 7

Installation
Optional Cable Connections
Shielded audio and video cables should be used between components. For best
results:
n Use 75-ohm coaxial shielded cables.
□ Use appropriate input and output connectors, that match your component connectors,
n Avoid long cables to minimize interference.
AC Power Supply Cord
CAUTION: TO PREVENT ELECTRIC SHOCK MATCH WIDE
BLADE OF PLUG TO WIDE SLOT OF AC OUTLET AND FULLY
INSERT. DO NOT USE A PLUG WITH A RECEPTACLE OR OTHER
OUTLET UNLESS THE BLADE CAN BE FULLY INSERTED TO
PREVENT BLADE EXPOSURE.
PROTECT POWER CORDS FROM BEING WALKED ON, ROLLED OVER,
CRIMPED, BENT OR PINCHED, PARTICULARLY AT PLUGS, CONVENIENCE
RECEPTACLES, AND THE POINT WHERE THEY EXIT FROM THE APPARATUS.
Cable / Antenna Connection
Polarized plug
For proper reception, either a cable or antenna connection is required.
Cable Connection
Connect the cable supplied by your local cable company.
Note: A cable converter box may be required for proper reception.
Check with your local cable company for compatibility
requirements.
Antenna Connections
□ For proper reception of VHF/UHF channels, an external antenna is required. For best
reception an outdoor antenna is recommended.
□ Antenna Mode must be set to TV. incoming Cable from
Incoming Cable from
Cable Company
75 Ohm VHF/UHF
on back of TV
Home Antenna
Cable Preset
Cable Mode is preset at the factory. Antenna
users must change to Antenna Mode in the
Setup Menu.
Page 8
Optional Equipment Connections
IMPORTANT INFORMATION REGARDING USE OF VIDEO GAMES, COMPUTERS, DSS OR OTHER FIXED IMAGE DISPLAYS.
The extended use of fixed image program material can cause a permanent “shadow image” on
the picture tube. This background image is viewable on normal programs in the form of a
stationary fixed image. This type of irreversible picture tube deterioration can be limited by
observing the following steps:
A. Reduce the brightness/contrast setting to a minimum viewing level.
B. Do not display the fixed image for extended periods of time.
C. Turn the power off when not in actual use.
Note:
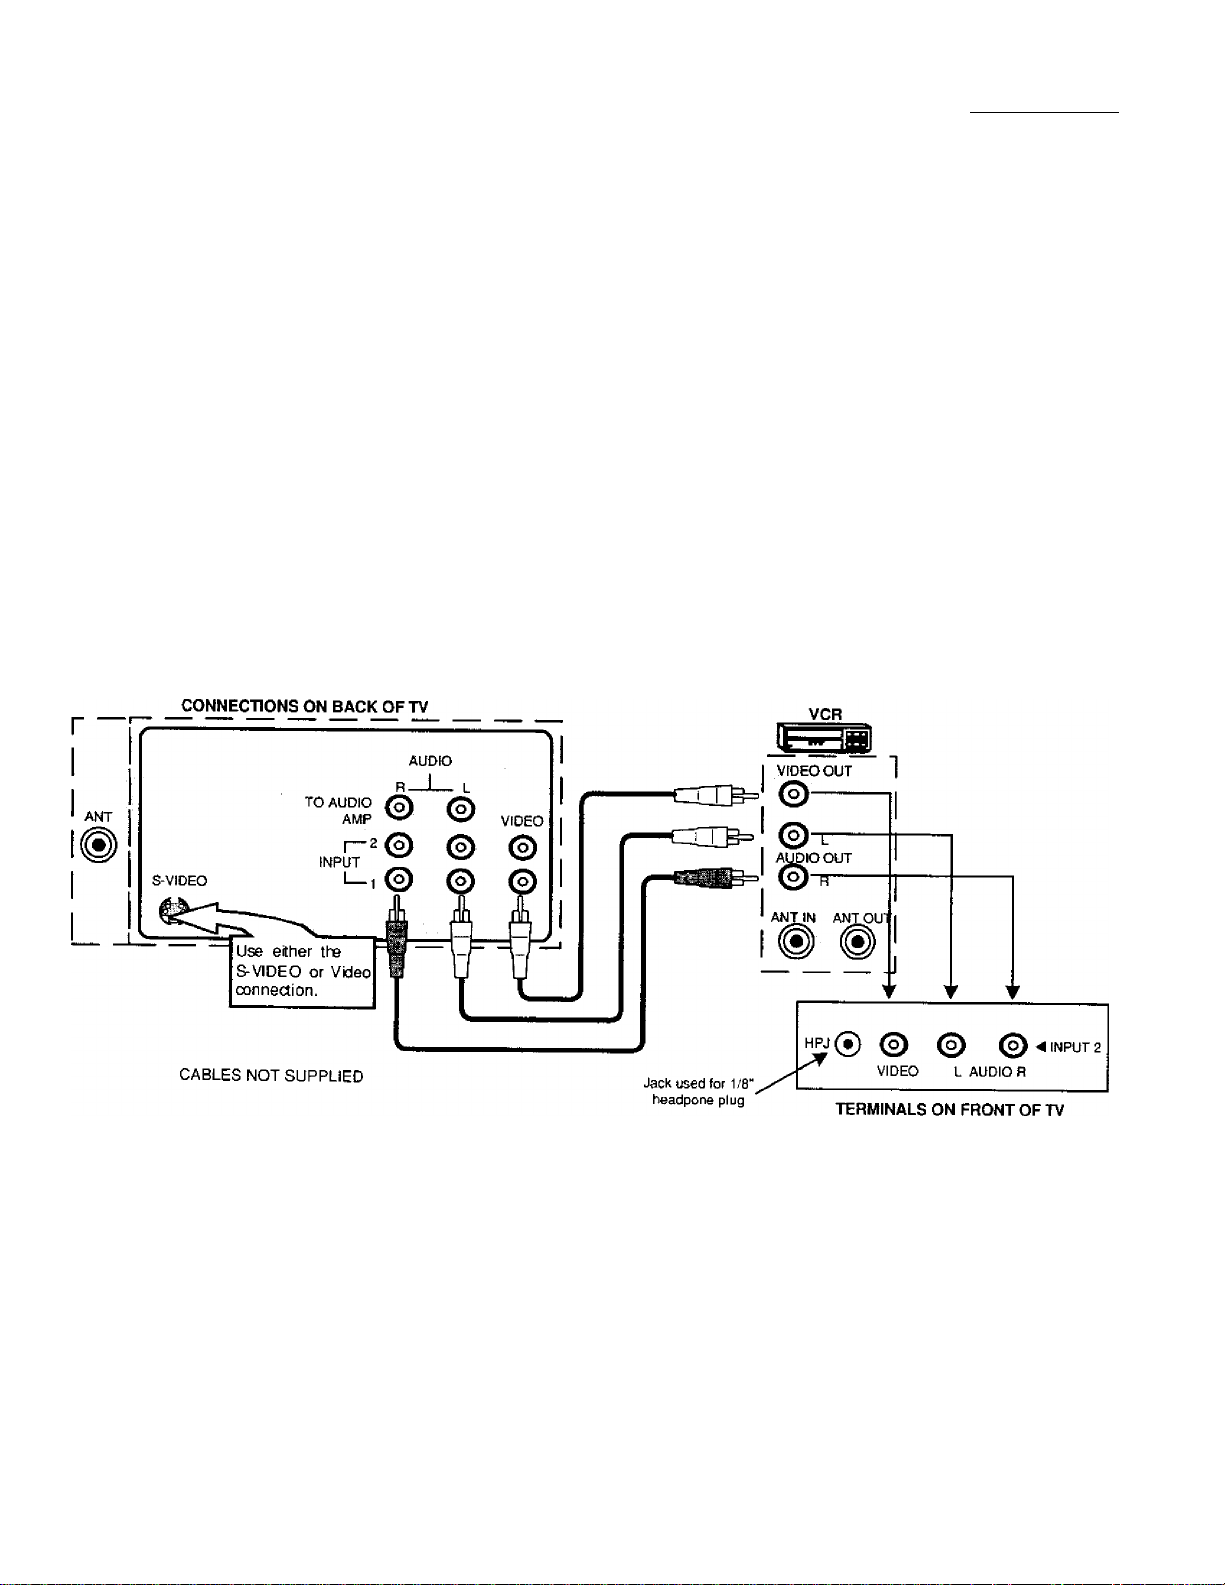
VCR Connection
VCRs, video disc players, video game equipment, and DSS equipment can also be
connected to the video inputs. See the optional equipment manual for more
information.
The marking or retained image on the picture tube resulting from fixed image
use is not an operating defect and as such is not covered by Warranty. This
product is not designed to display fixed image patterns for extended periods
of time.
Installation
Procedure
1. Connect equipment as shown to front or rear Audio/Video input jacks.
Note: Front and rear AudioA/ideo connections (INPUT 2) cannot be operated at the
same time.
2. Select the Video mode by pressing TV/VIDEO button.
3. Operate optional equipment as instructed in equipment manual.
Page 9
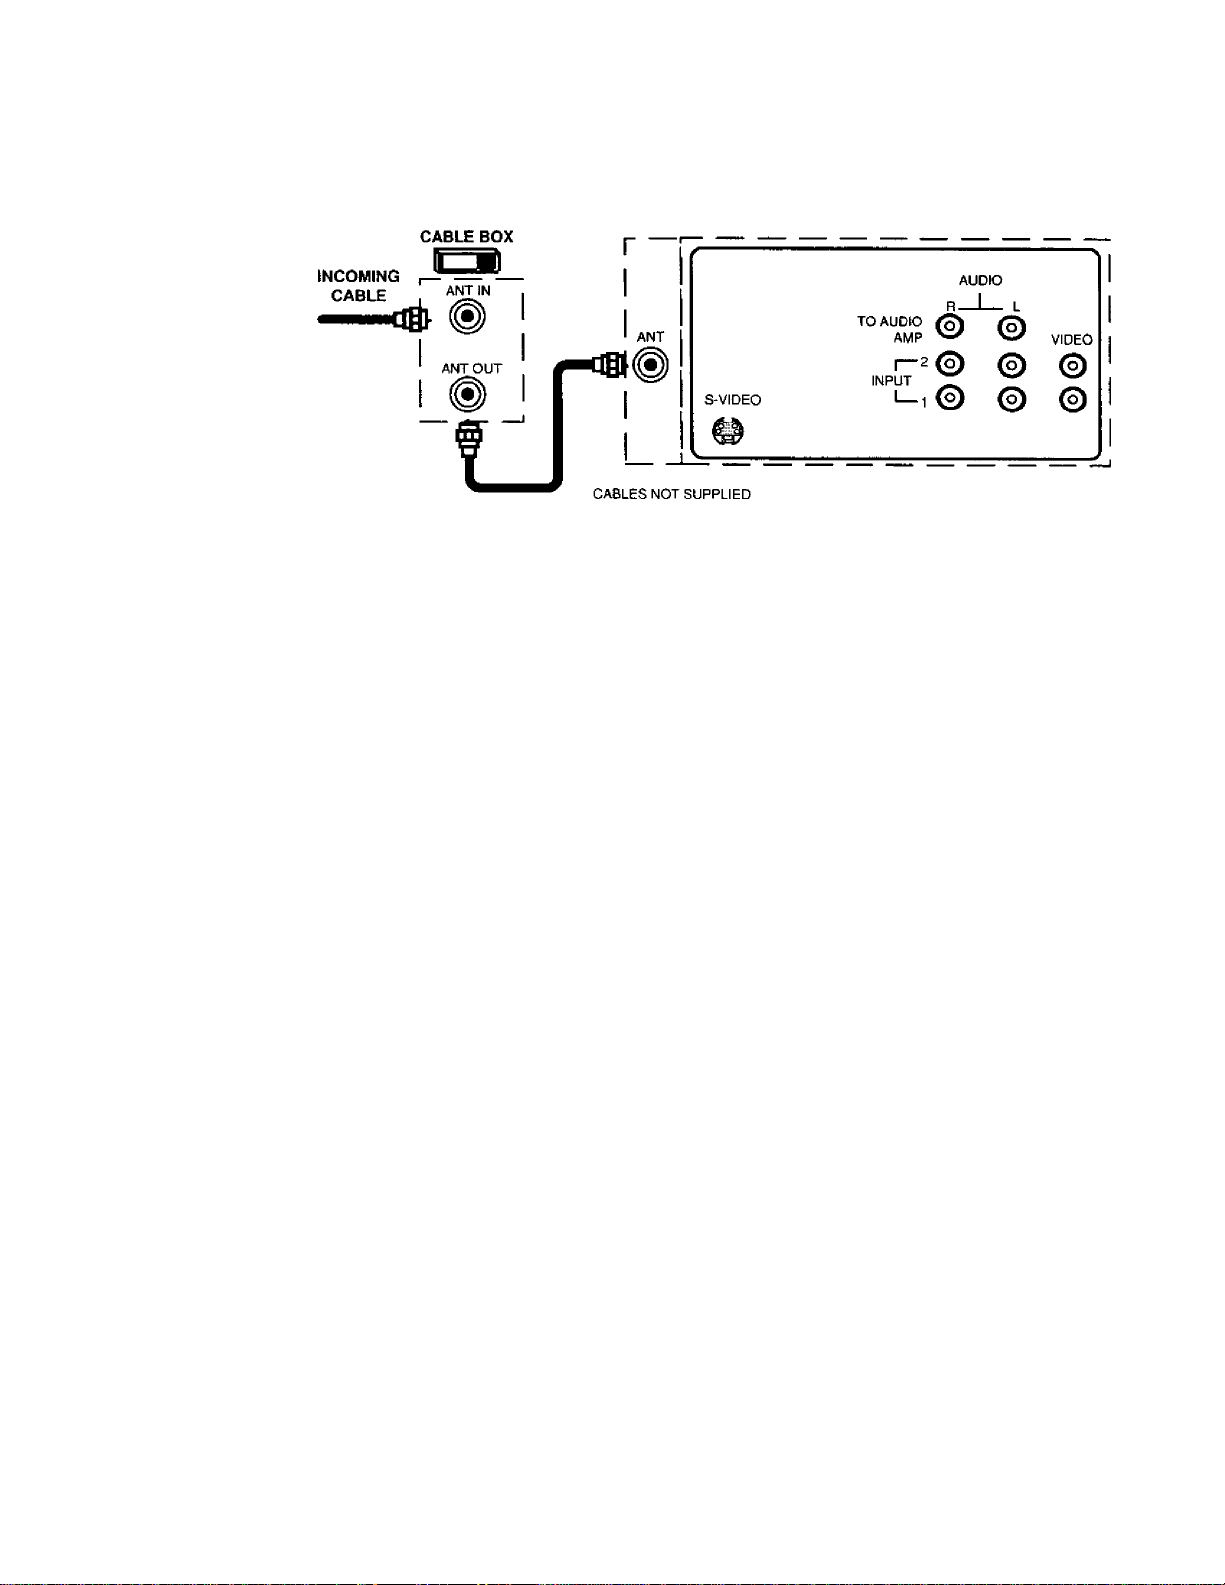
Installation
Cable Box Connection
Follow this diagram when connecting your television to a cable box only.
CONNECTIONS ON BACK OF TV
Note: The remote control must be programmed with supplied codes to operate the cable
box. See Programming the Remote Control in the Remote Control Quick Reference
Guide.
Viewing a premium (scrambled) cable channel
Procedure
1. Tune the television to Channel 3 or 4 depending on the RF out setting of the cable box.
2. Using the cable box, tune to the premium cable channel you want to view.
Page 10
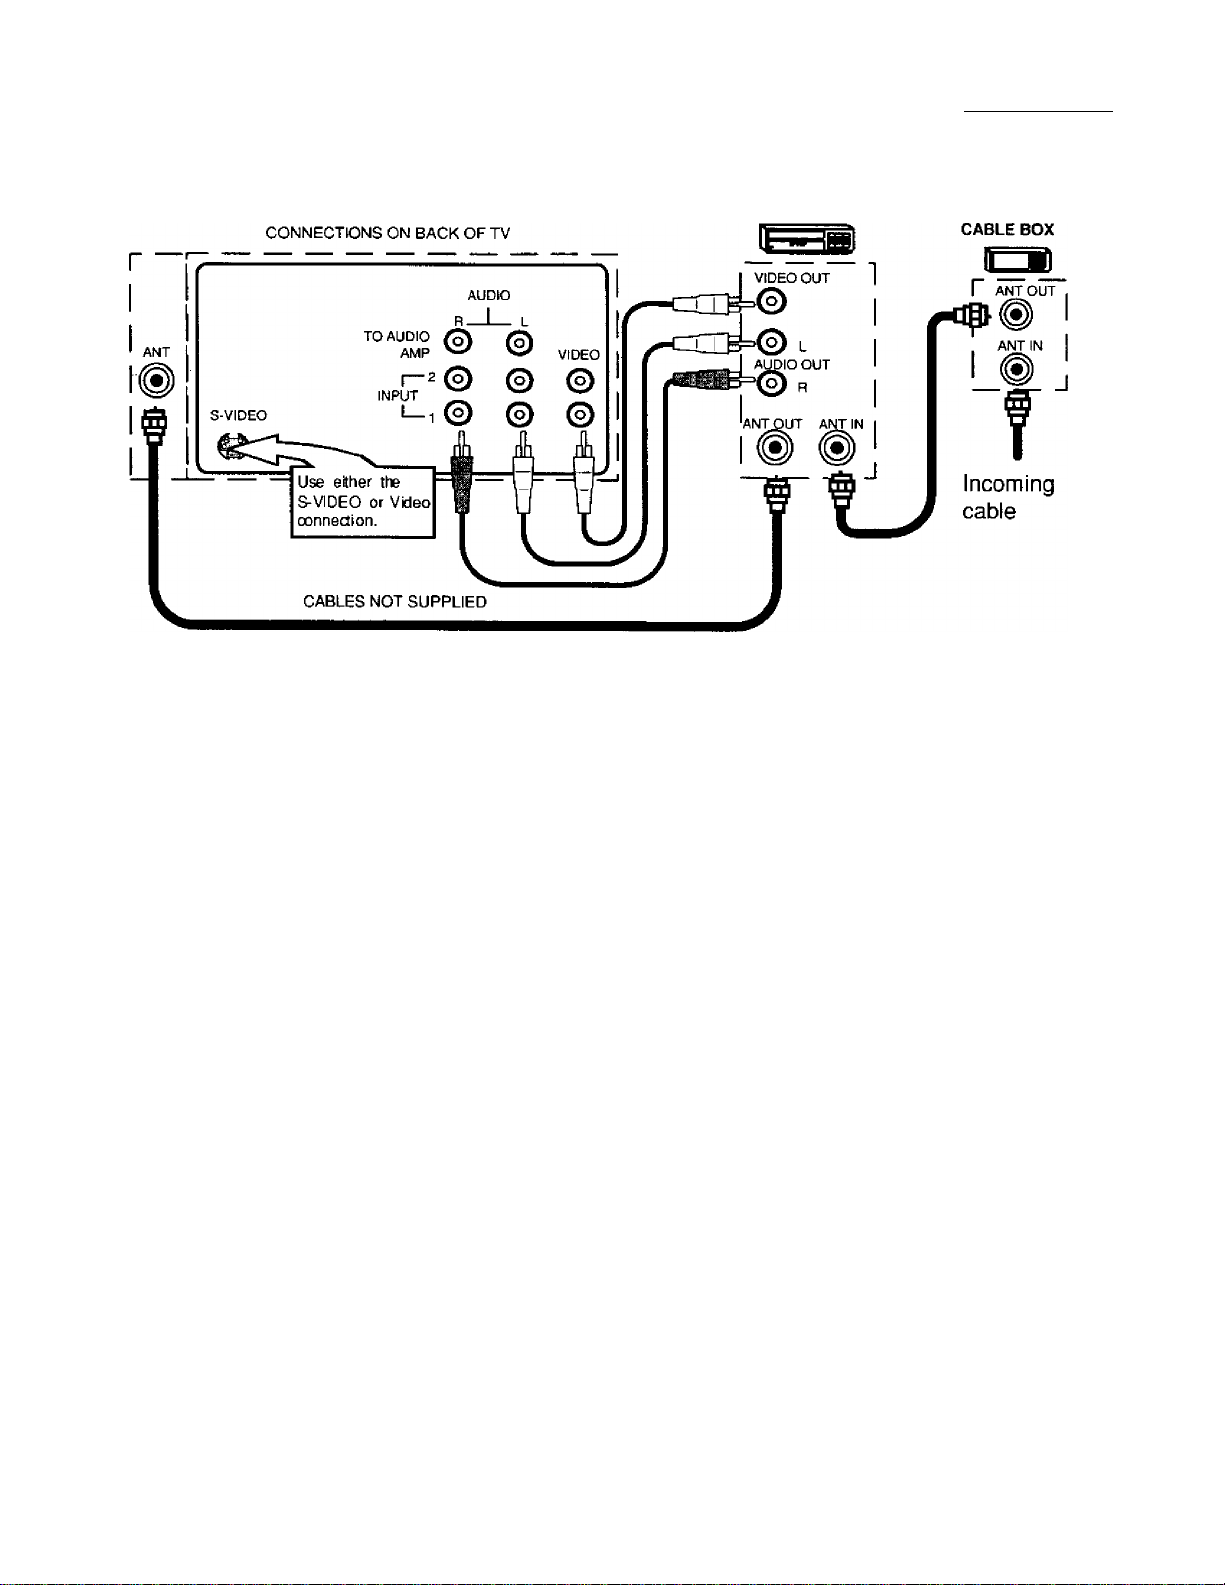
VCR and Cable Box Connection
Follow this diagram when connecting your television to both a VCR and a cable box.
VCH
Installation
Note: The remote control must be programmed with supplied codes to operate the VCR and
cable box. See Programming the Remote Control in the Remote Control Quick
Reference Guide.
Viewing a premium (scrambled) cable channel Procedure
1. Tune the television to CH 3 or CH 4 depending on the Cable box RF out.
2. Using the cable box, tune to the premium cable channel you want to view.
Recording a premium (scrambled) cable channel
Procedure
1. Press the TV/VIDEO button on the remote control to select the video input (VIDEO 1,
VIDEO 2, etc.) connected to your VCR.
2. Turn the VCR ON.
3. Tune the VCR to Channel 3 or 4, depending on your VCR.
4. Using your cable box, tune to the premium cable channel you want to record.
5. Begin recording.
Page 11
Installation
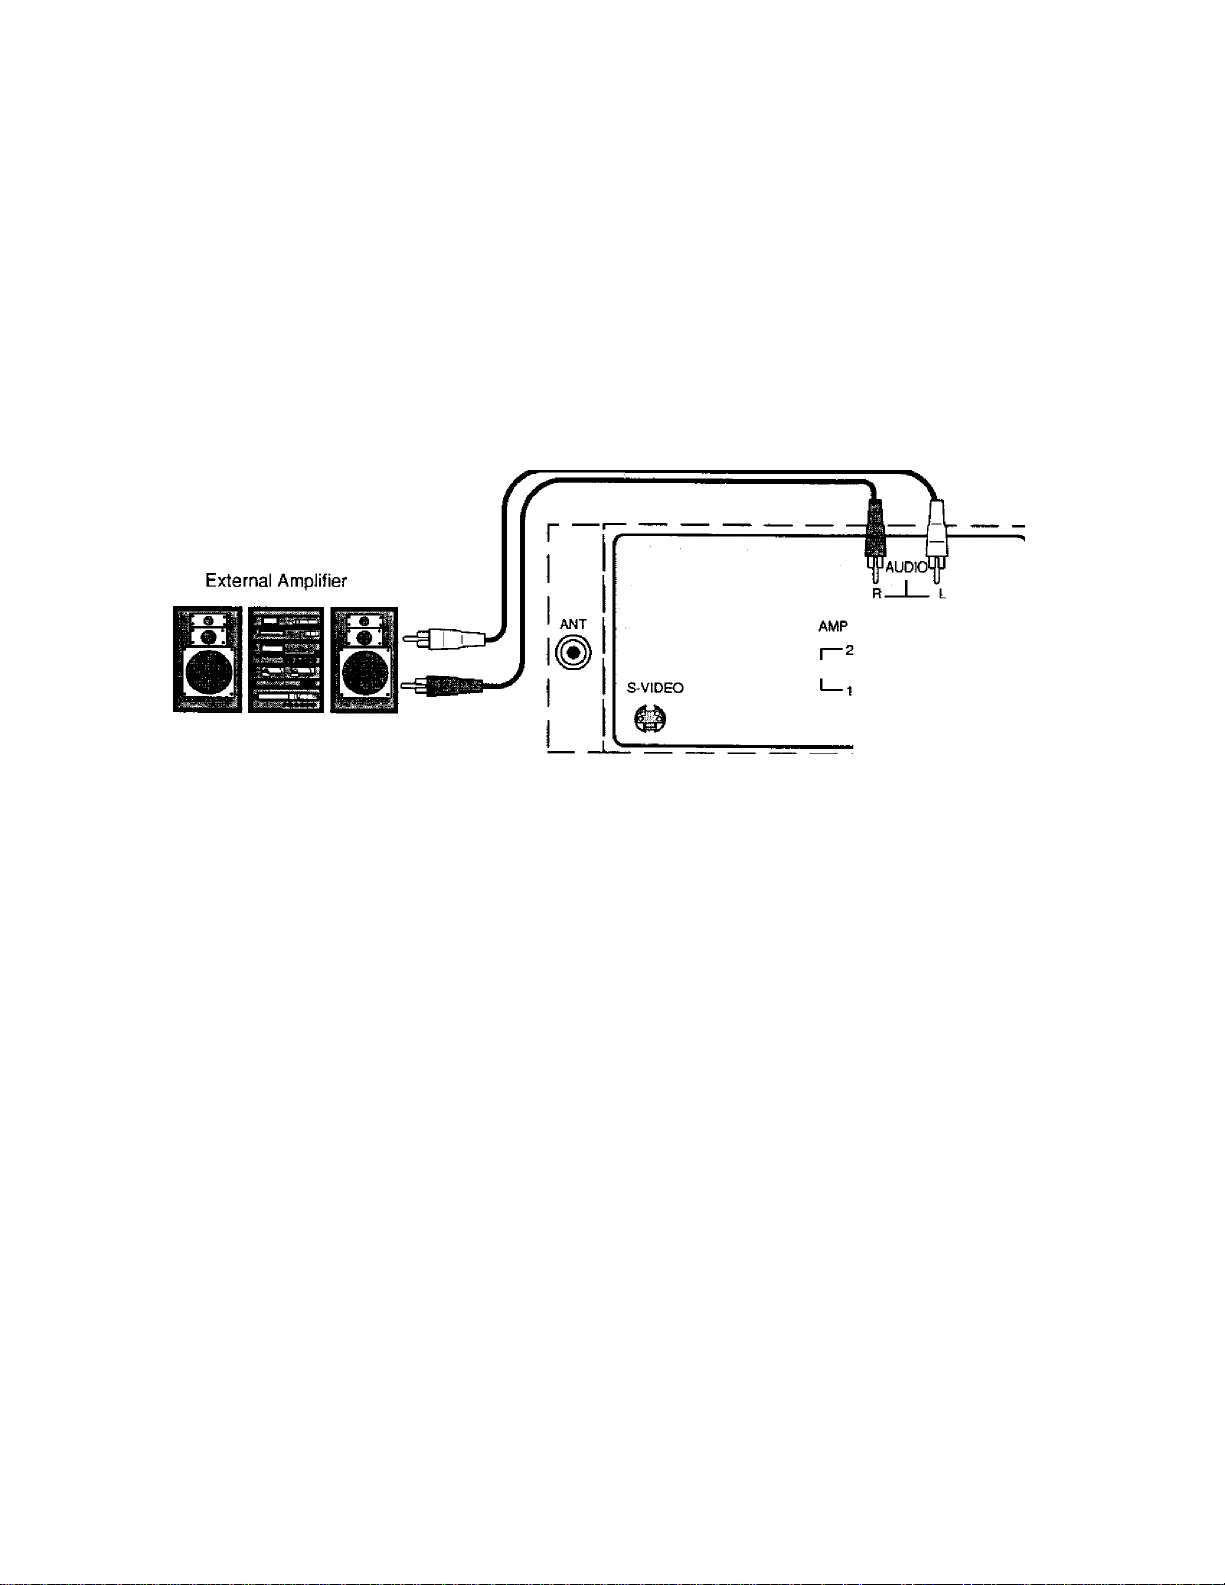
Amplifier Connection (To Audio Amp)
Connect to an external audio amplifier input for listening to a stereo system.
Note: TO AUDIO AMP terminals cannot be connected directly to external speakers.
Audio Adjustments
1. Select TV SPEAKERS ON from AUDIO menu.
2. Set amplifier volume to minimum.
3. Adjust TV volume to desired level.
4. Adjust amplifier volume to match the TV.
5. Select TV SPEAKERS OFF&VAO from AUDIO menu.
6. Volume, mute, bass, treble and balance are now controlled from the TV.
Note: In OFF&FAO the volume is controlled by the external amplifier.
CONNECTIONS ON BACK OF TV
TO AUDIO 0 0
CABLES NOT SUPPLIED
INPUT
© ©
© ©
Page 12
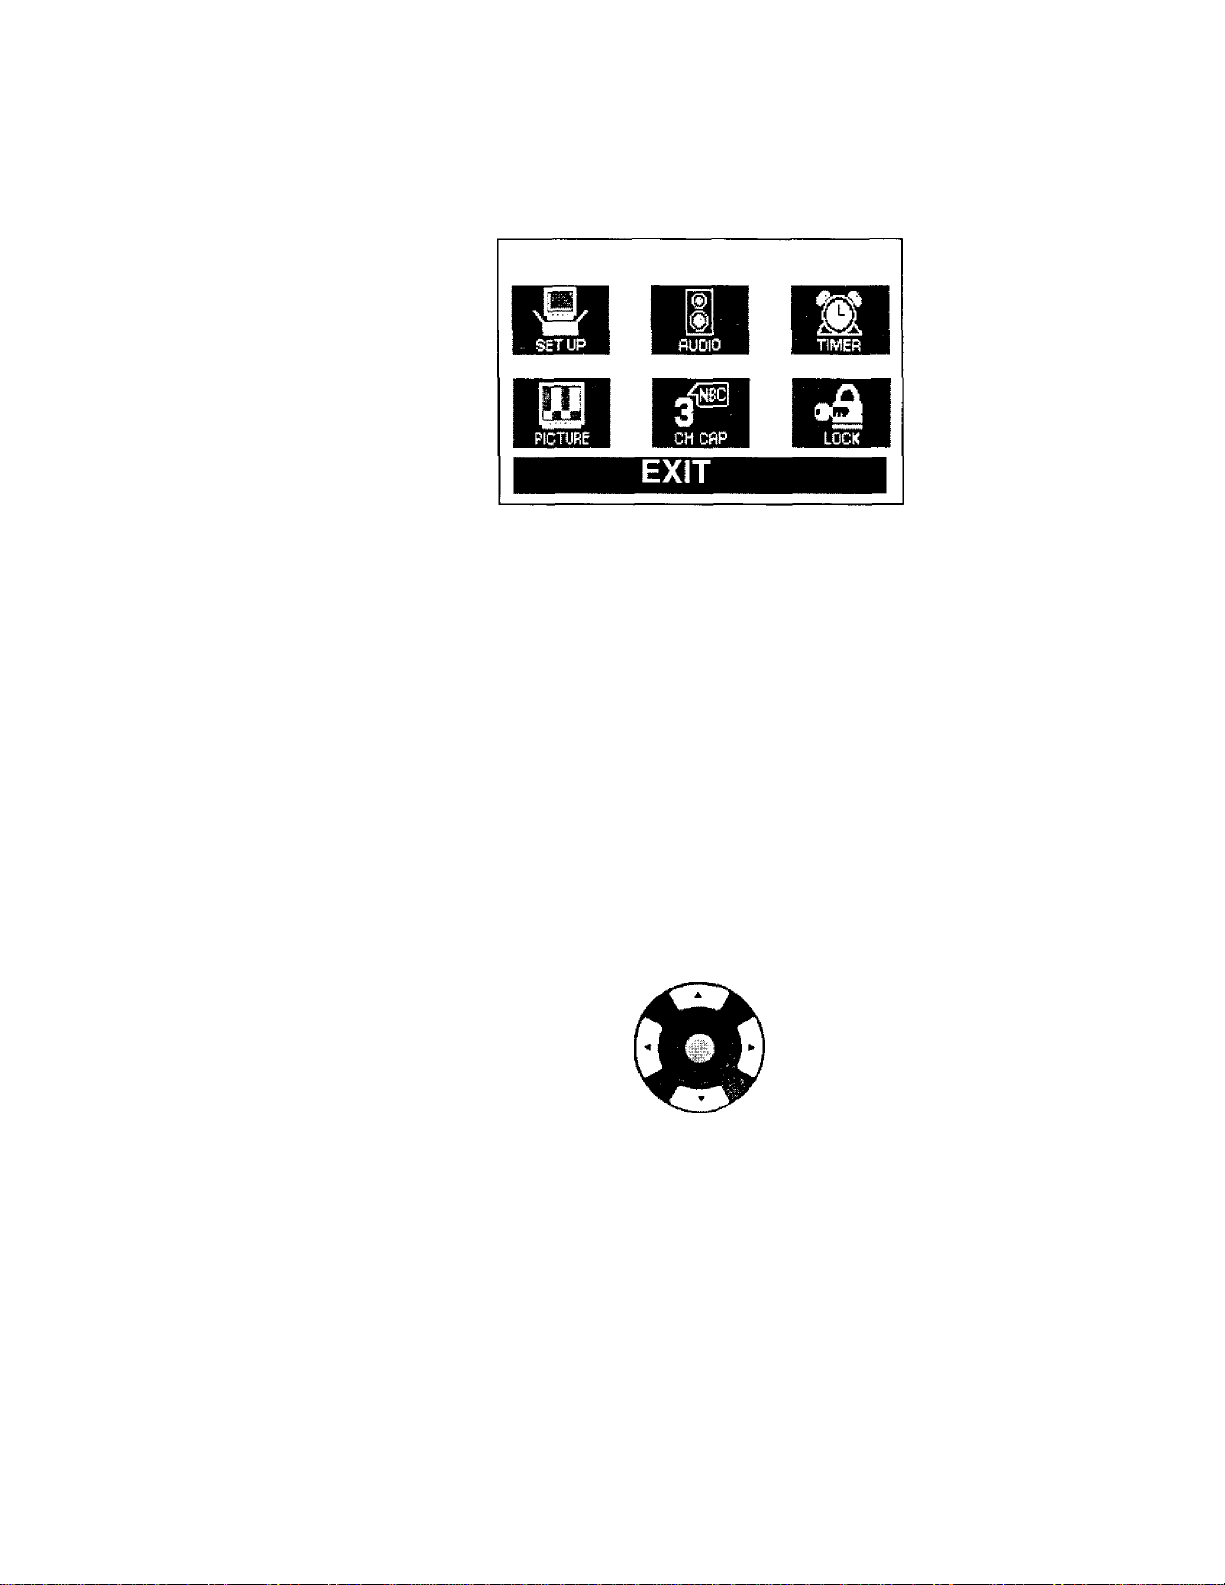
Main Menu
ACTION Button
Main Menu
Main Menu
Press the ACTION button to display the Main Menu and submenus. Press the ACTION button
repeatedly to exit.
CH / VOL Buttons
Press the CH {channel) or VOL (volume) buttons to select an icon. Use the CH buttons to
highlight the desired features. Use VOL buttons to select and adjust features.
Remote Control Buttons
Remote Control Guide
The Remote Control Quick Reference Guide is located within the package provided
with this TV.
Remote ACTION / Navigation Button
CH
VOL VOL
CH
Page 13
Main Menu Feature Chart
Main Menu Feature Chart
Menu
SETTIME
ANT
AUTO PROG
MANUAL PROG
AUTO POWER ON
CC MODE
LANGUAGES
OEscmiPncm
SET UP
When entered, TIME will display on screen after
pressing POWER button, RECALL button, or
changing channels.
Choose CABLE or TV to match the signal at your
antenna input.
Automatically program channels with a signal
into memory.
Manually add or delete channels from memory.
Select SET to power up the TV at the same time as
the Cable Box or other components or select OFF.
Select Cl or C2 for Closed Captioning display. Select
OFF to display closed captioning when MUTE button
is pressed.
Select English, Spanish, or French menu.
AUDIO NORM
BASS
TREBLE
BALANCE
MODE
Al SOUND
SURROUND
TV SPEAKERS
AUDIO
Reset BASS, TREBLE and BALANCE to factory
default.
Increase or decrease the bass response.
Increase or decrease the treble response.
Emphasize the left/right speaker volume.
Select the audio mode:
□ STEREO - Two channel audio reception.
□ SAP - (Second Audio Program) Tune to the
alternate audio channel if available in your area
(bilingual or descriptive audio).
n MONO - One channel audio. Use when stereo
signal is weak
Automatically maintain constant volume between
programs and commercials.
Enhances audio response when listening to stereo.
Select TV SPEAKERS:
□ ON - TV SPEAKERS operate normally
□ OFF&VAO (Variable Audio Output) - TV
Speakers off — audio adjustable by TV.
□ OFF&FAO (Fixed Audio Output) - TV
SPEAKERS off — audio adjustable only by the
external amplifier.
Page 14
Main Menu Feature Chart
Main Menu Feature Chart (Cent)
0ESCR№T1QN
TIMER
TIMER
SLEEP TIMER
PROGRAM TIMER
PICTURE
PICTURE NORM
COLOR
TINT
BRIGHTNESS
PICTURE
SHARPNESS
CHANNEL CAPTION
Program TV to automatically turn oft in 30, 60, or
90 minutes. Select NO to turn timer off.
Program TV to automatically turn on and off at
selected time on a selected channel, daily or only one
day.
PICTURE
Reset all picture adjustments to factory default
settings.
Adjust desired color intensity.
Adjust natural flesh tones.
Adjust dark areas for crisp detail.
Adjust white areas of picture.
Adjust clarity of outline detail.
CH CAP
Provide labels tor up to 30 stations using up to four
characters for each station.
mSk
GAME GUARD
LOCK
Program to prevent video games, cable box, and
VCRs from being viewed.
Page 15

Special Features
Special Features
SETUP
Menu Languages
In SETUP menu, select ENGLISH, ESPAÑOL (Spanish), or FRANÇAIS (French) to change the
menu language.
Timer
SET-UP
SET TIME
ANT
AUTO PROG NO
MANUAL PROG
AUTO POWER ON OFF
feel MODE
¡ENGLISH. Espilili
; AM
CABLE
NO
OFF
Sleep Timer
in TIMER menu, program to turn TV OFF in 30, 60, or 90 minutes. Select NO to turn off timer.
TIMER CONTROL
PROGRAM TIMER
ON :
: OFF :
CHANNEL 3
SET TIME FIRST
______
__
Program Timer
In Timer menu, program TV to automatically turn on and off at selected time on a selected
channel, daily or one day.
TIMER CONTROL
SLEEP TIMER
........ON ’
OFF
CHANNEL
SET
NO
3
NO
Note: TIME must be entered in the SETUP menu to operate PROGRAM TIMER.
Page 16
The TV automatically turns OFF after 90 minutes
when turned on by the PROGRAM TIMER. If the
OFF time is programmed or if a key is pressed,
the automatic OFF after 90 minutes will
be cancelled.
The PROGRAM TIMER is active when the TV is
OFF er ON. The TV will switch to the selected
channel at the selected time set by the
PROGRAM TIMER.
Special Features
CH CAP (Channel Caption)
Program channel captions {station labels) for 30 stations using up to four characters. Use the
numeric keypad for entering numbers unavailable with the select arrows.
Note: Delete channel captions by entering dashes (-) in all four character slots.
CHANNEL CAPTION
. f» . ■ - . ■
ENTER CAPTION
-K E fi S
A TO MOVE TO SELECT
TCURSOR CHANNEL
Page 17
Special Features
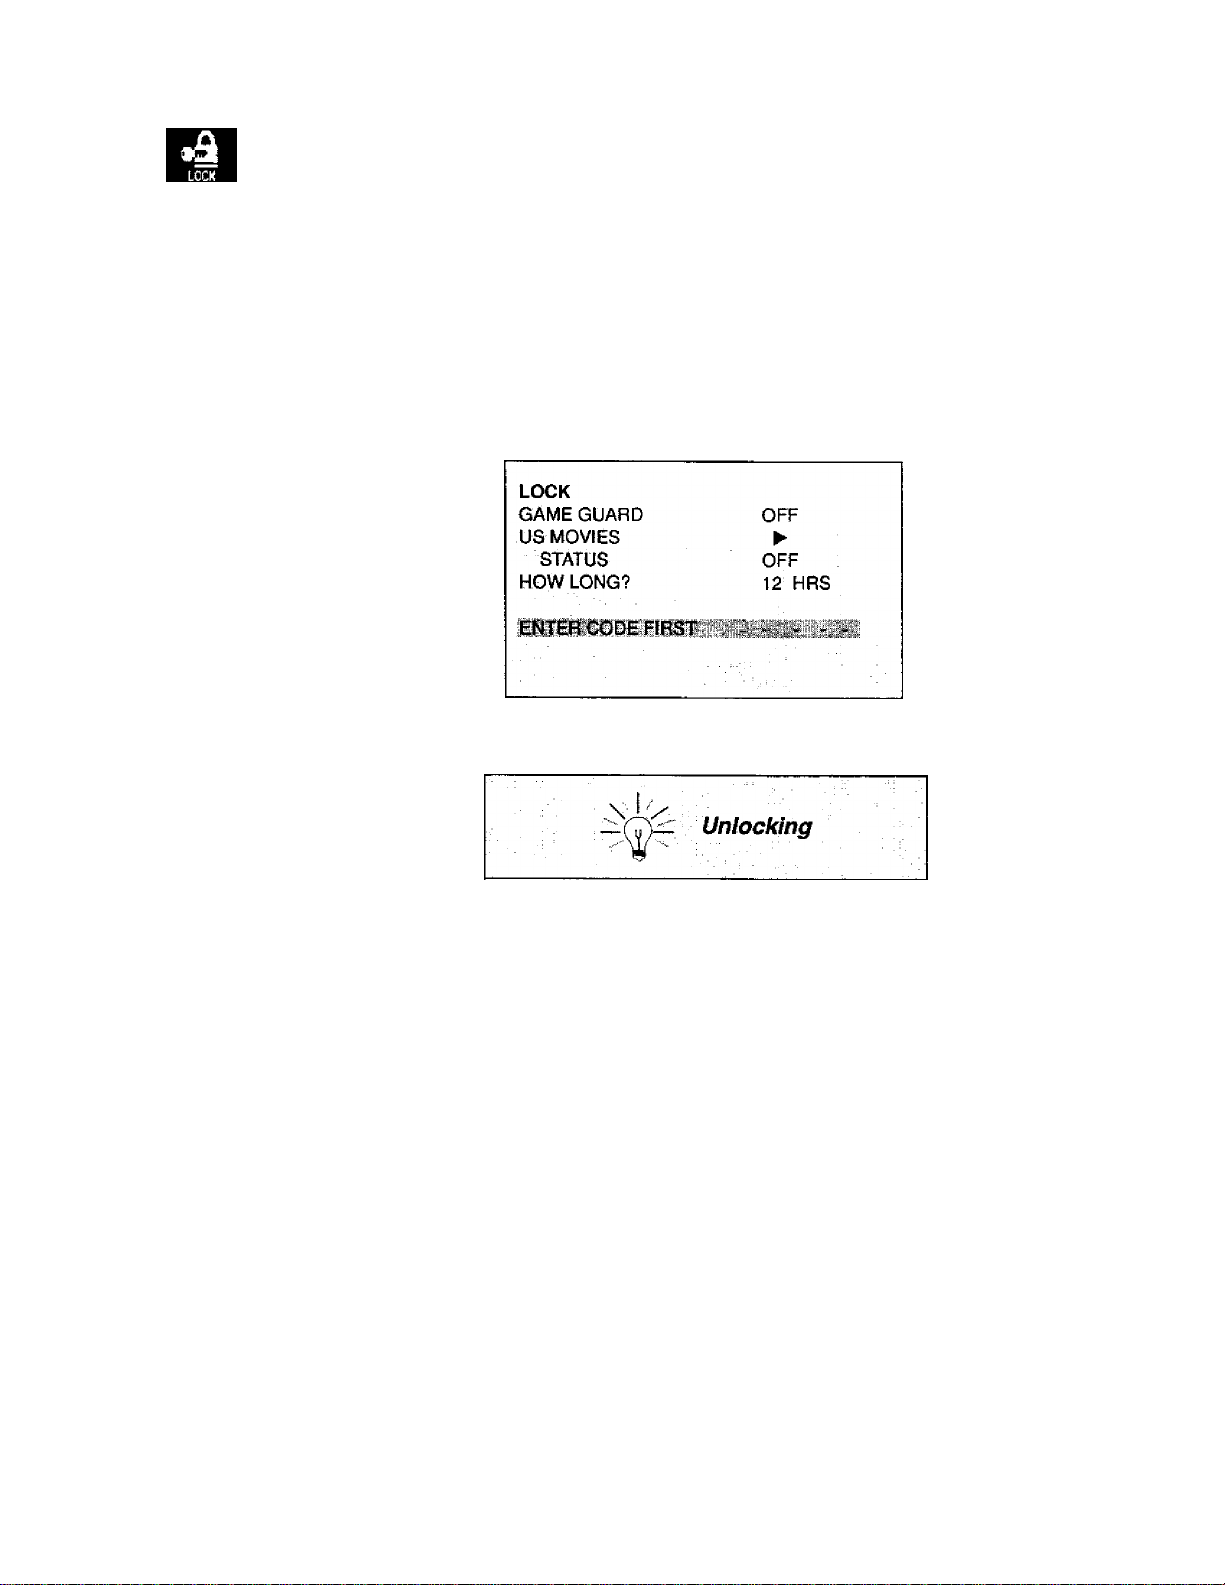
LOCK
Game Guard Lock and Unlock
Select GAME GUARD to prevent video games and videotapes from being viewed.
Lock Channel 3, Channel 4, and video inputs for 12, 24, 48 hours or ALWAYS by entering a
four-digit secret code, then selecting GAME GUARD ON.
Note: Understand how to unlock GAME GUARD before using it. Use a code that is easy to
remember or record it in a safe place.
Unlock GAME GUARD by reentering your four-digit secret code, then selecting GAME GUARD
OFF.
Note:
If GAME GUARD is ON, and if a blocked channel or video input is selected, the
message GAME GUARD ON displays in the upper right corner of the TV screen.
If you do not remember your code, the LOCK will
unlock in 12, 24, 48 hours or ALWAYS, depending
on the current setup. Be cautious when selecting
ALWAYS. If ALWAYS is selected, and you forget
your secret code, the TV must be serviced by a
qualified technician in order to clear the
LOCK setup.
Note: For more information about LOCK menu, see the V-CHIP Parental Lock manual provided
with the TV package.
Page 18
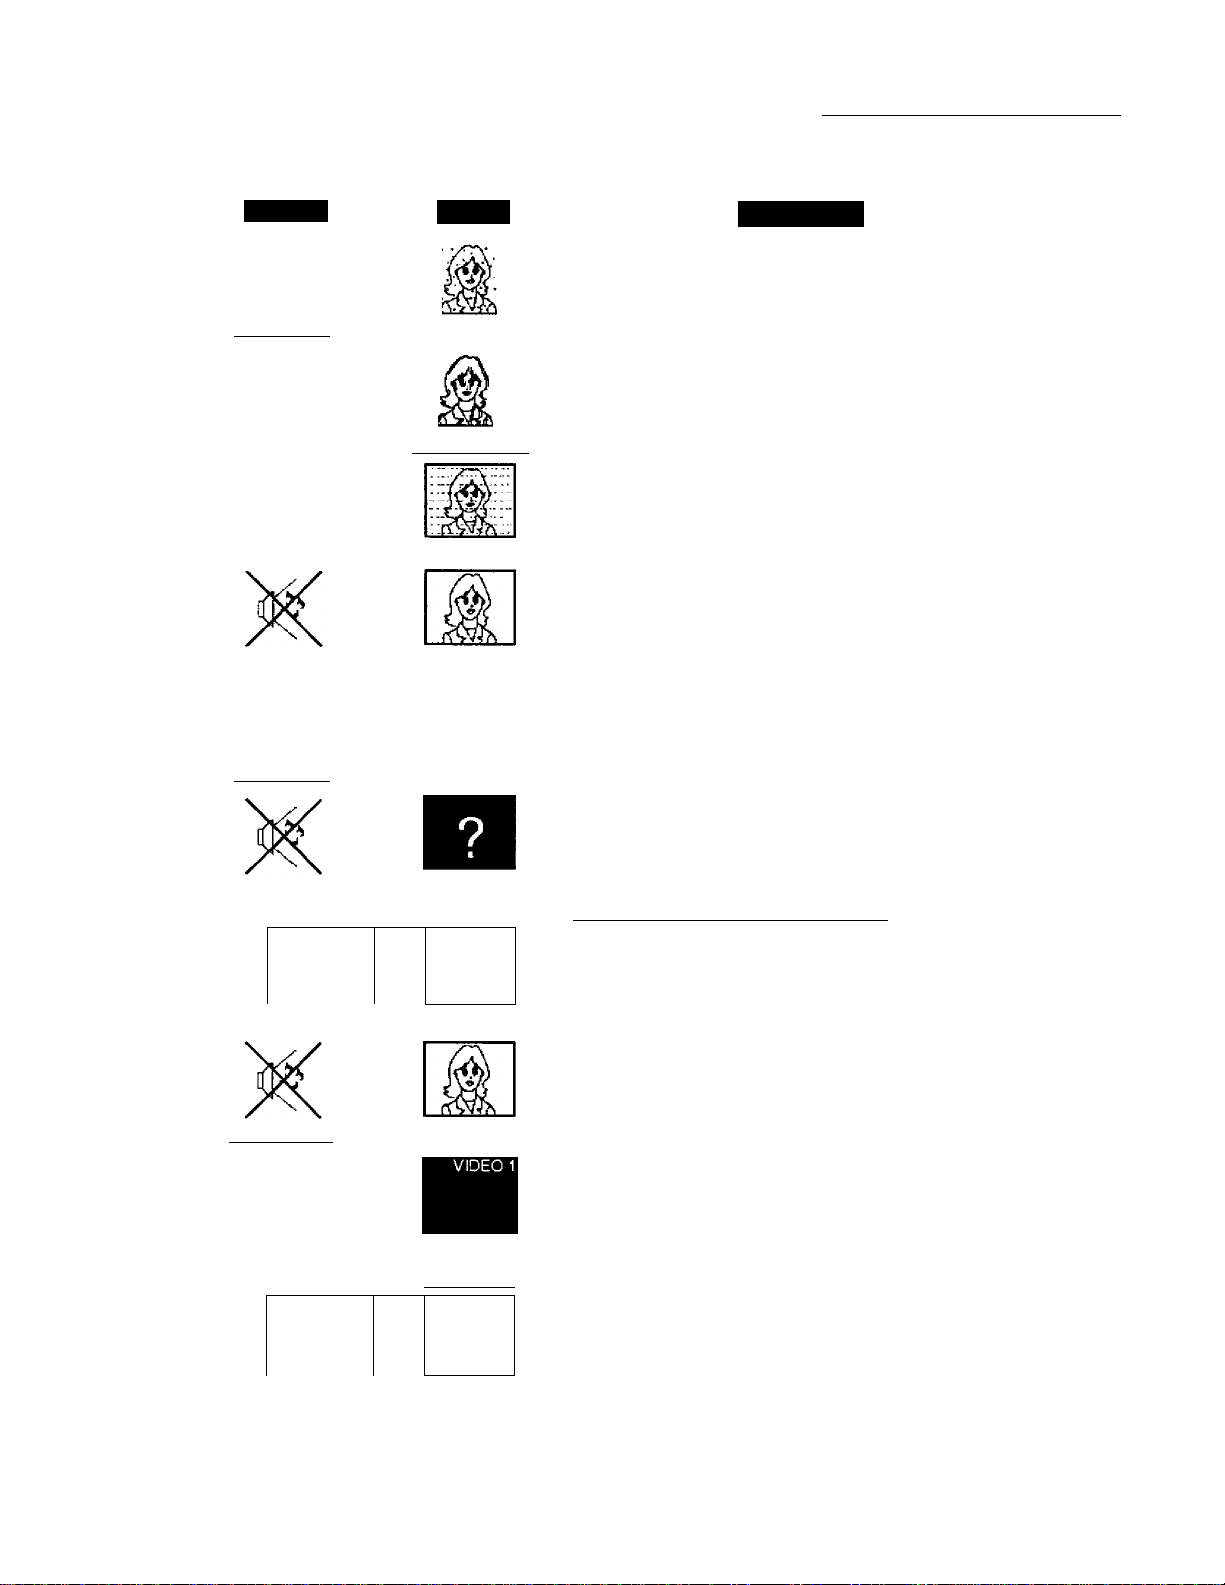
Troubleshooting Chart
Troubleshooting Chart
Before calling for service, determine the symptoms and follow suggested solutions.
AUDfO
d
Noisy Audio
d
Noisy Audio
X
d
Noisy Audio
No Audio
1
Noisy Audio
No Audio
Video
Snowy Video
Multiple Image
Interference
Normal Video
No Video with Snow
No Video / No PIP
SàfuUons
Adjust Antenna Location and Connection
Adjust Antenna Location and Connection
Check Antenna Lead-in Wire
Move TV from Electrical Appliances, Lights, Vehicles,
and Medical Equipment
Increase Volume
Check Mute
Check TV SPEAKERS on/off
Change Channel
Set TV or Cable Mode Properly
Check Antenna Cables
Check Power Cord is Plugged into Active Outlet
Adjust Brightness and Audio Controls
Change Channel
Check Cable Connections
Program the Remote Control Again
Check Second Video Source Operation
d
Normal Audio
Wrong Audio
Normal Audio
No Color
Normal Video
Missing Video
Input mode
d
Normal Audio
Intermittent Remote Control Operation
Normal Video
Adjust Color Settings
Change Channel
Check Audio Is Set To Stereo Or Mono, Not SAP
De-Select Skip Feature Located In The Channel
Menu
Replace Remote Control Batteries
Page 19

Notes
Panasonic Consumer Electronics Company,
Division of Matsushita
Electric Corporation of America
One Panasonic Way
Secaucus, New Jersey 07094
www.panasonlc.com
Panasonic de Mexico, S.A, de C.V.
Amores No, 1120
Col. Del Valle C.R 03100
México, D.F.
Tel. (915 ó 0151 488-1000
Fax (915 ó 015) 575-6763, 575-6765
Panasonic Sales Company,
Division of Matsushita Electric
of Puerto Rico Inc. (“PSC")
Ave. 65 de Infantería. Km 9.5
San Gabriel Industrial Park
Carolina, Puerto Rico 00965
Tel, (787) 750-4300
Fax (787) 768-2910
 Loading...