

Page 1

nasonlc
Color Television
Operating Instructions
CT-27D10
CT-27D10U
CT-32D10
CT-32D10U
For assistance, please call: 1-800-211-PANA (7262) or
send e-mail to: consumerproducta@panasonic.com (USA only)
ISSUE 0
TQB2AA0331 00308
PRINTED IN USA
Page 2

WARNING: To reduce the risk of electric shock do not remove cover or back.
No user-serviceable parts inside. Refer servicing to qualifiedservice personnel.
head within a triangle is triangle is intended to tell the
/_ The lighting flash with arrow The exclamation point within a
WARNING: To preventfire orshockhazard, do notexposethis appliance
intended to tell the user that user that important operaOng
parts inside the product are a and servicing instructions are in
risk of electric shock to persons, the pape_ with the appliance,
to rainor moisture.
ii
Page 3
TABLE OF CONTENTS
Table of Contents
Congratulations .................... .................................... 3
Installation ................................................................. 4
Optional Equipment Connections ........................... 5
Main Menu ................................................................. 6
Main Menu Feature Chart ......................................... 7
Customer Record ..................................................................... 3
Care and Cleaning ................................................................... 3
Specifications ........... :............................................................... 3
Television Location ................................................................... 4
Optional Cable Connections ..................................................... 4
AC Power Supply Cord ............................................................ 4
Cable / Antenna Connection .................................................... 4
VCR Connection ....................................................................... 5
Amplifier Connection (To Audio Amp) ..................................... 5
ACTION Button ........................................................................ 7
CH / VOL Buttons ..................................................................... 7
Remote Control Guide .............................................................. 7
Special Features ..................................................... 10
Menu Languages .................................................................... 10
Program Channels ................................................................. 10
Sleep Timer ............................................................................ 11
Timer 1 and Timer 2 ............................................................... 11
Other Adjustments (Picture) .................................................. 12
Favorite Channels and Caption .............................................. 12
Mode (Lock) .......................................................................... 13
Digital TV- Set-Top (DTV-STB) Connection ......... 14
Glossary .................................................................. 15
Frequently Asked Questions About Digital TV .... 16
Troubleshooting Chart ........................................... 17
El
Read these Instructions completely before operating TV.
Contents are subject to change without notice or obligation.
Copyright 2000 by MatsushitaElectricCorporation of America. All rights reserved.
Unauthorizedcopyingand distribution isa violationoflaw.
Page 4

Congratulations
Your new IV features a solid state chassis that is designed to give you many years of
enjoyment. It was thoroughly tested and tuned at the factory for best performance.
Customer Record
The model and serial number of this product are located on the back of the TV. You
should note the model and serial number in the space provided and retain as a
permanent record of your purchase. This will aid in identification in the event of theft or
loss. Product registraton for U.S. customers is available at: www.prodreg.com/
panasonic.
Care and Cleaning
Screen (Turn "IV Off)
CONGRATULATIONS
Model
Number
Serial
Number
[] Use a mild soap solution or window cleaner with a soft clean cloth. DO NOT USE
ABRASIVE CLEANERS.
D Avoid excessive moisture and wipe dry.
Note: Do not spray any type of cleaning fluid directly on the screen.
Cabinet and Remote Control
[] For cabinets and remote control, use a soft cloth dampened with water or a mild detergent
solution. Avoid excessive moisture and wipe dry.
[] Do not use benzene, thinner or other petroleum based products.
Specifications
Power Source
CT-27D10 (2.0A)
CT-27D10U (2,0A)
CT-32D10 (2.1A) 120V AC, 60Hz
CT-32D10U (2.1A)
Channel Capability- 181 VHF-12; UHF-56; Cable-125
2 Video Input Jacks lVp-p, 75 Ohm, Phono Jack Type
4 Audio Input Jacks 500rnV RMS 47K Ohm
1 Component Input (Y / PB / PR) 75 Ohm, Phono Jack Type
S-Video Input Jacks S-Video (Y-C) Connector
Specifications are subject to change without notice or obligation.
El
Page 5

INSTALLATION
Installation
Television Location
This unit is intended to be used with an optional stand or entertainment center.
Consult your dealer for available options,
£3 Avoid excessive sunlight or bright lights, including reflections.
£3 Keep away from excessive heat or moisture. Inadequate ventilation may cause internal
component failure.
£3 Fluorescent lighting may reduce remote control transmitting range.
£3 Keep away from magnetic equipment, including motors, fans and external speakers.
Optional Cable Connections
Shielded audio and video cables should be used between components. For best
results:
Use 75-ohm coaxial shielded cables.
C3 Use appropriate input and output connectors, that match your component connectors.
C3 Avoid long cables to minimize interference.
AC Power Supply Cord
CAUTION: TO PREVENT ELECTRIC SHOCK MATCH WIDE BLADE OF PLUG TO
WIDE SLOT OF AC OUTLET AND FULLY INSERT. DO NOT USE A PLUG WITH A
RECEPTACLE OR OTHER OUTLET UNLESS THE BLADE CAN BE FULLY
INSERTED TO PREVENT BLADE EXPOSURE. FOR SOME MODELS THAT ARE
NON-POLARIZED, THE USE OF AN AC ADAPTOR CONNECTOR MAY
BE NECESSARY.
Polarized plug
Non-Polarized plug
Cable / Antenna Connection
For proper reception, either a cable or antenna connection is required.
Cable Connection Incoming Cable from
Connect the cable supplied by your local cable company.
Note: A cable converter box may be required for proper reception.
Check with your local cable company for compatibility
requirements,
Antenna Connections
t-i For proper reception of VHF/UHF channels, an external antenna is
required. For best reception an outdoor antenna is recommended.
£3 Antenna Mode must be set to FV.
Cable Company
75 Ohm VHF/UHF
on back of TV
Incoming Cable from
Home Antenna
i---_/- Cable Preset
Cable Mode is preset at the factory, Antenna
users must change to Antenna Mode in the
Setup Menu.
III
Page 6
Optional Equipment Connections
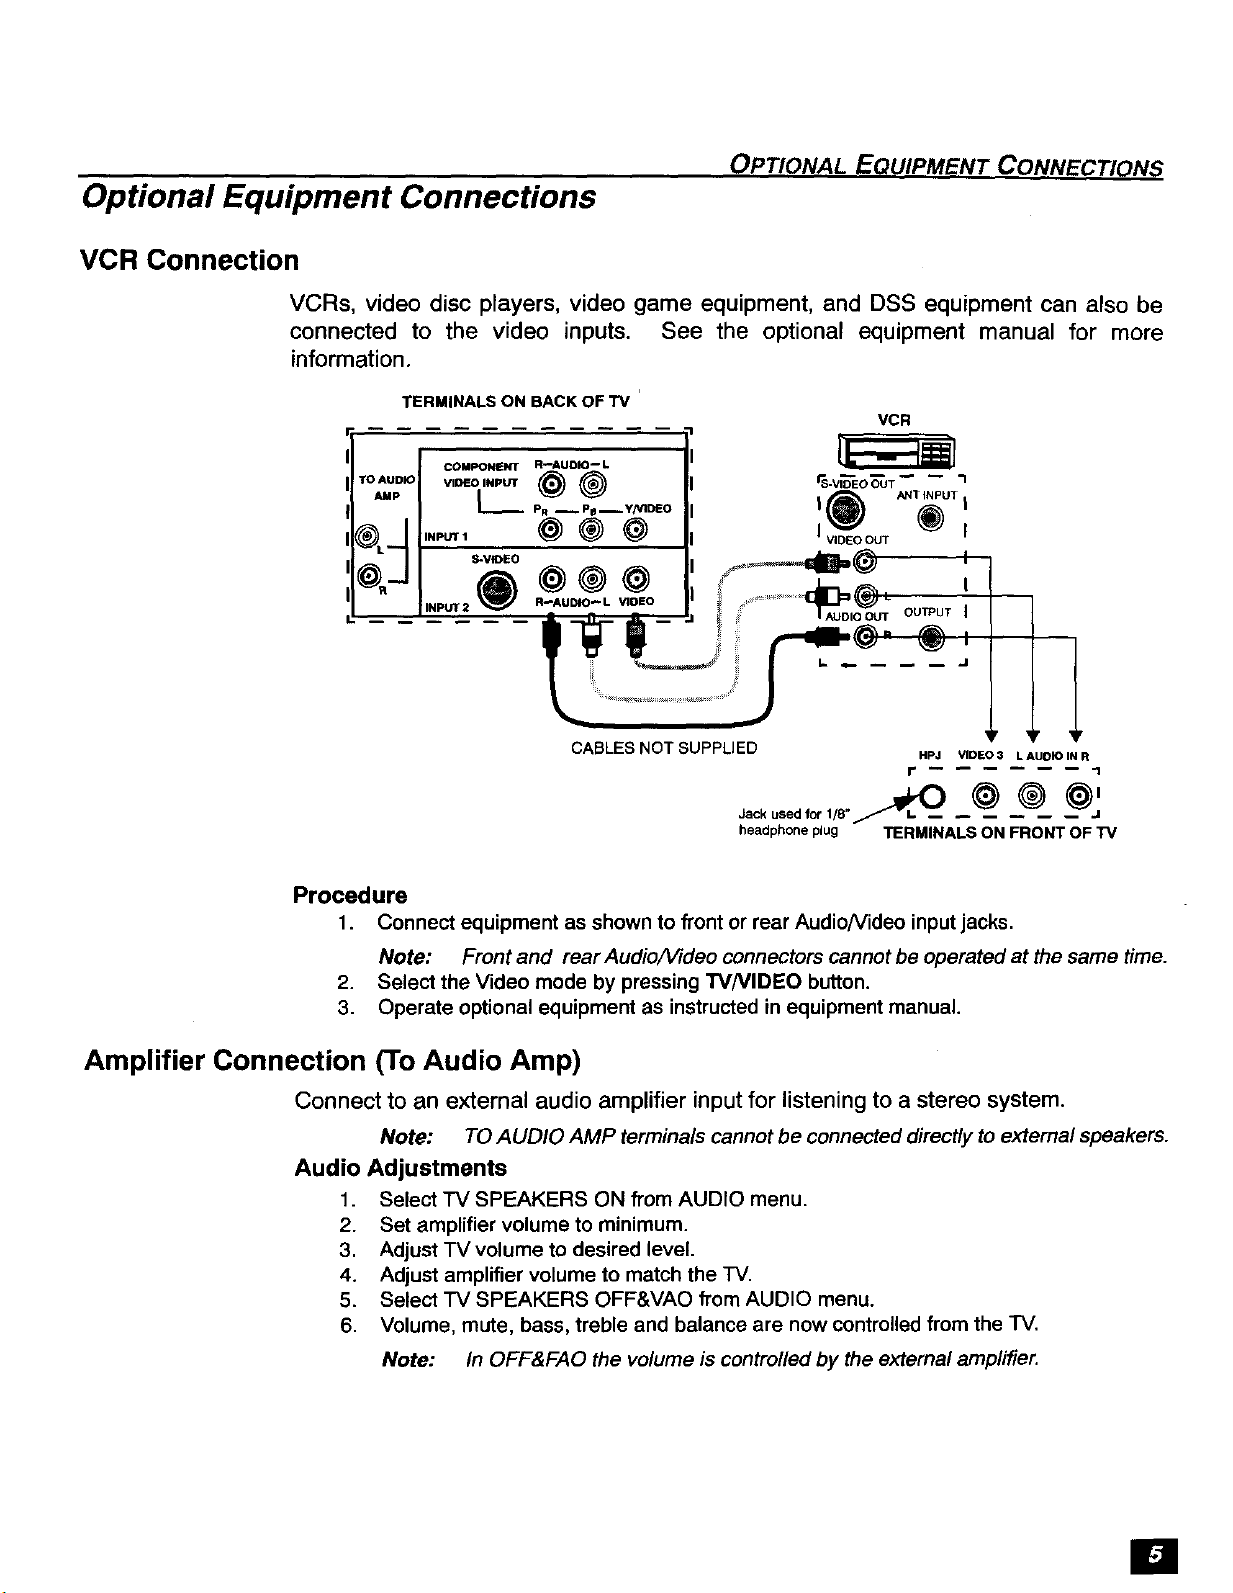
VCR Connection
VCRs, video disc players, video game equipment, and DSS equipment can also be
connected to the video inputs. See the optional equipment manual for more
information.
OP_ONAL EQUIPMENT CONNEC_ONS
TERMINALS ON BACK OF TV
!
TO AUD
AMp
COMPONENT R--AUDIO-- L
v,_o,.._ _) _ _v,_o_T
L_ PR _ PB -Y/VII_O I _ ANTiNPUT |
INPUT 1 _) _ _) I VIDEO OUT _) I
CABLES NOT SUPPLIED HPJ VIDIEO3 LAUDIO IN R
headphoneplug TERMINALS ON FRONT OF TV
VCR
Procedure
1. Connect equipment as shown to front or rear Audio/Video inputjacks.
Note: Front and rear Audio/1/ideo connectors cannot be operated at the same time.
2. Select the Video mode by pressing W/VIDEO button.
3. Operate optional equipment as instructed in equipment manual.
r I
Amplifier Connection (To Audio Amp)
Connect to an external audio amplifier input for listening to a stereo system.
Note: TO AUDIO AMP terminals cannot be connected directly to external speakers.
Audio Adjustments
1. Select TV SPEAKERS ON from AUDIO menu.
2. Set amplifier volume to minimum.
3. Adjust TV volume to desired level.
4. Adjust amplifier volume to match the TV.
5. Select TV SPEAKERS OFF&VAO fl'om AUDIO menu.
6. Volume, mute, bass, treble and balance are now controlled from the TV.
Note: In OFF&FAO the volume is controlled by the external amplifier.
im
Page 7
MAIN MENU
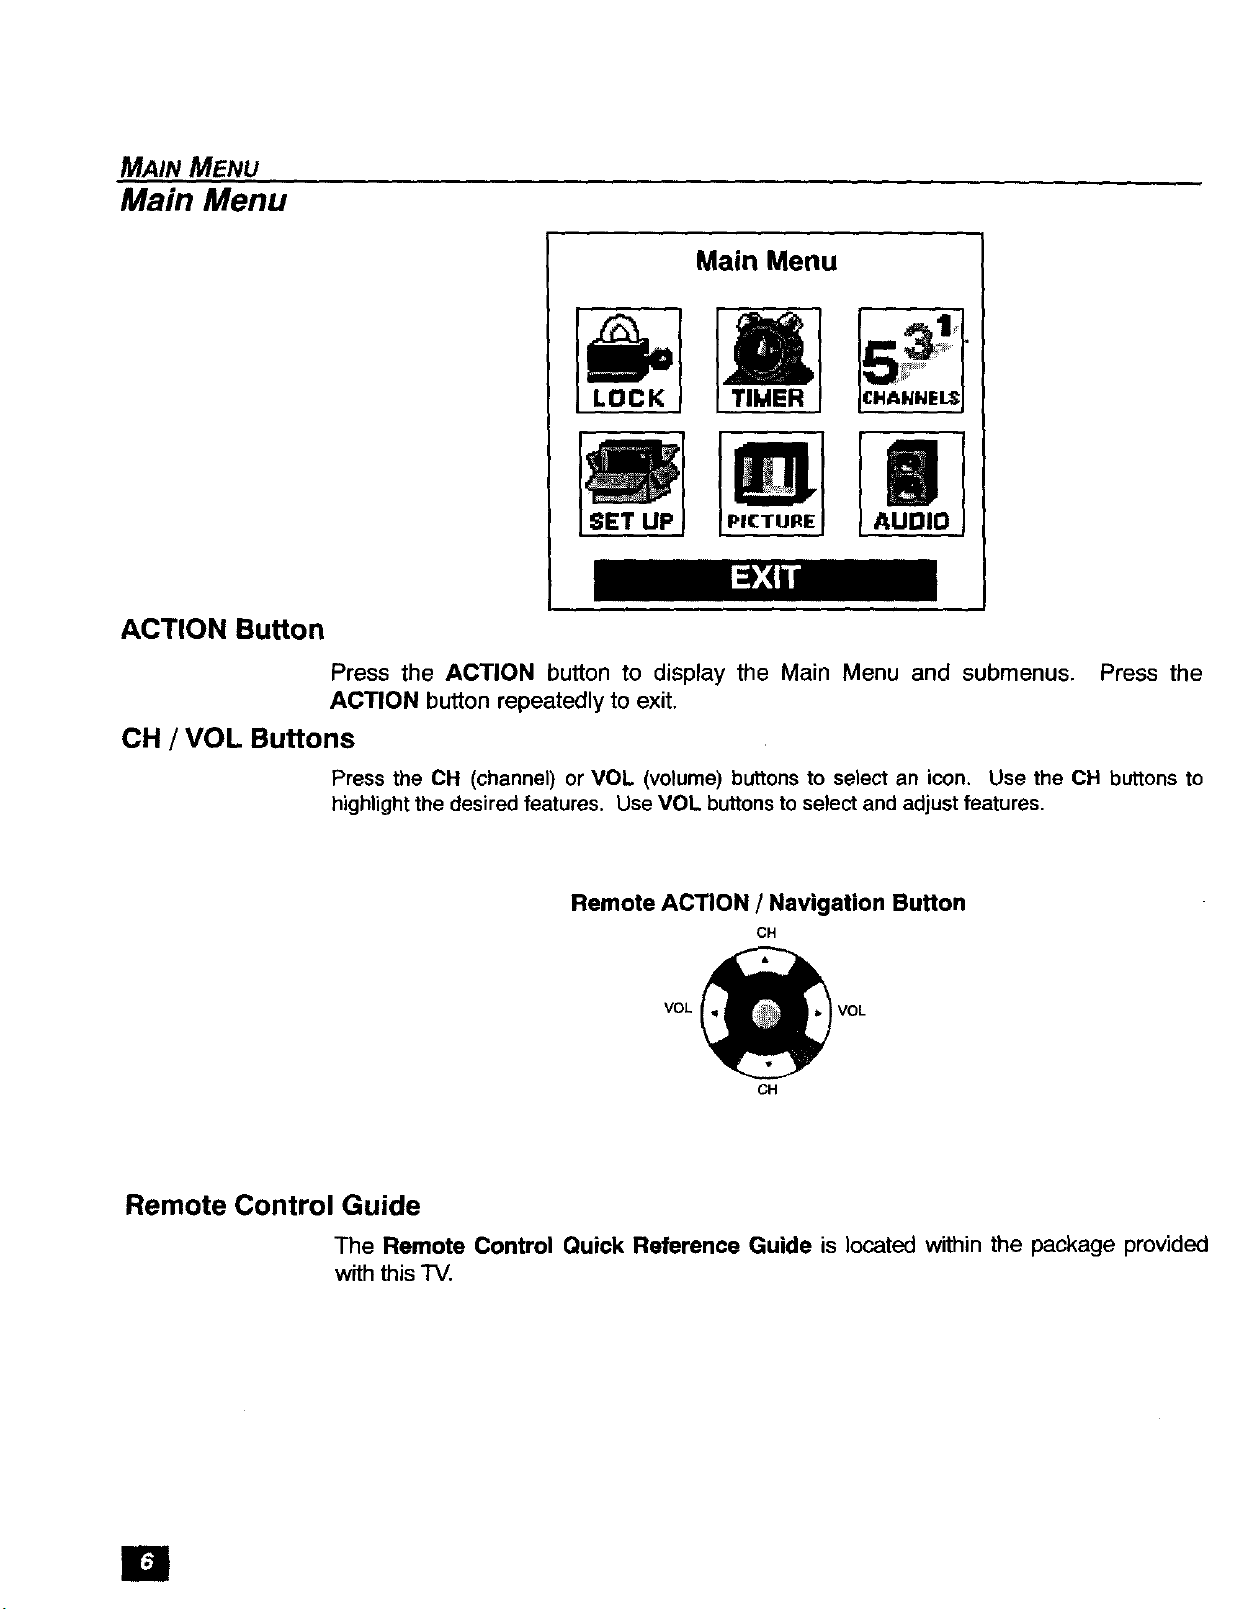
Main Menu
ACTION Button
CH / VOL Buttons
Main Menu
Press the ACTION button to display the Main Menu and submenus. Press the
ACTION button repeatedly to exit,
Press the CH (channel) or VOL (volume) buttons to select an icon. Use the CH buttons to
highlight the desired features. Use VOL buttons to select and adjust features,
Remote Control Guide
The Remote Control Quick Reference Guide is located within the package provided
with this "IV.
Remote ACTION / Navigation Button
CH
VOL VOL
CH
E1
Page 8

MAIN MENU FEATURE CHART
Main Menu Feature Chart
SET UP
LANGUAGES
PROG. CHAN
(ProgramChannels)
(Closed Captioning)
OTHER ADJ.
II
AUDIO
AUDIO ADJ.
(Adjustments)
OTHER ADJ.
(Adjustment)
SURROUND
SPEAKERS
[] Select English, Spanish, or French menu.
i"1 MODE - Select Cable or TV. See Installa-
tion section in manual.
[] AUTO PROGRAM - Automatically program
channels having a signal into memory.
[] MANUAL PROGRAM - Manually add or
delete channels from memory.
[] CC ON MUTE - Activate C1-C2 for Closed
Captioning display when the remote MUTE
button is pressed.
[] CC MODE - Select C1 or C2 for Closed
Captioning, program guides and other
information.
[] AUTO POWER ON - Select SET to power
up the TV at the same time as the Cable
Box or other components or select OFF.
AUDIO
[] MODE - Select STEREO, SAP (Second
Audio Program) or MONO. (Use MONO
when stereo signal is weak.)
[] BASS - Increase or decrease the bass
response.
[] TREBLE - Increase or decrease the treble
response.
[] BALANCE Emphasize the left/right
speaker volume.
[] NORMAL - Reset BASS, TREBLE and
BALANCE to factory default.
[] AI SOUND - Automatically adjust volume
to maintain a comfortable listening level.
(AI sound is not available in VIDEO mode).
O
Enhances audio response when listening
to stereo.
[]
ON - TV speakers operate normally.
[]
OFF & VAO (Variable Audio Output) -
TV speakers off - audio adjustable by TV.
O
OFF &FAO (Fixed Audio Output)-
TV speakers off - audio adjustable only b_
the external amplifier.
l=
Page 9

MAIN MENU FEATURE CHART
Main Menu Feature Chart (Cont.)
J|L
TIMER
CLOCK SET
SLEEP
TIMER 1
TIMER 2
D
PI(TURE '
VIDEO ADJ,
(Adjustments)
OTHER ADJ.
(Adjustments)
TIMER
[]
Set the time and the day Of the week.
(Time will display onscreen after turning on
the television, pressing the RECALL button
or changing channels).
[]
Set timer to turn off "IV in 30, 60 or
90 minutes. Select NO to turn timer off.
[]
Set one or both timers to automatically turn
television on and off at selected times, on
selected channels, and on selected days.
(Clock must be set to use Timer features).
PICTURE
[] COLOR - Adjust desired color intensity.
[] TINT - Adjust natural flesh tones.
[] BRIGHTNESS - Adjust dark areas for crisp
detail.
1_ PICTURE - Adjust white areas of picture.
[] SHARPNESS - Adjust clarity of outline
detail.
£3 NORMAL- Reset all picture adjustments to
factory default settings.
[] COLOR TEMP - Adjust white balance to
COOL (blue), WARM (red) or NORMAL,.
El
CHANNELS
O CHANNEL SCAN Select FAV (16
FAVORITES favorites) or ALL channels to scan
channels using the up/down CH buttons.
[] MANUAL CAPTION Enter channel
CAPTION
numbers and captions manually.
[] INPUT LABEL - Label video connections
for onscreen display of optional equipment.
Page 10

MAIN MENU FEATURE CHART
Main Menu Feature Chart (Cont.)
LOCK
!O Lock All Channels or Game with a secret
code.
MODE
HOW LONG?
Note: For more information about B/ock
Programs, see the V-CHIP Parental Lock
manua/ provided withthe 77/package.
O Select the period of time (12, 24, 48 hours
or ALWAYS) for your option to be locked.
LOCK
El
Page 11

SPECIAL FEATURES
Special Features
SET UP
Menu Languages
In SET UP Menu, select IDIOMA / LANGUE to change menu language to ENGLISH,
ESPAI_IOL (Spanish), or FRAN(_AIS (French).
Prog Chan (Program Channels)
In SET UP menu under PROG CHAN select:
£3 MODE to select TV (antenna) or CABLE mode depending on the signal source.
[_ AUTO PROG RAM to automatically program all channels with a signal.
MODE ENGLISH •
[e3ll-'l__7:b_eH
MANUAL PROGRAM to manually add or delete channels.
[_
MODE CABLE •
AUTO PROGRAM •
MANUAL PROGRAM •
Page 12

TIMER
SPECIAL FEATURES
Sleep
In TIMER menu, select SLEEP to turn "IV off in 30, 60 or 90 minutes. Select NO to
turn off timer.
HOW LONG? NO •
kil_l_:_
ii_L_l:i:_l
Timer I and Timer 2
In TIMER menu, select one or both timers to turn the television on and off at selected
times, on selected channels, and on selected days.
Note: TIME must be entered in CLOCK SET to operate TIMER features.
DAY MON-FRt •
[-"]IL:_=1"J
ON TIME
OFF TIME
ENTER CHANNEL - - -
SET NO •
SET TIME FIRST
>_/-- Turn Off After 90 Minutes
The "IV automatically turns OFF after 90 minutes
when turned on by the TIMER. If the OFF time is
selected or if a key is pressed, the automatic OFF
after 90 minutes will be cancelled.
__/-- TIMER Activation
The TIMER is active when the TV is OFF or ON.
The "IV will switch to the selected channel at the
selected time set in the TIMER,
I
Page 13

SPECIAL FEATURES
PICTURE
CHANNELS
Other Adjustments
In Picture menu under OTHER ADJ. select:
I-I COLOR TEMP to increase and decrease WARM (red) and COOL (blue) colors to suit
personal preferences
COLOR TEMP NORMAL •
Favorites
In CHANNELS menu under FAVORITES select:
£3 CHANNEL SCAN FAV to enter up to 16 favorite channels.
£3 CHANNEL SCAN ALL to scan all channels when using the CH up/down buttons.
CHANNEL SCAN ALL• I
ENTER CHANNEL 3
FAVORITE CHANNELS
3
• TO ADD
TO DELETE
Caption
In CHANNELS menu under CAPTION select:
£3 MANUAL CAPTION to enter numbers and captions manually.
£3 INPUT LABEL to label video input connections for onscreen display.
INPUT LABEL •
Im
Page 14

LOCK
SPECIAL FEATURES
MODE
To use LOCK options:
[3 ENTER CODE FIRST - Use the numeric keypad to enter a four-diglt secret code. After
entering your secret code for the first time, the onscreen display will change to CHANGE
CODE.
Note: Use a code that is easy to remember or record it in a safe place.
In MODE submenu select:
[3 LOCK SET to choose:
• OFF - To turn lock function off.
• ALL - To lock all channels and video inputs.
• CHANNEL - To lock up to four channels of your choice.
• GAME - To lock channels 3, 4 and video inputs.
[3 BLOCK PROGRAMS _r - To use Block Programs Ratings.
13 CHANGE CODE - Use numeric keypad to change your four-digit secret code.
Note: If in CHANGE CODE you enter a different code from the one used previously,
the new code becomes the controlling code.
Press the ACTION button to return to submenu, then select HOW LONG to choose
the period of time you want your option to be locked (12, 24, 48 hours or ALWAYS).
Note: Be cautious when selecting ALWAYS. IfALWAYS is selected, and you forget
your secret code, the television must be serviced by a qualified technician in
order to clear the LOCK setup.
Press the ACTION button to return to submenu, and to exit menus.
!_!_i_!_i_ LOCK SET OFF
BLOCK PROGRAMS:
U.S. "IV PROGRAMS
STATUS OFF
ENTER CODE ....
FI RST
Note: If GAME, CHANNEL or ALL is selected, and if a blocked channel or video input is
selected, the message PG (Parent Guard) displays in the upper right corner of the
television screen
Unlock LOCK SET by reentering the same four-digit secret code and selecting OFE
*For more information about Block Programs, see the V-CHIP Parental Lock
manual provided with the TV package.
El
Page 15

DIGITAL TV- SET-TOP BOX (DTV-STB) CONNECTION
Digital TV. Set-Top Box (DTV-STB) Connection
Use this diagram to connect the Panasonic DI'V-STB (Digital l-V-Set-Top Box) to the
back of your "IV.
DTV TERMINALS ON BACK OF "IV
D'IV TERMINALS ON BACK OF DTV-STB
DIGITAL TV OUTPUT [
VIDEO
p
Note: There are three video inputs, Y, PB, and PR. Separate component color inputs provide
luminance and color separation. Use the L (left) and R (right) audio inputs.
Page 16

Glossary
Digital Television
Digital Television (D'I-V) broadcasts are now available in 10 major U.S. markets.
Broadcasts are in both high definition (HDIV) and standard definition (SD'I-V). The
HDI-V signal formats are 1080i (interlaced scan) and 720p (progressive scan). SD-I-V
signal formats are 480i and 480p.
SDTV-Compatible (480p/480i)
SDTV-compatible TV models process and display the standard definition output with
the use of a Panasonic D'I'VoSTB at 480 lines, interlaced or progressive scan. When
DIV programming is available, you can view it in the standard format, either 4:3
aspect ratio or 16:9 aspect ratio.
DTV Compatibility
This TV is capable of displaying only the 480p/480i SDI-V signal using the Panasonic
DTV-STB. In order to view DIV programming, the STB must be connected to the TV
component video inputs (Y, PB, PR) and audio inputs and in DTV mode. A DTV signal
must be available in your area and the D'I-V-STB must be tuned to the proper channel.
GLOSSARY
Progressive Scan
Progressive scan de-interlaces the incoming signal and progressively scans the
image. This allows you to sit very close to the TV and not see the thin black horizontal
scan lines (venetian blind effect) associated with an interlaced picture.
B
Page 17

FREQUENTL Y ASKED QUESTIONS ABOUT DIGITAL TV
Frequently Asked Questions About Digital TV
What is digital TV (DTV)?
In April 1997, the FCC (Federal Communications Commission) announced that by
2006, all television broadcasting will be digital. Digital "IV broadca_iting delivers
crystal-clear pictures, approaching the quality of 35mm movies and CD (compact disc)
sound. Digital broadcasts include both High Definition Television (HDTV) and
Standard Definition Television (SDTV). Broadcasters may choose their own broadcast
formats.
HDTV (High Definition Television)
One form of digital broadcasting is HD-I'V, which provides the highest resolution
picture. Besides incredible picture, the sound is available in the 5.1 channel surround
sound.
SDTV (Standard Definition Television)
Another form of digital broadcasting is SDTV, which provides lower resolution, but still
presents a very sharp, clear picture. Lower resolution allows broadcasters to transmit
more than one program per channel.
When will TV stations start broadcasting digital signals?
Television stations are required to continue broadcasting regular IV signals along
side the digital signals until 2006. Cable TV and satellite "IV are not affected by this
FCC ruling.
All stations are required to become digital by 2006. This will be an evolutionary
process. According to the FCC, digital broadcasting must be available in the top ten
markets, covering 30% of households by May 1999. By the end of 1999, digital
broadcasting must be available in the top 30 markets, covering 50% of households.
Will I be able to adapt my current TV to receive digital broadcasts?
Manufacturers will offer a digital "IV set-top box (D'I'V-STB) which will allow current
televisions to display digitally broadcast programs. The picture and sound quality will
be about the same as small dish digital satellite systems today.
Conventional televisions (non-digital televisions) will not be able to display the HDTV
resolution quality or sound.
What digital formats will broadcasters use?
There are presently four DTV formats: 1080i (interlaced), 720p (progressive), 480i
and 480p. The higher numbers indicate a higher resolution picture.
In an interlaced picture, the odd numbered lines (picture information) are scanned first
creating field 1 and then the even numbered lines are scanned, creating field 2. The
two fields are then interlaced to provide the entire image (one frame). This process
happens in 1/30 th of a second and is invisible to the human eye. In progressive
scanning, all lines in the entire frame are scanned sequentially in 1/60 th of a second.
Broadcasters may choose to transmit different levels of resolution throughout the day,
broadcasting day programs in SDTV and night sports and movies in HDTV.
Page 18

TROUBLESHOOTING CHART
Troubleshooting Chart
Before calling for service, determine the symptoms and follow suggested solutions.
Adjust Antenna Location and Connection
\
Noisy Audio
Snowy Video
Noisy Audio
\
Noisy Audio
No Audio
\
Noisy Audio
No Audio
r
L
Multiple Image
Interference
I
Normal Video
, ", ... -_.
• , .... *,,
, • . , , ,
, . • , ,
No Video with Snow
No Video / No PIP
Adjust AntennaLocationand Connection
Check Antenna Lead-inWire
Move "IV from Electrical Appliances, Lights,
Vehicles, and Medical Equipment
Increase Volume
Check Mute
Check TV SPEAKERS on/off
Change Channel
Set "IV or Cable Mode Properly
Check Antenna Cables
Check Power Cord is Plugged into Active Outlet
Adjust Brightness and Audio Controls
Change Channel
Check Cable Connections
i Program the Remote Control Again
Check Second Video Source Operation
Z
Normal Audio
Wrong Audio
\
Normal Audio
\
Normal Audio
Intermittent Remote Control Operation
No Color
Normal Video
Black Box on Screen
Normal Video
Adjust Color Settings
Change Channel
Check Audio Is Set To Stereo Or Mono, Not SAP
Change CC (Closed Captioning) from Text Mode
Replace Remote Control Batteries
la
Page 19

NOTES
W
Page 20

NOTES
El
Page 21

NOTES
Q
Panasonlc Consumer Electronics Company,
Division of Matsuabita
Electric Corporation of America
One Pagasonic Way
Secaucus, New Jersey 07094
www.panasonic.com
(8OO) 222-4213
PanaSOnlC de Mexico, S.A, de C.'_
Amores No, 1120
Col. Del Vatle C.P, 0_100
M_xico, D,F
Tel. (915 b 015) 488-1000
Fa_x(015 b 015) 575-6763, 575-6765
Panasonic Sales Company,
Division of Mafstmhlta EleCtric
of Puerto Rico Inc. (_PSC")
Ave, 65 de _rifa/lteria, Km 9.5
San Gabriel Industrial park
Carolina, Puerto Rico 00905
Tel, (787) 750-4300
Fax (787) 768-2910
 Loading...