

Page 1

Color Television
Operating Instructions
®
CT-2017
CT-25G7
CT-25G7U
CT-G2132
CT-G2132L
CT-G2172
CT-G2172L
CT-G2972
CT-G2972L
CT-G3352
CT-G3352X
For assistance, please call: 1-800-211-PANA (7262) or
send e-mail to: [email protected] (USA only)
TQB2AA0370-2 20325
PRINTED IN USA
Page 2
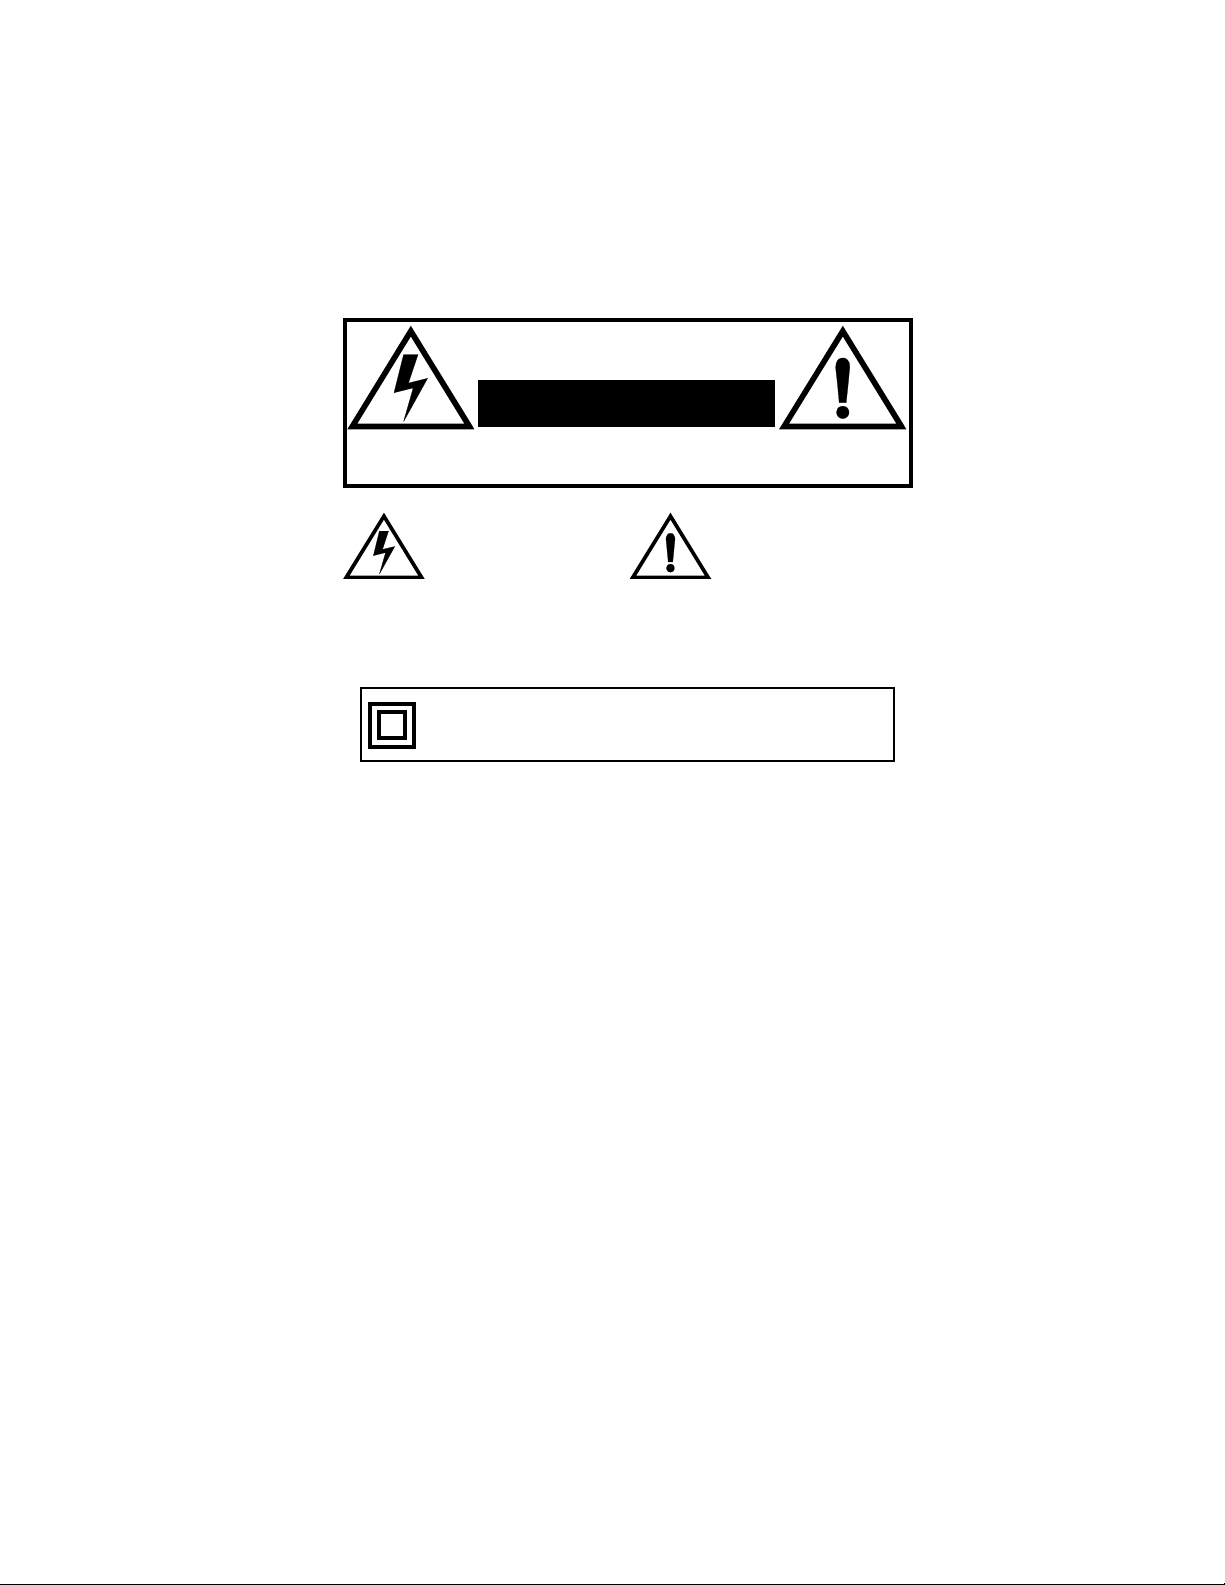
WARNING
RISK OF ELECTRIC SHOCK
DO NOT OPEN
WA RNIN G: To reduce the risk of electric shock do not remove cover or back.
No user-serviceable par ts i nside. Refer se rvicing t o qual ifie d servi ce per sonnel.
WARNING: TO REDUCE THE RISK OF FIRE OR ELECTRIC SHOCK, DO
FCC CAUTION:
ENVIRONMENTAL NOTICE:
The lightning f lash with arrow
head within a triangle is
intended to tell the user that
parts inside the product are a
risk of electric shock to
persons.
The exclamation p oint within a
triangle is intended to tell the
user that important operating
and servicing instructions are
in the papers with the
appliance.
NOT EXPOSE THIS APPARATUS TO RAIN OR MOISTURE.
The double insulation symbol (a square within a square) is
intended to alert qualified service personnel to use only
identical replacement parts in this apparatus.
ANY CHANGES OR MODIFICATIONS TO THIS TV
RECEIVER NOT EXPRESSLY APPROVED BY
MATSUSHITA ELECTRIC CORPORATION OF AMERICA
COULD CAUSE HARMFUL INTERFERENCE, WHICH
WOULD VOID THE USER’S AUTHORITY TO OPERATE
THIS EQUIPMENT.
THIS PRODUCT UTILIZES BOTH A CATHODE RAY TUBE (CRT) AND
OTHER COMPONENTS THAT CONTAIN LEAD. DISPOSAL OF THESE
MATERIALS MAY BE REGULATED IN YOUR COMMUNITY DUE TO
ENVIRONMENTAL CONSIDERATIONS. FOR DISPOSAL OR RECYCLING
INFORMATION PLEASE CONTACT YOUR LOCAL AUTHORITIES, OR THE
ELECTRONICS INDUSTRIES ALLIANCE: <HTTP://WWW.EIAE.ORG.>
Page 3

Table of Contents
Congratulations.........................................................2
Customer Record ......................................................................2
Care and Cleaning.................. ....... ...... ....... ...... ...... ....... ...... ......2
Specifications ................................ ...... ......................................2
Installation..................................................................3
Television Location....................................................................3
Optional Cable Connections......................................................3
AC Power Supply Cord..............................................................3
Cable / Antenna Connection......................................................3
Feature Comparison Chart .......................................4
Auto Set Up Menu......................................................5
Optional Equipment Connections ...........................6
VCR .........................................................................................6
Amplifier (TO AUDIO AMP) ......................................................6
Front Control Panel...................................................7
Remote Control Operation ......................................8
Battery Installation ....................................................................9
Remote Control Operation (CT-G2972
CT-G2972L, CT-G3352 and CT-G3352X only)
Battery Installation ....................................................................9
Mode Operational Key Chart ..................................................10
Programming the Remote .......................................................12
Programming Without a Code.................................................12
Component Codes.................. ....... ...................................... ....13
Icon Menu Navigation .............................................15
Main Menu Icons......................................................16
Icon Menus..............................................................................16
Icon Menus Operation.............................................17
Set Up......................................................................................17
Picture .....................................................................................18
Timer .......................................................................................19
Audio .......................................................................................20
Channels .................................................................................21
Lock.........................................................................................21
V-Chip Menu Operation...........................................22
FM Radio Operation (model CT-25G7 only).................27
Troubleshooting Chart............................................28
Limited Warranty.....................................................29
Customer Services Directory.................................31
Index .........................................................................33
.................9
T
ABLE OF CONTENTS
Read these instructions completely before operating television.
Contents are subject to change without notice or obligation.
Copyright 2002 by Matsushita Electric Corporation of America. All rights reserved.
Unauthorized copying and distribution is a violation of law.
1 l
Page 4
C
ONGRATULATIONS
Congratulations
Your new TV Monitor/Rece iver features a soli d state ch assi s that is de signe d to give you many year s of enj oymen t. It was
thoroughly tested and tuned at the factory for best performance.
Customer Record
The model and serial number of this product are located on the back of the television. You should note the model and serial
number in the space provided and retain as a permanent record of your purchase. This will aid in identification in the event
of theft or loss. Product registration for U.S. customers is available at www.prodreg.com/panasonic.
Model
Number
Serial
Number
Care and Cleaning
Screen (Turn TV Off)
• Use a mild soap solution or window cleaner with a soft clean cloth. DO NOT USE ABRASIVE CLEANERS.
• Avoid excessive moisture and wipe dry.
Note: Do not spray any type of cleaning fluid directly on the screen.
Cabinet and Remote Control
r For cabinets and remote control, use a soft cloth dampened with water or a mild detergent solution. Avoid excessive moisture and
wipe dry.
r Do not use benzene, thinner or other petroleum based products.
Specifications
Power Source
CT-2017 (1.4A)
CT-25G7 (1.8A)
CT-25G7U (1.8A)
Channel Capability - 181 VHF-12; UHF-56; Cable-113
Video Input Jack 1Vp-p, 75 Ohm, Phono Jack Type
Audio Input Jacks 500mV RMS 47K Ohm
Specifications are subject to change without notice or obligation.
120V AC, 60Hz
2 l
Page 5
I
NSTALLATION
Installation
Television Location
Follow these recommendations before deciding the location of your television.
r Avoid excessive sunlight or bright lights, including reflections.
r Keep away from excessive heat or moisture. Inadequate ventilation may cause internal component failure.
r Fluorescent lighting may reduce remote control transmitting range.
r Keep away from magnetic equipment, including motors, fans and external speakers.
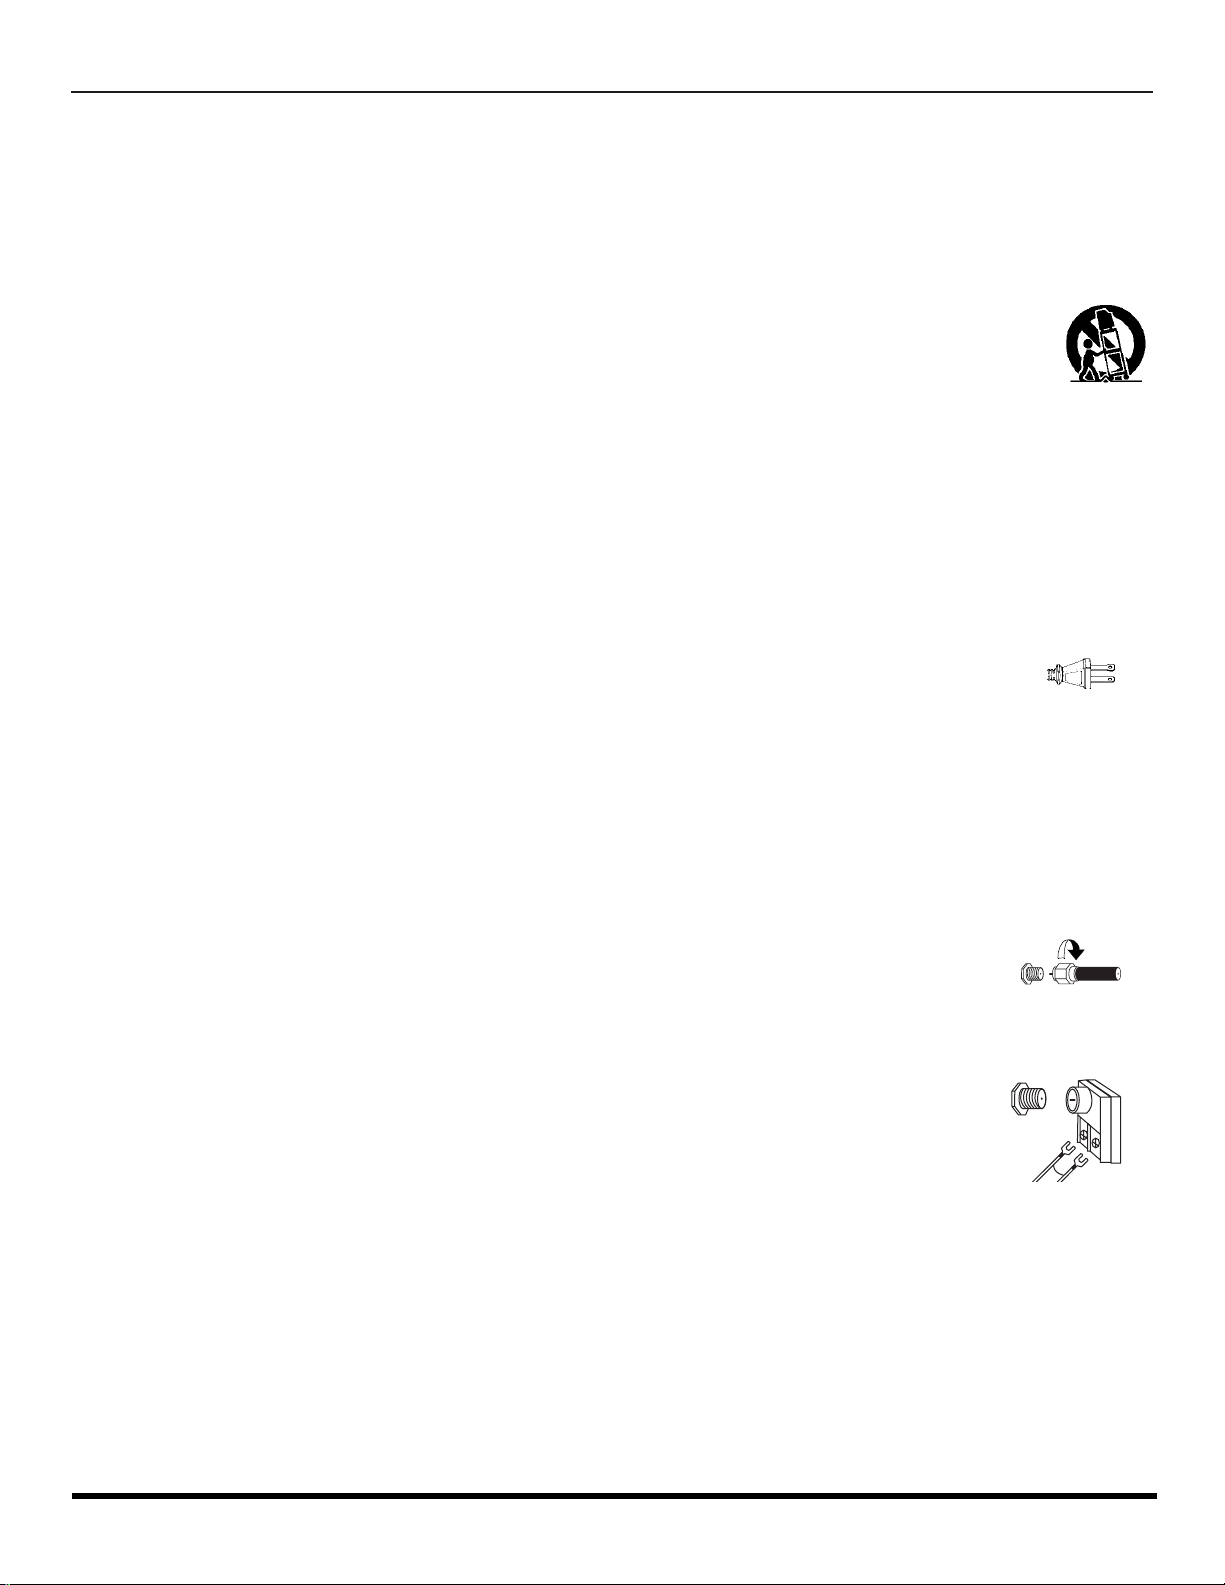
CAUTION: Use this television receiver only with the cart, stand, tripod, bracket, or table specified by the manufacturer, or
sold with the apparatus. When a cart is used, use caution when moving the cart/apparatus combination to avoid injury from
tip-over. In order to avoid injury to children, never place your television receiver on a piece of furniture that is capable of
being tilted by a child leaning on it, pulling on it, standing on it, or climbing on it.
Optional Cable Connections
Shielded audio and video cables should be used between components. For best results:
r Use 75-ohm coaxial shielded cables.
r Use appropriate input and output connectors that match your component connectors.
r Avoid long cables to minimize interference.
AC Power Supply Cord
CAUTION: TO PREVENT ELECTRIC SHOCK MATCH WIDE BLADE OF PLUG TO WIDE SLOT OF AC OUTLET
AND FULLY INSERT. DO NOT USE A PLUG WITH A RECEPTACLE OR OTHER OUTLET UNLESS THE BLADE
CAN BE FULLY INSERTED TO PREVENT BLADE EXPOSURE.
PROTECT POWER CORDS FROM BEING WALKED ON, ROLLED OVER, CRIMPED, BENT OR PINCHED,
PARTICULARLY AT PLUGS, CONVENIENCE RECEPTACLES, AND THE POINT WHERE THEY EXIT FROM THE APPARATUS.
Polarized plug
Cable / Antenna Connection
For proper reception, either a cable or antenna connection is required.
Cable Connection
Connect the cable supplied by your local cable company.
Note: A cable conv erter box m ay be requ ired for p roper rece ption. Chec k with you r local ca ble company for
compatibility requirements.
Antenna Connection
• For proper reception of VHF/UHF channels, an external antenna is required. For best reception, an
outdoor antenna is recommended.
Note: Cable Mode is preset at the factory. Antenna users must change to TV mode in the Set Up Menu under
Prog Chan.
VHF/UHF Antenna
A VHF/UHF antenna and transformer are supplied in some models. Attach to the TV, adjust the
antenna until the picture is clear.
Note: Refer to Feature Comparison Chart on next page for models with antenna included.
Incoming Cable from
Cable Company
75 Ohm VHF/UHF
on back of TV
Incoming Cable from
Home Antenna
3 l
Page 6
F
EATURE COMPARISON CHART
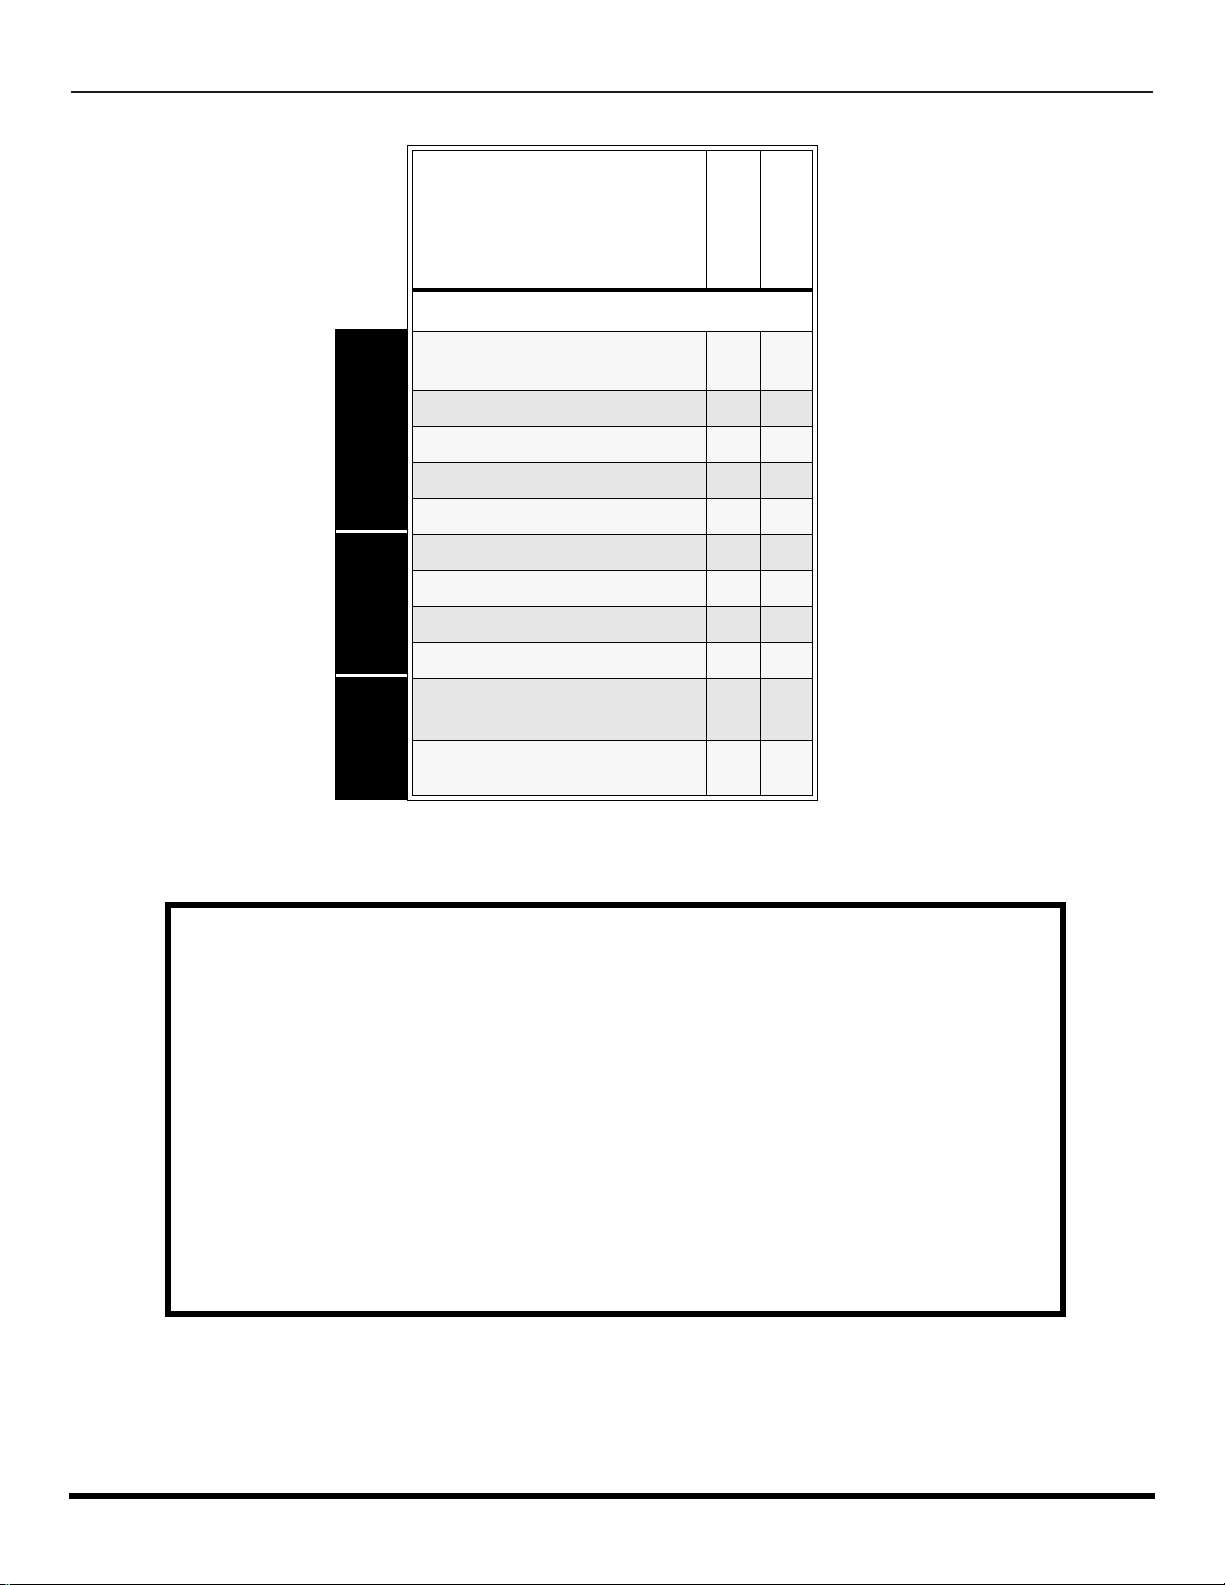
Feature Comparison Chart
SPECIAL
FEATURES
AUDIO
NUMBER OF SPEAKERS 2 2
A/V
JACKS
MODELS
Features
MENU LANGUAGE
ENG/SP AN/FR
CLOSED CAPTIONING
V-CHIP CAPABILITY
75 OHM INPUT
VIDEO NORM
FM RADIO
STEREO
AI SOUND
A/V IN
(REAR/FRONT)
HEADPHONE
JACK
CT-2017
r r
r r
r r
r r
r r
r
r r
r r
1
(1/1)1 (1/1)
r r
CT-25G7
IMPORTANT INFORMATION REGARDING THE USE OF VIDEO GAMES, COMPUTERS, OR
OTHER FIXED IMAGE DISPLAYS.
WARNING: The marking or retained image on the picture tube resulting from viewing fixed
image is not an operating defect and as such is not covered by Warranty.
This television is designed to display constantly moving imag es on the s creen. Con tinuous v iewing
of stationary images such as letterbox pictures on standard screen TVs (with top/bottom bars), nonexpanded standard (4:3) pictu res on wide screen TVs (with side bars s hown on each side of an
image), stock mark et report ba rs (ticker running at the bott om of the scr een), vid eo game patterns ,
fixed scoreboards, bright station logos, on-line (internet) or repetitive computer style patterns should
be limited.
The extended use of fi xed image program mat erial can cause a perm anent picture tube dam age,
shown as a “shadow im age” viewable on normal program s. This type of irreversible pic ture tube
deterioration can be limited by performing the following steps:
• Do not display the fixed image for extended periods of time.
• Turn the power off when not in use.
4 l
Page 7
A
VOL
VOL
VOL
UTO SET UP MENU
Auto Set Up Menu
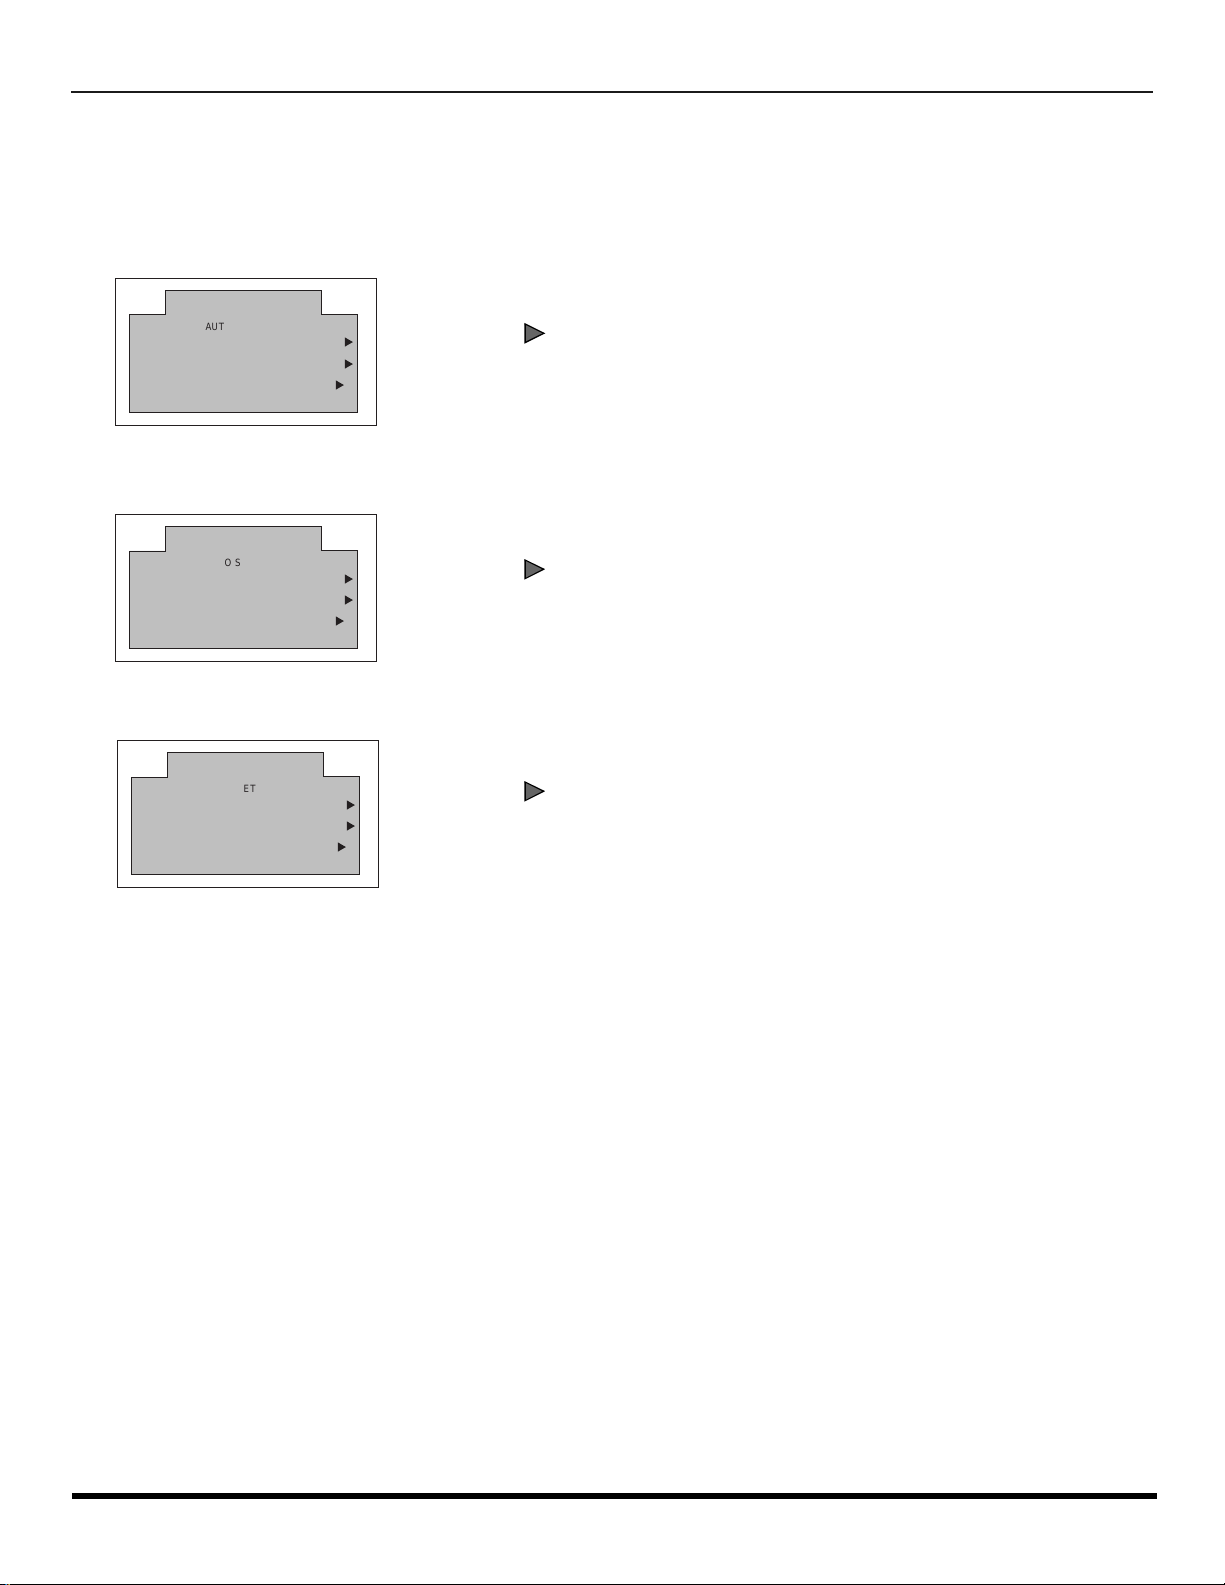
For your convenience, Auto Set up menu will be displayed on screen when the set is turned on for the first time. If needed,
follow the menus and procedures for setting up the features.
r IDIOMA/LANGUE - To change menu language to ENGLISH, SPANISH or FRENCH.
FIRST PLEASE
CONNECT THE ANTENNA
IDIOMA/LANGUE ENGLISH
AUTO PROGRAM
AUTO SET UP
PRESS ACTION TO EXIT
u
CABLEMODE
u
u
r MODE - To select TV (antenna) or CABLE mode depending on the signal source.
FIRST PLEASE
CONNECT THE ANTENNA
IDIOMA/LANGUE ENGLISH
AUTO PROGRAM
AUTO SET UP
PRESS ACTION TO EXIT
u
CABLEMODE
u
u
Press to select English, Spanish or French.
Press to select TV or CABLE.
r AUTO PROGRAM - To automatically program all channels with a signal.
FIRST PLEASE
CONNECT THE ANTENNA
IDIOMA/LANGUE ENGLISH
AUTO SET UP
CABLEMODE
AUTO PROGRAM
PRESS ACTION TO EXIT
u
u
u
Press to start Auto Programming.
5 l
Page 8
O
PTIONAL EQUIPMENT CONNECTIONS
Optional Equipment Connections
VCR Connection
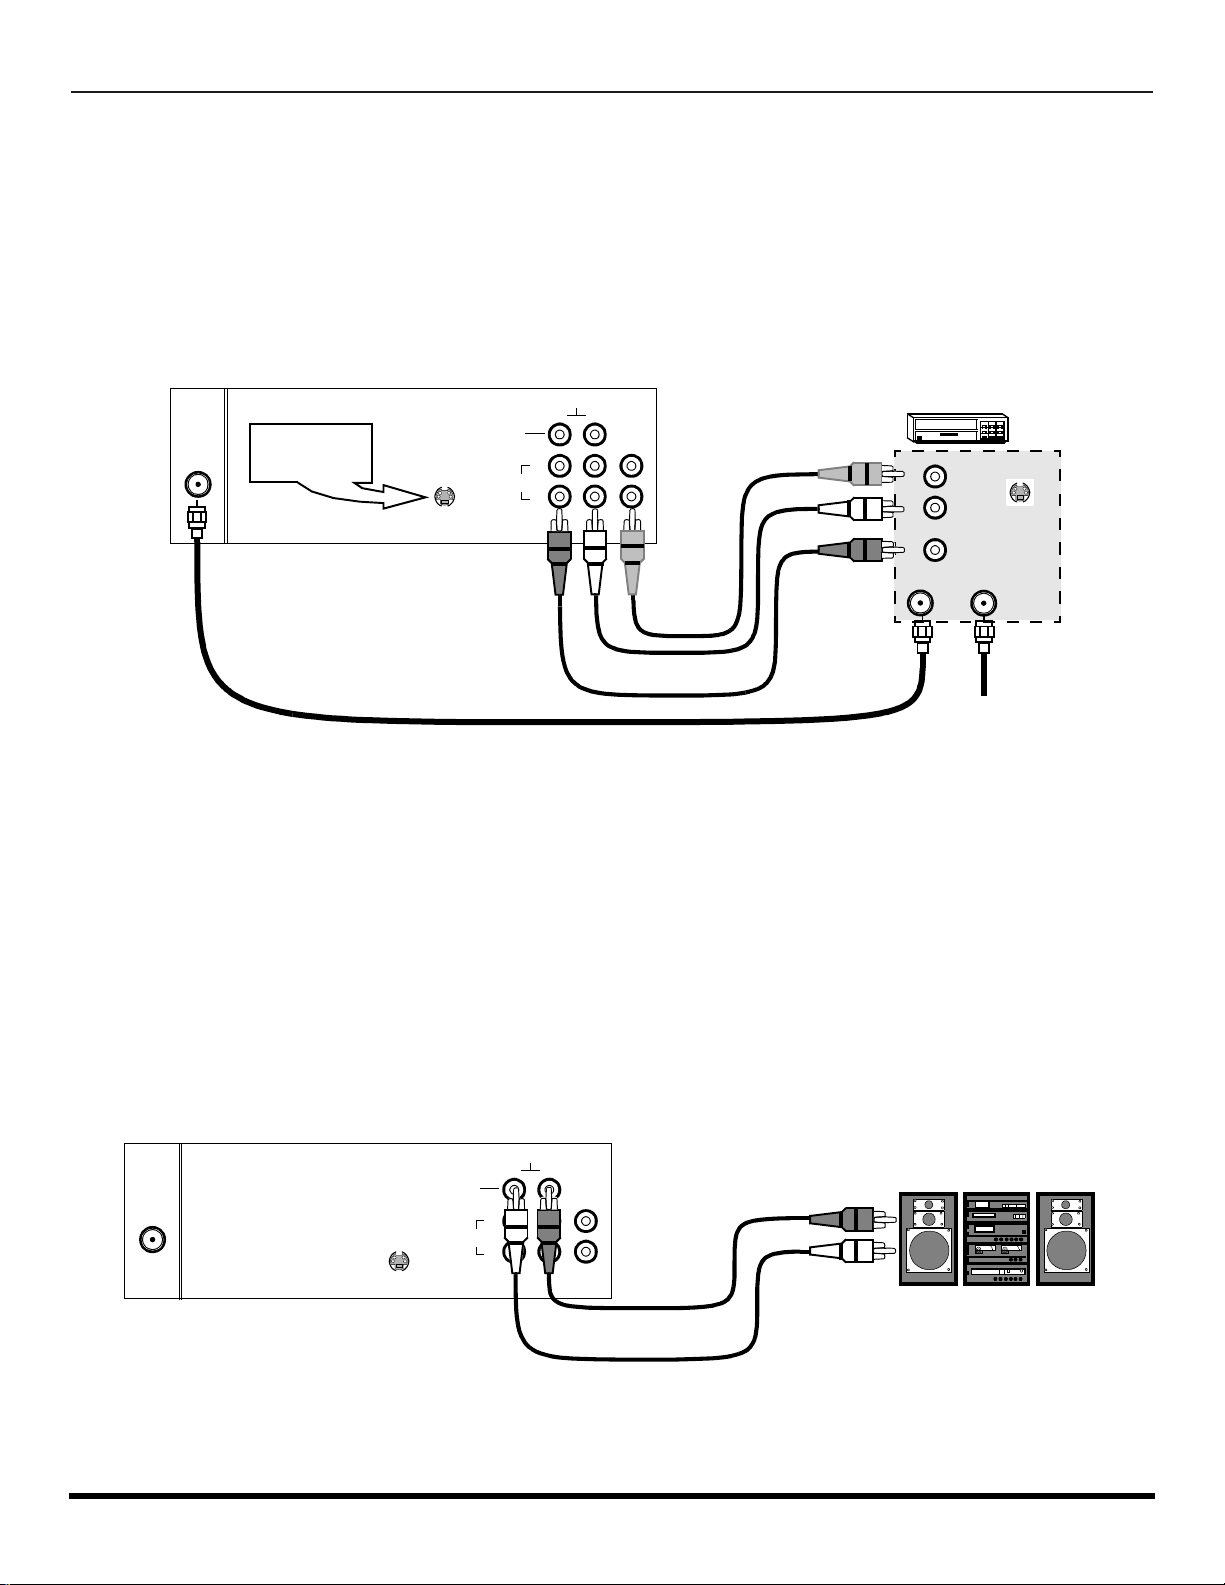
Connect equipment as shown to front or rear Audio/Video input jacks.
Note: Front and rear Audio/Video connections cannot be operated at the same time.
1. Select the Video mode by pressing TV/VIDEO button.
2. Operate optional equipment as instructed in equipment manual.
Note: VCRs, video disc players, video game equipment, and DSS equipment can also be connected to the antenna input connection.
(See your equipment manual).
CONNECTIONS ON BACK OF TV
Note: May vary depending on model.
ANT
Use either the
S-Video or Video
connection.
CABLES NOT SUPPLIED
S-VIDEO
TO AUDIO
AMP
INPUT
2
1
RL
VIDEOAUDIO
VIDEO OUT
AUDIO OUT
OUTPUT
VCR
L
R
ANT INPUT
S-VIDEO
OUT
Incoming Cable
Amplifier Connection (TO AUDIO AMP)
To listen through a separate stereo system, connect an external audio amplifier TO AUDIO AMP inputs on back of
television.
Note: TO AUDIO AMP terminals cannot be connected directly to external speakers.
Audio Adjustments
1. Select SPEAKERS ON located in the onscreen AUDIO menu.
2. Set amplifier volume to minimum.
3. Adjust television volume to desired level.
4. Adjust amplifier volume to match the television.
5. Select SPEAKERS OFF & VARIABLE AUDIO OUT from AUDIO menu.
6. Volume, mute, bass, treble and balance are now controlled through the television.
Note: Select SPEAKERS OFF & FIXED AUDIO OUT to control audio functions through the external amplifier.
CONNECTIONS ON BACK OF TV
Note: For models with TO AUDIO AMP audio jacks.
VIDEOAUDIO
ANT
S-VIDEO
TO AUDIO
AMP
INPUT
RL
2
1
External Amplifier
6 l
Page 9
F
(some models)
Jack used for
1/8” earphone plug
(some models)
Jack used for
1/8” earphone plug
(some models)
Jack used for
1/8” headphone plug
RONT CONTROL PANEL
Front Control Panel
TV/VIDEO
Press to select VIDEO input mode.
Note: The front control panel can be used to access menus and switch video mode when the remote control is not available.
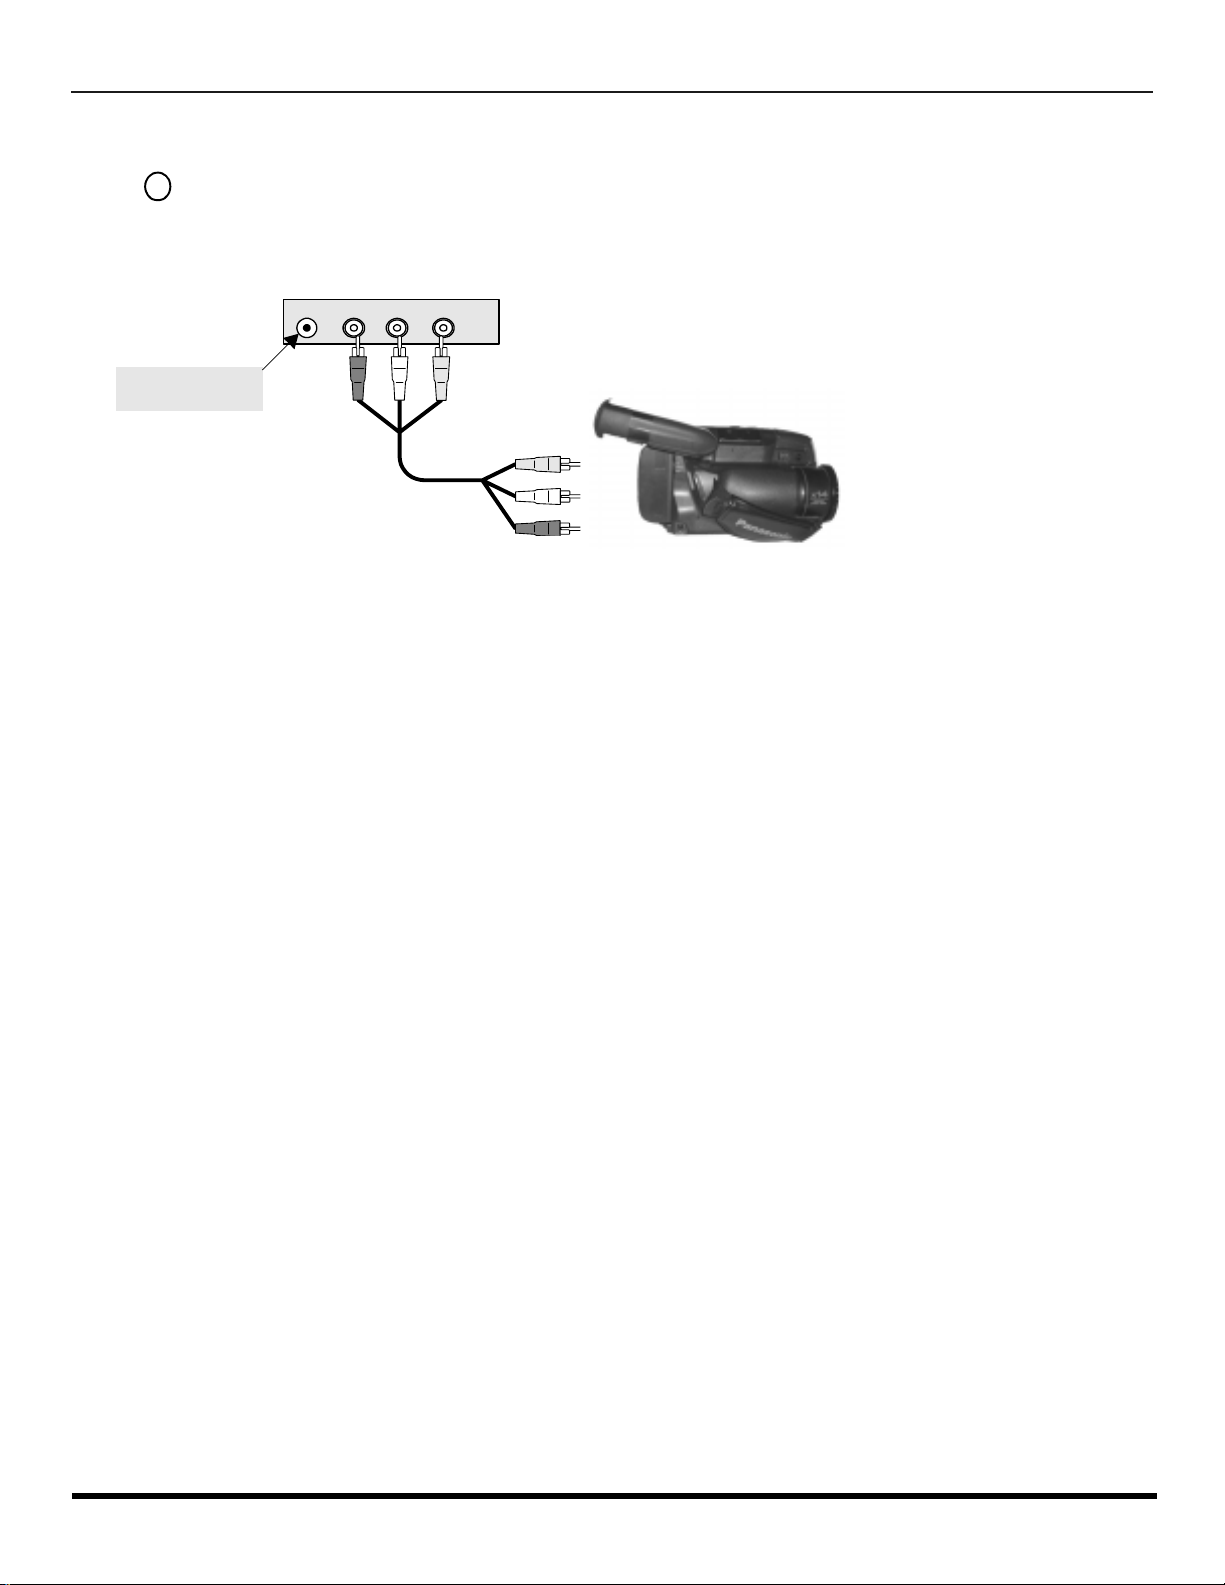
FRONT A/V JACK S
VIDEO L - AUDIO - R
HPJ
CAMCORDER
A second VCR, a video disc player, video game equipment and DSS equipment can also be connected to the video inputs.
See the optional equipment manual for details.
Procedure
1. Connect equipment to front or rear Audio/Video input jacks.
2. Operate optional equipment as instructed in equipment manual.
Note: Front and rear Audio/Video connections cannot be operated at the same time.
7 l
Page 10
R
EMOTE CONTROL OPERATION
Remote Control Operation
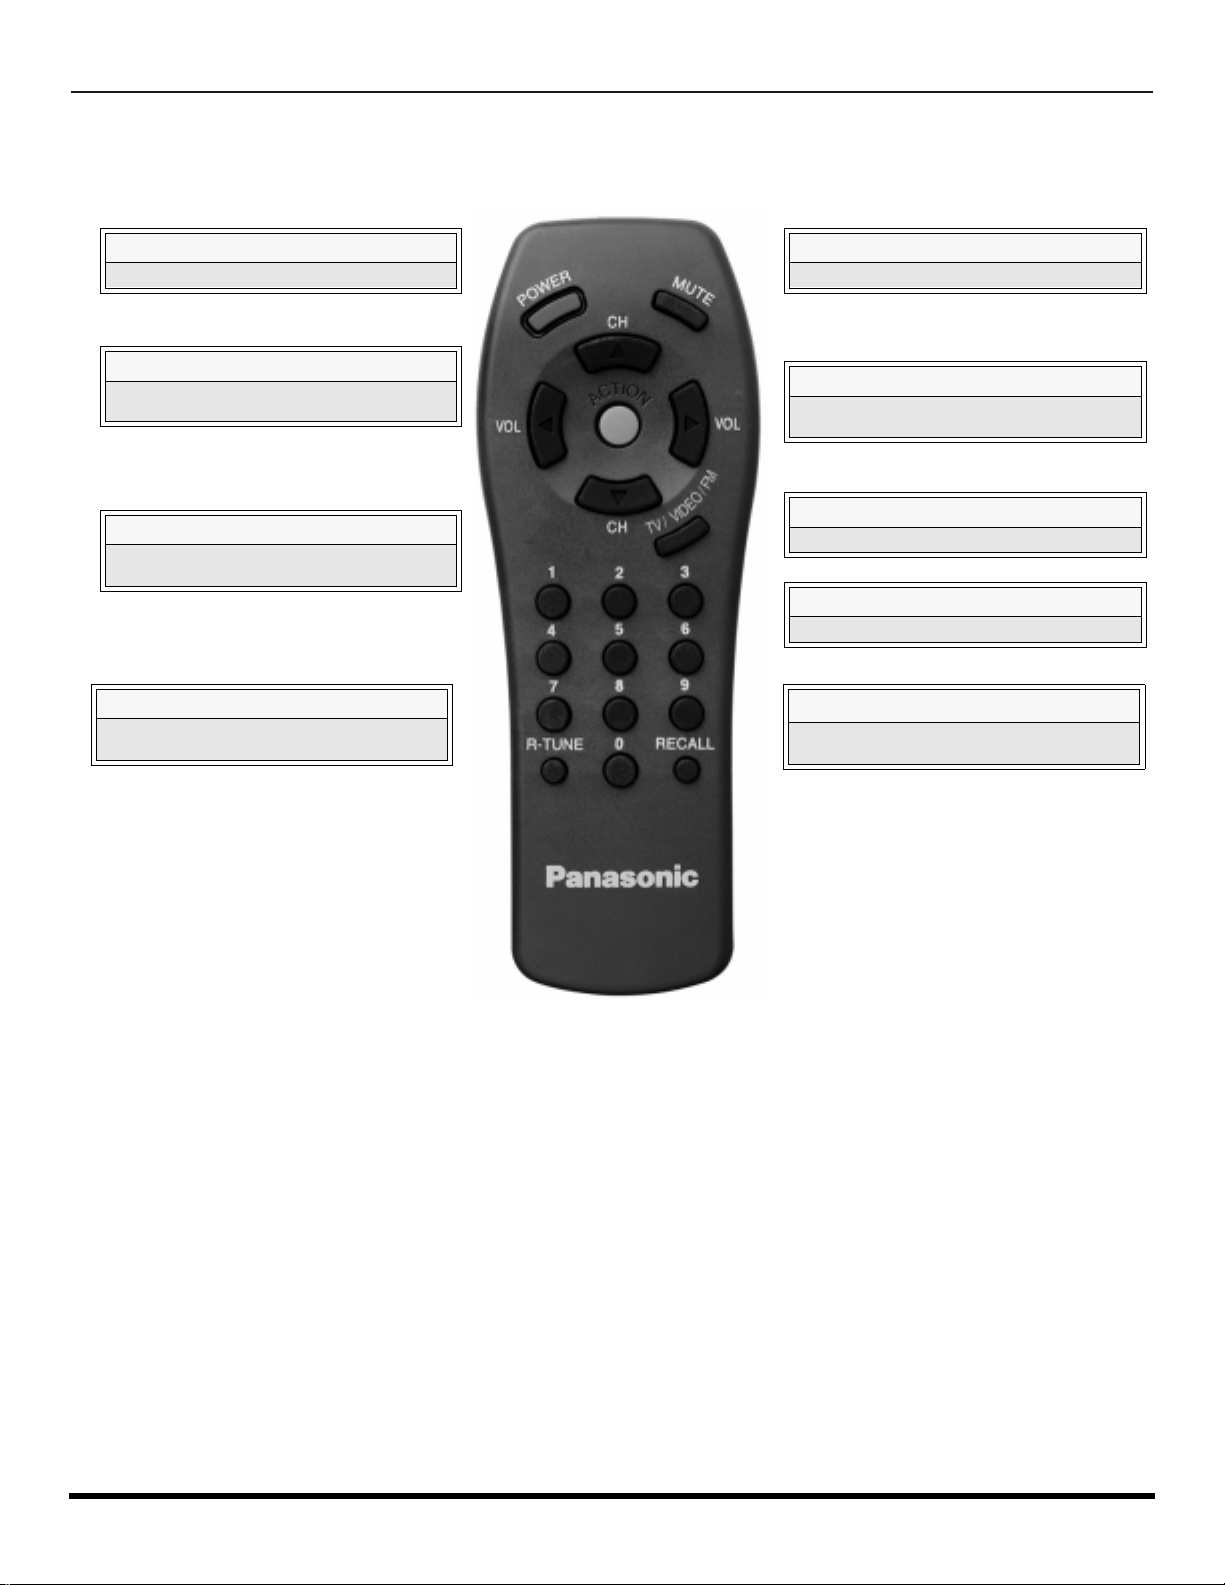
(For models CT-2017 and CT-25G7 only.)
POWER
Press to turn ON and OFF.
VOL
Press to adjust TV sound and navigate in
menus.
“0” ~ “9”
Press numeric keypad to select any channel
or preset FM stations.
R-TUNE
Press to switch to previously viewed
channel or video mode.
MUTE
Press to mute sound.
CH
Press to select next channel and navigate in
menus.
ACTION
Press to access menus.
*TV/VIDEO/FM
Press to select TV, Video or FM mode.
RECALL
Press to display time, channel, sleep timer,
and other options.
EUR501450
EUR501455
Note: *The TV/VIDEO/FM button is only for remote EUR501455.
Remote EUR501450 has a TV/VIDEO button.
Battery Installation
Use two AA batteries:
Remove battery cover by pushing in and up near arrow.
Install batteries matching (+) and (-) polarity signs.
Replace the battery cover.
Note:
Incorrect installation can cause battery leakage and
corrosion that will damage the Remote Control
8 l
Precautions
• Replace batteries in pairs.
• Do not mix battery types (zinc carbon
with alkaline).
• Do not recharge, heat, short-circuit,
disassemble, or burn batteries.
Page 11
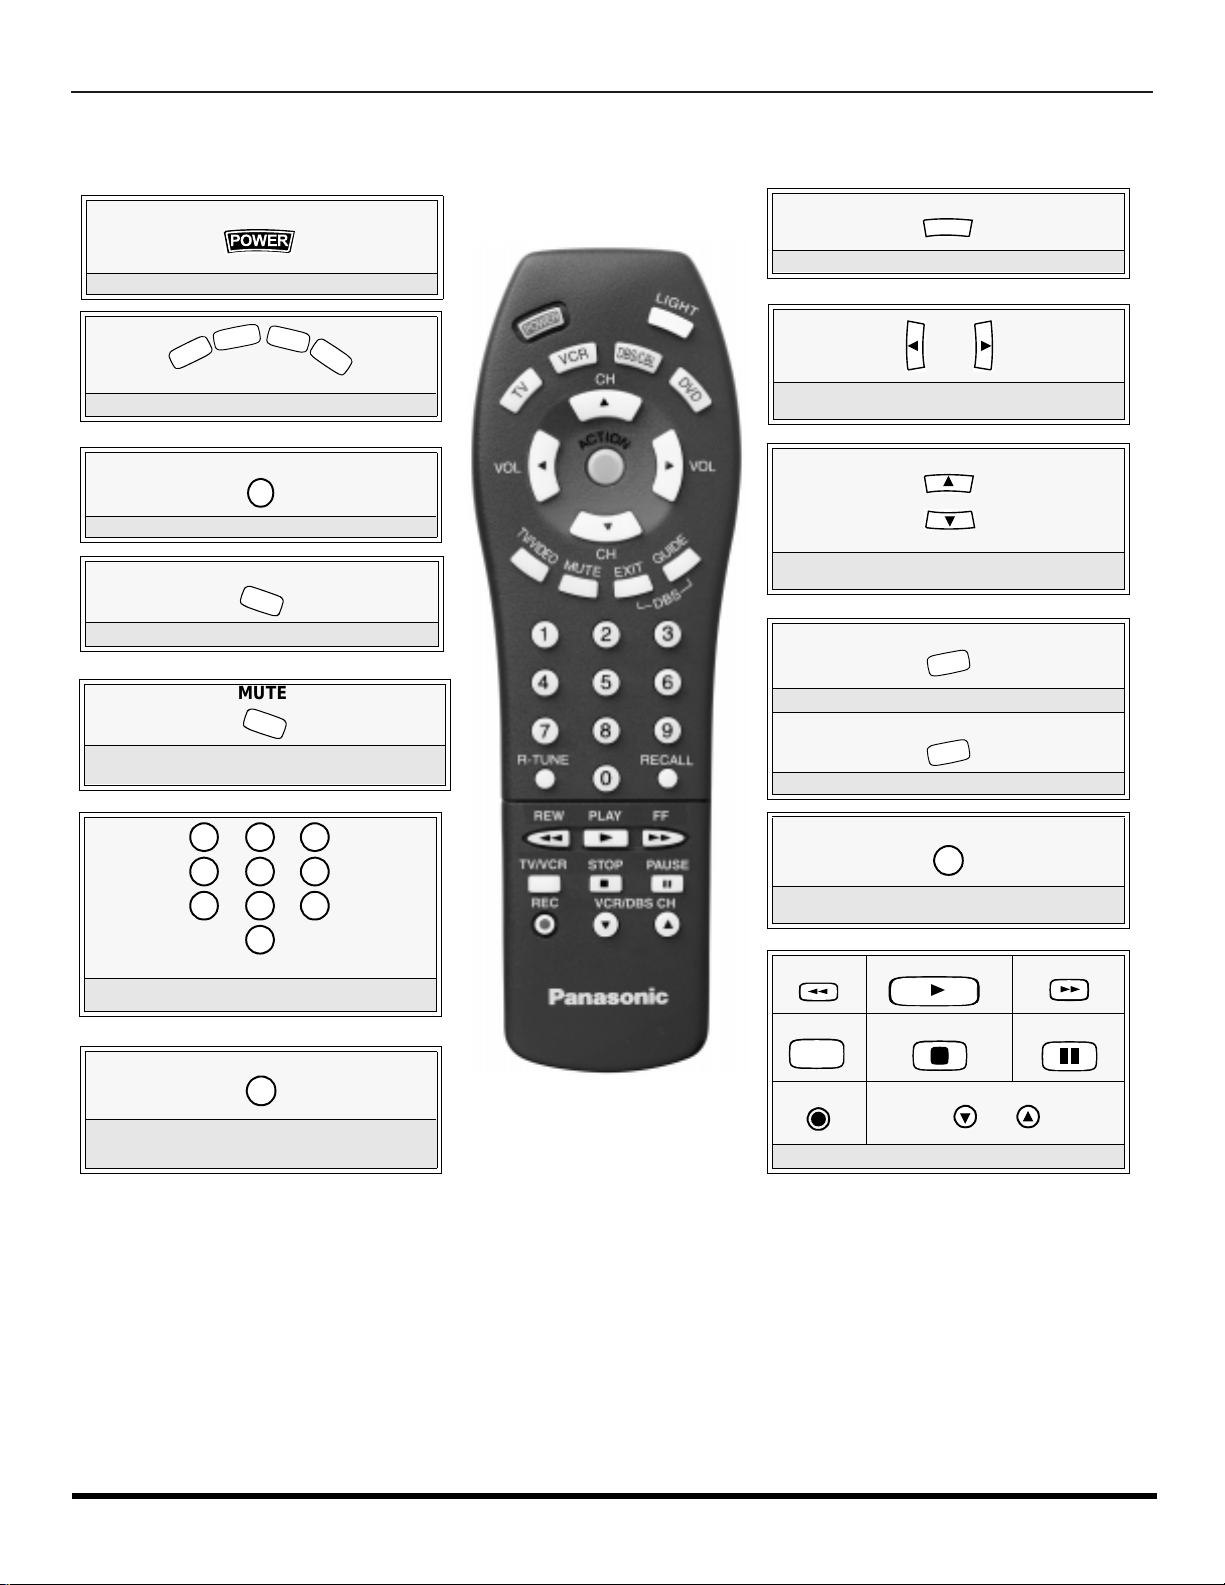
Remote Control Operation
T
V
V
C
R
D
B
S
/
C
B
L
D
V
D
7
4
1 2
5
8
0
9
6
3
(For models CT-G2972, CT-G2972L, CT-G3352 and CT-G3352X only.)
R
EMOTE CONTROL OPERATION
POWER
POWER
Press to turn ON and OFF.
Press to select remote operation.
ACTION
Press to access menus.
TV/VIDEO
Press to select TV or Video mode.
MUTE
Press to mute sound. Press to display and
cancel CC (Closed Caption).
*LIGHT
Press to illuminate remote buttons.
VOL VOL
Press to adjust TV sound and navigate in
menus.
CH
CH
Press to select next or previous channel and
navigate in menus.
EXIT
DBS functions button.
GUIDE
DBS functions button.
Press numeric keypad to select any channel.
R-TUNE
Press to switch to previously viewed
channel or video mode.
Battery Installation
Use two AA batteries:
Remove battery cover by pushing in and up near arrow.
Install batteries matching (+) and (-) polarity signs.
Replace the battery cover.
Note:
Incorrect installation can cause battery leakage and
corrosion that will damage the Remote Control
EUR511502
RECALL
Press to display time, channel, sleep timer,
and other options.
REW
TV/VCR
REC
Component function butto ns
PLAY
u
STOP
VCR/DBS CH
Precautions
• Replace batteries in pai r s.
• Do not mix battery types (zinc carbon
with alkaline).
• Do not recharge, heat, short-circuit,
disassemble, or burn batteries.
*To prolong the life for the batteries, turn the light
off and on by pressing R-TUNE and RECALL
buttons, simultaneously.
FF
PAUSE
9 l
Page 12
R
EMOTE CONTROL OPERATION
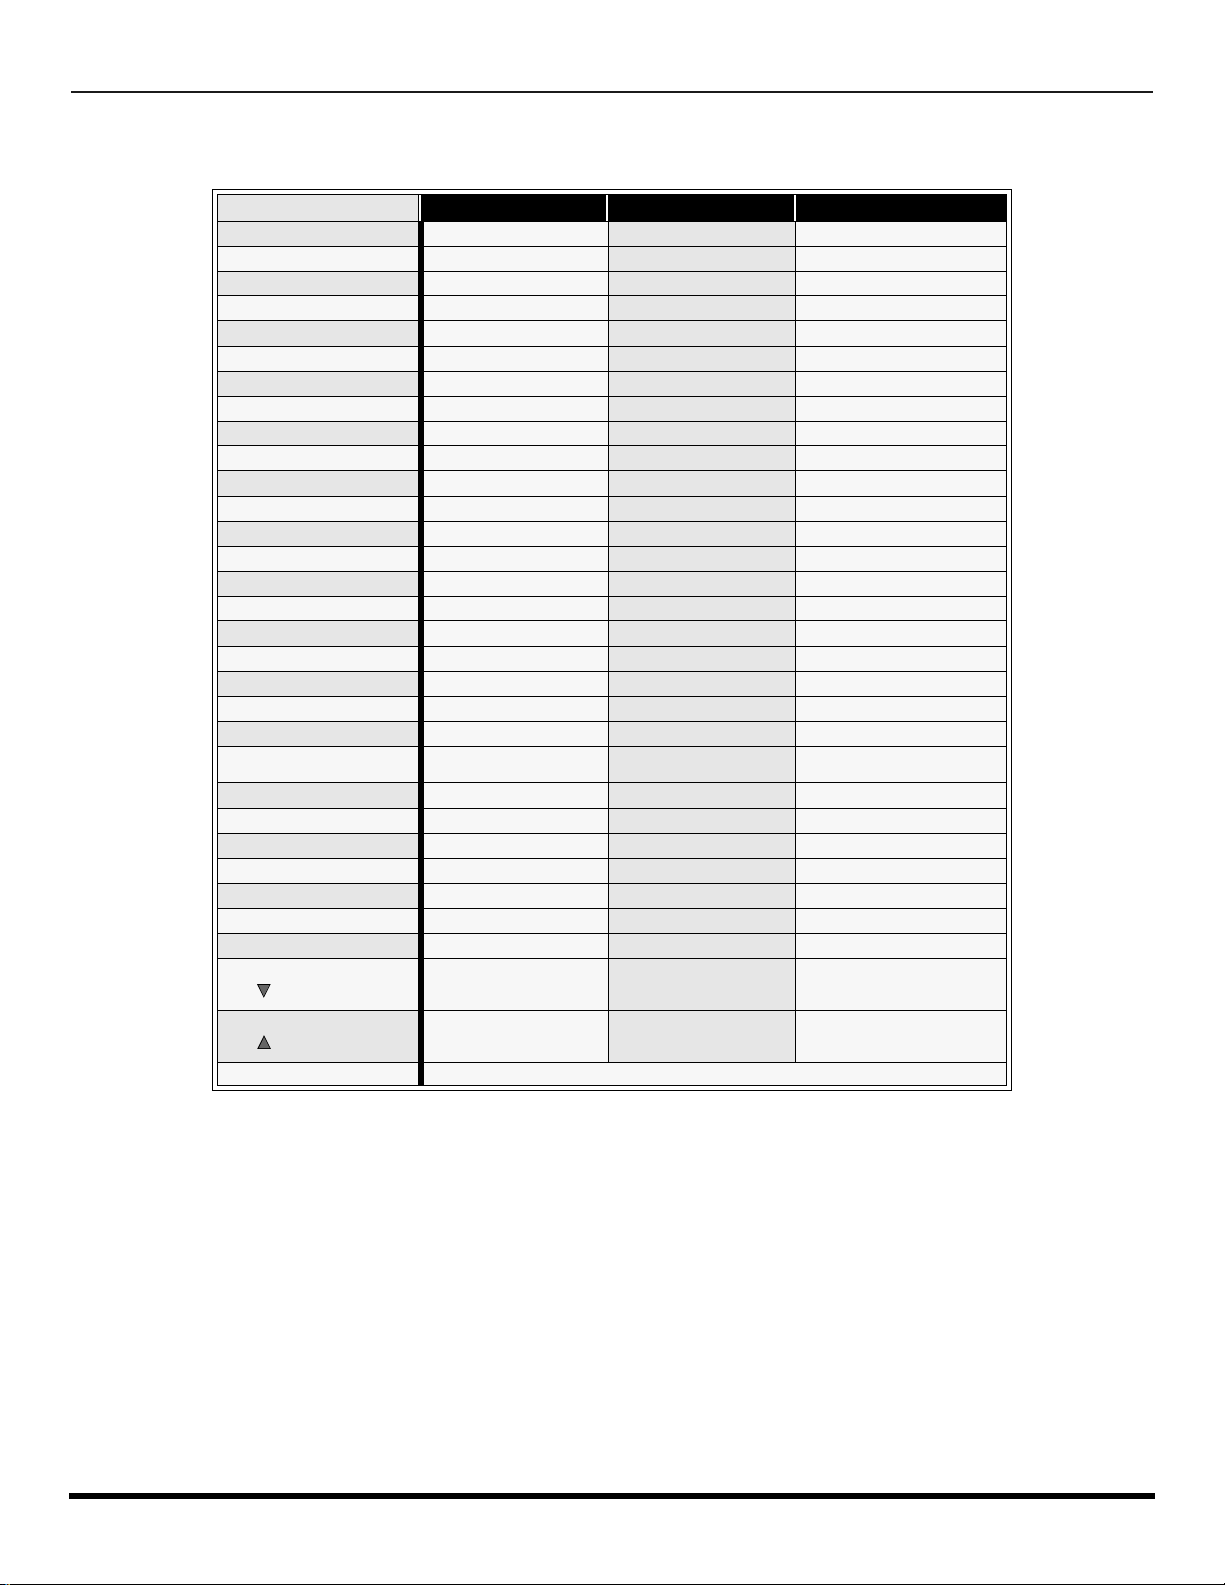
Mode Operational Key Chart
This chart defines the key s that are oper ational in the selected com ponent mode s (TV, VCR, DBS, CABLE or DVD) after
programming (if needed).
POWER
MUTE
TV/VIDEO
CHAN UP
CHAN DOWN
VOL RIGHT
VOL LEFT
ACTION
RECALL
EXIT
GUIDE
1
2
3
4
5
6
7
8
9
0
R-TUNE
<<REW
PLAY
>>FF
PAUSE
STOP
RECORD
TV/VCR
VCR/DBSCHAN
VCR/DBS CHAN
LIGHT
KEY NAME
TV MODE CABLE MODE DBS MODE
POWER POWER POWER
MUTE CBL MUTE TV MUTE
INPUT SWITCH TV INPUT SWITCH TV INPUT SWITCH
CHANNEL UP CABLE CHANNEL UP DBS NAVIGATION UP
CHANNEL DOWN CABLE CHANNEL DOWN DBS NAVIGATION DOWN
VOL + TV VOL + DBS NAVIGATION RIGHT
VOL - TV VOL - DBS NAVIGATION LEFT
ACTION ENTER DBS MENU
DISPLAY TV DISPLAY DBS PROG. INFO
- - DBS EXIT
- - DBS GUIDE
DIGIT 1 DIGIT 1 DIGIT 1
DIGIT 2 DIGIT 2 DIGIT 2
DIGIT 3 DIGIT 3 DIGIT 3
DIGIT 4 DIGIT 4 DIGIT 4
DIGIT 5 DIGIT 5 DIGIT 5
DIGIT 6 DIGIT 6 DIGIT 6
DIGIT 7 DIGIT 7 DIGIT 7
DIGIT 8 DIGIT 8 DIGIT 8
DIGIT 9 DIGIT 9 DIGIT 9
DIGIT 0 DIGIT 0 DIGIT 0
PREVIOUS CHAN
OR VIDEO MODE
VCR REWIND - -
VCR PLAY - -
VCR FAST FORWARD - -
VCR PAUSE - -
VCR STOP - -
VCR RECORD - -
TV/VCR SWITCH - -
VCR CHANNEL DOWN - DBS CHANNEL DOWN
VCR CHANNEL UP - DBS CHANNEL UP
CABLE PREVIOUS
CHANNEL
REMOTE BUTTONS
PREVIOUS DBS CHANNEL
10 l
Page 13
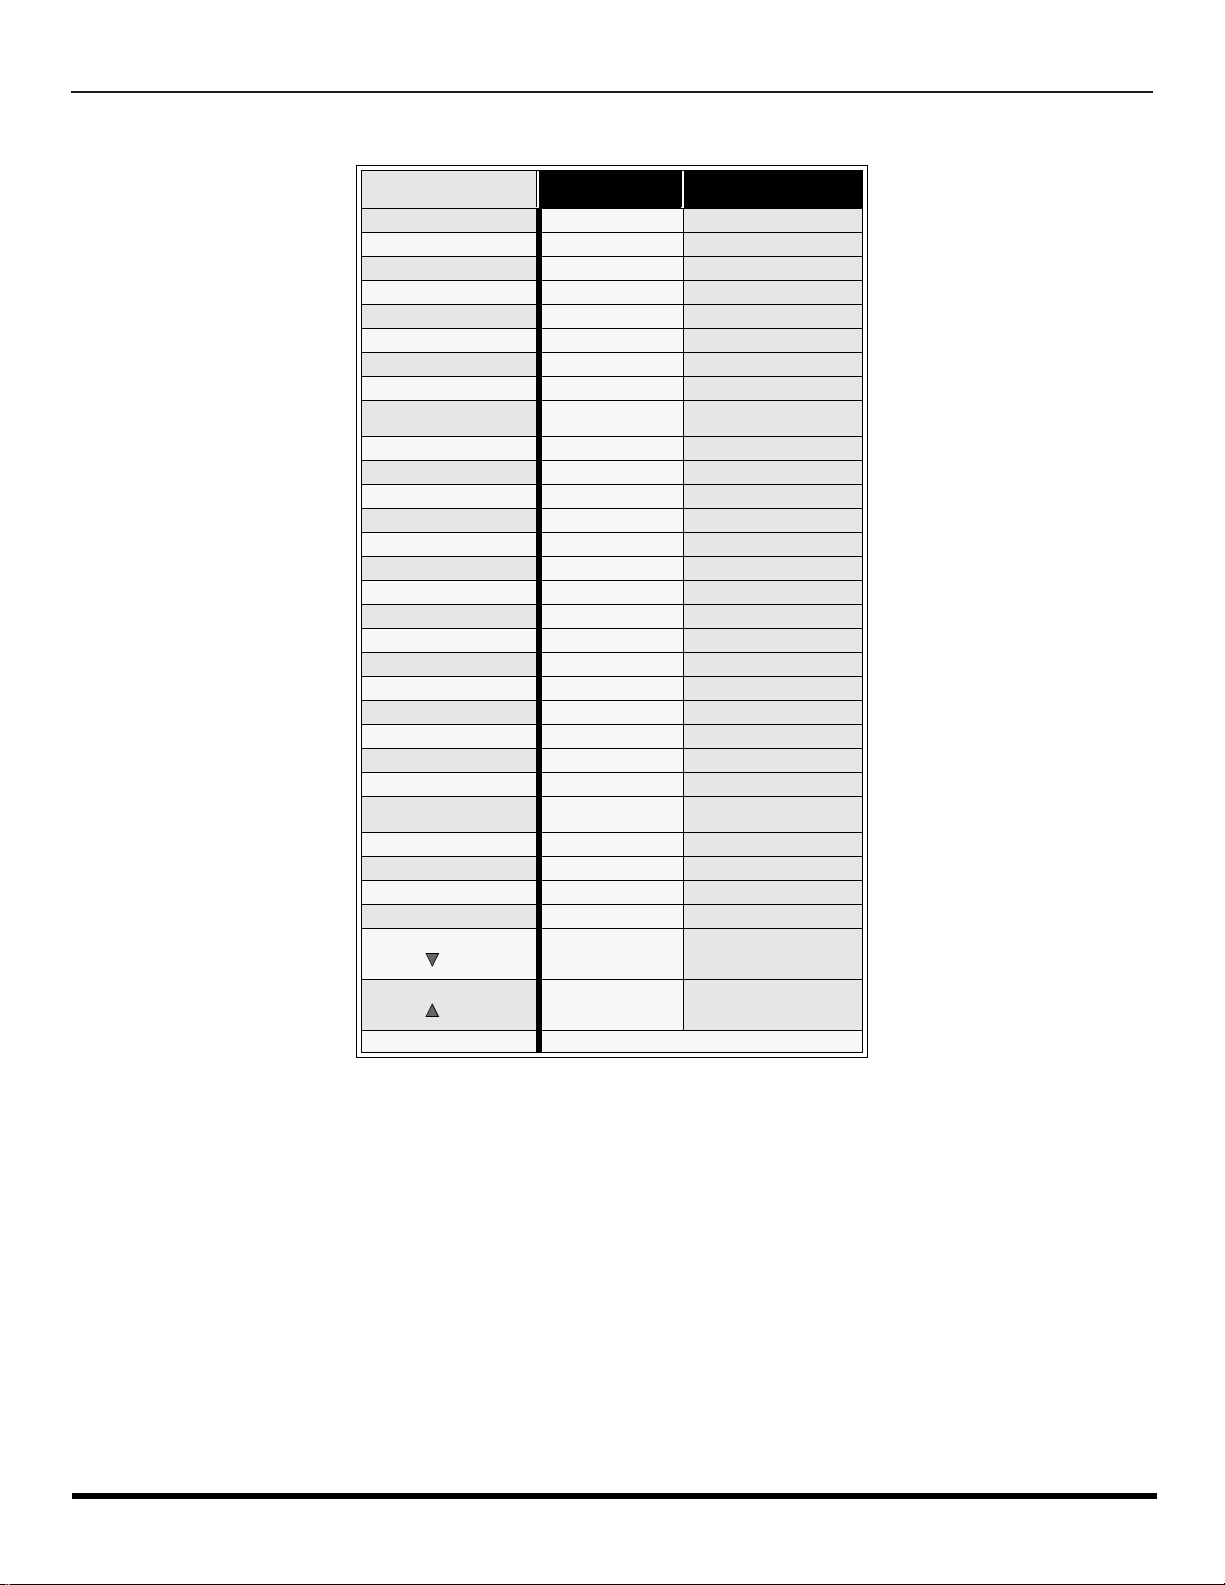
Mode Operational Key Chart (contd.)
R
EMOTE CONTROL OPERATION
KEY NAME
POWER
MUTE
TV/VIDEO
ACTION
CHAN UP
CHAN DOWN
VOL RIGH T
VOL LEFT
RECALL
EXIT
GUIDE
1
2
3
4
5
6
7
8
9
0
R-TUNE
<<REW
PLAY
>>FF
PAUSE
STOP
RECORD
TV/VCR
VCR/DBS
CHAN
VCR/DBS
CHAN
LIGHT
VCR
MODE
POWER POWER
TV MUTE TV MUTE
TV INPUT SWITCH TV INPUT SWITCH
- SELECT
- NEXT CHAPTER
- PREVIOUS CHAPTER
TV VOLUME + NAVIGATION RIGHT
TV VOLUME - NAVIGATION LEFT
ONSCREEN VCR
DISPLAY
- -
- -
- -
- -
- -
- -
- -
- -
- -
- -
- -
- -
- -
VCR REWIND SKIP SEARCH <<
VCR PLAY DVD PLAY
VCR FF
VCR PAUSE DVD PAUSE
VCR STOP DVD STOP
VCR RECORD -
TV/VCR SWITCH OPEN/CLOSE
VCR CHANNEL
DOWN
VCR CHANNEL UP SLOW +
REMOTE BUTTONS
DVD MODE
DVD DISPLAY
SKIP SEARCH
FF>>
SLOW -
11 l
Page 14
R
EMOTE CONTROL OPERATION
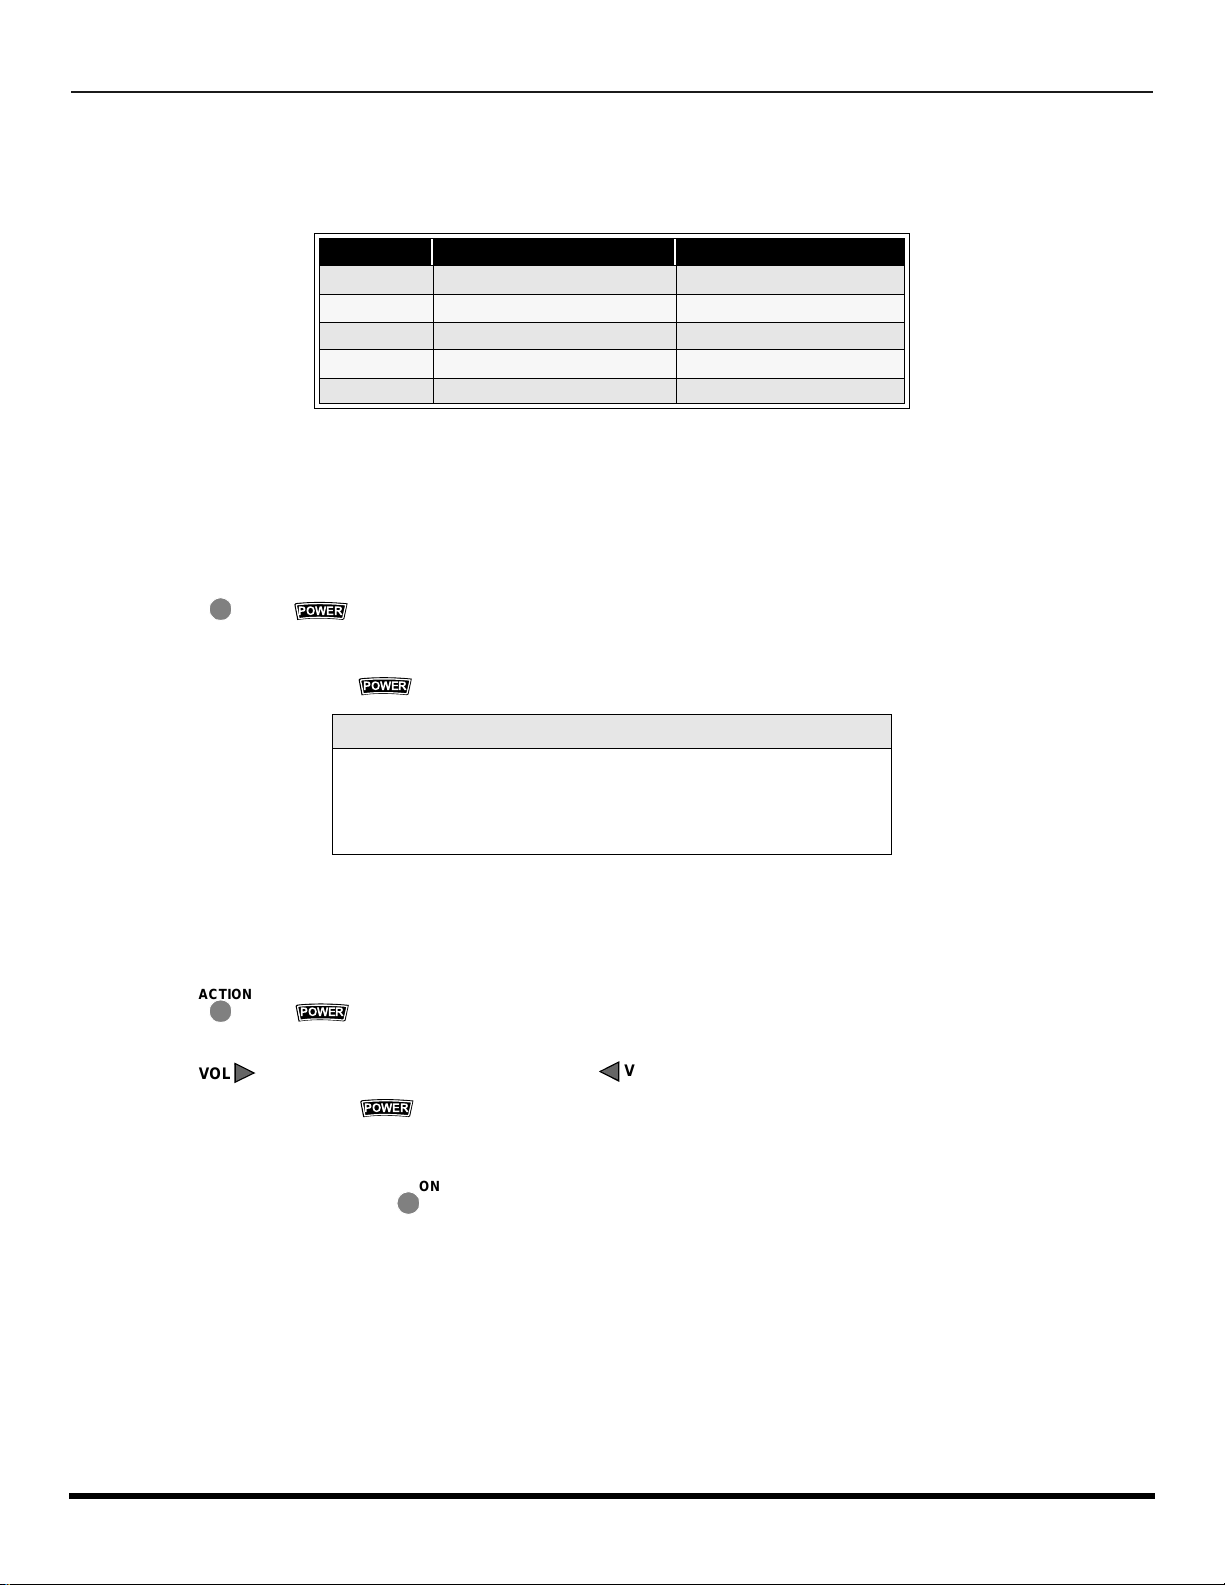
Programming The Remote
The Universal Remote Control ca n be programmed to operate many manufacturers’ co mponents, using the component
function buttons for VCR, DVD, CABLE or DBS. Follow the procedures for programming your Remote Control with or
without a code for the component.
Default Modes For Remote Control
Device Operates Default
TV TV (Panasonic Only) Panasonic TV Codes
VCR VCR (Preset) Panasonic VCR Codes
DBS DBS (Preset) Panasonic DBS Codes
CABLE CABLE (Preset) Panasonic DBS Codes
DVD DVD, CD (Preset) Panasonic DVD Codes
Determine the manufacturer of the component and look in the table for the code.
Programming With a Code
Procedure
• Confirm that the external component is plugged in and operating.
• Turn the component off.
• Press and together, for at least 5 seconds.
ACTION
• Press appropriate component button on the Remote Control VCR, DVD, CABLE or DBS.
• Enter the 3-digit component code using the Remote Control numeric keypad (0 ~ 9 buttons).
• Press the Remote Control to test the component. If the procedure was successful, the component will turn on.
POWER
POWER
Helpful Hints: Unsuccessful Code
If the component does not operate with the Remote Control, repeat
the procedure using another code. (Some brands have multiple
codes).
If an incorrect code is entered, or if the procedure takes longer than
30 seconds, the programming will fail.
Programming Without A Code
This procedure searches all codes and is called the “sequence method.”
• Confirm that the external component is plugged in and on.
• Turn the component off.
• Press and together, for at least 5 seconds.
• Press appropriate component button on the Remote Control.
• Press to move forward to the next code. Press to move backward.
• Press the Remote Control to test the component. If the procedure was successful, the component will turn on.
ACTION
VOL
Note: Repeat the above steps until the component code is found. It may take many attempts before the correct code
is found.
• After the code is found, press to store the code.
POWER
VOL
POWER
ACTION
12 l
Page 15
R
EMOTE CONTROL OPERATION
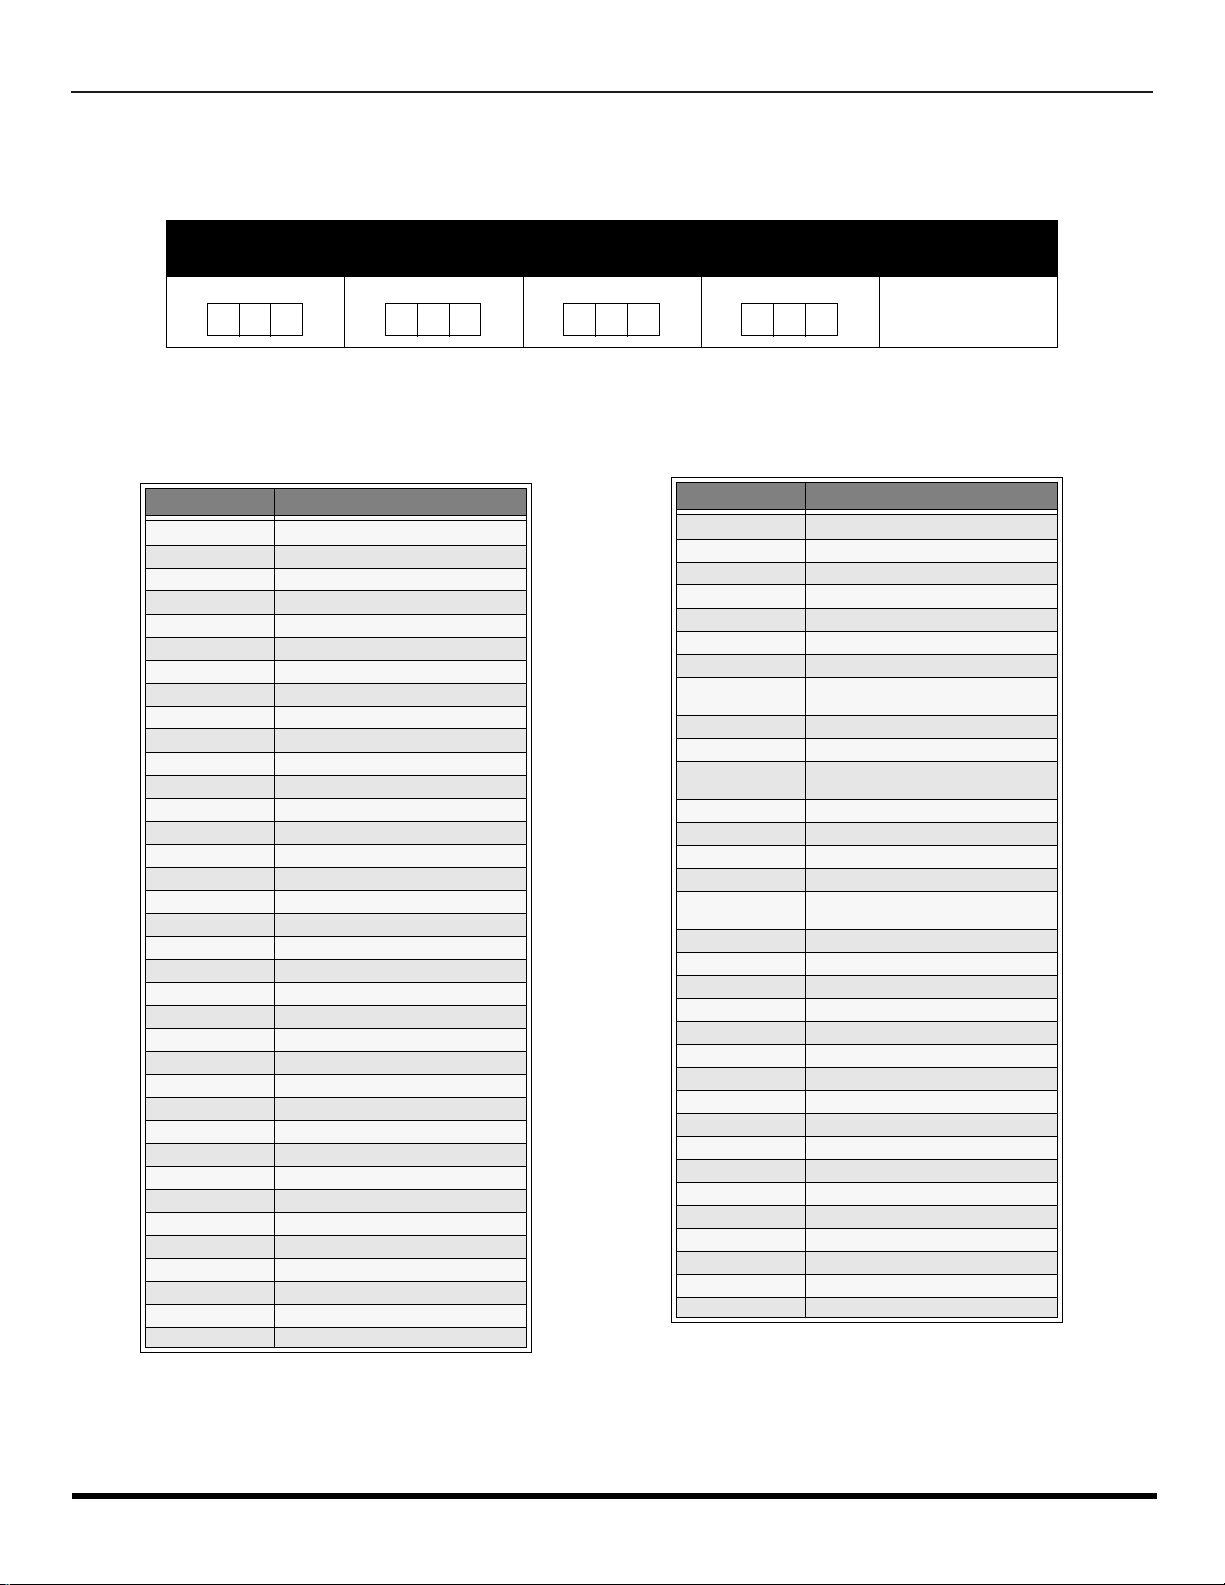
Component Codes
The Universal Remo te Control i s capable of operating many component brands after ent ering a c ode. Som e components
may not operate because t he codes are not available due to limited memory. The Universal Remote Contr ol does not
control all features found in each model.
Write the code numbers from tables in this space. This will serve as a reference if you need
to program your Remote Control.
VCR
DVD
DBS
CABLE
Codes For VCR
Brand Code
Admiral
Aiwa 127, 132
Akai 114, 115, 116, 129
Audio Dynamic 111, 139
Bell & Howell 105, 113
Broksonic 120, 126
Canon 123, 125
Citizen 106
Craig 105, 106, 129
Curtis Mathes 124, 127, 145
Daewoo 175, 124, 143
DBX 110, 111, 139
Dimensia 145
Emerson 103, 119, 1 20, 125, 126, 143
Fisher 105, 107, 108, 109, 113
Funai 120, 126, 134
GE 124, 133,145
Goldstar 106
Gradiente 134
Hitachi 1 00, 123, 145
Instant Replay 123, 124
Jensen 139
JVC 110, 111, 134,139
Kenwood 306, 310, 311, 339
LXI 100, 105, 106,107, 108, 109
Magnavox 123, 124, 131
Marantz 110, 111, 139
Marta 106
Memorex 109, 124
MGA 138, 140, 141, 147,148
Minolta 100,145
Mitsubishi 138, 140, 141, 147, 148
Multitech 104, 147
NEC 110,111, 134, 139
Olympic 123, 124
Optimus 106, 121, 128, 135
135
Brand Code
Orion 120, 126
Panasonic 121,122, 123, 124
J.C. Penney 100,105, 110, 111, 124, 139, 145
Pentax 100,111, 145
Philco 120, 123, 124, 126, 131, 143
Philips 123, 124, 131
Pioneer 123
Proscan
Quasar 121, 122, 123, 124
Radio Shack 105, 109, 124, 133, 136, 140
RCA
Realistic 105, 109, 124, 136, 140
Samsung 102, 104, 133
Sansui 120, 126, 139, 152
Sanyo 105, 109, 113
Scott
Sears 100, 105, 106, 107, 108
Sharp 135, 136
Shintom 117
Signature 2000 135
Singer 117
Sony 128, 129, 130
Sylvania 123, 124, 131
Tashiro 106
Tatung 110, 111, 139
Teac 110, 111, 139
Technics 121, 122, 123, 124
Teknika 124
Toshiba 101, 146
Vector Research 111
Wards 106, 109, 135, 136, 144
Yamaha 105, 110, 111, 139
Zenith 106,144
100, 101, 102, 123, 124, 131, 133,
145, 146
100, 101,102, 123, 124, 131, 133,
145, 146
101, 102, 104, 109, 120, 126, 138,
140, 147, 148
13 l
Page 16
R
EMOTE CONTROL OPERATION
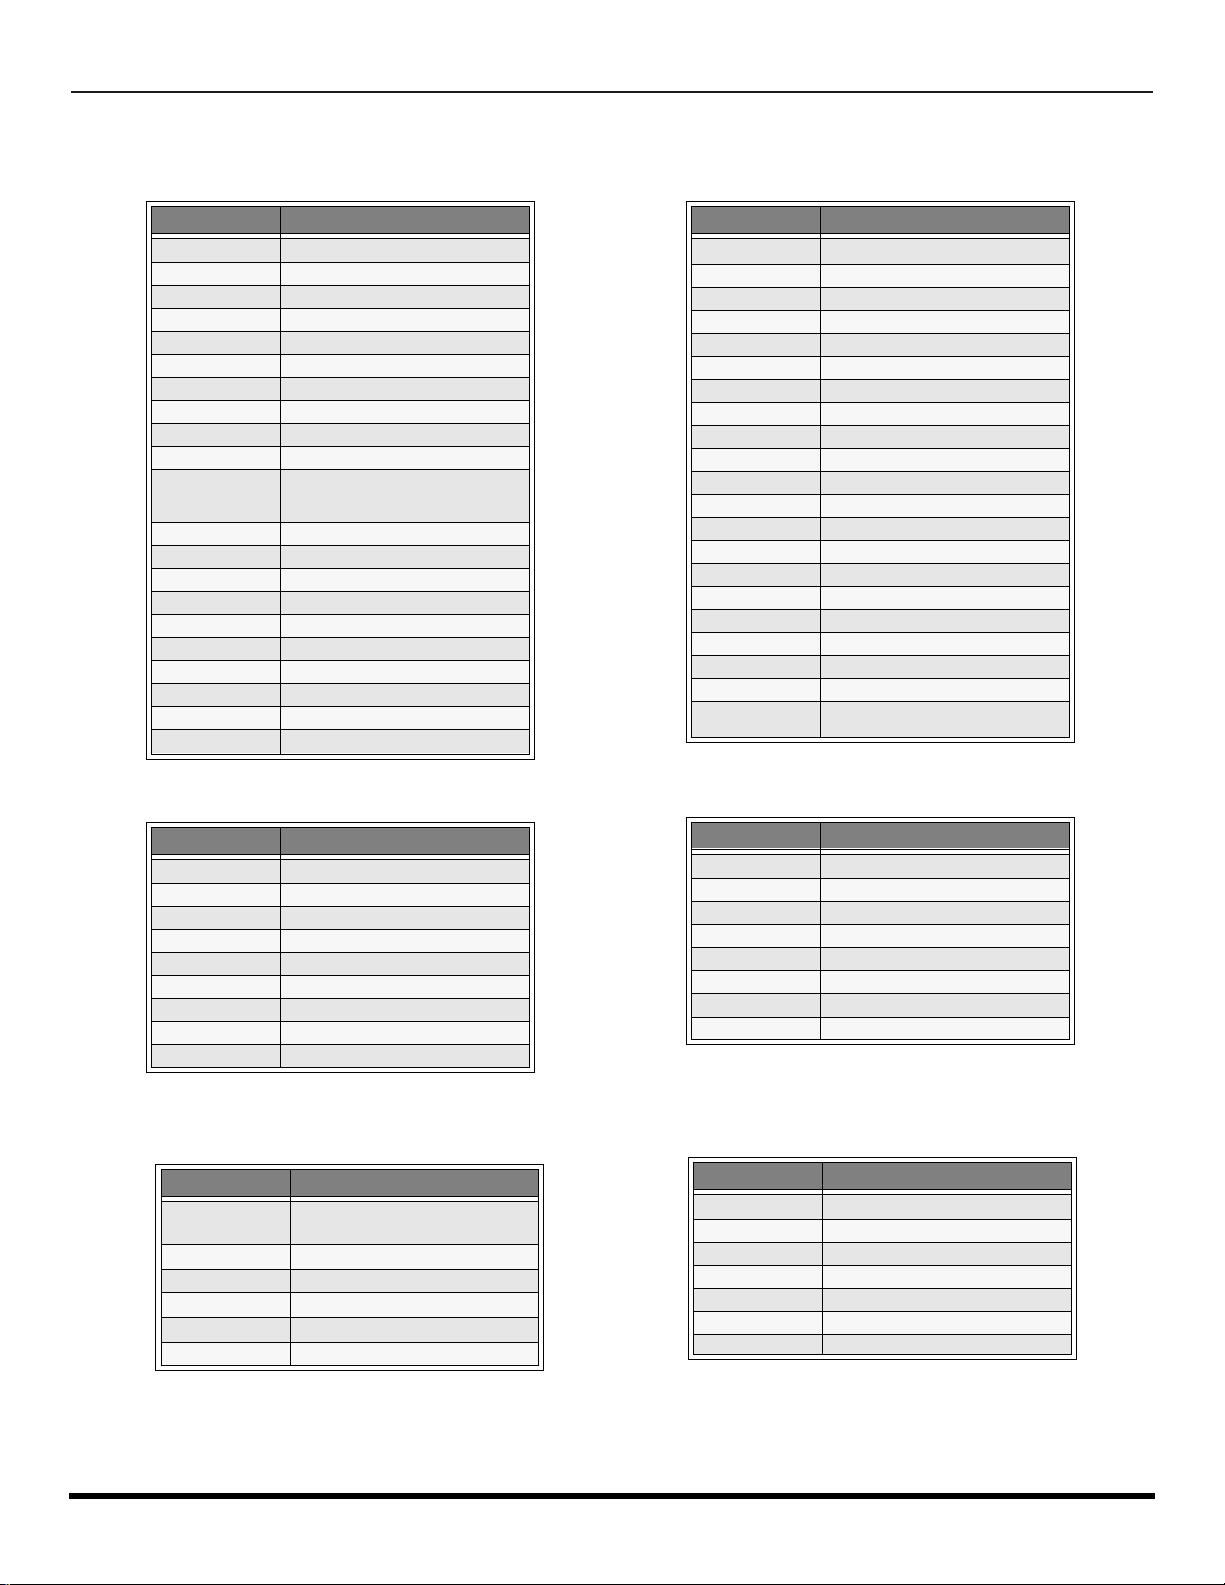
Component Codes (contd.)
Codes for Cable Box
Brand Code
ABC 224
Archer 225, 232
Cableview 205, 232
Citizen 205, 222
Curtis 212, 213
Diamond 224, 225, 232
Eagle 229
Eastern 234
GC Brand 205,232
Gemini 222
General
Instrument/
Jerrold
Hamlin 212, 218, 240, 241, 242, 245
Hitachi 203, 224
Macom 203, 204, 205
Memorex 230
Movietime 205, 232
Oak 202, 237,239
Panasonic 209, 210, 214
Philips 206, 207, 228, 229, 230
Pioneer 201, 216
Pulsar 205, 232
211, 219, 220, 221, 222, 224, 225,
226, 227
Brand Code
Puser
RCA 215
Realistic 232
Regal 212, 218, 240, 241, 242, 245, 249
Regency 234
Rembrandt 205, 232, 237
Samsung 205
Scientific Atlanta 211, 212, 213
Slmark 201, 205
Sprucer 205, 210
Stargate 205, 232
Teleview 201, 205
Texscan 244
Tocom 235, 236, 247
Toshiba 204
Unika 225, 232
Universal 222, 232
Videoway 206
Viewstar 229, 230
Zenith 200, 227
Zenith / Drake
Satellite
232
200
Brand Code
Denon 100
Ferguson 101
JVC 109
Mitsubishi 105
Nordmende 101
Panasonic 100
Philips 103
Pioneer 102
RCA 101
Brand Code
Dish Network
(Echostar)
Echo Star 105
G.E. 106
Gradiente 114
Hitachi 103, 111, 112
HNS (Hughes) 103
105, 115, 116
Codes for DVD
Codes for DBS
Brand Code
Saba
Samsung 110
Sharp 108
Sony 104
Thomson 101
Toshiba 103
101
Yamaha 100
Zenith 107
Brand Code
Panasonic
Philips 101, 102
Primestar 108
RCA 106, 109, 110, 113
Sony 107
Toshiba 100
Uniden 101, 102
104
14 l
Page 17
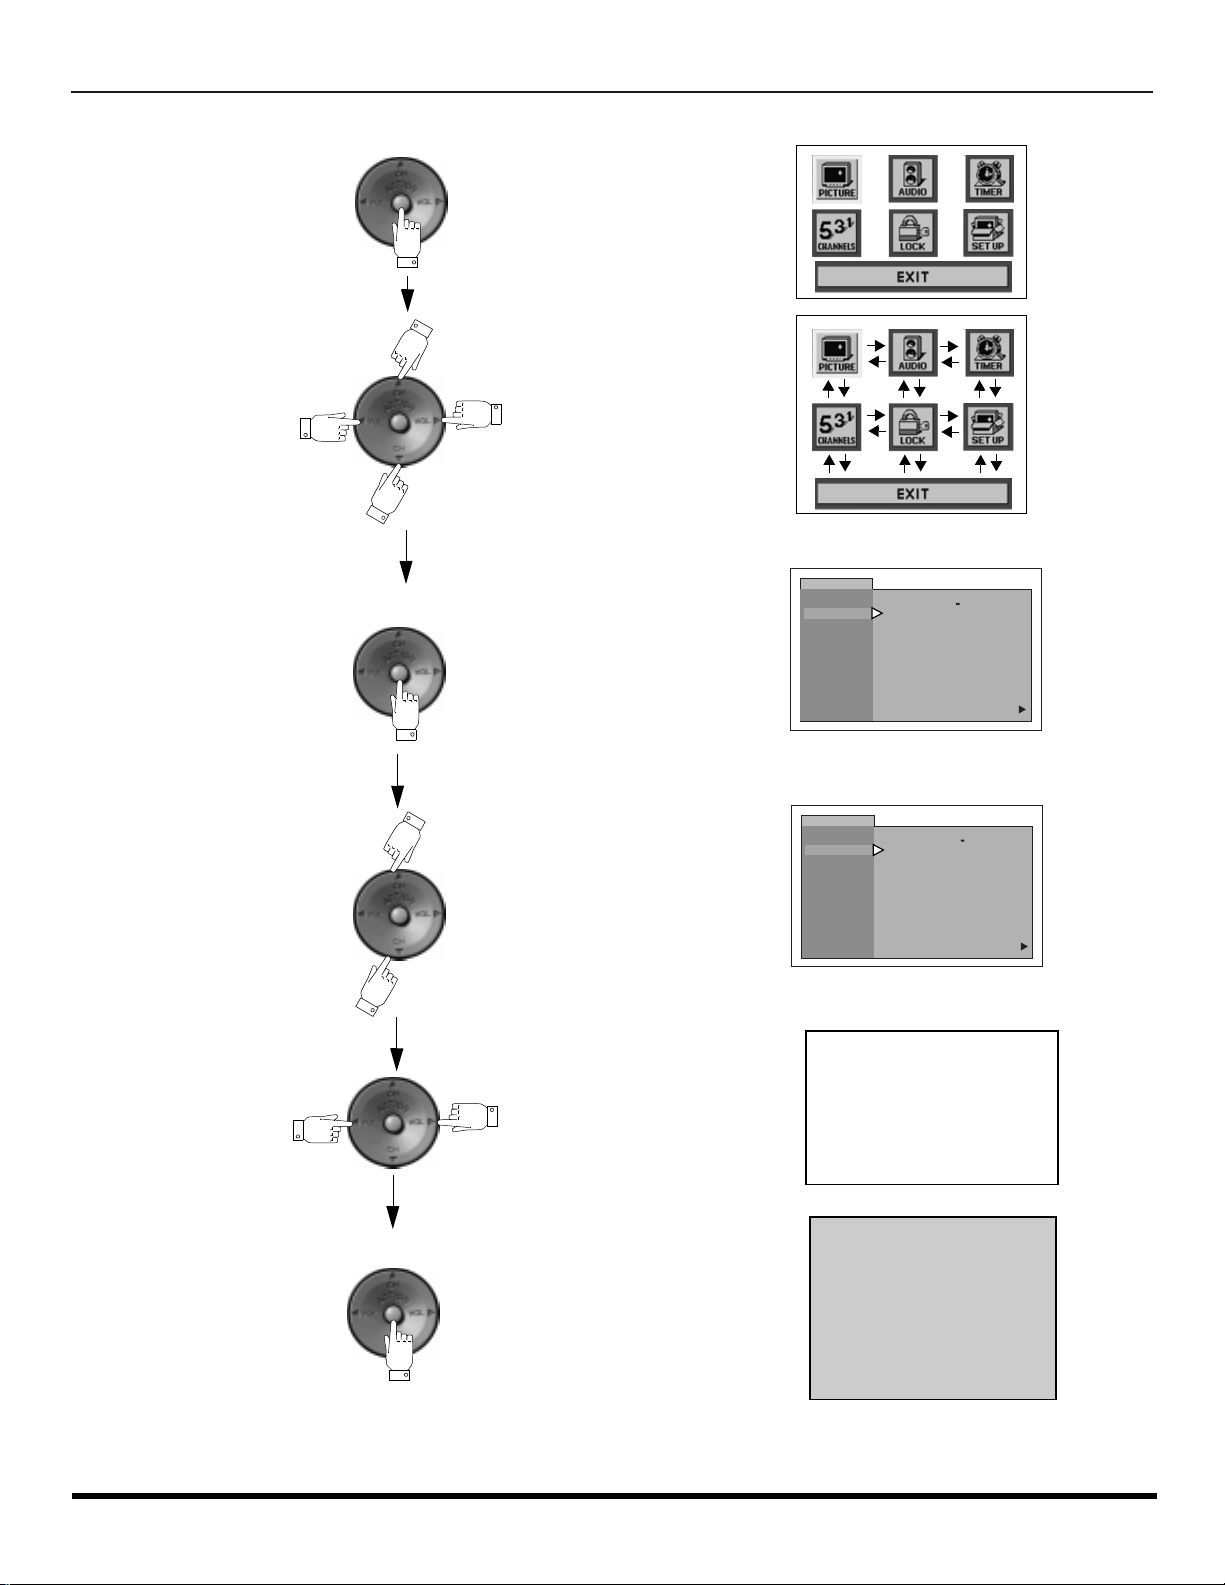
Icon Menu Navigation
Press to display the Icons.
Press to select desired icon.
I
CON MENU NAVIGATION
Press to display selected
Icon features.
Press to select feature.
Press
to adjust or activate feature.
PICTURE
VIDEO ADJ
PICTURE
VIDEO ADJ
COLOR
TINT
BRIGHTNESS
PICTURE
SHARPNESS
NORMAL
COLOR
TINT
BRIGHTNESS
PICTURE
SHARPNESS
NORMAL
-- -- -- I -- -- --
-- I -- -- --
-- --
-- -- -- I -- -- --
-- -- -- -- ---- -- -- -- -- -- I
-- -- -- I -- -- --
-- -- -- I -- -- --
-- I -- -- --
-- --
-- -- -- I -- -- --
-- -- -- -- ---- -- -- -- -- -- I
-- -- -- I -- -- --
BRIGHTNESS 32 -- -- -- I -- -- --
NO
u
NO
u
Press repeatedly to exit menus.
NORMAL PICTURE
15 l
Page 18
M
AIN MENU ICONS
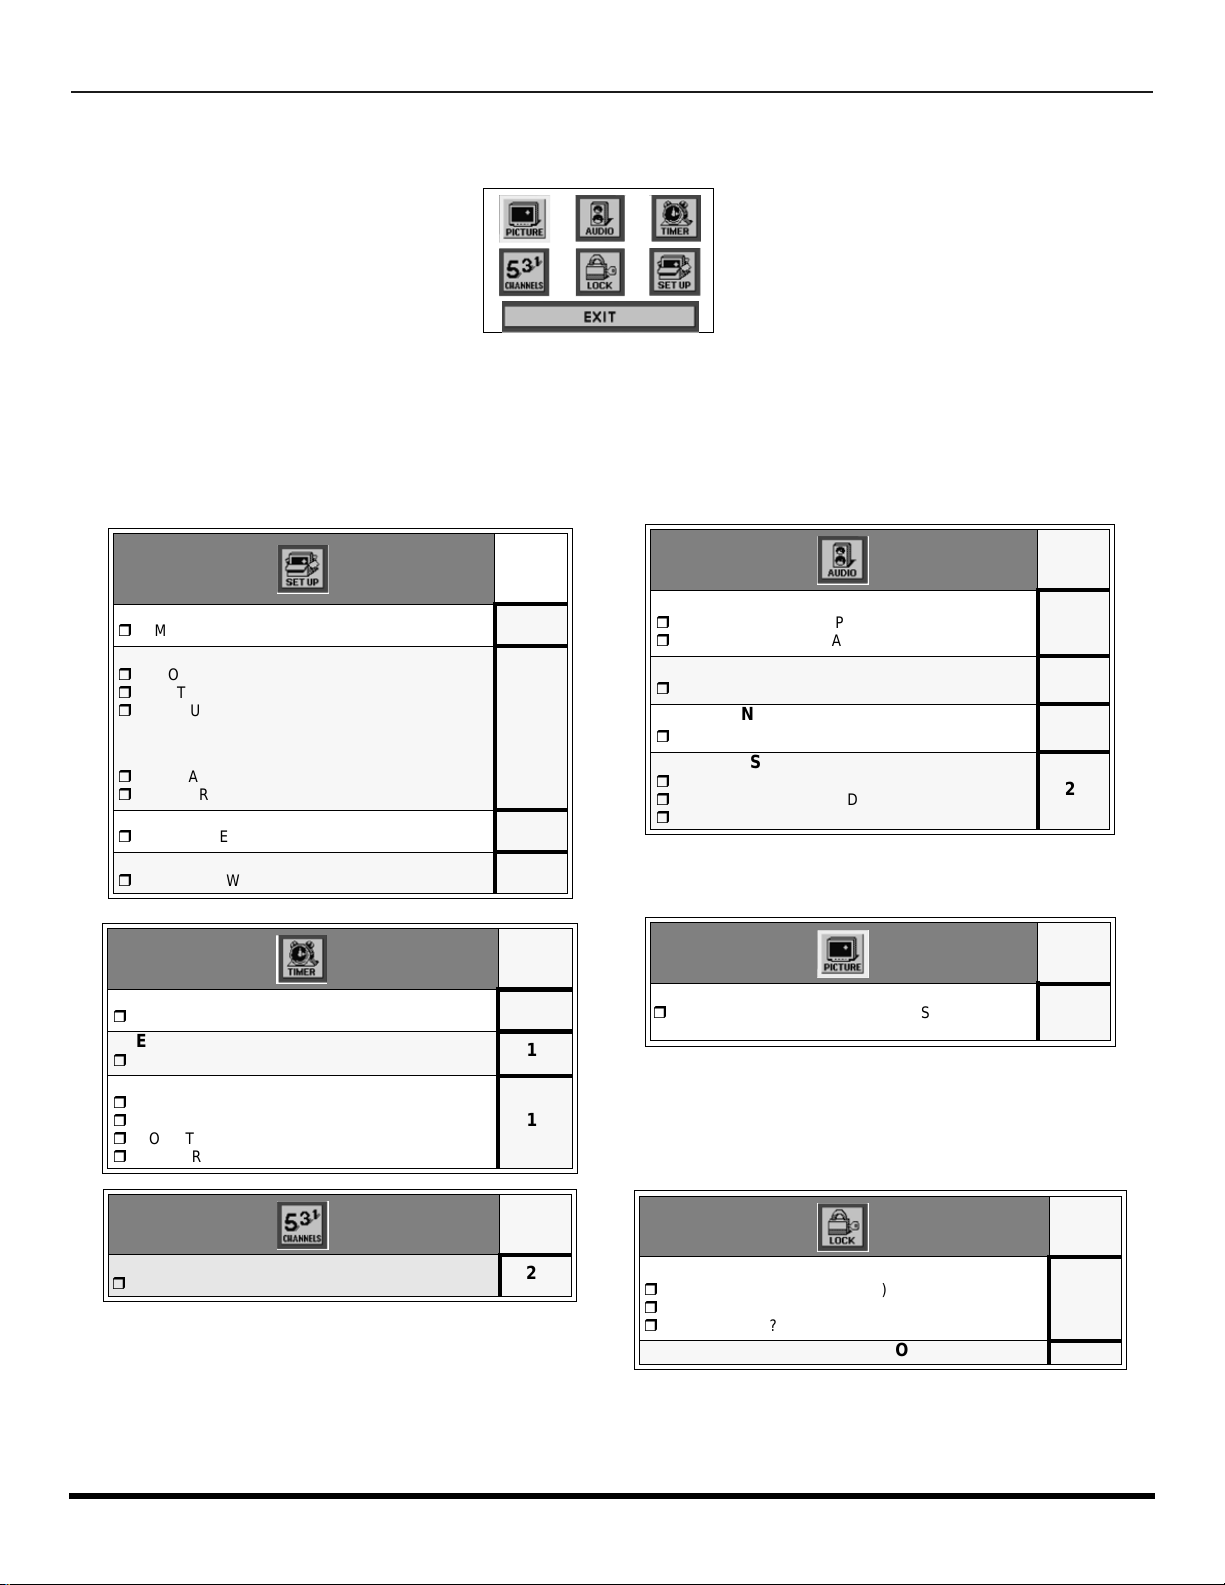
Main Menu Icons
Icon Menus
These charts list all menus under each Icon and which pages to refer to for menus description.
Note: *Menus may vary depending on model.
IDIOMA/LANGUE
r
MODE - (ENGLISH, FRANÇAIS, ESPAÑOL)
PROG CHAN
r
MODE - (TV or CABLE)
r
AUTO PROGRAM
r
MANUAL PROGRAM
Note: The following features will appear for
r
r
models with FM radio when in FM mode.
*FM ANTENNA
*FM PROGRAM
CC (CLOSED CAPTIONED)
r
CC MODE
OTHER ADJ.
r
AUTO POWER
CLOCK SET
r
TIME
SLEEP
r
HOW LONG?
TIMER
r
DAY
r
ON TIME
r
OFF TIME
r
ENTER CHANNEL
REFER
TO
PAGE
17
17
27
18
18
REFER
TO
PAGE
19
19
19
AUDIO ADJ.
r
MODE (STERO, SAP or MONO)
r
*BASS, TREBLE, BALANCE or NORMAL
OTHER ADJ.
r
AI SOUND
*SURROUND
r
SURROUND
*SPEAKERS
r
ON
r
OFF & VARIABLE AUDIO OUT
r
OFF & FIXED AUDIO OUT
VIDEO ADJ
r
COLOR, TINT, BRIGHTNESS, PICTURE,
SHARPNESS OR NORMAL
REFER
TO
PAGE
20
20
20
20
REFER
TO
PAGE
18
CAPTION
r
MANUAL CAPTION
16 l
REFER
TO
PAGE
21
MODE
r
LOCK SET - (OFF or GAME)
r
BLOCK PROGRAM
r
HOW LONG?
V-CHIP OPERATION 24
REFER
TO
PAGE
23
Page 19
I
VOL
VOL
VOL
CON MENU OPERATION
Icon Menu Operation
SET UP
Note: Refer to page 15 for Icon Menu Navigation procedures.
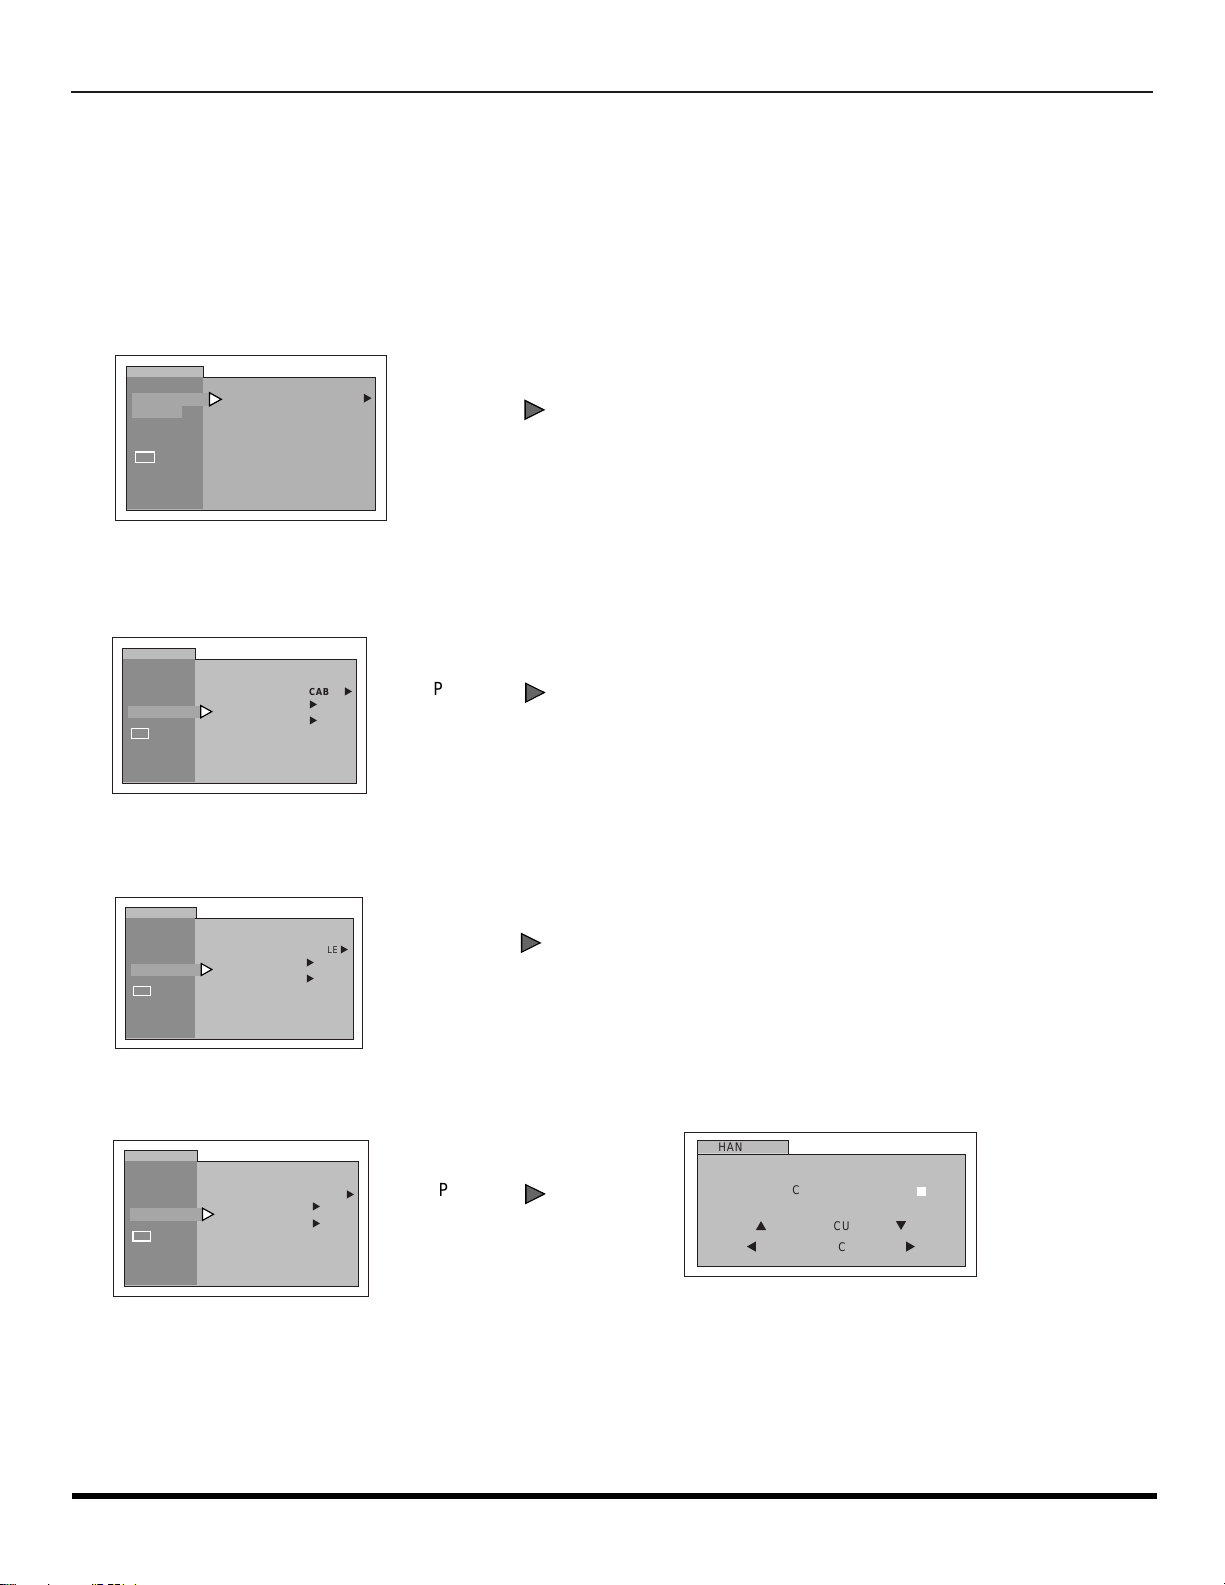
IDIOMA/LANGUE (Menu Languages)
In SET UP Menu, select IDIOMA /LANG UE to c hange menu l anguag e to ENGL ISH, ES PAÑOL (Spanish) or FRANÇAIS
(French).
SETUP
IDIOMA/
LANGUE
PROG CHAN
CC
OTHER ADJ.
MODE ENGLISH
Prog Chan (Program Channels)
In SET UP menu under PROG CHAN select:
r MODE - To select TV (antenna) or CABLE mode depending on the signal source.
SETUP
IDIOMA/
LANGUE
PROG CHAN
CC
OTHER ADJ.
MODE
AUTO PROGRAM
MANUAL PROGRAM
CABLE
u
u
u
u
Press to select English, Spanish or French.
Press to select TV or CABLE.
r AUTO PROGRAM - To automatically program all channels with a signal.
SETUP
IDIOMA/
LANGUE
PROG CHAN
CC
OTHER ADJ.
MODE
AUTO PROGRAM
MANUAL PROGRAM
CABLE
u
u
u
Press to start AUTO PROGRAM.
r MANUAL PROGRAM - To manually add or delete channels.
SETUP
IDIOMA/
LANGUE
PROG CHAN
CC
OTHER ADJ.
MODE
AUTO PROGRAM
MANUAL PROGRAM
CABLE
u
u
u
Press
VOL
to display next menu.
Note: Use Remote numeric keypad to enter channel
numbers.
CHANNELS
ENTER CHANNEL
ENTER CAPTION
p
TO MOVE CURSOR
t
TO SELECT CHANNEL
MANUAL CAPTION
3
- - - -
q
u
17 l
Page 20
I
VOL
VOL
CH
CON MENU OPERATION
CC
(Closed Captioning)
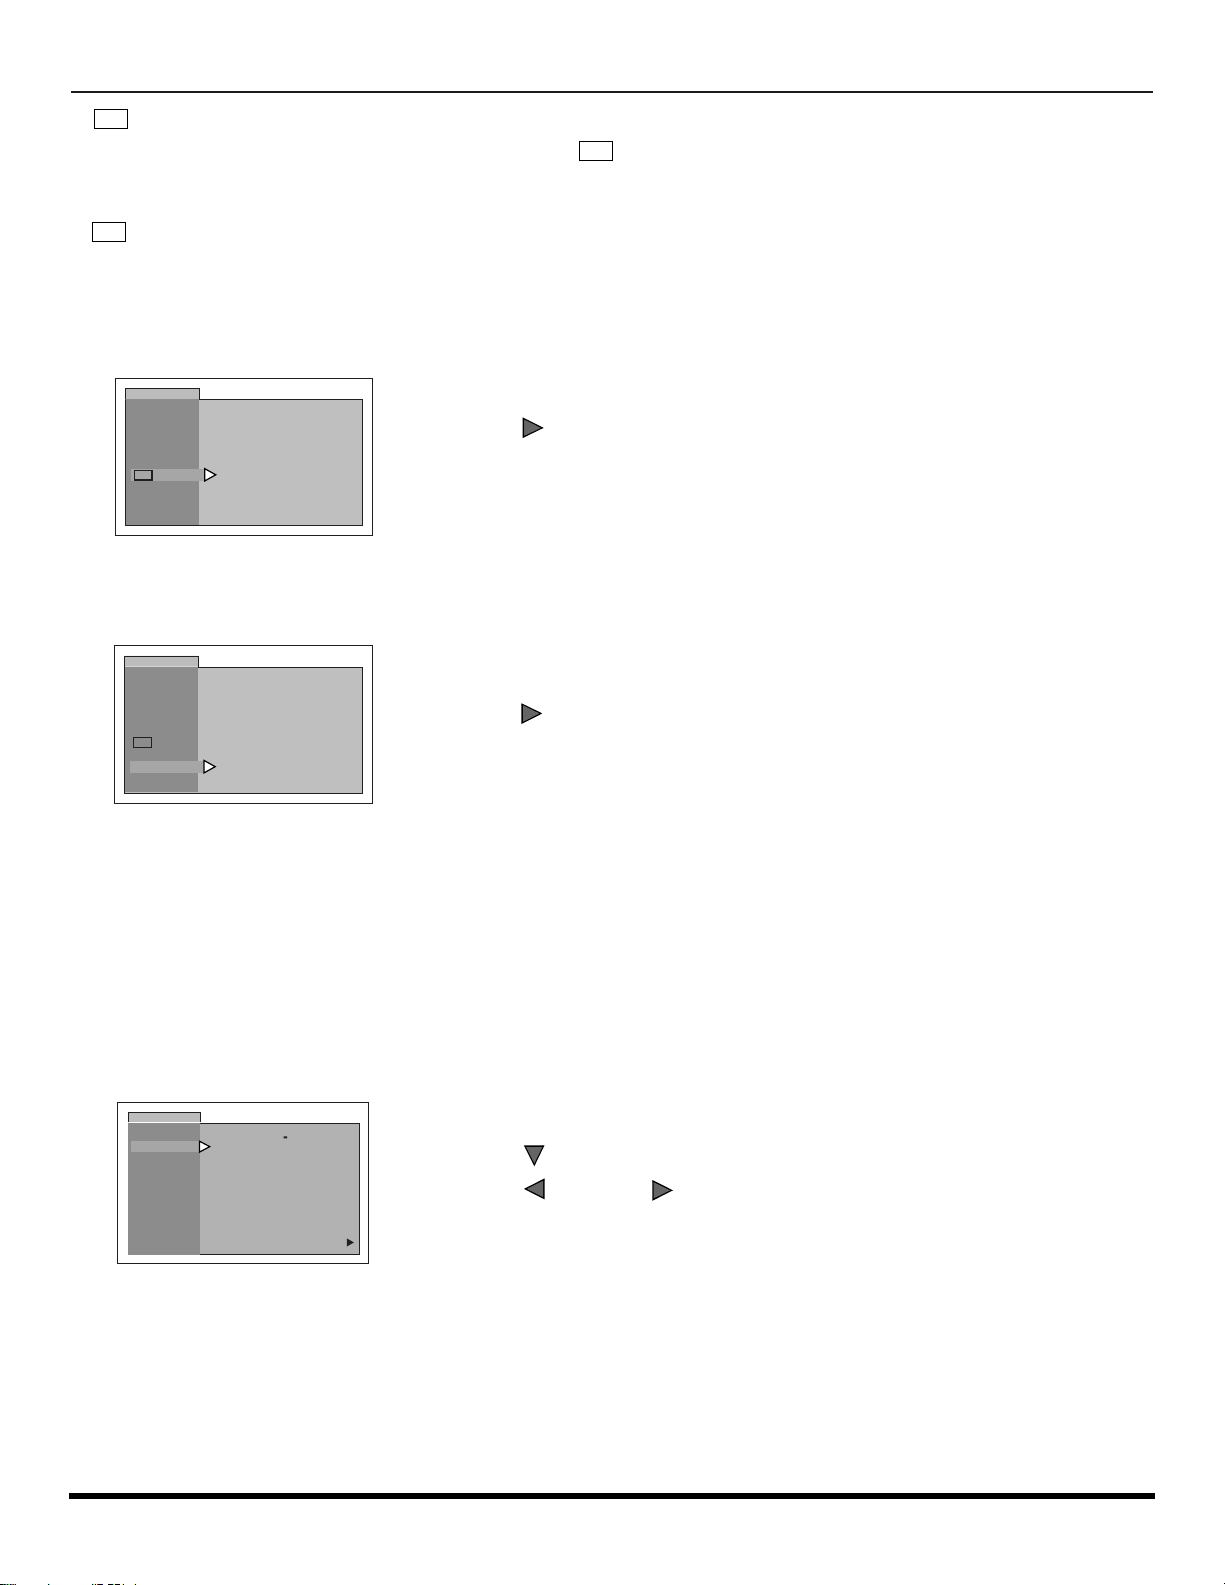
This television co ntains a bui lt-i n de co der th at d is pl ay s (Closed Captioned) tex t across the scree n ( whi te or co lo re d
CC
letters on black backgr ound). It allows th e viewer to read the dialogue of a tele vision program or other informati on. The
program viewed must include Closed Captioning for the feature to work.
CC
Mode
Activates the onscreen Closed Caption feature by selecting one of the following modes.
r OFF - When Closed Caption is not desired.
r C1 - For video related information to be displayed, up to 4 lines onscreen at a time. (It does not block relevant parts of the picture).
Text may be in any language.
r C2 - For other modes of video related information.
SETUP
IDIOMA/
LANGUE
PROG CHAN
CC
OTHER ADJ.
CC MODE OFF
Press to select C1, C2, or OFF.
Note: C1 mode is recommended for viewing Closed Caption.
Other Adjustments
In SETUP Menu under OTHER ADJ. select:
r AUTO POWER ON - Select SET to power up the TV at the same time as the Cable box or other components or select OFF.
SETUP
IDIOMA/
LANGUE
PROG CHAN
CC
OTHER ADJ.
AUTO POWER ON OFF
Press to select OFF or SET.
PICTURE
Note: Refer to page 15 for Icon Menu Navigation procedures.
Video Adj.
In Picture menu under VIDEO ADJ. select:
r COLOR - Adjusts desired color intensity.
r TINT - Adjusts natural flesh tones.
r BRIGHTNESS - Adjusts dark areas of picture.
r PICTURE - Adjusts white areas of pict ure.
r SHARPNESS - Adjusts clarity of outline detail.
r NORMAL - Reset all picture adjustments to factory default settings.
PICTURE
VIDEO ADJ
COLOR
TINT
BRIGHTNESS
PICTURE
SHARPNESS
NORMAL
-- -- -- I -- -- --
-- I -- -- --
-- --
-- -- -- I -- -- --
-- -- -- -- ---- -- -- -- -- -- I
-- -- -- I -- -- --
NO
r Press to select desired picture adjustment.
r Press or to adjust.
u
VOL
VOL
18 l
Page 21
I
CH
VOL
CH
CH
CH
CON MENU OPERATION
TIMER
Note: Refer to page 15 for Icon Menu Navigation procedures.
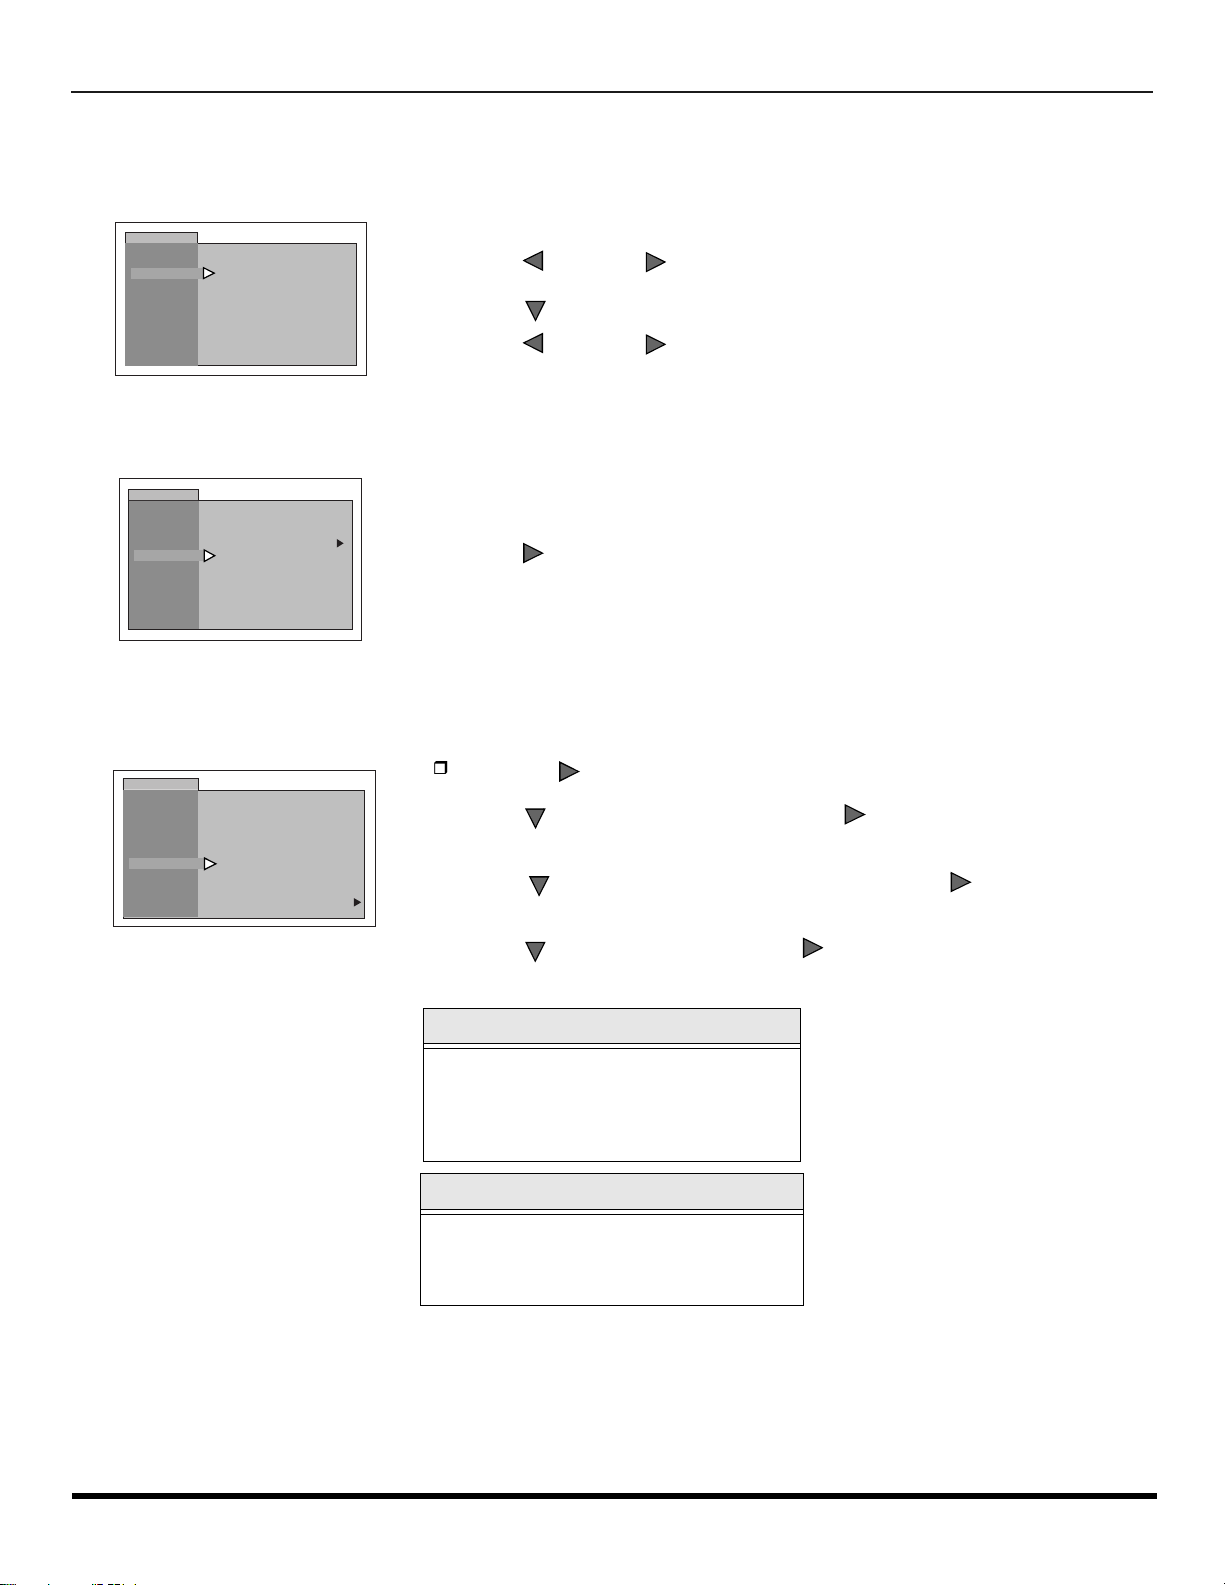
Clock Set
Set the time of the day.
TIMER
CLOCK SET
SLEEP
TIMER
TIME - - : - -
Sleep Timer
In TIMER menu, Select SLEEP to turn television off in 30, 60 or 90 minutes. Select NO to turn off timer.
TIMER
AM
r Press or to select hours AM or PM.
VOL
VOL
r Press to select minutes position.
r Press or to select minutes.
VOL
VOL
CLOCK SET
SLEEP
TIMER
HOW LONG?
NO
u
Press to select 30, 60, 90 or NO.
Timer
In TIMER menu, select timer to turn the telev ision on and off at selec ted times, on selec ted channels, an d on selected
days.TIME must be entered in CLOCK SET to operate the TIMER features.
TIMER
CLOCK SET
SLEEP
TIMER
MODE ONE DAY
ON TIME - - : - -
OFF TIME - - : - -
ENTER CHANNEL - - -
SET
NO
r Press to select day or days.
r Press to select ON TIME, then press .
r Repeat for setting OFF TIME.
r Press to select ENTER CHANNEL, then press to
u
r Press to select SET, then press to select YES.
VOL
VOL
VOL
select channel.
VOL
Turn Off After 90 Minutes
The television automatically turns OFF after
90 minutes when turned ON by the TIMER.
If the OFF time is selected or if a key is
pressed, the automatic OFF after 90
minutes will becancelled.
TIMER Activation
The TIMER is active when the television is
OFF or ON. The television will switch to the
selected channel at the selected time set in
the TIMER.
19 l
Page 22
I
VOL
VOL
VOL
VOL
VOL
CON MENU OPERATION
AUDIO
Note: Refer to page 15 for Icon Menu Navigation procedures.
Audio ADJ.
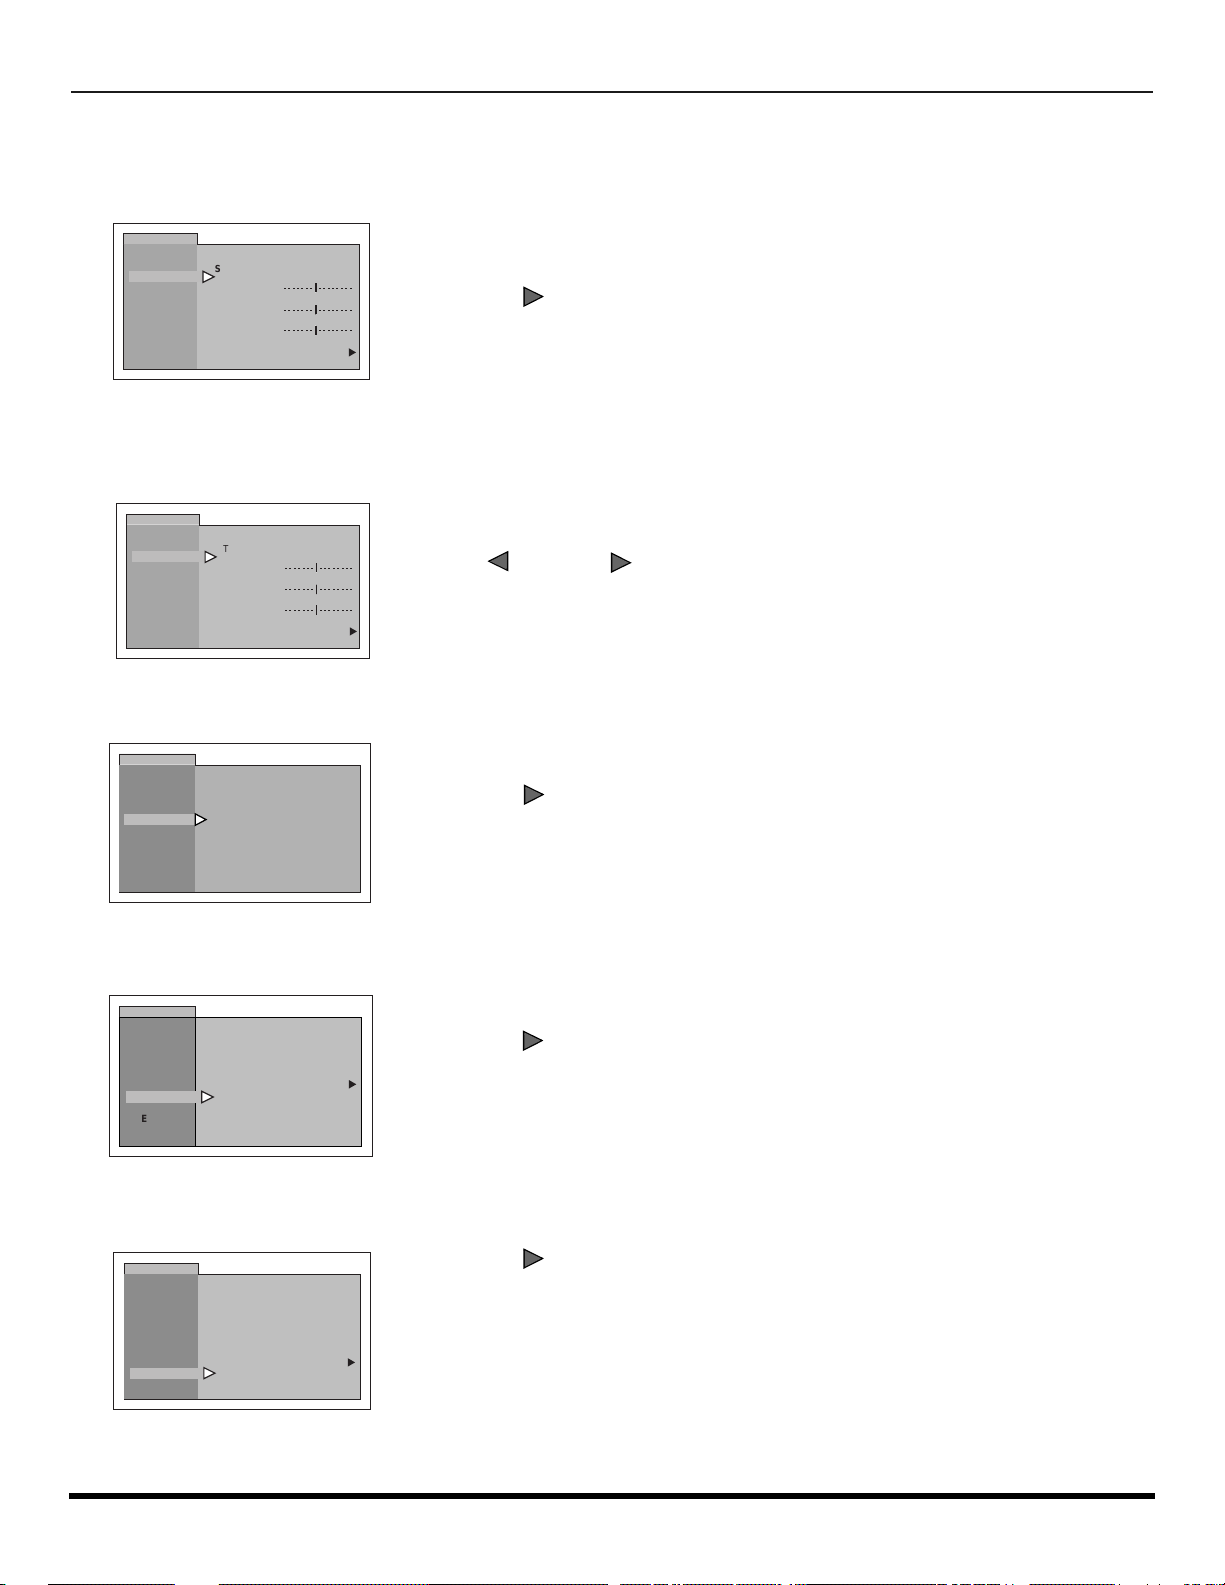
r MODE - Select STEREO, SAP (Second Audio Program) or MONO. (Use MONO when stereo signal is weak).
AUDIO
AUDIO ADJ.
OTHER ADJ.
SURROUND
SPEAKERS
MODE
STEREO SAP MONO
BASS
TREBLE
BALANCE
NORMAL
Press to select STEREO, SAP or MONO.
NO
u
r BASS - Increase or decrease the bass response. (some models)
r TREBLE - Increase or decrease the treble response. (some models)
r BALANCE - Emphasize the left/right speaker volume. (some models)
r NORMAL - Reset BASS, TREBLE and BALANCE adjustments to factory default settings. (some models)
AUDIO
AUDIO ADJ.
OTHER ADJ.
SURROUND
SPEAKERS
MODE
STEREO SAP MONO
BASS
TREBLE
BALANCE
NORMAL
Press or to adjust.
NO
u
VOL
Other ADJ.
r AI SOUND - Automatically maintain constant volume between programs and commercials.
AUDIO
AUDIO ADJ.
OTHER ADJ.
SURROUND
SPEAKERS
AI SOUND ON u
Press to select ON or OFF.
Surround (some models)
r Surround - Three dimensional surround sound with two speakers.
AUDIO
AUDIO ADJ.
OTHER ADJ.
SURROUND
SPEAKERS
SURROUND
OFF
u
Press to select ON or OFF.
Speakers (some models)
In AUDIO menu under SPEAKERS.
AUDIO
AUDIO ADJ.
OTHER ADJ.
SURROUND
SPEAKERS
ON
u
Press to select :
r ON - TV speakers operate normally.
r OFF & Variable Audio Out - TV speakers off - audio adjustable by television.
r OFF & Fixed Audio Out - TV speakers off - audio adjustable by the external
amplifier only.
20 l
Page 23
I
VOL
ACTION
CH
CON MENU OPERATION
CHANNELS
Caption
r
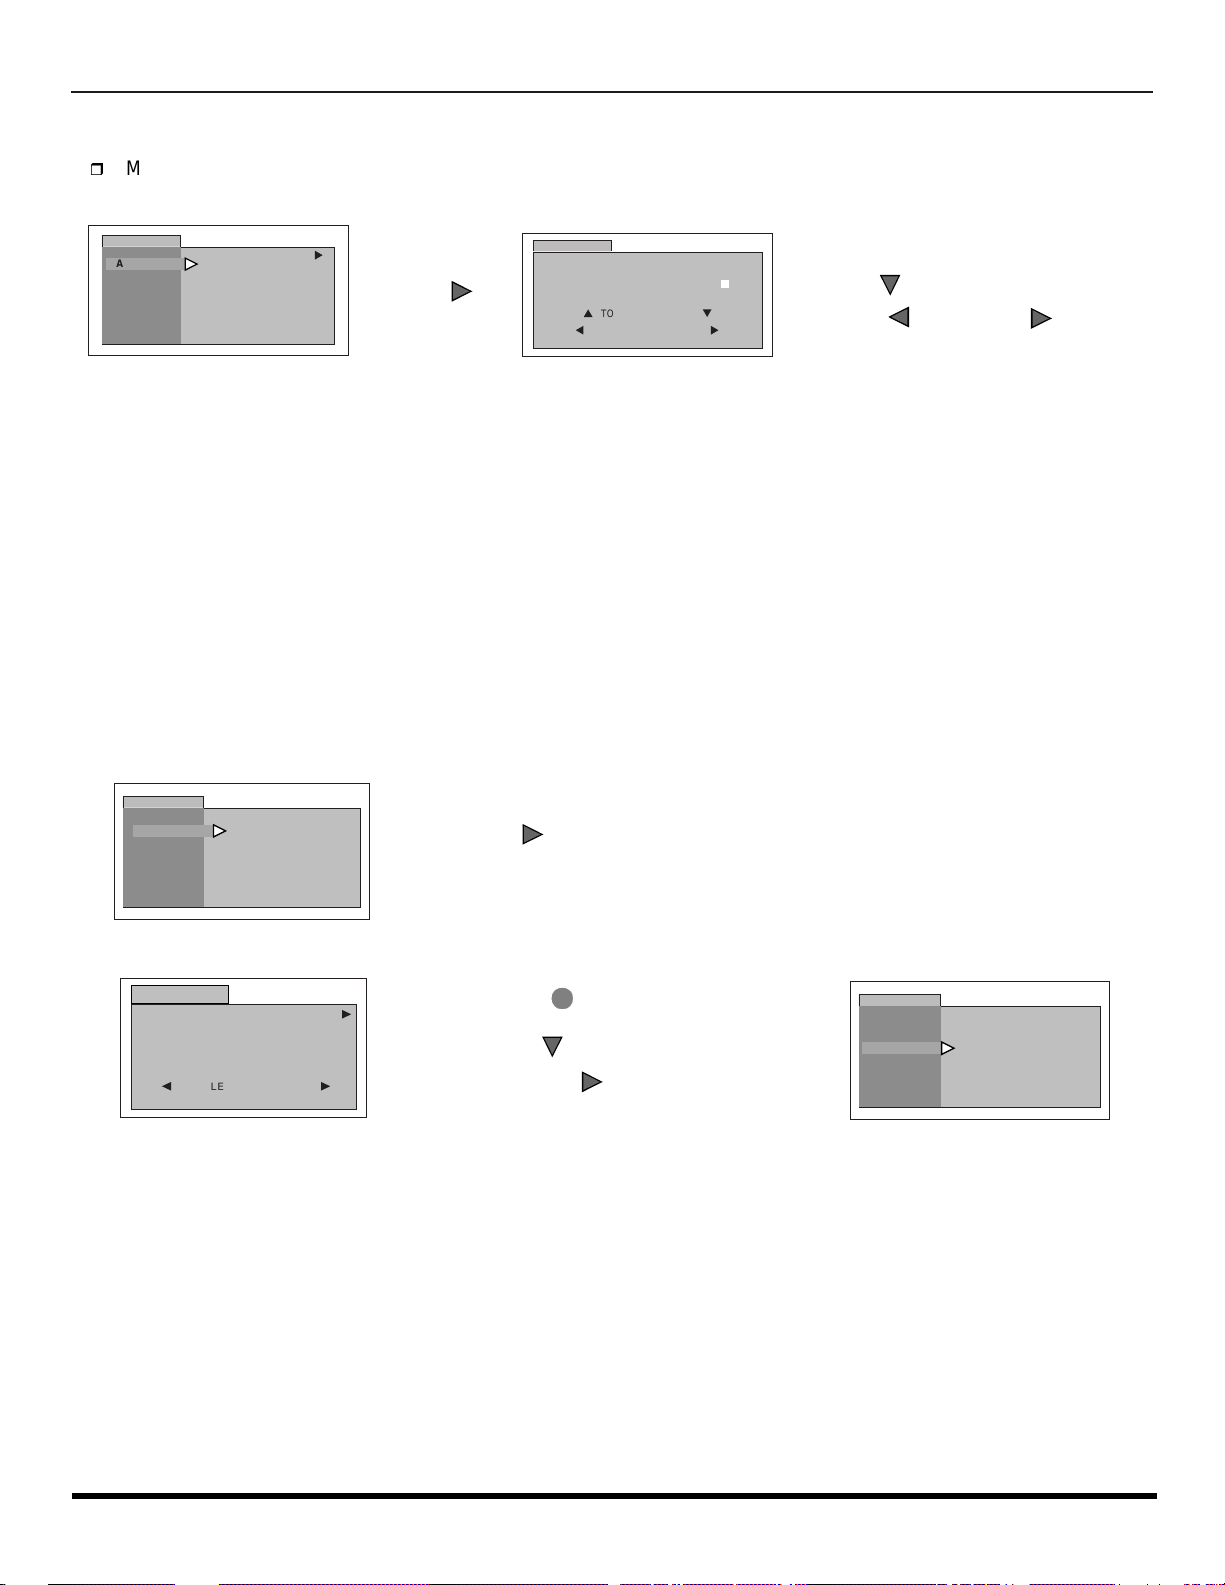
Manual Caption - To enter numbers and captions manually.
r Use remote numeric keypad to select
desired channel (refer to your local TV
CHANNELS
CAPTION
MANUAL CAPTION
u
Press to
display next menu.
VOL
CHANNELS
ENTER CHANNEL
ENTER CAPTION
p
t
TO MOVE CURSOR
MANUAL CAPTION
TO SELECT CHANNEL
q
- - - -
u
3
guide).
r Press to select ENTER CAPTION.
r Press or to select
CH
VOL
VOL
characters.
LOCK
Note: Refer to page 15 for Icon Menu Navigation procedures.
Mode
Lock Set
Select LOCK SET to prevent video games and VCR tapes from being viewed.
r Use the remote numeric keypad to enter a four-digit secret code (
place).
Notes:
• If you do not reme mber y our co de, LO CK wil l unlo ck in 12, 24 , or 48 h our s, dep ending on the curren t setup . Be ca utious whe n
selecting ALW AYS. If ALW AYS is selected, and you forget your secret code, the TV must be serviced by a qualified technician
to clear the LOCK setup.
• If you select CHAN G E CODE , a nd y ou cha ng e your code from the one used in th e LO C K me nu , your new code becomes the
controlling code.
r OFF - Turns Lock function off.
Use a code that is easy to remember and record it in a safe
LOCK
MODE
HOW LONG?
LOCK SET
BLOCK PROGRAMS:
U.S. TV PROGRAMS
STATUS
ENTER CODE
FIRST
OFF
OFF
* * * *
Press to display LOCK MODE GAME menu.
r GAME - Lock CH 3, 4 and Video inputs.
LOCK
LOCK MODE GAME
LOCKS CH 3 , 4 AND
VIDEO INPUTS
TO SELECT LOCK MODE
t
u
u
r Press twice.
r Press to highlight HOW LONG?.
r Press to select 12 Hours, 24
VOL
Hours, 48 Hours or ALWAYS.
LOCK
MODE
HOW LONG?
12 HOURS
21 l
Page 24
V-CHIP M
CH
CH
CH
CH
ENU OPERATION
V-CHIP Menu Operation
Note: Refer to page 15 for Icon Menu Navigation procedures.
BLOCKING MESSAGE
If V-Chip is enabled and the program ex ceeds the rating l imit set by you, the blocking m essage wil l appear an d the a udio
will be muted. Enter your four-digit s ecret code if you wish to contin ue viewing the pr ogram. After enterin g your code, all
locks and rating blocks are disabled until the TV is turned off or until all settings are off.
PROGRAM RATING EXCEEDED
ACCESS CODE
Note: If you enter your four-digit secret code to override rating blocks, you must reset
all rating blocks by either reprogramming or turning the TV off.
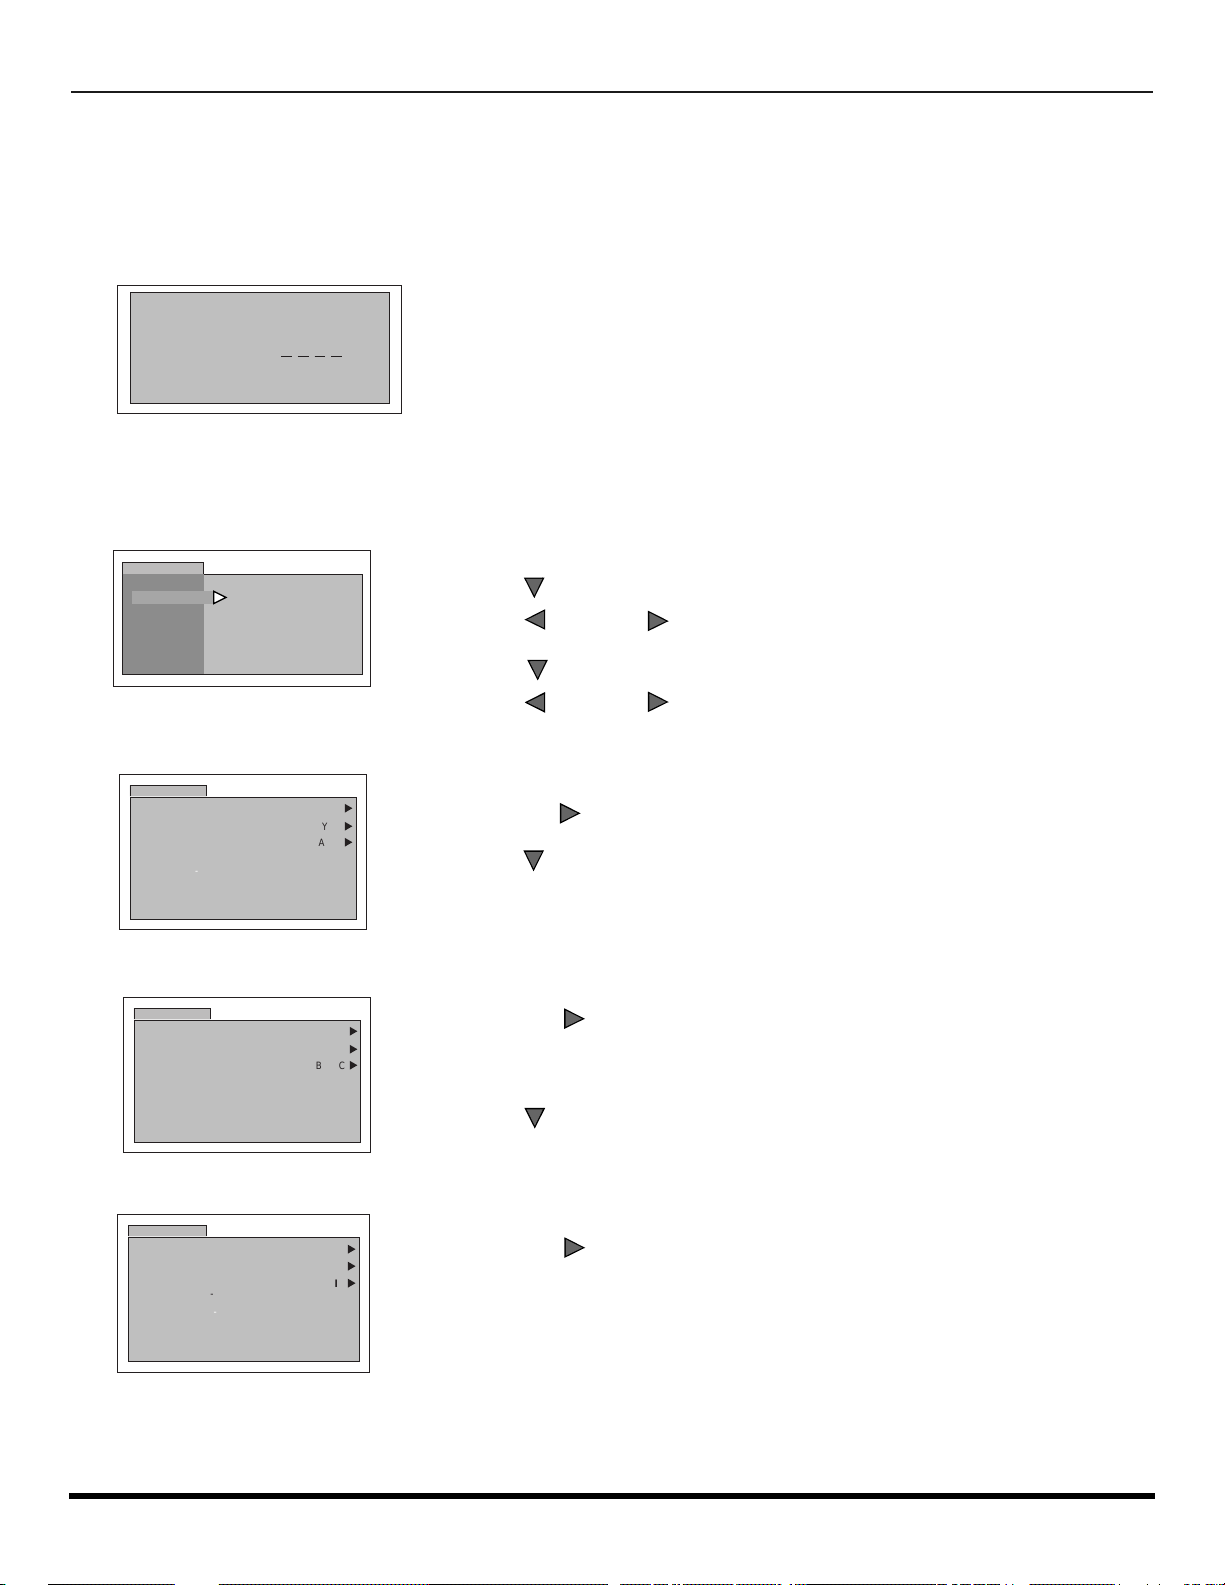
U.S. TV PROGRAMS
This TV model features the “V-Chip technology ” which allows you to use U.S. TV PRO GRAMS Guide ratings to blo ck
various types of TV programs.
LOCK
MODE
HOW LONG?
LOCK SET
BLOCK PROGRAMS:
U.S. TV PROGRAMS
STATUS
ENTER CODE
FIRST
OFF
OFF
* * * *
r Use the numeric keypad to enter your four digit code.
Use a code that is easy to remember and record it in a safe place.
(
)
r Press to enter the BLOCK PROGRAMS field.
r Press or to select U.S. TV PROGRAMS.
VOL
VOL
r Press to highlight STATUS.
r Press or to display U.S TV PROGRAMS RATING CHART.
VOL
VOL
U.S. TV Programs Rating
LOCK
U.S. TV PROGRAMS
VIEW NR PROGRAMS?
SETTING:
TV-Y
TV-Y7 FV
- - - - - - - - - - - - - - - - - -
TV-G
TV-PG V S L D
TV-14 V S L D
TV-MA V S L
OFF
YES
BASIC
u
u
u
r Press to select U.S. TV PROGRAMS ON or OFF.
VOL
r Press to select VIEW NR PROGRAMS?
22 l
LOCK
U.S. TV PROGRAMS
VIEW NR PROGRAMS?
TV-Y
TV-Y7 FV
- - - - - - - - - - - - - - - - - -
TV-G
TV-PG V S L D
TV-14 V S L D
TV-MA V S L
LOCK
U.S. TV PROGRAMS
VIEW NR PROGRAMS?
TV-Y
TV-Y7 FV
- - - - - - - - - - - - - - - - - -
TV-G
TV-PG V S L D
TV-14 V S L D
TV-MA V S L
SETTING:
SETTING:
OFF
YES
BASIC
OFF
YES
BASIC
u
u
u
r Press to select VIEW NR PROGRAMS? YES or NO.
Note: Selecting “Yes”, NR programs will be received. Selecting “NO”, NR programs
VOL
will be blocked. See Customer Caution below.
r Press to select SETTING.
u
u
u
r Press to select BASIC or DETAILED.
VOL
BASIC - Allows you to select only general ratings such as TV-Y, TV-PG, etc.
DET AI LED - All ow s yo u t o s elec t bo th gen era l ra tin gs an d c on ten t s uch a s V, L, et c.
Page 25
U.S. TV Programs Menu Chart (cont’d)
VOL
VOL
CH
CH
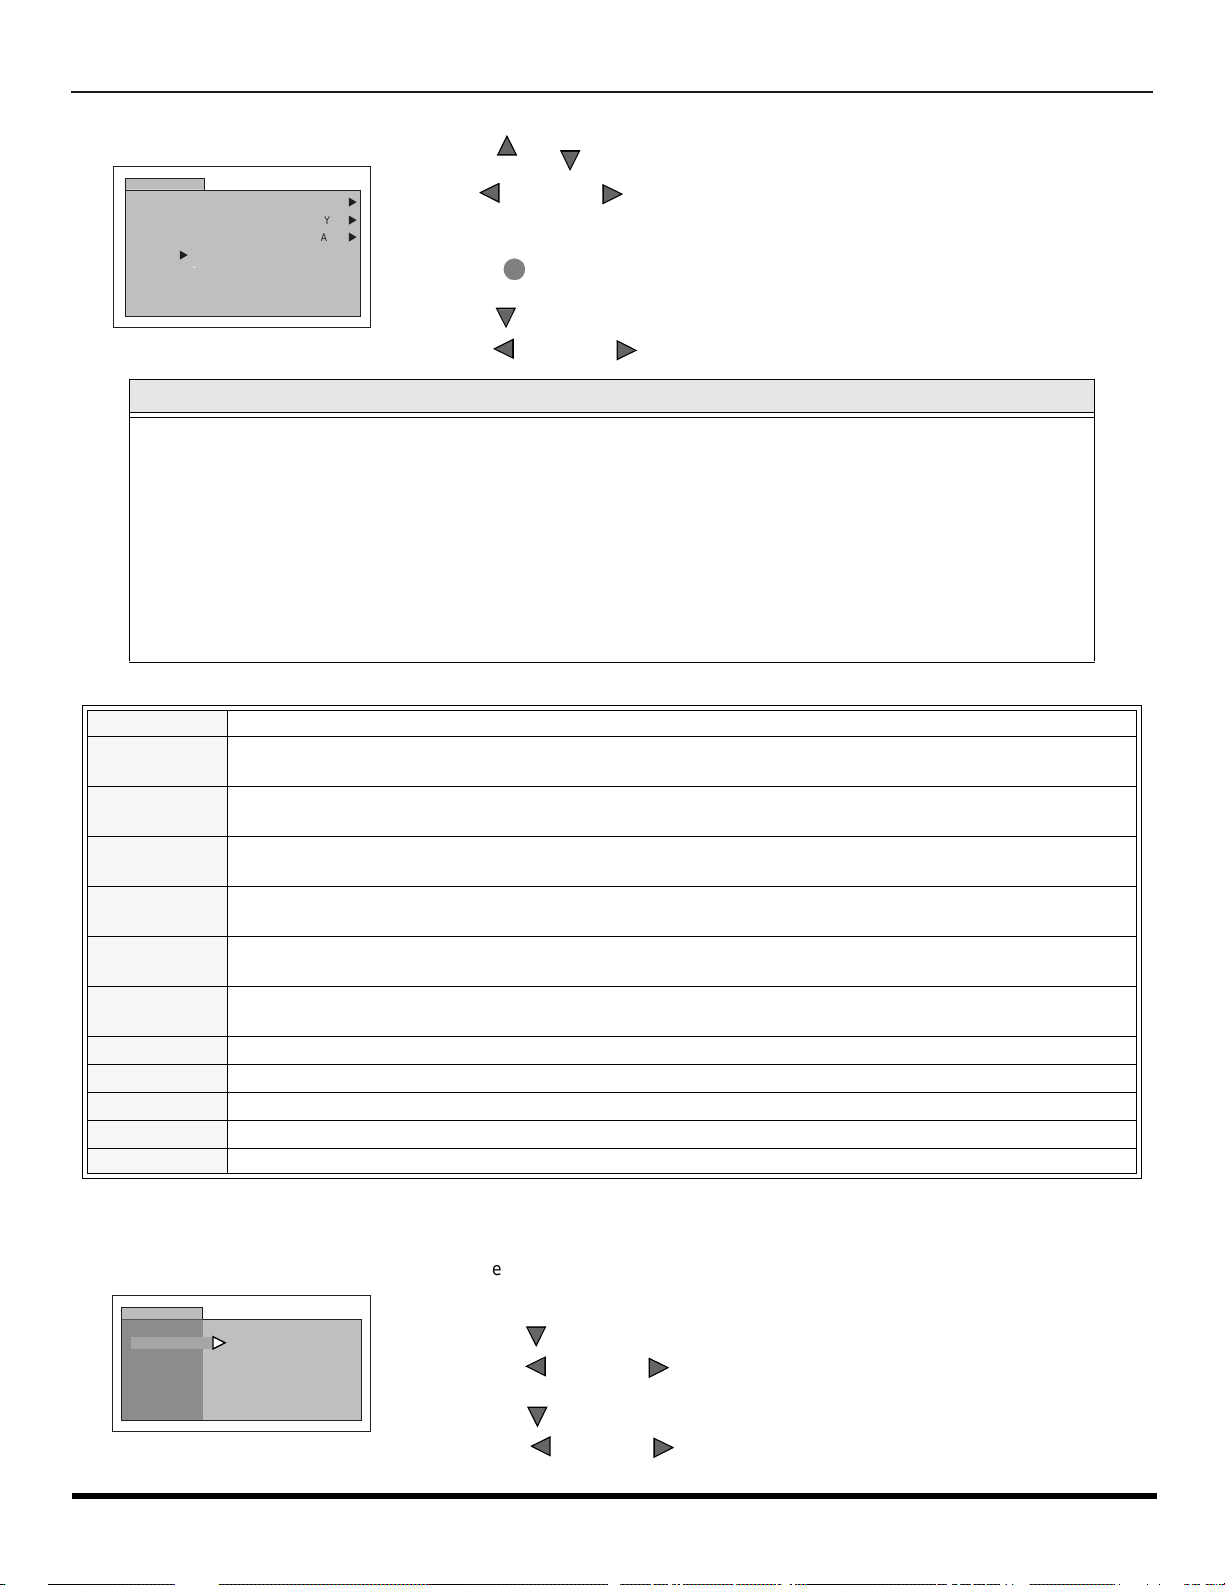
r Press or to move between different ratings.
LOCK
U.S. TV PROGRAMS
VIEW NR PROGRAMS?
TV-Y
u
TV-Y7 FV
- - - - - - - - - - - - - - - - - -
TV-G
TV-PG V S L D
TV-14 V S L D
TV-MA V S L
SETTING:
OFF
YES
BASIC
r Use or to select ratings you want to block (RED) and unblo c k (GREEN).
u
u
Note: See the U.S. TV PROGRAMS RATINGS CHART.
u
r Press twice to return to MODE in Lock menu.
r Press to select HOW LONG?
CH
ACTION
CH
CH
VOL
V-CHIP M
ENU OPERATION
r Press or to select 12, 24, 48 hours or ALWAYS.
VOL
Customer Caution
The V-Chi p syste m that is use d in this set is capabl e of block ing “NR” prog rams (non rated, not appl icabl e and none ) per
“
FCC Rules Section 15.120(e)(2). If the option of blocking “NR” programs is chosen
results may occur, and you may not receive emergency bulletins or any of the following types of programming:
unexpected and possibly confusing
”
• Emergency Bulletins (Such as EAS messages, weather warnings and others)
• Locally originated programm ing
•News
• Political
• Public Service Announcements
• Religious
• Sports
• Weather
U.S. TV PROGRAMS RATINGS CHART
NR Not Rated. SEE CUSTOMER CAUTION on previous page.
TV-Y
TV-Y7
TV-G
TV-PG
TV-14
TV-MA
All children. The themes and elements in this program are specifically designed for a very young audience,
including children from ages 2-6.
Directed to older children. Themes and elements in this program may include mild physical or comedic
violence, or may frighten children under the age of 7.
General audience. It contains little or no violence, no strong language, and little or no sexual dialogue or
situations.
Parental guidance suggested. The program may contain infrequent coarse language, limited violence, some
suggestive sexual dialogue and situations.
Parents strongly cautioned. This program may contain sophisticated themes, sexual content, strong language
and more intense violence.
Mature audiences only. This program may contain mature themes, profane language, graphic violence, and
explicit sexual content.
FV FANTASY/CARTOON VIOLENCE
V VIOLENCE
S SEX
L OFFENSIVE LANGUAGE
D DIALOGUE WITH SEXUAL CONTENT
U.S. MOVIES
This TV model features the “V-Chip technology” which allows you to use Motion Picture Ratings when viewing movies or
video tapes. This innovation allows parents to block various types of movies and video tapes at their discretion.
LOCK
MODE
HOW LONG?
LOCK SET
BLOCK PROGRAMS:
U.S. TV MOVIES
STATUS
ENTER CODE
FIRST
OFF
OFF
* * * *
r Use the numeric keypad to enter your four digit code. (
easy to remember and record it in a safe place.
)
r Press to enter the BLOCK PROGRAMS field.
r Press or to select U.S. MOVIES.
VOL
VOL
r Press to highlight STATUS.
Use a code tha t is
r Press or to display U.S MOVIES RATING CHART.
VOL
VOL
23 l
Page 26
V-CHIP M
CH
VOL
CH
ACTION
CH
ENU OPERATION
U.S. Movies Menu
LOCK
U.S. MOVIES
VIEW NR PROGRAMS?
LOCK
U.S. MOVIES
VIEW NR PROGRAMS?
G
PG
PG-13
R
NC-17
X
G
PG
PG-13
R
NC-17
X
OFF
YES
OFF
YES
u
u
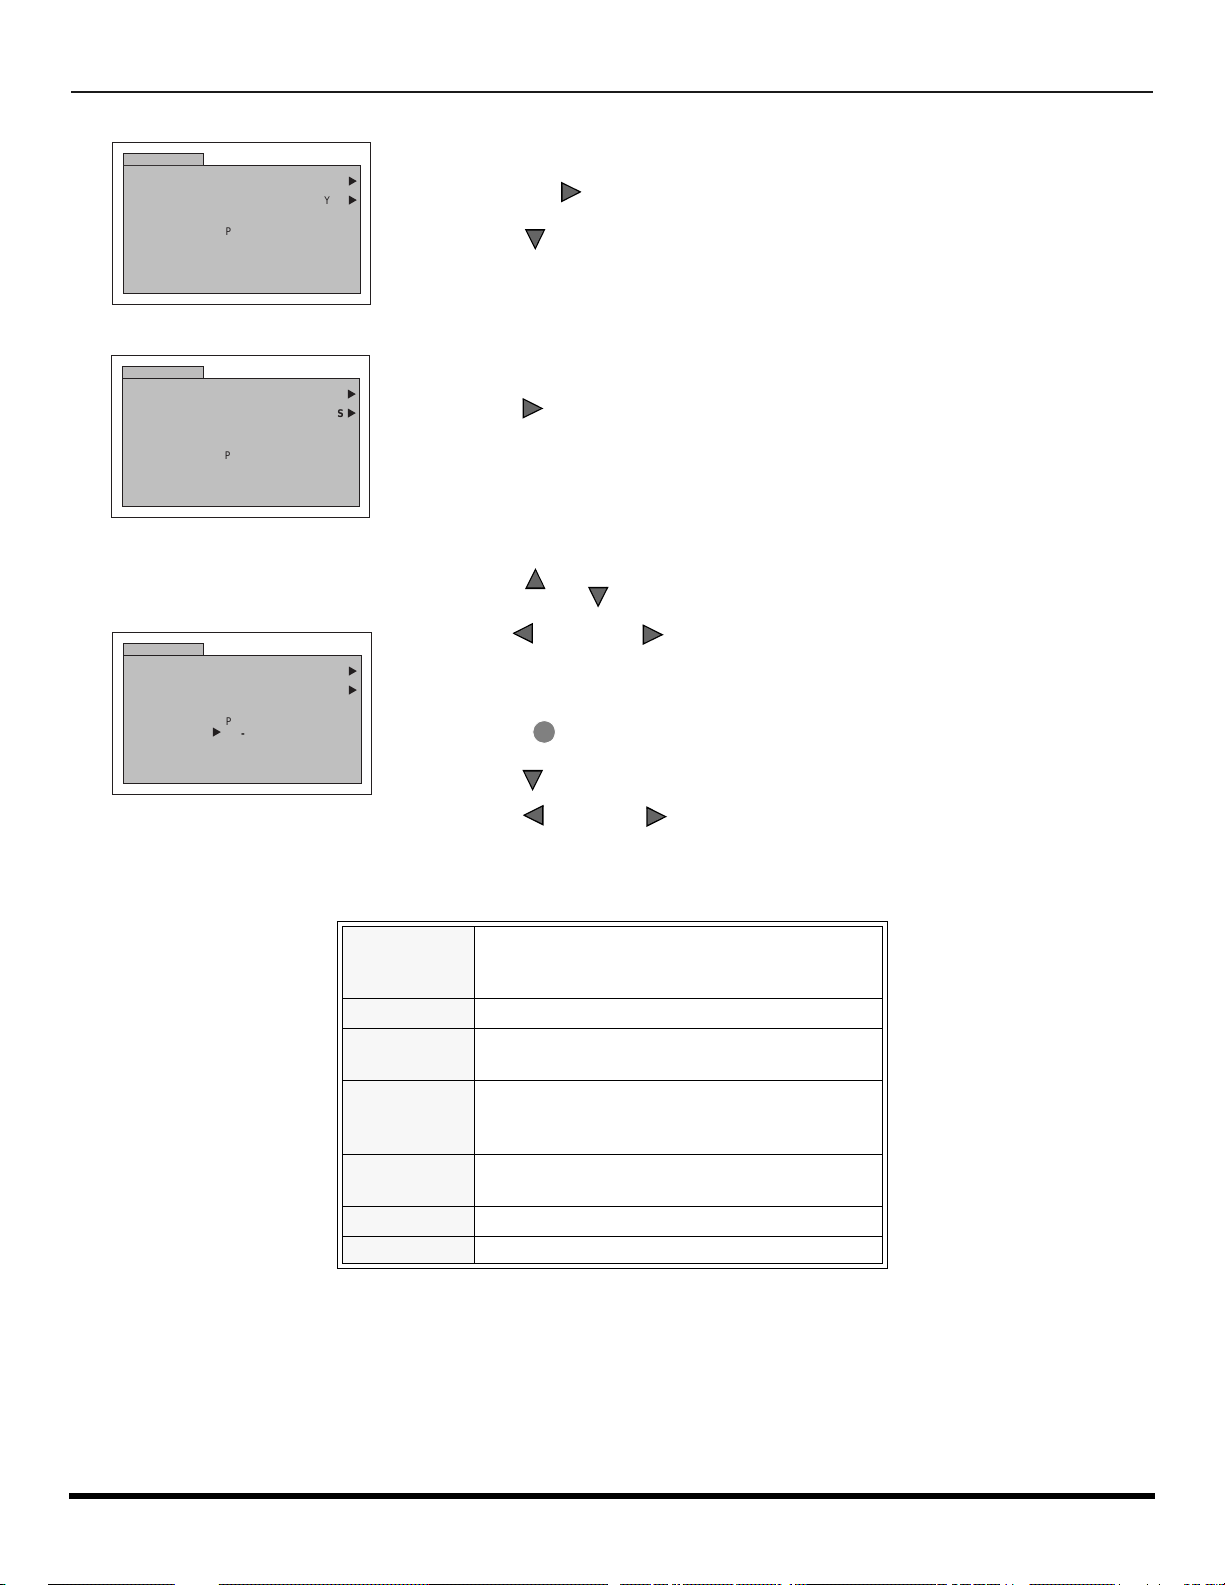
r Press to select U.S. MOVIES ON or OFF.
VOL
r Press to select VIEW NR PROGRAMS?
u
u
Press to select VIEW NR PROGRAMS? YES or NO.
Note: Some movies are not rated for a variety of reasons. Old movies and foreign films are
usually not rated.
LOCK
U.S. MOVIES
VIEW NR PROGRAMS?
G
PG
u
PG-13
R
NC-17
X
PG-13, R, NC-17 and X will be blocked.
OFF
YES
u
u
VOL
CH
VOL
r Press or to move between different ratings.
r Use or to select ratings you want to block (RED) and
unblock (GREEN).
Note: See the U.S. MOVIES CHART.
r Press twice to return to MODE in Lock menu.
r Press to select HOW LONG?
r Press or to select 12, 24, 48 hours or ALWAYS.
VOL
VOL
U.S. MOVIES RATINGS CHART
CONTAINS NO RATING (NOT RATED) AND NA
NR
(NOT APPLICABLE) PROGRAMS. Movie has
not been rated or rating does not apply.
G GENERAL AUDIENCES. All ages admitted.
PG
PARENTAL GUIDANCE SUGGESTED. Some
material may not be suitable for children.
PARENTS STRONGLY CAUTIONED. Some
PG-13
material may be inappropriate for children under
13.
R
RESTRICTED. Under 17 requires accompanying
parent or adult guardian.
NC-17 NO ONE 17 AND UNDER ADMITTED.
X ADULTS ONLY.
24 l
Page 27
V-CHIP M
CH
CH
CH
VOL
ENU OPERATION
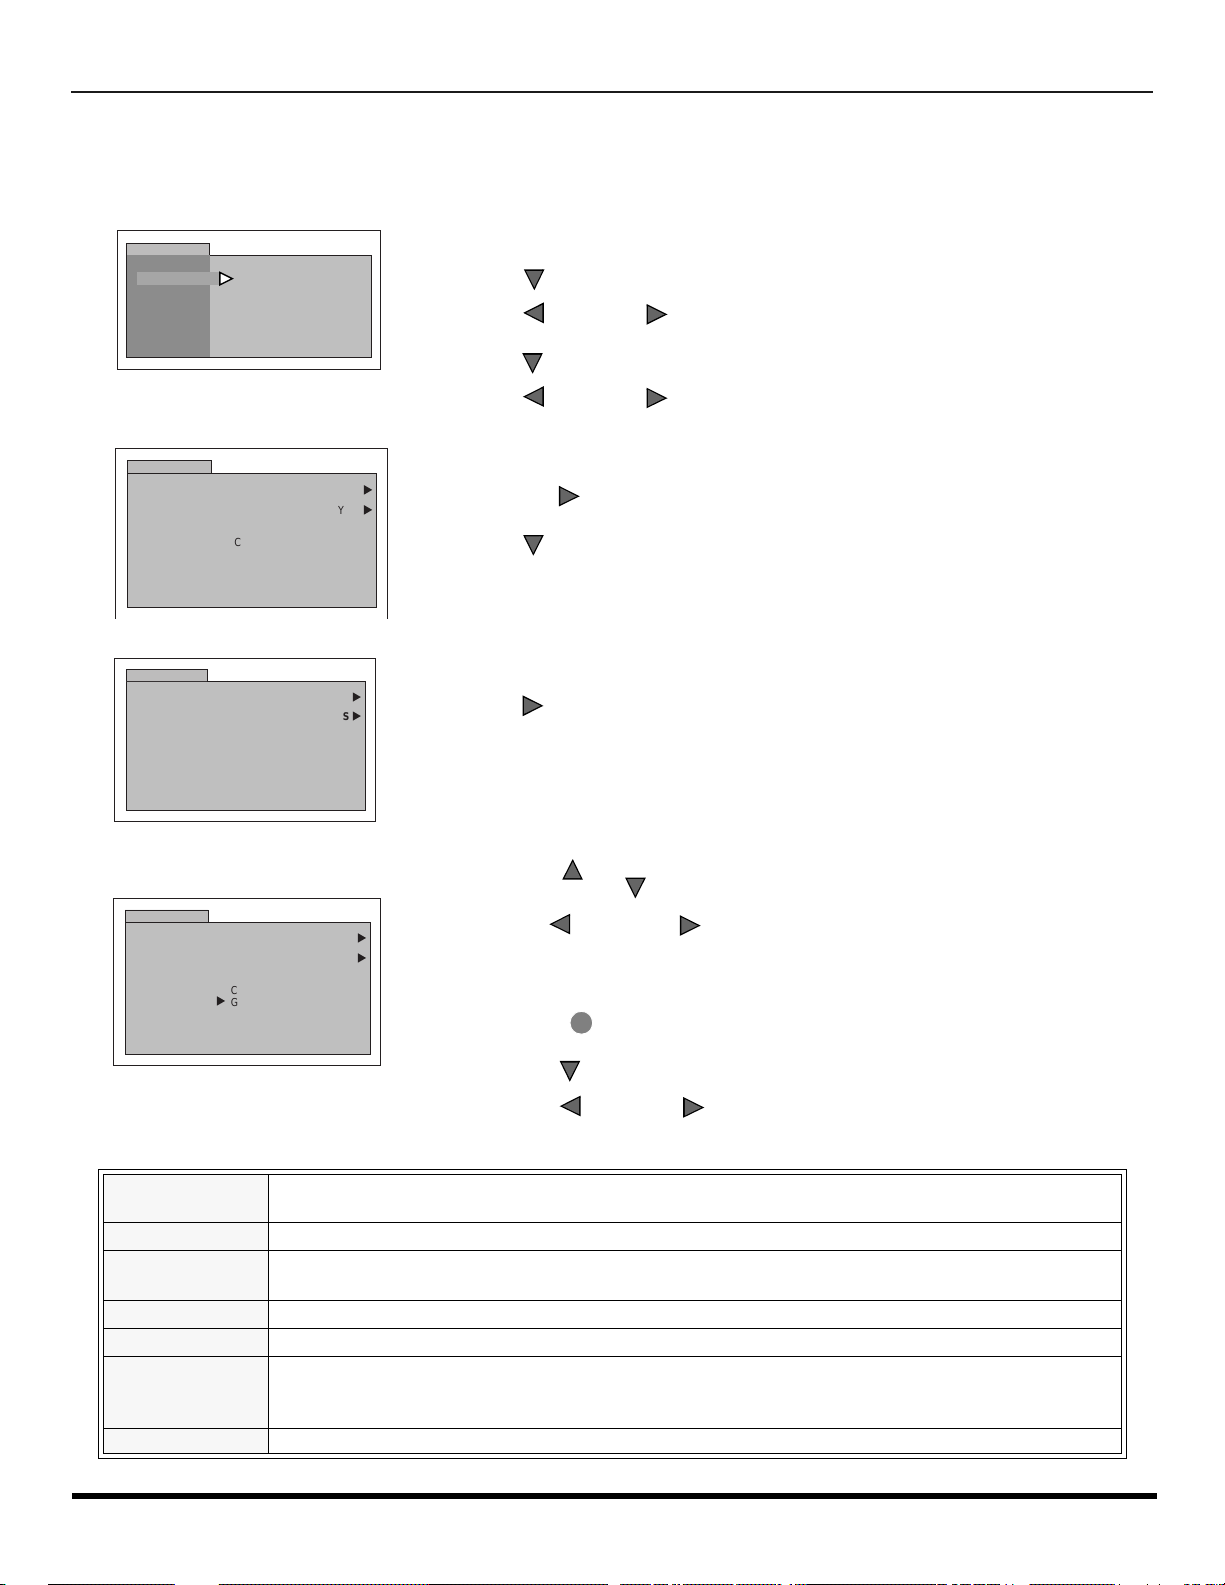
Rating Systems for Canada
Canadian English
The V-CHIP used in this TV model allows you to block various types of movies and television programs based on the two
rating systems used in Canada.
LOCK
MODE
HOW LONG?
LOCK SET
BLOCK PROGRAMS:
CANADIAN ENGLISH
STATUS
ENTER CODE
FIRST
OFF
OFF
- - - -
r Use the numeric keypad to enter your four digit code. (
remember and record it in a safe place.
)
r Press to enter the BLOCK PROGRAMS field.
r Press or to select CANADIAN ENGLISH.
VOL
VOL
r Press to highlight STATUS.
Use a code that is easy to
r Press or to display CANADIAN ENGLISH RATING CHART.
LOCK
CANADIAN ENGLISH
VIEW E PROGRAMS?
C
C8 +
G
PG
14 +
18 +
LOCK
CANADIAN ENGLISH
VIEW E PROGRAMS?
C
C8 +
G
PG
14 +
18 +
OFF
YES
OFF
YES
u
u
r Press to select CANADIAN ENGLISH ON or OFF.
r Press to select VIEW E PROGRAMS?.
u
u
Press to select VIEW E PROGRAMS? YES or NO.
Note: E (Exempt) programming includes: news, sports, documentaries and other
r Press or to move between different ratings.
LOCK
CANADIAN ENGLISH
VIEW E PROGRAMS?
OFF
u
YES
C
C8 +
u
G
PG
14 +
18 +
u
r Use or to select ratings you want to block (RED) and
Note: See the CANADIAN ENGLISH RATINGS CHART.
r Press twice to return to MODE in Lock menu.
r Press to select HOW LONG?.
VOL
VOL
VOL
information programming, talk shows, music videos, and variety programming.
CH
CH
VOL
VOL
unblock (GREEN).
ACTION
CH
r Press or to select 12, 24, 48 hours or ALWAYS.
.
E
Exempt - Exempt programming includes: news, sports, documentaries and other information
programming, talk shows, music videos, and variety programming.
CANADIAN ENGLISH RATINGS CHART
VOL
VOL
c Programming intended for children under age 8. No offensive language, nudity or sexual content.
C8+
Programming generally considered acceptable for children 8 years and over. No profanity, nudity or
sexual content.
G General programming, suitable for all audiences.
PG Parental Guidance suggested. Some material may not be suitable for children.
Programming contains themes or content which may not be suitable for viewers under the age of
14+
14. Parents are strongly cautioned to exercise discretion in permitting viewing by pre-teens and
early teens.
18 ADULTS ONLY
25 l
Page 28
V-CHIP M
CH
CH
CH
VOL
VOL
ACTION
ENU OPERATION
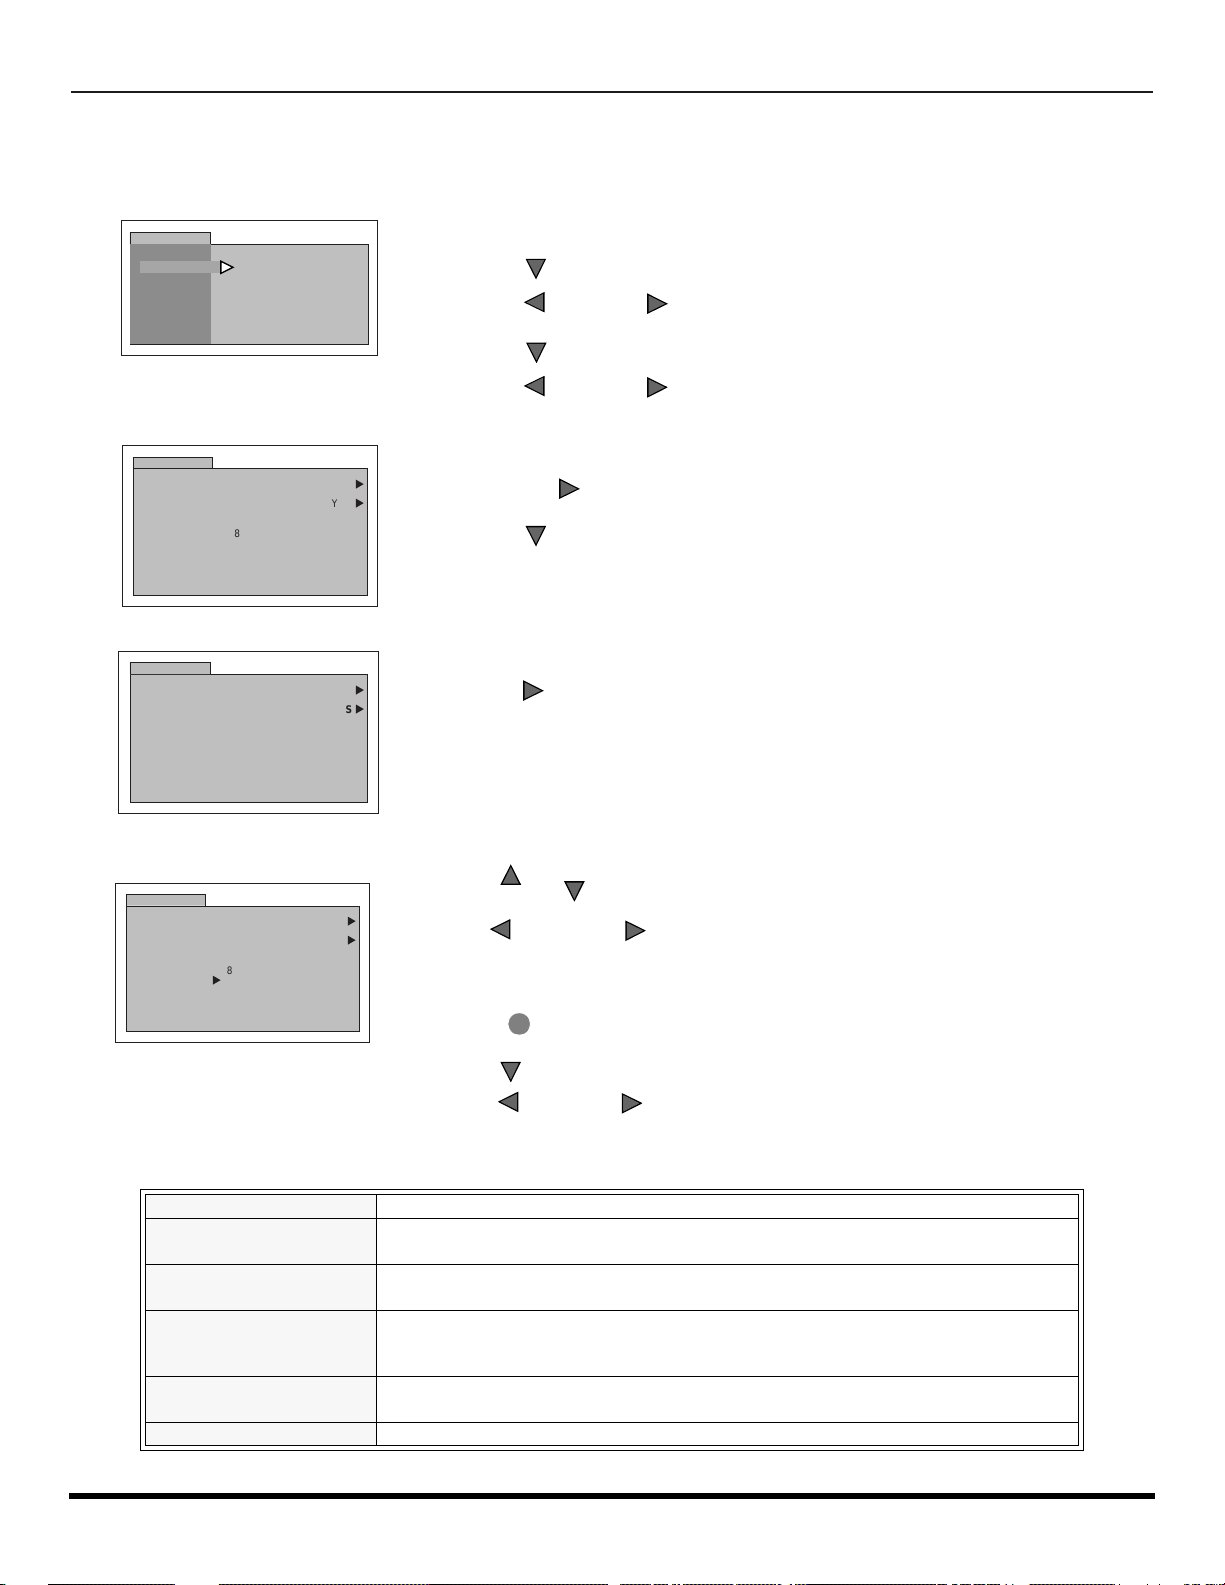
Canadian French
The V-CHIP used in this TV model also lets you block or unblock Canadian French programs according to various ratings
categories.
LOCK
MODE
HOW LONG?
LOCK SET
BLOCK PROGRAMS:
CANADIAN FRENCH
STATUS
ENTER CODE
FIRST
OFF
OFF
- - - -
r Use the numeric keypad to enter your four digit code. (
remember and record it in a safe place.
)
r Press to enter the BLOCK PROGRAMS field.
r Press or to select CANADIAN FRENCH.
VOL
VOL
r Press to highlight STATUS.
Use a code that is easy to
LOCK
CANADIAN FRENCH
VIEW NR PROGRAMS?
G
8 ANS+
13 ANS+
16 ANS+
18 ANS+
LOCK
CANADIAN FRENCH
VIEW NR PROGRAMS?
G
8 ANS+
13 ANS+
16 ANS+
18 ANS+
.
LOCK
CANADIAN FRENCH
VIEW NR PROGRAMS?
G
8 ANS+
u
13 ANS+
16 ANS+
18 ANS+
OFF
YES
OFF
YES
OFF
YES
u
u
13ANS+, 16ANS+ and 18ANS+ will be blocked
r Press or to display CANADIAN FRENCH menu rating chart.
u
u
r Press to select CANADIAN FRENCH ON or OFF.
VOL
VOL
VOL
r Press to select VIEW E PROGRAMS?
u
u
Press to select VIEW E PROGRAMS? YES or NO.
Note: E (Exempt) programming includes: news, sports, documentaries and other information
programming, talk shows, music videos, and variety programming.
r Press or to move between different ratings.
CH
r Use or to select ratings you want to block (RED) and unblock
CH
VOL
(GREEN).
Note: See the CANADIAN FRENCH RATING CHART.
r Press twice to return to MODE in Lock menu.
r Press to select HOW LONG?
CH
26 l
r Press or to select 12, 24, 48 hours or ALWAYS.
VOL
VOL
CANADIAN FRENCH RATINGS CHART
E Exempt - Exempt programming.
G
8 ans +
13 ans +
16 ans +
18 ans + Programming restricted to adults. Contains constant violence or scenes of extreme violence.
General - Programming intended for audience of all ages. Contains no violence, or the violence
content is minimal or is depicted appropriately.
8+ General - Not recommended for young children. Programming intended for a broad audience
but contains light or occasional violence. Adult supervision recommended.
Programming may not be suitable for children under the age of 13 - Contains either a few
violent scenes or one or more sufficiently violent scenes to affect them. Adult supervision strongly
suggested.
Programming may not be suitable for children under the age of 16 - Contains frequent
scenes of violence or intense violence.
Page 29
FM R
ADIO OPERATION
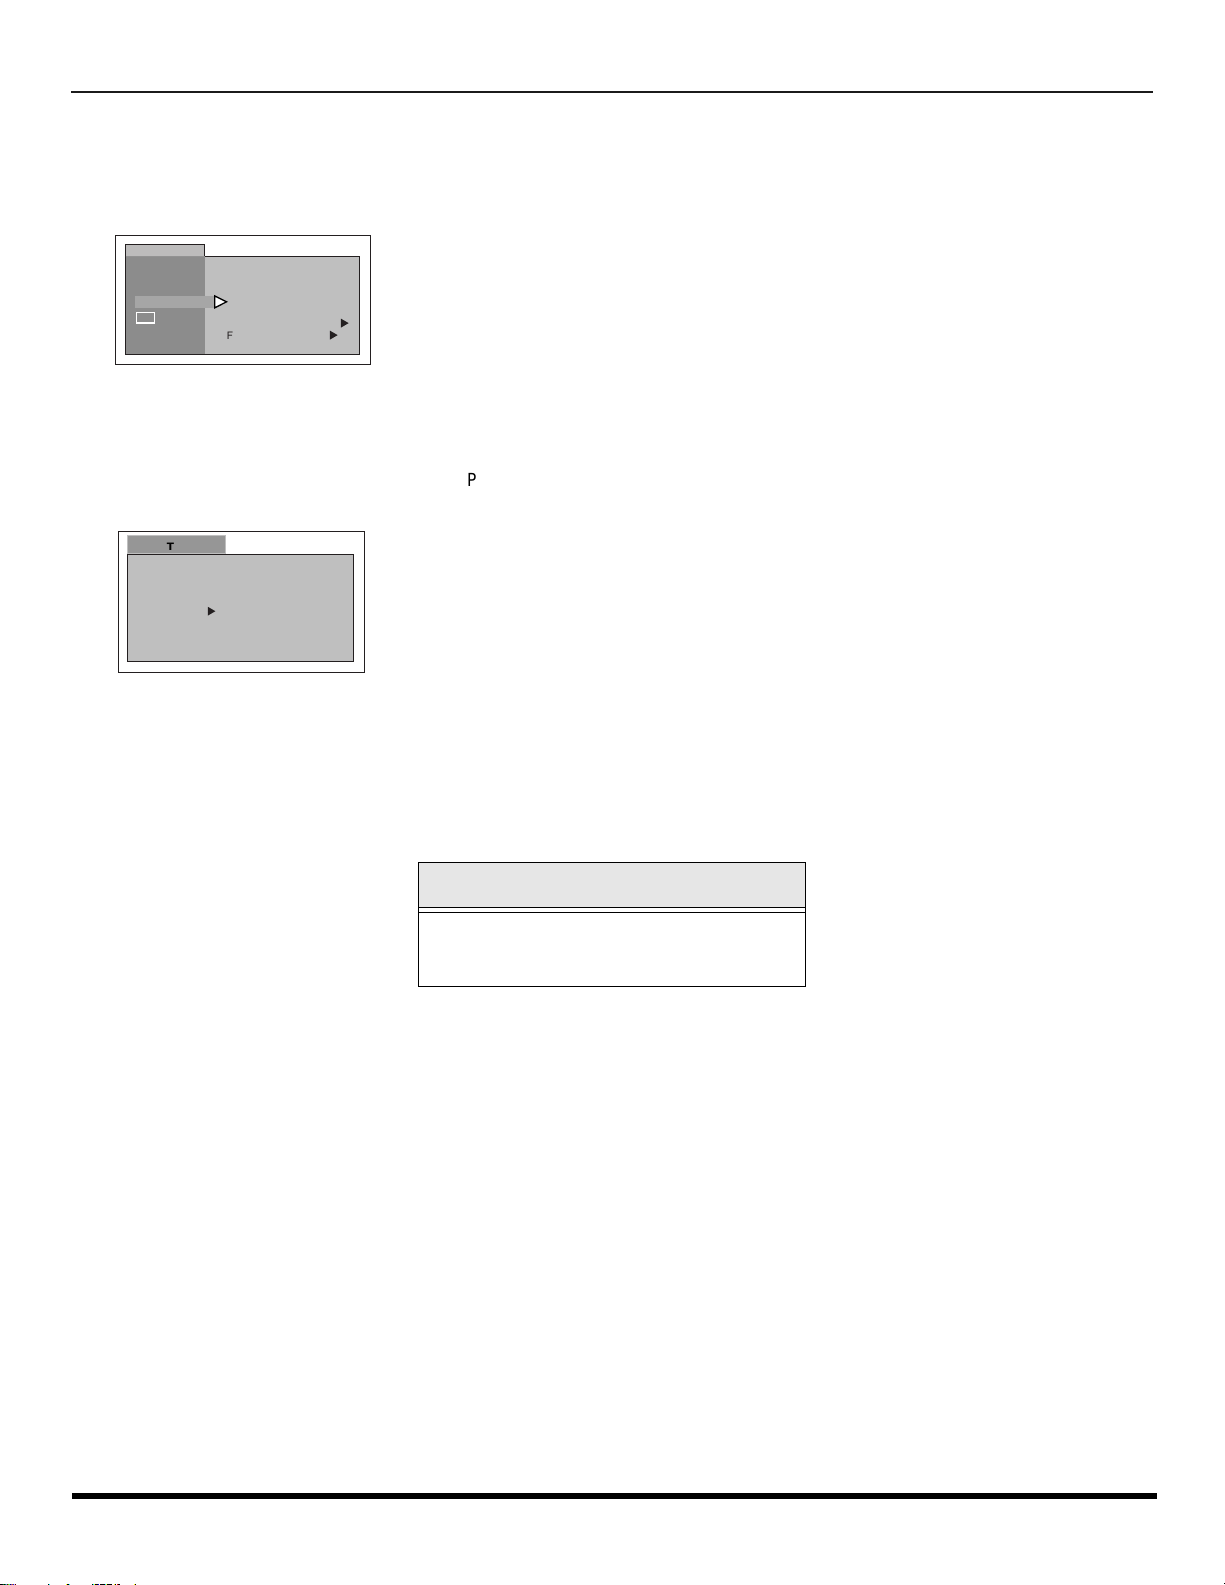
FM Radio Operation
(For model CT-25G7 only.)
Some televisions have built-in FM tuner. You can pre-program up to 9 different FM stations for easy access.
SETUP
IDIOMA/
LANGUE
PROG CHAN
CC
OTHER ADJ.
FM ANTENNA EXT
FM PROGRAM
u
u
r Press TV/VIDEO button on the remote control twice to get into FM
mode.
r Press ACTION button to display MENU Icons.
r Press pq or tu to highlight the SET UP icon.
r Press ACTION button to display the SET UP menu.
r Press p or q button to highlight PROG CHAN.
r Press u button to highlight FM ANTENNA
.
r Press t or u button to select INT (INTERNAL) or EXT (EXTERNAL).
• INT - For Cable TV users.
• EXT - For Antenna users.
SET UP
FM PROGRAM
FM POSITION 3 90.5 MHZ
TO ADD
u
r Press q button to highlight FM Program.
r Press u button to display FM PROGRAM screen
r Press numeric keys 1 through 9 on the remote control to select the
appropriate FM position.
r Press p or q button to select the desired FM frequency.
r Press u button to add the station to memory.
r Repeat steps 10 through 12 until all 9 positions have been programmed into
memory.
r Press ACTION button to exit the programming menu.
Note: You can select any of the 9 stations by pressing the appropriate number
button on the remote control, while in FM mode.
Helpful Hint:
In FM mode, at no volume or in Mute mode, there is
no indication of the set being ON. Volume should
be kept at audible level.
Tuning FM station manually
In FM mode, press p or q button to change the station frequency.
Note: While in FM mode, press R-TUNE button to toggle between TV and FM radio mode.
27 l
Page 30
T
ROUBLESHOOTING CHART
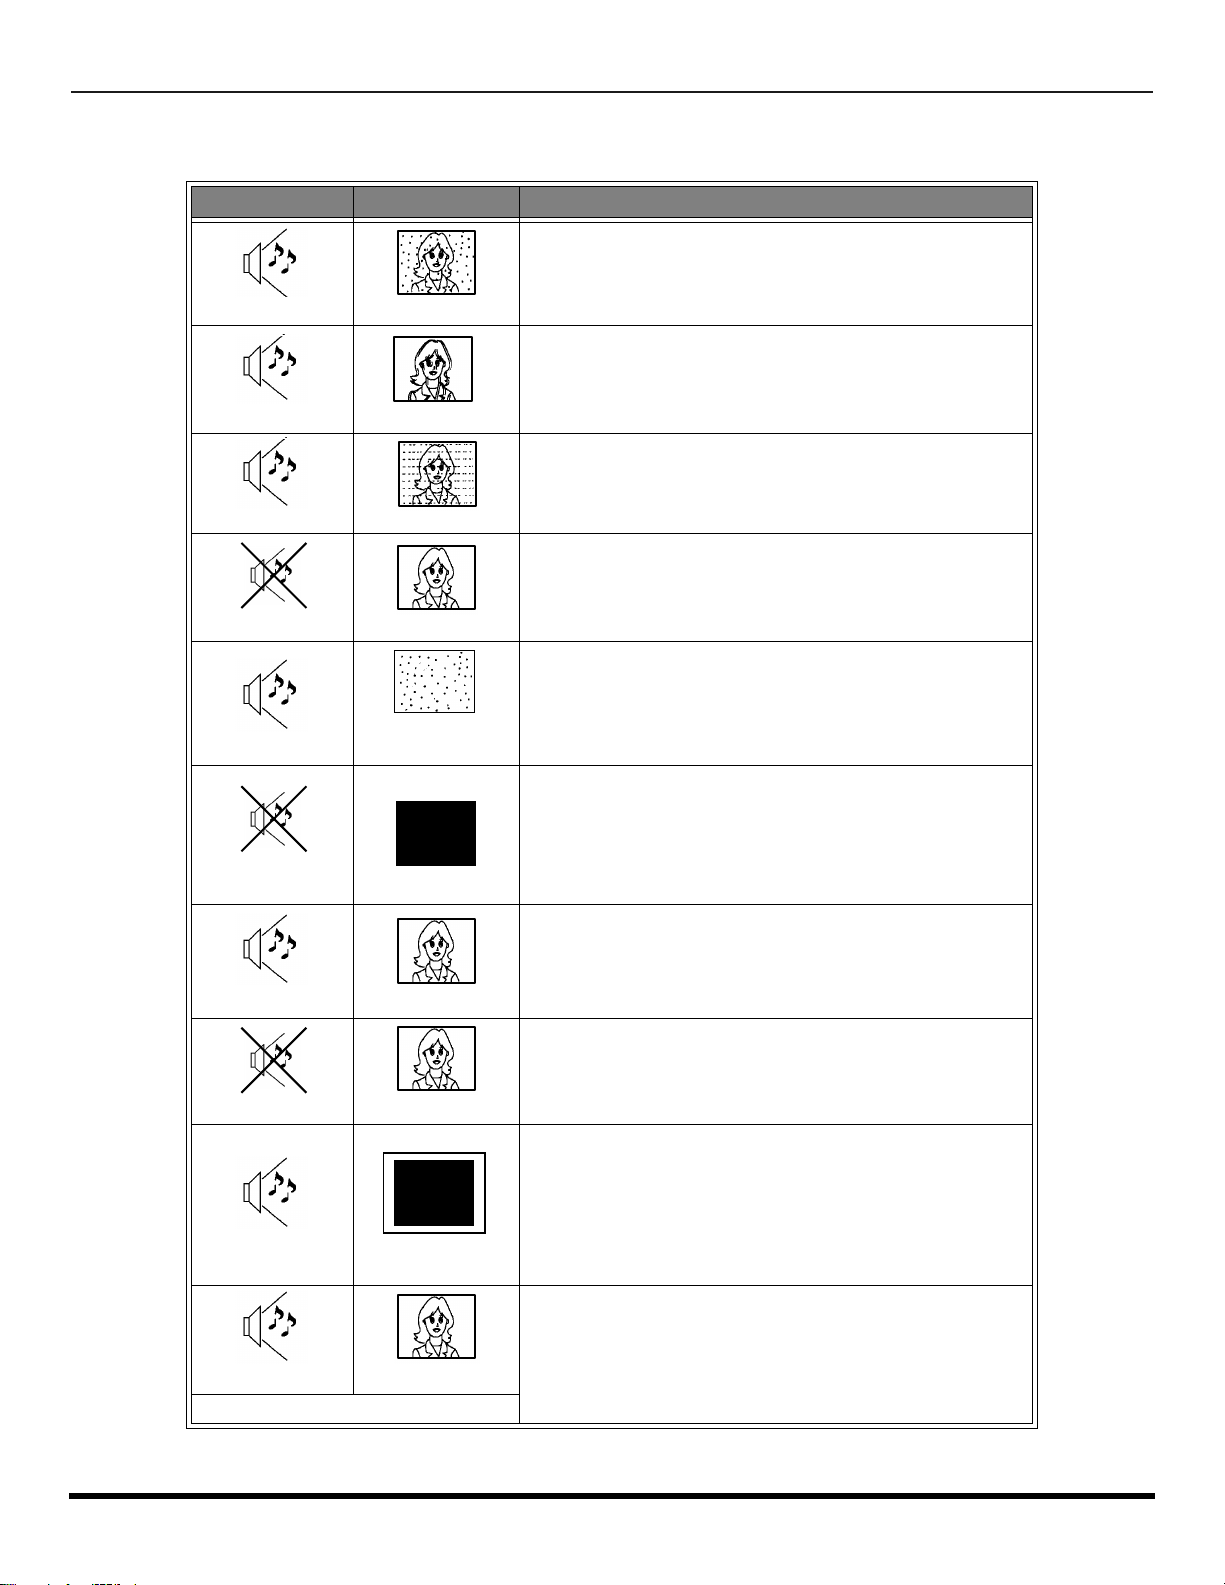
Troubleshooting Chart
Before calling for service, determine the symptoms and follow suggested solutions.
A
UDIO
V
IDEO
Solutions
Adjust Antenna Location and Connection
Noisy Audio
Noisy Audio
Noisy Audio
No Audio
Noisy Audio
No Audio
Snowy Video
Multiple Image
Interference
Normal Video
No Video with
Snow
?
No Video
Adjust Antenna Location and Connection
Check Antenna Lead-in Wire
Move television from Electrical Appliance s , Lights,
Vehicles and Medical Equipment
Increase Volume
Check Mute
Check television SPEAKERS on/off
Change Channel
Set TV or Cable Mode Properly
Check Antenna Cables
Check Power Cord is Plugged into Active Outlet
Adjust Brightness and Audio Controls
Change Channel
Check Cable Connections
Program the Remote Control Again
Check Second Video Source Operation
28 l
Normal Audio
Wrong Audio
Normal Audio
Normal Audio Normal Video
Intermittent Remote Control Operation
No Color
Normal Video
Black Box on
Screen
Adjust Color Settings
Change Channel
Check Audio Is Set To Stereo or Mono, Not SAP
Change CC (Closed Captioning) from Text Mode
Replace Remote Control Batteries
Page 31
L
IMITED WARRANTY
PANASONIC CONSUMER ELECTRONICS COMPANY, PANASONIC SALES COMPANY,
DIVISION OF: DIVISION OF:
MATSUSHITA ELECTRIC CORPORATION OF AMERICA MATSUSHITA ELECTRIC OF PUERTO RICO,
One Panasonic Way INC., Ave. 65 de Infanteria, Km. 9.5
Secaucus, New Jersey 07094 San Gabriel Industrial Park
Carolina, Puerto Rico 00985
Panasonic Color Television
Limited Warranty
Limited Warranty Coverage
If your product does not work properly because of a defect in materials or workmanship, Panasonic Consumer
Electronics Company or Panasonic Sales Company (collectively referred to as “the warrantor”) will, for the
length of the period indicated on the chart below, which starts with the date of original purchase ("warranty
period"), at its option either (a) repair your product with new or refurbished parts, or (b) replace it with a new or
a refurbished product. The decision to repair or replace will be made by the warrantor.
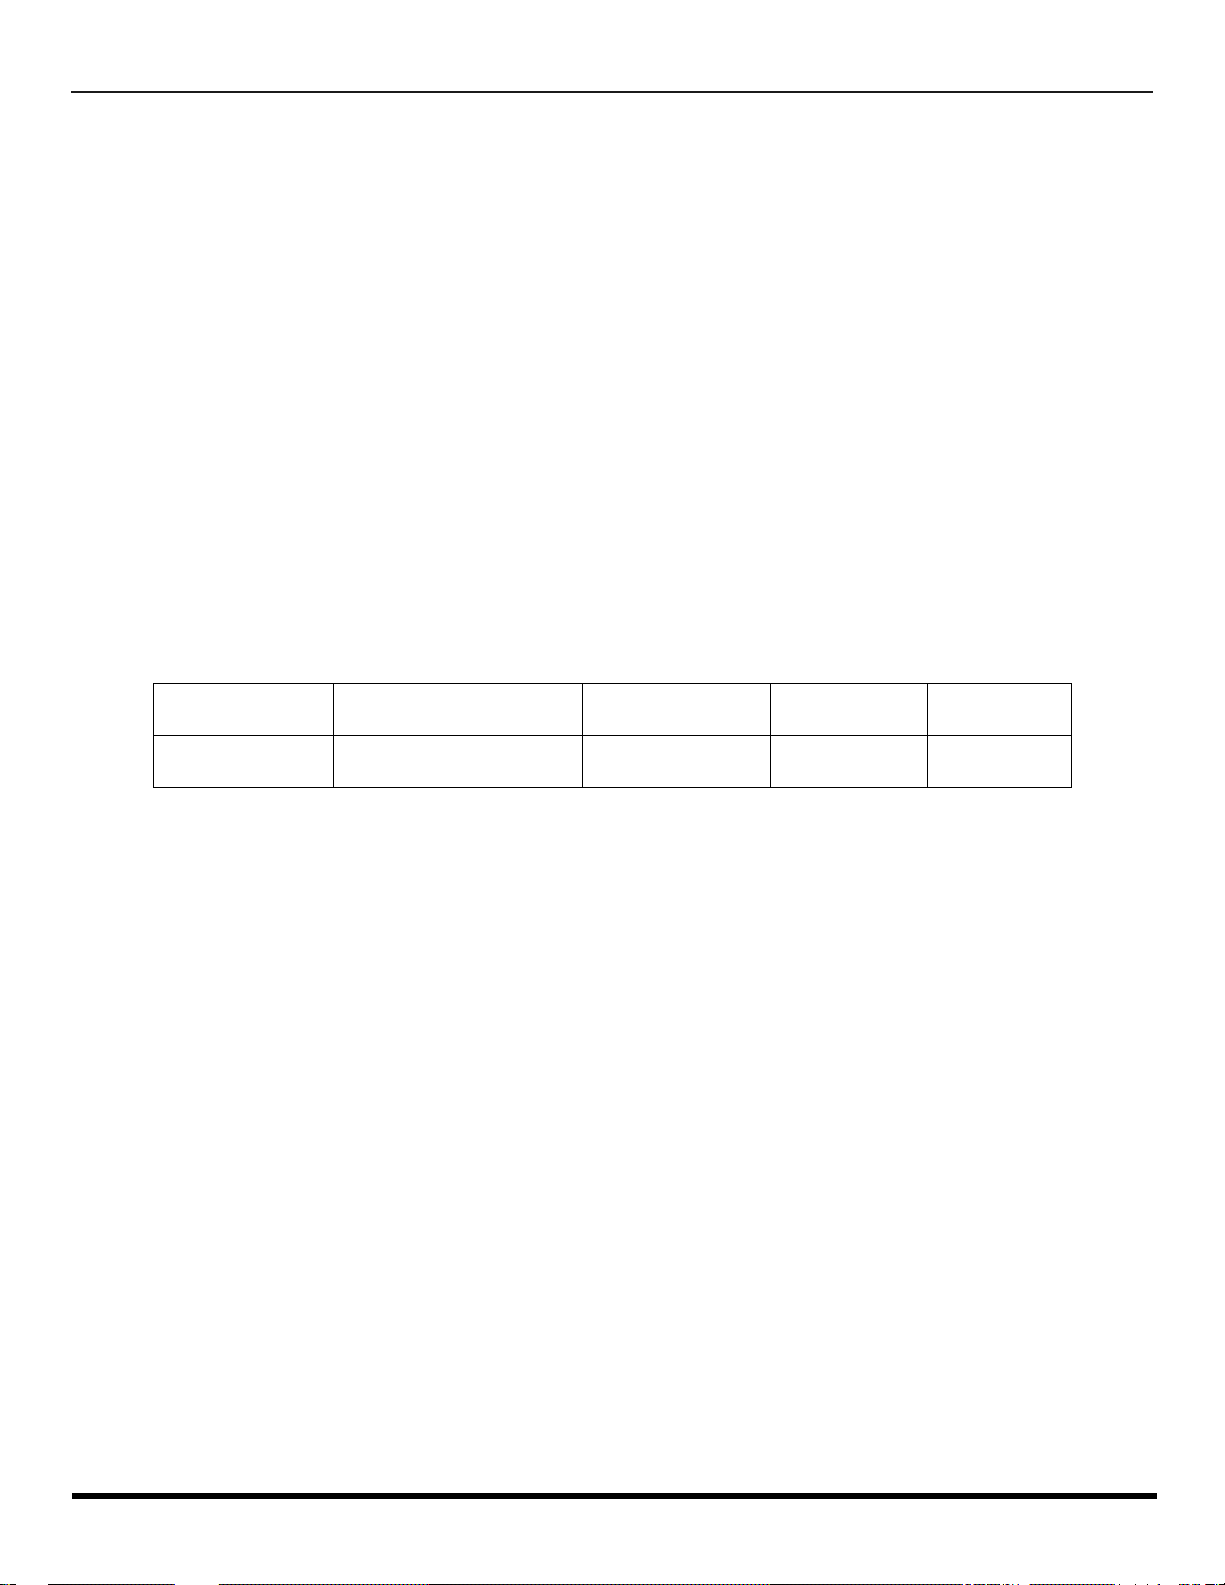
TV CATEGORIES ALL PARTS EXCEPT CRT CRT LABOR SERVICE
9”-21” diagonal 1 (ONE) YEAR 2 (TWO) YEARS 90 DAYS CARRY-IN
22”-27” diagonal 1 (ONE) YEAR 2 (TWO) YEARS 90 DAYS IN-HOME OR
CARRY-IN
During the "Labor" warranty period there will be no charge for labor. During the "Parts" warranty period, there
will be no charge for parts. You must carry-in your product or arrange for in-home service (in-home service
available only for 22” [diagonal] and larger screen), as applicable, during the warranty period. If nonrechargeable batteries are included, they are not warranted. This warranty only applies to products purchased
and serviced in the United States or Puerto Rico. This warranty is extended only to the original purchaser of a
new product which was not sold "as is". A purchase receipt or other proof of the original purchase date is
required for warranty service.
Carry-in or In-Home Service
For Carry-In or In-Home Service (as applicable) in the United States call 1-800-211-PANA(7262) or visit
Panasonic Web Site: http://www.panasonic.com
For assistance in Puerto Rico call Panasonic Sales Company (787)-750-4300 or fax (787)-768-2910.
In-Home service, if applicable, requires clear, complete and easy access to the product by the authorized servicer
and does not include removal or re-installation of an installed product. It is possible that certain in-home repairs
will not be completed in-home, but will require that the product, or parts of the product, be removed for shop
diagnosis and/or repair and then returned.
Limited Warranty continued on next page
29 l
Page 32

L
IMITED WARRANTY
Limited Warranty continued from previous page
Limited Warranty Limits And Exclusions
This warranty ONLY COVERS failures due to defects in materials or workmanship, and DOES NOT COVER
normal wear and tear or cosmetic damage, nor does it cover markings or retained images on the picture tube
resulting from viewing fixed images (including, among other things, letterbox pictures on standard 4:3 screen
TV’s, or non-expanded standard 4:3 pictures on wide screen TV’s, or onscreen data in a stationary and fixed
location). The warranty ALSO DOES NOT COVER damages which occurred in shipment, or failures which are
caused by products not supplied by the warrantor, or failures which result from accidents, misuse, abuse, neglect,
mishandling, misapplication, alteration, faulty installation, set-up adjustments, misadjustment of consumer
controls, improper maintenance, power line surge, lightning damage, modification, or commercial use (such as in
a hotel, office, restaurant, or other business), rental use of the product, service by anyone other than a Factory
Servicenter or other Authorized Servicer, or damage that is attributable to acts of God.
THERE ARE NO EXPRESS WARRANTIES EXCEPT AS LISTED UNDER "LIMITED WARRANTY
COVERAGE". THE WARRANTOR IS NOT LIABLE FOR INCIDENTAL OR CONSEQUENTIAL
DAMAGES RESULTING FROM THE USE OF THIS PRODUCT, OR ARISING OUT OF ANY
BREACH OF THIS W ARRANTY. (As examples, this excludes damages for lost time, cost of having someone
remove or re-install an installed unit if applicable, or travel to and from the servicer. The items listed are not
exclusive, but are for illustration only.) ALL EXPRESS AND IMPLIED WARRANTIES, INCLUDING
THE WARRANTY OF MERCHANTABILITY, ARE LIMITED TO THE PERIOD OF THE LIMITED
WARRANTY.
Some states do not allow the exclusion or limitation of incidental or consequential damages, or limitations on
how long an implied warranty lasts, so the exclusions may not apply to you.
This warranty gives you specific legal rights and you may also have others rights which vary from state to state.
If a problem with this product develops during or after the warranty period, you may contact your dealer or
Servicenter. If the problem is not handled to your satisfaction, then write to the warrantor's Consumer Affairs
Department at the addresses listed for the warrantor.
PARTS AND SERVICE (INCLUDING COST OF AN IN-HOME SERVICE CALL, WHERE
APPLICABLE) WHICH ARE NOT COVERED BY THIS LIMITED WARRANTY ARE YOUR
RESPONSIBILITY.
30 l
Page 33

C
USTOMER SERVICES DIRECTORY
For Product Information, Operating Assistance, Lit e rature Request, Dealer Locations, and
all Customer Service inquiries please contact:
1-800-211-PANA (7262),
Monday-Friday 9am - 9pm; Saturday-Sunday 9am - 7pm, EST.
Web Site: http://www.panasonic.com
You can purchase parts, accessories or
locate your nearest servicenter by visiting
our Web Site.
Accessory Purchases:
1-800-332-5368 (Customer Orders Only)
Panasonic Services Company 20421 84th Avenue South, Kent, WA 98032
(6 am to 5 pm Monday - Friday; 6 am to 10:30 am Saturday; PST)
(Visa, MasterCard, Discover Card, American Express, Check)
Service in Puerto Rico
Matsushita Electric of Puerto Rico, Inc. Panasonic Sales Company/Factory Servicenter:
Ave. 65 de Infanteria, Km. 9.5, San Gabriel Industrial Park, Carolina, Puerto Rico 00985
Phone (787) 750-4300 Fax (787) 768-2910
31 l
Page 34

N
OTES
32 l
Page 35

Index
I
NDEX
A
AC Power Supply Cord 3
Accessory Purchases 31
AI Sound 20
Amplifier Connection 6
Antenna Connection 3
Audio 20
Auto Power On 18
Auto Program 17
Auto Set Up Menu 5
B
Balance 20
Bass 20
Battery Installation 9
Brightness 18
C
Cabinet and Remote Control 2
Cable / Antenna Connection 3
Care and Cleaning 2
Caution 3
Channels 21
Clock Set 19
Closed Captioning 18
Codes for Cable Box 14
Codes for DBS 14
Codes for DVD 14
Codes for VCR 13
Color 18
Component Codes 13
Congratulations 2
Customer Record 2
Customer Services
Directory 31
D
Default Modes for Remote
Control 12
F
Feature Comparis on Chart 4
FM Radio Operation 27
Front Control Panel 7
G
Game 21
I
Icon Menu Navigation 15
Icon Menu Operation 17
Icon Menus 16
Installation 3
L
Limited Warranty 29, 30
Lock 21
Lock Set 21
M
Main Menu Icons 16
Manual Program 17
Menu Languages 17
Mode Operational
Key Chart 10
Mono 20
N
Normal 20
O
Optional Cable Connections 3
P
Picture 18
Product Information 31
Prog Chan 17
Programming The Remote 12
Programming Without
A Code 12
R
Rating Systems for Ca nada 25
Remote Control Operation 8, 9
S
SAP 20
Servicenters
Sharpness 18
Sleep Timer 19
Speakers 20
Specifications 2
Stereo 20
Surround 20
T
Television Location 3
Time 19
Timer 19
Tint 18
Treble 20
Troubleshooting Chart 28
Tuning FM station m anually 27
TV or Cable 5
U
U.S. Movies 23
U.S. Movies Menu 24
U.S. Movies Ratings Chart 24
U.S. TV Programs 22
U.S. TV Programs Rating 22
V
V-Chip Menu Operation 22
VCR Connection 6
VHF/UHF Antenna 3
Video Adj. 18
W
Warranty 29, 30
33 l
Page 36

N
OTES
34 l
Panasonic Consumer Electronics Company,
Division of Matsushita
Electric Corporation of America
One Panasonic Way
Secaucus, New Jersey 07094
www.panasonic.com
Panasonic de Mexico, S.A, de C.V.
Amores No. 1120
Col. Del Valle C.P. 03100
México, D.F.
Tel. (0155) 5488-1000
Fax (0155) 5575-6763, 5575-6765
Panasonic Sales Company,
Division of Matsushita Electric
of Puerto Rico Inc. (“PSC”)
Ave. 65 de Infantería, Km 9.5
San Gabriel Industrial Park
Carolina, Puerto Rico 00985
Tel. (787) 750-4300
Fax (787) 768-2910
Page 37

Televisor a color
Instrucciones de Operación
®
CT -2017
CT -25G7
CT -25G7U
CT-G2132
CT-G2132L
CT-G2172
CT-G2172L
CT-G2972
CT-G2972L
CT-G3352
CT-G3352X
Para asistencia llame al teléfono: 1-800-211-PANA (7262)
o envíe un correo electrónico a la dirección:
consumerproducts@p anasonic.com (Solo en Estados Unidos)
TQB2AA0370-2 20325
PRINTED IN USA
Page 38
ADVERTENCIA
RIESGO DE SACUDIDAS
ELECTRICAS. NO ABRIR.
ADVERTENCIA: A fin de reducir el riesgo de sacudidas eléctricas, no
deberán quitarse ni la cubierta ni la tapa posterior. No hay e n el inter ior pieza
alguna que el usuario tenga que reparar. Todo servicio habrá de brindarlo
personal de reparación capacitado.
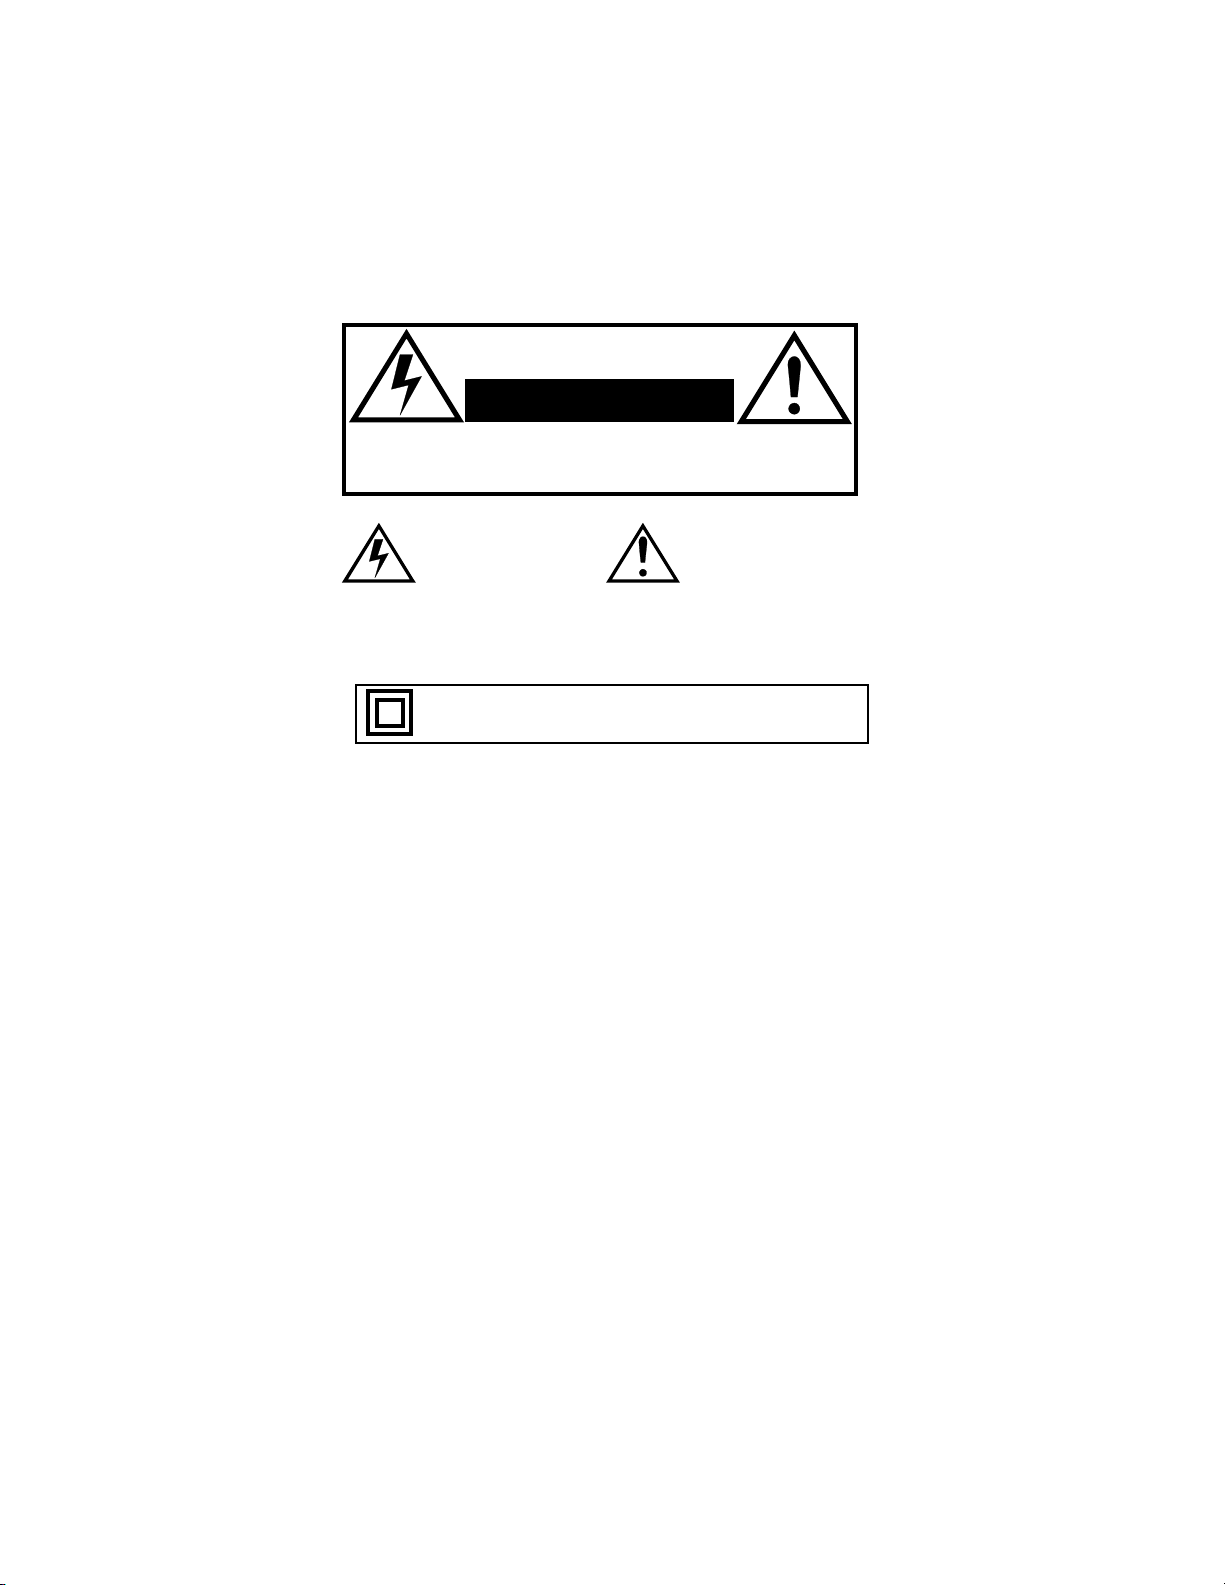
El propósito del relámpago con
punta de flecha dentro de un
triángulo es el de advertir al
usuario de que existen piezas
internas del producto que
representan riesgo de que las
personas reciban sacudidas
eléctricas.
ADVERTENCIA: Con el objeto de prevenir el riesgo de incendio o de sacudida
eléctrica, este aparato no deberá verse expuesto a la lluvia ni a la humedad.
El simbolo de doble insulación (un cuadro dentro de otro cuadro) es
con la intención de alertar al personal de servicio calificado a usar
partes de reemplazo idénticas únicamente en este aparato.
El propósito del signo de
exclamación dentro de un
triángulo es el de advertir al
usuario de que los
documentos que acompañan
al aparato incluyen
importantes instrucciones de
funcionamiento y reparación.
Aviso de la FCC:
AVISO AMBIENTAL:
Cualquier cambio o modificación a este receptor de TV no aprovado
expresamente por Matsushita Electric Corporation of America podria
provocar interferencia dañina, que nulificaría la autoridad del usuario
para operar este equipo.
Este producto utiliza un tubo de rayos catódicos (TRC) así como
otros componentes que contienen plomo. El desecho de estos
materiales puede estar regulado en su comunidad debido a
consideraciones ambientales. Para información de desecho o
reciclaje contacte a sus autoridades locales, o a la alianza de
industrias electrónicas: <HTTP://WWW.EIAE.ORG.>
Page 39

Indice
Felicidades.................................................................2
Registro del Usuario..................................................................2
Cuidado y limpieza ....................................................................2
Especificaciones........................................................................2
Instalación..................................................................3
Ubicación de la Televisión.........................................................3
Conexiones de Cable Opcional.................................................3
Cable de Suministro de Corriente Alterna.................................3
Conexión de Cable / Antena......................................................3
Tabla de Comparación de Características..............4
Menú de Auto Programación....................................5
Conexiones de Equipo Opcional .............................6
Videocasetera............................................................................6
Conexión del Amplificador (TO AUDIO AMP) ...........................6
Conexión del Decodificador de Televisión
Panel de Control Frontal ..........................................7
Operación del Control Remoto (CT-G2132, CT-G2132L,
CT-G2172 y CT-G2172L solamente)...............................8
Instalación de Pilas en el Control Remoto.................................8
Operación del Control Remoto (CT-G2972,
CT-G2972L, CT-G3352 y CT-G3352X solamente)
Instalación de Pilas en el Control Remoto.................................9
Tabla del Modo Operacional de las Teclas .............................10
Programando el Control Remoto......... ....... ...... ...... ....... ..........12
Programando Sin Código .............. ...................................... ....12
Códigos de Componentes................................................... ....13
Navegación del Menú de Iconos............................15
Menú de Iconos Principal .......................................16
Menús de iconos .....................................................................16
Operación del Menú de Iconos ..............................17
Ajuste.......................................................................................17
Imagen.....................................................................................18
Cronómetro..............................................................................19
Audio .......................................................................................20
Canales ...................................................................................21
Bloqueo ...................................................................................21
Operación del Menú de V-Chip .............................22
Recepción de Radio FM (CT-25G7 solamente) ..........27
Cuadro de Localización de Fallas..........................28
Guia de Servicios Tecnicos....................................29
Indice ........................................................................30
.............9
I
NDICE
Lea estas instrucciones completamente antes de operar la Televisión.
El contenido está sujeto a cambios sin previo aviso u obligación.
Derechos Reservados 2002 por Matsushita Electric Corporation of America.
Todos los Derechos Reservados. La copia y distribución sin autorización es violación de la ley.
1 l
Page 40
F
ELICIDADES
Felicidades
Su nuevo Televisor Monitor/Receptor se caracteriza por un chasis de estado sólido que está diseñado para brindarle
satisfacción por muchos años. Ha sido probada completamente en la fábrica para su mejor desempeño.
Registro del Usuario
Los números de modelo y de serie de esta unidad se encuentran en la parte posterior de la Televisión. Se recomienda que
anote dichos números en los espacios que se proporcionan y se conserven como registro permanente de su compra. Esto
le ayudará a identificarlo en caso de robo o pérdida.
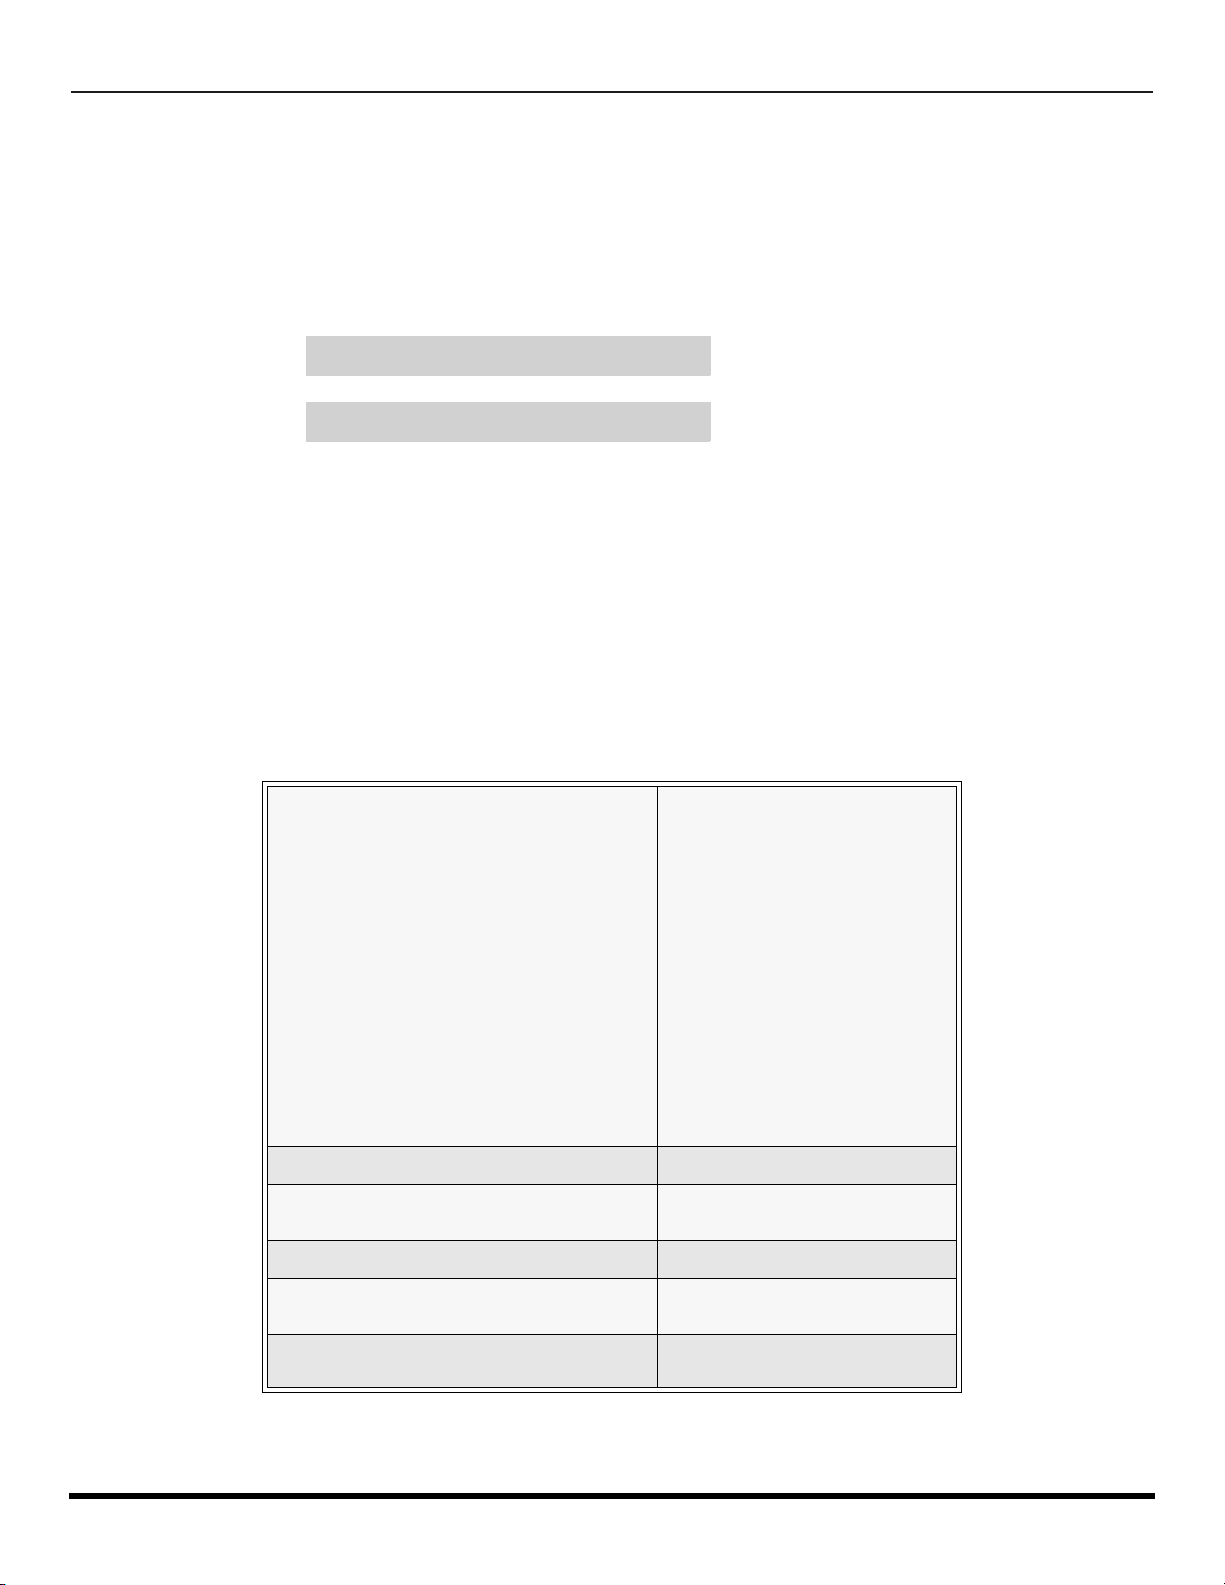
Número de
Modelo
Número de
Serie
Cuidado y limpieza
Pantalla (Apagar la Televisión)
• Use una solución de jabón suave o limpiador de vidrios con un paño suave y limpio. NO USE LIMPIADORES
ABRASIVOS.
• Evite la humedad excesiva y seque bien.
Nota: Evite rociar cualquier tipo de limpiadores directamente sobre la pantalla.
Gabinete y Control Remoto
r Para control remoto y gabinetes de plástico, use un paño suave humedecido con agua o una solución detergente suave. Evite
exceso de humedad y frote hasta secar.
r No use benceno, diluyentes u otros productos a base de petróleo.
Especificaciones
Fuente de Potencia
CT-2017 (1,4A)
CT-25G7 (1,8A)
CT-25G7U (1,8A)
CT-G2132 (1,4A)
CT-G2172 (1,5A)
CT-G2972 (2,0A)
CT-G3352 (2,0A)
CT-G335 2X (2,0A)
CT-G2132L (1,5A)
CT-G2172L (1,6A)
CT-G2972L (2,0A)
Capacidad de Canales - 181 VHF-12; UHF-56; Cable-113
Terminales de Entrada de Vídeo
Terminales de Entrada de Audio 500mV RMS 47Kilo Ohmios
Terminales de Salida de Audio
(algunos modelos)
120V AC, 60Hz
127ca 60Hz
Auto (110Vca-220Vca)
50/60Hz
1Vp-p, 75 Ohmios, Estilo
fonográfico
0-2,0V RMS 4,7Kilo Ohmios
2 l
Terminales de Entrada S-Vídeo
(algunos modelos)
Conector S-Vídeo (Y-C)
Las especificaciones están sujetas a cambio sin previo aviso ni obligación alguna.
Page 41
I
a
NSTALACIÓN
Instalación
Ubicación de la Televisión
Esta unidad tiene como pro pósito ser usad a como parte de un centr o de entreteni miento. Cons ulte a su distrib uidor para
obtener opciones disponibles.
r Evite el exceso de luz del sol u otras luces brillantes, incluyendo reflejos.
r Mantenga alejada la unidad del exceso de calor o humedad. La ventilación inadecuada puede causar fallas en componentes
internos.
r La iluminación fluorescente puede reducir el rango de transmisión del control remoto.
r Evite el equipo magnético, incluyendo motores, ventiladores o altavoces externos.
PRECAUCIÓN: Use únicamente con el mueble, mesa, cómoda o librero especificado por el fabricante o comprado con el
aparato. Si mueve el mueble con el aparato sobre de el, tenga mucho cuidado de que el aparato no caiga sobre usted al
empujar. Para evitar le si one s a infantes, nunca c ol oqu e el televisor en muebl es qu e p ue dan ser inclinados o mo vi dos p or un
niño.
Conexiones de Cable Opcional
Cables blindados de audio y video deben usarse entre los componentes. Para obtener mejores resultados:
r Use cable coaxial blindado de 75 ohmios.
r Use los conectores de entrada y salida apropiados, iguales a los de su componente.
r Evite el uso de cables largos para minimizar interferencia.
Cable de Suministro de Corriente Alterna
PRECAUCION: PARA PREVENIR UNA DESCARGA ELECTRICA, BUSQUE LA CLAVIJA ANCHA DEL ENCHUFE
E INSERTELA POR COMPLETO EN LA RENDIJA ANCHA DE LA TOMA DE CORRIENTE ALTERNA. NO USE
ESTE ENCHUFE CON UN RECEPT ACULO U OTRA TOMA DE CORRIENTE SALVO QUE LA CLAVIJA SE PUEDA
INSERTAR POR COMPLETO PREVINIENDO QUE SE EXPONGA LA CLAVIJA.
PROTEJA EL CABLE DE AC DE SER PISADO, ENRROLLADO, PLEGADO, TROZADO O PERFORADO,
PARTICULARMENTE EN LOS CONECTORES Y EN LOS PUNTOS DONDE SALE DEL APARATO.
Enchufe polarizado
Conexión de Cable / Antena
Para una recepción adecuada, se requiere una conexión de cable o de antena.
Conexión de cable
Conecte el cable suministrado por su compañía local de cable.
Nota: Se puede requerir de un decodificador de cable para una recepción adecuada. Verifique con su
compañía de cable local sobre los requisitos de compatibilidad.
Conexión de Antena
• Para una recepción adecuada de canales VHF/UHF, se requiere de una antena externa. Para la
mejor recepción, se recomienda una antena en el exterior.
• La Modalidad de Antena debe estar ajustada en televisión.
Nota: La Modalidad de Cable está predispuesta de fábrica. Usuarios de antena deberán cambiar a Modalidad
de Antena en el menú de Ajuste (SETUP).
Antena VHF/UHF
Una antena VHF/UHF y su transformador se incluyen en al gunos modelos. Coloque en la televisi ón,
ajuste la antena hasta que la imagen sea clara. (Vea la conexión de Antena).
Cable de Entrada de la
Compañía de Cable
75 Ohmios VHF/UHF en l
parte posterior de la TV
Cable de Entrada de
una Antena de Casa
3 l
Page 42
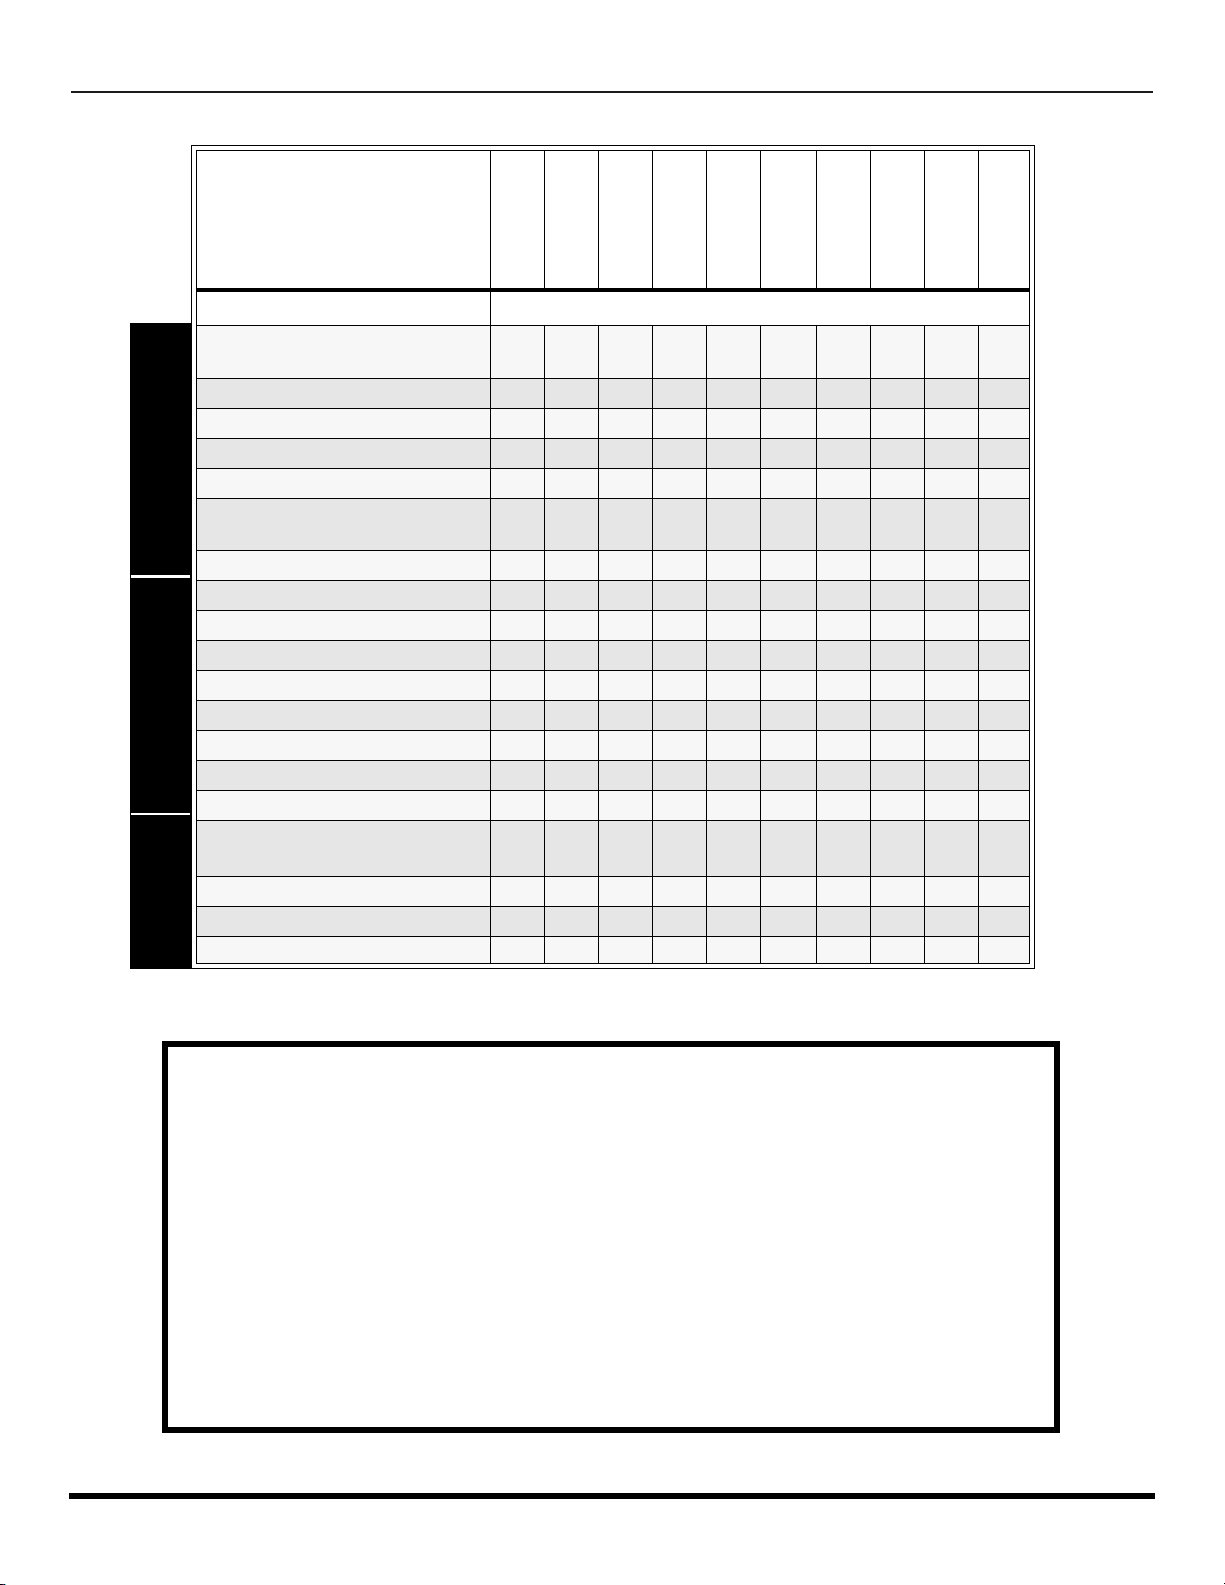
T
ABLA DE COMPARACIÓN DE CARACTERÍSTICAS
CARACTERÍSTICAS
AUDIO
CONECTORES
ADAPTADOR DE 75 OHM
ESPECIALES
BAJOS/BALANCE/AGUDOS
(POSTERIOR/DELANTERA)
CONECTOR DE AUDIFONOS
SALIDA PARA AUDIFONO
DE A/V
Tabla de Comparación de Características
MODELOS
CT-G2132
CT-G2132L
CT-G2172
CT-G2172L
CT-G2972
CT-G2972L
CT-G3352
CT-2017
CT -G3352X
CARACTERISTICAS
LENGUAJE DEL MENÚ
ENG/ESP/FRAN
SUBTITULACION
CAPACIDAD DEL V-CHIP
ENTRADA DE 75 OHM
ANTENA INCLUIDA
INCLUIDO
VIDEO NORM
AUDIO NORM
ESTEREO
RADIO FM
SONIDO IA
ENVOLVENTE
SALIDA AUDIO
NUMERO DE BOCINAS 2 2 4 4 4 4 2 2 2 2
ENTRADA A/V
ENTRADA S-VHS
r r r r r r r r r r
r r r r r r r r r r
r r r r r r r r r r
r r r r r r r r r r
r r r r
r r r r
r r r r r r r r r r
r r r r r r
r r r r r r
r r r r r r r r
r r r r r r r r
r r r r r r
r r r r r r
1
(1/1)1 (1/1)2(2/1)2(2/1)2 (2/1)
r r r r r r
r r
r r r r r r r r
2
(2/1)2 (2/1)2 (2/1)1 (1/1)1 (1/1)
CT-25G7
r
4 l
INFORMACIÓN IMPORTANTE ACERCA DEL USO DE VIDEO JUEGOS, COMPUTADORAS,
U OTROS TIPOS DE IMÁGENES FIJAS.
ADVERTENCIA: El marcado o retención de imágen en los tubos de proyección como resultado del
uso de una imágen fija no es un defecto de operación y como tal no está cubierto por la garantía.
Este televisor esta diseñado para desplegar imágenes en movimiento constante en la pantalla. El uso
constante de imágenes fijas tal como peliculas en formato letterbox en pantallas estándar (con barras arriba
y abajo de la imágen), pe licul as es tándar n o exp andi das (4:3 ) en TV ’s de p ant alla a ncha (c on barra s latera les
visibles a cada lado de la imágen), barras de reporte de la bolsa mercantil (barra con información en
movimiento en la parte inferior de la pantalla), patrones de video juegos, marcadores deportivos fijos, logos
de estación televisora, patrones de internet u otros patrones de tipo computadora deben limitarse.
El uso extendido de material de imágen fija puede causar daño permanente a los tubos de proyección, el
cual se presenta como ‘imágen fantasma” visible en la imágen normal. Este tipo de desgaste irreversible de
los tubos de proyección puede limitarse mediante los siguientes pasos:
• No utilice la imagen fija por periodos largos de tiempo.
• Apague la unidad cuando no se este usando.
Page 43
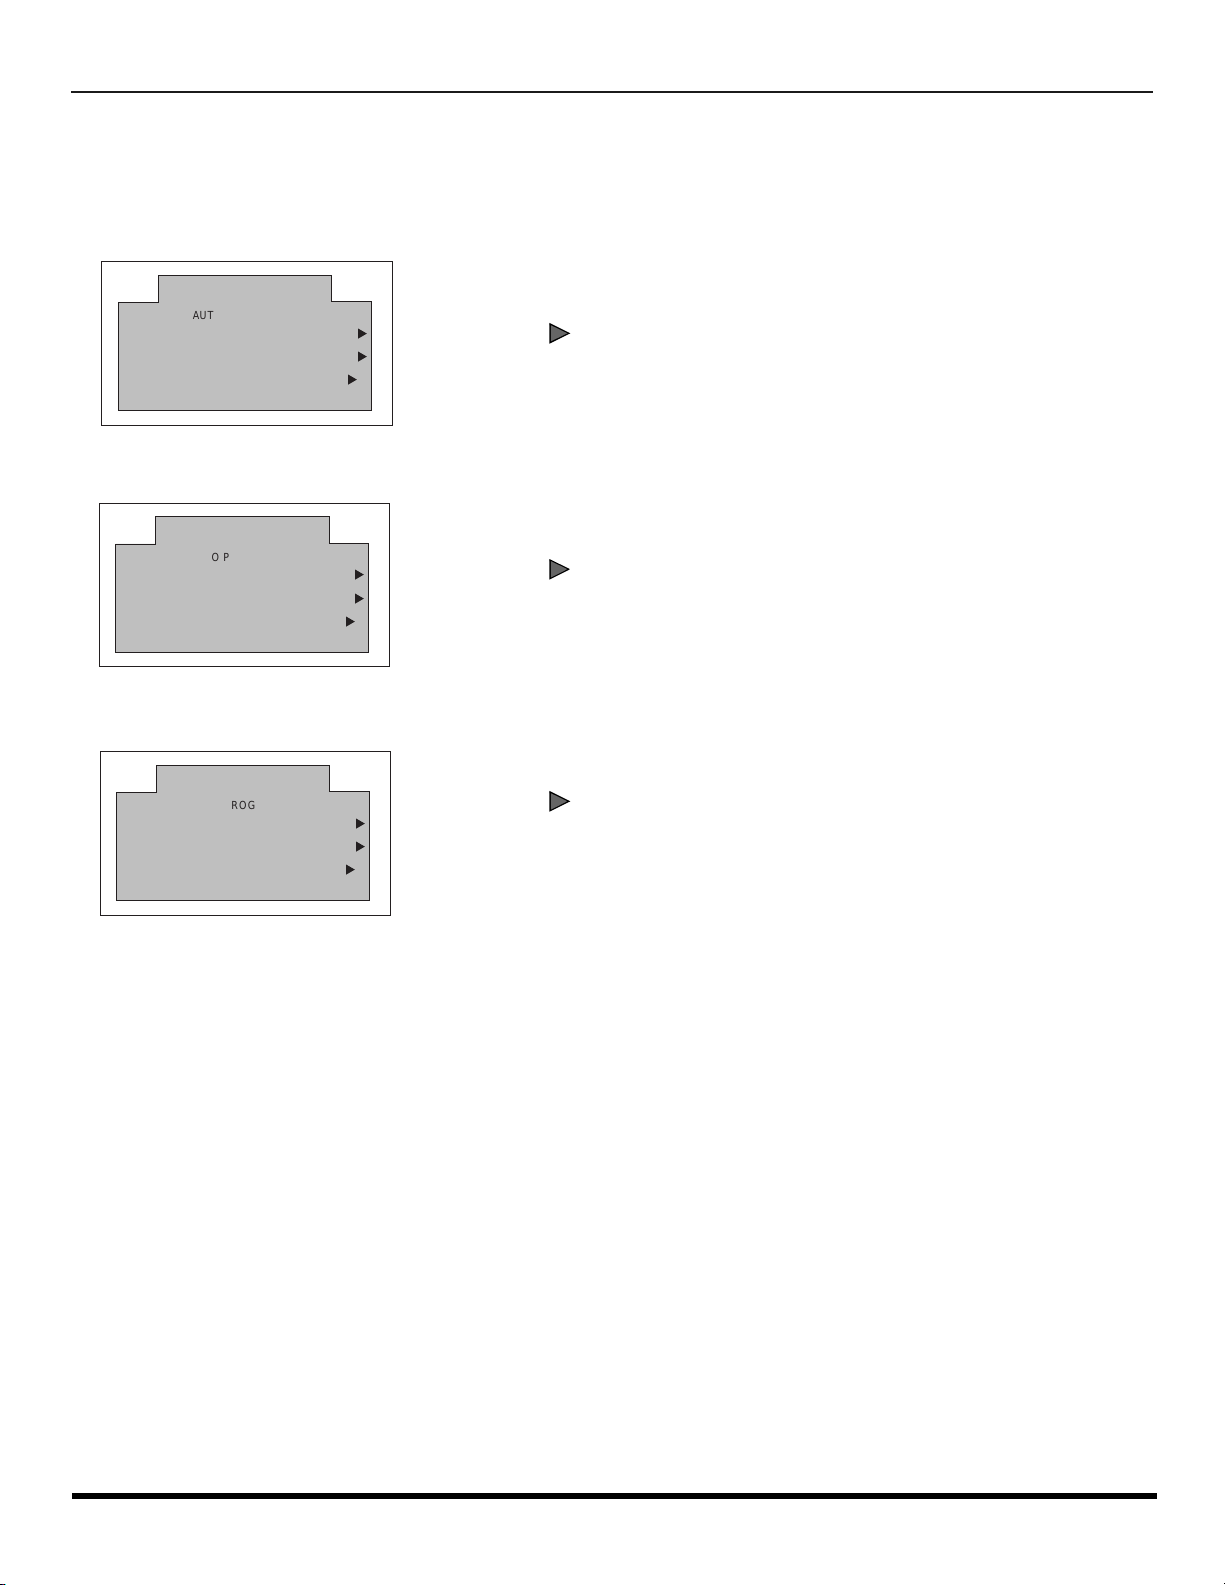
M
ENÚ DE AUTO PROGRAMACIÓN
Menú de Auto Programación
Para su conveniencia, el menú de auto programación será desplegado en pantalla cuando el set sea encendido por
primera vez. De ser necesario, siga los menús y los procedimientos para ajustar las caracteristicas.
r IDIOMA/LANGUE - Seleccione el idioma del menú ENGLISH (Inglés), ESPAÑOL o FRANCAIS (Francés).
LA ANTENA DEBE ESTAR
CONECTADA
IDIOMA/LANGUE ESPAÑOL
PROGRAMA AUTO
AUTO PROGRAMACION
CABLEMODO
PRESIONE ACTION PARA SALIR
u
u
u
r MODO - Para seleccionar la modalidad de TV (antena) o CABLE dependiendo de la fuente de la señal.
LA ANTENA DEBE ESTAR
CONECTADA
IDIOMA/LANGUE ESPAÑOL
PROGRAMA AUTO
AUTO PROGRAMACION
CABLEMODO
PRESIONE ACTION PARA SALIR
u
u
u
Presione para seleccionar menú en Inglés, Español, o Francés
Presione para seleccionar modo deTELEVISIÓN o CABLE.
VOL
VOL
r PROGRAMA AUTO -
LA ANTENA DEBE ESTAR
CONECTADA
IDIOMA/LANGUE ESPAÑOL
PROGRAMA AUTO
AUTO PROGRAMACION
PRESIONE ACTION PARA SALIR
Para programar automáticamente todos los canales con señal.
Presione para iniciar la programación automática de canales.
u
CABLEMODO
u
u
VOL
5 l
Page 44
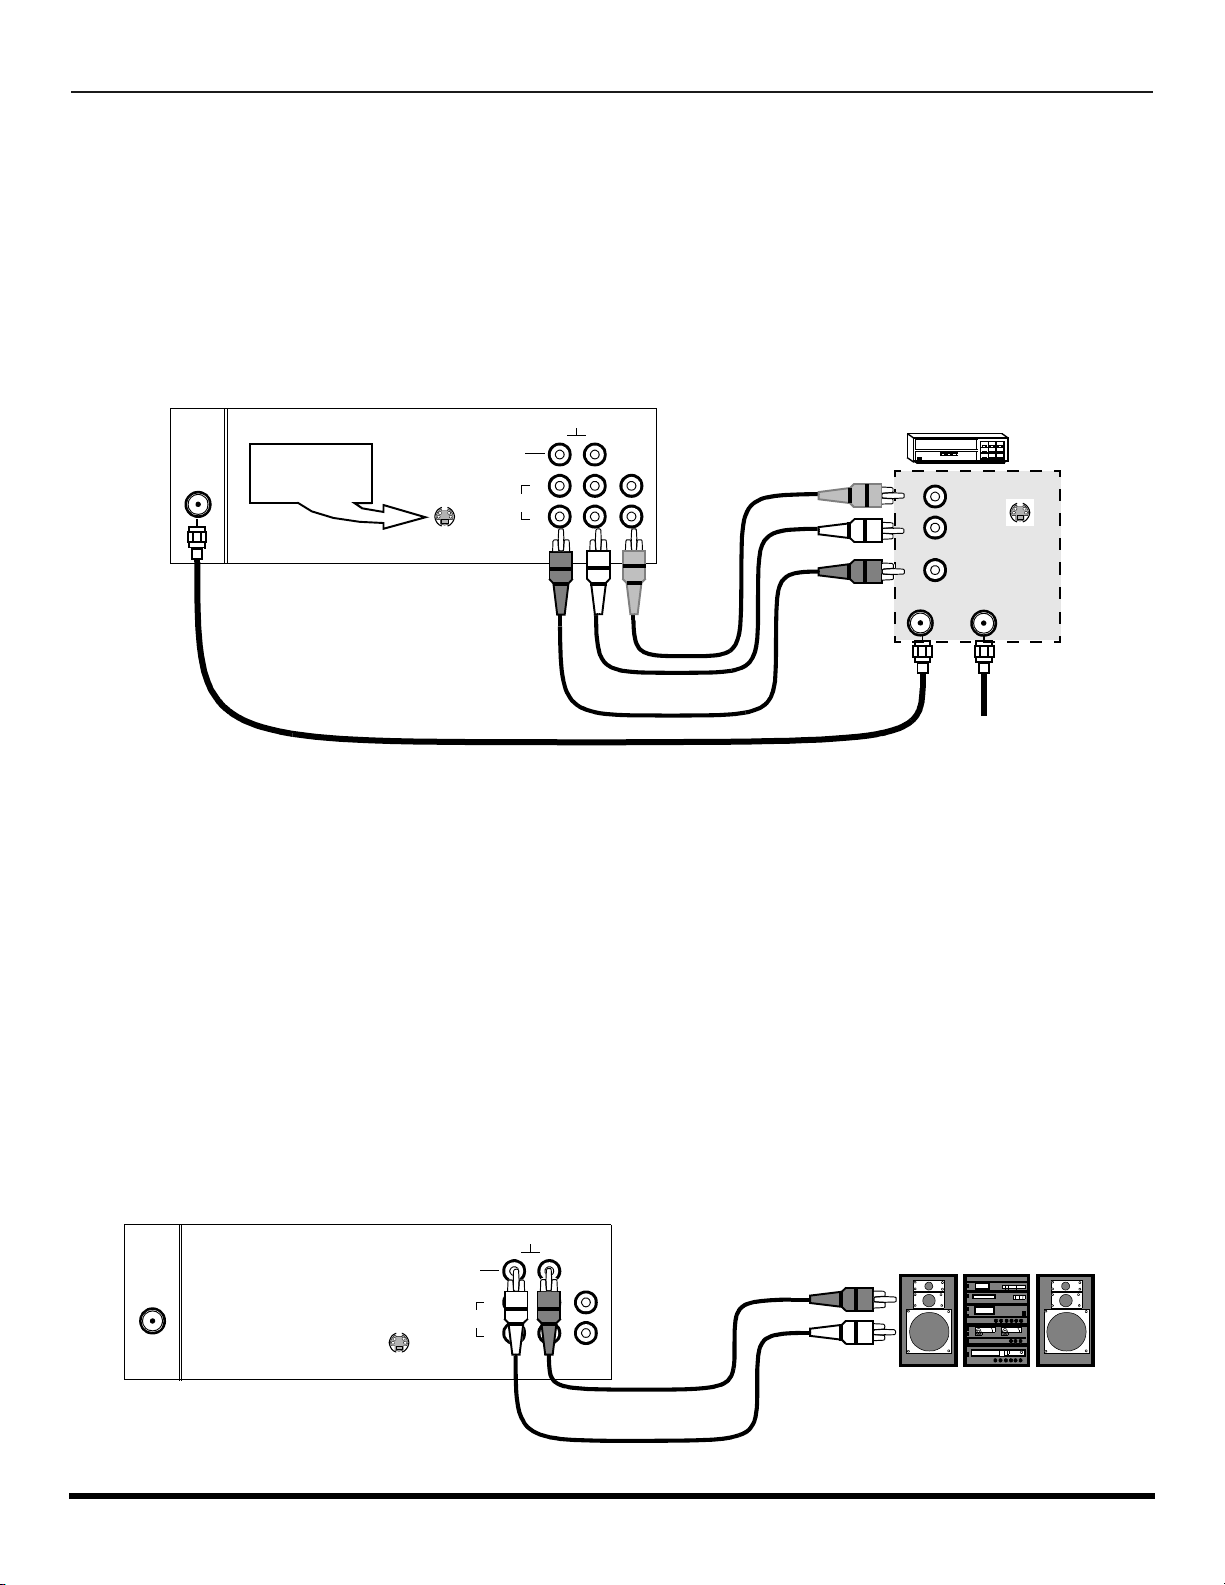
C
ONEXIONES DE EQUIPO OPCIONAL
Conexiones de Equipo Opcional
Conexión de la Videocasetera
Conecte el equipo como se muestra a la parte frontal o posterior de la entrada de Audio/Video.
Nota: Conexiones de Audio/Video frontales y de la parte posterior no pueden usarse al mismo tiempo.
1. Seleccione la Modalidad de Vídeo presionando el botón de TV/VIDEO.
2. Opere el equipo opcional tal como se instruye en el manual del equipo.
Nota: Videocaseteras, equipo de videodiscos, equipo de videojuegos y teletexto pueden también ser conectados a la
entrada de conexión de antena. (Vea el manual de su equipo.)
CONEXIONES EN LA PARTE POSTERIOR DE LA TELEVISION
Nota: Puede variar segun el modelo.
VIDEOAUDIO
INPUT
RL
2
1
ANT
Use el conector
de S-Video ó el
de video.
S-VIDEO
TO AUDIO
AMP
Videocasetera
VIDEO OUT
AUDIO OUT
OUTPUT
L
R
ANT INPUT
S-VIDEO
OUT
CABLES NO INCLUIDOS
Cable de Entrada de una
Antena de Casa
Nota: El control remoto debe ser programado con los códigos que se incluyen para operar la videocasetera.
Conexión del Amplificador (TO AUDIO AMP)
Para escuchar el sonid o a través de un sistem a estére o sep arado , conec te un ampl ifica dor exter no a las co nexio nes T O AUDI O AMP en
la parte posterior de la televisión.
Nota: Las conexiones TO AUDIO AMP no pueden ser conectadas directamente a altavoces (bocinas) externas.
Ajustes de Audio
1. Seleccione en la pantalla ALTAVOCES SI en el menú de AUDIO (SONIDO).
2. Ajuste el volumen del amplificador al mínimo.
3. Ajuste el volumen de la televisión al nivel deseado.
4. Ajuste el volumen del amplificador hasta igualar el de la televisión.
5. Seleccione ALTAVOCES APAGADAS Y SALIDA DE AUDIO VARIABLE en el menú de AUDIO (SONIDO).
6. Ahora puede controlar el volumen, el silencio, los bajos, los altos, y el balance usando la televisión.
Nota: Seleccione ALTAVOCES APAGADAS Y SALIDA DE AUDIO FIJA para controlar las funciones de audio a través del
amplificador externo.
CONEXIONES EN LA PARTE POSTERIOR DE LA TELEVISION
Nota: Para modelos con conectores de audio TO AUDIO AMP
VIDEOAUDIO
ANT
S-VIDEO
TO AUDIO
AMP
INPUT
RL
CABLES NO INCLUIDOS
2
1
Amplificador Externo
6 l
Page 45
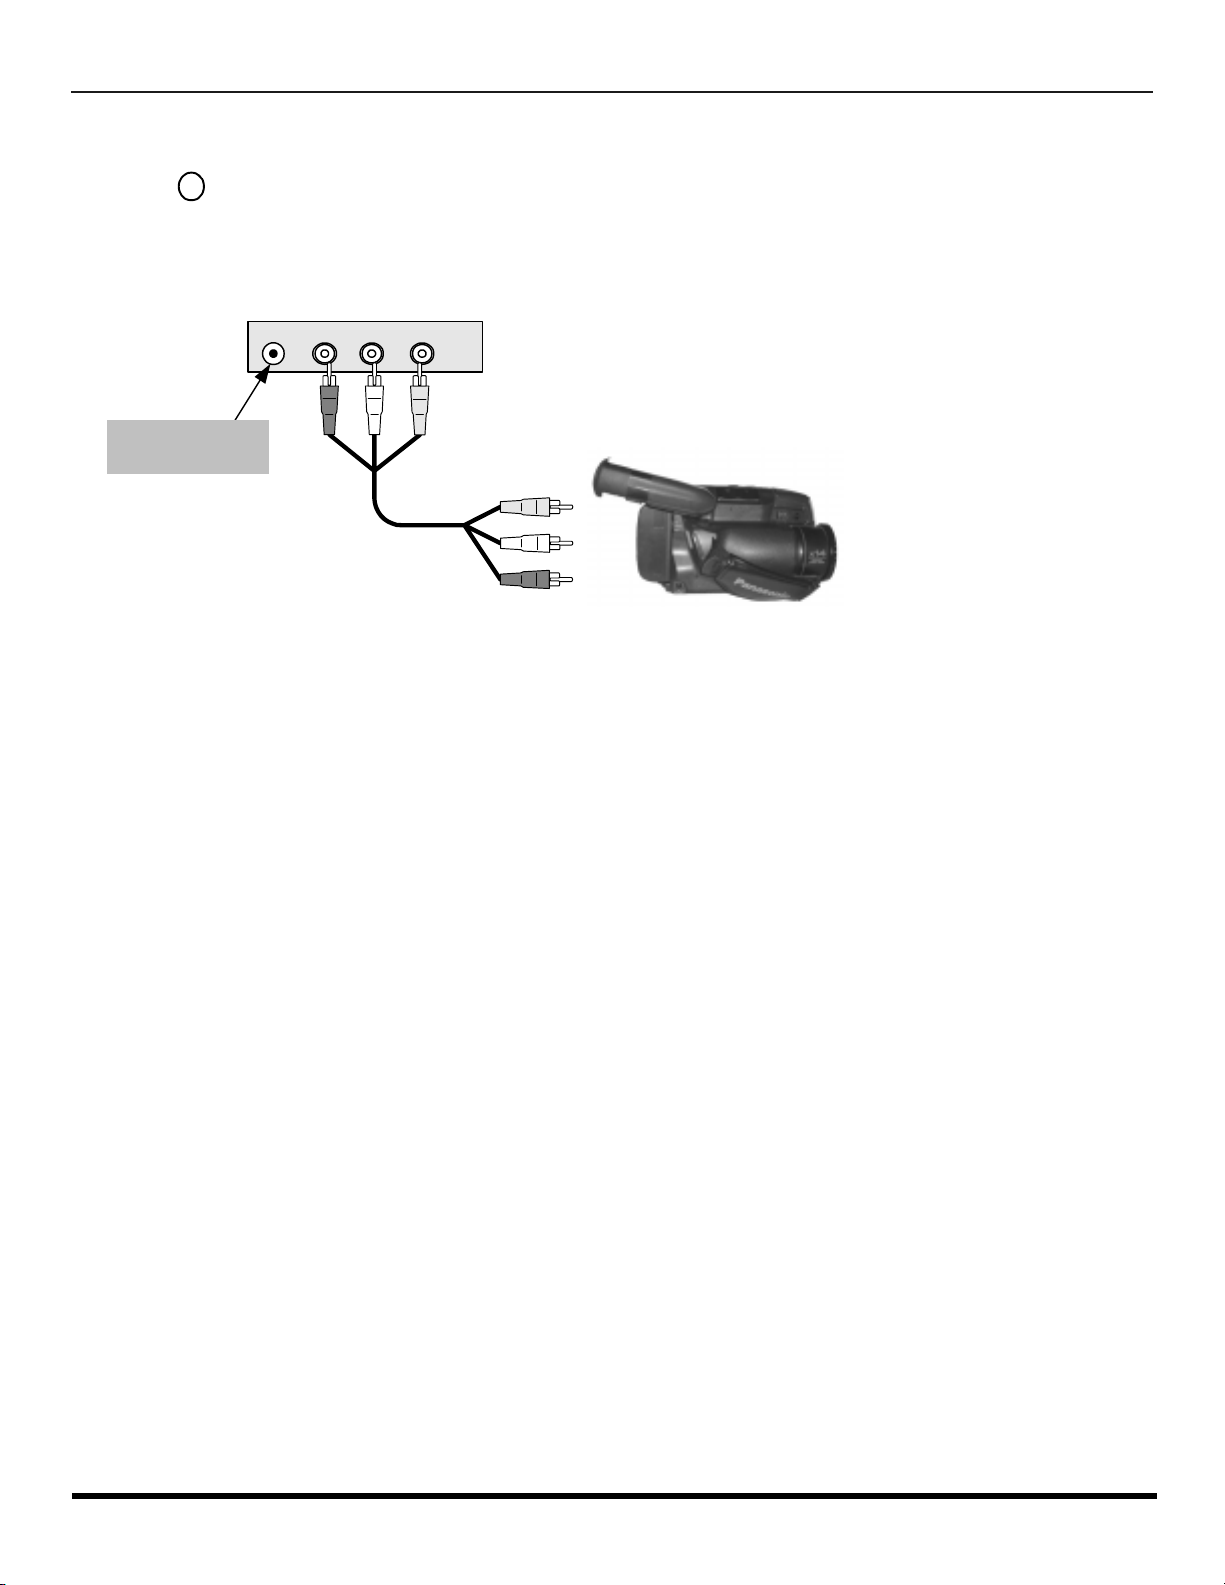
P
Terminales en el frente de televisión
VIDEO L - AUDIO - R
HPJ
Entrada para audifonos
con conector de 1/8"
(algunos modelos)
ANEL DE CONTROL FRONTAL
Panel de Con trol Frontal
TV/VIDEO
Presione para seleccionar la modalidad de entrada de VIDEO.
Nota: El panel de control frontal puede ser usado para accesar el menú ó cambiar el modo de video cuando no se disponga del
control remoto.
Video Cámara
Una segunda videocasetera, un reproductor de videodiscos, un equipo de videojuegos y equipo de DSS (sistema de
transmisión digital ví a satélite) pueden también ser conec tados a las conexiones de Audio /Video. Vea el manual de su
equipo opcional para más detalles.
Procedimiento
1. C onecte su eq uipo a las conexiones Audio/Vídeo en la parte frontal o posterior de la televisión.
2. Opere el equipo como se instruye en el manual del equipo.
Nota: Conexiones de Audio/Vídeo frontales y de la parte posterior no pueden usarse al mismo tiempo.
7 l
Page 46
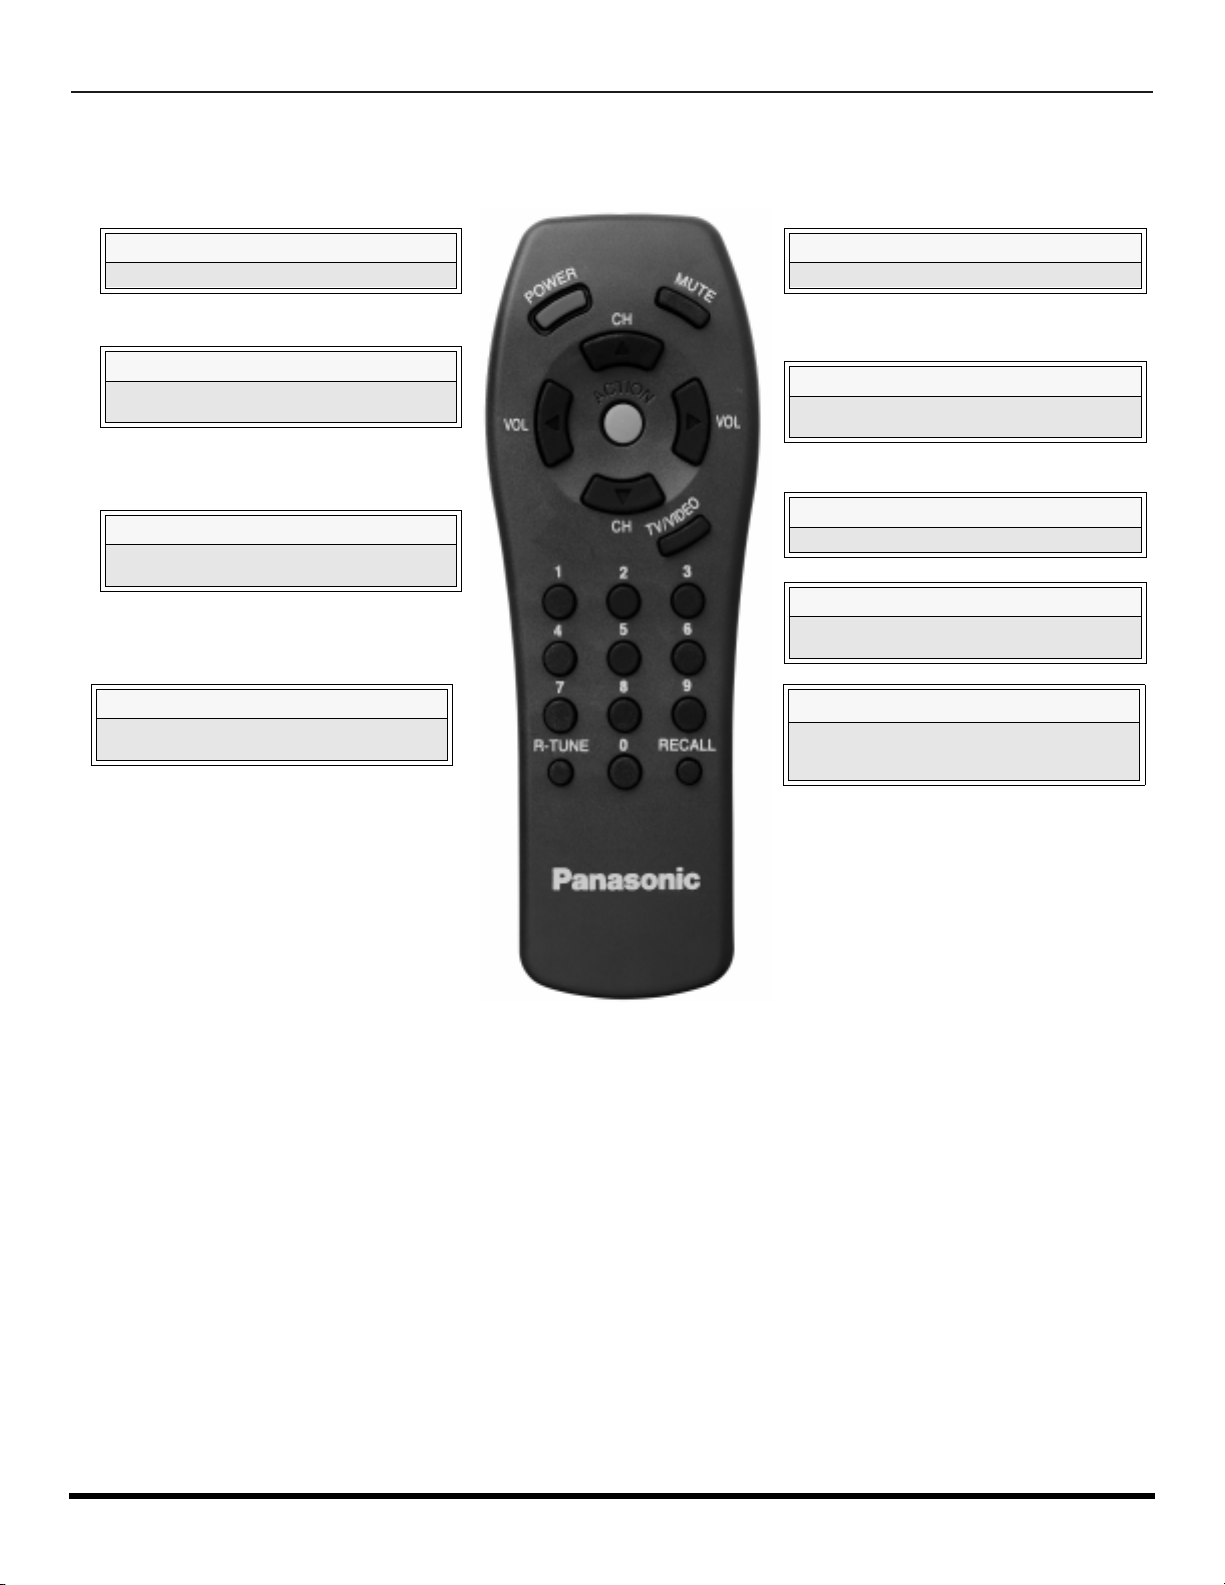
O
PERACIÓN DEL CONTROL REMOTO
Operación del Control Remoto
(Para los modelos CT-G2132, CT-G2132L, CT-G2172 y CT-G2172L, solamente.)
POWER
Presione para ENCENDER y APAGAR.
VOL
Presione para ajustar el nivel del audio de la TV
y navegar en los menús.
“0” ~ “9”
Presione el teclado numérico para seleccionar
cualquier canal.
R-TUNE
Presione para regresar al canal previ amente visto
o modo de vídeo.
MUTE
Presione para silenciar el sonido.
CH
Presione para seleccionar el siguiente canal y
navegar en los menús.
ACTION
Presione para accesar los menús.
TV/VIDEO
Presione para seleccionar la Modalidad de
televisión o video.
RECALL
Presione para visualizar la hora, el canal,
cronómetro de apagado automático, y otras
opciones.
EUR501450
Instalación de Pilas en el Control Remoto
Use dos pilas AA:
Quite la tapa del compartimiento de pilas presionando en dirección a la flecha.
Instale las pilas igualando las marcas (+) y (–) de la polaridad.
Coloque nuevamente la tapa de las pilas.
Precauciones
• Reemplace las pilas por pares.
• No mezcle tipos de pilas (carbono de zinc con alcalina).
• No intente cargar, hacer cortocircuito, desarmar, calentar ó quemar las pilas.
Nota: Instalación incorrecta puede causar derrame y corrosión que dañará al Control Remoto.
8 l
Page 47
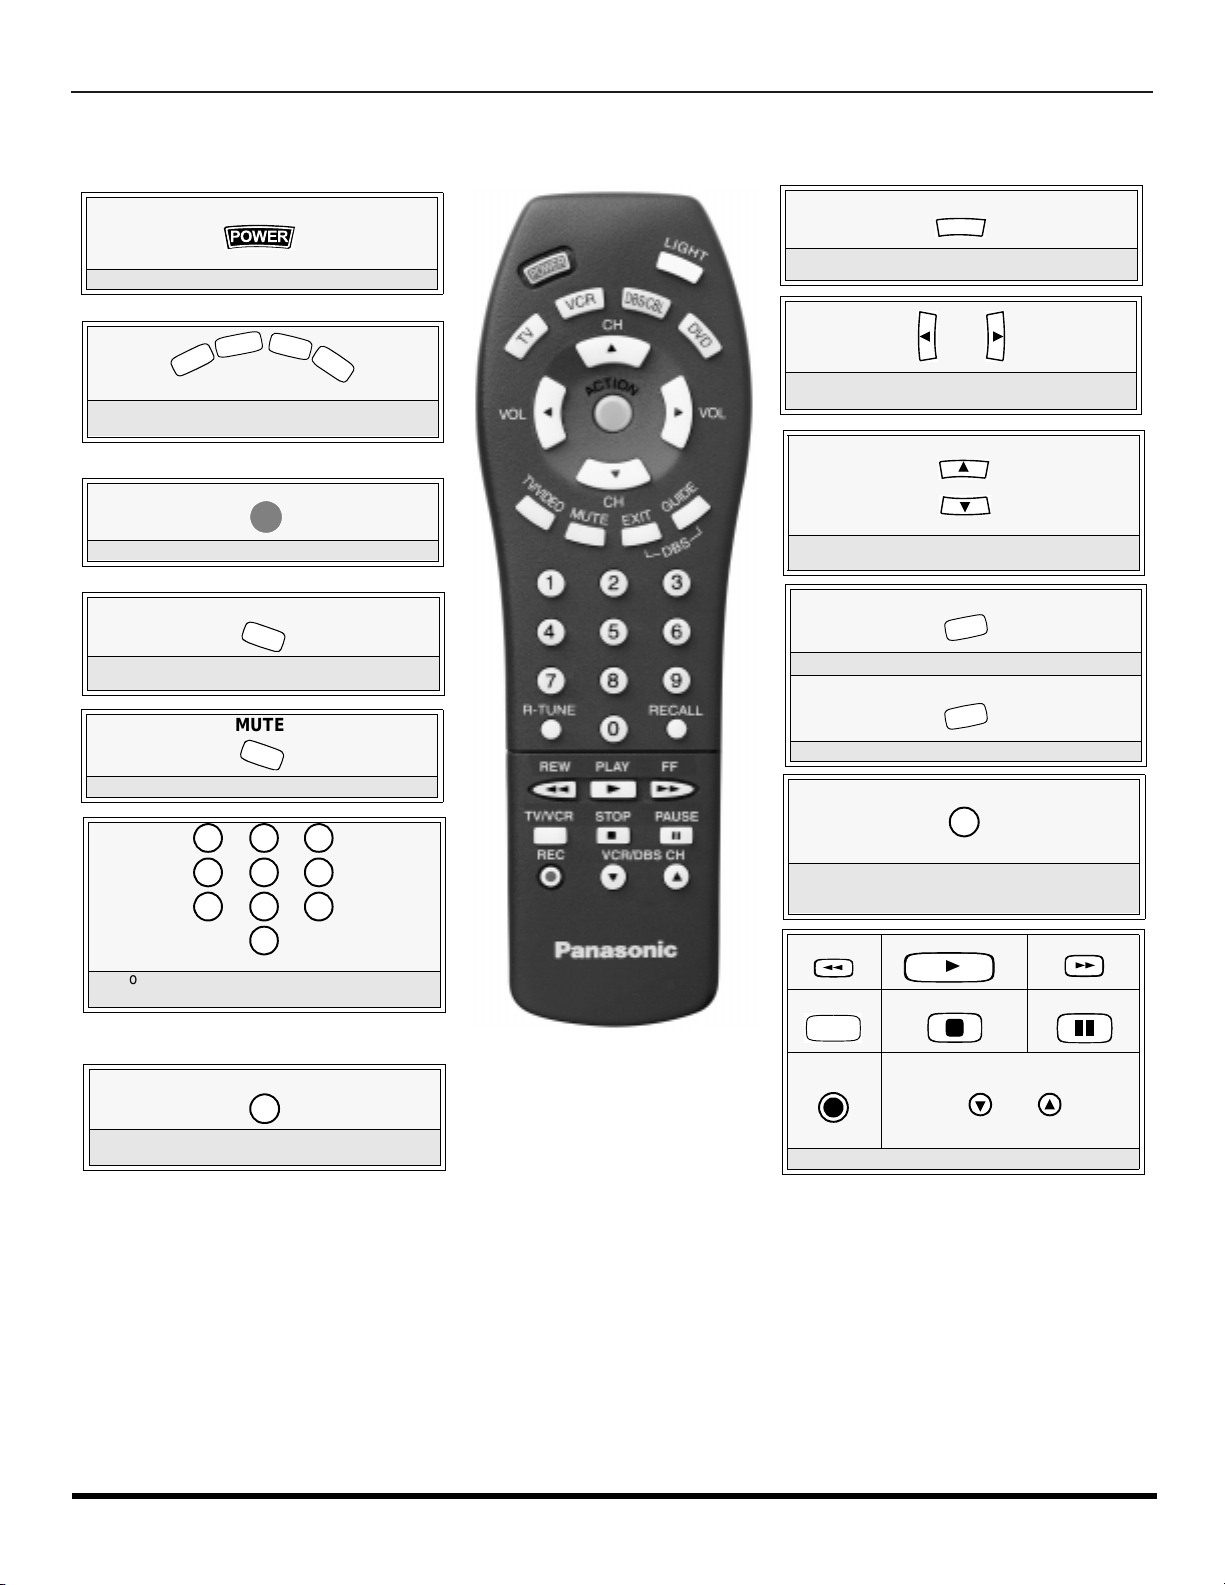
Operación del Control Remoto
T
V
V
CR
D
B
S
/
C
B
L
D
V
D
7
4
1 2
5
8
0
9
6
3
(Para los modelos CT-G2972, CT-G2972L, CT-G3352 y CT-G3352X solamente.)
POWER
Presione para ENCENDER y APAGAR
Presione para seleccionar el funcionamiento del
control remoto.
ACTION
Presione para accesar los menús.
O
PERACIÓN DEL CONTROL REMOTO
*LIGHT
Presione para illuminar los botones del control
remoto.
VOL VOL
Presione para ajustar el nivel del audio de la TV
y navegar en los menús.
CH
Presione para seleccionar el siguiente canal y
navegar en los menús.
CH
TV/VIDEO
Presione para seleccionar la modalidad de
televisión o vídeo.
MUTE
Presione para silenciar el sonido.
Presione el teclado numérico p a ra seleccio nar
cualquier canal.
R-TUNE
Presione para regres ar al ca nal pre viamen te vi sto
o modo de vídeo.
EUR511502
EXIT
Botones de función de DBS.
GUIDE
Botones de función de DBS.
RECALL
Presione para visualizar la hora, el canal,
cronómetro de apagado automático, y otras
opciones.
REW
TV/VCR
REC
Botones de función Componente.
PLAY
u
STOP
VCR/DBS CH
FF
PAUSE
Instalación de Pilas en el Control Remoto
Use dos pilas AA:
Quite la tapa del compartimiento de pilas presionando en dirección a la flecha.
Instale las pilas igualando las marcas (+) y (–) de la polaridad.
Coloque nuevamente la tapa de las pilas.
Precauciones
• Reemplace las pilas por pares.
• No mezcle tipos de pilas ( carbono de zinc con alcalina).
• No intente cargar, hacer cortocircuito, desarmar, calentar ó quemar las pilas.
Nota: Instalación incorrecta puede causar derrame y corrosión que dañará al Control Remoto.
*Para prolonger la vida de las pilas,
encienda y apague la luz presionando
los botones R-TUNE y RECALL
simultáneamente.
9 l
Page 48
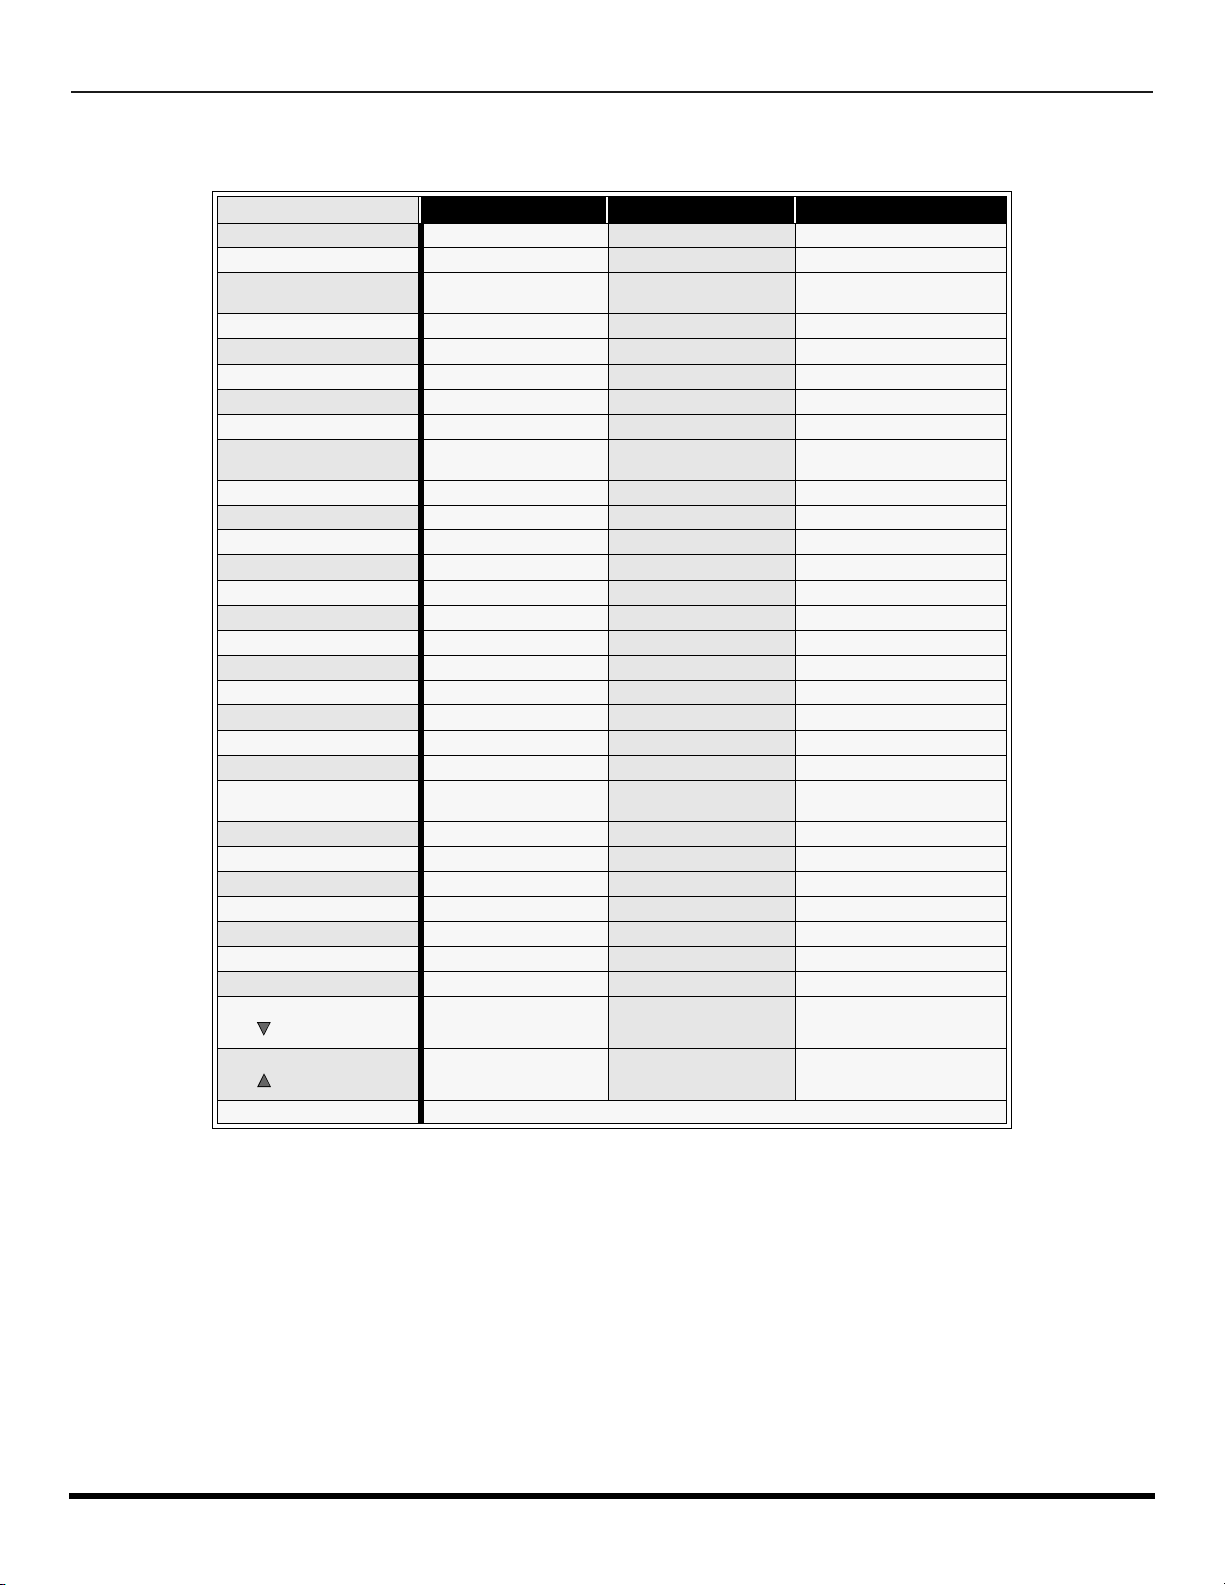
O
PERACIÓN DEL CONTROL REMOTO
Tabla del Modo operacional de las Teclas
Esta tabla define que teclas func ionan después de pr ogramar (si es requ erido) el control remoto, cuando se se leccciona
uno de los modos TV, DTV, CABLE, DBS, VCR, DVD ...etc.
Nombre
POWER Encendido Encendido Encen di do
MUTE Mudo Televísión Mudo Televísión Mudo
TV/VIDEO
CHAN UP Canal Arriba Canal Arriba Navegación Arriba
CHAN DOWN Canal Abajo Canal Abajo Navegación Abajo
VOL RIGHT VOL + Televísión VOL + Navegación Derecha
VOL LEFT VOL - Televísión VOL - Navegación Izquierda
ACTION Menú/Entrar - Menú
RECALL
EXIT - - Salida DBS
GUIDE - - Guia DBS
1 Digito 1 Digito 1 Digito 1
2 Digito 2 Digito 2 Digito 2
3 Digito 3 Digito 3 Digito 3
4 Digito 4 Digito 4 Digito 4
5 Digito 5 Digito 5 Digito 5
6 Digito 6 Digito 6 Digito 6
7 Digito 7 Digito 7 Digito 7
8 Digito 8 Digito 8 Digito 8
9 Digito 9 Digito 9 Digito 9
0 Digito 0 Digito 0 Digito 0
R-TUNE
<<REW Regresar VCR - -
PLAY Tocar VCR - >>FF FF VCR - PAUSE Pausa VCR - STOP Detener VCR - RECORD Grabar VCR - TV/VCR Interruptor TV/VCR - VCR/DBSCHAN
VCR/DBS CHAN
LIGHT Iluminar los botones del control remoto
MODO TV MODO CABLE MODO DBS
Selección De Fuente
De Video
Desplegar
Información
Canal o Modo De
Video Previo
Canal Abajo VCR - DBS Canal Abajo
Canal Arriba VCR - DBS Canal Arriba
Selección De Fuente
De Video Televísión
T e levísión Desplegar
Información
Canal Previo Programa DBS
Selección De Fuente De
Video Televísión
Info. De Programa
10 l
Page 49
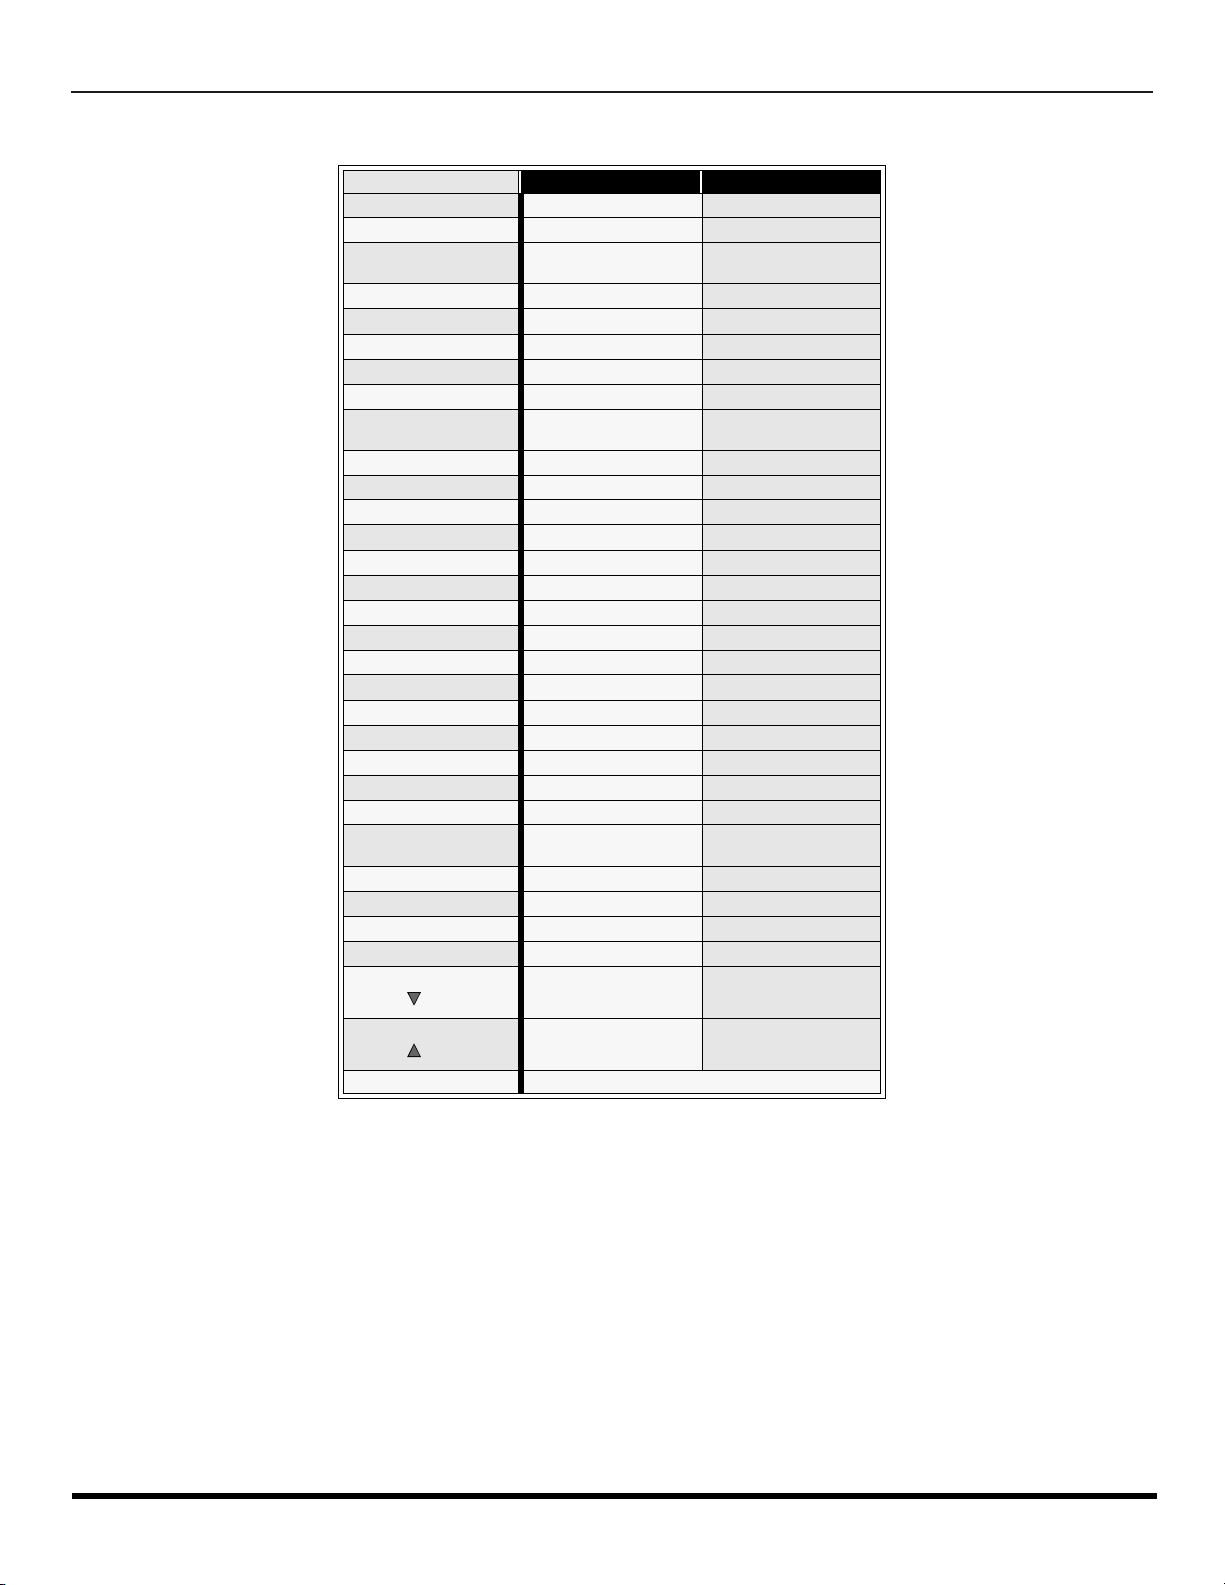
Tabla del Modo operacional de las Teclas (cont.)
Nombre MODO VCR MODO DVD
POWER Encendido Encendido
MUTE Te levísión Mudo Televísión Mudo
TV/VIDEO
ACTION - -
CHAN UP - Capitulo Siguiente
CHAN DOWN - Capitulo Previo
VOL RIGHT Televísión Vol + Navegación Derecha
VOL LEFT Televísión Vol - Navegación Izguierda
RECALL
EXIT - -
GUIDE - 1 - 2 - 3 - 4 - 5 - 6 - 7 - 8 - 9 - 0 - R-TUNE - <<REW Regresar Salto Atrás <<
PLAY Tocar Tocar
>>FF FF
PAUSE Pausa Pausa
STOP Detener Detener
RECORD Grabar TV/VCR Interruptor TV/VCR Abrir/Cerrar
VCR/DBS
CHAN
VCR/DBS
CHAN
LIGHT Iluminar los botones del control remoto
Selección De Fuente
De Video Televísión
Despliegue En
Pantalla
Canal Abajo Despacio -
Canal Arriba Despacio +
O
PERACIÓN DEL CONTROL REMOTO
Selección De Fuente
De Video Televísión
Despliegue En
Pantalla
Salto Atrás
FF>>
11 l
Page 50
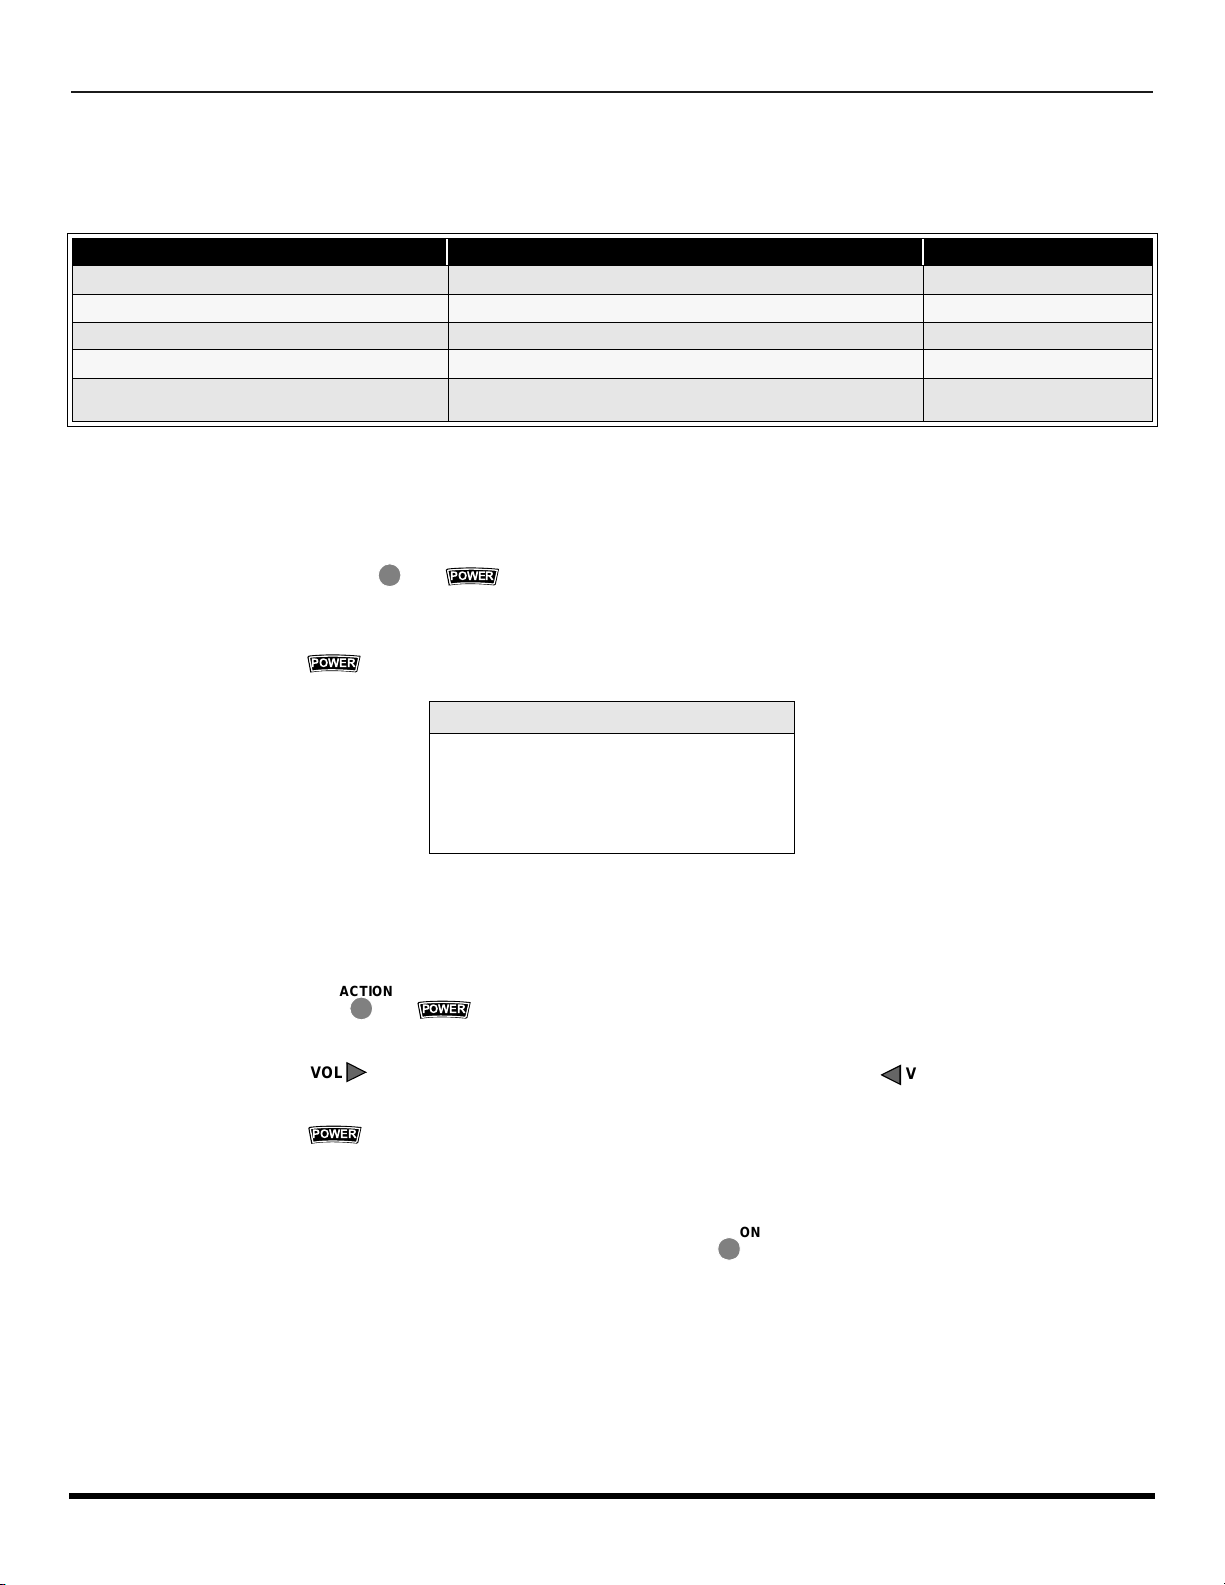
O
PERACIÓN DEL CONTROL REMOTO
Programando El Control Remoto
El Control Remoto Univers al puede programars e para operar componentes de varios fabrican tes usando los bo tones de
función para VCR, DVD, CABLE o DBS. Siga los procedimientos para programar su Control Remoto con o sin código para
el componente.
Modos De Default Para El Control Remoto
Equipo Funciona Default
TELEVISIÓN TELEVISIÓN (Solo Panasonic ) Código TV Panasonic
CABLE CABLE (preajustado) Código CABLE Panasonic
SISTEMA DE TRANSMISIÓN DIGITAL SISTEMA DE TRANSMISIÓN DIGITAL (preajustado) Código DBS Panasonic
VIDEOCASETERA VIDEOCASETERA Código VCR Panasonic
VIDEO DISCO DIGITAL/DISCO COMPACT O
Determine el fabricante del componente y busque en la tabla su código.
VIDEO DISCO DIGITAL/DISCO COMPACTO
(preajustado)
Código DVD Panasonic
Procedimiento
• Confirme que el componente esté conectado y en operación
• Apague el componente.
• Presione los botones de y
ACTION
POWER
juntos, cuando menos 5 segundos.
• Presione el botón de la función apropiada del componente en el Control Remoto. (VCR, DVD, CABLE o DBS).
• Ponga el código del componente de 3 dígitos usando el teclado numérico (botones 0 ~ 9) del Control Remoto.
•
Presione el botón de el Control Remoto para probar el componente. Si éste procedimiento ha sido exitoso,
el componente se encenderá
POWER
.
Consejos Utiles: Código sin éxito
Si el componente no opera con el Control
Remoto, repita el procedimiento usando otro
código. (Algunas marcas tienen múltiples
códigos.)
Si un código se ha puesto incorrectamente, o si el
procedimiento toma más de 30 segundos, la
programación ha fracasado.
.
Programación Sin Código
Este procedimiento busca todos los códigos y se le llama “método de secuencia.”
•
Confirme que el componente esté conectado y en operación
• Apague el componente.
ACTION
VOL
• Presi one los boton es
•
Presione el botón de la función apropiada del componente en el Control Remoto
• Presi one el botón
POWER
y junt os, cuando menos 5 segundos.
para ubicarse en el sigui ente cód igo. Presi one el bo tón para regresar a l có digo
anterior.
• Presione el botón de el Control Remoto para probar el componente. Si éste procedimiento ha sido exitoso,
POWER
el componente se encenderá.
Nota: Repita los pasos anteriores hasta que el código del componente se halla encontrado. Puede tomar varios intentos
hasta encontrar el código correcto.
• Después de que el código se ha encontrado, presione el botón para guardar el código.
.
.
VOL
ACTION
12 l
Page 51
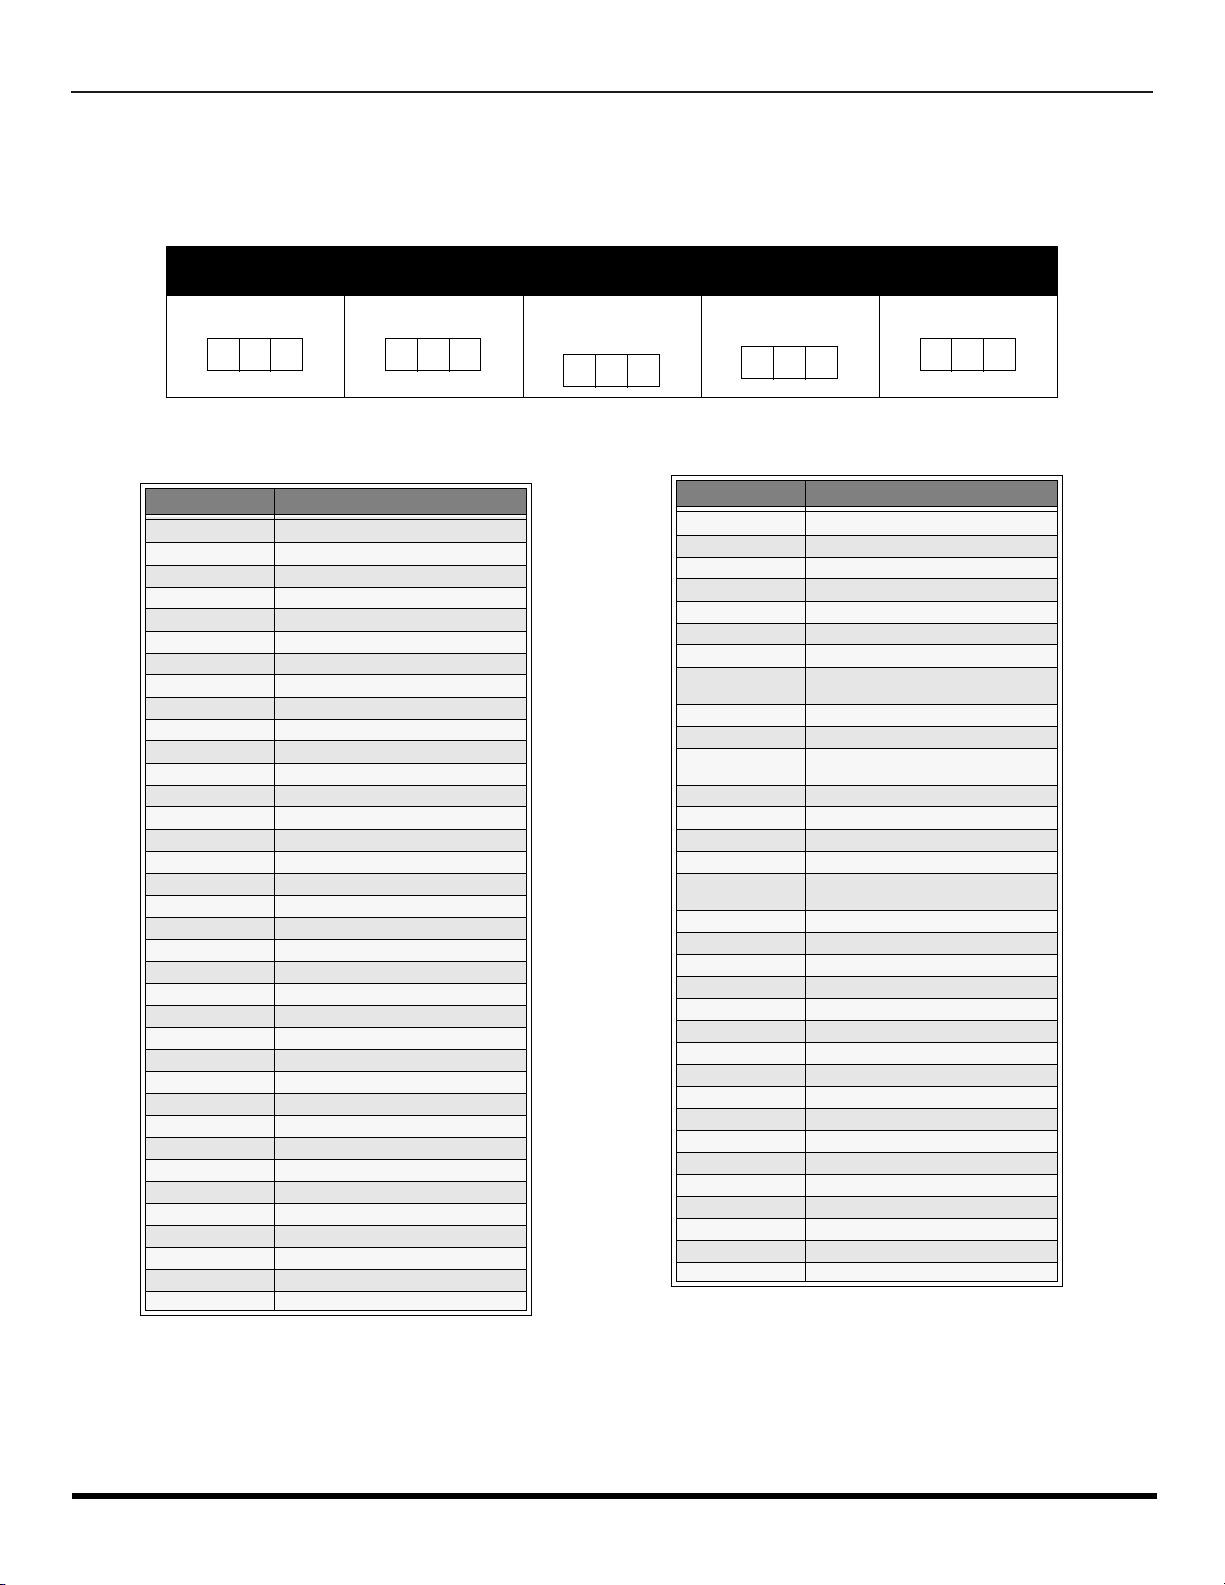
O
PERACIÓN DEL CONTROL REMOTO
Códigos de Componentes
El Control Remoto Uni versal tiene capacidad de op erar varias marcas de com ponentes después de intr oducir el código
apropiado. A causa del límite de memoria no se han incluido todos los códigos existente s, por lo cual es posible que
algunos componentes no operen. El Control Remoto Universal no controla todas la funciones y características disponibles
en todos los modelos.
Escriba los números del código en este espacio. Esto le servirá como referencia cuando necesite programar su
Control Remoto
Videocasetera
.
Videodisco Digital
Sistema de
Transmisión digital
(DBS)
Decodificador de
cable
Otros
Codigos para VCR
Marque Code
Admiral
Aiwa 127, 132
Akai 114, 1 15, 116, 129
Audio Dynamic 111, 139
Bell & Howell 105, 113
Broksonic 120, 126
Canon 123, 125
Citizen 106
Craig 105, 106, 129
Curtis Mathes 124, 127, 145
Daewoo 175, 124, 143
DBX 110, 111, 139
Dimensia 145
Emerson 103, 119, 120, 125, 126, 143
Fisher 105, 107, 108, 109, 113
Funai 120, 126, 134
GE 124, 133,145
Goldstar 106
Gradiente 134
Hitachi 100, 123, 145
Instant Replay 123, 124
Jensen 139
JVC 110, 111, 134,139
Kenwood 306, 310, 311, 339
LXI 100, 105, 106,107, 108, 109
Magnavox 123, 124, 131
Marantz 310, 311, 339
Marta 106
Memorex 109, 124
MGA 138, 140, 141, 147,148
Minolta 100,145
Mitsubishi 138, 140, 141, 147, 148
Multitech 104, 147
NEC 110,111, 134, 139
Olympic 123, 124
Optimus 106, 121, 128, 135
135
Marque Code
Orion 120, 126
Panasonic 121,122, 123, 124
J.C. Penney 100,105, 110, 111, 124, 139, 145
Pentax 100,111, 145
Philco 120, 123, 124, 126, 131, 1 43
Philips 123, 124, 131
Pioneer 123
Proscan
Quasar 121, 122, 123, 124
Radio Shack 105, 109, 124, 133, 136, 140
RCA
Realistic 105, 109, 124, 136, 140
Samsung 102, 104, 133
Sansui 120, 126, 139, 152
Sanyo 105, 109, 113
Scott
Sears 100, 105, 106, 107, 108
Sharp 135, 136
Shintom 117
Signature 2000 135
Singer 117
Sony 128, 129, 130
Sylvania 123, 124, 131
Tashiro 106
Tatung 110, 111, 139
Teac 1 10, 111, 139
Technics 121, 122, 123, 124
Teknika 124
Toshiba 101, 146
Vector Research 111
Wards 106, 109, 135, 136, 144
Yamaha 105, 110, 111, 139
Zenith 106,144
100, 101, 102, 123, 124, 131, 133,
145, 146
100, 101,102, 123, 124, 131, 133,
145, 146
101, 102, 104, 109, 120, 126, 138,
140, 147, 148
13 l
Page 52
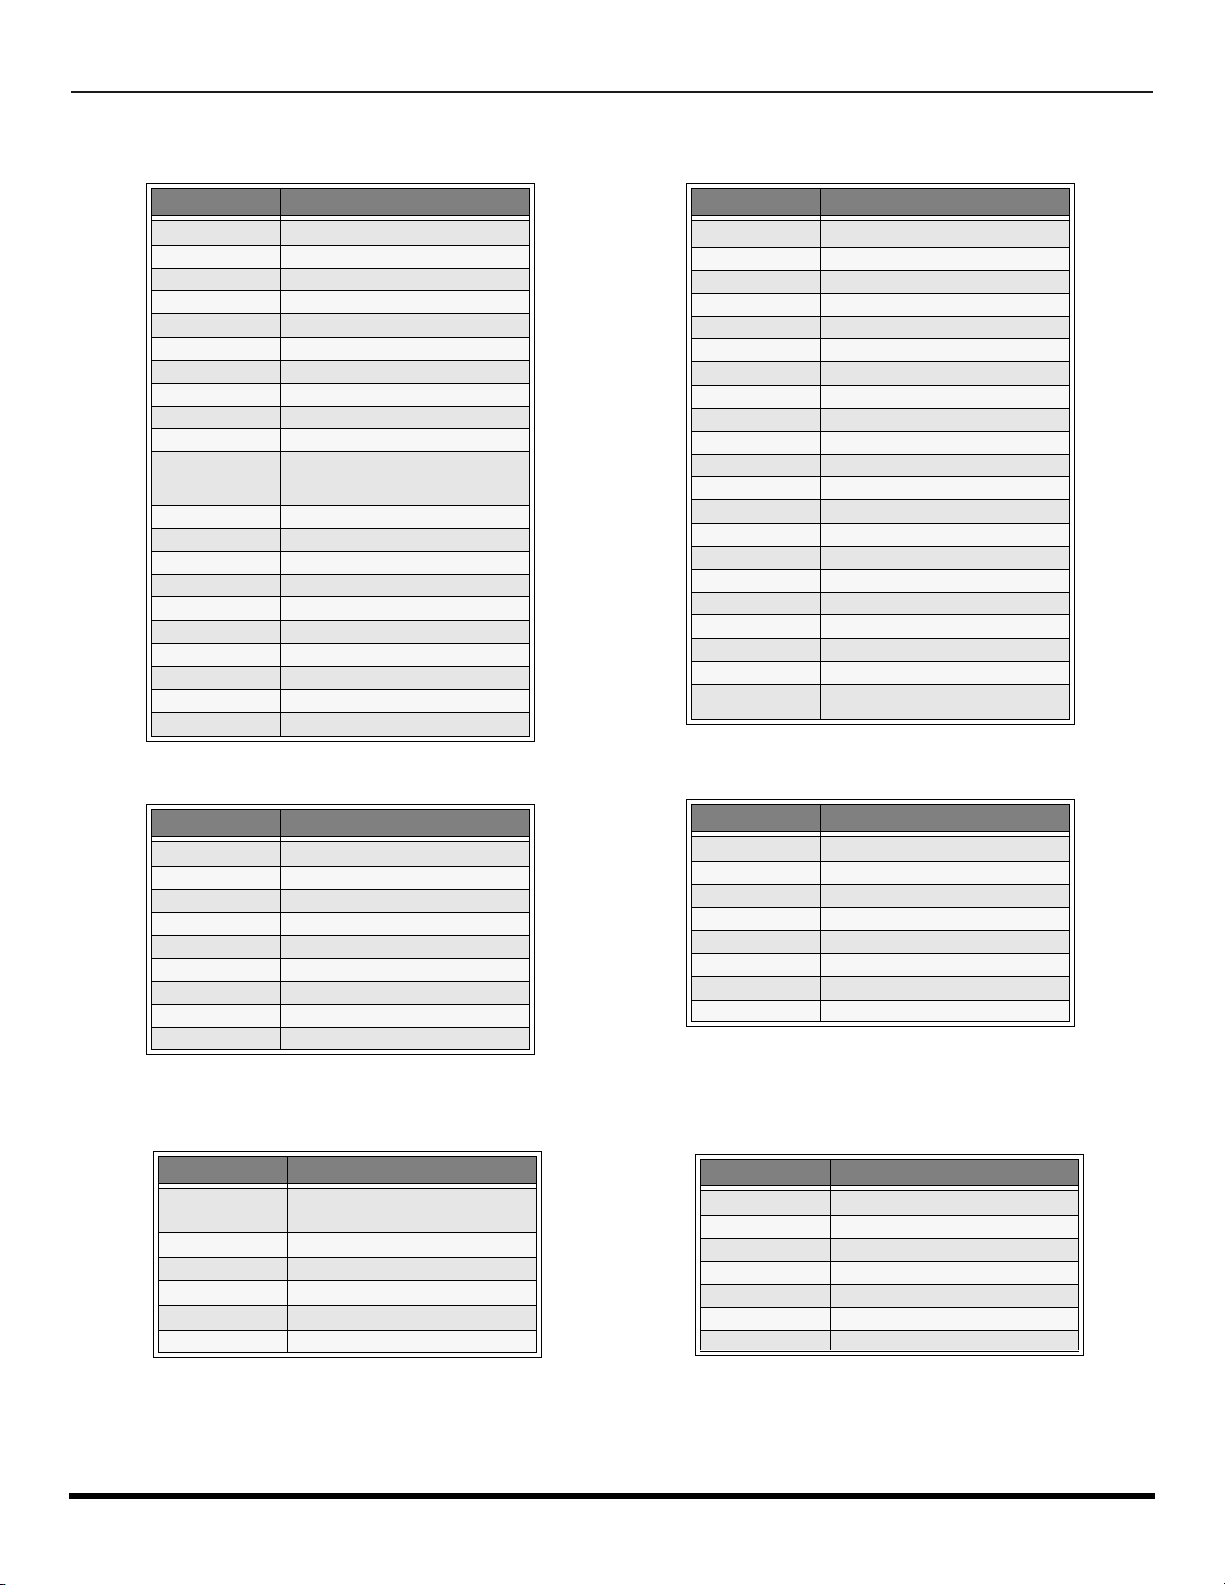
O
PERACIÓN DEL CONTROL REMOTO
Códigos de Componentes (cont.)
Códigos para Decodificador de Cable
Marque Code
ABC 224
Archer 225, 232
Cableview 205, 232
Citizen 205, 222
Curtis 212, 213
Diamond 224, 225, 232
Eagle 229
Eastern 234
GC Brand 205,232
Gemini 222
General
Instrument/
Jerrold
Hamlin 212, 218, 240, 241, 242, 245
Hitachi 203, 224
Macom 203, 204, 205
Memorex 230
Movietime 205, 232
Oak 202, 237,239
Panasonic 209, 210, 214
Philips 206, 207, 228, 229, 230
Pioneer 201, 216
Pulsar 205, 232
211, 219, 220, 221, 222, 224, 225,
226, 227
Marque Code
Puser
RCA 215
Realistic 232
Regal 212, 218, 240, 241, 242, 245, 249
Regency 234
Rembrandt 205, 232, 237
Samsung 205
Scientific Atlanta 211, 212, 213
Slmark 201, 205
Sprucer 205, 210
Stargate 205, 232
Teleview 201, 205
Texscan 244
Tocom 235, 236,247
Toshiba 204
Unika 225, 232
Universal 222, 232
Videoway 206
Viewstar 229, 230
Zenith 200, 217
Zenith / Drake
Satellite
232
200
Marque Code
Denon 100
Ferguson 101
JVC 108
Mitsubishi 105
Nordmende 101
Panasonic 100
Philips 103
Pioneer 102
RCA 101
Marque Code
Dish Network
(Echostar)
Echo Star 105
G.E. 106
Gradiente 114
Hitachi 103, 111, 112
HNS (Hughes) 103
105, 115, 116
Códigos para DVD
Saba
Samsung 110
Sharp 108
Sony 104
Thomson 101
Toshiba 103
Yamaha 100
Zenith 107
Códigos para DBS
Marque Code
101
Marque Code
Panasonic
Philips 101, 102
Primestar 108
RCA 106, 109, 110, 113
Sony 107
Toshiba 100
Uniden 101, 102
104
14 l
Page 53
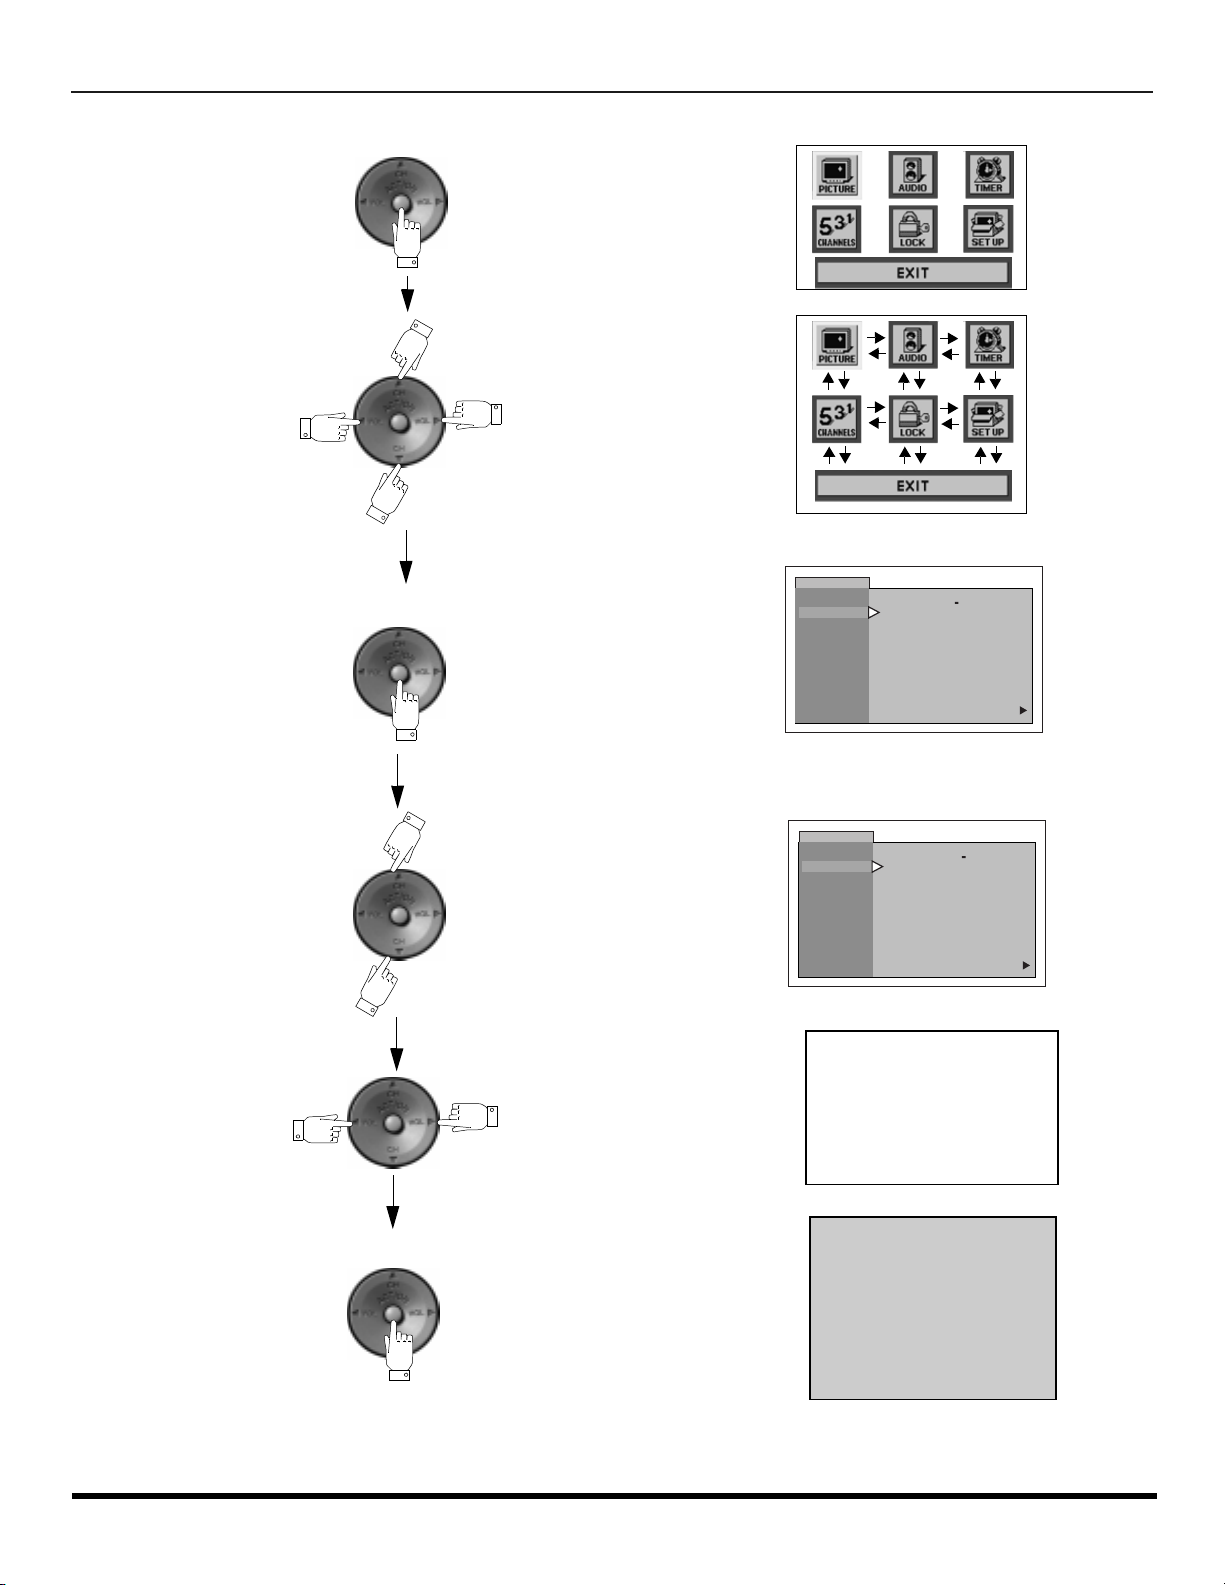
N
AVEGACIÓN DEL MENU DE ICONOS
Navegación del menu de iconos
Presione para deplegar los iconos.
Presione para seleccionar el icono deseado.
Presione para desplegar las características
del icono seleccionado
IMAGEN
AJ. IMAGEN
COLOR
TINTE
BRILLO
CONTRASTE
NITIDEZ
NORMAL
-- -- -- I -- -- --
-- --
-- I -- -- --
-- -- -- I -- -- --
-- -- -- -- ---- -- -- -- -- -- I
-- -- -- I -- -- --
NO
u
Presione para seleccionar la caracteristica.
Presione
para ajustar o activar la
caracteristica
Presione repetidamente para salir de
los menús.
IMAGEN
AJ. IMAGEN
COLOR
TINTE
BRILLO
CONTRASTE
NITIDEZ
NORMAL
BRILLO 32 -- -- -- I -- -- --
Imágen normal
-- --
--
I -- -- --
--
I -- -- --
-- --
-- --
--
I -- -- --
-- -- -- -- ---- -- -- -- --
-- --
--
I -- -- --
--
I
NO
u
15 l
Page 54
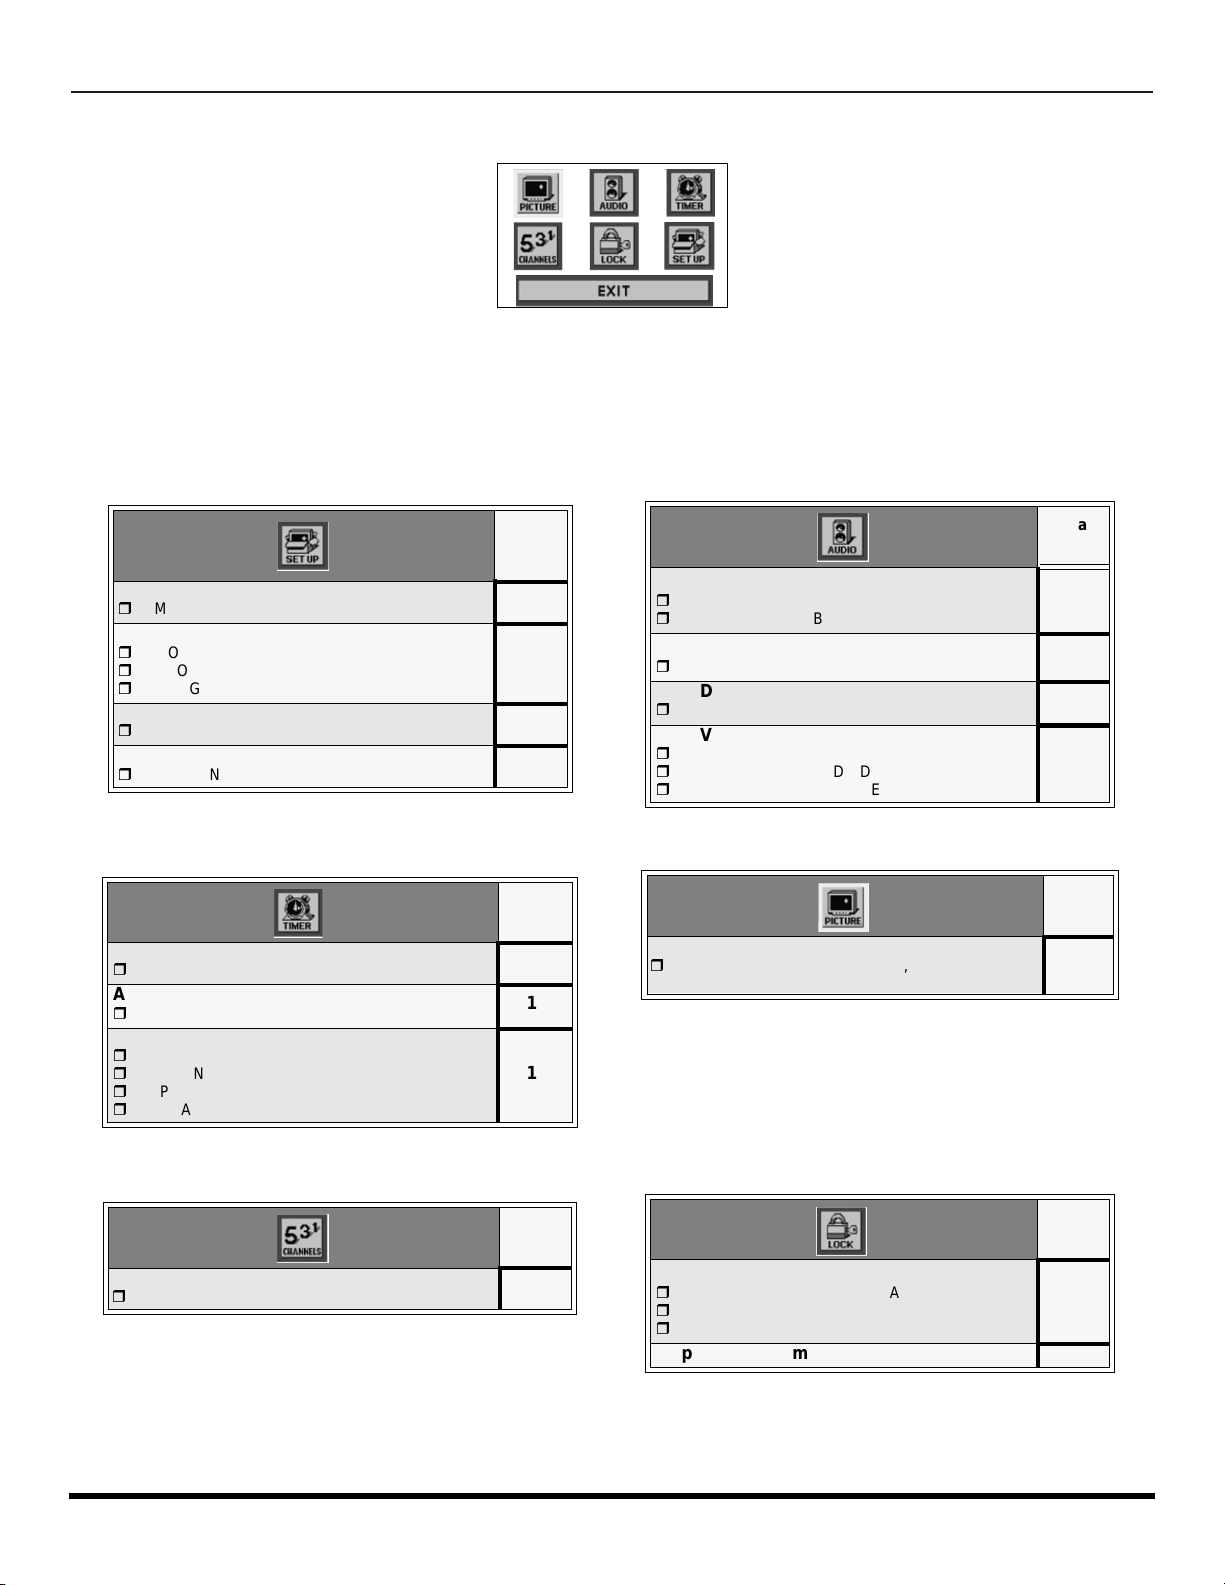
M
ENÚ
DE I
CONOS PRINCIPAL
Menu de iconos Principal
Menú de Iconos
Estas tablas muestran todos los menús de cada icono y a que páginas ir para sus descripciones.
Ir a
página
IDIOMA/LANGUE
r
MODO - (INGLÉS, FRANÇAIS, ESPAÑOL)
PROG CNLS
r
MODO - (TELEVISIÓN o CABLE)
r
PROGRAMA AUTO
r
PROGRAMA MANUAL
CC (CLOSED CAPTIONED - Subtítulos)
r
MODO CC
OTROS AJ.
r
AUTOENCENDIDO
17
17
18
18
AJ. AUDIO
r
MODO (ESTERO, SPA o MONO)
r
BAJOS, ALTOS, BALANCE o NORMAL
OTROS AJ.
r
SONIDO IA
SONIDO ENVOLVENTE
r
ENVOLVENTE
ALTAVOCES
r
SI
r
APAGADAS Y SALIDA DE AUDIO VARIABLE
r
APAGADAS Y SALIDA DE AUDIO FIJA
Ir a
página
20
20
20
20
AJUSTE DE RELOJ
r
HORA
APAGADO
r
TIEMPO?
CRONOM
r
MODO
r
ENCENDER
r
APAGAR
r
ELIJA CANAL
TITULOS
r
MANUAL
Ir a
página
19
19
19
Ir a
página
21
AJ. IMAGEN
r
COLOR, TINTE, BRILLO, CONTRASTE,
NITIDEZ o NORMAL
MODO
r
BLOQUEO - (TODOS, CANALES o JUEGO)
r
PROGRAMAS
r
TIEMPO?
Operación del menú de V-CHIP 24
Ir a
página
18
Ir a
página
23
16 l
Page 55
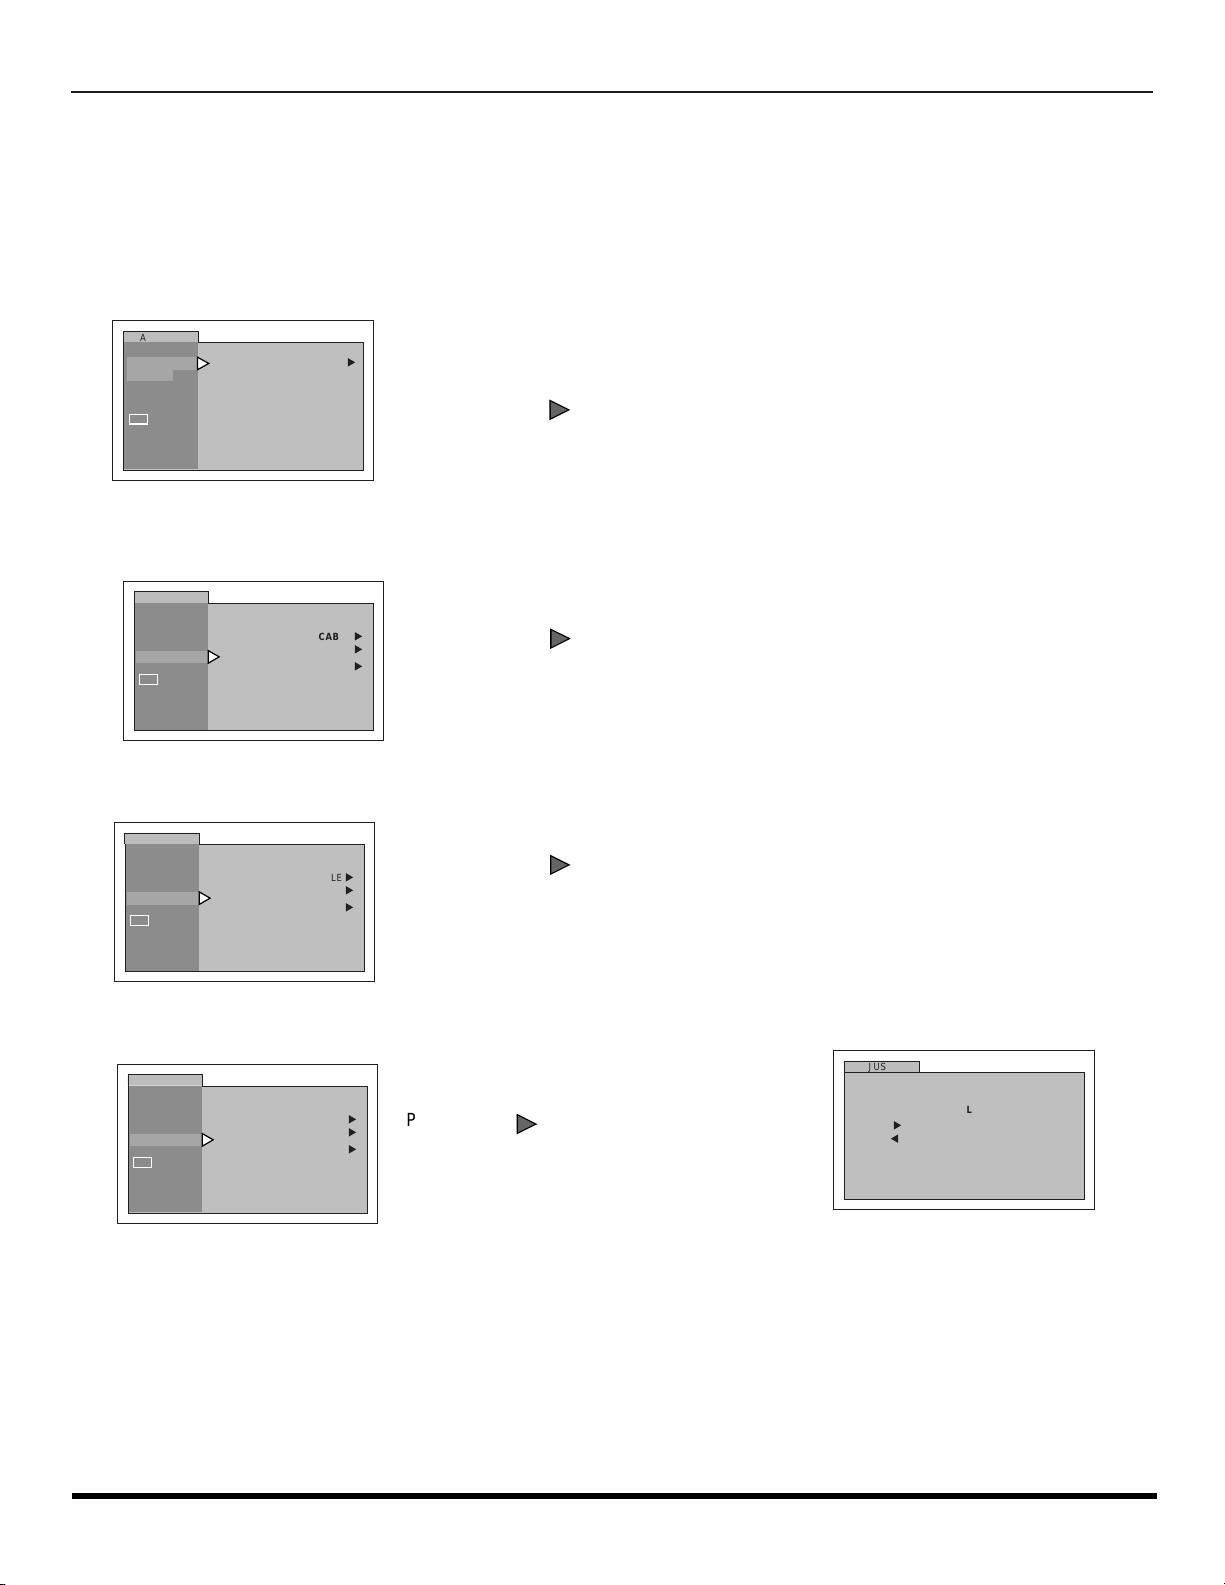
O
VOL
PERACIÓN DEL
M
ENÚ
DE I
CONOS
Operación del Menú de Iconos
AJUSTE
Nota: Vea la pág. 15 para los procedimientos de navegación del menú de iconos.
Idiomas del Menú
En el menú de SET UP (AJUSTE) bajo IDIOMA/LANGUE seleccione el idioma del menú ENGLISH (Inglés), ESPAÑOL o
FRANCAIS (Francés).
AJUSTE
IDIOMA/
LANGUE
PROG CNLS
CC
OTROS AJ.
MODO ESPAÑOL
Prog Cnls (Programación de Canales)
En el menú de AJUSTE bajo PROG CNLS seleccione:
r MODO - Para seleccionar la modalidad de TV (antena) o CABLE dependiendo de la fuente de la señal.
AJUSTE
IDIOMA/
LANGUE
PROG CNLS
CC
OTROS AJ.
MODO
PROGRAMA AUTO
PROGRAMA MANUAL
CABLE
u
Presione para seleccionar menus en Inglés, Español o Francés.
u
u
u
Presione para seleccionar TELEVISIÓN o CABLE.
VOL
VOL
r PROGRAMA AUTO -Para programar automáticamente todos los canales con señal.
AJUSTE
IDIOMA/
LANGUE
PROG CNLS
CC
OTROS AJ.
MODO
PROGRAMA AUTO
PROGRAMA MANUAL
CABLE
u
u
u
Presione para iniciar la programación automática de canales.
VOL
r PROGRAMA MANUAL - Para manualmente incluir o borrar canales.
AJUSTE
IDIOMA/
LANGUE
PROG CNLS
CC
OTROS AJ.
MODO
PROGRAMA AUTO
PROGRAMA MANUAL
CABLE
u
Presione para desplegar el si guient e menú.
u
u
Nota: Use las tecl as numéricas del contr ol remoto
para seleccionar los números de canal.
AJUSTE
PROGRAMA MANUAL
ELIJA CANEL 3
u
PARA AGREGAR
u
PARA ELIMINAR
17 l
Page 56
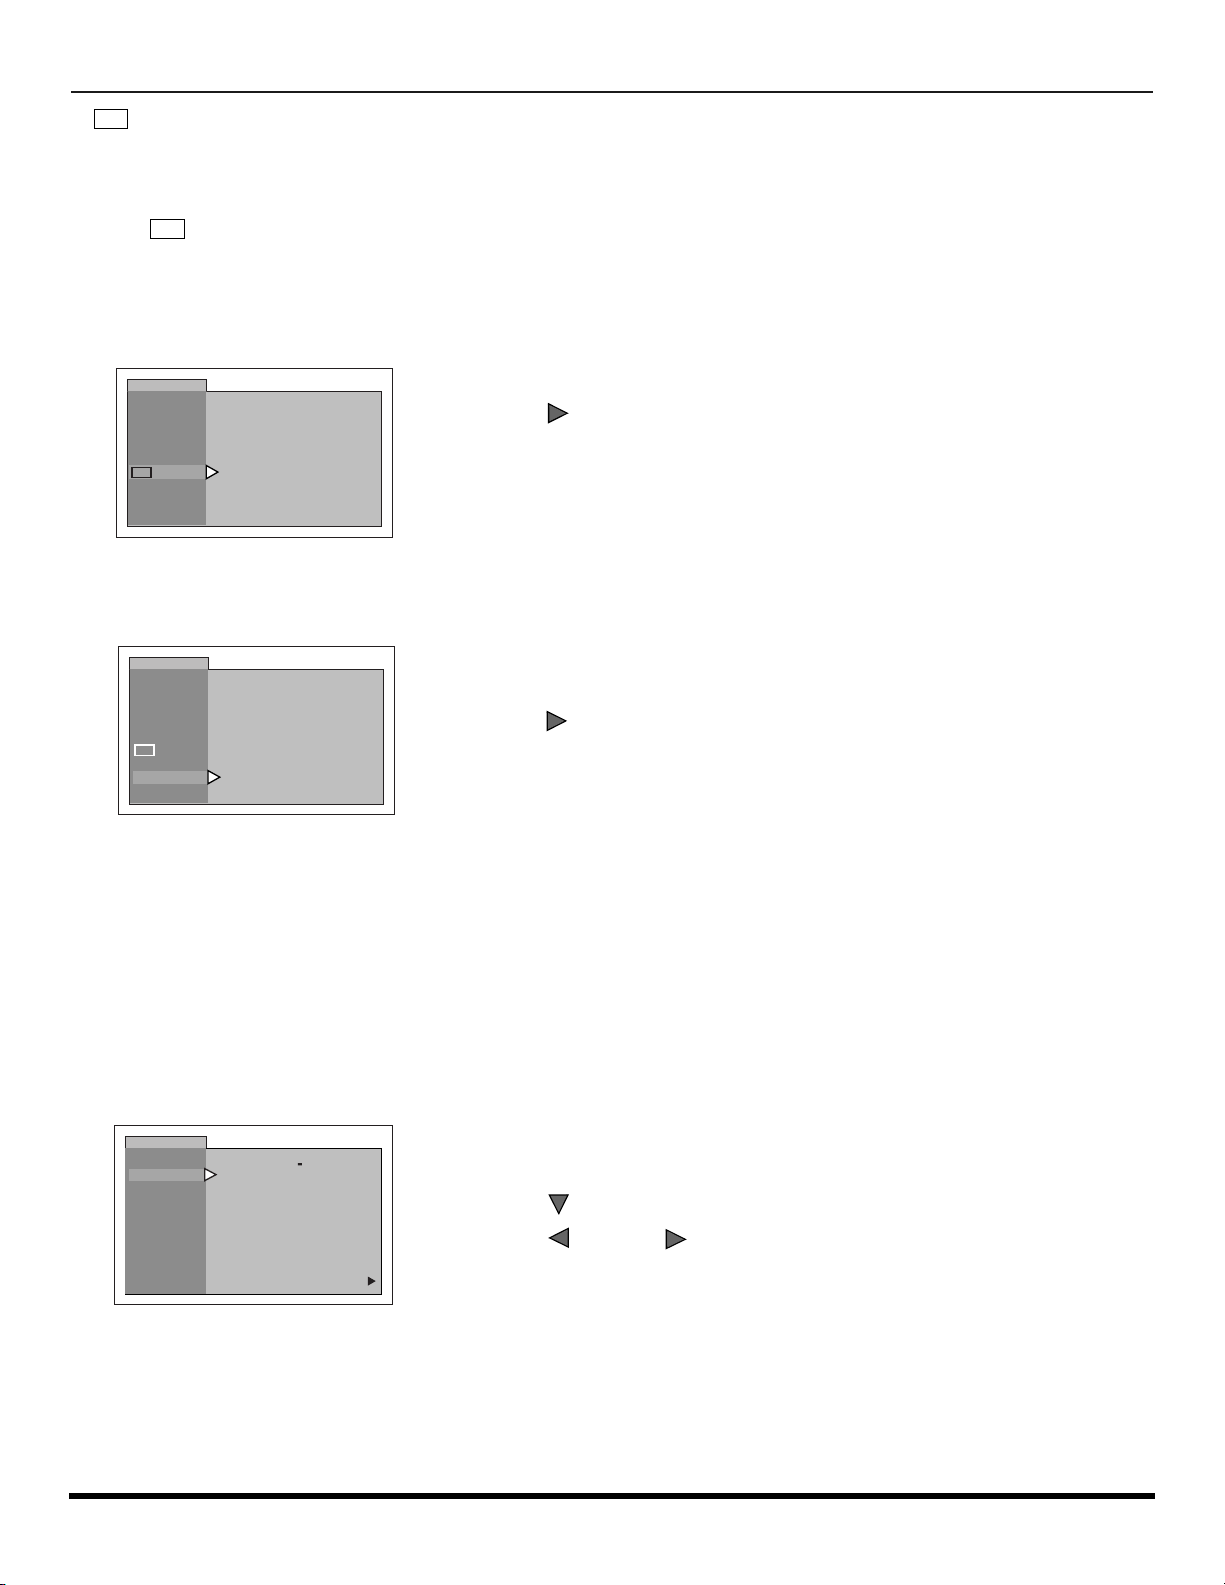
O
CH
PERACIÓN DEL
CC
(Subtítulos)
M
ENÚ
DE I
CONOS
Esta televisión tie ne un dec odificad or integrad o que d esplieg a subtítul os (text o en letr as blancas o de col ores sobr e un
fondo negro) en pantalla. Permite al usario leer el diálogo de un programa de televisión u otra información. El programa
visto debe incluir la modalidad de subtítulos para que esta función opere.
Modo
CC
Activa la caracteristica de subtítulos seleccionando uno de los siguientes modos.
r NO - Cuando no se desea la modalidad de subtítulos.
r C1 - Para que la información rela cio nada con el vídeo sea despleg ada en ha st a 4 líneas en pantalla a la ve z. (N o bl oqu ea partes
relevantes de la imagen). El texto puede ser en cualquier idioma.
r C2- Otras modalidades de información relacionada con el video.
AJUSTE
IDIOMA/
LANGUE
PROG CNLS
CC
OTROS AJ.
MODO CC
NO
Presione para seleccionar C1, C2 ó NO.
VOL
Nota: Se recomienda el modo C1 para ver subtitulos.
Otros Ajustes
En el menú de AJUSTE bajo OTROS AJ. seleccione:
r AUTOENCENDIDO - Seleccione SI para encender la televisión al mismo tiempo que el Decodificador de Cable u otros
componentes, ó seleccione NO.
AJUSTE
IDIOMA/
LANGUE
PROG CNLS
CC
OTROS AJ.
AUTOENCENDIDO NO
Presione para selecciona r NO ó Si.
VOL
IMAGEN
Nota: Vea la pág. 15 para los procedimientos de navegación del menú de iconos.
AJ. (Ajustes) Imágen
En el menú de PICTURE (Imágen) bajo AJ. IMAGEN seleccione:
r COLOR - Ajusta la intensidad del color deseada.
r TINTE - Ajusta los tonos naturales de la piel.
r BRILLO - Ajusta las áreas oscuras para detalles más nítidos.
r CONTRASTE - Ajusta las área blancas de la imagen.
r NITIDEZ - Ajusta para dar mejor claridad a los detalles de la silueta.
r NORMAL - Reajusta todas las modificaciones de la imagen a los predispuestos de fábrica.
IMAGEN
AJ. IMAGEN
COLOR
TINTE
BRILLO
CONTRASTE
NITIDEZ
NORMAL
-- -- -- I -- -- --
-- I -- -- --
-- --
-- -- -- I -- -- --
-- -- -- -- ---- -- -- -- -- -- I
-- -- -- I -- -- --
NO
r Presione para seleccionar el ajuste de imágen deseado
r Presione ó para ajustar.
u
VOL
VOL
18 l
Page 57
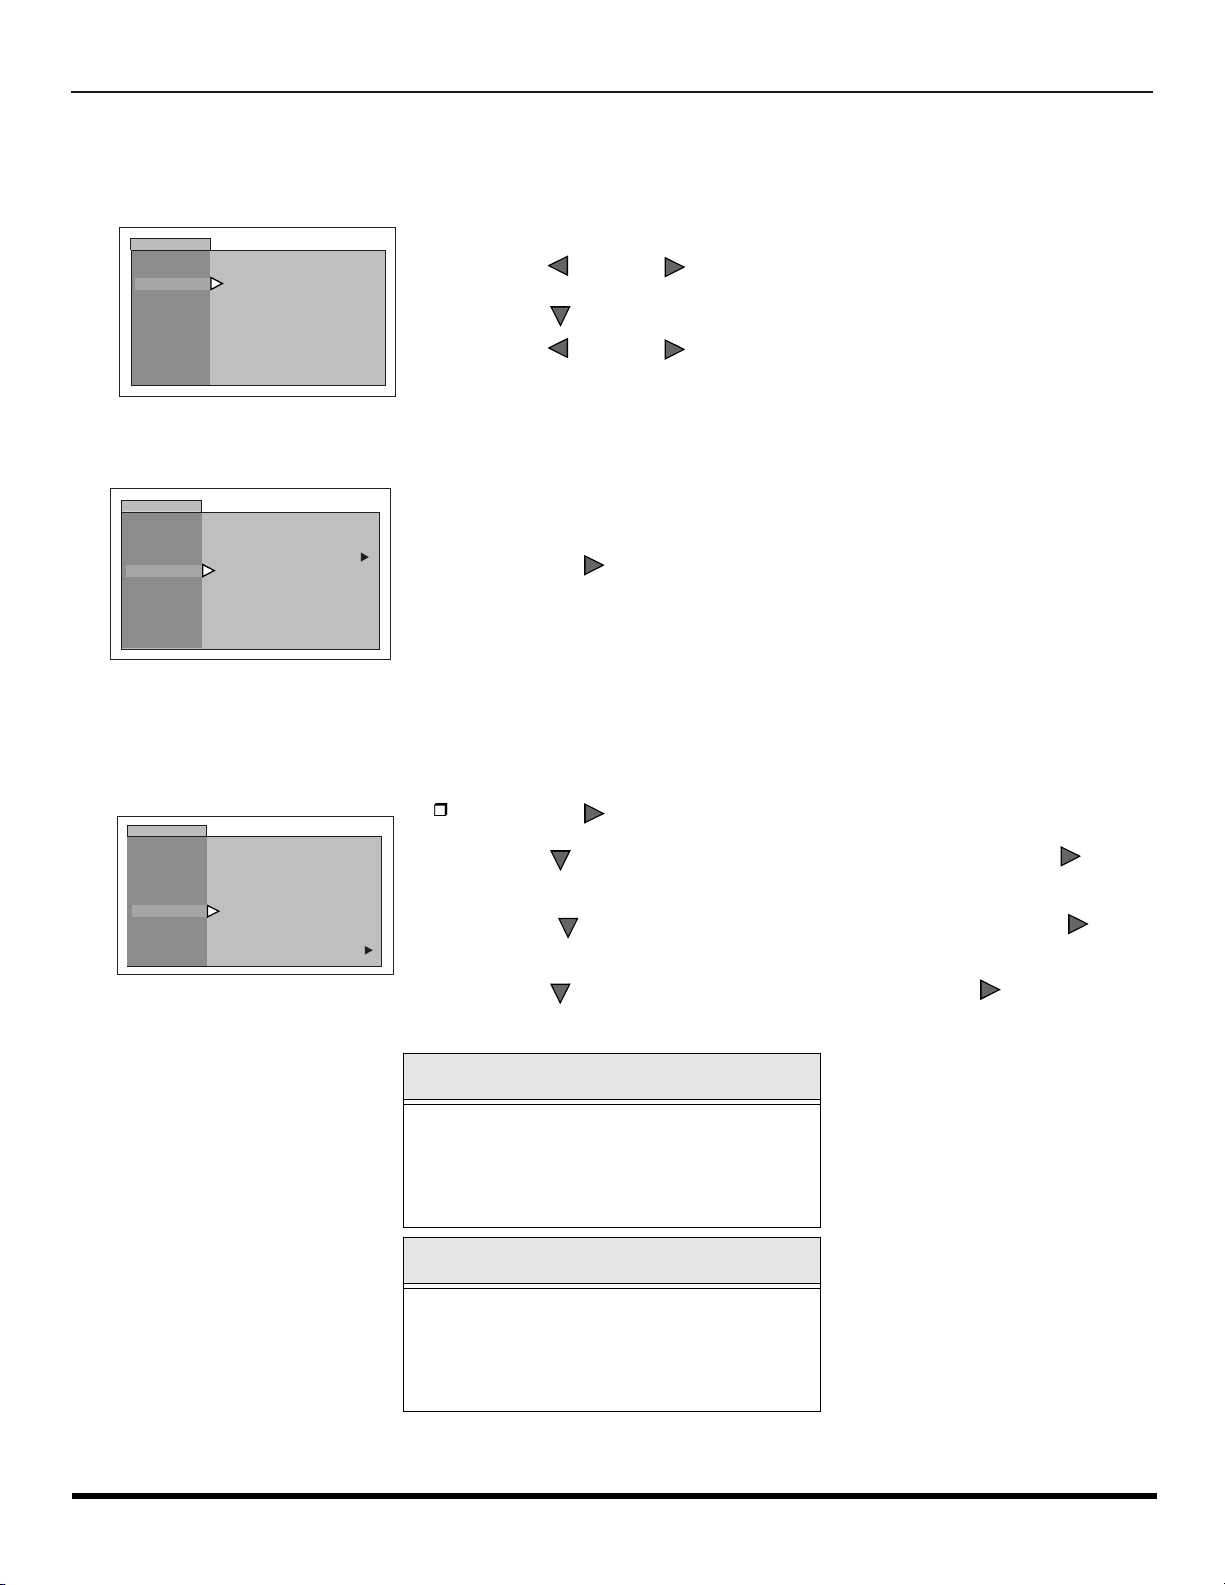
O
CH
CH
CH
PERACIÓN DEL
M
ENÚ
DE I
CONOS
Cronómetro
Nota: Vea la pág. 15 para los procedimientos de navegación del menú de iconos.
Ajuste del reloj
Ajusta la hora del día.
CRONOMETRO
RELOJ
APAGADO
CRONOM
HORA - - : - -
AM
r Presione ó para seleccionar horas AM o PM.
r Presione para seleccionar la posición de minutos.
r Presione ó para seleccionar minutos.
Cronómetro de dormir
En el menú de CRONOMETRO, seleccione APAGADO para poder apagar la Televisión en 30, 60 ó 90 minutos.
Seleccione NO para desactivar el CRONOMETRO
CRONOMETRO
VOL
VOL
VOL
VOL
.
RELOJ
APAGADO
CRONOM
TIEMPO?
NO
u
r Presione para seleccione 30, 60, 90 ó NO.
VOL
Cronómetro
En el menú de CRONO METRO seleccione u no o ambos cronóme tros, para encender y apagar la televisió n a la hora
seleccionada, en un canal seleccionado, en los días seleccionados.
Nota: La HORA debe anotarse en el menú de RELOJ para que las funciones del CRONOMETRO funcionen.
CRONOMETRO
RELOJ
APAGADO
CRONOM
MODO UN DIA
ENCENDER - - : - -
APAGAR - - : - -
ELIJA CANAL - - -
ACTIVAR
NO
r Presione para seleccionar día o días.
r Presione para seleccionar tiempo de encendido, luego presione .
r Repita para ajustar el tiempo de apagado.
r Presione para seleccionar ELIJA CANAL, luego presione para
u
seleccionar el canal.
r Presione para seleccionar ACTIVAR, luego presione para seleccionar
VOL
VOL
CH
VOL
VOL
SI.
.
Apagado después de 90 minutos
La televisión se apaga automát icament e d espu és
de 90 minutos cuando se encendió con el
CRONOMETRO. Si se seleccion a APAGAR o si
se presiona una t ecla, el a pagado automático d e
90 minutos se cancela.
Activación del CRONOMETRO
El CRONOMETRO está activo cuando la
televisión está apagada o encendida. La
televisión cambiará al canal seleccionado a la
hora seleccionada según se ajustó en el
CRONOMETRO.
19 l
Page 58
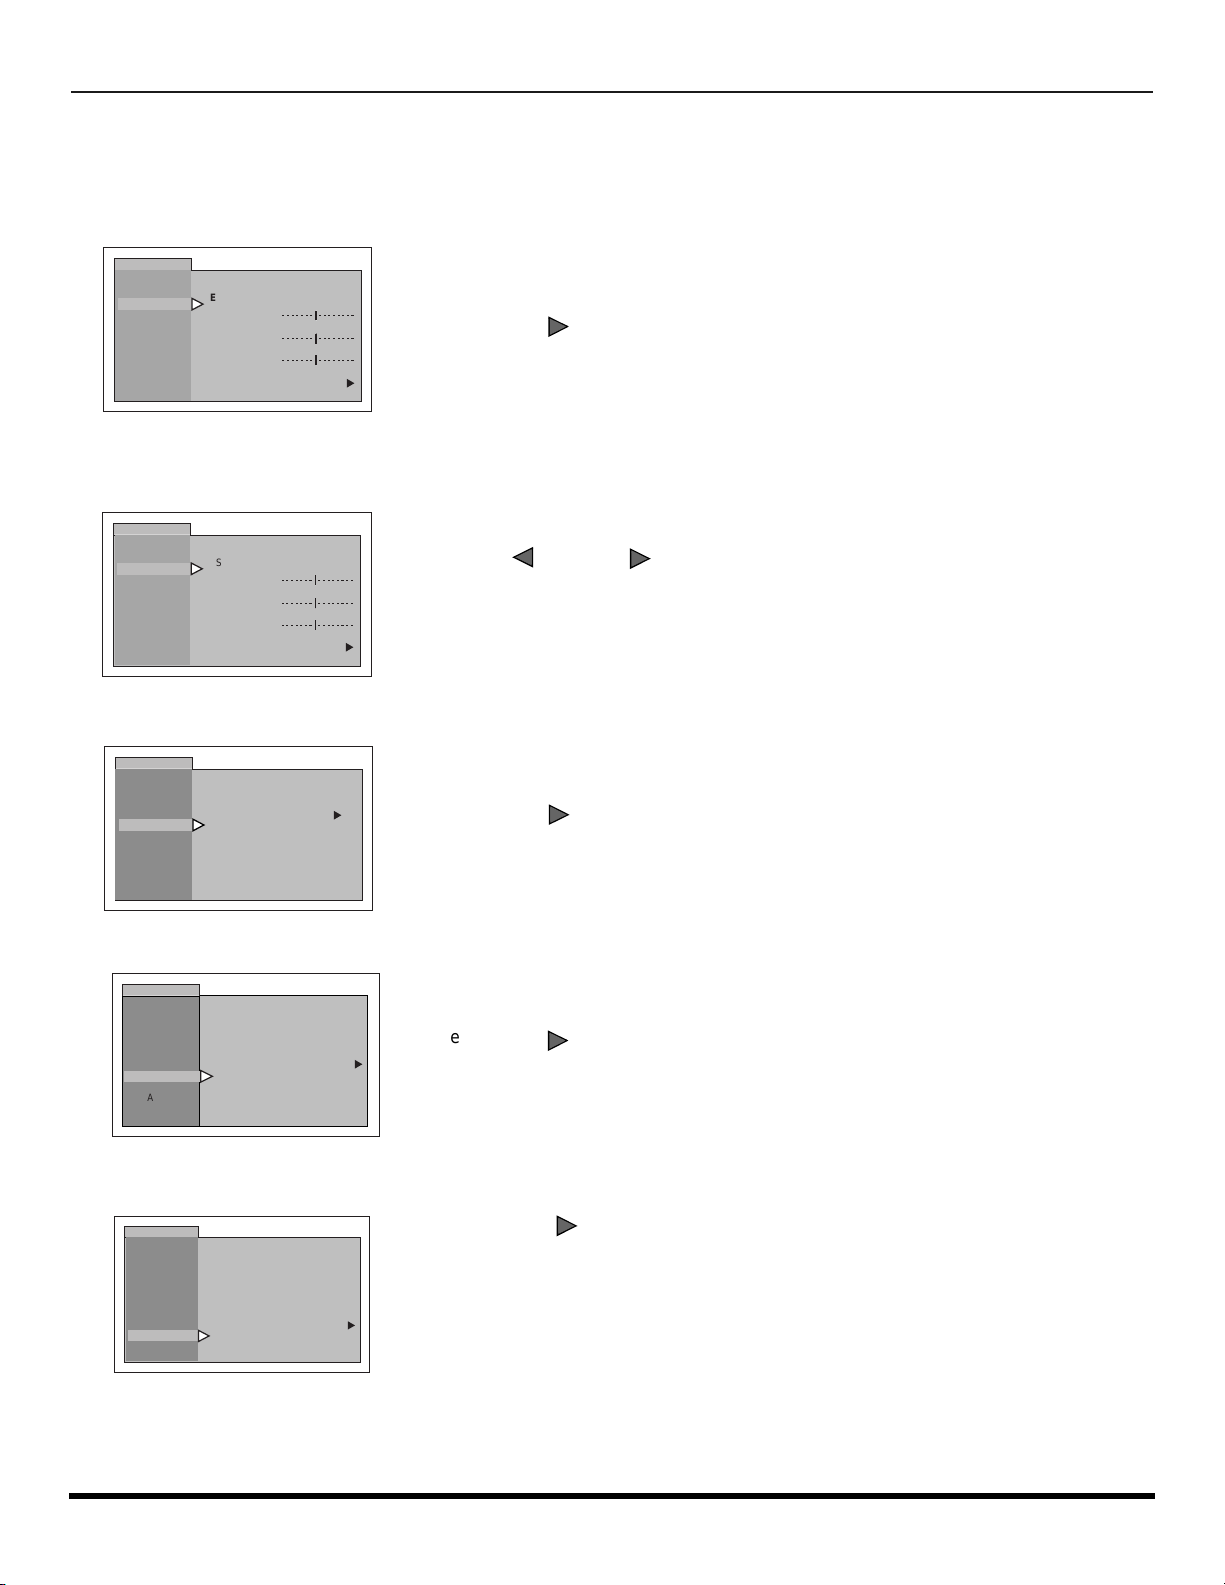
O
PERACIÓN DEL
M
ENÚ
DE I
CONOS
AUDIO
Nota: Vea la pág. 15 para los procedimientos de navegación del menú de iconos.
A.J. Audio (algunos modelos)
r MODO - Seleccione ESTEREO, SPA (Programa Secundario de audio) o MONO. (Use MONO cuando la señal de estéreo es
débil.)
AUDIO
MODO
AJ. AUDIO
OTROS AJ.
ENVOLVENTE
ALTAVOCES
r BAJOS - Aumenta o disminuye los sonidos bajos.
r ALTOS - Aumenta o disminuye los sonidos altos.
r BALANCE - Enfatiza el volumen del altavoz derecho / izquierdo.
r NORMAL - Reajusta BAJOS, ALTOS y BALANCE a los niveles prefijados de fábrica.
AUDIO
AJ. AUDIO
OTROS AJ.
ENVOLVENTE
ALTAVOCES
ESTEREO SPA MONO
BAJOS
ALTOS
BALANCE
NORMAL NO
MODO
ESTEREO SPA MONO
BAJOS
ALTOS
BALANCE
NORMAL NO
Presione para seleccionar ESTEREO, SPA o MONO.
u
Presione ó para a j ustar.
u
VOL
VOL VOL
Otros Ajustes (algunos modelos)
r SONIDO IA- Automáticamente mantiene el volumen constante entre programas y comerciales.
AUDIO
AJ. AUDIO
OTROS AJ.
ENVOLVENTE
ALTAVOCES
SONIDO IA SI
u
Presione para seleccionar SI ó NO.
VOL
Envolvente (algunos modelos)
r Envolvente - Sonido envolvente tridimensional con dos altavoces.
AUDIO
AJ. AUDIO
OTROS AJ.
ENVOLVENTE
ALTAVOCES
ENVOLVENTE
NO
u
Presione para seleccionar SI ó NO.
VOL
Altavoces (algunos modelos)
r En el menú de AUDIO en ALTAVOCES.
AUDIO
AJ. AUDIO
OTROS AJ.
ENVOLVENTE
ALTAVOCES
Presione para seleccionar:
r SI - Los Altavoces de la televisión funcionan normalmente.
r APAGADAS Y SALIDA DE AUDIO VARIABLE - Los Altavoces de la TV están
SI
u
r APAGADASB Y SALIDA DE AUDIO FIJA - Los Altavoces de la TV están apagados,
VOL
apagados, el sonido es ajustable mediante la televisión.
el sonido es ajustable sólo mediante el amplif icador externo.
20 l
Page 59
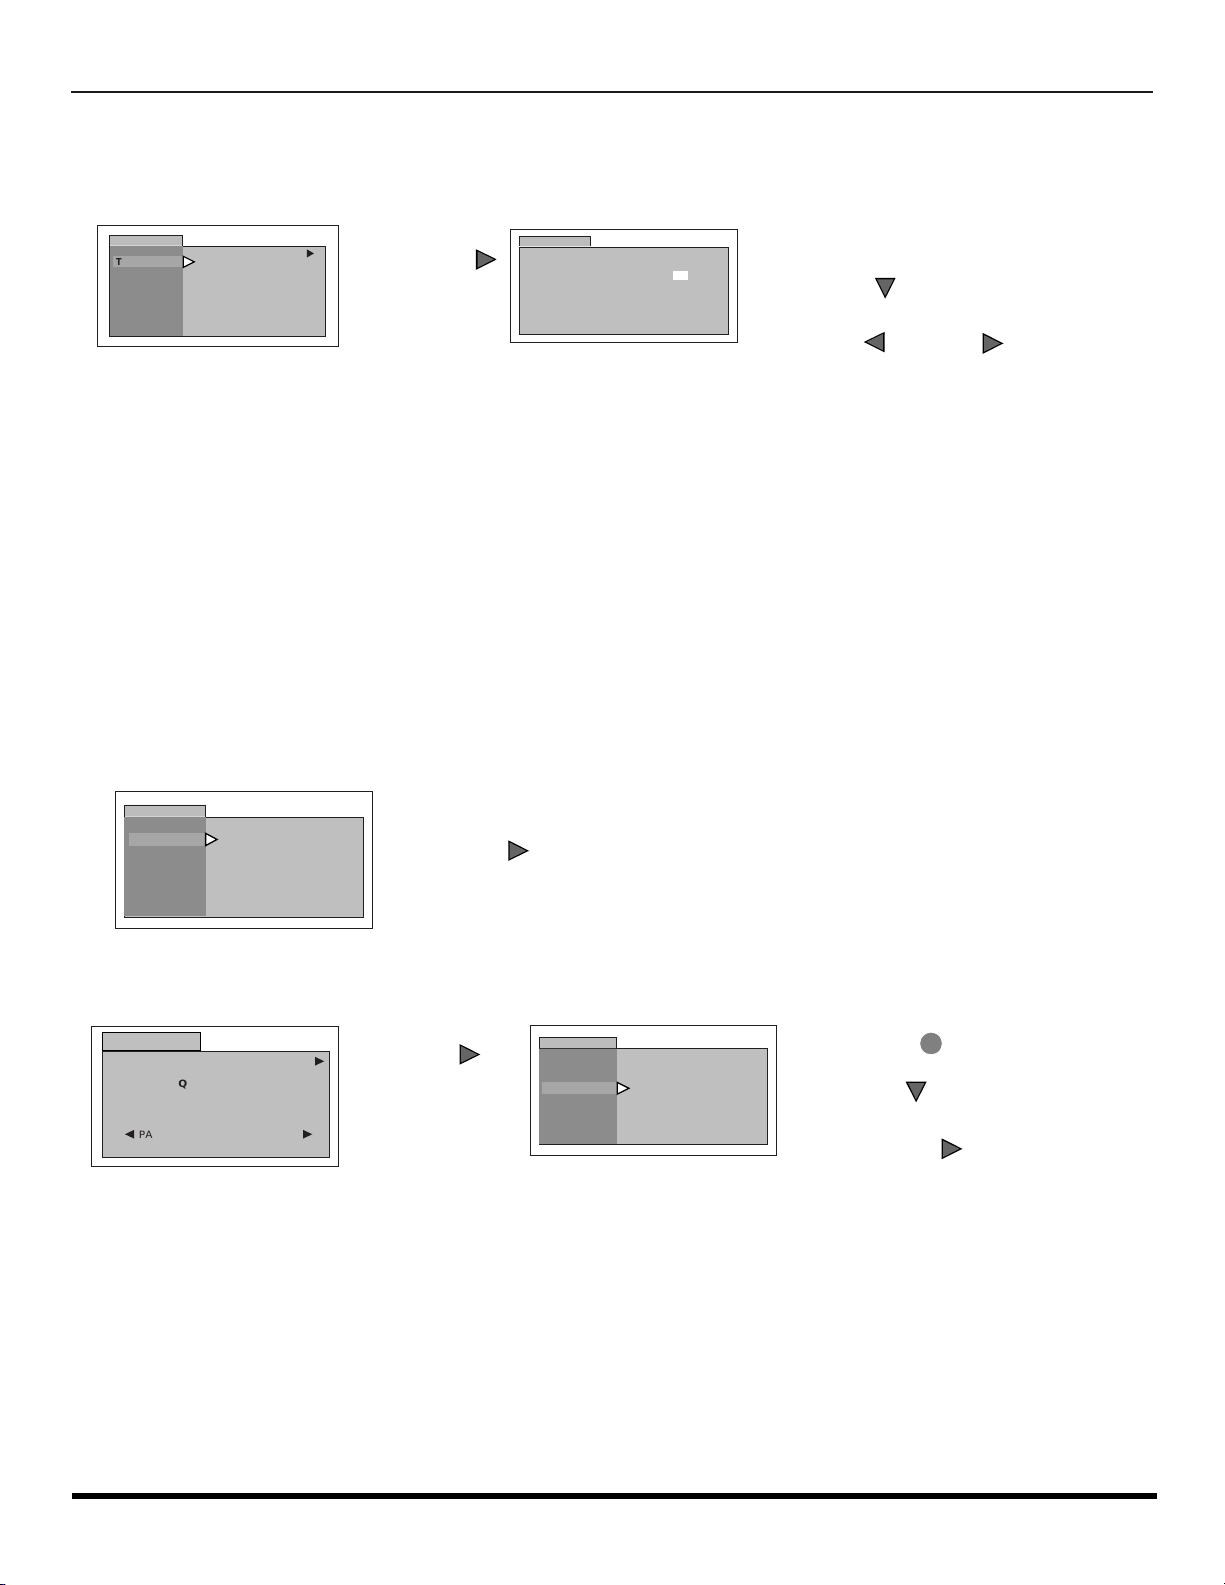
O
VOL
VOL
PERACIÓN DEL
M
ENÚ
DE I
CANALES
TÍTULO
r MANUAL - Para introducir los números y títulos manualmente.
r Use el teclado numérico del control remoto
CANALES
TITULOS
MANUAL
u
Presione
para desplegar el
siguiente menú.
CANALES
ELIJAH CANAL
PONGA IDENTIDAD
MANUAL
10
LLENO
para seleccionar el canal deseado (hacer
referencia a su guia local de TV ).
r Presione para seleccionar PONGA
CH
IDENTIDAD.
r Presione ó para seleccion ar
VOL
VOL
caracteres.
BLOQUEO
Nota: Vea la pág. 15 para los procedimientos de navegación del menú de iconos.
Modo
Bloqueo
Seleccione BLOQUEO para prevenir juegos de vídeo y videocasetes de ser vistos.
r
Use un código que sea fácil de recordar y escríbalo en un lugar seguro.
Notas:
• Use el teclado numérico para introducir un código secreto de cuatro dígitos.
• Si usted no recuerda su código, el BLOQUEO se desactivará en 12, 24, ó 48 horas dependiendo de lo que esté ajustado.
Sea cuidadoso al seleccionar SIEMPRE. Si SIEMPRE ha sido seleccionado, y olvida su código secreto, la TV debe ser
atendida por un técnico calificado para limpiar el ajuste de BLOQUEO.
• Si selecciona CAMBIO DE CLAVE, e introduce un código diferente al usado previamente en el menú de BLOQUEO, su
nuevo código queda como el código definitivo.
r No - Para apagar la función de bloqueo.
CONOS
BLOQUEO
MODO
TIEMPO?
BLOQUEO
PROGRAMAS:
PROGRAMAS DE EEUU
ACTIVADO
INGRESAR
CLAVE
NO
Presione para desplegar el menú de Bloqueo.
NO
- - - -
r JUEGO - Para bloquear los canales 3, 4 y las entradas de vídeo.
BLOQUEO
BLOQUEO JUEGO
BLOQUEA CNL 3,4 Y
ENTRADAS DE VIDEO
PARA ESCOGER BLOQUEO
t
Presione para
u
VOL
seleccionar Juego .
u
BLOQUEO
MODO
TIEMPO?
12 HORAS
r Presione dos veces.
ACTION
r Presione para seleccionar cuánto
CH
tiempo?.
r Presione para seleccionar 12
VOL
Horas, 24 Horas, 48 Horas o Siempre.
21 l
Page 60
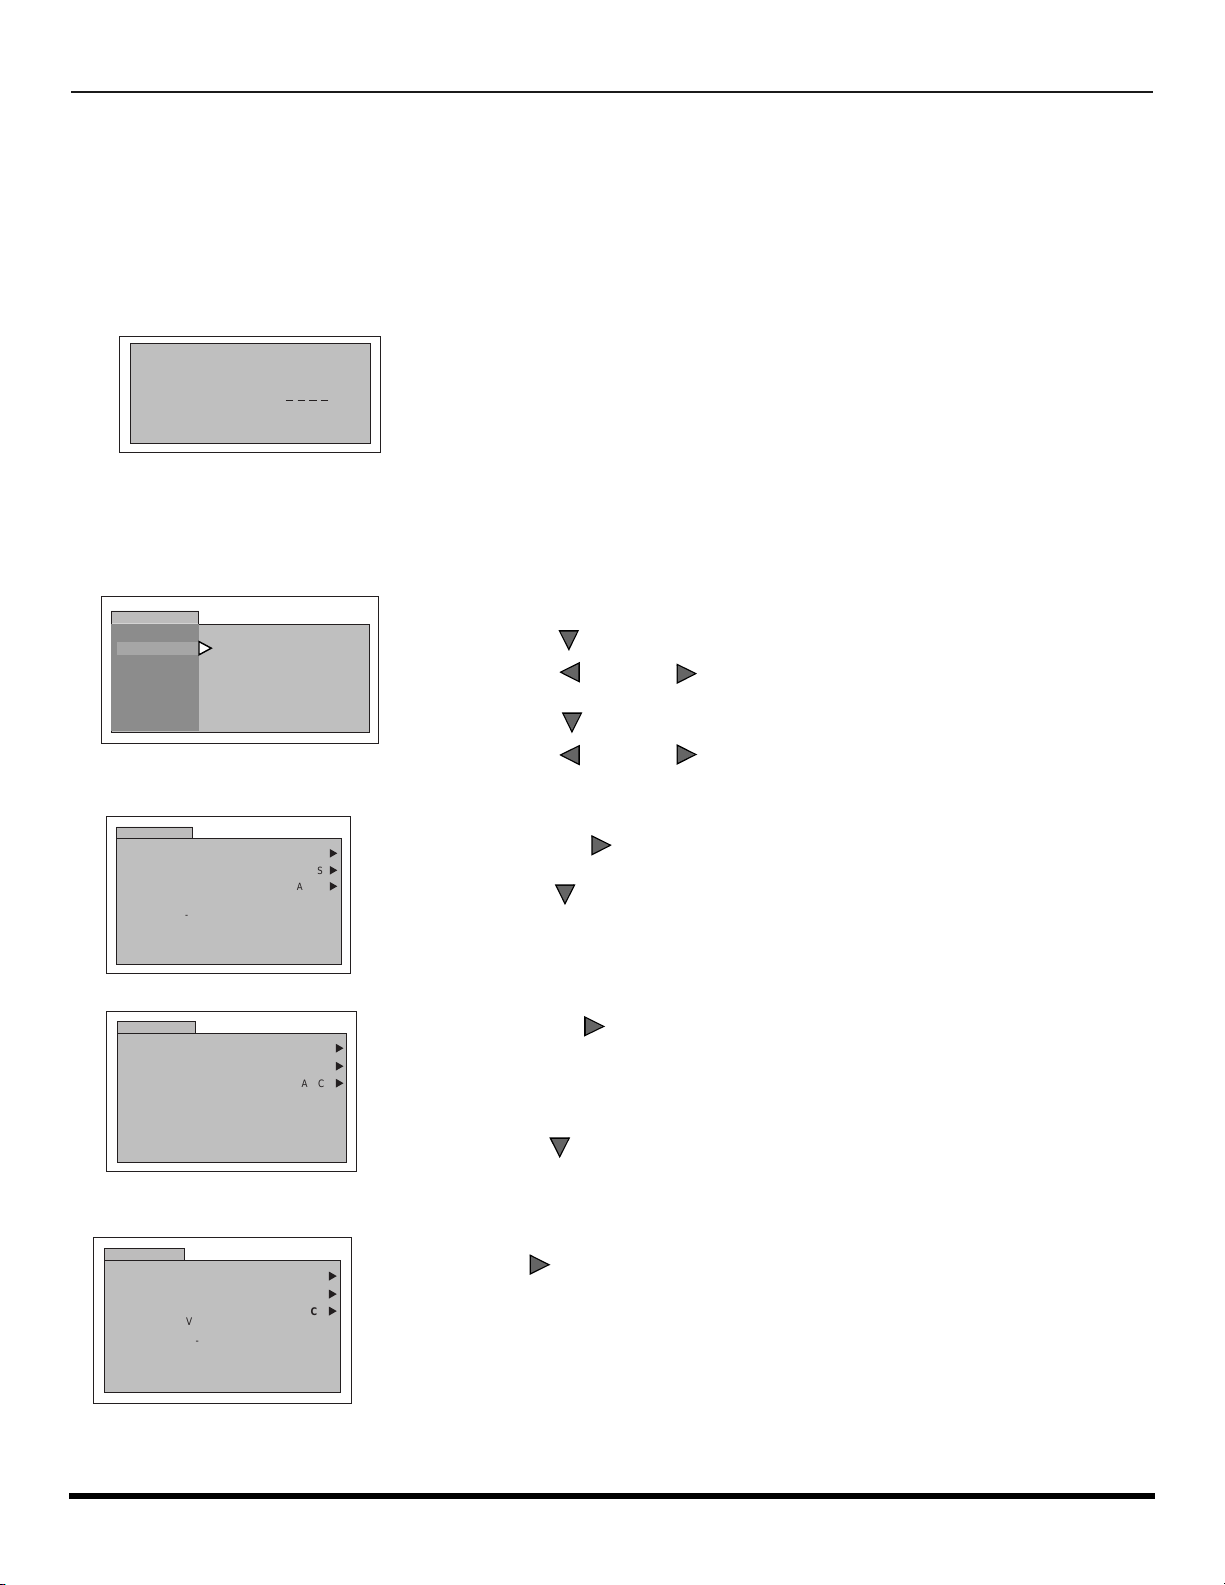
O
BLOQUEO
PROGRAMAS DE EEUU
PROGRAMACION:
NO CLASIFICADOS
NO
u
SI
u
BASICA
TV-Y
TV-Y7 FV
u
- - - - - - - - - - - - - - - - - -
TV-G
TV-PG V S L D
TV-14 V S L D
TV-MA V S L
CH
.
PERACIÓN DEL MENU
V-CHIP
Operación del Menu V-CHIP
Nota: Vea la pág. 15 para los procedimientos de navegación del menú de iconos.
Mensaje de Bloqueo
Si el V-Chip está activado y el programa exce de el límite de c lasificac ión ajustados po r el usuario, apare cerá el mens aje
de bloqueo y el so ni do ser á s i len ciado . S i d ese a c on t inu ar v ien do e l p ro gram a in trodu zc a s u c ód ig o s ecre to. Des pué s d e
introducir el código, todos los bloqueos y clasificaciones son desactivados hasta apagar la televisión o hasta que todos los
ajustes sean desactivados.
Nota: Si el código secreto es introducido para anular las clasificaciones, deberá
PROGRAM A RESTRINGIDO
CLAVE DE ACCESSO
Programas de EEUU
Las características de este modelo de televisión y la “Tecnología V-CHIP” permite usar clasificaciones al ver programas
de televisión. Esta innovación permite a los padres bloquear varios tipos de programación de TV a su discreción.
r Use el teclado numérico para introducir su código de cuatro dígitos.
BLOQUEO
MODO
TIEMPO?
BLOQUEO
PROGRAMAS:
PROGRAMAS DE EEUU
ACTIVADO
INGRESAR
CLAVE
NO
NO
- - - -
r Presione para seleccionar PROGRAMAS.
r Presione ó para seleccionar PROGRAMAS DE EEUU.
r Presione
reajustar todas las clasificaciones mediante reprogramción ó apagando la TV.
(
Use un código fácil de recordar, y escríbalo en un lugar seguro
CH
VOL
VOL
CH
para seleccionar ACTIVADO.
).
Tabla de Programas de EEUU
BLOQUEO
PROGRAMAS DE EEUU
NO CLASIFICADOS
PROGRAMACION:
TV-Y
TV-Y7 FV
- - - - - - - - - - - - - - - - - -
TV-G
TV-PG V S L D
TV-14 V S L D
TV-MA V S L
BLOQUEO
PROGRAMAS DE EEUU
NO CLASIFICADOS
PROGRAMACION:
TV-Y
TV-Y7 FV
- - - - - - - - - - - - - - - - - -
TV-G
TV-PG V S L D
TV-14 V S L D
TV-MA V S L
NO
BASICA
NO
SI
BASICA
r Presione ó para mostrar el menú de PROGRAMAS DE EEUU.
VOL
VOL
r Presione para seleccionar PROGRAMAS DE EEUU NO o SI.
r Presione para seleccionar NO CLASIFICADOS.
r Presione para seleccionar NO CLASIFICADOS SI o NO.
u
SI
u
u
VOL
CH
VOL
Nota: Si se selecciona “SI” se recibirán programas NO CLASIFICADOS. Si
se selecciona “NO” se bloqu earán los programas NO CLASIFICADOS.
Vea el recuadro Precauciones del Cliente en la siguiente página.
r Presione para seleccionar PROGRAMACION.
r Presione para seleccionar BASICA o DETALLADA.
u
u
u
BASICA - Solo le permite seleccionar clasificaciones generales como TV-Y, TV-PG, etc.
VOL
DETALLADA - Le permite seleccionar clasificaciones generales y contenido como V, L, etc
22 l
Page 61
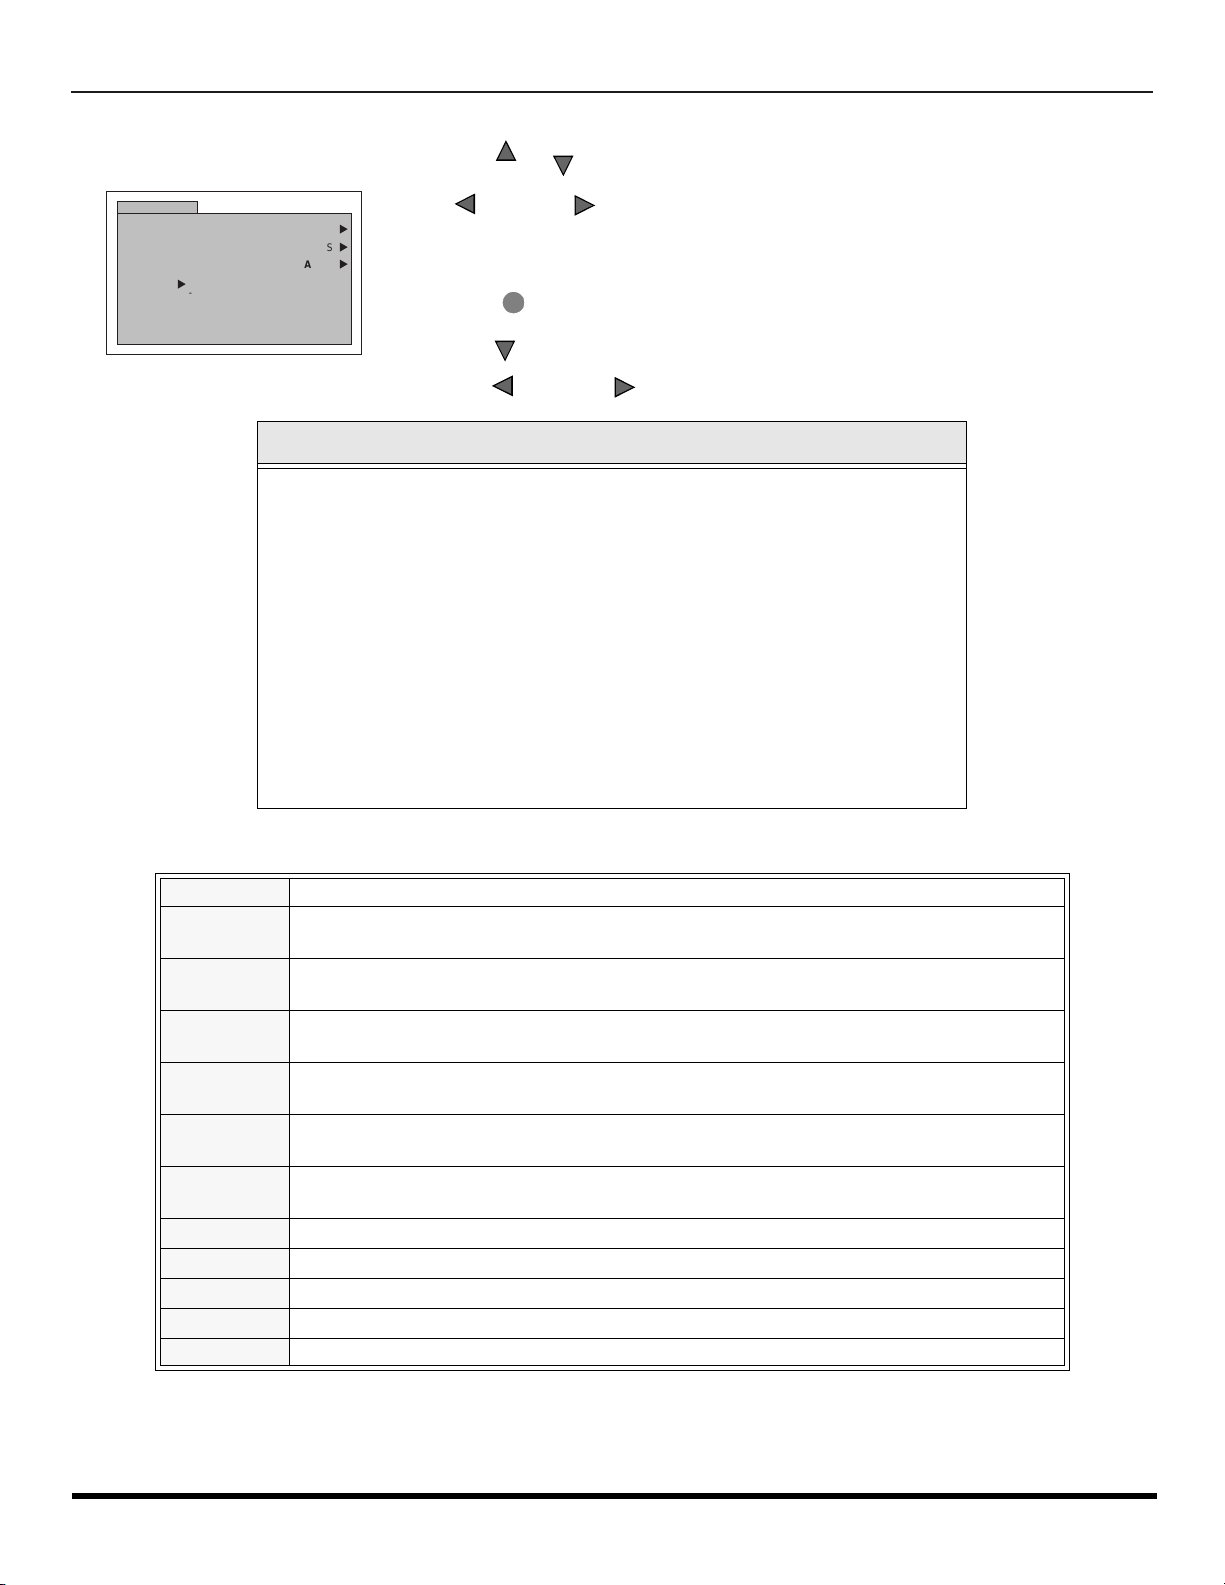
Tabla de Programas de EEUU (cont.)
CH
VOL
VOL
O
PERACIÓN DEL MENU
V-CHIP
BLOQUEO
PROGRAMAS DE EEUU
u
- - - - - - - - - - - - - - - - - -
NO CLASIFICADOS
PROGRAMACION:
TV-Y
TV-Y7 FV
TV-G
TV-PG V S L D
TV-14 V S L D
TV-MA V S L
El sistema V-CHIP que es usado en este equipo es capaz de bloquear programas “NO
CLASIFICADOS” (no clasificados, clasificación no aplicable y ninguna) de acuerdo a la
sección 15.120(e)(2 ) del Com ité F ede ral d e Com unicaciones de los Estad os Unido s Si
la opción de bloqueo “NO CLASIFICADO” es escogida
inesperados y posiblemente confusos, además usted podría no recibir boletines de
emergencia o cualquiera de los siguientes tipos de programación:”
BASICA
r Presione ó para mover el cursor entre la diferentes clasificaciones.
r Use ó para s eleccion ar las cl asificaci ones que desea bl oquear (ROJO) y
NO
u
SI
u
u
desactivar el bloqueo (VERDE).
Nota: Vea la tabla de PROGRAMAS DE EEUU
r Presione dos veces para regresar a MODO en el menú de BLOQUE0.
r Presione para realzar TIEMPO?.
r Presione ó para seleccionar 12, 24, 48 horas o SIEMPRE.
CH
VOL
.
ACTION
CH
VOL
Precauciones del Cliente
“
pueden ocurrir resultados
• Boletines de Emergencia (como mensajes de EAS (Servicios de Alerta en
Emergencias, advertencias del clima y otros)
• Programas originados localmente
• Noticias
• Política
• Anuncios de Servicio Público
• Religioso
• Deportes
• Estado del Tiempo
TABLA DE PROGRAMAS DE EEUU
NR No clasificado. VEA CUIDADO DEL CLIENTE en la página anterior.
TV-Y
TV-Y7
TV-G
TV-PG
TV-14
TV-MA
FV FANTASIA/ CARICATURAS CON VIOLENCIA
V VIOLENCIA
S SEXO
L LENGUAJE OFENSIVO
D DIALOGO CON CONTENIDO SEXUAL
Todos los niños. Los temas y elementos en este programa están especialmente diseñados
para un públi co infanti l, incluyendo niños de 2-6 años.
Dirigido a niños mayores. Los temas y elementos en este programa pueden incluir ligera vio-
lencia física o cómica, o puede asustar a niños menores de 7 años.
Audiencia General. Contiene poca o nada de violencia, nada de lenguaje fuerte, y poco o
nada de diálogo o situaciones con contenido sexual.
Guía de los padres sugerida. El programa puede contener lenguaje obsceno infrecuente,
violencia limitada, diálogos o situaciones sexualmente sugestivas.
Advertencia a los padres. Este programa puede contener temas sofisticados, contenido
sexual, lenguaje inapropiado , y violencia más intens a.
Sólo audiencia Madura. Este programa puede contener temas para ad ulto s, lenguaje profano,
violencia gráfica y contenido sexual explícito.
23 l
Page 62
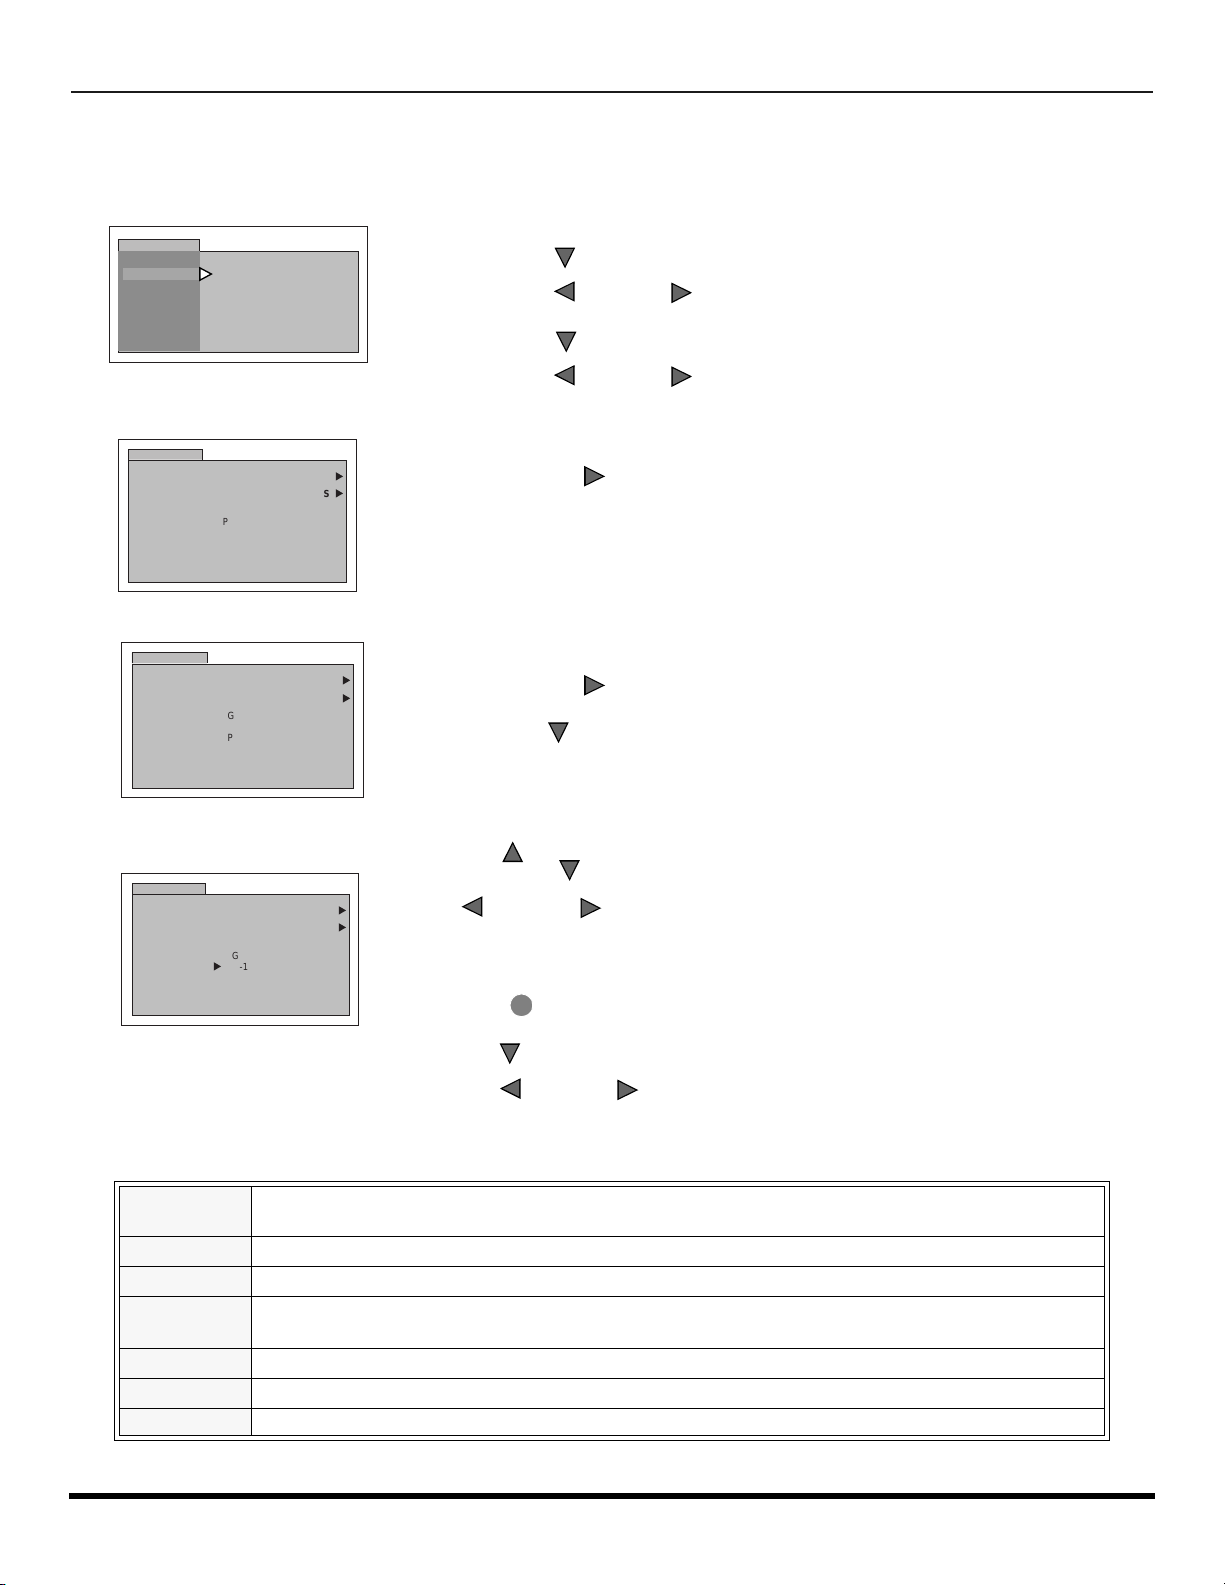
O
CH
CH
BLOQUEO
PELICULAS DE EEUU
NO CLASIFICADOS
NO
u
SI
u
G
PG
PG-13
R
NC-17
X
CH
BLOQUEO
PELICULAS DE EEUU
NO CLASIFICADOS
NO
u
SI
u
G
PG
PG-13
R
NC-17
X
VOL
ACTION
BLOQUEO
PELICULAS DE EEUU
NO CLASIFICADOS
NO
u
SI
u
u
G
PG
PG-13
R
NC-17
X
PERACIÓN DEL MENU
V-CHIP
Peliculas de EEUU
Las características de este modelo de televisión y la “Tecnología V-CHIP” permite usar clasificaciones al ver películas o
vídeos. Esta innovación permite a los padres bloquear varios tipos de películas y vídeos a su discreción.
BLOQUEO
MODO
TIEMPO?
BLOQUEO
PROGRAMAS:
PELICULAS DE EEUU
ACTIVADO
INGRESAR
CLAVE
NO
- - - -
NO
r Use el teclado num ér ico para introducir su cód ig o s ec r eto de cua t ro dígi tos . (
código fácil de recordar, y escríbalo en un lugar seguro.
)
r Presione para realzar PROGRAMAS.
r Presione ó para seleccionar PELICULAS DE EEUU.
VOL
VOL
r Presione para realzar ACTIVADO.
Use un
TABLA DE PELICULAS DE EEUU
r Presione ó para mostrar el menú de PELICULAS DE EEUU.
r Presione para seleccionar NO CLASFICADOS SI o NO.
VOL VOL
VOL
Nota: Algunas veces las películas no son clasificadas por una variedad de razones.
Películas antiguas y extranjeras normalmente no tienen clasificación.
r Presione para seleccionar PELICULAS DE EEUU NO o SI.
VOL
r Presione para realzar NO CLASIFICADOS.
r Presione ó para mover el cursor entre la diferentes clasificaciones.
r Use ó para seleccionar las clasificaciones que desea bloquear (ROJO) y
CH
CH
VOL
desactivar el bloqueo (VERDE).
Nota: Vea la tabla de CLASIFICACION DE PELICULAS DE EEUU.
PG-13, R, NC-17 y X serán bloqueados
NR
PROGRAMA NO CLASIFICADO Y NA (NO APLICABLE). Película que no ha sido clasificada o que la
clasificacion no aplica.
G AUDIENCIA GENERAL. Se admiten todas las edades.
PG GUIA DE LOS PADRES SUGERIDA. Con material no acons ejable para niños.
PG-13
FUERTE SUPERVISION DE LOS PADRES. C on m ate rial q ue puede ser inapropi ado para niños menore s
de 13 años.
R AUDIENCIA GENERAL. Se admiten todas las edades.
NC-17 NO SE ADMITE NADIE DE 17 AÑOS O MENOS.
X SOLO ADULTOS.
24 l
r Presione dos veces para regresar a MODO en el menú de BLOQUEO.
r Presione para realzar TIEMPO?.
r Presione ó para seleccionar 12, 24, 48 horas o SIEMPRE.
CH
VOL
VOL
TABLA DE CLASIFICACION DE PELICULAS DE EEUU
Page 63
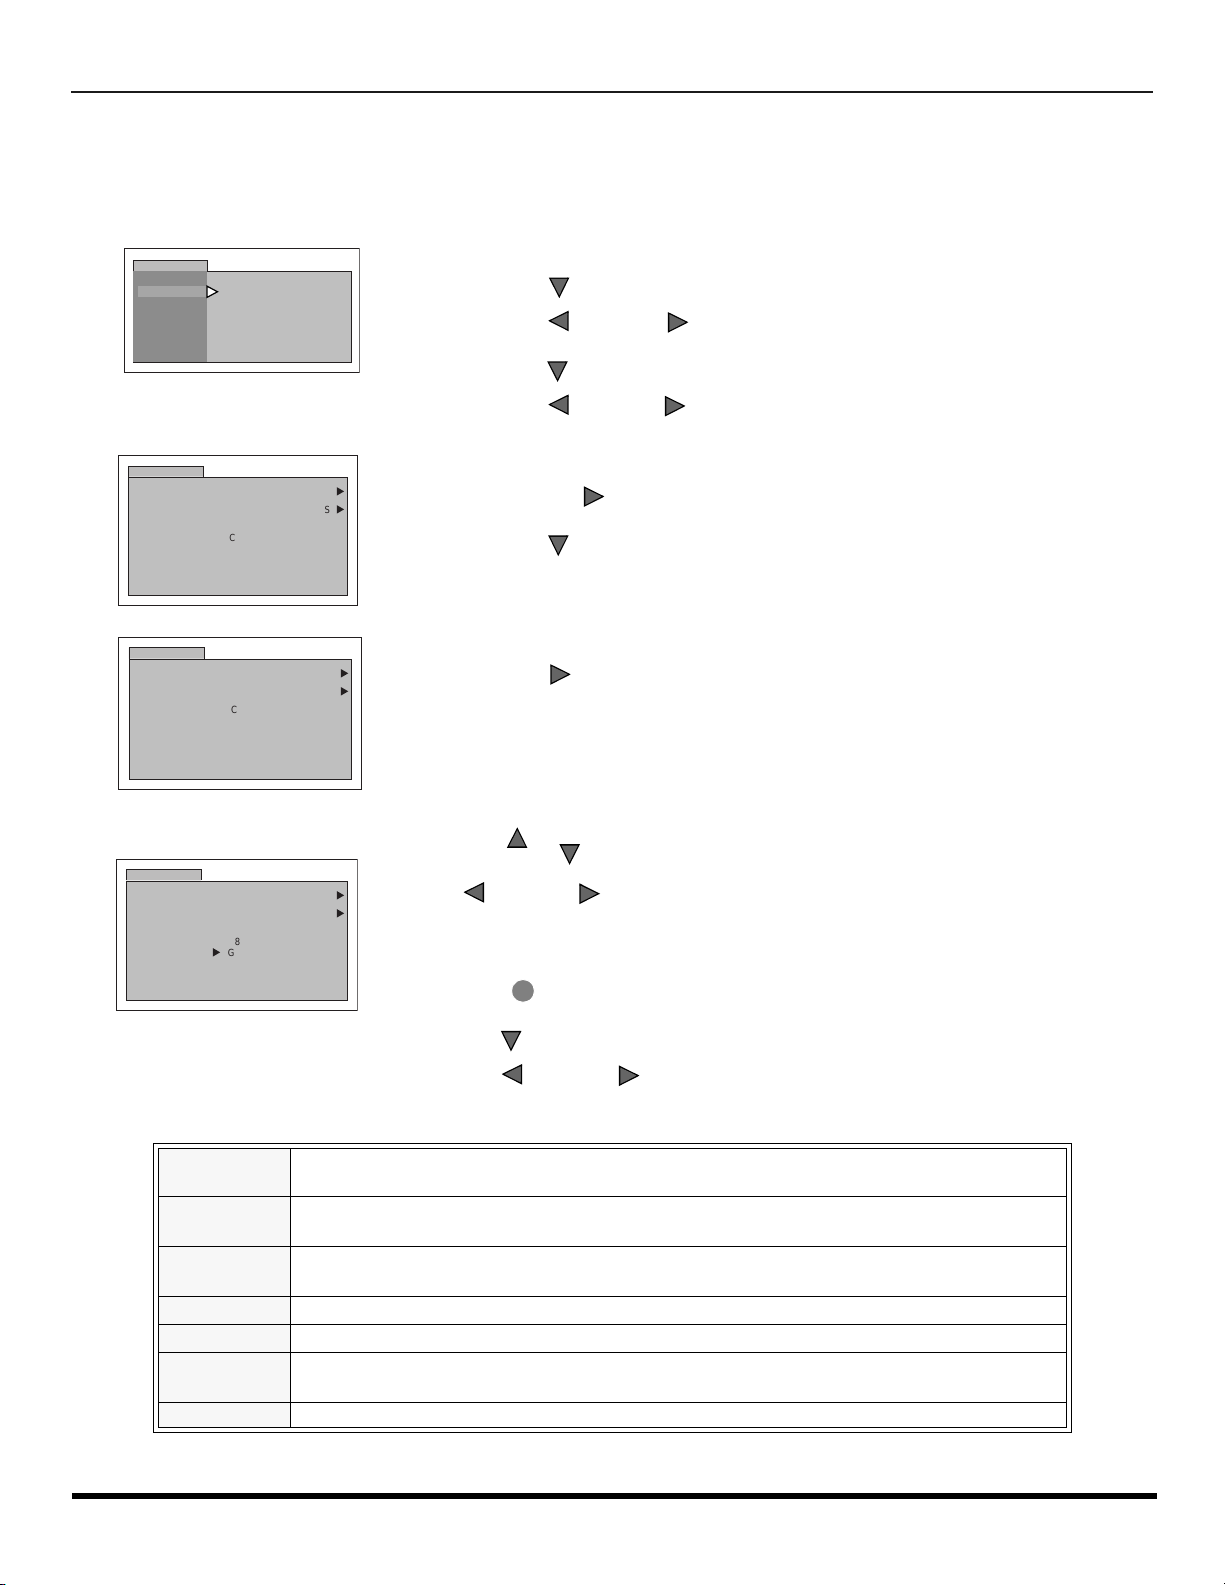
O
CH
CH
MODO
BLOQUEO
BLOQUEO
PROGRAMAS:
INGLES DE CANADA
NO
TIEMPO?
ACTIVADO
INGRESAR
CLAVE
NO
- - - -
CH
BLOQUEO
INGLES DE CANADA
NO CLASIFICADOS
NO
u
SI
u
C
C8 +
G
PG
14 +
18 +
BLOQUEO
INGLES DE CANADA
NO CLASIFICADOS
NO
u
SI
u
C
C8 +
G
PG
14 +
18 +
VOL
ACTION
BLOQUEO
INGLES DE CANADA
NO CLASIFICADOS
NO
u
SI
u
C
C8 +
G
PG
14 +
18 +
u
PERACIÓN DEL MENU
V-CHIP
Sistemas de Clasificación de Canada
Inglés de Canada
Las características de este modelo de televisión y la “Tecnología V-CHIP” permite usar clasificaciones al ver películas o
vídeos. Esta innovación permite a los padres bloquear varios tipos de películas y vídeos a su discreción.
r Use el teclado numéric o p ara in trod uc ir s u c ód igo de cu atro díg ito s. (
fácil de recordar, y escríbalo en un lugar seguro
).
r Presione para realzar PROGRAMAS.
Use un código
r Presione
ó para seleccionar INGLES DE CANADA.
VOL
VOL
r Presione para realzar ACTIVADO.
r Presione
r Presione para seleccionar INGLES DE CANADA NO o SI.
ó para mostrar el menú de INGLES DE CANADA.
VOL
VOL
VOL
r Presione para realzar NO CLASIFICADOS.
r Presione para seleccionar N O CLASIFICADOS? SI o NO.
Nota: E (Exento)
VOL
Los programas exentos incluyen: noticieros, deportivos,
documentales y programas informativos; programas de entretenimiento,
videos musicales, y programación variada
r Presione ó para mover el cursor entre la diferentes clasificaciones.
r Use
CH
CH
ó para seleccionar las clasificaciones que desea bloquear (ROJO) y
VOL
.
desactivar el bloqueo (VERDE).
Nota: Vea la tabla de INGLES DE CANADA
.
r Presione dos veces para regresar a MODO en el menú de BLOQUEO.
r Presione para realzar TIEMPO?.
r Presione ó para seleccionar 12, 24, 48 horas o SIEMPRE.
CH
VOL
VOL
TABLA DE INGLES DE CANADA
E
c
C8+
Exento - Los programas exentos incluyen: noticieros, deportivos, documentales y programas
informativos; programas de entretenimiento, videos musicales, y programación variada.
Programación dirigida a niños menores de 8 años. No contiene lenguaje ofensivo, sexual ni
desnudos.
Programación considerada apta para niños de 8 años en adelante. No tiene contenido
sexual ni desnudos.
G AUDIENCIA GENERAL. Se admiten todas las edades.
PG GUIA DE LOS PADRES SUGERIDA. Con material no aconsejable para niños..
14+
Programación que por su contenido no es recomendada para espectadores menores de
14 años. Se recomienda a los padres discreción con audiencia adolenscente.
18 SOLO ADULTOS
25 l
Page 64
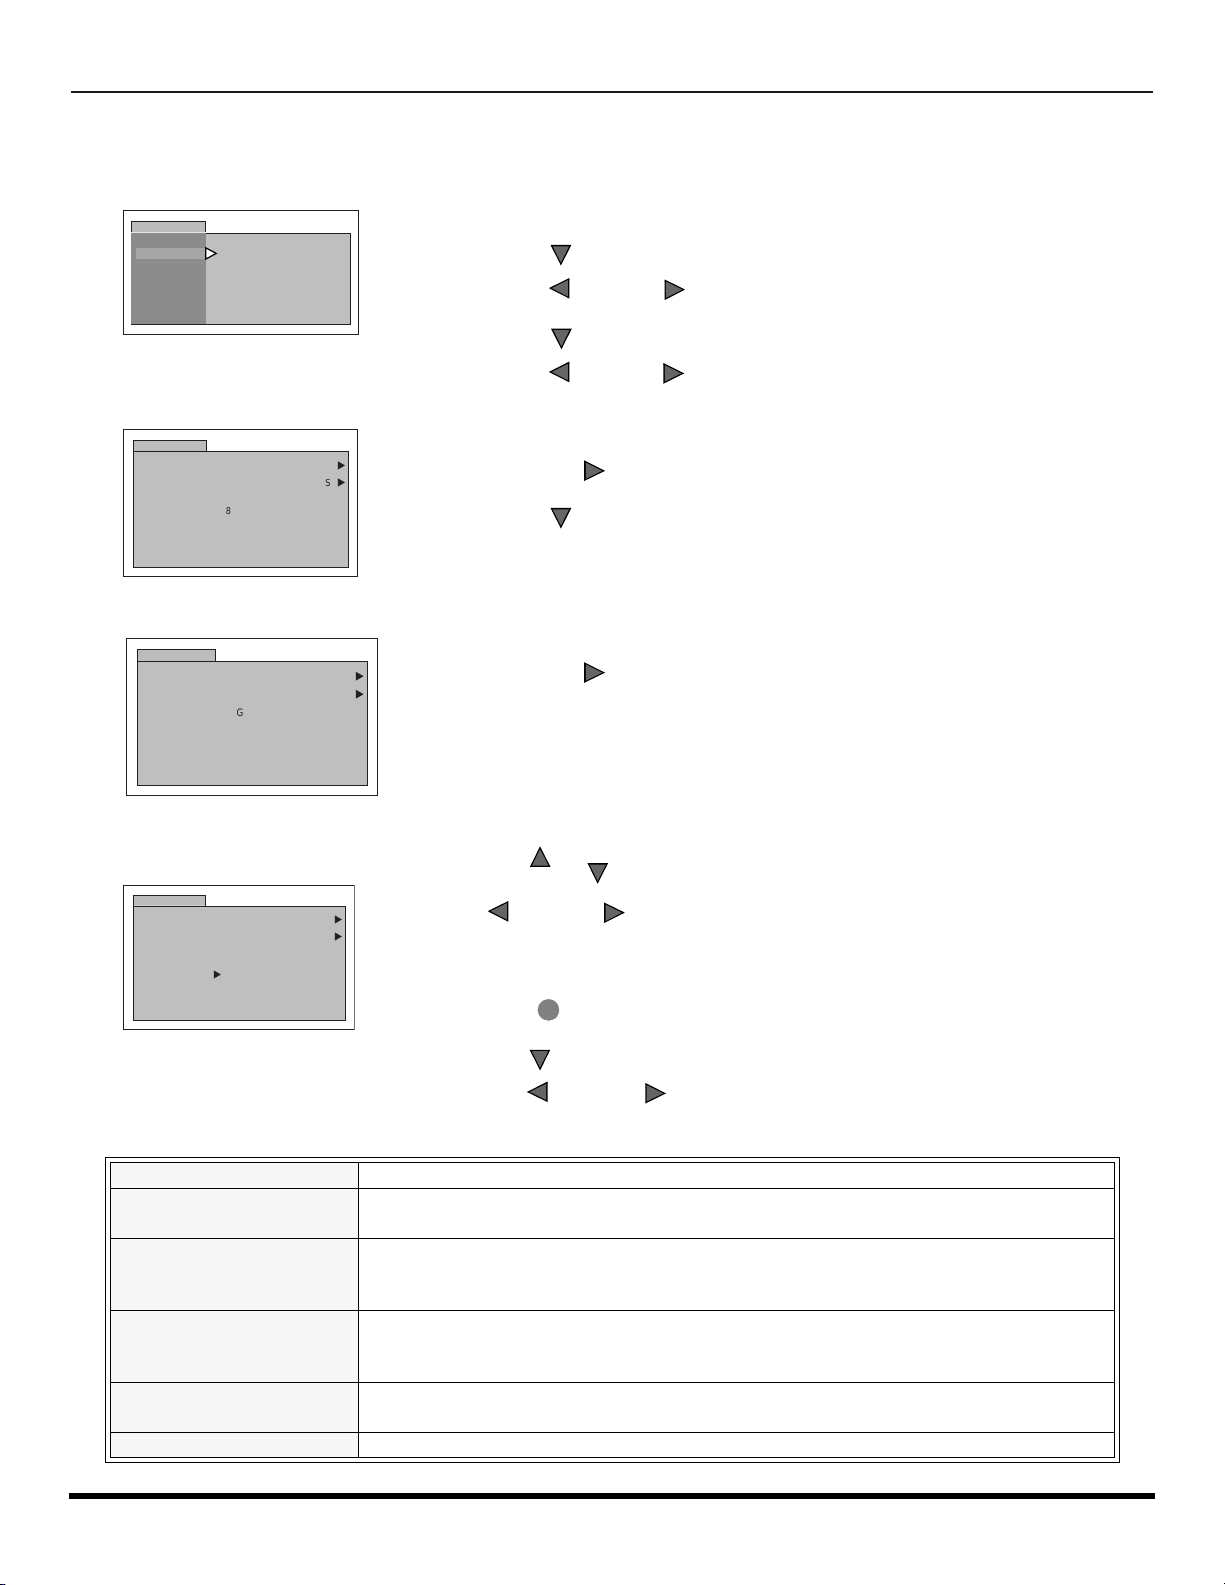
O
CH
CH
MODO
BLOQUEO
BLOQUEO
PROGRAMAS:
FRANCES DE CANADA
NO
TIEMPO?
ACTIVADO
INGRESAR
CLAVE
NO
- - - -
CH
BLOQUEO
FRANCES DE CANADA
NO CLASIFICADOS
NO
u
SI
u
G
8 ANS+
13 ANS+
16 ANS+
18 ANS+
CH
VOL
ACTION
CH
BLOQUEO
FRANCES DE CANADA
NO CLASIFICADOS
NO
u
SI
u
G
8 ANS+
13 ANS+
16 ANS+
18 ANS+
u
PERACIÓN DEL MENU
V-CHIP
Francés de Canada
Las características de este modelo de televisión y la “Tecnología V-CHIP” permite usar clasificaciones al ver películas o
vídeos. Esta innovación permite a los padres bloquear varios tipos de películas y vídeos a su discreción.
r Use el teclado nu mé ric o para introducir su có di go de cuatro dígitos. (
fácil de recordar, y escríbalo en un lugar seguro
).
r Presione para realzar PROGRAMAS.
Use un código
r Presione
ó para seleccionar FRANCES DE CANADA.
VOL
VOL
r Presione para realzar ACTIVADO.
r Presione
r Presione para seleccionar FRANCES DE CANADA SI o NO.
ó para mostrar el menú de FRANCES DE CANADA.
VOL
VOL
VOL
r Presione para realzar NO CLASIFICADOS.
BLOQUEO
FRANCES DE CANADA
NO CLASIFICADOS
G
8 ANS+
13 ANS+
16 ANS+
18 ANS+
.
NO
u
SI
u
r Presione para seleccionar NO CLASIFICADOS? SI o NO.
Nota: E (
VOL
Si se selecciona “SI” se recibirán programas NO CLASIFICADOS. Si se
selecciona “NO” se bloquearán los programas NO CLASIFICADOS. Vea el
recuadro Cuidado del Cliente en la parte inferior de la página.)
r Presione ó para mover el cursor entre la diferentes clasificac iones.
CH
13ANS+, 16ANS+ y 18ANS+ serán bloqueados
TABLA DE CLASIFICACIONES PARA EL FRANCES DE CANADA
E Exento - Programación exenta.
G
8 ans +
13 ans +
16 ans +
18 ans + Programación solo para adultos - contiene escenas de violencia o de violencia extrema.
26 l
r Use ó para seleccionar las clas ificac iones que d esea bloque ar (ROJO)
VOL
y desactivar el bloqueo (VERDE).
Nota: Vea la tabla de FRANCES DE CANADA
r Presione dos veces para regresar a MODO en el menú de BLOQUEO.
r Presione para realzar TIEMP O?.
r Presione ó para selecciona r 12, 24, 48 horas o SIEMPRE.
VOL
VOL
Audiencia General. Contiene poca o nada de violencia, nada de lenguaje fuerte, y poco o
nada de dialogo o situaciones con contenido sexual.
8+ General - No recomendada para niños pequeños. Programación dirigida a la audiencia
general, pero con lig ero u oc asi on al c ont enido de violencia. Se recomie nda supervisión de un
adulto.
Programación no recomenda para niños menores de 13 años - Puede contener algunas
escenas violentas que podrían asustar a los menores. Se recomienda enfaticamente
supervisión de un adulto.
Programación no recomenda para menores de 16 años - Contiene frecuentes escenas de
violencia o violencia intensa.
Page 65
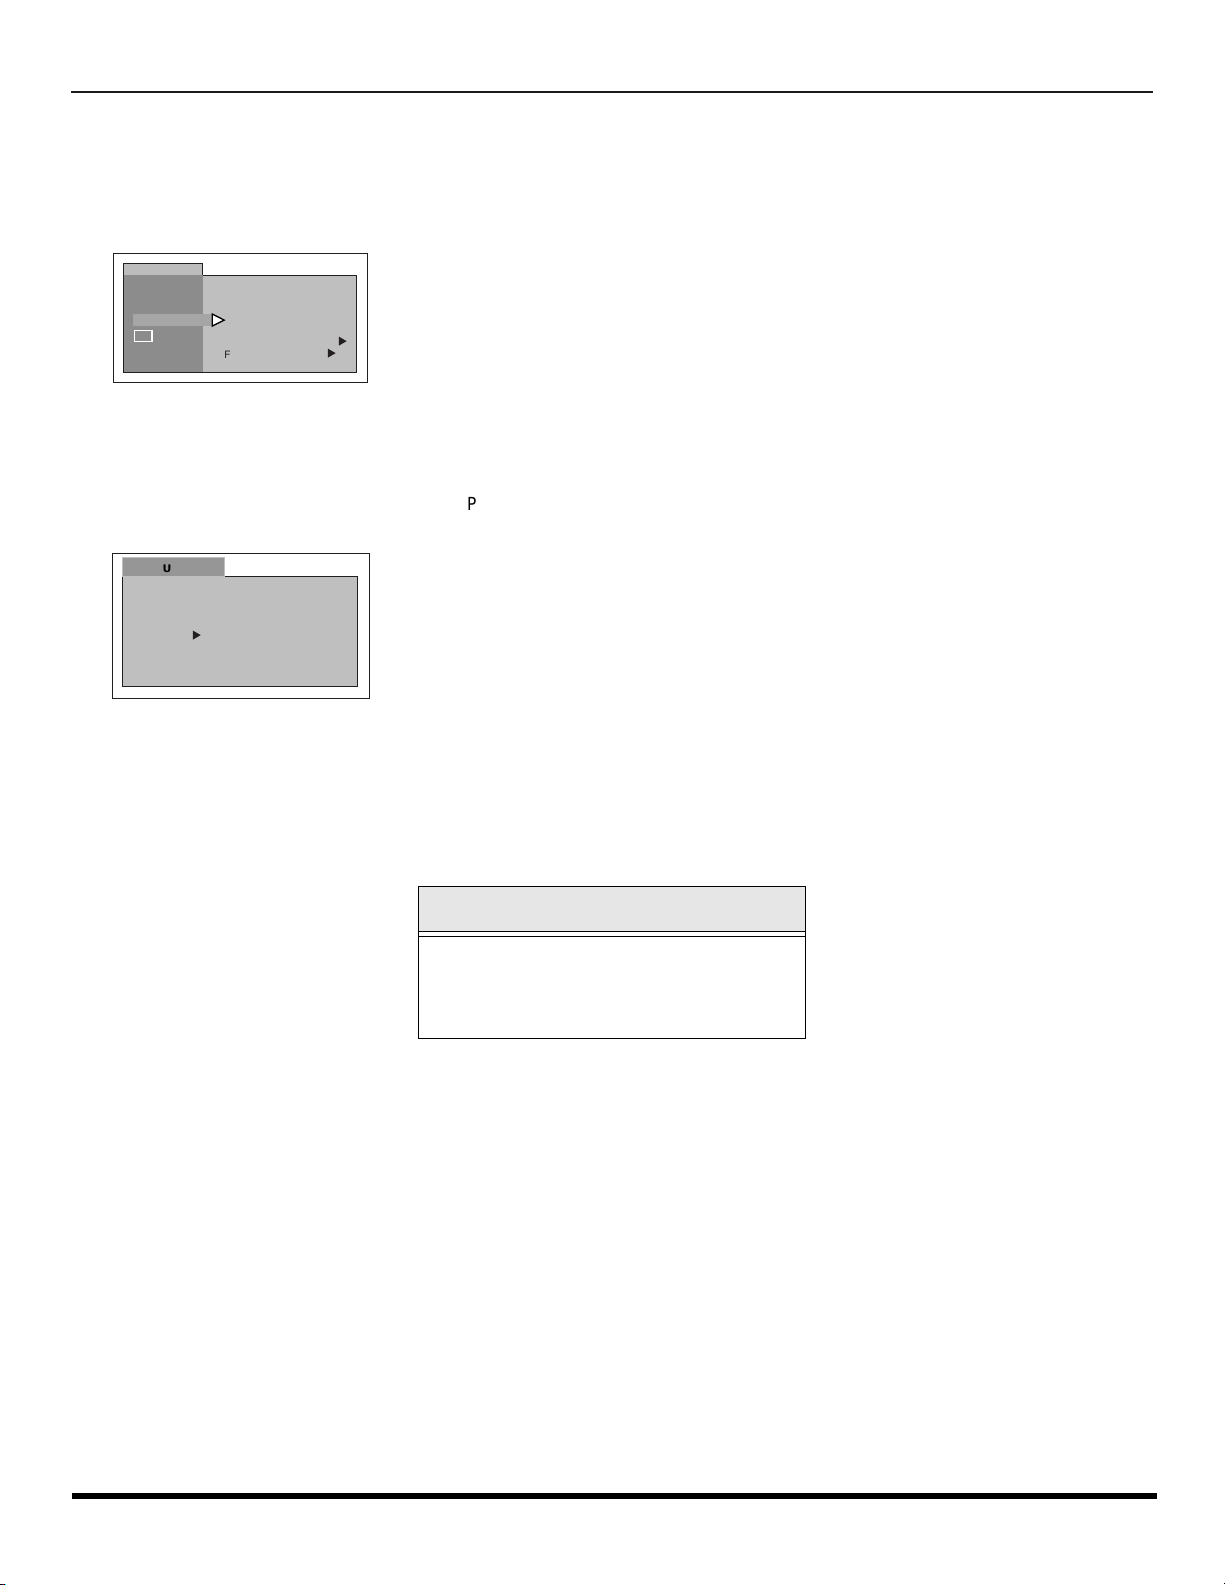
R
ECEPCIÓN DE RADIO
FM
Recepción de Radio FM
(Para modelo CT-25G7 solamente.)
Algunos televisores tienen sintonizador de FM integrado. Es posible programar hasta nueve diferentes estaciones de FM
para un fácil aceso
.
AJUSTE
IDIOMA/
LANGUE
PROG CNLS
CC
OTR0S AJ.
FM ANTENA SALIDA
FM PROGRAMA
u
u
r Presione do s veces el botón del contro l remoto para entrar al modo FM.
r Presione ACT ION para despl egar el menú.
r Presione los botones pq ó tu para seleccionar el ícono de SETUP.
r Presione ACTION en el remoto para desplegar el menú SETUP.
r Presione p ó q para seleccionar PROG CNLS.
r Presione u para realzar ANTENA FM.
.
r Presione t ó u para seleccionar INT o EXT.
• INT - Para usuarios de cable.
• EXT - Para usuarios de antenna terrestre.
AJUSTE
FM PROGRAMA
FM POSICIÓN 3 90.5 MHZ
PARA AGREGAR
u
r Presione q para seleccionar PROGRAMA FM
r Presione u para desplegar la pantalla de PROGRAMA FM.
r Utilice el teclado nemérico en el control remoto para seleccionar la posición
deseada.
r Presione p ó q para seleccionar la estación de FM deseada.
r Presione u para agregar la estación a la memoria
r Repita los pas os 10 a 12 para programar las 9 posiciones en la memoria.
r Presione ACTION para salir del menú de programación.
Nota: Puede seleccionar cualquiera de las 9 estaciones presionando
el numero correspondiente en el control Remoto.
Consejos Utiles:
En modo FM, sin vo lúmen o en modo Mudo,
no hay indicación de que el set esta
encendio, el volúmen debe de mantenerse a
un nivel audible.
Si quiere seleccionar manualmente una estación, siga los siguientes pasos.
En el modo FM, presione p ó q para cambiar la estación.
Nota: En modo FM, presione el botón R-TUNE para alternar entre TV y FM.
27 l
Page 66
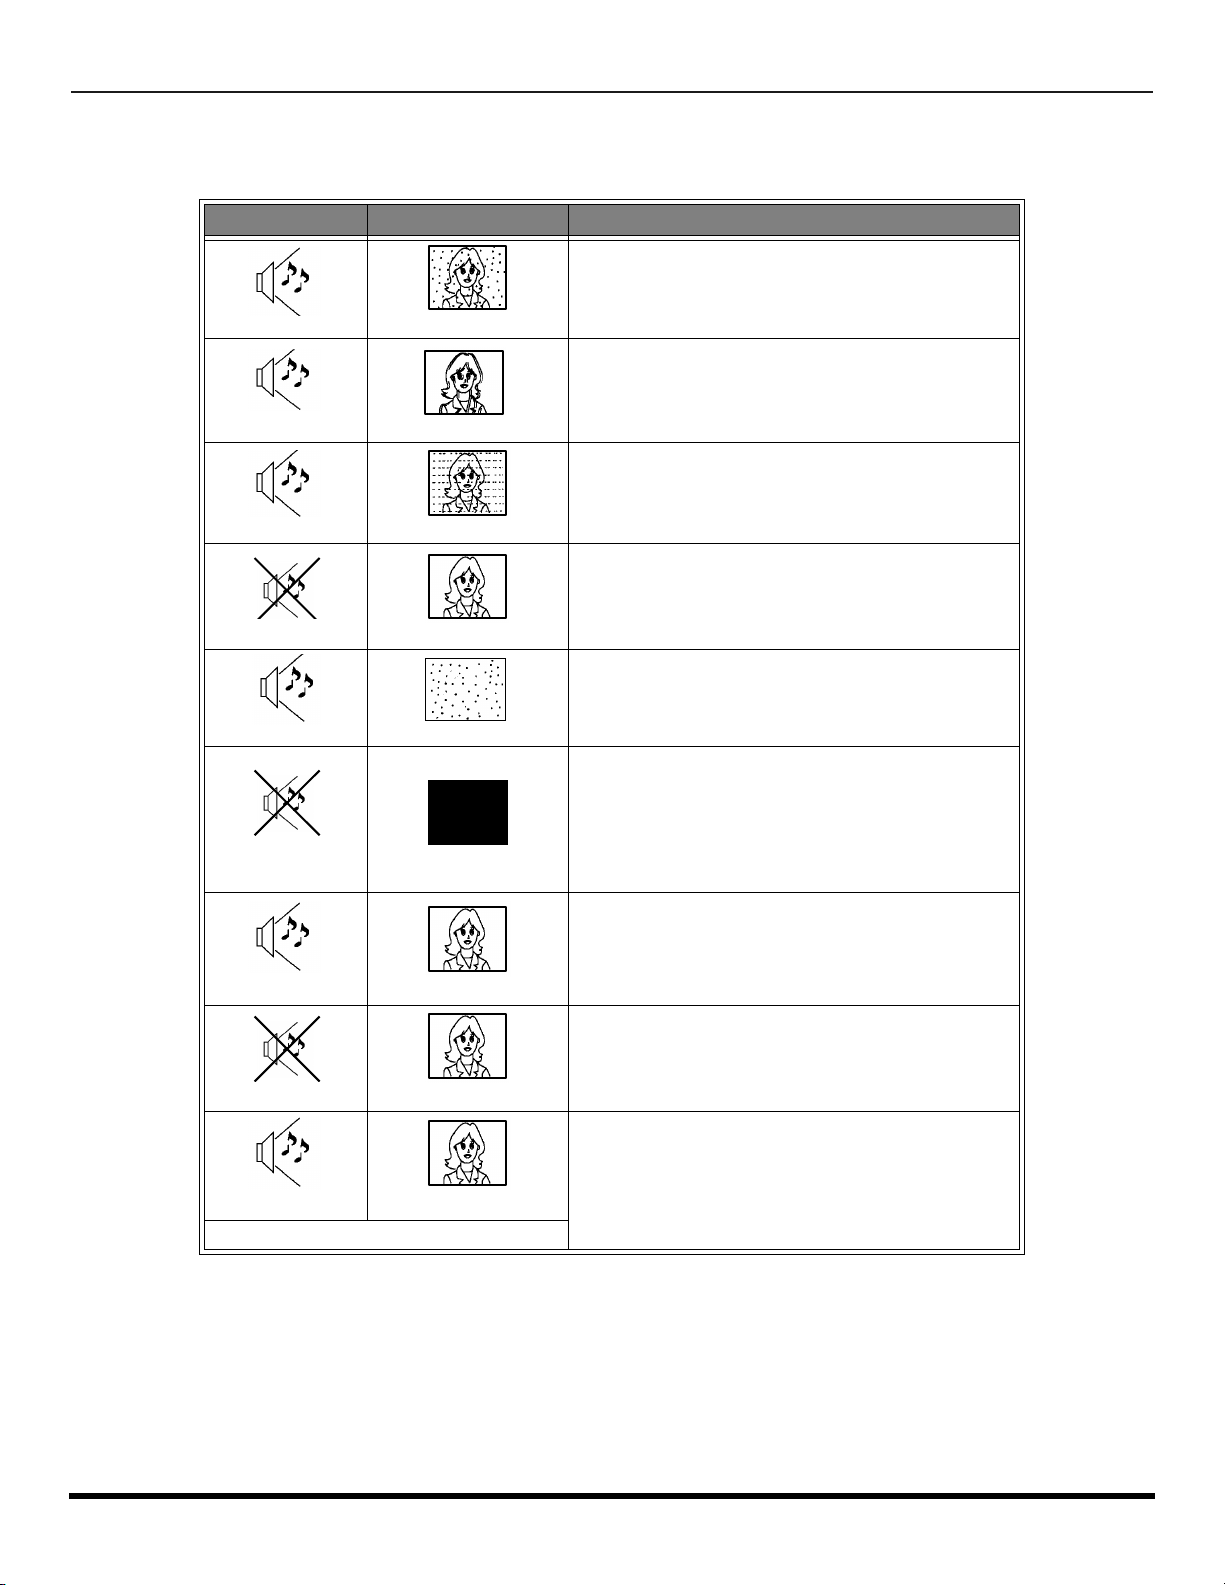
C
?
UADRO DE LOCALIZACIÓN DE FALLAS
Cuadro de Localización de Fallas
Antes de solicitar servicio, establezca los síntomas y lleve a cabo las siguientes posibles soluciones.
S
ONIDO
I
MAGEN
Soluciones
Ajuste la Ubicación y/o Conexión de la Antena
Sonido Ruidoso
Sonido Ruidoso
Sonido Ruidoso
Sin Sonido
Sonido Ruidoso
Sin Sonido
Imagen Moteada
Imagen Múltiple
Interferencia
Imagen Normal
Sin Imagen/Con Motas
Sin Imagen
Ajuste la Ubicación y la Conexión de la Antena
Revise el Cable de Entrada de la Antena
Aleje la TV de los Aparatos Electrodomésticos,
Luces, Vehículos y Equipo Médico
Aumente el Volumen
Revise Mute (Mudo)
Revise en el Menú de Audio: ALTAVOCES > SI
Cambie el Canal
Ajuste apropiadamente la modalidad de TV o del Cable
Revise los Cables de la Antena
Revise que el Cable de Corriente este Enchufado a
una toma de Corriente Activa
Ajuste los Controles de Brillo y Audio
Cambie el Canal
Revise las Conexiones del Cable
Programe el Control Remoto otra vez
Revise la Operación de la Segunda Fuente de Video
Sonido Normal
Sonido Erróneo
Sonido Normal
Operación Intermite nte de l Control Remoto
Sin Color
Imagen Normal
Imagen Normal
Ajuste el Color
Cambie el Canal
Revise en el menú de AUDIO que el Ajuste se
encuentre en Estéreo o Mono, no en SPA
Reemplace las Pilas del Control Remot o
28 l
Page 67

(Para los modelos CT-G2132, CT-G2172, CT-G2132L, CT-G2172, CT-G2972,
CT-G2972 y CT-G3352 solamente.)
Nota: La hoja de garantía y la información de centros de servicio para el modelo CT-G3352X está localizada
en la bolsa de documentos.
Guia de Servicios Tecnicos
En caso que su unidad deba ser reparada en cualquier otro pais que no sea el de compra, se ruega ponerse en contacto con uno de los centros de servicio mencionados por pais en
esta Guia. Recuerde que la presente Guia de Servicios Técnicos no es garantia y que la presentación de la misma no acondiciona en ningún momento a que el servicio prestado sea
gratuito, sino con pagos correspondientes, salvo aquellos que se presten de acuerdo con las condiciones estipuladas en esta Guia y que se realicen en los paises de su aplicación. En
caso que la pieza o piezas requeridas estén sujetas a restricciones de importación, rogamos tener presente que se podria requerir más tiempo para la reparación del producto. En
algunos casos, el servicio no podra realizarse, po no disponer de las piezas necesarias debido a restriciones de importación o porque las técnicas o herramientas para tales reparaciones no existen en paises donde estos productos no están a la venta en nuestros distribuidores de ventas autorizados.
Casas De Servicio Autorizadas
LATIN ARGENTINA Panasonic de Fueg uina S.A. Manuel Garcia 352 C.P. 1284-Buenos Aires Tel. 3087-1610
AMERICA BRAZIL Panasonic do Brasil Ltda. Rod. Presidente Dutra KM159 San Jose Dos Campos Sao
CHILE Soc. de Servicios Electrónicos Ltda. Santa Elena 1722, Casilla 401, Correo 3 Santiago Tel. 567096, -7, -8
COSTA RICA Panasonic de Costa Rica, S.A. Apartado 5295, San Jose Tel. 39-1911
EL SALVADO R Panasonic de El Salvador, SA. de C.V. Apa rt ad o Posta l (06), 1208 San Salvador Tel. 71-4482
GUATEMALA Panasonic de Guatemala, S.A. 5a Calle 1-02, Zona 13, Ciudad de Gua te m ala, Guatemala Tel. 72-0536
PANAMA Pa naso ni c Latin Ame rica , S.A. Via Simon Bolivar (Transistmica). Contiguo Colegio la Salle Tel. (507) 29-2294
The caribbean area and other
Latin America countries
except México
PERU Matsushita Electric del Peru, S.A. Av. La Marina 2620, San Mig ue l, Li m a Tel. 52-94-70
VENEZUELA “Panasonic” Corpo ration Venezolana, S.A. Av. El hatillo, Con Av. Gonzalez Rincones, Edf. Panasoni c,
ASIA PHILIPPINES Matsushita Electric Phillipines Corp Bonaventure Plaza Garden Level and Ground Floor, Ortigas
Please contact Panasonic Latin America, S.A.
(PANAMA)
Paulo
LA Trinidad, Caracas
Avenue, Greenhills, San Juan Metro Manila
Tel. (0123) 31-8011
Fax. (507) 29-2536
Tel. 93-30-22
Tel. 2-793960, 793630
G
UIA
DE
SERVICIOS
TECNICOS
29 l
Page 68

I
NDICE
Indice
A
AJ. Audio 20
AJ. (Ajustes) Imágen 18
Ajuste del reloj 19
Altavoces 20
Altos 20
Antena VHF/UHF 3
Audio 20
Autoencendido 18
B
Bajos 20
Balance 20
Bloqueo 21
Brillo 18
C
Cable De Suministro
De Corriente Alterna 3
Canales 21
CC Modo 18
Códigos de Componen tes 13
Códigos para Decodificador
de Cable 14
Códigos para DVD 14
Códigos para VCR 13
Color 18
Conexión de Antena 3
Conexión de Cabl e / Antena 3
Conexión de la
Videocasetera 6
Conexión del Amplificador 6
Conexiones de
Cable Opcional 3
Contraste 18
Cronómetro 19
Cronómetro de dormir 19
Cuadro de Localización
de Fallas 28
Cuidado y limpieza 2
E
Envolvente 20
Especificaciones 2
Estereo 20
F
Felicidades 2
Francés de Canada
(V-Chip) 26
G
Gabinete y Control Remoto 2
Guia de Servicios Tecnicos 29
I
Idiomas del Menú 17
Imágen 18
Inglés de Canada (V-Chip) 25
Instalación 3
Instalación de Pilas en el
Control Remoto 8, 9
J
Juego 21
M
Manual (Canales) 21
Menú de auto Programación 5
Menú de Icono s 16
Menú de iconos Prin cipal 16
Modos de Default
Para El Control Remo to 12
Mono 20
N
Navegación del menu
de Iconos 15
Nitidez 18
Normal 18, 20
O
Operación del Control
Remoto 8, 9
Operación del menú
de Iconos 17
Operación Menu V-CHIP 22
Otros Ajustes 20
P
Panel de Control Frontal 7
Pantalla 2
Peliculas de EEUU 24
Ponga Título 21
Precaución 3
Prog Cnls (Programación
de Canales) 17
Programa Auto 17
Programa Manual 17
Programando El
Control Remoto 12
Programas de EEUU 22
Programas Sin Código 12
R
Recepción de Radio FM 27
Registro del Usuario 2
S
Sistemas de Clasificación de
Canada 25
Sonido IA 20
SPA 20
Subtítulos 18
T
Tabla de Clasificacion
de Peliculas De EEUU 24
Tabla de Comparación de
Características 4
Tabla de Peliculas
de EEUU 24
Tabla de Progra mas
De EEUU 22
Tabla del Modo Operacional
De las Teclas 10
Televisión o Cable Modo 5
Tinte 18
Título 21
U
Ubicación de la Televisión 3
30 l
Page 69

N
OTAS
31 l
Page 70

N
OTAS
32 l
Page 71

N
OTAS
33 l
Page 72

N
OTAS
34 l
Panasonic Consumer Electronics Company,
Division of Matsushita
Electric Corporation of America
One Panasonic Way
Secaucus, New Jersey 07094
www.panasonic.com
Panasonic de Mexico, S.A, de C.V.
Amores No. 1120
Col. Del Valle C.P. 03100
México, D.F.
Tel. (0155) 5488-1000
Fax (0155) 5575-6763, 5575-6765
Panasonic Sales Company,
Division of Matsushita Electric
of Puerto Rico Inc. (“PSC”)
Ave. 65 de Infantería, Km 9.5
San Gabriel Industrial Park
Carolina, Puerto Rico 00985
Tel. (787) 750-4300
Fax (787) 768-2910
 Loading...