

Page 1
Panasonic
Installer's Guide
Manual de Instalación
S«v« ttM documeoi for future refereix«
Con—fv —ft documento para futuras refereno—
CT-2010H
CT-2020H
CT-2720H
AMd these tneiructiori» completely before operating television.
Lee eetas Instruoaonee cornpietameme antes de operar la televioion
Contente ere BiOyecI lo change wihout noeoe or obiioeMon
El comando oelé euieio a cambios sin previo awsc u odigociOh
Becy* '
:d»e»r
CT-2620H
Page 2

Table of Contents
Indice
Care and Cleaning...............................3
Installation
Television Location
Power Supply Cord.........................................3
Adding Mounting Brackets
To The Television........................................4
Location of Controls
Quick Reference Control Operation
...........................................
.........................................
............................
...............
Remote Control Guide.........................6
Main Menu......................................... 7
Basic Navigation
Lock Menu.......................................................7
.............................................
Commercial (Hotel) Mode Feature
Chart
....
.............................................8
Clone Box Use.....................................9
Setting the “Master” Television
Uploading Television Settings into
the Clone Box (LEARN)
Downloading Settings into Other
Televisions (TEACH)
Setting Individual Volume Limits..................11
Testing the Settings in the Clone Box
Testing the Clone Box Battery......................12
Resetting the Television to Normal
TV Mode
............................................:........
.................................
.......................
.............................
...........
10
10
Setting the Television without
a Clone Box.....................................14
Troubleshooting Guide
......................
15
Cuidado y limpieza...............................3
Instalación............................................3
3
3
5
5
Ubicación de la televisión................................3
Cable de suministro de corriente
Añadiendo un soporte a la televisión
Ubicación de los controles
Referencia rápida para la operación de
controles
.......................................................
...................
Guía para el control remoto
Menú principal......................................7
7
Navegación básica
Menú de bloqueo.............................................7
..........................................
Tabla de características de la
modalidad comercial (hotel)
Uso de la caja de clonación
9
12
13
(duplicación)
Configurando la televisión “maestra”
Grabando la configuración de la
televisión maestra en la caja
de clonación (APRENDE)
Duplicando la configuración de la
televisión maestra en otras
televisiones (ENSEÑA)
Ajustando límites individuales
de volumen
Probando la configuración en la
caja de clonación........................................12
Probando la pila de la caja
de clonación
Reajustando la televisión a
la modalidad normal de televisión
......................................
..........................
..............................
................................................
..............................................
....................
..............
.................
..............
..............
.............
3
4
5
5
6
7
8
9
9
10
10
11
12
13
Safety Warning
................................
16
Configurando la televisión sin
una caja de clonación
.....................
Cuadro de localización de fallas
Instrucciones de seguridad
-2-
.........
................
14
15
16
Page 3

Care and Cleaning
Cuidado y limpieza
Screen (turn television off)
□ Use a mild soap solution or window cleaner
with a soft clean cloth. DO NOT USE
ABRASIVE CLEANERS.
□ Avoid excessive moisture and wipe dry.
Cabinet and Remote Control
□ For the cabinet and remote control, use a soft
cloth dampened with water or a mild
detergent solution. Avoid excessive moisture
and wipe dry.
n Do not use benzene, thinner or other
petroleum based products.
Installation
Television Location
□ Avoid excessive sunlight or bright lights,
including reflections.
□ Keep away from excessive heat or moisture.
Inadequate ventilation may cause internal
component failure.
□ Fluorescent lighting may reduce remote
control transmitting range.
n Keep away from magnetic equipment
including motors, fans and external speakers.
Power Supply Cord
CAUTION: TO PREVENT ELECTRIC SHOCK,
MATCH WIDE BLADE OF PLUG TO WIDE
SLOT OF AC OUTLET AND FULLY INSERT.
DO NOT USE A PLUG WITH A RECEPTACLE
OR OTHER OUTLET UNLESS THE BLADE
CAN BE FULLY INSERTED TO PREVENT
BLADE EXPOSURE.
Pantalla (apague la televisión)
□ Use una solución de jabón suave o limpiador
de vidrios con un paño suave y limpio. NO
USE LIMPIADORES ABRASIVOS.
□ Evite la humedad excesiva y seque bien.
Gabinete y control remoto
n Para gabinete y control remoto, use un paño
suave humedecido con agua o una solución
detergente suave. Evite exceso de humedad
y frote hasta secar.
n No use benceno, diluyentes u otros productos
a base de petróleo.
Instalación
Ubicación de la televisión
n Evite e! exceso de luz sol u otras luces
brillantes, incluyendo reflejos,
n Mantenga alejada la unidad del exceso de
calor o humedad. La ventilación inadecuada
puede causar fallas en componentes
internos.
□ La iluminación fluorescente puede reducir el
rango de transmisión del control remoto.
□ Evite el equipo magnético incluyendo
motores, ventiladores o altavoces externos.
Cable de suministro de corriente
PRECAUCION: PARA PREVENIR UNA
DESCARGA ELECTRICA, BUSQUE LA HOJA
ANCHA DEL ENCHUFE E INSERTELA POR
COMPLETO EN LA RENDIJA ANCHA
CORRESPONDIENTE DE LA TOMA DE
CORRIENTE ALTERNA. NO USE ESTE
ENCHUFE CON UN RECEPTACULO U OTRA
TOMA DE CORRIENTE SALVO QUE LA HOJA
SE PUEDA INSERTAR POR COMPLETO PARA
PREVENIR LA EXPOSICION DE LA HOJA.
Polarized plug
Enchufe polarizado
-3-
Page 4
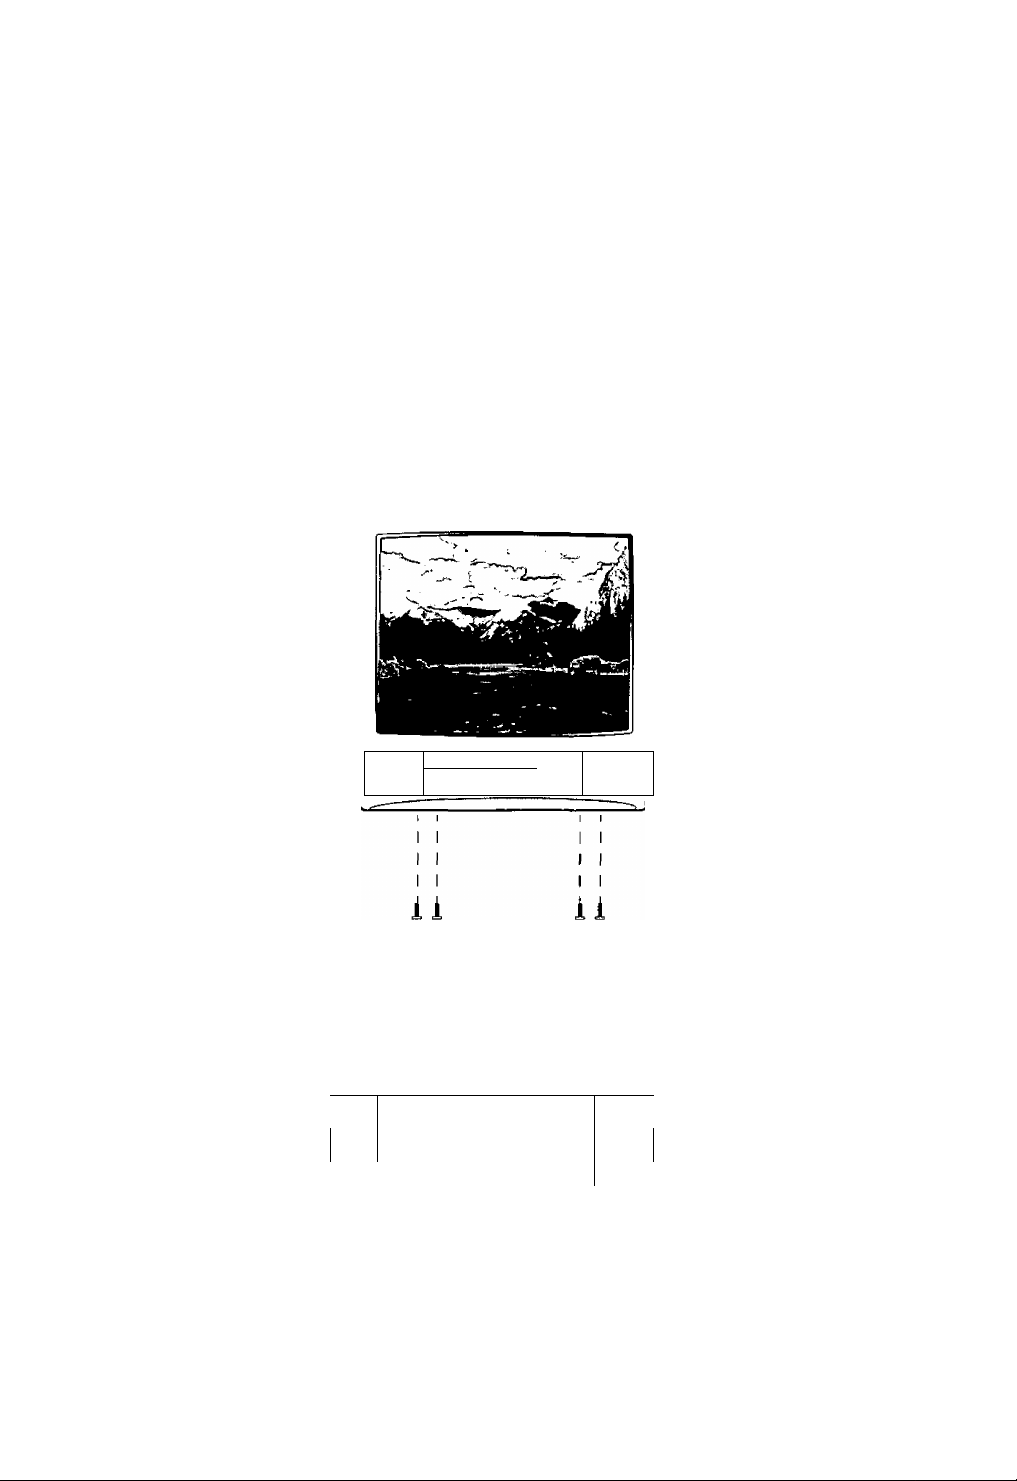
Adding Mounting Brackets To The Television
The bottom of the television has four mounting
holes to attach a mounting bracket. The
mounting bracket is not supplied.
Note: Be sure to use an approved bracket that
can hold the size and weight of the
television.
Use four (4) size #10 screws to mount the
bracket to the bottom of the television. See the
diagram below.
(r
Añadiendo un soporte a la televisión
Esta televisión cuenta con cuatro orificios en su
parte inferior, los cuales permiten añadir un
soporte a la televisión. El soporte no está
incluido.
Nota: Asegúrese de usar un soporte aprobado
capaz de sostener el tamaño y peso de la
televisión.
Use cuatro (4) tornillos tamaño #10 para
ensamblar el soporte a la parte inferior de la
televisión. Vea el diagrama a continuación.
Mounting holes
for screws
Orificios en la
parte inferior de
la televisión
~n 1 1 'S
lili
Bottom view of television cabinet
Vista de la parte inferior del gabinete de ia televisión
iiiiiiiiiiiiiiiiiiiiiiiiiiiiiiii
A
IIIIIIIIIIIIIIIIIIIIIIIIIIOIIBIIIII
IIIIIIIIIIIIIIIIIBIIIlilllOIIDIBDI
XTiiii ^ omiiiiiiiiiiiEiiiii ©
cr
Front of television
Frente de la televisión
m
i
70
mnii^
Mounting holes
for screws
Orificios en la
parte inferior de
la televisión
-4-
Page 5
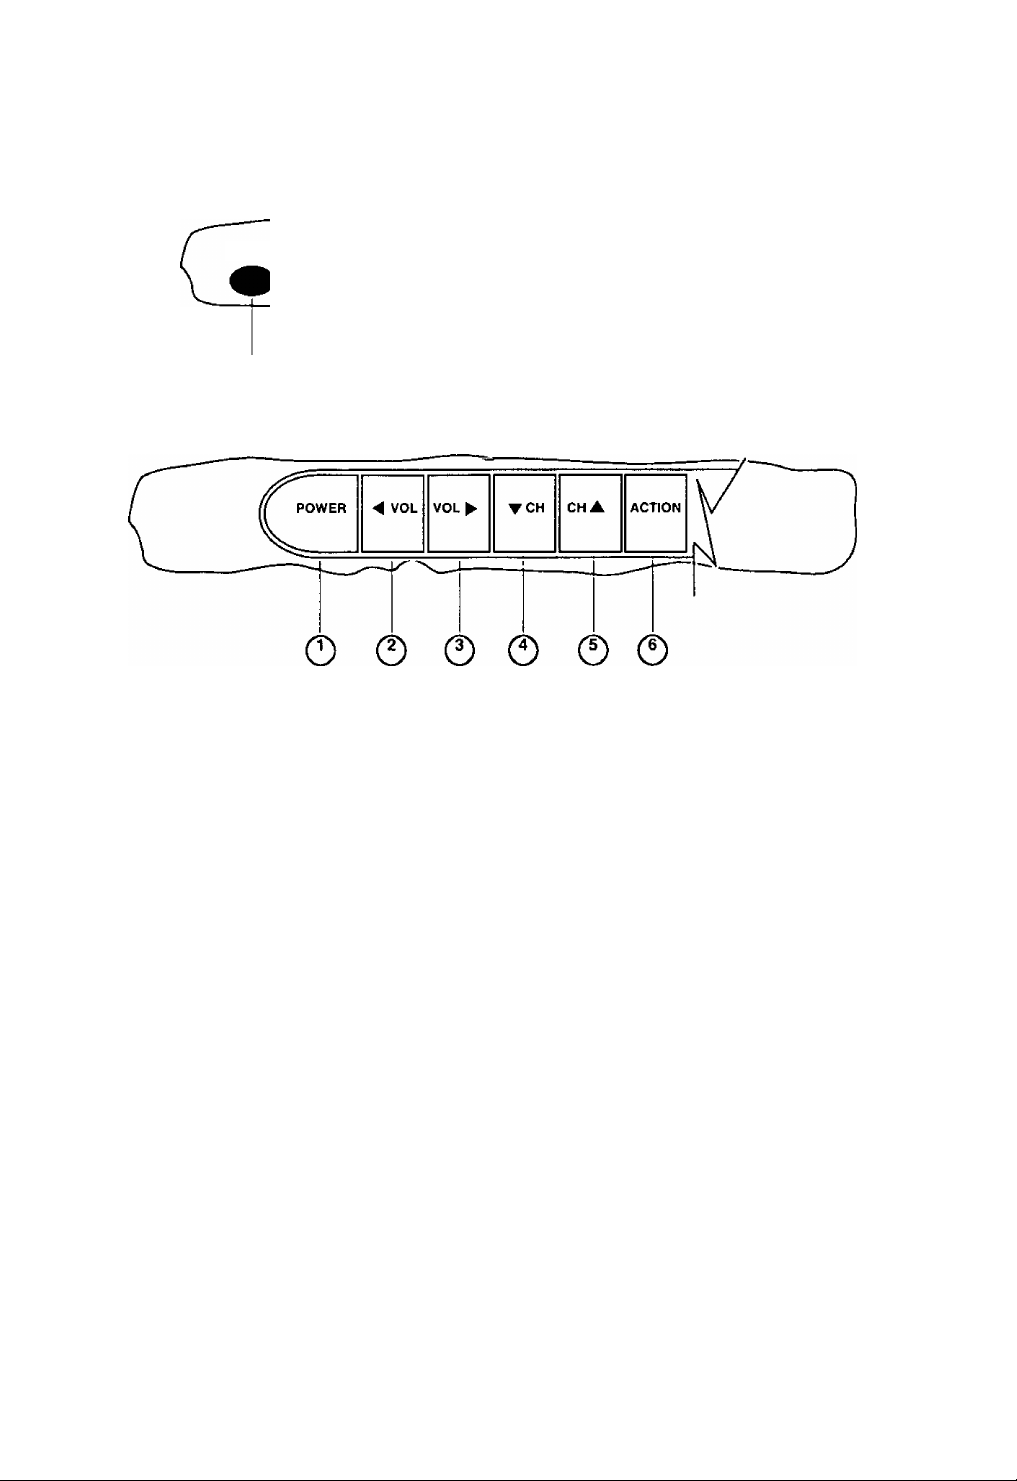
Location of Controls
Ubicación de los controles
POWER ^ VOLUME^ T CHANNEL A ACTION TV/VIDEO
O © © © © © © “
Front Panel for CT-2020H/CT-2720H
Panel frontal para CT-2020H/CT-2720H
Front Panel for CT-2520H
Panel frontal para CT-2520H
Control Sensor
del control remoto
Quick Reference
Control Operation
Power Button - Press to turn ON or
©
OFF.
Volume Buttons - Press to adjust
Sound Level, or to adjust Audio
©
Menus, Video Menus, and select
operating features when menus are
0
displayed
Channel Buttons - Press to select
©
programmed channels. Press to
highlight desired features when
menus are displayed.
0
Action Button - Press to display
Main Menu and access On Screen
©
Feature and Adjustment Menus
(normal TV mode only).
TVWideo Button - Press to select TV
O
or Video Input.
Referencia rápida para la
operación de controles
Botón de encendido - Presione para
o
ENCENDER o APAGAR.
Botones de voiumen - Presione
0
para ajustar el nivel del sonido, o para
ajustar los menús de audio, vídeo, y
para seleccionar las funciones de
0
operación cuando los menús se
muestran en pantalla.
Botones de canai - Presione para
©
seleccionar los canales
programados. Presione para realzar
la función deseada cuando los menús
©
se muestran en pantalla.
Botón de acción - Presione para
©
desplegar el menú principal, accesar
las funciones y los menús de ajuste
en pantalla (sólo en la modalidad de
televisión normal).
Botón de TV/Video - Presione para
O
seleccionar la entrada de televisión o
vídeo.
-5-
Page 6
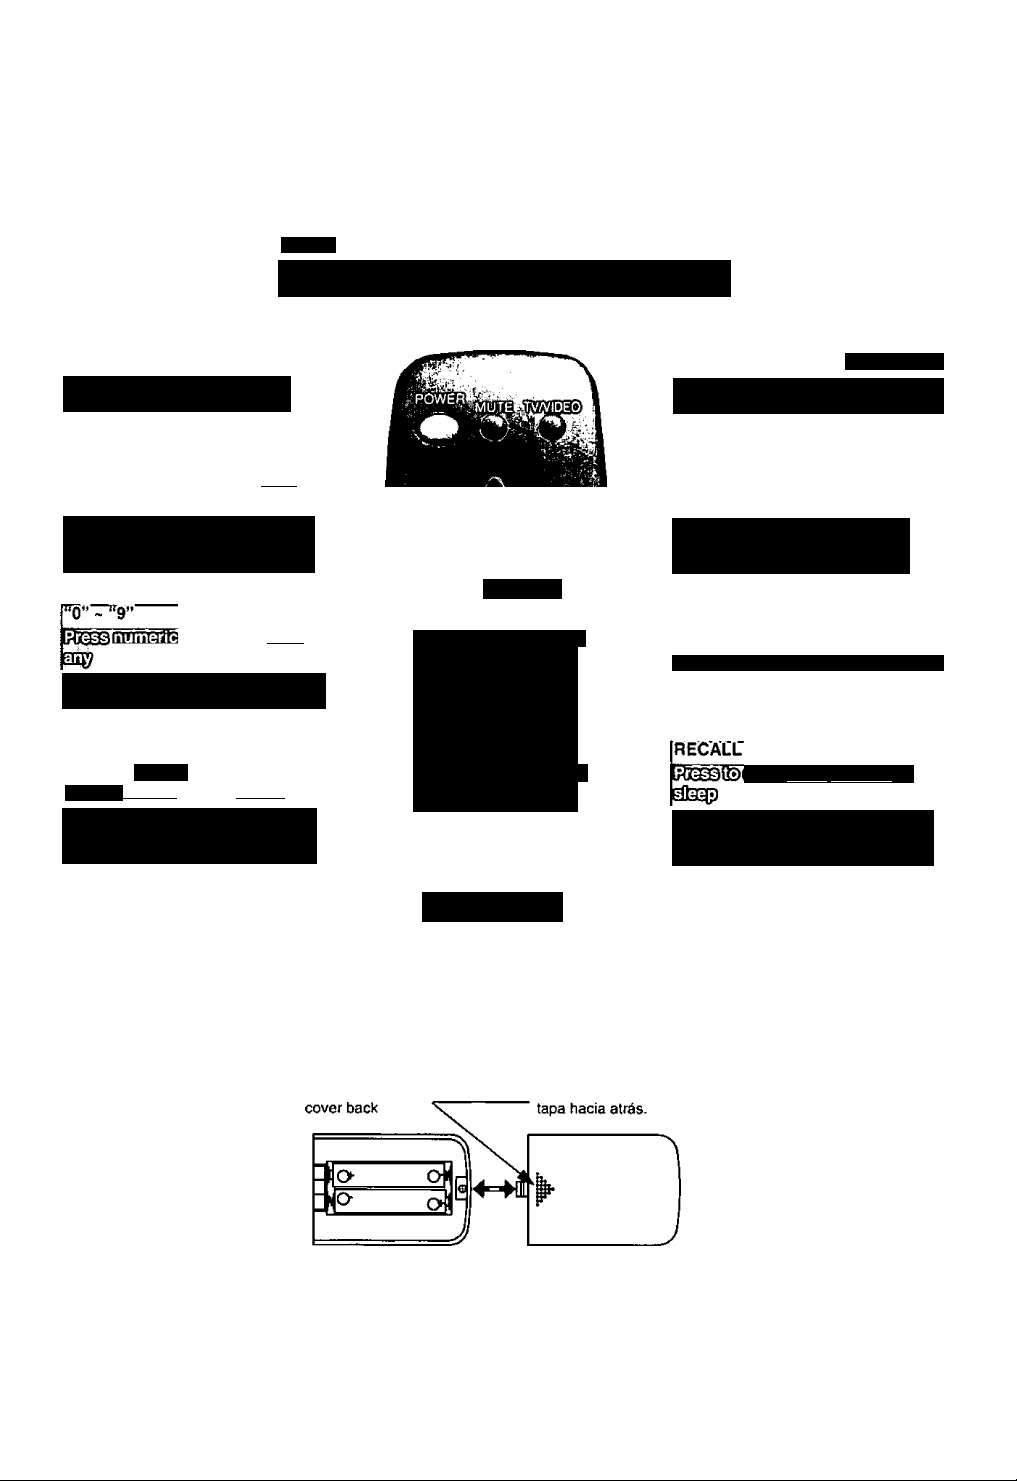
Remote Control Guide / Guía para el control remoto*
MUTE'
closed
Presione para silenciar el sonido. También presione para
activar y desactivar la modalidad de subtítulos (CC).
F0WÉR’
Presione para ENCENDER y
APAGAR.
vüí:
griffi
Presione para ajustar el sonido
de la televisión y accesar las
opciones en los menús.
I5ri^;;pgffifnicffimì
C^iETiTíTgfí>
Presione el teclado numerico
para seleccionar cualquier canal.
R-tÜNE'
switch
Wi
ÍfifíffiíiítiflCTpffifeifñffffta.
viewed
Presione para regresar al canal
previamente visto o modalidad
de vídeo.
Installation of Batteries
Use two AA batteries;
Remove battery cover by pressing
in and up near arrow.
Install batteries matching (+) and (-)
polarity signs.
Replace the battery cover.
TVAÍIDEÓTT'
Presione para seleccionar la
modalidad de televisión o vídeo.
ee®33Qd cansa
Presione para seleccionar el
siguiente canal y accesar las
opciones en los menús.
[ACTION
ACTION
Presione para accesar tos menus.
(T;
tT^
R-TUNE
Panasonic
EUR501371
Press down here and slide the Presione aquí y deslize la
nr5
RECALL
Presione para visualizar la hora,
canal, cronómetro de apagado
aufomá//co, y otras opciones.
Instalación de pilas
Use dos pilas AA:
Vid^ModS*
displa^timeitchannel!
íSnOÍ QíaGffiIЗ?(Ц$8^
Quite la tapa del compartimiento
de pilas presionando en dirección
a la flecha.
Instale las pilas igualando las
marcas (i-) y (-) de la polaridad.
Coloque nuevamente la tapa de
las pilas.
★ The remote control is not supplied. It can be
purchased separately.
El control remoto no está incluido. Se vende
por separado.
* * Operation not available with CT-2020H and
CT-2520H.
No está disponible en CT-2020H y CT2520H.
-6-
Page 7
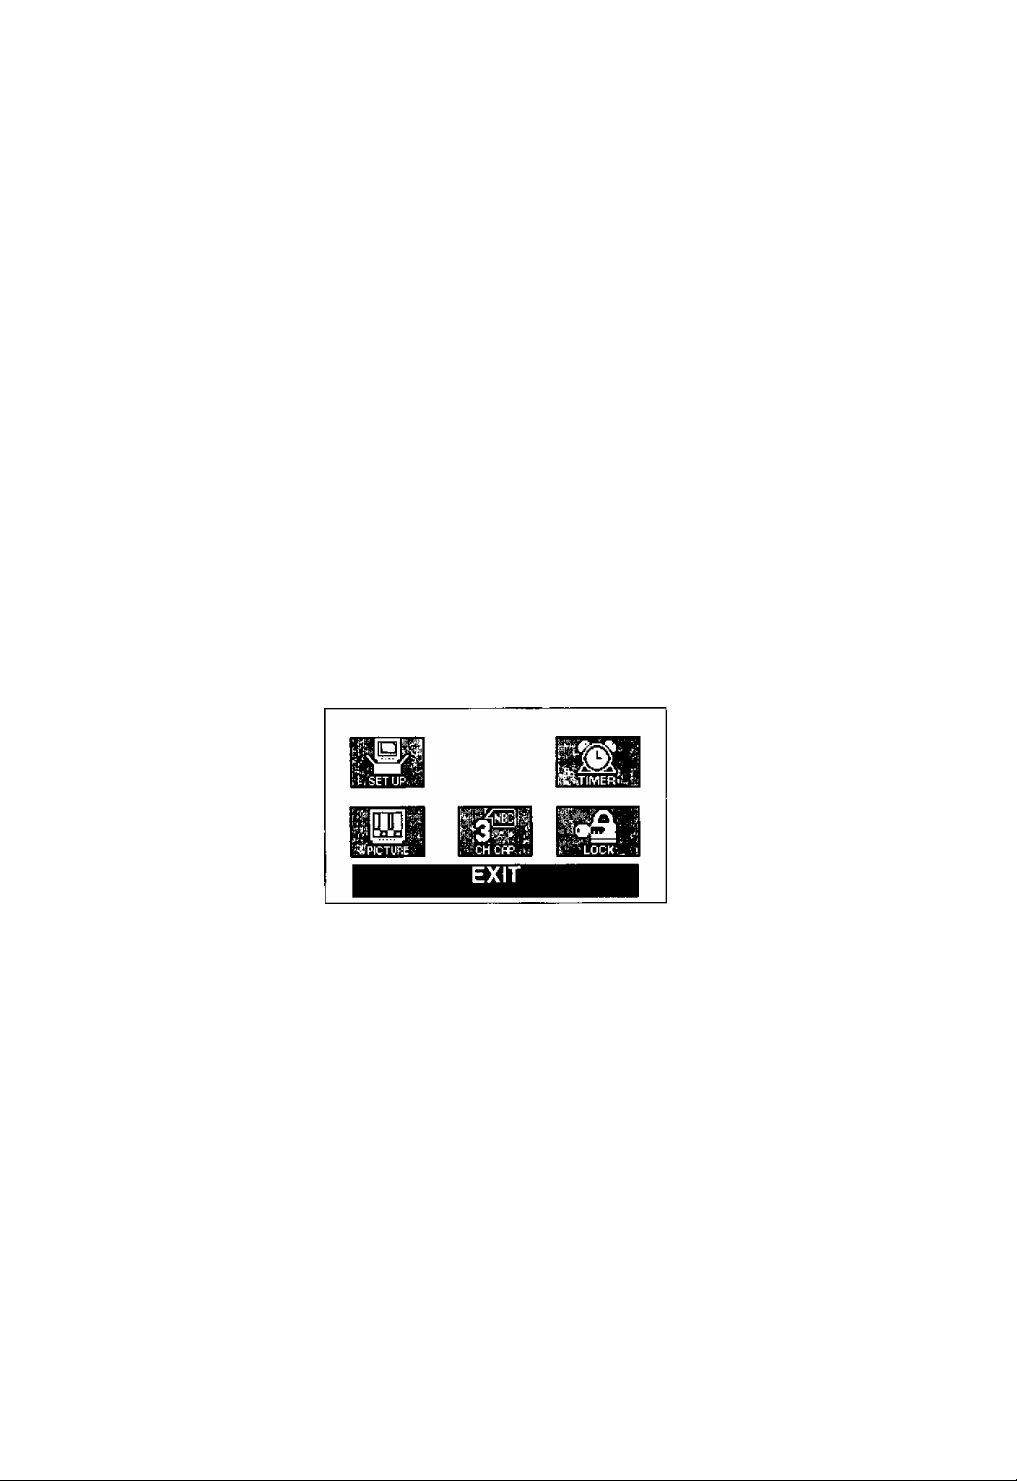
Main Menu
The Main Menu appears only when the television
is in Normal TV Mode.
Basic Navigation
1. Press the ACTION button on the remote
control to display the Main Menu.
2. Press the CH and/or VOL buttons to select
an icon.
3. Press the ACTION button to display a
submenu.
4. Press the CH buttons to move within the
submenu.
5. Press the VOL buttons to adjust features
within the submenu.
6. Press the ACTION button twice to exit all
menus.
Main Menu
Menú principal
Menu principal
El menú principal aparece sólo cuando la
televisión se encuentra en la modalidad de
televisión normal.
Navegación básica
1. Presione el botón ACTION en el control
remoto para desplegar el menú principal.
2. Presione los botones de CANAL y
VOLUMEN para seleccionar un icono.
3. Presione el botón ACTION para desplegar
un submenú.
4. Presione los botones de CANAL para
mover el cursor dentro del mismo
submenú.
5. Presione los botones de VOLUMEN para
ajustar las funciones dentro del submenú.
6. Presione el botón ACTION dos veces para
salir de tos menús.
Lock Menu
The Lock feature allows various types of movies,
videos, video games and television programs to
be blocked.
When in Commercial (Hotel) mode, the default on
screen menu does not display the Lock (Parental
Lock) menu. To display the menu, press the
following keyboard codes, using the front panel.
1. Press the ACTION button and the CH ▼
button simultaneously.
2. Within a second, press the ACTION button
and the VOL ◄ button simultaneously.
Menú de bloqueo
La función LOCK (bloqueo) permite bloquear
diferentes tipos de películas, vídeos, videojuegos
y programas de televisión.
En el preajuste de fábrica para la modalidad
comercial (hotel) no aparece la opción de
bloqueo (Parental Lock) en el menú principal. Si
desea ver el menú de bloqueo, realice los
siguientes códigos de teclado usando el panel
frontal de la televisión.
1. Presione el botón ACTION y CH
simultaneamente.
2. En el espacio de un segundo, presione el
botón ACTION y VOL ◄ simultaneamente.
-7-
T
Page 8
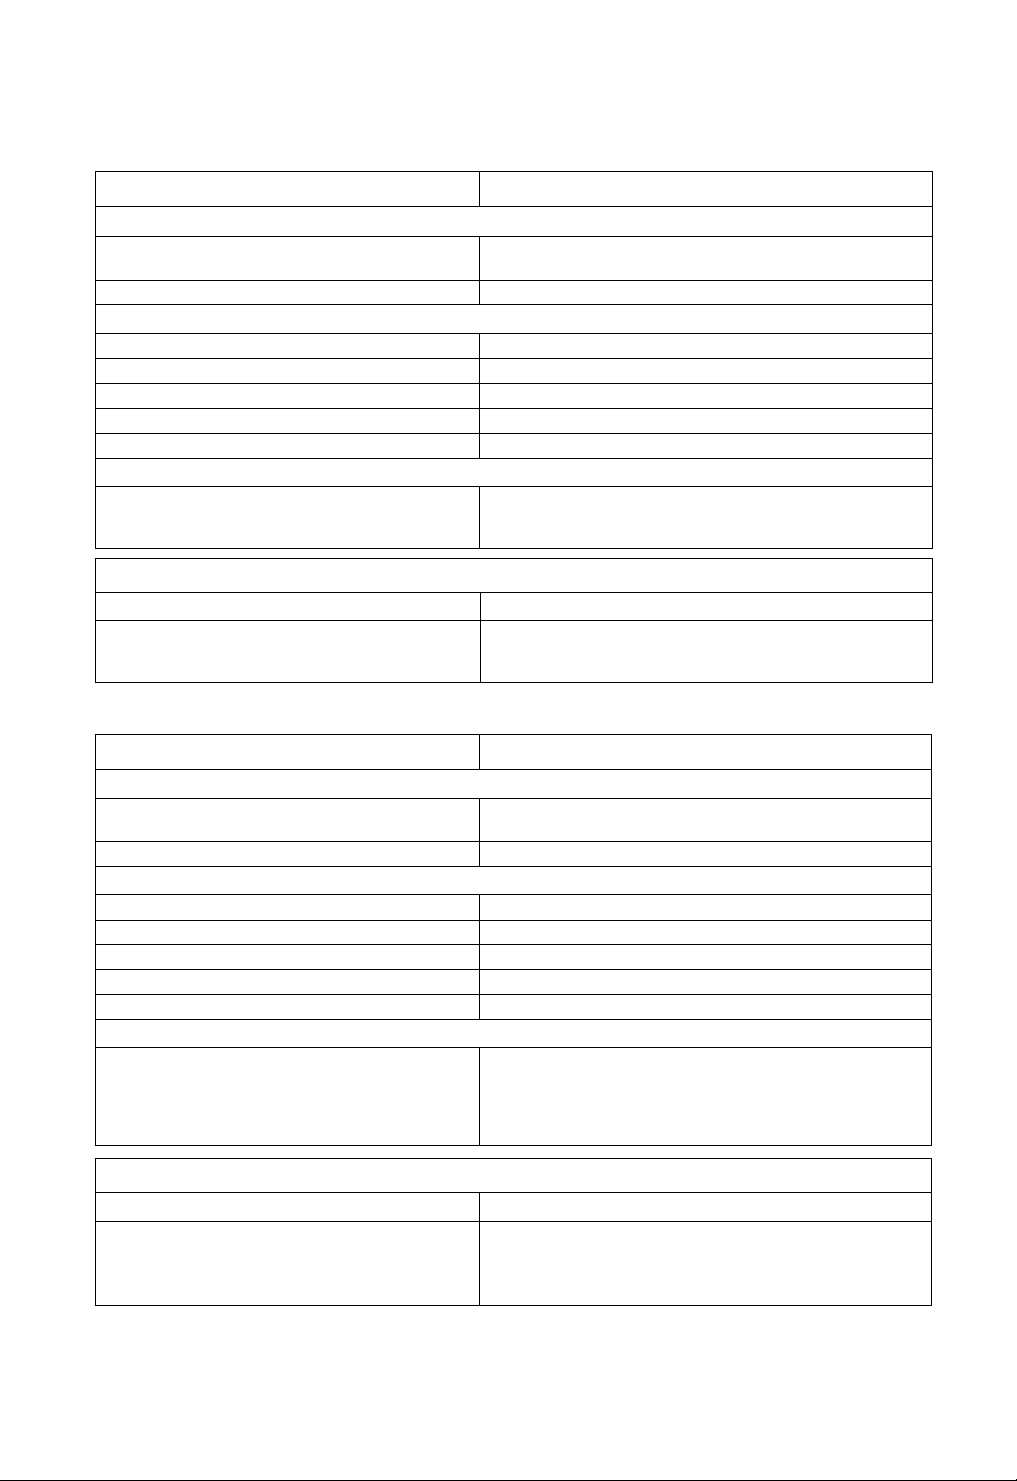
Commercial (Hotel) Mode Feature Table
gtiasuziAtitizy
SETUP
AUTO PROG
MANUAL PROG
COLOR
TINT G Adjusts the natural flesh tones.
BRIGHTNESS G Adjusts the dark areas of the picture for crisp detail.
PICTURE G Adjusts the white areas of the picture.
SHARPNESS
CHANNEL CAPTION
G Automatically programs channels having a signal into
memory.
G Allows manual deletion of channels from memory.
PICTURE
G Adjusts the color intensity.
G Adjusts the clarity of outline detail.
CHCAP
G Allows assignment of channel captions up to 125 stations.
Note: To delete a channel caption, place dashes (•) in all the character
positions in the ENTER CAPTION area.
VOLUME LIMITING
G Sets maximum volume level.
G Sets the first channel viewed when the television is turned on.
INITIAL CHANNEL
Note: This setting must be done using the CH buttons on the front
panel ol the television.
Tabla de características de la modalidad comercial (hotel)
AJUSTE (SETUP)
AUTO PROG (programación automática de canales)
MANUAL PROG (programación manual de canales) G Permite borrar manualmente canales de la memoria.
COLOR (COLOR)
TINTE (TINT) G Ajusta los tonos naturales de la piel.
BRILLO (BRIGHTNESS) G Ajusta las áreas oscuras para detalles mas nítidos.
CONTRASTE (PICTURE) G Ajusta las área blancas de la imagen.
NITIDEZ (SHARPNESS) G Ajusta la claridad de los detalles de silueta.
TITULOS DE CANAL (CHANNEL CAPTION)
G Programa automaticamente los canales con señal en
memoria.
IMAGEN (PICTURE)
G Ajusta la intensidad del color.
CHCAP
O Permite asignar títulos o identificación de canal hasta 125
canales.
Woía: Para borrar el titulo o la identificación de canal, introduzca
guión (-) en todas las posiciones de los caracteres en el
área de ENTER CAPTION.
LIMITE OE VOLUMEN
CANAL INICIAL
G Ajusta el nivel máximo de volumen.
G Ajusta el canal que será visto al encendido inicial de la
televisión.
Nota: Este ajuste debe llevarse a cabo usando los bolones de
canal en el panel frontal de la televisión.
-8-
Page 9

Clone Box Use
The clone box uploads (LEARN) the settings of
one television and downloads (TEACH) them to
other televisions. This places the television into
Commercial (Hotel) Mode.
Setting the “Master” Television
The features listed in the Commercial (Hotel)
Mode table must be adjusted before cloning can
begin.
1. Turn the television ON.
2. Access the Main Menu by pressing the
ACTION button.
3. Access the Set Up menu.
Use the CH and VOL buttons to highlight the
Set Up icon, then press the ACTION button.
Use the CH buttons to highlight AUTO PROG
(Auto Channel Programming), then press the
VOL button to begin programming.
Note: This step is mandatory.
If necessary, use MANUAL PROG (Manual
Channel Programming) to delete any
undesired channels.
Press the ACTION button to return to the Main
Menu.
If necessary, access the Picture menu.
4.
Use the CH and VOL buttons to highlight the
Picture icon, then press the ACTION button.
Use the CH buttons to highlight a feature, then
press the VOL buttons to adjust them.
Press the ACTION button to return to the Main
Menu.
If desired, access the Channel Caption
5.
menu.
Use the CH and VOL buttons to highlight the
Ch Cap icon, then press the ACTION button.
Use the CH buttons to highlight the channel
number, then press the VOL buttons to select
characters for the channel caption.
Press the ACTION button to return to the Main
Menu.
Exit the Main Menu by pressing the
6.
ACTION button.
If necessary, set the maximum volume
7.
level.
Model CT-2010H
Model CT-2010H does not have a digital
interlace on the back of the television. To
set the television, use the front panel.
Uso de la caja de clonación
(caja de duplicación)
La caja de donación graba (APRENDE) la
configuración de una televisión, y posteriormente la
duplica a otras televisiones (ENSEÑA). Esto coloca
a la televisión en la modalidad comercial (hotel).
Configurando la televisión “Maestra”
Las funciones listadas en la tabla de la
modalidad comercial deben ser ajustadas antes
de empezar este procedimiento.
1. ENCIENDA la televisión.
2. Presione el botón ACTION para accesar
al menú principal.
3. Accese al menú Set Up (Ajuste).
• Use los botones de CANAL y VOLUMEN
para realzar el icono de Set Up, luego
presione el botón ACTION.
• Use los botones de CANAL para realzar
AUTO PROG (programación automática de
canales), luego presione el botón de
VOLUMEN para comenzar la programación.
Nota: Este paso es obligatorío.
• Si necesita, use la función MANUAL PROG
(programación manual de canales) para
borrar los canales no deseados.
• Presione el botón ACTION para regresar al
menú principal.
4. Si necesita, accese al menú de Imagen.
• Use los botones de CANAL y VOLUMEN
para realzar el icono de Imagen, luego
presione el botón ACTION.
• Use los botones de canal para realzar la
función deseada, luego presione los botones
de VOLUMEN para ajustarla.
• Presione el botón ACTION para regresar al
menú principal.
5. Si desea, accese el menú de títulos de
canal.
• Use los botones de CANAL y VOLUMEN
para realzar el icono de Ch Cap, luego
presione el botón ACTION.
• Use los botones de CANAL para realzar el
número de canal deseado, luego presione los
botones de VOLUMEN para seleccionar
caracteres para el título o identificación del
canal.
• Presione el botón ACTION para regresar al
menú principal.
6. Presione el botón ACTION para salir del
menú principal.
7. Si necesita, ajuste el nivel máximo de
volumen.
T^rTTp------------------------------
El modelo CT'2010H no incluye una interface
digital en la parte posterior de la televisión.
Ajuste su televisión usando el panel frontal.
Modelo CT-2010H
-9-
Page 10

uploading Television Settings into the
Clone Box (LEARN)
1. Press the POWER ON button on the clone
box.
• The LEDs will flash red and green to confirm
power is ON.
2. Connect the clone box to the Digital
Interface port on the back of the television.
• The television must be plugged into an AC
outlet but can be either OFF or ON.
3. Hold the ALT button while pressing the
LEARN button.
• The red LED will flash while the data is
uploaded to the box. The green LED will light
for about two (2) seconds when the procedure
is complete.
Note: The television is now in Commercial
(Hotel) Mode.
4. Disconnect the clone box from the
television and turn it OFF.
Note: This will not affect the data stored in the
box as long as the battery is inserted and
charged.
Downloading Settings into Other
Televisions (TEACH)
1. Press the POWER ON button on the clone
box.
• The LEDs will flash red and green to confirm
power is ON.
2. Connect the clone box to the Digital
Interface port on the back of the television.
• The television must be plugged into an AC
outlet but can be either OFF or ON.
3. Press the TEACH button.
• The green LED will flash while data is
downloaded to the television. The green LED
will tight for about two (2) seconds when the
procedure is complete.
Note: The television is now in Commercial
(Hotel) Mode.
4. Disconnect the clone box from the
television and turn it OFF.
5. Repeat steps 1-4 to set up other
televisions.
Grabando la configuración de la
televisión maestra en la caja de
clonación (APRENDE)
1. Presione el botón POWER ON en la caja
de clonación.
• Los indicadores rojo y verde emitirán una luz
intermitente para confirmar que la caja de
clonación está encendida.
2. Conecte la caja de clonación a la interface
digital en la parte posterior de la televisión.
• Aunque la televisión puede estar encendida o
apagada debe estar conectada al suministro
de corriente alterna.
3. Mientras mantiene presionado el botón
ALT oprima el botón LEARN (Aprende).
• El indicador rojo emitirá una luz intermitente
mientras la información es grabada en la caja
de clonación. EL indicador verde emitirá un
luz continua por aproximadamente dos
segundos cuando el procedimiento halla
concluido.
Nota: Ahora la televisión está en la modalidad
comercial (Hotel).
4. Desconecte la caja de clonación de la
televisión y APAGUELA.
Nota: La información almacenada en la caja de
clonación no será afectada siempre y cuando la
pila este insertada y con carga.
Duplicando la configuración de la
televisión maestra a otras televisiones
(ENSEÑA)
1. Presione el botón POWER ON en la caja
de clonación.
• Los indicadores rojo y verde emitirán una luz
intermitente para confirmar que la caja de
clonación está encendida.
2. Conecte la caja de clonación a la interface
digital en la parte posterior de la televisión.
• Aunque la televisión puede estar encendida o
apagada debe estar conectada al suministro
de corriente alterna.
3. Presione el botón de TEACH (enseña).
• El indicador verde emitirá una luz intermitente
mientras descarga la información almacenada
a las otras televisiones. El indicador verde
emitirá un luz continua por aproximadamente
dos segundos cuando el procedimiento halla
concluido.
4. Desconecte la caja de clonación de la
televisión y APAGUELA.
5. Repita los pasos del 1 al 4 para configurar
otras televisiones.
-10-
Page 11

Setting Individual Volume Limits
This procedure allows the maxinnum volume level
to be changed on individual televisions.
□ For lower volume
The television must be in Commercial (Hotel)
mode.
1. Turn television ON.
2. Adjust the television volume to desired
level.
Note: This win become the new maximum
volume level.
3. Press the POWER ON button on the clone
box.
* The LEDs will flash red and green to confirm
power is ON.
4. Connect the clone box to the Digital
Interface port on the back of the television.
5. Hold the ALT button while pressing the
LEARN button on the clone box.
* The red LED will flash while the data is
uploaded into the box. The green LED will
light for about two (2) seconds when the
procedure is complete.
6. Disconnect the clone box from the
television and turn it OFF.
7. Reset the volume on the television.
8. Refer to the section entitled Setting Up
Other Televisions Using the Clone Box
(TEACH)
n For higher volume
The television must be in Normal TV mode. Refer
to the section entitled Resetting the Television to
Normal TV mode.
1. Turn television ON.
2. Adjust the television volume to the
minimum setting.
3. Press the POWER ON button on the clone
box.
* The LEDs will flash red and green to confirm
power is ON.
4. Connect the clone box to the Digital
Interface port on the back of the television.
5. Adjust the television volume to maximum
desired level.
6. Hold the ALT button while pressing the
LEARN button on the clone box.
Ajustando límites individuales de volumen
Este procedimiento permite modificar
individualmente los niveles de volumen máximo
en las televisiones.
G Para disminuir el volumen.
La televisión debe estar en la modalidad
comercial (hotel).
1. ENCIENDA su televisión.
2. Ajuste el volumen de la televisión al nivel
deseado.
Nota: £ste será el nuevo limite para el nivel máximo
de volumen.
3. Presione el botón POWER ON en la caja
de clonación.
• Los indicadores rojo y verde emitirán una luz
intermitente para confirmar que la caja de
clonación está encendida.
4. Conecte la caja de clonación a la interface
digital en la parte posterior de la televisión.
5. Mientras mantiene presionado el botón
ALT oprima el botón LEARN (Aprende) en
la caja de clonación.
• El indicador rojo emitirá una luz intermitente
mientras la caja de clonación graba la
información. El indicador verde emitirá una luz
continua por aproximadamente dos segundos
cuando el procedimiento halla concluido.
6. Desconecte la caja de clonación del la
televisión y APAGUELA.
7. Reajuste el volumen en la televisión.
8. Refiérase a la sección titulada
Configurando otras televisjones usando su
caja de clonación (ENSEÑAR).
D Para aumentar el volumen.
La televisión debe estar en la modalidad normal
de televisión. Refiérase a la sección titulada
Reajustando la televisión a la modalidad normal
de televisión.
1. ENCIENDA la televisión.
2. Ajuste el volumen de la televisión al
mínimo.
3. Presione el botón POWER ON en la caja
de clonación.
• Los indicadores rojo y verde emitirán una iuz
intermitente para confirmar que la caja de
cionación está encendida.
4. Conecte la caja de clonación a la interface
digital en la parte posterior de la televisión.
5. Ajuste el volumen al nivel máximo
deseado.
6. Mientras mantiene presionado el botón
ALT oprima el botón LEARN (Aprende) en
la caja de clonación.
-11 -
Page 12

• The red LED will flash while the data is
uploaded into the box. The green LED will
light for about two (2) seconds when the
procedure is complete.
• If the green LED does not light for about two
(2) seconds, retry by holding the ALT button
while pressing the LEARN button.
7. Disconnect the clone box from the
television and turn it OFF.
8. Reset the volume on the television.
9. Refer to the section entitled Setting Up
Other Televisions Using the Clone Box
(TEACH).
Testing the Settings in the Clone Box
This test compares the clone box settings with
the television settings. The television must be in
Commercial (Hotel) mode.
1. Press the POWER ON button on the clone
box.
• The LEDs will flash red and green to confirm
power is ON.
2. Connect the clone box to the Digital
Interface port on the back of the television.
• The television must be plugged into an AC
outlet but can be either OFF or ON.
3. Press the TEST button.
• The LEDs wilt flash red and green while the
data is compared. The green LED will light for
about two (2) seconds if the settings in the box
match the television.
4. Disconnect the clone box from the
television and turn it OFF.
Testing the Clone Box Battery
1. Press the POWER ON button on the clone
box.
• The LEDs will flash red and green to confirm
power is ON.
2. Hold the ALT button while pressing the
TEST button.
• The LEDs will alternately flash red and green
while the box is tested.
Note: Replace the 9 volt battery if the LEDs do
not flash red and green.
• The green LED will light for about two (2)
seconds, if battery is charged.
Note: If the green LED does not light for about
two (2) seconds at the end of the test, new
data must be downloaded into the box.
• EI indicador rojo emitirá una luz intermitente
mientras la información es grabada en la caja
de clonación. El indicador verde emitirá una
luz continua por aproximadamente dos
segundos cuando el procedimiento halla
concluido.
• Si el indicador verde no emite luz por los
aproximados dos segundos, vuelva a intentar
presionando el botón ALT y LEARN
simultáneamente.
7. Desconecte la caja de clonación del la
televisión y APAGUELA.
8. Reajuste el volumen en la televisión.
9. Refiérase a la sección titulada
Configurando otras televispnes usando su
caja de clonación (ENSEÑA).
Probando la configuración en la caja
de clonación.
Mediante este procedimiento se compara la
configuración de la caja de clonación con la de la
televisión. La televisión debe estar en la
modalidad comercial (hotel).
1. Presione el botón POWER ON en la caja
de clonación.
• Los indicadores rojo y verde emitirán una luz
intermitente para confirmar que la caja de
clonación está encendida.
2. Conecte la caja de clonación a la interface
digital en la parte posterior de la televisión.
• Aunque la televisión puede estar encendida o
apagada debe estar conectada al suministro
de corriente alterna.
3. Presione el botón TEST (Prueba).
• Los indicadores rojo y verde emitirán una luz
intermitente mientras se compara la
información. El indicador emitirá una luz verde
continua por aproximadamente dos segundos
si la configuración de la caja es igual a la de la
televisión.
4. Desconecte la caja de clonación de la
televisión y APAGUELA.
Probando la pila de la caja de clonación
1. Presione el botón POWER ON en la caja
de clonación.
• Los indicadores rojo y verde emitirán una luz
intermitente para confirmar que la caja de
clonación está encendida.
2. Mientras mantiene presionado el botón
ALT oprima el botón TEST (Prueba).
• Los indicadores rojo y verde emitirán una luz
alternada durante la revisión de la caja.
Nota: Si el indicador no emite la luz verde y roja en
forma intermitente, reemplace la pila de 9
voltios.
-12-
Page 13

Resetting the Television to Normal TV
Mode
1. Press the POWER ON button on the clone
box.
• The LEDs will flash red and green to confirm
power is ON,
2. Connect the clone box to the Digital
Interface port on the back of the television.
• The television must be plugged into an AC
outlet but can be either OFF or ON.
3. Press the AMS button.
Note: Insert a slender tool about 3/4 inch (paper
clip) into the opening.
• The green LED will flash while the television is
reset to Normal TV mode. The green LED will
light for about two (2) seconds when the
procedure is complete.
4. Disconnect the clone box from the
television and turn it OFF.
• Si la pita está cargada, el indicador emitirá un
luz verde intermitente por aproximadamente
dos segundos.
Nota: Si al termino de la revisión el indicador no emite
luz por los aproximados dos según dos, se
tendrá que grabar nueva información en la caja
de clonación.
Reajustando la televisión a la modalidad normal de televisión
1. Presione el botón POWER ON en la caja
de clonación.
• Los indicadores rojo y verde emitirán una luz
intermitente para confirmar que la caja de
clonación está encendida.
Conecte la caja de clonación a la interface
2.
digital en la parte posterior de la televisión.
• Aunque la televisión puede estar encendida o
apagada debe estar conectada al suministro
de corriente alterna.
Presione el botón AMS.
3.
Nota: Inserte en la abertura una herramienta angosta
de aproximadamente 3/4 de pulgada (clip de
papel).
• El indicador emitirá una luz verde mientras la
televisión es reajustada a la modalidad normal
de TV. El indicador se encenderá por
aproximadamente dos segundos cuando el
procedimiento halla concluido.
Desconecte la caja de clonación y
4.
APAGUELA.
-13-
Page 14

Setting the Television without a Clone Box
Configurando la televisión sin una caja de clonación
Switching to Commercial (Hotel) Mode
Adjust the features listed in the Commercial
(Hotel) Mode Feature Chart before switching
modes.
1. Press the ACTION (6*) button and the
VOL ► (3) button simultaneously.
2. Within a second, press the ACTION (6)
button and the CH A (5) button
simultaneously.
3. ON will flash in red in the lower corner of
the screen, indicating Commercial (Hotel)
Mode.
Switching to Normal TV Mode
1. Repeat steps 1 and 2 from the previous
section.
2. OFF will flash in red in the lower corner of
the screen, indicating Normal TV Mode.
Cambiando a la modalidad comercial (hotel)
Las funciones listadas en la tabla de
características de la modalidad comercial deben
ser ajustadas antes de cambiar de modalidad.
1. Presione los botones ACTION (6*) y VOL
► (3) simultaneamente.
2. En el espacio de un segundo, presione los
botones ACTION (6) y CH A (5)
simultaneamente.
3. La palabra ON (encendido) apaerecerá en
la esquina inferior de la pantalla, en forma
intermitente indicando la modalidad
comercial (hotel)
Cambiando a la modalidad normal de TV
1. Repita los pasos 1 y 2 de la sección
previa.
2. La palabra OFF (apagado) apaerecerá en
la esquina inferior de la pantalla, en forma
intermitente indicando la modalidad
normal de TV.
*Refer to the illustrations of the front panel in the section entitled
Location of Controls.
-14-
*Vea las ilustraciones del panel frontal en la seción titulada
Ubicación de controles.
Page 15
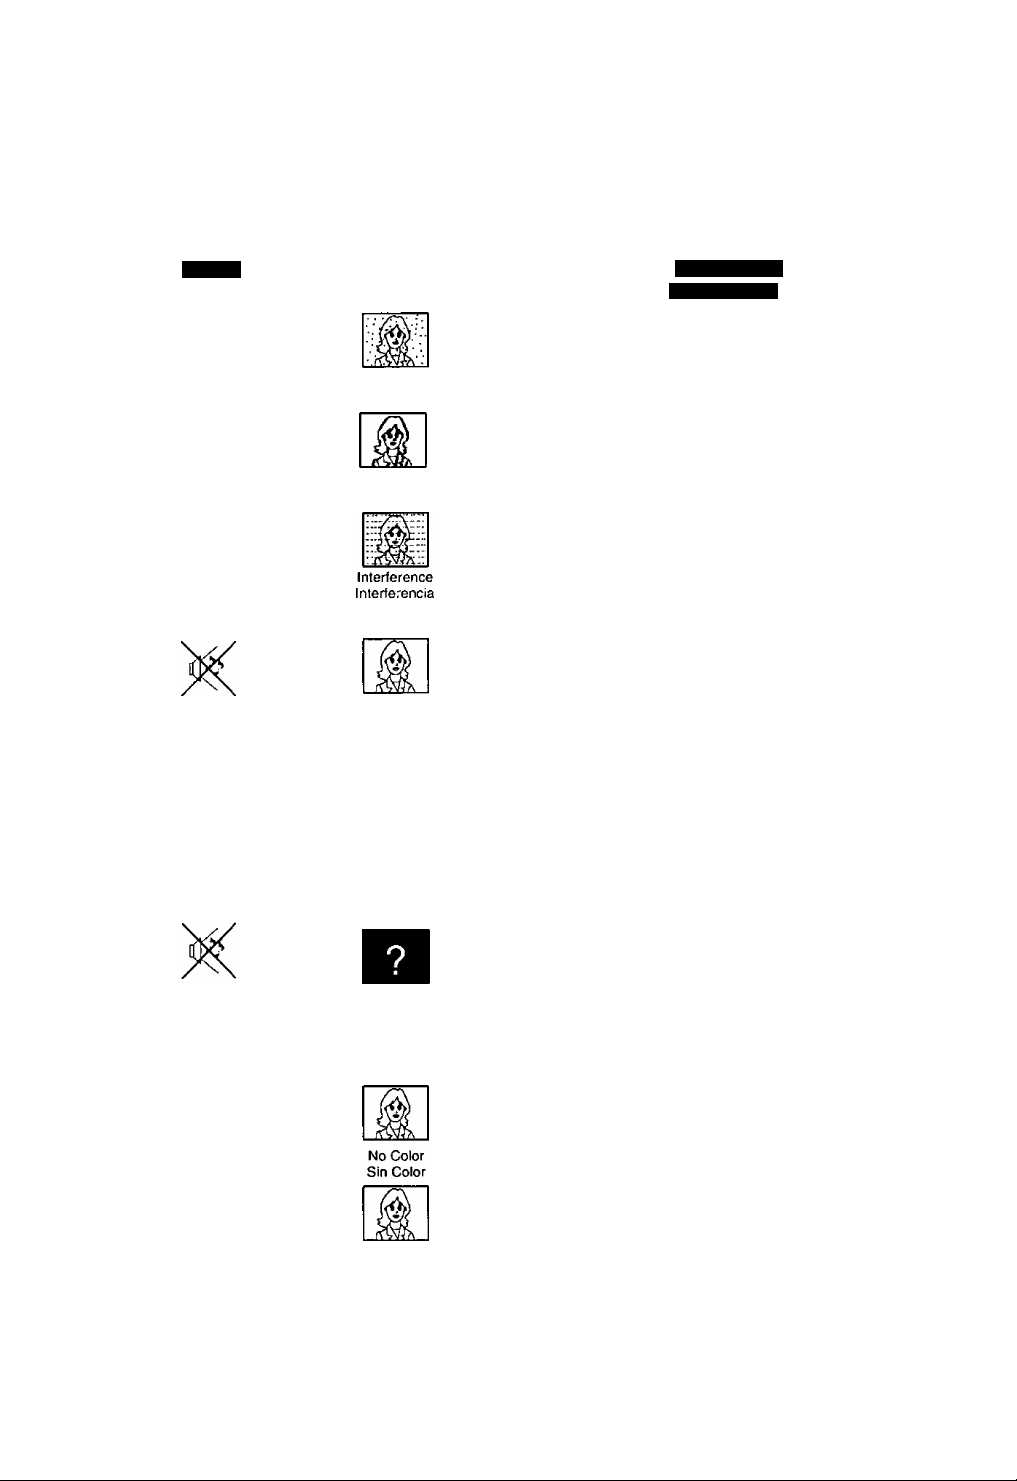
Troubleshooting Chart
Cuadro de localización de fallas
Antes de solicitar servicio, establezca los síntomas y lleve a cabo las siguientes posibles soluciones.
Before catling for service, determine the symptoms and foilow suggested soiutions.
Ml/O/Q
OsSaSS
Noisy Audio
Sonido Ruidoso
.s
Noisy Audio
Sonido Ruidoso
Noisy Audio
Sonido Ruidoso
No Audio
Sin Sonido
Noisy Audio
Sonido Ruidoso
No Audio
Sin Sonido
Cte)
Snowy Video
Imagen Moteada
Multiple Image
Imagen Múltiple
Normal Video
Imagen Normal
No Video with Snow
Sin Imagen con Motas
No Video
Sin Imagen
SOÜÜTJONS
S^IUCIONES.
Adjust Antenna Location and/or Connection
Ajuste la ubicación y/o conexión de la antena
Adjust Antenna Location and/or Connection
Ajuste la ubicación y/o conexión de la antena
Check Antenna Lead-in Wire
Revise el cable de entrada de la antena
Move Television from Electrical Appliances. Lights, Vehicles and
Medical Equipment
Aleje la televisión de los aparatos electrodomésticos, luces,
vehículos y equipo médico
Increase Volume
Aumente el volumen
Check Mute
Revise mute (mudo)
Check Television SPEAKERS on/off
Revise en el menú de audio: ALTAVOCES > SI
Change the Channel
Cambie el canal
Set TV or Cable Mode Properly
Ajuste apropiadamente la modalidad de tv o del cable
Check Antenna Cables
Revise los cables de la antena
Check Power Cord is Plugged into Active Outlet
Revise que el cable de corriente este enchufado a una toma de
corriente adiva
Adjust Brightness and Audio Controls
Ajuste los controles de brillo y audio
Change the Channel
Cambie el canal
Check Cable Connections
Revise las conexiones del cable
Program the Remote Control Again
Programe el control remoto otra vez
Normal Audio
Sonido Normal
Normal Audio
Sonido Normal
Intermittent Remote Control Operation
Operación intermitente del control remoto
Normal Video
Imagen Normal
Adjust Color Settings
Ajuste el color
Change the Channel
Gamble el canal
Replace Remote Control Batteries
Reemplace las pilas del control remoto
-15-
Page 16
WARNING
RISK OF
ELECTRIC SHOCK
DO NOT OPEN
WARNING: To reduce the risk of electric shock do not remove
cover or back. No user-serviceable parts inside. Refer servicing to
qualified service personnel.
The lightning flash with arrow
A
head within a triangle is
intended to tell the user that
parts inside the product are a
risk of electric shock to
persons.
A
WARNING: To prevent fire or shock hazard, do not expose this
appliance to rain or moisture.
The exclamation point within a
triangle is intended to tell the
user that important operating
and servicing instructions
are in the papers with the
appliance.
ADVERTENCIA
RIESGO DE
SACUDIDAS ELECTRICAS.
NO ABRIR.
ADVERTENCIA: A fin de reducir el riesgo de sacudidas eléctricas, no
deberán quitarse ni la cubierta ni la tapa posterior. No hay en el interior pieza
alguna que el usuario tenga que reparar. Todo servicio habrá de brindarlo
personal de reparación capacitado.
A
El propósito del relámpago con
punta de flecha dentro de un
triángulo es el de advertir
usuario de que existen piezas
internas del producto que
representan riesgo de que las
personas recíban sacudidas
eléctricas.
’"A
al / • \
El propósito del signo de
exclamación dentro de un triángulo
es el de advertir al usuario de que
los documentos que acompañan al
aparato incluyen importantes
instrucciones de funcionamiento y
reparación.
ADVERTENCIA: Con el objeto de prevenir el riesgo de incendio o de
sacudida eléctrica, este aparato no deberá verse expuesto a la lluvia ni a
la humedad.
PANASONIC HOME AND COMMERCIAL PRODUCTS COMPANY,
DIVISION OF MATSUSHITA ELECTRIC CORPORATION OF AMERICA
One Panasonic Way, 4A-4
Secaucus, New Jersey 07094
For Authorized Panasonic Servicenter, call 1-800-545-2672
-16-
 Loading...