

Page 1
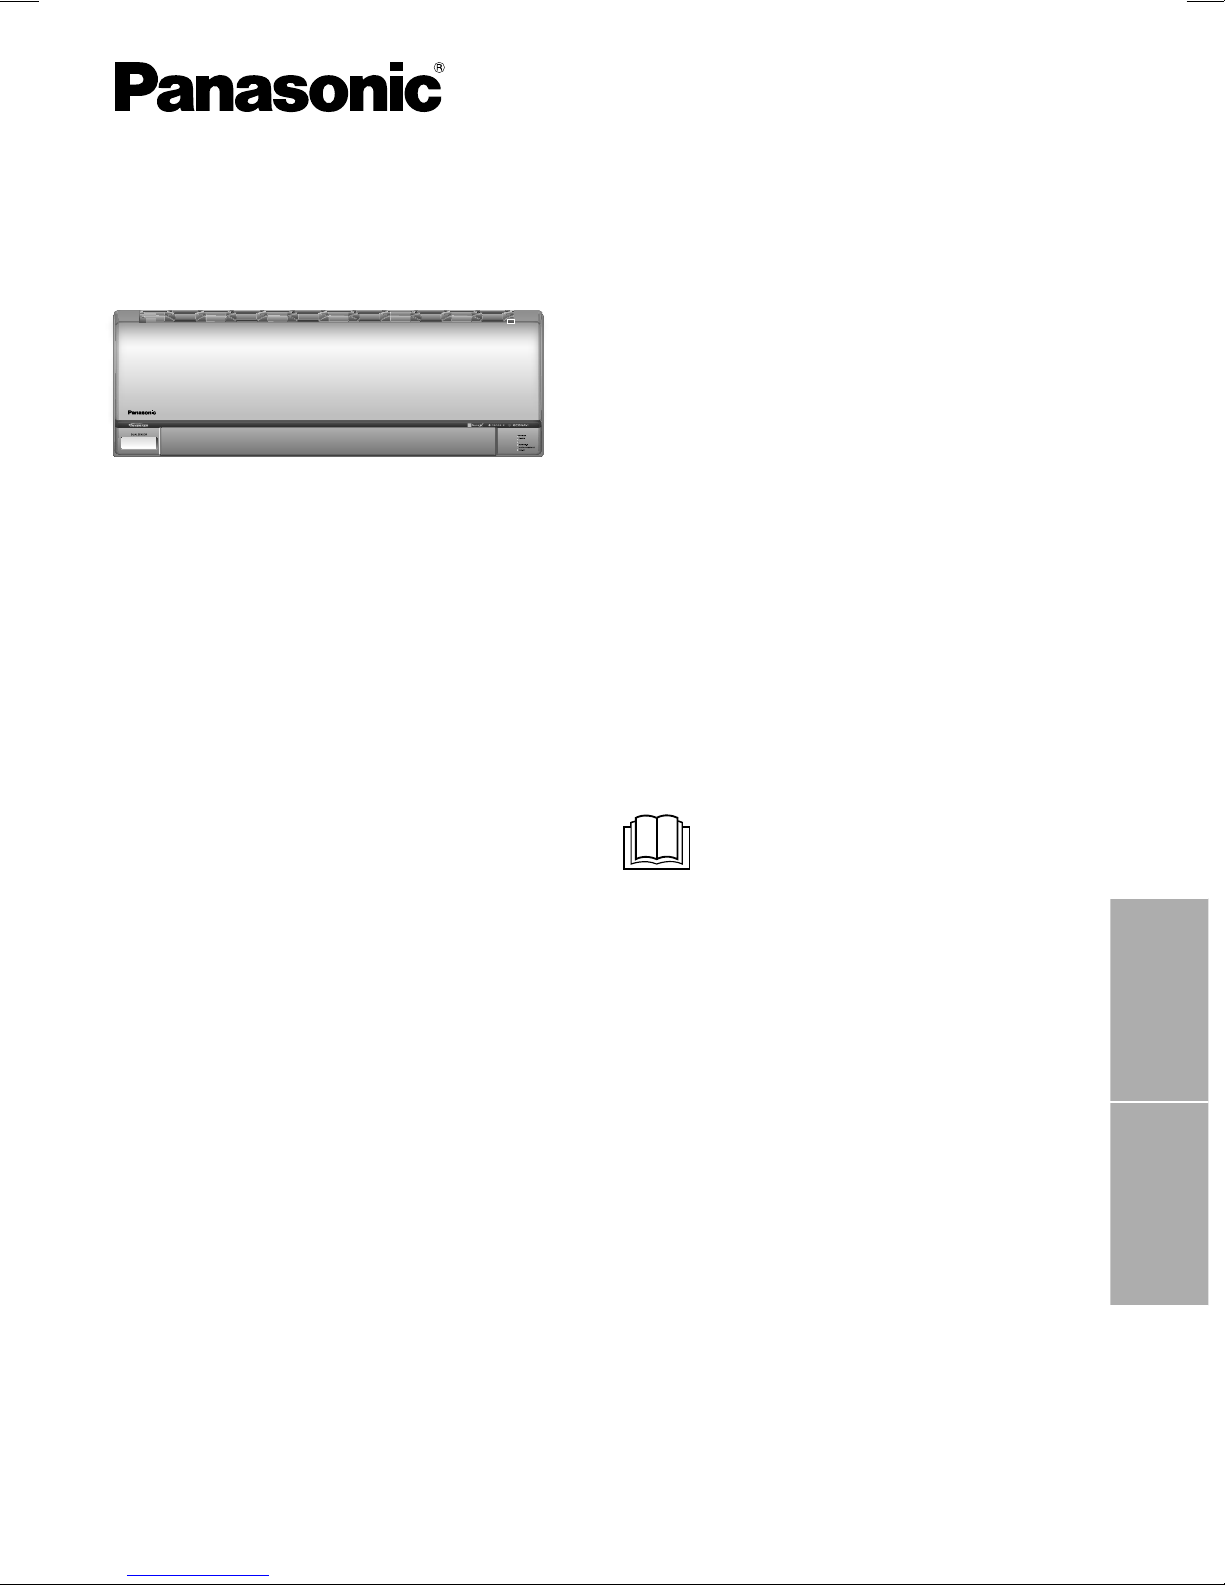
Instrucciones de Operación
Aire Acondicionado
i AUTO-X
Model No.
Indoor Unit Outdoor Unit
CS-S9RKV
CS-S12RKV
CS-S18RKV
CS-S24RKV
CS-S28RKV
CU-S9RKV
CU-S12RKV
CU-S18RKV
CU-S24RKV
CU-S28RKV
Instrucciones de Operación
Aire Acondicionado
Muchas gracias por adquirir una unidad de aire
acondicionado Panasonic.
Instrucciones de instalación adjuntas.
Antes de utilizar la unidad, lea atentamente estas
instrucciones de funcionamiento y consérvelas como
futuro elemento de consulta.
Operating Instructions
Air Conditioner
Thank you for purchasing Panasonic Air conditioner.
Installation instructions attached.
Before operating the unit, read these operating
instructions thoroughly and keep them for future
reference.
2-11
12-21
English Español (LE)
F569797
Page 2
Proporcione refrigeración rápida, máximo
confort, aire limpio y optimice el ahorro
de energía
i AUTO-X Refrigeración cuando cuenta, Confort cuando importa
i AUTO-X con el compresor de Tecnología de mejora térmica de Panasonic (P-TECh) es una tecnología
de control de compresor exclusiva de Panasonic que le permite al compresor alcanzar la frecuencia
máxima en un corto período de tiempo.
i AUTO-X también viene con solapas dobles AEROWINGS que funcionan dinámicamente para ajustar
las direcciones del fl ujo de aire. AEROWINGS le brinda una refrigeración rápida en el arranque al dirigir
el fl ujo de aire hacia abajo y le brinda confort con una refrigeración tipo ducha al dirigir el fl ujo de aire
hacia arriba.
Entonces, puede disfrutar de la satisfacción que le otorga la refrigeración rápida al instante y la
comodidad de la refrigeración que dura todo el día.
*Aplicable para la confi guración AUTO de solapa horizontal.
ECONAVI + INVERTER La perfecta tecnología de ahorro de energía
ECONAVI detecta dónde se consume generalmente la energía y ajusta la potencia de refrigeración
dependiendo de las condiciones de la habitación y los niveles de actividad. Luego, INVERTER
aprovecha los datos del sensor ECONAVI y vería la velocidad de rotación del compresor. Esto ayuda a
optimizar la operación de refrigeración y reduce la refrigeración inefi ciente.
nanoe-G Purifi ca el aire hasta las partículas más pequeñas
Desactiva microorganismos peligrosos como lo son virus, bacterias, etc. para mantener el aire limpio.
Además desactiva virus y bacteria en el fi ltro para mantener limpio el interior de la unidad.
Para más detalles, consulte “Saber más...”.
2
Page 3
Guía rápida
S
CK
RES
AC
RC
ON
O
CANCEL
1
3
TIMER
K
A
R
S
CK
RES
C
RC
ON
O
S
CANCEL
1
2
3
TIMER
ECO
I
G
OCOMFO
Q
F
D
A
G
i
iA
UTO-X
Contenido
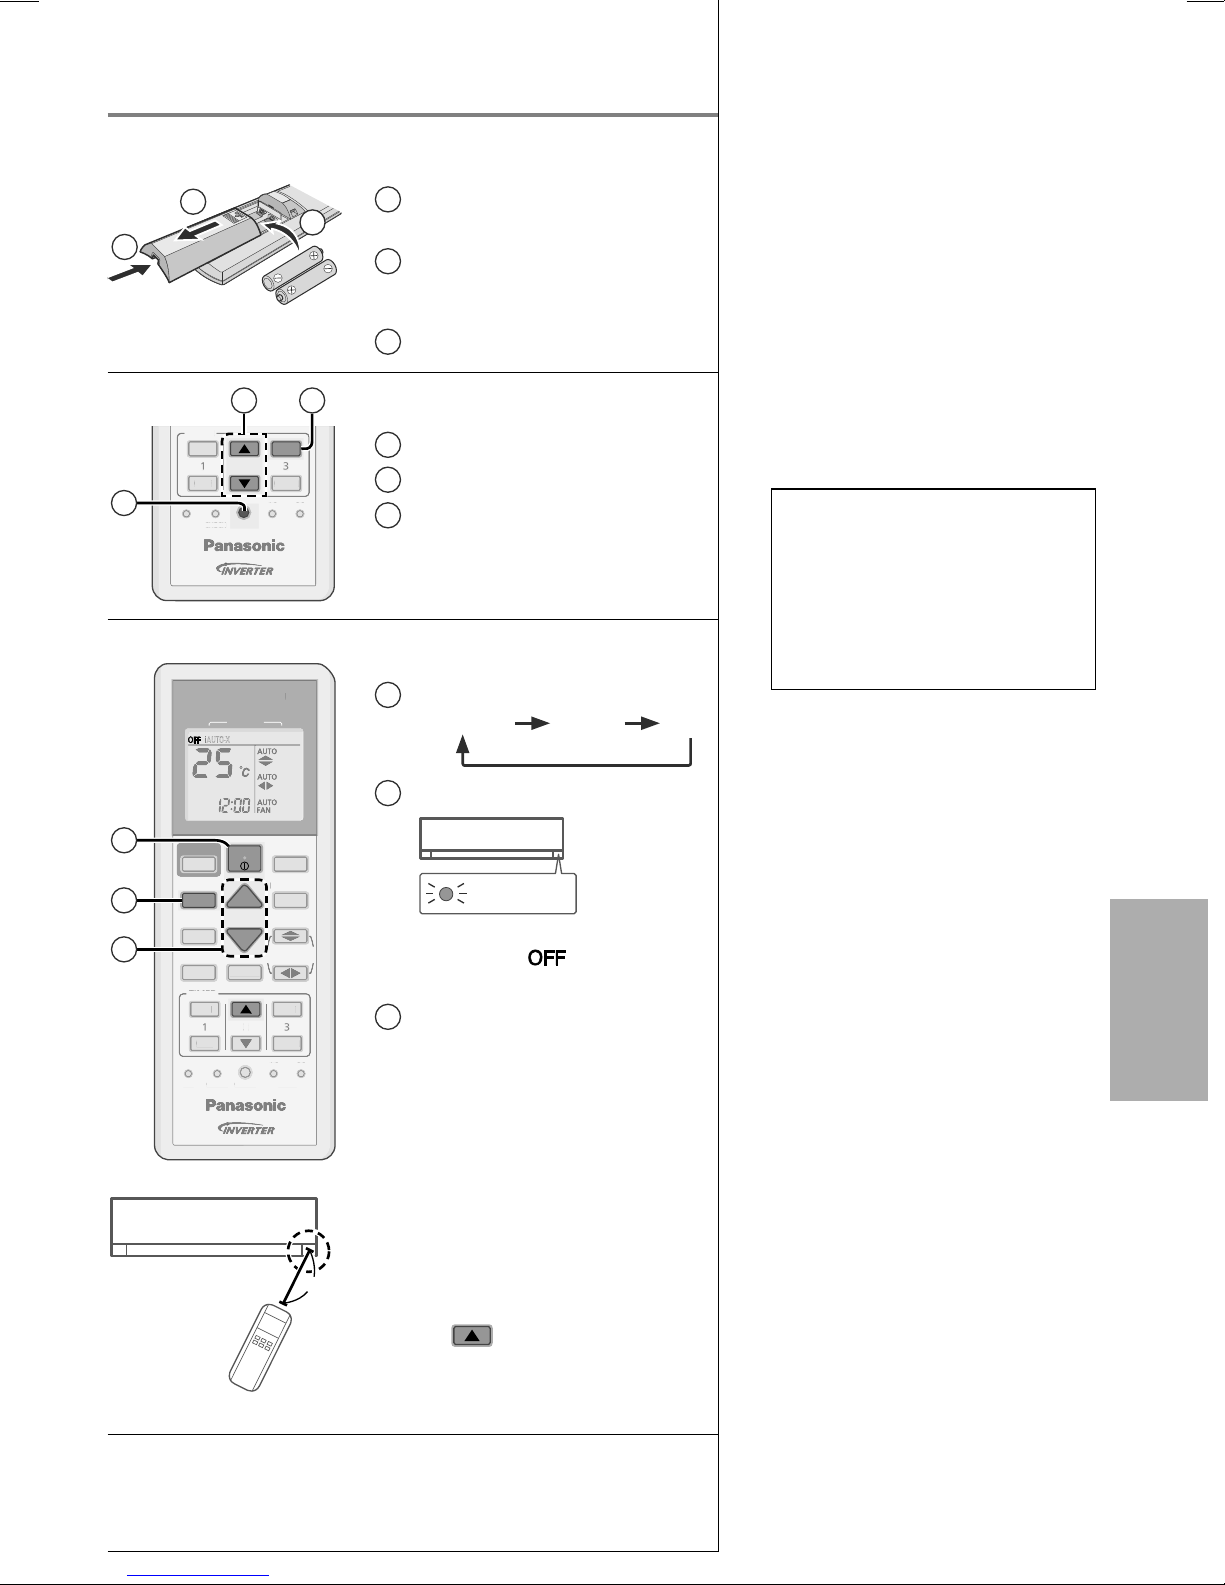
Inserción de las baterías
Precauciones de
1
Retire la cubierta trasera del
1
2
3
2 3
TIMER
ON
123
OFF
FF
1
ETCHE
AIR CONDITIONER
IR CONDITIONE
iAUTO-X
CANCEL
AC
CLOCKSET CHECK RESET
MODE
MODE
SET
RC
ET
control remoto
Coloque baterías AAA o R03
2
(Se puede utilizar
aproximadamente 1 año)
3
Cierre la cubierta
Ajuste del reloj
1
Pulse CLOCK
2
Ajuste la hora
3
Confi rme
Funcionamiento básico
Seleccione el modo deseado
1
seguridad .................................4-5
Modo de empleo ......................6-7
Saber más... ..........................8-9
Instrucciones de limpieza ......... 10
Localización de averías ............ 11
Información ....... Cubierta trasera
Accesorio
• Control remoto
• 2 Pilas AAA o R03
• Soporte del control remoto
• 2 Tornillos para el soporte del
control remoto
DRYi AUTO-X COOL
Para encender o apagar la unidad.
2
2
1
i AUTO-X
AUTO-X
MODE
AUTO
AUT
COMFORT
RT
3
QUIET
UIET
TIMER
ON
123
OFF
FF
SET CHECK RESET
ETCHE
OFF/ON
TEMP
FAN SPEED
AN SPEE
CLOCK
CLOC
ECONAVI
NAV
NANOE-G
NANOE-
AIR SWING
IR SWIN
SET
ET
CANCEL
RC
AC
A
ET
POWER
•
Tenga en cuenta que la indicación
de apagado
para iniciar.
3
Seleccione la temperature deseada
•
Gama de selección: 16 °C ~ 30 °C.
•
El funcionamiento de la unidad
dentro de la temperatura
está encendida
Español (LE)
recomendada puede ahorrar
energía.
COOL (FRÍO): 26 °C ~ 28 °C.
DRY (DESHUMIDIFICACIÓN):
1 °C ~ 2 °C menor en comparación
con la temperatura del recinto.
•
8m
Para oscurecer o restablecer el brillo
del indicador de la unidad, mantenga
pulsado
durante 5 segundos.
•
Utilice el control remoto a no más de 8
m del receptor de la unidad interior.
Las ilustraciones de este manual sirven únicamente
para describir las explicaciones y pueden no coincidir
exactamente con las del aparato suministrado. Están sujetas
a cambios sin previo aviso con el fi n de mejorar el producto.
3
Page 4
Precauciones de seguridad
Entrada de
aire
Entrada de
aire
Salida de
aire
Salida de
aire
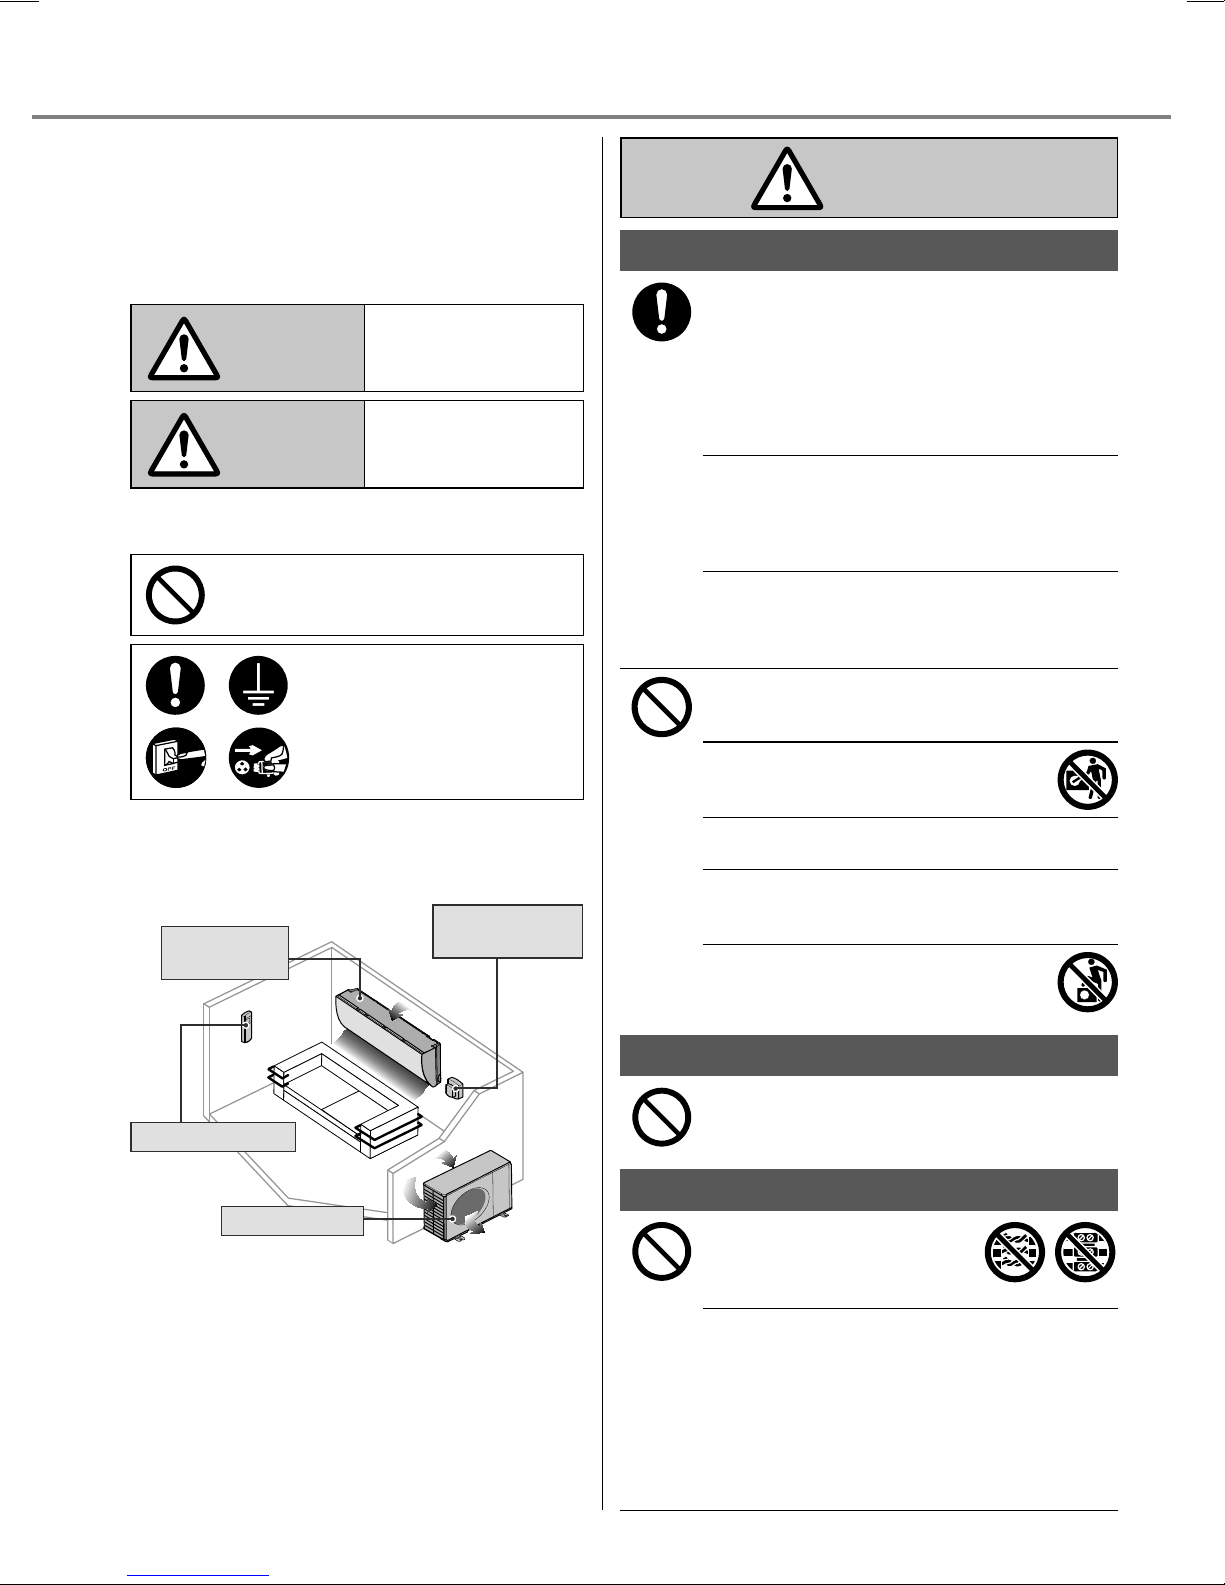
Para evitar lesiones personales, lesiones a otras
personas o daños a la propiedad, respete las
siguientes indicaciones:
La operación incorrecta por no seguir las
instrucciones puede provocar daños o lesiones de
diferente gravedad, según la clasifi cación que se
incluye a continuación:
Esta señal advierte
ADVERTENCIA
PRECAUCIÓN
Las instrucciones que usted debe seguir se
clasifi can por medio de los siguientes símbolos:
Este símbolo indica una acción
PROHIBIDA.
Estos símbolos indican
acciones OBLIGATORIAS.
sobre lesiones graves
o la muerte.
Esta señal advierte
sobre lesiones o
daños a la propiedad.
Suministro de
Unidad
interior
Entrada de
aire
energía
Unidad interior y unidad exterior
Este equipo no ha sido diseñado para ser utilizado por
personas (incluidos los niños) con capacidad física,
sensorial o mental disminuida, o que no posean la
experiencia y los conocimientos necesarios, a menos
que una persona responsable de su seguridad los
supervise o les dé instrucciones sobre el uso del
equipo. Es necesario supervisar a los niños para
asegurarse de que no jueguen con el equipo.
Por favor consulte un distribuidor o especialista
autorizado para limpiar las partes internas, reparar,
instalar, sacar o reinstalar la unidad. La instalación
y la manipulación inadecuadas pueden provocar
fi ltraciones, descargas eléctricas o incendios.
Confi rme con un distribuidor o especialista autorizado el
uso de cualquier tipo de refrigerante especifi cado.
Usar un tipo de refrigerante distinto al especifi cado
puede provocar daños, quemaduras, lesiones, etc.
No instale la unidad en una atmósfera potencialmente
explosiva o infl amable. Si lo hace podría provocar un
incendio accidental.
No coloque los dedos ni objetos en la unidad
interior o exterior del aire acondicionado. Las
piezas giratorias podrían provocarle lesiones.
No toque la unidad exterior durante una tormenta
eléctrica ya que podría haber una descarga eléctrica.
No se exponga directamente al aire frío durante
un período prolongado para evitar un enfriamiento
excesivo.
No se siente o pare sobre la unidad, se
podría caer accidentalmente.
ADVERTENCIA
Salida de
aire
Control remoto
Unidad exterior
Entrada de
aire
4
Salida de
aire
Control remoto
No permita que los bebés y los niños pequeños
jueguen con el control remoto a fi n de evitar que se
traguen accidentalmente las baterías.
Suministro de energía
No utilice cables modifi cados,
cables empalmados, alargues o
cables no especifi cados para evitar
el recalentamiento e incendios.
Para evitar un sobrecalentamiento, un incendio o
descarga electrica:
•
No comparta el mismo tomacorriente con otros
equipos.
•
No ponga a funcionar la unidad mientras tenga las
manos mojadas.
•
No doble demasiado el cable de alimentación.
•
No opere o detenga la unidad al insertar o extraer el
cable de alimentación.
Page 5
Para evitar riesgos, si el cable de alimentación
está dañado y es necesario cambiarlo, deberá
hacerlo el fabricante, un representante del
servicio técnico o una persona califi cada.
Se recomienda fi rmemente instalar este equipo
con un Interruptor de circuito de fuga a tierra
(ELCB) o un Dispositivo de corriente residual
(RCD) a fi n de evitar las descargas eléctricas o
incendios.
Para evitar un sobrecalentamiento, un incendio o
descarga eléctrica:
•
Introduzca el cable correctamente.
•
El polvo presente en el cable de alimentación
debe limpiarse periódicamente con un paño
seco.
Deje de usar el producto cuando ocurra
cualquier anomalía/falla y desconecte el enchufe
o apague el interruptor y disyuntor.
(Riesgo de humo/fuego/descarga eléctrica)
Ejemplos de anomalía/falla
•
El ELCB se dispara frecuentemente.
•
Huele a quemado.
•
La unidad emite un ruido anormal o vibra.
•
Gotea agua desde la unidad interior.
•
El cable de alimentación o enchufe se calienta
anormalmente.
•
No se puede controlar la velocidad del
ventilador.
•
La unidad deja de funcionar inmediatamente
aunque esté encendida.
•
El ventilador no se detiene aunque se haya
apagado la unidad.
Contacte inmediatamente su distribuidor local
para mantenimiento/reparaciones.
El reemplazo o instalación de los enchufes debe
ser realizado por personal autorizado/califi cado.
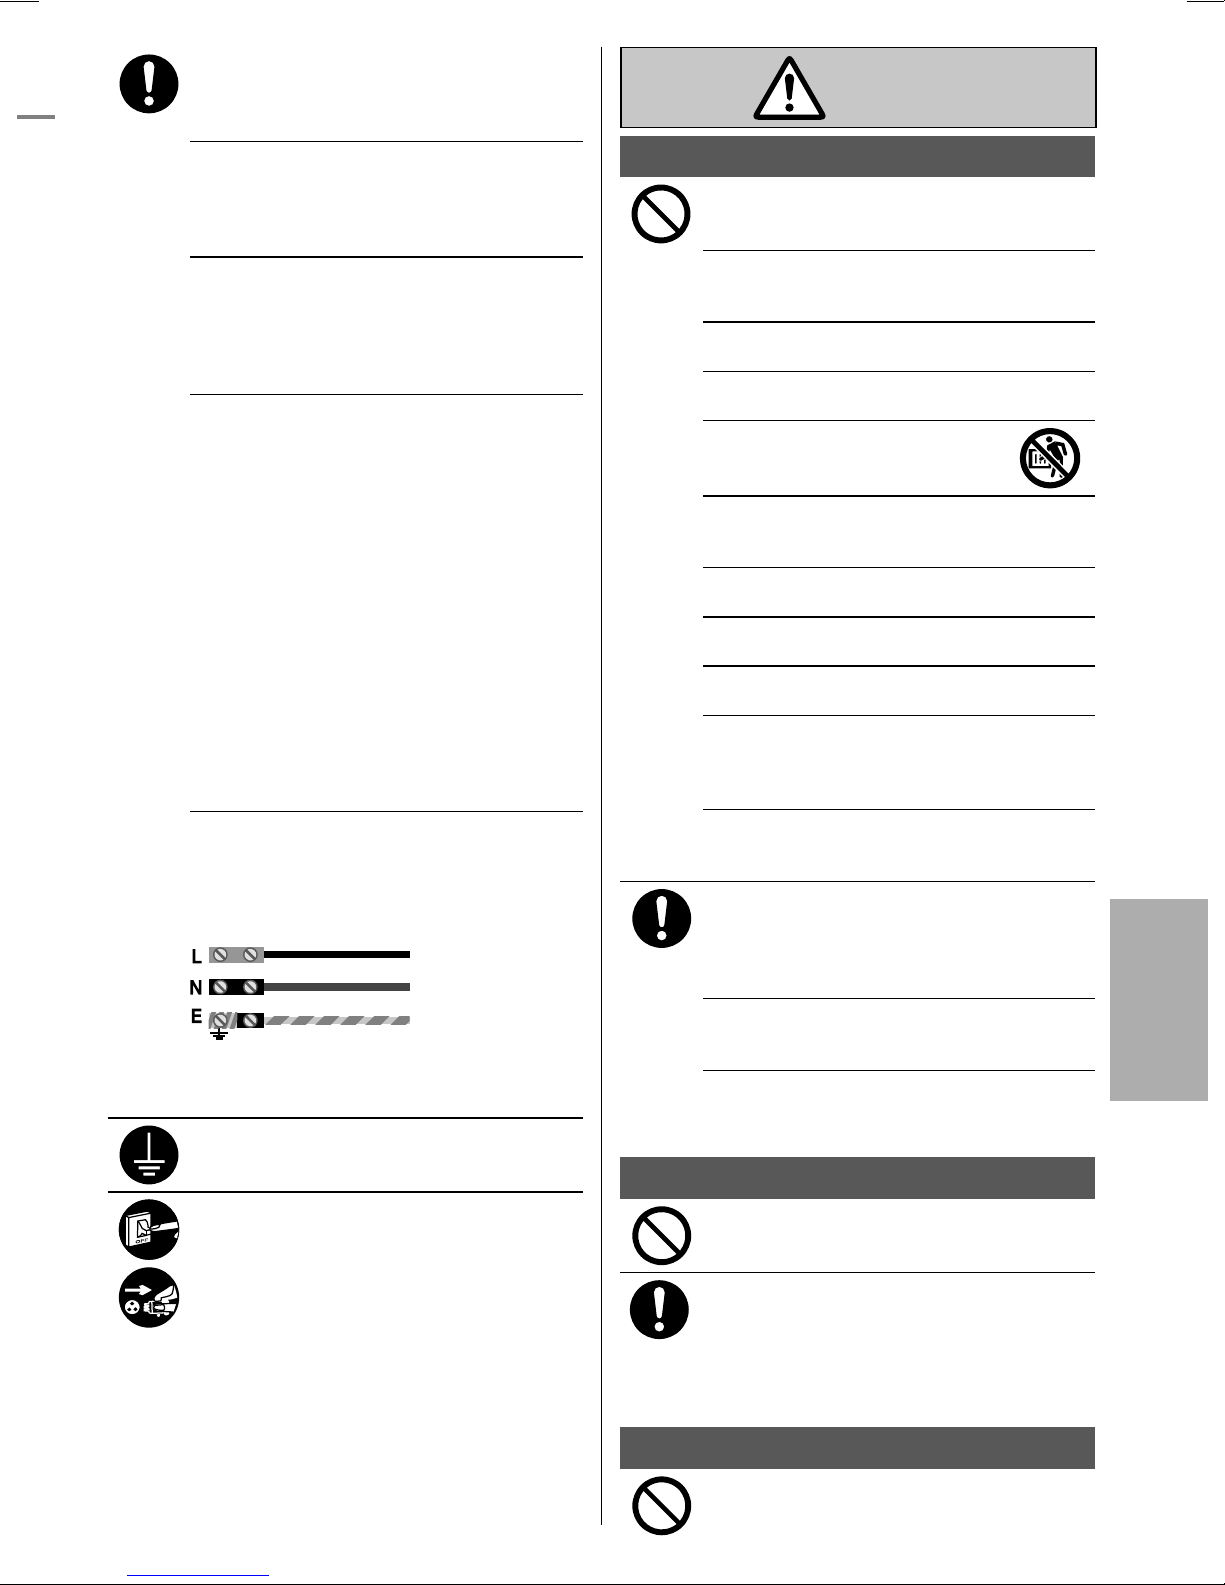
Los alambres de este cable de alimentación
tienen colores de acuerdo al siguiente código:
Terminales
Rojo
Negro
Verde/Amarillo
cables
con corriente
neutral
tierra
colores (Estándar de
Gran Bretaña)
marrón
azul
verde-amarillo
El color de los cables podría variar dependiendo
de las normas de los códigos de cableado del
país.
Este equipo debe conectarse a tierra para evitar
descargas eléctricas o un incendio.
Evite descargas eléctricas desactivando la
fuente de alimentación y desconectando la
unidad:
- Antes de limpiar o de reparar,
- Si no se va a usar durante un tiempo
prolongado, o
- Si están cayendo relámpagos de una manera
anormalmente intensa.
PRECAUCIÓN
Unidad interior y unidad exterior
No lave la unidad interior con agua, benceno, solvente o
pulidor en polvo para evitar daños a la unidad o corrosión
en la unidad.
No use para la preservación de equipos precisos,
alimentos, animales, plantas, trabajos artísticos u otros
objetos. Esto podría provocar deterioro en la calidad, etc.
No utilice ningún equipo combustible frente a la salida del
fl ujo de aire a fi n de evitar la propagación del fuego.
No exponga las plantas o las mascotas directamente al
fl ujo del aire para evitar daños físicos, etc.
No toque las chapas de aluminio delgadas,
las partes afi ladas podrían provocarle
lesiones.
No ENCIENDA la unidad cuando esté encerando el piso.
Después de encerar, ventile correctamente la habitación
antes de encender el equipo.
No instale la unidad en áreas grasientas o con humo
para evitar daños a la unidad.
No desmantele la unidad con la fi nalidad de limpiarla
para evitar daños físicos.
No se pare sobre un banco inestable al limpiar la unidad
para evitar daños físicos.
No coloque fl oreros o un recipiente con agua sobre la
unidad. Puede que entre agua en la unidad y que la
misma degrade el aislamiento. Esto podría provocar una
descarga eléctrica.
No abra la ventana o la puerta durante un tiempo
prolongado mientras funcione el modo COOL (FRÍO)/
DRY (DESHUMIDIFICACIÓN).
Evite escapes de agua asegurándose de que el tubo de
drenaje está:
- Correctamente conectado,
- Libre de canaletas y recipientes, o
- No sumergido en agua
Después de usarse durante un período prolongado o de
usarse con cualquier equipo que use combustible, airee
la habitación regularmente.
Después de un período prolongado de uso, asegúrese
de que el estante de instalación no esté deteriorado para
evitar que el equipo se caiga.
Control remoto
No utilice baterías recargables (Ni-Cd). Podría dañar el
control remoto.
Para evitar un funcionamiento inadecuado o daños al
control remoto:
•
Extraiga las pilas si no va a utilizar la unidad durante un
periodo prolongado de tiempo.
•
Deben introducirse baterías nuevas del mismo tipo de
acuerdo a la polaridad indicada.
Precauciones de seguridad
Español (LE)
Suministro de energía
No desconecte el enchufe tirando del cable, así evitará
una descarga eléctrica.
5
Page 6
Modo de empleo
K
O
ON
CHECK
ON
OFFS
CANCEL
i AUTO-X
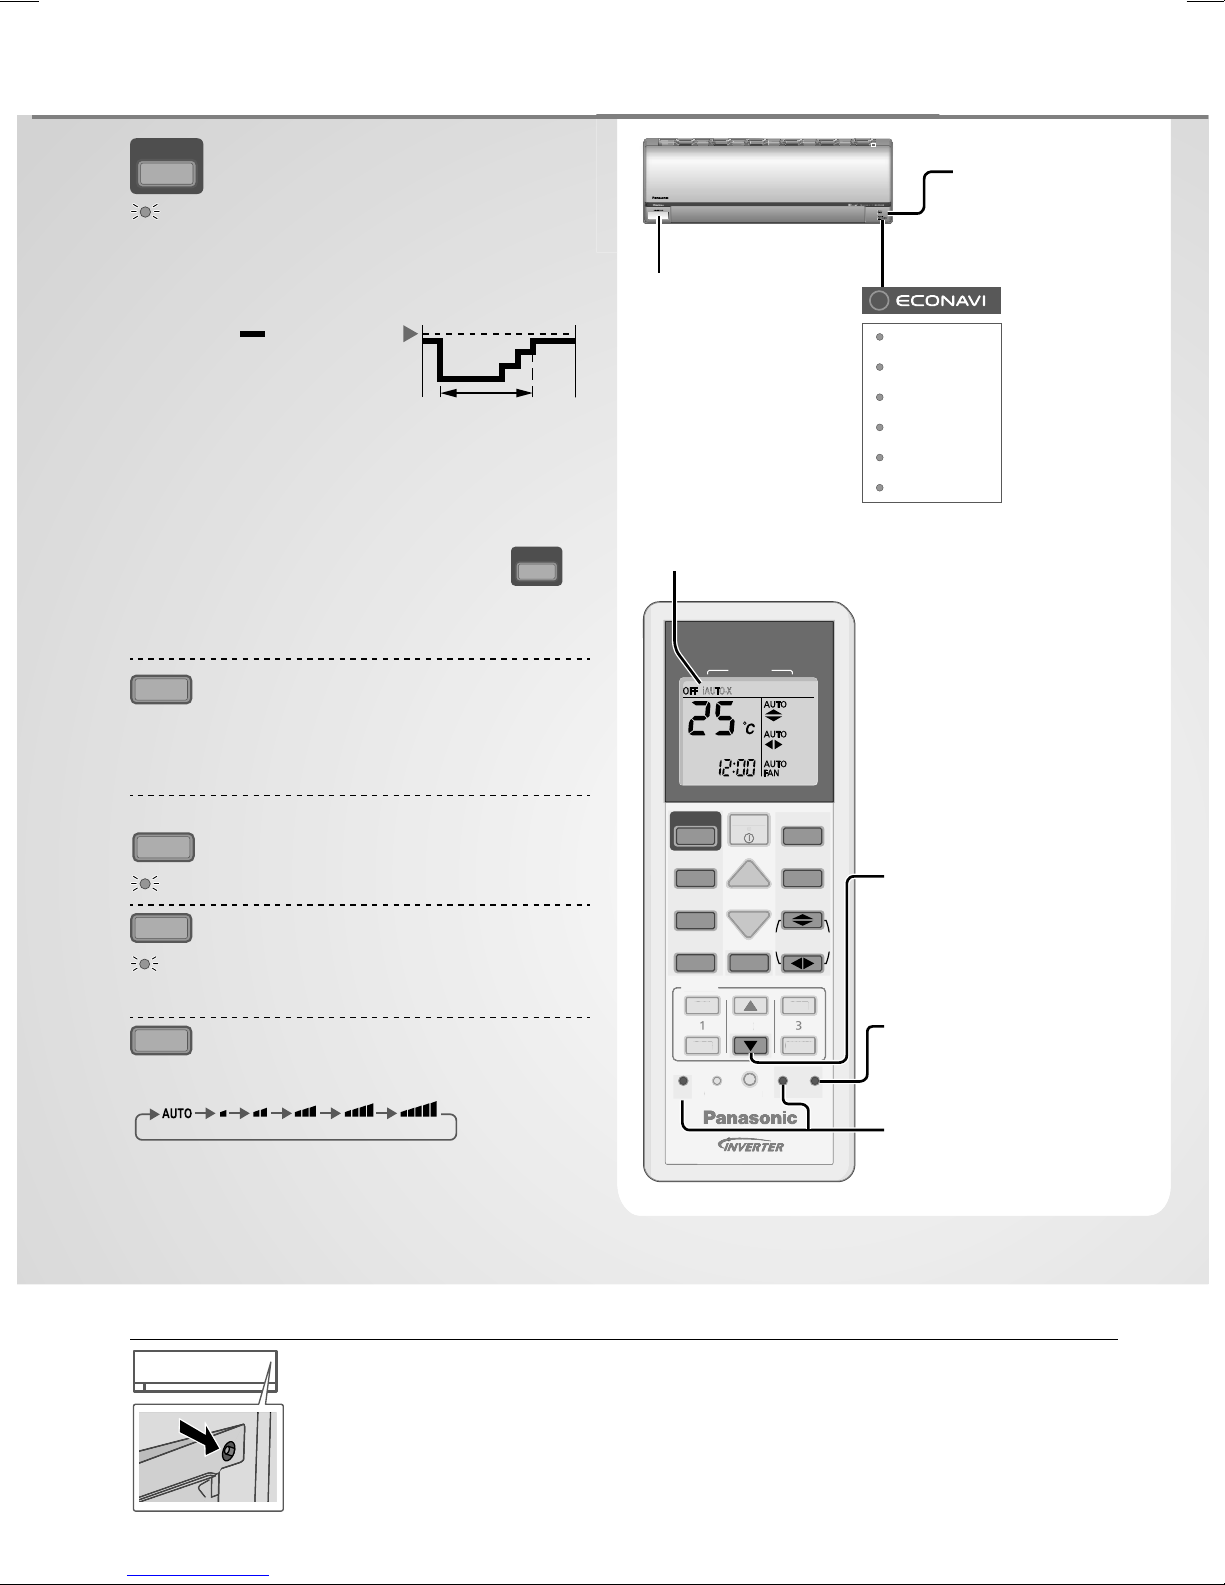
Para alcanzar temperatura rápidamente
i AUTO-X
•
La unidad controla la temperatura fi jada de acuerdo
con la temperatura de la habitación para acelerar en
enfriamiento de la habitación.
i AUTO-X
•
Después de 4 horas como máximo, la temperatura
confi gurada se cambia de acuerdo con la detección
de actividad de AUTO COMFORT.
•
La velocidad del ventilador está fi jada en AUTO, está
prohibida la selección de la velocidad del ventilador.
•
Mientras la unidad está apagada, presionar
encenderá la unidad con el modo i AUTO-X.
•
El modo i AUTO-X se puede cancelar al presionar
nuevamente el respectivo botón.
MODE
Para seleccionar el modo de operación
Temperatura
ajustada
-1°C
Máx: 4 horas
i AUTO-X
i AUTO-X
Sensor de
actividad humana
Pantalla del control remoto
AIR CONDITIONER
MODE
iAUTO-X
Sensor de luz
solar y receptor
de control remoto
POWER
TIMER
i AUTO-X
NANOE-G
AUTO COMFORT
QUIET
Indicador
(Verde)
(Verde)
(Naranja)
(Naranja)
(Azul)
(Verde)
(Naranja)
i AUTO-X COOL DRY -
AUTO
COMFORT
Para alcanzar temperatura rápidamente
Para disfrutar del aire fresco
Para deshumidifi car el ambiente
Para maximizar la comodidad
AUTO COMFORT
QUIET
Para disfrutar del funcionamiento silencioso
QUIET
•
Esta operación reduce el ruido de corriente de aire.
FAN SPEED
Para seleccionar la velocidad del ventilador
(Pantalla del control remoto)
•
En el modo AUTO, la velocidad del ventilador se ajusta
de manera automática según el modo de operación.
•
Si el modo i AUTO-X está fi jado, la velocidad del
ventilador está fi jada en AUTO. Para ajustar la
velocidad del ventilador, cancele el modo i AUTO-X.
OFF/ON
FF/
TEMP
FAN SPEED
CLOCK
CLOC
ECONAVI
NANOE-G
AIR SWING
CANCEL
AC
i AUTO-X
MODE
AUTO
COMFORT
QUIET
TIMER
ON
123
OFF
SET CHECK RESET
SET
Pulse y mantenga pulsado
durante aproximadamente
10 segundos para mostrar
la confi guración de la
temperatura en ºC o en ºF.
ET
Presione para restablecer
RC
el ajuste de fábrica del
control remoto.
No se utiliza en las
operaciones normales.
Botón de ENCENDIDO/APAGADO automático (auto OFF/ON)
Use cuando el control remoto esté extraviado o cuando la unidad no funcione
adecuadamente. Suba el panel frontal:
• Para utilizar la unidad en modo i AUTO-X, presione el botón una vez.
• Para usar la unidad en modo COOL (FRÍO), presione y mantenga el botón hasta
que escuche un pitido, luego suéltelo.
• Presione el botón de nuevo para apagar.
6
Page 7
Para más detalles, consulte "Saber más...".
L
ECONAVI
Para optimizar el ahorro de
energía
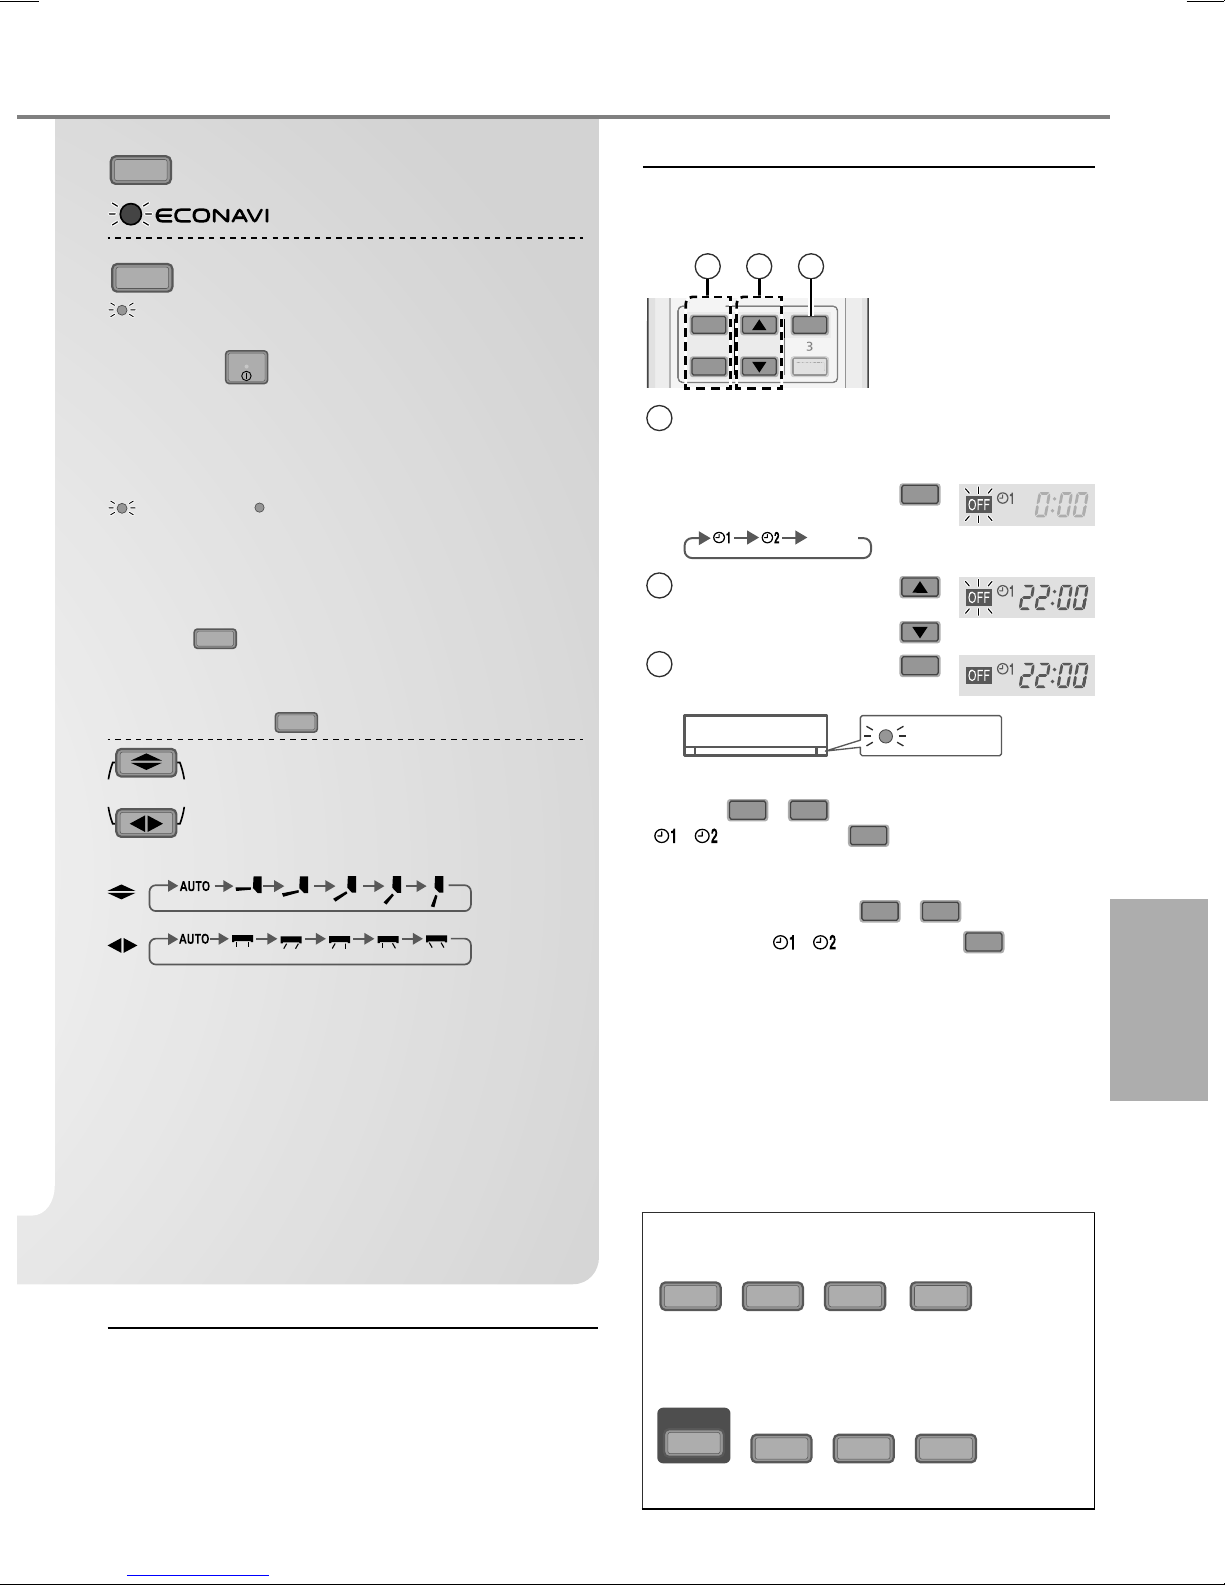
Para ajustar el temporizador
Están disponibles 2 conjuntos de temporizadores
de encendido y apagado para encender o apagar
la unidad en diferentes tiempo predeterminados.
NANOE-G
Para purifi car el aire
NANOE-G
•
nanoe-G se inicia de manera automática cuando la unidad se
enciende con
•
Puede activarse aunque la unidad esté apagada. En esta
condición, la unidad funcionará como un ventilador con la
OFF/ON
.
1
velocidad de ventilador AUTO y la oscilación de la solapa.
Para desactivar virus/bacterias en el fi ltro
NANOE-G
•
Luego de que se apague la unidad, la desactivación del
fi ltro interno nanoe-G puede activarse hasta 150 minutos. Al
encender la unidad se cancela esta operación.
•
Para deshabilitar esta operación en el futuro, presione y
NANOE-G
sostenga
deshabilitará la función de purifi car el aire de nanoe-G.
•
Para restablecer la desactivación del fi ltro interior nanoe-G,
presione y sostenga
POWER
2
hasta que escuche un pitido corto. Esto no
3
NANOE-G
hasta que escuche un pitido largo.
1 2 3
TIMER
ON
123
OFF
SET
CANCEL
ANCE
Seleccione el
temporizador de
ENCENDIDO o APAGADO
• Cada vez que se
presiona:
Cancel
Ajuste la hora
Confi rme
Ejemplo :
Apagado a las 22:00
OFF
2
SET
TIMER
AIR SWING
Para ajustar la dirección
vertical de la corriente de aire
(Pantalla del control remoto)
•
Mantiene la habitación ventilada.
•
En el modo COOL(FRÍO)/DRY(DESHUMIDIFICACIÓN), si
se confi gura AUTO, las solapas oscilan automáticamente
izquierda/derecha y arriba/abajo.
•
En el modo AUTO-X, si se confi gure AUTO, la solapa
horizontal se fi ja en la posición más baja y cambia a la
posición superior después de que alcanza la temperatura
confi gurada. El movimiento de la solapa vertical depende
del sensor de actividad humana. Si se confi gura en manual,
se fi jan las solapas horizontal y vertical en una posición
predeterminada.
•
No ajuste la solapa con la mano.
Control de reinicio automático
• Si el suministro eléctrico es reanudado después
de una caída del suministro eléctrico, la operación
reiniciará autormáticamente después de un cierto
tiempo con el modo de funcionamiento anterior y
fl ujo de aire.
• Este control no es aplicable cuando el
TEMPORIZADOR está ajustado.
•
Para cancelar el temporizador de encendido o apagado,
presione ON u
o , luego presione
•
Si el temporizador se cancela manualmente o debido
a una falla de energía, puede restaurar de nuevo el
temporizador presionando ON u
los respectivos o , luego presione
•
La confi guración del temporizador más cercano se
OFF
para seleccionar los respectivos
CANCEL
.
OFF
para seleccionar
SET
.
Modo de empleo
mostrará y se activará de manera secuencial.
•
Cuando el temporizador de ENCENDIDO está ajustado,
es posible que la unidad arranque (hasta 15 minutos)
antes de la hora real establecida a fi n de alcanzar la
Español (LE)
temperatura deseada a tiempo.
•
La operación del temporizador se basa en el reloj que
se ajusta en el control remoto y se repite diariamente
una vez programada. Para ajustar el reloj, consulte la
Guía rápida.
Nota
ECONAVI
QUIET
,
•
Se puede activar en el modo COOL(FRÍO) y
DRY(DESHUMIDIFICACIÓN) y se puede cancelar
al presionar de Nuevo el botón correspondiente.
i AUTO-X
ECONAVI
,
•
No pueden ser seleccionadas al mismo tiempo.
AUTO
COMFORT
,
QUIET
,
NANOE-G
,
COMFORT
,
AUTO
7
Page 8
Saber más...
Modo de operación
i AUTO-X : La refrigeración rápida es ideal cuando llega a casa en un día caluroso.
COOL : Proporciona refrigeración efi ciente de confort que se adapta a sus necesidades.
DRY : La unidad funciona con el ventilador en la velocidad baja para ofrecer una operación de refrigeración suave.
Desactivación del fi ltro interior nanoe-G
Dependiendo del tiempo de operación acumulado de la unidad, la desactivación del fi ltro interior nanoe-G puede
activarse solamente una vez al día después de que se apaga la unidad.
Para eliminar la humedad que queda en las piezas internas, el ventilador puede funcionar durante 30 minutos con la
solapa un poco abierta. Este proceso se aplica solamente cuando la unidad se opera en modo COOL (FRÍO)/DRY
(DESHUMIDIFICACIÓN) antes de apagarse. Después, nanoe-G desactiva los virus/bacterias en el fi ltro durante 2
horas con el ventilador detenido y la solapa cerrada.
No desactive la fuente de alimentación durante esta operación. Después de una caída del suministro eléctrico, esta
operación no se reanudará.
ECONAVI y AUTO COMFORT
ECONAVI
La unidad empezará a inicializarse
(durante aproximadamente 1 minuto)
o
AUTO
COMFORT
El sensor de actividad
humana y el sensor de luz
solar empezarán a detectar.
Nota
AIR SWING
Cuando se seleccione AIR SWING
(CAMBIO DE AIRE) manual, se
cancelarán las operaciones de
ECONAVI y AUTO COMFORT.
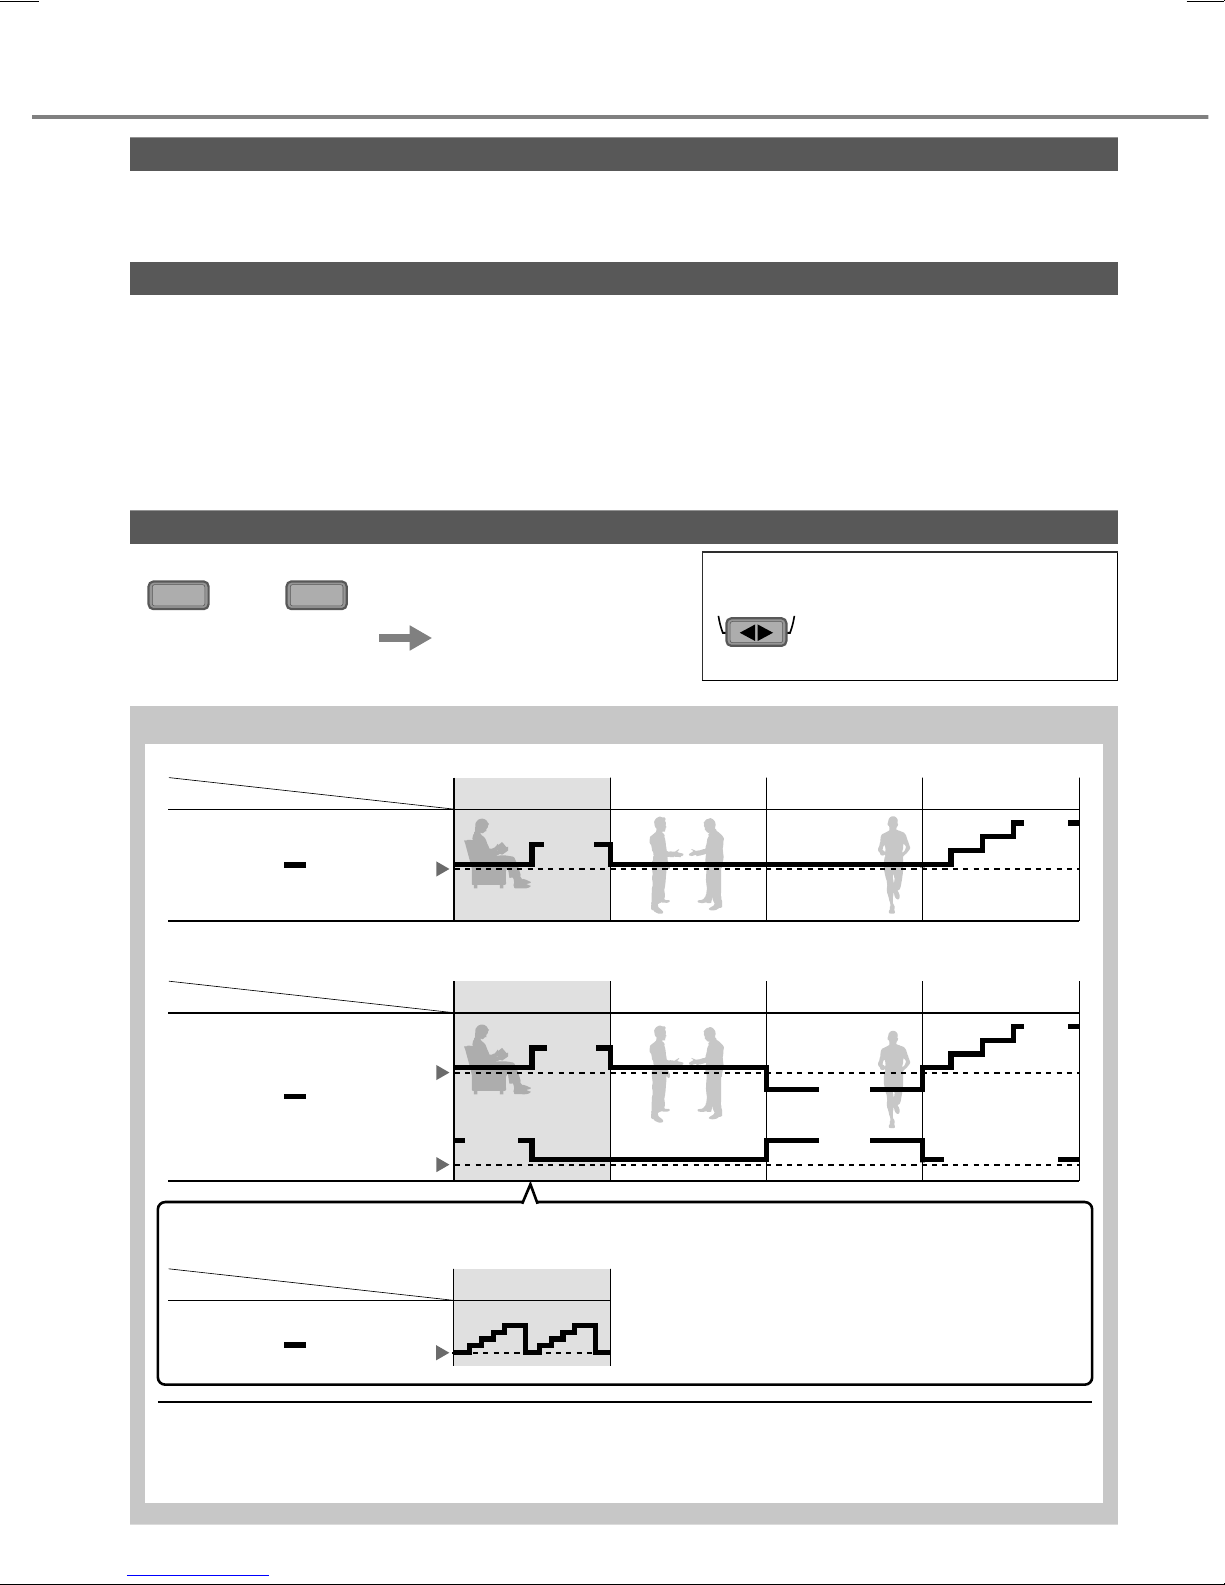
Funcionamiento del sensor de actividad humana
ECONAVI ;
Modo
COOL (FRÍO)/
DRY
(DESHUMIDIFICACIÓN)
AUTO COMFORT ;
mantener el confort de forma constante.
Modo
COOL (FRÍO)/
DRY
(DESHUMIDIFICACIÓN)
ECONAVI y AUTO COMFORT
Control preciso de la temperatura durante baja actividad para maximizar el ahorro de energía.
Modo
COOL (FRÍO)/
DRY
(DESHUMIDIFICACIÓN)
Detección de presencia y actividad humana, la unidad controla la temperatura del recinto para ahorrar energía.
Humano
Temperatura
ajustada
Detección de presencia y actividad humana, la unidad controla la temperatura del recinto para
Humano
Temperatura
ajustada
Definir la velocidad
del ventilador
Humano
Temperatura
ajustada
Actividad baja
+1 °C
Actividad baja
+1 °C
+1 punto*
Actividad baja
Actividad normal
Actividad normal
ECONAVI y AUTO COMFORT aprovechan que, por su
naturaleza, las personas tardan en sentir las subidas de
temperatura en condiciones de baja actividad, la unidad
ajusta la temperatura para maximizar el ahorro de
energía sin sacrificar el confort.
Actividad alta
Actividad alta
-1 °C
+1 punto
Ausente
+2 °C
Ausente
+2 °C
Ventilador medio**
*
En condiciones de baja actividad, se aprovecha el nivel 1 de la velocidad del ventilador durante los primeros 15 minutos o hasta
que se llegue a la temperatura ajustada.
**
Durante la ausencia de presencia humana, la velocidad máxima del ventilador para el modo COOL (FRÍO)/
DRY (DESHUMIDIFICACIÓN) se establece en un modo de velocidad del ventilador media.
8
Page 9
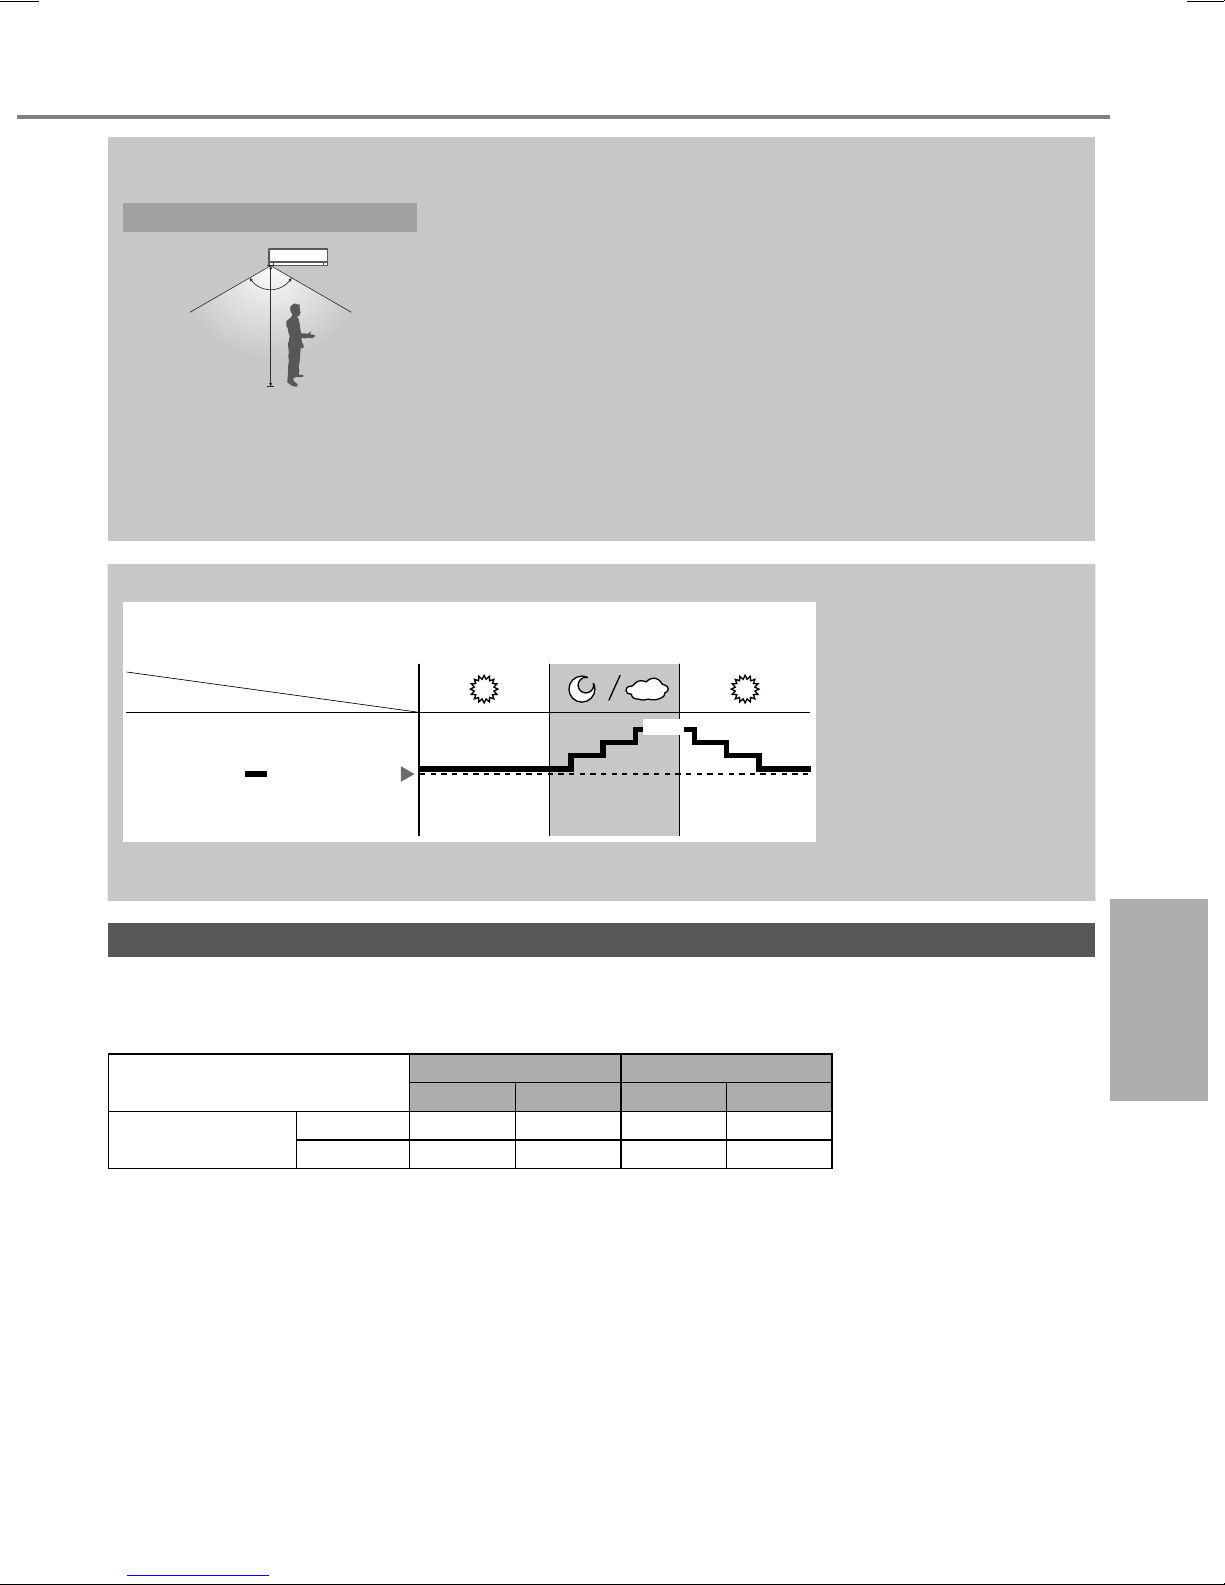
El sensor de actividad humana también escaneará el área para detectar la fuente de calor y el movimiento en la
habitación.
Área de detección
• En función de la actividad del área, la rejilla de dirección de corriente de
120º
7m
•
El sensor de actividad humana podría:
-
detectar de manera errónea un objeto con una fuente de calor y movimientos similares a los de los humanos, como es el
caso de mascotas, etc.
-
erróneamente no detectar como fuente de calor y movimiento a una persona que permanezca inmóvil durante cierto tiempo.
•
No coloque objetos grandes cerca del sensor y mantenga unidades de calefacción o humidifi cadores alejados del área de
detección del sensor. Puede dar lugar a un mal funcionamiento del sensor.
aire horizontal se ajustará fi ja en una posición predeterminada u oscilando
a la izquierda/derecha de forma periódica.
• El rendimiento del sensor de actividad humana dependerá de la ubicación
de la unidad interior, de la velocidad de movimiento, del intervalo de
temperatura, etc.
Funcionamiento del sensor de luz solar
ECONAVI ; Detección de intensidad de la luz solar, la unidad ajusta la temperatura
para ahorrar energía.
Condición del medio
Modo
COOL (FRÍO)/
DRY
(DESHUMIDIFICACIÓN)
ambiente
+1 °C
Temperatura
ajustada
ECONAVI se activa, la unidad
mantiene la temperatura
ajustada hasta que se detecta
una elevada intensidad de luz
solar. El sensor de luz solar
detecta la intensidad de la
luz solar durante cambios de
tiempo o de día/noche, y la
unidad ajusta la temperatura.
• En una habitación sin ventanas o con una cortina gruesa, el sensor de luz solar determinará si está nublado o si es
de noche.
Condiciones de funcionamiento
Utilice este aparato de aire acondicionado dentro del siguiente intervalo de temperaturas.
DBT : Temperatura de bulbo seco
WBT : Temperatura de bulbo húmedo
Temperatura (°C)
COOL (FRÍO)
Máxima 32 23 43 26
Mínima 16 11 16 11
Interior Exterior
DBT WBT DBT WBT
Saber más...
Español (LE)
9
Page 10
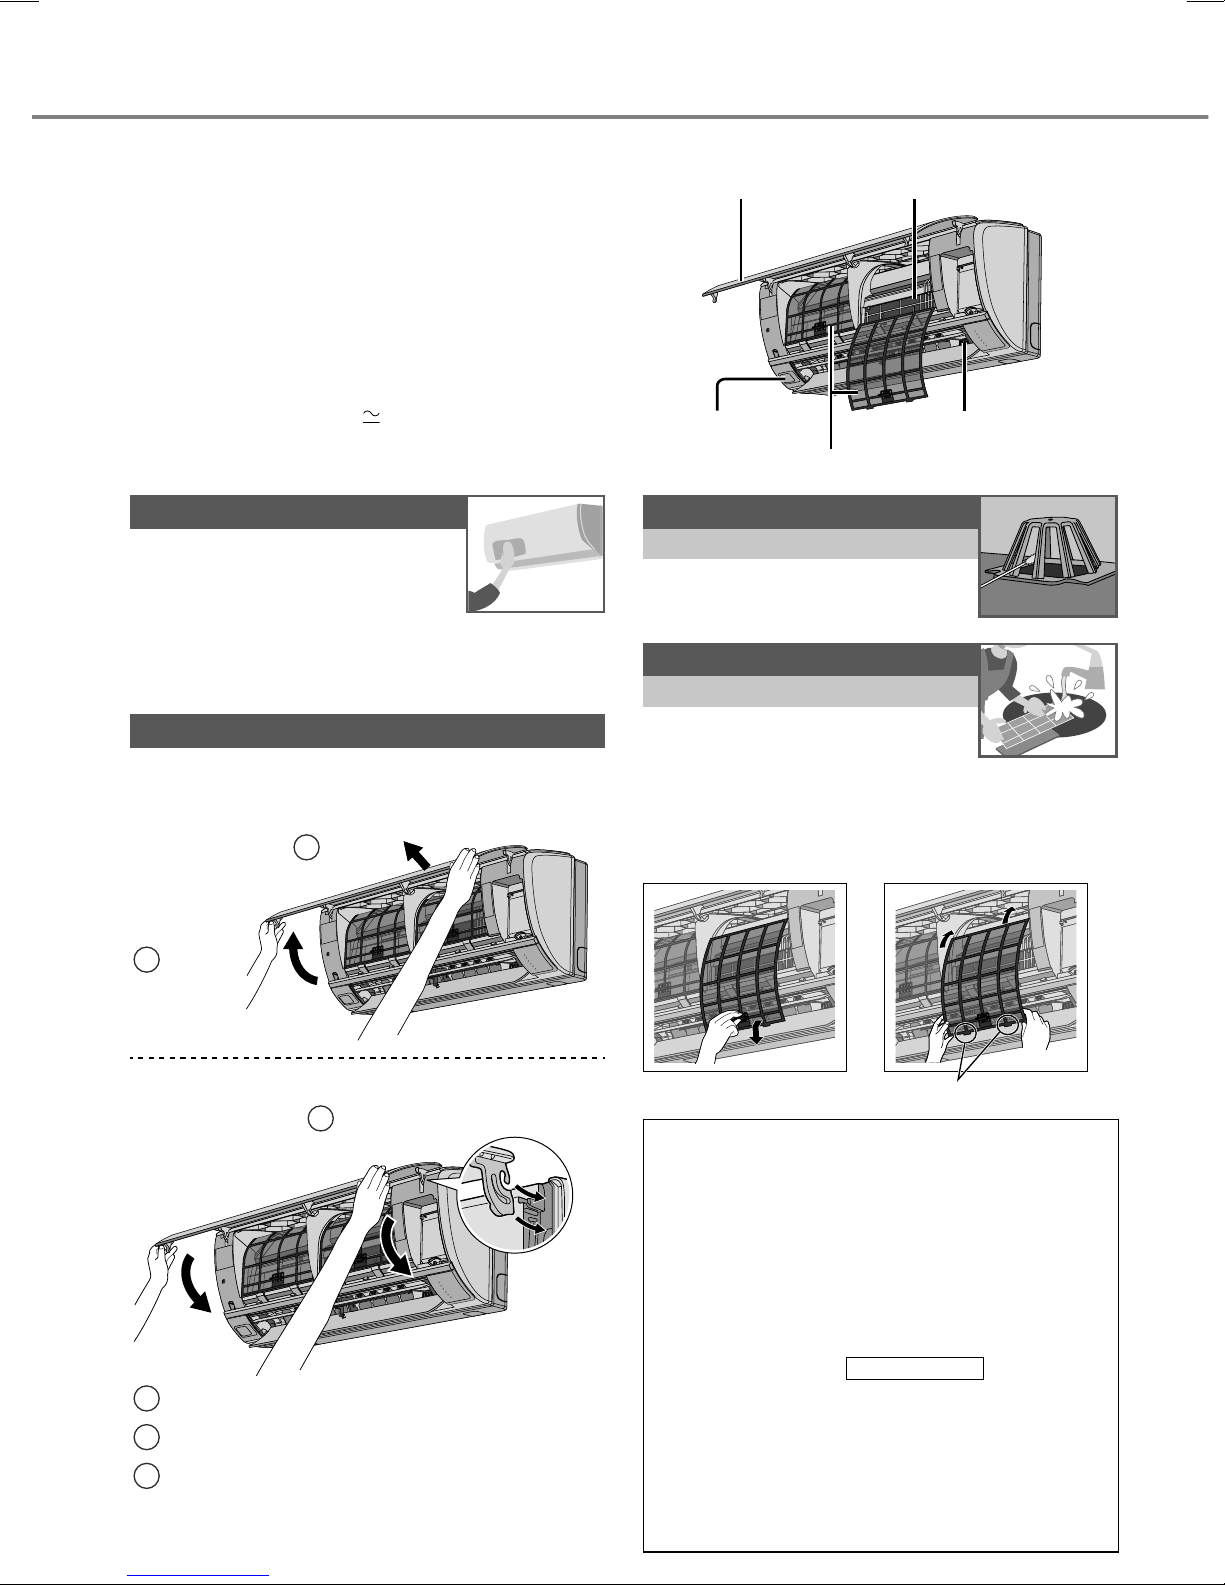
Instrucciones de limpieza
Para garantizar un desempeño óptimo de
la unidad, la limpieza se debe realizar en
intervalos regulares. La unidad sucia puede
causar un mal funcionamiento y puede ver
que el indicador nanoe-G parpadea o puede
ver el código de error “H99”. Consulte con un
distribuidor autorizado.
•
Apague la unidad y desenchúfela antes de limpiarla.
•
No toque las aletas de aluminio, las partes afi ladas
podrían provocarle lesiones.
•
No utilice benceno, disolvente o limpiador en polvo.
•
Utilice únicamente jabón
( pH 7)
o detergente
neutro de uso doméstico.
•
No utilice agua caliente a más de 40°C.
Unidad interior
Limpie suavemente la unidad con
un paño suave y seco.
Sensor de actividad humana
No lo golpee o presione con violencia, ni lo golpee
con objetos afi lados. Esto puede causar daños y
fallas.
Panel frontal
Lave y seque la unidad cuidadosamente.
Retire el panel frontal.
Retire
2
Unidad interior
Aleta de aluminioPanel frontal
POWER
TIMER
i AUTO-X
NONOE-G
AUTO COMFORT
QUIET
Sensor de
actividad humana
Filtro de aire
Generador
nanoe-G
Generador nanoe-G
Cada 2 semanas
•
Limpie con un bastoncillo de algodón
seco.
•
No toque durante el funcionamiento.
Filtro de aire
Cada 2 semanas
Lave/enjuague los fi ltros con agua, con
•
cuidado para evitar dañar la superfi cie del
mismo.
•
Secar minuciosamente los fi ltros a la sombra, lejos del fuego
o la luz solar directa.
•
Reemplace los fi ltros dañados.
Retire el fi ltro de aire Instale el fi ltro de aire
Levante
1
Cierre de forma segura
Introduzca en
1
ambos lados
Cierre
2
Presione ambos extremos del panel frontal
3
Para CS-S18RKV, CS-S24RKV,
4
CS-S28RKV:
Presione en el centro del panel frontal.
10
POWER
TIMER
i AUTO-X
NONOE-G
AUTO COMFORT
QUIET
Insértelo en la unidad
Inspección estacional después de un período extenso
sin uso
•
Verifi cación de las baterías del control remoto (control
remoto inalámbrico).
•
Ausencia de obstrucción en los orifi cios de entrada y salida
de aire.
POWER
TIMER
i AUTO-X
NONOE-G
AUTO COMFORT
QUIET
•
Use el botón Auto OFF/ON (apagado/encendido automático)
para seleccionar el funcionamiento de COOL (FRÍO).
Después de 15 minutos de operación, es normal que exista
la siguiente diferencia de temperatura entre los orifi cios de
entrada y salida de aire:
COOL: ≥ 8 °C
En caso de no utiizar el equipo por un tiempo prolongado
•
Active la operación nanoe-G por 2~3 horas como una
alternativa para eliminar la humedad existente en las partes
internas de manera exhaustiva para evitar el crecimiento de
hongos.
•
Apague la unidad y desenchúfela.
•
Quite las baterías del control remoto.
Page 11
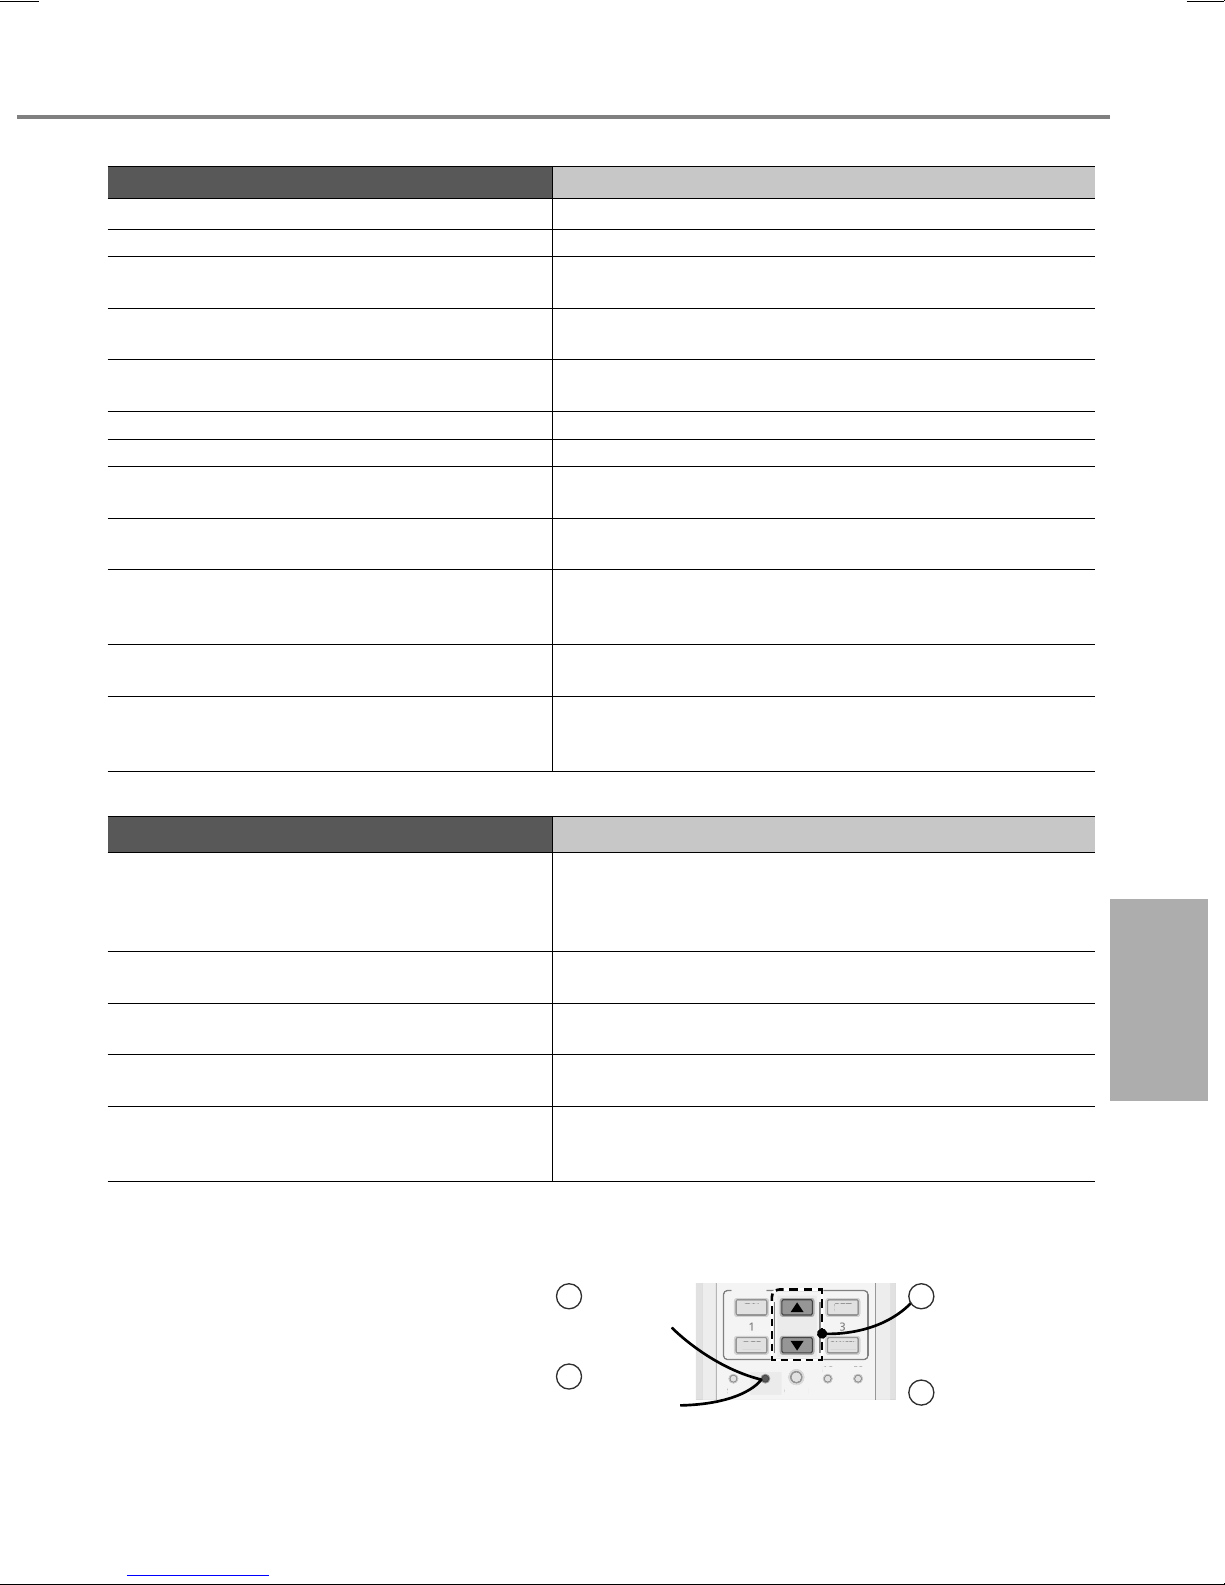
Localización de averías
K
L
Los siguientes síntomas no indican ningún desperfecto.
Síntoma Causa
La unidad interior despide vapor.
Ruido de agua durante la operación.
La habitación tiene un olor peculiar.
El ventilador interno se detiene ocasionalmente durante el
ajuste automático de la velocidad del ventilador.
La operación se retrasa unos minutos después de volver a
encender la unidad.
La unidad exterior emite agua/vapor.
El indicador TEMPORIZADOR (TIMER) siempre está encendido.
El indicador de ENCENDIDO (POWER) parpadea antes de
encenderse la unidad.
Sonido seco (de chasquido) durante el funcionamiento.
Decoloración de algunas piezas de plástico.
Ruido fuerte en la unidad exterior durante la operación
temprana de i AUTO-X.
Puede haberse recogido polvo alrededor del panel frontal,
parrillas y pared en entorno de la unidad después de un uso
prolongado.
•
Efecto de condensación debido al proceso de enfriamiento.
•
El fl ujo del refrigerante dentro de la unidad.
•
Esto se puede deber al olor a humedad que emiten las paredes, las
alfombras, los muebles o la vestimenta.
•
Esto ayuda a eliminar los olores circundantes.
•
El retraso es una protección del compresor de la unidad.
•
Presencia de condensación o evaporación en los caños.
•
El ajuste del temporizador se repite diariamente una vez que se lo ajusta.
•
Se trata de un paso preliminar para preparar el funcionamiento cuando se
ha ajustado el temporizador de encendido.
•
Los cambios de temperatura provocan la expansión/contracción de la
unidad.
•
La decoloración está sujeta a los tipos de materiales usados en las piezas
plásticas y se acelera cuando estas se exponen al sol, la luz solar, la luz
UV o los factores ambientales.
•
El compresor y el ventilador giran a una mayor velocidad para aumentar el
rendimiento de enfriamiento durante la operación inicial.
•
La acumulación de polvo es debida al effecto de purifi cación de aire de
iones negativos desde nanoe-G. Remueva regularmente el polvo con un
paño húmedo y limpio.
Verifi fi que lo siguiente antes de solicitar un servicio.
Síntoma Verifi que
El modo COOL (FRÍO) no funciona efi cientemente.
Ruido durante el funcionamiento.
El control remoto no funciona.
(La pantalla está oscura o la señal de transmisión es débil.)
La unidad no funciona.
La unidad no recibe la señal del control remoto.• Asegúrese de que no haya una obstrucción en el receptor.
CRITERIOS PARA NO USAR EL EQUIPO
APAGUE LA FUENTE DE ALIMENTACIÓN
Y DESCONECTE, después consulte a un
distribuidor autorizado bajo las siguiente
condiciones:
•
Ruido anormal durante el funcionamiento.
•
Ingreso de agua o partículas extrañas en el
control remoto.
•
Filtraciones de agua desde la unidad interior.
•
Activación frecuente del interruptor de
protección.
•
El cable de alimentación se calienta.
•
Los botones o interruptores no funcionan
correctamente.
•
Ajuste correctamente la temperatura.
•
Cierre todas las puertas y ventanas.
•
Limpie o reemplace los fi ltros.
•
Despeje cualquier obstrucción en las aberturas de entrada y salida de aire.
•
Compruebe si la unidad ha sido instalada en una inclinación.
•
Cierre el panel delantero correctamente.
•
Coloque correctamente las baterías.
•
Reemplace las baterías descargadas.
•
Verifi que si se activó el interruptor de circuito.
•
Verifi que si se han ajustado los temporizadores.
•
Ciertas luces fl uorescentes puede interferir con el transmisor de señal.
Instrucciones de limpieza / Localización de averías
Español (LE)
Consulte con un distribuidor autorizado.
La unidad se detiene y el indicador
TEMPORIZADOR (TIMER) parpadea.
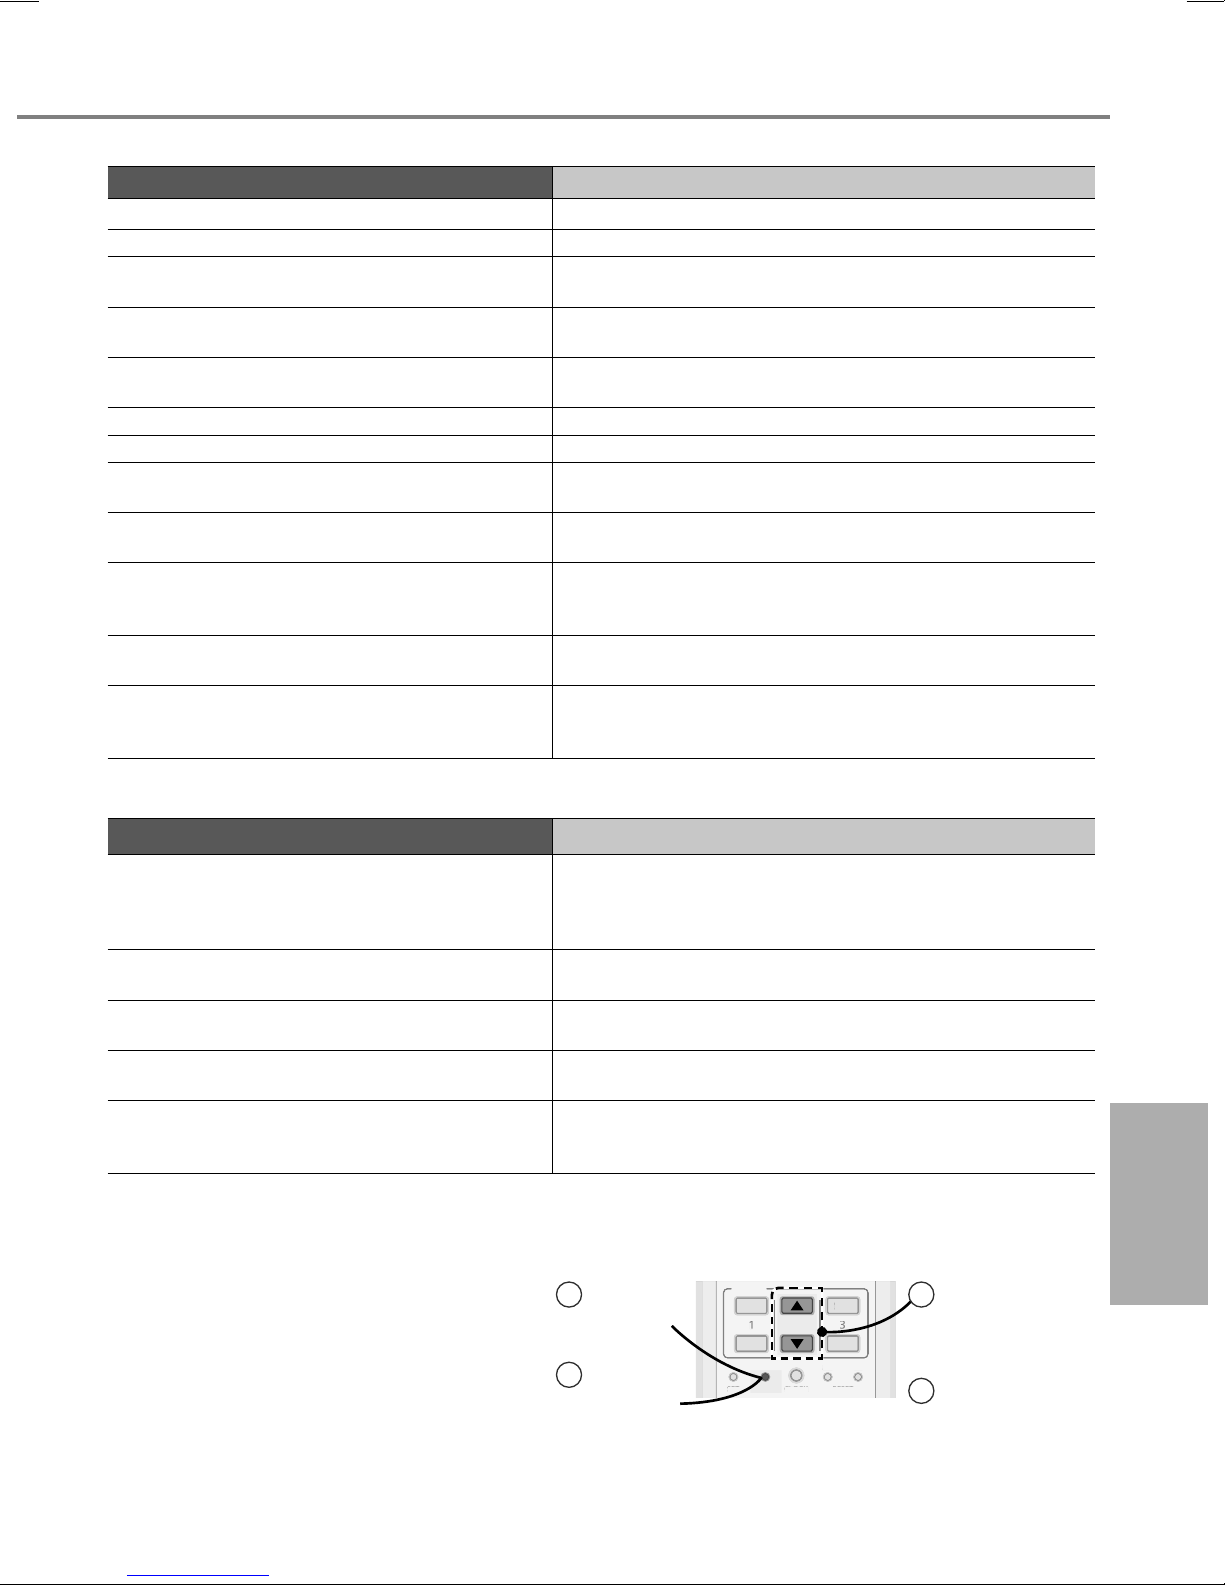
Use el control remoto para visualizar el código de error.
Pulse durante
5 segundos
3
Pulse durante
5 segundos
para
abandonar la
comprobación
•
Para ciertos errores puede reiniciar la unidad con un funcionamiento
TIMER
ON
123
OFF
FF
ET
SET
CANCEL
ANCE
AC
CLOCKSET CHECK RESET
CLOC
ET
RC
ESET
limitado, esto se realizara al escuchar 4 pitidos durante el inicio de la
operación del equipo.
21
Pulse hasta escuchar
un pitido y, después,
apunte el código
del error
4
Apague la unidad e
informe el código de
error al distribuidor
autorizado
11
Page 12
Provide fast cooling, maximum comfort,
clean air and optimise energy saving
i AUTO-X Cooling when it counts, Comfort when it matters
i AUTO-X with the new Panasonic Thermal Enhancement Technology (P-TECh) is a unique Panasonic
compressor control technology which enable compressor to achieve maximum frequency in a short time.
i AUTO-X also comes with new AEROWINGS - twin fl aps that works dynamically to adjust airfl ow
directions. AEROWINGS gives you fast cooling at start up by directing airfl ow downwards*, and comfort
of shower cooling by directing airfl ow upwards*.
So, you get to enjoy instant fast cooling satisfaction on a hot day and cooling comfort that goes on all
day long.
*Applicable for horizontal fl ap AUTO setting.
ECONAVI + INVERTER The Perfect Energy Saving Technology
ECONAVI detects where energy is normally wasted and adjusts cooling power depending on room
conditions and activity levels. Then, INVERTER leverages ECONAVI sensor data and varies compressor
rotation speed. This helps to optimize cooling operation and reduces wasteful cooling.
nanoe-G Purifi es the air down to the smallest particles
Deactivates harmful micro-organisms such as viruses, bacteria, etc. to keep air clean.
It also deactivates viruses and bacteria on the fi lter to keep inside of the unit clean.
See “To learn more...” for details.
12
Page 13
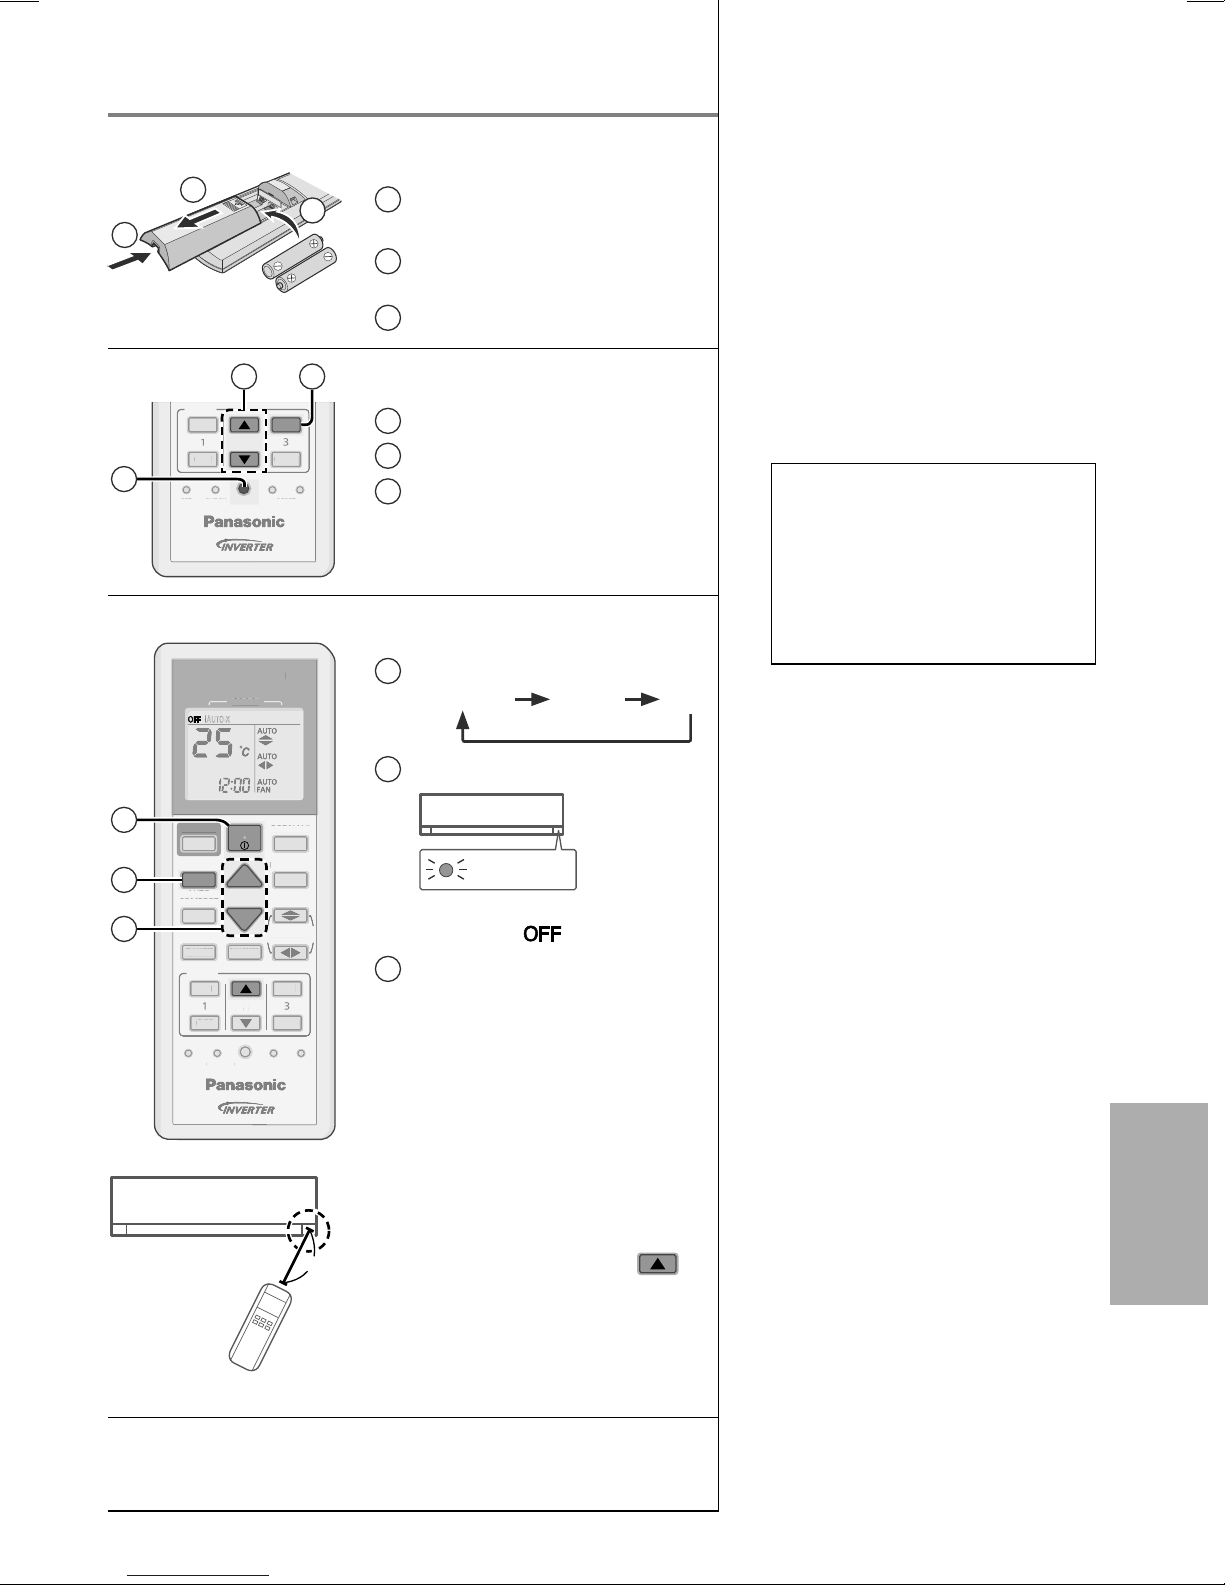
Quick guide
CK
L
K
R
CK
C
L
I
GUTO
D
G
Table of contents
Inserting the batteries
1
2
3
1
Pull out the back cover of
remote control
Insert AAA or R03 batteries
2
(can be used ~ 1 year)
3
Close the cover
2 3
TIMER
ON
123
OFF
FF
1
ET
HE
SET
CANCEL
ANCE
AC
CLOCKSET CHECK RESET
RC
ESET
Clock setting
1
Press CLOCK
2
Set the time
3
Confi rm
Basic operation
AIR CONDITIONER
IR CONDITIONE
MODE
MODE
iAUTO-X
Select the desired mode
1
COOL
DRYi AUTO-X
Safety precautions ...............14-15
How to use...........................16-17
To learn more... ..................18-19
Cleaning instructions ................ 20
Troubleshooting ........................ 21
Information.................Back cover
Accessories
• Remote control
• AAA or R03 batteries × 2
• Remote control holder
• Screws for remote control
holder × 2
Start/stop the operation
2
2
1
i AUTO-X
AUTO-X
MODE
AUTO
COMFORT
COMFORT
3
QUIET
UIET
TIMER
ON
123
OFF
FF
SET CHECK RESET
ET
HE
OFF/ON
TEMP
FAN SPEED
AN SPEE
CLOCK
CLOC
ECONAVI
ECONAV
NANOE-G
ANOE-
AIR SWING
IR SWIN
SET
ET
CANCEL
ANCE
RC
AC
A
ESET
POWER
• Please note that the OFF
indication is on to start.
3
Select the desired
temperature
• Selection range:
16 °C ~ 30 °C.
•
Operating the unit within the
recommended temperature
may save energy.
COOL: 26 °C ~ 28 °C.
DRY : 1 °C ~ 2 °C lower than
room temperature.
English
8m
• To dim or restore the unit’s
indicator brightness, press
and hold for 5 seconds.
• Use remote control within 8 m
from the remote control receiver
of the indoor unit.
The illustrations in this manual are for explanation purposes
only and may differ from the actual unit. They are subject to
change without notice for future improvement.
13
Page 14
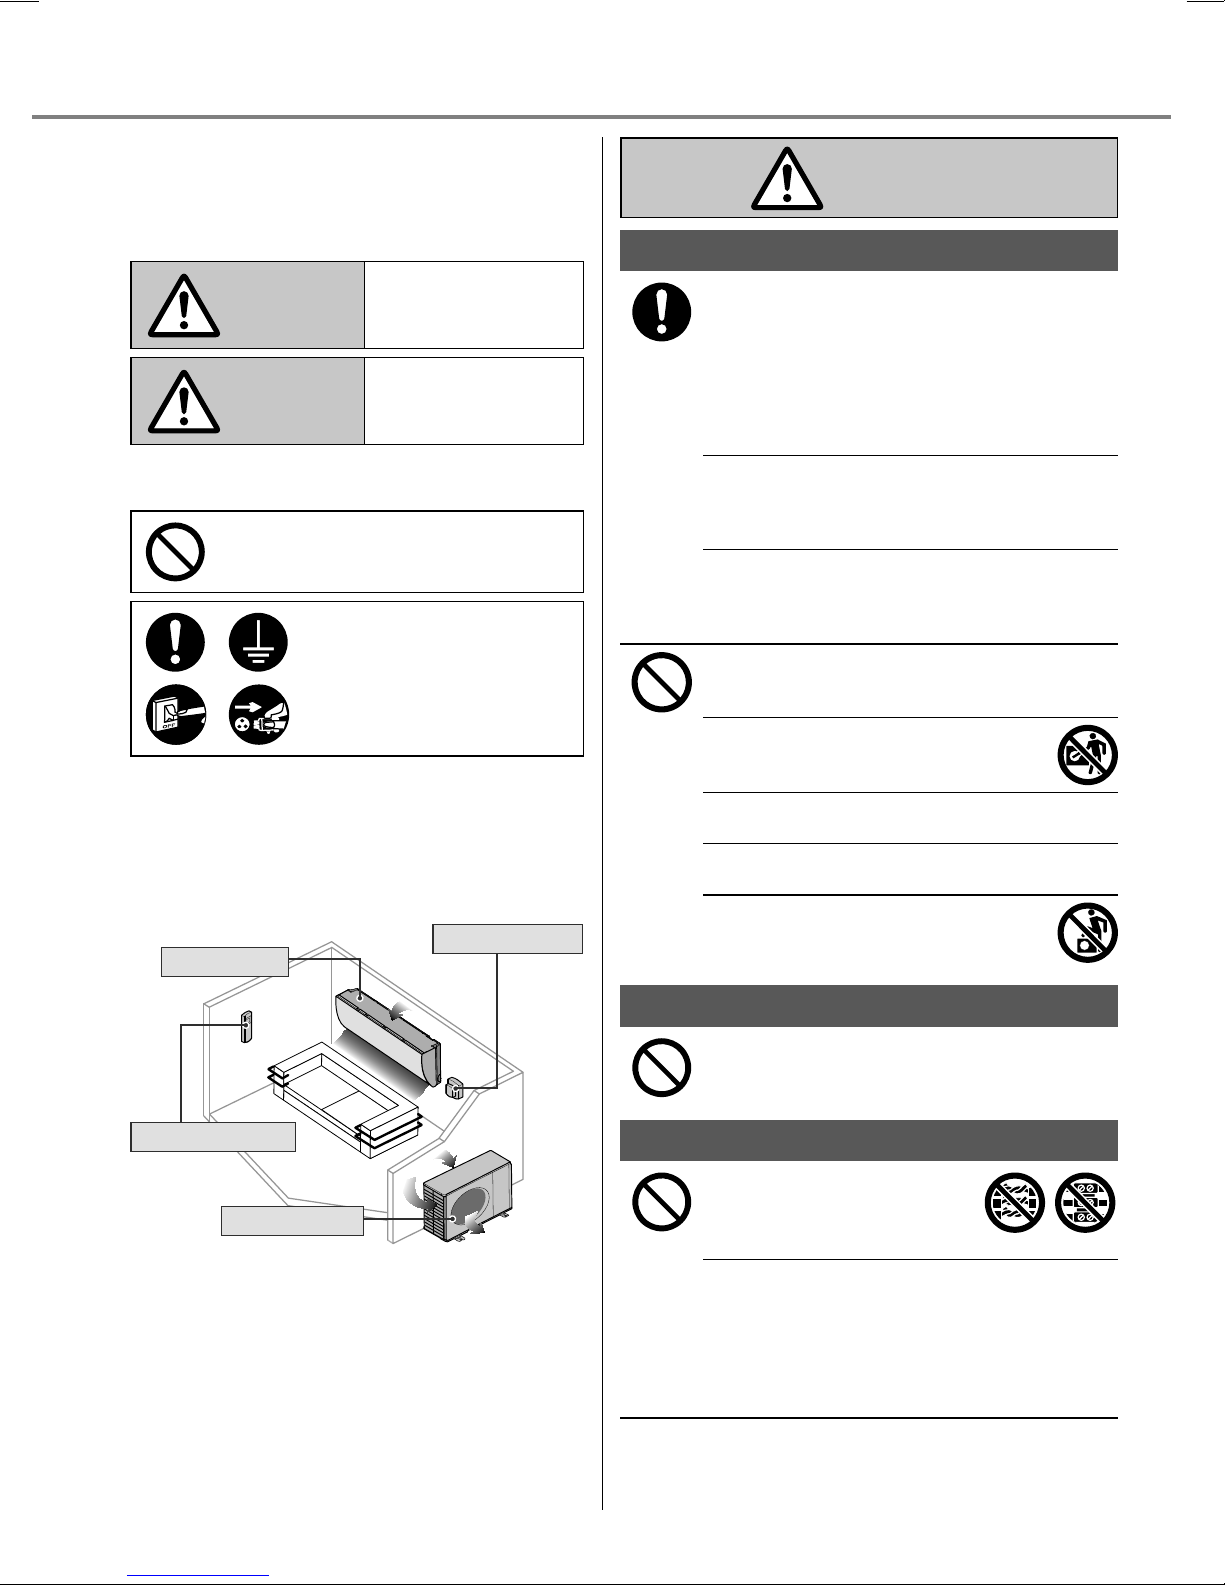
Safety precautions
Air inlet
Air inlet
Air outlet
Air outlet
To prevent personal injury, injury to others or
property damage, please comply with the following:
Incorrect operation due to failure to follow
instructions below may cause harm or damage, the
seriousness of which is classifi ed as below:
WARNING
Indoor unit and outdoor unit
WARNING
CAUTION
The instructions to be followed are classifi ed by the
following symbols:
This symbol denotes an action
that is PROHIBITED.
These symbols denote actions
COMPULSORY.
Indoor unit
This sign warns of
death or serious injury.
This sign warns of
injury or damage to
property.
Power supply
Air inlet
This appliance is not intended for use by persons
(including children) with reduced physical, sensory
or mental capabilities, or lack of experience
and knowledge, unless they have been given
supervision or instruction concerning use of the
appliance by a person responsible for their safety.
Children should be supervised to ensure that they
do not play with the appliance.
Please consult authorised dealer or specialist to
clean the internal parts, repair, install, remove and
reinstall the unit. Improper installation and handling
will cause leakage, electric shock or fi re.
Confi rm with authorised dealer or specialist on
usage of any specifi ed refrigerant type.
Using refrigerant type other than the specifi ed may
cause product damage, burst and injury etc.
Do not install the unit in a potentially explosive or
fl ammable atmosphere. Failure to do so could result
in fi re.
Do not insert your fi ngers or other objects
into the air conditioner indoor or outdoor
unit, rotating parts may cause injury.
Do not touch the outdoor unit during lightning, it
may cause electric shock.
Do not expose yourself directly to cold air for a long
period to avoid excess cooling.
Do not sit or step on the unit, you may fall
down accidentally.
Remote control
Air outlet
Remote control
Air inlet
Outdoor unit
14
Air outlet
Do not allow infants and small children to play with
the remote control to prevent them from accidentally
swallowing the batteries.
Power supply
Do not use a modifi ed cord,
joint cord, extension cord or
unspecifi ed cord to prevent
overheating and fi re.
To prevent overheating, fi re or electric shock:
•
Do not share the same power outlet with other
equipment.
•
Do not operate with wet hands.
•
Do not over bend the power supply cord.
•
Do not operate or stop the unit by inserting or
pulling out the power plug.
Page 15
If the supply cord is damaged, it must be
replaced by the manufacturer, service agent or
similarly qualifi ed persons in order to avoid a
hazard.
It is strongly recommended to be installed
with Earth Leakage Circuit Breaker (ELCB)
or Residual Current Device (RCD) to prevent
electric shock or fi re.
To prevent overheating, fi re or electric shock:
•
Insert the power plug properly.
•
Dust on the power plug should be periodically
wiped with a dry cloth.
Stop using the product if any abnormality/failure
occurs and disconnect the power plug or turn off
the power switch and breaker.
(Risk of smoke/fi re/electric shock) Examples of
abnormality/failure
•
The ELCB trips frequently.
•
Burning smell is observed.
•
Abnormal noise or vibration of the unit is
observed.
•
Water leaks from the indoor unit.
•
Power cord or plug becomes abnormally hot.
•
Fan speed cannot be controlled.
•
The unit stops running immediately even if it is
switched on for operation.
•
The fan does not stop even if the operation is
stopped.
Contact your local dealer immediately for
maintenance/repair.
Replacement or installation of power plugs shall
be performed by authorised/qualifi ed personnel
only. The wires in this mains lead are coloured in
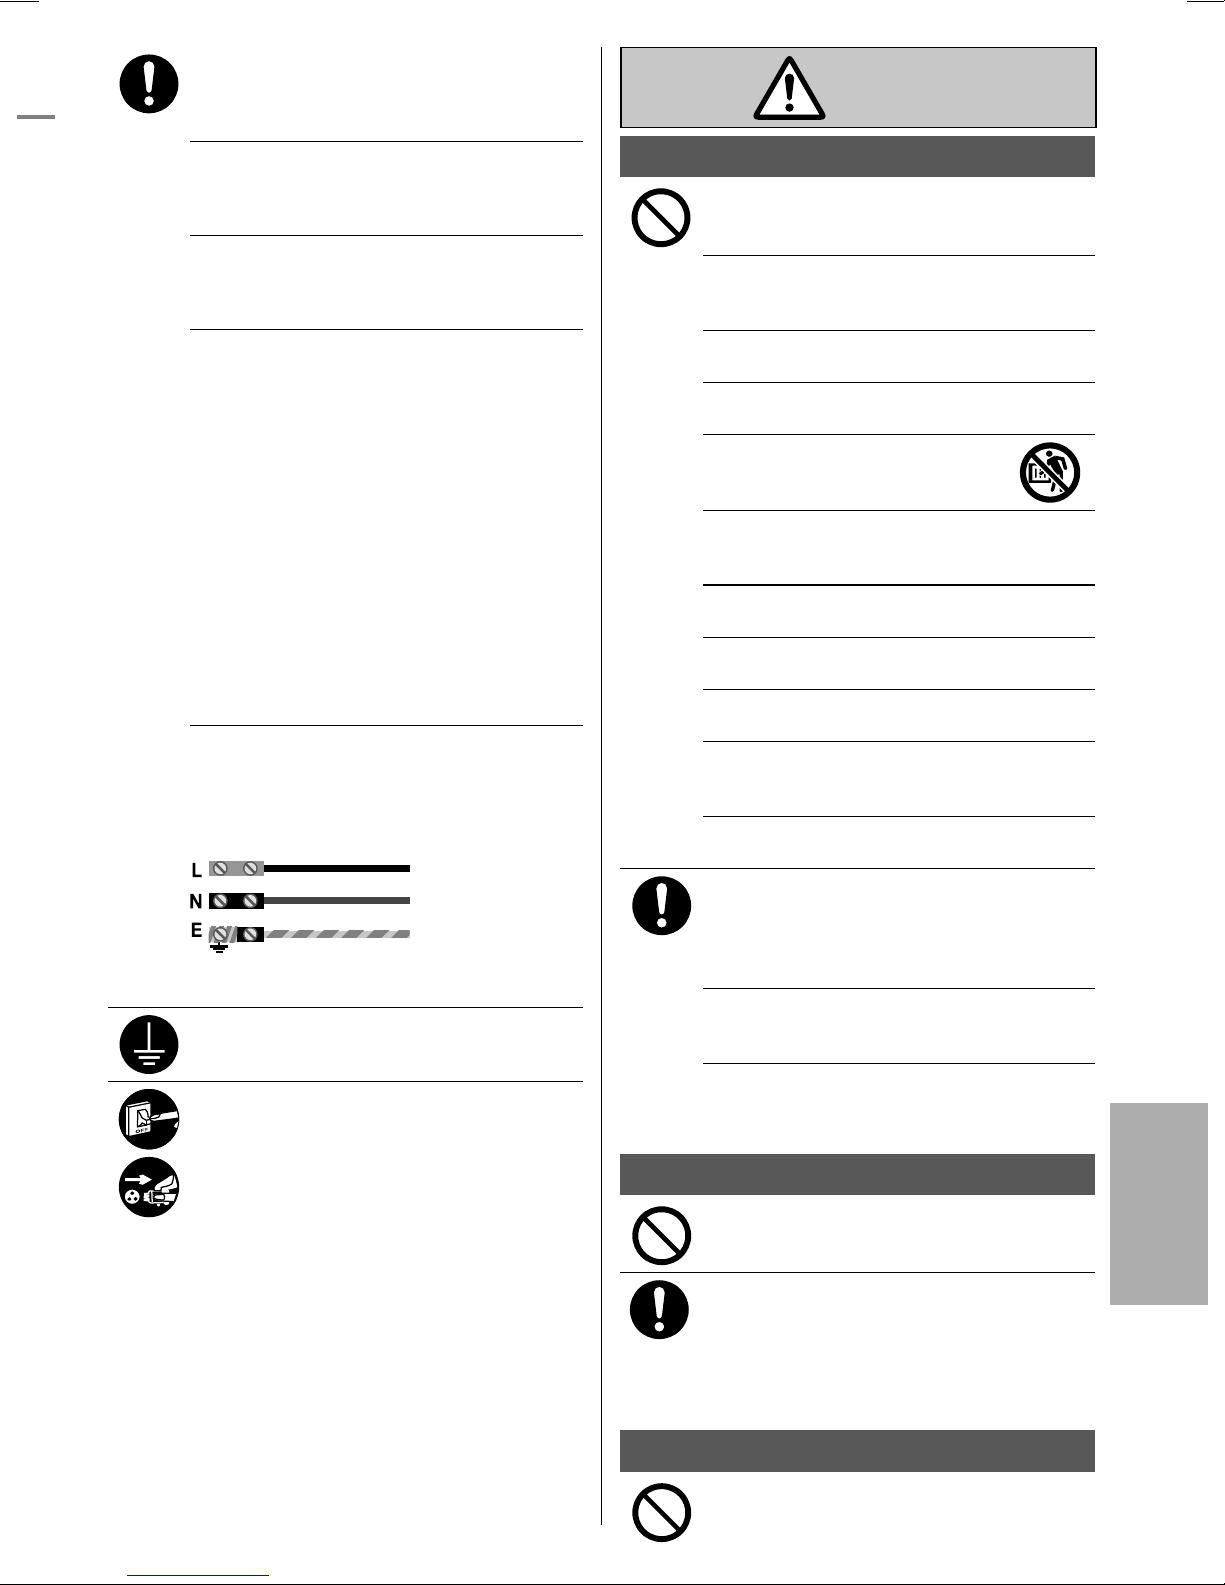
accordance with the following code:
Terminals
Red
Black
Green/Yellow
wires
colours (GB Standard)
live
brown
neutral
blue
earth
green-yellow
Wiring colour may vary depending on a country
wiring code’s standard.
This equipment must be earthed to prevent
electrical shock or fi re.
Prevent electric shock by switching off the power
supply and unplug:
- Before cleaning or servicing,
- When extended non-use, or
- During abnormally strong lightning activity.
CAUTION
Indoor unit and outdoor unit
Do not wash the indoor unit with water, benzine,
thinner or scouring powder to avoid damage or
corrosion at the unit.
Do not use for preservation of precise equipment,
food, animals, plants, artwork or other objects. This
may cause quality deterioration, etc.
Do not use any combustible equipment in front of
the airfl ow outlet to avoid fi re propagation.
Do not expose plants or pet directly to airfl ow to
avoid injury, etc.
Do not touch the sharp aluminium fi n,
sharp parts may cause injury.
Do not switch ON the indoor unit when waxing
the fl oor. After waxing, aerate the room properly
before operating the unit.
Do not install the unit in oily and smoky areas to
prevent damage to the unit.
Do not dismantle the unit for cleaning purpose to
avoid injury.
Do not step onto an unstable bench when
cleaning the unit to avoid injury.
Do not place a vase or water container on the
unit. Water may enter the unit and degrade the
insulation. This may cause an electric shock.
Do not open window or door for long time during
COOL/DRY mode operation.
Prevent water leakage by ensuring drainage
pipe is:
- Connected properly,
- Kept clear of gutters and containers, or
- Not immersed in water
After a long period of use or use with any
combustible equipment, aerate the room
regularly.
After a long period of use, make sure the
installation rack does not deteriorate to prevent
the unit from falling down.
Remote control
Do not use rechargeable (Ni-Cd) batteries. It may
damage the remote control.
Safety precautions
English
To prevent malfunction or damage of the remote
control:
•
Remove the batteries if the unit is not going to
be used for a long period of time.
•
New batteries of the same type must be
inserted following the polarity stated.
Power supply
Do not disconnect the plug by pulling the cord to
prevent electric shock.
15
Page 16
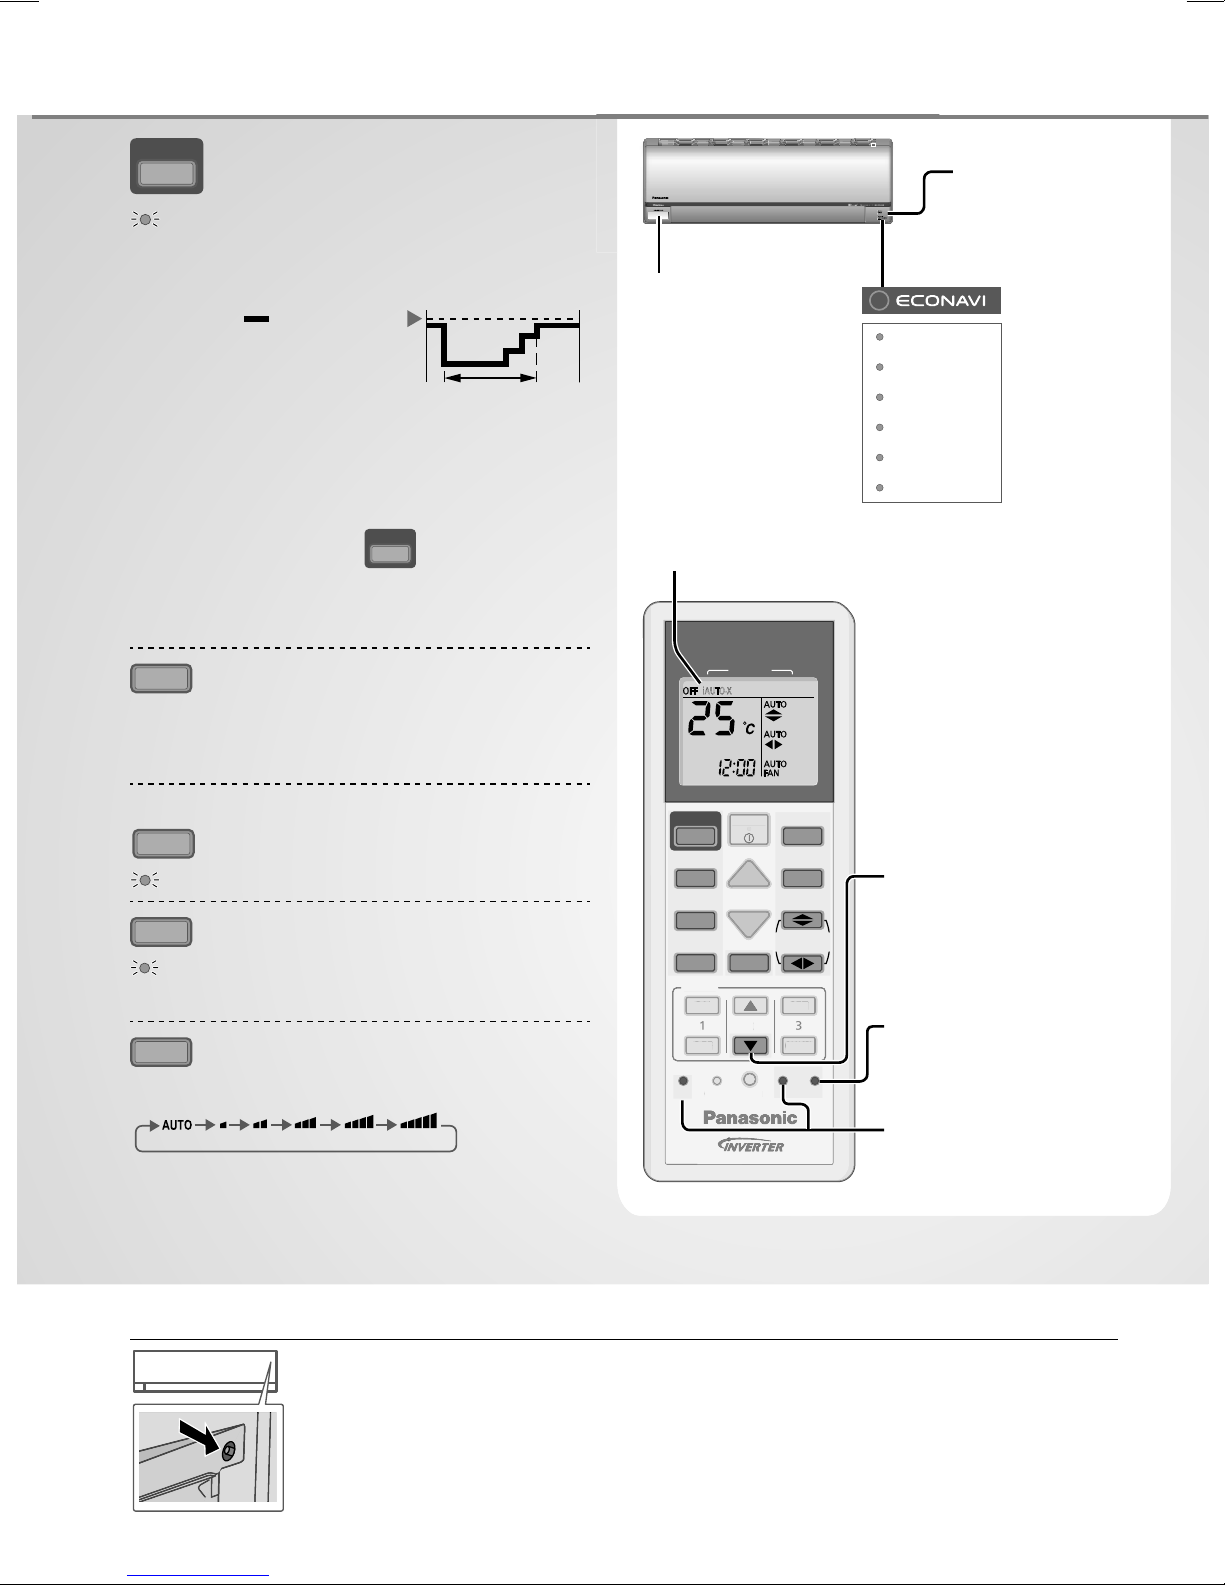
How to use
K
ON
CK
L
i AUTO-X
To reach temperature quickly
i AUTO-X
• The unit controls set temperature according to
room temperature to accelerate room cooling.
i AUTO-X
• After max 4 hours, the set temperature is
shifted according to AUTO COMFORT activity
detection.
• Fan speed is fi xed at AUTO, fan speed
selection is prohibited.
• During unit is off, press
unit with i AUTO-X mode.
• i AUTO-X mode can be cancelled by pressing
the respective button again.
MODE
To select operation mode
i AUTO-X - To reach temperature quickly
COOL - To enjoy cool air
DRY - To dehumidify the environment
Set
temperature
-1°C
Max = 4 hours
i AUTO-X
will turn on the
Human activity
sensor
Remote control display
AIR CONDITIONER
MODE
iAUTO-X
i AUTO-X
POWER
TIMER
i AUTO-X
NANOE-G
AUTO COMFORT
QUIET
Sunlight sensor
and remote
control receiver
Indicator
(Green)
(Green)
(Orange)
(Orange)
(Blue)
(Green)
(Orange)
AUTO
COMFORT
To maximise comfort
AUTO COMFORT
QUIET
To enjoy quiet operation
QUIET
• This operation reduces airfl ow noise.
FAN SPEED
To select fan speed
(Remote control display)
•
For AUTO, the indoor fan speed is automatically
adjusted according to the operation mode.
•
If i AUTO-X mode is set, fan speed is fi xed to
AUTO. To adjust fan speed, cancel i AUTO-X
mode.
Auto OFF/ON button
Use when remote control is misplaced or a malfunction occurs. Raise the front panel:
• To use in i AUTO-X mode, press the button once.
• To use in COOL mode, press and hold the button until 1 beep is heard, then
release.
• Press the button again to turn off.
OFF/ON
FF/
TEMP
FAN SPEED
CLOCK
CLOC
ECONAVI
NANOE-G
AIR SWING
CANCEL
AC
i AUTO-X
MODE
AUTO
COMFORT
QUIET
TIMER
ON
123
OFF
FF
SET CHECK RESET
HE
SET
ANCE
Press and hold for
approximately
10 seconds to show
temperature setting in
°C or °F.
ET
Press to restore the
RC
remote control to
default setting.
Not used in normal
operations.
16
Page 17
See "To learn more..." for details.
L
ECONAVI
To optimise energy saving
NANOE-G
To purify the air
NANOE-G
• nanoe-G starts automatically when the unit is
turned on with
OFF/ON
.
• Can be activated even when the unit is turned
off. In this condition, the unit will operate as a fan
with AUTO fan speed and fl ap swing.
To deactivate viruses/bacteria on the fi lter
NANOE-G
• After the unit is turned off, the nanoe-G in-fi lter
deactivation may activate up to 150 minutes.
Turning on the unit cancels this operation.
• To disable this operation in the future, press and
NANOE-G
hold
will not disable the nanoe-G to purify the air.
• To restore the nanoe-G in-fi lter deactivation,
press and hold
heard.
AIR SWING
To adjust airfl ow direction
(Remote control display)
• Keeps the room ventilated.
• In COOL/DRY mode, if AUTO is set, the fl aps
swings left/right and up/down automatically.
• In i AUTO-X mode, if AUTO is set, the horizontal
fl ap is fi xed at the lower position and shift to the
upper position after reaches set temperature.
The vertical fl ap movement depends on human
activity sensor. If manual is set, the horizontal
and vertical fl ap are fi xed at the predetermined
position.
• Do not adjust the fl ap by hand.
POWER
until a short beep sound is heard. This
NANOE-G
until a long beep sound is
Auto Restart Control
• If power is resumed after a power failure, the
operation will restart automatically after a period
of time with previous operation mode and airfl ow
direction.
• This control is not applicable when TIMER is set.
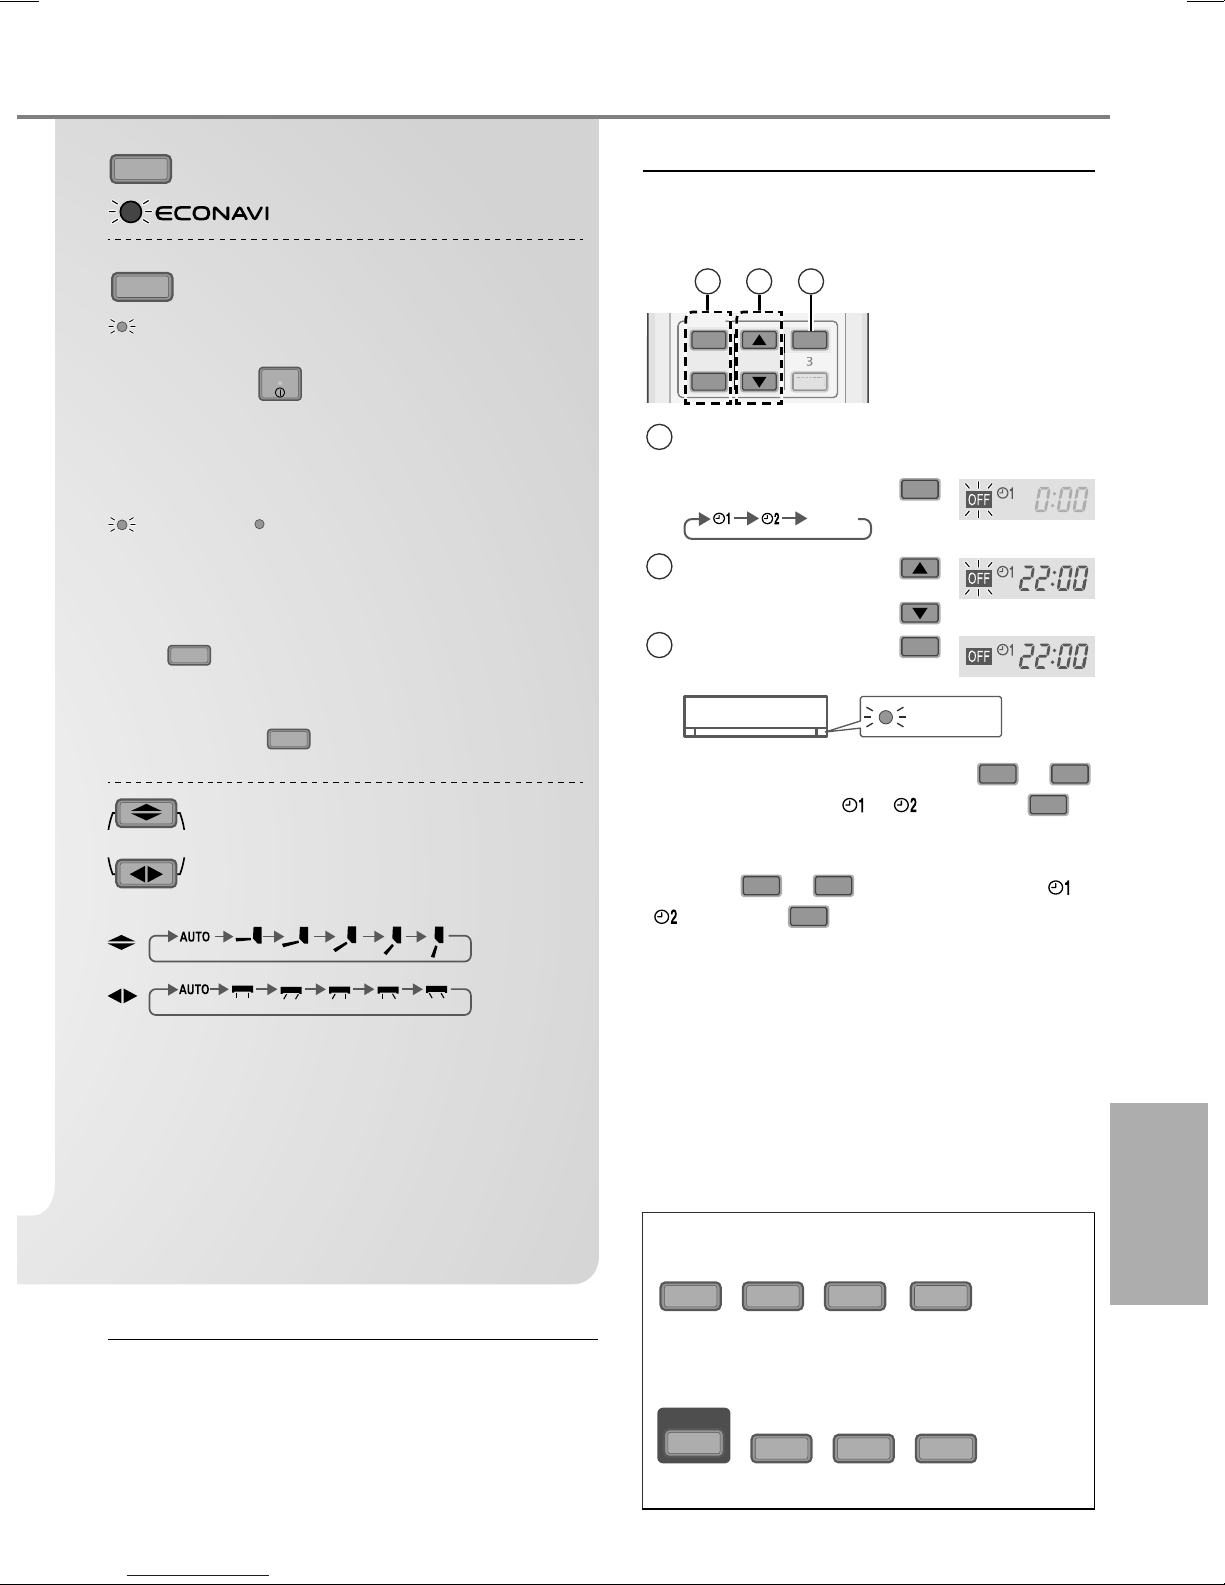
To set the timer
2 sets of ON and OFF timers are available
to turn ON or OFF the unit at different preset
times.
1 2 3
TIMER
ON
123
OFF
Select ON or OFF
1
timer
• Each time pressed:
Set the time
2
Confi rm
3
SET
CANCEL
ANCE
Cancel
Example:
OFF at 22:00
OFF
2
SET
TIMER
• To cancel ON or OFF timer, press
ON
to select respective or then press
• If timer is cancelled manually or due to power
failure, you can restore the timer again by
pressing
then press
ON
or
OFF
to select respective or
SET
.
• The nearest timer setting will be displayed and
will activate in sequence.
• When ON Timer is set, the unit may start
earlier (up to 15 minutes) before the actual
set time in order to achieve the desired
temperature on time.
• Timer operation is based on the clock set in
the remote control and repeats daily once set.
For clock setting, please refer to Quick guide.
or
CANCEL
OFF
.
Note
ECONAVI
QUIET
,
• Can be activated in COOL and DRY mode
and can be cancelled by pressing the
respective button again.
i AUTO-X
ECONAVI
,
• Cannot be selected at the same time.
AUTO
COMFORT
,
QUIET
,
NANOE-G
,
COMFORT
,
AUTO
How to use
English
17
Page 18
To learn more...
Operation mode
i AUTO-X : The fast cooling is ideal when you come home on a hot day.
COOL : Provides effi cient comfort cooling to suit your needs.
DRY : Unit operates at low fan speed to give a gentle cooling operation.
nanoe-G in-fi lter deactivation
Depending on the unit’s accumulated operation time, nanoe-G in-fi lter deactivation may activate only once a day after
the unit turned off.
To remove the moisture left in the internal parts, the fan will operate for 30 minutes with fl ap opened slightly. This
process only applicable when the unit is operated in COOL/DRY mode before turned off. Then, nanoe-G deactivates
viruses/bacteria on the fi lter for 2 hours with fan stopped and fl ap closed.
Do not turn off the power supply during this operation. After power failure, this operation will not resume.
ECONAVI and AUTO COMFORT
ECONAVI
The unit will start to initialise
(for approximately 1 minute)
or
AUTO
COMFORT
The human activity sensor
and the sunlight sensor will
start to detect.
Note
AIR SWING
When manual AIR SWING is selected,
the ECONAVI and AUTO COMFORT
operations will be cancelled.
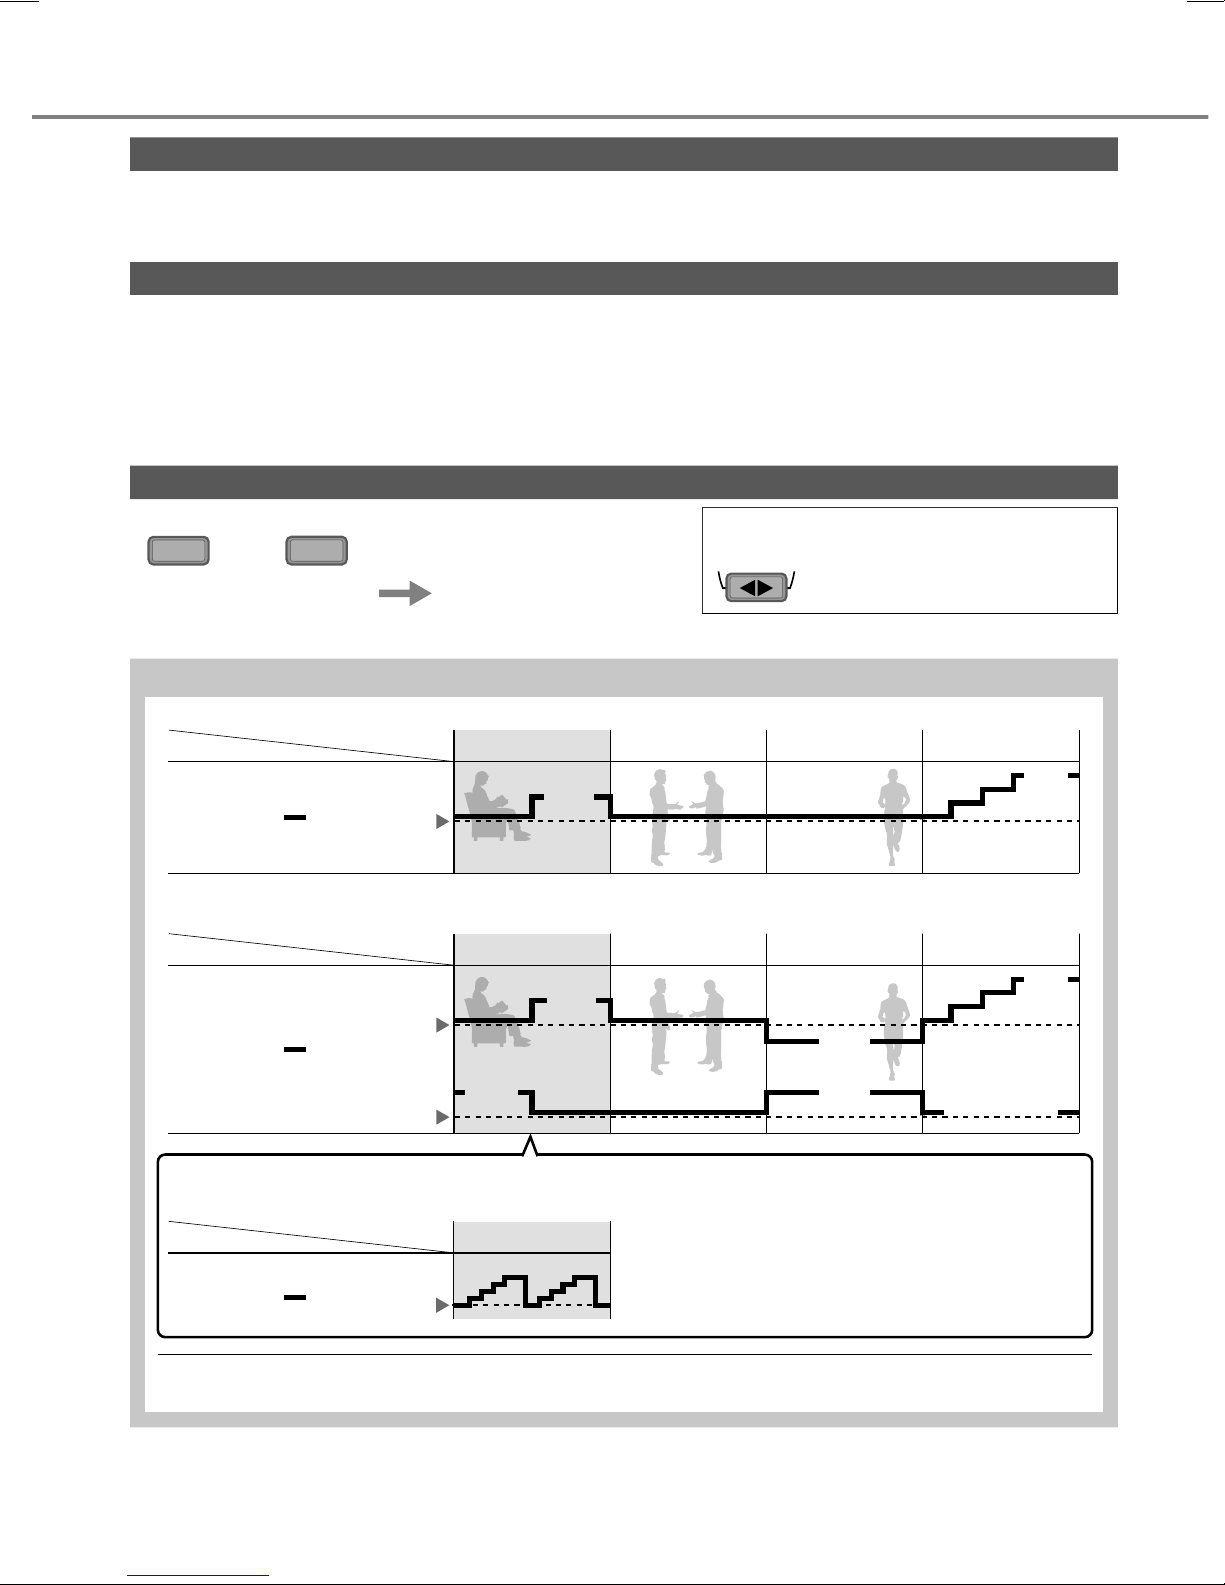
Human activity sensor operation
ECONAVI ; Detecting human presence and activity, the unit controls room temperature to save energy.
Mode
COOL/DRY
AUTO COMFORT ; Detecting human presence and activity, the unit controls room temperature to keep human
comfortable consistently.
Mode
COOL/DRY
ECONAVI and AUTO COMFORT
Precise control of temperature during low activity to maximise energy saving.
Mode
COOL/DRY
Set
temperature
Set
temperature
Set
Fan Speed
Set
temperature
Human
Human
Human
Low activity
Low activity
WDS
Low activity
+1 °C
+1 °C
Normal activity
Normal activity
ECONAVI and AUTO COMFORT take advantage of
the human nature that human being takes time to feel
the temperature rise during low activity level; the unit
adjusts temperature to maximise energy saving
without sacrificing the comfort.
High activity
High activity
-1 °C
+1 tap
Absent
Absent
0HGLXP)DQ
+2 °C
+2 °C
'XULQJORZDFWLYLW\IDQVSHHGWDSXSIRUILUVWPLQXWHVRUXQWLOVHWWHPSHUDWXUHLVUHDFKHG
'XULQJKXPDQDEVHQFHPD[LPXPIDQVSHHGIRU&22/'5<PRGHLVPHGLXPIDQ
18
Page 19
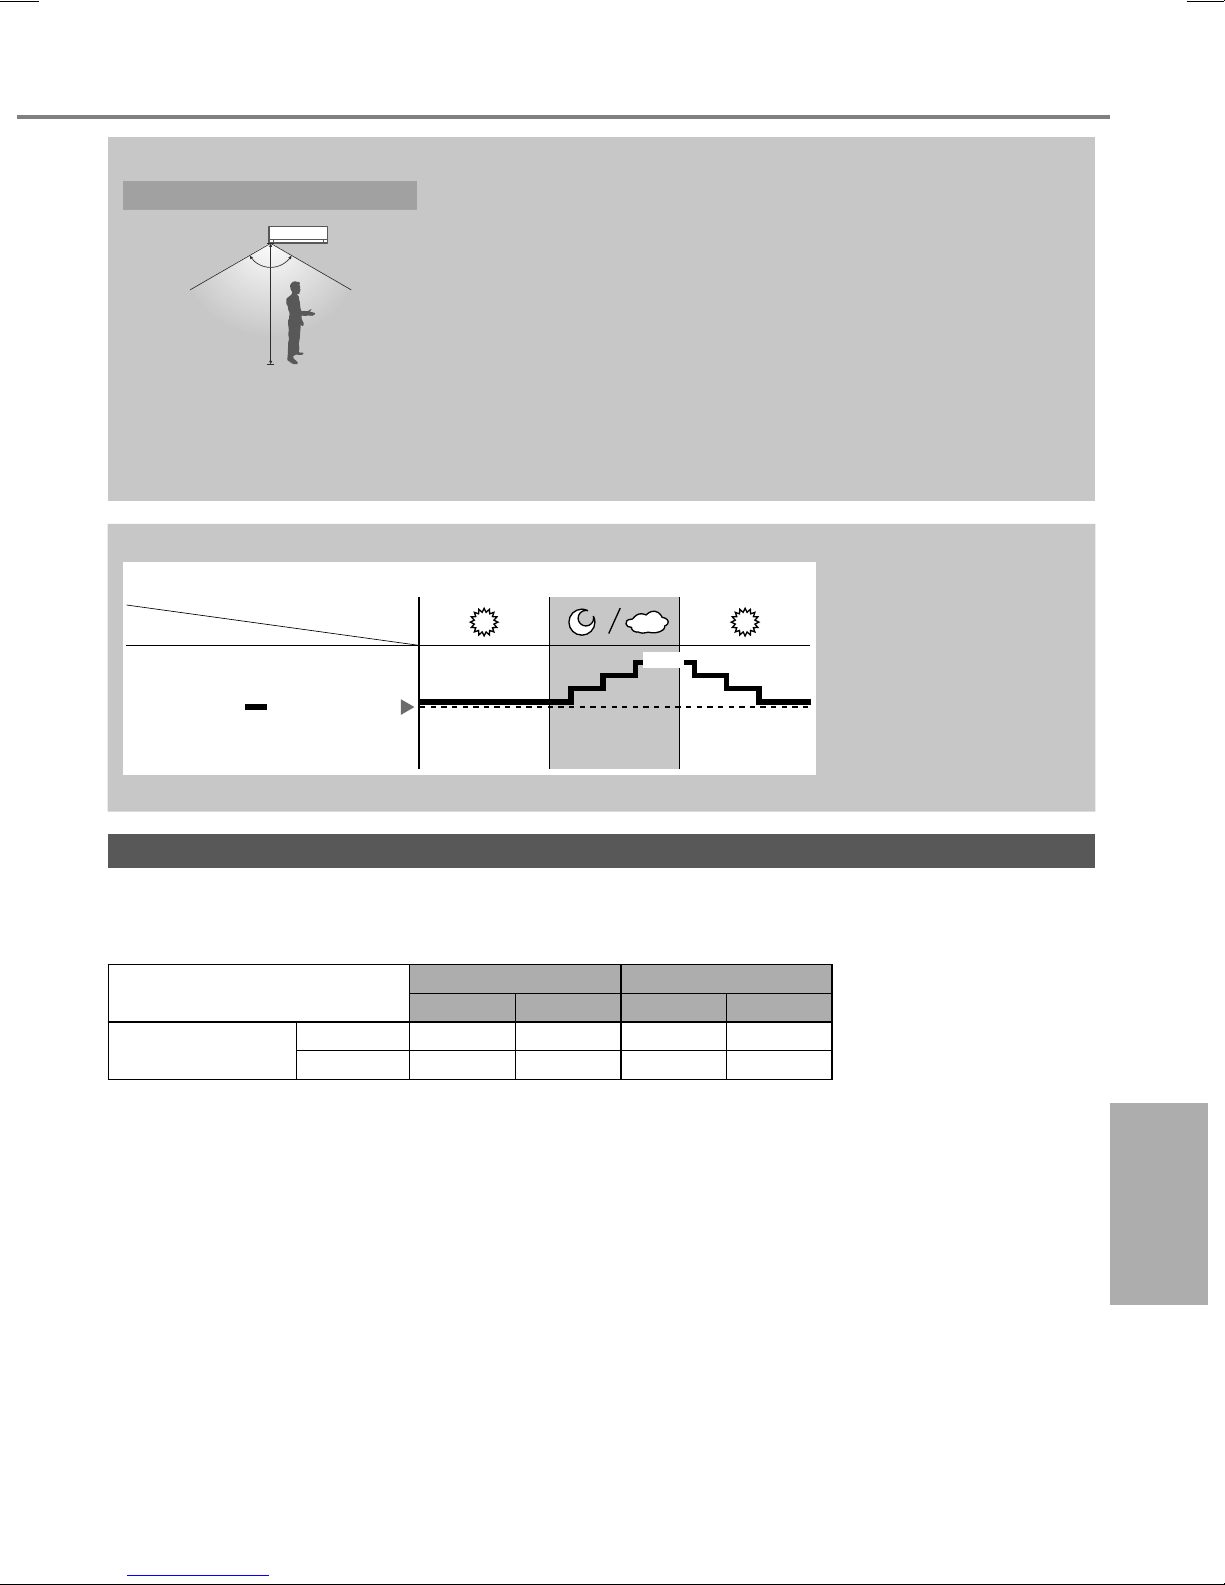
The human activity sensor will also scan for area of heat source and movement in a room.
Detection area
• Based on area activeness horizontal airfl ow direction will adjust either fi x
120º
at predetermined position or swing left/right periodically.
• The human activity sensor performance is infl uenced by indoor unit
location, movement speed, temperature range, etc.
7m
• The human activity sensor may:
- mistakenly detect an object with heat source & movement similar to human, such as pets, etc.
- mistakenly detect as non-heat source & movement if a human stays motionless for certain period of time.
• Do not place large objects near the sensor and keep away heating units or humidifi er from the sensor’s detection
area. They may cause sensor malfunction.
Sunlight Sensor operation
ECONAVI ; Detecting sunlight intensity, the unit adjust temperature to save energy.
Ambient condition
Mode
+1 °C
COOL/DRY
Set
temperature
ECONAVI is activated,
the unit maintains set
temperature until a high
sunlight intensity is detected.
The sunlight sensor detects
sunlight intensity during
weather or day/night
changes, and the unit adjusts
temperature.
• In a room without window or with thick curtain, the sunlight sensor will judge as cloudy/night.
Operation conditions
Use this air conditioner under the following temperature range.
DBT : Dry bulb temperature
WBT : Wet bulb temperature
Temperature (°C)
COOL
Max. 32 23 43 26
Min. 16 11 16 11
Indoor Outdoor
DBT WBT DBT WBT
To learn more...
English
19
Page 20
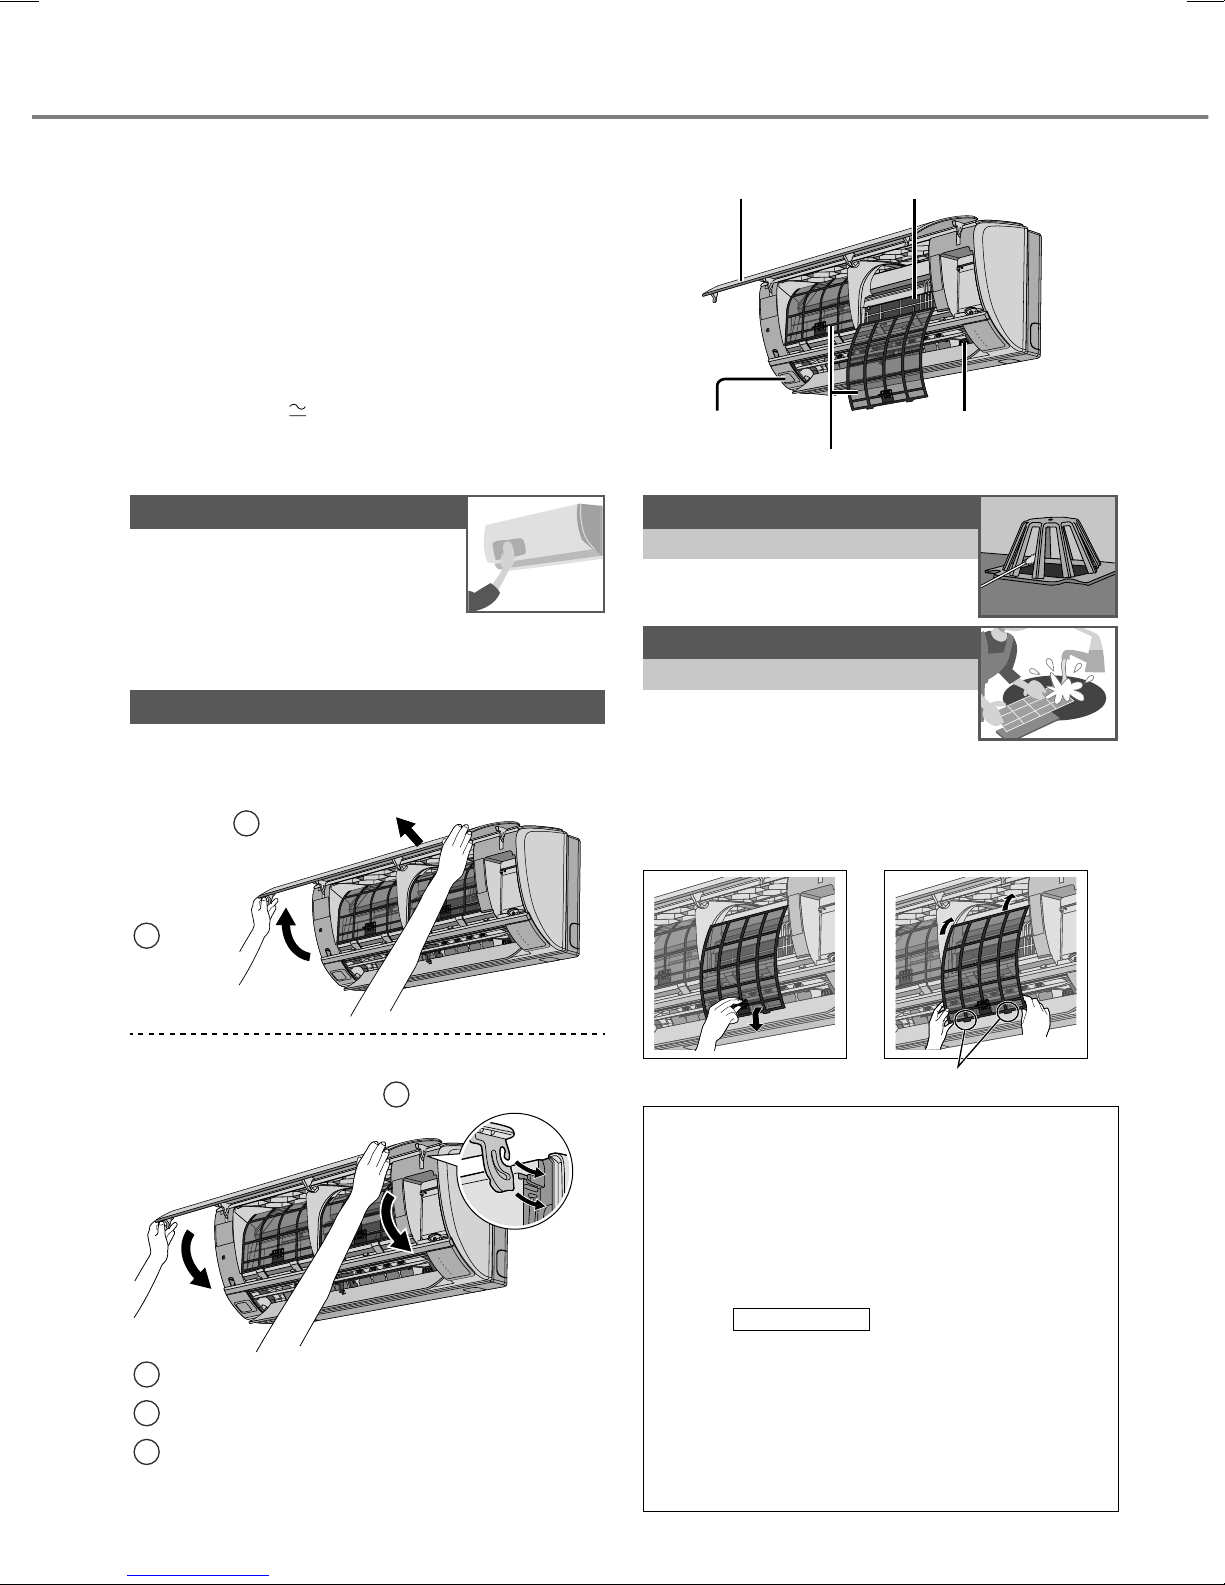
Cleaning instructions
To ensure optimal performance of the unit,
cleaning has to be carried out at regular
intervals. Dirty unit may cause malfunction
and you may see nanoe-G indicator blinks or
error code “H99”. Please consult authorised
dealer.
• Switch off the power supply and unplug before
cleaning.
• Do not touch the aluminium fi n, sharp parts may
cause injury.
• Do not use benzine, thinner or scouring powder.
• Use only soap (
pH 7) or neutral household
detergent.
• Do not use water hotter than 40 °C.
Indoor unit
Wipe the unit gently with a soft,
dry cloth.
Human activity sensor
Do not hit or violently press or poke it with a sharp
object. This can lead to damage and malfunction.
Front panel
Wash gently and dry.
Remove the front panel
Pull out
2
Indoor unit
Aluminium fi nFront panel
POWER
TIMER
i AUTO-X
NONOE-G
AUTO COMFORT
QUIET
Human activity
sensor
Air fi lters
nanoe-G
Generator
nanoe-G Generator
Every 2 weeks
• Clean with dry cotton bud.
• Do not touch during operation.
Air fi lters
Every 2 weeks
• Wash/rinse the fi lters gently
with water to avoid damage to
the fi lter surface.
• Dry the fi lters thoroughly under shade, away
from fi re or direct sunlight.
• Replace any damaged fi lters.
Remove air fi lter Attach air fi lter
Raise
1
Close it securely
Close down
2
Press both ends of the front panel
3
For CS-S18RKV, CS-S24RKV,
4
CS-S28RKV:
Press at center of the front panel.
POWER
TIMER
i AUTO-X
NONOE-G
AUTO COMFORT
QUIET
Insert at both sides1
Insert into the unit
For seasonal inspection after extended
non-use
• Checking of remote control batteries.
• No obstruction at air inlet and air outlet vents.
• Use Auto OFF/ON button to select COOL
POWER
TIMER
i AUTO-X
NONOE-G
AUTO COMFORT
QUIET
operation. After 15 minutes of operation, it
is normal to have the following temperature
difference between air inlet and air outlet
vents:
COOL: ≥ 8 °C
For extended non-use
• Activate nanoe-G operation for 2~3 hours as
an alternative to remove moisture left in the
internal parts thoroughly to prevent mould
growth.
• Turn off the power supply and unplug.
• Remove the remote control batteries.
20
Page 21
Troubleshooting
K
L
The following symptoms do not indicate malfunction.
Symptom Cause
Mist emerges from indoor unit. • Condensation effect due to cooling process.
Water fl owing sound during operation. • Refrigerant fl ow inside the unit.
The room has a peculiar odour. • This may be due to damp smell emitted by the wall,
carpet, furniture or clothing.
Indoor fan stops occasionally during automatic
fan speed setting.
Operation is delayed a few minutes after
restarting.
Outdoor unit emits water/steam. • Condensation or evaporation occurs on pipes.
TIMER indicator is always on. • The timer setting repeats daily once set.
POWER indicator blinks before the unit is
switched on.
Cracking sound during operation. • Changes of temperature caused the expansion/
Discoloration of some plastic parts. • Discoloration is subject to material types used in plastic
Louder noise at outdoor unit during early
operation of i AUTO-X.
Dust may have collected around the front
panel, grilles and wall surrounding the unit
after extended use.
• This helps to remove the surrounding odour.
• The delay is a protection to the unit’s compressor.
• This is a preliminary step in preparation for the
operation when the ON timer has been set.
contraction of the unit.
parts, accelerated when exposed to heat, sun light, UV
light, or environmental factor.
• The compressor and fan rotate at higher speed to
boost cooling performance during initial operation.
• The dust accumulation is due to air purifi cation effect of
negative ions from nanoe-G. Remove the dust regularly
with a clean dampened cloth.
Check the following before calling for servicing.
Symptom Check
Operation in COOL mode is not working
effi ciently.
Noisy during operation. • Check if the unit has been installed at an incline.
Remote control does not work.
(Display is dim or transmission signal is weak.)
The unit does not work. • Check if the circuit breaker is tripped.
The unit does not receive the signal from the
remote control.
NON SERVICEABLE CRITERIAS
TURN OFF POWER SUPPLY AND
UNPLUG then please consult authorised
dealer under the following conditions:
• Abnormal noise during operation.
• Water/foreign particles have entered the
remote control.
• Water leaks from Indoor unit.
• Circuit breaker switches off frequently.
• Power cord becomes unnaturally warm.
• Switches or buttons are not functioning
properly.
• Set the temperature correctly.
• Close all doors and windows.
• Clean or replace the fi lters.
•
Clear any obstruction at the air inlet and air outlet vents.
• Close the front panel properly.
• Insert the batteries correctly.
• Replace weak batteries.
• Check if timers have been set.
• Make sure the receiver is not obstructed.
• Certain fl uorescent lights may interfere with signal
transmitter. Please consult authorised dealer.
The unit stops and the TIMER indicator
blinks.
Use remote control to retrieve error code.
Press for
5 seconds
3
Press for
5 seconds
to quit
checking
TIMER
ON
123
OFF
FF
ET
SET
CANCEL
ANCE
AC
CLOCKSET CHECK RESET
CLOC
ET
RC
ESET
• For certain errors, you may restart the unit for limited
operation with 4 beeps when operation starts.
21
Press until you
hear beep sound,
then write down
the error code
4
Turn the unit off
and reveal the
error code to
authorised dealer
Cleaning instructions / Troubleshooting
English
21
Page 22

Memo
Page 23

Memo
Page 24
Información/Information
Español (LE)
Información para usuarios sobre la recolección y Eliminación de aparatos viejos y baterías
usadas
[Informacion sobre la Eliminación en otros países fuera de la Unión
Europea]
Estos símbolos sólo son válidos dentro de la Unión Europea. Si desea
desechar estos objetos, por favor contacte con sus autoridades locales o
distribuidor y consulte por el método correcto de eliminación.
Nota sobre el símbolo de la bateria (abajo, dos ejemplos de símbolos):
Este símbolo puede ser usado en combinación con un símbolo químico.
En este caso, el mismo cumple con los requerimientos establecidos por la
Pb
English
Information for Users on Collection and Disposal of Old Equipment and used Batteries
Directiva para los químicos involucrados.
Pb
[Information on Disposal in other Countries outside the European Union]
These symbols are only valid in the European Union. If you wish to discard
these items, please contact your local authorities or dealer and ask for the
correct method of disposal.
Note for the battery symbol (bottom two symbol examples):
This symbol might be used in combination with a chemical symbol. In this case
it complies with the requirement set by the Directive for the chemical involved.
Panasonic Corporation
Website: http://panasonic.net/
© Panasonic Corporation 2015
Printed in Malaysia
F569797
YA0115-0
 Loading...