

Panasonic CS-S9NKZW, CS-S12NKZW, CS-S9NKZW-2, CS-S12NKZW-2, CS-S15NKZW Operating Instructions Manual [en, es, zh]
...Page 1

© Panasonic Appliances Air-Conditioning Malaysia
Sdn. Bhd. 2012. Unauthorized copying and distribution
is a violation of law.
F568374
Operating Instructions
Air Conditioner
Model No.
Indoor Unit
CS-S9NKZW CS-S12NKZW
CS-S9NKZW-2 CS-S12NKZW-2
CS-S15NKZW CS-S18NKZW
CS-S24NKZW CS-S28NKZ
Single Split Outdoor Unit
CU-S9NKZ CU-S12NKZ
CU-S15NKZ CU-S18NKZ
CU-S24NKZ CU-S28NKZ
Multi Split Outdoor Unit
CU-2S18KKZ
CU-3S27KKZ
CU-3S27MKZ
CU-4S27NKZ
QUICK GUIDE
QUICK GUIDE
簡易指南
簡易指南
GUÍA RÁPIDA
GUÍA RÁPIDA
ENGLISH
Before operating the unit, read these operating
instructions thoroughly and keep them for future
reference.
中文
在操作空調器前,請細讀此操作說明,並保
存此書以備日後參考。
ESPAÑOL (LE)
Antes de utilizar la unidad, sírvase leer
atentamente estas instrucciones de
funcionamiento y conservarlas como futuro
elemento de consulta.
Page 2

2
ENGLISH Thank you for purchasing Panasonic Air Conditioner
TABLE OF CONTENTS
TABLE OF CONTENTS
OPERATION CONDITION
SAFETY PRECAUTIONS 4~5
REMOTE CONTROL
6~8
INDOOR UNIT
9
TROUBLESHOOTING
10
MULTI AIR CONDITIONER SYSTEM
11
INFORMATION
11
QUICK GUIDE
BACK COVER
NOTE : The illustrations in this manual are for explanation purposes only and may differ from the actual unit. They are
subjected to change without notice for future improvement.
中文 感謝您購買Panasonic 空調器
目錄
目錄
操作條件
安全措施 12~13
遙控器
14~16
室內機
17
故障檢修
18
多聯型空調器系統
19
信息
19
簡易指南
封底
注 : 本操作說明書裡的圖解僅作為說明用途,並且可能與實際產品有所區别。若因為產品改進而發生
變更,恕不另行通知。
ESPAÑOL (LE) Muchas gracias por elegir una unidad de aire acondicionado Panasonic
CONTENIDO
CONTENIDO
CONDICIONES DE FUNCIONAMIENTO
PRECAUCIONES DE SEGURIDAD 20~21
CONTROL REMOTO
22~24
UNIDAD INTERNA
25
SOLUCIÓN DE PROBLEMAS
26
SIISTEMA DE AIIRE ACONDIICIINADO MÚLLTIIPLLE
27
INFORMACIÓN
27
GUÍA RÁPIDA
CUBIERTA TRASERA
NOTA : Las ilustraciones de este manual sirven únicamente para describir las explicaciones y pueden no coincidir
exactamente con las del aparato suministrado. Están sujetas a cambios sin previo aviso con el fi n de mejorar
el producto.
Page 3

3
OPERATION CONDITION
OPERATION CONDITION
Use this air conditioner under the following temperature range
Temperature (°C)
Indoor Outdoor
* DBT: Dry bulb temperature
* WBT: Wet bulb temperature
*DBT *WBT *DBT *WBT
COOLING
Max. 32 23 43 26
Min. 16 11 16 11
操作條件
操作條件
在以下溫度範圍內使用空調器
溫度 (°C)
室內 室外
* DBT:
乾球溫度
* WBT:
濕球溫度
*DBT *WBT *DBT *WBT
製冷
最高
32 23 43 26
最低
16 11 16 11
CONDICIONES DE FUNCIONAMIENTO
CONDICIONES DE FUNCIONAMIENTO
Utilice este aparato de aire acondicionado dentro del siguiente intervalo de temperaturas
Temperatura (°C)
Interior Exterior
* DBT: Temperatura de bulbo
seco
* WBT: Temperatura de bulbo
húmedo
*DBT *WBT *DBT *WBT
ENFRIAMIENTO
Máxima 32 23 43 26
Mínima 16 11 16 11
Page 4

4
SAFETY PRECAUTIONS
To prevent personal injury, injury to others, or property
damage, please comply with the following.
Incorrect operation due to failure to follow instructions below
may cause harm or damage, the seriousness of which is
classifi ed as below:
WARNING
WARNING
This sign warns of death or serious injury.
CAUTION
CAUTION
This sign warns of injury or damage to property.
The instructions to be followed are classifi ed by the following
symbols:
This symbol denotes an action that is PROHIBITED.
These symbols denote an actions that is
COMPULSORY.
WARNING
WARNING
INDOOR UNIT AND OUTDOOR UNIT
This appliance is not intended for use by
persons (including children) with reduced
physical, sensory or mental capabilities, or lack
of experience and knowledge, unless they have
been given supervision or instruction concerning
use of the appliance by a person responsible for
their safety. Children should be supervised to
ensure that they do not play with the appliance.
Please consult authorized dealer or specialist to
clean the internal parts, repair, install, remove
and reinstall the unit. Improper installation and
handling will cause leakage, electric shock or
fi re.
Confi rm to authorized dealer or specialist on
usage of specifi ed refrigerant type. Using of
refrigerant other than the specifi ed type may
cause product damage, burst and injury etc.
Do not install the unit in a potentially explosive
or fl ammable atmosphere. Failure to do so could
result in fi re.
Do not insert your fi ngers or other
objects into the air conditioner indoor
or outdoor unit, rotating parts may
cause injury.
Do not touch the outdoor unit during lightning, it
may cause electric shock.
Do not expose yourself directly to cold air for a
long period to avoid excess cooling.
Do not sit or step on the unit, you may
fall down accidentally.
REMOTE CONTROL
Do not allow infants and small children to play
with the remote control to prevent them from
accidentally swallowing the batteries.
POWER SUPPLY
Do not use a modifi ed cord,
joint cord, extension cord or
unspecifi ed cord to prevent
overheating and fi re.
To prevent overheating, fi re or electric shock:
• Do not share the same power outlet with other
equipment.
• Do not operate with wet hands.
• Do not over bend the power supply cord.
• Do not operate or stop the unit by inserting or
pulling out the power plug.
Air Inlet
Air Inlet
Air Outlet
Air Outlet
Air Outlet
Air Outlet
Air Inlet
Air Inlet
Remote
Control
Power
Supply
Indoor
Unit
Outdoor
Unit
Page 5

ENGLISH
5
CAUTION
CAUTION
INDOOR UNIT AND OUTDOOR UNIT
Do not wash the indoor unit with water, benzene,
thinner or scouring powder to avoid damage or
corrosion at the unit.
Do not use for preservation of precise
equipment, food, animals, plants, artwork
or other objects. This may cause quality
deterioration, etc.
Do not use any combustible equipment in front of
the airfl ow outlet to avoid fi re propagation.
Do not expose plants or pet directly to airfl ow to
avoid injury, etc.
Do not touch the sharp aluminium fi n,
sharp parts may cause injury.
Do not switch ON the indoor unit when waxing
the fl oor. After waxing, aerate the room properly
before operating the unit.
Do not install the unit in oily and smoky areas to
prevent damage to the unit.
Do not dismantle the unit for cleaning purpose to
avoid injury.
Do not step onto an unstable bench when
cleaning the unit to avoid injury.
Do not place a vase or water container on the
unit. Water may enter the unit and degrade the
insulation. This may cause an electric shock.
Do not open window or door for long time during
COOL/DRY mode operation.
Ensure drainage pipe is connected properly and
keep drainage outlet clear of gutters, containers
or does not immersed in water to prevent water
leakage.
After a long period of use or use with any
combustible equipment, aerate the room
regularly.
After a long period of use, make sure the
installation rack does not deteriorate to prevent
the unit from falling down.
REMOTE CONTROL
Do not use rechargeable (Ni-Cd) batteries.
It may damage the remote control.
To prevent malfunction or damage of the remote
control:
• Remove the batteries if the unit is not going to
be used for a long period of time.
• New batteries of the same type must be
inserted following the polarity stated.
POWER SUPPLY
Do not pull the cord to disconnect the plug to
prevent electric shock.
WARNING
WARNING
POWER SUPPLY
Use complete power supply cord without joining.
In unavoidable circumstances that complete
power supply cord without joining is impossible,
use an approved connection means
(for example: socket and plug).
Air Conditioner
◄
Complete wire
without joining
◄
◄
Approved connecting
means (for example:
approved socket and
plug)
Complete wire
without joining
Power
Supply
OR
Indoor Unit
Outdoor
Unit
If the supply cord is damage, it must be replaced
by the manufacturer, its service agent or similarly
qualifi ed persons in order to avoid a hazard.
It is strongly recommended to be installed
with Earth Leakage Circuit Breaker (ELCB)
or Residual Current Device (RCD) to prevent
electric shock or fi re.
To prevent overheating, fi re or electric shock:
• Insert the power plug properly.
• Dust on the power plug should be periodically
wiped with a dry cloth.
Stop using the product if any abnormality/failure
occurs and disconnect the power plug or turn off
the power switch and breaker.
(Risk of smoke/fi re/electric shock)
Examples of abnormality/failure
• The ELCB trips frequently.
• Burning smell is observed.
• Abnormal noise or vibration of the unit is
observed.
• Water leaks from the indoor unit.
• Power cord or plug becomes abnormally hot.
• Fan speed cannot be controlled.
• The unit stops running immediately even if it is
switched on for operation.
• The fan does not stop even if the operation is
stopped.
Contact your local dealer immediately for
maintenance/repair.
This equipment must be earthed to prevent
electrical shock or fi re.
Prevent electric shock by switching off the power
supply and unplug when:
- Before cleaning or servicing.
- Extended non-use.
- Abnormally strong lightning activity.
Page 6

6
REMOTE CONTROL
AUTO
COMFORT
MODE
POW
ERFUL/
QUIET
TEMP
OFF/
ON
TIMER
SET
CAN
CEL
ON
OFF
1
2
3
AIR
SWI
NG
FAN
SPE
ED
SET CHE
CK CLOCK
RESE
T
AC
RC
FAN
SPEED
AIR
SWI
NG
AUTO
COOL
DRY
NANOE-G
ECO
NAVI
3
9
6
2
5
1
Remote
Control display
8
4
7
Press the remote control’s button
1
TO TURN ON OR OFF THE UNIT
POWER
• Please be aware of the OFF indication on the remote
control display to prevent the unit from starting/stopping
improperly.
2
TO SET TEMPERATURE
• Selection range: 16˚C ~ 30˚C.
• Operating the unit within the recommended temperature
could induce energy saving.
COOL mode : 26˚C ~ 28˚C.
DRY mode : 1˚C ~ 2˚C lower than room temperature.
3
TO SELECT OPERATION MODE
AUTO mode - For your convenience
• During operation mode selection the power indicator
blinks.
• Unit selects operation mode during startup according to
temperature setting and room temperature.
COOL mode - To enjoy cool air
• Use curtains to screen off sunlight and outdoor heat to
reduce power consumption during cool mode.
DRY mode - To dehumidify the environment
• Unit operates at low fan speed to give a gentle cooling
operation.
4
TO SELECT FAN SPEED (5 OPTIONS)
FAN SPEED
• For AUTO, the indoor fan speed is automatically adjusted
according to the operation mode.
5
TO ADJUST AIRFLOW DIRECTION (5 OPTIONS)
AIR SWING
• Keeps the room ventilated.
• In COOL/DRY mode, if AUTO is set, the louver swing
left/right and up/down automatically.
Maximum
distance: 8m
Human activity
sensor and
indicator
Indicator
(Green)
(Green)
(Orange)
(Green)
(Blue)
(Orange)
(Green)
POWER
TIMER
AUTO COMFORT
NANOE-G
POWERFUL
QUIET
Sunlight sensor and remote control receiver
Page 7

ENGLISH
7
6
TO PURIFY THE AIR
NANOE-G
• Removes/deactivates harmful micro-organisms such as
viruses, bacteria, etc.
• Can be activated even when the unit is turned off. In this
condition, fan speed and air swing cannot be adjusted.
• nanoe-G starts automatically with the unit switched on
with
OFF/ON
.
7
TO SWITCH BETWEEN POWERFUL & QUIET
POWERFUL/
QUIET
QUIETPOWERFUL NORMAL
POWERFUL
TO REACH TEMPERATURE
QUICKLY
POWERFUL
• Single Split System: This operation stops
automatically after 4 hours.
• Multi Split System: Press the button again or
turn OFF the unit to stop this operation.
Q
UIET
TO ENJOY QUIET
OPERATION
QUIET
• This operation reduces airfl ow noises.
8 9
TO MONITOR HUMAN PRESENCE &
ACTIVITY, SUNLIGHT FOR ENERGY SAVING
& COMFORT
ECONAVI
To optimize energy
saving
AUTO
COMFORT
To maximize comfort
AUTO COMFOR
T
• When either operation is activated, the unit will start
to initialize for approximately 1 minute. Human activity
indicator is blinking in sequence.
• After initialization, the human activity sensor will start
to detect the level of heat source & movement, the unit
adjusts the temperature and airfl ow to keep you comfort
consistently.
Heat Source & Movement
Normal
HighLow
None
Set Fan Speed
≤ Medium
Fan
+1 tap*
+2°C
-1°C
+1°C
+1 tap
COOL/DRY Mode
Set Temperature
* For first 15 minutes or until set temperature is reached.
• The human activity sensor will also scan for area of heat
source and movement in a room.
Human activity indicator Heat source & movement
At left area of the room
At right area of the room
At centre area or multiple areas
of the room.
• The unit will determine the heat source & movement
hotspot, and automatically adjust horizontal airfl ow
direction louver either fi x at predetermined position or
swing left/right.
Detection area (top view)
7m
120º
• When manual AIR SWING is selected, the ECONAVI
and AUTO COMFORT operation will be cancelled.
• The human activity sensor may not detect moving objects
further than 7m away or beyond detection angle.
• The human activity sensor sensitivity is infl uenced by
indoor unit location, movement speed, temperature range,
etc.
• The human activity sensor may:
- Mistakenly detects an object with heat source &
movement similar to human, such as pets, etc. as
human being.
- Mistakenly detects as non-heat source & movement if
a person stays motionless for certain period of time.
• During ECONAVI operation, the sunlight sensor
detects sunlight intensity coming through windows and
differentiates between sunny and cloudy/night to further
optimize energy saving by adjusting the temperature.
Ambient condition
SunnyCloudy/
Night
SunnyCloudy/
Night
COOL/DRY Mode
Set Temperature
+1°C
ECONAVI is activated while it is cloudy / night.
ECONAVI is activated while it is sunny.
• In a room without window or with thick curtain, the sunlight
sensor will judge as cloudy/night.
Page 8

8
TIMER
SET
CANCEL
ON
OFF
1
2
3
SET CHECK CLOCK RESET
AC
RC
REMOTE CONTROL
TO SET THE TIMER
TO SET THE TIMER
• 2 sets of ON and OFF timers are available to turn ON
or OFF the unit at different preset time.
• Complete below procedures to set each timer:
ON
OFF
1
Cancel
Cancel
2
TIMER
S
ET
Select ON or OFF timer
Set the
time
Confi rm
• Example of application at living room:
Morning: ON
at 07:00 (Wake up)
OFF at 08:00 (Out for work)
Evening: ON at 17:00 (Back home)
OFF at 22:00 (Sleep)
• To cancel ON or OFF timer, press
O
N
or
OFF
to
select respective or then press
CANCEL
.
• If timer is cancelled manually or due to power failure,
you can restore the timer again by pressing
O
N
or
OFF
to select respective or then press
SET
.
• Upcoming timer will be displayed and will be activated
in sequence.
• When ON Timer is set, the unit may start earlier (up
to 15 minutes) before the actual set time in order to
achieve the desired temperature on time.
• Timer operation is based on the clock set in the
remote control and repeats daily once set. For clock
setting, please refer to Remote Control Preparation
on the back cover.
10
Press and hold for 5 seconds to dim or restore the
unit’s indicator brightness.
11
Press and hold for approximately 10 seconds to
show temperature setting in °C or °F.
12
Press to restore the remote control’s default setting.
13
Not used in normal operations.
10
11
12
13
NOTES
NOTES
NANOE-G
,
POWERFUL/
QUIET
,
AUT
O
COMFORT
,
ECONAV
I
POWERFUL/
QUIET
,
AUT
O
COMFORT
,
ECONAV
I
• Can be activated in all modes and can be cancelled by
pressing the respective button again.
• Cannot be selected at the same time.
Page 9

ENGLISH
9
POWE
R
TIMER
AUTO C
OMFO
RT
NAN
OE-G
POWE
RFUL
QUIE
T
INDOOR UNIT
CAUTION
• Switch off the power supply and unplug before cleaning.
• Do not touch the aluminium fi n, sharp parts may cause injury.
CLEANING INSTRUCTIONS
CLEANING INSTRUCTIONS
HINT
HINT
• Do not use benzene, thinner or scouring powder.
• Use only soap ( pH7) or neutral household detergent.
• Do not use water hotter than 40°C.
• To ensure optimal performance of the unit, cleaning
maintenance has to be carried out at regular intervals.
Dirty unit may cause malfunction and you may see error
code “H99”. Please consult authorized dealer.
5
HUMAN ACTIVITY SENSOR
• Do not hit or violently press the sensor or
poke it with a sharp object. This can lead to
damage and malfunction.
• Do not place large objects near the sensor
and keep away heating units or humidifi ers
from the sensor’s detection area. This may
lead to sensor malfunction.
2
8
1
4
9
5
6
7 3
10
nanoe-G GENERATOR
• Do not touch during operation.
1
INDOOR UNIT
• Wipe the unit gently with a soft, dry cloth.
2
FRONT PANEL
Remove Front Panel
• Raise and pull to remove the front panel.
• Wash gently and dry.
Close Front Panel
21 1
1
Press down both ends of the front panel to close it.
2
Press at center of the front panel to close it securely.
(CS-S18NKZW, CS-S24NKZW, CS-S28NKZ)
3
SUNLIGHT SENSOR AND REMOTE CONTROL
RECEIVER
4
ALUMINIUM FIN
5
HUMAN ACTIVITY SENSOR
6
HORIZONTAL AIRFLOW DIRECTION LOUVER
• Do not adjust by hand.
7
VERTICAL AIRFLOW DIRECTION LOUVER
• Do not adjust by hand.
8
AUTO OFF/ON BUTTON
• Use when remote control is misplaced or a malfunction
occurs.
Action Mode
Press once. Auto
Press and hold until 1 beep is
heard, then release.
Cooling
Press the button to turn off.
9
AIR FILTERS
• Air fi lter cleaning is required every two weeks.
• Wash/rinse the fi lters gently with water to avoid damage
to the fi lter surface.
• Dry the fi lters thoroughly under shade, away from fi re or
direct sunlight.
• Replace any damaged fi lters.
10
nanoe-G GENERATOR
Clean with dry cotton bud.
• nanoe-G generator cleaning is
recommended every 6 months.
Page 10
10
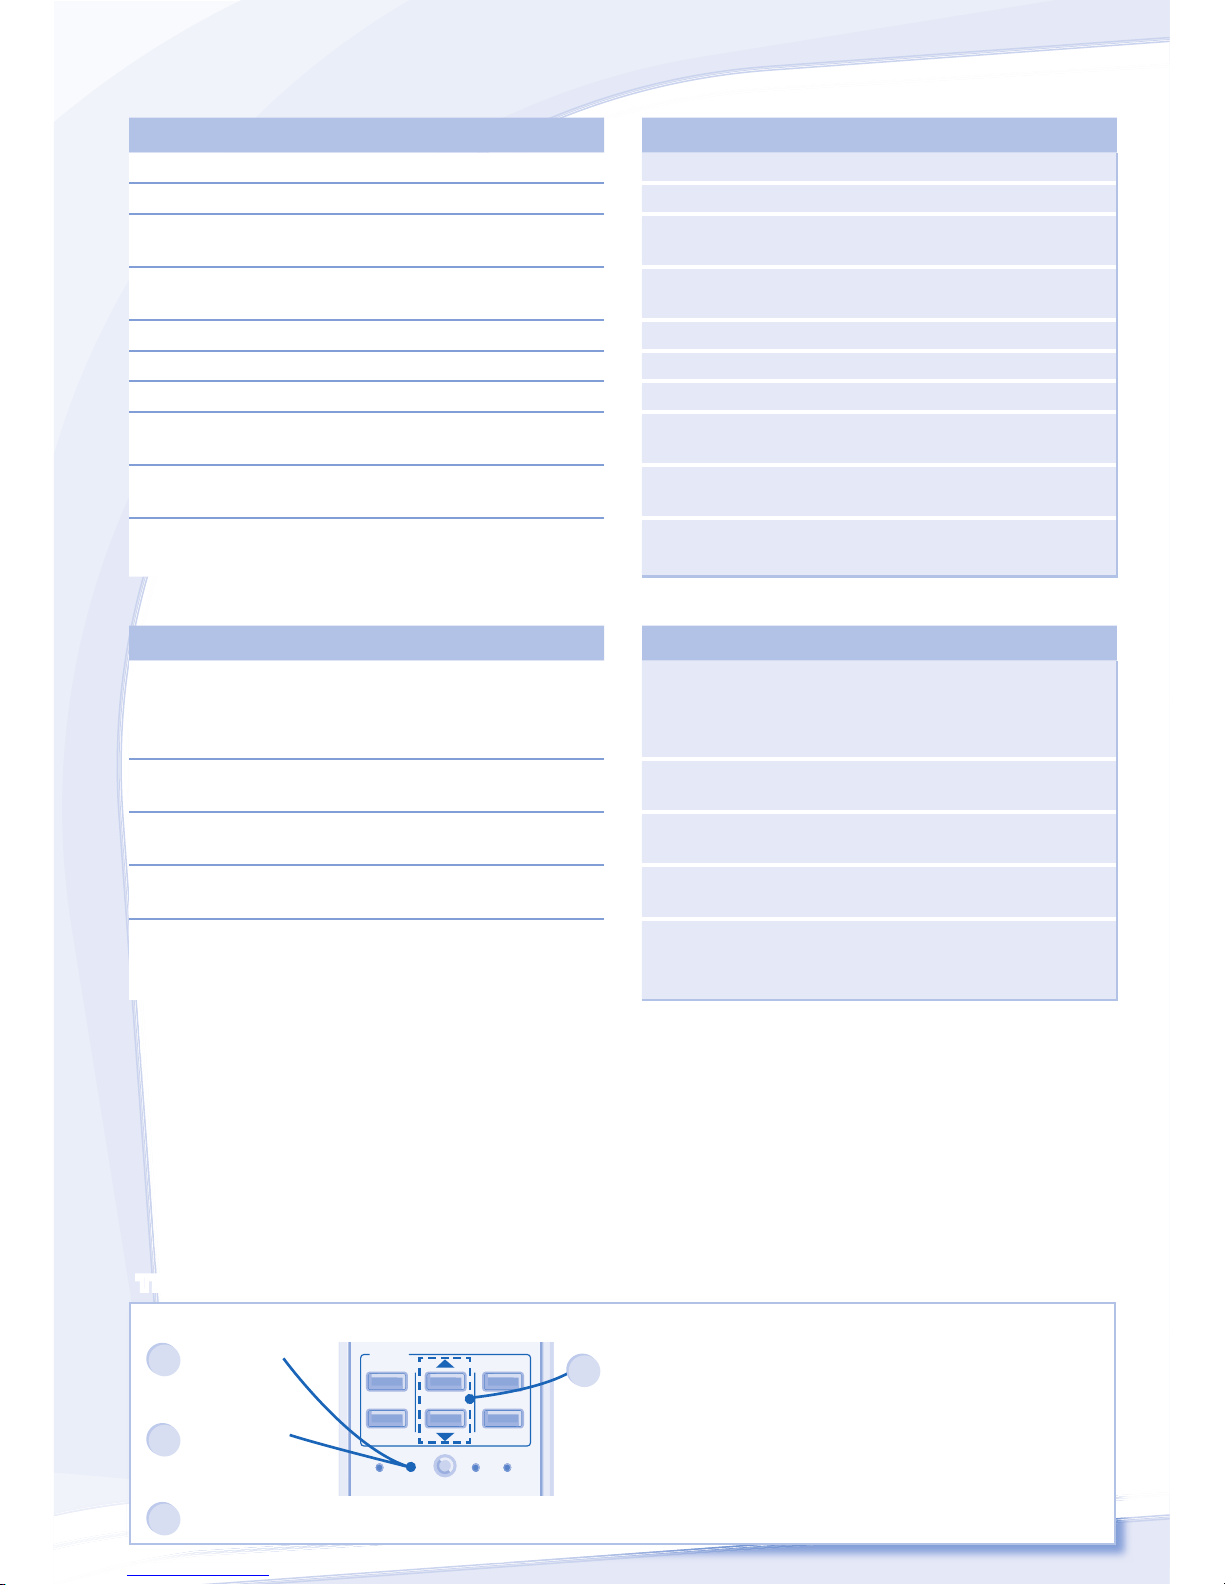
TROUBLESHOOTING
The following symptoms do not indicate malfunction.
The following symptoms do not indicate malfunction.
SYMPTOM
SYMPTOM
CAUSE
CAUSE
Mist emerges from indoor unit. ► • Condensation effect due to cooling process.
Water fl owing sound during operation. ► • Refrigerant fl ow inside the unit.
The room has a peculiar odor. ► • This may be due to damp smell emitted by the wall,
carpet, furniture or clothing.
Indoor fan stops occasionally during automatic fan speed
setting.
► • This helps to remove the surrounding odours.
Operation is delayed a few minutes after restarting. ► • The delay is a protection to the unit’s compressor.
Outdoor unit emits water/steam. ► • Condensation or evaporation occurs on pipes.
TIMER indicator is always on. ► • The timer setting repeats daily once set.
POWER indicator blinks before the unit is switched on. ► • This is a preliminary step in preparation for the operation
when the ON timer has been set.
Cracking sound during operation. ► • Changes of temperature caused the expansion/
contraction of the unit.
2 or more human activity indicator turns on simultaneously. ► • Judgement of heat source and movement area in
progress.
Check the following before calling for servicing.
Check the following before calling for servicing.
SYMPTOM
SYMPTOM
CHECK
CHECK
Cooling operation is not working effi ciently. ► • Set the temperature correctly.
• Close all doors and windows.
• Clean or replace the fi lters.
• Clear any obstruction at the air inlet and air outlet vents.
Noisy during operation. ► • Check if the unit has been installed at an incline.
• Close the front panel properly.
Remote control does not work.
(Display is dim or transmission signal is weak.)
► • Insert the batteries correctly.
• Replace weak batteries.
The unit does not work. ► • Check if the circuit breaker is tripped.
• Check if timers have been set.
The unit does not receive the signal from the remote
control.
► • Make sure the receiver is not obstructed.
• Certain fl uorescent lights may interfere with signal
transmitter. Please consult authorized dealer.
The unit stops and the TIMER indicator blinks.
Use remote control to retrieve error code.
TIMER
SET
CANCEL
ON
OFF
1
2
3
SET CHECK CLOCK RESET
AC
RC
1
Press for 5
seconds.
3
Press for 5
seconds to
quit checking.
2
Press until you hear
beep sound, then
write down the error
code.
Note:
• For certain errors, you
may restart the unit for
limited operation with 4
beeps when operation
starts.
4
Turn the unit off and reveal the error code to authorized dealer.
Page 11
ENGLISH
11
INFORMATION
FOR SEASONAL INSPECTION AFTER EXTENDED
NON-USE
• Checking of remote control batteries.
• No obstruction at air inlet and air outlet vents.
• Use Auto OFF/ON button to select Cooling operation.
After 15 minutes of operation, it is normal to have the
following temperature difference between air inlet and air
outlet vents:
Cooling: ≥ 8°C
FOR EXTENDED NON-USE
• Activate nanoe-G operation for 2~3 hours as an
alternative to remove moisture left in the internal parts
thoroughly to prevent mould growth.
• Turn off the power supply and unplug.
• Remove the remote control batteries.
NON SERVICEABLE CRITERIAS
TURN OFF POWER SUPPLY AND UNPLUG then
please consult authorized dealer under the following
conditions:
• Abnormal noise during operation.
• Water/foreign particles have entered the remote
control.
• Water leaks from Indoor unit.
• Circuit breaker switches off frequently.
• Power cord becomes unnaturally warm.
• Switches or buttons are not functioning properly.
Information for Users on Collection and Disposal of Old Equipment and used Batteries
[Information on Disposal in other Countries
outside the European Union]
These symbols are only valid in the European
Union. If you wish to discard these items,
please contact your local authorities or dealer
and ask for the correct method of disposal.
Note for the battery symbol (bottom two
symbol examples):
This symbol might be used in combination with
a chemical symbol. In this case it complies with
the requirement set by the Directive for the
chemical involved.
Pb
Room B
Room B
Room A
Room A
Room C
Room C
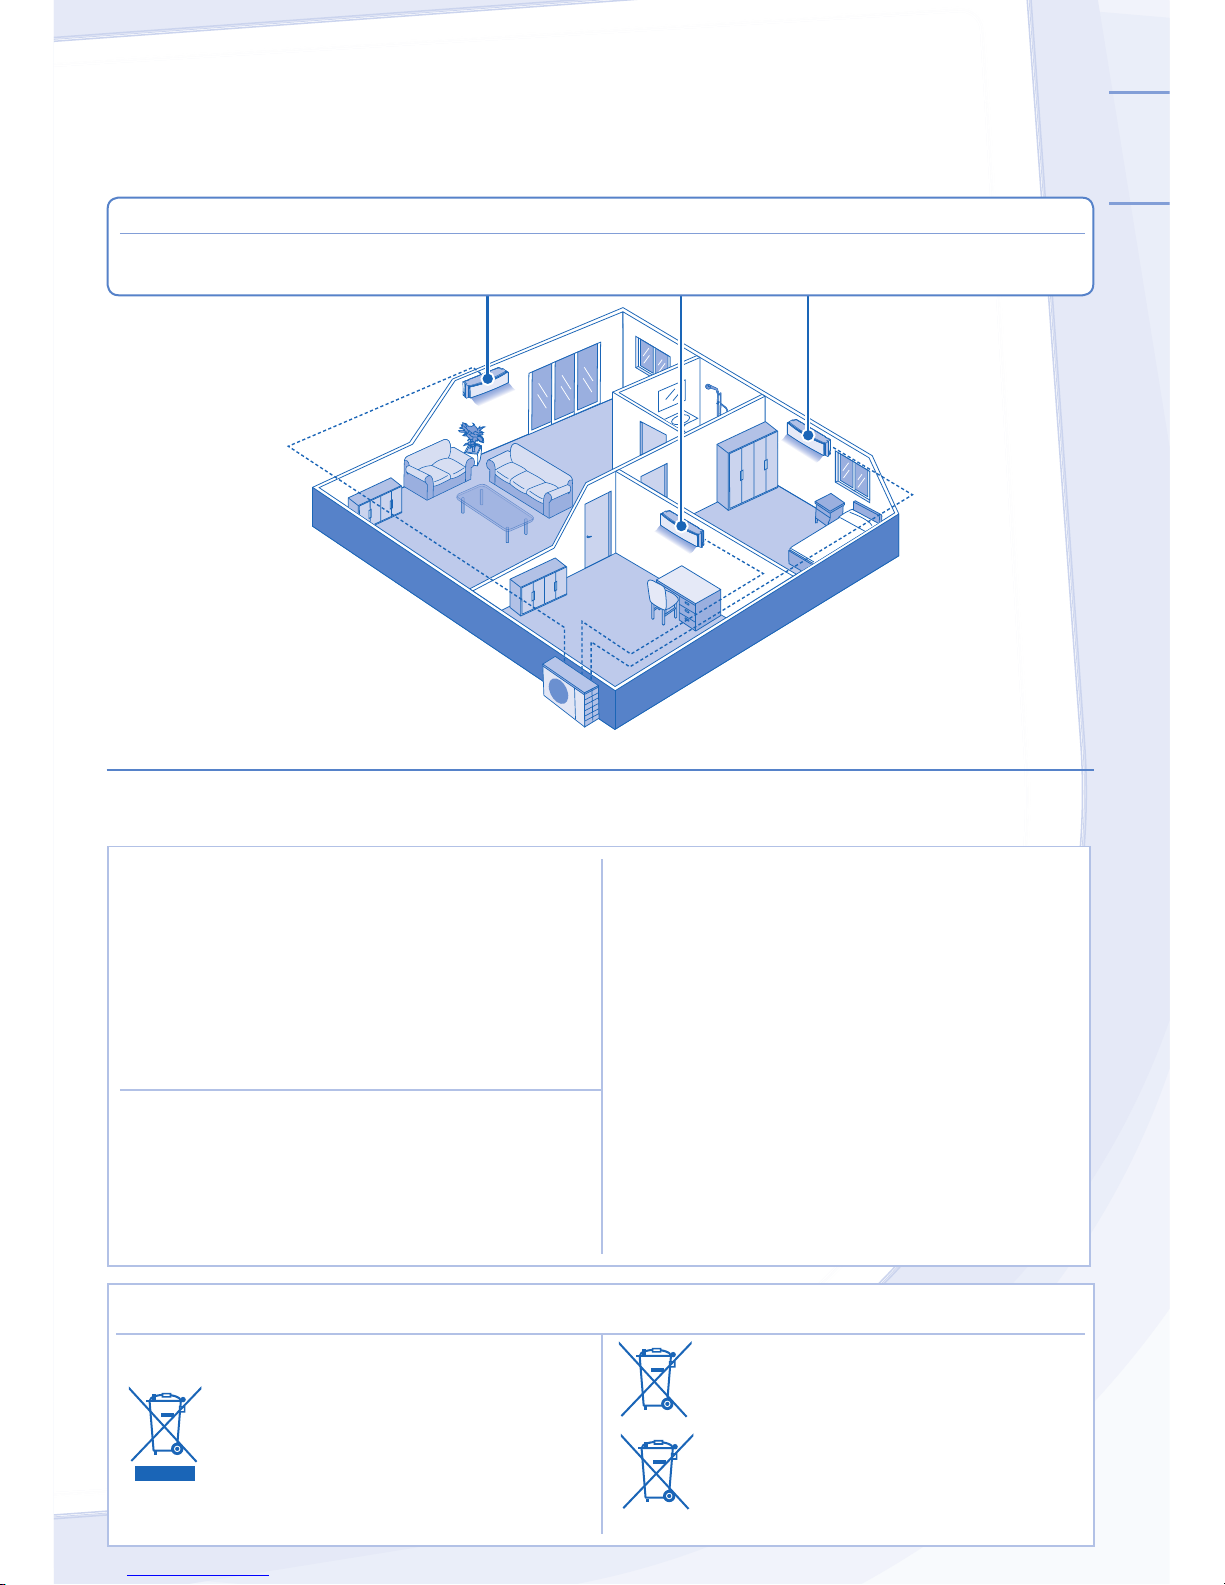
MULTI AIR CONDITIONER SYSTEM
Multi Split
Multi Split
Outdoor Unit
Outdoor Unit
* Note: For complete product combination, please refer to catalog.
Multi Split Outdoor Unit
(CU-2S18KKZ, 3S27KKZ, 3S27MKZ, 4S27NKZ)
DEFINITION
Multi air conditioner systems save space by letting you connect multiple indoor units to a single outdoor unit.
INDOOR UNIT
• It is possible to operate the indoor units individually or simultaneously. The operation mode priority is given to the fi rst
unit that turned on.
Page 12
12
安全措施
為了防止個人傷害,危害其他人或財物的損失,
請遵守以下指示。
因不遵守以下指示導致的錯誤操作將引起傷害或損
壞,其嚴重程度分類如下:
警告
警告
此標識所示的行為有可能導致嚴重傷害或死亡。
注意
注意
此標識所示的行為有可能導致傷害或財產損失。
要遵守的指示按下列符號分類:
此符號表示被禁止的行為。
此符號表示務必執行的行為。
警告
警告
室内機及室外機
此裝置不適合殘疾、感應欠佳或智障,
經驗與知識不足的人士(包括兒童)使
用。除非負責其安全的監督人從旁監督
或指示如何正確使用此裝置。務必監督
兒童以確保他們不會玩弄本機。
請諮詢授權經銷商或專業人員清洗内部
零件,修理,安裝,拆卸和重新安裝本
機。安裝和處理不當將導致漏電,觸電
或火災。
請向授權經銷商或專業人員確認指定製
冷劑類型之運用。使用非指定製冷劑類
型會導致產品損壞,爆裂並導致傷害
等。
切勿將本機安裝在爆炸或可燃性的環境
中。否則會導致火災。
切勿把手指或其他物件插入空調
器的室内或室外機以免受到旋轉
部件傷害。
閃電時切勿觸摸室外機,否則會導致觸
電。
切勿長時間受冷氣流直接吹拂以免過
冷。
切勿坐或踩踏在主機上以免意外
摔跤。
遙控器
切勿讓嬰兒和小孩玩遙控器以免不小心
吞下電池。
電源
切勿採用改裝電線,接
合電線,延長電線或非
指定的電線,以免過熱及
火災。
為免過熱,火災或觸電:
• 切勿與其他設備共用一個電源插座。
• 切勿用潮濕的手操作。
• 切勿過度扭曲電線。
• 切勿以插入或拉出插頭的方式來操作或
停止本機。
空氣
空氣
吸入口
吸入口
空氣吸入口
空氣吸入口
空氣吹出口
空氣吹出口
空氣
空氣
吹出口
吹出口
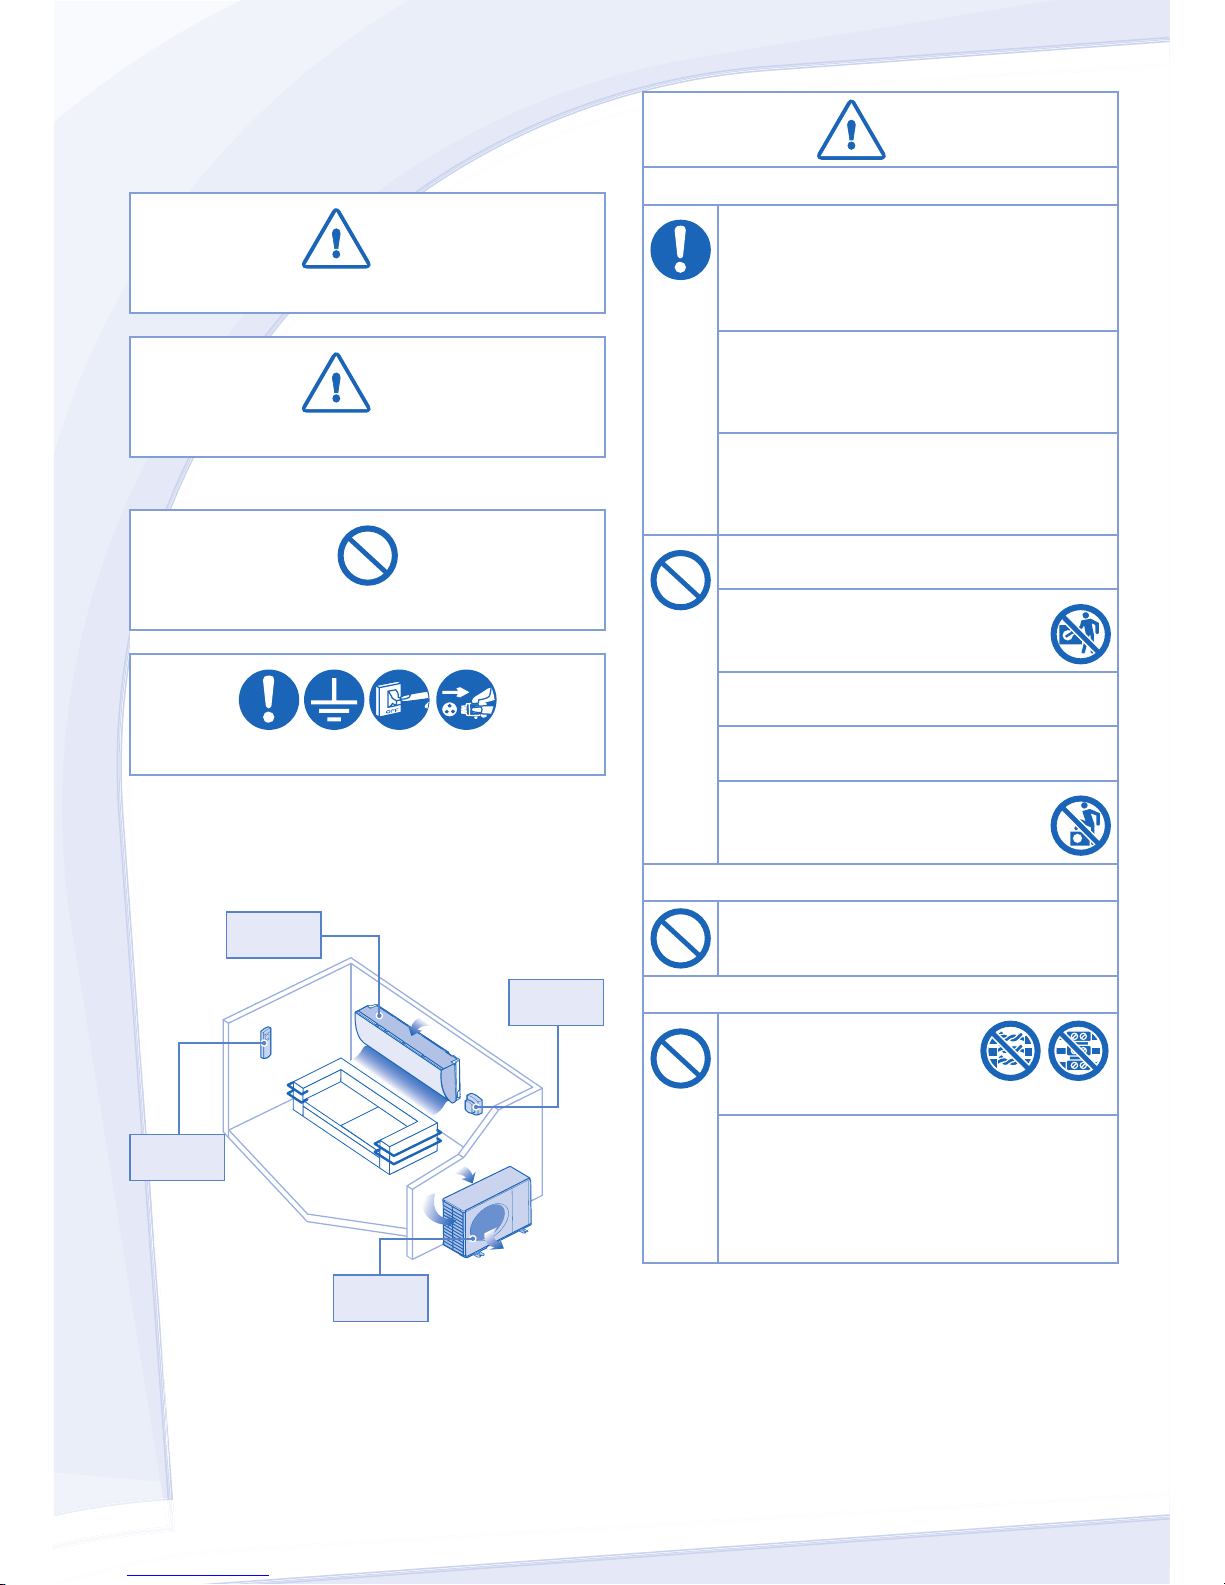
室內機
遙控器
室外機
電源
Page 13
中文
13
注意
注意
室内機及室外機
切勿用水、苯、稀釋劑或潔亮粉末清
洗室内機以免損壞或腐蝕本機。
切勿充作其他用途,如貯藏食物、動
物、植物、藝術品或其他物件。否則會
破壞品質等。
切勿在氣流出口使用任何易燃器具以免
引起火災。
切勿讓植物或寵物受冷氣流直接吹拂以
免損傷等。
切勿觸摸尖銳的鋁散熱片以免受
到尖銳部件傷害。
當在地面打蠟時切勿開啟室内機。打蠟
完畢之後,請先讓房間良好通風再操作
本機。
切勿將本機安裝在油煙重的場所以免損
壞本機。
切勿拆卸本機來進行清洗工作以免受
傷。
當清洗本機時切勿踩踏在不穩固的架子
上以免受傷。
切勿將花瓶或水容器放置在本機上。水
會進入本機而導致絕緣受到破壞。這會
引起觸電。
切勿在製冷或除濕模式下長時間打開門
窗。
確保排水軟管連接正確和不受通水道,
容器阻擋或浸在水裏以免漏水。
長時間使用或與其他易燃設備一起使用
後請定時讓房間通風換氣。
長期使用後,請注意安裝支架是否有損
壞以免主機墜落。
遙控器
切勿使用可充電電池 (Ni-Cd) 。
它會損壞遙控器。
為免遙控器失靈或損壞:
• 如果準備長期不使用本機,務必將電池
取出。
• 務必採用同類型的新電池並對準電極插
入。
電源
切勿以抽拉電線的方式來拔除插頭以免
觸電。
警告
警告
電源
請採用不須進行接合的完整電線。在沒
有完整電線而必須接合電線的情況下,
請採用合格的連接配件(例如插座及插
頭)。
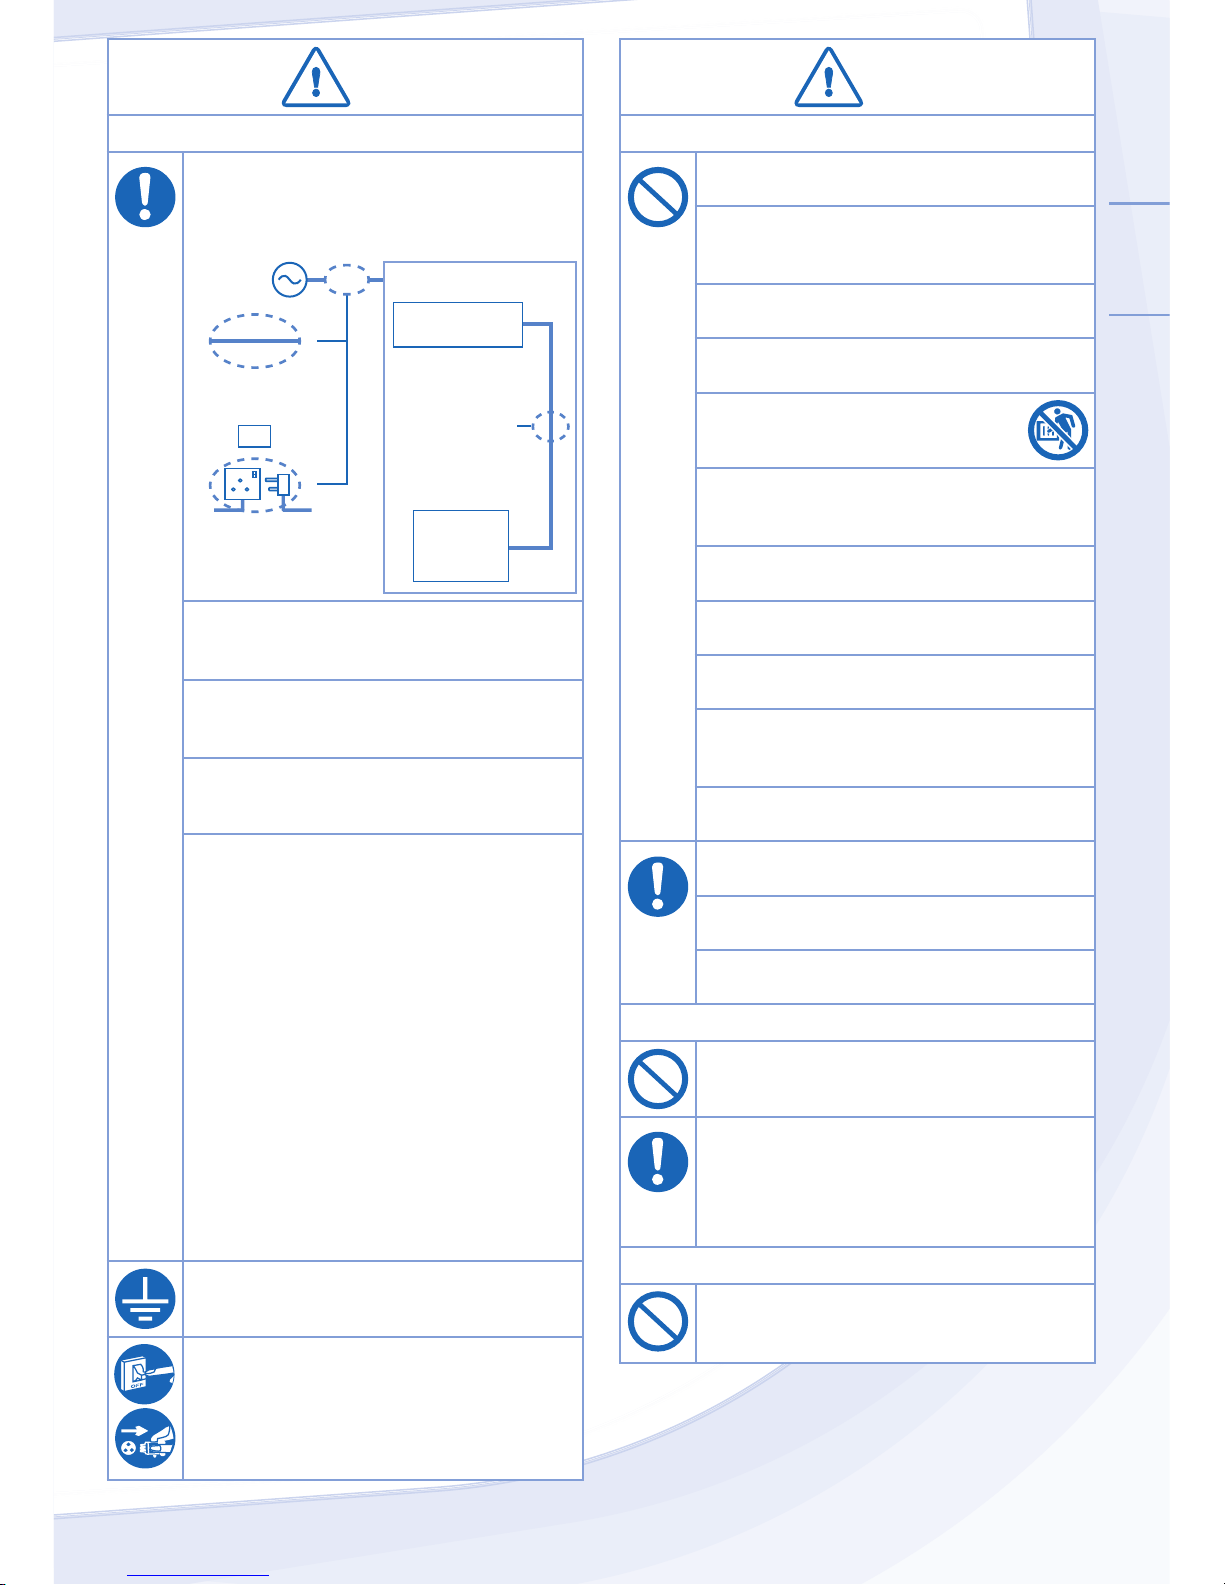
空調器
◄
不須進行接合
的完整電線
◄
◄
合格的連接配件
(例如合格的插座
及插頭)
不須進行接
合的完整
電線
電源
或
室內機
室外機
如果電線損壞,必須由製造商或其服務
代理商或具有同等資格的合格人員進行
更換,以免遭受危害。
強烈建議您安裝接地漏電電源斷路器
(ELCB) 或殘餘電流裝置 (RCD) 以免觸電
或火災。
為免過熱,火災或觸電:
• 妥當插入插頭。
• 務必定時用乾布擦掉插頭上的灰塵。
當出現任何異常/故障時,請停止使用
本機,拔出電插頭或關掉電源開關及斷
路器。
(煙霧/火災/觸電危險)
異常/故障舉例
• 接地漏電電源斷路器 (ELCB) 頻繁跳
閘。
• 出現燒焦味。
• 本機出現異常噪音或振動。
• 室内機漏水。
• 電線或插頭變得異常熱。
• 無法控制風量。
• 本機立即停止運轉,雖然已經打開準備
操作。
• 雖然已經停止操作, 風扇仍然不停止轉
動。
立即諮詢經銷商以進行保養/修理 。
本設備必須接地以免觸電或火災。
為免觸電,請在下列情況時關閉電源並
拔出插頭:
- 清洗或維修之前。
- 長期不使用時。
- 異常強烈閃電時。
Page 14
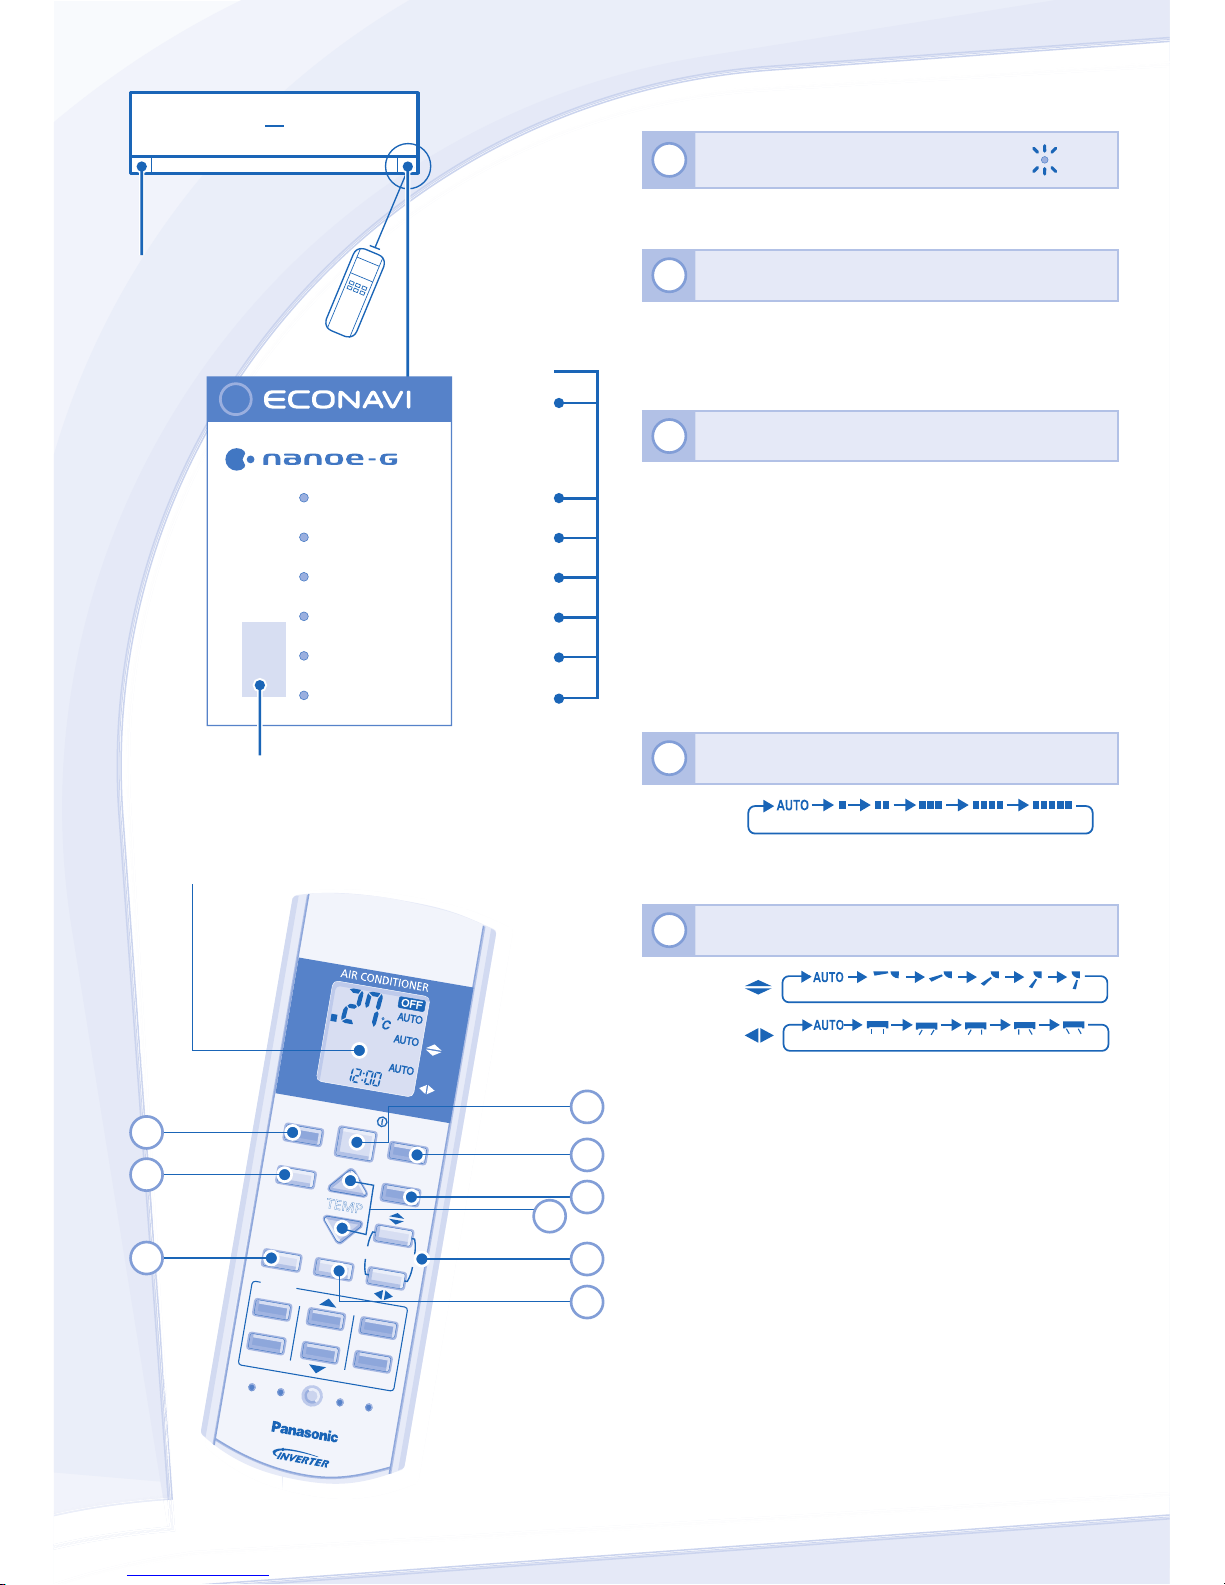
14
遙控器
指示燈
(綠色)
(綠色)
(橙色)
(綠色)
(藍色)
(橙色)
(綠色)
人類活動
感測器與
指示燈
最遠距離: 8米
POWER
TIMER
AUTO COMFORT
NANOE-G
POWERFUL
QUIET
陽光感測器及遙控接收器
AUTO
COMFORT
MODE
POWERF
UL/
QUIET
TEMP
OFF/ON
TIMER
SET
CANCEL
ON
OFF
1
2
3
AIR
SWI
NG
FAN
SPE
ED
SET CHE
CK CLOCK
RESE
T
AC
RC
FAN
SPEED
AIR
SWING
AUTO
COOL
DRY
NANOE-G
ECO
NAVI
3
9
6
2
5
1
遙控器顯示屏
8
4
7
按下遙控器的按鈕
1
啟動或關閉主機
POWER
• 請留意遙控顯示屏上的 OFF 顯示以防本機不正當
地啟動/停止。
2
設定溫度
• 選擇範圍﹕16°C ~ 30°C。
• 在所建議的溫度內操作本機可為您節省能源。
COOL﹕26°C ~ 28°C。
DRY﹕比室温低 1°C ~ 2°C。
3
選擇運轉模式
AUTO - 給您方便
• 在運轉模式選擇時,電源指示燈將閃爍。
• 本機在啟動中依據設定溫度及室溫選擇運轉模
式。
COOL - 享受清涼
• 為了在製冷模式下降低耗電量,請拉上窗簾以避
免陽光直接照射和室外暖氣進入。
DRY - 為您創造乾爽的環境
• 空調以低速運轉,進行極為柔和的製冷運轉。
4
選擇風量(5 級選擇)
FAN SPEED
• 至於自動運轉,室内風扇風量將依據運轉模式自
動調節。
5
調節風向(5 級選擇)
AIR SWING
• 保持室內空氣循環。
• 在製冷/除濕模式下,如果設定為自動風向時,
導風板將自動向左/右及向上/下擺動。
Page 15
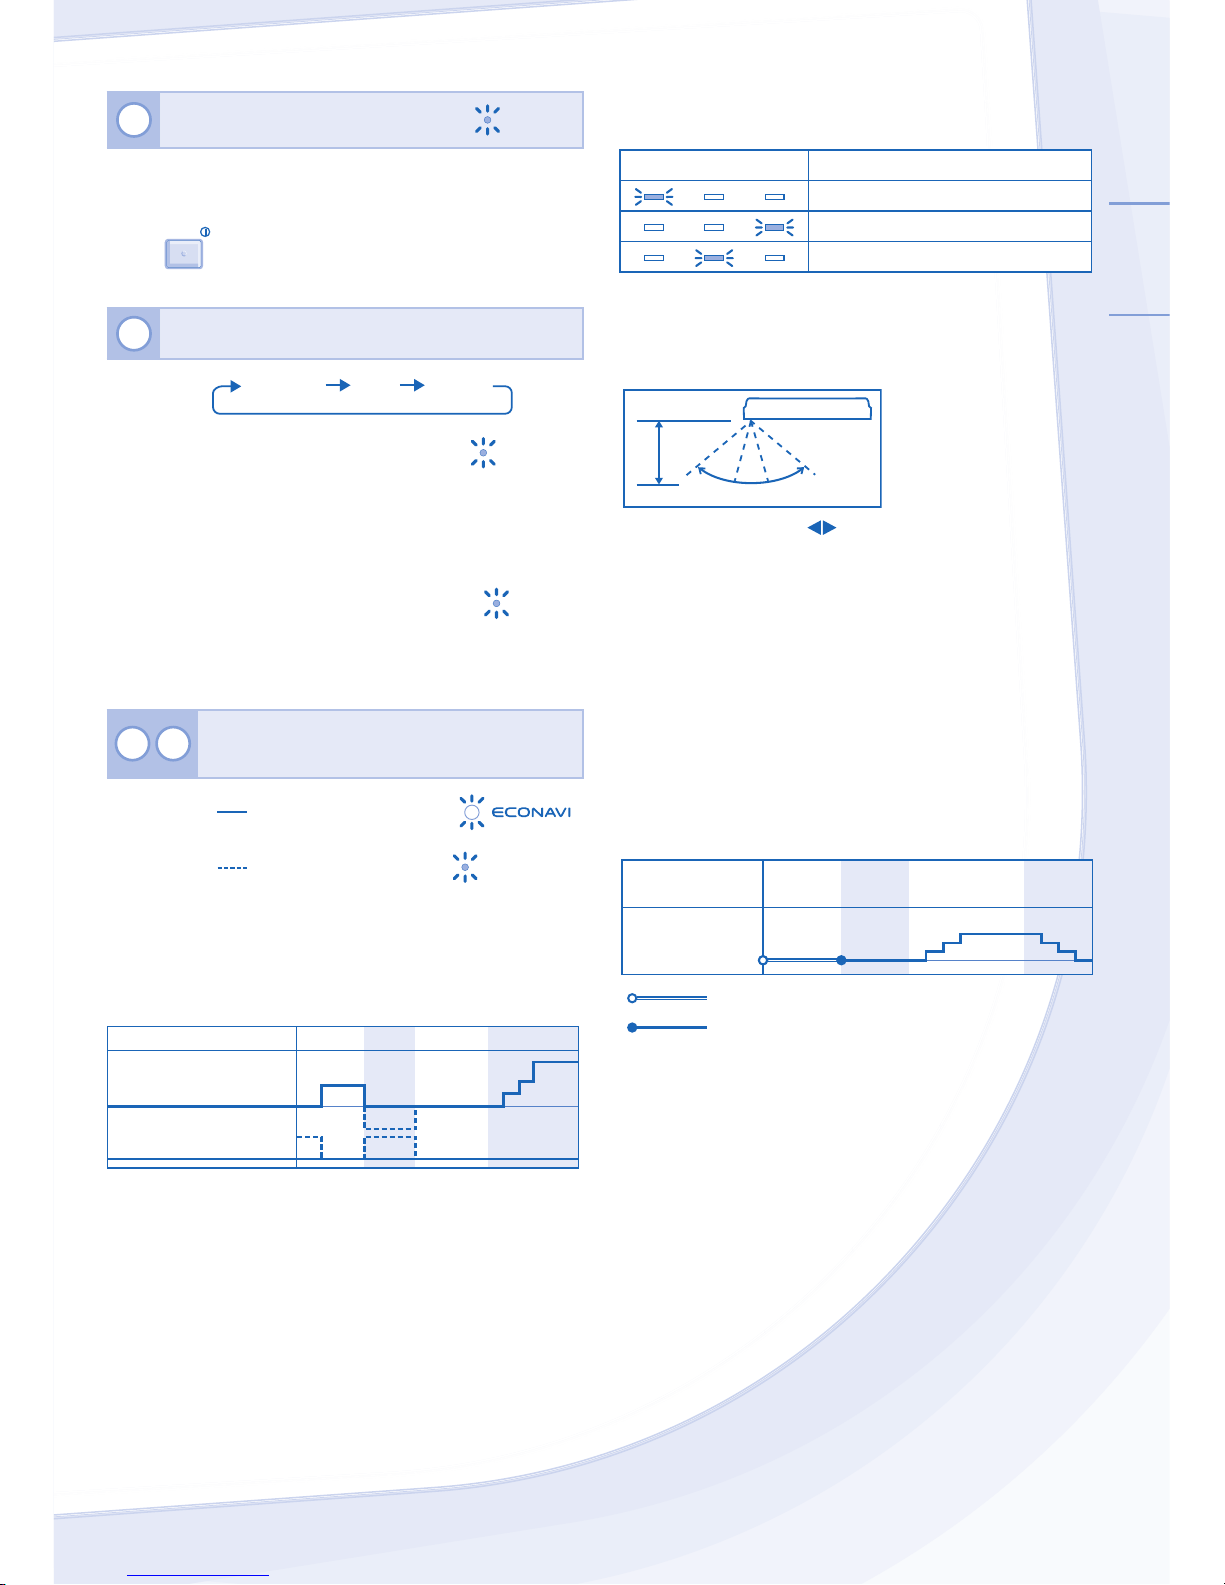
中文
15
6
以淨化空氣
NANOE-G
• 消除/壓制有害微生物如病毒,細菌等。
• 此模式在主機關閉的狀態下,依然可以被啟動。
在此情況下,風量及風擺無法被調節。
• 用
OFF/ON
啟動主機時 nanoe-G 功能即自動開始操
作。
7
轉換於 POWERFUL 與 QUIET 模式
POWERFUL/
QUIET
QUIETPOWERFUL NORMAL
POWERFUL
迅速達到設定温度
POWERFUL
• 單一分體式:此運轉在四小時後自動
停止。
• 多聯分體式:再次按下按鈕或關閉本
機以停止此運轉。
Q
UIET
享受安靜運轉
QUIET
• 此
功能
將減低氣流噪音。
• 當此功能被啟動時,指示燈的亮度會
變暗。
8 9
監測人數及活動,陽光以節省能源和
令您感到舒適
ECONAVI
為更有效的節省
能源
AUTO
COMFORT
為獲取最佳的舒
適度
AUTO COMFOR
T
• 當其中一個模式被啟動,本機將開始預置約一分
鐘。人類活動指示燈則依順序閃爍。
• 預置後人類活動感測器將開始檢測熱源與動作
量,本機將調節溫度和氣流以讓您持續感到舒
適。
➅⑤㟛ࢩ
ℷᐌ
催Ԣ
㻑ދ䰸▩ᓣ
䀁ᅮ⑿ᑺ
⛵
䀁ᅮ乼䞣
≤ Ё䗳
乼䞣
+1 ㋮*
+2°C
-1°C
+1°C
+1 ㋮
* 首15分鐘或達到設定溫度時。
• 人類活動感測器也可掃描房間的熱源與動作範
圍。
人類活動指示燈 熱源與動作
房間的左邊範圍
房間的右邊範圍
房間的中間或多面範圍。
• 本機將確定熱源與動作重點從而自動調節水平
風向導風板,即固定在已確定的位置或左/右擺
動。
檢測範圍(頂觀)
7m
120º
• 當手動 AIR SWING 被選取時,ECONAVI 和
AUTO COMFORT 運轉會被取消。
• 人類活動感測器可能無法偵查於 7 米以外或偵查
角度以外之移動物體。
• 人類活動感測器的靈敏度取決於室内機的位置,
移動速度,溫度等。
• 人類活動感應器或許會:
- 誤將類似人類熱源及動作之物體, 例如寵物等
判斷為人類。
- 誤將在一定時間內保持不動的人判斷為無熱源
或動作。
• ECONAVI 運轉時, 陽光感測器檢測從窗戶透射之
陽光強度並區分晴朗和多雲/夜晚, 進而調節溫
度以更有效地節省能源。
+1°C
ೡᚙ⊕
᱈ᳫ䳆
ᰮ
᥍ᦶ䳆
ᰮ
㻑ދ䰸▩ᓣ
䀁ᅮ⑿ᑺ
ECONAVI 啟動於多雲/夜晚期間。
ECONAVI 啟動於晴朗期間。
• 在無窗戶或使用厚窗簾的房間, 陽光感測器將判
斷為多雲/夜晚。
Page 16
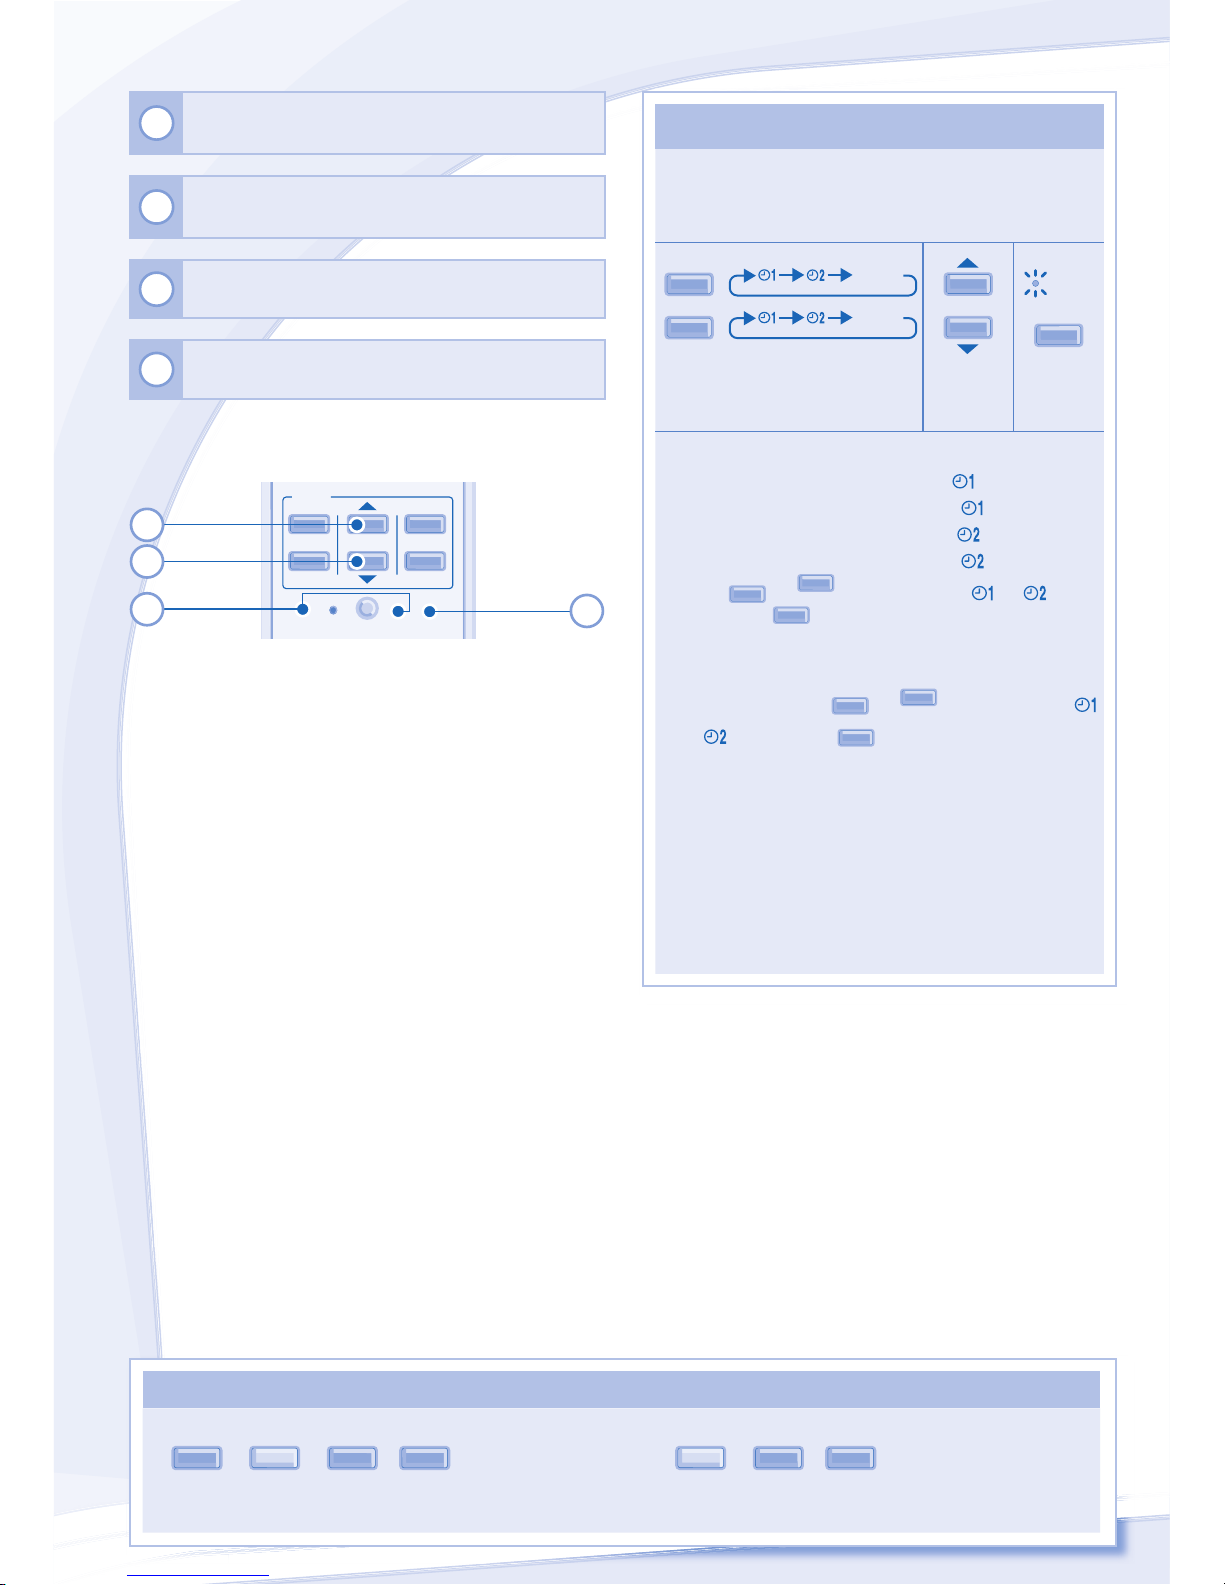
16
TIMER
SET
CANCEL
ON
OFF
1
2
3
SET CHECK CLOCK RESET
AC
RC
遙控器
10
持續按下 5 秒以調暗或恢復主機的指示燈
亮度。
11
持續按下大約 10 秒以在 °C 或 °F 格式中顯
示溫度。
12
按下以恢復遙控器的出廠設定。
13
在正常操作下不使用。
10
11
12
13
設定預約時間
設定預約時間
• 具有兩組開機及關機定時預約時間以在不同
的預約時間下啟動或關閉主機。
• 完成以下步驟以設定每個定時預約:
ON
OFF
1
Cancel
Cancel
2
TIMER
S
ET
選擇“ON(開機)”或
“OFF(關機)” 模式
設定
時間
確認
• 在客廳使用的舉例:
早晨:在 07:00“ON(開機)”
(起床)
在 08:00“OFF(關機)” (出外工作)
傍晚:在 17:00 “ON(開機)” (回家)
在 22:00“OFF(關機)” (睡覺)
• 按下
O
N
或
OFF
以選擇相關的 或 ,
然後按下
CANCEL
以取消開機或關機定時預約
時間。
• 如果自行取消定時預約或因爲發生停電而被
取消,您可按下
O
N
或
OFF
以選擇相關的
或 ,然後按下
SET
以恢復之前的設定。
• 即將出現的定時預約將會按順序顯示及開
啟。
• 當設定了定時開機時,為了在您設定的時間
內達到您所設定的溫度,空調器會在設定的
時間提前運轉(高達15分鐘)。
• 定時預約機能將依據遙控器所設定的時間操
作,並且一旦被設定後會每天重覆操作。至
於時鐘設定,請參閱封底的遙控器的凖備。
注意
注意
NANOE-G
,
POWERFUL/
QUIET
,
AUT
O
COMFORT
,
ECONAV
I
POWERFUL/
QUIET
,
AUT
O
COMFORT
,
ECONAV
I
• 可以在任何模式中操作。再分別按下相關的按
鈕即可取消操作。
• 無法被同時選取。
Page 17
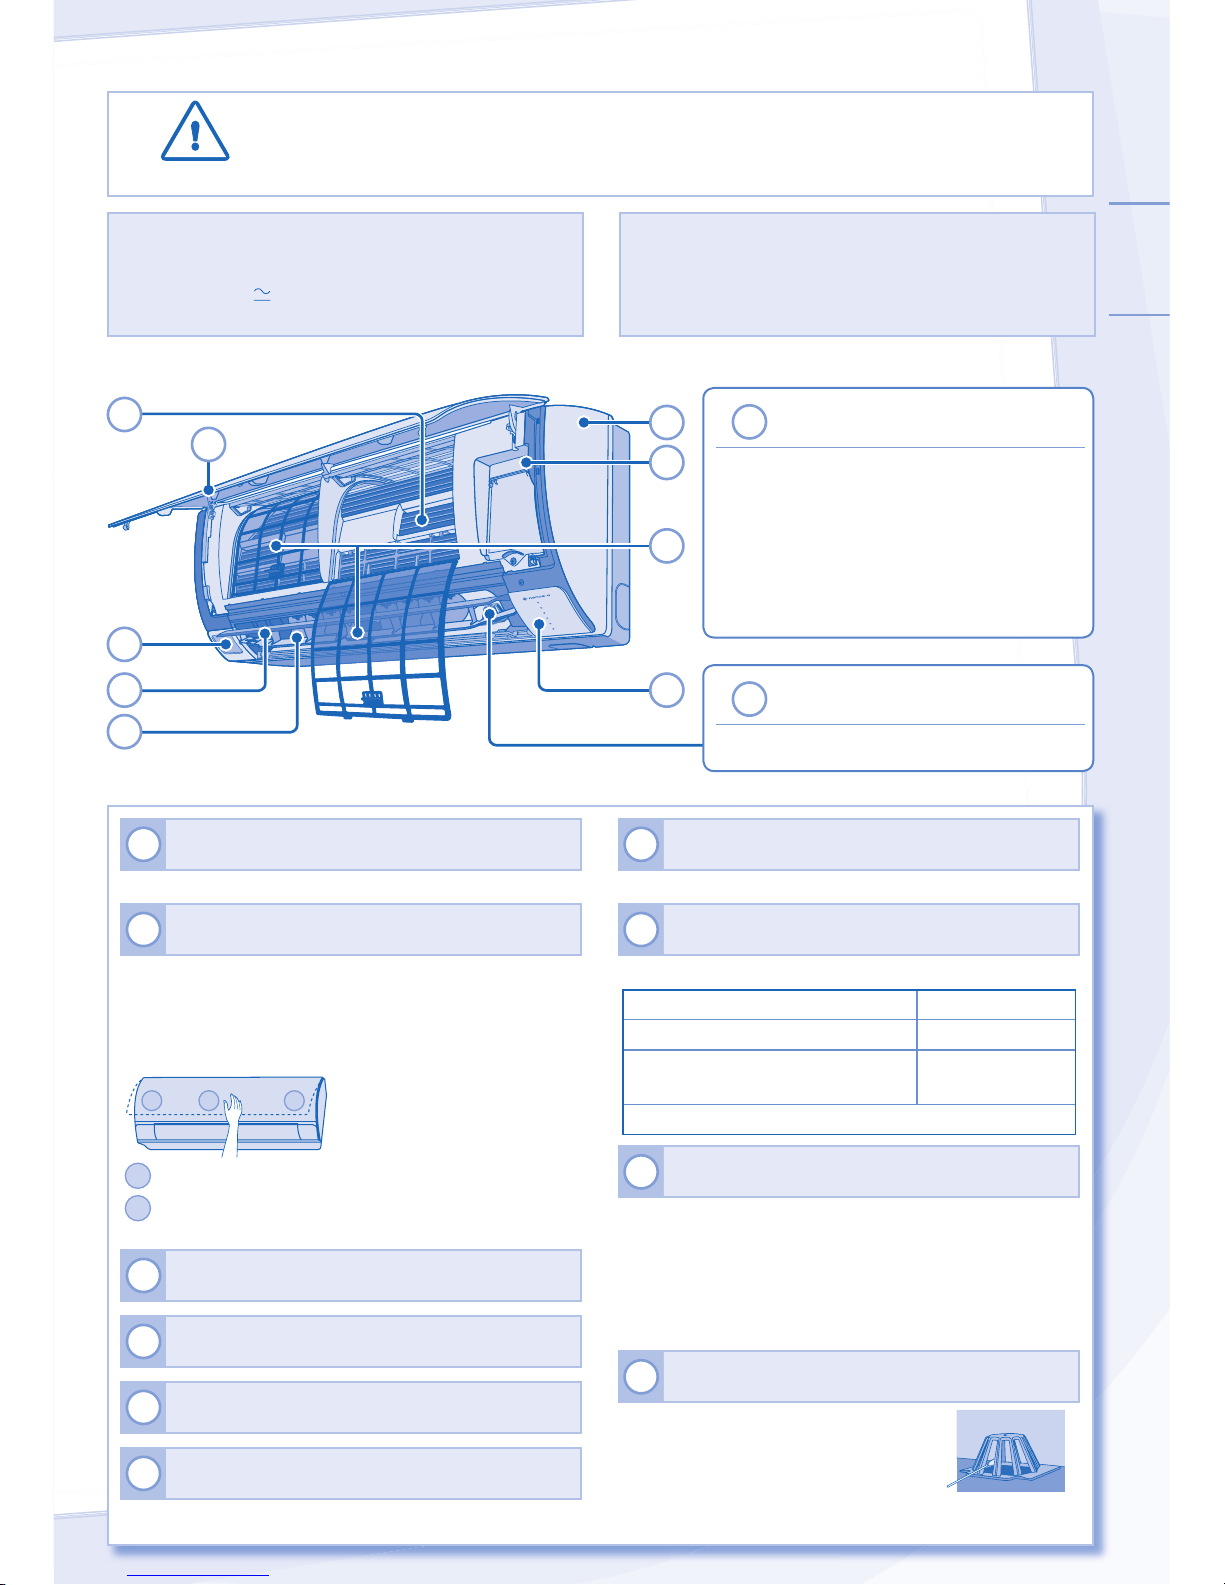
中文
17
室內機
注意
• 進行清洗前,關掉電源並拔出插頭。
• 切勿觸摸鋁片,尖銳部分會造成傷害。
清洗說明
清洗說明
提示
提示
• 切勿使用稀釋劑、苯、潔亮粉。
• 僅使用肥皂 (
pH7) 或中性家用清潔劑。
• 切勿使用溫度高過 40°C 的水。
• 為了確保本機發揮最佳功能,您必須進行
定期維修清洗。本機變髒會導致故障並出
現“H99”錯誤代碼。請諮詢授權經銷商。
POWE
R
TIMER
AUTO C
OMFO
RT
NAN
OE-G
POWE
RFUL
QUIE
T
5
人類活動感測器
• 切勿敲打或用力按感測器或用尖锐
物件刺感測器,否則會導致損壞及
故障。
• 切勿放置任何大型物件於感測器附
近,並且別放置製暖器或潮濕器於
感測器的感測範圍内。否則會導致
感測器故障。
2
8
1
4
9
5
6
7
10
nanoe-G 產生器
• 運轉時切勿觸摸。
1
室內機
• 使用乾、軟的布輕抹。
2
正面板
打開正面板
• 向上提及拉開以取出正面板。
• 輕洗並弄乾。
關上正面板
21 1
1
將正面板的兩端往下按以便關上。
2
按正面板的中間將其確實關上。
(CS-S18NKZW, CS-S24NKZW, CS-S28NKZ)
3
陽光感測器及遙控接收器
4
鋁片
5
人類活動感測器
6
水平風向導風板
• 切勿用手調節。
7
垂直風向導風板
• 切勿用手調節。
8
自動關/開按鈕
•
當遙控器遺失或失靈時使用。
動作 模式
按一次。 自動
持續按下直到聽見一
聲“嗶”,然後鬆開。
製冷
按下按鈕以關閉。
9
空氣過濾網
• 每兩星期需要清洗空氣過濾網。
• 用水輕輕清洗/冲洗過濾網以免損壞過濾網的
表層。
• 在陰凉處徹底弄乾過濾網,遠離火源或直射陽
光。
• 請更換損壞的過濾網。
10
nanoe-G 產生器
使用乾棉花棒清洗。
• 建議每 6 個月清潔 nanoe-G
產生器一次。
3
Page 18
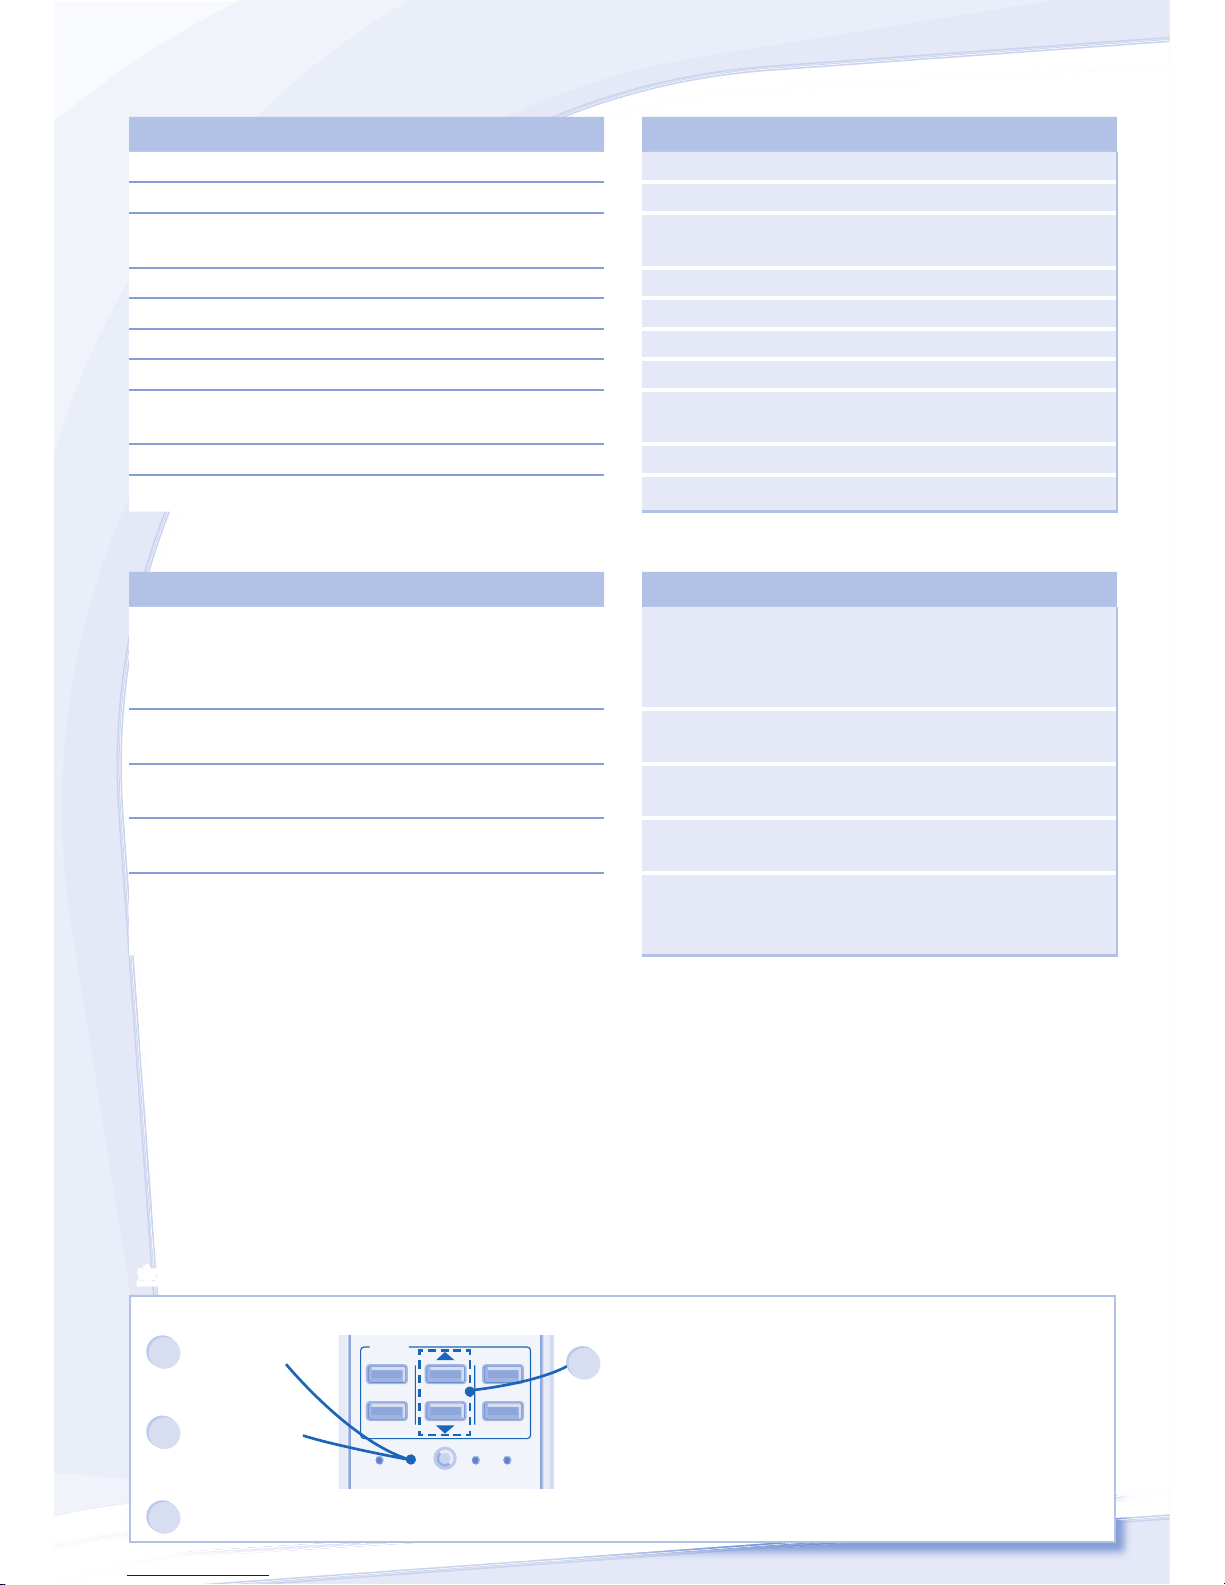
18
故障檢修
以下現象並非表示故障。
以下現象並非表示故障。
現象
現象
原因
原因
室內機散發出霧氣。
► • 製冷導致冷凝現象。
運轉時,聽見類似流水聲。
► • 機內製冷劑流動的聲音。
室內有異味。
► • 這可能是牆壁、地毯、家具或衣物散發出來的
氣味。
在自動風量設定中,室內風扇時開時停。
► • 這是為了排除周圍所發出的異味。
重新啟動後,運轉延遲幾分鐘。
► • 此延遲用於保護本機壓縮機。
室外機滴水/蒸氣。
► • 這是配管表面水蒸氣冷凝或蒸發的現象。
定時器 (TIMER) 的指示燈一直亮。 ► • 一旦設定後,定時預約設定會每天重覆操作。
在打開主機以前電源 (POWER) 指示燈會閃爍。 ► • 這是當開機定時預約時間被設定時凖備開始操
作的初步工作。
運轉時發出吱嗄噪聲。
► • 温度變化造成主機膨脹或收縮。
超過兩個人類活動指示燈同時打開。
► • 熱源與動作範圍判斷在進行中。
在進行维修之前請先檢查以下各項。
在進行维修之前請先檢查以下各項。
現象
現象
檢查
檢查
製冷運轉無法有效地操作。
► • 設定正確溫度。
• 關上所有房門及窗戶。
• 清洗或更換過濾網。
• 移除阻擋空氣吸入或吹出口的任何阻礙物。
運轉時產生噪音。
► • 檢查是否装斜了主機。
• 妥善關閉正面板。
遙控器不操作。
(顯示屏變暗或傳輸信號微弱。)
► • 正確地安装電池。
• 更換微弱的電池。
本機不能啟動。
► • 檢查是否是電流斷路器跳開了。
• 檢查是否已設定預約時間。
本機沒有從遙控器收到信號。
► • 確認接收器不受阻礙。
• 某種類型的螢光燈可能會影響訊號接收。請諮
詢授權經銷商。
主機停止操作及定時預約指示燈閃爍。
用遙控器檢索錯誤代碼。
TIMER
SET
CANCEL
ON
OFF
1
2
3
SET CHECK CLOCK RESET
AC
RC
1
按下 5 秒秒。。
3
按下 5 秒即
可退出故障
診斷模式。
2
按下直到您聼
見“嗶”聲,然後
抄下錯誤代碼。
注:
注:
• 至於某些錯誤代碼
在運轉啟動時您可聽
見4聲嗶聲重新啟動主
機於某些限制運轉。
4
關閉空調並將故障代碼告知授權經銷商。
Page 19
中文
19
信息
至於長期不使用時的換季檢查
• 檢查遙控器的電池。
• 確保室內機或室外機的空氣吸入或吹出口順暢
無阻。
• 用自動關/開按鈕來選擇製冷運轉。運轉15分鐘
後,在正常情況下,室內機空氣吸入及吹出口
的溫差為:
製冷: ≥ 8°C
長期不使用時
• 啟動 nanoe-G 運轉 2 至 3 小時是徹底排除留在内
部機件的濕氣,以防止微菌滋生。
• 關閉電源並拔出插頭。
• 取出遙控器的電池。
不可維修的情況
若出現以下情況,請關掉電源並拔出插頭,然
後諮詢授權經銷商:
• 運轉時發出異常噪音。
• 有水/異物進入遙控器。
• 室內機漏水。
• 電源斷路器經常跳閘。
• 電線異常發熱。
• 開關鈕或按鈕不能正常操作。
關於用戶回收與丟棄舊設備及電池的信息
[非歐共體國家的處理信息]
這些符號僅有效於歐洲共同體。如果您
要丟棄這些物件,請諮詢您的當地政府
或經銷商並詢問正確的丟棄方式。
電池符號的注意事項(底部兩個符號
舉例):
此符號可與化學符號綜合使用。在此
情況下,它須符合制定給該化學的使
用條件。
Pb
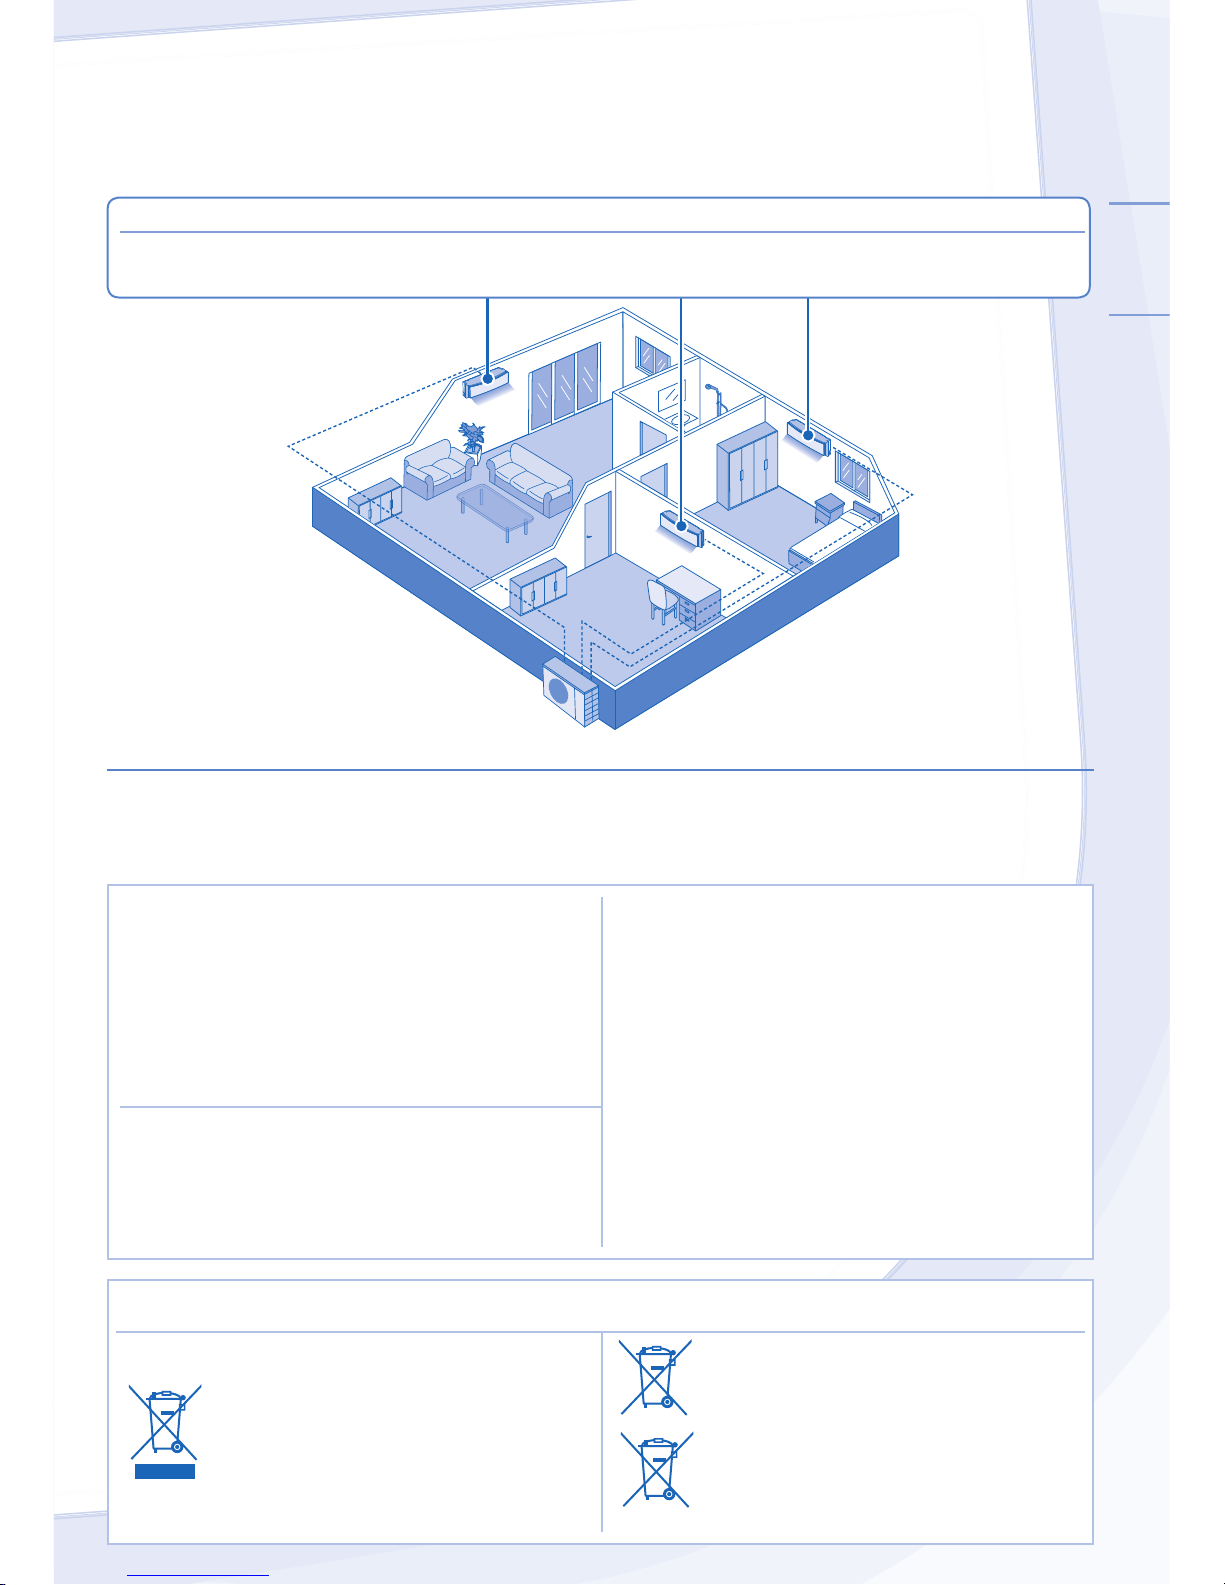
房間
房間 B B
房間
房間 A A
房間
房間 C C
多聯型空調器系統
多聯型分
多聯型分
體式室外機
體式室外機
* 注: 有關於完整產品組合,請參閱目錄冊。
多聯型分體式室外機
(CU-2S18KKZ, 3S27KKZ, 3S27MKZ, 4S27NKZ)
解說
多聯型空調器系統节省空間,你可選擇將2台或以上機能力相當的室內機和一台室外機搭配。
室內機
• 可選擇只操作一台室內機或同時操作多台室內機 。當同時操作多台室內機時,首台被啟動的室內機
將優先制定運轉模式。
Page 20
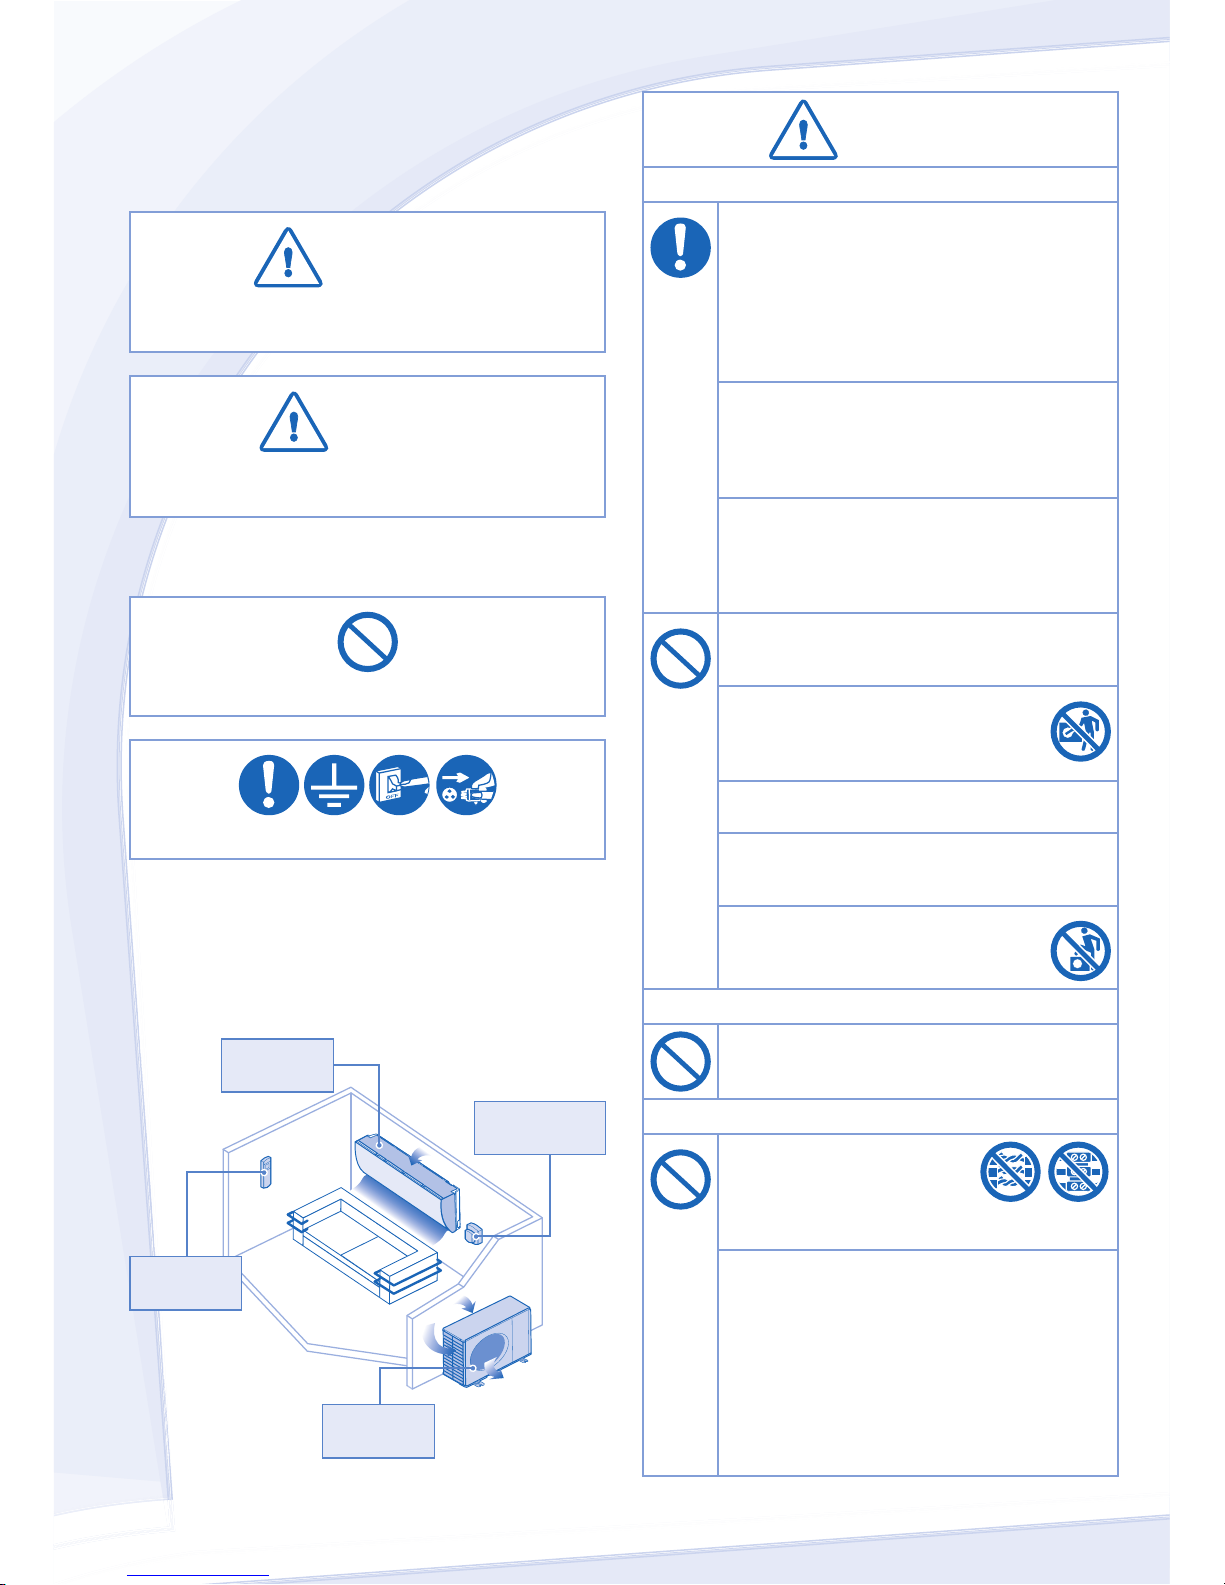
20
PRECAUCIONES DE SEGURIDAD
Para evitar lesiones personales, lesiones a otras personas o
daños a la propiedad, respete las siguientes indicaciones.La
operación incorrecta por no seguir las instrucciones puede
provocar daños o lesiones de diferente gravedad, según la
clasifi cación que se incluye a continuación:
ADVERTENCIA
ADVERTENCIA
Esta señal advierte sobre lesiones graves o la
muerte.
PRECAUCIÓN
PRECAUCIÓN
Esta señal advierte sobre lesiones o daños a la
propiedad.
Las instrucciones que usted debe seguir se clasifi can por
medio de los siguientes símbolos:
Este símbolo indica una acción PROHIBIDA.
Este símbolo indica una acción OBLIGATORIA.
ADVERTENCIA
ADVERTENCIA
UNIDAD INTERNA Y UNIDAD EXTERNA
Este equipo no ha sido diseñado para ser utilizado por
personas (incluidos los niños) con capacidad física,
sensorial o mental disminuida, o que no posean la
experiencia y los conocimientos necesarios, a menos
que una persona responsable de su seguridad los
supervise o les dé instrucciones sobre el uso del
equipo. Es necesario supervisar a los niños para
asegurarse de que no jueguen con el equipo.
Por favor consulte un distribuidor o especialista
autorizado para limpiar las partes internas, reparar,
instalar, sacar o reinstalar la unidad. La instalación
y la manipulación inadecuadas pueden provocar
fi ltraciones, descargas eléctricas o incendios.
Confi rme el uso del tipo de refrigerante especifi cado
con el distribuidor autorizado o especialista. El uso
de un refrigerante que no sea del tipo especifi cado
podría provocar daños al producto, roturas y lesiones
físicas, etc.
No instale la unidad en una atmósfera potencialmente
explosiva o infl amable. Si lo hace podría provocar un
incendio accidental.
No coloque los dedos ni objetos en
la unidad interna o externa del aire
acondicionado. Las piezas giratorias
podrían provocarle lesiones.
No toque la unidad externa durante una tormenta
eléctrica ya que podría haber una descarga eléctrica.
No se exponga directamente al aire frío durante
un período prolongado para evitar un enfriamiento
excesivo.
No se siente o pare sobre la unidad,
se podría caer accidentalmente.
CONTROL REMOTO
No permita que los bebés y los niños pequeños
jueguen con el control remoto a fi n de evitar que se
traguen accidentalmente las baterías.
SUMINISTRO DE ENERGÍA
No utilice cables modifi cados,
cables empalmados, alargues
o cables no especifi cados para
evitar el recalentamiento e
incendios.
Para evitar el sobrecalentamiento, un incendio o
descarga eléctrica:
• No comparta el mismo tomacorriente con otros
equipos.
• No ponga a funcionar la unidad mientras tenga las
manos mojadas.
• No doble demasiado el cable de alimentación.
• No ponga a funcionar al introducir el cable de
alimentación, ni la detenga al halar el cable de
alimentación.
Entrada
Entrada
de aire
de aire
Salida de aire
Salida de aire
Salida de aire
Salida de aire
Control
remoto
Suministro
de energia
Unidad
interna
Unidad
externa
Entrada
Entrada
de aire
de aire
Page 21
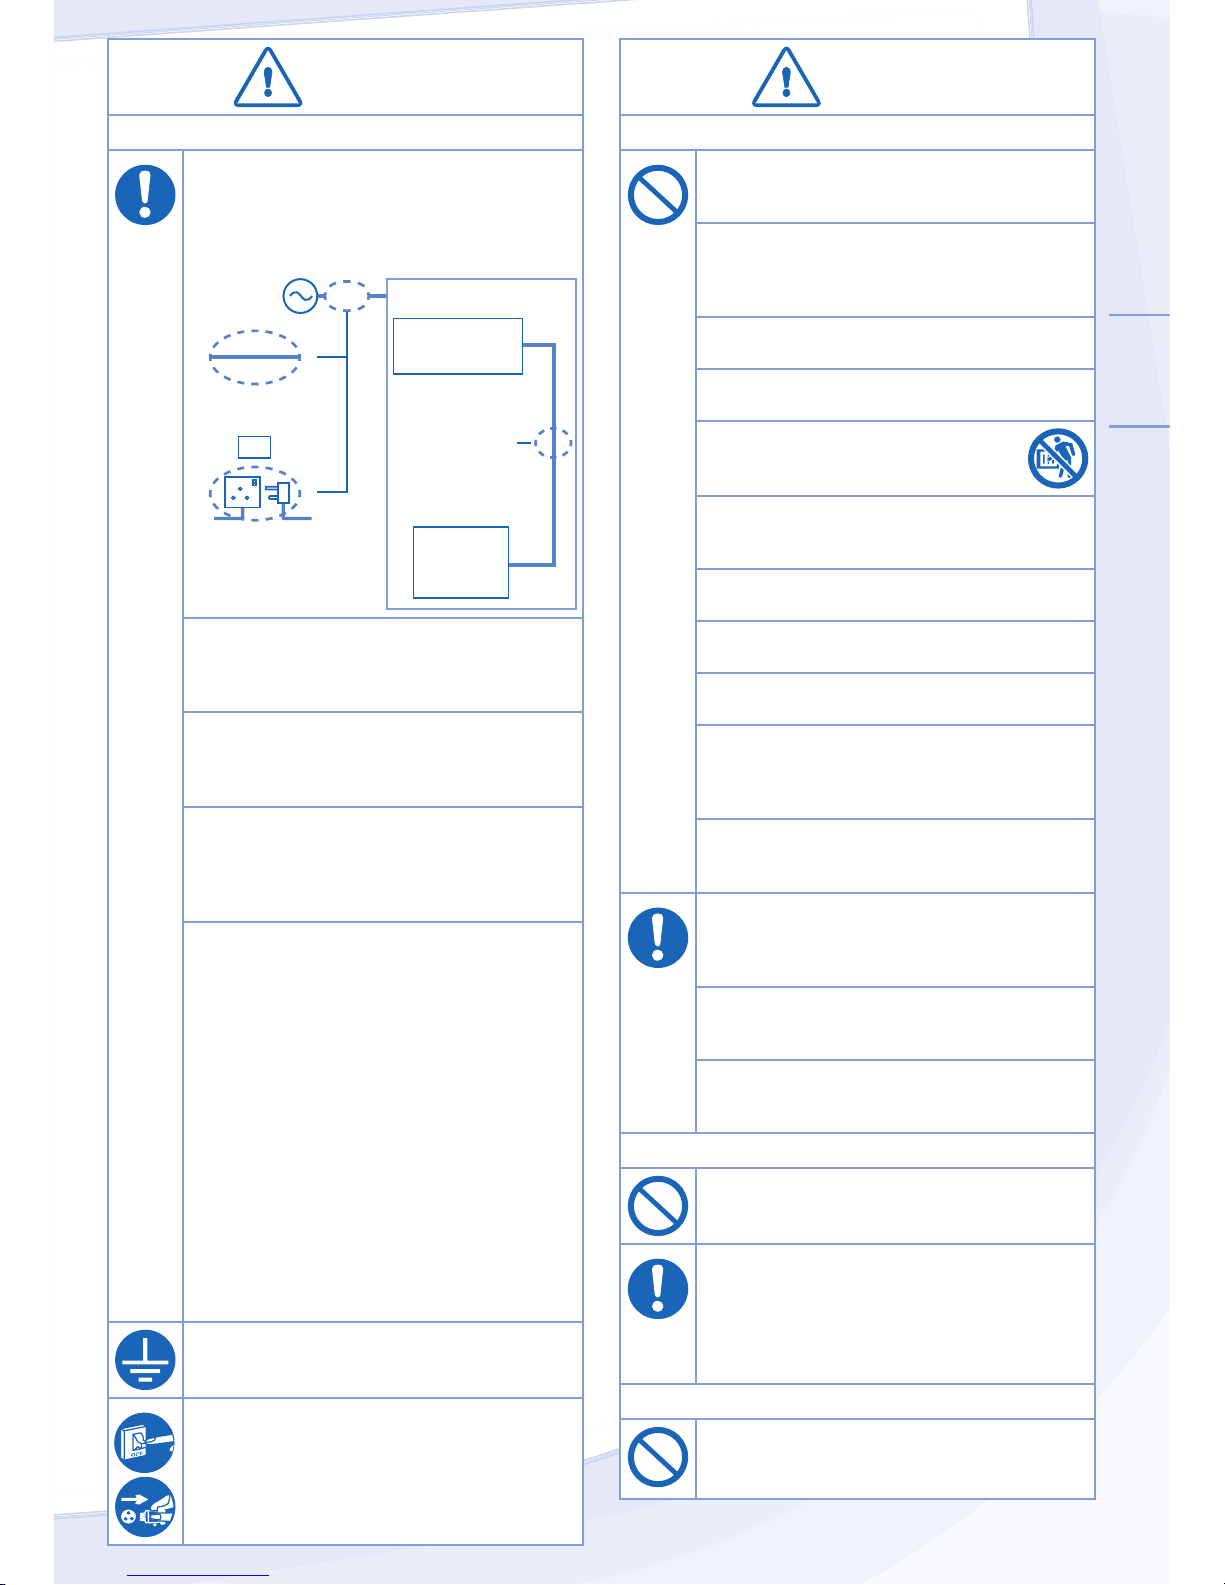
ESPAÑOL (LE)
21
PRECAUCIÓN
PRECAUCIÓN
UNIDAD INTERNA Y UNIDAD EXTERNA
UNIDAD INTERNA Y UNIDAD EXTERNA
No lave la unidad interior con agua, benceno, solvente
o pulidor en polvo para evitar daños a la unidad o
corrosión en la unidad.
No use para la preservación de equipos de precisión,
alimentos, animales, plantas, trabajos artísticos u
otros objetos. Esto podría provocar deterioro en la
calidad, etc.
No utilice equipo combustible frente a la salida del
fl ujo de aire para evitar la propagación del fuego.
No exponga las plantas o las mascotas directamente
al fl ujo del aire para evitar daños físicos, etc.
No toque las chapas de aluminio delgadas,
las partes afi ladas podrían provocarle
lesiones.
No ENCIENDA la unidad cuando esté encerando el
piso. Después de encerar, ventile correctamente la
habitación antes de encender el equipo.
No instale la unidad en áreas grasientas o con humo
para evitar daños a la unidad.
No desmantele la unidad con la fi nalidad de limpiarla
para evitar daños físicos.
No se pare sobre un banco inestable al limpiar la
unidad para evitar daños físicos.
No coloque fl oreros o un recipiente con agua sobre la
unidad. Puede que entre agua en la unidad y que la
misma degrade el aislamiento. Esto podría provocar
una descarga eléctrica.
No abra la ventana o la puerta durante un tiempo
prolongado mientras funcione el modo COOL(FRÍO)/
DRY(DESHUMIDIFICACIÓN).
Asegúrese de que el drenaje de la tubería esté
conectado correctamente y mantenga la salida del
drenaje libre de canaletas, recipientes y no sumerja en
agua para evitar escapes de agua.
Después de usarse durante un período prolongado o
de usarse con cualquier equipo que use combustible,
airee la habitación regularmente.
Después de un período prolongado de uso, asegúrese
de que el estante de instalación no esté deteriorado
para evitar que el equipo se caiga.
CONTROL REMOTO
No utilice baterías recargables (Ni-Cd).
Podrían dañar al control remoto.
Para evitar el funcionamiento inadecuado o daños al
control remoto:
• Extraiga las pilas si no va a utilizar la unidad
durante un periodo prolongado de tiempo.
• Deben introducirse baterías nuevas del mismo tipo
de acuerdo a la polaridad indicada.
SUMINISTRO DE ENERGÍA
No hale el cable para desconectar el enchufe, así
evitará una descarga eléctrica.
ADVERTENCIA
ADVERTENCIA
SUMINISTRO DE ENERGÍA
Use el cable de alimentación completo sin una
extensión. En circunstancias en las que sea
inevitable usar el cable de alimentación con una
extensión, use un medio de conexión aprobado
(por ejemplo: tomacorrientes y enchufe).
Aire acondicionado
◄
Cable completo
sin extensiones
◄
◄
Medios de conexión
aprobados (por ejemplo:
tomacorrientes y enchufe
aprobados).
Cable completo
sin extensiones
Suministro
de energía
O
Unidad
Interna
Unidad
Externa
Si el cable de alimentación está dañado, debe ser
reemplazado por el fabricante, un agente de servicio
o una persona igualmente califi cada a fi n de evitar
riesgos.
Se recomienda fi rmemente instalar este equipo con un
Interruptor de circuito de fuga a tierra o un Dispositivo
de corriente residual a fi n de evitar las descargas
eléctricas o incendios.
Para evitar el sobrecalentamiento, un incendio o
descarga eléctrica:
• Introduzca el cable correctamente.
• El polvo presente en el cable de alimentación debe
limpiarse periódicamente con un paño seco.
Deje de usar el producto cuando ocurra cualquier
anomalía/falla y desconecte el enchufe o apague el
interruptor y disyuntor.
(Riesgo de humo/fuego/descarga eléctrica)
Ejemplos de anomalía/falla
• El ELCB se dispara frecuentemente.
• Huele a quemado.
• La unidad emite un ruido anormal o vibra.
• Gotea agua desde la unidad interior.
• El cable de alimentación o enchufe se calienta
anormalmente.
• No se puede controlar la velocidad del ventilador.
• La unidad deja de funcionar inmediatamente
aunque esté encendida.
• El ventilador no se detiene aunque se haya
apagado la unidad.
Contacte inmediatamente su distribuidor local para
mantenimiento/reparaciones.
Este equipo debe conectarse a tierra para evitar
descargas eléctricas o un incendio.
Evite una descarga eléctrica apagando la fuente de
alimentación y desconectando la unidad:
- Antes de limpiar o de reparar.
- Si no se va usar durante un tiempo prolongado.
- Si están cayendo relámpagos de una manera
anormalmente intensa.
Page 22
22
CONTROL REMOTO
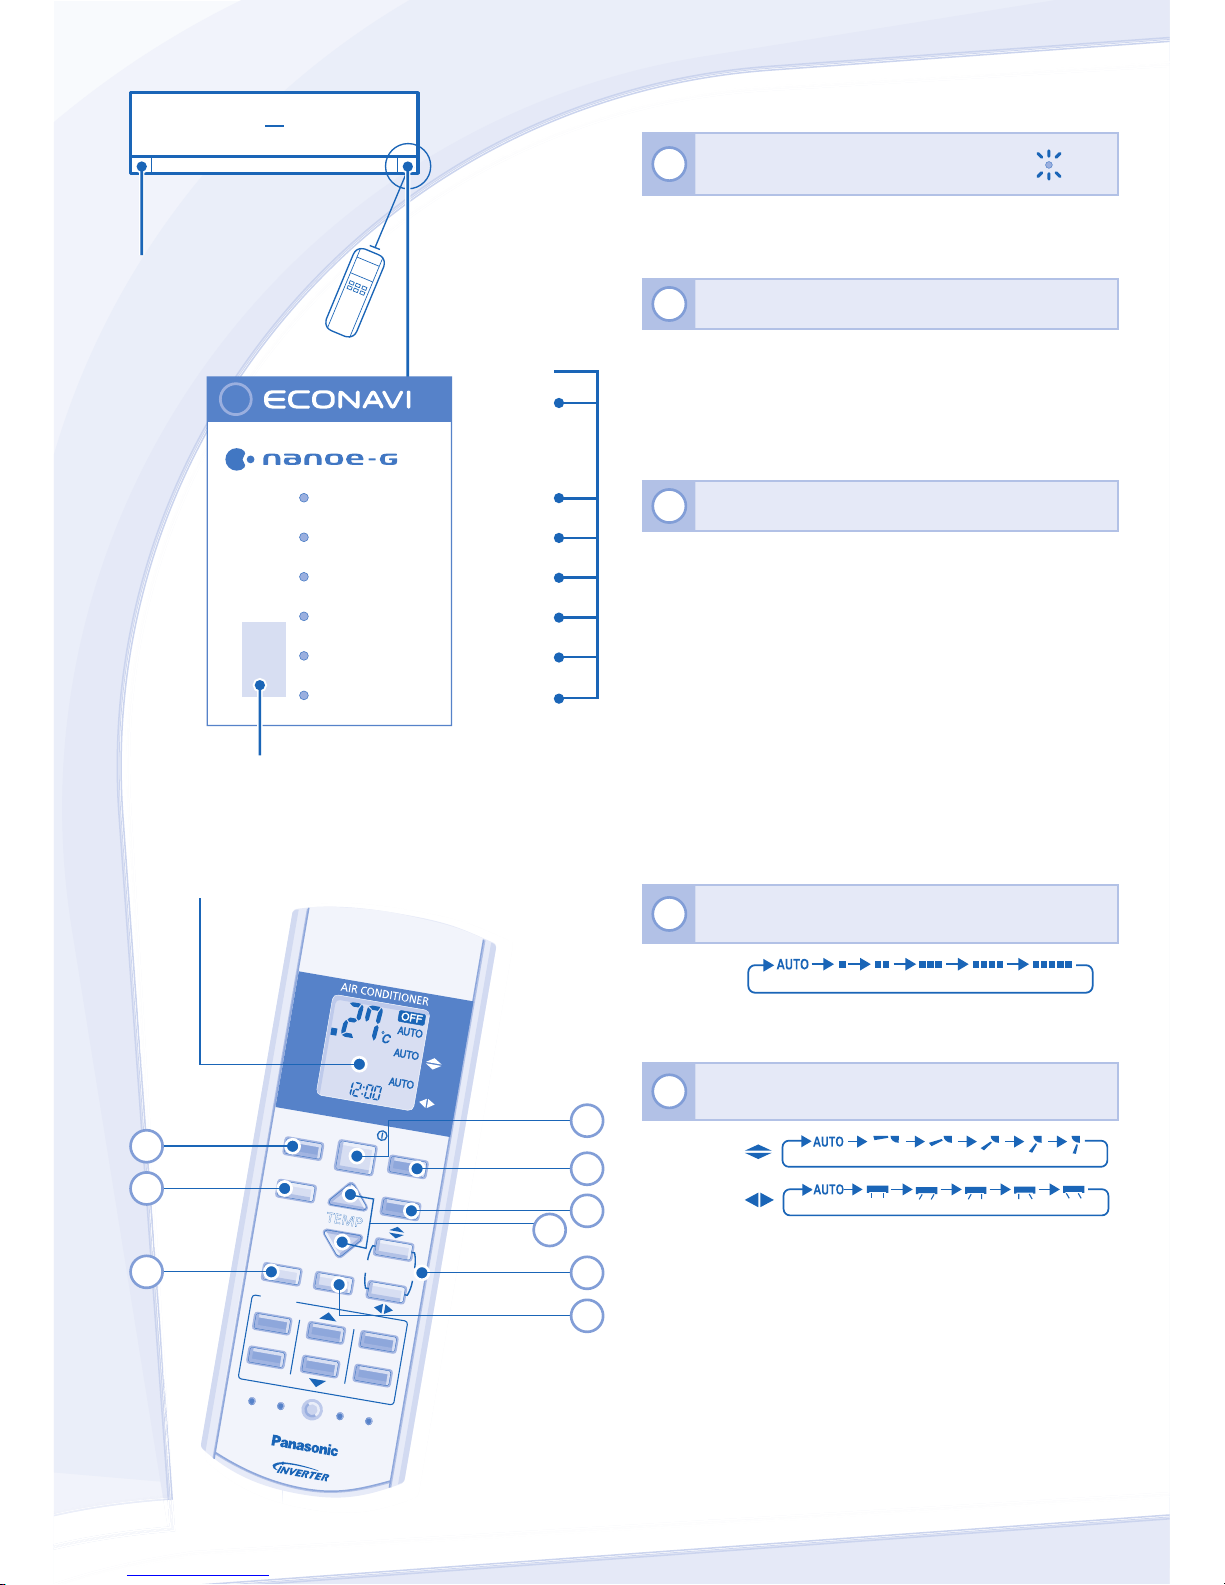
Pulse el botón del control remoto
1
PARA ENCENDER O APAGAR LA
UNIDAD
POWER
• Por favor esté pendiente de la indicación OFF en la
pantalla del control remoto para evitar que la unidad inicie
o se detenga inadecuadamente.
2
PARA AJUSTAR LA TEMPERATURA
• Gama de selección: 16°C ~ 30°C.
• El funcionamiento de la unidad dentro de la temperatura
recomendada podría resultar en el ahorro de energía.
Modo REFRIGERACIÓN : 26°C ~ 28°C.
Modo SECO : 1°C ~ 2°C menos que la temperatura
ambiente.
3
PARA SELECCIONAR EL MODO DE OPERACIÓN
Modo AUTO - Para su comodidad
• Durante la selección del modo de operación el indicador
de encendido parpadea.
• La unidad selecciona el modo de operación durante el
inicio de acuerdo a la confi guración de la temperatura y a
la temperatura de la habitación.
Modo REFRIGERACIÓN - Para disfrutar del aire fresco
• Utilice cortinas para fi ltrar la luz solar y el calor exterior a
fi n de reducir el consumo de energía durante el modo de
refrigeración.
Modo SECO - Para deshumidifi car el ambiente
• La unidad funciona con el ventilador en la velocidad baja
para ofrecer una operación de refrigeración suave.
4
PARA SELECCIONAR LA VELOCIDAD DEL
VENTILADOR (5 OPCIONES)
FAN SPEED
• En el modo AUTO, la velocidad del ventilador se ajusta
de manera automática según el modo de operación.
5
PARA AJUSTAR LA DIRECCIÓN DEL FLUJO DEL
AIRE (5 OPCIONES)
AIR SWING
• Mantiene la habitación ventilada.
• En el modo COOL(FRÍO)/DRY (SECO), si se confi gura
AUTO, la rejilla oscilará de izquierda a derecha y de
arriba hacia abajo de manera automática.
Distancia
máxima: 8m
Sensor de
actividad e
indicador
humana
Indicador
(Verde)
(Verde)
(Naranja)
(Verde)
(Azul)
(Naranja)
(Verde)
POWER
TIMER
AUTO COMFORT
NANOE-G
POWERFUL
QUIET
Sensor de luz solar y receptor de control remoto
AUTO
COMFORT
MODE
POWERF
UL/
QUIET
TEMP
OFF/
ON
TIMER
SET
CAN
CEL
ON
OFF
1
2
3
AIR
SWI
NG
FAN
SPE
ED
SET CHE
CK CLOCK
RESE
T
AC
RC
FAN
SPEED
AIR
SWING
AUTO
COOL
DRY
NANOE-G
ECO
NAVI
3
9
6
2
5
1
Visor del
control remoto
8
4
7
Page 23
ESPAÑOL (LE)
23
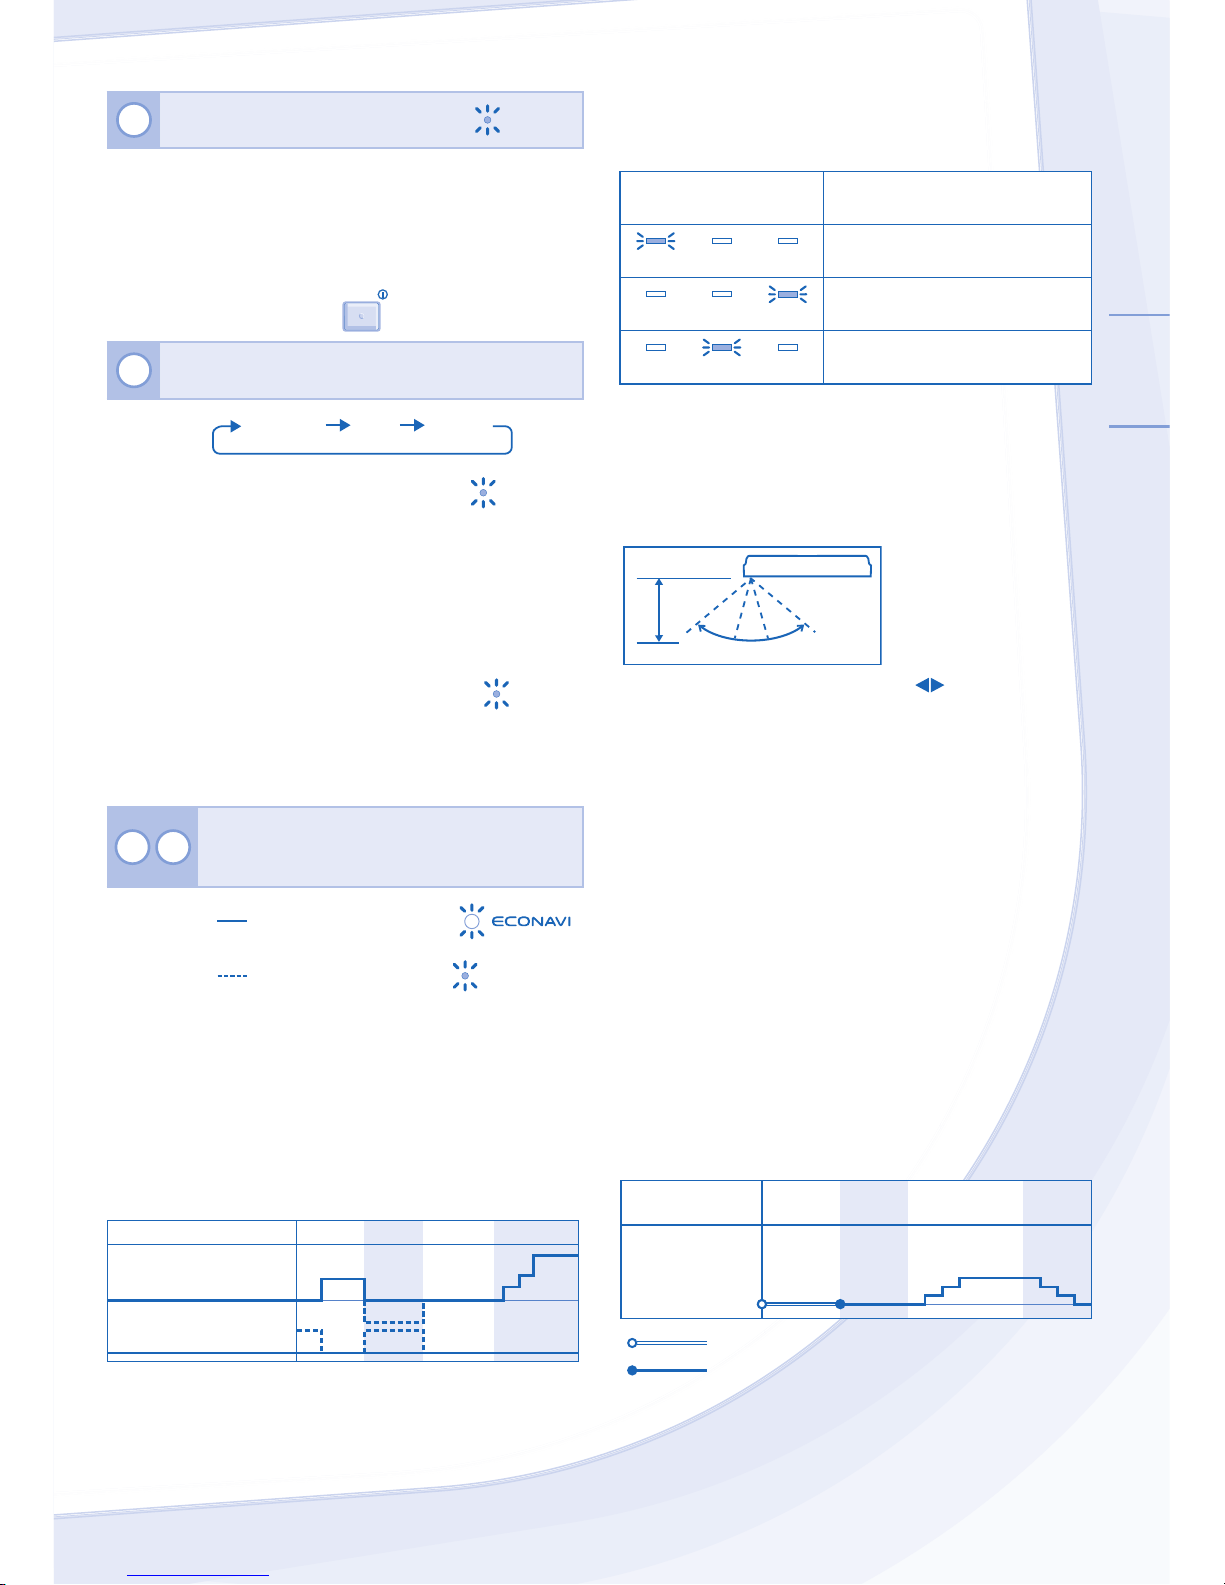
6
PARA PURIFICAR EL AIRE
NANOE-G
• Elimina/desactiva microorganismos peligrosos como lo
son virus, bacterias, etc.
• Se puede activar incluso cuando la unidad esté apagada.
En este estado, la velocidad del ventilador y la dirección
del aire no se pueden ajustar.
• nanoe-G inicia de manera automática con la unidad
cuando es encendida con
OFF/ON
.
7
PARA CAMBIAR ENTRE POTENTE Y
TRANQUILO
POWERFUL/
QUIET
QUIETPOWERFUL NORMAL
POWERFUL
PARA ALCANZAR
TEMPERATURA
RÁPIDAMENTE
POWERFUL
•
Sistema dividido simple: Este funcionamiento se
detiene automáticamente después de 4 horas.
•
Sistema dividido múltiple: Presione nuevamente
el botón o apague la unidad para detener esta
operación.
Q
UIET
PARA DISFRUTAR DEL
FUNCIONAMIENTO
SILENCIOSO
QUIET
•
Esta operación reduce el ruido de corriente de
aire.
8 9
PARA MONITOREAR LA PRESENCIA Y LA
ACTIVIDAD HUMANA, LUZ SOLAR PARA
AHORRO DE ENERGÍA Y COMODIDAD
ECONAVI
Para optimizar el
ahorro de energía
AUTO
COMFORT
Para maximizar la
comodidad
AUTO COMFOR
T
• Cuando cualquiera de las operaciones se encuentre
activada, la unidad comenzará a inicializarse durante
aproximadamente 1 minuto. El indicador de actividad
humana parpadeará de manera secuencial.
• Después de la inicialización, el sensor de actividad
humana comenzará a detectar el nivel de la fuente de
calor y del movimiento, la unidad ajustará la temperatura
y el fl ujo de aire para mantener su comodidad de manera
consistente.
Fuente de calor y movimiento
Normal
AltaBaja Ninguna
Definir la velocidad del
ventilador
≤ Ventilador
medio
+1 punto*
+1 punto
+2°C
-1°C
+1°C
Modo FRÍO (COOL)/
DESHUMIDIFICACIÓN (DRY)
Temperatura configurada
* Durante los primeros 15 minutos o hasta que se alcance la
temperatura configurada.
• El sensor de actividad humana también escaneará el
área para detectar la fuente de calor y el movimiento en
la habitación.
Indicador de actividad
humana
Fuente de calor y movimiento
Un área a la izquierda en la
habitación
Un área a la derecha en la
habitación
Un área céntrica o varias áreas
de la habitación.
• La unidad determinará la fuente de calor y el punto
caliente en movimiento, y ajustará automáticamente la
rejilla de dirección del fl ujo de aire horizontal hasta una
posición predeterminada u oscilará de la izquierda a
derecha.
Área de detección (vista superior)
7m
120º
• Cuando se seleccione AIR SWING manualmente, se
cancelará la operación ECONAVI o AUTO COMFORT.
• El sensor de actividad humana podría no detectar objetos
en movimiento después de los 7 m. o más allá del ángulo
de detección.
• La sensibilidad del sensor de actividad humana
dependerá de la ubicación de la unidad interior, de la
velocidad del movimiento, del intervalo de temperatura,
etc.
• El sensor de actividad humana podría:
- Detectar un objeto de manera errónea un objeto con
una fuente de calor y movimientos similares a los de
los humanos, como es el caso de mascotas, etc.,
como si se tratase de un ser humano.
- Erróneamente no detectar como fuentes de calor y
movimiento una persona que permanezca inmóvil
durante cierto tiempo.
• Durante la operación ECONAVI, el sensor de la luz solar
detecta la intensidad de la luz solar que proviene de
las ventanas y diferencia entre un día soleado y un día
nublado/la noche para optimizar adicionalmente el ahorro
de energía al ajustar la temperatura.
+1°C
Condición del
medio ambiente
Soleado
Nublado/
Noche
SoleadoNublado/
Noche
Modo FRÍO (COOL)/
DESHUMIDIFICACIÓN (DRY)
Temperatura
configurada
ECONAVI active durante un día nublado/la noche.
ECONAVI active durante un día soleado.
• En una habitación sin ventanas o con una cortina gruesa,
el sensor de luz solar determinará si está nublado o si es
de noche.
Page 24
24
TIMER
SET
CANCEL
ON
OFF
1
2
3
SET CHECK CLOCK RESET
AC
RC
CONTROL REMOTO
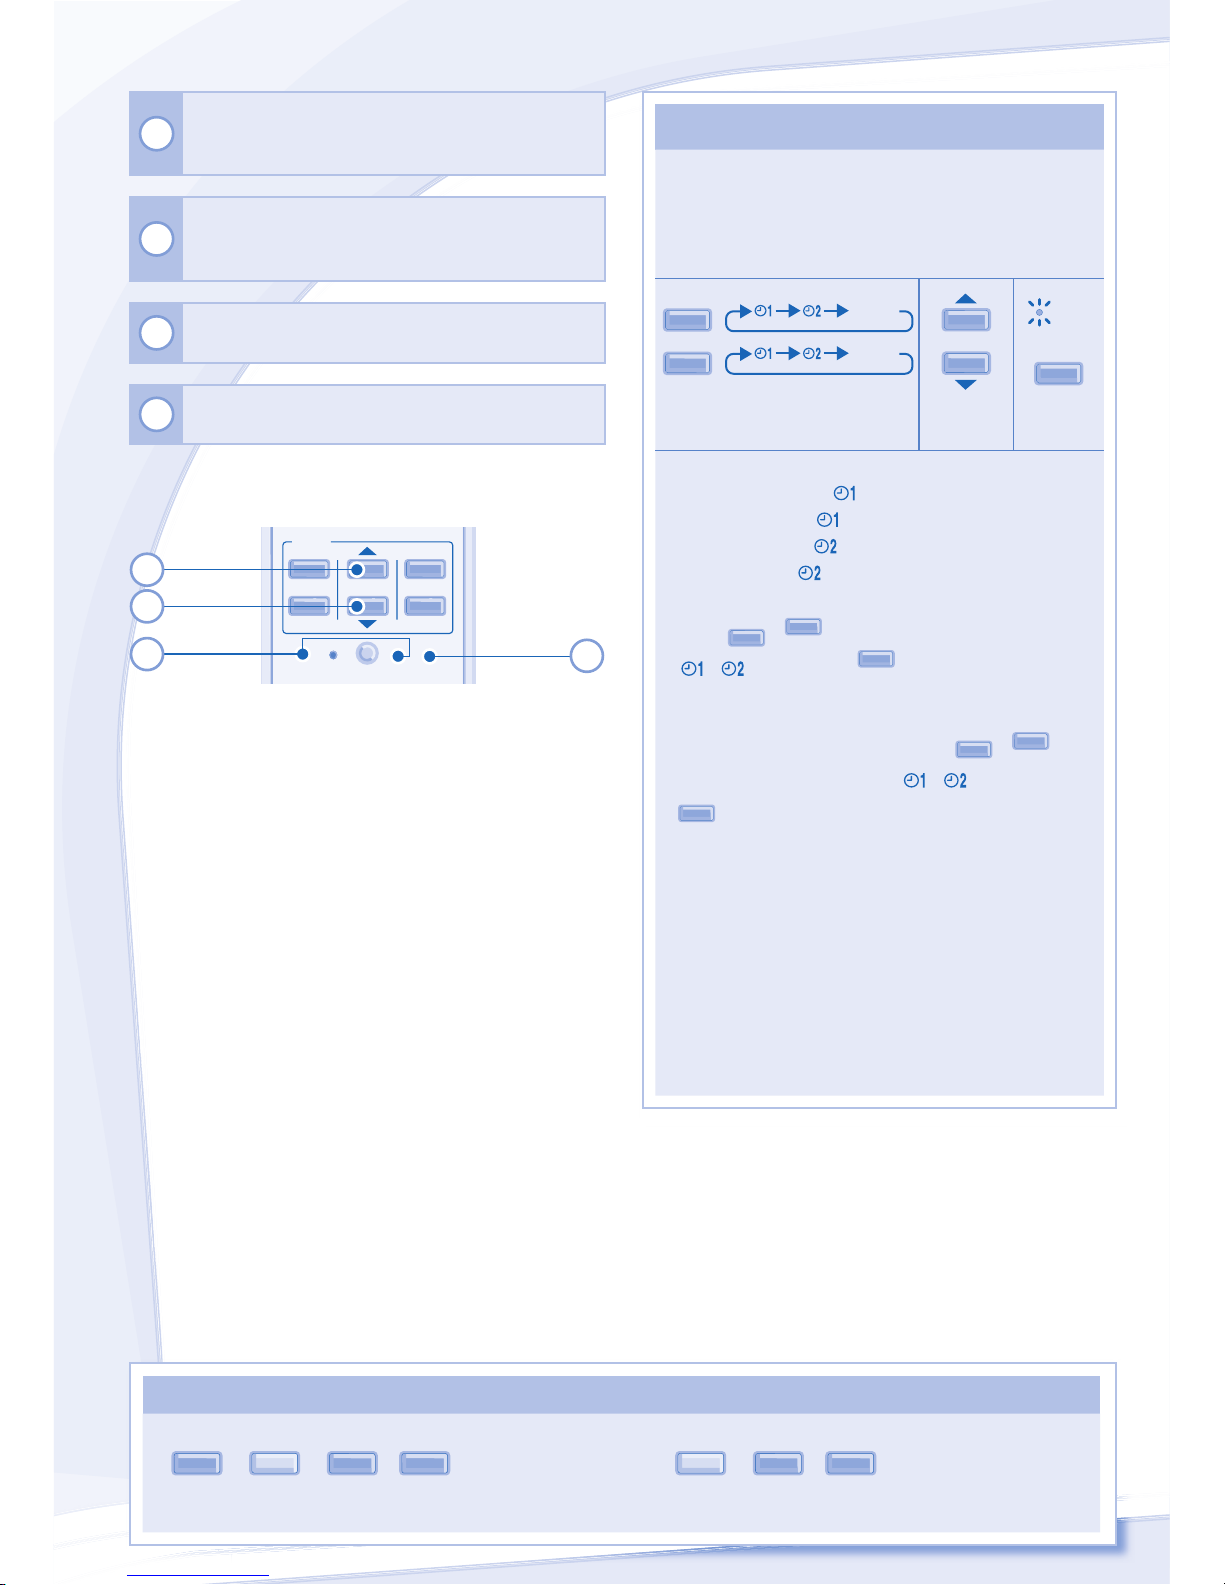
PARA AJUSTAR EL TEMPORIZADOR
PARA AJUSTAR EL TEMPORIZADOR
• Están disponibles 2 conjuntos de temporizadores de
encender y apagar, para encender y apagar la unidad
a diferentes tiempos predefi nidos.
• Complete los procedimientos de abajo para confi gurar
cada temporizador:
ON
OFF
1
Cancel
Cancel
2
TIMER
S
ET
Seleccione el temporizador de
ENCENDIDO o APAGADO
Ajuste la
hora
Confi rme
• Ejemplo de aplicación en una sala de estar:
Mañana: Encender
a las 07:00 (Despertarse)
Apagar a las 08:00 (Salir a trabajar)
Tarde: Encender a las 17:00 (De vuelta a casa)
Apagar a las 22:00 (Acostarse)
• Para cancelar el temporizador de encender y apagar,
pulse
O
N
o
OFF
para seleccionar respectivamente
o y luego pulse
CANCEL
.
• Si el temporizador se cancela manualmente o a
causa de un fallo de alimentación, puede restablecer
de nuevo el temporizador pulsando
O
N
o
OFF
para
seleccionar respectivamente o y luego pulse
SET
.
• El temporizador aparecerá y se activará de modo
secuencial.
• Cuando el temporizador de ENCENDIDO está
ajustado, es posible que la unidad arranque (hasta
15 minutos) antes de la hora real establecida a fi n de
alcanzar la temperatura deseada a tiempo.
• La operación del temporizador se basa en el reloj que
se ajusta en el control remoto y se repite diariamente
una vez programada. Para el ajuste del reloj, por
favor consulte Preparación del Mando a Distancia en
la contra portada.
10
Pulse y mantenga pulsado durante 5 segundos
para atenuar o restaurar el brillo del indicador de la
unidad.
11
Pulse y mantenga pulsado durante
aproximadamente 10 segundos para mostrar la
confi guración de la temperatura en ºC o en ºF.
12
Presione para restaurar los ajustes
predeterminados del control remoto.
13
No se utiliza en las operaciones normales.
10
11
12
13
NOTAS
NOTAS
NANOE-G
,
POWERFUL/
QUIET
,
AUT
O
COMFORT
,
ECONAV
I
POWERFUL/
QUIET
,
AUT
O
COMFORT
,
ECONAV
I
• Se puede activar en todos los modos y se puede
cancelar pulsando de nuevo el botón respectivo.
• No se puede seleccionar al mismo tiempo.
Page 25
ESPAÑOL (LE)
25
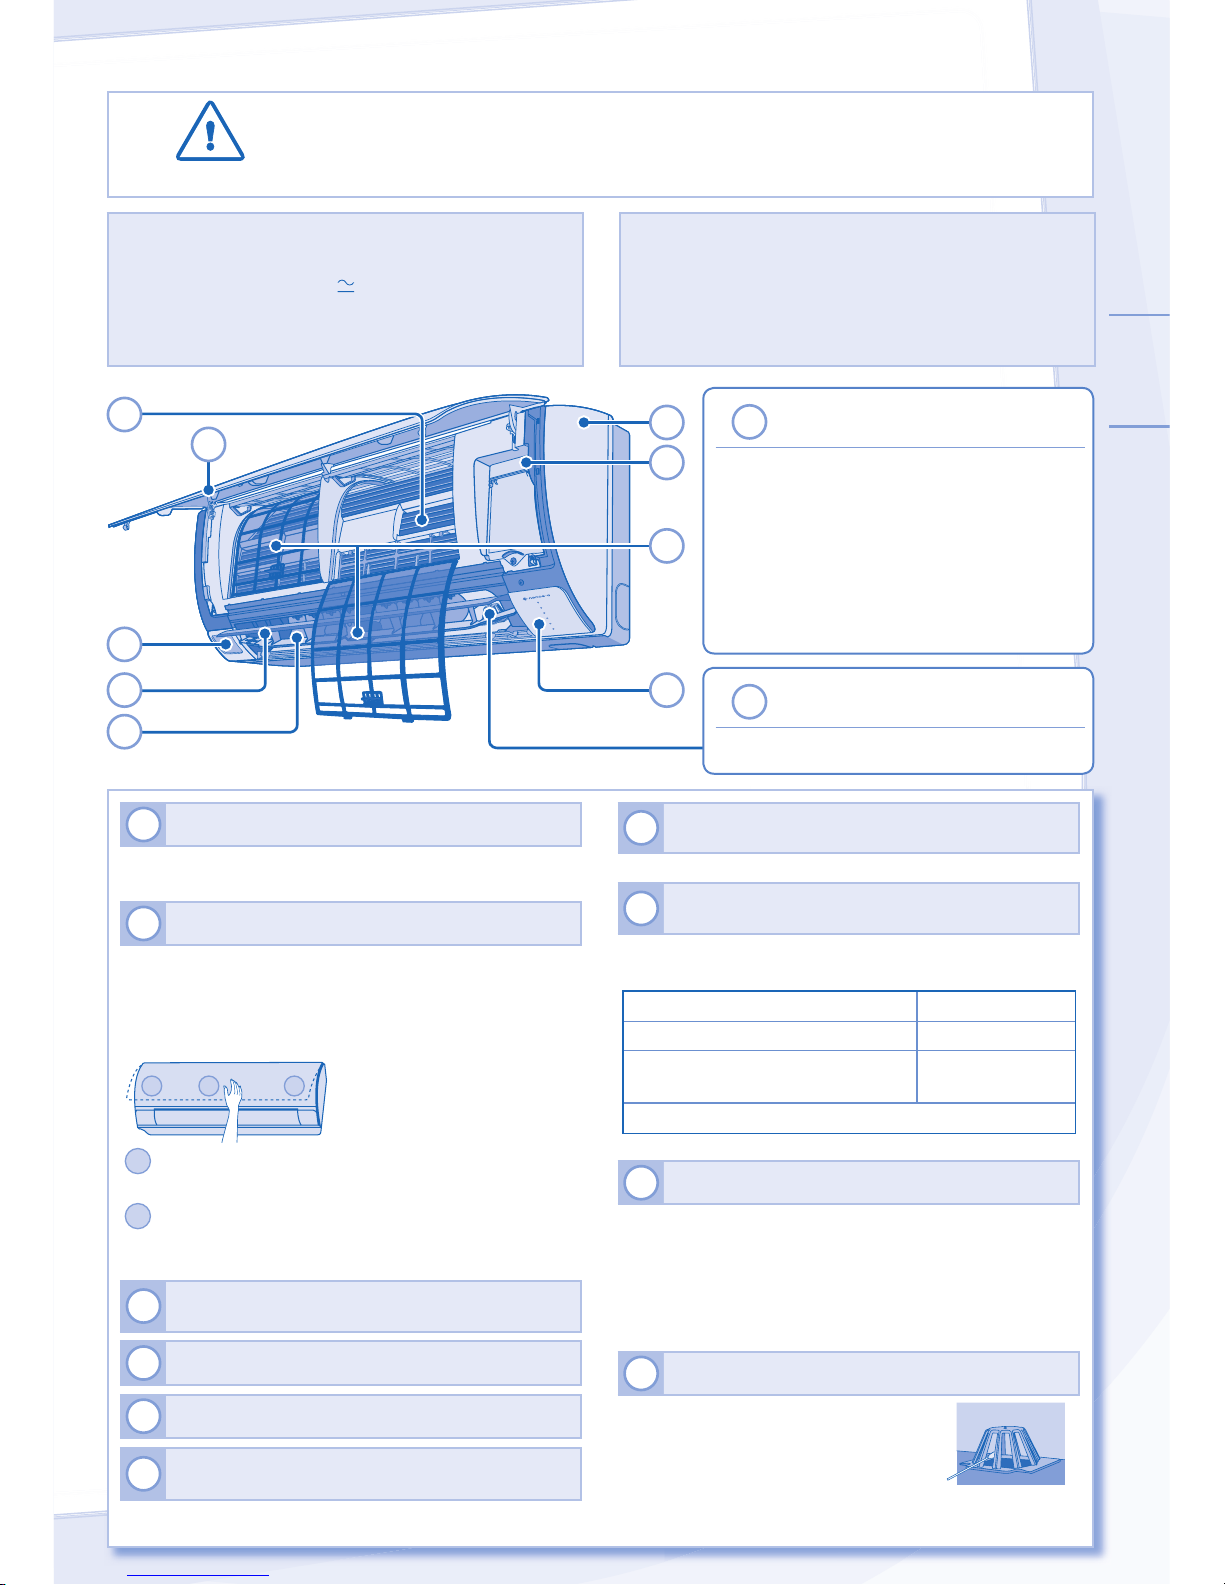
UNIDAD INTERNA
PRECAUCIÓN
• Apague la unidad y desenchúfela antes de limpiarla.
• No toque las chapas de aluminio, las partes afi ladas podrían
provocarle lesiones.
INTRUCCIONES DE LAVADO
INTRUCCIONES DE LAVADO
CONSEJOS
CONSEJOS
• No utilice benceno, diluyente o polvo limpiador.
• Utilice únicamente jabón ( pH7) o detergente neutro
de uso doméstico.
• No utilice agua caliente a más de 40°C.
• Para garantizar un desempeño óptimo de la unidad,
el mantenimiento de limpieza se debe realizar en
intervalos regulares. La unidad sucia puede causar un
mal funcionamiento y puede recuperar el código de
error “H99”. Consulte al distribuidor autorizado.
1
UNIDAD INTERNA
• Repase suavemente la unidad con un paño suave y
seco.
2
PANEL FRONTAL
Retire el panel frontal
• Levante y hale del panel frontal para retirarlo.
• Lávelo con cuidado y séquelo.
Cierre el panel frontal
21 1
1
Pulse hacia abajo los dos extremos del panel frontal
para cerrarlo.
2
Pulse el centro del panel frontal para cerrarlo
herméticamente.
(CS-S18NKZW, CS-S24NKZW, CS-S28NKZ)
3
SENSOR DE LUZ SOLAR Y RECEPTOR DE
CONTROL REMOTO
4
ALETA DE ALUMINIO
5
SENSOR DE ACTIVIDAD HUMANA
6
REJILLA DE DIRECCIÓN DE CORRIENTE DE
AIRE HORIZONTAL
• No lo ajuste manualmente.
7
REJILLA DE DIRECCIÓN DE CORRIENTE DE
AIRE VERTICAL
• No lo ajuste manualmente.
8
BOTÓN DE ENCENDIDO/APAGADO
AUTOMÁTICO (AUTO OFF/ON)
• Use cuando el control remoto esté extraviado o cuando la
unidad no funcione adecuadamente.
Acción Modo
Pulsar una vez. Automático
Presione y mantenga hasta que
escuche un pitido, luego suéltelo.
Enfriamiento
Pulsar el botón para apagar.
9
FILTRO DE AIRE
• Es necesario limpiar los fi ltros de aire cada dos semanas.
• Lave/enjuague los fi ltros con agua, con cuidado para evitar
dañar la superfi cie del mismo.
• Secar minuciosamente los fi ltros a la sombra, lejos del
fuego o la luz solar directa.
• Reemplace los fi ltros dañados.
10
GENERADOR nanoe-G
Límpielos con un bastoncillo de
algodón seco.
• Se recomienda limpiar el generador
nanoe-G cada 6 meses.
POWE
R
TIMER
AUTO C
OMFO
RT
NAN
OE-G
POWE
RFUL
QUIE
T
5
SENSOR DE ACTIVIDAD HUMANA
•
No golpee ni presione violentamente el
sensor ni introduzca un objeto fi loso. Esto
puede causar daños y fallas.
•
No coloque objetos grandes cerca del sensor
y mantenga unidades de calefacción y
humidifi cadores lejos del área de detección
del sensor. Esto podría provocar que el
sensor funcione de manera inadecuada.
2
8
1
4
9
5
6
7 3
10
GENERADOR nanoe-G
• No toque durante el funcionamiento.
Page 26
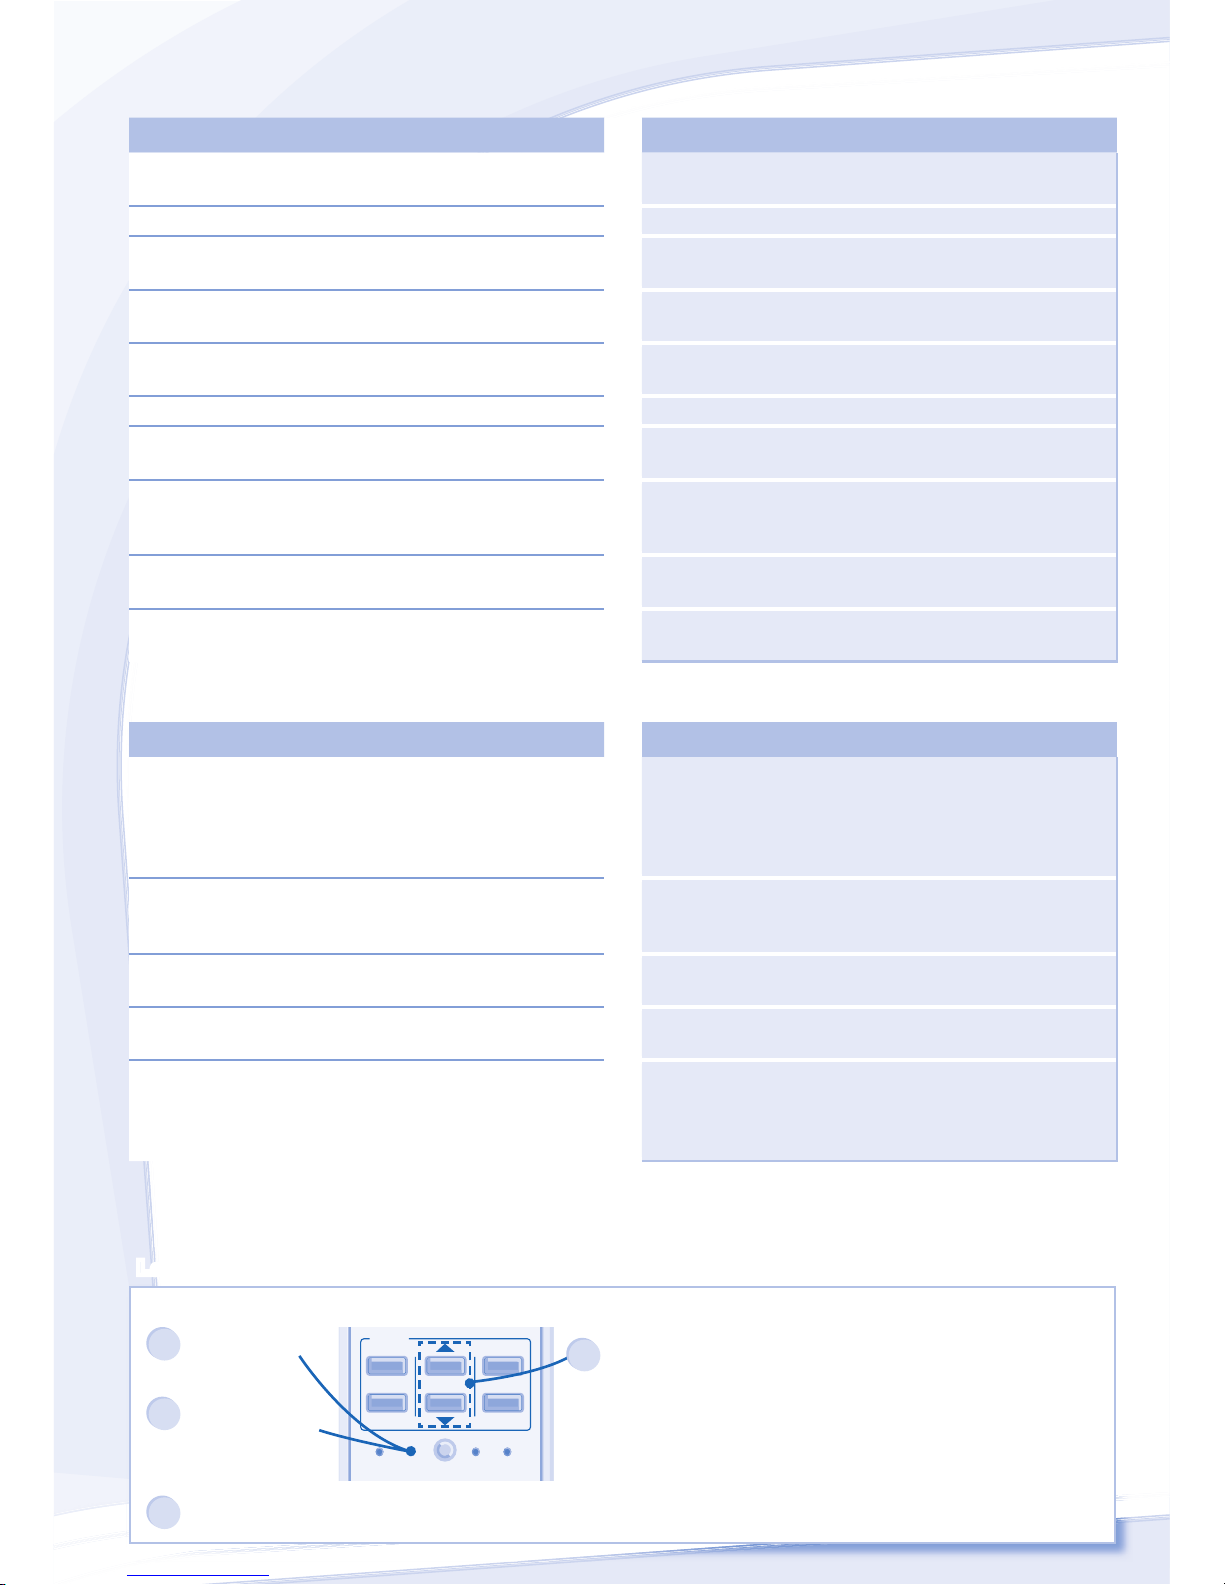
26
SOLUCIÓN DE PROBLEMAS
Los siguientes síntomas no indican ningún desperfecto.
Los siguientes síntomas no indican ningún desperfecto.
SÍNTOMA
SÍNTOMA
CAUSA
CAUSA
La unidad interna despide vapor. ► • Efecto de condensación debido al proceso de
enfriamiento.
Ruido de agua durante la operación. ► • El fl ujo del refrigerante dentro de la unidad.
La habitación tiene un olor peculiar. ► • Esto se puede deber al olor a humedad que emiten las
paredes, las alfombras, los muebles o la vestimenta.
El ventilador interno se detiene ocasionalmente durante el
ajuste automático de la velocidad del ventilador.
► • Esto ayuda a eliminar los olores circundantes.
La operación se retrasa unos minutos después de volver a
encender la unidad.
► • El retraso es una protección del compresor de la unidad.
La unidad externa emite agua/vapor. ► • Presencia de condensación o evaporación en los caños.
El indicador TEMPORIZADOR (TIMER) siempre está
encendido.
► • El ajuste del temporizador se repite diariamente una vez
que se lo ajusta.
El indicador de ENCENDIDO (POWER) parpadea antes de
encenderse la unidad.
► • Se trata de un paso preliminar para preparar el
funcionamiento cuando se ha ajustado el temporizador
de encendido.
Crujido durante el funcionamiento. ► • Los cambios de temperatura provocan la expansión/
contracción de la unidad.
2 o más indicadores de actividad humana se encienden
simultáneamente.
► • Análisis de fuente de calor y movimiento en curso.
Verifi fi que lo siguiente antes de solicitar un servicio.
Verifi fi que lo siguiente antes de solicitar un servicio.
SÍNTOMA
SÍNTOMA
VERIFIQUE
VERIFIQUE
La operación frío no funciona efi cientemente. ► • Ajuste correctamente la temperatura.
• Cierre todas las puertas y ventanas.
• Limpie o reemplace los fi ltros.
• Despeje cualquier obstrucción en las aberturas de
entrada y salida de aire.
Ruido durante el funcionamiento. ► • Compruebe si la unidad ha sido instalada en una
inclinación.
• Cierre el panel delantero correctamente.
El control remoto no funciona.
(La pantalla está oscura o la señal de transmisión es débil.)
► • Coloque correctamente las baterías.
• Reemplace las baterías descargadas.
La unidad no funciona. ► • Verifi que si se activó el interruptor de circuito.
• Verifi que si se han ajustado los temporizadores.
La unidad no recibe la señal del control remoto. ► •
Asegúrese de que no haya una obstrucción en el receptor.
• Ciertas luces fl uorescentes puede interferir con el
transmisor de señal. Consulte con un distribuidor
autorizado.
La unidad se detiene y el indicador TEMPORIZADOR (TIMER) titila.
Use el control remoto para recuperar el código de error.
TIMER
SET
CANCEL
ON
OFF
1
2
3
SET CHECK CLOCK RESET
AC
RC
1
Pulse durante
5 segundos.
3
Pulse durante 5
segundos para
abandonar la
comprobación.
2
Pulse hasta escuchar
un pitido y, después,
apunte el código del
error.
Nota:
• Para cierto error, puede
reiniciar la unidad con el
funcionamiento limitado
con 4 pitidos durante el
inicio de la operación.
4
Apague la unidad e informe el código de error al distribuidor autorizado.
Page 27
ESPAÑOL (LE)
27
INFORMACIÓN
Información para usuarios sobre la recolección y la disposición de equipos viejos y baterías usadas
[Información sobre la Disposición en otros
países fuera de la Unión Europea]
Estos símbolos son únicamente válidos en
la Unión Europea. Si desea descartar estos
artículos, comuníquese con las autoridades
locales o con el distribuidor local y averigüe
cuál es el método adecuado de disposición.
Nota sobre el símbolo de la bateria
(ejemplos de los dos símbolos inferiores):
Este símbolo se puede utilizar en combinación
con un símbolo químico. En este caso, cumple
con los Pb requisitos establecidos por la
Directiva para la sustancia química involucrada.
Pb
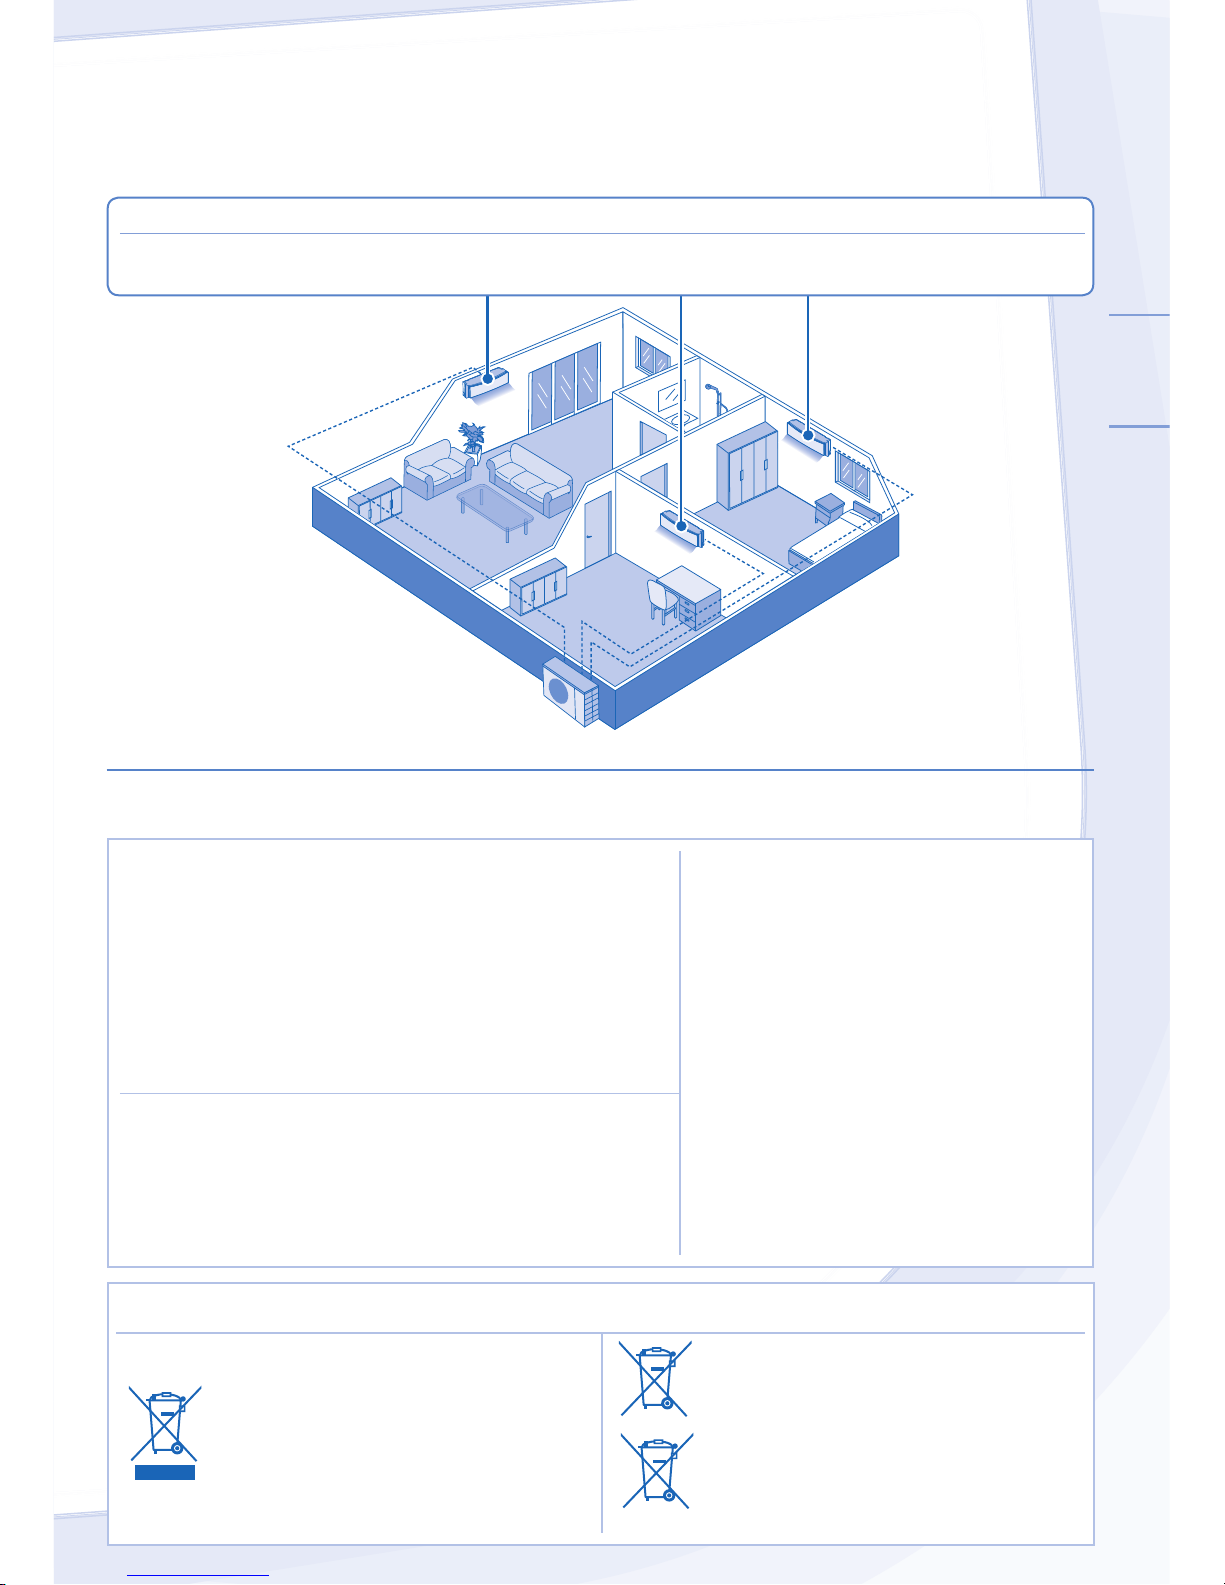
Habitación A
Habitación A
SIISTEMA DE AIIRE ACONDIICIINADO MÚLLTIIPLLE
Unidad dividida
Unidad dividida
exterior múltiple
exterior múltiple
* Nota: Para todas las combinaciones de productos disponibles, por favor refi érase al catálogo.
INSPECCIÓN ESTACIONAL DESPUÉS DE UN PERÍODO
EXTENSO SIN USO
• Verifi cación de las baterías del control remoto
(control remoto inalámbrico).
• Ausencia de obstrucción en los orifi cios de entrada y salida de aire.
• Use el botón Auto OFF/ON (apagado/encendido automático) para
seleccionar el funcionamiento de Refrigeración. Después de 15
minutos de operación, es normal que exista la siguiente diferencia
de temperatura entre los orifi cios de entrada y salida de aire:
Refrigeración: ≥ 8°C
FALTA DE USO PROLONGADA
• Active la operación nanoe-G por 2~3 horas como una alternativa
para eliminar la humedad existente en las partes internas de
manera exhaustiva para evitar el crecimiento de hongos.
• Apague la unidad y desenchúfela.
• Quite las baterías del control remoto.
CRITERIOS PARA NO USAR EL EQUIPO
APAGUE LA FUENTE DE ALIMENTACIÓN
Y DESCONECTE, después consulte a un
distribuidor autorizado bajo las siguiente
condiciones:
• Ruido anormal durante el funcionamiento.
• Ingreso de agua o partículas extrañas en el
control remoto.
• Filtraciones de agua desde la Unidad interna.
• Activación frecuente del interruptor de circuito.
• El cable de alimentación se calienta.
• Los botones o interruptores no funcionan
correctamente.
Habitación B
Habitación B
Habitación C
Habitación C
Unidad dividida exterior múltiple
(CU-2S18KKZ, 3S27KKZ, 3S27MKZ, 4S27NKZ)
DEFINICIÓN
Los sistemas de aire acondicionado múltiple ahorran espacio permitiéndole conectar varias unidades interiores a una sola unidad exterior.
UNIDAD INTERNA
• Es posible manejar las unidades interiores individualmente o simultáneamente. La prioridad de modo de funcionamiento
se le da a la unidad que se conectó primero.
Page 28
QUICK GUIDE/簡易指南/GUÍA RÁPIDA
AUTO
COMFORT
MODE
POWERFUL/
QUIET
TEMP
OFF/ON
TIMER
SET
CANCEL
ON
OFF
1
2
3
AIR SWING
FAN SPEED
SET CHECK CLOCK RESET
AC
RC
FAN
SPEED
AIR
SWING
AUTO
COOL
DRY
NANOE-G
ECONAVI
1
3
Panasonic Corporation
Website: http://panasonic.net/
Printed in Malaysia
F568374
YS0811-0
2
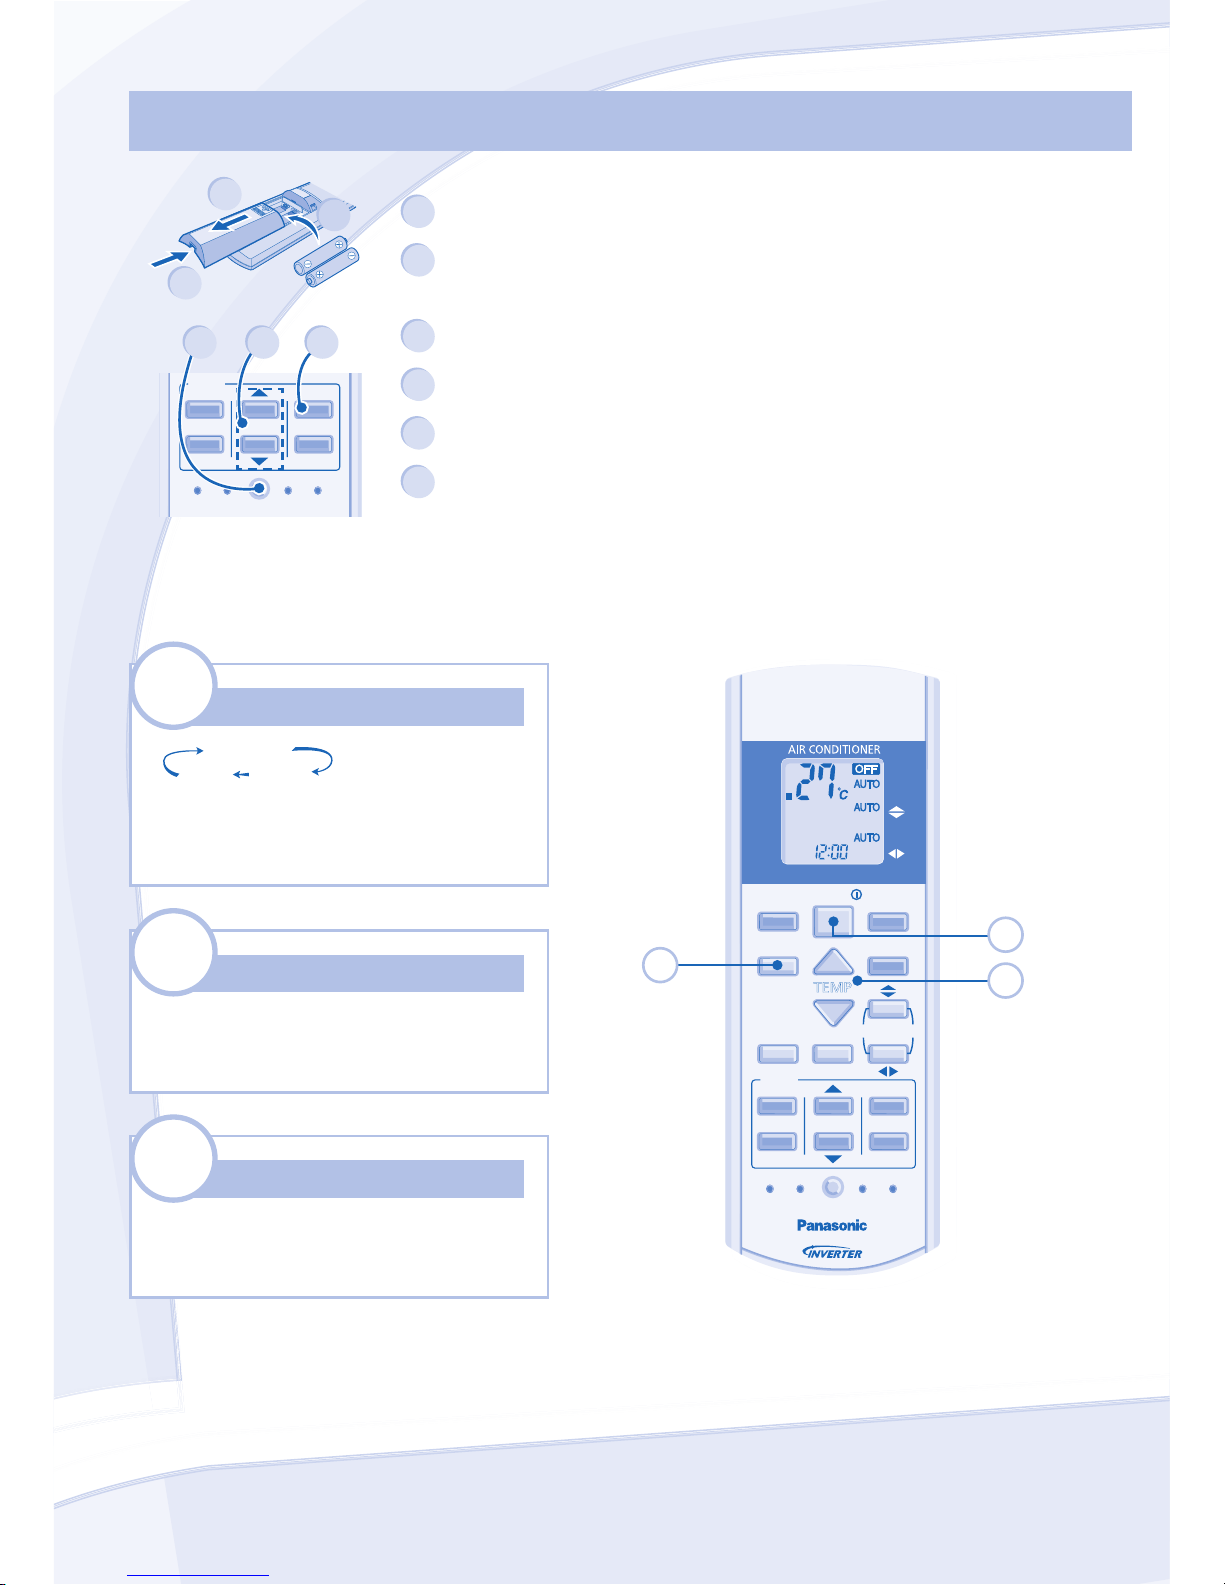
Remote Control Preparation
Remote Control Preparation • •
遙控器的準備
遙控器的準備
• Preparación Del Control Remoto
• Preparación Del Control Remoto
1
2
3
TIMER
SET
CANCEL
ON
OFF
1
2
3
SET CHECK CLOCK RESET
AC
RC
4 5 6
1
Pull out • 拉出 • Quite
2
Insert AAA or R03 batteries (can be used ~ 1 year) •
裝入 AAA 或 R03 電池(可用大約一年)•
Coloque baterías AAA o R03 (Se puede utilizar aproximadamente 1 año)
3
Close the cover • 把蓋關上 • Cierre la cubierta
4
Press CLOCK • 按下時間(CLOCK) • Pulse RELOJ
5
Set time • 設定時間 • Ajuste la hora
6
Confi rm • 確認 • Confi rme
MODE
MODE
AUTO
DRY COOL
Select the desired mode.
選擇所需要的模式。
Seleccione el modo deseado.
1
OFF/ON
OFF/ON
Start/stop the operation.
開始/停止操作。
Inicie/detenga el funcionamiento.
2
TEMP
TEMP
Select the desired temperature.
選擇所需要的溫度。
Seleccione la temperature deseada.
3
 Loading...