

Panasonic CS-PS9NKP, CU-PS9NKP, CS-PS12NKP, CU-PS12NKP, CS-PS18NKP Quick Manual [id, en]
...Page 1
F568269
Petunjuk Pengoperasian
Pendingin Ruangan
No Model.
Unit Dalam Unit Luar
CS-PS9NKP CU-PS9NKP
CS-PS12NKP CU-PS12NKP
CS-PS18NKP CU-PS18NKP
CS-PS24NKP CU-PS24NKP
PEDOMAN CEPAT
PEDOMAN CEPAT
QUICK GUIDE
QUICK GUIDE
B.INDONESIA
Sebelum mengoperasikan unit, baca terlebih
dahulu petunjuk penggunaan secara teliti dan
simpan untuk referensi selanjutnya.
ENGLISH
Before operating the unit, read these operating
instructions thoroughly and keep them for future
reference.
© Panasonic Appliances Air-Conditioning Malaysia
Sdn. Bhd. 2012. Unauthorized copying and distribution
is a violation of law.
DepDag No. I.15.PGI11.03802.1211
Page 2
2
B.INDONESIA
Terima kasih atas kepercayaan anda untuk membeli Pendingin Ruangan Panasonic
DAFTAR ISI
DAFTAR ISI
KONDISI PENGOPERASIAN
LANGKAH KESELAMATAN 4~5
REMOT KONTROL
6~7
INFORMASI
7
UNIT DALAM
8
MENCARI DAN MENGATASI MASALAH
9
PEDOMAN CEPAT
LEMBAR BELAKANG
CATATAN :
Ilustrasi dalam buku ini hanya bersifat informasi saja dan kemungkinan berbeda dengan unit sebenarnya.
Perubahan dapat dilakukan tanpa pemberitahuan terlebih dahulu demi perbaikan produk untuk masa depan.
ENGLISH
Thank you for purchasing Panasonic Air Conditioner
TABLE OF CONTENTS
TABLE OF CONTENTS
OPERATION CONDITION
SAFETY PRECAUTIONS 10~11
REMOTE CONTROL
12~13
INFORMATION
13
INDOOR UNIT
14
TROUBLESHOOTING
15
QUICK GUIDE
BACK COVER
NOTE : The illustrations in this manual are for explanation purposes only and may differ from the actual unit. They are
subjected to change without notice for future improvement.
Page 3
3
KONDISI PENGOPERASIAN
KONDISI PENGOPERASIAN
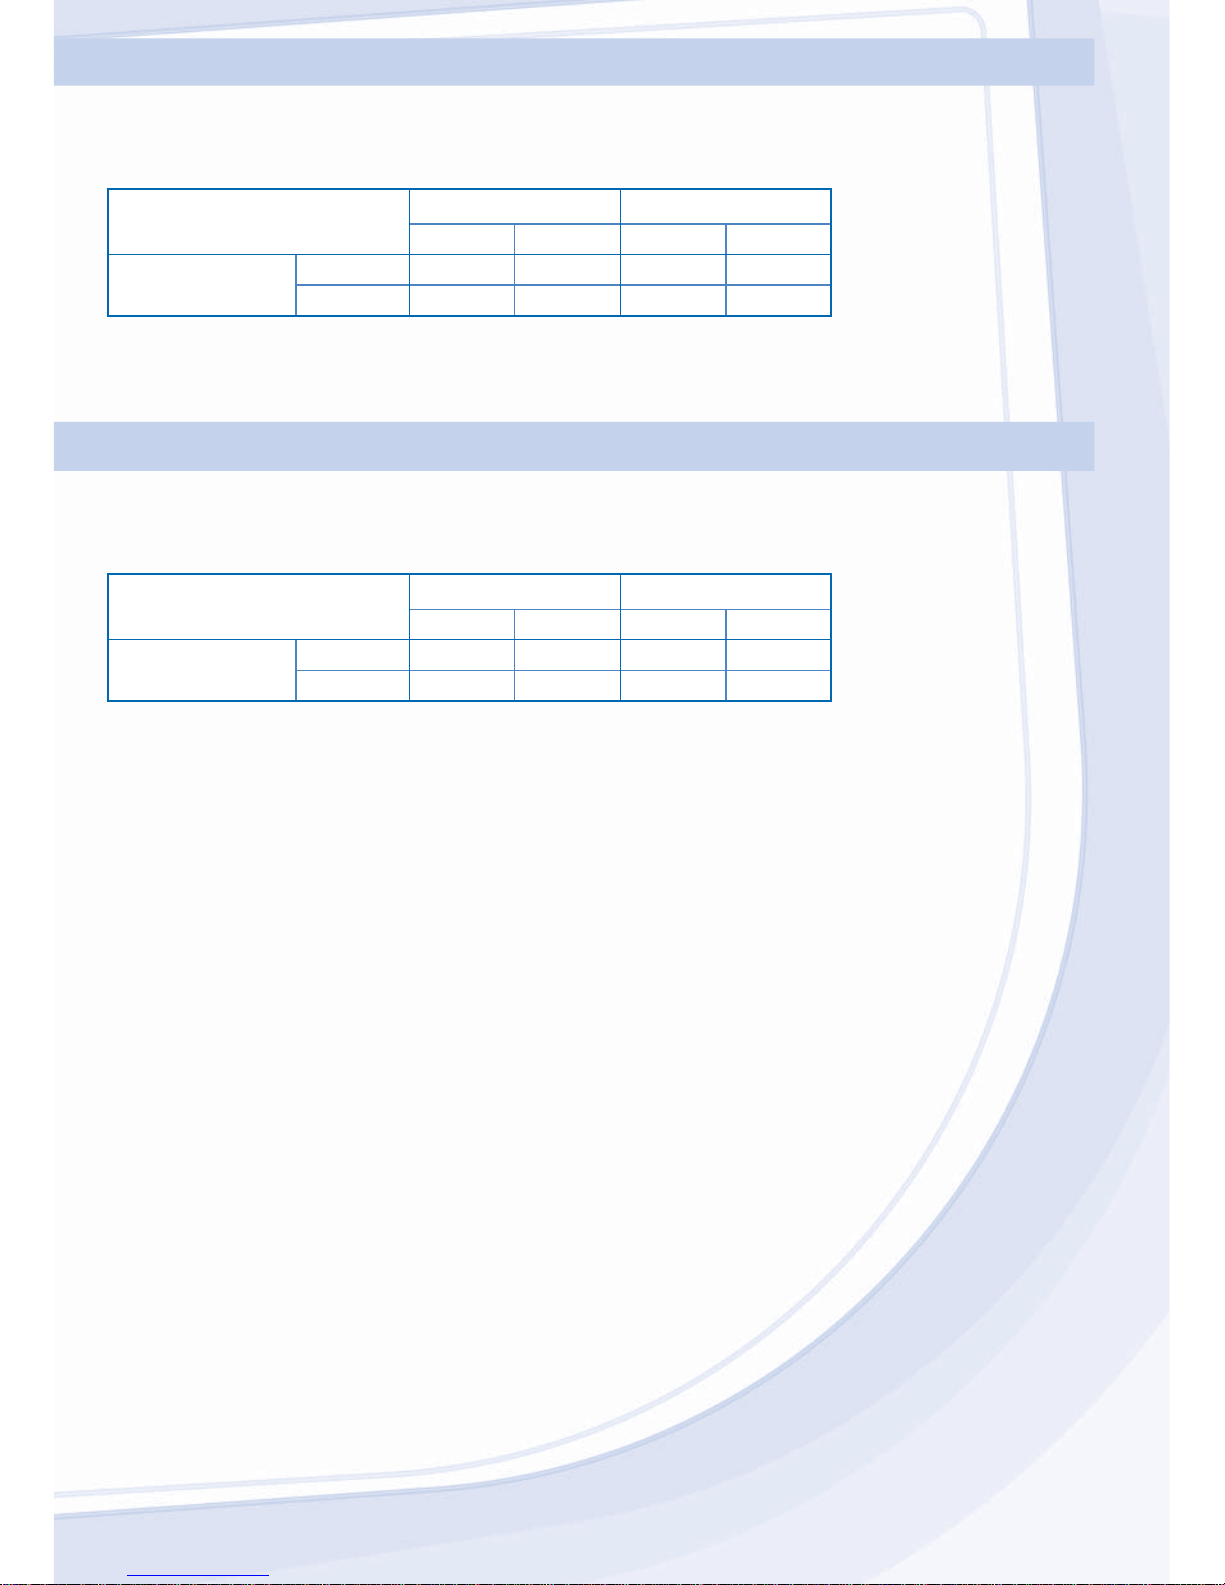
Gunakan pendingin ruangan ini mengikuti batasan suhu berikut
Suhu (°C)
Dalam Luar
* DBT: Suhu Bola Kering
* WBT: Suhu Bola Basah
*DBT *WBT *DBT *WBT
SEJUK
Mak. 32 23 43 26
Min. 16 11 16 11
OPERATION CONDITION
OPERATION CONDITION
Use this air conditioner under the following temperature range
Temperature (°C)
Indoor Outdoor
* DBT: Dry bulb temperature
* WBT: Wet bulb temperature
*DBT *WBT *DBT *WBT
COOLING
Max. 32 23 43 26
Min. 16 11 16 11
Page 4
4
LANGKAH KESELAMATAN
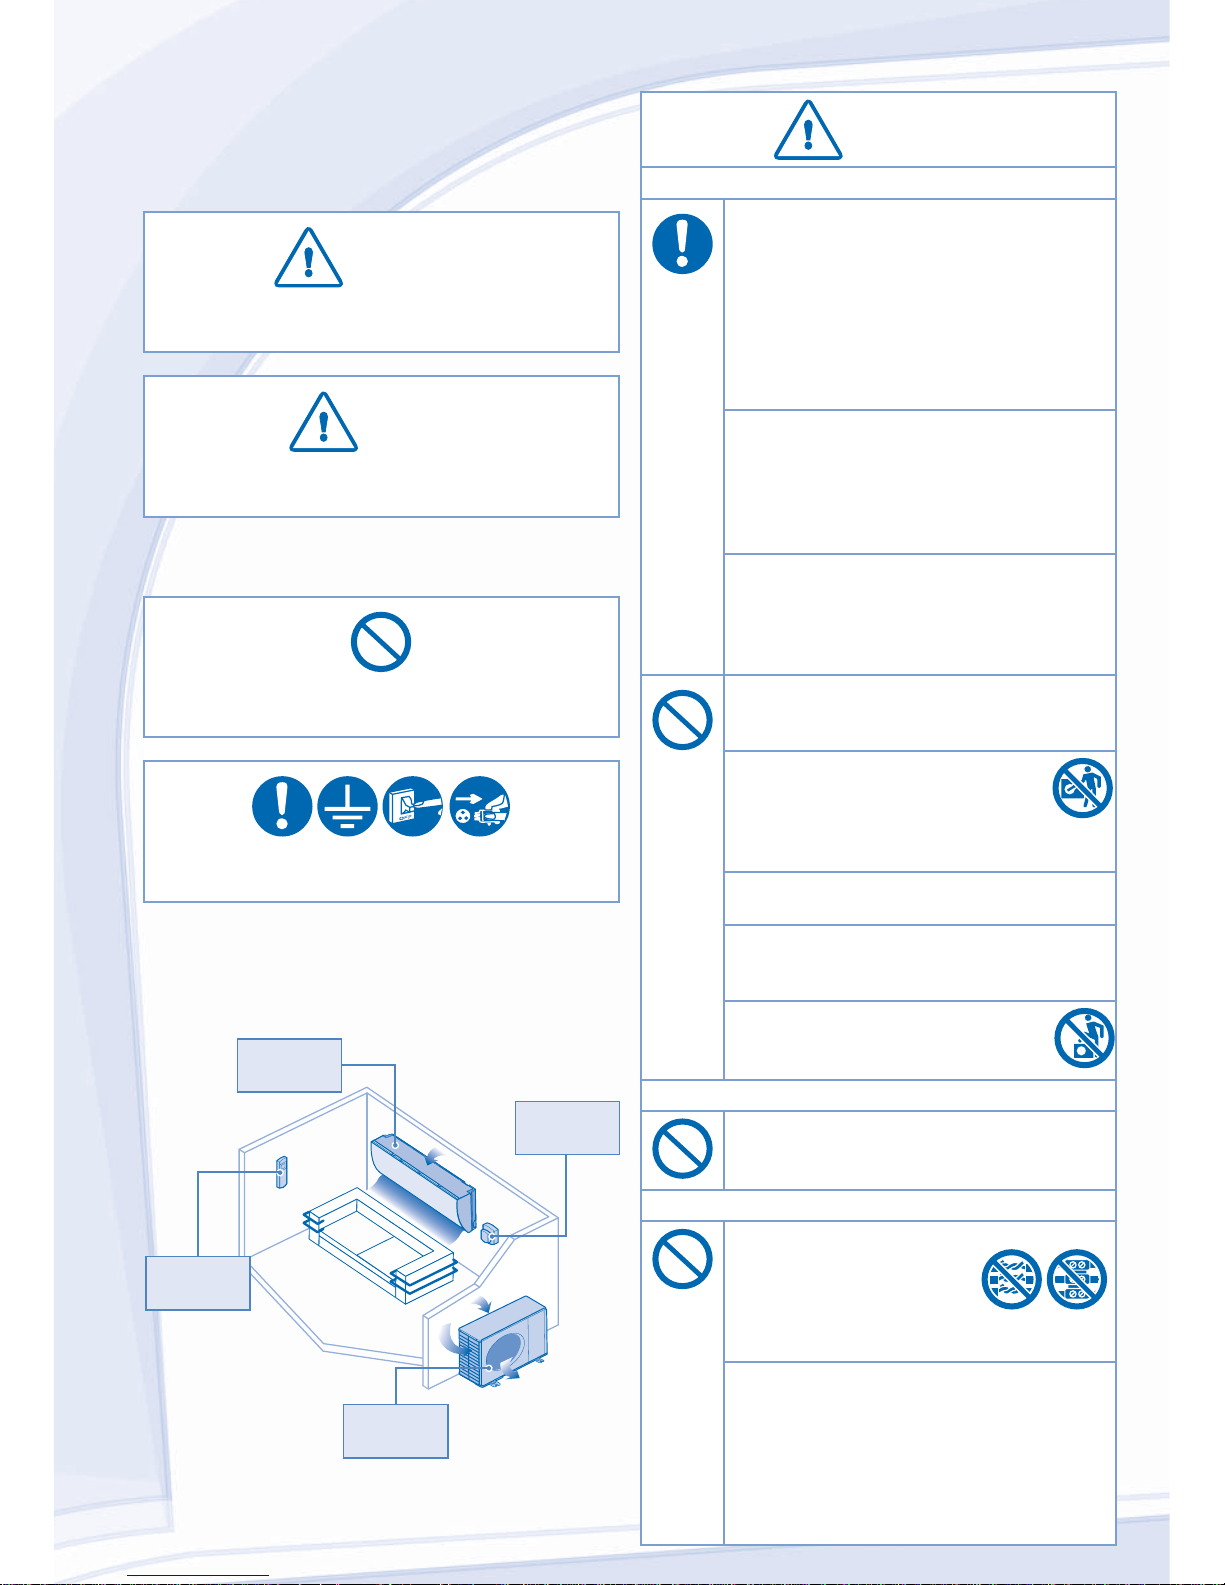
Untuk menghindari kecelakaan terhadap diri sendiri, orang
lain atau kerusakan peralatan, ikutilah peraturan dibawah ini.
Pengoperasian yang salah karena tidak mengikuti petunjuk
akan menyebabkan kecelakaan dan kerusakan terhadap
peralatan. Tingkatannya dapat diklasifi kasikan seperti berikut:
PERINGATAN
PERINGATAN
Simbol ini menunjukkan dapat menyebabkan
kematian atau kecelakaan parah.
HATI-HATI
HATI-HATI
Simbol ini menunjukkan dapat menimbulkan
kerusakan terhadap peralatan.
Petunjuk yang harus diikuti diklasifi kasikan dengan simbol
berikut:
Simbol ini berarti DILARANG melakukan tindakan
seperti yang digambarkan.
Simbol-simbol ini berarti tindakan yang WAJIB
dilakukan.
PERINGATAN
PERINGATAN
UNIT DALAM DAN UNIT LUAR
UNIT DALAM DAN UNIT LUAR
Pendingin ruangan ini bukan untuk digunakan oleh
orang (termasuk kanak-kanak) yang mempunyai
kelemahan fi sik, pancaindera dan mental, atau kurang
berpengalaman dan ilmu pengetahuan, kecuali
mereka diawasi atau diberikan instruksi mengenai cara
penggunaannya oleh seseorang yang bertanggung
jawab terhadap keselamatan mereka. Kanak-kanak
haruslah diawasi untuk memastikan agar mereka tidak
menjadikan peralatan ini sebagai permainan mereka.
Hubungi dealer resmi atau spesialis untuk
membersihkan suku cadang internal, mereparasi,
memasang, menanggalkan atau memasang kembali
unit. Pemasangan dan penanganan yang tidak
sempurna akan menimbulkan kebocoran, terkena arus
listrik atau kebakaran.
Konfi rmasikan ke dealer resmi atau spesialis mengenai
penggunaan jenis bahan pendingin yang ditentukan.
Penggunaan bahan pendingin selain dari yang
ditentukan kemungkinan akan merusak produk, terjadi
ledakan dan kecideraan dll.
Jangan pasang unit di tempat yang kemungkinan
berpotensi untuk meledak dan mudah terbakar. Jika
tidak dipatuhi kemungkinan akan terjadi kebakaran.
Jangan masukkan jari tangan atau benda
lainnya kedalam unit dalam dan unit luar
pendingin ruangan, suku cadang berputar
kemungkinan akan mengakibatkan
kecideraan.
Jangan sentuh unit luar sewaktu terjadi kilat,
kemungkinan akan terkena arus listrik.
Jangan biarkan diri anda terkena tiupan udara dingin
secara langsung terlalu lama yang mengakibatkan anda
sangat dingin.
Jangan duduk atau injak unit, anda bisa jatuh.
REMOT KONTROL
Jangan biarkan bayi atau anak-anak bermain remot
kontrol untuk menghindari baterai tertelan.
SUPLAI LISTRIK
Jangan gunakan kabel yang
dimodifi ksi, kabel sambungan,
kabel tambahan atau kabel yang
tidak ditentukan bagi mencegah
timbulnya kondisi menjadi terlalu
panas dan kebakaran.
Untuk mencegah timbulnya kondisi terlalu panas,
kebakaran atau terkena arus listrik:
• Jangan gunakan sumber listrik yang sama dengan
peralatan lain.
• Jangan operasikan dengan tangan basah.
• Jangan bengkokkan kabel lisrik.
• Jangan menghidupkan atau mematikan unit dengan
memasukkan atau mencabut steker listrik.
Aliran udara
Aliran udara
keluar
keluar
Remot
Kontrol
Suplai
Listrik
Unit
Dalam
Unit
Luar
Aliran udara
Aliran udara
keluar
keluar
Aliran udara
Aliran udara
masuk
masuk
Aliran udara
Aliran udara
masuk
masuk
Page 5
5
B.INDONESIA
HATI-HATI
HATI-HATI
UNIT DALAM DAN UNIT LUAR
UNIT DALAM DAN UNIT LUAR
Jangan cuci unit dalam dengan air, bensin, tener atau
serbuk penggosok agar unit tidak rusak atau mengalami
korosi.
Jangan gunakan bahan pengawet peralatan presisi,
makanan, binatang, tanaman, karya seni atau obyek lain.
Hal ini mungkin menyebabkan kualitasnya menurun, dll.
Jangan gunakan peralatan yang mudah terbakar di
depan saluran keluar udara untuk menghindarkan
penyebaran api.
Jangan letakkan tanaman atau binatang piaraan
langsung dibawah arus udara untuk menghindarkan
kecideraan, dll.
Jangan sentuh sisi aluminium yang tajam,
suku cadang yang tajam bisa
menimbulkan kecideraan.
Jangan hidupkan unit dalam bilamana menggosok
lantai dengan lilin. Setelah menggosok lantai
dengan lilin, biarkan udara segar memasuki
ruangan sebelum mengoperasikan unit.
Jangan pasang unit di tempat yang berminyak atau
berasap agar unit tidak rusak.
Jangan membongkar unit untuk tujuan pembersihan
untuk menghindarkan kecideraan.
Jangan menginjak bangku yang tidak stabil bilamana
membersihkan unit untuk menghindarkan kecideraan.
Jangan letakkan jambangan atau wadah air di atas
unit. Air bisa masuk unit dan merusak isolasi. Ini bisa
mengakibatkan terkena arus listrik.
Jangan buka jendela atau pintu terlalu lama sewaktu
pengoperasian mode COOL/DRY.
Pastikan pipa pembuangan disambungkan dengan
sempurna dan jaga agar saluran pembuangan bebas dari
selokan, wadah atau tidak tenggelam dalam air untuk
menghindarkan kebocoran air.
Setelah lama digunakan atau digunakan dengan
peralatan yang mudah terbakar, biarkan udara segar
memasuki ruangan secara berkala.
Setelah penggunaan yang lama, pastikan rak
pemasangan tidak memburuk agar unit tidak merurut.
REMOT KONTROL
Jangan gunakan baterai yang dapat diisi ulang (Ni-Cd).
Hal itu kemungkinan dapat merusak remot kontrol.
Untuk mencegah kegagalan pemakaian atau kerusakan
remot kontrol:
• Keluarkan baterai jika unit tidak digunakan dalam
jangka waktu yang lama.
• Baterai baru dengan tipe yang sama haruslah
dipasang menurut kutubnya.
SUPLAI LISTRIK
Jangan tarik kabel untuk mencabut steker agar tidak
terkena arus listrik.
PERINGATAN
PERINGATAN
SUPLAI LISTRIK
Gunakan kabel suplai tenaga tanpa sambungan. Dalam
keadaan yang tidak dapat dihindarkan yang mana
kabel suplai tenaga tanpa sambungan tidak mungkin
ada, gunakan cara penyambungan yang memenuhi
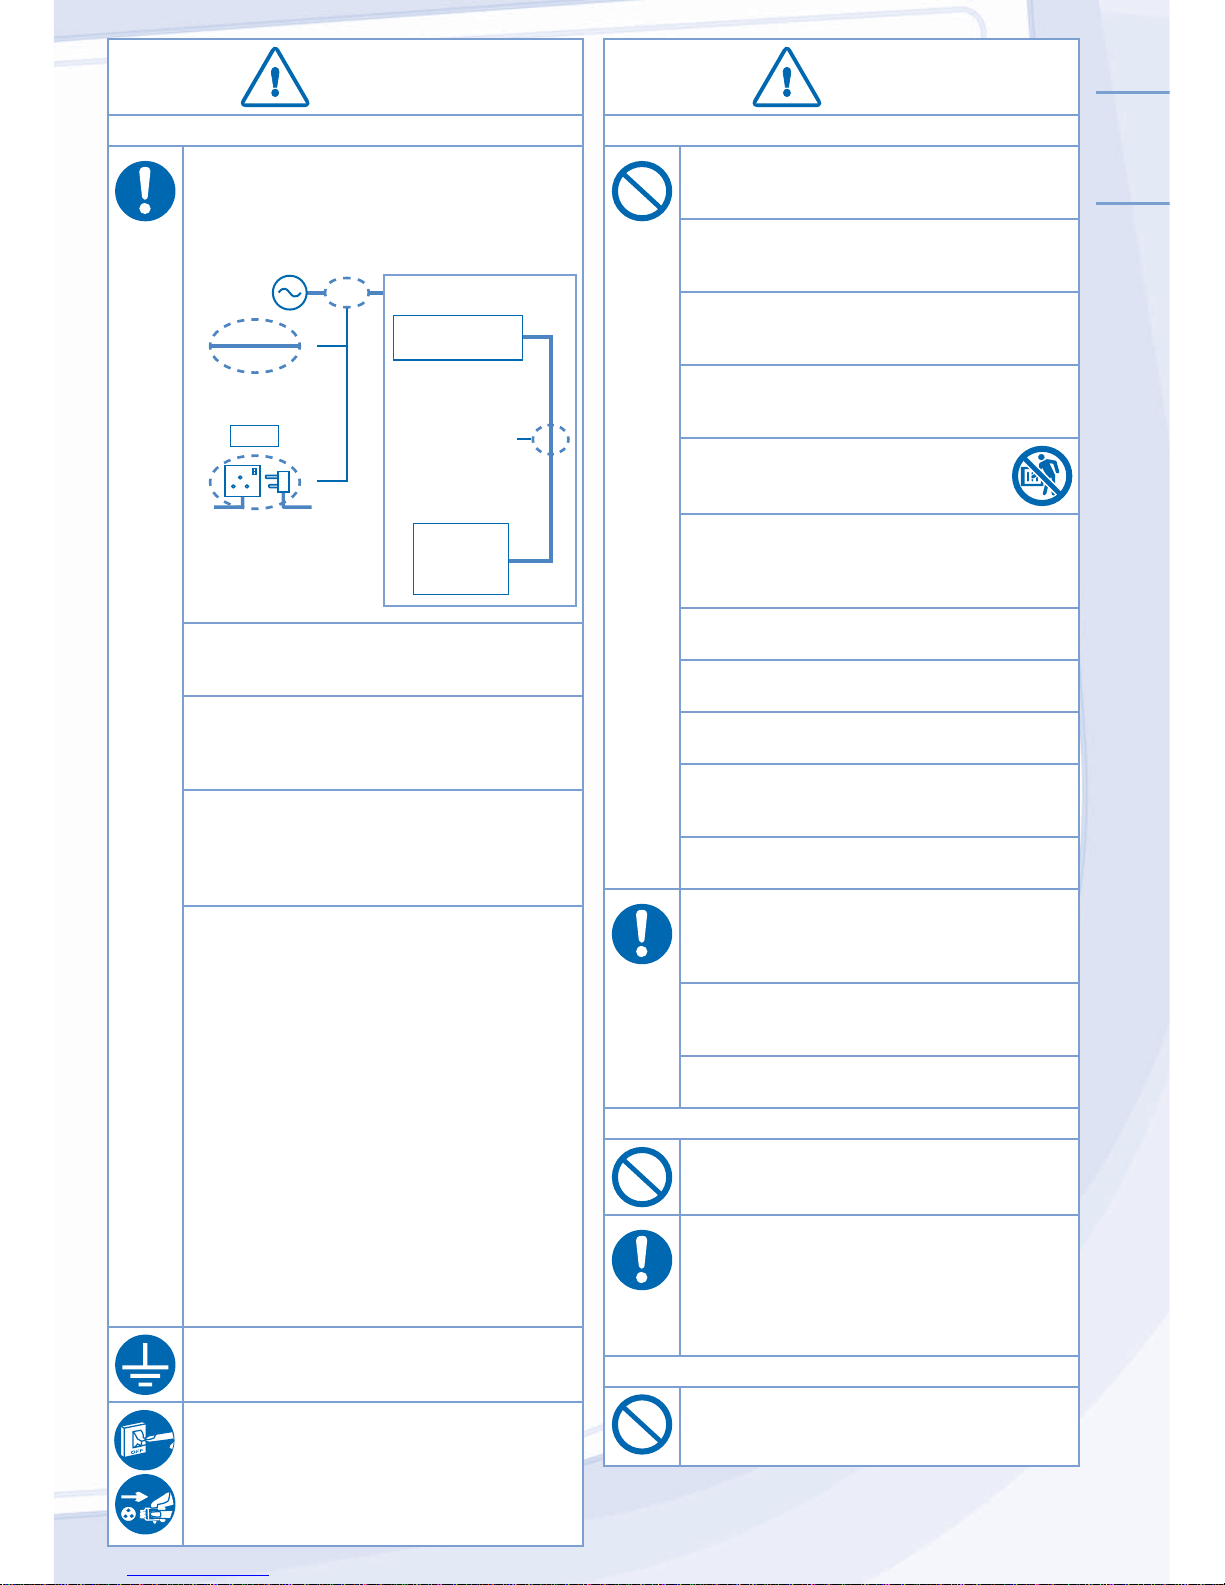
persyaratan (contohnya: stopkontak dan steker ).
Pendingin Ruangan
◄
Kebel yang lengkap
tanpa sambungan
◄
◄
Cara penyambungan yang
memenuhi persyaratan
(contohnya: stopkontak
dan steker yang memenuhi
persyaratan)
Kebel yang
lengkap tanpa
sambungan
Suplai
Listrik
ATAU
Unit Dalam
Unit Luar
Jika kabel listrik rusak atau harus diganti, hubungi agen
pelayanan purna jualnya atau teknisi yang ahli agar tidak
menimbulkan bahaya.
Adalah sangat disarankan sekali agar dipasang dengan
Pemutus Arus Kebocoran Pentanahan (ELCB) atau Alat
Sisa Arus Listrik (RCD) agar tidak terkena arus listrik atau
kebakaran.
Untuk mencegah timbulnya kondisi terlalu panas,
kebakaran atau terkena arus listrik:
• Masukkan steker listrik dengan sempurna.
• Debu yang melekat di steker listrik haruslah dilap
secara berkala dengan kain kering.
Jangan gunakan produk jika terjadi keabnormalan/
kerusakan dan cabut steker listrik atau matikan tombol
listrik dan pemutus arus.
(Resiko terjadinya asap/kebakaran/terkena arus listrik)
Contoh keabnormalan/kerusakan
• Pemutus Arus Kebocoran Pentanahan ELCB selalu
turun.
• Tercium bau benda terbakar.
• Terdengar kebisingan dan getaran unit yang abnormal.
• Kebocoran air dari unit dalam.
• Kabel tenaga atau steker menjadi panas yang
abnormal.
• Kecepatan kipas tidak dapat dikontrol.
• Unit berhenti beroperasi dengan segera meskipun
tombol dihidupkan untuk pengoperasian.
• Kipas tidak berhenti meskipun jika pengoperasian
dihentikan.
Hubungi segera dealer lokal anda untuk melakukan
pemeliharaan/reparasi.
Peralatan ini harus dipasang kabel pentanahan untuk
mencegah agar tidak terkena arus listrik atau kebakaran.
Mencegah dari terkena arus listrik dengan memutuskan
suplai listrik dan mencabut steker bilamana:
- Sebelum membersihkan atau melakukan servis.
- Tidak digunakan dalam jangka waktu lama.
- Aktivitas kilat yang kuat dan abnormal.
Page 6
6
REMOT KONTROL
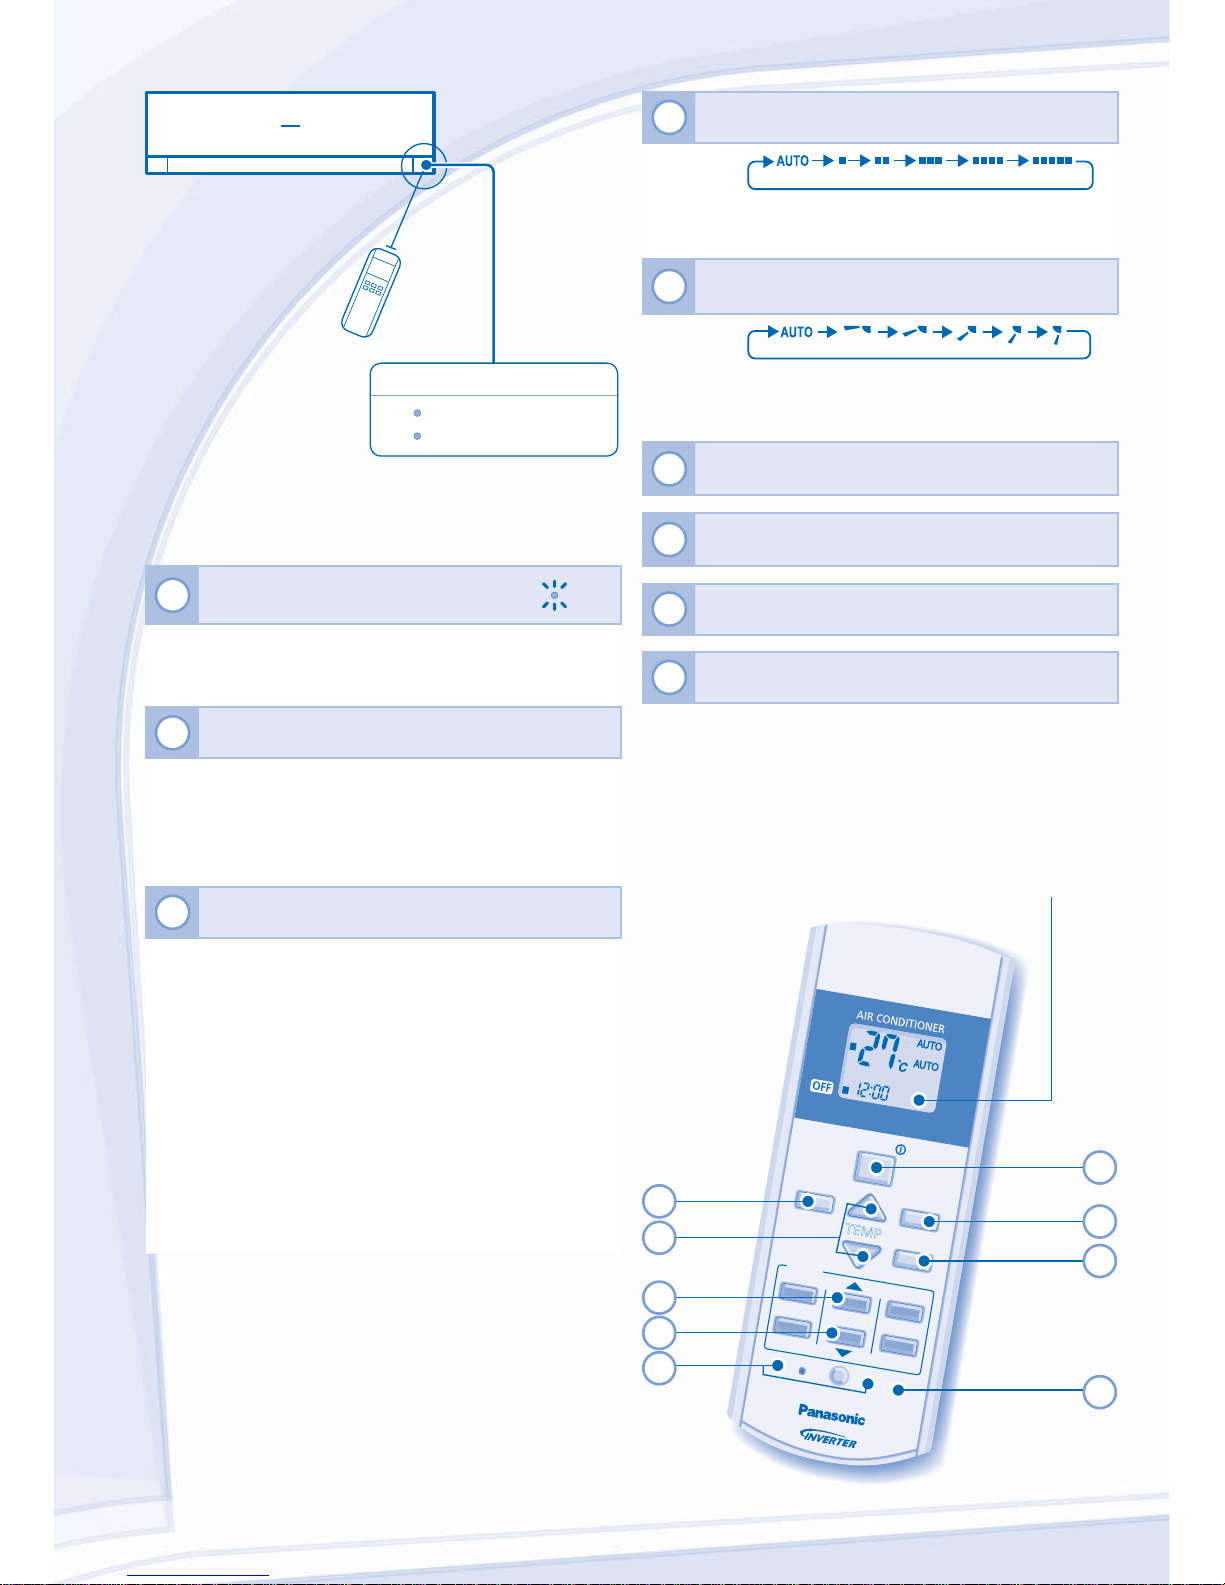
Tekan tombol remot kontrol
1
UNTUK MENGHIDUPKAN DAN
MEMATIKAN UNIT
POWER
• Harap anda melihat indikasi OFF pada tampailan remot
kontrol untuk menghindarkan unit beroperasi/berhenti
secara tidak sewajarnya.
2
MENYETEL SUHU
• Jangkauan dipilih: 16°C ~ 30°C.
• Pengoperasian unit dalam suhu yang direkomendasikan
akan menghemat listrik.
COOL : 26°C ~ 28°C.
DRY : 1°C ~ 2°C lebih rendah dari suhu ruangan.
3
UNTUK MEMILIH MODE PENGOPERASIAN
AUTO - Untuk memudahkan anda
• Sewaktu pilihan mode pengoperasian, indikator aliran
listrik berkedip.
• Unit memilih mode pengoperasian sewaktu memulai
menurut setelan suhu dan suhu ruangan.
COOL - Udara sejuk
• Gunakan gorden untuk menghalangi sinar matahari
atau panas dari luar untuk mengurangi pemakaian listrik
sewaktu mode sejuk.
DRY - Menurunkan kelembaban di ruangan anda
• Unit beroperasi pada kecepatan kipas yang rendah untuk
pengoperasian pendinginan yang lembut.
Jarak maksimum: 8m
4
PEMILIHAN KECEPATAN KIPAS (5 PILIHAN)
FAN SPEED
• Untuk AUTO, kecepatan kipas unit dalam secara otomatis
akan disetelah menurut mode pengoperasian.
5
UNTUK MENYETEL ARAH ARUS UDARA
VERTIKAL (5 PILIHAN)
AIR SWING
• Pastikan udara ruangan dapat bersirkulasi.
•
Dalam mode COOL/DRY, Jika disetel AUTO, jalur pengarah
secara otomatis akan bergerak arah keatas/kebawah.
6
Tekan selama 5 detik untuk meredupkan atau
memulihkan indikator terang unit.
7
Tekan selama 10 detik untuk menunjukkan setelan
suhu dalam °C atau °F.
8
Tekan untuk memulihkan setelan asal remot kontrol.
9
Tidak digunakan dalam pengoperasian normal.
FAN SPE
ED
AIR SWI
NG
MOD
E
TEMP
OFF/
ON
TIMER
SET
CANCEL
ON
OFF
1
2
3
OFF
TIM
ER
ON
TIMER
AUTO
COOL
DRY
FAN
SPE
ED
AIR
SWING
CLOCK
SET CHECK
RESET
AC
RC
3
4
5
6
7
Tampilan remot kontrol
1
8
2
9
INDIKATOR
POWER
(Hijau)
TIMER
(Jingga)
Page 7
7
B.INDONESIA
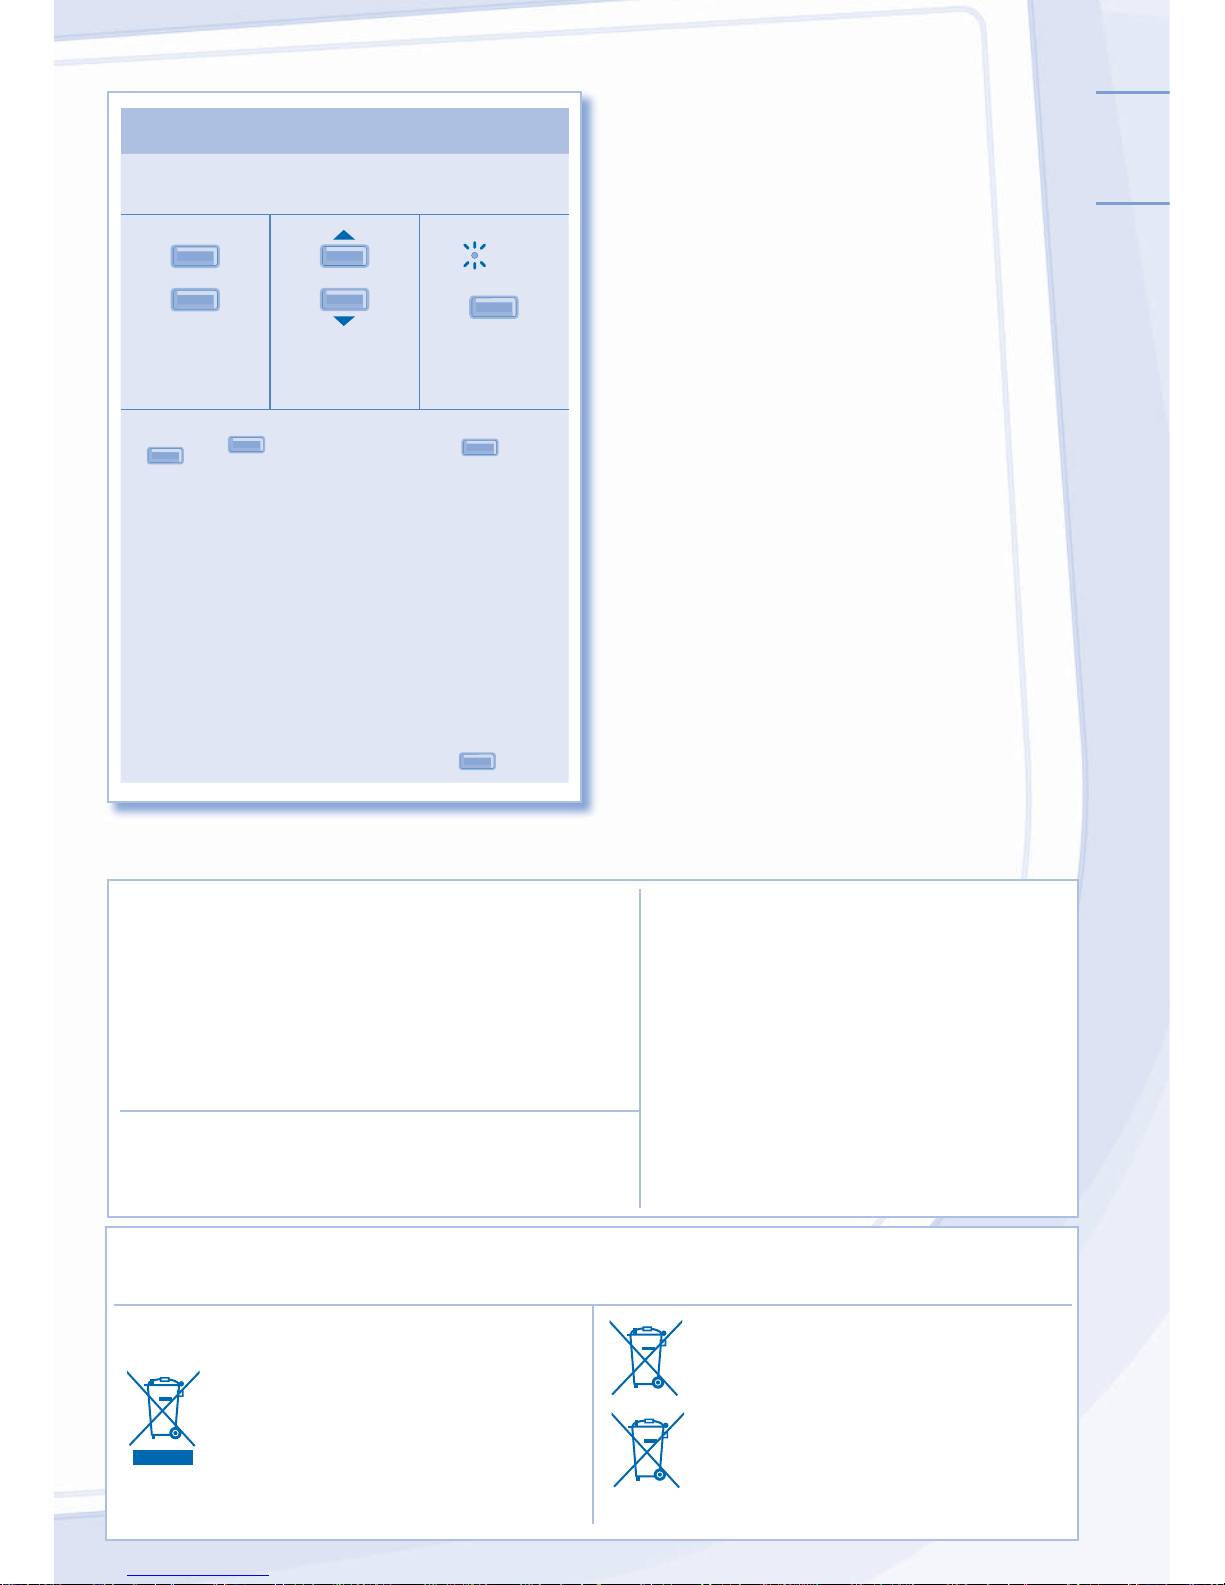
MENYETEL PENGATUR WAKTU
MENYETEL PENGATUR WAKTU
• Untuk menghidupkan atau mematikan unit sesuai
waktu yang diinginkan.
ON
OFF
1
2
TIMER
S
ET
Pilih pengatur
waktu “ON” atau
“OFF”
Setel waktu Memastikan
• Untuk membatalkan pengatur waktu tekan tombol
O
N
atau
OFF
, kemudian tekan tombol
CANCEL
.
•
Apabila pengatur waktu “ON” disetel, unit kemungkinan
akan beroperasi lebih awal (hingga 15 menit) sebelum
waktu sebenarnya untuk dapat mencapai suhu yang
diinginkan pada tepat pada waktunya.
• Pengoperasian pengatur waktu berdasarkan pada
jam yang terdapat pada remot kontrol dan diulang
setiap hari setelah disetel. Untuk menyetel jam, lihat
Persiapan Remot Kontrol di penutup belakangnya.
• Jika pengatur waktu dibatalkan secara manual atau
karena listrik terputus, anda dapat mengembalikan
setelan waktu sebelumnya (segera setelah listrik
hidup kembali) dengan menekan tombol
SET
.
INFORMASI
Informasi untuk Pemakai tentang Pengumpulan dan Pembuangan Peralatan Lama dan Baterai yang
telah digunakan
[Keterangan tentang Pembuangan di
Negara-negara lain di luar Uni Eropa]
Simbol-simbol ini hanya sah di Uni Eropa.
Jika anda ingin membuang item ini, hubungi
pihak berwewenang setempat atau dealer
resmi anda dan minta keterangan mengenai
cara pembuangannya.
Catatan tentang simbol baterai (bawah, dua
contoh simbol):
Simbol ini kemungkinan digunakan dengan
kombinasi dengan simbol kimia. Dalam
hubungan ini dinyatakan telah mematuhi
Peraturan Bahan Kimia yang telah ditetapkan.
Pb
UNTUK PEMERIKSAAN MUSIMAN SETELAH TIDAK
DIGUNAKAN DALAM JANGKA WAKTU LAMA
• Pemeriksaan baterai remot kontrol.
• Tidak ada penghalang sirkulasi udara masuk dan keluar.
• Gunakan tombol otomatis OFF/ON untuk memilih
pengoperasian penyejukan. Setelah 15 menit pengoperasian,
adalah normal terjadi perbedaan suhu antara ventilasi udara
masuk dan keluar:
Penyejukan: ≥ 8°C
JIKA TIDAK DIGUNAKAN DALAM JANGKA WAKTU LAMA
• Putuskan aliran listrik dengan menarik steker.
• Lepaskan baterai remot kontrol.
KRITERIA NON SERVIS
PUTUSKAN SUPLAI LISTRIK DAN CABUT
STEKER kemudian hubungi dealer resmi jika
terjadi kondisi berikut:
• Bunyi tidak normal sewaktu dioperasikan.
• Air/partikel asing masuk kedalam Remot
Kontrol.
• Kebocoran air dari Unit Dalam.
• Tombol sakelar pemutus arus listrik selalu mati.
• Steker/Kabel listrik terasa panas.
• Knop atau tombol tidak beroperasi dengan baik.
Page 8
8
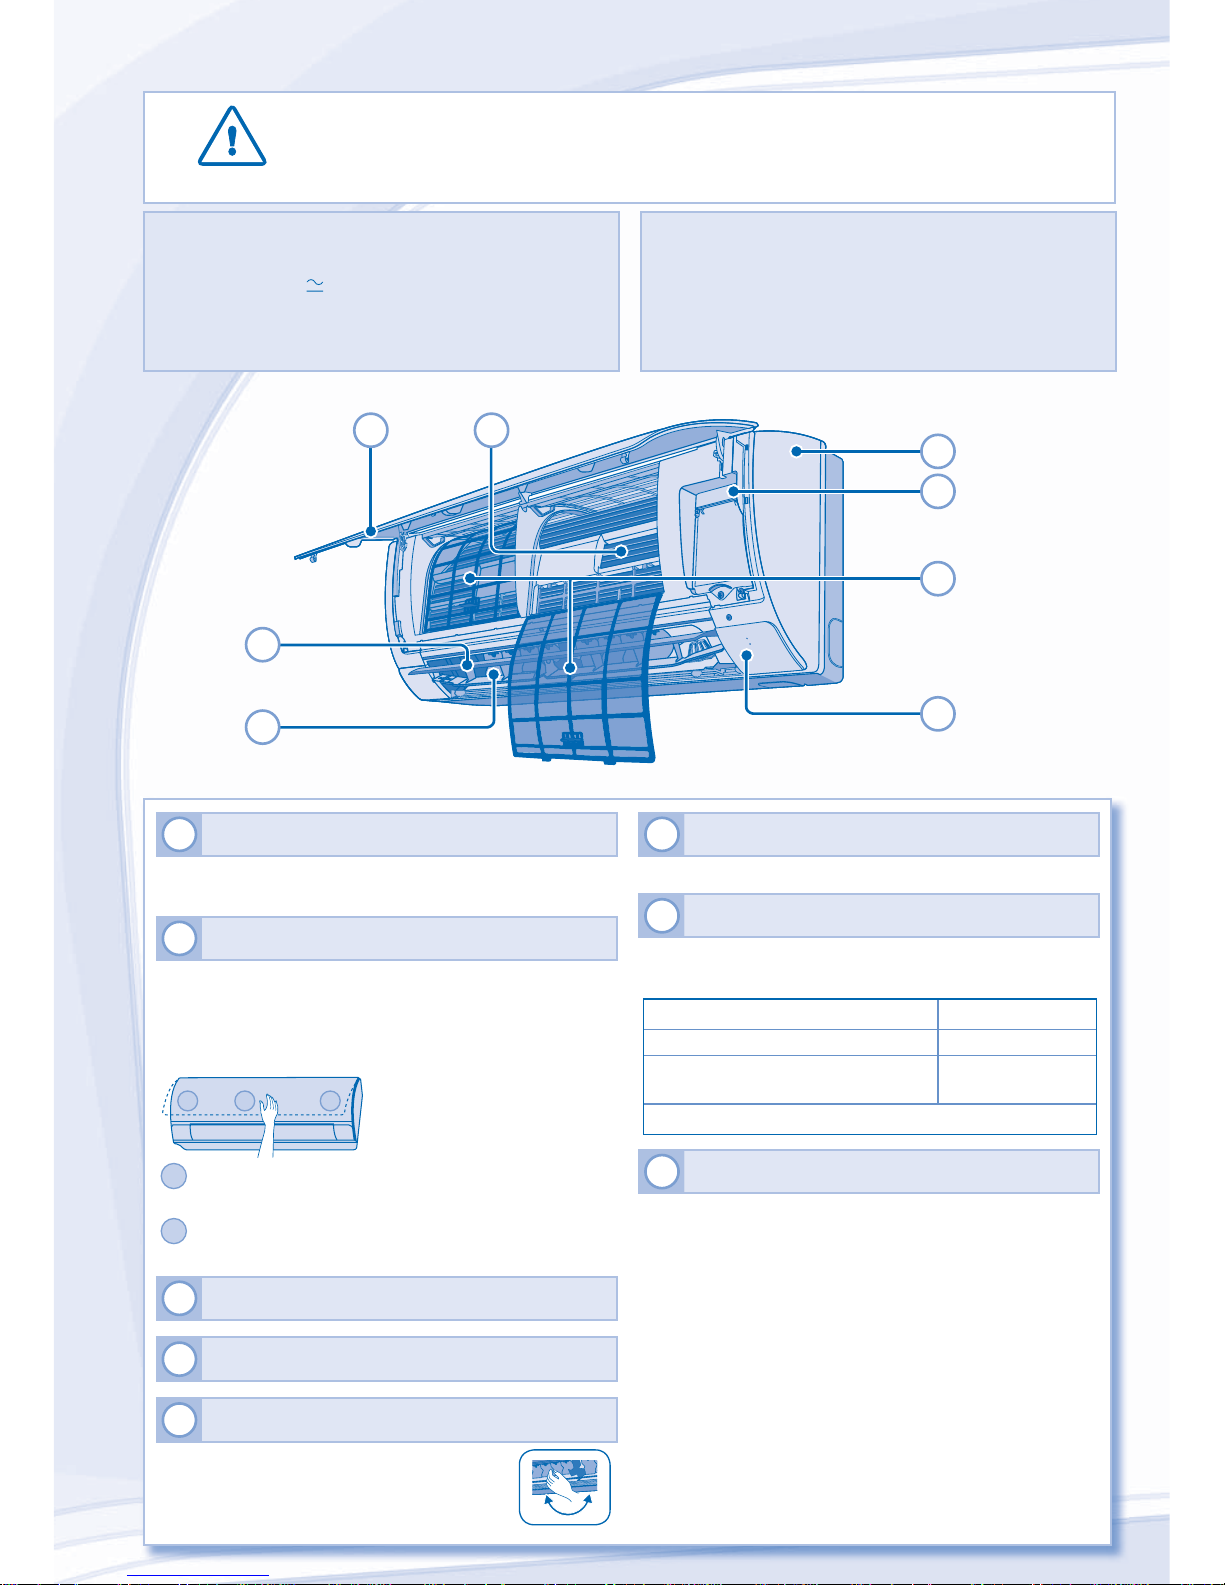
1
UNIT DALAM
• Lap unit dalam dengan hati-hati dan gunakan kain yang
lembut dan kering.
2
PANEL DEPAN
Membuka Panel Depan
• Angkat dan tarik untuk membuka panel depan.
• Cuci dengan hati-hati dan keringkan.
Tutup Panel Depan
21 1
1
Tekan ke bawah pada kedua ujung panel depan untuk
menutupnya.
2
Tekan bagian tengah panel depan untuk menutup
dengan teguh. (CS-PS18NKP, CS-PS24NKP)
3
PENERIMA REMOT KONTROL
4
LAPISAN ALUMINIUM
5
JALUR PENGARAH ARUS UDARA HORIZONTAL
• Penyetelan manual.
6
JALUR PENGARAH ARUS UDARA VERTIKAL
• Jangan setel dengan tangan.
7
TOMBOL OTOMATIS OFF/ON
• Gunakan bilamana remot kontrol tidak dapat ditemukan
atau tidak berfungsi.
Tindakan Mode
Tekan sekali. Otomatis
Tekan hingga terdengar bunyi “tit”
sekali, kemudian lepaskan.
Sejuk
Tekan tombol untuk mematikan.
8
SARINGAN UDARA
• Pembersihan saringan udara perlu dilakukan setiap dua
minggu.
• Cuci/bilas saringan udara dengan hati-hati agar
permukaannya tidak rusak.
• Keringkan saringan udara secara tuntas di tempat yang
terlindung dari api atau sinar matahari langsung.
• Segera ganti saringan udara yang rusak.
POWER
TIM
ER
2
5
7
1
4
8
6
3
HATI-HATI
•
Matikan aliran listrik dan cabut steker sebelum melakukan pembersihan.
•
Jangan sentuh lapisan aluminium, suku cadang yang tajam bisa
menimbulkan luka cidera.
UNIT DALAM
PETUNJUK PENCUCIAN
PETUNJUK PENCUCIAN
TIP
TIP
• Jangan gunakan bensin, tener atau serbuk penggosok.
• Gunakan sabun ( pH7) atau deterjen yang biasa
dipakai dirumah tangga.
• Gunakan air dengan suhu tidak melebihi 40°C.
• Untuk memastikan kinerja unit optimal, perawatan
kebersihan harus dijalankan pada interval berkala.
Unit yang kotor kemungkinan mengakibatkan tidak
berfungsi dan anda kemungkinan akan melihat kode
kesalahan “H99”. Hubungi dealer resmi anda.
Page 9
9
B.INDONESIA
MENCARI DAN MENGATASI MASALAH
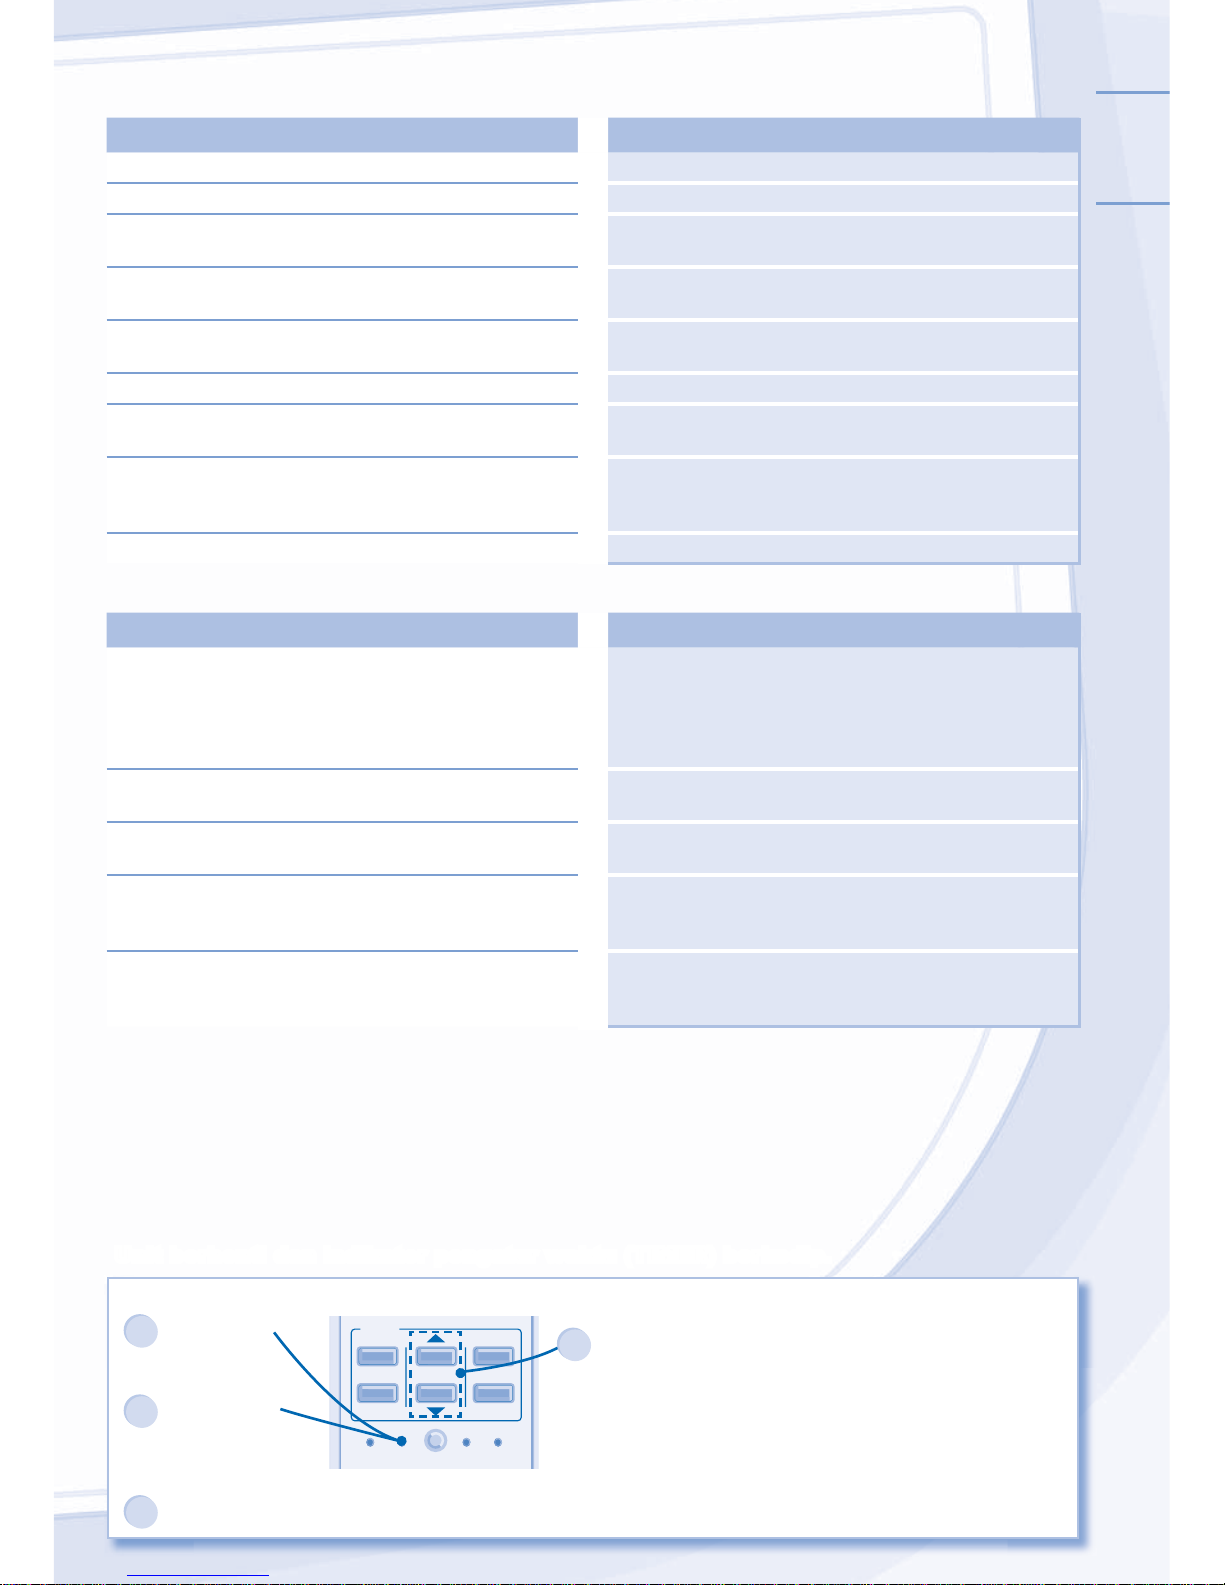
Gejala-gelaja berikut ini bukanlah menunjukkan unit tidak bisa berfungsi.
Gejala-gelaja berikut ini bukanlah menunjukkan unit tidak bisa berfungsi.
GEJALA
GEJALA
PENYEBAB
PENYEBAB
Kabut keluar dari unit dalam. ► • Efek kondensasi karena proses penyejukan.
Bunyi air mengalir saat unit beroperasi. ► • Aliran bahan pendingin dalam unit.
Ruangan berbau tidak enak. ► • Bau tersebut kemungkinan berasal dari dinding, karpet,
mebel atau pakaian yang lembab.
Kipas unit dalam kadang-kadang berhenti saat setelan
kecepatan kipas otomatis.
► • Untuk membantu menghilangkan bau disekitar ruangan.
Pengoperasian tertunda selama beberapa menit setelah
dimulai kembali.
► • Penundaan bertujuan untuk melindungi unit itu sendiri
terutama kompresor.
Unit luar mengeluarkan air/uap. ► • Kondensasi atau penguapan terjadi di permukaan pipa.
Indikator pengatur waktu (TIMER) selalu hidup. ► • Setelan pengatur waktu selalu berulang setiap hari satu
kali disetel.
Indikator POWER berkedip sebelum unit dihidupkan. ► • Ini merupakan langkah permulaan dalam persiapan
pengoperasian bilamana pengatur waktu ON telah
disetel.
Bunyi keriat-keriut sewaktu pengoperasian. ► • Perubahan suhu karena pemuaian/penyusutan unit.
Periksa hal-hal berikut ini sebelum meminta bantuan servis.
Periksa hal-hal berikut ini sebelum meminta bantuan servis.
GEJALA
GEJALA
PERIKSA
PERIKSA
Pengoperasian sejuk tidak berjalan dengan baik. ► • Suhu disetel dengan betul.
• Tutup semua pintu dan jendela.
• Bersihkan saringan udara dan ganti apabila rusak.
• Pindahkan benda-benda yang menghalangi sirkulasi
aliran udara masuk dan keluar.
Kebisingan sewaktu pengoperasian. ► • Periksa apakah unit dipasang miring.
• Tutup panel depan dengan benar.
Remot kontrol tidak berfungsi.
(Tampilan suram atau sinyal transmisi lemah.)
► • Masukkan baterai dengan benar.
• Ganti baterai yang lemah.
Unit tidak berfungsi. ► •
Periksa apakah pemutus arus listrik atau MCB rumah mati.
• Periksa apakah pengatur waktu telah disetel dengan
benar.
Unit tidak menerima sinyal dari remot kontrol. ► • Pastikan penerima tidak terhalang.
• Lampu neon tertentu kemungkinan mengganggu
pengiriman sinyal. Hubungi dealer resmi.
Unit berhenti dan indikator pengatur waktu (TIMER) berkedip.
Gunakan remot kontrol untuk mendapat kembali kode kesalahan.
TIMER
SET
CANCEL
ON
OFF
1
2
3
SET CHECK CLOCK RESET
AC
RC
1
Tekan selama
5 detik.
3
Tekan selama
5 detik untuk
menghentikan
pemeriksaan.
2
Tekan hingga
kedengaran bunyi “tit”,
kemudian catat kode
error atau kesalahan.
Catatan:
• Untuk kesalahan tertentu,
anda kemungkinan harus
merestart unit dengan
pengoperasian terbatas
dengan 4 bunyi tit sewaktu
pengoperasian start.
4
Matikan unit dan laporkan kode kesalahan kepada dealer resmi.
Page 10
10
SAFETY PRECAUTIONS
To prevent personal injury, injury to others, or property
damage, please comply with the following.
Incorrect operation due to failure to follow instructions below
may cause harm or damage, the seriousness of which is
classifi ed as below:
WARNING
WARNING
This sign warns of death or serious injury.
CAUTION
CAUTION
This sign warns of injury or damage to property.
The instructions to be followed are classifi ed by the following
symbols:
This symbol denotes an action that is PROHIBITED.
These symbols denote an actions that is
COMPULSORY.
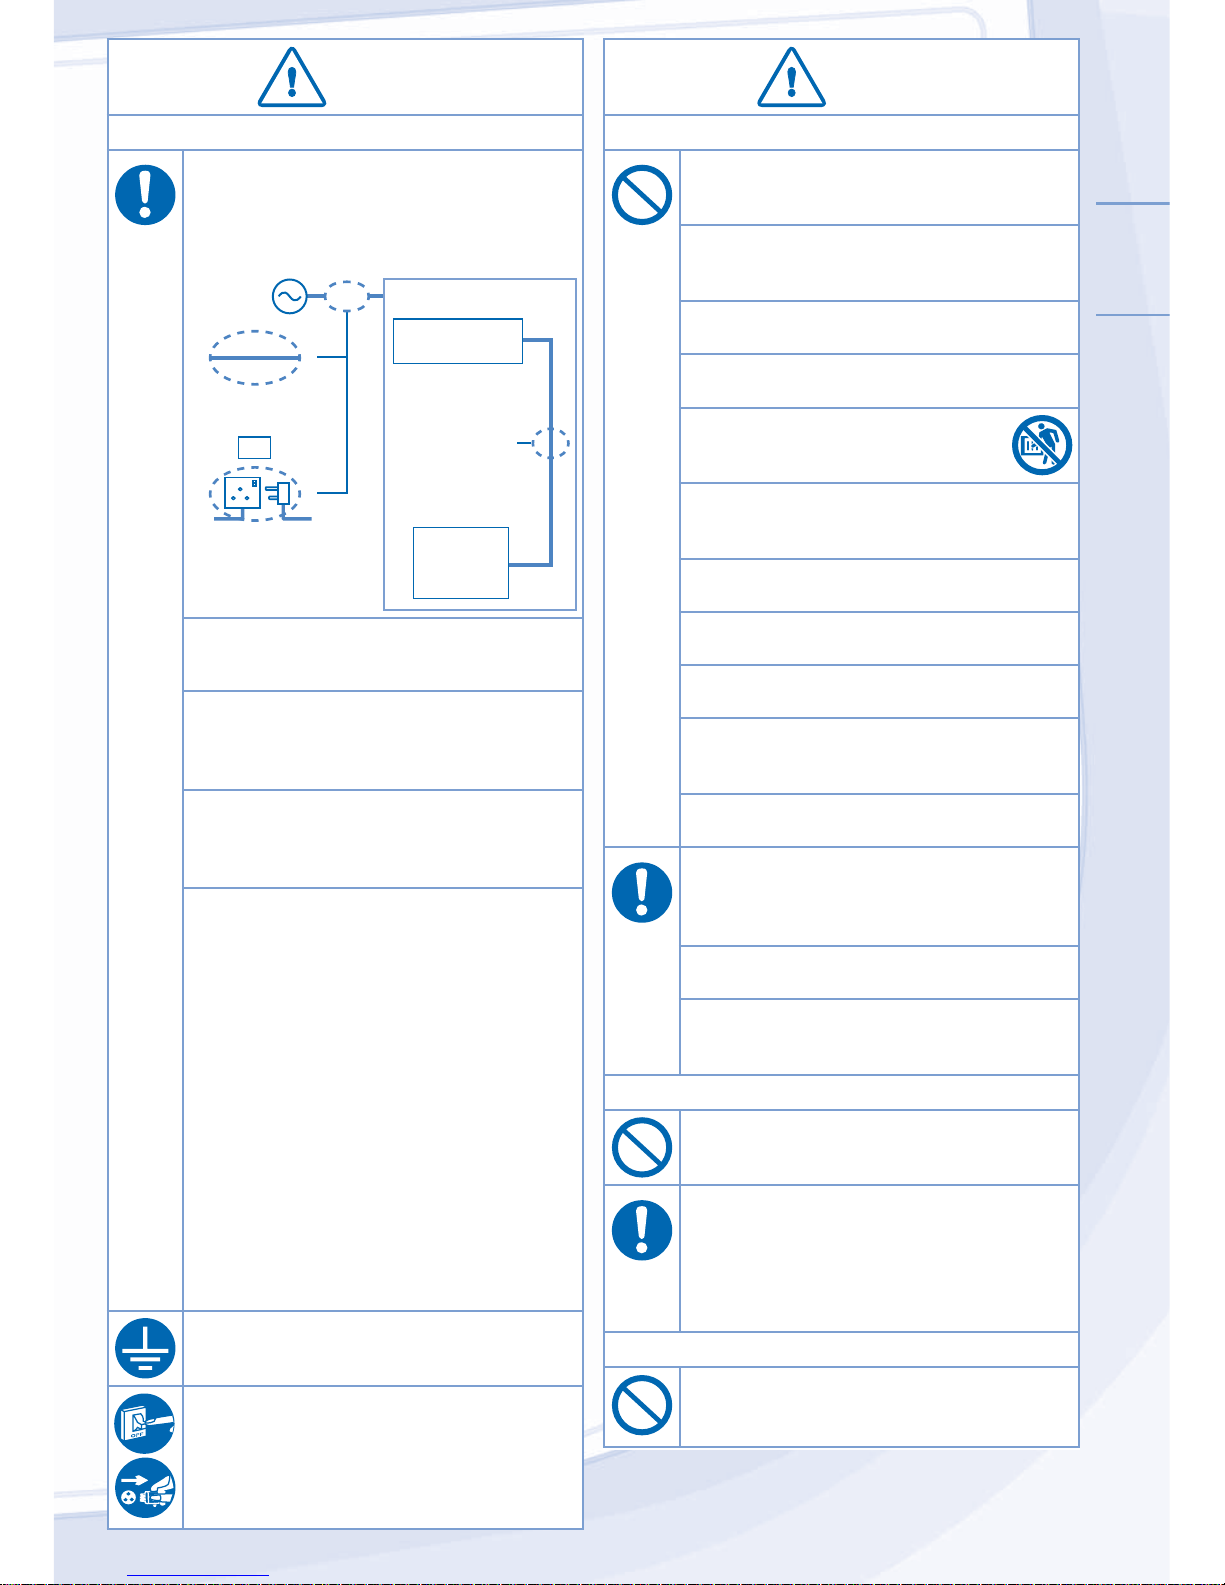
Air Inlet
Air Inlet
Air Outlet
Air Outlet
Air Outlet
Air Outlet
Air Inlet
Air Inlet
Remote
Control
Power
Supply
Indoor
Unit
Outdoor
Unit
WARNING
WARNING
INDOOR UNIT AND OUTDOOR UNIT
This appliance is not intended for use by persons
(including children) with reduced physical, sensory
or mental capabilities, or lack of experience
and knowledge, unless they have been given
supervision or instruction concerning use of the
appliance by a person responsible for their safety.
Children should be supervised to ensure that they
do not play with the appliance.
Please consult authorized dealer or specialist to
clean the internal parts, repair, install, remove
and reinstall the unit. Improper installation and
handling will cause leakage, electric shock or fi re.
Confi rm to authorized dealer or specialist on
usage of specifi ed refrigerant type. Using of
refrigerant other than the specifi ed type may
cause product damage, burst and injury etc.
Do not install the unit in a potentially explosive
or fl ammable atmosphere. Failure to do so could
result in fi re.
Do not insert your fi ngers or other
objects into the air conditioner indoor or
outdoor unit, rotating parts may cause
injury.
Do not touch the outdoor unit during lightning, it
may cause electric shock.
Do not expose yourself directly to cold air for a
long period to avoid excess cooling.
Do not sit or step on the unit, you may
fall down accidentally.
REMOTE CONTROL
Do not allow infants and small children to play
with the remote control to prevent them from
accidentally swallowing the batteries.
POWER SUPPLY
Do not use a modifi ed cord,
joint cord, extension cord or
unspecifi ed cord to prevent
overheating and fi re.
To prevent overheating, fi re or electric shock:
• Do not share the same power outlet with other
equipment.
• Do not operate with wet hands.
• Do not over bend the power supply cord.
• Do not operate or stop the unit by inserting or
pulling out the power plug.
Page 11
11
ENGLISH
CAUTION
CAUTION
INDOOR UNIT AND OUTDOOR UNIT
Do not wash the indoor unit with water, benzene,
thinner or scouring powder to avoid damage or
corrosion at the unit.
Do not use for preservation of precise equipment,
food, animals, plants, artwork or other objects. This
may cause quality deterioration, etc.
Do not use any combustible equipment in front of
the airfl ow outlet to avoid fi re propagation.
Do not expose plants or pet directly to airfl ow to
avoid injury, etc.
Do not touch the sharp aluminium fi n,
sharp parts may cause injury.
Do not switch ON the indoor unit when waxing the
fl oor. After waxing, aerate the room properly before
operating the unit.
Do not install the unit in oily and smoky areas to
prevent damage to the unit.
Do not dismantle the unit for cleaning purpose to
avoid injury.
Do not step onto an unstable bench when cleaning
the unit to avoid injury.
Do not place a vase or water container on the
unit. Water may enter the unit and degrade the
insulation. This may cause an electric shock.
Do not open window or door for long time during
COOL/DRY mode operation.
Ensure drainage pipe is connected properly and
keep drainage outlet clear of gutters, containers
or does not immersed in water to prevent water
leakage.
After a long period of use or use with any
combustible equipment, aerate the room regularly.
After a long period of use, make sure the
installation rack does not deteriorate to prevent the
unit from falling down.
REMOTE CONTROL
Do not use rechargeable (Ni-Cd) batteries.
It may damage the remote control.
To prevent malfunction or damage of the remote
control:
• Remove the batteries if the unit is not going to be
used for a long period of time.
• New batteries of the same type must be inserted
following the polarity stated.
POWER SUPPLY
Do not pull the cord to disconnect the plug to
prevent electric shock.
WARNING
WARNING
POWER SUPPLY
Use complete power supply cord without joining.
In unavoidable circumstances that complete power
supply cord without joining is impossible, use an
approved connection means
(for example: socket and plug).
Air Conditioner
◄
Complete wire
without joining
◄
◄
Approved connecting
means (for example:
approved socket and
plug)
Complete wire
without joining
Power
Supply
OR
Indoor Unit
Outdoor
Unit
If the supply cord is damage, it must be replaced
by the manufacturer, its service agent or similarly
qualifi ed persons in order to avoid a hazard.
It is strongly recommended to be installed with
Earth Leakage Circuit Breaker (ELCB) or Residual
Current Device (RCD) to prevent electric shock
or fi re.
To prevent overheating, fi re or electric shock:
• Insert the power plug properly.
• Dust on the power plug should be periodically
wiped with a dry cloth.
Stop using the product if any abnormality/failure
occurs and disconnect the power plug or turn off
the power switch and breaker.
(Risk of smoke/fi re/electric shock)
Examples of abnormality/failure
• The ELCB trips frequently.
• Burning smell is observed.
• Abnormal noise or vibration of the unit is
observed.
• Water leaks from the indoor unit.
• Power cord or plug becomes abnormally hot.
• Fan speed cannot be controlled.
• The unit stops running immediately even if it is
switched on for operation.
• The fan does not stop even if the operation is
stopped.
Contact your local dealer immediately for
maintenance/repair.
This equipment must be earthed to prevent
electrical shock or fi re.
Prevent electric shock by switching off the power
supply and unplug when:
- Before cleaning or servicing.
- Extended non-use.
- Abnormally strong lightning activity.
Page 12
12
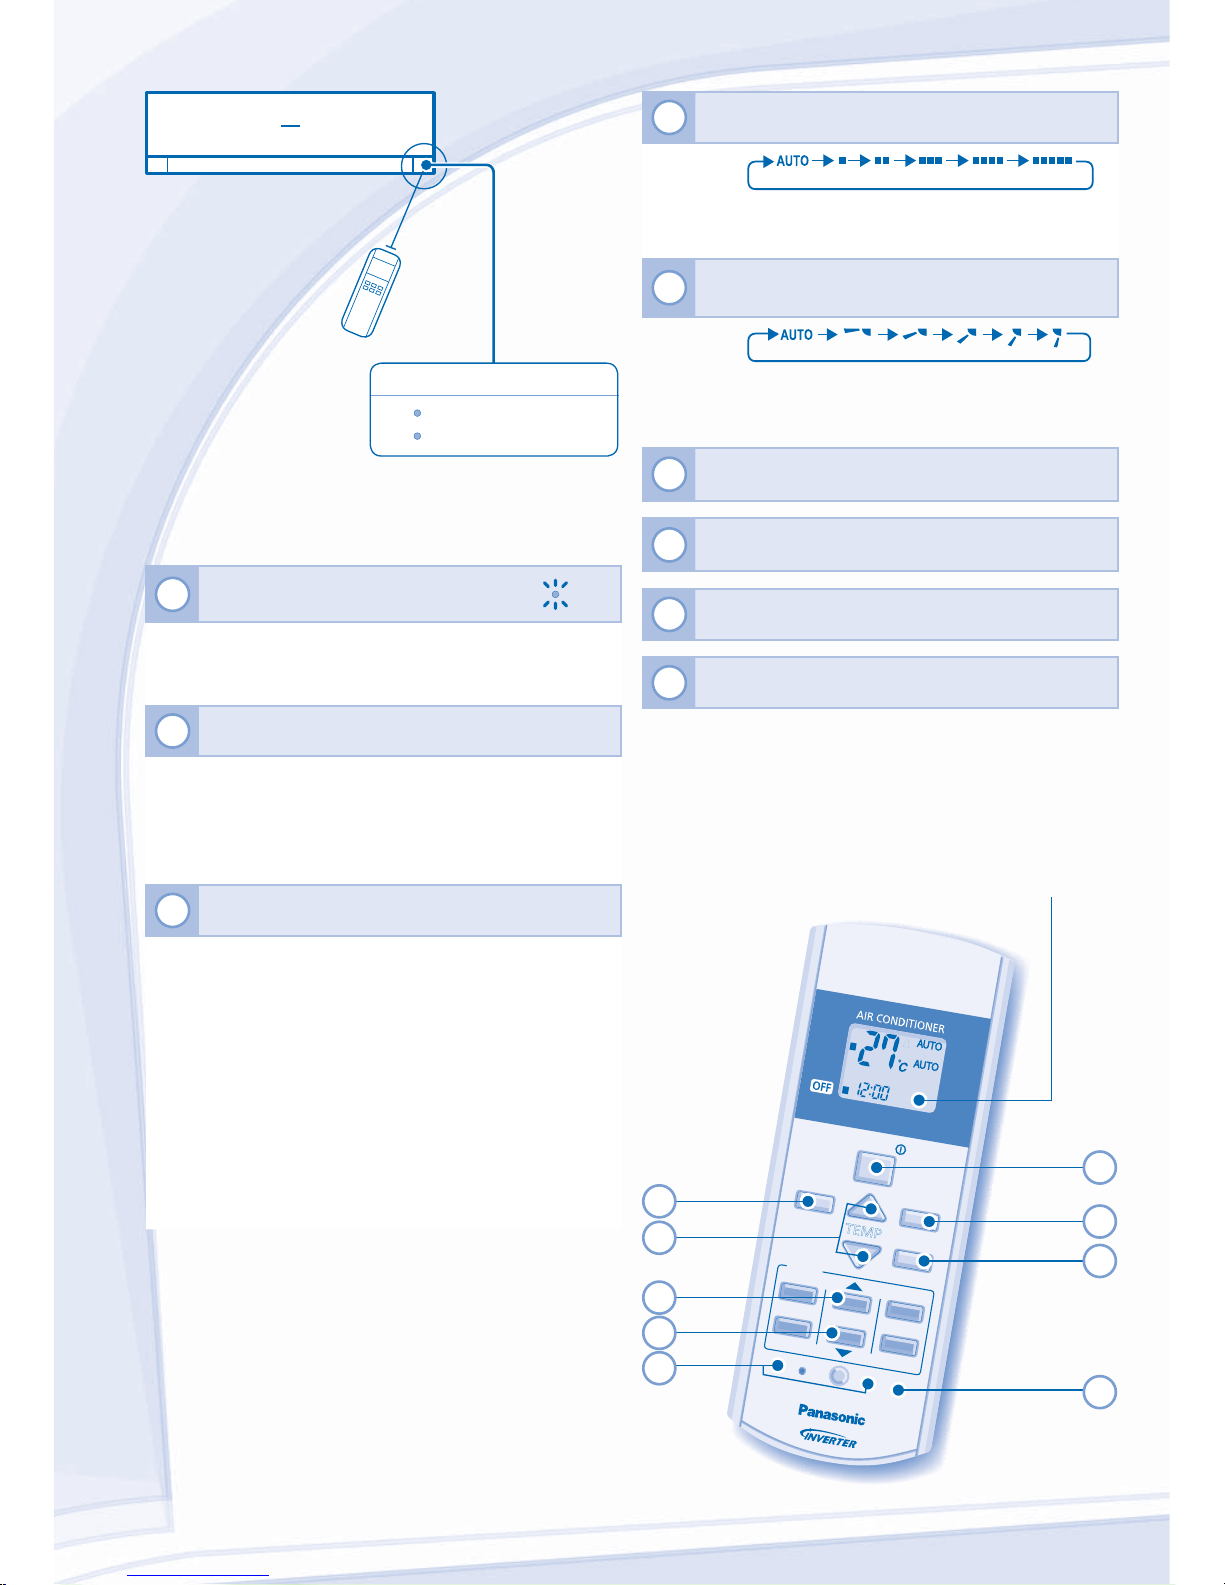
REMOTE CONTROL
Press the remote control’s button
1
TO TURN ON OR OFF THE UNIT
POWER
• Please be aware of the OFF indication on the remote
control display to prevent the unit from starting/stopping
improperly.
2
TO SET TEMPERATURE
• Selection range: 16°C ~ 30°C.
• Operating the unit within the recommended temperature
could induce energy saving.
COOL mode : 26°C ~ 28°C.
DRY mode : 1°C ~ 2°C lower than room temperature.
3
TO SELECT OPERATION MODE
AUTO mode - For your convenience
• During operation mode selection the power indicator
blinks.
• Unit selects operation mode during startup according to
temperature setting and room temperature.
COOL mode - To enjoy cool air
• Use curtains to screen off sunlight and outdoor heat to
reduce power consumption during cool mode.
DRY mode - To dehumidify the environment
• Unit operates at low fan speed to give a gentle cooling
operation.
Maximum distance: 8m
4
TO SELECT FAN SPEED (5 OPTIONS)
FAN SPEED
• For AUTO, the indoor fan speed is automatically adjusted
according to the operation mode.
5
TO ADJUST VERTICAL AIRFLOW DIRECTION
(5 OPTIONS)
AIR SWING
• Keeps the room ventilated.
• In COOL/DRY mode, if AUTO is set, the louver swing
up/down automatically.
6
Press and hold for 5 seconds to dim or restore the
unit’s indicator brightness.
7
Press and hold for approximately 10 seconds to
show temperature setting in °C or °F.
8
Press to restore the remote control’s default setting.
9
Not used in normal operations.
FAN SPE
ED
AIR SWI
NG
MOD
E
TEMP
OFF/
ON
TIMER
SET
CANCEL
ON
OFF
1
2
3
OFF
TIM
ER
ON
TIMER
AUTO
COOL
DRY
FAN
SPE
ED
AIR
SWING
CLOCK
SET CHECK
RESET
AC
RC
3
4
5
6
7
Remote Control display
1
8
2
9
INDICATOR
POWER
(Green)
TIMER
(Orange)
Page 13
13
ENGLISH
INFORMATION
Information for Users on Collection and Disposal of Old Equipment and used Batteries
[Information on Disposal in other
Countries outside the European Union]
These symbols are only valid in the European
Union. If you wish to discard these items,
please contact your local authorities or dealer
and ask for the correct method of disposal.
Note for the battery symbol (bottom two
symbol examples):
This symbol might be used in combination with
a chemical symbol. In this case it complies with
the requirement set by the Directive for the
chemical involved.
Pb
FOR SEASONAL INSPECTION AFTER EXTENDED NON-USE
• Checking of remote control batteries.
• No obstruction at air inlet and air outlet vents.
• Use Auto OFF/ON button to select Cooling operation. After
15 minutes of operation, it is normal to have the following
temperature difference between air inlet and air outlet vents:
Cooling: ≥ 8°C
FOR EXTENDED NON-USE
• Turn off the power supply and unplug.
• Remove the remote control batteries.
NON SERVICEABLE CRITERIAS
TURN OFF POWER SUPPLY AND UNPLUG
then please consult authorized dealer under the
following conditions:
• Abnormal noise during operation.
• Water/foreign particles have entered the remote
control.
• Water leaks from Indoor unit.
• Circuit breaker switches off frequently.
• Power cord becomes unnaturally warm.
• Switches or buttons are not functioning properly.
TO SET THE TIMER
TO SET THE TIMER
• To turn ON or OFF the unit at a preset time.
ON
OFF
1
2
TIMER
S
ET
Select ON or
OFF timer
Set the time Confi rm
• To cancel ON or OFF timer, press
O
N
or
OFF
then
press
CANCEL
.
• When ON Timer is set, the unit may start earlier (up
to 15 minutes) before the actual set time in order to
achieve the desired temperature on time.
• Timer operation is based on the clock set in the
remote control and repeats daily once set. For clock
setting, please refer to Remote Control Preparation
on the back cover.
• If timer is cancelled manually or due to power failure,
you can restore the previous setting (once power is
resumed) by pressing
SET
.
Page 14
14
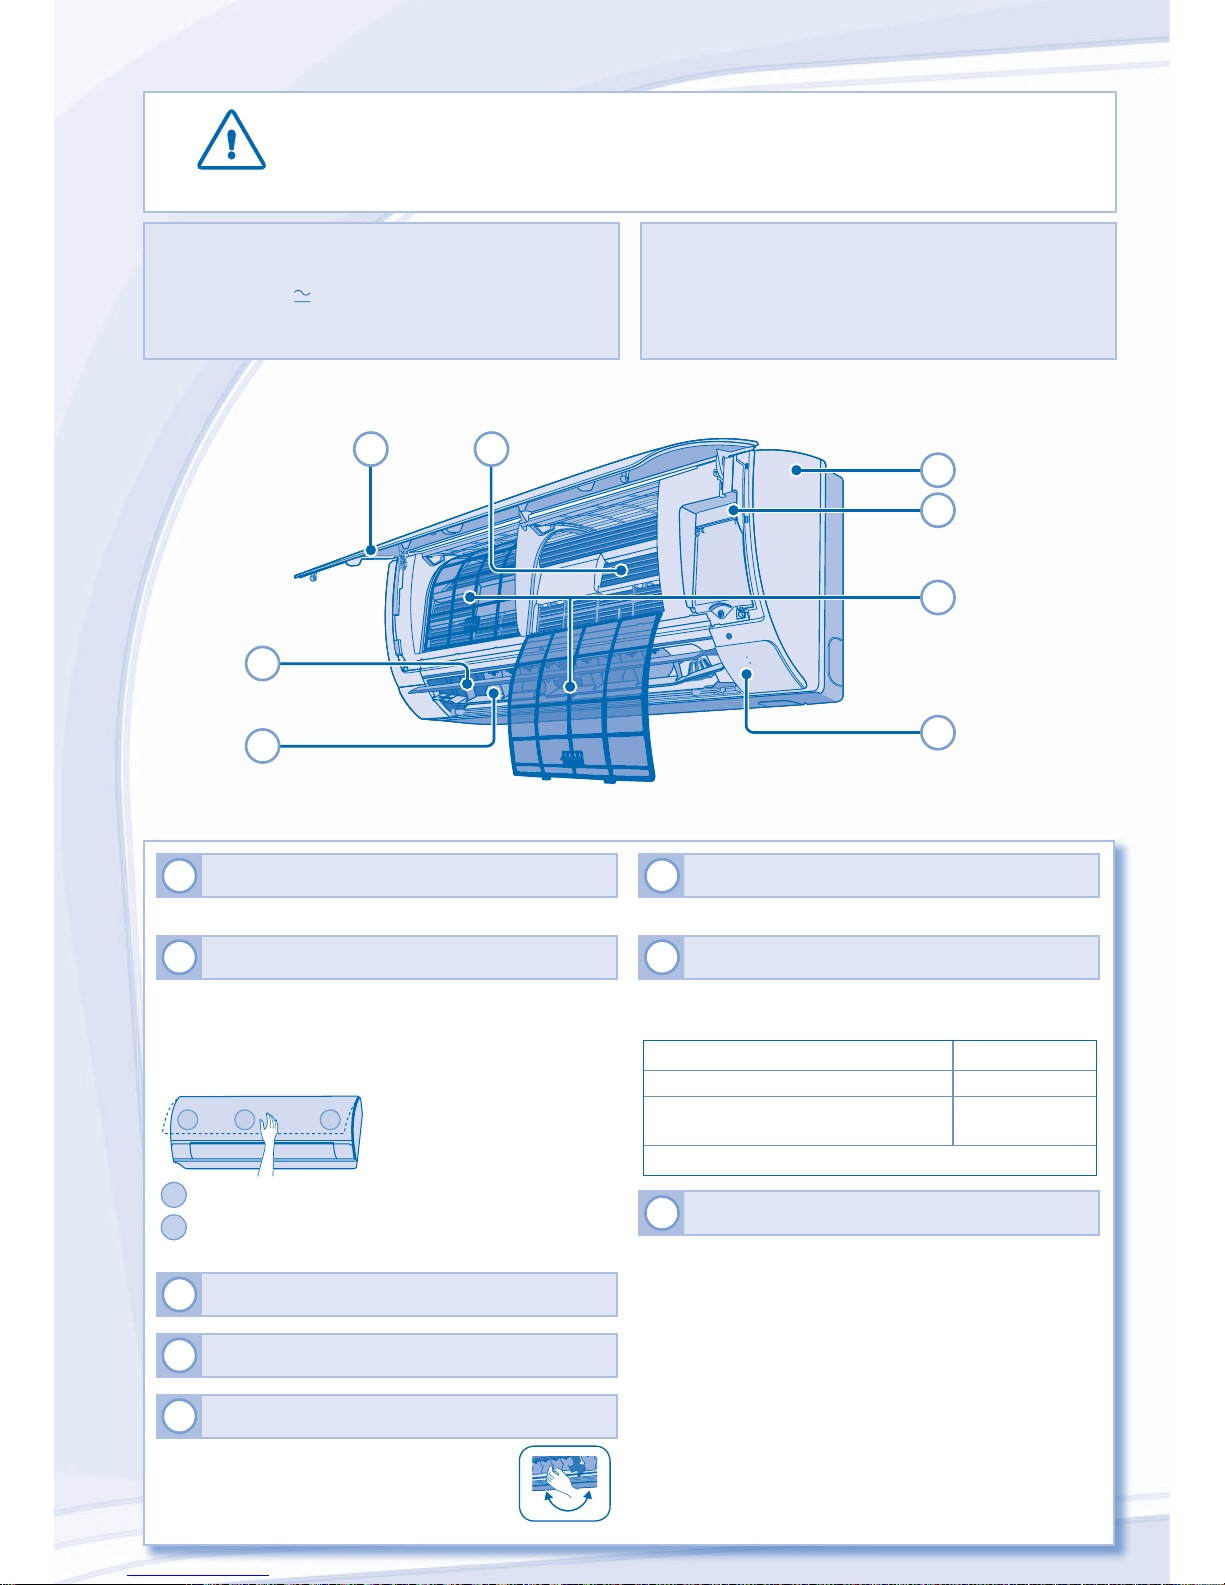
CAUTION
• Switch off the power supply and unplug before cleaning.
• Do not touch the aluminium fi n, sharp parts may cause injury.
POWER
TIM
ER
1
INDOOR UNIT
• Wipe the unit gently with a soft, dry cloth.
2
FRONT PANEL
Remove Front Panel
• Raise and pull to remove the front panel.
• Wash gently and dry.
Close Front Panel
21 1
1
Press down both ends of the front panel to close it.
2
Press at center of the front panel to close it securely.
(CS-PS18NKP, CS-PS24NKP)
3
REMOTE CONTROL RECEIVER
4
ALUMINIUM FIN
5
HORIZONTAL AIRFLOW DIRECTION LOUVER
• Manually adjustable.
6
VERTICAL AIRFLOW DIRECTION LOUVER
• Do not adjust by hand.
7
AUTO OFF/ON BUTTON
• Use when remote control is misplaced or a malfunction
occurs.
Action Mode
Press once. Auto
Press and hold until 1 beep is heard,
then release.
Cooling
Press the button to turn off.
8
AIR FILTERS
• Air fi lter cleaning is required every two weeks.
• Wash/rinse the fi lters gently with water to avoid damage
to the fi lter surface.
• Dry the fi lters thoroughly under shade, away from fi re or
direct sunlight.
• Replace any damaged fi lters.
2
5
7
1
4
8
6
3
INDOOR UNIT
CLEANING INSTRUCTIONS
CLEANING INSTRUCTIONS
HINT
HINT
• Do not use benzene, thinner or scouring powder.
• Use only soap ( pH7) or neutral household detergent.
• Do not use water hotter than 40°C.
• To ensure optimal performance of the unit, cleaning
maintenance has to be carried out at regular intervals.
Dirty unit may cause malfunction and you may see error
code “H99”. Please consult authorized dealer.
Page 15
15
ENGLISH
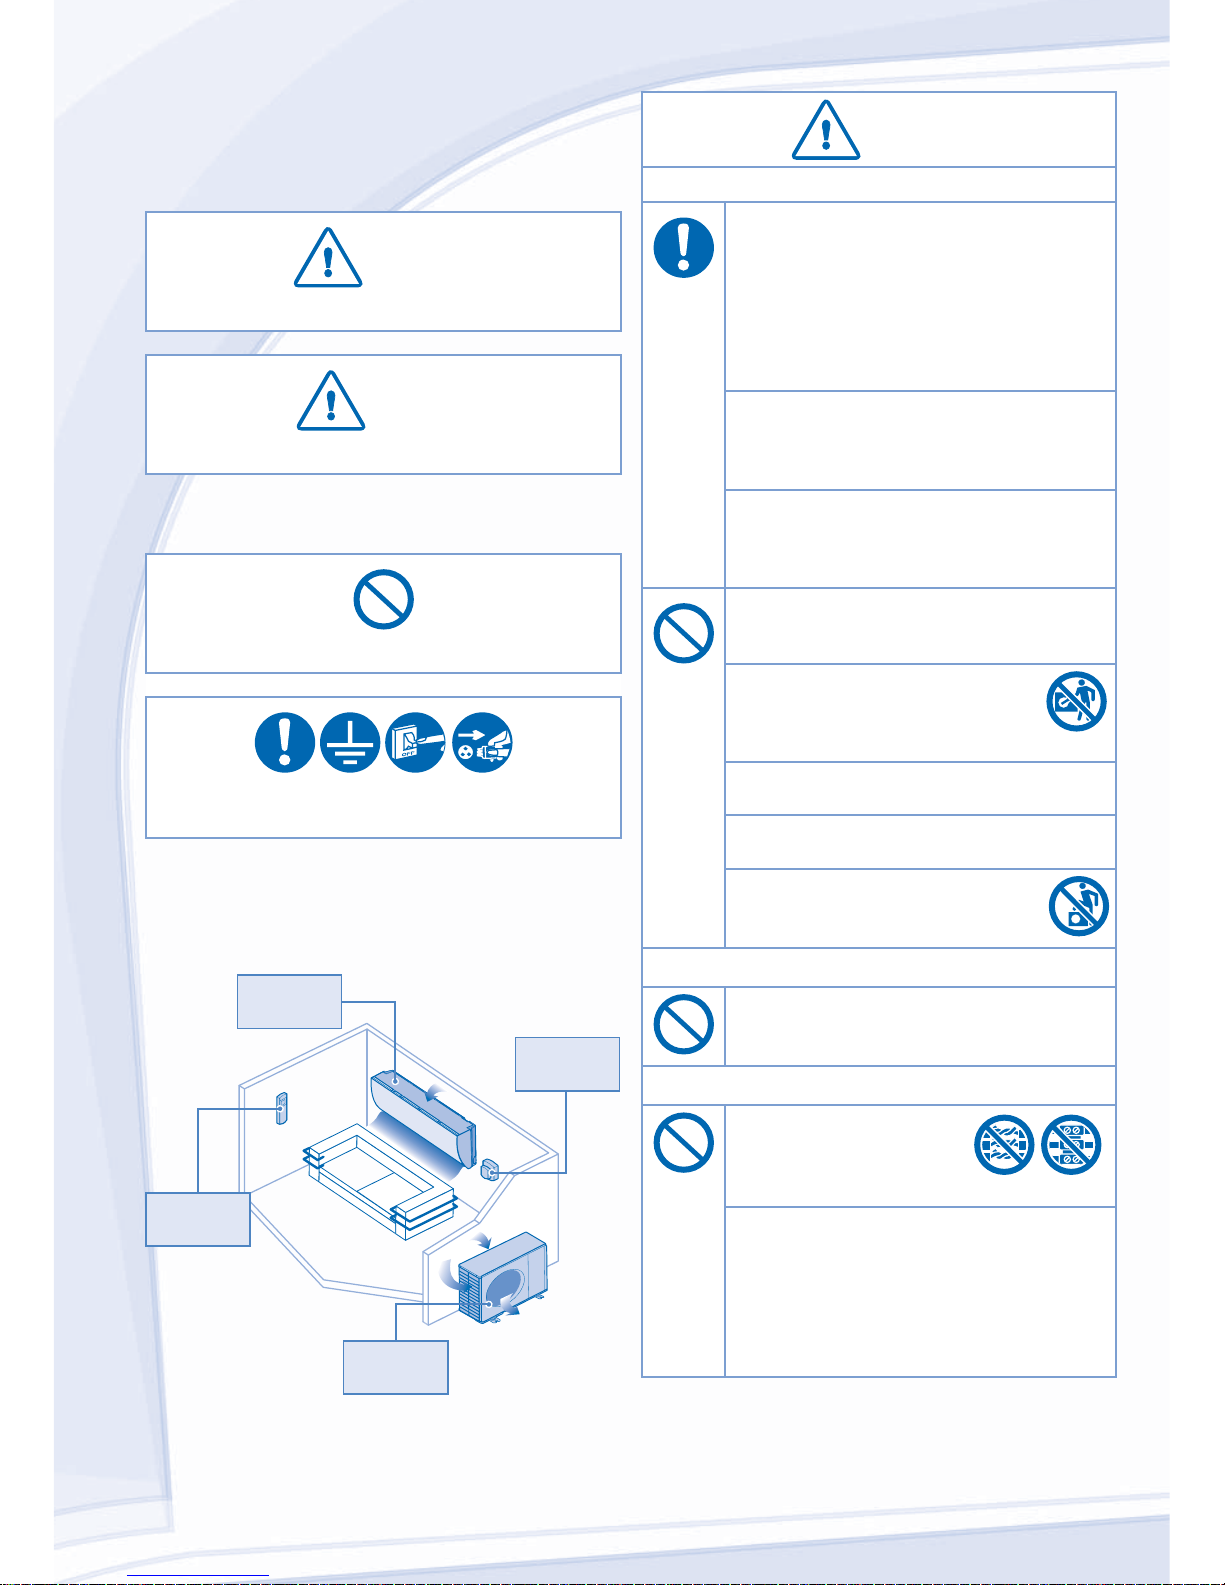
The following symptoms do not indicate malfunction.
The following symptoms do not indicate malfunction.
SYMPTOM
SYMPTOM
CAUSE
CAUSE
Mist emerges from indoor unit. ► • Condensation effect due to cooling process.
Water fl owing sound during operation. ► • Refrigerant fl ow inside the unit.
The room has a peculiar odor. ► • This may be due to damp smell emitted by the wall,
carpet, furniture or clothing.
Indoor fan stops occasionally during automatic fan speed
setting.
► • This helps to remove the surrounding odours.
Operation is delayed a few minutes after restarting. ► • The delay is a protection to the unit’s compressor.
Outdoor unit emits water/steam. ► • Condensation or evaporation occurs on pipes.
TIMER indicator is always on. ► • The timer setting repeats daily once set.
POWER indicator blinks before the unit is switched on. ► • This is a preliminary step in preparation for the operation
when the ON timer has been set.
Cracking sound during operation. ► • Changes of temperature caused the expansion/
contraction of the unit.
Check the following before calling for servicing.
Check the following before calling for servicing.
SYMPTOM
SYMPTOM
CHECK
CHECK
Cooling operation is not working effi ciently. ► • Set the temperature correctly.
• Close all doors and windows.
• Clean or replace the fi lters.
• Clear any obstruction at the air inlet and air outlet vents.
Noisy during operation. ► • Check if the unit has been installed at an incline.
• Close the front panel properly.
Remote control does not work.
(Display is dim or transmission signal is weak.)
► • Insert the batteries correctly.
• Replace weak batteries.
The unit does not work. ► • Check if the circuit breaker is tripped.
• Check if timers have been set.
The unit does not receive the signal from the remote
control.
► • Make sure the receiver is not obstructed.
• Certain fl uorescent lights may interfere with signal
transmitter. Please consult authorized dealer.
TROUBLESHOOTING
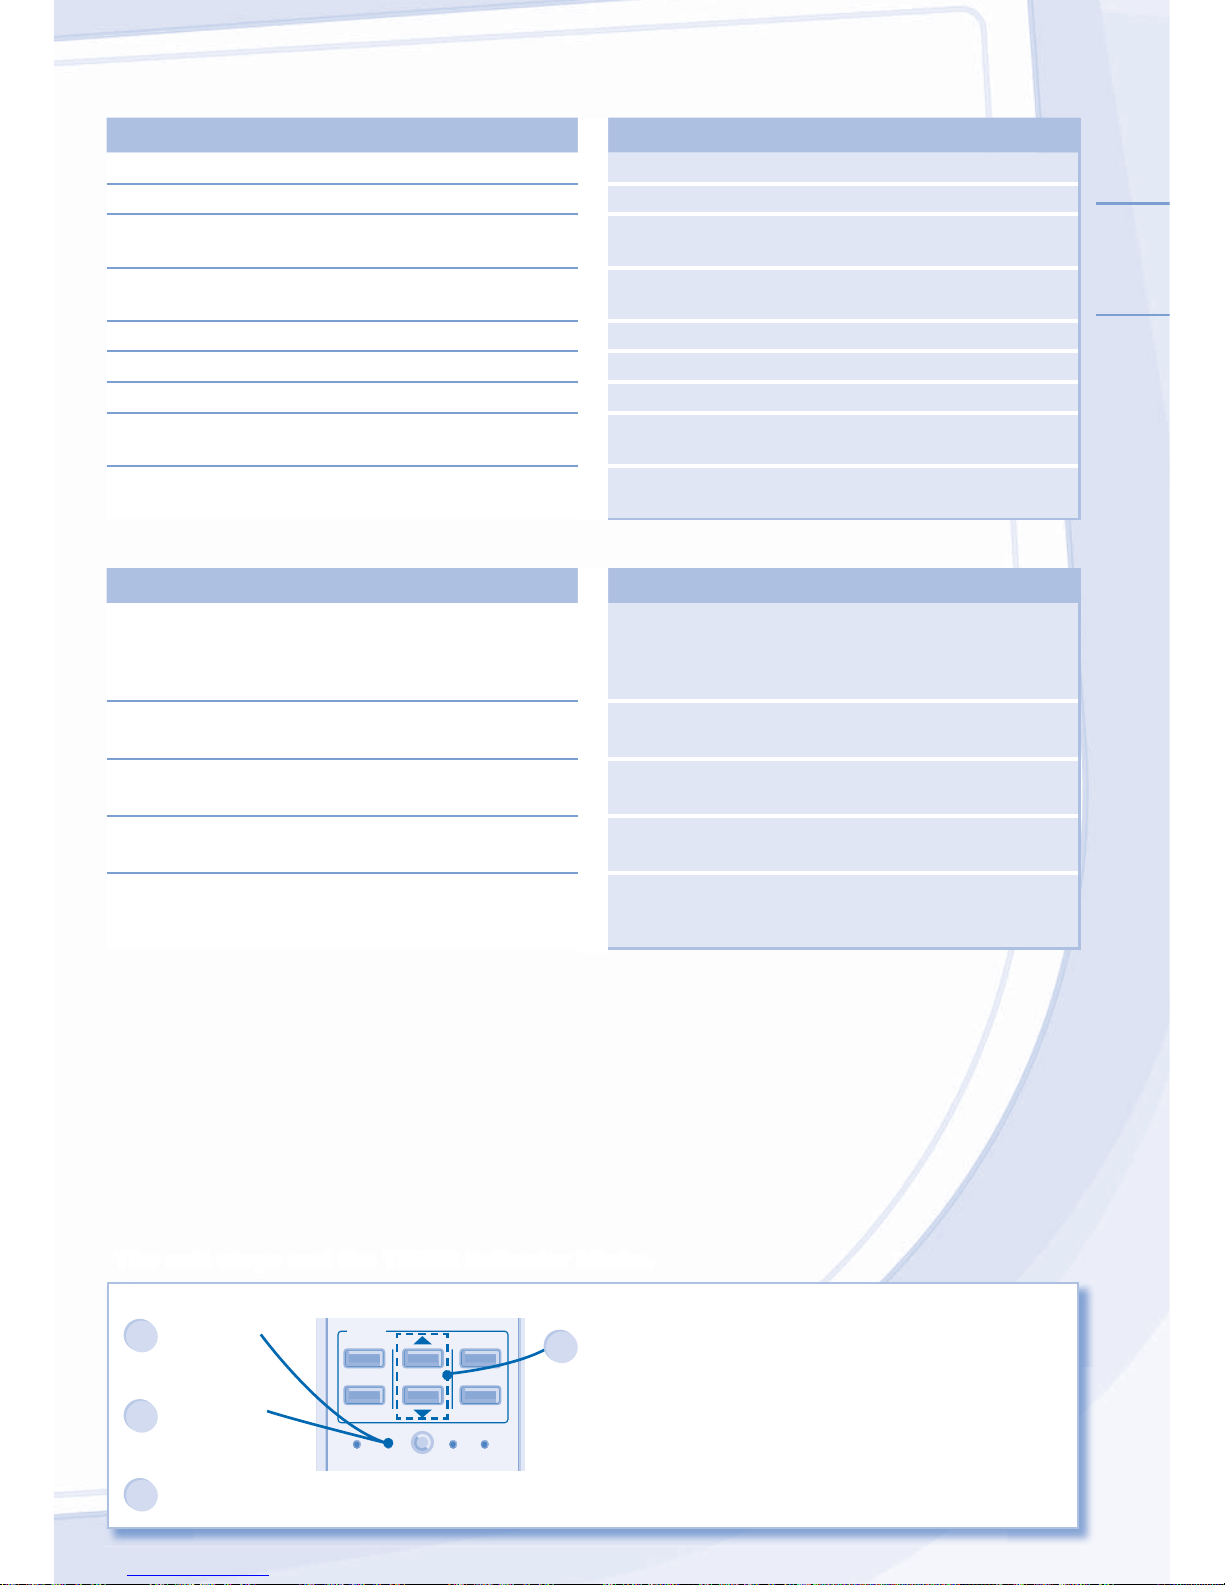
The unit stops and the TIMER indicator blinks.
Use remote control to retrieve error code.
TIMER
SET
CANCEL
ON
OFF
1
2
3
SET CHECK CLOCK RESET
AC
RC
1
Press for 5
seconds.
3
Press for 5
seconds to
quit checking.
2
Press until you hear
beep sound, then write
down the error code.
Note:
• For certain errors, you
may restart the unit for
limited operation with 4
beeps when operation
starts.
4
Turn the unit off and reveal the error code to authorized dealer.
Page 16
F568269
ST0811-0
Dicetak di Malaysia
Panasonic Corporation
Website: http://panasonic.net/
Diimpor oleh:
PT. Panasonic Gobel Indonesia
Jl. Dewi Sartika No.14 (Cawang
II
),
Jakarta 13630 Indonesia
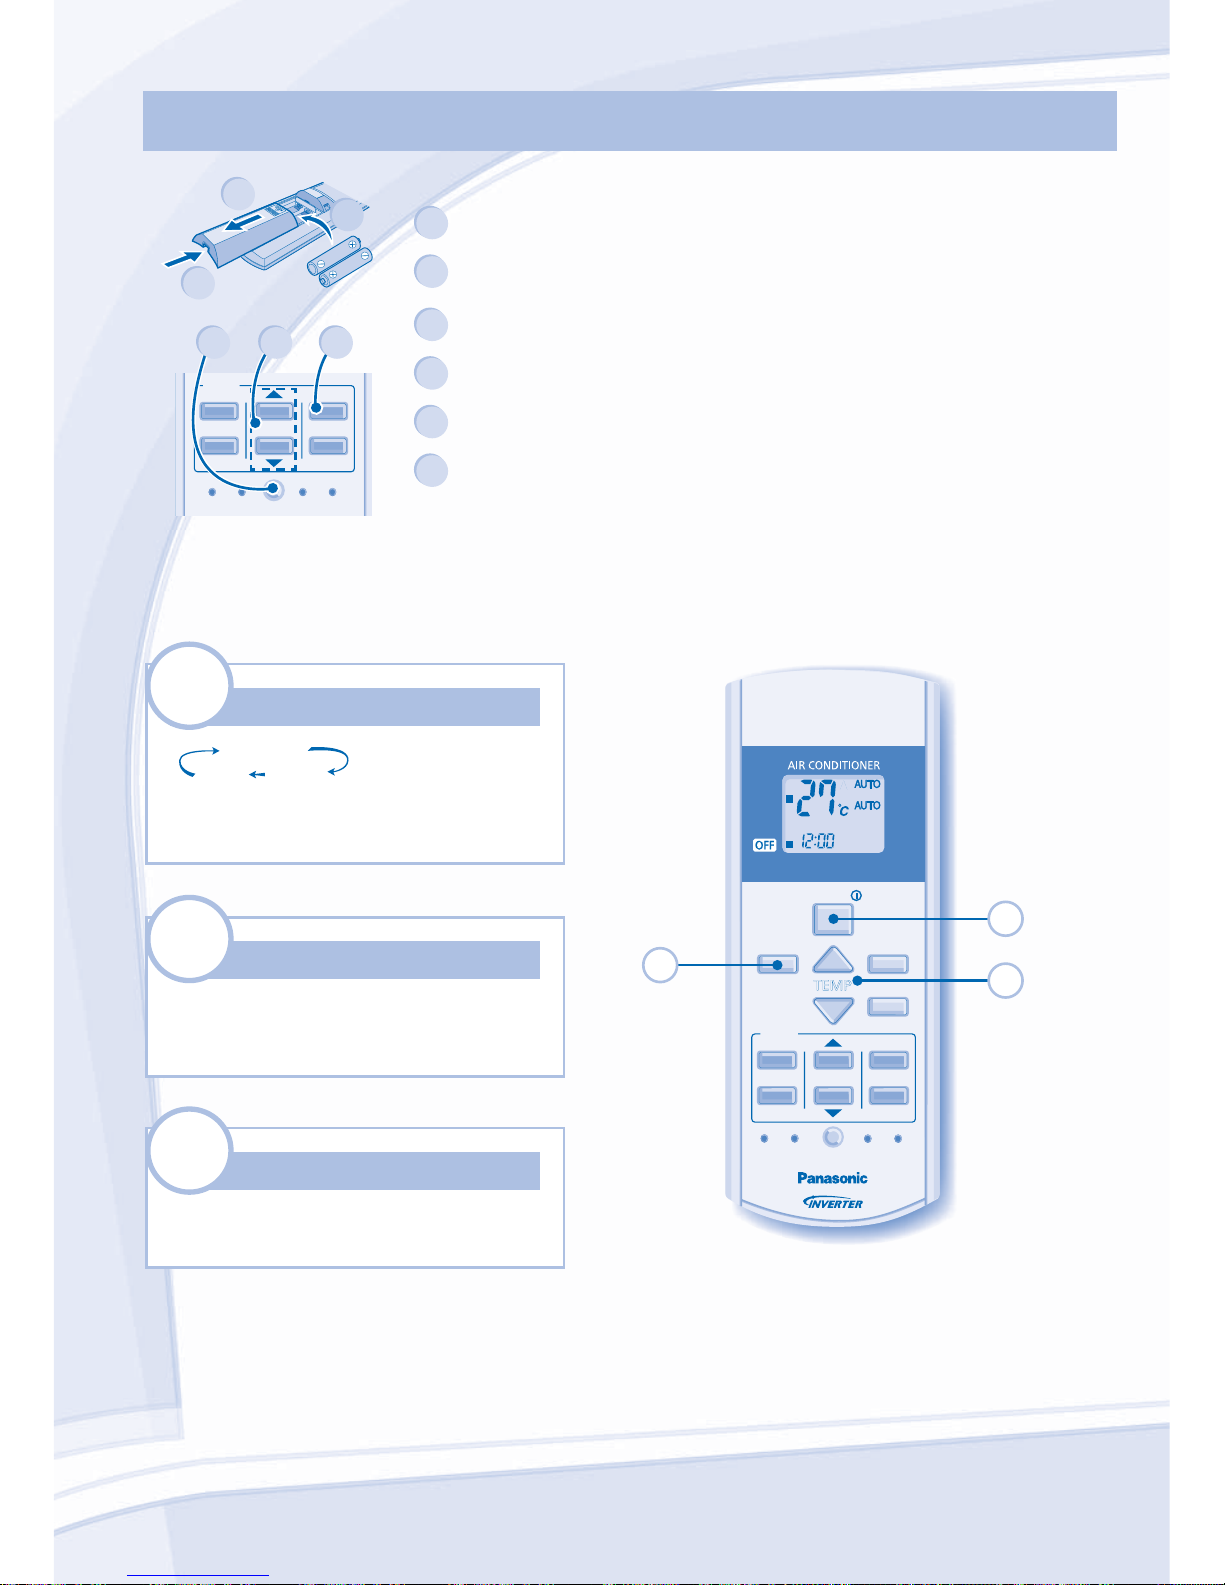
Persiapan Remot Kontrol
Persiapan Remot Kontrol • •
Remote Control Preparation
Remote Control Preparation
1
2
3
TIMER
SET
CANCEL
ON
OFF
1
2
3
SET CHECK CLOCK RESET
AC
RC
4
5 6
1
Buka, tarik kebawah • Pull out
2
Masukkan baterai AAA atau R03 (dapat digunakan ~ 1 tahun) •
Insert AAA or R03 batteries (can be used ~ 1 year)
3
Pasang penutup • Close the cover
4
Tekan JAM (CLOCK) • Press CLOCK
5
Menyetel waktu • Set time
6
Memastikan • Confi rm
FAN SPEED
AIR SWING
MODE
TEMP
OFF/ON
TIMER
SET
CANCEL
ON
OFF
1
2
3
OFF
TIMERONTIMER
AUTO
COOL
DRY
FAN
SPEED
AIR
SWING
CLOCK
SET CHECK
RESET
AC
RC
2
1
3
MODE
MODE
AUTO
DRY COOL
Memilih mode yang diinginkan.
Select the desired mode.
1
OFF/ON
OFF/ON
Menghidupkan/mematikan pengoperasian
unit.
Start/stop the operation.
2
TEMP
TEMP
Memilih suhu yang diinginkan.
Select the desired temperature.
3
PEDOMAN CEPAT/QUICK GUIDE
 Loading...