

Panasonic CQMR-505-N Service manual
1
16
4
1
5
3
1
4
1
2
3
1
2
2
24
25
89
6
B
E
C
B
C
E
B
C
E
1
8
5
8
5
4
16
1
89
1
16 17
32
E
BBC
C
E
8
1
5
4
1
7
1
4
14
8
4
1
1
B
C
E
22
20
1
15
[E-6788Ba][T op Vie w]
5
2
4
1
1
15
1
8
4
5
10
40
41
21
20
5
60
61
3
7
8
6
1
80
1
8
5
4
6
1
1
[E-6788Bc][T op Vie w]
3
CQ-MR505/MR303N
CLASS 1
LASER PRODUCT
OPEN
S
O
U
R
C
E
SEL
VOL
BAND
R
E
M
O
T
E
1
2
3
R
@
4
5
SCAN
REP
6
HDB
PTY
DISP/CT
MR505N
DISC
super bright display with level meters
TA
AF
REG
MOS FET 45Wx4 MD PLAYER/RECEIVER WITH CHANGER CONTROL
SCAN
REPEAT
MONO/LOC
RANDOM
PWR
TUNE
TRACK
A
U
T
O
·
P
EON
E
PTY
E
CT
S
8
HDB
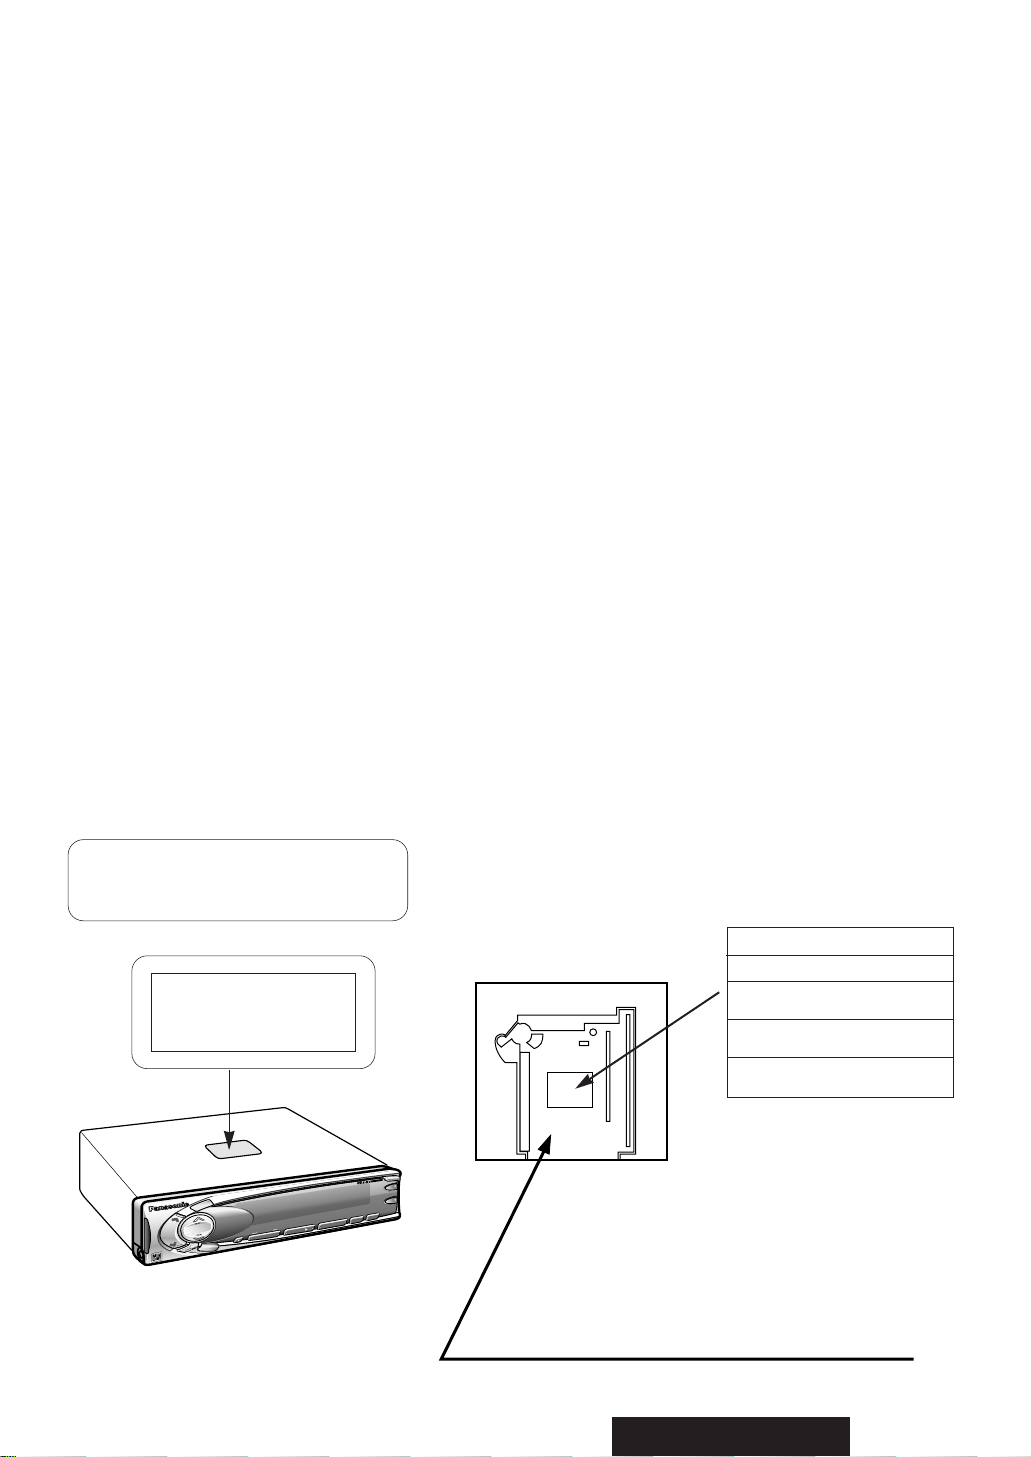
¡Label Indications and Their Locations
¡Warnetiketten und deren Anbringungsort
¡Indications portées les étiquettes et
emplacement
¡Aanduiding van de labels en hun plaats
¡Varningsskyltarna, och deras placering
¡Indicazioni delle etichette e le loro posizioni
¡Indicaciones de las etiquetas y su ubicación
¡APPAREIL À LASER DE CLASSE 1
¡KLASS 1 LASER APPARAT
¡LUOKAN 1 LASERPLAITE
VORSICHT! UNSICHTBARE LASERSTRAHLUNG, WENN
ABDECKUNG GEÖFFNET IST, NICHT DEM
LASERSTRAHL AUSSETZEN.
¡Caution Mark
¡Warnzeichen
¡Marque d’avertissement
¡Waarschuwingsteken
¡Varningsmärke
¡Marca di precauzione
¡Marka de advertencia
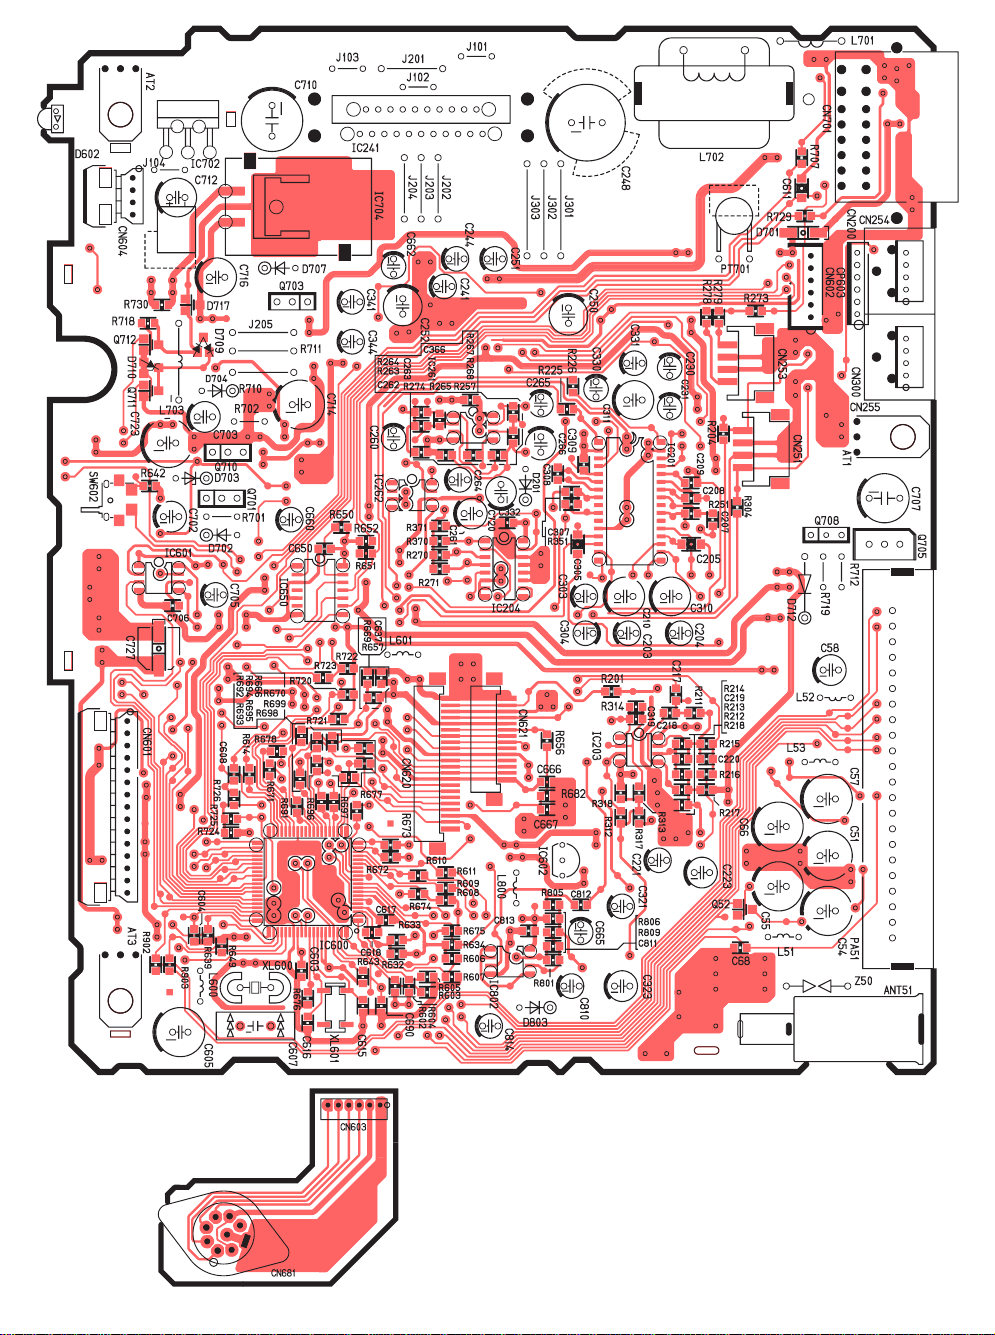
¡Deck Ass’y (Upper Side)
¡Geräteansicht (Oberseite)
¡Assemblage de la table lecture (Côté supérieur)
¡Dekkbevestig (Bovenkant)
¡Däcksenhet (Topp)
¡Gruppo della piastra (Lato superiore)
¡Conjunto de la platina (Lado superior)
DANGER! Invisible laser radiation when
open. Avoid direct exposure to beam.
ADVARSEL! Usynligt laserlys udstråles
ved åbning. Undgå direkte bestråling.
VARO! Avattaessa ja suojalukitus
ohitettaessa olet alttiina näkymättömälle
lasersäteilylle. Älä kasto säteeseen.
VARNING! Osynlig laserstrålning när
denna del är öppnad och spärren är
urkopplad. Betrakta ej strålen.
ADVERSEL! Usynlig laserstråling når
deksel åpnes og sikkerhedslås brytes.
Unngå eksponering for strålen.
4
CQ-MR505/MR303N
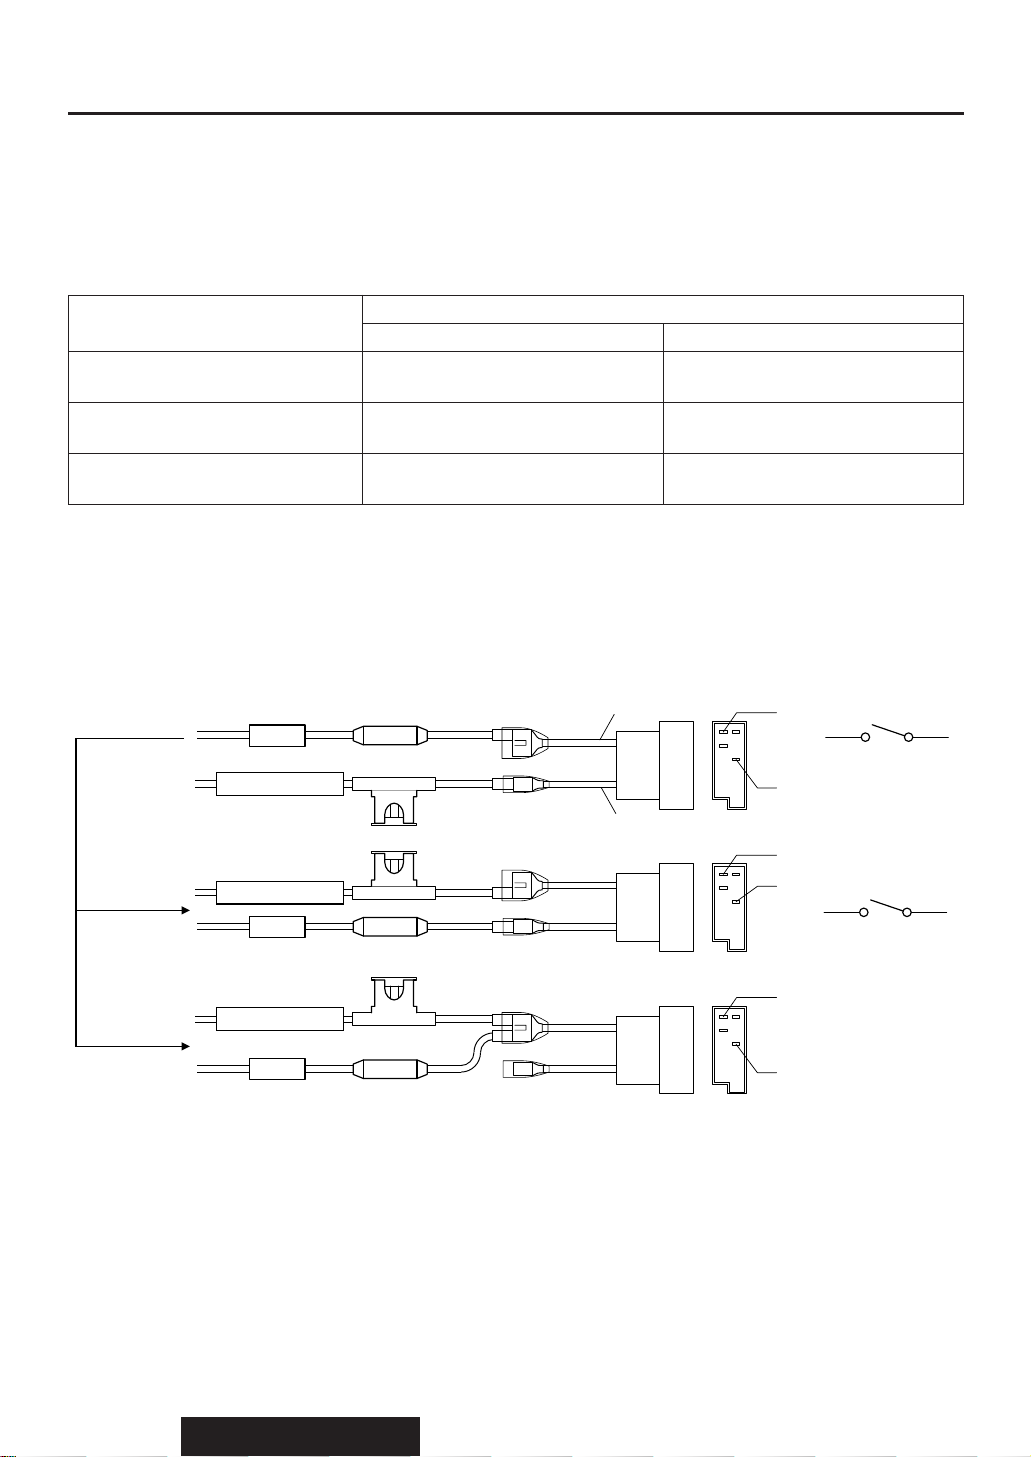
Car for standard ISO
Precautions (ISO Connector)
¡Wiring for the power connector conforms to the arrangement of standard ISO connectors.
¡In case of some car types, the arrangement of connector may differ from the standard ISO
as shown in Table 1, even though ISO connectors are adopted.
¡Make sure the ISO connector arrangement in your car side is as the same as the stan-
dard ISO. (Table 1, Fig. 1)
¡In case of arrangement for Car type A or B, change connections of the red/yellow leads at
the re-connectable joint (C) as shown in Fig.1.
Table 1
Battery
(permanent 12 V supply)
“IGN” or “ACC”
(switched 12 V supply)
No Connection
“IGN” or “ACC”
(switched 12 V supply)
Battery
(permanent 12 V supply)
Battery
(permanent 12 V supply)
In case of Car type A
In case of Car type B
Fig. 1 Pin No.
A4 A7
BATTERY 15A
BATTERY 15A
BATTERY 15A
ACC
ACC
A7FACC/IGN Switch
+12V
A4
F
+12V Battery
(Red)
ƒ
ƒ
(Red)
(Yellow) (Yellow)
A7
A4
A7F+12V Battery
A4
F
(Yellow)
ƒ
ƒ
(Red)
(Red) (Yellow)
ACC
A7F+12V Battery
A4
F
No Connection
(Yellow)
ƒ
ƒ
(Red)
(Red) (Yellow)
ACC/IGN Switch
+12V
Standard ISO
Car type A
Car type B
Fig.1
¡After fixing the connections, the part (C) should be insulated with electrical tape to keep
away from unit damage.
11
CQ-MR505/MR303N
1
E
N
G
L
I
S
H
Panasonic welcomes you to their constantly growing family of electronic products owners.
We endeavor to give you the advantages of precise electronic and mechanical engineering, manufactured with
carefully selected components, and assembled by people who are proud of the reputation their work has built
for our company . We know this product will bring you many hours of enjoyment, and after you discover the quality , value and reliability we have built into it, you too will be proud to be a member of our family.
Precautions
Volume Level
For your driving safety, keep the volume level low
enough to be aware of road and traffic conditions.
Car Washing
To avoid electrical shorts which may cause fire, or
other damage, do not expose this product (including
the speakers and MDs) to water or excessive moisture.
Car Ventilation
If your car is parked for several hours in direct sunlight, the temperature inside the car may become
very high. It is advisable to drive the car and give
the interior a chance to cool down before switching
the unit on.
Power Supply
This product is designed to be used in a car having
12-volt negative ground battery system.
Disc Mechanism
Do not insert coins or any small objects. Keep
screwdrivers and other metallic objects away from
the disc mechanism and disc.
Service
This product is made of precision parts. Do not
attempt to disassemble or adjust any parts. For
repair, please consult your nearest authorized
Panasonic Service Center.
About Preset Memory
The preset memory is cleared to return to the original factory setting when the power connector or battery is disconnected.
Laser Products
Caution:
This product utilizes a laser.
Use of controls or adjustments or performance of procedures other than those specified herein may result in hazardous radiation exposure.
Laser products:
Wave Length 790 nm
Laser Power No hazardous radiation is
emitted with safety protection.
Do not take apart this unit or attempt to make any changes yourself.
This unit is a very intricate device that uses a laser pickup to retrieve information from the surface of Mini
discs. The laser is carefully shielded so that its rays remain inside the cabinet.
Therefore, never try to disassemble the player or alter any of its parts since you may be exposed to laser
rays and dangerous voltages.
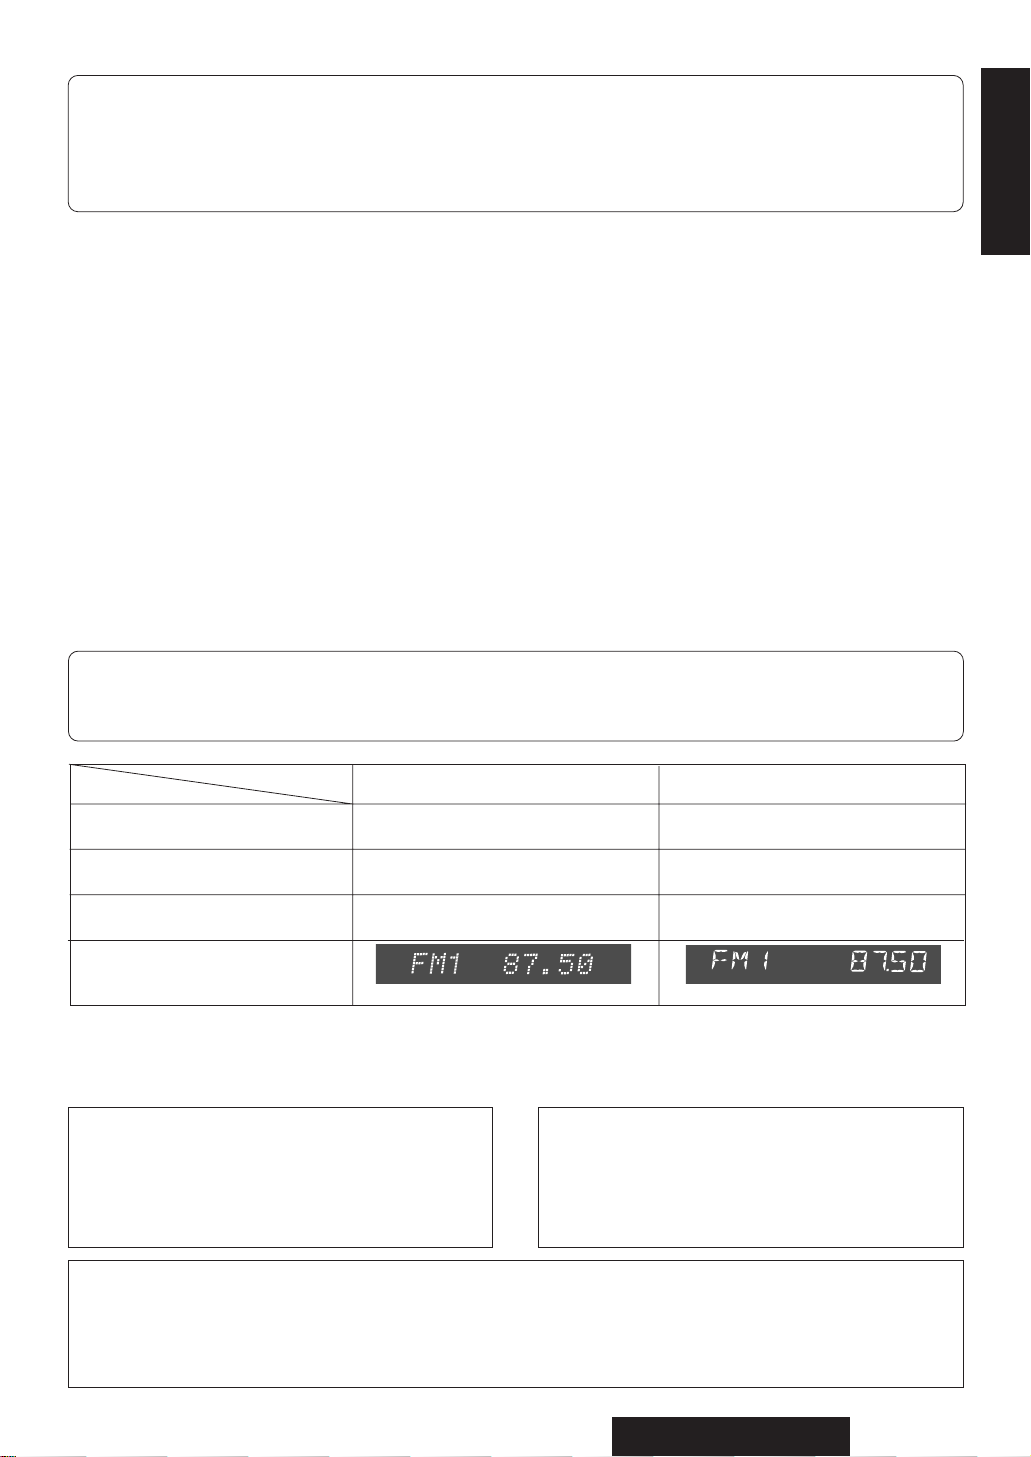
CQ-MR303NCQ-MR505N
Max Output Power
Note:This operating instruction manual is for two models CQ-MR505N and CQ-MR303N.
The differences between these models are mentioned below. All illustrations throughout this manual
represent model CQ-MR505N unless otherwise specified.
45 W x 4 40 W x 4
Sub-Woofer Out
Yes None
LCD Color
Blue
Multi Color
Model
Features
Display
Dot Union Jack
12
CQ-MR505/MR303N
2
E
N
G
L
I
S
H
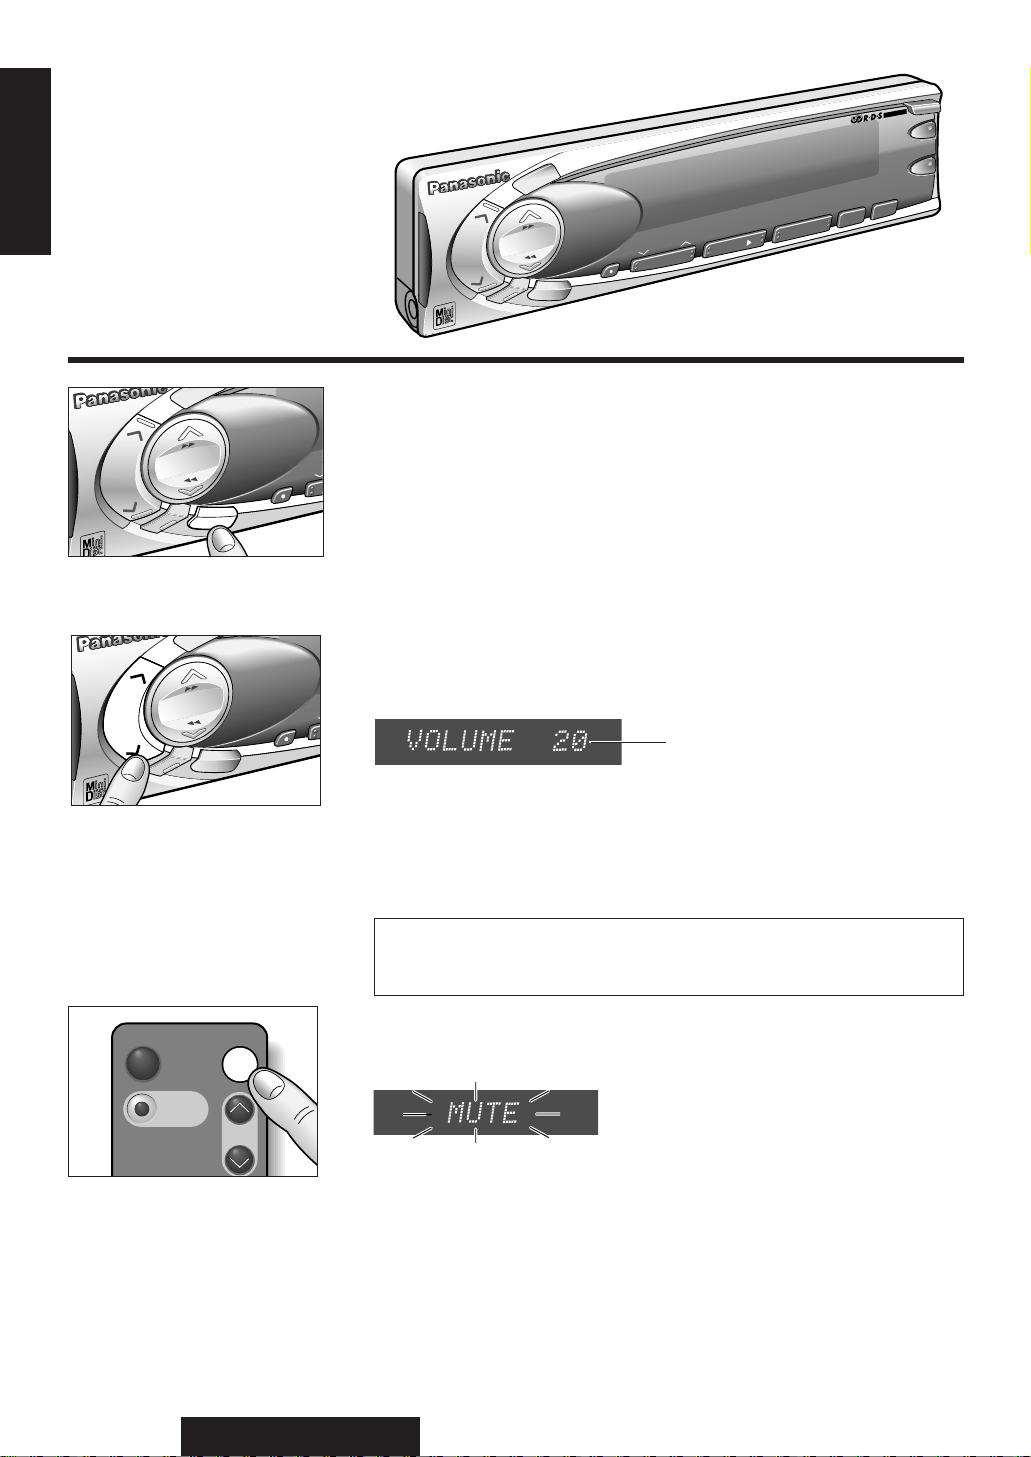
Volume
¡ Press [jVOL] or [iVOL] to increase or decrease the volume.
¡ Press and hold [jVOL] or [iVOL] for more than 0.5 seconds to
change the numeric level in sequence.
Note: In the VOLUME mode, the display will be back to regular operation mode with no operation for more than 2 seconds.
P o wer and
Sound
Controls
Power
Turn the key in the ignition until the accessory indicator lights.
Press [SOURCE](PWR) to switch on the power.
Press and hold [SOURCE](PWR) again for more than 2 seconds to
switch off the power. When the power is switched off, the panel removal
alarm sounds. (See page 34 about the panel removal alarm.)
Note: When the power is switched on for the first time, a demonstration
message appears on the display. To cancel this display, press [
•
]
(DISP/CT).
Volume Level (0 to 40)
8
OPEN
S
O
U
R
C
E
SEL
VOL
BAND
R
E
M
O
T
E
1
2
3
R
@
4
5
SCAN
REP
6
HDB
PTY
DISP/CT
MR505N
DISC
super bright display with level meters
TA
AF
REG
MOS FET 45Wx4 MD PLAYER/RECEIVER WITH CHANGER CONTROL
SCAN
REPEAT
S
HDB
MONO/LOC
RANDOM
PWR
TUNE
TRACK
A
U
T
O
·
P
EON
E
PTY
E
CT
S
O
U
R
C
E
SEL
VOL
BAND
R
E
M
O
T
E
1
DISP/CT
MR505N
su
PWR
TUNE
TRACK
BAN
1
Mute (Only for Remote Control)
¡Press [MUTE] to mute the sound completely.
¡Press [MUTE] again to cancel.
(ATT)
PWR
VOL
MODE
MUTE
Anti-Volume-Blast Circuit
This unit has a safety function which slowly raises volume level when power
is switched back on after it is turned off at a specific level (20) or higher.
E
C
S
R
O
U
MR505N
VOL
VOL
SEL
TUNE
TRACK
E
DISP/CT
T
O
M
E
R
PWR
E
C
S
R
O
U
13
CQ-MR505/MR303N
3
E
N
G
L
I
S
H
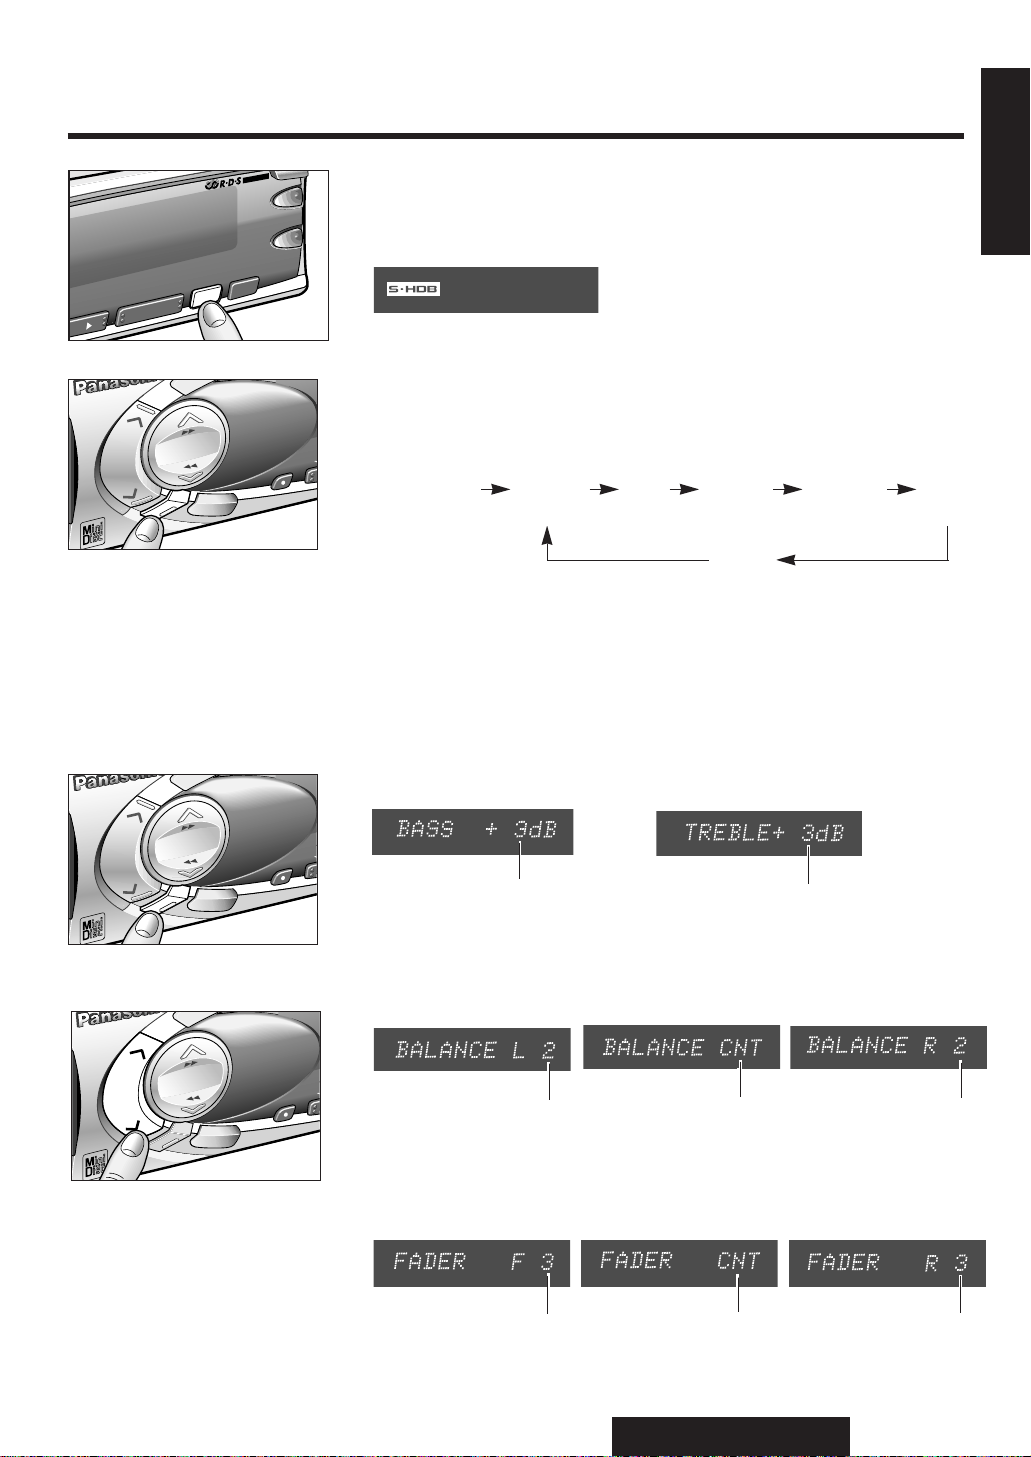
Audio Mode
Press [SEL] to change the audio mode setting as follows.
Fader
Press [SEL] to change to the fader mode. Press [jVOL] or [iVOL] to
shift the sound volume to the front or rear speakers.
Balance
Press [SEL] to change to the balance mode. Press [jVOL] or [iVOL]
to shift the sound volume to the right or left speakers.
Bass and T reble
Press [SEL] to change to the bass (or treble) mode. Press [jVOL] or
[iVOL] to increase or decrease the bass (or treble) level by 3 dB step.
–12 to +12
1 to 15
Balance Center
1 to 15
1 to 15
Fader Center
–12 to +12
S
O
U
R
C
E
SEL
VOL
BAN
R
E
M
O
T
E
1
DISP/CT
MR505N
PWR
TUNE
TRACK
BAN
1
BAN
1
1 to 15
Note: In the audio mode (BASS/TREBLE/BALANCE/FADER/SUBW),
the display will be back to regular operation mode with no operation for
more than 5 seconds (2 seconds in the VOLUME mode).
d
SUBW
(Sub-Woofer)
Regular Mode
VOLUME BASS TREBLE BALANCE FADER
(Volume) (Bass) (Treble) (Balance) (Fader)
8
OPEN
R
@
4
5
SCAN
REP
6
HDB
PTY
TA
AF
REG
SCAN
REPEAT
S
HDB
MONO/LOC
RANDOM
EON
E
PTY
E
CT
HDB
S•HDB (Super High Definition Bass)
Especially for rock music, the bass-sound will be more powerful.
¡Press [HDB](S•HDB) to be able to listen to high-definition bass.
¡Press [HDB](S•HDB) again to cancel.
(Only for CQ-MR505N)
MR505N
MR505N
VOL
SEL
SEL
SEL
TUNE
TRACK
E
DISP/CT
T
O
M
E
R
PWR
E
C
S
R
O
U
TRACK
SEL
TUNE
E
DISP/CT
T
O
M
E
R
PWR
E
C
S
R
O
U
VOL
VOL
14
CQ-MR505/MR303N
4
E
N
G
L
I
S
H
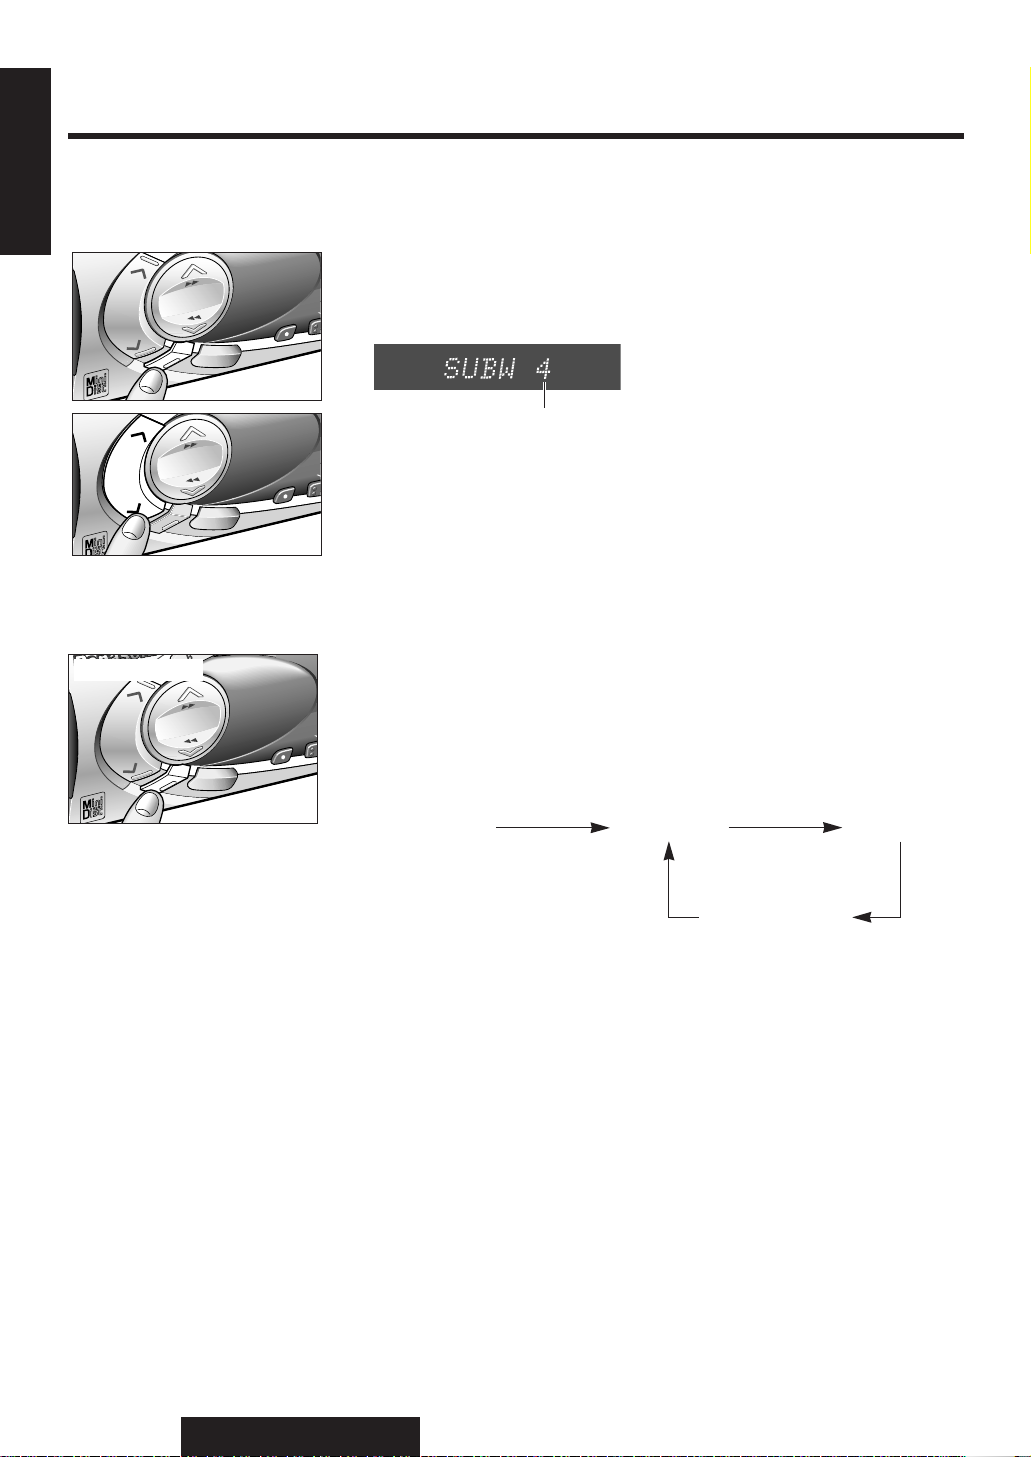
Display Controls
P o wer and Sound Controls
(continued)
Change to the Display Control Mode
q Press and hold [SEL] for more than 2 seconds to change to the display
control mode.
w Press [SEL] to change the display control mode as follows.
S
O
U
R
C
E
SEL
VOL
BAN
R
E
M
O
T
E
1
DISP/CT
MR505N
PWR
TUNE
TRACK
Press and hold
* See page 34 about Security Indicator.
Regular Mode
Level Meter Dimmer
Security Indicator*
Press and hold [SEL]
Press [SEL]
Press
[SEL]
Sub-Woofer Volume
(Only for CQ-MR505N)
Press [SEL] to change to the Sub-Woofer mode. Press [jVOL] or
[iVOL] to increase or decrease the Sub-Woofer volume.
<Only for CQ-MR505N>
Sub-Woofer
S
O
U
R
C
E
SEL
VOL
R
E
M
O
T
E
1
DISP/CT
MR505
s
PWR
TUNE
TRACK
1
MR50
Note: In the display control mode, the display will be back to the previous mode with no operation for more than 5 seconds.
Press
[SEL]
Sub-Woofer
Volume Level:
MUTE (0) to 8 (Default: level 4)
SEL
SEL
TUNE
TRACK
C
S
R
O
U
VOL
VOL
SEL
E
DISP/CT
T
O
M
E
R
PWR
E
15
CQ-MR505/MR303N
1
E
N
G
L
I
S
H
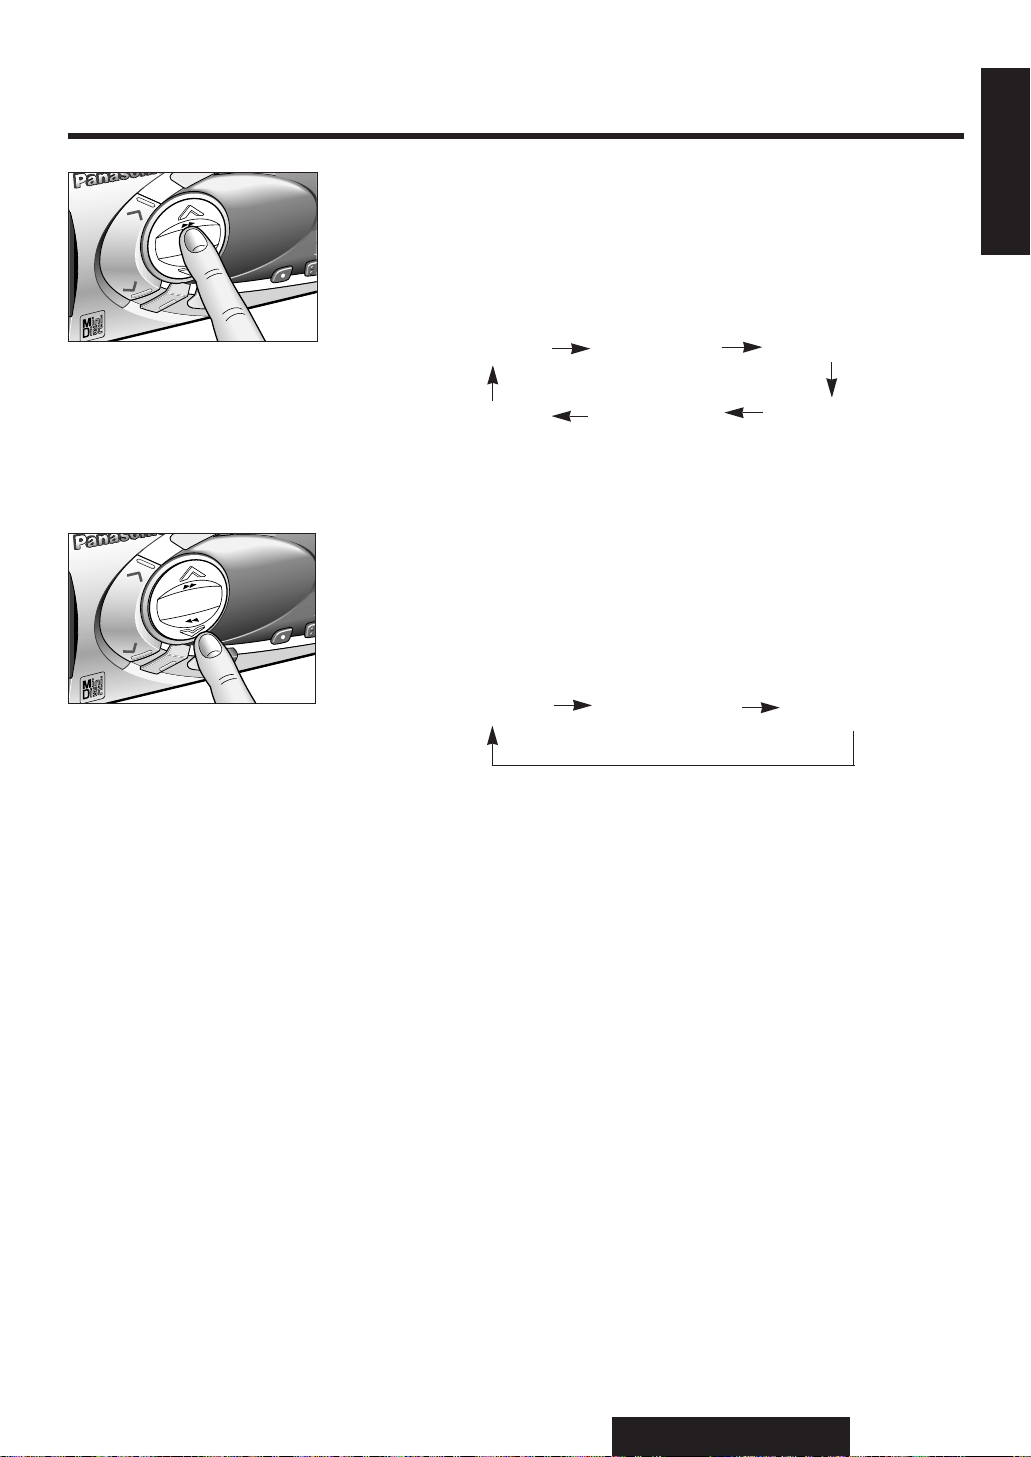
Dimmer
Press [SEL] during the display control mode to change to the dimmer
change mode. Press [iTUNE] to change the dimmer level setting as
follows. (Default: Dimmer 3)
Dimmer 3 Dimmer 2 Dimmer 1
(Brighter) (Center) (Darker)
Level Meter
Press [SEL] during the display control mode to change to the level
meter mode.
Press [jTUNE] to change the level meter setting as fol-
lows.
Select your desired pattern.
Pattern 1
Pattern 2
Pattern 4
Pattern 3
Pattern
Off
Pattern 5
([iTUNE]: opposite direction)
([jTUNE]: opposite direction)
S
O
U
R
C
E
SEL
VOL
BAN
R
E
M
O
T
E
1
DISP/CT
MR505N
PWR
TUNE
TRACK
TUNE
BAN
1
5
TRACK
MR505N
VOL
SEL
TUNE
TUNE
TRACK
TRACK
E
DISP/CT
T
O
M
E
R
PWR
E
C
S
R
O
U

16
CQ-MR505/MR303N
6
E
N
G
L
I
S
H
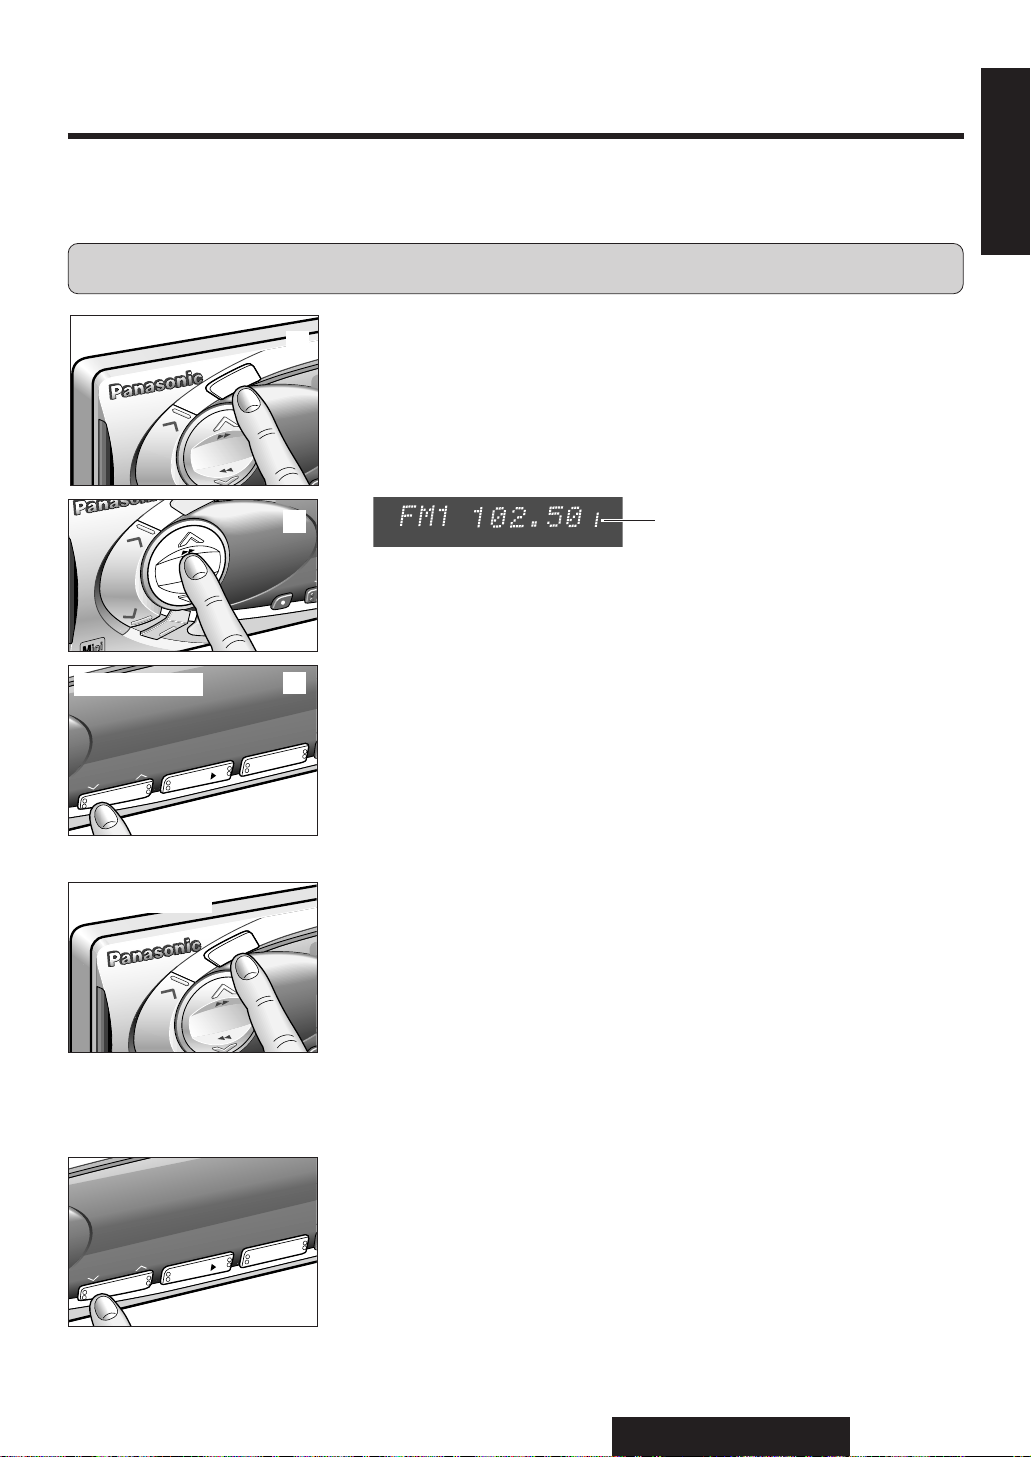
Radio Basics
Seek Tuning
Press and hold [jTUNE] or [iTUNE] for more than 0.5 seconds,
then release it. Seeking will automatically stop when a signal of the next
broadcast station is received.
Manual Tuning
Press [jTUNE] or [iTUNE] to tune in a higher or lower frequency.
Band
Press [BAND] to change the band setting as follows.
The stereo indicator lights during reception of an FM
stereo broadcast.
Tuner Mode
Press [SOURCE] to change the source as follows.
Radio MD CD Changer Control
(When a disc is inserted) (When a CD Changer is connected)
8
OPEN
S
O
U
R
C
E
SEL
VOL
BAND
R
E
M
O
T
E
1
2
3
R
@
4
5
SCAN
REP
6
HDB
PTY
DISP/CT
MR505N
DISC
super bright display with level meters
TA
AF
REG
MOS FET 45Wx4 MD PLAYER/RECEIVER WITH CHANGER CONTROL
SCAN
REPEAT
S
HDB
MONO/LOC
RANDOM
PWR
TUNE
TRACK
A
U
T
O
·
P
EON
E
PTY
E
CT
S
O
U
R
C
E
SEL
VOL
BAN
R
E
M
O
T
E
1
DISP/CT
MR505N
PWR
TUNE
TRACK
Hold and
release
S
O
U
R
C
E
SEL
VOL
BAND
R
E
M
O
T
E
1
DISP/CT
MR505N
su
PWR
TUNE
TRACK
S
BAN
1
FM1 FM2 FM3 AM(LW/MW)
MR505N
MR505N
VOL
VOL
SEL
TUNE
TUNE
TRACK
TRACK
S
R
O
U
TUNE
TRACK
S
R
O
U
E
C
BAND
BAND
E
C
P
·
O
T
U
A
E
DI
T
O
M
ST
E
DISP/CT
T
O
M
E
R
PWR
TUNE
TRACK
17
CQ-MR505/MR303N
7
E
N
G
L
I
S
H
Auto Station Preset
Select the band, press and hold [BAND](AUTO• P) for more than 2 seconds (Auto Preset Memory).
¡The 6 strongest available stations will be automatically saved in the
memory on preset buttons [1] to [6].
¡Once set, the preset stations are sequentially scanned for 5 seconds
each.
Note: The stations manually preset on the selected band will be deleted.
Tuning in a Preset Station
Press the corresponding preset buttons [1] to [6] to tune in a preset station.
Manual Station Preset
q Press [BAND] to select a desired band.
w Use manual or seek tuning to find a station which is to be preset in
the memory.
e Press and hold one of the preset buttons [1] to [6] for more than 2
seconds until the display blinks once.
Caution: To ensure safety, never attempt to preset stations while you are driving.
Note: You can change the memory setting by repeating the above pro-
cedure.
Preset Number
Station Preset
FM1, FM2, FM3 and AM (LW/MW) can save maximum 6 stations each in their preset station memories.
VOL
BAND
O
T
E
DIS
MR505N
TUNE
TRACK
A
U
T
O
·
P
BAN
1
YER/REC
S
e
Press and hold
VOL
BAND
O
T
E
DIS
MR505N
TUNE
TRACK
A
U
T
O
·
P
Press and hold
1
2
3
R
@
4
5
SCAN
REP
6
DISC
super bright display with level meters
MOS FET 45Wx4 MD PLAYER/REC
SCAN
REPEAT
S
RANDOM
w
q
MR505N
VOL
TRACK
TRACK
SEL
MOS FET 45Wx4 MD PLA
super bright display with level meters
DISC
T
1
1
3
3
2
2
TUNE
TUNE
S
R
O
U
RANDOM
R
R
C
4
4
@
@
BAND
E
R
E
BAND
M
PWR
T
O
SCAN
E
5
5
SCAN
SCAN
DISP/CT
REPEAT
REP
REP
6
6
1
2
3
R
6
REP
SCAN
5
4
@
18
CQ-MR505/MR303N
8
E
N
G
L
I
S
H
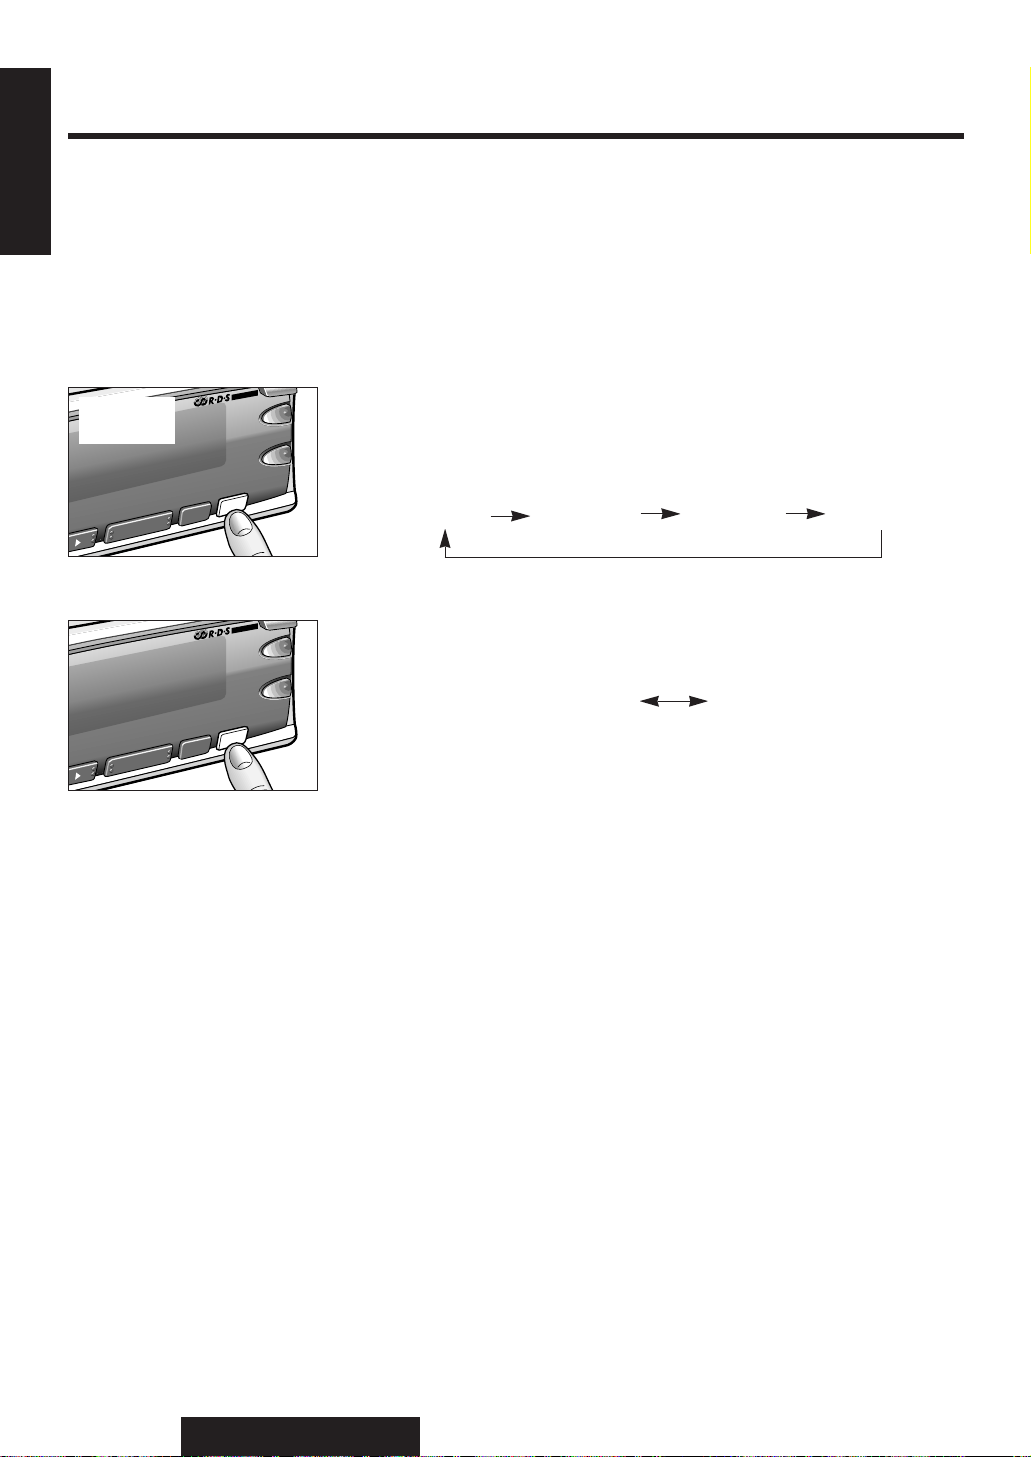
w AM Broadcasts
Press [PTY](MONO/LOC) to switch the Local mode as follows.
LOCAL OFF LOCAL ON
MONO/LOCAL Selection
¡At the MONO setting, noise is significantly decreased when weak sig-
nals are received from an FM broadcast station.
¡
At the LOCAL setting, only strong signals of stations are searched in
seek tuning, while at the LOCAL OFF setting, relatively weak signals
are also searched.
q FM Broadcasts
Press and hold [PTY](MONO/LOC) to change the mode until the desired
mode is reached, then release it.
MONO OFF
LOCAL ON
MONO ON
LOCAL ON
MONO ON
LOCAL OFF
MONO OFF
LOCAL OFF
8
OPEN
@
4
5
SCAN
REP
6
HDB
PTY
TA
AF
REG
SCAN
REPEAT
S
HDB
MONO/LOC
EON
E
PTY
E
CT
N
q
w
Hold and
release
Radio Basics
(continued)
EIVER WITH CHANGER CONTROL
8
rs
DOM
SCAN
SCAN
5
4
@
REPEAT
REP
S
HDB
6
HDB
PTY
EON
MONO/LOC
PTY
PTY
OPE
CT
E
PTY
E
TA
REG
AF

19
CQ-MR505/MR303N
9
E
N
G
L
I
S
H
RDS (Radio Data System) Reception
Note: When you’re in AF ON mode, auto preset memory only works for RDS station. When in TA O N
mode, it only works for TP stations.
To make auto preset for ordinary stations, cancel AF mode and
change to TA off in advance.
Many FM stations are broadcasting added data compatible with RDS. This radio set offers
convenient functions using such data.
AF (Alternative Frequency)r
When receiving condition becomes poor, an RDS
station with the same program will be automatically
selected.
EON (Enhanced Other Networks)r
When EON data is received, the EON indicator
lights and the TA and AF functions are expanded.
TA: Traffic information from not only the station now
tuned in to but also other network stations can
be received.
AF: The frequency list of the RDS stations preset
by received EON data is updated.
PS (Program Service Name)r
When an RDS station is received, the name of that
station automatically displays instead of the frequency. When [
•
](DISP/CT) is pressed during PS
display, the frequency appears on the display for 3
seconds, then PS display returns.
PI (Program Identification)r
If a preset RDS station is poor in receiving condition when it is selected, the automatic seek (PI
Seek) starts to seek the same program and tune
in to it.
PTY (Program Type)r
Program type identification signal
Example : News, rock, classical music, etc.
TA (Traffic Announcement)
When an FM station that periodically provides the latest traffic information is received, the TP indicator lights. If
TA ON is set, FM traffic information automatically interrupts your listening to a MD or CD changer until it ends,
then you will listen again to whatever you have been listening to.
REG (Region)
The AF, Best Station Research, PI Seek functions will be as follows:
REG ON : The frequency changes only with the same regional program. This function is mainly used
while driving in the same area, for example, in a city.
REG OFF: The frequency changes even with a different regional program if the station is in the same net-
work. The broadcast may be different depending on the case. This function is mainly used
when driving far from one region to another.
What Provides EON Capabilities
EON lets the radio set take advantage of RDS information much more than before. It constantly updates
the AF list of all presets, including the station currently tuned in to. So, even if you change preset far
from home, you will be able to receive the same station at an alternative frequency, or another station
serving the same program if any. EON also keeps track of locally available TP stations for quick reception.
Best Station Research
If a preset RDS station is in poor condition of reception when you try to tune in to it, the best frequency is
selected from the AF list of that station.

20
CQ-MR505/MR303N
10
E
N
G
L
I
S
H
8
OPEN
S
O
U
R
C
E
SEL
VOL
BAND
R
E
M
O
T
E
1
2
3
R
@
4
5
SCAN
REP
6
HDB
PTY
DISP/CT
MR505N
DISC
super bright display with level meters
TA
AF
REG
MOS FET 45Wx4 MD PLAYER/RECEIVER WITH CHANGER CONTROL
SCAN
REPEAT
S
HDB
MONO/LOC
RANDOM
PWR
TUNE
TRACK
A
U
T
O
·
P
EON
E
PTY
E
CT
RDS Reception
Press [AF] when receiving a station in the FM1, FM2 or FM3 band.
¡
AF ON/OFF can be set common to all FM bands.
¡Select AF ON if you wish to use the AF network of an RDS station.
Best station research is activated at the same time.
¡Select AF OFF if the AF network of an RDS station is not necessary.
Notes:
1. Default mode is AF1.
2. AF1 has a low level of AF operating sensitivity in urban areas.
Therefore, AF does not frequently operate even when sensitivity is
temporarily lowered between skyscrapers, for example.
3. AF2 is for suburban areas with a higher level of sensitivity than AF1.
8
OPEN
PTY
TA
AF
REG
REPEAT
S
HDB
MONO/LOC
EON
E
PTY
E
CT
Changing AF Mode
Press [AF] to change AF ON and activate Best Station Research at the
same time. (3 seconds maximum)
A. Basic Operation in RDS Reception
(PS, AF, CT, PI)
……… AF 1 Mode (Default)
d
……… AF 2 Mode
d
……… AF OFF Mode
RDS (Radio Data System) Reception
(continued)
AF
EIVER WITH CHANGER CONTROL
rs
OPEN
CT
E
PTY
E
EON
TA
REG
AF
AF
MONO/LOC
8
HDB
S
REPEAT
PTY
21
CQ-MR505/MR303N
11
E
N
G
L
I
S
H
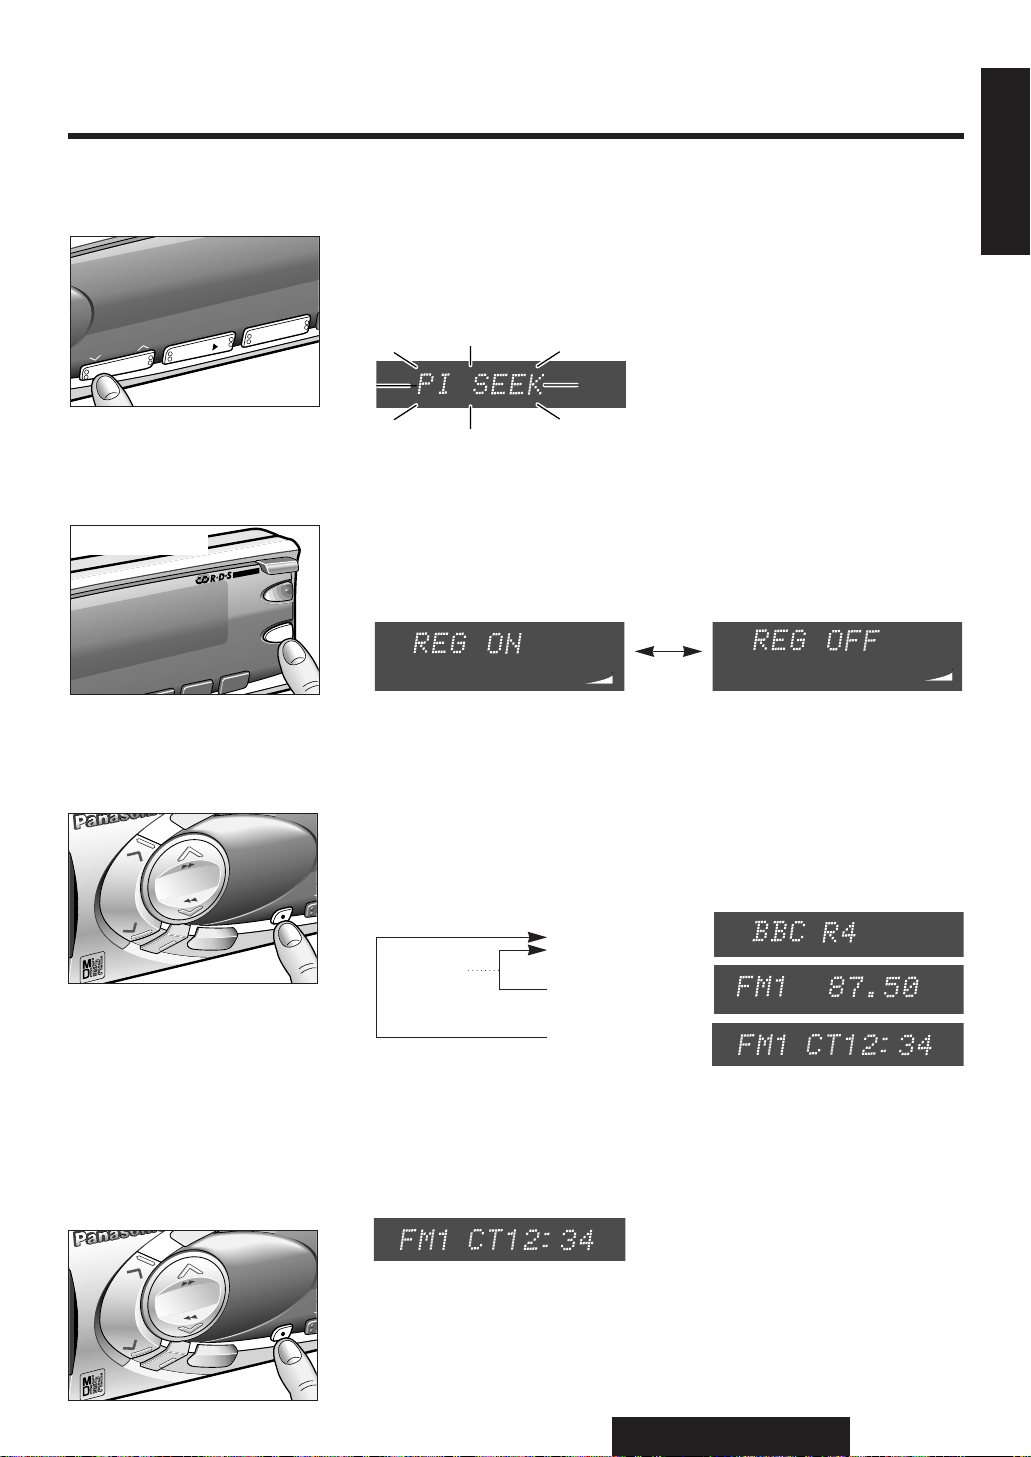
RDS seek tuning (PI seek)
The PI seek function may be used if an RDS station selected from the
memory is poor in receiving condition. Press the preset button again
for the station now tuned in to.
PI Seek: If Best Station Research fails in selecting the best station,
the PI seek function operates to automatically tune in to the
same program.
Changing Display
Press [•](DISP/CT) to change the display as follows.
(Frequency display continues for only 3 seconds, returning to PS display after that.)
Clock Time (CT) System
The CT (24-hour) system may not properly operate in areas where
RDS CT service is not available.
Once CT service is received, the CT
system keeps operating. “NO CT” appears on the display in areas where
no CT service is available.
For Seek Tuning, RDS Station Preset, Tuning in a RDS preset station, and Auto RDS
Station Preset, please refer to Radio Basics (pages 16 to 18).
Note: If you wish to stay with the same program, keep REG ON. In
REG OFF mode, there is a higher possibility of returning to an AF station in better receiving condition. The relationship of the PI seek function with REG ON and REG OFF is as described above.
Region (REG) Switching
Press and hold [AF](REG) for more than 2 seconds in AF mode to alternately select between REG ON and REG OFF.
Clock Display
Press [
•](DISP/CT)
to indicate the clock display.
AF
ST
TAon
AF
ST
TAon
8
OPEN
PTY
TA
AF
REG
REPEAT
S
HDB
MONO/LOC
EON
E
PTY
E
CT
Press and hold
S
O
U
R
C
E
SEL
VOL
BAN
R
E
M
O
T
E
1
DISP/CT
MR505N
PWR
TUNE
TRACK
BAN
1
YER/REC
S
PS display
d
Frequency display
d
CT display
3 seconds
MOS FET 45Wx4 MD PLA
super bright display with level meters
DISC
T
2
2
1
1
3
3
RANDOM
R
R
REPEAT
SCAN
6
6
REP
REP
SCAN
SCAN
5
5
4
4
@
@
AF
MR505N
VOL
SEL
TUNE
TRACK
S
R
O
U
E
DISP/CT
T
O
M
E
R
PWR
E
C
 Loading...