

Page 1
Panasonic.
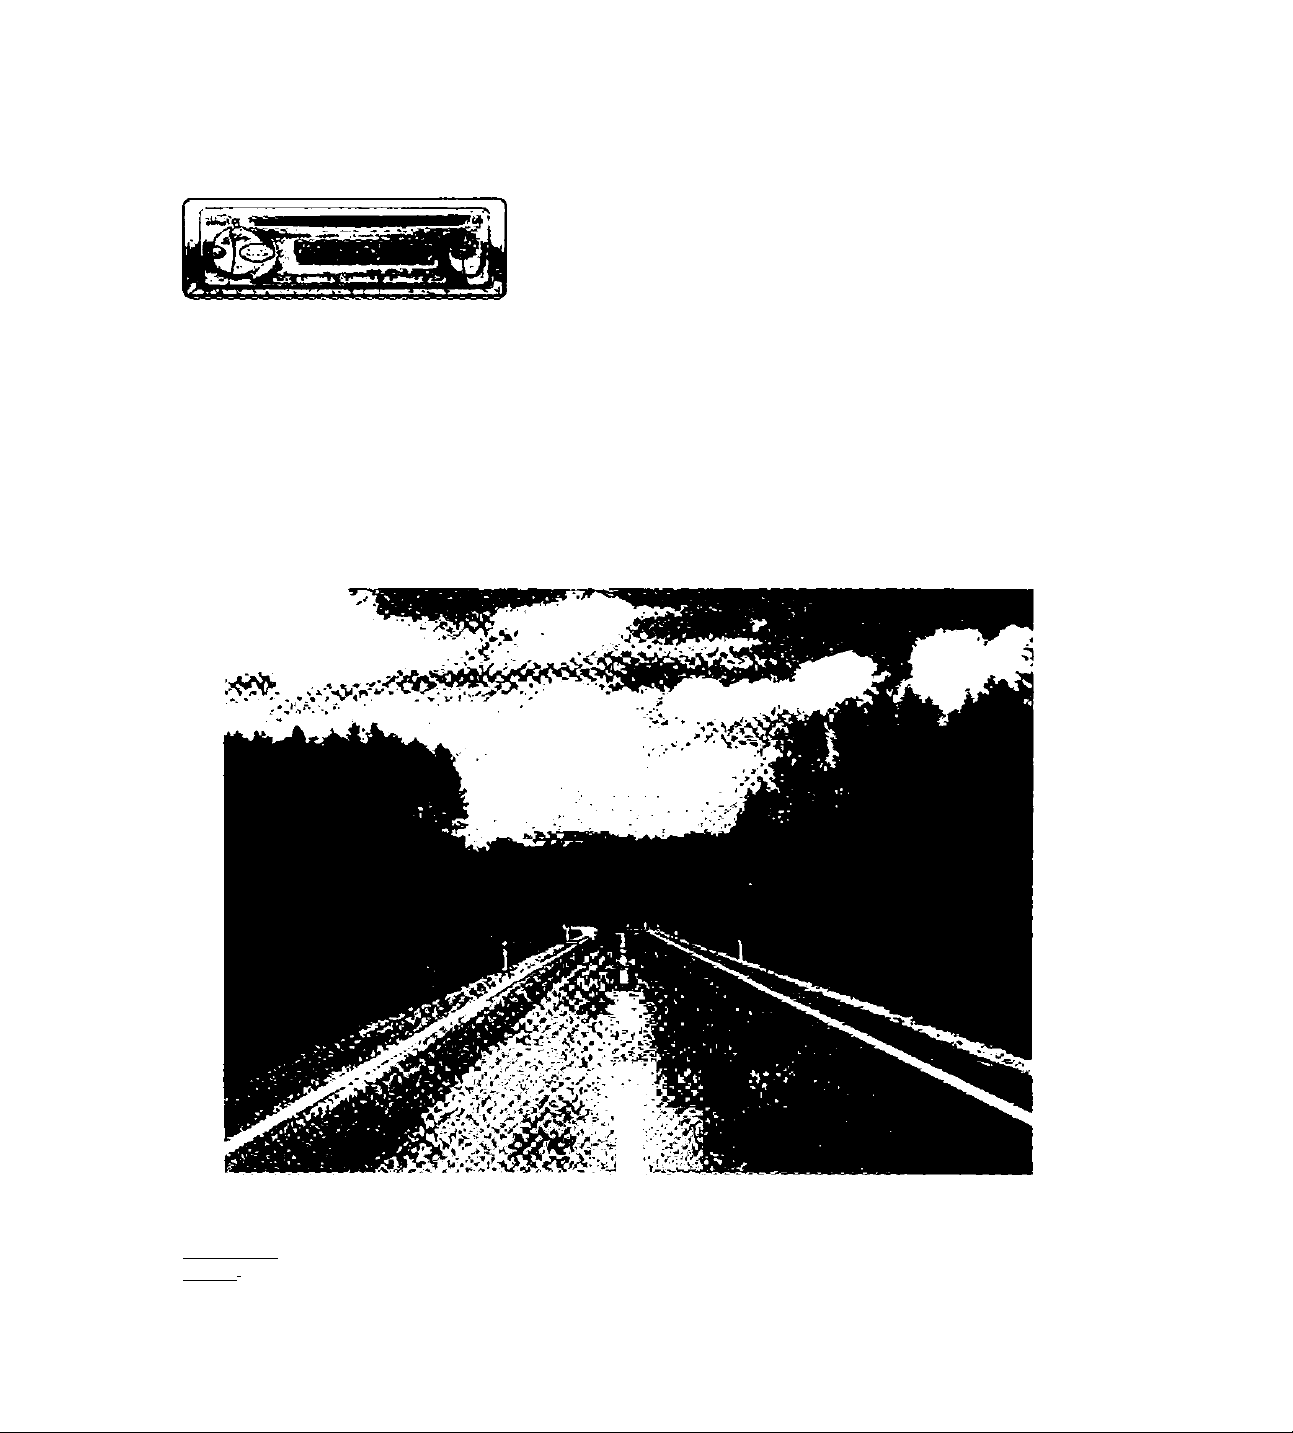
R6íTíOV5t»le Full Front CD Plâyôf/RëCôiver with
Changer Control
Lecteur GD/Rècepteiir avec commande de changeur
de CD et panneau avant entièrement amovible
Reproductor de CD/Receptor con carátula completa
desmontable y control de cambiador de CD
CQ-DP171U
Operating Instructions
Manuel d’instructions
Manual de instrucciones
OIGITALAUDIO
•
r^>T I
• Pleads road these instructions cnrcfulty betors usmtj this produci and keep this mommi tor future use
• Prièifi (le liiK mstiuchon:» uttuntia-meul avant d'lilmsui le produit ut yardor k manuel pour rutitisatíon iilténeuru.
• Lea cnn atención estas ínstnii^crones antes de tilillíar el producto y gutirde cslu manual para podcrlr? consultar en si lulum
Page 2
Safety Information
Radio Frequency Interference Statement (Part 15 of the FCC Rules) :
Applies only in U.S.A.
This equipment has been tested and found to comply with the limits for a Class B digital, pursuant to Part
15 of the FCC Rules.
• These limits are designed to provide reasonable protection against harmful Interference in an automo
bile installation. This equipment generates, uses, and can radiate radio frequency energy and, if not
installed and used in accordance vi/ith the instructions, may cause harmful interference to radio commu
nications. However, there is no guarantee that interference will not occur in a particular installation. If
this equipment does cause harmful interference to radio or television reception, which can be deter
mined by turning the equipment off and on, the user Is encouraged to consult the dealer or an experi
ence radio technician for help.
FCC Warning:
Any unauthorized changes or modifications to this equipment would void the user's authority to operate
this device.__________________________________________________________________________________________________________
This device complies with Part 15 of the FCC Rules:
Operation is subject to the following two conditions:
(1) This device may not cause harmful interference, and
(2) This device must accept any interference received, including interference that may cause undesired
operation.
For Canada:
This Class B digital apparatus complies with Canadian ICES-003.
WARNING:
Label Indication and Location
TO REDUCE THE RISK OF FIRE OR ELECTRIC
SHOCK, DO NOT EXPOSE THIS PRODUCT TO
RAIN OR MOISTURE.
CAUTION:
THIS PRODUCT IS A CLASS I LASER PROD
UCT.
USE OF CONTROLS OR ADJUSTMENTS OR
PERFORMANCE OF PROCEDURES OTHER
THAN THOSE SPECIFIED HEREIN MAY RESULT
IN HAZARDOUS RADIATION EXPOSURE.
DO NOT OPEN COVERS AND DO NOT REPAIR
YOURSELF. REFER SERVICING TO QUALI
FIED PERSONNEL.
Laser products:
Wave length: 780 nm
Laser power: No hazardous radiation is emitted
with safety protection.
Find the model number and serial number on either
the back or bottom of the unit. Please record them in
the space below and retain this booklet as a perma
nent record of your purchase to help with identifica
tion in case of theft.
MODEL NUMBER
SERIAL NUMBER
TO REDUCE THE RISK OF FIRE OR ELECTRIC
SHOCK, AND ANNOYING INTERFERENCE,
USE ONLY THE INCLUDED COMPONENTS.
DATE PURCHASED
FROM
Panasonic
MoòetNo. CQ-DP17UJ
■B
cCI
12V
Manufactured by Dalian Matsushita
Communication Industrial Co.. LUi.
Dalian China Made in China
Serial No.
N’ Da Sèria
This devica compiles with Part 15 o1 the
FCC Rules. Operation is tupjecl to the
condition that this device does riot cause
harmful irrtarterenca.
ISA
4-Ш
¥
CQ-DP171U
T
FM750
CQ-DP171U
Page 3

Con si gn es d e sé cu r it é In fo rm ac ió n pa ra s u s eg ur id ad
MISE EN GARDE:
POUR RÉDUIRE L£S RISQUES D'INCENDIE OU
D’ÉLfCTROCUnON, N'EXPOSEZ PAS CET APPAREIL
À LA PLUIE OU À L'HUMIDITÉ.
AHENTION:
CET APPAREIL EST UN PRODUIT LASER DE LA
CLASSE I.
L'URUSATION DE COMMANDES OU RÉGLAGES OU
L'EXÉCURON D'OPÉRATIONS AUTRES QUE CELLES
QUI SONT INDIQUÉES DANS CE DOCUMENT PEU
VENT RÉSULTER EN UNE EXPOSIRON À UN RAYON
NEMENT DANGEREUX.
N'OUVREZ PAS LES COUVERCLES ET N'ESSAYEZ
PAS D'EFFECTUER VOUS-MÊME DES RÉPARA
ADVERTENCIA:
PARA REDUCIR EL RIESGO DE INCENDIOS O SACU
DIDAS ELÉCTRICAS, NO EXPONGA ESTE PRODUC
TO A LA aUVlA NI A LA HUMEDAD.
PRECAUCION:
ÉSTE ES UN PRODUCTO LÁSER DE LA CLASE I.
LA UTIUZACIÓN DE CONTROLES, EL HACER
AJUSTES O EL SEGUIR PROCEDIMIENTOS DISTIN
TOS DE LOS ESPECinCADOS EN ESTE MANUAL
PODRÍA CAUSAR UNA EXPOSICIÓN PELIGROSA A
LA RADIACIÓN.
NO ABRA LAS CUBIERTAS NI HAGA REPARACIONES
USTED MISMO. SOUCfTE LOS TRABAJOS DE SER
VICIO AL PERSONAL CAUñCADO.
TIONS. ADRESSEZ-VOUS À UN PERSONNEL QUAU-
FIÉ POUR TOUTE RÉPARATION.
Produits laser:
Longueur d'onde: 780 nnn
Puissance du laser: Aucune radiation dangereuse
n'est émise avec la protection
de sécurité.
Productos láser:
Longitud de onda: 780 nm
Potencia láser: Con protección de seguridad no se
emite radiación peligrosa.
AFIN DE PREVENIR TOUT RISQUE D'INCENDIE OU
D'INTERFÉRENCES, UTIUSER UNIQUEMENT LES
COMPOSANTS FOURNIS.
-Z- Déclaration d'interférence de fréquences
radio (Partie 15 des Règlements FCC):
Cet appareil numérique de Classe B est con
forme au règlement (CES-003 canadien.
II est recommandé de noter, dans l'espace prévu cidessous, les numéros de modèle et de série inscrits
soit à l'arrière soit sous le fond de l'appareil, et de
conserver ce manuel comme mémorandum de
rachat afin de permettre l'identification de l'appareil
en cas de vol.
NUMERO DE MODELE
NUMÉRO DE SÉRIE
DATE DE L'ACHAT
VENDEUR
CQ-DP171U
Busque el número del modelo y el número de serie
ya sea en la parte trasera o en el fondo de la unidad.
Sírvase anotar dichos números en el espacio si
guiente, y mantenga este líbrete como una anotación
permanente de su compra para ayudar en la identifi
cación en el caso de robo.
NUMERO DEL MODELO
NUMERO DE SERIE
FECHA DE COMPRA
NOMBRE DE LATIENDA
PARA REDUCIR RIESGO DE INCENDIOS O SACUDI
DAS ELÉCTRICAS, Y PARA EVITAR LAS INTERFE
RENCIAS MOLESTAS, URUCE SOLAMENTE LOS
COMPONENTES INCLUIDOS.
CQ-DP171U
CQ-DP171U
Page 4
□ Use This Product Safely
When Driving
Keep the volume level low/ enough to be aware of road
and traffic conditions.
When Washing Your Car
Do not expose the product, including the speakers and
CDs, to water orexcessive moisture. This could cause
electrical shorts, fire, or other damage.
When Parked
Parking in direct sunlight can produce very high tempera
tures inside your car. Give the interior a chance to cool
down before switching the unit on.
Use the Proper Power Supply
This product is designed to operate with a 12 V, negative
ground battery system (the normal system in a North
American car.)
□ Components
• operating instructions.............................................................1
• Installation hardware
• Power connector
• Remote control unit
• Lithium battery (CR2025)
• Warranty card.........................................................................1
...............................
...................................................................
...............................................................
......................................................
1 set page 24)
Disc Mechanism
Do not insert coins or any small objects. Keep screw
drivers and other metallic objects away from the disc
mechanism and disc.
Use Authorized Servlcenters
Do not attempt to disassemble or adjust this precision
product. Please refer to the Servicenter list included with
this product for service assistance.
For Installation
The product should be installed in a horizontal position
with the front end up at a convenient angle, but not more
than 30°.
1
1
1
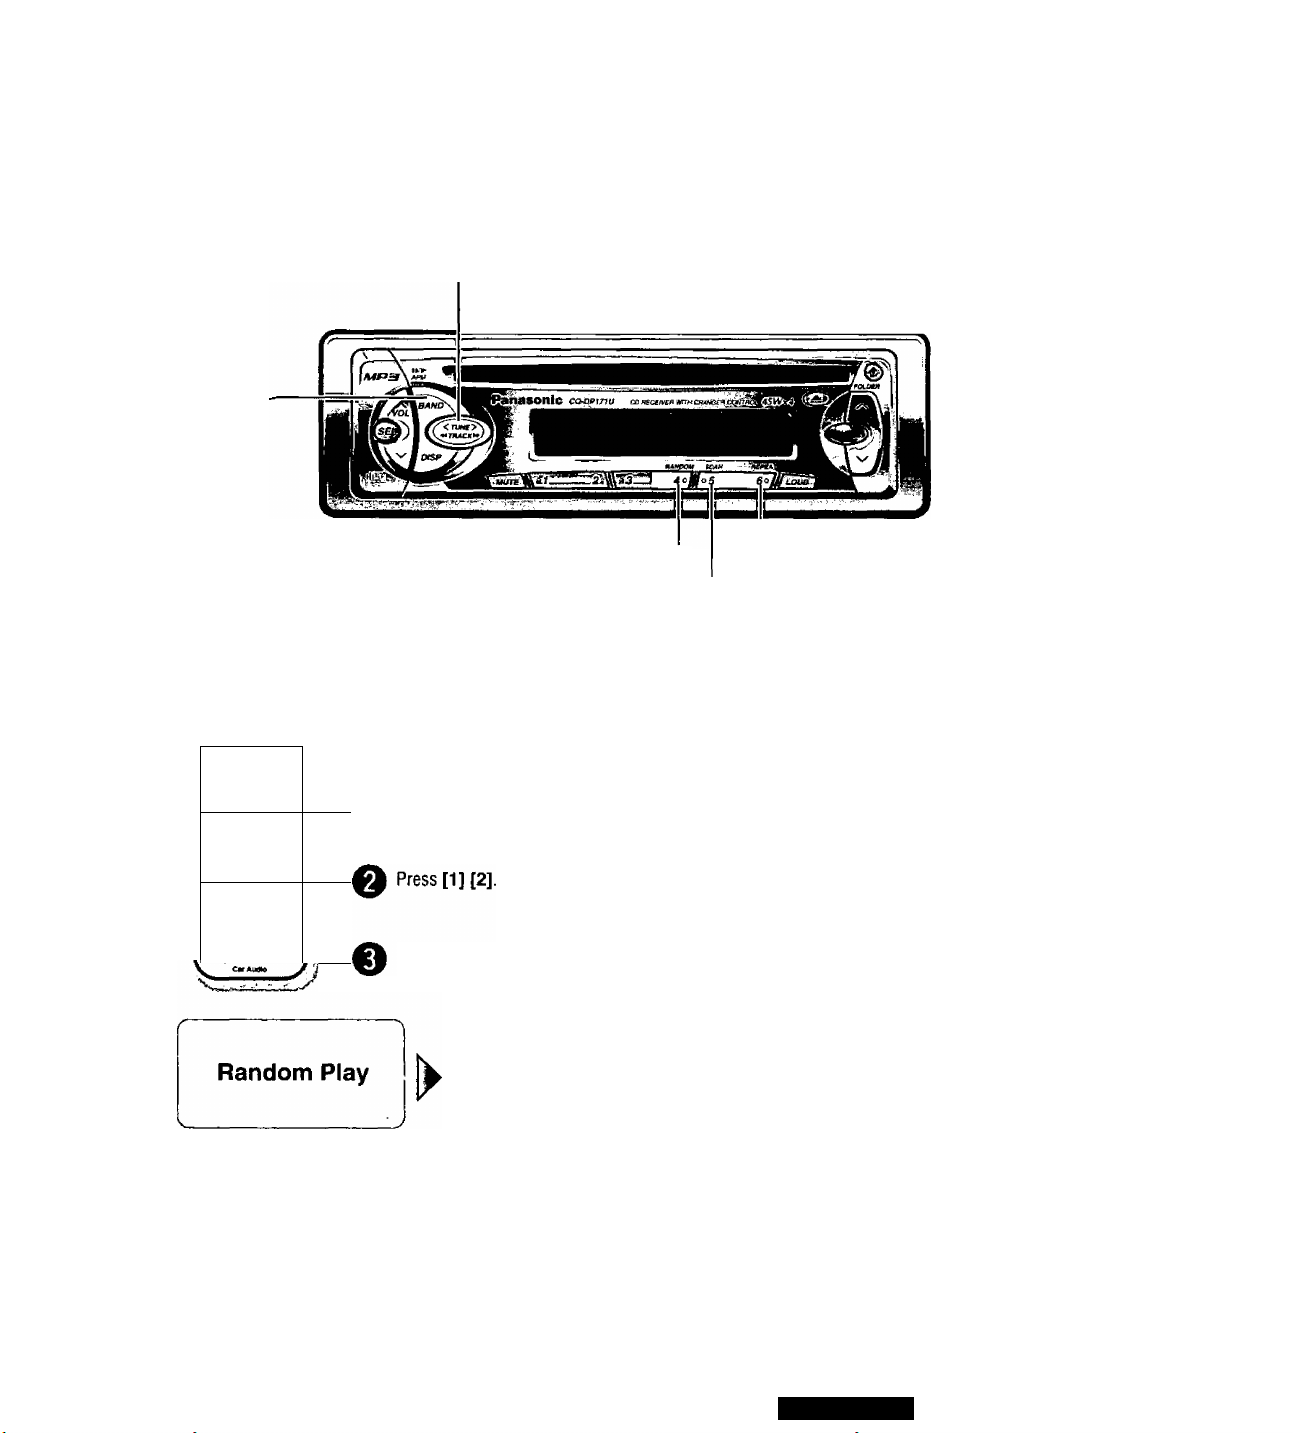
□ Features
• A CD-R and a CD-RW that hold CD-DA data can be reproduced.
• A CD-ROM, a CD-R and a CD-RW that hold MP3 data can be reproduced.
• Title display function
CD text (disc and track title)* during reproducing a CD that supports CD text.
MP3 folder and file name
CQ-DP171U
Page 5

Panasonic est heureuse de vous compter parmi les utilisateurs de ses appareils électroniques.
Nous pouvons vous assurer que cet appareil vous procurera de longues heures d’agrément. Notre réputa
tion est fondée sur une ingénierie électronique et mécanique de haute précision laquelle préside à ta fabri
cation d’appareils ne comportant que des composants de choix assemblés par un personnel soucieux de
la bonne réputation acquise par la qualité de son travail. Après avoir découvert la qualité, la valeur et ta fia
bilité de cet appareil, vous aussi serez fier d’être un client Panasonic.
□ Précautions à prendre
Au volant
Réglez le volume à un niveau qui ne risque pas de mas
quer les bruits ambiants.
Lavage de la voiture
Afin de prévenir tout risque de court-circuit ou d’incendie,
n’exposez pas l’équipement, y compris les haut-parleurs
et les disques, à l’eau ou à une humidité excessive.
Voiture stationnée
L’habitacle d’une voiture immobile exposée au soleil
toutes vitres fermées devient rapidement très chaud.
Laisser rafraîchir l’intérieur du véhicule avant d’utiliser
l’appareil.
Source d’alimentation
Cet appareil est conçu pour fonctionner sur un système
d’alimentation avec batterie de 12 V à masse négative
(système standard sur les voitures de construction nordaméricaine).
□ Eléments constitutifs
• Manuel d'instructions
• Quincaillerie pour l’installation
...................................................1 ensemble (^ page 56)
• Connecteur d’alimentation.....................................................1
• Télécommande......................................................................1
• Pile au lithium (CR2025)........................................................1
• Carte de garantie...................................................................1
.............................................................
Mécanisme de disque
N’insérez pas de pièces de monnaie ou de petits objets.
Gardez les tournevis et autres objets métalliques à l’écart
du mécanisme de disque et du disque.
Réparation
Ne tentez pas de démonter ou d’ajuster l’appareil vous-
même. Veuillez vous référer à la liste des centres de ser
vice fournie avec cet appareil pour contacter le service
d’assistance.
Installation
L’appareil doit être installé en position horizontale avec
son extrémité avant inclinée vers te haut à un angle com
mode, mais ne dépassant pas 30^
1
□ Caractéristiques
• Un CD-R et un CD-RW contenant des données CD-DA peuvent être reproduits.
• Un disque CD-ROM, un CD-R et un CD-RW contenant des données MP3 peuvent être reproduits.
• Fonction d’affichage des titres :
Texte CD (titres de disque et de plage)^ durant la reproduction d’un CD qui soutient le texte CD,
Noms de dossier et de fichier MP3
CQ-DP171U
Page 6

Panasonic le da la bienvenida a la familia constantemente en aumento de poseedores de productos elec
trónicos. Nos esforzamos en proporcionarle las ventajas de la ingeniería mecánica y electrónica de pre
cisión, de una fabricación con componentes cuidadosamente seleccionados, y de un montaje realizado
por personas orguliosas de la reputación que su trabajo ha cimentado para nuestra empresa. Estamos
seguros de que este producto le proporcionará muchas horas de distracción y, una vez comprobada la
calidad, el valor y la fiabilidad incorporados, usted también se sentirá orgulloso de pertenecer a nuestra
familia.
□ Uso de este equipo con seguridad
Cuando conduzca
Mantenga el nivel del volumen suficientemente bajo para
estar atento a la carretera y a las condiciones del tráfico.
Cuando lave el automóvil
No exponga el equipo, incluyendo los altavoces y los
CDs, al agua ni a una humedad excesiva. Esto puede
causar cortocircuitos eléctricos, incendios u otros daños.
Cuando esté estacionado
El estacionamiento a la luz solar directa puede producir
temperaturas muy altas en el interior de su vehículo.
Procure enfriar el interior antes de encender la unidad.
Uso de la alimentación apropiada
Este equipo ha sido diseñado para funcionar con un sis
tema de batería de 12 V con negativo a masa {el sistema
normal en un vehículo norteamericano).
□ Componentes
• Manual de Instrucciones
• Accesorios suministrados..1 juego página 88)
• Conector de alimentación
• Unidad del controlador remoto.......................1
• Pila de litio {CR2025)
• Tarjeta de garantía..........................................1
..................................
..............................
.....................................
1
1
Mecanismo del disco
No inserte monedas ni ningún objeto pequeño. Mantenga
los destornilladores u otros objetos metálicos apartados
del mecanismo de disco y del disco.
Uso de los centros de servicio autorizados
No intente desmontar ni ajustar este equipo de precisión.
Consulte la lista de centros de servicio incluidos con este
producto para acudir a ellos cuando sea necesario.
Instalación
La unidad deberá instalarse en posición horizontal, con el
extremo delantero hacia arriba formando un ángulo con
veniente, pero no más de 30°.
1
□ Características
• Un CD-R y un CD-RW con datos CD-DA que pueden reproducirse.
• Un CD-ROM, un CD-R y un CD-RW con datos MP3 que pueden reproducirse.
• Función de visualización de títulos
Texto de CD (título del disco y de la pista)* durante la reproducción de discos CD compatibles con texto de CD.
Carpeta MP3 y nombre de archivo
CQ-DP171U
Page 7
Contents
Safety Information .............................................................................................................................Page 2
Radio Frequency Interference Statement (Part 15 of the FCC Rules) ..........................................................2
Use this Product Safely ................................................................................................................................
Components.................................................................................................................................................4
Features ......................................................................................................................................................4
□ Remote Control Unit Preparation........................................................................................................10
Battery Installation, battery notes, control reference guide
□ Power and Sound Controls.................................................................................................................11
How to adjust the volume, tone and balance, mode selection, setting mute, setting
loudness, setting/resetting the time, selecting the clock display
□ Radio Basics.......................................................................................................................................14
Manual and automatic tuning, band selection, preset stations
□ CD Player Basics ...............................................................................................................................16
Disc insert and playback, stop and disc eject, mode selection, display change,
disc/track title scroll, track selection, search, pause, direct track selection, random,
scan, repeat
□ MP3 Player Basics..............................................................................................................................18
Disc insert and playback, stop and disc eject, mode selection, display change,
folder/file name scroti, MP3 folder selection, pause, direct MP3 folder selection, MP3
file selection, MP3 in-file search, random, scan, repeat
4
to;
oc
30
□ CD Changer Control...........................................................................................................................22
Mode selection, disc selection, direct disc selection, track selection, search, random,
scan, repeat
□ Installation Guide................................................................................................................................24
Step-by-step procedures
□ Anti-Theft System................................................................................................................................29
^ Place the removable face plate into case, install removable face plate
□ Electrical Connections........................................................................................................................30
Cautions and wiring diagram
□ Troubleshooting..................................................................................................................................32
Where to get service help, troubleshooting tips, error display messages
□ Notes on MP3......................................................................................................................................38
What is MP3, points to remember when recording on MP3 disc, glossary
□ Maintenance.......................................................................................................................................40
Care of the unit, notes on CD/CD media (CD-ROM, CD-R, CD-RW)
□ Specifications.....................................................................................................................................41
o o o o o
CQ-DP171U
Page 8
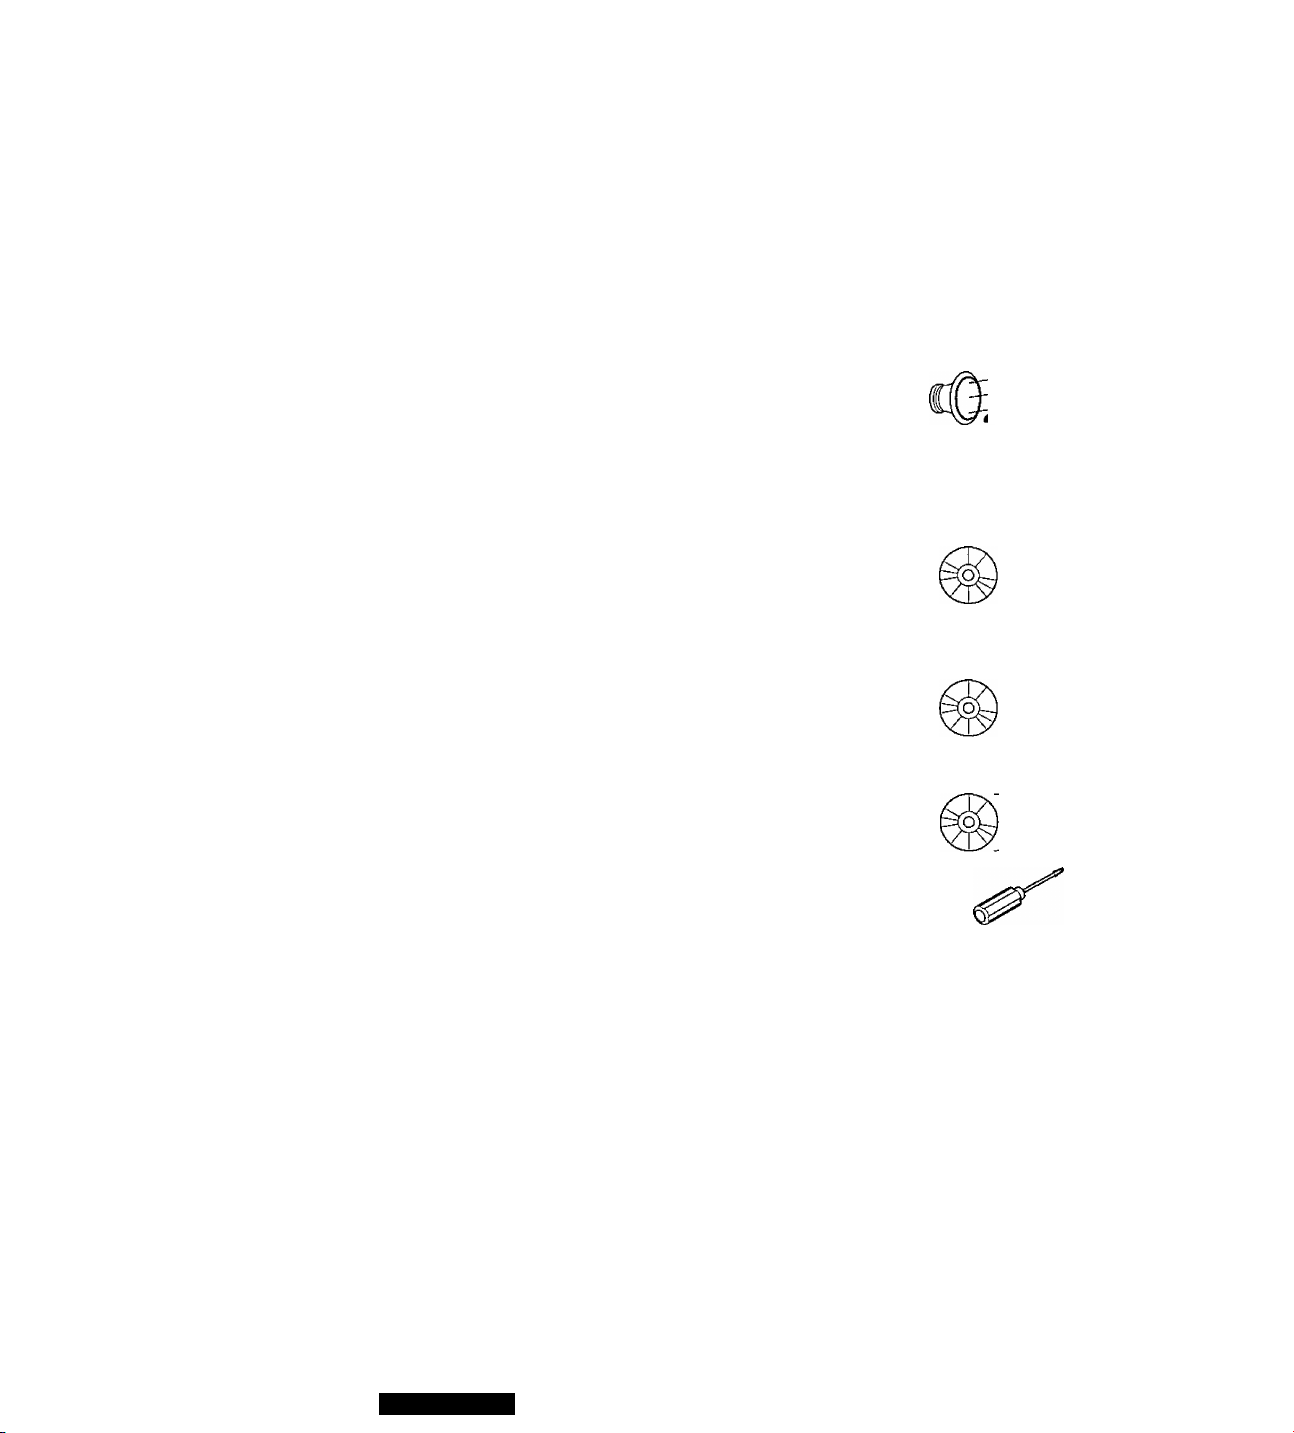
Table des matières
Consignes de sécurité.......................................................................................................................Page 3
Précautions à prendre ................................................................................................................................5
Éléments constitutifs ...................................................................................................................................5
Caractéristiques ..........................................................................................................................................5
□ Préparation de la télécommande........................................................................................................42
Installation de la pile, remarques sur la pile, guide de référence des commandes
□ Commandes d’alimentation et de son ................................................................................................43
Réglage du volume, de l’équilibre et de la tonalité, de la sélection du mode, du
compensateur physiologique, de la coupure du son, de l’horloge
□ Fonctionnement de base de la radio...................................................................................................46
Syntonisation manuelle et automatique, sélection de la bande et stations en mémoire
□ Fonctionnement de base du lecteur CD.............................................................................................48
Insertion de disque et lecture, arrêt et éjection de disque, sélection de mode,
changement d’affichage, défilement des titres (disque/plage), sélection de plage,
recherche, pause, sélection directe de plage, lecture aléatoire, lecture par balayage,
lecture en reprise
□ Fonctionnement de base du lecteur MP3...........................................................................................50
Insertion de disque et lecture, arrêt et éjection de disque, sélection de mode,
changement d’affichage, défilement des noms (dossier/fichier), pause, sélection d’un
dossier MP3, sélection directe d’un dossier MP3, sélection de fichier MP3, sélection
au sein d’un fichier MP3, lecture aléatoire, lecture par balayage, lecture en reprise
OC
lO
□ Fonctionnement de base du changeur CD.........................................................................................54
Sélection de mode, sélection d’un disque, sélection directe d’un disque, sélection de
plage, recherche, lecture aléatoire, lecture par balayage, lecture en reprise
□ Guide d’installation..............................................................................................................................56
Marche à suivre
□ Système antivol...................................................................................................................................61
Mettre le panneau avant amovible dans l’étui, installer le panneau avant amovible
□ Branchements électriques .................................................................................................................62
Précautions et schéma de câblage
□ En cas de difficulté..............................................................................................................................64
Service après-vente, guide de dépannage, affichage des messages d’erreur
□ À propos de MP3 ................................................................................................................................70
Qu’est-ce que MP3, points importants à ne pas oublier lors de l'enregistrement d’un
disque MP3, glossaire
□ Entretien..............................................................................................................................................72
Entretien de l’appareil, à propos des disques (CD, CD-ROM, CD-R, CD-RW)
□ Données techniques............................................................................................................................73
O O O O O
CQ-DP171U
Page 9
Indice
Información para su seguridad ......................................................................................................Página 3
Uso de este equipo con seguridad ............................................................................................................6
Componentes ..............................................................................................................................................6
Características.............................................................................................................................................6
□ Preparación del controlador remoto ..................................................................................................74
Sustitución de la pila, notas sobre la pila, nomenclatura de los controles principales
□ Controles de alimentación y sonido....................................................................................................75
Ajuste del volumen, del tono, y del balance, selección del modo, ajuste de silenciamiento,
ajuste de sonoridad, ajuste/reajuste de la hora, selección de la visualización de la hora
□ Radio: Conceptos generales..............................................................................................................78
Sintonización manual y automática, selección de banda y preajuste de emisoras
□ Reproductor de CD: Conceptos generales..........................................................................80
Inserción y reproducción del disco, parada y expulsión del disco, selección del modo, cambio
de la visualización, despiazamiento dei título del dísco/pista, selección de pistas, pausa,
búsqueda, pausa, selección directa de pistas, reproducción aleatoria, exploración, repetición
□ Reproductor MP3: Conceptos generales...........................................................................................82
Inserción y reproducción del disco, parada y expulsión del disco, selección del modo, cambio
de la visualización, desplazamiento del nombre de carpeta/archivo. pausa, selección de
carpetas MP3, selección directa de carpeta MP3, selección de archivos MP3, búsqueda den
tro del archivo MP3, reproducción aleatoria, exploración, repetición
O ñio
□ Control del cambiador de discos CD.................................................................................................86
Selección del modo, selección del discos, selección directa del disco, selección de
pistas, búsqueda, reproducción aleatoria, exploración, repetición
□ Guía de instalación.............................................................................................................................88
Procedimientos paso a paso
□ Sistema antirrobo................................................................................................................................93
Coloque la placa frontal extraíble en la caja, instale la placa frontal extraíble
□ Conexiones eléctricas.........................................................................................................................94
Medidas de precaución y diagrama del cableado
□ Solución de problemas...................................................................................................................... 96
Dónde obtener ayuda técnica, consejos sobre solución de problemas, mensajes de
error
□ Notas sobre MP3..............................................................................................................................102
Qué es MP3, puntos que deben tenerse presente para grabar en un disco MP3,
glosario
□ Mantenimiento..................................................................................................................................104
Cuidado del aparato, notas sobre los discos CD/tipos de CD {CD-ROM, CD-R, CD-
RW)
□ Especificaciones...............................................................................................................................105
o o o o o
CQ-DP171U
Page 10
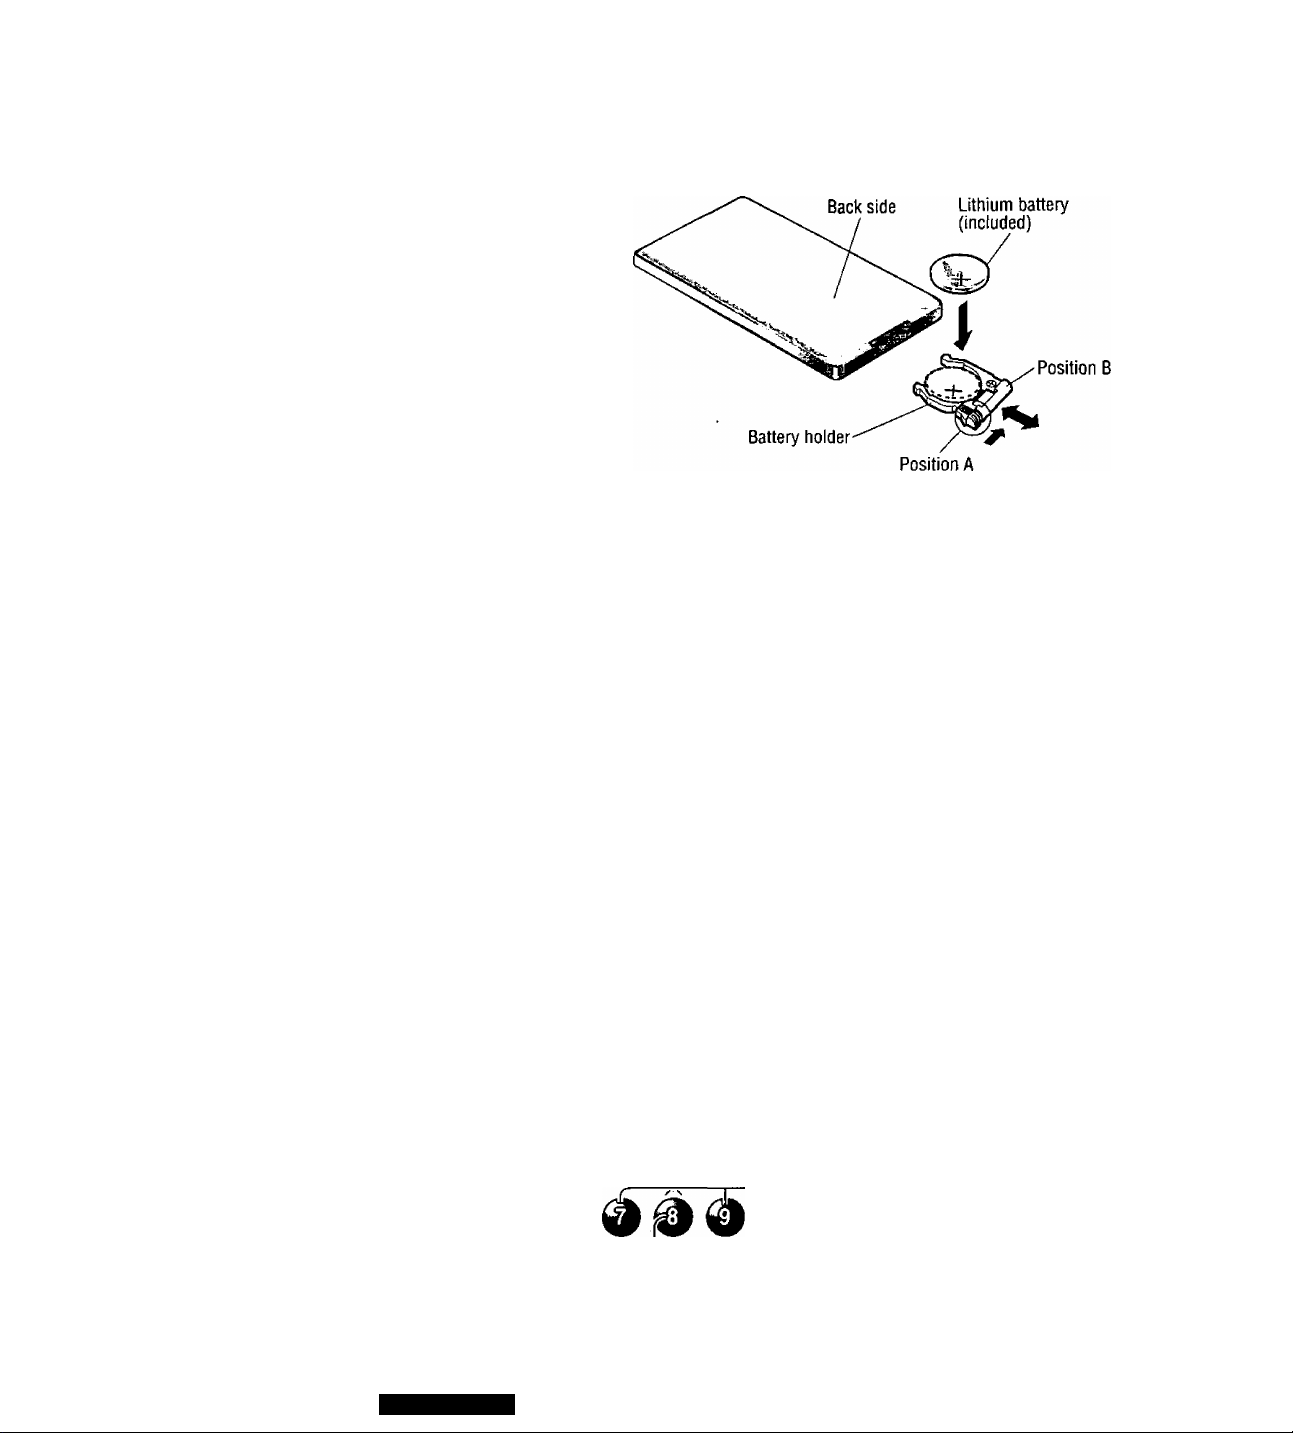
Remote Control Unit Preparation
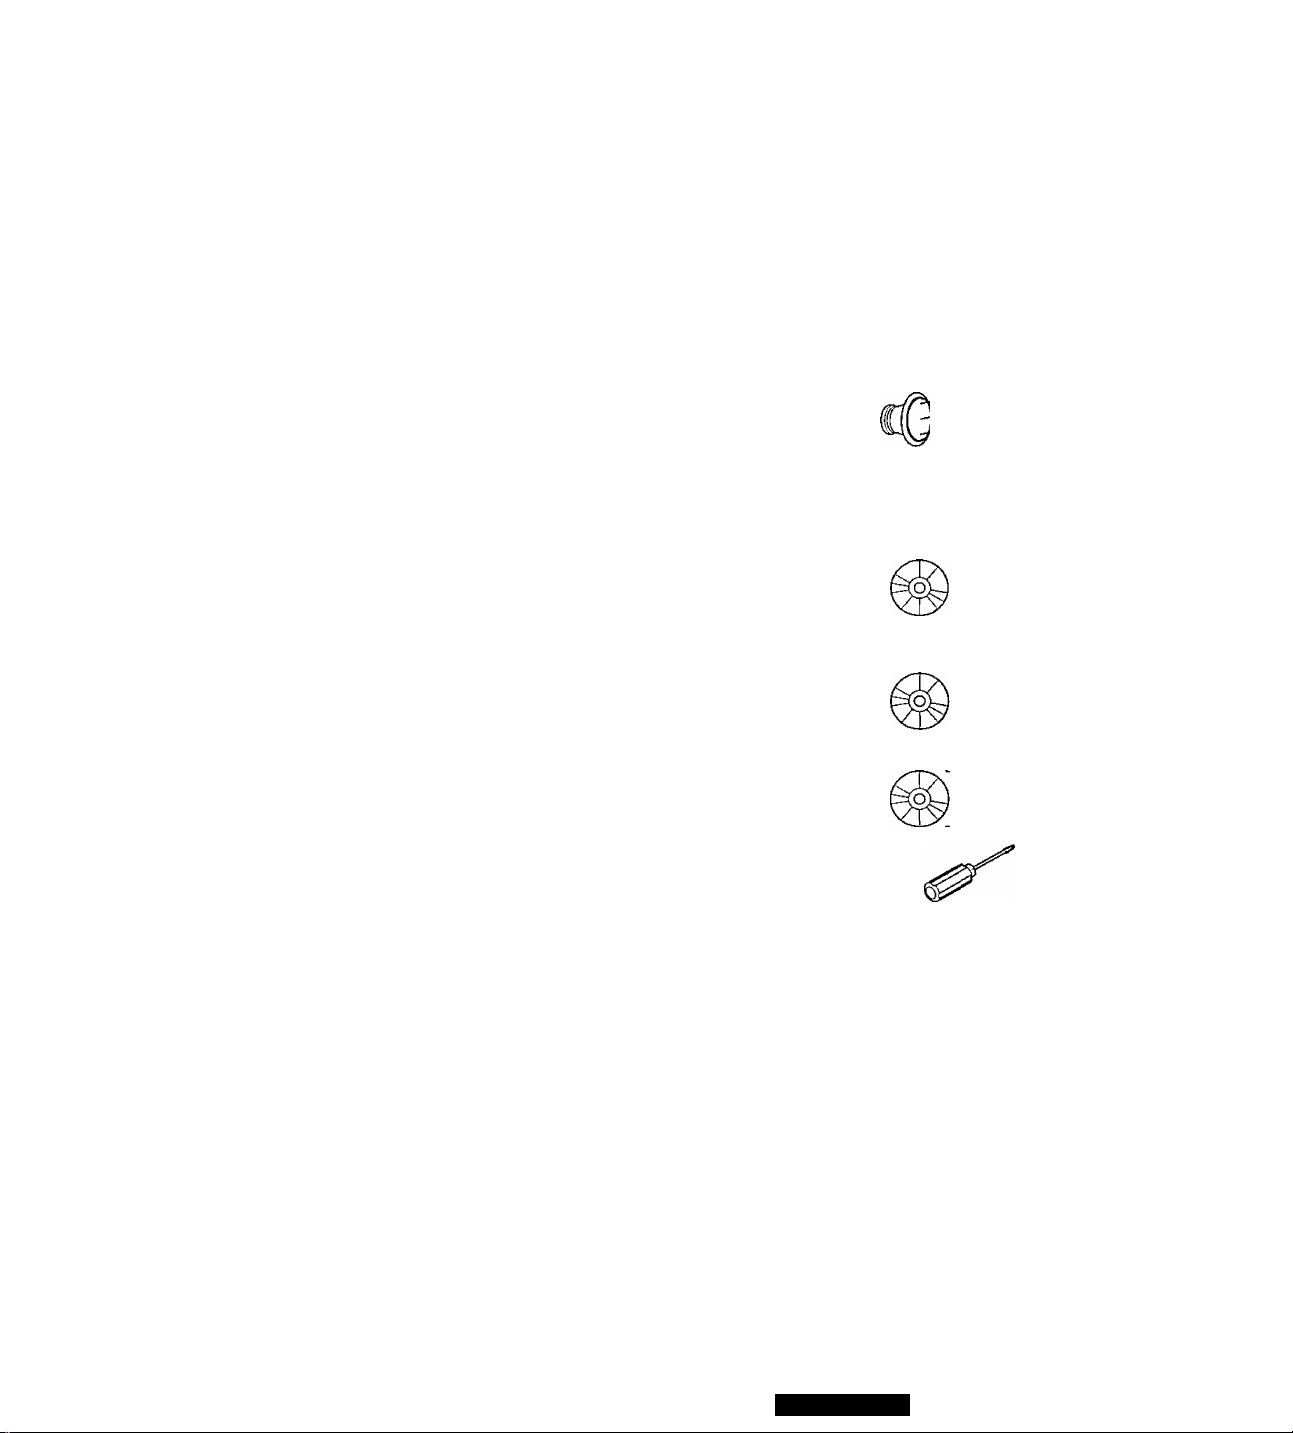
Battery Installation
O Remove the battery holder.
Pull the holder by the position B while pushing
position A in the direction indicated by the arrow.
O Install the battery on the battery holder.
Set a new battery properly with its (+) side facing
upas shown in the figure.
O Insert the battery holder.
Push the battery holder back into its original
position.
Battery Notes
Remove and dispose of an old battery immediately.
Battery Information:
• Battery Type: Panasonic lithium battery (CR2025) (Included)
• Battery Life: Approximately 6 months with normal use (at room temperature)
Caution: Improper use of batteries may cause overheating, an explosion, ignition, resulting in injury or a fire. Battery
leakage may damage the unit.
• Do not disassemble or short the battery. Do not throw a battery into a fire.
• Keep batteries away from children to avoid the risk of accidents.
• Be careful to observe proper local disposal rules when you dispose of batteries.
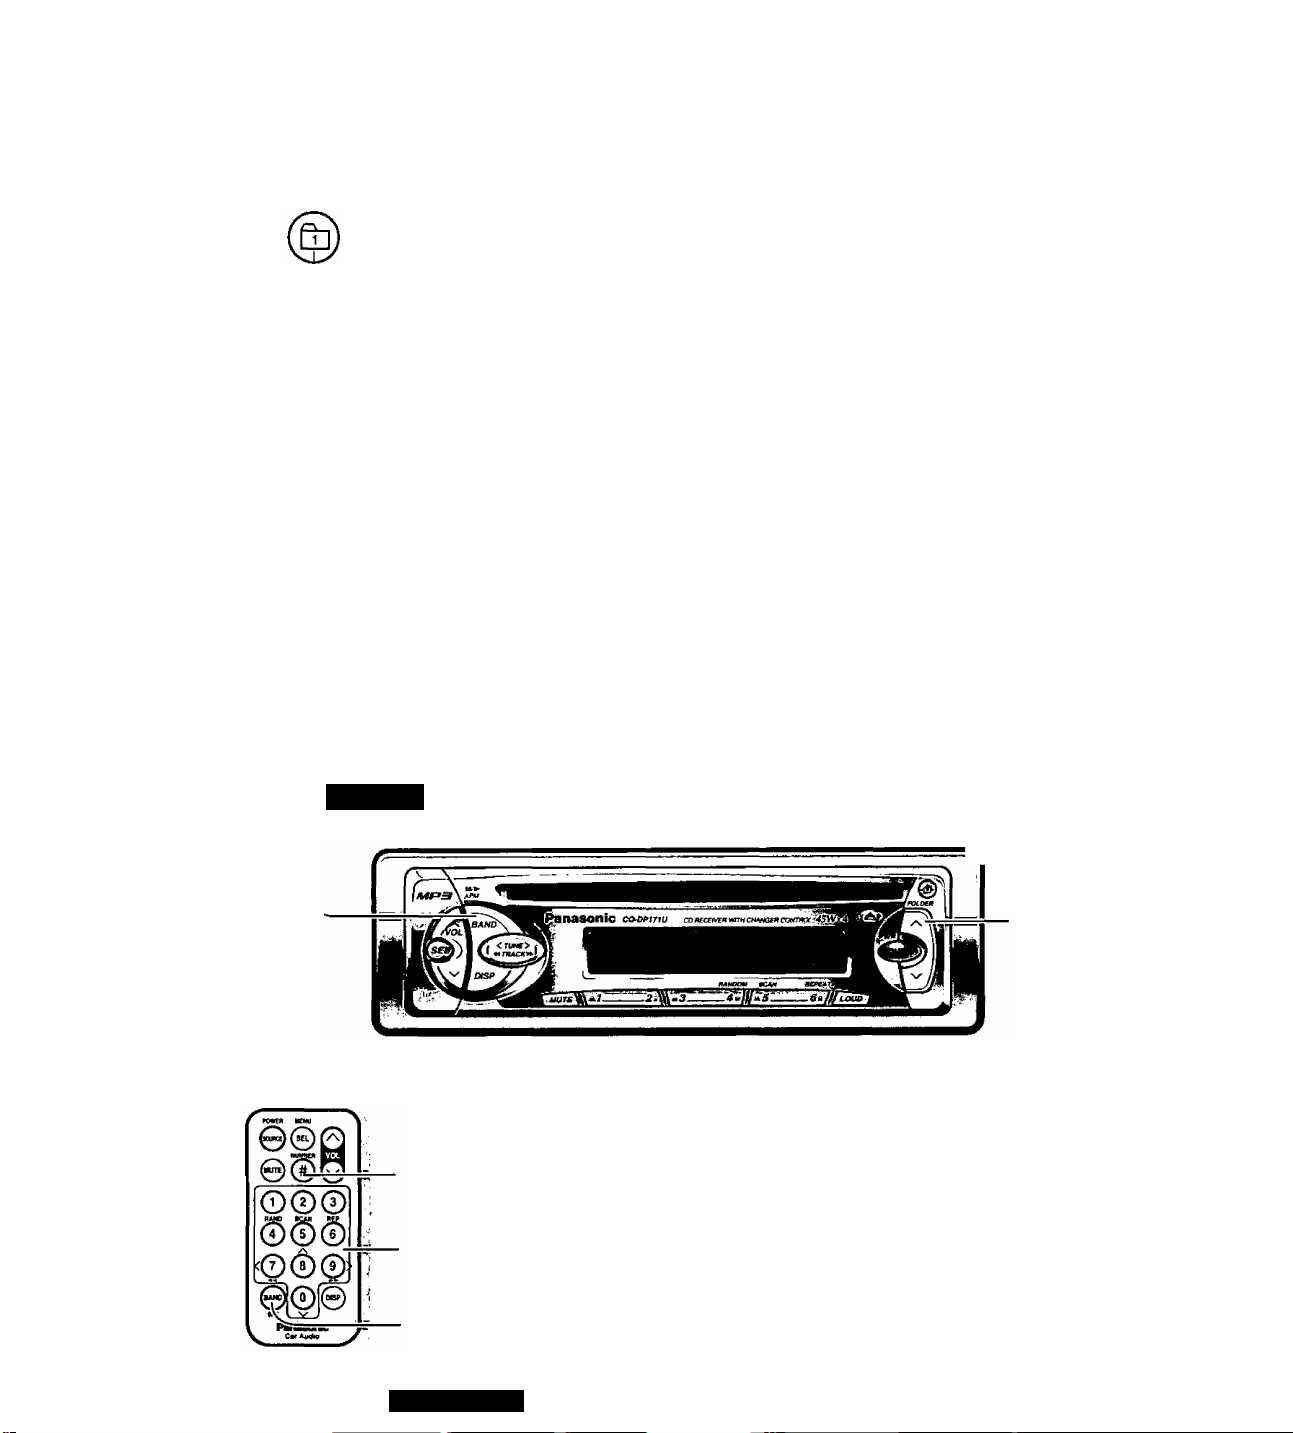
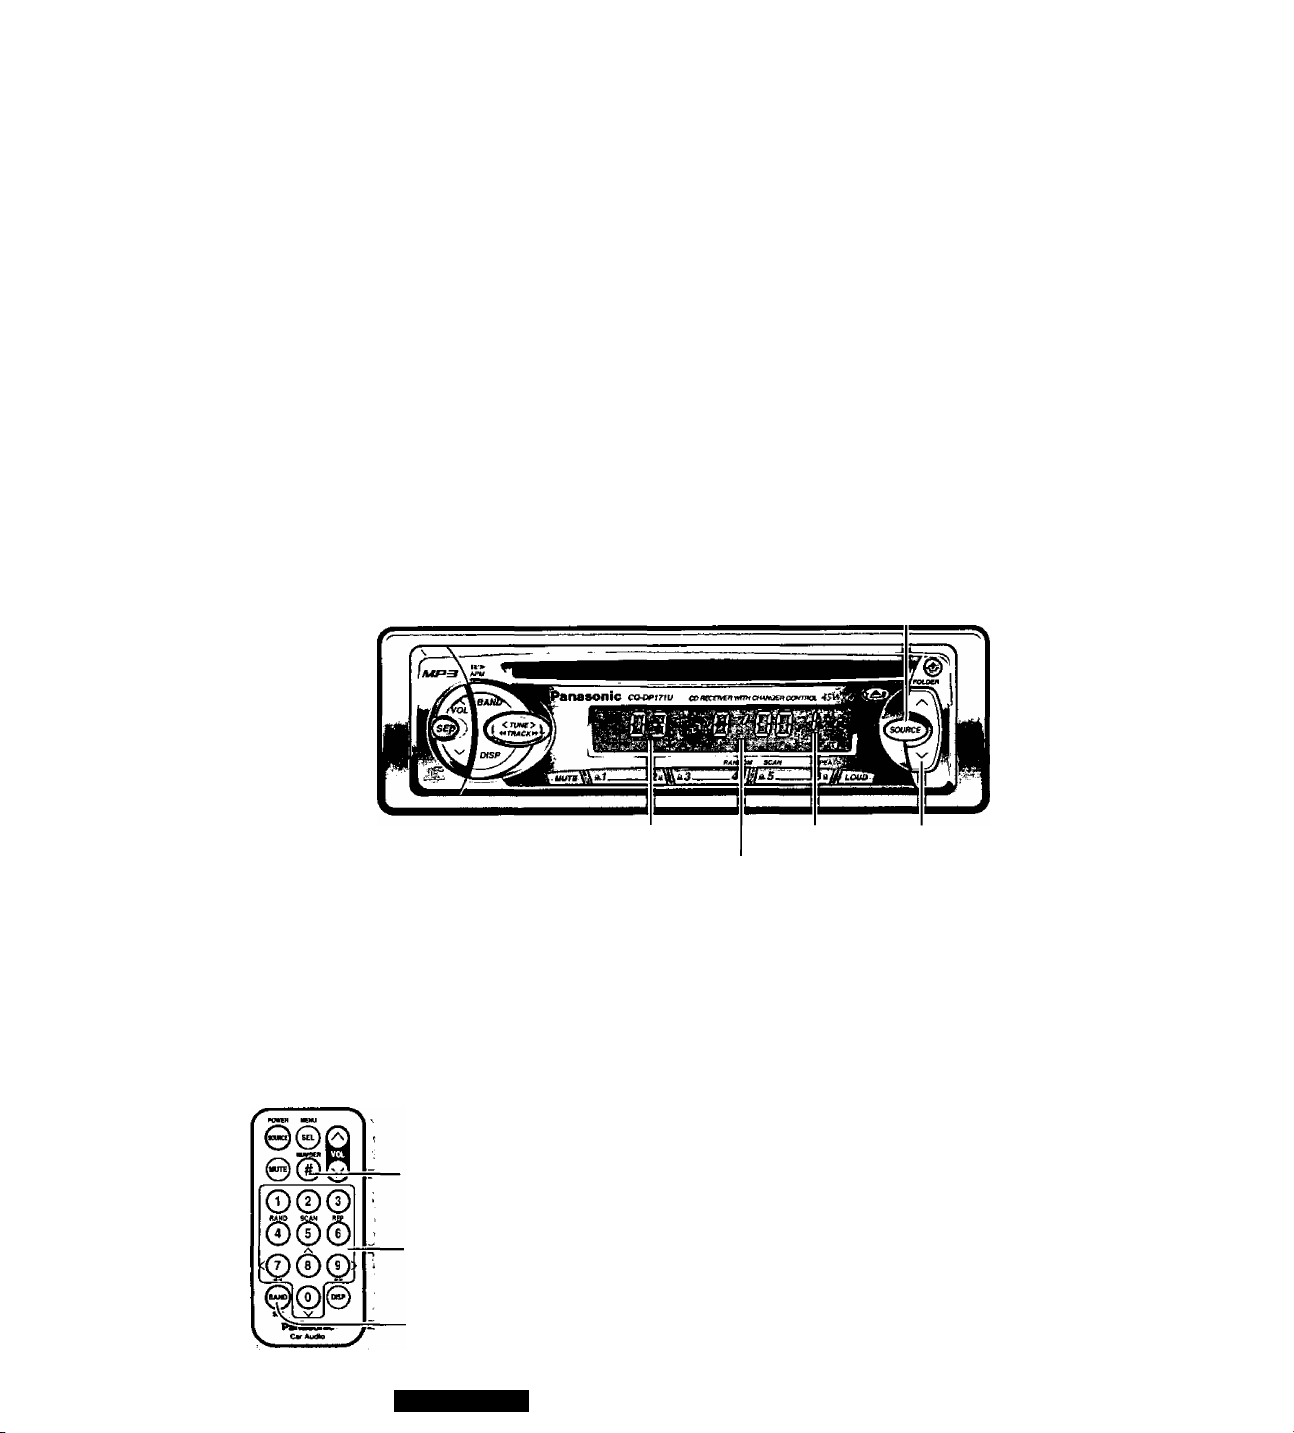
Control Reference Guide
Buttons of the remote control function in the same way as the controls on the main unit of the reference page.
Point the remote control unit at the main unit's sensor (REMOTE).
Select/Menu
(^ pages 12,16,19)
—\
-LJ (
Track/Folder/DIsc number input
pages 17, 20, 22)
-Tune/Track/Fite Selection and Search
(">pages13,14.16,17,19, 21,23)
Display
(^ pages 11,13,16,17,19, 20, 22)
[OJ to (91
(^ pages 15,17, 20, 22)
Power/Source
(^ pages 11,14,16,18, 22)
Mute
-------------------------------------
(^ page 11)
Random
Scan
Repeat
-----------------------
(^ pages 17, 21,23)
Folder/Disc Selection
(^ pages 20,22) \
Band/Set/Pause
pages 14,15,17, 20, 22)
10
------------------------
CQ-DP171U
POWER MENU.
--------
-Volume control
-Q pages 11,12)
^ ^ ^
RAND SCAN REP
J_/bandI
I ^
I SET
ill
N/
Pariai^pnic
Car Aubff
-------
Page 11
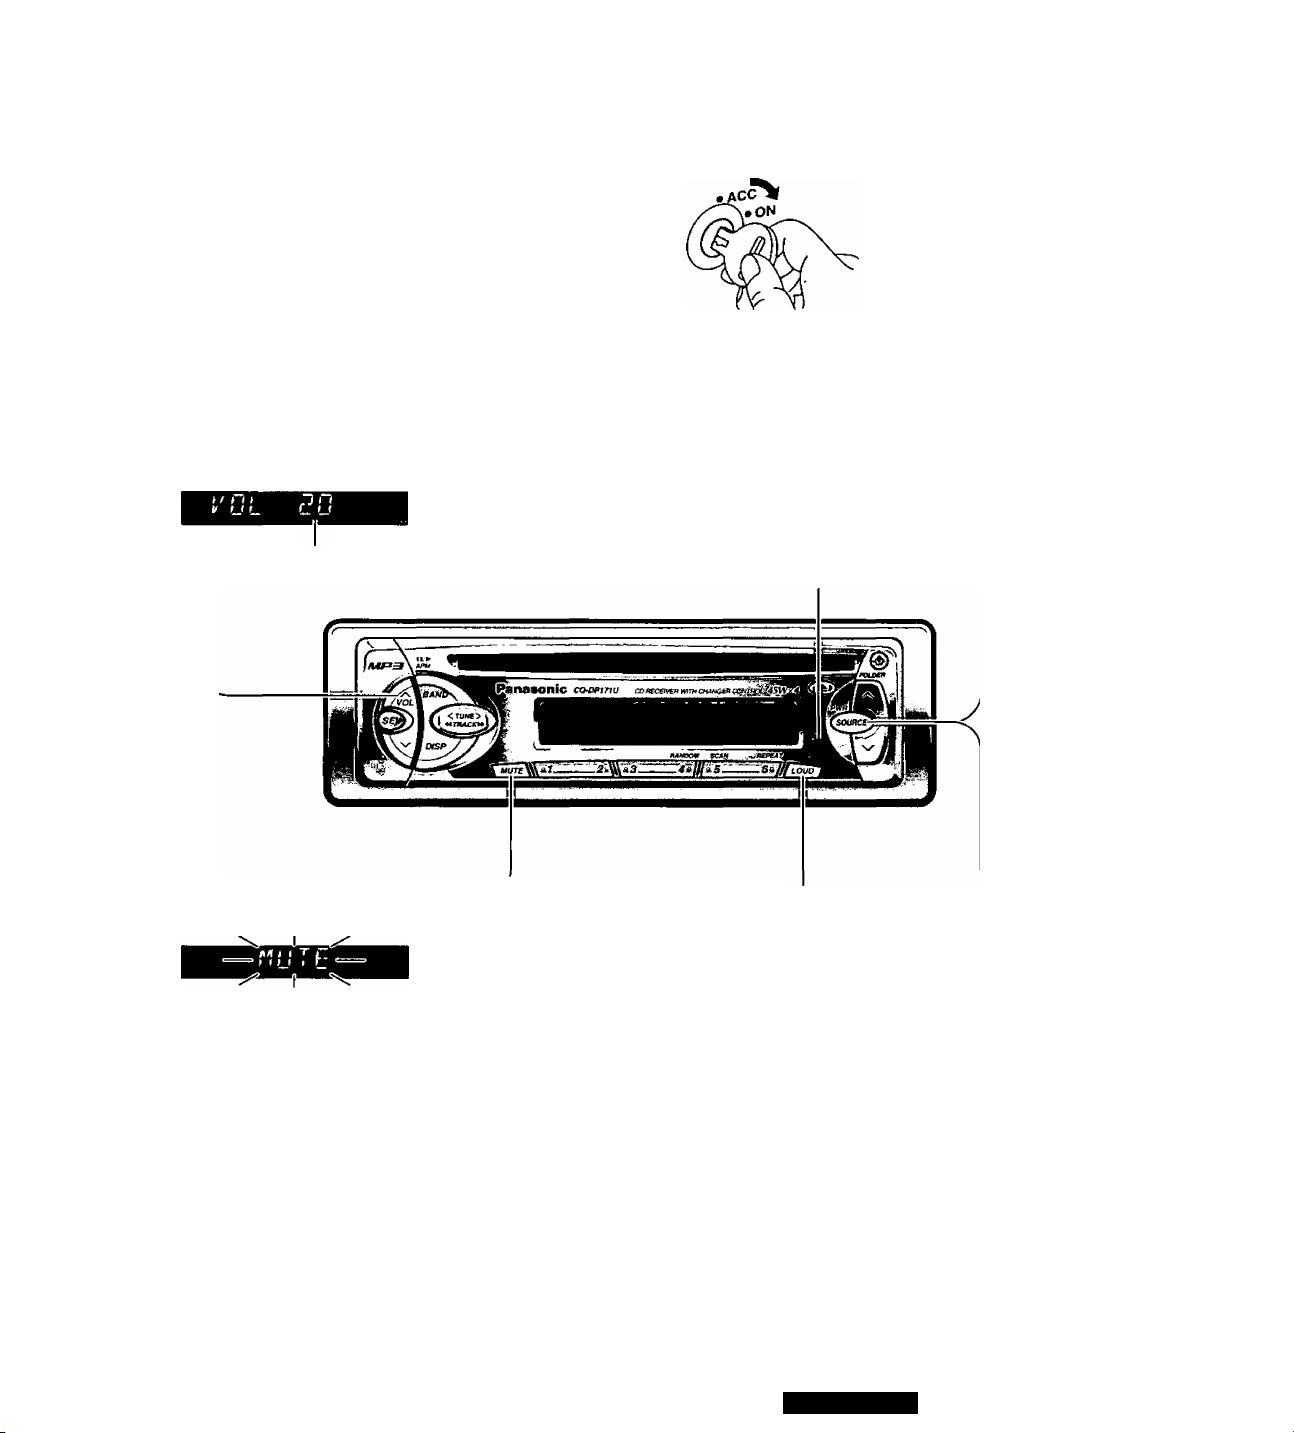
Power and Sound Controls
Power
Turn the key in the ignition until the accessory indicator iights.
Power on : Press [SOURCE] (PWR).
Power off: Press [SOURCE] (PWR) again and hold.
Note: When you use this unit for the first time, a demon
stration message appears on the display.
To cancel this display, press [DISP].
Volume
[AVOL]: Up
IVVOL] : Down
Press and hold for rapid adjustment.
Anti-Volume-Blast Circuit:
When the power is switched off and on again, the volume
slowly rises to the previous level.
The anti-volume-blast circuit will not work when the volume
level is set lower than position 20 on the display.
Volume level (Oto 40)
Mute
Press [MUTE] to mute the sound completely.
Press [MUTE] again to cancel.
Mode Selection
Press [SOURCE] to change the mode.
Tuner
{^page 14)
Loudness (Only for main unit)
Press [LOUD] to enhance bass and treble
tones at low or medium volume.
Press [LOUD] again to cancel.
CD Player
(When a CD is in the player.)
(“♦ page 16)
or
MP3 Player
(When a MP3 files recorded disc
is in the player.) page 18)
Remote control sensor
CD Changer
{When a CD changer is connected and
magazine is in the changer.) page 22)
CQ-DP171U
11
Page 12
Power and Sound Controls
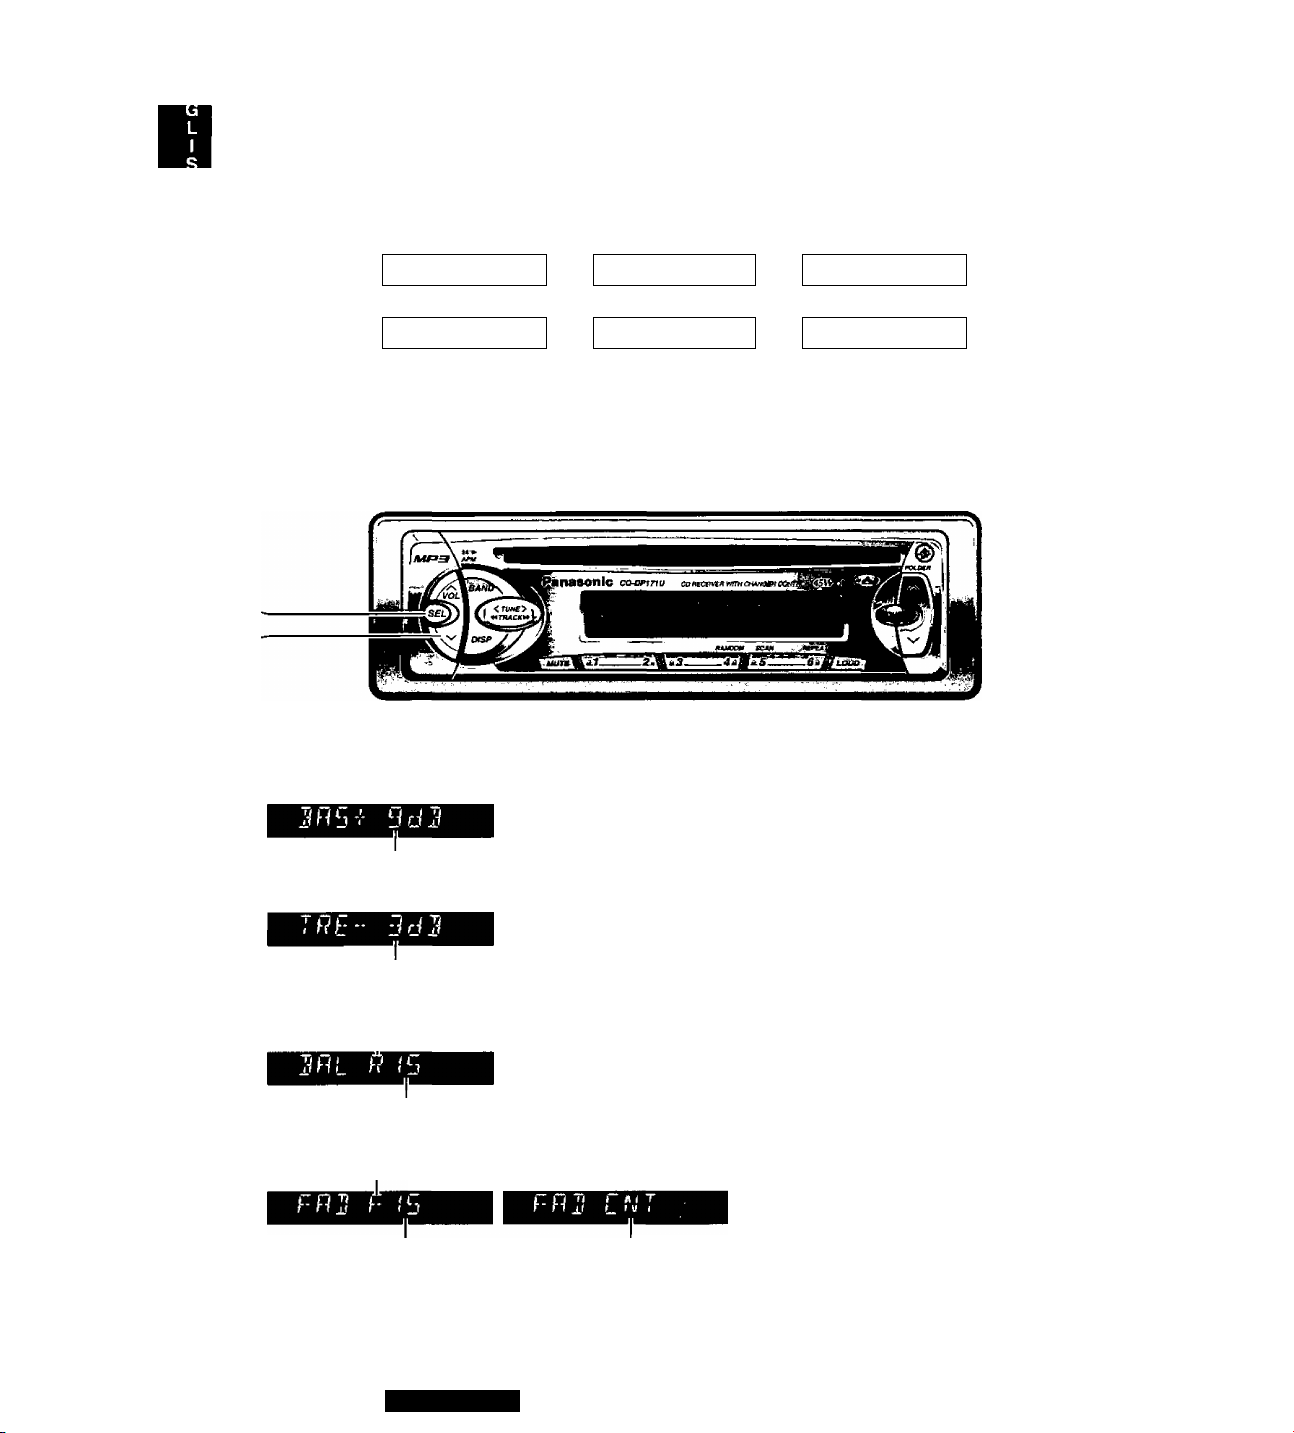
Audio Mode (Bass/Treble/Balance/Fader)
0 Press [SEL] to select the audio mode.
(Continued)
Regular Mode
t 4
Fader
Note; If no operation takes place for more than 5 seconds in audio mode (2 seconds in volume mode), the display
returns to the regular mode.
(D Press [AVOL] or [\/VOL] to change each level.
<4
Volume
Balance
Bass
Treble
Bass:
12
Adjustable range: -12 to +12 by 3 dB step
Treble:
Adjustable range: -12 to +12 by 3 dB step
Balance:
R {right speaker) or L (left speaker)
Adjustable range: 1 to 15 by 1 step Balance center
Fader:
F (front speaker) or R (rear speaker)
Adjustable range: 1 to 15 by 1 step Fader center
CQ-DP171U
Page 13

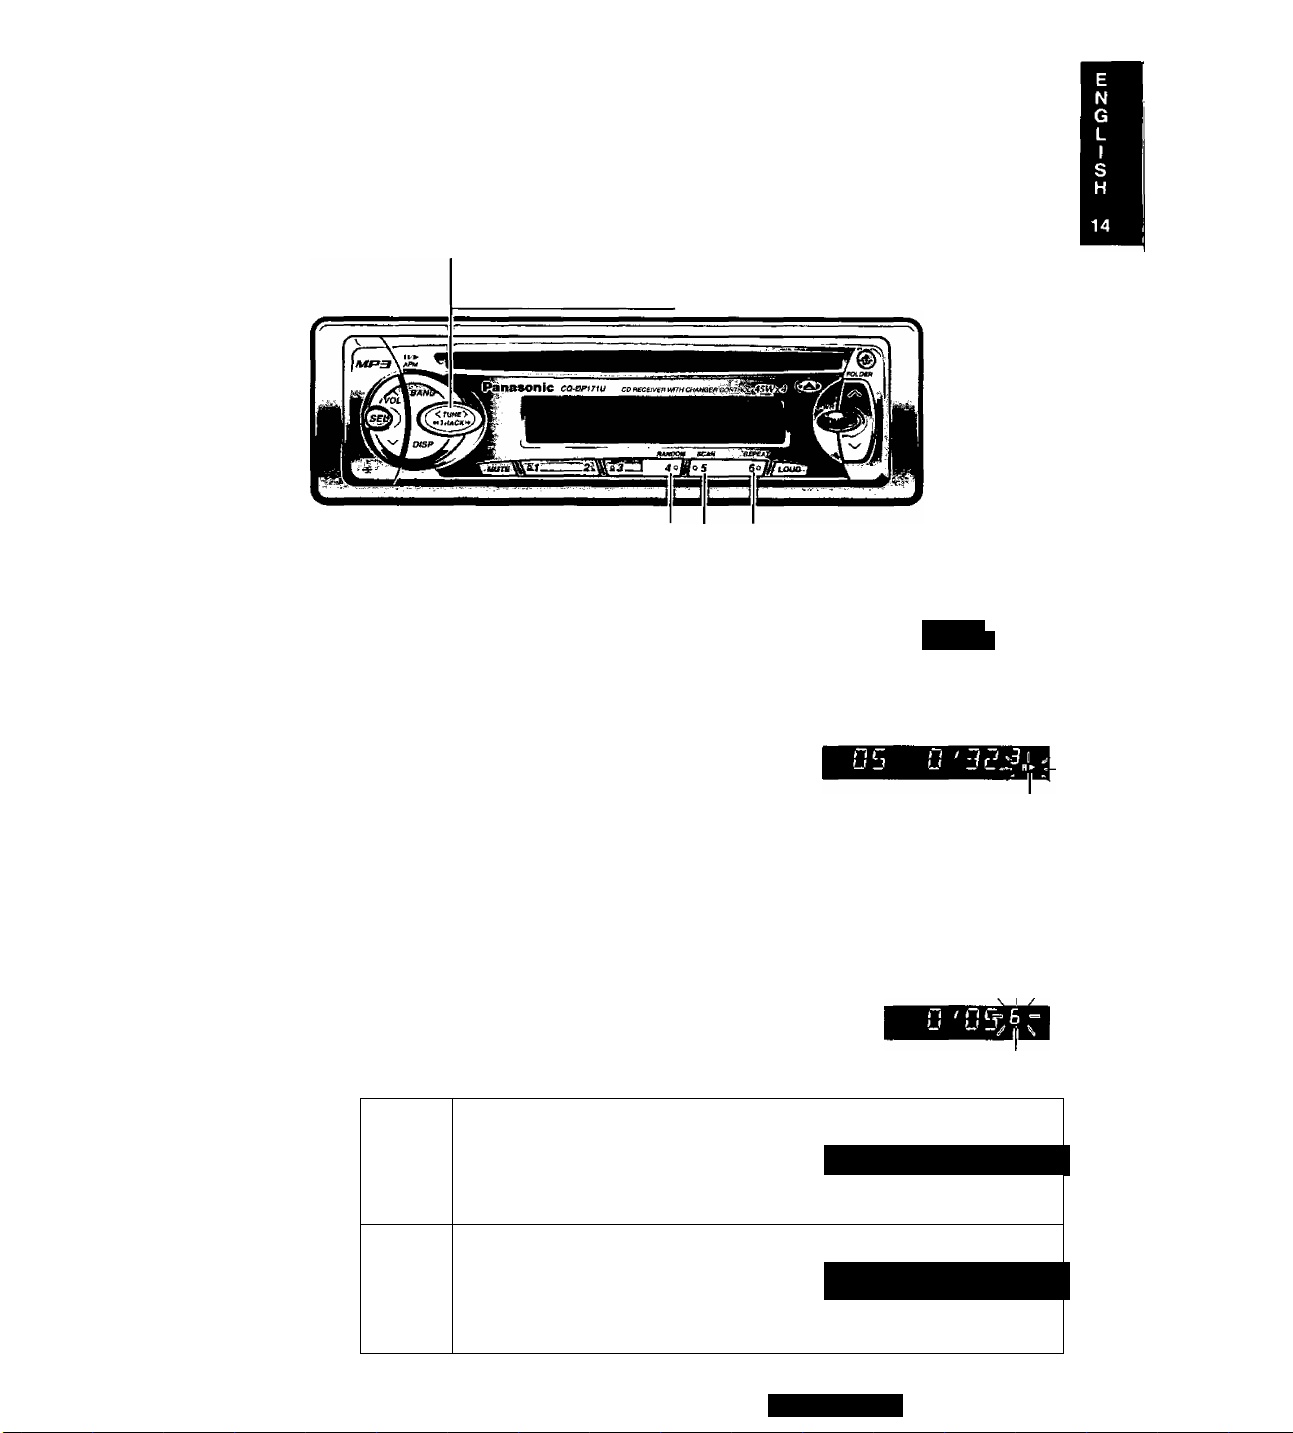
Clock Basics
The 12-hour system is used for the clock.
Initial Time
O Press [DISP] (DISPLAY).
Ti n < l, T
XI 1 t (Clock display.)
Hours
O Press and hold [DISP] (DISPLAY).
O Press [<TUNE] or [>TUNE].
Minutes
©Press[DISP] (DISPLAY).
0 Press [<TUNE] or [>TUNE].
©Press[DISP] (DISPLAY).
Note: Press and hold [<TUNE] or [>TUNE] to
change numbers rapidly.
R
n-pTU
^ T \ -
(Hours blink.)
I
(Minutes blink.)
(Minutes set.)
“ (End.)
(Hours set.)
Clock Display
Press [DISP] (DISPLAY) to switch to the clock display.
In tuner mode:
Broadcast station
Clock display
In CD changer mode:
U IJ
U U
f
CD changer play
Clock display
When the power is off:
No display Clock display
Note: Refer to each description of the clock display for the
modes of CD player and MP3 player (■♦ pages 16 and 19)
Time Reset
Press and hold [DiSP] (DISPLAY) for more than 2 sec
onds to activate the time setting mode to reset the time.
Then, repeat steps 0 to 0.
Note: The clock is not adjustable during Track / Disc /
Folder/File name scrolling.
CQ-DP171U
13
Page 14
Radio Basics
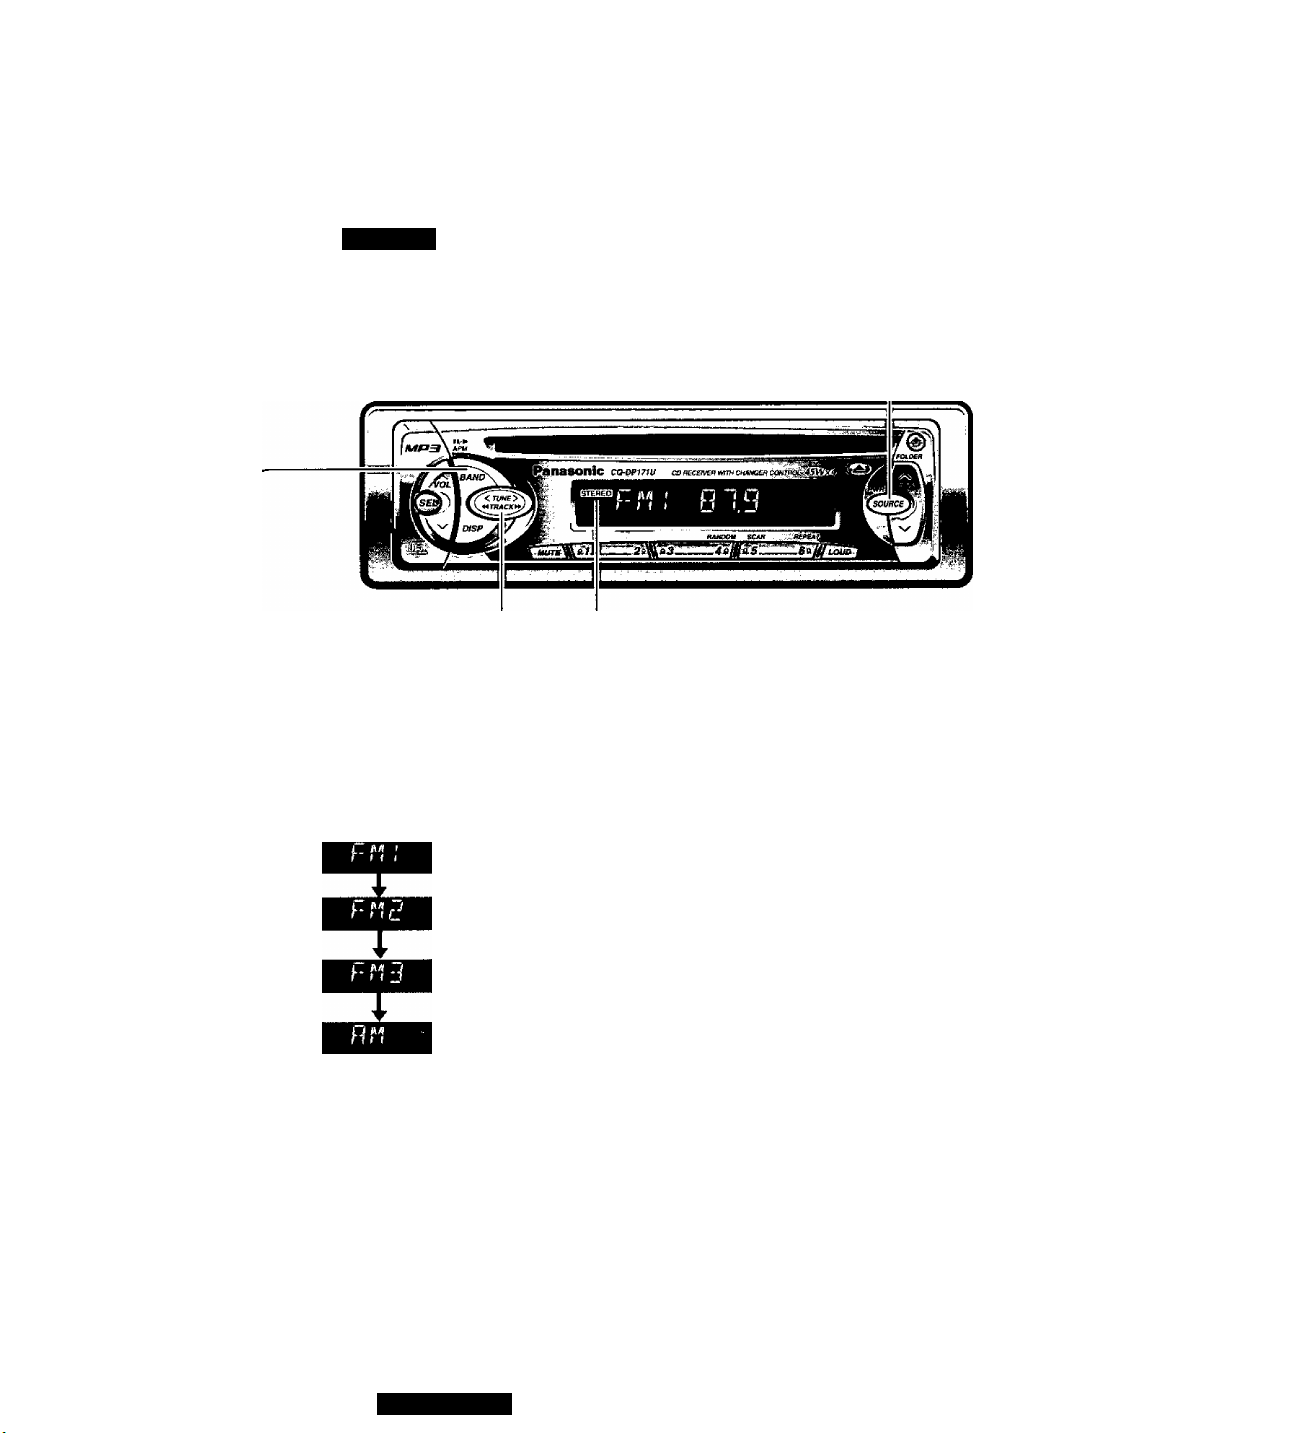
A Mode Selection
Press [SOURCE] to change to the radio mode.
T i i it u. n
t r V L rr
FM stereo indicator lights during reception
of an FM stereo broadcast
Band ^
o
Press [BAND] to change the band.
A Manual Tuning
[>TUNE] : Higher frequency
[<TUNE] : Lower frequency
Seek Tuning
Press and hold...
[>TUNE]: Higher frequency
[<TUNE]: Lower frequency
Tuning will automatically stop when the signals
of the next broadcast station are received.
14
CQ-DP171U
Page 15
(Т) Band
Press [BAND] to select a desired band,
page 14)
(2)
Auto Station Preset
Press and hold [BAND] (АРМ ; auto preset memory) tor
more than 2 seconds.
• The 6 strongest available stations will be automatically
saved in the memory under preset buttons [1] to [6].
• Once set, the preset stations are sequentially scanned
for 5 seconds each.
Note: The stations manually preset on the selected band
will be deleted.
Preset number
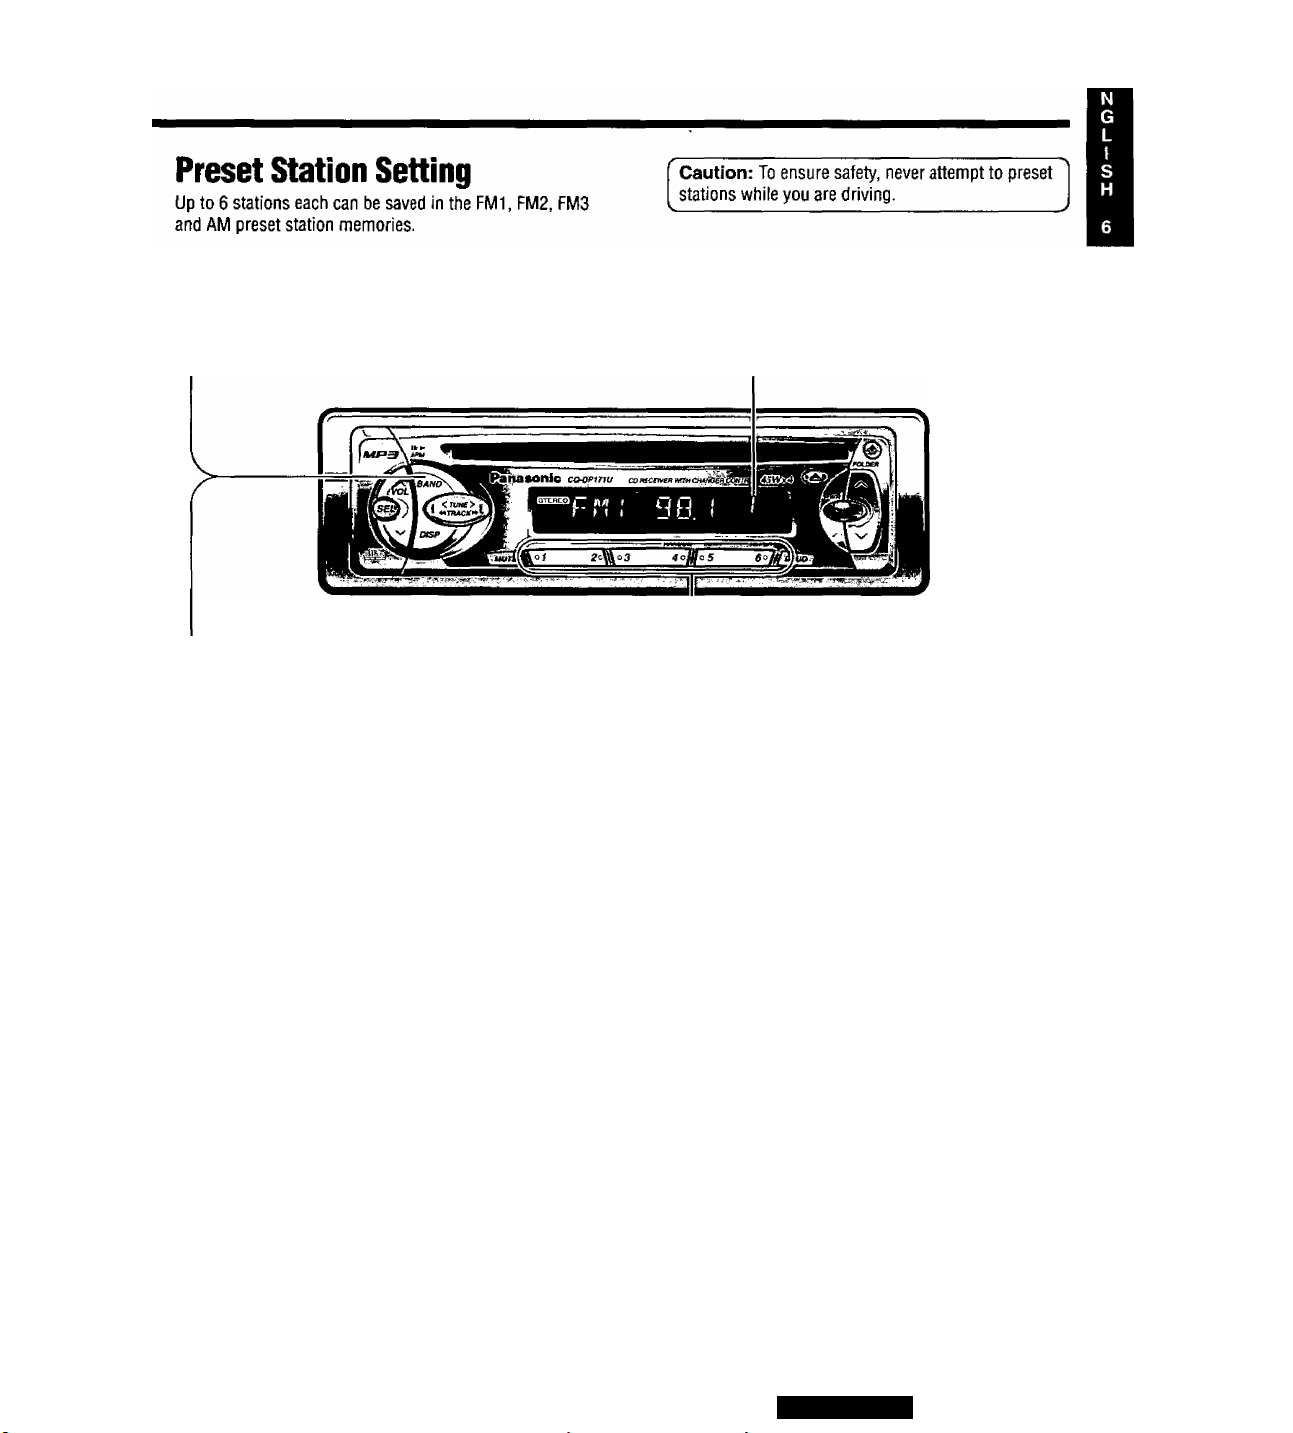
Manual Station Preset
O Use manual or seek tuning to find a station.
(-f page 14)
O Press and hold one of the preset buttons [1] to [6]
until the display blinks once.
Tuning in a Preset Station—
Press the corresponding preset button [1] to [6] to tune
in a preset station.
Note: You can change the memory presetting by repeating
the above procedure.
CQ-DP171U
15
Page 16
CD Player Basics
Cautions;
• Only 5” (12 cm) CD, CD-DA data recorded CD*R and CD-RW discs are
available for this unit.
• Do not use irregular shaped discs.
• Do not use discs that have a seal or label attached.
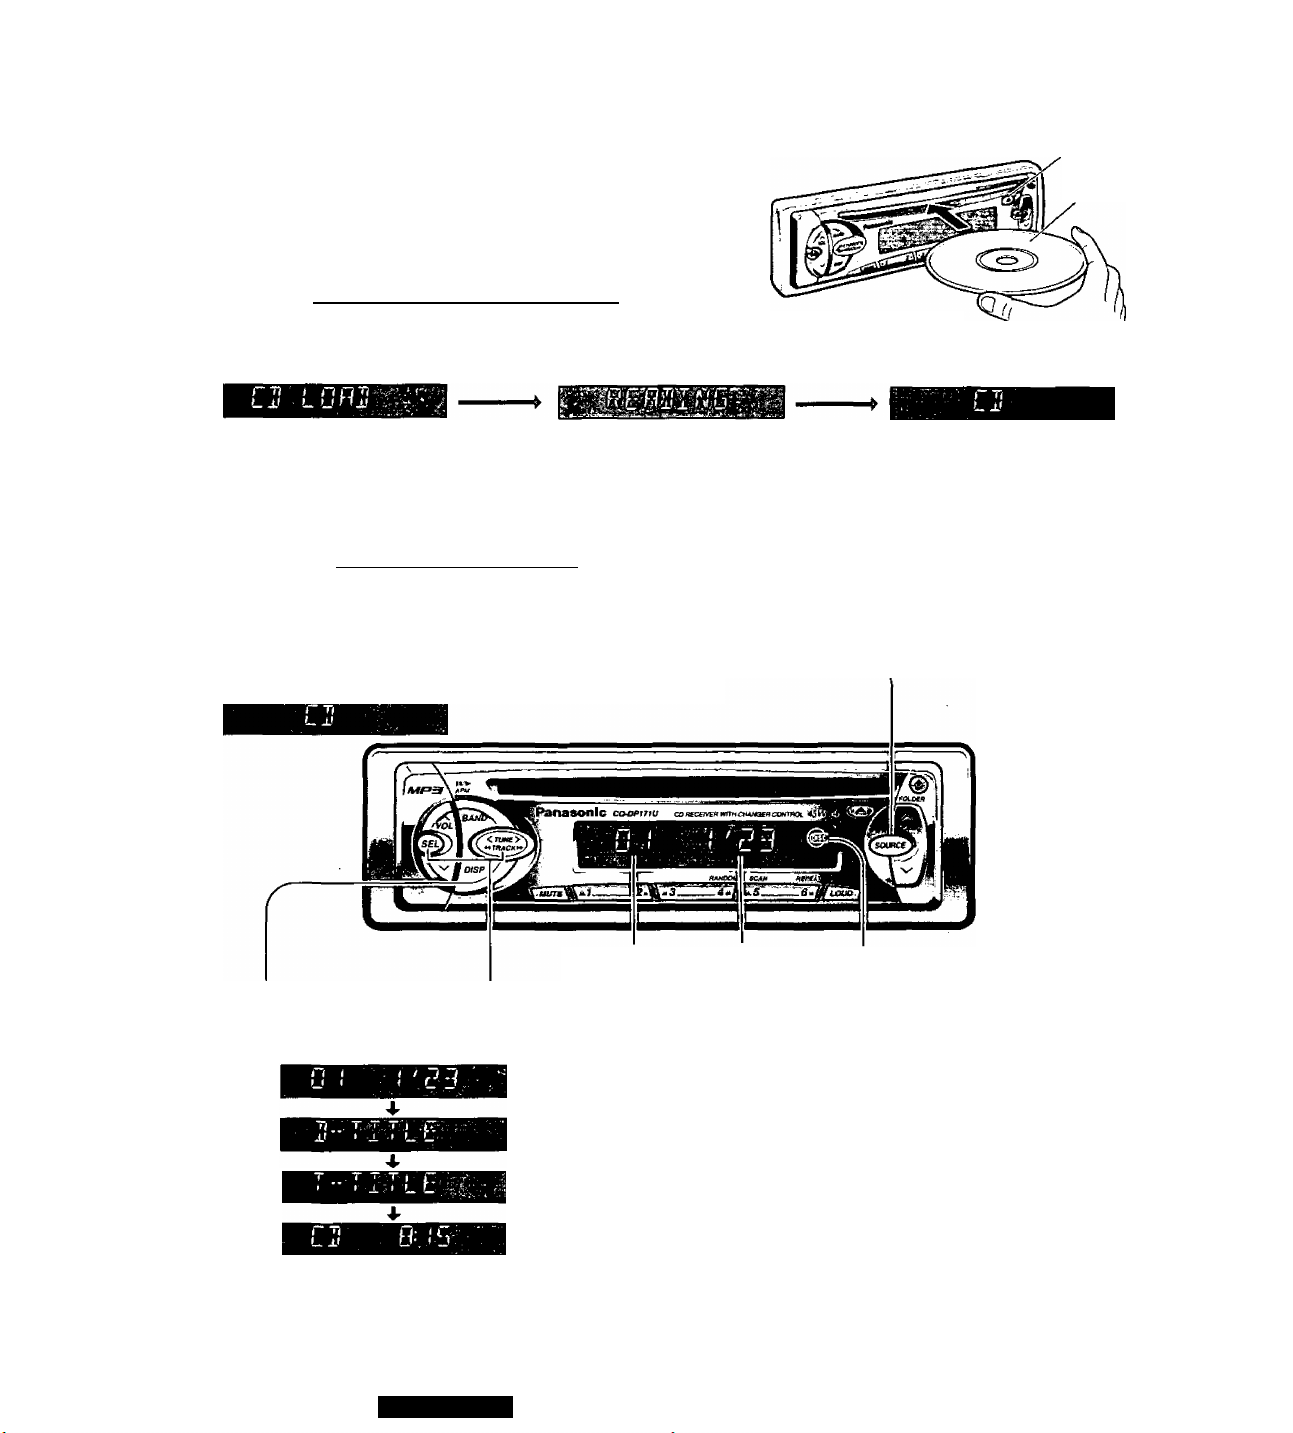
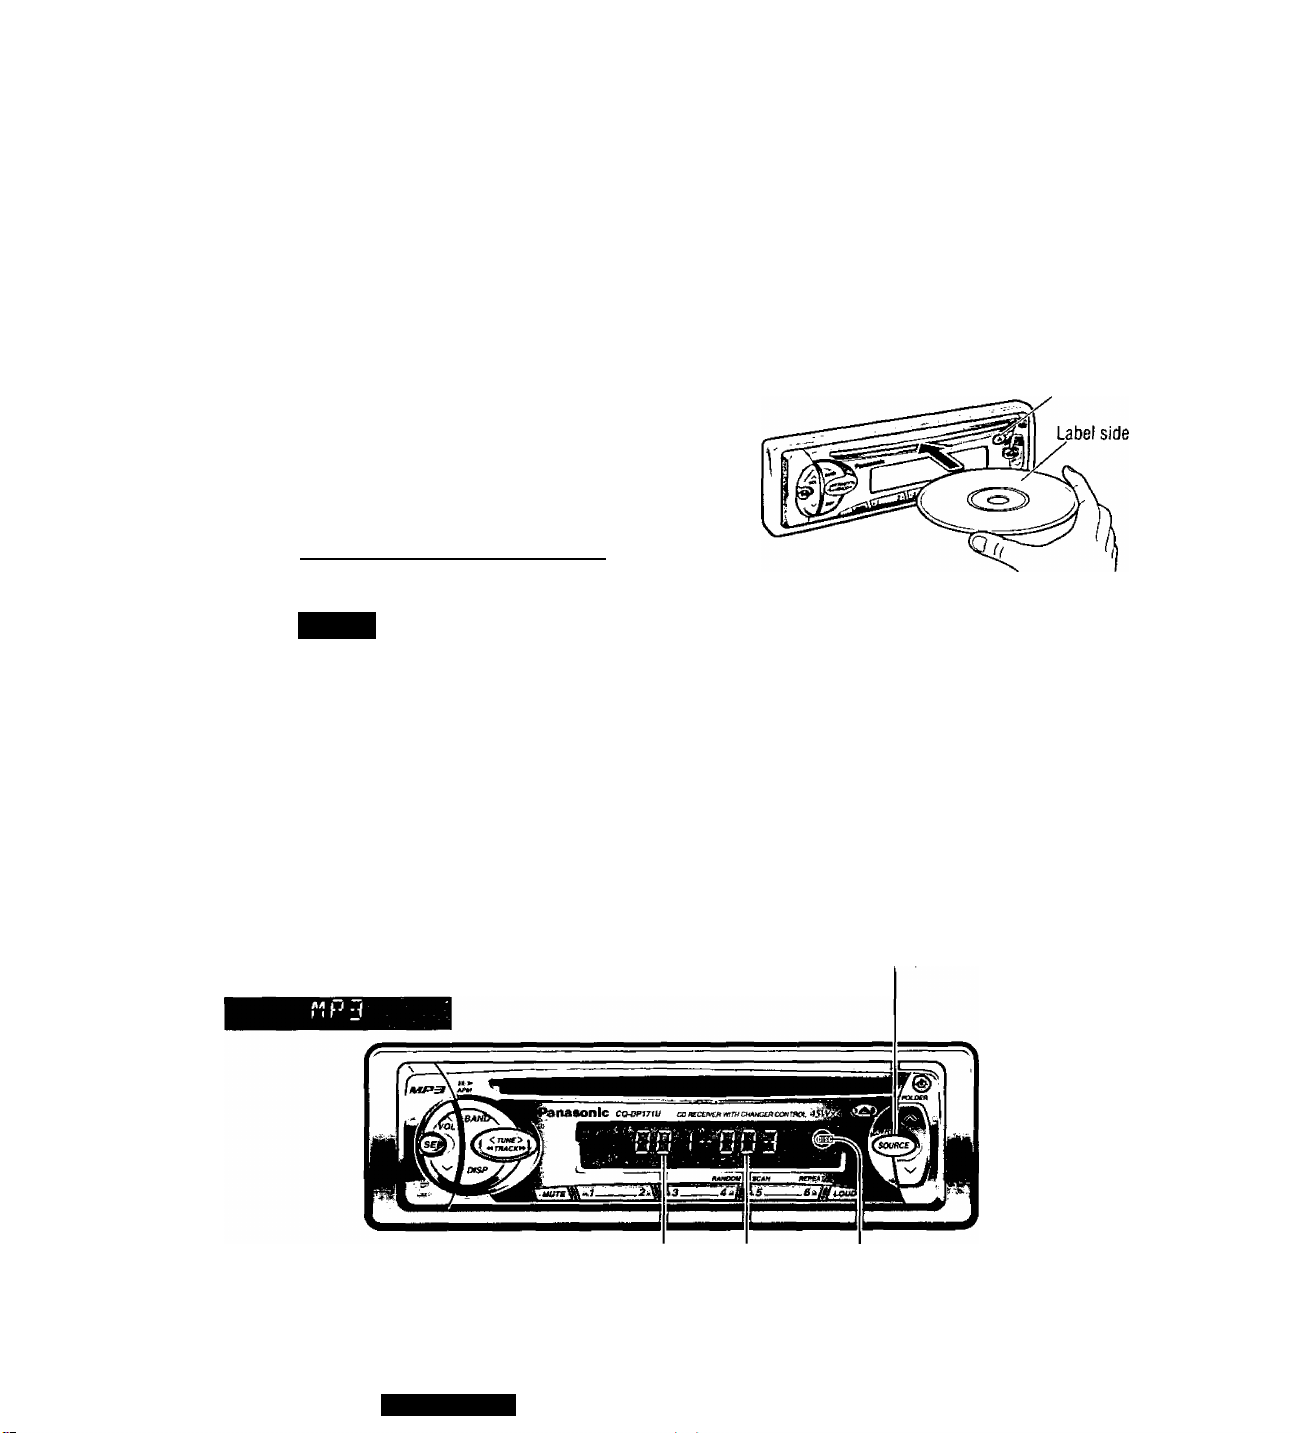
Disc Insert and Playback
The display changes as shown below. Playback will start automatically after the unit recognized the
loaded disc as an ordinary music CD. (When a CD-R or CD-RW which has CD-DA formatted data as the same as an
ordinary music CD is loaded, this unit recognizes it as an ordinary music CD.)
±
(EJECT)
Label side
(Disc loaded)
(Data reading)
Notes;
• Do not insert a disc when this indicator lights. ^
• Loading a disc when the power is off allows the power to be turned on.
• It may take some time to distinguish CD-DA and MP3 before playback starts.
(See below.)
Stop and Disc Eject
Press [±] (EJECT) to stop CD play and eject the disc.
Note: Ejecting the disc when the unit is in the CD player mode allows the power to be turned off.
Mode Selection (when a CD is in the player)
Press [SOURCE] to change to CD player mode and playback starts.
Track number Track playing time Lights when the disc is loaded.
Blinks in the CD play mode.
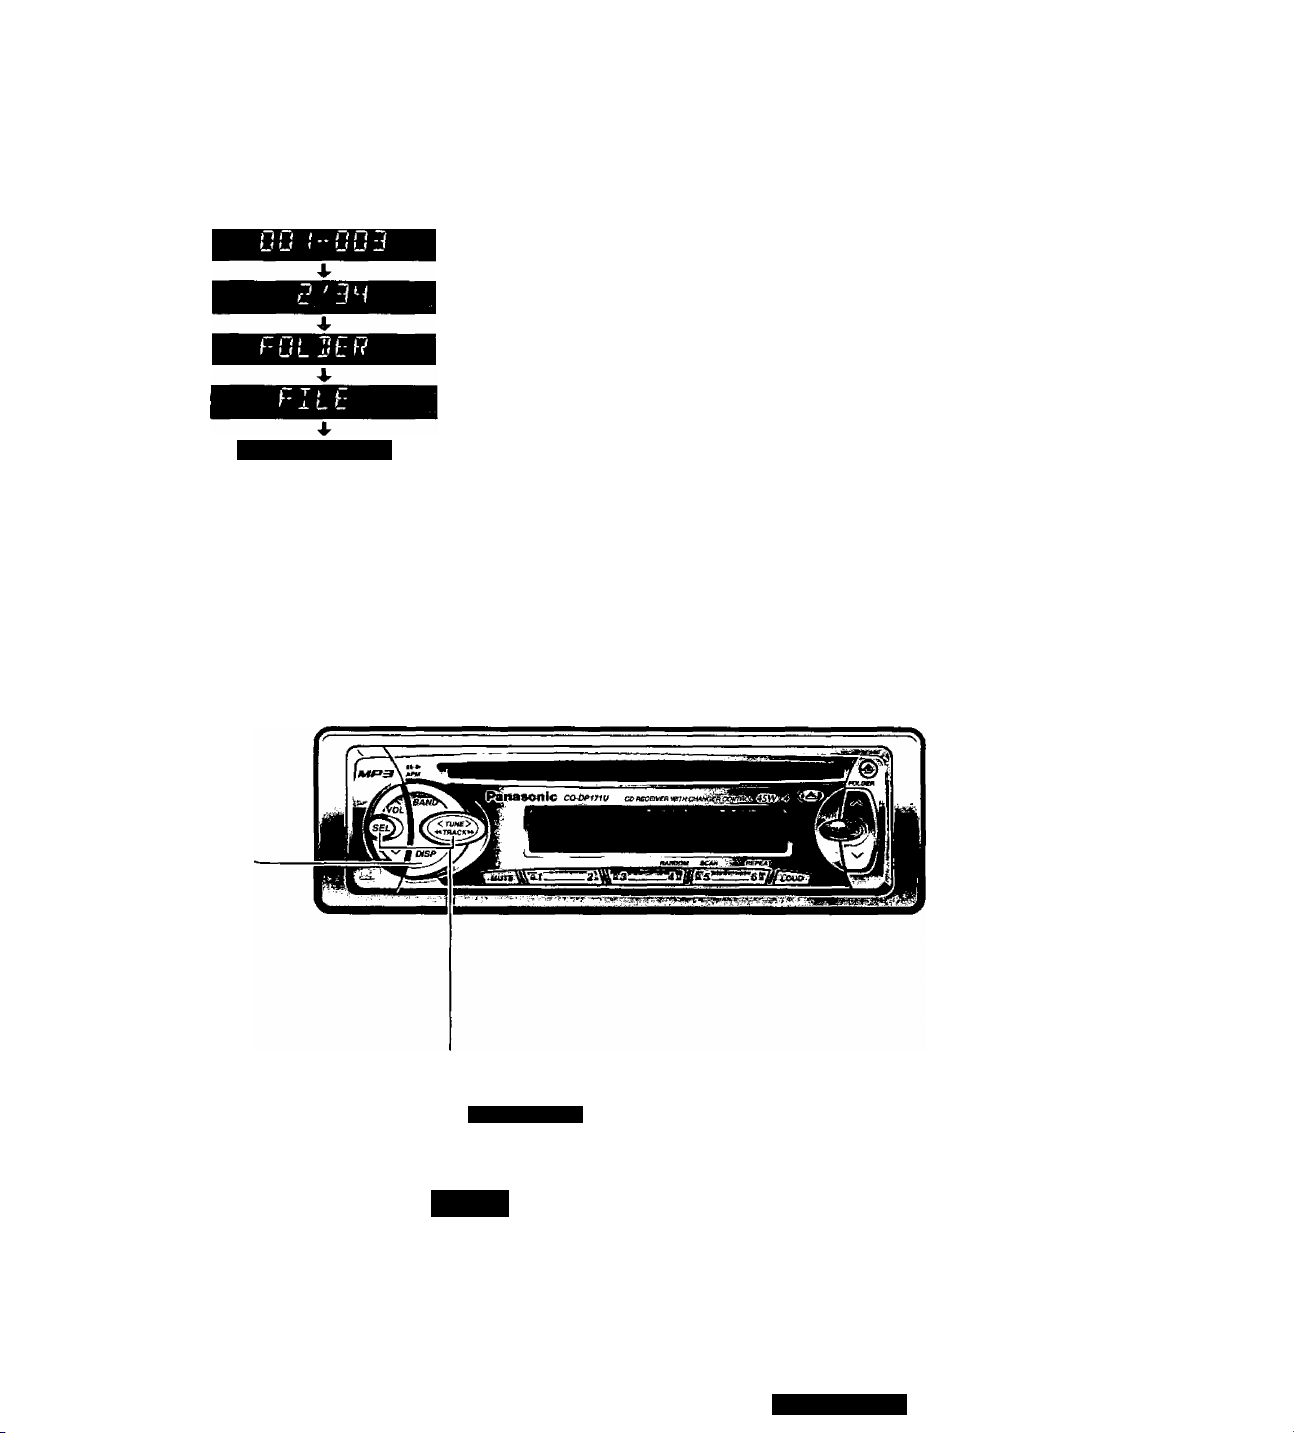
Display Change
Press [DISP] (DISPLAY) to change the display as follows.
Track number/Track
playing time (default)
Disc title (scroll)
Disc / Track Title Scroll
O Press and hold [SEL]
for more than 2 seconds.
O Press [>TUNE] or [<TUNE] to switch between ON or
OFF in turn.
(Ordinary music CD recognized
and playback starts)
Track title (scroll)
Clock display
Notes:
• The display shows title information only when a disc which
has CD text information is loaded. (Up to 62 letters can be
displayed when scrolling. Some letters are not serviceable.)
• “NO TITLE" is displayed when there is no information.
16
CQ-DP171U
Continuous scroll
Scroll stops after a circle scroll.
Notes;
• If no keys have been pressed for more than 10 seconds,
the display returns to the regular mode.
• Press [DISP] (DISPLAY) to return to the regular mode.
• Press and hold [DISP] (DISPLAY) for more than 2 sec
onds to have another circle scroll when set to scroll off.
• Do not watch the scroll display while driving.
Page 17
Note: If a disc contains both CD-DA and MP3 data, only one type of data will be played back. For example, if the disc
starts with CD-DA data, it will be recognized as an ordinary music CD, if it starts with an MP3 file, it will be recognized as
an MP3.
Track Selection
[►►TRACK]: Advance to the next track.
[►<TRACK]; Back to the beginning of the current
track.
Back to the previous track. (Press twice.)
Pause
Press [BAND] to pause.
Press [BAND] again to cancel.
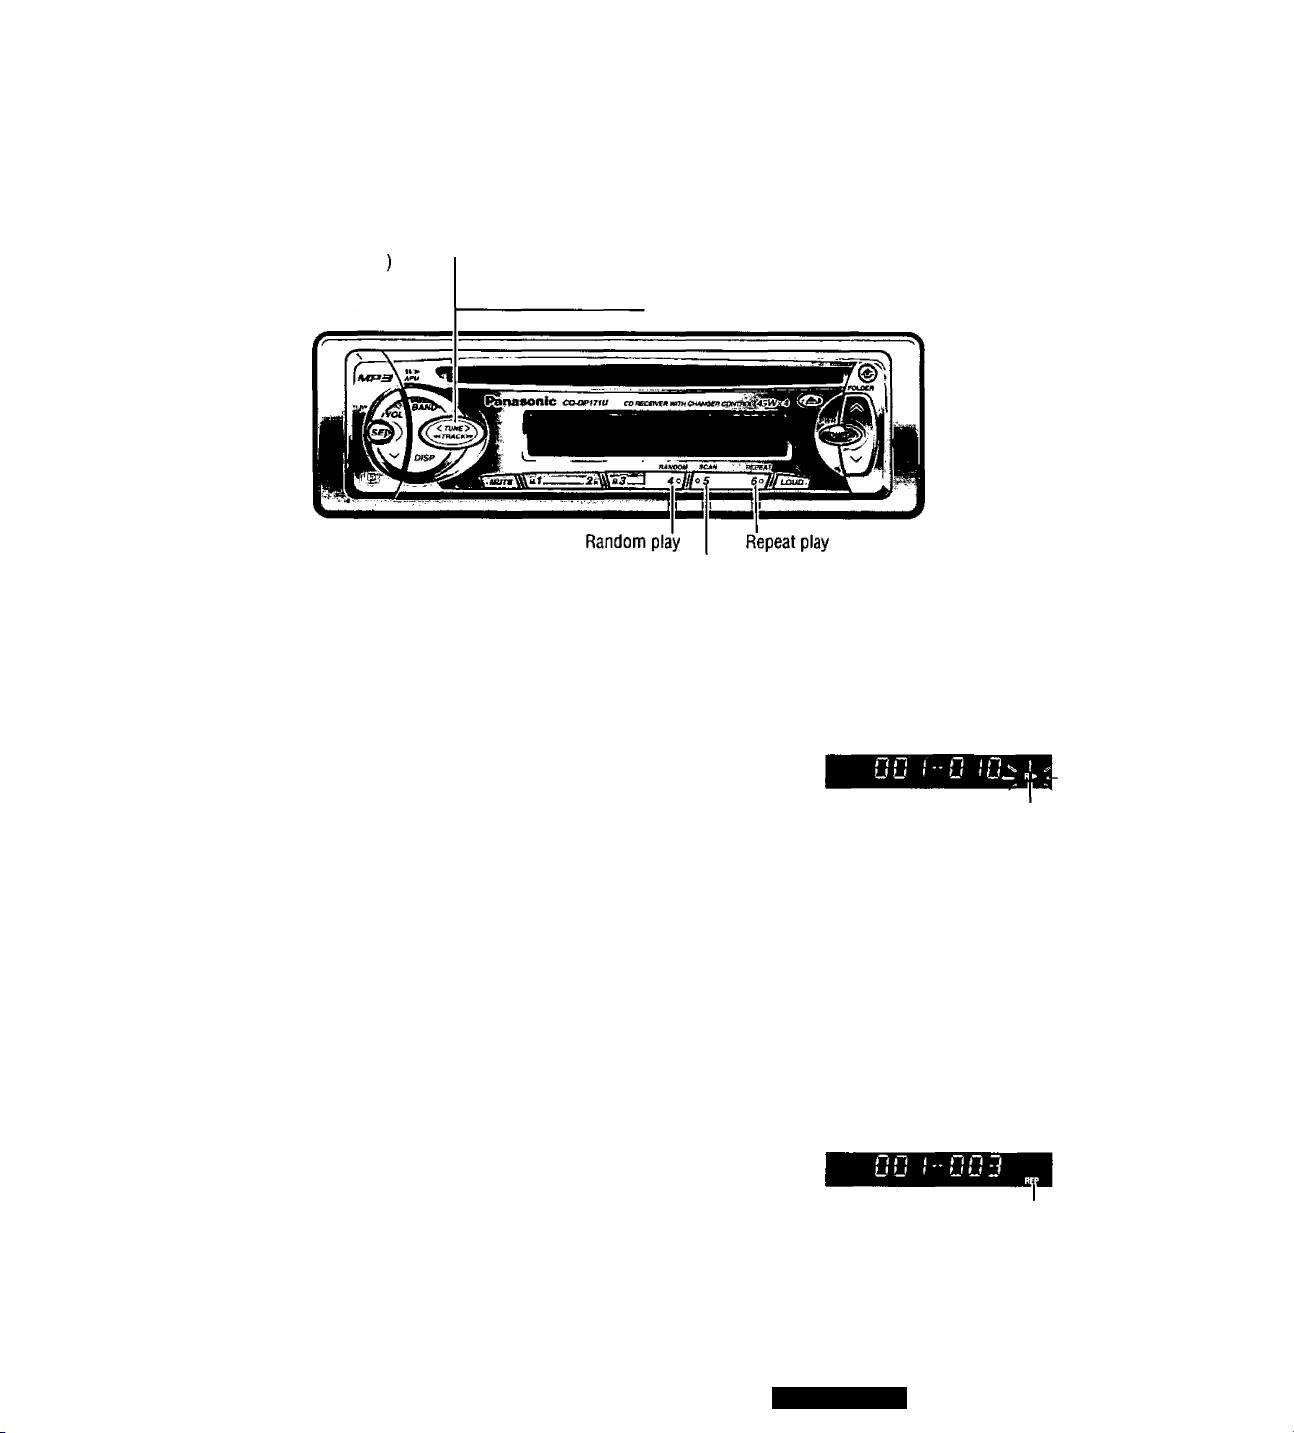
Random play
Direct Track Seiection (Only for remote control)
Track Search
Press and hold...
[►►TRACK]; Fast forward
[►<TRACK]: Fast reverse
Release to resume the regular CD play.
_J
Repeat play
Scan
0©Q
O0© 1
tt am <CjUi og
©©©
'©© ©
^®(©
Scan Play
Repeat Play
Example: Track number 12
1
A
^ Press [#] (NUMBER).
1
1
Press [BAND] (SET). The
corresponding track starts playing.
►
_J
►
Notes:
• Press [#] (NUMBER) on the remote control to re-input
the number.
• If no keys have been pressed for more than 10 seconds,
the display returns to the regular mode.
• Press [DISP] (DISPLAY) to return to the regular mode.
• Press [4] (RANDOM).
All the tracks are played in random order.
• Press [4] (RANDOM) again to cancel.
‘Press [5] (SCAN). ^ | ^
The first 10 seconds of each track on the disc .B
are played in sequence.
’ Press [5] (SCAN) again to cancel. Bijn^s
• Press [6] (REPEAT).
The current track is repeated.
• Press [6] (REPEAT) again to cancel.
Lights
Lights
CQ-DP171U
17
Page 18
MP3 Player Basics
Cautions;
• Only 5” (12 cm) MP3 data recorded CD media (CD-ROM, CD-R, CD-RW) are available for this unit.
• Do not use irregular shaped discs.
• Do not use discs that have a seai or iabei attached.
• Never attempt to play a file that is not in the MP3 format by changing its file name extension to “.mp3”. This
may not only produce noise from the speakers and speaker damage, but can damage your hearing.
Not all CD media containing MP3$ will play back normally. For details see "Notes on MP3” ("f page 38).
Notes:
• When you insert a CD media containing MP3 files (CD-ROM,
CD-R, CD-RW) into the slot, this player will automatically
enter MP3 mode and start playing the MP3s on the disc.
• A directory is interpreted as a folder in these instructions.
Disc Insert and Playback
The display changes as shown below. Playback will start automatically when an MP3 file has been recognized on the disc.
I n nm
r_t r1 »(
(Disc loaded)
Notes:
• Do not insert a disc when this indicator lights. (See below.)
• Loading a disc when the power is off allows the power to be turned on.
• It may take some time to distinguish CD-DA and MP3 before playback starts.
• If you record too many folders and MP3 files onto a disc, it may take some time before playback starts.
(Data reading)
(MP3 data recognized and
playback starts)
±
(EJECT)
Stop and Disc Eject
Press [A] (EJECT) to stop MP3 play and eject the disc.
Note: Ejecting the disc when the unit is in the MP3 player mode allows the power to be turned off.
Mode Selection (virhen a MP3 files recorded disc is in the player)---------------^
Press [SOURCE] to change to MP3 player mode and playback starts.
Folder number File number Ljg^ts when the disc is loaded.
Blinks in the MP3 play mode.
Note; If the ignition switch of your car is turned to OFF during playback, there may be a time lag between the file playing
time on the display and the actual playing time. In addition, playback may start from the beginning of the music when using
VBR (Variable Bit Rate) of a MP3 file in the same situation.
18
CQ-DP171U
Page 19
Note: If a disc contains both CD-DA and MP3 data, only one type of data will be played back. For example, if the disc
starts with CD-DA data, it will be recognized as an ordinary music CD, if it starts with an MP3 file, it will be recognized as an
MP3.
Display Change
Press [DISP] (DISPLAY) to change the display as follows.
Folder number/MP3
file number (default)
File playing time
MP3 folder name (scroll)
MP3 file name (scroll)
Clock display
Notes:
• When VBR (Variable Bit Rate) MP3 file is played
back, the file playing time may not be correct.
When the reproduction of VBR MP3 file is fin
ished, it will count again.
• Running a file in fast forward or fast reverse may
cause an error in the file playing timé. The file
playing time display will return to normal when
you play another file.
• “NO TITLE” is displayed when there is no informa
tion.
• MP3 folder and file names can be displayed.
Displayable character number varies with file
systems. Refer to “Supported file systems and
file names" in "Notes on MP3” for details {■► page
39),
• The “.mp3” file name extension is not displayed.
• When playing a Tree 1 file, the folder name is dis
played with the word “ROOT” (root folder).
• Characters that the player cannot display are
shown as an asterisk.
Folder / File Name Scroll
O Press and hoid [SEL] for
more than 2 seconds.
O
Press [>TUNE] or «TUNE] to switch between ON or OFF in turn.
Continuous scroll
Scroll stops after a circle scroll.
D L ft* Li L L
S C f? L
Notes:
• tf no keys have been pressed for more than
10 seconds, the display returns to the regular
mode.
• Press [DISP] (DISPLAY) to return to the reg
ular mode.
• Press and hold [DISP] (DISPLAY) for more
than 2 seconds to have another circle scroll
when set to scroll off.
• Do not watch the scroll display while driving.
CQ-DP171U
19
Page 20
MP3 Player Basics (continued)
Folder Selection 0rder/MP3 file playback order (Example)
Notes:
• This unit counts the number of folders
irrespective of the presence or absence
of MP3 file. (Example: there is no MP3
file in a root folder as shown in the
right drawing, but a folder number
“001” is given. In fact, there is no MP3
file to reproduce. Therefore, the next
folder is automatically selected.)
• The writing software sometimes
changes the order of folders and files
on a disc, so the order may differ from
what you specified. For details refer to
the user manual of your writing
software.
• If you record too many folders or files
other than MP3s onto a disc, it may
take some time before playback starts,
and you may have difficulties using
fast forward and fast reverse.
• Playback order varies with players
even if the same disc is loaded.
-Qj
Lm
Tree 1 Tree 2
Root Folder
{Root Directory)
■a
l_
-a
-S:
&
Tree 3 Tree 4
Folder Selection
In the order
File Selection
In the order 1 - 0
Trees
&l - g]
Pause
Press [BAND] to pause.
Press [BAND] again to cancel.
P R U 5E
MP3 Folder Selection
[A ]
[V J
Notes:
• If the selected folder does not contain any MP3 files, the nearest MP3 file in
• If the total of files and folders exceeds 254, successful playback may not be performed.
Direct MP3 Folder Selection
Example: Folder number 5
^ Press [#] (NUMBER).
^ Press [5].
Press [BAND] (SET). The
corresponding folder starts playing,
©
- Next folder
: Previous folder
the order of playback will be played.
(Only for remote control)
Notes:
• Press [#] (NUMBER) on the remote control to re-input
the number.
• If no keys have been pressed for more than 10 seconds,
the display returns to the regular mode.
• Press [DISP] (DISPLAY) to return to the regular mode.
• If there is no file in the specified folder, error message
“E4" appears. Select another folder which contains MP3
clorto
files.
20
CQ-DP171U
Page 21
MP3 File Selection
[►►TRACK]: Advance to the next MP3 file.
[►<rRACK]: Back to the beginning of the current MP3 file.
Back to the previous MP3 file.
(Press twice.
Press [4] (RANDOM).
All the MP3 files on all folders play in a
random sequence.
' Press [4] (RANDOM) again to cancel.
»Press and hold [4] (RANDOM) for more than
2 seconds.
All the available MP3 files on the current
folder play in a random sequence.
• Press and hold [4] (RANDOM) again to
cancel.
Random
File
Play
Folder
J
MP3 In-file Search
Press and hold...
[►►TRACK]: Fast forward
[►<TRACK]: Fast reverse
Release to resume the regular MP3 play.
J
Scan play
Lights
Blinks
Scan Play
Repeat Play 1
V
______
___
• Press [5] (SCAN).
File
►
Folder
File
Folder
J
The first 10 seconds of each MP3 file on all
the folders play in sequence,
• Press [5] (SCAN) again to cancel.
• Press and hold [5] (SCAN) for more than 2
seconds.
From the next folder, the beginning 10
seconds of the first MP3 file on each folder
play in sequence,
• Press and hold [5] (SCAN) again to cancel.
• Press [6] (REPEAT).
Repeat the current MP3 file.
• Press [6] (REPEAT) again to cancel.
• Press and hold [6] (REPEAT) for more than 2
seconds.
Repeat the current folder.
• Press and hold [6] (REPEAT) again to cancel.
CQ-DP171U
Blinks
Blinks
Lights
Blinks
21
Page 22
CD Changer Control
CD changer functions are designed for optional Panasonic CD changer unit.
Connect the CD changer, and load a magazine.
Caution: Do not use irregular shaped CDs.
Notes:
• Loading a magazine when the power is off allows the power to be turned on.
• Ejecting the magazine when the unit is in the CD changer mode allows the power to be turned off.
• The CD changer cannot play back CD-ROM, CD-R and CD-RW. Use the CD changer to listen to normal music CDs exclu
sively.
• CD text can not be displayed.
Mode Selection (when a CD changer is connected and a magazine is in the changer)
Press [SOURCE] to change to CD changer mode and playback starts.
Disc Selection
[A] ‘ Next disc
[V ]
: Previous disc
Direct Disc Selection (Only for remote control)
Example: Disc number 5
^ Press [#] (NUMBER).
O
Press [5].
Press [BAND] (SET). The
0
corresponding disc starts playing.
22
CQ-DP171U
Track number | Disc number
Track playing time
Notes:
• Press [#] (NUMBER) on the remote control to re-input
the number.
• If no keys have been pressed for more than 10 seconds,
the display returns to the regular mode.
• Press [DISP] (DISPLAY) to return to the regular mode.
Page 23
Track Selection
[►►TRACK]: Advance to the next track.
[-♦<rRACK]: Back to the beginning of the current track.
Back to the previous track. (Press tv/ice.)
Track Search
Press and hold...
[►►TRACK]: Fast forward
['♦^TRACK]; Fast reverse
Release to resume the regular CD play.
Random play Repeat play
Scan play
r
Random
Scan Play
Repeat Play
Play I
►
►
Track
Disc
Track
Disc
c
----------
Track
Disc
• Press [4] (RANDOM).
All the available tracks on all discs in the
magazine play in a random sequence.
• Press [4] (RANDOM) again to cancel.
• Press and hold [4] (RANDOM) for more than
2 seconds.
All the available tracks on the current disc
play in a random sequence.
• Press and hold [4] (RANDOM) again to
cancel.
• Press [5] (SCAN).
The first 10 seconds of each track on the
discs play in sequence.
• Press [5] (SCAN) again to cancel.
• Press and hold [5] (SCAN) for more than 2
seconds.
The first 10 seconds of the first track of all
the discs in the magazine play in sequence.
• Press and hold [5] (SCAN) again to cancel.
• Press [6] (REPEAT). .
Repeat the current track. |
• Press [6] (REPEAT) again to cancel.
• Press and hold [6] (REPEAT) for more than 2
seconds. I
Repeat the current disc. '
• Press and hold [6] (REPEAT) again to cancel,
W
> t t
f t ( u 1 t 1
n /
1
IP
Lights
Blinks
Blinks
O'l
0 'PB I
i < / l, < . ■
HEP ■
Lights
REP <9
Blinks I
1
r
i
CQ-DP171U
23
Page 24
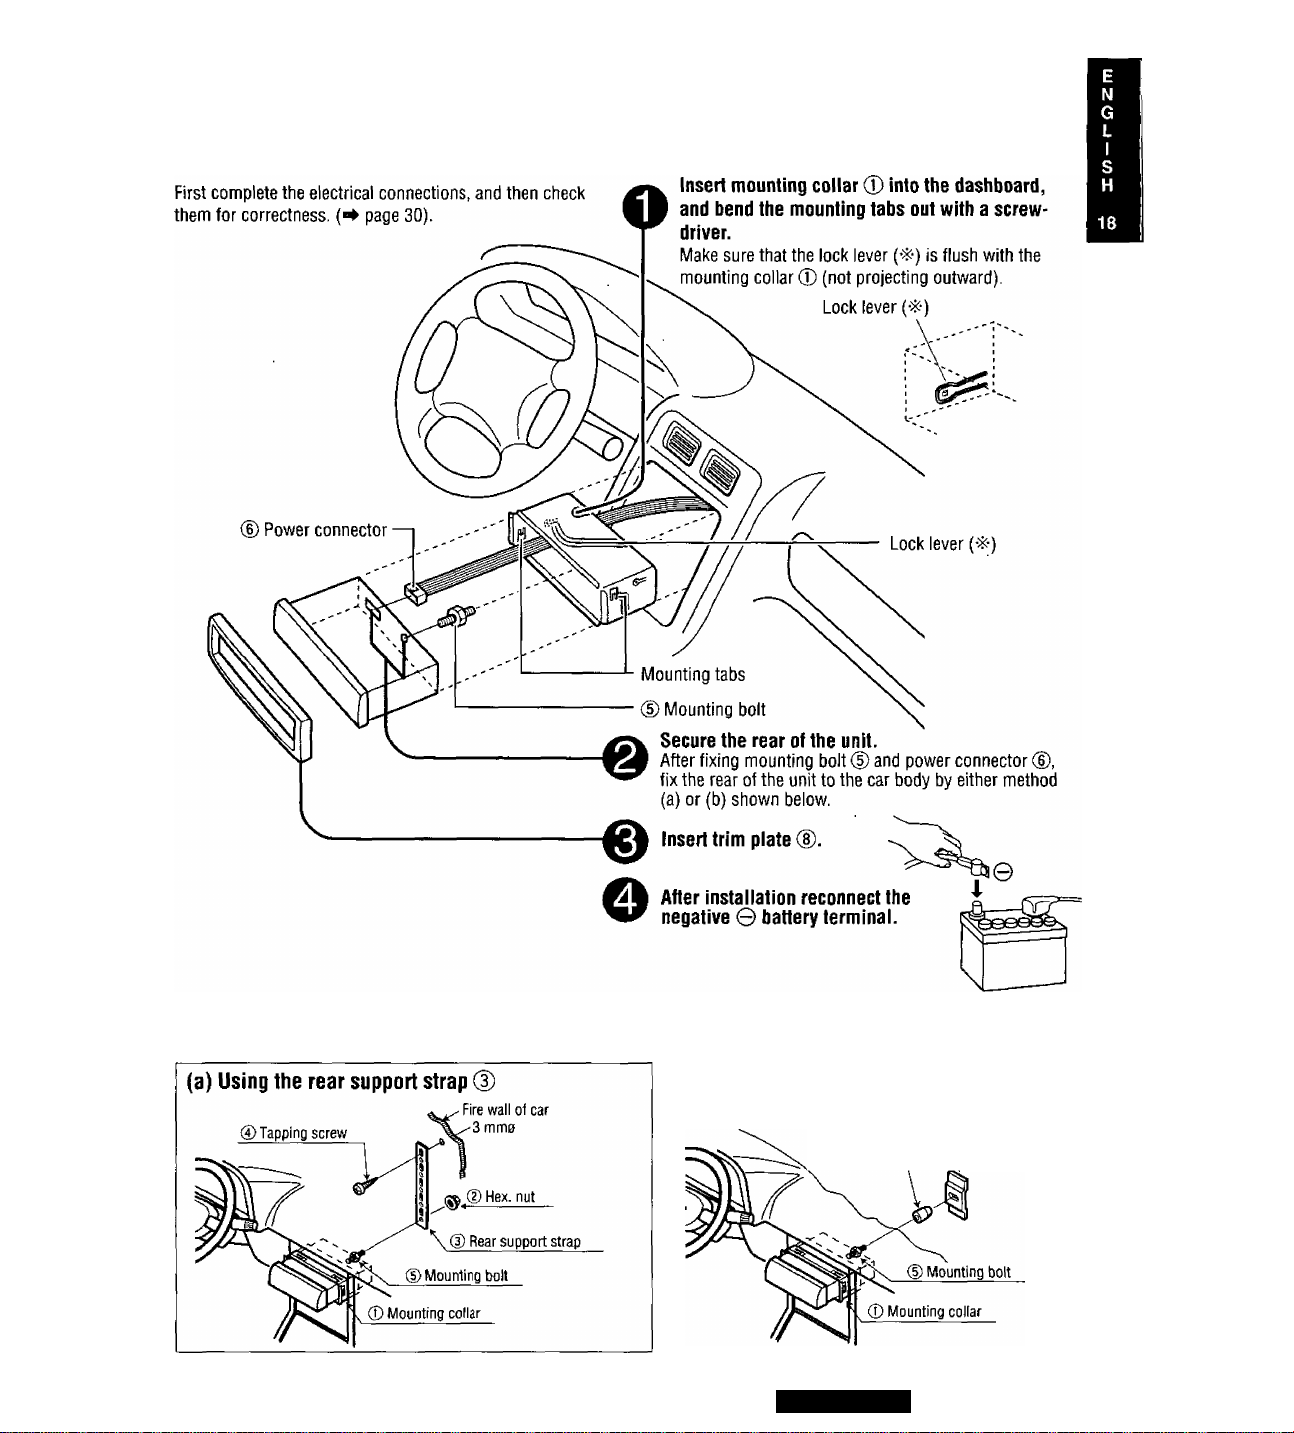
Installation Guide
A
WARNING
This installation information is designed for experienced installers and is not
intended for non-technical individuals. It does not contain warnings or cautions of
potential dangers involved in attempting to install this product.
Any attempt to install this product in a motor vehicle by anyone other than a qual
ified installer could cause damage to the electrical system and could result in
serious personal injury or death.
□ Installation Hardware
No. Item
Mounting collar
Hex. nut (5 mmo)
CD
Rear support strap
CD
Tapping screw (5 mmo x
©
16 mm)
Mounting bolt (5 mmo) 1
CD
Diagram
%
Q’ty
1
1
1
1
Caution: This unit operates with a 12 V DC negative
ground auto battery system only. Do not attempt to use
it in any other system. Doing so could cause serious
damage.
Betöre you begin installation, look for the items which are
packed with your unit.
• Warranty Card ... Fill this out promptly.
• Panasonic Servicenter for Service Directory... Keep
for future reference in case the product needs servicing.
• Instaiiation Hardware ... Needed for in-dash installa
tion.
Power connector
®
Removable face plate case 1
Trim plate 1
□ Overview
This product should be installed by a professional.
However, if you plan to install this product yourself, your
first step is to decide where to install it. The instructions in
these pages will guide you through the remaining steps:
(Please refer to the “WARNING” statement above).
• Identify and label the car wires.
• Connect the car wires to the wires of the power connec
tor.
• Install the unit in the dashboard.
• Check the operation of the unit.
If you encounter problems, please consult your nearest
professional installer.
24
CQ-DP171U
1
You’ll need a screwdriver, a 1.5 V AA battery, and the fol
lowing:
12V DC
Test bulb
(n)
Electrical
tape
Side-cut
pliers
□ Dashboard Specifications
Thickness
Min. 3/16” (4.75 mm)
"II"— Max. 7/32” (5.56 mm)
□ Required Tools
I
7 5/32” (182 mm)
2 3/32” (53 mm)
Page 25
□ Identify All Leads
The first step in installation is to identify all the car wires
you’ll use when hooking up your sound system.
As you identify each wire, we suggest that you label it
using masking tape and a permanent marker. This will
help avoid confusion when making connections later.
Note: Do not connect the power connector to the stereo
unit until you have made all connections. If there are no
plastic caps on the stereo hooking wires, insulate all
exposed leads with electrical tape until you are ready to
use them. Identify the leads in the following order
Power Lead
if your car has a radio or is pre-wired for one :
Cut the connector wires one at a time from the plug (leav
ing the leads as long as possible) so that you can work
with individual leads.
u
Turn the ignition on to the accessory position, and ground
one lead of the test bulb to the chassis.
Touch the other lead of the test bulb to each of the
exposed wires from the cut radio connector plug. Touch
one wire at a time until you find the outlet that causes the
test bulb to light.
A handy way to identify the speaker leads and the speaker
they are connected with is to test the leads using a 1.5 V
AA battery as follows;
Hold one lead against one pole of the battery and stroke
the other lead across the other pole. 'Vou will hear a scrap
ing sound in one of the speakers if you are holding a
speaker lead.
If not, keep testing different lead combinations until you
have located all the speaker leads. When you label them,
include the speaker location for each.
Antenna Motor
If your car is equipped with an automatic power antenna,
identify the car motor antenna lead by connecting one
bulb tester lead to the car battery lead and touching the
remaining exposed wires from the cut radio connector
plug one at a time. You will hear the antenna motor acti
vate when you touch the correct wire.
Antenna
The antenna lead is a thick, black wire with a metal
plug at the end.
□ Connect All Leads
Now that you have identified all the wires in the car, you
are ready to begin connecting them to the stereo unit
wires. The wiring diagram (^ page 30) shows the proper
connections and color coding of the leads.
We strongly recommend that you test the unit before mak
ing a final installation.
Now turn the ignition off and then on. If the bulb also
turns off and on, that outlet is the car power lead.
If your car is not wired for an audio unit:
Go to the fuse block and find the fuse port for radio
(RADIO), accessory (ACC), or ignition (IGN).
Battery Lead
If your stereo unit has a yellow lead, you will need to
locate the car’s battery lead. Otherwise you may ignore
this procedure. (The yellow battery lead provides continu
ous power to maintain a clock, memory storage, or other
function.)
If your car has a radio or is pre-wired for one;
With the ignition and headlights off, identify the car bat
tery lead by grounding one lead of the test bulb to the
chassis and checking the remaining exposed wires from
the cut radio connector plug.
If your car is not wired for an audio unit;
Go to the fuse block and find the fuse port for the battery,
usually marked BAT.
Speakers
Identify the car speaker leads. There are two leads for
each speaker which are usually color coded.
You can set the unit on the floor and make temporary con
nections to test the unit. Use electrical tape to cover all
exposed wires.
Important: Connect the red power lead last, after you
have made and insulated all other connections.
Ground
Connect the black ground lead of the power connector to
the metal car chassis.
Speakers
Connect the speaker wires. See the wiring diagram
(^ page 30) for the proper hookups. Follow the diagram
carefully to avoid damaging the speakers and the stereo
unit.
The speaker used must be able to handle more than 45 W
of audio power. If using an optional audio amplifier, the
speakers should be able to handle the maximum amplifier
output power. Speakers with low input ratings can be
damaged.
Speaker impedance should measure 4 - 8 ii, which is typ
ically marked on most speakers. Lower or higher imped
ance speakers will affect output and can cause both
speaker and stereo unit damage.
CQ-DP171U
25
Page 26
Installation Guide
(continued)
Motor Antenna
Connect the car motor antenna lead to the blue motor
antenna relay control lead.
(Do not confuse the antenna lead with blue/white stripe
lead for a power amplifier.)
Battery
Connect the yellow battery lead to the correct radio wire or
to the battery fuse port on the fuse block.
Antenna
Connect the antenna by plugging the antenna lead into the
antenna receptacle.
Equipment
Connect any optional equipment such as an amplifier,
according to the instructions furnished with the equip
ment. Leave about 12” (30 cm) of distance between the
speaker leads/amplifier unit and the antenna/antenna
extension cord. Read the operating and installation
instructions of any equipment you will connect to this unit.
Power
Connect the red power lead to the correct car radio wire or
to the appropriate fuse port on the fuse block.
If the stereo unit functions properly with all these connec
tions made, disconnect the wires and proceed to the final
installation.
□ Final Installation
a Preparation
• We strongly recommend that you wear gloves for
installation work to protect yourself from injuries.
• When bending the mounting tabs of the mounting
collar with a screwdriver, be careful not to injure your
hands and fingers.
• Disconnect the cable from the negative © battery ter
minal (see caution below).
• Unit should be installed in a horizontal position with the
front end up at a convenient angle, but not more than
30°.
Less than 30'
Caution: Do not disconnect the battery terminals of a
car with trip or navigational computer since all user set
tings stored in memory will be lost. Instead take extra
care with installing the unit to prevent shorts.
Lead Connections
Connect all wires, making sure that each connection is
insulated and secure. Bundle all loose wires and fasten
them with tape so they will not fall down later. Now insert
the stereo unit into the mounting collar.
Congratulations! After making a few final checks, you’re
ready to enjoy your new auto stereo system.
□ Final Checks
1. Make sure that all wires are properly connected and
insulated.
2. Make sure that the stereo unit is securely held in the
mounting collar.
3. Turn on the ignition to check the unit for proper opera
tion.
If you have difficulties, consult your nearest authorized
professional installer for assistance.
Dashboard Installation
Installation Opening
2 3/32”
(53 mm)
- 7 5/32” -
(182 mm)
This unit can be installed in any dashboard having an
opening as shown above. The dashboard should be 3/i6"
(4.75 mm) - 7/32" (5.56 mm) thick in order to be able to
support the unit.
26
CQ-DP171U
Page 27
(b) Using the rubber cushion (option)
Rear support bracket
{Provided on the car)
Rubber cushion \
(option)
CQ-DP171U
27
Page 28
Installation Guide (continued)
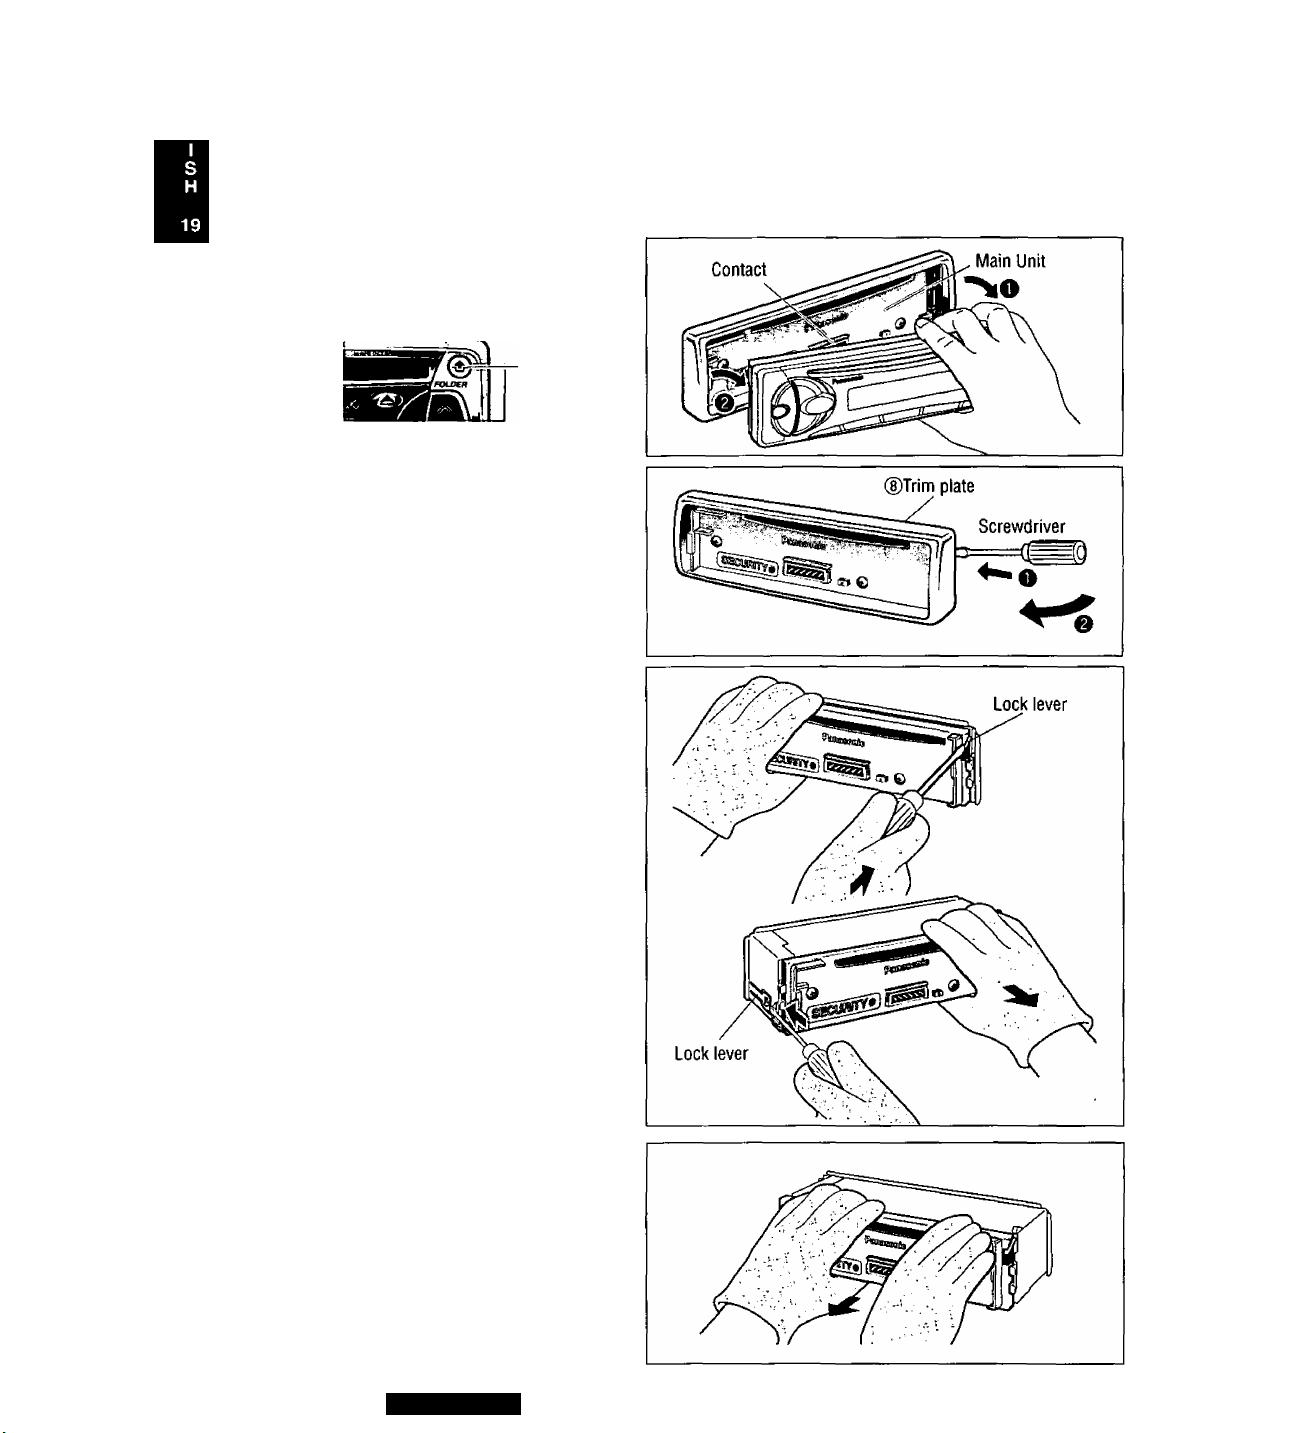
Remove the Unit
Switch off the power of the unit.
Remove the removable face plate.
O Press {A ] {release button). The remov
able face plate will be released.
Release button
O Pull on the right side of the unit.
Remove the trim plate (D with a screw
driver.
e
Pull out the unit while pushing down
the lock lever with a screwdriver.
e
28
Remove the unit pulling with both
hands.
O
CQ-DP171U
Page 29
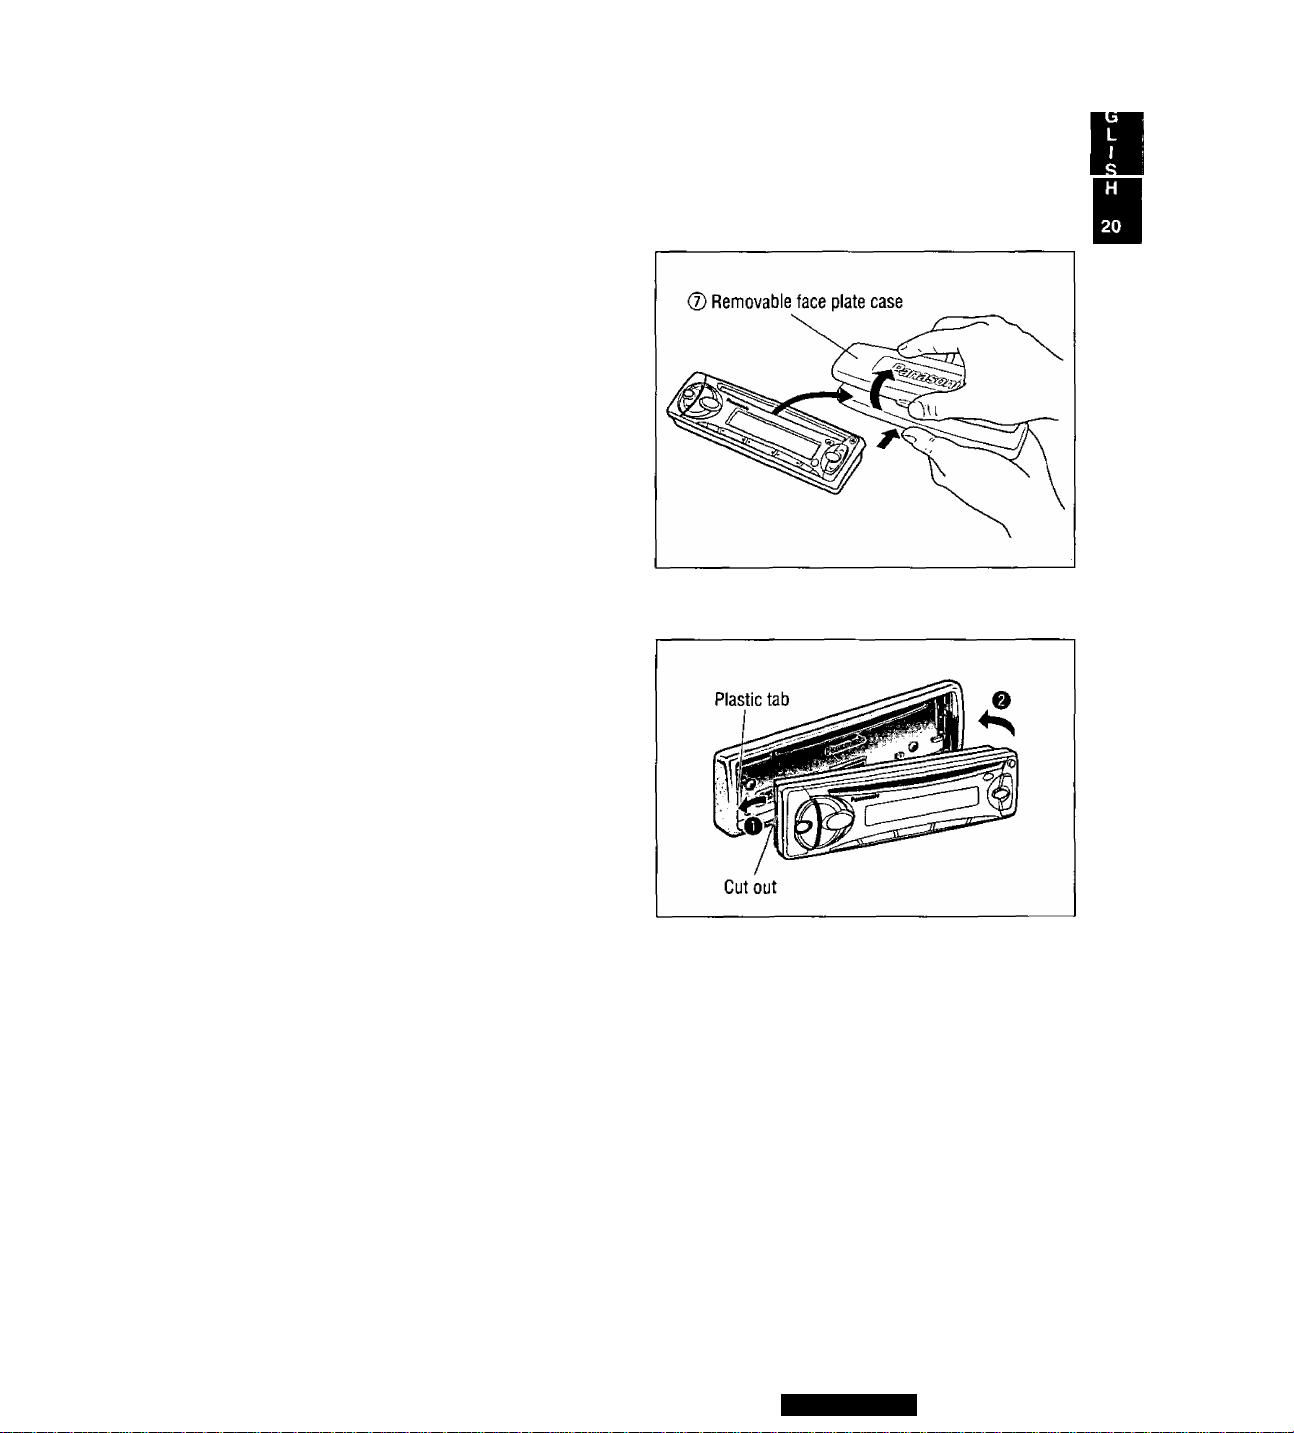
Anti-Theft System
This unit is equipped with a removable face plate. Removing this face plate makes the radio totally inoperable.
Place Removable Face Plate into Case
O Switch off the power of the unit.
O Remove the removable face plate. page 28)
O Gently press the bottom of the case and open the cover.
Place the face plate into the case and take it with you when
you leave the car.
Install Removable Face Plate
O Slide the left side of the removable face plate in place.
O Press the right end of removable face plate until “click” is
heard.
Cautions;
• This face plate is not waterproof. Do not expose it to water or excessive moisture.
• Do not remove the face plate white driving your car.
• Do not place the face plate on the dashboard or nearby areas where the temperature rises to high level.
• Do not touch the contacts on the face plate or on the main unit, since this may result in poor electrical contacts.
• If dirt or other foreign substances get on the contacts, wipe them off with clean and dry cloth.
CQ-DP171U
29
Page 30
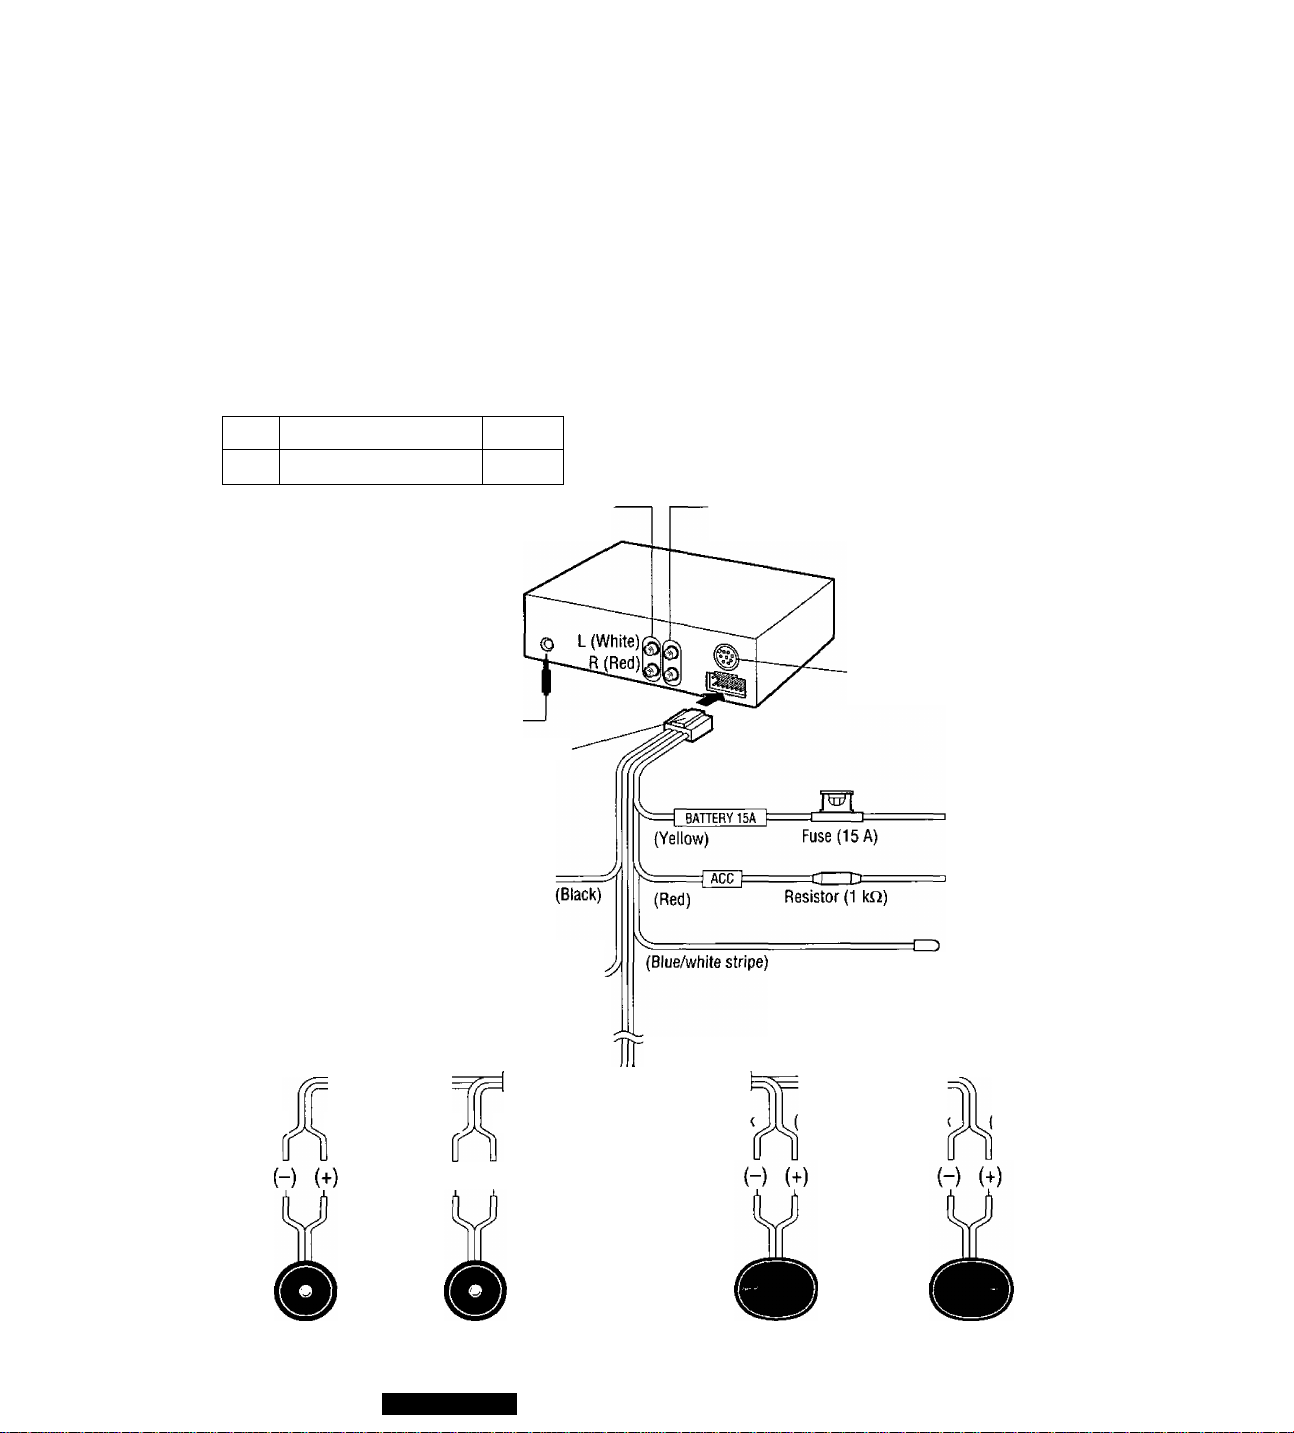
Electrical Connections
Cautions:
• This product is designed to operate off a 12 V DC, negative ground battery system.
• To prevent damage to the unit, be sure to follow the connection diagram below.
• Remove approx, V4" (5 mm) of protective covering from the ends of the leads before connecting.
• Do not insert the power connector into the unit until the wiring is completed.
• Be sure to insulate any exposed wires from a possible short-circuit from the car chassis. Bundle all cables and keep
cable terminals free from touching any metal parts.
• Remember, if your car has a drive computer or a navigation computer, the data of its memory may be erased when
the battery terminals are disconnected.
Accessory used for wiring
No.
CD
Mem Q’ty
Power connector 1
□ Wiring Diagram
Pre-Amp output
connector (Rear)
w
Antenna
Power connector
Ground lead
To a clean, bare metallic part of the car
chassis.
Motor antenna
relay control lead CZI
(To motor antenna) (Max. 500mA) (Blue)
This lead is not intended for use with switch actuated
power antenna.
Note: The power antenna extends automatically when
the radio mode is selected.
FRONT SP
CD changer input connector
Speaker lead
REAR SP
CD changer control
connector
Battery lead
To the car battery,
continuous +12 V DC
ACC power lead
To ACC power,
+12VDC
External amplifier control lead (Max. 500 mA)
This lead is for connection to the power amplifier.
Note: This lead is used for power control when
an external power amplifier is connected. The
power supply of a power amplifier will be
activated when turning on the power of this unit.
(White/black
stripe)
30
(White) (Gray/black
Left Speaker
(Front)
stripe)
H (+)
Right Speaker
(Front)
CQ-DP171U
(Gray)
(Green/blacI Green) (Violet/blacl Violet)
stripe)
Left Speaker
(Rear)
stripe)
Right Speaker
(Rear)
Page 31

□ Upgrading the system
Example Combination
CD Changer {CX-OP88U) (option)
Note: For wiring, carefuliy read the operating instructions for the devices connected.
CQ-DP171U
31
Page 32

Troubleshooting
Preliminary Steps
Check and take steps as described in the tables below.
If You Suspect Something Wrong
Immediately switch power off.
Disconnect the power connector and check that there is neither
smoke nor heat from the unit before asking for repairs. Never try to
repair the unit yourself because it is dangerous to do so.
Troubleshooting Tips
■ Common
( Trouble )
Car’s engine switch is not on.
^ Turn your car's ignition switch to ACC or ON.
Cables are not correctly connected.
*4 Connect cables correctly.
Battery cable is not correctly connected.
^ Connect the battery cable to tbe terminal that is always live.
No power
►
Accessory cable is not correctly connected.
^ Connect the accessory cable to your car's ACC source.
Cautions;
• Do not use the unit if it malfunctions or
something is wrong.
• Do not use the unit in abnormal conditions,
for example, without sound, or if it emits
smoke or a foul smell, which can cause
ignition or electric shock. Immediately stop
using the unit and catt the store where you
purchased it.
Cause / Step
3
No sound
______________________
Noise
Audio sound is out
put but the display
shows demonstration
message.
32
[►
_ J
►
[►
CQ-DP171U
Grounding wire is not correctly connected.
^ Connect the grounding wire to a metal part of your car
Fuse is burnt.
^ Call the store where you purchased the unit, or your nearest Servicenter
(see the attached sheet) and ask for fuse replacement.
Mute is set to ON.
Set it to OFF.
Cables are not correctly connected.
^ Connect cables correctly.
Condensation (dew)
^ Wait for a while before use.
/■
A mobile phone is used near the unit.
^ Keep the mobile phone away from the unit.
V
----------------------------------------------
Demonstration mode is ON.
---------------
__________________
Press [DISP] (DISPLAY) to cancel demonstration mode.
>
/
Page 33

Radío
c
Trouble
3 C
Cause / Step
Station is too far, or signals are too weak.
^ Seiect other stations of higher signai level.
3
Too much noise in FM
stereo and monaural
broadcasts.
Preset station is reset.
CD/MP3
C
Disc is in the CD com
partment but no sound
is made, or disc is
ejected automatically.
Trouble
3 c
The motor antenna relay control lead is not connected correctly.
^ If there is a motor antenna in the car, connect the motor antenna relay control
lead to the motor antenna lead that is installed in the car correctly.
The radio antenna is not extended enough.
^ Fully extend the radio antenna.
Battery cable is not correctly connected.
^ Connect the battery cable to the terminal that is always live.
Cause / Step
Disc is upside down.
3
^ Place disc in the correct direction with the label side up.
Disc is di^.
^ Clean disc, referring to the section on “Notes on CD/CD media (CD-ROM, CD-R, CD-RW)”.
A disc that has data other than CD-DA or MP3 type is loaded.
^ Discs that have CD-DA or MP3 type data should be used.
^ The unit may not successfully play back a CD-R/RW that was made by the combi
nation of writing software, a CD recorder (CD-R/RW drive) and a disc if they are
incompatible one another. Refer to instructions for the concerned devices for details.
Sound skips, bad
sound quality, (e.g.
caused by noise)
Sound skip due to
vibration.
►
Disc is di^.
^ Clean disc, referring to (he section on “Notes on CD/CD media (CO-ROM, CD-R, CD-RW)”.
^ The unit may not successfully play back a CD-R/RW that was made by the combi
nation of writing software, a CD recorder (CD-R/RW drive) and a disc if they are
incompatible one another. Refer to instructions for the concerned devices for details.
Mounting angle is over 30”.
^ Adjust mounting angle to less than 30”
Unstable mounting.
^Mount the unit securely with the mounting parts, referring to the section
on Installation.
• Disc is defective.
• Mechanical trouble.
^ Press [^] (EJECT). If normal operation is not restored, call the store
where you purchased the unit or the nearest Servicenter to ask for repairs.
CQ-DP171U
33
Page 34

Troubleshooting (continued)
CD
c
CD text is not dis
played normally.
Trouble
3 C
[►
Disc is dirty, or has scratches.
^ Clean disc, referring to the section on “Notes on CD/CD media (CD-ROM, CD-R, CD-RW)”.
Cause/Step
3
Time is counted but no
sound comes out.
MP3
C
No playback.
It takes too long for
playback to start.
Poor recording quality,
sound skipping
Trouble
3 C
[►
>
The 1 St track of a mix mode disc was reproduced. {Mix mode is a format in
which data except music is recorded on the 1 st track and music data is record
ed on other than the 1st track in a session.)
^ Play back music data recorded on other than the 1st track.
Cause/Step
The disc does not conform to any of the file systems supported by this player.
Insert a disc that conforms to the file systems supported by this player
For supported file systems see “Notes on MP3” (*=> page 38).
The MP3 file is missing the “.mp3" file name extension.
•^Make sure to add the “.mp3” extension to each MP3 file name.
The folders and files recorded on the disc are layered too much.
checking of files takes longer in this case, do not record any unneces
sary folders or files other than MP3s on the disc.
(If there are many hierarchies of files and folders, it may take up to 150
seconds to start playback.)
^The recording quality differs depending on the encoding software used,
and on settings such as the bit rate. Set the bit rate within the range
specified in the specifications chart (^ page 41).
It is recommended to set the bit rate to 128 kbps or more” and “Fixed”.
High-speed writing was executed when MP3 data was recorded on the disc.
«^Decrease writing speed as low as possible.
D
Files are not played in
the desired order.
Folder/ftle name is not
displayed correctly.
File playing time is not
displayed correctly.
34
[>
CQ-DP171U
Files or folders are not recorded in the desired playback order.
^Some writing software lets you specify the recording order by adding a
prefix in the range of “01” ■ “99”, etc. to the file name. For details refer
to the user manual of your writing software.
The disc does not conform to the file systems supported by this player.
^ Insert a disc that conforms to the file systems supported by this player.
For supported file systems see “Notes on MP3” page 38).
There may be a problem with your writing software or CD recorder (COR/RW drive). For details refer to the user manual of your writing software.
You ran the file in fast forward or fast reverse during playback or turned off the
ignition switch of the car during playback.
^Playing another file will return the file playing time to normal.
You played a VBR (Variable Bit Rate) format MP3 file.
-^The file playing time of VBR (Variable Bit Rate) format MP3 file is some
times displayed incorrectly.
Page 35

Sound Setting
C
No sound from left,
right, front, or rear
speakers.
Trouble
3 C
[►
Cause / Step
Left and right balance, or front and rear balance is off on one side.
^Adjust balance / fader mode as appropriate.
Cables are not correctly connected.
^Connect the cables correctly.
3
Left and right sounds
are reversed in stereo
listening.
Remote Control
c
Buttons are invalid for
operation.
Trouble
[►
3 c
[►
The right speaker wire is connected to the left speaker and the left speaker wire
to the right speaker.
^Connect the speaker wires to the correct one.
Cause / Step
----------------------
Battery poles (+) (-) are reversed.
^Insert the battery correctly.
Wrong battery.
■ ^Check the battery.
Battery has run down.
■ ^Replace the battery.
Remote control is in the wrong direction.
•^Direct the remote control at sensor (REMOTE) on the panel.
3
'
j
CQ-DP171U
35
Page 36

Ihiubleshooting (continued)
Error Display Messages
■ CD / MP3
Display
The disc ejected automatically
POWER OFF
The disc ejected automatically
POWER OFF
Cause / Step
' Disc is dirty, or is upside down.
' A disc that has data other than CO-DA or MP3 type is loaded.
* Check disc.
Disc has scratches.
^ Check disc.
No operation by some cause.
^ Turn off the car engine (ACC off) and remove the fuse from the battery
lead (yellow) for 1 minute. Then reinstall the fuse.
When there is no MP3 files in the specified folder during direct MP3 folder selection.
^ Select another folder which contains MP3 files.
The player for some reason cannot read the file you are trying to play. (File
recorded in an unsupported file system, compression scheme, data format,
file name extension, damaged data, etc.)
Select a file that the player can read. Confirm the type of data record
ed on the disc. Create a new disc if necessary.
CD Changer
Display
' Disc is dirty, or is upside down.
To next disc automatically
Disc number
To next disc automatically
Disc number
Notes:
• Some CD changers will let this unit to be turned off after E3 error message appears.
• For details refer to the operating instructions of your CD changer.
36
CQ-DP171U
•A disc other than a music CD (CD-DA type) is loaded.
^ Check disc.
Disc has scratches.
^ Check disc.
No operation by some cause.
^ If normal operation is not restored, call the store where you pur
chased the unit or the nearest Servicenter to ask for repairs.
The display continues if you cannot switch off the power.
No disc is in the changer (magaiine).
^ Insert discs into the changer (magazine).
Cause / Step
Page 37

Maintenance
Your product is designed and manufactured to ensure a minimum of maintenance. Use a dry, soft cloth for routine exterior
cleaning. Never use benzine, thinner or other solvents.
Product Servicing
If the suggestions in the charts do not solve the problem, we recommend that you take it to your nearest authorized
Panasonic Servicenter. The product should be serviced only by a qualified technician.
Replacing the Fuse
Use fuses of the same specified rating {15 A). Using different substitutes or fuses with higher ratings, or connecting the
unit directly without a fuse, could cause a fire or damage to the stereo unit.
If the replacement fuse tails, contact your nearest Panasonic Servicenter for service.
CQ-DP171U
37
Page 38

Notes on MP3
This player allows you to play MP3 files recorded on CD-ROMs, CD-Rs
(Recordable) and CD-RWs (Rewritable).
What is MP3
MP3, short for MPEG Audio Layer-3, is a standard for compressing digital video data adopted for video CDs and similar
media. It is one of the audio compression schemes covered by MPEG’s (Motion Picture Experts Group) digital audio com
pression standards. What it does is reduce the number of bytes in a song without hurting the sound quality by means such
as eliminating big sound waves within the sound range that is imperceptible to the human ear. This compression allows
you to reduce the contents of a conventional music CD by a factor of around 10. This means that you can record the con
tents of 10 music CDs on a single CD-R or CD-RW. (The figures refer to data recorded on a 650 MB CD-R or CD-RW at a
fixed bit rate of 128 kbps and a sampling frequency of 44.1 kHz.)
Points to remember when recording an MP3 disc
Converting (encoding) audio data to an IVIP3 file
• It is recommended to set the bit rate to “128 kbps or more” and “Fixed".
• Bit rate 8 kbps of MPEG-2 and sampling frequency 16 kHz of MPEG-2 can not be reproduced.
• If set to VBR (Variable Bit Rate), the file playing time may not be displayed correctly.
• The playback sound quality differs depending on the encoding software and the bit rate. For details refer to the user
manual of your encoding software.
I Recording MP3 files on a CD-R/RW
• Do not record files other than MP3s or unnecessary folders on a disc. If too many folders or files other than MP3s are
recorded on a disc, it may take some time before playback starts, and you may have difficulties using fast forward and fas
reverse.
• Use ISO 9660 file system (Extension of the ISO 9660 file systems are included.) page 39). APPLE NFS file system
is not supported. If they do not conform to ISO 9660 file system, the file may not play normally, or the file or folder
names may not be displayed correctly.
• Make sure to add the “.mp3" extension to each MP3 file name. A file with a different file name extension or none at all
will not play.
• Although Multi session recording is supported, the use of Disc-at-Once is recommended. Make sure to close the ses
sion when you finished recording on a disc.
• ID3Tags are not supported. The song information is stored but not displayed.
• Packet writing software is not supported.
• A playlist function is not supported. Record files and folders in the order in which you want them to be played. Some
writing software lets you specify the recording order by adding a prefix in the range of “01 ” - “99”, etc. to the file name.
For details refer to the user manual of your writing software.
Note: You may encounter trouble in playing MP3s or displaying the information of MP3 files recorded with certain writing
softwares or CD recorders (CD-R/RW drives).
Caution: Never assign the “.mp3" file name extension to a file that is not in the MP3 format. This may not only pro
duce noise from the speakers and speaker damage, but can damage your hearing.
Note: MP3 encode software and writing software are not supplied to this model.
38
CQ-DP171U
Page 39

Maximum number of files/folders
• Maximum number of trees: 8
• Maximum number of files/folders: 254 (files + folders. Root folder is not included.)
Note: If the total of files and folders exceeds 254, successful playback may not be performed.
Supported file systems and file names
Supported file system
ISO 9660 Level 1
ISO 9660 Level 2
Joliet*
Romeo
Apple Extension to ISO 9660
Name files and folders in accordance with the standani of each file system.
Refer to the instructions of writing software for details.
• This player can display file names of up to 31 ASCII character set in
scroll mode.
* Up to 15 letters can be displayed when scrolling in the Joliet system.
According to the standard, “a”, “g”, etc. can be used. However, this
unit can not display those letters.
• File names entered in lower case will be displayed in upper case.
• The unit recognizes only ASCII character set (see the glossary below).
Chinese character, accented French character and accented Spanish
character will be converted into an asterisk (i).
Oisplayable folder names and file names
Glossary
ISO 9660
The most common international standard for the logical
format for files and directories.
APPLE NFS
The file system used by the Machintosh operating sys
tem to organize data. (Not supported)
Multi-session
A method of adding data incrementally to a CD-R or CDRW in more than one recording session.
Disc-at-Once
A method of writing data in a media by just one opera
tion and no more writing after that.
A function that allows character information (title, artist,
album title, date, etc.) to be written onto the disc.
A method of writing data on a CD media in small incre
to 9, and the following symbols: (space) !"#$%&’(
ID3Tag
(Not supported)
Packet writing
ments. (Not supported)
ASCII character set
ASCII character set consisting of A to Z, a to z, digits 0
) * + :< = >?@[\]‘_' {!}“
(However, lowercase characters are represented as
uppercase characters in this unit.)
Copyright
It is prohibited by copyright laws to copy, distribute and deliver copyrighted materials such as music without the approval
of copyright holder except enjoying yourself personally.
CQ-DP171U
39
Page 40

Maintenance
Care of the Unit
□ Cleaning this unit
Use a dry, soft cloth to wipe.
Notes on CD / CD Media (CD-ROM, CD-R, CD-RW)
Do not play any ordinary music CDs with labels
other than this one.
How to hold the disc
• Do not touch the underside of the disc.
• Do not scratch the disc.
• Do not bend disc.
• When not in use, keep disc in the case.
Do not use irregular shaped discs.
Do not leave discs on the following places:
• Direct sunlight
• Near car heaters
• Dirty, dusty and damp areas
• Seats and dashboards
Disc cleaning
Use a dry, soft cloth to wipe from the center outward.
Caution on new discs
A new disc may have rough edges on its inner and outer
perimeter. These may cause malfunction.
Remove the rough edges using a pencil, etc.
□ Caution on cleaning
Never use solvents such as benzine, thinner as they may
mar the surface of the unit.
DIGITAL AUDIO
Label side
Do not use irregular shaped discs.
<Right> -------
^ <Wrong>
Do not attach any seals or labels to your discs.
Rough edges
Do not write on the disc label in a heavy pen or
ballpoint pen stroke.
Notes on CD-Rs/RWs
• You may have trouble playing back some CD-R/RW discs recorded on CD recorders {CD-R/RW drives), either due to
their recording characteristics or dirt, fingerprints, scratches, etc. on the disc surface.
• CD-R/RW discs are less resistant to high temperatures and high humidity than ordinary music CDs. Leaving them inside
a car for extended periods may damage them and make playback impossible.
• The unit may not successfully play back a CD-R/RW that was made by the combination of writing software, a CD
recorder (CD-R/RW drive) and a disc if they are incompatible one another.
• This player cannot play CD-R/RW discs if the session is not closed.
• This player cannot play the CD-R/RW discs which contains other than CD-DA or MP3 data (Video CD, etc.).
• Be sure to observe the instructions of CD-R/RW disc for handling it.
40
CQ-DP171U
Page 41

Specifications
□ General
Power supply:
Current consumption:
Maximum power output:
Tone adjustment range:
Bass:
Treble:
Suitable speaker impedance:
Pre-Amp output voltage:
Output impedance:
Dimensions (W x H x D):
Weight:
□ FM stereo Radio
Frequency range:
Usable sensitivity:
50 dB quieting sensitivity:
Frequency response:
Alternate channel selectivity:
Stereo separation:
Image response ratio:
IF response ratio:
Signal/noise ratio:
12 VDC {11 V -16 V), test voltage 14.4 V, negative ground
Less than 2.2 A (CD play mode; 0.5 W x 4 channels)
45 W X 4 channels at 1 kHz, Volume control maximum
±12 dB at 100 Hz
±12 dB at 10 kHz
4-8 Q
2.0 V (CD play mode; 1 kHz, 0 dB)
200 n
7” X I^Vie” x 5Vs” (178 x 50 x 150 mm)
3 lbs, 5 oz (1.5 kg)
87.9 MHz-107.9 MHz
11.0 dBf. (1.25 pV,75 Q)
15.2 dBf. (1.6 pV,75 Q)
30 Hz-15 kHz (±3dB)
75 dB
42 dB (1 kHz)
75 dB
100 dB
70 dB
□ AM Radio
Frequency range:
Usable sensitivity:
530 kH z-1 710 kHz
28 dB/pV (25 pV, S/N 20 dB)
□ CD Piayer
Sampling frequency:
DA converter:
Error correction system:
Pick-up type:
Light source:
Wave length:
Frequency response:
Signal/noise ratio:
Total harmonic distortion:
Wow and flutter:
Channel separation:
MP3 decoding;
Bit rate:
Sampling frequency:
Above specifications comply with E!A standards.
Note: Specifications and the design are subject to modification without notice due to improvements in technology.
32 times oversampling
MASH*1 bit/4 DAC system
Panasonic super decoding algorithm
Astigma 3-beam
Semiconductor laser
780 nm
20 Hz- 20 kHz (±1 dB)
96 dB
0.01 % (1 kHz)
Below measurable limits
75 dB
MPEG 1 Audio Layer 3/MPEG 2 Audio Layer 3
(MPEG 1 Audio Layer 3) 32 kbps - 256 kbps, VBR (Variable Bit Rate)
(MPEG 2 Audio Layer 3) 16 kbps -160 kbps, VBR (Variable Bit Rate)
(MPEG 1 Audio Layer 3) 32 kHz, 44.1 kHz, 48 kHz
(MPEG 2 Audio Layer 3) 22.05 kHz, 24 kHz
CQ-DP171U
41
Page 42

Préparation de la télécommande
Installation de la pile
O Retirez le porte-pile.
Tirez le porte-pile par la partie B en poussant la par
tie A dans le sens indiqué par la flèche.
O Installez la pile sur le porte-pile.
Mettez la pile neuve en place en vous assurant que
le signe (+) se trouve sur le dessus, tel qu’indiqué
sur l’illustration.
O Réinsérez le porte-pile.
Repoussez le porte-pile iusqu’à sa position d’ori
gine.
Remarques sur la pile
Remplacez la pile dès les premiers signes d’affaiblissement.
Données techniques:
• Type de pile: Pile au lithium Panasonic (CR2025) (fournie)
• Durée de vie: Environ 6 mois lors d’une utilisation normale (à température ambiante normale)
Précaution: Une utilisation inadéquate de la pile peut causer une surchauffe, une explosion ou une ignition
d’allumage pouvant provoquer des blessures ou un incendie. Les fuites de la pile peuvent endommager l’appareil.
• l\le démontez pas la pile ni provoquer de court-circuit. Ne jetez pas la pile au feu.
• Afin de prévenir tout risque d’accident, conserver les piles hors de portée des enfants.
• Lors de l’élimination rejet des piles, observer les règlements y afférents.
Panneau
arrière
Porte-pile
Pile au lithium
(fournie)
Partie A
Partie B
Guide de référence des commandes
Les touches'de la télécommande fonctionnent de la même façon que les commandes sur l’appareil de la page de référence.
Orientez la télécommande vers le détecteur (REMOTE) sur l’unité principale.
- Sélection/Menu
(«♦ pages 44, 48, 51)
—Volume
(# pages 43,44)
-Entrée numéro de
Plage/Dossier/Disque
(^ pages 49, 52, 54)
Recherche et sélection de
pièce/plage/dossier
(•f pages 45, 46, 48, 49. 51, 53, 55)
Affichage
(«♦ pages 43, 45, 48, 49, 51,52, 54)
[01 à [9]
(^ pages 47,49, 52, 54)
Allmentation/Source
(^ pages 43,46, 48, 50, 54)
Sourdine -------------------------------
(^ page 43)
Aléatoire
Balayage
Reprise
---------------------------------
(^ pages 49, 53, 55)
Sélection Oossier/Oisque
(^ pages 52, 54) t
Bande/Confirmation/Pause
(^ pages 46,47, 49, 52, 54)
42
POWER MENU.
---------------
KUMBER
RAND SCAN REP
^ ^ Q
CQ-DP171U
Page 43

Commandes d’alimentation et de son
Alimentation
Tournez la clé dans le démarreur jusqu’à ce que le témoin de l’accessoire s’allume.
Mise sous tension: Appuyez sur [SOURCE] (PWR).
Mise hors tension: Appuyez de nouveau sur [SOURCE] (PWR) et maintenez
enfoncé.
Remarque: Lors de l’utilisation Initiale de cet appareil, un message de
démonstration apparaît sur l’écran.
Pour faire disparaître le message, appuyer sur la touche [DISP].
Volume
[AVOL] : Haut
[VVOL] : Bas
Appuyez et maintenez enfoncé pour un ajustement rapide.
Niveau de volume (0 à 40)
|oa5onlc
...
' ■
Coupure du son
Appuyez sur [MUTE] pour couper le son
complètement. I
----------
Circuit de protection plein volume:
Lorsque l’appareil est mis hors tension et de
nouveau sous tension, le volume s’élève lente
ment jusqu’au niveau précédent.
Le circuit de protection plein volume ne fonc
tionne pas lorsque le niveau de volume est réglé
sur une position inférieure à 20 sur l’affichage.
Détecteur pour une télécommande
f^‘5___Saj^LO
1
Compensateur physiologique
(Seulement pour l'unité principale)
Appuyez sur [LOUD] pour améliorer les tonalités
graves et aiguës à volume bas ou moyen.
Appuyez de nouveau sur [MUTE] pour annuler.
Sélection de mode
Appuyez sur [SOURCE] pour changer le mode.
Tuner
page 46)
------------
(Lorsqu’un CO est mis dans le lecteur)
>(*^ page 48)
(Lorsqu’un disque sur lequel des fichiers MP3 ont été
enregistrés est mis dans le lecteur.) (*^ page 50)
Appuyez de nouveau sur [LOUD] pour annuler.
Lecteur CD
Commande de changeur CD
OU
Lecteur MP3
(Lorsqu’un changeur CD est connecté et que le
magasin est mis dans le changeur)(^ page 54)
CQ-DP171U
43
Page 44

Commandes d’alimentation et de son
Mode audio (Graves/Aigus/Balance/Equilibreur)
(D Appuyez sur [SEL] pour setectionner le mode audio.
(suite)
Mode standard '
Volume
Graves
t 4
Équilibreur
Remarque: Si aucune opération n’est effectuée pendant plus de 5 secondes en mode audio {2 secondes en mode
volume), l’affichage retourne en mode standard.
Balance
Aigus
(D Appuyez sur [ AVOL] ou [VVOL] pour changer chaque niveau.
Graves:
44
Gamme de réglage: -12 à +12 par palier de 3 dS
Aigus:
Gamme de réglage: -12 à +12 par palier de 3 dB
Balance:
R (haut-parleur droit) ou L (haut-parleur gauche)
Gamme de réglage: 1 à 15 par palier de 1 Centre de balance
Équilibreur:
F (haut-parleur avant) ou R (haut-parleur arrière)
Gamme de réglage; 1 à 15 par palier de 1 Centre d’équilibreur
CQ-DP171U
Page 45

Fonctionnement de base de l’horloge
L'horloge utilise un cycle de 12 heures.
Temps initial
O Appuyez sur [DISP] (Affichage).
Heures
O
Q Appuyez sur ["^TUNE] ou [>TUNE].
Minutes
O Appuyez sur [DISP] (Affichage).
0 Appuyez sur [<TUNE] ou [>TUNE].
O Appuyez sur [DISP] (Affichage).
Remarque: Appuyez sur [<TUNE] ou [>TUNE] et
maintenez enfoncé pour changer les chiffres rapidement.
n Tî U < c T
ri jJ U U J I
Appuyez sur [DISP] (Affichage) et maintenez enfoncé.
CL-n
U U u~
J t %
(Affichage de l’horloge)
(Les heures clignotent.)
(Réglage des heures)
(Les minutes clignotent.)
(Réglage des minutes)
(Fin)
Affichage de l’horloge
Appuyez sur [DISP] (Affichage) pour commuter sur l’af
fichage de l’horloge.
En mode de syntonisateur:
station émetthce Affichage de l’horloge
En mode de changeur CD:
Lecture de changeur CD Affichage de l’horloge
Lorsque l’alimentation est coupée:
Pas d’affichage Affichage de l’horloge
Remarque: Reportez-vous à la description de l’affichage
de l’heure pour les modes lecteur CD et lecteur MP3 (■►
pages 48 et 51).
Remise à l’heure
Appuyez sur [DISP] (Affichage) et maintenez enfoncé pen
dant plus de 2 secondes pour activer le mode de réglage de
l’heure afin de remettre l’horloge à l’heure.
Puis, répétez les étapes 0 à 0.
Remarque: L’horloge n’est pas réglable durant le défile
ment des noms de Plage/Disque/Dossier/Fichier.
CQ-DP171U
45
Page 46

Fonctionnement de base de la
Sélection de mode
Appuyez sur [SOURCE] pour passer au mode radio.
T i < A i n n
1 U » « L rf
-----------
Le témoin FM stéréo s'allume pendant la
réception d'une émission FM stéréophonique,
—
Bande
O
Appuyez sur [BAND] pour changer de bande.
O manuelle
[>TUNE] : Fréquence plus élevée
[<TUNE] : Fréquence plus basse
Syntonisation par
recherche
Appuyez et maintenez enfoncé ...
[>TUNE] : Fréquence plus élevée
[<TUNE] : Fréquence plus basse
La syntonisation s’arrêtera automatiquement
lorsque les signaux de la station émettrice sui
vante seront captés.
46
CQ-DP171U
Page 47

Réglage de station mémorisée
Jusqu'à 6 stations peuvent être sauvegardées dans chacune des
mémoires de station mémorisée FM1, FM2, FM3 et AM.
Précaution: Pour des raisons de sécurité, n’es
sayez jamais de mémoriser des stations tout en con
duisant.
0 Bande
Appuyez sur [BAND] pour sélectionner la bande désirée,
page 46)
sonie tw>PiTw CD R£<XiVÊA ттм
(2) Mémorisation automatique de station
Appuyez sur [BAND] (АРМ: mémorisation automatique) et
maintenez enfoncé pendant plus de 2 secondes.
• Les 6 stations disponibles dont les signaux sont les plus
torts seront automatiquement sauvegardées en mémoire
sous les touches de mémorisation [1] à [6].
• Une fois réglées, les stations mémorisées sont balayées
successivement pendant 5 secondes chacune.
Numéro mémorisé
Remarque: Les stations mémorisées manuellement sur la
bande sélectionnée seront effacées.
Mémorisation manuolio do
-----------
station
O utilisez la syntonisation manuelle ou la syntonisation par
recherche pour trouver une station. (^ page 46)
©Appuyez sur l’une des touches de mémorisation [l] à [6]
et maintenez-la enfoncée jusqu’à ce que l’affichage cli
gnote une fois.
Syntonisation d’une station— mémorisée
Appuyez sur la touche de mémorisation [1] à [6] corres
pondante pour syntoniser une station mémorisée.
Remarque: Vous pouvez changer te réglage de la
mémoire en répétant la procédure ci-dessus.
CQ-DP171U
47
Page 48

Fonctionnement de base du lecteur CD
Précautions:
• Seuls les CD, CD-R et CD-RW avec données du type CD-DA de 5 pouces
(12 cm) sont disponibles pour cet appareil.
• N'utilisez pas de disques de forme irrégulière.
• N’utilisez pas un disque sur lequel est apposé un sceau ou une étiquette.
(Ejection)
Côté étiquete
Insertion de disque et lecture
L’affichage change de la manière illustrée ci-dessous. La lecture s’amorce automatiquement après que l’appareil
ait reconnu le disque inséré comme étant un CD audio ordinaire. (Lorsqu’un CD-R ou un CD-RW comportant les mêmes données au
format CD-DA qu’un CD audio ordinaire est introduit, cet appareil le prend comme un CD audio ordinaire.)
(Disque mis en place)
Remarques:
• N’insérez pas de disque lorsque cet indicateur est allumé.
L’insertion d’un disque lorsque l'appareil est hors tension le met sous tension.
il faut un certain temps depuis la lecture des données jusqu’au début de reproduction, pour la distinction entre les formats CD-DA et MP3.
(Lecture des données)
(Voir la description ci-dessous.)
(Un CD audio ordinaire est reconnu
et la lecture commence.)
Arrêt et éjection de disque
Appuyez sur la touche [A] (Éjection) pour arrêter la lecture du CD et éjecter le disque.
Remarque: L'éjection du disque lorsque l’appareil est en mode CD le met hors tension.
Sélection de mode (Lorsqu’un CD est mis dans le lecteur)
Appuyez sur [SOURCE] pour passer en mode de lecteur CD et commencer la lecture.
Changement
d’affichage
Appuyez sur [DISP] (Affichage) pour modifier l’affichage comme suit
Remarques:
• Les informations relatives aux titres ne s’affichent que si le
disque comporte des informations textuelles. (62 lettres au
maximum peuvent être affichées lors du défilement. Certaines
lettres ne sont pas utilisables.)
• « NO TITLE » est affiché lorsqu’il n’y a aucune information.
48
CQ-DP171U
Numéro de plage/Temps
de lecture de ta plage
(par défaut)
Titre du disque
(défilement)
Titre de plage
(défilement)
Affichage de
l’horloge
Temps de lecture
de plage
S’allume lorsque le disque est inséré.
Clignote dans le mode lecture CD.
Défilement des titres (disque/plage)
O Appuyez sur [SEL] et maintenez enfoncé pendant plus de
2 secondes.
©Appuyez sur [>TUNE] ou [<TUNE] pour activer ou
désactiver en alternance.
Défilement continu Le défilement s’arrête après un cycle.
Remarques:
• Après un délai d’inactivité de 10 secondes, l’affichage
revient au mode régulier.
• Appuyez sur [DISP] (Affichage) pour revenir au mode régulier.
• Appuyez sur [DISP] (Affichage) et maintenez enfoncé
plus de 2 secondes pour lancer un autre cycle de défile
ment lorsque le mode défilement est désactivé.
• Ne tentez pas de lire les informations qui défilent lorsque
vous êtes au volant.
* •
L, r n i n I
rr U t_ !_
Page 49

Remarque; Dans le cas où un disque contiendrait à la fois des données CD-DA et MP3, seul l’un des deux types sera
lu. Par exemple, si les premières données sont du type CD-DA, le disque est reconnu comme un CD audio ordinaire ; s’î
s’agit de données MP3, il sera reconnu comme disque MP3.
Sélection de plage
[►►TRACK] : Avance à la plage suivante.
[-♦<TRACK] : Retour au début de la plage actuelle.
Retour à la plage précédente.
(Appuyez deux fois.
Recherche de plage
Appuyez et maintenez enfoncé...
p^TRACK] : Défilement avant rapide
["♦^RACK] : Défilement arrière rapide
Relâchez pour revenir en lecture de CO ordinaire.
J
Pause
Appuyez sur [BAND] pour activer le mode de pause.
Appuyez sur [BAND] de nouveau pour annuler.
HHIJbL'
Lecture aléatoire
Lecture par balayage
Sélection directe de plage (Seulement pour la télécommande)
mwER mm '
©00
©0©
MM dCAN KP
©©©
©(î)©’
@[®l©
Exemple: Numéro de plage 12
1
Ì
Appuyez sur [#] (Numéro).
O Appuyez sur [1] puis [2].
1
1
Appuyez sur [BAND] (Confirmation).
La lecture de la plage sélectionnée
e
s’amorce.
Remarques:
• Appuyez sur [#] (Numéro) de la télécommande pour
refaire la saisie du numéro.
• Après un délai d’inactivité de 10 secondes, l’affichage
revient au mode régulier.
• Appuyez sur [DISP] (Affichage) pour revenir au mode
régulier.
Lecture en reprise
Lecture aléatoire
Lecture par
balayage
Lecture en
reprise
• Appuyez sur [4] (Aléatoire).
Toutes les plages sont lues, en ordre aléatoire.
• Appuyez sur [4] (Aléatoire) de nouveau pour
►
►
►
annuler.
• Appuyez sur [5] (Balayage).
Les 10 premieres secondes de chacune des
plages du disque sont lues, en séquence.
• Appuyez sur [5] (Balayage) de nouveau pour
annuler.
• Appuyez sur [6] (Reprise).
La plage actuelle est répétée.
• Appuyez sur [6] (Reprise) de nouveau pour
annuler.
V
_______________________________________
\
Clignote
—
n i
CQ-DP171U
S’allume
Í1 ^ M M ■
1
S’allume ^
Ì
49
Page 50

Fonctionnement de base du lecteur MP3
Précautions:
• Seuls les supports comportant des données au format MP3 (disque CD-ROM, CD-R, CD-RW) de 5 pouces (12 cm) sont
disponibles pour cet appareil.
• N'utilisez pas de disques de forme irrégulière.
• N’utiiisez pas un disque sur lequel est apposé un sceau ou une étiquette.
• Ne tentez jamais de iire un fichier qui n'est pas au format MP3 en changeant l'extension de son nom de fichier à
« .mp3 ». Le bruit ainsi engendré peut endommager non seulement les haut-parleurs mais aussi votre ouïe.
Certains CD contenant des fichiers MP3 pourraient ne pas
pouvoir être lus correctement. Pour plus de détails,
reportez-vous à « À propos de MP3 » (^ page 70.)
Remarques:
• Lorsqu’un CD (CD-ROM, CD-R, CD-RW) contenant des
fichiers MP3 est mis en place, le lecteur passe automatique
ment dans le mode MP3 et lance la lecture des fichiers MP3.
• Un répertoire est interprété comme un dossier dans ce mode
d’emploi.
Insertion de disque et lecture
L’affichage change de la manière illustrée ci-dessous. La lecture s’amorce automatiquement dès qu’un fichier MP3 sur le
disque a été reconnu comme tel.
(Éjection)
(Disque mis en place)
Remarques:
• N’insérez pas de disque lorsque cet indicateur est allumé.
• L'insertion d'un disque lorsque l'appareil est hors tension le met sous tension.
• il faut un certain temps depuis la lecture des données jusqu’au début de reproduction, pour la distinction entre les
formats CD-DA et MP3.
• Si vous gravez des dossiers et fichiers MP3 trop nombreux sur un disque, cela peut prendre du temps pour que la
lecture commence.
(Lecture des données)
(Voir la description ci-dessous.)
(Les données au format MP3 sont
reconnues et la lecture commence.)
Arrêt et éjection de disque
Appuyez sur [A] (Éjection) pour mettre fin à la lecture MP3 et éjecter le disque.
Remarque: Éjecter le disque alors que l’appareil est dans le mode MP3 a pour effet de mettre ie lecteur hors marche.
Sélection de mode (si le disque comporte des fichiers MP3)
Appuyez sur [SOURCE] pour passer dans te mode lecteur MP3 et lancer la lecture.
--------------------------
^
Numéro de fichier
Numéro de dossier
S'allume lorsque le disque est inséré.
Clignote dans le mode de lecture MP3.
Remarque: Si la clé de contact dans votre voiture est mise en position OFF durant la lecture, il peut y avoir un décalage
entre le temps de lecture du fichier affiché et le temps de lecture réel. De plus, la lecture peut commencer depuis le début
de la musique lors de l'utilisation d'un débit binaire variable du fichier MP3 dans la même situation.
50
Page 51

Remarque: Dans le cas où un disque contiendrait à la fois des données CD-DA et MP3, seul l’un des deux types sera lu.
Par exemple, si les premières données sont du type CD-DA, le disque est reconnu comme un CD audio ordinaire ; s’il s’agit
de données MP3, il sera reconnu comme disque MP3.
Changement d’affichage
Appuyez sur [DISP] (Affichage) pour modifier l’affichage comme suit :
n n ( „ n J
U U 1 U 1.
4^
4^
■i^Bi
4r
1 FILE.
4^
fiP3, 0;
L? ' J ^
F? :
Numéro de dossier/numéro
de fichier MP3 (par défaut)
Durée de lecture du fichier
Nom du dossier MP3
(défilement)
Nom du fichier MP3
(défilement)
Affichage de l’horloge
Remarques:
• Lors de la lecture d’un fichier MP3 à débit binaire vari
able, la durée de lecture peut ne pas avoir été correcte
ment déterminée. Après une première lecture d’un tel
fichier, l’indication de la durée sera précise.
• La lecture d’un fichier en accéléré peut causer une erreur
dans la détermination de sa durée de lecture.
L’indication de la durée de lecture reviendra à la normale
à la lecture d’un autre fichier.
• « NO TITLE » est affiché lorsqu’il n’y a aucune infor
mation.
• Les noms de dossier et de fichier MP3 peuvent être
affichés.
Le nombre de caractères visualisables varie en fonction
du système de fichiers. Référez-vous aux « Systèmes
de fichiers et noms de fichiers pris en charge » dans
les « À propos de MP3 » en ce qui concerne les
détails («^ page 71)
• L’extension « .mp3 » du nom du fichier n’est pas
affichée.
• Lors de la lecture d’un fichier de niveau 1 dans l’ar
borescence des fichiers, le nom du fichier est affiché
avec le mot « ROOT » (répertoire racine).
• Les caractères que le lecteur ne peut afficher apparais
sent comme des astérisques.
Défilement des noms (dossier/fichier)
O Appuyez sur [SEL] et maintenez enfoncé pendant plus de
i, * ~ o n I (
J rr Lf L. L
O
Appuyez sur [>TUNE] ou [<TUNE] pour activer ou désactiver en
alternance.
J n I M J) r
rf (_ U r «
Défilement continu
5Cf?L
Le défilement s’arrête après un cycle.
2
secondes.
Remarques:
• Après un délai d’inactivité de 10 secondes,
l’affichage revient au mode régulier.
• Appuyez sur [DISP] (Affichage) pour revenir
au mode régulier.
• Appuyez sur [DISP] (Affichage) et maintenez
enfoncé plus de 2 secondes pour tancer un
autre cycle de défilement lorsque le mode
défilement est désactivé.
• Ne tentez pas de lire les informations qui
défilent lorsque vous êtes au volant.
CQ-DP171U
51
Page 52

Fonctionnement de base du lecteur MP3
(suite)
Ordre de sélection de dossiers/Ordre de lecture de fichiers MP3 (exemple)
Remarques:
• Cet appareil compte le nombre de dossiers
indifféremment à la présence ou non du fichier
MP3. {Exemple ; Il n’existe aucun fichier MP3
dans un dossier racine comme l’indique le
dessin de droite, mais un numéro de dossier
« 001 » est donné. En fait, il n’y a aucun fichi
er MP3 à reproduire. Par conséquent, le dossier
suivant est automatiquement sélectionné.)
• Le logiciel d’écriture modifie parfois l’ordre des
0
®
dossiers et des fichiers sur un disque ; aussi
l’ordre peut-il être différent de celui que vous
avez établi. Pour plus de détails, reportez-vous
au manuel afférent au logiciel utilisé.
• Si vous enregistrez un trop grand nombre de
dossiers ou de fichiers autres que MP3 sur un
disque, il se peut que le lecture ne s’amorce
qu’après un certain délai et que l’avance ou la
marche arrière rapides ne fonctionnent pas cor
rectement.
• L’ordre de lecture varie suivant le lecteur même
si un même disque est introduit.
-Qu
Arbre 1
Dossier racine
{Répertoire racine)
Ê]
Ê]
■a
Arbre 2
Arbre 3 Arbre 4
Sélection de dossiers
Sélection de fichiers
Dans l’ordre 0
■0
Arbre 5
Ê] ~ Ê:Dans l’ordre
®
@
Pause
Appuyez sur [BAND] pour faire une pause.
Appuyez sur [BAND] de nouveau pour annuler.
pntJ5E
Sélection de dossier MP3
[A]
: Dossier suivant
[V]
; Dossier précédent
Remarques:
• Si le dossier sélectionné ne contient pas de fichiers MP3, le fichier MP3
le plus rapproché dans l’ordre de lecture est alors sélectionné et lu.
• Si le nombre total des fichiers et dossiers dépasse 254, la lecture ne
peut pas s’effectuer avec succès.
Sélection directe d’un dossier MP3 (Seulement pour la télécommande)
Exemple: Dossier numéro 5
Remarques:
52
Appuyez sur [#] {Numéro).
O
O Appuyez sur [5].
Appuyez sur [BAND]
((ionfirmation). La lecture du
dossier sélectionné débute.
CQ-DP171U
• Appuyez sur [#] (Numéro) de la télécommande pour
refaire la saisie du numéro.
• Après un délai d’inactivité de 10 secondes, l’affichage
revient au mode régulier.
• Appuyez sur [DISP] (Affichage) pour revenir au mode
régulier.
• S’il n’y a aucun fichier dans le dossier spécifié, le mes
sage d’erreur « E4 » apparaît. Sélectionnez un autre
dossier qui contient des fichiers MP3.
Page 53

Sélection de fichier MP3
[►►TRACK] : Avance jusqu’au prochain fichier MP3.
[’♦^TRACK] : Retour au début du fichier MP3 courant.
Retour au fichier MP3 précédent (deux
pressions).
Lecture
aléatoire
r
Fichier
►
Dossier
• Appuyez sur [4] (Aléatoire).
Lecture dans un ordre aléatoire de tous les
fichiers MP3 dans tous les dossiers.
• Appuyez sur [4] (Aléatoire) de nouveau pour
annuler.
• Appuyez sur [4] (Aléatoire) et maintenez
enfoncé pendant plus de 2 secondes.
Lecture dans un ordre aléatoire de tous les
fichiers MP3 dans le dossier sélectionné.
• Appuyez sur [4] (Aléatoire) et maintenez
enfoncé de nouveau pour annuler.
Recherche au sein d’un fichier MP3
Appuyez et maintenez enfoncé...
[►►TRACK] : Avance rapide
[^♦<TRACK] ; Marche arrière rapide
Relâchez pour poursuivre la lecture normale.
Lecture par balayage
9|l
S’allume
Clignote
Lecture par
balayage
Lecture en
reprise
J V.
J
►
►
Fichier
Dossier
r
Fichier
Dossier
V
____________
• Appuyez sur [5] (Balayage).
Lecture dans l’ordre des 10 premières secondes de
chacun des fichiers MP3 dans tous les dossiers.
• Appuyez sur [5] (Balayage) de nouveau pour
annuler.
• Appuyez sur [5] (Balayage) et maintenez enfoncé
pendant plus de 2 secondes.
Lecture dans l’ordre, à partir du dossier suivant dfâ 10 premières
secondes du premier fichier MP3 dans tous les dossiers.
• Appuyez sur [5] (Balayage) et maintenez enfoncé de '
nouveau pour annuler, Clignote
• Appuyez sur [6] (Reprise).
Lecture en reprise du fichier MP3 courant.
• Appuyez sur [6] (Reprise) de nouveau pour
annuler.
• Appuyez sur [6] (Reprise) et maintenez
enfoncé pendant plus de 2 secondes.
Lecture en reprise du dossier courant.
• Appuyez sur [6] (Reprise) et maintenez
enfoncé de nouveau pour annuler.
____
^
ntt
> I U 1
n n Tî .. n ni , ■
uuJ U U
CQ-DP171U
Clignote
J „ 1 i J ( .i ■
r ( 1 t 1 ■
REP ■
r
S’allume
Clignote I
1
53
Page 54

Fonctionnement de base du changeur CD
Les fonctions du changeur CD ont été conçues pour un changeur CD Panasonic optionnel.
Connectez le changeur CD et mettez un magasin en place.
Attention: N’utilisez pas de CD de forme irrégulière.
Remarques:
• La mise en place d’un magasin lorsque l’appareil est hors tension met celui-ci sous tension,
• L’éjection du magasin lorsque l’appareil est en mode changeur CD met celui-ci hors tension.
• Le changeur CD ne peut pas reproduire des disques CD-ROM, CD-R et CD-RW. Utilisez le changeur CD pour écouter
exclusivement des disques CD audio ordinaires.
• Le texte CD ne peut pas être affiché.
Sélection de mode
(Lorsqu’un changeur CD est connecté et que le magasin est mis dans le changeur) —^
Appuyez sur [SOURCE] pour passer en mode de changeur CD et commencer la lecture.
>1
Temps de lecture de plage
Sélection d'un disque
[A] : Disque suivant
iVl : Disque précédent
Sélection directe d'un disque (Seulement pour la télécommande)
Exempte: Numéro de disque 5
54
O©0
0©©
- Appuyez sur [#] (Numéro).
0
Appuyez sur [5].
Appuyez sur [BAND] (Confirmation), régulier.
Le disque correspondant com
©
mence à être reproduit.
CQ-DP171U
Remarques:
• Appuyez sur [#] (Numéro) sur la télécommande pour
refaire la saisie du numéro.
• Après un délai d’inactivité de 10 secondes, l’affichage
revient au mode régulier.
Appuyez sur [DISP] (Affichage) pour revenir au mode
Page 55

Sélection de plage
[►►TRACK] : Avance à la plage suivante.
¡-♦<TRACK] ; Retour au début de la plage actuelle.
Retour à la plage précédente.
(Appuyez deux fois.)
r
Plage
Lecture [k
aléatoire y
Disque
• Appuyez sur [4] (Aléatoire).
Toutes les plages disponibles de tous les dis
ques du magasin sont lues dans un ordre
aléatoire.
• Appuyez sur [4] (Aléatoire) de nouveau pour
annuler.
• Appuyez sur [4] (Aléatoire) et maintenez
enfoncé pendant plus de 2 secondes.
Toutes les plages disponibles du disque en cours
de lecture sont lues dans un ordre aléatoire,
• Appuyez sur [4] (Aléatoire) et maintenez
enfoncé de nouveau pour annuler.
Recherche de plage
Appuyez et maintenez enfoncé...
[►►TRACK] : Défilement avant rapide
[■♦^TRACK] ; Défilement arrière rapide
Relâchez pour revenir en lecture de CD ordinaire.
Lecture aléatoire Lecture en reprise
Lecture par balayage
LJ ‘J
■P
S’allume
HBB.
Clignote '
Lecture par
balayage
V
I
I
r~
Lecture en
reprise
J L.
►
►
Plage
Disque
Plage
Disque
' Appuyez sur [5] (Balayage).
Les 10 premières secondes de chaque plage
des disques sont lues dans l’ordre.
' Appuyez sur [5] (Balayage) de nouveau pour
annuler.
• Appuyez sur [5] (Balayage) et maintenez
enfoncé pendant plus de 2 secondes.
Les 10 premières secondes de la première plage de
tous les disques du magasin sont lues dans l’ordre.
• Appuyez sur [5] (Balayage) et maintenez
enfoncé de nouveau pour annuler.
• Appuyez sur [6] (Reprise).
Répétition de la plage en cours de lecture.
• Appuyez sur [6] (Reprise) de nouveau pour
annuler.
• Appuyez sur [6] (Reprise) et maintenez
enfoncé pendant plus de 2 secondes.
Répétition du disque en cours de lecture.
• Appuyez sur [6] (Reprise) et maintenez
enfoncé de nouveau pour annuler.
CQ-DP171U
\
Clignote
Clignote
S’allume
Clignote
55
Page 56

Guide d’installation
A
MISE EN GARDE
Les informations relatives à rinstallation sont prévues uniquement pour des
techniciens qualifiés. Elles ne contiennent pas de mises en garde ou d’avis
quant aux dangers potentiels pouvant être encourus lors de rinstallation de cet
appareil.
Toute tentative d’installation de cet appareil dans un véhicule motorisé par une
personne sans qualification peut causer des dommages au système électrique et
des blessures corporelles graves ou mortelles.
□ Quincaillerie pour rinstallation
№
©
®
®
Description Schéma
Collier de montage
Écrou hexagonal (5 mmo)
Plaque de fixation arrière 1
Vis taraudeuse (5 mmo x
16 mm)
Boulon d’assemblage
(5 mmo)
Qté
1
1
1
1
Précaution: Cet appareil ne peut fonctionner que sur
une batterie de 12 V c.c. avec négatif à la masse. Afin
de prévenir tout risque de dommage, ne tentez pas de
l’utiliser avec une autre source d’alimentation.
Avant de procéder à l’installation, vérifiez le contenu de
remballage.
• Carte de garantie... Veuillez la remplir sans tarder.
• Liste des centres de service Panasonic agréés...
Conservez cette liste pour consultation ultérieure si l’ap
pareil doit être réparé.
• Quincaillerie pour l’installation... Nécessaire pour
l’installation dans le tableau de bord.
Connecteur d’alimentation 1
Étui de rangement du
panneau avant amovible
Plaque de garniture
□ Généralités
Cet appareil doit être instalié par un technicien quaiifié.
Toutefois, si vous prévoyez rinstaller vous-même, la
première étape consistera au choix de remplacement. Les
instructions données dans ce manuel expliqueront les
étapes suivantes.
(Voir la « MISE EN GARDE » ci-dessus.)
• Identifiez et étiquetez les fils du véhicule.
• Raccordez les fils du véhicule à ceux du connecteur
d’alimentation.
• Installez l’appareil dans le tableau de bord.
• Vérifiez le fonctionnement de l’appareil.
En cas de difficulté, n’hésitez pas à consulter un installa
teur professionnel.
56
CQ-DP171U
□ Outils requis
Un tournevis, une pile AA de 1,5 V et les accessoires sui
1
1
vants;
Vérificateur de
continuité 12 V c.c.
Ruban
d'électricien
Pinces à
sectionner
a Dégagernent requis dans le
tauieâu de bord
Épaisseur
Minimum: 4,75 mm (3/iepo) .
Maximum: 5,56 mm (?/32 po) \
J 53 mm (23/32 po)
(75/32 po)
Page 57

□ Identifiez tous tes fits et câbtes
U première étape consiste à identifier tous les fils du véhicule
nécessaires au raccordement de l’appareil.
Après avoir identifié chacun des fils en cause, nous vous
suggérons de les étiqueter à l’aide de ruban-cache et d’un
marqueur indélébile. Cela évitera tout risque de confusion lors
des raccordements par la suite.
Remarque: Ne raccordez pas le connecteur d’alimentation à
l’appareil avant d’avoir effectué tous les raccordements. S’il n’y
a pas de capuchons de plastique sur les fils de raccordement
stéréo, isolez tous les fils exposés avec du ruban d’électricien
jusqu’à ce que vous soyez prêt pour les utiliser. Identifiez les
fils dans l'ordre suivant.
Câble d’alimentation
Si une radio est déjà en place ou si le câblage à cet effet est déjà
installé:
Coupez les fils du connecteur un à la fois (en prenant soin de
laisser les fils les plus longs possible) de manière à permettre le
raccordement individuel des fils.
fusible de la batterie, généralement indiqué par BAT.
Haut-parleurs
Identifiez les fils de haut-parleur. Il y en a deux par hautparleur; ils sont généralement identifiés par un code de couleur.
Pour faciliter l’Identification des fis de haut-parleur et leur hautparleur respectif, vérifiez-les avec une pile AA de 1,5 V de la
manière suivante.
Tenez un fil contre l’un des pôles de la pile et touchez l’autre
pôle avec un autre fil. S'il s’agit d'un fil de haut-parleur, un son
mécanique est entendu à travers un haut-parleur.
Sinon, poursuivez l’essai avec d’autres fils jusqu’à ce que les
fils de haut-parleurs aient été identifiés. Au moment de leur
étiquetage, indiquez à quel haut-parleur ils doivent être
raccordés,
Moteur de l’antenne
Si le véhicle est doté d’une antenne électrique, identifiez le fil du
moteur de l’antenne en reliant un fil du vérificateur de continuité
au fil de la batterie et en touchant un à un les fils exposés du
connecteur sectionné. Le fil recherché est celui qui fait tourner
le moteur de l’antenne (un bruit de rotation sera audible).
Fil d’antenne
Le fil de l’antenne est un fi! noir épais avec un capuchon
métallique à son extrémité.
Mettez la clé de contact du véhicule à la position « ACC »,
puis reliez un des fils du vérificateur de continuité au cadre de
l’automobile.
Reliez l’autre fil du vérificateur de continuité à chacun des fils
exposés du connecteur sectionné. Touchez un fil à la fois
jusqu’à ce que le fil faisant allumer l’ampoule du vérificateur ait
été repéré.
Ensuite, mettez la clé de contact à la position « OFF » puis à
la position « ON ». Si l’ampoule s’éteint et se rallume, le fil
identifié est le fil d’alimentation du véhicule.
Si 1e câblage pour l’installation d'une radio n'est pas déjà en
place:
Ouvrez le couvercle du bloc-fusibles et trouvez le réceptacle du
fusible de la radio (RADÍO), des accessoires (ACC) ou du
contact (IGN).
Fil de ta batterie
Si l’appareil est doté d’un fil jaune, il sera nécessaire de repérer
le câble de la batterie: sinon, omettez cette étape. (Le fil jaune
de la batterie assure l’alimentation continue du circuit de
l’horloge, de la mémoire, etc.)
Si une radio ou son câblage est déjà en place:
Mettez la clé de contact à la position « OFF » et assurez-vous
que les phares sont éteints. Repérez le fil de la batterie. Pour
ce faire, reliez un fil du vérificateur de continuité au cadre du
véhicule et vérifiez les autres fils exposés du connecteur sec
tionné au moyen de l’autre fil du vérificateur.
En l’absence de câblage pour l’installation d’une radio:
Enlevez le couvercle du bloc-fusibles et repérez le réceptacle du
□ Raccordez tous les fils
Après avoir identifié tous les câblages et fils, il est possible
d’effecteur les raccordements. Le schéma de câblage (^ page
62) représente les raccordements corrects et le code couleur
des fils.
Il est fortement recommandé de vérifier le fonctionnement de
i’appareil avant de procéder à l’installation finale.
Il est possible de mettre l’appareil sur le plancher du véhicle
pour faire des raccordements provisoires et de vérifier le
fonctionnement de l’appareil. Recouvrez tous les fils exposés
avec du ruban d’électricien.
Important: Raccordez le fil d’alimentation rouge en
dernier lieu seulement, après avoir fait tous les autres
raccordements et isolé tous les fils.
_______________________________________________________________>
Conducteur à la masse
Raccordez le conducteur à la masse noir du connecteur
d'alimentation au cadre métallique du véhicule.
Haut-parleurs
Raccordez les fils des haut-parleurs. Pour le raccordement,
consultez le schéma de câblage (^ page 62). Respectez
rigoureusement les indications du schéma pour ne pas risquer
d’endommager les haut-parleurs et l’appareil.
Les haut-parleurs doivent avoir une puissance admissible
minimale de 45 W. Si un amplificateur externe est utilisé,
assurez-vous que la puissance admissible nominale des
haut-parleurs correspond à la puissance maximale de l’ampli,
afin de ne pas endommager les haut-parleurs.
CQ-DP171U
57
Page 58

Guide d’installation
(suite)
L’impédance des haut-parleurs doit être de 4 à 8 n, ce qui est le
niveau standard. L’utilisation de haut-paiieurs d’une impédance
plus faible ou plus élevée affectera la qualité du rendu sonore et
risque d’endommager tant l’appareil que tes haut-parleurs euxmêmes.
Moteur de l’antenne
Reliez le fil du moteur de l’anyenne du véhicule au fil d’amenée
bleu du relais.
(Ne confondez pas le fil d’antenne avec le fil à rayures
bleue/blanche pour un amplificateur de puissance.)
Batterie
Raccordez le fil de batterie jaune du véhicule au fil approprié de
la radio ou au réceptacle du fusible de la batterie du blocfusibles.
Antenne
Raccordez l’antenne en branchant le fil d’antenne dans le
réceptacle de l’antenne.
Équipement auxiliaire
Raccordez tout appareil auxiliaire, tel qu'un ampli,
conformément aux instructions fournies avec l’appareil. Bien
éloignez d’au moins 30 cm (12 po) les fils de haut-
parleur/ampli de l’antenne et du fil/rallonge d’antenne.
Reportez-vous au manuel d’utilisation afférent à l’appareil
installé.
Alimentation
Raccordez le fil d’alimentation rouge au fil de radio ou au portefusibles approprié du bloc-fusibles.
Si l’appareil fonctionne normalement avec tous les raccorde
ments ainsi effectués, débranchez les fils et procédez à l'instal
lation finale.
□ Installation finale
□ Préparatifs
• Pour vous protéger contre les blessures, nous vous
recommandons vivement de porter des gants.
• Lorsque vous pliez les languettes de fixation du col
lier de montage avec un tournevis, veillez à ne pas
vous blesser les mains et les doigts.
• Déconnectez le câble à la borne négative © de la
batterie (voir Précaution ci-dessous).
• L’appareil doit être installé en position horizontale avec
son extrémité avant inclinée vers le haut à un angle
commode, mais ne dépassant pas 30“.
30“ ou moins
Précaution: Si votre véhicule est doté d’un ordinateur
de navigation ou de conduite, ne déconnectez pas les
bornes de la batterie car tous les réglages des
paramètres en mémoire seraient perdus. Au lieu de
cela, procédez avec les plus grandes précautions lors
de l’installation de l’appareil pour éviter les courtscircuits.
Installation sur le tableau de bord
Baie d’installation
Raccordement des fils
Raccordez tous les fils en prenant soin qu’ils soient tous bien
isolés et solidement raccordés. Enroulez toute longueur exsessive de fil et fixez-la en place avec une bande adhésive. Installez
l’appareil dans son collier de montage.
Félicitations! Après avoir effectué quelques vérifications finales,
vous serez prêt à utiliser votre nouvel appareil stéréophonique
d’automobile.
□ Vérifications finales
1. Assurez-vous que tous les fils sont bien raccordés et
isolés.
2. Assurez-vous que l’appareil est solidement en place dans
son collier de montage.
3. Faites démarrer la voiture et vérifiez le fonctionnement de
l’appareil.
En cas de difficulté, consultez un installateur professionnel.
58
CQ-DP171U
53 mm
(23/32 po)
182 mm -
(75/32 po)
Cet appareil peut être installé sur tout tableau de bord qui
possède une baie telle que celle représentée ci-dessus. Le
tableau de bord doit avoir une épaisseur de 4,75 mm
(3/16 po) à 5,56 mm (?/32 po) pour pouvoir supporter l’ap
pareil.
Page 59

□ Procédures d’installation
Effectuez d’abord les connexions électriques, puis vérifiez
si elles sont correctes. page 62)
Insérez le collier de montage (D dans le tableau
de bord et pliez les languettes de fixation avec
un tournevis.
Assurez-vous que le levier de blocage (■^•) est à fleur
du collier de montage ® (sans saillie en dehors).
Levier de blocage i'^')
(D Connecteur d’alimentation—
® Boulon d’assemblage
Fixez l’arrière de l’appareil.
Après avoir posé le boulon d’assemblage ® et le con
necteur d’alimentation ®, fixez l’arrière de l’appareil à la
carrosserie du véhicule par la méthode (a) ou (b)
représentée ci-dessous.
Insérez la^aque de
garniture
Après l’installation, ^
O
rebranchez la borne négative
O de la batterie.
(a) Utilisation de la plaque de fixation arrière (1)
Cloison pareieu de la voiture
®Vis taraudeuse
3 mni0
(b) utilisation du coussinet en caoutchouc
Levier de blocage (-i:-]
d).
(en option) Support de fixation arrière
caoutchouc
{déjà en place)
P Écrou hexagonal
\(D Plaque de fixation arrière
©Boulon d'assemblage
Collier de montage
® Collier de montage
CQ-DP171U
® Boulon d'assemblage
59
Page 60

Guide d’installation
Pour retirer l’appareil
Coupez l’alimentation de l’appareil.
Retirez le panneau avant amovible.
O Appuyez sur [^] {touche de dégage
ment). Le parineau avant amovile peut
alors être dégagé.
Touche de
dégagement
O Tirez du côté droit de l’appareil.
Retirez le plaque de garniture (D avec un
tournevis.
e
Dégagez l'appareil tout en repoussant le
levier de verrouillage en utilisant un
e
tournevis.
(suite)
60
Retirez l’appareil des deux mains.
O
CQ-DP171U
Page 61

Système antivol
Cet appareil est équipé d’un panneau avant amovible. Le retrait de ce panneau rend la radio totalement inopérante.
Mettre le panneau avant
amovible dans l’étui
O Coupez l’alimentation de l’appareil.
O
Retirez le panneau avant amovible. page 60)
O Appuyez doucement sur le bouton de l’étui et ouvrez le
couvercle. Placez le panneau avant dans l'étui et apportezle avec vous lorsque vous quittez le véhicule.
Installer le panneau avant amovible
O Faites glisser le côté gauche du panneau en place.
O Appuyez sur le côté droit du panneau jusqu’à ce qu’un
déclic se fasse entendre.
Précautions:
• Ce panneau avant n’est pas étanche à l’eau. Ne l’exposez ni à l'eau ni à une humidité excessive.
• Ne retirez pas le panneau avant en conduisant.
• Ne placez pas le panneau avant sur le tableau de bord ou dans un endroit susceptible de devenir excessivement
chaud.
• Ne touchez pas aux contacts du panneau avant amovible ni à ceux de l’appareil principal étant donné que cela peut
entraîner der mauvais contacts électriques par la suite.
• Si des saletés ou de la poussière se sont déposées sur les contacts, nettoyez-les soigneusement avec un chiffon sec
et propre.
CQ-DP171U
61
Page 62

Branchements électriques
Précautions:
• Cet appareil ne peut fonctionner que sur une batterie de 12 V ex. avec négatif à la masse.
• Toujours suivre te schéma de câblage ci-dessous pour éviter d’endommager t’appareil.
• Avant de raccorder un câble, dénuder son extrémité d’environ 5 mm (1/4 po).
• N’insérez pas le connecteur d’alimentation dans t’unité avant que l’instaliation électrique ne soit achevée.
• Toujours isolez les câbles exposés afin d’eviter un court-circuit possible avec le châssis de la voiture. Rassemblez
tous les câbles et vérifier que les bornes de câbles ne touchent à aucune pièce métallique.
• N’oubliez pas que si votre voiture est équipée d’un ordinateur de bord ou d’un ordinateur de radionavigation, les
données sauvegardées en mémoire risquent d’être effacées lorsque les bornes de batterie seront débranchées.
Accessoire utilisé pour le câblage
N*
®
Description
Connecteur d’alimentation
Qté
1
□ Schéma de
câblage
Connecteur de sortie
préamplificateur
(Arrière)
Antenne
(D Connecteur
d'alimentation
Fil de mise à la i ■
terre
Vers une partie métallique propre et
exposée du châssis du véhicule.
Fil de relais de contrôle du moteur de l'antenne
(Vers l'antenne CZI-
électrique) (500 mA max.) (Bleu)
Ce cable n'est pas destiné à une utilisation avec une antenne
électrique actionnée par commutateur.
Remarque: L’antenne électrique s'étend automatiquement sur
toute sa longueur lorsque le mode radio est sélectionné.
Connecteur d'entrée de
changeur CD
Connecteur de commande
de changeur CD
Ce fil de connexion permet le raccordement à un
amplificateur de puissance.
Remarque: Ce fil sert à contrôler le niveau de
sortie d’un éventuel amplificateur externe.
L’alimentation de l'amplificateur de puissance ser
activée lors de la mise sous tension de cet appart
Fil de batterie
Vers ta batterie du véhiculE
continu + 12 V c.c.
Fil d'alimentation ACC
Vers l'alimentation ACC,
+ 12 V c.c.
Fildecommandederamplificate
externe
(500 mA max.)
62
(Blanc rayé
noir)
Haut-parleur
gauche (avant)
(Blanc) (Gris rayé
noir)
CQ-DP171U
Haut-parleur
droit (avant)
(Vert) (Violet rayé Violet)
Haut-parleur
gauche (arrière)
noir)
Haut-parleur
droit (arrière)
Page 63

□ Système évolutif
Exemple de combinaison
Changeur CD {CX-DP88U) (en option)
Remarque: Pour effectuer le câblage, lire attentivement la notice d'instructions des appareils à raccorder.
CQ-DP171U
63
Page 64

En cas de difficulté
Etapes préliminaires
Vérifiez les indications mentionnées dans tes tableaux ci-dessous et
prenez les dispositions indiquées.
Lorsqu’on soupçonne que quelque chose est défectueux
Coupez immédiatement l’alimentation.
Débranchez le connecteur d’alimentation et vérifiez que l’appareil ne
dégage ni de ta fumée ni de la chaleur avant d’exiger un dépannage.
N'essayez jamais de faire vous-même des réparations parce que cela
peut s’avérer dangereux.
Guide de dépannage
■ Problèmes communs
C
Panne
Absence d’alimentation
3
C
La clé de contact de la voiture n’est pas tournée en position ON.
Tournez la clé de contact de la voiture sur ACC ou sur ON.
Les câbles ne sont pas branchés correctement.
^ Branchez les câbles correctement.
Le câble de la batterie n’est pas branché correctement.
Branchez le câble de la batterie à la borne délivrant le courant.
Le câble de l’accessoire n'est pas branché correctement.
Branchez le câble de l’accessoire à ta source ACC de la voiture.
Origine/Disposition à prendre
Précautions:
• N’utilisez pas l’appareil s’il ne fonctionne pas
normalement ou si quelque chose est
défectuéux.
• Le fait d’utiliser l’appareil dans des condi
tions anormales, par exempte lorsqu’aucun
son n’est délivré, s'il dégage de la fumée ou
une odeur anormale, peut favoriser un
amorçage électrique ou une électrocution.
Arrêtez-!e immédiatement et demandez au
magasin qui vous l’a vendu de le vérifier.
J
V
_____
Absence de son
V
________________________
Parasites
Le son est entendu
mais un message du
mode démonstration
est affiché.
64
____
y
►
_____
J
l>
CQ-DP171U
Le fil de mise à la masse n’est pas branché correctement.
^ Branchez le fil de mise la masse à une partie métallique de la voiture.
Fusible détruit.
^ Demandez l'assistance du magasin qui vous a vendu l’appareil ou du centre de service
après-vente le plus proche (voir la fiche fournie) pour que le fusible soit remplacé.
La fonction de coupure du son est activée.
^ Désactivez la fonction de coupure du son.
Les câbles ne sont pas branchés correctement.
^ Branchez les câbles correctement.
Condensation (buée)
^ Attendez un moment avant d’utiliser l’appareil.
Un téléphone cellulaire est utilisé près de l’appareil.
^ Maintenez le téléphone cellulaire loin de l’appareil.
Le mode de démonstration est ACTIVÉ.
^ Appuyez sur [DISP] (Affichage) pour annuler te mode de démonstration.
Page 65

Radio
c
Panne
D C
Origine/Disposition à prendre
La station émettrice est trop éloignée ou les signaux reçus sont trop faibles.
Sélectionnez d’autres stations dont le niveau des signaux est plus élevé.
3
Les programmes FM
stéréo et mono sont
fortement parasités.
Remise à zéro de station
présyntonisée.
CD/MP3
C
Il y a un disque dans
le logement de CD
mais ii n'y a pas de
son ou le disque est
automatiquement
éjecté.
Panne
[►
D C
Le fil de commande du relais de l’antenne n’est pas branché correctement.
^ Si la voiture est équipée d’une antenne électrique, connectez le fil de
commande du relais de l’antenne au fil d’antenne déjà en place.
L’antenne radio n’est pas assez allongée.
^ L’allonger complètement.
Le câble de la batterie n’est pas branché correctement.
Branchez le câble de la batterie à la borne délivrant le courant.
Origine/Disposition à prendre
Le disque est à l'envers.
3
^ Placez le disque en l'orientant dans le bon sens, étiquette vers le haut.
Le disque est sale.
^ Nettoyez le disque conformément aux instructions de la section « À pro
pos des disques (CD, CD-ROM, CD-R, CD-RW) ».
Un disque comportant des données autres que de type CD-DA ou MP3 a été mis en place.
^ Seuls les disques avec données de type CD-DA ou MP3 doivent être utilisés.
L’appareil ne peut pas reproduire avec succès un CD-R/RW qui a été fait par la
combinaison d’un logiciel d’écriture, d’un graveur de CD (lecteur de CD-R/RW) et
d’un CD s’ils sont incompatibles l’un avec l’autre. Référez-vous aux modes d’emploi
des dispositifs concernés en ce qui concerne les détails.
Le son saute et la
qualité du son est
basse (à cause du
bruit par exemple).
Des passages du son
sont sautés en
présence de vibra
tions.
Le disque n'est pas
éjecté.
>
[►
Le disque est sale.
^ Nettoyez le disque conformément aux instructions de la section « À pro
pos des disques (CO, CD-ROM, CD-R, CD-RW) ».
^ L'appareil ne peut pas reproduire avec succès un CO-R^W qui a été fait par la
combinaison d’un logiciel d’écriture, d’un graveur de CD (lecteur de CD-R/RW) et
d’un CD s’ils sont incompatibles l’un avec l’autre. Référez-vous aux modes d’emploi
des dispositifs concernés en ce qui concerne les détails.
L’angle d’installation de l’appareil est supérieur à 30°.
Faites en sorte que l’angle d’installation de l’appareil ne dépasse pas 30’
Installation instable.
^ Installez fermement l’appareil en utilisant les accessoires d’installation
tout en se référant à la section traitant des travaux d’installation.
• Le disque est défectueux.
• Panne d’ordre mécapique.
^ Appuyez sur [À] (Ejection). Si cela ne permet toujours pas de rétablir le
fonctionnement normal de l’appareil, demandez l’assistance du magasin
qui vous a vendu l’appareil, ou du centre de service après-vente le plus
proche pour qu'il effectue tes réparations nécessaires.
CQ-DP171U
65
Page 66

En cas de difficulté (suite)
CD
MP3
c
Panne
D C
La disque ne comporte pas de (ictiiers du type pouvant être pris en charge par l’appareil.
^ Mettez en place un (tisque comportant des types de fichiers pris en charge par l’appareil.
Pour la liste des types de fichiers compatibles, voir « À propos de MP3 » .(# page 70).
Origine/Disposition à prendre
3
Le délai de lancement
de la lecture est trop
long.
Enregistrement de
piètre qualité,
sautiiiement
La lecture des fichiers
ne procède pas dans
i’ordre vouiu.
Le nom du
dossier/fichier n'est
pas correctement
affiché.
L
Le fichier MP3 perd l’extension de nom de fichier « .mp3 ».
^Ajoutez l’extension « .mp3 » à chaque nom de fichier MP3.
L'arborescence des dossiers et des fichiers enregistrés sur le disque comporte trop de niveaux.
^ Parce que la vérification des fichiers demande plus de temps dans un tel cas, il est recommandé de
ne pas enregistrer sur le disque des dossiers ou des fichiers inutiles d’un format autre que MP3.
(S’il existe de nombreux niveaux hiérarchiques de fîchieis et de dossiers, 150 secondes au maxi
mum peuvent être requises pour commencer la lecture.)
B^La qualité de l’enregistrement varie selon le logiciel d’encodage utilisé ainsi que des
paramètres fixés comme, par exemple, le débit binaire. Réglez le débit binaire à une
valeur comprise dans la gamme indiquée dans le tableau des spécificatiDns.(^ page 73).
Il est recommandé de fixer le débit binaire à « 128 kbits/s ou plus » et à « Fixe ».
O
►
>
L'écriture rapide a été exécutée lorsque les données MP3 ont été gravées sur le
disque.
^Réduisez la vitesse d'écriture au minimum possible.
Les dossiers ou les fichiers n’ont pas été enregistrés dans l’ordre voulu pour la lecture.
^Certains logiciels d’écriture permettent de fixer l’ordre d’enregistrement en ajoutant
au nom du fichier un préfixe ordinal entre « 01 » et « 99 », etc. Pour plus de
détails, reportez-vous au manuel de l’utilisateur afférent au logiciel utilisé.
Le disque ne comporte pas un système de fichier pouvant être pris en charge par l’appareil.
^ Mettez en place un disque comportant des types de fichiers pris en charge par l’appareil.
Pour la liste des types de fichiers compatibles, voir « À propos de MP3 » (# page 7D).
411 est possible qu’il y ait un problème avec le logiciel d’écriture ou le graveur de CD (ou
lecteur de CD-R/RW). Pour plus de détails, reportez-vous au manuel de l’utilisateur
afférent au logiciel utilisé.
66
CQ-DP171U
Page 67

La durée de lecture du
fichier n'est pas
correctement affichée.
Réglage du son
C
Aucun son n’est délivré
par le haut-parleur
gauche, droit, avant ou
arrière.
Panne
3 C
[►
La lecture du fichier a été faite en avance rapide ou en marche arrière rapide, ou
le contact à clé de la voiture a été coupé en cours de la lecture.
^La lecture d’un autre fichier corrigera l’affichage de la durée de lecture.
Un fichier MP3 à débit binaire variable a été lu.
^La durée d’un lecture d’un fichier MP3 à débit binaire variable est parfois
incorrecte.
Origine/Dîsposition à prendre
La balance gauche et droite ou la balance avant et arrière est coupée d’un côté.
^Régler le mode balance/équilibreur de la façon appropriée.
“ >
Les câbles ne sont pas branchés correctement.
■ éBranchez les fils correctement.
3
Le son délivré à gauche et
à droite est inversé pen
dant l’écoute d’un pro
gramme stéréo.
■ Télécommande
( Panne )
Les commandes par
touche ne sont pas
validées.
[►
Les fils du haut-parleur droit sont raccordés au haut-parleur gauche et les fils
du haut-parleur gauche sont raccordés au haut-parleur droit.
^Branchez les fils de haut-parleur aux haut-parleurs correspondants.
C
Les polarités (+) (-) de la pile sont inversées.
Origine/Dîsposition à prendre
■ ^Insérez la pile correctement.
La pile utilisée n’est pas adaptée.
^Vérifiez la pile.
La pile est épuisée.
^Remplacez la pile.
La télécommande n’est pas orientée correctement.
^Dirigez la télécommande vers le capteur (REMOTE) du panneau.
3
CQ-DP171U
67
Page 68

En cas de difficulté
Messages d’erreur
■ CD/MP3
Affichage
• Le disque est sale ou est à l’envers.
U disque est automatiquement éjecté
—♦ HORS TENSION
Le disque est automatiquement éjecté
—♦ HORS TENSION
[►
• Un disque comportant des données autres que de type CO-DA ou MP3 a été mis en place.
^ Vérifiez le disque.
Le disque est rayé.
Ne fonctionne pas pour une raison quelconque.
^ Arrêtez le moteur de la voiture (mettre ACC en arrêt) et détachez le fusible du
Il n’y a aucun fichier MP3 dans le dossier spécifié durant la sélection
directe du dossier MP3.
^ Sélectionnez un autre dossier qui contient des fichiers MP3.
Pour une raison ou une autre (fichier enregistré dans un format non pris en charge par le
lecteur, format de compression incompatible, format des données, extension du nom du
fichier, données endommagées, etc.), le lecteur ne peut lire le fichier demandé.
^ Sélectionnez un fichier que le lecteur peut lire. Vérifiez le type des données
enregistrées sur le disque. Créez un nouveau disque si nécessaire.
(suite)
Origine/Disposition à prendre
Vérifiez le disque.
fil jaune pendant 1 minute. Remettez ensuite le fusible en place.
Changeur CD
Affichage
Le disque est sale ou est à l’envers.
N“ de disque
, Passage automatinue au disque suivant.
Un CD de type autre que CD-OA a été mis en place.
» Vérifiez le disque.
Le disque est rayé.
^ Vérifiez le disque.
Ne fonctionne pas pour une raison quelconque.
^ Si cela ne permet toujours pas de rétablir le fonctionnement normal de l’appareil,
demandez l’assistance du magasin qui vous a vendu l’appareil, ou du centre de ser
vice après-vente le plus proche pour qu’il effectue les réparations nécessaires.
L’affichage est maintenu si vous ne pouvez pas mettre l'appareil hors tension.
Il n’y a pas de disque dans le changeur (magasin).
Insérez des disques dans le changeur (magasin).
Remarques:
• Avec certains changeurs, l’appareil est mis hors marche suite à l’affichage d’un message d’erreur E3.
• Pour plus de détails, reportez-vous au manuel de l’utilisateur afférent au changeur utilisé.
68
CQ-DP171U
Origine/Disposition à prendre
Page 69

Entretien
Votre appareil a été conçu et fabriqué de manière à n’exiger qu’un minimum d’entretien. Utilisez un chiffon doux et sec pour
te nettoyage quotidien de l’extérieur. N’utilisez jamais de benzine, de diluant ou autres solvants.
Service après-vente de l’appareil
Si les suggestions indiquées dans les tableaux de dépannage ne permettent pas de résoudre le problème, il est recom
mandé de confier l’appareil à un centre de service après-vente Panasonic agréé. Confiez toute réparation de l’appareil
uniquement à un technicien qualifié.
Remplacement d’un fusible
Utilisez les fusibles de l’ampérage spécifié (15 A). L’utilisation de substituts ou de fusibles différents dont l’ampérage est
supérieur ou le raccordement direct de l’appareil sans passer par l’intermédiaire d’un fusible risque de provoquer un
incendie, voire d’endommager sérieusement l’appareil stéréo.
Si le fusible de remplacement saute, renseignez-vous auprès du centre de service après-vente Panasonic agréé le
plus proche.
CQ-DP171U
69
Page 70

À propos de MP3
Ce lecteur permet la lecture de fichiers MP3 enregistrés sur CD-ROM,
CD-R (Inscriptlbles) et CD-RW (réinscriptibles).
Qu’est-ce que le MP3 ?
MP3, abréviation de MPEG Audio Layer 3, est une norme de compression de données vidéo numériques adoptés pour les
CD vidéo et autres supports similaires. Il constitue l’un des formats de compression couverts par les normes de compres
sion audio numérique du MPEG {Motion Picture Experts Group). Il réduit le nombre d’octets que comprend une pièce
musicale sans affecter la qualité sonore en éliminant tes grandes ondes sonores sans la gamme de fréquences inaudible à
l’oreille humaine. Cette compression permet de réduire d’un facteur 10 la taille des fichiers que peut contenir un CD. Ainsi,
il est possible d’enregistrer le contenu de 10 CO audio sur un seul CD-R ou CD-RW. (Ces chiffres sont basés sur des
données enregistrées sur un CD-R ou CD-RW de 650 Mo à un débit binaire fixe de 128 kbits/s et à fréquence d’échantillon
nage de 44,1 kHz.)
Poi nt s im po rt an ts à n e pa s ou b li er l or s de l ’e n re gi st re me nt d ’u n di sq ue M P3
I Conversion (encodage) de données audio en un fichier MP3
• Il est recommandé de fixer le débit binaire à « 128 kbits/s ou plus » et à « Fixe ».
• Un disque MPEG-2 ne peut pas être reproduit avec un débit binaire de 8 kbits/s et une fréquence d’échantillonnage de
16 kHz.
• Si le débit binaire variable est choisi, la durée de lecture du fichier pourrait ne pas être correctement indiquée.
• La qualité sonore à la lecture varie selon le logiciel d’encodage et le débit binaire. Pour plus de détails, reportez-vous
au manuel de l’utilisateur afférent au logiciel utilisé.
I Enregistrement de fichiers MP3 sur un CO-R/RW
• N’enregistrez pas de fichiers autres que MP3 ou des dossiers inutiles sur un disque. Si trop de dossiers ou des
fichiers autres que MP3 sont enregistrés sur un disque, il peut y avoir un long délai avant le lancement de la lecture et
il pourrait être difficile d’utiliser l’avance et la marche arrière rapides.
• Utilisez le système de fichiers ISO 9660. (L’extension des systèmes de fichiers ISO 9660 est inclue.) (^ page
71). Le système de fichiers APPLE HFS n’est pas soutenu. Si un fichier n’est pas conforme au système de fichiers
ISO 9660, i! ne peut pas être reproduit normalement ou les noms de fichiers ou de dossiers ne peuvent pas être
affichés correctement.
• Assurez-vous d’ajouter l’extension « .mp3 » à chacun des noms de fichier. Un fichier sans extension ou avec un
extension incorrecte ne pourra être lu.
• Bien qu’un enregistrement multisession soit soutenué, l’utilisation d’un seul jet est recommandée. Assurez-vous
de clore la session après avoir terminé l’enregistrement sur un disque.
• Les entêtes ID3 ne sont pas prises en charge. Les informations sur la pièces musicale sont stockées mais ne sont
pas affichées.
• Le logiciel d’écriture par paquets n’est pas soutenu.
• Aucune fonction de liste de lecture n’est soutenue. Enregistrez les dossiers et les fichiers dans leur ordre de lecture
voulu. Certains logiciels d'écriture permettent de fixer l’ordre d’enregistrement en ajoutant au nom du fichier un
préfixe ordinal entre « 01 » et « 99 », etc. Pour plus de détails, reportez-vous au manuel de l’utilisateur afférent
au logiciel utilisé.
Remarque: Il est possible que vous rencontriez des problèmes pour la lecture de fichiers MP3 ou l’affichage des
informations afférentes aux fichiers MP3 enregistrés avec certains logiciels d'écriture ou des graveurs de CD (lecteurs
de CD-R/RW).
Mise en garde: Ne tentez jamais de lire un fichier qui n’est pas au format MP3 en changeant l’extension de son nom de
fichier à « .mp3 ». Le bruit ainsi engendré peut endommager non seulement les haut-parleurs mais aussi votre ouïe.
Remarque: Le logiciel de codage MP3 et le logiciel d’écriture ne sont pas fournis à ce modèle.
70
CQ-DP171U
Page 71

Nombre maximum de fichiers/dossiers
• Nombre maximum d’arbres 8
• Nombre maximum de fichiers/dossiers : 254 (fichiers + dossiers. Le dossier racine n'est pas compris.)
Remarque: Si le nombre total des fichiers et dossiers dépasse 254, la lecture ne peut pas s’effectuer avec succès.
Systèmes de fichiers et noms de fichiers pris en charge
Système de fichiers soutenu
ISO 9660 Niveau 1
Nommez les fichiers et dossiers conformément aux normes de chaque
système de fichiers.
Noms de dossiers et de fichiers visualisables
Référez-vous au mode d’emploi du logiciel d’écriture en ce qui
concerne les détails.
ISO 9660 Niveau 2
Joliet*
Romeo
Extension Apple à ISO 9660
• Ce lecteur peut afficher les noms de fichiers de 31 caractères ASCII au
maximum en mode défilement.
*15 lettres au maximum y compris les parties cachées peuvent être
affichées selon le système Joliet. Suivant les normes de ce système,
“à”, "ç”, etc. peuvent être affichés. Cependant cet appareil ne peut
pas afficher ces lettres.
• Les noms de fichiers saisis en lettres minuscules seront affichés en
majuscules.
• L’appareil ne reconnaît que le jeu de caractères ASCII (voir le glossaire
suivant). Les caractères chinois, français accentués et espagnols
accentués seront remplacés par un astérisque (»).
Glossaire
ISO 9660
Normes internationales les plus courantes pour le for
mat logique pour les fichiers et les répertoires.
APPLE HFS
Système de fichiers utilisé par le système d’exploitation
de Machintosh pour organiser les données. (Non
soutenue)
Entête ID3
Fonction qui permet d’écrire des informations textuelles
(titre, nom de l’interprète, titre de l’album, date, etc.) sur
le disque. (Non soutenue)
Ecriture par paquets
Méthode d’écriture de données sur un support CD par
petits incréments. (Non soutenue)
Multisession
Une méthode d’ajouter des données par accroissements
sur un CD-R ou CD-RW à l’occasion de plus d’une ses
sion d’enregistrement.
D’un seul jet (Disc-at-Once)
Méthode d'écriture de données dans un support d’un
seul coup et aucune écriture n'aura plus lieu par la suite.
Jeu de caractères ASCII
Jeu de caractères ASCII constitué par A à 2, a à z,
chiffres de 0 à 9, et les symboles suivants: (espace)! ” #
$ % & ’()* + ,- ./ :;< = >?@[\]^_'{lî~
(Cependant, les caractères bas de casse sont
représentés comme ceux haut de casse dans cet
appareil.)
Copyright
Il est interdit par la loi sur le copyright de copier, de distribuer et de livrer les matériaux protégés par le copyright tels que
les musiques sans approbation du détenteur du copyright sauf pour le divertissement personnel.
CQ-DP171U
71
Page 72

Entretien
Entretien de l’appareil
□ Nettoyage de l’appareil
utilisez un chiffon sec et souple pour essuyer l’appareil.
A propos des disques (CD, CD-ROM, CD-R, CD-RW)
N’utilisez pas de CD sur lesquels une étiquette
autre que celle indiqués ci-contre.
Comment saisir un disque
• Ne touchez pas la surface inférieure du disque.
• Veillez à ne pas rayer la surface du disque.
• Ne pliez pas le disque.
• Remettez le disque dans son boîtier après utilisation.
N'utilisez pas de disques de forme irrégulière.
Ne laissez pas les disques dans les endroits
suivants:
• En plein soleil
• Près des appareils de chauffage de la voiture
• Dans des endroits sales, poussiéreux et humides
• Sur les sièges ou le tableau de bord
Nettoyage des disques
Se servir d’un chiffon sec et souple pour nettoyer en partant
du centre du disque.
Précautions à prendre avec tes disques neufs
Le bord d’un disque neuf risque de présenter des imperfec
tions autant à la périphérie que sur le bord du trou intérieur.
Ceci peut être à l’origine d’un fonctionnement anormal.
Retirez les imperfections avec un crayon, etc.
N’apposez ni sceau, ni étiquette aux disques.
Si vous devez écrire sur un CD, n’appuyez pas sur
l’instrument d’écriture.
□ Précautions à prendre lors du nettoyage
N’utilisez jamais de solvants tels que de la benzine ou du
diluant: ils risquent d’endommager la surface de l’appareil.
n COMPACT
doi®
DIGITAL AUDIO
Face étiquettée
N’utilisez pas de disques de forme irrégulière.
<Procédé correcb
Bord présentant
des imperfections
<Procédé incorrect
Disques CD-R et CD-RW
• Il se peut que vous rencontriez des difficultés à la lecture de certains disques CD-R/RW enregistrés sur des graveurs CD
{lecteurs CD-R/RW) en raison des paramètres à l’enregistrement ou encore de la présence de saleté, d’empreintes, de
rayures, etc., sur la surface du disque.
• Les disques CD-R/RW résistent moins bien aux températures élevées et à l’humidité que les CD ordinaires. Aussi, est-il
recommandé de ne pas les laisser dans une voiture pendant de longues périodes.
• L’appareil ne peut pas reproduire avec succès un CD-R/RW qui a été fait par la combinaison d'un logiciel d’écriture, d’un
graveur {lecteur de CD-R/RW) et d'un CD s’ils sont incompatibles l’un avec l’autre.
• La lecture d’un CD-R/RW n’est possible que si la session d’enregistrement a été close.
• Ce lecteur ne peut lire un CD-R/RW contenant des données autres que celles au format CD-DA ou MP3 {CD vidéo, etc.).
• Respecter les consignes concernant la manipulations des CD-R/RW.
72
CQ-DP171U
Page 73

Données techniques
□ Généralités
Alimentation:
Consommation du courant:
Puissance de sortie maximale:
Gamme de réglage de tonalité:
Graves:
Aigus:
Impédance de haut-parleur:
Tension de sortie de préampli:
Impédance de sortie:
Dimensions (L x H x P):
Poids:
□ Radio FM stéréo
Gamme de fréquence:
Sensibilité utile:
Sensibilité au seuil de 50 dB:
Réponse en fréquence:
Sélectivité d’alternance:
Séparation stéréo:
Réjection d’image:
Réiection de la R!.:
Rapport signai/bruit:
12 V c.c. (11 V-16 V), Tension d’essai 14,4 V, Masse négative
Moins de 2,2 A (Lecteur CD en fonction; 0,5 W x 4 canaux)
45 W x 4 canaux à 1 kHz, volume au maximum
±12 dB à 100 Hz
+12 dB à 10 kHz
4-8 n
2,0 V (Lecteur CD en fonction; 1 kHz, 0 dB)
200 iï
178 X 50 X 150 mm (7 pox l^s/ie po x 5^/s po)
1,5 kg (31b,5oz)
87,9 MHz-107,9 MHz
11,0 dBf. (1,25 pV,75 ii)
15,2dBf. (1,6pV,75 n)
30 Hz-15 kHz (±3dB)
75 dB
42 dB (1 kHz)
75 dB
100 dB
70 dB
a Radio AM
Gamme de fréquence:
Sensibilité utilisable:
□ Lecteur CD
Fréquence d’échantillonnage:
Convertisseur numérique-analogique:
Système de correction d’erreur:
Type de lecteur;
Source lumineuse:
Longueur d’onde:
Réponse en fréquence:
Rapport signal/bruit:
Distorsion harmonique totale;
Pleurage et scintillement:
Séparation des canaux:
Décodage MP3:
Débit binaire:
Fréquence d’échantillonnage:
Les caractéristiques techniques ci-dessus sont conformes aux normes ElA.
Remarque : Aux fins d’améliorations technologiques, les caractéristiques et la conception sont susceptibles de
modification sans préavis.
530 kHz-1 710 kHz
28dB/pV (25 pV, S/B 20 dB)
Sur-échantillonnage de 32 fois
Système MASH-1 bit/4 DAC
Algorithme super décodeur Panasonic
3 faisceaux
Laser semi-conducteur
780 nm
20 Hz-20 kHz (±1 dB)
96 dB
0,01 % (1 kHz)
En-dessous de la limite mesurable
75 dB
MPEG 1 Audio Layer 3 / MPEG 2 Audio Layer 3
(MPEG 1 Audio Layer 3) 32 kbits/s - 256 kbits/s, débit binaire variable
(MPEG 2 Audio Layer 3) 16 kbits/s -160 kbits/s, débit binaire variable
(MPEG 1 Audio Layer 3) 32 kHz, 44,1 kHz, 48 kHz
(MPEG 2 Audio Layer 3) 22,05 kHz, 24 kHz
CQ-DP171U
73
Page 74

Preparación del controlador remoto
Sustitución de ia piia
O Quíte el sujetador de la pila.
Tire del sujeotador hacia la posición B a la vez que
empuja la posición A en la dirección indicada por la
fecha.
O Instale la pila en el sujetador.
Inserte una pila nueva de manera correcta, con el lado
{+) hacia arriba, como se muestra en la ilustración.
O Inserte el sujetador de la pila.
Empuje el sujetador de la pila a la posición original.
Notas sobre la pila
La pila vieja debe ser quitada y desechada inmediatamente.
Información sobre la pila:
• Tipo de la pila: Pila de litio Panasonic (CR2025) (suministrada)
• Vida de la pila: 6 meses bajo condiciones normales de uso (a temperatura normal)
Precaución: El uso incorrecto de la pila puede causar el sobrecalentamiento, explosión o ignición, resultando en
heridas o incendios. La fuga del electrólito de la pila puede causar daños en el aparato.
• No desmonte ni ponga en cortocircuito la pila. No tire la pila al fuego.
• Para evitar el riesgo de accidente, mantenga las pilas fuera del alcance de los niños.
• Respete las normas vigentes para tirar las pilas.
Sujetador de la pila
Lado trasero del
controlador remoto Pila de litio
(suministrada)
Posición A
Posición в
Nomenclatura de los controles principales
Los botones del controlador remoto funcionan del mismo modo que los mandos del aparato principal que aparecen en la
página de referencia.
Dirija el controlador remoto hacia el sensor de la unidad principal (REMOTE).
Selección/menú
(■♦ páginas 76, 80, 83)
—Control de volumen
("4 páginas 75, 76)
-Entrada del número de
písta/carpeta/disco
(^ páginas 81,84, 86)
Selección y búsqueda de
sintonía/pista/archivo
(«♦- páginas 77, 78, 80, 81,83, 85, 87)
Visualización
(<♦ páginas 75,77,80,81,83,84,86)
-[0] a [9]
(^ páginas 79,81, 84, 86)
Alimentación/fuente-
páginas 75, 78, 80, 82, 86)
Silenciamiento----------------
(«Ф página 75)
Reproducción aleatoria
Exploración
Repetición
(^ páginas 81, 85, 87)
Selección de carpeta/disco
(^ páginas 84, 86)
Band a/ajuste/pa usa
(^ páginas 78, 79, 81,84, 86)
74
CQ-DP171U
1 Г..
i:
POWER UENU.
NUMBER
RANO SCAN REP
PanawnKî
Саг Aufcjfrrz-
Page 75

Controles de alimentación у sonido
Alimentación------------------------------------------
Gire la llave de encendido hasta que se encienda el indicador del accesorio.
Alimentación encendida: Presione [SOURCE] (PWR).
Alimentación apagada: Presione de nuevo [SOURCE] (PWR) y manténgalo
presionado.
Nota: Cuando se utiliza esta unidad por primera vez, aparece un mensaje de
demostración en el visualizador.
Para cancelar este mensaje, presione [OISP].
r
Circuito contra subida brusca de volumen:
Volumen
[AVOL] : Subir
[V/VOL] : Bajar
Para un ajuste rápido, mantenga presionado.
Nivel de volumen (0 a 40)
Cuando el aparato se apaga y se vuelve a
encender, el volumen sube lentamente al
nivel anterior.
El circuito contra subida brusca de volumen
no funcionará cuando el nivel de volumen se
haya ajustado por debajo de la posición 20
en la pantalla.
Sensor de control remoto
Silenciamiento
Presione [MUTE] para silenciar por completo el sonido. P®'*® I® unidad principal)
Para anular el silenciamiento, presione [MUTE] otra vez.
Selección de modo
Presione [SOURCE] para cambiar el modo.
---------
Sonoridad
(Sólo para la uni
Presione [LOUD] para mejorar los tonos de
Presione [LOUD] |
bajos y agudos en volumen bajo o intermedio.
Para anularla, presione [LOUD] otra vez.
Reproductor de CD
Sintonizador
página 78)
{Cuando hay un CD en el reproductor)
(^página 80)^
Reproductor MP3
(Cuando se ha insertado un disco con
archivos MP3 grabados) página 82)
Control del cambiador de CO
(Cuando se ha conectado un cambiador
de discos CO y el cartucho está en el
cambiador) (^ página 86)
CQ-DP171U
75
Page 76

Controles de alimentación y sonido (commuación)
Modo audio (Bajo$/Agudos/Balance izquierdo-derecho/Balance delantero-trasero)
(D Presione [SEL] para seleccionar el modo audio.
Modo normal
t
4
Balance delantero-trasero
Nota: Si no se realiza ninguna operación durante más de 5 segundos en el modo de audio (2 segundos en el modo
de volumen), la pantalla vuelve al modo normal.
(D Presione [AVOL] o [ VVOL] para cambiar cada nivel.
"
Volumen Bajos
Balance izquierdo-derecho
Agudos
Bajos:
76
Escala ajustable: -12 a +12 en pasos de 3 dB
Agudos:
Escala ajustable: -12 a +12 en pasos de 3 dB
Balance izquierdo-derecho:
R (altavoz derecho) o L (altavoz izquierdo)
Escala ajustable: 1 a 15 en 1 paso Posición central de balance izquierdo-derecho
Balance delantero-trasero:
F (altavoz delantero) o R (altavoz trasero)
Escala ajustable: 1 a 15 en 1 paso Posición central del balance
delantero-trasero
CQ-DP171U
Page 77

Reloj: Conceptos generales
El reloj utiliza el sistema de 12 horas.
Hora inicial ^
O Presione [DISP] {Visualización).
Horas
O Mantenga presionado [DISP] (Visualización).
O Presione [<JTlfJNE] o [>TUNE],
Minutos
o Presione [DISPJ (Visualización).
0 Presione [<TUNE] q [>TUNE],
0 Presione [DISP] (Visualización).
Nota: Para cambiar los números rápidamente, mantenga
presionado [<TUNE] o [>TUNE].
T( J i u, I
Jj U U ‘
R
fl/í I „ jQ
r M * = U CrU
rr AX » Li;'» ('»“Il
r » t ( rj'U Lf
^ II ^
t
O' I5
{Visualización de reloj.)
(La hora parpadea.)
(Ajuste de la hora)
(Los minutos parpadean.
(Ajuste de los minutos.)
(Fin)
Visualización de reloj
Presione [DISP] (Visualización) para pasar a la visual
ización del reloj.
En modo sintonizador:
Emisora Visualización de reloj
En el modo de cambiador de CD:
Reproducción del cambiador de CD Visualización de reloj
Cuando el aparato está apagado:
Visualización apagada
Nota: Consulte cada una de las descripciones de la visual
ización del reloj para los modos de reproductor de CD y de
reproductor MP3 (=^ páginas 80 y 83)
Visualización de reloj
Reajuste de hora
Mantenga presionado [DISP] (Visualización) durante más
de 2 segundos para activar el modo de ajuste de hora para
reajustar la hora.
A continuación, repita los pasos 0 a 0.
I
Nota: El reloj no puede ajustarse durante el desplazamien
to del nombre del pista/disco/carpeta/archivo.
CQ-DP171U
77
Page 78

Radio: Conceptos generales
Selección de modo
Presione [SOURCE] para cambiar al modo de radio.
' M fl i t, n
* !_l ' X L rr
---------------
EI indicador de FM estéreo se enciende durante la
recepción de una difusión estereofónica de FM.
Banda
ó
Presione [BAND] para cambiar de banda.
-A Sintonización manuai
[>TUNE] : Frecuencia mayor
[<TUNE] : Frecuencia menor
Sintonización por
búsqueda
Mantenga presionado...
[>TUNE]: Frecuencia mayor
t<TUNE]; Frecuencia menor
La sintonización se interrumpirá automática
mente cuando se reciban las señales de la
siguiente emisora.
78
CQ-DP171U
Page 79

Ajuste de una emisora predeterminada
Pueden guardarse hasta 6 emisoras en cada una de las memorias de
emisora predeterminada FM1, FM2, FM3 y AM.
0 Banda
Presione [BAÑO] para seleccionar la banda deseada,
página 78)
0 Preajuste automático de emisora
Mantenga presionado [BAND] (АРМ: memoria de preajuste
automático) durante más de 2 segundos.
• Se guardarán automáticamente las 6 emisoras disponibles
más potentes, en la memoria debajo de los botones de
preajuste [l] a [6].
• Una vez ajustadas, las emisoras preajustadas son explo
radas secuencialmente durante 5 segundos cada una.
Precaución: Para garantizar la seguridad,
no se debe intentar nunca preajustar las
emisoras mientras se conduce.
Número de preajuste
Nota: Las emisoras preajustadas manualmente en la banda
seleccionada se borrarán.
Preajuste manual de emisoras
O Utilice la sintonización manual o por búsqueda para encon
trar una emisora. («♦ página 78)
O Mantenga presionado uno de los botones de preajuste [1]
a [6] hasta que la pantalla parpadee una vez.
Sintonización de una emisora preajustada
Presione el correspondiente botón de preajuste [1] a [6]
para sintonizar una emisora preajustada.
Nota: Para cambiar el preajuste de memoria, repita el
procedimiento anterior.
CQ-DP171U
79
Page 80

Reproductor de CD: Conceptos generales
Precauciones:
• En esta unidad sólo pueden utilizarse discos CO de 5 pulgadas (12 cm), y
discos CO-R y CD-RW con datos grabados CD-DA.
• No utilice discos con formas irregulares.
• No utilice discos que tengan pegatinas o etiquetas adheridas.
±. (Expulsar)
Lado de la
etiqueta
Inserción V reproducción del disco
La visualización cambia como se muestra a continuación. La reproducción se inicia automáticamente cuando el
aparato ha reconocido el disco insertado como un disco CD musical norma. (Cuando se inserta un disco CD-R o CD-RW que tienen
datos con formato CD-DA igual que los discos CD musicales normales, el aparato los reconoce como discos CD musicales normales.)
("Ti é n nTi
LjL' !_UriX'
(Disco insertado) (Lectura de los datos)
Notas:
• No introduzca un disco cuando esté encendido este indicador, (Vea más abajo)
• Si se inserta un disco cuando la alimentación está desconectada, se conecta la alimentación.
• El aparato puede tardar un poco en leer los datos hasta que se inicia la reproducción porque tiene que discriminar entre los formatos CD-DA y MP3.
(Se reconoce como un CD musical
normal y se inicia la reproducción)
Parada y explusión del disco
Presione [A] (Expulsar) para interrumpir la reproducción del CO y expulsar el disco.
Nota: Cuando se expulsa el disco mientras el aparato está en el modo de reproducción de CD, se desconecta la alimentación.
I
Selección del modo (Cuando hay un CD en el reproductor)
Presione [SOURCE] para cambiar al modo de reproducción de CD e iniciar la reproducción.
---------------
^
Cambio de la Número de pista
visualización
Presione [DISP] (Visualización) para'^'^-
cambiar ia visualización de la forma siguiente.
i-
Ti . T T T t
X*" ' X '
T T T
Tir
‘ I X ' L
É~TÍ ij. íi
X* ü' <
J
Notas:
• La visualización muestra la información del título sólo
cuando se ha insertado un disco que tiene información de
texto de CD. (Para un título pueden visualizarse hasta 62
letras con el desplazamiento.)
• "NO TITLE” se visualiza cuando no hay información.
80
CQ-DP171U
------
Número de pisía/Tiempo de
reproducción de pista
(predeterminado)
Título del disco
(desplazamiento)
Título de la pista
(desplazamiento)
Visualización del
reloj
Tiempo de reproducion de pista
Se enciende cuando se realiza la
carga de un disco.
Parpadea en el modo de reproducción de CD
Desplazamiento del título del disco/pista
O Presione y mantenga presionado [SEL] durante más de 2
segundos.
O Presione [>TUNE] o [<TUNE] para activarlo (ON) y
desactivarlo (OFF) por turnos.
t, I iJ 1 i ( « <
J !_ rr i_ !_( I w
Desplazamiento uniforme El desplazamiento se detiene después
^ de un ciclo de desplazamiento.
Notas:
• Si no se presiona ninguna tecla durante más de 10 segun
dos, la visualización vuelve al modo normal.
• Presione [DISP] (Visualización) para volver al modo normal.
• Presione y mantenga presionado [DISP] (Visualización) durante
más de 2 segundos para ver otro ciclo de desplazamiento cuando
el desplazamiento esté desactivado.
• No mire el desplazamiento de la visualización mientras esté
conduciendo.
T CT r t j M 1 r
( _? !_ rr !_i í_
ÎJ L
Page 81

Nota: Si un mismo disco contiene datos CD-DA y MP3, sólo se reproducirán los datos de uno de los dos formatos. Por
ejemplo, si el disco empieza por datos CD-DA, se reconocerá como un disco CD musical norma!, y si empieza por datos
de un archivo MP3, se reconocerá como un disco MP3.
Selección de pistas
[►►TRACK] : Avance a la pista siguiente.
["♦^TRACK] : Retroceso a inicio de pista actual.
Retroceso a la pista anterior. (Presione
dos veces.)
Pausa
Presione [BAND] para activar la pausa.
Presione [BAÑO] de nuevo para cancelar la pausa.
HHíJS
Reproducción aleatoria
Búsqueda de pistas
Mantenga presionado...
[►►TRACK] : Avance ràpido
[-♦^TRACK] ; Inversión rápida
Suelte el botón para reanudar la reproducción normal del CD.
Repetición de reproducción
Reproducción por exploración
Selección directa de pistas (Sólo para el controlador remoto)
- Presione [#] (Número).
O©©
. i
i
©®©
y
Reproducción
aleatoria
V _
Reproducción por
exploración
Repetición de
reproducción
L.
Ejemplo: Número de pista 12
O Presione [1] [2].
Presione [BAND] (Ajuste).
e
La pista correspondiente
empezará a reproducirse.
• Presione [4] (Aleatoria).
Todas las pistas se reproducen en orden
aleatorio.
• Presione de nuevo [4] (Aleatoria) para
►
►
cancelarla.
• Presione [5] (Exploración).
Se reproducen por orden secuencial los
primeros 10 segundos de cada pista del disco.
• Presione de nuevo [5] (Exploración) para
cancelarla.
• Presione [6] (Repetición).
Se repite la pista actual.
• Presione de nuevo [6] (Repetición) para
cancelarla.
Notas:
• Presione [#] (Número) en el controlador remoto para
volver a introducir el número.
• Si no se presiona ninguna tecla durante más de 10
segundos, la visualización vuelve al modo normal.
• Presione [DISP] (Visualización) para volver al modo
normal.
Encendido
Parpadea
Encendido
CQ-DP171U
81
Page 82

Reproductor MP3: Conceptos generales
Precauciones:
• En esta unidad sólo pueden utilizarse discos CD de 5 pulgadas (12 cm) (CD-ROM, CD-R y CD-RW) con datos grabados MP3.
• No utilice discos con formas irregulares.
• No utilice discos que tengan pegatinas o etiquetas adheridas.
• No intente nunca reproducir un archivo que no sea del formato MP3 cambiando la extensión de su nombre de
archivo a ".mp3 No sólo produciría ruido por los altavoces y daños en los mismos, sino que también podría
causarle daños en los oídos.
No todos los discos CD que contienen archivos MP3 se
reproducen con normalidad. Para más detalles, consulte
las “Notas sobre MP3’’ página 102).
Idiotas:
• Cuando se inserta un disco CD que contiene archivos MP3 (CD-ROM,
CD-R, CD-RW) en la ranura, e! reproductor se establecerá automática
mente en el modo MP3 y comenzará a reproducir los archivos MP3
del disco.
• En estas instrucciones un directorio se interpreta como una carpeta.
Inserción y reproducción del disco
La visualización cambia como se muestra abajo. La reproducción comienza automáticamente cuando se ha reconocido un
archivo MP3 en el disco.
I к » П I j Tj
Notas:
• No introduzca un disco cuando esté encendido este indicador. {Vea más abajo)
• Si se inserta un disco cuando la alimentación está desconectada, se conecta la alimentación.
• El aparato puede tardar un poco en leer los datos hasta que se inicia la reproducción porque tiene que discriminar entre
los formatos CD-DA y MP3.
• Si graba demasiadas carpetas y archivos MP3 en un disco, es posible que tarde un poco en comenzar la reproducción.
u rlj.(
(Disco insertado) (Lectura de (os datos)
* •
-►
f/ЕПм! fJh
(Los datos MP3 se reconocen
y se inicia la reproducción)
(Expulsar)
Lado de la
etiqueta
Parada y explusión del disco
Presione [A] (Expulsar) para detener la reproducción de MP3 y expulsar el disco.
Nota; Cuando se expulsa el disco mientras el aparato está en el modo de reproducción de MP3, se desconecta la alimentación.
Selección del modo (Cuando se ha insertado un disco con archivos MP3 grabados)
Presione [SOURCE] para cambiar al modo de reproducción MP3 y comenzará la reproducción.
Número de carpeta 5g enciende cuando se realiza la carga de un disco.
Nota: Si gira el interruptor de encendido del automóvil a la posición OFF durante la reproducción, puede producirse cierto
retardo entre el tiempo de reproducción del archivo visualizado y ei tiempo de reproducción real. Adicionalmente, es posi
ble que la reproducción comience desde el principio de la canción cuando se emplea VBR (velocidad de transmisión vari
able) de un archivo MP3 en la misma situación.
82
CQ-DP171U
Número de archivo Parpadea en el modo de reproducción MP3.
Page 83

Nota: Si un mismo disco contiene datos CD-DA y MP3, sólo se reproducirán los datos de uno de los dos formatos. Por
ejemplo, si el disco empieza por datos CD-DA, se reconocerá como un disco CD musical normal, y si empieza por datos de
un archivo MP3, se reconocerá como un disco MP3.
Cambio de la visualización
Presione [DISP] (Visualización) para cambiar la visualización de la
forma siguiente.
Número de carpeta/número
de archivo MP3
(predeterminado)
Tiempo de reproducción
del archivo
Nombre de la carpeta MP3
(desplazamiento)
Nombre del archivo MP3
(desplazamiento)
Visualización del reloj
Notas;
• Cuando se reproduce un archivo MP3 con VBR
(velocidad de transmisión variable), es posible que el
tiempo de reproducción del archivo no sea correcto.
Cuando se termine la reproducción del archivo MP3
con VBR, se contará de nuevo.
• La ejecución de un archivo en el modo de avance
rápido o inversión rápida puede causar un error en el
tiempo de reproducción del archivo. La visualización
del tiempo de reproducción del archivo volverá a la
normalidad cuando reproduzca otro archivo.
• “NO TITLE" se visualiza cuando no hay información.
• Pueden visualizarse nombres de carpeta y de archivo
MP3.
El número de caracteres que puede visualizarse varía
según el sistema de archivos. Para más detalles, con
sulte el apartado “Sistemas de archivos y nombres de
archivo compatibles” de la sección “Notas sobre
MP3” («^ página 103).
• La extensión del nombre de archivo “.mp3” no se
visualiza.
• Cuando se reproduce un archivo del Árbol 1, el
nombre de carpeta se visualizará con la palabra
“ROOT" (carpeta raíz),
• Los caracteres que no pueden visualizarse en el
reproductor se muestran con un asterisco.
Desplazamiento del nombre de carpeta/archivo
O Presione y mantenga presionado [SEL] durante más de
2 segundos.
■r П 1“ П n J J
I _1 !_ ГГ L.Í t_ !_
O Presione [>TUNE] o [<TUNE] para activarlo (ON) y
desactivarlo (OFF) por turnos.
bif^L IJhh
Desplazamiento uniforme El desplazamiento se detiene después
de un ciclo de desplazamiento.
Notas:
• Si no se presiona ninguna tecla durante más
de 10 segundos, la visualización vuelve al
modo normal.
• Presione [DISP] (Visualización) para volver
al modo normal.
• Presione y mantenga presionado [DISP]
(Visualización) durante más de 2 segundos
para ver otro ciclo de desplazamiento cuando,
el desplazamiento esté desactivado.
• No mire el desplazamiento de la visualización
mientras esté conduciendo.
CQ-DP171U
83
Page 84

Reproductor МРЗ: Conceptos generales (continuación)
Orden
de selección de carpetas/orden de reproducción de
archivos MP3 (ejemplo)
Carpeta raíz
{directorio raíz)
-a
Selección de carpetas
En el orden de
Selección de archivos
En el orden de
-Ш
-Od
l__
-a
■Щ®
a
-a
Arbol 1 Arbol 2
Pausa
Presione [BAND] para activar la pausa.
Presione [BAND] de nuevo para cancelar la pausa.
1—
Arbol 3 Arbol 4
Notas:
• Esta unidad cuenta e! número de carpetas inde
pendientemente de la presencia o ausencia de
archivos MP3. {Ejemplo: No hay archivos MP3
en la carpeta raiz que se muestra en la ilus
tración de la derecha, pero recibe el número
“00Г. En realidad, no hay ningún archivo MP3
para reproducirse. Por lo tanto, se selecciona
automáticamente la carpeta siguiente.)
• Hay veces que el software de grabación cambia
el orden de las carpetas y archivos en un disco,
por lo que es posible que el orden sea distinto
®
del que usted haya especificado. Para más
detalles, consulte el manual de instrucciones de
su software de grabación.
• Si graba demasiadas carpetas o archivos que no
son MP3 en un disco, es posible que tarde un
poco en comenzar la reproducción y que se
experimenten dificultades durante el avance
rápido y la inversión rápida.
• El orden de reproducción varía según el repro
ductor aunque se inserte el mismo disco.
Ш
Arbol 5
®
a - a
0 -
Ш
Selección de carpetas MP3
[A] í Carpeta siguiente
[VI: Carpeta anterior
Notas:
• Si la carpeta seleccionada no contiene ningún archivo MP3, se repro
ducirá el archivo MP3 más cercano en el orden de reproducción.
• Si el número total de archivos y carpetas es de más de 254, es posi
ble que no pueda realizarse con éxito la reproducción.
PiSlltASOnIc CO^Pí7W CÛ fí£C£nv/f WITH со^яо^ 4SWx4
!
L
—
-lAw
ялтхш scM
i,
Selección directa de carpetas MP3 (Sólo para el controlador remoto)
84
^ KWEP MENU
©00
©0©
SCA" 52.
©©©
©© ©'
000
Ejemplo: Número de carpeta 5
Presione [#] (Número).
0
Presione [5].
Presione [BAND] (Ajuste).
0
La carpeta correspondiente
empezarás reproducirse.
CQ-DP171U
Notas:
• Presione [#] (Número) en el controlador remoto para
volver a introducir el número.
• Si no se presiona ninguna tecla durante más de 10
segundos, la visualización vuelve al modo normal.
• Presione [DISP] (Visualización) para volver al modo
normal.
• Si no hay ningún archivo en la carpeta especificada,
aparece el mensaje de error “E4”. Seleccione otra carpe
ta que tenga archivos MP3.
Page 85

Selección de archivos MP3
[►►TRACK] : Avance al siguiente archivo MP3.
[-♦<TRACK] ; Retroceso al principio del archivo MP3 actual.
Retroceso al archivo MP3 anterior.
(Presione dos veces.
Reproducción aleatoria Repetición de reproducción
• Presione [4] (Aleatoria).
Todos los archivos MP3 de todas las carpetas
se reproducen en orden aleatorio.
• Presione de nuevo [4] (Aieatoria) para
cancelarla.
• Presione y mantenga presionado [4]
(Aleatoria) durante mas de 2 segundos,
todos los archivos MP3 disponibles en la car
peta actual se reproducen en orden aleatorio.
• Presione y mantenga presionado de nuevo [4]
(Aleatoria) para cancelarla.
• Presione [5] (Exploración).
Se reproducen por orden secuencial los
primeros 10 segundos de cada archivo MP3
de todas las carpetas.
• Presione de nuevo [5] (Exploración) para
cancelarla.
Presione y mantenga presionado [5]
(Exploración) durante más de 2 segundos.
Desde la carpeta siguiente, se reproducen por
orden secuencial los primeros 1Ó segundos
del primer archivo MP3 de cada carpeta.
Presione y mantenga presionado [5]
(Expioración) para cancelarla.
• Presione [6] (Repetición).
• Presione de nuevo [6] (Repetición) para 1
cancelarla.
• Presione y mantenga presionado [6]
(Repetición) durante más de 2 segundos. .
Se repite la carpeta actual.
• Presione y mantenga presionado [6]
(Repetición) para cancelarla.
(Reproducción |V
aleatoria y
^
____
r *
iReproducción
! por
i
exploración ¡
...
...........
^
r
Л
Repetición de< [V
reproducción ,
4.._
_______
J
Archivo
Carpeta
Archivo
Carpeta
Ч-.
(
-----------------------------
Archivo
Carpeta
V
________________
Búsqueda dentro del archivo MP3
Mantenga presionado...
[►►TRACK] : Avance rápido
[■♦^RACK] : Inversión rápida
Suelte para reanudar la reproducción normal de MP3.
Reproducción por exploración
Parpadea
Parpadea
Se repite el archivo MP3 actual. j
U ' < 1 * 1 ti 1 i ^ ■
Encendido
Parpadea
» 1 n ( n M ■
!_( tJ < и U _? ■
Г
Encendido
i < M .j M M i Ш
= REP .■
Parpadea 1
CQ-DP171U
85
Page 86

Control del
Las tupiciones del cambiador de CD están diseñadas para el cambiador de CD Panasonic opcional.
Conecte el cambiador de CD e inserte un cartucho.
Precaución: No utilice CDs de formas irregulares.
Notas:
• Si se inserta un cartucho cuando la alimentación está desconectada, se conecta la alimentación.
• Al expulsar el cartucho cuando la unidad está en el modo del cambiador de CD, se desconecta la alimentación.
• El cambiador de CD no puede reproducir discos CD-ROM, CD-R ni CD-RW. Emplee el cambiador de CD para escuchar
discos CD musicales normales exclusivamente.
• No puede visualizar el texto de los discos CD.
discos CD
Selección del modo
(Cuando S8 ha conectado un cambiador de discos CD y el cartucho está en el cambiador)
Presione [SOURCE] para cambiar al modo del cambiador CD e iniciar la reproducción.
CHfíwG Ef?
Tiempo de reprodución de pista
Selección de discos
[Al
: Disco siguiente
[VI
: Disco anterior
Selección directa del disco (Sólo para el controlador remoto)
Ejemplo: Número de carpeta 5
86
Presione [#] (Número).
O Presione [5].
Presione [BAND] (Ajuste).
El disco correspondiente
©
empezará a reproducirse.
CQ-DP171U
Notas:
• Presione [#] (Número) en el controlador remoto para
volver a introducir el número.
• Si no se presiona ninguna tecla durante más de 10
segundos, la visualización vuelve al modo normal.
• Presione [DISP] (Visualización) para volver al modo
normal.
Page 87

Selección de pistas
[►►TRACK] : Avance a la pista siguiente.
[-♦^TRACK] : Retroceso a inicio de pista actual.
Retroceso a pista anterior. (Presione
dos veces.)
• Presione [4] (Aleatoria).
Todas las pistas disponibles de todos los
Pista
Reproduccióní [W
aleatoria [r
Disco
J V-
discos del cargador se reproducen en orden
aleatorio.
• Presione de nuevo [4] (Aleatoria) para
cancelarla.
• Presione y mantenga presionado [4]
(Aleatoria) durante mas de 2 segundos,
todas las pistas disponibles del disco actual
se reproducen en orden aleatorio.
• Presione y mantenga presionado de nuevo
[4] (Aleatoria) para cancelarla.
Búsqueda de pistas
Mantenga presionado...
[►►TRACK] ; Avance rápido
[-♦^TRACK] : Inversión rápida
Suelte el botón para reanudar la reproducción normal del CD.
Reproducción aleatoria Repetición de reproducción
Reproducción por exploración
n 'J P
Encendido
Parpadea
Reproducción
por
exploración
Repetición de
reproducción
J
►
►
Pista
Disco
—
Pista
\
________
• Presione [5] (Exploración).
Los 10 primeros segundos de cada pista de
los discos se reproducen en orden.
• Presione de nuevo [5] (Exploración) para
cancelarla.
Presione y mantenga presionado [5]
(Exploración) durante más de 2 segundos.
Los 10 primeros segundos de la primera
pista de todos los discos del cargador se
reproducen en orden.
Presione y mantenga presionado [5]
(Exploración) para cancelarla.
• Presione [6] (Repetición).
Repetición de la pista actual.
• Presione de nuevo [6] (Repetición) para i
cancelarla.
• Presione y mantenga presionado [6]
(Repetición) durante más de 2 segundos. ,
Repetición del disco actual. |Disco
• Presione y mantenga presionado [6]
(Repetición) para cancelarla. Parpadea 1
I
\
Parpadea
/
Parpadea
* ' -J * < / n / ■
J U
Encendido
ili
r» f 1 Q ,
CQ-DP171U
1
C ü ' ■
HEF
r
■
RIF
■
87
Page 88

Guía de instalación
A
ADVERTENCIA
La información de instalación va dirigida a instaladores con experiencia, no a
individuos sin conocimientos técnicos. Ésta no contiene advertencias ni precau
ciones relacionadas con los posibles peligros causados al intentar instalar este
producto.
Cualquier intento de instalar este producto en un vehículo motorizado por parte
de una persona que no sea un instalador cualificado podrá causar daños en el
sistema eléctrico y producir lesiones graves o incluso la muerte.
□ Accesorios suministrados
N.“ ítem
Collar de montaje
Tuerca hexagonal
(D
(5 mmo)
Tira de soporte trasero
(3)
Tornillo autorroscante
(5 mmo X16 mm)
Perno de montaje
(D
(5 mmo)
Diagrama Cantidad
%
1
1
1
1
1
Precaución: Esta unidad sólo funcionará con un sis
tema de batería de automóvil de 12 V CC con negativo
a masa. No intente utilizarla con ningún otro sistema
porque podrían causarse graves averías.
Antes de iniciar la instalación, compruebe que tiene todos
los artículos incluidos en el embalaje de su unidad,
• Tarjeta de garantía... Rellénela rápidamente.
• Guía de centros de servicio Panasonic... Guárdela
para utilizarla como referencia en el futuro en caso de
que la unidad nececite ser reparada.
• Accesorios suministrados... Son necesarios para
realizar la instalación en el salpicadero.
□ Herramientas necesarias
Conector de alimentación 1
Estuche de la placa frontal
extraíble
Placa de adorno
CD
1
1
Necesitará un destornillador, una pila de 1,5 V tamaño AA
y lo siguiente:
Bombilla de prueba Cinta aislante para Alicates de corte
de 12 V CC usos eléctricos lateral
□ Perspectiva general
Este equipo deberá ser instalado por un profesional. Sin
embargo, si usted piensa instalar esta unidad usted
mismo, lo primero que tiene que decidir es dónde va a
instalarla. Las instrucciones de estas páginas le guiarán
para llevar a cabo los pasos restantes:
(Consulte “ADVERTENCIA” que se explica más arriba.)
• Idfentifique y ponga etiquetas en los cables del
vehículo.
• Conecte los alambres del vehículo con los conductores
del conector de alimentación.
• Instale la unidad en el salpicadero.
• Compruebe el funcionamiento de la unidad.
Si encuentra problemas, consulte a su instalador profe
sional más cercano.
88
CQ-DP171U
□ Especificaciones dei saipicadero
Grosor
Mínimo de 3/i6” (4,75 mm)
- Máximo de %2 "
7 5/32” (182 mm)
mi ii; 1
’’ (5,56 mm) \
2 3/32” (53 mm)
Page 89

□ Identificación de todos los conductores
El primer paso de la instalación consiste en identificar
todos los cables del vehículo que usted utilizará cuando
conecte su sistema de sonido.
Según identifica cada cable, le sugerimos que ponga en él
una etiqueta usando cinta adhesiva y un marcador de tinta
permanente. Esto evitará confusiones cuando tenga que
hacer las conexiones más adelante.
Nota: No conecte el conector de alimentación a la unidad
estéreo hasta después de haber terminado todas las
conexiones. Si no hay tapas de plástico en los cables de
conexión estéreo, aísle los conductores expuestos con
cinta para usos eléctricos hasta que esté listo para utilizar
los. Identifique los conductores en el orden siguiente.
Conductor de alimentación
Si su vehículo tiene una radio o tiene cables preparados
para ella;
Corte los conductores del conector uno a uno (dejando los
conductores tan largos como sea posible) para poder tra
bajar con conductores individuales.
«
Ponga la llave de contacto en la posición de accesorios y
conecte a masa, en el chasis, uno de los conductores de la
bombilla de prueba.
Toque con el otro conductor de la bombilla de prueba cada
uno de los cables expuestos de la clavija de conexión de
radio cortada.Toque los cables uno a uno hasta que
encuentre el que produce ei encendido de la bombilla.
Ahora ponga la llave de contacto en OFF y luego en ON.
Si la bombilla también se apaga y se enciende, esa salida
será el conductor de alimentación del vehículo.
Si su vehículo no está cableado para una unidad de audio:
Vaya al bloque de fusibles y encuentre el puerto de fusible
para radio (RADIO), accesorios (ACO) o encendido (IGN).
Conductor de batería
Si su unidad estéreo tiene un conductor amarillo, necesi
tará localizar el conductor de la batería del automóvil. De
lo contrario, podrá ignorar este precedimiento. (El con
ductor amarillo de la batería proporciona una alimentación
continua para el funcionamiento del reloj, mantener el
contenido de la memoria y otras funciones.)
Si su vehículo tiene una radio o tiene cables preparados
para ella;
Con el sistema de encendido y los faros apagados, identi
fique el conductor de la batería del automóvil conectando
a masa, al chasis, uno de los conductores de la bombilla
de prueba y comprobando los cables expuestos restantes
procedentes de la clavija de conexión de radio cortada.
Si su vehículo no está cableado para una unidad de audio:
Vaya al bloque de fusibles y encuentre el puerto de fusible
para la batería, generalmente marcado BAT.
Altavoces
Identifique los conductores de los altavoces. 'Habrá dos
conductores para cada altavoz que, generalmente, estarán
condificados con colores.
Una forma práctica de identificar los conductores de los
altavoces y los altavoces a los que deben conectarse con
siste en probar los conductores con una pila de 1,5 V
tamaño AA de la forma siguiente:
Sujete un conductor contra un polo de la pila y toque con
el otro conductor el otro polo. Si tiene en su mano un
conductor de altavoz oirá un sonido de rascado proce
dente de un altavoz.
Si no, siga probando diferentes combinaciones de con
ductores hasta que encuentre todos los conductores de
altavoces. Cuando ponga las etiquetas, incluya también la
ubicación de los altavoces para cada uno de ellos.
Motor de antena
Si su vehículo está equipado con una antena automática,
identifique el conductor de la antena del vehículo
conectando un conductor del provador de bombilla ai con
ductor de la batería del vehículo y tocando uno a uno los
cables expuestos restantes procedentes de la clavija de
conexión de radio cortada. Cuando toque el cable correc
to oirá que se activa el motor de la antena.
Antena
El conductor de la antena es un cable grueso y negro con
una clavija metálica en su extremo.
□ Conexión de todos los conductores
Ahora que ha identificado todos los cables del vehículo
estará listo para conectarlos a los cables de la unidad
estéreo. El diagrama del cableado (=> página 94) muestra
las conexiones apropiadas y los códigos de colores de los
conductores.
Le recomendamos encarecidamente probar la unidad
antes de realizar la instalación final.
Podrá poner la unidad en el suelo y hacer conexiones tem
porales para probar la unidad. Utilice cinta para usos
eléctricos para cubrir los cables expuestos.
Importante: Conecte el conductor de alimentación
rojo en último lugar, después de haber hecho todas las
conexiones y haberlas aislado.
Masa
Conecte el conductor de masa negro del conector de ali
mentación al chasis metálico del vehículo.
Altavoces
Conecte los cables de los altavoces. Consulte el diagrama
de cableado (=» página 94) para conocer las conexiones
apropiadas. Siga el diagrama cuidadosamente para evitar
estropear los altavoces y la unidad estéreo.
Los altavoces utilizados deberán ser capaces de conducir
más de 45 W de potencia. Si utiliza un amplificador de
CQ-DP171U
89
Page 90

Guía de instalación
audio opcional, los altavoces deberán ser capaces de con
ducir la potencia de salida máxima del amplificador. Los
altavoces con valores de entrada interiores podrán estro
pearse. La impedancia de los altavoces deberá ser de 4-8
íl, que típicamente estará marcada en la mayoría de los
altavoces. Los altavoces con impedancia inferior o supe
rior afectarán a la salida y podrán causar danos en los
altavoces y en la unidad estéreo.
Antena automática
Conecte el conductor de la antena automática del vehículo
al conductor azul de control del relé de la antena
automática.
{No confunda el conductor de la antena con el conductor
azul/franja blanca para un amplificador de potencia.)
Batería
Conecte el conductor de batería amarillo al cable de radio
correcto o al puerto de fusible de la batería ubicado en el
bloque de fusibles.
Antena
Conecte la antena enchufando el conductor de antena al
receptáculo de la antena.
Equipo
Conecte cualquier equipo opcional, tal como un amplifi
cador, según las instrucciones suministradas con el
equipo. Mantenga una separación de unos 12” (30 cm)
entre los cables de los altavoces y el amplificador, y entre
la antena y el cable de extensión de la antena. Lea las
instrucciones de funcionamiento e instalación de cualquier
equipo que conecte a esta unidad.
Alimentación
Conecte el conductor de alimentación rojo al cable de
radio correcto del vehículo o al puerto de fusible apropia
do en el bloque de fusibles.
Si la unidad estéreo funciona correctamente con todas
estas conexiones hechas, desconecte los cables y realice
la instalación final.
(continuación)
Si tiene dificultades, consulte a su instalador profesional
autorizado más cercano para solicitarle ayuda.
□ Preparación
Le recomendamos encarecidamente que se ponga
guantes ai realizar el trabajo de instalación para no
lesionarse.
Cuando doble las lengüetas de montaje del collar de
montaje con un destornillador, tenga cuidado de no
lesionarse las manos ni los dedos.
• Desconecte el cable del terminal de batería negativo ©
(consulte la precaución de más abajo).
• El aparato deberá instalarse en una posición horizontal
con el extremo delantero formando un ángulo adecua
do, pero con no más de 30°.
o menos
Precaución: No desconecte los termínales de la
batería de un automóvil con computadora de viajes o
de navegación porque todos ios ajustes del usuario
almacenados en la memoria se perderán. Cuando
instale el aparato tenga cuidado de impedir los
cortocircuitos.
□ Instalación final
Conexiones de los conductores
' Conecte todos los cables asegurándose de que cada
conexión esté aislada y segura. Una todos los cables flo
jos y apriételos con cinta para que no se caigan posterior
mente. Inserte ahora la unidad estéreo en el collar de
montaje.
¡Enhorabuena! Después de hacer unas pocas comproba
ciones finales, usted estará listo para disfrutar de su
nuevo sistema estéreo para automóvil.
□ Comprobaciones finales
1. Asegúrese de que todos los cables estén conectados y
aislados correctamente.
2. Asegúrese de que la unidad estéreo esté firmemente
sujetada en el collar de montaje.
3. Conecte el encendido para comprobar que la unidad
funcione correctamente.
90
CQ-DP171U
Instalación en el tablero de instrumentos
Apertura de instalación
2 3/32”
(53 mm)
- 7 5/32” -
(182 mm)
Este aparato puede instalarse en cualquier tablero de
instrumentos que tenga una apertura similar a la mostrada
en la imagen. El tablero de instrumentos deberá tener un
grosor de entre ^/le” (4,75 mm) y 7/32" (5,56 mm) para
poder aguantar el aparato.
Page 91

□ Procedimientos de instaiación
Complete primero ías conexiones eléctricas y luego
compruebe si están bien hechas. página 94).
Inserte el collar de montaje 0 en el tablero de
instrumentos, y doble las lengüetas de montaje
hacía fuera con un destornillador.
Asegúrese de que la palanca de bloqueo {íií) esté a
ras con el collar de montaje 0 {sin sobresalir).
Palanca de bloqueo {-s:-)
® Conector de alimentación —
o
(a) Utilizando la tira de soporte trasero (D
Parallamas del automóvil
©Tornillo autorroscante
3 mma
Palanca de bloqueo (íí-j
Lengüetas de montaje
® Perno de montaje
Asegure la parte trasera del aparato.
Después de fijar el perno de montaje ® y el conector de
alimentación ®, fije la parte trasera del aparato en la
ca-rrocería del automóvil siguiendo el método (a) o (b)
mostrado más abajo.
Inserte la placa de adorno
©
Después de realizar la insta
lación, vuelva a conectar el ler-
mlnal de batería negativo ©.
(b) utilizando un cojín de goma (opcional)
Escuadra de soporte trasero
{suministrado en el automóvil)
Cojín de goma
Tuerca hexagonal
\ (3)Tira de soporte trasero
(D Perno de montaje
Collar de montaje
® Collar de montaje
CQ-DP171U
© Perno de montaje
91
Page 92

Guía de instalación
Para extraer el aparato
Desconecte la alimentación del aparato.
Extraiga la placa frontal extraíble.
O Presione [A] (botón de liberación). La
placa frontal se soltará.
Botón de
liberación
O Tire del lateral derecho del aparato,
Extraiga la placa de adorno ® con un
destornillador.
e
Extraiga el aparato mientras presiona la
palanca de bloqueo hacía abajo con un
e
destornillador.
(continuación)
92
Extraiga el aparato tirando dei mismo con
ambas manos.
o
CQ-DP171U
Page 93

Sistema antirrobo
Este aparato está provisto de una placa frontal extraíble. Al extraer esta placa frontal, la radio queda totalmente inoperable.
Coloque la placa frontal extraíble en la caja
O Desconecte la alimentación del aparato.
O Extraiga la placa frontal extraíble. (=» página 92)
O Apriete con suavidad el botón del estuche para abrirlo.
Coloque la placa frontal en el estuche y llévese el estuche
con usted al salir del vehículo.
Instale la placa frontal extraíble
O Deslice el lado izquierdo de la placa frontal extraíble para
ponerla en su lugar.
e Presione el extreme derecho de la placa frontal extraíble
hasta que oiga un ruido seco.
Precauciones:
• Esta placa frontal no es impermeable. No la exponga al agua ni a humedad excesiva.
• No extraiga la placa frontal mientras conduzca el vehículo.
• No ponga la placa frontal sobre el tablero de instrumentos ni en tugares cercanos en ios que la temperatura sube en
gran medida.
• No toque los contactos de la placa frontal extraíble ni de la unidad principal, porque podría ocasionar mal contacto
eléctrico.
• Si se adhiere suciedad u otras materiales extrañas en los contactos, limpíelos con un paño limpio y seco.
CQ-DP171U
93
Page 94

Conexiones eléctricas
Precauciones:
• Este producto ha sido diseñado para funcionar con una batería de 12 V CC con masa negativa.
• Para prevenir daños a la unidad asegúrese de seguir e! diagrama de cableado de esta página.
• Quite aproximadamente V4” {5 mm) de la extremidad del revestimiento de los conductores antes de hacer las
conexiones.
• No inserte el conector de alimentación en el aparato hasta que haya terminado el tendido eléctrico.
• Asegúrese de aislar cualquier cable expuesto a un posible cortacircuito del chasis del automóvil. Sujete todos los
cables y mantenga los terminales de los cables libres de roces con cualquier parte metálica.
• Recuerde que si su automóvil tiene una computadora de conducción o una computadora de navegación, los tatos de
su memoria pueden quedar borrados cuando se desconectan los terminales de la batería.
Accesorios utilizados para el cableado
N."
Conector de alimentación
®
Item Cantidad
1
□ Diagrama del
cableado
Antena
(D Conector de alimentación
Conector de salida
de preamplífícador
(Trasero)
Cable de masa i
A una parte metálica, limpia y desnuda
del chasis del automóvil.
Cable de control de relé de antena automática
(A la antena del C3=
motor) (Máx. 500 mA)
Este cable no sirve para el uso con una antena de
alimentación activada por interruptor.
Nota: La antena automática se extiende automáticamente
cuando se selecciona el modo de la radío.
ÍTr
(Franja ,
blanca/
negra) U U
(-) (+)
(Blanco)
(Franja
gris/
negra)
(-)
FRONT SP
(Gris)
Conector de entrada del
cambiador de CD
Conector de control del
cambiador de CD
Fusible (15 A)
CEZXt
Resistor (1 kíl)
Cable de control del amplificador externo (Máx. 500 mA)
Este conductor es para hacer la conexión con el
amplificador de potencia.
Nota: Este cable se emplea para el control de la alimentación
cuando se ha conectado un amplificador de potencia externo, ü
alimentación de un amplificador de potencia se conectará al
conectar la alimentación de esta unidad.
(Verde) (Franja
violeta/negra)
Cable de batería
A la batería del
automóvil, continua
+12VCC
Cable de alimentación
de accesorios
A la alimentación de
accesorios, +12 V CC
94
Altavoz izquierdo
(Frontal)
Altavoz derecho
(Frontal)
CQ-DP171U
Altavoz izquierdo
(Trasero)
Altavoz derecho
(Trasero)
Page 95

□ Mejora del sistema
Combinación de ejempio
Cambiador de CD {CX-DP88U) (opcional)
Nota: En cuanto a las conexiones, lea atentamente el manual de instrucciones de los dispositivos conectados.
CQ-DP171U
95
Page 96

Solución de problemas
Pasos preliminares
Efectúe las comprobaciones y los pasos descritos en las tablas
si-guientes.
Si cree que hay algo que no funciona bien
Desconecte inmediatamente la alimentación.
Desenchufe el cable de la alimentación y compruebe que no haya humo
ni calor procedentes del aparato antes de solicitar la reparación. No
trate nunca de reparar usted mismo el aparato, porque es peligroso.
Precauciones:
• No emplee el aparato si no funciona bien o
si hay algún probrema.
• No emplee el aparato en un estado anormal,
por ejemplo, sin sonido, o con humo o mal
olor, porque pueden producirse fuego o
descargas eléctricas. Deje de utilizarlo
inmediatamente y (lame a la tienda donde lo
compró.
96
CQ-DP171U
Page 97

Radio
с
Problema
^ ( Causa/Paso
La emisora es demasiado lejana, o la señal es demasiado débil.
Seleccione otras emisoras con mejor nivel de señal.
3
Hay demasiado ruido
en las difusiones de
FM estéreo y
monofónicas.
Se reponen las emiso
ras preajustadas.
CD/MP3
C
compartimiento del
sonido, o el disco se
expulsa automática
Problema
El disco está en el
CD, pero no sale
mente.
3 C
>
El cable de control del relé de la antena motorizada no está correctamente conectado.
Si el vehículo tiene una antena motorizada, conecte correctamente el
cable de control del relé de la antena motorizada al cable de antena
motorizada instalado en el vehículo.
La antena de la radio no está extendida lo suficiente.
■ => Extienda por completo la antena de la radio.
El cable de la batería no está correctamente conectado.
^ Conecte el cable de la batería al terminal que está siempre activo.
Causa/Paso
El disco está al revés.
Ponga el disco en la posición correcta con la etiqueta arriba.
El disco está sucio.
^ Limpie el disco consultando la sección “Notas sobre los discos CDAipos
de CD (CD-ROM, CD-R, CD-RW)’’.
Se ha insertado un disco que tiene datos que no son CD-DA ni MP3.
^ Deben utilizarse discos con datos del tipo CD-DA o MP3.
^ Es posible que el aparato no pueda reproducir bien un disco CO-ñ/RW creado mediante la combi
nación de software de grabación, una grabadora de CO (unidad de CD-R/RW) y un CO sí no son com
patibles entre sí. Para más detalles, consulte las instrucciones de los dispositivos correspondientes.
Salta ei sonido, mala
calidad del sonido (por
ejemplo, causado por
ruido)
El sonido salta debido
a vibraciones.
No se expulsa el disco.
El texto de CD no se
visualiza con normalidad.
[>
[>
>
El disco está sucio.
^ Limpie el disco consultando la sección “Notas sobre los discos CD/típos
de CD (CD-ROM, CD-R, CD-RW)”.
^
Es posible que el aparato no pueda reproducir bien un disco CD-R/RW creado mediante la combi
nación de software de grabación, una grabadora de CO (unidad de CD-R/RW) y un CD si no son com
patibles entre sí. Para más detalles, consulte las instrucciones de los dispositivos correspondientes.
El ángulo de montaje es de más de 30°.
^ Ajuste el ángulo de montaje a menos de 30°
Montaje inestable.
c^Monte la unidad con seguridad con las partes de montaje, consultando la
sección de instalación.
• El disco está defectuoso.
• Avería mecánica.
Presione [^] (Expulsar). Si no se repone la operación normal, llame a la
tienda donde compró el aparato o al centro de servicio que le quede más
cercano para solicitar que se lo reparen.
El disco está sucio, o esta rayado.
^ Limpie el disco consultando la sección “Notas sobre los discos CDAípos
de CD (CD-ROM. CD-R, CD-RW)”.
CQ-DP171U
97
Page 98

CD
c
El texto de CD no se
visualiza con normalidad.
Se cuenta el tiempo,
pero no sale sonido.
Problema
■ MP3
( Problema
de problemas
3 C
El disco está sucio, o esta rayado.
[>
[>
^ Limpie el disco consultando la sección "Notas sobre los discos CDAípos
de CD (CD-ROM, CD-R, CD-RW)".
Se ha reproducido la primera pista de un disco del modo de mezcla. (El modo
de mezcla es un formato en el que se graban datos que no son musicales en la
primera pista y se graban datos musicales en las otras pistas en una sesión.)
■ f Reproduzca los datos musicales grabados en las otras pistas que no sean
la primera.
El disco no conforma ninguno de los sistemas de archivos compatibles con
este reproductor.
Inserte un disco que tenga sistemas de archivos compatibles con este
reproductor. En cuanto a los sistemas de archivos compatibles, consulte
"Notas sobre MP3” página 102).
Le falta la extensión del nombre de archivo “.mp3” al archivo MP3.
Asegúrese de añadir la extensión ".mp3" a cada nombre de archivo MP3.
(continuación)
Causa/Paso
Causa/Paso
3
J
La reproducción tarda
demasiado en comen
zar.
Mala calidad de
grabación, salta el
sonido.
Los archivos no se
reproducen en el
orden deseado.
El nombre de
carpeta/archivo no se
visualiza correcta
mente.
[>•
O
[►
Las carpetas y los archivos grabados en el disco tienen demasiados estratos.
^Puesto que en este caso se tarda más en comprobar los archivos, no
grabe carpetas ni archivos innecesarios que no sean MP3 en el disco.
(Si hay muchas jerarquías de archivos y carpetas, la reproducción puede
tardar hasta 150 segundos en comenzar.)
■ ^La calidad de la grabación cambia según el software de codificación uti
lizado, y según los ajustes tales como el de la velocidad de transmisión.
Ajuste la velocidad de transmisión dentro del margen especificado en las
especificaciones. (^ página 105).
Se recomienda ajustar la velocidad de transmisión a "128 kbps o más ” y "Fixed”.
Se eiecutó la escritura a alta velocidad cuando se grabaron los datos MP3 en el disco.
^Reduzca la velocidad de escritura todo lo que sea posible.
Los archivos o carpetas no están grabados en el orden deseado de reproducción.
^Ciertos programas de software permiten especificar el orden de grabación
añadiendo un prefijo en el margen de "01" a "99", etc. al nombre de
archivo. Para más detalles, consulte el manual de instrucciones de su
software de grabación.
El disco no conforma los sistemas de archivos compatibles con este reproductor,
^ Inserte un disco que tenga sistemas de archivos compatibles con este
reproductor. En cuanto a los sistemas de archivos compatibles, consulte
“Notas sobre MP3" ("f página 102).
^Puede existir algún problema en el software de grabación o en la
grabadora de CD (unidad de CD-R/RW). Para más detalles, consulte el
manual de instrucciones de su software de grabación.
98
CQ-DP171U
Page 99

El tiempo de reproduce
ción del archivo no se
visualiza correcta
mente.
■ Ajuste del sonido
( Problema ZD C
No sale sonido por el
altavoz izquierdo, dere
cho, frontal, o trasero.
'^Al escuchar en estéreo,
se invierten tos
sonidos de la derecha y
de la izquierda.
Usted efectuó el avance rápido o la inversión rápida en el archivo o desconectó
el interruptor de encendido del automóvil durante la reproducción.
"^Cuando reproduzca otro archivo se volverá at tiempo normal de reproduc
ción del archivo.
Se reproduce un archivo MP3 del formato VBR (velocidad de transmisión variable).
*=>EI tiempo de reproducción del archivo del archivo MP3 del formato VBR (veloci
dad de transmisión variable) se visualiza algunas veces incorrectamente.
. Causa/Paso
El balance izquierdo/derecho o el frontal/trasero está ajustado completamente a
un lado.
Ajuste adecuadamente el modo balance ízquierdo-derecho/balance
delantero-trasero.
- ---------------------------------------------------------------------------------------------------------------------------------------------------------------
Los cables no están correctamente conectados.
Conecte correctamente los cables.
El cable del altavoz derecho está conectado a! altavoz izquierdo y el cable del
altavoz izquierdo está conectado al alatavoz derecho.
y
Conecte los cables de los altavoces a los correctos.
:)
J
■ Control remoto
( Problema
Los botones no funcio
nan.
3 c
Causa/Paso
Se han invertido las polaridades de la pila {+) (-).
Inserte correctamente la pila.
Pila incorrectas.
^ Compruebe la pila.
La pila están gastadas.
Reemplace la pila.
El controlador remoto está en una dirección incorrecta.
Diríja el controlador remote al sensor (REMOTE) del panel.
CQ-DP171U
3
99
Page 100

Solución de problemas
Mensajes de visualizacíón de error
BCD/MP3
Visualizacióri
(continuación)
Causa/Paso
Ш
El disco se expulsa automáticamente.
<=> ALIMEÍiTACIÓN DESCONECTADA
Cambiador de CD
Visualizacíón
t>
• El disco está sucio o a! revés.
• Se ha insertado un disco que tiene datos que no son de! tipo CD-DA ni MP3.
Compruebe el disco.
El disco tiene marcas.
c> Compruebe el disco.
No funciona debido a alguna causa.
Apague el motor del automóvil (accesorios apagados) y quite el fusible del
conductor amerillo durante 1 minuto. Luego vuelva a instalar el fusible.
Cuando no hay archivos MP3 en ia carpeta especificada durante la
selección directa de la carpeta MP3.
^ Seleccione otra carpeta que tenga archivos MP3.
Por alguna razón, el reproductor no puede leer el archivo que usted se pro
pone reproducir. (El archivo está grabado en un sistema de archivos, tipo de
compresión, formato de datos, o con una extensión de nombre de archivo
que son incompatibles, o los datos están dañados, etc.
<=> Seleccione un archivo que pueda leer el reproductor. Confirme el tipo de los
datos grabados en el disco. Cree un disco nuevo si es necesario.
Causa/Paso
• El disco está sucio o al revés.
Automáticamente al disco siguiente
Número de disco
il
Número de disco
Automáticamente al disco siguiente
/
—Ч
• Se ha insertado un disco que no es un CD musical (tipo CD-DA).
^ Compruebe el disco.
El disco tiene marcas.
Compruebe el disco.
V
No funciona debido a alguna causa.
^ Si no se repone la operación normal, llame a la tienda donde compró
el aparato, o al centro de servicio que le quede más cercano para
[>
[>
Notas:
• Algunos cambiadores de CD permitan que la alimentación de este aparato se desconecte después de aparecer el mensaje
de error E3.
• Para más detalles, consulte el manual de instrucciones de su cambiador de CD.
100
CQ-DP171U
solicitar que se lo reparen.
La visualizacíón continúa si no puede desconectar la alimentación.
No hay disco en el cambiador (cargador).
^ Inserte discos en el cambiador (cargador).
J
 Loading...