

Panasonic CF-Y5LWEZDJM, CF-Y5LWEZZBM, CF-Y5LWEZZJM, CF-Y5LWFZDBM, CF-Y5LWFZZBM Reference Manual
...Page 1
1
Reference Manual
Personal Computer
Model No. CF-Y5 Series
We recommend that this Reference Manual be printed.
Page 2

Read Me First
2
Illustrations and Terminology in this Reference Manual
NOTE NOTE provides a useful fact or helpful information.
CAUTION CAUTION indicates a condition that may result in minor or moderate injury.
Enter
Fn+F5
(Start) - [All Programs] This illustration means to click (Start), then to click [All Programs].
Î or ⇒ These symbols indicate related pages.
*1
xxxx
z “Windows Vista™ Business” is indicated as “Windows” or “Windows Vista”.
z The following software packages are described as follows:
• “WinDVD™ 8 (OEM Version)” as “WinDVD”
• “B’s Recorder GOLD9 BASIC” as “B’s Recorder”
This illustration means to press the
This illustration means to press and hold the Fn key, then press the F5 key.
When using with the
key and the
Î : If this is clicked, it will jump to the page corresponding Reference Manual.
⇒ : Refer to the Operating Instructions.
If *1 is clicked, it will jump to a related topic.
Ctrl
Fn
key and the
key reversed.
Enter
key.
Ctrl
key functions interchanged, read with the Fn
User Account Control
User Account Control is a new security component of Windows Vista to stop unauthorized changes to your computer.
The User Account Control message will pop up every time you try making an important change to your computer.
Windows Sidebar
The Windows Sidebar does not appear in the default setting. To display it, click (Start) - [All Programs] - [Accessories] [Windows Sidebar].
z To always display the sidebar:
A Right-click the sidebar icon on the notification area, and click [Properties].
B Add a check mark for [Start Sidebar when Windows starts] and click [OK].
Page 3
Read Me First
3
When Using Wireless LAN
If you cannot communicate with the access point or if the access point is not detected, right-click on the notification area
and click [Connect to a network], and then click in the [Connect to a network] screen.
Sound and Video
z Sound (e.g. MP3, WMA) and video (e.g. MPG, WMV) recorded in PC Cards and SD Memory Cards may be interrupted
during playback. If this happens, copy them to the hard disk drive and play back.
z Sound and video in AVI files may be interrupted or produce a time-lag during playback. If this happens, click or on
the notification area, and click [High performance]. This may remedy the problem.
z Depending on the processing status on Windows, sound may be interrupted at Windows startup. You can mute the sound
at startup.
A Right-click the desktop and click [Personalize] - [Sounds].
B Remove the check mark from [Play Windows Startup sound], and click [OK].
Page 4
Using the Touch Pad
4
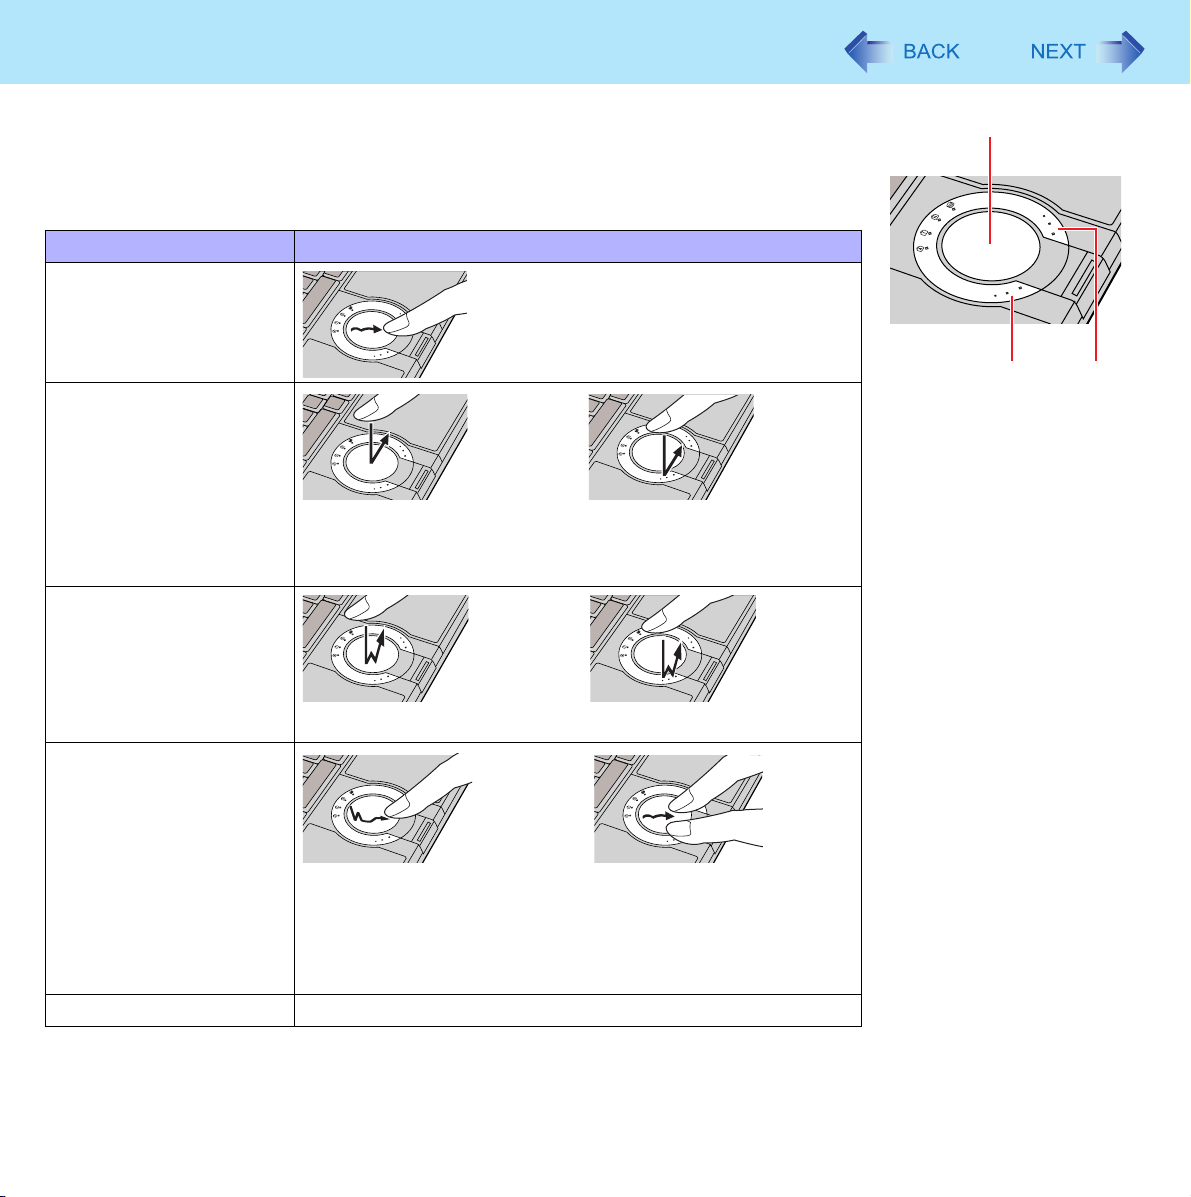
Use the Touch Pad to move the cursor on the screen and perform computer operations.
A. Work Surface (Touch Pad)
B. Left Button
C. Right Button
Function Operation
Moving the Cursor
Move the tip of your finger lightly over the
work surface.
Tapping/Clicking
tapping or clicking
To right-click: Can only be performed by clicking the right
button.
Double-Tapping/
Double-Clicking
A
BC
double-tapping or double-clicking
Dragging
Two quick taps, but on the second tap leaving your finger
down (applying pressure) and moving it on the work surface.
or
While holding down the button, moving your finger on the work
surface.
Scroll Trace a circle around the Touch Pad. (Î page 5)
Page 5

Using the Touch Pad
NOTE
z You can change the speed of the double-click or the operations of mouse buttons by clicking (Start) - [Control
Panel] - [Mouse].
5
Scroll
There are two ways of scrolling with the Touch Pad: the Touch Pad utility, and the Virtual Scrolling Function. You cannot use
both functions at the same time.
The Touch Pad utility is enabled in the default setting.
z The Touch Pad utility (below)
You can scroll continuously by tracing a circle on the Touch Pad.
Vertical scroll It can be used in the default setting.
Horizontal scroll A setting is required to use the horizontal scroll.
z The Virtual Scrolling function (Î page 10)
You can scroll vertically (or horizontally) by tracing repeatedly in the desired direction.
Vertical scroll The Virtual Scrolling function must be set to enable.
Horizontal scroll
You can use separate settings for each account regarding whether to use the Touch Pad utility or the Virtual Scrolling function.
Using the Touch Pad Utility
You can scroll easily by tracing a circle on the Touch Pad.
NOTE
z External mouse drivers cannot be used at the same time as the Touch Pad utility. (Î page 60)
1 Make the following settings to use the horizontal scroll.
Once the settings have been made, it is not necessary to make the same settings the next time.
Page 6

Using the Touch Pad
A Click on the notification area, and click [Settings].
When is not displayed:
Click (Start) - [All Programs] - [Panasonic] - [Touch Pad Utility settings].
If a message appears indicating that the Touch Pad utility is not running, click
(Start) - [All Programs] - [Panasonic] - [Touch Pad Utility], and display .
B Add a check mark for [Use horizontal scroll function] in the [General settings]
screen, and click [OK].
6
2 Display the scrollable screen.
3 Place the cursor over the area that you want to scroll, and tap
(click).
4 Remove your finger from the pad, then place your finger in the appropriate area to begin
scrolling.
The finger position on the Touch Pad can be changed using the Touch Pad utility. (Î page 7) This explanation
assumes in the default setting.
Vertical scroll
Position where finger is
placed
Icon on the notification area When you place your finger on the Touch Pad, the icon changes.
*1
If the horizontal scroll function has not been enabled, the segment shown in the figure above (A) is also included in the area
to begin vertical scrolling.
*1
Horizontal scroll
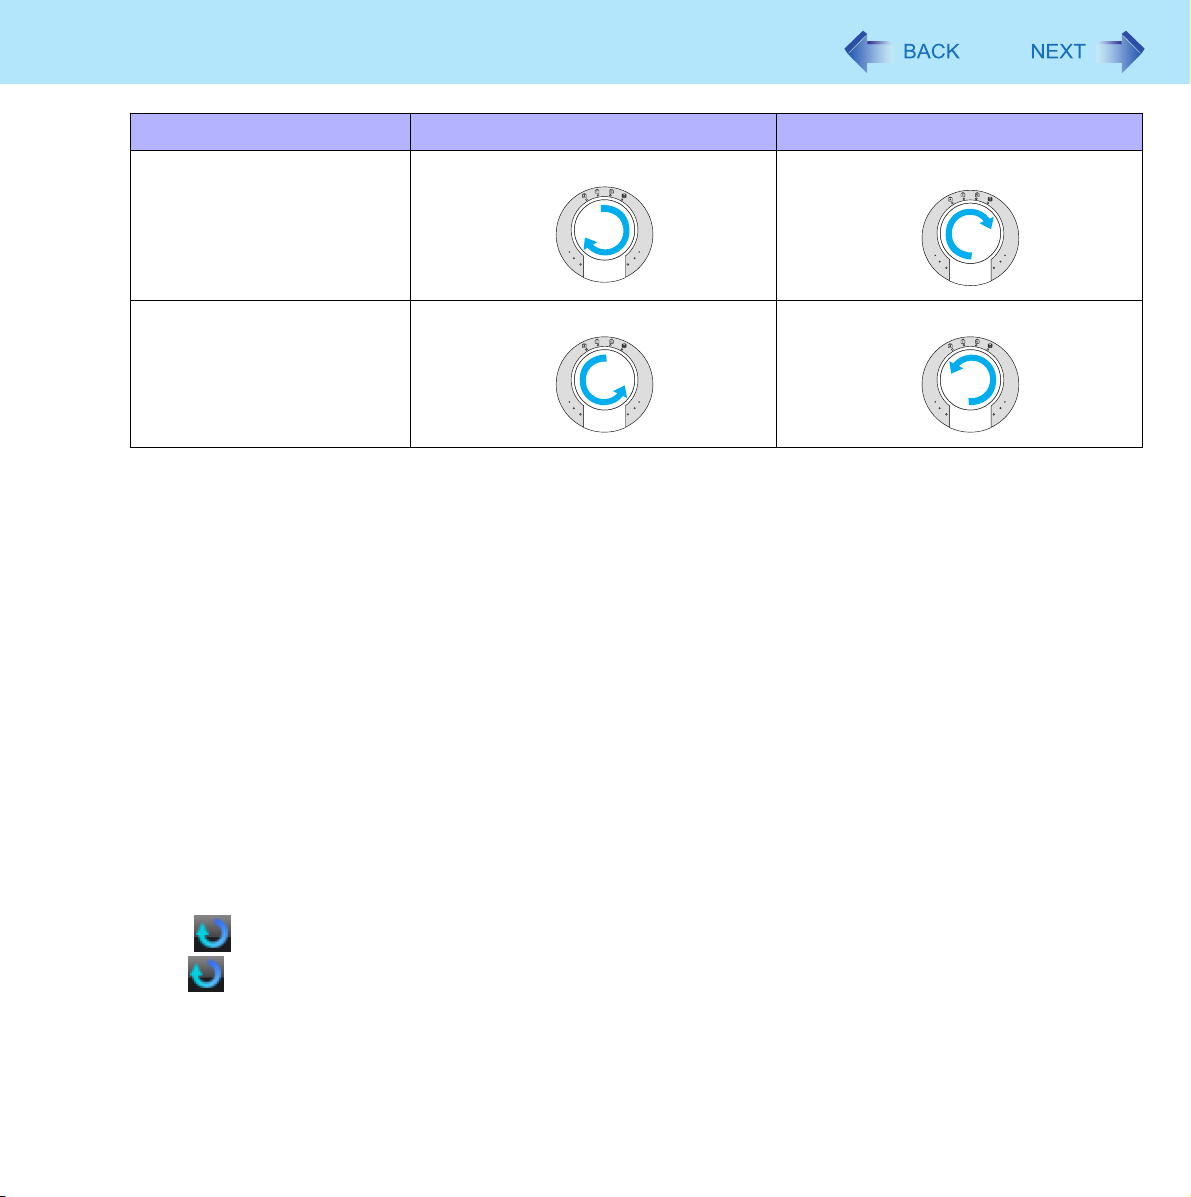
5 Trace a circle around the Touch Pad without lifting your finger from the pad.
The scroll direction can be changed using [Reverse the direction of the vertical scrolling] or [Reverse the direction
of the horizontal scrolling] in the Touch Pad utility. (Î page 7)
Page 7
Using the Touch Pad
7
Vertical scroll
Trace clockwise To scroll down To scroll right
Trace counter-clockwise To scroll up To scroll left
*2
When the horizontal scroll function has not been enabled, any scrolling will be vertical scrolling.
z The screen will not scroll if you trace toward the center of the Touch Pad.
z On screens that cannot be scrolled (e.g., desktop screen), if you scroll, the computer may try to scroll the screen,
causing the cursor to freeze. If this happens, remove your finger from the Touch Pad and begin again, this time
starting from the center of the Touch Pad.
z For example, on a screen that will only scroll horizontally, even if you execute a vertical scroll, the screen will
scroll horizontally.
Horizontal scroll
*2
6 Once scrolling has begun, continue to trace a circle on the Touch Pad without removing
your finger from the pad.
z As long as you are tracing a circle, you can continue scrolling using any position on the Touch Pad.
z To scroll in the opposite direction, trace a circle in the opposite direction without removing your finger from the
Touch Pad.
7 When you finish scrolling, remove your finger from the Touch Pad.
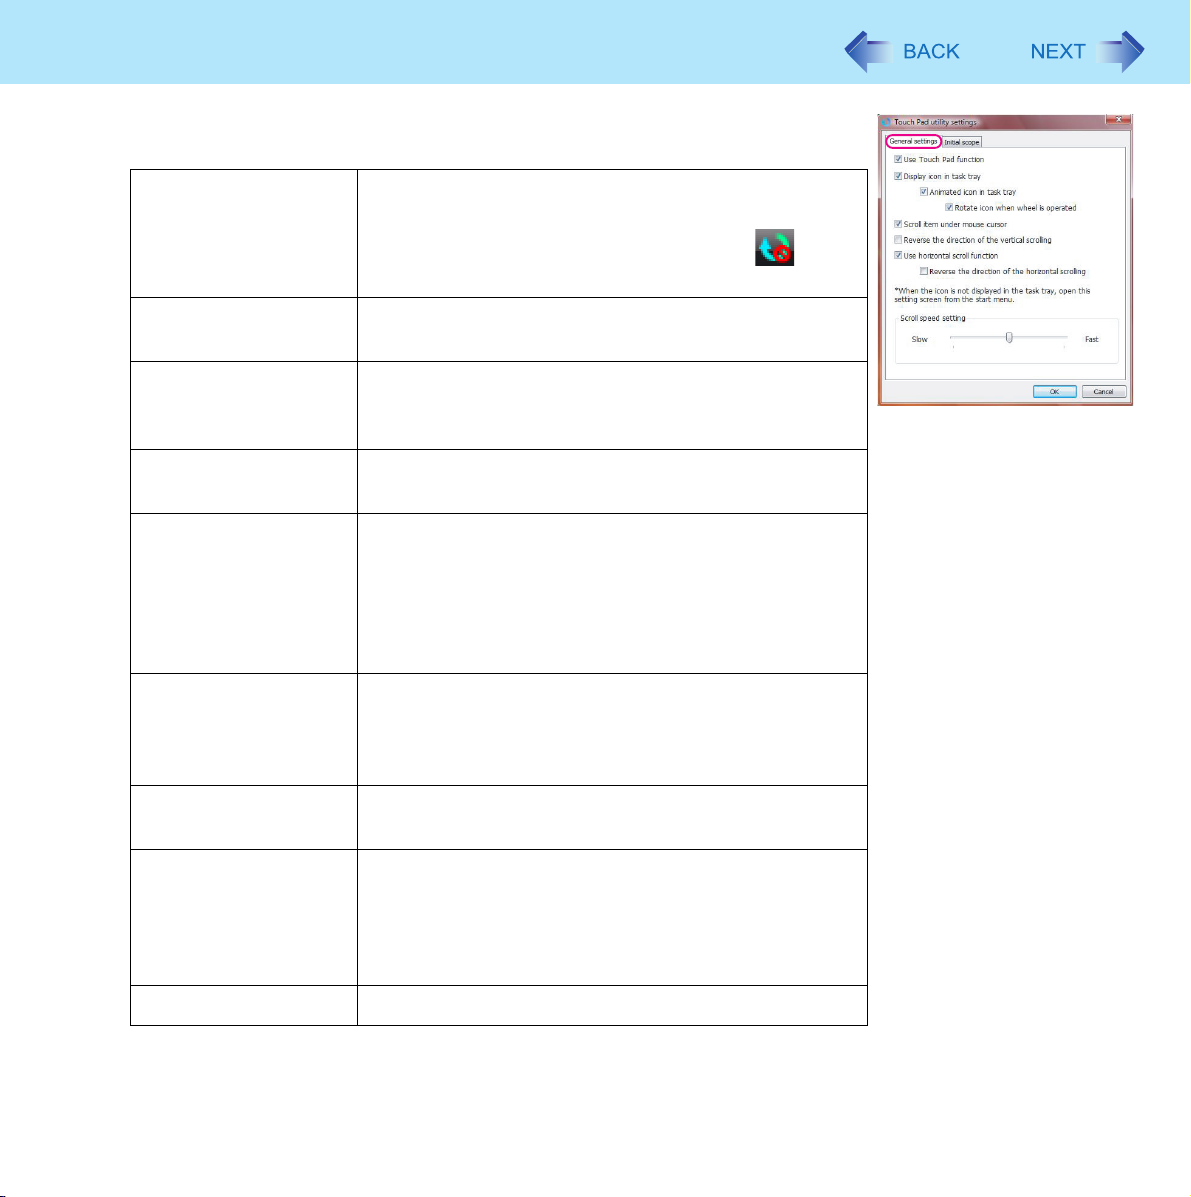
Change the settings for the Touch Pad utility
1 Click on the notification area, and then click [Settings].
When is not displayed:Î page 6, step1-A
Page 8
Using the Touch Pad
2 Change the settings.
z General settings
Use Touch Pad function
(On/Off)
If you add a check mark, you can use the Touch Pad
function (screen scroll). If you remove the check mark,
the Touch Pad function will be disabled, and will be
displayed on the notification area.
8
Display icon in task tray
(On/Off)
Animated icon in task
tray (On/Off)
Rotate icon when wheel
is operated (On/Off)
Scroll item under
mouse cursor
Reverse the direction of
the vertical scrolling
Use horizontal scroll
function (On/Off)
Reverse the direction of
the horizontal scrolling
If you add a check mark, the icon will be displayed in the
notification area.
If you add a check mark, the icon will change while
scrolling and the finger located within the region which
starts scrolling.
If you add a check mark, the icon will rotate while you
are scrolling.
If you add a check mark, scroll the region where the
mouse cursor is located within the active window.
If you remove the check mark, scroll the selected region
within the active window. In either case, if the mouse
cursor is outside the active window, scroll the selected
region.
You can change the direction in which the screen scrolls
when you trace the Touch Pad clockwise.
• When check mark is added: Upwards
• When check mark is removed: Downwards
If you add a check mark, you can use the horizontal
scroll.
When you add a check mark for [Use horizontal scroll
function], you can change the direction in which the
screen scrolls when you trace the Touch Pad clockwise.
• When check mark is added: Scroll left
• When check mark is removed: Scroll right
Scroll speed setting You can change the scroll speed.
Page 9
Using the Touch Pad
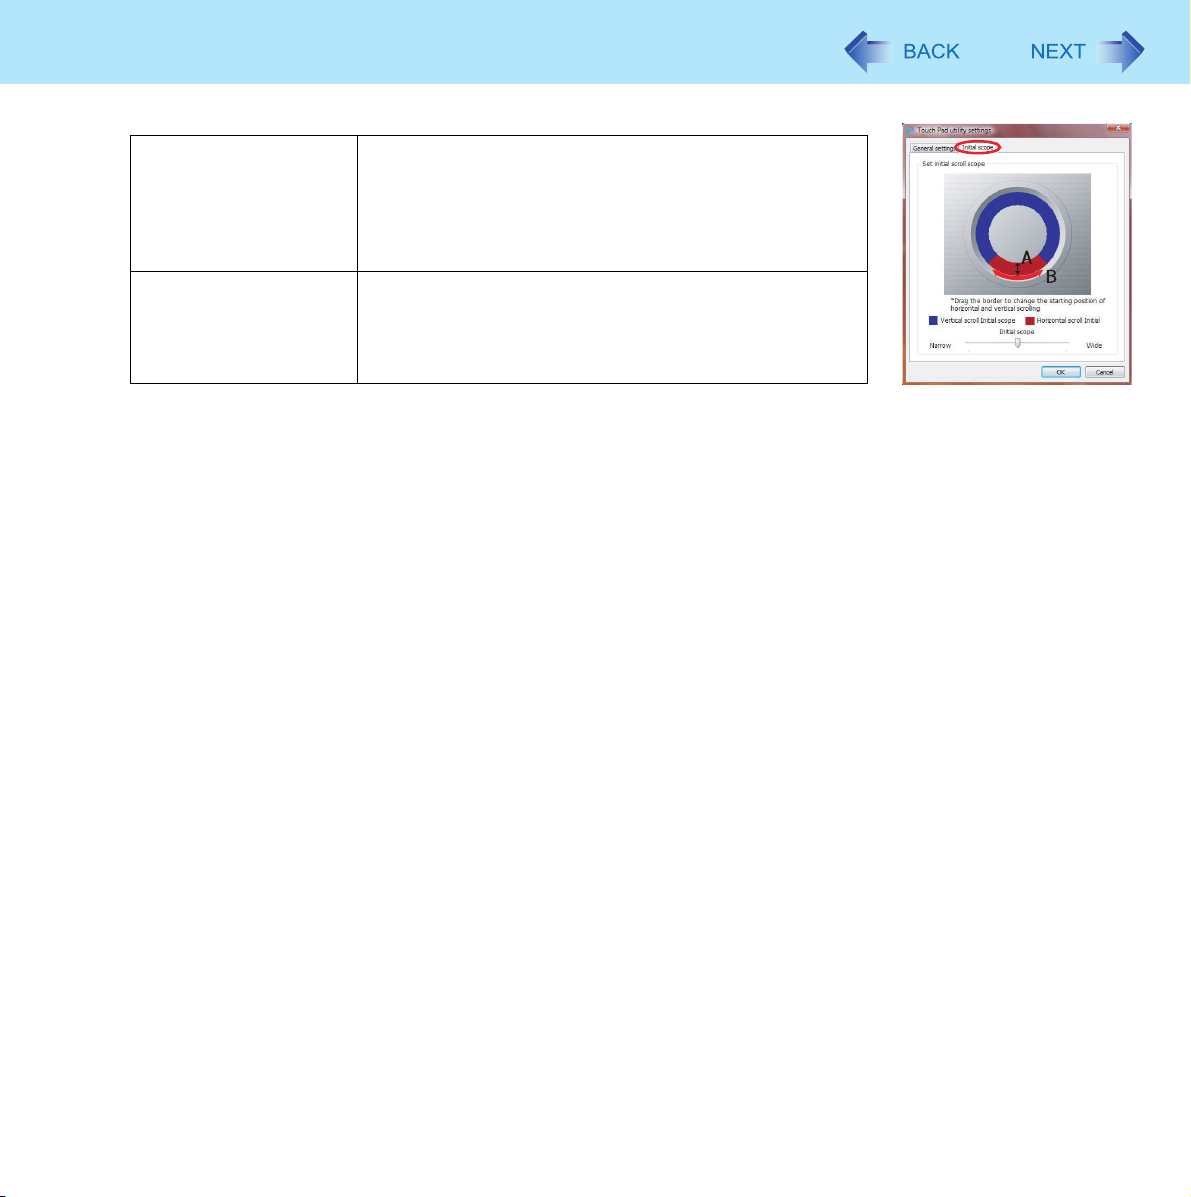
z Initial scope
A. Width of the initial
scope
By dragging the inner circumference of the starting area,
you can change the width of the initial scope (A) in five
stages.
You can also change the width by sliding the [Initial
scope] slide bar.
9
B. Vertical and
horizontal scroll
initial scope
3 Click [OK].
You can change the initial scope (B) by dragging border
of the vertical and horizontal scroll initial scope. The
maximum starting area for the horizontal scroll is half
the circumference.
Page 10
Using the Touch Pad
10
Using the Virtual Scrolling Function
Set the Virtual Scrolling function using the following procedure. The Touch Pad utility will be disabled.
1 Click on the notification area, and click [Settings].
When is not displayed:Î page 6, step 1-A
2 Remove a check mark from [Use Touch Pad function] in [General settings], and then click
[OK].
3 Click (Start) - [Control Panel] - [Mouse] - [Device Settings].
4 Click the device name (e.g., Synaptics TouchPad) in [Devices], then click [Settings].
5 Click [Virtual Scrolling], add a check mark for the scroll functions you want to use, then
click [OK].
6 Click [OK] at [Mouse Properties].
NOTE
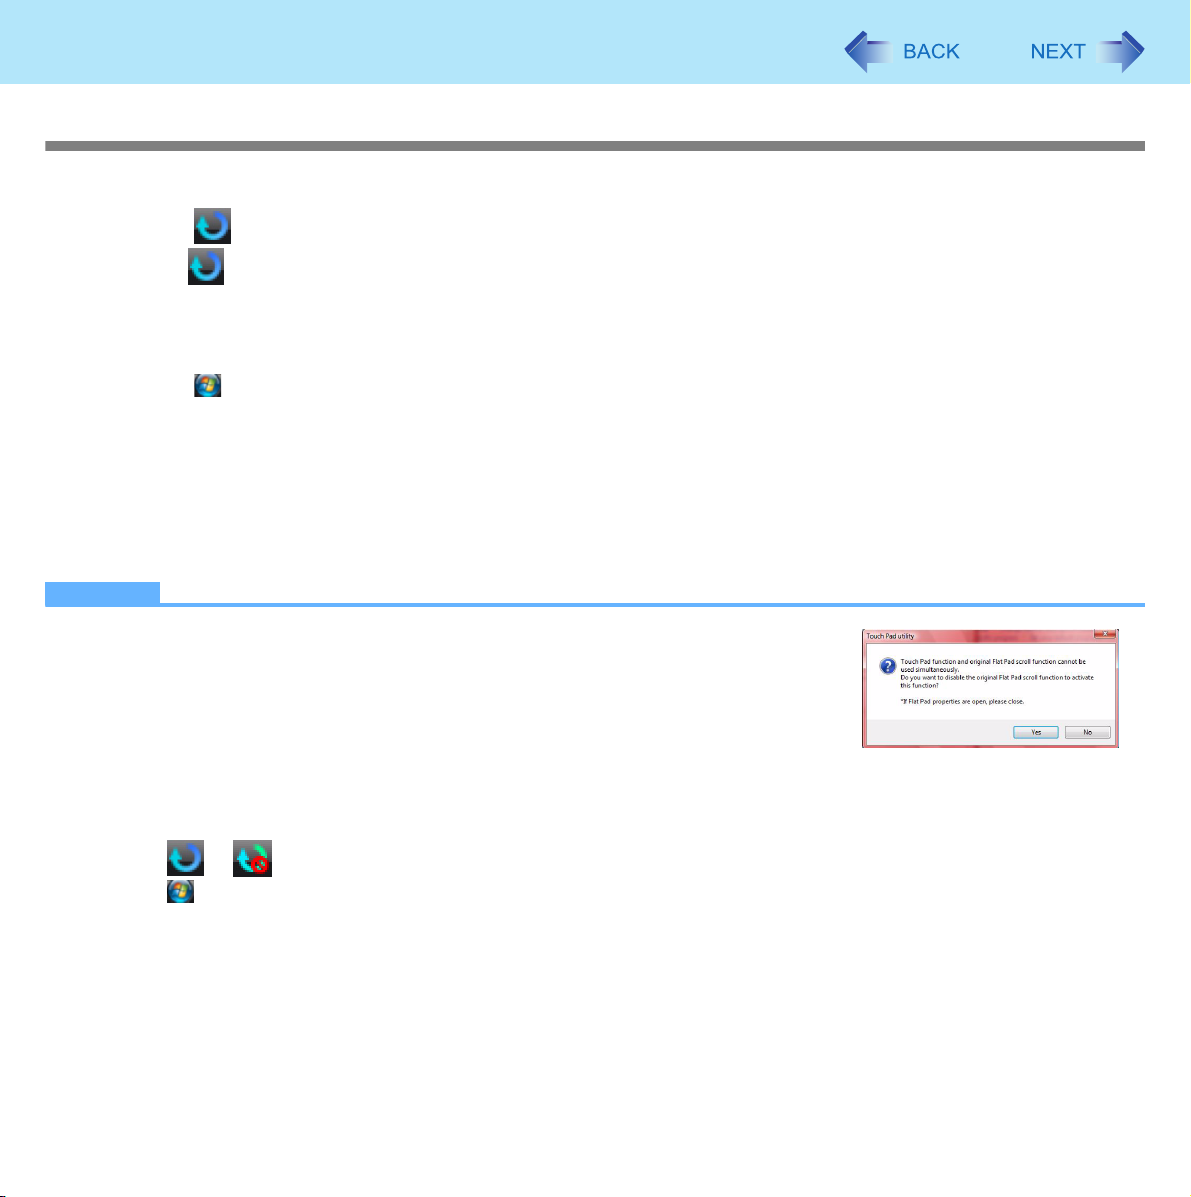
z Because the Touch Pad utility and the Virtual Scrolling function both offer scrolling
functions that use the Touch Pad, these two features cannot be used simultaneously.
If you try to use them at the same time, a message may be displayed asking you if
you want to enable the Touch Pad utility.
• To use the Touch Pad utility: Click [Yes]. The Virtual Scrolling function will be
disabled.
• To use the Virtual Scrolling function: Click [No].
You can uninstall the Touch Pad utility using the following procedure.
A Click or on the notification area, and then click [Exit].
B Click (Start) - [Control Panel] - [Uninstall a program] - [Touch Pad Utility], and then click [Uninstall] to remove the
program.
Page 11
Using the Touch Pad
z To begin using the Touch Pad utility again:
A Click (Start) and input [c:\util\touchpad] in [Start Search], and then press
B Right-click [setup] in [touchpad] folder and click [Run as Administrator].
If there are two or more “setup” files, right-click the file whose [Type] is [Application].
C Conduct steps
D Click [Virtual Scrolling], remove a check mark from [Enable vertical scrolling] and [Enable horizontal scrolling], then
click [OK].
E Click [OK] at [Mouse Properties].
F Click or on the notification area, and click [Settings].
3 to 4 (Î page 10).
Enter
.
11
When or is not displayed:Î page 6, step
G Click [General settings], add a check mark for [Use Touch Pad function], then click [OK].
1-A
Adjusting the Sensitivity when Touching the Touch Pad
Adjust [PalmCheck] and [Touch Sensitivity] using the following procedure:
1 Click (Start) - [Control Panel] - [Mouse] - [Device Settings].
2 Click the device name (e.g., Synaptics TouchPad) in [Devices], then click [Settings].
3 Double-click [Sensitivity], then click [PalmCheck] or [Touch Sensitivity].
4 After making the adjustment, click [OK].
PalmCheck™
z When operating the keyboard, if your hand touches the Touch Pad unintentionally causing the cursor to move, adjust the
sensitivity using “PalmCheck™.”
• By dragging slide bar to the [Maximum] position, you can prevent the cursor from moving unintentionally.
• By dragging slide bar to the [Minimum] position, you can enable the cursor to move even with a light touch of the palm
on the Touch Pad.
Touch Sensitivity
z When operating the Touch Pad, if your finger touches the Touch Pad, unintentionally causing the cursor to move; or if the
cursor does not move even when you move your finger on the Touch Pad, adjust the sensitivity using the “Touch Sensitivity”.
• By dragging slide bar to the [Heavy Touch] position, the cursor will only move with a strong touch on the Touch Pad.
• By dragging slide bar to the [Light Touch] position, the cursor will move even with a light touch on the Touch Pad.
Page 12
Using the Touch Pad
12
Handling the Touch Pad
z By design, the Touch Pad is to be used with a fingertip only. Do not place any object on the work surface or press down
forcefully with sharp-pointed objects (e.g., nails) or hard objects that can leave marks (e.g., pencils and ball point pens).
z Try to avoid having any harmful substances, such as oil, come in contact with the Touch Pad. The cursor may not work
properly in such cases.
z When the Touch Pad becomes dirty:
Wipe to remove dirt by using a dry soft cloth such as gauze or a soft cloth first applied with detergent diluted with water
and then thoroughly wrung.
Do not use benzene or thinner, or rubbing alcohol. Doing so may adversely affect the surface, e.g., discoloration. In addition, do not use commercially available household cleaners and cosmetics, as they may contain components harmful to
the surface.
Page 13
Key Combinations
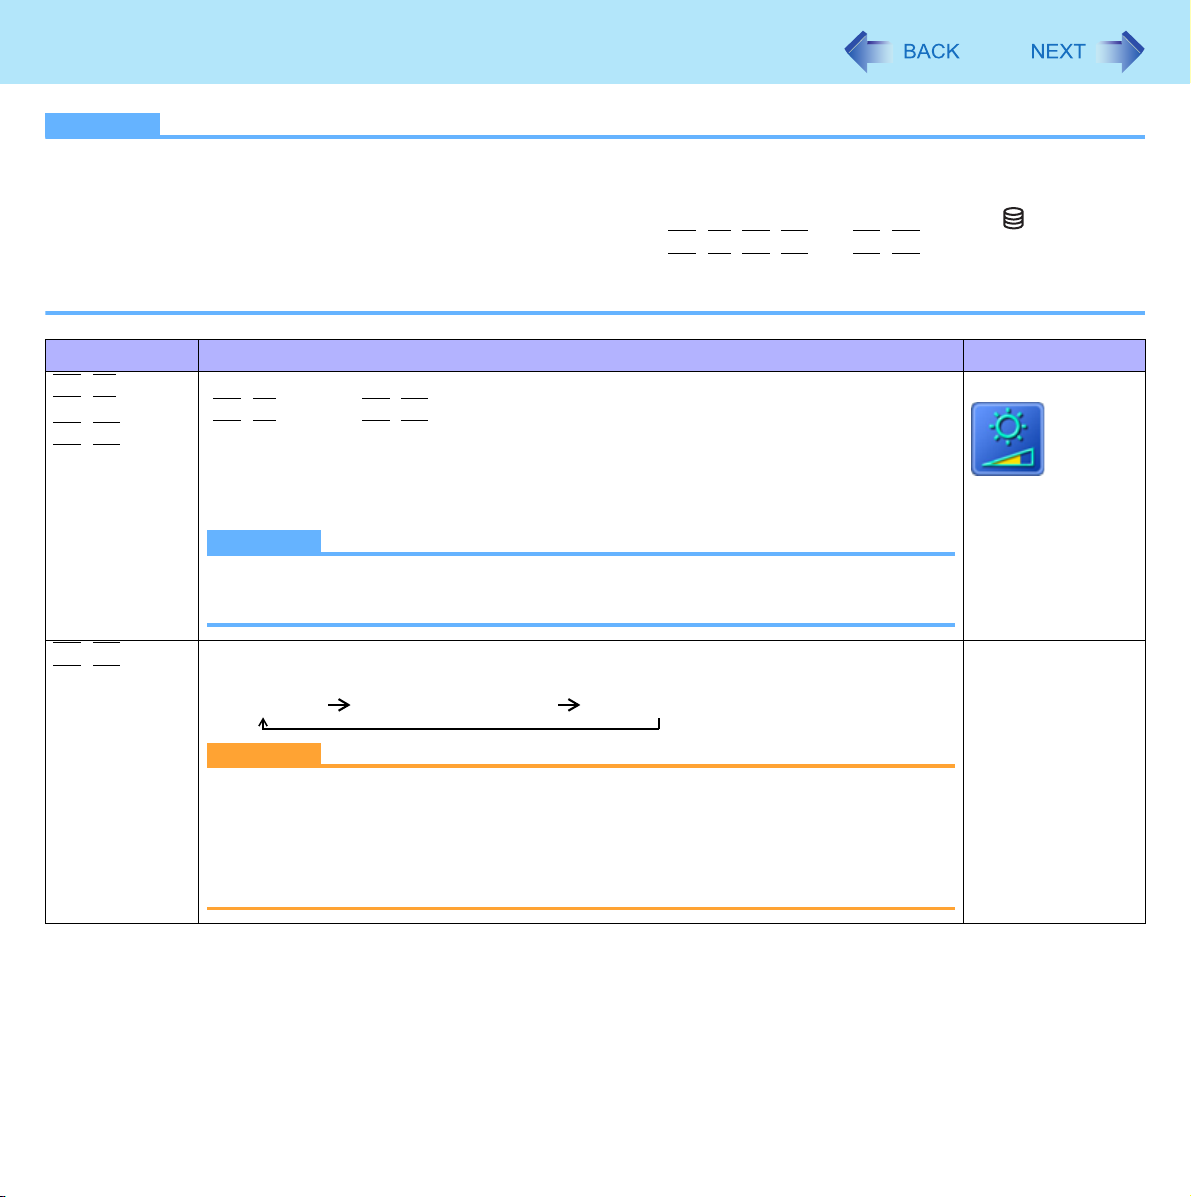
NOTE
z Do not repeatedly press the keys in quick succession.
z Do not use the key combinations together with Touch Pad (external mouse) or other key operations.
z Do not use the key combinations before you log on to Windows. Wait until the hard disk drive indicator turns off.
On the Setup Utility screen, you can use the key combinations of
z The key combinations may not work with some applications.
z The pop-up icon appears after logging on to Windows. It may not appear in some application conditions.
Key Functions Pop-up Icon
Fn+F1
Fn+F2
LCD brightness
Fn+F1
(
You can select a different brightness level setting for when the AC adaptor is connected and for when it is not connected.
(In the default setting, the LCD brightness is set to be darker when the AC adaptor is
not connected.)
= down / Fn+F2= up)
NOTE
z When you change the LCD brightness, the [Adjust display brightness] setting
of the power plan changes accordingly.
Fn+F1, Fn+F2
and Fn+F3.
13
Fn+F3
Display switching (Î page 57)
(When an external display is connected)
Internal LCD Simultaneous display External display
CAUTION
z Do not press any keys until the display has finished switching.
z Do not use this function:
• When an external display is not connected.
• When playing motion video such as DVD or MPEG.
• When using the Extended Desktop.
__
Page 14
Key Combinations
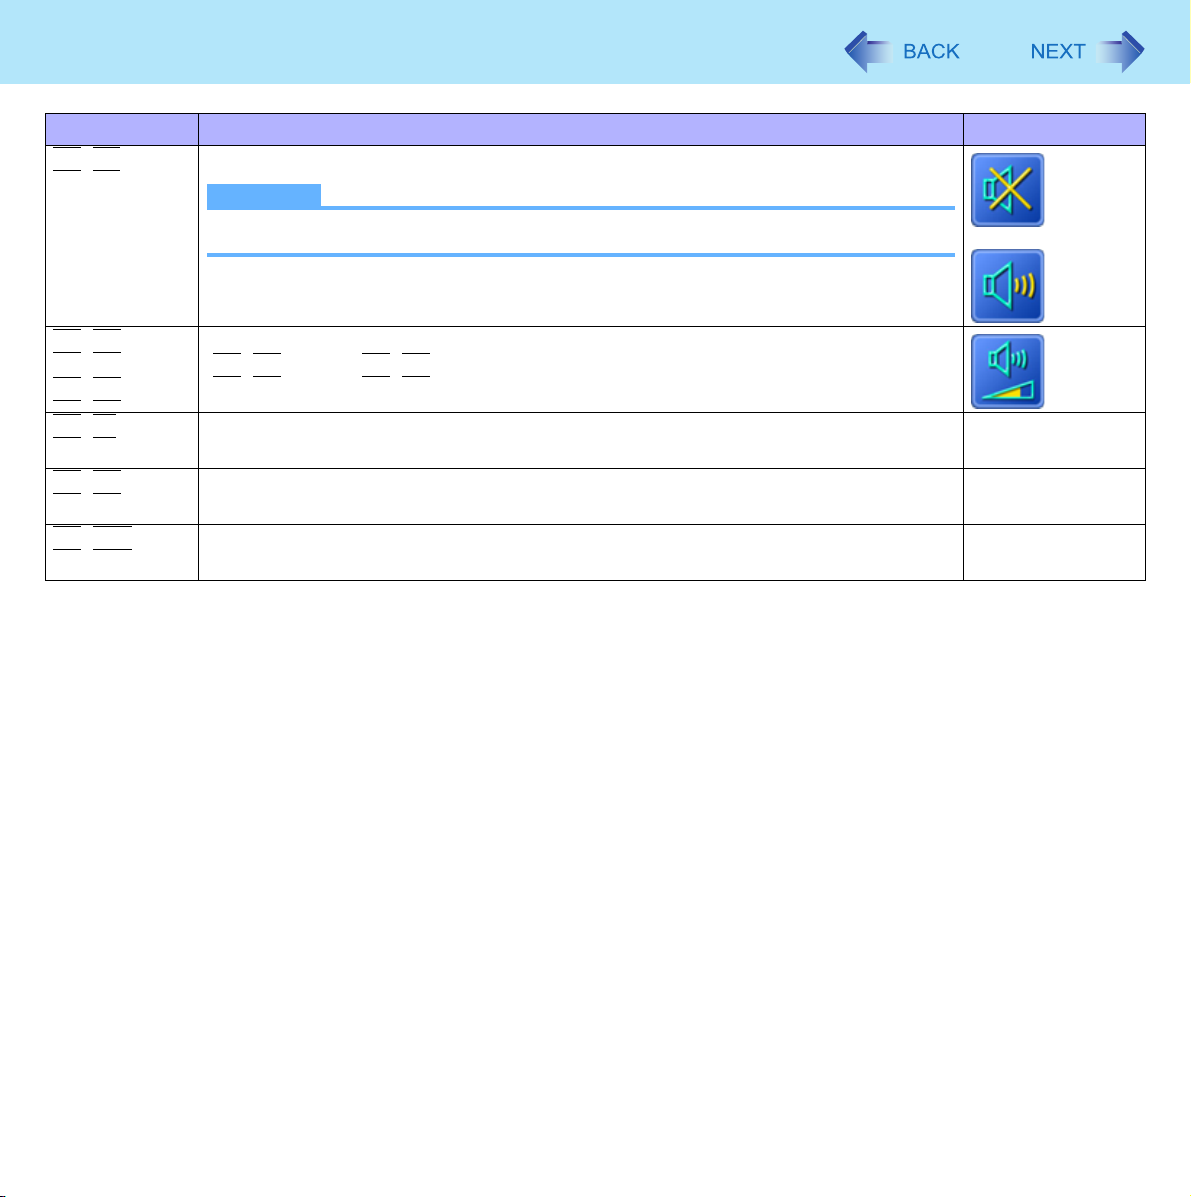
Key Functions Pop-up Icon
Fn+F4
Speaker on/off
NOTE
z Beeps do not sound if you turn off the speaker sound.
14
OFF
(MUTE)
ON
Fn+F5
Fn+F6
Fn+F7
Fn+F9
Fn+F10
Volume
Fn+F5
(
Activate sleep (Î page 29) __
Remaining battery power Î page 17
Activate hibernation (Î page 29) __
= down / Fn+F6= up)
Page 15
Key Combinations
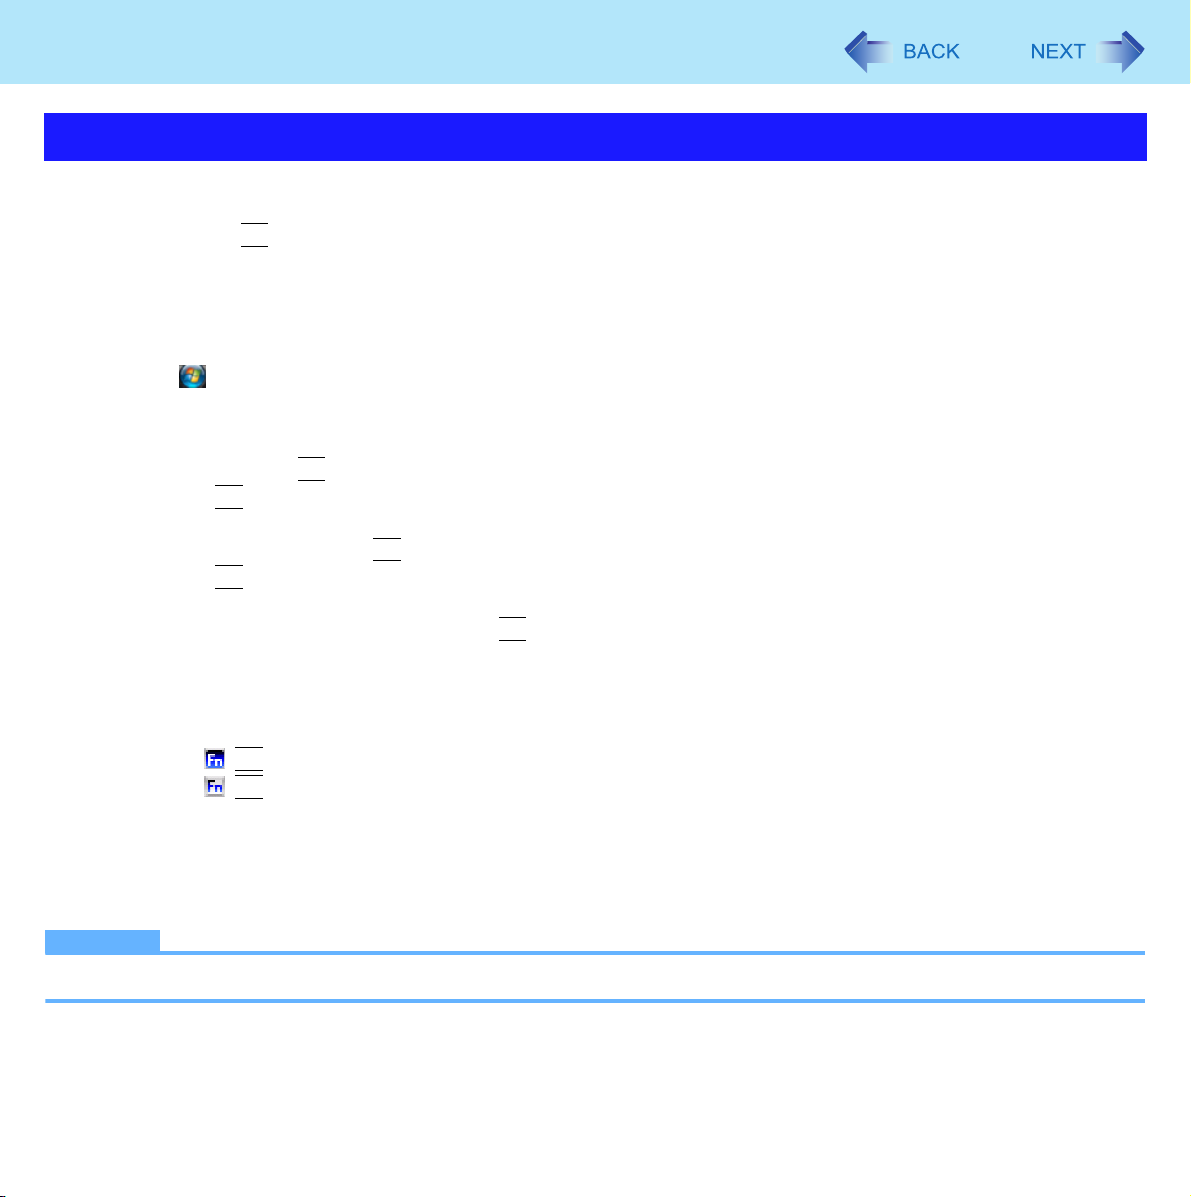
Hotkey Settings
You can make two settings:
• Fn key lock
Fn
When you press
combinations.
• Pop-up icon on/off
1 Start up the Hotkey Settings.
Click (Start) - [All Programs] - [Panasonic] - [Hotkey Settings].
2 Make the settings.
[Use Fn key lock]
z When using an
A Press
B Press another key. (Lock released)
z When using successive
A Press
B Press another key.
Fn key remains locked until you press
, the key is locked (pressed-down) until you press another key. Use this when pressing difficult key
Fn
key combination
Fn
once. (Locked)
Fn
Fn
twice. (Locked)
key combinations
Fn
again.
15
[Notification]
[Make sounds when Fn key is pressed]
[Show status on screen]: Displays the Fn key status on the notification area.
Fn
•:
•:
[Disable popup]
The Pop-up icon will not be displayed.
is locked.
Fn
is not locked.
3 Click [OK].
NOTE
z You can have different settings for each user.
*1
If the speakers are muted, beeps do not sound.
*1
Page 16
Battery Power
16
Tips about the Battery Pack
[Important Tips] (On-Line Manual)
z [Important Tips] provides information on how to maximize use of the battery pack, which is necessary for computing away
from your home or office.
See [Important Tips] using one of the following methods.
• Double-click on the desktop.
• Using the (Start) menu.
A Click (Start) - [All Programs] - [Panasonic].
B Select [On-Line Manuals] or [Battery], and click [Important Tips].
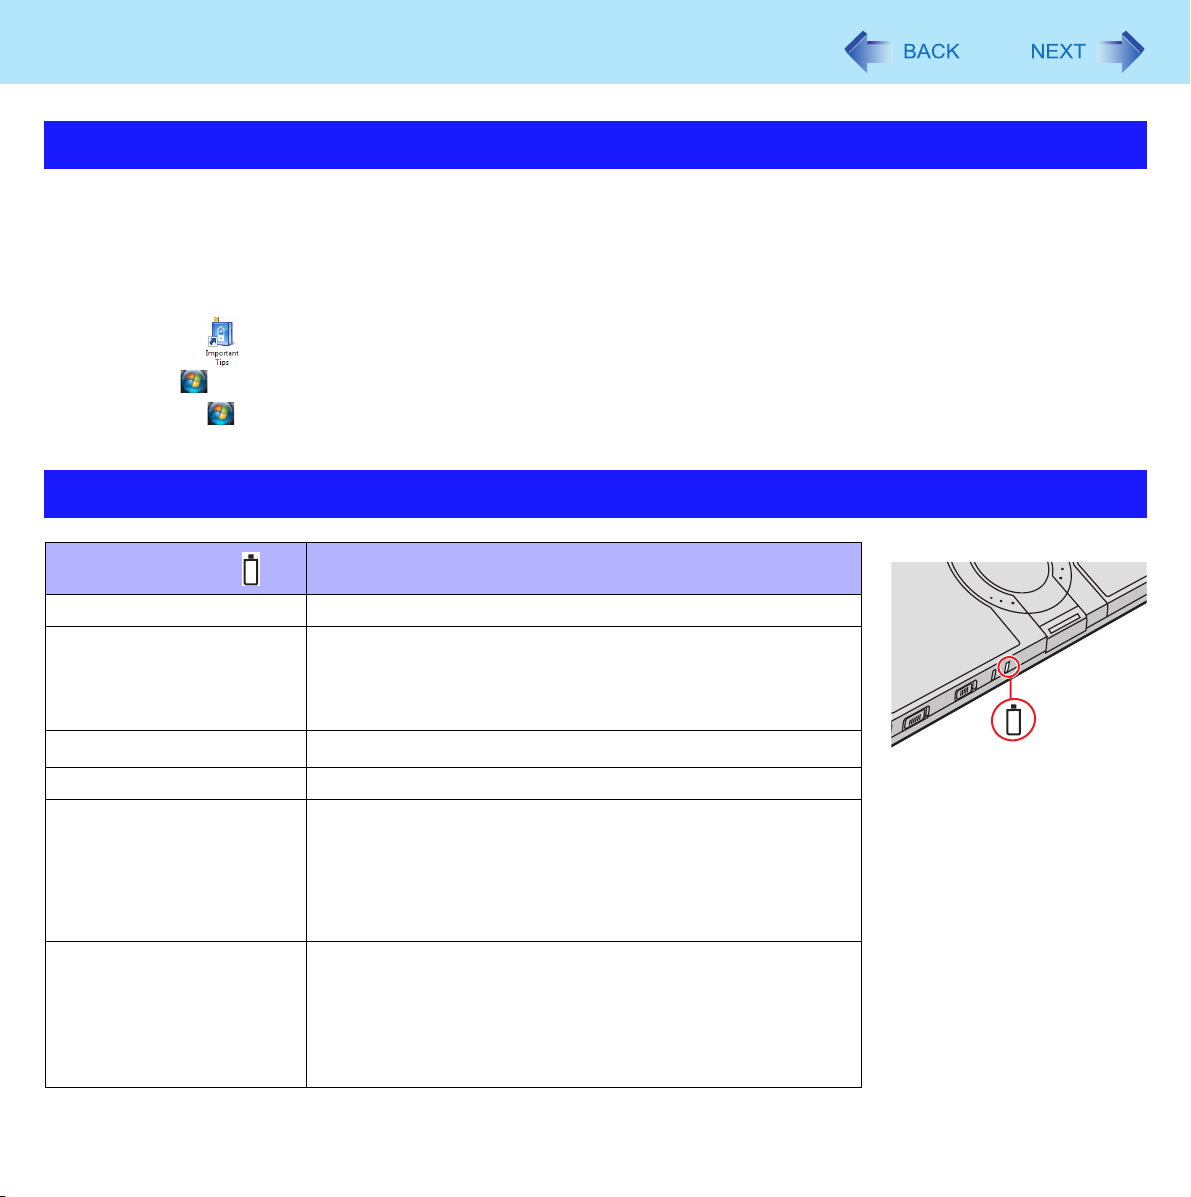
Checking the Battery Status
Battery Indicator
Not lit Battery pack is not connected or no charging.
Orange light on /
flashing
Green
Red The remaining battery power is approximately 9% or less.
Blinking red
Blinking orange
*1*2
*1
*1
*1*2
Charging in progress.
If [Battery Charging Indicator] in the [Main] menu of the Setup
Utility is set to [Flashing], the indicator will alternately become
lighter and darker (Flashing) (Î page 75).
Fully charged.
Battery pack or charging circuit may not be working properly.
Quickly save your data and power off your computer.
Remove the battery pack and disconnect the AC adaptor,
then connect them again. If the problem persists, contact
your technical support office. The battery pack or charging
circuit may be defective.
The battery cannot be charged temporarily due to the following reasons:
z Its internal temperature is out of the acceptable range.
z The power supply is not enough because software appli-
cations or peripheral devices are consuming a large
amount of power.
Battery Status
Page 17
Battery Power
*1
When the AC adaptor is connected.
*2
The orange display light has three modes: on, flashing and blinking. Note the difference between flashing and blinking.
NOTE
z Once the battery is fully charged, the computer performs recharging only when the remaining battery power becomes
less than approximately 95% (75% when Economy Mode (ECO) is enabled), so overcharging is avoided.
17
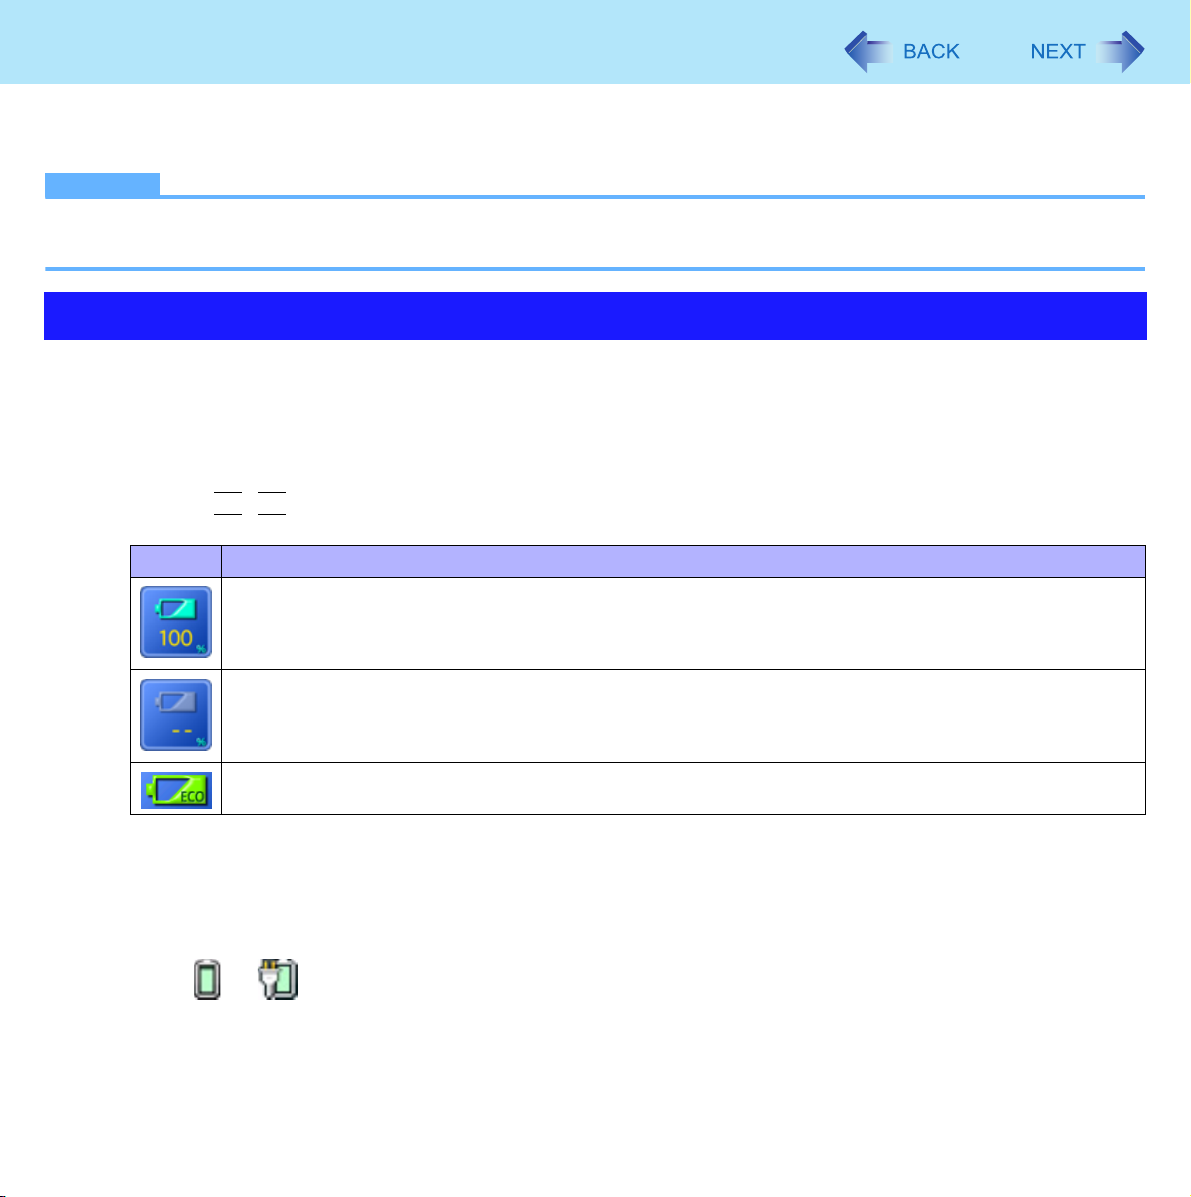
Checking the Remaining Battery Power
There are three methods to check the remaining battery power.
To check the remaining battery power on the screen
(After logging on to Windows)
1 Press
Display Condition
Fn+F9
.
When the battery pack is inserted (example)
When the battery pack is not inserted.
[ECO] is displayed when Economy Mode (ECO) is enabled.
To check the remaining battery power and remaining time using the Windows
Battery Meter
(After logging on to Windows)
1 Click or on the notification area.
Page 18
Battery Power
NOTE
z The battery display may not correspond to the actual remaining battery power in the cases as below. To correct the
display, perform the Battery Recalibration (Î page 21).
• The battery indicator remains red.
• The battery indicator lights orange and the display shows 99% for a long time (79% when Economy Mode (ECO) is
enabled).
• Low battery warning appears soon after a short time of use.
This can occur when the computer is in sleep for a long time without power supply from the AC adaptor.
z The battery display may not be the same as that of Battery Meter. This is not a malfunction.
18
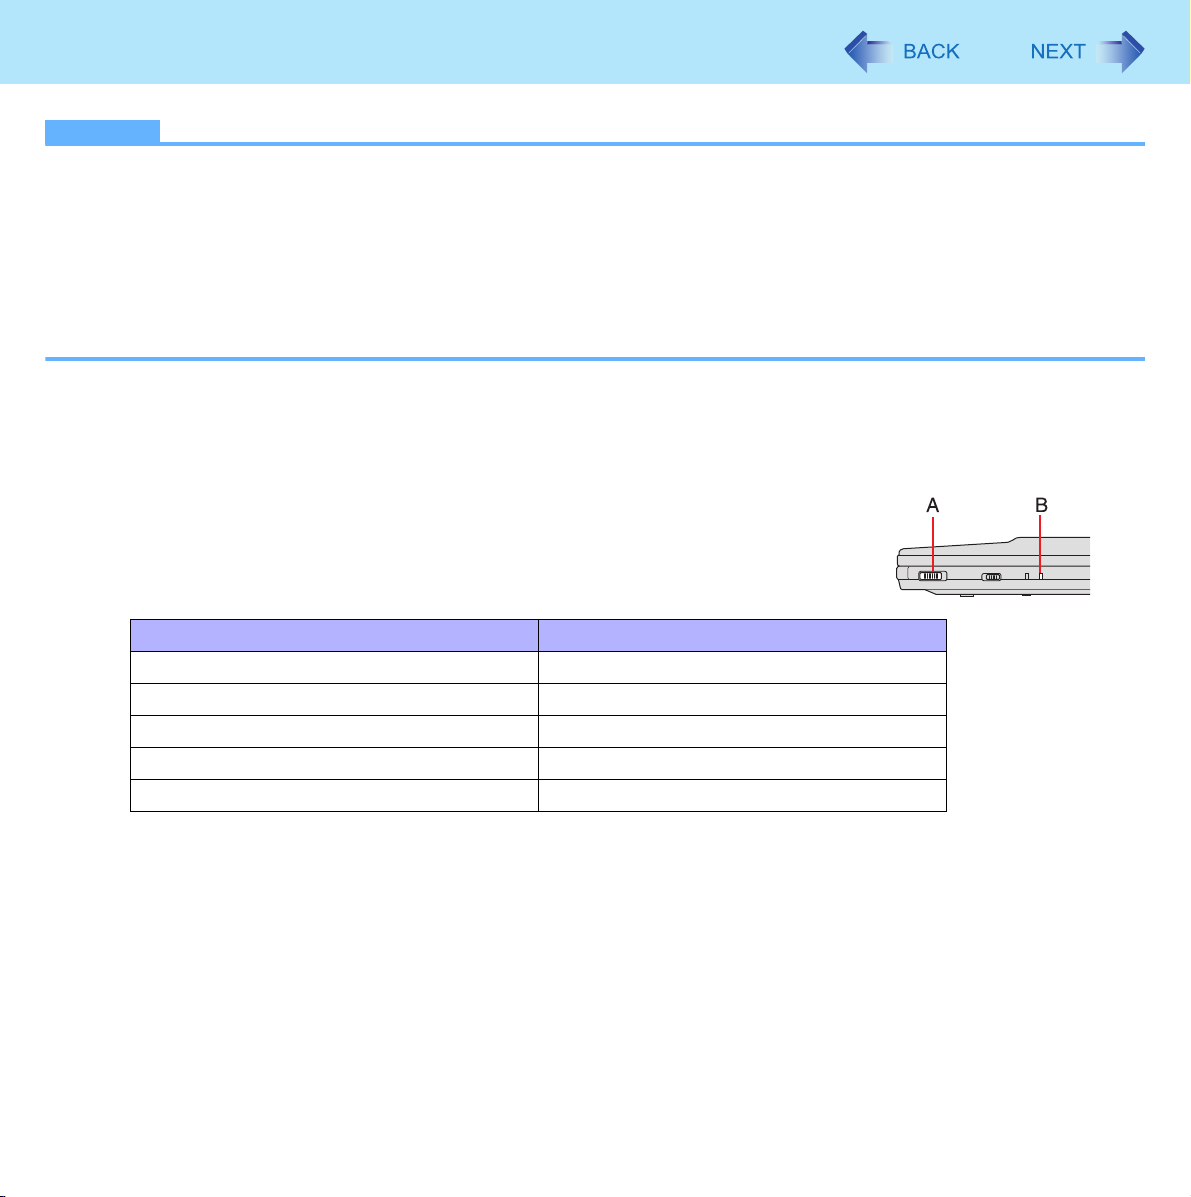
To check the remaining battery power using the battery indicator
(When the power is off or in sleep or hibernation)
1 Close the display and confirm that the latch is locked.
2 Disconnect the AC adaptor.
3 Slide the power switch (A) and confirm the battery indicator (B).
Battery Indicator (B) Remaining Battery Power
Red 0 % - 4 %
Blinking orange 5 % - 19 %
Orange 20 % - 49 %
Blinking green 50 % - 94 %
Green 95 % - 100 %
Page 19
Battery Power
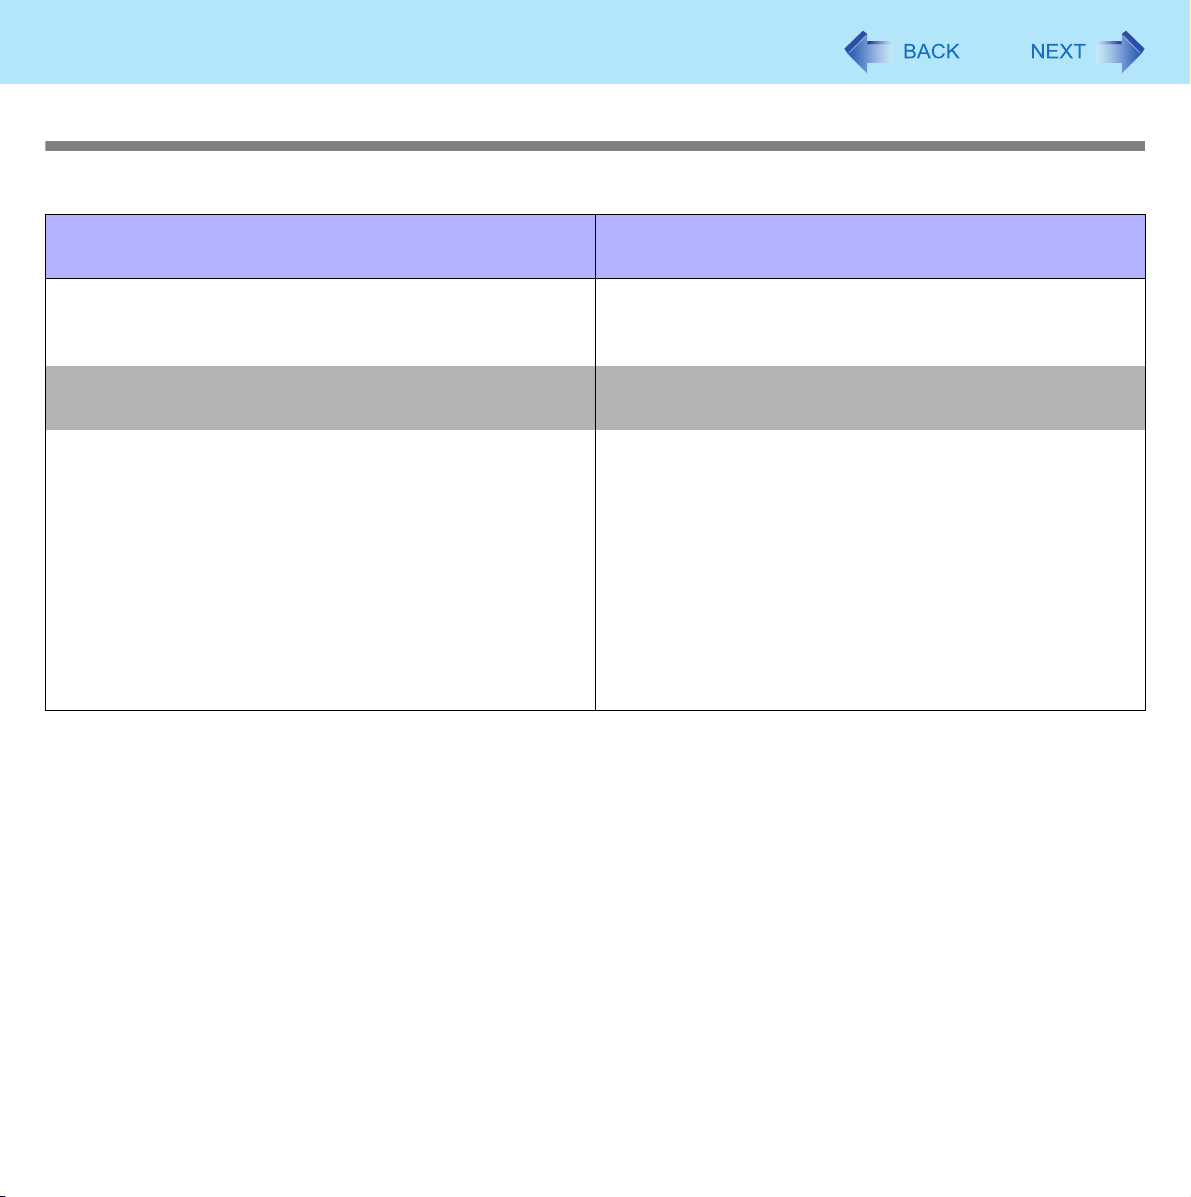
Computer behavior with low battery
The default settings are as follows.
19
When the remaining battery power becomes 10%
[Low battery level]
z Displays a message that the remaining battery power is
low.
↓
Charge the battery. Connect the AC adaptor or replace the battery to start up
z Connect the AC adaptor immediately. If you do not
have the AC adaptor, exit the running programs and
Windows, then confirm that the power indicator is off.
z If you have a fully charged spare battery, turn off the
computer, replace the battery and turn the computer on
again.
When the remaining battery power becomes 5%
[Critical battery level]
z The computer enters hibernation.
↓
the computer.
z Connect the AC adaptor and charge the battery.
z If you have a fully charged spare battery, turn off the
computer, replace the battery and turn the computer on
again.
When the computer enters hibernation with the battery
down and you resume the operation without charging
the battery, the Windows Resume Loader starts up. Follow the on-screen instructions. After that, however,
Windows may not start up normally, or the [Low battery
level]/[Critical battery level] function may not work normally.
Page 20
Battery Power
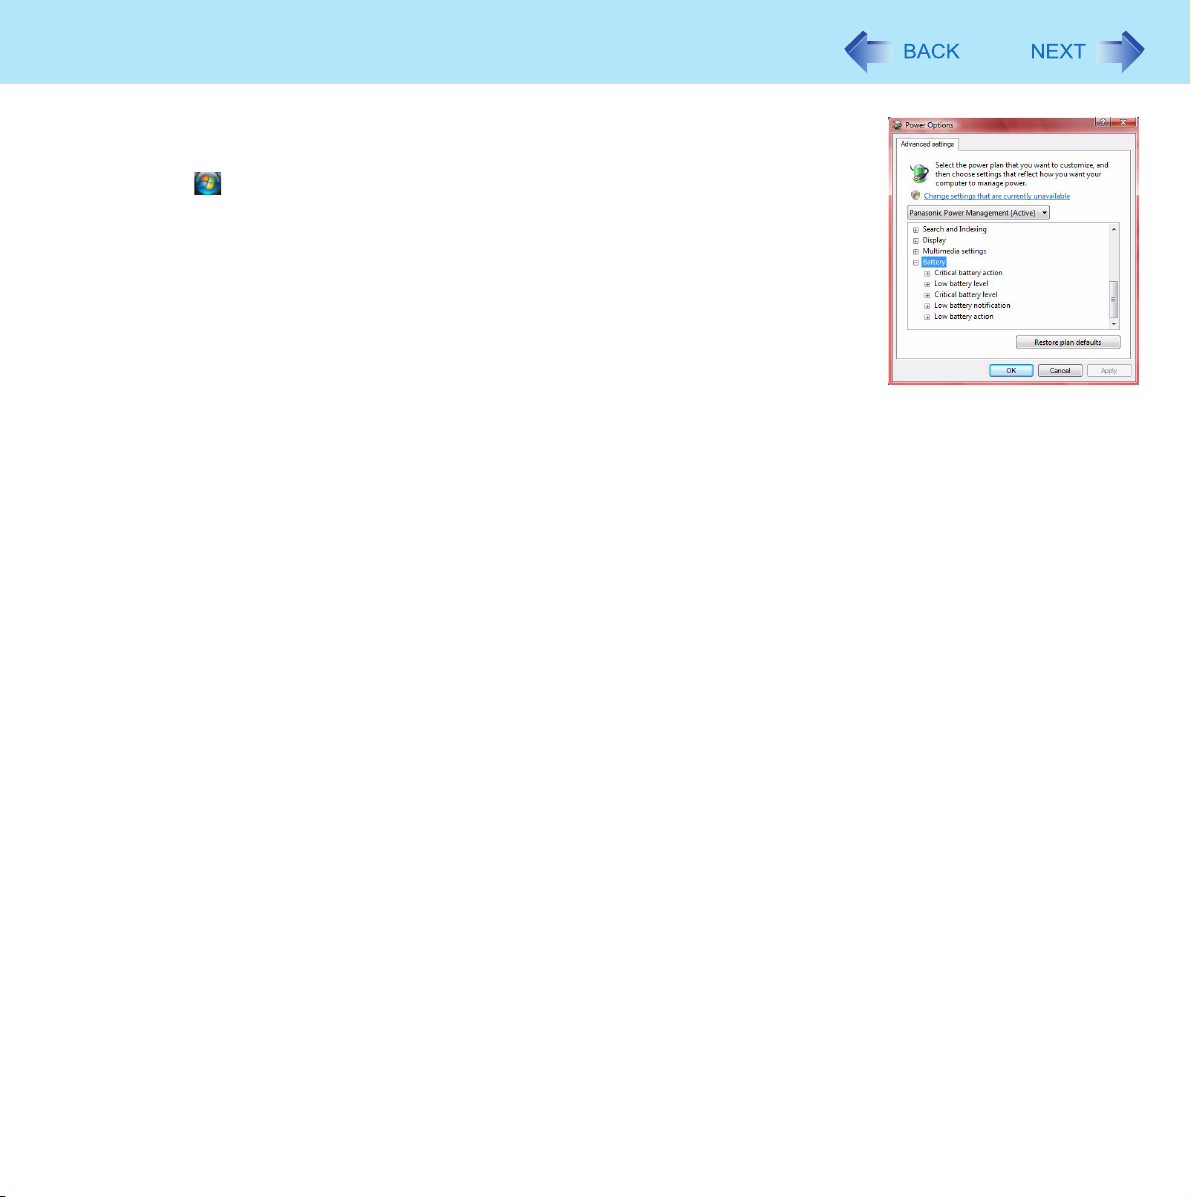
We recommend that you become familiar with alarm settings to become aware when battery
power is low.
1 Click (Start) - [Control Panel] - [System and Maintenance] -
[Power Options].
2 Click [Change plan settings] of the power plan you want to
change.
3 Click [Change advanced power settings].
4 Double-click [Battery], and double-click the item you want to
change.
5 Change the settings.
z Set the value for [Critical battery level] to 5% or more.
This is necessary for the sleep or hibernation to be completed (assuring data is saved) when the remaining
battery power is low.
6 Click [OK].
20
Page 21
Battery Power
21
Correcting the Battery Display (Battery Recalibration)
The “Battery Recalibration” function measures and memorizes the battery capacity. To correct the battery display, use this
function to fill the battery and then discharge it completely. Perform the procedure at least once immediately after purchasing
the computer. Normally the interval of “Battery Recalibration” is three months. The battery display may not be correct when
the battery pack deteriorates after a long time use. In this case, perform the procedure again.
1 Connect the AC adaptor.
2 Close all the applications.
3 Perform “Battery Recalibration”.
A Click (Start) - [All Programs] - [Panasonic] - [Battery] - [Battery Recalibration].
B When the confirmation message appears, click [Start].
z Frequent recalibration of the battery can degrade the battery. A caution message appears when the “Battery
Recalibration” is performed at the shorter interval than approximately a month. In this case, cancel the “Battery Recalibration”.
C When the message requests shut down of Windows, click [Yes].
The “Battery Recalibration” starts.
After the battery pack is fully charged, discharging starts. When the discharging is completed, the power goes off
automatically.
After the “Battery Recalibration” is finished, normal charging starts.
CAUTION
z Do not close the LCD while “Battery Recalibration” is being executed.
NOTE
z The temperature range should be 10
z The “Battery Recalibration” may take a long time due to the large battery capacity. This is not a malfunction.
• Full charge: Approximately 5 hours [MAX]
• Complete discharge: Approximately 4.5 hours
z “Battery Recalibration” does not increase the battery’s capacity. If “Battery Recalibration” is executed frequently, dete-
rioration of the battery may result.
z If you have two or more battery packs, perform the “Battery Recalibration” for each battery pack.
z If the computer is turned off during the “Battery Recalibration” (e.g., due to power failure, or accidental removal of the
AC adaptor and battery pack), the “Battery Recalibration” will not be completed.
z You can also perform the “Battery Recalibration” with the following procedure.
A Restart the computer.
°C to 30°C {50°F to 86°F}.
Page 22

Battery Power
B Press F9 while the [Panasonic] boot screen is displayed just after the computer starts the startup procedure.
C When the remaining battery power is displayed, press
D Follow the on-screen instructions.
Enter
.
22
Switching between Long Battery Life and Extended Operating
Time (Economy Mode (ECO) Setting Utility)
The battery pack is a consumable item, and deteriorates gradually each time it is used.
Use effective switching of the Economy Mode (ECO) to reduce battery pack deterioration, and enable the battery pack to last
a little longer. Switch the Economy Mode (ECO) in accordance with the way you use your computer.
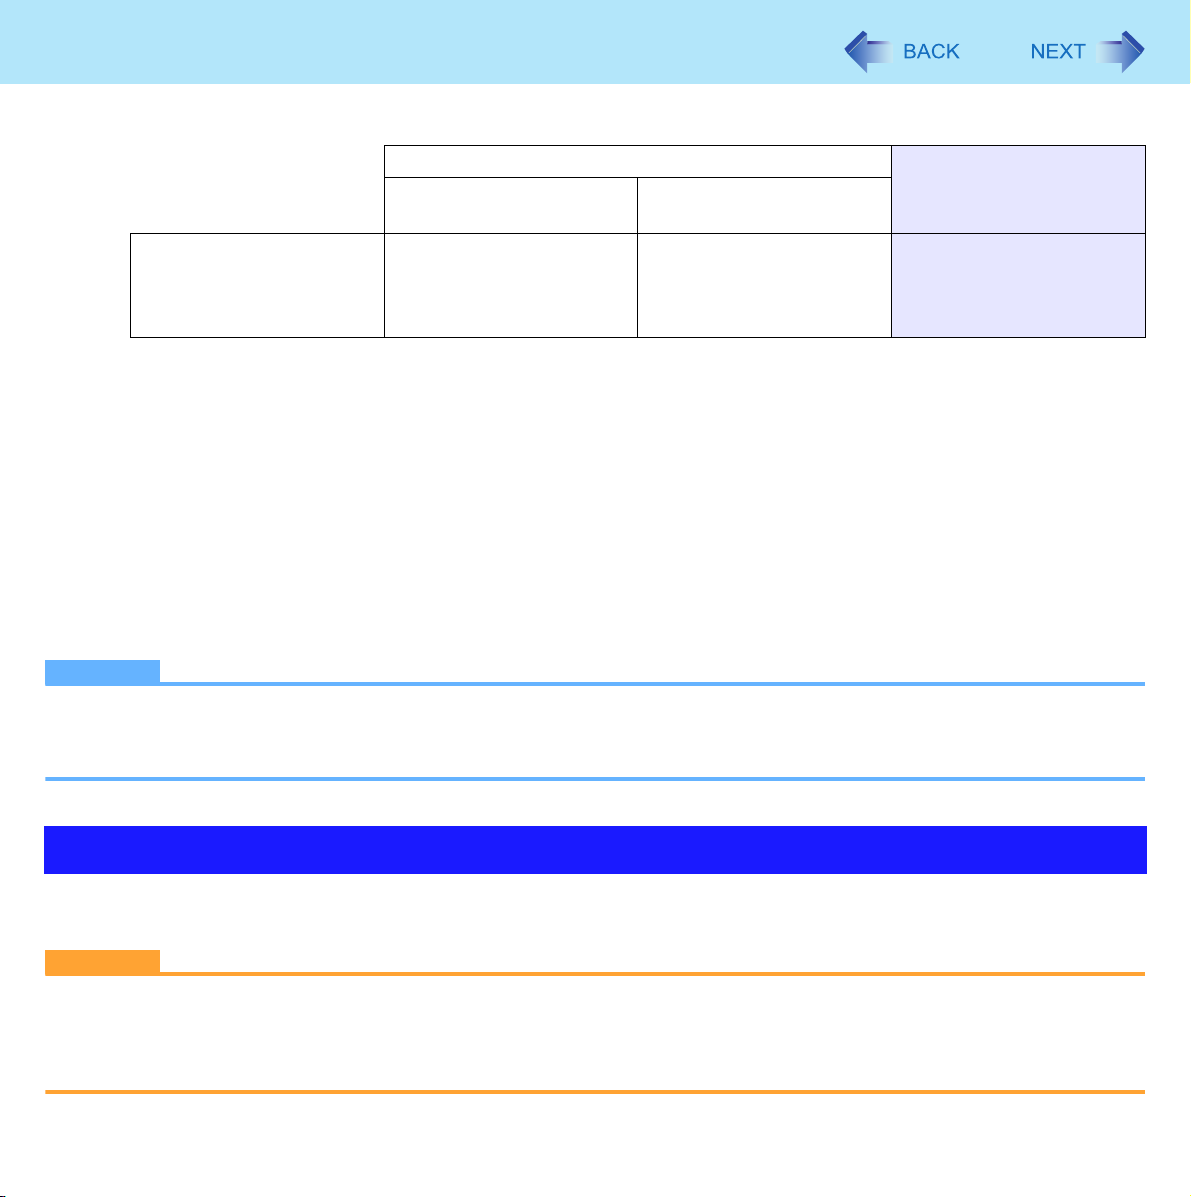
Economy Mode (ECO)
Disabled Enabled
Recommended usage
Operation time
Lifetime of battery
Mobile
Using your computer while on the move
Extended Normal
Normal Extended
AC adaptor is connected most of the time
Desktop
z Economy Mode (ECO) disabled:
In the default setting, the Economy Mode (ECO) is set to
Charge the battery to 100% (fully charged). We recommend that you disable the Economy Mode (ECO) if you use the battery pack frequently.
z Economy Mode (ECO) enabled:
Stop the battery recharging at 80% of fully charged. By stopping the battery recharging before 100% (fully charged), the
burden on the battery is reduced and deterioration is prevented, so the lifetime of battery pack will be extended. The computer will not operate as long on the battery as when Economy Mode (ECO) is disabled.
If you often use the computer with the AC adaptor connected, and if you want to prevent deterioration of the battery pack,
we recommend that you enable the Economy Mode (ECO).
“Disabled.”
Switching the Economy Mode (ECO)
1 Right-click either (Disable) or (Enable) on the notification area.
If or is not displayed, click (Start) - [All Programs] - [Panasonic] - [Battery] - [Economy Mode(ECO)
Setting Utility].
Page 23
Battery Power
2 Click [Economy Mode(ECO) Enable] or [Economy Mode(ECO) Disable].
[Economy Mode(ECO) Enable] [Economy Mode(ECO)
Remaining battery power:
81% or more.
Blink
Economy Mode (ECO)
Indicator
A When the confirmation message is displayed, read the message on the screen carefully, and click [OK].
B Use the computer with the AC adaptor unplugged until the remaining battery power is 80% or less.
When the remaining battery power falls to 80% or less, battery discharge ends, and the Economy Mode (ECO)
indicator lights.
If you continue using the computer with the AC adaptor, it may take about a day until the remaining battery
power falls to 80%.
C When the confirmation message is displayed, read the message on the screen carefully, and click [OK].
D Connect the AC adaptor.
If you do not click [OK] at step C, the computer will go into forced sleep after about three minutes to prevent the
remaining battery power from dropping.
• The computer will go into forced sleep even while application software is running or data is being sent or
received, or when the hard disk is being accessed, so be sure to connect the AC adaptor.
(The battery will discharge
until the remaining battery
power is 80% or less.)
Remaining battery power:
80% or less.
Light
23
Disable]
off
NOTE
z After disconnecting the battery pack, if you connect it to a computer on which the Economy Mode (ECO) settings differ,
the battery will either recharge or discharge until the next time the computer is turned on, giving priority to the battery
pack setting on that computer.
Replacing the Battery Pack
The battery pack is a consumable item so the replacement will be necessary (CF-VZSU45U). If the battery operation time
becomes noticeably short and not recovered even after recalibrating the battery, replace with a new battery.
CAUTION
z The battery pack is not charged when you first purchase it. Be sure to charge it before using for the first time. Charging
starts automatically when the AC adaptor is connected to the computer.
z Use only the specified battery pack (CF-VZSU45U) with your computer.
z In sleep, do not remove/replace the battery pack. Otherwise your data will be lost and the computer may be damaged.
Page 24

Battery Power
1 Turn off the computer.
z Do not use the sleep function.
2 Turn your computer over and remove/insert the battery pack.
z To r em ov e
A Slide the left latch (A) to the unlocked position ( ).
B Slide the right latch (B) to the unlocked position ( ) and while holding it there
push out the battery pack in parallel with the bottom surface of the computer.
z To i ns er t
A Slide the left latch (A) to the unlocked position ( ).
B Insert the battery pack in the correct direction until it securely fits the
connector.
C Slide the left latch (A) to the locked position ( ).
24
CAUTION
z Make sure the latch is securely locked, otherwise the battery pack may fall when you carry the computer.
z Do not remove the battery pack forcibly when the latch is locked. Doing so may damage the battery pack.
z Do not apply pressure from the top of the closed display when the battery pack has been removed. Doing so may
damage the LCD.
Page 25
Customizing the Power Setting
You can choose the optimum power setting for your operating condition by selecting a power plan. You can also create your
own power plan.
25
Changing the Power Plan Setting
1 Click or on the notification area and click [More power options].
2 Click [Change plan settings] of the power plan you want to change.
z If you do not find the power plan, click [Show additional plans].
3 Change the settings.
z [Change advanced power settings]: You can make more detailed settings.
4 Click [Save changes].
Creating Your Own Power Setting
1 Click or on the notification area and click [More power options].
2 Click [Create a power plan], click the basic plan and input the name of power plan.
3 Click [Next].
4 Change the settings and click [Create].
z To change the settings or to make more detailed settings (above “Changing the Power Plan Setting”)
Page 26

Computing on the Road
In the default setting, the power plan is set to [Panasonic Power Management], but you can reduce power consumption using
the following method.
When using the battery, the computer can be used for a longer period of time.
Power conservation effects can be achieved even when the AC adaptor is connected.
26
Select [Power saver] in the power plan setting
Î page 25, Changing the Power Plan Setting
Adjust the brightness (darker) with the Fn+F1 key (Î page 13)
Turn your computer off when not in use
Memory/Video Power Save
z You can select whether to put priority on saving power or on processing performance. Set [Memory/Video Power Save] in
the [Main] menu of the Setup Utility.
In the default setting, it is set to [Max Performance].
Remove peripheral devices (USB devices, PC Cards, external mouse, etc.) when
not in use
Turn off the wireless LAN when not in use (Î page 70)
Using display power saving settings
z Intel(R) Display Power Saving Technology makes it possible to reduce power consumption when operating with the bat-
tery by lowering the display luminance while maintaining a certain apparent LCD brightness by adjusting the image contrast, color and other settings. In some cases, however, the images on the display may become momentarily distorted, use
the setting in accordance with computer usage conditions.
We recommend removing the check mark from [Intel(R) Display Power Saving Technology] when fine adjustment of the
image or color is necessary, or when performing advanced image editing using image editing application software.
z Setting method:
A Right-click the desktop, and click [Graphics Properties].
B Click [Notebook] and click [Apply].
C Click [Display Settings] - [Power Settings].
Page 27

Computing on the Road
D Add a check mark for [Intel(R) Display Power Saving Technology] and set the slide
bar (A) to the [Maximum Battery] side, and click [OK].
z The slide bar can be adjusted in six steps, from [Maximum Battery] to [Maximum
Quality].
Minimize power consumption for the CD/DVD drive (Î page 36)
When using this computer with the battery pack only
z We recommend against using applications that place a significant load on the CPU.
Some screensavers place a large burden on the CPU even when you are not operating the computer.
We recommend that you do not use a screensaver.
Disable the Wake up from LAN Function (Î page 66)
27
Page 28
Sleep or Hibernation Functions
28
Starting Up Your Computer Quickly
The sleep or hibernation functions allow you to shut off the computer without closing programs and documents. You can
quickly return to the programs and documents that you were working on before sleep or hibernation.
Function Data is saved to Recovery time Power supply
Sleep Memory Short Required. (If power is not supplied, all data will be lost.)
Hibernation Hard disk Rather long Not required. (However power is slightly consumed to
keep the hibernation.)
Precautions
z Connect the AC adaptor if the computer will be in sleep for a long period of time. If you cannot use the AC adaptor, use
hibernation instead.
z Using sleep or hibernation repeatedly may cause malfunction of the computer. To stabilize computer operation, restart
Windows regularly (about once a week) without using sleep or hibernation.
z Save the necessary data.
z Close files you have opened from removable disks and network drives.
z The password you set in the Setup Utility is not requested at resuming. You can use the Windows password for security in
sleep or hibernation. In the default setting, the Windows password will be requested to resume. To set the Windows password, perform the following procedure.
A Click (Start) - [Control Panel] - [User Accounts] - [Change your Windows password].
B Click [Create a password for your account] and set the password.
C Click (Start) - [Control Panel] - [Change battery settings] - [Require a password on wakeup].
D Click [Change settings that are currently unavailable].
z A standard user needs to enter an administrator password.
E Check [Require a password] and click [Save changes].
z Do not enter sleep or hibernation in the conditions below, otherwise the data or file may be corrupted, sleep or hibernation
may not work, or malfunction may occur in the computer or the peripheral devices.
• When any of the hard disk drive indicator and the SD Memory Card indicator is on, or when the CD/DVD drive
indicator is blinking (accessing drive or card).
• When playing/recording audio files or displaying motion video such as MPEG files.
• When playing a DVD-Video.
• When writing to a disc.
• When using communication software or network function.
• When using peripheral devices.
(If peripheral devices fail to work normally, restart the computer.)
Page 29
Sleep or Hibernation Functions
Entering/Resuming from Sleep or Hibernation
To enter sleep or hibernation
29
1 Close the display, or slide the power switch (A) until a beep
Sleep: The power indicator (A) blinks green.
Hibernation: The power indicator (A) goes off.
z You can alternatively use the Windows menu to enter sleep or hibernation.
Click (Start) - - [Sleep] / [Hibernate].
CAUTION
While the computer is entering sleep or hibernation
z Do not:
• Touch the keyboard, Touch Pad, or power switch.
• Use an external mouse or other peripheral device.
• Connect or disconnect the AC adaptor.
• Operate the drive power/open switch.
• Operate the wireless switch.
• Close or open the display.
• Insert and remove the SD Memory Card.
Wait until the power indicator blinks green (sleep) or goes off (hibernation).
z It may take one or two minutes to enter sleep or hibernation.
z At the beep
cator blinks or goes off. If you slide and hold the power switch for longer than four seconds, the computer will forcibly
shut down and unsaved data will be lost even if you have set [When I press the power button:] to [Shut down] in
[Choose what the power button does].
*1
If the speakers are muted, beeps do not sound.
*1
, immediately release the power switch. After releasing the switch, do not operate it until the power indi-
*1
sounds.
A
In sleep or hibernation
z Do not attach or remove a peripheral device. Doing so may cause malfunction.
z Power is consumed in sleep. Power consumption may increase when a PC Card is inserted. When power is
exhausted, the data retained in memory will be lost. Connect the AC adaptor when using the sleep function.
To resume from sleep or hibernation
1 Open the display, or slide the power switch (A).
z In the default setting, the Windows password will be requested to resume.
A
Page 30
Sleep or Hibernation Functions
CAUTION
z Do not perform the following operations until resuming is complete. After the display is resumed, wait approximately
15 seconds (normally) or 60 seconds (when the computer is on a network).
• Touch the keyboard (except for password input), Touch Pad, or power switch.
• Use an external mouse or other peripheral device.
• Connect or disconnect the AC adaptor.
• Close or open the display.
• Shut down or restart Windows.
• Enter sleep or hibernation (Wait approximately one minute).
• Operate the drive power/open switch.
• Operate the wireless switch.
• Insert and remove the SD Memory Card.
z If the computer enters sleep while a USB keyboard or mouse is connected, touching the USB keyboard keys or mouse
will resume the computer.
30
Changing When the Computer Sleeps or Hibernates
Sleep
1 Click or on the notification area, and click [More power options] - [Change when
the computer sleeps].
2 Select the setting for [Put the computer to sleep:], and then click [Save changes].
z The setting for hibernation may change unexpectedly when you change the setting for sleep. Confirm that the
time to enter hibernation is 1,080 minutes (default setting) or longer (below).
Hibernation
1 After the step 1 of “Sleep” setting (above), click [Change advanced power settings].
2 Double-click [Sleep], and double-click [Hibernate after].
3 Click the item and select the setting.
4 Click [OK].
Page 31

Security Measures
You can set the password and/or enable/disable some functions for security purpose.
z Other security measures
• Embedded Security (TPM) (
Module (TPM)”.
Setting the Supervisor Password/User Password
Set the Supervisor Password before setting the User Password.
1 Start up the Setup Utility (Î page 74).
2 Select [Security].
Î page 77): For further information, refer to the Installation Manual of “Trusted Platform
31
3 Select [Set Supervisor Password] or [Set User Password], and press
4 Enter your password in [Enter New Password] and press
z When the password has been set, you need to enter your password in [Enter Current Password] and press
Enter
z To disable the password, leave the input field empty and press
.
Enter
Enter
.
.
5 Enter your password again in [Confirm New Password] and press
6 In [Setup Notice], press
7 Press
CAUTION
z Do not forget your password. If you forget your Supervisor Password, you will not be able to use your computer. Con-
tact technical support office.
z When running the Setup Utility, do not leave and go away from your computer even for a short time, since other people
may set or change the password.
NOTE
z The password will not be displayed on the screen.
z You can use up to 32 alphanumeric characters (including spaces).
• The case (upper/lower) is ignored.
• Use only the upper horizontal row of numeric keys to input your password.
• You cannot use
z Disabling the Supervisor Password also disables the User Password.
F10
, and then select [Yes] and press
Shift
and
Enter
Ctrl
to input a password.
.
Enter
.
Enter
Enter
.
.
Page 32
Security Measures
32
Preventing Your Computer from Unauthorized Use
You can set a start-up password to prevent your computer from unauthorized use.
1 Set the password (Î page 31), and select [Enable] in [Password on boot] in the [Security]
menu of the Setup Utility (Î page 77).
NOTE
z If the Supervisor Password or User Password has been set, the password input screen will be displayed on starting-up
of the Setup Utility even though [Password on boot] is set to [Disable].
Preventing Your Hard Disk Data from Being Read or Written
When the [Hard Disk Lock] is set to [Enable], it is impossible to read/write data from/to the hard disk when the hard disk is
inserted in a different computer. To be able to read/write data on the original computer, the Setup Utility settings must be the
same as when the hard disk was removed.
It is possible to set the hard disk lock even if [Password on boot] is set to [Disable], but we recommend that [Password on
boot] be set to [Enable] for security reasons.
(Note that this hard disk lock does not guarantee complete protection of data.)
1 Select [Enable] in [Hard Disk Lock] in the [Security] menu of the Setup Utility (Î page 77).
CAUTION
z When starting up the computer, if the message [Hard disk access is prohibited by “Hard Disk Lock”] appears, run the
Setup Utility, and change the settings to match the details when [Hard Disk Lock] was set.
z You cannot use the hard disk lock function without setting the Supervisor Password. Set the Supervisor Password
beforehand (Î page 31).
z When you have your computer repaired
• Contact technical support office.
• Before sending back the computer, be sure to set the [Hard Disk Lock] to [Disable].
NOTE
z The hard disk lock function works with the built-in hard disk. It does not work with the external hard disk.
Page 33
CD/DVD Drive
NOTE
z Connect the AC adaptor if writing operation takes a long time. If the remaining battery power becomes low and the power
is not supplied, writing operation may not be completed.
z Use Windows features or writing software to write to discs (e.g. “B’s Recorder” Î page 46).
Ensure the disc is compatible with the selected writing speed.
z The quality of written data depends on the disc.
33
Handling Precautions
Drive handling care
z Do not expose the drive to excessive smoke that may leave a residue, e.g., oil smoke, or tobacco smoke. Doing so can
shorten the life of the drive lens.
z We recommend cleaning the drive lens with an air puffer used for camera lenses.
(Do not use any spray-type of lens cleaning products.)
When opening/closing the disc cover
z When the computer is on, use the drive power/open switch (Î page 40).
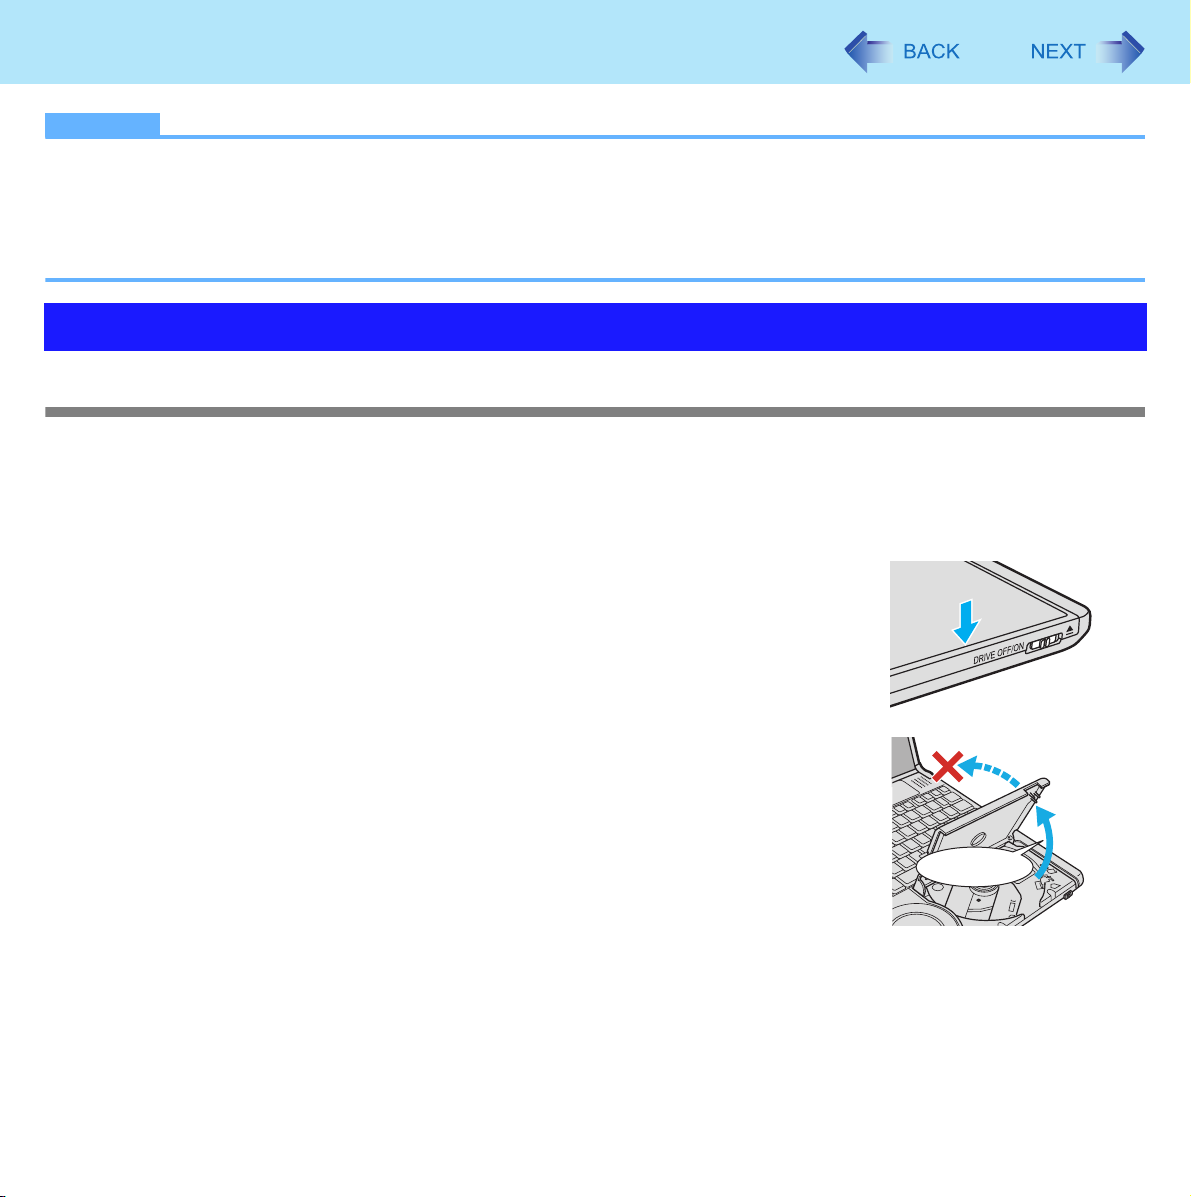
z When closing the disc cover, press down near the drive power/open switch (position of the
arrow) to ensure that the cover is locked.
z Do not access the drive until after the disc cover is closed and the CD/DVD drive indicator
changes to lighting from blinking.
z When inserting or removing a disc, be careful not to touch the lens of the drive.
z Do not leave the disc cover open and do not touch the lens.
The lens and disc can become dusty in some conditions. It may cause malfunction in reading or writing.
z The disc cover can be opened up to an angle of 75 degrees. Do not apply excessive force
to the disc cover. If you accidentally touch the disc cover causing the disc cover to open 75
degrees or more, press the cover forward slowly until the stopper returns to its original position.
z Be sure to close the display only after confirming the disc cover is closed. If the disc cover is
not closed, the LCD may become damaged.
z Never insert a foreign object such as a paper clip into the drive.
Doing so may cause malfunction.
z Insert the disc securely.
If the disc cover is closed without securely inserting the disc, the disc may be damaged.
75 degrees
Page 34

CD/DVD Drive
About recognition of disc
z It may take about 30 - 40 seconds for an image recorded to a rewritable media to be played back.
While the drive is being accessed
z Do not open the drive or move the computer while the drive is being accessed.
Doing so could cause the disc to shift position and this may damage the disc, or cause the drive to malfunction.
In addition, after running an application involving access to a disc, close the application before opening the disc cover.
z Do not move the computer while in the midst of writing or rewriting, as this may result in a writing failure.
z Do not apply excessive force to the disc cover.
z Do not operate the drive power/open switch.
z Do not shock the computer by removing or inserting cables and cards, etc. This may result in a read or write malfunction.
Regarding the internal drive connection interface
z The CD/DVD drive built into this computer uses a USB connection.
When removing PC Cards, SD Memory Card, or other USB devices, the internal CD/DVD drive is displayed as one of
[USB Mass Storage Device]. Do not remove the internal CD/DVD drive. If you remove it, the internal CD/DVD drive may
not operate normally and you may have to restart the computer.
34
Disc handling care
z Do not use deformed, warped, or irregularly shaped discs.
Reading of disc may not be possible depending on the disc conditions (cracks, dirt, modification, data recording quality,
copy protection, recording equipment/software that was used to create the disc, etc.)
z Before using a disc, carefully read the operating/handling instructions and package of the disc.
z If the discs are not handled appropriately, they may become dirty or scratched. Furthermore the writing speed may get
slower and the data may not be correctly written on or read from the disc. Other damage may cause a drive failure.
z Note the following precautions.
• Do not touch the disc surface.
• Keep the disc surface clean and free from dirt, dust, fingerprints and scratches.
• Do not write on the surface of the disc with a ballpoint pen or other writing instrument.
• Do not attach stickers to discs.
• Do not drop, bend, or place heavy objects on top of discs.
• Do not place or store discs in locations exposed to heat, direct sunlight, humidity or dust.
• If a disc is brought from a cold to a warm location, condensation may form on the disc. For read-only discs, wipe off the
condensation using a soft, dry, lint-free cloth before using the disc. For recordable/rewritable discs, wait until the condensation dries.
• When not using discs, keep them in their protective cases or cartridges.
Page 35
CD/DVD Drive
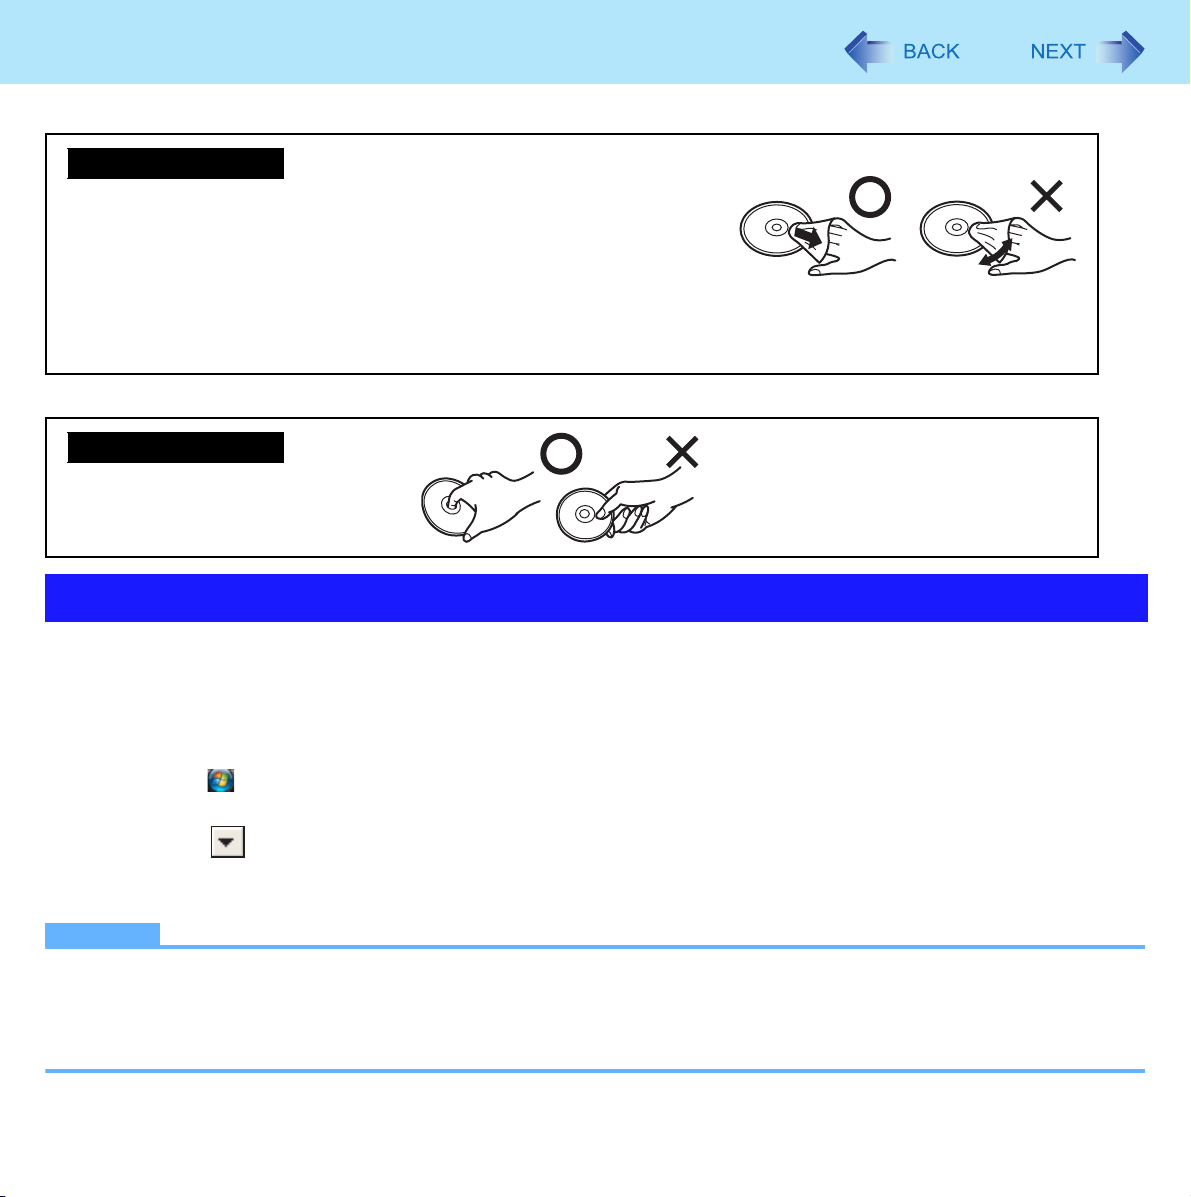
To clean discs
<For read-only discs>
Wipe discs with a dry, soft cloth from the center toward the edge.
If discs get very dirty, wipe with a moist, soft cloth from the center toward
the edge, then wipe again with a dry cloth to take up remaining moisture.
<For recordable/rewritable discs>
Use the Panasonic disc cleaner to clean these discs.
Do not use a cloth, CD cleaners or any other such cleaners under any circumstances.
How to hold a disc
Changing the Internal CD/DVD Drive Letter
35
In some cases, the drive letters for the CD/DVD drive or connected devices (SD Memory Card, external drives, etc.) may
change when the CD/DVD drive power is turned on or off.
z We recommend that you change the drive letter before installing application software and allocate the drive letter for the
CD/DVD drive from the latter half of the alphabet to prevent these letters from changing.
A Turn on the CD/DVD drive.
B Click (Start) - [All Programs] - [Panasonic] - [Optical Disc Drive Letter-Setting Utility].
z A standard user needs to enter an administrator password.
C Click in [New drive letter], click the drive letter, and click [OK].
D Add a check mark for [In the future, do not show this message.] and click [OK].
NOTE
z If you have the Optical Disc Drive Letter-Setting Utility currently running while logged on in one account, another user
cannot start it up after switching the Fast User Switching function.
z Even if you have set a new drive letter for the built-in CD/DVD drive, the drive letter may change if you insert an SD
Memory Card or a USB device after the power of the drive has been turned off.
Page 36
CD/DVD Drive
36
Turning On/Off the CD/DVD Drive
When you are not using the CD/DVD drive, you can turn the drive power off to minimize power consumption.
When you want to minimize power consumption (example)
z Set [CD/DVD Drive Power] in the Setup Utility to [Off]. (Î page 75)
The drive power remains off when the computer is started up.
z To use the drive, turn it on with the drive power/open switch or using [Manual Switching] in the Optical Disc Drive Power-
Saving Utility.
z When finished using the drive, turn the drive power off.
NOTE
z The drive power/open switch and the Optical Disc Drive Power-Saving Utility only operates after Windows has started
up.
z When the drive power is turned off, the message “The ‘USB Mass Storage Device’ device can now be safely removed
from the computer” will appear, but the CD/DVD drive is an internal device, so it cannot be removed.
z If the software application may not recognize the drive, exit the software application, and then start up the application
once more after checking to make sure that the drive power is on.
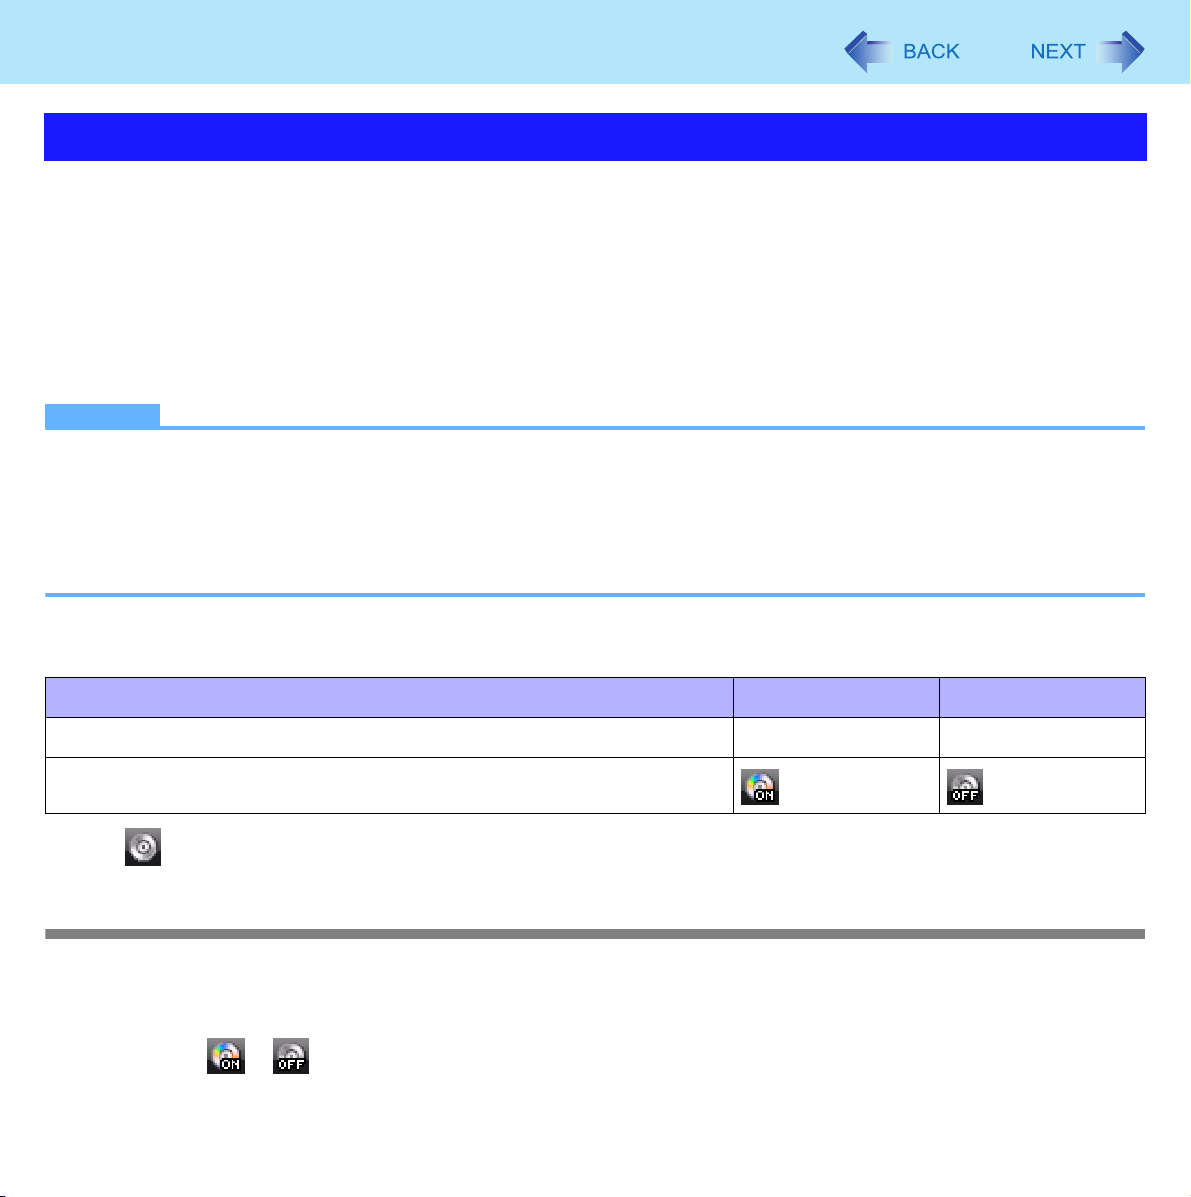
To check the power status of the drive
Where to check Power On Power Off
CD/DVD drive indicator Light on/Flashing Off
Drive power icon in the notification area
*1
When is displayed in the notification area (Î page 37)
*1
Turning on or off immediately
There are two methods, as follows.
z Use [Manual Switching] of the Optical Disc Drive Power-Saving Utility.
A Click or on the notification area.
Page 37
CD/DVD Drive
B Click [On] or [Off] for [Manual Switching].
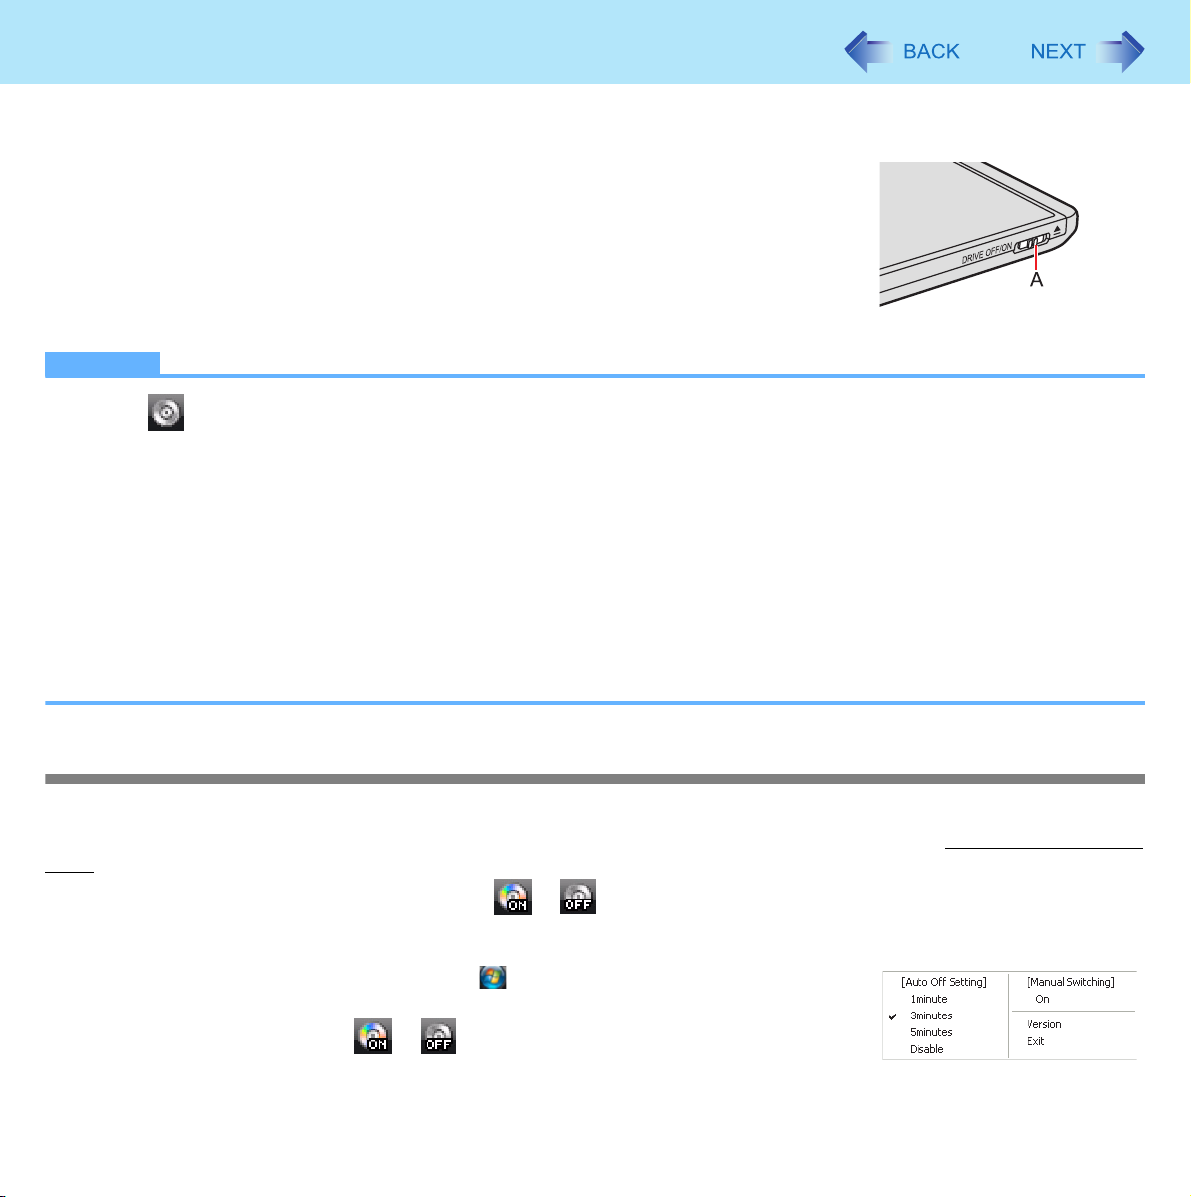
z Slide the drive power/open switch (A) to the left.
• Each time you slide the switch, you will hear a beep and the drive power will turn on or
off.
• If you slide the switch to the right, you will hear a beep and the disc cover will open after
the drive power turns on. After you hear the beep, it may take a few moments before the
drive power turns on/off, or until the cover opens. (If the speaker is muted, beeps do not
sound.)
NOTE
z When is displayed in the notification area:
• The [CD/DVD Drive] in the [Advanced] menu of the Setup Utility is set to [Disable]. In this case, you cannot use the
Optical Disc Drive Power-Saving Utility or the drive power/open switch.
z The Optical Disc Drive Power-Saving Utility only works with the internal CD/DVD drive in this computer. It will not work
with external CD/DVD drives.
z In the following cases, it is not possible to turn off using [Manual Switching]:
• When WinDVD is running
• During writing or reading of a disc
• When the drive is being used by an application such as B’s Recorder
z Do not slide the drive power/open switch repeatedly.
• If the switch is slid repeatedly, the message “The device ‘USB Mass Storage Device’ cannot be stopped because of
an unknown error.” may be displayed, but this is not a malfunction. Click [OK].
37
Turning off automatically after a preset time has elapsed
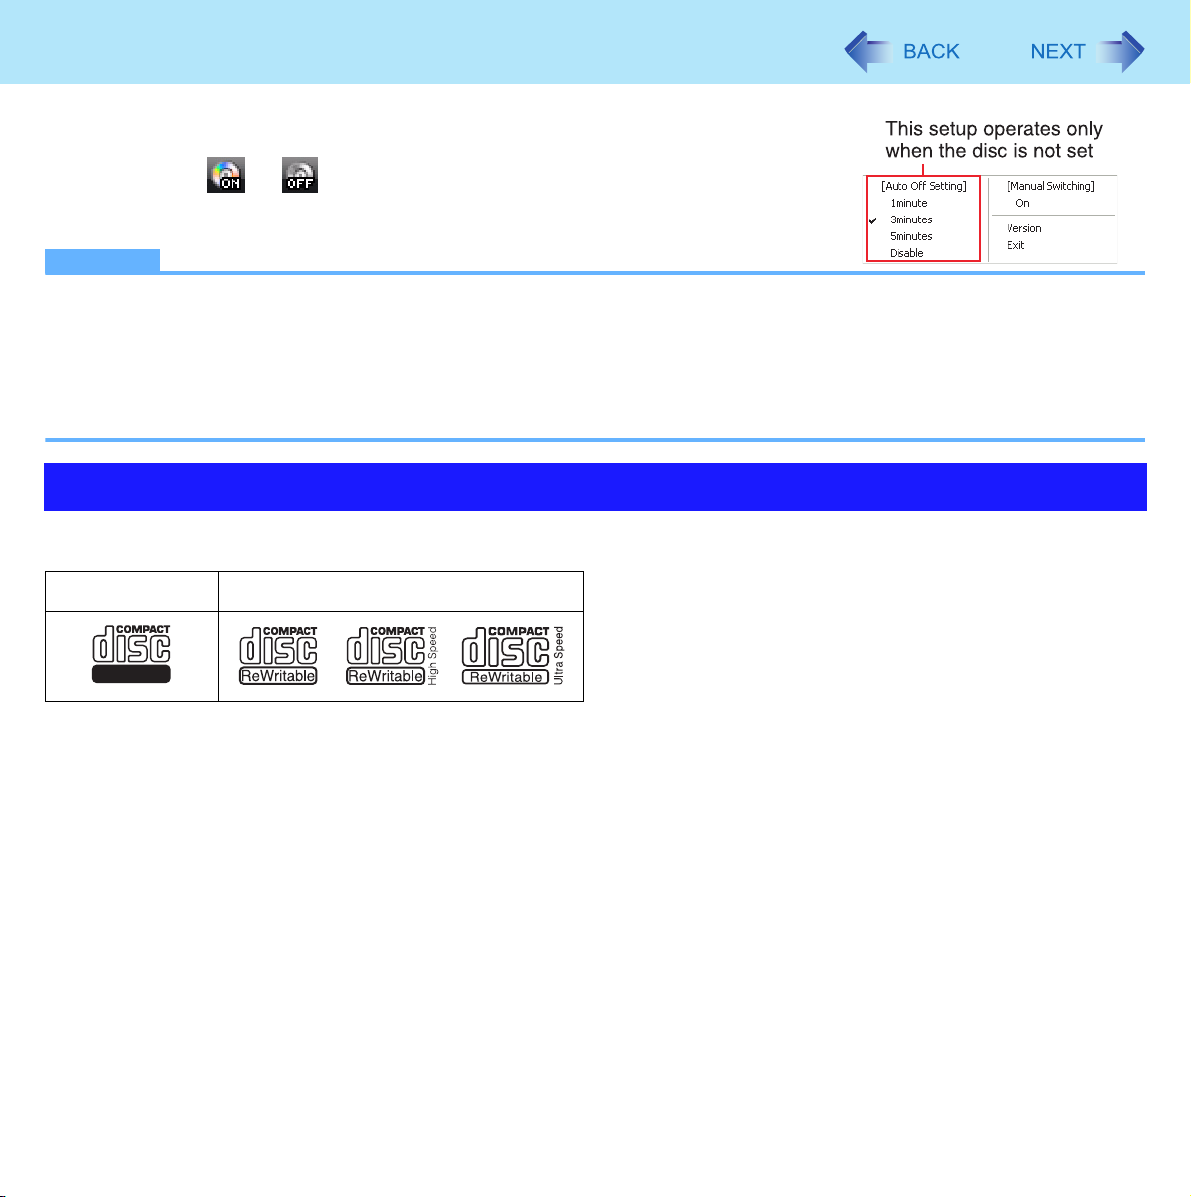
[Auto Off Setting] of this utility automatically turns the drive power off after the CD/DVD drive power has been turned on, or
after a disc has been removed from the CD/DVD drive, if a certain period of time passes during which a disc is not set in the
drive.
This utility starts up when computer is started, and or appears on the notification area.
z To turn the power on again after it has turned off: See “Turning on or off immediately” (Î page 36)
z To restart this utility after selecting [Exit], click (Start) - [All Programs] - [Panasonic] -
[Optical Disc Drive Power-Saving Utility], or restart the computer.
z When the cursor is placed over or , pop-up text will indicate the drive status and
the setting time.
(Optical Disc Drive Power-Saving Utility)
Page 38
CD/DVD Drive
Change the time until the power turns off
1 Select or on the notification area.
2 Select the desired time in [Auto Off Setting].
NOTE
z In the following cases, the drive power will not turn off even after the time set in [Auto Off Setting].
• When the disc cover is open
• When a disc is set in the drive
• When an external CD/DVD drive is connected (Including using a virtual CD drive)
• When WinDVD is running
• When the drive is being used by an application such as B’s Recorder
Disc Information
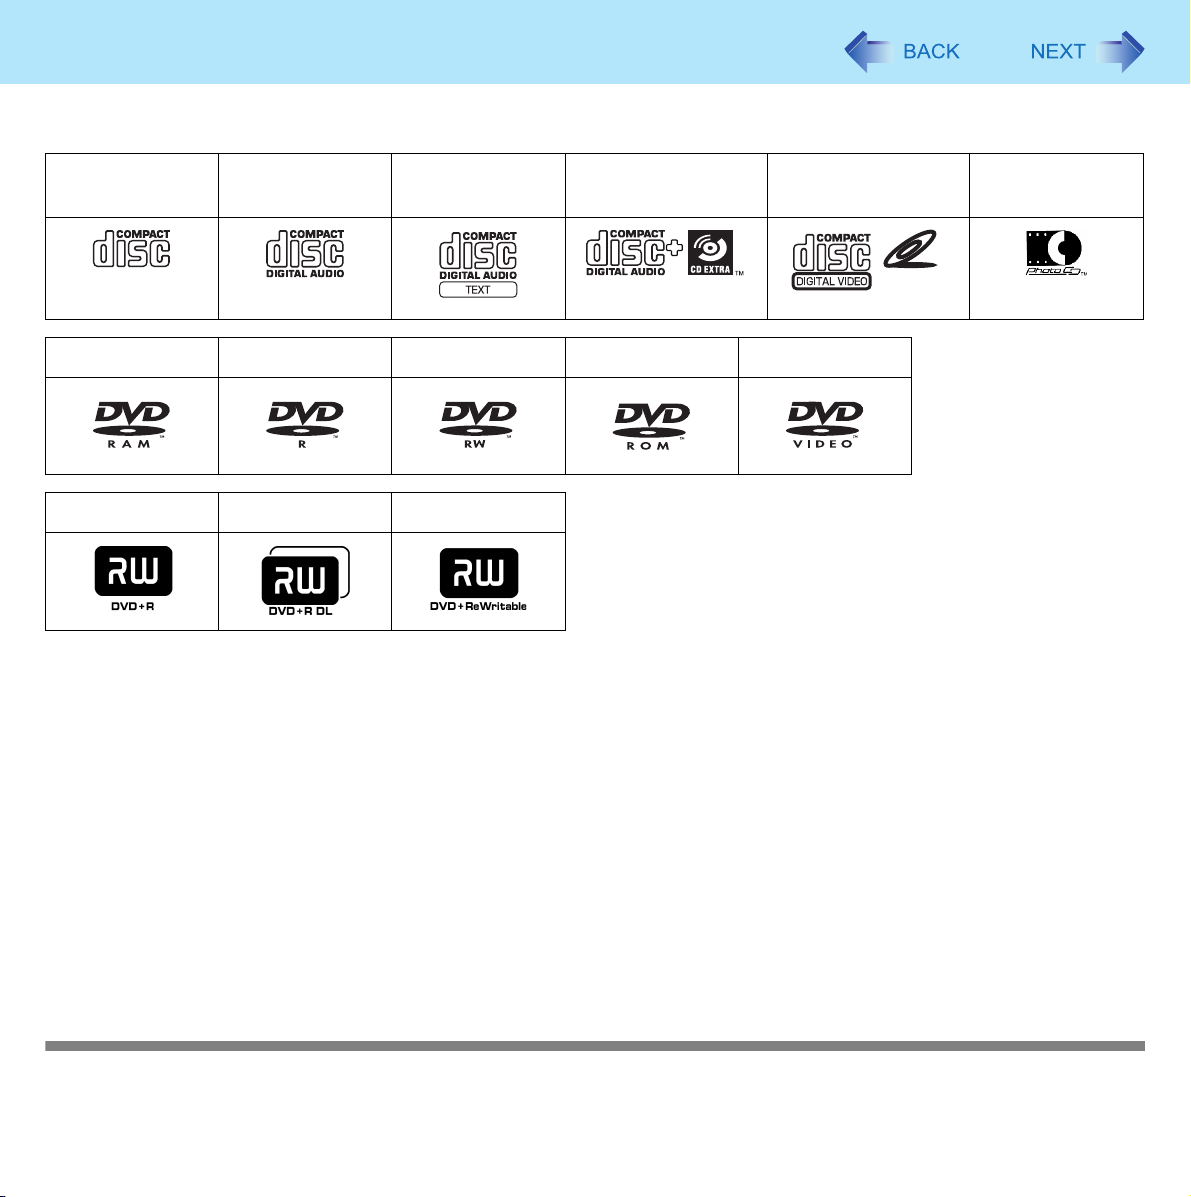
z You can read from/write to the following discs.
CD-R CD-RW
38
Recordable
Page 39
CD/DVD Drive
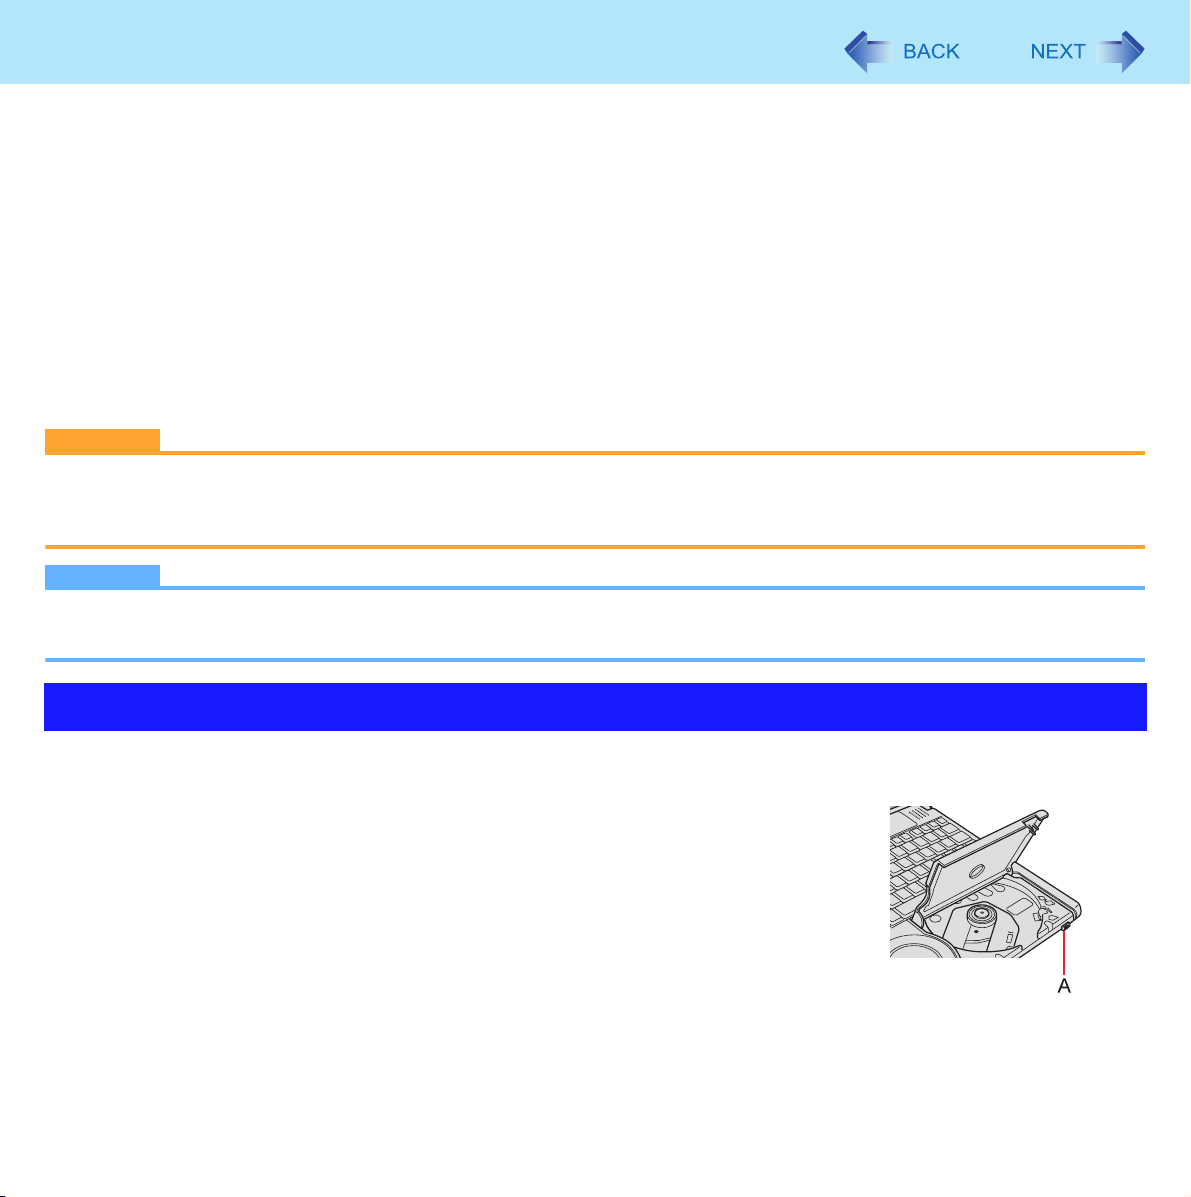
z You can read from the following discs.
39
CD-ROM CD DIGITAL
CD TEXT CD-EXTRA Video CD Photo CD
AUDIO
VIDEO CD
+R
*2
*3
DVD-RAM
*2
Only non-cartridge type or removable cartridge type can be used.
*3
DVD-Video mode/VR mode/+VR mode: Finalize using DVD recorder (Î page 45)
*4
Does not support DVD-RW Ver.1.0.
*5
When playing back motion video recorded over both layers of a one-sided, dual-layer disc, videos or sounds are interrupted at the point
where the recording layers change.
DVD-R
+R DL
*3
*3*5
DVD-RW
+RW
*3
*3*4
DVD-ROM DVD-Video
Recommended discs for writing
• CD-R
HITACHI MAXELL, Ltd.
MITSUBISHI KAGAKU MEDIA CO., Ltd.
RICOH Co., Ltd.
TAIYO YUDEN Co., Ltd.
• CD-RW/High-Speed CD-RW
MITSUBISHI KAGAKU MEDIA CO., Ltd.
RICOH Co., Ltd.
• Ultra-Speed CD-RW
MITSUBISHI KAGAKU MEDIA CO., Ltd.
Using DVD Discs
To play DVD-Video or MPEG2 files, you need to use DVD playback software such as WinDVD (Î page 43).
Page 40
CD/DVD Drive
40
Region code setting
DVD-Video are allocated to region codes according to where they are sold. To play a DVD-Video, the player’s software and
the drive must have the corresponding region code.
e.g.,
For U.S.A. and Canada: “1”
For Europe: “2”
For Southeast Asia (including Hong Kong and Taiwan): “3”
z The region code of the drive is not set at purchase. The operation depends on the DVD-Video that is first played.
• DVD-Video with a specific region code:
The drive will automatically be set at the same region code as the DVD-Video.
• DVD-Video with multiple region codes:
The screen to confirm the region code appears. (It may not appear with some DVD-Video.)
CAUTION
z You can change the region code setting up to five times including the initial setting. Be extremely careful because you
cannot change the region code anymore after the fifth change, even if you reinstall the operating system.
z Any problem resulting from illegal changing or altering of the region code is the user’s responsibility.
NOTE
z To check the current region code and the number of remaining times of changing the code, right-click on the WinDVD
screen and click [Setup] - [Region].
Inserting/Removing a Disc
1 Turn on the computer.
2 Slide the drive power/open switch (A) to the right.
z If the CD/DVD drive indicator is off (drive power is off), it will take some time for
the drive power to turn on, and for the disc cover to open. Wait for a moment.
3 Raise the disc cover a little.
z Do not force it open any wider than about 75 degrees. If you accidentally do so,
press the cover forward slowly until the stopper returns to its original position.
z If the disc cover cannot open if a hand is on the disc cover or the display is closed,
the drive will not be accessed correctly. In this case, open and close the disc
cover once or restart the computer.
Page 41
CD/DVD Drive
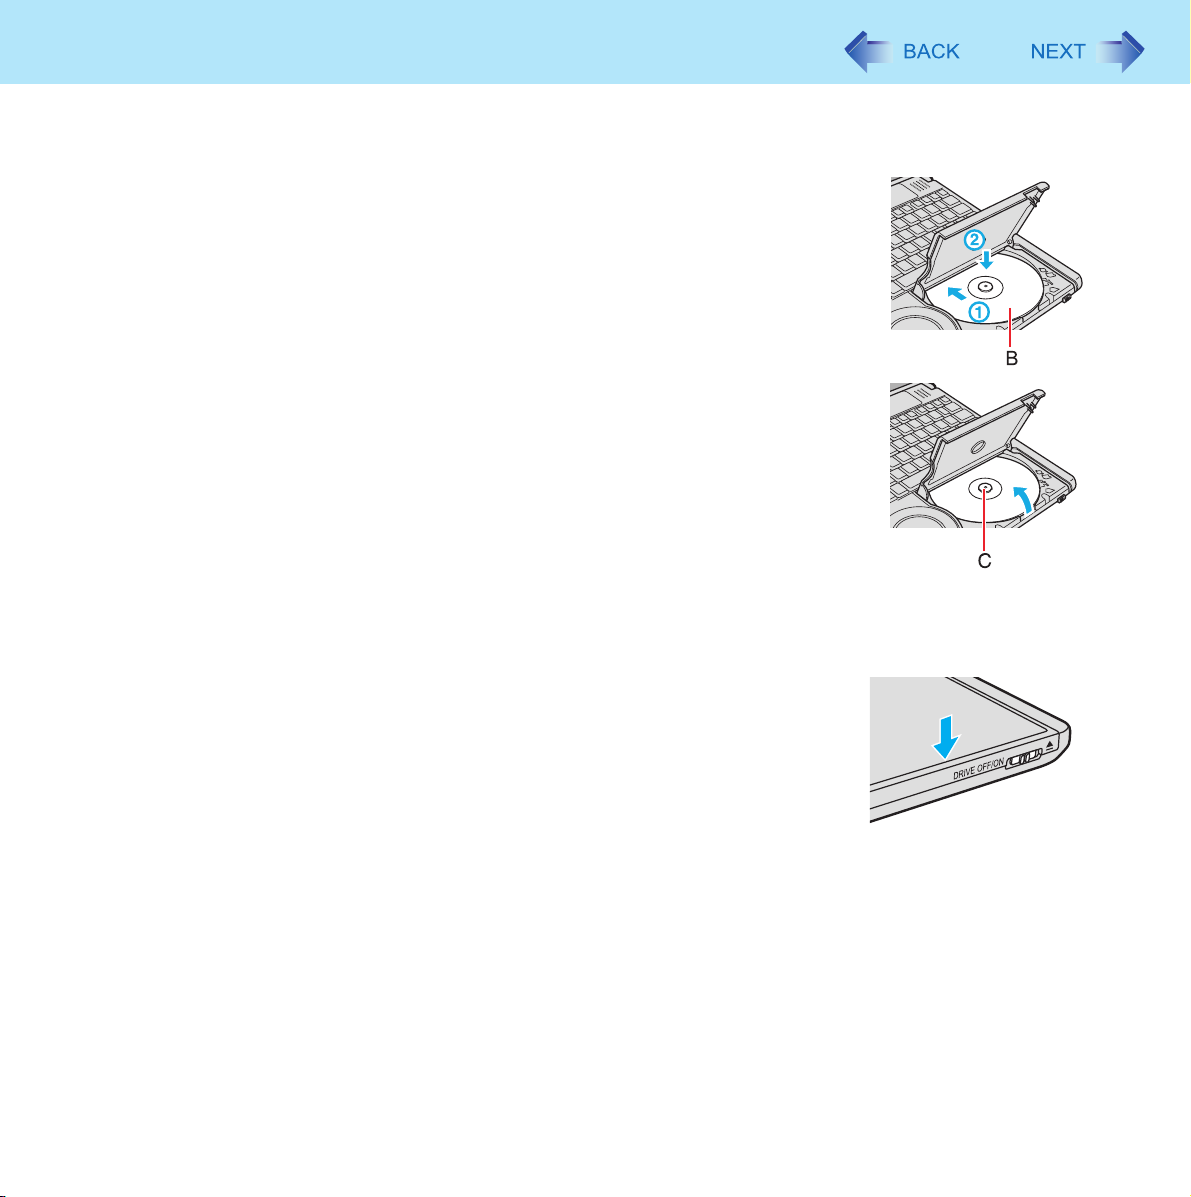
4 Insert/Remove a disc.
z To i ns er t
A With the title side of the disc (B) facing up, insert the disc under the keyboard.
B Push down on the center of the disc until it clicks in place.
z To r em ov e
Press on the center spindle (C) and carefully lift up the edge of the disc.
41
5 Close the disc cover.
Press down near the drive power/open switch (position of the arrow) to ensure
that the cover is locked.
Page 42
CD/DVD Drive
NOTE
z To remove a disc when the disc cover cannot be opened or when the computer is
powered off:
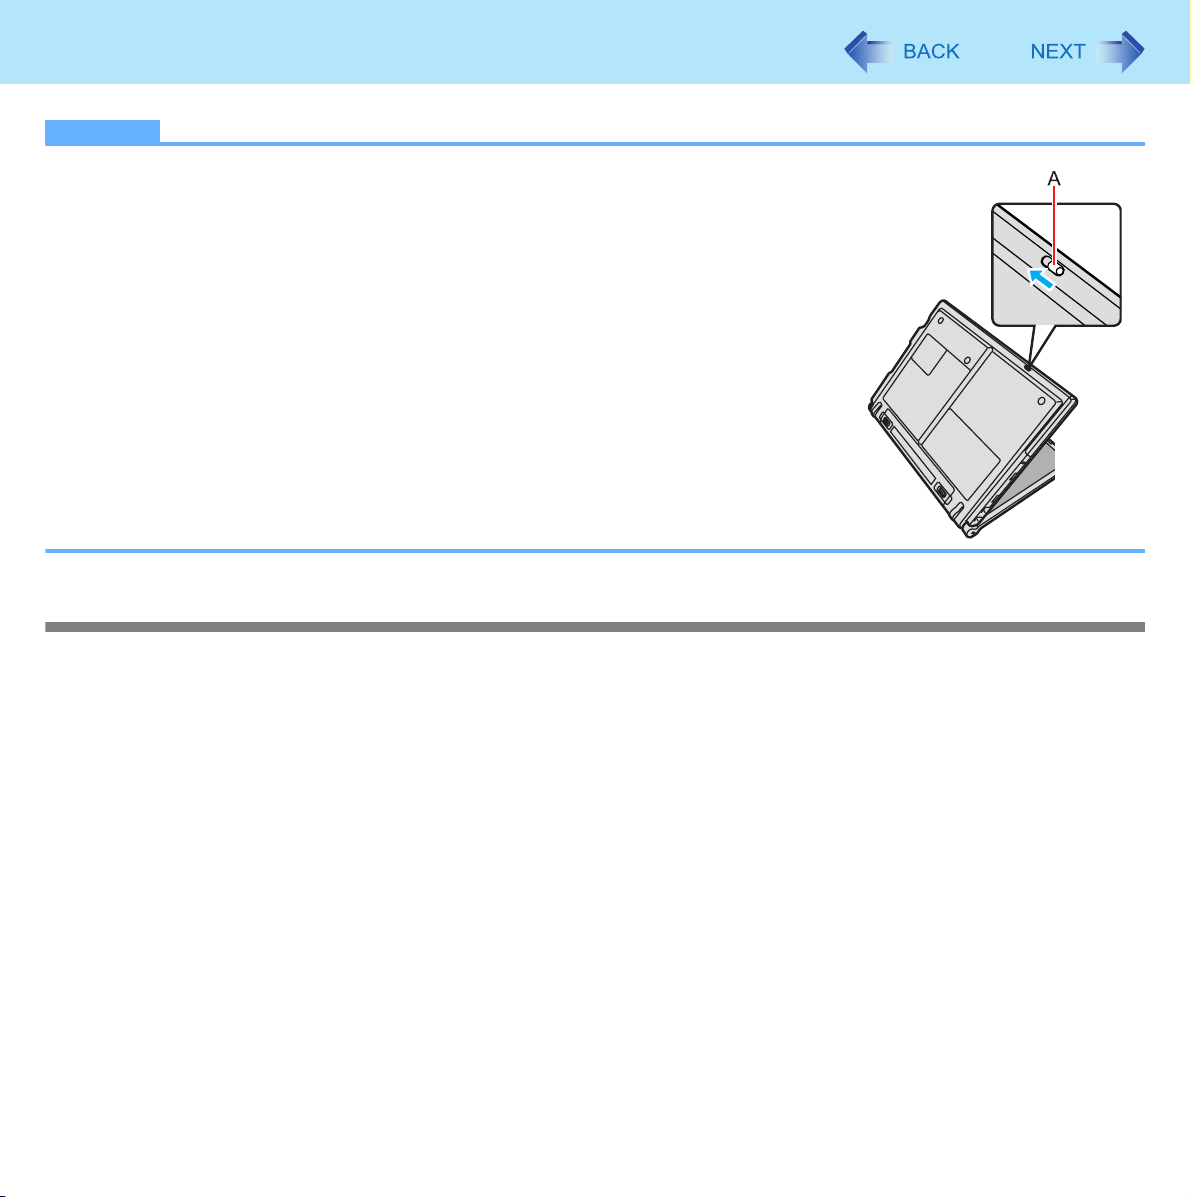
• Insert a pointed object (e.g., the bent-out tip of a paper clip, or the tip of a ballpoint
pen) into the emergency hole (A), and move in the direction of the arrow.
z After setting the disc, do not click the CD/DVD drive icon (on Windows Explorer,
etc.) until the disc is recognized by the computer.
z For AutoPlay CD:
• An AutoPlay CD may start during file access depending on the status of the disc.
z When playing back motion video from a disc, playback may not be smooth in some
conditions.
Power-saving mode
42
If the drive is not accessed for 30 seconds, the drive motor will automatically be shut down to reduce the power consumption.
When the drive is accessed again, the drive motor is turned on. In this case, reading of the disc data will take approximately
30 seconds.
Page 43
WinDVD
WinDVD is a software application for DVD playback. For further information, refer to the software’s online manual.
z DVD-Audio cannot be played back using WinDVD.
43
Running WinDVD
1 Double-click on the desktop.
z Alternatively click (Start) - [All Programs] - [InterVideo WinDVD] - [InterVideo WinDVD for Panasonic].
To access the online manual
After starting WinDVD, perform either of the following procedures.
z Click “?” on the WinDVD.
z Right-click on the WinDVD screen and click [Help].
SUPPORT INFORMATION
If WinDVD does not operate properly, we recommend carefully reading the online help file first for problems with the operating environment or operations.
If you still cannot troubleshoot the problem, enter the required information in the inquiry form on the InterVideo, Inc. homepage (http://www.intervideo.com/), and submit the form.
CAUTION
z Do not start WinDVD while the hard disk drive indicator is blinking immediately after the computer is turned on.
z While WinDVD is running, do not:
• Enter sleep or hibernation.
Fn
• Switch the output destination by pressing
• Turn off the CD/DVD drive power.
If performing the operations described above, shut down WinDVD, then restart.
z During motion video playback, do not:
• Eject the disc.
• Use other applications or the Command Prompt.
• Change the settings of the screen properties.
• Turn off the CD/DVD drive power.
If performing the operations described above, shut down WinDVD, then restart.
z Do not install another player software together with WinDVD.
Doing so may interfere with smooth playback. Some DVD-Video discs contain the player software and start installing. In
this case, cancel the installation as soon as possible. If you accidentally installed another player software and find a problem in playback, try either of the following procedures.
+ F3.
Page 44
WinDVD
• Uninstall the player software by clicking (Start) - [Control Panel] - [Uninstall a program].
(Refer to the instruction manual for the name of player software.)
• Set WinDVD as the playback software if you can select the option in the player software settings.
44
Notes During Use
If you maximize the video display window:
z You can return to the original window size by double-clicking over the images.
Frame dropping may occur (images or sounds are disrupted)
z Immediately after resuming from a pause, frame dropping may occur depending on the operating environment or DVD
video (images or sounds are disrupted).
z If the DVD video software other than WinDVD has been installed, the images and motion videos may not be displayed
properly.
The playback screen appears to be blurred, white, and jumpy
z Change the color preset settings.
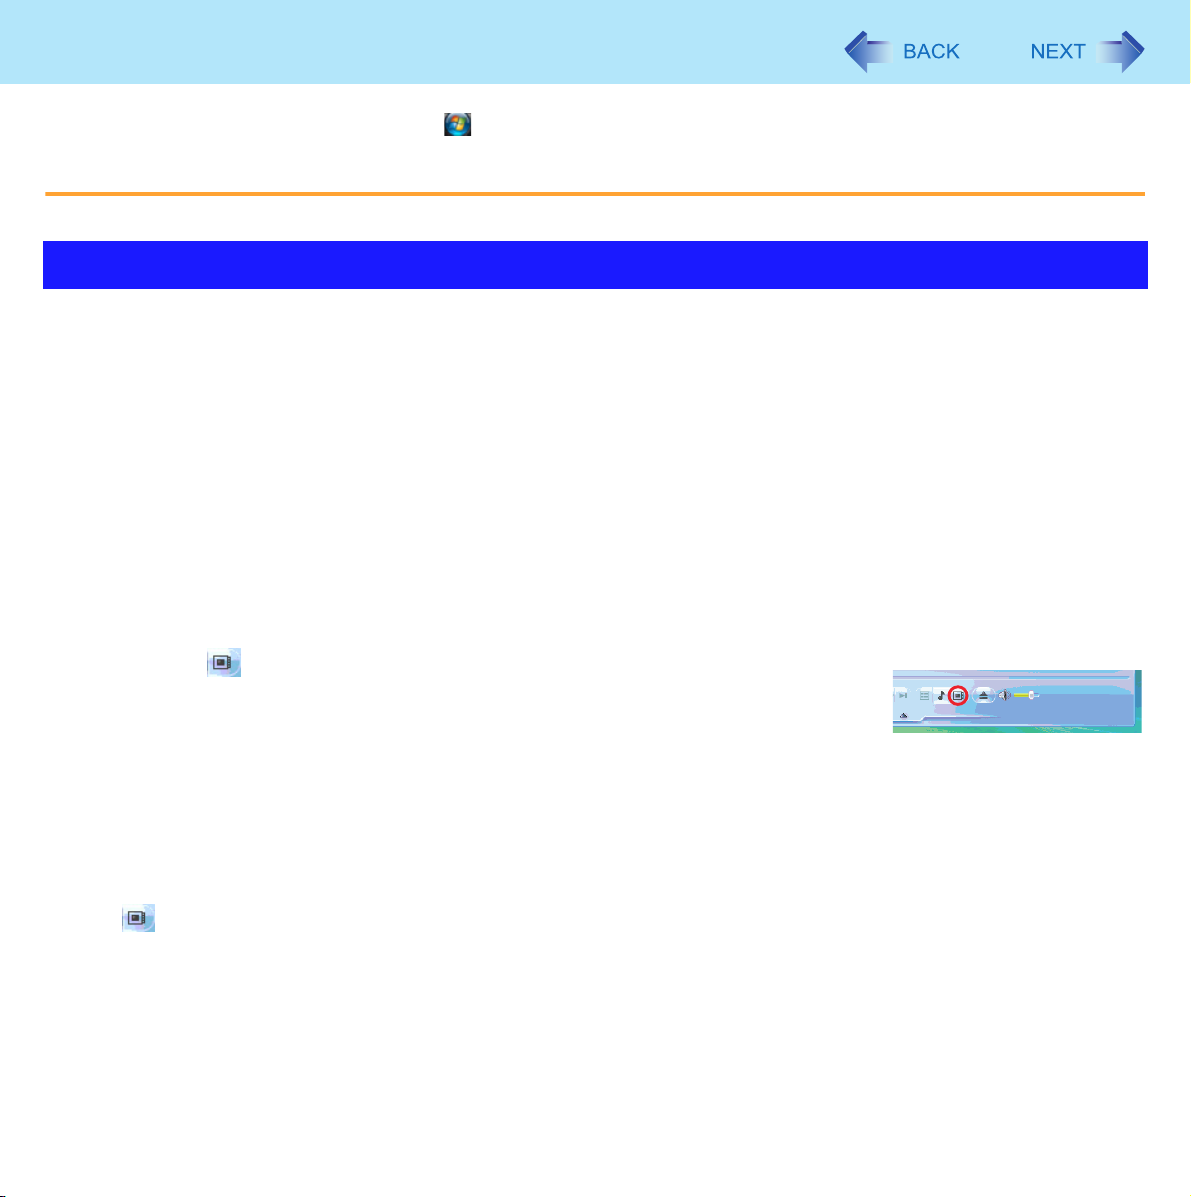
A Click on the Player Panel to display the Video Center.
B Click [Color].
C Click [Custom], and on the same screen adjust the color by moving the sliders.
When battery operation time has become short:
z Click on the Player Panel and click [Display]. Set [Deinterlace] to [Auto] in the Video Center.
Page 45
WinDVD
45
If you have uninstalled WinDVD accidentally:
z Reinstall it by following the steps below.
A Set the Product Recovery DVD-ROM in the CD/DVD drive.
*1
B Click (Start) and input [d:\windvd]
C Right-click [setup] in [windvd] folder and click [Run as Administrator].
If there are two or more “setup” files, right-click the file whose [Type] is [Application].
Follow the on-screen instructions and install WinDVD.
z A standard user needs to enter an administrator password.
*1
“d:” is the drive letter of the CD/DVD drive. Change this to match the drive letter on your own computer.
in [Start Search], and press
Enter
.
DVD Discs Created Using a DVD Recorder
z Playback may not be possible depending on the DVD recorder or the discs.
*2
z You must finalize
the DVD recorder.
z You cannot play discs protected with copyright management technologies such as CPPM (Content Protection for Prere-
corded Media) and CPRM (Content Protection for Recordable Media).
*2
A process that enables the playback of the discs on other DVD players, etc.
discs other than DVD-RAM before playback. For further information, refer to the instruction manual of
Page 46
Writing to CD
Using Windows Feature
1 Insert a disc.
2 In the [AutoPlay] screen, click [Burn files to disc using Windows].
z Alternatively you can click (Start) - [Computer], and double-click [DVD/CD-RW Drive].
z Follow the on-screen instructions.
Using B’s Recorder
“B’s Recorder” is a CD recording software application developed by B.H.A Corporation.
For further information, refer to the software’s online manual (below).
1 Double-click on the desktop to start up B’s Recorder or TaskGate.
z If you want to switch the startup application from B’s Recorder to TaskGate or vice versa, press and hold
and double-click , and click [Launch B’s Recorder GOLD9] or [Launch TaskGate].
z Alternatively you can click (Start) - [All Programs] - [B.H.A] - [B’s Recorder GOLD9] - [B’s Recorder GOLD9] /
[TaskGate].
46
Ctrl
Applicable Media
z Refer to the Disc Information (Î page 38).
z Refer to the software’s online manual (below).
About Copies
When writing to discs, make sure that you are not infringing upon any copyrights. It is illegal to copy audio CDs
for non-personal use.
When backing up software, make sure that you are not infringing upon any software copyrights for that product.
CAUTION
z Be sure to shut down B’s Recorder before you log off Windows.
Otherwise B’s Recorder may not start normally when you log on to Windows next time. In this case, restart the computer.
To access the online manual
A Click (Start) - [All Programs] - [B.H.A] - [B’s Recorder GOLD9] - [Manuals] - [User Manual] (user’s manual)
/ [TaskGate] (TaskGate manual).
Page 47
Writing to CD
47
Usage Precautions
When an external CD/DVD drive has been connected
z
Do not turn the CD/DVD drive power off on this computer when writing to a disc in an external CD/DVD drive using B’s Recorder.
Turning the power off may result in a malfunction, such as an interruption in the external CD/DVD drive operation.
Before entering sleep
z Before entering sleep, be sure to exit B’s Recorder. Otherwise B’s Recorder will not recognize a disc in the drive after
resuming, and the message [Insert a disc into the drive] will appear. In this case, perform either of the following procedures so B’s Recorder will recognize the disc.
• Click [File] - [Drive Settings] - [Rescan].
• Exit and start up B's Recorder again.
Using B’s Recorder to Create a CD for Booting the System
You can use B’s Recorder to create a CD that will allow you to boot the system from the CD/DVD drive.
z Create the CD using the following procedure.
For further information, refer to the online manual for B’s Recorder.
1 Run B’s Recorder. (Î page 46)
2 Set a new disc in the CD/DVD drive.
3 Register the data to be used for booting in the Data well.
4 Double-click [01 Data (Mode 1)] or [01 Data (Mode 2)] in [Track Type].
5 Click [Track Information] at the [Track Properties] screen, and click [Create from standard
bootable disk image.] under [Bootable CD].
6 Click [OK], and click [Record].
How to change the bootable disk image using B’s Recorder
1 Run B’s Recorder, and click [View] - [Disc Capacity Display Settings] - [Bootable Disk].
2 Select the required bootable disk image from [Floppy Disk Image Management], and click
[OK].
Page 48
Writing to CD
NOTE
z The bootable disk image is saved in the folder “c:\Program Files\B’s Recorder GOLD9”.
48
About the bootable disk image
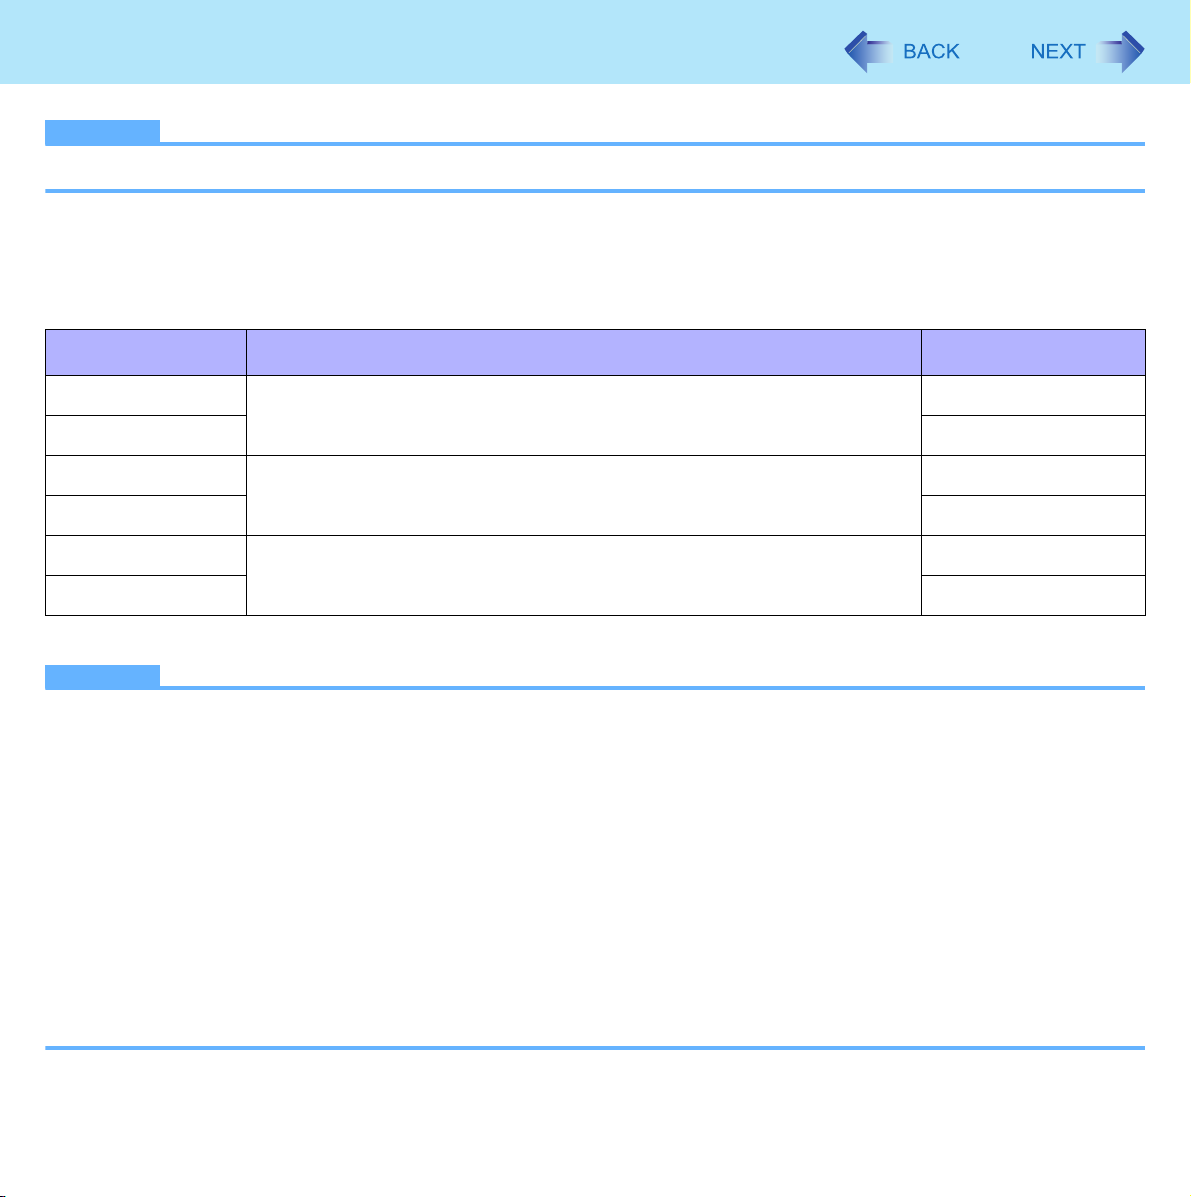
The following six types of bootable disk images can be used with the B’s Recorder preinstalled in this computer.
Disk Image Contents
BSDOS1.BIN Image that can be booted from this computer x
BSDOS2.BIN o
BSDOS3.BIN Image that can be booted from this computer or a drive connected with
BSDOS4.BIN o
BSDOS5.BIN Image that can be booted from a drive connected with ATAPI (IDE) x
BSDOS6.BIN o
*1
The program to restore the backup data by using the B’s Recorder “HDD Backup” function.
NOTE
z Bootable disk images BSDOS1.BIN and BSDOS2.BIN are specially designed for this computer. (Contains
KMEUSB.SYS)
In the default setting, images BSDOS1.BIN and BSDOS2.BIN are selected.
z If you boot the system using a disk created using bootable disk image BSDOS3.BIN or BSDOS4.BIN, one of the fol-
lowing error messages will be displayed, but this is not a malfunction.
<When booting the system on this computer>
• Not found CDROM !!
Check CD-ROM power and IDE cable.
CD-ROM drive is not available.
<When booting the system on a computer connected with an ATAPI (IDE) drive>
• CD-ROM Drive is not ready, aborting installation.
z This computer cannot be booted using a disk created using bootable disk image BSDOS5.BIN or BSDOS6.BIN.
z If you want to share a bootable disk with a CF-W2 series or CF-Y2 series, select bootable disk image BSDOS3.BIN or
BSDOS4.BIN.
ATAPI (IDE)
B’s restore program
x
*1
Page 49
Writing to CD
49
Notes During Use
If you have uninstalled B’s Recorder accidentally
Reinstall it by following the steps below.
A Click (Start) and input [c:\util\bha\gold] in [Start Search], and press
B Right-click [setup] in [gold] folder and click [Run as Administrator].
If there are two or more “setup” files, right-click the file whose [Type] is [Application].
Follow the on-screen instructions.
z A standard user needs to enter an administrator password.
z When the message that requires the serial number appears during the installation, input the serial number
that is located under “Troubleshooting (Basic)/Error Code/Message” “Reinstalling B’s Recorder/B’s CLiP” in
the Operating Instructions.
C After restarting the computer, click (Start) - [All Programs] - [Accessories] - [Command Prompt] and input
[c:\util\bha\update\bsupdate.exe], and press
Follow the on-screen instructions.
SUPPORT INFORMATION
z About User Registration
Follow the steps below for user registration.
A While connected to the Internet, start up B’s Recorder.
B Click [Help] - [Related Websites] - [User Registration] and follow the on-screen instructions.
z If B’s Recorder does not operate properly, we recommend carefully reading the online help file first for problems with
the operating environment or operations.
If you still cannot troubleshoot the problem, contact B.H.A.
URL: http://www.bhacorp.com/
E-mail addresses:
U.S./Canada (English, French, Spanish): [email protected]
Other countries (English, German, French, Italian, Spanish): [email protected]
Enter
.
Enter
.
Page 50
PC Cards
You can insert the PC Card Type I (3.3 mm) or II (5.0 mm) to the PC Card slot.
NOTE
z The following types of card are not supported:
PC Card Type III, ZV card, SRAM card, FLASH ROM card (excluding ATA interface type), and other cards that require
12V of operating voltage.
50
Inserting/Removing the Card
CAUTION
z Do not remove a PC Card while your computer is in the sleep or hibernation.
z Do not forcefully insert the card. Depending on the shape of the card, parts of the card may remain outside after inser-
tion. The PC Card slot or the card may be damaged or become stuck if it is forced in.
z Note that the PC Card removal may not be complete, depending on the status of the PC Card or the device connected
to the PC Card; this may occur when a SCSI card is used to connect an external hard disk to the computer. In such
cases, turn off the power from the (Start) menu, then remove the card.
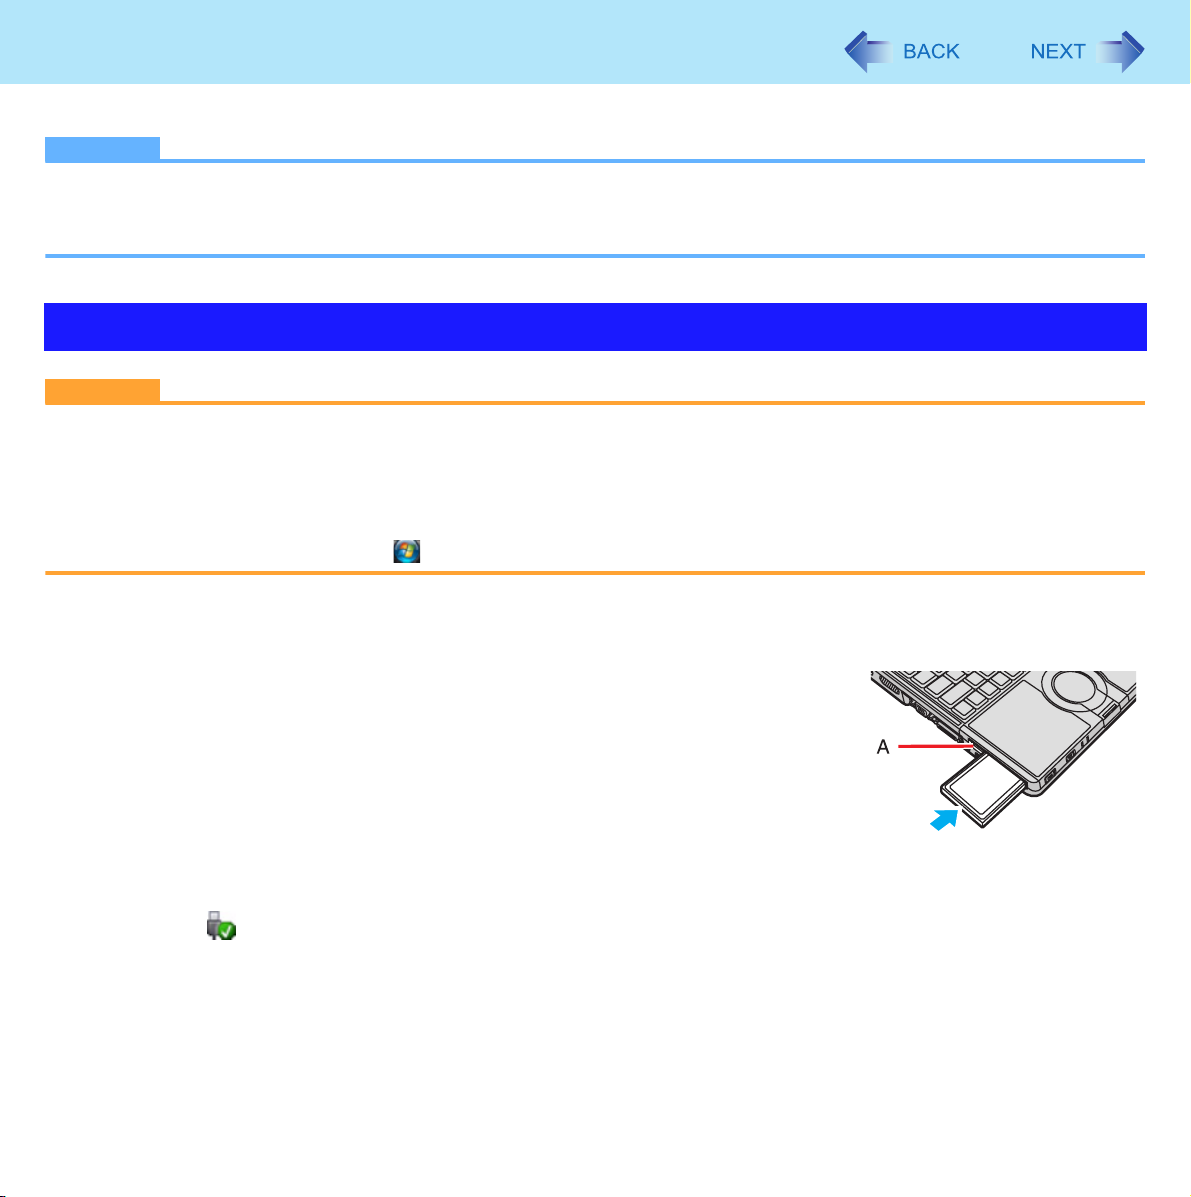
To insert the card
1 Insert the PC Card with the label side up until it securely fits in
the slot.
z For further information, refer to the instruction manual of the card.
2 After the card is inserted, bend the eject button (A).
To remove the card
1 Disable the card function.
A Click on the notification area and select the card, then click [OK].
z This step is not necessary when removing the card after turning off the computer.
Page 51
PC Cards
51
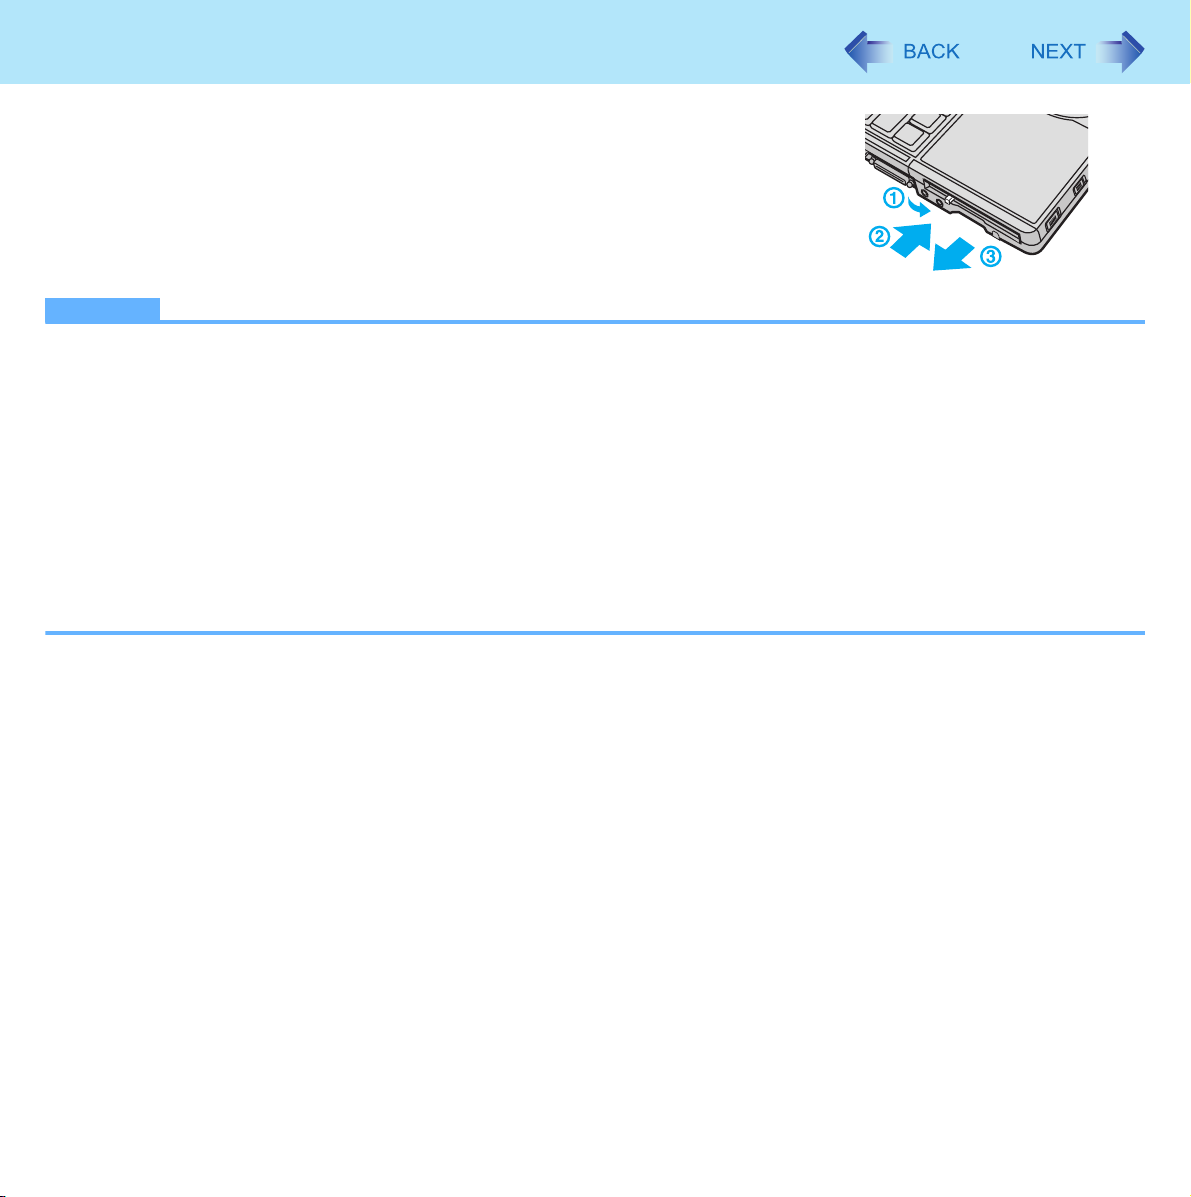
2 Remove the card.
A Raise the bent part of the eject button.
B Press the eject button so the card comes out of the slot.
C Draw the card straight out.
NOTE
z Check the card’s specification to prevent the total operating current from exceeding the allowable limit. Otherwise mal-
function may occur.
Allowable Current: 3.3 V: 400 mA, 5 V: 400 mA
z After repeating insertion and removal, some types of card will not be recognized. In this case, restart the computer.
z If the computer freezes after resuming from sleep or hibernation, remove and reinsert the card. If the problem persists,
restart the computer.
z When a card is inserted, power consumption increases. Remove the card when it is not in use, especially when oper-
ating by battery power.
z To connect peripheral devices (SCSI, IEEE1394, etc.) using a PC Card, follow the steps below (one example).
A Connect the peripheral device to the card.
B Turn on the power of device.
C Insert the card until it securely fits in the slot.
Page 52
SD Memory Card
52
SD Memory Card Information
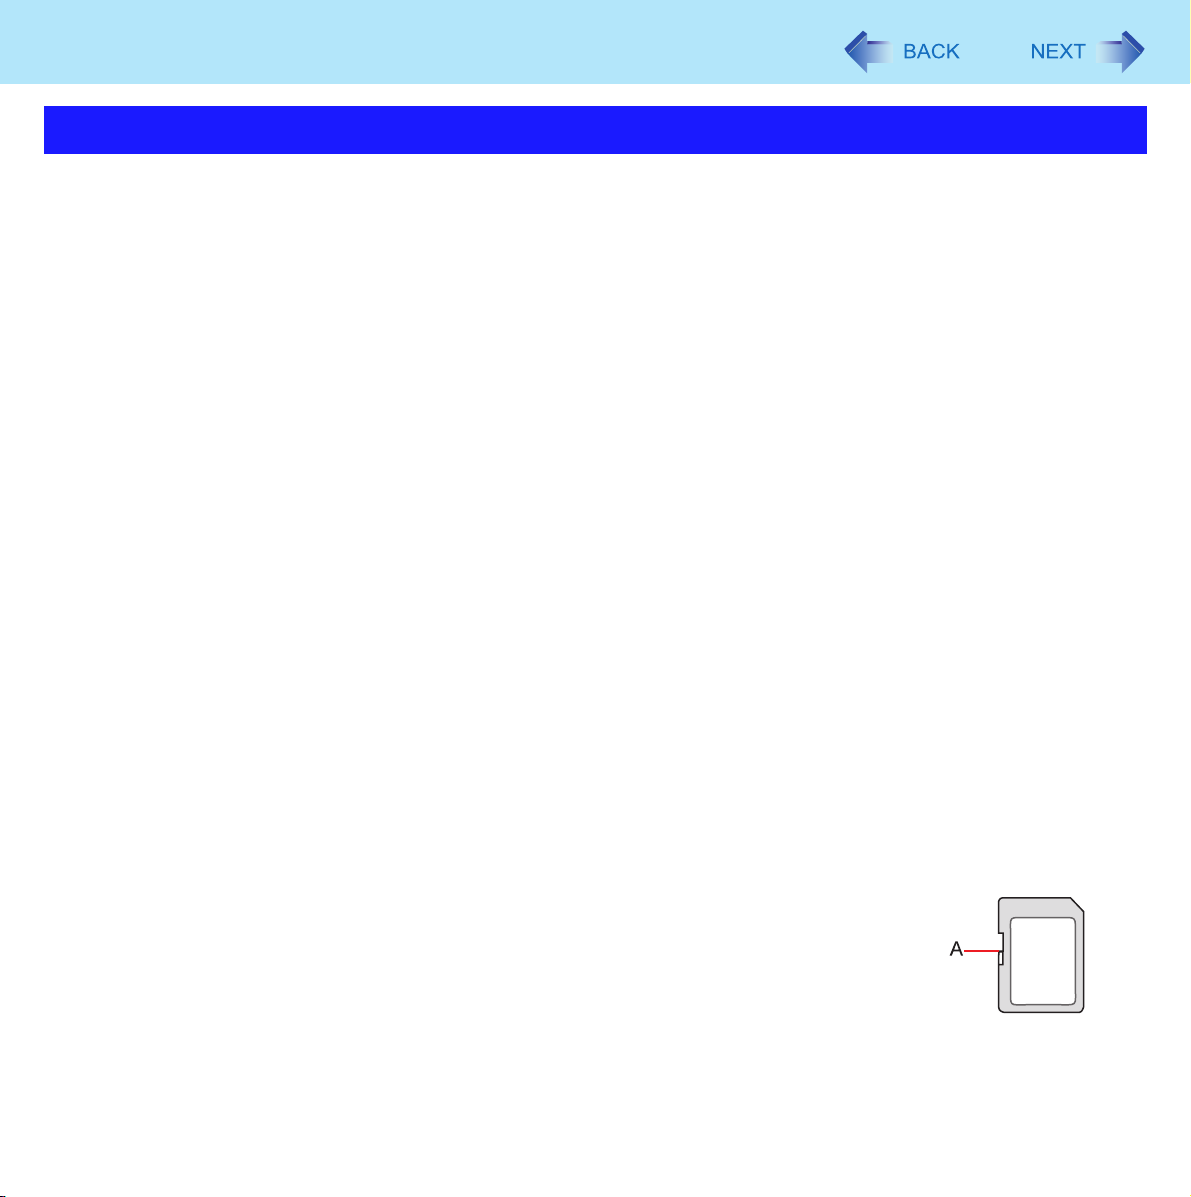
The SD Memory Card slot on this computer only accepts SD Memory Cards.
z When you use a miniSD Card or a microSD Card, set the card to a miniSD Card adaptor or a microSD Card adaptor, and
insert/remove the card with the adaptor. Be sure not to leave the adaptor in the card slot.
z The SD Memory Card has a copyright protection function which is compatible with content on-demand services on the
Internet, etc.
z To format the SD Memory Card on this computer, do not use [Format] of Windows, but use the SD Memory Card format
software.
You can download the software from the web site below.
http://panasonic.jp/support/global/cs/sd/download/sd_formatter.html
z To use the SD Memory Card on other devices, format the card on the devices. For further information, refer to the instruc-
tion manual of the devices.
The drive letter for the SD Memory Card slot
z The drive letter for the SD Memory Card slot cannot be changed or fixed. The drive letter for the SD Memory Card slot is
allocated as the first drive letter available when the memory card is first recognized.
Handling and storage cautions
z Store the SD Memory Card in the case after removing it from the computer.
z Do not:
• Disassemble or modify the card.
• Hit, bend, drop or wet the card.
• Touch the terminals with fingers or metal object.
• Remove the labels of the card / Attach other labels or stickers to the card.
z Do not place the card in the following locations.
• In direct sunlight or in very hot location such as inside of a car.
• In very dusty or humid location.
• In location subject to corrosive gas, etc.
Data handling cautions
z Set the write-protect switch (A) to the LOCK position. Unlock the switch when recording
(checkout), saving, or editing data.
z We recommend you to back up the important data to another storage medium.
z When disposing the card, we recommend you to physically destroy the card (using a ham-
mer, etc.) to prevent personal or confidential data from being leaked.
Page 53
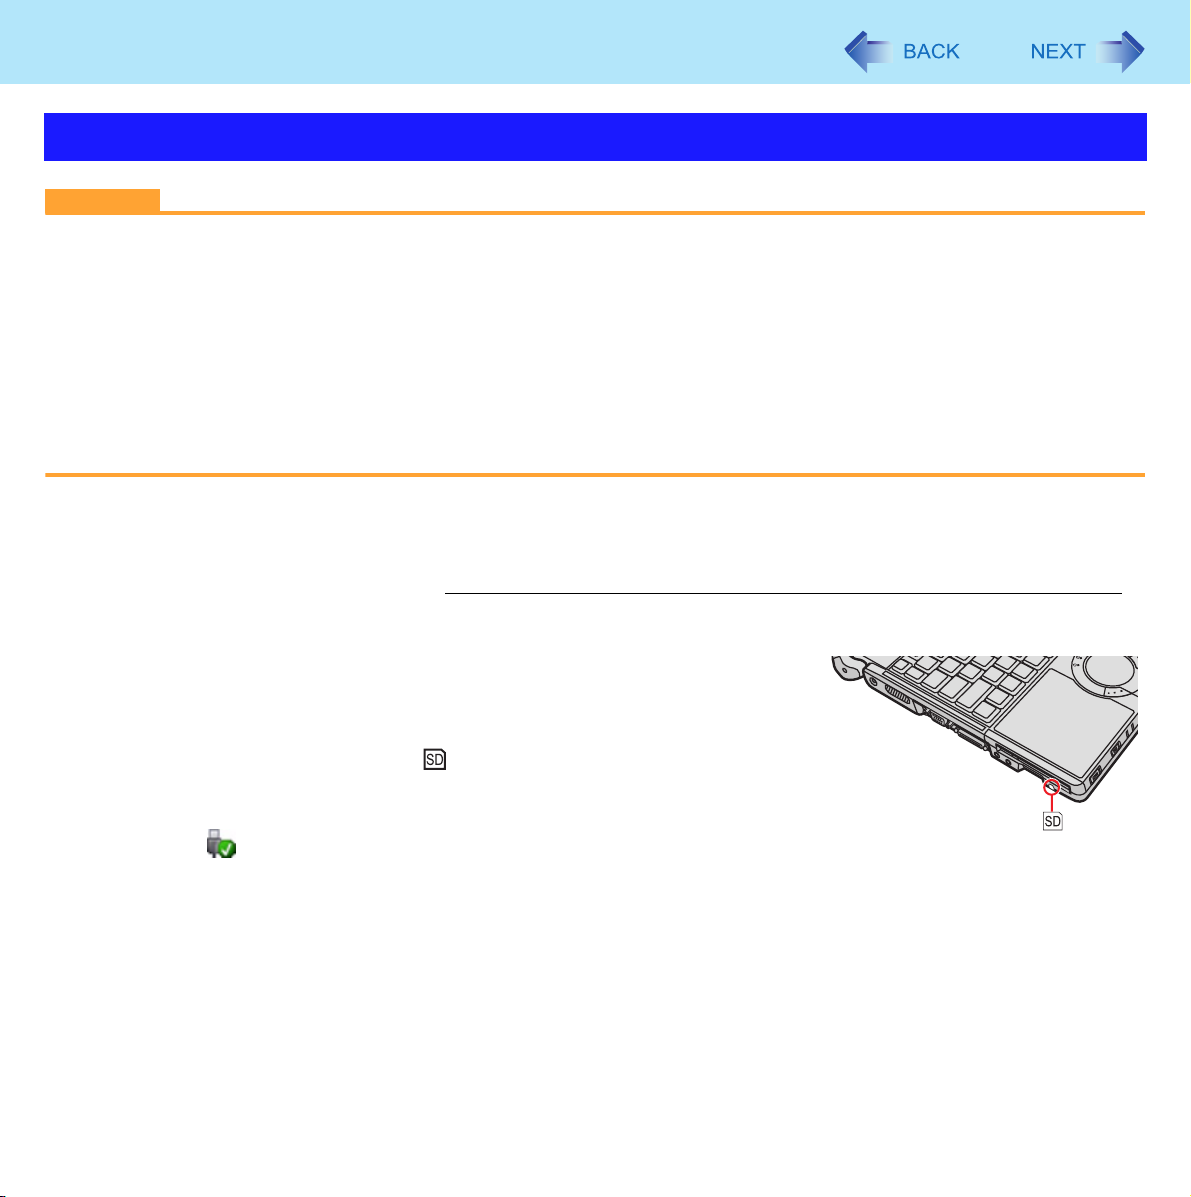
SD Memory Card
53
Inserting/Removing the SD Memory Card
CAUTION
z Do not remove or insert the SD Memory Card until Windows has completed loading.
z Do not remove the card or turn off the computer in the following cases, otherwise the data may be corrupted.
Just after the writing operation.
The computer may still continue the access to the card just after writing operation. If you remove the card before the
operation is completed, the data may be damaged or the card access may no longer perform normally.
z Note that Panasonic assumes absolutely no liability for any loss of data recorded by the user, or any other damages,
directly or indirectly.
z Do not forcibly draw out the card, otherwise the slot may be damaged.
z Insert the card in the correct direction, otherwise the card and the slot may be damaged.
z After resuming from sleep or hibernation, do not access the SD Memory Card for approximately 30 seconds.
To insert the card
1 Insert the SD Memory Card with the label side facing up and with the cut corner on top.
To remove the card
Preparation
z Save the data and close all applications.
z Confirm the SD Memory Card indicator is off.
1 Disable the card function.
A Click on the notification area and select the card, then click [OK].
z This step is not necessary when removing the card after turning off the
computer.
Page 54
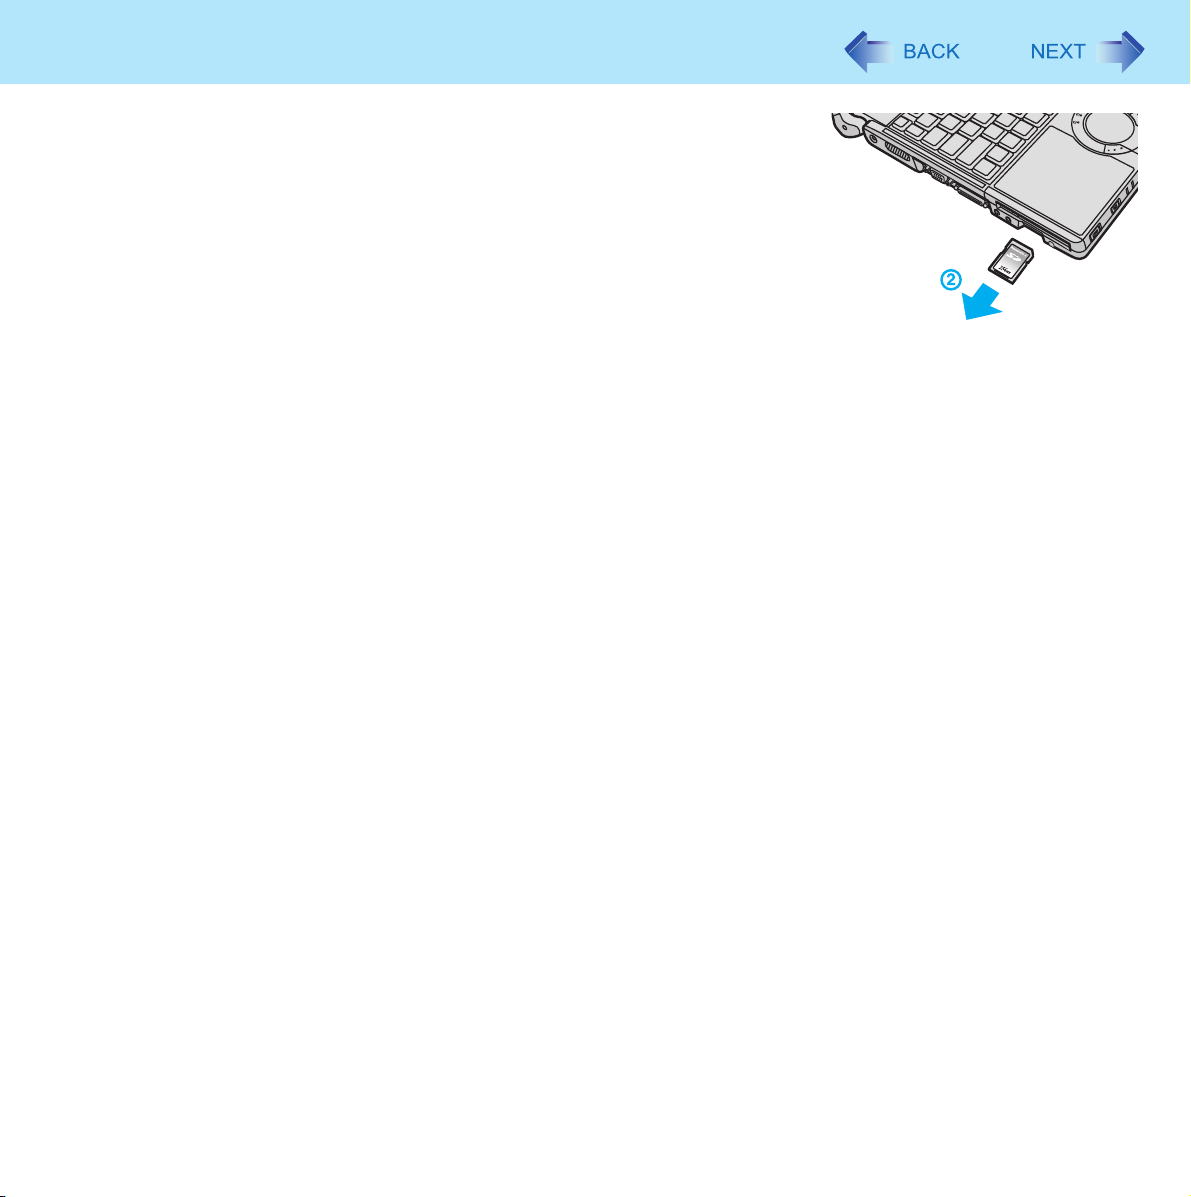
SD Memory Card
2 Remove the card.
A Press the card so it comes out of the slot.
B Draw it straight out.
54
Page 55
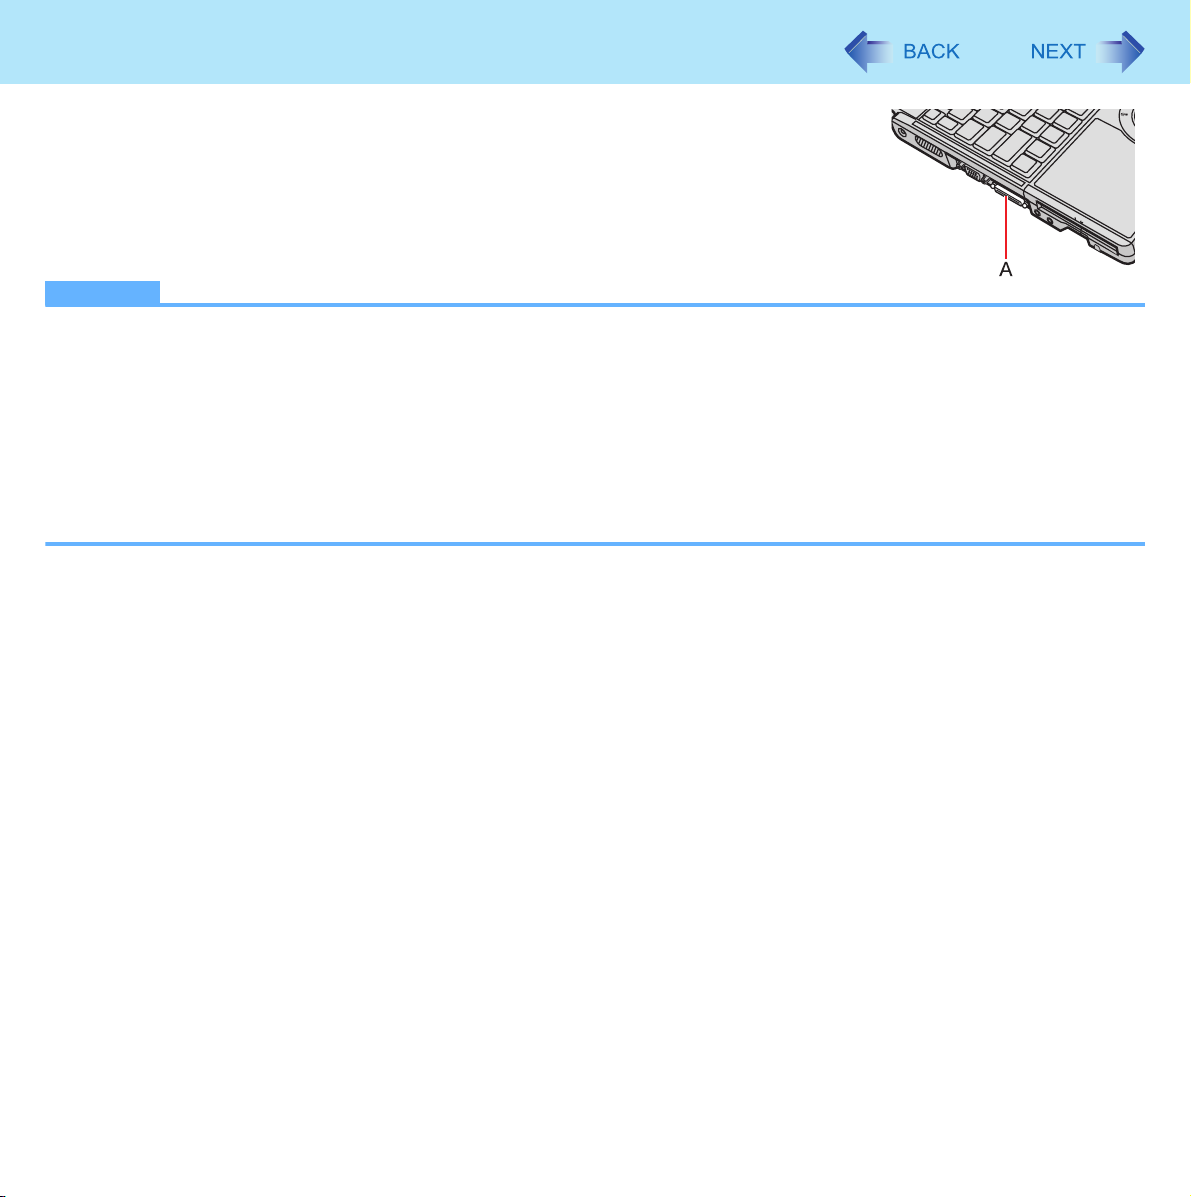
Mini Port Replicator
You can use an optional mini port replicator (CF-VEBU05AU). This device frees you from
being bothered by a lot of cable connections when you carry the computer. It also allows you
to connect various peripherals.
Connect the mini port replicator to the mini port replicator connector (A).
For further information, refer to the instruction manual of the mini port replicator.
NOTE
z To use the mini port replicator, set [USB Port] setting to [Enable] (default) in the [Advanced] menu of the Setup Utility.
z When the mini port replicator is connected, the AC cord, LAN cable and external display should be connected to the
mini port replicator.
The LAN port and external display port cannot be used.
z If devices connected to USB ports (2a, 2b, 2c) does not operate:
In the case of devices with consumption voltage exceeding 100 mA, or devices for which the consumption voltage
cannot be confirmed, connect via USB port 1 or the computer’s USB port.
(In the instruction manual of mini port replicator, you may find the instruction that you should try disabling the powersaving function of USB2.0 Root Hub. However, it is only for Windows XP, and not for this computer.)
55
Page 56
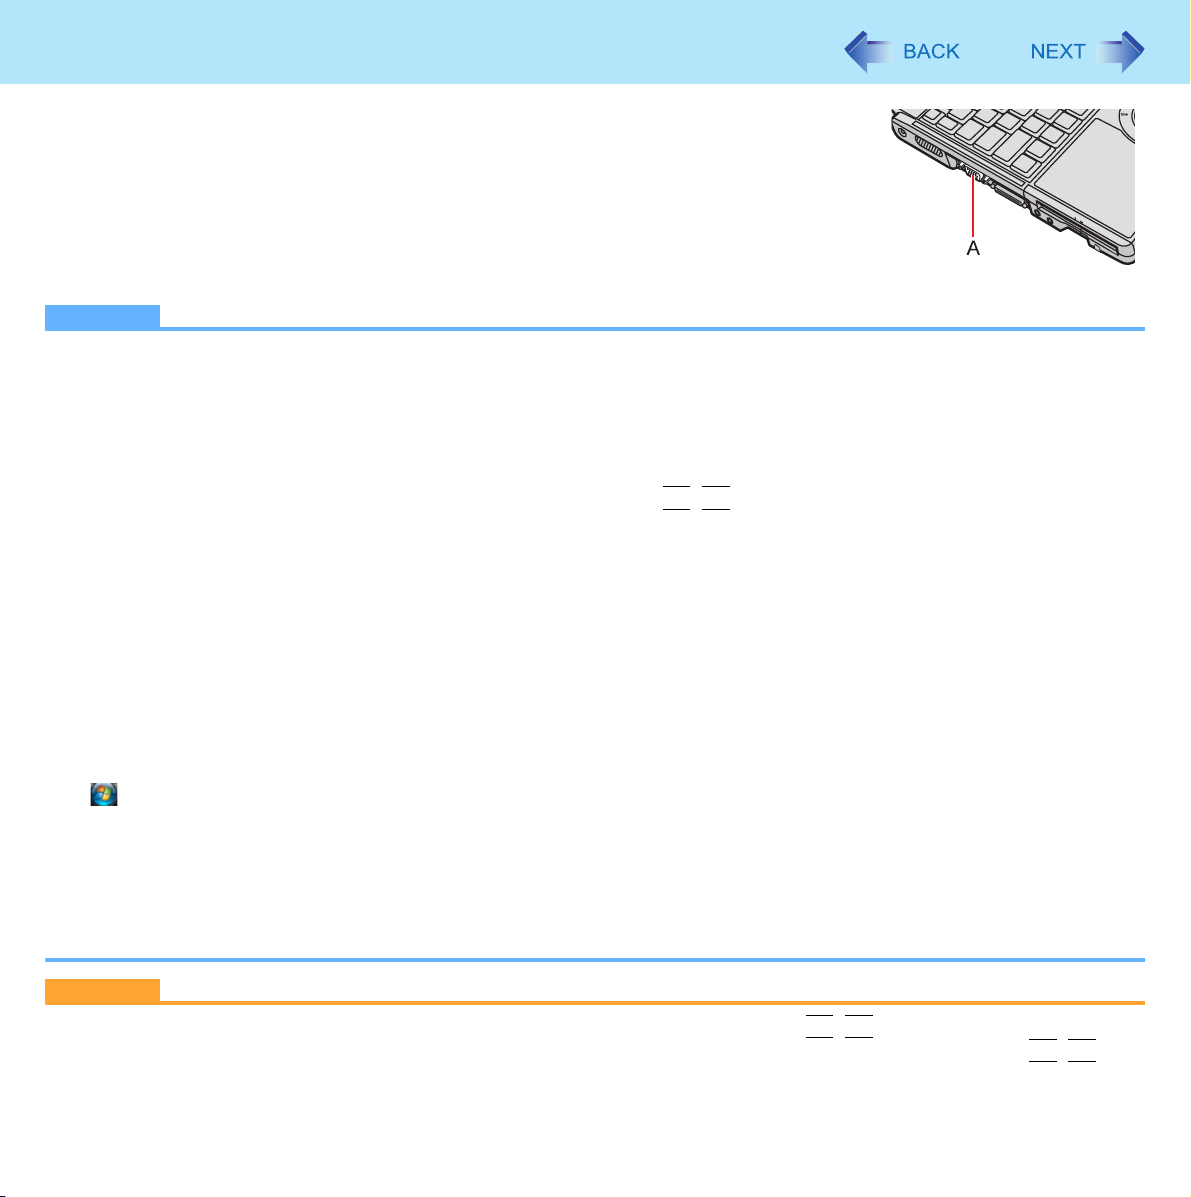
External Display
You can switch the output destination to an external display.
Connect the external display to the external display port (A).
NOTE
z After resuming from sleep or hibernation, or restarting the computer, the output destination may not be the same as
the one selected in the previous status.
z Do not connect or remove the external display during sleep or hibernation.
z It may take some time to switch between displays depending on the displays used.
z When you use high resolution displays, the display color, resolution or refresh rate may be changed, switching to
[Notebook] in [Intel(R) GMA Driver for Mobile].
We recommend you to switch the output destination by pressing
z When you change the output destination after Windows starts up, do not press any key until switching is complete.
z You cannot use the simultaneous display until Windows starts up.
z When you use an external display or extended desktop, click [Display Settings] and set a suitable number of colors,
resolution, or refresh rate for each display.
Depending on the settings, some external displays may be distorted or displayed incorrectly. In this case, check the
refresh rate setting.
z When you use the simultaneous display, DVD-Video, MPEG files and other motion image files may not be played back
smoothly.
z Carefully read the instruction manual of the external display.
z When connecting an external display that does not conform to the Plug & Play standards, select the display driver
accordingly in the following menu, or use the driver disc supplied with the external display.
(Start) - [Control Panel] - [Adjust screen resolution] - [Advanced Settings] - [Monitor] - [Properties] - [Driver] -
[Update Driver]
z When you use the external display with 2048 x 1536 dot resolution, use the display which is supported 60 Hz refresh
rate. If not, some external displays may be distorted. For further information, refer to the instruction manual of the
external display.
z If you connect an external display via the mini port replicator (CF-VEBU05AU), you cannot use the external display
port on the computer.
Fn+F3
.
56
CAUTION
z Before disconnecting the external display, switch to the internal LCD by pressing
image quality may become different from before disconnection (e.g., wrong resolution). In this case, press
reset the image quality.
Fn+F3
. Otherwise the displayed
Fn+F3
to
Page 57
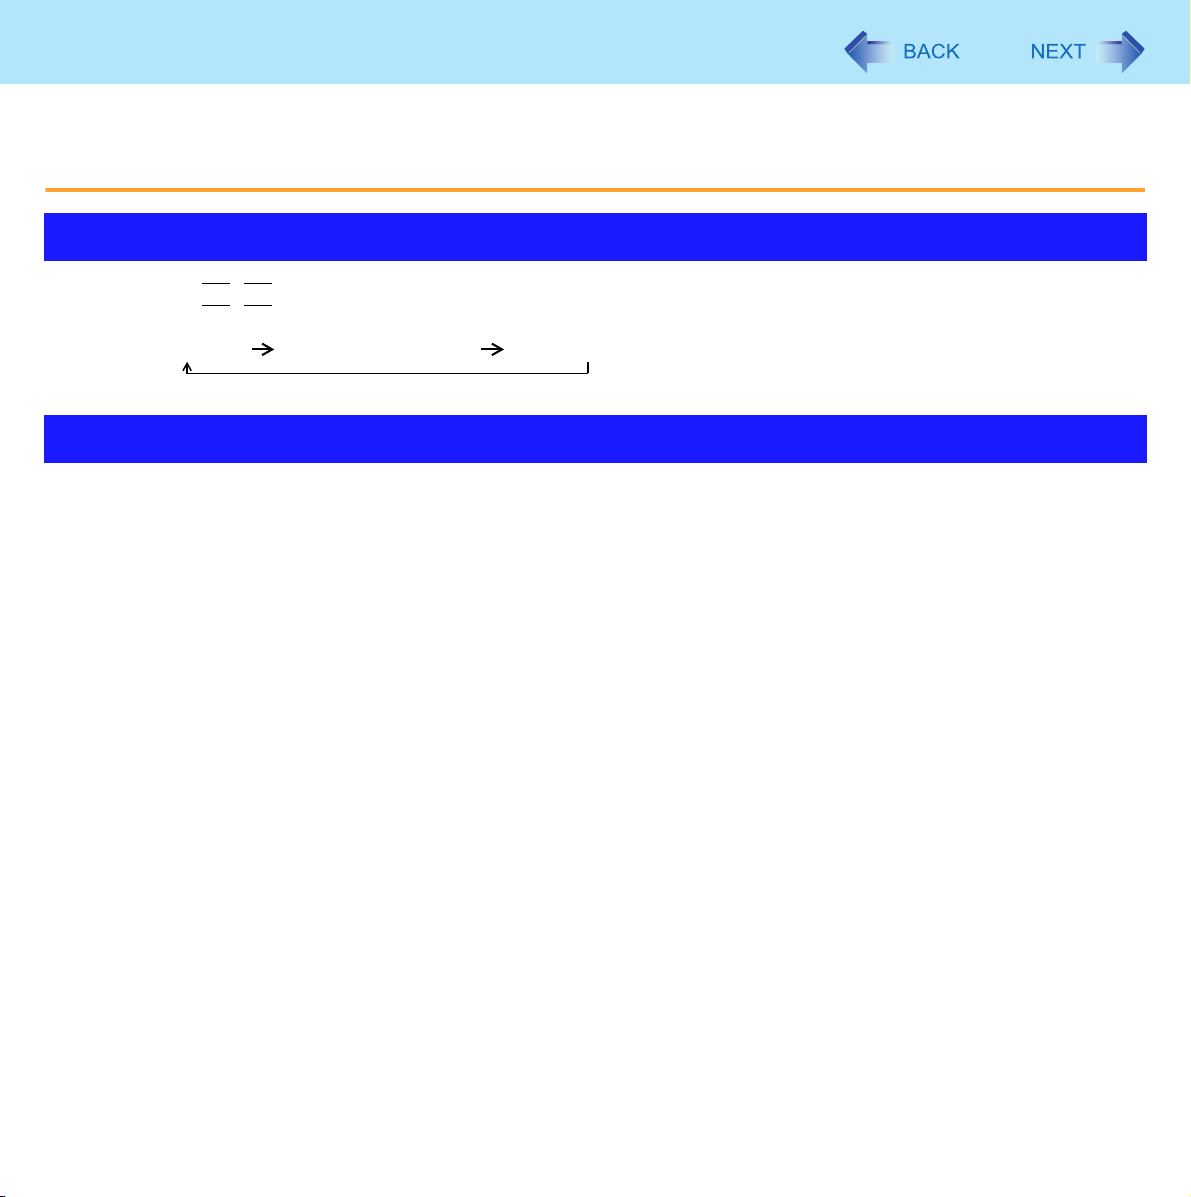
External Display
z The screen may become distorted due to the following operations. In this case, restart the computer.
• Disconnecting an external display for which you have set high resolution or high refresh rate.
• Connecting/disconnecting an external display during computer operations.
Switching the Display
57
1 Press
Each time you press the key combination:
Internal LCD Simultaneous display External display
Fn+F3
.
Extended Desktop
The extended desktop function allows you to use the working area across both the internal LCD and the external display. You
can drag an object from the internal LCD to the external display and vice versa.
To switch to the Extended desktop
1 Connect the external display.
z The [New Display Detected] screen appears. If not, perform the procedure of “To change the display settings”
(below).
2 Click [Show different parts of my desktop on each display (extended)].
3 Click [Right] or [Left] for the location of extended desktop, and click [OK].
To change the display settings
1 Right-click the desktop, and click [Graphics Properties].
2 Click [Extended Desktop], and select the settings for [Primary Device] and [Secondary
Device].
3 Click [Display Settings] and set the display color and resolution etc.
4 Click [OK].
Page 58
External Display
NOTE
z Always change the settings in the manner described above.
z It may not be possible to use the extended desktop with some software applications.
z When you click the maximize button, the window is displayed on one of the displays. You cannot move the maximized
window to the other display.
z You cannot switch the display by pressing
z To switch left (primary device) and right (secondary device), once return the display to “notebook only”. Follow the
steps below.
A Right-click the desktop and click [Graphics Options].
B Click [Output To] - [Notebook].
C Right-click the desktop and click [Graphics Options].
D Click [Output To] - [Extended Desktop], and click [Monitor + Notebook] (the external display will be set to primary
device) or [Notebook + Monitor] (the internal LCD will be set to primary device).
z To switch to the Extended Desktop, be sure to use the [Intel(R) GMA Driver for Mobile] screen or the [New Display
Detected] screen. If you use other methods (e.g. display setting, etc.), the screen may not be displayed correctly.
Fn
z The pop-up icon displayed by
z When the application running is not shown on the display:
When the application is in the external display or after the application is closed in the external display, there are times
the application will not be shown in the display when executed the next time if the position of the extended display is
changed or the Extended Desktop is closed.
When there is no display after the position of the extended display is changed:
The application running is displayed at the position of the extended display before the change. Return the position of
the extended display to the condition before the change. Move the application to the internal LCD, and then correct the
position of the extended display.
When there is no display when the Extended Desktop is disabled:
The application running is being displayed in the external display. Set the Extended Desktop again, move the application from the external display to the internal LCD and then disable the Extended Desktop.
z When the display domain for the Extended Desktop is changed, the wallpaper and icons may become displaced.
z When an animated pointer is used for the mouse pointer:
An error may occur when resuming from the sleep or hibernation. In such cases, change the mouse pointer to the
standard pointer with the following procedure:
A Click (Start) - [Control Panel] - [Mouse].
B Click [Pointers].
C Click [None] in [Scheme], then click [OK].
key combination appears only on the primary device.
Fn+F3
when using the extended desktop.
58
Page 59
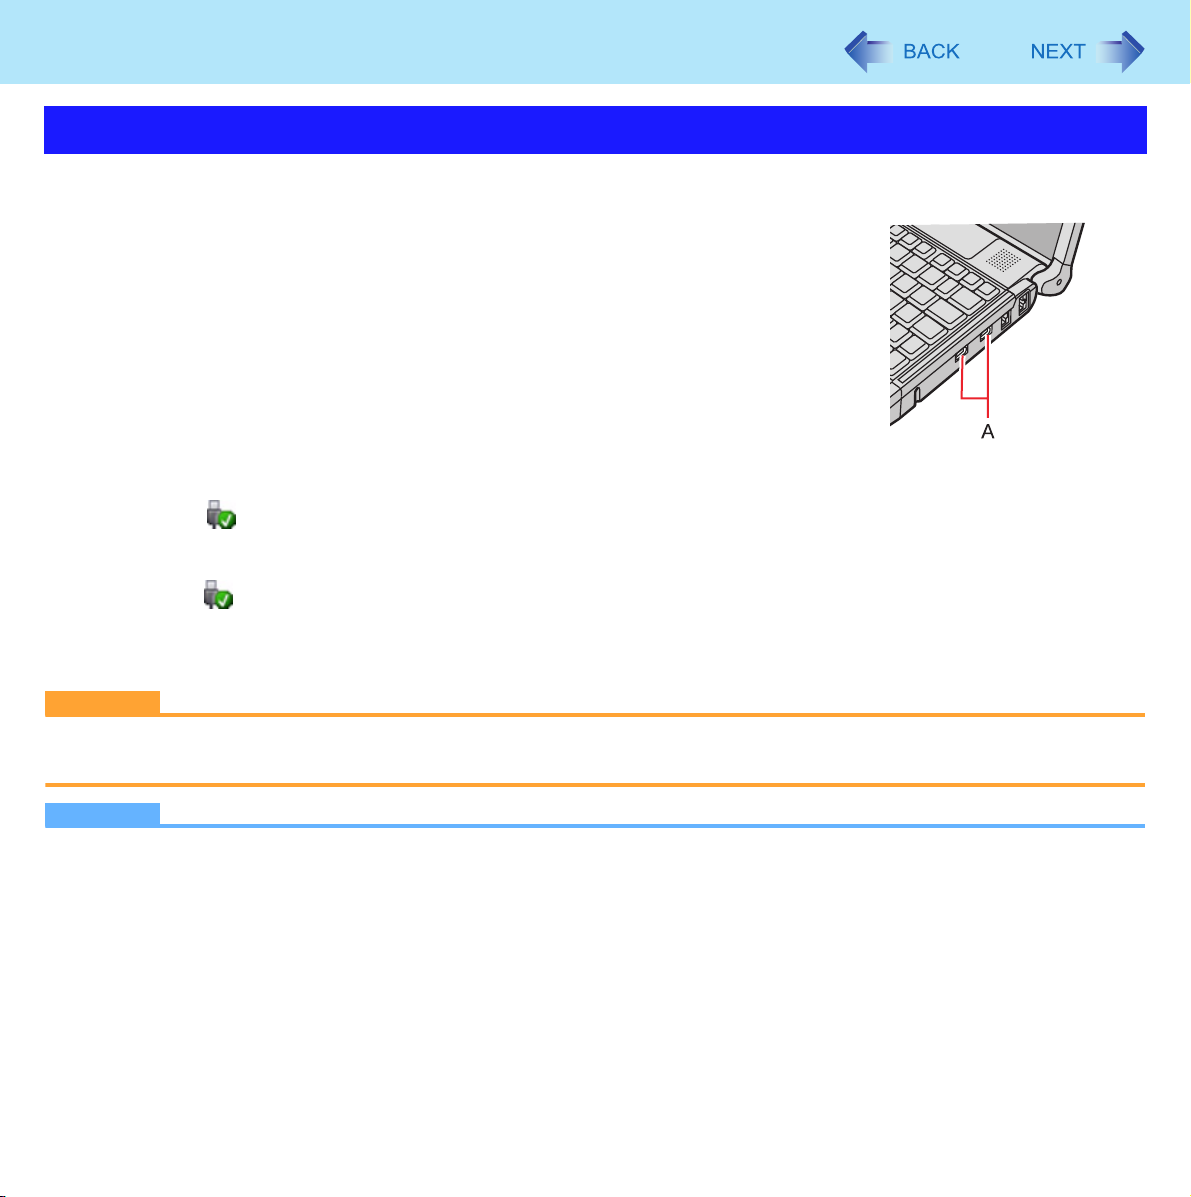
USB Devices
Connecting/Removing USB Devices
To connect the device
1 Connect the USB device to one of the USB ports (A).
For further information, refer to the instruction manual of the USB device.
To remove the device
Preparation
z Close all applications.
1 Disable the USB device.
A Click on the notification area and select the USB device, then select [OK].
z This step is not necessary when;
• Removing the device after turning off the computer.
• is not displayed.
• The device does not appear in step A.
59
2 Remove the USB device.
CAUTION
z Do not remove a USB device while your computer is in the sleep or hibernation.
z Save important data and close all applications.
NOTE
z You may need to install the driver for the USB device. Follow the on-screen instructions or refer to the instruction man-
ual of USB device.
You may need to install the driver again when connecting the device to another port.
z When a USB device is connected, sleep and hibernation may not function normally. If the computer does not start up
normally, remove the USB device and restart the computer.
z If the computer enters sleep or hibernation while a USB keyboard or mouse is connected, touching the USB keyboard
keys or mouse will resume the computer.
z Some devices will not operate when connected to a USB HUB. These devices must be connected directly to the USB
port on your computer.
Page 60
USB Devices
z When the USB device is removed and then inserted while the computer is on, may appear in the Device Manager
and the device may not be correctly recognized. In this case, remove and connect the device again, or restart the computer.
z When a USB device is connected, power consumption increases. Remove the USB device when it is not in use, espe-
cially when operating by battery power.
60
When Using an External Mouse
Before installing an external mouse driver, first uninstall the Touch Pad driver. In this case, you will be unable to use the Touch
Pad scroll function.
CAUTION
z Before uninstalling the driver, save important data and close each application.
1 Click or on the notification area, and then click [Exit].
2 Click (Start) - [Control Panel] - [Uninstall a program] - [Touch Pad Utility], and then
click [Uninstall] to remove the program.
Follow the on-screen instructions.
z A standard user needs to enter an administrator password.
3 Click (Start) - [Control Panel] - [Uninstall a program] - [Synaptics Pointing Device
Driver], and then click [Uninstall] to uninstall the driver.
Follow the on-screen instructions.
z A standard user needs to enter an administrator password.
4 After uninstalling the driver, restart the computer.
5 Install the mouse driver according to the instruction manual of the mouse driver.
NOTE
z If you do not use an external mouse and use the Touch Pad Scroll function again, follow the procedure for “To use the
Touch Pad Scroll again”.
Page 61
USB Devices
61
To use the Touch Pad Scroll again
Uninstall the external mouse driver and install the Touch Pad driver.
1 Click (Start) - [Control Panel] - [Uninstall a program] to remove the external mouse
driver.
z For further information, refer to the instruction manual of the mouse driver.
2 Turn off the computer.
z If an external mouse is connected, disconnect it after turning off the computer.
3 Turn on the computer.
4 Click (Start) and input [c:\util\drivers\mouse\setup.exe], and press
z Follow the on-screen instructions.
Enter
.
5 Restart the computer, and if [Synaptics Pointing Device Settings] is displayed, remove
the check mark from [Show this screen at startup] and click [Close].
6 Click (Start) and input [c:\util\touchpad], and press
Right-click [setup] in [touchpad] folder and click [Run as Administrator].
If there are two or more “setup” files, right-click the file whose [Type] is [Application].
z Follow the on-screen instructions.
z If the message [Touch Pad function and original Flat Pad scroll function cannot be used simultaneously] is
displayed after completing the installation, click [Yes].
Enter
.
Page 62
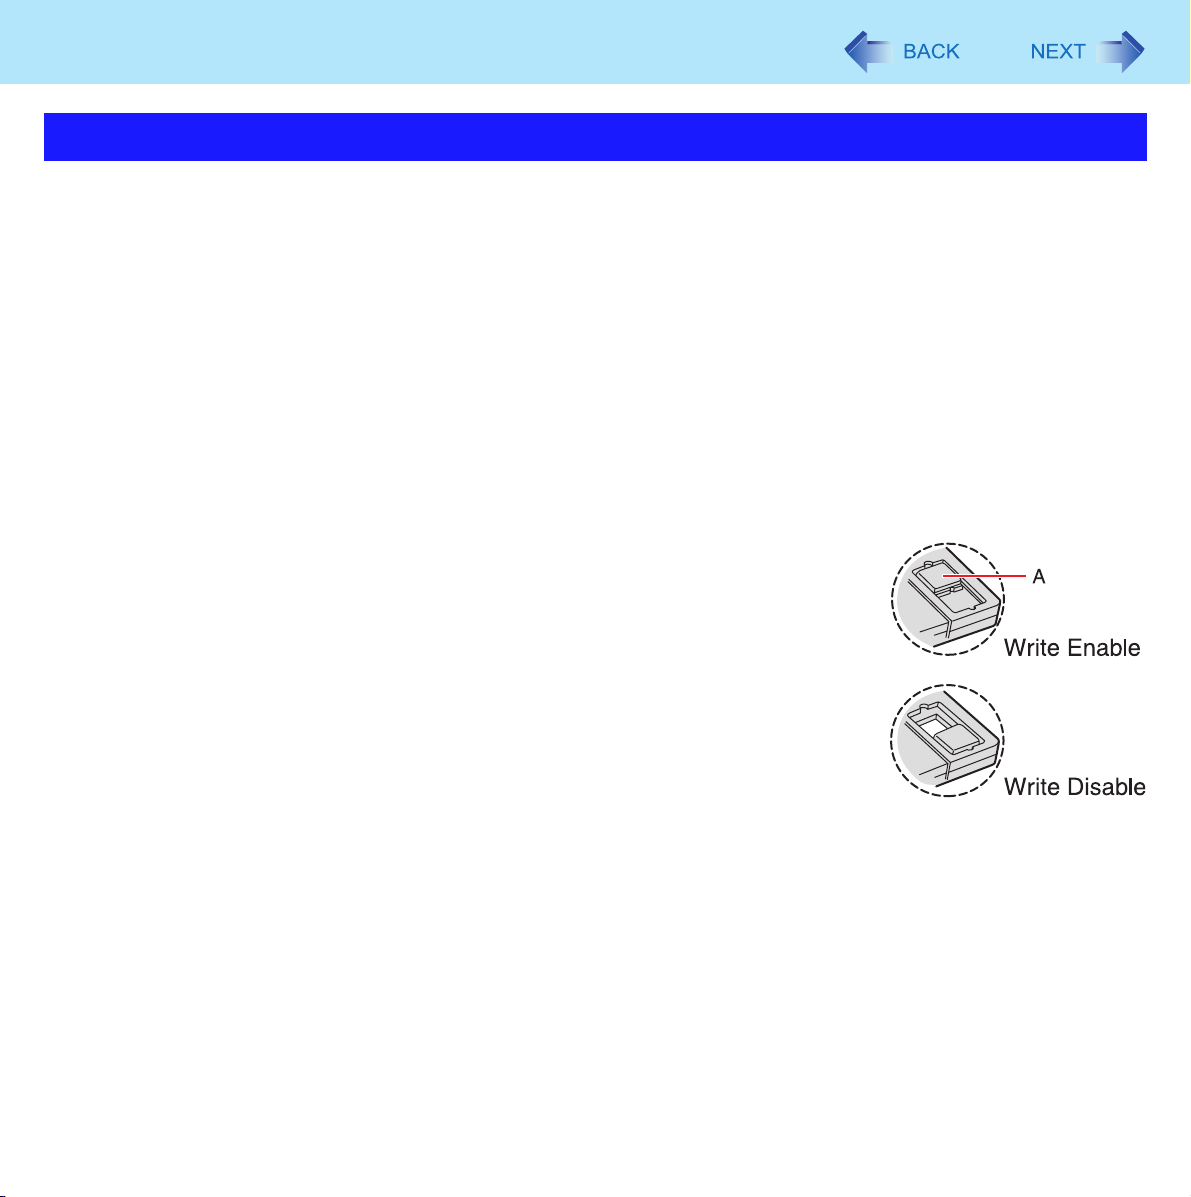
USB Devices
62
USB Floppy Disk Drive
Note the following when using an optional USB floppy disk drive (CF-VFDU03).
z Avoid the followings while the floppy disk drive is being accessed. Doing any of these may damage the data on the floppy
disk and render it useless.
• Power off your computer
• Remove the floppy disk drive
• Touch the floppy disk drive eject button
z Use care when handling floppy disks.
To protect the data on your floppy disks or to prevent a floppy disk from becoming stuck in your computer, avoid the
following:
• Manually sliding the shutter on the floppy disk
• Exposing the disk to a magnetic field
• Storing the disk in locations prone to high temperatures, low pitched noise, dampness, or dust
• Applying more than one label on the disk
z Confirm the contents of a floppy disk before formatting it.
Confirm that no important data is left on the floppy disk, because all data will be erased.
z Use the write-protect tab (A).
This is a must for preserving important data. This prevents your data from being erased or
overwritten.
z The USB floppy disk drive cannot be used at the same time as other floppy disk drives.
z Do not directly open application files (e.g., Microsoft Word, Microsoft Excel) which are
stored on the floppy disk.
First copy the files to the hard disk, then open the copied files from the hard disk.
Page 63
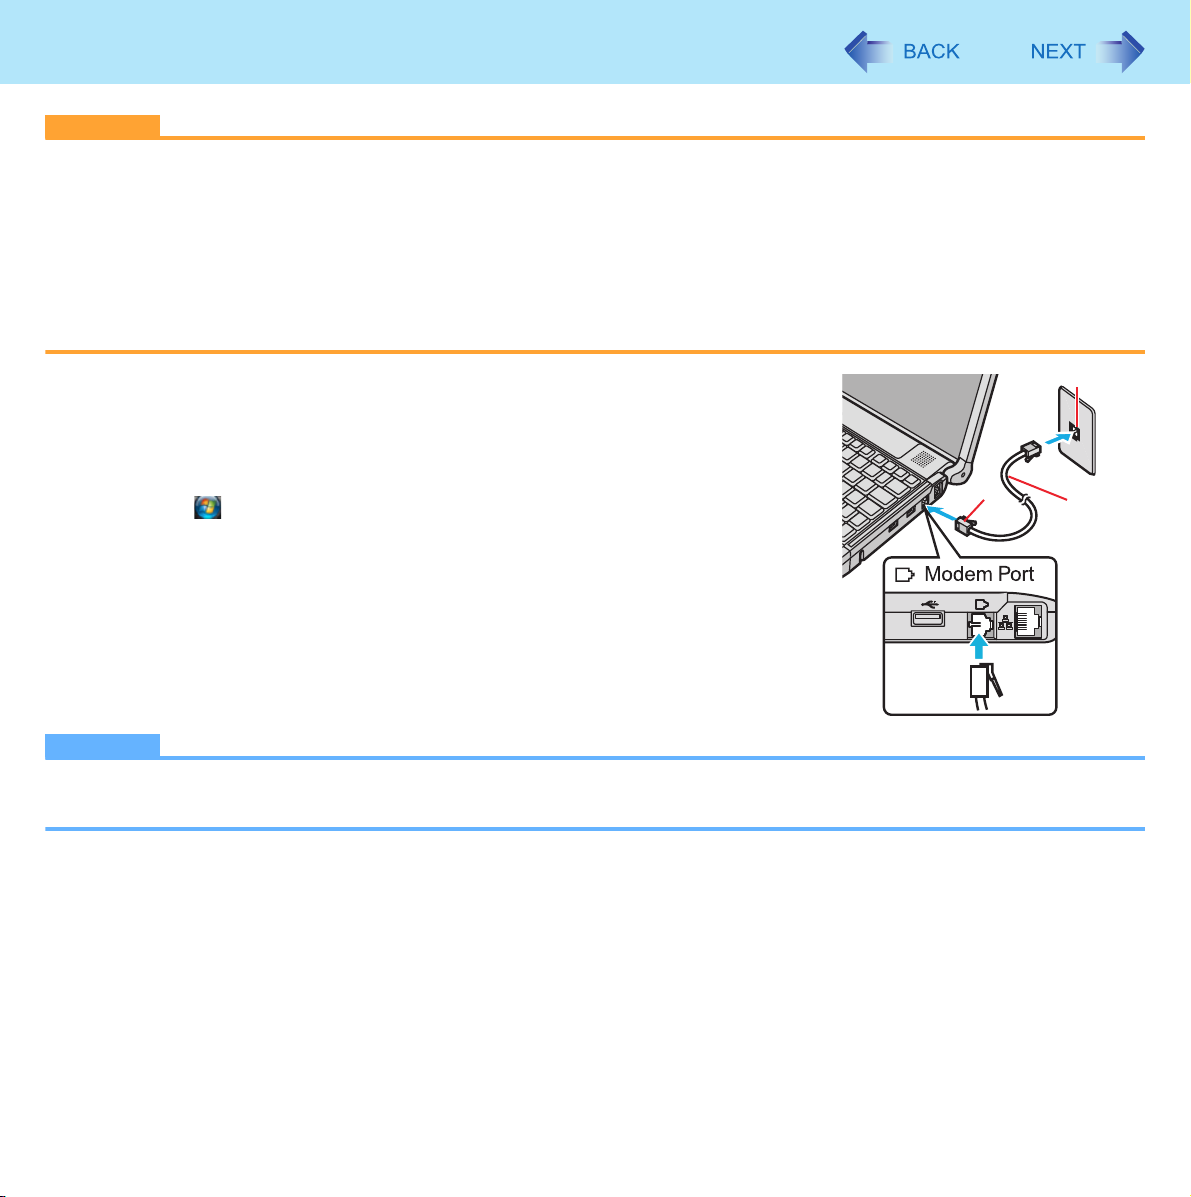
Modem
CAUTION
z Do not use the PBX internal phone lines installed in company offices. Doing so may lead to a fire or electric shock.
z You cannot connect the modem to the following lines.
• Interphone
• Intercom
•ISDN
z Be sure to connect the telephone cable into the modem port, not into the LAN port.
z Use a surge protector since the modem may be damaged by a sudden high voltage surge that may occur in the event
of a lightning strike.
63
1 Connect the computer and the telephone jack (A) using the
telephone cable (included: B).
z Hold the cable so that the shape of the connector (C) matches the port,
and insert fully until it clicks.
2 Click (Start) - [Control Panel] - [Connect to the Internet] -
[Dial-up] and change the settings as necessary.
NOTE
z Do not enter sleep or hibernation during communications.
z To remove the cable, press and hold the lever and pull out.
A
C
B
Page 64
Modem
64
Ring Resume Function
The computer automatically resumes from sleep when the telephone connected to the modem rings.
You will need software to keep the computer in an idle state waiting for a phone call, and if you prefer, to turn the computer to
sleep again afterward. For further information, refer to the instruction manual of the software application.
1 Click (Start) - [All Programs] - [Windows Fax and Scan].
2 Click [Tools] - [Fax Settings].
z A standard user needs to enter an administrator password.
3 Add a check mark for [Allow the device to receive fax calls] and click [OK].
4 Click (Start) - [Computer] - [System properties] - [Device Manager].
z A standard user needs to enter an administrator password.
5 Double-click [Modems], and then double-click the internal modem.
6 Click [Power Management] and add a check mark for [Allow this device to wake the com-
puter], and then click [OK].
To set the time to return the computer to sleep
The computer will enter sleep after the set time even when the communication is not completed. You can avoid such uncompleted communication if you select [Never], but the computer does not return to sleep after resuming by a phone call.
A Click or on the notification area and click [More power options] - [Change when the computer sleeps].
B Set the expected communication time for the sleep setting.
NOTE
z This function does not work when the computer is off or is in hibernation.
z Connect the AC adaptor.
z The screen remains dark after the computer resumes from sleep. The previous screen display will be restored when
you touch the keyboard or Touch Pad.
z The computer cannot resume if the telephone is not connected to the internal modem (e.g., you cannot use a PC Card
modem).
Page 65

Modem
z The computer needs some time to respond, so set the calling time longer than normal. If this is not possible on the
transmission side, reduce the number of rings before answering on the software that you are using to keep the computer in idle waiting for the call.
65
Page 66
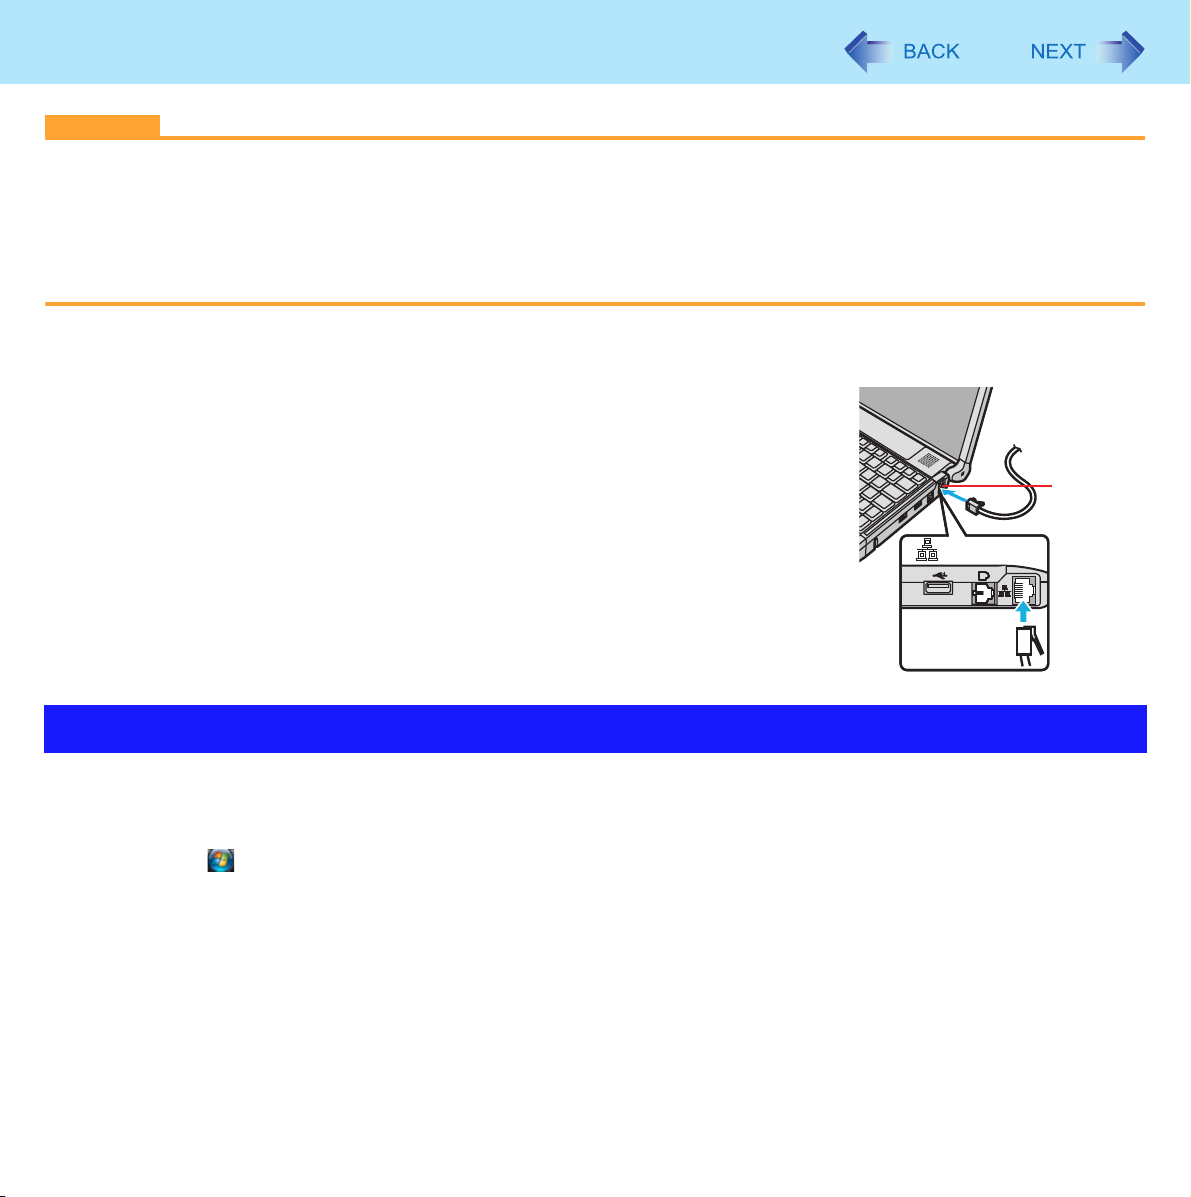
LAN
CAUTION
z Do not connect the telephone cable to the LAN port.
z To ensure proper network operations, use a twisted pair cable (category 5 or higher) less than 100 m in length.
z Do not use the sleep or hibernation during communications (except when the Wake up from LAN function is in use), as
this may cause an error in data transmission or reception. The timeout function may engage even during data transmissions, causing the computer to automatically go into sleep or hibernation. When not using the Wake up from LAN
function, we recommend setting [Never] for [Put the computer to sleep:] and [Hibernate after]. (Î page 30)
66
1 Turn off your computer.
z Do not use sleep or hibernation.
2 Connect the cable.
Connect the LAN port (A) and the network system (server, HUB, etc.) using a
LAN cable.
A
3 Turn on the computer.
LAN Port
Wake up from LAN Function
This is a function of the internal LAN to automatically resume the computer from a network server when the computer is in the
sleep or hibernation mode. To use this function, it is necessary to have a network environment that accommodates Wake up
from LAN. (The function is enabled in the default setting.)
A Click (Start) - [Computer] - [System properties] - [Device Manager].
z A standard user needs to enter an administrator password.
B Double-click [Network adapters], and double-click the internal network adaptor.
Page 67
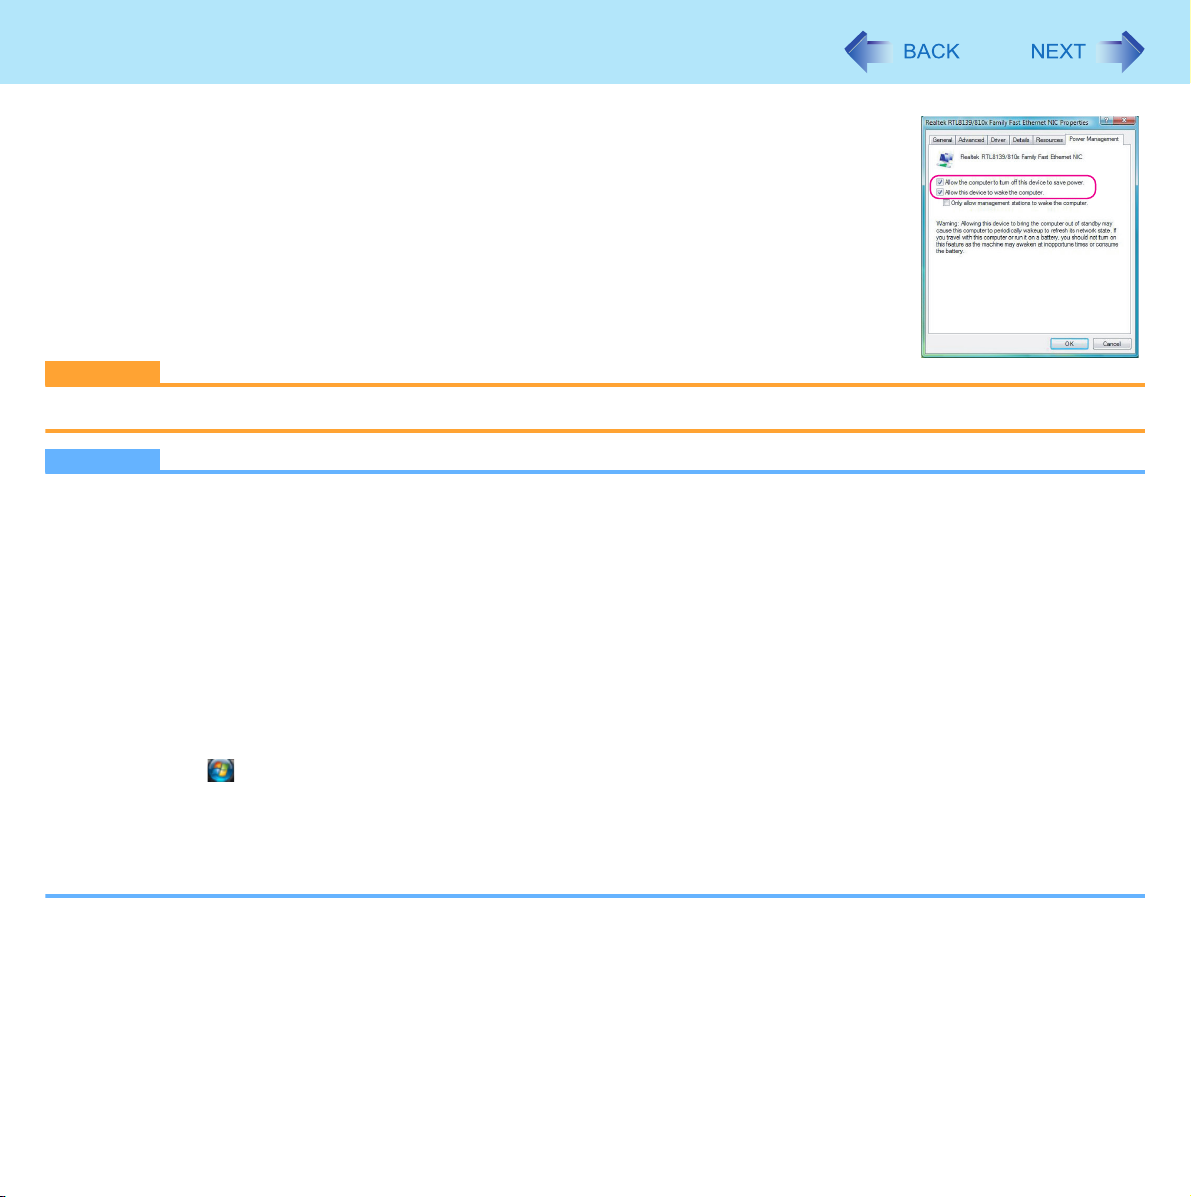
LAN
C Click [Power Management], add (to enable) or remove (to disable) check marks of
[Allow the computer to turn off this device to save power] and [Allow this device to
wake the computer], and then click [OK].
CAUTION
z Be sure to connect the AC adaptor, and enable the power supply.
NOTE
z Even when a password is set in the Setup Utility and [Password on boot] is set to [Enable], it is not necessary to input
the password set in the Setup Utility when the computer resumes from sleep or hibernation mode.
z The Wake up from LAN function will not operate under the following conditions:
• When the computer has been shut down
• When the power switch is slid over for four seconds or longer to turn off the power (e.g., when the computer hangs)
• When the AC adaptor and battery pack are removed from the computer or reattached to the computer
• When [LAN] is set to [Disable] in the Setup Utility
z After operations are resumed from sleep, the screen remains dark. The former screen display will be restored when
the keyboard or Touch Pad is touched.
z The computer may start up if accessed by another computer on the network.
The following procedure can be used to prevent startup due to unintentional access by a computer.
A Click (Start) - [Computer] - [System properties] - [Device Manager].
z A standard user needs to enter an administrator password.
B Double-click [Network adapters], and double-click the internal network adaptor.
C Click [Power Management], add a check mark for [Only allow management stations to wake the computer], and
then click [OK].
67
Page 68
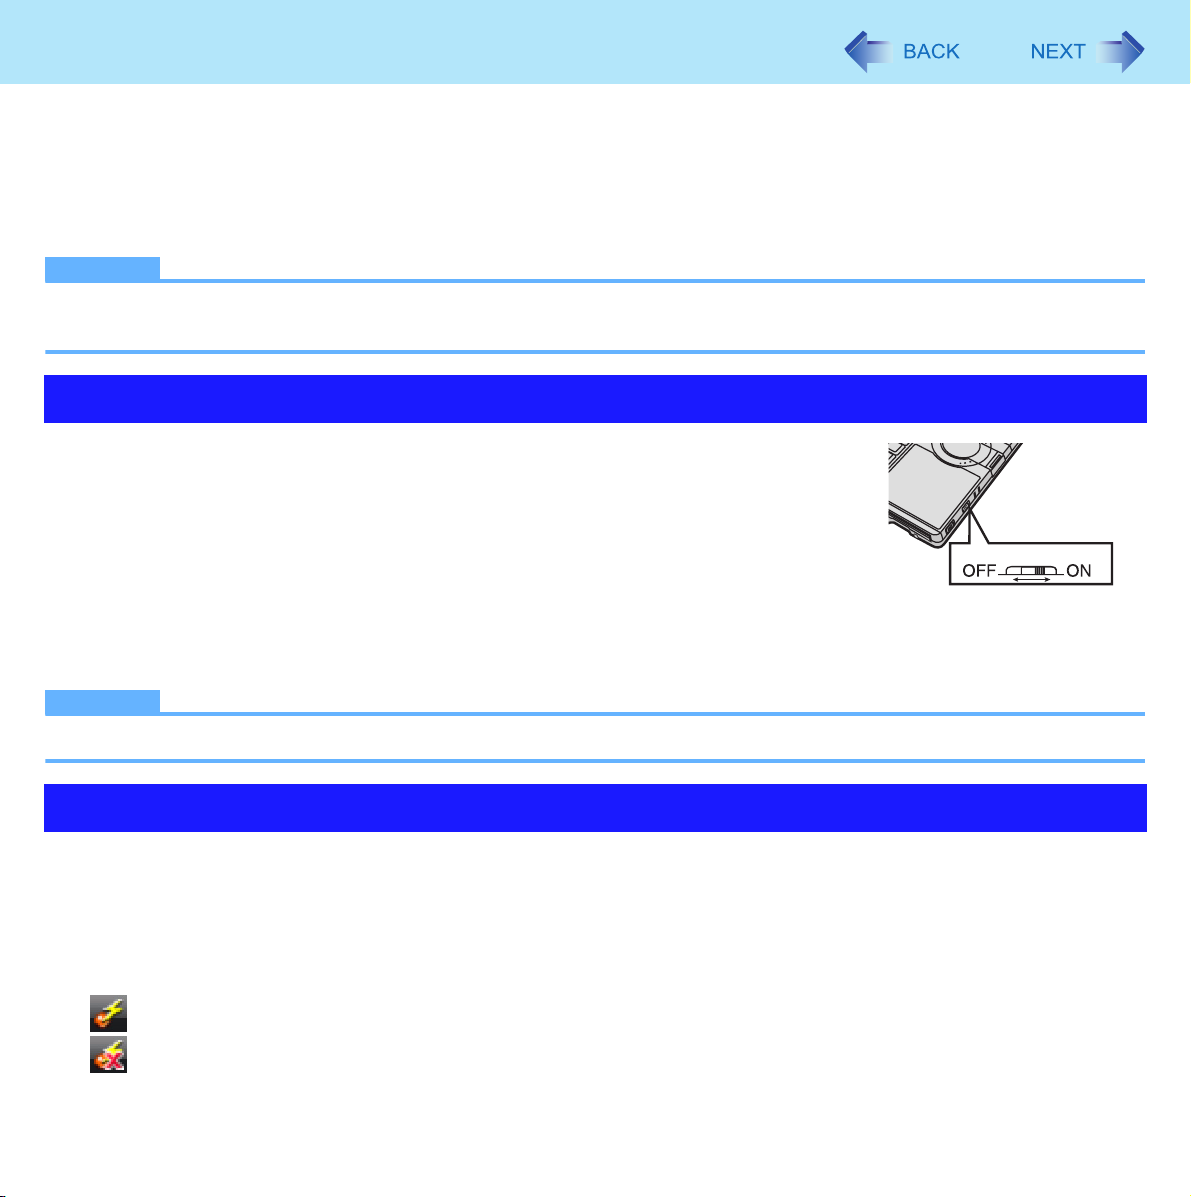
Disabling/Enabling Wireless Communication
<Only for model with wireless LAN and/or wireless WAN>
There are four ways of disabling and enabling wireless communication.
z The wireless switch on the front of the computer (below)
z The wireless switch utility (below)
z Settings in the Network and Sharing Center (Î page 70)
z Settings in the [Advanced] menu of the Setup Utility (Î page 76)
NOTE
z For further information about Wireless LAN: Î page 70
z For further information about Wireless WAN: Refer to the instruction manual of the wireless device.
68
The Wireless Switch
To disable all wireless communication
1 Switch to OFF
Wireless Switch
To enable wireless communication
1 Switch to ON
z In the default setting, the wireless switch enables all wireless devices when it is set to ON.
NOTE
z If you uninstall the Wireless Switch Utility, set the wireless switch to ON.
The Wireless Switch Utility
This utility allows you to control the function of the wireless switch. This utility also allows you to enable or disable wireless
devices from a pop-up menu in the notification area. In the default setting, all wireless devices are enabled.
The Wireless Switch Utility icon
The icon appears in the notification area when the computer is turned ON. It shows the status of wireless devices.
• : Indicates that the wireless devices are enabled.
• : Indicates that the wireless devices are off.
Page 69
Disabling/Enabling Wireless Communication
• : Indicates that the wireless devices have been disabled in the Setup Utility.
69
To enable or disable particular wireless devices
1 Click the Wireless Switch Utility icon to show the pop-up menu
2 Select On or Off for the device you want to enable or disable.
To change the function of the Wireless Switch
In the default setting, the Wireless Switch enables all wireless devices when it is set to ON. You can change this function.
[Selects the device for which to turn the device status on each time with the dialog box.]
Display a dialog each time you set the Wireless Switch to ON so you can choose which wireless device to
enable.
[Turns on the following device.] (default)
Only selected devices are enabled when you set the Wireless Switch to ON.
[Turns on the device that was on immediately before the wireless switch was turned off the last time.]
When you turn on the wireless switch, the on/off settings that were selected when you last turned off the wireless
switch will be restored.
1 Click the Wireless Switch Utility icon ( or ) on the notification area and click
[Settings].
2 Select the setting you want to assign to the wireless switch.
3 Click [OK].
Page 70
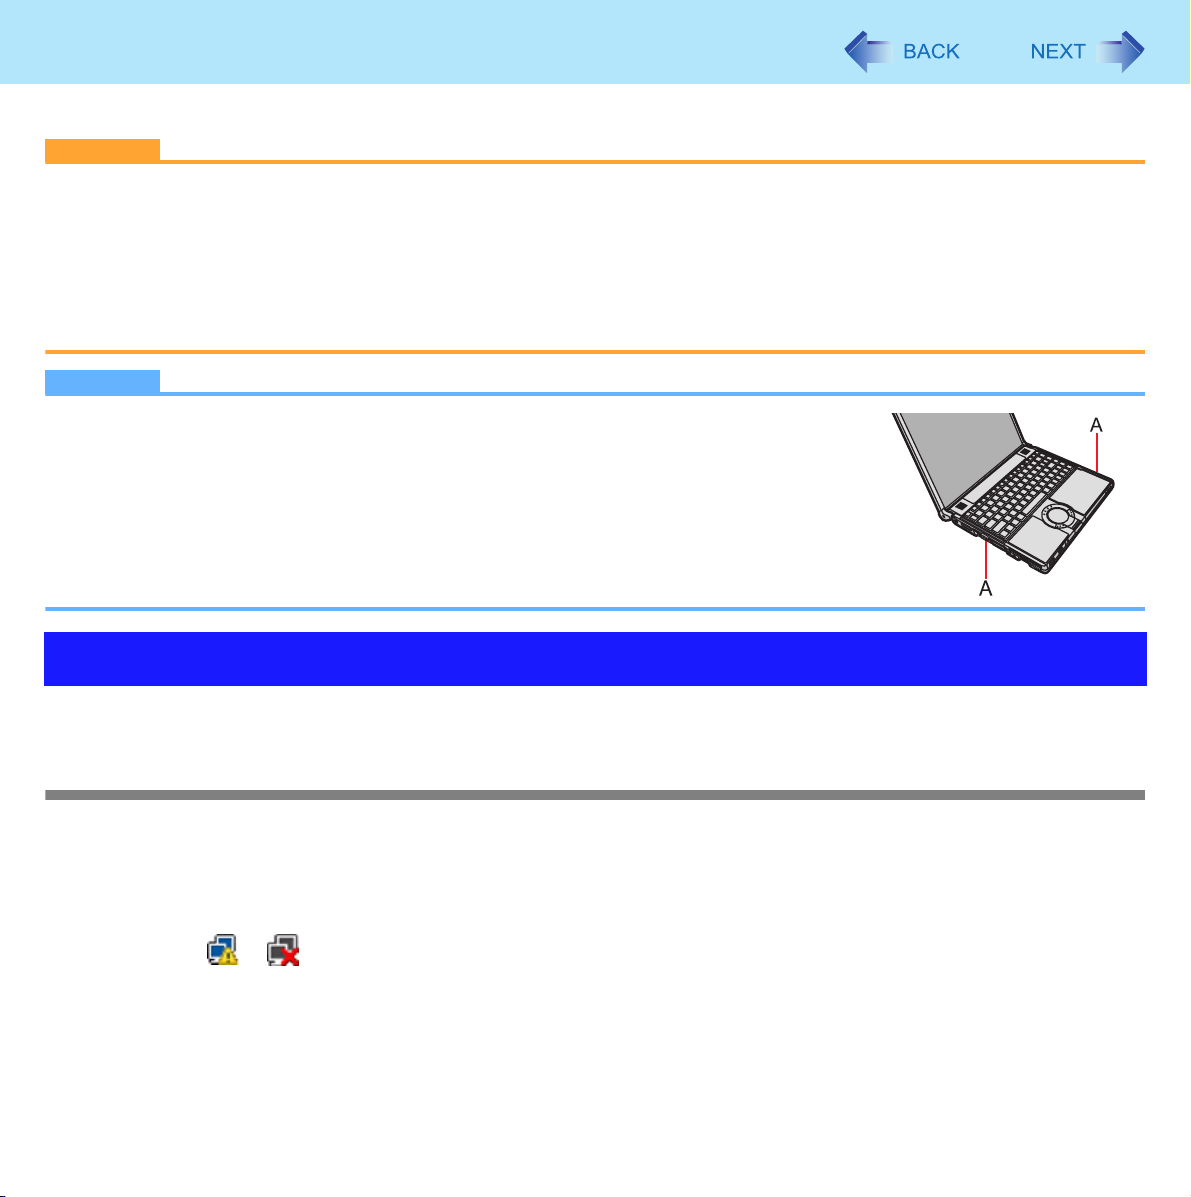
Wireless LAN
<Only for model with wireless LAN>
CAUTION
z Do not use wireless LAN on airplanes, in hospitals, or in other locations where wireless LAN signals may
affect peripheral devices.
Follow the instructions of airline companies and hospitals. If you use the computer in these locations, turn off the wireless LAN.
z To avoid unauthorized access to the computer through wireless LAN
We recommend you to make security settings such as encryption before using wireless LAN. Otherwise the hard disk
data such as the shared files can be exposed to the risk of unauthorized access.
NOTE
z Communication is established through the wireless LAN antenna (A). Do not block the
antenna area with your hand.
z Do not use the Fast User Switching function. The wireless LAN cannot perform.
z The transmission rate will be lower when a microwave oven is used.
70
Using the Wireless LAN Function
Before using a wireless LAN, turn the wireless LAN communication on.
Turning on/off the wireless LAN communication
1 Slide the wireless switch to turn on/off wireless LAN. (Î page 68)
z When turning on wireless LAN
If you cannot turn on wireless LAN using the wireless switch, confirm the Wireless Switch Utility setting (Î page
68), If you cannot turn on wireless LAN in the Wireless Switch Utility, try the following procedure.
A Click or on the notification area and click [Network and Sharing Center].
B Click [Manage network connections].
C Right-click [Wireless Network Connection] and click [Enable].
z A standard user needs to enter an administrator password.
z When [Disable] is displayed, [Wireless Network Connection] is already enabled.
D Turn on wireless LAN in the Wireless Switch Utility.
Page 71
Wireless LAN
NOTE
z You can use the following procedure instead of turning on wireless LAN in the Wireless Switch Utility.
A Click (Start) - [Control Panel] - [Adjust commonly used mobility settings].
B Click [Turn wireless on] in [Wireless Network].
• When [Turn wireless off] is displayed, the wireless network is already on.
• If you cannot select [Turn wireless on], the wireless switch is turned off.
71
Setting the wireless LAN access point
Preparation
Follow the instruction manual of the wireless LAN access point to make settings for the access point to recognize the computer.
1 Turn the wireless LAN on.
2 Click or on the notification area and click [Connect to a network].
If your computer is already connected to another network, click [Connect / Disconnect]. The [Connect to a network]
screen appears.
3 Click .
4 Input the key you set for the access point to recognize the computer, and click [Connect].
Wait for the computer to connect to the wireless LAN access point.
When [Successfully connected to XXXX] is displayed, the wireless LAN setting is complete.
z [Save this network] : Add a check mark to save the password, settings, etc.
z [Start this connection automatically] : Add a check mark so the computer automatically detects the access point
and connects to the Internet.
5 Click [Close].
NOTE
z The settings depend on the network environment. For further information, ask the system administrator or the person
in charge of the network.
Page 72
Wireless LAN
72
Enabling/Disabling the Wireless LAN Standard IEEE802.11a
(802.11a)
This section is available for countries except U.S.A. For U.S.A., do not change to [802.11a Enabled].
1 Click or on the notification area.
2 Click [802.11a Disabled] or [802.11a Enabled].
z A standard user needs to enter an administrator password.
NOTE
z In some countries, communication using IEEE802.11a (5 GHz wireless LAN) standard is restricted by law.
z The Wireless Switch Utility icon ( or ) indicates the on/off status of wireless LAN and/or wireless WAN, not the
setting of IEEE802.11a.
z If IEEE802.11a is enabled or disabled while the computer is connected to an IEEE802.11b/g access point, the connec-
tion will be temporarily interrupted.
z You can also change the IEEE802.11a setting in [Device Manager].
A Click (Start) - [Computer] - [System properties] - [Device Manager].
z A standard user needs to enter an administrator password.
B Double-click [Network adapters] and double-click [Intel(R) PRO/Wireless 3945ABG Network Connection].
C Click [Advanced], and then click [Wireless Mode] in [Property].
D Select the settings in [Value] (e.g., [802.11a/g]).
E Click [OK].
If you turn on/off 802.11a using the popup menu of Wireless Switch Utility, the setting in [Device Manager] will be
accordingly changed as below.
Settings in Device Manager
[802.11a/b/g]
[802.11b/g]
[802.11g]
[802.11a/g]
[802.11a]
[802.11b]
Settings in Wireless Switch Utility
When 802.11a is enabled When 802.11a is disabled
a+b+g is enabled b+g is enabled
a+g is enabled g is enabled
a is enabled b is enabled
Page 73
Wireless LAN
73
To check the wireless LAN network status
A Place the cursor over the Wireless Switch Utility icon ( or ) on the notification area.
A tooltip appears.
NOTE
z The Wireless Switch Utility icons ( and ) indicate the on/off status of wireless communication, not the
IEEE802.11a setting.
z If the IEEE802.11a setting is changed in [Device Manager], the display will be changed accordingly.
Exchanging Data between Computers Using the Wireless LAN
To communicate between two computers using the wireless LAN and without using an access point, make the following
settings on each computer.
z Set the network to be accessed as wireless ad hoc.
z Set the network names to the same name.
z Set the network authentication to the same authentication.
z When using encryption, set the same encryption and the same network key on both computers.
Page 74
Setup Utility
You can make the settings of the computer’s operating environment (password settings, startup drive selection, etc.)
z Cannot display the Setup Utility screen in simultaneous display.
74
Starting the Setup Utility
1 Turn on or restart the computer.
2 Press
F2
several times while [Panasonic] boot screen is displayed soon after the com-
puter starts the startup procedure.
When [Enter Password] is displayed, enter your password.
When you enter Supervisor Password
z You can make the settings of all items of the Setup Utility.
When you enter User Password
z Note the following:
• In the [Advanced] and [Boot] menus, you cannot make the settings of all items.
• In the [Security] menu, you can only change the User Password and TPM. You can change User Password
when [User Password Protection] is set to [No Protection]. You can change TPM when [Embedded Security
(TPM) Sub-Menu] is set to [No Protection].
• In the [Exit] menu, you cannot make the setting of [Get Default Values].
F9
does not function.
•
Information Menu
(Underlined items are the factory presets.)
Language English
Japanese
Model No.
Serial No.
CPU Type
CPU Speed
BIOS
Embedded Controller
System Memory
Primary Master
Optical Drive
Accumulative Operating Time
Computer Information (Cannot be
changed.)
Page 75
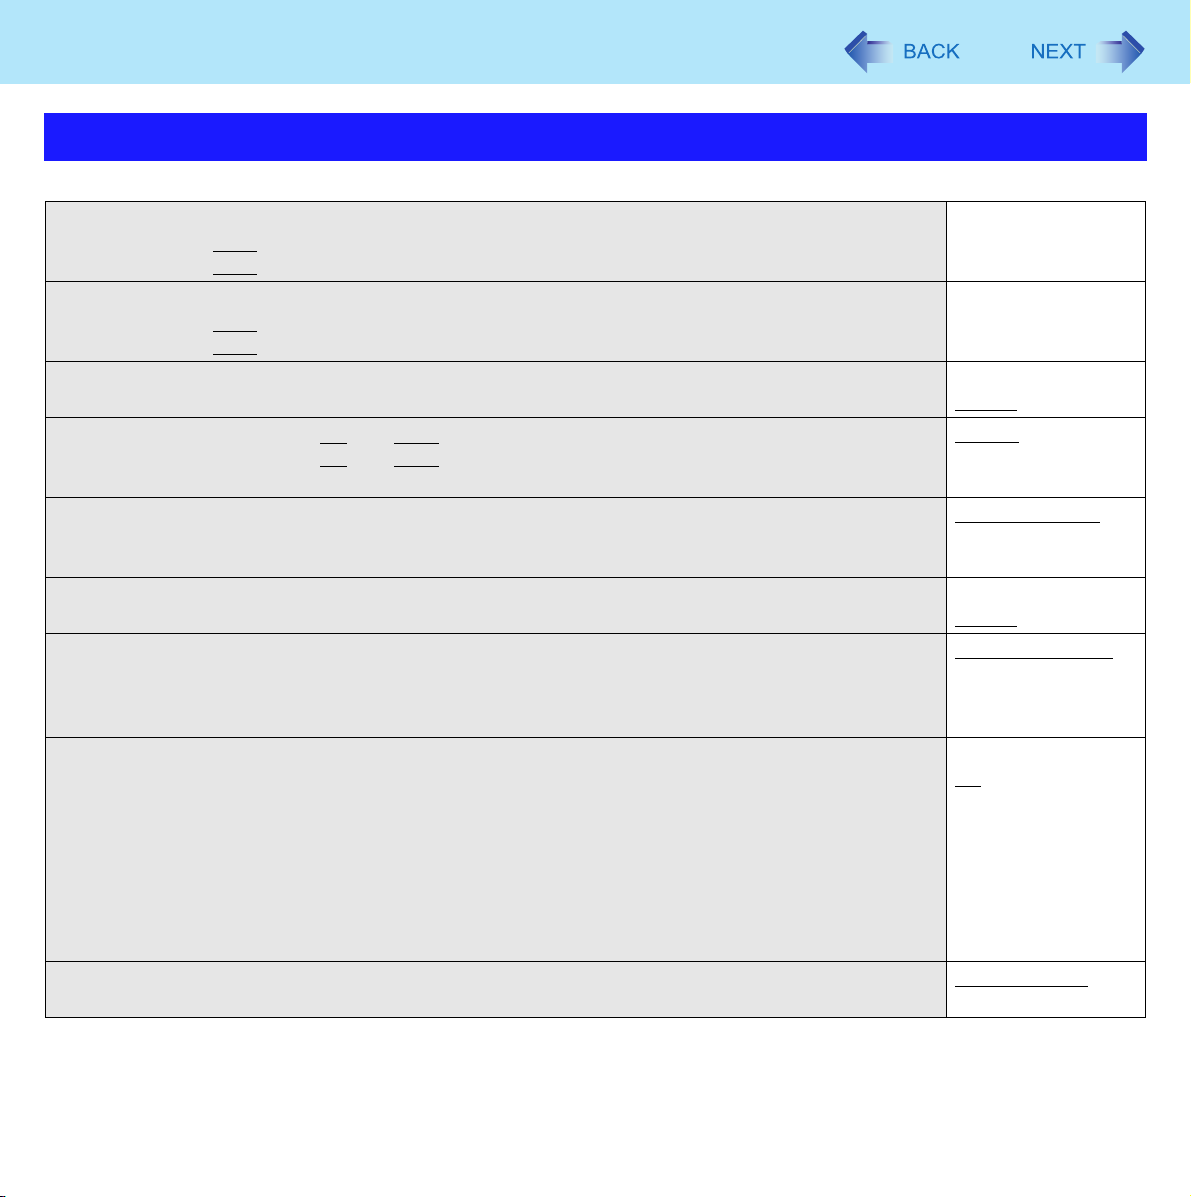
Setup Utility
75
Main Menu
(Underlined items are the factory presets.)
System Time
• 24-hr. style.
Tab
• You can use
System Date
• Month/Day/Year.
• You can use
Touch Pad Disable
Fn/Ctrl Key
• Select whether to switch
• Do not attempt to replace the markings on the keys, or the keys themselves.
Display
• The display during the Windows start-up process. When an external display is not connected,
the information appears on the internal LCD even though [External Monitor] is set.
Display Expansion Disable
Memory/Video Power Save
• When [Max Performance] is set, set the memory frequency up to 533 MHz and video frequency
up to 166 MHz.
• When [Battery Optimized] is set, set the memory up to 400 MHz and video up to 133 MHz.
CD/DVD Drive Power
• You can set the drive power to [On] or [Off] when the computer is started up.
• When set to [Off].
• From the next time you start the computer, you will be unable to start up from CD/
• If operations are resumed from hibernation while a disc is set, it may take about 20
Battery Charging Indicator On Continuous
to move the cursor.
Tab
to move the cursor.
Fn
with
Ctrl
functions, and vice versa on the internal keyboard.
DVD drive. The disc cover cannot be opened until Windows has started. To start
up from the CD/DVD drive (give preference to [USB CDD] (internal CD/DVD drive)
in the [Boot] menu), set this to [On].
seconds for operations to resume.
[xx:xx:xx]
[xx/xx/xxxx]
Enable
Normal
Replace
External Monitor
Internal LCD
Enable
Max Performance
Battery Optimized
Off
On
Flashing
Page 76
Setup Utility
76
LED Brightness
• You can set the brightness of the power indicator and the CD/DVD drive indicator. ([Auto] : The
brightness varies according to brightness of the internal LCD. [Dimmer] : The brightness
remains dark and does not vary.)
Auto
Dimmer
Advanced Menu
(Underlined items are the factory presets.)
Core Multi-Processing
• When using the originally installed Windows Vista, leave this set to [Enable]. Setting it to [Disable] is
not supported.
Modem Disable
LAN Disable
Wireless LAN
• Only for model with wireless LAN
Wireless WAN
• Only for model with wireless WAN
PC Card Slot Disable
SD Slot Disable
CD/DVD Drive Disable
USB Port Disable
Legacy USB Support
• Select whether to use the function that makes the computer recognize internal CD/DVD drive, USB
keyboard and USB floppy disk drive ([Enable]) or not ([Disable]) before starting Windows.
• For devices such as USB floppy disk drive, it is effective only when [USB Port] is set to [Enable].
Disable
Enable
Enable
Enable
Disable
Enable
Disable
Enable
Enable
Enable
Enable
Enable
Disable
Enable
Page 77
Setup Utility
77
Security Menu
(Underlined items are the factory presets.)
Execute-Disable Bit Capability
• [Enable] indicates that this computer supports hardware-based Data Execution Prevention (DEP).
It should usually be set to [Enable].
Password on boot Disable
XSet Supervisor Password Enter the sub-menu.
Setup Utility Prompt
• When [Setup Utility Prompt] is set to [Disable], the message “Press F2 for Setup / F12 for LAN” is
F2
and
F12
not displayed on [Panasonic] boot screen. However,
is not displayed.
Boot First Menu Disable
Hard Disk Lock Disable
User Password Protection No Protection
XSet User Password Enter the sub-menu.
XEmbedded Security (TPM) Sub-Menu
• Only for model with TPM
• For information on TPM, refer to Installation Manual of “Trusted Platform Module (TPM)”. Click
(Start) and input [c:\util\drivers\tpm\README.pdf] in [Start Search].
XComputrace (R) Sub-Menu Enter the sub-menu.
will work even if the message
Disable
Enable
Enable
Disable
Enable
Enable
Enable
Protected
Enter the sub-menu.
Page 78
Setup Utility
Boot Menu
Boot priority order:
1: USB FDD:
2: IDE HDD: xxxxxxxxxx
3: USB CDD: MATSHITA xxxxxxx
4: PCI LAN: xxxxxxxxxx
5:
6:
7:
8:
Excluded from boot order:
:USB KEY
:USB HDD
:USB LS120
*1
Use the Panasonic USB floppy disk drive (optional: CF-VFDU03)
*2
The devices under [Excluded from boot order] are not booted.
To change the boot order
*1
78
*2
To move up, select the device with Ï and Ð, and then press F6.
To move down, select the device with Ï
To move the device from [Excluded from boot order] to [Boot priority order] or vice versa, select the device with Ï
X
then press
To return to the default setting, press
NOTE
z The default order is [USB FDD] -> [IDE HDD] -> [USB CDD] -> [PCI LAN].
z To boot from the following devices, make the settings as below.
z In the [Boot] menu, the names of the connected devices (including internal devices) will be displayed.
“USB CDD: MATSHITA UJXXXXX XXXX” is the internal CD/DVD drive.
z If more than one of the same devices are connected, only one device name will be displayed.
.
To boot from
• Internal CD/DVD drive : [CD/DVD Drive] to [Enable] (Î page 76)
• USB connected device : [USB Port] and [Legacy USB Support] to [Enable] (Î page 76)
• LAN : [LAN] to [Enable] (Î page 76)
and Ð, and then press F5.
1
.
You need to set
[Legacy USB Support] to [Enable] (Î page 76)
[CD/DVD Drive Power] to [On] (Î page 75)
and Ð, and
Page 79
Setup Utility
79
z You can select the boot device during start-up of the computer, too. Press
displayed. [Boot Menu] appears and you can select the device. [Boot Menu] appears only when [Boot First Menu] in
the [Security] menu is set to [Enable] (Î page 77). When you change the setting in the [Boot] menu, [Boot Menu] will
be changed accordingly.
z Bootable CDs created using B’s Recorder in the CF-W2 and CF-Y2 series cannot be used on this computer. If you
want to share bootable CDs with those series, create a new bootable CD (Î page 47).
z This computer does not support startup operations from CD/DVD drives other than the internal CD/DVD drive.
Esc
soon after [Panasonic] boot screen is
Exit Menu
Save Values & Exit
Exit Without Saving Changes
Get Default Values To return the settings to the default values.
Load Previous Values To load the previous values from CMOS.
Save Current Values To save the changes to CMOS.
To save the changes to CMOS and reboot.
To exit without saving the changes to CMOS.
Page 80
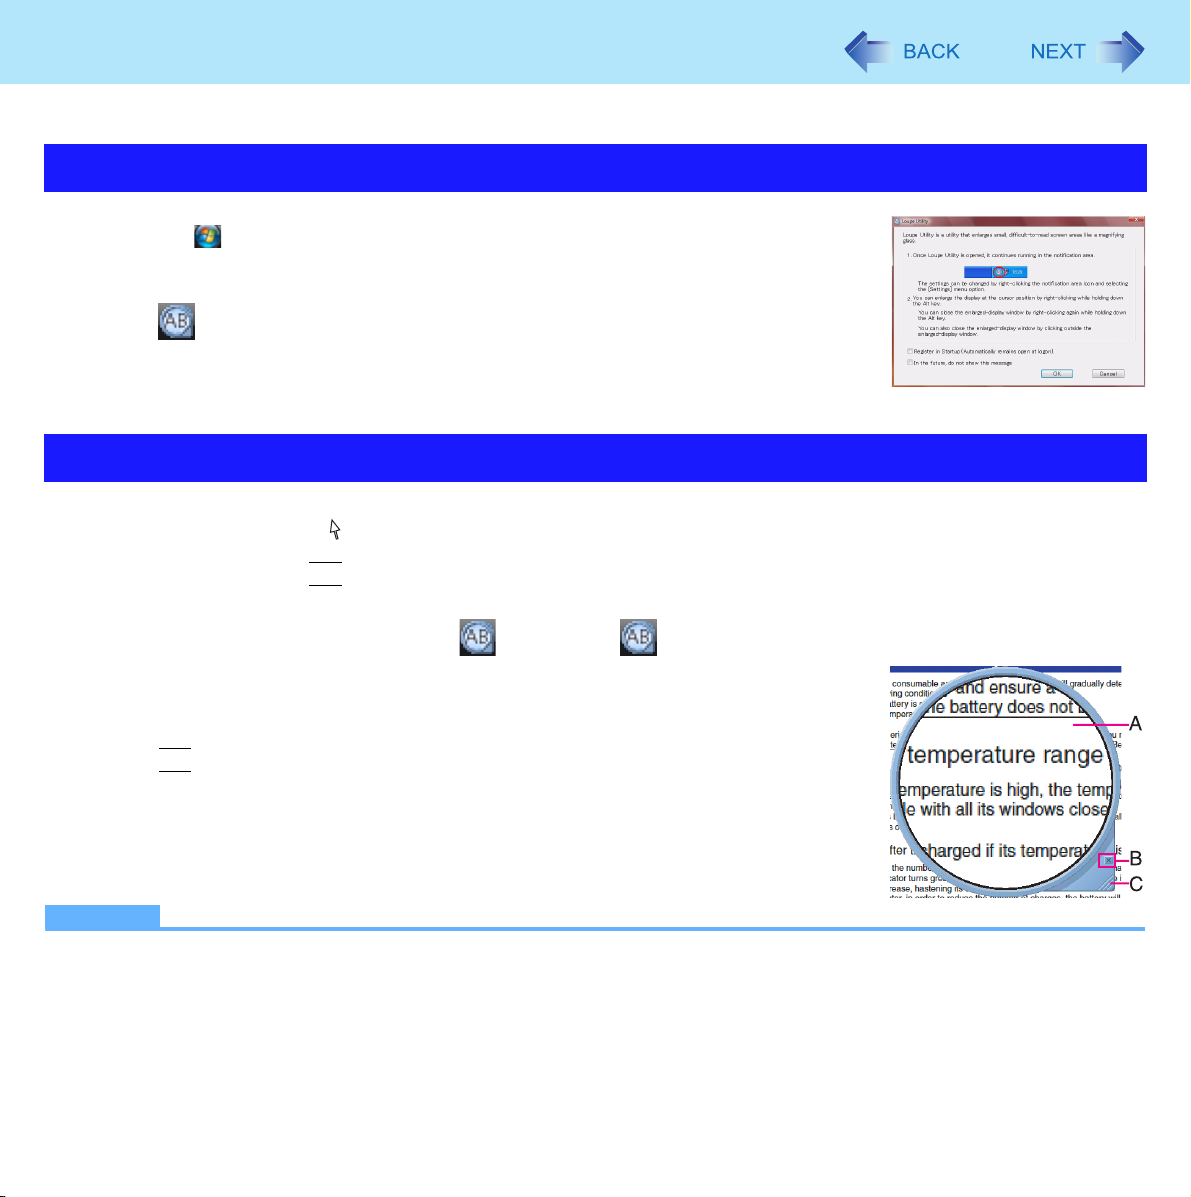
Loupe Utility
You can magnify the specific part of the screen.
Activating the Loupe Utility
1 Click (Start) - [All Programs] - [Panasonic] - [Loupe Utility].
2 Click [OK].
z appears on the notification area.
Using the Loupe Utility
1 Point the cursor at the part of the screen you want to magnify.
80
2 Press and hold
z The part pointed by the cursor is magnified.
z Alternatively you can double-click , or right-click and click [Show Loupe].
Alt
, and right-click.
3 Drag the loupe window (A) to move the magnified part.
z To hide the loupe window, click the Hide button (B).
Alternatively you can click any part out of the loupe window, or press and hold
Alt
and right-click.
z To change the loupe window size, drag the bottom-right corner (C).
The size range you can enlarge/shrink depends on the screen’s resolution.
NOTE
z If you execute the scroll operation while the loupe window is displayed, the window directly below the loupe window
will scroll vertically. The loupe window will not be displayed during vertical scrolling. When vertical scrolling stops, the
loupe window will be displayed in the same position where it appeared before scrolling began.
z Not compatible with the horizontal scroll function in the Touch Pad utility. (Î page 5)
Page 81
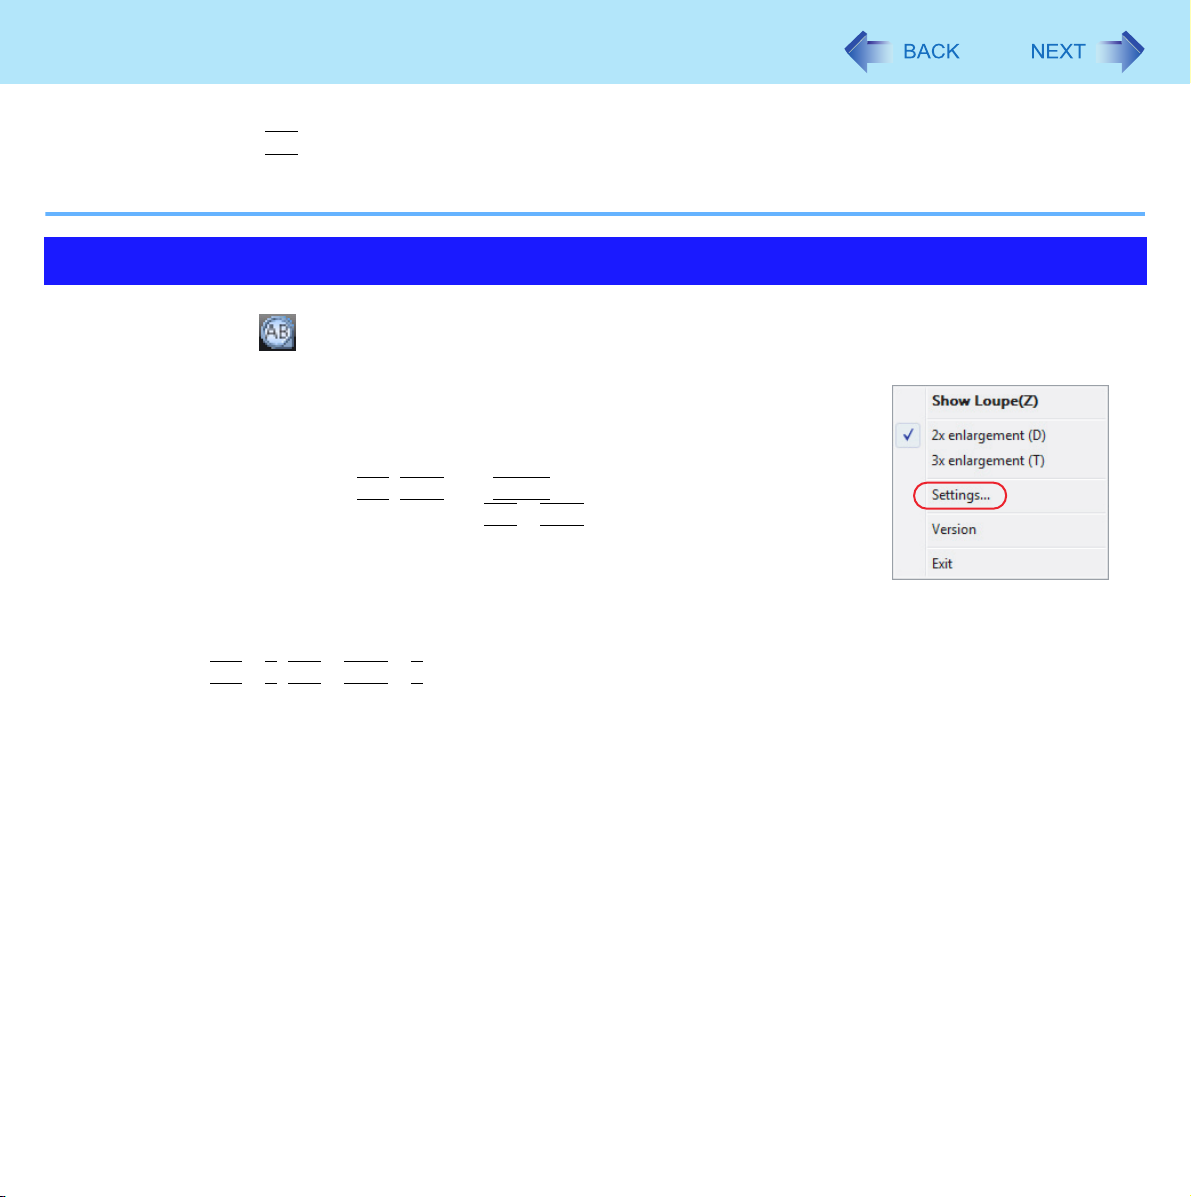
Loupe Utility
z The magnified text or image in the loupe window is fixed at the moment that the part is magnified (e.g., at the moment
Alt
you press and hold
click the loupe window.
z The Loupe Utility does not work with some applications.
and right-click). To reflect the change you made on the original screen to the loupe window,
81
Setting the Loupe Utility
1 Right-click on the notification area.
2 Click [Settings].
[Show/hide shortcuts assignment]
z When using the external mouse/Touch Pad
A Click [Mouse/Touch pad]
+
Alt, Ctrl
Ctrl
B Click a combination of
keys can be combined; for example,
C Select either [Right click] or [Left click] to use in combination with the key(s)
selected in step B above.
z When using the keyboard
A Click [Keyboard].
B Click the text box and then press the key used for the shortcut.
Alt
+ Z,
(e.g.,
Alt
, and
+ Z, etc.)
Shift
Alt
, and add the check mark. (Multiple
+
Ctrl
)
[Window shape]
Select the shape of the loupe window.
[Autorun]
You can turn on/off autorun of the Loupe Utility and the explanation window.
3 Click [OK].
Page 82
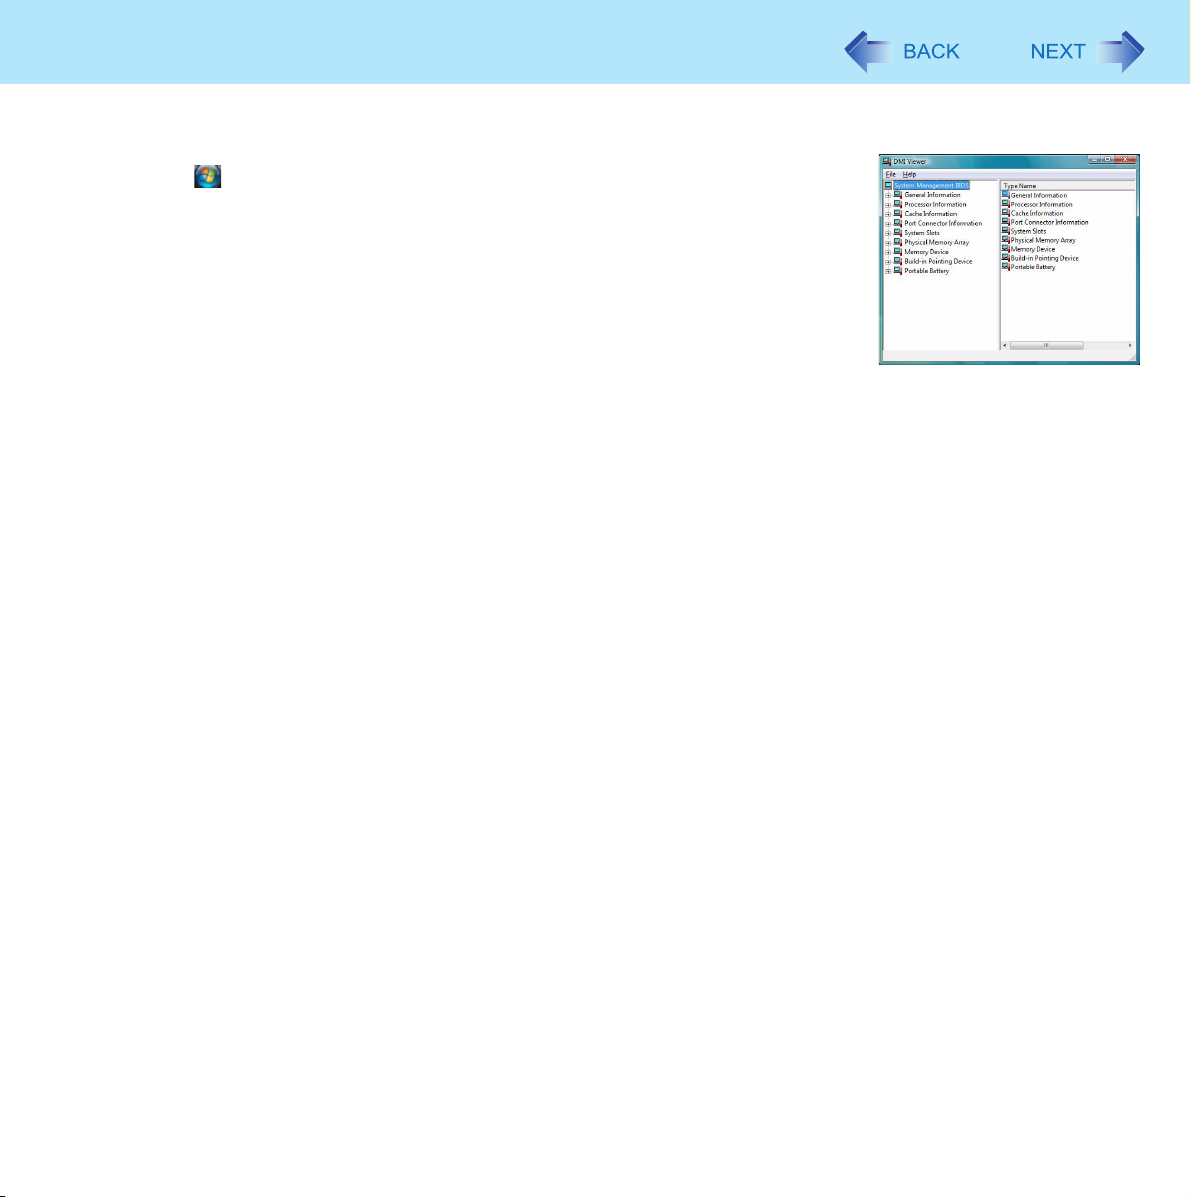
DMI Viewer
This computer conforms to the specifications of the Desktop Management Interface (DMI). You can use the DMI Viewer to
access the computer’s information including the CPU, memory and supported system.
82
1 Click (Start) - [All Programs] - [Panasonic] - [DMI Viewer].
The DMI Viewer screen appears.
2 Click the item to display the detailed information.
To save the information as a text file
A To save the item that is displayed
Click [File] - [Save Selected Data].
To save all items
Click [File] - [Save All Data].
B Select the folder, input the file name, and then click [Save].
Page 83
Troubleshooting (Advanced)
83
Problems with Starting Up, Shutting Down and Sleep and Hibernation
Cannot boot from a floppy disk
z Check if there is a Panasonic external floppy disk drive connected (CF-VFDU03). It is not possible to boot from other
floppy disk drives.
z Check that the boot disk is correctly inserted.
z Run the Setup Utility, and confirm the following settings.
• [USB Port] and [Legacy USB Support] are set to [Enable] in the [Advanced] menu. (Î page 76)
• [USB FDD] is the first device shown in [Boot priority order] in the [Boot] menu. (Î page 78)
z Turn off the computer, and reconnect the external floppy disk drive.
Windows startup is slow
z Restore the Setup Utility’s settings to their default values.
z If you install resident software after purchasing this computer, disable the resident software.
z This problem may be eliminated by adding external memory.
z Defragment the disk with the Disk Defragmenter.
z Use Windows ReadyBoost.
*1
The processing speed depends on the application software used, so this operation may not cause the processing speed to increase.
*1
*1
The computer does not enter sleep or hibernation
z If a peripheral is connected, first remove the peripheral, and then enter sleep or hibernation. If the computer still fails to
enter sleep or hibernation, restart the computer.
z It may take a minute or two to enter sleep or hibernation. Wait for a moment.
z The computer may not enter sleep properly and seems to be frozen in the mode that the computer is communicating via
the modem. When you cannot execute operations, slide the power switch for four seconds or more to forcibly turn your
computer off.
z When the display is closed, the computer may not enter sleep or hibernation.
In order to activate sleep or hibernation, set [Touch Pad] to [Disable] in the [Main] menu of the Setup Utility. (Î page 75)
*2
Functions that cause the computer to automatically enter sleep or hibernation after a certain time interval has passed.
*2
Page 84
Troubleshooting (Advanced)
84
The computer does not power off (Windows does not shut down)
z If a peripheral is connected, disconnect it, and then shut down.
If it is possible to shut down when the peripheral is disconnected, then there may be a problem with the peripheral. Consult the peripheral manufacturer.
z Also check the items in “No response”. (Î page 87)
z If it is no longer possible to shut down Windows after installing application software, click (Start) - [Control Panel] -
[Uninstall a program], and remove the installed application.
If it is possible to shut down when the application is removed, then consult the application software manufacturer.
z Check a disk error using the following procedure:
A Remove all peripheral devices (including an external display).
B Click (Start) - [Computer], right-click [Local Disk (C:)] and click [Properties].
C Click [Tools] - [Check Now].
z A standard user needs to enter an administrator password.
D In [Check disk options], add a check mark for [Automatically fix file system errors] and [Scan for and attempt
recovery of bad sectors], and click [Start].
The time taken to check the disk depends on the settings in [Check disk options].
If the disk check does not solve the problem, perform the reinstallation procedure and return the hard disk to its condition in the default setting. (⇒Operating Instructions “Reinstalling Software”)
The date and time are incorrect
z Click (Start) - [Control Panel] - [Clock, Language, and Region] - [Date and Time], and correct the date and time.
z If you continue to experience problems, the internal battery maintaining the clock may need to be replaced. Contact your
technical support office.
z When the computer is connected to a LAN, confirm the date and time of the server.
z This computer will not correctly recognize the date and time starting from the year 2100 A.D.
Problems with Passwords and Messages
When the administrator password is forgotten
z Log on as another administrator, and delete the forgotten password.
A Click (Start) - [Control Panel] - [Add or remove user accounts].
B Click the account whose password is forgotten, and click [Remove the password].
C Click [Remove Password].
Page 85
Troubleshooting (Advanced)
z Use a password reset disk. [Reset password] appears when you fail to input the correct password. Click [Reset password]
and follow the on-screen instructions, and set the password again.
z If you cannot remedy using the above procedures, perform reinstallation and return the hard disk to its default condition
(⇒Operating Instructions “Reinstalling Software”).
85
When resuming from the sleep or hibernation, [Enter Password] does not
appear
z Even when a password has been set in the [Security] menu of the Setup Utility, and [Password on boot] is set to [Enable],
[Enter Password] does not appear when the computer resumes from the sleep or hibernation.
Set the Windows password with the following procedure, and make input of the Windows password required.
A Click (Start) - [Control Panel] - [User Accounts] and set the password.
B Click (Start) - [Control Panel] - [Change battery settings] - [Require a password on wakeup] - [Change set-
tings that are currently unavailable].
C Add a check mark for [Require a password] and click [Save changes].
Problems with Operation during Use
Windows operation is slow
z Also check the items in “Windows startup is slow”. (Î page 83)
z If the performance is slow after installing the application software, click (Start) - [Control Panel] - [Uninstall a program]
and delete the application that has been installed.
z Defragment the disk with the Disk Defragmenter.
Disk Defragmenter may take some time. (The time required will depend on the disk capacity.)
• About the defragmentation
When files have been repeatedly written or rewritten to the hard disk, some files may become segmented and saved in
fragments. If this fragmentation continues, it may take some time to read from or write to the hard disk. The Disk
Defragmenter is a function that sorts these fragmented files in the most efficient order and enables you to read from and
write to the hard disk quickly.
• How to defragment disks:
A Click (Start) - [All Programs] - [Accessories] - [System Tools] - [Disk Defragmenter].
z A standard user needs to enter an administrator password.
B Click [Defragment now].
Defragmentation begins. It may take a long time depending on the drive volume, etc.
C When “Defragmentation is complete...” is displayed, click [Close].
Page 86
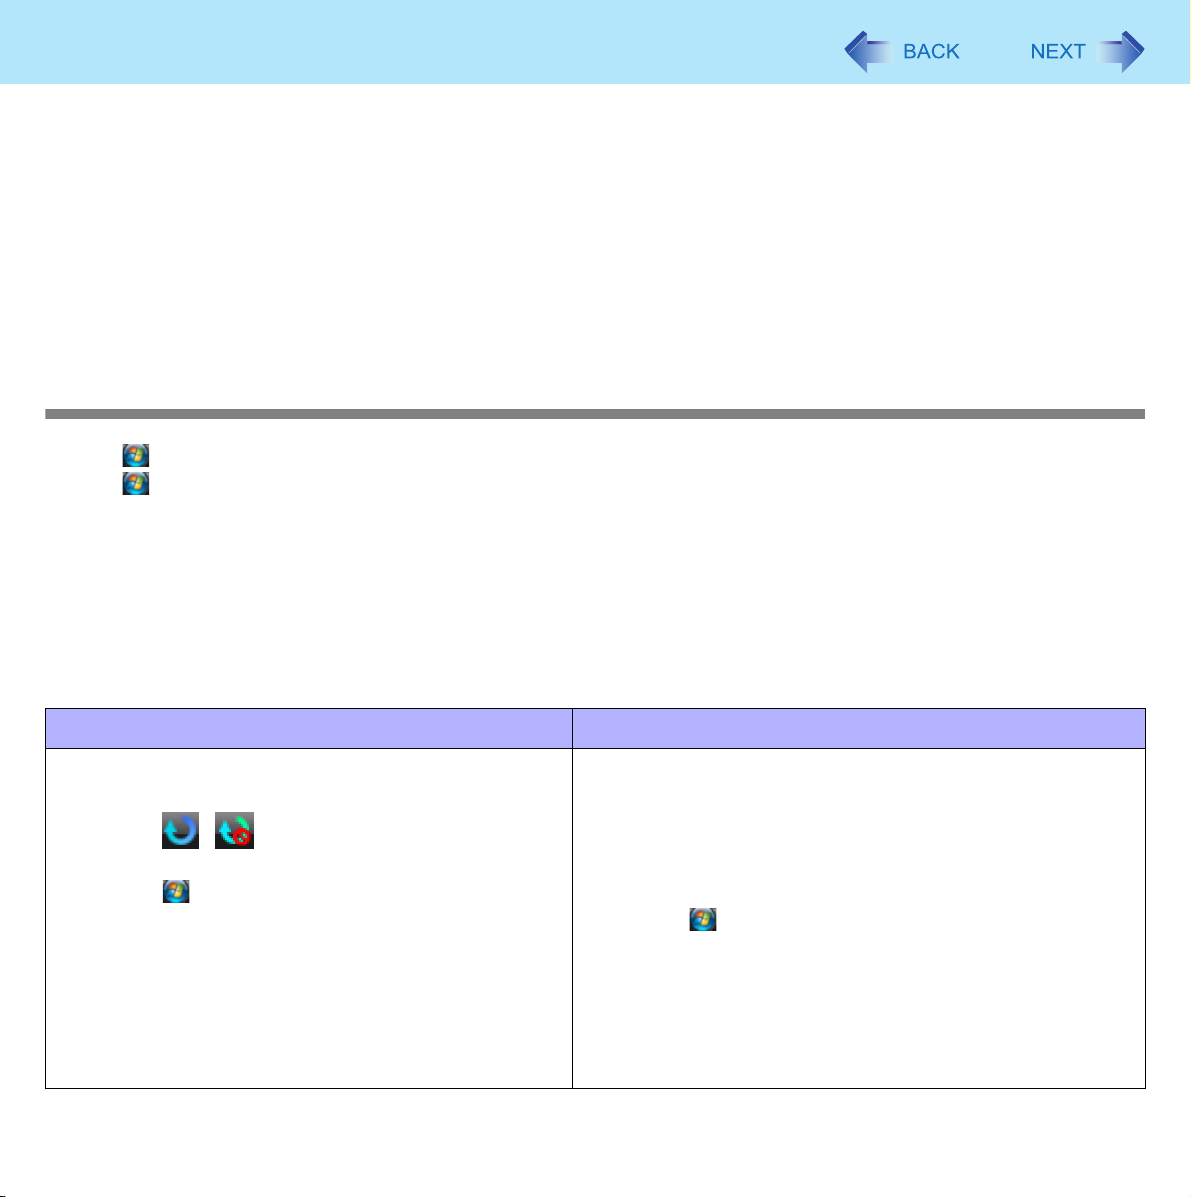
Troubleshooting (Advanced)
z When you use an external media which has higher random-access speed than the internal hard disk, use the Windows
ReadyBoost feature. It will make the computer more responsive using the storage area of external media such as USB
thumb drive.
z If operations slow down during streaming playback, confirm the number of colors of the display with the following proce-
*3
dure:
A Right-click the desktop, and click [Graphics Properties].
B Click [Display Settings].
C Confirm that [Color Quality] is set to [32 Bit].
*3
Note that this may not improve the speed of all operations.
86
Cannot scroll with the Touch Pad
z Click (Start) - [All Programs] - [Panasonic] - [Touch Pad Utility] to start up the Touch Pad utility.
z Click (Start) - [All Programs] - [Panasonic] - [Touch Pad Utility settings] - [General settings], and check that the check
mark is added for [Use Touch Pad function].
z If horizontal scrolling is not possible, in the above sequence, check that the check mark is added for [Use horizontal scroll
function] in [General settings].
z If a message appears indicating that “Flat Pad communication failed, so cannot start up Touch Pad utility,” check the fol-
lowing, and make the appropriate settings.
• If an external mouse is connected:
External mouse applications and drivers cannot be used at the same time as the Touch Pad utility. Use either the Touch
Pad or an external mouse.
When using an external mouse When using the Touch Pad
z Uninstall the Touch Pad utility using the following pro-
cedures.
A Click / on the notification area, and click
[Exit].
B Click (Start) - [Control Panel] - [Uninstall a
program].
C Click [Touch Pad Utility], and click [Uninstall] to
remove the program.
z Uninstall the external mouse application and driver.
(Î page 61)
z Check to ensure that [Touch Pad] is set to [Enable] in the
[Main] menu of the Setup Utility.
z Use the following procedures to confirm that the Touch Pad
driver has been installed.
A Click (Start) - [Computer] - [System properties] -
[Device Manager].
z A standard user needs to enter an administrator
password.
B Double-click [Mice and other pointing devices]. Confirm
that [Synaptics PS/2 Port TouchPad] is in this list.
z Disconnect the external mouse and restart your computer.
Page 87
Troubleshooting (Advanced)
z If the error message continues to appear even after confirming the above items, or if there is no external mouse con-
nected:
A If an application with a high CPU usage rate is running, exit this application, and click (Start) - [All
Programs] - [Panasonic] - [Touch Pad Utility].
B Uninstall and then reinstall the Synaptics TouchPad driver and Touch Pad utility. (Î page 60)
z If [Touch Pad Utility settings] does not appear when you click (Start) - [All Programs] - [Panasonic], click (Start) -
[Control Panel] - [Uninstall a program], and check that [Touch Pad Utility] appears.
• If it does not appear:
It is necessary to install the Touch Pad utility.
A Click (Start) and input [c:\util\touchpad] in [Start Search], and then press
B Right-click [setup] in [touchpad] folder and click [Run as Administrator].
If there are two or more “setup” files, right-click the file whose [Type] is [Application].
Follow the on-screen instructions for the installation.
• If it does appear:
Click [Touch Pad Utility], and click [Uninstall] to remove the program. Then follow the procedure under “If it does not
appear” above to reinstall.
z If an application has a screen in which only one of horizontal and vertical scrolling is possible, then regardless of the Touch
Pad operation, scrolling only occurs in the permitted direction. (For example, in a screen permitting only horizontal scrolling, a vertical scroll operation results in horizontal scrolling.)
Enter
.
87
Some applications may not work properly
z When switching to a different user with the Fast User Switching function, the following problems may occur:
• Some applications may not work properly.
Fn
• Key combination with the
• It may not be possible to set the settings of the display.
• Personal Secure Drive function of Security Platform (TPM) may not work (Only for models with TPM).
• The wireless LAN cannot be used. (only for models with wireless LAN)
In this case, log off all users without using Fast User Switching function, and try the operation once more. If the problem
persists, restart the computer.
z Some software applications installed after the time of purchase are not compatible with Windows Vista. Refer to applica-
tion software manufacturer homepage or other sources.
may not work.
No response
z Is there an input screen (e.g., password input screen at startup) hidden behind another window? Use the
check for other windows being displayed.
z Press the
Ctrl+Shift+Esc
to open Task Manager and close the software application which is not responding.
Alt+Tab
to
Page 88
Troubleshooting (Advanced)
z After sliding the power switch for at least four seconds to turn off the computer, turn on again.
If Windows runs correctly, but the application software does not start, click (Start) - [Control Panel] - [Uninstall a program] and remove the failing application software, then reinstall the application software.
88
Cannot play movies with the Windows® Media Player
z When you try to play a movie, is [Codec required] displayed?
Some video files use a Codec that is not installed as a standard. In these instances, if you play back the video file after
connecting to the Internet, the Codec may be downloaded automatically, allowing you to play back the file.
Problems with Battery
The battery indicator lights red
z The remaining battery power is very low (the charge is approx. 9% or less).
Connect the AC adaptor. You can use the computer when the battery indicator light is orange. If you do not have an AC
adaptor, save your data and power off your computer. After replacing the battery pack with a fully charged one, turn your
computer on again.
The battery indicator is blinking
z If blinking red:
Quickly save your data and power off your computer. Remove the battery pack and disconnect the AC adaptor, then connect them again. If the problem persists, contact your technical support office. The battery pack or charging circuit may be
defective.
z If blinking orange:
• Battery cannot be recharged temporarily because the internal temperature of the battery pack is outside the acceptable
temperature range for recharging. Your computer can be used normally in this state. Once the range requirement is
satisfied, charging begins automatically.
• Software applications and peripheral devices (USB devices, etc.) are consuming too much power. Exit the software
applications currently running. Once the range requirement is satisfied, charging begins automatically.
The battery indicator is flashing
z The battery is recharging.
If [Battery Charging Indicator] in [Main] menu of the Setup Utility is set to [Flashing], the indicator will alternately become
lighter and darker.
Page 89
Troubleshooting (Advanced)
89
To increase the lifetime of the battery
z You can prevent deterioration of the battery pack and extend the lifetime of the battery by setting Economy Mode (ECO) to
“Enable” in the Economy Mode (ECO) setting utility. (Î page 22)
However, when Economy Mode (ECO) is set to “Enable”, the battery pack stops charging at 80% of fully charged, so the
battery operation time is shorter.
To enable/disable the Economy Mode (ECO), refer to “Switching the Economy Mode (ECO)”. (Î page 22)
Problems with Cursor
The cursor cannot be controlled properly
z Sensitivity when touching the Touch Pad can be adjusted. (Î page 11)
z Make sure [Touch Pad] is set to [Enable] on the [Main] menu of the Setup Utility. (Î page 75)
z With the following procedure, check that no external mouse driver is installed. If it is installed, it may not possible to use
the Touch Pad.
A Click (Start) - [Computer] - [System properties] - [Device Manager].
z A standard user needs to enter an administrator password.
B Double-click [Mice and other pointing devices].
If a name other than [Synaptics PS/2...] is displayed, then an external mouse driver is installed. Delete it, then
restart the computer.
z Restart the computer by using the keyboard.
Press and press Î
If the computer does not respond to keyboard commands, read “No response.” (Î page 87)
three times, and press Ï to select [Restart] and press
Enter
.
The cursor moves randomly
z Adjust the touch sensitivity.
To adjust the sensitivity, refer to “Adjusting the Sensitivity when Touching the Touch Pad” (Î page 11).
z Check that no external mouse driver is installed. Refer to steps A and B under “The cursor cannot be controlled prop-
erly”. (above)
The cursor cannot be moved with a connected mouse
z Check that the mouse is correctly connected.
z Install the driver for the connected mouse.
If the external mouse driver is installed, the Touch Pad may not be used. Refer to “When Using an External Mouse”
(Î page 60).
Page 90
Troubleshooting (Advanced)
For details of the mouse driver, consult the mouse manufacturer.
(In some cases, later versions may be available.)
If operation is not correct even after installing the driver, set [Touch Pad] to [Disable] in the [Main] menu of the Setup Utility.
(Î page 75)
90
Problems with Display
Screen is too dark or too bright
z Press Fn+F2 (becomes brighter) or Fn+F1 (becomes darker).
z If the screen becomes darker after disconnecting the AC adaptor:
The computer has different set brightness levels for when the AC adaptor is connected and for when it is not connected.
Based on the settings in the default setting, the screen will become darker when the AC adaptor is removed. If you press
Fn+F2
the brightness next time the AC adaptor is disconnected.
(Making the display brighter shortens the battery operating time.)
There are red, green, or blue dots on the screen, or display defects (always-on
pixels or always-off pixels)
to increase the brightness when the AC adaptor is not connected, this brightness is maintained, and determines
z This is not a malfunction.
High-precision and advanced technologies are necessary for the production of color liquid crystal displays (color LCDs).
Therefore, if 0.002% or less of the picture elements either fail to light or remain constantly lit (that is, more than 99.998%
of elements are functioning properly), this is not considered a defect.
Nothing is displayed on the screen
z Check if the power-saving mode is active.
• If the power indicator is lit:
Ctrl
or
Shift
The display is turned off. Press a key with no independent effect, such as
Do not use a key that may make a selection (
• If the power indicator is blinking or is not lit:
The sleep or hibernation is entered. Slide the power switch.
Enter, Space, Esc, Y, N
, numeric keys, and so on).
.
Page 91
Troubleshooting (Advanced)
z Disconnect the external display before checking a disk error (Î page 84) or before using commercially available partition-
ing software. If you run this software with the external display still connected, in some cases, nothing will be displayed on
the screen. If this occurs, wait until the process is complete and the screen display returns.
z The display destination may be set to the external display.
Try changing the display destination by pressing
If you want to switch the display destination repeatedly by pressing
switched completely each time before pressing
z The screen may become darker. Press
Fn+F2
Fn+F3
Fn+F3
to make the screen brighter.
.
again.
Fn+F3
, make sure that the display destination has
91
There is an afterimage
z Display a different screen.
If the same screen is displayed for a long time, this may leave an afterimage.
The screen becomes disordered
z The screen display may become distorted if the resolution or number of colors is changed, or if an external display is con-
nected or disconnected while the computer is operating. Restart the computer.
The LCD brightness changes a number of times when the AC adaptor is disconnected
z Intel(R) Display Power Saving Technology (Î page 26) is active and automatically changes the LCD brightness.
Image colors are not reproduced as expected when displaying photographs or
other images
z We recommend removing the check mark from [Intel(R) Display Power Saving Technology]. (Î page 26)
Nothing appears on the external display, or the display is not correct
z Check that the external display cables are correctly connected.
z Check that the external display is turned on.
z Check that the external display settings are correct.
Page 92
Troubleshooting (Advanced)
z When an external display not compatible with the power-saving mode is used with the computer, the display may not func-
tion correctly when the computer enters the power-saving mode. In this case, turn on the external display again.
However, in the case of some external displays, the screen display may be distorted or the mouse cursor may not be properly displayed depending on the settings. In this case, try setting the number of colors, screen area (resolution), and
refresh rate to smaller values.
92
The sidebar gadgets are not correctly displayed
z Log off and log on Windows again.
Problems with Input
Pressing a letter key produces a number
z The computer may be in ten-key mode.
If NumLk indicator lights up, press
Only capital letters are being input
NumLk
, to disable the ten-key mode, and then input.
z The computer may be in Caps Lock mode.
If Caps Lock indicator lights up, press
Caps Lock
, to disable the Caps Lock mode, and then input.
How to input European characters (ß, à, ç etc.), symbols or Euro currency symbol is unclear
z With the following procedure, enter a character using the code table.
A Click (Start) - [All Programs] - [Accessories] - [System Tools] - [Character Map].
B Point to the desired font name, such as European fonts, and select it.
Combined key operations with the Fn key do not work
z Check whether [Fn/Ctrl Key] is set to [Replace] in the [Main] menu of the Setup Utility. (Î page 75).
Change the setting back to [Normal], or if continuing with [Replace] selected, use
Ctrl
in place of Fn.
Page 93
Troubleshooting (Advanced)
93
Problems with Disk and Drive
Unable to read/write to the hard disk
z Your drive or file may not have been properly set.
z Check if there is sufficient space on the hard disk.
z Check that the account with which you are logged on has read and write permissions.
z Your hard disk content may be corrupted. Contact your technical support office.
To check an internal hard disk error
z Disconnect all peripheral devices, including the external display, and check a disk error. (Î page 84)
Cannot boot from internal CD/DVD drive
z Check to make sure that the bootable disk is set properly.
z Start up the Setup Utility, and confirm the following settings.
• [USB Port] and [Legacy USB Support] are set to [Enable] in the [Advanced] menu. (Î page 76)
• [CD/DVD Drive Power] is set to [On] in the [Main] menu. (Î page 75)
• [USB CDD] is the first device shown in [Boot priority order] in the [Boot] menu. (Î page 78)
z Bootable CDs created using B’s Recorder in the CF-W2 and CF-Y2 series cannot be used on this computer. If you want to
share bootable CDs with those series, create a new bootable CD. (Î page 47)
z When an external CD/DVD drive is connected, you cannot boot from the internal CD/DVD drive.
Cannot play back TV programs recorded on a commercial DVD recorder
z In order to play media other than DVD-RAM, they must be finalized using the DVD recorder.
z Check whether the DVD is supported in this computer. (Î page 38)
The CD/DVD drive indicator does not light/blink
z Check that the disc is inserted correctly.
z The drive power may be turned off.
The drive power can be turned on with the following methods.
• Slide the drive power/open switch and open the disc cover.
Page 94
Troubleshooting (Advanced)
• Right-click the on the notification area, and click [On] in [Manual Switching].
z In the Setup Utility, is [CD/DVD Drive Power] set to [Off]? (Î page 75)
If this is set to off, unless Windows is running, it is not possible to turn on the drive.
94
Disc playback and writing is not possible
z Make sure the inserted disc is a compatible media type. For more about compatible media types, see “Disk Information”
(Î page 38).
z You may need to clean the lens or disc.
• Cleaning the disc Î page 35
z Check whether the disc is distorted, damaged, or dirty.
z When inserting a disc, follow the procedure below. Make sure the disc is inserted securely.
A Slide the drive power/open switch, and open the disc cover.
B Slide the disc into the drive under the keyboard with the label side up.
C Press firmly on the center of the disc until you hear it click into place.
To use B’s CLiP
z Install B’s CLiP. You will need the serial number to install (⇒“Troubleshooting (Basic)/Error Code/Message” “Reinstalling
B’s Recorder/B’s CLiP” in the Operating Instructions).
A Click (Start) and input “c:\util\bha\clip”, and press
B Right-click [setup] in [clip] folder and click [Run as Administrator].
If there are two or more “setup” files, right-click the file whose [Type] is [Application].
z Follow the on-screen instructions.
Enter
.
When a disc is inserted, it is not played automatically
z Remove the disc and reinsert it.
• If an AutoPlay CD does not start after the computer resumes from the sleep or hibernation, remove the disc from the
drive, then reinsert the disc again after a 15 second wait.
z Follow the procedure below.
A Click (Start) - [Control Panel] - [Play CDs or other media automatically]
B Click right [ ] of the item you want to automatically play and choose the action to play.
C Click [Save].
If the problem persists, refer to the disc’s operating instructions or other sources to play the disc.
Page 95
Troubleshooting (Advanced)
95
If the CD/DVD drive vibrates excessively or is noisy
z Is the disc bent or labeled?
z Check to see if the disc is inserted correctly, and is in good condition.
z When writing to CD-R/RW using B’s Recorder, you can minimize vibration while writing by setting the writing speed at [8x]
or less.
The CD/DVD drive cannot be turned on or off
z After turning off the CD/DVD drive, did you try to turn it on again immediately?
After turning off, you must wait for about 20 seconds until it is possible to turn on (or open the disc cover).
z In the following cases, it is not possible to turn off using [Manual Switching] of the Optical Disc Drive Power-Saving Utility:
• During writing or reading of a disc
• When the drive is being used by an application such as B’s Recorder
Cannot eject disc
z Check that the computer is turned on.
The drive power/open switch works only when the computer’s power is on.
When [CD/DVD Drive Power] is set to [Off] in the Setup Utility, it is not possible to open the disc cover unless Windows is
running.
z Press the area on the upper left of the driver power/open switch to confirm that the disc cover is locked firmly.
The disc cover will only open if it is in the firmly locked position.
z To remove a disc when the computer is turned off, insert a pointed object (e.g., the bent-out tip of a paper clip, or the tip of
a pencil or ballpoint pen) into the emergency hole on the bottom, and then move (Î page 42).
Problems with Sound
The sound is not heard
z Try changing the mute by pressing Fn+F4 or Fn+F6.
z With the following procedure, check that the Windows sound function is operating.
(If it is not operating, pressing
sound.)
A Click (Start) - [Computer] - [System properties] - [Device Manager].
z A standard user needs to enter an administrator password.
Fn+F5
or Fn+F6 displays the pop-up icon shown on the right, but there is no
Page 96
Troubleshooting (Advanced)
B Double-click [Sound, video and game controllers] and check if is displayed.
If is displayed, click the driver for which is shown, press
Then restart the computer.
Del
, and click [OK] in the confirm deletion screen.
96
To change the volume
z Press Fn+F5 (to lower the volume) or Fn+F6 (to increase the volume).
The audio is distorted
z During audio playback, operating a key with Fn may cause distortion of the sound. Stop playing and start again.
Problems with Peripherals
Your peripheral does not work
z Check that the drivers are installed for the connected devices.
A Click (Start) - [Computer] - [System properties] - [Device Manager].
z A standard user needs to enter an administrator password.
B Check whether is shown for the devices.
If is shown:
Try removing and inserting the device once more. If the problem persists, restart the computer.
z Check the peripheral manufacturer’s homepage or other sources to see if a driver update is available.
z After installing the driver, be sure to restart the computer.
z Depending on the device connected, the computer may not recognize when the device is connected or disconnected, or
the device may not operate properly.
Use the following procedure:
A Click (Start) - [Computer] - [System properties] - [Device Manager].
z A standard user needs to enter an administrator password.
B Select the applied device, and remove the check mark for [Allow the computer to turn off this device to save
power] in [Power Management]. (This item may be unavailable for some types of devices.)
z When operation resumes from the sleep or hibernation, devices such as an external mouse, modem or PC Cards may not
function properly. In such cases, restart your computer.
z If it still does not work after checking the above items, consult the peripheral manufacturer.
Page 97
Troubleshooting (Advanced)
97
An error occurs while installing the driver
z Check that the driver is supported by the operating system. If you use an incompatible driver, malfunction may occur.
z Set the [Execute-Disable Bit Capability] to [Disable] in the [Security] menu of the Setup Utility. If the error is not resolved, it
is possible that the driver being used is not compatible with the Data execution prevention function. For a driver, consult
the peripheral manufacturer.
The device will not operate properly if a different mouse driver is installed
z When you install a different mouse driver, such as IntelliPoint for Microsoft’s IntelliMouse, the mouse driver currently
installed in the computer may need to be uninstalled.
For information on how to uninstall the driver, refer to “When Using an External Mouse.” (Î page 60)
z If not using the Touch Pad, and using an external mouse only, set [Touch Pad] to [Disable] in the [Main] menu of the Setup
Utility. (Î page 75) And uninstall the mouse driver that is installed on this computer.
You do not know the available RAM module
z Refer to Operating Instructions “Expanding Memory” or “Specifications”.
To check if the additional RAM module has been installed successfully
z If the installation is successful, the main memory and total RAM module size appears in the [Information] menu of the
Setup Utility (Î page 74).
z If the RAM module is not confirmed:
• Turn the computer off and reinsert the RAM module.
• Confirm the recommended specifications.
Regarding the RAM module, refer to Operating Instructions “Expanding Memory” or “Specifications.”
The address map for IRQ, I/O port address, etc. is unclear
z You can check with the following procedure.
A Click (Start) - [Computer] - [System properties] - [Device Manager].
z A standard user needs to enter an administrator password.
B Click [View] - [Resources by type].
Page 98
Troubleshooting (Advanced)
98
When a USB device is connected, an acoustic noise can be heard from the computer
z Using the following procedure, set to [Disable] in the “USB Power Save Mode Switching Utility”.
When the “USB Power Save Mode Switching Utility” is set to [Disable], the computer will not operate as long on the battery.
A Click (Start) - [All Programs] - [Panasonic] - [USB Power Save Mode Switching Utility].
B Add a check mark for [Disable], and click [OK].
C Click [OK].
D Restart the computer.
Problems with General Network
Unable to connect to a network
z Check that the network you are using ([Modem], [LAN], [Wireless LAN] or [Wireless WAN]) is set to [Enable] in the
[Advanced] menu of the Setup Utility (Î page 76).
z Restart the computer.
z When using the computer as a network computer, some additional settings may have to be made depending on the usage
conditions. We recommend asking your system administrator or the person in charge of the network.
z If the hub unit link lump does not light up, one of the following problems may have occurred.
• A problem or failure in the hub unit
• Incorrect cable type or incorrect connection
• A break in the cable
Cannot check the computer’s MAC address
z Check the computer’s MAC address using the following procedure:
A Check that the LAN or wireless LAN is not disabled in the Setup Utility or the Device Manager.
B Click (Start) - [All Programs] - [Accessories] - [Command Prompt].
C Input [getmac/fo list /v], and press
z Insert a space between “fo” and “list”, and between “list” and “/v”.
D Wireless LAN’s MAC address:
Make a note of the 12-digit string of alphanumerics displayed on the wireless LAN’s “Physical Address” line.
LAN’s MAC address:
Make a note of the 12-digit string of alphanumerics displayed on the LAN’s “Physical Address” line.
E Enter “exit”, and press
Enter
Enter
.
.
Page 99
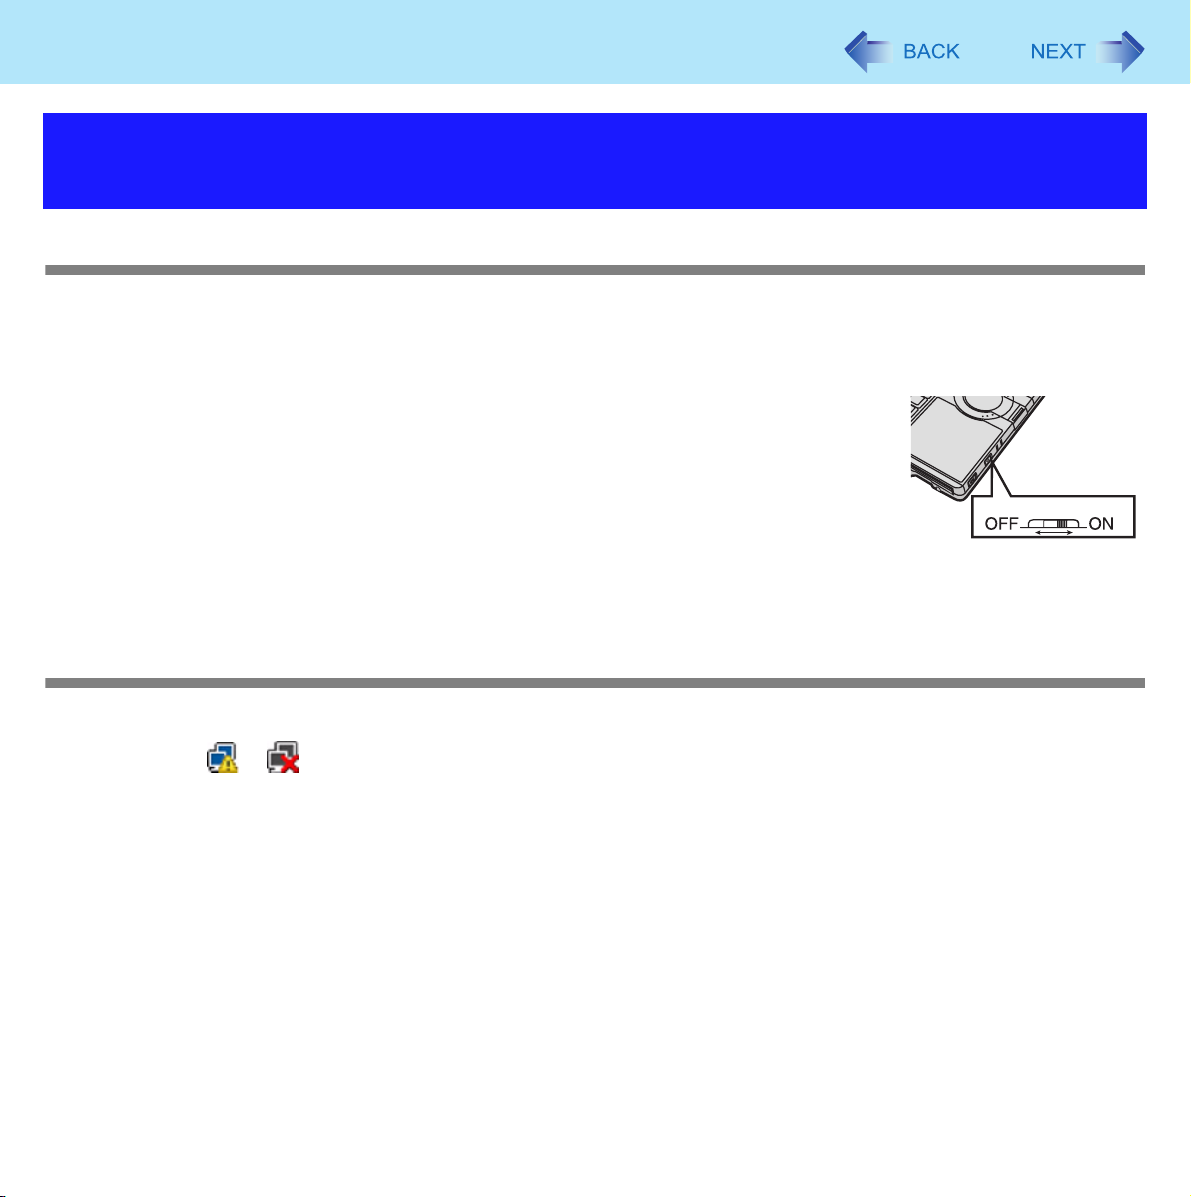
Troubleshooting (Advanced)
99
Problems with Wireless LAN (only for models with wireless LAN)
Access point is not detected
z Shorten the distance between the computer and the access point, and try the detection again.
z Confirm the following settings:
• [Wireless LAN] in the [Advanced] menu of the Setup Utility
Confirm that [Wireless LAN] is set to [Enable]. (Î page 76)
• Wireless LAN power supply
Slide the wireless switch to the right (ON).
*4
z This computer uses channels 1 through 11
being used by the access point.
*4
In the case of wireless communications, the frequency band being used can be divided into segments, so that different communications
can be conducted on each band segment. A “Channel” refers to the individual frequency bandwidth divisions.
when using IEEE802.11b/g. Check the channel
Wireless Switch
Cannot communicate with the access point
z Using the following procedure, confirm whether the computer’s protocol settings are correct (only when using TCP/IP).
A Click or on the notification area, and click [Network and Sharing Center].
B Click [Manage network connections].
C Right-click [Wireless Network Connection] and click [Properties].
z A standard user needs to enter an administrator password.
D Click [Internet Protocol Version 4 (TCP/IPv4)] and click [Properties].
E Confirm the protocol settings such as IP address, and do the settings properly again.
z Depending on the access point and settings access may not be accepted unless the computer’s MAC address is regis-
tered beforehand. In this case, check the computer’s MAC address (Î page 98) and register it according to the operating instructions of the access point.
Page 100
Troubleshooting (Advanced)
100
The communications speed is low
z Communication speed may decrease if, aside from the access point to which this computer is connected, there is another
access point nearby using the same channel or a similar channel. Change the channel on the connection access point,
and check to see if the speed recovers. Confirm method for changing channels using the access point manual.
z The communications speed may be reduced for the following reasons. Shorten the distance between the computer and
the access point.
• IEEE802.11g or IEEE802.11b may be affected by a microwave oven or similar, reducing the communications speed
while the microwave oven is in operation.
z When using a wireless LAN in an environment that combines both IEEE802.11g and IEEE802.11b, communication speed
when using IEEE802.11g may decrease.
z If you use a best-effort type service for internet connection, the communication speed may become slower than the nomi-
nal speed depending on the operating conditions.
Communications with access point are cut off
z Shorten the distance between the computer and the access point, and try the detection again.
z If there are multiple access points aside from the access point to which this computer is connected, confirm that different
channels have been set for each access point.
z Set the wireless adapter setting of the current power plan to [Maximum Performance].
A Click (Start) - [Control Panel] - [Change battery settings].
B Click [Change plan settings] of the current power plan, and click [Change advanced power settings].
C Double-click [Wireless Adapter Settings], and double-click [Power Saving Mode], and set [On battery] and
[Plugged in] to [Maximum Performance].
Cannot set wireless LAN to [Enable] or [Disable]
z It may become impossible to set the wireless LAN to [Enable] or [Disable] if these settings are changed repeatedly on the
[Network Connections] screen. In this case, restart the computer.
F9
z Press
tings).
in the Setup Utility. This will restore the Setup Utility’s settings to their default values (except the password set-
 Loading...