

Panasonic CFW4GWCZZBM Reference Manual

1
Reference Manual
Personal Computer
Model No. CF-W4 Series
We recommend that this Reference Manual be printed.
To magnify all the icon
display (for example, )
etc.
To magnify the one part
of the screen display

Read Me First
z Some of the illustrations in this manual may differ slightly in shape from the actual items
on your computer. This should make the explanations easier to understand.
z If a user has logged on to Windows without the administrator authority, some functions
may not be executable, and some screens may not be displayed as shown in this manual.
If this happens, log on to Windows with the administrator authority to enable these
functions.
2
z In this manual, “Microsoft
Security Technologies” is indicated as “Windows” or “Windows XP.”
z In this manual, the following software packages are described as follows:
• "WinDVD™ 5 (OEM Version)" as "WinDVD"
• "B's Recorder GOLD8 BASIC" as "B's Recorder"
• "B's CLiP 6" as "B's CLiP"
z If the icon on the notification area being explained in this manual is hidden and not
displayed, click the icon to display all icons.
(The icons on the notification area used in this manual are only examples. The actual
types and order of icons may differ depending on your operating environment; for
example, settings of various functions and connected devices.)
z Optional Products or Accessories
Confirm the latest information on optional products or accessories from various sources.
®
Windows® XP Professional Service Pack 2 with Advanced
Read Me First
Illustrations and Terminology in this Reference Manual
NOTE NOTE provides a useful fact or helpful information.
CAUTION CAUTION indicates a condition that may result in minor
or moderate injury.
Enter
Fn+F5
[start] - [Run] This illustration means to click [start], then to click [Run].
Î or ⇒ These symbols indicate related pages.
*1
xxxx
This illustration means to press the
This illustration means to press and hold the Fn key,
then press the
When using with the
interchanged, read with the
reversed.
Î : If this is clicked, it will jump to the page correspond-
ing Reference Manual.
⇒ : Refer to the Operating Instructions.
If *1 is clicked, it will jump to a related topic.
F5
key.
Fn
key and the
Fn
Enter
key and the
3
key.
Ctrl
key functions
Ctrl
key
Read Me First
About Display Mode
Internal LCD (Notebook) This computer's display
External Display (Monitor) External display connected to this computer
Simultaneous Display
(Intel(R) Dual Display Clone)
Extended Desktop To use both the internal LCD and the external display as
The terminology in ( ) is the one used in [Mobile Intel(R) 915GM/GMS, 910GML Express
Chipset Family Properties].
*1
To display:
Click [start] - [Control Panel], from the [See Also] area click [Other Control Panel Options], and then
click [Intel(R) GMA Driver for Mobile].
4
To display the same screen on both the LCD and
external display
an extended display domain. You can drag a window
between the internal LCD and the external displays.
*1
Using the Touch Pad
Use the touch pad to move the cursor on the screen and perform computer operations.
A.Work Surface (touch pad)
B.Left Button
C.Right Button
Function Operation
Moving the Cursor
Tapping/Clicking
Double-Tapping/
Double-Clicking
5
Move the tip of your finger lightly over the
work surface.
tapping or clicking
To right-click: Can only be performed by clicking the right
button.
double-tapping or double-clicking
Dragging
Two quick taps, but on the second tap leaving your finger
down (applying pressure) and moving it on the work surface.
or
While holding down the button, moving your finger on the work
surface.
Vertical/Horizontal Scroll Trace a circle around the touch pad. (Î page 6)
Using the Touch Pad
NOTE
z You can change the speed of the double-click or the operations of mouse buttons
When the cursor doesn’t move the way you want it to
z Sensitivity when touching the touch pad can be adjusted. (Î page 15)
z When an external mouse is connected and the cursor does not operate properly:
In the [Main] menu of the Setup Utility, set [Touch Pad] to [Disable]. When you want to
use the touch pad again, return the setting to [Enable]. (Î page 141)
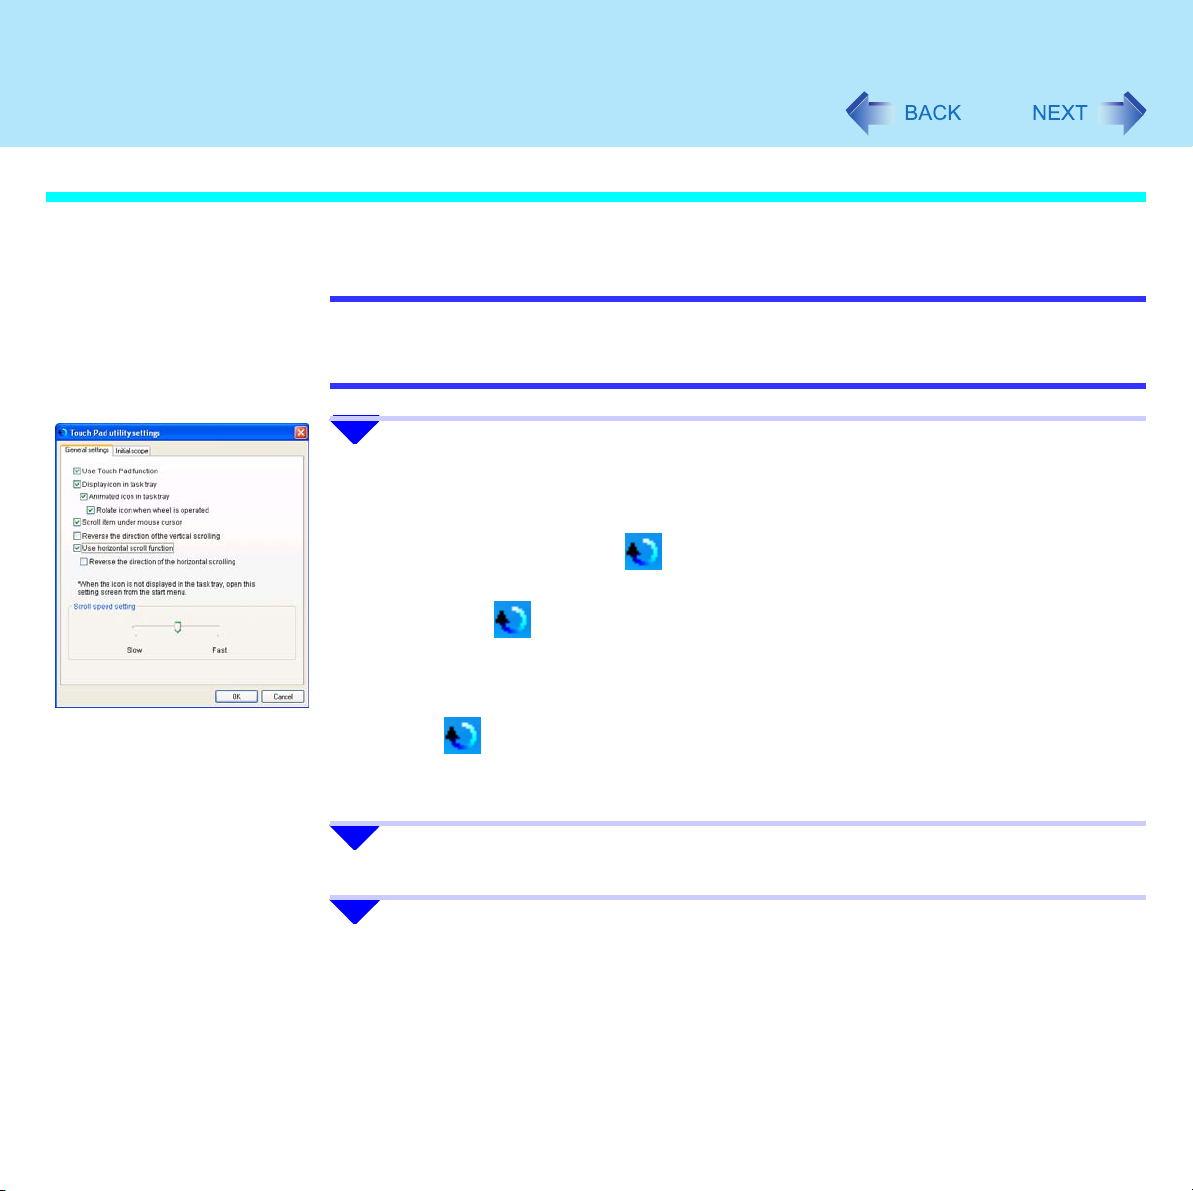
Scroll
There are two ways of scrolling with the touch pad: the Touch Pad utility, and the Virtual
Scrolling Function. You cannot use both functions at the same time.
The Touch Pad utility is enabled at the time of purchase.
6
using [Mouse Properties] screen.
To display [Mouse Properties]:
Click [start] - [Control Panel] - [Printers and Other Hardware] - [Mouse].
z The Touch Pad utility
• You can scroll continuously by tracing a circle on the touch pad.
• This is designed for ease of use, in keeping with the shape of the touch pad.
Vertical scroll It can be used at the time of purchase.
Horizontal scroll A setting is required to use the horizontal scroll. (Î page 7)
z The Virtual Scrolling function (Î page 13)
• You can scroll vertically (or horizontally) by tracing repeatedly in the desired direction.
• This is the same operation as that used on square touch pads installed in other
computers.
Vertical scroll The Virtual Scrolling function must be set to enable.
Horizontal scroll
You can use separate settings for each account regarding whether to use the Touch Pad
utility or the Virtual Scrolling function.
Using the Touch Pad
Using the Touch Pad Utility
You can scroll easily by tracing a circle on the touch pad.
NOTE
z External mouse drivers cannot be used at the same time as the Touch Pad utility.
1 Make the following settings to use the horizontal scroll.
7
When using an external mouse, refer to "When Using an External Mouse." (Î page
117)
Once the settings have been made, it is not necessary to make the same settings
the next time.
A Click the Scroll Icon on the notification area at the bottom right of the
screen, and click [Settings].
If the icon is not displayed, click [start] - [All Programs] - [Panasonic] [Touch Pad utility settings].
If a message appears indicating that the Touch Pad utility is not yet running,
click [start] - [All Programs] - [Panasonic] - [Touch Pad utility], and display the
icon.
B Add a checkmark for [Use horizontal scroll function] in the [General settings]
screen, and click [OK].
2 Display the scrollable screen.
3 Place the cursor over the area that you want to scroll, and tap (click).
Using the Touch Pad
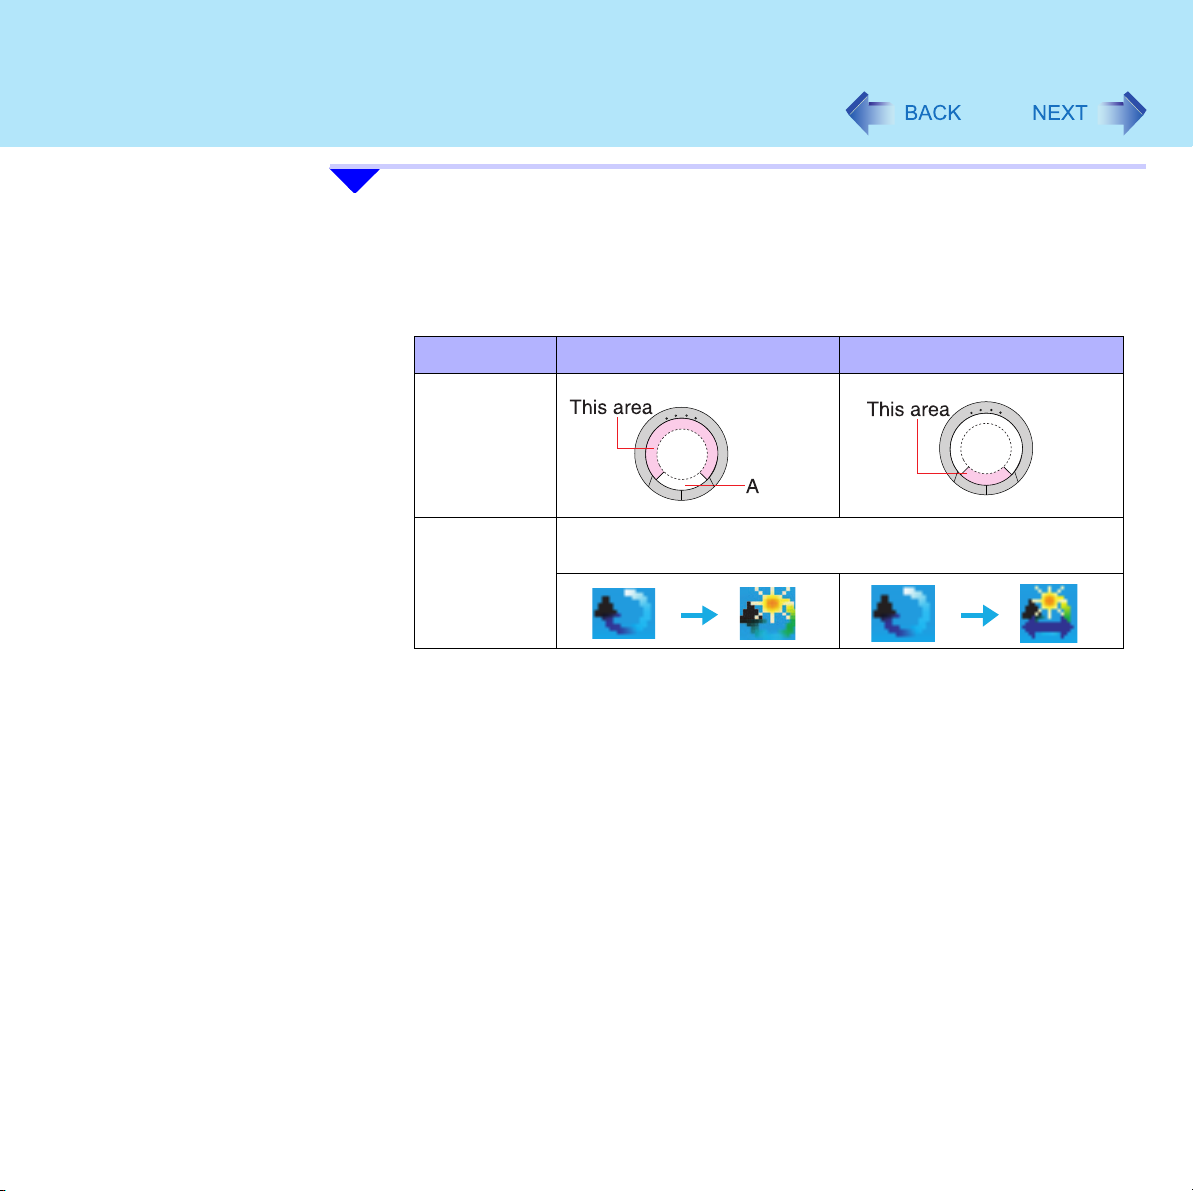
4 Lift up your finger, and place it in the area around the touch pad.
8
(See diagram below)
The scroll direction and finger position on the touch pad can be changed using
the settings in the Touch Pad utility. (Î page 10) This explanation assumes the
settings at the time of purchase.
Vertical scroll
Position
where finger
is placed
Icon on the
notification
area
*1
If the horizontal scroll function has not been enabled, the segment shown in the diagram above (A)
is also included in the position where the finger is placed.
*2
You can change the area for starting the scroll. The area illustrated here is the setting at the time of
purchase.
*2
When you place your finger on the touch pad, the icon
changes.
*1
Horizontal scroll
Using the Touch Pad
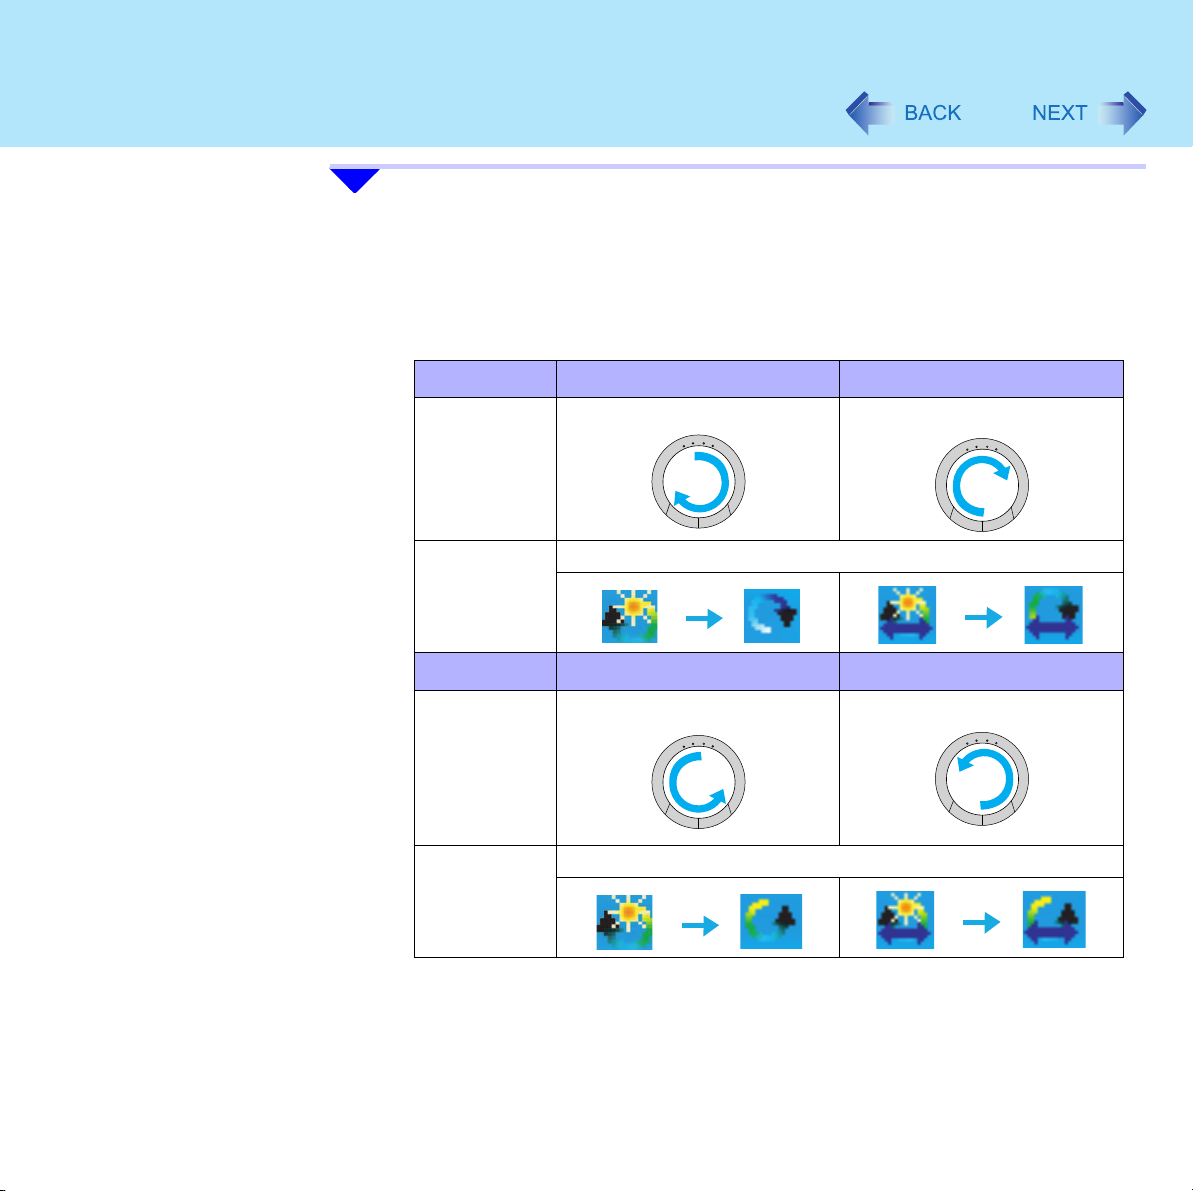
5 Trace a circle around the touch pad without lifting your finger from the
9
pad.
The scroll direction can be changed using [Reverse the direction of the vertical
scrolling] or [Reverse the direction of the horizontal scrolling] in the Touch Pad
utility. (Î page 10)
This explanation assumes the settings at the time of purchase.
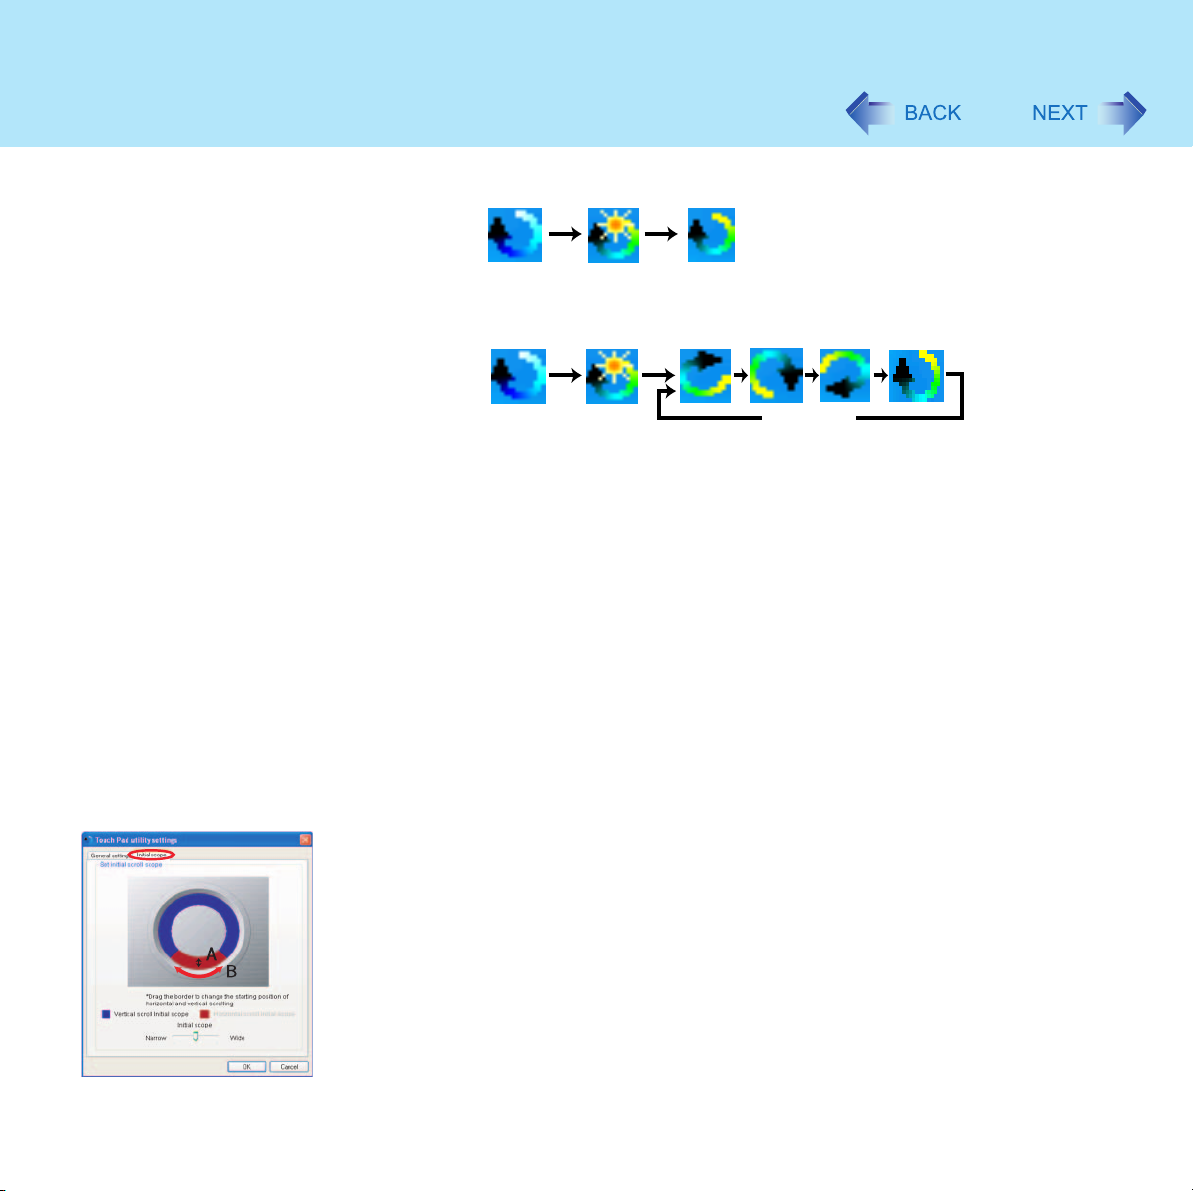
Trace clockwise
Icon on the
notification
area
Trace
counter-clockwise
Icon on the
notification
area
Vertical scroll
To scroll down To scroll right
While scrolling, the icon will rotate clockwise.
Vertical scroll
To scroll up To scroll left
While scrolling, the icon will rotate counter-clockwise.
Horizontal scroll
Horizontal scroll
*1
*1
*1
When the horizontal scroll function has not been enabled, any scrolling will be vertical scrolling.
z On screens that cannot be scrolled (e.g., desktop screen), if you scroll, the
computer may try to scroll the screen, causing the cursor to freeze. If this
Using the Touch Pad
6 Once scrolling has begun, continue to trace a circle on the touch pad
7 When you finish scrolling, remove your finger from the touch pad.
NOTE
z You can change various touch pad settings using the following procedure:
10
happens, remove your finger from the touch pad and begin again, this time
starting from the center of the touch pad.
z For example, on a screen that will only scroll horizontally, even if you execute a
vertical scroll, the screen will scroll horizontally.
without removing your finger from the pad.
z As long as you are tracing a circle, you can continue scrolling using any position
on the touch pad. It is not necessary to trace a circle around the edge of the
pad.
z To scroll in the opposite direction, trace a circle in the opposite direction without
removing your finger from the touch pad.
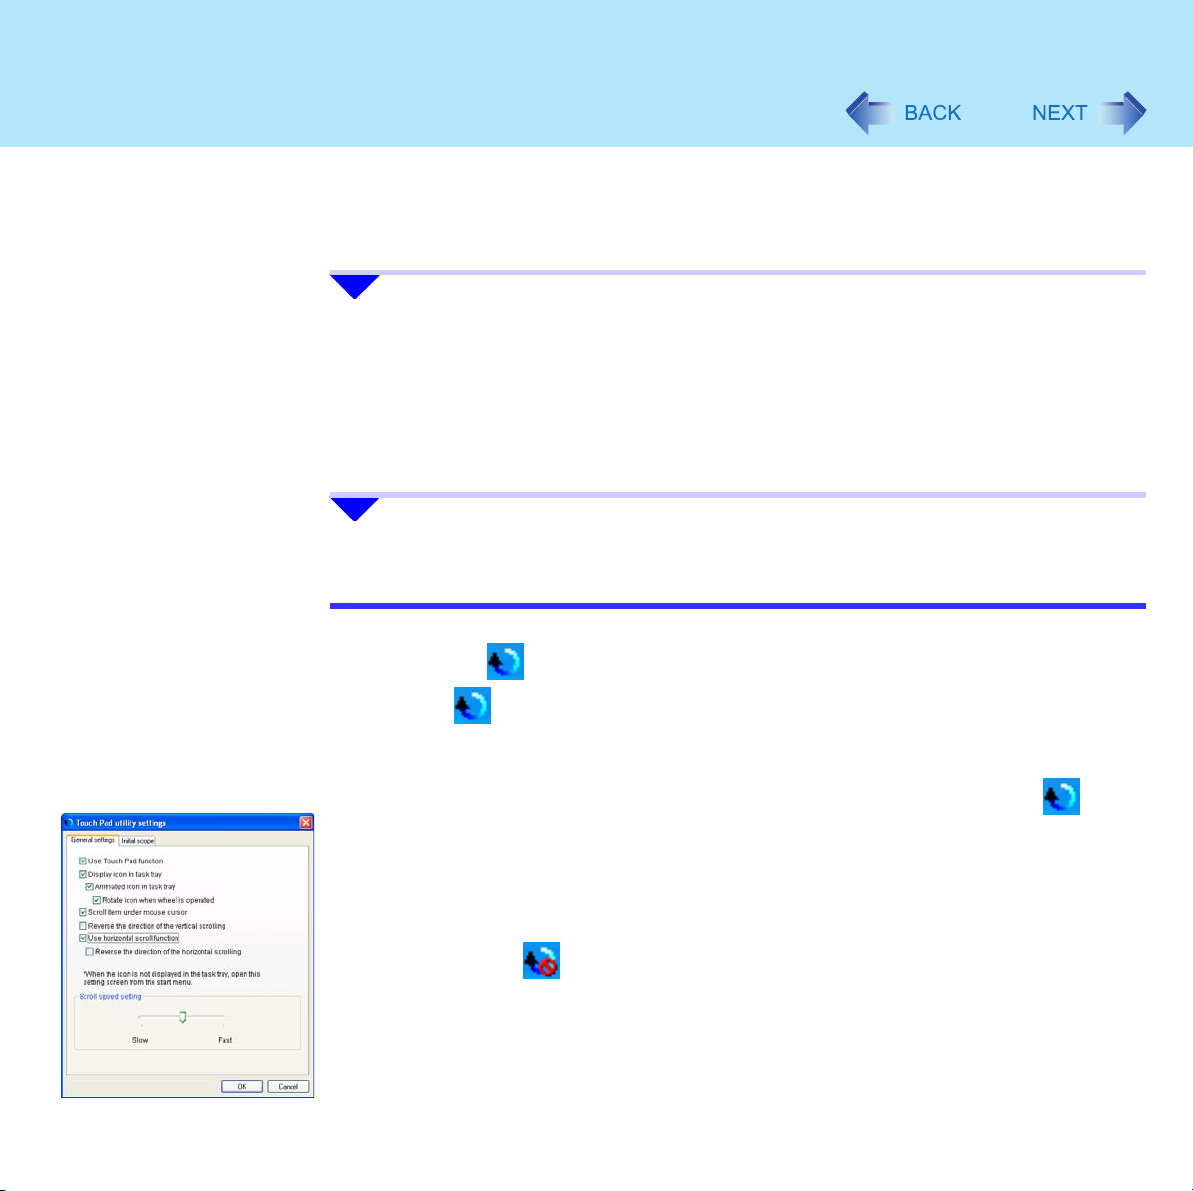
A Click the icon on the notification area, and then click [Settings].
If the icon is not displayed, click [start] - [All Programs] - [Panasonic] - [Touch
Pad utility settings].
If a message appears indicating that the Touch Pad utility is not yet running, click
[start] - [All Programs] - [Panasonic] - [Touch Pad utility], and display the icon.
B Change the settings.
z General settings
• Use Touch Pad function (On/Off)
If you add a checkmark, you can use the touch pad function (screen scroll).
If you remove the checkmark, the touch pad function will be disabled, and
the icon will be displayed on the notification area.
• Display icon in task tray (On/Off)
Using the Touch Pad
11
• Animated icon in task tray (On/Off)
Touch the pad
Scrolling
• Rotate icon when wheel is operated (On/Off)
Touch the pad
Scrolling
• Scroll item under mouse cursor
If a checkmark is added, scroll the region where the mouse cursor is
located within the active window.
If the checkmark is removed, scroll the selected region within the active
window. In either case, if the mouse cursor is outside the active window,
scroll the selected region.
• Reverse the direction of the vertical scrolling
Adding a checkmark and tracing the touch pad clockwise will scroll
upwards. Removing the checkmark and tracing the touch pad clockwise
will scroll downwards.
• Use horizontal scroll function (On/Off) (Î page 7)
• Reverse the direction of the horizontal scrolling
Adding a checkmark and tracing the touch pad clockwise will scroll to the
left. Removing the checkmark and tracing the touch pad clockwise will
scroll to the right.
• Scroll speed setting
You can change the scroll speed.
z Initial scope
• Set initial scroll scope
A. Width of the initial scope
By dragging the inner circumference of the starting area, you can
change the width of the initial scope (A) in five stages.
You can also change the width by sliding the [Initial scope] slide bar.
B. Vertical and horizontal scroll initial scope
You can change the initial scope (B) by dragging border of the vertical
and horizontal scroll initial scope.

Using the Touch Pad
12
• The maximum starting area for the horizontal scroll is half the
circumference.
C Click [OK].
Change will be enabled.
Using the Touch Pad
Using the Virtual Scrolling Function
Set the Virtual Scrolling function using the following procedure. The Touch Pad utility will be
disabled.
1 Click the icon on the notification area, and click [Settings].
If the icon is not displayed, click [start] - [All Programs] - [Panasonic] - [Touch
Pad utility settings].
13
The icon is not displayed:Î page 7, step
1
2 Remove a checkmark from [Use Touch Pad function] in [General set-
tings], and then click [OK].
The icon on the notification area will change to the icon.
3 Click [start] - [Control Panel] - [Printers and Other Hardware] -
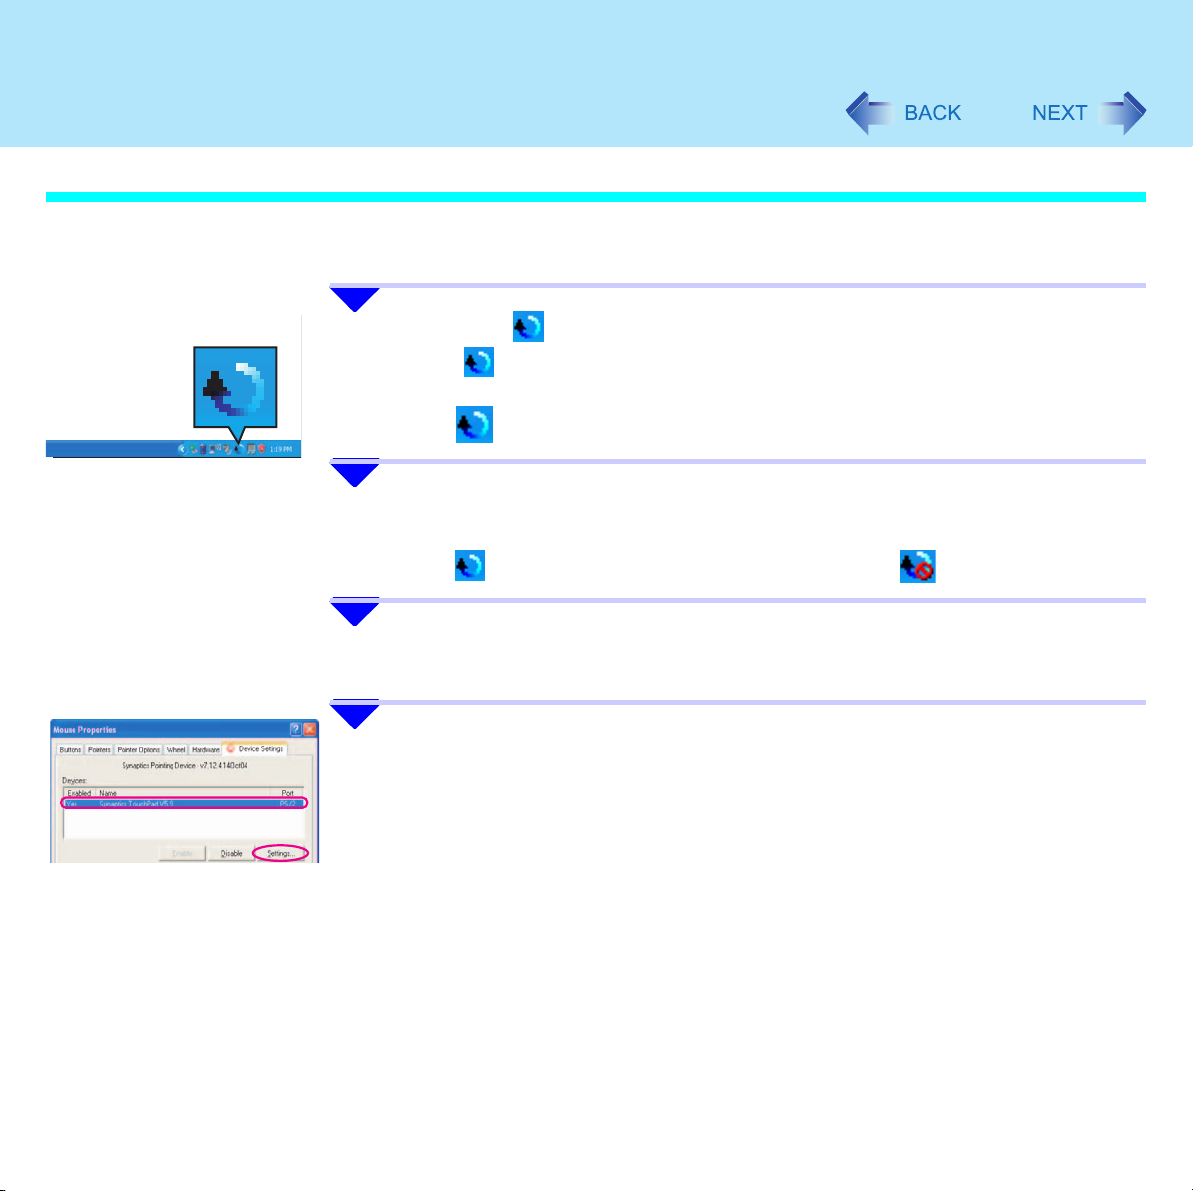
[Mouse] - [Device Settings].
4 Click the device name in [Devices] (e.g., Synaptics TouchPad), then
click [Settings].
Using the Touch Pad
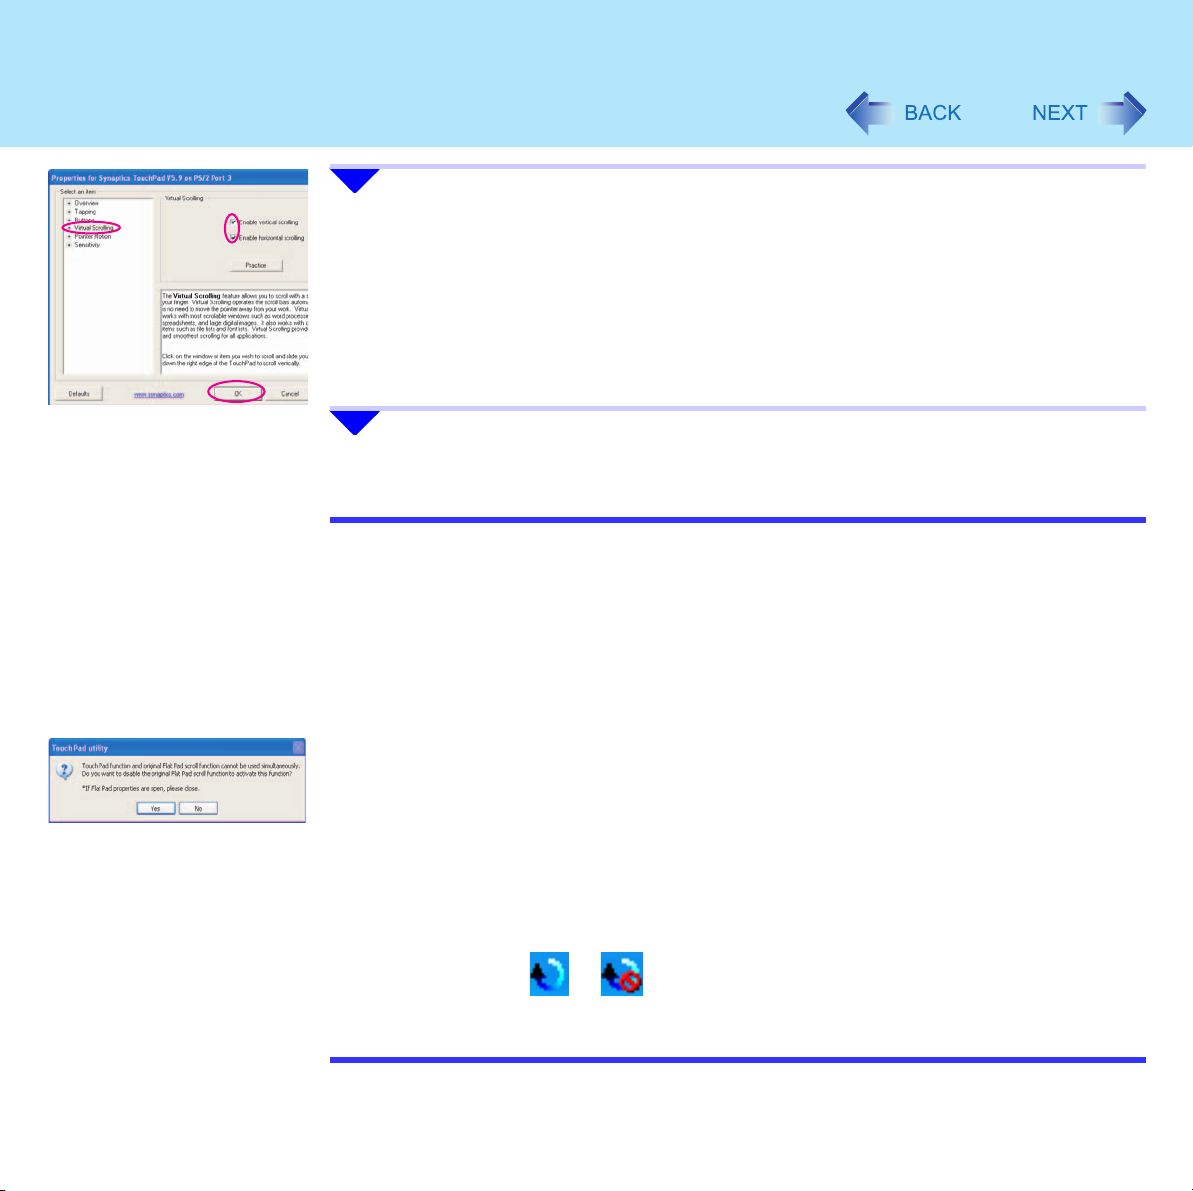
5 Click [Virtual Scrolling], add a checkmark for the scroll functions you
6 Click [OK] at [Mouse Properties].
NOTE
z To begin using the Touch Pad utility again:
z Because the Touch Pad utility and the Virtual Scrolling function both offer scrolling
14
want to use, then click [OK].
A Conduct steps
B Click [Virtual Scrolling], remove a checkmark from [Enable vertical scrolling] and
[Enable horizontal scrolling], then click [OK].
C Click [OK] at [Mouse Properties].
D Click [start] - [All Programs] - [Panasonic] - [Touch Pad utility settings].
E Click [General settings], add a checkmark for [Use Touch Pad function], then click
[OK].
functions that use the touch pad, these two features cannot be used simultaneously. If
you try to use them at the same time, a message may be displayed asking you if you
want to enable the Touch Pad utility.
• To use the Touch Pad utility:
Click [Yes]. The Virtual Scrolling function will be disabled.
• To use the Virtual Scrolling function:
Click [No].
You can uninstall the Touch Pad utility.
3 to 4 in previous page.
A Click the or icon on the notification area, and then click [Exit].
B Click [start] - [Control Panel] - [Add or Remove Programs] - [Touch Pad Utility],
and then click [Change/Remove] to remove the program.
Using the Touch Pad
Adjusting the Sensitivity when Touching the Touch Pad
Adjust [PalmCheck] and [Touch Sensitivity] using the following procedure:
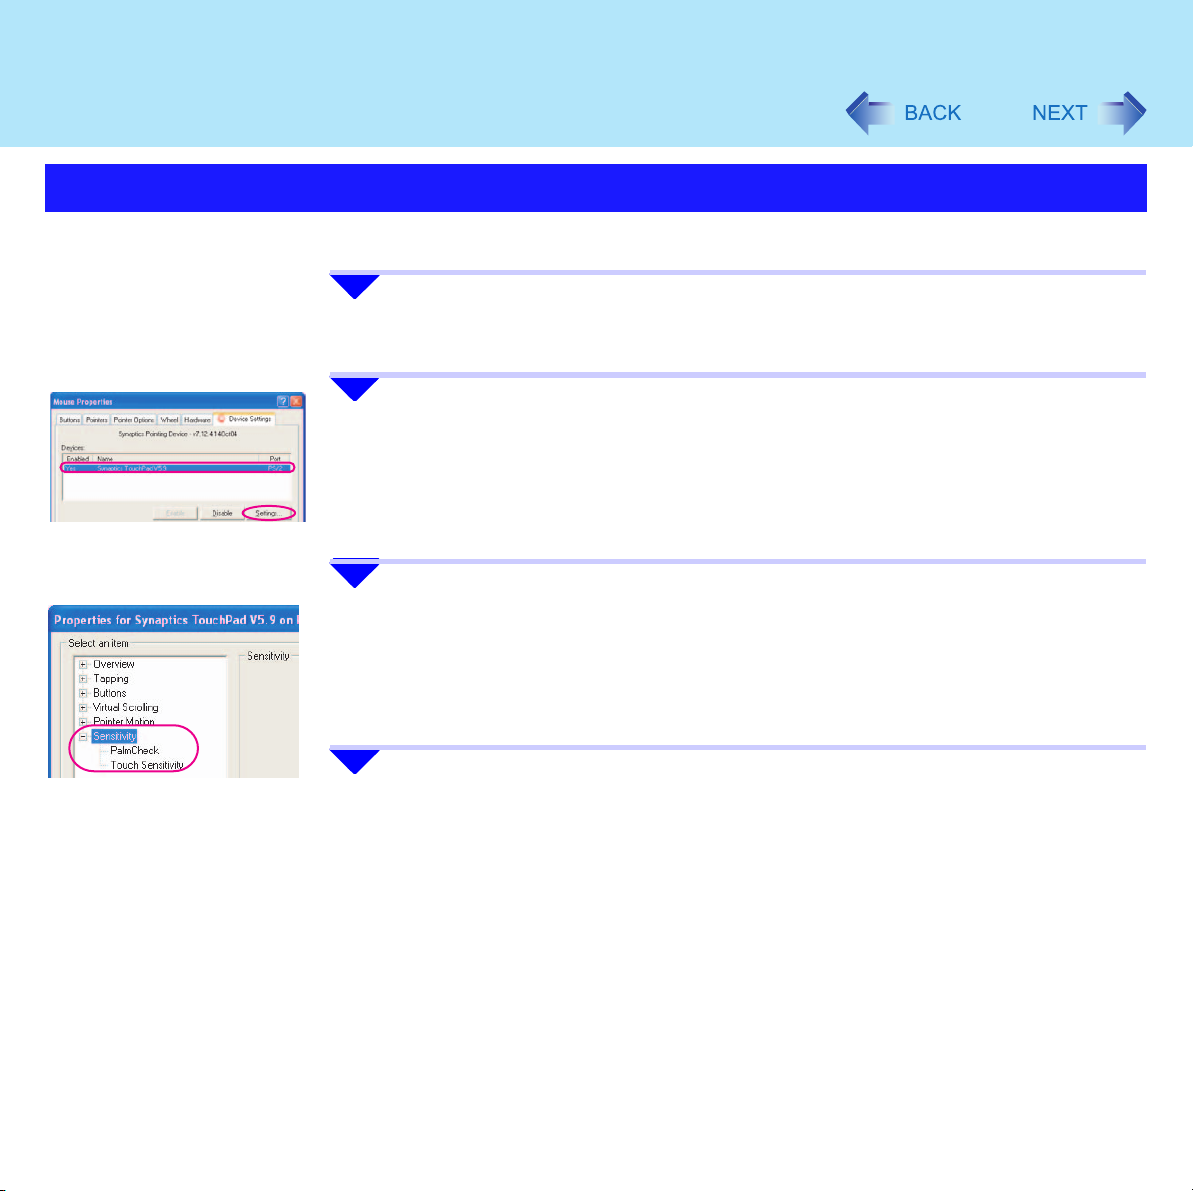
1 Click [start] - [Control Panel] - [Printers and Other Hardware] -
[Mouse] - [Device Settings].
2 Click the device name in [Devices] (e.g. Synaptics TouchPad), then
click [Settings].
3 Double-click [Sensitivity], then click [PalmCheck] or [Touch Sensitivity].
15
4 After making the adjustment, click [OK].

Using the Touch Pad
PalmCheck™
z When operating the keyboard, if your hand touches the touch pad unintentionally causing
the cursor to move, adjust the sensitivity using "PalmCheck™."
• By dragging slide bar (A) to the [Maximum] position, you can prevent the cursor from
• By dragging slide bar (A) to the [Minimum] position, you can enable the cursor to move
Touch Sensitivity
z When operating the touch pad, if your finger touches the touch pad, unintentionally
causing the cursor to move; or if the cursor does not move even when you move your
finger on the touch pad, adjust the sensitivity using the "Touch Sensitivity" setting.
• When slide bar (B) is dragged to the [Heavy Touch] position, the cursor will only move
• When slide bar (B) is dragged to the [Light Touch] position, the cursor will move even
16
moving unintentionally.
even with a light touch of the palm on the touch pad.
with a strong touch on the touch pad.
with a light touch on the touch pad.
NOTE
z Click [Defaults] to return the settings to their original positions at the time of purchase.
Handling the Touch Pad
z By design, the touch pad is to be used with a fingertip only. Do not place any object on the
work surface or press down forcefully with sharp-pointed objects (e.g., nails) or hard
objects that can leave marks (e.g., pencils and ball point pens).
z Try to avoid having any harmful substances, such as oil, come in contact with the touch
pad. The cursor may not work properly in such cases.
z When the touch pad becomes dirty:
Wipe to remove dirt by using a dry soft cloth such as gauze or a soft cloth first applied with
detergent diluted with water and then thoroughly wrung.
Do not use benzene or thinner, or rubbing alcohol. Doing so may adversely affect the
surface, e.g., discoloration. In addition, do not use commercially available household
cleaners and cosmetics, as they may contain components harmful to the surface.
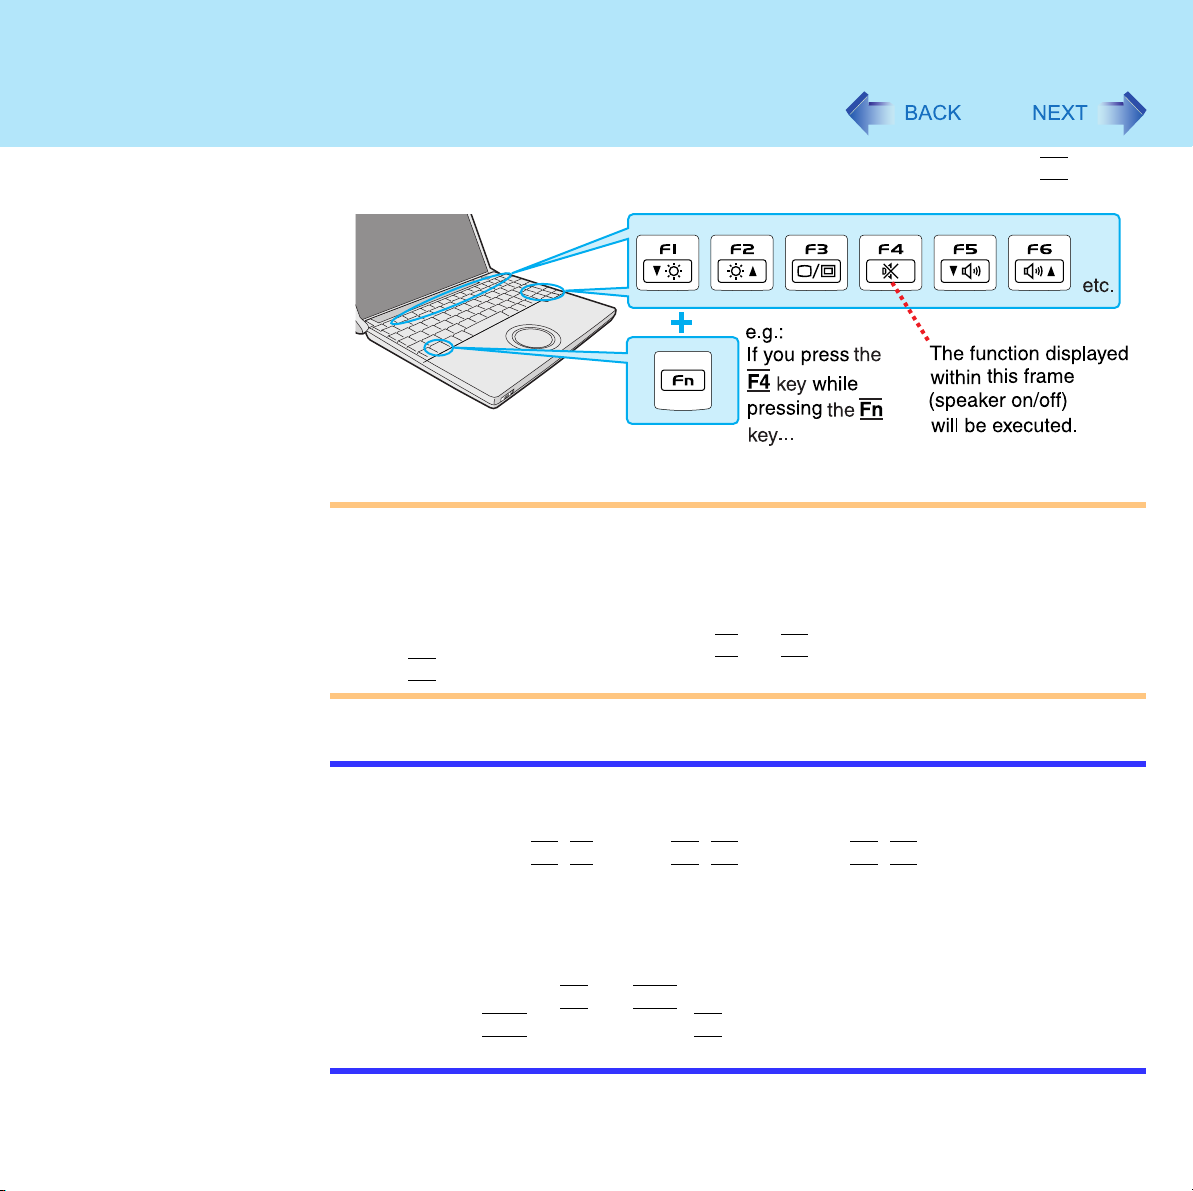
Using the Fn Key
If you press a key for a character or symbol contained in a key while pressing the Fn key, the
function for the character or the symbol contained in that key will be executed.
CAUTION
z Do not press the following key combinations repeatedly in (quick) succession. Also,
do not press different key combinations quickly one after another. (Execute the
following operation after the operation of pressing combined keys has been reflected.)
z Do not press the following key combinations while using the touch pad or external
mouse.
z Do not press the function key (such as
the
Fn
key.
17
F1
and F2) simultaneously while holding down
NOTE
z Do not press the following key combinations until you log on to Windows and the hard
disk drive indicator turns off.
Note, that pop-up windows will not be displayed in the Setup Utility, however, the key
combinations the
Setup Utility.
z The key combinations (Î page 18) may not work while some applications are
running.
The pop-up window may not be displayed, depending on the state of the application
you are using (e.g., when [Command Prompt] is set to "Full Screen").
z When using with the
• Press the
• It is not possible to replace the markings on the keys, or the keys themselves.
Fn+F1
Ctrl
key instead of the Fn key for the desired Fn function.
key, the Fn+F2 key and the Fn+F3 key are operable in the
Fn
and
Ctrl
functions interchanged (Î page 142)
Using the Fn Key
18
Key Functions Pop-up Window
(Displayed after
logging on to
Windows)
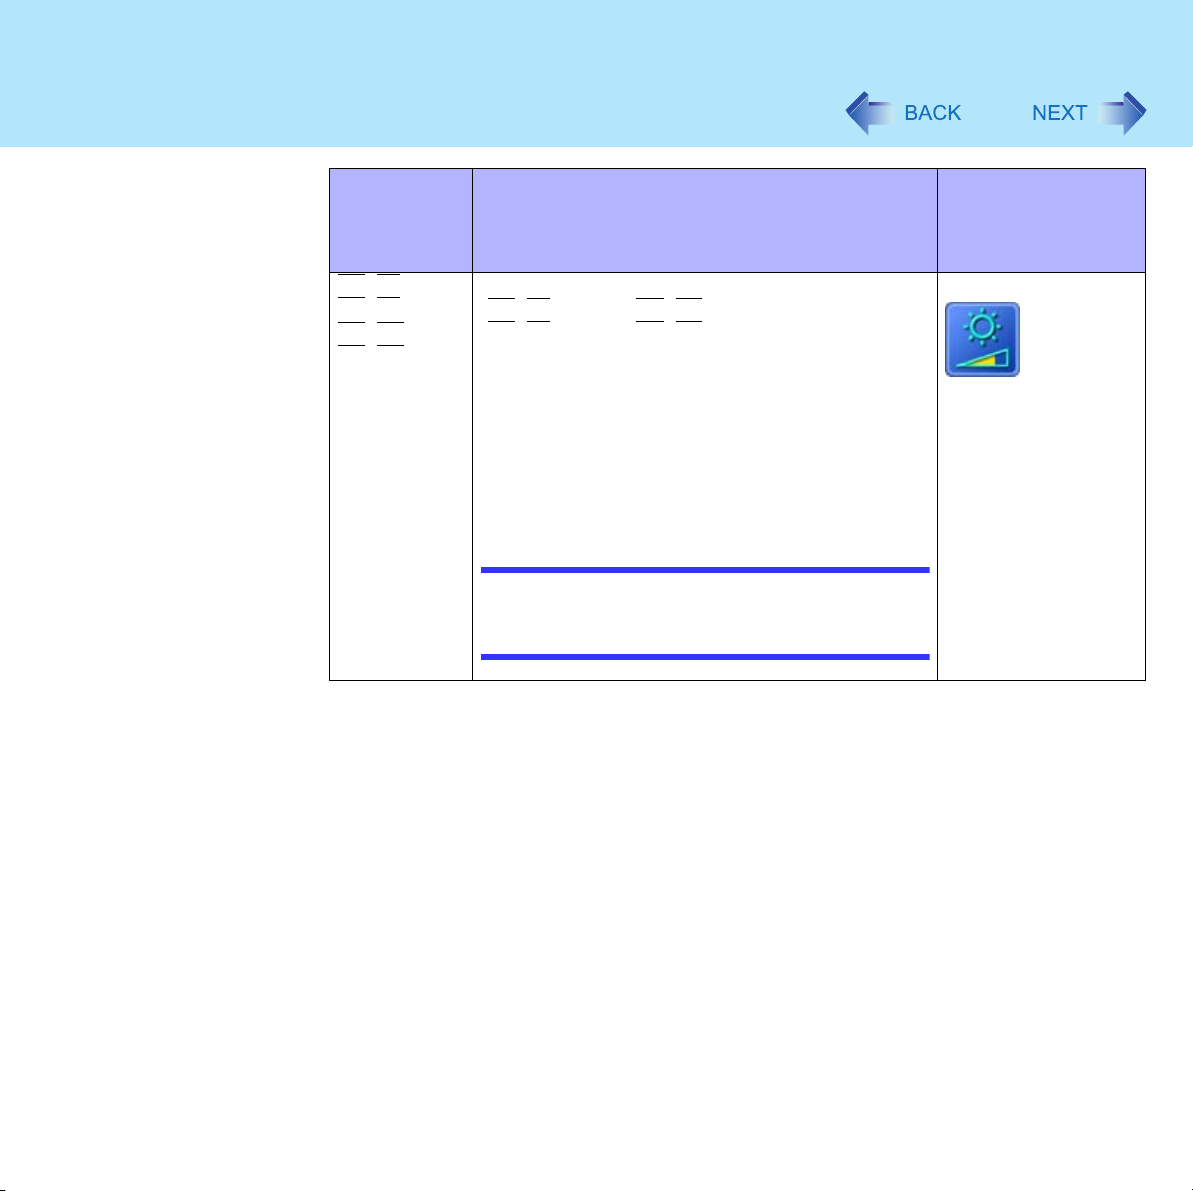
Fn+F1
Fn+F2
LCD brightness control
(
Fn+F1
Pressing this key combination adjusts the LCD
brightness control.
You can select a different brightness level setting
for when the AC adaptor is connected and for
when it is not connected.
(At the time of purchase, the LCD brightness is set
to be darker when the AC adaptor is not
connected.)
= down / Fn+F2= up)
NOTE
z The brightness of the power indicator
(Î page 24) changes in keeping with the
brightness level of the internal LCD.
Using the Fn Key
19
Key Functions Pop-up Window
(Displayed after
logging on to
Windows)
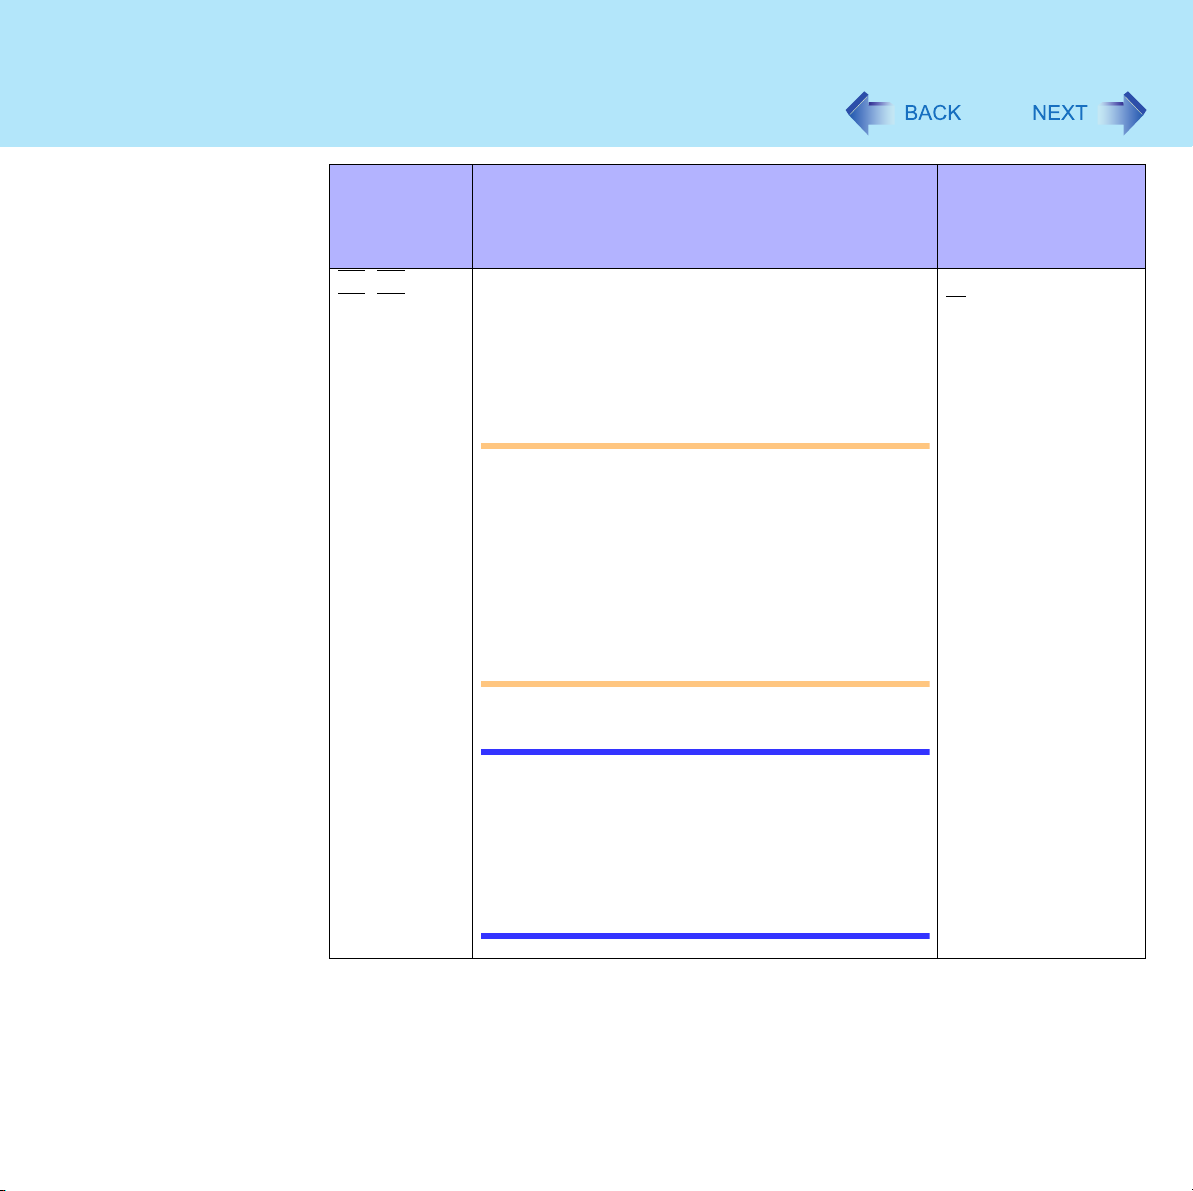
Fn+F3
Display change (When the external display is
connected)
By pressing this key combination, you can select
either an external display, internal LCD or
simultaneous. (Î page 111)
CAUTION
z Do not press another key until the display
destination has been completely switched.
z Do not press this key combination in the
following conditions:
• When a video such as a DVD video or an
MPEG file is playing
• When the Extended Desktop is being
utilized
• When a game such as pinball is displayed
NOTE
z When switching to a different user with the
Fast User Switching function, this key
operation may not work. In this case, log off
all users and restart the computer.
z When an external display is connected,
refer to "NOTE" in "External Display."
(Î page 112)
Using the Fn Key
20
Key Functions Pop-up Window
(Displayed after
logging on to
Windows)
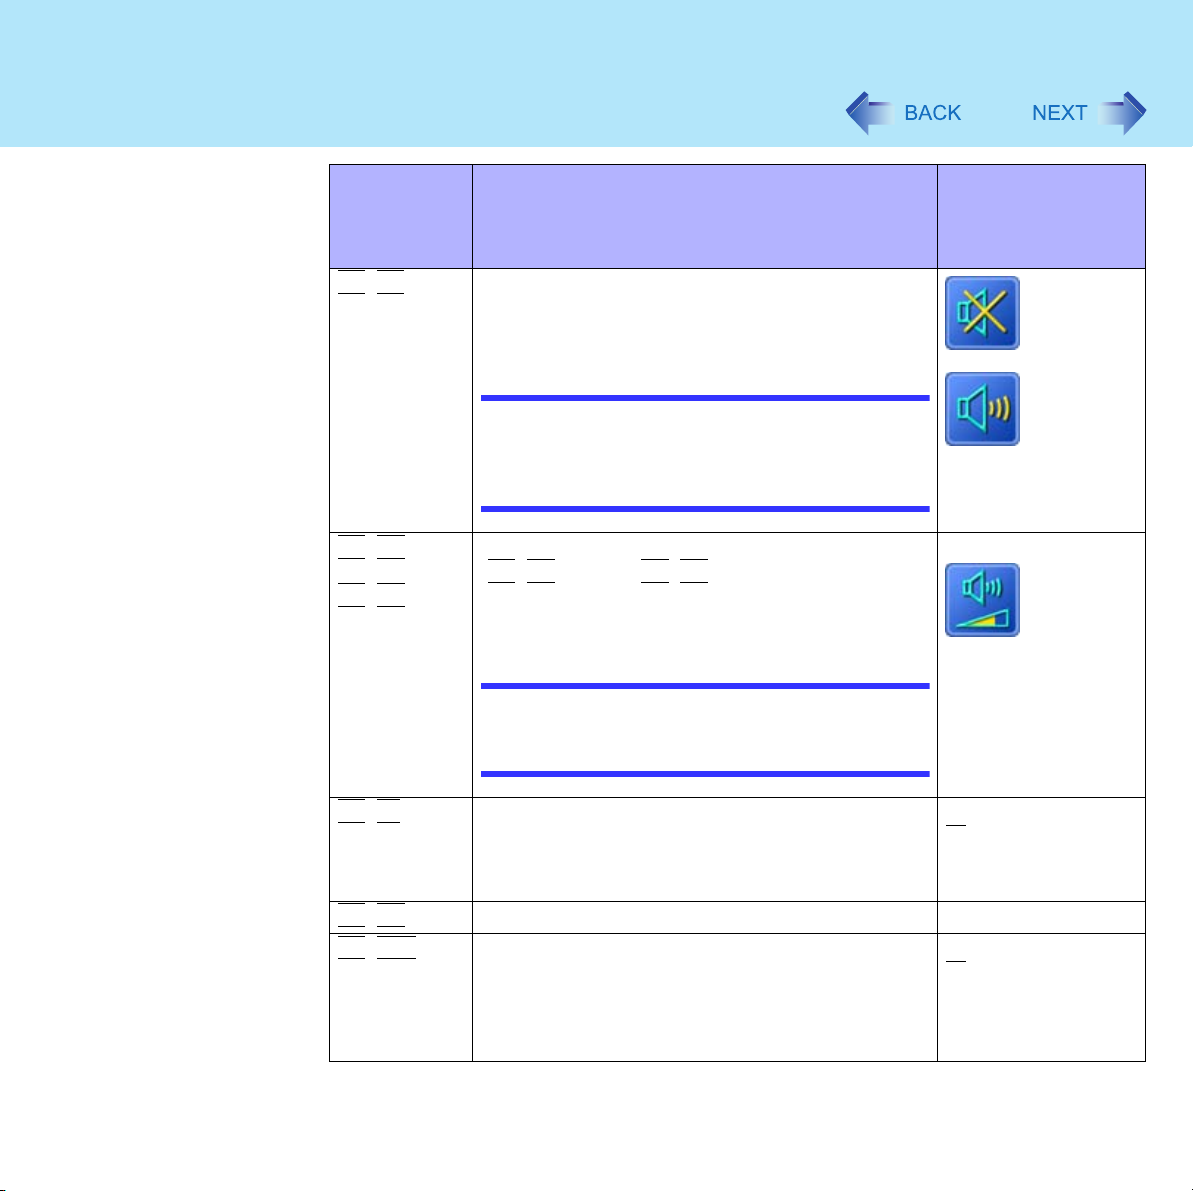
Fn+F4
Speaker on/off switch
Pressing this key combination turns on/off audio
from the internal speaker and headphone jack.
OFF
(MUTE)
Fn+F5
Fn+F6
Fn+F7
Fn+F9
Fn+F10
NOTE
z Turning off the speaker will also turn off the
warning beep.
z Speaker and other audio devices connected
to the USB port cannot be turned off.
Volume control
(
Fn+F5
Pressing this key combination adjusts the volume
of the internal speaker and headphone jack.
= down / Fn+F6= up)
NOTE
z The volume for speaker and other audio
devices connected to the USB port cannot
be adjusted.
Forcing the standby function
Pressing this key combination causes the current
status of the computer to be saved to memory, and
puts the computer into standby mode. (Î page 44)
Remaining capacity of the battery pack Î page 31
Forcing the hibernation function
Pressing this key combination causes the current
status of the computer to be saved to the hard disk,
and puts the computer into hibernation mode.
(Î page 44)
ON
Using the Fn Key
21
Key Functions Pop-up Window
(Displayed after
logging on to
Windows)
Fn+NumLk
Fn+Home
Fn
+
Ï
Fn
+
Ð
Run the ScrLk (Scroll Lock) function
The functions differ depending on the application
software being used.
Lead to the last page or move the cursor to the
end of the current line (End)
Move the back page (PgUp)
Move the next page (PgDn)
Using the Fn Key
Hotkey Settings
22
There are two Fn key functions as follows:
z Fn key lock function
After the
pressed. This is convenient when it is difficult to press two buttons simultaneously.
z Pop-up windows display ON/OFF
Fn
key is pressed once, it stays in the "pressed" position until another key is
NOTE
z The Hotkey settings can be set separately for each user.
z When using with the
read with the
Fn
and
Fn
key and the
Ctrl
key reversed.
Ctrl
key functions interchanged (Î page 142),
1 Run the Hotkey Settings.
Click [start] - [All Programs] - [Panasonic] - [Hotkey Settings].
2 Set the parameters.
A. Use Fn key lock
Add the checkmark if you want to enable the Fn key lock function. The following
Fn key lock function will then be enabled.
z To use the
A Press the
B Press another key for combination. (Lock released)
z To use the
A Press the
B Press another key for combination.
Fn key remains locked until the
B. Notification
This setting is only available when [Use Fn key lock] is checked.
[Make sounds when Fn key is pressed]
Notifies the user with a sound when the
When the speaker function is disabled, e.g., by the key combination the
key, there will be no sound. By the key combination the
Fn
key only once:
Fn
key once. (Locked)
Fn
key successively:
Fn
key twice. (Locked)
Fn
key is pressed once more.
Fn
key is locked or released.
Fn+F5
key, there will be
Fn+F4
Using the Fn Key
lower sound.
[Show status on screen]:
Displays the Fn key status on the notification area.
C. Disable popup
Add the checkmark if you want to turn the popup window display function OFF.
"Full Screen" of [Command Prompt] or MPEG files may change to a window
display if the
display function OFF.
Fn+Fx
*1
key is pressed. To prevent this, turn the popup window
3 Click [OK].
*1
The "Fx" key indicates any function key from the F1 key to the
F10
23
key.
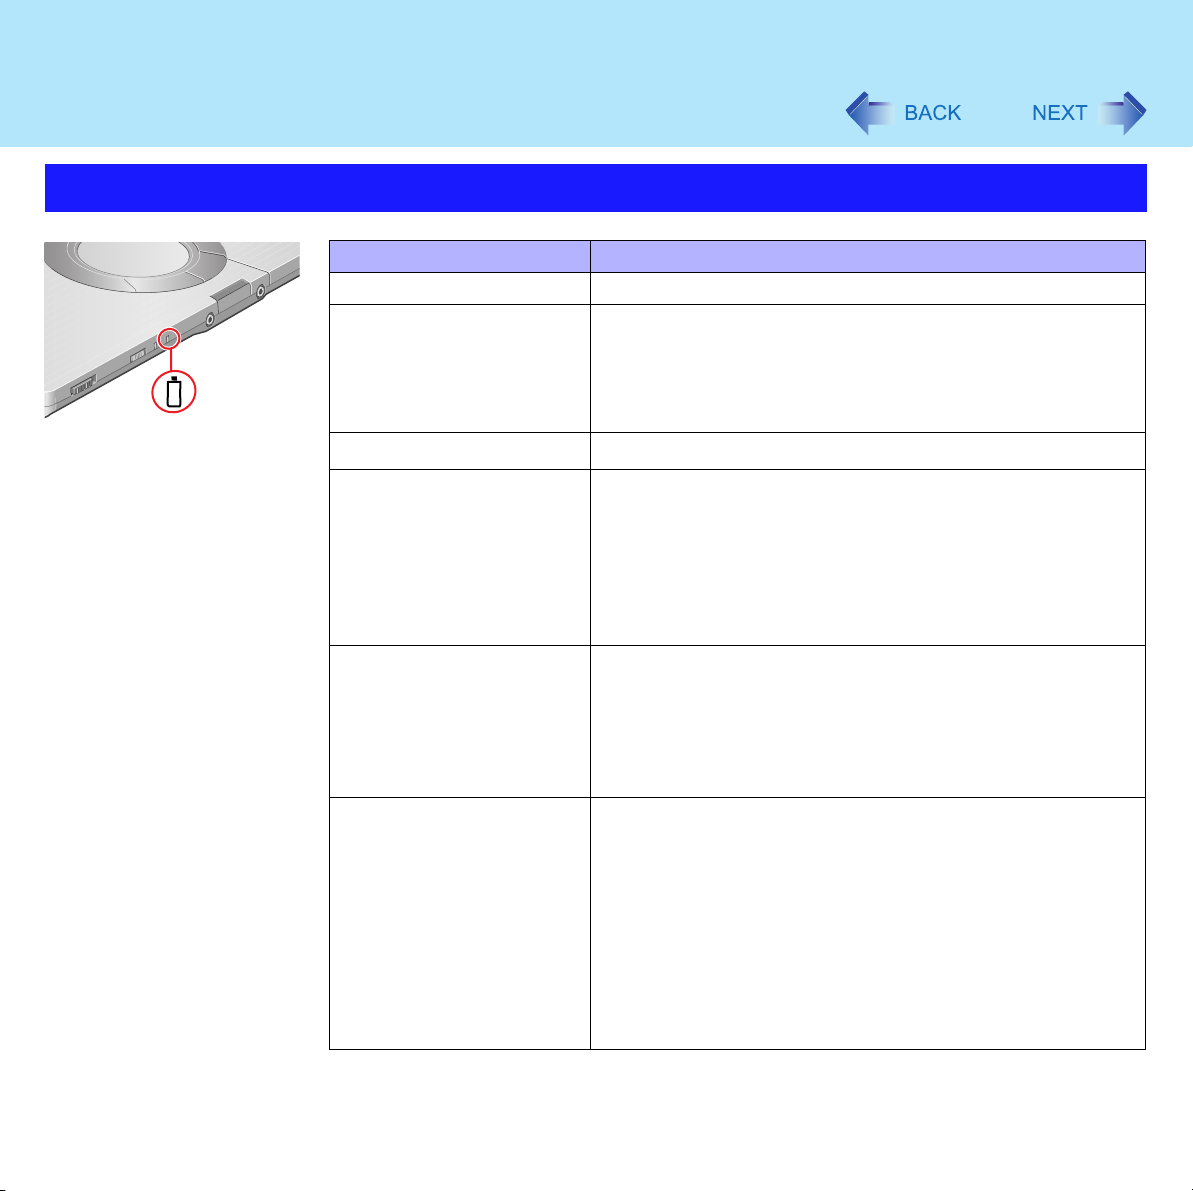
Confirm the Status Using the LEDs
Indicators Indicators Name Status
Power indicator z Not lit: Power off / Hibernation mode
z Green: Power on
z Blinking green: Standby mode
NOTE
z The brightness of the power indicator
changes in keeping with the brightness level
of the internal LCD.
24
ECO Economy Mode (ECO)
indicator
Battery indicator Î page 29
Caps Lock indicator This indicator lights green when the
Î page 36
z Not lit: Economy Mode (ECO) disabled.
z Green: Economy Mode (ECO) enabled.
z Blinking green: Economy Mode (ECO)
enabled (Discharging).
Caps Lock
non-shifted input is capitalized.
To disable, press the
(the indicator will turn off).
key is pressed. Subsequent
Caps Lock
key again

Confirm the Status Using the LEDs
Indicators Indicators Name Status
NumLk indicator
(Ten-key mode)
25
This indicator lights green when the
key is pressed.
Part of the keyboard (see figure below) will function as a ten-key numeric input. When the green
light is on, part of the keyboard can be used to
input numbers or calculation functions.
The
Enter
on the application.
To disable, press the
indicator will turn off).
key functions differently depending
NumLk
NumLk
key again (the
ScrLk indicator
(Scroll lock)
Hard disk drive indicator This indicator lights when the hard disk drive is
This indicator lights green when the
key is pressed. Scroll lock functions differently
depending on the application.
accessed.
Fn+ScrLk

Confirm the Status Using the LEDs
Indicators Indicators Name Status
A on the
left
DVD-ROM & CD-R/RW
drive indicator
SD memory card indicator This indicator lights when the SD memory card is
26
z Light off
Drive power is off.
z Light on
Drive power is on, but the DVD-ROM & CD-R/
RW drive is not accessed.
z Blinking
Drive power is on, and the DVD-ROM & CDR/RW drive is either being accessed or the
disk cover is ready to open.
How to switch the drive power on/off: Î page 63
accessed.

Battery Power
Precautions about the Battery Pack
Maintenance
z Do not touch the terminals on the battery pack and the computer. The battery pack may
no longer function properly if the contacts are dirty or damaged. Also, the computer may
not operate properly.
z Do not allow the battery pack to get wet.
z If the battery is damaged and battery fluid leaks out entering the eyes, immediately flush
with large volumes of water and contact your doctor.
Charging / Discharging (Operating Time)
z The battery pack is not charged when it is first purchased. Be sure to charge it before
using it for the first time. Charging begins automatically when the AC adaptor is
connected to the computer; charging time varies depending on usage conditions.
z This computer prevents overcharging of the battery by recharging only when the
remaining power is less than approx. 95%
z The battery pack normally becomes slightly warm during recharging and discharging.
This is not a malfunction.
z Battery operation time is reduced at low temperatures. Use the battery pack within the
acceptable temperature range.
*1
When Economy Mode (ECO) is enabled: 75%
27
*1
of capacity after the battery is fully charged.
When the computer is not going to be used for an extended
period (a month or more)
z In order to maintain the battery performance, remove the battery with a remaining charge
of 30% to 40% from the computer, and store it in a cool, dark place.
[Important Tips] (On-Line Manual)
z Important Tips provides information on how to maximize use of the battery pack, which is
necessary for computing away from your home or office.
See [Important Tips] using one of the following methods.
• Double-click the icon on the desktop.

Battery Power
28
• To see [start] menu.
A Click [start] - [All Programs] - [Panasonic].
B Click [On-Line Manuals] or [Battery], and click [Important Tips].
• Right-click on the Economy Mode (ECO) icon / , and click [Important Tips]
*1
If the [Important Tips] file has been deleted, Important Tips will not be displayed.
*1
Battery Power
Use the Battery Indicator to Check the Battery Status
Battery Indicator Battery Status
Not lit Battery pack is not connected or no charging.
Orange
Green
Red The battery level is very low (the charge is approx. 9% or
Blinking red
Blinking orange
*1
*1
*1
*1
Charging in progress.
z If [Battery Charging Indicator] in the [Main] menu of the
Setup Utility is set to [Flashing], the indicator will
alternately become lighter and darker (Flashing)
(Î page 142).
Fully charged.
less).
Connect the AC adaptor. You can use the computer when
the battery indicator light is orange. If you do not have an
AC adaptor, save your data and power off your computer.
After replacing the battery pack with a fully charged one, you
can turn your computer on.
Battery pack or charging circuit may not be working properly.
Quickly save your data and power off your computer.
Remove the battery pack and disconnect the AC adaptor,
then connect them again. If the problem persists, contact
your technical support office. The battery pack or charging
circuit may be defective.
z Battery cannot be recharged temporarily because the
internal temperature of the battery pack is outside the
acceptable temperature range for recharging. Once the
allowable range requirement is satisfied, charging begins
automatically. Your computer can be used normally in this
state.
z Software applications and peripheral devices (USB
devices, etc.) are consuming too much power. Exit the
software applications currently running. Once the
allowable range requirement is satisfied, charging begins
automatically.
29
*1
When the AC adaptor is connected.

Battery Power
Check the Remaining Battery Power
There are three methods to check the remaining battery power.
z Press the
z Check the Windows Power Meter. (After logging on to Windows)(Î page 31)
z Check the number of bright LEDs. (When the power is off or in standby/hibernation
mode)(Î page 32)
NOTE
z In the following cases, there may be a difference between the remaining battery
capacity displayed on the indicator and the actual remaining battery capacity. To
correct this, perform the "Battery Recalibration." (Î page 35)
• The battery indicator light remains red
• The battery remaining displays 99% ("79%" when Economy Mode (ECO) is
• Low battery warning appears after a short period of time
z The remaining battery power and remaining time indicated in the Windows Power
Meter ([Power Meter] in [Power Options Properties]) are calculated based on the
computer's usage conditions at that time, so these displays may change when usage
conditions change. (These displays are only a guide)
The remaining battery power displayed using the
so displays may differ to some degree. This is not a malfunction.
Fn+F9
enabled) and the indicator light is orange for a long period time.
This may be caused by the use of standby mode for long periods of time. The
battery is discharging while the computer is in standby mode when the AC adaptor
is not connected.
key. (After logging on to Windows)(Î page 31)
Fn+F9
30
key is calculated differently,
 Loading...