

Page 1
Backlit Keyboard
CF-VKBL02
OPERATING INSTRUCTIONS
Thank you for purchasing this backlit keyboard for the Panasonic computer series.
Refer to the Operating Instructions accompanying the computer about precautions.
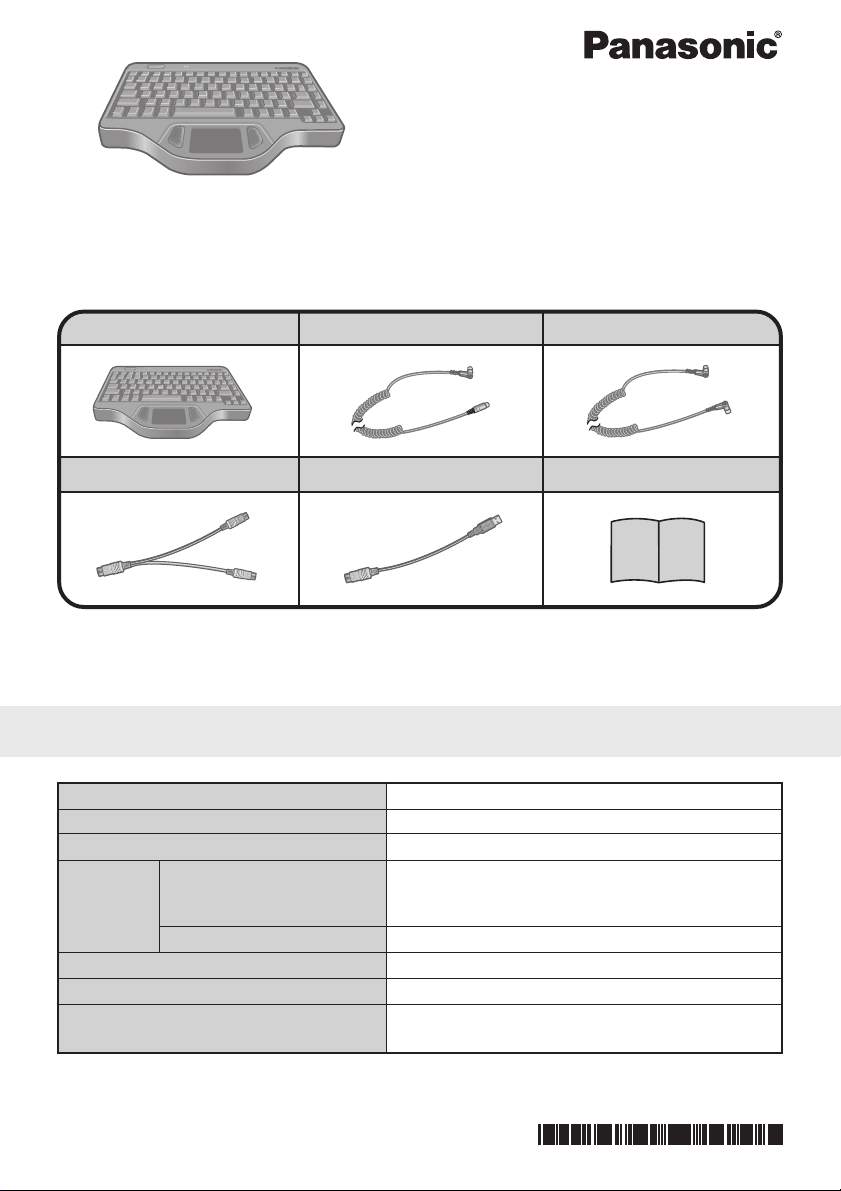
Backlit Keyboard .... 1
Splitter Cable........... 1
Some of the illustrations included with the text may differ slightly in shape from the actual
items included in the kit in order to make the explanation easier to understand.
PS/2 Cable ................ 1
USB PS/2 Transfer cable
... 1
Function Key Cable
Operating Instructions
... 1
... 1
Specifications
Item
Number of Keys
Pointing Device
Interface Keyboard Port
Function Keyboard Port
Physical Dimensions (W × H × D)
Weight
Operating Environment
Temperature / Humidity
87 keys
touch pad
mini DIN 6-pin (Connection of the backlit keyboard
to the USB port enabled using the USB PS/2 transfer cable.)
mini DIN 8-pin
300 mm × 205 mm× 26 mm {11.8 '' × 8.1 '' × 1.0 ''}
1.6 kg {3.53 lb.} (Excluding the cable)
5 °C to 35 °C {41 °F to 95 °F}/
30 % RH to 80 % RH (no condensation)
Description
Printed in Japan
DFQX5437ZA FJ0102-0
Page 2
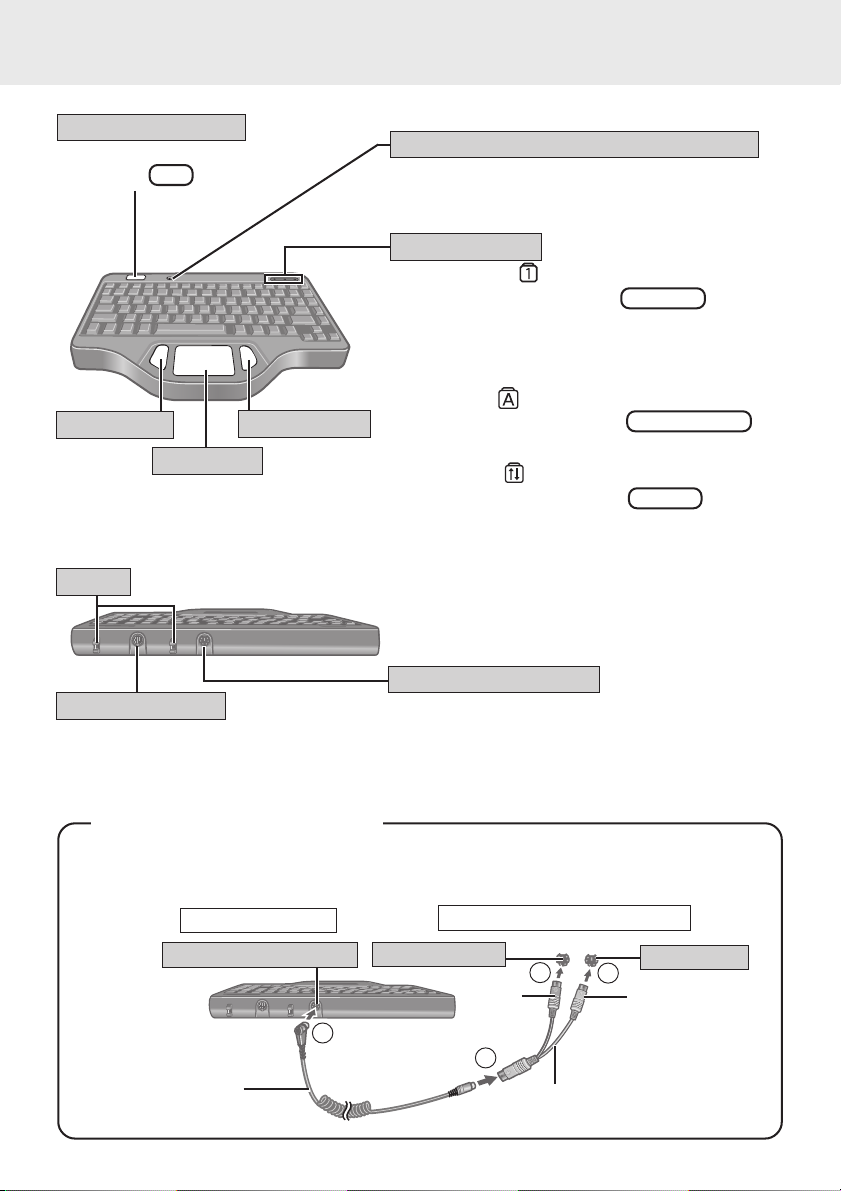
Names and Functions of Parts
Emergency Button
The application software
allocated to F11 is started up.
Left Button
Right Button
Touch Pad
Binder
Bind the cables.
Function Key Port
This connects to the Function Key Port
of the LCD monitor (CF-VDL01) with
the included function key cable.
Optical Sensor (Light Receiving Part)
This part determines whether to turn the backlight
on/off. Do not obstruct this part.
LED Indicators
Numeric Key :
This indicator lights green when NumLk is pressed.
This causes a portion of the keyboard to function as a
numeric keypad. The [Enter] key functions differently depending on the application.
Caps Lock :
This indicator lights green when Caps Lock is
pressed. Subsequent non-shifted input is capitalized.
Scroll Lock :
This indicator lights green when ScrLk is pressed.
Scroll lock functions differently depending on the
application.
Keyboard/Mouse Port
This connects to the external keyboard/mouse port
of the computer with the included PS/2 cable.
<Using the splitter cable>
If your computer or port replicator has both an external keyboard port and an external
mouse port, connect the included splitter cable with the following procedure.
Backlit Keyboard
Keyboard/Mouse Port
PS/2 cable
Keyboard Port
2
Computer or Port Replicator
3
gray
1
Splitter cable
3
beige
Mouse Port
Page 3

<Using the USB PS/2 Transfer cable>
Connect the backlit keyboard to the USB port on the computer or port replicator using
the USB PS/2 transfer cable.
Backlit Keyboard
Keyboard/Mouse Port
2
PS/2 cable
Computer or Port Replicator
1
USB PS/2 Transfer cable
Touch Pad (Basic Operation)
Work Surface
Left Button
Right Button
Use the touch pad to move the cursor on the display and perform normal computer operations. For instructions on how to
operate, refer to “Touch Pad (Advanced)”.
NOTE
The touch pad has been designed to work only when a
finger is used. Therefore, do not use any implement on
the touch pad.
USB Port
3
Basic Operation
Function Touch Pad Operation
Moving the Cursor
Tapping/Clicking
Move the tip of your finger lightly over
the surface.
or
(To next page)
Page 4

Touch Pad (Basic Operation)
Basic Operation (continued)
Function Touch Pad Operation
Double-Tapping/
Double-Clicking
or
Draggling
Two quick taps, but on the second tap leaving your finger
down (applying pressure) and
moving it on the work surface.
or
While holding down the button,
moving your finger on the work
surface.
Handling
Do not obstruct the optical sensor (light receiving part) in order to extend the life of the
backlight.
When pressing Fn + F12 , the brightness of the backlight will be switched by 4 steps.
Wipe the keyboard with a soft cloth, after applying water or detergent diluted with water
to the soft cloth and firmly wringing out excess water.
CAUTION
Do not use benzene, thinner, or rubbing alcohol. Doing so may adversely affect the
surface, e.g., discoloration. In addition, do not use commercially-available household
cleaners and cosmetics, as they may contain components harmful to the surface.
Do not directly add or spray water or detergent. If liquid enters the inside of the keyboard, it may cause it to work improperly or be damaged.
Under high-temperature conditions, the brightness of the backlight may be diminished
in order to protect the LEDs.
Handling the Touch Pad
Do not place any object on the work surface or press down forcefully with sharppointed objects (e.g., nails), hard objects that can leave marks (e.g., pencils and
ball point pens).
Do not allow things that could dirty the touch pad, such as oil. The cursor may not
work properly in such cases.
When the touch pad becomes dirty:
Wipe to remove dirty areas by using a dry soft cloth such as gauze or a soft cloth
first applied with detergent diluted with water and then thoroughly wrung.
Do not use benzene, thinner, or disinfectant-type alcohol.
 Loading...