

Page 1
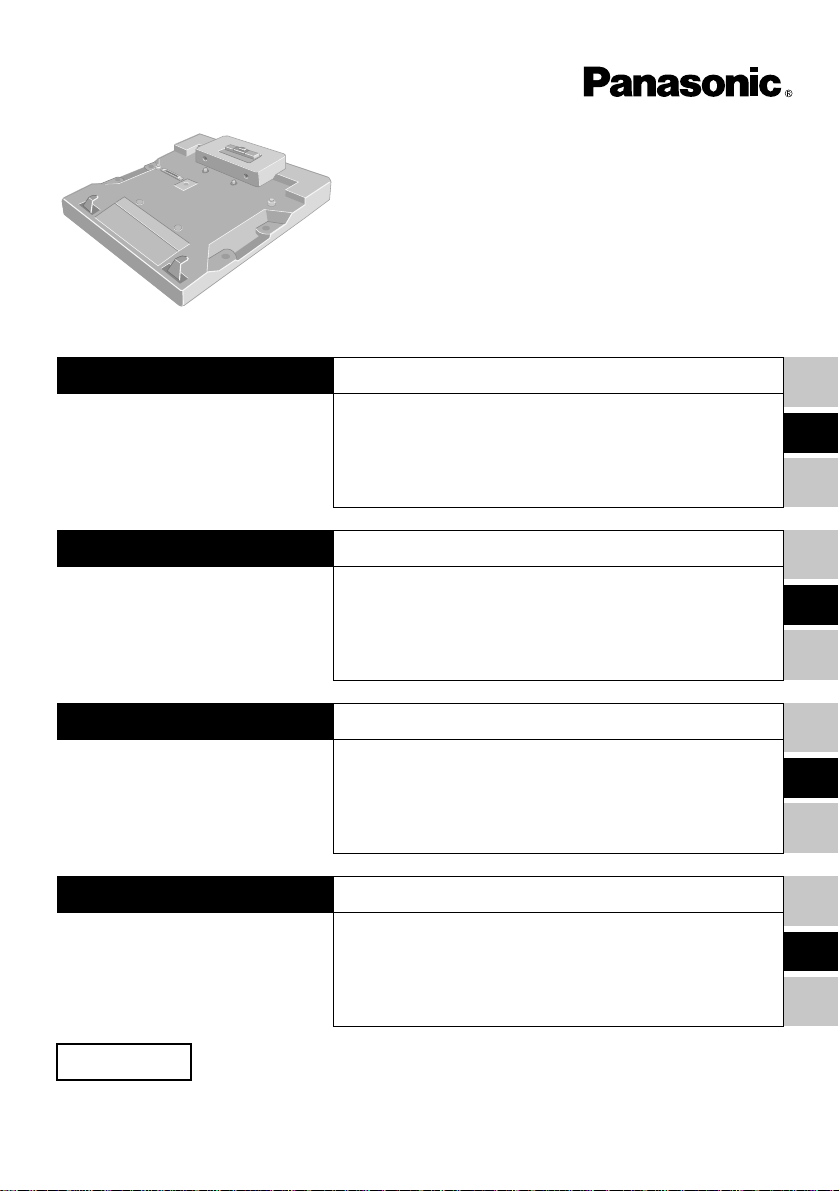
Port Replicator
Portreplikator
Le duplicateur de port
ポートリプリケーター
CF-VEB343
ENGLISH
DEUTSCH
FRANÇAIS
日本語
OPERATING INSTRUCTIONS
Names of Parts................................................ 6
Connecting/Disconnecting............................... 7
Specifications................................................ 10
BEDIENUNGSANLEITUNG
Bezeichnungen der Teile............................... 12
Anschließen/Entfernen.................................. 13
Technische Daten.......................................... 16
MODE D'EMPLOI
Nom des pièces............................................. 18
Connexion/Déconnexion ............................... 19
Spécifications................................................ 22
取扱説明書
安全上のご注意 ........................
各部の名称と働き ......................
取り付け/取り外し ....................
仕様 ..................................
24
27
28
31
E
D
F
J
保証書付属 (日本国内向け)
このたびはパナソニックポートリプリケータ−をお買い上げいただき、まことにありがとうございました。
・この取扱説明書をよくお読みのうえ、正しくお使いください。そのあと保存し、必要なときにお読みください。
・保証書は「お買い上げ日・販売店名」などの記入を確かめ、販売店からお受け取りください。
Page 2

For USA
Federal Communications Commission Radio Frequency Interference
Statement
Note: This equipment has been tested and found to comply with the limits for a Class B
digital device, pursuant to Part 15 of the FCC Rules. These limits are designed to provide
reasonable protection against harmful interference in a residential installation. This
equipment generates, uses and can radiate radio frequency energy and, if not installed and
used in accordance with the instructions, may cause harmful interference to radio
communications. However, there is no guarantee that interference will not occur in a
particular installation. If this equipment does cause harmful interference to radio or
television reception, which can be determined by turning the equipment off and on, the
user is encouraged to try to correct the interference by one or more of the following
measures:
• Reorient or relocate the receiving antenna.
• Increase the separation between the equipment and receiver.
• Connect the equipment into an outlet on a circuit different from that to which the
receiver is connected.
• Consult the Panasonic Service Center or an experienced radio/TV technician for help.
Warning
To assure continued compliance, use only shielded interface cables when connecting to a
computer or peripheral. Also, any changes or modifications not expressly approved by the
party responsible for compliance could void the user’s authority to operate this equipment.
This device is Class B verified to comply with Part 15 of FCC Rules when used with
Panasonic Notebook Computer.
This device complies with Part 15 of the FCC Rules. Operation is subject to the following
two conditions:
(1)This device may not cause harmful interference, and
(2)This device must accept any interference received, including interference that may
cause undesired operation.
Responsible Party: Matsushita Electric Corporation of America
One Panasonic Way
Secaucus, NJ 07094
Tel No:1-800-LAPTOP-5 (1-800-527-8675)
For Canada
This class B digital apparatus complies with Canadian ICES-003.
Cet appareil numèrique de la classe B est conforme à la norme NMB-003 du Canada.
2
Page 3

For Europe
Compliance Notice - CE Mark
This equipment is in conformance with the requirements of the European Council
Directive listed below:
73/23/EEC Low Voltage Directive with amendment 93/68/EEC
89/336/EEC EMC Directive with amendment 92/31/EEC and 93/68/EEC
This Notice is based upon compliance of the product to the following standards:
EN60950
EN55022
EN61000-3-2
EN61000-3-3
EN55024
Übereinstimmungserklärung - CE-Marke
Diese Ausrüstung erfüllt die Anforderungen der unten angegebenen EC-Direktive:
73/23/EEC Niederspannungsdirektive mit Abänderung 93/68/EEC
89/336/EEC EMC-Direktive mit Abänderungen 92/31/EEC und 93/68/EEC
Diese Erklärung beruht darauf, dass das Produkt die folgenden Normen erfüllt:
EN60950
EN55022
EN61000-3-2
EN61000-3-3
EN55024
Avis de conformité - Marque CE
Cet équipement est conforme aux conditions des Directives de la Commission Européenne
mentionnées ci-dessous:
73/23/EEC Directive sur la basse tension y compris la modification 93/68/EEC
89/336/EEC Directive CEM y compris les modifications 92/31/EEC et 93/68/EEC
Cet Avis se base sur la conformité du produit aux normes suivantes:
EN60950
EN55022
EN61000-3-2
EN61000-3-3
EN55024
3
Page 4

Interface Cable
Use of an interface cable longer than 3 m (9.84 feet) is not recommended.
Schnittstellenkabel
Verwendete Schnittstellenkabel sollten eine Länge von 3 Metern möglichst nicht
überschreiten.
Câble d’interface
Nous vous déconseillons d’utiliser un câble d’interface d’une longueur supérieure à 3m.
4
Page 5
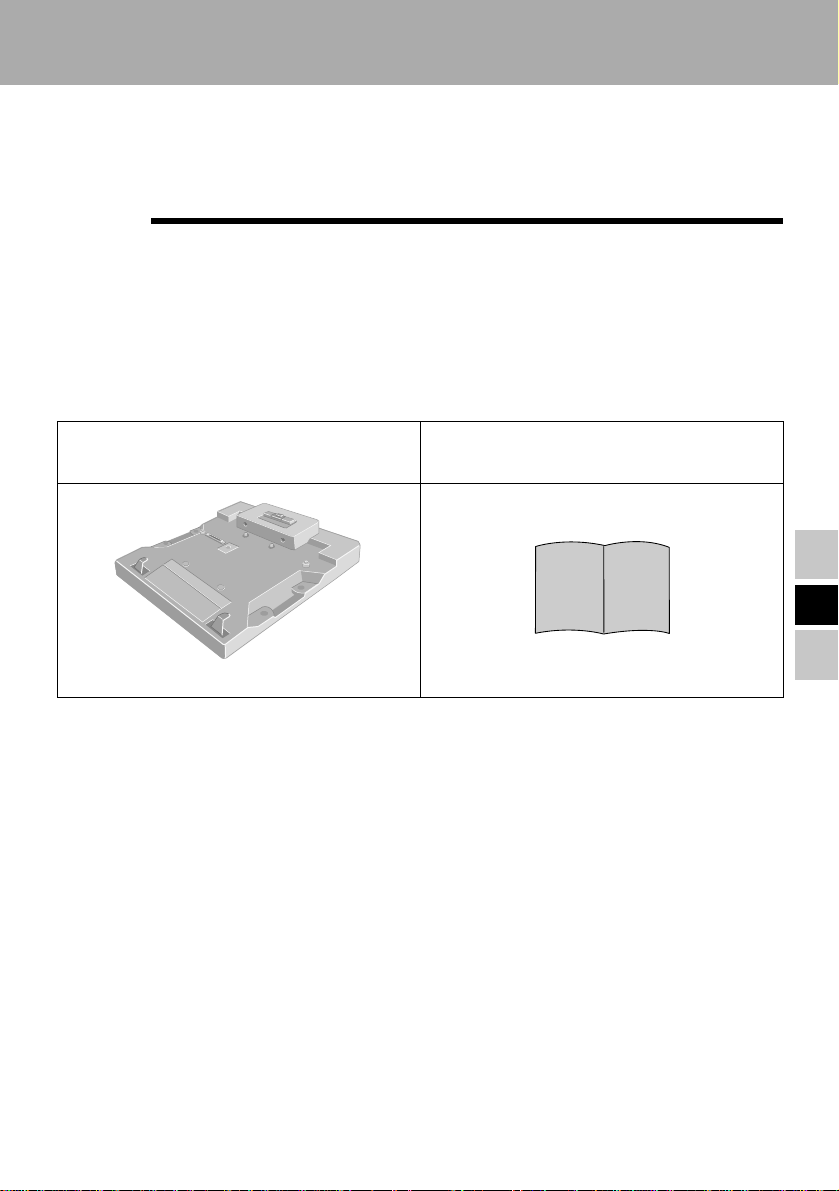
ENGLISH
Thank you for purchasing the port replicator for the Panasonic CF-M34 notebook
computer series.
By connecting your peripheral devices to the port replicator, you can save yourself the
trouble of having to connect and disconnect several cables every time you transport the
computer.
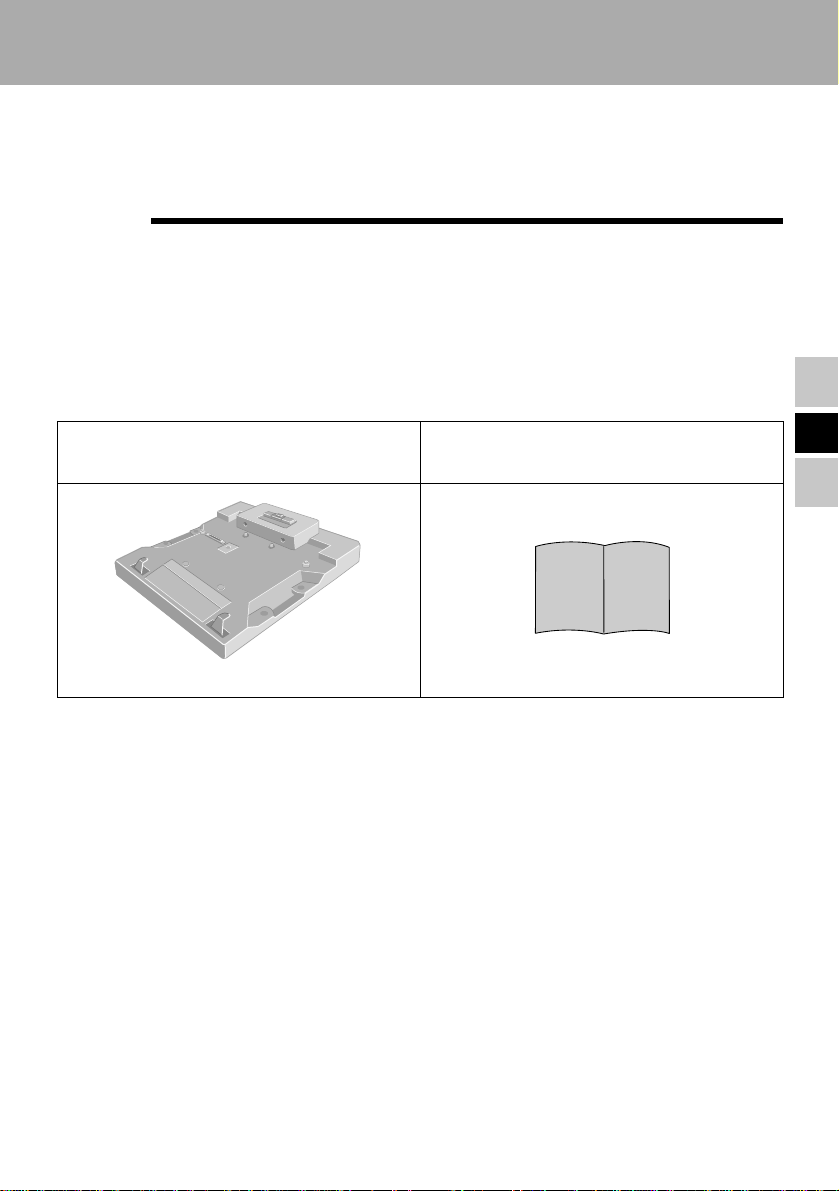
Port Replicator........................(1)
Some of the illustrations included with the text may differ slightly in shape from the actual
items included in the kit in order to make the explanation easier to understand.
Operating Instructions ...........(1)
(This book)
E
5
Page 6
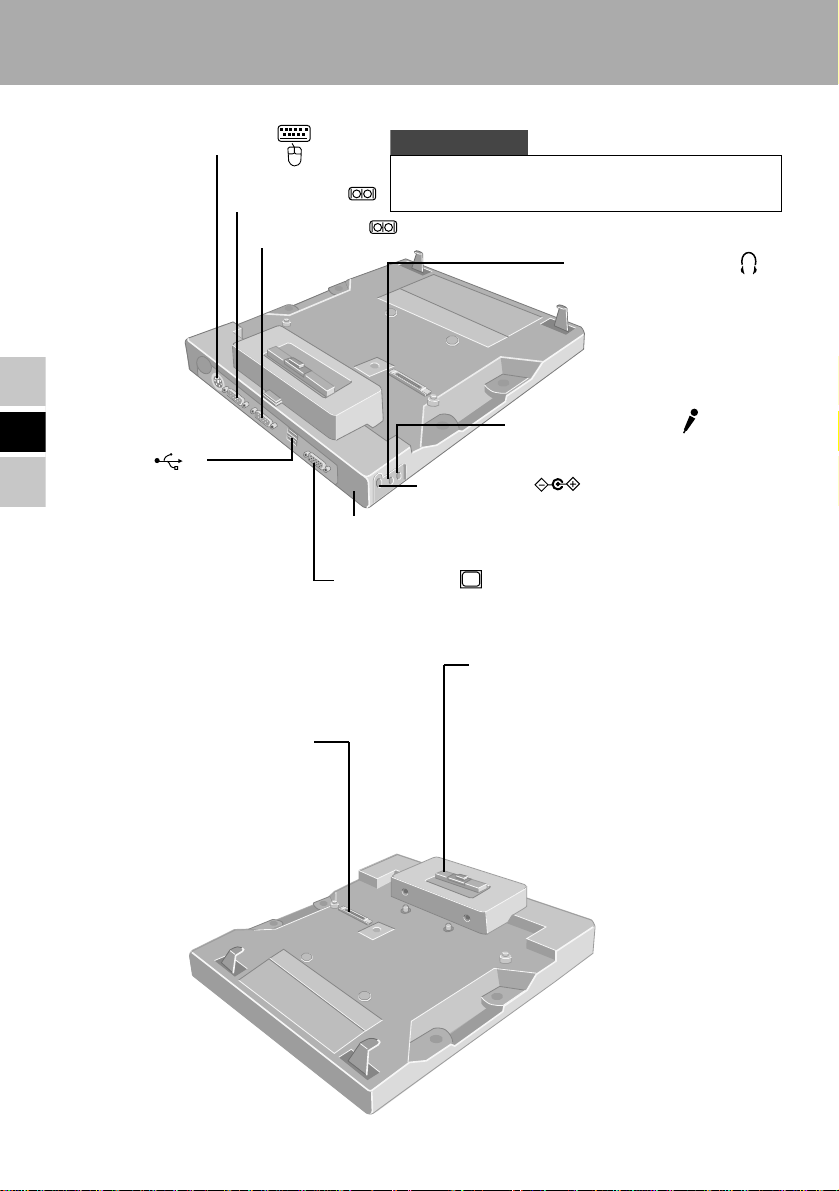
Names of Parts
Keyboard/Mouse Port
Serial Port A
E
USB Port
Refer to "USB Devices" in
the "Reference Manual"
(installed in your computer
in ".pdf" format).
Expansion Bus Connector
This connects to the expansion
bus connector on the bottom of
the computer.
Serial Port B
Security Lock (for Kensington Cable)
Display Port
CAUTION
Serial Port A can not be used for CF-M34JA****,
CF-M34T4**** and CF-17TR***** series.
Headphone Jack
Microphone Jack
DC-IN Jack
LOCK
Lever
Slide the lever to dock or undock the
computer.
When the port replicator is not
connected to the computer, be sure
that the lever remains in the
"UNDOCK" position towards the rear
of the unit.
6
Page 7
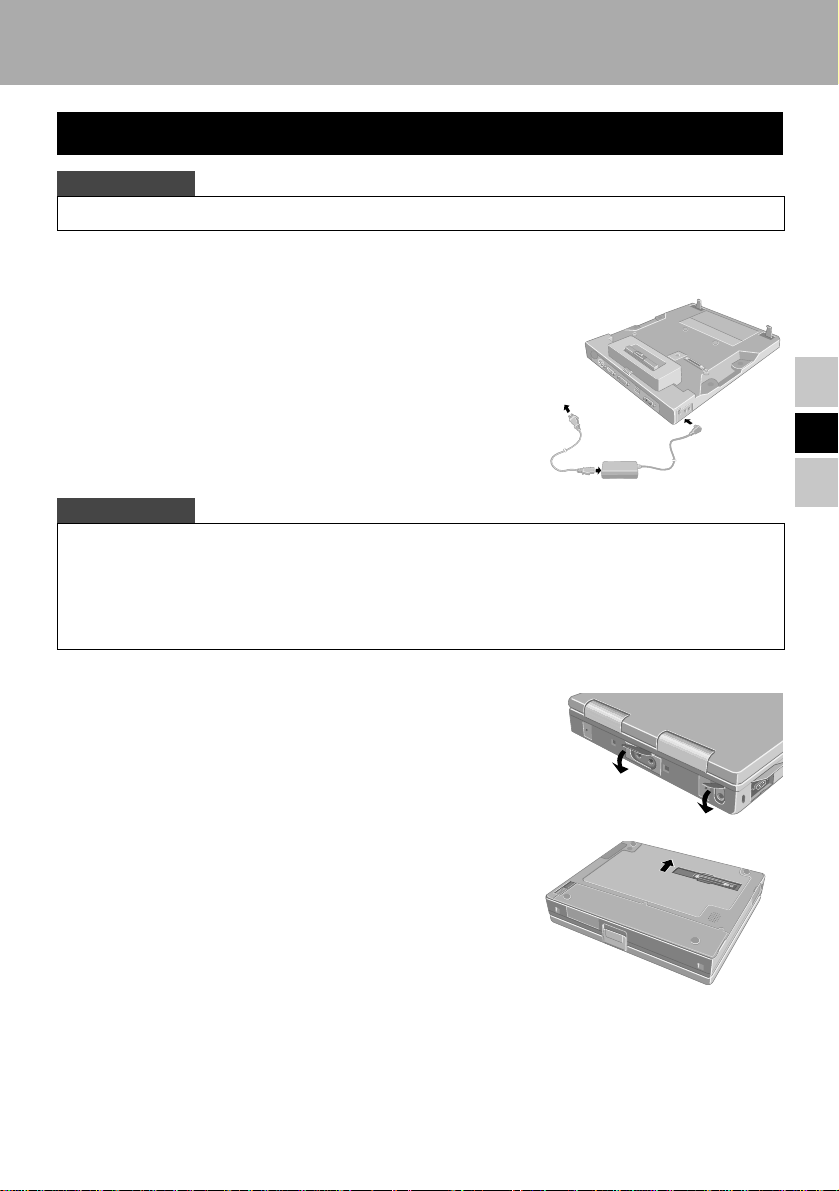
Connecting/Disconnecting
Connecting
CAUTION
Do not connect or disconnect the port replicator while the computer is powered on.
Power off the computer, and disconnect all cables from the computer.
1
Connect the plug of the AC adaptor that came
2
with the computer to the DC-IN jack of the port
replicator and plug the other end into an AC
outlet.
CAUTION
• Be sure to use the AC adaptor. (
battery power.
• Do not use other than the specified AC Adaptor (Model No.: CF-AA1527) and AC cord.
• Refer to the "Operating Instructions" provided with the computer for information on proper
handling of the AC adaptor and AC cord.
)
The port replicator will not function using the computer's
(3)
(1)
(2)
E
Remove the strap and firmly close the covers of
3
the headphone, microphone and DC-IN jacks of
the computer.
Turn the computer over , and open the cover of the
4
expansion bus connector of the computer.
7
Page 8
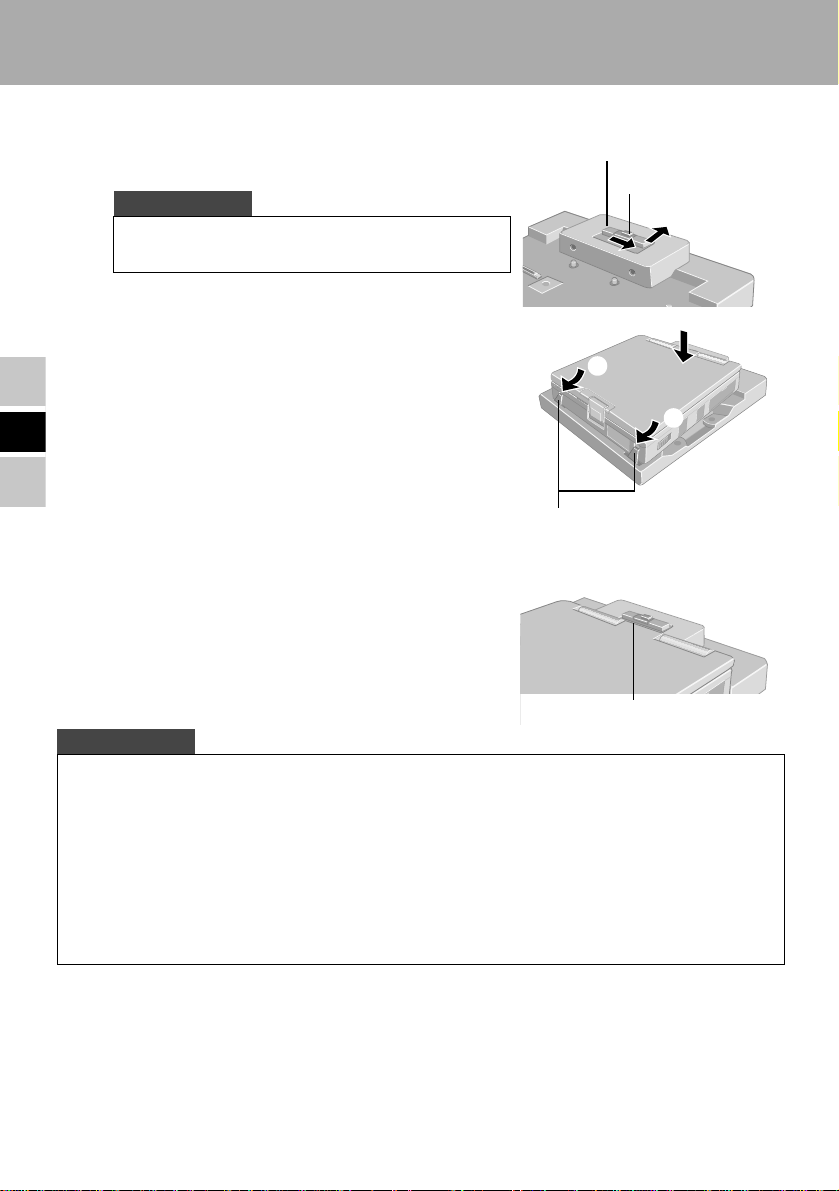
Connecting/Disconnecting
While holding the latch to the right side, slide the
5
lever all the way back. (UNDOCK POSITION)
CAUTION
Do not slide the lever without holding the latch to
the right side.
After confirming that the expansion bus
6
connector of the port replicator is positioned so
that the computer can be docked, insert the front
corners of the computer and then press down
E
lightly on the rear corners onto the port replicator
guide pins.
Confirm that the lever has moved all the way to
7
the front. (DOCK POSITION)
Lever
Latch
(2)
(1)
(1)
Insert the left and right hooks
into the computer's locking
holes.
Lever
CAUTION
• Do not attempt to make connections if there is any object between the computer and the port
replicator. Doing so could damage the computer and the port replicator.
• Do not attempt to move the port replicator when it is connected to the computer.
• If the computer malfunctions while the port replicator is attached, refer first to the
"Troubleshooting" section of the computer's "Operating Instructions". If you still are unable to
solve the problem, power off the computer, disconnect the port replicator, connect the AC
adaptor to the computer, and check to see if the computer operates normally. If the computer
operates normally when the port replicator is not attached, the port replicator may be
malfunctioning. Please contact Panasonic Technical Support.
8
Page 9
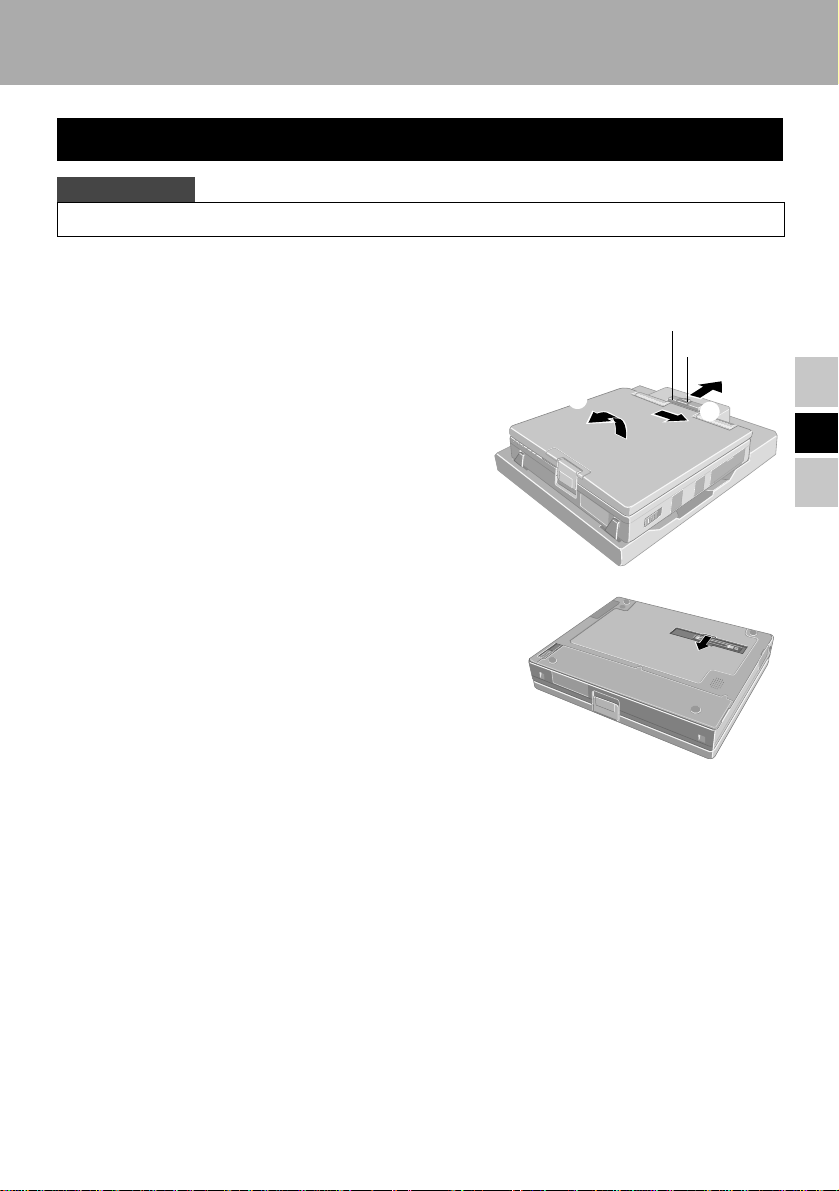
Disconnecting
CAUTION
Do not connect or disconnect the port replicator while the computer is powered on.
Power the computer off.
1
(1) While holding the latch to the right side,
2
slide the lever all the way back.
(2) Lift the rear corners first, then release the
front corners.
Close the cover of the expansion bus
3
connector of the computer.
(2)
Lever
Latch
(1)
E
9
Page 10
Specifications
Item Description
Power Supply Input DC 15.1V [Do not use other than the specified AC
adaptor (Model No.: CF-AA1527)].
Expansion Bus Connector 100-pin female
Display port Mini Dsub 15-pin female
Serial Port Dsub 9-pin male x 2
Microphone Jack Miniature jack, 3.5 DIA
(Use only a monaural condenser microphone .)
Headphone Jack Miniature jack, 3.5 DIA
Keyboard/Mouse Port Mini DIN 6-pin female
E
USB Port 4-pin x 2
Physical Dimensions
(Width x Depth x Height)
Weight Approx. 1.12 kg {2.47 lb.}
Operating Environment
Temperature / Humidity
229 mm x 262 mm x 75 mm
{9.02" x 10.31" x 2.95"}
5 °C to 35 °C {41 °F to 95 °F}/
30 % RH to 80 % RH (no condensation)
10
Page 11
DEUTSCH
Wir freuen uns darüber, dass Sie sich zum Kauf eines Portreplikators für das PanasonicNotebook CF-M34 entschieden haben.
Bei Anschluss Ihrer Peripheriegeräte an den Portreplikator ist es nicht erforderlich, beim
Mitnehmen des Computers jedes Mal eine Vielzahl von Kabeln anzuschließen bzw.
abzuziehen.
Portreplikator.......................... (1)
Aus Gründen der besseren Erkennbarkeit entsprechen einige Abbildungen in dieser
Anleitung dem Original nicht in allen Einzelheiten.
Bedienungsanleitung .............(1)
(Dieses Handbuch)
D
11
Page 12

Bezeichnungen der Teile
LOCK
Anschluss für externe Tastatur/
Maus
USB-Anschluss
Siehe „USB-Geräte“ im
„Bezugshandbuch“ (in
Ihrem Computer im „.pdf“Format installiert).
Serieller
Anschluss A
Serieller
Anschluss B
D
Erweiterungsbus-Anschluss
Hier auf der Unterseite des
Computers erfolgt der Anschluss
an den Erweiterungsbus.
VORSICHT
Serieller Anschluss A kann für die Serien
CF-M34JA****, CF-M34T4**** und CF17TR***** nicht verwendet werden.
Kopfhörerbuchse
Mikrofonbuchse
Gleichstrom-Eingangsbuchse
Sicherungsschloss
Anschluss für externes Display
Hebel
Verschieben Sie den Hebel, um den
Computer ein- oder auszudocken.
Wenn der Portreplikator nicht an den
Computer angeschlossen ist, müssen
Sie darauf achten, dass der Hebel in
der Stellung „UNDOCK“ (auf die
Rückseite des Gerätes hin weisend)
verbleibt.
12
Page 13

Anschließen/Entfernen
Anschließen
VORSICHT
Schließen Sie das Notebook nicht an oder entfernen es, wenn das Notebook im Betrieb ist.
Denken Sie daran, den Computer abzuschalten und trennen Sie alle Kabel vom
1
Computer.
Schließen Sie den Stecker des mit dem Computer
2
gelieferten Netzadapters an die GleichstromEingangsbuchse des Portreplikators an. Stecken
Sie den Netzstecker in eine Steckdose.
VORSICHT
• Denken Sie daran, den Netzadapter anzuschließen. (
Akkus des Computers versorgt werden.
• Verwenden Sie ausschließlich den vorgeschriebenen Netzadapter (CF-AA1527) und das
vorgeschriebene Netzkabel.
• Informationen zur sachgemäßen Handhabung von Netzadapter und Netzkabel finden Sie in der
Bedienungsanleitung des Computers.
)
Der Portreplikator kann nicht über die
(3)
(1)
(2)
D
Entfernen Sie den Trageriemen und schließen Sie
3
sorgfältig die Abdeckungen der Kopfhörer-,
Mikrofon- und Gleichstrom-Eingangsbuchsen
des Computers.
Stellen Sie den Computer auf den Kopf und
4
öffnen Sie die Abdeckung des Steckverbinders
für den Erweiterungsbus.
13
Page 14

Anschließen/Entfernen
Drücken Sie die Verriegelung nach rechts und
5
schieben Sie den Hebel ganz nach hinten.
(UNDOCK POSITION:
ENTKOPPLUNGSPOSITION)
VORSICHT
Verschieben Sie den Hebel nicht, ohne dabei die
Verriegelung nach rechts zu drücken.
Vergewissern Sie sich zunächst, dass der
6
Steckverbinder für den Erweiterungsbus am
Portreplikator so positioniert ist, dass der
Computer eingedockt werden kann. Setzen Sie
dann den Computer zuerst mit seinen beiden
vorderen Ecken ein und drücken Sie die beiden
hinteren Ecken leicht nach unten auf die
Führungsstifte des Portreplikators.
D
Vergewissern Sie sich, dass der Hebel den
7
vorderen Anschlag erreicht hat. (DOCK
POSITION: KOPPLUNGSPOSITION)
Hebel
Verriegelung
(2)
(1)
(1)
Führen Sie die
Befestigungshaken links und
rechts vorne in die dafür
vorgesehenen Öffnungen im
Notebook ein.
Hebel
VORSICHT
• Versuchen Sie auf keinen Fall, die Anschlüsse herzustellen, wenn sich irgendein Gegenstand
zwischen Computer und Portreplikator befindet. Anderenfalls können der Computer und der
Portreplikator beschädigt werden.
• Versuchen Sie auf keinen Fall, den Portreplikator zu bewegen, solange dieser an den Computer
angeschlossen ist.
• Wenn beim Anbringen des Portreplikators eine Störung des Computers auftritt, schlagen Sie
zunächst im Abschnitt „Fehlersuche“ in der Bedienungsanleitung des Computers nach. Wenn
sich das Problem dadurch nicht beseitigen lässt, schalten Sie den Computer aus, trennen Sie den
Portreplikator vom Computer, schließen Sie den Netzadapter an den Computer an und
überprüfen Sie, ob der Computer normal funktioniert. Wenn der Computer bei abgetrenntem
Portreplikator einwandfrei arbeitet, kann es sich um eine Störung des Portreplikators handeln.
In einem solchen Fall wenden Sie sich bitte an die nächste Panasonic-Kundendienststelle.
14
Page 15

Entfernen
VORSICHT
Schließen Sie das Notebook nicht an oder entfernen es, wenn das Notebook im Betrieb ist.
Denken Sie daran, den Computer abzuschalten.
1
(1) Drücken Sie die Verriegelung nach
2
rechts und schieben Sie den Hebel ganz
nach hinten.
(2) Heben Sie den Computer zuerst an den
hinteren, dann an der vorderen Ecken
heraus.
Schließen Sie die Abdeckung des
3
Steckverbinders für den Erweiterungsbus.
Hebel
(2)
Verriegelung
(1)
D
15
Page 16

Technische Daten
Gegenstand Beschreibung
Stromversorgung-Eingang Gleichstrom 15,1V [Verwenden Sie ausschließlich
den vorgeschriebenen Netzadapter (CF-AA1527)].
Erweiterungsbus-Anschluss 100-polig
Display-Anschluss DB-15-Mini-Steckbuchse
Serieller Anschluss DB-9-Stecker x 2
Mikrofonbuchse Minibuchse, 3,5 mm Durchmesser
(Verwenden Sie ausschließlich ein Mono-
Kondensatormikrofon.)
Kopfhörerbuchse Minibuchse, 3,5 mm Durchmesser
Tastature/Maus-Anschluss DIN-6-Mini-Steckbuchse
USB-Anschluss 4-polig x 2
Abmessungen
(Breite x Tiefe x Höhe)
Gewicht ca. 1,12 kg
D
Umgebungsbedingungen
Temperatur / Luftfeuchtigkeit
229 mm x 262 mm x 75 mm
5 °C bis 35 °C
30 % bis 80 % relative Feuchte (Ohne
Kondensation)
16
Page 17

FRANÇAIS
Merci d’avoir choisi le duplicateur de ports pour la série d’ordinateurs bloc-notes
Panasonic CF-M34.
Si vous connectez vos périphériques au duplicateur de ports, vous n’aurez plus à brancher
et débrancher plusieurs câbles chaque fois que vous transportez l’ordinateur.
Duplicateur de ports .............. (1)
Pour la clarté des explications, certaines illustrations de ce manuel sont légèrement
différentes des pièces du kit.
Mode d’emploi.........................(1)
(Ce manuel)
F
17
Page 18

Nom des pièces
LOCK
Port de clavier/souris
Port USB
Reportez-vous à
“Périphériques USB” dans
le “Manuel de référence”
(installé sur votre
ordinateur en format
“.pdf”).
Connecteur de bus
d’extension
F
Ce connecteur se branche au
connecteur de bus d’extension
situé sous l’ordinateur.
Port série A
Port série B
ATTENTION
Le port s
séries
17TR*****.
Prise DC-IN
Verrou antivol
(pour câble antivol Kensington )
Port d’écran
rie A ne peut pas
é
CF-M34JA****, CF-M34T4**** et CF-
Prise pour casque
Prise pour micro
Levier
Déplacez ce levier pour connecter ou
déconnecter l’ordinateur.
Lorsque le duplicateur de ports n’est
pas connecté à l’ordinateur, assurezvous que le levier demeure sur la
position “UNDOCK”, vers l ’arrière de
l’appareil.
être
utilis
é pour les
18
Page 19

Connexion/Déconnexion
Connexion
ATTENTION
Ne connectez pas et ne déconnectez pas le duplicateur de ports lorsque l’ordinateur est allumé.
Éteignez l’ordinateur et débranchez tous les câbles de l’ordinateur.
1
Branchez la fiche de l’adaptateur secteur fourni
2
avec l’ordinateur à la prise DC-IN du duplicateur
de ports et l’autre extrémité à une prise de
courant.
ATTENTION
• Utilisez impérativement l'adaptateur secteur (
avec l’alimentation de l’ordinateur
• N’utilisez que l’adaptateur secteur (n° de modèle : CF-AA1527) et le cordon secteur spécifiés.
• Pour plus d’informations sur l’utilisation correcte de l’adaptateur secteur et du cordon secteur,
consultez le “Mode d’emploi” de l’ordinateur.
).
le duplicateur de ports ne fonctionne pas
(3)
(1)
(2)
Retirez la dragonne et fermez solidement les
3
caches des prises pour casque, micro et DC-IN de
l’ordinateur.
Retournez l’ordinateur et ouvrez le cache du
4
connecteur de bus d’extension de l’ordinateur.
F
19
Page 20

Connexion/Déconnexion
Tout en maintenant le loquet vers la droite,
5
déplacez le levier à fond en arrière. (UNDOCK
POSITION : POSITION DE DÉCONNEXION)
ATTENTION
Ne déplacez pas le levier sans maintenir le loquet
du côté droit.
Après vous être assuré que le connecteur de bus
6
d’extension du duplicateur de ports se trouve sur
une position qui permette de connecter
l’ordinateur, insérez les coins avant de
l’ordinateur et appuyez légèrement sur les coins
arrière pour les enfoncer sur les ergots de
positionnement du duplicateur de ports.
Assurez-vous que le levier est complètement en
7
avant. (DOCK POSITION : POSITION DE
CONNEXION)
Levier
Loquet
(2)
(1)
(1)
Insérez les crochets gauche
et droit dans les orifices de
verrouillage de l’ordinateur.
Levier
ATTENTION
F
• N’essayez pas d’effectuer les connexions s’il y a un objet entre l’ordinateur et le duplicateur de
ports. Ceci pourrait endommager l’ordinateur et le duplicateur de ports.
• N’essayez pas de déplacer le duplicateur de ports lorsqu’il est connecté à l’ordinateur.
• Si l’ordinateur fonctionne mal lorsqu’il est connecté au duplicateur de ports, consultez tout
d'abord la section “Dépistage des pannes” du “Mode d’emploi” de l’ordinateur. Si vous ne
parvenez pas à résoudre le problème, éteignez l’ordinateur, débranchez le duplicateur de ports,
raccordez l’adaptateur secteur à l’ordinateur et vérifiez si l’ordinateur fonctionne normalement.
S’il fonctionne normalement lorsque le duplicateur de ports n’est pas connecté, ceci peut être
dû à une anomalie du duplicateur de ports. Consultez le Support technique Panasonic.
20
Page 21

Déconnexion
ATTENTION
Ne connectez pas et ne déconnectez pas le duplicateur de ports lorsque l’ordinateur est allumé.
Éteignez l’ordinateur.
1
Levier
Loquet
(1) Tout en maintenant le loquet vers la
2
droite, déplacez le levier à fond en
arrière.
(2) Soulevez tout d’abord les coins arrière,
puis dégagez les coins avant.
Refermez le cache du connecteur de bus
3
d’extension de l’ordinateur.
(2)
(1)
21
F
Page 22

Spécifications
Caractéristique Description
Entrée d'alimentation 15,1 V CC [N’utilisez que l’adaptateur secteur
spécifié (n° de modèle : CF-AA1527).]
Connecteur de bus d’extension 100 broches (femelle)
Port d’écran Mini D-sub 15 broches (femelle)
Port série D-sub 9 broches (mâle) x 2
Prise pour micro Prise mini-jack, 3,5 mm DIA
(N’utilisez qu’un micro à condensateur monaural.)
Prise pour casque Prise mini-jack, 3,5 mm DIA
Port de clavier/souris Mini-DIN 6 broches (femelle)
Port USB 4 broches x 2
Dimensions physiques
(largeur x profondeur x hauteur)
Poids 1,12 kg environ
Conditions d’utilisation
Température/humidité
229 mm x 262 mm x 75 mm
5 °C à 35 °C / 30 % à 80 % (humidité relative) (sans
condensation)
F
22
Page 23

日本語
このたびは、CF-M34 シリーズ用ポートリプリケーターをお買い上げいただき、ま
ことにありがとうございました。
ポートリプリケーターにいろいろな周辺機器を接続しておけば、コンピューター
を持ち運ぶとき、ケーブルを何本も接続したり外したりする必要がなくなります。
ポートリプリケーター .............(1)
説明の都合上、本文中のイラストは実際の物とは多少形状が異なる場合がありま
す。
取扱説明書 ...............................(1)
((((本本本本書書書書))))
J
23
Page 24

安全上のご注意
お使いになる人や他の人への危害、財産への損害を未然に防止するため、必ずお
守りいただくことを、次のように説明しています。
■表示内容を無視して誤った使い方をした時に生じる危害や障害の程度を、次の
表示で区分し、説明しています。
警告
この表示の欄は、「死亡または重傷などを負う可能性が想定
される」内容です。
必ずお守りください
注意
■お守りいただく内容の種類を、次の絵表示で、説明しています。(下記は、絵
表示の一例です。)
コンセントや配線器具の定格
を超える使い方や、交流 100V
この表示の欄は、「傷害を負う可能性または物質的損害のみ
が発生する可能性が想定される」内容です。
このような絵表示は、してはいけない「禁止」内容です。
このような絵表示は、必ず実行していただく「強制」内容で
す。
警告
警告
警告警告
上に水などの入った容器や金
属物を置かない
以外での使用はしない
禁止
禁止
たこ足配線等で定格を超えると、発熱に
J
よる火災の原因になります。
24
水などがこぼれたり、クリップ、コイン
などの異物が中に入ったりすると、火災・
感電の原因になります。
●内部に異物が入った場合は、すぐ
に電源を切って電源プラグとバッ
テリーパックを抜き、販売店にご
相談ください。
Page 25

警告
警告
警告警告
異常が起きたらすぐに電源プ
ラグを抜く
電源プラグ
を抜く
•
本体が破損した
•
本体内に異物が入った
•
煙が出ている
•
異臭がする
•
異常に熱い
などの異常状態のまま使用すると、火災・
感電の原因になります。
●異常が起きたらすぐに電源を切っ
て電源プラグを抜き、販売店にご
相談ください。
電源プラグは根元まで確実に
差し込む
電源プラグのほこり等は定期
的にとる
プラグにほこり等がたまると、湿気等で
絶縁不良となり、火災の原因になります。
●電源プラグを抜き、乾いた布でふ
いてください。
長期間使用しないときは、電源プ
ラグを抜いてください。
ぬれた手で電源プラグの抜き
差しはしない
差し込みが不完全ですと、感電や発熱に
よる火災の原因になります。
●傷んだプラグ、ゆるんだコンセン
トは使用しないでください。
ぬれ手禁止
感電の原因になります。
J
25
Page 26

安全上のご注意
警告
警告
警告警告
必ずお守りください
不安定な場所に置かない
バランスが崩れて倒れたり、落
下したりして、けがの原因にな
禁止
ることがあります。
電源コードは、プラグ部分を
持って抜く
電源コードを引っ張るとコー
ドが傷つき、火災・感電の原因
になることがあります。
長期間使用しないときは電源
プラグを抜く
湿気やほこりの多い場所に置
かない
火災・感電の原因になることが
あります。
禁止
炎天下の車中に長時間放置し
ない
高温により、キャビネットが変
形したり、内部の部品が故障ま
禁止
たは劣化したりすることがあ
ります。このような状態のまま
使用すると、ショートや絶縁不
良等により火災・感電につなが
ることがあります。
電源プラグを接続したまま移
動しない
絶縁劣化による感電や漏電火
災の原因になることがありま
す。
J
26
禁止
●電源コードが傷ついた場合は、す
ぐに電源プラグを抜いて販売店に
ご相談ください。
電源コードが傷つき、火災・感
電の原因になることがありま
す。
Page 27

各部の名称と働き
外部キーボード/マウス端子
シリアル
コネクター
USB
コネクター
コンピューター本体の『操
作マニュアル』「USB 機器」
参照
拡張バスコネクター
コンピューター底面の拡張バスコ
ネクターに接続します。
シリアル
コネクター
A
B
電源端子
セキュリティロック
ディスプレイコネクター
レバー
コンピューターに取り付けたり取り外
したりするときにスライドします。
ポートリプリケーターがコンピュー
ターに接続されていないときは、
UNDOCKの位置になっていること
を確認してください。
オーディオ出力端子
マイク入力端子
LOCK
27
J
Page 28

取り付け / 取り外し
おおおお願願願願いいいい
取り付け/取り外しの際は必ずコンピューターの電源を切ってください。
取り付け
コンピューターの電源を切り、コンピューターに接続されているケーブル
1
をすべて外す
コンピューター本体に付属の AC アダプター
2
をポートリプリケーターに接続する
警告
警告
警告警告
必ず指定の AC アダプターを使用する
指定以外のACアダプターを使用すると、火
災の原因になることがあります。
③
①
②
コンピューターのストラップを取り外し、
3
オーディオ出力端子、マイク入力端子、電
源端子のカバーをしっかりと閉じる
コンピューターを裏返し、拡張バスコネク
4
ターのカバーをスライドして開ける
J
ラッチを右側にスライドしながら、レバー
5
全体を後方(UNDOCKの位置)にスライ
ドする
おおおお願願願願いいいい
ラッチを右側にスライドしていない状態でレ
バーをスライドしないでください。
28
レバー
ラッチ
Page 29

コンピューターの前方から差し込み、後方
6
をポートリプリケーターのガイドピンにあ
わせて、軽く押す
レバー全体が前方(UNDOCKの位置)
7
に移動していることを確認する
おおおお願願願願いいいい
カバーが閉まっていたり、コンピューターとポートリプリケーターの間に異物が挟
•
まったりしている状態で差し込まないでください。コンピューターおよびポートリプ
リケーターの破損の原因になります。
コンピューターをポートリプリケーターに接続した状態で持ち運ばないでください。
•
ポートリプリケーターと接続している状態で、コンピューター本体が正常に動作しな
くなった場合は、まずコンピューター本体の『操作マニュアル』「困ったときの
を参照してください。それでも解決できない場合は、コンピューター本体の電源を切っ
てからポートリプリケーターを取り外し、コンピューター本体が正常に動作するか確
認してください。コンピューター本体が正常に動作する場合は、ポートリプリケーター
の故障が考えられます。ご相談窓口にお問い合わせください。
①
左右のフックをコンピュー
ターのロック穴に引っ掛け
る。
レバー
②
①
Q&A
」
29
J
Page 30

取り付け / 取り外し
取り外し
コンピューターの電源を切る
1
① ラッチを右側にスライドしながら、
2
② コンピューター後方を持ち上げ、前
コンピューター底面の拡張バスコネク
3
ターのカバーを閉じる
おおおお願願願願いいいい
ポートリプリケーターからコンピューターを取り外したあとは、拡張バスコネクター保
護のため、必ずカバーを閉めてください。故障の原因になります。
レバー全体を後方(UNDOCKの
位置)にスライドする
方を外す
②
レバー
ラッチ
①
J
30
Page 31

仕様
(日本国内専用)
項 目 内 容
電源入力
拡張バスコネクター
ディスプレイコネクター
シリアルコネクター
マイク入力端子
オーディオ出力端子
外部キーボード/マウス端子
USB
コネクター
外形寸法(幅 × 奥行 × 高さ) 約
質量 約
使用環境条件
* 本製品は一般家庭用の電源コードを使用するため、AC100 V のコンセントに接続して使
用してください。(→ 24 ページ)
100
RS-232C Dsub 9
4
DC 15.1 V [
ダプター*(
ピン
アナログ
ミニジャック
(コンデンサーマイクを使用のこと)
ステレオミニジャック
PS/2
タイプ ミニ
ピン ×
229 mm × 262 mm × 75 mm
1.12 kg
温度:5 ℃〜
湿度:
コンピューターに付属のACア
CF-AA1527
RGB
ミニ
2
35
℃
30 %RH〜80 %RH
Dsub15
ピン ×
DIN 6
)を使用
2
ピン
(結露なきこと)
]
ピン
31
J
Page 32

保証とアフターサービス
コンピューター本体の『取扱説明書』をご覧ください。
J
32
Page 33

33
J
Page 34

この装置は、情報処理装置等電波障害自主規制協議会 (VCCI) の基準に基づくク
ラス B 情報技術装置です。この装置は、家庭環境で使用することを目的として
いますが、この装置がラジオやテレビジョン受信機に近接して使用されると、
受信障害を引き起こすことがあります。
取扱説明書に従って正しい取り扱いをしてください。
• 本製品は、落雷等による電源の瞬時電圧低下に対して不都合が生じることが
J
あります。電源の瞬時電圧低下対策としては、交流無停電電源装置等を使用
されることをお薦めします。
• 漏洩電流について、この装置は、社団法人 電子情報技術産業協会のパソコ
ン業界基準(PC-11-1988)に適合しております。
松下電器産業株式会社 パーソナルコンピュータ事業部
〒 570-0021 大阪府守口市八雲東町一丁目 10 番 12 号
Matsushita Electric Industrial Co., Ltd. 2001
34
Page 35

切
り
取
り
線
〈無料修理規定〉
1.取扱説明書、本体貼付ラベル等の注意書に従った使用状態で保証期間内
に故した場合には、無料修理をさせていただきます。
(イ)無料修理をご依頼になる場合には、商品に取扱説明書から切り離した
本書を添えていただきお買い上げの販売店にお申しつけください。
(ロ)お買い上げの販売店に無料修理をご依頼にならない場合には、ご相談
窓口にご連絡ください。
2.ご転居の場合の修理ご依頼先等は、お買い上げの販売店またはご相談窓
口にご相談ください。
3.ご贈答品等で本保証書に記入の販売店で無料修理をお受けになれない場
合には、ご相談窓口へご連絡ください。
4.保証期間内でも次の場合には原則として有料にさせていただきます。
(イ)使用上の誤り及び不当な修理や改造による故障及び損傷
(ロ)お買い上げ後の輸送、落下などによる故障及び損傷
(ハ)火災、地震、水害、落雷、その他天災地変及び公害、塩害、虫害、ガ
ス害(硫化ガスなど)、異常電圧、指定外の使用電源(電圧、周波数)
などによる故障及び損傷
(ニ)車両、船舶等に搭載された場合に生ずる故障及び損傷
(ホ)本書のご提示がない場合
(ヘ)本書にお買い上げ年月日、お客様名、販売店名の記入のない場合、あ
るいは字句を書き替えられた場合
5.本書は日本国内においてのみ有効です。
6.本書は再発行いたしませんので大切に保管してください。
7.ご相談窓口はコンピューター本体の取扱説明書の「修理ご相談窓口」を
ご参照ください。
修理メモ
※この保証書は、本書に明示した期間、条件のもとにおいて無料修理をお
約束するものです。従ってこの保証書によって、お客様の法律上の権利
を制限するものではありませんので、保証期間経過後の修理についてご
不明の場合は、お買い上げの販売店またはお近くのご相談窓口にお問い
合わせください。
保証期間経過後の修理や補修用性能部品の保有期間についてはコンピュー
※
ター本体の取扱説明書の「保証とアフターサービス」をご覧ください。
※This warranty is valid only in Japan.
Page 36

持込修理
り
り
ポートリプリケーター保証書
本書はお買い上げの日から下記期間中故障が発生した場合には本書裏
面記載内容で無料修理を行うことをお約束するものです。詳細は裏面
をご参照ください。
品 番
保証期間
※
お買い上げ日
※
ご住所
お
客
お名前
様
お買い上げ日から
年 月 日
CF-VEB343U
本体1年間
様
電 話 ( ) −
※
住所・販売店名
販
売
店
電話( ) −
松下電器産業株式会社 パーソナルコンピュータ事業部
〒570‑0021大阪府守口市八雲東町一丁目10番12号
ご販売店さまへ ※印欄は必ず記入してお渡しください。
TEL(06)6908‑1001
切
取
線
松下電器産業株式会社 パーソナルコンピュータ事業部
〒570-0021大阪府守口市八雲東町一丁目10番12号
© Matsushita Electric Industrial Co., Ltd. 2001
FJ1201-0
DFQX5279ZA
 Loading...