

Panasonic CF-MX4 Operating Instructions Manual

OPERATING INSTRUCTIONS
Basic Guide
Personal Computer
Model No. CF-MX4 series
Contents
Getting Started
Introduction ..................................................... 2
Description of Parts ........................................ 4
First-time Operation ........................................ 7
Turning On / Turning Off .............................. 14
Useful Information
Handling and Maintenance .......................... 16
Installing Software ....................................... 21
Getting Started
Troubleshooting
Troubleshooting (Basic) ............................... 27
Appendix
LIMITED USE LICENSE AGREEMENT ...... 34
Specifications .............................................. 36
Standard Limited Warranty .......................... 41
Please read these instructions carefully before using this product, and save this manual for future use.
Useful Information
Troubleshooting
Appendix
Introduction
Thank you for purchasing this Panasonic product. For optimum performance and safety, please
read these instructions carefully.
In these instructions, the names are referred as follows.
indicates Windows® 8.1 Operating System.
indicates Windows® 7 Operating System.
■ Terms and illustrations in these instructions
CAUTION
NOTE
Enter
Fn
: Press [Enter] key.
+ F5 : Press and hold [Fn] key, and then press [F5] key.
Display “Charm”: Align the pointer to the top right (or bottom right) corner of the
●
- : Click (Settings) and then click (Power).
●
Getting Started
(Start) - [All Programs] : Click (Start), and then click [All Programs]. You may need to
è : Page in these Operating Instructions or in the Reference Manual.
: Reference to the on-screen manuals.
Some illustrations are simplified to help your understanding and may look different from the
●
actual unit.
If you do not log on as an administrator, you cannot use some functions or cannot display
●
some screens.
Refer for the latest information about optional products to the catalogs, etc.
●
In these instructions, the names and terms are referred as follows.
●
“Windows® 8.1 Pro Update 64-bit” as “Windows” or “Windows 8.1”
•
“Windows® 7 Professional 32-bit Service Pack 1” and “Windows® 7 Professional 64-bit
•
Service Pack 1” as “Windows” or “Windows 7”
“Multilanguage User Interface” as “MUI”
•
For models with the flash memory drive, read the terms “hard disk” and “hard disk drive” as
•
“flash memory drive”.
●
Screen messages are explained in [English (United States)].
(Depending on the language preference, some screen messages in these instructions are
different from the actual screen messages. For example, [Flight mode] may be displayed
instead of [Airplane mode] in some language preference.)
: Conditions that may result in minor or moderate injury.
: Useful and helpful information.
screen to display Charm menu. Alternatively, flick toward the
center of the screen from the right edge.
double-click in some cases.
■ Disclaimer
Computer specifications and manuals are subject to change without notice. Panasonic
Corporation assumes no liability for damage incurred directly or indirectly from errors, omissions
or discrepancies between the computer and the manuals.
2
■ Trademarks
Microsoft
Corporation of the United States and/or other countries.
Intel, Core and PROSet are either registered trademarks or trademarks of Intel Corporation.
SDXC Logo is a registered trademark of SD-3C, LLC.
Adobe, the Adobe logo and Adobe Reader are either registered trademarks or trademarks of
Adobe Systems Incorporated in the United States and/or other countries.
Bluetooth® is a registered trademark owned by Bluetooth SIG, Inc., U.S.A. and licensed to
Panasonic Corporation.
HDMI, the HDMI Logo and High-Definition Multimedia Interface are trademarks or registered
trademarks of HDMI Licensing LLC in the United States and other countries.
Names of products, brands, etc., appearing in this manual are trademarks or registered
trademarks of their respective own companies.
®
, Windows®, the Windows logo, and IntelliMouse are registered trademarks of Microsoft
■ On-screen Manual
For further information about the computer, you can refer to the on-screen manual.
Reference Manual
●
The Reference Manual contains the practical information to help you fully enjoy the
computer’s performance.
Important Battery Tips
●
The Important Battery Tips will provide you with the battery information so that you can use
the battery in the optimum condition to obtain longer operation time.
To access the on-screen manuals, follow the steps below.
Double-click [Manual Selector] on the desktop, and select the on-screen manual.
Getting Started
Alternatively, click the [Manual Selector] tile, on the Start screen and select the on-screen manual.
NOTE
[Contents] tab or [Search] tab of the on-screen manuals is displayed on the left side of the
•
window. Select tab and display the desired item.
3
Description of Parts
A
B
C
Getting Started
D
E
F
G
H
F
I
J
K
L
M
N
O
P
Q
R
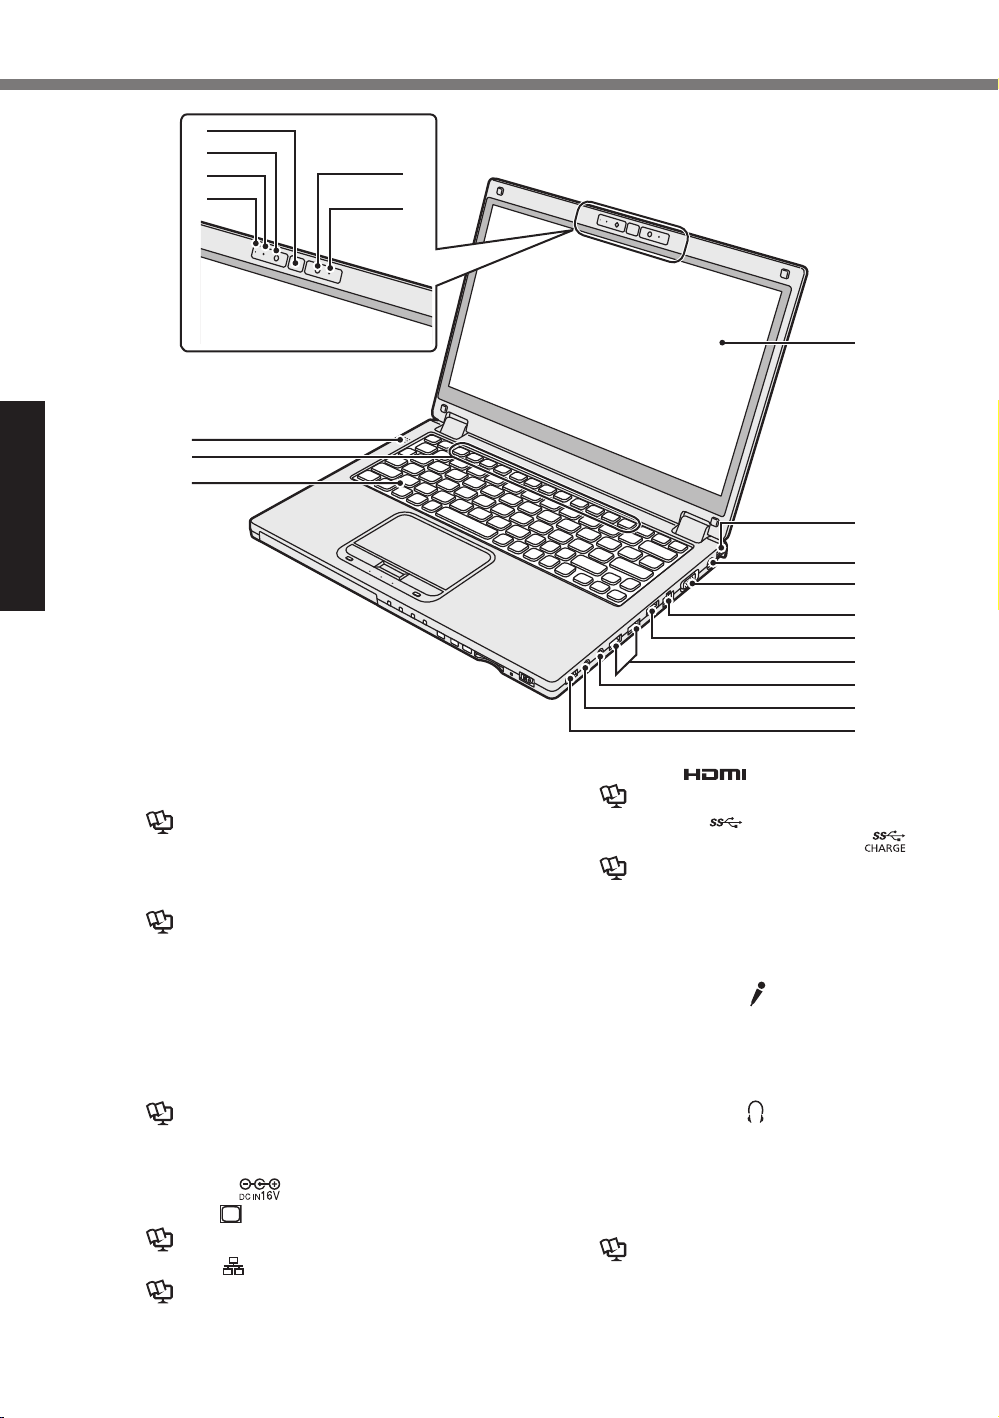
A: Speaker
B: Function Keys
è
C: Keyboard
D: Windows Button
E: Camera
è
F: Microphone
G: Camera Indicator
H: Ambient Light Sensor
The ambient light sensor is equipped
I: LCD (with touchscreen)
è
J: Strap Holder (Both sides)
K: DC-IN Jack
L: VGA Port
è
M: LAN Port
è Reference Manual “LAN
Reference Manual “Key Combinations”
Reference Manual “Camera”
with an automatic brightness adjustment
function that adjusts the display screen.
Reference Manual “Screen Input Operation”
Mounting holder for a hand strap (optional).
Reference Manual “External Display”
”
N: HDMI Port
è
O: USB 3.0 Port
USB 3.0 Port (USB Charging)
è Reference Manual “USB Devices
P: Microphone Jack
A condenser microphone can be used.
Q: Headphone Jack
You can connect headphones or amplified
R: Wireless Switch
WIRELESS
è
Reference Manual “External Display
”
Keep USB memory cards away from
•
infants and small children.
Do not insert any foreign object in the
•
USB port.
If other types of microphones are used,
audio input may not be possible, or
malfunctions may occur as a result.
speakers. When they are connected, audio
from the internal speakers is not heard.
Reference Manual “Disabling/
Enabling Wireless Communication
”
”
4
A
B
C
D
E
F
G
H
K
I
J
Getting Started
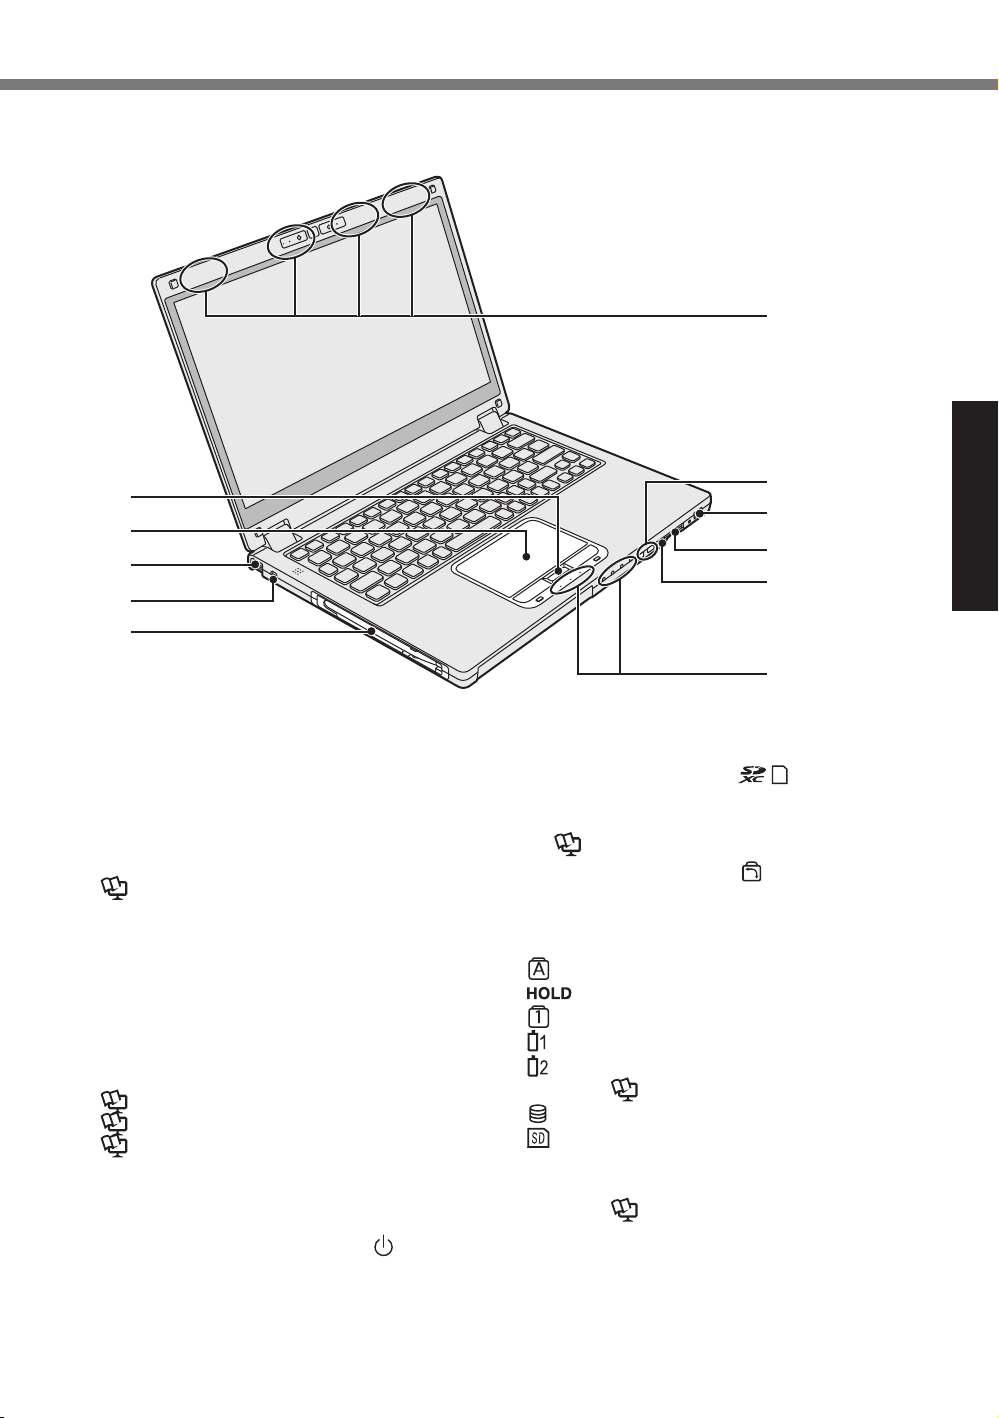
A: HOLD Button
You can press the HOLD button to disable
the keyboard and touchpad or only the
touchpad.
B: Touchpad
è
C: Strap Holder (Both sides)
D: Security Lock
A Kensington cable can be connected. For
E: Stylus Holder
F: Wireless Antenna
è
è Reference Manual “Bluetooth”
è
*1 Only for model with wireless WAN
G: Volume Button
H: Power Switch/Power Indicator
Off: Power off/Hibernation, Green: Power
Reference Manual “Using the Touch Pad”
Mounting holder for a hand strap (optional).
further information, read the manual that
comes with the cable.
Reference Manual “Wireless LAN”
Reference Manual “Wireless WAN
<Only for model with wireless WAN>”*
on, Blinking Green: Sleep, Blinking green
rapidly: Cannot power on or resume due to
low temperature.
I: SD Memory Card Slot
Keep SD Memory Cards away from infants
and small children.
è
J: Rotation Lock Button
The Rotation Lock button allows you to
K: LED Indicator
: Hold Mode
: Numeric Lock (NumLk)
: Battery Indicator 1
: Battery Indicator 2
: Drive Indicator
: SD Memory Card Indicator
1
Reference Manual “SD Memory Card”
lock the screen display.
: Caps lock
è
Reference Manual “Battery Power”
(Blinking: During access or a password
is requested)
è
Reference Manual “SD Memory Card”
5
Description of PartsDescription of Parts
B
C
D
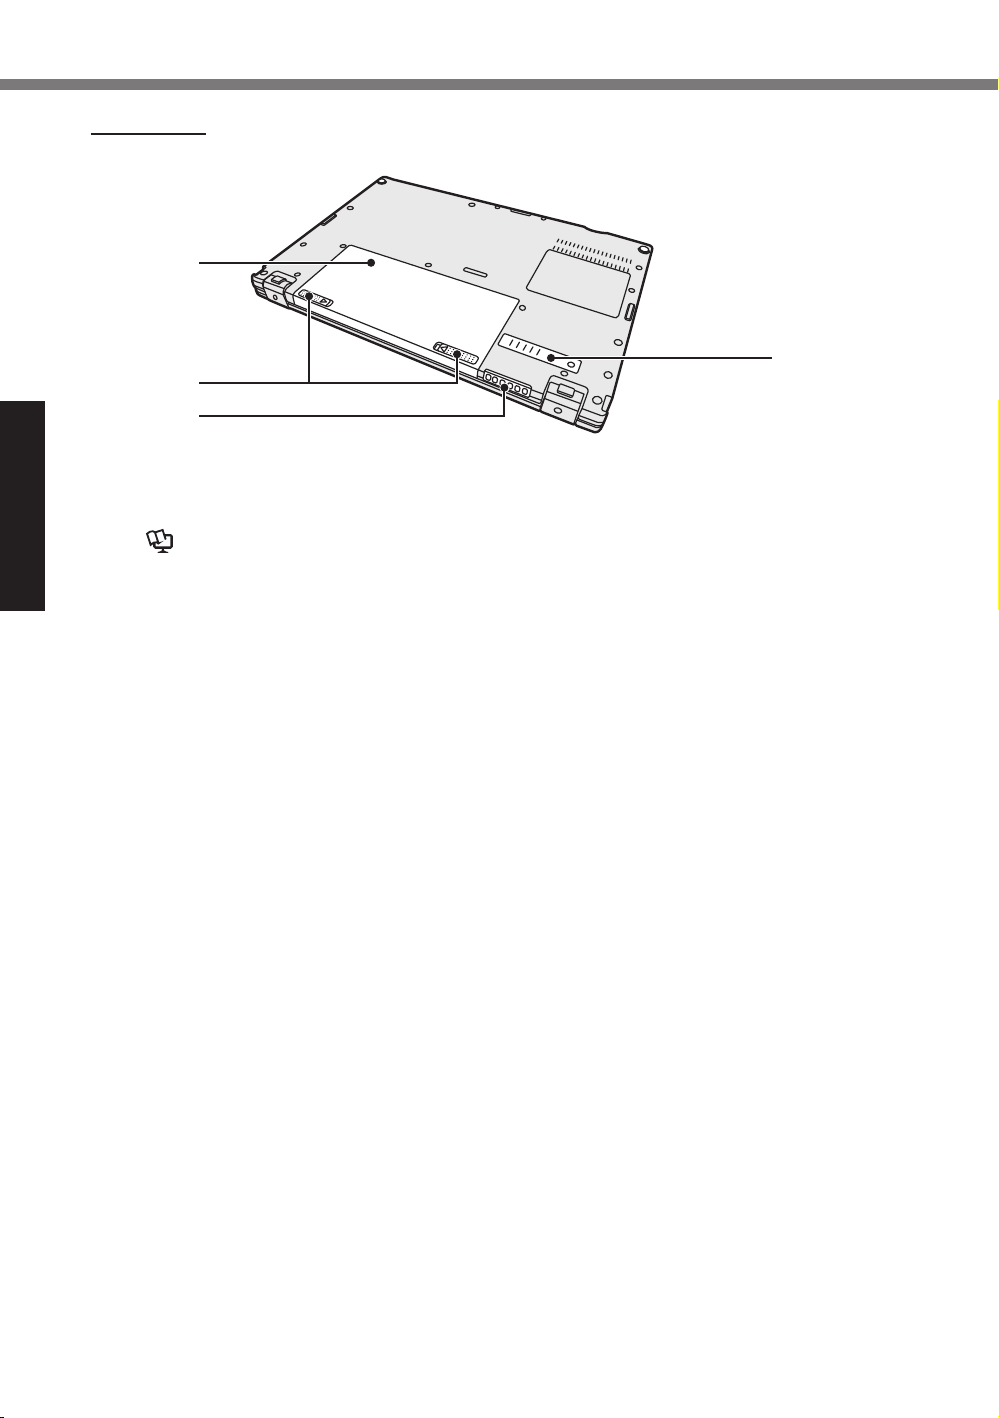
Bottom side
A
A: Battery Pack
è Reference Manual “Battery Power”
Getting Started
B: Battery Latch
C: Ventilation Hole (Exhaust)
D: Dust Cover
6
First-time Operation
B
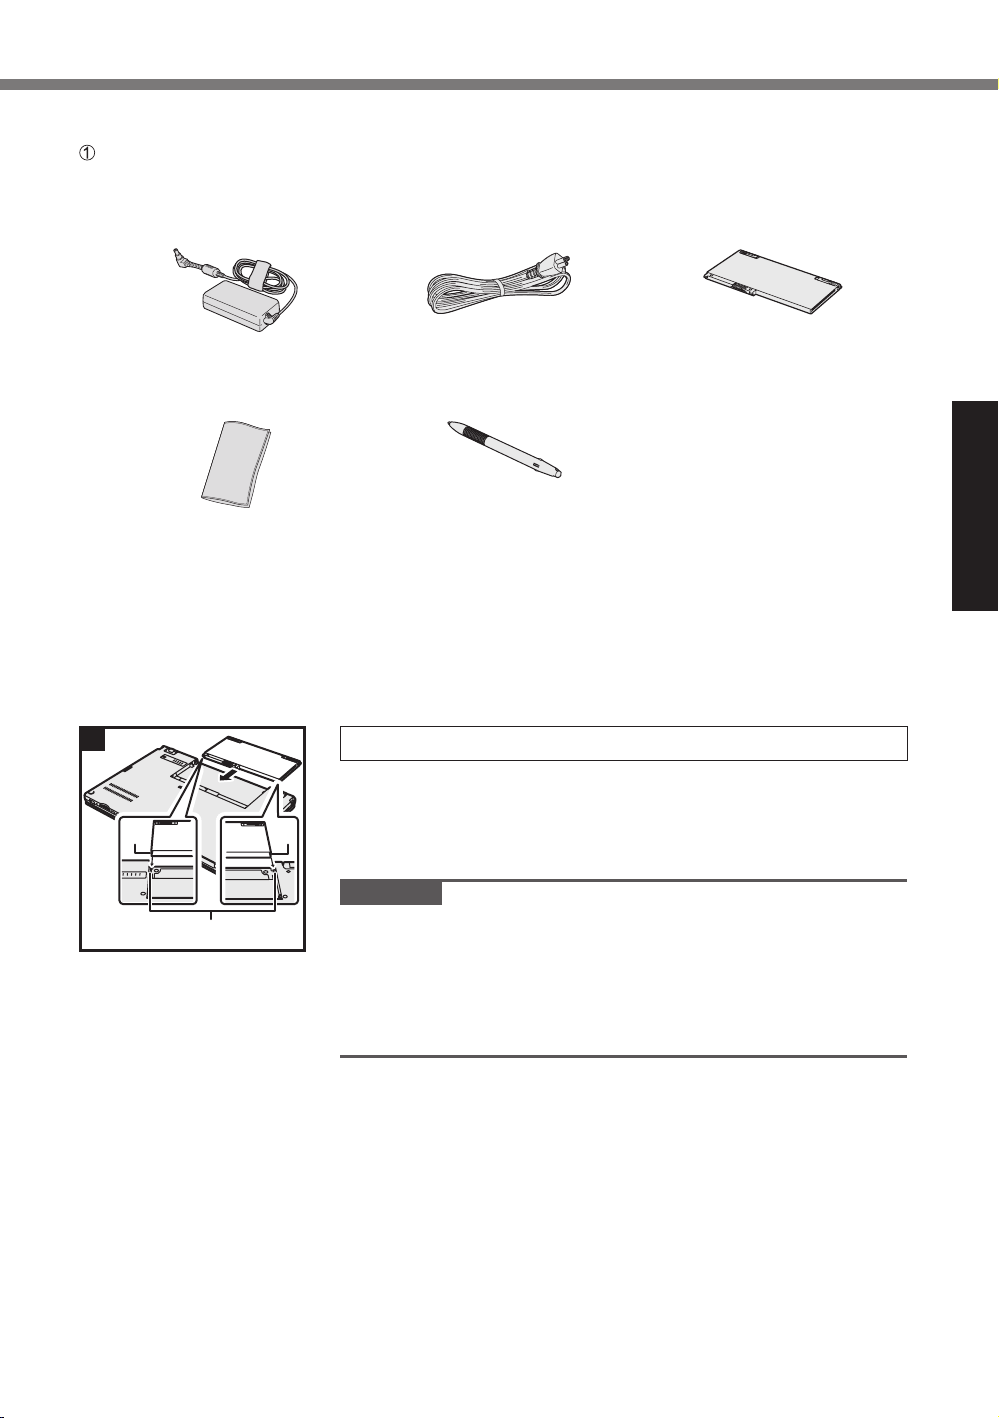
■ Preparation
Check and identify the supplied accessories.
If you do not find the described accessories, contact your support office.
• AC Adaptor .......1
Model No: CF-AA6413C
• Soft Cloth ........1 • Stylus ...........1
• OPERATING INSTRUCTIONS - Basic Guide (This book) ...................1
1
A
A
• AC Cord .........1 • Battery Pack .....1
Model No: CF-VZSU92EA
1 Insert the battery pack
Flip the computer over, and slide the battery pack in the
direction of the arrow to install it.
Insert the battery pack so that the grooves on its left and right
sides (A) align with the protrusions on the computer (B).
Getting Started
CAUTION
Make sure the latch is securely locked. Otherwise the battery
●
pack may fall when you carry the computer.
Do not touch the terminals of the battery pack and the
●
computer. Doing so can make the terminals dirty or
damaged, and may cause malfunction of the battery pack
and the computer.
7
First-time Operation
2
Getting Started
3
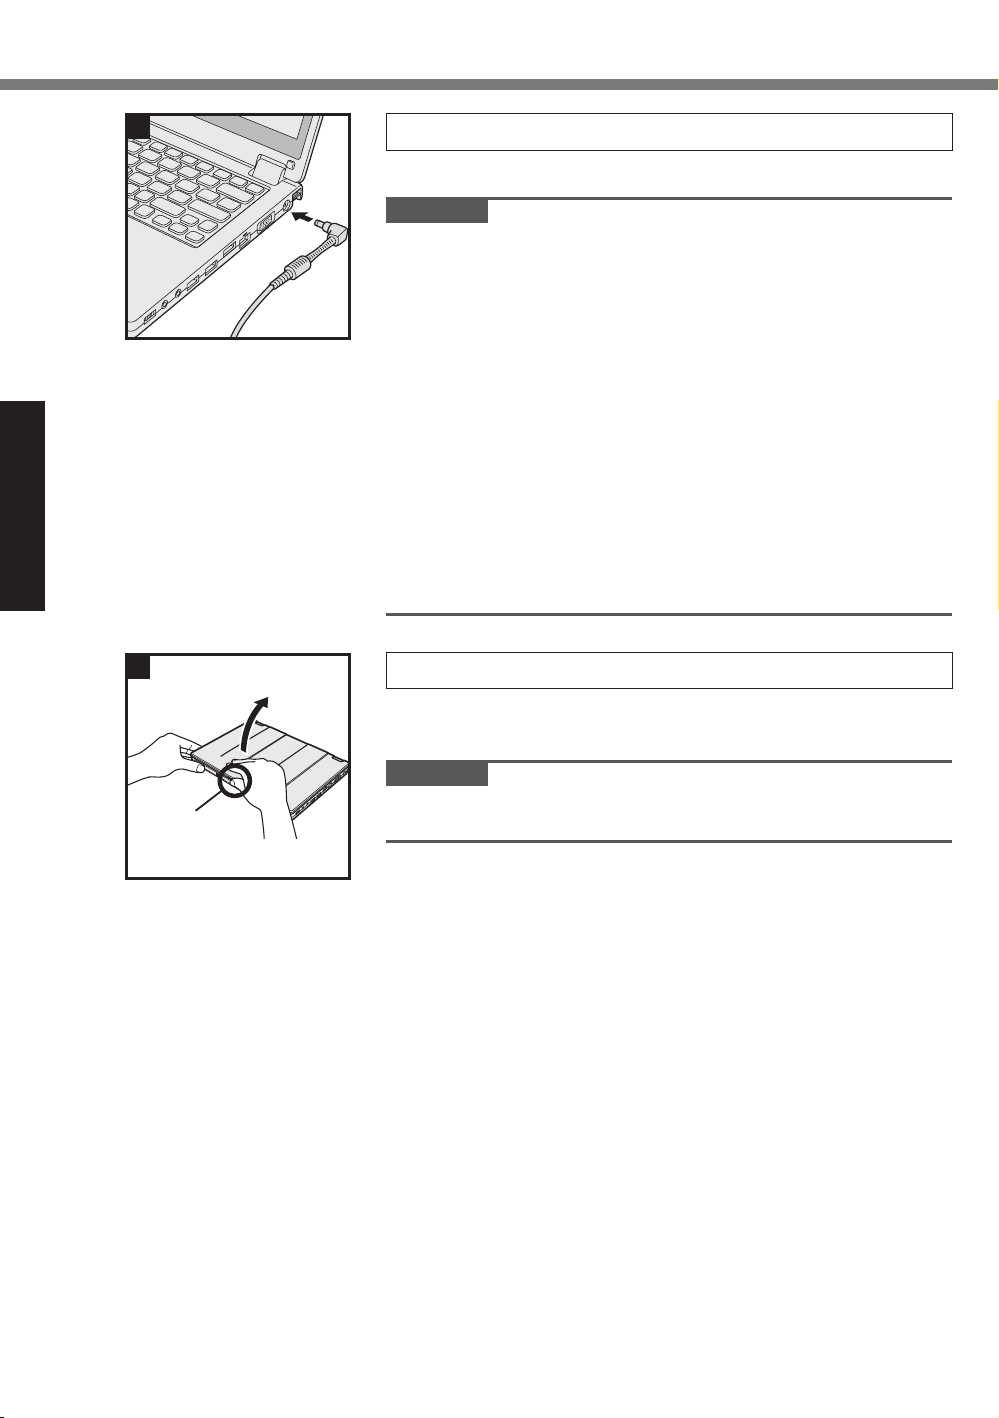
2 Connect your computer to a power outlet
The battery charging starts automatically.
CAUTION
Do not disconnect the AC adaptor and do not switch the
●
wireless switch to on until the first-time operation procedure
is completed.
When using the computer for the first time, do not connect
●
any peripheral device except the battery pack and AC
adaptor.
Handling the AC adaptor
●
Problems such as sudden voltage drops may arise during
periods of thunder and lightning. Since this could adversely
affect your computer, an uninterruptible power source (UPS)
is highly recommended unless running from the battery pack
alone.
When the DC plug is not connected to the computer,
●
disconnect the AC cord from your electrical outlet. Power is
consumed simply by having the AC adaptor plugged into an
electrical outlet.
3 Open the display
Hold the computer by its sides, and open the display while
holding (A).
CAUTION
Do not apply excessive pressure to the LCD. Do not open or
A
●
close the computer holding the edge of the LCD segment.
8

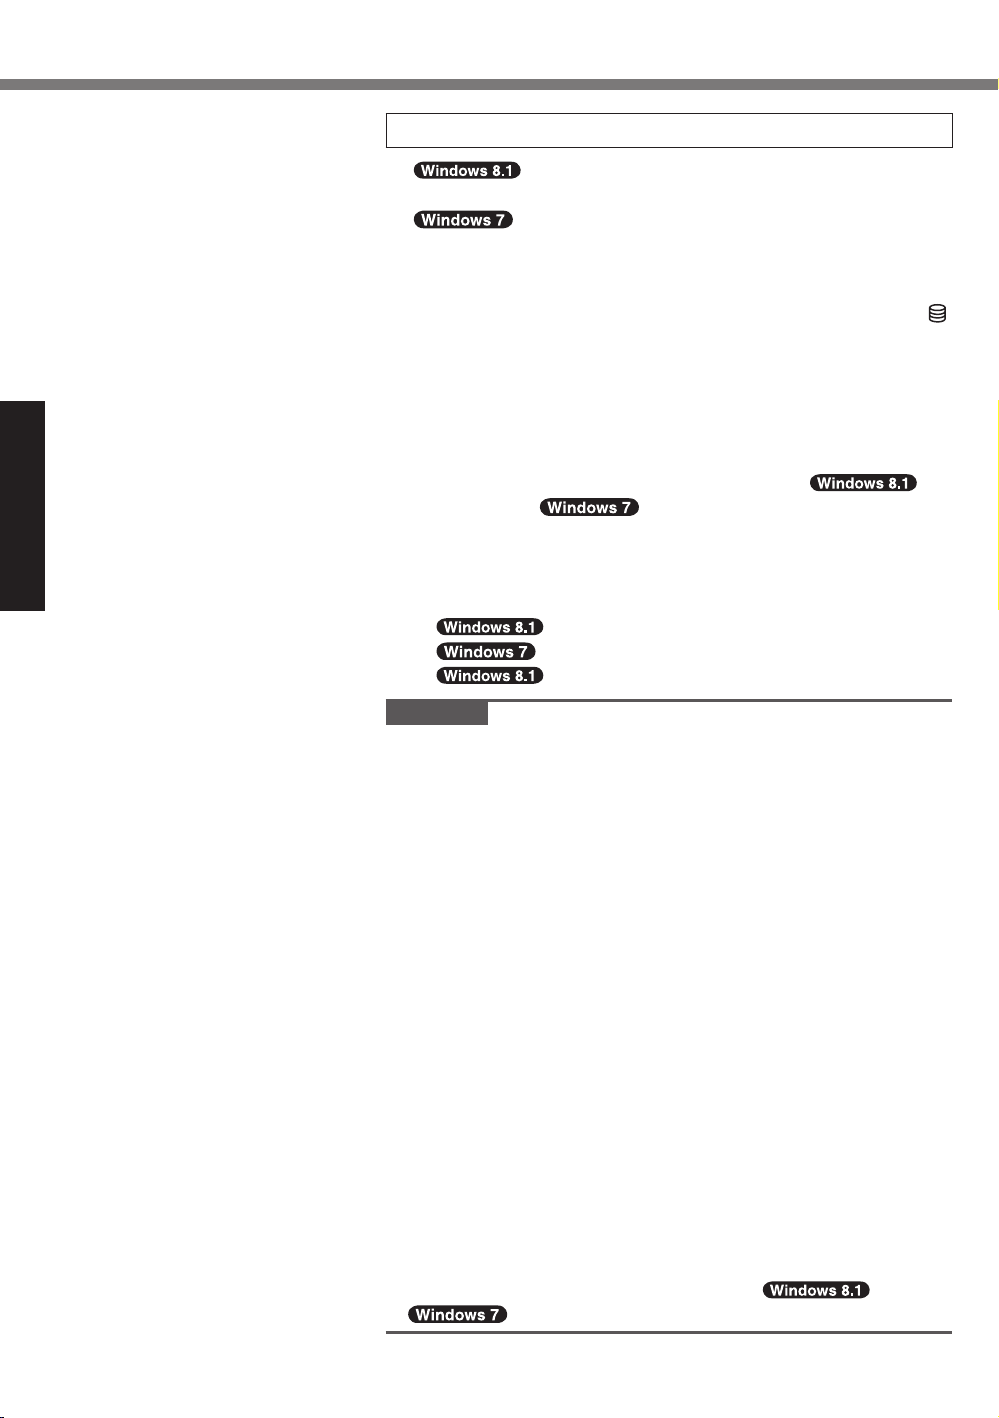
4
㻮
4 Turn on the computer
Slide and hold the power switch (B) until the power indicator
lights.
CAUTION
Do not slide the power switch repeatedly.
●
The computer will be forcibly turned off if you slide and hold
●
the power switch for 4 seconds or longer.
Once you turn off the computer, wait for 10 seconds or more
●
before you turn on the computer again.
Do not perform the following operation until the drive indicator
●
turns off.
Connecting or disconnecting the AC adaptor
•
Sliding the power switch
•
Touching the keyboard, touchpad, touchscreen <only for
•
model with touchscreen> or external mouse
Closing the display
•
Turn on/off the wireless switch
•
When the CPU temperature is high, the computer may not
●
start up to prevent overheating of the CPU. Wait until the
computer cools down, and then turn the power on again. If
the computer does not power on even after cooling down,
contact Panasonic Technical Support (è page 41).
Any changes from the default setting of the Setup Utility must
●
not be made until the First-time Operation is completed.
Getting Started
5
Select language and OS (32-bit or 64-bit)
CAUTION
Carefully choose your language because you cannot change
●
it later. If you set a wrong language, you need to reinstall
Windows.
Select language and OS (32-bit or 64-bit) on “Select OS”
screen and click [OK].
The language setting will start by clicking [OK] on the
confirmation screen.
The language and OS setting will be completed in about
15 minutes.
When termination screen is displayed, click [OK] to turn
off the computer.
9
First-time Operation
Getting Started
6 Setup Windows
Select language and click [Next].
Turn on the computer.
Follow the on-screen instructions.
The computer restarts several times. Do not touch the
●
keyboard or touchpad, and wait until the drive indicator
has turned off.
After the computer is turned on, the screen remains black
●
or unchanged for a while, but this is not a malfunction. Wait
for a moment until the Windows setup screen appears.
During setup of Windows, use the touchpad and clicking
●
to move the pointer and to click an item.
Setup of Windows will take approximately
●
5 minutes / 20 minutes.
Go to the next step, confirming each message on the
display.
You can set the Wireless Network after the setup of
●
Windows is complete.
If “Get online” is displayed, select “Skip this step”.
“Join a wireless network” screen may not appear.
●
Verify the time zone, date and time.
CAUTION
You can change the user name, password, image and
●
security setting after setup of Windows.
Remember your password. If you forget the password,
●
you cannot use Windows. Creating a password reset disk
beforehand is recommended.
Use standard characters as a computer name: numbers 0
●
through 9, uppercase and lowercase letters from A to Z, and
the hyphen (-) character. If the error message “The computer
name is not valid” appears, check if characters other than
the above are not entered. If the error message still remains
on the display, set the key entry mode to English (“EN”) and
enter characters.
<For MUI OS model>
When setting up the keyboard, choose the appropriate one to
●
your computer.
Otherwise, input by the keyboard may become unavailable.
Do not use the following words and characters for user
●
name: CON, PRN, AUX, CLOCK$, NUL, COM1 to COM9,
LPT1 to LPT9, LPT, @, &, space. In particular, if you create
a user name (account name) that includes the “@” mark, a
password will be requested at the log-on screen, even if no
password has been set. If you try to log on without entering
a password, “The user name or password is incorrect.” may
be displayed and you will not be able to sign in /
log on to Windows (è page 30).
10

7 Create a recovery disc
A recovery disc allows you to install OS and restore its factory
default condition, in case, the recovery partition of the HDD is
damaged.
We recommend creating a recovery disc before you begin using
the computer.
Refer to è Reference Manual “Recovery Disc Creation
Utility” about creating the disc.
Getting Started
11
First-time Operation
NOTE
PC Information Viewer
●
This computer periodically records the management information of the hard disk, etc.
The maximum data volume for each record is 1024 bytes.
This information is only used for estimating the cause in the case when the hard disk goes
down by any possibility. They are never sent to outside via network nor used for any other
purpose except for the purpose described the above.
To disable the function, add the check mark for [Disable the automatic save function for management
information history] in [Hard Disk Status] of PC Information Viewer, and click [OK].
(è Reference Manual “Troubleshooting (Advanced)” - “Checking the Computer’s Usage Status”)
Then follow the on-screen instructions.
<For MUI OS model>
●
screen. You may delete the icon if not necessary.
●
■ Before using wireless function
Open the cover, and then Slide the wireless switch to ON.
Getting Started
Display “Charm” and click - [Change PC Settings] - [Network] - [Airplane mode].
Set [Airplane mode] to [Off], and then;
Set [Wi-Fi] to [On] (for wireless LAN).
Set [Bluetooth] to [On] (for Bluetooth).
<Only for model with wireless WAN>
Set [Mobile broadband] to [On] (for wireless WAN).
<Only for model with wireless WAN>
Set [GPS] to [On] (for wireless WAN).
In the default settings, a shortcut icon for Korean language is on the Desktop
If the recovery partition is deleted, you cannot create Recovery Disc(s).
■ To change the partition structure
You can shrink a part of an existing partition to create unallocated disk space, from which you can
create a new partition.
In the default setting, you can use a single partition.
Right-click at the bottom left corner of the Desktop screen.
Click (Start) and right-click [Computer], then click [Manage].
A standard user needs to enter an administrator password.
●
Click [Disk Management].
Right-click the partition for Windows (“c” drive in the default setting), and click [Shrink Volume].
The partition size depends on the computer specifications.
●
Input the size in [Enter the amount of space to shrink in MB] and click [Shrink].
You cannot input a larger number than the displayed size.
●
To select [Reinstall Windows to the OS related partitions] in installing OS (è page 23),
●
100 GB / 60 GB or more is necessary for [Total size after shrink
in MB].
Right-click [Unallocated] (the shrunk space in the step ) and click [New Simple Volume].
Follow the on-screen instructions to make the settings, and click [Finish].
Wait until formatting is completed.
12

NOTE
You can create an additional partition using remaining unallocated space or newly creating
●
unallocated space.
To delete a partition, right-click the partition and click [Delete Volume] in the step .
●
■ <For MUI OS model> To select language
To select a language other than the one you have selected during the first-time operation, follow
the steps below.
Perform either of the following procedures.
Right-click at the bottom left corner of the Desktop screen.
●
Click on the Start screen.
●
Click [Control Panel].
Click [Clock, Language, and Region] - [Language] - [Add a language].
Select a language, and then click [Add].
Depending on the region, 2 or more languages are selectable. Click [Open] and select the
desired language, and then click [Add].
Click [Options] for the language you want to use.
Click [Make this the primary language].
NOTE
If [Make this the primary language] is not displayed, you cannot change to this language.
●
Follow the on-screen instructions.
Click [Log off now].
Sign in to the Windows.
Getting Started
13
Turning On / Turning Off
Turning On
Slide and hold the power switch (è page 5) until the power indicator (è page 5) lights.
NOTE
Do not slide the power switch repeatedly.
●
The computer will forcibly be turned off if you slide and hold the power switch for 4 seconds or
●
longer.
Once you turn off the computer, wait for 10 seconds or more before you turn on the computer
●
again.
Do not perform the following operation until the drive indicator turns off.
●
Connecting or disconnecting the AC adaptor
•
Sliding the power switch
•
Touching the keyboard, touchpad, touchscreen <only for model with touchscreen> or
•
external mouse
Closing the display
•
Turn on/off the wireless switch
•
Getting Started
Turning Off
You can shut down the computer by using either of the following steps.
From the Desktop screen:
•
Right-click at the bottom left corner of the Desktop screen.
Click [Shut down or sign out] - [Shut down].
From the Start screen:
•
Click - [Shut down].
Both the Start screen and Desktop screen:
•
Display “Charm” and click .
Click [Power] - [Shut down].
Click (Start) - [Shutdown].
NOTE
●
To turn off the computer completely, proceed as follows.
Display “Charm” and click - [Change PC settings] - [Update and recovery] - [Recovery].
Click [Restart now] under “Advanced startup”.
Click [Turn off your PC].
14
 Loading...