

Panasonic CF-M32W5M Operating Instructions Manual
OPERATING INSTRUCTIONS
Contents
Getting Started
Read Me First.......................................4
Names of Parts ....................................8
First-time Operation..........................11
Operation
Starting Up/Shutting Down..............15
Creating Backup Disks.....................21
Computing On The Road ................24
Using the Battery Pack ....................30
Security Measures ............................36
Infrared Data Communications ......40
Add-ons/Peripherals.........................42
Personal Computer
CF-M32 Series
Troubleshooting
List of Error Codes ............................52
Dealing With Problems ....................53
Reinstalling Software........................58
Appendix
LIMITED USE LICENSE AGREEMENT
....
69
Windows 95 Setup Procedure........70
Creating a Hibernation Data Area ....
71
Setup Utility.........................................73
Key Combinations .............................80
LED Indicators ...................................82
Specifications.....................................83
Index.....................................................84
95
Introduction
Thank you for purchasing the Panasonic computer. Please read the Operating Instructions
thoroughly for proper operation of your new computer.
Illustrations in this Manual
Customer's Record
Serial
No.
or
Date
of
Purchase
Model
No.*
Code
No.
Dealer's
Name
Dealer's
Address
2
Copyright
This manual is copyrighted by Matsushita Electric Industrial Co., Ltd. with all rights reserved. No part of this manual may be reproduced in any form without the prior written
permission of Matsushita Electric Industrial Co., Ltd.
No patent liability is assumed with respect to the use of the information contained herein.
©Matsushita Electric Industrial Co., Ltd. 1998. All Rights Reserved.
Disclaimer
Computer specifications and manuals are subject to change without notice. Matsushita
Electric Industrial Co., Ltd. assumes no liability for damage incurred directly or indirectly
from errors, omissions or discrepancies between the computer and the manuals.
Trademarks
Microsoft®, MS-DOS® and Windows® are registered trademarks of Microsoft
Corporation of the United States and/or other countries.
PS/2™ is a trademark of International Business Machines Corporation.
Pentium® is a registered trademark, and MMX™ is a trademark of Intel Corporation.
Panasonic® is a registered trademark of Matsushita Electric Industrial Co., Ltd.
NOTE : NOTE provides a useful fact or helpful information.
CAUTION : CAUTION indicates a condition that may result in minor or
moderate injury.
WARNING : WARNING indicates a hazard that may result in moderate or
serious injury, or even death.
[Start]-[Shut Down] : This illustration means to click [Start], then to click [Shut Down]
(For some applications, you may need to double-click.)
Enter : This illustration means to press the [Enter] key.
Fn + F2 : This illustration means to press [Fn], and while holding down
on [Fn], to press [F2].
CF-M32W5M

Federal Communications Commission Radio Frequency Interference Statement
Note: This equipment has been tested and found to comply with the limits for a Class B
digital device, pursuant to Part 15 of the FCC Rules. These limits are designed to provide
reasonable protection against harmful interference in a residential installation. This equipment generates, uses and can radiate radio frequency energy and, if not installed and used
in accordance with the instructions may cause harmful interference to radio communications. However, there is no guarantee that interference will not occur in a particular installation. If this equipment does cause harmful interference to radio or television reception,
which can be determined by turning the equipment off and on, the user is encouraged to
try to correct the interference by one or more of the following measures:
Reorient or relocate the receiving antenna.
Increase the separation between the equipment and receiver.
Connect the equipment into an outlet on a circuit different from that to which the receiver is connected.
Consult the Panasonic Service Center or an experienced radio/TV technician for help.
Warning
To assure continued compliance, use only shielded interface cables when connecting to a
computer or peripheral. Also, any changes or modifications not expressly approved by
the party responsible for compliance could void the user's authority to operate this equipment.
This device complies with Part 15 of the FCC Rules. Operation is subject to the following
two conditions:
(1) This device may not cause harmful interference, and
(2) This device must accept any interference received, including interference that may
cause undesired operation.
Responsible Party: Matsushita Electric Corporation of America
One Panasonic Way
Secaucus, NJ 07094
Tel No:1-800-LAPTOP-5 (1-800-527-8675)
Lithium Battery!
This computer contains a lithium battery to enable the date, time, and other data to be
stored in it.
The battery should only be exchanged by service personnel.
Warning! Risk of explosion from incorrect installation or misapplication!
3

4
Avoid Extreme Heat and Cold
Do not store or use the computer in locations exposed to heat, direct
sunlight, or extreme cold.
Avoid moving the computer between locations with large temperature
differences.
Operation: 5 oC to 35 oC (41 oF to 95 oF)
Storage: -20 oC to 60 oC (-4 oF to 140 oF)
Avoid Direct Sunlight on the LCD Panel
The display should not be exposed to direct sunlight or ultraviolet
light.
Avoid Magnetic Fields
Keep the computer away from magnets.
Avoid Humidity, Liquids and Dust
Do not store or use the computer in locations exposed to high humidity, liquids (including rain) or dust.
Prevent Shock
Avoid subjecting the computer to severe vibrations or impact. Do not
place the computer inside a car trunk.
Avoid Radio Frequency Interference
Do not place the computer near a television or radio receiver.
Avoid Stacking
Do not place heavy objects on top of the computer.
Keep Small Objects Away
Do not insert paper clips or other small objects into the computer.
Usage
Handling
Precautions
Read Me First

5
When flying
Do Not Disassemble the Computer
Do not attempt to disassemble your computer.
Avoid Excessive Force to the LCD Panel
Do not apply excessive downward force on the LCD Panel.
It is a good idea to make backup copies on floppy disks and carry them with you.
The external FDD (floppy disk drive; CF-VFDU01) and Port Replicator (CFVEBM31) are required to use floppy disks.
Do not carry your computer when it is ON.
Remove all cables before transporting your computer.
We recommend preparing a fully charged battery.
When transporting spare batteries inside a package, briefcase, etc., it is recommended that the batteries be stored in a plastic bag.
Do not carry the computer while the display is open, or carry it by gripping the
display.
Do not put anything (e.g., a piece of paper) between the display and keyboard.
Do not drop or hit your computer against solid objects.
Always carry your computer with you. Never check it with luggage. For use of the
computer inside an aircraft, we recommend asking the airlines regarding their policy
on this issue.
Transporting
Peripherals
Incorrectly using peripheral devices may lead to a decrease in performance, an
increase in temperature and/or damage your computer. For more information on
peripheral devices, please refer to "Add-ons / Peripherals" ( page 42)
Cables
Use of an interface cable longer than 3 m (9.84 feet) is not recommended.

6
Do not expose your computer to shock.
Please use care when handling your computer, shock may damage your hard disk or
make your software applications and data unusable.
Do not power down your computer while software applications are running
or HDD indicator is on.
Properly shut Windows* down to avoid problems ([Start]-[Shut Down]).
Save all valuable data to floppy disks.
Backing up data to floppy disks will limit damage should trouble occur to your
computer or should you inadvertently change or erase data.
The external FDD (CF-VFDU01) and Port Replicator (CF-VEBM31) are required
to use floppy disks.
Use the security function for all important data.
page 36 - Security Measures
* This computer uses Microsoft
®
Windows® 95 Operating System.
Saving Data on the Hard Disk
Read Me First
Maintenance
Display area
Use a soft dry cloth like gauze to lightly wipe the display.
All other areas
Wipe these areas with a soft cloth, after applying water or detergent diluted with
water to the soft cloth and firmly wringing it.
CAUTION
Do not use benzene or thinner, or disinfectant-type alcohol.
Do not directly use water, liquid detergents or spray-type cleaners. If liquid
enters the computer, this may cause the computer to malfunction or become
defective.

7
Computer Viruses
Do not power down your computer or press the floppy disk drive eject button
while the FDD indicator is on.
Doing so may damage the data on the floppy disk and render the disk useless.
Use care when handling floppy disks.
To protect the data on your floppy disks or to prevent a floppy disk from becoming
stuck in your computer, avoid the following:
• Sliding the shutter on the floppy disk manually.
• Exposing the disk to a magnetic field.
• Storing the disk in locations prone to high temperatures, low pitched noise, dampness,
or dust.
• Applying more than one label on the disk.
Confirm the contents of a floppy disk before formatting it.
Confirm that no important data is on the disk,
because all data on the disk will be erased.
Use the write-protect tab.
This is a must for preserving important data.
This prevents your data from being erased
or overwritten.
Users are advised to purchase the latest versions of virus protection software
and use them regularly.
We recommend you run the software:
• When booting your computer.
• After receiving data.
We recommend that you check data received on floppy disks or from external
sources, such as data downloaded from the Internet, e-mail, etc. (For compressed
files, please uncompress them before running a check).
Saving Data on Floppy Disks
Write Enable
Write-protect Tab
Write Disable
The external FDD (CF-VFDU01) and Port Replicator (CF-VEBM31) are required to use
floppy disks.
8
CAUTION
To suspend the screen, [Panel Switch] must be set to [Suspend] ( page 26) in
[Panasonic Power Management]. Do not reopen the LCD panel until the power
indicator is blinking green. If the LCD panel is reopened before this happens, it may
remain suspended and resuming may not be possible. In such cases, close the LCD
panel again and wait a few seconds before reopening it.
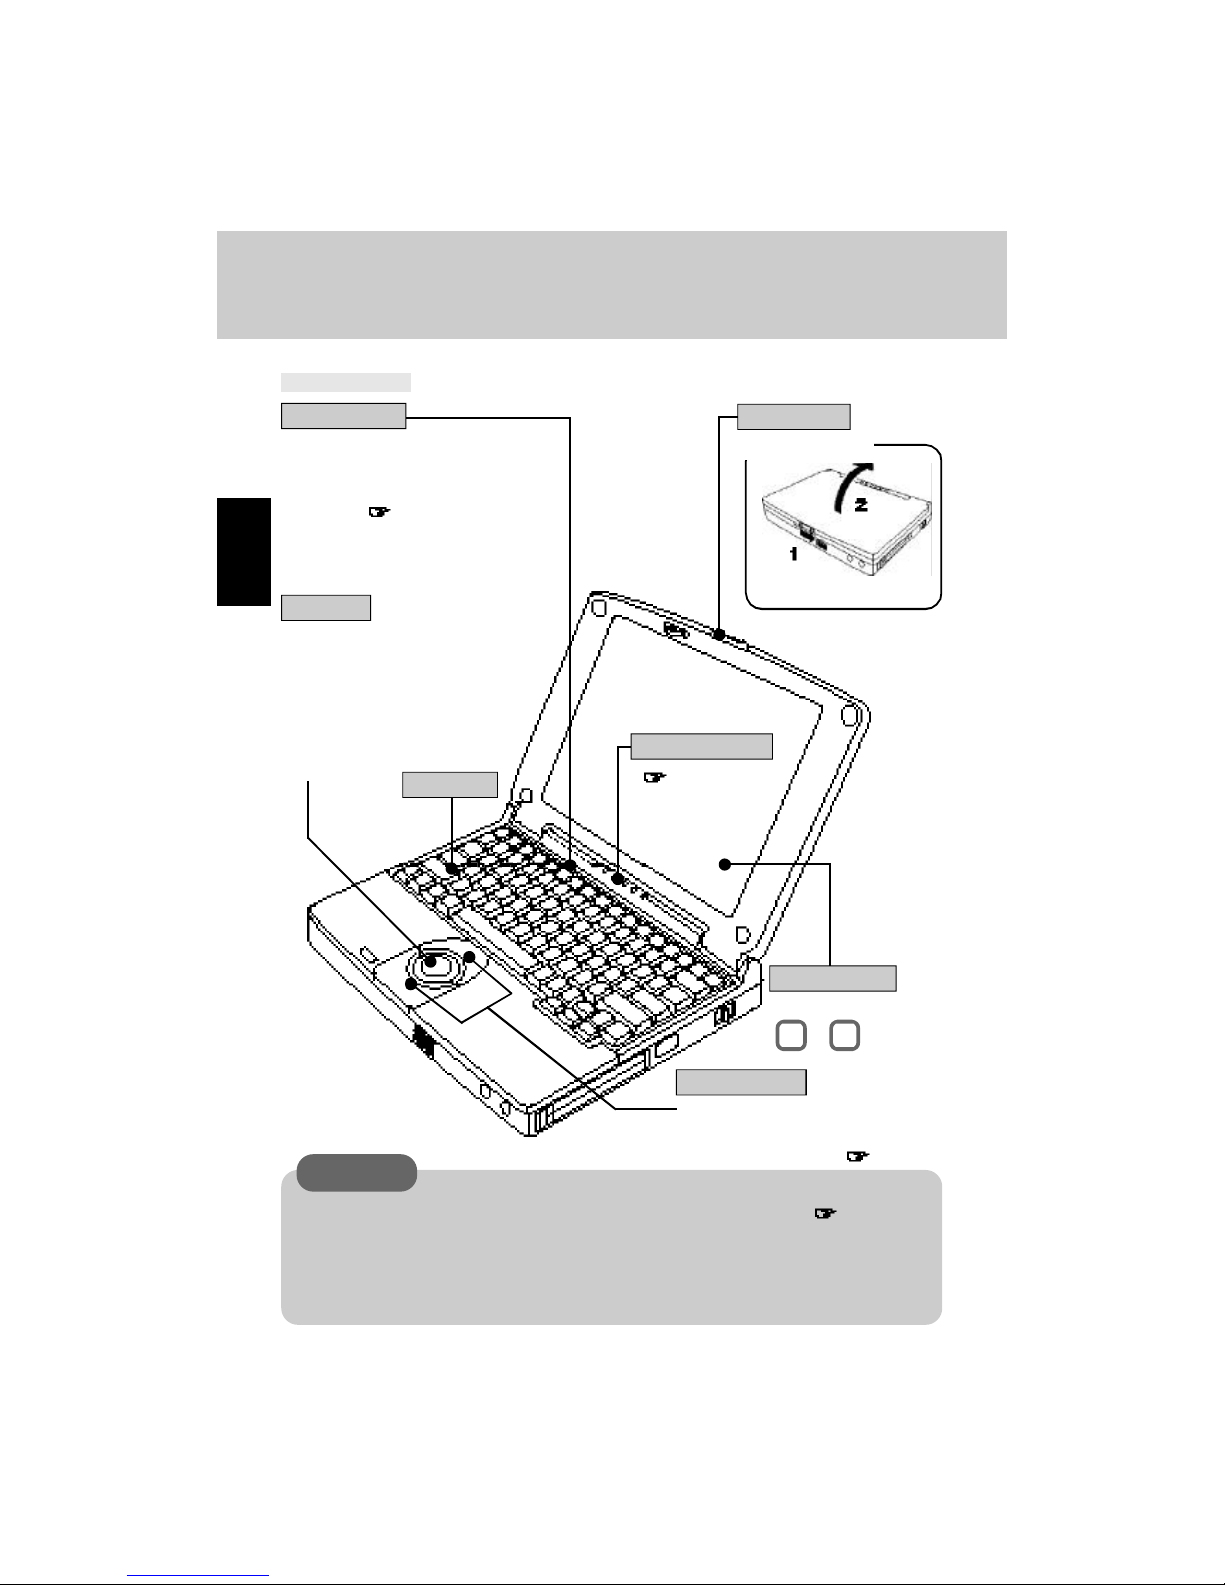
Names of Parts
A built-in pointing device
that works like a mouse. As
you spin the ball with your
fingertip, the cursor moves in
accordance with the speed
and direction of the ball's motion.
Trackball
When the LCD panel is closed, this
button is depressed, causing the screen
to automatically shut down or be
suspended ( Caution below). When
the LCD panel is opened, the screen
is turned on or resumes.
Panel Switch
Open the Display
Open Latch
When pressed while the trackball is
in use, the buttons select items or perform other operations ( page 17).
Top Side
Brightness Adjustment :
Fn + F2
LCD(Display)
Click Buttons
( page 82)
LED Indicators
Keyboard

9
( page 15)
Set the PC Cards that conform to the PC
Card standard. ( page 46)
Power Switch
PC Card Slots
USB Port
The USB port allows the mouse, modem, printer, and other
peripheral devices to be connected while the power is on.
To use the USB port, you may need to install a driver for
your USB devices and [USB Port] must be set to [Enabled]. ( page 78, 79)
DC-IN Jack
Use this connector to connect headphones or
amplifier-equipped speakers. Audio output
from the internal speaker is disabled when
headphones or outside speakers connected.
Connect a monaural dynamic microphone which
has a mini-jack.
Front / Right Side
Left Side
Volume Control: Fn + F4 or F5
Speaker on/off: Fn + F8
Speaker
Microphone Jack
CAUTION
Using an input source other than a
monaural dynamic microphone may
not allow audio to be input or may damage the equipment.
Headphone Jack
Infrared Communication
Port
( page 40)
10
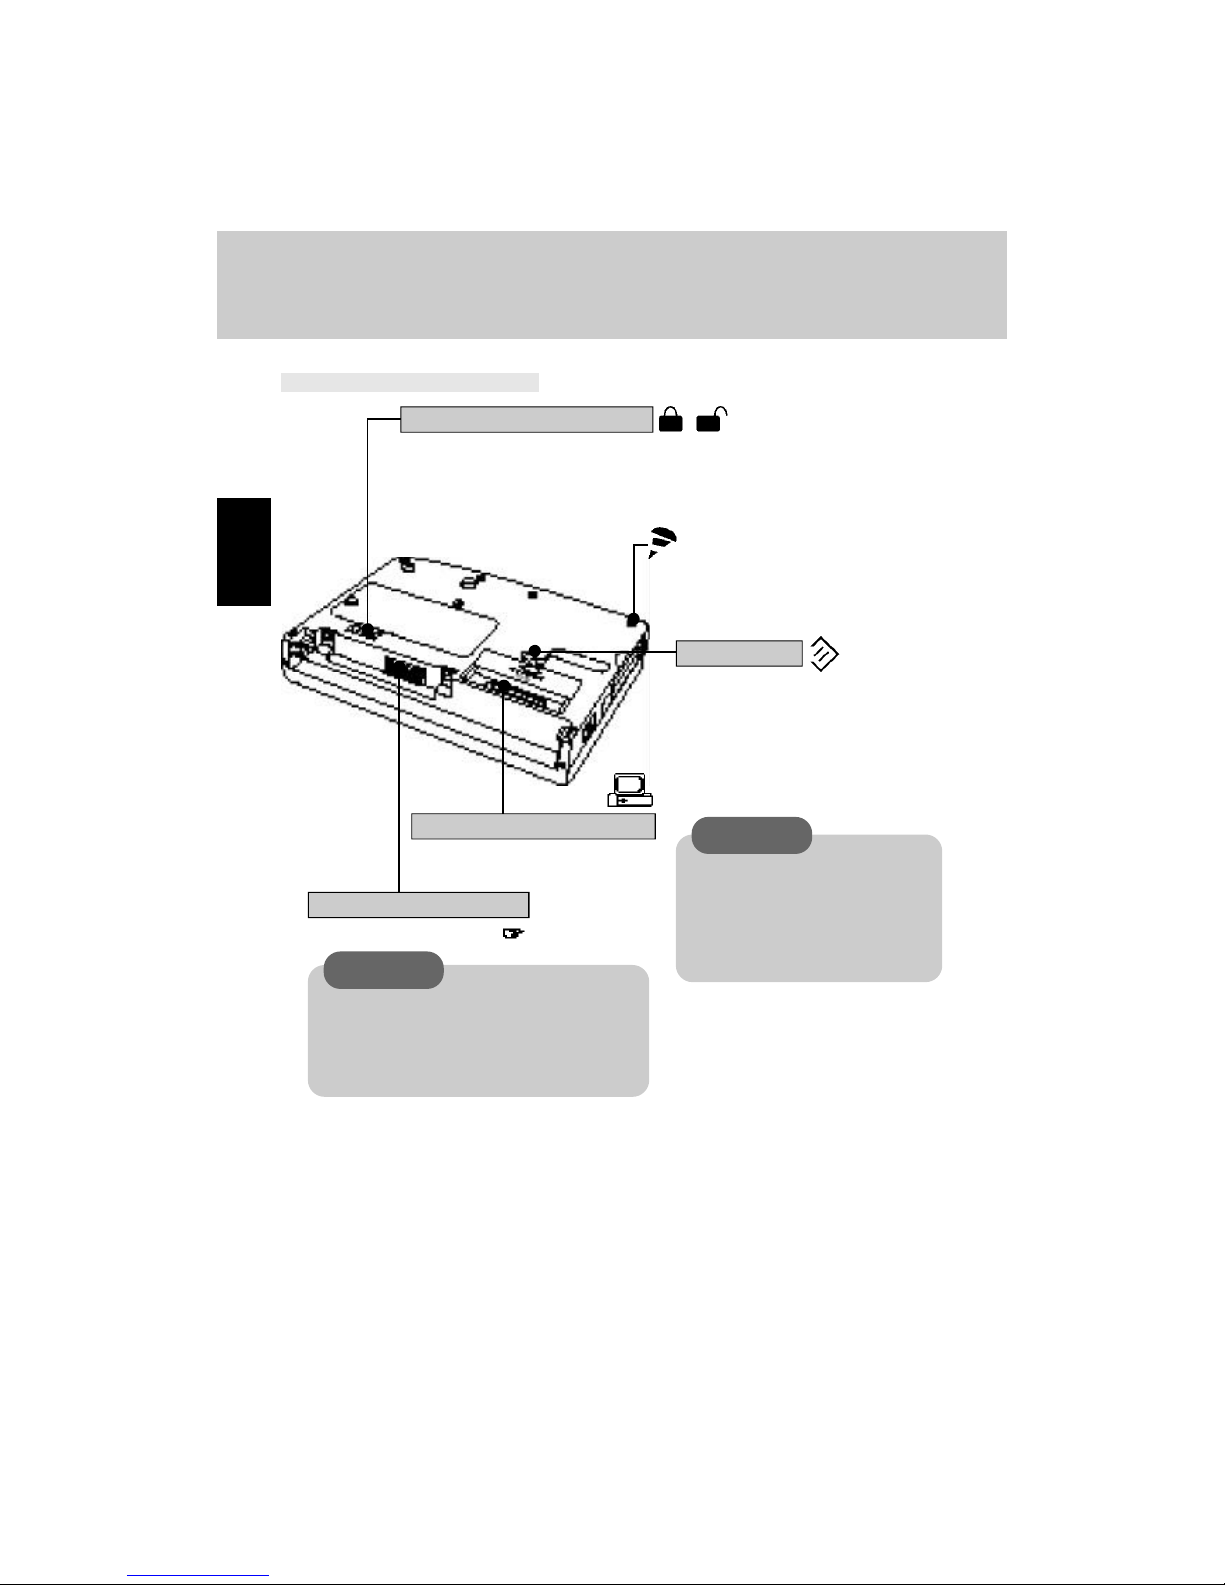
Rear / Bottom Side
Slide this lever when removing the battery pack.
Remove this screw when installing
or removing a RAM module.
When restarting your computer, use
a dull pointed object like a ball point
pen.
Do not use a pencil. Pencil lead can
break off inside the computer and
damage the computer’s circuit.
If a problem occurs but your
computer does not lock, we recommend not pressing the reset
button. It will cause you to lose
data if an application is open.
Install the port replicator.
Install the battery pack. ( page 30)
Expansion Bus Connector
Battery Pack Connector
Battery Pack Release Lever
Reset Button
CAUTION
Names of Parts
CAUTION
Do not install a battery pack other than
the battery pack (CF-VZSU05) or the
optional Extended life Battery Pack (CFVZSU06).
11
Operating Instructions...
1
Computer
First-time Operation
Please read the steps below to help you learn what items are included, and to gain an
understanding of some basic computer-related operations.
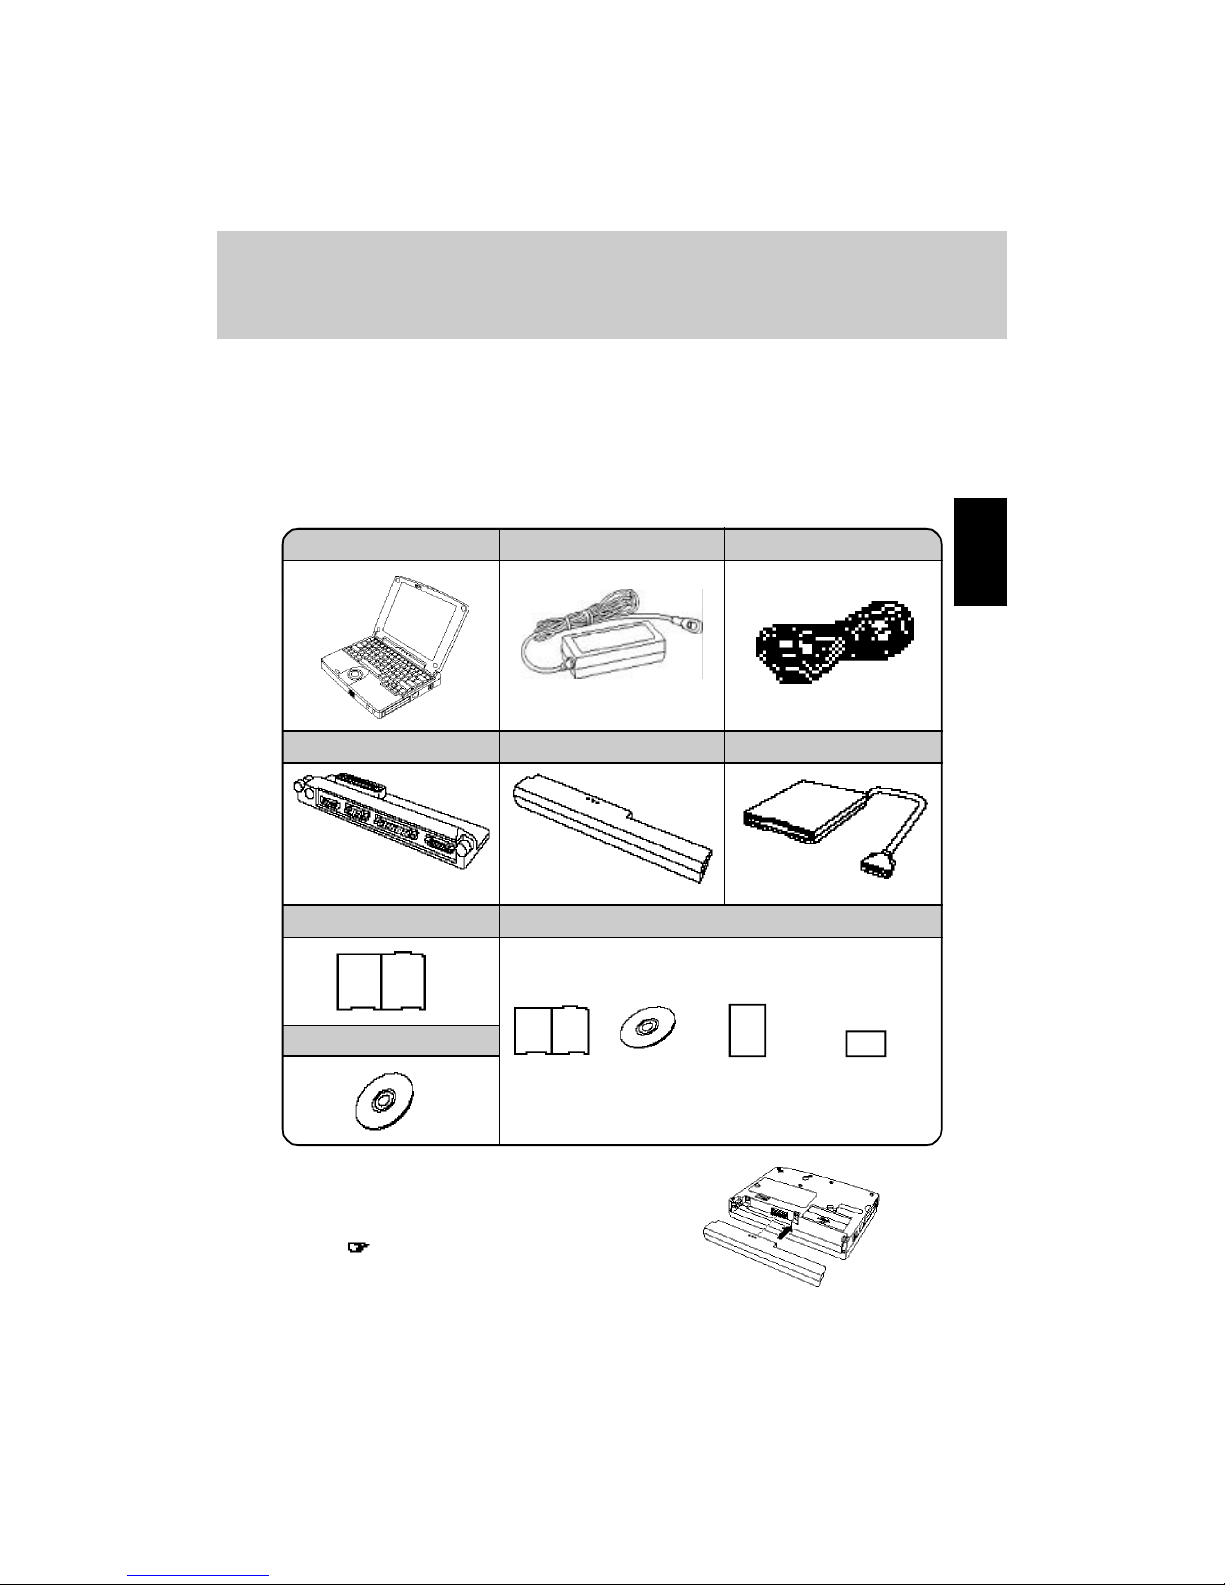
1 Confirm the inclusion of all parts
Make sure the parts shown in the figure have been supplied. If any of these items
are missing or is not working properly, please contact Panasonic Technical Support.
Turn your computer over,
install the battery pack
( page 32)
2
Battery Pack ..................1
CF-AA1527
CF-VZSU05
AC Adapter .................... 1 AC Cord .......................... 1
Port Replicator ............. 1
Windows 95
book
CD-ROM Registration
card
External FDD .................1
CF-VFDU01CF-VEBM31
(Microsoft Corporation)
Windows 95 System Pack ............................................... 1
Floppy disk label
FIRSTAID CD................. 1
12
First-time Operation
4
Read the LIMITED USE LICENSE AGREEMENT ( page 69)
To open the display, slide the latch located at the front and lift open the display.
Before removing the seal covering the power switch, please read the LIMITED
USE LICENSE AGREEMENT. Removal of this seal indicates agreement to the
terms specified. After you have agreed to the terms, you may turn your computer
on.
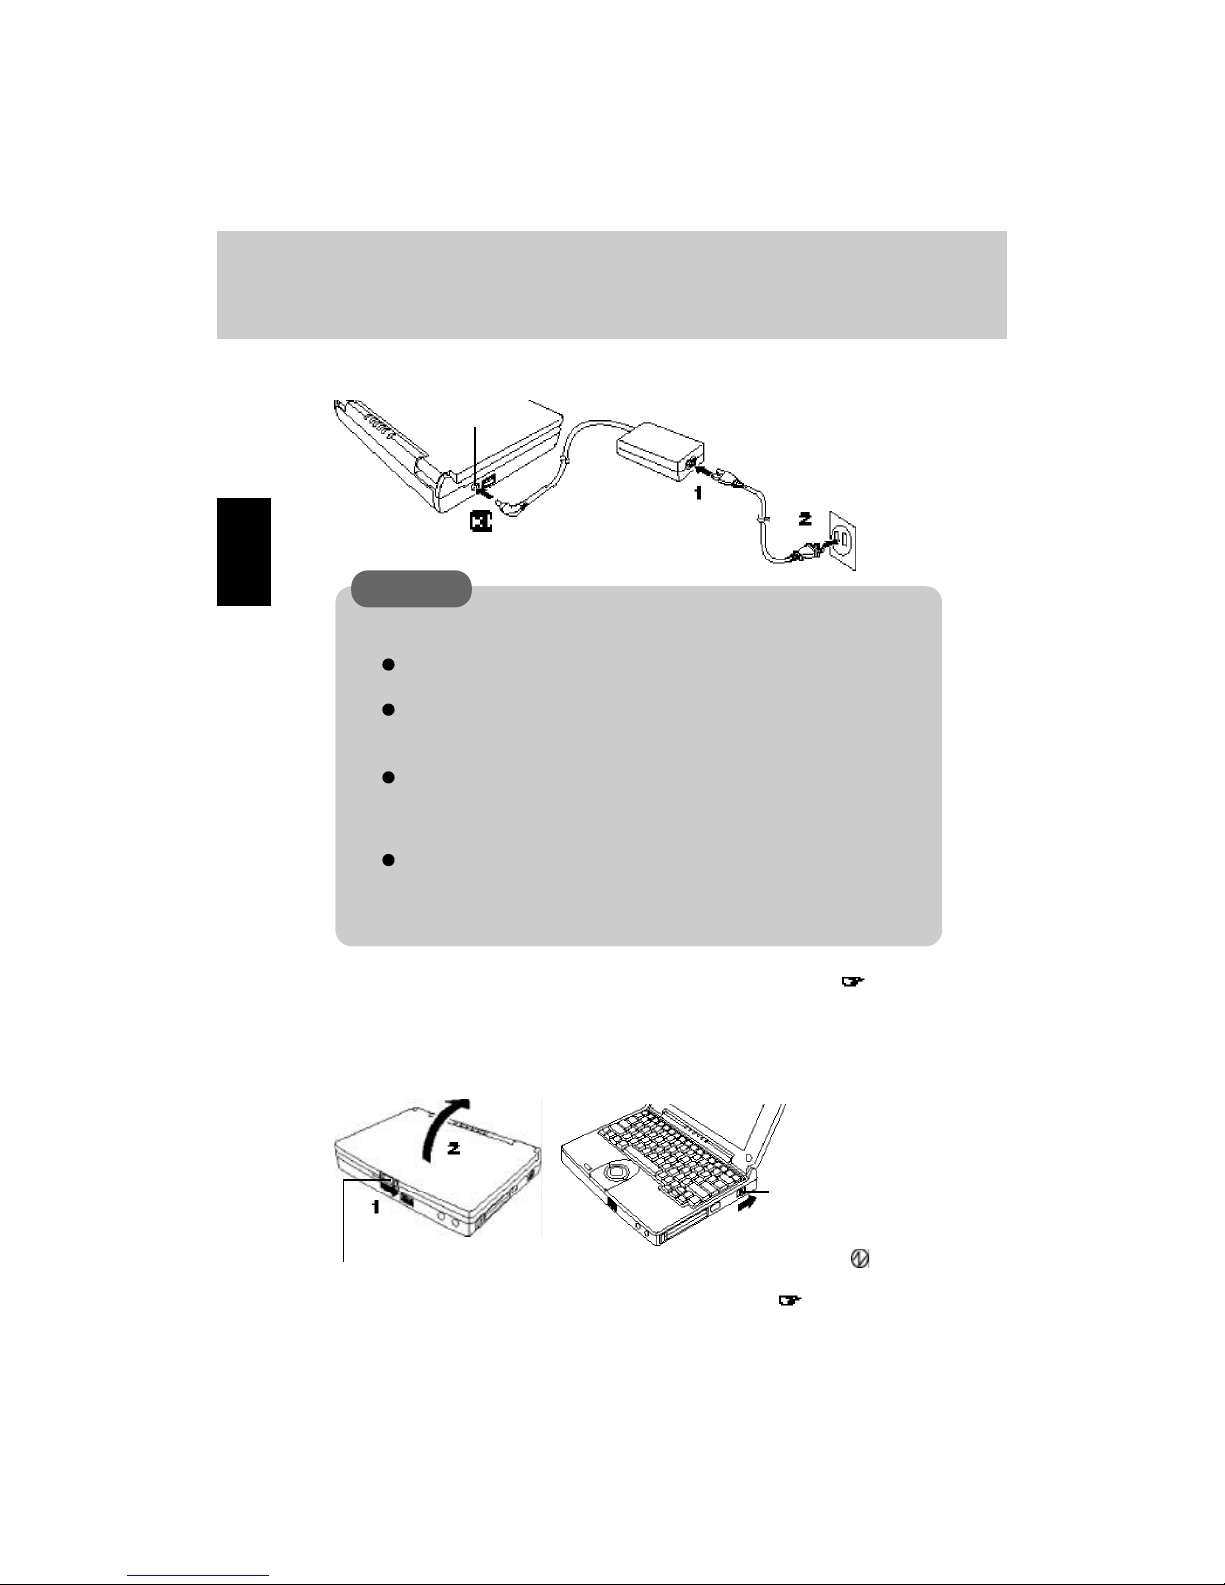
Connect your computer to a power outlet
CAUTION
3
Handling the AC adapter
Do not twist or pull the AC power cord forcefully. Doing so may damage the connections.
Use only the specified AC adapter with your computer. Using an AC
adapter other than the one supplied or car adapter might damage the
battery and/or the computer.
When the DC plug is not connected to the computer, disconnect the AC
cord from your AC wall outlet.
(If the cord is kept connected, a very low level of power equivalent to approx. 0.6 W will
be consumed.)
Problems such as sudden voltage drops or surges may arise during periods of thunder and lightning. Since this could adversely affect your
computer, an uninterruptible power source (UPS) is highly recommended unless a battery pack is installed.
Open Latch
Slide the power switch
toward the rear of the
computer and hold it
for approximately one
second until the power
indicator ( ) turns on
before releasing it.
( next page "CAUTION")
DC-IN Jack
13
5
Setup Windows
The [Windows 95 Setup Wizard] will run after the computer is turned on. Simply
follow the on-screen instructions.
When the setup procedure is completed, the Windows screen appears.
NOTE
Please read the supplemental “Windows 95 Setup Procedure” for a more
detailed explanation ( page 70).
Moving the cursor ( ) or selecting items can be done through the trackball
and click buttons. ( page 17).
If the display is dim or the sound quality is not right, you can adjust the
brightness and volume. ( page 8, 9, 80).
The power saving function is factory set to remove power from the display
if the computer is not operated or no access is made to a device for two
minutes (Battery) or thirty minutes (AC). The display will resume normal
operation if the trackball is moved or if a key on the keyboard is depressed.
CAUTION
If the power switch is held for more than four seconds at the ON position,
the power goes OFF. Do not slide the power switch and hold it for more than
four seconds.
After confirming that the power indicator has turned on, do not touch the
power switch until Windows setup has started.
Once the computer is powered off, you must wait at least five seconds before powering it on again.
NOTE
The computer will not power on when the LCD panel is closed.

14
Internet Explorer 4.01 places a tremendous load on the system in order to execute the
wide variety of functions that it provides. As a result, some unexpected faults may
occur.
If any of these faults occurs, try using the software with some Internet Explorer 4.01
functions turned off. (See Internet Explorer Help for more details.)
It takes a long time to reboot or the computer locks up.
Delete the check mark for [Internet Explorer Channel Bar] in [Control Panel] [Display] - [Web], then press [OK].
A system module error occurs.
Set [ (None)] for [Wallpaper] in [Control Panel] - [Display] - [Background].
Performing the above steps does not solve the problem.
Uninstall Internet Explorer 4.01 with the following step.
Select [Microsoft Internet Explorer 4.0] in [Start] - [Settings] - [Control Panel] [Add/Remove Programs] - [Install/Uninstall] and press [Add/Remove]. Follow the
on-screen instructions.
If a window with the message [Version Conflict] appears during the installation process (network card and application installation), select [Yes].
Proper operation may not be possible if [No] is selected.
Internet Explorer
First-time Operation
15
Starting Up/Shutting Down
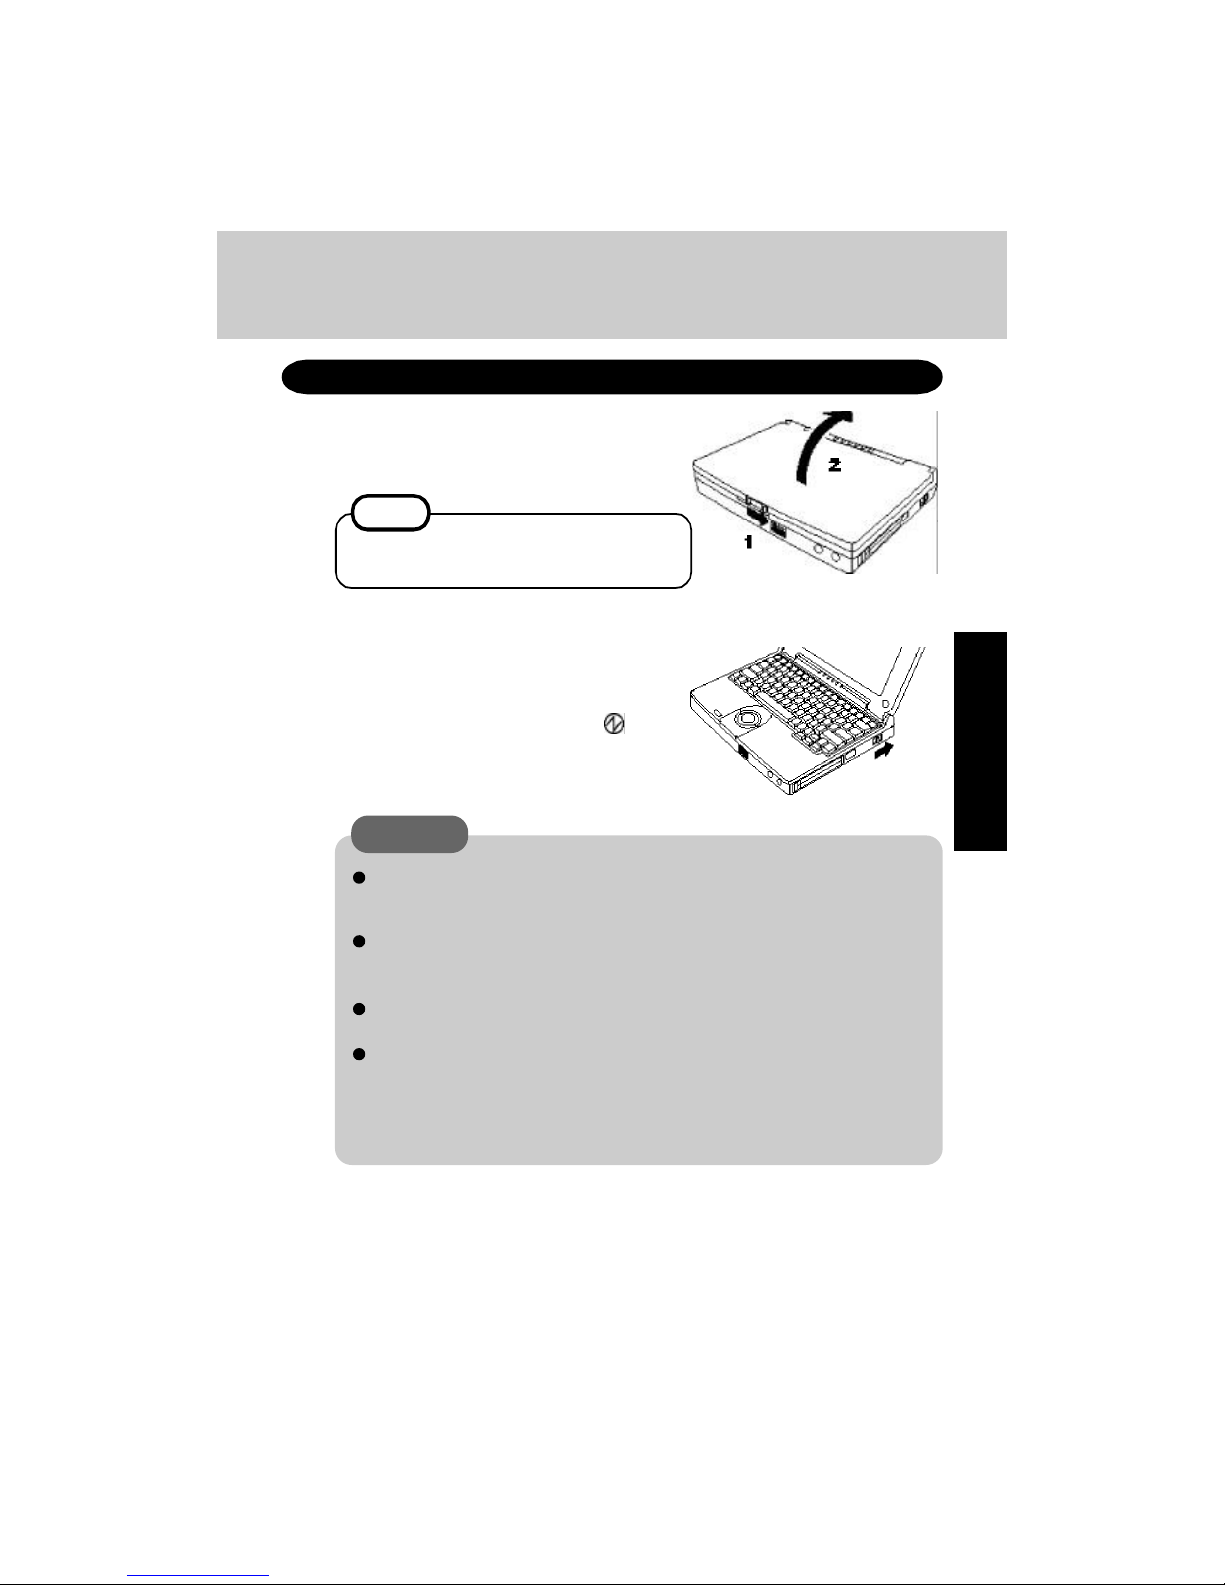
Starting Up
Open the display
Slide the latch as shown and lift open the display.
NOTE
The computer will not power on when the
LCD Panel is closed.
If the power switch is held for more than four seconds at the ON position,
the power goes OFF. Do not slide the power switch and hold it for more
than four seconds.
After confirming that the power indicator has turned on, do not touch the
power switch until Windows has completely started up. Also do not perform any keyboard or trackball operations.
Once the computer is powered off, you must wait at least five seconds
before powering it on again.
When the CPU temperature rises, the computer does not power on to prevent the CPU from overheating. Should this happen, allow the computer to
cool down then switch the power on again.
If the computer still does not turn on, please contact Panasonic Technical
Support.
Turn your computer on
Slide the power switch toward the rear of the
computer and hold it for approximately one
second until the power indicator ( ) turns
on before releasing it.
CAUTION
1
2
16
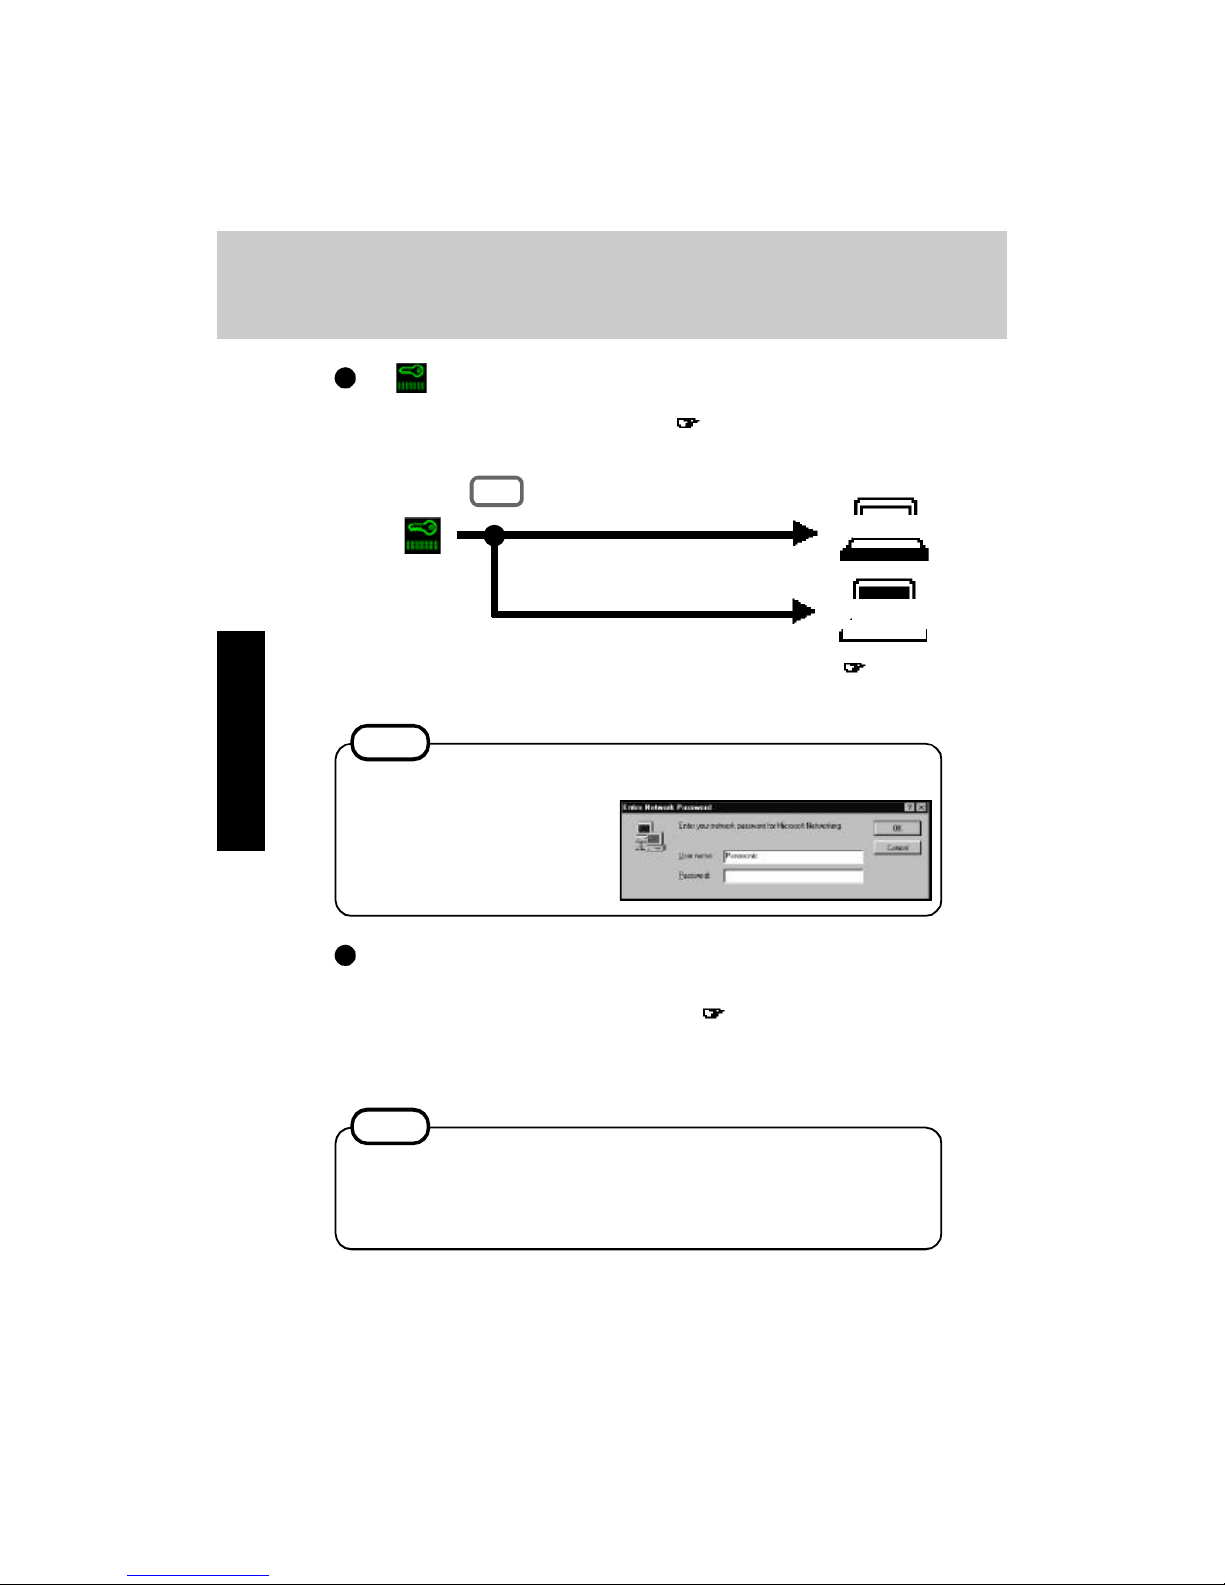
If is displayed,
you must first enter your User Password ( page 36).
* If you are starting from the suspend mode ( page 18), if
after three attempts the correct password is not input, or if no
password is entered for about a minute, the computer returns
to the suspend mode.
NOTE
When an application or file that was previously
displayed appears on your screen,
this means the suspend or hibernation mode ( page 18) has been set.
Select your application
You are able to start working on your computer.
Over three incorrect attempts,
If the correct password is input,
Will Start
Will Not Start*
(Power off)
If the display on the right appears,
The network password has been
set. To read and write data to
other computers, the correct
password must be entered.
Upon entering your
User Password and
pressing Enter ,
Starting Up/Shutting Down
3
NOTE
The power saving function is factory set to remove power from the display if
the computer is not operated or no access is made to a device for two minutes
(Battery) or thirty minutes (AC). The display will resume normal operation if
the trackball is moved or if a key on the keyboard is depressed.

17
Using the Trackball and Click Buttons
When pressed while the trackball is in use, the buttons select
items or perform other operations.
A built-in pointing device that works like a mouse. As
you spin the ball with your fingertip, the cursor moves in
accordance with the speed and direction of the ball's motion.
The actions of the two buttons vary according to the software application being
used. Normally the rear button is used to perform actions.
To change the settings for the front and rear buttons of the trackball, and the left
and right buttons of the mouse, select [Start] - [Settings] - [Control Panel] [Mouse].
Trackball
Click Buttons
Clicking
Double-clicking
Dragging
One tap
Two quick
taps
One tap
or
Two quick
taps
or
or
NOTE
While holding
down the button,
spinning the
trackball with
your fingertips
Rear Button
Front Button
18
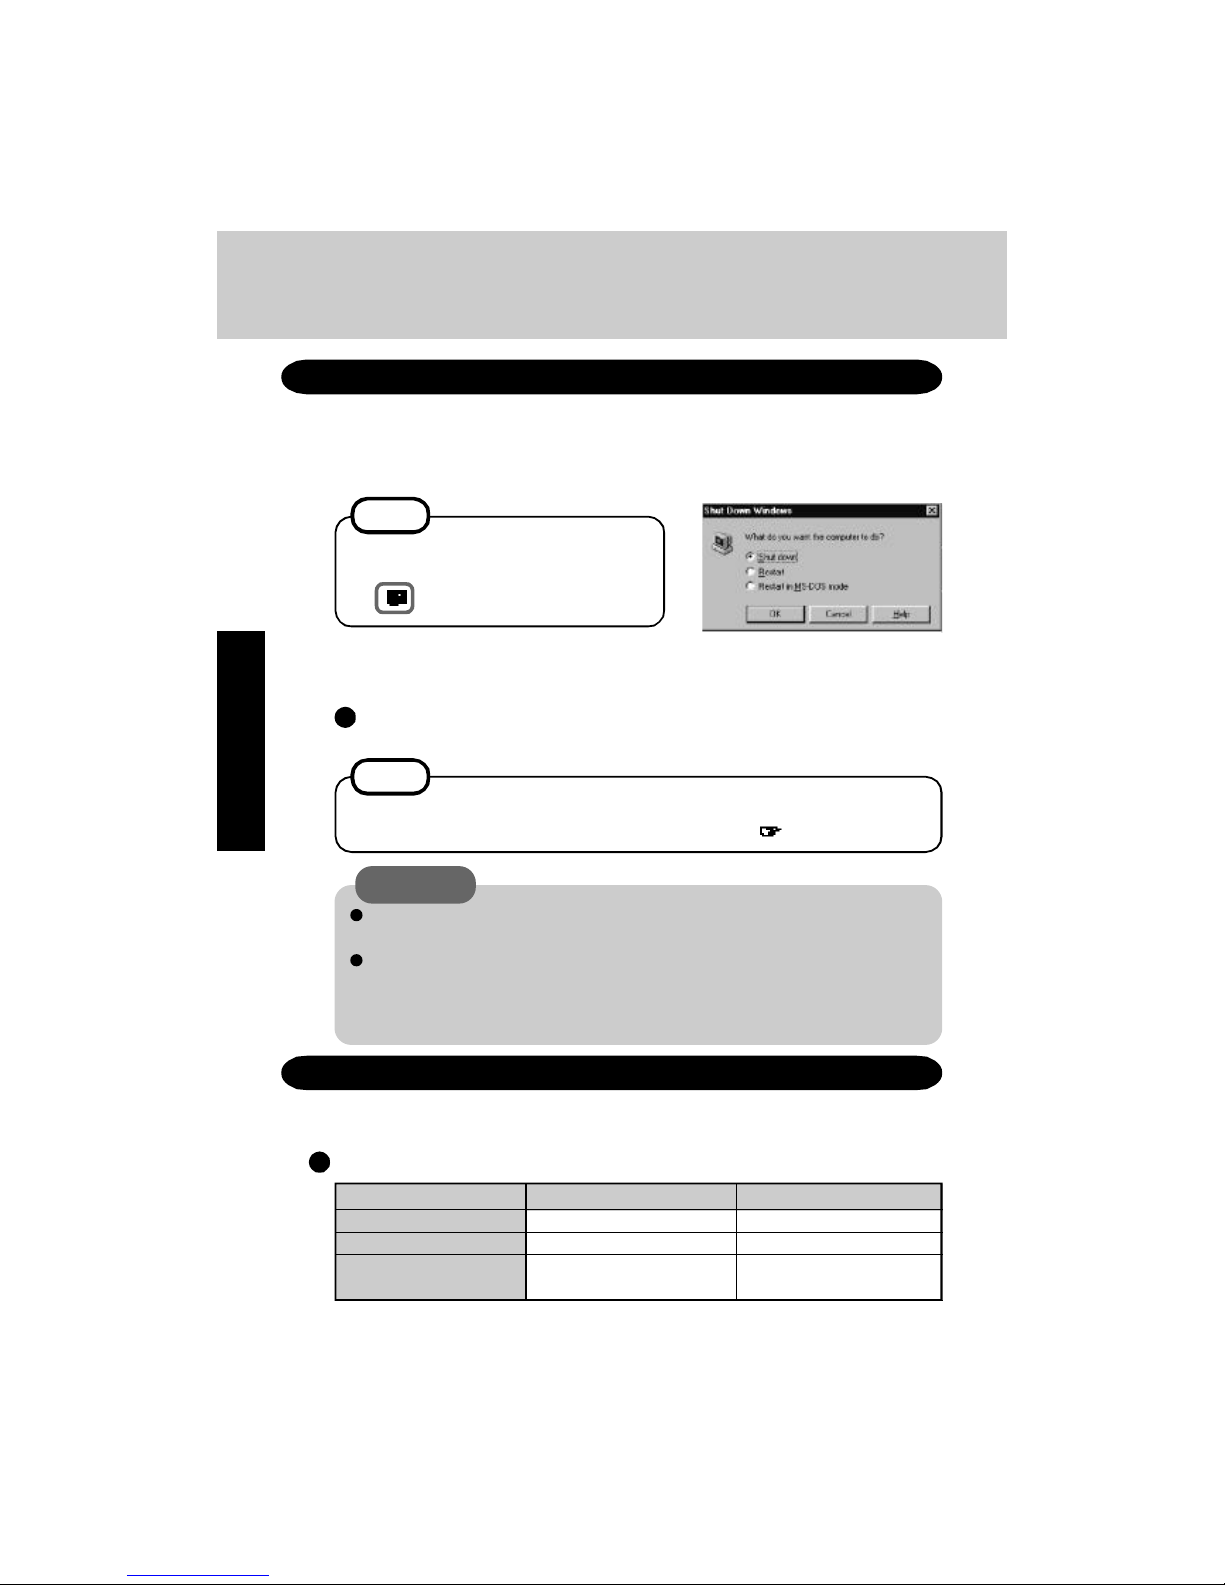
To shut down, save all data and select [Shut Down] from
the [Start] menu
Restarting your computer (without shutting down)
NOTE
Shutting Down (power off your computer)
Confirm shutdown
Do not power off your computer while the HDD indicator is on.
It may damage data on the hard disk.
If the computer will not be used for a long period of time, power off and
disconnect the AC adapter.
(If the cord is kept connected, a very low level of power equivalent to approx. 0.6 W will be
consumed.)
To quickly resume computer operation after shutting down,
The suspend or hibernation functions is available. ( below)
If you want to immediately start up and continue an application after shutting down
your computer, you can do so by using the suspend or hibernation function.
Differences between suspend and hibernation function
Starting Up Your Computer Quickly
Function
Suspend function Hibernation function
Where data is saved to
Memory Hard disk
Speed Fast Somewhat slow
Requires power supply
Yes (if power is cut, Power not required to
all data is lost) maintain data
Select [Restart], then click [OK].
From the keyboard,
You may choose to press down on
then select [Shut Down].
Select [Shut down], then click [OK].
Your computer will power off automatically.
NOTE
Starting Up/Shutting Down
2
CAUTION
This procedure is shutting down without using the suspend or hibernation function.
1
19
Shutting Down
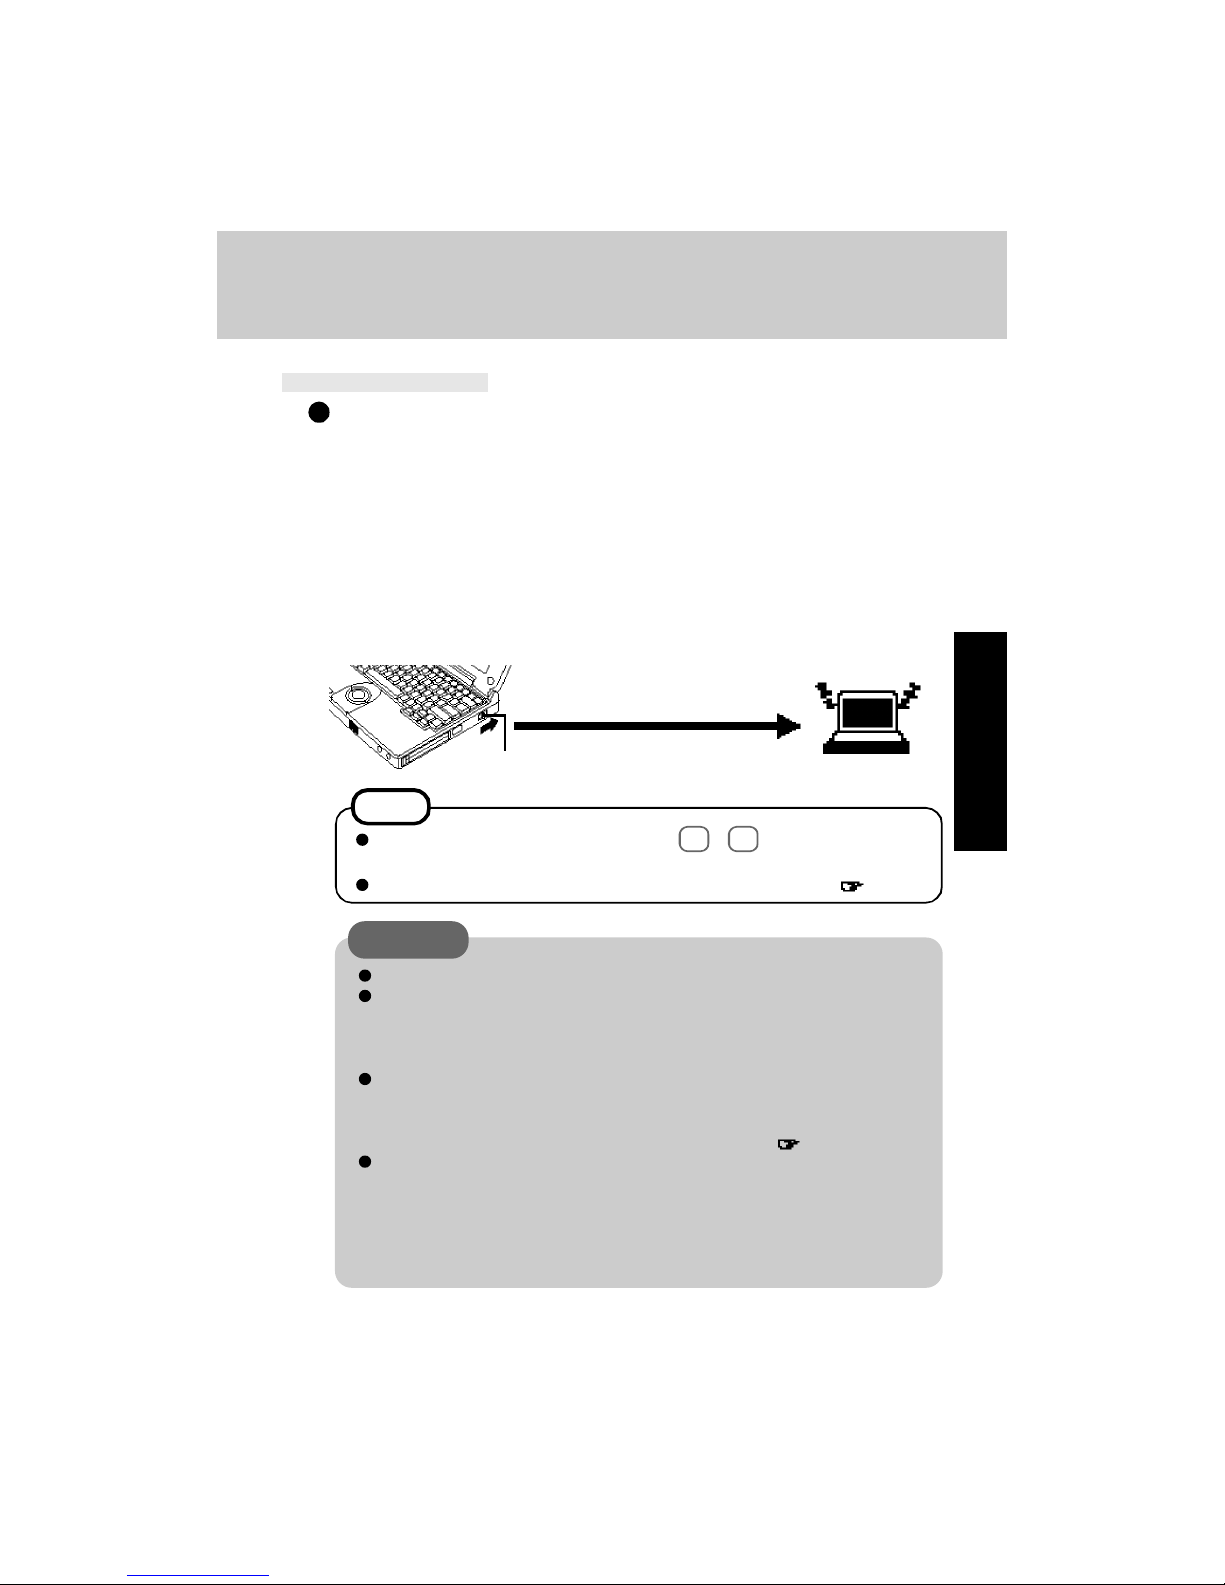
Using the suspend or hibernation function
It is necessary to set the suspend or hibernation function using the Panasonic Power
Management Setting.
Click [Start] - [Settings] - [Control Panel]
Double-click [Panasonic Power Management]
Click [Operation Setting], then set [Suspend] or [Hiber-
nation] for [Power Switch]
Click [OK]
Do not touch the power switch
while your computer is entering
the suspend or hibernation mode.
Power Switch
Suspend Mode or
Hibernation Mode
CAUTION
Save all data before powering off your computer.
If the power switch is held for more than four seconds at the ON position,
the "beep" sound will come out again and the power will go OFF without
activation of the suspend or hibernation function. Do not slide the power
switch and hold it for more than four seconds.
When restarting from or shutting down to the suspend or hibernation mode,
do not touch the trackball (or move the mouse (serial or PS/2 type) if one is
connected). There are cases where these devices will fail to operate; you
will have to restart your computer using the keyboard ( page 18"NOTE").
Do not use the suspend or hibernation function during the following periods (you may corrupt your data or file):
• While the FDD, HDD or CD-ROM is being used.
• While playing/recording audio files.
• While communications software is being used.
• While PC Cards (a SCSI card or ATA card etc.) are being used.
1
2
3
4
NOTE
If the internal speaker is off by pressing Fn + F8 , the "beep" sound will
not be heard.
You can also run [Power Management] from the Setup Utility ( page 76).
At the "beep" sound, release your finger.
20
CAUTION
Do not use the suspend or hibernation function when using an OS other than
Windows 95, the Setup Utility, or when experiencing static electricity or noise.
If you hold down on the Alt , Ctrl or Shift to enter the suspend or hibernation
mode, after resuming operation, you must press the same key. For example,
if you hold down on the Shift key while sliding the power switch, upon
resuming, if you do not press the Shift key again, only capital letters will
result from typing.
If your computer locks up, press the reset button. All data not saved is lost
when this button is pressed.
In the suspend mode, power is consumed. If PC Cards (e.g., a modem card)
are inserted, more power is consumed. When all power has been consumed,
all data at shut down is lost since it is retained in memory. We therefore
recommend plugging in the AC adapter when using the suspend function.
Set [USB Port] of [Supervisor Setup] to [Disabled] in the Setup Utility when
using the suspend or hibernation function.
A fixed memory data writing area is needed on the hard disk to use the
hibernation function. This area is already created on the hard disk at the
time of purchase. It will be necessary to create the area again if you change
the hard disk partitions ( page 71).
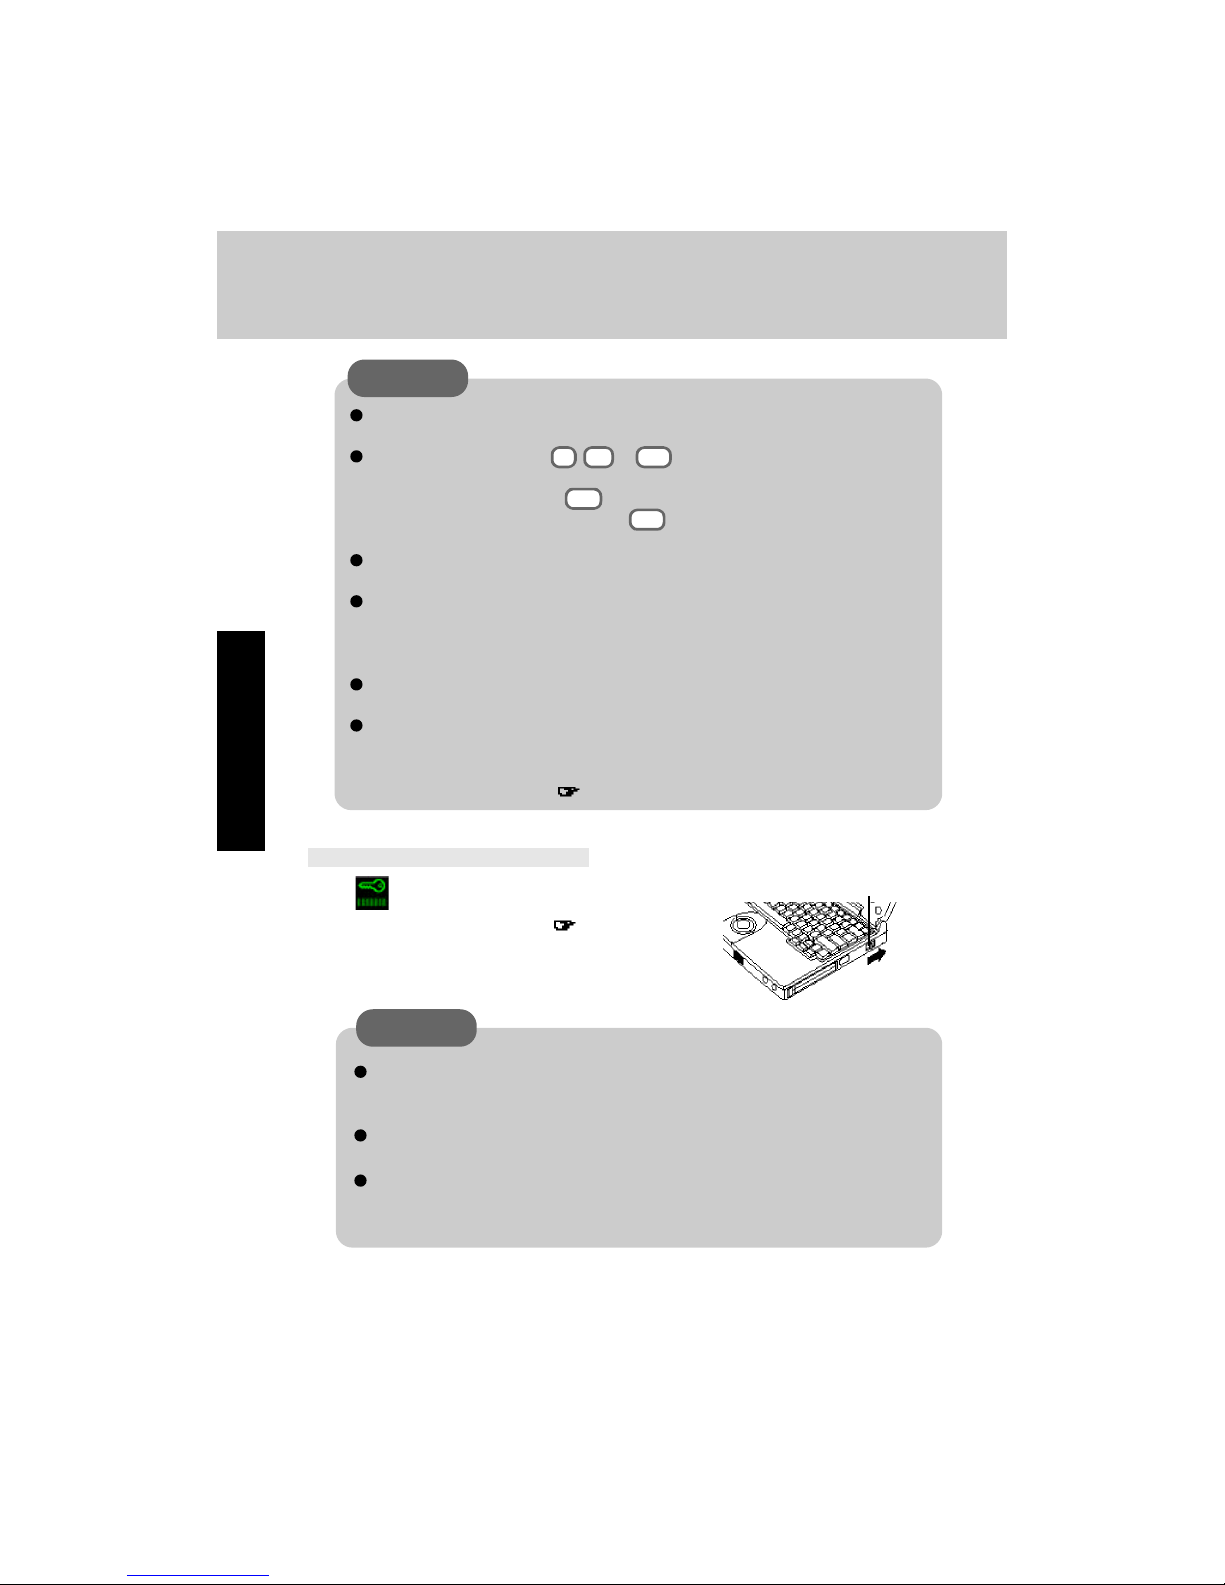
Power Switch
Resuming Operation
If the power switch is held for more than four seconds at the ON position,
the power goes OFF. Do not slide the power switch and hold it for more
than four seconds.
Do not perform any keyboard operations or move the mouse until Windows has completely started up.
When operation resumes, serial devices such as a mouse or modem, or
your PC Cards may not work. In such cases, you will need to restart your
computer or reinitialize the individual devices.
If is displayed upon sliding the power switch,
your password has been set ( page 16).
CAUTION
Starting Up/Shutting Down
21
Create the backup disks (total of 2 disks), listed below, in case you need to reinstall the
software (e.g., if the hard disk contents are erased).
1. Windows 95 CD-ROM Setup Boot Disk (1 disk)
2. FIRSTAID FD (1 disk)
Port Replicator
External floppy disk drive
Two 2HD floppy disks (Not included)
Floppy disk label "Microsoft Windows 95 CD-ROM Setup Boot Disk"
One floppy disk label (Not included)
The following items are necessary:
1
2
3
NOTE
Backup disks may be created repeatedly, however, they cannot be recreated
after reinstallation.
Power off your computer ( page 18) and disconnect the
AC adapter
Do not shut down using the suspend or hibernation mode.
Turn over the computer
If an Extended life Battery Pack (CF-VZSU06) is connected
to your computer, remove it ( page 32)
If you are using the included battery pack, it does not need to be removed.
Creating Backup Disks
22
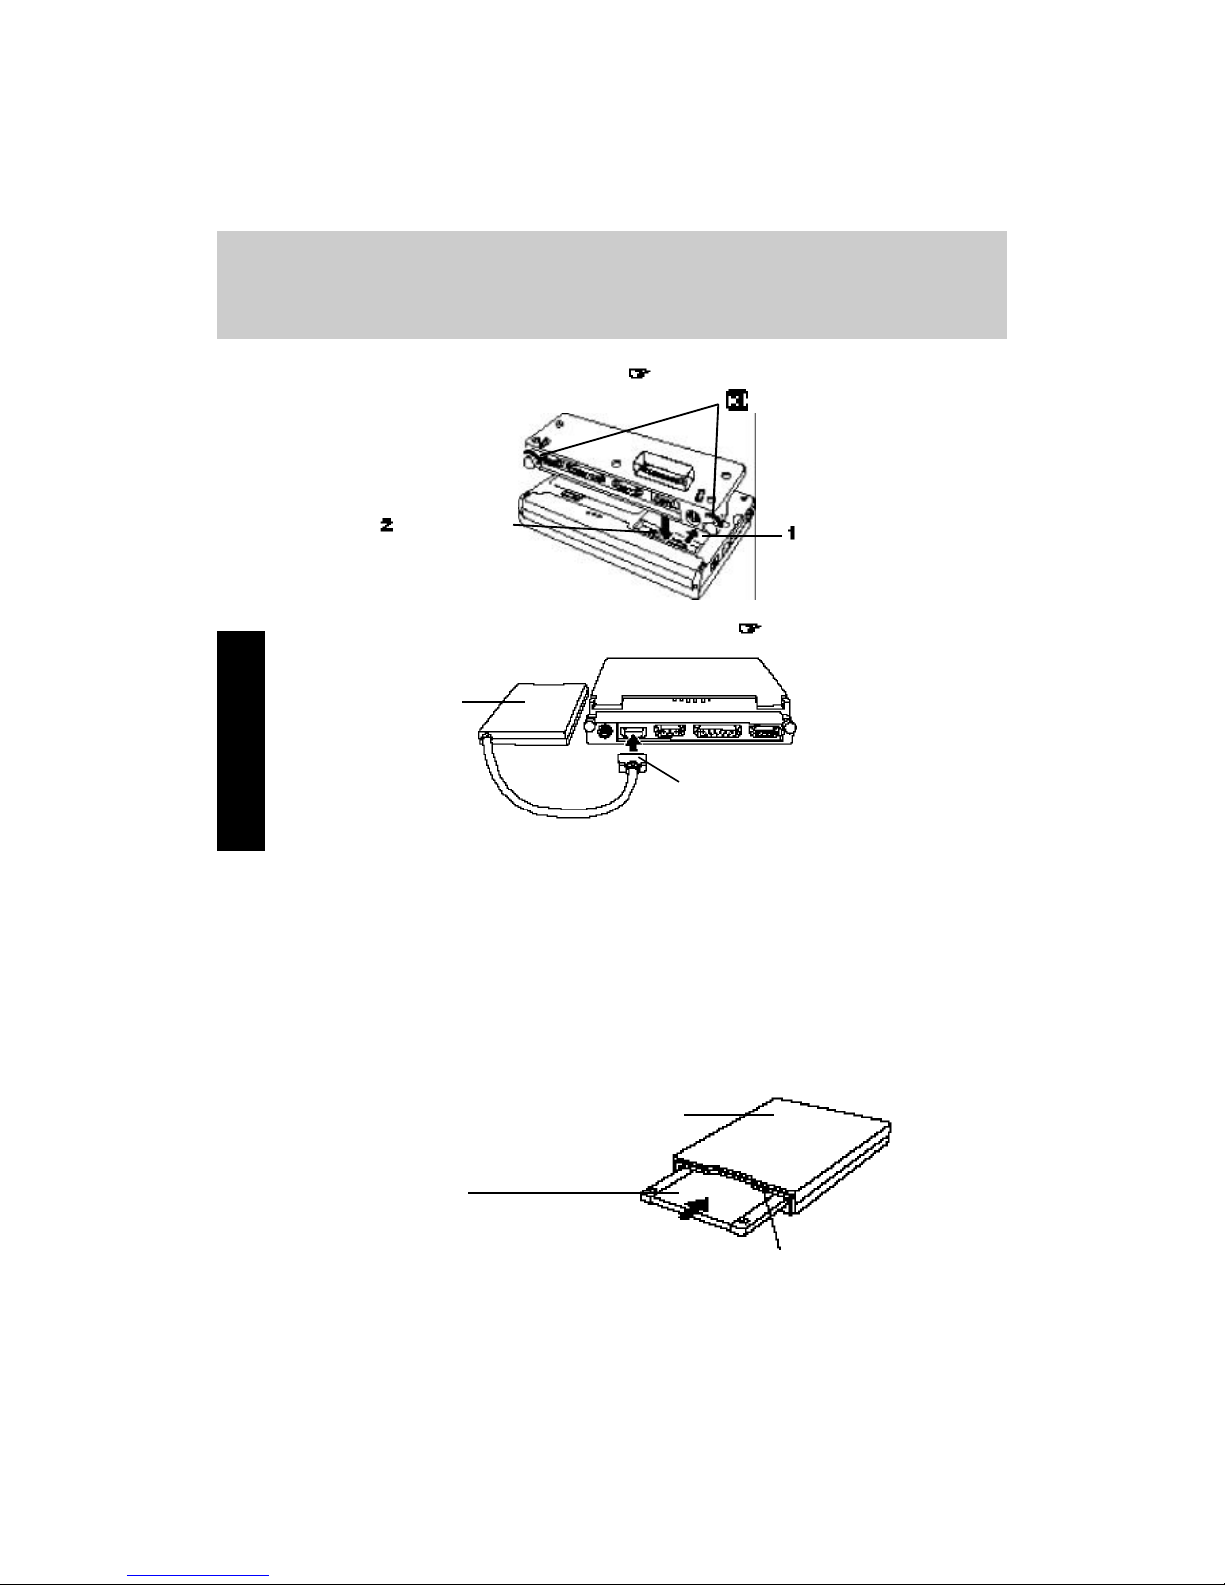
Attach the external floppy disk drive ( page 45)
Connect the AC adapter, then open the display panel and
turn on the power
The Windows screen will be displayed.
Push in the connector until both
sides lock, making sure that the connector position and orientation are
correct.
Slide the cover in
the direction of the
arrow to open it.
Attach the
connector.
Tighten the screws.
Floppy Disk
Drive
4
5
6
7
Creating Backup Disks
Attach the Port Replicator ( page 42)
Click [Start], then move the cursor to [Programs][Panasonic], then click [Create FIRSTAID FD]
Follow the instructions on the display. After this, place a label on each disk for
identification purposes.
Label-side up
Insert the shutter-side headfirst.
Eject Button
Floppy Disk Drive

23
Copy the necessary drivers, from the floppy disk included with your CD-ROM
drive, to the Windows 95 CD-ROM Setup Boot Disk. It will be necessary to
edit the CONFIG.SYS file and AUTOEXEC.BAT file on the Windows 95 CDROM Setup Boot Disk. When editing the AUTOEXEC.BAT file, be careful
not to delete lines containing settings for CAB files to be copied to the C drive
on the hard disk.
Some CD-ROM drives require card managers (card and socket service). See
the manual included with your CD-ROM drive for further details.
Make a copy of the CD-ROM driver
It may take several minutes to reboot the computer.
Please store the floppy disks in a safe place. They will enable you to return
your computer to close to the condition at the time of purchase should any
problems occur.
Do not remove the floppy disk while the FDD indicator is on, power down
your computer or use the suspend or hibernation function.
When creating floppy disks, do not run any other application program.
When creating floppy disks and the message [Insufficient files to copy] is
displayed, click [OK] and then contact Panasonic Technical Support.
CAUTION

24
Four Important Points
Computing On The Road
One of the main features of notebook-type computers is that you have the power of computing away from your home or office. In the following, information is provided on how
to maximize use of the battery pack which is necessary for such computing.
POINT 1
POINT 2
Be sure to charge your battery before and after use.
To get the maximum use of your battery, set the power
management mode.
Check to see that you have your AC adapter with you
before leaving your home or office.
Purchasing an extra battery (CF-VZSU05W/06W) is highly recommended.
Always watch your battery level!
POINT 3
POINT 4
Conserving Power
Things to Remember
Leave your computer off when it is not in use ( page 18)
Adjust the brightness (dark) with Fn + F2 ( page 80)
Before stepping away from your computer, press Fn +
F10 to put your computer in the standby mode( page 81)
The standby mode helps you conserve power by cutting off power to the hard disk
drive’s motor and display. To resume, you may press any key other than Fn or
move the trackball.
In the power management mode, the setting of [Power
Saving] is recommended ( page 26)
25
Enter the following settings under [Operation Setting] in
[Panasonic Power Management] ( page 26)
• Panel Switch: Suspend
The system will enter suspend mode and the power indicator will blink green
when the LCD panel is closed. The system will resume when the LCD panel is
opened.
• Automatic Hibernation: Enabled
After the system enters the suspend mode, it will automatically change to hibernation mode when a preset length of time, set in the [Operation Setting], has
elapsed.
• Turn Off PC Card in Suspend Mode: Enabled
The PC Card power is turned off in suspend mode.
NOTE
If you plan to use only the battery pack or set the power management, it is
necessary to check [Allow Windows to manage power use on this computer] in [Start] - [Settings] - [Control Panel] - [Power]. If the check is
removed, the time may not be displayed properly when operation is resumed from the suspend or hibernation mode or the operating time with
the battery pack may become short (the power management function of
Windows does work).
When the modem is connected through a PC Card, [Wake up the computer
when the phone rings] in [Control Panel]-[Power] is disabled.
26
Computing On The Road
6
Click [Start] - [Settings] - [Control Panel], then doubleclick [Panasonic Power Management]
Or, double-click the icon in the task bar.
(The icon is not displayed, if [Show settings icon on the task bar] in [Panasonic
Power Management] is not set.
3
4
5
2
Setting Panasonic Power Management
(How to set [Power Saving] and [Operation Setting])
1
Click [Power Saving] tab, then set [Power Saving] under
[Battery] or [AC]
NOTE
When this command is used, if the AC adapter is connected, the [AC] setting will be enabled. If the AC adapter is not connected, the [Battery] setting will be enabled.
The Fn and F6 keys can be pressed together to toggle the mode in the
following sequence: Standard --> Power Saving --> User Setting.
Click [Operation Setting] tab, then set [Suspend] under
[Panel Switch]
Enter a check next to [Enable Automatic Hibernation], and
set the time which must elapse before the change takes
place
Select [Turn Off PC Card in Suspend Mode]
Click [OK]
NOTE
You can also run [Power Management] from the Setup Utility ( page 76).

27
The settings are the same for [AC] and for [Battery].
Setting
Function
CPU Speed (%)
Standby Timeout (min)
Suspend Timeout (min)
LCD Backlight
Standard
100
30
Disabled
Bright
Power
Saving
25
2
10
Power
Saving
User Setting
100, 75, 50, 25, 12.5
1, 2, 5, 10, 15, 30, Disable
1, 2, 5, 10, 15, 30, Disable
Bright, Medium, Dark,
Power Saving
Standby Timeout : When the computer is idle or a device is not ac-
cessed, the computer enters the standby mode after a preset interval of time.
When [USB Port] of [Supervisor Setup] is set to
[Enabled] in Setup Utility, this function is disabled.
Suspend Timeout : When the computer is idle or a device is not ac-
cessed, the computer enters the suspend mode after a preset interval of time.
When [USB Port] of [Supervisor Setup] is set to
[Enabled] in Setup Utility, this function is disabled.
LCD Backlight : [Bright] [Medium] [Dark] [Power Saving]
Bright <---------------------------------> Dark
CAUTION
When installed in a network environment.
After resuming operation from the hibernation mode, the network connection may be
severed or the computer will not work properly.
When a device like a high-speed modem or ISDN terminal adapter is connected to the serial port, etc., or if the infrared communications port is
being used for data transfer.
There are times when high-speed communication is adversely affected if the power
management function is enable. Please disable the power management function.
Key operation and music playback.
When the power management function is running, the keyboard and trackball operations may feel sluggish. Also, music may not play correctly when entering the standby
mode during operation.
Panasonic Power Management Settings
 Loading...