

Page 1

95
®
Personal Computer
Reference Manual
CF-45 Series
Contents
Key Combinations............................................. 2
LED Indicators...................................................3
Suspend/Hibernation Functions ...................... 4
Security Measures ............................................ 7
Computing On the Road ................................ 11
Battery Power ................................................. 13
Using PC Cards .............................................. 15
Adding Memory .............................................. 17
Port Replicator................................................ 18
Using a Printer................................................ 19
Using an External Display ............................. 20
Using USB Devices................................................. 21
Infrared Data Communications.......................... 22
Hard Disk Drive............................................... 23
Setup Utility .................................................... 24
Technical Information .................................... 29
Computer Diagnosis ...................................... 32
DMI Viewe r ...................................................... 33
Dealing With Problems................................... 34
NOTE: NOTE provides a useful fact or helpful information.
CAUTION: CAUTION indicates a condition that may result in minor or moderate injury.
WARNING: WARNING indicates a hazard that may result in moderate or serious injury.
[Start]-[Shut Down]: This illustration means to click [Start], then to click [Shut Down].
(For some applications, you may need to double-click.)
Enter : This illustration means to press the [Enter] key.
Fn + F5 : This illustration means to press [Fn], and while holding down on [Fn], to press [F5].
: This illustration means to refer to the Operating Instructions
We recommend that this Reference Manual be printed out.
Page 2
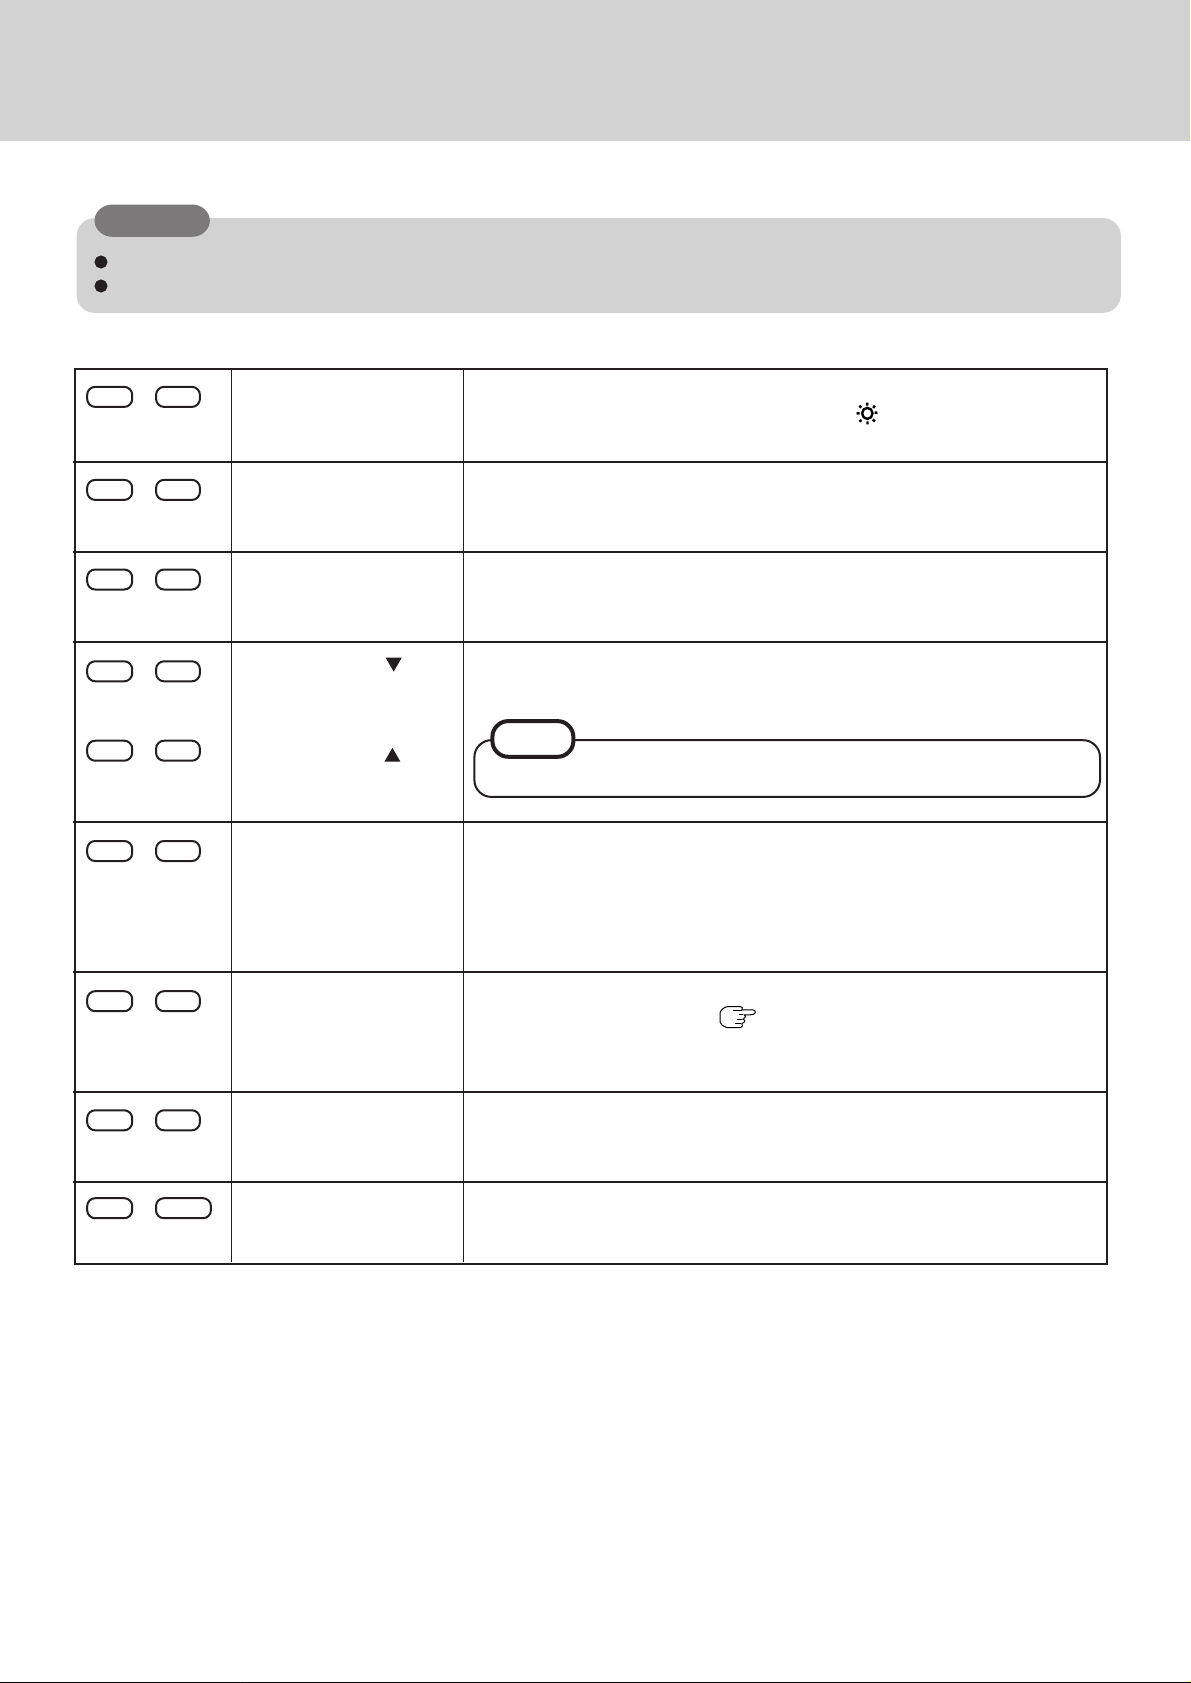
Key Combinations
CAUTION
Do not press the following key combinations repeatedly in (quick) succession.
Do not press the following key combinations while using the trackball (mouse) or other keys.
2
Fn + F2
Fn + F3
Fn + F4
Fn + F5
Fn + F6
Fn + F7
Fn + F8
Fn + F9
LCD brightness control
Display change
Speaker on/off switch
Volume contr ol ( down)
V olume control ( up)
Power off using the suspend function
Power Management
enable/disable switch
Remaining capacity of
the battery pack
Hold down the Fn key and press F2 to change the brightness.
(When the brightness is at its maximum value, is displayed.)
By pressing this key combination, you can select either an external display,
LCD or simultaneous.
Pressing this key combination turns off audio from the internal speaker and
headphone jack. Pressing it again turns audio back on.
Pressing this key combination adjusts the volume of the internal speaker and
headphone jack.
NOTE
This key combination cannot be used to adjust the volume of the beep sound.
Pressing this key combination causes the current screen on the display to be
saved to memory, and powers off the computer. When the computer is powered on again, this same screen will be displayed. (The computer must be
plugged into the AC adapter or have a battery pack with sufficient remaining
power installed.)
Pressing this key combination temporarily disables the power management
feature of the Setup Utility. ( page26) Pressing it again, or powering the
computer off and then back on enables the power management feature of the
Setup Utility.
Pressing this key combination displays the remaining battery capacity on the
screen.
Fn + F10
Standby mode
for conserving power
Pressing this key combination cuts off power to the LCD display until operation is resumed by pressing any key.
Page 3

LED Indicators
3
Caps Lock
NumLk (Numeric key)
ScrLk (Scroll lock)
KeyPad (Arrow key)
CD-ROM status
Floppy disk status
This indicator lights green when Caps Lock is pressed. Subsequent non-shifted
input is capitalized.
These indicators light green when NumLk is pressed and then KeyPad is pressed
while holding down the Fn key. This causes a portion of the keyboard to function as a numeric keypad. Depending on the application, the [Enter] key may
function differently than normal.
This indicator lights green when ScrLk is pressed. Scroll lock functions differently depending on the application.
This indicator lights green when KeyPad is pressed while holding down Fn.
When the indicator is not lit, a portion of the keyboard functions as arrow keys.
Depending on the application, the [Enter] key may function differently than
normal.
This indicator lights when the CD-ROM drive is accessed.
This indicator lights when the floppy disk drive is accessed.
Hard disk status
Battery pack status
Power status
This indicator lights when the hard disk drive is accessed.
Not lit : AC adapter not connected or charging not being
performed.
Lit constantly orange : Charging in progress.
Lit constantly green : Charging finished.
Lit constantly red : Battery is low (remaining battery capacity is approx.
9% or less).
Flashing red : Battery pack or charging malfunction.
Flashing orange for 5 seconds after the AC adapter is connected :
Charging on standby. (The ambient temperature is
outside the allowable range.)
Not lit : Power off
Lit constantly green : Power on
Flashing green : Suspend mode
Page 4

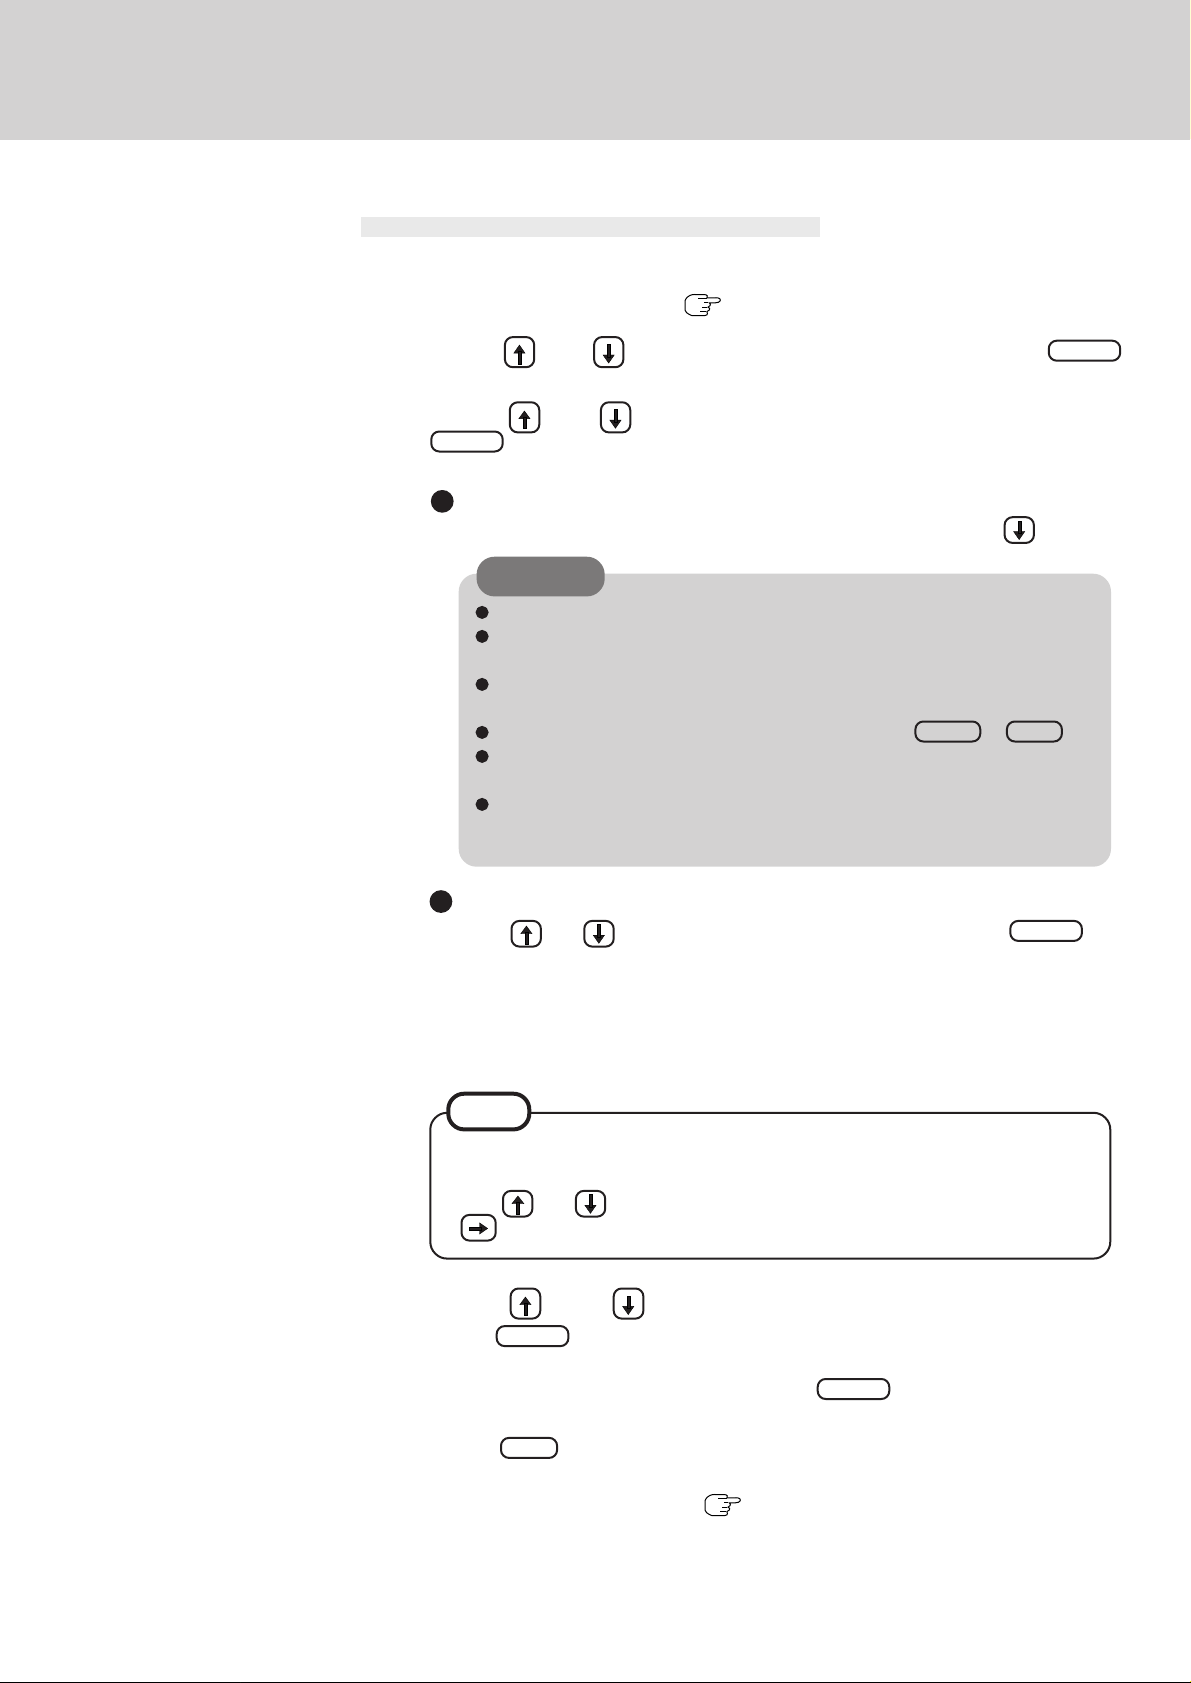
Suspend/Hibernation Functions
Starting Up Your Computer Quickly
If you want to immediately start up and continue an application after shutting down your computer, you can do so by using the suspend or hibernation function.
Differences between the suspend function and hibernation function
4
Function
Where data is saved to
Speed
Requires power supply
Suspend function Hibernation function
Memory Hard disk
Fast Somewhat slow
Yes (if power is cut, all data is lost) Power not required to maintain data
Setting the Suspend or Hibernation Function
Run the Setup Utility ( page 24)
1
Using and , select [Power Management], then press
2
Enter
Using and , select [Power Switch], set [Suspend] or
3
[Hibernation] with , then press Esc
Close the Setup Utility ( page 24)
4
Shutting Down Using the Suspend or Hibernation Function
The computer should be set for suspend or hibernation ( see the above procedure).
Power off your computer
(Do not touch the power switch while your
computer is entering the hibernation mode.) Suspend Mode
Hibernation Mode
CAUTION
If the power switch is held for over four seconds at the ON position, the power goes
OFF without activation of the suspend or hibernation function.
Do not slide the power switch and hold it for more than four seconds.
If the computer will not be operated for an extended period of time, it is recommended that hibernation mode is used instead of suspend mode.
or
Page 5

Suspend/Hibernation Functions
Shutting Down Using the Suspend Function
Fn + F7 or select [Suspend] from the [Start] menu
NOTE
When you select [Suspend] from the [Start] menu:
[Suspend] is deleted from the [Start] menu by unchecking [Allow Windows to manage
power use on this computer.] in [Start] - [Settings] - [Control Panel] - [Power] or by
unchecking [Show suspend command on Start menu] in [Advanced].
5
Suspend Mode
Resuming Operation
Turn your computer on
If security indicator ( ) is displayed upon sliding the power switch, your password has
been set.
CAUTION
After the display returns, the computer needs a short period of time to reinitialize.
This takes about 15 seconds. Do not shut down or restart Windows during this time,
as this may subsequently cause Windows to operate abnormally.
Do not install or remove peripherals while your computer is in the suspend or hibernation mode; abnormal operation may result.
When operation resumes, serial devices such as a mouse or modem, or your PC Cards
may not work. In such cases, you will need to restart your computer or reinitialize the
individual devices.
Do not use the suspend or hibernation functions when using USB devices.
Set [USB Controller] of [Supervisor Setup] to [Disable] in the Setup Utility when
using the suspend or hibernation functions.
Page 6

Suspend/Hibernation Functions
Precautions for Using the Suspend or Hibernation Function
CAUTION
Save all data before powering off your computer.
When restarting from or shutting down to the suspend or hibernation mode, do not touch
the trackball or move the mouse (serial or PS/2 type) if one is connected. There are cases
where these devices will fail to operate; you will have to restart your computer using the
keyboard.
Do not power off during the following periods (you may corrupt your data or file):
• While the FDD indicator ( ), HDD indicator ( ) or CD-ROM indicator ( ) is on.
• While playing/recording audio files.
• While communications software is being used.
Do not use the suspend or hibernation function when using an operating system other than
the one that comes with your computer, the diagnostics program (DIAG45), the Setup
Utility, or when experiencing static electricity or noise.
If you hold down on the Alt , Ctrl or Shift key to enter the suspend or
hibernation mode, after resuming operation, you must press the same key. For example,
if you hold down on the Shift key while sliding the power switch, upon resuming, if
you do not press the Shift key again, only capital letters will result from typing.
If your computer locks up, press the reset button. All data not saved is lost when this
button is pressed.
In the suspend mode, power is consumed. If PC cards (e.g., a modem card) are inserted,
more of that power is consumed. When all power has been consumed, all data at shutdown is lost since it is retained in memory. We therefore recommend plugging in the AC
adapter when using the suspend function.
Do not use the suspend or hibernation function during the following periods. The suspend or hibernation function, or peripherals may not work.
When a file in external devices such as a CD-ROM drive, external hard disk, or ATA
card is opened, the suspend or hibernation function may not work. In such cases, close
the file.
SCSI cards may not recover after entering the suspend or hibernation mode. If this
occurs, restart the computer.
6
Page 7

Security Measures
To prevent unauthorized access of your computer, the various security measures are provided below.
Situation Function to use Reference
Y ou do not want your computer to be used without permission
Same as above, but while you’re away temporarily
Y ou want to prevent theft or damage to data by using a floppy disk
Y ou do not want your Supervisor Setup changed without permission
Y ou want to prevent theft of your computer
When you do not want your computer to be used without permission
Set the User Password.
Without the password, access to your computer is impossible.
When the User Password is set
Upon entering your User Password
and pressing Enter .
User Password below
Coffee break Password page 8
Prevent operation by using a floppy disk page 9
Supervisor Password page 9
Use a security lock
If the correct password is input,
7
Will Start
Over three incorrect attempts,
Will Not Start*
(Power off)
* If you are starting from the suspend mode, if after three attempts the
correct password is not input, or if no password is entered for about
a minute, the computer returns to the suspend mode.
Setting the user password (enabling, changing, disabling)
Run the Setup Utility ( page 24)
1
Using and , select [System Setup], then press Enter
2
Using and , select [User Password], then press Enter
3
4
To enable or change your password
Enter your password at the [Enter User Password], then press .
CAUTION
Y our password will not be displayed on the screen.
Please limit your password to seven characters. Note that there is no distinction between upper and lower case letters.
White colored keys can be used. Note that the space bar and function keys
cannot be used.
Do not input your password while holding down on Shift or Ctrl .
Use only the upper horizontal row of numeric keys to input your user password.
Do not forget your password. If a password is forgotten, you will be unable
to use your computer.
To disable your password
Using the and keys, select [Delete User Password], then press Enter .
Go to step 7.
5
Re-enter your password at the [Enter User Password Again]
(This is for confirmation purposes.)
Using and , select [Set User Password], then press
6
Enter
Page 8

Security Measures
At the confirmation screen, press Enter
7
Press Esc to end the password setting procedure
8
Close the Setup Utility ( page 24)
9
CAUTION
T o prevent the changing of your password without permission
• When running the Setup Utility, do not leave your computer even for a short time.
• Set the User Password Protection option ( page10).
When you do not want your computer to be used without permission while away temporarily
Y ou should set the “Coffee break Password” (Note that you must first set the User Password).
When you input your selected key combination, the computer locks (key input, use of the trackball
and use of an external mouse are no longer possible).
When the coffee break password is set
When leaving your desk
Alt + Ctrl + F9
(Example of a selected key combination)
8
Input the correct password used at startup
and press Enter .
The computer
is locked
CA UTION
Do not leave your computer just after sensitive data had been shown on the screen.
It is impossible to lock your computer from an external device, such as a mouse
connected through the serial port or the USB device is used.
During the coffee break, is displayed on the screen. If the operations described below are performed during the coffee break, the indication may
disappear. In order to quit the coffee break and again begin using the computer,
input your password.
If a different popup window is displayed by using key combination.
If the computer is returned from the standby mode.
If the serial mouse is moved.
When an incorrect password is inputted,
Operation resumes
Operation does
not resume
Setting the Coffee break Passwo rd (enabling or disabling)
Set the User Password ( page 7 to 8, step
1
1
to 7 )
2
3
4
5
To enable the Coffee break Password
Using and , select [Coffee break Password], then set [Enable] with .
To disable the Coffee break Password
Using and , select [Coffee break Password], then set [Disable] with .
Go to step 4.
Using and keys, select [Key Combination for Coffee
break], then set your combination of keys with
Press Esc to end the password setting procedure
Close the Setup Utility ( page 24)
Page 9

Security Measures
When you want to prevent theft of or damage to data by using a floppy disk
You may choose to protect the data on your computer from being accessed illegally or overwritten accidentally by using a floppy disk. You can also set your computer to be unbootable from
a floppy disk.
9
Preventing the use of a floppy disk
Even when one tries to access a
floppy disk,
This error message is displayed.
Procedure
1
Run the Setup Utility ( page 24)
Using and , select [Supervisor Setup], then press Enter
2
Using and , select [Boot Up Drive], then set either
3
[HDD FDD] or [CDD FDD HDD] with
CAUTION
When changing to the [HDD FDD] or [CDD FDD HDD] setting, to
continue read/write operations from a floppy disk and to use the hard disk drive or
CD-ROM to start, press Esc and go to step 5.
Using the and , select [Floppy Operation], set [Disable]
4
with , then press Esc
Close the Setup Utility ( page 24)
5
When you do not want your Supervisor Setup changed without permission
Set the Supervisor Password. After it has been set, no changes can be made to the Supervisor
settings unless the password is entered.
When the supervisor password is set
In the Setup Utility ( page 24),
if is displayed,
Input the correct supervisor password and press Enter ,
When the supervisor password is incorrect or when the user
password is entered, (Or, even when the correct supervisor
password is entered). page 36
NOTE
You may wish to protect the User Password ( page 10).
(There are cases in which the Supervisor Setup does
not appear on the main screen). page 24
Supervisor Setup
May be
Opened
Supervisor Setup
Can not be
Opened
Page 10
Security Measures
Setting the Supervisor Password
(enabling, changing, disabling)
1
Run the Setup Utility ( page 24)
Using and , select [Supervisor Setup], then press Enter
2
Using and , select [Supervisor Password ], then press
3
Enter
10
4
5
To enable or change your supervisor password
Enter your password at the [Enter Supervisor Password], then press .
CAUTION
Your password will not be displayed on the screen.
Please limit your password to seven characters. Note that there is no distinction between upper and lower case letters.
White colored keys can be used. Note that the space bar and function keys
cannot be used.
Do not input your password while holding down on Shift or Ctrl .
Use only the upper horizontal row of numeric keys to input your user password.
Do not forget your password. If a password is forgotten you will be unable
to use your computer.
To disable your supervisor password
Using and , select [Delete Supervisor Password], then press Enter .
Go to step 7.
Re-enter your password at the [Enter Supervisor Password
Again]
(This is for confirmation purposes.)
NOTE
When you do not want the User Password enabled, changed, or disabled without permission,
use and to select [User Password Protection], then set [Enable] with
.
Using and , select [Set Super visor Pas sword] , then
6
press Enter
7
At the confirmation screen, press Enter
8
Press Esc to end the password setting procedure
Close the Setup Utility ( page 24)
9
Page 11
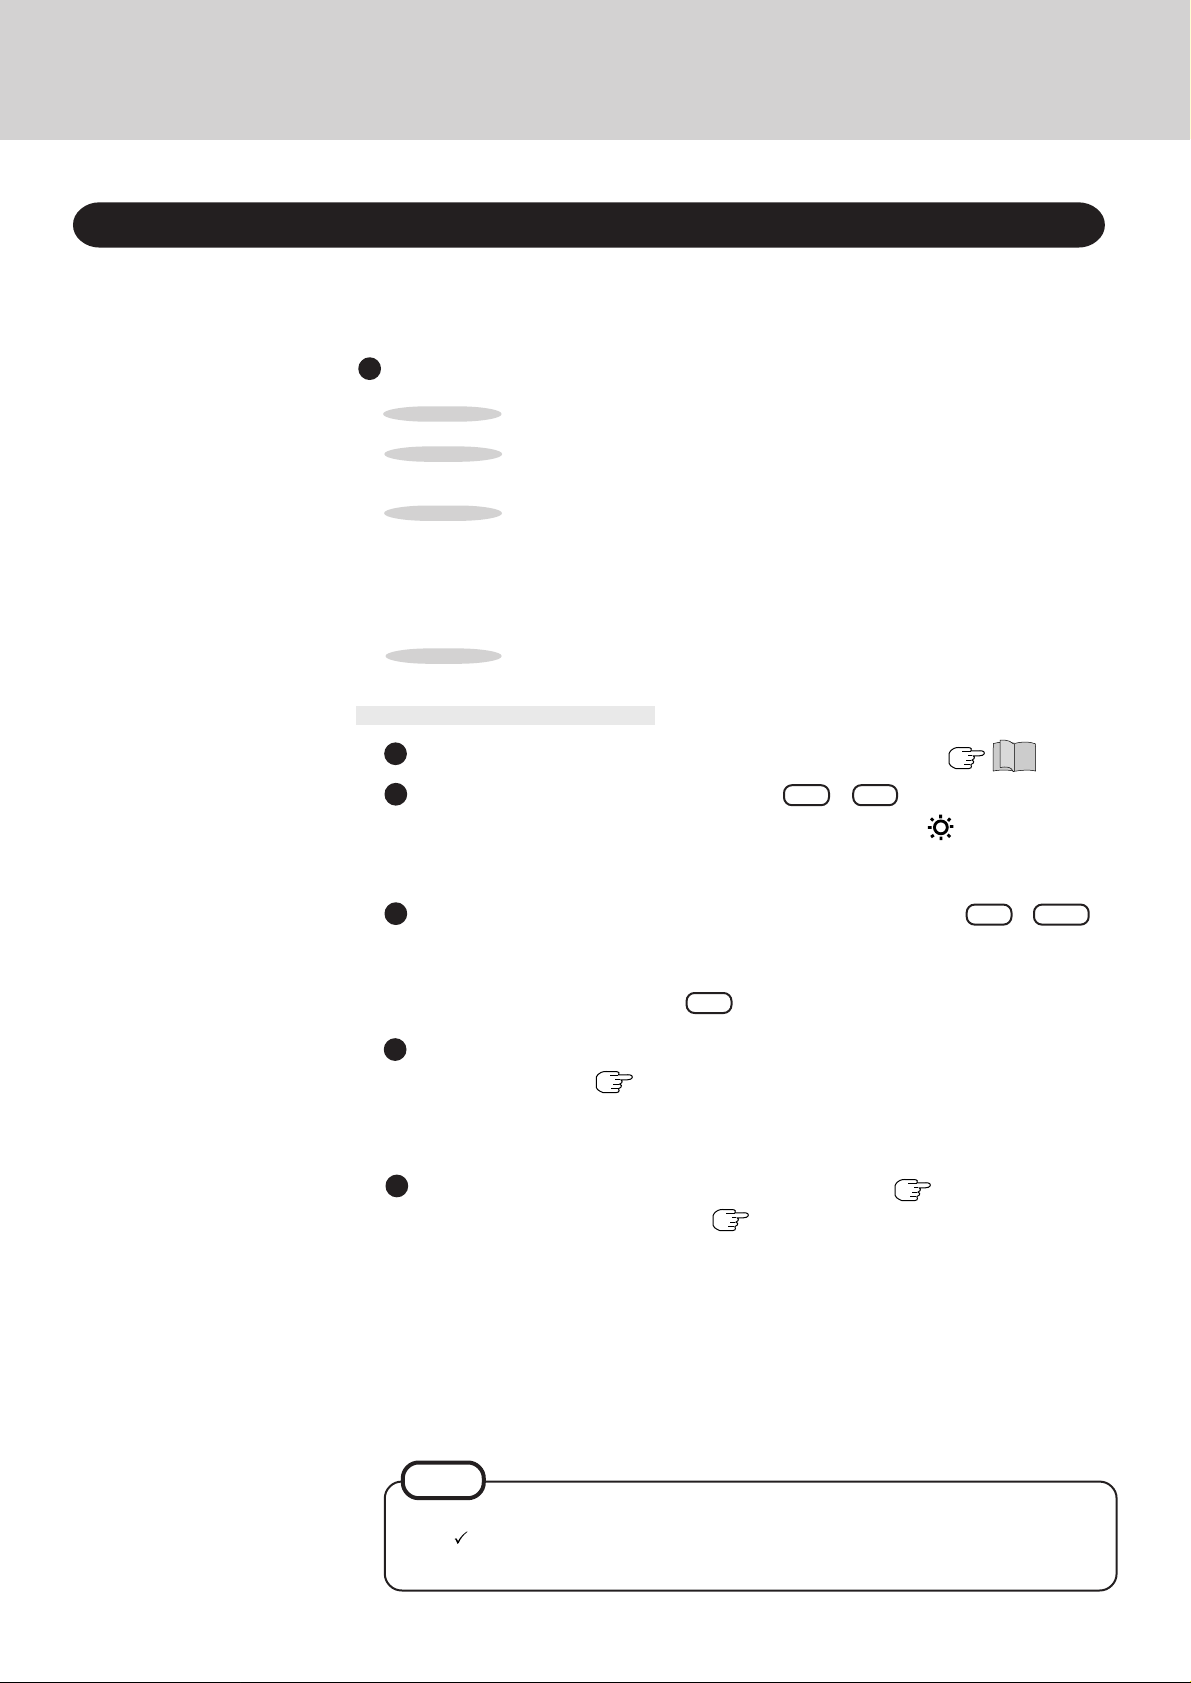
Computing On the Road
Conserving Power
One of the main features of notebook-type computers is that you have the power of computing
away from your home or office. In the following, information is provided on how to maximize
use of the battery pack which is necessary for such computing.
Four Important Poin t s
11
POINT
POINT
POINT
POINT
1
Be sure to charge your battery before and after use.
2
To get the maximum use of your battery, set the power management mode.
3
Check to see that you have your AC adapter with you before
leaving your home or office.
Purchasing an extra battery (CF-VZS251AW*) and the optional battery
charger (CF-VCB251W or CF-VCB251AW) is highly recommended.
*
Do not use CF-VZS251W with this Computer.
4
Always watch your battery level!
Things to Remember
Leave your computer off when it is not in use ( )
Adjust the brightness (dark) with Fn + F2
By repeatedly pressing the keys to maximize the brightness ( will be displayed),
following this, if the keys are repeatedly pressed again, the brightness will be minimized,
thereby lowering the power consumption.
Before stepping away from your computer, press Fn + F10 to
put your computer in the standby mode
The standby mode helps you conserve power by cutting off power to the LCD. To resume,
you may press any key other than Fn or move the trackball.
In the power management mode, the setting of [Ad vanced] is
recommended
With the Setup Utility, you can set the [Advanced] mode. This mode allows you to
maximize power save regardless of whether you are using only the battery pack or the
AC adapter.
( page 12)
Setting the suspend/hibernation timeout ( page 12)
The suspend or hibernation function ( page 4) allows you to save power by automatically cutting off power when the computer is idle or there is no access to individual de-
vices for 4 or 16 minutes. If [Advanced] or [Standard (Battery/AC adapter)] is selected
for [Power Saving], the suspend / hibernation timeout function will go into effect for both
the battery pack and the AC adapter. If, however, [Standard (Battery)] is selected for
[Power Saving], it will go into effect only during operation by the battery. The standby
timeout function is automatically set when [Advanced] or [Standard] is set. Note that the
standby timeout precedes the suspend/hibernation timeout.
It should be noted that for some applications, the suspend/hibernation timeout will not
work properly.
NOTE
If you plan to use only the battery pack or set the power management, it is necessary to
check [Allow Windows to manage power use on this computer] in [Start] - [Settings]
- [Control Panel] - [Power]. If no check is added, the hibernation timeout will not occur.
Page 12

Computing On the Road
Setting Power Management
(How to set [Advanced] and the suspend/hibernation timeout)
Run the Setup Utility ( page 24)
1
Using and , select [Power Management], then press
2
Enter
Using and , select [Po wer Saving], then set [Advanced]
3
with
(To avoid setting the suspend/hibernation timeout, press Esc and proceed on to step 6.)
Using and , select [P ower Switch], then set [Suspend] or
4
[Hibernation] with
Using and , select [Suspend/Hibernation Timeout], set
5
either [4 min] or [16 min] with , then press Esc
Close the Setup Utility ( page 24)
6
Power Management settings ( page 26)
Functions automatically
Power
Management
CPU Speed Change Mode
HDD Motor Timeout
CDD Motor Timeout
Standb y Timeout
CPU Speed Change Mode:
HDD Motor Timeout:
CDD Motor Timeout:
Standby Timeout:
CAUTION
When installed in a network environment.
Be sure to disable the suspend/hibernation timeout settings with the Setup Utility .
After resuming operation from the suspend or hibernation mode, the network connection may be
severed or the computer will not work properly.
When a device like a high-speed modem or ISDN terminal adapter is connected to the
serial port, etc.
There are times when high-speed communication is adversely affected if the power management function is enabled. Please confirm that is displayed by pressing
Fn + F8 to disable the power management function. After you have finished using
a communication device, you can enable the power management function by
pressing Fn + F8 .
Key operation and music playback.
When the power management function is running, you may feel that key and trackball (or mouse)
operations are sluggish. Furthermore, music may not be played back correctly when entering the
standby mode during playback.
Advanced Standard Standard OFF
set
Enable Enable Enable Disable
1 min 1 min 1 min Never
1 min 1 min 1 min Never
1 min 2 min 2 min Never
In this mode, the CPU is automatically stopped when there are no
operations.
When the hard disk drive is not accessed for more than a minute,
power to the motor is shut off.
When the CD-ROM drive is not accessed for more than a minute,
power to the motor is shut off.
When the computer is idle or a device is not accessed for one or two
minutes, the computer enters the standby mode.
(Battery/AC adapter)* (Battery)**
*
Setting at the time of purchase
**
Enabled only when the battery itself is being used.
12
Page 13

Battery Power
Battery Status
Use the Battery Indicator to Check on the Battery Status
Battery Indicator Batt ery Status
Orange*
Green*
Red
Blinking red*
Blinking orange for 5
seconds after the AC
adapter is connected*
Not lit
13
Charging
Fully-charged
Battery charge is low (the charge is less than approx. 9% capacity)
Battery pack or charger may not be working properly.
Quickly remove the battery pack and disconnect the AC adapter,
then connect them again. If the problem persists, contact Panasonic
Technical Support.
Unable to recharge due to violation of temperature limits
Battery pack is not connected or charging not being performed.
*
When the AC adapter is connected.
Getting a detailed reading
Fn + F9
NOTE
The actual remaining battery life and the displayed indication may differ.
In this case, the battery will need to be recharged. The following are indications of a
battery that needs to be recharged:
The battery indicator light remains red for a long period of time.
The battery remaining displays 99% and the indicator light is orange for a long period of time.
Low battery warning appears after a short period of time*.
*
This may be caused by the use of suspend mode for long periods of time. The Battery is discharging while
the unit is in suspend mode when the AC adapter is not connected.
If any of the above condition occurs, the battery must be discharged, then recharged. You
should use the computer without power connected until the battery is fully discharged
(reaches 0%) or the displayed battery life falls below 94%. Reconnect the AC adapter to
fully recharge the battery.
When the battery pack is not in the computer, is displayed.
When the Remaining Battery Charge Becomes Low
save your data and power off your computer
Following that:
Plug in the AC adapter, and fully charge your battery.
Use a spare battery if you have one.
If you have neither the AC adapter nor an extra battery, power the computer off.
If the suspend or hibernation function is set
Red indicator lights
Beep sounds
(at approx. 9% capacity)
**
Suspend Mode or Hibernation Mode
(at approx. 4% capacity)
If the suspend or hibernation function is not set
Red indicator lights
(at approx. 9% capacity)
**
When disabling the speakers with the Setup Utility (or pressing Fn + F4 ), the warning beep
is also disabled.
Beep sounds
(at approx. 4% capacity)
**
Computer
goes off
(at approx. 0% capacity)
Page 14

Battery Power
NOTE
Although the battery has not begun to run out, the battery indicator may light up red or emit
a beep. This indicates a significant rise in the temperature of the battery pack. This is
typically caused by the fact that the battery pack has been delivering a high level of power
because the computer has been used with the display at the brightest setting and with the
power-saving function off.
To protect the battery pack from increases in temperature, the brightness of the display
automatically decreases, allowing the temperature of the battery to drop. In this condition,
if the computer is left as is, it will automatically go off after about three minutes have elapsed.
Within that period, therefore, be sure to connect the AC adapter or shut the computer OFF
after saving any open data (if necessary).
Replacing the Battery Pack
When the charge provided by your battery pack is supplied for only a short period of time, even
after fully charging according to the instructions, it may be time to replace your battery pack.
The battery pack is a consumable item and therefore will require replacement (CF-VZS251AW).
14
CAUTION
Do not touch the terminals on the battery pack. The battery pack may no longer function
properly if the contacts are dirty or damaged.
The battery pack is not charged when the computer is first purchased. Be sure to charge
it before using it for the first time. When the AC adapter is connected to the computer,
charging begins automatically.
Cover
Lever
Connector Battery Pack
Power off your computer ( )
1
Do not shut down using the suspend mode.
CAUTION
In the suspend mode, do not remove/change the battery pack. Removing the pack in
the suspend mode will erase your data and may damage the computer.
Open the cover
2
Turn the computer over, unlock the lever and then open the cover.
3
Taking out the battery pack
As shown in the figure, lift the battery pack and remove it from the connector.
Inserting a battery pack
Reconnect the battery to the connector and
return it to its proper location.
CAUTION
Be sure the battery pack is properly connected to the connector.
Close the cover
4
Close the cover using the arrow as a guide, then
lock the lever into place.
CA UTION
Confirm that the lever lock is correctly
in place. Should you decide to carry your
computer without the lever lock in place,
the cover may open causing the battery
pack to fall out.
Page 15

Using PC Cards
PC Card
Your computer has two PC Card slots. These slots conform to the PC Card Standard; therefore,
communications and SCSI devices may be utilized. The slots allow you to use two Type I or
Type II cards (or one Type I and one Type II), or one Type III card.
15
Type I or II
Two cards can be used simultaneously.
Slot (Socket) 2
Slot (Socket) 1
CAUTION
Please check the PC Cards’ specifications. Be sure the total operating current does not
exceed the specified limit. Damage may result otherwise.
Allowable Current (total for two slots) : 3.3 V: 400 mA, 5 V: 400 mA, 12 V: 120 mA
There are times when both a T ype I card and a Type II card will not work at the same time.
When using a CardBus type PC card, the following cautions must be observed:
When using a CardBus type card, no other types of cards can be used.
When removing a CardBus type card (e.g., to insert a non-CardBus type card), be sure to
restart the computer after pressing [Stop] ( below “To remove a PC Card”). After
that, follow the procedure below on installing/removing a PC card.
T ype III
One card can be used only in the slot 1.
Installing/Removing the PC Card
CAUTION
To remove a PC card:
Before removing a PC Card, go to [Socket Status] (in [Start] - [Settings] - [Control
Panel] - [PC Card (PCMCIA)]), select the PC Card slot and press [Stop].
After removing a CardBus type PC Card, be sure to restart the computer.
Label-side up
2
1
Button
Power off your computer ( )
1
Do not shut down using the suspend or hibernation mode.
CAUTION
Do not install or remove peripherals while your computer is in the suspend or
hibernation mode; abnormal operation may result.
2
Installing a PC Card
Simply slide the PC Card in until it snaps into place. Please refer to the manual for
each card on how to install the card (insertion is typically label-side up).
CAUTION
When inserting a card, do not force the card in if doing so seems difficult. You
may damage the slot, making it impossible to remove the card.
Removing a PC Card
Pull the button out and press it.
1
2
Pull the PC Card the rest of the way out.
Turn your computer on
3
There are some PC Cards that require a special or updated device driver be installed.
Follow the instructions on the screen and read any related manuals on how to install
device drivers.
Page 16

Using PC Cards
PC Card Utility Program
16
About PhoenixCard Manager
TM
for Windows® 95
CAUTION
Follow the installation procedure below only if you will be using the ZV card. Otherwise,
do not perform the installation; abnormal operation may result.
If the hard disk has been reimaged, reinstall PhoenixCard Manager
if you will be using the ZV card.
TM
for Windows® 95
Installing (only if you will be using the ZV card)
1
Set [Sound Controller] to [Automatic (PnP)] in the Setup Utility.
2
Select [Start] - [Run].
3
Type "c:\util\drivers\pccard\setup.exe", press [OK], then follow the on-screen instructions.
CAUTION
After PhoenixCard ManagerTM for Windows® 95 has been installed, make sure to power
off the computer before installing or removing the card. Also, do not use the suspend or
hibernation functions if the card is installed.
NOTE
When running the power conservation function with the sound chip set, there may
be no sound output. In this case, the following setting needs to be made.
In [Control Panel] - [Power] - [OPL3-SAx power management], set [Non Power Save
mode] then press [Apply]. Then press [OK].
Uninstalling
If you will not be using the ZV card, uninstall PhoenixCard ManagerTM for W indows 95 in
[Start] - [Settings] - [Control Panel] - [Add/Remove Programs] and follow the procedure
below after restarting the computer.
1
Select [PC Card (PCMCIA)] in [Start] - [Settings] - [Control Panel].
2
Press [Next] at the display for the [Display Driver Wizard for PC Cards (PCMCIA)],
press [Next] again and then press [Finish]. When the message appears asking whether
to reboot the computer, select [Yes].
Page 17

Adding Memory
RAM Module
CAUTION
RAM modules are extremely sensitive to static electricity. There are cases where static electricity generated by the human body has adversely affected such modules. In addition, it is
easy to damage the RAM modules or internal components of the computer. Therefore, when
installing or removing a RAM module, handle the module with extreme care.
Installing/Removing the RAM Module
1
Power off your computer ( )
Do not shut down using the suspend or hibernation mode.
CA UTION
Do not install or remove peripherals while your computer is in the suspend or
Lever
2
hibernation mode; abnormal operation may result.
Remove the cover
Turn the computer over, unlock the lever and then slide the cover off.
17
Cover
Hard Disk Drive
Finger location
RAM Module Slot
RAM Module
CAUTION
Do not touch the terminals or internal components, insert objects other than the
module, or allow foreign particles to enter. Doing so has been known to cause
damage, fire or electric shock.
Flip over the hard disk
3
Do not disconnect the hard disk from the connector, and let it remain on the frame.
(Support the hard disk by hand.)
CAUTION
Be careful when handling the hard disk. The hard disk is extremely sensitive to
shock.
4
Installing the RAM module
Slide in the module at an angle and snap the module into place by pushing down on
it.
RAM module specifications
144 pins, 60/70 ns, 3.3 V
SO-DIMM, EDO
Take care not to remove
the connector
Hook
Removing the RAM module
Open the left and right hooks.
1
Gently remove the RAM module from the slot.
2
Gently return the hard disk into the slot, and then slide the
5
cover back on
Be sure to lock the lever.
( page 23, Step 4 and 5)
Page 18

Port Replicator
A port replicator is available as an option (CF-VEB451W). This device eliminates the
hassles of having you connect/disconnect the various cables when carrying your computer
around and allows a variety of peripherals to be connected including a headphone or
microphone, etc.
The port replicator connects to the expansion bus connector on the bottom of your computer.
When your computer is not connected to the port replicator, be sure that the expansion bus
connector on the bottom of the computer is covered.
For more detailed information, please refer to the operation manual for the port replicator.
CAUTION
When using the computer with the port replicator, the microphone, headphone, and
USB connectors must be connected to the port replicator, not directly to the computer.
18
Page 19

Using a Printer
Power off your computer ( )
1
Do not shut down using the suspend or hibernation mode.
CAUTION
Do not install or remove peripherals while your computer is in the suspend or
hibernation mode; abnormal operation may result.
Parallel Port
Connect the printer to your computer
2
3
Turn on the printer, then turn on your computer with the LCD
panel opened
19
Setting your printer
4
Go to [My Computer] - [Printers]. Find your printer’s icon, double-click on it, and click
[File] - [Set As Default]. If no icon is available, select [Add Printer] and then follow the
on-screen instructions.
NOTE
You may need to install a driver for your printer. Simply follow the on-screen instructions and refer to the operation manual for the printer on how to install the driver.
Page 20

Using an External Display
Power off your computer ( )
1
Do not shut down using the suspend or hibernation mode.
CAUTION
Do not install or remove peripherals while your computer is in the suspend or
hibernation mode; abnormal operation may result.
2
Ext. Display Port
Connect the external display to your computer
NOTE
For more detailed information, please refer to the operation manual of the external
display.
3
Turn on the display, then turn on your computer with the LCD
panel opened
You can choose to select either an external display, or the LCD, or both with Fn +
F3 .
In addition, you can set the display to use during start-up with the following procedure.
20
1
Run the Setup Utility ( page 24)
Using and , select [System Setup], then press
2
Enter
Using and , select [Display], select the displa y with
3
, then press Esc
Close the Setup Utility ( page 24)
4
4
Select your external display
Set your external display for [Monitor] in [Start] - [Settings] - [Control Panel] - [Display] - [Settings] - [Advanced Properties].
When a monitor that does not conform to the Plug & Play standards is connected, select
[Change] and make the monitor settings.
Page 21

Using USB Devices
21
USB Connector
Power off your computer ( )
1
Do not shut down using the suspend or hibernation mode.
CAUTION
Do not install or remove peripherals while your computer is in the suspend or
hibernation mode; abnormal operation may result.
2
Connect the USB device to your computer
NOTE
For more detailed information, please refer to the operation manual of the USB
device.
3
Run the Setup Utility ( page 24)
Using and , select [Supervisor Setup], then press Enter
4
Using and , select [USB Controller], set [Enable] with
5
, then press Enter
Using and , select [Power Management], then press
6
Enter
Using and , select [Power Saving], set [OFF]
7
Using and , select [Po wer Switch], set [ON-OFF] with
8
, then press Esc
Close the Setup Utility
9
CAUTION
When using a USB device, do not use the suspend or hibernation function. In addition,
do not use the standby mode by pressing Fn + F10 .
If by accident the suspend, etc., function is used, the computer may act abnormally. In
this case, restart the computer by pressing the reset button.
You may need to install a driver for your USB devices. Simply follow the on-screen
instructions and refer to the operation manual for USB devices on how to install the
driver.
( page 24)
Page 22

Infrared Data Communications
Y our computer is equipped with an infrared communications port enabling you to transfer data
without a cable.
Preparations for Infrared Data Communications
Set the address of your infrared communications port to enable. ( below)
Position your computer so that the port is face-to-face with the port of another computer.
Be sure the computers are not in direct contact with one another.
A port-to-port distance of 20 to 50 cm (8 to 20 inches) is recommended.
Problems with infrared data communications
An object is located between both ports.
There are other electronic devices nearby causing interference, such as a television,
VCR, wireless headphone, etc.
Direct sunlight or white glowing light, such as fluorescent lighting; can cause interference with communications between the ports.
When moving your computer while it is transmitting/receiving data.
Setting for Infrared Data Communications
22
Run the Setup Utility ( page 24)
1
Using and , select [Supervisor Setup], then press Enter
2
Using and , select [IrDA], set [2F8] with , then press
3
Esc
4
Close the Setup Utility ( page 24)
Data Communications
Select [Star t] - [Programs] - [Accessories] - [Direct Cable
1
Connection]
Select [Host] or [Guest], then press [Next ]
2
Select [Serial cable on COM4], then press [Next]
3
If [Serial cable on COM4] is not displayed, select [Install New Ports].
Press [Finish]
4
Infrared data communications will begin.
NOTE
To process at a transfer speed of 4 Mbps, separate application software is necessary.
When you select [Start] - [Settings] - [Control Panel], and then select [Infrared], this
will give you the conditions for infrared data communications.
Online help is available on how to use Direct Cable Connection.
Page 23

Hard Disk Drive
To change your hard disk, contact Panasonic Technical Support
For information on FAT32, refer to "T echnical Information" ( page 30).
CA UTION
To customers:
To change your hard disk, consult your nearest Panasonic Technical Support.
Be sure to back up all important data before the change.
To technicians (at Panasonic Technical Support):
Be careful when replacing the hard disk. The hard disk is extremely sensitive to shock.
In addition, static electricity could later affect some internal components.
Installing/Removing the hard disk
(For technicians at Panasonic Technical Support)
Power off your computer ( )
1
Do not shut down using the suspend or hibernation mode.
23
Cover
Connector
Tape
Lever
CAUTION
Do not install or remove peripherals while your computer is in the suspend or
hibernation mode; abnormal operation may result.
Take off the cover
2
Turn your computer over. Then, slide the cover and remove it.
Removing/Installing the hard disk
3
To dislodge the hard disk, after flipping it over, pull on the tape . When installing a hard
disk, be sure to hold the connector part.
Return the hard disk to the slot very gently
4
Put the cover back into place
5
Be sure to lock the lever.
Page 24

Setup Utility
Running the Setup Utility
24
To run the Setup Utility, you
need to restart your computer.
Upon seeing
this message
Press F1 for Setup
press
NOTE
The Setup Utility will not be run if F1 is not pressed soon after the computer restarts.
In this case, you need to restart your computer again.
If is displayed, enter your password.
If both the [User Password] and [Supervisor Password] have been set, after entering the
User Password, [Supervisor Setup] and [Load Default Setting...] will not be displayed on
the main screen.
To display the [Supervisor Setup]:
1
Restart the computer and press F1 when [Press F1 for Setup] is displayed.
2
When is displayed, enter the Supervisor Password.
For more details, on-line help is available; press F1 .
<Main Screen>
Setup Utility
•System Setup
•Power Management
•Supervisor Setup
Return to the state existing at the time of Setup
Save Settings
Restore Settings
Load Default Settings (PnP)
Load Default Settings (Non-PnP)
Exit Setup
NOTE
Utility startup, or to the settings saved with [Save
Settings].
Set default settings.
• (PnP) denotes “for Windows
• (Non-PnP) denotes “for other than Windows
95”.
• When the Supervisor Password has been set,
input of the password is necessary.
®
95”.
F1
®
Closing the Program
Select one of the items and press Enter .
(The display may be different if no changes to the settings are made.)
Key Operations
F1 : To display the corresponding
“help” file.
Enter : To make a selection.
Esc : To display previous screen
(To exit the program at the main
screen).
: To move among the items.
F9 : To return to the setting before a
F10 : To set the default values.
Exit Setup
Settings were changed.
Do you want to save them?
Yes, save and exit the Setup Utility.
No, exit the Setup Utility without saving.
No, return to the Setup Utility.
: To move among the values of
each item.
change.
NOTE
If the User Password has been
set, the password must be entered before Windows can start.
Page 25

Setup Utility
System Setup
System Setup
NumLk [ON]
Track Ball [Enable]
Speaker [Enable]
Display [External Monitor]
•User Password
Coffee break Password [Disable]
Key Combination for Coffee break [Disable]
25
Parameters
(Underlined item: Default)
NumLk
Track Ball
Speaker
Display
User Password
Coffee break Password*
Key Combination for Coffee
break**
ON
OFF
Enable
Disable
Enable
Disable
Internal LCD
External Monitor
Simultaneous
Enter displays the user passw ord menu.
Enable
Disable
Alt + Ctrl + F9
Alt + Ctrl + F10
Alt + Ctrl + F11
Alt + Ctrl + F12
* Cannot be selected when the user password setting is not allowed due to the supervisor
setting.
** Can only be selected when the [Coffee break Password] has been set.
Page 26

Setup Utility
Power Management
Power Management
Power Saving [Standard (Battery/AC adapter)]
CPU Speed Change Mode Enable
HDD Motor Timeout 1 min
CDD Motor Timeout 1 min
Standby Timeout 2 min
Power Switch [Hibernation]
Suspend/
Hibernation Timeout [4 min]
Parameters
26
(Underlined item: Default)
Power Saving
CPU Speed Change Mode
HDD Motor Timeout
CDD Motor Timeout
Standby Timeout
Power Switch
Suspend/Hibernation Timeout**
Power Management Settings
Advanced
Standard (Battery/AC adapter)
Standard (Battery)
OFF
Display Setting (Enable / Disable)
Display Setting (1 min / Never)
Display Setting (1 min / Never)
Display Setting (1 min / 2 min / Never)
Hibernation
Suspend
On-Off*
Disable
4 min
16 min
** Setting at the time of purchase.
** Can only be selected when the [Power Switch] has been set [Suspend] or [Hibernation].
CPU Speed Change Mode
HDD Motor Timeout
CDD Motor Timeout
Standby Timeout
Po w er Conservation
(AC Adapter Connected)
P opup Window
Advanced Standard (Battery/AC adapter) Standard (Battery)
Enable Enable Enable Disable
1 min 1 min 1 min Never
1 min 1 min 1 min Never
1 min 2 min 2 min Never
Enable Enable Disable Disable
OFF
Page 27

Setup Utility
Supervisor Setup
Supervisor Setup
Parallel Port (Address) [Automatic (PnP)]
Pa rallel Port Mode [Bidirectional]
Serial Port [Automatic (PnP)]
Sound Controller [Enable]
Sound Blaster Compatible I/O [Automatic (PnP)]
WSS CODEC I/O [Automatic (PnP)]
Sound IRQ-A [Automatic (PnP)]
Sound IRQ-B [Automatic (PnP)]
Sound DMA-A [Automatic (PnP)]
Sound DMA-B [Automatic (PnP)]
IrDA [Automatic (PnP)]
Floppy Operation [Enable]
CD Operation [Enable]
Boot Up Drive [FDD HDD]
•Supervisor Password
User Password Protection [Disable]
USB Controller [Disable]
27
Parameters
(PnP: Default underlined; Non-PnP: Default in Italic)
Parallel Port (Address)
Parallel Port Mode
Serial Port
Sound Controller
Sound Blaster Compatible I/O
Automatic (PnP)
378
3BC
OFF
Bidirectional
Unidirectional
ECP
Automatic (PnP)
3F8
OFF
Enable
Disable
Automatic (PnP)
220
240
OFF*
WSS CODEC I/O
Automatic (PnP)
530
F40
OFF*
* Can only be selected when the [Sound Controller] has been set [Disable].
Page 28

Setup Utility
28
Sound IRQ-A
Sound IRQ-B
Sound DMA-A
Sound DMA-B
IrDA
Automatic (PnP)
5
9
10
OFF*
Automatic (PnP)
Not Use
9
10
OFF*
Automatic (PnP)
0
1
OFF*
Automatic (PnP)
Not Use
7
OFF*
Automatic (PnP)
2F8
OFF
Floppy Operation**
CD Operation
Boot Up Drive
Supervisor Password
User Password Protection
USB Controller
***
Enable
Disable
Enable
Disable
FDD -> HDD
HDD -> FDD
CDD -> FDD -> HDD
Enter
Enable
displays the supervisor password menu.
Disable
Enable
Disable
* Can only be selected when the [Sound Controller] has been set [Disable].
** Cannot be selected when [Boot Up Drive] is set to [FDD -> HDD].
*** Cannot be selected when both [User Password] and [Supervisor Password] are
the same.
Page 29

Technical Information
Network
The network connection may be severed when entering the standby and suspend (hibernation)
mode. Be sure to disable the suspend/hibernation timeout settings with the Setup Utility if
you require a network environment.
When the power saving function is running, communications software may malfunction. For
example, communications may be halted if the suspend or hibernation mode is activated.
Be sure that the computer enters the standby or suspend (hibernation) mode after the communications software is closed. The computer must be restarted if one of these modes is entered
during data communications.
29
Page 30

Technical Information
Hard Disk
FAT32
This computer uses a new, highly efficient file system called F AT32. Please note the following
regarding FAT32.
Some software will not run normally:
Do not run disk utilities and other software not compatible with FAT32. Doing so could
cause incorrect information such as hard disk capacity to be shown or could destroy hard
disk data.
Contact the dealer or other outlet for the software and obtain the latest version.
Non-recognition from other operating systems:
You will not be able to view the contents of your hard disk from other operating systems.
(For example, you will not be able to view the contents of your hard disk even when starting
up using a floppy disk created with another computer.)
Other operating systems cannot therefore be installed. To install the operating system, please
refer to the method listed below. If you are unsure about this explanation, do not proceed
with installation of operating system.
30
Back up the contents of your hard disk.
1
Insert the FIRSTAID FD, and restart the computer.
2
3
When the [Windows 95 Startup Menu] appears, select [1. Boot].
4
Enter "FDISK", then press Enter .
When [Do you wish to enable large disk support (Y/N)...?] appears on the screen, press
“N”, then Enter .
5
Select [3. Delete partition or Logical DOS Drive].
6
Select [1. Delete Primary DOS Partition].
7
Start up again following the instructions on the screen.
These steps will allow you to install most operating systems.
The contents of the hard disk will be deleted. Always make sure to back up the hard disk
beforehand.
The following steps will normally be unnecessary, however , if installation is not possible, try
performing them.
Start up again using the FIRSTAID FD to open FDISK in the same way.
8
When [Do you wish to enable large disk support (Y/N)...?] appears on the first screen,
9
press “N”, then Enter .
Select [1. Create DOS partition or Logical DOS Drive].
10
Set the partition following the on-screen instructions and activate it.
11
Start up again following the on-screen instructions.
12
Page 31

Technical Information
Internet Explorer
Internet Explorer 4.01 places a tremendous load on the system in order to execute the wide
variety of functions that it provides. As a result, some unexpected faults may occur.
If any of these faults occurs, try using the software with some Internet Explorer 4.01 functions
turned off. (See Internet Explorer Help for more details.)
It takes a long time to reboot or the computer locks up.
Delete the check mark for [Internet Explorer Channel Bar] in [Control Panel] - [Display]
- [Web], then press [OK].
A system module error occurs.
Set [ (None)] for [Wallpaper] in [Control Panel] - [Display] - [Background].
Performing the above steps does not solve the problem.
Uninstall Internet Explorer 4.01 with the following step.
Select [Microsoft Internet Explorer 4.01] in [Start] - [Settings] - [Control Panel] - [Add/
Remove Programs] - [Install/Uninstall] and press [Add/Remove]. Follow the on-screen instructions.
If a window with the message [Version Conflict] appears during the installation process (network card and application installation), select [Yes].
Proper operation may not be possible if [No] is selected.
31
Reinstallation
When Windows is started up while pressing F8 , the [Microsoft Windows 95 Startup Menu] is
displayed. After reinstalling W indows, [Previous version of MS-DOS] also appears in this menu,
however, do not select this item as MS-DOS is not installed.
Power Saving Function in the Sound Chip
The sound chip has its own power saving function. You can enable this function in the [OPL3SAx power management] tab (select [Start] - [Settings] - [Control Panel] - [Power] - [OPL3-SAx
power management]).
In [Non Power Save mode], the power saving function is disabled.
(When a ZV card is used, set [Non Power Save mode] to enable sound to be normally produced.
This is the default setting.)
In [Minimum level of power save], the power saving function is enabled. You may encounter
problems, such as no sound from music CDs.
Do not select [Intermediate level of power save] or [Maximum level of power save] because
noise is likely.
Page 32

Computer Diagnosis
List of Error Codes
If a problem occurs with your hardware, and [POST Start up Error(s)] is displayed along with
the error code(s), follow the on-screen instructions.
Setup: Setup Utility ( page 24) is started. Run [Load Default Settings (PnP)].
Rerun the Setup Utility to input the appropriate operating environment settings.
Exit: Ignore the error message(s), and restart the computer.
Code Description
062 Boot failure--default configuration used Default configuration in use
101 System Board Failure Interrupt controller failure
102 System Board Failure T imer 2 test failure
106 System Board Failure Diskette controller failure
114 Adapter ROM Error Adapter ROM checksum error
151 System Board Failure Real-time clock failure
161 Bad CMOS Battery Dead battery
162 Configuration Change Has Occurred Configuration error
162 Configuration Error CMOS checksum error
163 Date and T ime Incorrect Real-time clock is not updating
173 Configuration Change Has Occurred ROM configuration has changed
201 Memory Size Error Memory size/data error
301 Keyboard Error Keyboard failure
303 Keyboard Error Keyboard controller failure
604 Diskette Drive Error Diskette drive 0 failure
605 Diskette Drive Error Diskette unlocked problem
1780 Hard Disk Error Fixed disk 0 failure
1800 PCI Error No more IRQs available
1801 PCI Error No more room for optional ROM
1802 PCI Error No more I/O space available
1803 PCI Error No more memory (above 1 MB) available
1804 PCI Error No more memory (below 1 MB) available
1805 PCI Error Checksum error or 0 size optional ROM
1962 An operating system could not be found
8603 Pointing Device Error Pointing device failure
I9990301 Hard disk failure
I9990305 An operating system could not be found
32
Using the Self-diagnosis Program
Follow the procedure below to check whether each part of your computer is operating properly.
To run the program, insert the FIRSTAID FD you created into
1
the floppy disk drive, then turn your computer on
Select [1] from the menu
2
At the MS-DOS prompt (A:\WINDO WS\COMMAND>), input the
3
following:
diag45 Enter
Follow the messages on the screen.
Page 33

33DMI Viewer
This computer conforms to the specifications of the Desktop Management Interface (DMI).
The DMI Viewer can be used when you want to know information on the internal systems this
computer supports, starting with the CPU and memory.
Running DMI Viewer
Select [DMI Viewer] from [Start] - [Programs] - [Panasonic]
The screen shown below is displayed.
When you click on an item, detailed information on that item will be displayed.
Click to close the DMI Viewer
Saving information to a file
Displayed information can be saved to a text file (*.txt). Run the DMI Viewer and display the
information you wish to save.
1
2
Save the item that is displayed
Select [Save Selected Data] from the [File] menu.
Save all items
Select [Save All Data] from the [File] menu.
Input the file name (and select the folder), then press [Save]
Page 34

Dealing With Problems
When a problem occurs, please refer to this page. The "Reference Manual" also contains detailed information. If a problem
appears to be related to a software application, read the software related manual. If you still cannot troubleshoot the problem,
please contact Panasonic Technical Support.
Starting Up
34
The power indicator or battery indicator is not lit
is displayed
[POST Start Up Error(s)] is
displayed
The pre-memory count,
Windows startup, or an operation is extremely slow
The date and time are
incorrect
When the previous item is
not the cause
Check the cable connection for the AC adapter.
Check to see if a fully charged battery is properly installed.
Pressing the reset button ( ) will solve the problem.
Remove the battery pack and disconnect the AC adapter, then connect them again.
Please input your password. If you have forgotten it, contact Panasonic Technical Support.
page 32
Run [Load Default Settings] (PnP) in the Setup Utility ( page 24). This will restore the
Setup Utility's settings to their default values (except the password settings). Then, the Setup
Utility must be run once again for you to input the appropriate operating environment settings.
(The processing speed depends on the application software used, so this operation may not cause
the processing speed to increase.)
You can set the date and time through [Date/Time] in [Start] - [Settings] - [Control Panel].
If you continue to experience problems, the internal battery maintaining the clock may need
to be replaced. Please contact Panasonic Technical Support.
Run [Load Default Settings] (PnP) in the Setup Utility ( page 24). This will restore the
Setup Utility's settings to their default values (except the password settings).
Try removing all peripheral devices.
In the MS-DOS mode, run SCANDISK to check the hard disk.
At start-up, press F8 to operate the computer in the Safe mode.
Battery Indicator
The red battery indicator
lights.
Repeated beeps sound while
the computer is in use.
The red indicator blinks
After the AC adapter is connected, the orange indicator
blinks five times
The battery level is low. Save your data and power off your computer.
After connecting the AC adapter or replacing the battery pack with a fully charged one, turn
your computer on.
The battery pack or recharging function may be defective. Quickly remove the battery
pack and disconnect the AC adapter, then connect them again.
If the problem persists, contact Panasonic Technical Support.
Unable to charge because of an improper temperature range. ( )
Page 35

Dealing With Problems
Display
35
No display after powering
on
The power has not been cut,
but after a certain period of
time, there is no display
An afterimage appears
The motion of the mouse
cursor is not smooth
Disk Operations
Cannot read/write to a
floppy disk
Unable to write to a floppy
disk
How to format a floppy
disk is unclear
Unable to read/write to the
hard disk
T rouble has occurred with
the CD
At the time of purchase, the display setting is preset for an external display. If you connect
an external display, the screen is displayed on the external display.
When there is no display to an external display,
• Check your cable connection to the external display.
• Confirm your display is powered on.
• Check the settings for your external display.
Try changing the display by pressing Fn + F3 .
If your computer is connected to an external display and the internal LCD has been set to
"off", and the computer is placed in the hibernation or suspend mode, the internal LCD
will remain in the "off" mode if the external display is not connected when the computer
is restarted. In this case, re-connect the external display and reboot the computer.
Has the computer been set to the power-saving mode?
To resume operation of your computer, press any key, or move the trackball or mouse.
To save power, your computer may have automatically entered the suspend or hiberna-
tion mode. ( page 11)
If an image is displayed for a prolonged period of time, an afterimage may appear. This is
not a malfunction. The afterimage will disappear when a different screen is displayed.
Select [Start]-[Settings]-[Control Panel]-[Mouse]-[Motion] and check [Show pointer trails].
Has the floppy disk been correctly inserted?
Has the floppy disk been correctly formatted?
Has the Setup Utility been used to set [Floppy Operation] to [Enable]? ( page 27)
Is the floppy disk write-protected?
Select [Format] in [My Computer] - [3 1/2 Floppy (A:)] - [File]. After confirming the disk
volume and format type, start formatting.
Y our drive or file may not have been properly set.
Check to see if the hard disk is full. If it is full, delete unnecessary files.
Your hard disk content may be corrupted. Contact Panasonic Technical Support.
You may need to clean the lens or CD;
When the previous item is
not the cause
The access lamp ( ) does
not light
Cannot play CD or read
data from it
Cannot eject CD
The CD-ROM drive vibrates a lot
Try testing another drive or media.
Is the CD loaded on the tray correctly?
Is the CD bent, scratched, or dirty?
Is the computer powered on?
To remove a CD when the computer is powered off, insert
a sharp object such as the bent-out tip of a paper clip into
the emergency hole. Pushing it completely to the end will
free the tray so that it can be pulled out.
Emergency Hole
Is the CD bent or labeled?
Page 36

Dealing With Problems
Character Input
36
Unable to input anything
but numerals
Only capital letters are
being input
How to input European
characters (ß, à, ç) or
symbols is unclear
Setup Utility
is displayed
[Supervisor Setup] is not
displayed in the menu
[User Password] cannot be
selected
[Coffee break Password]
or [Key Combination for
Coffee break] cannot be
selected
[Supervisor Password]
cannot be set
If NumLk and Key Pad are on, the Numeric Key Pad is ON. To switch it OFF,
press Fn + Key Pad .
If CapsLock is on, the Caps Lock function is ON. To switch it OFF, press Caps Lock .
Select [Start] - [Programs] - [Accessories] - [Character Map]. The Character Map will be
displayed. Point to the desired font name and select it.
Enter the User Password or Supervisor Password. If you have forgotten it, contact Panasonic
Technical Support.
At the start of the computer when is displayed, you have to enter the Supervisor Password. When both the User Password and Supervisor Password have been set, if you enter
the User Password, [Supervisor Setup] will not be displayed.
If [Supervisor Setup] is not displayed even after entering the Supervisor Password, you have
to delete the User Password. Run the Setup Utility again, and input the Supervisor Password.
[User Password Protection] in [Supervisor Setup] may be enabled.
You need to set the User Password.
If the User Password has been set first, the Supervisor Password can not be the same as the
User Password. Another password needs to be entered.
Page 37

Dealing With Problems
Connecting Peripherals
Your peripheral does not
work (An error occurs while
installing the driver)
Unable to print
The cursor does not move
from mouse operations
The device connected to the
serial port does not work
External mouse or trackball
connected to the ext. keyboard/mouse port does not
work
A PC Card does not work
You need to use drivers conforming to OS*. Some earlier drivers will no longer work.
For more information, please ask the manufacturer of the driver in question.
* Windows® 95 Version 4.00.950C (OSR-2.5)
Check the computer-printer connection.
Make sure the printer is on.
Make sure the printer is in the online state.
Make sure paper is in the printer tray and there is no paper jam.
Has the Setup Utility been used to set [Parallel Port (Address)] to [Automatic (PnP)],
[378] or [3BC]?
The Coffee break Password may be set; check if is displayed. If this is the case, input
the Coffee break Password.
Check your mouse connection, then reboot the computer from the keyboard.
From the keyboard, you may choose to press down on , then select [Shut Down].
Check the connection.
Confirm that the device driver for the serial port works. Please refer to the reference
manual of the device.
Confirm that two mouse devices are not connected, one through the ext. keyboard/mouse
port and the other through the serial port.
Try setting [Trackball] to disable in the Setup Utility.
Has the Setup Utility been used to set [Serial Port] to [Automatic (PnP)] or [3F8]?
Try setting [Trackball] to disable in the Setup Utility.
In some circumstances, if a PS/2 external mouse with a serial interface conversion function is connected to the port, it may not operate normally. Try connect it to the serial port.
Make sure the card is properly inserted.
Confirm that the card conforms to the PC Card Standard.
Note that after a driver is installed, the computer must be rebooted.
Check that the proper port settings have been made.
Read the PC Card’s manual. Or, you may need to call the manufacturer of the PC Card.
If you will be using a ZV card, please install PhoenixCard ManagerTM for Windows® 95.
( page 16)
37
You do not know the
available RAM module
The RAM module has not
been recognized
The address map for IRQ,
I/O port address, etc. is
unclear
A USB device does not
work
page 17
Make sure the RAM module has been properly inserted.
Check the address map by going to [View Resources] in [Start] - [Settings] - [Control Panel]
- [System] - [Device Manager] - [Computer] - [Properties].
Has the Setup Utility been used to set [USB Controller] to [Enable]?
Make sure a driver is installed.
Contact the manufacturer of the product.
Page 38

Dealing With Problems
Application Software
Computer Hangs
Network
Unable to connect to a
network
Press Ctrl + Alt + Del to forcibly reboot the computer.
Rerun the application program after the computer restarts. If the program no longer works
normally, go to [Start] - [Settings] - [Control Panel] - [Add/Remove Programs] to delete
the program. Then, try installing the program once again.
When using the computer as a network computer, some additional settings may have to be
made depending on the usage conditions. We recommend asking your system administrator
or the person in charge of the network.
38
Page 39

39
Copyright
This manual is copyrighted by Matsushita Electric Industrial Co., Ltd. with all rights reserved. No part of this manual may be
reproduced in any form without the prior written permission of Matsushita Electric Industrial Co., Ltd.
No patent liability is assumed with respect to the use of the information contained herein.
©Matsushita Electric Industrial Co., Ltd. 1998. All Rights Reserved.
Disclaimer
Computer specifications and manuals are subject to change without notice. Matsushita Electric Industrial Co., Ltd. assumes no
liability for damage incurred directly or indirectly from errors, omissions or discrepancies between the computer and the manuals.
Trademarks
PS/2™ is a trademark of International Business Machines Corporation.
Microsoft®, MS-DOS®, W indows® and Windows NT® are registered trademarks of Microsoft Corporation of the United States and/
or other countries.
PhoenixCard Manager™ and Phoenix Card Executive™ are trademarks of Phoenix Technologies Ltd.
Acrobat® is a registered trademark of Adobe Systems Incorporated.
Panasonic® is a registered trademark of Matsushita Electric Industrial Co., Ltd.
A
 Loading...