

Personal Computer
Supplementary Instructions for Windows® 98
CF-37 Series
This manual contains supplementary instructions regarding the use of the computer. It explains the cases
where the operation of the computer differs from that in the Operating Instructions.
<For CF-37VB6BAEM model only>
For U.S.A. “OPERATING INSTRUCTIONS (page 3)”
FCC Regulation Notice for modem
This equipment contains a FCC approved modem.
Manufacturer of modem: 3Com Corporation
Model No. 3CN3AC1556
®
Tested To Comply
With FCC Standards
FOR HOME OR OFFICE USE
First-time Operation “OPERATING INSTRUCTIONS (page 9)”
Replace the inclusion for the following.
Windows 95 System Pack .... 1
Windows® 95 Book
Registration Card
Product Recovery CD-ROM
Perform the following after step 1.
Write down the Product Key
CAUTION
The Product Key is necessary during the Setup procedure for Windows ( page 2,3), so be sure to
write down the alphanumeric Product Key, which is written on the “Certificate of Authenticity”
listed on the cover of the Windows book (that comes with this computer) or on the bottom panel of
the computer, in the margin of the manual.
Windows® Book......1
Product Recovery
CD-ROM.....1
Driver Update
CD.............1
Replace the first "NOTE" for the following. “OPERATING INSTRUCTIONS (page 10)”
NOTE
The power saving mode ([Power Scheme] in [Control Panel] - [Power Management]) is factory set, so if there is no
input from a key, the touch pad, the touchscreen or an external mouse (when one is connected) for a certain
interval of time, the power to the LCD and hard disk is shut down.
The LCD will resume operation when the touch pad or the touchscreen is used, or a key or an external
mouse is pressed.
The power to the LCD may be turned off while Windows is setting up or even when an application software is
being installed. In this case, because it is conceivable that a selection dialog box will be shown, do not press
the Enter key to attempt to resume from this condition as doing so may trigger a selection, but instead,
press a key unrelated to the direct triggering of a selection, like the key.
*With Windows 98, "Suspend" is called "Standby".
Shift
1
Replace the step 6 for the following. “OPERATING INSTRUCTIONS (page 11)”
Setup Windows 98
6
<For CF-37VB62AEM model>
Select settings for your region and your keyboard layout, then press [Next].
1
(for U.S.A.: United States 101)
NOTE
Moving the cursor ( ) or clicking buttons can be performed with the touch pad, a key or
the touchscreen. ( “OPERATING INSTRUCTIONS” page 13, "Touchscreen")
2
Enter your first name and last name, then press [Next].
3
Select [Skip] at the [Using Your Modem to Connect].
Select [Yes] at the [Cancel Dialing], then press [Next].
The License Agreement will be displayed.
4
After reading the agreement, select [I accept this agreement] or [I do not accept the
agreement], then press [Next].
NOTE
If [I accept this agreement] is selected, the [Certificate of Authenticity] will appear.
If [I do not accept the agreement] is selected, the Windows setup will be aborted.
5
Input the Product Key written down ( page 1) then press [Next].
6
Press [Finish].
Input the correct date, time and time zone and press [Close].
7
You can also complete these settings at a later time.
8
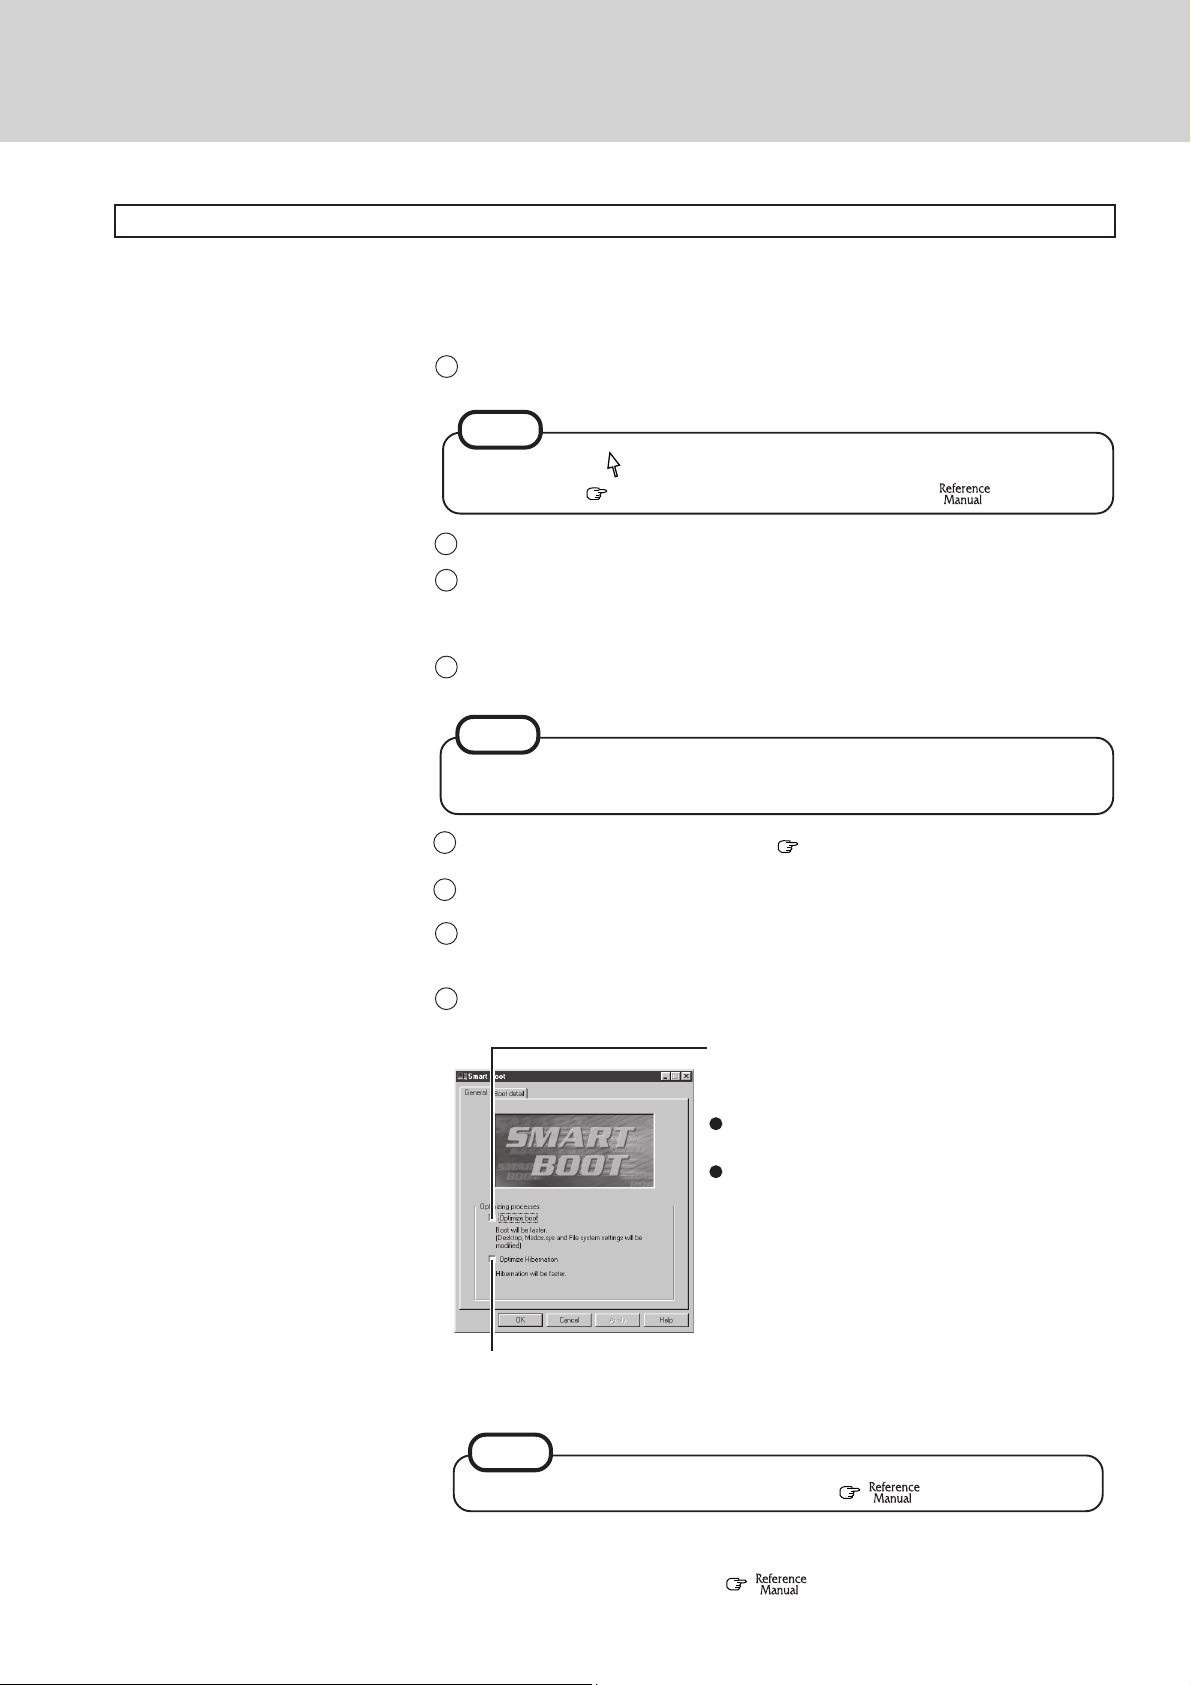
When the following screen is displayed, add the check mark depending on
your needs.
If this box is checked, it is possible to shorten the
start-up time from the computer OFF state and
the following occurs.
The Windows Logo display (i.e., the cloud display) is not shown at start-up.
No background paper is displayed.
If this box is checked, the time to enter the hibernation mode and the time to
resume from the hibernation mode are shortened.
2
NOTE
You can complete these settings at a later time. ( "Smart Boot" )
Then, when the alignment of the touchscreen is needed, perform [Calibrate] in
[Start] - [Programs] - [Updd]. ( "Touchscreen" )
<For CF-37VB6BAEM model>
1
At the [Add New Hardware Wizard], set the Driver Update CD in the CD-ROM drive.
2
Press [Next].
3
Select [Search for the best driver for your device.], then press [Next].
4
Input [L:\WIN98\LAN] for [Specify allocation], then press [Next].
5
If [Location of driver L:\WIN98\LAN\NET556N5.INF] is displayed, press [Next].
At the [Copying Files], input [L:\WIN98\LAN], then press [OK].
6
Press [Finish].
7
8
If the display asks you to restart Windows, press [Yes].
9
At the [Enter Network Password], input your user name and your password, then press [OK].
At the [Add New Hardware Wizard (PCI Communication Device)], press [Next].
10
11
Select [Search for the best driver for your device.], then press [Next].
Input [L:\WIN98\MODEM] for [Specify allocation], then press [Next].
12
If [Location of driver L:\WIN98\MODEM\WMHABBE.INF] is displayed, press [Next].
13
14
Press [Finish].
Select settings for your region and your keyboard layout, then press [Next].
15
(for U.S.A.: United States 101)
Enter your first name and last name, then press [Next].
16
17
Select [Skip] at the [Using Your Modem to Connect].
Select [Yes] at the [Cancel Dialing], then press [Next].
18
The License Agreement will be displayed.
After reading the agreement, select [I accept this agreement] or [I do not accept the agreement],
19
then press [Next].
NOTE
If [I accept this agreement] is selected, the [Certificate of Authenticity] will appear. If [I do not
accept the agreement] is selected, the Windows setup will be aborted.
Input the Product Key written down ( page 1) then press [Next].
20
Press [Finish].
21
Input the correct date, time and time zone and press [Close].
22
You can also complete these settings at a later time.
At the [Smart Boot], add the check mark depending on your needs, then press [OK].
23
( “Operating Instructions” page 11 step )
24
In [Start] - [Run], input [L:\WIN98\UPDATE.BAT], then press [OK].
At the [Registry Editor], press [Yes], then press [OK].
25
In [Start] - [Settings] - [Control Panel] - [System] - [Device Manager], confirm that there are
26
[3Com 10/100 Mini PCI Ethernet Adapter] in [Network adapters] and [3Com 56K V.90 Mini
PCI Modem] in [Modem], then press [OK]. (Confirm that there is not ! or X mark for them.)
When a modem other than [3Com 56K V.90 Mini PCI Modem] (for example, [MINI PCI type
27
3B Data Fax Modem by 3Com]) has been selected in [Modem Properties] (in [Control Panel] [Modems] - [General]), select [Remove] and delete the selection , then press [Close].
In [Start] - [Settings] - [Control Panel] - [Add/Remove Programs], remove [WorldPort], then press [OK].
28
Select [Start] - [Settings] - [Control Panel] - [System] - [Device Manager] - [Mouse] - [Alps GlidePoint].
29
Select [Driver] - [Update Driver].
30
At the [Update Device Driver Wizard], press [Next].
31
Select [Display a list of all the drivers in a specific location,...], then press [Next].
32
33
Select [Have Disk], input [L:\WIN98\MOUSE], then press [OK].
Press [Next].
34
If [Location of driver L:\WIN98\MOUSE\APOINT.INF] is displayed, press [Next].
35
Press [Finish].
36
If the display asks you to restart Windows, press [Yes].
37
9
3

Replace the "NOTE" for the following. “OPERATING INSTRUCTIONS (page 12)”
NOTE
When using the files in the following folders available on the retail version of the
Windows CD-ROM, it is necessary to run a separate file decompression program.
\tsclient
\tools
To uncompress the file, it is necessary to have approximately
available on the hard disk.
To use the CD-ROM drive or DVD-ROM drive in MS-DOS mode, perform the opera-
tion below after modifying config.sys and autoexec.bat. ( "Using a Multimedia Pocket Device").
File decompression method:
1
Turn your computer on.
2
When [Press <F2> to enter SETUP] is displayed, immediately press
Ctrl (until the menu is displayed).
3
Select [Command prompt only].
4
Insert the Product Recovery CD-ROM.
5
At the prompt, input the following:
L:\en\addfile Enter
Follow the message on the screen.
(If the computer enters the ECO mode while copying, press Ctrl . )
After this program is executed, the contents of the above folders will be decompressed
to the c:\util\win98add folder.
80 MB of free disk space
Starting Up/Shutting Down “OPERATING INSTRUCTIONS (page 15)”
4
Replace the first "NOTE" for the following. “OPERATING INSTRUCTIONS (page 16)”
NOTE
The power saving mode ([Power Schemes] in [Control Panel] - [Power Management]) is factory set, so if there is no input from a key, the touch pad, or an external
mouse (when one is connected) for a certain interval of time, the power to the LCD
and hard disk is may be turned off (ECO mode). In addition, when the computer is
left alone, it automatically enters the suspend mode ( "Suspend/Hibernation Functions").
The LCD will resume operation when the touch pad or an external mouse (when one
is connected) is used or a key is pressed.
[System Devices] in [Start] - [Settings] - [Control Panel] - [System] - [Device Manager] may contain a device or devices bearing an exclamation mark or question
mark. This does not indicate a malfunction. Such a mark (exclamation or question
mark) will not be displayed if the operating environment of the device showing the
mark is corrected, by for instance installing the driver of the device.

Dealing with Problems “OPERATING INSTRUCTIONS (page 19) ”
The following has been changed.
Starting Up
When the previous item is
not the cause
The following has been added.
Press F9 in the Setup Utility ( "Setup Utility"). This will restore the Setup
Utility's settings to their default values (except the password settings).
In the MS-DOS mode, run SCANDISK to check the hard disk.
At start-up, press and hold Ctrl to operate the computer in the Safe mode.
Try removing all peripheral devices.
Network
Windows cannot be shut
down or restarted
Was an attempt made to shut down (or restart) Windows while the computer was connected to a network drive using a LAN?
With the following procedure, shut down (or restart) Windows after disconnecting the
network drive.
1 Click [My Computer] on the Desktop with the front button of the trackball.
2 Click [Disconnect Network Drive].
3 Select all of the displayed network drives, and then click [OK].
Reinstalling Software “OPERATING INSTRUCTIONS (page 21)”
The following has been changed.
Windows 98
1 ~ 15 “OPERATING INSTRUCTIONS” page 21
16 Perform the setup procedure for Windows 98 by following the instructions on the screen. page 2,3
Specifications “OPERATING INSTRUCTIONS (page 25)”
The following has been changed.
Model No. CF-37VB62AEM CF-37VB6BAEM
Internal LAN IEEE 802.3 10Base-T
IEEE 802.3u 100Base-TX
Software Operating System Microsoft® Windows® 98 Second Edition (FAT32 File System)
5

<For CF-37VB6BAEM model only>
Modem “REFERENCE MANUAL (page 45)”
Replace the step 2 for the following and the step 3 is not needed.
Select [Dialing Properties] in [Start] - [Settings] - [Control Panel]
2
- [Modems]
1
Select the country in [Dialing Properties] - [My Locations] - [I am in].
Input the necessary information (items such as the phone system) and then press [Close].
2
NOTE
The country setting of the modem can not be set in the WorldPort Utility.
Do not change the default settings of [Serial Port B] in the Setup Utility.
To adjust the volume for dial-up connection sound, open the dial-up property used for
the Dial-up Networking connection, and adjust the settings by selecting [General] [Configure] - [Speaker Volume].
When adjusting the volume for modems other than that used for Dial-up, select [Start] [Settings] - [Control Panel] - [Modems], and open [3Com 56K V.90 Mini PCI Modem]
to set [Speaker Volume].
6

The following has been added.
<For CF-37VB6BAEM model only>
Connecting to the LAN
This model has an internal LAN port.
CAUTION
Do not insert a telephone line connector (including a PBX internal phone) into
the LAN port. Doing so may cause fire or electric shock.
LAN Port
<For CF-37VB6BAEM model only>
Wake up from LAN
This is a function to automatically power on the computer from a network server. To use this
function, it is necessary to have a network environment that accommodates Wake up from LAN
(for a Local Area Network).
When using this function, set [Wake up from LAN] to [Enable] with the Setup Utility.
( page 8)
NOTE
Be sure to connect the AC adapter, and enable the supply of power.
Make settings to allow the use of a Local Area Network.
Be sure to leave the LCD panel open when [Panel Switch] is set to [Suspend] or
[Hibernation] in the Setup Utility.
When using the Wake up from LAN function, User Password is not necessary even if
[User Password] has been set in the Setup Utility.
When [Wake up from LAN] in the Setup Utility is set to [Enable], remaining battery
power will dissipate in about three days. In particular, note that when the computer is
on standby using the suspend function, data in RAM memory may be lost. We recommend that when not using the Wake up from LAN function, you should keep the
above setting on [Disable].
The Wake up from LAN function will not operate under the following conditions:
- When the computer has been placed in suspend or hibernation from MS-DOS
mode.
- When the computer has been shut down by pressing the power switch for more
than four seconds.
- When the password has been input incorrectly, and the computer has returned to
suspend, hibernation, or power off status.
7

<For CF-37VB6BAEM model only>
Setup Utility “REFERENCE MANUAL (page 47)”
Replace the advanced menu for the following. “REFERENCE MANUAL (page 49)”
Plug & Play: [Disable]
Serial Port A:* [Auto]
Serial Port B:* [Auto]
Device: [Touchscreen]
Parallel Port:* [Auto]
Mode: [Bi-directional]
Internal Modem/LAN: [Enable]
Wake up from LAN: [Disable]
* If [Enable] is set, sub items will be displayed.
Parameters
Internal Modem/LAN
Wake up from LAN
Replace the boot menu for the following. “REFERENCE MANUAL (page 52)”
( : Default)
Disable
Enable
Disable
Enable
1. [ATAPI Removable]*
2. [Hard Disk]
3. [CD-ROM/DVD-ROM]
4. [Network]**
* The SuperDisk Drive is included in [ATAPI Removable].
** When [Network] is the top of the menu, the computer is booted from LAN.
The default order is as follows: [ATAPI Removable] [Hard Disk] [CD-ROM/DVD-ROM] [Network].
To move a device up by one in the order, select the device with , and then press F6 .
To move a device down by one in the order, select the device with , and then press F5 .
Printed in U.S.A.
8
UA0200-0
DFQX2842ZAU
 Loading...