

Panasonic CF-25, CF-25FXF4DAM, CF-25FVF4DAM, CF-25DGC4DAM, CF-25EGC4DAM Operating Instructions Manual
...
®
Contents
Names and Functions of Parts..................... 6
Personal Computer
CF-25 Series
OPERATING
INSTRUCTIONS
Startup and Shutdown .....................................8
Keyboard and Touch Pad .............................. 10
Battery Power ................................................... 12
Replacing.......................................................... 15
Recharging ....................................................... 16
Refreshing ........................................................ 17
Hardware Expansion ...................................... 18
Multimedia Pocket (MP) ................................ 18
PC Cards .......................................................... 19
Memory Expansion ........................................ 20
Expansion Bus Port........................................ 21
Hard Disk Drive
(For technicians at your nearest Panasonic Dealer).............. 22
Infrared Data Transfer .................................... 23
Setup Utility....................................................... 24
Diagnostics Program (DIAG25) ............................. 25
Error Codes ....................................................... 25
Dealing with Problems .................................. 26
Reinstalling Windows .................................... 28
Appendix
Floppy Disk Drive ............................................30
Hardware Technical Data .............................. 31
Display Properties........................................... 32
LIMITED USE LICENSE AGREEMENT ...... 33
Specifications................................................... 36
For LCD ............................................................38
Index.................................................................... 39
Getting Started
Operation
Troubleshooting

2
Computer
AC adapter and AC Cord (CF-AA1526)
Function Seal
Cap Sheet
Windows® 95 System Pack
Operating Instructions
TRANXIT REGISTRATION CARD
TRANXIT ACCESSORY CATALOGUE
©Matsushita Electric Industrial Co., Ltd. 1997. All Rights Reserved.
Copyright
This manual is copyrighted by Matsushita Electric Industrial Co., Ltd. with all rights reserved. No part of this manual may be
reproduced in any form without the prior written permission of Matsushita Electric Industrial Co., Ltd.
No patent liability is assumed with respect to the use of the information contained herein.
Disclaimer
Computers and manuals are subject to change without notice. Matsushita Electric Industrial Co., Ltd. assumes no liability for
damage incurred directly or indirectly from errors, omissions or discrepancies between the computer and the manuals.
Trademarks
IBM® is a registered trademark, and PS/2™ is a trademark of International Business Machines Corporation.
Microsoft®, MS-DOS® and Windows® are registered trademarks of Microsoft Corporation of the United States and/or other
countries.
Intel® and Pentium® are registered trademark or trademark of Intel Corporation.
CardWorks™ is a trademark of SystemSoft Corporation.
TranXit™ is a trademark of Puma Corporation.
Panasonic® is a registered trademark of Matsushita Electric Industrial Co., Ltd.
Checklist
Confirm that the following items are supplied.
( P.6)
Also, please see the README file, as it contains important information.
Introduction
Thank you for purchasing the Panasonic's CF-25 series computer . You will find that this computer offers many
convenient functions, and can be connected to a variety of optional peripheral devices. Please read the Operating
Instructions thoroughly for smooth operation of your new computer.
NOTE
Please affix the function seal that is supplied on the keyboard.
on
NOTE
LIMITED WARRANTY (US)
USER REGISTRATION (US)
LIMITED WARRANTY (CANADA)
WARRANTY STATEMENT (CANADA)

3
Conventions
Lithium Battery
NOTE
NOTE provides a useful fact or helpful information.
WARNING
WARNING indicates a hazard that may result in moderate
injury or serious injury, even death.
CAUTION
CAUTION indicates a condition that may result in minor
injury or slightly moderate injury.
For U.S.A.
Federal Communications Commission Radio
Frequency Interference Statement
Note: This equipment has been tested and found to comply
with the limits for a Class B digital device, pursuant to Part
15 of the FCC Rules. These limits are designed to provide
reasonable protection against harmful interference in a
residential installation. This equipment generates, uses and
can radiate radio frequency energy and, if not installed and
used in accordance with the instructions, may cause harmful
interference to radio communications. However, there is no
guarantee that interference will not occur in a particular
installation. If this equipment does cause harmful interference
to radio or television reception, which can be determined by
turning the equipment off and on, the user is encouraged to
try to correct the interference by one or more of the following
measures:
Reorient or relocate the receiving antenna.
Increase the separation between the equipment and receiver .
Connect the equipment into an outlet on a circuit different
from that to which the receiver is connected.
Consult the Panasonic Service Center or an experienced
radio/TV technician for help.
Warning
To assure continued compliance, use only shielded interface
cables when connecting to a computer or peripheral. Also,
any changes or modifications not expressly approved by the
party responsible for compliance could void the user's authority to operate this equipment.
This device complies with Part 15 of the FCC Rules. Operation
is subject to the following two conditions:
(1) This device may not cause harmful interference, and
(2) This device must accept any interference received,
including interference that may cause undesired operation.
Lithium Battery!
This computer contains a lithium battery to enable the date,
time, and other data to be stored in it.
Should only be exchanged by service personnel.
Warning! Risk of explosion from incorrect installation or
misapplication!
Litium batteri!
Denna dator innehåller ett lithium batteri som avänds för att
lagra datum, tid och annan data.
Bör endast bytas av servicepersonal. Explosionsfara vid
felaktig hantering.

4
To ensure safe operation the three-pin plug must be inserted
only into a standard three-pin power point which is effectively earthed through the normal household wiring.
Extension cords used with the equipment must be three-core
and be correctly wired to provide connection to earth. Wrongly
wired extension cords are a major cause of fatalities.
The fact that the equipment operates satisfactorily does not
imply that the power point is earthed and that the installation
is completely safe.
For your safety, if you have any doubt about the effective
earthing of the power point, consult a qualified electrician.
FOR YOUR SAFETY PLEASE READ THE FOLLOWING TEXT CAREFULLY
Warning
This apparatus must be earthed for your safety.
As the colours of the wires in the mains lead of this apparatus may not correspond with the coloured markings identifying the terminals in your plug, proceed as follows:
The wire which is coloured GREEN-and-YELLOW must be
connected to the terminal in the plug which is marked by the
letter E or by the safety earth symbol coloured GREEN
or GREEN-and-YELLOW.
The wire which is coloured Blue must be connected to the
terminal which is marked with the letter N or coloured
BLACK.
The wire which is coloured Brown must be connected to the
terminal which is marked with the letter L or coloured RED.
The mains plug on this equipment must be used to disconnect the mains power.
Please ensure that a socket outlet is available near the equipment and shall be easily accessible.
How to replace the fuse
Open the fuse compartment with a
screwdriver and replace the fuse.
Warnung bezüglich der LIthiumbatterie
(Sicherungsbatterie)
Lithiumbatterie!
Dieser Computer enthält eine Lithiumbatterie zur Sicherung
von Datum und Uhrzeit der eingebauten Uhr sowie anderer
Systemdaten im Speicher bei einer Unterbrechung der
Hauptstromversorgung. Diese Sicherungsbatterie darf nur von
Kundendienstpersonal ausgewechselt werden.
Warnung! Bei falschem Gebrauch besteht Explosionsgefahr!
Entsorgung gebrauchter Batterien nach Angaben des
Herstellers.
For France
Avertissement concernant la pile au
lithium (pile de sauvegarde)
Pile au lithium!
Le micro-ordinateur renferme une pile au lithium qui permet
de sauvegarder certaines données comme la date et l'heure
notamment. Elle ne devra être remplacée que par un technicien
qualifié.
Avertissement! Risque d'explosion en cas de non respect de
cette mise en garde!
For German
Warnings
This equipment is not designed for connection to an IT
power system.
(An IT system is a system having no direct connections
between live parts and Earth; the exposed-conducive-parts
of the electrical installation are earthed.
An IT system is not permitted where the computer is directly connected to public supply systems in the U.K.)
Disconnect the mains plug from the supply socket when
the computer is not in use.
This equipment is produced to BS800/1983.
This appliance is supplied with a moulded three pin mains
plug for your safety and convenience.
A 3 amp fuse is fitted in this plug.
Should the fuse need to be replaced please ensure that the
replacement fuse has a rating of 3 amps and that it is approved by ASTA or BSI to BS 1362.
Check for the ASTA mark
A S A
or the BSI mark on the
body of the fuse.
If the plug contains a removable fuse cover you must ensure
that it is refitted when the fuse is replaced.
If you lose the fuse cover the plug must not be used until a
replacement cover is obtained.
A replacement fuse cover can be purchased from your local
Panasonic Dealer.
IF THE FITTED MOULDED PLUG IS UNSUIT ABLE FOR
THE SOCKET OUTLET IN YOUR HOME THEN THE
FUSE SHOULD BE REMOVED AND THE PLUG CUT OFF
AND DISPOSED OF SAFELY.
THERE IS A DANGER OF SEVERE ELECTRICAL SHOCK
IF THE CUT OFF PLUG IS INSERTED INT O ANY 13 AMP
SOCKET .
If a new plug is to be fitted please observe the wiring code as
shown below.
If in any doubt please consult a qualified electrician.
Important
The wires in this mains lead are coloured in accordance with
the following code:
Green-and-yellow: Earth
Blue: Neutral
Brown: Live
Warning: THIS APPLIANCE MUST BE EARTHED.
For U.K.

5
Precautions
Cables
Use of an interface cable longer than 3m (118.11 inches)
is not recommended.
Against Computer Viruses
Anti-virus software is not supplied. However, you should
obtain such software if you plan to transfer files actively or
to use the Internet.
Handling the A C Adapter
Handling
Avoid Magnetic Fields
Keep the computer away from magnets.
Avoid Stacking
Do not place heavy objects on top of the
computer.
Keep Small Objects Away
Do not insert paper clips or other small objects
into the computer.
Do Not Disassemble the Computer
Do not attempt to disassemble your computer.
Prevent Shock
Avoid subjecting the computer to severe
vibrations or impact. Do not place the computer
inside a car trunk.
Avoid Radio Frequency Interference
Do not place the computer near a television or
radio receiver.
A void Humidity Liquids and Dust
Do not store or use the computer in locations
exposed to high humidity, liquids (including
rain) or dust.
Avoid Direct Sunlight on the LCD Panel
The LCD panel should not be exposed to direct
sunlight or ultraviolet light.
Do not twist or pull the AC power cord forcefully. Doing
so may damage the connections.
Use only the specified AC adapter (Factory Control Num-
ber: CF-AA1526) with your computer. Using an AC
adapter other than the one supplied might damage the battery and/or the computer.
When the DC plug is not connected to the computer, dis-
connect the AC cord from your AC wall outlet as well. If
the cord is kept connected, a very low level of power equivalent to approximately 1.5 watts will be consumed.
Problems such as sudden voltage drops/surges may arise
during periods of thunder and lighting. Since this could
adversely affect your computer, the uninterruptible power
supply is highly recommended.
Areas other than the Display
Gently wipe other areas using a soft cloth pre-soaked in
water or a neutral cleaner and wrung out thoroughly. Do
not use solvents like benzene and thinner, nor chemical
cloths.
Surface of the LCD Panel
Soak a piece of gauze or soft cloth sufficiently in isopropyl
alcohol only, and wipe the panel gently. Using excessive
force may scratch the panel. Avoid wiping with a dry cloth,
since this can damage the surface of the polarizing plate.
Also, be sure not to use water and perfumes, as these liquids can dissolve the coloration of the polarizing plate.
Maintenance
Carry the Computer Properly
Do not carry the computer without first turning off the
power.
Do not hold the computer by the LCD panel if the computer is open.
Do not move the computer while a floppy disk is inserted.
Avoid Excessive Force to the LCD Panel
Do not apply excessive downward force on the display when
it is completely opened, especially when plugs and/or cables
are connected to the rear of the computer.
Avoid Extreme Heat and Cold
Do not store or use the computer in locations
exposed to heat, direct sunlight, or extreme
cold.
Avoid moving the computer between locations
with large temperature differences.
Operation: 5 oC to 35 oC (41 oF to 95 oF)
Storage: -20 oC to 60 oC (-4 oF to 140 oF)
Usage
The CF-25 was developed based on thorough research into the real-world portable computing environments. Exhaustive pursuit of usability and reliability under harsh conditions led to innovations such has
the magnesium alloy exterior, MCM (multichip module) technology based cool-running Pentium
®
processor, vibration damped hard disk drive and floppy disk drive, flexible internal connections, sealed LCD and
keyboard, dust proof hinges and the revolutionary "Shirato" ruggedized LCD screen mounting system.
The CF-25's outstanding engineering has been tested using the stiff MIL-STD- 810E (for vibration and
shock) and IP (for dust and water) based procedures.
As with any portable computer device precautions should be taken to avoid any damage. The following
usage and handling procedures are recommended.
6
P.23
Names and Functions of Parts
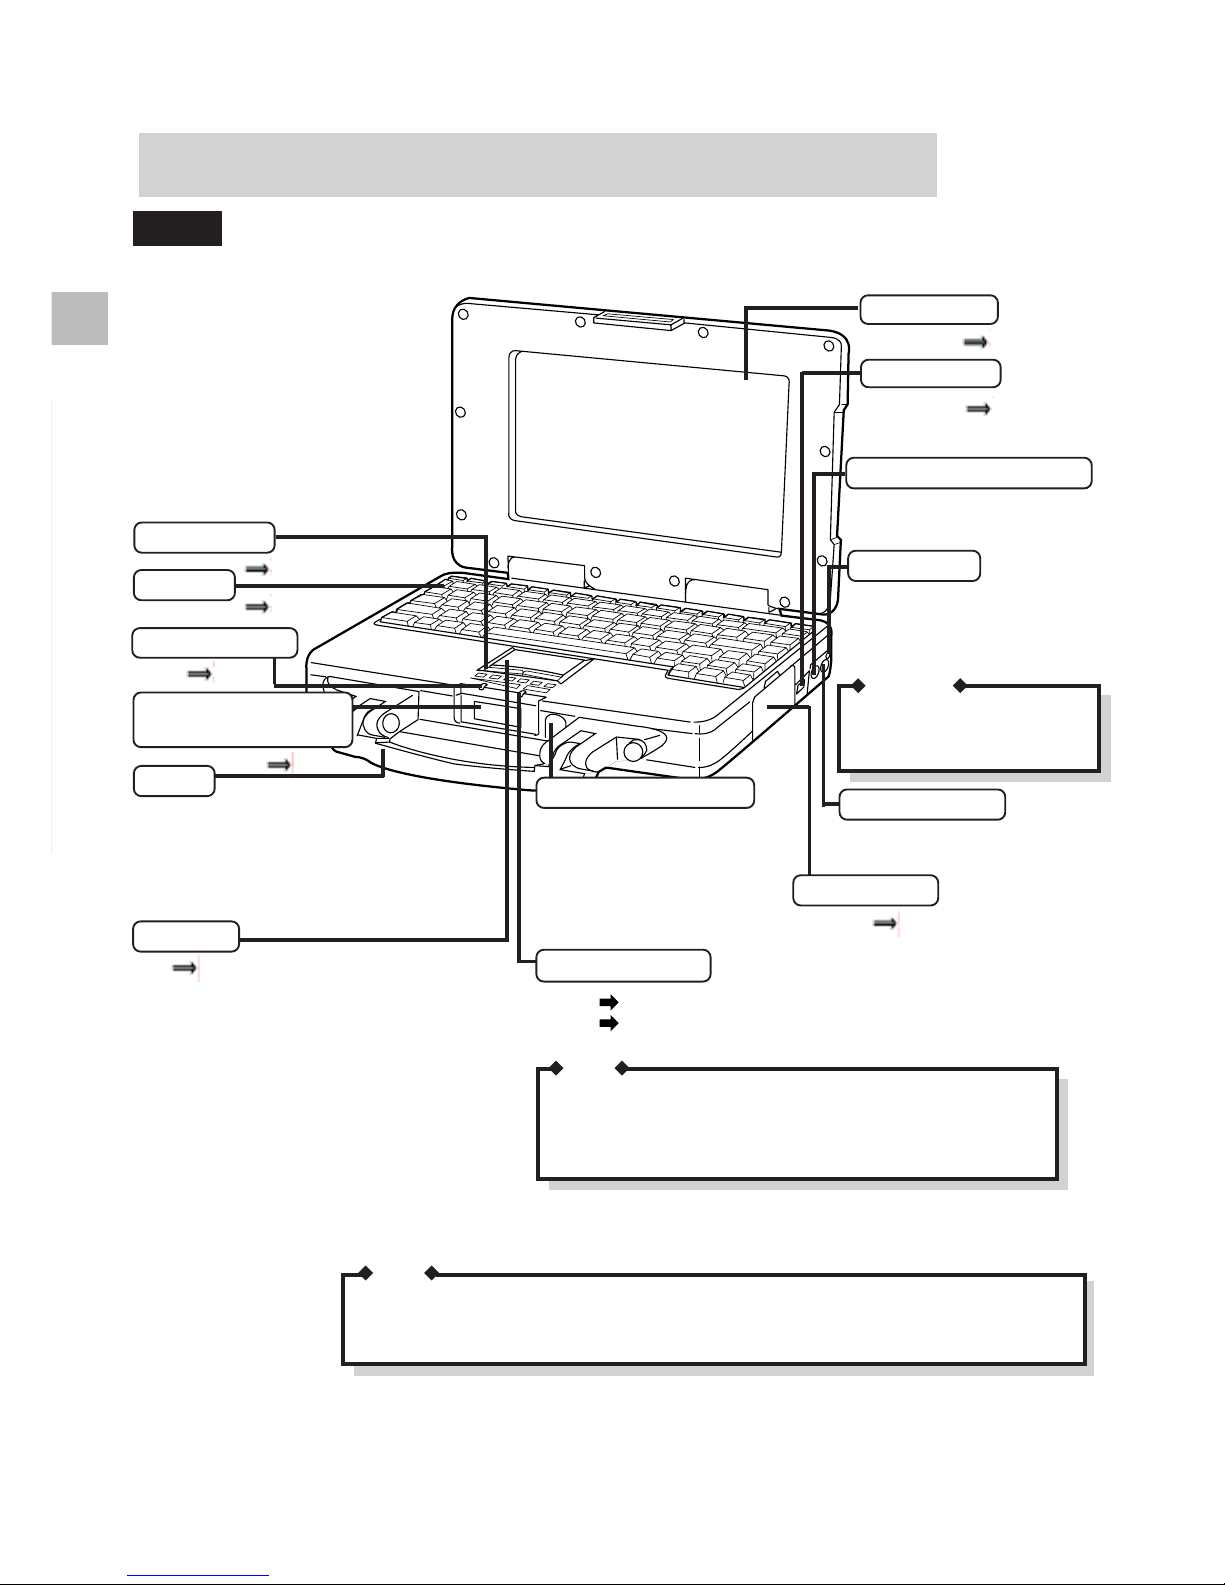
Front
Use this connector to connect
headphones or amplifier-equipped
speakers. Audio output from the internal speaker is disabled when
headphones or outside speakers are
connected.
Headphone Connector
Keyboard
Handle
P.11
Touch Pad
Infrared Communication
Port (IrDA compliant)
If your computer freezes, press this
button to reset the computer. Use
a narrow object such as the tip of a
ball-point pen to push the button.
CAUTION
Do not use a pencil. Pencil lead can
break off inside the computer and
damage the computer's circuitry.
Insert the DC plug of the supplied
AC adapter into this connector.
PC Card Slots
P.19
When the temperature of the CPU rises, the processing speed is
automatically reduced to protect the CPU from overheating.
When the temperature of the CPU drops, the normal processing
speed is automatically restored.
POWER Indicator
P.7
T o remove the handle, use a screwdriver to remove
the screws. When replacing the handle make sure
that the screws have been firmly fastened.
After removing the handle, please affix the two
caps from the cap sheet that is supplied.
Use this port to connect an external
mouse(PS/2 type) or keyboard.
Battery Indicator
LED Indicator
P.13
P.10
Power Switch
Display (LCD)
P.38
P.8
Ext. Mouse/Keyboard Port
DC-IN Connector
Reset Button
The characteristics of the anti-reflection coating on the LCD may cause fingerprints and smudges
to appear more visible when compared to standard LCD panels. If necessary, these can be easily
removed by following the LCD panel cleaning instructions found on page 5.
Green Power on / CPU normal speed mode
Orange Power on / CPU slow speed mode
(The CPU cools down)
NOTE
NOTE
7
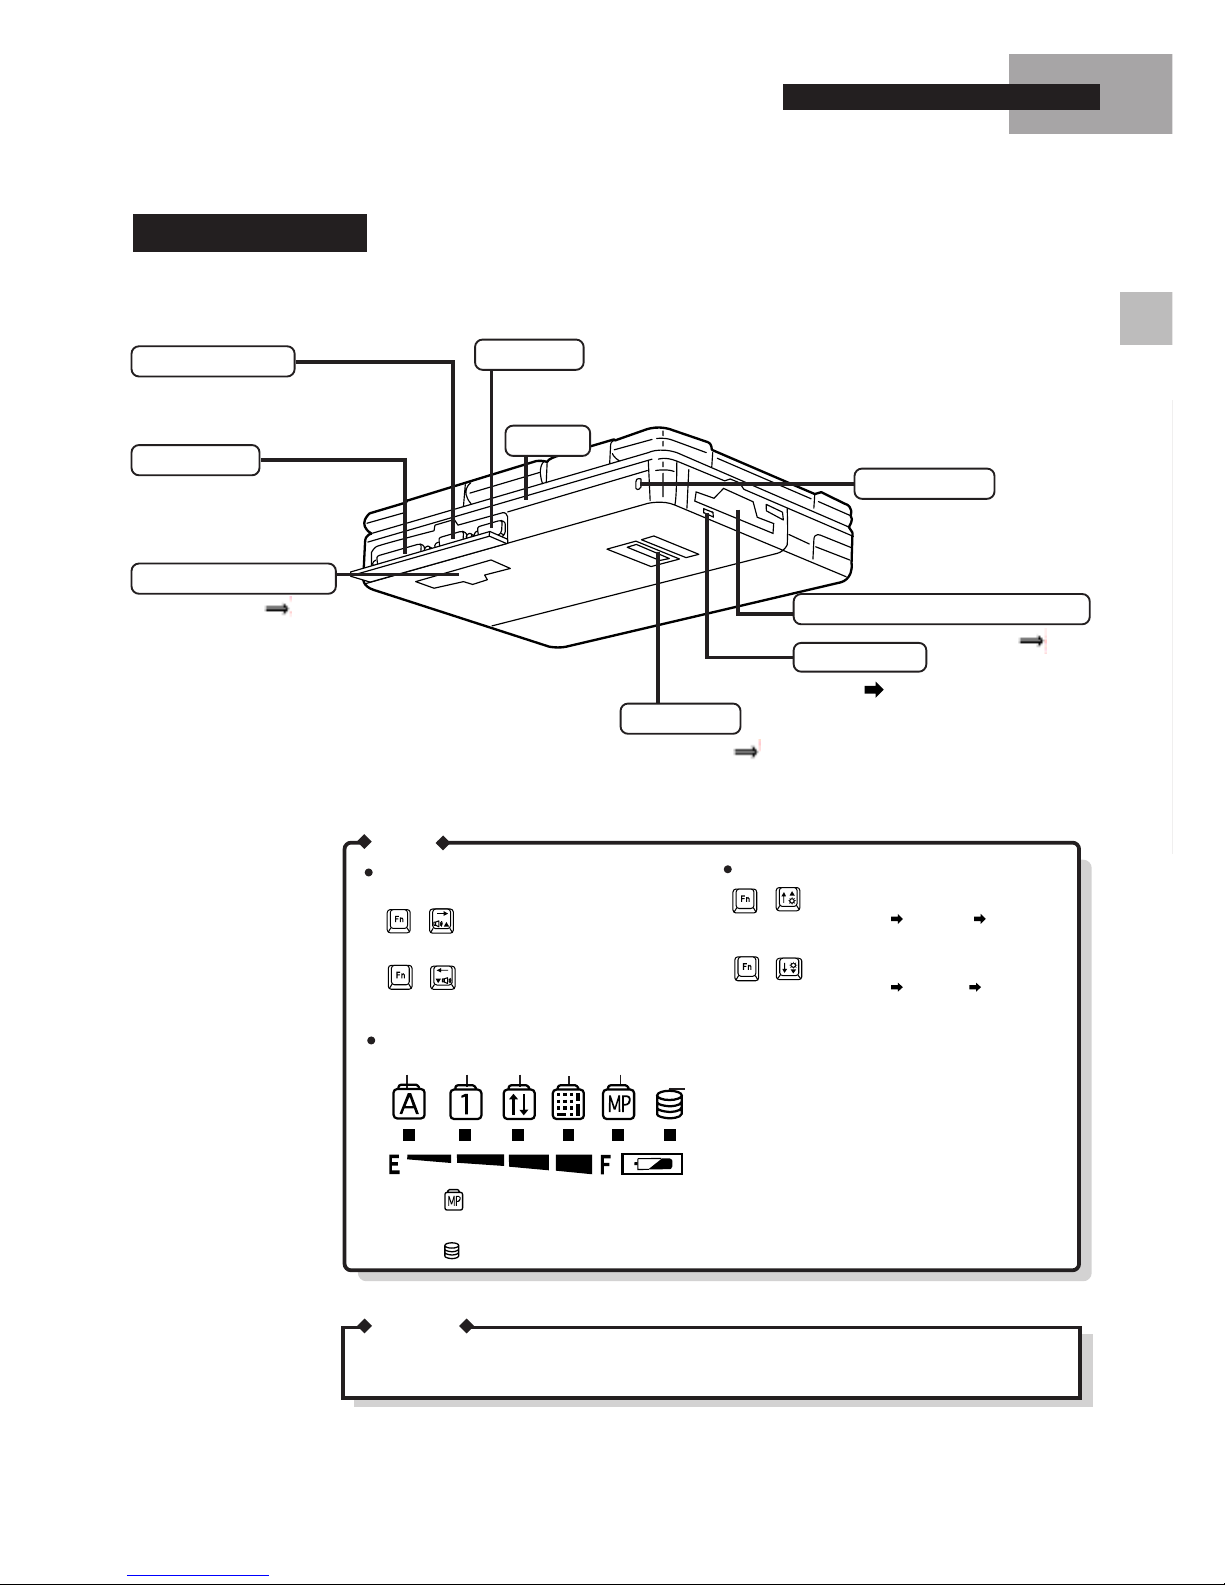
Back and Bottom
Names and Functions of Par ts
Do not allow the ports/connectors to get wet. Always make sure they are covered. If they do
happen to get wet, wipe them using a soft cloth immediately.
Multimedia Pocket Device (FDD)
P.18
Security Lock
Connect a cable (Kensington)
to anchor your computer to a
desk or some other large object
to prevent theft.
Speaker
Serial Port
Use this port to connect a serial mouse or a serial communications device such as a modem.
Use this port to connect an external
display.
Ext. Display Port
Parallel Port
Use this port to connect a
printer or some other parallel
port device.
P.21
Expansion Bus Port
Increase volume.
Volume adjustment
Decrease volume.
Display brightness adjustment
Increase brightness.
(Low Middle High)
Decrease brightness.
(High Middle Low)
When the LED indicator goes on, do not turn the computer off. Do not remove/insert a
floppy disk.
When the LED indicator goes on, do not turn the computer off.
Hard Disk
Multimedia Pocket
Key PadCaps Lock NumLk ScrLk
LED Indicator
P.18
MP Release
FDD Indicator
Green During operation
MEMO
CAUTION
+
+
+
+

8
Startup and Shutdo wn
Select settings for your region, then click [Next].
Select your Keyboard Layout, then click [Next].
( for U.S.A. : "United States 101", for U.K. : "British" )
T ype your name and the name of your company, then click [Next].
The License Agreement should be displayed. Read the Agreement, check
"I accept the agreement", and click [Next].
Type in the product number printed on the Certificate of Authenticity;
the Certificate is attached to the "Introducing Microsoft Windows 95
book" included in the "Windows 95 system pack". Click [Next].
Click [Finish] to start Wizard.
If the instruction to restart appears, click [OK].
Set the correct Date & Time and Time Zone, then click [Close]. (Note:
These settings can be changed later.)
If you want to install your printer driver(s), click [Next]. Follow the
prompts on the screen to specify the printer(s). Otherwise, click [Cancel]. (Note: Printer drivers can be added later.)
6
7
5
8
1
2
3
4
9
Windows 95 Setup
First time computer is started only
CAUTION
When the power is turned on at the first time, before you use software programs
furnished with this product, please read through "LIMITED USE LICENSE AGREE-
MENT" ( P.33). Then remove the seal.
Do not turn the computer off immediately
after turning it on.
Also, allow at least 10 seconds to elapse
after you have switched off the power and
want to turn the computer back on again.
CAUTION
P o wer On
Lift the latch and
open up the display .
Power Switch
Panasonic
Slide
Slide the power switch toward the rear of the computer
and hold it there for about one second.
Use only the specified AC adapter (CF-AA1526).
NOTE
3
2
1
Connect the AC cord to the AC adapter.
Plug the AC cord into an AC outlet.
3
The supplied battery is not charged. When using the computer for the
first time, be sure to charge the battery pack before using the computer.
Connecting the AC adapter automatically starts the charging process.
Check the battery indicator to confirm the current charging status.
MEMO
Plug the AC adapter into the computer.
Panasonic
1
2
Inserting the Battery pack
Insert the provided battery pack ( P.15).
Connecting the AC Adapter

9
Close the "Welcome to Windows 95" screen.
You can now use Windows 95, but in order to set the Panasonic origi-
nal environment and create back-up disks, select
(Panasonic Setup
icon). Windows restarts. If Windows does not restart, press the RESET button.
MEMO
You can also restart your computer in the MS-DOS
mode by selecting "Restart the computer in the MSDOS mode?"
Shutdown
You can turn your computer off by selecting "Shut Down..." from the
"Start" menu.
Startup and Shutdown
Ready to create Firstaid FD.
Insert a floppy disk in drive A and press any key.
Please remove the diskette and write protect it.
Press any key to continue...
NOTE
Make sure to create "Firstaid FD" etc. that
will allow you to reinstall the operating system if necessary.
Do not switch the power off or put the computer into the suspend or hibernation mode
while the "Firstaid FD" etc. is being created.
Beginning with the next time you turn on the computer, this screen will
be displayed as soon as power is switched on.
To set the user password, start the Setup utility. (
P.24)
Firstaid FD
Panasonic Tools Disk
CardWorks(TM) Installation Disk
TranXit Disk 1,2
Drivers Disk
If you have the floppy disks in hand, press any key and advance
t
the next step. Any data on these disks will, however, destroyed.
If the floppy disks are not currently available, turn off the po
w
until they are.
*
*
*
*
*
*
*
*
*
*
*
*******************************************************************
*
Press any key to continue...
1
1
1
2
1
10
11
Firstaid FD etc. creation
Create back-up disks of the software preinstalled in your computer .
Be sure to have 6 2HD-type floppy disks on hand. Please backup your
disks in the following order:
Firstaid FD
Panasonic Tools Disk
CardWorks™ INSTALLATION Disk
TranXit Disk (2)
DRIVERS DISK
Startup screen
10
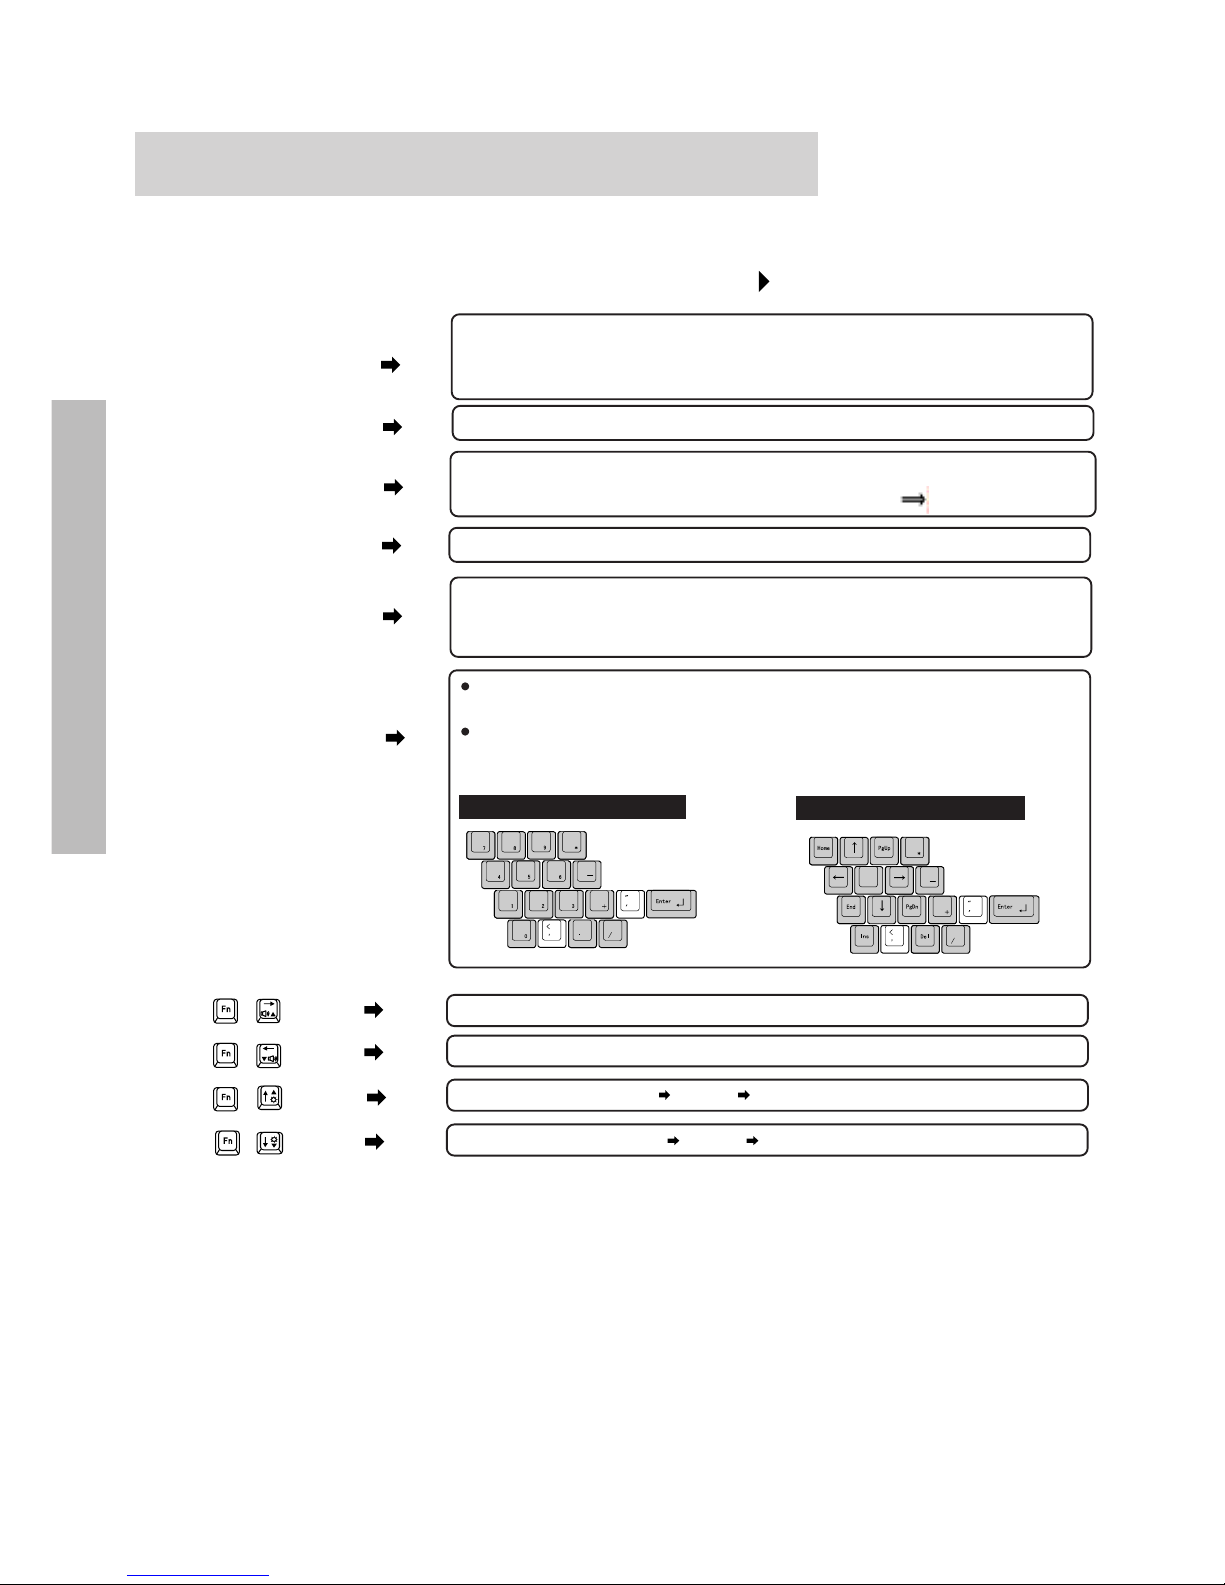
Keyboard and Touch Pad
The system is equipped with a keyboard and touch pad for input to the computer.
Powers off the computer and nullifies the hibernation function. Use this combination only after saving all open files, closing all open applications, and exiting Windows.
Ke y combinations for accessing special functions
Toggles the speaker on and off .
Enters the suspend mode immediately. The display resumes when the power switch
is pressed. Please affix the function seal that is supplied.( P.2)
Gives the current battery power status.
Powers off the hard disk drive motor and backlight of the display to conserve power .
The backlight goes on again when any key is pressed. Power to the hard disk drive
resumes when the hard disk is accessed.
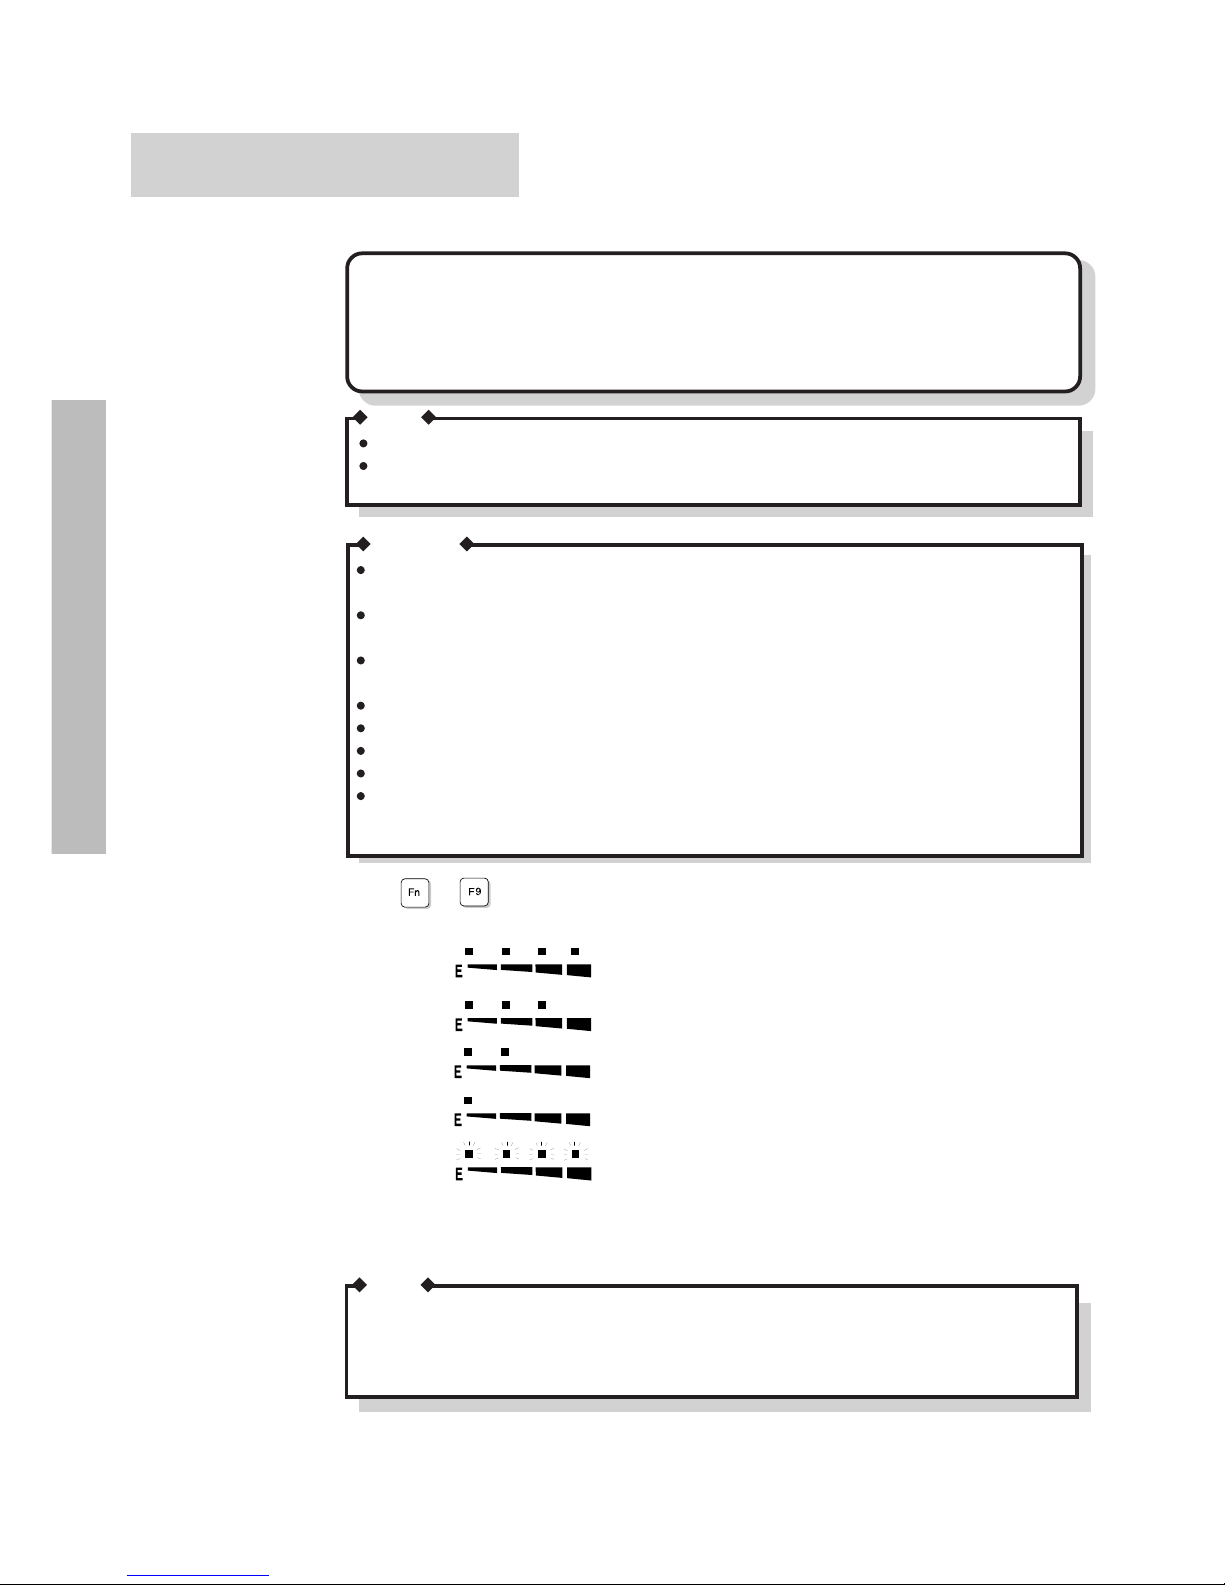
Toggles the numeric key pad on and off. When the key pad is on, the corresponding LED indicator lights and numerical values can be input.
Pressing the Fn key when the key pad is on turns it off, and vice versa.
When NumLk is activated in conjunction with the key pad, the shaded keys operate as shown.
NumLk off & KeyPad onNumLk on & KeyPad on
Increase volume.
Decrease volume.
Increase brightness. (Low Middle High)
Decrease brightness. (High Middle Low)
+
+
+
+
[Fn] +[KeyPad]
[Fn] +[F10]
[Fn] +[F9]
[Fn] +[F5]
[Fn] +[F7]
[Fn] +[Power Switch]
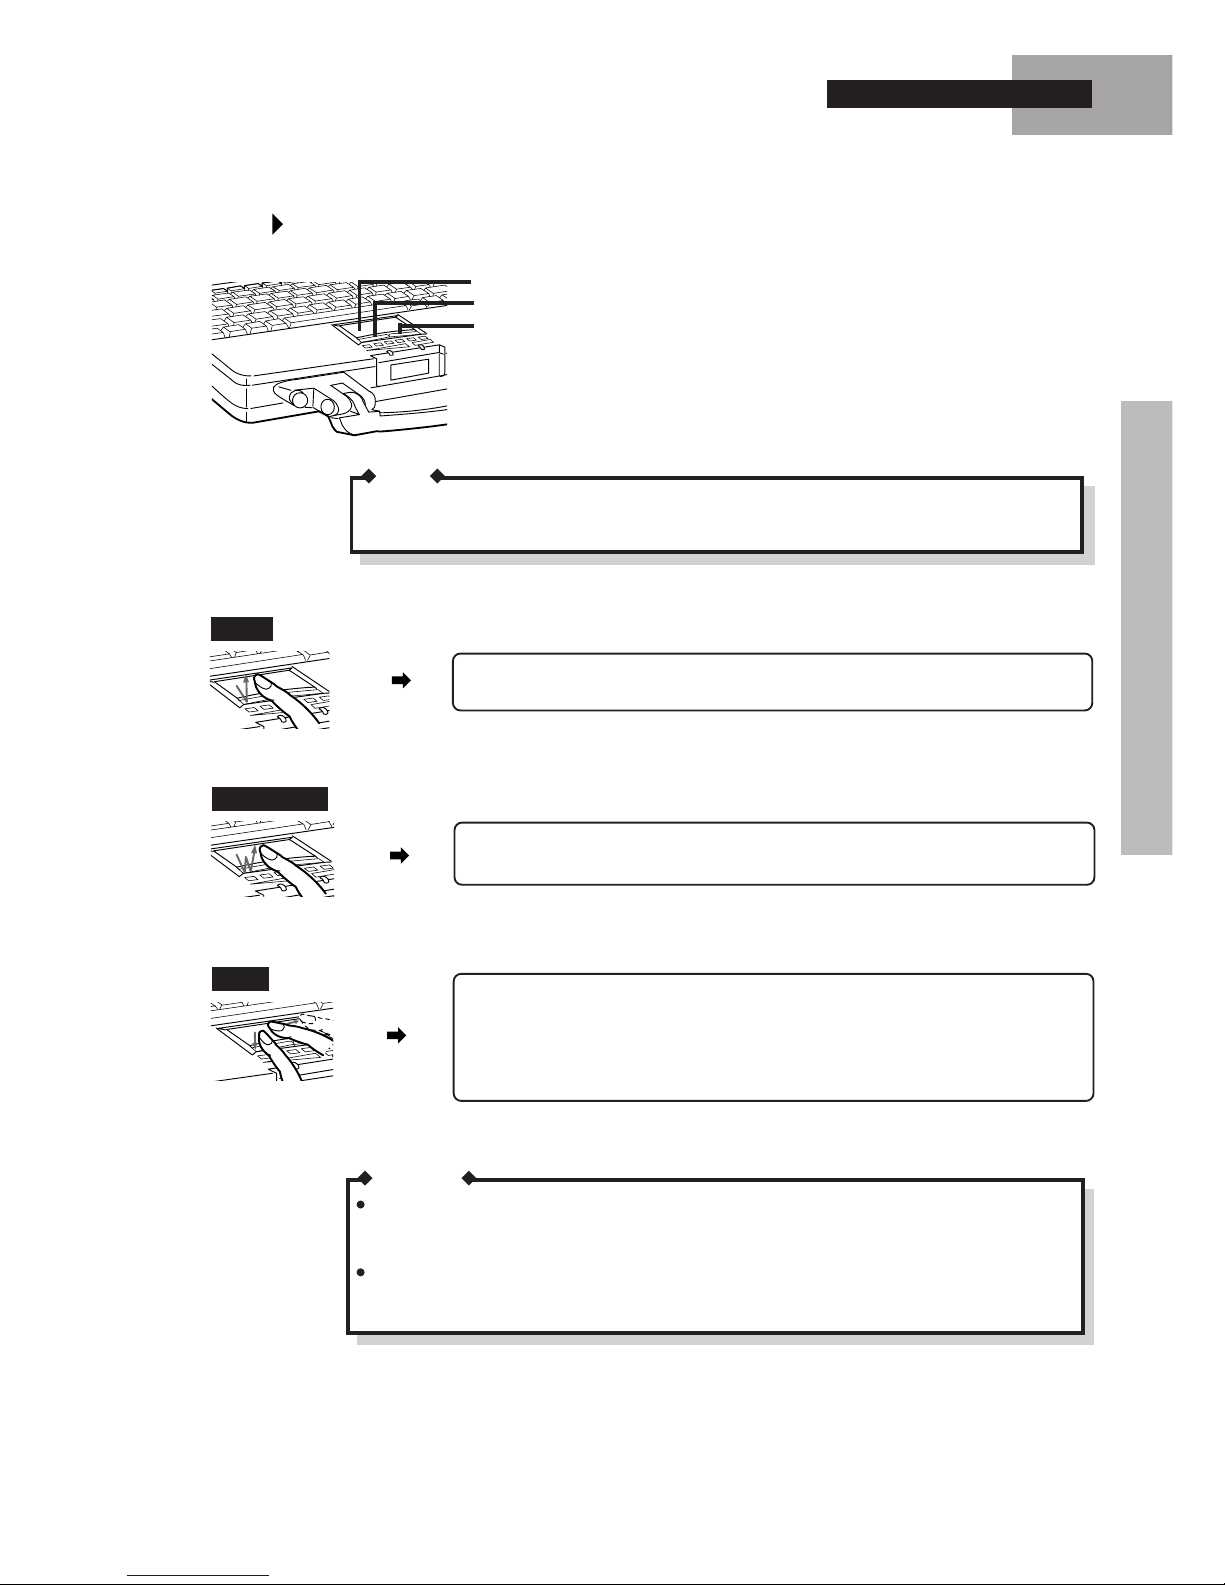
11
Touch P ad
Click
Click the left button once or tap the surface once lightly.
Drag
Double click
Click the left button twice in rapid succession or tap the surface twice lightly in
rapid succession.
The touch pad is used to move the cursor in the same way as a mouse
would.
Move the tip of your finger lightly over the surface to move the cursor.
Tapping lightly on the surface has the same effect as clicking the left
mouse button.
NOTE
Move the cursor to the object you want to drag. Hold down the left button with one
finger while moving another finger over the surface or double-tap the pad without
releasing your finger and drag the object.
Releasing the left button or lifting your finger from the pad, respectively , will "drop"
the object.
Right Button
Left Button
Work Surface
Keyboard and Touch Pad
CAUTION
Be sure never to press the POWER switch while the suspend or hibernation process is being
carried out. Also, do not input from the keyboard or the touch pad or move the mouse. The
processing may not be executed correctly.
Movement of the cursor may be affected if oil, etc., gets on the touch pad. Be sure that the
touch pad is clean at all times. Use a clean cloth with some water and a little detergent or
media head cleaner to gently wipe the touch pad.
If "Left-handed" is selected in the mouse settings, tapping the touch pad will have the same
effect as clicking the left button of the touch pad.
12
Battery Power
This computer contains the following two types of batteries.
Main Battery: (Ni-MH rechargeable battery pack)
Removable battery that runs the computer without the AC adapter.
Clock Battery: Battery that is housed inside the computer and maintains the clock and set-
tings.
NOTE
NOTE
The battery pack will become somewhat warm during normal use. This is not a malfunction.
The operating time may differ from the display depending on the charging and discharging
temperatures and battery wear.
When transporting spare batteries inside a package, briefcase, etc., it is recommended that
the batteries be stored in a plastic bag.
Exposure to strong shock (such as being dropped on the floor) can cause the battery pack to
malfunction.
Do not touch the terminals on the battery pack. Damaged terminals may cause system perfor-
mance failure.
Do not expose the battery pack to open frame.
Do not throw the battery pack into a fire or water.
Use the battery pack only with the computer for which it was designed.
Do not directly connect the negative and positive terminal on the battery pack.
If, due to damage, battery electrolyte comes in contact with skin or clothing, wash it off
quickly and thoroughly with water. Consult with your physician if you feel something is
wrong with you physically.
When +
Battery
are pressed, the remaining battery charge is shown by the four indicators.
90 ~ 100%
65 ~ 90%
35 ~ 65%
10 ~ 35%
[Blinking]
CAUTION
The battery pack is not installed or the
remaining battery charge is not known.
When the RESET button is pressed or when a battery pack has been replaced, the remaining
battery charge will not be recognized. The four LED indicators will blink to show this.
If the battery pack is charged fully or discharged until the red indicator lights, the remaining
battery charge becomes to be shown.
13
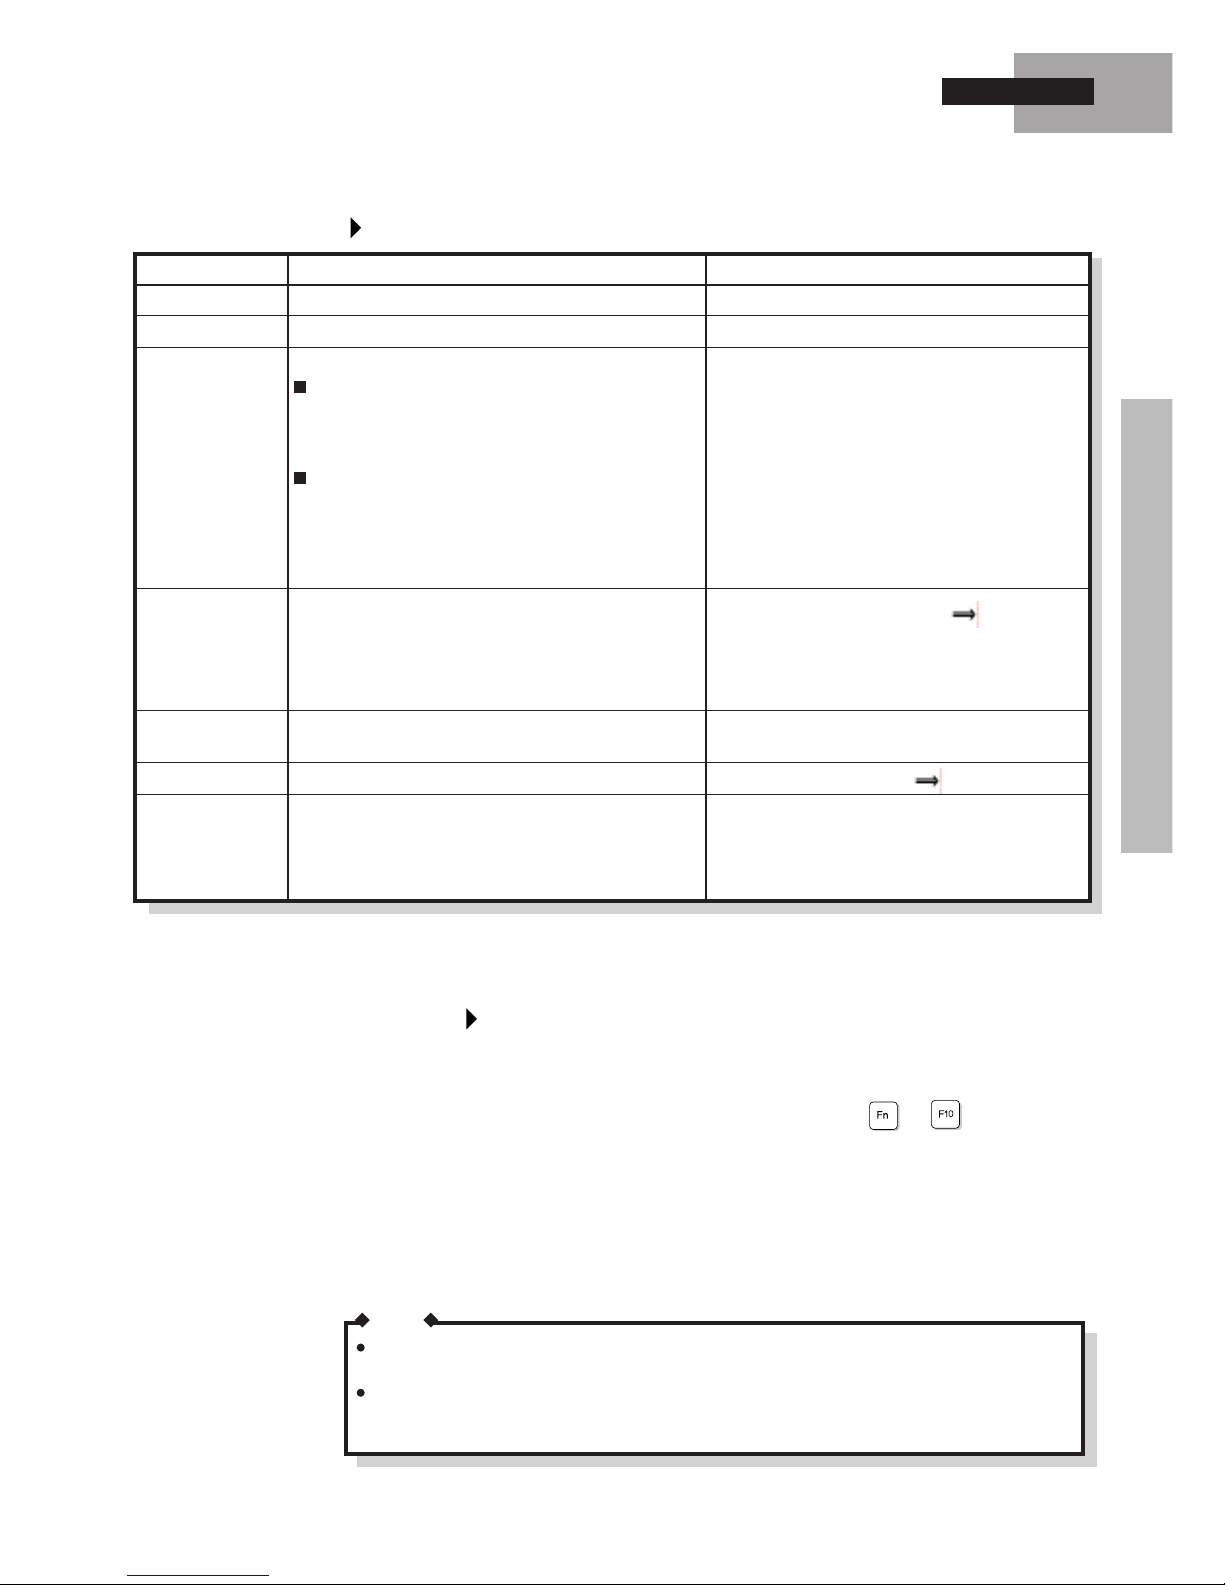
Battery Indicator
Power low
Hibernation function is enabled:
- The beeper sounds at the same time.
- The computer automatically enters the hibernation
mode a few minutes after the beeper sounds.
Hibernation function is disabled:
- The beeper sounds several minutes later.
- The computer automatically turns off a few minutes
after the beeper sounds.
Please continue normal use.
Please continue normal use.
Green
Orange
Charging
Fully charged
Action
Battery Status
Battery Indicator
"Power management" conserves battery power and enables the computer to be operated to the maximum extent possible.
Connect the AC adapter to the computer.
Replace the main battery with a fully charged
one.
If recharging is not possible at this time, immediately save any open files on your disk and turn
off the power.
When the indicator remains red for a long time,
proceed with refreshing unless there has been a
sudden change in temperature.
The battery or AC adapter may not have been
connected properly.
Please wait until refreshing finishes. Press ESC
if you wish to abort.
Blinking green
Blinking orange
Blinking orange
for 5 seconds after
the AC adapter is
connected.
Refreshing required
Refreshing
The temperature is outside the range of approximately
5°C to 35°C (41°F to 95°F).
Please wait until the temperature falls within the
allowable range.
NOTE
Certain applications may not run when "Power Saving" is set to "Advanced" or "Standard".
If this is the case, set "Power Saving" to "OFF".
When Windows is activated, select [Start]-[Settings]-[Control Panel]-[Power], and confirm
that the "Allow Windows to manage power use on this computer ." check box has been checked
at "Power". The default setting is "checked".
Conserving Battery P o wer
Battery Power
Red
Refresh the battery pack. ( P.17)
Blinking red
The computer enters the standby mode immediately after +
Standby
are pressed.
In this mode, the HDD motor and display is turned off.
In order to achieve maximum battery power, in the setup utility, set "Power Saving"
in "Power Management" to "Advanced".
Make the proper connections. ( P.8,15)
If the problem persists, contact the Panasonic
Service Center. (Trouble may have occurred in
the battery, charging controller, etc.)

14
A Shorter Than Expected Battery Drive Time
Your computer may experience a shallow charge-discharge cycle characterized by
computer operation for a short period of time followed by battery charging. Repetition of such cycles will decrease your battery’ s operating time temporarily . The above
should be kept in mind if you decide to run the computer off the battery after it has
been running off the AC adapter for an extended period of time.
The computer automatically determines the need for battery refreshing. In such cases,
the screen will display a message reminding you to refresh the battery , after the computer has been started up. In this case, the battery indicator blinks in green to indicate the need for battery refreshing. Refreshing is commenced after any key is pressed.
Also, if you leave a fully charged battery for 2 to 4 weeks in temperatures above 35°C
(95°F), the battery’s operating time may decrease temporarily.
These conditions are not due to a fault in the battery. Normal performance can generally be restored by fully charging and then discharging the battery two or three
times in succession. In order to fully discharge the battery in a short period of time, a
battery refresh tool (BATTREF.COM) is provided
( P.17). Please note that the
battery operating time may vary drastically depending on the types of installed options.
Battery Power
Replace the battery pack if the amount of time the computer can be operated on a full charge
drops to approximately one half of the normal duration.
NOTE
Hints on How to Use Battery Pack
If you plan to leave the computer idle for an extended period of time (approximately
two months or more), first discharge the battery using the “refresh” method, next,
charge the battery pack until the charge level reaches 50%, then remove it from the
computer and store it in a cool, dry place. (Refer to the Operating Instructions for
information on removing the battery.)
Excessive discharging of the battery can occur if it is left in the computer for extended periods of disuse, possibly shortening its service life or causing damage to
the computer. (Note that the battery will not discharge if the AC adapter is left
connected, so it does not have to be taken out in such cases.)

15
Turn the computer over.
Use a screwdriver to loosen the two screws located
toward the front of the computer.
Removal
Replacing
The battery pack is an item that at some point will require a replacement. If the
usage time of a battery pack becomes noticeably short, and repeated recharging does
not restore its performance, the battery pack should be replaced with a new one [part
number: CF-VZS250A(Ni-MH) or CF-VZS251(Li-Ion)].
Remove the cover.
Turn the computer off by pressing and holding the power
switch in the ON position simultaneously .
Slide the battery pack toward the outside edge to remove it.
Battery Power
NOTE
Always switch the computer off and disconnect the AC adapter before replacing a battery
pack.
The battery pack may malfunction if it is exposed to strong shocks. Caution should be exercised.
Mounting
Drop a new battery pack into the pocket.
Slide the battery pack inward until it is firmly in place.
Replace the cover and tighten the two screws.
 Loading...