


Removable Full Front MP3 WMA CD Player/Receiver with Full Dot Matrix
Display and CD Changer Control
CQ-C8400/C8300U
Removable Full Front CD Player/Receiver with Full Dot Matrix Display and
CD Changer Control
CQ-C8200/C8100U
≥ Please read these instructions carefully before using this product and save this manual for future use.
≥ Prière de lire ces instructions attentivement avant d’utiliser Ie produit et garder ce manuel pour l’utilisation ultérieure.
≥ Lea con atención estas instrucciones antes de utilizar el producto y guarde este manual para poderlo consultar en el futuro.
(CQ-C8400U)
Operating InstructionsOperating Instructions
Manuel d’instructionsManuel d’instructions
Manual de instruccionesManual de instrucciones
2
CQ-C8400/8300/8200/8100U
E
N
G
L
I
S
H
CQ-C8400/8300/8200/8100U
3
E
N
G
L
I
S
H
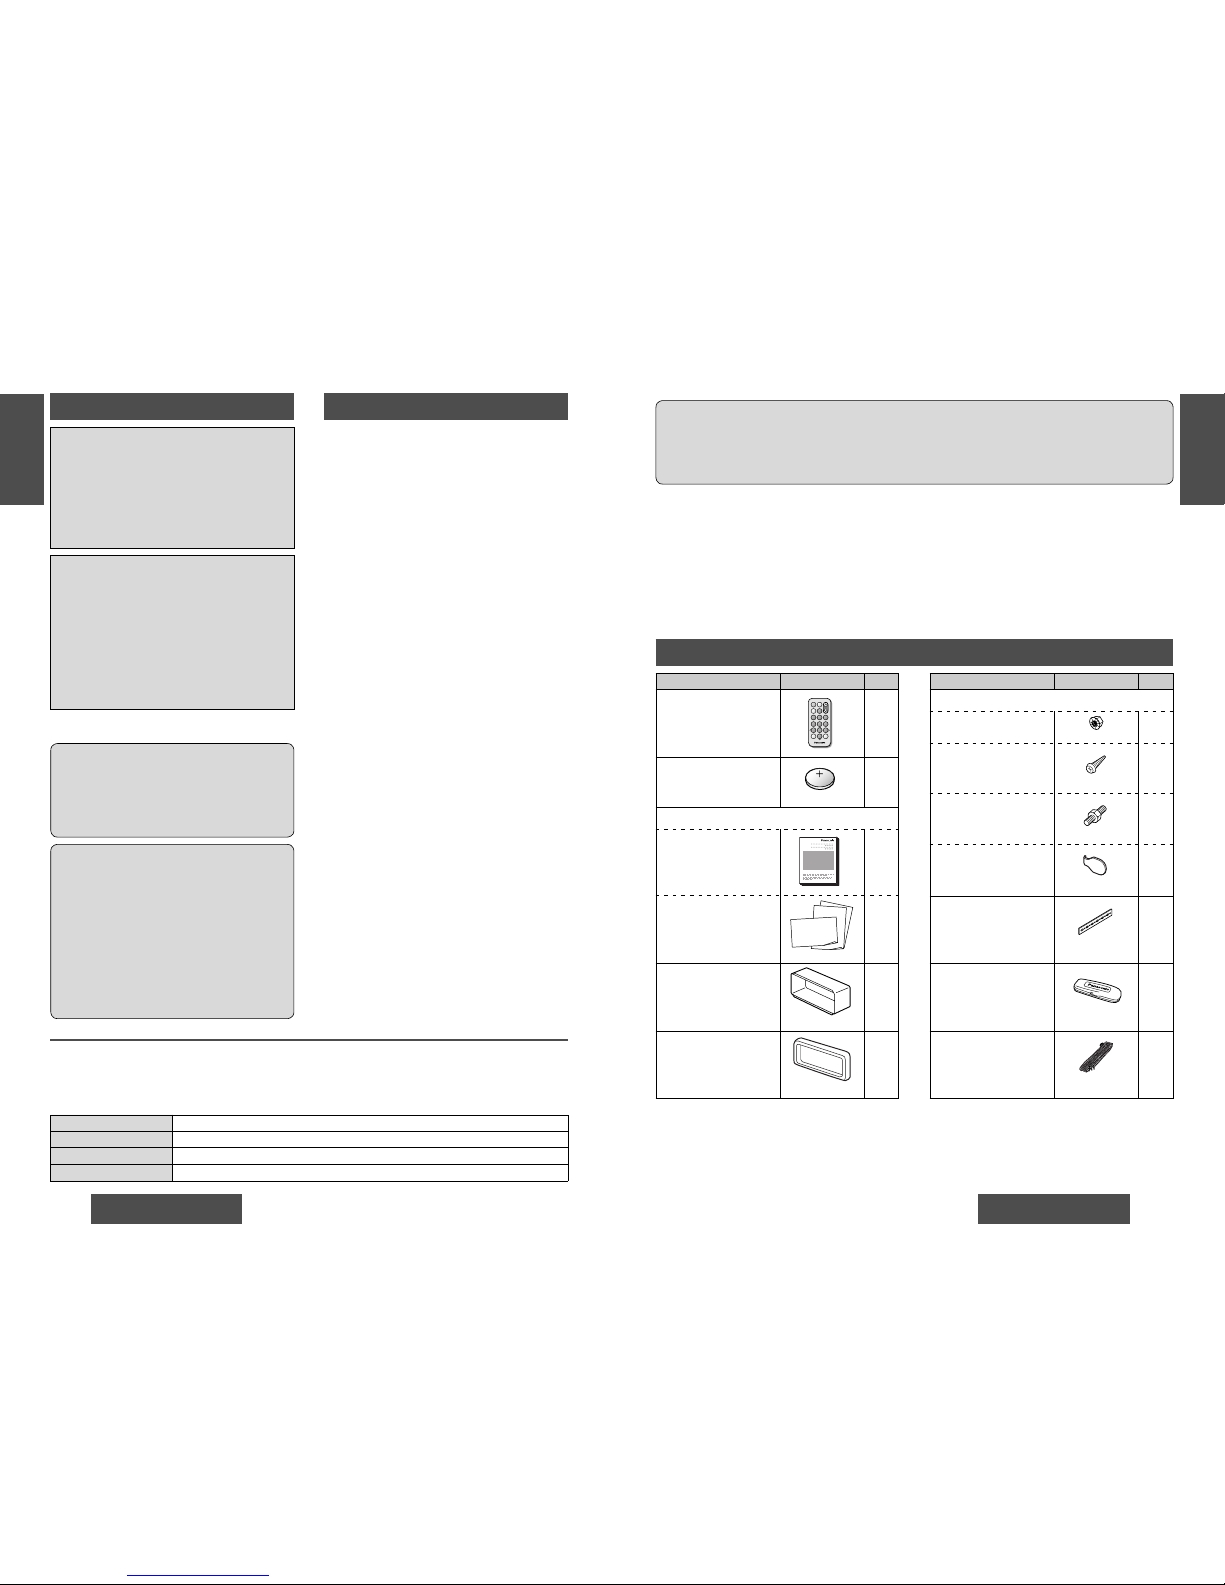
Item Diagram Q’ty
Screw Kit (YEP0FZ3158)
≥ Hex. Nut (5 mm‡)
1
≥ Tapping Screw
(5 mm‡t16 mm)
1
≥ Mounting Bolt
(5 mm‡)
1
≥ Lock Cancel Plate
2
Rear Support Strap
(YEFG04019)
1
Removable Face Plate
Case
(YEFA131646)
1
Power Connector
(YEAJ02871)
1
Item Diagram Q’ty
Remote Control Unit
(YEFX9992663)
1
Lithium Battery
<CR2025>
1
Instruction kit
≥ Operating Instructions
(YEFM284108)
1
≥ Warranty Card, etc.
1 set
Mounting Collar
(YEFX0215873)
1
Trim Plate
(YEFC05605)
1
Safety Information
WARNING:
TO REDUCE THE RISK OF FIRE OR ELECTRIC
SHOCK, DO NOT EXPOSE THIS PRODUCT TO
RAIN OR MOISTURE.
TO REDUCE THE RISK OF FIRE OR ELECTRIC
SHOCK, AND ANNOYING INTERFERENCE, USE
ONLY THE INCLUDED COMPONENTS.
CAUTION:
THIS PRODUCT IS A CLASS I LASER
PRODUCT.
USE OF CONTROLS OR ADJUSTMENTS OR
PERFORMANCE OF PROCEDURES OTHER
THAN THOSE SPECIFIED HEREIN MAY RESULT
IN HAZARDOUS RADIATION EXPOSURE.
DO NOT OPEN COVERS AND DO NOT REPAIR
YOURSELF. REFER SERVICING TO QUALIFIED
PERSONNEL.
The following applies only in the U.S.A.
Part 15 of the FCC Rules
FCC Warning:
Any unauthorized changes or modifi cations to
this equipment would void the user’s authority
to operate this device.
NOTICE:
This product has a fl uorescent lamp that
contains a small amount of mercury. It
also contains lead in some components.
Disposal of these materials may be regulated
in your community due to environmental
considerations.
For disposal or recycling information
please contact your local authorities,
or the Electronics Industries Alliance:
<http://www.eiae.org.>
Precautions
When Driving
Keep the volume level low enough to be aware of
road and traffi c conditions.
When Washing Your Car
Do not expose the product, including the speakers
and CDs, to water or excessive moisture. This could
cause electrical shorts, fi re, or other damage.
When Parked
Parking in direct sunlight can produce very high
temperatures inside your car. Give the interior a
chance to cool down before switching the unit on.
Use the Proper Power Supply
This product is designed to operate with a 12 V DC,
negative ground battery system (the normal system
in a North American car).
Disc Mechanism
Do not insert coins or any small objects. Keep
screwdrivers and other metallic objects away from
the disc mechanism and disc.
Use Authorized Servicenters
This product is made of precision parts. Do not
attempt to disassemble or adjust any parts. Please
refer to the Servicenter list including with this
product for service assistance.
For Installation
This product should be installed in a horizontal
position with the front end up at a convenient angle,
but not more than 30°.
Note:
≥ The preset memory is cleared to return to the
original factory setting when the power connector
or battery is disconnected.
Find the model number and serial number on either the back or bottom of the unit. Please record them in the
space below and retain this booklet as a permanent record of your purchase to help with identifi cation in case
of theft.
MODEL NUMBER CQ-C8400U / CQ-C8300U / CQ-C8200U / CQ-C8100U
SERIAL NUMBER
DATE PURCHASED
FROM
Accessories
Panasonic welcomes you to our ever growing family of electronic product owners. We know that
this product will bring you many hours of enjoyment. Our reputation is built on precise electronic and
mechanical engineering, manufactured with carefully selected components and assembled by people
who take pride in their work. Once you discover the quality, reliability, and value we have built into this
product, you too will be proud to be a member of our family.
64975
Car Audio
SOURCE
MUTE
POWER
RAND
VOL
312
DISPBAND
REP
6
5
SET
SEL
#
SCAN
MENU
NUMBER
8
0
CQ-C8400/C8300U
Removable Full Front MP3 WMA CD Player/Receiver with Full Dot Matrix Display and
CD Changer Control
CQ-C8200/C8100U
Removable Full Front CD Player/Receiver with Full Dot Matrix Display and CD Changer
Control
Note:
≥ Please refer to page 9 for information on differences in each model.
Note:
≥ The number in parenthesis underneath each accessory part name is the part number for maintenance and
service.
≥ Accessories and their parts numbers are subject to modifi cation without prior notice due to improvements.
≥ Mounting collar 1 and trim plate 7 are mounted on the main unit at shipment (page 60).

Pièce Schéma Qté
Ensemble de vissage (YEP0FZ3158)
≥ Écrou hexagonal
(5 mm‡)
1
≥ Vis autotaraudeuse
(5 mm‡t16 mm)
1
≥ Boulon de montage
(5 mm‡)
1
≥ Plaque de
déverrouillage
2
Plaque de fi xation arrière
(YEFG04019)
1
Étui pour panneau avant
amovible
(YEFA131646)
1
Connecteur d’alimentation
(YEAJ02871)
1
Pièce Schéma Qté
Télécommande
(YEFX9992663)
1
Pile au lithium
<CR2025>
1
Ensemble d’instructions
≥ Manuel d’instructions
(YEFM284108)
1
≥ Carte de garantie, etc.
1
Collier de montage
(YEFX0215873)
1
Plaque de garniture
(YEFC05605)
1
Consignes de sécurité
MISE EN GARDE:
POUR RÉDUIRE LES RISQUES D’INCENDIE OU
D’ÉLECTROCUTION, N’EXPOSEZ PAS CET
APPAREIL À LA PLUIE OU À L’HUMIDITÉ.
AFIN DE PRÉVENIR TOUT RISQUES D’INCENDIE OU
D’INTERFÉRENCES, UTILISEZ UNIQUEMENT LES
COMPOSANTS FOURNIS.
ATTENTION:
CET APPAREIL EST UN PRODUIT LASER DE LA
CLASSE I.
L’UTILISATION DE COMMANDES OU RÉGLAGES OU
L’EXÉCUTION D’OPÉRATIONS AUTRES QUE CELLES
QUI SONT INDIQUÉES DANS CE DOCUMENT
PEUVENT RÉSULTER EN UNE EXPOSITION À UN
RAYONNEMENT DANGEREUX.
N’OUVREZ PAS LES COUVERCLES ET
N’ESSAYEZ PAS D’EFFECTUER VOUS-MÊME DES
RÉPARATIONS. ADRESSEZ-VOUS À UN
PERSONNEL QUALIFIÉ POUR TOUTE RÉPARATION.
Précautions à prendre
Lorsque vous êtes au volant
Maintenez le niveau du volume assez bas afi n de pouvoir
demeurer attentif aux conditions routières et au trafi c.
Lorsque vous nettoyez le véhicule
Évitez d’exposer cet appareil, y compris les haut-parleurs
et les CD, à l'eau ou à une trop grande humidité. Il y a
risque de court-circuit, d’incendie ou autres dommages.
Lorsque le véhicule est stationné
L’intérieur d’un véhicule stationné dans un endroit
exposé directement aux rayons du soleil peut devenir
extrêmement chaud. Avant de mettre l’appareil sous
tension, laissez refroidir l’intérieur du véhicule.
Utilisez une source d’alimentation
adéquate
Cet appareil a été conçu pour être alimenté avec une
batterie de 12 V c.c. avec masse négative (dont sont
généralement équipés les véhicules nord-américains).
Mécanisme du logement du disque
Évitez d’insérer des pièces de monnaie ou tout autre petit
objet. Maintenez les tournevis et autres objets métalliques
à l’écart du disque et du mécanisme du logement du
disque.
Faites appel à un centre de service
après-vente agréé
Cet appareil est composé de pièces de précision. Ne
tentez pas de le démonter ou d’ajuster les pièces. Pour
toute demande de réparation, veuillez consulter la
liste des centres de service après-vente qui accompagne
l’appareil.
Pour l’installation
Cet appareil doit être installé à l’horizontale, en plaçant sa
face avant sur un angle adéquat ne dépassant pas 30°.
Remarque :
≥ La mémoire de présyntonisation est effacée et retourne
aux valeurs spécifi ées en usine lorsque le connecteur
d'alimentation ou la batterie est déconnecté(e).
Il est recommandé de noter, dans l’espace prévu ci-dessous, les numéros de modèle et de série inscrits soit à l’arrière soit
sous le fond de l’appareil, et de conserver ce manuel comme mémorandum de l’achat afi n de permettre l’identifi cation de
l’appareil en cas de vol.
NUMÉRO DE MODÈLE CQ-C8400U / CQ-C8300U / CQ-C8200U / CQ-C8100U
NUMÉRO DE SÉRIE
DATE DE L’ACHAT
VENDEUR
Accessoires
Panasonic vous souhaite la bienvenue au sein du groupe sans cesse croissant de propriétaires de ses produits
électroniques. Nous sommes convaincus que l’utilisation de cet appareil saura vous procurer de nombreuses
heures de divertissement. Notre réputation est fondée sur une ingénierie électronique et mécanique de précision,
et nos produits, fabriqués au moyen de composants soigneusement sélectionnés, sont assemblés par des gens
fi ers de la qualité de leur travail. Après avoir découvert la qualité, la fi abilité et la valeur de cet appareil, vous serez
également fi er d’être un client Panasonic.
64975
Car Audio
SOURCE
MUTE
POWER
RAND
VOL
312
DISPBAND
REP
6
5
SET
SEL
#
SCAN
MENU
NUMBER
8
0
CQ-C8400/C8300U
Récepteur/lecteur CD MP3 WMA avec panneau avant amovible, affi chage matriciel et contrôle de
changeur CD
CQ-C8200/C8100U
Récepteur/lecteur CD avec panneau avant amovible, affi chage matriciel et contrôle de changeur CD
Remarque :
≥ Pour plus d’informations concernant les différences entre les modèles respectifs, consultez la page 13.
Remarque :
≥ Le numéro indiqué entre parenthèses sous le nom des accessoires respectifs correspond au numéro de pièce pour
l’entretien et le service.
≥ Les accessoires et leurs numéros de pièce sont sujets à changement sans préavis en vue de l’amélioration.
≥ Le collier de montage 1 et la plaque de garniture 7 sont installés avant expédition (page 112).
F
R
A
N
Ç
A
I
S
F
R
A
N
Ç
A
I
S
4 5
CQ-C8400/8300/8200/8100U CQ-C8400/8300/8200/8100U

8
CQ-C8400/8300/8200/8100U
E
N
G
L
I
S
H
CQ-C8400/8300/8200/8100U
9
E
N
G
L
I
S
H
≥ This operating instruction manual applies to the following models. The differences among these models are
mentioned below.
≥ All illustrations represent model CQ-C8400U unless otherwise specifi ed.
Models
Features
MP3/WMA playback Yes Yes None None
CD text display Yes Yes None None
SBC-SW (Super Base
Control Sub-Woofer)
Yes None Yes None
Pre-amp output voltage 5 V 5 V 5 V 2.5 V
Power output 60 W 50 W 50 W 50 W
Customize function Yes Yes None None
This can only be controlled through
the main unit.
This can only be controlled through
the remote control unit.
Operations with neither mark can be performed
either by the main unit or the remote control unit.
CQ-C8400U only.
CQ-C8400U
CQ-C8300U only.
CQ-C8300U
CQ-C8200U only.CQ-C8200U
CQ-C8100U
CQ-C8100U only.
Indicates features applicable to
Features
MP3/WMA Playback from CD-R/RW
You can play your MP3/WMA (Windows Media
Audio) fi les as well as regular CDs.
With up to 10 to 12 times* the capacity of a
conventional CD, a single MP3/WMA-encoded disc
can keep you entertained throughout your entire
journey.
*Depending on bit rate.
SQ7 (7 bands Sound Quality)
SQ is a function that can call up various sound
types at the touch of button in accordance with your
listening music type.
At SQ7, SQ presets P2 to P6 can also be fi nely
adjusted as desired (page 42).
HPF (High Pass Filter)/LPF (Low Pass Filter)
Genuine subwoofer system achieved thanks to HPF
(High Pass Filter) and LPF (Low Pass Filter)
Electronic Switch Front Panel
The front panel opens and closes automatically by
pressing a button once.
CD Changer Control
You can connect the optional CD changer unit. For
details, refer to the operating instructions on the CD
changer unit.
≥ 2 CD changers (option) can be controlled with
this unit. To connect 2 CD changers to it, the
dual CD changer selector CA-CD55U (option) is
necessary.
Large-sized Volume Control
An large-sized rotary volume control that looks like
one belonging to a Hi-Fi audio system is featured.
Customize function
This function enables the user to rewrite the unit’s
graphic pattern, still picture or opening or closing
moving picture into a desired replacement image.
For this, a CD-R/RW disc containing the image
data created using an application (“IMAGE
STUDIO”) designed to process the image data
or images which can be found at the web site
designated by Panasonic is required (page 50).
CQ-C8300U
CQ-C8400U
CQ-C8400U
CQ-C8300U
CQ-C8200U
CQ-C8100U
CD changer
(CX-DP880U, option)
Subwoofer (option)
Dual CD changer selector
(CA-CD55U, option)
Stereo power
amplifi er (option)
Before Reading these Instructions
CQ-C8400U CQ-C8300U
CQ-C8200U
CQ-C8100U
System Upgrade
Note:
≥ This unit does not support Sirius satellite radio.
≥ You cannot connect CD changer and Sirius
receiver using the dual CD changer selector
(CA-CD55U, option).
CQ-C8400U CQ-C8300U

10
CQ-C8400/8300/8200/8100U
E
N
G
L
I
S
H
CQ-C8400/8300/8200/8100U
11
E
N
G
L
I
S
H
Preparation
1
2
3
Battery Installation
1 Remove the battery holder.
Pull the holder out at position B while pushing
position A as indicated.
2 Install the battery on the battery holder.
3 Insert the battery holder back into its original
position.
Battery Notes
≥ Battery type: Panasonic lithium battery (CR2025)
(included)
≥ Battery life: Approximately 6 months under
normal use (at room temperature)
≥ Remove and dispose of an old battery
immediately.
≥ Do not disassemble or short the battery. Do not
throw a battery into a fi re.
≥ Keep the battery away from children to avoid the
risk of accidents.
≥ Follow local regulations when disposing of the
battery.
Back side
Lithium battery
(included)
Battery holder
Position A
Position B
Remote Control Unit
Caution:
≥ Improper use of the battery may cause
overheating, an explosion or ignition, resulting
in injury or a fi re.
Subwoofer
Preparation:
≥ Connect the subwoofer (option) (page 70).
Subwoofer level setting:
≥ You can change the subwoofer level (page 44).
Subwoofer low pass fi lter setting:
≥ You can select the upper limit frequency of the
sound from subwoofer (page 44).
The 12-hour system is used for the clock.
≥ Turn your car’s ignition key to the ACC or ON
position.
≥ Press [SOURCE] (PWR).
≥ When the power is switched on for the fi rst
time, a demonstration appears on the display.
Press [DISP] (display) to change to regular
mode (page 22).
1 Press [MENU].
Press and hold [MENU] for more than
2 seconds.
2 Press [%] or [$] to select “DISPLAY”.
3 Press ["] or [#] to select “CLOCK ADJ”.
4 Press [SET].
5 Setting.
Hours:
1 Press [%].
The hour display hilights.
2 Press ["]: Put Forward
3 Press [#]: Put back
Minutes:
1 Press [$].
The Minutes display hilights.
2 Press ["]: Put Forward
3 Press [#]: Put back
6 Complete.
Press [SET].
Clock Setting

12
CQ-C8400/8300/8200/8100U
F
R
A
N
Ç
A
I
S
F
R
A
N
Ç
A
I
S
CQ-C8400/8300/8200/8100U
13
≥ Le présent mode d’emploi s’applique aux modèles suivants. Les différences entre les modèles respectifs sont indiquées
ci-dessous.
≥ Sauf indication contraire, toutes les illustrations représentent le modèle CQ-C8400U.
Modèles
Caractéristiques
Lecture des fi chiers MP3/WMA Oui Oui Non Non
Affi chage du texte CD Oui Oui Non Non
SBC-SW (Haut-parleur
d’extrêmes-graves à
contrôle supérieur des basses
fréquences)
Oui Non Oui Non
Tension de sortie
préamplifi cateur
5 V 5 V 5 V 2,5 V
Puissance de sortie 60 W 50 W 50 W 50 W
Fonction de personnalisation Oui Oui Non Non
La commande s’effectue uniquement depuis
l’appareil principal.
La commande s’effectue uniquement
depuis la télécommande.
Les commandes qui ne portent aucun de ces symboles
peuvent s’effectuer soit directement sur l’appareil
principal, soit au moyen de la télécommande.
CQ-C8400U uniquement.
CQ-C8400U
CQ-C8300U uniquement.
CQ-C8300U
CQ-C8200U uniquement.CQ-C8200U
CQ-C8100U
CQ-C8100U uniquement.
Indique une caractéristique qui
s’applique au modèle
Caractéristiques
Lecture des fi chiers MP3/WMA d’un
CD-R/RW
Cet appareil peut faire la lecture des fi chiers MP3/WMA
(Windows Media Audio), ainsi que des CD audio
ordinaires.
Avec une capacité 10 à 12 fois supérieure* à celle d’un
CD classique, un seul CD codé en format MP3/WMA peut
vous procurer un divertissement musical qui durera toute
la journée.
*Suivant le débit binaire.
SQ7 (Qualité sonore 7 bandes)
La fonction SQ permet d’activer divers types de son en
appuyant sur une touche, suivant le genre de musique
que vous êtes en train d’écouter.
À SQ7, les préréglages SQ P2 à P6 peuvent également
faire l’objet d’un ajustement précis, suivant vos
préférences (page 94).
HPF (fi ltre passe-haut)/LPF (fi ltre passe-bas)
Réalisation d’un véritable système de haut-parleur
d’extrêmes-graves grâce au HPF (fi ltre passe-haut) et au
LPF (fi ltre passe-bas)
Panneau avant à interrupteur électronique
Une seule pression sur une touche permet d’ouvrir et de
fermer le panneau avant.
Contrôle de changeur CD
Vous pouvez raccorder le changeur CD en option.
Pour plus de détails, consultez le mode d’emploi qui
accompagne le changeur CD.
≥ Cet appareil permet de commander 2 changeurs CD (en
option). Pour raccorder deux changeurs CD à l’appareil,
le sélecteur de changeur CD double CA-CD55U (en
option) est nécessaire.
Grande commande de volume
Cet appareil est équipé d’une grande commande de
volume rotative similaire à celle des chaînes audio haute
fi délité.
Fonction de personnalisation
Cette fonction permet de personnaliser l’affi chage
d’arrière-plan en choisissant une image animée ou une
image fi xe et d’affi cher celle-ci sur mise sous et hors
tension.
Pour cela, vous aurez besoin d’un disque CD-R/RW contenant
l’image de données créée au moyen d’une application (IMAGE
STUDIO) conçue pour le traitement des données d’image ou
des images, disponible sur le site Web indiqué par Panasonic
(page 102).
CQ-C8300U
CQ-C8400U
CQ-C8400U
CQ-C8300U
CQ-C8200U
CQ-C8100U
Changeur CD
(CX-DP880U, en option)
Haut-parleur
d’extrêmes-graves
(en option)
Sélecteur de changeur CD
double (CA-CD55U, en option)
Amplifi cateur de
puissance stéréo
(en option)
Avant de lire le présent mode d’emploi
CQ-C8400U CQ-C8300U
CQ-C8200U
CQ-C8100U
Mise à niveau du système
Remarque :
≥ Cet appareil ne prend pas en charge la radio
satellite Sirius.
≥ Il n’est pas possible de raccorder un changeur CD
et un récepteur Sirius au moyen du sélecteur de
changeur CD double (CA-CD55U, en option).
CQ-C8400U CQ-C8300U

14
CQ-C8400/8300/8200/8100U
F
R
A
N
Ç
A
I
S
F
R
A
N
Ç
A
I
S
CQ-C8400/8300/8200/8100U
15
Préparatifs
1
2
3
Insertion de la pile
1 Retirez le porte-pile.
Tirez le support par la position B tout en poussant sur
la position A, tel qu’indiqué.
2 Installez la pile dans le porte-pile.
3 Remettez le porte-pile en position initiale.
Remarques sur la pile
≥ Type de pile : Pile au lithium Panasonic (CR2025)
(fournie)
≥ Durée de la pile : Environ 6 mois dans des conditions
normales d’utilisation (à température
intérieure)
≥ Veuillez retirer et jeter la pile sans tarder lorsqu’elle est
épuisée.
≥ Évitez de démonter ou de court-circuiter la pile. Évitez
de jeter la pile au feu.
≥ Maintenez la pile hors de la portée des enfants pour
éviter tout risque d’accident.
≥ Respectez les règlements locaux lorsque vous jetez la
pile.
Face arrière
Pile au lithium
(fournie)
Porte-pile
Position A
Position B
Télécommande
Attention :
≥ Une mauvaise utilisation de la pile peut provoquer
une surchauffe, une explosion ou un feu, qui
risquent de causer des blessures ou un incendie.
Haut-parleur
d’extrêmes-graves
Préparatifs :
≥ Raccordez le haut-parleur d’extrêmes-graves (en
option) (page 122).
Réglage du niveau du haut-parleur d’extrêmes-graves :
≥ Vous pouvez modifi er le niveau du haut-parleur
d’extrêmes-graves (page 96).
Réglage du fi ltre passe-bas du haut-parleur
d’extrêmes-graves :
≥ Vous pouvez sélectionner la fréquence limite supérieure
du son émis par le haut-parleur d’extrêmes-graves
(page 96).
L’horloge fonctionne sur un cycle de 12 heures.
≥ Tournez la clé de contact du véhicule sur la position
ACC ou ON (activée).
≥ Appuyez sur [SOURCE] (PWR).
≥ La première fois que l’appareil est mis sous tension,
une démonstration apparaît sur l’affi cheur.
Appuyez sur [DISP] (affi chage) pour commuter en
mode normal (page 74).
1 Appuyez sur [MENU].
Appuyez de manière continue sur [MENU]
pendant plus de 2 secondes.
2 Appuyez sur [%] ou [$] pour sélectionner
« DISPLAY ».
3 Appuyez sur ["] ou [#] pour sélectionner « CLOCK
ADJ ».
4 Appuyez sur [SET].
5 Réglage.
Heures :
1 Appuyez sur [%].
L’affi chage de l’heure apparaît en surbrillance.
2 Appuyez sur ["] : Faire avancer
3 Appuyez sur [#] : Faire reculer
Minutes :
1 Appuyez sur [$].
L’affi chage des minutes apparaît en surbrillance.
2 Appuyez sur ["] : Faire avancer
3 Appuyez sur [#] : Faire reculer
6 Terminé.
Appuyez sur [SET].
Réglage de l’horloge

20
CQ-C8400/8300/8200/8100U
CQ-C8400/8300/8200/8100U
21
E
N
G
L
I
S
H
1
E
N
G
L
I
S
H
2
Audio Settings....................................................... 42
Volume, bass/treble, SQ adjustment, balance/fader, subwoofer level,
subwoofer low pass fi lter (LPF), high pass fi lter (HPF)
Display Settings..................................................... 46
Background display selection (GRAPHIC PATTERN), background display
selection (STILL IMAGE), contrast, clock adjustment
Function Settings ................................................... 48
Mute/attenuation, security function
Customize the Display ............................................. 50
What the customize function does, image data which can be changed,
customizing procedure
Troubleshooting..................................................... 52
Preliminary steps, if you suspect something wrong, troubleshooting tips, error
display messages, maintenance, product servicing, fuse
Notes on Discs ...................................................... 58
Notes on CD/CD media (CD-R, CD-RW, CD-ROM), notes on CD-Rs/RWs
Anti-Theft System................................................... 59
Remove the removable face plate, install removable face plate,
security indicator, panel removal alarm
Installation Guide................................................... 60
Electrical Connections ............................................. 66
Wiring diagram, upgrading the system 1, upgrading the system 2, speaker
system connection
Specifi cations ....................................................... 71
Safety Information .................................................................................Page 2
Precautions..................................................................................................... 2
Accessories............................................................3
Features................................................................8
Before Reading these Instructions .................................9
Preparation .......................................................... 10
Remote control unit, subwoofer
Clock Setting ........................................................ 11
General............................................................... 22
Power, source, volume, mute/attenuation, rear speakers as sub-woofers (super
bass control subwoofer/SBC-SW), open the front panel, close the front panel,
panel angle (tilt), dimmer, SQ (Sound Quality), display change
Radio ................................................................. 26
Radio mode, band, tuning, direct memory (D·M),
station preset, preset station calling
Before Disc Playback............................................... 28
Available discs, disc insert, when CD is in the player, disc eject
CD Player ............................................................ 29
Track selection, fast forward/fast reverse, pause, scan play, direct track
selection, text display, random play/repeat play
MP3/WMA Player ................................................... 32
Folder selection, fi le selection, fast forward/fast reverse,
pause, text display, scan play,
folder scan play, direct fi le selection,
direct folder selection, random play/repeat play, notes on MP3/WMA
CD Changer Control ................................................ 38
CD changer mode, disc selection, track selection,
fast forward/fast reverse, scan play, disc scan play, CD changer selection,
direct disc selection, random play/repeat play
WELCOME
FM
MP3/WMA
Contents

22
CQ-C8400/8300/8200/8100U
CQ-C8400/8300/8200/8100U
23
Volume
Note:
≥ The volume level can be set independently for
each source (for radio, one volume setting for
AM, one volume setting for all FMs).
Setting range: 0 to 40
(default: 18)
[VOL "]: Up
[VOL #]: Down
Down
Up
General
Source
E
N
G
L
I
S
H
4
E
N
G
L
I
S
H
3
Mute/Attenuation
ON: Press [MUTE].
OFF: Press [MUTE] again.
You can select mute or attenuation (page 48).
Power
Turn your car’s ignition key
to the ACC or ON position.
ON: Press [SOURCE] (PWR).
OFF: Press and hold [SOURCE] (PWR) until you
hear a beep (about 1 second), then release
it.
Press [SOURCE] (POWER) again and hold
for more than 1 second.
Note:
≥ After turning off the ignition key, a security
message is displayed, and the panel removable
alarm that reminds you to take the panel is
activated.
(When security function is set to on, page 48)
ACC
ON
Demonstration:
When the power is switched on for the fi rst time,
a demonstration appears on the display.
Press [DISP] (display) to change to regular
mode.
Note:
≥ To display the demonstration again, press and
hold [SOURCE] for more than 4 seconds when
turning power on.
64975
Car Audio
SOURCE
MUTE
POWER
RAND
VOL
312
DISPBAND
REP
6
5
SET
SEL
#
SCAN
MENU
NUMBER
8
0
[DISP]
(Display)
[SOURCE]
(Power/source)
[MUTE]
(Mute/attenation)
(SBC-SW)
[VOL "]
[VOL #]
(Volume)
[SOURCE]
(PWR: Power)
Press [SOURCE] to change the source.
[MUTE] (Mute/attenuation)
(SBC-SW)
[VOLUME]
CQ-C8400U CQ-C8300U
When a CD is in the player.
Radio (page 26)
CD player (page 29)
When a MP3 data disc is in
the player.
MP3 player (page 32)
When an optional CD changer
is connected.
CD changer control (page 38)
AUX (page 66)
or
CQ-C8200U
CQ-C8100U
Radio (page 26)
No sounds. (default)
Decrease the volume by 10 steps.
[DISP] (Display)
Point the remote control unit at the remote control signal sensor.
Rear Speakers as Sub-Woofers
(Super Bas s Control Subwoofer/ SBC-SW)
You can utilize the rear speaker connected to the
built-in amplifi er as Sub-Woofers that output only
bass. (Default: OFF)
Press and hold [MUTE] (SBC-SW) for more than
2 seconds.
CQ-C8400U
CQ-C8200U
When a WMA data disc is
in the player.
WMA player (page 32)
or
AUX (page 66)
OFF (default)
ON
When an optional CD changer
is connected.
CD changer control (page 38)
When a CD is in the player.
CD player (page 29)
Note:
≥ When ON has been selected, the settings resulting
from the adjustments performed at the subwoofer
level and subwoofer low pass fi lter settings are
refl ected in the output.
≥ Depending on the speakers used and the type of
music played, it may not be possible to achieve a
satisfactory effect.
lights.

24
CQ-C8400/8300/8200/8100U
CQ-C8400/8300/8200/8100U
25
General
(continued)
Open the Front Panel
Press [<: eject] (OPEN).
Note:
≥ If nothing is changed for 20 seconds, the original
panel position will be recovered.
Close the Front Panel
Press [<: eject] (OPEN) again.
[MENU] (DIM) [<: eject]
(OPEN/TILT)
Panel Angle (Tilt)
Press and hold [<: eject] (TILT) until you hear a
beep (about 1 second) from the speaker output, and
“TILT” is displayed. And then release it.
Set it to the position at which it is easy to read what
is on the display.
Each time the above operation is repeated, the panel
angle changes in the sequence shown below.
Dimmer
Press and hold [MENU] (DIM) for more than
2 seconds to change dimmer level setting as
follows.
Brighter (default)
Medium
Darker
[SQ] (Sound Quality)
Note:
≥ The position which has been set using TILT will
be retained even when the operations below are
performed.
• OPEN/CLOSE • Power on/off
E
N
G
L
I
S
H
6
E
N
G
L
I
S
H
5
TILT 1
TILT 2
TILT 3
Open
TILT OFF
(default)
SQ (Sound Quality)
SQ is a function that can call up various sound
types at the touch of button in accordance with your
listening music type.
At SQ7, SQ presets 2 to 6 can also be fi nely
adjusted to suit the acoustic characteristics inside
the car and the user’s preference (page 42).
Press [SQ] to select a sound types
as follows.
SQ7 lights (except FLAT).
Flat frequency response
not emphasize. (default)
Prevention of excessive
equalizing and capably
to cover wide variety of
music. Listener-friendly
and crisp sound.
Sharp and dynamic
sound. Powerful deep
bass and turgescent
treble.
Highlighted vocals
that are apt to be
overwhelmed by
instrumental sound.
Sound with emphasis on
sharpness of high-hat
and echo of saxophone.
Jazz-specifi c deep
sound.
Reproduction of realism
being in a club.
FLAT
ROCK
POP
VOCAL
JAZZ
CLUB
≥ If [<: eject] (OPEN) is pressed when a
disc is in the player, the front panel opens
and the disc is ejected automatically.
If no operation takes place for 20 seconds, the
disc is automatically retracted into the main unit.
Note:
≥ If no operation takes place for more than
5 seconds, the display returns to the regular mode.
≥ Setting of SQ, bass/treble and volume are
infl uenced one another. If the infl uence mentioned
above causes distortion to the audio signal,
readjust bass/treble or volume (page 42).
≥ After pressing [SQ] on the main unit, you
can also select a sound type by pressing
the preset buttons [1] to [6].
Press [DISP] (display) to return to the regular
mode.
Display Change
Press [DISP] (display).
∫ When Power is ON
Mode display
Folder hierarchy display
(MP3/WMA only)
Mode and Moving
picture display/
SA display (page 47)
Moving picture/
SA display (page 47)
Mode and Still picture
display
Still picture display
Mode and clock display
Display and light off
Clock display
Display and light off
∫ When Power is OFF
Note:
Displays before adjusting the clock (page 11).
≥ Set the background display (GRAPHIC PATTERN,
STILL IMAGE) in a separate procedure (page 46).
≥ “––:––” will appear before adjusting the clock on
the right corner of the mode display.
CQ-C8400U CQ-C8300U
[DISP]
(Display)

26
CQ-C8400/8300/8200/8100U
CQ-C8400/8300/8200/8100U
27
Note:
≥ New stations overwrite existing saved stations after this procedure.
Radio
Direct Memory (D·M)
This is a useful function that can call broadcast
stations directly during playback in other modes (CD,
CD Changer, etc.), even when the power is off.
Your favorite radio station can be memorized in
[D·M] (direct memory).
Default: FM 87.9 MHz
∫ Memorize
1 Select a band and frequency.
2 Press and hold [D·M] for more than
2 seconds.
≥ Frequency blinks once and is saved in the
memory.
Note:
≥ New stations overwrite existing saved
stations after this procedure above.
∫ Recalling the Direct Memory
Press [D·M].
Press [D·M] again to cancel.
[%] [$]
(TUNE)
[D·M] (Direct Memory)
E
N
G
L
I
S
H
7
E
N
G
L
I
S
H
8
[BAND]
(APM: Auto Preset Memory)
[SOURCE]
64975
Car Audio
SOURCE
MUTE
POWER
RAND
VOL
312
DISPBAND
REP
6
5
SET
SEL
#
SCAN
MENU
NUMBER
8
0
[SOURCE]
[%] [$]
(Tuning)
[BAND]
(Auto Preset
Memory)
[1] to [6]
(Preset station)
Stereo indicator
Radio Mode
Press [SOURCE] to select the radio mode.
Radio mode display
1
Tuning
[$]: Higher frequency
[%]: Lower frequency
Press and hold [%] or [$] for more than
0.5 seconds, then release. Seeking will start.
3
FrequencyBand
Station Preset
Up to 6 stations can be stored in each of the FM1, FM2, FM3 and AM band selections.
Caution:
≥ To ensure safety, never attempt to preset
stations while you are driving.
Auto Preset Memory (APM)
Automatically save stations with good reception in
the preset memory.
1 Select a band (previous page).
2 Press and hold [BAND] (APM: Auto Preset
Memory) for more than 2 seconds.
≥ The 6 stations with good reception will be
automatically saved in the memory under
preset number 1 to 6.
≥ Once set, the preset stations are sequentially
scanned for 5 seconds each (scanning).
Manual Preset Memory
Manually save a station in the preset memory.
1 Select a band and frequency (previous page).
2 Press and hold ["] or [#] until the preset
number blinks.
3 Press ["] or [#] to select the preset number
(1 to 6).
4 Press and hold ["] or [#] for more than
2 seconds to memorize.
≥ The display blinks once, and a receiving station
is saved in the memory.
Preset Station Calling
1 Select a band (previous page).
2 Press ["] or [#].
Press [1] to [6].
Note:
≥ When pressing [MENU] (pressing and hold
[MENU] for more than 2 seconds on the remote
control unit) in radio mode, the following display
appears.
This is because radio
mode does not have
any menu settings.
1 Select a band and frequency
(previous page).
2 Press and hold [1] to [6] for more than
2 seconds to memorize.
["] [#]
(Preset station)
Band
Press [BAND].
2
FM1 FM2 FM3 AM
Direct Memory mode
["] [#]
(Preset station)
28
CQ-C8400/8300/8200/8100U
CQ-C8400/8300/8200/8100U
29
Disc Insert
1 Press [<: eject] (OPEN).
If there is a disc loaded,
the disc will be ejected.
2 Insert a disc.
Note:
≥ It may take some time to start playing.
≥ Playback will start automatically after recognizing
the data of the loading disc.
Before Disc Playback
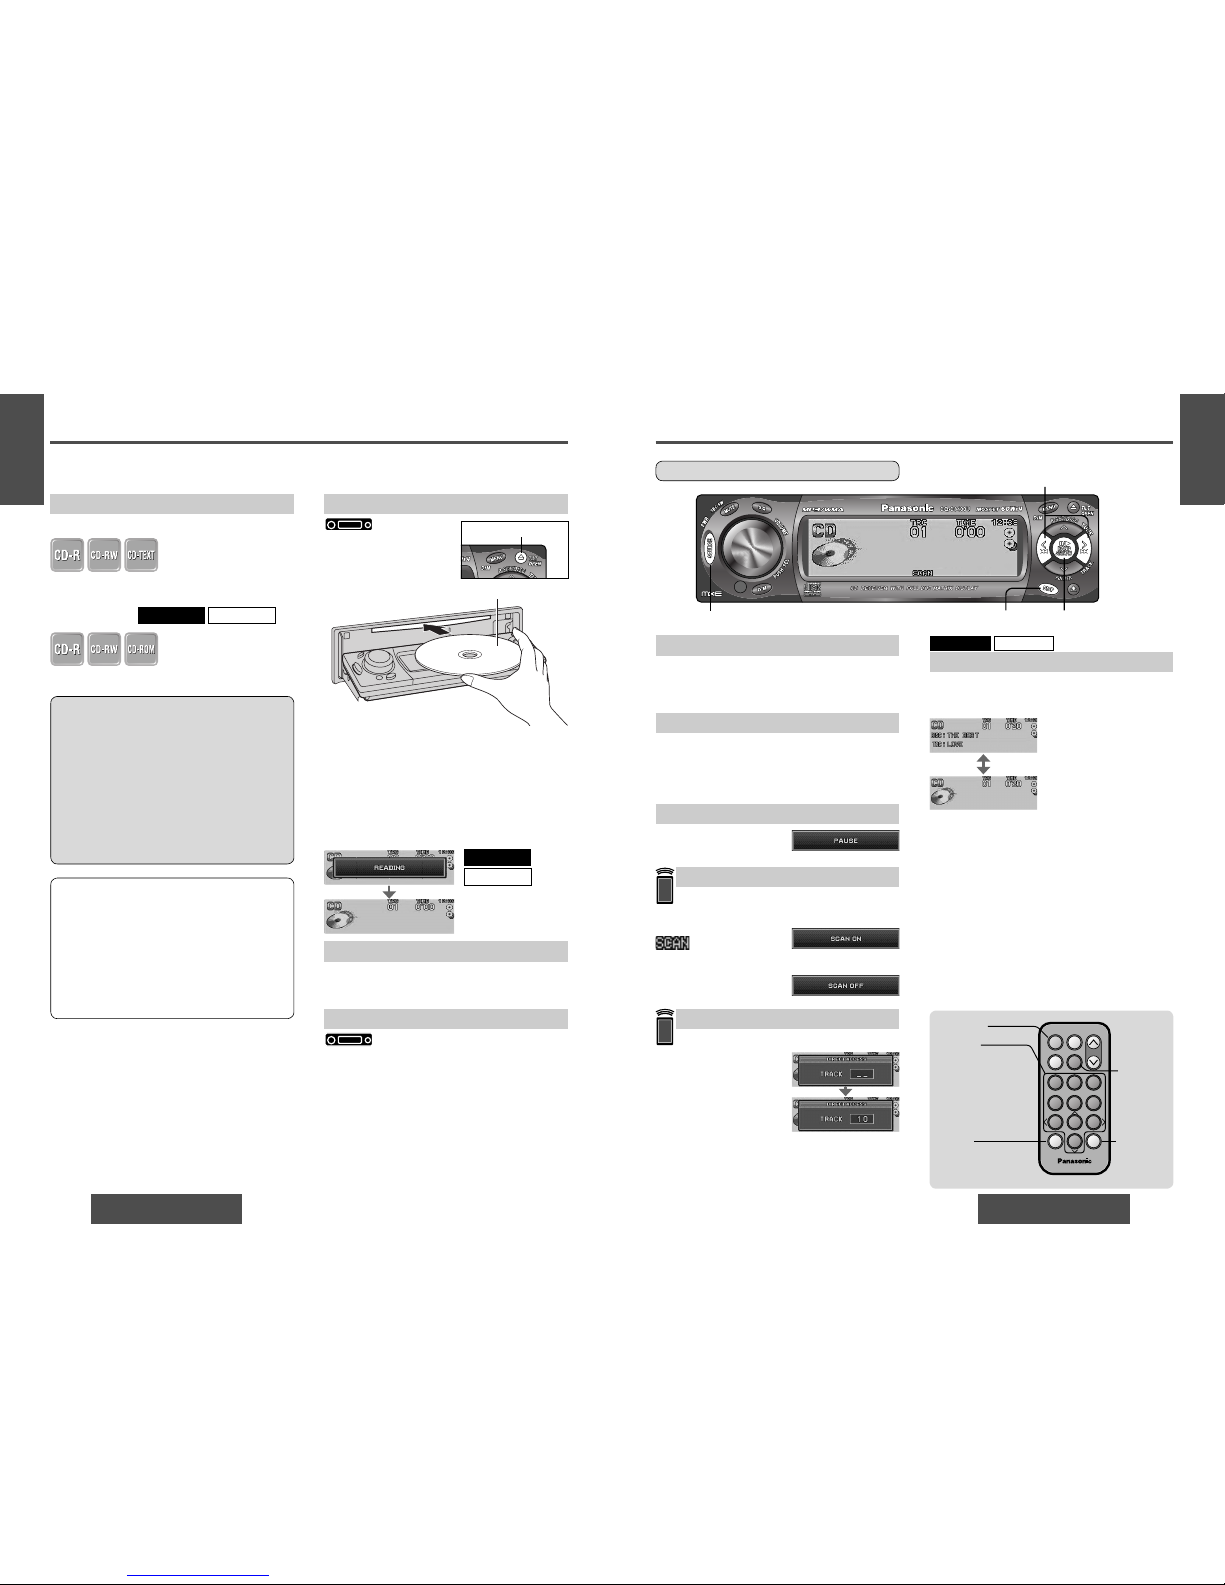
Track Selection
[9]: Next track
[:]: Beginning of the current track
For the previous track, press twice.
Fast Forward/Fast Reverse
Press and hold
[9] (5): Fast forward
[:] (6): Fast reverse
Release to resume the playback.
Pause
Press [;/1].
Press [;/1] again to cancel.
Scan Play
The fi rst 10 seconds of each track is played in
sequence.
Press [5] (SCAN).
lights.
Press [5] (SCAN) again to cancel.
Direct Track Selection
Example: track number 10
1 Press [fl].
2 Press [1] [0].
3 Press [BAND] (SET).
Note:
≥ To suspend direct selection, press [DISP]
(display) or [fl].
≥ Random, scan and repeat play are canceled once
[fl] is pressed.
CQ-C8200U/CQ-C8100U cannot play MP3/WMA fi les.
Text Display
Press and hold [DISP] (display) for more than
2 seconds in the mode display.
Note:
≥ The power will be turned on automatically when
a disc is loaded.
≥ A disc which has both CD-DA data and
MP3/WMA data on it may not be reproduced
normally. (For example, it may be reproduced
without sound.)
≥ Refer to the section on “Notes on MP3/WMA”
(page 36) and “Notes on Discs” (page 58).
E
N
G
L
I
S
H
9
E
N
G
L
I
S
H
10
CD Player
Do not watch the scroll display while driving.
[<: eject] (OPEN)
[:]/[9] (6/5)
(Track selection/fast forward/fast reverse)
[SOURCE] [BAND] (;/1: Pause)
(SET)
[0] to [9]
(Track number)
[5] (Scan play)
[6] [5]
(Track selection/fast
forward/fast reverse)
64975
Car Audio
SOURCE
MUTE
POWER
RAND
VOL
312
DISPBAND
REP
6
5
SET
SEL
#
SCAN
MENU
NUMBER
8
0
[DISP]
(Display)
[SOURCE]
[BAND]
(Pause) (SET)
[fl]
(Number)
Available Discs
∫ CD-DA
(CD-TEXT is only for CQ-C8400U/CQ-C8300U.)
∫ MP3/WMA
Caution:
≥ 3q (8 cm) CD is not available for this unit, so
do not insert it.
≥ Do not use irregularly shaped discs.
≥ Do not use discs that have a seal or label
attached.
≥ To avoid damaging the front panel, do not push
it down or place objects on it while it is open.
≥ Do not pinch your fi nger or hand in the front
panel.
≥ Do not insert foreign objects into the disc slot.
Label side
CQ-C8300U
CQ-C8400U
When CD is in the Player
Press [SOURCE] to select the CD (MP3/WMA)
player mode and playback starts.
Disc Eject
1 Press [<: eject].
The disc will be ejected after the front panel fully
opens.
2 Take a disc.
3 Press [<: eject] again to close.
Note:
≥ If no operation takes place within 20 seconds or
so after the panel has opened, the panel will close
automatically.
(Example: CD-DA)
* Press and hold [BAND] for more than 2 seconds
to have an another circle scroll when a title is
displayed.
Note:
≥
“NO TEXT”: Displays when there is no text.
*Disc/track title (default)
Mode display
[DISP] (Display)
CQ-C8400U CQ-C8300U
When placing a disc into or taking a disc out from
the main unit, hold it as shown in the fi gure, and
refrain from putting any of your fi ngers into the
disc’s center hole.
This instructions on this page are followed for both
CD-DA playback and MP3/WMA playback.
CQ-C8300U
CQ-C8400U

30
CQ-C8400/8300/8200/8100U
CQ-C8400/8300/8200/8100U
31
CD Player
(continued)
E
N
G
L
I
S
H
11
E
N
G
L
I
S
H
12
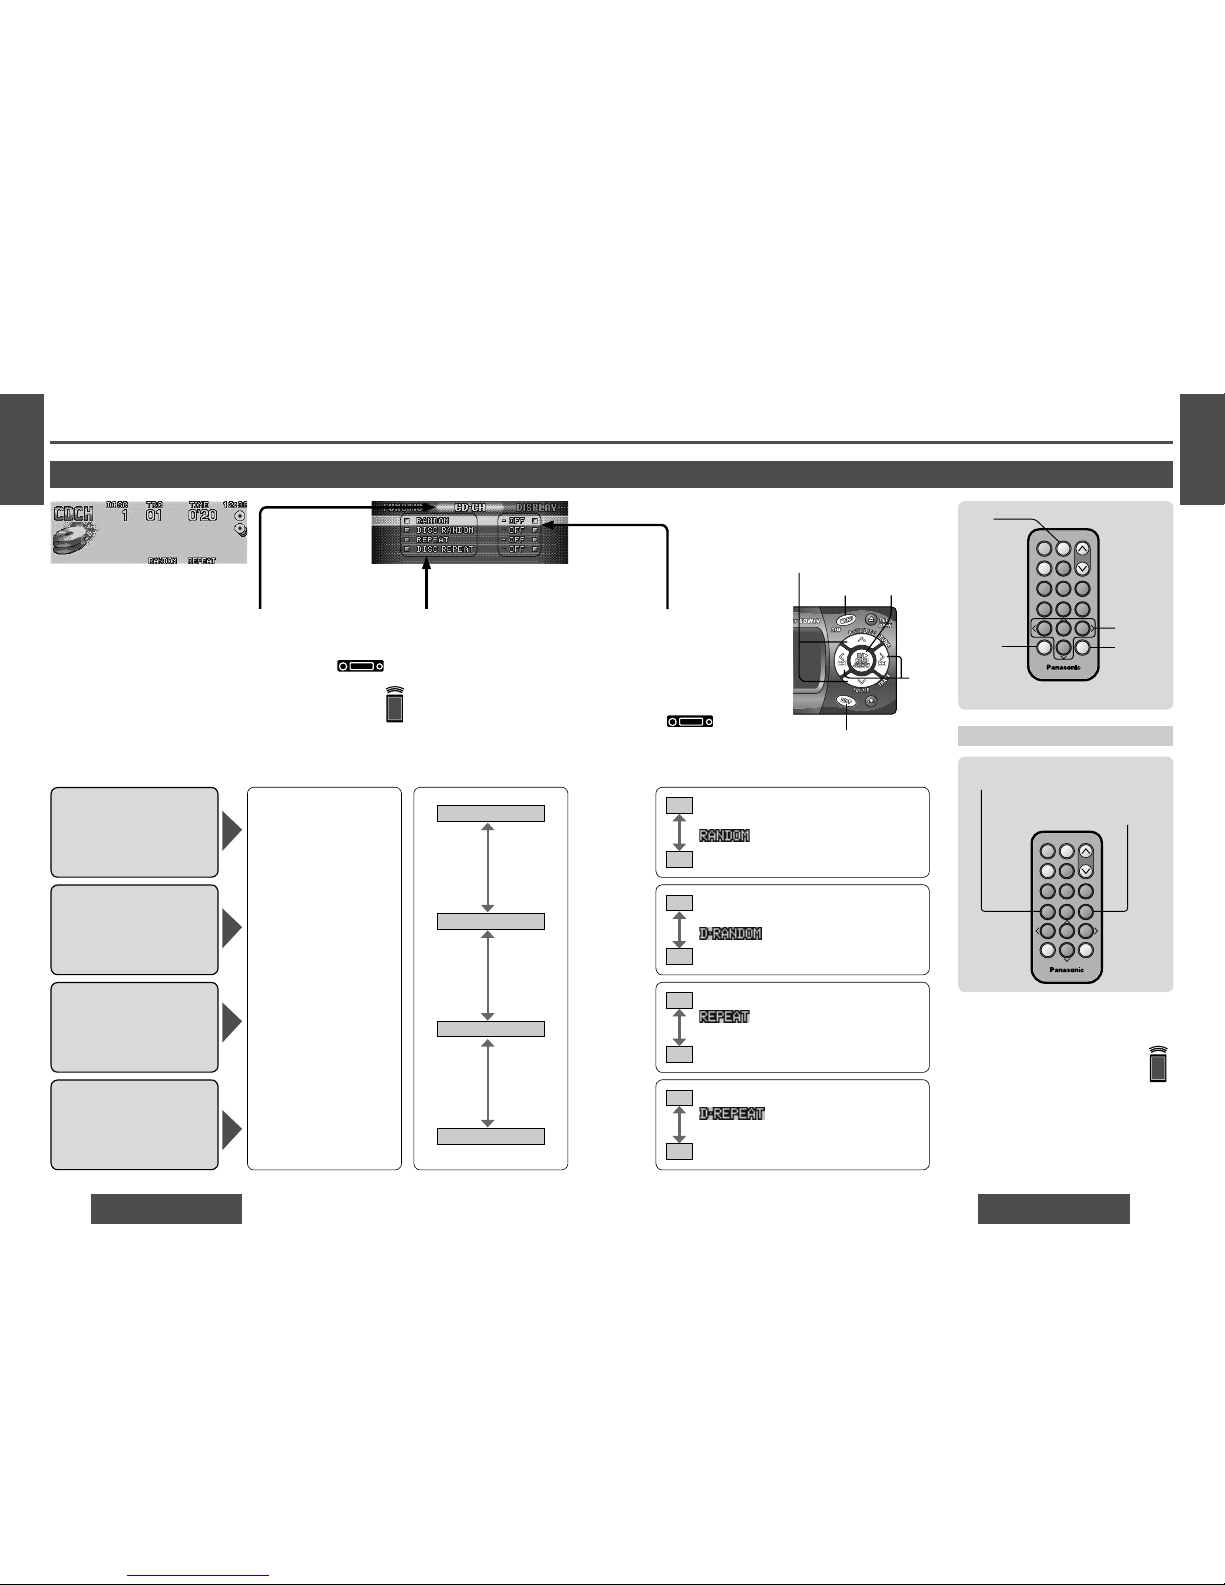
Random Play
Default: OFF
1 Menu
1 Press [MENU] during CD
playing.
Press and hold [MENU]
for more than 2 seconds
during CD playing.
2 Press [%] or [$] to select
“CD·DA” / “CD”.
3 Set
Press [SET].
Note:
≥ Press [DISP] (display) to return to the
regular mode.
≥ Press and hold [MENU] for more than
2 seconds to return to the regular
mode.
64975
Car Audio
SOURCE
MUTE
POWER
RAND
VOL
312
DISPBAND
REP
6
5
SET
SEL
#
SCAN
MENU
NUMBER
8
0
2 Submenu
Press ["] or [#].
Select “CD·DA”.
Repeat Play
Default: OFF
Select
∫ RANDOM
Select
∫ REPEAT
All the available tracks play in a random
sequence.
lights.
ON
Cancel
OFF
Repeat the current track.
lights.
ON
Cancel
OFF
Direct Operation
[#] ["] (Submenu)
[SET]
[MENU]
Press [4]
(Random play).
Press [6]
(Repeat play).
64975
Car Audio
SOURCE
MUTE
POWER
RAND
VOL
312
DISPBAND
REP
6
5
SET
SEL
#
SCAN
MENU
NUMBER
8
0
[SEL]
(MENU)
["] [#]
(Submenu)
[%] [$]
[BAND]
(SET)
Random Play/Repeat Play
CQ-C8400U CQ-C8300U
CQ-C8200U
CQ-C8100U
Select “CD”.
Example: CQ-C8400U
[DISP] (Display)
Note:
≥ Press [MENU] to return
to the regular mode.
[DISP]
(Display)
[%] [$]

32
CQ-C8400/8300/8200/8100U
CQ-C8400/8300/8200/8100U
33
Folder Selection
["]: Next folder
[#]: Previous folder
File Selection
[9]: Next fi le
[:]: Beginning of the current fi le
For the previous fi le, press twice.
Fast Forward/Fast Reverse
Press and hold
[9] (5): Fast forward
[:] (6): Fast reverse
Release to resume the playback.
Pause
Press [;/1].
Press [;/1] again to
cancel.
MP3/WMA Player
CQ-C8200U/CQ-C8100U cannot play MP3/WMA fi les.
E
N
G
L
I
S
H
13
E
N
G
L
I
S
H
14
Do not watch the scroll display while driving.
[:]/[9] (6/5)
(File selection/fast forward/fast reverse)
[SOURCE]
Scan Play
The fi rst 10 seconds of each fi les is played in
sequence.
Press [5] (SCAN).
lights.
Press [5] (SCAN) again to cancel.
Folder Scan Play
From the next folder, the fi rst 10 seconds of the
fi rst fi le on each folder is played in sequence.
Press and hold [5] (SCAN) for more than 2 seconds.
lights.
Press and hold [5] (SCAN) again for more than
2 seconds to cancel.
Direct File Selection
Example: fi le number 10
1 Press [fl].
2 Press [1] [0].
3 Press [BAND] (SET).
Direct Folder Selection
Example: folder number 10
1 Press [fl] twice.
2 Press [1] [0].
3 Press [BAND] (SET).
Note:
≥ To suspend direct selection, press [DISP]
(display).
≥ Random, scan and repeat play are canceled once
[fl] is pressed.
CQ-C8400U CQ-C8300U
[0] to [9]
(File selection/
folder number)
[5] (Scan play)
[6] [5]
(File selection/
fast forward/
fast reverse)
["] [#] (Folder)
64975
Car Audio
SOURCE
MUTE
POWER
RAND
VOL
312
DISPBAND
REP
6
5
SET
SEL
#
SCAN
MENU
NUMBER
8
0
[DISP]
(Display)
[SOURCE]
[BAND]
(Pause) (SET)
[fl]
(Number)
[DISP] (Display)
[BAND] (;/1: Pause)
Text Display
Press and hold [DISP] (display) for more than
2 seconds in the mode display.
* Press and hold [BAND] for more than 2 seconds
to have an another circle scroll when a name is
displayed.
Note:
≥ “NO TEXT”: Displays when there is no text.
* Folder name
File name
(default)
* Album name
Title (Song and
artist) name
(ID3/WMA tag)
Mode display
["] [#]
(Folder
selection)

34
CQ-C8400/8300/8200/8100U
CQ-C8400/8300/8200/8100U
35
1 Menu
1 Press [MENU] during
MP3/WMA playing.
Press and hold [MENU]
for more than 2 seconds
during MP3/WMA playing.
2 Press [%] or [$] to select
“MP3/WMA”.
MP3/WMA Player
(continued)
E
N
G
L
I
S
H
15
Random Play
Default: OFF
2 Submenu
Press ["] or [#].
Select “MP3/WMA”.
Folder Random Play
Default: OFF
Select
∫ RANDOM
Select
∫ FOLDER RANDOM
E
N
G
L
I
S
H
16
3 Set
Press [SET].
64975
Car Audio
SOURCE
MUTE
POWER
RAND
VOL
312
DISPBAND
REP
6
5
SET
SEL
#
SCAN
MENU
NUMBER
8
0
Direct Operation
["] [#] (Submenu)
[SET][MENU]
Press [4]
(Random play).
Press and hold [4]
(Folder random play).
Press [6]
(Repeat play).
Press and hold [6]
(Folder repeat play).
64975
Car Audio
SOURCE
MUTE
POWER
RAND
VOL
312
DISPBAND
REP
6
5
SET
SEL
#
SCAN
MENU
NUMBER
8
0
[SEL]
(MENU)
[BAND]
(SET)
Repeat Play
Default: OFF
Folder Repeat Play
Default: OFF
Select
∫ REPEAT
Select
∫ FOLDER REPEAT
Random Play/Repeat Play
All the fi les on all folders play in a random
sequence.
lights.
ON
Cancel
OFF
All the available fi les on the current folder play
in a random sequence.
lights.
ON
Cancel
OFF
Repeat the current fi le.
lights.
ON
Cancel
OFF
Repeat the current folder.
lights.
ON
Cancel
OFF
CQ-C8400U CQ-C8300U
CQ-C8200U/CQ-C8100U cannot play MP3/WMA fi les.
Note:
≥ Press [MENU] to return to
the regular mode.
[DISP] (Display)
Note:
≥ Press [DISP] (display) to return to the
regular mode.
≥ Press and hold [MENU] for more than
2 seconds to return to the regular
mode.
[DISP]
(Display)
[%] [$]
["] [#]
(Submenu)
[%] [$]

36
CQ-C8400/8300/8200/8100U
CQ-C8400/8300/8200/8100U
37
Display Information
∫ Displayed Items
CD-TEXT MP3 (ID3 tag)
≥ Disc title ≥ Album title
≥ Track title ≥ Title and artist
MP3/WMA WMA (WMA tag)
≥ Folder name ≥ Album title
≥ File name ≥ Title and artist
∫ Displayable Characters
≥ Displayable length of fi le name/folder name:
within 128 characters
≥ Name fi les and folders in accordance with
the standard of each fi le system. Refer to the
instructions of writing software for details.
≥ ASCII character set and special characters in each
language can be displayed.
ASCII character set:
A to Z, a to z, digits 0 to 9, and the following
symbols:
(space) ! ” ’ # $ % & ( ) * + , - . / : ; < = > ? @ [ \ ] ^
_ ` { | } ~
Special characters:
À Á Â Ã Å Ä à á â ã å ä
Ò Ó Ô Õ Ö ò ó ô õ ö
Ù Ú Û Ü ù ú û ü
Note:
≥ With some software in which MP3/WMA format
fi les have been encoded, the character information
may not be displayed properly.
≥ Undisplayable characters and symbols will be
converted into an asterisk.
What is MP3/WMA?
MP3 (MPEG audio layer 3) and WMA (Windows
Media™ Audio) are the compression formats of
digital audio. The former is developed by MPEG
(Motion Picture Experts Group), and the latter is
developed by Microsoft Corporation. Using these
compression formats, you can record the contents
of about 10 music CDs on a single CD media. (These
fi gures refer to data recorded on a 650 MB CD-R
or CD-RW at a fi xed bit rate of 128 kbps and a
sampling frequency of 44.1 kHz.)
Note:
≥ MP3/WMA encoding and writing software is not
supplied with this unit.
≥ CD writing software is not supplied with this unit.
Points to Remember
When Making MP3/WMA Files
Common:
≥ High bit rate and high sampling frequency are
recommended for high quality sounds.
≥ Selecting VBR (Variable Bit Rate) is not
recommended because playing time is not
displayed properly and sound may be skipped.
≥ The playback sound quality differs depending on
the encoding circumstances. For details, refer to
the user manual of your own encoding software
and writing software.
MP3:
≥ It is recommended to set the bit rate to “128 kbps
or more” and “fi xed”.
WMA:
≥ It is recommended to set the bit rate to “64 kbps
or more” and “fi xed”.
≥ Do not set the copy protect attribute on the WMA
fi le to enable this unit to playback.
MP3/WMA Player
(continued)
Notes on MP3/WMA
Caution:
≥ Never assign the “.mp3”, or “.wma” fi le
name extension to a fi le that is not in the
MP3/WMA format. This may not only produce
noise from the speaker damage, but also
damage your hearing.
CQ-C8200U/CQ-C8100U cannot play MP3/WMA fi les.
E
N
G
L
I
S
H
17
E
N
G
L
I
S
H
18
Compression formats:
(Recommendation: “Points to Remember When Making MP3/WMA Files” on the previous page)
Compression method Bit rate VBR Sampling frequency
MPEG 1 audio layer 3 (MP3) 32 kbps−320 kbps Yes 32, 44.1, 48 kHz
MPEG 2 audio layer 3 (MP3) 8 kbps−160 kbps Yes 16, 22.05, 24 kHz
Windows Media Audio Ver. 2/Ver. 8 64 kbps−192 kbps No 32, 44.1, 48 kHz
Copyright:
It is prohibited by copyright laws to copy, distribute
and deliver copyrighted materials such as music
without the approval of copyright holder except
enjoying yourself personally.
Windows Media, and
the Windows logo are
trademarks, or registered
trademarks of Microsoft
Corporation in the United
States and/or other
countries.
Recording MP3/WMA Files
on a CD-Media
≥ You are recommended to minimize the chances
of making a disc that contains both CD-DA fi les
and MP3/WMA fi les.
≥ If CD-DA fi les are on the same disc as MP3
or WMA fi les, the songs may not play in the
intended order, or some songs may not play at
all.
≥ When storing MP3 data and WMA data on the
same disc, use different folders for each data.
≥ Do not record fi les other than MP3/WMA fi les and
unnecessary folder on a disc.
≥ The name of MP3/WMA fi le should be added by
rules as shown in the following descriptions and
also comply with the rules of each fi le system.
≥ You may encounter trouble in playing MP3/WMA
fi les or displaying the information of MP3/WMA
fi les recorded with certain writing software or CD
recorders.
≥ The fi le extension “.mp3” or “.wma” should be
assigned to each fi le depending on the fi le format.
≥ This unit does not have the play list function.
≥ Although Multi-session recording is supported,
the use of Disc-at-Once is recommended.
Supported fi le systems:
ISO 9660 Level 1/Level 2, Apple Extension to ISO
9660, Joliet, Romeo
Note:
≥ Apple HFS, UDF 1.50, Mix CD, CD Extra are not
supported.
Folder Selection Order/File
Playback Order
Maximum number of fi les/folders:
≥ Maximum number of fi les: 999
≥ Maximum number of fi les in one folder: 255
≥ Maximum depth of trees: 8
≥ Maximum number of folders:
255 (Root folder is included.)
Note:
≥ This unit counts the number of folders irrespective
of the presence or absence of MP3/WMA fi le.
≥ Operation returns to the start of the disc when
a folder with no MP3 or WMA format fi les is
selected.
≥ Playback order may be different from other
MP3/WMA players even if the same disc is used.
≥ “ROOT” appears when displaying the root folder
name.
1
1
4
5
6
2
3
6
[1
[
1
[2
[3
[4
[
4
Root folder (root directory)
Tree 1
Folder selection
In the order to
File selection
In the order to
No warranty:
Above description complies with our investigations
as of December 2003. It has no warranty for
reproducibility and displayability of MP3/WMA.
CQ-C8400U
CQ-C8300U
Tree 2 Tree 3 ........Tree 8 (Max.)

38
CQ-C8400/8300/8200/8100U
CQ-C8400/8300/8200/8100U
39
CD Changer Control
E
N
G
L
I
S
H
19
E
N
G
L
I
S
H
20
CD changer functions are designed for optional
Panasonic CD changer unit.
≥ Connect the CD changer, and load a magazine
(CDs).
Disc Selection
["]: Next disc
[#]: Previous disc
Track Selection
[9]: Next track
[:]: Beginning of the current track
For the previous track, press twice.
Fast Forward/Fast Reverse
Press and hold
[9] (5): Fast forward
[:] (6): Fast reverse
Release to resume the playback.
Note:
≥ The power will be turned on automatically
when a magazine is loaded.
≥ This unit does not support the following
through the CD changer.
· CD-RW playback
(except when CX-DP880U is connected.)
· CD text display
· MP3/WMA playback
≥ Pausing does not function in the changer
mode.
CD Changer Mode
Press [SOURCE] to select the CD changer mode and
playback starts.
CD changer mode display
Note:
≥ Load a magazine with CDs when “NO DISC” is
displayed.
≥ “MAGAZINE EJECT” is displayed when magazine
is ejected in the CD changer mode.
CD Changer Selection
Preparation:
Use the dual CD changer selector (CA-CD55U,
option) to connect 2 CD changers (page 68).
Press [BAND].
The selected changer number (either 1 or 2) is
displayed.
Direct Disc Selection
Example: disc number 5
1 Press [fl].
2 Press [5].
3 Press [BAND] (SET).
Note:
≥ To suspend direct disc selection, press [DISP]
(display) or [fl].
≥ Random, scan and repeat play are canceled once
[fl] is pressed.
[0] to [9]
(Disc number)
[5] (Scan play)
[6] [5]
(Track selection/
fast forward/
fast reverse)
["] [#] (Disc)
64975
Car Audio
SOURCE
MUTE
POWER
RAND
VOL
312
DISPBAND
REP
6
5
SET
SEL
#
SCAN
MENU
NUMBER
8
0
[DISP]
(Display)
[SOURCE]
[BAND]
(CD changer selection)
(SET)
[fl]
(Number)
[:]/[9] (6/5)
(Track selection/
fast forward/fast reverse)
[SOURCE] [DISP] (Display)
[BAND] (CD changer selection)
["] [#]
(Disc
selection)
lights when the changer is connected.
Changer indicator
Scan Play
The fi rst 10 seconds of each track is played in
sequence.
Press [5] (SCAN).
lights.
Press [5] (SCAN) again to cancel.
Disc Scan Play
From the next disc, the fi rst 10 seconds of the
fi rst track of all the discs is played in sequence.
Press and hold [5] (SCAN) for more than 2 seconds.
lights.
Press and hold [5] (SCAN) again for more than
2 seconds to cancel.
40
CQ-C8400/8300/8200/8100U
CQ-C8400/8300/8200/8100U
41
1 Menu
1 Press [MENU] during CD
changer mode.
Press and hold [MENU]
for more than 2 seconds
during CD changer mode.
2 Press [%] or [$] to select
“CD•CH”.
CD Changer Control (continued)
E
N
G
L
I
S
H
21
Random Play
Default: OFF
2 Submenu
Press ["] or [#].
Select “CD•CH”.
Disc Random Play
Default: OFF
Select
∫ RANDOM
Select
∫ DISC RANDOM
E
N
G
L
I
S
H
22
3 Set
Press [SET].
64975
Car Audio
SOURCE
MUTE
POWER
RAND
VOL
312
DISPBAND
REP
6
5
SET
SEL
#
SCAN
MENU
NUMBER
8
0
All the available tracks on all discs in the
magazine play in a random sequence.
lights.
ON
Cancel
OFF
All the available tracks on the current disc play
in a random sequence.
lights.
ON
Cancel
OFF
Direct Operation
["] [#] (Submenu)
[SET][MENU]
Press [4]
(Random play).
Press and hold [4]
(Disc random play).
Press [6]
(Repeat play).
Press and hold [6]
(Disc repeat play).
64975
Car Audio
SOURCE
MUTE
POWER
RAND
VOL
312
DISPBAND
REP
6
5
SET
SEL
#
SCAN
MENU
NUMBER
8
0
[SEL]
(MENU)
["] [#]
(Submenu)
[%] [$]
[BAND]
(SET)
Repeat Play
Default: OFF
Disc Repeat Play
Default: OFF
Select
∫ REPEAT
Select
∫ DISC REPEAT
Repeat the current track.
lights.
ON
Cancel
OFF
Repeat the current disc.
lights.
ON
Cancel
OFF
Random Play/Repeat Play
Note:
≥ Press [MENU] to return
to the regular mode.
Note:
≥ Press [DISP] (display) to return to the
regular mode.
≥ Press and hold [MENU] for more than
2 seconds to return to the regular
mode.
[DISP] (Display)
[DISP]
(Display)
[%] [$]
 Loading...