

Page 1

Additional Feature Guide
Network Camera
Additional Feature table
The following features have been added to the camera. Read the Operating
Instructions and this Additional Feature Guide on the Setup CD-ROM before using
the product.
Additional Features Contents Page
Manual Setup Manual Setup can be selected on the
initial setting window of the Setup
Program on the CD-ROM even if
Automatic Setup (Local Access Only)
has not been performed.
The Digital Zoom feature The 10× digital zoom feature can be
used.
[For BL-C30]
Viewing Logs on Your Cell/
Mobile Phone
[For BL-C30]
Buffer/Transfer and new menus
on the Setup page
[For BL-C30]
The Motion Detection feature
Sensor and Motion Detection Logs
can be viewed over the Internet from
a compatible cell/mobile phone. Note
that the Motion Detection feature has
been added this time.
Buffer/Transfer has been moved on
the Setup page, and the Trigger,
Motion Detection and Sensor Log
menus have been added.
The Motion Detection feature can be
selected on the Trigger Setting page
for Buffering or Transferring images.
page 4
page 5
page 6
page 7
page 8
Page 2

Additional Feature Guide
Additional Features Contents Page
SMTP authentication methods Support SMTP authentication when
setting [E-mail] for the transfer
method in Buffering or Transferring
Images by Timer, Sensor or Motion
Detection Signal, has been added.
Note that the Motion Detection
feature has been added to only BLC30.
[For BL-C30]
Setting the Motion Detection
The threshold and sensitivity can be
adjusted for the Motion Detection on
the Motion Detection page.
[For BL-C30]
The Sensor Log Notification
A sensor log sent once a day at a
specified time can be checked.
feature
[For BL-C30]
French, Simplified Chinese and
Korean
Your favorite banner and
website
French and Simplified Chinese are
supported. Korean is supported on
limited pages.
An image and its linked website can
be specified for a banner on the
Image Display page.
[For BL-C30]
Selfcamera registration
This camera can be registered on the
Multi-Camera page without having to
enter all the details.
[For BL-C30]
Sensor Log menu on the
Sensor Log menu has been added on
the Maintenance page.
Maintenance page
page 9
page 11
page 14
page 17
page 18
page 20
page 21
[For BL-C30]
Confirming Sensor Logs
Sensor Logs can be confirmed on the
Sensor Log page.
page 21
2
Page 3

Additional Feature Guide
Trademarks
• Hotmail and ActiveX are either registered trademarks or trademarks of
Microsoft Corporation in the United States and/or other countries.
• This software is based in part on the work of the Independent JPEG Group.
• All other trademarks identified herein are the property of their respective
owners.
Abbreviations
• "Network Camera" is called "Camera" in this manual.
3
Page 4
Additional Feature Guide
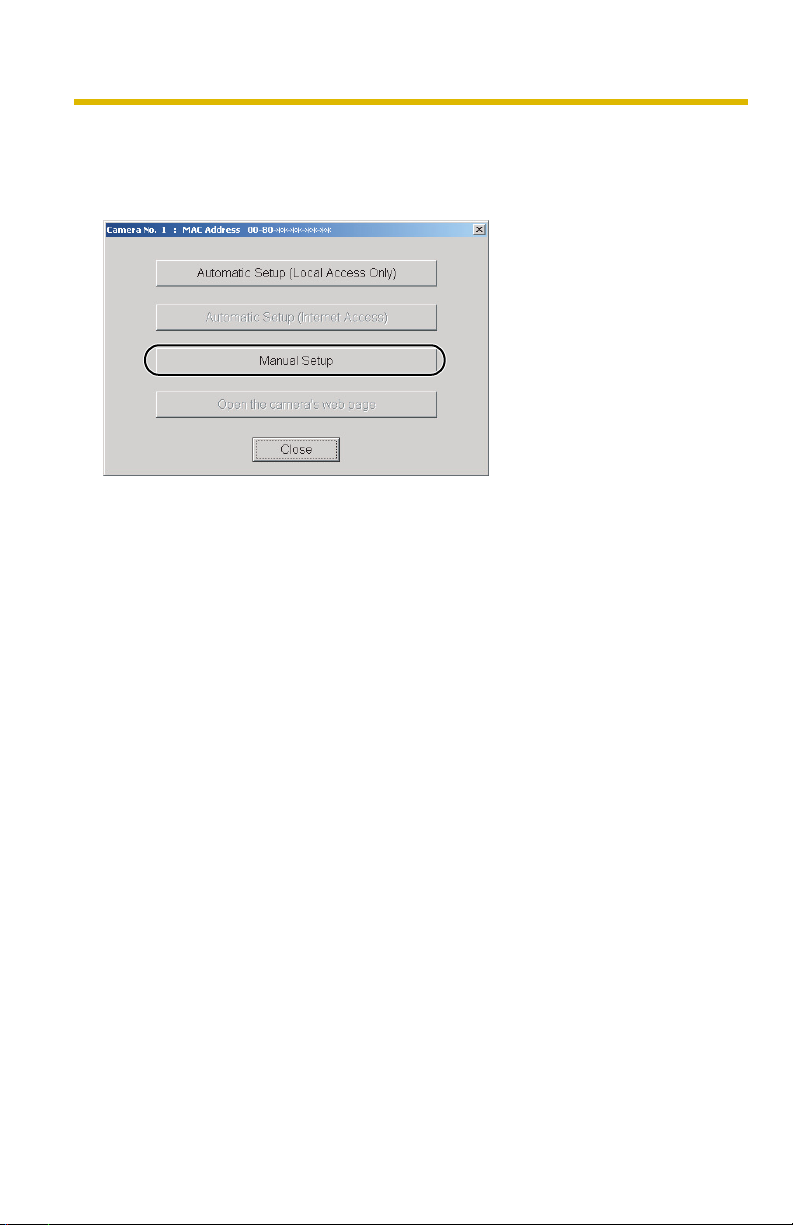
Manual Setup
Manual Setup can be selected on the initial setting window of the Setup Program
on the CD-ROM even if Automatic Setup (Local Access Only) has not been
performed.
4
Page 5
Additional Feature Guide
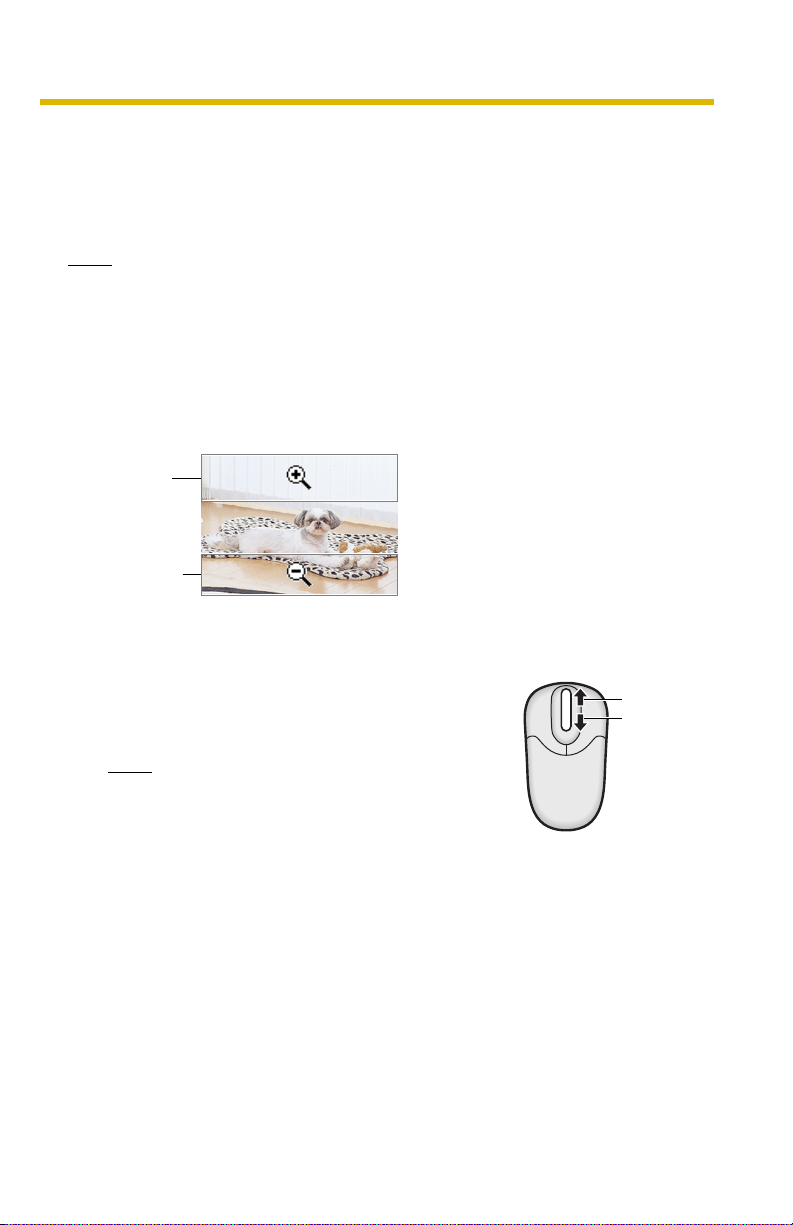
The Digital Zoom feature
The 10× digital zoom feature can be used. The feature uses ActiveX® Controls. The
digital zoom feature can be used while playing video (Motion JPEG) on the Single
Camera, Multi-Camera and Buffered Image pages. The digital zoom feature can be
operated by rotating the mouse wheel or clicking the right mouse button.
Note
• As the magnification increases, the image quality decreases.
• This feature is not available when viewing on a cell/mobile phone.
• When camera images are buffered and transferred, the camera images
are not zoomed in and out.
[Clicking the right mouse button]
Moving the mouse up or down while pressing the right mouse button zooms in
and out.
Zoom in
Zoom out
[Rotating the mouse wheel]
On a screen, rotating the mouse wheel away from
you zooms in, and rotating it towards you zooms
out.
Note
The performance of the mouse varies
according to your OS.
Zoom in
Zoom out
5
Page 6
Additional Feature Guide
[For BL-C30] Viewing Logs on Your Cell/Mobile Phone
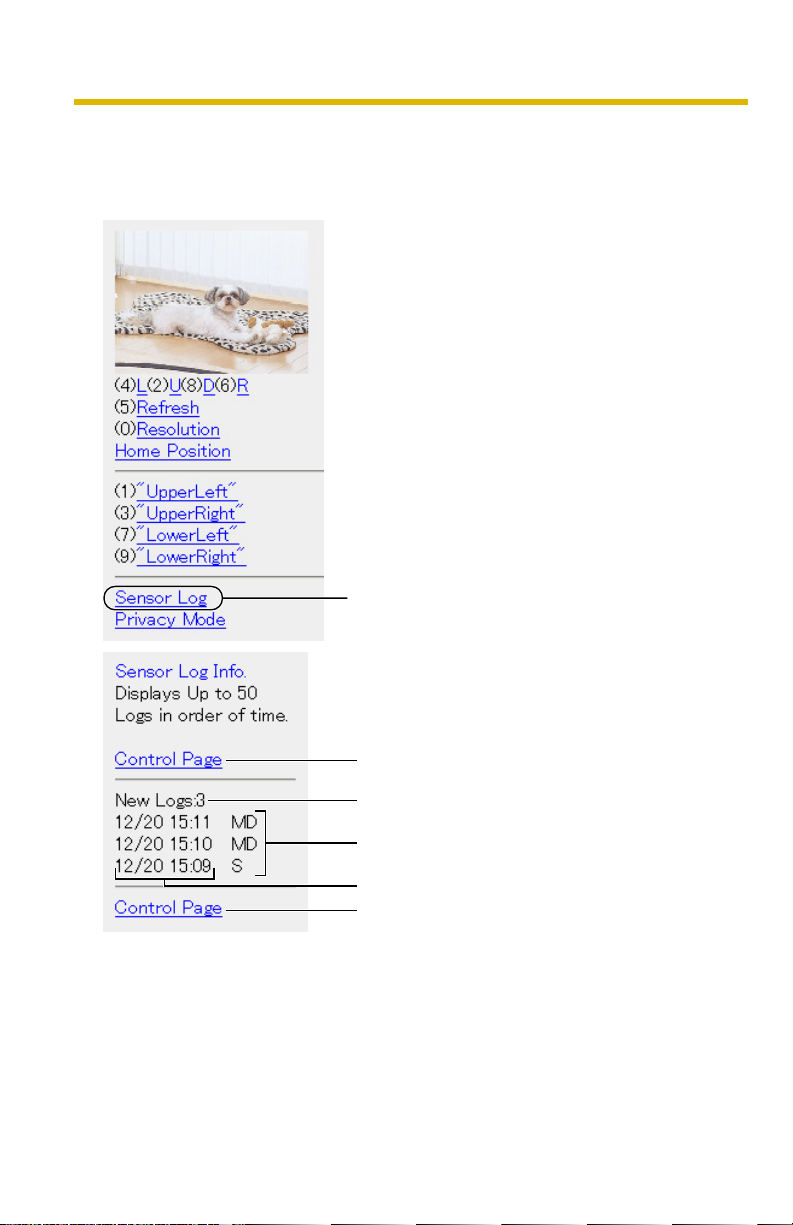
Sensor and Motion Detection Logs can be viewed over the Internet from a
compatible cell/mobile phone. Note that the Motion Detection feature (see page
has been added this time.
Displays up to 50 logs chronologically.
(Only for an administrator)
8)
Goes to the control page.
Displays the number of new logs.
MD: Motion Detection
S: Sensor
Displays the date and time.
Goes to the control page.
6
Page 7
Additional Feature Guide
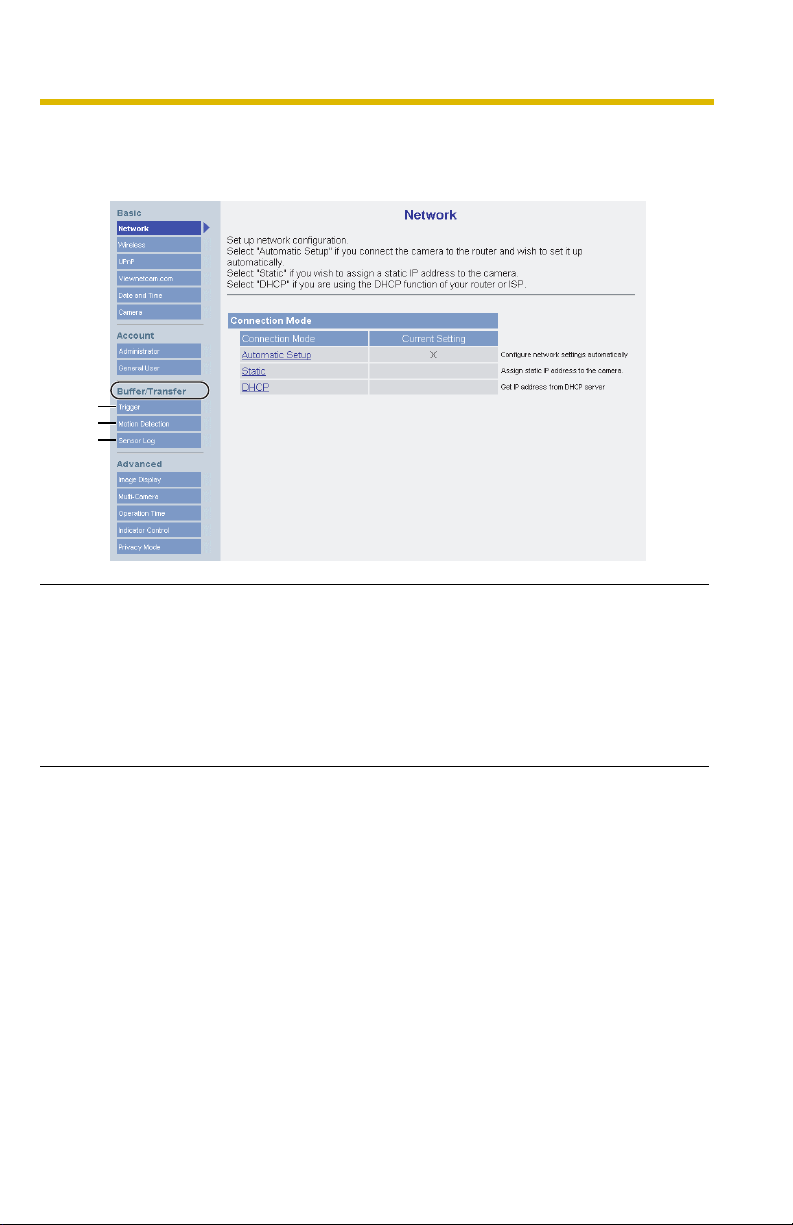
[For BL-C30] Buffer/Transfer and new menus on the Setup page
Buffer/Transfer has been moved on the Setup page, and the Trigger, Motion
Detection and Sensor Log menus have been added.
(1)
(2)
(3)
Buffer/Transfer
(1) Trig ger Sets image buffer or transfer by timer, sensor or motion
detection.
(2) Motion
Detection
(3) Sensor Log Sets settings to send logs by e-mail.
Sets the threshold and the sensitivity.
7
Page 8

Additional Feature Guide
[For BL-C30] The Motion Detection feature
The Motion Detection feature can be selected on the Trigger Setting page for
Buffering or Transferring images.
Note
• Click [Delete Buffered Images] to delete images already buffered.
• Click [Save] to save the settings. The buffered images will be deleted.
• Clicking [Cancel] takes you back to the Trigger page without saving
changes.
Setting Description
Enable Image
Buffer/Transfer
Tr i g g e r • Selecting [Timer] enables the camera to buffer/transfer
• Check the box to enable the Trigger setting. Uncheck the
box to disable it.
images during the specified date and time by timer.
• Selecting [Sensor] enables the camera to buffer/transfer
images when the sensor is detected during the specified
date and time.
• Selecting [Motion Detection] enables the camera to buffer/
transfer images when the motion is detected during the
specified date and time.
Note
• The level of motion detection depends on resolution, image quality, and
the object being viewed. Check the level by performing motion detection
recording. (See page 11)
• Enabling Motion Detection delays the frame rate of the camera.
• A change to light or wind conditions may detect motions accidentally.
• Motion Detection may not work in dark areas.
• Objects moving fast may not be detected.
8
Page 9

Additional Feature Guide
SMTP authentication methods
Support SMTP authentication when setting [E-mail] for the transfer method in
Buffering or Transferring Images by Timer, Sensor or Motion Detection Signal, has
been added. In accordance with this addition, the authentication setting page has
been modified. Note that the Motion Detection feature (see page
added to only BL-C30.
• The page when setting [E-mail] for transfer method in Buffering or Transferring
Images by Timer, Sensor or Motion Detection Signal.
8) has been
9
Page 10

Additional Feature Guide
Setting Description
How to
authenticate
The authentication method can be selected:
[No authentication], [POP before SMTP authentication] or
[SMTP authentication].
POP server authentication may be required by your ISP. In
that case, set POP before SMTP authentication.
• No authentication: No authentication when sending an email.
• POP before SMTP authentication: Some SMTP servers
that send e-mails do not have an authentication feature.
Therefore, the camera uses the authentication of a POP
server that receives e-mails, before sending e-mails.
– POP3 Server
IP Address or
Host Name
If you set a server IP address, set 4
numbers (0—255) and 3 periods, such as
*1
"192.168.0.253". Note that "0.0.0.0" and
:
"255.255.255.255" are not available. Or
set a host name (0—255 characters).
– Port No.: Enter a number (1—65535). Usually set
to 110.
– Login ID*2:
If your ISP requires a login ID to log in to
a POP3 server, set it (1—63 characters).
– Password*2: If your ISP requires a password to log in to
a POP3 server, set it (0—63 characters).
• SMTP authentication: Users are authenticated by user
name and password on the SMTP server. Your ISP must
support the SMTP authentication. The supported SMTP
authentications of the camera are the LOGIN and PLAIN
authentications. The CRAM-MD5 authentication is not
supported.
– Login ID*2: If your ISP requires a login ID to log in to
an SMTP server, set it (1—63 characters).
– Password*2: If your ISP requires a password to log in to
an SMTP server, set it (0—63 characters).
*1
Note that [Space], ["], ['], [&], [<] and [>] are not available.
*2
Note that ["] is not available.
10
Page 11

Additional Feature Guide
[For BL-C30] Setting the Motion Detection
The threshold and sensitivity can be adjusted for the Motion Detection on the
Motion Detection page.
Threshold: If the threshold is set low, this function detects nearly all movements.
Sensitivity: If you set sensitivity high, the amplitude of the motion detection bar gets
jumpy.
1. Click [Motion Detection] on the Setup page.
2. Click the Motion Detection bar in Threshold to set the threshold level.
3. Click the Motion Detection bar in Sensitivity to set the sensitivity level.
4. Click [Save] to save the settings.
• Clicking [Cancel] cancels your settings without saving changes.
5. Click [Go to Motion Detection page].
• The Motion Detection page is displayed.
Setting Description
Threshold • Adjusts the threshold for Motion Detection. As the value is
set lower, the sensor will detect motions of smaller
changes.
Sensitivity • Adjusts the sensitivity for Motion Detection. As the value is
set higher, the amplitude of the Motion Detection bar will
become greater.
Preview
Display the current threshold and detection level.
• The threshold is the line between the green and red bar.
• The detection level is the line between the dark red and light red color.
11
Page 12

Additional Feature Guide
Note
• The Threshold and Sensitivity settings are enabled after saving, and
reflected in preview.
• The Click to Center feature is available.
Note
No responsibility will be taken by our company with respect to consequences
resulting from the use of the Motion Detection feature. The Motion Detection
feature is not suitable and not recommended for uses that require a high
reliability constantly such as surveillance, etc.
Threshold
[What is the threshold?]
The threshold is the minimum value for the camera to detect motions on the
image during the motion detection buffering. Setting the threshold lower allows
subtler changes to be detected. Setting the threshold higher allows only bigger
changes that might occupy half the image to be detected.
12
Page 13

Additional Feature Guide
[What is the sensitivity?]
The sensitivity is the level of brightness detected as motion by the camera. A
high sensitivity setting enables the camera to detect slight brightness changes.
Lower the sensitivity to make the camera detect only big brightness changes.
Threshold
setting is
displayed.
The detection level exceeds the
threshold when motions are
detected.
Note
Lowering the threshold and increasing sensitivity enables the camera to
detect slight movements easily.
Note
• Motion Detection is activated by changes in the outline of objects and
brightness changes. This feature is designed to alleviate false detections
due to overall brightness changes caused by sunlight. But in some cases,
the camera may falsely detect rapid brightness changes by artificial light
such as fluorescent light. In other cases, the motion detection function on
the Network Camera Recorder may detect objects and brightness
changes. The way to detect motion differs between the camera and the
Network Camera Recorder. Additionally, if the object's color is similar to
the color of the background, motion can be hard to detect.
• The detection level depends on the object, resolution, or image quality.
Confirm the condition on the Preview window following the procedure
above.
13
Page 14

Additional Feature Guide
[For BL-C30] The Sensor Log Notification feature
A sensor log sent once a day at a specified time can be checked.To enable Sensor
Log, set Sensor or Motion Detection for Trigger Setting and check [Enable].
1. Click [Sensor Log] on the Setup page.
• When enabling the image/buffer transfer setting and selecting Sensor or
Motion Detection in the Trigger page, the Sensor log window is displayed.
2. Set each parameter.
3. Click [Save].
• Clicking [Cancel] cancels your settings without saving changes.
4. Click [Go to Sensor Log page].
14
Page 15

Additional Feature Guide
Note
• When the settings are saved, the number of new sensor logs becomes 0.
• The camera works only with an SMTP (Simple Mail Transfer Protocol)
server. It does not work with mail servers like "Hotmail
browser.
Setting Description
®
" that use a web
A setup of
• Sensor log operation can be set here.
operation
Time • Set the day of the week and time to send sensor logs via
E-mail.
SMTP Server IP
Address or Host
*1
Name
• If you set a server IP address, set 4 numbers (0—255) and
3 periods, such as "192.168.0.253". Note that "0.0.0.0" and
"255.255.255.255" are not available. Or set a host name
(1—255 characters).
Por t No. • Enter a number (1—65535). Usually set to 25.
Reply E-mail
Address
*2
Destination E-
• Set the sender's E-mail address. We recommend you to
set the administrator's E-mail address.
• Set up to 3 destination E-mail addresses.
mail Address 1-
*2
3
Subject
*2
• Enter a subject with ASCII characters or characters from
other languages (0—44 characters for a 1-byte character
and 0—22 characters for a 2-byte character).
15
Page 16

Additional Feature Guide
Setting Description
How to
authenticate
The authentication method can be selected:
[No authentication], [POP before SMTP authentication] or
[SMTP authentication].
POP server authentication may be required by your ISP. In
that case, set POP before SMTP authentication.
• No authentication: No authentication when sending an e-
mail.
• POP before SMTP authentication: Some SMTP servers
that send e-mails do not have an authentication feature.
Therefore, the camera uses the authentication of a POP
server that receives e-mails, before sending e-mails.
– POP3 Server
IP Address or
Host Name
If you set a server IP address, set 4
numbers (0—255) and 3 periods, such as
*1
"192.168.0.253". Note that "0.0.0.0" and
:
"255.255.255.255" are not available. Or
set a host name (0—255 characters).
– Port No.: Enter a number (1—65535). Usually set
to 110.
– Login ID*2: If your ISP requires a login ID to log in to
a POP3 server, set it (1—63 characters).
– Password*2: If your ISP requires a password to log in to
a POP3 server, set it (0—63 characters).
• SMTP authentication: Users are authenticated by user
name and password on the SMTP server. Your ISP must
support the SMTP authentication. The supported SMTP
authentications of the camera are the LOGIN and PLAIN
authentications. The CRAM-MD5 authentication is not
supported.
– Login ID*2: If your ISP requires a login ID to log in to
an SMTP server, set it (1—63 characters).
– Password*2: If your ISP requires a password to log in to
an SMTP server, set it (0—63 characters).
*1
Note that [Space], ["], ['], [&], [<] and [>] are not available.
*2
Note that ["] is not available.
16
Page 17

Additional Feature Guide
[For BL-C30] French, Simplified Chinese and Korean
French and Simplified Chinese can be displayed on all pages and Korean can be
displayed on limited pages.
Setting Description
Language • Select the initial language from English, Japanese, French,
German, Italian, Spanish, Simplified Chinese, Russian or
Korean. The selected language is displayed as the initial
language on the Top, Single Camera, Multi-Camera and
Buffered Image pages. If you select English, Japanese,
French or Simplified Chinese, all pages will be displayed in
the corresponding language. If you select another
language, the Setup, Maintenance and Support pages will
be displayed in English only.
17
Page 18

Additional Feature Guide
Your favorite banner and website
A banner of your choice can be displayed on the Single Camera page. A URL can
also be linked to this banner. The users can click the banner to access the URL.
18
Page 19

Additional Feature Guide
Setting Description
Banner Display When checked to [Enable], the setting will be enabled.
When unchecked, the setting will be disabled.
Note
• When the Banner Display is enabled, the camera
accesses the Image URL every time the Single
Camera page is displayed. The intermittent and
continuous switching of the Single page burdens
the PC that stores the image linked with the URL.
• If the image URL linked with an image stored in a
PC that requires an authentication is set, the
authentication window will be displayed when
displaying the Single Camera page.
• Banner user • All users : The banner can be displayed for
all users.
Administrator only : The banner can be displayed for
the administrator only.
General user only : The banner can be displayed for
the general user only.
• Image URL
• Link URL
*1
• Enter the image URL (1—127 characters) you want to
display as a banner. When [Enable] is checked, enter
the image URL.
*1
• Enter the target URL (0—127 characters) you want to
display when clicking the banner.
*1
Note that [Space], ["], ['], [&], [<], and [>] are not available.
19
Page 20

Additional Feature Guide
[For BL-C30] Selfcamera registration
This camera can be registered on the Multi-Camera page without having to enter
all the details.
By clicking [Clicking this link, enters this camera's settings.], the settings of the
selfcamera are entered automatically. "selfcamera" is displayed as the IP Address
or Host Name, "--" is displayed as the Port No., and the model no. is displayed as
the Camera Name.
Note
The selfcamera is registered at No. 1 by default.
20
Page 21

Additional Feature Guide
[For BL-C30] Sensor Log menu on the Maintenance page
Sensor Log menu has been added on the Maintenance page.
(1)
Maintenance
(1) Sensor Log Displays sensor logs.
[For BL-C30] Confirming Sensor Logs
The Sensor Log page displays up to 50 Sensor Logs in chronological order. Old
logs will be overwritten by new ones.
1. Click [Sensor Log] on the Maintenance page.
2. Sensor Logs are displayed.
Note
If the camera is restarted, all sensor logs are deleted.
Item Description
New Sensor Logs • Displays the number of new sensor logs.
Date • Displays the date and time when the Sensor or Motion
Detection is activated.
Sensor Type • Displays the Trigger Setting (Sensor or Motion
Detection) on the Trigger page.
21
Page 22

Copyright:
This material is copyrighted by Panasonic Communications Co., Ltd., and may be reproduced
for internal use only. All other reproduction, in whole or in part, is prohibited without the written
consent of Panasonic Communications Co., Ltd.
2006
Panasonic Communications
Co., Ltd. All Rights Reserved.
PQQX15114ZA KK1205JT0
 Loading...