

Panasonic AW-360B10 Operating Instructions Manual
Operating Instructions
360-degree Live Camera Base Unit
Model No. AW-360B10
Before operating this product, please read the instructions carefully and save this
manual for future use.
GJ
W0917HK1018 -FJ
ENGLISH
DVQP1395YA

Deutsch
Français
Italiano
Español
български
Hrvatski Za najnovije sigurnosne informacije i važne obavijesti o proizvodu posjetite sljedeću internetsku stranicu.
Čeština
Dansk
Nederlands
Eesti Toodet puudutava värskeima ohutusteabe ja oluliste märkuste saamiseks külastage järgmist veebilehte.
Suomi Käy seuraavalla verkkosivulla saadaksesi uusimmat turvallisuustiedot ja tärkeät tiedot liittyen laitteeseen.
Ελληνικά
Magyar
Latviešu
Lietuvių
Polski
Português
Română
Slovensky
Slovenščina
Svenska Besök följande webbplats för senaste säkerhetsinformation och viktiga meddelanden om produkten.
Für neueste Sicherheitsinformationen und wichtige Benachrichtigungen bezüglich des Produktes
besuchen Sie die folgende Website.
Visitez le site Web suivant pour consulter les dernières informations de sécurité et les notifications
importantes concernant le produit.
Visitare il seguente sito Web per le più recenti informazioni sulla sicurezza e per importanti notifiche sul
prodotto.
Visite el siguiente sitio web para consultar la última información sobre seguridad y notificaciones
importantes acerca del producto.
Посетете следния уебсайт относно последната информация за безопасността и важни
уведомления за продукта.
Na následujícím webu najdete nejaktuálnější bezpečnostní informace a důležité poznámky k tomuto
produktu.
Besøg følgende webside for den seneste sikkerhedsinformation og vigtige bemærkninger vedrørende
produktet.
Ga naar de volgende website voor de recentste veiligheidsinformatie en belangrijke meldingen over het
product.
Για τις πιο πρόσφατα επικαιροποιημένες πληροφορίες σχετικά με θέματα ασφάλειας και σημαντικές
ειδοποιήσεις που αφορούν το προϊόν σας, επισκεφτείτε τον ιστότοπο που ακολουθεί.
A termékkel kapcsolatos legfrissebb biztonsági információkért és fontos értesítésekért látogasson el az
alábbi weboldalra.
Lai iegūtu jaunāko informāciju par drošību un skatītu svarīgus paziņojumus par šo produktu, apmeklējiet
tālāk norādīto tīmekļa vietni.
Jei reikia naujausios saugos informacijos ir svarbių pranešimų apie gaminį, apsilankykite toliau nurodytoje
svetainėje.
Najnowsze informacje o bezpieczeństwie i ważne informacje o produkcie znajdują się w poniższej witrynie
internetowej.
Consulte o seguinte website para as mais recentes informações de segurança e importantes notificações
sobre o produto.
Vizitați următoarea pagină web pentru ultimele informaţii de securitate și notificări importante cu privire la
produs.
Pre najnovšie bezpečnostné informácie a dôležité oznámenia súvisiace s produktom navštívte túto
webovú stránku.
Za najnovejše varnostne informacije in pomembna obvestila v zvezi z izdelkom obiščite naslednje spletno
mesto.
http://pro-av.panasonic.net/en/manual/index.html
Manufactured by: Panasonic Corporation, Osaka, Japan
Importer’s name and address of pursuant to EU rules:
Panasonic Marketing Europe GmbH
Panasonic Testing Centre
Winsbergring 15, 22525 Hamburg, Germany
2

∫ Trademarks and registered trademarks
≥ SD Logo is a trademark of SD-3C, LLC.
≥ The terms HDMI and HDMI High-Definition Multimedia Interface, and the HDMI Logo are trademarks or registered
trademarks of HDMI Licensing Administrator, Inc. in the United States and other countries.
≥ Windows
≥ Intel
≥ Mac, macOS, iPad, and Safari are registered trademarks of Apple Inc. in the United States and other countries.
≥ Google Chrome™ is a trademark or registered trademark of Google Inc.
≥ Other names of systems and products mentioned in these instructions are usually the registered trademarks or
®
countries.
trademarks of the manufacturers who developed the system or product concerned.
is a registered trademark or trademark of Microsoft Corporation in the United States and/or other
®
and Intel®Core™ are trademarks of Intel Corporation in the U.S. and/or other countries.
∫ Carefully observe copyright laws
Transferring, copying, disassembling, decompiling or reverse engineering the software included in this unit, or
exporting it in violation of export laws is prohibited.
∫ About the pictures and illustrations used in this document
Please note that the product images, illustrations, and various drawings of the product used in this document slightly
differ from the actual product.
∫ For the purposes of these operating instructions
≥ microSD Memory Card, microSDHC Memory Card and microSDXC Memory Card are referred to as the “microSD
card”.
≥ The unit “360-degree Live Camera Base Unit (AW-360B10)” is referred to as the “Base Unit”.
≥ The optional “360-degree Live Camera Head (AW-360C10)” is referred to as the “Camera Head”.
≥ The process of combining video images recorded with multiple camera units of the Camera Head into a single
image is called “stitching” and is referred to as such throughout this document.
≥ Video images that are combined together by stitching are called “360-degree video” and are referred to as such
throughout this document.
≥ Pages for reference are indicated by an arrow, for example: l 00
3
Read this first!
Information for Your Safety
WARNING:
To reduce the risk of fire, electric shock or product
damage,
≥ Do not expose this unit to rain, moisture, dripping
or splashing.
≥ Do not place objects filled with liquids, such as
vases, on this unit.
≥ Use only the recommended accessories.
≥ Do not remove covers.
≥ Do not repair this unit by yourself. Refer
servicing to qualified service personnel.
CAUTION!
To reduce the risk of fire, electric shock or product
damage,
≥ Do not install or place this unit in a bookcase,
built-in cabinet or in another confined space.
Ensure this unit is well ventilated.
≥ Do not obstruct this unit’s ventilation openings
with newspapers, tablecloths, curtains, and
similar items.
≥ Do not place sources of naked flames, such as
lighted candles, on this unit.
CAUTION:
About using SD Card, Cable strap
≥ Keep the Memory Card, Cable strap out of reach
of children to prevent swallowing.
indicates safety information.
AVERTISSEMENT:
Afin de réduire les risques d’incendie, de chocs
électriques ou d’endommagement du produit,
≥ N’exposez pas cet appareil à la pluie, l’humidité,
l’égouttement ou les éclaboussures.
≥ Ne placez pas d’objets remplis d’eau, comme
des vases, sur cet appareil.
≥ Utiliser uniquement les accessoires
recommandés.
≥ Ne retirez pas les caches.
≥ Ne réparez pas vous-même l’appareil. Adressez-
vous à un personnel qualifié.
ATTENTION!
Afin de réduire les risques d’incendie, de chocs
électriques ou d’endommagement du produit,
≥ N’installez pas et ne placez pas cet appareil
dans une bibliothèque, un placard ou un autre
endroit confiné. Assurez-vous que l’appareil est
bien ventilé.
≥ Ne bouchez pas les ouvertures de ventilation de
l'appareil avec des journaux, des serviettes, des
rideaux, et d'autres éléments similaires.
≥ Ne placez pas de source de flamme nue, comme
une bougie allumée, sur cet appareil.
ATTENTION:
À propos de l'utilisation d'une carte SD, de la
sangle pour câble
≥ Conservez la carte mémoire, la sangle pour
câble, hors de portée des enfants afin qu’ils ne
puissent pas les avaler.
Informations concernant la sécurité.
4
∫ IMPORTANT SAFETY INSTRUCTIONS
Read these operating instructions carefully before using
the unit. Follow the safety instructions on the unit and the
applicable safety instructions listed below. Keep these
operating instructions handy for future reference.
1) Read these instructions.
2) Keep these instructions.
3) Heed all warnings.
4) Follow all instructions.
5) Do not use this apparatus near water.
6) Clean only with dry cloth.
7) Do not block any ventilation openings. Install in
accordance with the manufacturer’s instructions.
8) Do not install near any heat sources such as
radiators, heat registers, stoves, or other apparatus
(including amplifiers) that produce heat.
9) Do not defeat the safety purpose of the polarized or
grounding-type plug. A polarized plug has two
blades with one wider than the other. A groundingtype plug has two blades and a third grounding
prong. The wide blade or the third prong are
provided for your safety. If the provided plug does
not fit into your outlet, consult an electrician for
replacement of the obsolete outlet.
10) Protect the power cord from being walked on or
pinched particularly at plugs, convenience
receptacles, and the point where they exit from the
apparatus.
11) Only use attachments/accessories specified by the
manufacturer.
12) Use only with the cart, stand,
tripod, bracket, or table
specified by the manufacturer,
or sold with the apparatus.
When a cart is used, use
caution when moving the cart/
apparatus combination to
avoid injury from tip-over.
13) Unplug this apparatus during lightning storms or
when unused for long periods of time.
14) Refer all servicing to qualified service personnel.
Servicing is required when the apparatus has been
damaged in any way, such as power-supply cord or
plug is damaged, liquid has been spilled or objects
have fallen into the apparatus, the apparatus has
been exposed to rain or moisture, does not operate
normally, or has been dropped.
∫ Directives importantes
Avant d’utiliser l’appareil, lire attentivement les instructions
qui suivent. Se conformer tout particulièrement aux
avertissements inscrits sur l’appareil et aux consignes de
sécurité indiquées ci-dessous. Conserver le présent manuel
pour consultation ultérieure.
1) Lire attentivement ces instructions.
2) Conserver ces instructions.
3) Lire toutes les mises en garde.
4) Suivre toutes les instructions.
5) Ne pas utiliser cet appareil près d’une source d’eau.
6) Ne nettoyer qu’avec un chiffon sec.
7) Ne pas bloquer les évents d’aération. Installer
l’appareil selon les instructions du fabricant.
8) Ne pas installer l’appareil près d’un appareil de
chauffage tel qu’un radiateur, une cuisinière, un
registre de chaleur ou tout dispositif émettant de la
chaleur (y compris un amplificateur).
9) Pour des raisons de sécurité, ne pas modifier la
fiche polarisée ou celle de mise à la terre. Une fiche
polarisée est une fiche à deux lames, dont une plus
large. Une fiche de mise à la terre est une fiche à
deux lames avec une broche de masse. La lame
plus large ou la broche de masse procure une
protection accrue. Si ce genre de fiche ne peut être
inséré dans une prise de courant, communiquer
avec un électricien pour remplacer la prise.
10) S’assurer que le cordon est placé dans un endroit
où il ne risque pas d’être écrasé, piétiné ou coincé.
Faire particulièrement attention à ses extrémités de
branchement, y compris sa fiche.
11) N’utiliser que les accessoires ou périphériques
recommandés par le fabricant.
12) Ne placer l’appareil que dans une
baie ou sur un support, trépied,
gabarit d’installation, etc.,
recommandé par le fabricant ou
vendu avec l’appareil. Le chariot
sur lequel se trouve l’appareil doit
être déplacé avec soin. Des
arrêts brusques, l’utilisation d’une
force excessive et des surfaces inégales peuvent
entraîner la chute du chariot.
13) Débrancher cet appareil lors d’un orage ou en cas
de non-utilisation prolongée.
14) Confier l’appareil à un technicien qualifié pour toute
réparation : cordon d’alimentation ou fiche
endommagé, liquide renversé ou objet tombé dans
l’appareil, exposition à la pluie ou à une humidité
excessive, mauvais fonctionnement ou
échappement de l’appareil.
5
FCC NOTICE (USA)
Declaration of Conformity
Model Number: AW-360B10
Trade Name: Panasonic
Responsible Party: Panasonic Corporation of North America
Support contact: 1-800-524-1448
This device complies with Part 15 of the FCC Rules.
Operation is subject to the following two conditions:
(1) This device may not cause harmful interference, and (2) this device must accept any interference received,
including interference that may cause undesired operation.
To assure continued compliance, follow the attached installation instructions and do not make any unauthorized
modifications.
CAUTION:
This equipment has been tested and found to comply with the limits for a Class B digital device, pursuant to Part
15 of the FCC Rules. These limits are designed to provide reasonable protection against harmful interference in
a residential installation. This equipment generates, uses and can radiate radio frequency energy and, if not
installed and used in accordance with the instructions, may cause harmful interference to radio
communications. However, there is no guarantee that interference will not occur in a particular installation. If this
equipment does cause harmful interference to radio or television reception, which can be determined by turning
the equipment off and on, the user is encouraged to try to correct the interference by one or more of the
following measures:
≥ Reorient or relocate the receiving antenna.
≥ Increase the separation between the equipment and receiver.
≥ Connect the equipment into an outlet on a circuit different from that to which the receiver is connected.
≥ Consult the dealer or an experienced radio/TV technician for help.
The user may find the booklet “Something About Interference”
available from FCC local regional offices helpful.
FCC Warning:
To assure continued FCC emission limit compliance, follow the attached installation instructions and the user
must use only shielded interface cables when connecting to host computer or peripheral devices. Also, any
unauthorized changes or modifications to this equipment could void the user’s authority to operate this device.
NOTIFICATION (Canada)
CAN ICES-3(B)/NMB-3(B)
Two Riverfront Plaza Newark NJ07102
indicates safety information.
NOTIFICATION (Canada)
CAN ICES-3(B)/NMB-3(B)
Informations concernant la sécurité.
<For U.S.A. only>
AW-360B10
This unit is intended for use in moderate and tropical climates.
6
AEEE Yönetmeliğine Uygundur.
Інформація для покупця
Виробник:
Panasonic Corporation
Панасонік Корпорейшн
Адреса виробника:
Kadoma, Osaka, Japan
Кадома, Осака, Японія
Країна походження:
Japan
Японія
Імпортер:
ТОВ "ПАНАСОНІК УКРАЇНА ЛТД"
Адреса імпортера:
провулок Охтирський, будинок 7, місто Київ, 03022, Україна
Примітки:
Термін служби виробу
7 років
Дату виготовлення можна визначити за комбінацією букв і цифр серійного номера, що розташований на
маркувальній табличці виробу.
Приклад: X X XXXXXXX
Рік: остання цифра року (6 – 2016, 7 – 2017,…0 – 2020)
Місяць: А – Січень, В – Лютий… L – Грудень
AEEE Complies with Directive of Turkey.
Disposal of Old Equipment
Only for European Union and countries with recycling systems
This symbol on the products, packaging, and/or accompanying documents means
that used electrical and electronic products must not be mixed with general household
waste.
For proper treatment, recovery and recycling of old products, please take them to
applicable collection points in accordance with your national legislation.
By disposing of them correctly, you will help to save valuable resources and prevent
any potential negative effects on human health and the environment.
For more information about collection and recycling, please contact your local
municipality, dealer or supplier.
Penalties may be applicable for incorrect disposal of this waste, in accordance with
national legislation.
7

Contents
Read this first! ............................................................ 4
Information for Your Safety.................................... 4
Maintenance
Preparation
Operating precautions ............................................... 9
Accessories .............................................................. 14
Optional accessories ............................................... 14
What you can do with this system ......................... 15
Names and Functions of Main Parts ...................... 17
Connecting this unit to the Camera Head ............. 19
Attaching the Camera head option cable
(optional).............................................................. 19
Connecting HDMI Cables (optional) .................... 19
Turning the unit on/off ............................................. 21
Shooting
Before Shooting ....................................................... 22
Outputting Images to an External Device .............. 22
Web screen operations
Operating environment
(for web screen operations) ....................................23
Displaying the web screen ......................................24
User authentication.............................................. 26
About the main screen ............................................ 27
Stitching adjustment ............................................... 28
Making adjustments on the advanced
adjustment screen ...............................................30
Exposure (gain/shutter speed) adjustment ........... 31
Making adjustments on the advanced
adjustment screen (Master Camera Mode) ......... 32
Making adjustments on the advanced
adjustment screen (Detail Mode)......................... 33
White Balance .......................................................... 34
Making adjustments on the advanced
adjustment screen (Master Camera Mode) ......... 35
Making adjustments on the advanced
adjustment screen (Detail Mode)......................... 36
Saving/loading the image quality
setup information ..................................................... 37
Saving image quality setup information............... 37
Loading image quality setup information ............. 38
Settings screen ........................................................ 39
Basic setup screen [General] .............................. 40
Image output setup screen [Video Output] .......... 42
System setup screen [System Mode] .................. 43
Network setup screen [Networks]........................ 44
Camera setup screen [Camera] .......................... 49
Stitching setup screen [Stitching] ........................ 50
Memory card format screen
[SD Card Format] ................................................51
Product information screen [Product Info.] .......... 52
Hour meter screen [Hour Meter].......................... 53
Warning Indications ................................................ 54
Messages ................................................................. 55
Troubleshooting ...................................................... 56
Repairing microSD cards
in the Camera Head ............................................ 60
Specification
Appearance .............................................................. 61
Specification ............................................................ 62
8

Preparation
Operating precautions
∫ About this unit
The unit become warm during use. This is not a malfunction.
Keep this unit as far away as possible from electromagnetic equipment (such as microwave ovens, TVs, video
games etc.).
≥ If you use this unit on top of or near a TV, the pictures and/or sound on this unit may be disrupted by
electromagnetic wave radiation.
≥ Do not use this unit near cell phones because doing so may result in noise adversely affecting the pictures and/or
sound.
≥ Recorded data may be damaged, or pictures may be distorted, by strong magnetic fields created by speakers or
large motors.
≥ Electromagnetic wave radiation generated by microprocessors may adversely affect this unit, disturbing the pictures
and/or sound.
≥ If this unit is adversely affected and stops operating properly, disconnect the DC cable of the Base Unit and the
camera head option cable of the Camera Head first, and then reconnect these cables and turn on the unit again.
Do not use this unit near radio transmitters or high-voltage lines.
≥ If you use near radio transmitters or high-voltage lines, the recorded pictures and/or sound may be adversely
affected.
When connecting to the dedicated Camera Head (AW-360C10)
≥ Always use a genuine Panasonic Camera head option cable (AG-C20003G (3 m (9.8 feet)): optional).
≥ Always use a genuine Panasonic HDMI Cable (AW-CAH103G: optional).
When connecting to a network
≥ LAN cable* (category 5 or above), max. 100 meters (328 feet)
* Use of an STP (shielded twisted pair) cable is recommended.
When connecting to an HDMI output device
≥ Use a commercially-available High Speed HDMI cable. If possible, we recommend using a cable with a length of
3m (9.8feet) or less.
Power button [ ]/Status indicator
≥ Press this button to turn the unit on and off.
When the unit turns off, the status indicator goes off and the unit enters standby mode.
The unit is still using a small amount of power in the standby. Standby uses less power.
9

Do not extend the optional cables to be used.
Do not spray insecticides or volatile chemicals onto the unit.
≥ If the unit is sprayed with such chemicals, its body may be marred and the surface finish may peel off.
≥ Do not leave rubber or plastic products in contact with the unit for a long time.
When you use the unit in a sandy or dusty place such as a beach, do not let sand or fine dust get into the
body and terminals of the unit.
Also, keep the unit away from sea water.
≥ Sand or dust may damage the unit.
≥ If sea water splashes onto the unit, wipe off the water with a well wrung cloth. Then wipe the unit again with a dry
cloth.
When carrying the unit, do not drop or bump it.
≥ A strong impact can break the unit’s casing, causing it to malfunction.
Cleaning
When cleaning, do not use benzine or thinner.
≥ Using benzine or paint thinners may deform this unit and/or cause the surface finish to peel off.
≥ Disconnect the DC cable before cleaning.
≥ Use a soft, clean cloth to wipe this unit. To remove stubborn dirt, wipe this unit with a cloth moistened with kitchen
detergent that has been diluted with water and then use a dry cloth to take up the remaining moisture.
When you are not going to use the unit for an extended time
≥ When storing the unit, it is recommended that you place a desiccant (silica gel) in with it.
Do not leave the unit in direct contact with the skin when in use.
≥ Low temperature burns may result if the skin is left in direct contact with the high temperature parts of the unit or
heated air from the ventilation openings of the unit.
Do not allow the cord to drag on the ground or pull a connected cord along the passage
≥ The cord will be damaged, causing fire or electrical shock, when the cord gets caught by the feet, excite will also
cause personal injury.
∫ About operation from the Web screen
It is possible to change the setup of the unit (IP control) on the web browser screen of a PC or iPad connected to the
unit via a network. (l 24)
≥ The IP image refresh speed and operations from the web screen may become slower depending on the following
factors.
j Network environment
j PC or iPad performance
j Subjects
j Number of accesses to the unit
10

∫ About combination of 360-degree Live Camera Base Unit and 360-degree Live
Camera Head
This unit (AW-360B10) is compatible only to the dedicated camera head AW-360C10.
It will not operate if any other model is connected.
The camera head AW-360C10 will not operate when connected to any base unit other than this unit (AW-360B10).
∫ Regarding system frequencies
It is possible to switch the system frequency (59.94 Hz/50.00 Hz) with this unit by changing the setup for outputting
images from the Camera Head. ([Capture Mode]: l 43)
∫ Disclaimer of warranty
IN NO EVENT SHALL Panasonic Corporation BE LIABLE TO ANY PARTY OR ANY PERSON, EXCEPT FOR
REPLACEMENT OR REASONABLE MAINTENANCE OF THE PRODUCT, FOR THE CASES, INCLUDING BUT
NOT LIMITED TO BELOW:
1 ANY DAMAGE AND LOSS, INCLUDING WITHOUT LIMITATION, DIRECT OR INDIRECT, SPECIAL,
CONSEQUENTIAL OR EXEMPLARY, ARISING OUT OF OR RELATING TO THE PRODUCT;
2 PERSONAL INJURY OR ANY DAMAGE CAUSED BY INAPPROPRIATE USE OR NEGLIGENT OPERATION
OF THE USER;
3 UNAUTHORIZED DISASSEMBLE, REPAIR OR MODIFICATION OF THE PRODUCT BY THE USER;
4 INCONVENIENCE OR ANY LOSS ARISING WHEN IMAGES ARE NOT DISPLAYED, DUE TO ANY REASON
OR CAUSE INCLUDING ANY FAILURE OR PROBLEM OF THE PRODUCT;
5 ANY PROBLEM, CONSEQUENTIAL INCONVENIENCE, OR LOSS OR DAMAGE, ARISING OUT OF THE
SYSTEM COMBINED BY THE DEVICES OF THIRD PARTY;
6 DEMANDS FOR COMPENSATION, CLAIMS, ETC. MADE BY INDIVIDUALS AND/OR ORGANIZATIONS ON
GROUNDS SUCH AS THE INFRINGEMENT OF THEIR PRIVACY THAT RESULTED WHEN THEIR IMAGES
SHOT BY THE USER WERE USED AFTER BEING MADE AVAILABLE TO THE PUBLIC DOMAIN FOR SOME
REASON OR OTHER;
7 LOSS OF REGISTERED DATA CAUSED BY ANY FAILURE (INCLUDING INITIALIZATION OF THE PRODUCT
DUE TO FORGOTTEN AUTHENTICATION INFORMATION SUCH AS A USER NAME AND PASSWORD)
11

∫ Network security
As you will use the unit connected to a network, your attention is called to the following security risks.
1 Leakage or theft of information through the unit
2 Use of the unit for illegal operations by persons with malicious intent
3 Interference with or stoppage of the unit by persons with malicious intent
It is your responsibility to take precautions such as those described below to protect yourself against the above
network security risks.
≥ Use the unit in a network secured by a firewall, etc.
≥ If the unit is connected to a network that includes personal computers, make sure that the system is not infected by
computer viruses or other malicious entities (using a regularly updated antivirus program, anti-spyware program,
etc.).
≥ Protect your network against unauthorized access by setting up user authentication to restrict users to those who
log in with an authorized user name and password. In addition, to prevent third parties from identifying user name
information (including passwords), change the information from the factory default.
For details, refer to “User authentication” on page 26.
≥ After accessing the unit, be sure to close all web browsers.
≥ Store authentication information (user names and passwords) appropriately so that no third parties will be able to
access it.
≥ Change the password periodically.
≥ Restrict access to the unit by authenticating the users, for example, to prevent setting information stored on the unit
from leaking over the network.
≥ Do not install the camera in locations where the camera or the cables can be destroyed or damaged by persons with
malicious intent.
≥ Concerning user authorization
User authentication on the unit can be performed via basic authentication. If basic authentication is used without using
a dedicated line equipped with an authentication function, password leaks may occur.
≥ Usage restrictions
Use of the same segment is recommended for the network in which the unit and the personal computer are
connected.
If the equipment uses connections with different segments, events based on the settings inherent to the network
equipment, for instance, may occur so check this thoroughly prior to operation.
12

∫ About security
Be careful about the possibility of theft or loss of the unit, and be careful not to leave the unit unattended. Please note
that Panasonic does not accept any responsibility for the compromise, manipulation, and loss of information caused
by these events.
∫ When disposing of/transferring the unit
The unit records personal information related to your operations. When you part with the unit due to such reasons as
disposal or transfer, make sure to restore the default settings with the Function button (l 17) and erase recorded
information.
∫ Caution regarding laser beams
≥ The MOS sensor may be damaged if any of the lenses is subjected to light from a laser beam. Take sufficient care
to prevent laser beams from striking the lenses when recording in an environment where laser devices are used.
∫ Information on software used with this product
This product incorporates the following software:
(1) the software developed independently by or for Panasonic Corporation,
(2) the software owned by third party and licensed to Panasonic Corporation, and/or
(3) open source software
The software categorised as (3) is distributed in the hope that it will be useful, but WITHOUT ANY WARRANTY,
without even the implied warranty of MERCHANTABILITY or FITNESS FOR A PARTICULAR PURPOSE.
For details please refer to the license conditions displayed by the method described in Operating Instructions (PDF
format) [Settings screen] → [Product information screen [Product Info.]] → [OSS License Display]
13

Preparation
Accessories
Check the accessories before using this unit.
Cable strap (k2)
(l 20)
≥ To purchase extra accessories, contact your dealer.
≥ After removing the product from its container, dispose of the packing materials in an appropriate manner.
Preparation
Optional accessories
Some optional accessories may not be available in some countries.
360-degree Live Camera Head (AW-360C10)
Camera head option cable (AG-C20003G [3 m] (9.8 feet))
HDMI Cable (AW-CAH103G [3 m (9.8 feet) k4])
14
Preparation
CAM1
CAM2
CAM4
CAM3
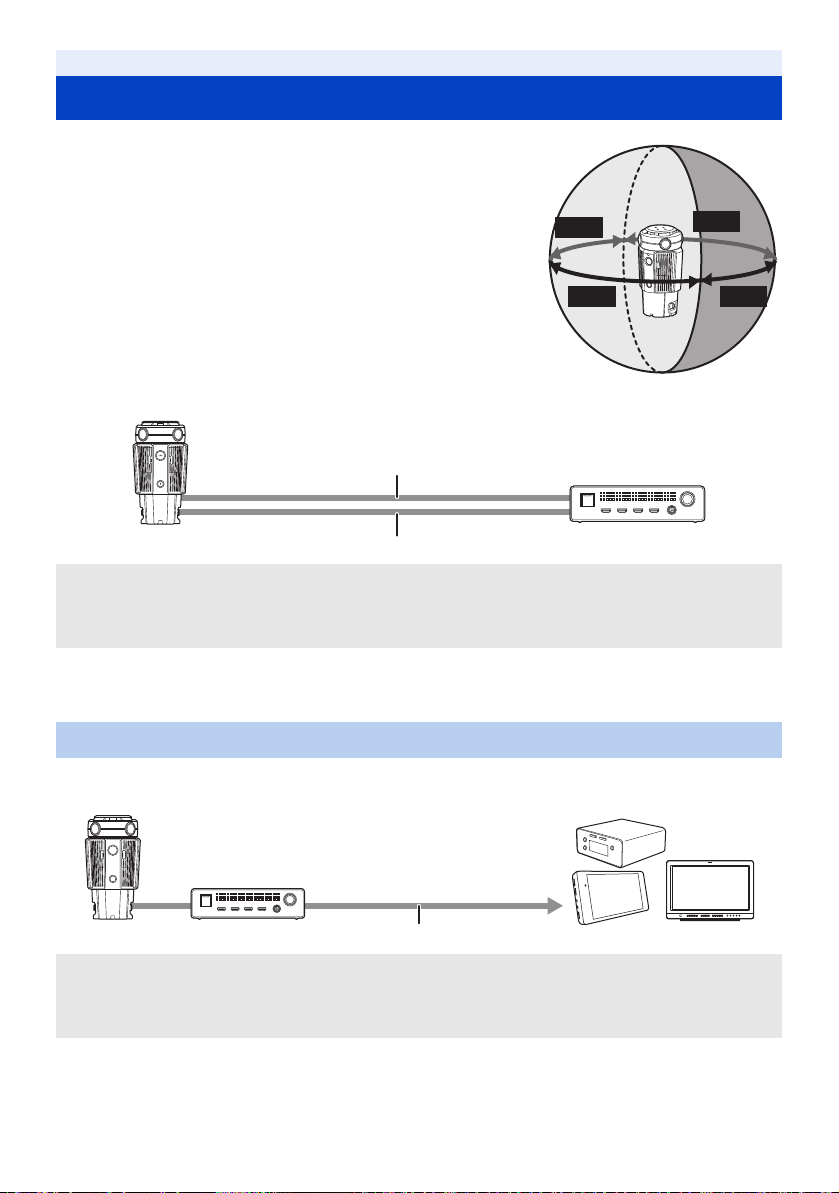
What you can do with this system
This unit is the Base Unit of the 360-degree Live Camera. The 360-degree
Live Camera comes with the following features.
≥ It is possible to combine images recorded with four camera units
together by using real-time stitching technology capable of
minimizing time lag.
≥ It is possible to combine images into 360-degree video with smooth
seams.
j It is possible to automatically correct parallax (i.e. automatically adjust
the seams between images) according to the movement of and changes
in subjects.
j It is possible to perform coordinated control of the brightness and White
Balance of the four camera units.
Images captured by the Camera Head are combined into 360-degree video
by the unit. Connect the unit and the Camera Head to use the unit. (l 19)
A 360-degree Live Camera Head (AW-360C10: optional)
B HDMI Cable (AW-CAH103G: optional)
C Camera head option cable (AG-C20003G: optional)
D 360-degree Live Camera Base Unit
≥ Objects around the edges of the images of the camera units that are closer than 1 m (3.3 feet) may not appear in
the combined image.
≥ Depending on the recording conditions, the combined image may have noticeable or misaligned seams.
Outputting images to an external device (live streaming device, etc.) at 4K resolution
It is possible to output 360-degree video in 4K resolution to an external device (live streaming device, recorder,
monitor, etc.) connected with HDMI Cables. (l 22)
A Camera Head
B Base Unit
C HDMI Cable (commercially-available)
D External device (live streaming device, monitor, recorder, etc.)
* Use a commercially-available High Speed HDMI cable. If possible, we recommend using a cable with a length of
3m (9.8feet) or less.
*
15
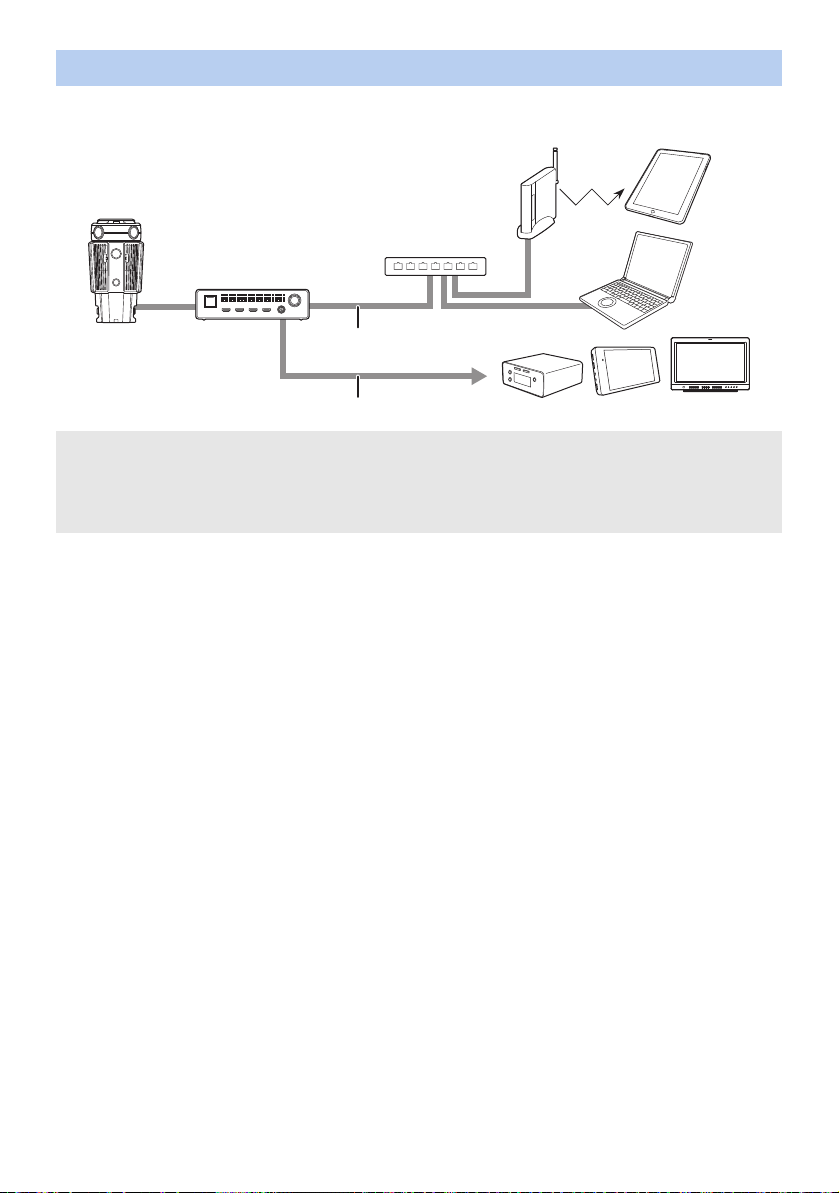
Cross-platform operation using a web browser
Operate the web browser of the PC connected via wired LAN or the iPad connected via a wireless access point to
configure various settings of the unit. Cross-platform operation is made possible by the use of a web browser. (l 24)
A Camera Head
B Base Unit
C LAN cable (commercially-available)
D Switching hub
E Wireless access point
* Use a commercially-available High Speed HDMI cable. If possible, we recommend using a cable with a length of
3m (9.8feet) or less.
≥ To display the images of the unit on a web browser, it is necessary to output them to an external device through
HDMI Cables.
F PC
G iPad
H HDMI Cable (commercially-available)
I External device (live streaming device, monitor,
recorder, etc.)
*
16
Preparation
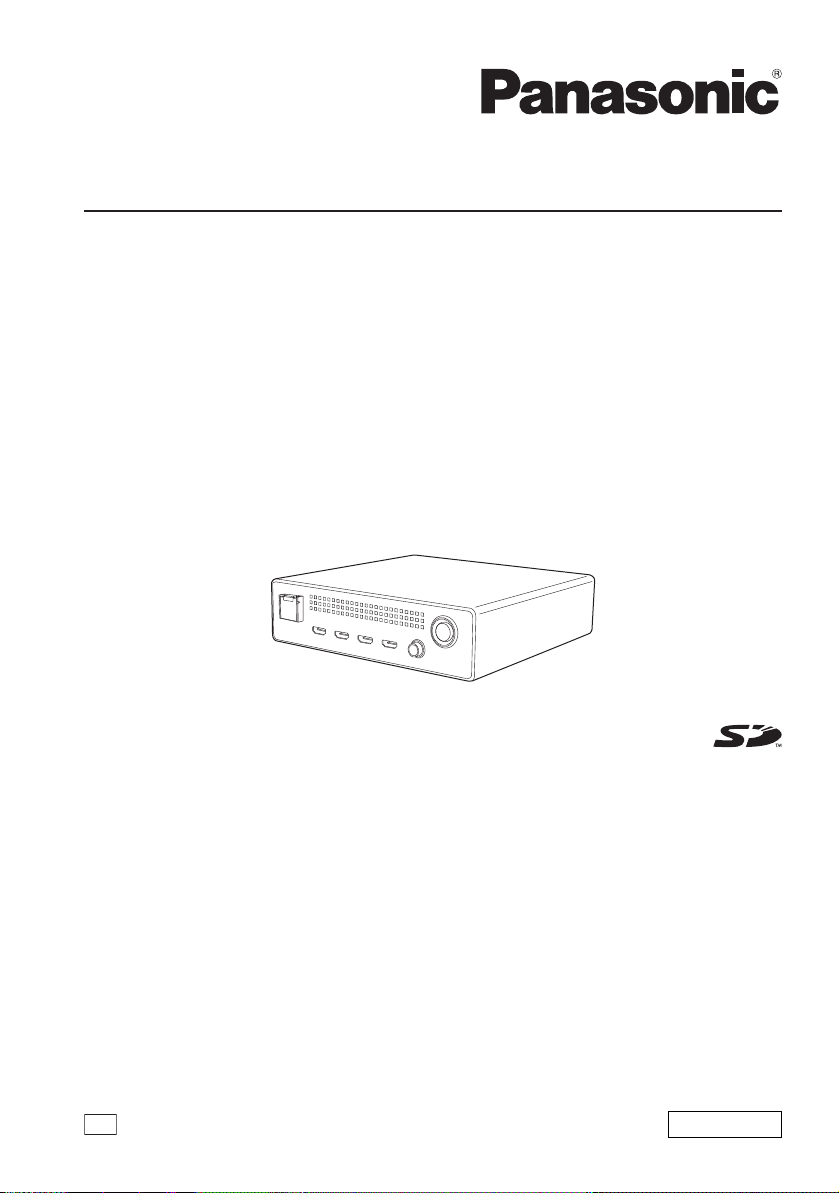
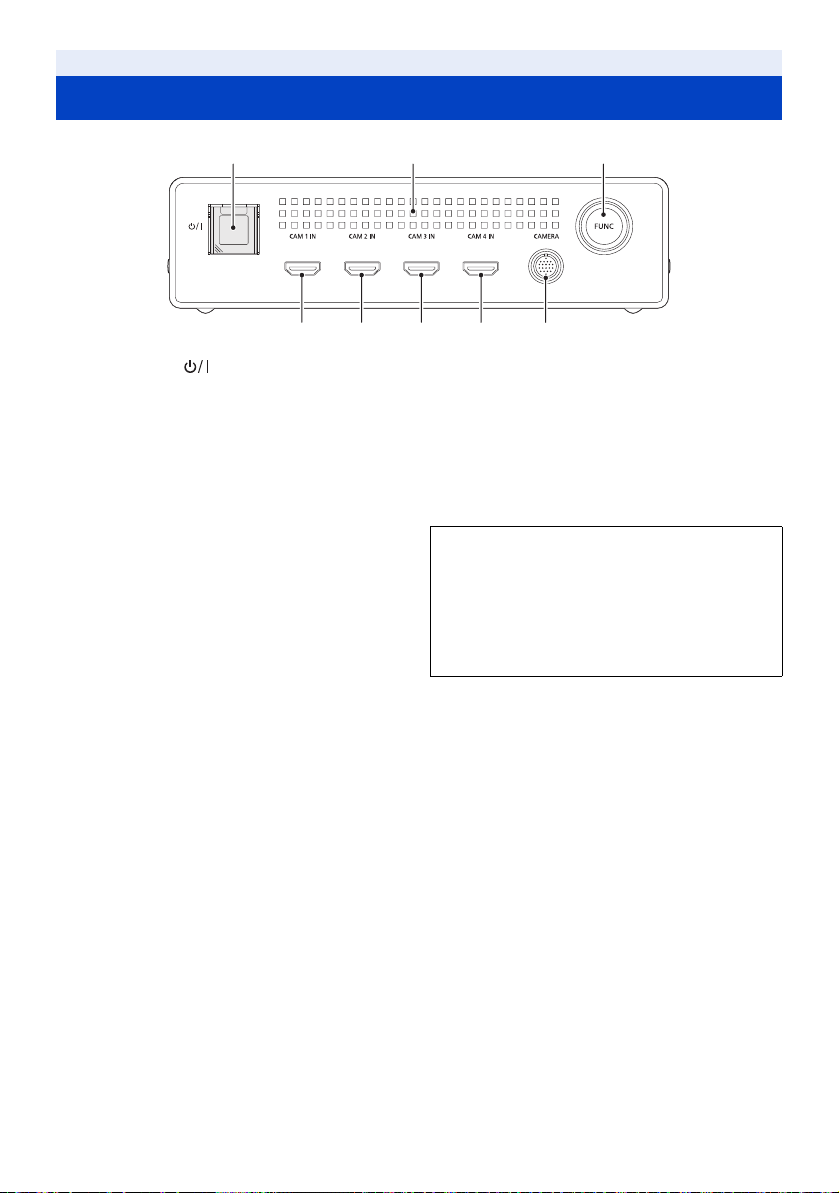
Names and Functions of Main Parts
1
1 Power button [ ] (l 21)/
Status indicator (l 21)
≥ The status indicator normally lights or flashes in green.
When there is a problem, it lights or flashes in red.
2 Air outlet (cooling fan)
3 Function button/Function lamp [FUNC]
≥ If you press and hold the function button (approx.
10 seconds) while the unit is turned on, the [Networks]
settings, such as the IP address setting (l 44), and
the login ID and password settings (l 41) will return to
the factory defaults.
When initialization starts, the status indicator (red) and
the function lamp will start flashing alternately.
Even after the settings are returned to the factory
defaults, there may be times when you want to restore
the factory defaults again. In such cases, before
performing the operation, turn off and on the unit.
2 3
874 5 6
≥ The function lamp lights while a card is being
accessed. For example, it will light when you format a
card on the Camera Head.
≥ Do not perform the following while the card is being
accessed (while the function lamp is lit). Doing so may
damage card data or cause the unit to malfunction.
j Removing the microSD card from the Camera Head
j Turning off the unit
j Shaking or striking the unit
4 [CAM 1 IN] terminal (l 19)
5 [CAM 2 IN] terminal (l 19)
6 [CAM 3 IN] terminal (l 19)
7 [CAM 4 IN] terminal (l 19)
≥ Use these terminals when connecting the unit and
the Camera Head with HDMI Cables.
Do not use the terminals for connection to other
devices.
8 CAMERA terminal (l 19)
17
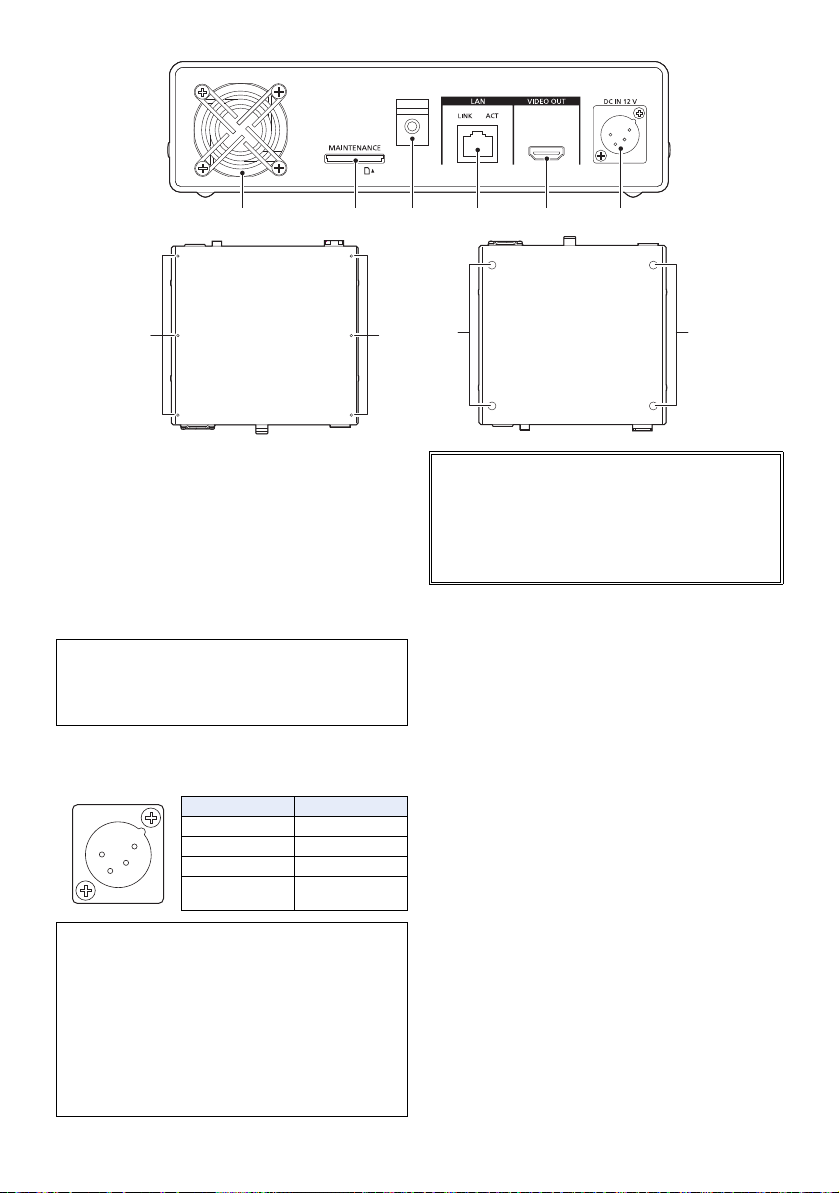
9 Air Inlet (cooling fan)
9 10 11 12 13 14
15
16 16
15
1
2
3
4
10 Maintenance port [MAINTENANCE]
≥ This port is used for maintenance of the unit. (Not
normally used)
11 Cable clamper (l 22)
12 LAN connector for IP control [LAN LINK/ACT]
≥ This LAN connector (RJ-45) is connected when
exercising IP control over the unit from an external
device. Use a cable with the following specifications for
the connection to the LAN connector:
LAN cable* (category 5 or above), max. 100 meters
(328 feet)
* Use of an STP (shielded twisted pair) cable is
recommended.
13 VIDEO OUT terminal (l 22)
14 DC input terminal [DC IN 12 V] (l 21)
≥ Connect a DC power source (DC 12 V).
Pin no. Signal
1GND
2, 3 ―
412V
CASE Frame GND
≥ Verify that the output voltage matches the unit’s
voltage rating before connection.
≥ Use a source with an output power rating equal to
or higher than the unit's input power rating.
≥ An inrush current is generated when this unit is
turned on. An insufficient power supply capacity
when the power is turned on may result in
malfunction. We recommend using a DC power
supply that can provide at least twice the power
consumption value of the unit.
Verify the pin positions of the output
connector of the DC power supply and the
unit’s DC IN terminal, and be sure to
connect with the correct polarities.
Connecting +12 V power to the GND
terminal may result in fire or malfunction.
15 Multipurpose screw hole
≥ M3 (3 mm diameter) type screws with lengths up to
6 mm can be used for the six screw holes on the upper
surface of this unit.
≥ When using screws, do not apply excessive force.
Also, if you use a M3 (3 mm diameter) type screw
longer than 6 mm in length, this unit may be damaged.
16 Setting legs
18

Preparation
Connecting this unit to the Camera Head
≥ Be sure to turn off this unit before attaching or removing the camera head option cable and HDMI Cables.
A Type D terminal
B Type A terminal
C Camera head option cable
D HDMI Cable (k4)
Attaching the Camera head option cable (optional)
1 Insert Camera head option cable D into this unit’s CAMERA
terminal and the Camera Head connecting terminal.
≥ Align notch A of the terminal of the Camera head option cable and
guide B of the connecting terminal to insert.
2 Turn the Camera head option cable terminal ring C
clockwise.
≥ Fix firmly so that there is no looseness.
∫ Removing the Camera head option cable
1 Loosen the ring on the terminal of the Camera head option cable by turning it
counterclockwise.
2 Hold the ring on the terminal of the Camera head option cable and pull it straight out.
Connecting HDMI Cables (optional)
1 Loosen the cable cover screw 1 of the Camera Head, and
remove the cable cover.
≥ Remove the two cable covers, the cable cover for CAM1/2 A and the
cable cover for CAM3/4 B.
19
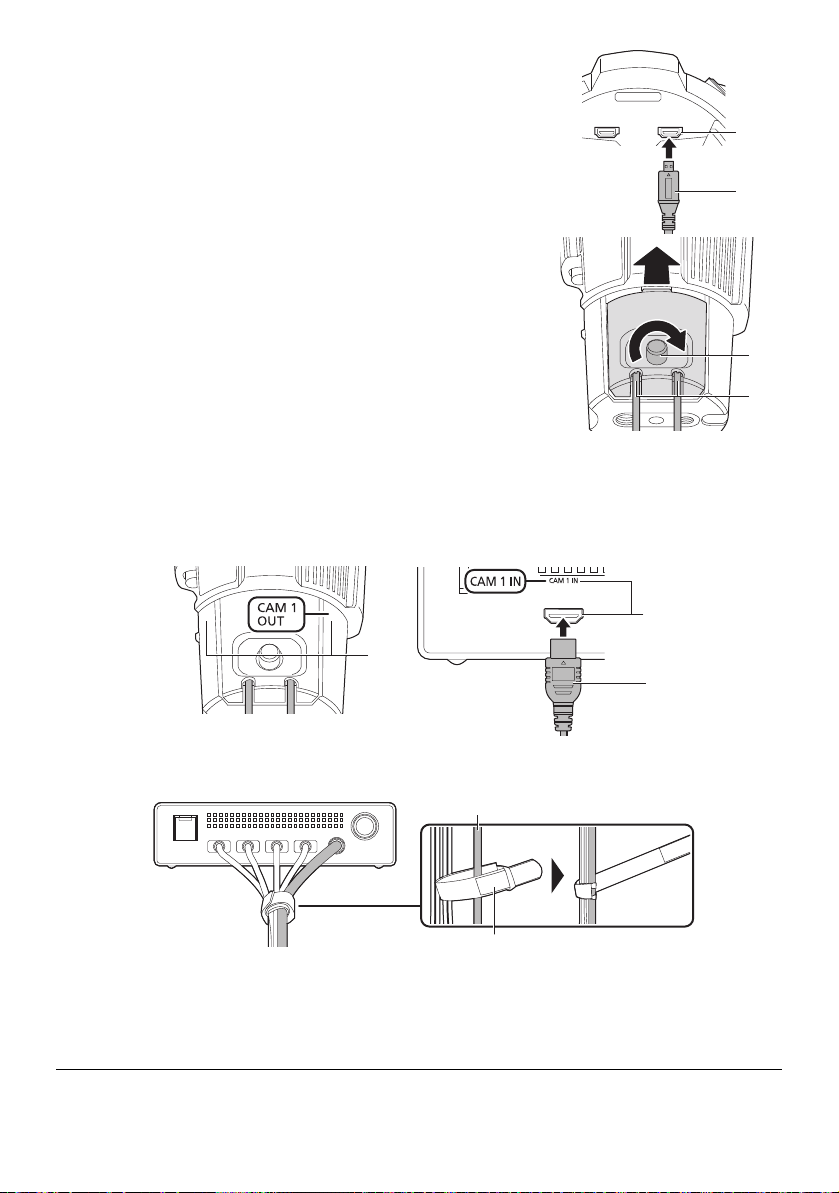
2 Insert the Type D connector 2 of each of the HDMI Cables
into one of the video output terminals 3 (illustrated
example: CAM1 OUT terminal) of the Camera Head.
≥ Insert the HDMI Cables to all of the CAM1 OUT-CAM4 OUT terminals.
3 Align the position of each of the HDMI Cables with the
corresponding cable cover slit 4, and attach the cable cover
to the Camera Head.
≥ Attaching the cable cover without aligning the position may cause
damage to the HDMI Cable. Be sure to align the position of each of the
HDMI Cables.
4 Tighten the cable cover screw 5 to fix the HDMI Cable.
≥ Use the cable cover while the HDMI Cable is connected to prevent it
from being accidentally pulled out.
≥ Attach the two cable covers, the cable cover for CAM1/2 and the cable
cover for CAM3/4.
5 Check each of the terminal numbers 6 (illustrated example: CAM1 OUT) on the Camera
Head, and insert the Type A connector 8 of each of the HDMI Cables into the Base Unit's
video input terminal 7 (illustrated example: CAM1 IN terminal) indicated with the matching
number.
≥ Insert the HDMI Cables to all of the CAM1 IN-CAM4 IN terminals.
≥ Bundle the Camera head option cable and the HDMI Cables together near the terminals of the unit using one of
the cable straps to prevent them from being accidentally pulled out. Attach the cable strap D to the Camera
head option cable C.
∫ Removing the HDMI Cables
Before disconnecting the HDMI Cables, remove the cable covers.
≥ Disconnecting the HDMI Cables while the cable covers are still attached may cause damage to the HDMI Cables.
≥ If the HDMI Cables are bundled, attach labels of some sort identifying terminal numbers to the terminals before
disconnecting them. The labels will be useful for reconnecting the bundled cables.
≥ Use the supplied cable straps to organize the camera head option cable and the HDMI Cables.
≥ When the HDMI Cables are not in use, attach the cable covers to the Camera Head to protect the terminals.
20
 Loading...