

Page 1

POWER
ALARM
F1 F2 F3 F4 F5
KEY DSK PinP AUX CLN PVW PGM 1 2
USERAUX SOURCEAUX BUS DELEGATION
1 2 3 4 5 6 7 8 9 10
AUX
PGM/A
PST/B
BKGD PATT
KEY PATT
FUNC N/R R
WIPE DIRECTIONWIPE PATTERN / FUNCTION
ON
WIPE SQ
SL 3D
POSITIONER
Z
ON
FTB
PinP
DSKCUT AUTO
MIX WIPE
BKGD KEY
MIX
WIPE
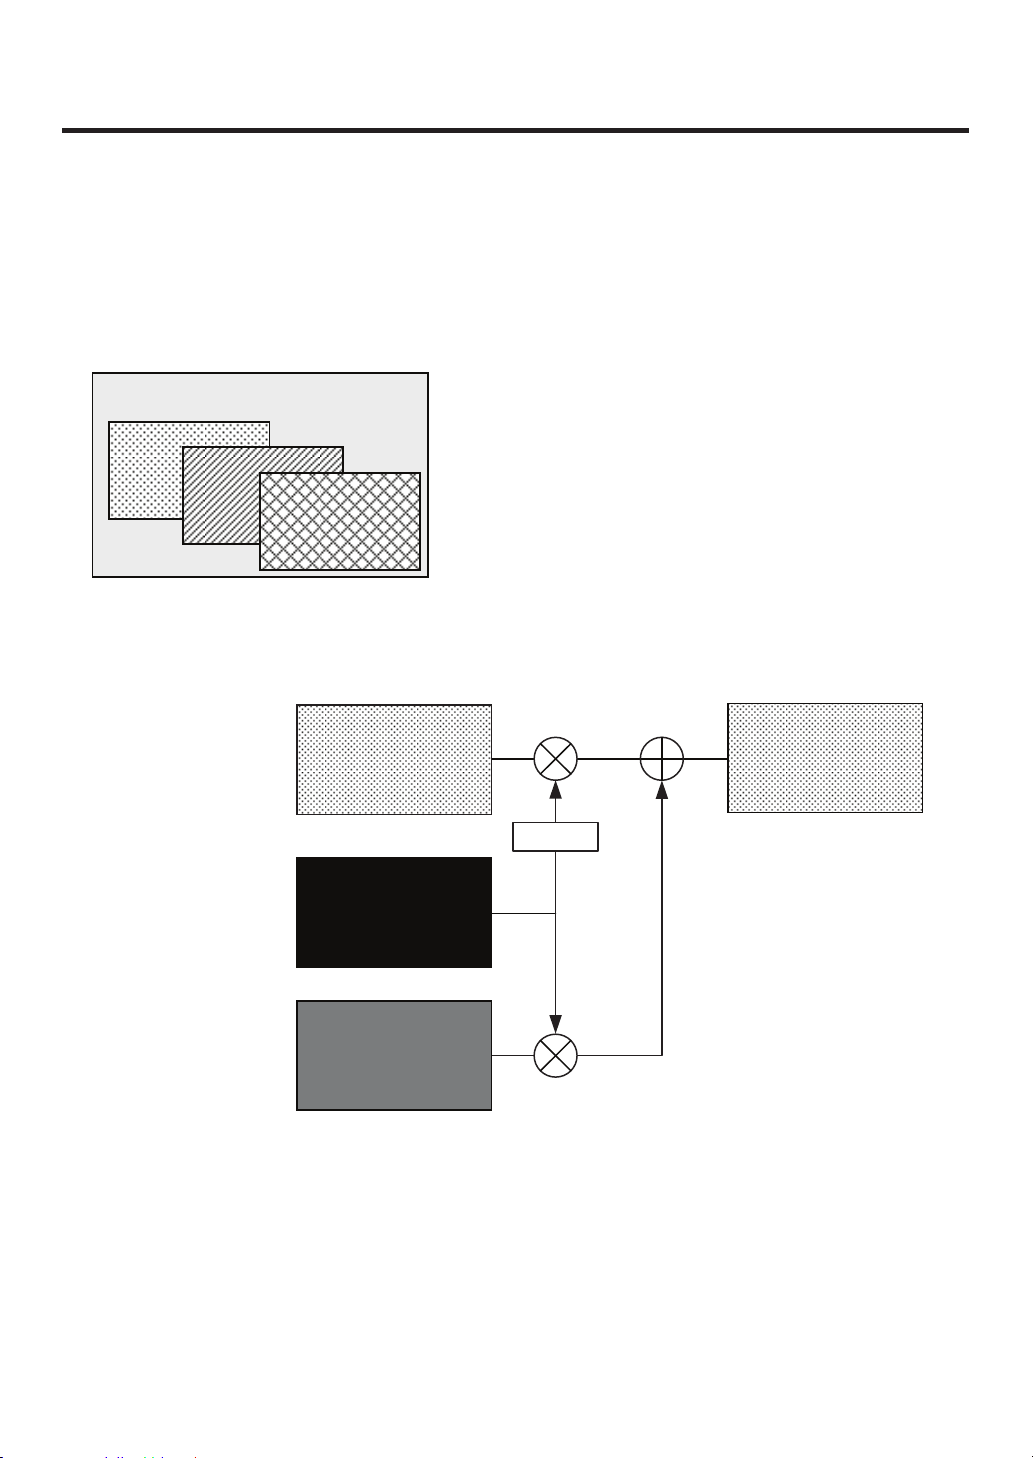
PAGE
AMB:FILL / GRN:SOURCE
Multi-format Live Switcher AV-HS400
11
TIME WIPE COLOR
KEY CHR KEY FREEZE
DSK PinP IN/OUT
MEMORY XPT SYSTEM
1 2 3
4 5 6
7 8 9
10 12
Operating Instructions
Multi-format Live Switcher
Model No. AV-HS400N
Before operating this product, please read the instructions carefully and save this manual for
future use.
Printed in Japan VQTB0308-3
Page 2
Safety precautions
CAUTION
RISK OF ELECTRIC SHOCK
DO NOT OPEN
CAUTION: TO REDUCE THE RISK OF ELECTRIC SHOCK,
REFER TO SERVICING TO QUALIFIED SERVICE PERSONNEL.
DO NOT REMOVE COVER (OR BACK).
NO USER SERVICEABLE PARTS INSIDE.
The lightning flash with arrowhead
symbol, within an equilateral triangle, is
intended to alert the user to the presence
of uninsulated “dangerous voltage” within
the product’s enclosure that may be of
sufficient magnitude to constitute a risk of
electric shock to persons.
The exclamation point within an equilateral
triangle is intended to alert the user to
the presence of important operating and
maintenance (service) instructions in the
literature accompanying the appliance.
WARNING:
THIS APPARATUS MUST BE EARTHED
To ensure safe operation, the three-pin plug must
be inserted only into a standard three-pin power
point which is effectively earthed through the
normal household wiring.
Extension cords
three cores and be correctly wired to provide
connection to the earth. Wrongly wired extension
cords are a major cause of fatalities.
act that the apparatus operates satisfactorily
The f
does not imply that the power point is earthed or
that the installation is completely safe. For your
safety, if you are in any doubt about the effective
earthing of the power point, please consult a
qualified electrician.
used with the apparatus must have
CAUTION:
TO REDUCE THE RISK OF FIRE OR SHOCK
HAZARD AND ANNOYING INTERFERENCE,
USE THE RECOMMENDED ACCESSORIES
ONLY.
FCC Note:
This equipment has been tested and found
to comply with the limits for a class A digital
device, pursuant to Part 15 of the FCC Rules.
These limits are designed to provide reasonable
protection against harmful interference when
the equipment is operated in a commercial
environment. This equipment generates, uses,
and can radiate radio frequency energy, and
if not installed and used in accordance with
the instruction manual, may cause harmful
interference to radio communications. Operation
of this equipment in a residential area is likely to
cause harmful interference in which case the user
will be required to correct the interference at his
own expense.
Warning:
To assure continued FCC emission limit
compliance, the user must use only shielded
interface cables when connecting to external units.
Also, any unauthorized changes or modifications
to this equipment could void the user’s authority to
operate it.
CAUTION:
In order to maintain adequate ventilation, do
not install or place this unit in a bookcase,
built-in cabinet or any other confined space.
To prevent risk of electric shock or fire hazard
due to overheating, ensure that curtains
and any other materials do not obstruct the
ventilation.
For CANADA
This class A digital apparatus complies
with Canadian ICES-003.
Cet appareil numérique de la classe A est
conforme à la norme NMB-003 du Canada.
WARNING:
• TO REDUCE THE RISK OF FIRE OR
ELECTRIC SHOCK, DO NOT EXPOSE THIS
APPARATUS TO RAIN OR MOISTURE.
• THE
APPARATUS SHALL NOT BE EXPOSED
TO DRIPPING OR SPLASHING AND THAT
NO OBJECTS FILLED WITH LIQUIDS, SUCH
AS VASES, SHALL BE PLACED ON THE
APPARATUS.
indicates safety information.
The socket outlet shall be installed near the
equipment and easily accessible or the mains plug
or a power switch shall remain readily operable.
A warning that an apparatus with CLASS I
construction shall be connected to a MAINS
socket outlet with a protective earthing connection.
2
Page 3
Safety precautions
IMPORTANT SAFETY INSTRUCTIONS
Read these operating instructions carefully before using the unit. Follow the safety instructions on the
unit and the applicable safety instructions listed below. Keep these operating instructions handy for future
reference.
1) Read these instructions.
2) Keep these instructions.
3) Heed all warnings.
4) Follow all instructions.
5) Do not use this apparatus near water.
6) Clean only with dry cloth.
7) Do not block any ventilation openings. Install
in accordance with the manufacturer’s
instructions.
8) D
o not install near any heat sources
such as radiators, heat registers, stoves, or
other apparatus (including amplifiers) that
produce heat.
9)
o not defeat the safety purpose of the
D
polarized or grounding-type plug. A polarized
plug has two blades with one wider than the
other. A grounding-type plug has two blades
and a third grounding prong. The wide blade or
the third prong are provided for your safety. If
the provided plug does not fit into your outlet,
consult an electrician for replacement of the
obsolete outlet.
10)
Protect
pinched particularly at plugs, convenience
receptacles, and the point where they exit from
the apparatus.
11)
Only
the manufacturer.
12)
Use only with the cart, stand,
tripod, bracket, or table specified
by the manufacturer, or sold with
the apparatus. When a cart is
used, use caution when moving
the cart/apparatus combination to
avoid injury from tip-over.
13)
Unplug
or when unused for long periods of time.
14) R
personnel. Servicing is required when the
apparatus has been damaged in any way, such
as power-supply cord or plug is damaged,
liquid has been spilled or objects have fallen
into the apparatus, the apparatus has been
exposed to rain or moisture, does not operate
normally, or has been dropped.
the power cord form being walked on or
use attachments/accessories specified by
this apparatus during lightning storms
efer all servicing to qualified service
indicates safety information.
<For USA-California Only>
This product contains a CR Coin Cell Lithium Battery which contains Perchlorate Material – special handling
may apply.
See www.dtsc.ca/gov/hazardouswaste.perchlorate.
3
Page 4

Contents
Description ................................................6
Features .....................................................6
Precautions for use ..................................7
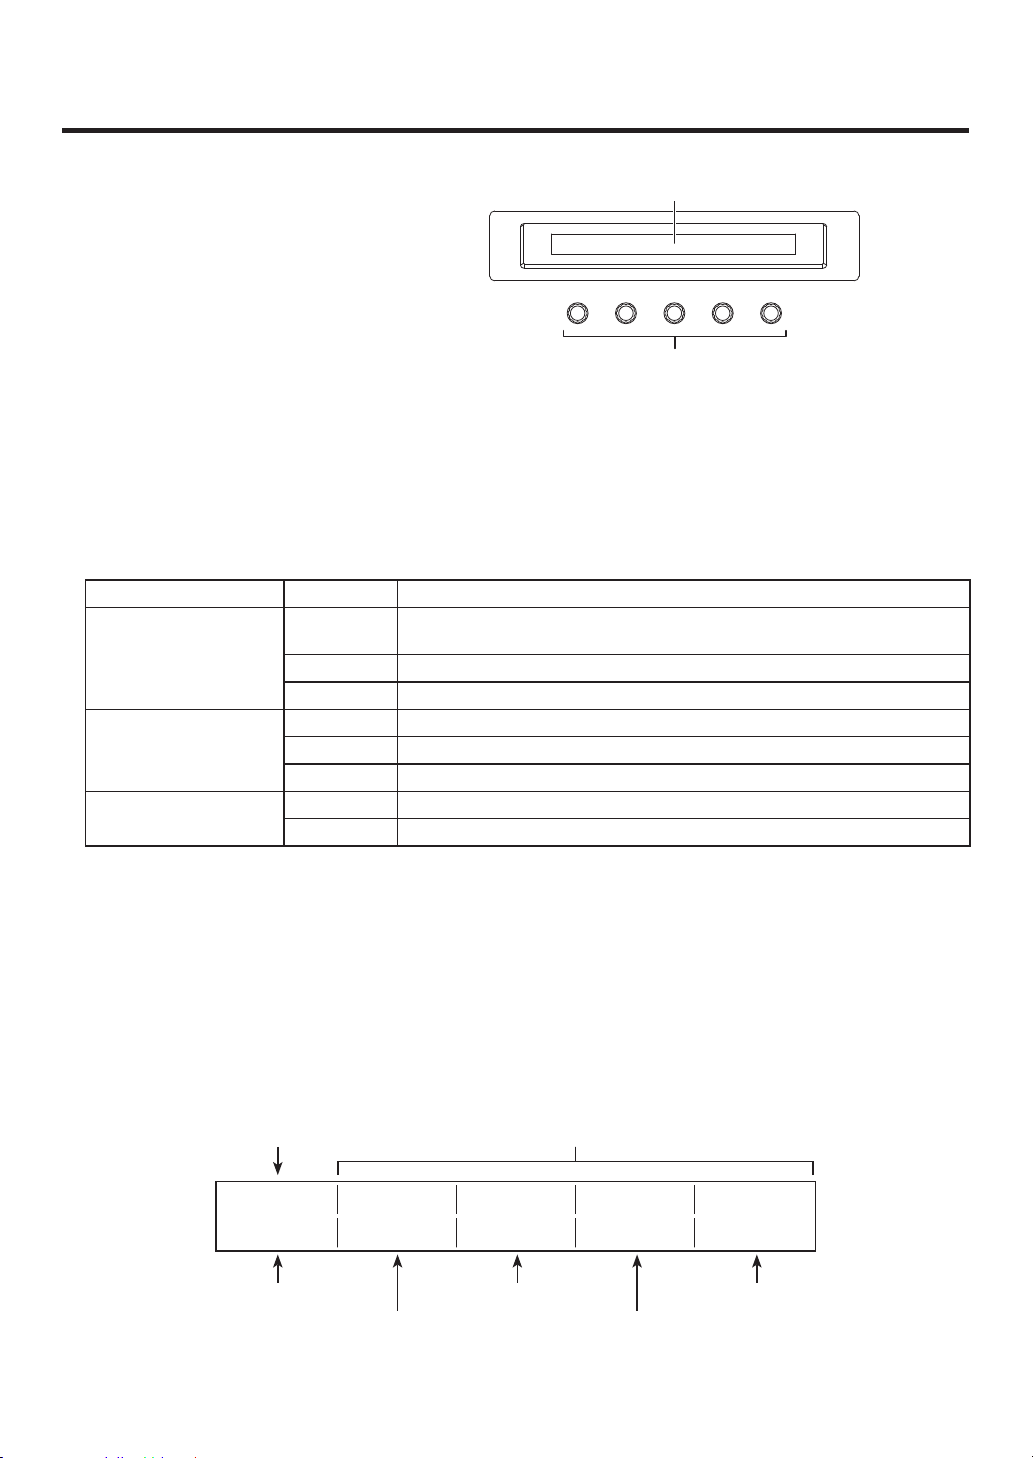
1. Functions in each area .........................8
1-1. Control panel .....................................................8
1-2. Crosspoint area .................................................9
1-3. Wipe area ........................................................10
1-4. User button area ..............................................11
1-5. Transition area .................................................1
1-6. LCD men
1-7. Positioner area ................................................15
1-8. SD memory card area .....................................15
1-9. Rear panel connections area ..........................16
u area ...............................................14
2. System ..................................................18
2-1. Configuration ...................................................18
2-2. Connections ....................................................19
3. Basic operations .................................21
3-1. Background transition ......................................21
3-1-1. Selecting the bus ......................................21
3-1-2
. Selecting the bus mode ............................21
3-1-3. Selecting the transition mode ...................22
3-1-4. Manual transition (using the fader lever) ...22
3-1-5. Auto transition ...........................................22
3-1-6. Cut transition .............................................22
3-
2.
Wipe ................................................................23
3-2-1. Selecting the wipe pattern ........................23
3-2-2. Selecting the wipe direction ......................24
3-2-3. Wipe decorations (border, soft effect) .......24
3-2-4. Setting the wipe start position ...................25
3-2-5. Modifying wipe ..........................................26
3-3. Key ..................................................................27
3-3-1. Selecting the k
3-3-2
. Selecting the key material .........................29
3-3-3. Key transitions ..........................................30
3-3-4. Key preview...............................................31
3-3-5.
Adjusting the luminance key and linear key
3-3-6. Adjusting the chroma key .........................32
3-3-7. K
3-3-8. Masking the key signals ............................36
ey decorations ........................................35
ey type ...............................28
...31
3-4. PinP (picture in picture) ...................................37
3-4-1. Selecting the PinP material ......................37
3-4-2.
PinP transitions .........................................37
3-4-3. PinP preview .............................................37
3-4-4. PinP adjustments ......................................38
3-4-5. PinP decorations .......................................39
3-4-6. Trimming settings ......................................40
3-5. DSK (downstream key)....................................41
3-5-1. Selecting the DSK type .............................41
3-5-
Selecting the DSK material .......................42
2.
3-5-3. DSK transitions .........................................43
2
3-5-4. DSK preview .............................................43
3-5-5. DSK adjustments ......................................43
3-5-6. DSK decorations .......................................44
3-6. FTB (fade to black) ..........................................45
3-7. Internal color signals .......................................46
3-7-1. Setting the color background ....................46
3-8. Freezing the input signals ...............................47
3-8-1. Displaying the freeze status ......................47
3-8-
Setting freeze ............................................47
2.
3-9. Switching the AUX output ................................48
3-10. Preset memory ..............................................49
3-11. Frame memories ...........................................5
3-11-1.
3-12
3-12-1.
3-123-12-3.
Transferring images from the AUX bus ...52
. SD memory cards .........................................53
Initializing the SD memory cards ............54
2. Saving data on SD memory cards ..........54
Loading data from SD memory cards .....55
2
4
Page 5

Contents
4. Input/output signal settings...............56
4-1. Setting the SDI input signals and analog input
signals .............................................................56
4-1-1. Setting the frame synchronizer .................56
4-1-2.
Setting the input mode ..............................57
4-1-3. Setting the analog input gain ....................58
4-2.
Setting the up-converter (option) .....................58
4-3. Setting the DVI input signals (option) ..............59
4-3-1. Setting the DVI input signals .....................59
Adjusting the DVI input signals .................61
4-3-2.
4-4. Setting the output signals ................................62
Types of output signals .............................62
4-4-1.
4-4-2
. Assigning the output signals .....................62
4-5. Setting the sync signals...................................63
4-6. Adjusting the output signal phase ...................64
4-7. Setting the multi view display ..........................66
4-8. Setting the on-screen display (OSD) ...............68
4-9. Setting the DVI output signals (option) ............69
4-10. Setting the ancillary data ...............................70
5. System settings ..................................71
5-1. Selecting the video format ...............................71
5-2. Setting the crosspoints ....................................72
5-2-1. Assigning signals to the crosspoints .........72
5-2-2. Setting the crosspoint switching ...............73
5-3. Button assignments .........................................74
5-3-1. Setting the user buttons ............................74
Setting the FTB button ..............................74
5-3-2.
5-4. Setting the date and time ................................75
5-5. Network settings ..............................................76
5-6. Other settings ..................................................77
5-6-1. Setting the LCD backlight .........................77
2.
Setting editor enable .................................77
5-6-
5-6-3. Setting the GPI .........................................78
5-7. Status displays ................................................79
5-7-1. Alarm status displays ................................79
5-7-2.
Displaying the version information and
option information .....................................80
5-8. Initialization......................................................81
6. External interfaces .............................82
6-1. RS-422 connector ...........................................82
6-2. GPI connector .................................................83
6-3. Tally connector.................................................84
7. Setting menu table ..............................85
8. Appearance .........................................91
9. Specifications and standar
d
accessories .........................................92
Appendix (glossary) ...............................95
5
Page 6

Description
This is a 1 ME digital video switcher which supports a multiple number of HD and SD formats.
Despite its compact dimensions, the video switcher comes standard with 4 input connectors and can support 8
input connectors when an option board is used.
It also has a multi-view display function that allows split-screen display with up to 10 screens.
It is capable of providing transitions (wipe, mix and DVE) as video effects, and keyer (luminance keys and chroma
keys), DSK and PinP specialized hardware is provided as a standard feature to enable video productions in many
different forms.
The unit also supports SD memory cards so still image data (BMP) can be imported from SD memory cards into
the unit’s frame memories for use as background images or key materials.
Features
Compact design, wide variety of input/output signals
As a standard feature
board is added, HD/SD analog component and DVI-I signals can also be accommodated. The input optional
board contains an up-converter.
Under the standard specifications, there are four SDI lines for the input signals, and this number can be
optionally increased by the user up to eight lines (supported by the optional board). Similarly, there are three
SDI lines for the output signals under the standard specifications, and this number can be optionally increased
by the user to five lines (PGM, PVW, AUX, KEYOUT and multi view displpay).
Multiple formats supported
Both HD formats (1080/59.94i, 1080/50i, 7
well as the DVI-I format are supported for the signals.
, the HD and SD-SDI formats are supported for the input and output signals. If an optional
20/59.94p and 720/50p) and SD formats (480/59.94i and 576/50i) as
Multi view display function
This unit enables up to 10 lines of program video (PGM), preview video (PVW) and input video signals to be
displayed altogether on a single screen at the same time.
Frame synchronizer system and external synchronization system supported
A high-performance 10-bit frame synchronizer is incorporated for all the inputs, and asynchronous video
signals can be input. By using the black burst (BB) output, it is possible to construct a system referenced to the
synchronization of the switcher.
A genlock function is provided, and an external synchronization system using external sync signals (BB or TRI
signals) as a reference are also supported.
Many different effect functions incorporated
Along with the standard wipe, mix and cut functions
transitions.
The unit comes with luminance ke
in the form of the DSK (downstream key) and PinP (picture in picture) functions as a standard option, enabling
video productions in many different forms.
SD memory cards supported
Still image data (BMP) can be imported from SD memory cards into the unit’s frame memories for use as
background images or key materials. Conversely, the images or setting data in the unit’s frame memories can be
stored on the SD memory cards.
Simple operations
Live transmissions can be delivered speedily thanks to the simple panel layout which enables the various
functions to be operated directly.
Presetting and other similar operations are performed using menus in the form of on-screen displays (OSD) which
appear on the unit’s LCD screen or an external monitor.
ys and chroma keys are provided as keyers as well as specialized hardware
, the unit can provide size reduction, slide and other DVE
6
Page 7

Precautions for use
Handle carefully.
Do not drop the product, or subject it to strong shock or vibration.
Do not carry or move the product by the fader lever. This is important to prevent trouble.
Use the product in an ambient temperature of 32 °F to 104 °F (0 °C to 40 °C).
Avoid using the product at a cold place below 32 °F (0 °C) or at a hot place above 104 °F (40 °C) because
extremely low or high temperature will adversely affect the parts inside.
Power off before connecting or disconnecting cables.
Before plugging or unplugging the cables, be sure to switch power off.
Avoid humidity and dust.
Avoid using the product at a humid, dusty place because much humidity and dust will cause damage to the
parts inside.
Maintenance
Wipe the product using a dry cloth. To remove stubborn dirt, dip a cloth into a diluted solution of kitchen
detergent, wring it out well, and wipe the product gently. Then, after wiping the product with a moist cloth, wipe
it again with a dry cloth.
Caution
• Avoid using benzine, paint thinners and other volatile fluids.
• If a chemical cleaning cloth is to be used, carefully read through the precautions for its use.
Precaution to be observed during production
This product’s image switching and image effect functions can be used to produce images which flicker rapidly
or images which change rapidly.
How
ever, bear in mind when using these functions in production that the kinds of images produced may have
an adverse effect on the viewer’s physical well-being.
Handling the optional boards
Be absolutely sure to turn off the power of the product before installing or removing any of the optional boards.
Furthermore, when installing or removing the optional boards, take care not to hurt yourself on the edges and
metal parts of the boards.
When the product is to be discarded
When the product is to be discarded at the end of its service life, ask a specialized contractor to dispose of it
properly in order to protect the environment.
7
Page 8
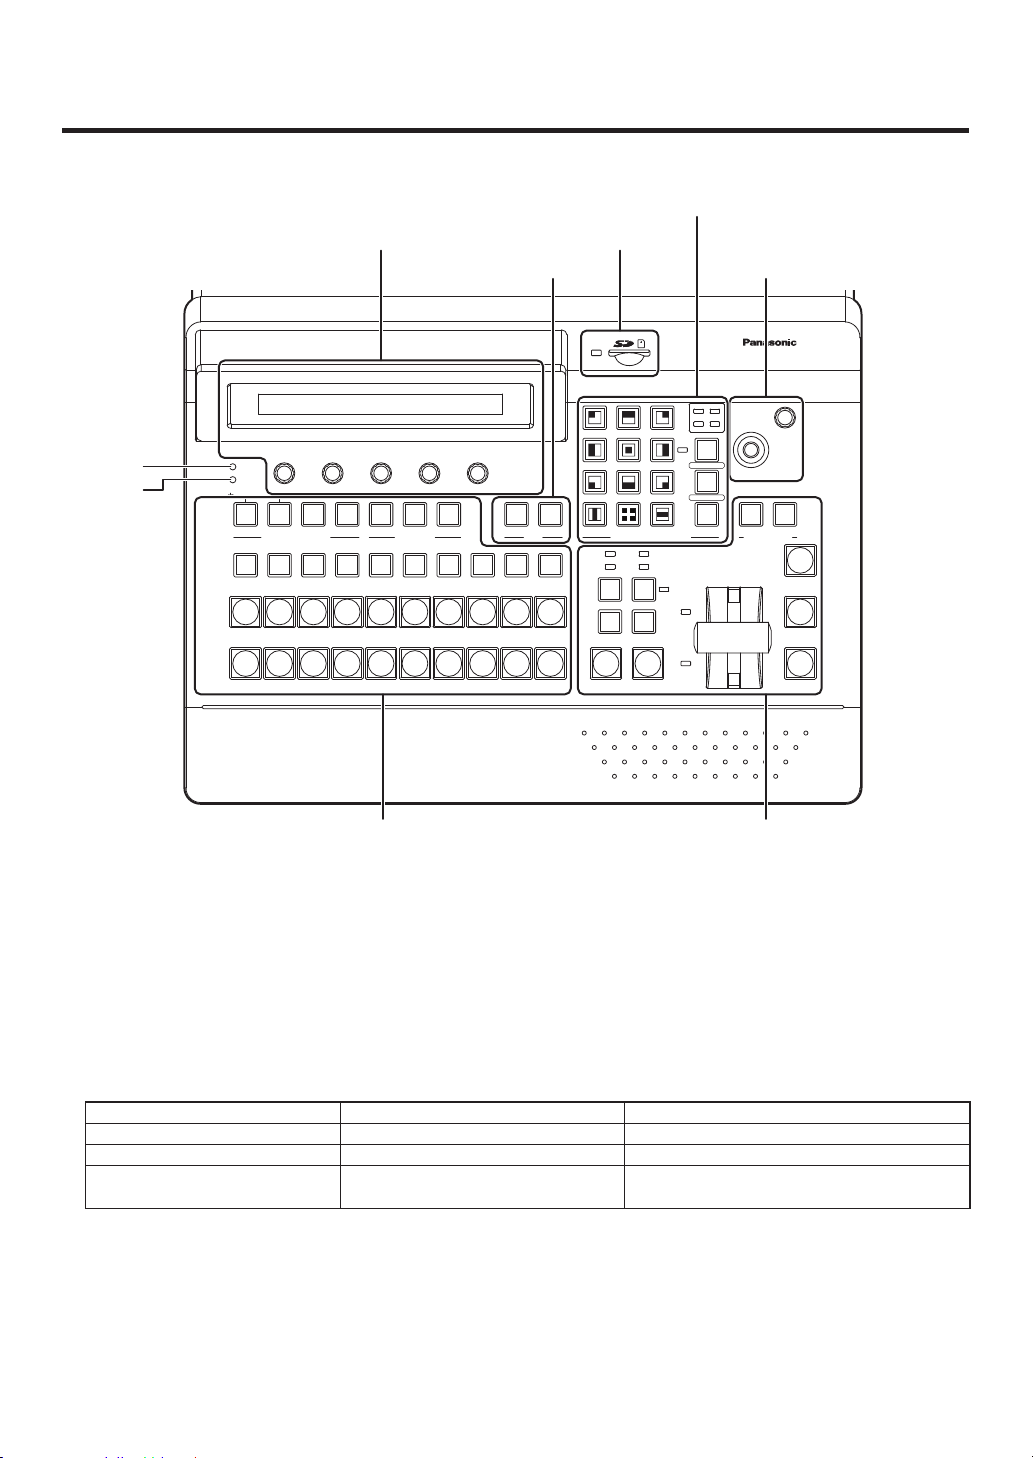
1. Functions in each area
POWER
ALARM
F1 F2 F3 F4 F5
KEY DSK PinP AUX CLN PVW PGM 1 2
USERAUX SOURCEAUX BUS DELEGATION
1 2 3 4 5 6 7 8 9 10
AUX
PGM/A
PST/B
BKGD PATT
KEY PATT
FUNC N/R R
WIPE DIRECTIONWIPE PATTERN / FUNCTION
ON
WIPE SQ
SL 3D
POSITIONER
Z
ON
FTB
PinP
DSKCUT AUTO
MIX WIPE
BKGD KEY
MIX
WIPE
PAGE
AMB:FILL / GRN:SOURCE
Multi-format Live Switcher AV-HS400
TIME WIPE COLOR
KEY CHR KEY FREEZE
DSK PinP IN/OUT
MEMORY XPT SYSTEM
11
1 2 3
4 5 6
7 8 9
10 12
1-1. Control panel
Wipe pattern area
LCD menu area SD memory card area
User button area
Positioner area
Power indicator [POWER]
This indicator lights when the power switch (_) on the rear panel is set to ON while power is supplied to the AC
power input socket.
It goes off when the power switch (_) is set to OFF.
2 Alarm indicator [ALARM]
This indicator lights when the fan is stopped or there is a problem with the power supply (such as a drop in
voltage).
When an alarm has occurred, the type of trouble can be checked on the System/Alarm (6/14) menu. In
addition, an alarm message is displayed on the OSD screen of the LCD screen and the external monitor.
Fan alarm Alarm display in Fan items ALARM! FAN STOP
Power alarm Alarm display in Power items ALARM! POWER FAILURE
Power alarm and fan alarm
If the alarm goes off, stop using the unit immediately and be sure to contact your dealer.
Continuing to use the unit even after the alarm goes off could damage it.
ALARM TYPE System/Alarm (6/14) ALARM MESSAGE
Alarm display in Fan items and
Power items
8
Transition areaCrosspoint area
ALARM! POWER FAILURE & FAN STOP
Page 9
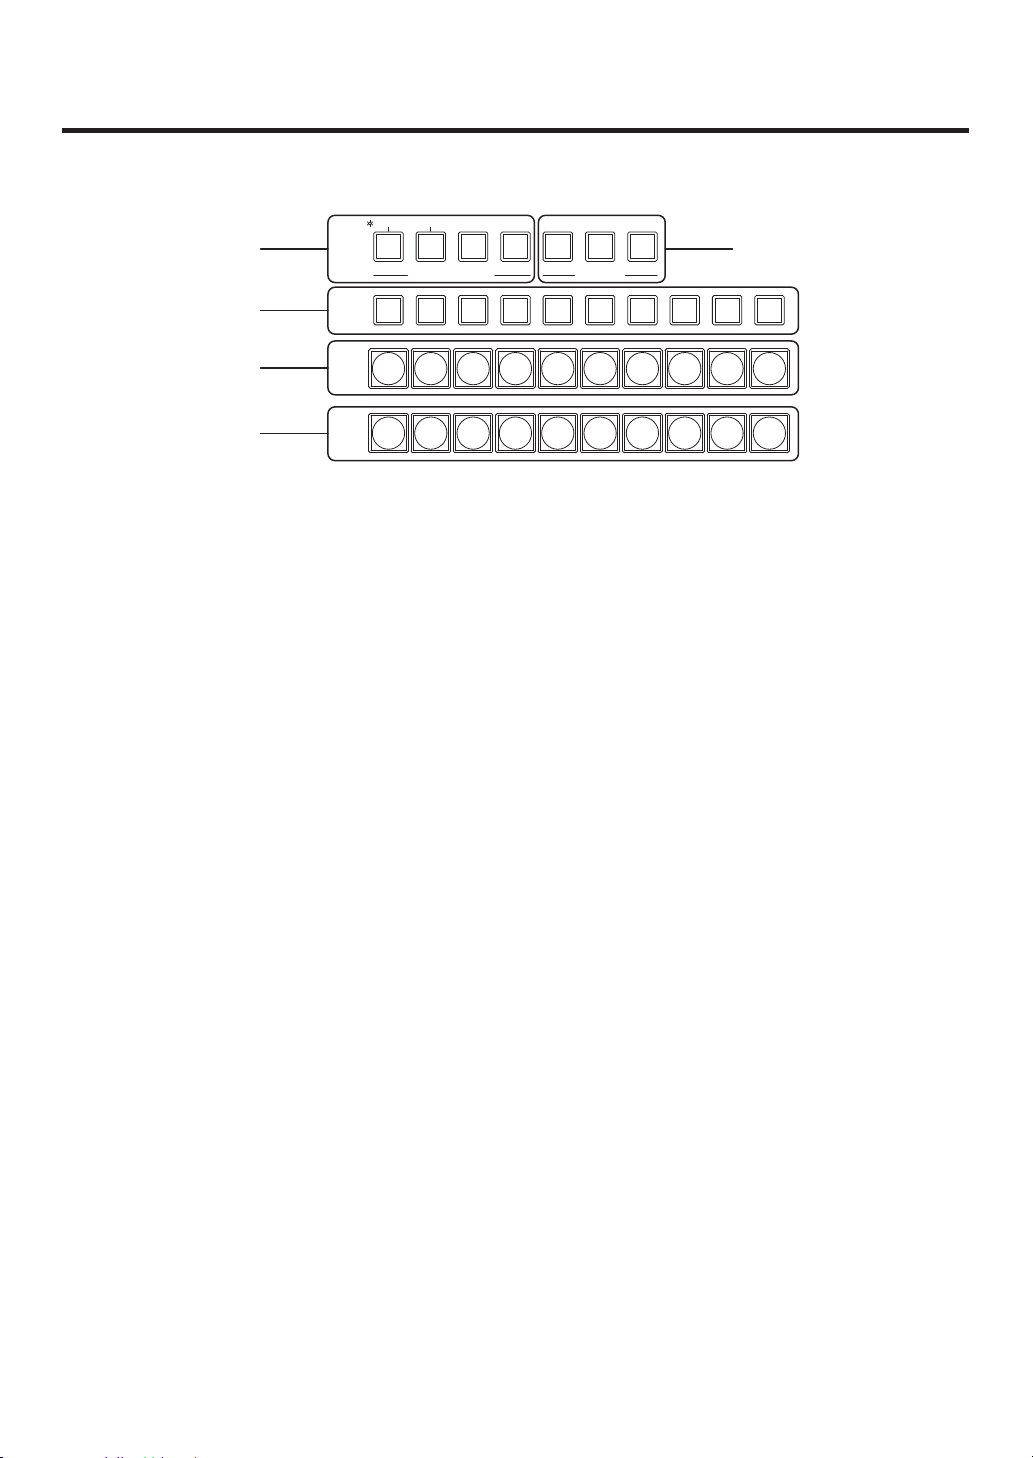
1. Functions in each area
F1 F2 F3 F4 F5
KEY DSK PinP AUX CLN PVW PGM 1 2
USERAUX SOURCEAUX BUS DELEGATION
1 2 3 4 5 6 7 8 9 10
AUX
PGM/A
PST/B
AMB:FILL / GRN:SOURCE
1-2. Crosspoint area
3 PGM/A bus crosspoint buttons [PGM/A 1 to 10]
These are used to select the PGM/A bus video signals. In the case of the flip-flop system, the main line video
(PGM) signals are always selected.
4 PST/B bus crosspoint buttons [PST/B 1 to 10]
These are used to select the PST/B bus video signals. In the case of the flip-flop system, the images inserted
next (PST) are always selected.
5 AUX bus selector buttons [KEY, DSK, PinP, AUX]
Press the KEY button, DSK button, PinP button or AUX button to switch the bus which is selected using the
AUX bus crosspoint buttons (7). The indicator of the button that was pressed lights.
[KEY]: Press this button to s
(Each time the button is pressed, the key fill bus or key source bus is selected alternately. When the
key fill bus is selected, the indicator of the button lights in amber, and when the key source bus is
selected, it lights in green.)
[DSK]:
Press this button to s
(Each time the button is pressed, the DSK fill bus or DSK source bus is selected alternately. When
the DSK fill bus is selected, the indicator of the button lights in amber, and when the DSK source bus
is selected, it lights in green.)
[PinP]:
Press this button to s
[AUX]: Press this button to s
witch the AUX bus crosspoint buttons to the key fill bus or key source bus.
witch the AUX bus crosspoint buttons to the DSK fill bus or DSK source bus.
witch the AUX bus crosspoint buttons to the PinP bus.
witch the AUX bus crosspoint buttons to the AUX bus.
6 AUX bus dedicated crosspoint buttons [CLN, PVW, PGM]
These buttons are used to select the AUX bus source while the indicator of the [AUX] button is lighted. The
indicator of the pressed button lights in amber.
[CLN]: The clean signals (images whose DSK signals hav
output to the AUX bus.
[PVW]: PVW signals are output to the AUX bus
[PGM]: PGM signals are output to the AUX bus
7 AUX crosspoint buttons
These buttons are used to select the source of the bus which was selected by the [AUX] bus selector button
(5).
e been removed from the PGM signals) are
.
.
9
Page 10

1. Functions in each area
BKGD PATT
KEY PATT
FUNC
WIPE PATTERN / FUNCTION
ON
WIPE SQ
SL 3D
PAGE
TIME WIPE COLOR
KEY CHR KEY FREEZE
DSK PinP IN/OUT
MEMORY XPT SYSTEM
1 2 3
4 5 6
7 8 9
10 12
11
1-3. Wipe area
8 Wipe pattern selector buttons
These 12 buttons are used to select the corresponding wipe patterns
while the indicator of the [BKGD PATT] button (9) or KEY PATT button
(9) is lighted.
They are used to select the corresponding setting menus when the
indicator of the FUNC button (;) is lighted.
The indicator of the selected button lights in amber.
9 BKGD, KEY pattern selector buttons
These buttons are used to switch the wipe pattern selection.
The wipe pattern of a background transition is selected when the
indicator of the [BKGD PATT] button is lighted after it was pressed.
The wipe pattern of a key transition is selected when the indicator of the [KEY PATT] button is lighted after it
was pressed.
Each time the [BKGD PATT] button or [KEY PATT] button is pressed, the pattern page is changed in the
sequence of WIPE, SQ (squeeze), SL (slide) and 3D (3 dimensions), and the pattern page indicator LED (:) is
also switched.
3D cannot be selected using the [KEY PATT] button.
: Pattern page indicator LEDs
These LEDs indicate the pages selected by the background transitions while the indicator of the [BKGD PATT]
button is lighted. They indicate the pages selected by the key transitions while the indicator of the [KEY PATT]
button is lighted.
The WIPE, SQ (squeeze), SL (slide) or 3D (3 dimensions) LED lights.
; FUNC button
When this button is pressed, its indicator lights in amber. When a wipe pattern selector button (8) is pressed
while the indicator of the FUNC button is lighted, the setting menu indicated below the button is displayed on
the LCD screen.
[TIME]:
The auto transition time settings are perf
[WIPE]: The modify, border or soft eff
[COLOR]: The color backg
[KEY]: The ke
[CHR KEY]: The chroma ke
[FREEZE]: The freeze status is displa
[DSK]: DSK settings are perfor
[PinP]: PinP settings are perfor
[IN/OUT]: The input/output signals are set. See 4.
[MEMOR
Y]: The preset memory
See 3-10, 3-11 and 3-12.
[XPT]:
The crosspoint assignment is display
[SYSTEM]: The system settings are perfor
< Freeze status indicator LED
When this LED is lighted, it means that one of the input signals is in the freeze status. The freeze status of the
input signals assigned to the crosspoint buttons can be checked on the menu. See 3-8.
Since the freeze status is established while this indicator is lighted, the input image handled inside the unit will
remain unchanged even when a different image is input.
ormed. See 3-1-5.
ect decoration settings are performed for wipe. See 3-2.
round settings are performed. See 3-7.
y settings are performed. See 3-3.
y settings are performed. See 3-3-6.
yed and freeze settings are performed. See 3-8.
med. See 3-5.
med. See 3-4.
, frame memory or SD card memory settings are performed.
ed and set. See 5-2.
med. See 5.
10
Page 11

1. Functions in each area
1 2
USER
1-4. User button area
= User buttons [USER 1, USER 2]
These are used to allocate some functions of the menu settings to the USER 1 button and USER 2 button.
See 5-3-1.
11
Page 12

1. Functions in each area
KEY PATT
FUNC N/R R
WIPE DIRECTIONWIPE PATTERN / FUNCTION
ON
FTB
PinP
DSK
CUT AUTO
MIX WIPE
BKGD KEY
MIX
WIPE
DSK PinP IN/OUT
MEMORY XPT SYSTEM
7 8 9
10 11 12
1-5. Transition area
> [BKGD] button
This executes the background transition when the [AUTO] button (D) or fader lever (J) has been operated.
When the [BKGD] button is pressed and it is selected, its indicator lights in amber. If the [KEY] button (?) is
now pressed, the indicator goes off, and the de
When the [BKGD] button and [KEY] button (?) are pressed at the same time, both buttons are set to the
selected status.
? [KEY] button
This executes the key transition when the [AUTO] button (D) or fader lever (J) has been operated.
When the [KEY] button is pressed and it is selected, its indicator lights in amber.
If the [BKGD] button (>) is now pressed, the indicator goes off, and the de-selected status is established.
When the [BKGD] button (>) and [KEY] button are pressed at the same time, both buttons are set to the
selected status.
-selected status is established.
@ KEY ON tally LED
This lights in red when the key ON status is established.
A MIX, WIPE selection status tally LEDs
These light up to indicate whether MIX or WIPE has been selected when background transitions or key
transitions are executed.
B [MIX] button
This is used to switch the A and B bus images while making them overlap.
During the transition, the A and B bus output total is kept at 100 %.
When the [MIX] button is pressed and it is selected, its indicator lights in amber.
If the [WIPE] button (C) is now pressed, it goes off, and the de-selected status is established.
C [WIPE] button
This is used to execute the transition using the pattern selected by the wipe pattern selector button (8).
When the [WIPE] button is pressed and it is selected, its indicator lights in amber.
If the [MIX] button (B) is now pressed, it goes off, and the de-selected status is established.
12
Page 13

1. Functions in each area
D [AUTO] button
This is used to automatically execute transitions (auto transition) using the transition time which has been set.
During auto transition its indicator lights in amber. When the button is pressed again during auto transition, the
auto transition operation is suspended, and the indicator lights in green. When it is pressed again while auto
transition is suspended, the remaining transition is executed.
The indicator goes off when auto transition is completed.
When the [AUTO] button is pressed while the fader lever (J) is at an interim setting, the transition is executed
in the time remaining from the interim setting.
E [CUT] button
This button is used to execute transitions instantly. Its indicator lights in amber during a transition, and it goes
off when the transition is completed.
F [FTB] button
This button is used to execute fade-out to a black screen or fade-in from a black screen for the transition time
which has been set.
G [PinP] button
This button is used to execute fade-in or fade-out of the picture in picture for the transition time which has been
set.
H [DSK] button
This button is used to execute fade-in or fade-out of downstream key for the transition time which has been set.
I Wipe direction selection buttons
These buttons are used to select the direction in which to wipe for executing background transitions.
When the indicators are off:
Wiping proceeds in the normal direction.
When the [R] indicator is lighted:
Wiping proceeds in the reverse direction.
When the [N/R] indicator is lighted:
The normal direction is replaced with the reverse direction (or vice versa) when the transition is
completed. (The lighted and extinguished statuses of the [R] button are also switched in line with the
direction of the wiping.)
J Fader lever
This is used to execute background or key transitions. When it is moved as far as it will go, the transition
is completed. When it has been operated during auto transition, auto transition will be switched to manual
operation as soon as the fader position overtakes the amount of the transition being executed.
K Bus tally LEDs
These indicate the output statuses of the A bus and B bus. The LED corresponding to the bus whose program
signals (PGM) are being output lights.
13
Page 14
1. Functions in each area
POWER
ALARM
F1 F2 F3 F4 F5
1-6. LCD menu area
L LCD
The setting menus are displayed on the LCD.
When the [FUNC] button (;) is pressed and its indicator is lighted and then one of the wipe pattern selector
buttons (8) is pressed, the setting menu is displayed.
When the buttons listed below are double-clicked, the specified menu is selected. (The menu delegation
function)
The operation corresponding to the button pressed is also executed.
<List of menu delegation functions>
Button Menu
Crosspoint area
(AUX bus selector buttons)
Transition area BKGD TIME menu/BKGD sub menu (1/5)
Wipe area WIPE #5 WIPE menu/WIPEPos sub menu (3/5) (BKGD or KEY)
KEY KEY menu/Adjust sub menu (
DSK DSK menu/Adjust sub menu (
PinP PinP menu/Position sub menu (4/6)
KEY TIME men
WIPE WIPE menu/Border sub menu (1/5)
SQ #5 WIPE menu/SQPos sub menu (4/5) (BKGD or KEY)
CHR KEY menu/Auto sub menu (1/3) (with chroma key selection)
u/KEY sub menu (
2/8)
2/5)
2/5)
M Rotary encoders [F1] to [F5]
These are used to set the parameters displayed on the menus (LCD screen or external monitor). For details on
the operations, refer to the sections in “3. Basic operations”.
[F1]: Rotate this rotary encoder to s
[F2] to [F5]: Rotate these rotary encoders to set the par
witch the sub menu.
ameters.
When the down arrow (↓) is shown at a menu item, its parameter is set by pressing the corresponding rotary
encoder.
When the parameter is one which is set using a numerical value, its default will be restored when the rotary
encoder is held down. (However, the network settings and date and time settings will not be returned to the
defaults.)
Sub menu Parameter setting area
Adjust Clip Gain Density Invert
2/8 0.0 100.0 100.0 Off
Operate here
using [F1].
Operate here
using [F2].
Operate here
using [F3].
14
Operate here
using [F4].
Operate here
using [F5].
Page 15
1. Functions in each area
POSITIONER
Z
1-7. Positioner area
N Positioners [X/Y]
This is used to set the PinP position or wipe start position (WIPE and SQ #5) or to select the chroma key area.
It takes effect only when the menu is selected.
The center values of the positioners are set during the time it takes for the unit to start up after its power is
turned on. Do not operate the positioners until after the switcher has started up.
O Rotary encoder [Z]
This is used to set the PinP size or to select the chroma key area. In either case, it takes effect only when the
menu is selected.
PinP Wipe Chroma key
Positioner X/Y Position adjustments Start position
adjustments
Rotary encoder Z Size adjustments
(size increased by rotating the
encoder clockwise and reduced
by rotating it counterclockwise)
Switch Hold switch down to restore
initial values (X/Y, Z).
Valid menu All PinP menus WIPE/WIPEPos
— Selected area size adjustments
Hold switch down to
restore initial values
(X/Y).
WIPE/SQPos
Selected area position
adjustments
(size increased by rotating the
encoder clockwise and reduced
by rotating it counterclockwise)
Hold switch down to restore
initial values (X/Y, Z).
CHR KEY/Auto
(only when Marker item is set
to On)
1-8. SD memory card area
P SD memory card slot
The SD memory card (sold separately) is inserted
into this slot.
Q SD memory card access LED
This LED lights while the data on the SD memory card is being accessed.
Do not turn off the unit’s power or eject the SD memory card while the access LED is lighted. Doing so can
damage the data on the SD memory card.
Concerning the recommended SD cards
Use of the f
RP-SD128B
ollowing SD memory cards made by Panasonic is recommended.
U1A
RP-SD256BU1A
RP-SDR512U1A
RP-SDR01GU1A
RP-SDM02GU1A
15
SD Logo is a trademark.
Page 16

1. Functions in each area
POWER
1
REF
SLOT2
2
SLOT
4
2
34 SLOT1
1
SLOT2 8
~IN
SDI INPUTS
TALLY
6
6
INPUTS
SDI OUTPUTS
INOUT
3
INOUT
2
INOUT
1
INOUT
OUTPUTS
1
5 7
SLOT
OFF
2
SLOT1 5
SLOTSLOT
PGM
RS-422LAN
ON
ANALOG INPUTS
Y Pb
Pr
Y Pb
Pr
DVI INPUTS
ANALOG OUTPUTS
Y Pb
Pr
Y Pb
Pr
DVI/ANALOG OUTPUTS
Y Pb
Pr
DVI-I
DVI-I DVI-I
GPI
SIGNAL
GND
REF
1-9. Rear panel connections area
R SDI signal input connectors [DIGITAL INPUTS 1 to 4]
IN: SDI signal input; OUT: active through output (use this as a monitor output application).
S Optional input connector SLOT1 [INPUT 5, 6] (optional)
T Optional input connector SLOT2 [INPUT 7, 8] (optional)
A board (with built-in up-converter), whether an SDI input board, analog input board or DVI input board, can be
connected to each of these slots.
For further details, refer to the operating instructions of the optional board concerned.
U SDI signal output connectors [DIGITAL OUTPUTS PGM, OUTPUT 1, 2]
PGM: PGM output connectors
OUTPUT 1, 2: The signals for these connectors can be assigned using a menu.
V Optional output connector SLOT1 [OUTPUT 3, 4] (optional)
A board, whether an analog output board or DVI/analog output board (OUTPUT3: DVI, OUTPUT4: analog), can
be connected to this slot.
For further details, refer to the operating instructions of the optional board concerned.
W Optional output connector SLOT2 [OUTPUT 5, 6] (optional)
A board, whether an analog output board or DVI/analog output board (OUTPUT5: DVI, OUTPUT6: analog), can
be connected to this slot.
For further details, refer to the operating instructions of the optional board concerned.
X Reference input connector/BB output
connector [REF]
Loop-through output in the external sync mode.
If the loop-through output is not going to be used,
provide a 75-ohm termination.
BB signals output from both connectors in the internal
sync mode.
<In the external synchronization mode>
External synchronization signal input
Loop-through output
Input the external synchronization signal to the upper of
the two connectors shown above.
16
Page 17

1. Functions in each area
Y LAN connector [LAN] (RJ-45) (10BASE-T, 100BASE-TX)
Z RS-422 interface connector [RS-422] (D-sub 9-pin, female)
For details on connection, refer to “6. External interfaces”.
[ Tally output connector [TALLY] (D-sub 15-pin, male)
For details on connection, refer to “6. External interfaces”.
\ GPI input connector [GPI] (3.5 mm diameter stereo mini jack)
For details on connection, refer to “6. External interfaces”.
] Ground connector
Connect to the system’s earth ground.
^ AC power input socket [AC IN] (AC 100V-120V)
Connect one end of the supplied power cable to this socket and the other end to the AC outlet.
The supplied power cable comes with a 3-pin power plug. Be absolutely sure to plug it into a 3-point power
outlet as the power source in order to earth the unit securely.
If a 3-point power outlet is not available for this connection, be absolutely sure to consult your dealer.
_ Power switch
This is used to turn the power on and off.
17
Page 18
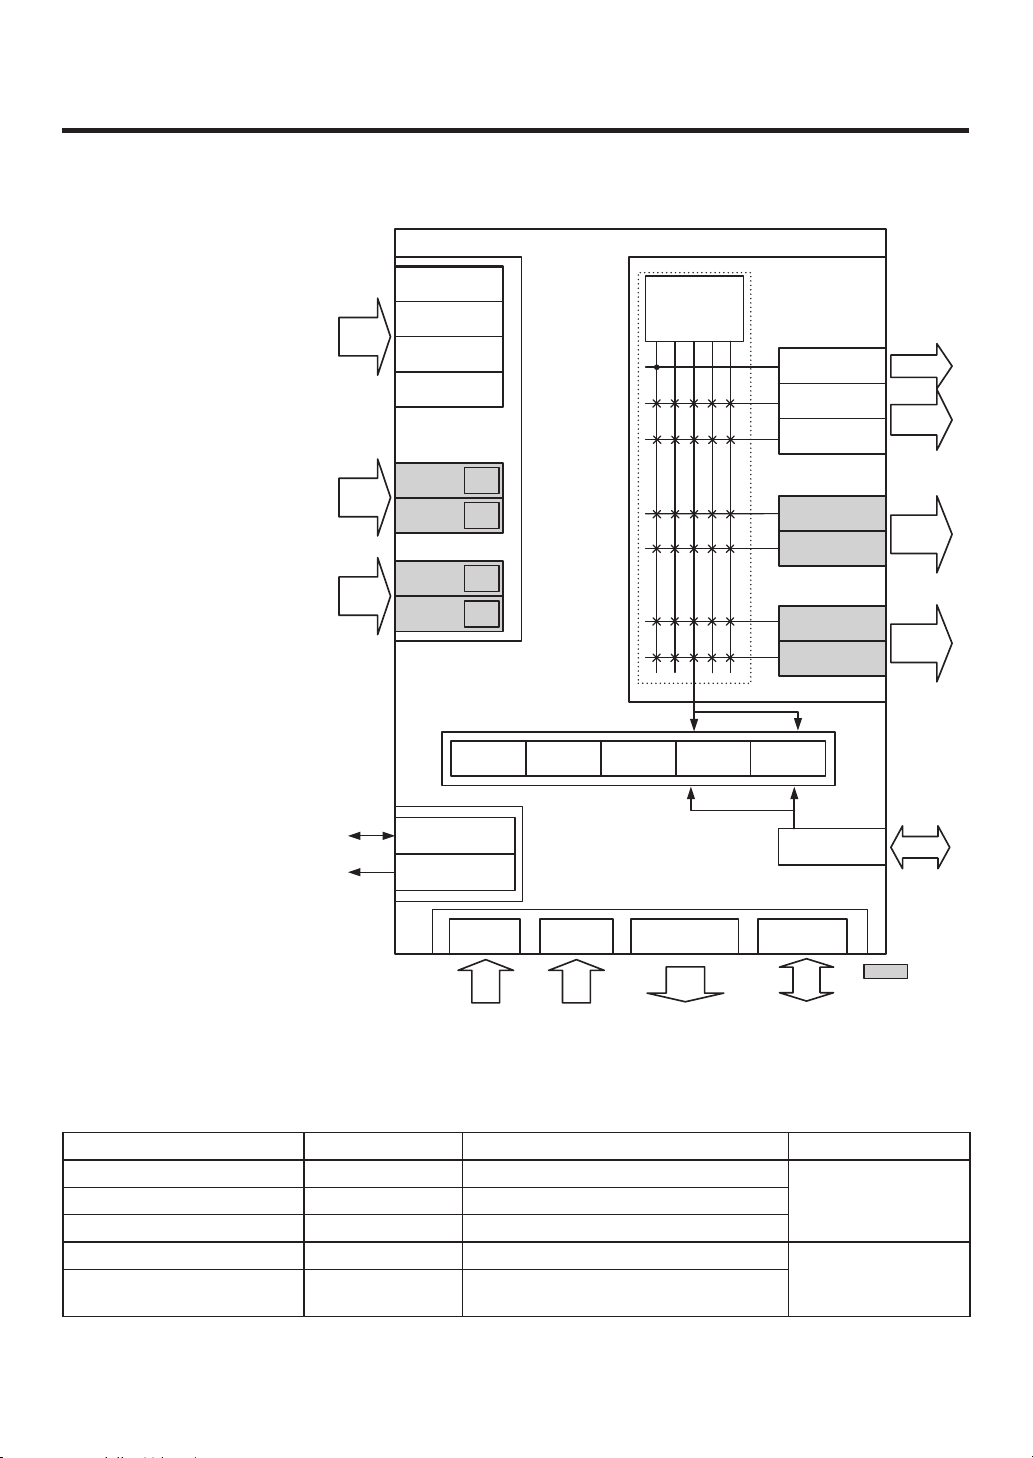
2. System
AV-HS400
PGM
PVW
AUX
Multi
KeyOut
INPUT1(SDI)
INPUT2(SDI)
INPUT3(SDI)
INPUT4(SDI)
INPUT5 UC
UC
UC
UC
INPUT6
INPUT7
INPUT8
Black ColorBGD ColorBar FMEM1 FMEM2
REF
PGM1, 2(SDI)
OUTPUT1(SDI)
OUTPUT2(SDI)
OUTPUT4
OUTPUT3
OUTPUT6
OUTPUT5
PGM1, 2
OUTPUT
1, 2
OUTPUT
5, 6
OUTPUT
3, 4
VIDEO INPUT VIDEO OUTPUT
INTERNAL VIDEO
CONTROL
Output Matrix
INPUT
1–4
INPUT
7, 8
INPUT
5, 6
REF IN/OUT(1)
SD
Memory Card
RS422 GPI TALLY OUT LAN
: Option
REF OUT(2)
INPUT SLOT1(Option)
OUTPUT SLOT1(Option)
OUTPUT SLOT2(Option)
INPUT SLOT2(Option)
2-1. Configuration
1: When external synchronization is
selected as the ref
the reference signal is input. When
internal synchronization is selected, the
reference signal is output.
2: When external synchronization is
selected as the reference signal setting,
the signals are looped through and
output. When internal synchronization is
selected, the reference signal is output.
Table of optional boards
SDI Input Board AV-HS04M1 SDI input ×2 lines INPUT SLO
Analog Input Board AV-HS04M
DVI Input Board AV-HS04M3 DVI-I input ×2
Analog Output Board AV-HS04M4 Analog component output ×2 lines OUTPUT SLO
DVI/Analog Output Board AV-HS04M5 DVI output ×1 line
erence signal setting,
Board Model number Function Where connected
2 Analog component input ×2 lines
SLOT2
T1 or
lines
SLOT2
Analog component output ×1 line
T1 or
18
Page 19

2. System
POWER
1
REF
GPI
SLOT2
2
SLOT
4
2
34 SLOT1
1
SLOT2 8
~IN
SDI INPUTS
TALLY
6
6
INPUTS
SIGNAL
SDI OUTPUTS
GND
INOUT
3
INOUT
2
INOUT
1
INOUT
OUTPUTS
1
5 7
SLOT
OFF
2
SLOT1 5
SLOTSLOT
PGM
RS-422LAN
ON
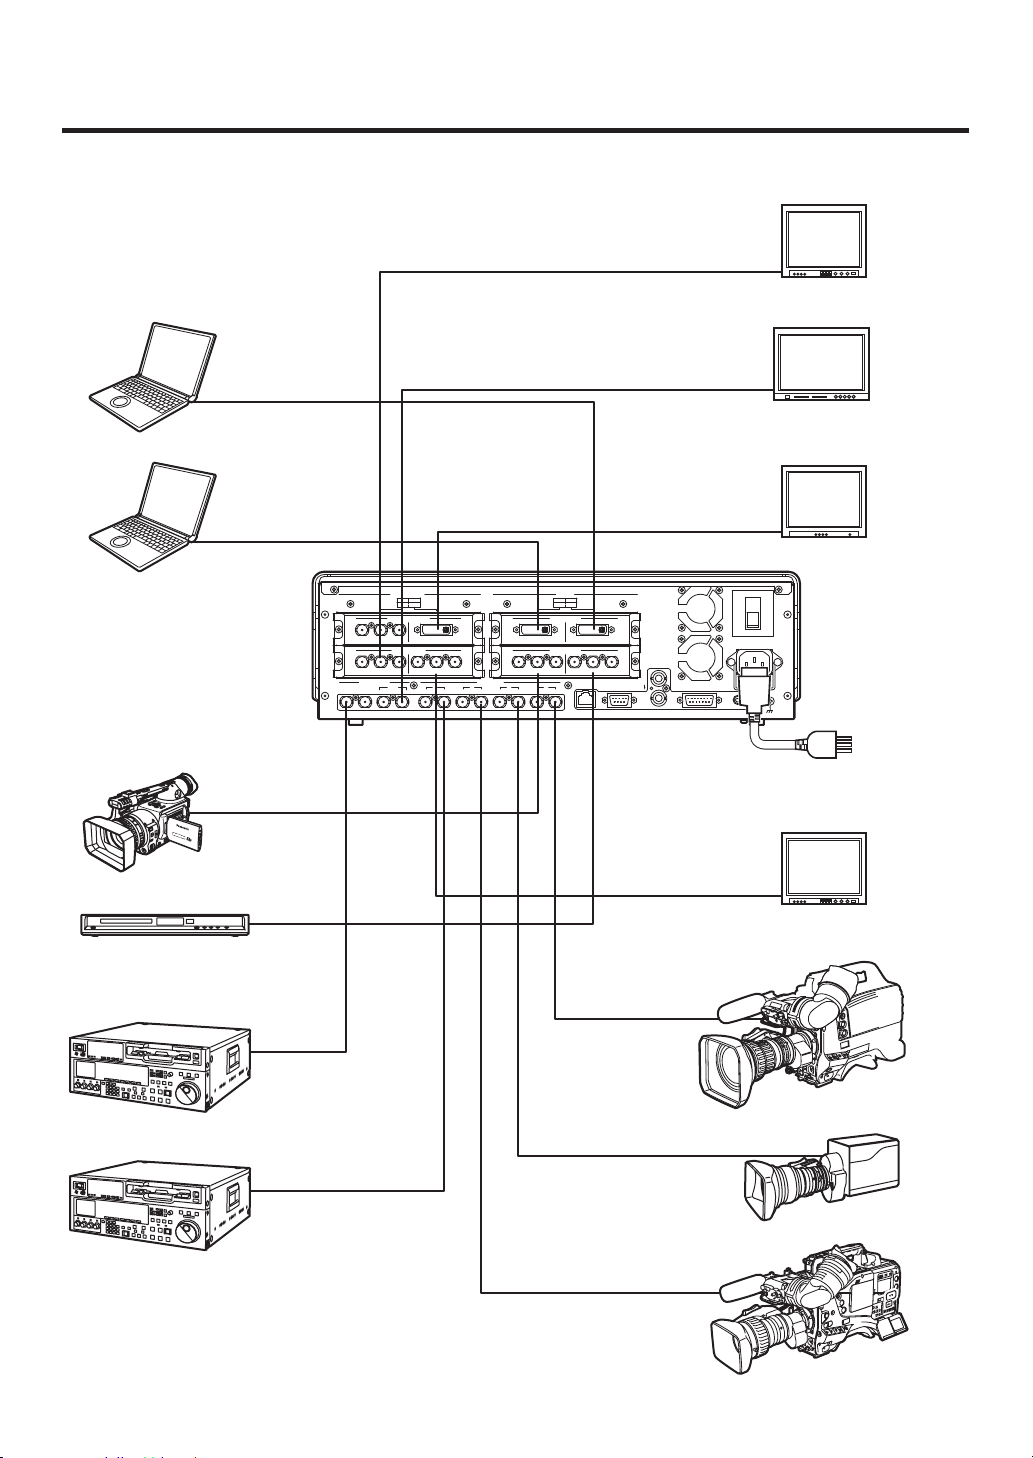
2-2. Connections
Connections when implementing gen-lock
(frame synchronizer OFF)
Signal Generator
HD camera
HD SDI
HD camera
HD camera
VTR
HD SDI
HD SDI
HD SDI monitor
HD SDI
HD SDI
HD SDI monitor
HD SDI
HD SDI
HD SDI monitor
Multi-format live switcher
AV-HS400N
When the unit is to be installed and when the connections are to be performed, be absolutely
sure to ask your dealer to be responsible for carrying out the work that needs to be done.
Use a 3-point power outlet as the power source in order to earth the unit securely.
19
Power cord
(AC100V - 120V, 50/60Hz)
Page 20
2. System
POWER
1
REF
GPI
SLOT2
2
SLOT
4
2
34 SLOT1
1
SLOT2 8
~IN
SDI INPUTS
TALLY
6
6
INPUTS
SIGNAL
SDI OUTPUTS
GND
INOUT
3
INOUT
2
INOUT
1
INOUT
OUTPUTS
1
5 7
SLOT
OFF
2
SLOT1 5
SLOTSLOT
PGM
RS-422LAN
ON
ANALOG INPUTS
Y PbPrY Pb
Pr
DVI INPUTS
ANALOG OUTPUTS
Y PbPrY Pb
Pr
DVI/ANALOG OUTPUTS
Y Pb
Pr
DVI-I
DVI-I DVI-I
Connections when not implementing gen-lock
(frame synchronizer ON)
• Example where the optional board is used
PC
HD Component
HD component
monitor
HD camera
DVD player
DVI or VGA
PC
DVI or VGA
HD Component
HD Component
HD SDI
HD SDI monitor
DVI or VGA
PC monitor
Multi-format live
switcher
AV-HS400N
HD Component
Power cord
(AC100V - 120V, 50/60Hz)
HD component
monitor
VTR
VTR
HD SDI
HD SDI
HD camera
HD SDI
HD SDI
HD camera
HD SDI
HD camera
20
Page 21
3. Basic operations
1 2 3 4 5 6 7 8 9 10
PGM/A
PST/B
1 2
PGM/A
PST/B
1 2 1 2
1 2
PGM/A
PST/B
1 2 1 2
3-1. Background transition
3-1-1. Selecting the bus
Press the crosspoint buttons to select the material which will be targeted for the background transition.
By pressing these buttons, the signals are selected, and the indicators of the selected buttons light.
The color in which the button indicators light differs depending on the operation status.
Lighting in red:
(How
Lighting in green: When the selected input signals are not output to PGM.
3-1-2. Selecting the bus mode
Select the A/B bus system or flip-flop system (PGM/PST system) from the setting menu.
1 Press the [FUNC] button to light its indicator, and then press the [SYSTEM] button to display the SYSTEM
m
enu.
2 Turn [F1] to display the System sub menu.
3
Turn [F2], and select the A/B or PGM/PST (flip-flop system) using the BusMode item.
<Men
u display>
System BusMode BL EditEN
2/13 PGM/PST On On
A/B
When the selected input signals are output to PGM.
ever, the indicator lights in amber during FTB operations.)
Lighting in red
Lighting in green
Off Off
With the flip-flop (PGM/PST) system, the PGM/A bus selected signals are always output as PGM images, and the
PST/B bus selected signals are always output as PVW (PST) images.
System Video output Before transition During transition After transition completion
A/B
PGM PGM/A PGM/A, PST/B PST/B
PVW (PST) PST/B PST/B PGM/A
With an A B transition
Lighting in red
Lighting in green
System Video output Before transition During transition After transition completion
Flip-flop
PGM/PST
PGM PGM/A PGM/A, PST/B PGM/A
PVW (PST) PST/B PST/B PST/B
Lighting in red
Lighting in green
21
Page 22

3. Basic operations
3-1-3. Selecting the transition mode
Press the [BKGD] button in the transition area so that its indicator lights in amber. When the [BKGD] button and
[KEY] button are pressed at the same time, both buttons are selected.
Use the [MIX] and [WIPE] buttons in the transition area to select the background transition mode.
The indicator of the selected button lights in amber.
3-1-4. Manual transition (using the fader lever)
Operate the fader lever to execute transitions manually.
If the fader lever has been operated during auto transition, auto transition will be switched to manual operation as
soon as the fader position overtakes the amount of the transition being executed.
The bus tally LEDs on the left of the fader lever indicate the program bus output status.
Top LED only lights: PGM/A b
Top and bottom LEDs light
Bottom LED onl
y lights: PST/B output
: during the transition
3-1-5. Auto transition
When the [AUTO] button is pressed, the transition is executed automatically using the transition time which has
been set.
When the [AUT
time remaining from the interim setting.
The auto transition time is set using the menu.
1
Press the [FUNC] button to light its indicator, and press the [TIME] b
2 Turn [F1] to display the BKGD sub menu.
3 Tur
n [F4] to select the display unit using the UNIT item.
4 When frames (F) ha
5 When seconds (SEC) hav
frame units.
<Menu display>
BKGD TransTime Unit
1/5 16s 39f Sec
O] button is pressed while the fader lever is at an interim setting, the transition is executed in the
ve been selected as the unit, turn [F2] or [F3] to set the transition time.
e been selected as the unit, turn [F2] to set the second units or [F3] to set the
us output
utton to display the TIME menu.
BKGD TransTime Unit
1/5 999f Frame
Any time from 0 to 999f can be set. The time which can be set when seconds are used as the display unit
differs depending on the video format.
59.94i: max. 33s09f, 59.94p: max. 16s39f
50i:
max. 39s24f, 50p: max. 19s49f
3-1-6. Cut transition
When the [CUT] button is pressed, the transition is executed instantly.
22
Page 23
3. Basic operations
BKGD PATT
KEY PATT
FUNC
WIPE PATTERN / FUNCTION
ON
WIPE SQ
SL 3D
PAGE
TIME WIPE COLOR
KEY CHR KEY FREEZE
DSK PinP IN/OUT
MEMORY XPT SYSTEM
1 2 3
4 5 6
7 8 9
10
11
12
3-2. Wipe
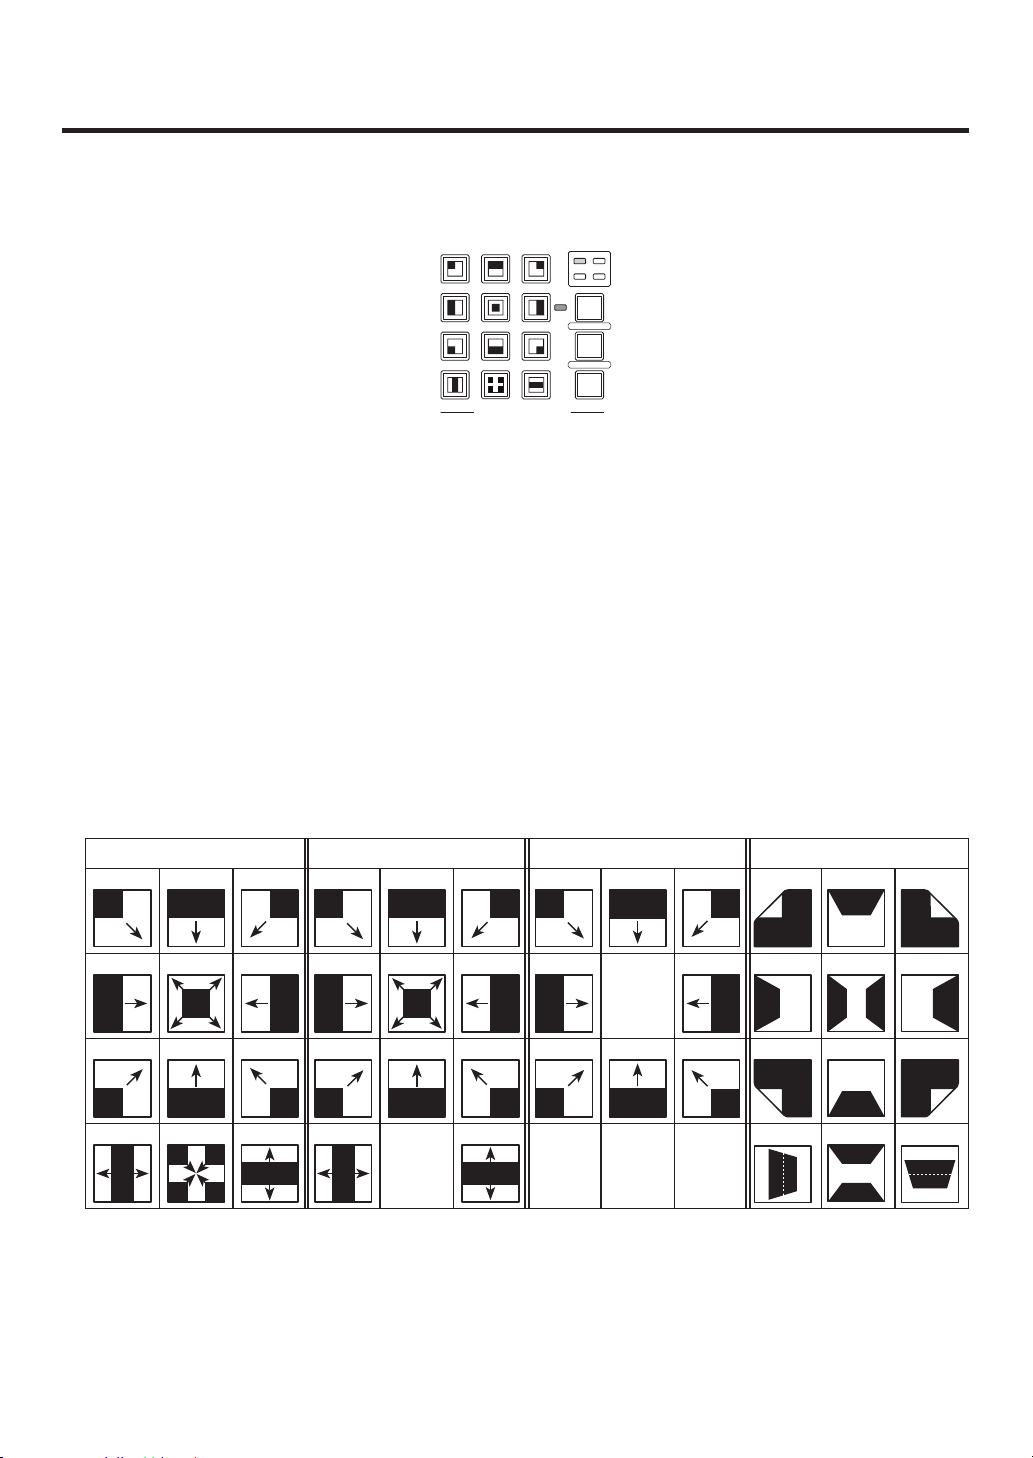
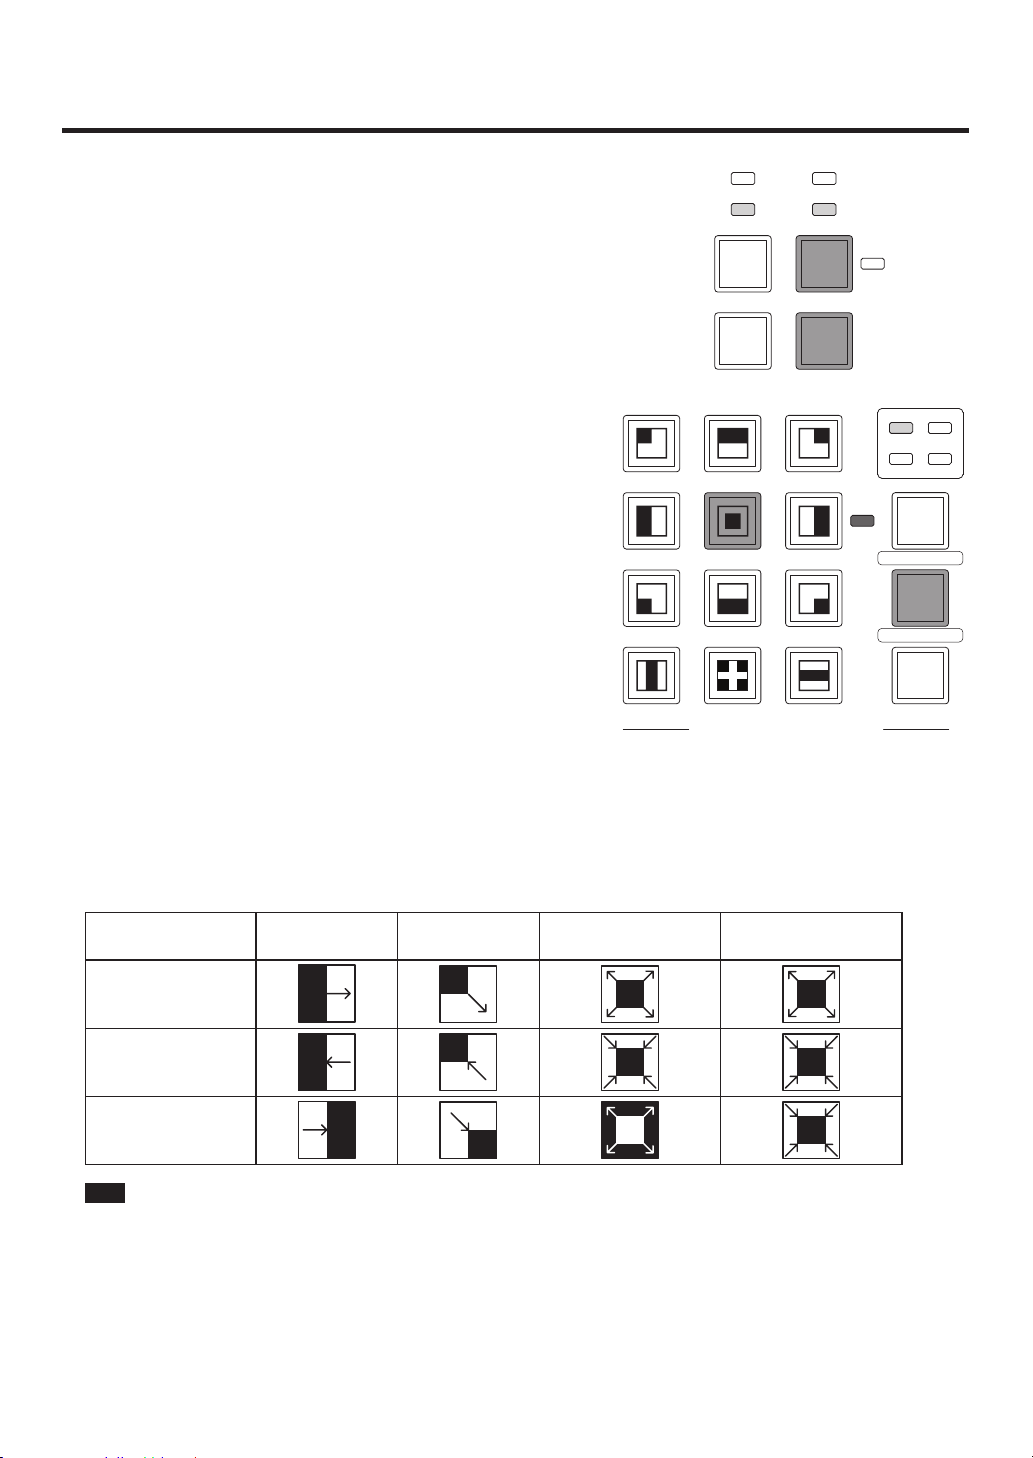
3-2-1. Selecting the wipe pattern
The wipe patterns which are allocated to the 12 wipe pattern buttons are used as the basis for wiping, and each
button has four pages — wipe, squeeze, slide and 3D — of patterns. (Refer to the table of wipe patterns.)
Displayed for each wipe pattern selector button are an image of the basic wipe pattern and a number.
<How to select the wipe patterns>
1
Press the [BKGD PA
Each time the button is pressed, the page is selected, and the indicator LED (WIPE, SQ, SL or 3D) for the
selected page lights. (3D cannot be selected using the [KEY PATT] button.)
2
Select the button from among the 1
concerned is indicated. The selected pattern lights, and a wipe image appears on the external monitor
(OSD).
TT] button or [KEY PATT] button to select the page.
2 wipe pattern selector buttons for which the number of the pattern
The pattern page indicator LEDs light only when the [BKGD PATT] button or [KEY PATT] button has been
selected.
<Table of wipe patterns>
1 2 3 1
4 5 6 4
7 8 9 7
10 11 12 10
There are no corresponding patterns for 11 of SQ and 5, 10, 11 and 12 for SL and, therefore, they cannot be
selected.
WIPE SQ (squeeze) SL (slide) 3D (3 dimensions)
SQ
SQ
SQ
SQ
2
5
8
11
pattern
SQ
SQ
SQ
No
3
6
9
12
SQ1SL
SQ
SQ
SQ
4
SL
7
SL
10
pattern
No
2
5
pattern
8
11
pattern
SL
No
SL
No
3
6
9
12
pattern
1 2 3
SL
4 5 6
SL
7 8 9
SL
10 11 12
No
23
Page 24
3. Basic operations
!."
"
!
"
!
"
!
"2!
! "
!
.2
"
! "
3-2-2. Selecting the wipe direction
Operate the wipe direction selector buttons to select the wipe direction for the background transition.
(The key transitions are set by the menu. The direction which is set here will not be reflected. See 3-3-3.)
When the indicators are off:
Wiping proceeds in the normal direction.
When the [R] indicator is lighted:
Wiping proceeds in the rev
When the [N/R] indicator is lighted:
The normal direction is replaced with the re
direction (or vice versa) when the transition is
completed. (The lighted and extinguished statuses
of the [R] button are also switched in line with the
direction of the wiping.)
3-2-3. Wipe decorations (border, soft effect)
A border effect or soft effect can be added to the wiping of background transitions (but not for key transitions).
erse direction.
verse
Setting the border and soft eff
1 Press the [FUNC] button to light its indicator
ect
, and press
the [WIPE] button to display the WIPE menu.
2 Turn [F1] to display the Border sub menu.
3
Turn [F2] to set ON (or OFF) for the border using the
Border item.
4
Turn [F3] to set the width of the border using the Width
item.
5
Turn [F4] to set the amount of soft effect using the Soft
item.
The soft effect is OFF if 0 is set.
<Menu display>
Border Border Width Soft
1/5 Off 5.0 0.0
On
0.1
~
100.0
0.0
~
100.0
When “On” has been selected as the Border item setting, the ratio of the soft effect to the border width is
indicated as the amount of soft effect.
When only the soft effect is to be added to wipe
Setting the border color
On the WIPE menu, turn [F1] to display the BodrCol
1
sub men
u.
2 Turn [F2], [F3] and [F4] to adjust the Hue, Sat and Lum
of the border color
.
3 To call a preset color, turn [F5] to select the preset color
using the Load item, and press the [F5] s
, select “Off” as the Border item setting.
<Menu display>
BodrCol Hue Sat Lum Load
2/5 0.0 0.0 100.0 White
0.0
witch. The
359.9
~
0.0
~
100.0
0.0
~
108.0
Hue, Sat and Lum values are changed to the preset
color values.
(The values which ha
ve been set will not be stored in
the memory until the [F5] switch is pressed.)
Yellow
Cyan
Green
Magenta
Red
Blue
Black
24
Page 25
3. Basic operations
3-2-4. Setting the wipe start position
Any start position can be set for wipe pattern WIPE and SQ #5. The start position has one set of values for a
background pattern and another set for a key pattern.
1
Press the [FUNC] button to light its indicator
2 Turn [F1] to display the WIPEPos sub menu or the SQPos sub menu.
<Men
u display>
WIPEPos
3/5 BKGD 0.00 0.00 KEY
3 Turn [F2] to select the pattern (background or key) to be set using the Select item.
4 Either operate the positioners or tur
Pos item.
These settings can be established only when
or key pattern.
5
Either operate the f
–50 has been set for X-Pos and –50 for Y-Pos, the following screen (or key) appears from the bottom left and
wipe is performed while the screen (or key) moves to the screen center.)
<X-Pos, Y-Pos setting range>
Select X-Pos Y-Pos CopyTo
KEY
−100.00
+100.00
ader lever or press the [AUTO] button to check the wipe operation. (When, for instance,
−100.00
~
+100.00
~
n [F3] and [F4] to set the wipe start position using the X-Pos item and Y-
, and press the [WIPE] button to display the WIPE menu.
WIPE or SQ #5 has been selected as the background pattern
Inside screen area
Outside screen area
6 To copy the start position settings, press [F5].
The copy destination appears under the CopyTo item. (It will not change even if [F5] is turned.)
25
Page 26

3. Basic operations
3-2-5. Modifying wipe
Setting the lighting effect
When 3D (1, 3, 7, 9) has been selected as the wipe pattern, a lighting effect can be added.
1
Press the [FUNC] button to light its indicator
2 Turn [F1] to display the Modify sub menu.
<Men
3 Turn [F2] to select whether the lighting effect is to be added using the Light item.
On: The lighting effect is added.
Off: The lighting effect is not added.
Setting the trimming
When SQ, SL or 3D has been selected as the wipe pattern, the tr
The trimming setting takes effect only when the HD format has been set as the system format.
1
2
On:
4:3: The images are trimmed using the 4:3 aspect r
u display>
Modify Light Trim
5/5 Off Off
On
On the WIPE menu, turn [F1] to display the Modify sub menu.
Turn [F5] to set the aspect ratio to which the images are to be trimmed using the Trim item.
No trimming
completed.
, and press the [WIPE] button to display the WIPE menu.
4:3
imming can be set.
atio. Trimming is released when the transition is
26
Page 27
3. Basic operations
KEY
PinP
DSK
HS400
HS400
3-3. Key
This operation combines the background image with another image. The key definition can be adjusted, and an
edge can be added to the combined image.
Also available as materials besides KEY for combining with the background image are PinP (picture in picture)
and DSK (downstream key). The figure below shows their priorities.
<Key, PinP and DSK priorities>
Background image
How key combinations work is shown in the figure below.
<How key composition works>
Background
Key source
Key fill
Invert
Output image
27
Page 28

3. Basic operations
3-3-1. Selecting the key type
1 Press the [FUNC] button to light its indicator, and press the [KEY] button to display the KEY menu.
2 Turn [F1] to display the KEY sub menu.
3
Turn [F2] to select the Type item.
<Men
Lum (luminance key/self key):
This is for creating the key signals from the luminance component or luminance and chroma component
Linear (linear key/EXT key):
Chroma (chr
This is for creating the key signals using a specific hue of the key fill signal as the reference.
Since the luminance and chroma keys are operated as self keys, the key fill signals are used as the key source
signals. When the luminance key or chroma key has been selected as the key type, the key signals will remain
unchanged even when the key source signals are switched.
Furthermore, when “Lum” or “Chroma” is selected, the KEY button in the crosspoint area changes to lighting in
amber (key fill bus selection status).
u display>
KEY
1/8 Linear ChrmOff Bus Auto
of the key fill signal.
This is for creating the key signals from the luminance component of the key source signal. It is used
when the key source signal and key fill signal are different.
Type LumKey Fill PVW
Lum
Chroma
ChrmOn Matte Off
On
oma key/self key):
When using the linear key, use material with a black background and white characters or shape to be combined
by the key as the key source signal. Material which is not black and white may not be combined clearly.
Material with a white background and black characters, etc. can be reversed using the key invert function for
use.
4
When the luminance ke
key signals in view of the self key application. (This does not apply to the linear key.)
Tur
n [F3], and select the setting using the LumKey item.
ChrmOn: In addition to the luminance component, the chroma component is also taken into account in the
gener
This is the setting f
when defining blue characters).
ChrmOff: The k
5 Turn [F4] to select the fill type using the Fill item.
Bus:
Matte: The internal fill matte is used for the k
The bus signal is used for the k
y has been selected, the chroma component can be included in the generation of the
ation of the key signals.
or using a color with a low luminance component for the key signals (such as
ey signals are gener
ated from only the luminance component.
ey fill signal.
ey fill signal.
28
Page 29
3. Basic operations
KEY DSK PinP AUX CLN PVW PGM
AUX SOURCEAUX BUS DELEGATION
AUX
AMB:FILL / GRN:SOURCE
KEY DSK PinP AUX CLN PVW PGM
AUX SOURCEAUX BUS DELEGATION
AUX
AMB:FILL / GRN:SOURCE
3-3-2. Selecting the key material
Selecting the key fill and key source signals
Press the KEY button in the AUX bus selection area, and switch the selection of the key fill signal (indicator
lights in amber) and key source signal (indicator lights in green).
<Selecting the key fill signal>
With the indicator of the KEY button lighted in amber, press one of the AUX crosspoint buttons 1 to 10 to select
the key fill signal.
The indicator of the selected crosspoint button lights in amber. (It will light in red if the selected signal is being
output from the PGM connector.)
Lighting in amber
<Selecting the key source signal>
With the indicator of the KEY button lighted in green, press one of the AUX crosspoint buttons 1 to 10 to select
the key source signal.
The indicator of the selected crosspoint button lights in green. (It will light in red if the selected signal is being
output from the PGM connector.)
Since the luminance and chroma keys are operated as self keys, the key fill signals are used as the key source
signals. When the luminance key or chroma key has been selected as the key type, the key signals will remain
unchanged even when the key source signals are switched.
Setting the fill matte color
1 Press the [FUNC] button to light its indicator
2 Turn [F1] to display the FillMatt sub menu.
3
Turn [F2] ,[F3] and [F4] to adjust the Hue, Sat and Lum of the fill matte.
4
To call a preset color, turn [F5] to select the preset color using the Load item, and press the [F5] switch.
The Hue, Sat and Lum values are changed to the preset color values.
(The values which have been set will not be stored in the memory until the [F5] switch is pressed.)
<Menu display>
FillMatt
Hue Sat Lum Load
3/8 0.0 0.0 100.0 White
0.0
~
359.9
0.0
100.0
~
0.0
~
108.0
Lighting in green
, and press the [KEY] button to display the KEY menu.
Yellow
Cyan
Green
Magenta
Red
Blue
Black
29
Page 30
3. Basic operations
ON
MIX WIPE
BKGD KEY
MIX
WIPE
BKGD PATT
KEY PATT
FUNC
WIPE PATTERN / FUNCTION
ON
WIPE SQ
SL 3D
PAGE
TIME WIPE COLOR
KEY CHR KEY FREEZE
DSK PinP IN/OUT
MEMORY XPT SYSTEM
1 2 3
4 5 6
7 8 9
10 12
11
3-3-3. Key transitions
1 Select key in the transition mode.
Press the [KEY] button in the transition area to light its
indicator.
To e
xecute a background transition and key transition at the
same time, press the [BKGD] button and [KEY] button together
to turn on both indicators.
2 Select the transition type.
Use the [MIX] button or [WIPE] button in the transition area to
select the key transition mode. The indicator of the selected
button lights in amber. At the same time, the MIX or WIPE
selection status indicator LED lights.
When WIPE has been selected, press the [KEY P
to light its indicator, and select the wipe pattern.
3
Set the time of the transition.
On the TIME menu, turn [F1] to display the KEY sub menu.
As with a background transition, set the transition time.
4 Set the wipe direction.
On the KEY menu, turn [F1] to display the Trans sub menu.
Turn [F1] to set Nor (normal) or Rev (reverse) using the
OutPatt item.
Nor (normal): The ke
Rev (reverse): The ke
y out pattern moves in the same direction as the key in pattern.
y out pattern moves in the opposite direction from the key in pattern.
However, the operations in pattern example 3 are performed for WIPE 5, 10, 11 and 12, and the operations
in pattern example 4 are performed for SQ 5, 10 and 12.
ATT] button
<Pattern examples>
Key in
Key out (Nor)
Key out (Rev)
: This indicates the areas where keys are combined.
Pattern example 1 Pattern example 2 Pattern example 3
(WIPE5, 10, 11, 12)
SQ
SQ
SQ
30
Pattern example 4
(SQ5, 10, 12)
SQ
SQ
SQ
Page 31

3. Basic operations
5 Execute the transition.
Press the [AUTO] button to execute the transition automatically for the transition time which has been set.
Alternatively, execute the transition manually by operating the fader lever.
When the KEYA
automatically for the transition time which has been set when the [FTB] key is pressed no matter which
transition mode has been selected.
During k
completed.
If the [FTB] button is pressed with the picture completely k
executed.
During k
completed. If the [FTB] button is pressed during the transition, the transition direction is reversed.
uto function has been assigned to the [FTB] button, the transition will be executed
ey in, the indicator of the [FTB] button blinks in red, and it lights in red when the transition is
eyed in, the Key image transition (key out) is
ey out, the indicator of the [FTB] button lights in red, and it goes off when the transition is
3-3-4. Key preview
Key preview images can be output to the preview output, and the keys can be adjusted and checked.
On the KEY menu, turn [F1] to display the KEY sub menu.
Turn [F5] to set the preview mode using the PVW item.
On:
An image with ke
Off: An image with no ke
Auto: The previe
y effects added is output to the preview output.
y effects added is output to the preview output.
w image of the next transition is output to the preview output.
3-3-5. Adjusting the luminance key and linear key
These steps are taken to adjust the luminance key and linear key definition.
1 Press the [FUNC] button to light its indicator, and then press the [KEY] b
2 Turn [F1] to display the Adjust sub menu.
<Menu displa
Adjust Clip Gain Density Invert
2/8 0.0 100.0 100.0 Off
3 Turn [F2], [F3] and [F4] to adjust the key definition.
4 Turn [F5] to set key invert.
When On is selected, the key signals to be generated internally are inverted.
y>
utton to display the KEY menu.
Operation Parameter Description of setting Setting range
F2 Clip
F3 Gain Key amplitude 0.0 to
F4 Density K
F5 Invert Key signal inversion On, Off
Reference level for generating
key signals
ey density 0.0 to 100.0
0.0 to 108.0
200.0
31
Page 32

3. Basic operations
Y
Hue
Sat Radius
Chroma
Hue Radius
3-3-6. Adjusting the chroma key
These steps are taken to adjust the chroma key definition.
Before proceeding with the adjustments, select “Chroma” as the
Type item setting in “3-3-1. Selecting the key type.”
The signal for the chroma key is created using a specific color tone
as a reference. For instance, the background color is detected
from the image of a person who is standing in front of a specific
background color, the key signal is created, and a different
background is combined.
This unit employs an area system which is designated using a
rectangular frame. The color of the pixels inside the area which
have been averaged is used as the reference color of the chroma
key (key reference), and the maximum deviation from the average
value is used as the radius of the chroma key oval. Chroma keys
faithful to the chroma space sample (area C in the figure) can be
generated.
Oval-shaped chroma key
Executing auto sampling
The chroma component is sampled by specifying the screen area.
1 Press the [FUNC] button to light its indicator
menu.
2 Turn [F1] to display the Auto sub menu, and turn [F2] to set On using the Marker item.
<Men
u display>
Auto Marker Aspect Sample
1/3 On 0.0 Start
Off
−50.00
~
+50.00
, and press the [CHR KEY] button to display the CHR KEY
3 The sample marker is displayed on the preview screen.
Select the area to be sampled using the positioners, rotary encoder [Z] and Aspect item (turn [F3] to adjust).
Positioners:
Specify the X coordinate and Y coordinate of the sample marker.
Rotary encoder [Z]:
Adjust the size of the sample marker.
When rotary encoder [Z] is held down, the X and Y coordinates of the sample marker as well as the size
of the marker are returned to their initial values.
Aspect:
Change the aspect r
4 When the [F5] switch or the rotar
5 On completion of the sampling, the sampled values are reflected on the Adjust1 and Adjust
marker is sampled.
and a chroma key combined image is output to preview. (Set the key preview function to ON.)
atio of the sample marker.
y encoder [Z] is pressed, the hue component of the area selected by the
2 sub menus,
32
Page 33

3. Basic operations
Adjusting the chroma key.
1 Press the [FUNC] button to light its indicator
menu.
2 Turn [F1] to display the Adjust1 sub menu, and turn [F2] to [F5] to set the items.
<Men
u display>
Adjust1 Hue Sat Lum Y-Infl
2/3 100.0 100.0 100.0 0.0
<Item operations>
Operation Parameter Setting Setting range Initial value
F2 Hue Hue serving as reference 359.9 to 0.0
F3 Sat Color saturation serving as reference 0.0 to 100.0
F4 Lum Luminance serving as reference 0.0 to 108.0
F5 Y-Infl Extent of Y component influence
1: After auto sampling has been executed, the sampled values the reference.
2: The e
xtent of the Y (Lum) component influence is set using the Y-Infl item. The higher the setting, the
greater the influence, and at the 0 setting, the Y component is irrelevant.
3
Turn [F1] to display the Adjust2 sub menu, and turn [F2] to [F5] to set the items.
<Men
u display>
Adjust2 Hue-Rad Sat-Rad Soft Cancel
3/3 100.0 100.0 0.0 0.0
, and press the [CHR KEY] button to display the CHR KEY
2
0.0 to 100.0 0.0
1
1
1
<Item operations>
Operation Parameter Setting Setting range Initial value
F2 Hue-Rad Size of range of hue to be defined 0.0 to 100.0
F3 Sat-Rad Size of range of saturation to be defined 0.0 to 100.0
F4 Soft
F5 Cancel Cancel amount
Extent of soft effect on border of color to
be defined
2
0.0 to 100.0 0.0
0.0 to 100.0 0.0
1: After auto sampling has been executed, the sampled values the reference.
2: The amount of color cancellation is adjusted using the Cancel item.
This adjustment is made when the
background color covers the fill image.
Tips for chroma key adjustments
Chroma key adjustments can be facilitated by taking the steps below.
1
Execute auto sampling, and decide on which color is to be removed.
2
Using the Hue-Rad item and Sat-Rad item, adjust in such a wa
y that the background
color is completely removed.
3 Using the Soft item, finely adjusting the border of the ke
y signal.
1
1
33
Page 34

3. Basic operations
Making other adjustments
Perform the key density and key invert settings.
1
Press the [FUNC] button to light its indicator
2 Turn [F1] to display the Adjust sub menu.
<Men
(Neither the Clip item nor the Gain item can be set when the chroma key is selected.)
3 Turn [F4] to select the key density using the Density item.
4
u display>
Adjust Clip Gain Density Invert
2/8 − − 100.0 Off
0.0
100.0
Turn [F5] to set key invert.
, and press the [KEY] button to display the KEY menu.
On
~
34
Page 35

3. Basic operations
Border
Drop
OutlineShadow
3-3-7. Key decorations
A border, shadow or other edge can be added to the key.
Setting the key edg
1 Press the [FUNC] button to light its indicator
press the [KEY] button to display the KEY menu.
2 Turn [F1] to display the Edge sub menu.
3 Turn [F2] to select the edge type.
: An edge is not added.
Off
Border
Dr
Shadow: A shadow is added b
Outline: An outline
4 Turn [F3] to set the edge width.
Setting the edge color
1
On the KEY menu, tur
2 Turn [F2] ,[F3] and [F4] to adjust the Hue, Sat and Lum of the edge color.
3
To call a preset color, turn [F5] to select the preset color using the Load item, and press the [F5] switch. The
Hue
be stored in the memory until the [F5] switch is pressed.)
<Menu display>
EdgeCol Hue Sat Lum Load
5/8 0.0 0.0 0.0 Black
: A border is added around the entire edge.
op: A diagonal border is added but only in the
direction to
toward the bottom right of the key.
, Sat and Lum values are changed to the preset color values. (The values which have been set will not
0.0
359.9
~
e
, and then
ward the bottom right of the key.
ut only in the direction
(only a border with no fill) is added.
n [F1] to display the EdgeCol sub menu.
0.0
100.0
~
0.0
~
108.0
Yellow
Cyan
Green
Magenta
Red
Blue
White
<Menu display>
Edge Type Width
4/8 Off 2
Border
Drop
Shadow
Outline
0~4
35
Page 36

3. Basic operations
0
+50
-50
+500-50
TOP (+25)
BOTTOM (-25)
(+25)
RIGHT
(-25)
LEFT
3-3-8. Masking the key signals
These steps are taken to mask the key signals using the mask signal of the box pattern.
1 Press the [FUNC] button to light its indicator
2 Turn [F1] to display the Mask sub menu.
<Men
3 Turn [F2], and select mask On or Off using the Mask item.
On: The key signals are masked.
Off: The ke
4 Turn [F3] to set whether to invert the mask signal using the Invert item.
On:
Off: The mask signal is not inver
5 Turn [F1] to display the MaskAdj sub menu.
<Men
u display>
Mask Mask Invert
6/8 Off Off
On
y signals are not masked.
The mask signal is inver
u display>
MaskAdj
7/8 −25.00 +25.00 −25.00 +25.00
Left Top Bottom Right
On
ted.
ted.
, and press the [KEY] button to display the KEY menu.
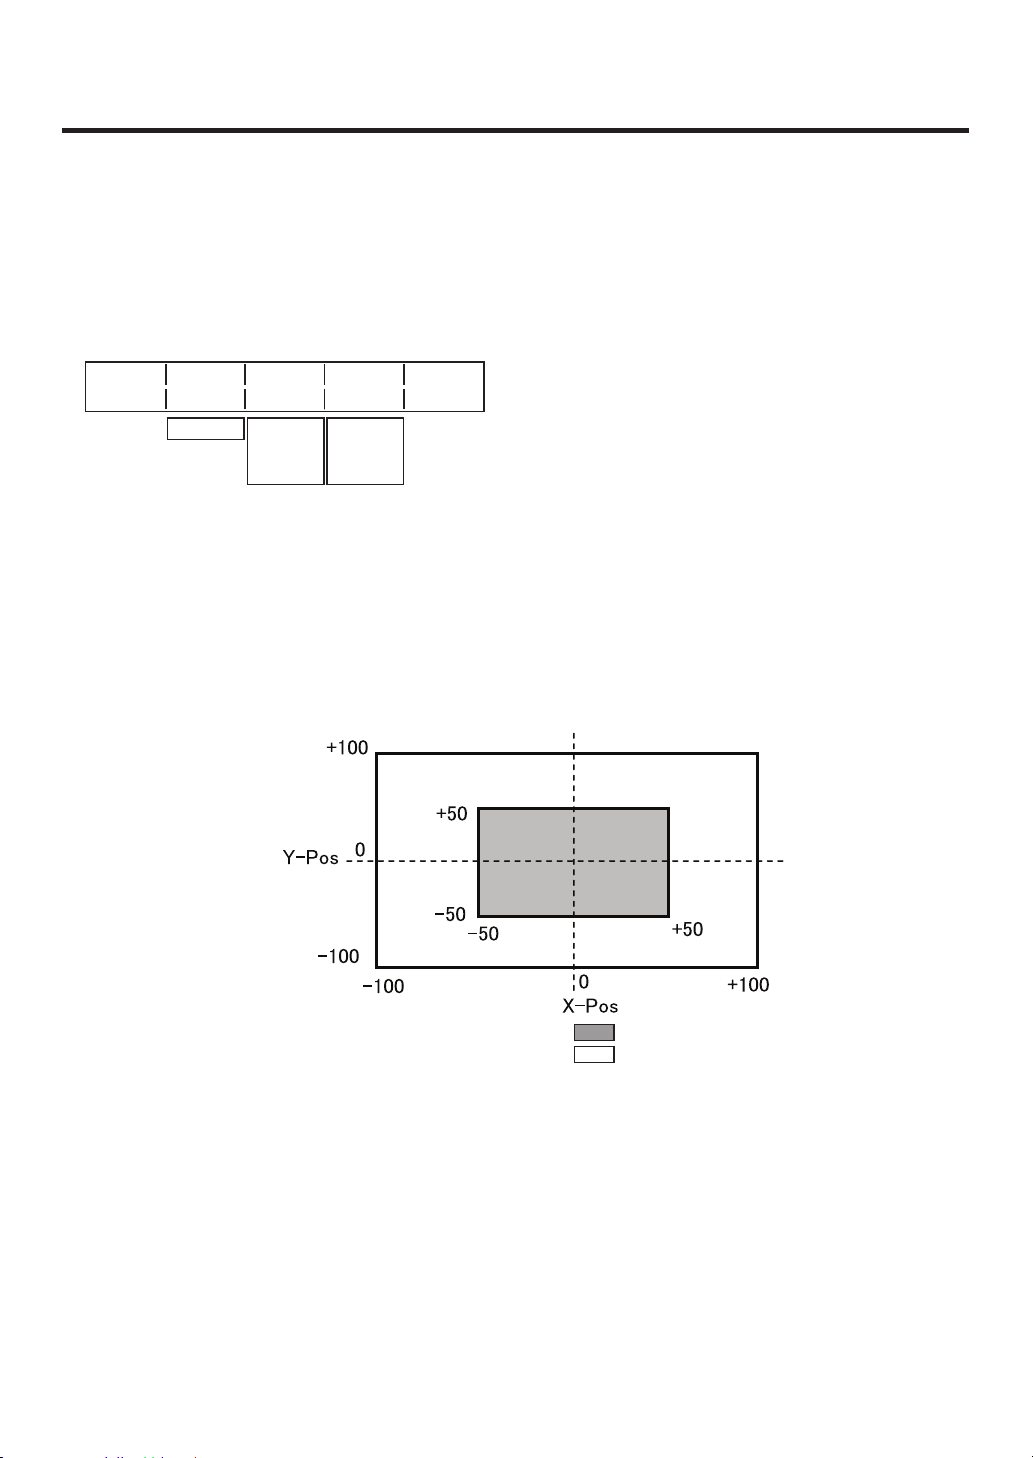
6 Turn [F2] to [F5] to set the area to be masked.
Operation Parameter Setting Setting range Initial value
F2 Left Key left position −50.00 to +50.00 −25.00
F3 T
F4 Bottom K
F5 Right K
The Left setting cannot exceed the Right setting (and vice versa) and, similarly, the Top setting cannot
exceed the Bottom setting (and vice versa).
<Key mask setting> (figure shows the default values)
op Key top position −50.00 to +50.00 +25.00
ey bottom position −50.00 to +50.00 −25.00
ey right position −50.00 to +50.00 +25.00
Area masked
Area where the key signal is
effective
Video signal range
36
Page 37

3. Basic operations
KEY DSK PinP AUX CLN PVW PGM
AUX SOURCEAUX BUS DELEGATION
AUX
AMB:FILL / GRN:SOURCE
PinP
3-4. PinP (picture in picture)
Another image can be combined with the background image.
3-4-1. Selecting the PinP material
Press the [PinP] button among the AUX bus selector buttons to light its indicator, and press one of the AUX bus
crosspoint buttons 1 to 10 to select the PinP signal.
The indicators of both the [PinP] button and the selected AUX bus crosspoint button light in amber. (They light in
red if the selected signal is being output to the PGM connector.)
3-4-2. PinP transitions
1 Set the transition time.
On the TIME menu, turn [F1] to display the PinP menu.
Set the transition time in the same way as for background transitions.
2 When the [PinP] button in the tr
(fade-in) is executed for the transition time which has been set.
During f
when the transition is completed. If the [PinP] button is pressed with the picture
completely faded in, the PinP image transition (fade-out) is executed.
During fade-out, the indicator of the [PinP] button lights in red, and it goes off when the transition (fade-out)
is completed. If the [PinP] button is pressed during the transition, the transition direction is reversed.
ade-in, the indicator of the [PinP] button blinks in red, and it lights in red
ansition area is pressed, the PinP image transition
3-4-3. PinP preview
The user can select whether to output the PinP preview image to the preview output.
On the PinP sub menu, turn [F5] to set the PVW item.
<Menu display>
PinP
1/6 100.0 Off
On: The image with the PinP effect added is output to the preview output.
Off: The image with no PinP effect added is output to the pre
PVW On and Off can be allocated to the user buttons. See 5-3-1.
Density PVW
0.0
~
100.0
On
view output.
37
Page 38

3. Basic operations
SD HD
SD
3-4-4. PinP adjustments
Adjusting the PinP position and size
While the PinP menu is selected, adjust the X and Y coordinates using the positioners in the positioner area,
and adjust the size using the rotary encoder [Z]. Alternatively, the settings can be performed on the menus.
1
Press the [FUNC] button to light its indicator
2 Turn [F1] to display the Position sub menu.
3
Either operate the positioners and the rotar
coordinates and the size using the X-Pos, Y-Pos and Size items.
<Menu display>
Position
4/6 0.00 0.00 100.00
Select the dot by dot mode
When the system is set to the HD mode and an SD format image is to be used for the PinP material, the
images can be combined in the dot by dot mode (actual-size images).
In this mode, the SD format image will not be up-converted so image deterioration can be prevented.
Furthermore, since the images are handled in their actual size, the PinP size is fixed.
On the IN/OUT menu, turn [F1] to display the Input menu, and select D by D using the Mode item.
X-Pos Y-Pos Size
−50.00
+50.00
~
−50.00
~
+50.00
0.0
100.0
PinP material
~
, and press the [PinP] button to display the PinP menu.
y encoder [Z] or turn [F2], [F3] and [F4] to set the X and Y
Adjusting the density
The step below is taken to adjust the PinP transparency (density).
On the PinP sub menu, turn [F
PinP combined image
2] to set the Density item.
38
Page 39

3. Basic operations
3-4-5. PinP decorations
A border or soft effect can be added to PinP.
1 Press the [FUNC] button to light its indicator
, and press the [PinP] button to display the PinP menu.
2 Turn [F1] to display the Border sub menu.
<Men
u display>
Border Border Width Soft
2/6 Off 5.0 0.0
On
0.1
~
100.0
0.0
~
100.0
3 Turn [F2] to set ON (or OFF) for the border using the Border item.
4 Turn [F3] to set the width of the border using the Width item.
5
Turn [F4] to set the amount of soft effect using the Soft item. The soft effect is OFF if 0 is set.
When “On” has been selected as the Border item setting, the ratio of the soft effect to the border width is
indicated as the amount of soft effect.
When only the soft effect is to be added to PinP
, select “Off” as the Border item setting.
Setting the border color
On the KEY menu, tur
1
n [F1] to display the BodrCol sub menu.
2 Turn [F2] ,[F3] and [F4] to adjust the Hue, Sat and Lum of the border color.
3
To call a preset color, turn [F5] to select the preset color using the Load item, and press the [F5] switch. The
Hue
, Sat and Lum values are changed to the preset color values.
(The values which ha
ve been set will not be stored in the memory until the [F5] switch is pressed.)
<Menu display>
BodrCol Hue Sat Lum Load
3/6 0.0 0.0 100.0 White
0.0
359.9
~
0.0
~
100.0
0.0
~
108.0
Yellow
Cyan
Green
Magenta
Red
Blue
Black
39
Page 40

3. Basic operations
0
+50
-50
+500-50
TOP (+40)
BOTTOM (-40)
(-40)
LEFT
(+40)
RIGHT
3-4-6. Trimming settings
1 Press the [FUNC] button to light its indicator, and press the [PinP] button to display the PinP menu.
2 Turn [F1] to display the Trim sub menu.
<Men
3 Turn [F2] to select the trimming type using the Trim item.
Off: No trimming
4:3: Automatic tr
Manual:
4 Turn [F3] to select the operation to be performed during the manual setting using the Manual item.
Free:
However, the Left setting cannot exceed the Right setting (and vice versa) and, similarly, the Top
Pair:
u display>
Trim Trim Manual
5/6 Off Free
4:3
Manual
Trimming using the value set on the TrimAdj sub menu
The Left, Right, T
setting cannot exceed the Bottom setting (and vice versa).
The settings are changed in such a wa
Bottom trimming amount are the same. (This makes for a top-bottom and left-right symmetry.)
Pair
imming so that the aspect ratio is 4:3
op and Bottom parameters change independently.
y that the Left and Right trimming amounts and the Top and
5
Turn [F1] to display the TrimAdj sub menu, and turn [F2], [F3], [F4] and [F5] to set the trimming values.
Operation Parameter Setting Setting range Initial value
F2 Left Trimming value at left −50.00 to +50.00 −40.00
F3 Top Trimming value at top −50.00 to +50.00 +40.00
F4 Bottom Trimming value at bottom −50.00 to +50.00 −40.00
F5 Right Trimming value at right −50.00 to +50.00 +40.00
<Trimming settings> (figure shows the default values)
Area trimmed
Area where PinP is effective
Original size of PinP
40
Page 41

3. Basic operations
3-5. DSK (downstream key)
Characters or other images can be combined with the background image.
3-5-1. Selecting the DSK type
1 Press the [FUNC] button to light its indicator, and press the [DSK] button to display the DSK menu.
2 Turn [F1] to display the DSK sub menu.
3
Turn [F2] to select the Type item.
<Men
Lum (luminance key/self key):
This is for creating the key signals from the luminance component of the key fill signal.
Linear (linear key/EXT key):
This is for creating the key signals from the luminance component of the key source signal. It is used
Since the luminance key is operated as a self key, the key fill signals are used as the key source signals. When
the luminance key has been selected as the downstream key type, the key signals will remain unchanged even
when the key source signals are switched.
Furthermore, when “Lum” is selected, the DSK button in the crosspoint area changes to lighting in amber (key
fill bus selection status).
u display>
DSK Type Fill PVW
1/5 Linear Bus Off
Lum
when the key source signal and key fill signal are different.
Matte On
When using the linear key, use material with a black background and white characters or shape to be combined
by the key as the key source signal.
Material which is not black and white may not be combined clearly.
Material with a white background and black characters, etc. can be reversed using the key invert function for
use.
4
Turn [F4] to select the fill type using the Fill item.
Bus:
Matte: The internal fill matte is used for the k
The bus signal is used for the k
ey fill signal.
ey fill signal.
41
Page 42

3. Basic operations
KEY DSK PinP AUX CLN PVW PGM
AUX SOURCEAUX BUS DELEGATION
AUX
AMB:FILL / GRN:SOURCE
KEY DSK PinP AUX CLN PVW PGM
AUX SOURCEAUX BUS DELEGATION
AUX
AMB:FILL / GRN:SOURCE
3-5-2. Selecting the DSK material
Selecting the DSK fill signal and DSK source signal
Press the [DSK] button in the AUX bus selection area to switch the selection of the DSK fill signal (indicator
lights in amber) and DSK source signal (indicator lights in green).
<Selecting the DSK fill signal>
While the indicator of the [DSK] button is lighted in
amber, press one of the AUX bus crosspoint buttons
1 to 10 to select the DSK fill signal.
The indicator of the selected AUX bus crosspoint
button lights in amber. (It lights in red if the selected
signal is being output from the PGM connector.)
<Selecting the DSK source signal>
While the indicator of the [DSK] button is lighted in
green, press one of the AUX bus crosspoint buttons
1 to 10 to select the DSK source signal.
The indicator of the selected AUX bus crosspoint
button lights in green. (It lights in red if the selected
signal is being output from the PGM connector.)
Since the luminance key is operated as a self key,
the key fill signals are used as the key source
signals. When the luminance key has been selected
as the downstream key type, the key signals will
remain unchanged even when the key source
signals are switched.
Lighting in amber
Lighting in green
Setting the fill matte color
1 On the KEY menu, tur
2 Turn [F2] ,[F3] and [F4] to adjust the Hue, Sat and Lum of the fill matte.
3
To call a preset color, turn [F5] to select the preset color using the Load item, and press the [F5] switch. The
Hue
, Sat and Lum values are changed to the preset color values. (The values which have been set will not
be stored in the memory until the [F5] switch is pressed.)
<Menu display>
FillMatt
Hue Sat Lum Load
3/5 0.0 0.0 100.0 White
0.0
359.9
~
n [F1] to display the FillMatt sub menu.
0.0
100.0
~
0.0
~
108.0
Yellow
Cyan
Green
Magenta
Red
Blue
Black
42
Page 43

3. Basic operations
DSK
3-5-3. DSK transitions
1 Set the duration of the transition.
On the TIME menu, turn [F1] to display the DSK sub menu.
As with a background transition, set the transition time.
2 When the [DSK] button in the tr
combined (fade-in) for the transition time which was set.
During f
when the transition (fade-in) is completed. If the [DSK] button is pressed with the
picture completely faded in, the DSK image transition (fade-out) is executed.
During fade-out, the indicator of the [DSK] button lights in red, and it goes off when the transition is
completed. If the [DSK] button is pressed during the transition, the transition direction is reversed.
ade-in, the indicator of the [DSK] button blinks in red, and it lights in red
3-5-4. DSK preview
The user can select whether to output the DSK preview image to the preview output.
On the DSK sub menu, turn [F5] to set the PVW item.
On:
The image with the DSK effect added is output to the pre
Off: The image with no DSK effect added is output to the pre
PVW On and Off can be allocated to the user buttons. See 5-3-1.
ansition area is pressed, the DSK image is
view output.
view output.
3-5-5. DSK adjustments
The DSK definition can be adjusted.
1 Press the [FUNC] button to light its indicator
2 Turn [F1] to display the Adjust sub menu.
<Men
3 Turn [F2], [F3] and [F4] to adjust the DSK (downstream key) definition.
u display>
Adjust Clip Gain Density Invert
2/5 0.0 100.0 100.0 Off
Operation Parameter Setting Setting range
F2 Clip Reference level for generating key signals 0.0 to 108.0
F3 Gain Key amplitude 0.0 to 200.0
F4 Density K
F5 Invert Key signal inversion On, Off
ey density 0.0 to 100.0
, and press the [DSK] button to display the DSK menu.
43
Page 44

3. Basic operations
Drop
Shadow
3-5-6. DSK decorations
A shadow or other type of edge can be added to DSK.
Setting the edge
1
Press the [FUNC] button to light its indicator
2 Turn [F1] to display the Edge sub menu.
<Menu display>
Edge Type Width
4/5 Off 2
Drop
3 Turn [F2] to select the type of edge.
Off:
Drop: A diagonal border is added. The direction is at the bottom r
Shadow: A shadow is added.
Shadow
An edge is not added.
0~4
The direction is at the bottom right of the key only.
4 Turn [F3] to set the width of the edge.
, and press the [DSK] button to display the DSK menu.
ight of the key only.
Setting the edge color
1
On the DSK menu, tur
2 Turn [F2] ,[F3] and [F4] to adjust the Hue, Sat and Lum of the edge color.
3
To call a preset color, turn [F5] to select the preset color using the Load item, and press the [F5] switch. The
Hue
, Sat and Lum values are changed to the preset color values.
(The values which ha
<Menu display>
EdgeCol Hue Sat Lum Load
5/5 0.0 0.0 0.0 Black
0.0
~
359.9
n [F1] to display the EdgeCol sub menu.
ve been set will not be stored in the memory until the [F5] switch is pressed.)
0.0
100.0
~
0.0
~
108.0
Yellow
Cyan
Green
Magenta
Red
Blue
White
44
Page 45

3. Basic operations
FTB
3-6. FTB (fade to black)
The user can fade out from a program image to the black screen or fade in to a program image from a black
screen.
1
Set the duration of the tr
On the TIME menu, turn [F1] to display the FTB sub menu.
As with a background transition, set the transition time.
2 When the [FTB] button in the tr
screen is initiated.
During f
when the transition (fade-out) is completed, and the black screen is displayed.
When the [FTB] button is pressed with the black screen displayed, fade-in to the
program image is initiated.
During fade-in, the indicator of the [FTB] button lights in red, and it goes off when the transition (fade-in) is
completed. If the [FTB] button is pressed during the transition, the transition direction is reversed.
1:
The KEYAuto function acn be assigned to the [FTB] button. See “5-3. Button assignments.”
ade-out, the indicator of the [FTB] button blinks in red, and it lights in red
In the FTB status, the crosspoint b
light in green when the key source and DSK source have been selected.
ansition.
ansition area is pressed, fade-out to the black
utton which is normally lighted in red lights in amber. However, it will
1
45
Page 46

3. Basic operations
3-7. Internal color signals
3-7-1. Setting the color background
The color background to be used by the bus can be set.
Two methods are available: under one method the Hue (hue), Sat (color saturation) and Lum (luminance) are set,
and under the other the 8 preset colors (white, yellow, cyan, green, magenta, red, blue and black) are called. The
Hue, Sat and Lum of the called colors can also be adjusted.
Adjusting the colors
1
Press the [FUNC] button to light its indicator
menu.
2 Turn [F2], [F3] and [F4] to perform the color adjustments (Hue, Sat and Lum).
Calling the preset colors
3
Turn [F5] to select the preset color using the Load item, and press the [F5] switch. The preset color is now
called, and its Hue
(The values which ha
<Menu display>
CBGD Hue Sat Lum Load
1/1 100.0 100.0 100.0 White
0~359.9
, Sat and Lum values are displayed.
ve been set will not be stored in the memory until the [F5] switch is pressed.)
0~100.0 0~108.0 Yellow
, and then press the [COLOR] button to display the COLOR
Cyan
Green
Magenta
Red
Blue
Black
46
Page 47

3. Basic operations
3-8. Freezing the input signals
The input signals can be frozen and used. If any of the input signals has been frozen, the freeze status display
LED lights. While signals are frozen, the tally signals of the corresponding input will not be output.
3-8-1. Displaying the freeze status
1 Press the [FUNC] button to light its indicator, and press the [FREEZE] button to display the Freeze menu.
2 Turn [F1] to display the Status sub menu.
Asterisks () appear above the numbers of the crosspoint buttons which are currently in the freeze status.
<Menu display>
Status FRZ:
1/2 XPT:1 2 3 4 5 6 7 8 9 10
3-8-2. Setting freeze
1 On the freeze menu, turn [F1] to display the Freeze sub menu.
<Menu display>
Freeze Signal Select Freeze
2/2 IN1 Frame Off
2 Turn [F2] to select the input video signal using the Signal item.
Frame: The images are frozen frame b
Field: The images are frozen field by field.
This is used to freeze moving images.
With interlace signals, however, diagonal lines and moving parts appear jagged.
Frame or Field can also be selected while an image is frozen.
3 Press the [F4] switch to freez
If the [F4] switch is pressed while the display is “Off,” the video signal is frozen, and the display is set to “On.”
If the [F4] switch is pressed while the display is “On,” the video signal freezing is canceled, and the display is
set to “Off.”
IN1~8
Field On
y frame.
e the input image or cancel the freeze.
When the unit is used with the frame synchronizer function OFF, the output images may be disturbed when
freezing is executed, but the frozen images will not be adversely affected.
The frame synchronizer function will automatically be switched ON.
47
Page 48

3. Basic operations
KEY DSK PinP AUX CLN PVW PGM
AUX SOURCEAUX BUS DELEGATION
AUX
AMB:FILL / GRN:SOURCE
3-9. Switching the AUX output
The user can switch the AUX output signals.
The signals of any of the AUX bus crosspoint button 1 to 10, PGM (program) signals, PVW (preview) signals or
CLN (clean) signals can be selected for output to the AUX bus.
[PGM]:
[PVW]: The PVW signals are output to the AUX b
[CLN]: The clean signals (images whose DSK signals hav
The PGM signals are output to the AUX b
the AUX bus.
us.
us.
e been removed from the PGM signals) are output to
Selecting the output signals using the crosspoint b
Press the [AUX] button among the AUX bus selector buttons to light its indicator, and press one of the AUX bus
crosspoint buttons 1 to 10, CLN, PVW or PGM button to select the AUX output signals.
The indicators of the [AUX] button and the selected button light in amber.
(They light in red if the selected signal is being output to the PGM connector.)
uttons
48
Page 49

3. Basic operations
3-10. Preset memory
Up to 10 panel settings can be stored in this memory.
The table below lists the settings which are stored.
<Table of stored preset memory>
Item Description of setting Initial value (factory default)
Crosspoint
Transition area
Border (BKGD Wipe)
Wipe
Key
A bus
B bus
KEY FILL bus 1
KEY SOURCE bus 1
PinP bus 1
DSK FILL bus 1
DSK SOURCE bus 1
AUX bus 1
BKGD/KEY selection BKGD
MIX/WIPE selection MIX
N/R selection N (Normal)
Auto transition time (BKGD) 1s
Auto transition time (KEY) 1s
Transition time (PinP) 1s
Transition time (DSK) 1s
Transition time (FTB) 1s
KEY ON status
PinP ON status
DSK ON status
FTB status
Border ON/OFF Off
Border width 5.0
Soft effect width 0.0
Border color Hue: 0.0, Sat: 0.0, Lum: 100.0
Wipe pattern (BKGD) WIPE5
Center position of BKGD pattern WIPE5 center (X: 0, Y: 0)
Center position of BKGD pattern SQ5 center (X: 0, Y: 0)
Wipe pattern (KEY) WIPE5
Center position of KEY pattern WIPE5 center (X: 0, Y: 0)
Center position of KEY pattern SQ5 center (X: 0, Y: 0)
Lighting (Light) Off
Wipe (DVE) trimming (Trim) Off
Key type (Type) Linear
Luminance key setting ChrmOff
Key adjustment (Adjust) Gain: 100.0, Clip: 0.0, Density: 100.0
Invert Off
Fill type Bus
Fill matte Hue: 0.0, Sat: 0.0, Lum: 100.0
Edge color Hue: 0.0, Sat: 0.0, Lum: 0.0
Edge type Off
Edge width 2
Key out pattern (OutPatt) Nor
Mask Off
Mask invert Off
Mask setting Left, Bottom: −
ON at an interim point Off
ON at an interim point Off
ON at an interim point Off
ON at an interim point Off
1
1
Right,
25
Top: +25
49
Page 50

3. Basic operations
Item Description of setting Initial value (factory default)
Chroma key
DSK
PinP
Color
Chroma key reference color Hue: 354.0, Sat: 100.0, Lum: 100.0
Extent of Y component effect (Y-Infl) 0.0
Chroma key range Hue-Rad: 100.0, Sat-Rad: 50.0
Chroma key border soft effect (Soft) 0.0
Chroma cancel amount (CANCEL) 0.0
Marker position, size (X:
Marker aspect ratio 0.0
Key type (Type) LINEAR
Key adjustment (Adjust) Gain: 100.0, Clip: 0.0, Density: 100.0
Invert Off
Fill type Bus
Fill matte Hue: 0.0, Sat: 0.0, Lum: 100.0
Edge color Hue: 0.0, Sat: 0.0, Lum: 0.0
Edge type Off
Edge width 2
Position, Size (X, Y, Z) (X:
Border ON/OFF Off
Border width 5.0
Border soft effect amount 0.0
Border color Hue: 0.0, Sat: 0.0, Lum: 100.0
Density 100.0
Trimming Off
Trimming setting Left, Bottom: −40
CBGD (color bac
kground) Hue: 0.0, Sat: 0.0, Lum: 100.0
2
5.0, Y: 25.0, Z: 5.0)
0.0, Y
: 0.0, Z: 25.0)
Right,
Top: +40
STORE: This is used to store the panel settings in the preset memory.
1 Press the [FUNC] button to light its indicator
, and then press the [MEMORY] button to display the MEMORY
menu.
2 Turn [F1] to display the PSMEM sub menu.
3
Turn [F2], select “Store” using the Mode item, turn [F3], and set the preset memory number using the
NO
.Sel item.
4 Press the [F5] switch (Exec) to store the settings
.
<Menu display>
PSMEM Mode NO.Sel XPT Exec
1/3 Store 1 Disable
Recall
Clear
1~10 Enable
The appears at the left of the number when data has been saved in the preset memory.
50
Page 51

3. Basic operations
RECALL: This is used to recall the preset memory data and change the panel settings.
1 On the MEMORY men
2 Turn [F2], select “Recall” using the Mode item, turn [F3], and set the preset memory number using the
NO
.Sel item.
3 Turn [F4] to select whether to call the crosspoint selection status using the XPT item.
Enab
le: The data stored in the preset memory is used.
Disable
4
Press the [F5] switch (Ex
CLEAR: This is used to clear contents in the preset memory.
1
On the MEMORY men
2 Turn [F2], select “Clear” using the Mode item, turn [F3], and set the preset memory number using the
NO
3 Press the [F5] switch (Ex
: The data stored in the preset memory is not used, and the settings prior to recall are retained.
.Sel item.
u, turn [F1] to display the PSMEM sub menu.
ec) to clear the content.
u, turn [F1] to display the PSMEM sub menu first.
ec) to clear the content.
51
Page 52

3. Basic operations
3-11. Frame memories
Still images can be stored in the unit’s two internal frame memories for use.
The still images are transferred to the frame memories through the AUX bus and an SD memory card. Conversely,
the images in the frame memories can be transferred to an SD memory card.
Images in the
assignment function.
Since the images stored in the frame memories are stored in the unit’s RAM area, they cannot be used once the
power is turned off. Transfer them again after the power has been turned back on.
3-11-1. Transferring images from the AUX bus
1 Press the [FUNC] button to light its indicator, and press the [MEMORY] button to display the MEMORY
menu.
2 Turn [F1] to display the FMEM sub menu.
<Men
FMEM Signal Store Exec
2/3 AUX FMEM1
3 Turn [F3] to select the frame memory in which to store the images using the Store item.
4 Press the [F5] switch (Ex
frame memories can be used as bus images by assigning FMEM1 and FMEM2 using the crosspoint
u display>
FMEM2
ec) to transfer the still images to the frame memory.
52
Page 53

3. Basic operations
3-12. SD memory cards
The unit’s frame memory data and system data can be stored on SD memory cards. Conversely, this data can be
loaded from the SD memory cards to the unit.
Frame memory data (still image data):
2
4-bit (uncompressed) BMP (bitmap) is the only file for
created using another device such as a personal computer, save the data as 24-bit (uncompressed) BMP files.
This unit cannot resize the images so resize them appropriately using another device such as a personal
computer before saving them on the SD memory card.
HD/1080i: 1920×1080, HD/720p: 1280×720,
SD/NTSC: 720×487, SD/PAL: 720×576
If the sizes are different, the center of the images will be lined up.
If the image is large, it will be cropped.
If the image is small, the area around it will be filled in with a black border.
The pixels of images in SD format are not square, so the aspect ratio will be different when the images are
displayed on the computer and when they are imported into frame memory (with NTSC format, they will be
vertically long).
T
o keep the images tr
are in NTSC format, use images shrunk to 720
enlarged to 720
ue to their actual proportions, make sure the original size is 720
×487 pixels. If the images are in PAL format, use images
×576 pixels.
mat which is supported. When using still image data
×540 pixels. If the images
System data:
The “system data” refers to all the data stored in the unit with the exception of the date, time and network
settings and of the still image data. The extension used for the system data files is “hs4.”
SD memory card handling precautions
Do NOT eject the SD memory card while the SD memory card access LED is lighted.
The data stored on SD memory cards may be lost as a result of misplacing the cards or perf
operations, for instance. It is recommended that valuable data be stored on a personal computer or other
device..
orming erroneous
53
Page 54

3. Basic operations
3-12-1. Initializing the SD memory cards
In order for an SD memory card to be used in the unit, it must first be initialized by the unit. Initializing an SD
memory card optimizes it and creates the dedicated directory.
(All files saved on the SD memory card will be erased.)
Use SD memory car
1 Insert the SD memory card into the unit’s SD memory card slot.
2
Press the [FUNC] button to light its indicator
menu.
3 Turn [F1] to display the SDCard sub menu.
4
Turn [F2] to select “Init” using the Mode item, and then press the [F2] switch.
The “Init ?” message now appears.
If the SD memory card has not been inserted, “No Card” will appear at the Mode item.
When the mode is selected, an asterisk (
an asterisk does not appear, press the [F
5 Turn [F5] to select “Yes,” and press the [F5] switch to initialize the card. To cancel the initializing, turn [F5] to
select
“No,” and press the [F5] switch.
<Menu display>
SDCard Mode Select Init? Exec
3/3Init — No
ds which have been formatted in accordance with the SD standard.
, and press the [MEMORY] button to display the MEMORY
) appears on the left of the selected mode (Init, Save or Load). If
2] switch to select a mode.
SDCard Mode Select Init? Exec
3/3Init — Yes
3-12-2. Saving data on SD memory cards
1 Insert the SD memory card which has been initialized by the unit, into the SD memory card slot.
2 On the MEMORY men
3 Turn [F2] to select “Save” using the Mode item, and then press the [F2] switch.
<Men
u display>
SDCard Mode Select SaveFile Exec
3/3 Save FMEM1
4 Turn [F3] to select the data which is to be stored on the SD memory card using the Select item.
FMEM1, 2: Still image data of frame memor
System: System data
5 If the [F5] switch is no
(Filenames are allocated automatically.)
System data: “HS400/SYSTEM” folder
Still ima
While the file is being stored, the following message and filename are displayed.
SDCard Saving File
3/3 HS070531100000
ge data: “HS400/IMAGE” f
u, turn [F1] to display the SDCard sub menu.
FMEM2
System
y 1, frame memory 2
w pressed, the file is stored on the SD memory card.
older
54
Page 55

3. Basic operations
3-12-3. Loading data from SD memory cards
1 Insert the SD memory card on which the data is stored into the SD memory card slot.
Load the file after its data has been stored in the each folder. Data stored in other folders will not be
recognized by the unit.
System data: “HS400/SYSTEM” folder
Still ima
2 On the MEMORY menu, turn [F1] to display the SDCard sub menu.
3 Turn [F2] to select “Load” using the Mode item, and then press the [F2] switch.
<Men
SDCard Mode Select LoadFile Exec
3/3 Load FMEM1 HS070531100000
4 Turn [F3] to select the transfer destination using the Select item.
5 Using the LoadFile item, turn [F4] to select the name of the file to be loaded.
6
If the [F5] switch is no
memory.
While the file is being loaded, the follo
SDCard Loading File
3/3 HS070531100000
Up to 100 files can be loaded.
The following alphanumerics and symbols can be used as the characters for filenames (see below).
Files using other characters will not be displayed by the unit.
<Characters which can be used for filenames>
A to Z, a to z, 0 to 9, Sapce, ! # $ % & ' ( ) + , - . ; = @ [ ] ^ _ ` { }
ge data: “HS400/IMAGE” f
u display>
FMEM2
System
older
w pressed, the file is loaded from the SD memory card and stored in the unit’s internal
wing message and filename are displayed.
55
Page 56

4. Input/output signal settings
4-1. Setting the SDI input signals and analog input signals
The user can set the SDI input signals and analog input signals. IN5 to IN8 can be set only when the SDI input
board (optional accessory) or analog input board (optional accessory) has been connected.
4-1-1. Setting the frame synchronizer
The frame synchronizer can be set to On or Off for each input.
The DVI input (option) frame synchronizer is permanently On. It cannot be set from On to Off or vice versa.
1 Press the [FUNC] button to light its indicator
menu.
2 Turn [F1] to display the Input sub menu.
3 Turn [F2], select the input signals using the Signal item, turn [F3], and select On or Off for the frame
synchroniz
If the output signal phase is set to 0H, Off cannot be selected as the FS item setting.
<Menu displa
Input Signal FS Mode AnaGain
1/11 In1 OnNormal 0
er using the FS item.
y>
IN1~8
Off D by D
UC
Auto
, and then press the [IN/OUT] button to display the IN/OUT
−30~+30
AVDL function is active while the frame synchronizer function is set to Off.
The AVDL function automatically adjusts the input image signal phase to the horizontal synchronization
reference signal phase.
For details, refer to “4-6. Adjusting the output signal phase”.
56
Page 57

4. Input/output signal settings
4-1-2. Setting the input mode
The mode can be set for each input only when HD has been selected as the system format. When SD is selected
as the system format, the input mode is always the same as Normal.
Normal: Input signals in confor
D by D: When SD signals with the same frame r
dot by dot (1x magnification) basis with no up-conversion.
(This setting is only possible when the system f
In this mode, there is minimal deterioration in the image quality and, as such, the mode is used to
combine SD format material using the PinP function.
UC: When SD signals with the same frame r
converted. (This mode can be selected for inputs 5 to 8 only.)
Auto: Input signals in confor
Furthermore, if input signals with the same frame rate as the system format are input when HD is
selected as the system format, they are up-converted. (This mode can be selected for SDI inputs 5 to
8 only.)
In the A
uto mode, the images may be disturbed when the input signals are switched.
1 On the Input sub menu, tur
2 Turn [F4] to set the input mode using the Mode item, and press the [F4] switch to enter the selection.
An aster
isk () appears at the left of the input mode currently selected.
<List of input modes supported>
System Mode 480/59.94i 576/50i 1080/59.94i 1080/50i 720/59.94p 720/50p
SD 480/59.94i —
576/50i —
HD 1080/59.94i Normal
D by D
UC
Auto
1080/50i Normal
D by D
UC
Auto
7
20/59.94p
7
20/50p
Normal
UC
Auto
Normal
UC
Auto
mity with the system format take effect.
ate as the system format have been input, they are input on a
ormat is 1080i.)
ate as the system format have been input, they are up-
mity with the system format take effect.
n [F2] to select the input signals using the Signal item.
Input
○ ■ ■ ■ ■ ■
■ ○ ■ ■ ■ ■
■ ■ ○ ■ ■ ■
○ ■ ■ ■ ■ ■
○ ■ ■ ■ ■ ■
(UC)
○
■ ■ ■ ○ ■ ■
■ ○ ■ ■ ■ ■
■ ○ ■ ■ ■ ■
■ ○
■ ■ ■ ■ ○ ■
○ ■ ■ ■ ■ ■
(UC)
○
■ ■ ■ ■ ■ ○
■ ○ ■ ■ ■ ■
■ ○
■ ○ ■ ■ ■
(UC)
■ ■ ■ ○ ■
(UC)
■ ○ ■ ■
■ ■ ■ ○
denotes a black screen.
The UC mode or Auto mode cannot be selected f
or inputs 1 to 4.
If D by D, UC or Auto mode is selected, the frame synchronizer will be turned on.
The input mode cannot be changed when freeze is set to on.
57
Page 58

4. Input/output signal settings
4-1-3. Setting the analog input gain
The user can set the gain when the input signals are analog signals. The setting range is ±30 steps, and the gain
changes by ±2 dB. The amount of change in the gain when it is changed by one step is not fixed.
1 On the Input sub menu, tur
2 Turn [F5] to set the input signal gain using the AnaGain item.
4-2. Setting the up-converter (option)
The settings for the up-converter contained on the optional SDI input board and analog input board are performed
below.
n [F2] to select the input signals using the Signal item.
1
Press the [FUNC] button to light its indicator
2 Turn [F1] to display the UpConvt sub menu.
An aster
<Menu display>
UpConvt Signal Scale MovDet Sharp
11/11 IN5 SQ 3 3
3 Turn [F2] to select the input signal using the Signal item.
4 Turn [F3] to select the scaling system using the Scale item, and press the [F3] switch to enter the selection.
SQ (squeez
EC (edge crop): The aspect ratio of the image is maintained, the image siz
LB (letter box): The aspect ratio of the image is maintained, the image siz
5 Turn [F4] to set the image movement detection sensitivity using the MovDet item, and press the [F4] switch
to enter the selection.
1: Toward still images 3: standard 5: toward moving images
6
Turn [F5] to set the extent of the edge sharpness for the images using the Sharp item, and press the [F5]
s
1: Not sharp edges 3: standard 5: very sharp edges
isk () appears at the left of the parameter currently selected.
IN5~8
Input image SQ EC LB
witch to enter the selection.
EC
LB
e): The image is enlarged both horiz
with the vertical resolution, and black bands are added at the left and right.
with the horizontal resolution, and the image is cropped at the top and bottom.
1~5 1~5
, and press the [IN/OUT] button to display the IN/OUT menu.
ontally and vertically to fill the entire screen.
e is increased in accordance
e is increased in accordance
For details on the other settings, refer to the operating instructions of the optional board.
58
Page 59

4. Input/output signal settings
4-3. Setting the DVI input signals (option)
4-3-1. Setting the DVI input signals
The user can set the DVI input signals when the DVI input board (optional accessory) has been connected.
Signals with the following resolutions can be input. If signals with any other resolution or frequency are input, the
picture will turn black.
XGA (1024 × 768), 60 Hz
WXGA (12
SXGA (12
1 Press the [FUNC] button to light its indicator
2 Turn [F1] to display the DVIIN sub menu.
u display>
<Men
DVIIN Signal Mode Scale Auto
8/11 IN5 Dig Fit-V Black
3 Turn [F2] to select the input signal using the Signal item, and turn [F3] to select the signal system using the
Mode item.
Dig: Digital input signals of the D
Ana: Analog input signals of the DVI connector are effectiv
4 Turn [F4] to select the scaling method.
Fit-V
Fit-H:
Full: The size of the input images is increased or reduced in accordance with the system resolution.
For details on the siz
page.
5 The black level (offset) and white level (gain) of the analog input signals are adjusted automatically.
Depending on the personal computer used, there may be some deviation from the correct levels.
To proceed with automatic adjustment to correct this deviation, display the black-and-white signals (BW.
bmp) on the supplied CD-ROM or the full-screen black signals and full-screen white signals on the personal
computer connected to the DVI input connector, and input these signals as the DVI input signals.
When using
to the center of the monitor screen.
When using the full-screen blac
that covers at least 80% of the screen from the screen center.
Before making an
section.
Automatic adjustment of the blac
Input the black-and-white signals (BW.bmp) or full-screen black signals.
Turn [F5] to select “Black” in the Auto item, and press [F5] to adjust the black level automatically.
After the level has been adjusted, an asterisk (
Automatic adjustment of the white level
Input the black-and-white signals (BW.bmp) or full-screen white signals.
Turn [F5] to select “White” in the Auto item, and press [F5] to adjust the white level automatically.
After the level has been adjusted, an asterisk (
Initializing the adjusted values
At this time, the asterisk () displayed on the left is cleared.
80 × 768), 60 Hz
84 × 1024), 60 Hz
, and press the [IN/OUT] button to display the IN/OUT menu.
IN5~8
: The aspect ratio of the input images is maintained, and the siz
in accordance with the vertical resolution.
The aspect ratio of the input images is maintained, and the siz
in accordance with the horizontal resolution.
aspect ratio of the input images is not kept the same. The rate at which the image size is increased or
reduced in the vertical direction and in the horizontal direction differs.)
Turn [F5] to select “Init” in the Auto item, and press [F5] to return the adjusted values to their factory
settings.
Ana Fit-H
Full
es that correspond to the formats, refer to “DVI input scaling size table” on the next
the black-and-white signals, position them so that the boundary between black and white comes
y adjustments, follow the instructions given in the “Automatic adjustment of the black level”
White
Init
VI connector are effectiv
k signals or full-screen white signals, display the black or white in an area
k level
) appears to the left of Black.
) appears to the left of White.
e.
e.
e of the images is increased or reduced
e of the images is increased or reduced
(The
59
Page 60

4. Input/output signal settings
480
720
576
720
480
720
576
720
480
675
576
675
480
720
576
720
<DVI input scaling size table>
DVI format Mode
XGA
1024×768
Fit-V
Fit-H
Full
HD/1080i HD/720P SD/NTSC SD/PAL
1920 1080 1280 720 720 480 720 576
SXGA
1280×1024
WXGA
1280×768
Fit-V
Fit-H
Full
Fit-V
Fit-H
Full
: Black images are inserted here.
: The parts of the images protruding in these areas are cropped.
60
Page 61

4. Input/output signal settings
4-3-2. Adjusting the DVI input signals
Adjust the clock/phase and position of the DVI input signals.
1 Press the [FUNC] button to light its indicator
menu.
2 Turn [F1] to display the DVIPhs sub menu.
<Menu displa
DVIPhs Signal ClkPhs H-Pos V-Pos
9/11 IN5 0 0 0
3 Turn [F2] to select the input signal using the Signal item.
4 Turn [F3] to adjust the clock phase of the analog input signals using the ClkPhs item.
While viewing the image quality, set the value at which the noise level is minimized.
5 Turn [F4] to adjust the horizontal position using the H-Pos item.
6 Tur
n [F5] to adjust the vertical position using the V-Pos item.
y>
IN5~8
−16
~
+15
−100
~
+100
, and then press the [IN/OUT] button to display the IN/OUT
−100
~
+100
61
Page 62

4. Input/output signal settings
4-4. Setting the output signals
4-4-1. Types of output signals
There are five output signal types: PGM, PVW, AUX, MULTI and KEYOUT.
Five lines of output signals can be assigned to OUTPUT1 to 6.
PGM: This is the main-line output of the switcher
them are output.
PVW: This is the preview output which enab
AUX: Signals selected by the AUX b
MULTI: This is the multi vie
output to one screen.
KEYOUT: This outputs the ke
Connector Signal type Output (default) Assignment
PGM1, 2 SDI PGM Cannot be assigned.
OUTPUT1 SDI MULTI PGM, PVW, AUX, MULTI,
OUTPUT
OUTPUT3 (optional slot 1-1) ANALOG or D
OUTPUT4 (optional slot 1OUTPUT5 (optional slot 2-1) ANALOG or D
OUTPUT6 (optional slot 2-
2 SDI AUX
w display output. The multiple input signals and output signals are reduced and
y signals.
2) ANALOG A
2) ANALOG AUX
us are output.
; images with wipe, mix, key and other effects added to
les the next operation to be checked in advance.
KEYOut
VI MULTI
UX
VI MULTI
4-4-2. Assigning the output signals
Assign the output signals to OUTPUT1 to 6.
1 Press the [FUNC] button to light its indicator
2 Turn [F1] to display the Output sub menu.
3
Turn [F2] to select the signal name using the Signal item, and turn [F3] to set the type of output signal using
the Assign item.
<Menu display>
Output Signal Assign
2/11 OUT1 PGM
OUT1~6
PVW
AUX
Multi
KEYOut
, and press the [IN/OUT] button to display the IN/OUT menu.
62
Page 63

4. Input/output signal settings
4-5. Setting the sync signals
The sync signals to be used by the system can be selected.
External sync: For synchronization with an e
looped through and output.
BBST: Black burst signal (v
BBAD: Black b
TRI:
Internal sync: For synchronization with an inter
signal) is output from the two reference connectors.
urst signal
( Vertical phase of 90H when the 59.94i or 59.94p format is selected;
vertical phase of 75H when the 50i or 50p format is selected)
Tri-level sync signal (vertical phase of 0H)
This can be selected when HD f
xternal sync signal (gen-lock). The reference input signal is
ertical phase of 0H)
ormat signals are supplied.
nal reference signal (INT). The REFOUT signal (black burst
1
Press the [FUNC] button to light its indicator
menu.
2 Turn [F1] to display the Ref sub menu.
<Menu displa
Ref Sync BBSetup GenLock
3/11 BBST 7.5IRE Locked
3 Turn [F2], select the sync signal using the Sync item, and press the [F2] switch to enter the selection.
An asterisk () appears at the left of the reference signal currently selected.
4 Turn [F3] to select the setup level of the black burst signal in the internal synchronization mode using the
BBSetup item.
The setup lev
The genlock status is displayed in the GenLock item.
Locked: Synchronized with the exter
UnLock: Not synchronized with the exter
y>
BBAD
TRI
INT
0IRE UnLock
This setting takes effect when the video system is 59.94i or 59.94p.
el is fixed at 0 IRE when the system is 50i or 50p.
, and then press the [IN/OUT] button to display the IN/OUT
nal sync signal or internal reference signal
nal sync signal or internal reference signal
63
Page 64

4. Input/output signal settings
4-6. Adjusting the output signal phase
The phase of the output video signals can be adjusted.
1 Press the [FUNC] button to light its indicator
menu.
2 Turn [F1] to display the OutPhs sub menu.
<Menu displa
OutPhs System H-Phase V-Phase
4/11 1H 0 0
y>
0H
−1100
~
+1099
−100
~
+100
3 Turn [F2], and select 0H or 1H using the System item.
0H: The output video signals are output to the system REF signal with using in-phase.
The frame synchronizer function is ON for all input signals.
1H: The output video signals are output to the system REF signal with 1H delay.
When the frame synchronizer function is ON, the output video signals are output with 1 frame + 1H
delay.
4
Turn [F3] to adjust H phase using the H-Phase item
H-Phase can be adjusted within a range of –0.5H to +0.5H.
5 Turn [F4] to adjust V phase using the V-Phase item.
V-Phase can be adjusted within a range of –100H to +100H.
, and then press the [IN/OUT] button to display the IN/OUT
Output video signal phase adjustment
Phase Video format Adjustment range
H-Phase
-Phase Same for all formats −100 to 100
V
1080i/59.94i −1100 to 1099
1080/50i −13
720/59.94p −825 to 824
720/50p −990 to 989
480/59.94i −4
576/50i −432 to 431
29 to 4
20 to 1319
28
64
Page 65

4. Input/output signal settings
REF
(System standard)
• 1H Output
(+1H)
• 0H Output
(1F delay for REF and in-phase output)
Shortest
Output (+0.5H)
Longest Output
(+1.5H)
REF Phase Reference
Output Phase Variable Range
Output Phase Variable Range
Output Phase Variable Range
AVDL Range
AVDL Range
AVDL Range
Output Phase Variable Range
FS Range
H Phase (–0.5H to +0.5H) + V Phase vertical (100 lines)
H Phase (–0.5H to +0.5H) + V Phase vertical (100 lines)
Approx. -0.2H to +0.8H
Approx. -0.7H to +0.3H
Approx. +0.3H to +1.3H
Approx. 0.3H
+0.5H
Approx. 0.3H
+0.5H
Approx. 0.2H
Approx. 0.2H
Approx. 0.2H
Internal Fixed DL
Internal Fixed DL
Internal Fixed DL
Internal Fixed DL
MAX less than approximately 1 frame
H Phase (–0.5H to +0.5H) + V Phase vertical (100 lines)
H Phase (–0.5H to +0.5H) + V Phase vertical (100 lines)
<Phase adjustment setup>
AVDL Range: Range for automatic phase adjustment.
65
Page 66

4. Input/output signal settings
PGM
PVW
PGM
INPUT1 INPUT2 INPUT3 INPUT4
INPUT5 INPUT6 INPUT7 INPUT8
PVW
PVW
PGM
PVW
INPUT1 INPUT2 INPUT3 INPUT4
INPUT5 INPUT6 INPUT7 INPUT8
PGM
INPUT3 INPUT4
INPUT1 INPUT2
INPUT1 INPUT2 INPUT3
INPUT4 INPUT5 INPUT6
PGM
PGM
PVW
PVW
INPUT1 INPUT2 INPUT3
INPUT4 INPUT5 INPUT6
PVW
PVW
PGM
PGM
4-7. Setting the multi view display
The input images, program images and preview images can be output side by side on one screen on the external
monitor. There are three display modes for multi view display where the screen is divided into 10 parts, 4 parts or
8 parts.
Inputs 1 to 8, frame memories and color background can be assigned to sub-screens 1 to 8.
The images of the program output material are displayed with red frames around them.
<Display modes>
10-division modes A, B (10SPL-A, B):
Eight images are display
or frame memory images, and color background (CBGD) image.
4-division mode (4SPL):
Four images are displa
(CBGD) image.
8-division modes A, B (8SPL-A, B):
Six images are display
frame memory images, and color background (CBGD) image.
In this mode, the aspect r
are displayed in the SXGA size from the DVI output (option).
(Size is set to
“SXGA” and Scale is set to “5:4” using the DVI output settings.)
ed in these modes: the program (PGM) image, preview (PVW) image, input images
yed in this mode: the input images or frame memory images, and color background
ed in these modes: the program (PGM) image, preview (PVW) image, input images or
atio can be kept at 16:9 for the display of HD format images when these images
<10-division mode A>
The positions of the PGM and PVW images are
fixed.
<4-division mode>
<8-division mode A>
The positions of the PGM and PVW images are
fixed.
<10-division mode B>
The positions of the PGM and PVW images are
fixed.
<8-division mode B>
The positions of the PGM and PVW images are
fixed.
66
Page 67

4. Input/output signal settings
1 Press the [FUNC] button to light its indicator, and press the [IN/OUT] button to display the IN/OUT menu.
2 Turn [F1] to display the Multi sub menu.
<Men
u display>
Multi Split Char Pos Signal
6/11 10SPL-A On 1 PGM
10SPL-B
4SPL
8SPL-A
8SPL-B
3 Turn [F2] to select the display mode using the Mode item.
4 Turn [F3] to set whether to display the name of the material using the Char item.
ON:
The name of the material is displa
The “!” mark appears in front of the name of the material when no signals are input or signals with a
different format are input.
OFF:
If, however, the menu and the name of the material are selected for the OSD display, the menu display takes
5
Different settings are stored f
IN1-8 is the default setting for Pos1-8 in any of the modes.
The name of the material is not displa
priority, and the name of the material is not displayed.
Select the position (1
using the Signal item.
Off 1~8 IN1~8
FMEM1
FMEM2
CBGD
yed under the sub-screen.
yed.
to 8 in the figures) using the Pos item, and turn [F4] to set the name of the signal
or 10SPL, 4SPL and 8SPL.
67
Page 68

4. Input/output signal settings
Input
1/11
Output
2/11
Ref
3/11
OutPhs
4/11
OSD
5/11
[IN/OUT]
[BKGD PATT] [KEY PATT]
>
Signal
IN1
Signal
OUT2
Sync↓
BBST
System
1H
OSD
On
FS
On
Output
PVW
BBSetup
H-Phase
0
Select
PVW
Mode↓
Normal
GenLock
UnLock
V-Phase
0
AnaGain
-
SQ
4-8. Setting the on-screen display (OSD)
The menu screen is superimposed on the preview output or multi view display output for display.
1 Press the [FUNC] button to light its indicator
2 Turn [F1] to display the OSD sub menu.
<Men
u display>
OSD OSD Select
5/11 On PVW
Off
3 Turn [F2] to set whether to display the OSD using the OSD item.
On: OSD is displayed.
Off:
OSD is not displayed.
This function can be assigned to a user button. See 5-3-1.
4 Turn [F3] to set the output destination using the Select item.
PVW
Multi: The menu screen is superimposed onto the m
: The menu screen is superimposed onto the pre
Multi
, and press the [IN/OUT] button to display the IN/OUT menu.
view output, and output.
ulti view display output, and output.
When On is selected as the OSD item setting, the multi view displa
displayed on the monitor.
Examples of OSD displays
“>” appears to the left of the selected menu.
This indicates the wipe pattern for the background
transition.
68
y split frame and tally information are not
This indicates the wipe pattern for the
key transition.
Page 69

4. Input/output signal settings
4-9. Setting the DVI output signals (option)
Set the DVI output signals when the DVI/analog output boards (optional accessories) have been connected.
1 Press the [FUNC] button to light its indicator
2 Turn [F1] to display the DVIOut sub menu.
An aster
<Menu display>
DVIOut Signal Mode Size Scale
10/11 OUT3 Dig Auto Fit-V
3 Turn [F2] to select the output signal using the Signal item.
4 Turn [F3] to select the signal system using the Mode item, and press the [F3] switch to enter the selection.
Dig:
Ana: DVI analog signals (RGB) are output from the D
When “Ana”
F
5 Turn [F4] to select the resolution of the images to be output, and press the [F4] switch to enter the selection.
A
If the equipment inf
XGA: The images are output at the 102
WXGA: The images are output at the 12
SXGA: The images are output at the 12
WSXGA+: The images are output at the 1680 × 1050 resolution and 60 Hz frequency.
UXGA+: The images are output at the 1600 × 12
WUXGA: The images are output at the 192
6 Turn [F5] to select the scaling method, and press the [F5] switch to enter the selection.
Fit-V
(Blac
Fit-H: The aspect ratio of the output images is maintained, and the siz
(Blac
Full: The size of the output images is increased or reduced in accordance with the system resolution.
(The aspect ratio of the output images is not maintained. The rate at which the image size is
5:4: When HD is set as the system for
isk () appears at the left of the parameter currently selected.
OUT5
DVI digital signals are output from the DVI connector.
which is connected. If it is off, adjust the position at the monitor.
or details on the adjustment method, refer to the operating instructions of the monitor.
uto: The equipment infor
: The aspect ratio of the output images is maintained, and the siz
reduced in accordance with the vertical resolution.
images are cropped.)
reduced in accordance with the horizontal resolution.
images are cropped.)
increased or reduced in the vertical direction differs from that in the horizontal direction.)
the display in the 8-division mode of the multi view display fills the entire screen with no change in the
aspect ratio.
Ana XGA
WXGA
SXGA
WSXGA+
UXGA
WUXGA
has been selected, the display position of the image may be off depending on the monitor
mation of the output destination is captured by the DVI signals, and the
images are output at the optimum resolution. (The vertical frequency is 60 Hz, and the maximum
resolution is SXGA for analog output signals and WUXGA for digital output signals.)
ormation cannot be captured or if the resolution and frequency which can be
output by the product are not contained in the equipment information, the images will be output
at the XGA setting.
only when digital signals are output.)
only when digital signals are output.)
only when digital signals are output.)
k bands are inserted into the areas where there are no images. The protruding parts of the
k bands are inserted into the areas where there are no images. The protruding parts of the
, and press the [IN/OUT] button to display the IN/OUT menu.
Fit-H
Full
5:4
VI connector.
4 × 768 resolution and 60 Hz frequency.
80 × 768 resolution and 60 Hz frequency.
80 × 1024 resolution and 60 Hz frequency.
(This can be selected
00 resolution and 60 Hz frequency. (This can be selected
0 × 1200 resolution and 60 Hz frequency. (This can be selected
e of the images is increased or
e of the images is increased or
mat and SXGA is set for the resolution of the images to be output,
69
Page 70

4. Input/output signal settings
4-10. Setting the ancillary data
In this section, the function for allowing the ancillary data of the SDI input signals to pass through is set.
If SD format signals are input while the HD format has been set as the system format, it will not be possible for
their ancillary data to be passed through.
Setting the V ancillar
It is possible to decide whether to allow the V ancillary data, which is superimposed in the vertical blanking
period of the input images, to pass through the PGM bus.
The background bus data which is output to program (PGM) is passed through for images whose transition has
been cut off.
During a transition, the background bus data which was output to program (PGM) immediately before is passed
through.
1
Press the [FUNC] button to light its indicator
2 Turn [F1] to display the VAnci sub menu.
<Men
u display>
Anci VAnci E.Audio
7/11 Off Off
On
3 Turn [F2] to select On or Off for the V ancillary data using the VAnci item.
On: In the case of the HD for
In the case of the SD format, the ancillary data starting with line 14 is passed through.
Off: The data is not passed through.
Setting the embedded audio data
The embedded audio data of the input images can be passed through the A
(If PGM, PVW or CLN is selected as the AUX bus source, the embedded audio data cannot be passed
through.)
On the Anci sub men
On: The data is passed through.
Off: The data is not passed through.
When “On” has been selected, the V ancillary data of the input images is also passed through at the same time.
y data
On
u, turn [F
, and press the [IN/OUT] button to display the IN/OUT menu.
mat, the ancillary data starting with line 10 is passed through.
UX bus.
2] to select On or Off for the embedded audio data using the E.Audio item.
70
Page 71

5. System settings
5-1. Selecting the video format
One system (input/output signal) video format can be selected.
1 Press the [FUNC] button to light its indicator
menu.
2 Turn [F1] to display the Format sub menu.
3 Turn [F2], select the format using the Mode item, and press the [F2] switch to enter the selection.
An aster
<Menu display>
Format Mode
1/14
isk () appears at the left of the format currently selected.
1080/59.94i
1080/50i
720/59.94p
720/50p
480/59.94i
576/50i
, and then press the [SYSTEM] button to display the SYSTEM
71
Page 72

5. System settings
5-2. Setting the crosspoints
5-2-1. Assigning signals to the crosspoints
External video input signals and internally generated signals can be assigned to crosspoint buttons 1 to 10.
Displaying the assignment statuses
1 Press the [FUNC] b
2 Turn [F1] to display the XPTStats sub menu.
The names of the assigned signals are ab
<Menu display>
XPTStats
1/3
When one of the crosspoint buttons 1 to 10 is held down for a long time, the name of the signal assigned is
displayed on the LCD while the button is held down.
Example: When crosspoint button 1 is pressed (when the INPUT1 signal has been assigned to this button).
XPTStats SIG:IN1
SIG:B 1 2 3 4 5 6 7 8 G
XPT:1 2 3 4 5 6 7 8 9 10
XTP:1
utton to light its indicator, and then press the [XPT] b
breviated on the display.
utton to display the XPT menu.
Assigning signals to the crosspoints
1 Press the [FUNC] button to light its indicator, and then press the [XPT] b
2 Turn [F1] to display the XPTAsign sub menu.
3 Turn [F2], select the crosspoint button using the XPT item, turn [F3] and select the input signal using the
Signal item.
<Menu display>
XPTAsign XPT Signal
2/3 1 IN1
1~10
The table below lists the materials which can be assigned.
Button Signal Abbreviation Description
XP1 to 10 INPUT1 to 8 IN1 to 8 1 to 8 SDI, analog component and DVI
BLACK Black B
COLOR BACKGROUND CBGD G
COLOR BAR CBAR C
FRAME MEMOR
None None —
IN1~8
Black
CBGD
CBAR
FMEM1
FMEM2
None
Y1, 2 FMEM1,
2 F1, F2
utton to display the XPT menu.
Internally generated signal, black
Internally generated signal, color
background
Internally generated signal, color bar
Frame memory image
No assignment
The image will not be changed by pressing any b
utton to which “None” is assigned.
72
Page 73

5. System settings
The table below lists the default settings.
Button Signal Description
XP1 BLACK Internally generated signal, black
XP2 INPUT1 External video input 1:
XP3 INPUT
XP4 INPUT3 External video input 3: SDI
XP5 INPUT4 External video input 4: SDI
XP6 INPUT5 External video input 5: SDI, analog component and DVI
XP7 INPUT6 External video input 6: SDI, analog component and DVI
XP8 INPUT7 External video input 7: SDI, analog component and DVI
XP9 INPUT8 External video input 8: SDI, analog component and DVI
XP10 CBGD Internally generated signal, color background
2 External video input
If the optional circuit board has not been connected, black images are input for INPUT5 to 8.
5-2-2. Setting the crosspoint switching
The timing at which the crosspoints are to be switched can be set.
SDI
2: SDI
1 Press the [FUNC] button to light its indicator, and then press the [XPT] b
utton to display the XPT menu.
2 Turn [F1] to display the XPTSwch sub menu.
3 Tur
n [F2], and select the switching timing using the Timing item.
<Menu displa
XPTSwch
3/3 Any
y>
Timing
Field1
Field2
Any: The crosspoints are switched in the nearest field. This is suited to live applications.
Field1: The crosspoints are switched in field 1.
Field2: The crosspoints are switched in field 2
This is suited to editing applications.
. This is suited to editing applications.
73
Page 74

5. System settings
5-3. Button assignments
5-3-1. Setting the user buttons
The user can assign several functions which can be set using the menu items into two user buttons (USER 1 and
USER 2).
The user buttons light in amber when the assigned function is ON and are off when the assigned function is OFF.
Each time the user button is pressed, the function setting alternates between ON and OFF.
The table below lists the functions which can be assigned to the user buttons.
Function Description Menu
PinPPVW ON or OFF for preview of picture-in-picture (PinP)
effect
DSKPVW ON or OFF for preview of downstream key (DSK) DSK menu DSK sub menu PVW
EditEN ON or OFF f
GPIEN ON or OFF for enabling control from GPI port SYSTEM menu GPI sub menu GPIEN
OSD ON or OFF for OSD display IN/OUT menu OSD sub menu OSD
<Setting method>
1 Press the [FUNC] button to light its indicator
2 Turn [F1] to display the Button sub menu.
3
Turn [F2] to select the function to be assigned to the USER 1 button using the USER1 item.
4
Turn [F3] to select the function to be assigned to the USER 2 button using the USER2 item.
<Men
u display>
Button USER1 USER2 FTB
3/14 PinPPVW DSKPVW FTB
DSKPVW
EditEN
GPIEN
OSD
connector
PinPPVW
EditEN
GPIEN
OSD
or enabling control from RS-4
, and press the [SYSTEM] button to display the SYSTEM menu.
KEYAuto
Disable
22
PinP menu PinP sub menu PVW
SYSTEM menu System sub menu EDITEN
5-3-2. Setting the FTB button
A function can be assigned to the FTB button or the button’s function can be disabled.
On the Button sub menu, turn [F4] to set assignment to the FTB button using the FTB item.
FTB:
KeyAuto: The auto transition of the k
Disable: The FTB button’
The fade to b
lack (FTB) effect is executed.
ey is executed.
s function is disabled.
74
Page 75

5. System settings
5-4. Setting the date and time
The user can set the date and time to be used as the SD memory card’s time stamp. Be absolutely sure to set
them when an SD memory card is to be used.
Setting the date
1 Press the [FUNC] button to light its indicator
2 Turn [F1] to display the Date sub menu.
3
Turn [F2] to set the year using the Year item.
4
Turn [F3] to set the month using the Month item.
5
Turn [F4] to set the day using the Date item.
6
Press the [F5] switch to enter the y
<Menu display>
Date Year Month Date Set
11/14 2007 11 1
2000
2099
Setting the time
1 Press the [FUNC] button to light its indicator
2 Turn [F1] to display the Time sub menu.
3
Turn [F2] to set the hour using the Hour item.
4
Turn [F3] to set the minutes using the Minute item.
5
Turn [F4] to set the seconds using the Second item.
6
Press the [F5] switch to enter the hour/min
<Menu display>
Time Hour Minute Second Set
12/14 0 0 0
0~23
1~12 1~31
~
0~59 0~59
ear/month/day.
, and press the [SYSTEM] button to display the SYSTEM menu.
, and press the [SYSTEM] button to display the SYSTEM menu.
utes/seconds.
75
Page 76

5. System settings
5-5. Network settings
Proceed with the network settings to perform such tasks as updating the software version via LAN.
The network initial setup is: IP address: 192.168.0.10, subnet mask: 255.255.255.0 and gateway: 0.0.0.0 (unused).
When using the host computer with settings matching the network setup, it is not necessary to setup via the
menu.
For the setting to take effect, the system must be rebooted. Turn the system’s power off and then back on.
Setting the IP address
1
Press the [FUNC] button to light its indicator
menu.
2 Turn [F1] to display the Network1 sub menu.
3 Turn [F2] to [F5] to set the IP address, and press the [F5] switch (Save) to enter the address.
<Men
u display>
NetWork1 IP Address Save
7/14 192 168 0 1
0~255
Setting the subnet mask
1 Press the [FUNC] button to light its indicator
menu.
2 Turn [F1] to display the Network2 sub menu.
3 Turn [F2] to [F5] to set the subnet mask, and press the [F5] switch (Save) to enter the mask.
<Men
u display>
NetWork2 Subnet Mask Save
8/14 255 255 255 0
0~255
0~255 0~255 0~255
0~255 0~255 0~255
, and then press the [SYSTEM] button to display the SYSTEM
, and then press the [SYSTEM] button to display the SYSTEM
Setting the gateway
1 Press the [FUNC] button to light its indicator
menu.
2 Turn [F1] to display the Network3 sub menu.
3 Turn [F2] to [F5] to set the gateway, and press the [F5] switch (Save) to enter the gateway.
<Men
u display>
NetWork3 Gateway Save
9/14 0 0 0 0
0~255
Display the MAC address
1 On the SYSTEM menu, tur
The MAC address now appears.
<Menu display> (When the MAC address is “008045448000”.)
NetWork4 MAC Address
10/14 008045448000
0~255 0~255 0~255
n [F1] to display the Network4 sub menu.
, and then press the [SYSTEM] button to display the SYSTEM
76
Page 77

5. System settings
5-6. Other settings
5-6-1. Setting the LCD backlight
The LCD backlight can be set to ON or OFF.
1 Press the [FUNC] button to light its indicator
menu.
2 Turn [F1] to display the System sub menu.
T
urn [F3], and select ON or OFF for the backlight using the LCD-BL item.
<Menu display>
System BusMode LCD-BL EditEN
2/14 PGM/PST On On
A/B
Off Off
5-6-2. Setting editor enable
The user can set whether to enable control from an external device (editor) connected to the RS-422 connector.
On the System sub menu, turn [F4] to set On or Off for control from the external device (editor) connected to
the RS-422 connector using the EditEN item.
On:
Control is enabled.
Off: Control is disabled.
EditEN item On and Off can be assigned to one of the user buttons
, and then press the [SYSTEM] button to display the SYSTEM
. See 5-3-1.
77
Page 78

5. System settings
5-6-3. Setting the GPI
The user can set the functions that are to be controlled from the GPI ports and set whether to enable the control.
1 Press the [FUNC] button to light its indicator
2 Turn [F1] to display the GPI sub menu, and turn [F2] to set the function to be controlled by the GPI port 1
using the GPI1 item.
<Men
u display>
GPI GPI1 GPI2 GPIEN
4/14 AUTO DSK On
CUT
DSK
PinP
FTB
BGDAUTO
BGDCUT
KEYAUTO
KEYCUT
3 Turn [F3] to set the function to be controlled by the GPI port 2 using the GPI2 item.
4 Turn [F4] to set On or Off for the control from the GPI port using the GPIEN item.
On:
Control is enabled.
Off: Control is disabled.
GPIEN item On and Off can be assigned to one of the user buttons
AUTO
CUT
PinP
FTB
BGDAUTO
BGDCUT
KEYAUTO
KEYCUT
Off
, and press the [SYSTEM] button to display the SYSTEM menu.
. See 5-3-1.
78
Page 79

5. System settings
5-7. Status displays
5-7-1. Alarm status displays
These displays indicate a trouble status (alarm) in the power supply or fan.
1 Press the [FUNC] button to light its indicator
2 Turn [F1] to display the Alarm sub menu.
<Men
u display>
Alarm Power Fan
6/14 NoAlarm NoAlarm
Alarm
Power: This indicates a trouble status (alarm) in the power supply.
Alarm: Trouble
NoAlarm: No trouble
Fan: This indicates a trouble status (alarm) in the f
Alarm: Trouble
NoAlarm: No trouble
Alarm
, and press the [SYSTEM] button to display the SYSTEM menu.
an.
79
Page 80

5. System settings
5-7-2. Displaying the version information and option information
Information on the unit’s software and hardware versions and the statuses of the options are displayed.
1 Press the [FUNC] button to light its indicator
2 Turn [F1] to display the MainVer sub menu.
3
Turn [F2] to select the item whose version is to be displayed using the Select item.
4
The version information is displayed in the Version item.
The system version information is displayed in the SysVer item.
<Menu display>
MainVer Select Version SysVer
13/14 Soft 1.00 1.00.00
Control
Panel
Input
Soft: The software version information is displayed.
Control, Panel, Input, M/E:
The hardware version information is displayed.
5 Turn [F1] to display the OptVer sub menu.
<Men
OptVer Select Board Version
14/14 IN-SL1 SDI 0001
6 Turn [F2] to select the option slot using the Select item.
7 The types of the optional boards connected are display
IN-SL1, 2 (option input slots 1, 2)
SDI: SDI input board
Analog: Analog input board
DVI: DVI input board
None: No optional board
OUT-SL1, 2 (option output slots 1, 2)
Analog: Analog output board
DVI/Ana: DVI/analog output board
None: No optional board
8 The optional board version inf
M/E
u display>
IN-SL2
OUT-SL1
OUT-SL2
ormation is displayed in the Version item.
, and press the [SYSTEM] button to display the SYSTEM menu.
ed in the Board item.
80
Page 81

5. System settings
5-8. Initialization
Initialization returns the set data to the factory shipment status.
(The date and time data is not initialized.)
1 Press the [FUNC] button to light its indicator
menu.
2 Turn [F1] to display the Initial sub menu.
<Menu displa
Initial Init
5/14
3 Press [F2] to initialize the settings. The “Init?” message appears.
4 To initialize the settings, turn [F2] to select YES, and then press the [F2] switch.
T
o cancel the initialization, turn [F2] to select NO, and then press the [F2] switch.
<Menu display>
Initial Init?
5/14 No
y>
YES
, and then press the [SYSTEM] button to display the SYSTEM
81
Page 82

6. External interfaces
12345
9 8 7 6
This unit comes with RS-422, GPI and tally connectors to serve as external interfaces.
6-1. RS-422 connector
This enables the unit to be controlled by an external device.
Use it with the settings below. (D-sub 9-pin, female)
Baud rate: 38400 bps
Parity: ODD
Stop bit: 1 bit
Pin assignment
Pin No. Signal name Description of signal
1 FRAME GROUND Frame ground
2 TXD – Send data (–)
3 RXD + Receive data (+)
4 GROUND Ground
5 NC Not used
6 GROUND Ground
7 TXD + Send data (+)
8 RXD – Receive data (–)
9 FRAME GROUND Frame ground
The following lists the functions which can be controlled by editing controller AG-A850.
(Compliant with the GVG protocol)
• Crosspoint switch
• Wipe pattern selection (BKGD)
• Transition mode (MIX/WIPE) selection
• Auto transition time setting
• Auto transition execution
<Table of wipe patterns supported>
RS-422 control AV-HS400 RS-422 control AV-HS400 RS-422 control AV-HS400 RS-422 control AV-HS400
0
1 WIPE #2 13 SQ #2 25 SL #
2 WIPE #3 14 SQ #3 26 SL #3 38 3D #3
3 WIPE #4
4 WIPE #5
5 WIPE #6
6 WIPE #7
7 WIPE #8
8 WIPE #9 2
9 WIPE #10 21 SQ #10 33 — 45 3D #10
10 WIPE #11 22 — 34 — 46 3D #11
11 WIPE #1
WIPE #1 12 SQ #1 24 SL #1 36 3D #1
2 37 3D #2
15 SQ #4 27 SL #4 39 3D #4
16 SQ #5 28 — 40 3D #5
17 SQ #6 29 SL #6 41 3D #6
18 SQ #7 30 SL #7 42 3D #7
19 SQ #8 31 SL #8 43 3D #8
0 SQ #9 32 SL #9 44 3D #9
2 23
SQ #12 35 — 47 3D #12
: Set “No. 256” when control is to be exercised from the AG-A850.
On the System sub menu of the SYSTEM menu, set On or Off for control from the external device (editor)
connected to the RS-422 connector
.
For details on the settings, see 5-6-2.
82
Page 83

6. External interfaces
GPI2 COMMON
GPI1
6-2. GPI connector
These connectors enable the unit to be controlled from an external source.
Signals are input using contacts. The following types of control are exercised
using the contacts as triggers. Use stereo mini plugs with a 3.5 mm diameter
for connection to the unit.
<Control functions that can be assigned>
Function assigned Description of control Remarks
AUTO Control exercised using AUTO button on unit’s panel
CUT Control exercised using CUT button on unit’s panel
DSK Control exercised using DSK button on unit’s panel
PinP Control exercised using PinP button on unit’s panel
FTB Control exercised using FTB button on unit’s panel
BGDAUTO Auto transition control for background Control is exercised regardless of the
BGDCUT Cut transition control for background
KEYAUTO Auto transition control for key
KEYCUT Cut transition control for key
selection statuses of the switches
and buttons on the unit’s panel.
<Initial setting>
Port Function assigned Description of control
GPI1 AUTO Control exercised using AUTO button on unit’s panel
GPI2 DSK Control ex
Use the GPI sub menu under the SYSTEM menu to set the functions to be controlled using the external switches
connected to the GPI ports and to enable or disable the control using the external switches.
For details on the settings, see 5-6-3.
ercised using DSK button on unit’s panel
83
Page 84

6. External interfaces
54321
9 10 11 12613714815
6-3. Tally connector
The tally connector comes with tally output, output enable, power supply or fan alarm output pins.
The output signals from the tally output pins are for lighting the tally lamps, and these outputs are open collector
outputs.
(D-sub 15-pin male)
Pin assignment
Pin No. Signal name Input/output Description of signal
1 IN1 Open collector output Tally output of input video 1
2 IN
3 IN3 Open collector output T
4 IN4 Open collector output Tally output of input video 4
5 IN5 Open collector output Tally output of input video 5
6 IN6 Open collector output Tally output of input video 6
7 IN7 Open collector output Tally output of input video 7
8 IN8 Open collector output Tally output of input video 8
9 ALARM Open collector output Fan alarm or power supply alarm output
10, 11, 1
2 RESERVED K
13 ENABLE Input Enable signal of tally output and alarm output
14, 15 GROUND GROUND Ground
2 Open collector output Tally output of input video 2
ally output of input video 3
eep these pins unconnected.
Open: Output; GND: no output
Pins 1 to 9 must satisfy the following conditions:
Dielectric strength: Max. DC 24 V
Current: Max. 50 mA
Example of tally connections
AV-HS400N
Tally, Alarm output
(IN1 to 8, ALARM)
(Max. current: 50mA)
GROUND
(Max. voltage: 24V)
Tally LED
84
Page 85

7. Setting menu table
A setting is entered when an item displayed (↓) is selected and then the [F1], [F2], [F3], [F4] or [F5] switch is
pressed.
(It will not be entered unless the switch is pressed.)
Menu
TIME BKGD Parameter TransTime Unit —
WIPE Border Parameter Border Width Soft
COLOR CBGD Parameter Hue Sat Lum Load
Sub menu
Turn F1 to select. Turn F2 to select. Turn F3 to select. Turn F4 to select. Turn F5 to select.
1/5 Setting range 0 to 13s 0 to 999f Frame, Sec —
Default value 1s 0f Sec —
KEY Parameter TransTime Unit —
2
/5
DSK Parameter TransTime Unit —
3/5 Setting range 0 to 13s 0 to 999f Frame, Sec —
PinP Parameter TransTime Unit —
4/5 Setting range 0 to 13s 0 to 999f Frame, Sec —
FTB Parameter Unit —
5/5 Setting range 0 to 13s 0 to 999f Frame, Sec —
1/5 Setting range On, Off 0.1 to 100.0 0.0 to 100.0
BodrCol Parameter Hue Sat Lum Load
/5
2
WIPEPos Parameter Select X-Pos Y-Pos CopyTO
3/5 Setting range BKGD, KEY −100.00 to
SQPos Parameter Select X-Pos Y-Pos CopyTO
4/5 Setting range BKGD, KEY −100.00 to
Modify Parameter Light Trim
5/5 Setting range On, Off Off, 4:3
1/1 Setting range 0.0 to 359.9 0.0 to 100.0 0.0 to 108.0 White, Yellow,
Setting range
Default value 1s 0f Sec —
Default value 1s 0f Sec —
Default value 1s 0f Sec —
Default value 1s 0f Sec —
Default value Off 5.0 0.0
Setting range
Default value 0.0 0.0 100.0 White
Default value BKGD 0.00 0.00
Default value BKGD 0.00 0.00
Default value Off Off
Default value 0.0 0.0 100.0 White
Parameter 1 Parameter 2 Parameter 3 Parameter 4
0 to 13s 0 to 999f Frame, Sec —
↓
0.0 to 359.9 0.0 to 100.0 0.0 to 108.0 White
−100.00 to
+100.00
+100.00
+100.00
−100.00 to
+100.00
Y
ellow
,
Cyan,Green
Magenta,Red
Blue,Black
↓
Display only
↓
Display only
(Selection enabled
when HD format is
used)
↓
Cyan, Green,
Magenta, Red,
Blue, Black
,
,
,
85
Page 86

7. Setting menu table
Menu
KEY KEY Parameter Type LumKey Fill PVW
CHR KEY Auto Parameter Marker Aspect Sample
FREEZE Status Display only
Sub menu
Turn F1 to select. Turn F2 to select. Turn F3 to select. Turn F4 to select. Turn F5 to select.
1/8 Setting range Lum, Linear,
Default value Linear ChrmOff Bus Auto
Adjust Parameter Clip Gain Density Invert
/8
2
FillMatt Parameter Hue Sat Lum Load
3/8 Setting range 0.0 to 359.9 0.0 to 100.0 0.0 to 108.0 White, Yellow,
Edge Parameter Type Width
4/8 Setting range Off, Border, Drop,
EdgeCol Parameter Hue Sat Lum Load
5/8 Setting range 0.0 to 359.9 0.0 to 100.0 0.0 to 108.0 White, Yellow,
Mask Parameter Mask Invert
6/8 Setting range On, Off On, Off
MaskAdj Parameter Left Top Bottom Right
7/8 Setting range −50.00 to +50.00 −50.00 to +50.00 −50.00 to +50.00 −50.00 to +50.00
Trans Parameter OutPatt
8/8 Setting range Nor, Rev
1/3 Setting range On, Off −50.00 to +50.00 Start
Adjust1 Parameter Hue Sat Lum Y-Infl
2/3
Adjust2 Parameter Hue-Rad Sat-Rad Soft Cancel
3/3 Setting range 0.0 to 100.0 0.0 to 100.0 0.0 to 100.0 0.0 to 100.0
1/2
Freeze P
2/2
Setting range
Default value 0.0 100.0 100.0 Off
Default value 0.0 0.0 100.0 White
Default value Off 2
Default value 0.0 0.0 0.0 Black
Default value Off Off
Default value −
Default value Nor
Default value Off 0.00
Setting range
Default value 354.0 100.0 7.0 0
Default value 100.0 50.0 0 0
arameter Signal Select Freeze
ange IN1 to 8 Frame, Field Toggling between
Setting r
Default value — Frame Off
Parameter 1 Parameter 2 Parameter 3 Parameter 4
ChrmOn, ChrmOff Bus, Matte Auto, On, Off
Chroma
0.0 to 108.0 0.0 to 200.0
0 to 4
Shadow, Outline
25.00 +
0.0 to 359.9 0.0 to 100.0 0.0 to 110.0 0.0 to 100.0
FRZ:
XPT:1 2 3 4 5 6 7 8 9 10
25.00 −25.00 +25.00
0.0 to 100.0 On, Off
↓
Cyan, Green,
Magenta, Red,
Blue, Black
↓
Cyan, Green,
Magenta, Red,
Blue, Black
On and Off
↓
↓
86
Page 87

7. Setting menu table
Menu
DSK DSK Parameter Type Fill PVW
PinP PinP Parameter Density PVW
Sub menu
Turn F1 to select. Turn F2 to select. Turn F3 to select. Turn F4 to select. Turn F5 to select.
1/5 Setting range Lum, Linear Bus, Matte On, Off
Default value Linear Bus Off
Adjust Parameter Clip Gain Density Invert
2/5
FillMatt Parameter Hue Sat Lum Load
3/5 Setting range 0.0 to 359.9 0.0 to 100.0 0.0 to 108.0 White, Yellow,
Edge Parameter Type Width
4/5 Setting range Off, Drop, Shadow 0 to 4
EdgeCol Parameter Hue Sat Lum Load
5/5 Setting range 0.0 to 359.9 0.0 to 100.0 0.0 to 108.0 White, Yellow,
1/6 Setting range 0.0 to 100.0 On, Off
Border Parameter Border Width Soft
2
/6
BodrCol Parameter Hue Sat Lum Load
3/6 Setting range 0.0 to 359.9 0.0 to 100.0 0.0 to 108.0 White, Yellow,
Position Parameter X-Pos Y-Pos Size
4/6 Setting range −50.00 to +50.00 −50.00 to +50.00 0.00 to 100.00
Trim P
5/6 Setting range Off, 4:3, Manual Free, Pair
TrimAdj Parameter Left Top Bottom Right
6/6 Setting range −50.00 to +50.00 −50.00 to +50.00 −50.00 to +50.00 −50.00 to +50.00
Setting range
Default value 0.0 100.0 100.0 Off
Default value 0.0 0.0 100.0 White
Default value Off 2
Default value 0.0 0.0 0.0 Black
Default value 100.0 Off
Setting range
Default value Off 5.0 0.0
Default value 0.0 0.0 100.0 White
Default value 0.00 0.00 2
arameter Trim Manual
Default value Off Free
Default value −40.00 +40.00 −40.00 +40.00
Parameter 1 Parameter 2 Parameter 3 Parameter 4
0.0 to 108.0 0.0 to 200.0
Off, On 0.1 to 100.0 0.0 to 100.0
0.0 to 100.0 On, Off
Cyan, Green,
Magenta, Red,
Blue, Black
Cyan, Green,
Magenta, Red,
Blue, Black
Cyan, Green,
Magenta, Red,
Blue, Black
5.00
↓
↓
↓
87
Page 88

7. Setting menu table
Menu
IN/OUT Input Parameter Signal FS Mode
Sub menu
Turn F1 to select. Turn F2 to select. Turn F3 to select. Turn F4 to select. Turn F5 to select.
1/11 Setting range IN1 to 8 On, Off
Default value — On Normal 0
Output Parameter Signal Assign
/11
2
Ref Parameter Sync
3/11 Setting rangeBBST, BBAD,
OutPhs Parameter System H-Phase V-Phase
4/11 Setting range 0H, 1H −13
OSD Parameter OSD Select
5/11 Setting range On, Off PVW, Multi
Multi Parameter Split Char Pos Signal
6/11 Setting range 10SPL-A,
Anci Parameter VAnci E.Audio
7/11 Setting range On, Off On, Off
DVIIn Parameter Signal Mode Scale Auto
8/11 Setting range IN5 to 8 Dig, Ana Fit-V, Fit-H, Full Black, White, Init
DVIPhs Parameter Signal ClkPhs H-Pos V-Pos
9/11 Setting range IN5 to 8 −16 to 15 −100 to 100 −100 to 100
DVIOut Parameter Signal Mode
10/11 Setting range OUT3, OUT5
UpConvt Parameter Signal Scale
11/11 Setting range IN5 to 8
Setting range
Default value —
Default value BBST 7.5IRE —
Default value 1H 0 0
Default value On PVW
ault value 10SPL-A On — —
Def
Default value Off Off
Default value — Dig Fit-V Black
Default value — 0 0 0
Default value — Dig Auto Fit-V
Default value — SQ 3 3
Parameter 1 Parameter 2 Parameter 3 Parameter 4
Normal, UC,
AUTO, D by D
OUT1 to 6 PGM, PVW, AUX,
Multi, KEYOut
↓
TRI, INT
10SPL-B, 4SPL,
8SPL-A, 8SPL-B
BBSetup GenLock
0IRE, 7.5IRE Locked, UnLock
20 to +1319
On, Off 1 to 8
↓
Dig, Ana
↓
SQ, EC, LB
−100 to +100
(1 to 4)
(1 to 6)
Size
Auto, XGA,
WXGA, SXGA,
WSXGA+, UXGA,
WUXGA
MovDet
1 to 5
↓
↓
↓
AnaGain
−30 to +30
IN1 to 8, FMEM1,
2, CBGD
FMEM
↓
↓
Scale
Fit-V, Fit-H, Full,
5:4 (“5:4” can be
selected when
SXGA has been
selected as the
Size item setting.)
↓
Sharp
1 to 5
88
Page 89

7. Setting menu table
Menu
MEMORY PSMEM Parameter Mode NO.Sel XPT Exec
XPT XPTStats Display only
SYSTEM Format Parameter Mode
Sub menu
Turn F1 to select. Turn F2 to select. Turn F3 to select. Turn F4 to select. Turn F5 to select.
1/3 Setting range Store, Recall,
Default value — — — —
FMEM Parameter Signal Store Exec
/3
2
SDCard Parameter Mode
3/3 Setting rangeLoad, Save, Init,
1/3
XPTAsign Parameter XPT Signal
/3
2
XPTSwch Parameter Timing
3/3 Setting range An
1/14 Setting range1080/59.94i, 1080/50i,
System Parameter BusMode LCD-BL EditEN
/14 Setting range A/B,
2
Button Parameter USER1 USER2 FTB
3/14 Setting range
Setting range
Def
Def
Setting range
Def
Default value Any
Default value 1080/59.94i
Default value PGM/PST On On
Default value PinPPVW DSKPVW FTB
alue — — —
ault v
ault value — — —
ault value — — —
Parameter 1 Parameter 2 Parameter 3 Parameter 4
1 to 10 Disable, Enable
Clear
AUX FMEM1, FMEM
↓
No Card
SIG:B 1 2 3 4 5 6 7 8 G
XPT:1 2 3 4 5 6 7 8 9 10
1 to 10 IN1 to 8, Black,
y, Field1, Field
↓
720/59.94p
480/59.94i, 576/50i
PGM/PST
PinPPVW,
DSKPVW, EditEN,
GPIEN, OSD
2
Select SaveFile Ex
FMEM1, FMEM2,
System
CBGD, CBAR,
FMEM1, FMEM2,
None
2
, 720/50p,
On, Off On, Off
PinPPVW,
DSKPVW, EditEN,
GPIEN, OSD
HS070531100000
FTB, KEYAuto,
Disable
ec
↓
↓
↓
89
Page 90

7. Setting menu table
Menu
SYSTEM GPI Parameter GPI1 GPI2 GPIEN
Sub menu
Turn F1 to select. Turn F2 to select. Turn F3 to select. Turn F4 to select. Turn F5 to select.
4/14 Setting range AUTO, CUT,
Default value AUTO DSK ON
Initial Parameter Init
5/14 Setting range
Alarm Parameter Power Fan
6/14 Setting range Alarm, NoAlarm Alarm, NoAlarm
Default value
NetWork1 Parameter IP Ad
7/14 Setting range 0 to 255 0 to
Default value 19
NetW
ork2 P
8/14 Setting r
NetWork3 Parameter Gateway
9/14 Setting range 0 to 255 0 to
NetWork4 Parameter MAC Address
10/14 Display only
Date Parameter Year Month Date Set
11/14 Setting range 2
Time Parameter Hour Minute Second Set
12/14
MainVer Parameter Select Version SysVer
13/14 Setting range Soft, Control,
OptVer Parameter Select Board Version
14/14 Setting range IN-SL1, IN-SL
arameter Subnet Mask Save
ange 0 to 255 0 to
Default value 2
Default value 0 0 0 0
Default value — — — —
ange 0 to 23 0 to 59 0 to 59 —
Setting r
ault value — — — —
Def
Parameter 1 Parameter 2 Parameter 3 Parameter 4
AUTO, CUT,
DSK, PinP, FTB,
BGDAUTO,
BGDCUT,
KEYAUTO,
KEYCUT
↓
dress Sa
2 168 0 1
55 2
Save
000 to 2
099 1 to 12 1 to 31 —
Panel, Input, M/E
OUT
-SL1,
OUT-SL2
DSK, PinP, FTB,
BGDAUTO,
BGDCUT,
KEYAUTO,
KEYCUT
↓
ve
255 0 to 255 0 to 255
↓
255 0 to 255 0 to 255
55 2
↓
255 0 to 255 0 to 255
Version number Version number
2,
SDI, Analog, DVI,
DVI/Ana, None
ON, OFF
55 0
Version number
↓
↓
90
Page 91

8. Appearance
POWER
ALARM
F1 F2 F3 F4 F5
KEY DSK PinP AUX CLN PVW PGM 1 2
USERAUX SOURCEAUX BUS DELEGATION
1 2 3 4 5 6 7 8 9 10
AUX
PGM/A
PST/B
BKGD PATT
KEY PATT
FUNC N/R R
WIPE DIRECTIONWIPE PATTERN / FUNCTION
ON
WIPE SQ
SL 3D
POSITIONER
Z
ON
FTB
PinP
DSKCUT AUTO
MIX WIPE
BKGD KEY
MIX
WIPE
PAGE
AMB:FILL / GRN:SOURCE
Multi-format Live Switcher AV-HS400
11
TIME WIPE COLOR
KEY CHR KEY FREEZE
DSK PinP IN/OUT
MEMORY XPT SYSTEM
1 2 3
4 5 6
7 8 9
10 12
POWER
1
REF
SLOT2
2
SLOT
4
2
34 SLOT1
1
SLOT2 8
~IN
SDI INPUTS
TALLY
6
6
INPUTS
SDI OUTPUTS
INOUT
3
INOUT
2
INOUT
1
INOUT
OUTPUTS
1
5 7
SLOT
OFF
2
SLOT1 5
SLOTSLOT
PGM
RS-422LAN
ON
ANALOG INPUTS
Y Pb
Pr
Y Pb
Pr
DVI INPUTS
ANALOG OUTPUTS
Y Pb
Pr
Y Pb
Pr
DVI/ANALOG OUTPUTS
Y Pb
Pr
DVI-I
DVI-I DVI-I
GPI
SIGNAL
GND
16-9/16 (420)
16-1/16 (408)
5-3/16 (132)
1-4/16 (31)
Unit: inch (mm)
91
Page 92

9. Specifications and standard accessories
Specifications
Inputs 8 video input lines (maximum)
4 standard video input lines:
SDI inputs ×4
Maximum of an additional 4 video input lines as options:
SDI inputs ×2
Up to two circuit boards from among the various optional input boards
(incorporating two up-converter lines) can be additionally connected.
Reference 1
Outputs 7 video signal lines (maximum)
3 standard video output lines (SDI):
PGM outputs ×2
Maximum of an additional 4 video output lines as options:
OUTPUT3 to 6 ×1 output
Up to tw
output boards can be additionally connected.
PGM, PVW, A
Reference 1
Signal formats SD: 480/59.94i, 576/50i
HD: 1080/59.94i, 1080/50i, 72
Signal processing Y:Cb:Cr 4:
RGB 4:4:4, 8 bit
ME number 1ME
SDI inputs HD: Serial digital (SMPTE
SD: Component digital (SMPTE 259M)
BNC connector, IN1 to 8 (with active through) IN5 to 8 are optional inputs.
HD [SMPTE
• 0.8 Vp-p 10 % (75 )
• Input return loss More than 15 dB (5 MHz to 750 MHz)
More than 10 dB (750 MHz to 1.5 GHz)
• A
utomatic equalizer 100 m (when 5C-FB cable is used)
SD [SMPTE 259M standard complied with]
• 0.8 Vp-p 10 % (75 )
• Input return loss More than 15 dB (5 MHz to
• Automatic equalizer 200 m (when 5C-2V cable is used)
SDI outputs HD: Serial digital (SMPTE
SD: Component digital (SMPTE 259M)
BNC connector, PGM 1 (2 output), OUTPUT
HD [SMPTE 292M (BTA S-004B) standard complied with]
• Output return loss More than 15 dB (5 MHz to 750 MHz)
More than 10 dB (750 MHz to 1.5 GHz)
• Output level 0.8 Vp-p
• Rise time Less than 2
• Fall time Less than 270 ps
• Difference between rise time and fall time
Less than 100 ps
• Alignment jitter Less than 0.2
• Timing jitter Less than 1.0 UI
• Eye aperture ratio More than 90 %
• DC offset 0
2: 2, 10 bit
, analog (HD/SD) inputs ×2, DVI inputs ×2
, OUTPUT1 output ×1, OUTPUT2 output ×1
o circuit boards from among the analog (HD/SD) ×2, DVI ×1 and analog ×1
UX, MULTI and KEYOUT can be assigned to OUTPUT1 to 6.
0/59.94p, 720/50p
292M)
292M (BTA S-004B) standard complied with]
270 MHz)
292M)
2
10 % (75 )
70 ps
UI (130 ps)
0.5 V
92
Page 93

9. Specifications and standard accessories
SDI outputs SD [SMPTE 259M standard complied with]
• Output return loss More than 15 dB (5 MHz to 270 MHz)
• Output level 0.8 Vp-p 10 % (75 )
• Rise time Less than 1.5 ns
• Fall time
• Difference between rise time and fall time
Less than 0.5 ns
• Jitter Less than 0.2
Analog input
(option)
Analog output
(option)
DVI-I input
(option)
DVI-I output
(option)
Key input 1 input from video inputs
Downstream Key
input
Reference input
Reference output
Video delay time F
Control I/O LAN
External media SD memory cards Memory size suppor
Ambient operating
temperature
Humidity 10 % to 90 % (no condensation)
P
ower supply AC100V - 12
Dimensions
(W H D)
Weight 14.1 lbs. (6.4 kg): when no options have been installed
SD/HD analog component Y/Pb/Pr (1.0 Vp-p, 75 )
BNC connector, IN5 to 8
SD/HD analog component Y/Pb/Pr (1.0 Vp-p, 75 )
BNC connector, OUTPUT3 to 6, up to 4 lines (which can be assigned)
XGA 1024 × 768,
Vertical frequency: 60 Hz
DVI-I connector, IN5 to 8
XGA 1024 × 768,
WSXGA+ 1680 × 1050, UXGA 1600 × 1200,
(: Selectable only when digital signals are output)
Vertical frequency: 60 Hz
DVI-I connector, OUTPUT3, OUTPUT5, up to
1 input from video inputs
BNC connector, Black burst or Tri-level Sync (with loop-through) 1
In gen-lock mode: BNC connector, loop-through output 1,
In internal sync mode: BNC connector, black burst 2
rame synchronizer OFF 1H
Frame synchronizer ON 1F
(10BASE-T, 100BASE-TX)
Serial communication
interface
Tally output Open collector outputs (negative logic) 1 to 8
GPI GPI ×2 (3.5 mm diameter stereo mini jac
32 °F to 104 °F (0 °C to 40 °C)
Power consumption 98 W
16-9/16˝×5-3/16˝×16-1/16˝ (420×13
[Excluding protrusions]
15.9 lbs. (7.
Less than 1.5 ns
UI
WXGA 1280 × 768, SXGA 1280 × 1024
WXGA 1280 × 768, SXGA 1280 × 1024,
WUXGA 1920 × 1200
2 lines (which can be assigned)
100 Mbps/10 Mbps ×1 (RJ-45)
Port used for maintenance work
RS-422
GVG standard protocol subset supported
(D-sub 15-pin, male)
Still image file transfer (24-bit uncompressed bitmap)
0V, 50/60Hz
2 kg): when all the possible options have been installed
1 (D-sub 9-pin, female)
ted: Max. 2GB
2×408 mm)
k)
93
Page 94

9. Specifications and standard accessories
Standard accessories
Operating instructions ................................................................. 1
Operating instructions (CD-ROM) .............................................. 1
Power Cord ................................................................................. 1
Optional circuit boards (sold separately)
SDI Input Board: AV-HS04M1
Analog Input Board: AV-HS04M2
DVI Input Board: AV-HS04M3
Analog Output Board: AV-HS04M4
DVI/Analog Output Board: AV-HS04M5
Refer to the operating instructions that come with the optional board for details about the installation method.
94
Page 95

Appendix (glossary)
Defined below are the terms used in this manual.
Word Explanation
AB Bus system A bus control mode. By executing a transition, the A bus and B bus signals
are output to the program images alternately.
Ancillary Data The auxiliary data other than the video signals which is transmitted inside
the data stream of the video serial interface. The data superimposed on the
vertical blanking period is referred to as the V ancillary data (VANC).
Aspect ratio The ratio between the horizontal and vertical dimensions of an image or
screen.
It is 16:9 for the HD format and 4:3 for the SD format.
AUX
[Auxiliary Bus]
AVDL
[Automatic Video Delayline]
BB
[Black burst]
Border The area or margin that is added to the edge of a wipe or key.
Chroma key This refers to the function for creating the key signals based on the color
Clip The threshold level of the luminance when key signals are created from a
Color Background The signals which are output from the internal color generator and used as
Cut This refers to the effect where the display is instantly switched to the next
Density A parameter which is used to adjust the density of the key signals.
Dot by Dot This treats images as actual size (1×) images. With PinP, it allows SD
DSK [Downstream Key] This refers to the key combination process which is performed at the end of
DVE [Digital Video Effect] This refers to the transition patterns accompanying size reductions or slide
DVI
[Digital Visual Interface]
Embedded Audio This refers to the audio data packets which are transferred inside the data
Flip Flop system
(PGM/PST system)
Frame Memory A memory which can hold the video signals equivalent to one frame.
Frame Synchronizer A function which matches the synchronization of non-synchronized video
A spare bus which can be switched by signals other than the main line
output signals.
A function to automatically adjust the input image signal phase to the
horizontal synchronization reference signal phase.
The black burst signal. A full-screen black level composite signal which is
used as the reference signal for gen-lock.
Its width and color can be adjusted. The defocusing of the area around a
border is referred to as the soft effect.
information of the video signals and combining the keys.
key source.
the background image.
image.
images to be combined with HD images with no accompanying deterioration
in the images themselves.
the mix effect. The key is always combined with the foremost image.
effects.
A digital video interface standard.
DVI-I can handle both digital signals and analog signals.
stream of the video serial interface.
A bus control mode. The signals selected by the program bus are always
output as the program images. By executing a transition, the program bus
and preset bus signals are switched over.
input signals.
95
Page 96

Appendix (glossary)
Word Explanation
Freeze A function which continues the display of the same image, creating the
impression that the image has been “frozen”.
FTB [Fade to Black] This is the effect where the background image is faded out to the black
screen.
Genlock A function for synchronizing the video signals using an external sync signal
as the reference.
GPI
[General Purpose Interface]
IRE A unit used for video signal levels.
Hue The color tone of the video signals.
Key Edge The border or shadow added to the edges of keys.
Key Fill The signal that uses key combination processing to fill in the areas left blank
Key Gain A parameter which is used to adjust the amplitude of the key signals.
Key invert A function which inverts the key signals.
Key Mask This is the function that specifies the area for key combination using the
Key Source The video signals for creating the key signals.
Linear Key The function which combines keys using monochrome key signals with
Lum
[Luminance]
Luminance Key The function which creates key signals based on the luminance (brightness)
ME
[Mix Effect]
Mix The picture-changing effect produced by overlapping one image with the
Multi View Display This is the function that combines a multiple number of materials.
OSD [On Screen Display] This function enables settings to be performed on the menu screens which
PinP [Picture in Picture] This function combines a sub screen image with the background image.
PVW
[Preview]
PGM
[Program Bus]
Interface signals which control auto transition from an external source.
The setup level (black level) of the signals is expressed as 0 IRE, 7.5 IRE,
etc.
by the key signals.
box pattern, etc. When only part of the area of the key signals is used, key
combination is executed with the unnecessary area masked.
gradations in its outlines as a reference.
The brightness portion of the video signals.
information of the video signals to combine keys.
A video effect device which combines a number of video signals to create
mix, wipe, key and other video signals.
next.
It is also referred to as “dissolve”.
PGM, PVW and the input material can be previewed at the same time on a
single screen.
are displayed in the monitor output.
The function for checking ahead of time the image which will be output after
the next transition. The image is output from the PVW system.
The bus which always carries the program output signals.
96
Page 97

Appendix (glossary)
Word Explanation
PST
[Preset Bus]
Preset Memory The memory in which the control panel statuses can be saved and recalled.
RS-422 A serial interface standard. It is the interface used to control the switcher
Sat
[Saturation]
SDI
[Serial Digital Interface]
Self Key A function that creates key signals from key fill signals for combining keys.
Tally The signal which outputs the program output statuses of the input signals to
Transition A function that switches from one image to another.
Tri-level Sync The sync signal used for HD formats.
Trimming This is the function that eliminates the unnecessary parts at the top, bottom,
Up Converter This is the function that converts material in the SD format into the HD
Wipe A video effect in which one image is gradually replaced by another as the
The bus which carries the program output signals after the next background
transition.
The button selection statuses as well as the border, color and other setting
information can be saved in this memory.
from an editor or other external device.
This refers to the intensity of the color chrominance level of video signals.
The standard by which video signals in various SD and HD formats are
transmitted along a single coaxial cable.
an external device. The LED that indicates the program output status on the
control panel is also referred to as tally.
Wipe, mix and other effects are available for the images during switching.
left and/or right of the images which are combined using the PinP function.
format which yields a high resolution.
boundary between the two is moved using a preselected pattern.
97
Page 98

PANASONIC BROADCAST & TELEVISION SYSTEMS COMPANY
UNIT COMPANY OF PANASONIC CORPORATION OF NORTH AMERICA
Headquarters:
3 Panasonic W
ay 4E-7, Secaucus, NJ 07094 (201) 348-5300
EASTERN ZONE:
3 Panasonic W
ay 4E-7, Secaucus, NJ 07094 (201) 348-7196
WESTERN ZONE:
3330 Cahuenga Blvd. W
est, Los Angeles, CA 90068 (323) 438-3608
Government office:
(201) 348-7587
Br
oadcast PARTS INFORMATION & ORDERING:
9:00 a.m. – 5:00 p.m.
(PST) (800) 334-4881/24 Hr. Fax (800) 334-4880
Emergency after hour parts orders (800) 334-4881
TECHNICAL SUPPORT:
Emergency 24 Hour Ser
vice (800) 222-0741
Panasonic Canada Inc.
5770 Ambler Driv
e, Mississauga, Ontario L4W 2T3 (905) 624-5010
Corporativo Panasonic de México
Moras No.
313, Col. Tlacoquemecatl del Valle, Del. Benito Juárez, México, Distrito Federal, C.P. 03200. 01 (55) 54 88 10 00
Panasonic Puerto Rico Inc.
San Gabriel Industrial Park, 65th Infantry Ave., Km. 9.5, Carolina, Puerto Rico 00630 (787) 750-4300
© 2007 Matsushita Electr
ic Industrial Co., Ltd. All rights reserved.
F1007Y3048 @
 Loading...