

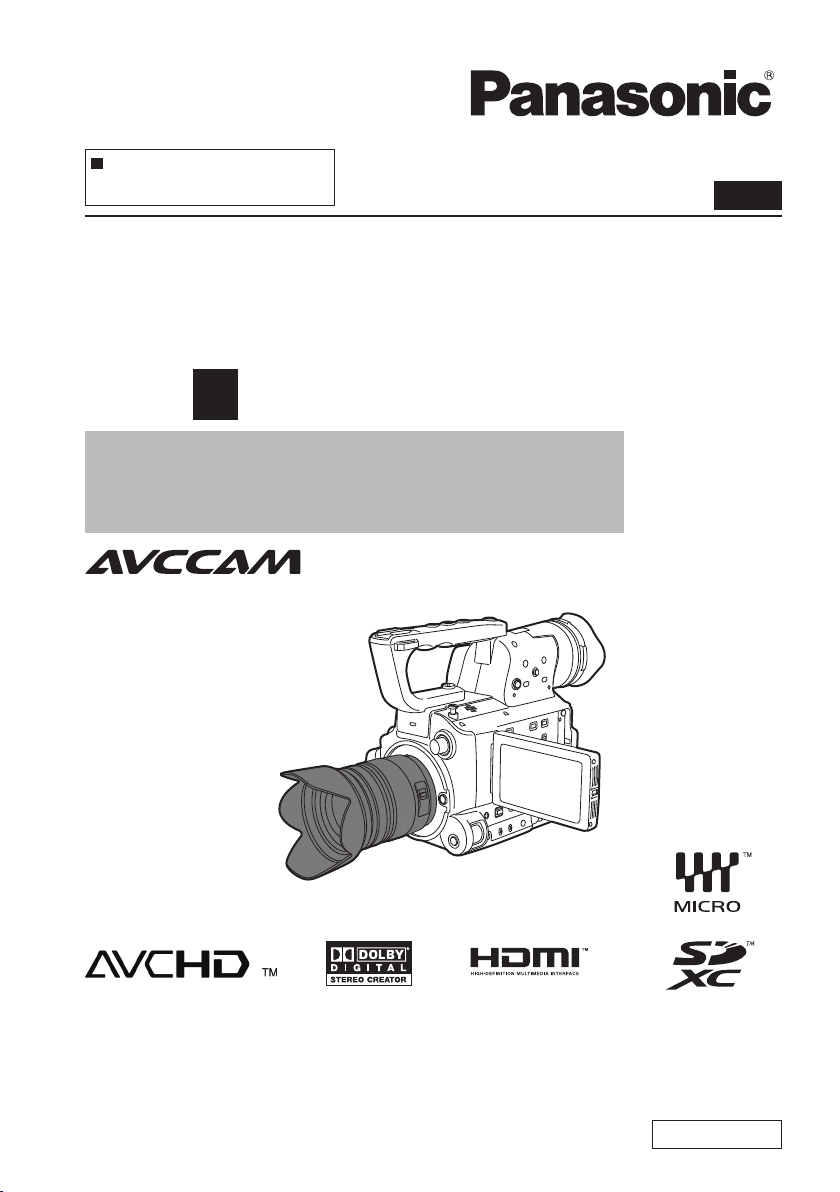
Panasonic AVCCAM AG-AF101E, AG-AF101AE Operating Instructions Manual
This product is eligible for the AVCCAM
3 Year Warranty Repair Program. For
details, see page E-5.
Operating Instructions
Vol.1
Memory Card Camera-Recorder
Model No. AG-AF101E
Volume
Note that Operation Instructions Vol.1 describes basic operations of
the Memory Card Camera-Recorder.
For instructions on advanced operations of the Memory Card
Camera-Recorder, refer to Operating Instructions Vol.2 (pdf file)
contained in the supplied CD-ROM.
1
Before operating this product, please read the instructions carefully and save this manual for
future use.
M1210AT0 -FJ
ENGLISH
VQT3M19 (E)
E-1
Read this first!
WARNING:
To reduce the risk of fire or electric shock, •
do not expose this equipment to rain or
moisture.
To reduce the risk of fire or electric shock •
hazard, keep this equipment away from all
liquids. Use and store only in locations which
are not exposed to the risk of dripping or
splashing liquids, and do not place any liquid
containers on top of the equipment.
WARNING:
This equipment must be earthed
To ensure safe operation, the three-pin plug must
be inserted only into a standard three-pin power
point which is effectively earthed through normal
house-hold wiring.
Extension cords used with the equipment must
have three cores and be correctly wired to provide
connection to the earth. Wrongly wired extension
cords are a major cause of fatalities.
The fact that the equipment operates satisfactorily
does not imply that the power point is earthed or
that the installation is completely safe. For your
safety, if you are in any doubt about the effective
earthing of the power point, please consult a
qualified electrician.
WARNING:
Always keep memory cards or accessories
(coin battery, microphone holder screws,
microphone holder adaptor, cable clamper,
screws for cable clamper, INPUT terminal
covers, major hook) out of the reach of babies
and small children.
indicates safety information.
CAUTION:
Do not lift the unit by its handle while the
tripod is attached. When the tripod is attached,
its weight will also affect the unit’s handle,
possibly causing the handle to break and
hurting the user. To carry the unit while the
tripod is attached, take hold of the tripod.
CAUTION:
The mains plug of the power supply cord shall
remain readily operable.
The AC receptacle (mains socket outlet) shall be
installed near the equipment and shall be easily
accessible.
To completely disconnect this equipment from the
AC mains, disconnect the power cord plug from the
AC receptacle.
CAUTION:
Danger of explosion or fire if battery is
incorrectly replaced or mistreated.
Do not disassemble the battery or dispose of it •
in fire.
Do not store in temperatures over 60°C.•
Do not expose the battery to excessive heat •
such as sunshine, fire or the like.
For Battery Pack
Use specified charger.•
Replace only with same or specified type.•
For Battery of Remote Controller
Replace battery with part No. CR2025 only.•
Do not recharge the battery.•
CAUTION:
Do not remove panel covers by unscrewing
them.
To reduce the risk of electric shock, do not
remove the covers. No user serviceable parts
inside.
Refer servicing to qualified service personnel.
CAUTION:
To reduce the risk of fire or electric shock and
annoying interference, use the recommended
accessories only.
CAUTION:
In order to maintain adequate ventilation, do
not install or place this unit in a bookcase,
built-in cabinet or any other confined space.
To prevent risk of electric shock or fire hazard
due to overheating, ensure that curtains and any
other materials do not obstruct the ventilation.
CAUTION:
Do not jar, swing, or shake the unit by its
handle while the conversion lens or another
accessory is attached.
Due to the added weight of the conversion
lens, any strong jolt to the handle may damage
the unit or result in personal injury.
CAUTION:
Excessive sound pressure from earphones
and headphones can cause hearing loss.
CAUTION:
Do not leave the unit in direct contact with the
skin for long periods of time when in use.
Low temperature burn injuries may be suffered
if the high temperature parts of this unit are
in direct contact with the skin for long periods
of time. When using the equipment for long
periods of time, make use of the tripod.

E-2
indicates safety information.
Caution for AC Mains Lead
For battery charger
FOR YOUR SAFETY PLEASE READ THE FOLLOWING TEXT CAREFULLY.
This product is equipped with 2 types of AC mains cable. One is for continental Europe, etc.
and the other one is only for U.K.
Appropriate mains cable must be used in each local area, since the other type of mains cable is
not suitable.
FOR CONTINENTAL EUROPE, ETC.
Not to be used in the U.K.
FOR U.K. ONLY
This appliance is supplied with a moulded
three pin mains plug for your safety and
convenience.
A 5 amp fuse is fitted in this plug.
Should the fuse need to be replaced please
ensure that the replacement fuse has a
rating of 5 amps and that it is approved by
ASTA or BSI to BS1362.
Check for the ASTA mark
on the body of the fuse.
If the plug contains a removable fuse cover
you must ensure that it is refitted when the
fuse is replaced.
If you lose the fuse cover the plug must
not be used until a replacement cover is
obtained.
A replacement fuse cover can be purchased
from your local Panasonic Dealer.
or the BSI mark
FOR U.K. ONLY
How to replace the fuse
1. Open the fuse compartment with a
screwdriver.
2. Replace the fuse
Fuse
Camera-Recorder
The rating plate is on the underside of the viewfinder.
Battery Charger / AC Adaptor
The rating plate is on the underside of the Battery Charger and AC Adaptor. Disconnect the AC mains
plug from the AC mains socket when not in use.
EEE Yönetmeliğine Uygundur.
EEE Complies with Directive of Turkey.

E-3
indicates safety information.
Caution for AC Mains Lead
For AC adaptor
FOR YOUR SAFETY PLEASE READ THE FOLLOWING TEXT CAREFULLY.
This product is equipped with 2 types of AC mains cable. One is for continental Europe, etc.
and the other one is only for U.K.
Appropriate mains cable must be used in each local area, since the other type of mains cable is
not suitable.
FOR CONTINENTAL EUROPE, ETC.
Not to be used in the U.K.
FOR U.K. ONLY
This appliance is supplied with a moulded
three pin mains plug for your safety and
convenience.
A 13 amp fuse is fitted in this plug.
Should the fuse need to be replaced please
ensure that the replacement fuse has a rating
of 13 amps and that it is approved by ASTA
or BSI to BS1362.
Check for the ASTA mark
on the body of the fuse.
If the plug contains a removable fuse cover
you must ensure that it is refitted when the
fuse is replaced.
If you lose the fuse cover the plug must
not be used until a replacement cover is
obtained.
A replacement fuse cover can be purchased
from your local Panasonic Dealer.
or the BSI mark
FOR U.K. ONLY
How to replace the fuse
1. Open the fuse compartment with a
screwdriver.
2. Replace the fuse
Fuse

E-4
EMC NOTICE FOR THE PURCHASER/USER OF THE APPARATUS
1. Applicable standards and operating environment
The apparatus is compliant with:
standards EN55103-1 and EN55103-2 2009, and•
electromagnetic environments E1, E2, E3 and E4.•
2. Pre-requisite conditions to achieving compliance with the above standards
<1> Peripheral equipment to be connected to the apparatus and special connecting cables
The purchaser/user is urged to use only equipment which has been recommended by us as •
peripheral equipment to be connected to the apparatus.
The purchaser/user is urged to use only the connecting cables described below.•
<2> For the connecting cables, use shielded cables which suit the intended purpose of the
apparatus.
Video signal connecting cables •
Use double shielded coaxial cables, which are designed for 75-ohm type high-frequency
applications, for SDI (Serial Digital Interface).
Coaxial cables, which are designed for 75-ohm type high-frequency applications, are
recommended for analog video signals.
Audio signal connecting cables •
If your apparatus supports AES/EBU serial digital audio signals, use cables designed for AES/
EBU.
Use shielded cables, which provide quality performance for high-frequency transmission
applications, for analog audio signals.
Other connecting cables (IEEE1394, USB) •
Use shielded cables, which provide quality performance for high-frequency applications, as
connecting cables.
When connecting to the DVI signal terminal, use a cable with a ferrite core.•
If your apparatus is supplied with ferrite core(s), they must be attached on cable(s) following •
instructions in this manual.
3. Performance level
The performance level of the apparatus is equivalent to or better than the performance level
required by these standards.
However, the apparatus may be adversely affected by interference if it is being used in an EMC
environment, such as an area where strong electromagnetic fields are generated (by the presence
of signal transmission towers, cellular phones, etc.). In order to minimize the adverse effects of the
interference on the apparatus in cases like this, it is recommended that the following steps be taken
with the apparatus being affected and with its operating environment:
1. Place the apparatus at a distance from the source of the interference.
2. Change the direction of the apparatus.
3. Change the connection method used for the apparatus.
4. Connect the apparatus to another power outlet where the power is not shared by any other
appliances.
Batteries that may be used with this product (Correct as of December 2010) ■
Panasonic VW-VBG260 and VW-VBG6 batteries may be used with this product.
The VW-VBG260 and VW-VBG6 batteries contain a function to enable verification as to whether they
may be safely used with this product.
It has been found that counterfeit battery packs which look very similar to the genuine product are
made available to purchase in some markets. Some of these battery packs are not adequately
protected with internal protection to meet the requirements of appropriate safety standards. There is
a possibility that these battery packs may lead to fire or explosion. Please be advised that we are not
liable for any accident or failure occurring as a result of use of a counterfeit battery pack. To ensure that
safe products are used we would recommend that a genuine Panasonic battery pack is used.
E-5
*1: Please note that this extended warranty is not available in some countries/regions. *2: Not all models eligible for extended warranty coverage.
*3: The basic warranty period may vary depending on the country/region. *4: Not all repair work is covered by this extended warranty.
Purchase
AVCCAM product
Register online
within 1 month
“Registration Notice”
e-mail sent
Details about user registration and the extended warranty: http://panasonic.biz/sav/pass_e
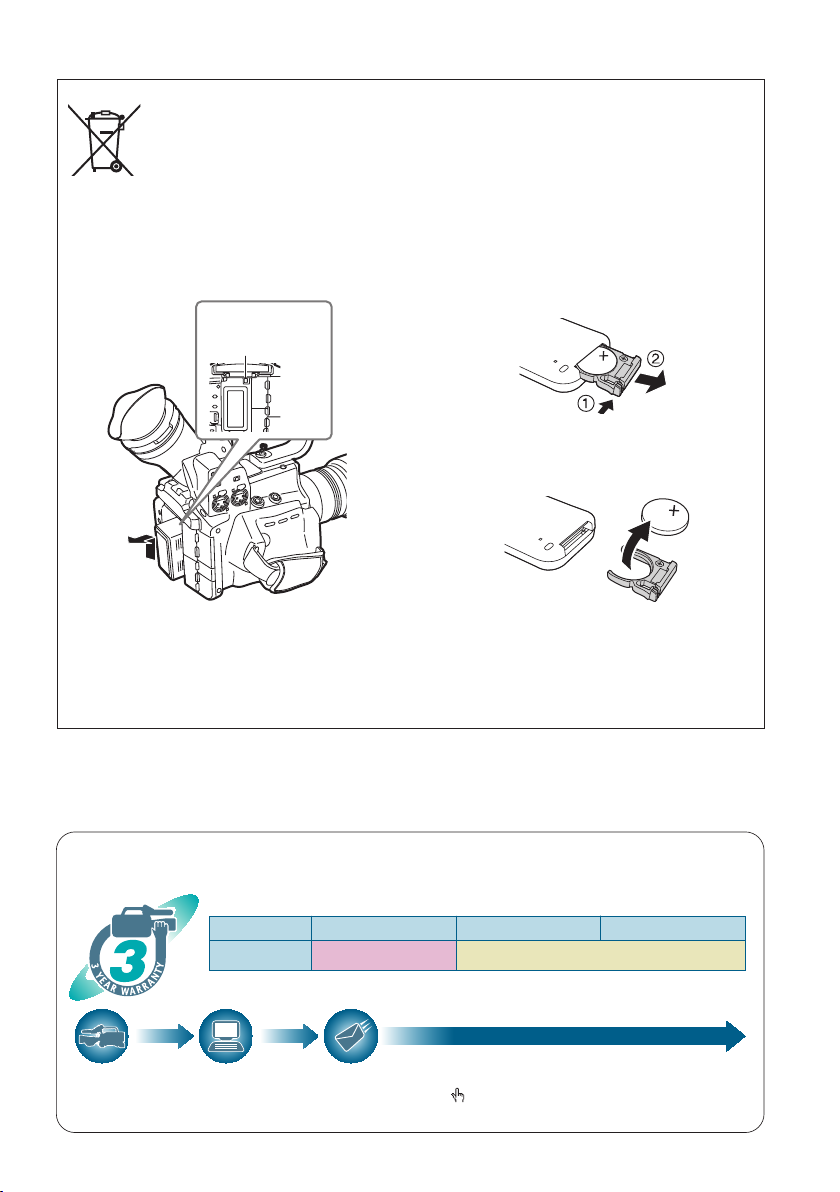
Free 3 years of Warranty Repairs
Customers who register as users on the website will receive an extended warranty repair valid for up to
three years.
AVCCAM 3 Year Warranty Repair Program*
1
Thank you for purchasing this Panasonic AVCCAM device.
Register as a user for this device to receive a special service warranty up to three years of free warranty repairs.
Make sure to save the “Registration Notice” e-mail
during the warranty period.
Please note, this is a site that is not maintained by Panasonic Canada Inc. The Panasonic Canada Inc. privacy policy does not apply and is not applicable in relation to any
information submitted. This link is provided to you for convenience.
1st year 2nd year 3rd year
AVCCAM device
*
2
Basic warranty
*
3
Extended warranty repair
*
4
To remove the battery
EU
Main Power Battery (Lithium ion Battery)
(Refer to page E-25 for the detail.)
Press the battery release button.
Battery
release button
Back-up Battery (Lithium Battery)
For the removal of the battery for disposal at •
the end of its service life, please consult your
dealer.
Remote Control Battery (Lithium Battery)
1) Push the catch in the direction shown by
arrow
1 to remove the holder.
2) Remove the button-type battery from the
battery holder..
E-6
Contents
Volume 1 (This Book)
Read this first! ............................................ E-1
Outline of operations ................................. E-8
Please read before use .............................. E-9
Lenses compatible with this camera ..............E-9
Lens attachment and detachment ................E-10
SD Memory Cards compatible with this product
Operating precautions ............................. E-14
(
SD speed class 4) .....................E-13
(
SD speed class 6) .....................E-13
..E-12
Before use
Precaution for use .................................... E-16
Accessories .............................................. E-19
Optional accessories ............................... E-19
Description of parts
Description of parts .................................. E-20
Left side ........................................................E-20
Right side and rear side ...............................E-21
Left side and front side .................................E-22
Remote control .............................................E-23
Preparation
Recharging the battery ............................ E-23
Recharging ...................................................E-23
Power sources .......................................... E-25
Using the battery ..........................................E-25
Using the AC adaptor ...................................E-25
Adjusting the hand strap ......................... E-26
Attaching/detaching the handle .............. E-26
Attaching/detaching the grip ................... E-26
The remote control ................................... E-27
Insert the battery ..........................................E-27
Remote control usable range .......................E-27
Turn on/off the camera ............................. E-27
Tally lamp .................................................. E-28
Viewfinder ................................................. E-29
Using the viewfinder .....................................E-29
Using the LCD ..............................................E-30
Emphasizing outlines ...................................E-30
Adjusting the screen display .........................E-31
Changing backlight brightness .....................E-32
Setting the calendar ................................. E-33
Shooting
Basic shooting operations ...................... E-35
Preparing for recording .................................E-35
Checking photos taken (REC CHECK) ........E-35
SD Memory Card access lamp .....................E-36
Selecting a slot ............................................ E-36
Formatting SD Memory Cards ......................E-36
SD Memory Card recording times ................E-37
Removing SD Memory Card ........................E-38
Protecting SD Memory Cards .......................E-38
Repairing SD Memory Cards .......................E-38
Basic operations of the camera .............. E-39
Manual focusing ..........................................E-39
Using focus assist ........................................E-40
Iris adjustments ............................................E-40
Adjusting the gain .........................................E-41
Light intensity adjustments ...........................E-41
Adjusting the white balance ..........................E-41
Menu
Using the setup menus ............................ E-44
Using the menus ..........................................E-44
Initializing the menu settings ........................E-45
Setup menu structure .............................. E-46
Menu ............................................................E-46
Reference
Specifications ........................................... E-48

E-7
Contents (continued)
Volume2 (CD)
Shooting
Shooting in progressive mode
Shooting techniques for different targets
Adjusting the shutter speed
Switching Audio Input
Using scene files
Saving scene files and other settings on
SD Memory Cards
Clip metadata
Using the Counter
Charging the built-in battery/
Setting the time code
Playback
Basic playback operations
Thumbnail screen
Playback settings (PLAY SETUP)
Thumbnail operations
Useful playback functions
Editing
Connecting external units
Nonlinear editing
Displays
Screen displays
Menu
Setup menu list
Reference
Before calling for service
Updating the firmware incorporated into
the unit
Cleaning
Storage Precautions
How to handle data recorded on
SD Memory Card
E-8
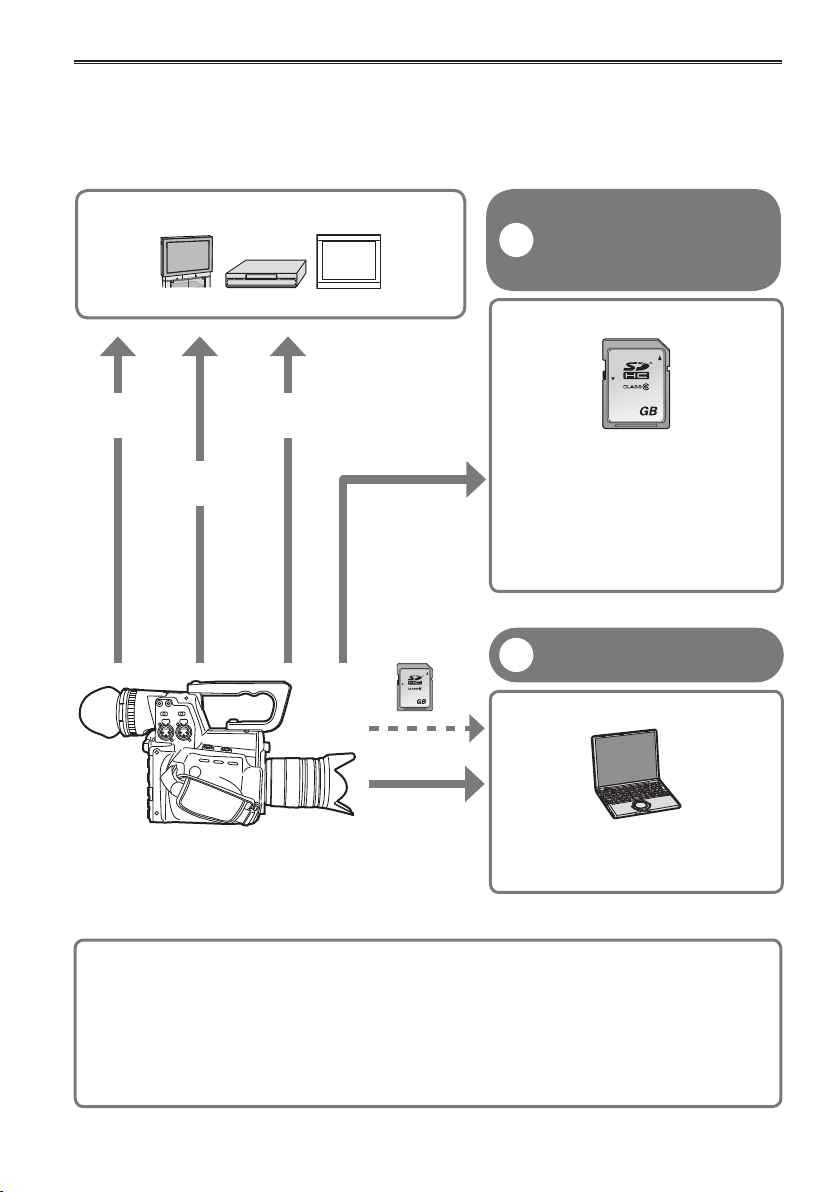
Outline of operations
32
LOCK
32
LOCK
This camera-recorder is compatible with the AVCHD standard, and uses low-cost and easily-available SD/
SDHC/SDXC Memory Cards as recording media.
The unit enables high-quality picture recording of close to broadcasting standard, as well as highly creative
video production.
Television/Video device/Monitor
HDMI cable
Video cable
BNC cable (HD SDI)
SD/SDHC/SDXC
Memory Card
Recording to and playback
from SD/SDHC/SDXC
1
Memory Cards
(Page E-35, Page 28 of Vol.2)
SD/SDHC Memory Card
Images can be recorded in HD •
(high definition).
Please see page 73 of Vol.2 for details
on the handling of recorded data.
A set number of user files can be •
recorded to and read from the SD
Memory Card. (Page 21 of Vol.2)
PC mode
2
(Page 44 of Vol.2)
Computer
USB2.0
Send data (files) to your computer
for non-linear editing, etc.
Lens (No lenses are included with this camera. Please use lenses purchased
separately.)
Micro Four Thirds (Page E-9) Four Thirds (Page E-9)
A separately available mount adaptor (DMWMA1) is necessary

E-9
Please read before use
Lenses compatible with this camera
No lenses are included with this camera. Please use lenses purchased separately.
This camera includes a Micro Four Thirds
Micro Four Thirds and Four Thirds
TM
TM
system lens mount. However, the successful operation of all
standard lenses cannot be guaranteed.
Also, some functions such as optical image stabilization (OIS) and auto focus (AF) cannot be used
depending on the lens.
Panasonic has confirmed the compatibility of the following lenses (as of December 2010).
Please use a lens support when using large lenses weighing more than 1kg. Not using a lens support may
result in damage to the lens mount.
* Micro Four Thirds™ and Four Thirds are trademarks or registered trademarks of Olympus
Imaging Corporation in Japan, USA, the EU, and other countries.
(○: Usable,
l: Some functions/features limited, —: Not usable)
*1
AF
Lens Type
60i/60p/30p/
50i/50p/25p
24p
OnePush
AF
MF
Camera Focus
by Remote
Control
Micro Four Thirds Lens
H-FS014045 (Panasonic)
H-FS045200 (Panasonic)
H-F007014 (Panasonic)
*2
*2
*2
*3
l
*3
l
*3
l
*4
l
*4
l
*4
l
○ ○ ○
○ ○ ○
○ ○ ○
H-VS014140 (Panasonic) ○ ○ ○ ○ ○
H-H020 (Panasonic)
H-ES045 (Panasonic)
H-F008 (Panasonic)
*2
*2
*2
H-FS014042 (Panasonic)
*2
- - ○ ○ ○
*3
l
*3
l
*3
l
*4
l
*4
l
*4
l
○ ○ ○
○ ○ ○
○ ○ ○
Four Thirds Lens
(a mount adaptor (DMW-MA1), available separately, is necessary when using a Four Thirds lens)
L-ES014050 (Panasonic)
L-RS014050 (Panasonic)
L-RS014150 (Panasonic)
L-X025 (Panasonic)
*2
ZUIKO DIGITAL ED
14-35mm F2.0 SWD
(OLYMPUS)
*2
*2
*2
*2
- - - ○ -
- - l
- - l
- - l
- - l
*5
*5
*5
*5
○ l
○ l
○ l
○ l
*5
*5
*5
*5
*1 Tracking becomes extremely slow in slow shutter mode.
*2 Sounds from focus and iris operation may be recorded.
*3 Tracking performance is inferior compared to H-VS014140 (lens for movie recording, Micro Four
Thirds mount).
*4 AF tracking becomes slow in 24p mode.
*5 Limitations apply to the simultaneous operation of FOCUS and IRIS.
Note: use of H-VS014140 (lens for movie recording, Micro Four Thirds mount) is assumed throughout this
operating instructions document.
For the latest information regarding supported lenses, please refer to Panasonic catalogs/web
site etc.
http://pro-av.panasonic.net/
E-10
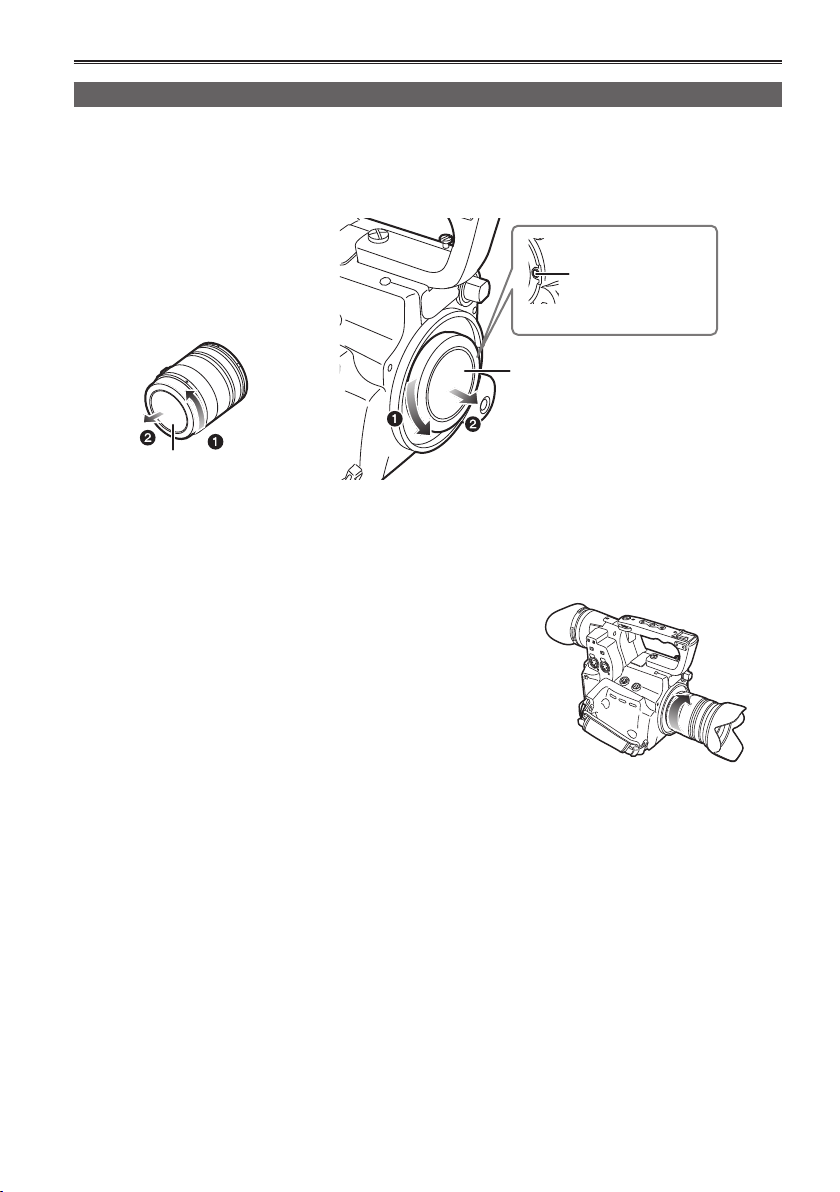
Lens attachment and detachment
Check that the power switch is set to OFF.•
■
Attaching a lens to the camera
Turn the lens rear cap and body cap in the direction indicated by the arrows and remove.
1
Lens detachment
button
Body cap
Lens rear cap
Do not insert fingers into the mount.•
Line up the lens attachment marks (red) on the camera and lens, and then turn the lens in the
2
direction indicated by the arrows until it audibly clicks into place.
Do not press the lens detachment button while attaching •
the lens.
Damage may occur to the lens attachment if the lens is •
not at right angles to the camera during attachment.
Ensure that the lens is attached properly.•
Remove lens cap.
3
Remove lens cap prior to recording.•

E-11
Precaution for use (continued)
Detaching a lens from the camera ■
Attach the lens cap.
1
While pressing the lens detachment button, turn the
2
lens in the direction indicated by the arrows until it
stops, and detach.
Attach the body cap.
3
Ensure that the body cap is attached to prevent dust or •
dirt from entering the camera.
To prevent damage to the lens connection, be sure to •
attach the lens rear cap.
When using lenses other than those conforming to the Micro Four Thirds and Four Thirds standard, •
see the LENS CHECK item in the OTHER FUNCTIONS screen of MENU settings.
Change lenses in a place that is relatively free of dust and dirt.•
When the power switch is [OFF] or when carrying the camera, attach the lens cap to prevent damage •
to the surface of the lens.
Be careful not to misplace the body cap, lens cap, or lens rear cap.•
Enabling Image Stabilization
■
Image Stabilization can be enabled with lenses equipped with OIS.
Lens detachment
button
Set the OIS switch of the lens to [ON]
Setting the OIS switch to [OFF] is recommended when using a tripod.
Use the OIS switch on the camera if a lens has an Image Stabilization function but does not have an •
OIS switch. If the lens has an OIS switch, the OIS switch on the camera is disabled.

E-12
SD Memory Cards compatible with this product
Speed class 4 or above is required for recording in the PH mode or HA mode. Speed class 6 or above
is required when using the VFR function. It is recommended that you use the following Panasonic SD
memory cards, SDHC memory cards, or SDXC memory cards. (As of December, 2010)
Card type Recording capacity Recording/playback
SD Memory
Card
SDHC Memory
Card
SDXC Memory
Card
8 MB
16 MB
32 MB
64 MB
128 MB
256 MB
512 MB
1 GB
2 GB
4 GB
6 GB
8 GB
12 GB
16 GB
32 GB
48 GB
64 GB
Cannot be used.
Successful operation cannot be
guaranteed. Recording may be
suddenly terminated with certain
SD Memory Cards.
Can be used.
Saving/reading of scene files and
user files, reading of metadata
Can be used.
Please see our support page at the following website for the latest information not included in these •
operating instructions.
http://pro-av.panasonic.net/
This camera supports FAT12 & FAT16 formatted SD memory cards, FAT32 formatted SDHC memory •
cards, and exFAT formatted SDXC memory cards that are compliant with the SD standard.
4 GB (or greater) memory cards without the SDHC logo and 48 GB (or greater) memory cards without •
the SDXC logo are not based on the SD standard.
Use this product to format the SD Memory Cards to be used. Formatting memory cards on computers •
or other devices may cause recording to take longer than normal, or may cause cards to become
incompatible with this product. (Page E-36) (Use this product to reformat any cards that have already
been formatted on computers, etc.)
MultiMediaCards cannot be used with this product.•
(Continued on the next page)

E-13
Please read before use (continued)
(SD speed class 4)
This refers to a class 4 speed standard (SD speed class) for the continuous writing of data between SDcompatible devices and SD Memory Cards, as designated by the SD standards.
When the use of an SD speed class 4 card is recommended for SD-compatible products, this indicates
that stable recording operation can be achieved when using SD Memory Cards of class 4 and above.
(SD speed class 6)
This refers to a class 6 speed standard (SD speed class) for the continuous writing of data between SDcompatible devices and SD Memory Cards, as designated by the SD standards.
When the use of an SD speed class 6 card is recommended for SD-compatible products, this indicates
that stable recording operation can be achieved when using SD Memory Cards of class 6 and above.
Cautions for usage
Do not allow dirt, water, or other substances to come into contact with the connector part on the •
reverse of the card.
Do not leave the card in the following places:•
– In direct sunlight or in places of high humidity, e.g. close to heating equipment
– In highly humid or dusty locations
– In locations with high variations in temperature (condensation may appear on card)
– In places subject to static electricity or electromagnetic waves
Store cards in bags or cases after use.•

E-14
Operating precautions
Do not allow any water to get into the camerarecorder when using it in the rain or snow or at
the beach.
Failure to heed this caution will cause the •
camera-recorder or a card to malfunction (and
may result in irreparable damage).
Keep the camera-recorder away from
equipment (such as TV sets and video game
machines) that generate magnetic fields.
Using the camera-recorder on top of or near a •
TV set may cause distortion in the images and/
or sound due to the electromagnetic waves that
the set emits.
The powerful magnetic fields generated by •
speakers or large motors may damage your
recordings or distort the images.
The electromagnetic waves emitted from a •
microcomputer will adversely affect the camerarecorder, causing the images and/or sound to be
distorted.
If the camera-recorder is so adversely affected by •
products that generate magnetic fields that it no
longer operates properly, turn it off and remove
the battery or unplug the AC adaptor from the
power outlet. Then install the battery again or
reconnect the AC adaptor. After this, turn the
camera-recorder back on.
Do not use the camera-recorder near radio
transmitters or high-voltage equipment.
Using the camera-recorder near a radio •
transmitter or high-voltage equipment may
adversely affect the recorded images and/or
sound.
Do not allow any sand or dust to get into the
camera-recorder when using it at the beach
and other similar places.
Sand and dust can damage the camera-recorder •
or a card. (Be especially careful when inserting or
removing a card.)
AC adaptor (battery charger) and battery
If the CHARGE lamp continues to blink even •
when the battery temperature is normal, there
may be something wrong with the battery or AC
adaptor (battery charger). Contact your dealer.
The battery takes longer to charge when it is •
warm.
The AC adaptor (battery charger) can interfere •
with radio reception so keep radios at least 1
meter away from it.
The AC adaptor (battery charger) may make •
some noise when you are using it, but this is
normal.
Take precautions not to drop the camera when
moving it.
Strong impacts may damage the camera and •
cause it to stop working.
Handle the camera with care, using the hand •
strap or shoulder strap to carry it.
Do not spray the camera with insect sprays or
other volatile substances.
These can warp the camera or cause the finish •
to come off.
Do not leave the camera-recorder in contact with •
rubber or PVC products for extended periods of
time.
After use, remove the battery and disconnect
the AC power supply cord.
Battery characteristics
This camera-recorder uses a rechargeable
lithiumion battery that uses its internal chemical
reaction to generate electrical energy. This reaction
is easily influenced by the ambient temperature
and humidity, and the battery’s effective operating
time is reduced as the temperature rises or falls.
If you use this camera at locations with extremely
low temperatures, its operating time will be
reduced.
Protective circuitry functions if you use the battery
where it is very hot and you will have to wait before
you can use it again.
Remove the battery after use.
Completely remove the battery. (The battery
continues to be used even if you have turned
the camera off.) The battery can over discharge
if you leave it in the camera and it may become
impossible to recharge it.
Disposing of spent batteries
The battery will become unchargeable. Rather than
throwing the battery into the garbage, take it to a
store that can assist in recycling it.
Do not remove the battery when the POWER
switch is ON.
Disconnect the power supply after turning OFF the
POWER switch and making sure the mode lamp is
completely OFF.

Operating precautions (continued)
What to remember when throwing memory
cards away or transferring them to others
Formatting memory cards or deleting data using
the functions of the unit or a computer will merely
change the file management information: it will
not completely erase the data on the cards. When
throwing these cards away or transferring them
to others, either physically destroy them or use a
data deletion program for computers (commercially
available) to completely erase the data. Users are
responsible for managing the data on their memory
cards.
Liquid crystal displays
Images or letters can get burned onto the screen •
of the LCD or viewfinder if they are displayed for
a long time, but you can fix this by leaving the
camera off for several hours.
The liquid crystal parts are highly precise with •
99.99% of the pixels effective. This leaves less
than 0.01% of pixels that may not light or may
remain on all the time. These phenomena are
normal and will have no effect on the images you
shoot.
Condensation may form if you use the camera •
where temperatures fluctuate. Wipe dry with a
soft, dry cloth.
The LCD may appear dim after immediately •
turning on a cold camera, but will brighten as the
camera warms up.
Do not point the lens or viewfinder at the sun.
Doing so may damage the parts inside.
Protective caps for the connectors
Keep the protective caps fitted over any
connectors that are not being used.
E-15
 Loading...