

Page 1

Arbitrator (ARB-SI) ver.1.9
Quick Reference Guide
Page 2
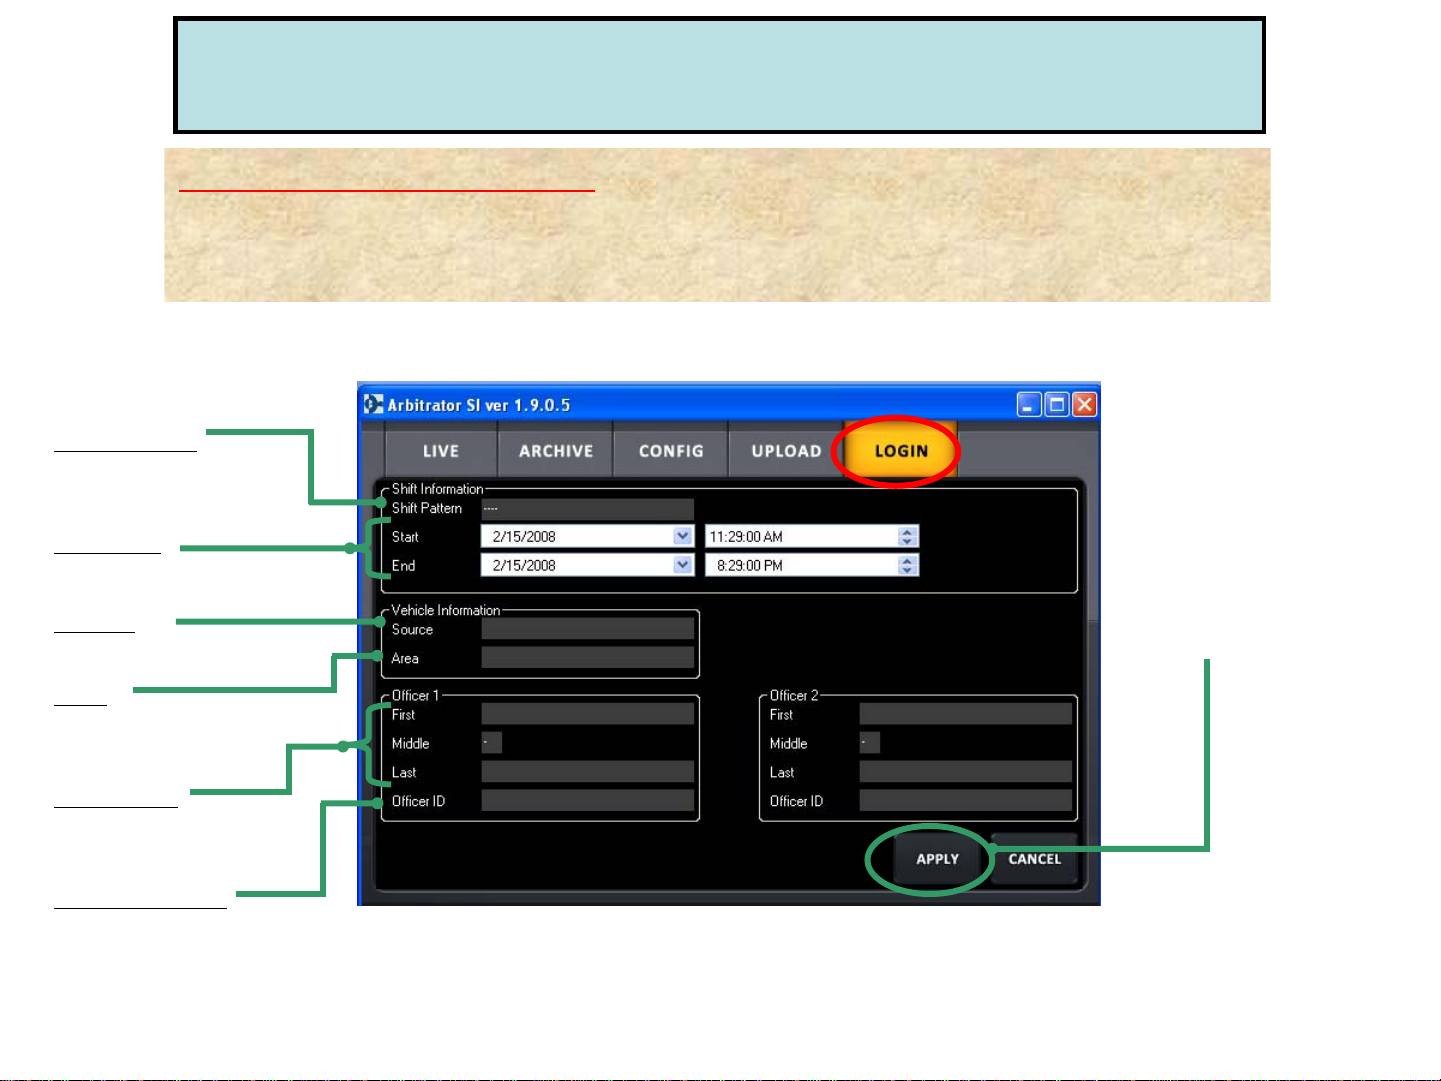
[Register by “LOGIN” of SI]
(1) Select “LOGIN” tab and type all the information (Shift, Vehicle, Officer Name)
at the beginning of shift.
(2) After completing all the information, press “APPLY” button to register it.
Shift Pattern
For DUI, traffic stop, etc.
according to the officer
Start/End
For the start and end times
of the shift
Source
For the vehicle ID
Officer Information (“LOGIN” Mode)
Register at the beginning of shift
Press this button
after entering all
the information.
Area
For the general location
of where the mobile unit
resides
Officer 1, 2
For the names of
Officers 1 & 2
OID (Officer ID)
For the IDs for Officers 1 & 2
Page 3

Select “LIVE” tab of SI (Front End Application) for live recording control.
Auto Zoom
Bookmark
While recording, users
can create a bookmark
by pressing this button
Backlight
Compensation
W: Zoom Out
T: Zoom In
“LIVE” Mode Menu for Officer
Advanced
Camera
For camera
and audio control
Video Information
For metadata and
officer information
Status Information
For P2 card storage
capacity and system
messages
REC
Button
Stop
Button
Audio 2
Mute
nd
Mute 2
by pressing on
this button
audio
IR Mode
(Auto/ON/OFF)
Camera
Select
(Camera 1/2)
Pressing these buttons
will expand more menus
on the right side of screen.
Snapshot
Get a still image of
whatever the camera
is currently viewing
Page 4
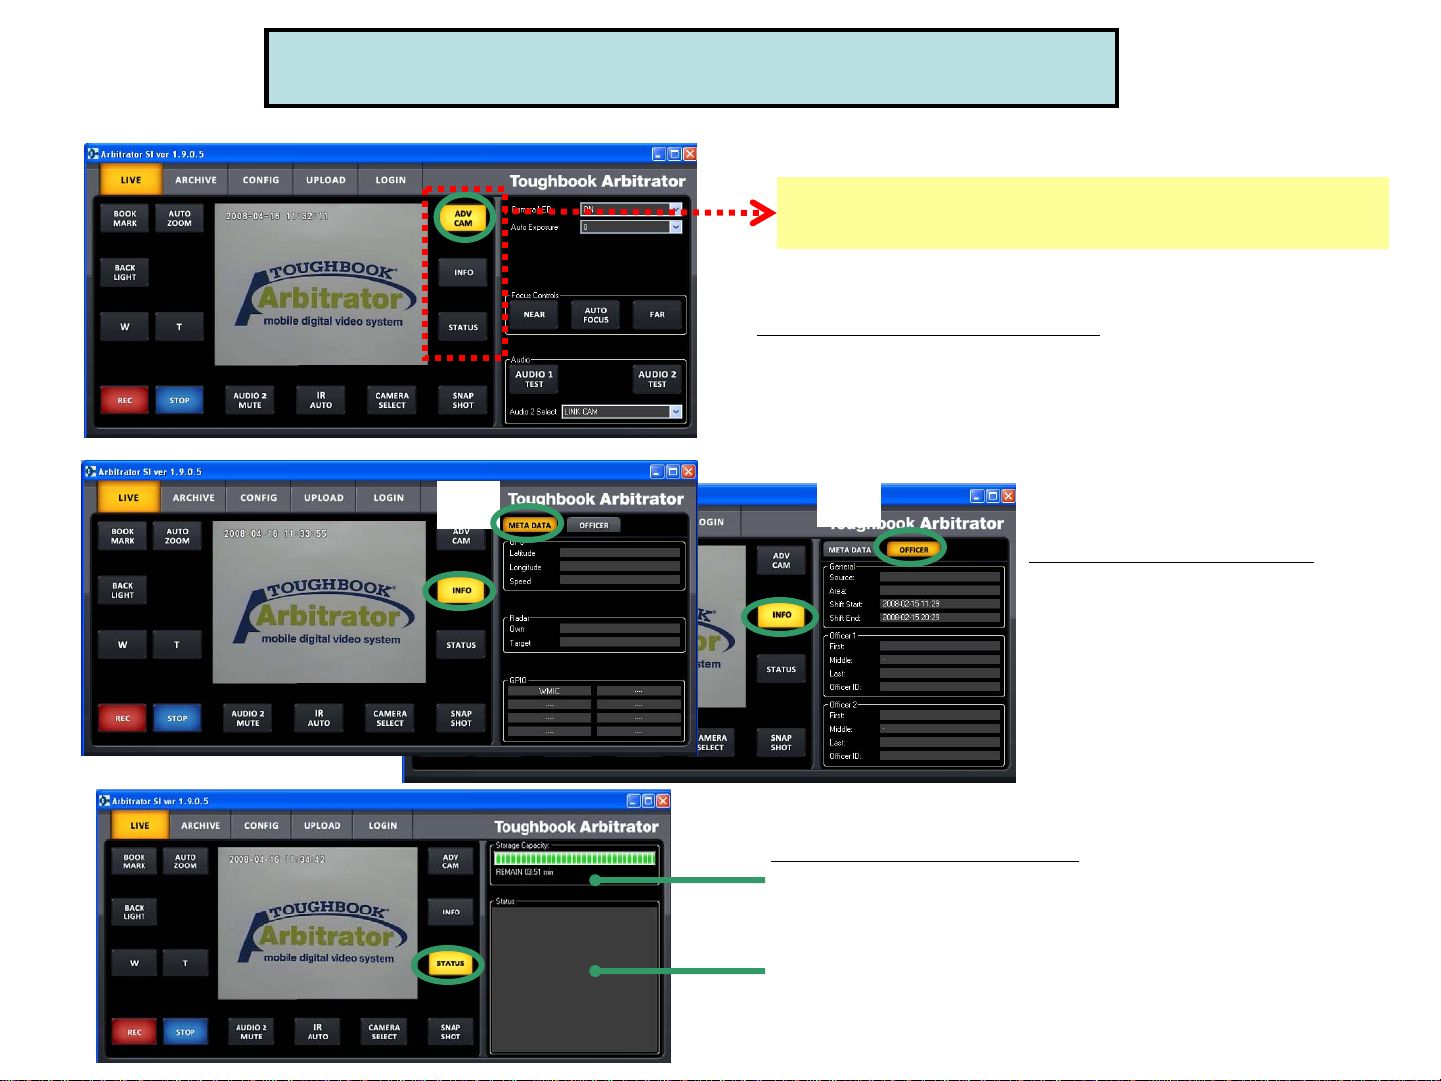
“LIVE” Mode Menu for Officer
Pressing these buttons (“ADV CAM,” “INFO,”
“STATUS”) will expand the menu on the right side.
ADV CAM (Advanced Camera)
For camera and audio control
(More detail in “Camera Control”)
(1)
(2)
INFO (Video Information)
(1) “META DATA” for GPS, Radar Gun,
GPIO trigger information
(2) “OFFICER” for Source, Area, Shift
time, Officer 1 & 2 information
Status (Status Information)
“Storage Capacity”:
Shows how much space has been taken on P2 card and how much
time is remaining
“Status”:
Any system message, including errors, bookmark creation or
snapshot will be displayed
Page 5
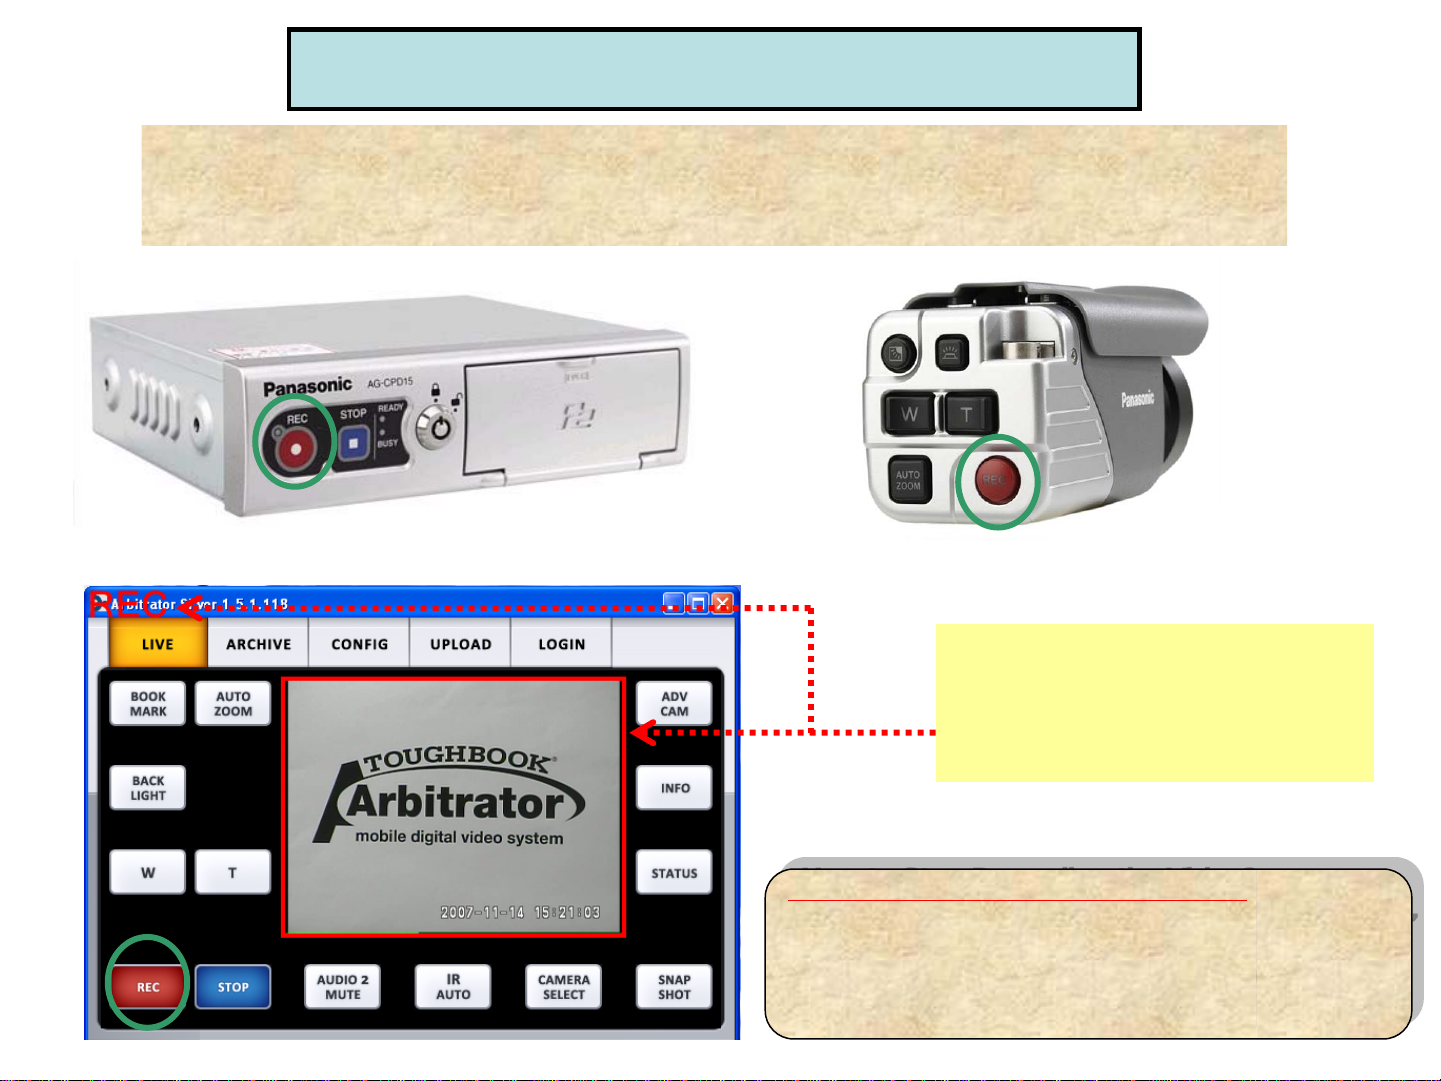
“LIVE” Mode - Record the Video
Press REC button for (1) VPU (P2 Recorder), (2) Camera (Rear Panel)
or (3) “LIVE” tab of SI
*If the trigger is set, VPU will start recording automatically when the trigger is on.
<VPU-P2 Recorder>
<SI-Front End Application>
<Camera>
When recording, users can see
the viewing pane surrounded
by a red highlight and the letters
“REC” in the upper left corner of SI
(Front End Application).
How to Stop Recording the Video?
How to Stop Recording the Video?
(1) Press STOP button for VPU (P2 Recorder),
(1) Press STOP button for VPU (P2 Recorder),
or “LIVE” tab of SI.
or “LIVE” tab of SI.
(2) Keep pressing the Camera REC button
(2) Keep pressing the Camera REC button
for 2 seconds.
for 2 seconds.
Page 6

“LIVE” Mode - Camera Control
Auto Zoom
Backlight
Compensation
Backlight
Compensation
W: Zoom Out
W: Zoom Out
T: Zoom In
Auto Zoom
T: Zoom In
Snapshot
IR Mode
(Auto, On, Off)
Camera Select
Pressing “ADV CAM” button for camera and audio control will expand another menu on the right side.
*Initial LPR mode is disabled.
Camera LED
The camera REC LED will light up Red when it is on
Auto Exposure
To set up the brightness of the picture
Focus Control
To configure the sharpness of the image manually
(Near/Far) or automatically
Audio 2 Select
1. “IN CAR” for in-car mic (Mic in)
2. “WMIC” for 2nd wireless mic (Audio 2 in)*
3. “LINKCAM” to change the Audio 1 or 2
by linking with the camera changes,
*Audio 1 for wireless mic 1 (Audio 1 in)
Page 7

“LIVE” Mode - Camera Control
for LPR (License Plate Recognition) users
This camera control is for LPR (License Plate Recognition) users. In order to use LPR mode,
the administrator needs to set up “Init LPR Mode” as “Enable” in Admin/Camera menu.
[When the recording is being STOPPED in “LIVE” mode]
1) [LPR Mode] is set to “LPR”
LPR ON
[When the “LIVE” screen is being RECORDED]
1) [LPR Mode] is set to “LPR”
2) [LPR Mode] is set to “PATROL”
Select “LPR” for LPR ON,
or “PATROL” for LPR OFF
Select “AUTO,” “1/500”
or “1/1000”
Select “AUTO,” “1/100,”
“1/500” or “1/1000”
Set x1.0 to x22.0
LPR OFF
2) [LPR Mode] is set to “PATROL”
Page 8

“ARCHIVE” Mode Menu - Play Back the Recorded Video
Archive
List all the files available
for playback on VPU.
Double clicking the file
will begin playing the
selected file in the
display area
Bookmark
Create a bookmark when
viewing the video by
pressing this button
Select “ARCHIVE” tab of SI to view the recorded video.
Playback Control
Rewind, Pause, Slow and
Fast Forward
Snapshot
Make a still image of
whatever camera is
currently viewing
Audio
These buttons
mute Audio 1 or 2
Pressing “INFO” button will
expand the screen that can be
viewed for “META DATA,”
“OFFICER” and “BOOKMARK”
Bookmark
Date/Time
A drop-down list containing
all the bookmarks for the
selected file
Event Type/
Description
User can enter free-form text
into this field, which will be a
searchable descriptor in Back
End Application
OK
Saves the edits or additions
made to Bookmark
Reload
Changes back to the
original format before
the recent changes
GPS Information
Radar Gun Information
GPIO (Trigger)
Show max. 8 triggers
configured for the system
“META DATA”
“OFFICER”
Officer Information
Including Source, Area,
Shift time, Officer 1, 2 as
metadata
Page 9

“UPLOAD” Mode Menu
For “Manual”* wireless upload, select (1) “UPLOAD” tab and press “UPLOAD” button (2), (3).
For “Auto”* wireless upload, NO need to go to this “UPLOAD” menu; video will be automatically
uploaded once getting into wireless network range.
*If the administrator sets up “Use Auto Upload” as “False” at “CONFIG” menu, it will be “Manual” upload.
If it is set up as “True,” it will be “Auto” upload.
(1)
(2)
(3)
Page 10

“RESTORE” Mode Menu
“RESTORE” button will appear in the tab of SI when the video file is corrupted*
and cannot be played back.
*Video file corruption can occur when the power to the VPU is lost or turned off while recording,
or when a P2 card is removed while recording
1. Select “RESTORE” tab (1) of SI and press “RESTORE” button (2)
to solve the file corruption and restore the file.
2. Then, “RESTORE” button will disappear and the file will be restored.
(1)
(2)
Page 11

Control Reference Guide
Front Camera (AG-CK10P)
Rear Panel LED Control
Backlight Compensation
to make it brighter
Auto Zoom
Camera Control
REC LED
Lights up in RED
while recording
Connector for VPU
T(TELE) for Zoom In
W(WIDE) for Zoom Out
REC START and STOP
*Pressing this button for
more than 2 seconds will stop recording.
SUN Shade
Page 12

REC
LED
Control Reference Guide
P2 Recorder - VPU (AG-CPD15P)
Key Lock
Locks and unlocks
the P2 card slot cover
P2 Card
Slot Cover
REC
Button
STOP
Button
READY Lamp
Lights up when
recording is ready
BUSY Lamp
Lights up or flashes
while a P2 card is being accessed
P2 Card
Slot 1, 2
Page 13

Digital Wireless Microphone TX and RX (CCR24PNA)
Transmitter (TX)
with Receiver (RX)
Built-in Mic
Control Reference Guide
Transmitter (Top View)
TALK Button:
Press for REC
Lavalier Mic
Input
TALK ON : Green LED
BATT : Red-Charging, Green-Fully charged
Please refer to CCR24PNA User Guide for more operation information
MODE Selection Button
Transmitter (Bottom View)
MUTE Button
ON/OFF
Switch
Page 14

Control Reference Guide
(CCR24PNA Vibration / LED Indication)
Mode
Selection
Vibration
and
LED
Vibration Only No Vibration
when Tx is
ready
No Vibration
GREEN On GREEN Blink RED Blink RED On
when Tx is
under
recording
mode
Vibration
(one time only)
Vibration
(one time only)
when Tx is
under
"Low Battery"
status
Vibration
(1 time per second)
Vibration
(1 time per second)
when Tx is
under
"Out Of Range"
status
Vibration
(2 times per 3 seconds)
Vibration
(2 times per 3 seconds)
when Mute is initiated
Vibration
(1 time per 5 seconds)
Tx is not recording:
GREEN On & RED Fast Blink
-------------------------------------------Tx is under recording:
GREEN Blink & RED Fast Blink
Vibration
(1 time per 5 seconds)
None
No Vibration
No LED
1. Default mode when power on.
2. After synchronized, the mode goes back to the last.
3. Please refer to CCR24PNA User Guide for more operation information
 Loading...