

Panasonic Arbitrator-CP, Arbitrator-CP 1.9 Reference Manual

Arbitrator-CP ver.1.9
Basic Operation
[For Officers]

Arbitrator-CP Basic Operation for Officers
-Contents-
(1) Control Reference Guide
z Front Camera (AG-CK10P)
z P2 Recorder-VPU (AG-CPD15P)
z Control Panel (AG-RCP30P)
z Control Panel - User Friendly Design
z Digital Wireless Microphone (TDSS-900-PNA)
(2-a) Control Panel Menu for Officer (for non LPR users)
(2-b) Camera Menu for LPR (License Plate Recognition)
(3) Record the video (Live Mode)
(4) Playback the recorded video (Archive Mode)
(5) Camera Control: (a) Zoom (b) Auto Zoom (c) IR Mode
(6) Officer Information - Register at the beginning of shift & delete at
the end of shift
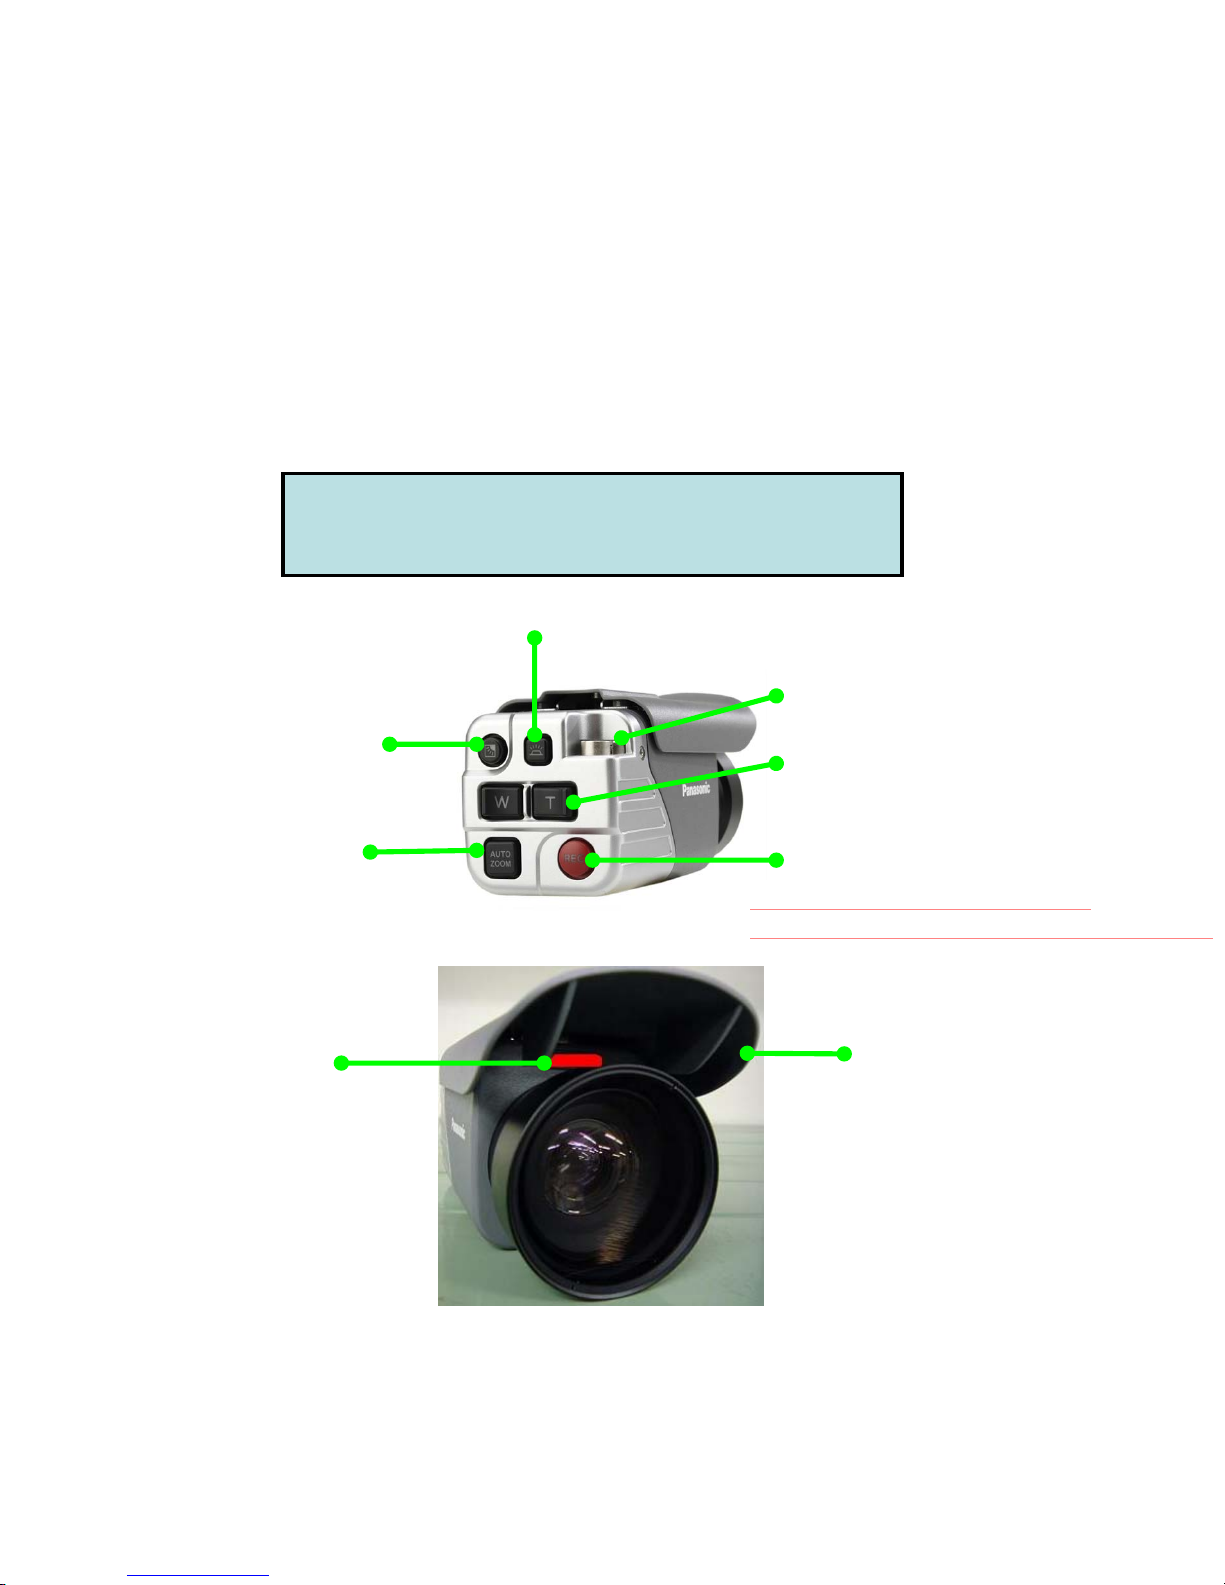
Backlight compensation
to make it brighter
T(TELE) for Zoom In
W(WIDE) for Zoom Out
*Keep pressing this button for
more than 2 seconds will stop recording.
Rear panel LED Control
Auto Zoom
Camera Control
Connector for VPU
(1) Control Reference Guide
Front Camera (AG-CK10P)
REC Start and STOP
SUN Shade
REC LED
Lights up in RED
while recording
(1) Control Reference Guide
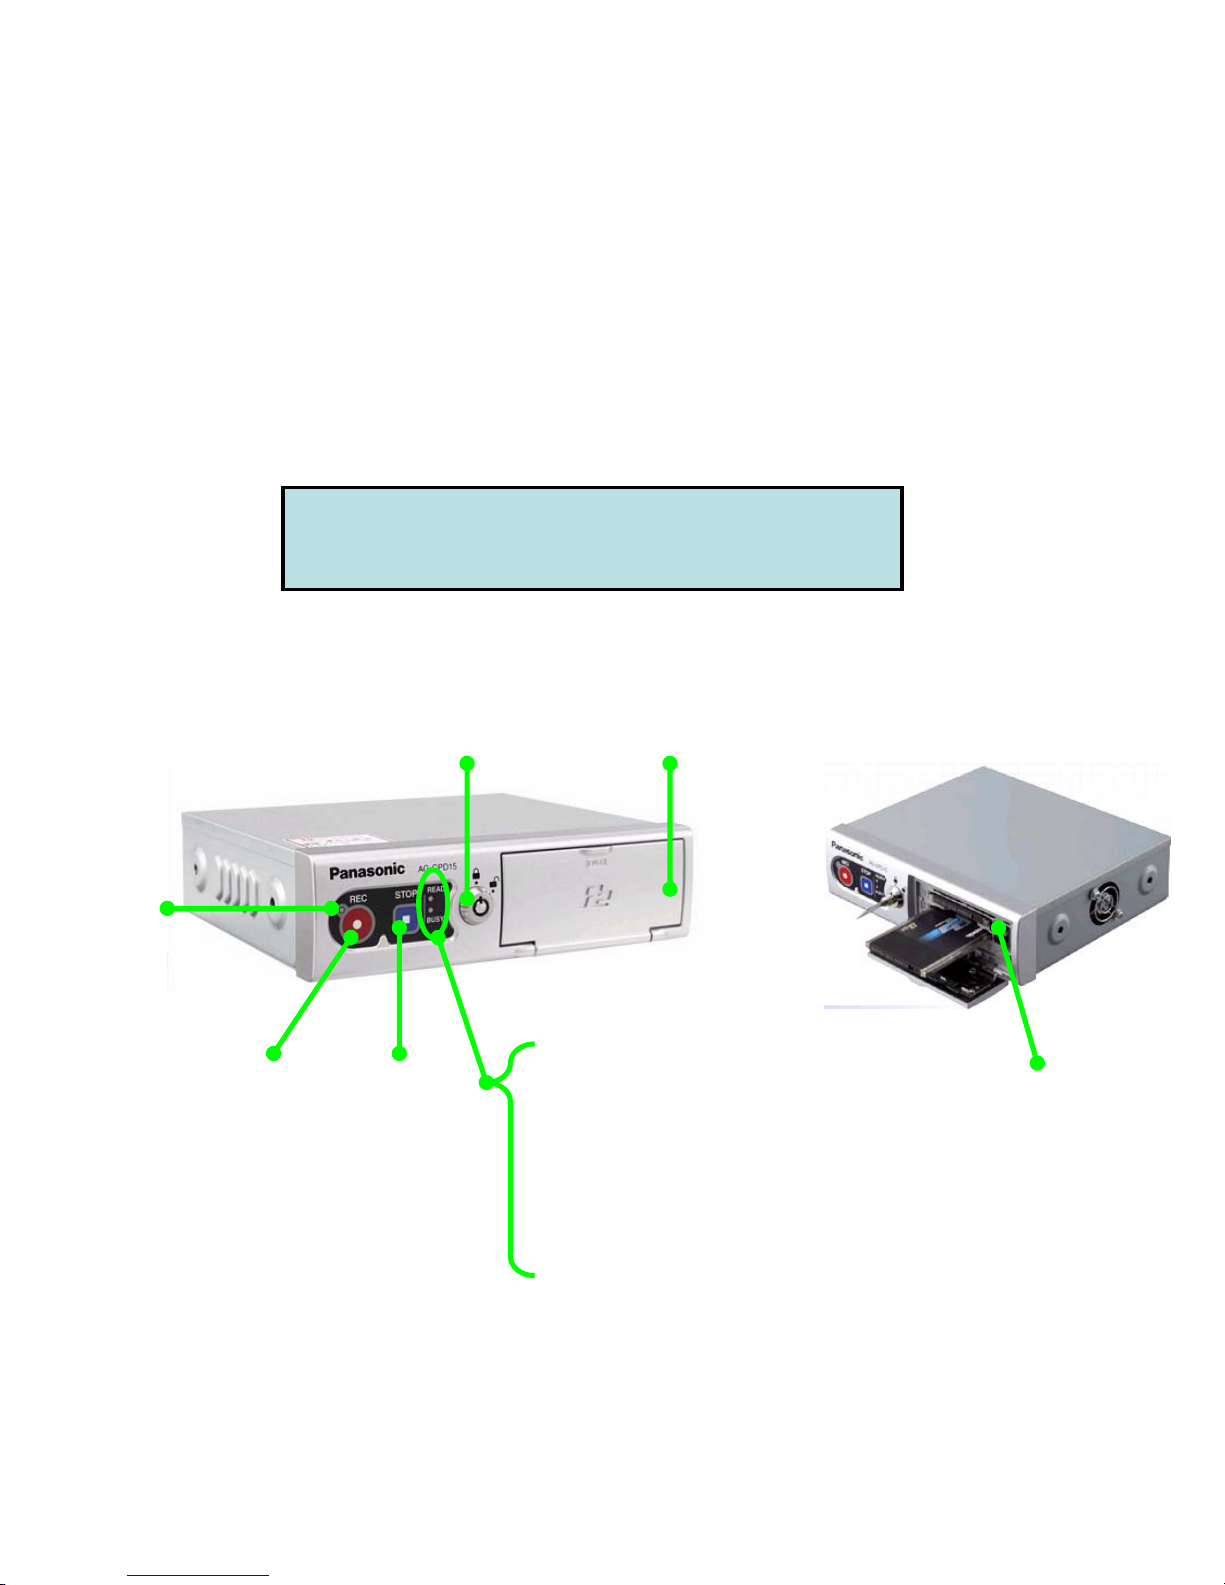
P2 Recorder - VPU (AG-CPD15P)
REC
button
REC
LED
STOP
button
READY lamp
Lights up when
recording is ready
BUSY lamp
Lights up or flashes
while a P2 card is accessed.
Key Lock
Locks and unlocks
the P2 Card slot cover
P2 card
slot cover
P2 card
slot 1, 2

LCD
Screen
Auto
Zoom
Book
Mark
Backlight
Compensation
T: Zoom In
W: Zoom Out
REC/STOP
Lamp
Skip
(Back/Forward)
REC
Button
Live/Archive
Switching Button
STOP
Button
Audio 2 Mute
Button/Lamp
Mute Audio 2 and lamp lights
on by pushing this button.
No recording while muting
(lights on)
Control Panel
ON/OFF
Return
To go back to previous
menu or setting
Cursor Button
1) Lock Lamp
Lock except “REC”, “Menu”,
“Control Panel ON/OFF”,
“Return” Button while lights on
2) Ready Lamp
3) Busy Lamp
Menu
(1) Control Reference Guide
Control Panel (AG-RCP30P)
IR Mode
(Auto/ON/OFF)
Camera
Select
(Camera1/2)
Volume
Control
Brightness
Control
)
Live Control
Mode Buttons
Admin/Archive
Control
Mode Buttons
(1) Control Reference Guide
Control Panel (AG-RCP30P) - User Friendly Design
1. High Priority Buttons for Live Control Mode on the left side for easy access
High Priority Buttons REC, STOP, Zoom in/out, Bookmark Auto Zoom, Backlight compensation
2. The Same REC/STOP Button Size as that of VPU (P2 Recorder) for easy
recognition
3. Large Button Size and Space
between buttons for Users
(1) Control Reference Guide
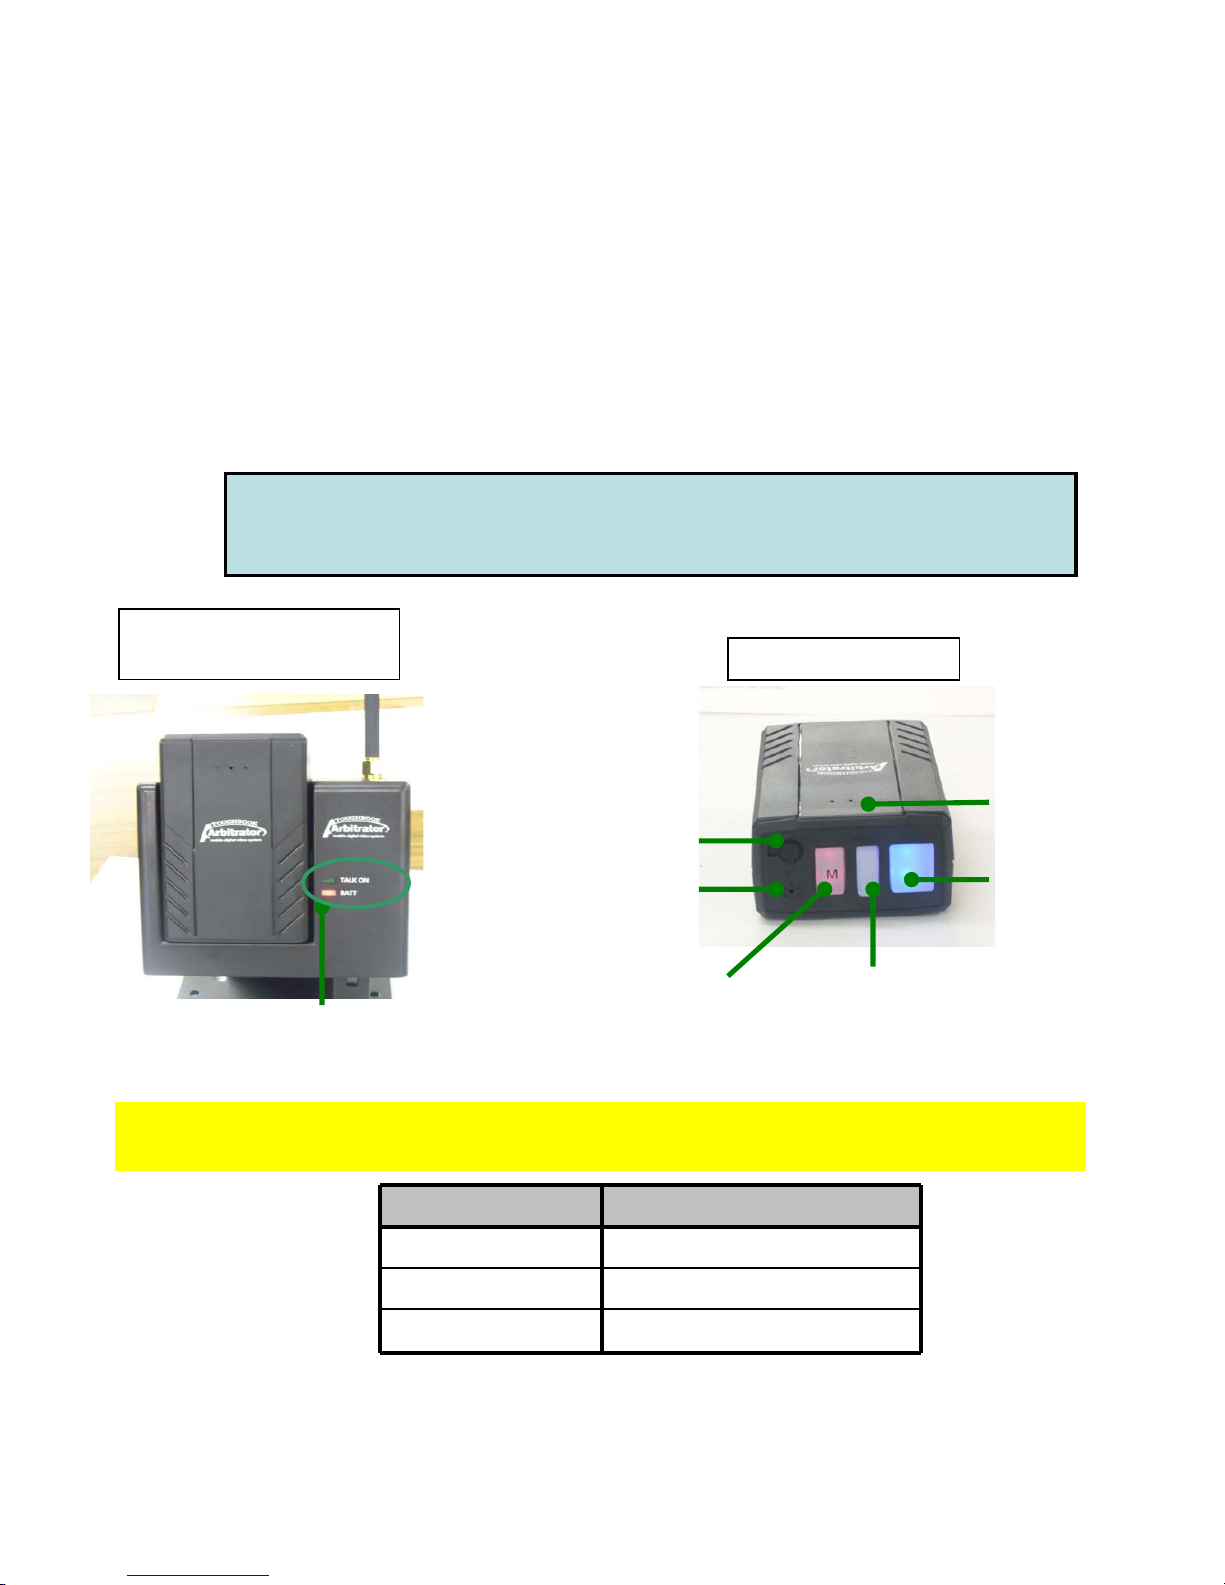
Digital Wireless Microphone TX and RX (TDSS-900-PNA)
Transmitter (TX)
With Receiver (RX)
Transmitter (TX)
Talk ON : Green LED
BATT : Red-In charging, Green-Fully charged
Beep Tone
Talk Button:
Press for REC
Mute Button Mode Selection Button
Lavalier Mic
Input
Built-in Mic
Regarding Mode and Indication of LED Buttons, there are 3 different versions of TX
as below serial numbers.
Version Serial Number
Version 1.0 070601609 to 071103658
071103659 to 071104658
071104659 and above
Version 1.5.2
Version 1.5.3
(1) Control Reference Guide
Version 1.0: Digital Wireless Microphone TX
Mode Talk
Push
REC
Low
Battery
Out of
Range
Mute
Push
Off On
BEEP Blue
on
Blue
blink
Red
on
Red
blink fast
Red
off blink
Vibration Blue
off
Blue
off
Red
on
Red
blink fast
Red
off blink
B+V Blue
on
Blue
blink
Red
on
Red
blink fast
Red
off blink
No
Indication
Blue
off
Blue
off
Red
on
Red
blink fast
Red
off blink
Indication of LED BUTTON: TDSS-900 TX Version 1.0
Serial No: 070601609 to 071103658
Talk button
Mute button
Mode button
1. Goes this mode as initial when Power on.
2. After synchronized, the mode goes back to the last.
Mode Talk
Push
REC Low
Battery
Out of range Mute Button
Push
OFF ON
Mode 1
BEEP
Blue
OFF
Blue
ON
Blue
Blink Fast
Blue LED OFF
Beep ON
Blue LED
OFF Blink Slow
Mode 2
Vibration
Blue
OFF
Blue
OFF
Blue OFF Blue LED OFF
Vibr ON
Blue LED
OFF OFF
Mode 3
B+V
Blue
OFF
Blue
ON
Blue
Blink Fast
Blue LED OFF
B+V ON
Blue LED
OFF Blink Slow
Mode 4
No Indication
Blue
OFF
Blue
OFF
BLUE
OFF
BLUE
OFF
Blue LED OFF
Talk button
Mode button
1. Blink 2 time and then LED OFF: this mode as initial when Power on.
2. After synchronized, the mode goes back to the last.
3. When TX is Off and inserted to RX, there will be no synchronized.
4. RED LED is not available any mode.
(1) Control Reference Guide
Version 1.5.2: Digital Wireless Microphone TX
Indication of LED BUTTON: TDSS-900 TX Version 1.5.2
Serial No: 071103659 to 071104658
Mode Talk REC
Low
Battery
Out of
range
Mute
Push
Off On
Vibration Blue
on
Blue
blink
Red
on
Red
Blink
Red
off
No
Vibration
Blue
off
Blue
off
Red
off
Red
off
Red
off
Talk button
Mute button
Mode button
(1) Control Reference Guide
Version 1.5.3: Digital Wireless Microphone TX
Indication of LED BUTTON: TDSS-900 TX Version 1.5.3
Serial No: 071104659 and above
Push
Talk button
Mode
button
Red/Blue Blink
(Mute/Talk button)
1. LED ON: this mode as initial when Power on
2. After synchronized, the mode goes back to the last.
3. When TX is Off and inserted to RX, there will be no synchronized.
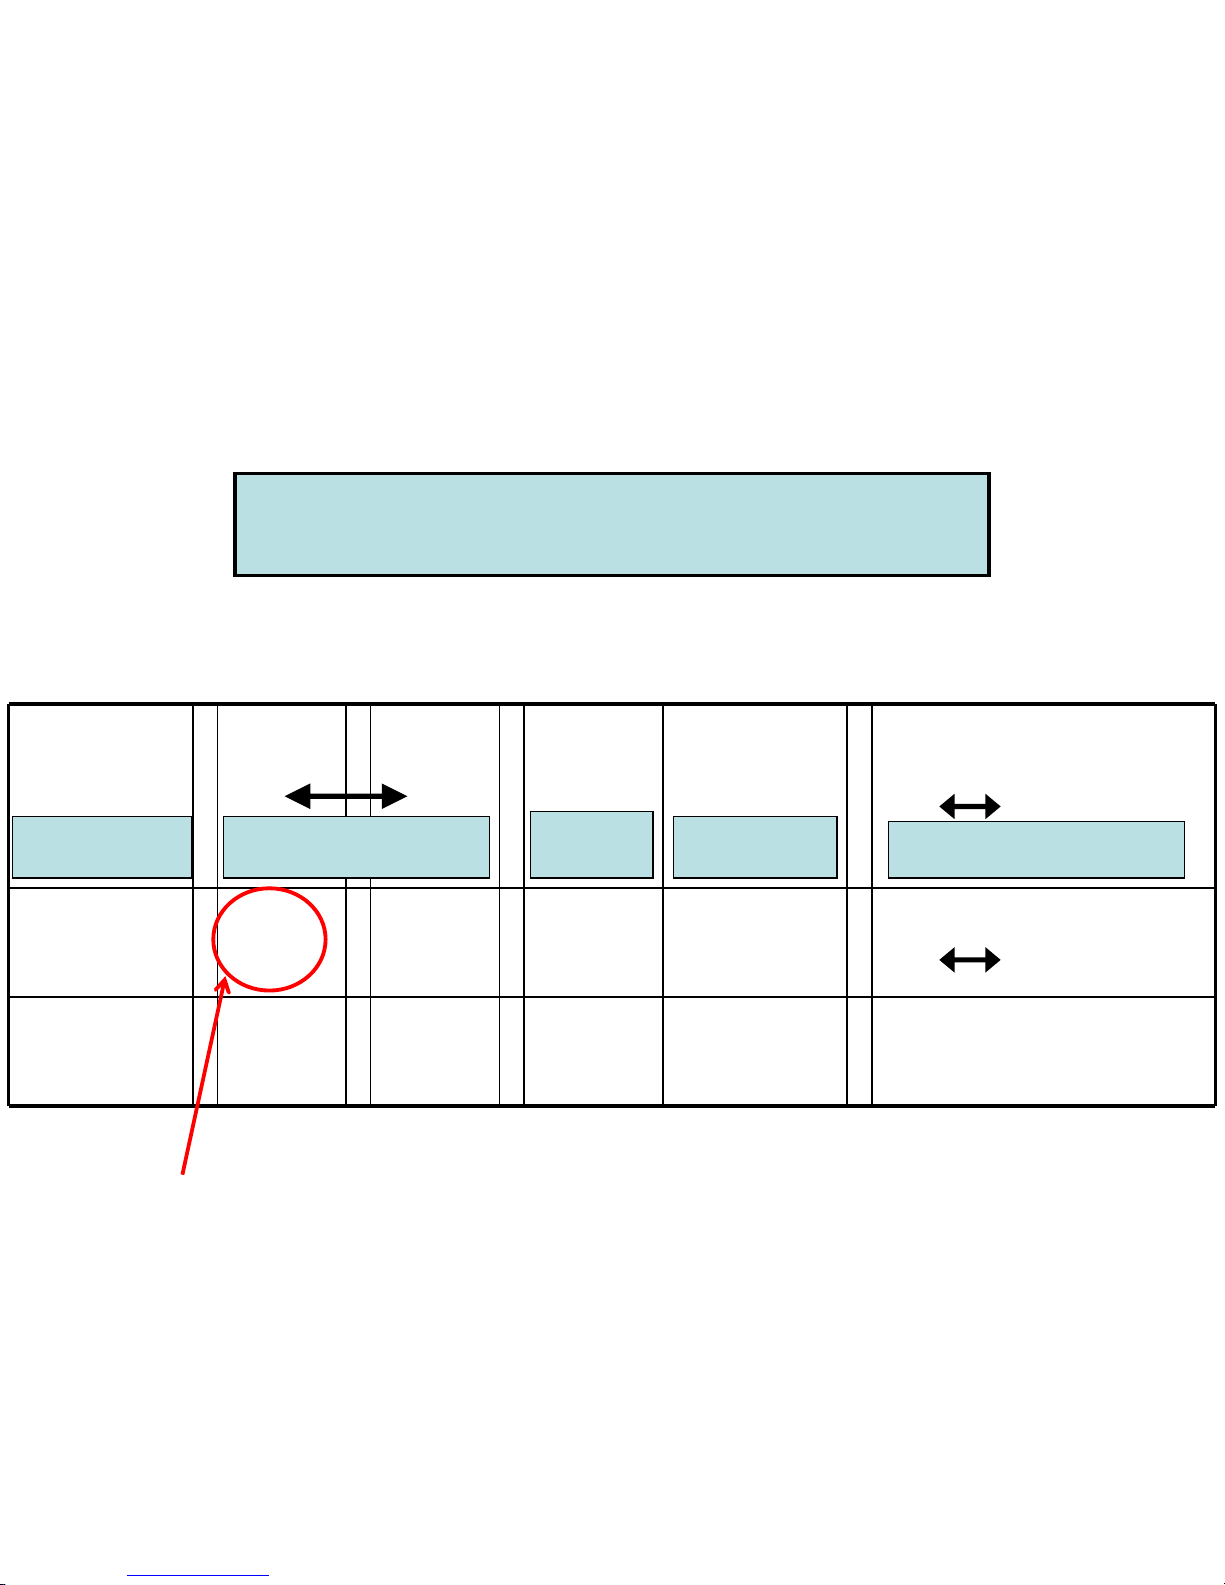
When appeared in
Control Panel OSD, execute
“Restore”
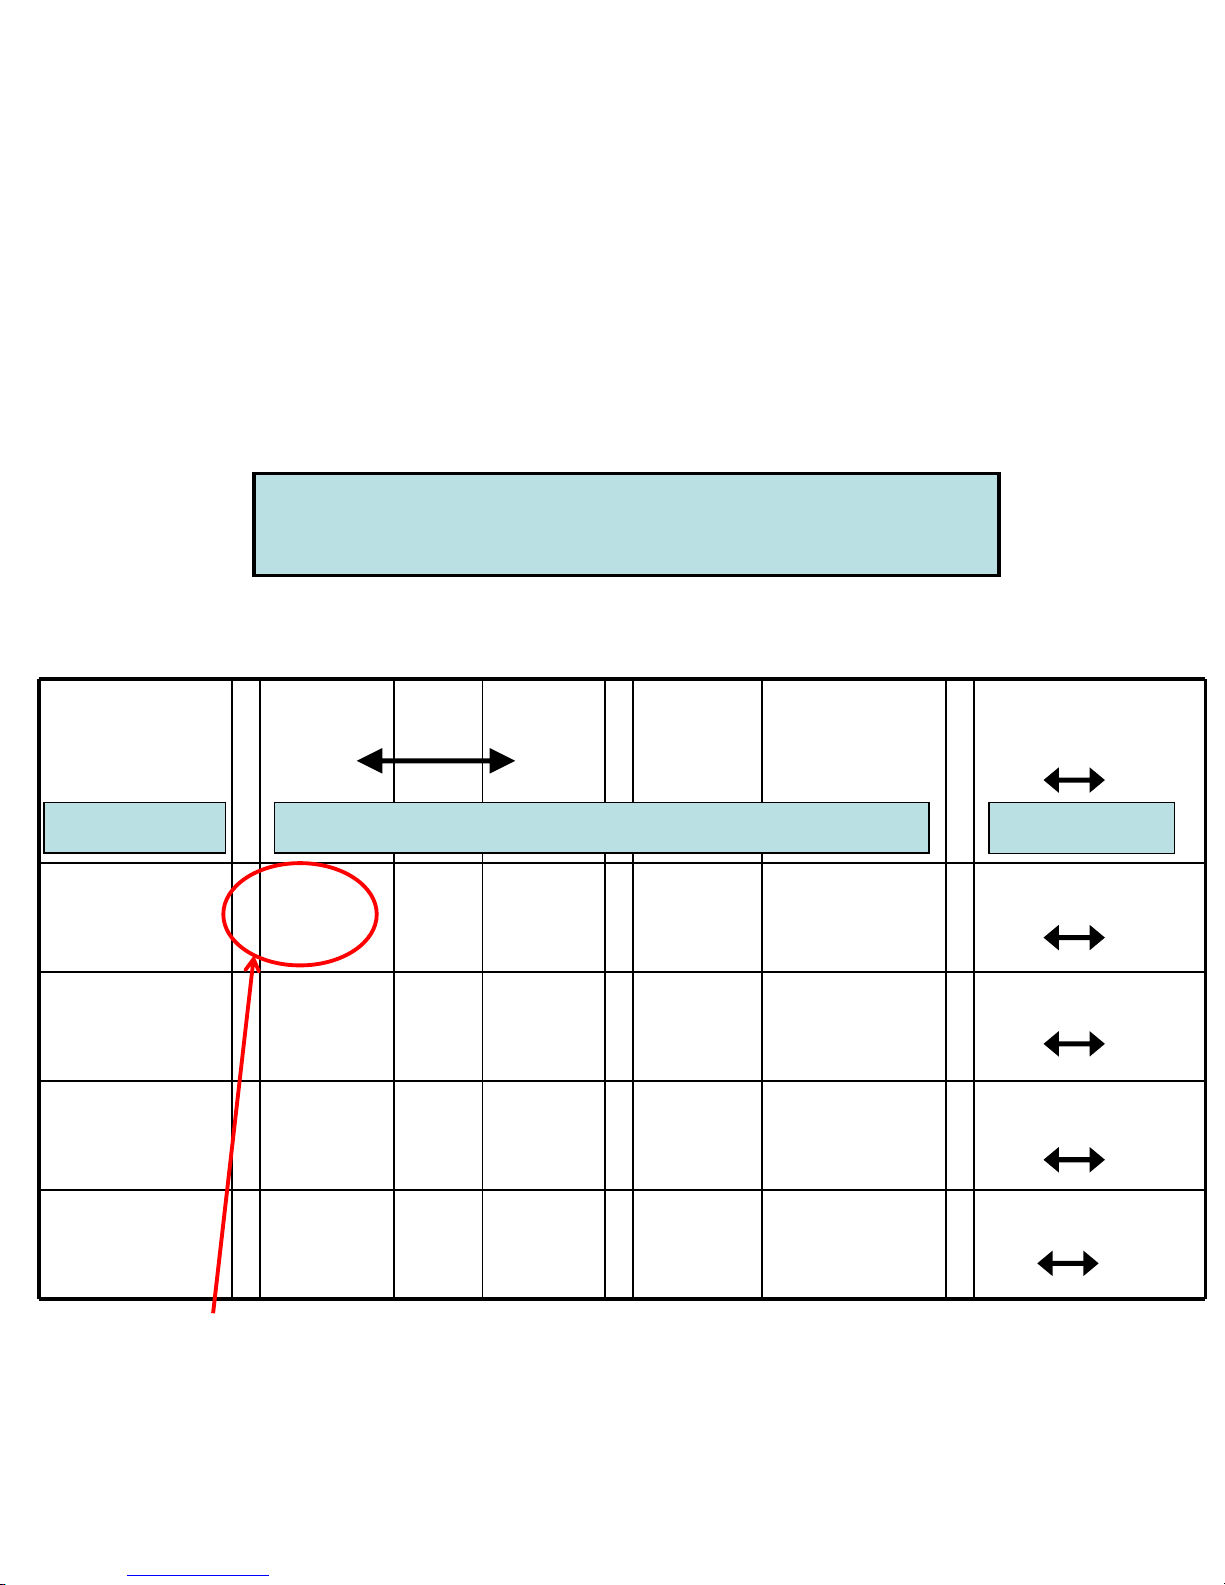
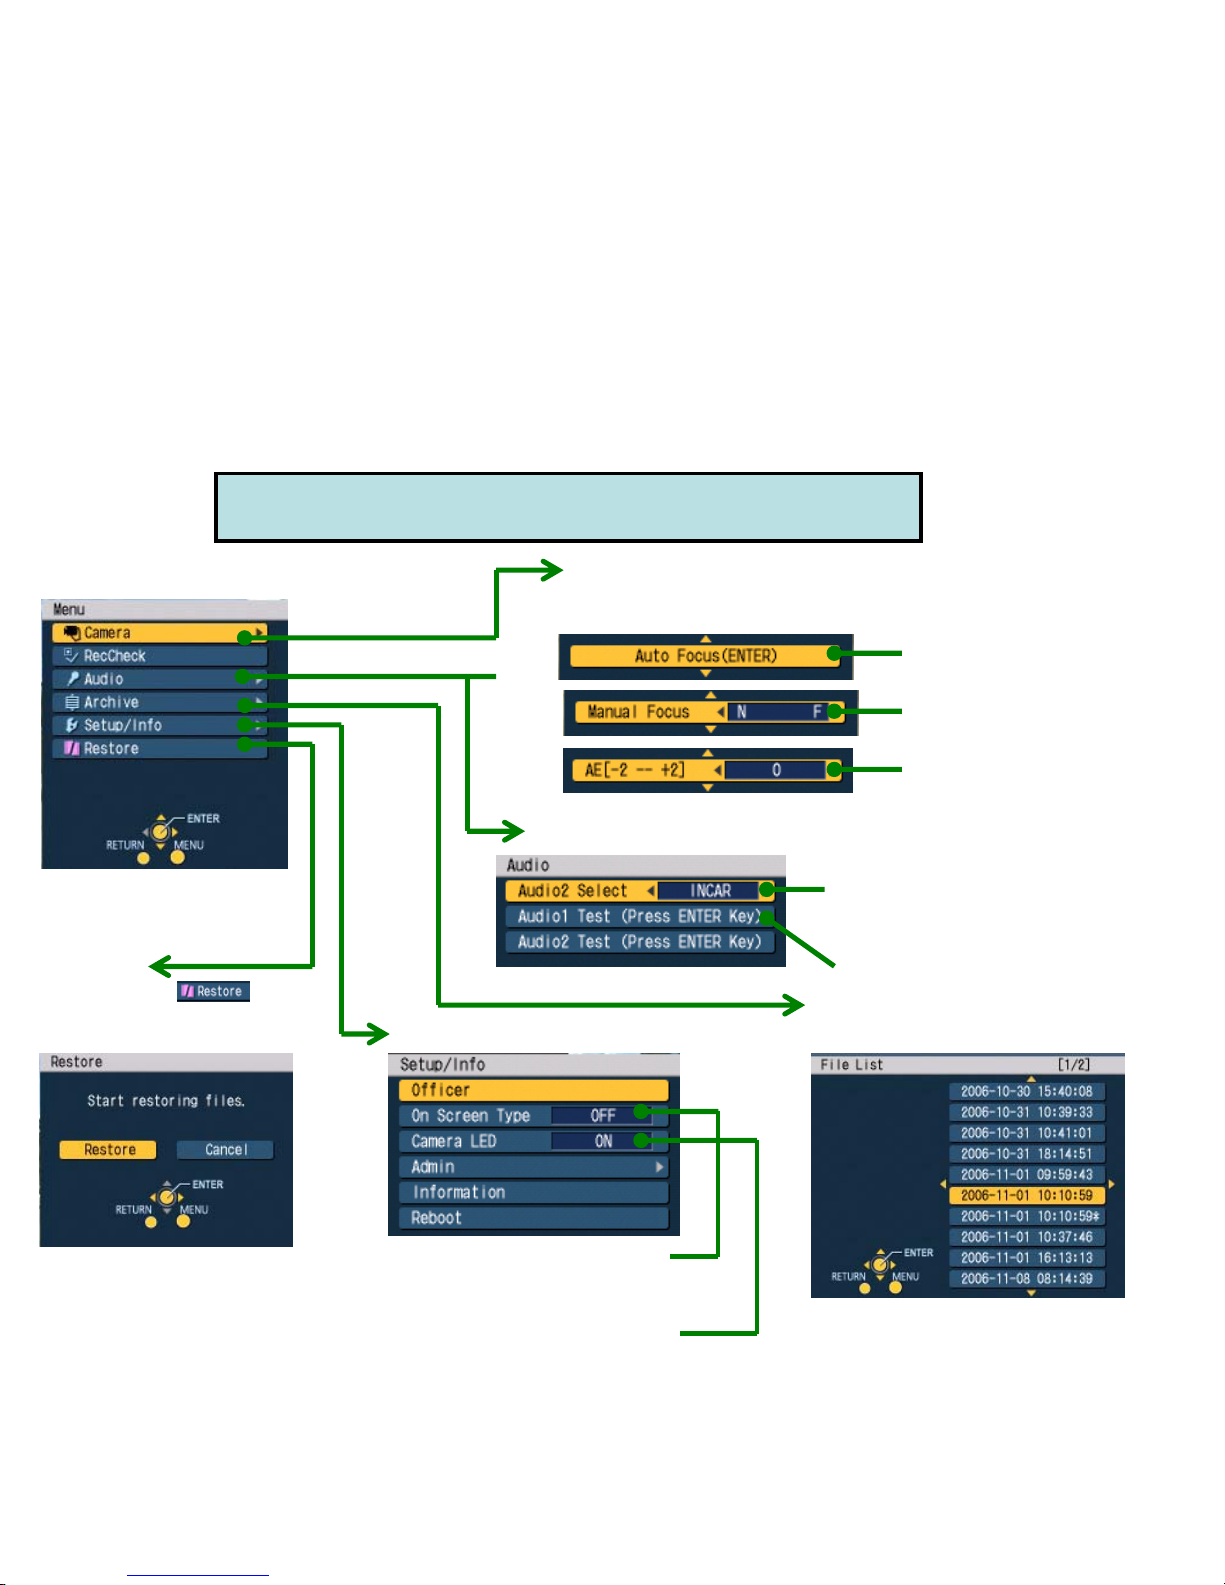
[Camera] For users who do not use LPR (License Plate Recognition mode)
(“Init LPR Mode” in Admin set up is “Disable”a s a factory default.)
*For LPR users, please go to ”Camer a Menu for LPR” for details
(2-a) Control Panel Menu for Officer
Adjust manual focus
Adjust image brightness
1. “IN CAR” for In car Mic (Mic in)
2. “WMIC” for 2nd Wireless Mic (Audio 2 in)
3. “LINKCAM” to change the Audio 1 or 2
by linking with the camera chang es,
*Audio 1 for Wireless Mic 1 (Audio 1 in)
[Audio]
[Archive]
Playback the recorded video
[Setup/Info]
[Restore]
[Top Menu]
On Screen Type for Control Panel
“Auto”, “SIMPLE”, “DETAILS” or “OFF”
Camera LED (Camera Tally Light),
for “ON” or “OFF”
Check Audio
Re-Auto Focusing
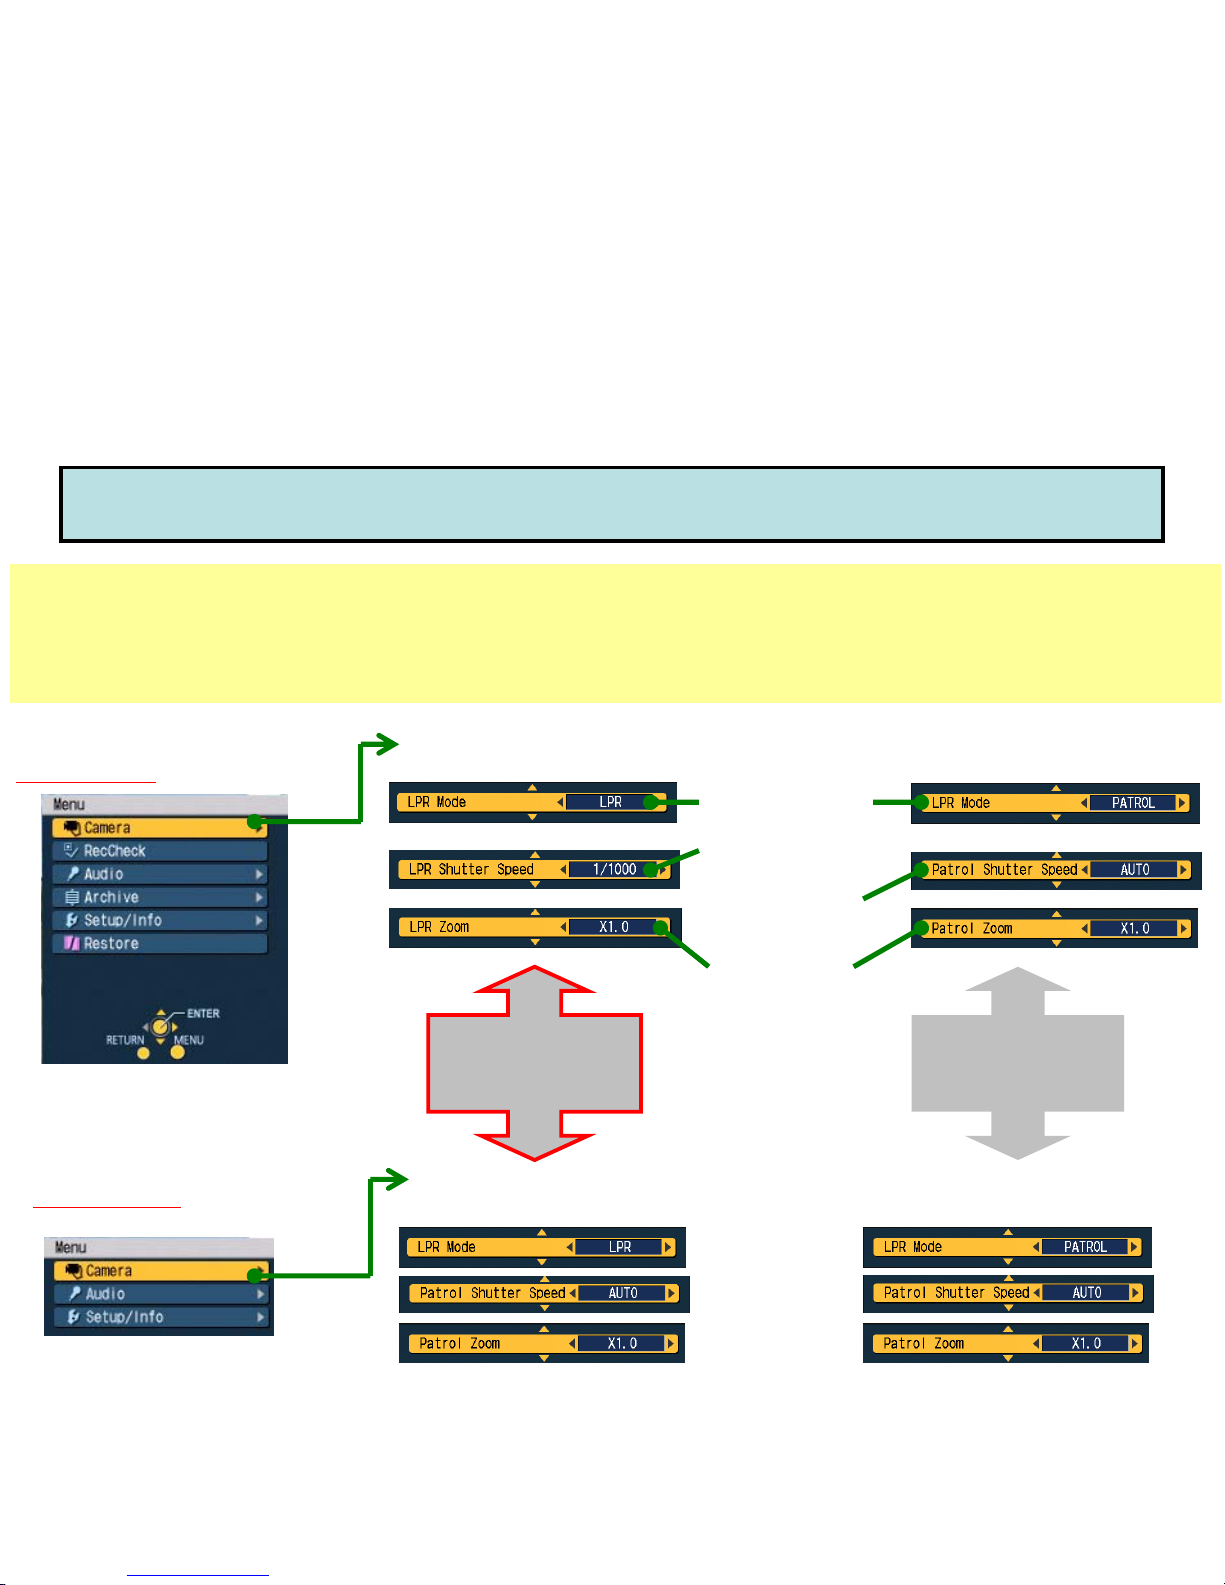
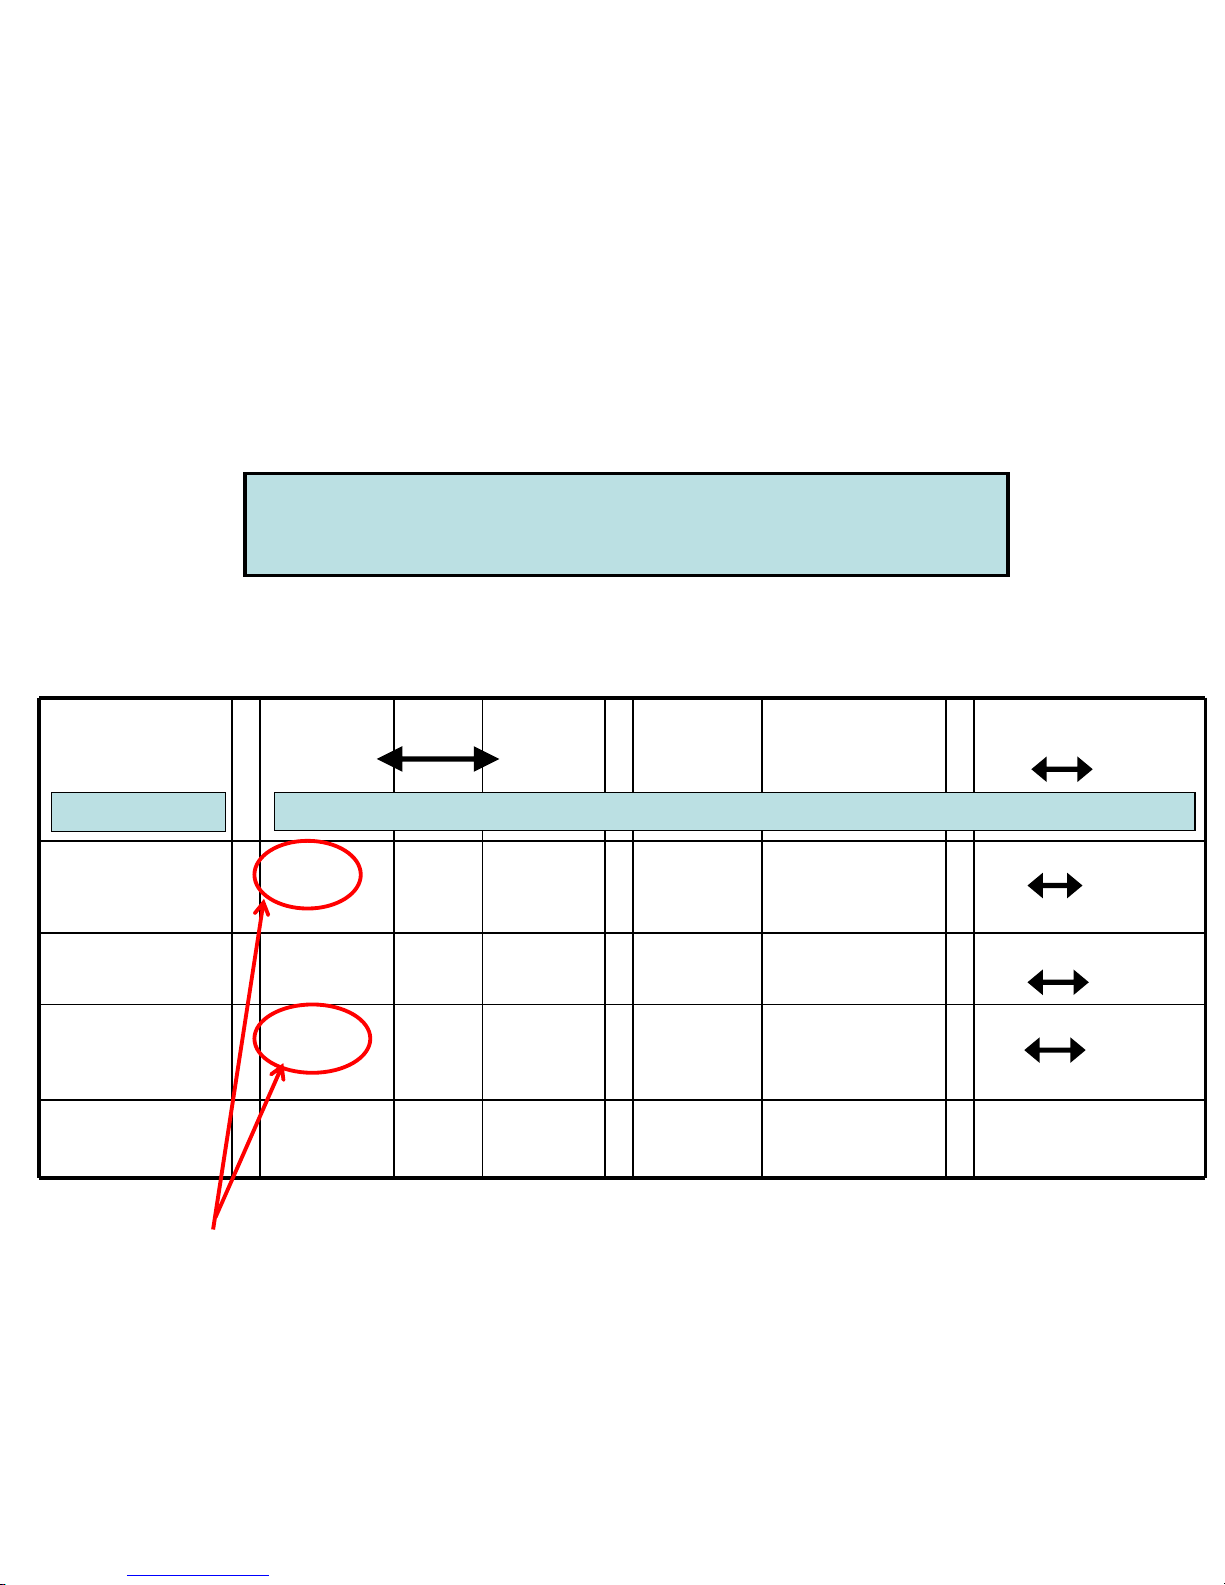
(2-b) Camera Menu for LPR (License Plate Recognition)
In order to use LPR (License Plate Recognition) mode, the Administrator needs to set up
“Init LPR Mode” as “Enable” in Admin/Camera menu.
*If setting up “Init LPR Mode” as “Disable”, there will be no “LPR Mode”, “LPR/Patrol Shutter Speed”, “LPR/Patrol Zoom” on screen as shown
below. (Just “Auto Focus”, “Manual Focus” or “AE” can be selectable and changed in “Camera” menu.)
[Camera]
1) [LPR Mode] is set to “LPR”
[Top Menu] while recording is
being stopped
2) [LPR Mode] is set to “PATROL”
in the live screen
[Top Menu] while the live screen
is being recorded
Select “Auto”,
“1/500”, or “1/1000”
“LPR” for LPR ON
“Patrol” for LPR OFF
Select “Auto”, “1/100”
“1/500”, or “1/1000”
Set x1.0 to x22.0
[Camera]
1) [LPR Mode] is set to “LPR”
2) [LPR Mode] is set to “PATROL”
LPR ON LPR OFF

(3) Record the video (Live Mode)
Press REC button for (1) Control Panel, (2) Camera (Rear Panel), or (3) VPU (P2 Recorder)
*If the trigger is set, VPU will start recording automatically when the trigger is on.
<Camera>
<Control Panel>
<VPU-P2 Recorder>
 Loading...