

Page 1
Page 2

IMPORTANT
“Unauthorized recording of copyrighted television programs, video tapes and other materials
may infringe the right of copyright owners and
be contrary to copyright laws.”
CAUTION
RISK OF ELECTRIC SHOCK
DO NOT OPEN
CAUTION: TO REDUCE THE RISK OF ELECTRIC SHOCK,
DO NOT REMOVE COVER (OR BACK).
NO USER-SERVICEABLE PARTS INSIDE.
REFER SERVICING TO QUALIFIED SERVICE PERSONNEL.
The lightning flash with arrowhead symbol, within an
equilateral triangle, is intended to alert the user to the
presence of uninsulated “dangerous voltage” within
the product’s enclosure that may be of sufficient
magnitude to constitute a risk of electric shock to
persons.
The exclamation point within an equilateral triangle is
intended to alert the user to the presence of important
operating and maintenance (servicing) instructions in
the literature accompanying the appliance.
CAUTION:
To reduce the risk of fire or shock hazard and
annoying interference, use the recommended
accessories only.
WARNING:
To reduce the risk of fire or shock hazard,
do not expose this equipment to rain or
moisture.
CAUTION:
TO REDUCE THE RISK OF FIRE OR
SHOCK HAZARD, REFER MOUNTING OF
THE OPTIONAL INTERFACE BOARD TO
AUTHORIZED SERVICE PERSONNEL.
FCC Note:
This device complies with Part 15 of the FCC Rules.
To assure continued compliance follow the attached
installation instructions and do not make any
unauthorized modifications.
This equipment has been tested and found to comply
with the limits for a Class A digital device, pursuant to
Part 15 of the FCC Rules. These limits are designed
to provide reasonable protection against harmful
interference when the equipment is operated in a
commercial environment. This equipment generates,
uses, and can radiate radio frequency energy and, if
not installed and used in accordance with the instruction manual, may cause harmful interference to radio
communications. Operation of this equipment in a
residential area is likely to cause harmful interference
in which case the user will be required to correct the
interference at his own expense.
is the safety information.
■
Do not insert fingers or any objects into the video
casette holder.
■
Avoid operating or leaving the unit near strong
magnetic fields. Be especially careful of large audio
speakers.
■
Avoid operating or storing the unit in an excessively
hot, cold, or damp environment as this may result in
damage both to the recorder and to the tape.
■
Do not spray any cleaner or wax directly on the unit.
■
If the unit is not going to be used for a length of time,
protect it from dirt and dust.
■
Do not leave a cassette in the recorder when not in
use.
■
Do not block the ventilation slots of the unit.
– 2 –
■
Use this unit horizontally and do not place anything on
the top panel.
■
Cassette tape can be used only for one-side, one
direction recording. Two-way or two-track recordings
cannot be made.
■
Cassette tape can be used for either Color or Black &
White recording.
■
Do not attempt to disassemble the recorder.
There are no user serviceable parts inside.
■
If any liquid spills inside the recorder, have the recorder
examined for possible damage.
■
Refer any needed servicing to authorized service
personnel.
Page 3

Contents
General and Features
Controls and their functions
Controls and their functions
Front panel
•
Connector area
•
Tapes
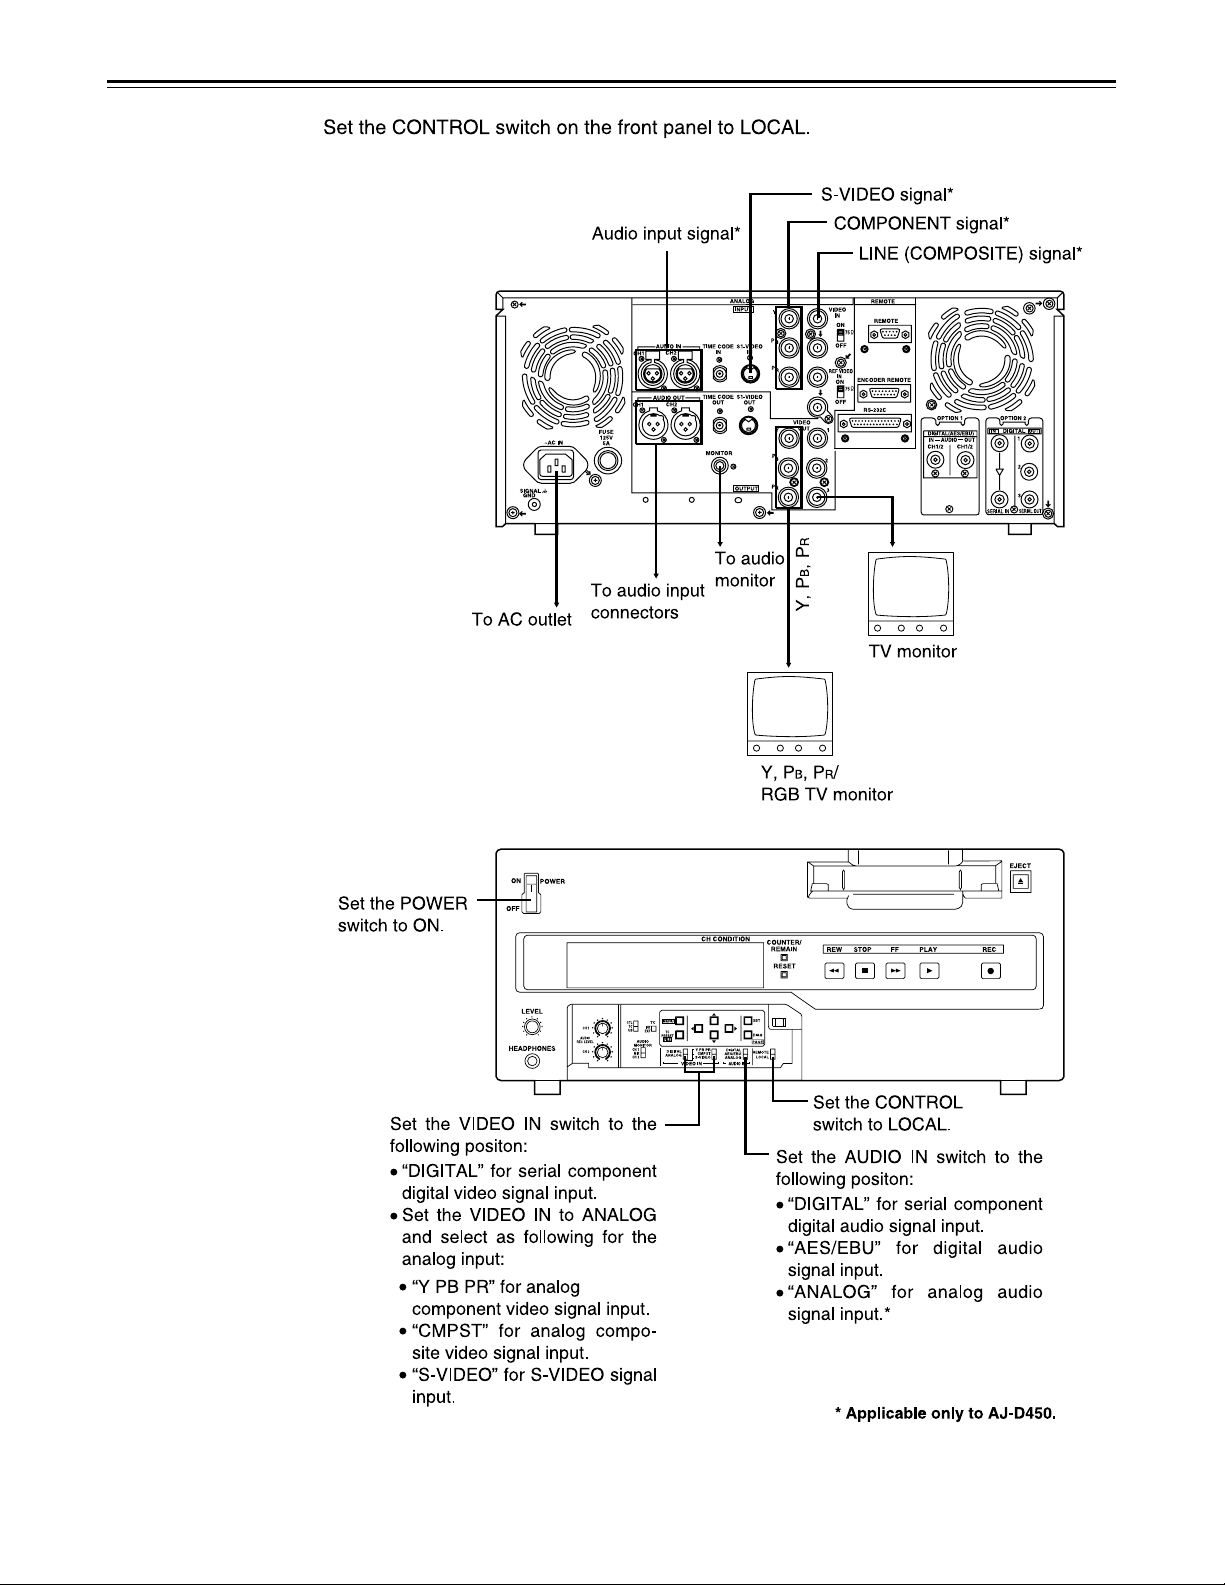
Connections and settings
Connections
When recording/playback using 1 unit
•
When recording, playback and editing
•
with 2 units
When using an editing controller
•
Internal encoder adjustments
Printed circuit board
Basic operations
Switching on the power/inserting the cassette
STOP mode
Recording (AJ-D450 only)
Playback
Setup menus
Setup (default settings)
Setup (setting) menus
System menu
•
Basic menu
•
Operation menu
•
Interface menu
•
Edit menu
•
Tape protect menu
•
Time Code menu
•
Video menu
•
Audio menu
•
Menu menu
•
. . . . . . . . . . . . . . . . . . . . . . . . . . . . . . .
. . . . . . . . . . . . . . . . . . . . . . . . . . . . . . . . . . . .
. . . . . . . . . . . . . . . . . . . . . . . . . . . . . . .
. . . . . . . . . . . . . . . . . . . . . . . . . . . . . . .
. . . . . . . . . . . . . . . . . . . . . . . . . . . . . . . . . .
. . . . . . . . . . . . . . . . . . . . . . . . . . . . . .
. . . . . . . . . . . . . . . . . . . . . . . . . . . . . . .
. . . . . . . . . . . . . . . . . . . . . . . . . . . . . .
. . . . . . . . . . . . . . . . . . . . . . . . . . . . . .
. . . . . . . . . . . . . . . . . . . . . . . . . . . . . .
. . . . . . . . . . . . . . . . . . . . . . . .
. . . . . . . . . . . . . . . . . . .
. . . . . . . . . . . . . . . . . . . . . . . . . . .
. . . . . . . . . .
. . . . . . . . . . . . . . . . . . . . . . . . . . . . .
. . . . . . . . . . . . . .
. . . . . . . . . . . . . . . . . .
. . . . . . . . . . . . . . . . . . . . . . . . .
. . . . . . . . . . . . . . . . . . . . . . .
. . . . . . . . . . . . . . . . . . . . . .
. . . . . . . . . . . . . . . . . . . . . . .
. . . . . . . . . . . . . . . . . . . . . . . . . . . . .
. . . . . . . . . . . . . . . . . . . . . . . . . . .
. . . . . . . . . . . . . . . . . . . . . . . . . . . .
. . . . . . . . . . . . . . . . . . . . . . . . .
. . . . . . . . . . . . . . . . . . . . . . . . . .
. . . . .
11
14
15
15
16
17
18
20
21
22
23
24
25
26
30
30
32
34
35
37
38
39
41
43
4
6
7
Time code
Time code/user bit
Recording internal/external time codes
•
Reproducing the time code/user bit
•
Functions
Superimpose screen
Servo reference
Audio V Fade Function (AJ-D450 only)
Maintenance
Rack mounting
Head cleaning
Condensation
Error messages
Specifications and others
RS-232C interface
Connector signals
Specifications
. . . . . . . . . . . . . . . . . . . . . . . . . .
. . . . . . . . . . . . . . . . . . . . . . . .
. . . . . . . . . . . . . . . . . . . . . . . . . . . .
. . . . . . . . . . . . . . . . . . . . . . . . . . . . .
. . . . . . . . . . . . . . . . . . . . . . . . . . . . .
. . . . . . . . . . . . . . . . . . . . . . . . . . . . . .
. . . . . . . . . . . . . . . . . . . . . . . . . . . .
. . . . . . . . . . . . . . . . . . . . . . . . . .
. . . . . . . . . . . . . . . . . . . . . . . . . .
. . . . . . . . . . . . . . . . . . . . . . . . . . . . . .
. . . . . . . . .
. . . . . . . . . . . .
. . . . . . . . . .
44
45
46
47
48
50
51
52
52
53
57
64
66
Before operating this unit, check that all of its accessories are present and accounted for.
Power cord....1 pc
Option
AJ-YA750P component serial interface board
•
AJ-CS750P Cassette adaptor
•
AJ-MA75P Rack mounting adaptor
•
AJ-YA655P Digital Audio Interface Board
•
AJ-YA752P Audio memory unit
•
– 3 –
Page 4

General and Features
This unit is a digital video cassette recorder which uses 1/4-inch tapes.
It incorporates digital compression technology so that the deterioration in picture quality and
sound quality resulting from dubbing is significantly minimized compared with existing
analog systems.
Furthermore, since it has a compact 4U size and light weight, the unit can be carried around
or mounted in a 19-inch rack with ease.
The settings for the unit’s setup can be performed while viewing the screen menus on the
TV monitor. With the AJ-D450 unit, both assemble and insert editing are possible through
external control.
Features
Compact size and light weight
This is a 4U size digital VTR. It can be mounted in a 19-inch rack with ease using the
optional rack-mounting adaptors (AJ-MA75P).
Up to 184 minutes of recording
Two sizes of cassette tapes can be used with this unit: M cassette (max. 66 minutes) and L
cassette (max. 184 minutes). The width of the tapes measures 1/4 inch to achieve a
compact design.
Compatibility with consumer products
Consumer cassette tapes shot with digital cameras available on the consumer market can
be played back on this unit using the optional cassette adaptor (AJ-CS750P).
<Notes>
Slow motion playback is not possible with consumer cassette tapes.
•
Consumer cassette tapes recorded in LP mode cannot be played back.
•
* Applicable only to
AJ-D450.
Digital slow motion/jog
The slow motion playback images can be reproduced clearly at any of the speeds given below
using commands from the external controller or other such device: –0.43/–0.3/–0.2/–0.1/
–0.03/0/ +0.03/+0.1/+0.2/+0.3/+0.5/+0.75.
<Notes>
Some noise may occur when the slow motion speed is changed.
•
When slow motion playback is used, the image shakes slightly in the vertical direction.
•
Dialy shuttle operation is possible through the external controller
Shuttle operations enable the tape to be played back with color images at a speed of up to
60 times normal tape speed in either the forward or reverse direction.
Time codes
This unit comes with a built-in time code generator* (TCG)/time code reader (TCR). In
addition to the internal time code, an external time code input or input signal VITC can be
recorded in the machine as the LTC time code.
– 4 –
Page 5

Features
(continued)
Multi-function input/output interfaces (AJ-D450 only for input)
Analog input/output
•
Component (Y, PB, PR) and composite and S-VIDEO signal input and output connectors are
provided.
Digital audio input/output
•
AES/EBU audio input/output is possible when the optional digital audio interface board (AJYA655P) is used.
Serial digital input/output
•
Serial digital (SMPTE 259M-C, 272M) input/output is possible when the optional component
serial interface board (AJ-YA750P) is used.
<Note>
The AJ-YA655P board, sold separately, is necessary when using serial digital audio
(SMPTE 272M).
9-pin (RS-422A)/(RS-232C) remote
•
The standard 9-pin serial (RS-422A) connector or RS-232C connector is used.
2-channel high-sound-quality digital audio (AJ-D450 only for recording)
Sound can be edited separately for two channels, and channel mixing capabilities are also
available. One channel is provided for the analog cue track.
Information selected from audio CH1 and CH2 can be recorded in the cue track memory.
(Set at the set up menu.)
Cue track input and output connectors are not provided.
•
Automatic editing functions from the external controller (only AJ-D450)
AJ-D450 allows both assemble and insert editing from the external controller.
Menu-driven setup
The setup settings, which are conducted prior to operating the unit, are performed while
viewing the setup menus either on the unit display or TV monitor.
– 5 –
Page 6
Controls and their functions
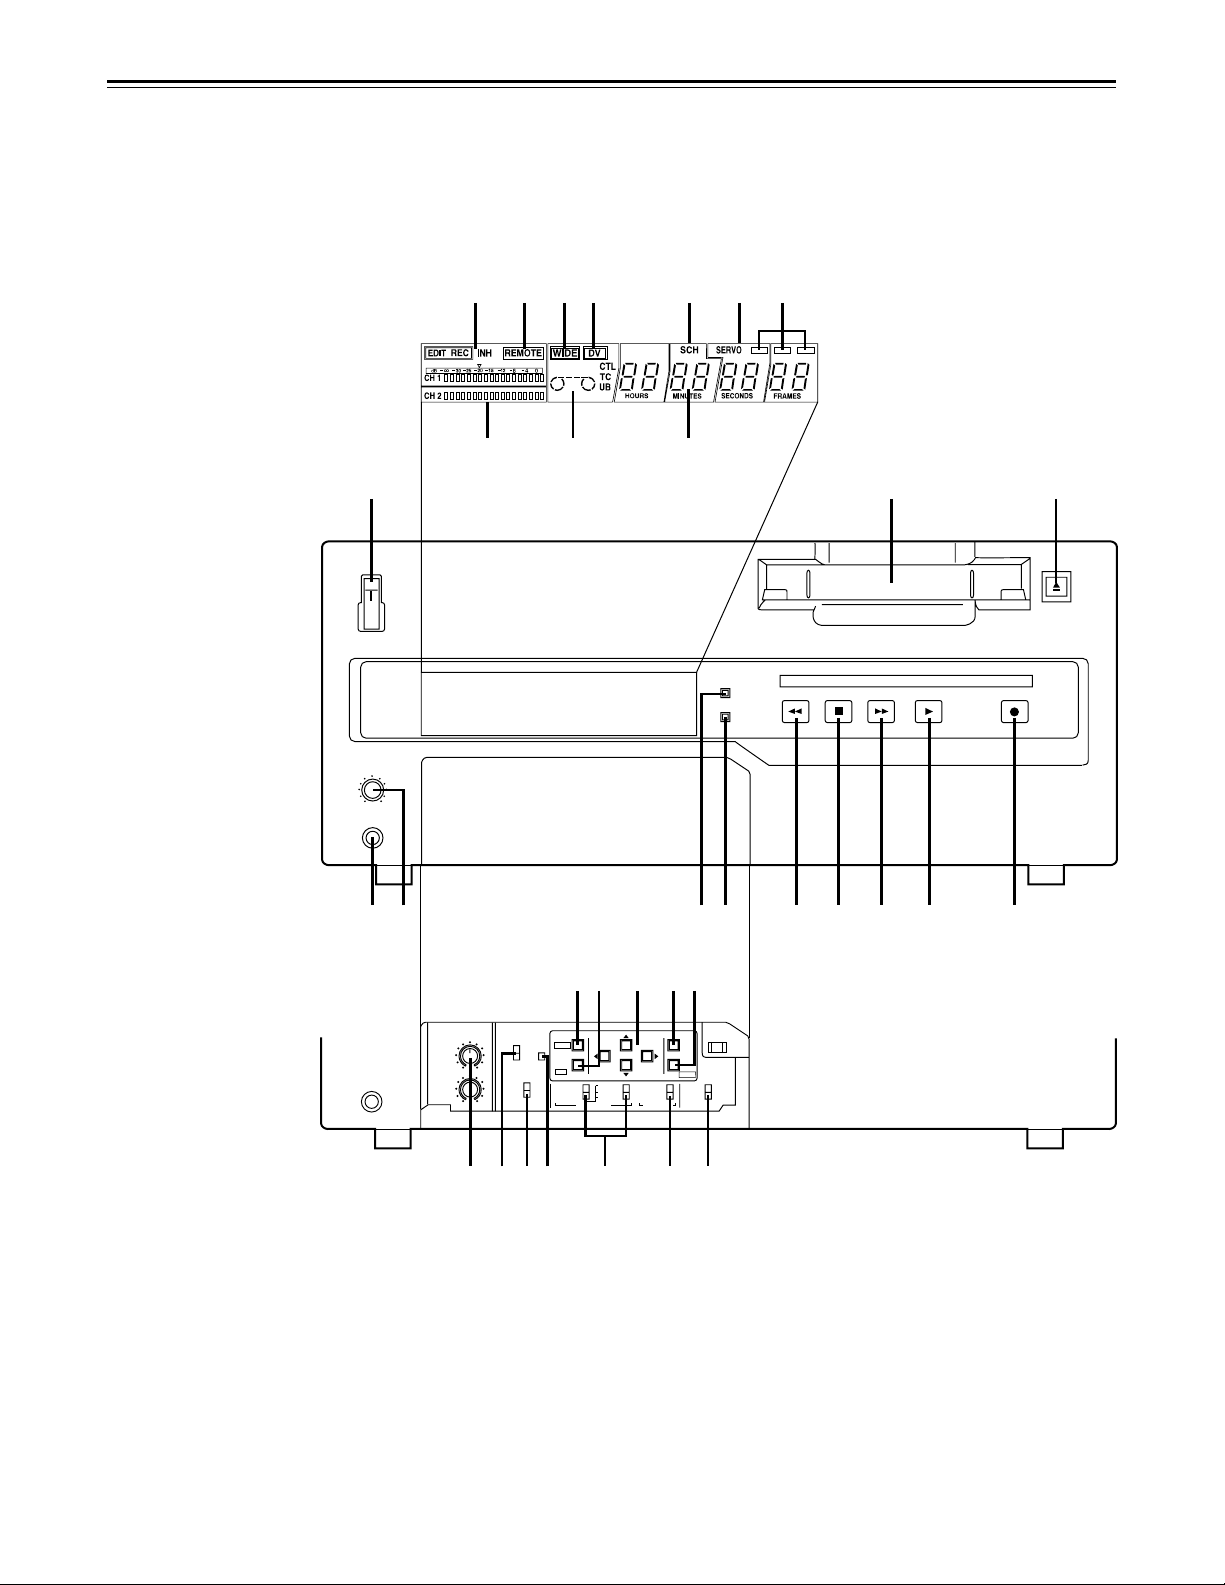
Front panel
Counter Display Section
r t y u i o!0
!1 !2 !3
ON
POWER
OFF
ewq
EJECT
CH CONDITION
LEVEL
HEADPHONES
COUNTER/
REMAIN
RESET
@1 @2 !4 !5 !6 !7 !8 !9 @0*
@7@8 @9 #0#1
DIGITAL
AES/EBU
ANALOG
AUDIO IN
SET
DIAG
PAGE
REMOTE
LOCAL
CH 1
AUDIO
REC LEVEL
CH 2
MENU
TC
CTL
TC
INT
UB
EXT
TC
PRESET
FILE
AUDIO
MONITOR
CH 1
MIX
CH 2
DIGITAL
ANALOG
VIDEO IN
Y PB PR
CMPST
S-VIDEO
@3*@4 @5@6* #2* #3* #4
RECPLAYFFSTOPREW
* Applicable only to AJ-D450.
– 6 –
Page 7

q
POWER switch
When the ON side is pressed, the power is switched on, and the counter display lights up.
w
Cassette insertion slot
The M cassette, L cassette and consumer cassette (S cassette) with adaptor are inserted
into this slot.
Consumer cassettes can be played back only.
e
EJECT button
When this is pressed, the tape is unloaded and several seconds later the cassette is
automatically ejected. When the counter display indicates “CTL”, the display is reset.
r
EDIT/EDIT REC/REC/REC INH lamps (AJ-D450 only)
EDIT:
EDIT REC:
REC:
REC INH:
t
REMOTE lamp
This lights when the REMOTE/LOCAL switch has been set to the REMOTE position.
y
WIDE lamp
This lights when the unit is in 16:9 wide screen mode.
This lights when the editing mode is chosen from the 9P remote control.
This lights when editing from the 9P remote control.
Thsi lights during video recording.
This lights when the accidental erasure prevention mode has been set for the
cassette. In this state, neither recording nor editing is possbile.
u
Consumer cassette insertion display lamp
This lights when a cassette recorded on a consumer DV device has been inserted.
i
SCH lamp
This lights when the SCH of the external sync signal is within a specific range.
o
SERVO lamp
This lights when the drum servo and capstan servo have locked.
!0
Channel condition lamps
One of these lamps lights in accordance with the error rate status. (Green→blue→red)
Green:
Blue:
Red:
!1
Level meters
These indicate the PCM audio signal CH1/CH2.
The audio signal indicates the input signal levels during recording and EE selection, and
the output signal levels during playback.
!2
Cassette insertion display lamp
This lights when a cassette has been inserted into the unit.
This lights when the error rates for the video and audio playback signals are both
acceptable.
This lights when the error rate for the video or audio playback signals has
deteriorated.
The playback picture will remain normal even when this lamp lights.
This lights when the video or audio signals are subject to rectification or
interpolation.
!3
Counter display
This displays the TC and CTL count values, on-screen information and other messages.
– 7 –
Page 8
Page 9

@1
Headphones jack
The sound being recorded, played back or edited can be monitored on stereo
headphones when they are connected to this jack.
@2
Volume control
This is used to adjust the headphones volume.
@3
Audio recording level controls (AJ-D450 only)
These are used to adjust the recording levels of the analog audio signal CH1/CH2.
@4
CTL/TC/UB switch
Use this switch when selecting the counter display.
Tape timer (control signal) is displayed.
CTL:
Time code is displayed.
TC:
User bit is displayed.
UB:
@5
MONITOR SELECT switch
This is used to select the audio signals output to the monitor channel.
(With the No. 713 (MONI CH SEL) setting on the setup menu, the display may not match
the monitor output.)
@6
INT/EXT switch (AJ-D450 only)
INT:
For using the built-in time code generator.
EXT:
For using the time external code which is input from the time code input connector or
the video signal VITC. The selection is set at the setup menu.
@7
MENU button
When this is pressed, the setup menu appears on the TV monitor using VIDEO OUT 3
connector, and the setup menu No. appears on the display.
When it is pressed again, the setup mode is exited and the original operating mode is
restored.
@8
TC PRESET (FILE) button (TC PRESET function: AJ-D450 only)
When this is pressed, the time code setting mode is established.
User file can be selected when the cursor buttons ( , ) are used during the setup
menu mode. (For details, see setup menu items on page 26.)
@9
Cursor buttons ( , , , )
These are used when setting time codes and settings at menu setup.
, :
, :
The flashing digit changes continuously when the button is continously pressed.
For details about operation during setup menu mode, see setup menu items (page 25).
These change the flashing digit in the time code indicators.
Each time they are pressed, the flashing indicator moves incremently to the left or
right.
increments to the left; increments to the right.
These change the flashing digit in the time code indicators.
Each time they are pressed, the indicated value increments and decrements.
decrements the value; increments the value.
– 9 –
Page 10

Controls and their functions (continued)
#0
SET button
When this is pressed, the data which has been set on the setup menu is entered. After
data entry, the setup mode is exited and the original operating mode is restored.
DIAG button
#1
When this is pressed, VTR information is displayed. When it is pressed again, the original
display is restored.
There are two types of VTR information: “HOURS METER” information and “WARNING”
information. Swithcing between these types is enabled by pressing the cursor buttons
( , ).
Indicated on the “HOUR METER” screen are the power-on time, drum rotation time, tape
travel time, loading count, etc.
Indicated on the “WARNING” screen are the warnings.
VIDEO INPUT switch (AJ-D450 only)
#2
This switches the video input signal.
DIGITAL:
ANALOG:
* The optional AJ-YA750P serial interface board is necessary.
AUDIO INPUT switch (AJ-D450 only)
#3
This switches the audio input signal.
DIGITAL:
AES/EBU:
ANALOG:
*1 Both the optional AJ-YA750P serial interface board and the optional AJ-YA655P digital
audio interface board are necessary.
*2 The optional AJ-YA655P digital audio interface board is necessary.
REMOTE/LOCAL switch
#4
This switch is set when the unit is to be controlled from an external source using the
REMOTE connector or RS-232C connector.
REMOTE:
LOCAL:
For selecting serial component digital video signal (SMPTE 259M-C)
recording.*
For selecting analog video signal recording.
Select the analog video signal as follows to correspond with the input signal.
Y PB PR: For recording an analog component video signal.
CMPST: For recording an analog composite video signal.
S-VIDEO: For recording a S-VIDEO signal.
For selecting serial digital audio signal (SMPTE 272M) recording.*
For recording a digital audio signal.*
For recording an analog audio signal.
Set to this position when controlling the unit by a device connected using the
9-pin REMOTE connector or RS-232C connector.
Set to this position when controlling the unit using the controls on its own
operation panel.
1
2
– 10 –
Page 11
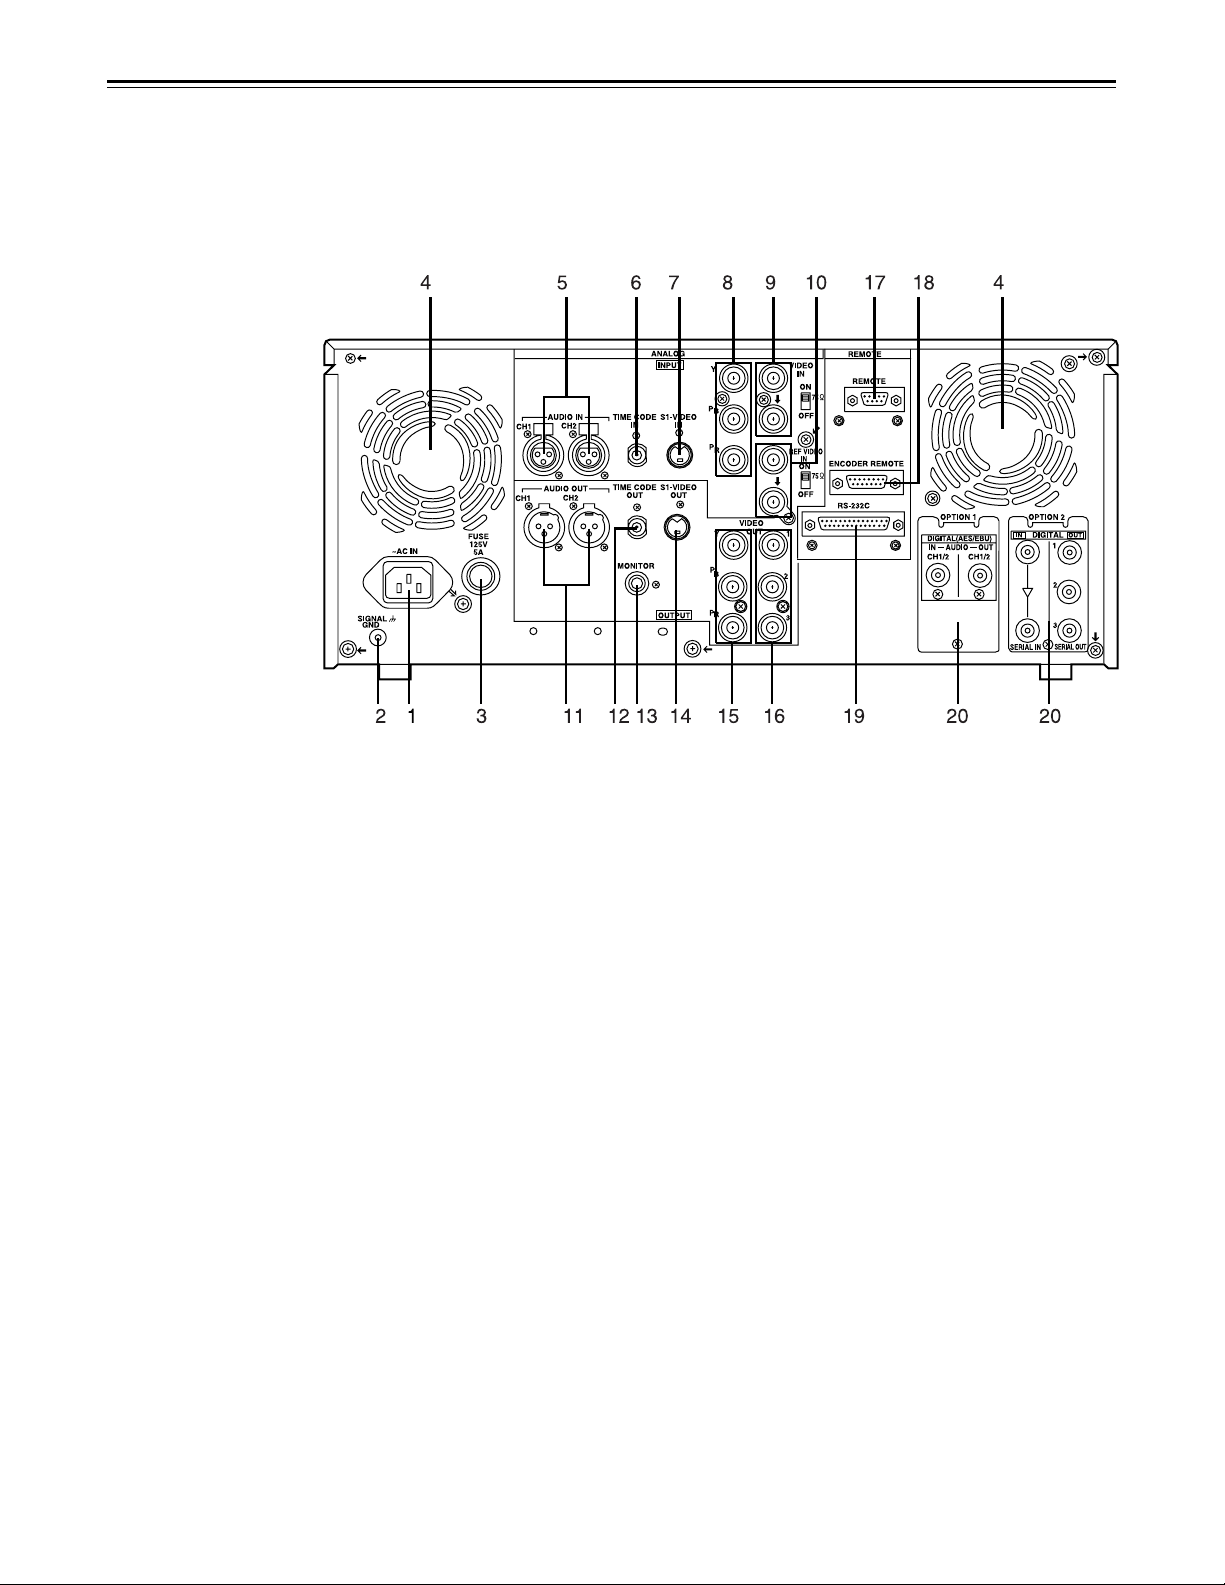
Connector area
* Applicable only to AJ-D450.
– 11 –
Page 12

Controls and their functions (continued)
<Connector area>
q
AC IN connector
This is for connecting the unit to the power outlet using the power cord provided.
w
SIGNAL GND terminal
This terminal is connected to the signa unit which is connected to the unit in order to
reduce noise. It is not connected to ground for safety purposes.
e
Fuse holder
This contains a fuse.
r
Fan motor
This is for cooling the unit.
The error code is displayed on the counter when trouble has caused the fan motor to
stop. If the unit is still operated in the warning status, the temperature inside the deck will
rise, and when it exceeds the safety temperature, all the unit’s operations will be shut
down.
t
ANALOG AUDIO IN connectors*
These are the analog audio input connectors.
y
TIME CODE IN connector*
This is the connector for recording the external time code on the tape.
* Applicable only to
AJ-D450.
u
S1-VIDEO IN connector*
This is the S-VIDEO input connector.
i
ANALOG COMPONENT VIDEO IN connector*
The analog component video signal is supplied to this connector.
o
ANALOG COMPOSITE VIDEO IN connectors and 75Ω termination switch*
The analog composite video signal is supplied to these two connectors which are
connected in a loop-through configuration. When the termination is required, set the
switch to ON.
!0
REF VIDEO IN connectors and 75Ω termination switch
These are the input connectors for the reference video signals. When the termination is
required, set the switch to ON.
!1
ANALOG AUDIO OUT connectors
The analog audio signals are output from these connectors.
!2
TIME CODE OUT connector
The playback time code is output from this connector during playback.
During recording, the time code generated by the internal time code generator is output.
!3
MONITOR OUT connector
The playback signals from the CUE track or PCM audio signal CH1/CH2 are output from
this connector.
– 12 –
Page 13

<Connector area>
!4
S1-VIDEO OUT connector
This is the S-VIDEO output connector.
!5
ANALOG COMPONENT VIDEO OUT connector
The analog component video signal is output from this connector.
!6
ANALOG COMPOSITE VIDEO OUT connectors
The analog composite video signals are output from these connectors.
The video signal with signals superimposed on it can be output from the VIDEO OUT3
connector.
The superimpose function can be set ON or OFF on the setup menu No. 006 (SUPER).
!7
REMOTE connector
The unit can be controlled from an external source by connecting an external controller.
!8
ENCODER REMOTE connector
The external encoder/controller is hooked up to this connector when the video output
signal and other settings are to be adjusted from an external source.
!9
RS-232C connector
@0
DIGITAL AUDIO IN/OUT connector (optional AJ-YA655P required.)
This I/O connector is for digital audio signals which comply with the AES/EBU standard.
<Note>
Does not input with AJ-D440.
@1
SERIAL DIGITAL COMPONENT AUDIO/VIDEO IN/OUT connector
(optional AJ-YA750P interface board required)
This I/O connector is for digital component audio and video signals which comply with the
SMPTE 259M-C/272M standard.
The optional AJ-YA655P is required for digital audio signal output on the AJ-YA750P
board.
<Note>
Does not input with AJ-D440.
– 13 –
Page 14
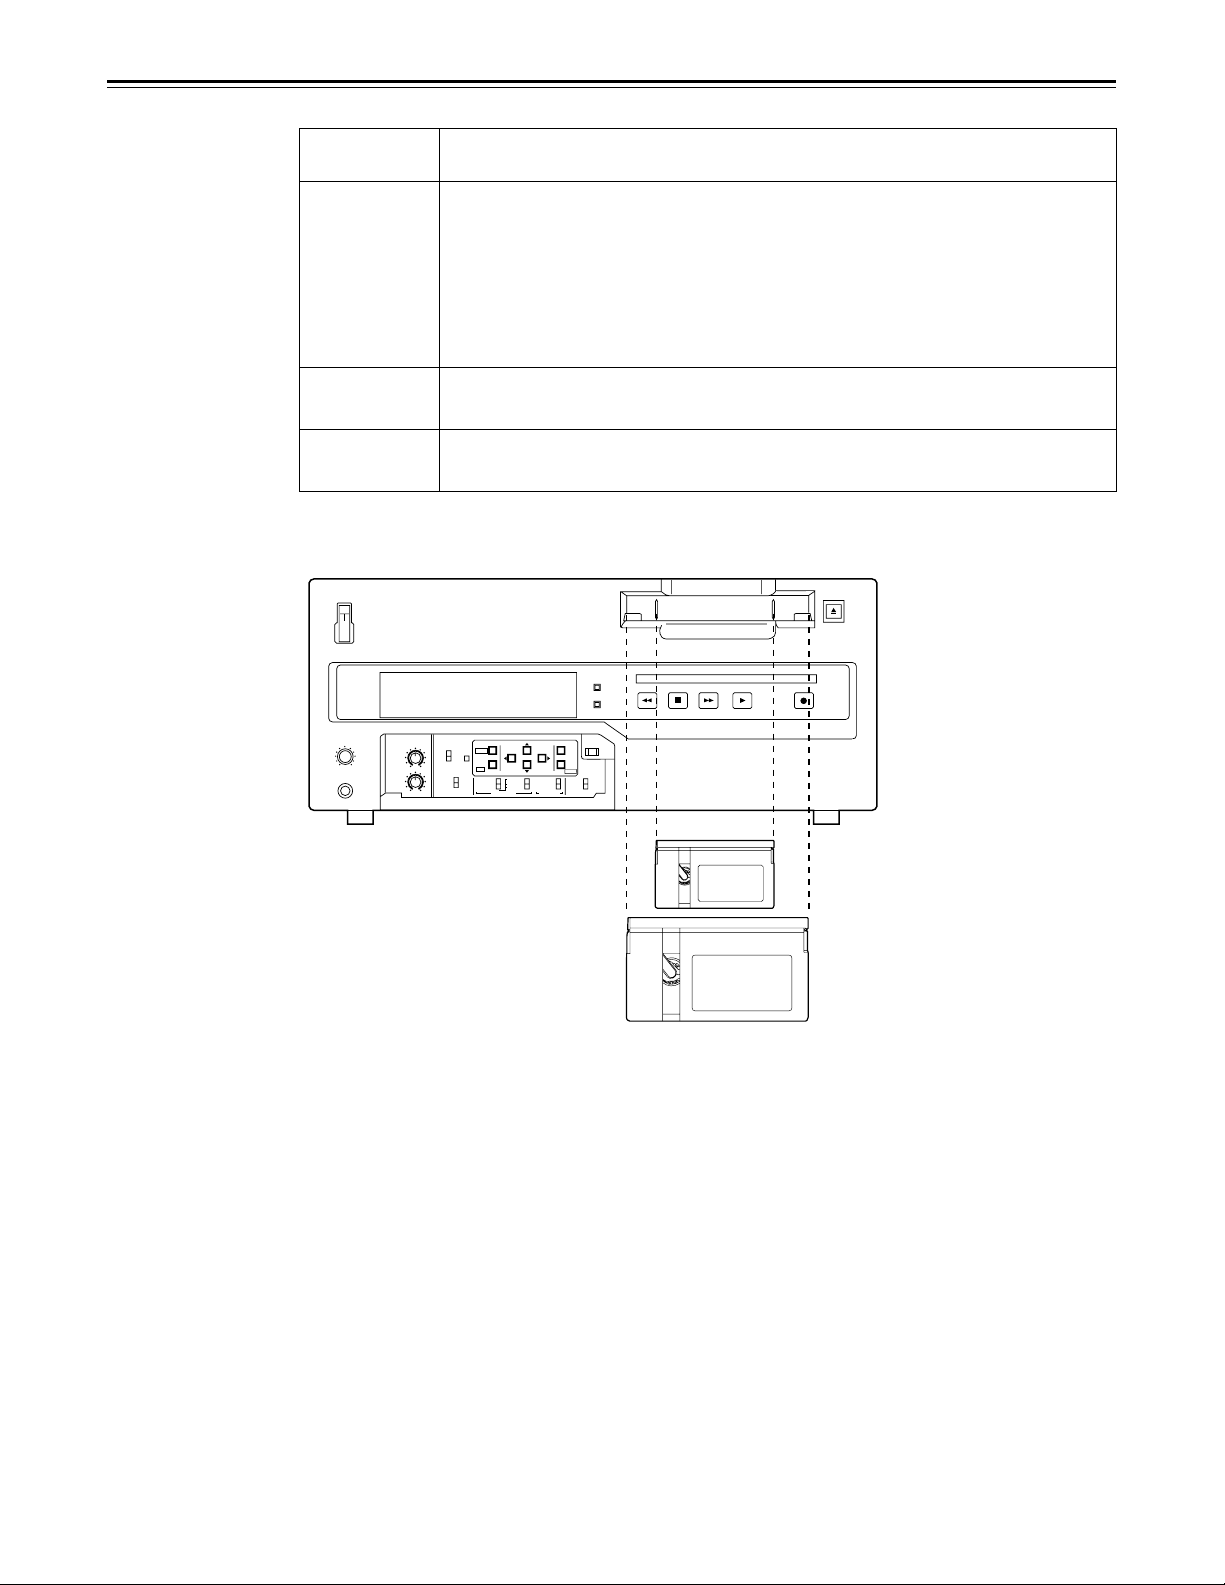
Tapes
Type Description
Tape designed exclusively for the camcorders used by consumers in
general. Only playback is possible using the optional cassette adaptor
Consumer
cassette
(S cassette)
(AJ-CS750P). However, please note that long-play cassette tapes (80minute standard/120-minute LP mode) cannot be used.
Use of Panasonic consumer DV cassette tapes is recommended.
Note that inserting a cassette tape without using the cassette adaptor
can damage the unit.
M cassette
L cassette
Recording/playback tape with a maximum capacity of 66 minutes.
(AJ-P12MP, AJ-P24MP, AJ-P33MP, AJ-P46MP, AJ-P66MP)
Recording/playback tape with a maximum capacity of 184 minutes.
(AJ-P34LP, AJ-P66LP, AJ-P94LP, AJ-P126LP, AJ-5P92LP)
Align the cassette with the center of the insertion slot and push it in gently. The cassette
tape is loaded automatically.
ON
OFF
LEVEL
HEADPHONES
POWER
AUDIO
REC LEVEL
CH CONDITION
MENU
TC
CTL
TC
CH 1
CH 2
INT
UB
EXT
TC
PRESET
FILE
AUDIO
MONITOR
CH 1
MIX
CH 2
ANALOG
Y PB PR
DIGITAL
CMPST
S-VIDEO
VIDEO IN
AES/EBU
ANALOG
DIGITAL
AUDIO IN
SET
DIAG
PAGE
REMOTE
LOCAL
COUNTER/
REMAIN
RESET
EJECT
RECPLAYFFSTOPREW
M cassette
L cassette
<Note>
For AJ-5P92LP cassette tape, use a VTR supporting DVCPRO (25 Mbps) 184 minute tapes.
<Cautions when playing back consumer DV tapes and DVCAM tapes>
Consumer DV tapes and DVCAM tapes can be used for playback only.
•
Consumer DV tapes which have been recorded in the LP mode cannot be played back.
•
When materials which have been recorded on consumer DV tapes or DVCAM tapes are to be edited,
•
record them onto a DVCPRO tape or tape of any other broadcasting VTR for use.
Recordings cannot be made on consumer DV tapes and DVCAM tapes: this means that all functions
•
related to recording, REC operation, TAPE/EE switching and other such operations are prohibited.
The maximum transport speed for consumer DV tapes and DVCAM tapes is 32 times the normal
•
tape speed.
The maximum time for the STILL TIMER when consumer DV tapes or DVCAM tapes are used is set
•
to 10 seconds, and the total STEP FWD time when the machine has been left standing in the STILL
status is set to 1 minute.
Slow-motion playback of consumer DV tapes and DVCAM tapes is not possible.
•
In order to protect your tapes, it is recommended that repeated cue-up in the same location on a
•
consumer DV tape or DVCAM tape be avoided as far as possible.
Finally, check out the cautionary items for setup menu item No. 108 “FORMAT SEL”.
•
– 14 –
Page 15
When recording/playback using 1 unit
– 15 –
Page 16
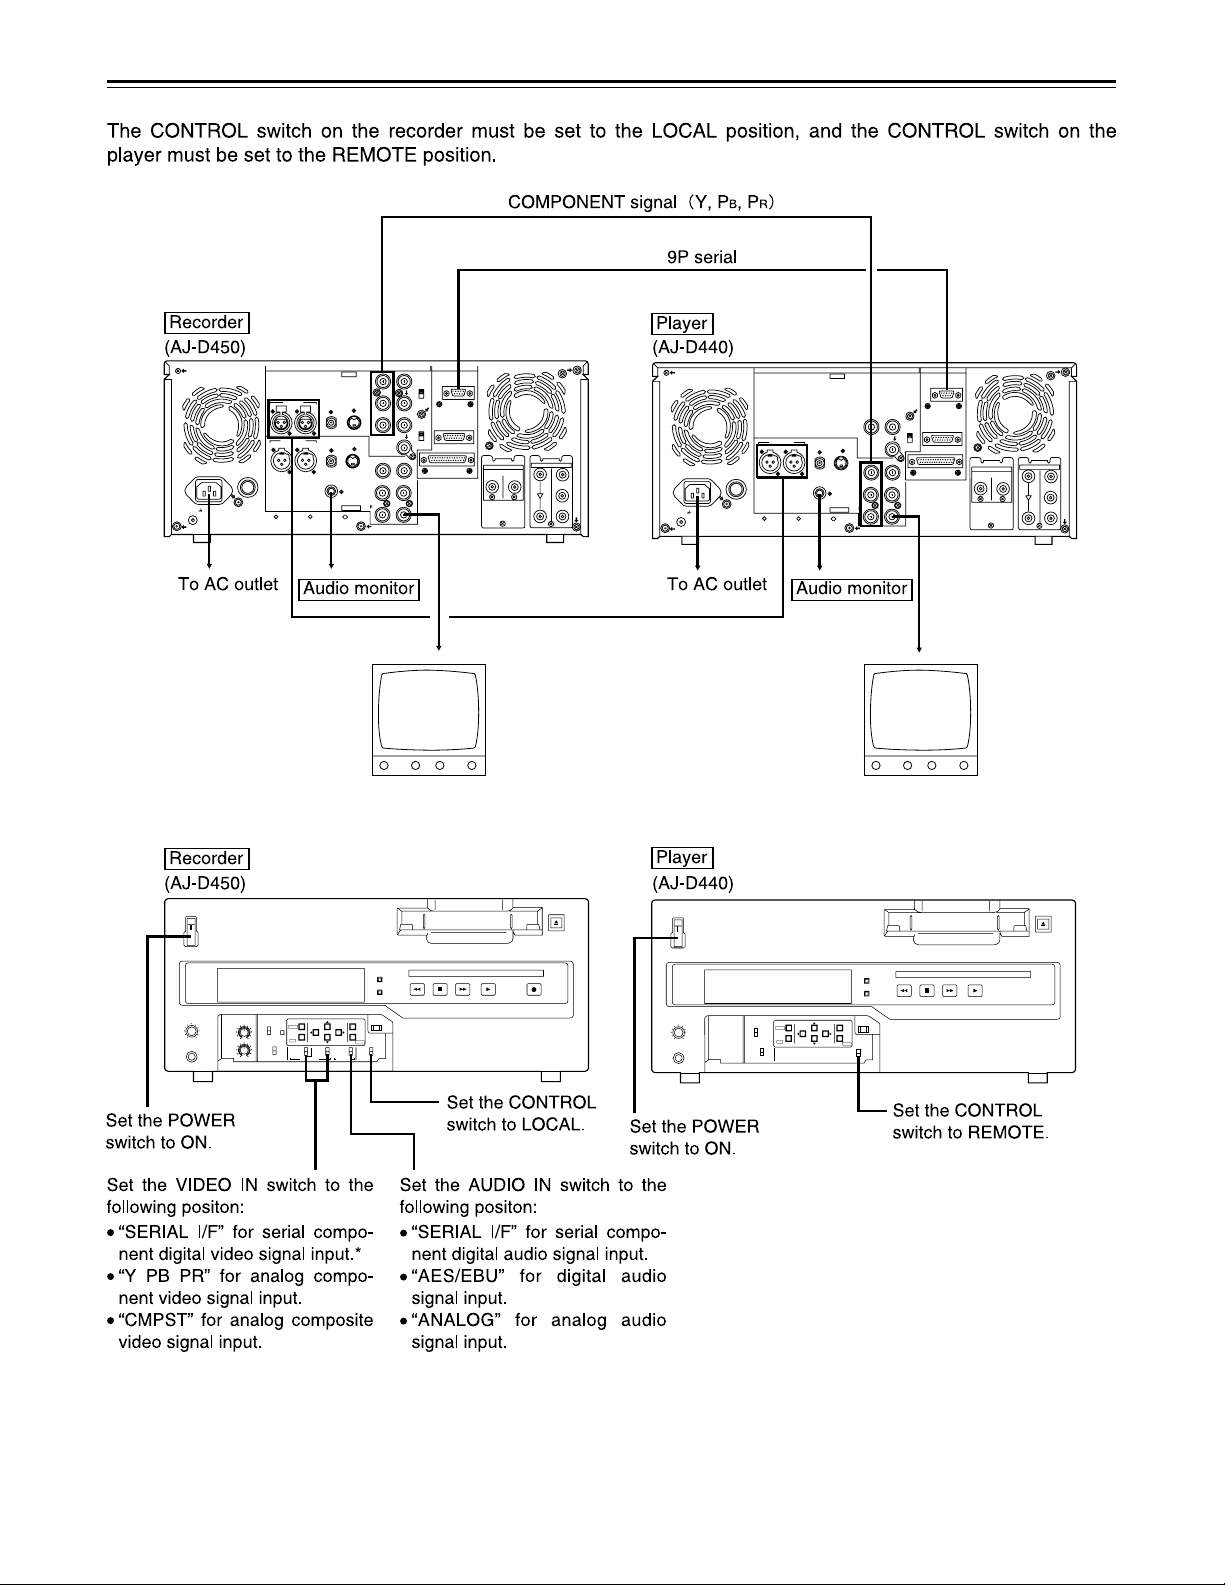
When recording, playback & editing with 2 units (deck to deck)
– 16 –
Page 17
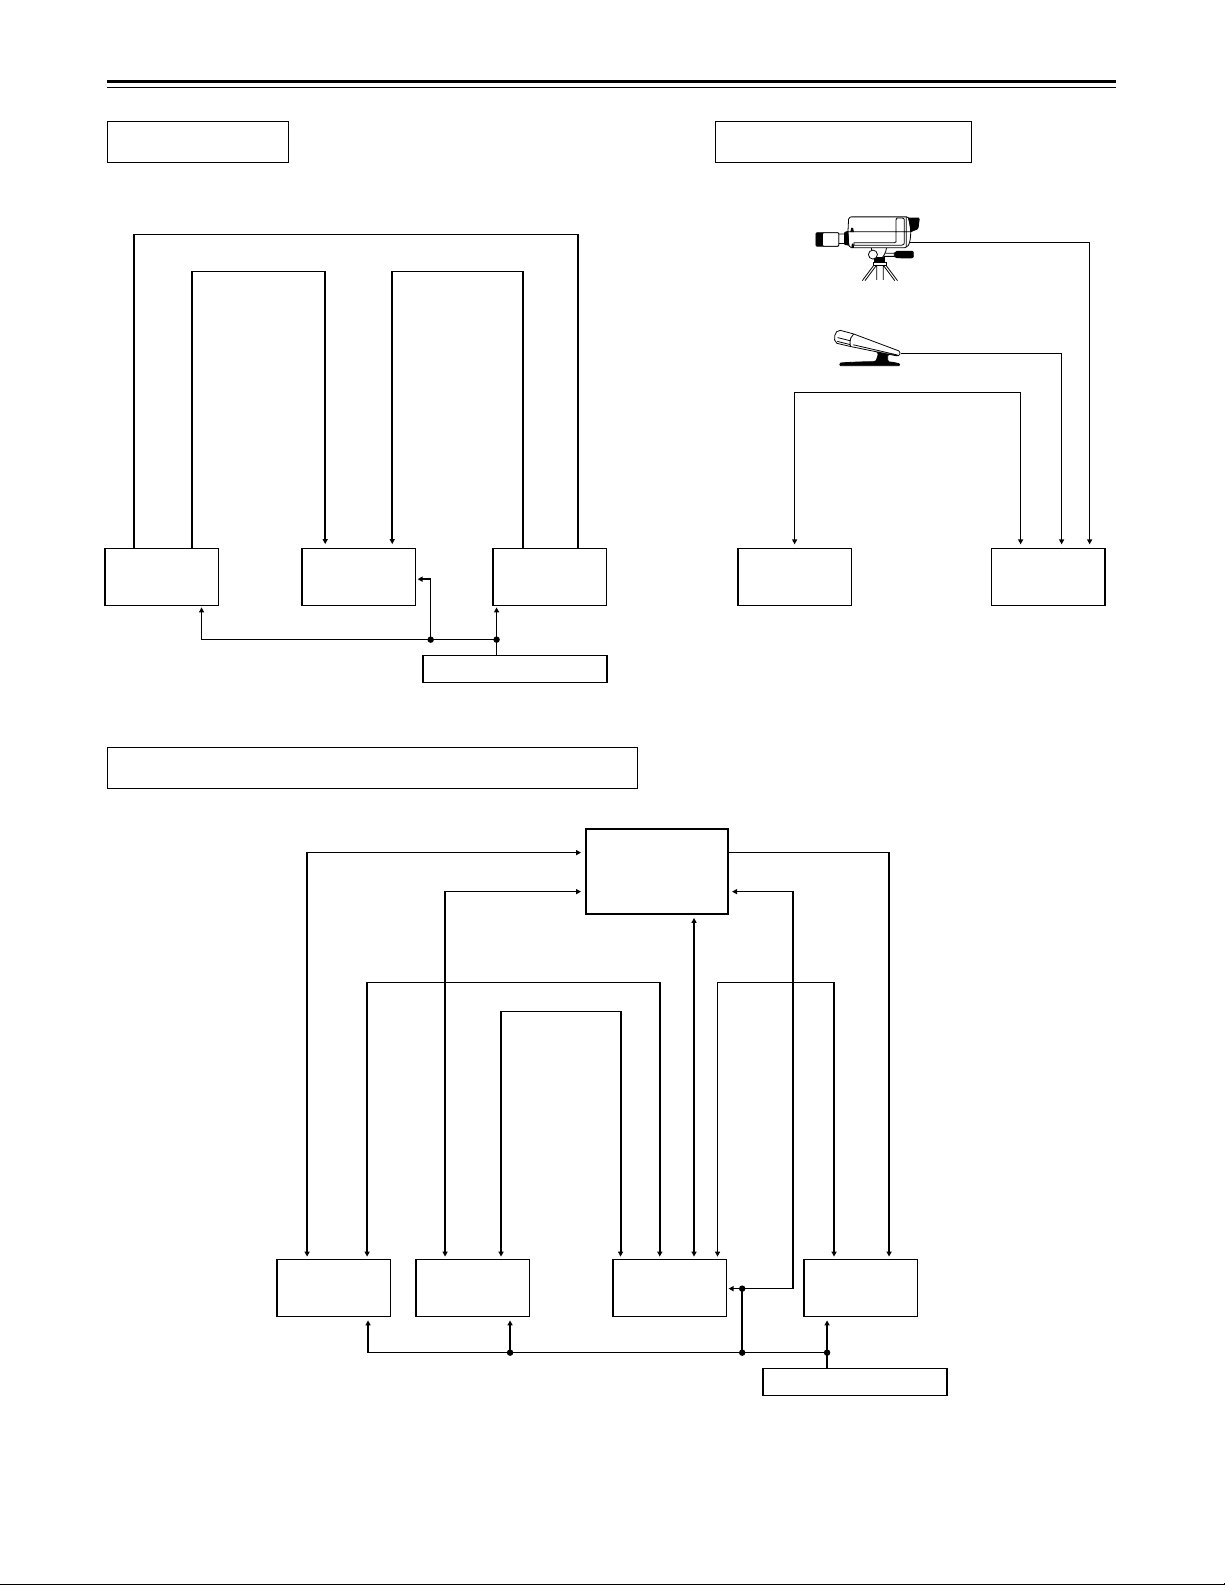
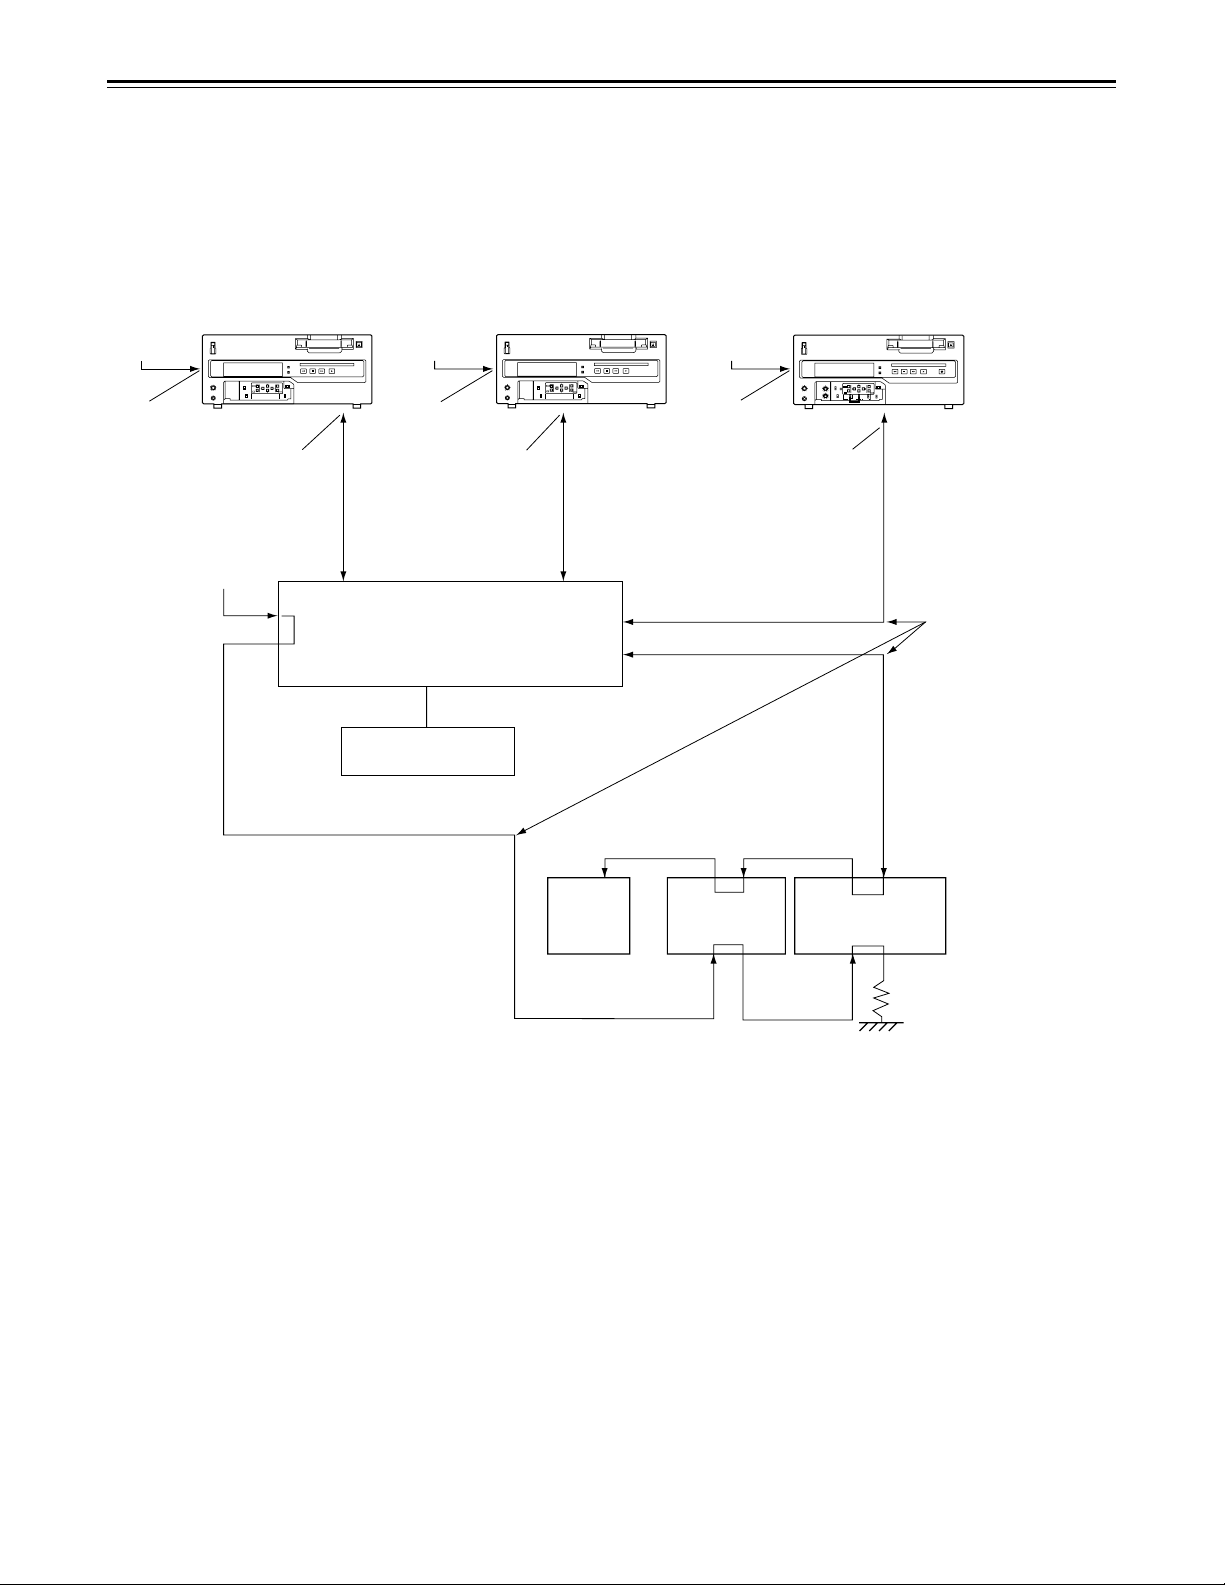
When using an editing controller
Basic system Camera/external input editing
Camera
Video/audio signals
Remote Remote
Microphone
Video signals
Audio signals
AJ-D440
Player Recorder Recorder
System using two players (AB roll editing)
AG-A850 AG-A850
Sync signal generator
Video/audio signals Video/audio signals
Video/audio signals
AJ-D450
AJ-D750
Reference signalSwitcher
Remote
RemoteRemote
Remote
AJ-D450
AJ-D750
AJ-D440 AJ-D440 AG-A850
AJ-D450
AJ-D750
RecorderPlayer 1 Player 2
Sync signal generator
For further details, refer to the Operating Instructions of the AG-A850 editing controller (optional accessory).
– 17 –
Page 18
Internal encoder adjustments
In order to ensure error-free and accurate editing during AB roll editing (a method of editing using two source
VTRs) using an editor, the ENCODER OUT controls must be adjusted after the system has been connected.
(These controls must be re-adjusted each time the connecting cables are replaced or the connections are
changed.)
Connect the equipment as shown in the figure below.
REF
(BB)
REF
VIDEO IN
P1 (AJ-D440) P2 (AJ-D440) Recorder (AJ-D750/AJ-D450)
REF
(BB)
REF
VIDEO IN
VIDEO 1
OUT
VIDEO 1
OUT
REF
(BB)
REF
VIDEO IN
ON
POWER
OFF
CH CONDITION
LEVEL
MENU
TC
CTL
TC
INT
CH 1
UB
EXT
TC
PRESET
AUDIO
FILE
AUDIO
REC LEVEL
MONITOR
HEADPHONES
CH 1
Y PB PR
DIGITAL
CH 2
MIX
CMPST
ANALOG
CH 2
S-VIDEO
VIDEO IN
VIDEO IN
EJECT
COUNTER/
REMAIN
RESET
SET
DIAG
PAGE
DIGITAL
REMOTE
AES/EBU
LOCAL
ANALOG
AUDIO IN
RECPLAYFFSTOPREW
REF (BB)
P1 IN P2 IN
REF IN
Switcher
RECORDER OUT
MONITOR OUT
Make these three
cables equally long.
Editing controller
(AG-A850)
q
The external reference signal is
supplied from the sync signal
generator to the equipment.
w
Composite connections apply
TV
monitor
WFM
(waveform
monitor)
VSC
(vectorscope)
for the video signals.
75Ω
If a waveform monitor and vectorscope are not available, correct any color shifting while actually monitoring the
picture on the TV monitor.
– 18 –
Page 19
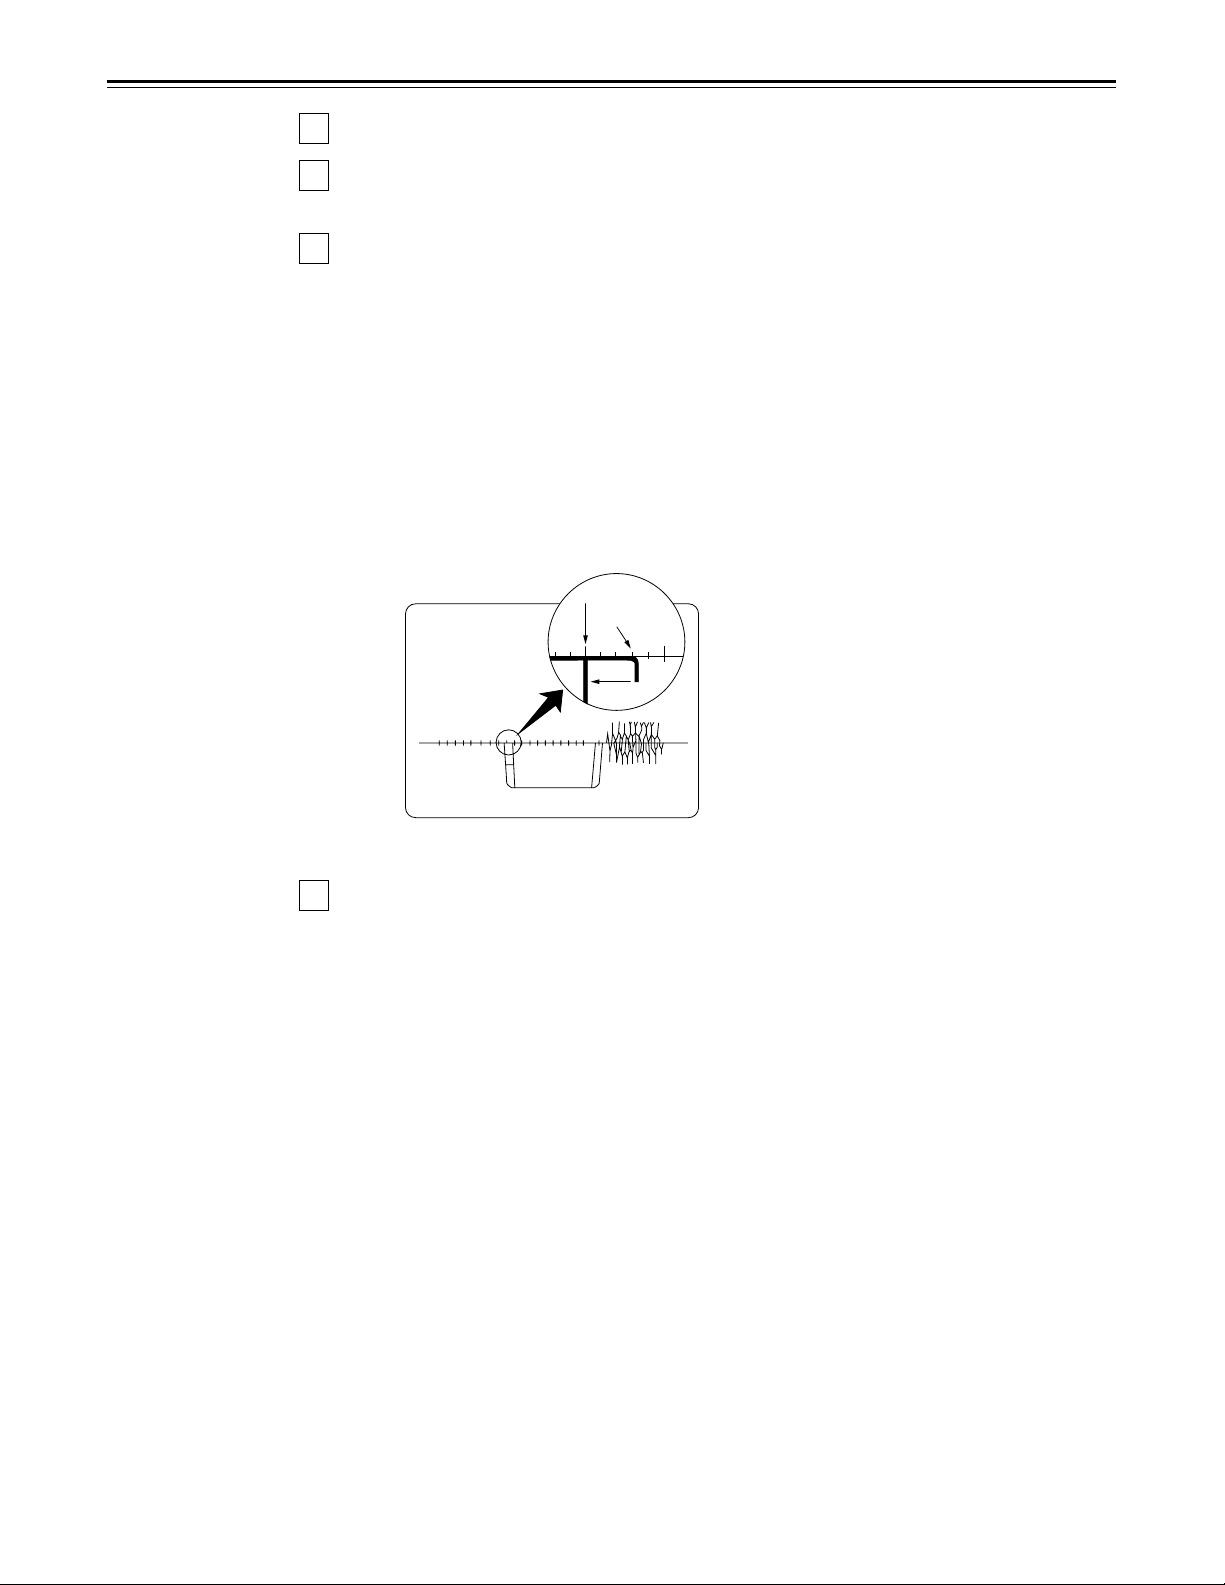
1
Check the connections. (see previous page.)
2
Select [OFF] on ENCODER SEL at the set up menu. (See page 30.)
Select [ON] to operate the internal encoder externally.
3
Adjust the SYSTEM PHASE.
3-1
On the P1 VTR, play back a cassette tape on which standard color bar signals
have been recorded.
Adjust P1 VTR SYS PHASE.
3-2
Adjust the controls to the following with the waveform monitor (WFM).
1)
Expand WFM 0.1 µs on the INT mode.
2)
Check the H SYNC position.
3)
In this status, select EXT mode for the WFM.
4)
In EXT mode, adjust the SYSTEM PHASE to H, SC COARSE, SC FINE, in
this order, at the set up menu to set H SYNC to its previous position.
■Waveform on waveform monitor
INT mode
(Expanded to
0.1 µs)
EXT mode
Adjust.
(Observe the SYNC fall.)
4
Adjust the connected P2 VTR in the same way.
– 19 –
Page 20
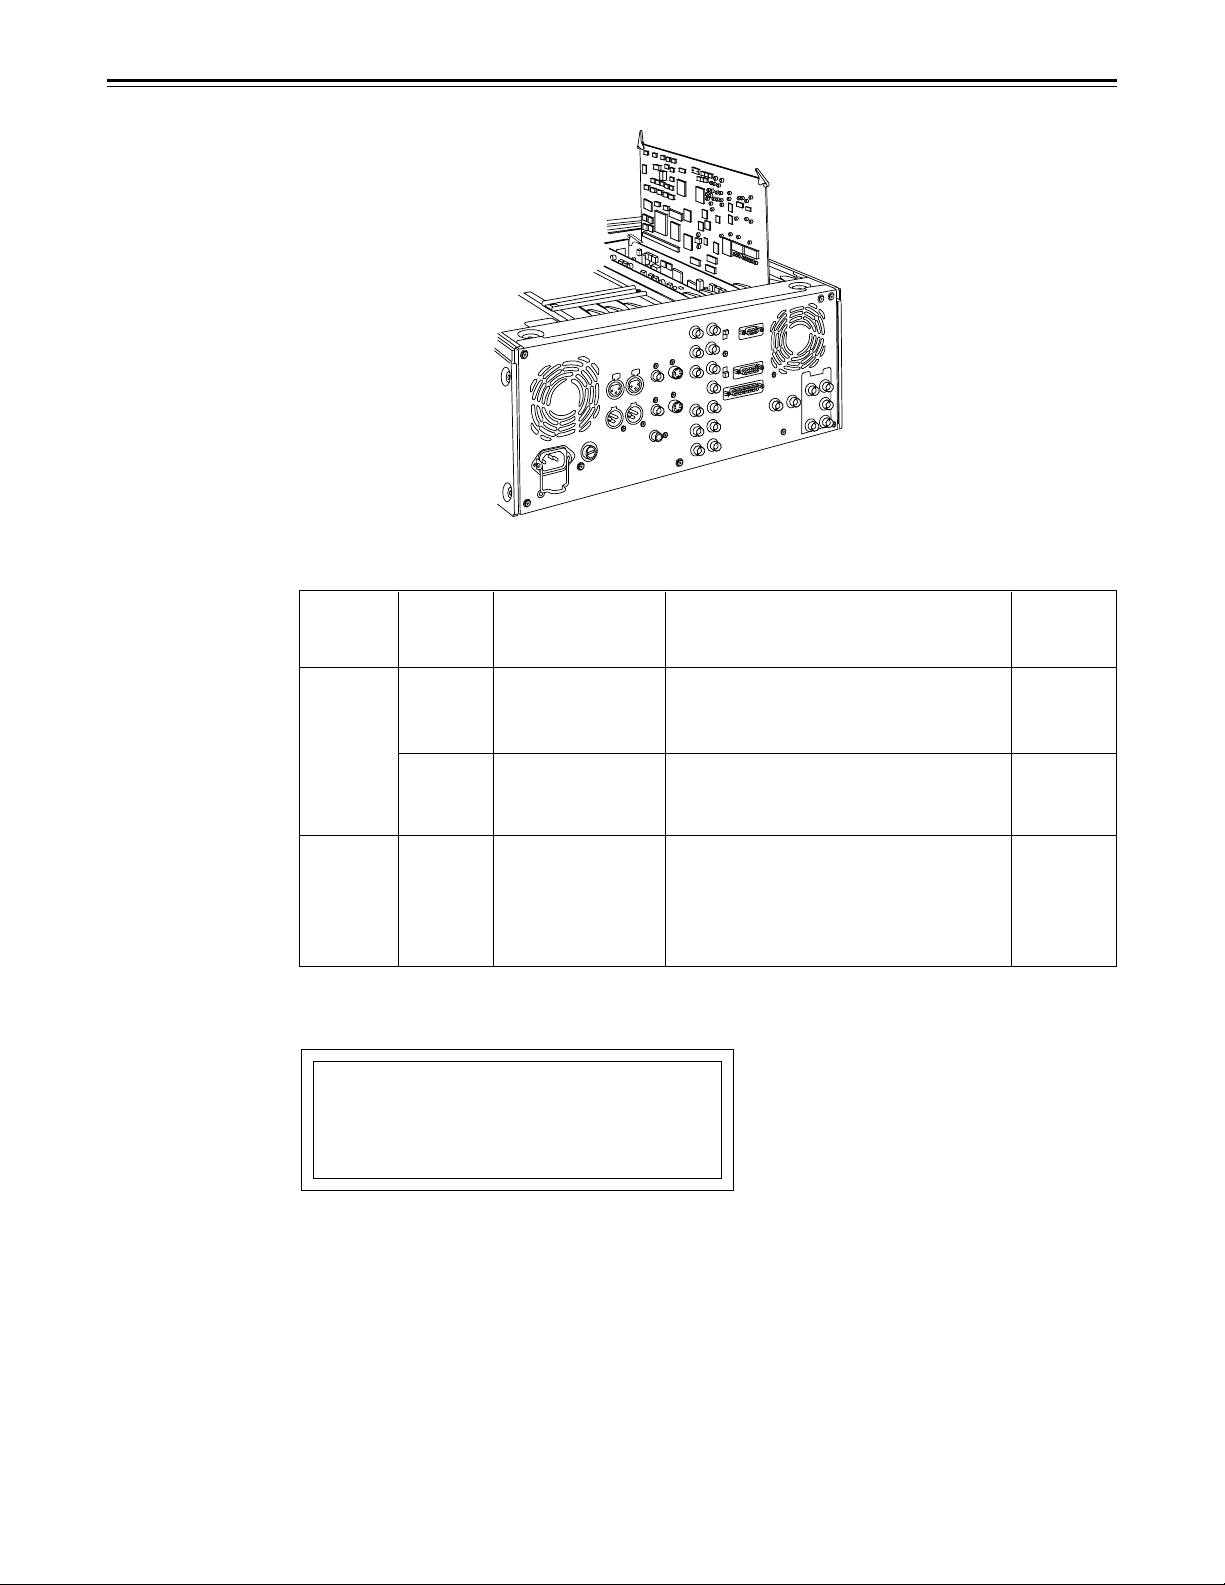
Printed circuit board
* Applicable only to
AJ-D450.
Printed
circuit
board
F8 board
ADDACUE*
Abbr.
name
Full name Function
SW1 Audio Input
Impedance SW
SW61
Audio Input
Impedance SW
This sets the CH1 audio input
impedance.
HIGH/600Ω
This sets the CH2 audio input
impedance.
HIGH/600Ω
B/PR
F4 board
SW400
Component P
Output level
selector
This sets the component PB/PR
output level when connecting with
the editor.
MII : MII level
BETA : ß-CAM level
<Note>
Component PB/PR input levels are selected at No. 600 in the setup menu.*
CAUTION:
TO REDUCE THE RISK OF FIRE OF SHOCK
HAZARD, REFER CHANGE OF SWITCH
SETTING INSIDE THE UNIT TO AUTHORIZED
SERVICE PERSONNEL.
Factory
setting
HIGH
HIGH
BETA
– 20 –
Page 21
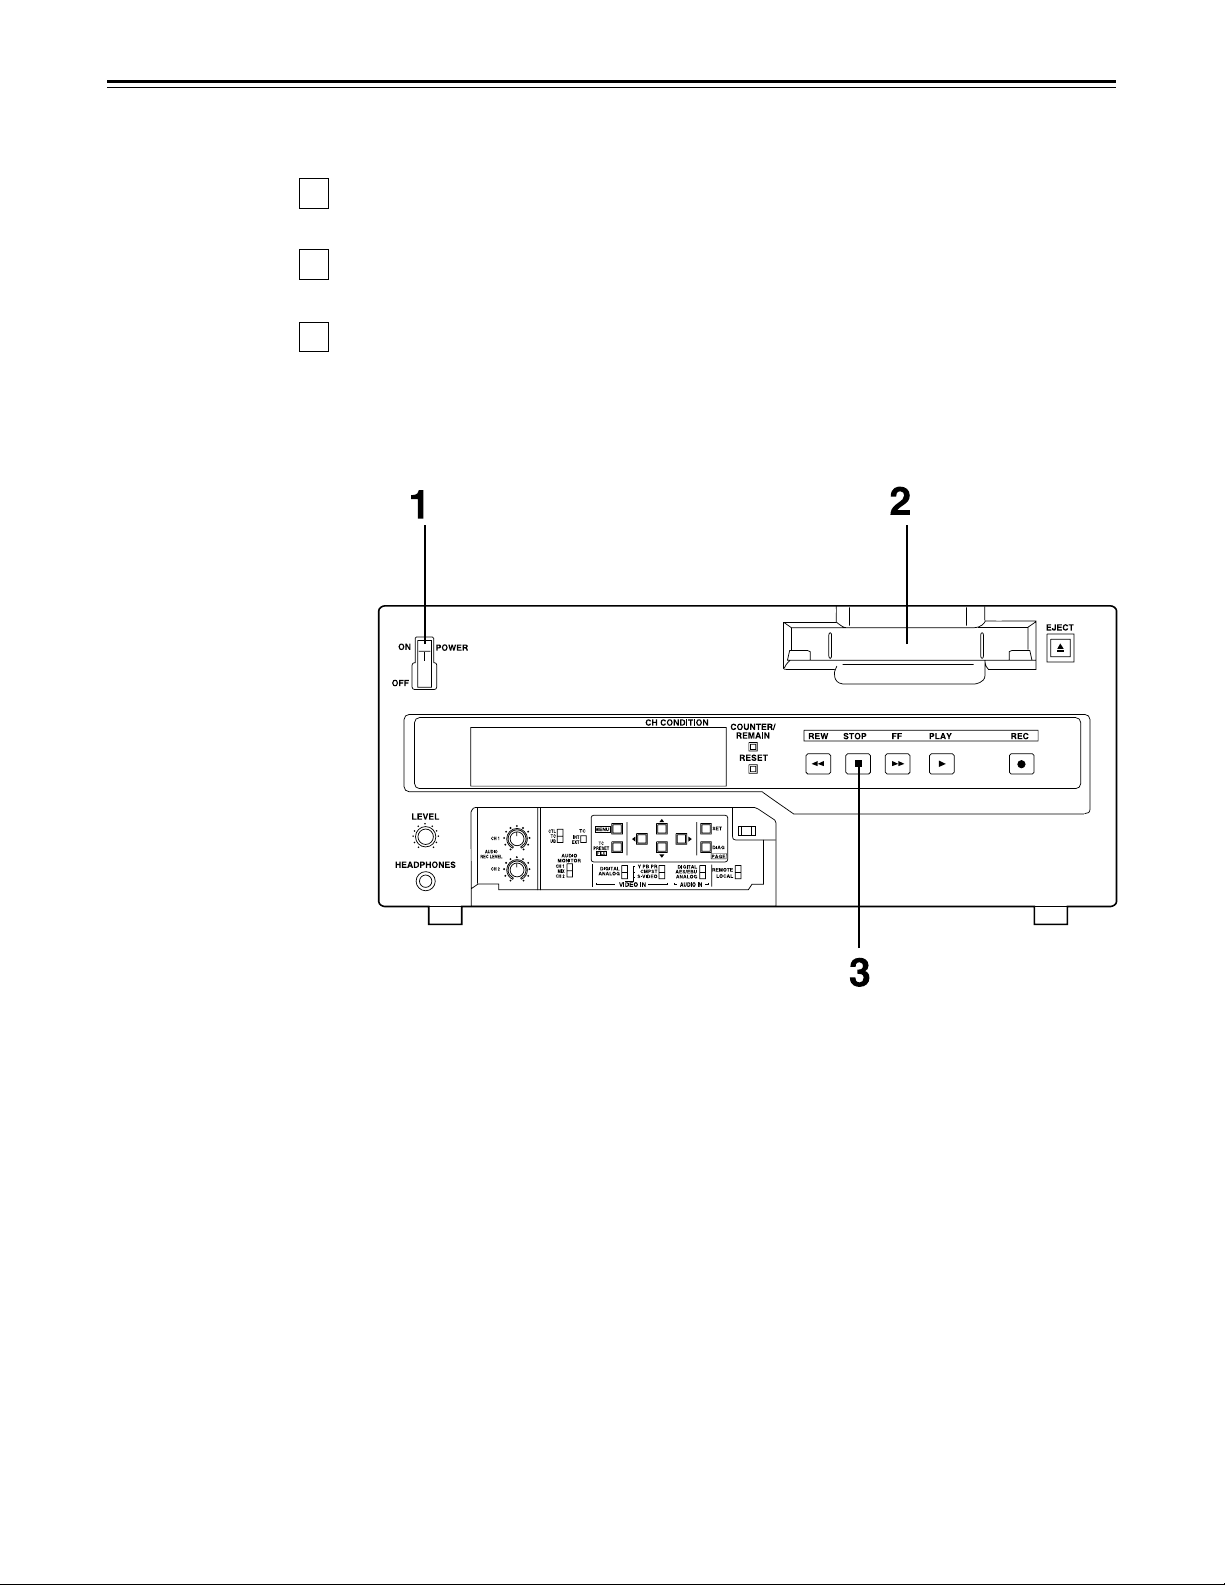
Switching on the power/inserting the cassette
Before starting to operate the unit, check whether the equipment has been connected
properly.
1
Turn on the power.
Check that the error indicator is not displayed on the counter.
2
Insert the cassette tape.
Insert the tape at its proper position without force. (See page 14.)
3
Check that the STOP lamp is on.
When the tape is inserted, the drum rotates automatically, the tape is loaded and the
unit goes into the stop mode.
– 21 –
Page 22

STOP mode
1
When the STOP button is pressed, the unit goes into the stop mode. The STOP lamp
lights and the tape stops traveling.
In order to protect the tape, the unit goes into the standby OFF mode after the time
•
set by setup menu No. 400 (STILL TIMER) has elapsed. When the STOP, REW, FF
or PLAY button is pressed, the unit will go into the appropriate mode.
Still Timer Setting
In order to protect the tape and VTR helical heads, it is recommended that the Still Timer be
set for automatic tape protection mode in 30 seconds or under.
Page 37 indicates the settings for menu item 400-Still Timer set. Still Timer settings 4 and
below will best protect the tape.
– 22 –
Page 23

Recording (AJ-D450 only)
1
Set the accidental erasure prevention tab on the cassette tape to the “recording”
position and insert the tape.
2
Press the STOP button to place the unit in the stop mode.
3
Check that the REC INHIBIT lamp is off.
4
Select the video and audio input signals and adjust their levels.
4-1 Selecting video/audio input signals
1
2
4-2 Adjusting the audio level
Adjust the audio input signal levels of the analog audio CH1/CH2 signals. When
set at the center position, audio signals will be recorded at the proper level.
5
Press the PLAY button while holding down the REC button. The REC and PLAY lamps
light, and recording commences.
6
To end the recording, press the STOP button.
Recording is ended, and the unit goes into the stop mode.
Connect the signals to be recorded.
Select the input signals using the INPUT SELECT switches on the front
panel.
<Notes>
Check that the SERVO lamp is lighted during recording. If it flashes or if it is off, the
•
images played back will be disturbed.
The sound and pictures to be recorded are offset from the playback pictures by 5 frames
•
and recorded. When, for instance, recording sound at a particular timing while the
playback pictures are monitored, the sound to be edited will be recorded at a position
which is offset from the playback pictures by 5 frames.
– 23 –
Page 24

Playback
1
Insert the cassette tape, and place the unit in the stop mode.
2
Press the PLAY button.
Regular playback is now commenced.
3
To end playback, press the STOP button.
The VTR now goes into the stop mode.
<Note>
Check that the SERVO lamp is lighted during playback. If it flashes or if it is off, the images
played back will be disturbed.
– 24 –
Page 25

Setup (default settings)
The unit’s major settings are performed by making selections on menus.
The setting menus appear on the TV monitor when the TV monitor and VIDEO OUT 3
connector in the unit's connector area are hooked up.
<Notes>
When the RESET button is
•
pressed to return to the
factory settings, the factory
settings are restored only for
the user file currently being
used and other user files are
not affected.
The changed SYSTEM menu
•
contents are stored in the
memory even if the MENU
button is pressed.
– 25 –
Page 26

Setup (setting) menus
This unit can store up to 5 user files (user 1 to user 5) containing different menu settings,
and these files can be selected and used.
Changing the file
1
Press the MENU button.
2
Hold down the FILE button and press the cursor button to switch to the next user
file.
Hold down the FILE button and press the cursor button to switch to the previous
user file.
SYSTEM USER 1 USER 2 USER 3 USER 4 USER 5
USER FILE
Each user file contains the following items.
BASIC
•
OPERATION
•
INTERFACE
•
EDIT
•
TAPE PROTECT
•
TIME CODE
•
VIDEO
•
AUDIO
•
MENU
•
3
Repeat the operation in step 2 to select the user file to be used and press the SET
button. The user file is changed and stored in the memory.
<Note>
SYSTEM menu items are not included in user files 1 to 5.
Therefore, after selecting the user file, switch to the SYSTEM file and set the SYSTEM
menu items.
– 26 –
Page 27

Setup menus
Lock mode can be set to protect the settings in the system files and user files (USER2 –
USER5). Settings can no longer be changed when this mode is set.
To set and release the lock mode for the system files and user files use setup item No. 30
(MENU LOCK) and setup menu item No. A03 (MENU LOCK), respectively.
<Notes>
The lock mode cannot be set for the USER1 file settings.
•
Even if the RESET button is pressed, the files which has been set to the lock mode cannot
•
be reset to the factory settings.
– 27 –
Page 28

Setup menus
The contents of the USER2 – USER5 files can be copied (loaded) into the USER1 file. In
addition, the contents of the USER1 file can be copied (saved) to the USER2 – USER5 files.
USER1 USER2
Load or save
Load or save
Load or save
Load or save
USER3
USER4
USER5
Settings can be locked.
Settings can be locked.
Settings can be locked.
Settings can be locked.
– 28 –
Page 29

Saving a user file
Automatic loading of user file when the power is turned on
When the user file to be loaded is selected in advance using setup menu item No. A02
(P.ON LOAD), it can be automatically loaded into USER1 when the power is turned on.
– 29 –
Page 30

Page 31

Setup menus
USER menu
<BASIC> (continued)
Item Setting
Superimposed
No.
display
001 CHARA
H-POS
002 CHARA
V-POS
003 DISPLAY
SEL
004 LOCAL
ENA
005 TAPE
TIMER
006 SUPER 0000
007 CHARA
TYPE
No.
0000
0005
0012
0000
0018
0022
0000
0001
0002
0000
0001
0002
0000
0001
0001
0000
0001
Superimposed
display
.
.
.
.
.
.
.
.
.
.
.
.
T&STA
T&S&M
ST&EJ
WHITE
W/OUT
.
.
.
.
.
.
12
.
.
.
18
.
.
.
22
TIME
DIS
ENA
±12h
24h
OFF
ON
Description
This sets the position of the characters on the horizontal
0
plane for the time code and other super displays output to the
VIDEO OUT 3 connector.
5
<Notes>
1.
When setting this item, the DISPLAY SEL status is output
to VIDEO OUT 3 even if SUPER OFF has been set.
However, when the menu is exited, operation complies
with the SUPER OFF/ON setting.
Also, CHARA TYPE is output to VIDEO OUT 3 according
to the status set in the menu.
2.
When the DISPLAY SEL setting causes characters to
extend beyond the edges of the screen, the setting value
is changed so that the characters are automatically
displayed in a position on the screen.
This sets the position of the characters on the vertical plane
0
for the time code and other super displays output to the
VIDEO OUT 3 connector.
<Notes>
1.2.When setting this item, the DISPLAY SEL status is output
to VIDEO OUT 3 even if SUPER OFF has been set.
However, when the menu is exited, operation complies
with the SUPER OFF/ON setting.
Also, CHARA TYPE is output to VIDEO OUT 3 according
to the status set in the menu.
When the DISPLAY SEL setting causes characters to
extend beyond the edges of the screen, the setting value
is changed so that the characters are automatically
displayed in a position on the screen.
This selects what information is to be provided by the time code
and other super displays output to the VIDEO OUT 3 connector.
0:
Time only.
1:
Time and status.
2:
Time, status and mode.
<Notes>
When T&S&M has been selected, one of the following displays
•
appears on the third line of the superimposed display.
In the DVCPRO mode:
In the DV mode:
In the DVCAM mode:
An error message is displayed when an warning or error
•
occurs.
This selects the buttons which can be operated on the front
panel when the REMOTE/LOCAL switch has been set to
REMOTE.
0:
No buttons can be operated.
1:
Only the STOP and EJECT buttons can be operated.
2:
All buttons can be operated.
This selects the 12 or 24 hour display for the CTL counter.
0:
12 hour display
1:
24 hour display
This selects whether the time code and other super display
which are output to the VIDEO OUT 3 connector is to shown.
0:1:Not shown.
Shown.
This selects the display type for the super display output to
the VIDEO OUT 3 connector as well as for displays such as
the setting menu, etc.
0:1:White characters against a black background.
White characters with a black border.
DVCPRO MODE
DV MODE
DVCAM MODE
The underline on the setting item denotes the initial setting.
– 31 –
Page 32

Setup menus
– 32 –
Page 33

USER menu
<OPERATION> (continued)
Item Setting
Superimposed
No.
display
109* EJECT EE
SEL
110* F/R EE SEL 0000
111* STOP EE
SEL
112 AUTO REW 0000
113 MEMORY
STOP
114* REC
INHIBIT
115 STOP
RESPNS
The underline on the setting item denotes the initial setting.
* The Setup menu can only be displayed for the model AJ-D450.
Superimposed
No.
0000
0001
0001
0000
0001
0001
0000
0001
0000
0001
0000
0001
display
EE
BLACK
EE
TAPE
EE
TAPE
OFF
ON
OFF
ON
OFF
ON
NORMAL
QUICK
This selects whether EE mode or BLACK is to be used during
EJECT status.
0:
EE mode
1:
Video blackens, audio mutes.
This selects whether EE mode or playback mode is to be
used during FF/REW operations.
0:
EE mode
1:
Playback mode
This selects whether EE mode or playback mode is to be
used during stop mode.
0:
EE mode
1:
Playback mode
<Note>
The STAND-BY OFF mode complies with the above selection.
When TAPE is selected, however, the video becomes grey.
This selects whether to rewind the tape automatically to the
tape start when the tape end is detected.
0:
The tape stops at the tape end.
1:
The tape is rewound to the tape start.
This selects whether the VTR is to stop automatically when
the counter value reaches “0” during a fast forwarding or
rewinding operation in the CTL mode.
0:
The VTR does not stop.
1:
The VTR stops automatically.
<Notes>
1.
The stop mode concerned is either the stop or the stillpicture (SHTL STILL) mode depending on the setup menu
No. 313 (AFTER CUE-UP) setting.
2.
When both the AUTO REW function and MEMORY
function have been selected at the same time, the AUTO
REW function takes precedence.
This selects whether to allow (enable) or prohibit (disable) the
recording of signals on the cassette tape.
0:
Signals can be recorded on the cassette tape when the
cassette’s accidental erasure prevention mechanism is
set to the recording enable position.
1:
Recording on the cassette tape is prohibited. In this case,
the REC INH lamp on the front panel lights.
This selects the response when the mode is changed to
STOP/STILL while the tape is traveling.
0:
Priority is given to the output picture.
1:
Priority is given to the response.
<Notes>
At the 1 (QUICK) setting, the picture may not be as clear in
•
the STOP/STILL mode as it would be at the 0 (NORMAL)
setting.
CTL may shift by ±2 frames.
•
Description
– 33 –
Page 34

Setup menus
USER menu
<INTERFACE>
Item Setting
Superimposed
No.
display
201 9P SEL 0000
202 ID SEL 0000
204 RS232C SEL 0000
205 BAUD RATE 0000
206 DATA
LENGTH
207 STOP BIT 0000
208 PARITY 0000
209 RETURN
ACK
The underline on the setting item denotes the initial setting.
Superimposed
No.
0001
0001
0001
0001
0002
0003
0004
0005
0000
0001
0001
0001
0002
0000
0001
display
OFF
ON
OTHER
DVCPRO
OFF
ON
300
600
1200
2400
4800
9600
NON
ODD
EVEN
OFF
ON
This selects whether the 9P connector functions when the
REMOTE/LOCAL switch has been set to REMOTE.
0:
Do not function
1:
Function
This selects the ID information which is returned to the
controller.
0:
20 25H
1:
DVCPRO’s, own ID is returned (F0 33H).
These settings are for selecting whether the RS-232C
connector is to function when the REMOTE/LOCAL switch is
set to REMOTE.
0:1:Connector does not function.
Connector functions.
These settings are for selecting the RS-232C communication
speed (baud rate).
These settings are for selecting the RS-232C data length.
7
(Unit: bit)
8
These settings are for selecting the RS-232C stop bit length.
1
(Unit: bit)
2
These settings are for selecting the none, odd or even for the
RS-232C parity bit.
Parity bit is not used.
0:
An odd number of bits is used for the parity system.
1:
An even number of bits is used for the parity system.
2:
These settings are for selecting whether the ACK code is to
be returned when a command is received from RS-232C.
0:1:ACK code is not returned.
ACK code is returned.
Description
– 34 –
Page 35

USER menu
<EDIT>
Item Setting
Superimposed
No.
303* STD/
304* SERVO
305* EDIT
306* EDIT
307* EDIT
309* AUD EDIT
310* AUD EDIT
display
NON-STD
REF
RPLCE1
RPLCE2
RPLCEC
IN
OUT
Superimposed
No.
0000
0001
0002
0000
0001
0000
0001
0002
0003
0000
0001
0002
0003
0000
0001
0002
0003
0000
0001
0000
0001
display
AUTO
STD
N-STD
AUTO
EXT
N-DEF
CH1
CH2
CH1+2
N-DEF
CH1
CH2
CH1+2
N-DEF
CH1
CH2
CH1+2
CUT
FADE
CUT
FADE
Description
This selects STD or NON-STD in accordance with the
composite input signal.
0:
Standard/non-standard signals are automatically identified
and processed.
1:
Standard signals are processed. (Forced STD)
2:
Non-standard signals are processed. (Forced NON-STD)
This selects the video signal processing.
0:
Servo is synchronized with the input signal during recording
and editing, or with the REF signal during playback.
1:
Servo is synchronized at all times with the REF signal.
This sets the channel assignments for the controller’s analog
audio preset when editing the digital audio of the VTR using a
controller which does not have a digital audio edit preset
control function.
This selects the channel concerned when the VTR CH1 edit
preset is set in compliance with the ON or OFF presetting for
the analog audio signals designated by the controller.
0:
Not set.
1:
Compliance with analog CH1 edit preset.
2:
Compliance with analog CH2 edit preset.
3:
Compliance with either analog CH1 ot CH2 edit preset.
This sets the channel assignments for the controller’s analog
audio preset when editing the digital audio of the VTR using a
controller which does not have a digital audio edit preset
control function.
This selects the channel concerned when the VTR CH2 edit
preset is set in compliance with the ON or OFF presetting for
the analog audio signals designated by the controller.
Not set.
0:
Compliance with analog CH1 edit preset.
1:
Compliance with analog CH2 edit preset.
2:
Compliance with either analog CH1 ot CH2 edit preset.
3:
This sets the channel assignments for the controller’s analog
audio preset when editing the digital audio of the VTR using a
controller which does not have a digital audio edit preset
control function.
This selects the channel concerned when the VTR CUE edit
preset is set in compliance with the ON or OFF presetting for
the analog audio signals designated by the editor or
controller.
0:
Not set.
1:
Compliance with analog CH1 edit preset.
2:
Compliance with analog CH2 edit preset.
3:
Compliance with either analog CH1 ot CH2 edit preset.
This selects the connection method for the digital audio edit
IN point.
0:
Cut processing
1:
V Fade processing
This selects the connection method for the digital audio edit
OUT point.
0:
Cut processing
1:
V Fade processing
The underline on the setting item denotes the initial setting.
* The Setup menu can only be displayed for the model AJ-D450.
– 35 –
Page 36

Setup menus
– 36 –
Page 37

USER menu
<EDIT> (continued)
The underline on the setting item denotes the initial setting.
USER menu
<TAPE PROTECT>
The underline on the setting item denotes the initial setting.
<Note>
In order to protect the tape and VTR helical heads, it is recommended that the Still Timer be set for
automatic tape protection mode in 30 seconds or under.
– 37 –
Page 38

Setup menus
USER menu
– 38 –
Page 39

USER menu
<TIME CODE> (continued)
Item Setting
Superimposed
No.
display
507 PHASE
CORR
508* TCG CF
FLAG
509 DF MODE 0000
510* RUN MODE 0000
511* TC OUT
REF
Superimposed
No.
0000
0001
0000
0001
0001
0001
0000
0001
display
OFF
ON
OFF
ON
NDF
REC
FREE
V OUT
TC IN
Description
This selects whether to control the phase correction of the
LTC generated by the TCG.
0:
Phase correction control is not performed.
1:
Phase correction control is performed.
This selects whether the CF flag of the TCG is to ON.
0:
CF flag is OFF.
1:
CF flag is ON.
This selects the DF/NDF mode for CTL and TCG.
DF
0:
Drop frame mode.
1:
Non-drop frame mode.
No. 509 is valid when the CONTROL is LOCAL or LOCAL
ENA of item 004 to “ENA”.
This selects the time code generator run mode.
0:
Generator runs only during recording.
1:
Generator runs during usual operation.
<Note>
Even if “0” is selected, the time code generator runs during
usual operation when “1” is selected at the setting menu
No. 504 (REGEN MODE).
This is used to switch the phase of the time code, which is
output from the TIME CODE OUT connector, for the external
LTC input when the TC INT/EXT switch is at the EXT
position. (In EE mode only)
0:
Time code is synchronized with output video signal.
1:
Time code is synchronized with external time code input.
* The Setup menu can
only be displayed for
the model AJ-D450.
<VIDEO>
Item Setting
Superimposed
No.
display
600* PB/PR
IN LV
601* INT BB
SIG
602* INPUT
C KILL
603* OUT
VSYNC
604 V-MUTE
SEL
605 CC (F1)
BLANK
The underline on the setting item denotes the initial setting.
Superimposed
No.
0000
0001
0000
0001
0000
0001
0000
0001
0000
0001
0000
0001
display
M
B-CAM
OFF
BB
B/W
AUTO
N-VF
VF
N-MUTE
LOW–RF
BLANK
THRU
This selects the component input signal level.
II
0:
MII level.
1:
ß cam level.
This selects whether to generate the internal black burst
signal.
0:
Signal is not generated.
1:
Signal is generated.
This selects color killer processing for the video input signals.
0:
The signals are forcibly processed as B/W signals.
1:
The signals are automatically processed.
This selects whether to float the vertical sync position of the
video output in order to align the video output phase with the
input in the EE/record/edit modes.
Signals are not floated.
0:
Signals are floated.
1:
This selects whether the video output signal is to be muted
when the blank portion of the tape is detected during
playback.
0:
No muting (picture freezes).
1:
Muting (picture turns grey).
This selects ON or OFF for the closed capture signal in the
first field.
0:
Forced blanking performed.
1:
Blanking not performed.
Description
– 39 –
Page 40

Setup menus
USER menu
<VIDEO> (continued)
Item Setting
Superimposed
No.
display
606 CC (F2)
BLANK
608 FREEZE
SEL
611 EDH 0000
612 WIDE
SELECT
613 VIN SETUP 0000
614 VOUT
SETUP
No.
0000
0001
0000
0001
0001
0000
0001
0002
0001
0000
0001
Superimposed
display
BLANK
THRU
FIELD
FRAME
OFF
ON
AUTO
WIDE
NORMAL
THRU
CUT
THRU
ADD
Description
This selects ON or OFF for the closed capture signal in the
second field.
0:
Forced blanking performed.
1:
Blanking not performed.
This selects the freeze mode for still pictures.
0:
Field freeze
1:
Frame freeze
<Note>
When frame freeze is selected, the frame freeze mode is
established even during slow motion.
This selects whether to superimpose EDH onto the serial
output signals.
0:
EDH is not superimposed.
1:
EDH is superimposed.
This item setting is valid when the optional serial interface
•
board has been installed.
This selects the operation to be conducted in response to the
WIDE information.
0:
During recording, if the Y/C input signals contain WIDE
information, the WIDE information is recorded on the tape.
During playback, if WIDE information is on the tape, it is
added to the Y/C output signals.
1:
During recording, the WIDE information is recorded on the
tape regardless of whether the Y/C input signals contain
the WIDE information.
During playback, the WIDE information is added to the
Y/C output signals regardless of whether the WIDE
information is on the tape. → Forced WIDE ON
2:
During recording, the WIDE information is not recorded on
the tape regardless of whether the Y/C input signals
contain the WIDE information.
During playback, the WIDE information is not added to the
Y/C output signals regardless of whether the WIDE
information is on the tape. → Forced WIDE OFF
<Note>
This item is effective during recording at the start of the
recording and during playback at all times. Therefore, when
its setting has been changed during recording, the MENU
contents will be changed but no change will occur in the
actual operation.
This selects whether the composite signal is to be recorded
with setup or without setup.
0:
When recording signals with no setup.
1:
When recording signals with 7.5% setup.
<Note>
When recording composite signals, be sure to double-check
whether the signals are to be recorded with or without setup.
This selects the composite output signal.
0:
The signal is output without setup.
1:
Ths signal is output with 7.5% setup.
The underline on the setting item denotes the initial setting.
– 40 –
Page 41

USER menu
<AUDIO>
The underline on the setting item denotes the initial setting.
* The Setup menu can only be displayed for the model AJ-D450.
– 41 –
Page 42

Setup menus
USER menu
<AUDIO> (continued)
Item Setting
Superimposed
No.
display
716 REC CUE 0000
718 DV
OUTPUT
<Note>
This item setting is valid only when the tape recorded on the four channels of the DV or DVCAM
format is played back.
719 PB FADE 0000
720 EMBEDDED
AUD
<Note>
This item is valid when both optional serial interface and optional digital audio interface boards
have been installed.
721 LINE CH
SEL
<Note>
The PCM AUDIO or QUICK PCM AUDIO output is not affected by the AUDIO MONITOR
SELECT SW, and CH1 and CH2 are output independently.
722* INT SG 0000
<Note>
The internal signal has a frequency of 1 kHz.
723 DV PB ATT 0000
<Notes>
As indicated below, whether the setting takes effect or not depends on the size of the cassette
tape used.
1. When an “L” size cassette is used
The setting takes effect only when “DV” has been selected as the setting for setup menu
No. 108 (FORMAT SEL).
2. When an “M” size cassette is used
The setting does not take effect.
3. When an “S” size cassette is used
The setting takes effect only when “DV” has been selected as the setting for setup menu
No. 108 (FORMAT SEL).
The underline on the setting item denotes the initial setting.
* The Setup menu can only be displayed for the model AJ-D450.
Superimposed
No.
0001
0002
0000
0001
0002
0001
0002
0000
0001
0000
0001
0001
0001
display
CH1
CH2
CH1+2
ST1
ST2
ST1+2
AUTO
CUT
FADE
OFF
ON
PCM
AUTO
OFF
ON
OFF
ON
This selects the input signal recorded in CUE.
0:
The signal selected by SETUP-MENU No. 714 is recorded
on CH1.
1:
The signal selected by SETUP-MENU No. 715 is recorded
on CH2.
2:
The signal selected by SETUP-MENU No. 714 and No. 715
are mixed and recorded on CH1 and CH2.
This selects the AUDIO CH1 and CH2 output signals during
DV or DVCAM format playback.
0:
The CH1 track signals are output to CH1 and the CH2
track signals to CH2. (Only the sound during shooting is
output.)
1:
The CH3 track signals are output to CH1 and the CH4
track signals to CH2. (Only the audio dubbing sound is
output.)
2:
The mixed CH1 and CH3 track signals are output to CH1
and the mixed CH2 and CH4 track signals to CH2. (The
sound during shooting and audio dubbing sound are
output simultaneously.)
This selects the processing method for the audio edit points
(IN point, OUT point) during playback.
0:
According to the status during recording. (Setup menus
No. 309, 310)
1:
Forced CUT
2:
Forced FADE
This selects whether to superimpose the audio data onto the
serial output.
0:1:Data is not superimposed.
Data is superimposed.
This selects the audio output (LINE OUT).
0:
PCM AUDIO or QUICK PCM AUDIO is output.
1:
Whatever is selected by SETUP-MENU No. 713 (MONI
CH SEL) output.
This selects whether the internal signal is to be used for the
audio input signal.
0:
The internal signal is not selected.
1:
The internal signal is selected.
This selects the audio output level for DV format playback.
0:
The audio output level is not attenuated.
1:
The audio output level is attenuated (reduced).
Description
– 42 –
Page 43

USER menu
<AUDIO> (continued)
Item Setting
Superimposed
No.
display
No.
725 CUE SLOW 0000
0001
<Notes>
When “1” (LINEAR) has been set:
It may not be possible to achieve as clear a picture as in the STEP mode.
•
The CTL counter may not operate properly.
•
Superimposed
display
STEP
LINEAR
This selects the tape travel status (CUE track playback
status) during SLOW playback.
0:1:Priority is given to the output picture, and tape travel is set
to the step feed status.
Priority is given to CUE track playback, and the tape
travel is set to the linear status.
Description
<MENU>
Item Setting
Superimposed
No.
display
A00 LOAD 0000
A01 SAVE 0000
A02 P.ON LOAD 0000
A03 MENU LOCK 0000
Superimposed
No.
0001
0002
0003
0001
0002
0003
0004
0001
0002
0003
0004
0001
display
USER2
USER3
USER4
USER5
USER2
USER3
USER4
USER5
LOCKED
OFF
USER2
USER3
USER4
USER5
OFF
ON
This selects the user file whose contents will be loaded into
USER1.
0:
The USER2 file contents are loaded.
1:
The USER3 file contents are loaded.
2:
The USER4 file contents are loaded.
3:
The USER5 file contents are loaded.
<Note>
When the SET button is pressed after loading, the setting will
be stored in the memory. When the MENU button is pressed,
the setting will not be changed.
This selects the user file into which the USER1 settings will
be saved.
0:
The settings are saved in USER2.
1:
The settings are saved in USER3.
2:
The settings are saved in USER4.
3:
The settings are saved in USER5.
4:
This display appears when all the user files are in the
change prohibit status.
<Notes>
User files whose status have been set to change prohibit
•
cannot be selected.
When all the user files are in the change prohibit status, the
•
“LOCKED” display appears and the contents cannot be saved.
This loads the contents of the selected user file into USER1
and it starts operation with the USER1 settings when the
power is turned on.
0:
Operation is started with the settings of the previously set
user file.
1:
The contents of USER2 are loaded into USER1 and
operation is started with the USER1 settings.
2:
The contents of USER3 are loaded into USER1 and
operation is started with the USER1 settings.
3:
The contents of USER4 are loaded into USER1 and
operation is started with the USER1 settings.
4:
The contents of USER5 are loaded into USER1 and
operation is started with the USER1 settings.
This selects whether to set or release the user file (USER2 –
USER5) lock mode.
0:
The lock is released (changes can be made).
1:
The lock is set (changes are prohibited).
<Note>
The lock cannot be set for USER1.
The underline on the setting item denotes the initial setting.
<Notes>
No. A00 (LOAD), No. A01 (SAVE) and No. A02 (P.ON LOAD) are the menu items which
•
can be set only for USER1. They are not displayed with the USER2 – USER5 files.
No. A03 (MENU LOCK) is the menu item which can be set only for the USER2 – USER5
•
files. It is not displayed with USER1.
Description
– 43 –
Page 44

Time code/user bit
Time code
The time code is used when the time code signal generated by the time code generator
(time code signal generator) is to be recorded on the tape, its values are to be read by the
time code reader (time code signal reader), and the absolute position of the tape is to be
displayed in increments of hours, minutes, seconds and frames.
The time code is written in the sub-code area (data area) of the helical track. This enables
insert editing to be conducted independently using the time code alone. In addition, the
VTR’s playback speed can be read from the stop mode to slow-motion playback up to highspeed play (approx. 100X normal speed).
The time code values are indicated using the display and superimpose functions.
<Note>
Time code reader values normally appear on the superimposed display.
Values appear as shown below on the front display.
Playback: Time code reader values
REC, EE: Time code generator values
Time code generator values can be checked when the REC button is pressed even during
playback.
TCR 00 : 07 : 04 : 24
SecondsHours
Minutes
Frames
User bit
“User bit” refers to the 32-bit (8-digit) data frame among the time code signals which has
been released to users. It enables operator numbers values to be recorded.
The alphanumeric characters which can be used for the user bit are the figures 0 to 9 and
the letters A to F.
– 44 –
Page 45

Recording internal/external time codes
1. Setting the internal time code
1
Place the VTR in the stop mode.
2
Set the CTL/TC/UB switch to TC.
3
Set the TC INT/EXT switch to INT. (Internal time code selected)
4
Set the RUN MODE. (setup menu No. 510)
REC (RUN):
FREE (RUN):
5
Set the REGEN MODE. (setup menu No. 504)
ON (REGEN):
OFF (PRESET):
6
Set the TC PRESET button.
Use the TC PRESET button to set the start number of the time code or user bit.
The leftmost digit flashes.
1
Align the flashing light and the digit to be set with the cursor buttons ( , ).
The time code runs at the same time as the recording proceeds.
The time code runs in the same way as the time regardless of the
VTR’s operation.
Continuity is maintained with the recorded time code before editing.
(Detailed settings are also possible using the menu settings. See the
menu items below.)
Setting menu No. 503 (TCG REGEN)
Recording starts from the value set with the TC PRESET button.
2
Press the cursor button or to change the value.
Each time the button is pressed, the number changes. The setting range is given
below.
When using the time code and user bit in real time
•
00:00:00:00 – 23:59:59:29
User bit
•
00 00 00 00 – FF FF FF FF
Repeat steps 1 and 2 to change the value.
3
When the setting of the start number is completed, press the SET button. In the
4
FREE RUN mode, the time code now starts running.
5
Proceed with the recording or editing.
2. Setting the external time code (TC switch → EXT)
1
Place the VTR in the stop mode.
2
Set the TC/CTL/UB switch to TC.
3
Set the TC INT/EXT switch to EXT. (External time code selected)
4
Setup menu No. 505 (EXT TC SEL) can be set as follows.
LTC:
VITC:
The LTC signal input to the TIME CODE IN connector (BNC) on the rear jack
panel is recorded as the time code.
<Note> The LTC signal must be synchronized with the video signal.
The input video signal’s VITC is recorded as the time code.
– 45 –
Page 46

Reproducing the time code/user bit
1
Place the unit in the stop mode.
2
Set the CTL/TC/UB switch to TC or UB.
TC:
The time code is displayed.
UB:
The user bit is displayed.
When it is no longer possible to read the time code, it is interpolated using the
•
CTL signal.
3
Press the PLAY button.
Playback now commences, and the time code appears on the display.
When setup menu No.006 (SUPER) is ON, the time code value is superimposed onto
the video signal from the VIDEO OUT 3 connector.
<Notes>
The colon between the seconds and frames changes to a period when the drop frame time
•
code is read.
When the time code signal cannot be read, the time code is automatically interpolated by
•
the CTL signal.
The superimposed appears as shown below.
T R
When the time code signal cannot be read,
an asterix ( ) is displayed on the superimposed TV monitor.
00:01:04:07
The colon between the seconds and frames
changes to a period during drop frame mode.
– 46 –
Page 47

Superimpose screen
– 47 –
Page 48

Servo reference
This unit automatically selects the input video signal selected by the INPUT switch, the
reference video signal supplied from the REF VIDEO input connector or the internal sync
signal as the servo reference signal.
When the signal is selected, the unit's mode and servo reference stand in the relationship
shown in the flowchart presented below.
1
What is the SERVO REF on the setup
menu No. 304 setting?
AUTO
EXT
Is the unit in the recording mode?
2
NO
Is the unit in the editing mode?
3
(Is VIDEO, CH1, CH2, CUE or TC
selected?)
NO
Is the REF VIDEO signal supplied?
4
YES
The REF VIDEO input
signal serves as the
reference signal.
YES
YES
NO
NO
The internal sync signal
serves as the reference
signal.
Is the input video signal
available?
YES
The input video signal
serves as the reference
signal.
Applicable only to AJ-D450.
– 48 –
Page 49

Servo reference setting tables
– 49 –
Page 50

Audio V Fade Function (AJ-D450 only)
When editing tapes, the edit point splicing selection (setup menu No. 309 and 310)
information is recorded on the tape. This information is then sensed during playback, and V
fade or cut processing is automatically performed for these sections. [However, only when
the playback fade selection (No. 719) is AUTO.]
When the edit point splicing selection (setup menu No. 309 and 310) is CUT
Audio singal A
Noise may appear at the edit splice.
When the edit point splicing selection (setup menu No. 309 and 310) is FADE
Audio singal A Audio singal B
V fade is performed instantaneously to eliminate the noise.
<Notes>
When the playback fade selection (No. 719) is CUT, cut processing is performed for all
•
splices.
When the playback fade selection (No. 719) is FADE, V fade processing is performed for
•
all splices.
Audio singal B
– 50 –
Page 51

Rack mounting
The unit can be mounted into a 19-inch standard rack if the optional rack-mounting adaptors
(AJ-MA75P) are used. For the installation rails, it is recommended that the rail and bracket
for 18" length (model number CC3001-99-0400) of CHASSIS TRAK be used. (The complete
slide rail and bracket unit is not available from Panasonic) For further details, consult with
your dealer.
1
2
Remove the screws on the left and right sides of the unit.
Use the removed screw to attach the inner members of the slide rails.
Inner member
The length of the screws used is subject to restriction. If some of the mounting screws
have been lost or misplaced, use screws which are less than 4" long in their place.
Use four screws to secure each inner member.
3
Attach the outer member brackets to the rack.
Check that the height is the same for the left and right brackets.
4
Attach the AJ-MA75P rack-mounting adaptors with included 4 screws.
5
Remove the 4 rubber legs from the bottom of the unit, and install the unit in the rack.
After the unit has been installed, check that it moves smoothly along the rails.
EIA standard rack
Fasten it to the
rack with set
screws.
<Notes>
Keep the temperature inside the rack to between +41°F (5°C) and +104°F (40°C).
•
Bolt the rack securely to the floor so that it will not topple over when the VTR is drawn out.
•
– 51 –
Page 52

Video head cleaning
This unit has an auto head cleaning function which automatically reduces the dirt on the
heads. However, to further increase the unit’s reliability, it is recommended that its video
heads be cleaned every day.
Use the cleaning fluid designated by Panasonic.
Condensation
Condensation occurs due to the same principle involved when droplets of water form on a
window pane of a heated room. It occurs when the unit or tape is moved between places
where the temperature or humidity varies greatly or when, for instance:
It is moved to a very humid place full of steam or a room immediately after it has been
•
heated up.
It is suddenly moved from a cold location to a hot or humid location.
•
When moving the unit to locations such as these, leave it standing for about 10 minutes
rather than switching on the power immediately.
If condensation has formed on or in the unit, the “E-20” code flashes in the counter display
and the cassette tape is automatically ejected.
Keep the power supplied and simply wait until the “E-20” code goes off.
– 52 –
Page 53

Error messages
When a warning occurs in this unit, an error number appears at the counter display.
Opening the DIAG menu will display the error description on the monitor. Also, when an
abnormal operation is detected in this unit, an error number flashes on the counter display.
DIAG menu
This display the VTR information.
VCR information includes “WARNING” information and “HOURS METER” (usage time)
information. A DIAG menu appears on the monitor when the monitor is connected to the
VIDEO OUT 3 connector on the connector section.
Displaying the DIAG menu
1
Press the DIAG button.
The DIAG menu screen is displayed on the monitor, and the error number is displayed
on the counter display.
2
The “WARNING” information and “HOURS METER” information can be switched by
pressing the cursor buttons ( , ).
3
Press the DIAG button again to return to the original display.
ON
OFF
LEVEL
HEADPHONES
POWER
CH 1
AUDIO
REC LEVEL
CH 2
CH CONDITION
MENU
TC
CTL
TC
INT
UB
EXT
TC
PRESET
FILE
AUDIO
MONITOR
CH 1
MIX
CH 2
DIGITAL
ANALOG
VIDEO IN
Y PB PR
CMPST
S-VIDEO
2
DIGITAL
AES/EBU
ANALOG
AUDIO IN
1, 3
SET
DIAG
PAGE
REMOTE
LOCAL
COUNTER/
REMAIN
RESET
EJECT
RECPLAYFFSTOPREW
“WARNING” information display
A warning message is displayed on the monitor whenever a warning occurs. When
•
warnings have not been detected, “NO WARNING” is displayed on the monitor, and “Err–”
is displayed on the counter display.
When multiple warning occur, the descriptions for each warning can be checked by using
•
the cursor buttons ( , ).
– 53 –
Page 54

Error messages
– 54 –
Page 55

– 55 –
Page 56

Error messages
– 56 –
Page 57

RS-232C interface
1. Introduction
(1)
The VTR can be operated by commands when the RS-232C interface is used.
(See command table on page 60 – 62.)
(2)
Conditions for acknowledging commands from RS-232C interface
The front panel REMOTE/LOCAL switch must be at REMOTE.
The setup menu item No. 204 “RS232C SEL” must be ON.
If the above conditions are not met, [ACK] + [STX]ER001[ETX] is returned to the external unit.
Whether the [ACK] code is returned depends on the setting which has been selected for setup menu item No. 209
“RETURN ACK”.
2. Hardware specifications
External interface specifications
1) Connector specifications
Connector: D-SUB 25-pin (straight cable supported)
Pin No. Signal Circuit name Description
1 FG Protective ground Frame ground
2 TXD Transmitted data Data is received from PC.
3 RXD Received data Data is sent to PC.
4 RTS Request to send Shorted with pin 5.
5 CTS Clear to send Shorted with pin 4.
6 DSR Data set ready + voltage output after communication enable status
7 SG Signal ground Signal ground
20 DTR Data terminal ready No processing
2) Example of connection with controller (PC)
■Using straight cable with D-SUB 25-pin connectors
PC side
(D-SUB 25-pin
connector)
FG
TXD
RXD
RTS
CTS
DSR
SG
DTR
1
2
3
4
5
6
7
20
VTR side
1
2
3
4
5
6
7
20
FG
TXD
RXD
RTS
CTS
DSR
SG
DTR
■Using straight cable with D-SUB 9-pin connectors
and 25-pin connectors
PC side
(D-SUB 9-pin
connector)
RXD
TXD
DTR
SG
DSR
RTS
CTS
2
3
4
5
6
7
8
VTR side
1
FG
2
TXD
3
RXD
4
RTS
5
CTS
6
DSR
7
SG
20
DTR
– 57 –
Page 58

RS-232C interface
– 58 –
Page 59

– 59 –
Page 60

RS-232C interface
– 60 –
Page 61

– 61 –
Page 62

RS-232C interface
(2)
Commands relating to inquiries
<Notes>
As for the return (completion) message, [ACK] is first returned when data is received, and the execution message is
•
subsequently returned. It is only the execution message which is listed in this table.
In the case of commands not listed in the table, ER001 (invalid command) is returned after [ACK] has been returned.
•
VTR
operation
CTL/TC
DATA
REQUEST
STATUS
REQUEST
ID (VTR No.)
REQUEST
Send command
[STX] QCD [ETX]
[STX] QOP [ETX]
[STX] QID [ETX]
Return (completion)
message
[STX] CD data [ETX]
data = f w gh mm ss ff
= F
f
= S
w
=
gh
g =
CTL:
h =
gh =
TC:
00 – 59: minutes
=
mm
00 – 59: seconds
=
ss
00 – 29: frames
=
ff
[STX] xxx [ETX]
xxx =
[STX] data [ETX]
EJECT
OEJ:
FAST FORWARD
OFF:
PLAY
OPL:
REC
ORC:
REWIND
ORW:
STOP (including the STANDBY ON)
OSP:
(IN/OUT) PREROLL
SRS:
STANDBY OFF
OBF:
SHTL FORWARD
OSF:
SHTL REVERSE
OSR:
JOG FORWARD/REVERSE
OJG:
VAR FORWARD/REVERSE
OSW:
AUTO EDIT
EAE:
EDIT ON (MANUAL EDIT)
EON:
PREVIEW
EPV:
REVIEW
ERV:
Supplementary notes
This command is for inquiring about the counter
value.
SP (20h):
– (2Dh):
0 – 9: hours
00 – 23: hours
This command is for inquiring about the VTR’s operation mode.
This command is for inquiring about the VTR used.
for a plus display
for a minus display
CTL or TC is returned,
whichever corresponds
to the front display
mode.
data = AJ-D440, AJ-D450
– 62 –
Page 63

(3)
Microsoft QuickBASIC sample program
CLS
STX$ = CHR$(&H2): ETX$ = CHR$ (&H3): NAK$ = CHR$(15): ACK$ = CHR$(&H6)
PRINT "*** RS-232C COMMUNICATION SAMPLE PROGRAM ***"
PRINT "Type Command 'QUIT' to quit."
PRINT
REM *** Communication Port Initial & Open ***
REM Port 1,9600Bps,No parity,8 bit data,1 stop bit
OPEN "COM1:9600,N,8,1" FOR RANDOM AS #1 LEN = 256
REM *** Input Command & Send Command ***
SendCmd:
INPUT "Input Command ="; SEND$
IF SEND$ = "QUIT" THEN GOTO ProgEnd
PRINT #1, STX$ + SEND$ + ETX$
REM *** Wait for Receive Command ***
WHILE LOC(1) = 0
WAITKEY$ = INKEY$
IF WAITKEY$ = "Q" THEN PRINT "*** Quit ***": GOTO ProgEnd
WEND
REM *** Receive Command ***
RecvCmd:
RECV$ = INPUT$(1, #1)
IF RECV$ = STX$ THEN RECV$ = "[Stx]"
IF RECV$ = ACK$ THEN RECV$ = "[Ack]"
IF RECV$ = NAK$ THEN RECV$ = "[Nak]"
IF RECV$ = ETX$ THEN BUFFER$ = BUFFER$ + "[Etx]": GOTO DispOut
BUFFER$ = BUFFER$ + RECV$
GOTO RecvCmd
REM *** Output Receive Command ***
DispOut:
PRINT "Receive Command ="; BUFFER$
PRINT
BUFFER$ = ""
GOTO SendCmd
REM *** End Program ***
ProgEnd:
CLOSE
END
MICROSOFT QUICKBASIC is a registered trade mark of Microsoft Corporation.
– 63 –
Page 64

Connector signals
– 64 –
Page 65

RS-232C REMOTE (25-pin D-SUB straight cable supported)
Pin No.
1 FRAME GROUND
2
4
5
6
7 SG Signal ground Signal ground
20
Abbreviation Circuit Description
TxD Transmitted data Receives data from the PC.
RxD Received data Sends data to the PC.3
RTS Request to send Shorted with pin 5.
CTS Clear to send Shorted with pin 4.
DSR Data set ready
DTR Data terminal ready No processing
ENCODER REMOTE (15P)
Pin No. Pin No.
1
2 SET UP 7 12
3 C LEVEL 8 13
4 GND 9 HUE
Protective ground
Frame ground
Positive power output after communication enable
status
Signal Signal Pin No. Signal
611
SYSTEM H
RET GND
SYS.SC COARSE (2)
–12V
14 SYS.SC FINE
10 VIDEO LEVEL5 +12V
15
SYS.SC COARSE (1)
– 65 –
Page 66

Specifications
GENERAL
Power supply:
Power consumption:
Operating ambient temperature:
Operating ambient humidity:
Weight:
Dimensions (W × H × D):
Recording format:
Recording tracks:
Tape speed:
Recording time:
Tape:
FF/REW time:
Editing accuracy*:
Tape timer accuracy:
Servo lock time:
AC 120 V, 50 – 60 Hz
AJ-D440; 120 W
AJ-D450; 150 W
41°F to 104°F (5°C to 40°C)
10% to 90% (no condensation)
AJ-D440; 33 lbs (15 kg)
AJ-D450; 34.98 lbs (15.9 kg)
16-3/4 × 6-15/16 ×16-3/8 inches
(424 × 175 × 415 mm)
DVCPRO format
Digital video
Time code;
Digital audio;
Cue Track;
Control (CTL);
33.820 mm/sec
184 minutes (with AJ-5P92LP)
66 minutes (with AJ-P66MP)
1/4-inch thin magnetic layer metal tape
Less than 3 min (with AJ-5P92LP)
Less than 2 min (with AJ-P66MP)
±0 frame (using time code)
±1 frame (using continuous CTL signal)
Less than 0.5 sec. (color framing/
standby ON)
VIDEO
(Digital video)
Sampling frequencies:
Quantizing:
Error correction:
Y; 13.5 MHz/P
8 bits
Reed-Solomon product code
(Digital IN/analog component OUT)
Video bandwidth:
S/N ratio:
K factor:
Y; 30 Hz to 5.5 MHz (±1.0 dB)
B, PR; 30 Hz to 1.0 MHz (±1.0 dB)
P
Better than 56 dB
Less than 2%
(Analog component IN/component OUT)
Video bandwidth:
S/N ratio:
K factor:
Y; 30 Hz to 5.5 MHz (–1.5 dB to +1.0 dB)
B, PR; 30 Hz to 1.0 MHz
P
(–2.0 dB to +1.0 dB)
Better than 55 dB
Less than 2%
(Analog composite IN/composite OUT)
Video bandwidth:
DG:
DP:
Y/C delay:
K factor:
S/N ratio:
Y; 30 Hz to 4.5 MHz (–1.5 dB to +1.0 dB)
Less than 4%
Less than 3°
Better than 20 ns
Less than 3%
Better than 48 dB
(Video input connector)*
Analog component input*:
Analog composite input*:
S VIDEO input*:
Reference input:
Serial digital component input
(option)*:
BNC×3 (Y, P
Y; 1.0 Vp-p, 75Ω
B, PR; 0.486/0.7 Vp-p switchable, 75Ω
P
(75% color bar, 7.5% setup)
BNC×2, loop-through, 75Ω on/off
S terminal (4-pin)×1
Y; 1.0 Vp-p, 75Ω
C; 0.286 Vp-p (burst), 75Ω
Analog composite
BNC×2, loop-through, 75Ω on/off
Complies with SMPTE259M-C standard,
BNC×2, active through
B, PR)
Recorded in sub-code area
2channels
1 track
1 track
B, PR; 3.375 MHz
(Video output connector)
Analog component output:
Analog composite output:
S VIDEO output:
Serial digital component output
(option):
BNC×3 (Y, P
Y; 1.0 Vp-p, 75Ω
B, PR; 0.486/0.7 Vp-p switchable, 75Ω
P
(75% color bar, 7.5% setup)
BNC×3
Video1/video2/video3 (superimpose
on/off)
S terminal (4-pin)×1
Y; 1.0 Vp-p, 75Ω
C; 0.286 Vp-p (burst), 75Ω
Complies with SMPTE259M-C standard,
BNC×3
(Video signals adjustment)
Video output gain:
Video output chroma gain:
Video output hue:
Video output setup:
Video output sync phase:
Video output SC phase:
±3 dB
±3 dB
±30°
±15 IRE
±2 µs
±180°
AUDIO
(Digital audio)
Sampling frequencies:
Quantizing:
Frequency response:
Dynamic range:
Distortion:
Crosstalk:
Wow & flutter:
Headroom:
De-emphasis:
48 kHz
16 bits
20 Hz to 20 kHz (±1.0 dB)
Better than 85 dB (1 kHz, emphasis OFF,
“A” weighted)
Less than 0.1% (1 kHz, emphasis OFF,
standard level)
Less than –80 dB (1 kHz, between
2 channels)
Below measurable limits
20 dB
T1=50 µs/T2=15 µs (on/off automatic)
(Cue track)
Frequency response:
300 Hz to 6 kHz ±3 dB
(Audio input connector)*
Analog input (CH1/CH2):
Digital input (CH1/CH2) (option):
Serial digital input (option):
XLR×2, 600Ω/high impedance selectable,
+4/0/–20/–60 dBu
BNC×1, AES/EBU format
Complies with SMPTE259M-C, 272M
standard (BNC)
(Audio output connector)
Analog output (CH1/CH2):
Digital output (CH1/CH2)
(option):
Serial digital output (option):
Monitor output:
Headphones:
XLR×2, low impedance, +4/0/–20 dBu
BNC×1, AES/EBU format
Complies with SMPTE259M-C, 272M
standard (BNC)
Phono×1, 600 Ω, –8 dBV
Variable level, 1/4" phone, 8Ω
Other input/output connector
Time code input*:
Time code output:
RS-422A input/output:
RS-232C:
Encoder remote:
BNC×1, 0.5 to 8 Vp-p
BNC×1, 2.0 Vp-p
D-sub 9-pin, RS-422A interface
D-sub 25-pin, RS-232C interface
D-sub 15-pin
B, PR)
Control from ENCODER
REMOTE connector
* Items marked with an asterisk ( * ) indicate AJ-D450 only.
Weight and dimensions when shown are approximately.
Specifications are subject to change without notice.
– 66 –
Page 67

– 67 –
Page 68

PANASONIC BROADCAST & DIGITAL SYSTEMS COMPANY
DIVISION OF MATSUSHITA ELECTRIC CORPORATION OF AMERICA
Executive Office:
3330 Cahuenga Blvd W., Los Angeles, CA 90068 (323) 436-3500
EASTERN ZONE:
One Panasonic Way 4E-7, Secaucus, NJ 07094 (201) 348-7621
Mid-Atlantic/New England:
One Panasonic Way 4E-7, Secaucus, NJ 07094 (201) 348-7621
Southeast Region:
1225 Northbrook Parkway, Ste 1-160 Suwanee, GA 30024 (770) 338-6835
Central Region:
1707 N Randall Road E1-C-1, Elgin, IL 60123 (847) 468-5200
WESTERN ZONE:
3330 Cahuenga Blvd W., Los Angeles, CA 90068 (323) 436-3500
Dallas Region:
6226 Abington Way, Houston, TX 77008 (713) 802-2726
No. CA/Northwest Region:
5870 Stoneridge, #3, Pleasanton, CA 94588 (925) 416-5108
Government Marketing Department:
52 West Gude Drive, Rockville, MD 20850 (301) 738-3840
PANASONIC CANADA INC.
5770 Ambler Drive, Mississauga, Ontario L4W 2T3 (905) 624-5010
PANASONIC SALES COMPANY
DIVISION OF MATSUSHITA ELECTRIC OF PUERTO RICO, INC.
San Gabriel Industrial Park, 65th Infantry Ave., KM9.5 Carolina, Puerto Rico 00630 (787) 750-4300
 Loading...