

Thank you for choosing
Panasonic
Professional/Industrial Video
ms
VOTS3578A
Operating
Instructions
Please read these irtstructions carefuHy before attemptir>g to conriect.
operate or adjust this product. Please save this manual.
D
O *
3 “o
3 to
Q)
Things You Should Know
Congratulations
on your purchase of one of the most sophisticated and
reliable products on the market today. Used properly, it will
bring you and your family years of enjoyment. Please fill in
the information at right. The serial number is on the tag
located on the back of your Combination VCR.
Date of Purchase
Dealer Purchased From
Dealer Address
Dealer Phone No.
Model No.
Serial No.
______
_______
________
_________
_______
J^G-52ZP
Safety Precautions
Warning: To prevent fire or shock hazard, do not expose this equipment to rain or moisture.
This video recorder, equipped with the HQ ( High Quality) System, is compatible with existing VHS equipment.
Only use those tapes with the №1 mark. It is recommended that only cassette tapes that have been tested and
inspected for use in 2, 4, 6, and 8 hour VCR machines be used.
This television receiver provides display of television closed captioning in accordance with §15.119 of the FCC rules.
CAUTION
RISK OF ELECTRIC SHOCK
A
CAUTION; TO reduce THE RISK OF ELECTRIC SHOCK,
REFER servicing TO QUALIFIED SERVICE PERSONNEL
iX) NOT OPEN
DO NOT remove COVER (OR BACK)
NO user-serviceable parts inside
A
This symbol warns the user that uninsulated voltage within
the unit may have sufficient magnitude to cause electric
shock. Therefore, it is dangerous to make any kind of
contact with any inside part of this unit.
This symbol alerts the user that important iiterature
concerning the operation and maintenance of this unit has
been included. Therefore, it should be read carefully in order
to avoid any problems.
Important Safeguards and Precautions...........................................................................................................3
Unpacking Your Combination VCR • Product Features...................................................................................4
Antenna or Cable Connections (Outdoor Antenna, Cable Box, Scrambled/Unscrambled Channels)
Location of Controls (Remote Control, Combination VCR)........................................................................6, 7
One Time Setup (Tuner ON or OFF, On-Screen Language, Channel Memory, Auto Clock Set)
On-Screen Displays (OSD) (Function, Channel, Menu, VCR Status/Clock, Warning, Instruction)
TV Operation (Main Operation, Using the 100 key, Rapid Tune, Audio Mute, Phones)............................... 12
Audio/Picture Adjustment (Bass, Treble, Color, Tint, Bright, Picture, Sharpness, Reset)
TV Timer Features (On Timer, Sleep Timer)................................................................................................ 14
Closed Caption System (Main operation. Caption On Mute)........................................................................ 15
Playback a Tape (Special Effects, Quality Picture Features)....................................................................... 16
Tape Operation (Play Lock, Repeat Play, One Minute Skip, Zero Search, Auto Functions)........................ 17
Record On a Tape (Main Operation, One Touch Record, Input Select)....................................................... 18
Copying Your Tapes (Connection, Main Operation)..................................................................................... 19
Timer Playback (Main Operation, Cancel, Clear or Replace Program).................................................20, 21
Timer Recording (Main Operation, Cancel, Clear or Replace Program)...............................................22, 23
MTS BroadcastA/HS Hi-Fi Stereo System (Stereo/SAP/Mono Broadcast, Select Audio Mode)
............................
............
.......
..............
..........
5
8, 9, 10
11
13
24, 25
Unit and Cassette Information ..................................................................................................................... 26
Before Requesting Service (Self-check items).............................................................................................27
2
fyK I mpo rt ant Saf egua rds an d Pre caut io ns
FOR YOUR SAFETY, READ AND RETAIN ALL
SAFETY AND OPERATING INSTRUCTIONS.
HEED ALL WARNINGS IN THE MANUAL AND
ON THE UNIT
INSTALLATION
1 POWER SOURCE CAUTION
Operate only from a power source indicated on the unit
or in this manual.
If necessary, have your Electric Utility Service Company
or Video Products Dealer verify the power source in your
home.
2 POLARIZED OR GROUNDING PLUG
As a safety feature, this Video product comes with either
a polarized power cord plug {one blade is wider than the
other), or a three-wire grounding type plug.
POLARIZED PLUG CAUTION:
This plug will only fit into an outlet one way. If you cannot
fully insert the plug, try reversing it. If it still will not fit, have
an electrician install the proper wall outlet. Do not defeat
the safety feature by tampering with the plug.
GROUNDING PLUG CAUTION:
This plug will only fit into a three-hole grounding outlet. If
necessary, have an electrician install the proper outlet. Do
not defeat the safety feature by tampering with the plug.
3 POWER CORD
Make sure power cords are routed so that they are not
likely to have anything rest on them, roll over them, or
be in the way of walking traffic.
If an extension cord is used, make sure it also has either
a polarized or grounded plug and that the cords can be
securely connected.
Frayed cords, damaged plugs, and damaged or cracked
wire insulation are hazardous and should be replaced by
a qualified service technician.
Overloaded outlets and extension cords are fire hazards
and should be avoided.
4 DO NOT BLOCK VENTILATION HOLES
Ventilation openings in the cabinet release heat
generated during operation. If they are blocked, heat
build-up inside the unit can cause failures that may
result in a fire hazard or heat damage to cassettes.
For protection follow these rules:
a. Never cover ventilation slots or the unit while in use,
or operate the unit when placed on a bed, sofa, rug,
or other soft surface.
b. Avoid built-in installation, such as a book case or
rack, unless proper ventilation is provided.
5 AVOID EXTREMELY HOT LOCATIONS OR
SUDDEN TEMPERATURE CHANGES
Do not place the unit over or near any kind of heater or
regulator, in direct sunlight, inside a closed vehicle, etc..
Do not move the unit suddenly between areas of
extreme temperature variation. If the unit is suddenly
moved from a cold place to a warm place, moisture
may condense in the unit and on the tape.
6 TO AVOID PERSONAL INJURY
• Do not place unsecured equipment on a sloping
surface.
• Support for the unit should be firm,
level, and adequately strong.
• An appliance and cart combination
should be moved with care. Quick
stops, excessive force, and uneven
surfaces may cause the appliance
and cart combination to overturn.
• Carefully follow all operating
instructions and use the manufacturer's recommended
accessories when operating this unit or connecting if to
any other equipment.
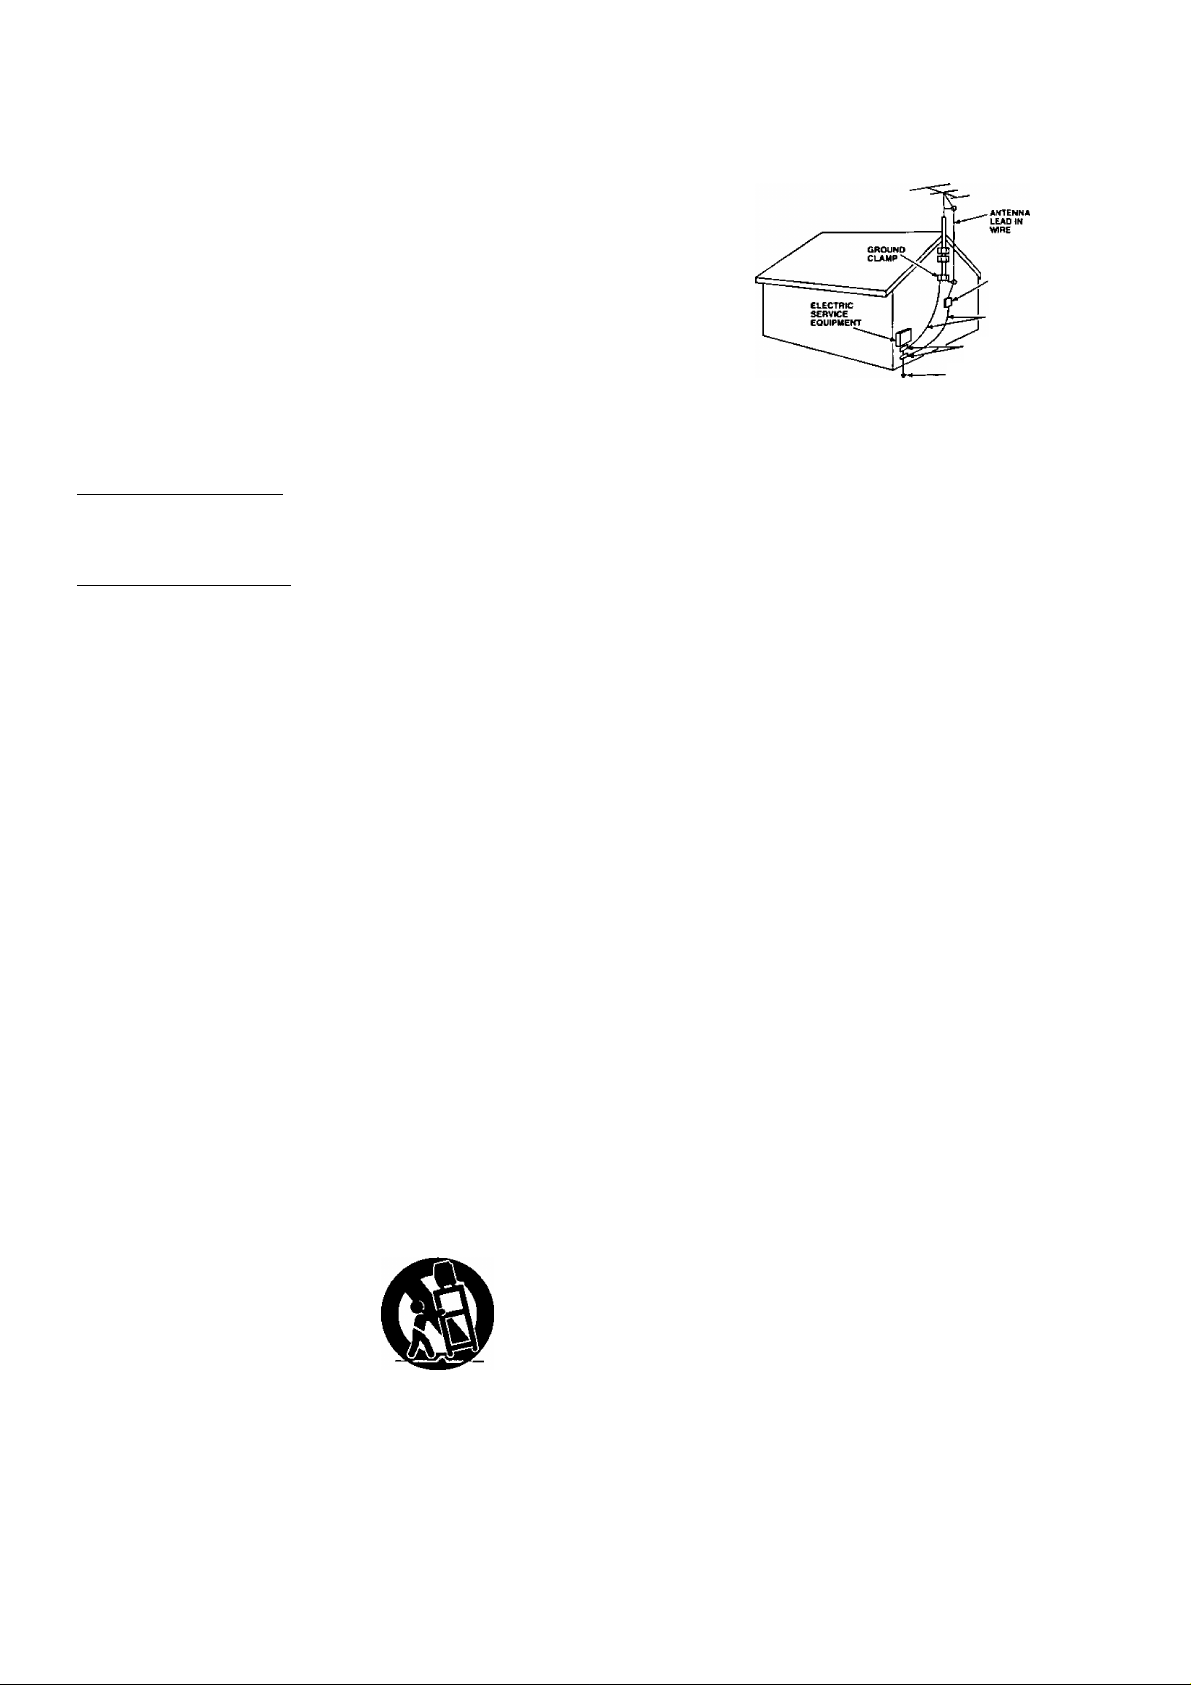
OUTDOOR ANTENNA INSTALLATION
1 SAFE ANTENNA AND CABLE CONNECTION
If an outside antenna or
cable system is connected
to the equipment, be sure
the antenna or cable
system is grounded so as
to provide some protection
against built up static
charges and voltage
surges. Section 810 of the
National Electrical Code,
ANSI/NFPA 70 (in Canada,
part 1 of the Canadian
Electrical Code) provides
information with respect to proper grounding of the mast and supporting
structure, grounding of the lead-in wire to an antenna discharge unit, size
of grounding conductors, location of antenna discharge unit, connection to
grounding electrodes and requirements for the grounding electrode.
NEC ' NATIONAL ELECTRICAL CODE
ANTENNA
DISCHARGE UNIT
(NEC SECTWN
GROUND CLAMPS
POWER SERVICE CROUNDINQ
ELECTRODE SYSTEM
(NEC ART 250. PART H)
2 KEEP ANTENNA CLEAR OF HIGH VOLTAGE POWER
LINES OR CIRCUITS
An outside antenna system should be located well away from power lines,
electric light or power circuits and where it will never come into contact
with these power sources if it should happen to fall. When installing an
outside antenna, extreme care should be taken to avoid touching power
lines, circuits or other power sources as this could be fatal. Because of the
hazards involved, antenna installation should be left to a professional.
USING THE VIDEO UNIT
If the unit has been in storage or moved to a new location, refer first
to the INSTALLATION section of these safeguards.
1 KEEP THIS VIDEO UNIT AWAY FROM WATER OR
MOISTURE OF ANY KIND.
2 IF EQUIPMENT IS EXPOSED TO RAIN, MOISTURE, OR
STRONG IMPACT, unplug the unit and have it inspected by a
qualified service technician before use.
3 DURING AN ELECTRICAL STORM
During a lightning storm, whether indoors or outdoors, or before leaving
the unit unused for extended periods of time, disconnect all equipment
from the power source as well as the antenna and cable system.
4 WHEN THE UNIT IS PLUGGED IN
• Never expose the unit to rain or water. DO NOT OPERATE if liquid has
been spilled into the unit. Immediately unplug the unit, and have it
inspected by a service technician. Fire and shock hazards can result
from electrical shorts caused by liquid contact inside.
• Never drop or push any object through openings in the unit. Some
internal parts carry hazardous voltages and contact can cause electric
shock or fire hazard.
• Avoid placing the unit directly above or below your TV set as this may cause
electrical interference. Keep all magnets away from electronic equipment.
5 USING ACCESSORIES
Use only accessories recommended by the manufacturer to avoid risk of
fire, shock, or other hazards.
6 CLEANING THE UNIT
Unplug the unit. Then, use a clean, dry, chemically untreated cloth to
gently remove dust or debris. DO NOT USE cleaning fluids, aerosols, or forced
air that could over-spray, or seep into the unit and cause electrical shock. Any
substance such as wax, adhesive tape, etc. may mar the cabinet surface.
Exposure to greasy, humid, or dusty areas may adversely affect internal parts.
SERVICE
DO NOT SERVICE THIS PRODUCT YOURSELF
If, after carefully following the detailed operating instructions, this Video
product does not operate properly, do not attempt to open or remove
covers, or make any adjustments not described in the manual. Unplug the
unit and contact a qualified service technician.
IF REPLACEMENT PARTS ARE REQUIRED
Make sure the service technician uses only parts specified by the manufacturer,
or those having the same safety characteristics as the original parts. The use of
unauthorized substitutes may result in fire, electric shock, or other hazards.
HAVE THE SERVICE TECHNICIAN PERFORM
A SAFETY CHECK
After any service or repairs to the unit, request the service technician to
conduct a thorough safety check as described in the manufacture's service
literature to insure that the video unit is in safe operating condition.
Unpacking Your Combination VCR • Product Features
Unpacking Your
Combination VCR
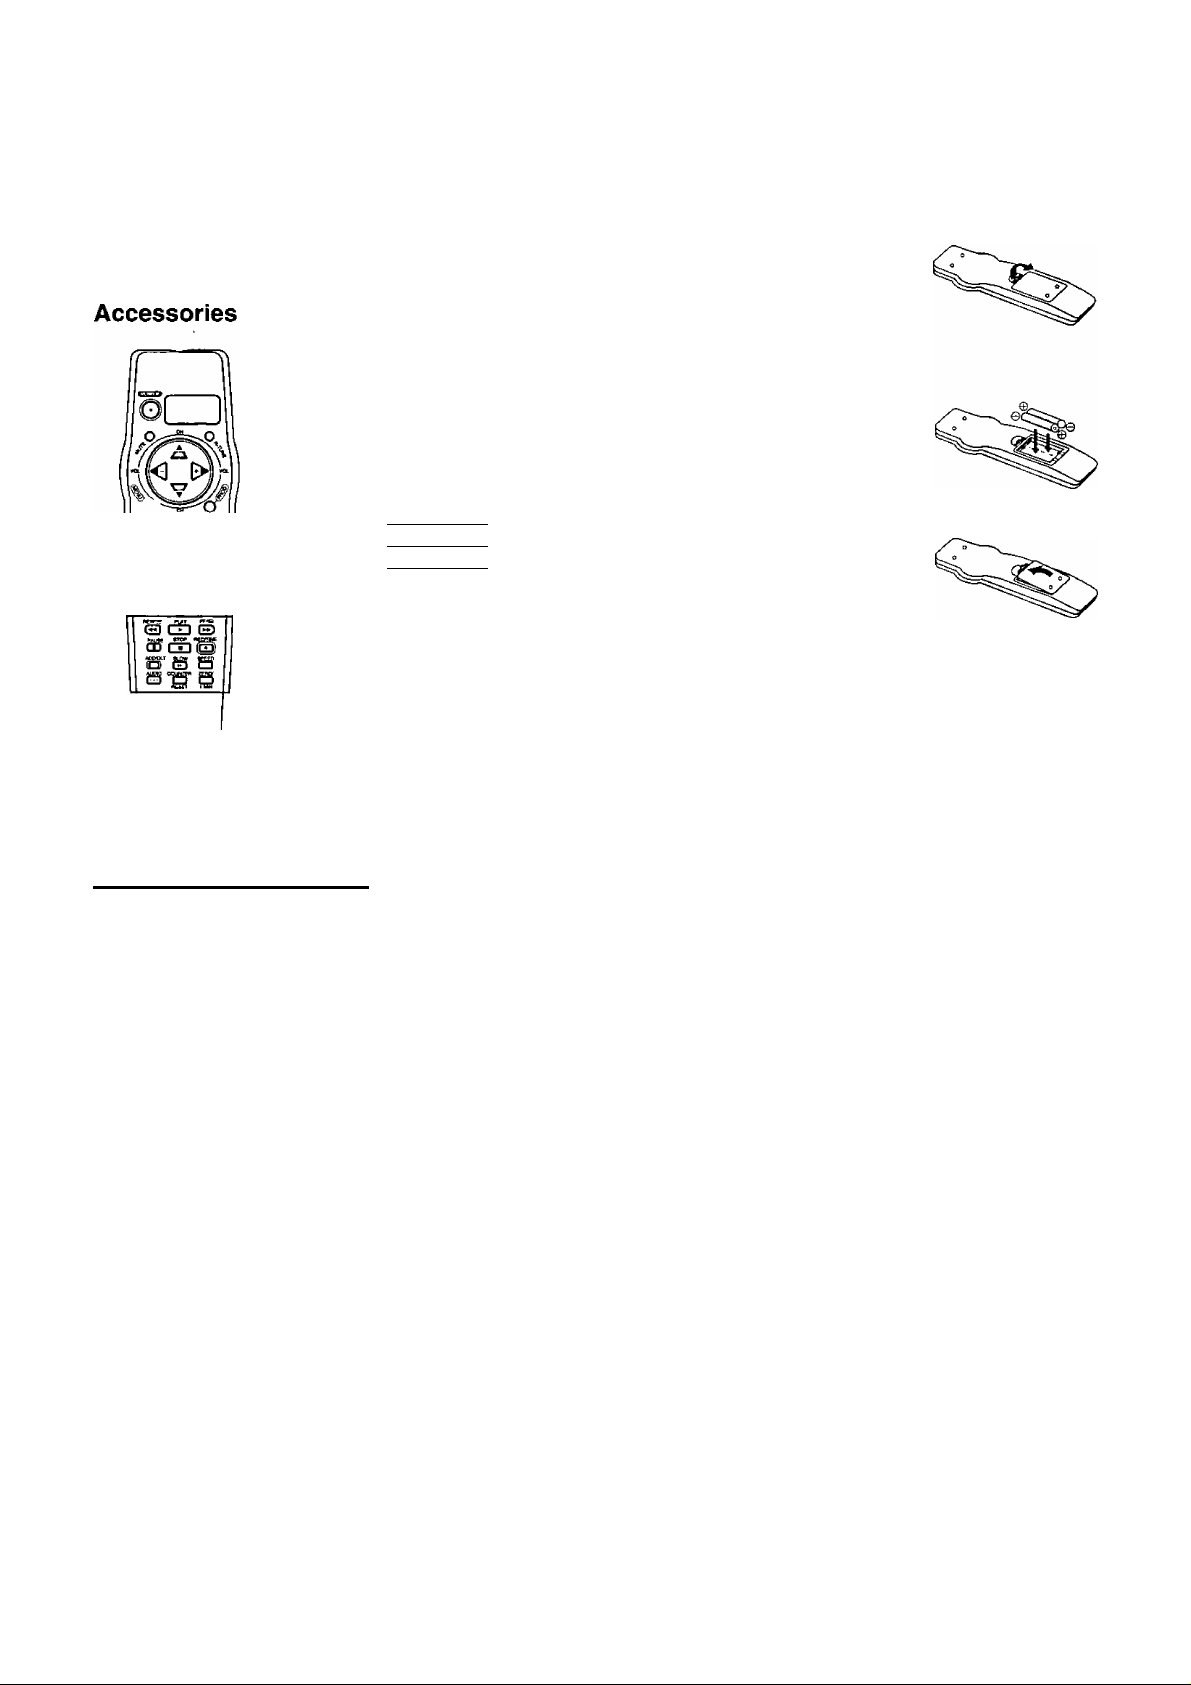
The accessories shown below are provided to
help you use or set up your Combination VCR.
Remote Control
VSQS1512
O'
G © ©;
© 0 ©'
© © ®
0 0
d'oo'cd
__
2 “AA” Batteries
__
)
)
Load the batteries
Push in and up on the
latch with your thumb
nail and lift off the lid.
Install two batteries
as indicated inside the
Battery Compartment.
Fit the lid’s hinge piece
into the indent on the
case, and snap the lid
into place.
Battery replacement caution
• Do not mix old and new batteries.
• Do not mix alkaline with manganese batteries.
Product Features
All Channel Auto Set/181-CH TV/CATV Tuner .................................................................................................9
Auto Clock Set...................................................................................................................................................9
Auto Daylight Saving Time ..............................................................................................................................26
Auto Operation Functions (Auto Playback, Rewind, Tape Eject, Power Off) .................................................. 17
Black Tube .......................................................................................................................................................16
Closed Caption System................................................................................................................................... 15
Easy-to-Read English/Spanish/French On Screen Displays .......................................................8~10, 20-23
Front-mounted AA/ In Terminals......................................................................................................................19
MTS Broadcast System ..................................................................................................................................24
One Minute Skip...............................................................................................................................................17
One Month, 4 Program Auto Timer Playback...........................................................................................20, 21
One Month, 4 Program Auto Timer Recording.........................................................................................22, 23
One Touch Recording (OTR)...........................................................................................................................18
Quick Play Mechanism ....................................................................................................................................27
Rapid Tune .....................................................................................................................................................11
Tuner ON/OFF System .....................................................................................................................................8
Special Effects Playback ..................................................................................................................................16
Unattended (Timer) Playback with Repeat Function ...............................................................................20, 21
VMS Hi-Fi Stereo System ........................................................................................................................24, 25
Zero Search.....................................................................................................................................................17
___________
_______________________
Antenna or Cable Connections
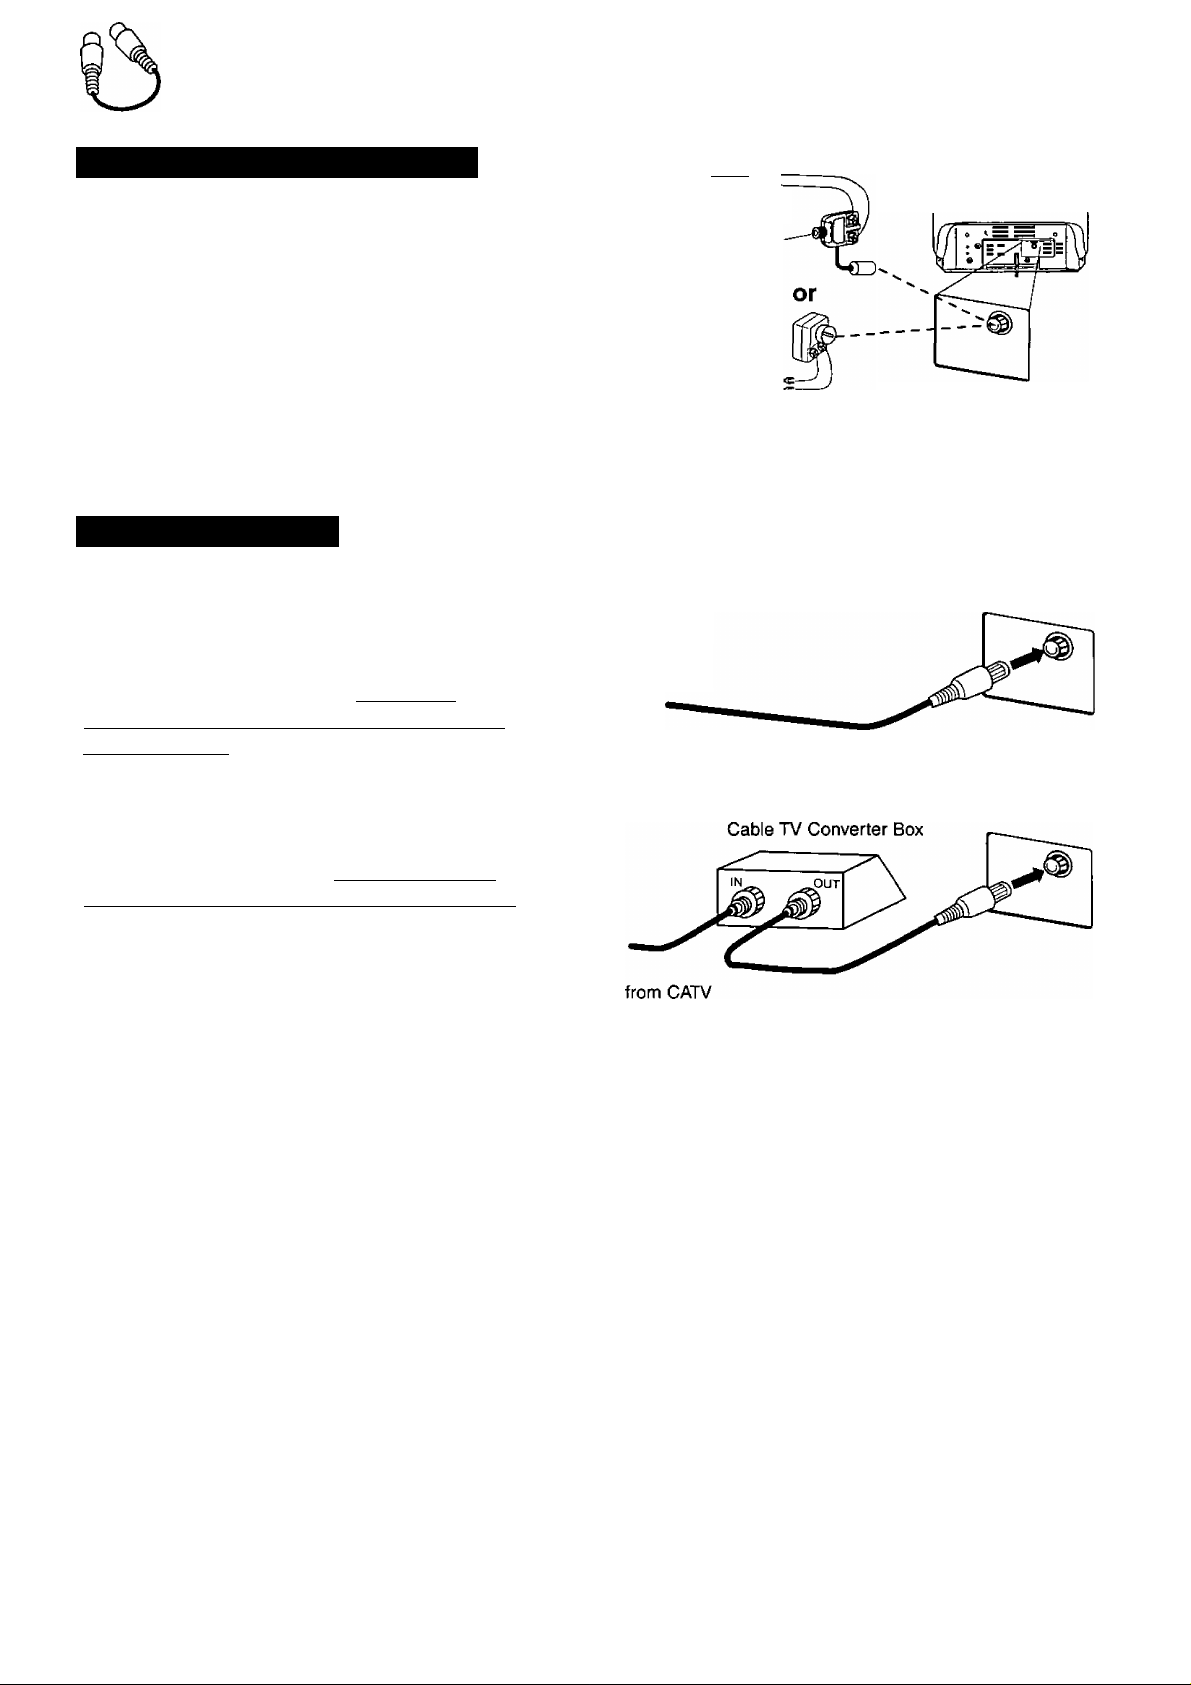
Outdoor Antenna Connection
Unhook the antenna from your previous TV
or VCR and connect it to the back of the
Combination VCR as shown in the diagram.
If your antenna system has separate UHF
and VHF lead-ins, you need a UHFA/HF
Band Mixer (not supplied).
Cable Connections
(A) Without a Converter/Descrambler Box
With this connection, you can: use your
Combination VCR remote control to select
channels for viewing and select unscrambled
channels for timer recording. Scrambled
channels may not be viewed or recorded with
this connection.
(Flat)Twin Lead
300 Ohm Cable ^
(Round) 75 Ohm
coaxial Cable
300-75 ohm
Transformer
from (not supplied)
Antenna ,
(Flat)Twin Lead
300 Ohm Cable
(A)
from CATV
(cable)
UHFA/HF
Band Mixer
Back of
Combination VCR
Back of Combination VCR
(B) With a Converter/Descrambler Box
With this connection, you may record and view
any channel including scrambled channels.
Please note, however that channel selection
must be made at the cable company converter
box. Timer recording is limited to one channel at
a time, and you can only view the channel you
are recording.
To Watch and Record Scrambled/
Unscrambled Channels
Set the Combination VCR to the output channel
of the cable converter box (e.g. CHS).
Now, select channels to be viewed or recorded"
at the cable converter box.
FCC WARNING; Any unauthorized changes or
modifications to this equipment wouid void the
user’s authority to operate.
(B)
(cable)
Note to CATV System instaiier
This reminder is provided to call the CATV (Cable TV)
System Installers attention to Article 820-40 of the
NEC that provides guidelines for proper grounding
and, in particular, specifies that the cable ground shall
be connected to the grounding system of the building,
as close to the point of cable entry as practical.
Location of Controls
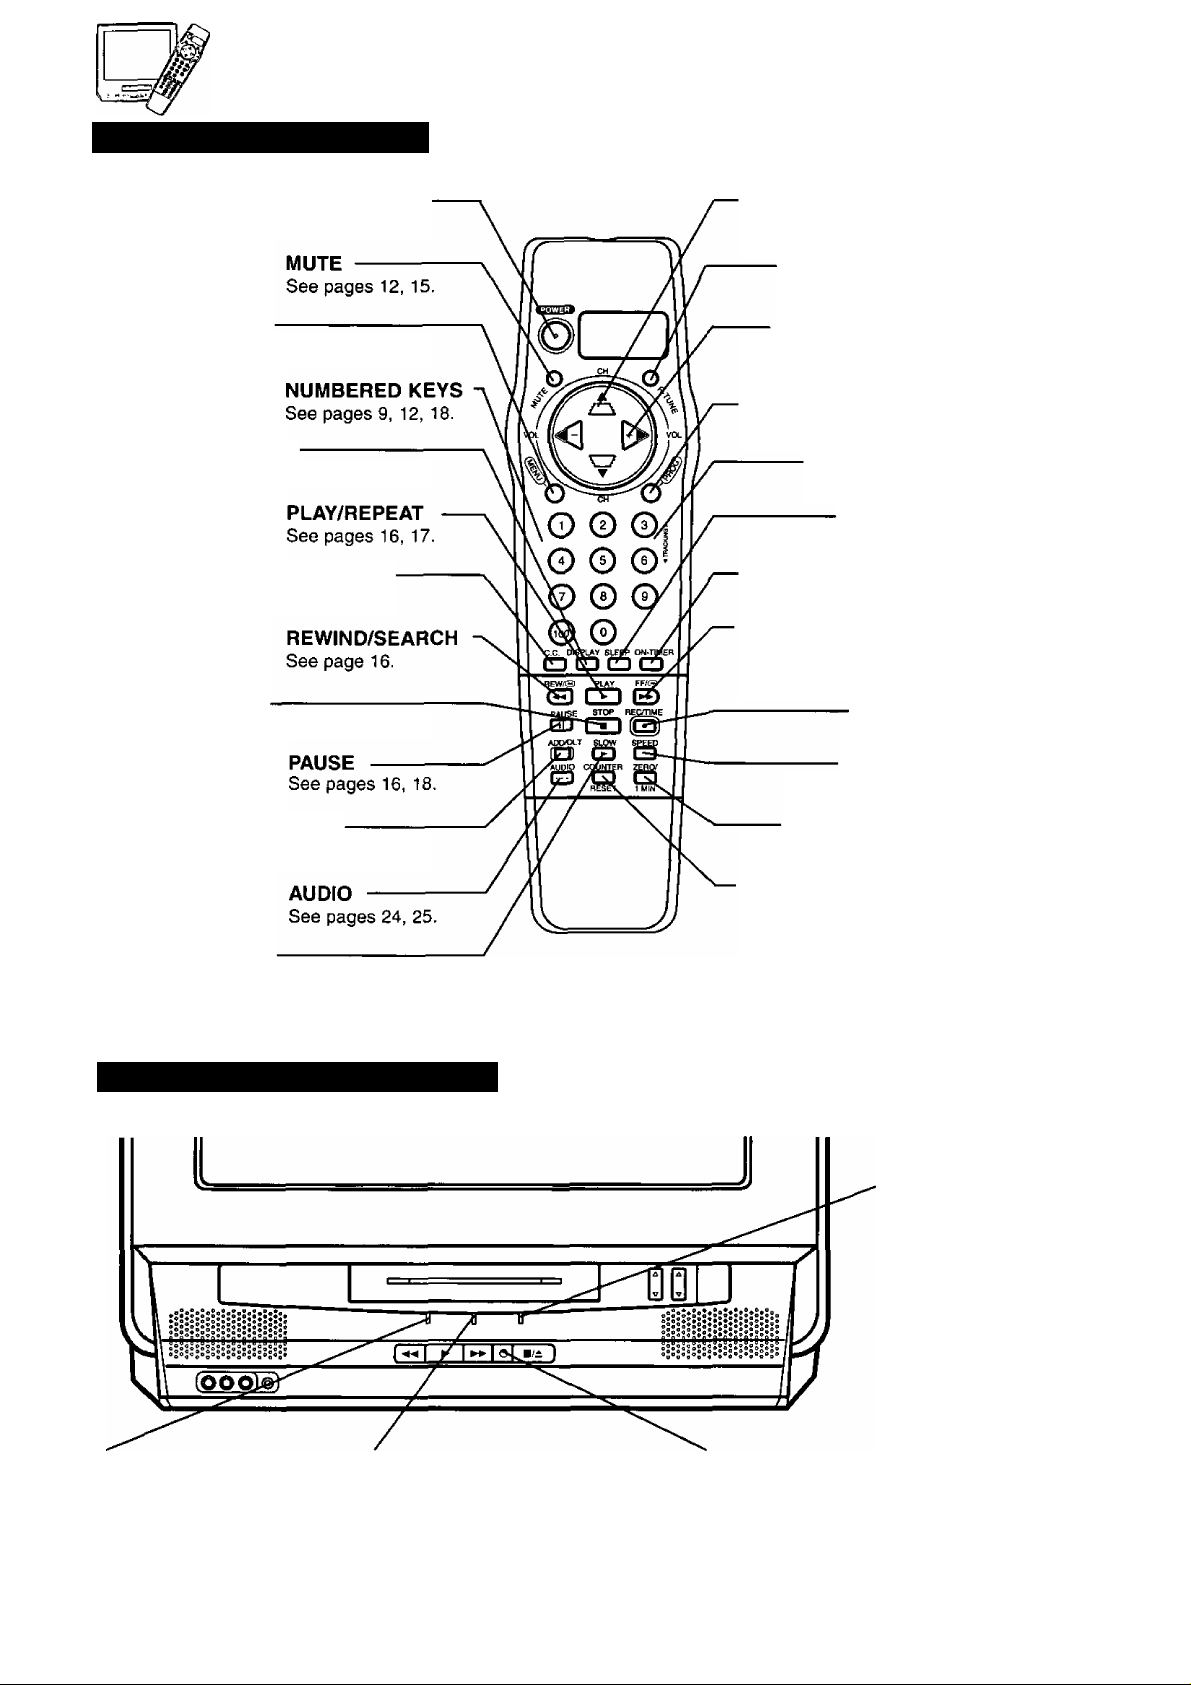
Remote Control Buttons
POWER
See pages 8, 12.
MENU
See pages 8-11, 13, 15, 18.
DtSPLAY
See pages 11, 14, 17, 24.
CLOSED CAPTION
See page 15.
STOP
See pages 16, 18, 21, 23.
CHANNEL UP/DOWN
SELECT UP/DOWN
See pages 8-15, 18, 20-23.
RAPID TUNE
See page 12.
VOLUME UP/DOWN SET/
BACKSPACE
See pages 8-15, 18, 20-23.
PROGRAM
See pages 20-23.
TRACKING UP/DOWN
See page 16.
SLEEP
See page 14.
ON-TIMER
See page 14.
FAST FORWARD/
SEARCH
See page 16.
RECORD/TIME
See page 18.
SPEED
See page 18.
ADD/DELETE
See pages 10, 14, 21.23.
SLOW
See page 16.
Indicators on the Front Panel
REPEAT Indicator
This indicator lights when
the repeat function is
selected and playback is
in progress.
See pages 17, 20, 21.
ON TIMER Indicator
Lights when the Timer On
is set.
See page 14.
ZERO/1 MINUTE SKIP
See page 17.
COUNTER RESET
See page 17.
PROGRAM TIMER Indicator
Lights when the
Combination VCR is set
for Timer Playback or
Timer Recording. It
flashes when a Timer
Recording has been set,
with no tape inserted,
the clock is not set, or
the tape is in motion.
See pages 18, 20-23.
RECORD Indicator
Lights during recording.
In Rec Pause or OTR
Pause mode, the
indicator flashes.
See page 18.
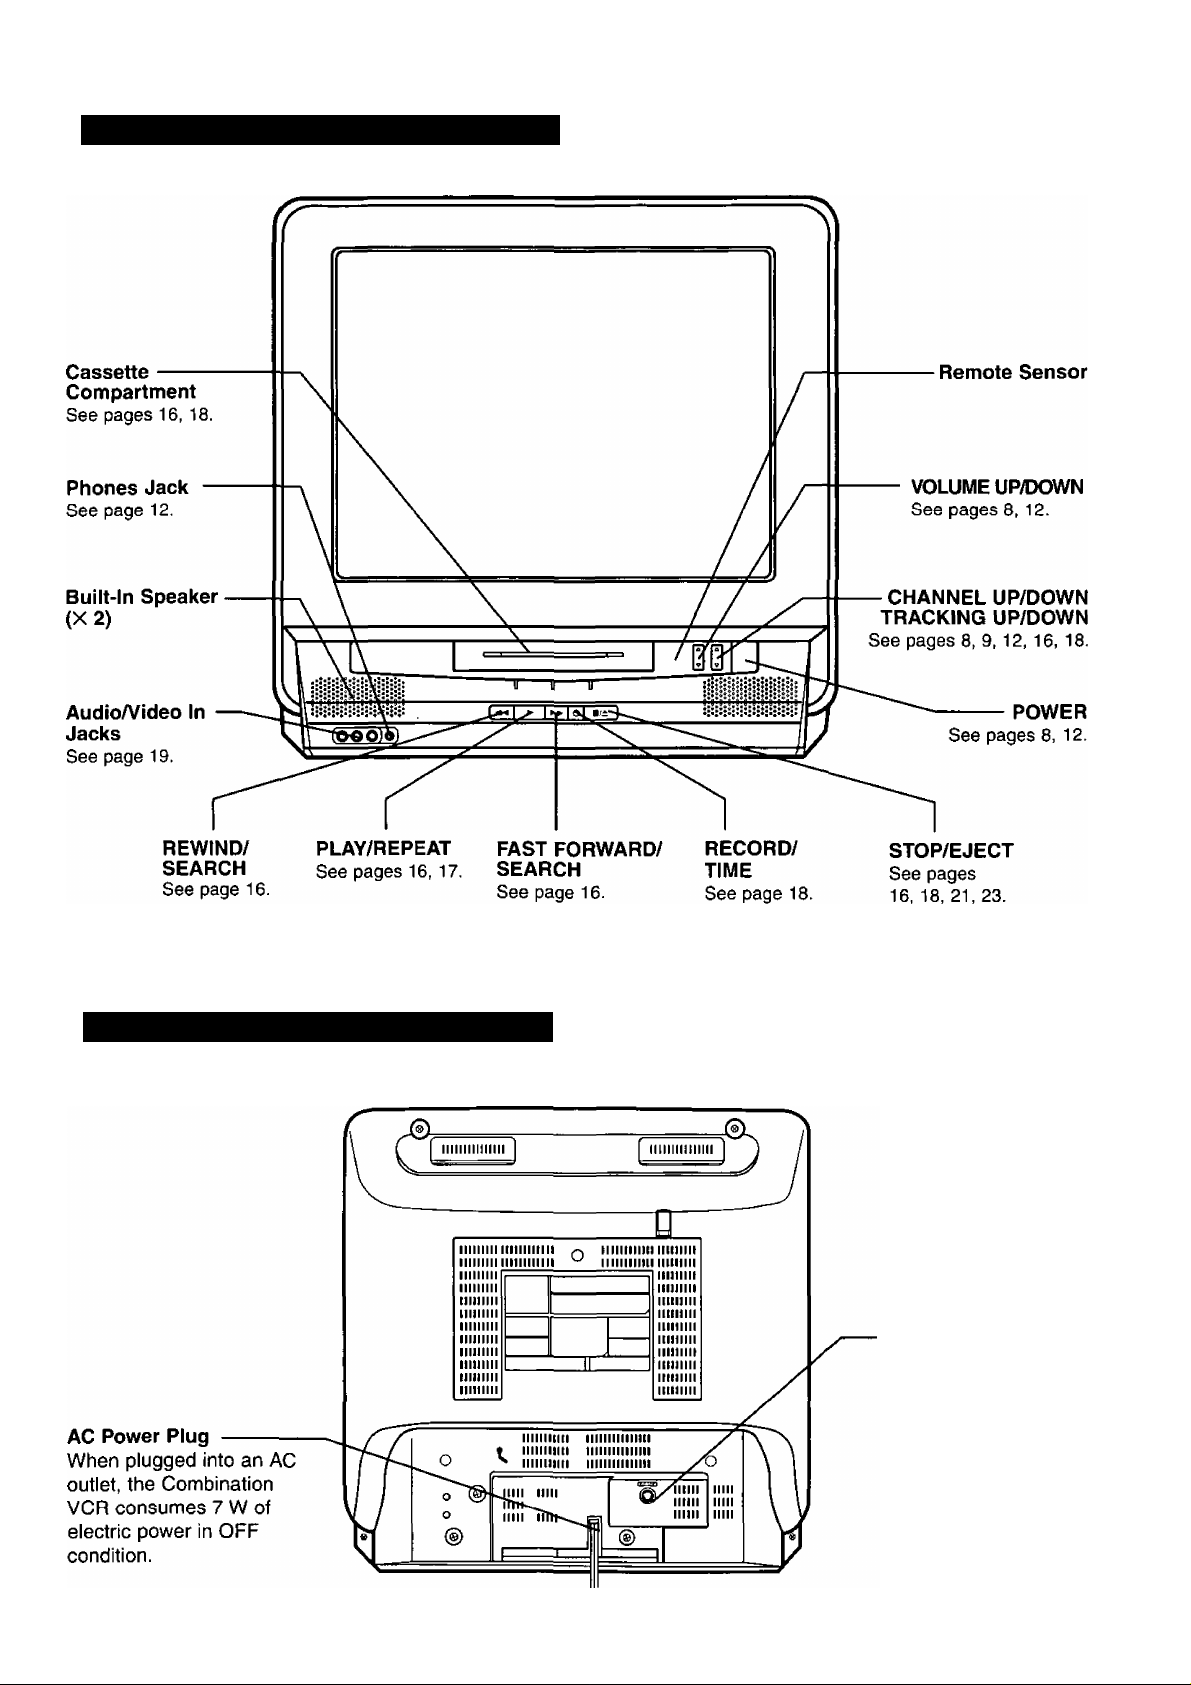
Front View of the Combination VCR
Rear View of the Combination VCR
■VHF/UHF Antenna
Input Terminal
In from your Antenna
or Cable.
See page 5.
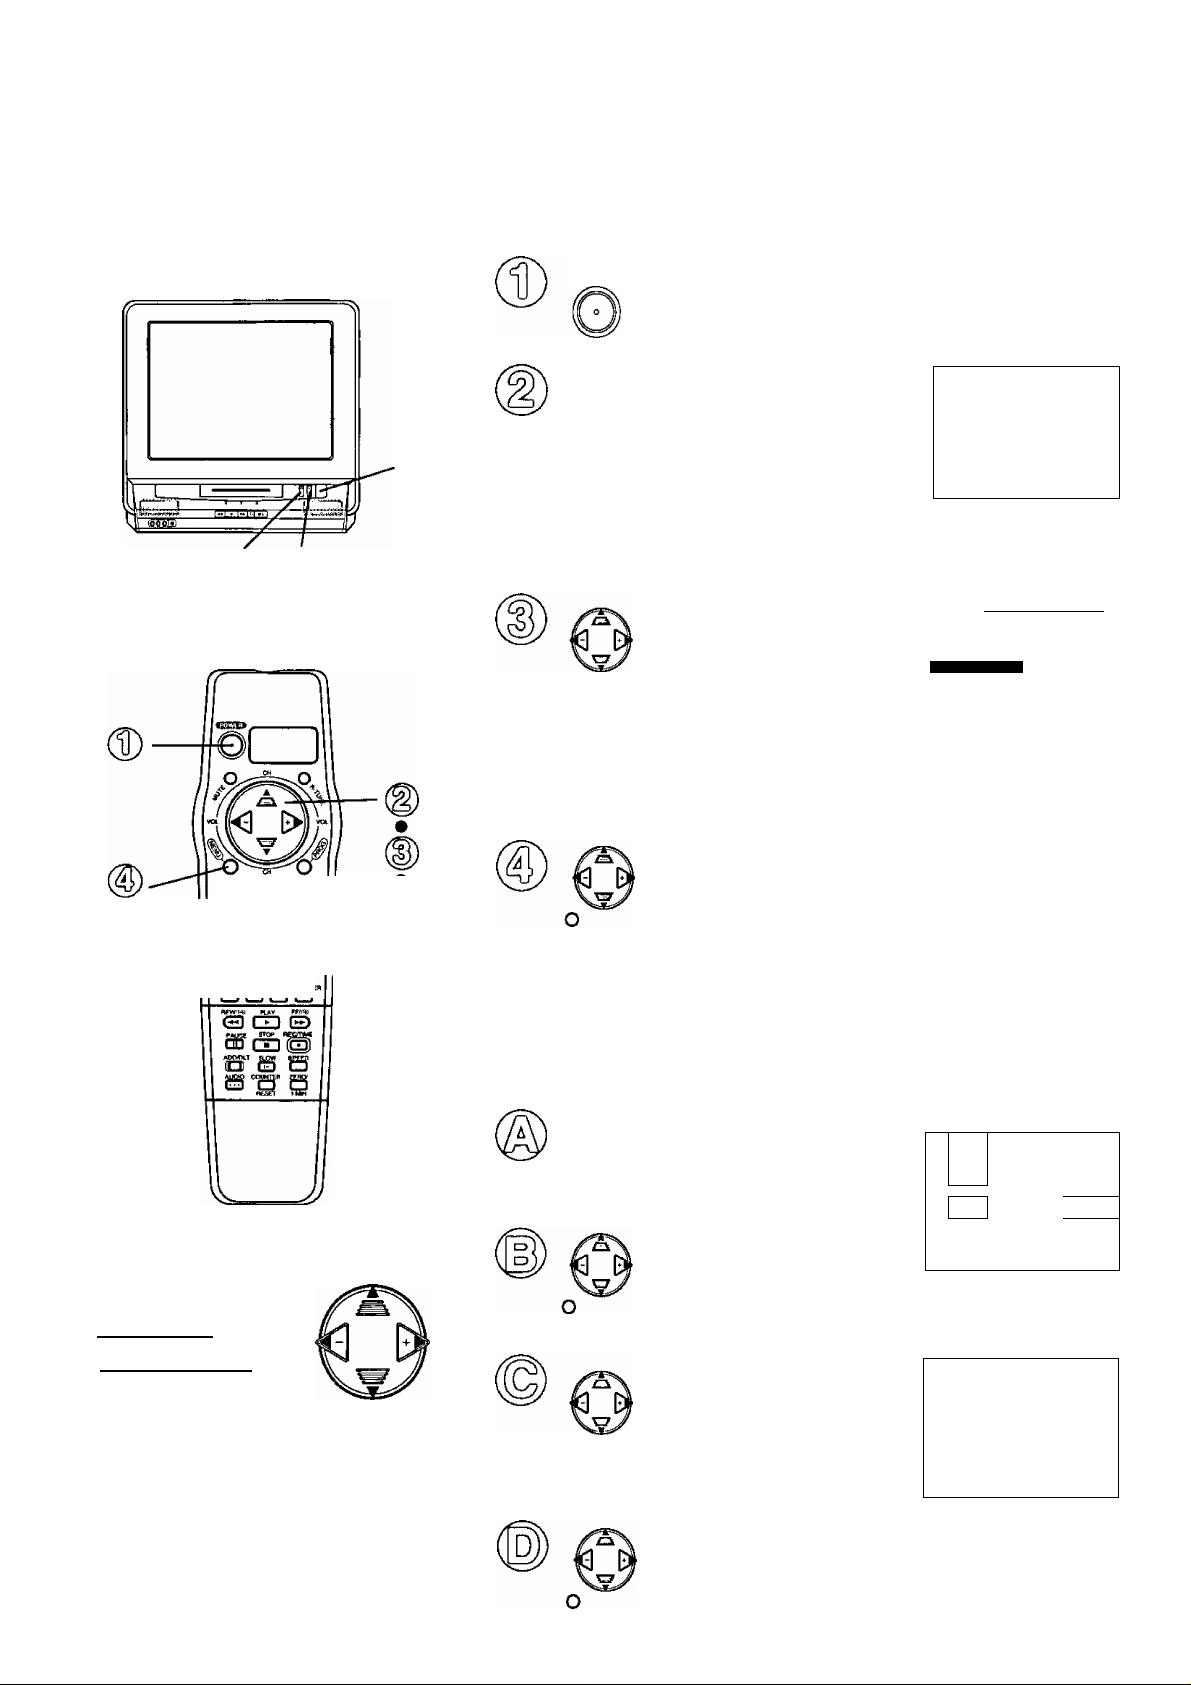
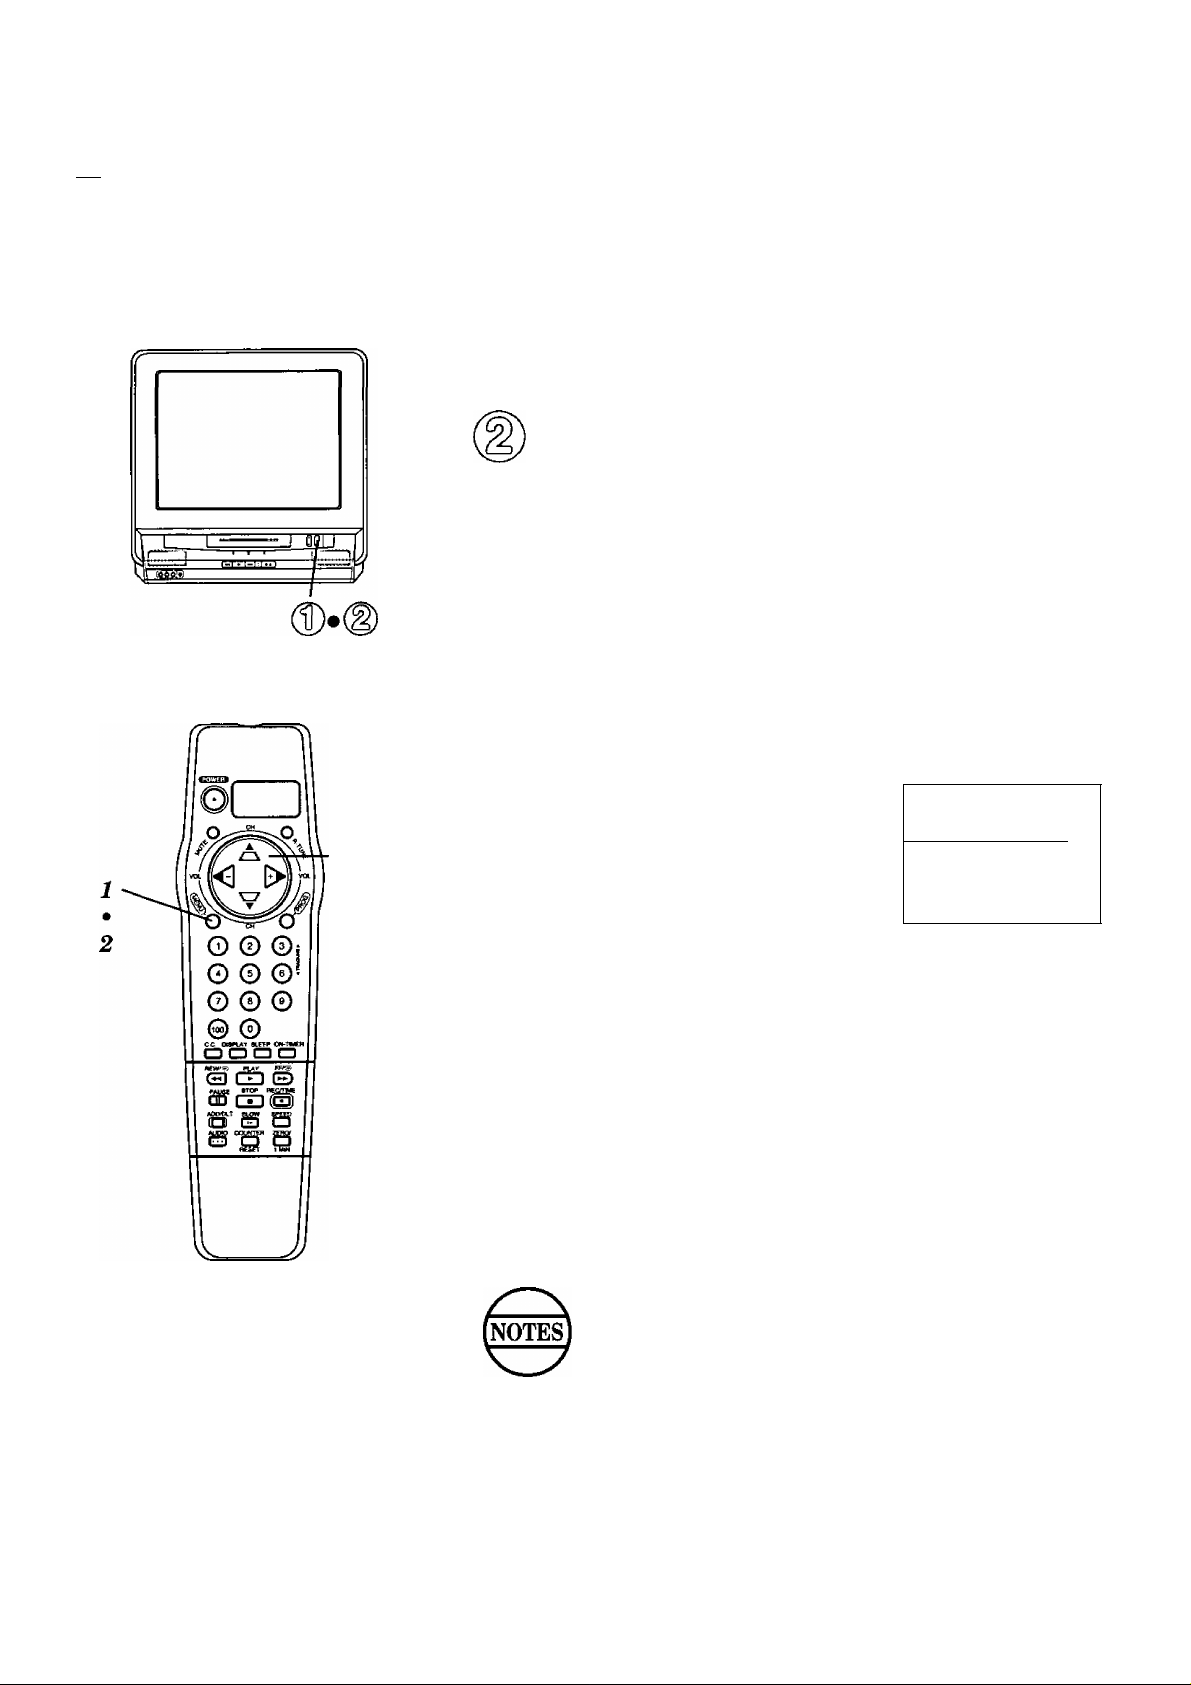
One Time Setup
Set the Clock (Initial Power On)
Your Combination VCR can be set to TUNER ON or TUNER OFF, When the
Combination VCR is first turned on, the tuner is set to off and a prompt to set
the clock is displayed. By selecting ‘TUNER:ON” (see below), you can place
channels in memory and/or use the Auto/Clock Set feature (see next page).
Push POWER to turn the
Combination VCR on.
O © ©I
0 0 0
O © 0
© 0
A,
Push or 0 for
SELECT UNGUAGE
on-screen displays in
or
T
or
English, Spanish or French.
• If you choose the wrong
language, please see the
“Reset all Combination VCR
Memory Functions” section on page 26.
If you use a cable box, the cable box must be left on
for auto channel set.
Push A Vto select
and Oto enter the
month, date, year, time,
and D.S.T (Daylight
Saving Time).
To Make Corrections,
push <3 0-repeatedly to move back or
forward to the desired item.
PUSH CH
PULSECHT ;Es pañol
APP. VOL
SELECT MONTH
SELECT :A T KEY
SET :► KEY
END :MENU KEY
“DST:ON”
automatically adjusts
for daylight saving
time. (See page 26.)
A
SET CLOCK
:Engl ish
:F ranga i s
...................
DST:ON
Push MENU to start the clock. Then,
push A ¥ <1 l>to select “EXIT.” Now,
push MENU to exit the MAIN MENU.
'
Using the
A V ^
Whenever a menu or program screen
is displayed, CHANNEL UP/DOWN and
VOLUME UP/DOWN on the remote
control function as V ^ l^only.
For VOLUME UP/DOWN functions, use
the buttons on the Combination VCR.
E>
ke\s
Select Tuner ON or OFF
When Tuner OFF is selected, your Combination VCR is automatically in LINE
mode. When Tuner ON is selected, Channel selection, Input selection,
Channel Add/Delete, etc. is available.
Push MENU to display
a
TV
CH
SR FfTT
SET
—
- SET UP VCR - - -
:MENU KEY
MAIN MENU
VCR U
CLOCK
A ▼ ► KEY
MENU KEY
SfJGDSbE
n|
EXIT
the MAIN MENU.
Push A V ^ E^to
select “VCR,” and then
push MENU to display
the SET UP VCR screen.
push Oto select
TUNER “ON” or “OFF.”
• If you selected ON, go to the
Set Up Channel and Auto
Clock set selection at right.
SET :► KEY
END
Push MENU to end, and then push
A ¥ *<3 E^to select “EXIT.” Now, push
MENU to exit the MAIN MENU.
8
I\X Check list before you begin.
□ Your Combination VCR is connected to an
Antenna, or Cable system (see page 5).
Set up Channel and Auto Clock Set
(TUNERiON only)
Important: If you use a cable box, turn it on and select
@
^ PBS station In your time zone.
* Push QorVto display Channel Auto Set
or screen.
{^3
^ Push A to start Channel
“ Auto Set.
These on-screen displays will appear
in sequence.
• CH AUTO SET PROCEEDING
• CH AUTO SET COMPLETED
CHANNEL/CLOCK AUTO SET
CONNECT ANTENNA CABLE
AND IF YOU USE A CABLE
BOX, TUNE 1T TO YOUR
LOCAL PBS CH THEN. . .
PLEASE PUSH CH UP KEY
To Use the Auto Clock Set Feature
When “AUTO SET’ is selected in the steps below, the CHANNEL/CLOCK
AUTO SET screen appears. If Channel Auto Set has already been
completed in the above steps, only Auto Clock Set will be performed.
1 Push MENU to display the MAIN
MENU.
2 Push A V ^ to select “CLOCK.”
• •
Then, push MENU to display the
SET CLOCK screen.
3 Push ci V to select “AUTO SET,”
and then to start Channel Auto
Set and Clock Auto Set.
These on-screen displays will appear
in sequence.
• CH AUTO SET PROCEEDING
• CH AUTO SET COMPLETED
• AUTO CLOCK SET PROCEEDING
............ SET CLOCK
MANUAL SET
SELECT :A ▼ KEY
SET > KEY
END :MENU KEY
CHANNEL/CLOCK AUTO SET
CONNECT ANTENNA CABLE
AND IF YOU USE A CABLE
BOX,TUNE IT TO YOUR
LOCAL PBS CH THEN. . .
PLEASE PUSH CH UP KEY
------------
—
If AUTO CLOCK SET IS INCOMPLETE appears, please set the
clock manually.
a. Push MENU to display the SET CLOCK screen.
b. Do steps 3 and 4 on previous page.
Auto clock set will be periomned when the Combination VCR is
turned off the first time each day. If you use a cable box and you
want auto clock set to be performed, the cable box must be left on
and tuned to the PBS channel at the time the Combination VCR
power is turned off.
If for any reason the time is changed manually, automatic time
correction will not occur.
 Loading...