

Panasonic AF-FX100, AF-FX110 Setup Instructions

Before attempting to connect or operate this product,
please read these instructions carefully and save this manual for future use.
The model number is abbreviated in some descriptions in this manual.
Setup Instructions
Intrusion Detection
Image Recognition BOX
Model No. AF-FX100, AF-FX110

2
CONTENTS
Limitation of liability ................................................... 3
Disclaimer of warranty ............................................... 3
Preface ...................................................................... 4
About the user manuals ........................................ 4
System requirements for a PC .............................. 4
Trademarks and registered trademarks ................ 4
Software license ................................................... 5
Copyright .............................................................. 5
Export control ....................................................... 5
Abbreviations ....................................................... 5
Network security ................................................... 5
Management ......................................................... 6
Authentication information .................................... 6
Caution in disposing of or transferring this unit .... 6
Caution in repair .................................................... 6
Image recognition ...................................................... 7
Major operating controls and their functions ............ 8
Input and output devices .......................................... 9
Input camera/encoder ........................................... 9
External output .................................................... 10
HUB ..................................................................... 11
Setup flow ............................................................... 12
Setting of connected PC ......................................... 13
Install the parameter setting application ................. 14
Installer file configuration .................................... 14
Install procedure .................................................. 14
Check the installation .......................................... 15
Setting and checking of BOX using Web browser .. 16
Logging into BOX ................................................ 16
Set the BOX IP address ...................................... 18
Change the user name and password for the
BOX ..................................................................... 20
Change the user name and password for the
camera login (saving on BOX) ............................. 21
Update the parameter for the image recognition
library ................................................................... 22
Download the parameter for the image
recognition library ................................................ 23
BOX reboot .......................................................... 24
Update of the image recognition library .............. 25
Initialization of BOX setting information .............. 26
Check the resource of the BOX .......................... 27
Check the image processing status of the
BOX ..................................................................... 27
Check syslog of the BOX .................................... 28
Obtain the syslog data file of the BOX ................ 29
Obtaining version information of the BOX ........... 30
Setting and checking of BOX using parameter
setting application ................................................... 31
Application start-up ............................................. 31
Application setup ................................................ 32
Newly creation of parameter ............................... 34
Reading parameter .............................................. 34
Editing parameter ................................................ 35
Save and update the parameter .......................... 52
How to display the version .................................. 54
How to update the program ................................ 55
How to restart BOX ............................................. 57
Canceling communication with the BOX ............ 58
How to exit from application ............................... 58
Uninstall the parameter setting application ............. 60
Uninstallation ....................................................... 60
Check the uninstallation ...................................... 60
Contents of the log and message ........................... 61
Log files ............................................................... 61
Message contents ............................................... 61
Appendix 1 Cautions in registering with
DG-ASM100 ............................................................ 62
Appendix 2 Detailed parameters of "General" ........ 64
Appendix 3 "Intrusion detection" parameters ......... 67
Standard Accessories ............................................. 68

3
Limitation of liability
THIS PUBLICATION IS PROVIDED "AS IS" WITHOUT WARRANTY OF ANY KIND, EITHER EXPRESS OR
IMPLIED, INCLUDING BUT NOT LIMITED TO, THE IMPLIED WARRANTIES OF MERCHANTABILITY, FITNESS
FOR ANY PARTICULAR PURPOSE, OR NON-INFRINGEMENT OF THE THIRD PARTY'S RIGHT.
THIS PUBLICATION COULD INCLUDE TECHNICAL INACCURACIES OR TYPOGRAPHICAL ERRORS.
CHANGES ARE ADDED TO THE INFORMATION HEREIN, AT ANY TIME, FOR THE IMPROVEMENTS OF THIS
PUBLICATION AND/OR THE CORRESPONDING PRODUCT (S).
Disclaimer of warranty
THE PRODUCT IS MADE TO PROCESS THE SURVEILANCE CAMERA’S IMAGES AND TO OUTPUT THE
RESULT TO THE OTHER PRODUCTS.
IN NO EVENT SHALL Panasonic System Networks Co.,Ltd. BE LIABLE TO ANY PARTY OR ANY PERSON,
FOR THE CASES, INCLUDING BUT NOT LIMITED TO BELOW:
(1) ANY AND ALL LOSS OR DAMAGE INCLUDING WITHOUT LIMITATION, INDIRECT, SPECIAL,
CONSEQUENTIAL OR EXEMPLARY, ARISING OUT OF OR RELATING TO THE PRODUCT;
(2) ANY LOSS OR DAMAGE ARISING OUT OF OR RELATING TO POSITIVE FALSE OR NEGATIVE FALSE OF
RECOGNITION FUNCTION OF THE PRODUCT;
(3) ANY LOSS OR DAMAGE CAUSED BY INAPPROPRIATE USE, NEGLIGENT OPERATION OR MISTAKEN
SETUP OF THE USER (INCLUDING WITHOUT LIMITATION, ANY DAMAGE CAUSED BY DIVULGING OF
UNINTENDED INFORMATION, LOSING PASSWORD OR USED PASSWORD BY THE THIRD PERSONS);
(4) ANY DAMAGE CAUSED BY DISASSEMBLE, REPAIR OR MODIFICATION OF THE PRODUCT BY A
PERSON OR ENTITY OTHER THAN Panasonic System Networks Co.,Ltd. OR THE SERVICE COMPANY
DESIGNATED BY Panasonic System Networks Co.,Ltd.;
(5) ANY LOSS OR DAMAGE ARISING WHEN IMAGES ARE NOT DISPLAYED OR SETUP INFORMATION IS
LOST;
(6) ANY LOSS OR DAMAGE ARISING OUT OF THE SYSTEM COMBINED BY ANY DEVICE OR SOFTWARE
OTHER THAN THAT MANUFACTURED OR DESIGNATED BY Panasonic System Networks Co.,Ltd.;
(7) ANY LOSS OR DAMAGE ARISING WHEN THE PRODUCT IS USED FOR ANY PURPOSE OTHER THAN
THE PURPOSE AS SET FORTH ABOVE OR IS USED BY THIRD PERSONS FOR SOME REASON
(INCLUDING WITHOUT LIMITATION, ANY CLAIM OR ACTION FOR DAMAGES DUE TO VIOLATION OF
PRIVACY WITH THE RESULT OF THAT SURVEILLANCE-CAMERA'S PICTURE, INCLUDING SAVED DATA
BECOMES PUBLIC).
ADDITIONALLY, Panasonic System Networks Co.,Ltd. HAS NO LIABILITY FOR ANY LOSS OR DAMAGES
ARISING OUT OF THE INABILITY TO USE THE PRODUCT IN THE ABOVE CASES.

4
Preface
This unit (AF-FX100, AF-FX110) is an IP network-capable image processing device.
This unit receives image data from a network camera, and externally transmits the resultant data processed
with the image recognition algorithm via the IP network.
About the user manuals
Operating Instructions for this unit consist of 2 parts; one is this book, and the other is the Setup Instructions
(PDF).
This book explains how to install and connect the unit.
For description of how to perform the settings of this unit from a PC via a network, refer to the "Setup
Instructions (PDF)" on the provided CD-ROM. Adobe® Reader® is required to read these operating instructions
(PDF) on the provided CD-ROM.
When the Adobe
®
Reader® is not installed on the PC, download the latest Adobe® Reader® from the Adobe
web site and install it.
System requirements for a PC
The following requirements are recommended for the PC to be used for the settings of this unit.
OS: Microsoft® Windows® 7 Professional 32 bit Edition
CPU: Intel® Celeron® 900 2.2 GHz or faster
Memory: 2 GB or more
Monitor: 1 024 x 768 pixels or more, 24-bit True color or better
Network interface: A 100/1000 Mbps network interface card must be installed.
Web browser: Windows® Internet Explorer® 8.0
Other: CD-ROM drive: It is necessary to refer to the operating instructions on
the provided CD-ROM.
Adobe® Reader®: It is necessary to refer to the operating instructions on
the provided CD-ROM.
Important:
•If a PC that does not meet the recommended requirements is used, a malfunction may occur such as
slowed screen display, inoperable brower, and inoperable parameter setting application.
•Microsoft® Windows® 7 Professional 64 bit Edition is not supported.
•Windows® XP Mode is not supported.
Trademarks and registered trademarks
Adobe, Adobe logos, and Adobe Reader are registered trademarks of Adobe Systems Incorporated in the U.S.
and/or other countries.
Microsoft, Microsoft logo, Windows and Windows logo are registered trademarks of Microsoft Corporation in
the U.S. and/or other countries.
Intel and Celeron are registered trademarks of Intel Corporation in the U.S. and other countries.
Other company names and product names are generally displays, trademarks, or registered trademarks of
respective companies.

5
Software license
•This product contains software licensed under GPL (GNU General Public License), LGPL (GNU Lesser
General Public License), etc.
•Transfer, copy, disassembling, decompilation, reverse engineering, and also exporting in violation of export
laws of software provided with GNU General Public License are prohibited. However, libraries licensed
under LPGL are not applicable to prohibited matters such as disassembling.
•Customers can duplicate, distribute and modify the source code of the software under license of GPL and/
or LGPL. (The source code is included in the supplied CD-ROM.)
•Refer to the "readme.txt" file in the supplied CD-ROM for further information about the source code of the
software and the copyright notice included in the GPL/LGPL software.
•Please note that Panasonic shall not respond to any inquiries regarding the source code.
Copyright
The copyrights of software and other copyrighted works included this unit belong to Panasonic System
Networks Co.,Ltd. and licensers who give licenses to Panasonic System Networks Co.,Ltd.
Export control
In the event of exporting the product, you shall acquire the necessary export permit from the authorities concerned on your own responsibility.
Abbreviations
The following abbreviations are used in this manual.
Microsoft® Windows® 7 Professional 32 bit Edition is referred to as Windows 7 hereafter.
Image Recognition BOX is referred to as BOX hereafter.
Network security
As you will use this unit connected to a network, your attention is called to the following security risks.
① Leakage or theft of information through this unit
② Use of this unit for illegal operations by persons with malicious intent
③ Interference with or stoppage of this unit by persons with malicious intent
④ Invalid firmware updated by remote update
⑤ This unit-compatible protocol (NTP client) set externally in an unauthorized manner by automatic setting
function
⑥ Setting externally in an unauthorized manner with improper use of this unit-compatible protocol (FTP client)
It is your responsibility to take precautions such as those described below to protect yourself against the
above network security risks.
•Protect your network against unauthorized access by restricting users to those who log in with an authorized user name and password.
•Change the administrator's password on a regular basis.
•Take measures such as access restriction with user authentication to prevent authentication information
(user name and password) from leaking on a network.

6
•Use this product in a network secured by a firewall, etc.
•If this product is connected to a network that includes PCs, make sure that the system is not infected by
computer viruses or other malicious entities (using a regularly updated anti-virus program, anti-spyware program, etc.).
•Install a password-protected screen saver on PCs that access this unit.
•Be sure to close all the browsers after access to this unit as an administrator.
Management
Be sure to note the following point:
•Inadequacies in management such as inappropriate installation location or information leakage or outflow
caused by inadequacies in definition and setting of access authority
Authentication information
Our system support center will never ask customer's password by e-mail or telephone.
Caution in disposing of or transferring this unit
When this unit is disposed of or transferred, be sure to erase the data to prevent information from being leaked
or flowing out.
Caution in repair
Contact us for repare survice of this unit.
When requesting a repare service of this unit, be sure to erase the data and initialize the authentication information yourself.
We will not be responsible for the data which left in the unit at reparing.

7
Image recognition
This unit is equipped with the following image recognition functions. Presetting of detection conditions allows
this unit to detect human intrusion, abandoning an object, and removing an object on a screen. When human
intrusion, abandoning an object, or removing an object is detected, the detection frame and trajectory can be
displayed on the screen.
In addition, by setting the human size, it is also possible to designate the size of an object and the motion range
of a human. Up to 2 cameras can be simultaneously operated for the image recognition function.
Intrusion detection
The motion of an object is detected on the image that is shot by the intrusion detecting camera.
Presetting of an intrusion detection area allows an alarm to be issued when a moving object intrudes into the
area. (To prevent a false alarm, the moving object needs to be detected for 2 sec. or more as a moving object
to issue an alarm.)
Up to 8 moving objects can be simultaneously detected by 1 camera. A 9th or higher object cannot be
detected. (The detectable maximum number may be less than 8 depending on the size of moving objects.)
The detected status is cancelled when the moving object moves out of the screen (when alarm automatic cancellation is activated).
Object abandonment/removal detection
This function detects object abandoning/removing on images via the cameras with which object abandonment/
removal detection is performed.
Presetting of the areas of object abandonment/removal detection allows an alarm to be issued when object
abandonment/removal occurs in the areas. (To issue an alarm, the status of object abandonment/removal
needs to last for 10 sec. or more.)
Up to 8 object abandonment/removal can be simultaneously detected by 1 camera. A 9th or higher object cannot be detected. The detected status is cancelled approx. 60 sec. after detection (when alarm automatic cancellation is activated).
Important:
•You are recommended not to move the direction of the camera that is performing intrusion detection to prevent a false alarm.
•A movement is hard to be detected or cannot be detected, or a malfunction is caused in the following
cases:
No difference in brightness between a background and a foreground
Water droplets or stains attached on the camera dome
Insufficient brightness, for example, when shooting at night
The object is moving straight at the camera
The object is moving too fast or too slow.
The object is too small or too large.
There are too many moving objects
Variable light state, for example, in outdoors and at the window
The camera is shaking.
Entry of outside light, such as sunlight or the headlights of a car
Remarkably bad weather conditions
Flickering fluorescent light
Object with a depth
•For intrusion detection setting, perform area setting in accordance with camera installation conditions and
expected object movements, and then perform the operation check in the daytime and nighttime. If nothing
is detected or false detection occurs, use another sensor (option).
•Object abandonment/removal detection is dependent on fluctuation in brightness. Therefore, use of this
function at places where brightness is stable is recommended.
8
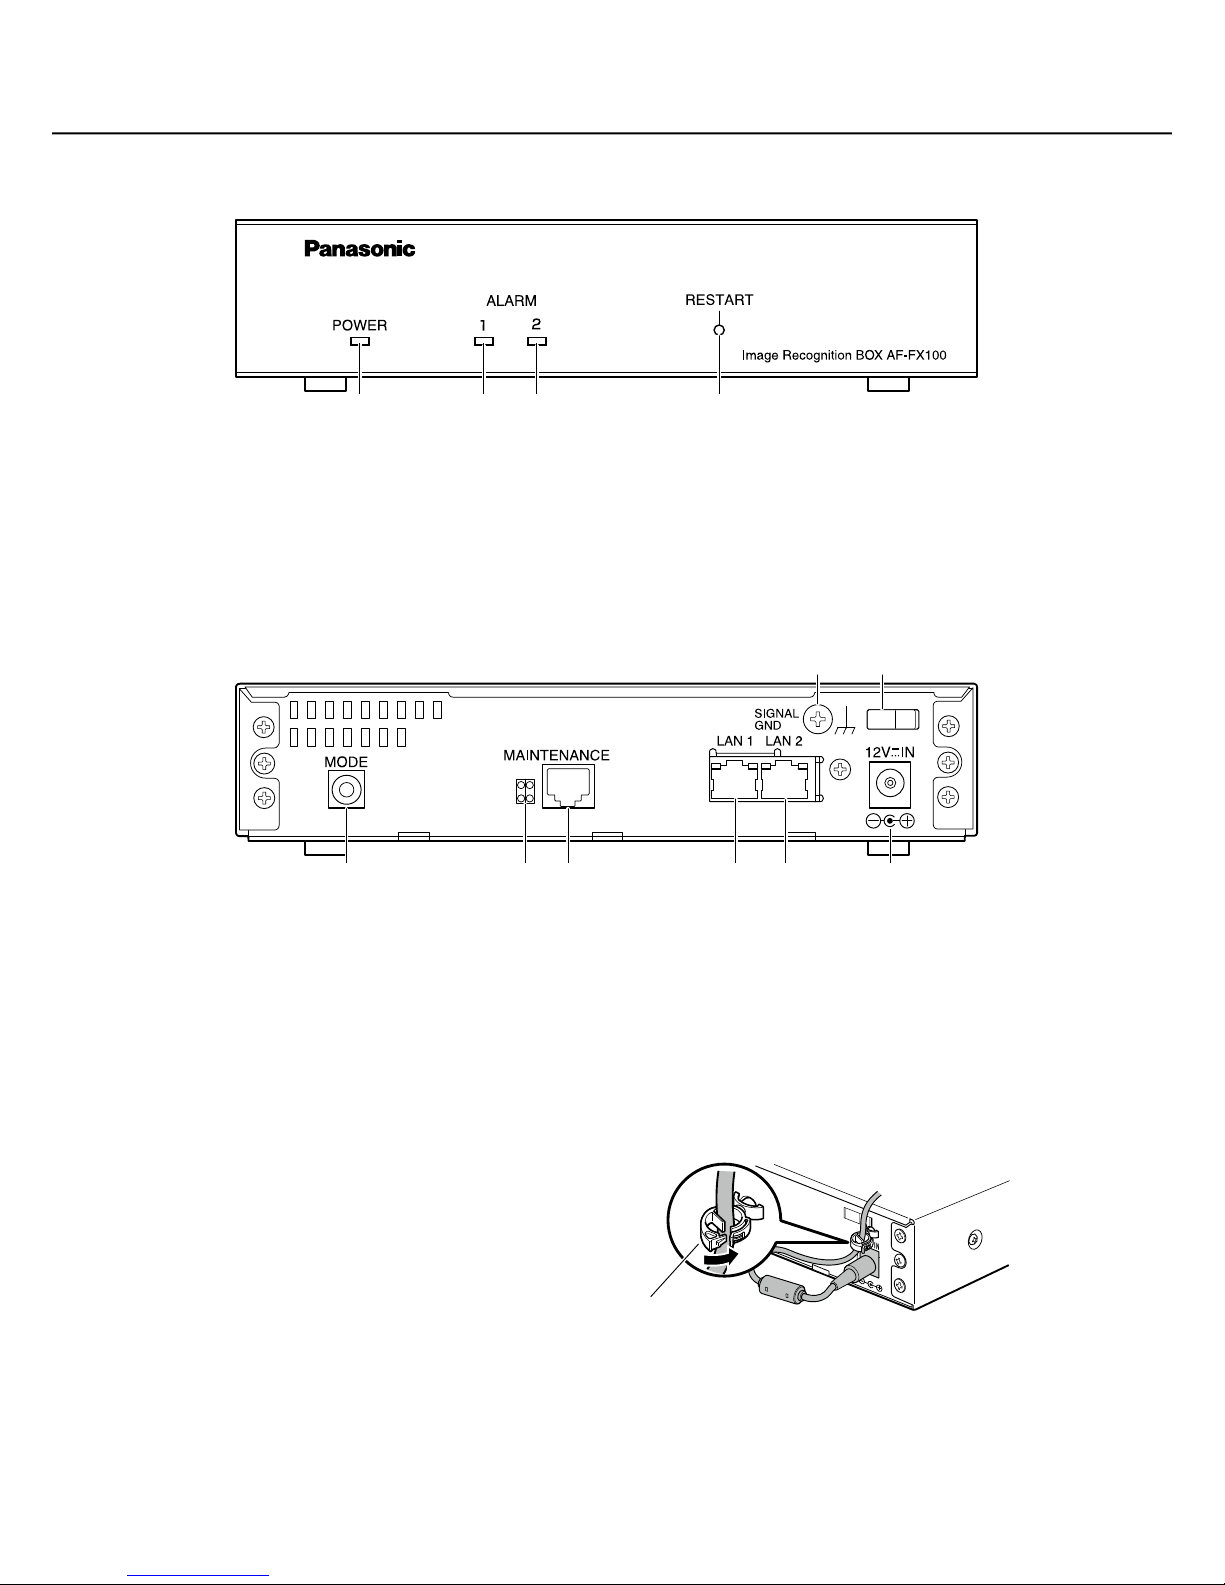
Major operating controls and their functions
Front panel
① [POWER] indicator (green)
Lights when the power is on.
② [ALARM1] indicator (red)
Not used.
③ [ALARM2] indicator (orange)
Lights when an IP address is duplicately detected
at BOX start-up.
④ [RESTART] button
Restarts this unit.
Rear panel
① [MODE]
If you forget the IP address of the BOX, the user-
name/password for the Web login, start up the
BOX assigned to "8". Return to "0" after ensuring
that initialization is completed.
Default:
IP address: 192.168.10.10
User name: admin
Password: panasonic
② [MAINTENANCE] lamp (top: red, bottom:
green)
Not used.
③ [MAINTENANCE] Maintenance port
Not used.
④ [LAN1] Network port 1
Not used.
⑤ [LAN2] Network port 2
Connects to the system network.
Default:
IP address: 192.168.10.10
⑥ [SIGNAL GND] SIGNAL GND terminal
Connect this terminal to a SIGNAL GND terminal
of a device other than this unit in the system or
the frame ground for ground connection. Failure
to observe this may cause trouble such as oscillation and noise.
⑦ Cable clamp
Fastens the supplied AC adapter’s power cable.
⑧ DC input jack
Connects to 12 V DC power source. Be sure to
use the supplied AC adaptor.
① ② ③ ④
⑥ ⑦
① ② ④③ ⑧⑤
Cable clamp

9
Input and output devices
Input camera/encoder
The table below shows cameras and encoders connectable to this unit and settings to receive images by this
unit.
To receive sound from a camera at the PC side after camera connection, follow the settings in the table below.
Input Main settings
1 DG-NP502 Camera title/ Date/time display setting: OFF
Image capture mode: 1.3 mega pixel
JPEG setting: VGA, 10 fps
Video encoding format: MPEG-4
MPEG-4 setting: OFF
Audio setting: Interactive(Full-duplex), 32 kbps, Mic input volume: Middle, Mic
input interval: 80 ms
2 DG-NW960 Camera title/ Date/time display setting: OFF
JPEG setting: VGA, 10 fps
MPEG-4 setting: OFF
Audio setting: Interactive(Full-duplex), 32 kbps, Mic input volume: Middle, Mic
input interval: 80 ms
3 DG-NS202A Camera title/ Date/time display setting: OFF
JPEG setting: VGA, 10 fps
MPEG-4 setting: OFF
Audio setting: Interactive(Full-duplex), 32 kbps, Mic input volume: Middle, Mic
input interval: 80 ms
4 DG-GXE500 Camera title/ Date/time display setting: OFF
Image capture mode: VGA[4:3]
JPEG setting: VGA, 10 fps
Video encoding format: MPEG-4
MPEG-4 setting: OFF
Audio setting: OFF
5 DG-NT314
DG-NT304
Camera title/ Date/time display setting: OFF
Bandwidth control(bit rate): Unlimited
JPEG setting: VGA, 10 fps
MPEG-4 setting (common): OFF
Audio setting: OFF

10
External output
The table below shows the outputs of the BOX.
Output Description Destination devices
1 Through image This image is for monitoring in real time. The
output of a camera is transferred as it is with
minor delay.
DG-ASM100*
1
, DG-ND400,
AF-SX100S
2 OSD image*
2
This image is with which a monitoring area, a
detection point, and a detection factor of
intrusion detection are dis-playable on an NTSC
monitor or the like in real time. Storing an image
on DG-ND400 allows a detection factor to be
identified only by playing back the image.
AF-HX100DA/DE,
DG-GXD400, DG-ND400
3 AVMD image*
3
This image is for DG-ASM100. The detected
frame information is embedded in the header
area of JPEG image data. DG-ASM100 is
equipped with a function that can display the
original image with the frame information
superimposed.
DG-ASM100
4 Panasonic alarm
protocol
This alarm is used in the PC software
(DG-ASM100) and the monitoring recorder (DGND400) of Panasonic System Networks Co., Ltd.
An alarm can be sent when an event is detected.
An alarm factor of the BOX cannot be
transmitted. Record management can be
performed by using DG-ASM100 and DG-ND400.
DG-ASM100 or DG-ND400
5 Communication
with control
section
(Interactive)
This is a telegraphic message between the PC
software package (AF-SX100S) and BOX. This is
equipped with a function where a detection
factor is received from the BOX and information
such as detection cancellation, test alarm, and
detection inhibition is sent to the BOX.
AF-SX100S
Be aware of the following when the BOX is registered with each output destination device:
•Specify the IP address of the BOX in the same procedure to register the IP address of a camera.
•Specify the model types of the camera/encoder to which the BOX is connected. However, the setting values
of resolution and the like shall be the same as the values that have been set for the camera.
•The BOX transfers a control command sent from each output destination device to the camera/encoder as it
is. This enables the camera/encoder to be operated as if they are directly controlled. However, the BOX
shall not support all the control operations via the BOX.
*1: Be aware of the displayed contents when an encoder is connected to the BOX and the BOX is registered
with DG-ASM100 (see Appendix 2 (+ page 64)).
*2: This is an image with a detecting area frame, a detection frame, and a detection factor (text) superimposed.
*3: This image can be displayed with DG-ASM100 only when DG-NS202A is connected to the BOX.

11
HUB
Select "auto negotiation" for the hub port to which the BOX is connected. Failure to observe this may cause
abnormal operation when images are received, for example.

12
Setup flow
2
1
3
4
Installation of parameter setting application
on connected PC
Setting and checking of BOX using Web browser
Setting and checking of BOX
using parameter setting application
Install the application with which the BOX
parameters are specified on the connected
PC. (+ Page 14)
Change the BOX setting with use of a Web
browser via the connected PC.
(+ Page 16)
Specify the BOX parameters with use of
the parameter setting application via the
connected PC. (+ Page 31)
Setting of connected PC
Change the network setting and the web
browser setting of the PC to conform to
the settings of the BOX. (+ Page 13)
➜➜ ➜
The procedure below explains how to set the BOX.
13
Setting of connected PC
Network Setting of PC
The PC connected to the BOX should have an IP address capable of communicating with the BOX and needs
to be connected to a network.
Determine the IP address of the PC capable of accessing the BOX without any duplication of the IP address
assigned to the BOX and the IP address of any one of devices connected to the network.
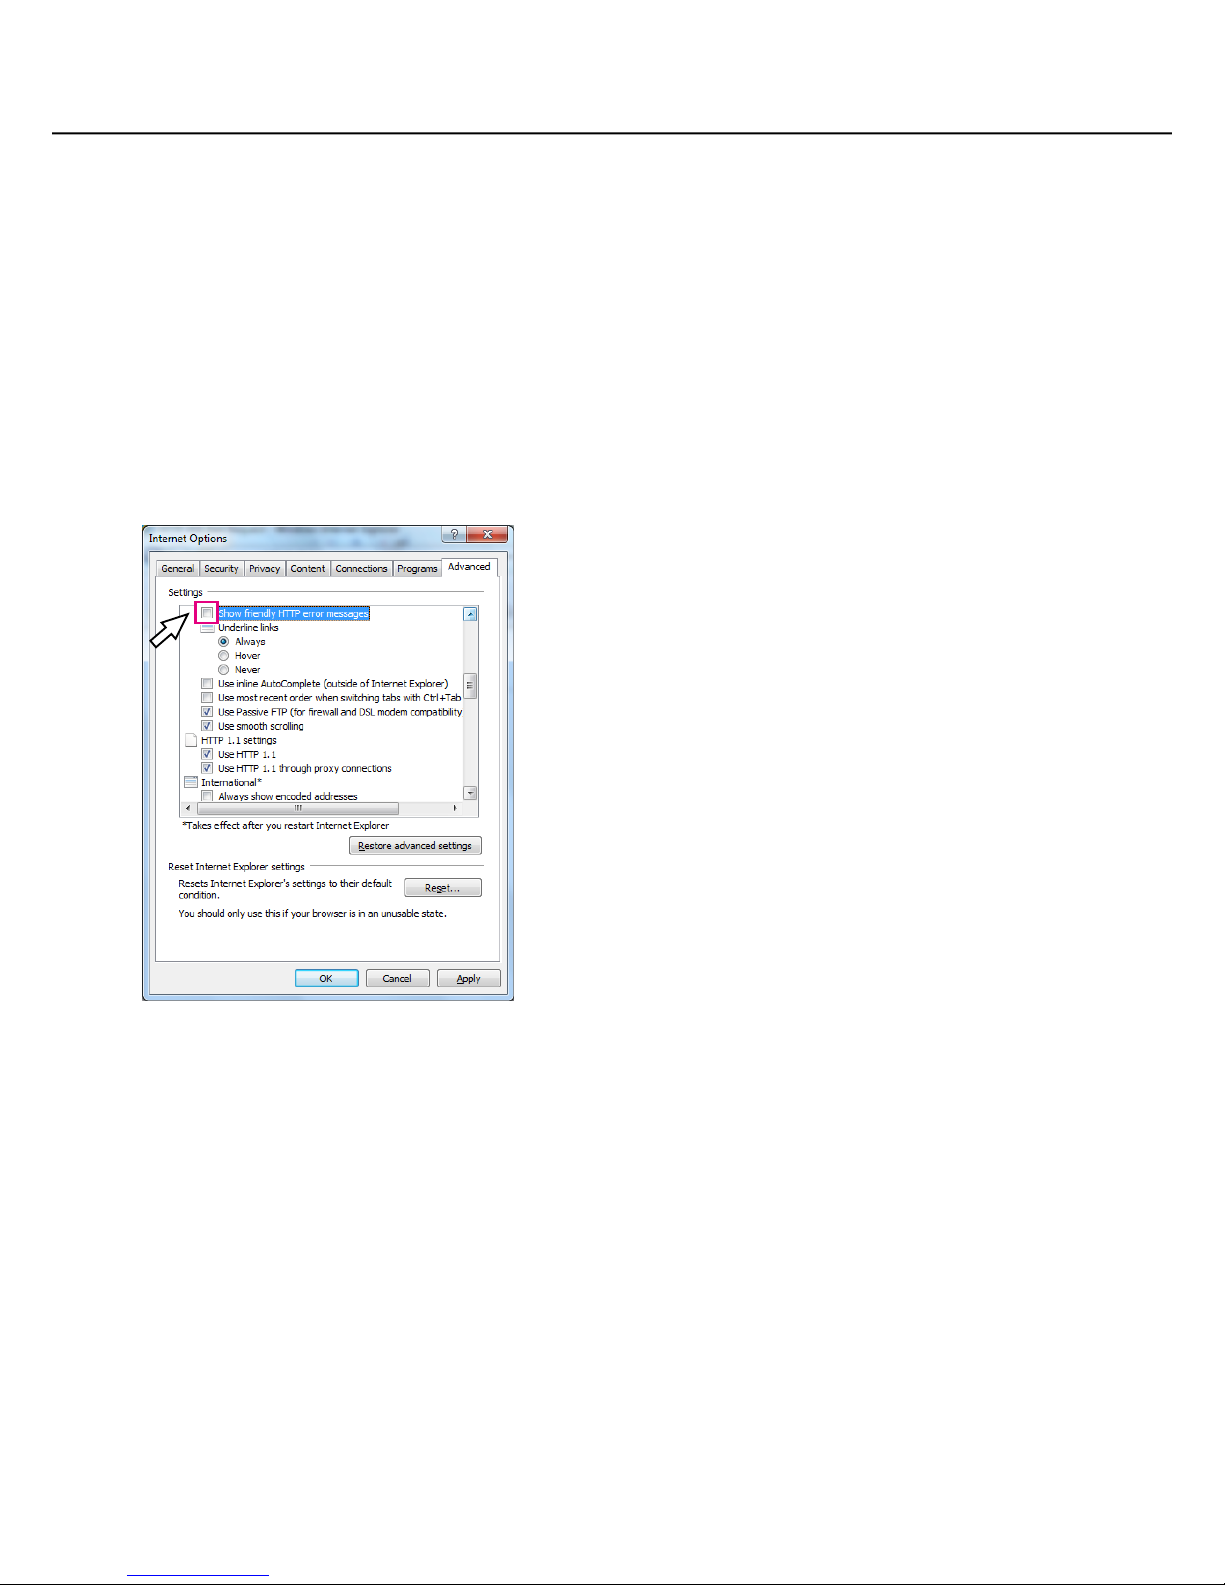
Web browser setting of PC
All the access to the BOX is performed via the Web. Follow the steps below to obtain correct display.
1. Click "Tools" and "Internet Options" and select [Advanced] tab.
2. Uncheck "Show friendly HTTP error messages"

14
Install the parameter setting application
Installer file configuration
Folder Name Description
./(Current) setup.exe Installer executable file
SettingParameterSetUp.msi Windows Installer package file
Install procedure
Step 1
Turn on the PC on which the parameter setting application is installed (hereafter called PC) and login the
PC using administrator privilege.
Step 2
Run the Installer executable file "setup.exe".
The "Image Recognition BOX Setting Parameter
Application Setup Wizard" window will be displayed.
Caution:
•When using this application, it is necessary that
".NET Framework 3.5" is installed on the PC. If
".NET Framework 3.5" has not been installed on
the PC on which the parameter setting application
is installed, in advance of installing the parameter
setting application, install ".NET Framework 3.5".
Step 3
Click the [Next>] button.
Wait until the confirmation window is displayed.
Installation destination, "C: \panasonic\box" is fixed.
If the message of "Do you want to allow the following
program from an unknown publisher to make
changes to this computer" may be displayed due to
user account control, click the [Yes] button.

15
Step 4
Click the [Next>] button.
The wizard is ready to install.
Step 5
When installation complete window will be displayed,
click the [Close] button to close the window.
Check the installation
After completion of installation, check that the files below are assigned to the specified folders.
Folder File name Description
c:\panasonic\box
SettingParameter.exe Parameter setting application
common.ini Setting file for parameter setting application
tar32.dll
tar32 library
c:\panasonic\box\ja SettingParameter.resources.
dll
Japanese resource
c:\panasonic\box\default
appli.ini Default configuration parameter of the library-
independent parameter
avmd.ini Default configuration parameter for the intru-
sion detection setting parameter
cde_wwd.ini Unused
face.ini Unused
avmdfixed.bin Fixed parameter for intrusion detection
boxip.csv Sample list of the BOX IP addresses
Desktop SettingParameter Shortcut of SettingParameter.exe

16
Setting and checking of BOX using Web browser
Logging into BOX
Follow the steps below to log in the BOX.
Step 1
Visit the URL, "http://***.***.***.***/box/index.html",
using Internet Explorer.
"***.***.***.***" represents the IP address. That is
"192.168.10.10" if the default is not changed, and
accordingly the URL becomes "http://192.168.10.10/
box/index.html".
The access window will be displayed.
Step 2
Enter the user name and password.
Default
User name: admin
Password: panasonic
If the username or password is changed at Web setting, enter the updated username or password.
The main window will be displayed.
Note:
•A plurality of users are not supported.
•Renaming the username and password is recom-
mended from the viewpoint of security. (Refer to
"Change the user name and password for the
BOX" (+ page 20).)
•If authentication fails 3 times, "Access failure
screen" is displayed. In such a case, visit
"http://***.***.***.***/box/index.html" again and call
the access screen again.

17
Main window
The structure of the main screen for BOX control is shown below.
① Check the settings are appropriate.
1. Resources: Check the resource status of the BOX
(+ page 27)
2. Processing status: Check the image processing
status (+ page 27)
3. Logs: Check the logs (+ page 28)
4. Log download: Check the log data file (+ page
29)
5. Version: Check the version of software installed
(+ page 30)
② The settings are performed.
1. IP address setting: IP Address setting (+ page 18)
2. BOX authentication setting: User name or password change for the BOX (+ page 20)
3. Camera authentication setting: User name or
password change for the camera (+ page 21)
4. Parameter update: Parameter update for the
image recognition library (+ page 22)
5. Parameter download: Parameter download for the
image recognition library (+ page 23)
③ Configure the control settings.
1. Reboot: Restart (+ page 24)
2. Firmware update: Image recognition library
update (+ page 25)
3. Reset BOX to default: BOX information reset
(+ page 26)
①
②
③

18
Set the BOX IP address
The IP address, subnet mask, etc. of the BOX are configured.
Step 1
Select "2.Settings" on the BOX configuration page
(+ page 17).
The setup window will be displayed.
Step 2
Select "1.IP address setting".
The address setting window will be displayed.
Step 3
After entering each IP address (+ page 19), click the
[Execute] button.
The reboot request window will be displayed.
Step 4
Click the [reboot] button.
The success window will be displayed.
The BOX restarts.
If one of the steps fails, the failure screen is displayed. In such a case, go back to Step 1 and try
again.

19
Detailed BOX connection
Connection type Description
1 IP address and subnet mask of
the BOX
(IP Address1, IP Address2)
IP address and subnet mask of the BOX
•For processing with only 1 camera in intrusion detection,
Leave the IP address/subnet mask of the IP address 2 blank.
•For processing with 2 cameras in intrusion detection,
Fill in the IP address/subnet mask of the IP address 2. The sub-
net mask should the same as the subnet mask of the address 1.
2 Default Gateway IP address
(Default Gateway)
Default Gateway IP address.
3 IP address of the NTP server
(NTP Server)
If an NTP server is established for time adjustment of the BOX, this
address is specified. Otherwise, leave this blank.
4 IP address of the FTP server
(FTP Server)
If parameters needed for image recognition are saved on an external
device (server), this address is specified. Otherwise, leave this blank.
The settings are performed for an FTP server (such as a PC).
User name: box
Password: panasonic
Folder location & file name:
(FTP root folder)/************/box.tar.gz
"************" is filled with 12 digits IP address with dots deleted and
octets zero-filled.
(Ex) When the IP address of the BOX is "192.168.10.10", the folder
name is ‘192168010010’.
5 IP address of the syslog server
(SYSLOG Server)
If the syslog of the BOX is saved on an external syslog server, this
address is specified. Otherwise, leave this blank.
Note:
•If any one of the IP addresses is a duplication of one of other devices, the failure screen is displayed.
If any one of the IP addresses is a duplication of one of other devices at BOX start-up, "Alarm 2" lights on
the front panel. Determine IP addresses appropriately.
•If a Windows XP-based PC starts after the start of BOX operation, duplication detection cannot be performed. Be aware of the IP system for integrating the aforementioned PC into the system.
•If you forget the IP address of the BOX, the initial IP address resumes by setting the rotary switch on the
rear panel to "8" and turning the power off and then on. After making sure that the initial IP address
resumes, put the rotary switch back to "0". This operation also allows "Username and password for BOX" to
be initialized.
•Change the IP address at shipment, "192.168.10.10", from the viewpoint of security.

20
Change the user name and password for the BOX
"Username and password" to log into the BOX are changed. Even either of them can be changed.
Step 1
Select "2.Settings" on the BOX configuration page (+
page 17).
The setup window will be displayed.
Step 2
Select "2.BOX authentication setting".
The change window of the BOX user name and
password will be displayed.
Step 3
Click the [Execute] button after entering the user
name and password.
The confirmation window will be displayed.
Re-enter the registration details. The success window
will be displayed when the registration is successful.
This unregistered window will be displayed when the
registration is unsuccessful.
Note:
•If you forget the username and password for the
BOX, the initial username and password resume
by setting the rotary switch on the rear panel to
"8" and turning the power off and then on. After
making sure that the initial username and password resume, put the rotary switch back to "0".
This operation also allows "IP address of BOX" to
be initialized.
•Change the username, "admin" and password,
"panasonic" at shipment from the viewpoint of
security.
•Use 4 to 31 one-byte alphanumeric characters for
both username and password.

21
Change the user name and password for the camera login
(saving on BOX)
If the camera authentication function is activated, the camera login username and password need to be registered with the BOX.
Register the login username and password in accordance with camera settings.
If camera authentication function activated, follow the steps below.
Step 1
Select "2.Settings" on the BOX configuration page (+
page 17).
The setup window will be displayed.
Step 2
Select "3.Camera authentication setting".
The change window for the camera login user
name and password will be displayed.
Step 3
Click the [Execute] button after entering the user
name and password.
The reboot window will be displayed when the
registration is successful.
The success window will be displayed when the
reboot is successful.
Caution:
•Use 4 to 31 one-byte alphanumeric characters for
both username and password.
•Images cannot be acquired if the camera login
username and password are different from the
registered ones.
 Loading...