

Page 1
Page 2

A210 Operating Instructions
Contents
Important Information .... 1
Safety considerations............. 1
SAR........................................ 6
Care and maintenance........... 8
About this manual ................ 10
About Your Phone........ 12
Phone overview.................... 12
Key functions........................ 13
Display ................................. 15
Indicator light........................ 17
Getting Started ............. 18
Installing the SIM and the
battery .............................. 18
Charging the battery............. 20
Switching the phone on/off... 21
Basic Operations.......... 22
Making calls ......................... 22
Answering calls .................... 24
Silent mode .......................... 25
Voicemail.............................. 25
In-call operations.................. 26
Multiple calls operations....... 28
Text Entry...................... 31
Menu Navigation........... 34
Main menu structure ............ 34
Displaying the menu............. 35
Messages .......................36
Messages menu structure ....36
SMS (Short Message
Service).............................36
Illumination Messages ..........42
Voicemail ..............................46
Cell Broadcast ......................47
Memory status .....................49
Contacts.........................50
Contacts menu structure.......50
Browsing the Contacts list ....51
Adding contacts ....................52
Call log..................................55
Speed Dial list ......................56
Groups..................................57
Advanced..............................58
Settings ..........................61
Settings menu structure........61
Sounds..................................62
Alerts.....................................64
Display..................................64
Language..............................67
GSM network .......................68
Calls......................................70
Security.................................75
Auto answer..........................78
Any key answer ....................78
Auto key lock ........................79
Time and date.......................79
Defaults.................................80
Profiles..................................80
i
Page 3

Contents
Games............................ 81
Games menu structure .........81
Playing games......................81
Browser ......................... 83
Browser menu structure .......83
Settings.................................83
Starting the Browser .............85
Bookmarks............................86
Data connections..................87
Applications.................. 88
Applications menu
structure............................ 88
Alarm ....................................88
Calculator .............................89
Currency converter ...............90
My Media ....................... 91
My Media menu structure .....91
Pictures.................................91
Sounds .................................91
User defined folders .............92
Shortcuts ..............................92
Memory status ......................92
Calendar ........................ 93
Profiles .......................... 94
Profiles menu structure.........94
Profiles..................................94
Important Error
Messages................. 100
Glossary of Terms...... 102
Specifications ............. 104
Licensing..................... 105
Index ............................ 109
Accessories .................. 96
Troubleshooting ........... 97
ii
Page 4

Important Information
Thank you for purchasing this Panasonic digital cellular phone. This
phone is designed to operate on GSM networks – GSM900 and
GSM1800. It also supports GPRS for packet data connections.
Please ensure the battery is fully charged before use.
We, Panasonic Mobile Communications Development of Europe
Ltd., declare that the EB-A210 conforms with the essential and other
relevant requirements of the directive 1999/5/EC. A declaration of
conformity to this effect can be found at
http://panasonic.co.jp/pmc/en/
Safety considerations
The following information should be read and understood as it
provides details, which will enable you to operate your phone in a
manner which is both safe to you and your environment, and
conforms to legal requirements regarding the use of cellular phones.
Power
This equipment should only be charged with approved
charging equipment to ensure optimum performance and
any approval given to this apparatus and may be dangerous. Ensure
the voltage rating of the Travel Charger is compatible with the area
of use when travelling abroad. A Travel Charger (EB-CAA210xx*) is
supplied with the Main Kit.
Note* xx identifies the charger region, e.g. CN, EU, UK, AU, US.
Battery
continuously for a long time, such as a game or browser, battery life
will become extremely short. To maintain longer battery life, set the
Key backlight to off. (See “Key backlight” on page 66.)
Do not use this phone without the battery cover attached.
avoid damage to your phone. Other usage will invalidate
Use of another battery pack than that recommended by the
manufacturer may result in a safety hazard.
If you use a feature which keeps the key backlight on
1
Page 5

Important Information
Disposing of the Battery
Do not incinerate or dispose of the battery as ordinary
rubbish. The battery must be disposed of in accordance
with local regulations and may be recycled.
Aircraft
Switch off your cellular phone when in an aircraft. Ensure
that the setting of the Alarm or Power on time function will
not contravene regulations whereby it may automatically
power on when in an aircraft or medical facility etc. The use of
cellular phones in an aircraft may be dangerous to the operation of
the aircraft, disrupt the cellular network and may be illegal. Failure to
observe this instruction may lead to the suspension or denial of
cellular phone services to the offender, or legal action or both.
Do Not Use
It is advised not to use the equipment at a refuelling point.
Users are reminded to observe restrictions on the use of
radio equipment in fuel depots, chemical plants or where
blasting operations are in progress. Never expose the battery to
extreme temperatures (in excess of 60°C).
Driving
It is imperative that the driver exercises proper control of
the vehicle at all times. Do not hold a phone while you are
driving; find a safe place to stop first. Do not speak into a
handsfree microphone if it will take your mind off the road. Always
acquaint yourself thoroughly with restrictions concerning the use of
cellular phones within the area where you are driving and observe
them at all times.
Electronic Devices
Care must be taken when using the phone in close
proximity to personal medical devices, such as
pacemakers and hearing aids.
2
Page 6

Important Information
Heating Equipment
When your handset, the accompanying battery or charging
accessories are wet, do not put those in any type of
heating equipment, such as a microwave oven, a high
pressure container, or a drier or similar. It may cause the battery,
handset and/or charging equipment to leak, heat up, expand,
explode and/or catch fire. Moreover, the product or accessories may
emit smoke and their electrical circuits may become damaged and
cause the products to malfunction. Panasonic is not responsible for
any and all damages, whether direct or indirect, howsoever caused
by any misuse.
Backup Copies & Security
It is recommended that you create a copy or backup, as
appropriate, of any important information and data which
you store in your phone’s memory. In order to avoid
accidental loss of data, please follow all instructions relating to the
care and maintenance of your phone and its battery.
Your phone has the capability of storing and communicating
personal information. It is recommended that you take care to
ensure that any personal or financial information is stored separately
from your phone. You should use security features, such as the SIM
lock to protect information held in your phone. Panasonic accepts no
liability for any and all losses howsoever arising from any loss of
data, including but not limited to direct and indirect losses (to
include, but not limited to consequential loss, anticipated savings,
loss of revenue).
3
Page 7
Important Information
Downloading
Your phone has the capability of downloading and storing
information and data from external sources. It is your
responsibility to ensure that in doing this you are not
infringing any copyright laws or other applicable legislation.
Panasonic accepts no liability for any and all losses howsoever
arising from any loss of data or any such infringement of copyright or
intellectual property rights, including but not limited to direct and
indirect losses (to include, but not limited to consequential loss,
anticipated savings, loss or revenues).
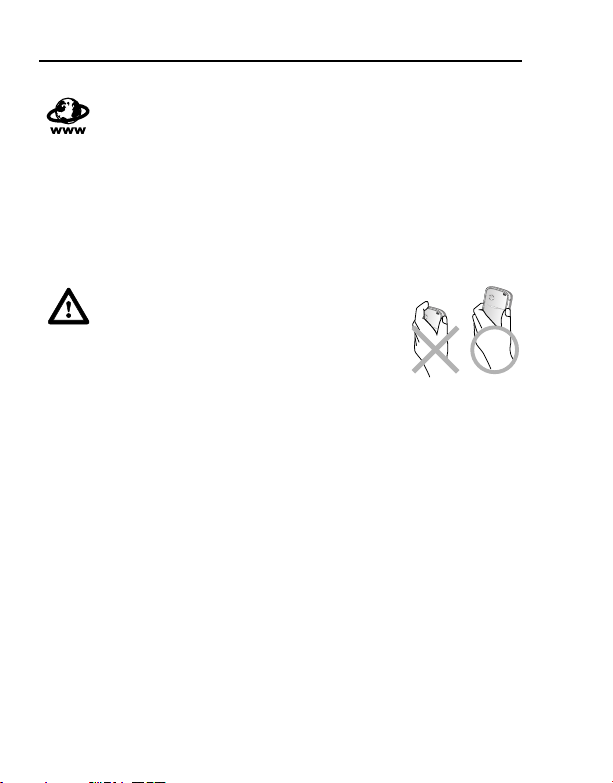
Efficient Use
For most efficient use, hold the phone as
you would any normal phone. To avoid
deterioration of signal quality or antenna
performance, do not touch or “cup” the antenna
area while the phone is switched on. Unauthorised
modifications or attachments may damage the
phone and violate applicable regulations. The use of an unapproved
modification or attachment may result in the invalidation of your
guarantee – this does not affect your statutory rights.
Other important information
The colour liquid crystal display (LCD) uses high-precision
production technology, and in certain circumstances pixels may
appear brighter or darker. This is due to characteristics of the LCD
and is not a manufacturing defect.
This phone is designed, manufactured and tested to ensure that it
complies with the specifications covering RF exposure guidelines
applicable at the time of manufacture, in accordance with EU, USA
FCC and Australian ACA regulations.
This phone should only be used with Panasonic approved
accessories to ensure optimum performance and avoid damage to
your phone. Panasonic is not responsible for damage caused by
using non-Panasonic approved accessories.
4
Page 8

Important Information
This phone must be used in compliance with any applicable
international or national law or any special restrictions governing its
use in specified applications and environments. This includes but is
not limited to use in hospitals, aircraft, whilst driving and any other
restricted uses.
Some of the contents described in this manual are subject to change
without notice.
Please refer to our website for latest information/standards and
compliance in your country/region of use.
http://panasonic.co.jp/pmc/en/
5
Page 9

Important Information
SAR
INTERNATIONAL – ICNIRP
THIS PANASONIC PHONE (MODEL EB-A210) MEETS REQUIREMENTS
FOR EXPOSURE TO RADIO WAVES
Your mobile phone is a radio transmitter and receiver. It is designed
and manufactured not to exceed the limits for exposure to radio
frequency (RF) recommended by international guidelines (ICNIRP).
These limits are part of comprehensive guidelines and establish
permitted levels of RF energy for the general population. The
guidelines were developed by independent scientific organisations
through periodic and thorough evaluation of scientific studies. The
guidelines include a substantial safety margin designed to assure
the safety of all persons, regardless of age and health.
The exposure standard for mobile phones employs a unit of
measurement known as the Specific Absorption Rate or SAR. The
SAR limit stated in the international guidelines is 2.0 W/kg*. Tests for
SAR are conducted using standard operating positions with the
phone transmitting at its highest certified power level in all tested
frequency bands. Although the SAR is determined at the highest
certified power level, the actual SAR of the phone while operating
can be well below the maximum value. This is because the phone is
designed to operate at multiple power levels so as to use only the
power required to reach the network. In general, the closer you are
to a base station, the lower the power output of the phone.
The SAR value for this model phone, when tested for use at the ear,
for compliance with the guidelines was
10g mass. While there may be differences between the SAR levels
of various phones and at various positions, they all meet the relevant
international guidelines for RF exposure.
* The SAR limit for mobile phones used by the public is 2.0 watts/
kilogram (W/kg) averaged over ten grams of body tissue. The
guidelines incorporate a substantial margin of safety to give
additional protection for the public and to account for any variations
6
0.549W/kg
averaged over a
Page 10

Important Information
in measurements. SAR values may vary depending on national
reporting requirements and the network band.
7
Page 11
Important Information
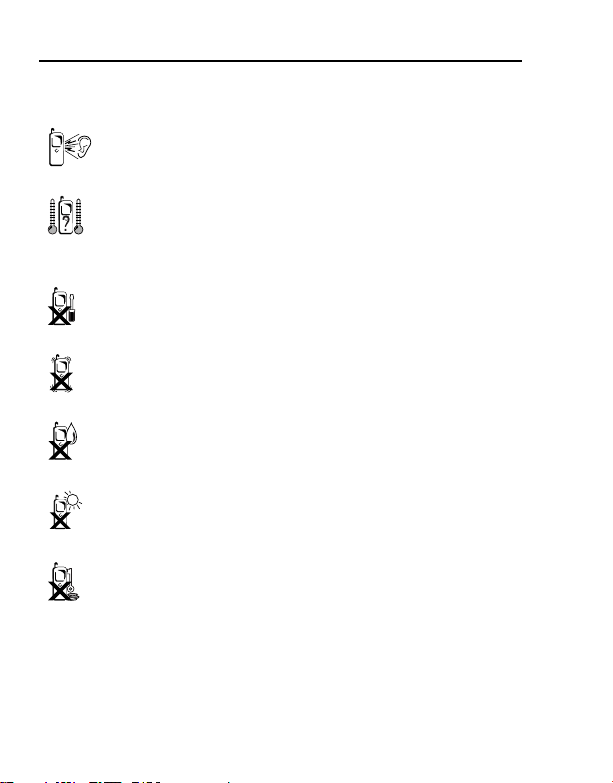
Care and maintenance
Pressing any of the keys may produce a loud tone. Avoid
holding the phone close to the ear while pressing the keys.
Extreme temperatures may have a temporary effect on the
operation of your phone. This is normal and does not
indicate a fault. The display quality may deteriorate if the
phone is used in environments over 40°C for a long time.
Do not modify or disassemble the equipment. There are
no user serviceable parts inside.
Do not subject the equipment to excessive vibration or
shocks. Do not drop the battery.
Avoid contact with liquids. If the equipment becomes wet,
immediately remove the battery and contact your dealer.
Do not leave the equipment in direct sunlight or a humid,
dusty or hot area. Never throw a battery into a fire. It may
explode.
Keep metallic items that may accidentally touch the
terminals away from the equipment/battery.
Batteries can cause property damage, injury, or burns if
terminals are touched with a conductive material (i.e.
metal jewellery, keys, etc.).
8
Page 12
Important Information
Always charge the battery in a well ventilated area, not in
direct sunlight, between +5°C and +35°C. It is not possible
to recharge the battery if it is outside this temperature
range.
When disposing of any packing materials or old
equipment, check with your local authorities for
information on recycling.
9
Page 13
Important Information
About this manual
Symbols used in this manual
The following symbols are used in this manual to represent the
limited availability of the function or service.
= Depending on your SIM.
= Depending on network availability.
= Depending on your network operator or country/region.
Graphics
The graphic elements in this manual are for illustrative purposes and
may differ from the actual phone and/or graphic elements displayed
on the phone. Panasonic reserves the right to change the
information in this manual without prior notice.
Keys
Keys in this manual may differ from the actual keys on your phone.
Refer to page 13 for the icons that represent the keys in this manual.
10
Page 14
Important Information
How to read this manual
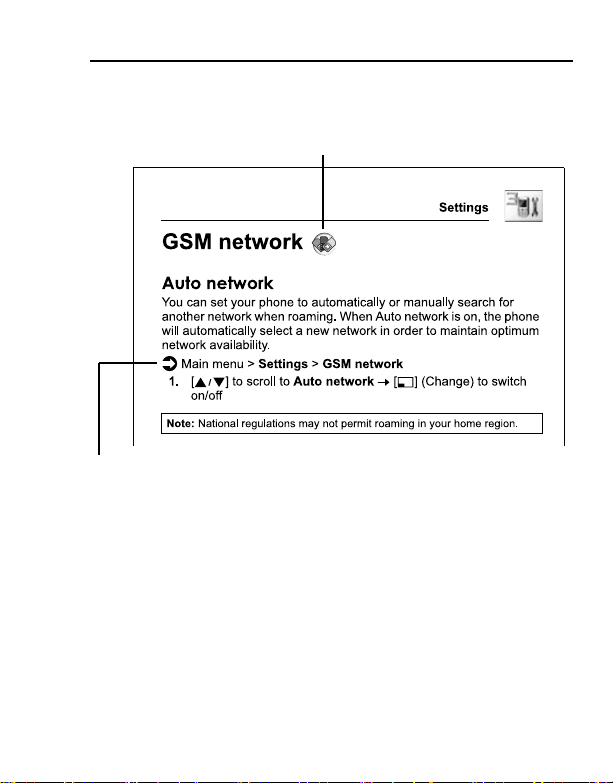
<Example> GSM network in Settings menu on page 68
This function is SIM dependent. For other symbols, refer to page 10.
d Menu navigation
Before following the steps, you need to enter the Main menu, then
move through the submenus, as described next to the d icon.
“>” means “scroll through the menu and select”.
In the example given above:
From Main menu, press Navigation key to scroll to Settings and
press Left soft key (Select)*, then press Navigation key to scroll to
GSM network and press Left soft key (Select)*.
Now you can continue onto the step 1:
1. Press Navigation key to scroll to Auto network, then press Left
soft key (Change)* to switch Auto network on or off.
* The word is shown in the lower left-hand corner of the display, indicating a
command that the key gives to the phone when you press it.
11
Page 15
About Your Phone
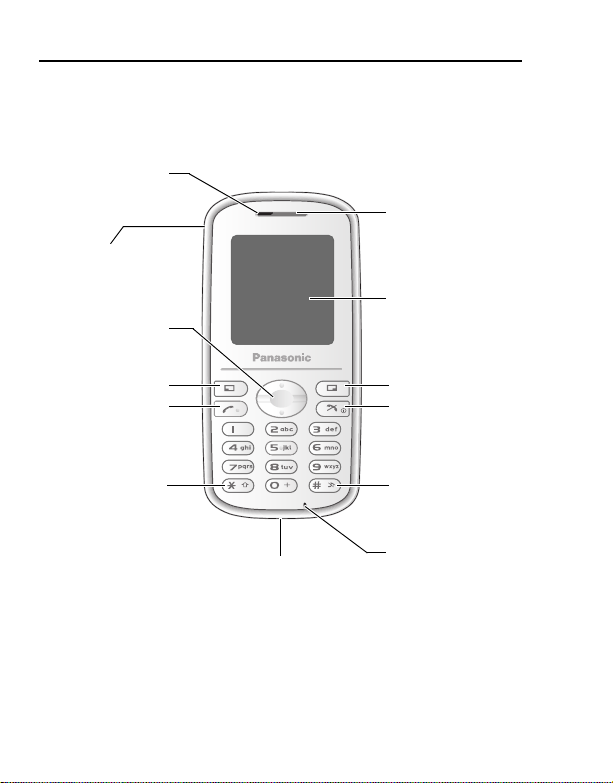
Phone overview
Earpiece
Personal handsfree
Connector
Navigation key
Indicator light
Display
Left Soft key
Asterisk key
12
Send key
Charging Connector
Right Soft key
Power/End key
Silent mode key
Microphone
Page 16

About Your Phone
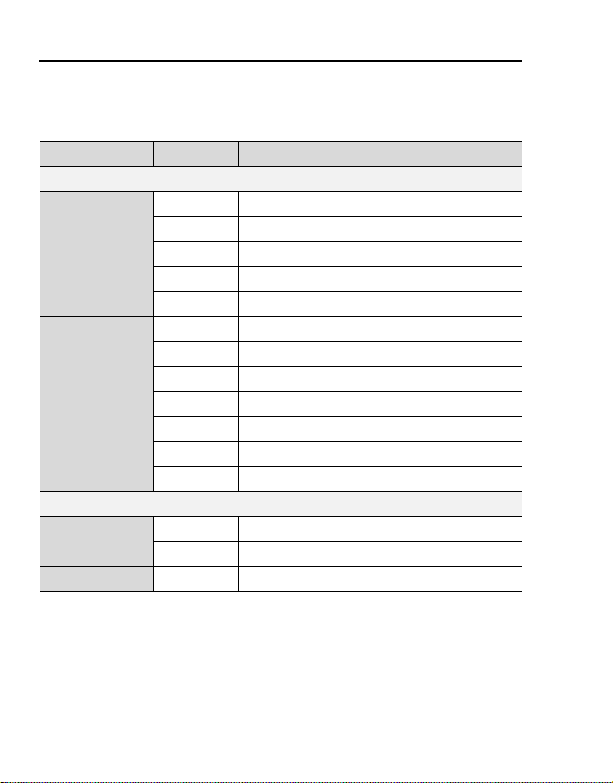
Key functions
Key name Function Key icon*
Navigation
key
Left Soft key
Right Soft
key
Send key Make or answer a call. [T]
Power/End
key
Numeric
keys
Asterisk key
Silent mode
key
Press top [1] or bottom [2] edge to move the
screen cursor, or adjust the earpiece volume
while on a call.
Perform the functions indicated by text shown
in the lower left-hand corner of the display.
Perform the functions indicated by text shown
in the lower right-hand corner of the display.
Press and hold to switch the phone on/off.
End or reject a call.
During key operations, return to the previous
display or press and hold to return to Idle
mode.
Enter numbers and characters.
Press and hold [S] - [K] for Speed dialling.
Press and hold [A] to call your voice mailbox
to retrieve voice messages.
Press and hold [L] to enter the international
prefix (+) or a pause (P) while entering a
phone number.
Enter “e”.
In text entry mode, press to change the letter
case, or press and hold to change the input
mode.
Enter “r”.
Press and hold to switch the Silent mode on/
off.
[L] to [K]
[1]
[2]
[5]
[6]
[w]
[e]
[r]
* The key icons given in the table represent the actual keys on the phone.
13
Page 17
About Your Phone
Quick keys
You can easily access features instead of navigating through the
menus.
Key Function
In Idle mode
[5] Open Main menu
[6] Open Messages menu
Short press
Long press
During a call
Short press
Long press [r] Hands free speaker on/off
[1] Open Shortcuts menu
[2] Open Contacts list
[T] Open Call log
[5] Switch the selected Shortcuts menu on/off
[6] Open Browser menu
[1] Auto key lock on
[2] Open Calendar
[A] Dial your voice mailbox
[S] - [K] Speed Dial
[r] Silent mode on/off
[1] Increase the volume
[2] Decrease the volume
14
Page 18
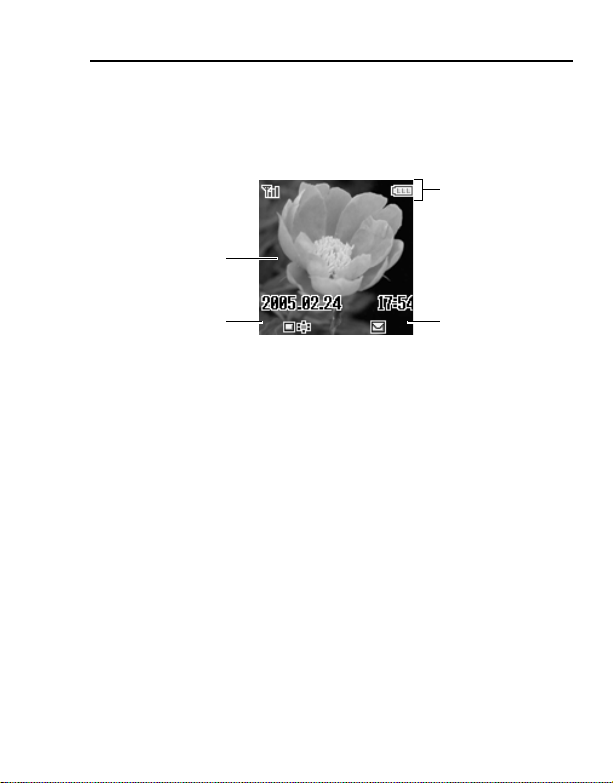
Display
Idle display
Wallpaper
About Your Phone
Status icon area
Left Soft key
selection area
Right Soft key
selection area
Idle clock
The clock appears on the display about a minute after you press the
last key.
15
Page 19
About Your Phone
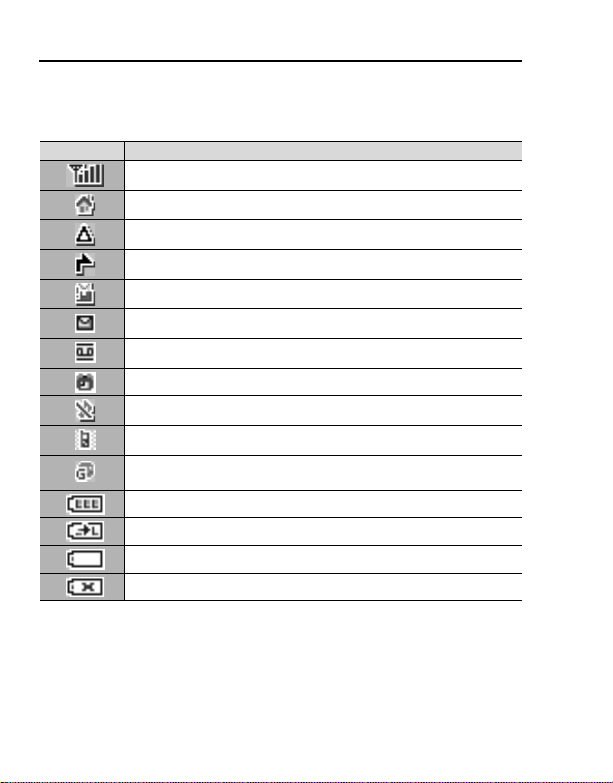
Status icons
The status icons are displayed or animated according to the
currently activated functions.
Icon Meaning
Signal strength; the more bars visible, the stronger the signal.
Home network that you subscribe to is within range.
Registered to a non-home network – roaming.
All incoming voice calls are diverted if All voice calls is set.
Message area is full.
Unread message is stored.
Voicemail has been received.
Alarm is set.
All tones are off.
Vibration alert is on.
(Grey) GPRS connection is active.
(Blue) Data is transmitting via GPRS.
Battery charged.
Battery is charging.
Low battery
Abnormal charging
16
Page 20
About Your Phone
Indicator light
The indicator light flashes or beams when you receive calls/
messages, the battery is charging, the alarm sounds or you press
the keypad.
To specify the default illumination colour for incoming calls,
messages and the alarm, or to switch on or off the Illumination for
battery charge and keypad press, see “Illumination” on page 65.
To set a different illumination colour for respective contacts, see
“Storing a contact in your phone” on page 52, and select the
required Call Illumination or Msg Illumination.
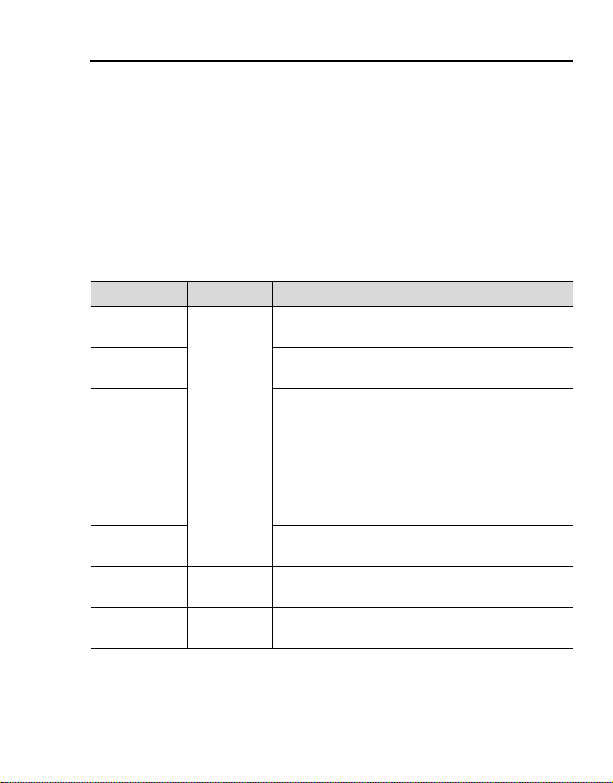
Function Colour Description
Incoming
calls
Incoming
messages
Illumination
Messages
Alarm
Battery
charge
Keypad
press
Off
Colour 1-8
Off
Colour 3
Off
Random
Flash or beam in the selected colour when you
receive calls.
Flash or beam in the selected colour when you
receive messages.
Flash or beam in the selected colour when you
receive or view Illumination messages. The
Indicator light is illuminated in response to the
emoticons or animations embedded in the
Illumination message. See “Illumination
Messages” on page 42 for comprehensive
instruction. To set, view or preview the
Illumination, see page 37-40.
Flash or beam in the selected colour when the
alarm sounds.
Beam in Colour 3 when the battery is charging.
Beam in random colours when you press keys
[L] - [K], [e] and [r].
17
Page 21
Getting Started
Installing the SIM and the battery
The SIM (Subscriber Identity Module) card and the battery must be
installed before using your phone.
Before handling the SIM and the battery, ensure that the phone is
switched off and the charger is disconnected from the phone.
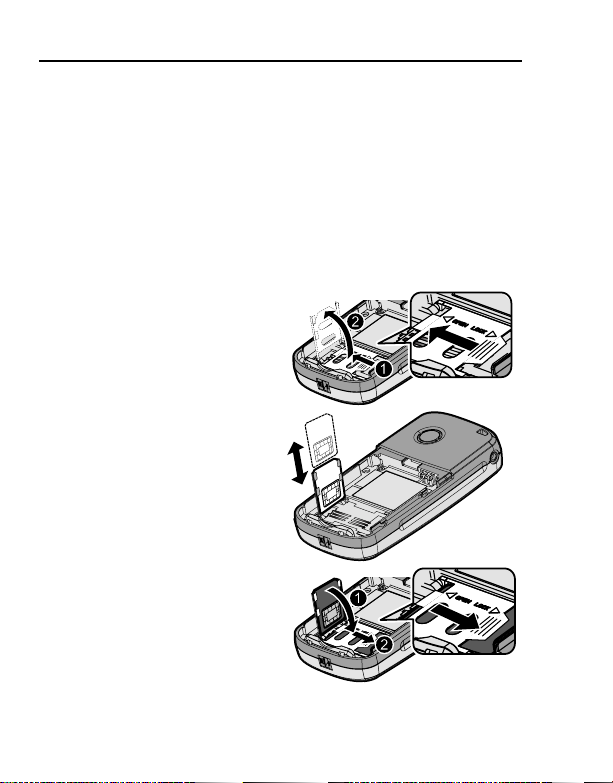
Inserting/removing the SIM
See “Inserting/removing the battery” on page 19 to remove or attach
the battery cover and the battery.
1. Slide the SIM holder in the
direction of the OPEN
arrow ; until it clicks, and
lift it up :.
2. Insert the SIM into the SIM
holder.
To remove the SIM, slide it
out of the holder.
3. Lay down the SIM holder ;
and slide it in the direction
of the LOCK arrow : until it
clicks.
18
Page 22
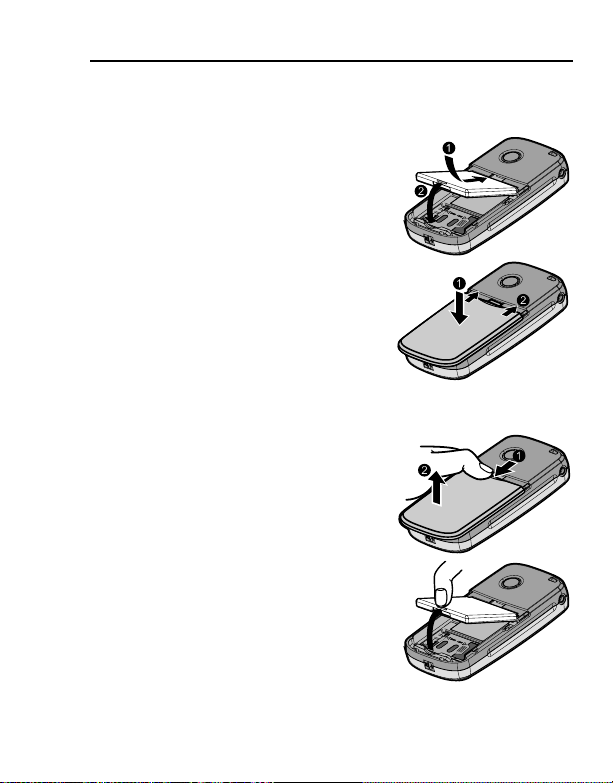
Inserting/removing the battery
Inserting the battery
1. Insert the battery into the battery
compartment, ensuring the 3 gold
contacts align with the 3 gold pins at
the top of the compartment.
2. Replace the cover on the phone.
Make sure the cover clicks into
place.
Removing the battery
1. Place your finger on the small tab at
the top of the cover. Slide the cover
slightly toward the bottom of the
phone, then lift the cover off the
phone.
2. Place your finger on the tab at the
base of the battery. Lift the battery off
the compartment.
Getting Started
19
Page 23
Getting Started
Charging the battery
Your phone can be charged either when it is switched on or off. You
can use your phone switched on even while charging.
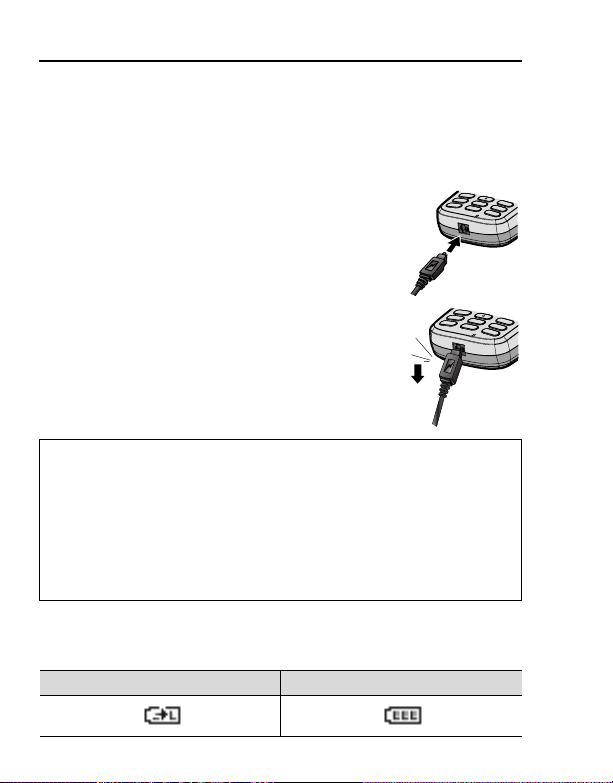
Ensure that the battery is attached in the phone before charging.
1. Connect the charger to the Charging
Connector, then connect the charger to the
mains power supply.
The charging indicator will light and a scrolling
icon will appear in Idle display.
2. When charging is complete, disconnect the
charger from the outlet before removing the
plug from the phone.
Note: DO NOT force the connector as this may damage the phone and/or
the charger.
If the battery has been deeply discharged, it may take several minutes
before the Battery level indicator is displayed.
It is recommended to charge the battery for a maximum of 150 minutes
before use.
The charging indicator will light if the Illumination setting for battery charge is
on. (See “Illumination” on page 65.)
Battery level indicator
While charging Charging complete
20
Page 24

Getting Started
Low battery warning
When the battery power is low, a “Battery is low” message will be
displayed and a warning tone will sound. The phone will display the
message for several times, then switch off automatically. If you
receive the low battery warning during a conversation, charge your
phone to continue the conversation.
Switching the phone on/off
1. Press and hold [w] for 2 to 3 seconds to switch the phone on
A greeting may be displayed and the phone enters Idle mode.
2. Press and hold [w] for 2 to 3 seconds to switch the phone off
while in Idle mode
21
Page 25

Basic Operations
Making calls
To make a call, your phone must be within range of a network with
adequate signal strength.
Standard dialling
In Idle mode:
1. Enter the area code and phone number 7 [T]
2. When the other party answers, talk into the microphone
3. [w] to hang up
The duration of the call will be displayed when the call is ended.
If Max cost is on, the remaining units will be displayed. (See “Max cost”
on page 73.)
Note: While on a call, you can adjust the earpiece volume by pressing
[192].
Contacts dialling
You can make calls using the numbers in Contacts.
In Idle mode:
1. [2]
2. [192] to scroll to the required contact 7 [T]
To find a contact beginning with letters you enter, see “Browsing the
Contacts list” on page 51.
Last number dialling
You can make calls using the numbers in the Call log.
In Idle mode:
1. [T]
2. [192] to scroll to Dialled numbers, Answered calls or
Missed calls 7 [5] (Select)
3. [192] to scroll to the required entry 7 [T]
22
Page 26

Basic Operations
International dialling
The international prefix (+) for the destination country/region should
be entered, followed by the country/region code, area code and
phone number.
In Idle mode:
1. Press and hold [L] until “+” is displayed
2. Enter the country/region code
3. Enter the area code and phone number 7 [T]
Note: Many countries/regions include an initial “0” in the area code. This
should, in most cases, be omitted when dialling international numbers.
For further help, contact your network operator.
Emergency call
To make an emergency call, the antenna ( p ) must be present.
When SIM is inserted:
1. Enter the local emergency number (such as [AAS]) 7 [T]
Note: Most countries support the international emergency number 112. If
you find the number does not work on your phone, call your network
operator.
When SIM is not inserted:
1. Enter the local emergency number (such as [AAS]) 7 [T]
OR
[6] (SOS) 7 “Emergency call” 7 [5] (Yes)
23
Page 27

Basic Operations
Answering calls
When there is an incoming call, the phone rings and/or vibrates
(depending on your phone’s alert setting). (See “Alerts” on page 64.)
While the phone is ringing and/or vibrating:
1. [T] or [5] (Reply)
OR
If Any key answer is on:
1. Press any key except [w] and [6] (Mute)
(See “Any key answer” on page 78.)
Rejecting calls
While the phone is ringing and/or vibrating:
1. [w]
Alert mute
You can turn the ring tone and vibration off before answering a call.
While the phone is ringing and vibrating:
1. [6] (Mute)
2. To answer the call: [T] or [5] (Reply)
If Any key answer is on:
Press any key except [w] and [6] (Reject)
OR
To reject the call: [w] or [6] (Reject)
24
Page 28

Basic Operations
Answering a second call
While on an active call, you may receive another call.
To enable this service, Call waiting must be active. (See “Call
waiting” on page 71.)
If you hear an alert tone during a call:
1. [T]
The first call is placed on hold.
2. [6] (Swap) to switch between the two calls if required
To reject another call:
1. [6] (Reject)
Silent mode
To use your phone in a quiet situation, you can activate the Silent
mode (ringtone off / vibration on).
In Idle mode:
1. Press and hold [r] to activate/deactivate the Silent mode
Voicemail
Voicemail is a network service which allows callers, who could not
reach you, to leave voice messages. When a new voice message is
stored, an alert sounds and ( ) appears on the Idle screen. To use
this service, you may need to subscribe to the Voicemail service
through your network operator. For further details, contact your
network operator.
To retrieve stored voice messages:
In Idle mode:
1. Press and hold [A] to call your voice mailbox
2. Follow the recorded instructions
3. [w] when finished
See “Voicemail” on page 46 for details.
25
Page 29
Basic Operations
In-call operations
In-call menu (while connected to an active call)
While on a call, you can access the in-call menu.
1. [5] (Menu)
2. [192] to scroll to the required menu 7 [5] (Select)
Hands free / Hand
held
End End the call.
Contacts list Access the Contacts list.
Messages Access the Messages menu.
Call status
Send DTMF
Hold
You can put a call on hold.
During a call:
1. [6] (Hold) to put a call on hold
2. [6] (Retrieve) to resume
Switch to Hands free or Hand held.
Check or manage the call status. (See “Call
status” on page 30.)
Send DTMF to access voicemail, paging or
computerised home banking. (See “DTMF” on
page 27.)
26
Page 30
Basic Operations
DTMF
DTMF (Dual Tone Multi Frequency) can be sent during a
conversation. These are often used to access voicemail, paging and
computerised home banking. For example, you may need to enter a
number to remotely access voicemail messages. A phone number
may be stored in the Contacts together with a DTMF sequence,
allowing the number to be dialled upon recall and the DTMF
sequence to be sent automatically.
To send DTMF during a call:
1. Enter digits ([L] - [K], [e] or [r])
Pause dial
Using pauses allows you to send DTMF automatically.
1. Enter the phone number
2. Press and hold [L] until a “P” is displayed
3. Enter the DTMF digits after the pause, e.g. enter the number to
access voicemail messages
4. [T]
When the call is connected, the DTMF sequence will be sent after
3 seconds.
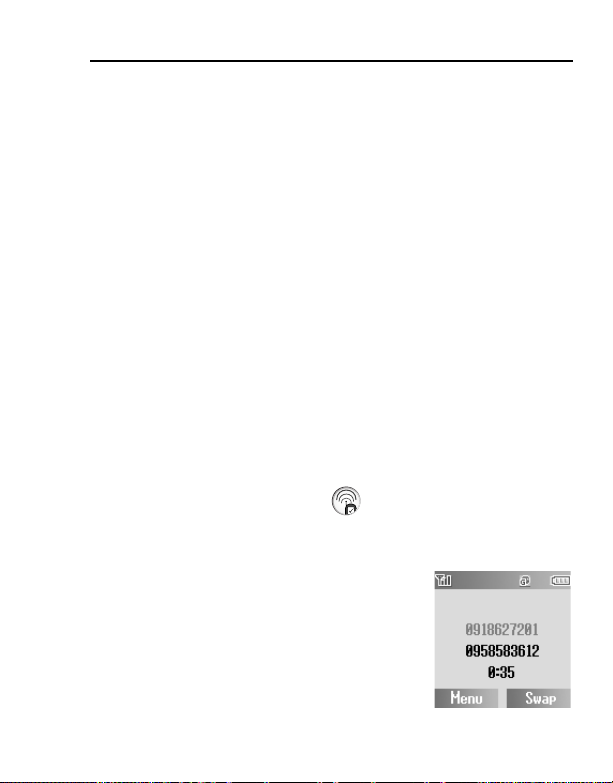
Making a second call
You can make another call while on a call.
During a call:
1. Enter the second phone number or select
a phone number from the Contacts list
To access Contacts list, see “In-call menu” on
page 26.
2. [T]
The first call is put on hold.
3. [6] (Swap) to switch between the two
calls if required
27
Page 31

Basic Operations
Multiple calls operations
In-call menu (while on multiple calls)
While on more than one call, you can access the in-call menu.
1. [5] (Menu)
2. [192] to select the required menu 7 [5] (Select)
Hands free / Hand
held
Conference*
Call transfer*
End End the selected call.
Split*
Contacts list Access the Contacts list.
Messages Access the Messages menu.
Call status
Send DTMF
1
*
1
1
1
Switch to Hands free or Hand held.
Allow you to have a conversation with up to
5 parties. (See “Conference” on page 29.)
Connect an active call and held call, then
disconnect yourself from both calls, leaving the
two callers to talk to each other. (See “Call
transfer” on page 29.)
Separate an individual from the active conference
call. (See “Split” on page 29.)
Check or manage the call status. (See “Call
status” on page 30.)
Send DTMF to access voicemail, paging or
computerised home banking. (See “DTMF” on
page 27.)
Note: To answer a second call, Call waiting must be active. (See “Call
waiting” on page 71.)
28
Page 32

Basic Operations
Conference
You can have a conversation with up to 5 people on a Conference
call.
During a call (one active call and one call on hold):
1. [5] (Menu)
2. [192] to scroll to Conference 7 [5] (Select)
The 2 calls are joined into a Conference call.
To add new participants:
3. Call the next person or answer an incoming call
4. Repeat the procedure (Step 1-2)
Call transfer
You can transfer an active call to a call on hold. You can connect the
two parties into a conversation and disconnect yourself from them.
During a call (one active call and one call on hold):
1. [5] (Menu)
2. [192] to scroll to Call transfer 7 [5] (Select)
Split
You can separate an individual from the Conference call, then you
can have a private conversation with the person.
During a Conference call:
1. [5] (Menu)
2. [192] to scroll to Split 7 [5] (Select)
3. [192] to scroll to the required caller you wish to talk to 7 [5]
(Select)
The Conference call is placed on hold.
29
Page 33
Basic Operations
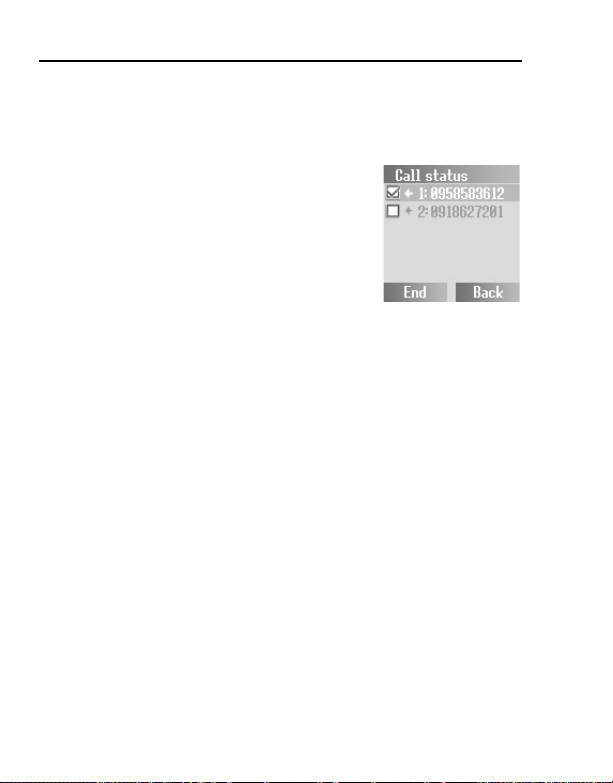
Call status
When you have multiple calls (including calls on hold), you can
check or manage the status of the calls.
During a multiple calls:
1. [5] (Menu)
2. [192] to scroll to Call status 7 [5]
(Select)
The list of the calls is displayed.
3. To end a call: [192] to scroll to the
required call 7 [5] (End)
OR
To join a call on hold: [192] to scroll to
the required call on hold 7 [5] (Join)
30
Page 34

Text Entr y
Your phone provides three text entry modes to enter characters.
®
T9
Multi-tap
Numeric You can enter numbers (0-9), e and r.
Selecting a text mode
Press and hold [e] to cycle through the text input modes as follows.
Multi-tap (Abc) 7 Numeric (123) 7 T9 (T9Abc)
T9® Text input mode
The T9® Text input method enables you to enter text faster and
easier. You only need to press a key once for any letter you require
on that key. The desired letter may not be displayed. Continue
pressing other keys until the end of a word is reached. The program
searches its built-in dictionary to predict the word that most closely
matches your key presses. If the combination of letters typed has
produced a word which is not the one you require, press [5]
repeatedly until the correct word is displayed. In case the required
word is not in the internal dictionary, press [6] (Spell) to spell the
required word if “- - -” appears while pressing [5] to search for the
word, or use Multi-tap mode instead.
For example, to enter “Hello!” in T9
Key [F][D][G][G][H][A][5] x 4
Display I He Gel Hell Hello Hello. Hello!
A predictive text entry system. You can enter a word with
fewer key presses.
A traditional way to type in a letter. Press a key several
times until the required letter appears.
®
mode, press keys as follows.
Note: Before entering text, you must customise the T9 language on your
phone (see “T9 input” on page 67).
Displayed characters in the T9
setting.
®
mode vary depending on the T9 language
31
Page 35

Text Entry
Changing the letter case
Press [e] to change the letter case mode as follows.
abc/T9abc 7 Abc/T9Abc 7 ABC/T9ABC
Auto capital change
Auto capital affects Multi-tap (Abc) and T9 (Abc).
When the entry mode is changed to Multi-tap (Abc) or T9 (Abc), the
first character is input as upper case and subsequent letters as
lower case.
When one of the following characters [. (Period) or ! or ? ] is input
before a space, the next character is input as upper case.
Editing text
Move the cursor by pressing [192] to the position you want to insert
or delete a letter. Press [6] (Clear) to delete a character.
Pop-up character table
Press and hold [L] - [K] for the character table. To select the required
character, press [192] to move the cursor to the right or left, or
press and hold [192] to move up or down, then press [5] (Select)
to enter the targeted character.
Key
[L] - [K]
.n/:; e r + - “ , ! ¡ ? ¿ _ ( ) [ ] { } ’ & % \ ^ ~ | < > = f ¢ £ $ ¥
¤ § Space Linefeed
A B C Γ Ä Å Æ Ç D E F ∆ É G H I Θ J K L Λ M N O Ξ Ñ Ö Ø
P Q R S Π Σ T U V Φ Ü W X Y Z Ψ Ω
a b c ä å æ à
v ü ù w x y z
0123456789
T9® or Multi-tap
ç d e f é è g h i ì j k l m n o ñ ö ø ò p q r s ß t u
32
Page 36

Text Entry
The following table shows characters available on your phone.
To use the function in the bottom cell assigned to a key, press and
hold the key. In the T9
®
or Multi-tap mode, press and hold numeric
keys to show a set of all characters. (See “Pop-up character table”
on page 32.)
Key
T9® (Input language: English)
(T9abc, T9Abc or T9ABC)
[L]. n
., - ? ! ' @ : ; / 1 .,?1!“-:; n / e ( ) r + _ = [ ] { }
[A]
’ ¡ ¿ & % \ ^ ~ | < > f ¢ £ $ ¥ ¤
§ Linefeed
A B C 2 -
[S]
(a b c 2 -)
D E F 3 -
[D]
(d e f 3 -)
G H I 4 -
[F]
(g h i 4 -)
J K L 5 -
[G]
(j k l 5 -)
M N O 6 -
[H]
(m n o 6 -)
P Q R S 7 -
[I]
(p q r s 7 -)
T U V 8 -
[J]
(t u v 8 -)
W X Y Z 9 -
[K]
(w x y z 9 -)
[e]
[r]
[5] Options / word search Options
•[A] key (T9 mode): Press [A] repeatedly to display the set of characters in
the bottom cell.
Letter case change e
Space Space e r
Text Mode
Multi-tap
(abc, Abc or ABC)
/ - _
+ 0 0
.,?1!“-:; n / e ( ) r + _ =
[ ] { } ’ ¡ ¿ & % \ ^ ~ | < >
f ¢ £ $ ¥ ¤ § Linefeed
A B C 2 Γ Ä Å Æ Ç
(a b c 2 ä å æ à
D E F 3 ∆ É
(d e f 3 é è
G H I 4 Θ
(g h i 4 ì
)
J K L 5 Λ
(j k l 5
)
M N O 6 Ξ Ñ Ö Ø
(m n o 6 ñ ö ø ò
P Q R S 7 Π Σ
(p q r s 7 ß
T U V 8 Φ Ü
(t u v 8 ü ù
W X Y Z 9 Ψ Ω
(w x y z 9
Input mode change
Linefeed
Numeric
(123)
1
ç
)
)
)
)
)
)
2
3
4
5
6
7
8
9
r
33
Page 37

Menu Navigation
Main menu structure
The 9 menus are as follows:
Messages
Inbox ........................ 38
Archive .....................39
Create new...............40
Voicemail..................46
Cell Broadcast..........47
User Emoticon.......... 41
Text templates ..........41
Settings ....................37
Memory status.......... 49
Games
Hit Mouse .................81
Funny Toggle............ 82
My Media
Pictures ....................91
Sounds.....................91
User 1.......................92
User 2.......................92
User 3.......................92
User 4.......................92
Shortcuts ..................92
Memory status.......... 92
34
Contacts
Contacts list ............. 51
Add Contact .............52
Call log..................... 55
Speed Dial list .......... 56
Groups .....................57
Advanced ................. 58
Browser
Start Browser ...........85
Bookmarks ............... 86
Settings .................... 83
Data connections .....87
Calendar.............93
Profiles
Normal ..................... 94
Quiet ........................ 94
Meeting ....................94
Outdoor .................... 94
Headset.................... 94
Settings
Sounds .................... 62
Alerts........................ 64
Display..................... 64
Language................. 67
GSM network ........... 68
Calls......................... 70
Security.................... 75
Auto answer............. 78
Any key answer ....... 78
Auto key lock ........... 79
Time and date.......... 79
Defaults.................... 80
(Profiles) .................. 80
Applications
Alarm ....................... 88
Calculator ................ 89
Currency .................. 90
*STK (SIM Tool Kit)
If your SIM includes
STK, Profiles menu
appears under Settings
menu.
Page 38

Menu Navigation
Displaying the menu
The menu system allows you to access functions which do not have
their own dedicated buttons on the keypad.
In Idle mode:
1. [5]
()
The Main menu appears with 9 menu options.
(See “Main menu structure” on page 34.)
2. [192] to scroll to the required menu 7
[5] (Select)
OR
To directly jump to the required menu:
Press [A] - [K]
[A]: Messages
[S]: Contacts
[D]: Settings
[F]: Games
[G]: Browser
[H]: Applications
[I]: My Media
[J]: Calendar
[K]: Profiles (or STK)
To go back to the Main menu:
1. [w] or [6] (Back) repeatedly until the Main menu display
appears
35
Page 39

Messages
Messages menu structure
Inbox.......................... 38
Archive ...................... 39
Create new ................ 40
Voicemail...................46
Call Mailbox ...................46
Set Mailbox number .......46
Cell Broadcast .......... 47
Auto display ................... 47
Read messages .............47
Message list ................... 47
Topic list .........................48
Languages .....................49
User Emoticon ..........41
Text templates...........41
Settings .....................37
Message centre..............37
Protocol ..........................37
Illumination .....................37
Validity period.................37
Delivery report................37
SMS via GPRS...............37
Memory status ..........49
SMS (Short Message Service)
SMS allows you to send and receive short text messages to/from
mobile phones. Small pictures, sounds and/or animations can be
inserted in the message.
36
Page 40
Messages
Setting the Message centre number
Your connection settings must be configured before using the
service. The Message centre number may be preprogrammed.
Changing this number may cause failure of a text message.
d Main menu > Messages > Settings > Message centre
1. Enter your Message centre number in the international dialling
format 7 [5] (OK) (See “International dialling” on page 23.)
Other SMS settings
d Main menu > Messages > Settings
1. [192] to scroll to the required setting 7 [5] (Select)
Select the protocol type which specifies the format your
Protocol
Illumination
Validity period
Delivery
report
SMS via GPRS
message is converted to.
[192] to scroll to Standard text, Fax, X.400, Paging,
ERMES or E-mail 7 [5] (Select)
Decide whether or not you want the Indicator light to be
illuminated when receiving or viewing an Illumination
message.
[192] to scroll to Receiving or Viewing 7 [
(Change) to switch on/off
Set the validity period that the message is stored at the
Message centre.
[192] to scroll to 1 hour, 12 hours, 1 day, 1 week or
Maximum 7 [5] (Select)
Choose whether or not you want to receive a confirmation
that your message has been delivered.
[5] (Select) to switch on/off
Decide whether or not you want to send your message via
GPRS.
[5] (Select) to switch on/off
5]
37
Page 41

Messages
Receiving messages
When you receive a message, the message icon ( ) is displayed
along with a ringtone, illumination and/or vibration.
d Main menu > Messages > Inbox
1. [192] to scroll to the required message 7 [5] (Options)
2. [192] to scroll to View 7 [5] (Select)
Options
When viewing the list of messages or the selected message, the
following options are available by pressing [5] (Options).
1
View*
Reply Reply to the selected message.
1
Edit*
Forward Forward the selected message.
View Illumination*
Extract number
Hyperlink*
Delete Delete the selected message.
Delete all*
2
1
View the selected message.
Edit or add text, pictures, animations and/or
sounds.
Check how the Indicator light is illuminated.
2
Available only for Illumination messages.
Save the phone number in the message.
[192] to scroll to the required number 7 [5]
(Select) 7 [5] (Save) 7 [192] to scroll to SIM
or Phone 7 [5] (Select)
Bookmark the URL in the message.
[192] to scroll to the required URL 7 [5]
(Select) 7 Enter the title 7 [5] (Save)
Delete all messages.
*1Available only in the list of messages.
2
*
Available only when viewing the selected message.
38
Page 42

Messages
Viewing messages in the Archive
You can view messages sent and/or waiting to be sent in the
Archive.
d Main menu > Messages > Archive
1. [192] to scroll to the required message 7 [5] (Options)
2. [192] to scroll to View 7 [5] (Select)
Options
When viewing the list of messages or the selected message, the
following options are available by pressing [5] (Options).
1
View*
Send
Edit Edit or add text, pictures and/or sounds.
View Illumination*
Extract number
Hyperlink*
Delete Delete the selected message.
Delete all*
*1Available only in the list of messages.
2
*
2
1
Available only when viewing the selected message.
View the selected message.
Send the selected message. (See “Sending a
message” on page 41.)
Check how the Indicator light is illuminated.
2
Available only for Illumination messages.
Save the phone number in the message. (See
“Extract number” on page 38.)
Bookmark the URL in the message. (See
“Hyperlink” on page 38.)
Delete all messages.
39
Page 43
Messages
Creating a message
You can create messages with pictures, sounds, etc.
d Main menu > Messages > Create new
1. Enter your text (See “Text Entry” on page 31.) 7 [5] (Options)
2. [192] to scroll to the required option 7 [5] (Select)
Send
Save Save the message in the Archive.
Save & send
Emoticon
Picture &
sound
Format
Text
templates
View
Illumination
Send the message. (See “Sending a message” on
page 41.)
Save and send the message. (See “Sending a message”
on page 41.)
Add “Illumination” or user defined Emoticon to the
message.
[192] to scroll to Illumination or User defined 7 [5]
(Select)
For Illumination: (See “Illumination Messages” on
page 42.)
For User defined: [192] to scroll to the required
Emoticon 7 [5] (Select)
Insert sounds, pictures and/or animations to the
message.
[192] to scroll to Fix sounds, Fix animations, Own
animations or Own pictures 7 [5] (Select)
Edit the message by changing the format.
[192] to scroll to Insert new line, Font face or Font
colour 7 [5] (Select)
Add the text template to the message.
Check how the Indicator light is illuminated.
40
Page 44

Messages
Sending a message
When a message is completed:
1. [5] (Options)
2. [192] to scroll to Send or Save & send 7 [5] (Select)
3. Enter the phone number 7 [5] (OK)
Options
You can recall a number from Contacts or Groups list by pressing
[5] (Options).
Contacts list
Groups
[192] to scroll to the required contact 7 [5] (Select) 7
[5] (OK)
[192] to scroll to the required group 7 [5] (Select) 7
[5] (Send) to add the required member 7 [5]
(Continue)
User Emoticon
You can create your own Emoticon icons and save them for later
use.
d Main menu > Messages > User Emoticon
1. [192] to scroll to <Empty> 7 [5] (Select)
2. Create your Emoticon icon 7 [5] (Options)
3. [192] to scroll to Save & send or Save 7 [5] (Select)
Text templates
You can edit the preprogrammed messages, then save them for
later use. You can edit the messages except for the first
5 messages.
d Main menu > Messages > Text templates
1. [192] to scroll to the required message 7 [5] (Select)
2. Edit the message 7 [5] (Options)
3. [192] to scroll to Save & send or Save 7 [5] (Select)
41
Page 45
Messages
Illumination Messages
With the Illumination feature, you can express special feelings in a
message. The Indicator light will respond to the pictographs in an
Illumination message and light in combinations of colours and light
patterns when you receive or view an Illumination message.
Switch on Illumination so that the Indicator light on the phone will
be illuminated when receiving or viewing the Illumination message.
(See “Illumination” in the table on page 37.)
Note: The Indicator light will not be illuminated if Illumination setting is
switched off. (See “Illumination” in “Other SMS settings” on page 37.)
Creating an Illumination Message with emoticons
d Main menu > Messages > Create new
1. Enter your text
2. [5] (Options)
3. [192] to scroll to Emoticon 7 [5] (Select)
4. [192] to scroll to Illumination 7 [5] (Select)
5. [192] to scroll to the required emoticon 7 [5] (Select)
See the table of emoticons on page 43.
To check the Illumination of the received messages:
“View Illumination” on page 38.
To check the Illumination of the messages you create:
“View Illumination” on page 39 and 40.
42
Page 46

Messages
Select the required emoticons from the list below.
Emoticon
:-D (^-^)
>:-<
:e
:-P C (*~o~*)
:->
8-)
Indicator
Colour
:-)
Colour 3
Colour 6
:’(
:-(
:-/
:-[ C (-_-; C
:()
:-I
I-( A (_ _)Zzz A
;-) Colour 8 C (^_~)” Colour 8 C
Colour 1
Colour 5
Colour 2
Colour 4
Colour 7
Light
Pattern
A
B
B (;_;)
A
A (^w^)
B
C
Emoticon
\^o^/
\(>o<)/
^3^
(T_T)
(?_?)
^&^
(@_@)
p(^-^)p A
(-_-)
Indicator
Colour
Colour 3
Colour 60:-) A (o^-^o)
Colour 1
Colour 5:-S B (>_<) B
Colour 2
Colour 4:-O (*o*)
Colour 7
Light
Pattern
A
B:-|| (>-<#)
A
B
A
A
B=:-)
C
• Pattern A: [Firefly] flickers slowly for about two seconds.
• Pattern B: [Flash] flickers fast for about one second.
• Pattern C: [Beam] lights for about one second (two seconds in Colour 8).
43
Page 47

Messages
Creating an Illumination Message with animations
d Main menu > Messages > Create new
1. Enter your text
2. [5] (Options)
3. [192] to scroll to Picture & sound 7
[5] (Select)
4. [192] to scroll to Fix animations 7 [5]
(Select)
5. [192] to scroll to the required animation
7 [5] (Select)
See the table of animations on page 45.
The number displayed in the menu bar indicates the number of pages
used in the message.
To check the Illumination of the received messages:
“View Illumination” on page 38.
To check the Illumination of the messages you create:
“View Illumination” on page 39 and 40.
<Example>
In the text:
“Good morning It’s fine today (^-^)”, the Indicator light beams
in Colour 8 and then flickers in Colour 3 slowly for about two
seconds each.
44
Page 48

Messages
Select the required animation from the list below.
Name Animation Indicator Colour Light Pattern
I am ironic Colour 6
I am glad Colour 3
I am sceptical Colour 5
I am sad Colour 1
Wow! Colour 4
I am crying Colour 1
I am winking Colour 8 C
I am laughing Colour 4 A
I am indifferent Colour 7 C
In love/kissing Colour 6
I am confused Colour 5
Tongue hanging Colour 2 A
I am angry Colour 3
Devil Colour 3
• Pattern A: [Firefly] flickers slowly for about two seconds.
• Pattern B: [Flash] flickers fast for about one second.
• Pattern C: [Beam] lights for about one second (two seconds in Colour 8).
A
B
B
BWearing glasses Colour 2
45
Page 49

Messages
Voicemail
The Voicemail service lets you access your voice mailbox. To listen
to your voice messages, you may need to subscribe to the Voicemail
service through your service provider.
Listening to Voice messages
From Idle mode:
1. Press and hold [A] to call your voice mailbox
2. Follow the recorded instructions
3. [w] when finished
From Message menu:
d Main menu > Messages > Voicemail > Call Mailbox
1. Stored mailbox number is dialled
2. Follow the recorded instructions
3. [w] when finished
Setting the mailbox number
d Main menu > Messages > Voicemail > Set Mailbox number
1. Enter the mailbox number 7 [5] (OK)
Note: For further details, contact your network operator.
46
Page 50

Messages
Cell Broadcast
You can receive messages on specified topics, such as weather
information and traffic news, regularly from your service provider.
You need to specify the “topic(s)” of information and the language in
which you wish to receive the information.
To receive the broadcasts, Read messages must be on.
Auto display
You can set your phone to display the latest information messages
automatically in Idle mode.
d Main menu > Messages > Cell Broadcast
1. [192] to scroll to Auto display 7 [5] (Change) to switch on/
off
Receiving messages
To receive messages, you must turn the Read messages on.
d Main menu > Messages > Cell Broadcast
1. [192] to scroll to Read messages 7 [5] (Change) to switch
on/off
Reading a Cell Broadcast message
You can shuffle through messages to select.
d Main menu > Messages > Cell Broadcast > Message list
1. [5] (Next) to select the required message
47
Page 51

Messages
User defined topic
You can add your favourite topics to the user-defined topic list.
d Main menu > Messages > Cell Broadcast > Topic list > User
defined
1. [192] to scroll to <New entry> 7 [5] (Options)
2. Enter the message ID 7 [5] (OK)
3. Enter the name 7 [5] (OK)
Options
While viewing the list, the following options are available by pressing
[5] (Options): Add, Edit and Delete.
The highlight must be on a stored topic.
Topic list
You can specify topics to be received from your network service
operator.
d Main menu > Messages > Cell Broadcast > Topic list >
Current
1. [192] to scroll to <Add topics> 7 [5] (Select)
2. [192] to scroll to the required topic 7 [5] (Select)
Options
While viewing the list, the following options are available by pressing
[5] (Options): Add and Delete.
The highlight must be on a stored topic.
48
Page 52

Messages
Languages
You can set the language of the message you receive.
d Main menu > Messages > Cell Broadcast > Languages
1. If there are no entries: [192] to scroll to Insert or Add to end
7 [5] (Select)
OR
If there are any entries: [5] (Options) 7 [192] to scroll to
Insert or Add to end 7 [5] (Select)
“Insert” adds a required language below the language you highlight
whereas “Add to end” adds the language to the end of the list.
2. [192] to scroll to the required language 7 [5] (Select)
To remove a language:
1. [192] to scroll to the required language 7 [5] (Options)
2. [192] to scroll to Delete 7 [5] (Select)
Memory status
Memory status shows the used memory space and the maximum
memory capacity of SMS.
d Main menu > Messages > Memory status
= Phone
= SIM
49
Page 53

Contacts
Contacts menu structure
Contacts list..............51
Add Contact ..............52
Phone.............................52
SIM.................................53
Call log ......................55
Dialled numbers .............55
Answered calls...............55
Missed calls ...................55
Speed Dial list...........56
Groups.......................57
Advanced ..................58
My Numbers...................58
Memory status................59
My Contacts ...................59
SDN................................60
(Information number)* ....60
*
50
Page 54

Contacts
Browsing the Contacts list
You can search for a number in the Contacts list.
You need to set SIM or Phone Contacts list as your default Contacts
list to begin with. (See “My Contacts” on page 59.)
Browsing the list for a contact
d Main menu > Contacts > Contacts list
1. [192] to scroll to the required contact entry 7 [6] (View)
Searching for a contact by entering letters
d Main menu > Contacts > Contacts list
1. Enter letters to find a contact beginning with the specific letters
Options
When selecting the required contact entry, the following options are
available by pressing [5] (Options).
View View the selected contact.
Edit Edit the selected contact.
Send SMS Send a message to the selected contact.
Copy to Phone/SIM
Copy all to Phone/
SIM
Delete Delete the selected contact.
Delete all
Copy the selected contact to the phone or the
SIM.
Copy all the contacts to the phone or the SIM.
Delete all the contacts stored in SIM Contacts list
or Phone Contacts list (depending on which
Contacts list is set as the default setting).
51
Page 55

Contacts
Adding contacts
Storing a contact in your phone
In the phone, you can store detailed information for each contact.
The entries are grouped together and are retained even if you
damage your SIM.
d Main menu > Contacts > Add Contact > Phone
1. Name: Enter the name 7 [2]
2. Phone: Enter the phone number 7 [2]
You can select the country/region code by pressing [6] (+List) before
entering the number in steps 2 to 4.
3. Tel./office: Enter the office phone number 7 [2]
4. Tel./mobile: Enter the mobile phone number 7 [2]
5. E-mail: Enter the E-mail address 7 [2]
6. Notes: Enter notes 7 [2]
7. Groups: [6] (Change) to select the required group 7 [2]
8. Picture: [5] (Options) 7 [192] to scroll to Change 7 [5]
(Select) 7 [192] to select the required picture 7 [5] (Select)
7 [2]
9. Call Illumination: [6] (Change) to select the required Call
Illumination 7 [2]
10. Msg Illumination: [6] (Change) to select the required Msg
Illumination 7 [2]
11. Melod ies: [5] (Options) 7 [192] to scroll to Change 7 [5]
(Select) 7 [192] to select the required melody 7 [5]
(Select)
12. When entries are completed, [5] (Options)
13. [192] to scroll to Save 7 [5] (Select)
52
Page 56

Contacts
Storing a contact in your SIM
You can store some information for each contact in your SIM.
d Main menu > Contacts > Add Contact > SIM
1. Name: Enter the name 7 [2]
2. Phone: Enter the phone number 7 [2]
You can select the country/region code by pressing [6] (+List) before
entering the number.
3. Location: [6] (Change) to select SIM 7 [2]
To store a contact in FDN, see “Storing a contact in FDN” on page 54.
4. Record no.: [6] (Change) to select the required record
number 7 [5] (Save)
Note: The length of name and number, and the total amount of data are SIM
dependent.
53
Page 57

Contacts
Storing a contact in FDN
The Fixed dial feature allows you to limit your outgoing calls to a
certain set of numbers saved in FDN (Fixed Dial Number), which is
located in your SIM. When this function is on, only the Fixed dial
numbers can be dialled, and any attempt to call any other number
will fail.
To activate the Fixed dial function, see “Fixed dial” on page 77.
To store a fixed dial number, you need to enter your PIN2 code.
d Main menu > Contacts > Add Contact > SIM
1. Name: Enter the name 7 [2]
2. Phone: Enter the phone number 7 [2]
You can select the country/region code by pressing [6] (+List) before
entering the number.
3. Location: [6] (Change) to select FDN 7 [2]
4. Record no.: [6] (Change) to select the required record
number 7 [5] (Save)
5. Enter your PIN2 7 [5] (OK)
Note: When the Fixed dial function is enabled, only the Contacts entries
stored in FDN can be edited.
When the Fixed dial function is disabled, the Contacts entries stored in FDN
and ADN can be edited.
54
Page 58

Contacts
Call log
Recently dialled phone numbers, answered calls and missed calls
are stored in the Call log. The numbers in the Call log list can be
used to call or add to Contacts.
Viewing/Dialling from Call log
d Main menu > Contacts > Call log
1. [192] to scroll to Dialled numbers, Answered calls or
Missed calls 7 [5] (Select)
2. [192] to scroll to the required log
3. [T] to dial the selected number if required
Options
When selecting the required log, the following options are available
by pressing [5] (Options): Add to contacts, Delete and Delete all.
55
Page 59

Contacts
Speed Dial list
Setting speed dialling keys
You can quickly dial phone numbers stored at locations 2-9 in the
Contacts list.
You must assign a required contact a speed dialling key before
switching the Speed Dial on/off.
d Main menu > Contacts > Speed Dial list
1. [192] to scroll to the required key 7 [6] (Edit)
2. [192] to scroll to the required Contact 7 [5] (Select)
3. “Switch on Speed Dial setting” 7 [5] (Yes) or [6] (No)
To switch on/off the Speed Dial setting:
In the Speed Dial list:
1. [192] to scroll to the required key 7 [5] (On/Off)
Using the speed dialling keys
In Idle mode:
1. Press and hold a speed dialling key ([S] - [K])
56
Page 60

Contacts
Groups
You can categorise the Contacts list stored in your phone into
10 groups. You can edit each group by renaming, or selecting a
particular ringtone or icon, so that you can identify the incoming
caller.
Viewing groups
d Main menu > Contacts > Groups
1. [192] to scroll to the required group 7 [6] (View)
To add a new entry:
2. [192] to scroll to <New entry>
3. To add from Contacts list: [6] ( ) 7 [192] to scroll to
the required contact 7 [5] (Select)
OR
To add a new contact: [5] (Select) 7 See “Storing a contact in
your phone” on page 52.
Options
When highlighting a group member, the following options are
available by pressing [5] (Options): Insert, View, Edit, Send SMS
and Remove entry.
57
Page 61
Contacts
Editing the group
d Main menu > Contacts > Groups
1. [192] to scroll to the required group 7 [5] (Options)
2. [192] to scroll to the required option 7 [5] (Select)
View View the Contacts in the selected group.
Set ringtone
Set image [192] to scroll to the required icon 7 [5] (Select)
Rename Rename the group 7 [5] (OK)
Remove
entries
Note: Downloaded in Set ringtone is country/region dependent.
[192] to scroll to Preinstalled, My Media or
Downloaded 7 [5] (Select) 7 [192] to scroll to the
required ringtone 7 [5] (Select)
“Remove all entries?” 7 [5] (Yes) or [6] (No)
Advanced
My Numbers
My Numbers is a handy phone book where names and phone
numbers can be stored and viewed.
d Main menu > Contacts > Advanced > My Numbers
1. [192] to scroll to <Empty> 7 [5] (Options)
2. [192] to scroll to Edit 7 [5] (Select)
3. Enter the phone number 7 [2]
You can select the country/region code by pressing [6] (+List) before
entering the number.
4. Enter the name 7 [5] (Save)
58
Page 62

Contacts
Viewing My Numbers
d Main menu > Contacts > Advanced > My Numbers
1. [192] to scroll to the required entry 7 [6] (View)
Options
When highlighting the stored entry, the following options are
available by pressing [5] (Options): View, Edit and Delete.
Memory status
Memory status shows how many locations are available in the
Contacts list.
d Main menu > Contacts > Advanced > Memory status
Icons in the status display:
= SIM
= FDN
= Phone
Note: The amount of memory for SIM/FDN storage depends on your SIM.
My Contacts
You can determine your default Contacts list based on either the SIM
or the phone.
d Main menu > Contacts > Advanced > My Contacts
1. [192] to scroll to SIM or Phone 7 [5] (Select)
59
Page 63

Contacts
SDN
If your SIM includes SDN (Service Dialling Number), you can call a
service number by selecting from the list.
SDN enables you to access special services provided by your
network operator, such as customer support, emergency services,
etc.
d Main menu > Contacts > Advanced > SDN
1. [192] to scroll to the required SDN
2. To call the number: [5] (Select)
OR
To view the details: [6] (View)
Information number
The Information number may be included in a SIM which supports
CPHS and Information Dialling Number.
d Main menu > Contacts > Advanced > Information number
1. [192] to scroll to the required information number 7 [5]
(Select)
60
Page 64

Settings
Settings menu structure
Sounds ...................... 62
Volume...........................62
Ringtones.......................62
Warning tone..................63
Alerts ......................... 64
Ring only ........................ 64
None .............................. 64
Ring & Vibrate................64
Vibrate only .................... 64
Ring once.......................64
Display....................... 64
Wallpaper.......................64
Colour Theme ................64
Illumination.....................65
Contrast ......................... 65
Backlight time.................65
Greeting .........................65
Brightness ...................... 66
(Hide network name)*
Key backlight..................66
1
...66
Language ..................67
T9 input .......................... 67
Display Languages ........67
Calls...........................70
Call Diverts.....................70
Call Service ....................71
(Send my number)*
Security .....................75
Call bar...........................75
Codes.............................76
Fixed dial........................77
SIM lock .........................78
Auto answer ..............78
Any key answer ........78
Auto key lock ............79
Time and date ...........79
Settings ..........................79
Power on time ................80
Power off time ................80
Defaults .....................80
1
......74
GSM network ............68
Auto network ..................68
New network ..................68
Network list .................... 69
Band select ....................69
(Profiles)*2.................80
*1
2
*
61
Page 65

Settings
Sounds
Volume
You can change the volume of different ringtones used for the
following: Calls, Contacts calls, Alarm, Messages, Cell
Broadcast, Key volume and Group 1-10.
d Main menu > Settings > Sounds > Vo lum e
1. [192] to scroll to the required ringtone 7 [5] (Select)
2. [192] to adjust the volume level 7 [5] (OK)
Ringtones
You can change the ringtone for different events and situations.
d Main menu > Settings > Sounds > Ringtones
1. [192] to scroll to the required event 7 [5] (Select)
Calls
Contacts calls
Alarm
Messages
Cell Broadcast
Group 1-10
Key tone
*1Ringtones downloaded from the Internet are stored.
2
*
Ringtones downloaded via the SMS service are stored.
[192] to scroll to Preinstalled, My Media*
Downloaded*
required item 7 [5] (Select)
[192] to scroll to Off, Ton e 1 , Tone 2 or Tone 3 7 [5]
(Select)
2
7 [5] (Select) 7 [192] to select the
1
or
62
Page 66

Settings
Downloading ringtones via the SMS service
Your requested ringtones can be downloaded to your phone via the
SMS service. When a message is received containing a ringtone,
notification appears on the Idle screen.
When a ringtone message appears on the Idle display:
1. [5] (View) to check the downloaded ringtone
2. [5] (Save)
3. [5] (OK)
OR
[192] to scroll to the required slot 7 [5] (Select)
The first 10 downloaded ringtones are stored in the empty slots. After all
the slots are occupied, you can select an existing ringtone to be
overwritten with a new one.
To reject downloaded ringtones:
[6] (Reject) in step 2.
Note: Ask your network operator or service provider about the service in
details.
Warning tone
The Warning tone informs you of low battery or camp-on calls.
d Main menu > Settings > Sounds > Warning tone
1. [5] (Select) to switch on/off
63
Page 67

Settings
Alerts
You can set your phone to ring and/or vibrate when you receive a
call or message, or the set time is reached.
The following alert types are available: Ring only, None, Ring &
Vibrate, Vibrate only or Ring once.
d Main menu > Settings > Alerts
1. [192] to scroll to the required alert 7 [5] (Select)
Display
Wallpaper
You can change the wallpaper on the Idle display.
d Main menu > Settings > Display > Wallpaper
1. [192] to scroll to Preinstalled, My Media or Off 7 [5]
(Select)
2. [192] to scroll to the required wallpaper 7 [5] (Options)
3. To set: [192] to scroll to Select 7 [5] (Select)
OR
To view and set: [192] to scroll to View 7 [5] (Select) twice
Colour Theme
You can change the colour theme of the display.
d Main menu > Settings > Display
1. [192] to scroll to Colour Theme 7 [5] (Change)
2. [192] to scroll to the required colour theme 7 [5] (Select)
64
Page 68

Settings
Illumination
The phone alerts you with illumination when specific events occur.
d Main menu > Settings > Display > Illumination
1. [192] to scroll to the required event 7 [5] (Select)
Calls
Contacts calls
Messages
Alarm
Battery charge
Keypad
[192] to select Off or Colour 1-8 7 [5] (Select)
[5] (Select) to switch on/off
Contrast
You can adjust the colour contrast of the display.
d Main menu > Settings > Display > Contrast
1. [192] to adjust the contrast 7 [5] (OK)
Backlight time
You can set the length of time the display is illuminated by the
backlight.
d Main menu > Settings > Display > Backlight time
1. [192] to scroll to 10 secs, 30 secs or 60 secs 7 [5] (Select)
Greeting
You can create a greeting message that is displayed each time the
phone is switched on.
d Main menu > Settings > Display
1. [192] to scroll to Greeting 7 [6] (Edit)
2. Enter the greeting 7 [5] (OK)
3. [5] (On/Off)
65
Page 69

Settings
Brightness
You can adjust the brightness of the display.
d Main menu > Settings > Display
1. [192] to scroll to Brightness 7 [5] (Change)
2. [192] to scroll to Maximum, High, Medium, or Low 7 [5]
(Select)
Hide network name
You can hide the network name which is shown in Idle mode.
d Main menu > Settings > Display
1. [192] to scroll to Hide network name 7 [5] (Select) to
switch on/off
Key backlight
You can switch the key backlight on or off.
d Main menu > Settings > Display
1. [192] to scroll to Key backlight 7 [5] (Select) to switch on/
off
66
Page 70

Settings
Language
T9 input
When you create text, T9® dramatically reduces the number of key
presses. The following T9
T9 preferred Decide your preferred input mode to start with.
T9 language
d Main menu > Settings > Language > T9 input
1. [192] to scroll to T9 preferred or T9 language 7 [5]
(Change or Select)
(If T9 language is selected, go to the next step.)
2. [192] to scroll to the required language or input mode 7 [5]
(Change) to switch on/off
See “Text Entry” on page 31 for details.
Display Languages
It is possible to change the display language on your phone.
d Main menu > Settings > Language > Display Languages
1. [192] to scroll to the required language 7 [5] (Select)
®
input modes are available:
Depending on the customisation of your phone,
other language version(s) of T9 are available (or
this function itself may not be available).
67
Page 71

Settings
GSM network
Auto network
You can set your phone to automatically or manually search for
another network when roaming. When Auto network is on, the phone
will automatically select a new network in order to maintain optimum
network availability.
d Main menu > Settings > GSM network
1. [192] to scroll to Auto network 7 [5] (Change) to switch
on/off
Note: National regulations may not permit roaming in your home region.
New network
You can manually select a network that is available in your current
location.
d Main menu > Settings > GSM network > New network
1. “Change network?” 7 [5] (Yes) or [6] (No)
(If yes, go to the next step.)
2. If Auto network is off: [192] to scroll to the required network 7
[5] (Select)
OR
If Auto network is on: “Done” 7 [5] (OK)
68
Page 72

Settings
Network list
The Network list is used when the Auto network is set to on. The
order in the list indicates the search priority. You can edit the list as
required.
d Main menu > Settings > GSM network > Network list
1. [5] (List)
Options
In the Network list, the following options are available:
Store a new network above the highlighted location.
1. [192] to scroll to the required network as an insertion
Insert
Add to end
Delete
point 7 [5] (Options)
2. [192] to scroll to Insert 7 [5] (Options)
3. [192] to scroll to the required network to add to the list
7 [5] (Options) 7 [5] (OK)
Store a new network at the end of the list.
1. [5] (Options)
2. [192] to scroll to Add to end 7 [5] (Options)
3. [192] to scroll to the required network to add to the list
7 [5] (Options) 7 [5] (OK)
Delete the selected network.
1. [192] to scroll to the required network 7 [5]
(Options)
2. [192] to scroll to Delete 7 [5] (Options) 7 [5]
(OK)
Band select
You can select a network band.
d Main menu > Settings > GSM network > Band select
1. [192] to scroll to 900 MHz, 1800 MHz or 900/1800 MHz 7
[5] (Select)
69
Page 73
Settings
Calls
Call Diverts
Voice calls can be diverted to different numbers in different
situations. For example, you can divert calls to your voice mailbox
when you are out of reach.
Calls can be diverted in the following situations:
All voice calls Divert all incoming voice calls.
Not reachable
No reply Divert incoming voice calls if call is not answered.
Busy Divert incoming voice calls when a call is in progress.
d Main menu > Settings > Calls > Call Diverts
1. [192] to scroll to the divert situation 7 [5] (Select)
2. [192] to scroll to Set, Clear or Check status 7 [5] (Select)
(When you select Set, go to the next step.)
3. Enter the phone number to divert to 7 [5] (OK)
OR
To select from Contacts: [5] ( ) 7 [192] to scroll to the
required contact 7 [5] (Select)
OR
To divert calls to the voice mailbox: [6] (Mailbox) to launch the
voice mailbox number
When All voice calls setting is enabled, the divert icon () is displayed
on the Idle display.
To check the status or cancel all the settings:
On step 1, [192] to scroll to Status check or Cancel all 7 [5]
(Select)
Divert incoming voice calls when phone is not in a
coverage area.
70
Page 74

Settings
Call Service
Time/Charge
Check the duration and the remaining units of calls.
Last call Display the date, time and duration of the last call.
All voice calls
Cost left Display the remaining call units available.
d Main menu > Settings > Calls > Call Service > Time/Charge
1. [192] to scroll to Last call, All voice calls or Cost left 7 [5]
(Select)
(When you select All voice calls, go to the next step.)
2. To check the number of calls made and the duration: [192] to
scroll to Outgoing or Incoming 7 [5] (Select)
OR
To check the units of call charge: [192] to scroll to Call meter
7 [5] (Select)
Call waiting
If Call waiting is switched on, another call can be received while on a
call and multiple calls can be made.
d Main menu > Settings > Calls > Call Service > Call waiting
1. [192] to scroll to Set, Clear or Status check 7 [5] (Select)
Display the total duration, number, and call units of all the
outgoing or incoming voice calls.
71
Page 75
Settings
Withhold ID
Withhold ID may already be set to prevent showing your name and/
or number to another phone by the network operator. You can check
the status here.
d Main menu > Settings > Calls > Call Service > Withhold ID
The current status is displayed.
Note: Ask your network operator about the service in details.
Caller’s ID
Caller’s ID allows you to display the caller’s name and/or number on
your display. You can check the status here.
d Main menu > Settings > Calls > Call Service > Caller’s ID
The current status is displayed.
Note: Ask your network operator about the service in details.
72
Page 76

Settings
Charge settings
You can check the service charge settings or reset the settings.
d Main menu > Settings > Calls > Call Service > Charge
settings
1. [192] to scroll to the required setting 7 [5] (Select or
Change)
(If one of the settings except for Auto display is selected, go to
the next step.)
2. [5] (Edit) 7 Enter the PIN2 code 7 [5] (OK)
3. Follow the operation shown below:
Currency
Personal rate
Max cost
Auto display
You can set the currency unit in which your service rate is
determined. Firstly, Personal rate must be entered.
Enter the currency unit (max. 3 characters) 7 [5] (Save)
You can set your personal rate. This is the cost that the
service provider charges for one unit of call time.
[192] to scroll to Per unit: or Per min.: 7 Enter the
value 7 [5] (Save)
You can set the maximum cost of calls allowed.
To set the Display credit:
[192] to scroll to Display credit 7 [6] (Change) to
switch on/off 7 [5] (Save)
To set the Max cost:
[192] to scroll to Max cost 7 Enter the credit limit 7
[5] (Save)
In Idle mode, the cost of the last dialled call is displayed
automatically.
Note: The duration of one unit may vary between peak and off-peak times.
Call charges can be calculated accordingly. However, the actual tariffs
charged by your network operator may not be reflected in the calculation.
73
Page 77

Settings
Line
Your phone has two phone lines if your SIM supports CPHS and
Alternate Line Service.
d Main menu > Settings > Calls > Call Service > Line
1. [192] to scroll to Line 1 or Line 2 7 [5] (Select)
Note: Ask your network operator about service in details.
Send my number
You can choose whether or not to show your name and/or number to
another phone. You can comply with your network’s own setting (see
“Withhold ID” on page 72) if you select Network set.
d Main menu > Settings > Calls > Send my number
1. [192] to scroll to Network set, On or Off 7 [5] (Select)
Note: The status of Withhold ID which is set only by your network operator
does not affect Send my number setting.
Ask your network operator about the service in details.
74
Page 78

Settings
Security
Call bar
Call barring restricts certain calls using a password supplied by your
service provider. You can check or change the status of Call bar.
The following Call bar settings are available:
All outgoing All outgoing calls are barred.
Outgo int’l International outgoing calls are barred.
Out. int’l x home
All incoming All incoming calls are barred.
When roaming
d Main menu > Settings > Security > Call bar
1. [192] to scroll to the required setting 7 [5] (Select)
2. [192] to scroll to Set, Clear or Check status 7 [5] (Select)
(If Set or Clear is selected, go to the next step.)
3. Enter the required password 7 [5] (OK)
To check the status:
On step 1, [192] to scroll to Status check 7 [5] (Select)
To cancel all the settings:
On step 1, [192] to scroll to Cancel all 7 [5] (Select) 7 Enter the
required password 7 [5] (OK)
To change the password:
On step 1, [192] to scroll to Password 7 [5] (Select) 7 Enter
the current password 7 [5] (OK) 7 Enter a new password 7 [5]
(OK) 7 Enter the new password to verify 7 [5] (OK)
International outgoing calls except to your home
country/region are barred.
All international incoming calls when roaming
outside the home PLMN are barred.
Note: Ask your network operator for the password.
75
Page 79

Settings
Codes
Changing the phonecode
You can change the phonecode for enhancing security. See “SIM
lock” on page 78.
d Main menu > Settings > Security > Codes > Change
phonecode
1. Enter a new phonecode 7 [5] (OK)
2. Enter the new code to verify 7 [5] (OK)
To change the phonecode, enter the current phonecode, then repeat the
step 1-2.
Note: Your phonecode must be 6 to16 digits. You are advised to write down
your phonecode. If the phonecode is entered incorrectly 10 times, the phone
will cease to operate permanently.
PIN control
The PIN protects your phone against unauthorised use. If you
enable the PIN, you will be prompted to enter the PIN every time the
phone is switched on.
d Main menu > Settings > Security > Codes > PIN control
1. Enter the PIN code 7 [5] (OK)
2. [5] (Change) to switch on/off 7 [6] (OK)
Note: If the PIN code is entered incorrectly several times (depends on your
SIM), the PIN will be blocked. To unblock the PIN, you must enter your PUK
code. If you enter an incorrect PUK code 10 times, your SIM will be blocked
permanently.
76
Page 80

Settings
Changing PIN/PIN2
You must enable the PIN before changing the code. See “PIN
control” on page 76.
d Main menu > Settings > Security > Codes
1. [192] to scroll to Change PIN or Change PIN2 7 [5]
(Select)
2. Enter the current code 7 [5] (OK)
3. Enter a new code 7 [5] (OK)
4. Enter the new code to verify 7 [5] (OK)
Note: If either PIN or PIN2 is entered incorrectly several times (depends on
your SIM), the phone will be locked and then you will need to enter the PUK
or PUK2 code. If the PUK/PUK2 code is entered incorrectly 10 times, the
phone will cease to operate permanently. All information stored in the SIM
will be lost and the SIM will need to be replaced. Contact the service
provider for more details.
Fixed dial
The Fixed dial feature allows you to limit your outgoing calls to a
certain set of numbers saved in FDN (Fixed Dial Number), which is
located in your SIM. When this function is on, only the Fixed dial
numbers can be dialled, and any attempt to call any other number
will fail. To enter Fixed dial numbers, see “Storing a contact in FDN”
on page 54. When the Fixed dial is on, any manually dialled phone
numbers must be the same as the numbers in the FDN, otherwise
the call cannot be made.
d Main menu > Settings > Security > Fixed dial
1. Enter the PIN2 code 7 [5] (OK)
2. [5] (Change) to switch on/off 7 [6] (OK)
Note: If the PIN2 code is entered incorrectly several times, the PIN2 will be
blocked. To unblock the PIN2, you must enter your PUK2 code. If you enter
an incorrect PUK2 code 10 times, your SIM will be blocked permanently.
77
Page 81
Settings
SIM lock
Once you enable the SIM lock, you will be prompted to enter your
phonecode when you switch on the phone with a different SIM
inserted.
d Main menu > Settings > Security > SIM lock
1. Enter the phonecode 7 [5] (OK)
2. [5] (Change) to switch on/off 7 [6] (OK)
Note: Your phonecode must be 6 to 16 digits. You are advised to write down
your phonecode. If the phonecode is entered incorrectly 10 times, the phone
will cease to operate permanently.
Auto answer
When you use the optional Personal handsfree earpiece, you can
answer a call automatically.
d Main menu > Settings
1. [192] to scroll to Auto answer 7 [5] (Change) to switch on/
off
Any key answer
Calls can be answered by pressing any key (except [w] and [6]
(Reject or Mute)) if you switch on Any key answer.
d Main menu > Settings
1. [192] to scroll to Any key answer 7 [5] (Change) to switch
on/off
78
Page 82

Settings
Auto key lock
The Auto key lock is used to prevent any keys from being pressed
accidentally e.g. when the phone is being carried. This function
automatically turns on shortly after the phone returns to Idle mode.
d Main menu > Settings
1. [192] to scroll to Auto key lock 7 [5] (Change) to switch
on/off
To deactivate Auto key lock when the keypad is locked:
1. [5] 7 “Unlock keypad?” 7 [5] (OK)
Time and date
Settings
You can set the current time and date on your phone.
d Main menu > Settings > Time and date > Settings
1. [192] to select the required setting 7 [5] (Change or Select)
2. Follow the operation shown below:
Display time Choose to display the time in Idle mode.
Before setting the time and date, set the time zone of your
Time zone
Time & date
Date format
Time format
region.
[192] to select the required region 7 [5] (Select) 7
“Daylight saving?” 7 [5] (Yes) or [6] (No) 7 “Set
this city to local” 7 [5] (OK)
Set the time and date.
[5] (Edit) 7 Enter the date 7 [2] 7 Enter the time 7
[5] (Save)
Select the required display format for the date.
[192] to scroll to the required format 7 [5] (Select)
Select the required display format for the time.
[192] to scroll to 12 hours or 24 hours 7 [5] (Select)
79
Page 83

Settings
Power on/off time
The phone can be set to turn itself on/off automatically at a specified
time.
d Main menu > Settings > Time and date
1. [192] to scroll to Power on time or Power off time 7 [5]
(Change)
2. [6] (Change) to switch on/off
3. If you select On: [2] 7 Enter the time (24 hour clock) 7 [5]
(Save)
OR
If you select Off: [5] (Save)
Note: Ensure that Power on time settings will not contravene any
regulations by switching on automatically when in an aircraft, medical facility,
etc.
Defaults
All personal settings are returned to their factory default settings.
d Main menu > Settings > Defaults
1. “Restore default settings?” 7 [5] (Yes) or [6] (No)
Profiles
Profiles menu is available under Settings menu if your SIM card
provides STK services. See “Profiles” on page 94 for details.
80
Page 84

Games
Games menu structure
Hit Mouse .................. 81
Funny Toggle............82
Playing games
Hit Mouse
When you see the mouse, press any key from [A] to [K] as quickly as
possible to hit it. Keep in mind that the dog is not your target.
Example: If you press [G], you will hit the object hidden in the 5th
hole. This game will end automatically and you will be given a score.
This score might be the highest one! Good luck!
d Main menu > Games > Hit Mouse
1. [5] (Options) 7 [192] to scroll to New 7 [5] (Select)
2. [A] - [K] to hit the target
81
Page 85

Games
Funny Toggle
Toggle green and red cards to match all the
faces with as few tries as you can. Press [S],
[F], [H] or [J] to move the cursor, and [G] to
select a card. When all the faces match, you
will be given a score.
d Main menu > Games > Funny Toggle
1. [5] (Options) 7 [192] to scroll to New
7 [5] (Select)
2. [S], [F], [H] or [J] to toggle through the cards
3. [G] to select the card
Options
In each game, the following options are available.
1. [5] (Options)
2. [192] to scroll to the required option 7 [5] (Select)
New Start the game.
Edit Switch Sound or Silent alert on/off.
Level
Top score Show the top score of the game.
Instructions Show the instruction of the game.
Start the game on a level of your choice [192] to scroll
to the required level 7 [5] (Select)
82
Page 86

Browser
Browser menu structure
Start Browser............ 85
Bookmarks................ 86
Settings ..................... 83
Push setting ...................84
Server list ....................... 84
Data connections......87
CSD................................87
GPRS .............................87
GPRS info*.....................87
*
Settings
Setting up to access the Internet
Your phone supports WAP (Wireless Application Protocol) and has a
WAP browser. Connect wirelessly to Mobile Internet and access
information you need such as news, weather reports, stock quotes,
banking, travel information and sport results, etc.
Before connecting to the Internet; (1) you need to subscribe to your
network operator and (2) you must configure an Internet Access
Point. (Your network operator may have already completed the
Internet Access Point connection settings.)
Note: Modifying the preinstalled settings without accurate knowledge may
cause a failure in connection.
Contact your network operator if you can not connect to the Internet even
though you have already subscribed to the service and not modified the
preinstalled settings.
83
Page 87

Browser
d Main menu > Browser > Settings > Server list
1. [192] to scroll to the required server 7 [6] (Edit)
2. [192] to edit the required item 7 [5] (Save)
3. [5] (Launch)
The phone can contain five server settings.
If no settings are present, contact your network operator.
The following information is available for each server setting: Server
name, IP address, IP port, Homepage, Linger time, Connection
(Auto, CSD or GPRS), CSD and GPRS.
Note: You need to configure CSD or GPRS before configuring the server
settings. See “Data connections” on page 87.
Push setting
WAP Push messages inform you of updated news, sometimes
containing a link to a webpage.
You can set the Push setting to decide how you want to receive
WAP push messages from your network operator.
d Main menu > Browser > Settings > Push setting
1. [192] to scroll to Always all, Always none or Limited SMS
centre 7 [5] (Select)
(If Limited SMS centre is selected, go to the next step.)
2. Enter the SMS centre number 7 [5] (Save)
You can select the country/region code by pressing [6] (+List) before
entering the number.
84
Page 88

Browser
Starting the Browser
The first time the Browser is activated, the Home page will be
displayed. During an Internet connection, you can add bookmarks,
reload pages, view active session details, etc.
d Main menu > Browser > Start Browser
To scroll webpages:
1. [5] to go to the next webpage
OR
[w] to return to the previous webpage
Options
While viewing the Browser, the following options are available by
pressing [T].
Home Jump to the home page which is pre-defined in Settings.
Bookmarks
Save Items Save items in the currently displayed page.
Reload Reload and update the currently displayed page.
Go To URL Enter a URL and jump to the page.
Show URL Show the URL of the currently displayed page.
SnapShots
Advanced
Settings
Select one of your bookmarks and jump to the page, or
bookmark the currently displayed page.
Capture the screen image of the currently displayed
page.
The following advanced options are available: Inbox,
Restart Browser and About....
The following settings are available: Scroll Mode,
Downloads, View Title Region, Security and Send
Referrer.
85
Page 89

Browser
Bookmarks
Once you bookmark your favourite webpage, you can quickly jump
to the page.
Bookmarking a page
You can save web addresses to your list of bookmarks.
d Main menu > Browser > Bookmarks
1. [192] to scroll to <Empty> 7 [5]
(Options)
2. [192] to scroll to Edit 7 [5] (Select)
3. Enter the title and URL 7 [5] (Save)
Viewing a bookmarked page
d Main menu > Browser > Bookmarks
1. [192] to scroll to the required bookmark
2. [6] (Launch)
OR
[5] (Options) 7 [192] to scroll to Launch 7 [5] (Select)
To delete a bookmark:
On step 2, [5] (Options) 7 [192] to scroll to Delete 7 [5]
(Select) 7 [5] (OK)
86
Page 90

Browser
Data connections
Data connection settings
You must configure the Data connections (GPRS and CSD) before
configuring the server settings.
d Main menu > Browser > Data connections
1. [192] to scroll to CSD or GPRS 7 [5] (Select)
2. [192] to scroll to the required server 7 [5] (Select)
3. [192] to edit the required information 7 [5] (Save)
Used to transmit and receive data over telephone
CSD
GPRS
Note: Modifying the preinstalled settings without accurate knowledge may
cause a failure in connection.
Contact your network operator if you can not connect to the Internet even
though you have already subscribed to the service and not modified the
preinstalled settings.
GPRS info
GPRS info displays the size of transferred data and the duration of
the data connection session.
d Main menu > Browser > Data connections > GPRS info
connections.
Information to edit: Server name, Call type (ISDN/
Analogue), Dial number, Login name, Password
Used to transmit and receive data in packets rather than
setting up a continuous channel.
Information to edit: Server name, GPRS APN, Login name,
Password, Authentication (Activate/Deactivate)
87
Page 91

Applications
Applications menu structure
Alarm ......................... 88
Calculator..................89
Currency.................... 90
Rate setting....................90
Rate compute.................90
Alarm
You can set the alarm so that the phone will sound, vibrate and/or
light when the set time is reached.
d Main menu > Applications > Alarm
1. [192] to scroll to the required setting 7
[5] (Options)
2. [192] to scroll to Edit 7 [5] (Select)
3. Time: Enter the time (24 hour clock) 7
[2]
4. Day: [6] (Change) 7 [192] to scroll to
a day of the week 7 [5] (Change)
5. [6] (Back) 7 [2]
6. Status: [6] (Change) to select Activate or Deactivate 7 [2]
7. Description: Enter the description 7 [5] (Save)
The alarm set indicator () appears on the Idle display.
To set the Indicator light to be illuminated when the set time is
reached, see “Illumination” on page 65.
88
Page 92
Applications
Options
When the required setting is highlighted, the following options are
available by pressing [5] (Options): Activate
Delete and Delete all.
Note: If you are on a call when the set time is reached, the alarm will sound.
Ensure that Alarm settings will not contravene any regulations by switching
on automatically when in an aircraft, medical facility, etc.
/Deactivate, Edit,
Stopping the alarm
1. Press any key or [5] (Off) to stop the alarm
OR
[6] (Pause) to pause the alarm and start again after 5 minutes
Calculator
You can use the 4-function calculator (addition, subtraction,
multiplication and division) to make simple arithmetic operations.
d Main menu > Applications > Calculator
1. Enter a number
To enter a decimal point: [r]
To enter a minus sign: [e]
2. [192] to select the arithmetic operation
3. Enter a number
4. [5] (=) to calculate
89
Page 93

Applications
Currency converter
Conversion rate setting
The currency converter enables you to convert from/to a home
currency using a conversion rate that you enter.
Before beginning conversions, choose a base currency and enter
the conversion rate. The base currency rate is set to 1.
d Main menu > Applications > Currency > Rate setting
1. Enter the conversion rate next to the red arrow 7 [5]
(Compute)
To enter a decimal point: [r]
You can change the base currency by pressing [192].
2. [5] (Save)
Converting one currency to another
After setting the conversion rate, you can start converting an amount
of money in one currency into another.
d Main menu > Applications > Currency > Rate compute
1. Enter the amount in your home currency to convert into the
amount in the foreign currency 7 [5] (Convert)
To enter a decimal point: [r]
You can also enter the amount in the foreign currency to convert into the
amount in your home currency if you change the base currency by
pressing [192].
90
Page 94

My Media
My Media menu structure
Pictures ..................... 91
Sounds ...................... 91
User 1 - 4 ................... 92
Shortcuts...................92
Memory status ..........92
Pictures
Pictures downloaded from the Internet are stored in the Pictures
folder.
d Main menu > My Media > Pictures
1. [192] to scroll to the required picture 7 [5] (Select)
2. [192] to scroll to the required option 7 [5] (Select)
The following options are available: View, Set as wallpaper,
Rename, Copy, Cut, Paste, Delete, Delete all and Properties.
Sounds
Downloaded sounds are stored in the Sounds folder.
d Main menu > My Media > Sounds
1. [192] to scroll to the required sound 7 [5] (Select)
2. [192] to scroll to the required option 7 [5] (Select)
The following options are available: Set as ringtone, Rename,
Copy, Cut, Paste, Delete, Delete all and Properties.
91
Page 95

My Media
User defined folders
You can also store your pictures and sounds in the user defined
folders.
d Main menu > My Media > Pictures or Sounds
1. [192] to scroll to the required file 7 [5] (Select)
2. [192] to scroll to Copy 7 [5] (Select)
3. [6] (Back)
4. [192] to scroll to User 1, User 2, User 3, or User 4 7 [5]
(Select)
5. [5] (Select) to scroll to Paste 7 [5] (Select)
Shortcuts
It is possible to make a shortcut to a specific menu so that you can
access the menu directly from Idle mode.
The following menus are available: Alarm, Bookmarks, Create
new, Inbox, Archive, Sounds, Illumination, My Media, Profiles,
Alerts, Calendar, Currency and Calculator.
d Main menu > My Media > Shortcuts
1. [192] to scroll to the required menu 7 [5] (Change) to
switch on/off
Note: Profiles may not appear in Shortcuts list depending on the
customisation of your phone.
Memory status
The available memory space and used memory space for storing
multimedia data are displayed.
d Main menu > My Media > Memory status
92
Page 96

Calendar
You need to set the date before viewing the calendar (see “Time and
date” on page 79).
d Main menu > Calendar
1. Press the following keys to scroll to the
required date, week, month or year
Date: [F] or [H]
Week: [192], [S] or [J]
Month: [e] or [r]
Year : [A] or [D]
93
Page 97

Profiles
Profiles menu structure
Normal .......................94
Note: The menu is subject to
Quiet .......................... 94
Meeting...................... 94
Outdoor .....................94
Headset .....................94
change. If your SIM includes
STK, STK replaces Profiles
menu, and Profiles menu
appears under Settings
menu.
Profiles
Activating a profile
You can switch among different profiles in your phone, each with a
distinct combination of alert method, ringtone, etc. Profiles are set up
for use in the following environments:
Normal For everyday settings.
Quiet For formal occasions.
Meeting For meetings.
Outdoor For noisy environments.
Headset Ringing with vibration when it is difficult to hear the ringtone.
d Main menu > Profiles
1. [192] to scroll to the required profile 7 [5] (Options)
2. [192] to scroll to Activate 7 [5] (Select)
94
Page 98

Profiles
Setting a profile
You can customise a profile by changing the alerts, ring volume,
warning tone, and/or brightness.
d Main menu > Profiles
1. [192] to scroll to the required profile 7 [5] (Options)
2. [192] to scroll to Edit 7 [5] (Select)
3. [192] to scroll to Alerts, Vol ume , Warning tone or
Brightness 7 [5] (Select)
Alerts
Volume
Warning tone Switch on/off the warning tone.
Brightness
See “Alerts” on page 64 for the instruction on
selecting an alert.
See “Volume” on page 62 for the instruction on
adjusting a ring volume.
See “Brightness” on page 66 for the instruction on
adjusting the brightness.
95
Page 99

Accessories
The following accessories are available for your Panasonic phone.
Travel charger
Carry this wherever you go, so you can always recharge your
battery.
(EB-CAA210 EU)
Battery (EB-BSA210)
Double your talk time by having a spare battery.
Personal handsfree (EB-EMG70)
Talk and move while keeping your hands free, by
using a personal handsfree. Put the ear piece in your
ear and the adaptor in the side of the handset, and
talk.
(EB-CAA210 UK)
96
Page 100

Troubleshooting
Should any problem persist, contact your dealer.
Problem Cause Remedy
Phone will not
switch on.
Extremely short
battery life for a
new battery.
Short battery life
for an old
battery.
The battery level
indicator does
not appear and
the phone
cannot be
switched on
when charging.
Battery fails to
charge.
The network you are using
and the condition of the
battery can affect battery
life.
The battery has worn out. Replace with a new fully
The battery is not
attached to the phone or
the battery has been
deeply discharged.
The battery is not
attached to the phone.
The battery was
connected to the phone
after the charger was
connected.
Check that the battery is
charged and correctly
connected to the phone.
charged battery.
Leave the phone charging
the battery for a few
minutes before the battery
level indicator appears and
you attempt to switch the
phone on.
Ensure the battery is fitted
to the phone prior to
commencing charging.
97
 Loading...