

Panasonic 9TGCF-293A, 9TGCF-295A Users Manual
Starting Up/Shutting Down
Starting Up
3
Power Switch
2
1
Power Indicator
Latch
POWER
1
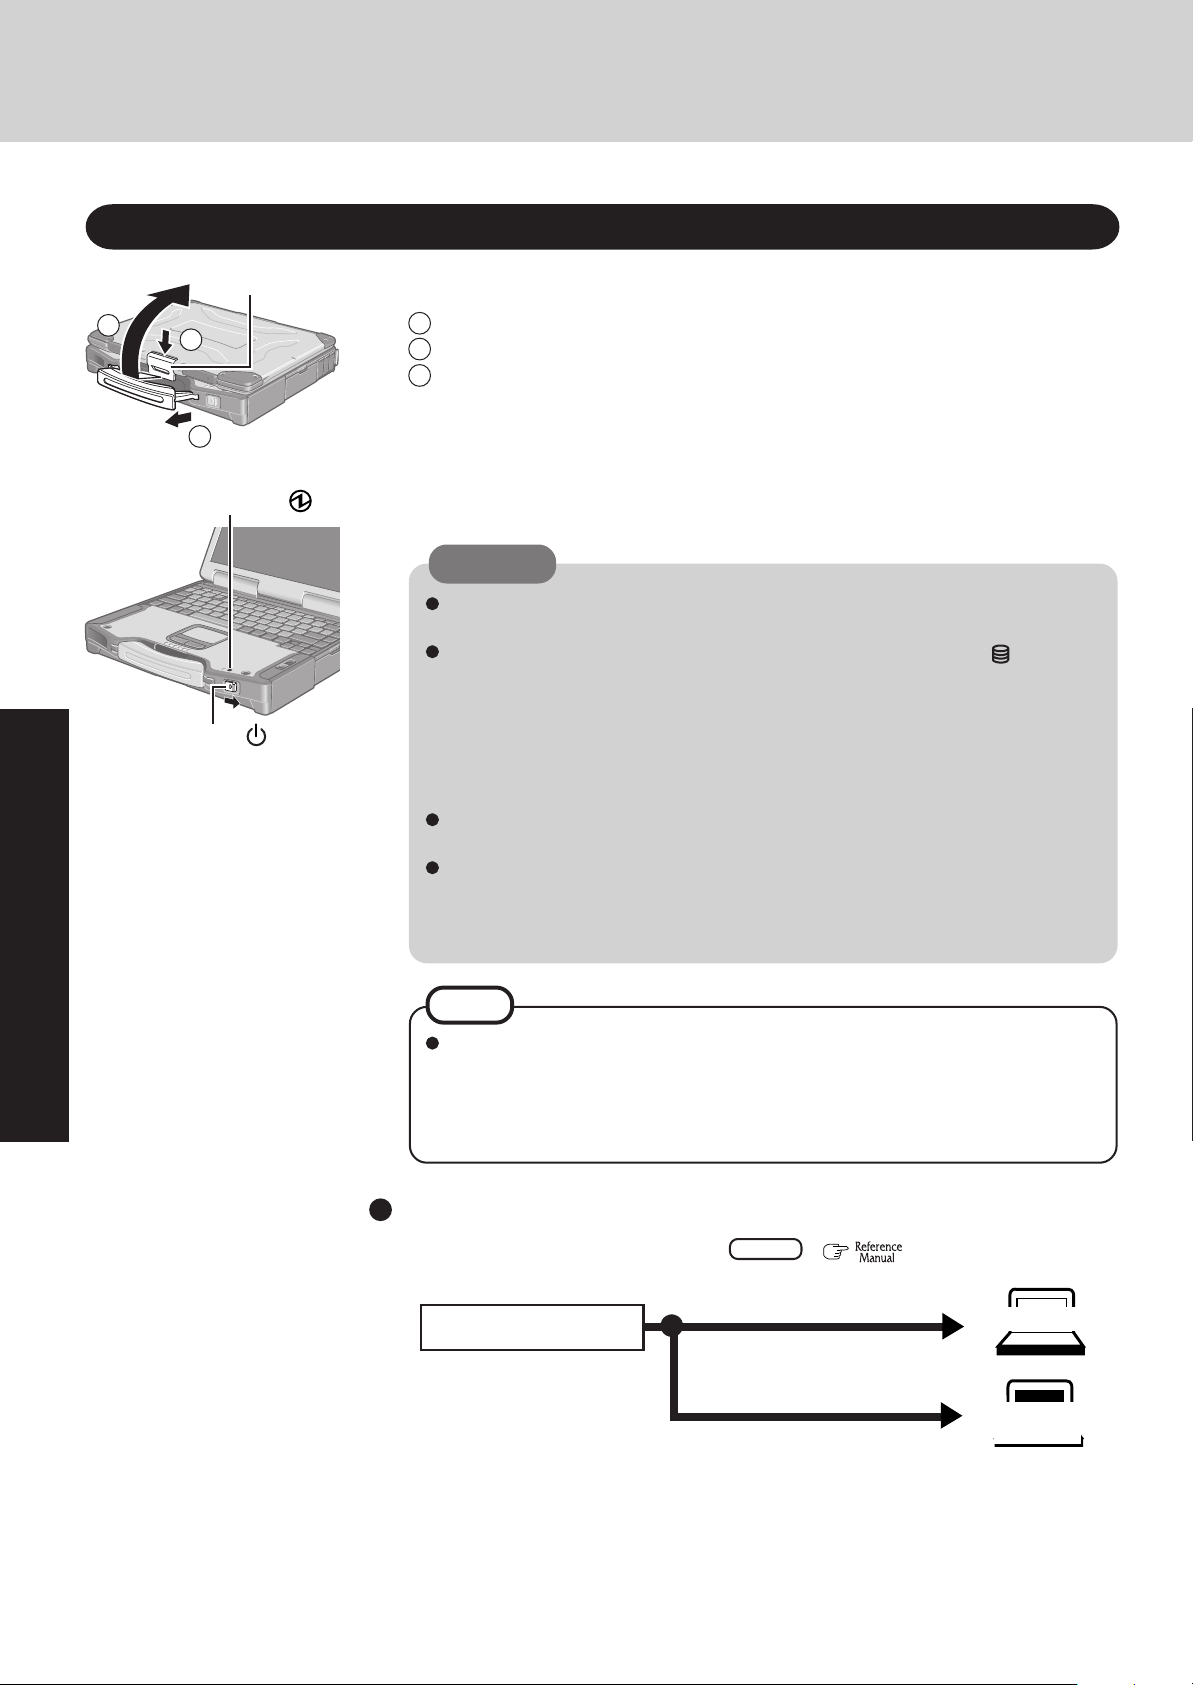
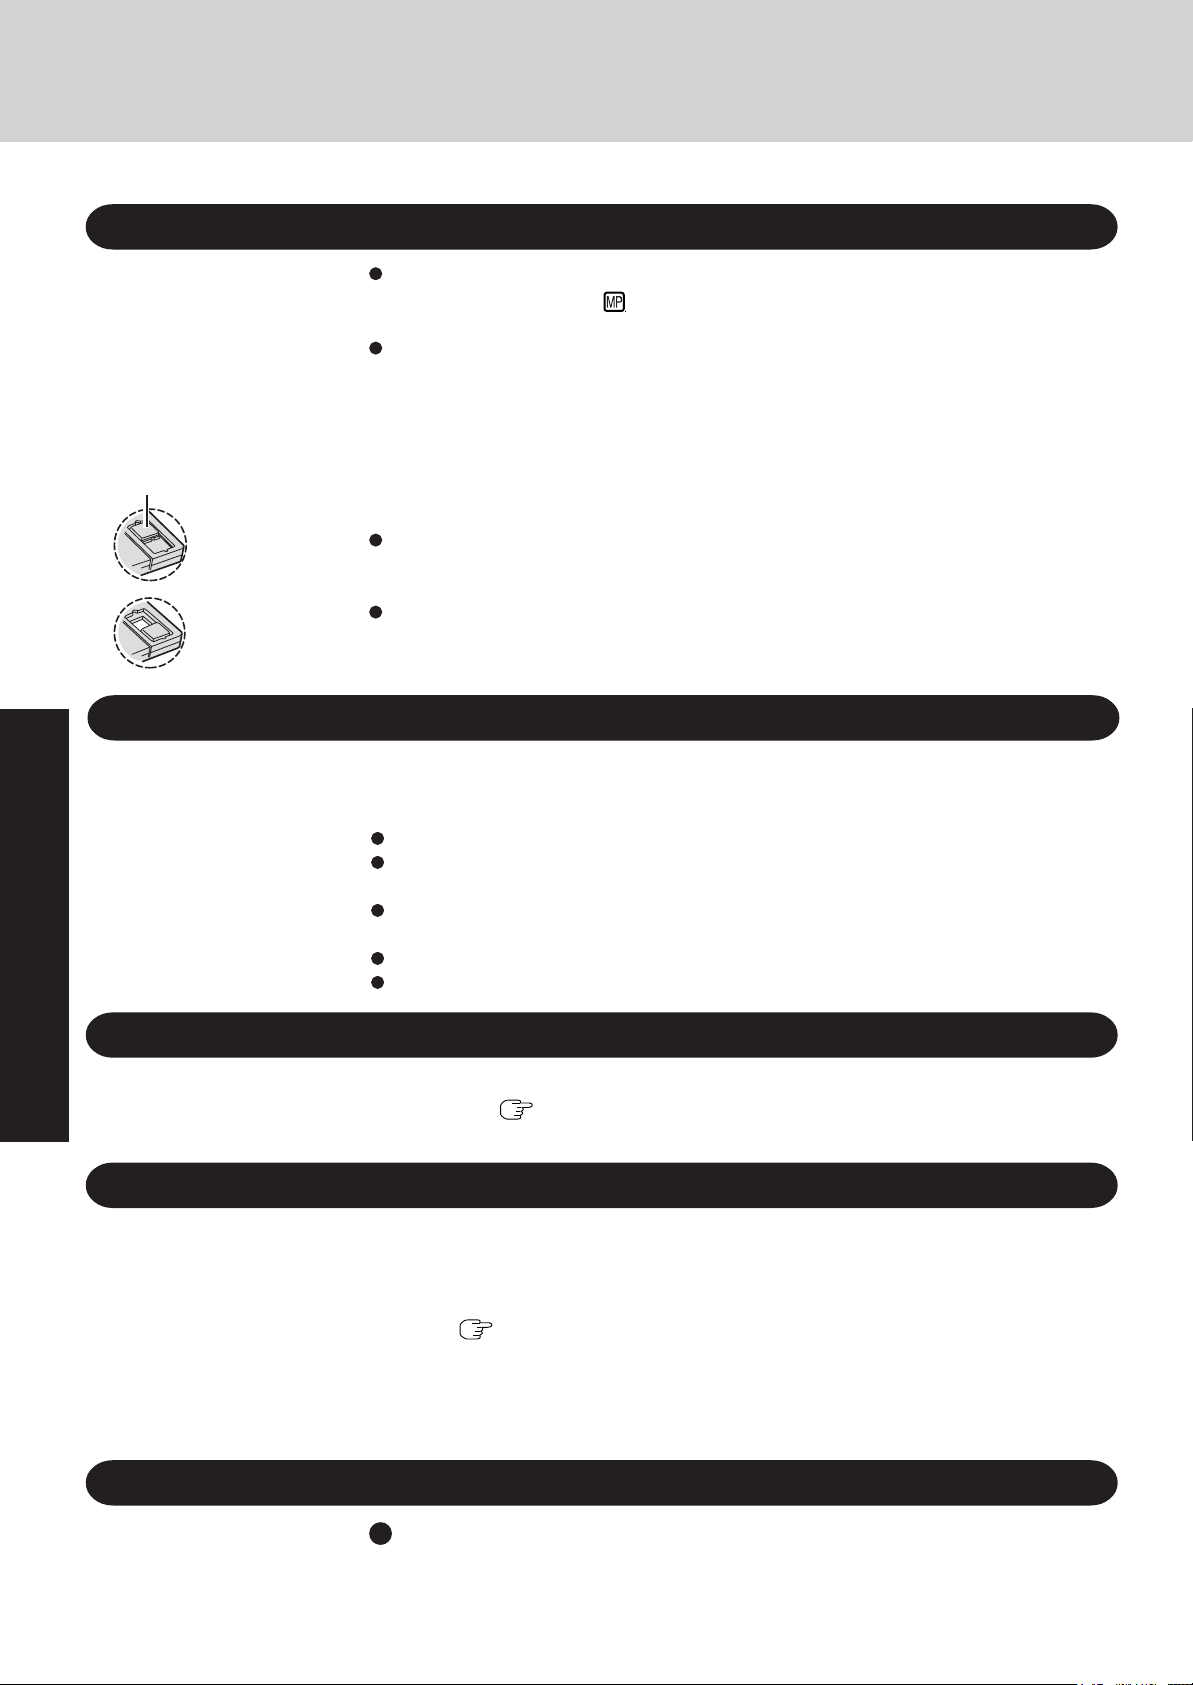
Open the display.
1 Pull the carrying handle forward.
2 Press the latch as illustrated.
3 Lift up the latch and open the display.
2
Turn your computer on.
Slide the power switch and hold it for approximately one second until the power indicator
turns on before releasing it.
CAUTION
Under the condition that both the AC adaptor and the port replicator are not connected, the power will not go on if the display is closed.
While booting, avoid the following until the hard disk drive indicator ( ) has turned
off.
• Connecting or disconnecting the AC adaptor.
• Touching the power switch.
• Performing any keyboard, touch pad, touchscreen (only for models with touchscreen), or external mouse operations.
• Closing the display.
Once the computer is powered off, you must wait at least ten seconds before powering it on again.
When the CPU temperature rises, the computer may not power on to prevent the
CPU from overheating. Should this happen, allow the computer to cool down then
switch the power on again.
If the computer still does not power on, contact Panasonic Technical Support.
Operation
NOTE
When the power is turned on in a low-temperature environment, sometimes the
message “Warming up the system. Please wait...” is displayed (up to 20 minutes) or
the battery indicator alternately blinks green and orange. This function is designed
to prevent hard disk drive malfunctions that may occur at low temperatures. Wait
for the computer to start up.
If [Enter Password] is displayed
Enter your password*1 and press Enter . ( “Security Measures”)
The correct password
Enter Password [ ]
Three incorrect attempts
or
No password for about a minute
Will Not Start
*1Supervisor Password or User Password set in the Setup Utility (not
the Windows password).
Will Start
(Power off)
16

3
Log on to Windows.
After confirming that the hard disk drive indicator ( ) has turned off, select the user and
input the password, then select
not operate.
4
Select your application.
You are able to start working on your computer.
NOTE
The power saving function is factory set, so if there is no input from a key, the touch pad,
the touchscreen (only for models with touchscreen) or an external mouse (when one is
connected) for a certain interval of time, the power to the LCD and hard disk may be
turned off. The LCD will resume operation when the touch pad, the touchscreen (only
for models with touchscreen) or an external mouse (when one is connected) is used or a
key is pressed.
The power to the LCD may be turned off even when an application software is being
installed. In this case, because it is conceivable that a selection dialog box will be shown,
do not press Space or Enter to attempt to resume from this condition as doing
so may trigger a selection, but instead, press a key unrelated to the direct triggering of a
selection, like Ctrl .
In addition, when the computer is left alone, it automatically enters the standby or hibernation mode. The computer will resume by sliding the power switch. (
“Standby/Hibernation Functions”)
. Until the correct password is entered, the computer will
Operation
17

Starting Up/Shutting Down
Shutting Down (power off your computer)
1
Save important data and close each application.
2
Select [start] - [Turn Off Computer].
3
Select [Turn Off].
Your computer will power off automatically.
Restarting your computer (without shutting down)
Select [Restart].
To shut down using the keyboard;
Press , U , and select [Turn Off] with U .
CAUTION
Do not do the following during the shutdown/restart procedure.
• Connecting or disconnecting the AC adaptor.
• Touching the power switch.
• Performing any keyboard, touch pad, touchscreen (only for models with touchscreen), or external mouse operations.
• Closing the display.
Operation
NOTE
To quickly resume computer operation after shutting down,
The standby or hibernation function is available (
Functions”).
When you leave the computer or interrupt your work...
If you use the “Standby” or “Hibernation” function, then when you turn on the
power next time, the application software and files you were using before will be
displayed, and you can restart the same operations immediately ( “Standby/
Hibernation Functions”).
4
Close the display until the latch clicks into place.
“Standby/Hibernation
18
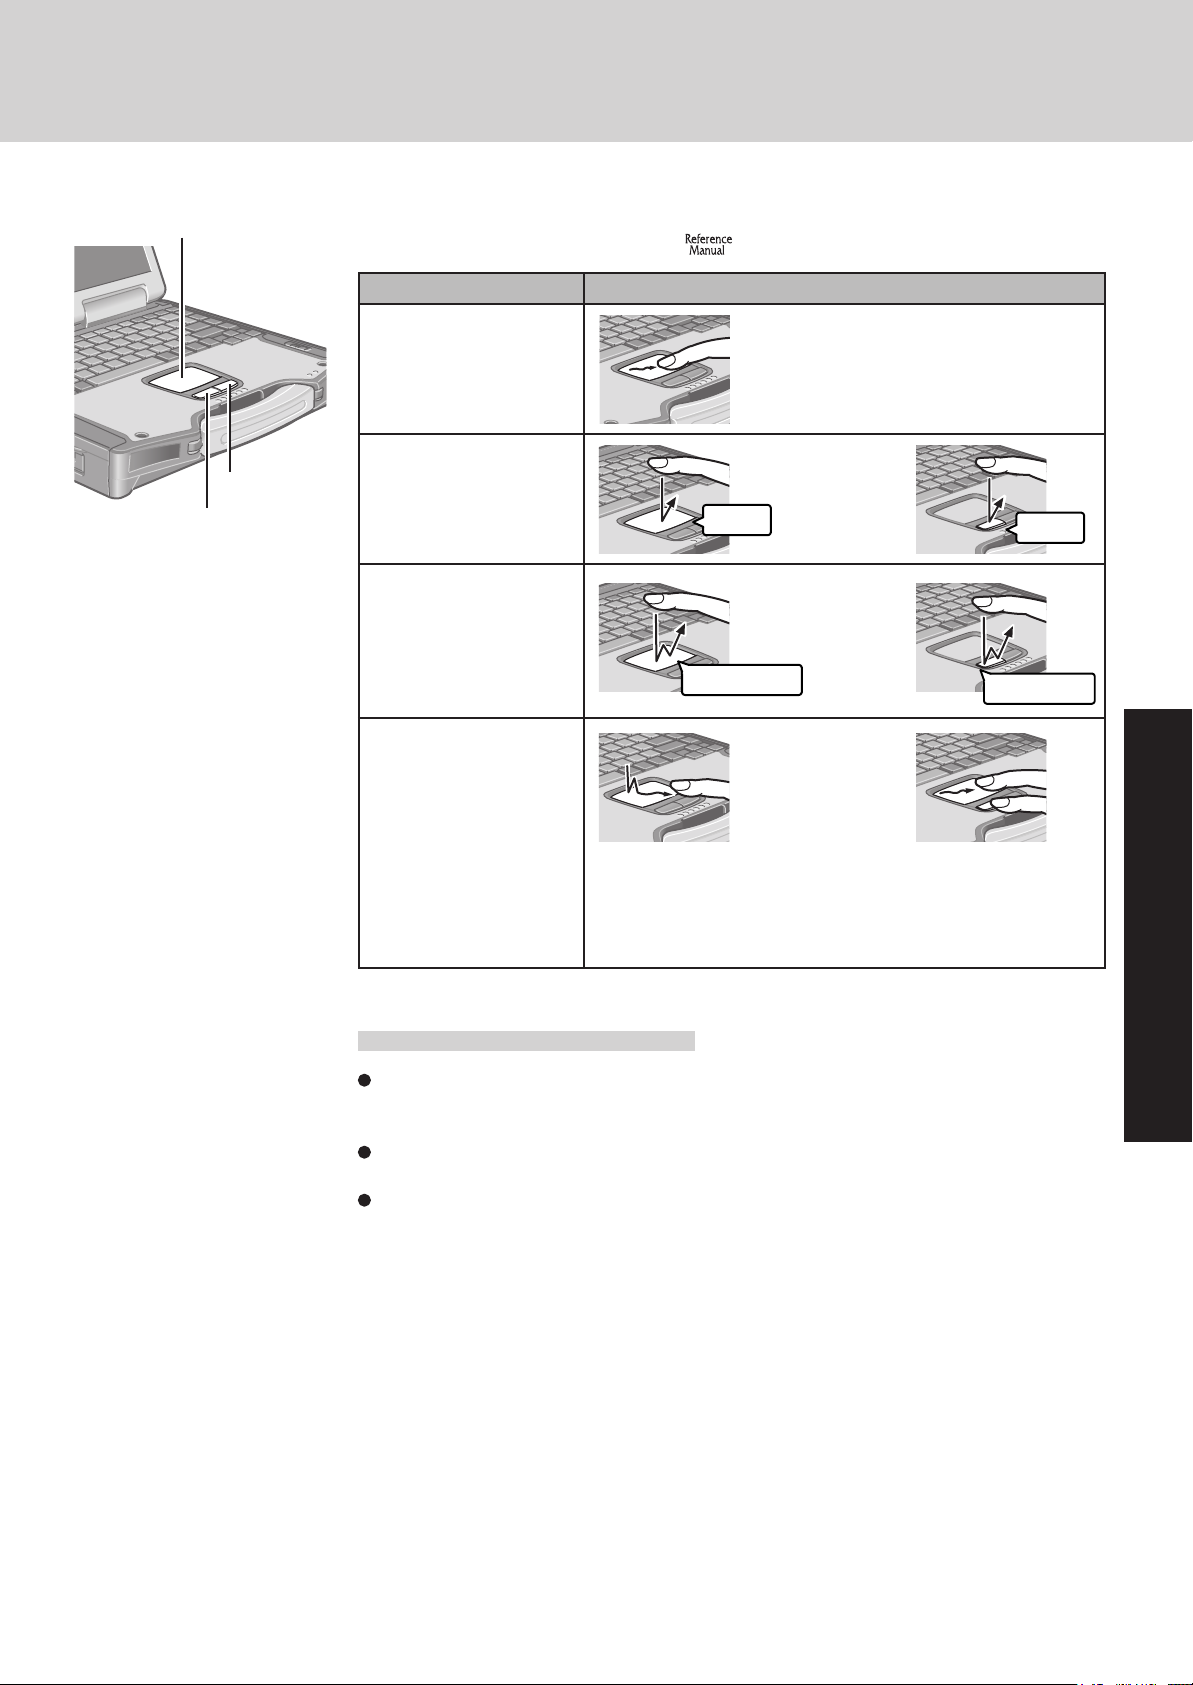
Touch Pad (Basic Operation)
Work Surface
Right Button
Left Button
Use the touch pad to move the cursor on the screen and perform computer operations. For
instructions on how to operate, refer to
Function
Moving the Cursor
Tapping/Clicking
Double-Tapping/
Double-Clicking
Dragging
Touch Pad Operation
“Touch Pad”.
Move the tip of your finger lightly over
the surface.
tapping
double-tapping
or
clicking
or
double-clicking
or
Two quick taps, but on the
second tap leaving your
finger down (applying
pressure) and moving it on
the work surface.
While holding down
the button, moving
your finger on the
work surface.
Handling the Touch Pad
By design the touch pad is to be used with a finger tip only. Do not place any object on the
work surface or press down forcefully with sharp-pointed objects (e.g., nails) or hard objects that can leave marks (e.g., pencils and ball point pen).
Try to avoid having any harmful substances such as oil, come in contact with the touch pad.
The cursor may not work properly in such cases.
When the touch pad becomes dirty:
Wipe to remove dirt by using a dry soft cloth such as gauze or a soft cloth first applied with
detergent diluted with water and then thoroughly wrung.
Do not use benzene, thinner, or rubbing alcohol. Doing so may adversely affect the surface,
e.g., discoloration. In addition, do not use commercially-available household cleaners and
cosmetics, as they may contain components harmful to the surface.
Operation
19
Reference Manual
The Reference Manual and the Important Tips can be accessed on your computer. When a
printer is connected, these manuals can also be printed.
Reference Manual
The Reference Manual explains functions for you to make greater use of the computer, such
as how to add peripheral devices, how the Setup Utility works, and other useful information.
(Refer to the cover of this manual for a list of the main contents included.)
How to access the Reference Manual
Select [Reference Manual] in [start].
Important Tips
Important Tips provides information on how to maximize use of the battery pack, which is
necessary for computing away from your home or office.
<Only for models with touchscreen>
It also offers helpful explanations on how to use the touchscreen more effectively.
How to access the Important Tips
Select
Important Tips can also be accessed from [start] - [All Programs] - [Panasonic] - [OnLine Manuals] - [Important Tips].
on the desktop.
Operation
When the Reference Manual or Important Tips is started up for the first time, the License Agreement of the Adobe Reader may be displayed. If it is displayed, after reading the agreement, select
[Accept] to access the Reference Manual or Important Tips.
Refer to Adobe Reader Help to use the Adobe Reader.
NOTE
Illustrations may be difficult to view depending on the magnification. If the illustration
is too small, magnify the display.
If a printer is connected, we recommend printing the pages required. The illustrations
and display samples may not be printed with a high quality.
20

Useful Information
Usage Environment
Environment
Operation: Temperature: 5 °C to 35 °C {41 °F to 95 °F}
Humidity : 30% to 80% RH (No condensation)
Storage: Temperature: -20 °C to 60 °C {-4 °F to 140 °F}
Humidity : 30% to 90% RH (No condensation)
Even within the temperature and humidity ranges noted above, using the computer for
long periods of time in an environment with exceptionally low or high temperatures or
high humidity may result in deterioration of the product, which can lead to a reduction in
product life.
NOTE
Only use the computer within the allowable temperature range.
When the computer is left powered on in a low temperature environment, set [Turn off
hard disks] to [Never] in the following menu to avoid damage to the hard disk drive.
[start] - [Control Panel] - [Performance and Maintenance] - [Power Options] - [Power
Schemes]
Handling
Places not to use your computer
Such areas may result in damage to the computer.
Areas with electronic equipment
These areas may interfere with your display or cause your computer to produce strange
sounds.
Areas with extremely high/low temperatures
Do not leave things near the computer that are sensitive to heat. During operation, the
computer may become warm.
Before putting the computer away, be sure to wipe off any moisture.
Operation
This computer has been designed so as to minimize shock to the LCD and hard disk drive, the
leakage of liquid (e.g., water) on to the keyboard, etc., but no warranty is provided against such
trouble. Therefore, as a precision instrument, be extremely careful when handling.
When carrying the computer, be sure to keep to the following:
Turn off the computer.
Remove all external devices, cables, and PC Cards sticking out of the computer (see the
figure on the left) before transporting the computer.
Do not drop or hit your computer against solid objects.
Do not place the computer upright or allow it to tip over. When the computer receives
extremely strong shock after falling, the hard disk or floppy disk drive, etc., may become
inoperable.
Do not carry the computer while the display is open, or carry it by gripping the display.
Do not put anything (e.g., a piece of paper) between the display and keyboard.
When taking an airplane, always carry your computer with you. Never check it in with
luggage. Before using the computer inside an airplane, we recommend asking the airlines
regarding their policy on this issue.
Do not leave a disk in the drive while transporting your computer.
When transporting spare batteries inside a package, briefcase, etc., it is recommended that
the batteries be stored in a plastic bag.
We recommend the following:
Preparing a fully charged battery pack (and optional charger, if possible).
Making backup copies on discs and carrying them with you.
21

Useful Information
Maintenance
Display
<Models with touchscreen>
Use the Soft Cloth included with the computer. (For more information, refer to “Suggestions
About Cleaning the LCD Surface” that come with the Soft Cloth.)
If the Protective Film becomes damaged, it may be time to replace your Protective Film. The
Protective Film is a disposable item. To find out the model number of your Protective Film,
contact Panasonic Technical Support. (For more information, refer to the “Operating Instructions” that come with the Protective Film.)
CAUTION
Do not touch or use a touchscreen before you re-attach a Protective Film, as you may
leave a mark or a scratch on the touchscreen.
<Models without touchscreen>
Avoid using water when cleaning the panel. Ingredients included in water may leave residue
and reduce readability of the screen.
<When cleaning dust/dirt>
Avoid rubbing off dust/dirt with cloth since it may leave scratch on the screen.
Sweep dust/dirt with fine brush, then wipe it with “dry” soft cloth used for cleaning glasses.
<When cleaning oily surface>
Apply camera lens cleaner on a soft gauze and clean it with gentle force. Then, wipe with dry
soft cloth used for cleaning glasses.
Operation
Security Center/Antivirus Protection
Areas excluding the display
Wipe these areas with a soft cloth, after applying water or detergent diluted with water to the
soft cloth and firmly wringing out excess water.
CAUTION
Do not use benzene, thinner, or rubbing alcohol. Doing so may adversely affect the surface, e.g., discoloration. In addition, do not use commercially-available household cleaners and cosmetics, as they may contain components harmful to the surface.
Do not directly add or spray water or detergent. If liquid enters the inside of the computer, it may cause it to work improperly or be damaged.
Use the Windows Security Center function to protect Windows from damage by computer
viruses, etc.
Windows Security Center
What is Windows Security Center?
The Windows Security Center allows centralized management of Windows security information, and monitors antivirus measures and other Windows security settings to ensure
optimum safety.
Use the Windows Security Center function to protect your computer from damage by viruses, etc.
Select [start] - [Control Panel] - [Security Center] to display the current settings for the
following security functions.
• Windows Firewall
A security system for protecting the computer from unauthorized access via the Internet
or other external networks.
The firewall regulates the data exchanged between the computer and the external network, so that only approved data can pass through.
At the time of purchase, the Windows Firewall is set to be enabled.
22
• Automatic Updates
If your computer is connected to the Internet, this function regularly checks whether security updates and other important updates have been made available, and automatically
installs these updates in their latest conditions.
• Virus Protection
This function regularly checks whether antivirus software has been installed in the computer, and whether the version of that software is the latest version available.
If the message “Your computer might be at risk” is displayed
Computer Viruses
Windows Update
Read the message, select
This message, which the Windows Security Center (
related settings regularly, will be displayed until the settings are made more properly.
(red icon) on the taskbar, and make the appropriate settings.
page 22) displays to confirm the security-
NOTE
This message does not indicate an error. You can use the computer while the message is
displayed. However, in order to operate the computer more safely, we recommend making the appropriate measures to reduce damage from virus and other attacks, thus avoiding the appearance of this message.
Users are advised to purchase the latest versions of virus protection software and use
them regularly.
We recommend you run the software:
• When booting your computer.
• After receiving data.
We recommend that you check data received on disks or from external sources, such as data
downloaded from the Internet, e-mail, etc. (For compressed files, uncompress them before
running a check).
You can use the latest patches and service packs for Windows with the following menus.
Do not apply “Driver Updates” even if a message to update a driver appears. If a driver
update is required, contact to Panasonic Technical Support. (
[start] - [All programs] - [Windows Update]
page 44)
Operation
Saving Data on the Hard Disk
Do not expose your computer to shock.
Use care when handling your computer, shock may damage your hard disk or make your
software applications and data unusable.
Do not power off your computer while software applications are running or hard disk
drive indicator (
Properly shut Windows down to avoid problems.
Save all valuable data to floppy disks, etc.
Backing up data to floppy disks, etc. will limit damage should trouble occur to your computer or should you inadvertently change or erase data.
Use the security function for all important data. ( “Security Measures”)
Hard Disk Lock
When the Hard Disk Lock is set to [Enable], it is impossible to read/write data from/to the
hard disk when the hard disk is installed in a different computer, since a password is also set
for the hard disk. When the hard disk is returned to the original computer, you can read and
write data as before. In this case, however, make the settings in the Setup Utility exactly the
same as they were before the hard disk was removed. (Note that this Hard Disk Lock does
not guarantee complete protection of data.) (
) is on.
“Security Measures”)
23
Useful Information
Saving Data on Floppy Disks
Do not power down your computer or press the disk eject button while the Multimedia
pocket device indicator (
Doing so may damage the data on the floppy disk and render the floppy disk useless.
Use care when handling floppy disks.
To protect the data on your floppy disks or to prevent a floppy disk from becoming stuck in
your computer, avoid the following:
• Sliding the shutter on the floppy disk manually.
• Exposing the floppy disk to a magnetic field.
Write-protect Tab
Write Enable
Write Disable
• Storing the floppy disk in locations prone to high temperatures, low pitched noise, dampness, or dust.
• Applying more than one label on the floppy disk.
Confirm the contents of a floppy disk before formatting it.
Confirm that no important data is on the floppy disk, because all data on the floppy disk will
be erased.
Use the write-protect tab.
This is
a must for preserving important data. This prevents your data from being erased or overwrit-
ten.
) is on.
When Using Peripheral Devices
Operation
When Changing Hard Disk Partitions
When Disposing of or Transferring Ownership of This Device
Pay strict attention to the following points to avoid damage to the computer, peripheral devices,
cables, etc. Also, in addition to following this manual and the Reference Manual, carefully read
the instruction manuals for the peripheral devices being used.
Use only peripheral devices that conform to the computer’s specifications.
Connect the devices properly, paying close attention to the condition and position of the
connectors.
If a connection cannot be made easily, do not apply undue force; check once more to confirm
the condition and position of the connector (alignment of pins, etc.) .
If the connector has holding screws, fasten the screws firmly.
Do not carry the computer with cables attached, and do not pull on the cables forcefully.
When using the hard disk backup function, divide the hard disk into partitions when a backup
area is created.(
backup area, the backup area cannot be created.
When disposing of or transferring ownership of this device, erase all data on the hard disk in order
to prevent the theft of hard disk data. Even if you delete data or initialize the hard disk through
normal Windows commands, data can still be read using special software. In order to erase all
data, either have the data erased by a specialist (at a charge) or use the hard disk data erase utility
(included) (
will be completely erased.)
Also, note that if you transfer ownership of this device without deleting commercial software that you have installed to the hard disk, you may be in violation of the licensing
agreement for that software.
page 37) If you divide the hard disk into partitions before creating the
page 41). (Note that this hard disk data erase utility does not guarantee that data
24
Wireless LAN (only for models with wireless LAN)
To prevent theft of data or unauthorized access to the hard disk
via a wireless LAN.
If you plan to use wireless LAN functions, we recommend that you do so only after making
the appropriate security settings, such as for data encryption.
List of Error Codes
When turning on the computer, if one of the following error codes or messages is displayed, follow the instructions shown below.
If the problem persists, or if the error code or message displayed is not shown here, contact Panasonic Technical Support.
Error Code/Message
0211: Keyboard error
0251: System CMOS checksum
bad - Default configuration used
0271: Check date and time settings
0280: Previous boot incomplete
- Default configuration used
02B0: Diskette drive A error
0613: Serial Port*1 configuration changed
0614: Serial Port*
- device disabled
*1The port name, such as A or B, is
displayed, indicating the conflicting ports.
Press <F2> to Setup
Operating System not found
Extended RAM Module Failed
1
config. error
Action
If an external keyboard or mouse is connected, disconnect these devices.
An error has occurred in the memory that stores the Setup Utility settings. This error occurs
when the memory content is changed through some inadvertent operation by a program or
other function.
Run the Setup Utility and load the default values, then change the settings to the appropriate values as needed.
If the problem persists, the internal clock battery may need to be replaced. Contact Panasonic Technical Support.
The data and time setting are incorrect.
Run the Setup Utility and set the date and time correctly.
If the problem persists, the internal clock battery may need to be replaced. Contact Panasonic Technical Support. (
Startup has failed repeatedly, so the Setup Utility settings have been returned to their default
values, and the computer has been restarted.
Run the Setup Utility and load the default values, then change the settings to the appropri-
ate values as needed.
Disconnect the floppy disk drive and reconnect it. Make sure the drive is secured correctly.
I/O address and IRQ settings are in conflict.
Run the Setup Utility and change the settings in [Advanced] menu so there is no port
conflicts.
Write down the error details and press F2 to run the Setup Utility. Confirm the settings,
and change the settings to the appropriate values as needed.
The OS is not properly installed on the floppy disk or the hard disk that you are trying to boot
from.
If the computer cannot be booted from the floppy disk, check the floppy disk drive to
ensure that the disk is in fact bootable, and change it to another if not.
If the computer cannot be booted from the hard disk, confirm whether the hard disk is
properly recognized in [Information] menu of the Setup Utility.
• If the hard disk is recognized, perform the reinstallation procedure.
• If not, contact Panasonic Technical Support.
If a device is connected to the USB port, disconnect the device, or run the Setup Utility
and set [Legacy USB Support] in [Advanced] menu to [Disable].
If the extended RAM module has not been inserted properly, or if an extended RAM
module other than one matching the specifications has been inserted, a beep will sound
and the message “Extended RAM Module Failed” will be displayed when turning the
power on. In this case, turn the power off, confirm that the extended RAM module meets
the specifications, and reinsert it.
page 44)
Troubleshooting
To run the Setup Utility
1
Restart the computer.
2
Press F2 while [Panasonic] boot screen is displayed soon after the computer begins the startup procedure.
25
 Loading...