

Panasonic 9TGCF-291A, 9TGCF-292A Users Manual
First-time Operation
Read the steps below to help you learn what parts are included, and to gain an understanding of
some basic computer-related operations.
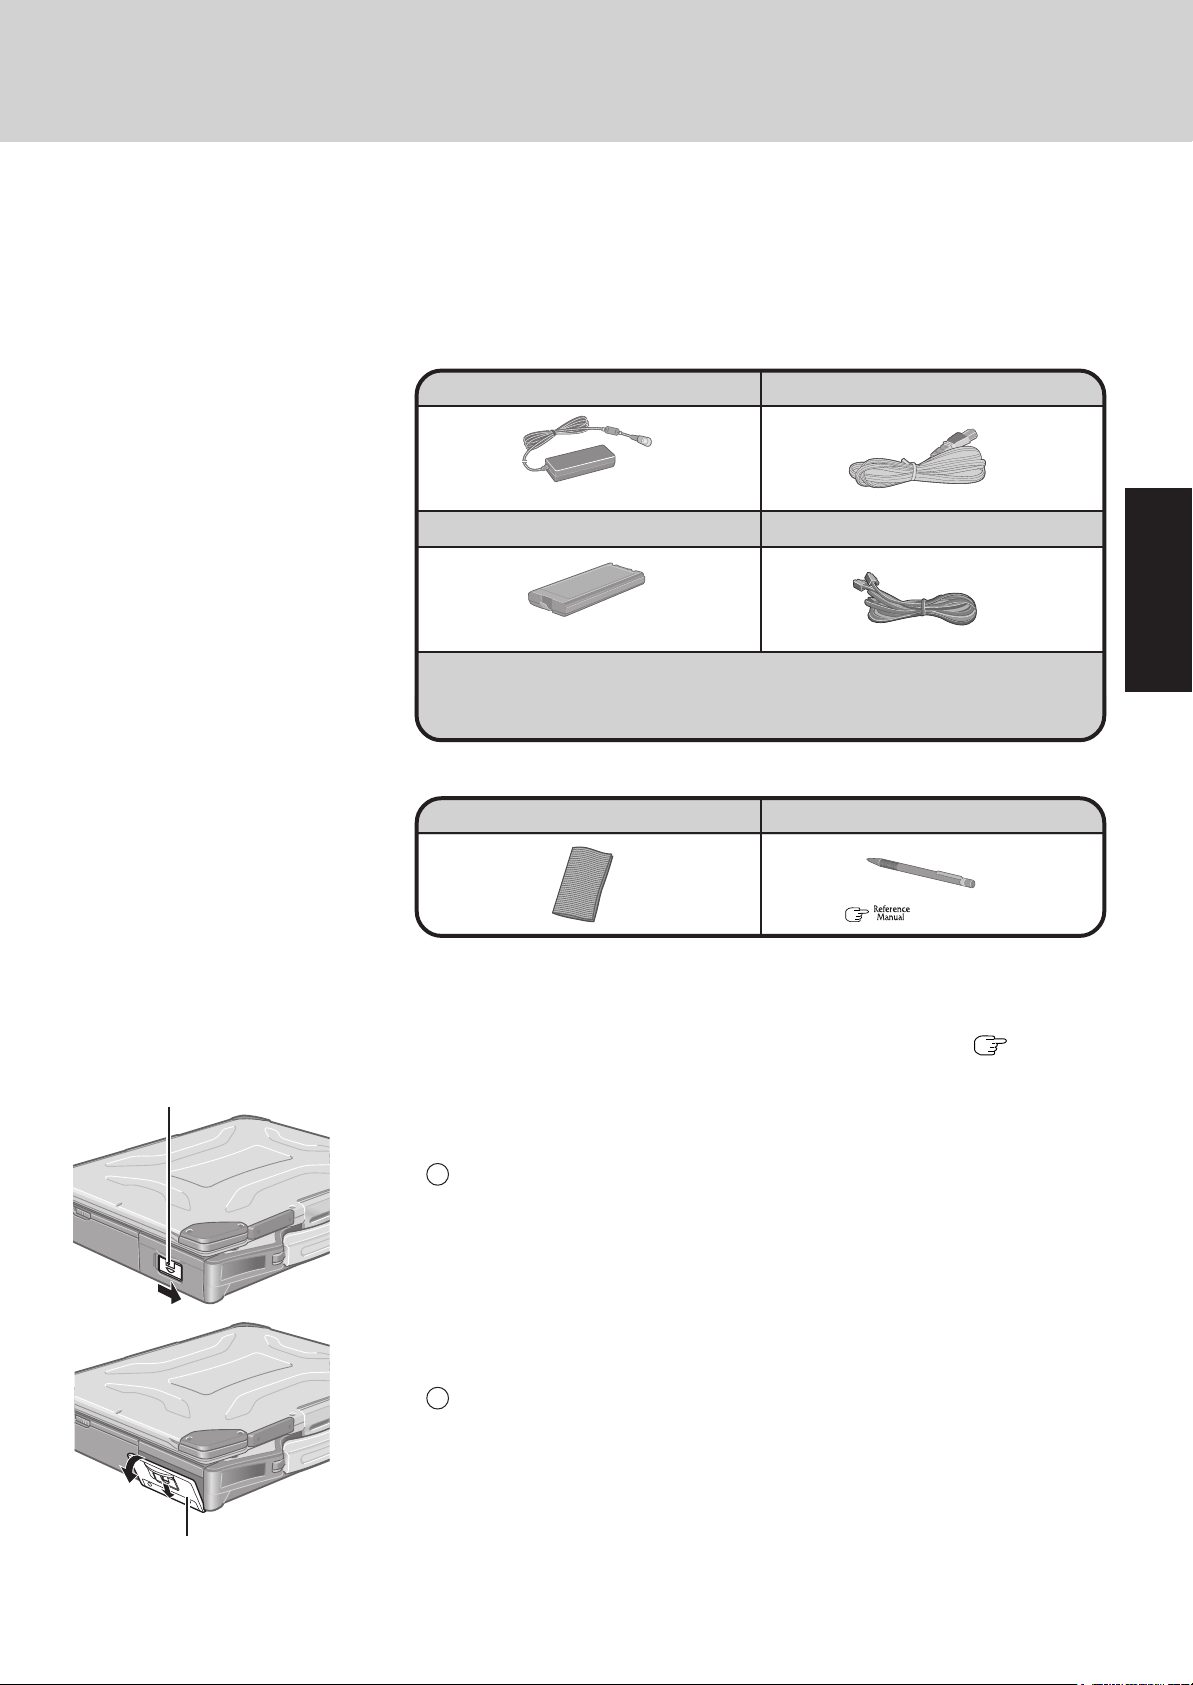
1 Confirm the inclusion of all parts.
Make sure the parts shown in the figure have been supplied. If any of these items are
missing or are not working properly, contact Panasonic Technical Support.
AC Adaptor................................ 1 AC Cord ..................................... 1
Model No : CF-AA1653A
Battery Pack.............................. 1 Modem T elephone Cable.......... 1
Model No : CF-VZSU29
Latch
Operating Instructions (This book)*1.......................................................... 1
Windows
Product Recovery CD-ROM ................................................................... 3
<Only for models with touchscreen>
Soft Cloth .................................. 1 Stylus .....................................1
*1If additional instructions are included with the computer, be sure to read them. It may be neces-
sary to perform additional operations during the following procedures.
®
Book ...................................................................................... 1
( “T ouchscreen”)
2 Read the LIMITED USE LICENSE AGREEMENT. ( page 35)
Be sure to read the LIMITED USE LICENSE AGREEMENT before breaking the seal
on the computer’s packaging.
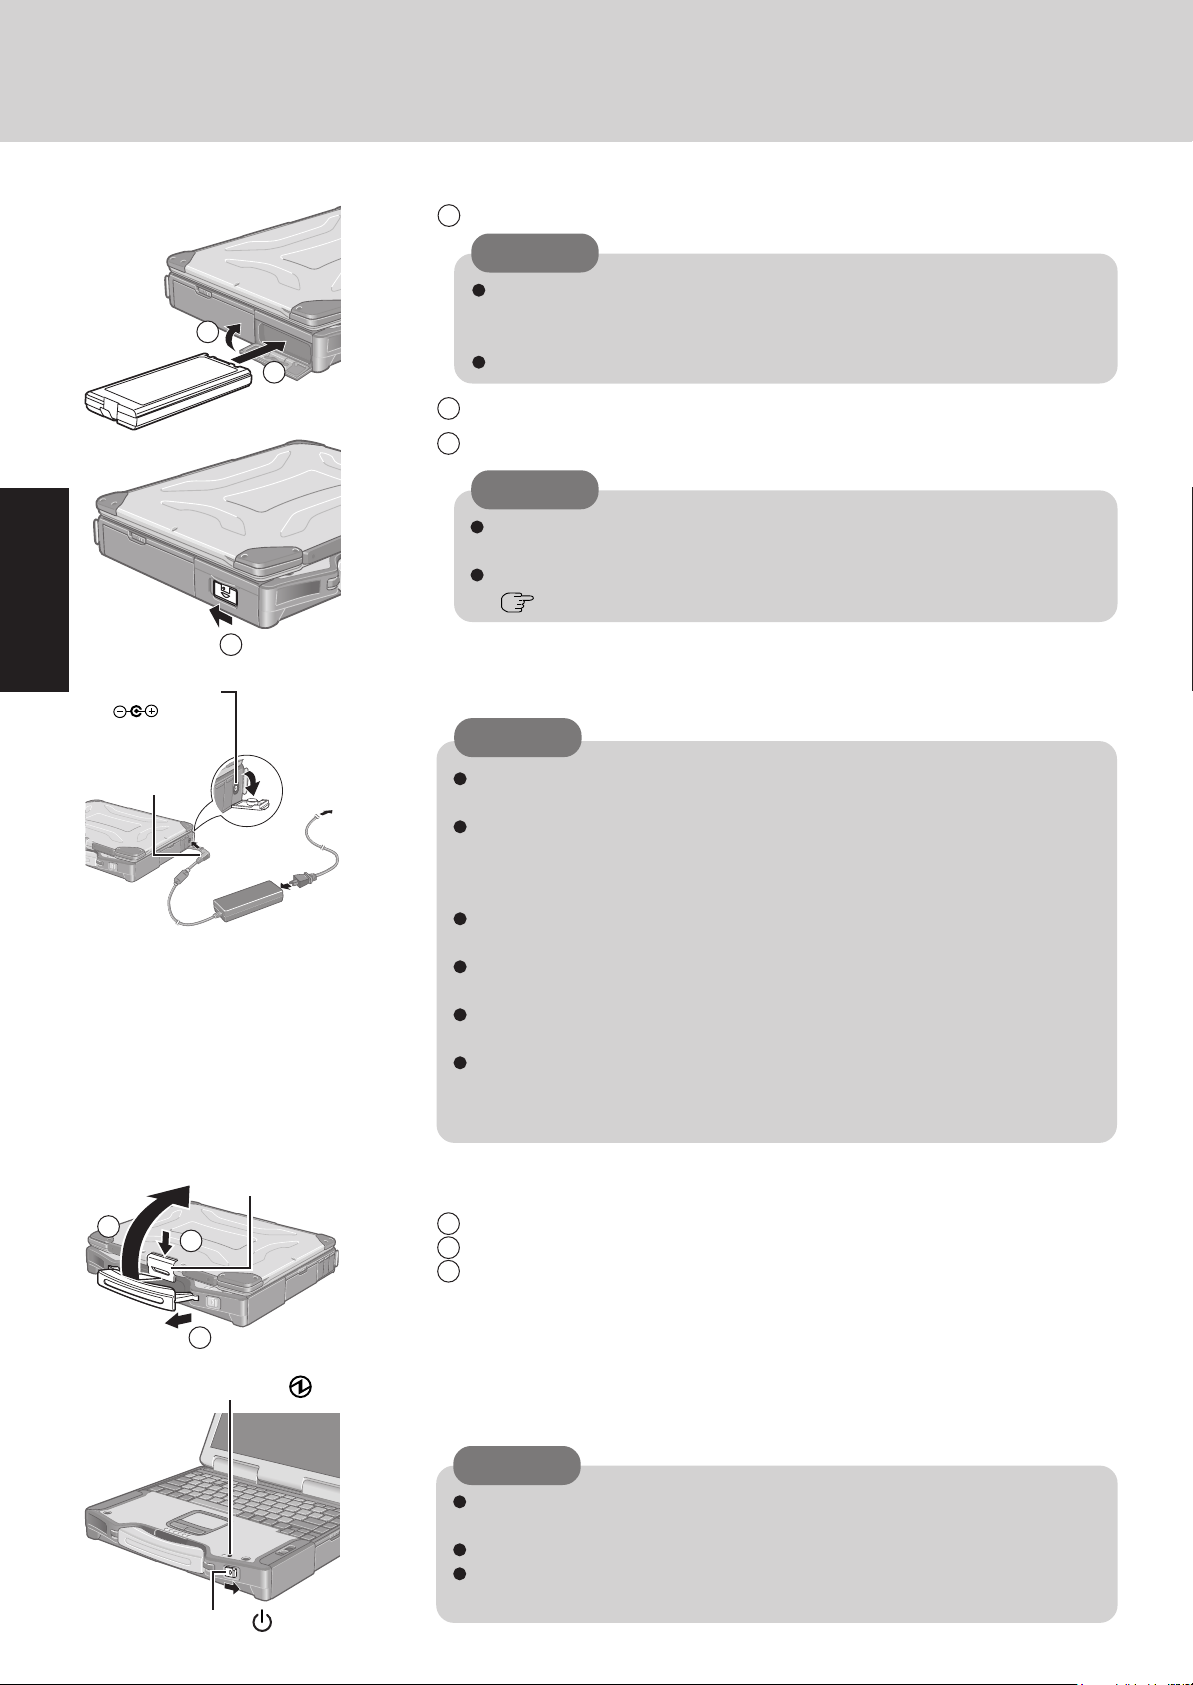
3 Insert the battery pack.
1 Unlock the cover by sliding the latch to the right.
Getting Started
Cover
Slide the latch down, and then without releasing it, open the cover as illustrated.
2
11
First-time Operation
3 Slide the battery pack inward until it is firmly in place.
4
3
4 Close the cover until it clicks into place.
5 Lock the cover by sliding the latch to the left.
5
Getting Started
DC-IN Jack
DC IN 15.6 V
4 Connect your computer to a power outlet.
CAUTION
Do not touch the terminals on the battery pack and the computer. The battery
pack may no longer function properly if the contacts are dirty or damaged.
Also, the computer may not operate properly.
Be sure to insert the battery pack as illustrated.
CAUTION
Confirm that the latch lock is correctly in place. If you carry your computer
without the latch lock in place, the battery pack may fall out.
Before using the battery pack, carefully read “Precautions (Battery Pack)”
(
page 7-8).
CAUTION
DC Plug
3
Be sure the AC adaptor is connected until completing the first-time use operation.
When using the computer for the first time, do not connect any peripheral device except the battery pack and AC adaptor to the computer.
Handling the AC adaptor
Do not twist or pull the AC power cord forcefully. Doing so may damage the
connections.
Use only the specified AC adaptor with your computer. Using an AC adaptor
other than the one supplied might damage the battery and/or the computer.
When the DC plug is not connected to the computer, disconnect the AC cord
from your AC wall outlet.
Problems such as sudden voltage drops may arise during periods of thunder and
lightning. Since this could adversely affect your computer, an uninterruptible
power source (UPS) is highly recommended unless the battery pack is installed.
Latch
2
1
5 Open the display.
1 Pull the carrying handle forward.
2 Press the latch as illustrated.
3 Lift up the latch and open the display.
12
Power Indicator
Power Switc h
6 Turn your computer on.
Slide the power switch and hold it for approximately one second until the power indicator turns on before releasing it.
CAUTION
Do not slide the power switch and hold it for more than four seconds; this will
cause the power to be turned off forcibly.
Do not slide the power switch repeatedly.
Once the computer is powered off, you must wait at least ten seconds before
powering it on again.
POWER
7 Setup Windows.
Moving the cursor ( ) or clicking buttons can be performed with the touch pad.
NOTE
The touchscreen does not work properly during the Windows setup.
CAUTION
Do not press any keys or touch the touch pad until [Windows XP Professional
Setup] is displayed.
1 At [Welcome to the Windows XP Setup Wizard], select [Next].
2 After reading the agreement, select [I accept this agreement] or [I don’t accept this
agreement], then select [Next].
NOTE
If [I don’t accept this agreement] is selected, the Windows setup will be aborted.
3
Select settings for your region, then select [Next].
4 Enter your name and organization and then select [Next].
5 Enter your computer name and administrator password and then select [Next].
CAUTION
Remember this password! If the password is forgotten, Windows cannot be
operated.
6 Enter the correct date, time and time zone, then select [Next].
The computer will restart.
NOTE
It may take some time before the computer restarts and the screen of step 7 is
displayed. Wait, and do not press any keys, or touch the touch pad, etc.
7 Enter your administrator password and select .
Wait until the hard disk drive indicator (
) has turned off.
NOTE
When Windows setup is completed, the following message will be displayed at
the bottom right of the screen: “Your computer might be at risk.” Continue to
the next step.
The message is generated by the [Security Center] function in [Control Panel],
and does not indicate an error or malfunction. For more information about [Security Center]:
page 22.
Getting Started
8 <Only for models with touchscreen>
Calibrate the touchscreen.
1 Select [start] - [Control Panel] - [Printers and Other Hardware] - [Mouse] -
[TouchScreen] - [Calibration].
2 Touch the “+” mark on the calibration screen with the stylus (included) for about one
second.
3 After the calibration procedure is executed (e.g., after the nine “+” marks are touched),
the procedure ends when Enter is pressed.
4 Select [OK].
13
First-time Operation
9 Create a new account.
1 Select [start] - [Control Panel] - [User Accounts] - [Create a new account].
2 Enter a name for the new account, then select [Next].
3 Select [Computer administrator], then select [Create Account].
4 <When you want to create a password for the new account>
Select the new account you have created and select [Create a password].
Follow the instructions on the screen to create a password.
5 Select [start] - [Turn Off Computer] - [Restart] to restart the computer.
CAUTION
Remember this password! If the password is forgotten, Windows cannot be operated. You can create a password reset disk beforehand (
NOTE
When creating a new user account:
• If you make mail settings, create password reset disks (
Getting Started
related operations before creating the user account, you will be unable to use any previous mail history or settings.
• When you create the first new account, you can only select [Computer administrator].
Once a “Computer Administrator” account has been created, you can create additional
limited user accounts.
Note also that only the added user account will be displayed in the Welcome screen.
The account for the administrator created during Windows setup will not be displayed.
The message “Your computer might be at risk,” which is displayed at the bottom right of
the screen, is generated by the “Security Center” function in Windows XP, and does not
indicate an error or malfunction.
To prevent this message from being displayed, select
select [Turn on Automatic Updates].
About the Icon Enlarger:
• If the characters or icons on the screen are too small and difficult to see, after complet-
ing step 9, select [start] - [All Programs] - [Panasonic] - [Icon Enlarger]. This will
allow you to magnify the display of characters and icons on the screen.
• The [Icon Enlarger] can be set separately for each account.
You can also use [Loupe Utility], which enlarges a part of the screen.( “Loupe
Utility”)
<Only for models with wireless LAN>
If you use the wireless LAN, be sure to refer to the Reference Manual’s “Wireless LAN”.
page 15).
page 15), or conduct other
(red icon) on the taskbar, then
14
This concludes the first-time use operation guidelines.

Information for Windows XP
Depending on the Windows settings, installed applications, and drivers, menus and other
displays may differ, or some functions (such as use of the password reset disk) may be inoperable. Check with your system administrator for details.
You can select Classic view for the Control Panel or select the Classic Start menu. You can
also change the way a user logs on or off.
The procedure in this manual uses the method or view of the Windows XP default setting
(not Classic view or Classic Start menu etc.).
Resetting the password
Windows XP has a function to reset a forgotten password.
To use this function, you need to create a password reset disk beforehand following the steps
below.
1 Select [start] - [Control Panel] - [User Accounts].
2 Select [Prevent a forgotten password] from the [Related Tasks] menu of the account you
have logged on to, and create a password reset disk following the on-screen instructions.
Store the password reset disk in a safe place.
• Only the logon password for each account can be reset.
The password set in the Setup Utility (
“Setup Utility”) cannot be reset.
Getting Started
15

Star ting Up/Shutting Down
Starting Up
3
Power Switch
2
1
Power Indicator
Latch
POWER
1 Open the display.
1 Pull the carrying handle forward.
2 Press the latch as illustrated.
3 Lift up the latch and open the display.
2 Turn your computer on.
Slide the power switch and hold it for approximately one second until the power indicator
turns on before releasing it.
CAUTION
Under the condition that both the AC adaptor and the port replicator are not connected, the power will not go on if the display is closed.
While booting, avoid the following until the hard disk drive indicator ( ) has turned
off.
• Connecting or disconnecting the AC adaptor.
• Touching the power switch.
• Performing any keyboard, touch pad, touchscreen (only for models with touchscreen), or external mouse operations.
• Closing the display.
Once the computer is powered off, you must wait at least ten seconds before powering it on again.
When the CPU temperature rises, the computer may not power on to prevent the
CPU from overheating. Should this happen, allow the computer to cool down then
switch the power on again.
If the computer still does not power on, contact Panasonic Technical Support.
Operation
NOTE
When the power is turned on in a low-temperature environment, sometimes the
message “Warming up the system. Please wait...” is displayed (up to 20 minutes) or
the battery indicator alternately blinks green and orange. This function is designed
to prevent hard disk drive malfunctions that may occur at low temperatures. Wait
for the computer to start up.
If [Enter Password] is displayed
Enter your password*1 and press Enter . ( “Security Measures”)
The correct password
Enter Password [ ]
1
*
Supervisor Password or User Password set in the Setup Utility (not
the Windows password).
Three incorrect attempts
or
No password for about a minute
Will Not Start
Will Start
(Power off)
16
 Loading...